

Page 1

3
English Page 4
Français Page 9
Deutsch Seite 14
Nederlands Pagina 19
Italiano Pagina 24
Español Página 29
Português Página 34
Dansk Side 39
Norsk Side 43
Svenska Sid 47
Suomi Sivu 51
Page 2

4
8
12
6
4
3
MIN
MAX
8
10
MAX
MIN
MIN
8
6
4
3
MAX
12
10
8
6
4
1
1
2
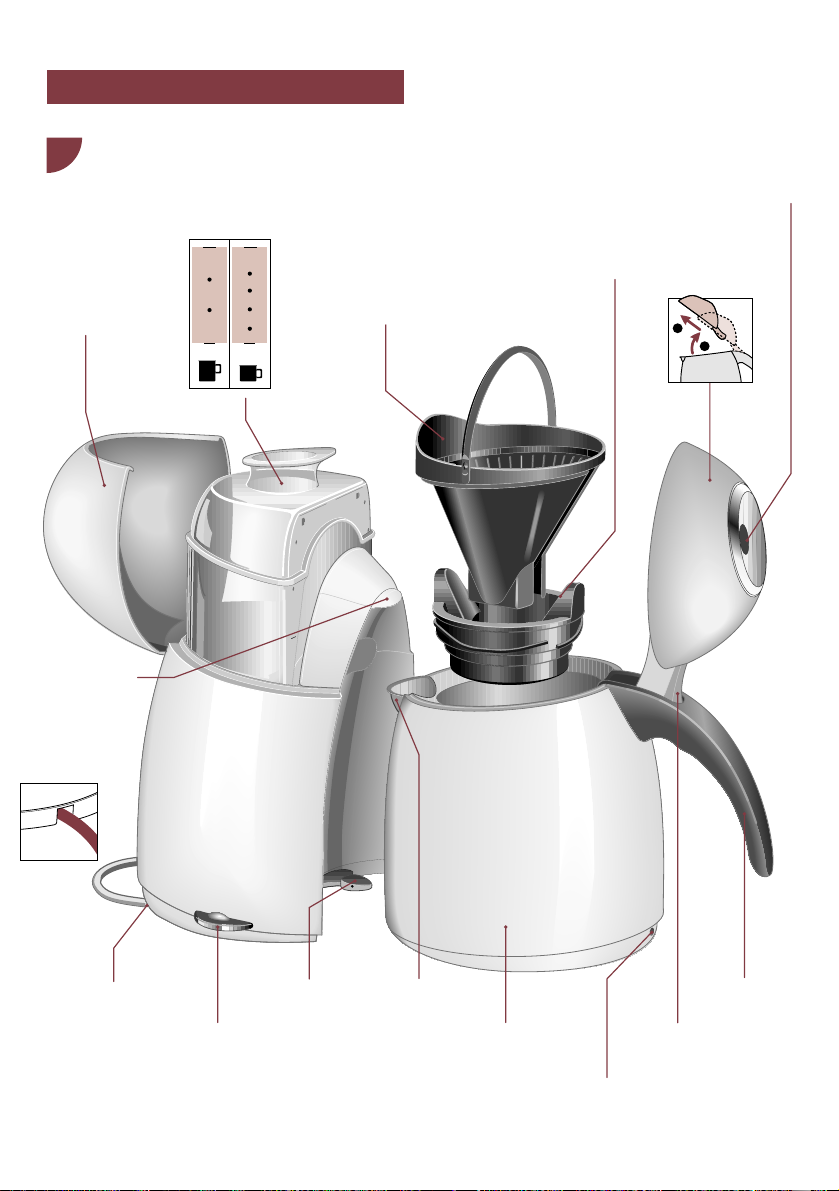
ENGLISH
Lid of water
tank
Water tank
(removable)
Filter holder
(removable) with
handle
Paper filter bag
type 102 or
No. 2
Thermo lid
(screw to fix)
Lid of jug
(removable)
Inlet opening for
hot water
On/off switch with
pilot light
Mains cord storage
compartment
Spout
Pilot light
“Coffee hotkeeping”
Hand grip
Outlet
opening for
hot water
Jug with integrated
hotplate
Electrical
connector
for coffee hotkeeping
(low voltage)
Button for opening
the lid
Page 3
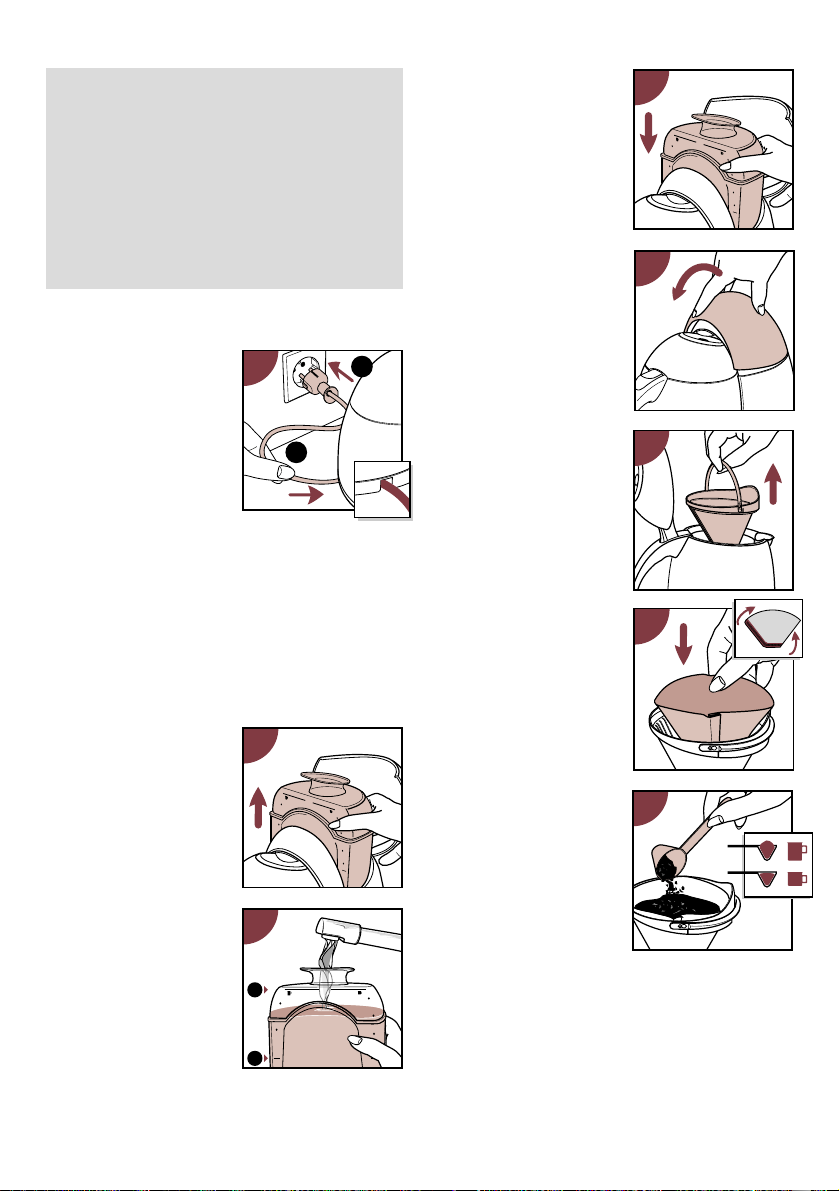
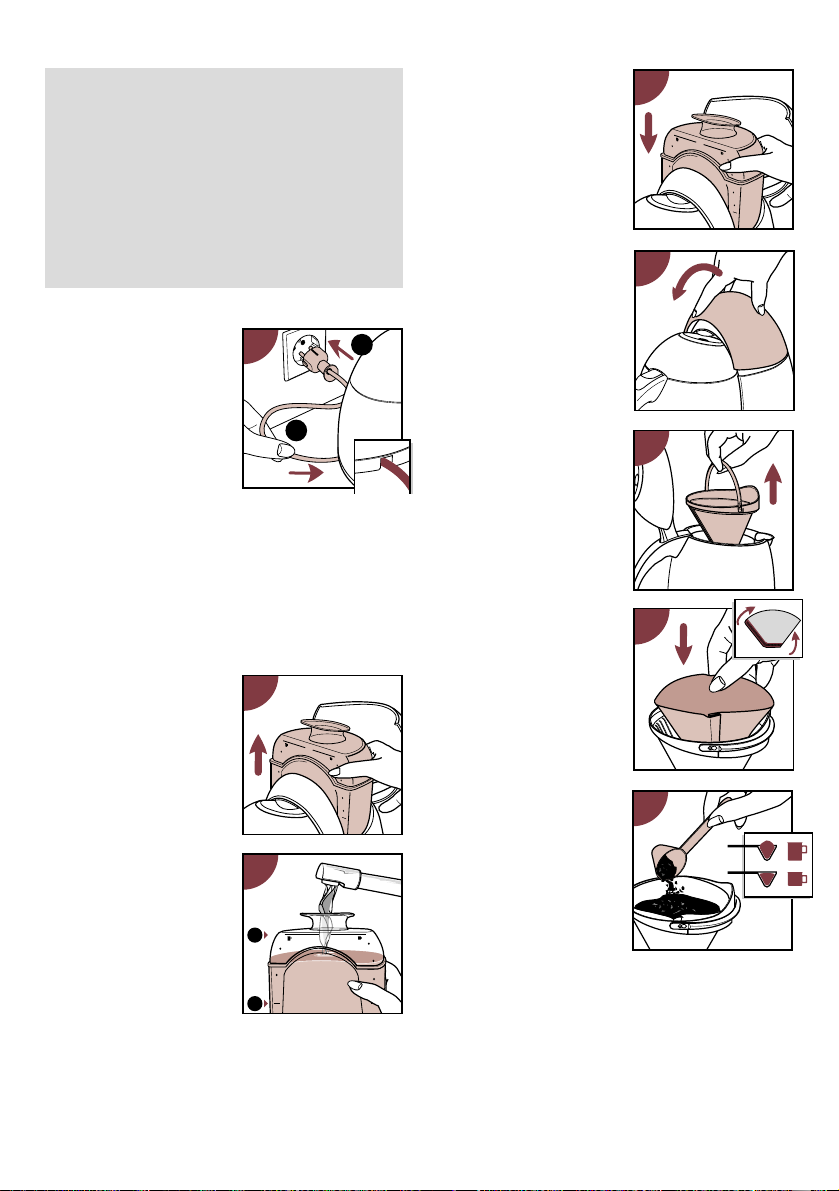
Mains cord storage
- Excess mains cord can
be stored in the
bottom plate of the
appliance (fig. 2).
Before first use
- Operate the appliance once without filling the
filter with coffee. (See section "Making coffee".)
- Next, clean the removable parts. (See section
"Cleaning".)
Making coffee
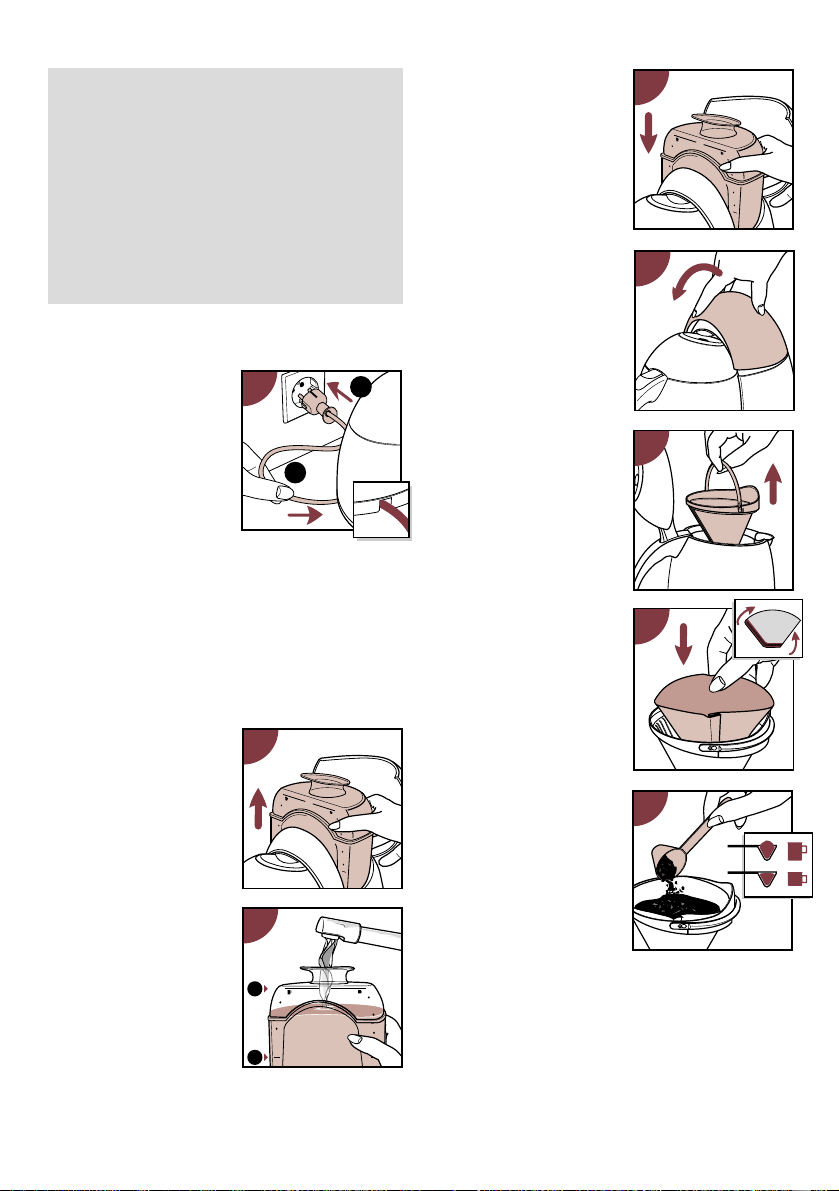
- (Fig. 3.) Open the lid
and remove the water
tank from the
appliance.
- (Fig. 4.) Fill the water
tank with the required
quantity of water.
Ensure that the water
level is not lower than
the minimum mark
(“MIN”) and not higher
than indication "MAX".
Use fresh, cold water
only.
• The left hand side level
indications correspond
to large cups (125 ml);
the right hand side
level indications correspond to smaller cups
(85 ml).
- (Fig. 5) Place the water
tank back into the
appliance. (Press firmly.)
- (Fig. 6.) Close the lid of
the water tank.
- (Fig. 7.) Open the lid of
the jug and remove the
filter holder.
- (Fig. 8.) Place a paper
filter bag (type 102 or
no. 2) into the filter
holder.
Do not forget to fold
the rims.
- (Fig. 9.) Put the
required quantity of
ground coffee into the
filter. Distribute the
coffee evenly.
• For each large cup,
you take one full
(heaped) measuring
spoonful.
For each smaller cup, you take one level (flat)
measuring spoonful.
• Use fast-filter ground coffee. If you grind the
coffee yourself, do not grind it to a fine powder.
Philips and Alessi worked together to create
a unique line of electric kitchen appliances,
uniting the very best in form and function.
The Philips-Alessi Line consists of a toaster,
a coffee maker, a kettle and a citrus press.
5
5
81
M
A
X
6
2
8
6
M
IN
4
6
2
2
1
3
8
M
A
X
1
6
2
8
6
M
IN
4
4
MAX
MIN
MAX
812
6
4
MIN
3
7
8
102
9
10
8
6
MIN
4
Page 4
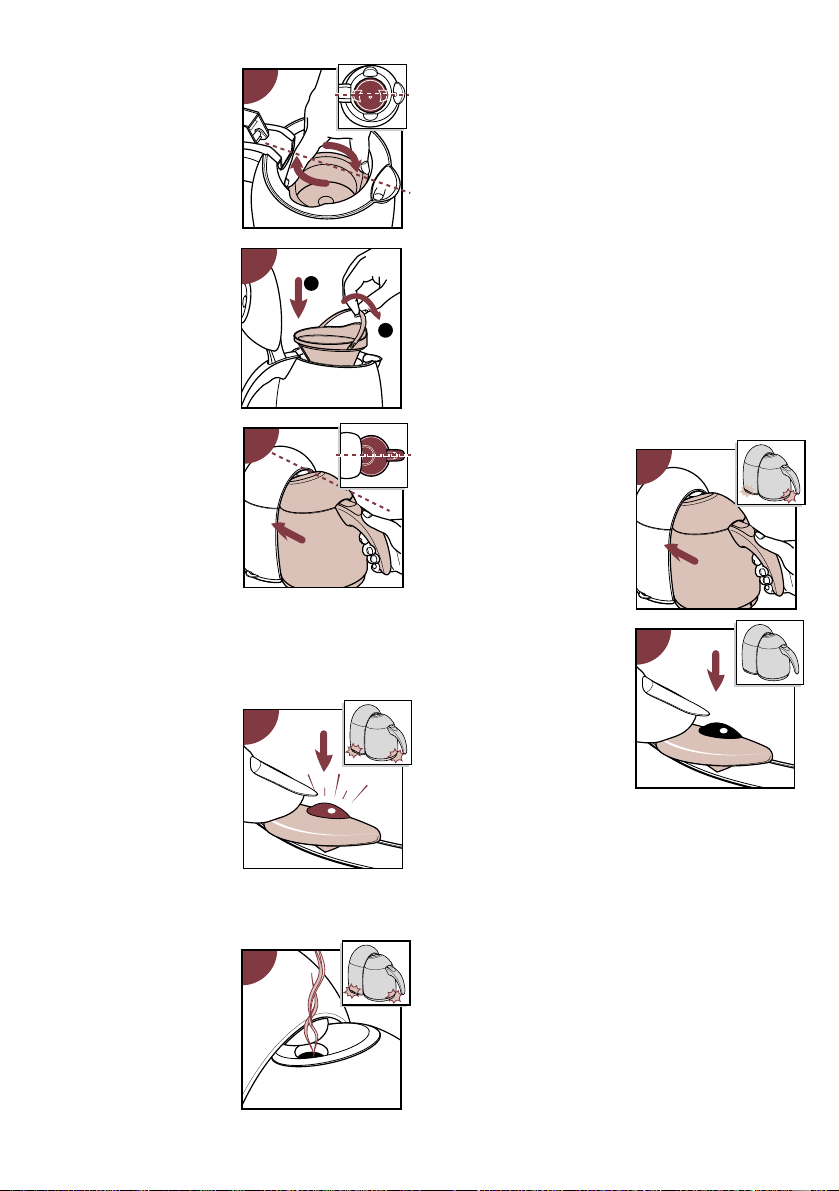
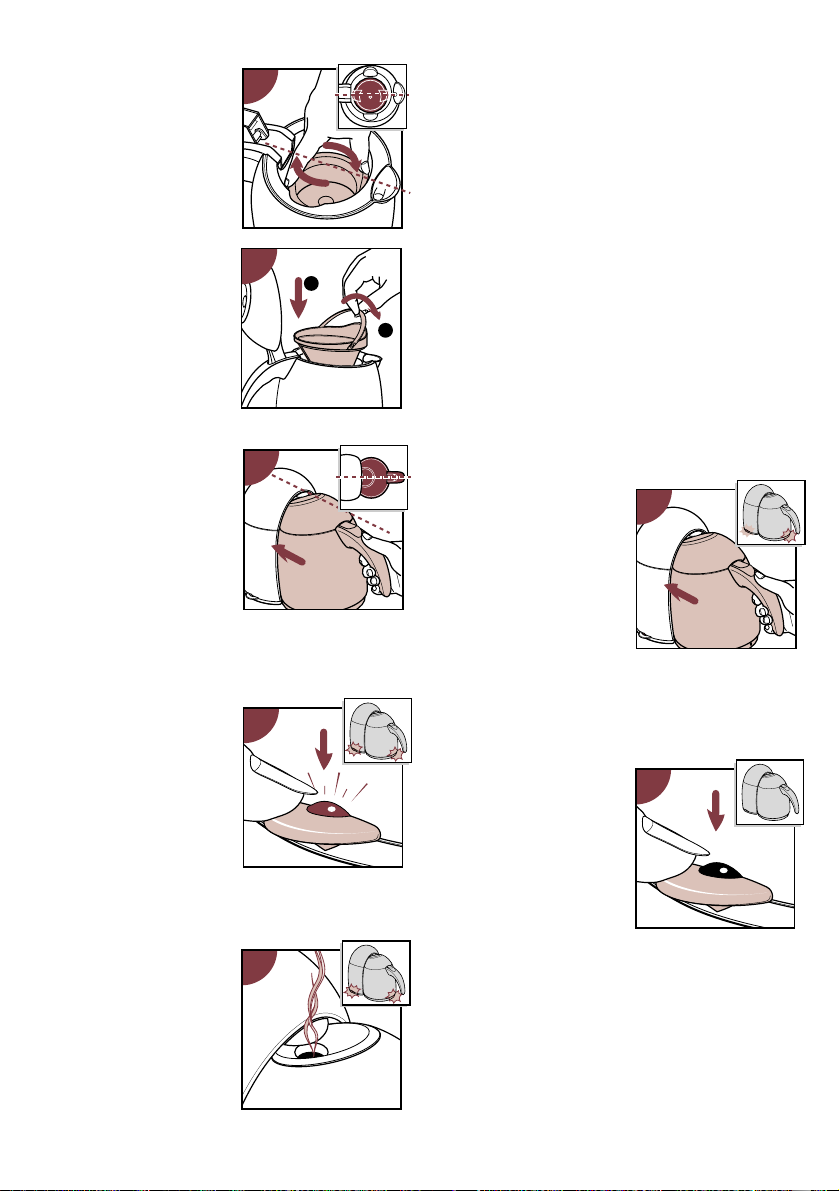
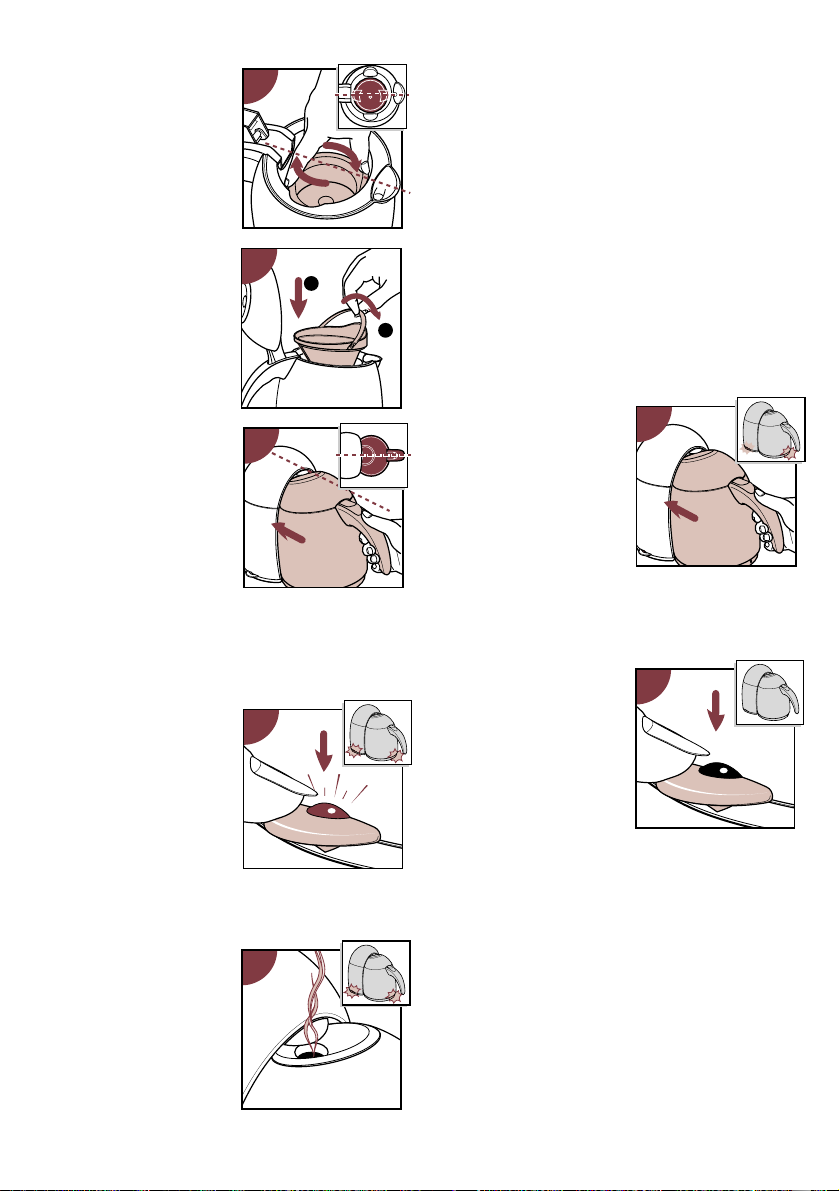
- (Fig. 10.) Place the
Thermo lid on the jug
and screw it until tight.
(Please note: the
Thermo lid must reach
the illustrated position
exactly.)
- (Fig. 11.) Position the
filter holder on top of
the Thermo lid. (See
the illustration for
correct positioning.
Please note the
position of the handle.)
Then close the lid of
the jug.
- (Fig. 12.) Position the
jug.
Slide the jug fully
against the coffeemaker
to ensure correct
electrical connection.
Note the correct
position: only then the
hot water can stream
into the water inlet
opening of the jug.
- (Fig. 13.) Switch the
applliance on by
pressing the on/off
switch downwards. The
two pilot lights (at the
on/off switch and on
the jug) will come on
and the brewing
process will begin.
Coffee is ready
- (Fig. 14.) After some
time hot water will
stop flowing into the
jug. Then some steam
will come from the
appliance.
At this stage the
appliance is ready
making coffee.
To keep the coffee hot, the jug remains
switched on. The two pilot lights (at the on/off
switch and on the jug) stay on.
- When the steaming stops, you can remove the
jug.
Your coffee is now ready to be poured.
• Prevent splashing and spillage. Move the jug
gently. Do not turn it over more than required
for pouring (just a little further than horizontal is
quite enough).
• You can pour out coffee without removing the
filter holder from the jug.
• Or, if you prefer, the filter can be easily removed
using the handle.
However, the Thermo lid must remain in place
whilst doing so.
-
(Fig. 15.) Since the jug is
partly insulated, the
coffee will not cool down
rapidly.
However, to keep the
coffee nice and hot for a
longer period of time,
place the jug back on
to the coffeemaker.
The pilot light on the
jug will come on again,
to indicate that the
integrated hotplate is
on.
-
(Fig. 16.)
If you do not
wish to keep coffee hot
any longer,
switch off by
pressing the on/off
switch.
The two pilot lights (at the on/off switch and on the
jug) will go out.
Making more coffee straight away?
If you have finished making coffee and wish to
make more straight away, first switch off by
pressing the on/off switch (fig. 16).
The two pilot lights (at the on/off switch and on
the jug) will go out.
Allow the appliance to cool down for about three
minutes.
After that you can refill the water tank.
6
10
11
12
13
1
2
15
16
14
Page 5
Cleaning
• Always remove the mains plug from the wall
socket before cleaning the appliance.
• Never immerse the appliance or the jug into
water.
You can clean the two items with a damp cloth.
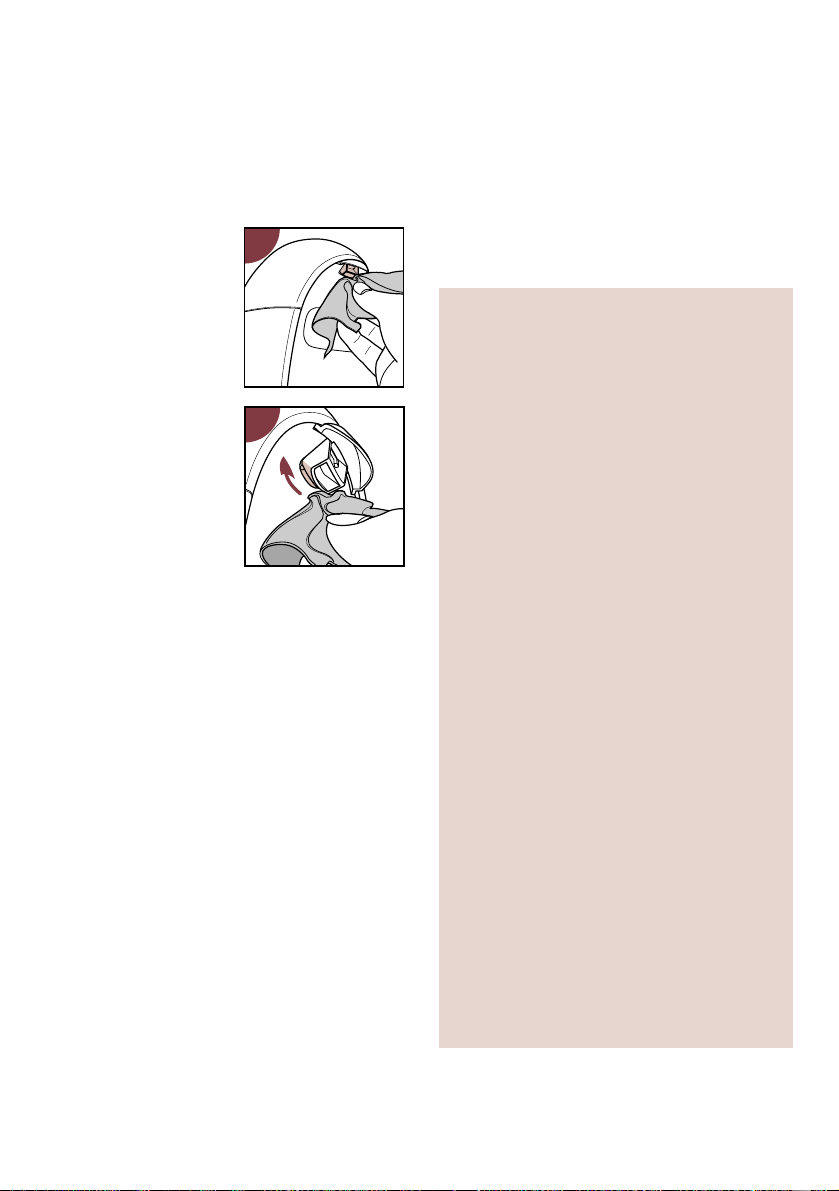
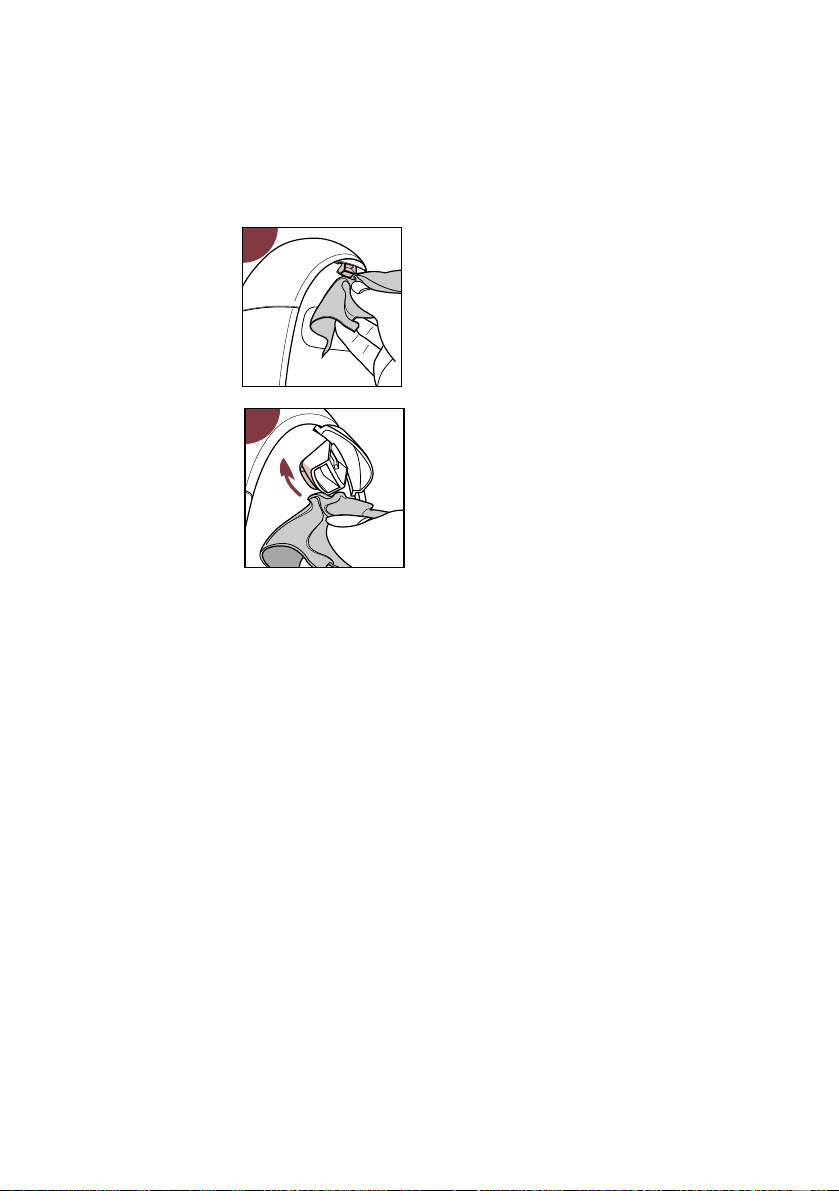
• Especially do not forget
to clean the hot water
outlet opening with a
damp cloth (fig. 17, 18).
(In time, calc setting
might even cause hot
water to flow along the
outside of the
coffeemaker.)
• Pour hot water into
the jug.
Wash the inside of the
jug with a brush.
Rinse the jug with fresh
hot water.
The Thermo lid of the
jug can be removed
(pull the lid while
opening) for easy
cleaning.
Also clean the spout with hot water.
• The filter holder and the Thermo lid can be
washed in hot soapy water.
Rinse with clean hot water and dry.
• Do not clean any part in a dishwasher.
Descaling
To guarantee proper functioning, descale your
appliance regularly.
With normal use (two full jugs a day):
• If you use soft water (hardness up to 18 °DH /
22.5 °Clarke) - two or three times a year.
• If you use hard water (hardness over 18 °DH /
22.5 °Clarke) - four or five times a year.
Your water supply company can inform you about
the hardness of your water.
- Operate the appliance twice as indicated in
section "Making coffee".
However, now use ordinary vinegar to fill the
water tank and do not fill the paper filter
with coffee.
- After descaling, operate the appliance twice
7
more with cold water only, in order to rinse
away the vinegar and scale remainders.
- Clean the jug, the lid and filter assembly. (See
section "Cleaning".)
• Especially do not forget to clean the hot water
outlet opening with a damp cloth (fig. 17, 18).
Important
• If the mains cord of this appliance is
damaged, it must be replaced by the
original type only.
Please apply to your Philips dealer or to
the Philips organisation in your country
for replacement.
• Connect the appliance to an earthed wall
socket only.
• Do not place the appliance on a hot
surface.
• Place the appliance on a solid surface.
Prevent the appliance from falling into
water.
• Never remove the jug during the process
of brewing: hot water will keep on
coming from the water outlet opening.
• During brewing the metal section at the
water inlet opening will become hot.
Do not touch!
• Prevent children from pulling the mains
cord or knocking the appliance over
accidentally.
• Do not disassemble the jug.
• The jug is not intended for heating-up
cold water (or cold coffee).
The appliance could become disordered
for a couple of hours if the jug would be
connected filled with cold liquid.
• The electrical connection between coffee
maker and jug is low-voltage and thus not
dangerous to touch.
• A spark may be noticed when placing or
removing the jug. This is a normal
phenomenon and not at all dangerous.
17
18
Page 6

8
For U.K. only:
This appliance is supplied with a non-rewirable
13 Amp. plug. The plug must never be used
without the fuse cover being in place.
If a replacement fuse cover is required, it must be
of the same type or colour as the coloured insert
around the fuse cover.
Replacement fuse covers are available from
Electrical Retailers or direct from Philips,
tel. 0181 689 2166, ext. 8014.
Replacement 13 Amp. fuses must be BSI or
ASTA BS 1362 approved.
Important safety information
If the non-rewirable plug is not suitable for the
socket outlets in your home, it can be removed
and replaced by a plug of the correct type.
The non-rewirable plug must be cut from the
mains cord, the fuse removed, and the plug safely
discarded to prevent further use.
The removed plug can be hazardous if inserted
into a live mains socket.
Fitting a plug
Connections - Applicable to U.K. only
Important
WARNING - THIS APPLIANCE MUST
BE EARTHED
The wires in this mains lead are coloured in
accordance with the following code:
GREEN AND YELLOW - EARTH
BLUE - NEUTRAL
BROWN - LIVE
As the colours of the wires in the mains lead
of this appliance may not correspond with the
markings identifying the terminals in your plug,
proceed as follows:
The wire which is coloured GREEN AND
YELLOW must be connected to the terminal
which is marked with the letter "E" or by the
earth symbol E or coloured GREEN or
GREEN AND YELLOW.
The wire which is coloured BLUE must be
connected to the terminal which is marked
with a letter "N" or coloured BLACK.
The wire which is coloured BROWN must be
connected to the terminal which is marked
with the letter "L" or coloured RED.
Note: If the terminals of the plug are
unmarked or if you are in any doubt,
consult a qualified electrician.
If a 13 Amp. 3-pin plug is fitted, it must be an
ASTA approved plug, conforming to BS 1363-
1986.
If a (BS 1363) 13 Amp. plug is used, this must
be fitted with a 13 Amp. fuse.
Page 7

9
8
12
6
4
3
MIN
MAX
8
10
MAX
MIN
MIN
8
6
4
3
MAX
12
10
8
6
4
1
1
2
FRANÇAIS
Couvercle du
réservoir à eau
Réservoir à eau
(détachable)
Porte filtre
(détachable) avec
poignée
Filtre papier
type 102 ou
n° 2
Couvercle isolant
(tournez pour )
Couvercle de la
verseuse
(détachable)
Entrée d'eau
pour eau chaude
Interrupteur
marche/arrêt avec
témoin lumineux
Compartiment de
rangement du cordon
Bec verseur
Témoin lumineux
"maintien du café
au chaud"
Poignée
Sortie d'eau
pour eau
chaude
Verseuse avec
plaque chauffante
intégrée
Connecteurs
électriques pour le
maintien du café au
chaud (basse tension)
Bouton pour ouvrir
le couvercle
Page 8
Compartiment de rangement du cordon
- L'excédent de cordon
peut être rangé dans le
fond de l'appareil
(fig. 2).
Avant la première
utilisation
- Nettoyez l'appareil une fois sans remplir le filtre
de café. (Voir section "Préparation du café".)
- Nettoyez ensuite les parties amovibles.
(Voir paragraphe "Nettoyage".)
Préparation du café
- (Fig. 3.) Ouvrez le
couvercle et enlevez le
réservoir à eau de
l'appareil.
- (Fig. 4.) Remplissez le
réservoir à eau de la
quantité d'eau désirée.
Assurez vous que le
niveau d'eau n'est pas
inférieur à l'indication
(MIN) et pas supérieur
à l'indication "MAX".
Utilisez uniquement de
l'eau fraîche.
• Les graduations du côté
gauche correspondent
à de grandes tasses
(125 ml); les
graduations du côté droit correspondent à de
petites tasses (85 ml).
- (Fig. 5) Replacez le
réservoir à eau dans
l'appareil. (Pressez
fermement).
- (Fig. 6) Fermez le
couvercle du réservoir
à eau.
- (Fig. 7) Ouvrez le
couvercle de la
verseuse et enlevez le
porte filtre.
- (Fig. 8) Placez un filtre
papier (type 102 ou n°
2) dans le porte filtre.
N'oubliez pas de plier
les bords.
- (Fig. 9.) Mettez la
quantité désirée de café
moulu dans le filtre.
Répartissez le café
uniformément.
• Pour chaque grande
tasse, prenez une
cuillère doseuse bien
pleine.
Pour chaque petite tasse, prenez une cuillère
doseuse rase.
• Utilisez des filtres rapides. Si vous moulez le café
vous-même, ne le moulez trop finement.
Philips et Alessi ont travaillé ensemble pour
créer une ligne unique d'appareils électriques
de cuisine, unissant le meilleur au niveau de
la forme et de la fonction.
La gamme Philips-Alessi se compose d'un
grille-pain, d'une cafetière, d'une bouilloire
et d'un presse agrumes.
10
5
81
M
A
X
6
2
8
6
M
IN
4
6
2
2
1
3
812
M
A
X
6
8
6
M
IN
4
4
MAX
MIN
MAX
812
6
4
MIN
3
10
8
6
MIN
4
7
8
102
9
Page 9
- (Fig. 10) Placez le
couvercle isolant sur la
verseuse et vissez-le
jusqu'à la butée. (Nota:
le couvercle isolant
doit être positionné
comme indiqué sur
l'illustration).
- (Fig. 11) Positionnez le
porte filtre sur le
dessus du couvercle
isolant. (Voir
l'illustration pour un
positionnement
correct. Notez la
position de la poignée.)
Fermez ensuite le
couvercle de la
verseuse.
- (Fig. 12) Positionnez la
verseuse.
Glissez la verseuse
complètement contre
la cafetière pour
s'assurer de la
connexion électrique.
Notez la position
correcte : seulement
alors l'eau chaude peut
couler dans l'entrée
d'eau de la verseuse.
- (Fig. 13) Arrêtez
l'appareil en appuyant
sur l'interrupteur
marche/arrêt vers le
bas. Les deux témoins
lumineux (à
l'interrupteur
marche/arrêt et sur la
verseuse) s'allument et
la préparation du café commence.
Le café est prêt
- (Fig. 14) Après un peu
de temps, l'eau chaude
s'arrêtera de couler
dans la verseuse. Alors
un peu de vapeur
sortira de l'appareil.
A ce stade l'appareil est prêt pour la préparation
du café.
Pour maintenir le café chaud, la verseuse reste
en marche. Les deux témoins lumineux
(à l'interrupteur marche/arrêt et sur la verseuse)
restent allumés.
- Quand la vapeur s'arrête, vous pouvez enlever la
verseuse.
Votre café est maintenant prêt à être versé.
• Pour empêcher éclaboussures et débordement,
déplacez la verseuse doucement. Ne tournez pas
plus que désiré pour verser (juste un peu plus
que horizontal).
• Vous pouvez verser le café sans enlever le porte
filtre à partir de la verseuse.
• Ou, si vous préférez, vous pouvez retirer le filtre
en utilisant la poignée.
Cependant, le couvercle isolant doit rester en
position pendant cette opération.
- (Fig. 15) Du fait que la
verseuse est
partiellement isolée, le
café ne refroidira pas
rapidement.
Cependant, pour
maintenir le café bon et
chaud pour une période
plus longue, placez la
verseuse sur la cafetière.
Le témoin lumineux sur la verseuse s'allume de
nouveau, indiquant que la plaque chauffante
intégrée est alimentée.
- (Fig. 16.) Si vous ne
désirez pas maintenir le
café chaud plus
longtemps, arrêtez en
pressant l'interrupteur
marche/arrêt.
Les deux témoins
lumineux (à
l'interrupteur
marche/arrêt et sur la verseuse) s'éteignent.
11
10
11
12
13
14
1
2
15
16
Page 10

Refaire du café immediatement ?
Si vous avez fini la préparation du café et désirez
en refaire immédiatement, arrêtez d'abord
l'appareil en appuyant sur l'interrupteur
marche/arrêt (fig. 16).
Les deux témoins lumineux (à l'interrupteur
marche/arrêt et sur la verseuse) s'éteignent.
Laissez l'appareil refroidir suffisamment (environ
trois minutes).
Vous pouvez ensuite remplir à nouveau le
réservoir à eau.
Nettoyage
• Retirez toujours la fiche de la prise de courant
avant le nettoyage de l'appareil.
• N'immergez jamais l'appareil ou la verseuse dans
l'eau.
Vous pouvez nettoyer les deux accessoires avec
un chiffon doux.
• Surtout n'oubliez pas de nettoyer la sortie d'eau
à l'eau chaude avec un chiffon doux (fig. 17, 18).
(Au cours du temps, le dépôt de calcaire peut
même faire couler l'eau chaude à l'extérieur le
long de la cafetière.)
• Versez l'eau chaude dans la verseuse.
Lavez l'intérieur de la verseuse avec une brosse.
Rincez la verseuse à l'eau chaude.
Le couvercle isolant de la verseuse peut être
enlevé (tirez le couvercle en ouvrant) pour un
nettoyage facile.
Nettoyez également le bec verseur à l'eau
chaude.
• Le porte filtre et le couvercle isolant
peuvent être lavés à l'eau chaude savonneuse.
Rincez à l'eau très chaude et séchez.
• Ne nettoyez aucune partie dans un lave-vaisselle.
Détartrage
Afin de garantir un fonctionnement correct,
détartrez votre appareil régulièrement.
En utilisation normale (deux verseuses pleines par
jour) :
• 2 à 3 fois par an si la dureté de l'eau est
inférieure à 30° TH ;
• 4 à 5 fois par an si la dureté de l'eau est
supérieure à 30° TH.
12
La Compagnie des Eaux de votre région vous
renseignera sur le degré de dureté de votre eau.
- Nettoyez l'appareil deux fois comme indiqué
dans la section "Préparation du café".
Cependant, utilisez du vinaigre blanc
ordinaire pour remplir le réservoir à eau
et ne remplissez pas le papier filtre avec du
café.
- Après détartrage, faites
fonctionner l'appareil
deux fois avec de l'eau
froide seulement, afin
d'éliminer toute trace
résiduelle de vinaigre et
de calcaire.
- Nettoyez la verseuse, le
couvercle et le filtre.
(Voir paragraphe
"Nettoyage".)
• Surtout n'oubliez pas de
nettoyer la sortie d'eau
à l'eau chaude avec un
chiffon doux
(fig. 17, 18).
17
18
Page 11

13
Important
• Si le cordon d'alimentation de cet appareil
est endommagé, il doit être remplacé par
le type original seulement.
Rapportez votre appareil chez votre
revendeur Philips ou à un Centre Service
Agréé pour le remplacement.
• Branchez l'appareil à une prise équipée de
terre.
• Ne placez jamais l'appareil sur une surface
chaude.
• Placez l'appareil sur une surface solide.
Empêchez l'appareil de tomber à l'eau.
• N'enlevez jamais la verseuse pendant la
préparation du café, de l'eau chaude
pouvant sortir de l'arrivée d'eau.
• Pendant la préparation la partie
métallique à l'entrée d'eau devient très
chaude.
Ne la touchez pas !
• Empêchez les enfants de tirer le cordon
d'alimentation ou de cogner l'appareil
accidentellement.
• Ne désassemblez pas la verseuse.
• La verseuse n'est pas faite pour réchauffer
de l'eau froide (ou du café froid).
L'appareil pourrait devenir indisponible
pour une longue durée si la verseuse était
branchée remplie avec un liquide froid.
• La connexion électrique entre la cafetière
et la verseuse est basse tension et ainsi
pas dangereuse à toucher.
• Une étincelle peut être aperçue quand
vous placez ou retirez la verseuse. Ceci
est normal et pas du tout dangereux.
Page 12
14
8
12
6
4
3
MIN
MAX
8
10
MAX
MIN
MIN
8
6
4
3
MAX
12
10
8
6
4
1
1
2
DEUTSCH
Deckel des
Wasserbehälters
Wasserbehälter,
abnehmbar
Filterhalter mit
Griff, abnehmbar
Filtertüte
Type 102 oder
No.2
Thermodeckel,
einzuschrauben
Deckel der
Kaffeekanne,
abnehmbar
Einfüllöffnung für
Heißwasser
Ein-/Ausschalter
mit Kontrollampe
Kabelfach
Ausguß
Kontrollampe “Kaffee
wird warmgehalten”
Griff
Auslaß-
öffnung für
Heißwasser
Kaffeekanne mit
integrierter
Warmhalteplatte
Elektrischer
NiedervoltAnschluß für die
Warmhalteplatte
Druckschalter zum
Öffnen des Deckels
Page 13
Kabelfach
- (Abb. 2)
Überschüssiges
Netzkabel kann in der
Grundplatte des Geräts
untergebracht werden.
Vor dem ersten
Gebrauch
- Betreiben Sie das Gerät erst einmal mit Wasser
(s. “Kaffee zubereiten”), ohne Kaffee im Filter.
- Waschen Sie dann die abnehmbaren Teile ab (s.
“Reinigen”).
Kaffee zubereiten
- (Abb. 3) Öffnen Sie den
Deckel des
Wasserbehälters, und
nehmen Sie den
Wasserbehälter vom
Gerät.
- (Abb. 4) Füllen Sie den
Wasserbehälter mit
der erforderlichen
Menge Wasser,
mindestens bis zur
unteren Markierung
(“MIN”) und nicht
höher als bis zur
oberen Markierung
(“MAX”).
Verwenden Sie nur
frisches kaltes Wasser.
• Die linke Seite der Skala entspricht großen
Tassen von 125 ml Inhalt.
Die rechte Seite der Skala entspricht kleinen
Tassen von 85 ml Inhalt.
- (Abb. 5) Setzen Sie den
Wasserbehälter mit
festem Druck in die
Basisstation zurück.
- (Abb. 6) Schließen Sie
den Deckel des
Wasserbehälters.
- (Abb. 7) Öffnen Sie die
Kaffeekanne, und
nehmen Sie den
Filterhalter heraus.
- (Abb. 8) Legen Sie eine
Filtertüte (Typ 102
oder No. 2) in den
Filterhalter.
Vergessen Sie nicht, die
Ränder der Filtertüte
zu falzen.
- (Abb. 9) Geben Sie
erforderliche Menge
Kaffeemehl in die
Filtertüte.
Verteilen Sie das
Kaffeemehl gleichmäßig.
• Nehmen Sie für jede
große Tasse einen
gehäuften Meßlöffel
Kaffeemehl.
Nehmen Sie für jede kleine Tasse einen
gestrichenen Meßlöffel Kaffeemehl.
• Nehmen Sie nur normal gemahlenen Kaffee.
Mahlen Sie den Kaffee nicht zu fein, wenn Sie ihn
selbst mahlen.
Philips und Alessi haben gemeinsam eine
Einheit von elektrischen Hausgeräten
entwickelt - einzigartig in Form und
Funktion.
Die Philips-Alessi Produktlinie besteht aus
einem Toaster, einer Kaffeemaschine, einem
Wasserkocher und einer Zitruspresse.
15
2
2
1
3
8
M
A
X
1
6
2
8
6
M
I
N
4
4
MAX
MIN
MAX
812
6
4
MIN
3
10
MIN
5
8
6
4
81
M
A
X
6
2
8
6
M
IN
4
6
7
8
9
102
Page 14
- (Abb. 10) Setzen Sie
den Thermodeckel auf
die Kaffeekanne und
schrauben Sie ihn fest
ein. Er muß sich in der
Position befinden, die in
der Abbildung gezeigt
wird.
- (Abb. 11) Setzen Sie
den Filterhalter
paßgenau in den
Thermodeckel. Achten
Sie auf die Stellung des
Henkels. Schließen Sie
den Deckel der
Kaffeekanne.
- (Abb. 12) Schieben Sie
die geschlossene
Kaffeekanne fest an die
Basisstation. Achten Sie
dabei darauf, daß die
Kaffeekanne korrekt
positioniert ist
(“Klick”). Das Wasser
kann nur dann genau
durch den HeißwasserEinlaß strömen.
- (Abb. 13) Schalten Sie
das Gerät ein, indem
Sie den Ein/Ausschalter nach
unten drücken. Die
Kontrollampen im Ein/Ausschalter und an der
Kaffeekanne leuchten
auf. Die
Kaffeezubereitung
beginnt.
Nach der
Kaffeezubereitung
- (Abb. 14) Nach einiger
Zeit fließt kein heißes
Wasser mehr in die
Kaffeekanne. Dabei
wird etwas Dampf am
Gerät frei. Der Kaffee
ist jetzt fertig.
Die Warmhalteplatte
der Kanne bleibt eingeschaltet. Die beiden
Kontrollampen (im Ein-/Ausschalter und an der
Kaffeekanne) leuchten weiter.
- Sobald kein Dampf mehr aus dem Gerät kommt,
können Sie die Kaffeekanne aus der Basisstation
herausnehmen.
• Bewegen Sie die volle Kaffeekanne vorsichtig, um
Spritzer zu vermeiden. Neigen Sie die Kanne
beim Ausschenken nur ein wenig, gerade soviel
wie nötig ist, damit Kaffe über den Ausguß fließt.
• Sie können den Kaffee ausschenken, ohne den
Filterhalter aus der Kaffeekanne zu nehmen.
• Sie können aber auch zuerst den Filterhalter am
Henkel herausnehmen. Nehmen Sie dann aber
nicht den Thermodeckel ab!
- (Abb. 15) Die Kaffeekanne ist isoliert; darum
kühlt der Kaffee nicht
so schnell ab.
Wollen Sie den Kaffee
für längere Zeit warm
halten, so stellen Sie die
Kaffeekanne fest in die
Basisstation zurück. Die
Kontrollampe an der
Kaffeekanne leuchtet
wieder auf und zeigt an,
daß die integrierte
Warmhalteplatte
eingeschaltet ist.
- (Abb. 16) Wollen Sie
den Kaffee nicht länger
warmhalten, so schalten
Sie das Gerät am Ein/Ausschalter aus. Die
beiden Kontrollampen
erlöschen dann.
Gleich wieder frischen Kaffee zubereiten
Wenn Sie sofort wieder frischen Kaffee zubereiten
wollen, so schalten Sie zunnächst das Gerät aus
(Abb. 16). Die beiden Kontrollampen erlöschen.
Lassen Sie das Gerät jetzt ca. drei Minuten
abkühlen.
Danach können Sie wieder frisches Wasser in den
Wasserbehälter füllen.
16
10
11
12
13
1
2
15
16
14
Page 15
Reinigen
• Ziehen Sie stets den Stecker aus der Steckdose,
bevor Sie das Gerät reinigen.
Tauchen Sie die Basissation oder die Kaffeekanne
niemals in Wasser.Sie können beide Teile mit
einem feuchten Tuch reinigen.
• Denken Sie vor allem
daran, die Einfüllöffnung
für Heißwasser mit
einem feuchten Tuch
auszuwischen (Abb. 17
und 18). Mit der Zeit
könnten sonst
Kalkablagerungen dazu
führen, daß heißes
Wasser an der
Außenseite der
Kaffeekanne
herabfließt.
• Gießen Sie etwas
heißes Wasser, dem Sie
ein wenig Spülmittel
zugefügt haben, in die
Kaffeekanne.
Reinigen Sie das Innere
der Kaffeekanne mit einer Spülbürste.
Spülen Sie die Kaffeekanne gründlich mit frischem
heißem Wasser aus.
Der Deckel der Kaffeekanne kann leicht gereinigt
werden, nachdem Sie ihn geöffnet und
hochgezogen haben.
Reinigen Sie schließlich den Ausguß mit heißem
Wasser.
• Der Filterhalter und der Thermodeckel
können in heißem Wasser gereinigt werden, dem
Sie etwas Spülmittel zugefügt haben.
Spülen Sie mit frischem heißem Wasser nach und
trocknen Sie ab.
• Spülen Sie keines dieser Teile im Geschirrspüler!
Entkalken
Entkalken Sie Ihr Gerät regelmäßig, um eine
reibunslose Funktion zu gewährleisten.
Bei Zubereitung von zwei vollen Kaffeekannen
täglich trifft die folgende Regel zu:
• bei weichem Wasser (Wasserhärte bis zu 18°
dH): zwei- oder dreimal im Jahr,
• bei hartem Wasser (Wasserhärte über 18°
dH): vier- bis fünfmal im Jahr.
17
Ihre Wasserwerke können Sie über die Härte
Ihres Wassers informieren.
- Betreiben Sie das Gerät zweimal wie im
Abschnitt “Kaffee zubereiten” beschrieben, aber
füllen Sie den Wasserbehälter mit Haushaltsessig
statt mit Wasser, setzen Sie den Filter ohne
Kaffeemehl ein.
- Um den Essig und Kalkreste zu entfernen,
betreiben Sie dann das Gerät in gleicher Weise
noch zweimal mit frischem, kaltem
Leitungswasser.
- Reinigen Sie anschließend die Kaffeekanne, den
Deckel und den Filterhalter (s. “Reinigen”).
• Vergessen Sie schließlich nicht, die Einlaßöffnung
für das Heißwasser mit einem feuchten Tuch zu
reinigen (Abb. 17 und 18).
17
18
Page 16

18
Wichtig
• Wenn das Netzkabel defekt oder
beschädigt ist, muß es durch ein original
Philips Netzkabel ersetzt werden.
Wenden Sie sich an Ihren Philips-Händler
oder die Philips-Organisation in Ihrem
Lande.
• Schließen Sie das Gerät nur an eine
Schuko-Steckdose an.
• Stellen Sie das Gerät nicht auf eine heiße
Oberfläche.
• Stellen Sie das Gerät immer auf eine
feste, waagerechte Oberfläche. Achten Sie
darauf, daß es nicht herunterfallen kann.
• Nehmen Sie die Kaffeekanne nicht aus der
Basisstation, solange noch Kaffee
zubereitet wird. Es kommt dann noch
heißes Wasser aus dem Auslaß.
• Die Metallteile werden während der
Zubereitung des Kaffees heiß. Nicht
berühren!
• Achten Sie darauf, daß Kinder das
Netzkabel nicht berühren oder das Gerät
auf andere Weise herunterziehen können.
• Nehmen Sie niemals die Kaffeekanne
auseinander.
• Die Kaffeekanne ist nicht zur Zubereitung
von heißem Wasser oder zum
Aufwärmen von kaltem Kaffee geeignet.
Das Gerät kann für einige Stunden
ausfallen, wenn die Kaffeekanne mit kalter
Flüssigkeit gefüllt ist und eingeschaltet
wird.
• Der Anschluß zwischen der Basissation
und der Kaffeeekanne führt
Schwachstrom. Es ist darum ungefährlich,
ihn zu berühren.
• Wenn die Kaffeekanne aus der
Basisstation herausgenommen oder
eingesetzt wird, ist es normal und völlig
ungefährlich, daß dabei ein Funke
entsteht.
Page 17

19
8
12
6
4
3
MIN
MAX
8
10
MAX
MIN
MIN
8
6
4
3
MAX
12
10
8
6
4
1
1
2
NEDERLANDS
Deksel van
waterreservoir
Waterreservoir
(uitneembaar)
Filterhouder
(uitneembaar)
met handgreep
Filterzakje
(papier) type
102 of No. 2
Thermo-deksel
(vastdraaien)
Deksel van kan
(afneembaar)
Instroomopening
voor heet water
Aan/uit schakelaar
met controlelampje
Snoeropbergplaats
Tuit
Controlelampje
“Koffie Warmhouden”
Handgreep
Uitstroomopening voor
heet water
Kan
met ingebouwde
warmhoudplaat
Elektrisch
contactpunt
voor het warmhouden van de koffie
(laagspanning)
Druktoets voor
openen van het deksel
Page 18

Snoer opbergen
- Overtollig snoer kunt u
aan de onderzijde van
het apparaat opbergen
(fig. 2).
Vóór het eerste
gebruik
- Laat het apparaat een keer werken zonder koffie
in het filter. (Zie "Koffiezetten".)
- Was daarna de losse onderdelen af.
(Zie "Schoonmaken".)
Koffiezetten
- (Fig. 3.) Open het
deksel en neem het
waterreservoir uit het
apparaat.
- (Fig. 4.) Vul het
waterreservoir niet
lager dan het onderste
streepje (“MIN”) en
niet hoger dan de
aanduiding "MAX".
Gebruik alleen vers,
koud water.
• De linker niveau-
aanduidingen gelden
voor grote koppen
(125 ml);
de rechter niveauaanduidingen gelden
voor kleinere koppen
(85 ml).
- (Fig. 5.) Zet het
waterreservoir weer in
het apparaat. (Goed
aandrukken.)
- (Fig. 6.) Sluit het deksel
van het waterreservoir.
- (Fig. 7.) Open het
deksel van de kan en
neem de filterhouder er
uit.
- (Fig. 8.) Plaats een
papieren filterzakje type
(type 102 of no. 2) in
de filterhouder.
Vergeet niet de randen
om te vouwen.
- (Fig. 9.) Doe de
benodigde hoeveelheid
gemalen koffie in het
filterzakje.
Verdeel de koffie
gelijkmatig.
• Voor grote koppen
koffie: één volle
maatlepel
koffiemaalsel per kop.
Voor kleinere koppen koffie: één
afgestreken maatlepel koffie maalsel per kop.
• Gebruik snelfiltermaling. Als u de koffie zelf
maalt, zorg er dan voor dat het maalsel niet
poederfijn wordt.
Philips en Alessi werkten samen om een
unieke reeks elektrische apparaten voor de
keuken te creëren, waarbij vorm en functie
optimaal zijn gecombineerd.
De Philips-Alessi Line bestaat uit een
broodrooster, een koffiezetter, een waterkoker
en een citruspers.
20
5
81
M
A
X
6
2
8
6
M
IN
4
6
2
2
1
3
8
M
A
X
1
6
2
8
6
M
IN
4
4
MAX
MIN
MAX
812
6
4
MIN
3
10
8
6
MIN
4
7
8
9
102
Page 19

- (Fig. 10.) Plaats het
Thermo-deksel in de
kan en draai het goed
vast. (Let op: het
Thermo-deksel moet in
de afgebeelde stand
komen.)
- (Fig. 11.) Plaats de
filterhouder in de juiste
stand op het Thermodeksel. (Let op de
plaats van het
hengseltje.)
Sluit dan het deksel van
de kan.
- (Fig. 12.) Zet de kan op
zijn plaats.
Schuif de kan geheel
aan, zodat de
elektrische aansluiting
goed tot stand wordt
gebracht.
Let op de juiste stand:
alleen dan kan het hete
water in de
instroomopening van
de kan lopen.
- (Fig. 13.) Schakel het
apparaat in door op de
aan/uit schakelaar te
drukken.
De beide
controlelampjes (bij de
aan/uit schakelaar en
op de kan) gaan
branden en het
koffiezetten begint.
Koffie klaar
- (Fig. 14.) Na enige tijd
stroomt er geen heet
water meer in de kan
en begint het apparaat
wat na te stomen.
Het apparaat is nu klaar
met koffiezetten.
Om de koffie warm te
houden, blijft de kan
ingeschakeld. De beide controlelampjes (bij de
aan/uit schakelaar en op de kan) blijven branden.
- Als het nastomen ophoudt, kunt u de kan van
zijn plaats nemen.
U kunt nu koffie inschenken.
• Voorkom spatten en morsen. Beweeg de kan
rustig. Kantel hem niet verder dan nodig is voor
het schenken (een beetje verder dan horizontaal
is zeker voldoende).
• U kunt nu direkt koffie inschenken, dus zònder
de filterhouder uit de kan te halen.
• U kunt desgewenst ook eerst de filterhouder
(met behulp van het hengseltje) uit de kan
verwijderen. Laat het Thermo-deksel dan echter
op zijn plaats.
-
(Fig. 15.) De kan is
gedeeltelijk geïsoleerd,
zodat de koffie niet
snel zal afkoelen.
Om de koffie echter
gedurende langere tijd
goed op temperatuur te
houden, zet u de kan
weer vast aan de
koffiezetter.
Het controlelampje op de kan gaat opnieuw
branden, om aan te geven dat de ingebouwde
warmhoudplaat in
werking is.
-
(Fig. 16.) Als u niet
l;anger koffie wilt
warmhouden, schakelt
u het apparaat uit door
op de aan/uit schakelaar
te drukken.
De beide
controlelampjes (bij de
aan/uit schakelaar en op
de kan) gaan dan uit.
Meteen opnieuw koffiezetten?
Als u meteen opnieuw koffie wilt zetten, schakelt u
eerst het apparaat uit door op de aan/uit
schakelaar te drukken (fig. 16).
De beide controlelampjes (bij de aan/uit schakelaar
en op de kan) gaan dan uit.
Laat het apparaat ongeveer drie minuten afkoelen.
Daarna kunt u het waterreservoir weer vullen.
21
10
11
12
13
1
2
15
16
14
Page 20

Schoonmaken
• Haal altijd de stekker uit het stopcontact voordat
u het apparaat gaat schoonmaken.
• Dompel het apparaat en de kan nooit in water.
U kunt deze beide delen schoonmaken met een
vochtige doek.
• Vergeet vooral niet de
uitstroomopening voor
heet water met een
vochtige doek schoon
te maken (fig. 17, 18).
(Kalkaanslag kan er op
den duur zelfs de
oorzaak van zijn, dat
heet water langs de
buitenkant van de
koffiezetter stroomt.)
• Giet wat heet water in
de kan.
Was de binnenzijde af
met behulp van een
borstel.
Spoel de kan na met
schoon heet water.
U kunt het deksel van
de kan verwijderen (tijdens het openen aan het
deksel trekken) om het af te wassen.
Maak ook de tuit schoon met heet water.
• De filterhouder en het Thermo-deksel kunt u
afwassen in heet sop.
Spoel ze na met heet water en droog ze af.
• Maak geen van de onderdelen schoon in de
afwasmachine.
Ontkalken
Om ervoor te zorgen dat het apparaat goed blijft
werken, dient u het regelmatig te ontkalken.
Bij normaal gebruik (twee volle kannen per dag):
• 2 à 3 keer per jaar als u zacht water gebruikt
(tot 18 °DH);
• 4 à 5 keer per jaar als u hard water gebruikt
(boven 18 °DH).
Uw waterleidingbedrijf kan u over de plaatselijke
waterhardheid informeren.
22
- Gebruik het apparaat twee keer zoals
aangegeven in "Koffie zetten".
Vul het waterreservoir nu echter met gewone
azijn in plaats van water, en doe geen koffie in
het filter.
- Laat na het ontkalken het apparaat nog twee
keer met alleen koud water werken om azijn en
kalkresten weg te spoelen.
- Maak de kan, het deksel en de onderdelen van
het filter schoon. (Zie Schoonmaken".)
Vergeet vooral niet de uitstroomopening voor
heet water met een vochtige doek schoon te
maken (fig. 17, 18).
17
18
Page 21

23
Belangrijk
• Indien het snoer van dit apparaat is
beschadigd, dient het uitsluitend door het
originele type te worden vervangen.
Wend u daartoe tot uw Philips leverancier
of tot de Philips organisatie in uw land.
• Sluit het apparaat alleen aan op een
geaard stopcontact.
• Zet het apparaat niet op een heet
oppervlak.
• Zet het apparaat op een stevig oppervlak.
Zorg ervoor dat het apparaat niet in het
water kan vallen.
• Verwijder de kan nooit tijdens het
koffiezetten: er blijft dan heet water uit de
uitstroomopening stromen!
• Het metalen gedeelte bij de
waterinstroomopening wordt heet tijdens
het koffiezetten. Niet aanraken!
• Zorg ervoor dat kinderen niet aan het
snoer kunnen trekken of per ongeluk het
apparaat omstoten.
• Haal de kan niet uit elkaar.
• De kan is niet bedoeld voor het
opwarmen van koud water (of koude
koffie).
Als de kan met koude inhoud wordt
ingeschakeld, kan het apparaat voor
enkele uren ontregeld raken.
• Het elektrische contact tussen de
koffiezetter en de kan heeft een laag
voltage. Aanraking levert daarom geen
gevaar op.
• Het is mogelijk dat er bij het plaatsen of
verwijderen van de kan een vonkje
optreedt. Dit is een normaal verschijnsel
en volstrekt ongevaarlijk.
Page 22

24
8
12
6
4
3
MIN
MAX
8
10
MAX
MIN
MIN
8
6
4
3
MAX
12
10
8
6
4
1
1
2
ITALIANO
Coperchio
serbatoio
dell’acqua
Serbatoio
dell’acqua
(asportabile)
Porta-filtro
(asportabile)
con maniglia
Filtro in carta
mod. 102 o
n° 2.
Coperchio
termico
(con vite per il
fissaggio)
Coperchio
brocca termica
(asportabile)
Apertura per
fuoriuscita acqua
calda
Interruttore
acceso/spento con
spia luminosa
Scomparto per
alloggio cavo
Beccuccio
Spia “Caffè in caldo”
Impugnatura
Apertura
interna della
macchina
per caffè,
per passaggio
acqua calda
Brocca
con piastra
riscaldante
incorporata
Connettore
elettrico
per mantenere caldo
il caffè
Pulsante per
apertura coperchio
Page 23

Come riporre il cavo
- La parte eccedente del
cavo di alimentazione
può essere riposta
nell’apposito
scomparto posto sotto
l’apparecchio (fig. 2).
Quando utilizzate l’apparecchio per la prima
volta
- Fate funzionare l’apparecchio per una volta senza
mettere il caffè (vedere il paragrafo “Come
preparare il caffè”).
- Successivamente, pulite tutte le parti asportabili
(vedere il paragrafo “Pulizia”).
Come preparare il caffè
- (Fig. 3) Aprite il
coperchio e togliete il
serbatoio dell’acqua.
- (Fig. 4) Riempite il
serbatoio con la
quantità d’acqua
necessaria.
Assicuratevi che il
livello dell’acqua non
sia al di sotto del livello
“MIN” e non superi il
livello “MAX”.
Usate esclusivamente
acqua fredda e pulita.
• Il livello riportato sul
lato sinistro
corrisponde alle tazze
grandi (125 ml.) mentre quello sul lato destro
corrisponde alle tazze piccole (85 ml.)
- (Fig. 5) Rimettete a
posto il serbatoio
dell’acqua (Premete con
forza).
- (Fig. 6) Chiudete il
coperchio del serbatoio
dell’acqua
- (Fig. 7) Aprite il
coperchio della brocca
e togliete il porta-filtro.
- (Fig. 8) Inserite un filtro
in carta (modello 102 o
n° 2) nel porta-filtro.
Non dimenticate di
ripiegare i bordi.
- (Fig. 9) Mettete la
quantità desiderata di
caffè nel filtro e distribuitela uniformemente.
• Per le tazze grandi,
calcolate un misurino
colmo (abbondante) di
caffè.
Per le tazze piccole,
calcolate un misurino raso di caffè.
• Usate caffè appositamente macinato per il filtro.
Se decidete di macinare da soli il caffè,
attenzione a non ridurlo in polvere troppo fine.
Philips e Alessi hanno unito i loro sforzi per
realizzare una linea davvero particolare di
piccoli elettrodomestici, nei quali la forma e
la funzionalità vanno di pari passo.
La linea Philips-Alessi comprende un
tostafette, una macchina per il caffè
all’americana, un bollitore e uno
spremiagrumi.
25
2
2
1
5
8
M
A
X
1
6
2
8
6
M
IN
4
6
7
8
102
3
812
M
A
X
6
8
6
M
IN
4
4
MAX
MIN
MAX
812
6
4
MIN
3
9
10
8
6
MIN
4
Page 24

- (Fig. 10) Mettete il
coperchio termico sulla
brocca e avvitatelo con
forza. (Nota: il
coperchio termico
dovrà trovarsi nella
posizione indicata).
- (Fig. 11) Mettete il
porta-filtro
opportunamente
posizionato in cima al
coperchio termico.
(Osservate la figura per
posizionarlo in modo
corretto. Notate la
posizione della
maniglia).
Chiudete il coperchio della brocca.
- (Fig. 12) Posizionate la
brocca, facendola
scivolare contro l’altra
parte per garantire un
corretto collegamento
elettrico.
Notate la posizione
corretta: solo in questo
modo l’acqua calda
potrà fluire
nell’apposita apertura della brocca.
- (fig. 13) Accendete
l’apparecchio
premendo verso il
basso il pulsante
acceso/spento. A
questo punto si
accenderanno le due
spie (quella
dell’interruttore e
quella della brocca) e
l’apparecchio entrerà in funzione.
Il caffè è pronto
- (Fig. 14) Dopo qualche
minuto, l’acqua calda
smetterà di fluire nella
brocca e
dall’apparecchio
fuoriuscirà del vapore.
A questo punto l’apparecchio è pronto per
preparare il caffè.
Per mantenere caldo il caffè, la brocca rimane
accesa con entrambe le spie (quella
dell’interruttore e quella della brocca) illuminate.
- Al termine della fuoriuscita di vapore, potrete
togliere la brocca.
A questo punto potrete versare direttamente il
caffè senza togliere il porta-filtro dalla brocca.
• Per evitare gli schizzi, maneggiate con cura la
brocca. Non rovesciatela più del necessario per
versare il caffè (basta una posizione poco più che
orizzontale).
• Potete anche versare il caffè senza togliere il
porta-filtro dalla brocca.
• Se lo desiderate, tuttavia, potete anche togliere il
porta-filtro, usando l’apposito manico.
Non dimenticate di lasciare il coperchio termico
al suo posto.
- (Fig. 15) Dal momento
che la brocca è
parzialmente isolata, il
caffè impiegherà un po’
di tempo a raffreddarsi.
Per mantenere caldo e
fragrante il caffè,
rimettete la brocca
sull’apparecchio.
La spia si accenderà per
indicare che la piastra
riscaldante incorporata
è in funzione.
- (Fig. 16) Se non volete
tenere il caffè al caldo,
spegnete l’apparecchio
premendo
l’interruttore
acceso/spento.
Le due spie (quella dell’interruttore e quella della
brocca) si spegneranno.
26
10
11
12
13
1
2
15
16
14
Page 25

Volete preparare subito dell’altro caffè?
Se avete appena preparato del caffè e volete farne
dell’altro, spegnete per prima cosa l’apparecchio
premendo il pulsante acceso/spento (Fig. 16).
Entrambe le spie (quella dell’interruttore e quella
della brocca) si spegneranno.
Lasciate raffreddare l’apparecchio per circa tre
minuti.
A questo punto potrete riempire nuovamente il
serbatoio dell’acqua.
Pulizia
• Togliete sempre la spina dalla presa di
alimentazione prima di pulire l’apparecchio.
Non immergete mai l’apparecchio o la brocca
nell’acqua.
Sia l’apparecchio che la brocca possono essere
puliti con un panno umido.
• Non dimenticate di
pulire sempre con un
panno umido il
beccuccio di fuoriuscita
dell’acqua calda
(fig. 17, 18). (Con il
passare del tempo i
depositi di calcare
potrebbero
determinare la
fuoriuscita dell’acqua
calda dai lati
dell’apparecchio).
• Versate dell’acqua calda
saponata nella brocca.
Pulite le pareti interne
con una spazzola e
risciacquate
accuratamente con acqua corrente.
Il coperchio termico della brocca può essere
tolto (aprite il coperchio e tirate verso l’alto) per
facilitare la pulizia della brocca.
• Pulite il beccuccio con acqua calda.
- Il porta-filtro e il coperchio termico possono
essere lavati in acqua calda saponata.
Risciacquate con acqua calda corrente e
asciugate con cura.
• Non mettete in lavastoviglie nessuna delle parti
che compongono l’apparecchio.
27
Disincrostazione
Per ottenere un funzionamento ottimale,
ricordatevi di disincrostare periodicamente il
vostro apparecchio.
Nel caso di utilizzo normale (due brocche piene al
giorno):
• se usate acqua dolce (durezza fino a 18°DH)
due o tre volte all’anno;
• se usate acqua dura (durezza superiore a
18°DH) quattro o cinque volte all’anno.
La società dell’acqua potabile vi potrà fornire
informazioni sulla durezza dell’acqua nella vostra
zona.
- Fate funzionare l’apparecchio due volte, come
indicato nel paragrafo “Come preparare il caffè”,
ma riempite il serbatoio con aceto comune e
non riempite il filtro con il caffè.
- Al termine della disincrostazione, fate funzionare
l’apparecchio due volte usando solo acqua, per
togliere qualsiasi traccia di aceto e calcare.
- Pulite la brocca, il coperchio e il filtro (Vedere il
paragrafo “Pulizia”).
- Non dimenticate di pulire con un panno umido il
beccuccio di fuoriuscita dell’acqua calda
(fig. 17, 18).
17
18
Page 26

28
IMPORTANTE
• Nel caso in cui il cavo risultasse
danneggiato, dovrà essere sostituito
esclusivamente con un cavo originale che
troverete presso i Centri di Assistenza
Philips o presso il vostro rivenditore di
fiducia.
• Collegate l’apparecchio esclusivamente ad
una presa dotata di messa a terra.
• Non appoggiate l’apparecchio su una
superficie calda.
• Collocate l’apparecchio su una superficie
piana e stabile. Assicuratevi che
l’apparecchio non possa cadere in acqua.
• Non togliete mai la brocca mentre state
preparando il caffè: l’acqua continuerà
infatti a fuoriuscire dall’apposita apertura.
• Durante la preparazione del caffè la parte
in metallo posta sull’apertura per la
fuoriuscita dell’acqua diventerà bollente.
Attenzione a non toccarla!
• Fate in modo che i bambini non tirino il
cavo di alimentazione o rovescino
accidentalmente l’apparecchio.
• Non smontate la brocca.
• Non utilizzate la brocca per riscaldare
l’acqua (o il caffè freddo).
L’apparecchio potrebbe non funzionare in
modo corretto per un paio d’ore nel caso
la brocca venisse riempita di liquidi freddi.
• Il collegamento elettrico fra l’apparecchio
e la brocca è a bassa tensione e quindi non
pericoloso.
• Potreste notare una scintilla quando
mettete o togliete la brocca. Si tratta di
un fenomeno del tutto normale e
assolutamente innocuo.
Page 27

29
8
12
6
4
3
MIN
MAX
8
10
MAX
MIN
MIN
8
6
4
3
MAX
12
10
8
6
4
1
1
2
ESPAÑOL
Tapa del depósito
del agua
Depósito del agua
( desmontable )
Soporte del filtro
(desmontable)
con asa
Bolsa de papel
para filtro tipo 102
ó Nº 2
Tapa Thermo
(fijación por rosca)
Tapa de la jarra
(desmontable)
Abertura de
entrada para el agua
caliente
Interruptor paro /
marcha con lámpara
piloto
Compartimiento de
almacenaje del cable
de red
Pico vertedor
Lámpara piloto “Café
manteniéndose caliente”
Empuñadura
Abertura de
salida del
agua caliente
Jarra
con placa caliente
integrada
Conector
eléctrico
para el mantenimiento caliente del
café ( bajo voltaje )
Botón para abrir la
tapa
Page 28

Almacenamiento del cable de red
- El exceso de cable de
red puede ser
almacenado en la placa
de la parte inferior del
aparato ( fig. 2 ).
Antes del primer uso
- Hagan funcionar el aparato una vez sin llenar el
filtro con café ( Vean la sección “ Elaboración del
café “ ).
- A continuación, laven las partes desmontables
( ver la sección “ Limpieza “ ).
Elaboración del café
- ( Fig. 3 ) Abran la tapa y
quiten el depósito del
agua del aparato.
- ( Fig. 4 ) Llenen el
depósito del agua con
la requerida cantidad
de agua.
Asegúrense de que el
nivel de agua no esté
por debajo de la marca
mínima ( “ MIN “ ) ni
por encima de la
indicación “ MAX “.
Usen solo agua pura
fría.
• Indicaciones del lado
izquierdo del nivel :
Para tazas grandes
( 125 ml ).
Indicaciones del lado derecho del nivel : Para
tazas pequeñas ( 85 ml ).
- ( Fig. 5 ) Vuelvan a
colocar el depósito del
agua en el aparato
( Presionen firmemente ).
- ( Fig. 6 ) Cierren la tapa
del depósito del agua.
- ( Fig. 7 ) Abran la tapa
de la jarra y quiten el
soporte del filtro.
- ( Fig. 8 ) Coloquen una
bolsa de papel para
filtro ( tipo 102 ó nº 2)
en el soporte del filtro.
No olviden doblar los
bordes.
- ( Fig. 9 ) Pongan la
cantidad requerida de
café molido en el filtro.
Distribúyanlo por igual.
• Para cada taza grande
pongan una cucharada
de medida llena
( colmada ).
Para cada taza pequeña
pongan una cucharada de medida llena ( rasa ).
• Usen café molido de filtrado rápido. Si muelen el
café Vds. mismos, no lo muelan hasta formar un
polvo fino.
30
Philips y Alessi han trabajado juntos para
crear una única línea de aparatos eléctricos
de cocina, reuniendo lo mejor en estilo y
funcionamiento.La Línea Philips - Alessi
consta de un tostador, una cafetera, una
hervidora de agua y un exprimidor.
5
812
M
A
X
6
8
6
M
I
N
4
2
2
1
3
812
M
A
X
6
8
6
M
IN
4
4
MAX
MIN
MAX
812
6
4
MIN
3
6
7
8
102
9
10
8
6
MIN
4
Page 29

- ( Fig. 10 ) Coloquen la
tapa Thermo sobre la
jarra y enrósquenla
hasta que quede
apretada.
Nota : La tapa Thermo
debe alcanzar
realmente la posición
indicada.
- ( Fig. 11 ) Coloquen el
soporte del filtro en
posición correcta
sobre la parte superior
de la tapa Thermo
( Para su correcto
posicionado, vean la
ilustración.
Comprueben la
posición del asa ). Cierren entonces la tapa de la
jarra.
- ( Fig. 12 ) Coloquen la
jarra. Para asegurar una
correcta conexión
eléctrica, deslízenla
completamente contra
la cafetera.
Comprueben el
correcto posicionado
ya que solo entonces el
agua caliente puede fluir a la abertura de entrada
del agua de la jarra.
- ( Fig. 13 ) Pongan en
marcha el aparato
presionando hacia
abajo el interruptor
paro / marcha. Las dos
lámparas piloto ( La del
interruptor paro /
marcha y la de la jarra )
se encenderán y
empezará el proceso
de preparación.
El café está listo
- ( Fig. 14 ) Después de
algún tiempo, el agua
caliente dejara de fluir a
la jarra, saliendo
entonces un poco de vapor del aparato.
En estado el aparato está listo para preparar café.
Para mantener el café caliente, la jarra
permanece conectada.
Las dos lámparas piloto ( La del interruptor paro
/ marcha y la de la jarra ) permanecerán
encendidas.
- Cuando se pare la vaporización, pueden quitar la
jarra.
Su café está ahora listo para ser servido
• Eviten salpicaduras y derrames. Saquen la jarra
con cuidado.
No la incline más de lo necesario para verter ( Es
suficiente un poco más de la horizontal ).
• Pueden verter el café directamente sin quitar el
soporte del filtro de la jarra.
• O, si lo prefieren, pueden quitar fácilmente el
filtro usando el asa. No obstante, dejen la tapa
Thermo en su lugar cuando lo hagan así.
- ( Fig. 15 ) Dado que la
jarra está parcialmente
aislada, el café no se
enfriará rápidamente.
Sin embargo, para
mantener el café
sabroso y caliente
durante un largo
período de tiempo,
vuelvan a colocar la jarra sobre la cafetera. La
lámpara piloto de la jarra se encenderá de nuevo
para indicar que la placa caliente integrada está
funcionando.
- ( Fig. 16 ) Si no desean
mantener el café
caliente por más
tiempo, desconecten
presionando el
interruptor paro /
marcha.
Las dos lámparas piloto
( La del interruptor
paro / marcha y la de la jarra ) se apagarán.
¿ Desean hacer café inmediatamente ?
Si acaban de hacer café e, inmediatamente, desean
hacer más, desconecten la cafetera presionando el
interruptor paro / marcha ( Fig. 16 ).
Las dos lámparas piloto ( La del interruptor paro /
marcha y la de la jarra ) se apagarán.
31
10
11
1
12
13
14
2
15
16
Page 30

Dejen que el aparato se enfríe durante unos
3 minutos.
Después de ello, pueden volver a llenar el depósito
de agua.
Limpieza
• Antes de limpiar el aparato, desenchufen siempre
la clavija para la red de la toma de corriente.
No sumerjan nunca el aparato o la jarra en agua.
Pueden limpiarlos con un paño húmedo.
• Especialmente, no se
olviden de limpiar la
abertura de salida del
agua caliente con un
paño húmedo
( Figs. 17, 18 ).
( Con el tiempo, las
aportaciones de cal
pueden incluso causar
que el agua caliente
fluya a lo largo del
exterior de la
cafetera ).
• Viertan un poco de
agua caliente en la
jarra. Limpien el
interior de la jarra con
un cepillo. Aclaren la
jarra con agua caliente
limpia.
La tapa Thermo de la jarra puede desmontarse
( Estiren de la tapa mientras abren ) para una fácil
limpieza.
Limpien también el pico vertedor con agua
caliente.
• El soporte del filtro y la tapa Thermo pueden
lavarse en agua caliente jabonosa. Aclaren con
agua caliente limpia y sequen.
No limpien ninguna pieza en un lavavajillas.
Desincrustación
Para garantizar un funcionamiento adecuado,
desincrusten regularmente su cafetera.
Con un uso normal ( dos jarras llenas por día ) :
• Dos o tres veces al año, si usan agua blanda
( con dureza hasta 18 ºDH ).
• Cuatro o cinco veces al año, si usan agua dura
( con dureza mayor de 18 ºDH ).
32
Su compañía suministradora de agua podrá
informarles acerca de la dureza de su agua.
- Pongan en marcha el aparato dos veces tal
como se indica en la sección “ Elaboración del
café “, pero usando vinagre ordinario para
llenar el depósito del agua y sin llenar el filtro
de papel con café.
- Después de la desincrustación, y para eliminar
todos los restos de vinagre e incrustaciones,
hagan funcionar dos veces más el aparato solo
con agua.
- Laven la jarra, la tapa y el conjunto filtro
( Ver la sección “ Limpieza “ ).
• Especialmente, no se olviden de limpiar la
abertura de salida del agua caliente con un paño
húmedo ( Figs. 17, 18 ).
17
18
Page 31

33
Importante
• Si se deteriora el cable de red de este
aparato, debe ser cambiado por un cable
del tipo original. Para el recambio,
diríjanse a su vendedor Philips o a la
organización Philips de su país..
• Enchufen el aparato solo a una toma de
corriente con toma de tierra.
• No coloquen el aparato sobre una
superficie caliente.
• Coloquen el aparato sobre una superficie
solida. Eviten que el aparato caiga en el
agua.
• No quiten nunca la jarra durante el
proceso de preparación ya que el agua
caliente seguirá fluyendo de la abertura de
salida del agua.
• Durante la preparación, la parte metálica
de la abertura de entrada de agua se
calentará ¡ No la toquen !
• Eviten que los niños estiren el cable de red
o que golpeen accidentalmente el aparato.
• No desmonten la jarra.
• La jarra no es adecuada para calentar
agua fría (o café frío).
El aparato se desarreglaría durante un par
de horas si la jarra se conectase llena de
liquido frío.
• La conexión eléctrica entre la cafetera y la
jarra es de bajo voltaje y, por ello, el
tocarla no ofrece peligro.
• Puede notarse una chispa al colocar o
sacar la jarra. Esto es un fenómeno
normal y de ningún modo peligroso.
Page 32

34
8
12
6
4
3
MIN
MAX
8
10
MAX
MIN
MIN
8
6
4
3
MAX
12
10
8
6
4
1
1
2
PORTUGUÊS
Tampa do
depósito da água
Depósito da
água (removível)
Depósito do filtro
(removível) com pega
Filtro de papel
tipo 102 ou No. 2
Tampa do
jarrotérmico
(enrosca para
fixar)
Tampa do jarro
(removível)
Abertura para
águaquente
Botão on/off com
lâmpada piloto
Compartimento
para guardar o fio
Bico
Lâmpada piloto
"Manutenção da
temperatura do café"
Pega
Jarro com placa de
calor integrada
Conector
eléctrico para
manutenção da
temperatura do café
(baixa voltagem)
Botão para abrir a
tampa
Page 33

Compartimento para o cabo
- O fio excedente
poderá ser guardado na
placa inferior do
aparelho (fig. 2).
Antes da primeira
utilização
- Utilize o aparelho pela primeira vez sem colocar
café no depósito. (Consulte a secção “Como
fazer o café”).
- Em seguida, limpe todas as peças amovíveis
(Consulte a secção “Limpeza”).
Como fazer o café
- (Fig. 3). Abra a tampa e
retire o depósito da
água do aparelho.
- (Fig. 4). Encha o
depósito da água com a
quantidade de água
necessária. O nível da
água não deverá ser
inferior à marca de
mínimo ("MIN") nem
superior à indicação
"MAX". Utilize apenas
água limpa e fria.
• As indicações de nível à esquerda
correspondem a chávenas maiores (125 ml); as
indicações de nível à
direita correspondem
a chávenas mais
pequenas (85 ml).
- (Fig. 5). Volte a colocar
o depósito da água no
aparelho. (Carregue
com firmeza).
- (Fig. 6). Feche a tampa
do depósito da água.
- (Fig. 7). Abra a tampa
do jarro e retire o
depósito do filtro.
- (Fig. 8). Coloque um
filtro de papel (tipo 102
ou no. 2) no depósito
do filtro.
Não se esqueça de
dobrar as orlas.
- (Fig. 9). Deite no
depósito a quantidade
de pó de café
necessária. Espalhe bem
o café.
• Por cada chávena
grande, deite uma
medida cheia (bem
cheia) de café.
Por cada chávena mais pequena, deite uma
medida (rasa) de café.
Philips e Alessi trabalharam em conjunto e
criaram uma linha única de aparelhos
eléctricos de cozinha, associando o melhor nas
formas e na função. A Linha Philips-Alessi
consiste numa torradeira, numa máquina de
café, numa chaleira e num espremedor de
citrinos.
35
2
1
5
8
M
A
X
1
6
2
8
6
M
IN
4
6
2
3
81
M
A
X
6
2
8
6
M
IN
4
4
MAX
MIN
MAX
812
6
4
MIN
3
10
8
6
MIN
4
7
8
9
102
Page 34

• Use café moído para máquinas com filtro. Se
moer o café em casa, não o deixe muito fino.
- (Fig. 10). Coloque a
tampa termostática no
jarro e aperte-a bem.
(Tome nota: a tampa
isoladora deverá ter a
posição exacta indicada
na figura).
- (Fig. 11). Coloque o
depósito do filtro
sobre a tampa
isoladora. (Consulte a
ilustração para a
posição correcta.
Repare na posição da
pega). Em seguida,
feche a tampa do jarro.
- (Fig. 12). Coloque o
jarro. Faça deslizar o
jarro até tocar por
completo na máquina
de café. Só assim
garantirá um correcto
contacto eléctrico.
Repare na posição
certa: só assim a água
quente poderá gotejar
sobre a abertura do
jarro.
- (Fig. 13). Ligue a
máquina, colocando o
botão "on/off" para
baixo. As duas
lâmpadas piloto (do
botão de ligar/desligar
e do jarro) acendem-se e começará o processo de decantação.
Café pronto
- (Fig. 14). Algum tempo
depois, a água quente
cessará de pingar para
o jarro. Formar-se-á
algum vapor que sairá
da máquina. Nesta fase,
a máquina estará a fazer o café.
Para conservar o café quente, o jarro ficará
ligado. As duas lâmpadas piloto (do botão
"on/off" e do jarro) manter-se-ão acesas.
- Quando o vapor parar, poderá retirar o jarro.
O café está pronto a ser servido.
• Para evitar salpicos e derrames, retire o jarro
com suavidade. Não o incline mais do que o
necessário para servir o café (um pouco mais do
que a posição horizontal é suficiente).
• Poderá servir o café sem retirar o depósito do
filtro do jarro.
• Ou, se preferir, poderá retirar o filtro facilmente,
segurando pela pega.
Porém, a tampa térmica deverá continuar
colocada quando retirar o filtro.
- (Fig. 15). Uma vez que
o jarro é parcilamente
térmico, o café não
arrefecerá facilmente.
Contudo, para
conservar o café
agradável e quente
durante mais tempo,
deverá voltar a colocar
o jarro na máquina. A lâmpada piloto do jarro
acender-se-á novamente, indicando que a placa
integrada está ligada.
- (Fig. 16). Se já não
pretender continuar a
manter o café quente,
desligue a máquina,
fazendo deslizar o
comutador para a
posição "off".
As duas lâmpadas piloto
(do botão "on/off" e do
jarro) apagar-se-ão.
36
10
11
1
12
13
2
15
16
14
Page 35

Quer fazer mais café logo em seguida?
Se tiver acabado de fazer café e pretender fazer
mais logo em seguida, desligue a máquina,
colocando na posição "off" (fig. 16).
As duas lâmpadas piloto (do botão "on/off" e do
jarro) apagam-se.
Deixe a máquina arrefecer durante cerca de três
minutos.
Passado esse tempo, poderá voltar a encher o
depósito da água.
Limpeza
• Retire sempre a ficha
da tomada de corrente
antes de limpar a
máquina.
• Nunca mergulhe a
máquina ou o jarro em
água.
Ambos os elementos
poderão ser limpos
com um pano húmido.
• Não se esqueça,
principalmente, de
limpar o bico de saída
da água quente com um
pano húmido (fig. 17,
18). (Com o tempo, o
calcário instalar-se-á e
a água quente poderá
mesmo começar a sair pelo exterior da
máquina).
• Deite água quente no jarro. Lave o interior com
uma escova. Enxague o jarro com água quente. A
tampa térmica do jarro pode ser retirada (puxe a
tampa ao abrir) para se limpar melhor. O bico
também deverá ser limpo com água quente.
• O compartimento do filtro e a tampa
Thermo podem ser lavados numa sabonária de
água quente. Enxaguam-se com água quente e
secam-se.
• Nunca lave nenhuma das peças na máquina de
lavar loiça.
37
Descalcificação
Para garantir um funcionamento perfeito,
descalcifique a máquina regularmente.
Numa utilização normal (dois jarros cheios por
dia):
• Se a água for pouco calcária, (dureza até 18º
DH/22.5º Clarke) - duas ou três vezes por ano.
• Se a água for dura (dureza superior a 18º
DH/22.5º Clarke) - quatro ou cinco vezes por
ano.
A Companhia das Águas poderá informar do
grau de dureza da água da rede.
- Ligue a máquina duas vezes, conforme indicado
na secção "Como fazer o café".
Porém, deverá encher o depósito da máquina
com vinagre comum e não colocar café no
compartimento do filtro.
- Depois da descalcificação, ligue a máquina por
mais duas vezes, mas apenas com água limpa e
fria, para limpar todos os restos de vinagre e de
calcário.
- Limpe o jarro, a tampa e o conjunto do filtro.
(Consulte a secção "Limpeza").
• Principalmente, não se esqueça de limpar a saída
da água quente com um pano húmido
(fig. 17, 18).
17
18
Page 36

38
Importante
• Se o cabo de alimentação deste aparelho
se danificar, deverá ser substituído apenas
por uma peça original.
Dirija-se ao seu distribuidor Philips local
ou à organização nacional Philips para
proceder à sua substituição.
• Ligue o aparelho apenas a uma tomada de
corrente com terra.
• Não coloque a máquina sobre uma
superfície quente.
• Coloque a máquina sobre uma superfície
sólida. Não corra o risco do aparelho cair
dentro de água.
• Nunca retire o jarro quando a máquina
está a fazer a decantação: a água quente
continuará a sair pelo bico apropriado.
• Durante a decantação, a parte metálica da
abertura para entrada da água fica
quente. Não lhe toque!
• Não deixe as crianças aproximarem-se da
máquina, evitando assim que puxem o fio
ou a deixem cair acidentalmente.
• Não desarme o jarro.
• O jarro não se destina ao aquecimento de
água fria (ou café frio).
A máquina poderia ficar descontrolada
durante algumas horas se fosse ligada
cheia com um líquido frio.
• A ligação eléctrica entre a máquina de
café e o jarro tem pouca voltagem e, por
conseguinte, não apresenta perigo se for
tocada.
• Poderá notar-se uma faísca quando se
coloca ou se retira o jarro. É
perfeitamente normal e de modo nenhum
perigoso.
Page 37

39
8
12
6
4
3
MIN
MAX
8
10
MAX
MIN
MIN
8
6
4
3
MAX
12
10
8
6
4
1
1
2
DANSK
Låg til
vandbeholder
Vandbeholder
(aftagelig)
Filterholder
(aftagelig) med
hank
Papir-kaffefilter
type 102 eller
nr. 2
Indvendigt
termo-skruelåg
Låg til kande
(aftageligt)
Indløbsåbning for
varmt vand
Tænd/sluk kontakt
med kontrollampe
Opbevaringsrum for
netledning
Hældetud
Kontrollampe: “Kaffen
holdes varm”
Håndtag
Udløbsåbning
for varmt vand
Kande med
indbygget
varmeplade
Eltilslutning:
“Kaffen holdes
varm”
(lavspænding, ingen
berøringsfare)
Knap til åbning af låg
Page 38

Opbevaringsrum for netledningen.
- Overskydende
netledning kan
opbevares i rummet på
undersiden af apparatet
(fig. 2).
Før maskinen tages i
brug første gang.
- Lad kaffemaskinen køre en gang igennem, men
uden kaffe i filteret (se afsnittet “Sådan laver man
kaffe”).
- Derefter rengøres de aftagelige dele, som
beskrevet i afsnittet “Rengøring”.
Sådan laver man kaffe.
- (Fig. 3). Åbn låget og
tag vandbeholderen ud
af apparatet.
- (Fig. 4). Fyld den
ønskede mængde vand i
vandbeholderen.
Sørg for, at
vandmængden aldrig er
under “MIN”-
markeringen eller over
“MAX”-markeringen.
Brug kun friskt, koldt
vand.
- Markeringerne på
venstre side af
vandbeholderen svarer
til store kopper (125 ml) og på højre side til
mindre kopper (85 ml).
- (Fig. 5). Sæt
vandbeholderen tilbage
på plads. (Trykkes godt
ned).
- (Fig. 6). Luk låget til
vandbeholderen.
- (Fig. 7): Åbn låget på
kanden og løft
filterholderen op.
- (Fig. 8). Kom et
kaffefilter (type 102
eller nr.2) i filterholderen. Husk at bøje
kanterne om.
- (Fig. 9). Kom den
ønskede mængde kaffe i
filteret, og fordel den
jævnt.
• Til store kopper
bruges en
måleskefuld kaffe
med top pr. kop og til
almindelige kopper en
strøget måleskefuld.
• Hvis De selv maler kaffen, skal De passe på, at
den ikke bliver for finmalet.
Philips og Alessi har i nært samarbejde
udviklet en ny og spændende serie elektriske
køkkenapparater, hvor funktionalisme og
unik, moderne formgivning går op i en højere
enhed.
Philips-Alessi serien består af en brødrister,
en kaffemaskine, en elkedel og en
citruspresser.
40
5
6
812
M
A
X
6
8
6
M
IN
4
2
2
1
3
812
M
A
X
6
8
6
M
IN
4
4
MAX
MIN
MAX
812
6
4
MIN
3
7
8
102
9
10
8
6
MIN
4
Page 39

- (Fig. 10). Placér det
indvendige termoskruelåg i kanden og
skru det fast til.
(Bemærk: Termolåget
skal skrues i, så det når
den viste stilling).
- (Fig. 11). Sæt
filterholderen korrekt
på plads oven på
termolåget i kanden
(bemærk hankens
stilling), og luk låget på
kanden.
- (Fig. 12). Sæt kanden på
plads. Skub kanden
helt ind mod
kaffemaskinen for at
sikre korrekt
eltilslutning.
Sørg for, at janden er
rigtigt placeret. Ellers
kan det varme vand
ikke løbe ned i kandens
indløbsåbning
- (Fig. 13). Tænd for
kaffemaskinen ved at
trykke ned på
tænd/sluk-kontakten.
De to kontrollamper
(på tænd/sluk kontakten og på kanden) lyser,
og kaffebrygningen
begynder.
Når kaffen er klar.
- (Fig. 14). Efter et stykke
tid, når der ikke løber
mere varmt vand ned i
kanden, kommer der
lidt damp fra apparatet.
- Kaffen er nu færdig.
For at holde kaffen varm, skal kanden stadig
holdes tilsluttet. De to kontrollamper (på
tænd/sluk kontakten og på kanden) fortsætter
med at lyse.
-Når der ikke kommer mere damp, kan kanden
fjernes.
• Kaffen er nu klar til at blive skænket.
Bevæg kanden roligt så spild og overløb undgås.
Vip den ikke mere end nødvendigt for at hælde
(det er kun nødvendigt med en ganske lille
hældning).
• Kaffen kan skænkes uden at fjerne filterholderen
fra kanden.
• Hvis ønsket, kan filteret imidlertid fjernes nemt,
inden kaffen hældes op (løftes op i hanken), men
det indvendige termo-skruelåg skal blive
siddende.
- (Fig. 15) Da kanden er
delvist isoleret, vil
kaffen ikke blive kold
med det samme.
Ønsker man imidlertid
at holde kaffen varm
længere, sættes kanden
tilbage i kaffemaskinen.
Kontrollampen på kanden lyser som tegn på, at
den indbyggede varmeplade er tilsluttet.
- (Fig. 16). Når man ikke
længere ønsker at
holde kaffen varm,
afbrydes apparatet ved
at trykke på tænd/sluk
kontakten.
De to kontrollamper
(på tænd/sluk kontakten
og på kanden) slukker.
Ønskes mere end en kande kaffe ?
Har man lige lavet en kande kaffe og ønsker at lave
mere med det samme, afbrydes kaffemaskinen
først ved at trykke på tænd/sluk kontakten
(fig. 16).
De to kontrollamper (på tænd/sluk kontakten og
på kanden) slukker.
Lad herefter apparatet køle af i ca. 3 minutter,
hvorefter vandbeholderen kan fyldes igen.
41
10
11
12
13
14
1
2
15
16
Page 40

Rengøring.
• Tag altid stikket ud af stikkontakten, før De
begynder at rengøre apparatet.
Nedsænk aldrig apparatet eller kanden i vand.
De to enheder kan rengøres med en fugtig klud.
• Det er specielt vigtigt
at rengøre
udløbsåbningen for
varmt vand med en
fugtig klud (fig. 17, 18)
(da kalkaflejringer kan
få det varme vand til at
løbe ned af ydersiden
på kaffemaskinen).
• Hæld lidt varmt vand i
kanden og vask
indersiden med en
børste. Skyl efter med
rent, varmt vand. Låget
på kanden kan tages af
for nemmere rengøring
(åbn låget og træk det
lige op).
Rengør også hældetuden med varmt vand.
• Filterholderen og det indvendige termo-
skruelåg kan vaskes i varmt sæbevand. Skyl efter
med rent, varmt vand og tør delene af.
• Bemærk: Ingen af delene tåler opvaskemaskine.
Afkalkning.
For at sikre apparatets optimale funktion skal det
afkalkes med jævne mellemrum. Følgende
tommelfingerregel gælder ved normal brug af
maskinen (to hele kander kaffe om dagen):
• Vandhårdhed op til 18°dH: Afkalkning 3-4 gange
om året.
• Vandhårdhed over 18°dH: Afkalkning 5-8 gange
om året.
Oplysninger om vandets hårdhed fås på det
lokale vandværk.
- Lad maskinen køre to gange med en blanding
af 1/3 32% eddikesyre og 2/3 vand i
vandbeholderen og uden kaffe i filteret.
- Efter afkalkningen lader man maskinen køre
endnu to gange med koldt vand for at skylle
afkalkningsvæske og kalkrester bort.
42
- Kande, låg, filterholder og det indvendige termoskruelåg rengøres (se afsnittet “Rengøring”).
- Det er specielt vigtigt altid at holde
udløbsåbningen for varmt vand ren med en fugtig
klud (fig. 17, 18).
Vigtigt!
• Hvis netledningen beskadiges, skal De
enten henvende Dem til Deres Philips
forhandler eller direkte til Philips, da den
kun må udskiftes med en ny original
ledning.
• Stil aldrig apparatet på en varm overflade.
• Anbring apparatet på en solid overflade
og sørg for, at det ikke kan falde ned i
vand.
• Flyt aldrig kanden under kaffebrygningen,
da der løber varmt vand ud af udløbs-
åbningen, så længe maskinen arbejder.
• Rør ikke metallet omkring
indløbsåbningen på kanden, når maskinen
er i brug, da det bliver meget varmt.
• Sørg for, at børn ikke kan komme til at
trække i netledningen eller vælte
apparatet (så skoldningsulykker undgås).
• Prøv ikke at adskille kanden.
• Kanden må ikke anvendes til opvarmning
af koldt vand (eller kold kaffe), da det kan
medføre, at varmepladen slås fra i op til
et par timer.
Hvis kanden tilsluttes, når den er fyldt
med koldt vand eller væske kan det
forekomme, at apparatet vil være ude af
drift i op til et par timer.
• Den elektriske tilslutning mellem
kaffemaskine og kande er helt ufarlig at
røre ved, da det er lavspænding.
• Venligst bemærk, at der kan opstå en
gnist, når kanden anbringes eller fjernes
fra tilslutningen. Dette er helt normalt og
ganske ufarligt.
17
18
Page 41

43
8
12
6
4
3
MIN
MAX
8
10
MAX
MIN
MIN
8
6
4
3
MAX
12
10
8
6
4
1
1
2
NORSK
Lokk til
vanntank
Vanntank
(avtagbar)
Filterholder
(avtagbar) med
håndtak
Kaffefilter
type 102 eller
nr. 2
Termoslokk
(skru for å feste)
Kannelokk
(avtagbart)
Åpning for varmt
vann
På/Av bryter med
indikatorlys
Oppbevaringsplass
for ledning
Tut
Indikatorlys
“kaffevarmeholder”
Håndtak
Åpning for
varmt vann
Kanne med
innebygd
varmeplate
Elektrisk kontakt
for å holde kaffen
varm (lavspenning)
Knapp for å åpne
lokket
Page 42

Oppbevaringsplass for ledning
- Overflødig nettledning
kan oppbevares i
prduktets bunnplate
(fig. 2).
Før første gangs bruk
- Bruk apparatet en gang
uten å fylle filteret med kaffe (se avsnitt “Trakting
av kaffe”).
- Rengjør så de avtagbare delene (se avsnitt
“Rengjøring”).
Trakting av kaffe
- (Fig. 3). Åpne lokket og
ta ut vanntanken fra
apparatet.
- (Fig. 4). Fyll vanntanken
med ønsket mengde
vann. Forsikre Dem om
at vannivået ikke er
lavere enn
minimumsmerket
(“MIN”) og ikke høyere
enn “MAX” merket.
Bruk bare friskt kaldt
vann.
• Merkene på venstre side representerer store
kopper (125 ml); og merkene på høyre side
representerer små kopper (85 ml).
- (Fig. 5). Sett vanntanken
tilbake i apparatet
(trykk den godt på
plass).
- (Fig. 6). Lukk lokket på
vanntanken (og trykk
det godt fast).
- (Fig. 7). Åpne lokket på
kannen og ta ut
filterholderen.
- (Fig. 8). Plasser et
kaffefilter (type 102
eller Nr. 2) i
filterholderen. Glem
ikke å brette kantene.
- (Fig. 9). Fyll på ønsket
mengde filtermalt kaffe i
filteret. Sørg for at
kaffen er jevnt fordelt i
filteret.
- For hver stor kopp, ta
en toppet måleskje
kaffe. For hver liten
kopp, ta en strøken
måleskje kaffe.
• Bruk filtermalt kaffe. Hvis De maler kaffen selv,
mal den ikke til et fint pulver.
Philips og Alessi har samarbeidet for å skape
en unik serie av elektriske kjøkkenartikler,
kombinere det aller beste i form og funksjon.
Philips-Alessi-serien består av brødrister,
kaffetrakter, hurtigkoker og en sitruspresse.
44
5
81
M
A
X
6
2
8
6
M
IN
4
6
2
2
1
3
8
M
A
X
1
6
2
8
6
M
IN
4
4
MAX
MIN
MAX
812
6
4
MIN
3
7
8
102
9
10
8
6
MIN
4
Page 43

- (Fig. 10). Sett
termolokket på kannen
og skru til det er tett.
(NB! Lokket må settes
nøyaktig i den viste
posisjonen).
- (Fig. 11). Sett
filterholderen riktig på
plass på toppen av
lokket. (Se figuren for
riktig plassering.
NB!Legg merke til
håndtakets posisjon.
Lukk så lokket til
kannen).
- (Fig. 12). Sett kannen
på plass. Skyv kannen
godt mot den andre
delen for å sikre riktig
elektrisk forbindelse.
Legg merke til den
riktige plasseringen:
Bare da kan varmt vann
renne inn i
varmtvannsåpningen til
kannen.
- (Fig. 13). Slå på
apparatet ved å trykke
ned På/Av bryteren. De
to indikatorlysene (et
på PÅ/Av bryteren og
et på kannen) vil tennes
og trakteprosessen vil
begynne.
Kaffen er ferdig
- (Fig. 14). Etter en tid vil
vannet slutte å renne
inn i kannen. Deretter
vil det komme noe
damp ut fra apparatet.
På dette tidspunkt er
apparatet ferdig med å
lage kaffe. For å holde
kaffen varm vil kannen
fortsatt være slått på. De to indikatorlysene (et
på PÅ/Av bryteren og et på kannen) vil fortsatt
lyse.
-Når dampen stopper kan De ta ut kannen.
Kaffen er nå klar til å helles ut.
• Hindre sprut og søl. Beveg kannen forsiktig. Hell
ikke mer på kannen enn nødvendig for å helle ut
kaffe (litt mer enn horisontalt er mer en nok).
• De kan helle ut kaffe uten å fjerne filterholderen
fra kannen.
• På den annen side kan De også fjerne filteret ved
hjelp av håndtaket. Men, pass på at termolokket
fortsatt sitter på plass når dette gjøres.
- (Fig. 15). Da kannen er
delvis isolert vil kaffen
ikke avkjøles hurtig.
Men for å holde kaffen
varm over en lengre tid,
sett kannen tilbake på
plass mot trakteren.
Indikatorlyset på
kannen vil begynne å
lyse igjen, for å vise at
den integrerte
innebygde varmeplaten
er på.
- (Fig 16). Hvis De ikke
ønsker å holde kaffen
varm lenger, slå av ved
å trykke på På/Av
bryteren. De to
indikatorlysene (det på På/Av bryteren og det på
kannen) vil slokke.
Trakting av mer kaffe med en gang
Hvis De har avsluttet traktingen av kaffe og ønsker
å trakte mer med en gang, slå først av ved å trykke
på På/Av bryteren (fig. 16). De to indikatorlysene
(det på På/Av bryteren og det på kannen) vil
slokke. La apparatet avkjøles i ca. 3 minutter. Etter
det kan De fylle vanntanken på nytt.
45
10
11
1
12
13
14
2
15
16
Page 44

Rengjøring
• Trekk alltid ut støpselet fra stikkontakten før
apparatet rengjøres. Dypp aldri apparatet eller
kannen i vann. De to delene kan rengjøres med
en fuktig klut.
• Glem ikke å rengjøre
åpningen for varmt
vann med en fuktig klut
(fig. 17, 18) (etter som
tiden går kan
kalkavleiringer til og
med forårsake at varmt
vann renner på utsiden
av trakteren).
• Hell noe varmt vann i
kannen. Vask innsiden
av kannen med en
børste. Skyll kannen
med rent varmt vann.
Kannelokket kan
fjernes (åpne lokket og
trekk oppover) for
enkel rengjøring.
Rengjør også tuten med varmt vann.
• Filterholderen og termokannelokket kan vaskes i
varmt såpevann. Skyll med rent varmt vann og
tørk.
• Vask ikke noen av delene i oppvaskmaskinen.
Avkalking
For å garantere korrekt funksjon avkalk apparatet
regelmessig. Ved normalt bruk (2 fulle kanner om
dagen):
• Hvis De bruker bløtt vann (hardhet opptil
18° DH/ eller 22,5° Clarke) - to til tre ganger
om året.
• Hvis De bruker hardt vann (hardhet over
18° DH/22,5° Clarke) - fire til fem ganger i
året.
Deres lokale vannverk kan informere Dem om
vannets hardhet.
-Kjør apparatet to ganger. Se avsnitt “Trakting
av kaffe”. Men bruk nå vanlig eddik i
vanntanken og fyll ikke filteret med kaffe.
- Etter avkalking kjør bare rent, kaldt vann
gjennom trakteren to ganger for å skylle bort
eddik og kalkrester.
- Rengjør kannen, lokket og filterenheten (se avsnitt “Rengjøring”). Husk spesielt på å rengjøre
åpningen for varmt vann med en fuktig klut
(fig. 17, 18).
46
Viktig
• Hvis nettledningen på apparatet blir
ødelagt må den bare erstattes med en
originalledning. Vennligst ta kontakt med
Deres forhandler eller direkte til Philips.
• Koble kun apparatet til en jordet
stikkontakt.
• Plasser ikke apparatet på en varm
overflate.
• Plasser apparatet på en solid flate. Sørg
for at apparatet ikke kan falle i vann.
• Fjern aldri kannen under trakteprosessen:
varmt vann vil fortsette å komme ut av
vannåpningen.
• Under trakting vil metalldelen rundt
vannåpningen bli varm. Ikke berør denne.
• Påse at barn ikke ved et uhell kan trekke i
nettledningen eller velte apparatet.
• Ta ikke kannen fra hverandre.
• Kannen er ikke beregnet for å varme opp
kaldt vann (eller kald kaffe). Apparatet
kan komme i ulage noen timer hvis
kannen kobles til mens den er fylt med
kald væske.
• Den elektriske forbindelsen mellom
kaffetrakter og kanne har lav spenning og
er derfor ikke farlig å berøre.
• En gnist kan sees når man setter kannen
på plass eller fjerner den. Dette er et
normalt fenomen og er ikke farlig i det
hele tatt.
17
18
Page 45

47
8
12
6
4
3
MIN
MAX
8
10
MAX
MIN
MIN
8
6
4
3
MAX
12
10
8
6
4
1
1
2
SVENSKA
Lock över
vattentanken
Vattentank
Löstagbar
Filterhållare
Löstagbar, med
handtag
Pappersfilter
102
eller nr 2
Skruvlock
för varmhållning.
Kannans lock
löstagbart
Inloppsöppning
för hett vatten
Till/från-knapp
med signallampa
Förvaringsutrymme
för nätsladden
Pip
Signallampa
“Kaffet hålls varmt”
Handtag
Vattenutlopp
för det
heta vattnet
Kanna
med inbyggd
värmeplatta
Elanslutning för
varmhållning av
kaffet.
Lågspänning.
Tumgrepp
för att öppna locket
Läs först hela bruksanvisningen! Spara den!
Spara köpbevis och kvitto!
Page 46

Förvaring av nätsladden
- Överskjutande längd av
nätsladden kan skjutas
in under bryggaren.
Före första
användning
-Kör bryggare två
gånger med enbart vatten utan kaffe. Se avsnittet
“Att brygga kaffe”.
- Diska sedan alla löstagbara delar och skölj dem
väl. Se avsnittet “Rengöring”
Att Brygga kaffe
- Fig 3: Öppna locket och
tag ut vattentanken ur
bryggaren.
- Fig 4: Fyll vattentanken
med önskad mängd
vatten. Vattennivån får
inte vara lägre än MINmarkeringen och inte
högre än MAXmarkeringen. Vattnet
skall vara kallt.
• Vänstra skalan
markerar antalet stora
koppar motsvarande 1
dl per streck. Högra
skalan markerar
antalet små koppar
motsvarande 0,85 dl
per streck.
- Fig 5: Sätt tillbaka
vattentanken i
bryggaren. Tryck ner
den ordentligt.
- Fig 6: Stäng locket över
vattentanken.
- Fig 7: Öppna kannans
lock och tag ut
filterhållaren.
- Fig 8: Sätt ett filter
storlek 102 eller nr 2 i
filterhållaren. Vik först
in kanterna på det.
- Fig 9: Fyll i önskad
mängd kaffe och sprid
det jämnt.
• Fyll ett rågat mått för
varje stor kopp och ett
struket mått för varje
liten kopp kaffe.
• Använd bryggmalet
kaffe eller E-brygg. Om
du själv maler kaffet, mal det inte för fint. Då kan
vattnet föda över i filtret.
Philips och Alessi har tillsammans utvecklat
en unik serie hushållsapparater med speciell
tonvikt på design och funktion.
Philips-Alessi-serien består av brödrost,
kaffebryggare, snabbkokare och citruspress.
48
5
81
M
A
X
6
2
8
6
M
IN
4
6
2
2
1
3
8
M
A
X
1
6
2
8
6
M
IN
4
4
MAX
MIN
MAX
812
6
4
MIN
3
7
8
102
9
10
8
6
MIN
4
Page 47

- Fig 10: Skruva i
skruvlocket i kannan.
Skruva fast det
ordentligt. Locket
måste skruvas tills det
når det läge figuren
visar.
- Fig 11. Sätt
filterhållaren i kannan
ovanför skruvlocket.
Handtaget måste
vändas rätt, som
figuren visar.
Stäng sedan kannans
lock.
- Fig 12. Ställ kannan mot
bryggaren och skjut in
den som figuren visar.
Observera att den
måste stå rätt för att
det heta vattnen skall
kunna rinna ner genom
hålet i kannans lock.
- Fig 13. Starta bryggaren
med ett tryck på
till/från-knappen. Både
signallampan på kannan
och i till/från-knappen
tänds.
När kaffet är färdigt
- Fig 14: Efter en tid
slutar det att rinna hett
vatten i kannan. Då
kommer en del ånga att
pysa ut.
De båda signallamporna
fortsätter att lysa och
kaffet hålls varmt så
länge kannan är
ansluten till bryggaren.
-När det slutat att ånga kan du ta bort kannan
från bryggaren.
Kaffet kan nu hällas upp.
• Undvik spill vid serveringen. Hantera kannan
försiktigt. Tippa den inte mer än nödvändigt när
du häller upp kaffet, något mer än horisontellt är
tillräckligt.
• Du kan hälla upp kaffe utan att ta ut filtret ur
kannan.
• Du kan också först ta ut filterhållaren, men
skruvlocket skall sitta kvar. Lyft filterhållaren i
handtaget.
- Fig 15: Kannan är
värmeisolerad och
håller kaffet varmt
någon tid. För att hålla
kaffet varmt en längre
tid bör kannan ställas
tillbaka i bryggaren. Då
tänds signallampan på
kannan och visar att
varmhållningen är i
funktion.
- Fig 16: Tryck på
till/från-knappen när
ingen varmhållning
krävs. Då stängs all
värme av och de båda
signallamporna
slocknar.
Brygga nytt kaffe med en gång
Om du just bryggt kaffe och vill brygga nytt
omedelbart, måste du stänga av bryggaren med ett
tryck på till/från-knappen, fig 16, så att de båda
signallamporna är släckta. Låt sedan bryggaren
kallna minst 3 minuter. Först därefter kan du fylla
vattentanken med vatten.
49
10
11
1
12
13
14
2
15
16
Page 48

Rengöring
• Drag ut stickproppen ur vägguttaget innan du gör
ren själva bryggaren.
• Du får aldrig doppa bryggaren eller kannan i
vatten. De kan torkas av med en väl urvriden
fuktig trasa.
• Kom ihåg att torka ren
vattenutloppet med en
fuktig trasa, fig 17 och
18. Kalkavlagringar här
kan göra att vattnet
rinner utefter
bryggarens utsida.
• Häll vatten med
diskmedel i kannan och
skölj ur den. Du kan
borsta den inuti med
en flaskborste. Töm
den och skölj den väl
med rent varmt vatten.
Kannans lock kan tas
loss för enkel
rengöring. Öppna det
och drag rakt uppåt.
Gör ren pipen med hett vatten.
• Filterhållaren och skruvlocket diskas i hett
vatten med diskmedel. Skölj dem väl i rent hett
vatten och torka dem.
Diska aldrig några delar i diskmaskin.
Avkalkning
Bryggaren bör avkalkas regelbundet. Används
bryggaren normalt, d v s du brygger två fulla
kannor om dagen, gäller:
• Med mjukt vatten, hårdhet under 18°DH, avkalka
två till tre gånger per år.
• Med hårt vatten, hårdhet över 18°DH, avkalka
fyra till fem gånger per år.
Vattenverket på din ort kan upplysa om vattnets
hårdhetsgrad.
Avkalkning görs så här:
- Blanda 1/2 liter vatten och 1/2 liter 12%-ig
ättikssprit. Detta ger en 6%-ig ättiksblandning.
Häll denna blandningen i vattentanken.
- Använd aldrig andra i handeln
förekommande avkalkningsmedel.
-Förbered bryggaren som när du brygger kaffe
50
dock utan att fylla i kaffe.
- Placera kannan i bryggaren.
- Starta bryggaren och låt ättiksblandningen
passera genom bryggaren.
-Låt ättiksblandningen kallna och kör den en gång
till genom bryggaren.
-Kör sedan kaffebryggaren 2 gånger med enbart
vatten för att skölja bort kalkrester och ättika.
- Kasta pappersfiltret, Diska kannan, filterhållaren
och övriga lösa tillbehör. Se avsnittet
“Rengöring”.
• Kom särskilt ihåg att torka ren vattenutloppet
med en fuktig trasa, fig 17 och 18.
Viktigt
• Ställ aldrig bryggaren, kannan eller
andra delar på ett hett underlag, t ex
spisplatta.
• Ställ bryggaren på ett stadigt underlag.
Den får inte falla i vatten.
• När kannan placeras i bryggaren resp
när den tas bort kan ibland en gnista
synas. Detta är normalt och ofarligt.
• Tag aldrig bort kannan medan
bryggning pågår. Hett vatten kommer
då att rinna ut på underlaget.
• Kannan skall inte användas för
uppvärmning av kallt vatten eller kaffe.
Vid uppvärming av kall vätska kan
värmningsfunktionen störas så att
signallampan inte tänds när kannan
ställs i bryggaren. Detta är inget fel.
Efter någon timme blir funktionen
normal.
• Vid bryggning blir metalldelen upptill
på kannan het. Rör inte vid denna! Du
kan bränna dig.
• Håll barn under uppsikt så att de inte
drar i sladden eller på annat sätt
kommer åt bryggaren så att den faller
eller välter.
• Spänningen i kontakterna till kannan är
låg och därför ofarlig.
• Skruva inte isär kannan.
• Bryggaren bör anslutas till ett jordat
vägguttag.
• Om sladden på bryggaren skadas måste
den ersättas med en specialsladd, vilken
tillhandahålls av Philips eller av deras
serviceombud.
17
18
Page 49

51
8
12
6
4
3
MIN
MAX
8
10
MAX
MIN
MIN
8
6
4
3
MAX
12
10
8
6
4
1
1
2
SUOMI
Vesisäiliön
kansi
Vesisäiliö
(irrotettava)
Suodatinteline
(irrotettava),
kahvallinen
Suodatinpaperi koko
102 tai nro 2.
Korkki
(kierrettävä)
Kannun kansi
(irrotettava
Kuuman veden
sisäänmenoaukko
Käynnistyskytkin ja
merkkivalo
Säilytystila
liitosjohdolle
Kaatonokka
Merkkivalo
“Kahvi kuumana”
Kahva
Kuuman veden
ulostuloaukko
Kannu jossa
sisäänrakennettu
lämpölevy
Sähköliitin kahvin
pitämiseksi kuumana
(matala jännite)
Kannen avauspainike
Page 50

Johdon säilytys
- Liitosjohdon pituutta
voidaan säätää
työntämällä johtoa
keittimen pohjan sisään
(kuva 2).
Ennen käyttöönottoa-
Käytä laitetta kerran
laittamatta suodattimeen
kahvia. (Katso osaa
“Kahvin valmistus”.)
- Puhdista seuraavaksi irrotettavat osat. (Katso
osaa “Puhdistus”.)
Kahvin valmistus
- (Kuva 3.) Avaa kansi ja
nosta vesisäiliö pois
keittimestä.
- (Kuva 4.) Mittaa
vesisäiliöön tarvittava
määrä vettä. Täytä
säiliö vähintään
alarajaan (“MIN”) asti
muttei ylärajan
(“MAX”) yli. Käytä
raikasta, kylmää vettä.
• Vasemmalla olevat
merkit vastaavat
suuria kuppeja (125
ml); oikealla olevat
merkit vastaavat pieniä
kuppeja (85 ml).
- (Kuva 5.) Laita vesisäiliö
takaisin keittimeen.
(Paina kunnolla.)
- (Kuva 6.) Sulje
vesisäiliön kansi.
- (Kuva 7.) Avaa kannun
kansi ja nosta
suodatinteline pois.
- (Kuva 8.) Levitä
suodatinpaperi auki
(koko 102 tai nro 2)
suodatintelineeseen.
Muista taivuttaa reunat.
- (Kuva 9.) Mittaa
tarvittava määrä
kahvijauhetta
suodattimeen. Levitä
kahvijauhe tasaisesti.
• Mittaa yhtä suurta
kupillista kohti yksi
kukkurapäinen
mitallinen
kahvijauhetta.
Mittaa yhtä pientä kupillista kohti yksi
tasapäinen mitallinen kahvijauhetta.
• Käytä suodatinjauhettua kahvia. Jos jauhat itse
kahvin, älä jauha liian hienoksi.
Philips ja Alessi ovat kehittäneet yhdessä
ainutlaatuisen sarjan sähköllä toimivia
keittiökoneita.
Philips-Alessi-sarjaan kuuluu leivänpaahdin,
kahvinkeitin, vedenkeitin ja sitruspuserrin.
52
2
1
3
8
M
A
X
1
6
2
8
6
M
IN
4
4
MAX
MIN
MAX
812
6
4
MIN
3
5
81
M
A
X
6
2
8
6
M
IN
4
6
2
10
8
6
MIN
4
7
8
102
9
Page 51

- (Kuva 10.) Laita korkki
kannun päälle ja kierrä
kunnolla kiinni.
(Huomaa: Korkin on
oltava kuvan
mukaisessa asennossa.)
- (Kuva 11.) Aseta
suodatinteline oikeaan
asentoon korkin päälle.
(Huomaa kahvan
asento.)
Sulje sitten kannun
kansi.
- (Kuva 12.) Laita kannu
paikalleen. (Työnnä se
kunnolla toista osaa
vasten, niin että
sähkökytkentä toimii.)
Huomaa oikea asento:
vain siten kuuma vesi
pääsee valumaan
kannun
sisäänmenoaukosta.
- (Kuva 13.) Käynnistä
keitin painamalla
käynnistyskytkintä
alaspäin. Molemmat
merkkivalot
(käynnistyskytkimessä
ja kannussa) syttyvät ja
kahvin suodatus alkaa.
Kahvi on valmista
- (Kuva 14.) Jonkin ajan
kuluttua kuuman veden
tulo kannuun lakkaa.
Keittimestä tulee silloin
jonkin verran höyryä.
Keitin on valmistanut
kahvin.
Jotta kahvi pysyisi
kuumana, kannun virta
on kytkettynä. Molemmat merkkivalot
(käynnistyskytkimessä ja kannussa) palavat.
- Kun höyryäminen on lakannut, voit nostaa
kannun pois.
Kahvi on nyt valmista kaadettavaksi.
• Vältä roiskimista ja läikyttämistä. Liikuta kannua
varovasti. Älä kallista kannua enempää kuin
kaataminen vaatii (hieman vaakatason ohi riittää
hyvin).
• Voit kaataa kahvia poistamatta suodatintelinettä
kannusta.
•Tai, jos haluat, voit helposti poistaa
suodatintelineen kannusta käyttämällä kahvaa.
Jätä kuitenkin termoskannun korkki paikalleen.
- (Kuva 15.) Koska kannu
on osittain
termoskannu, kahvi ei
jäähdy kovin nopeasti.
Kahvi voidaan pitää
kuumana pidempään
nostamalla kannu
takaisin
kahvinkeittimeen.
Kannussa oleva
merkkivalo syttyy
uudelleen osoittamaan,
että sisäänrakennettu
lämpölevy on kytketty.
- (Kuva 16.) Ellet halua
enää pitää kahvia
kuumana, katkaise virta
painamalla
käynnistyskytkintä.
Molemmat merkkivalot (käynnistyskytkimessä ja
kannussa) sammuvat.
Heti lisää kahvia?
Jos haluat heti valmistaa lisää kahvia, katkaise ensin
virta painamalla käynnistyskytkintä (kuva 16).
Molemmat merkkivalot (käynnistyskytkimessä ja
kannussa) sammuvat.Anna keittimen jäähtyä noin
kolme minuuttia.
Sen jälkeen voit täyttää vesisäiliön uudelleen.
Puhdistus
• Irrota pistotulppa pistorasiasta ennen keittimen
puhdistamista.
•Älä upota keitintä äläkä kannua veteen.
Puhdista nämä kaksi osaa kostealla liinalla.
53
10
11
1
12
13
14
2
15
16
Page 52

• Muista varsinkin
pyyhkiä
vedentuloaukko
kostealla liinalla (kuvat
17, 18). (Kerääntynyt
kalkki voi aikaa myöden
aiheuttaa sen, että
kuuma vesi alkaa valua
keittimen ulkovaipalle.)
• Kaada kannuun
lämmintä saippuavettä.
Pese kannu sisältä
harjalla. Huuhtele
kannu lämpimällä
vedellä. Kannun korkki
voidaan irrottaa
puhdistuksen
helpottamiseksi (avaa ja
vedä suoraan ylös).
Puhdista myös kaatonokka lämpimällä vedellä.
• Pese suodatinteline ja kannun korkki
saippuavedellä.
Huuhtele lämpimällä vedellä ja kuivaa.
•Älä pese mitään osia astianpesukoneessa.
Kalkin poisto
Veden kovuudesta ja keittimen käytöstä riippuen
kalkin poisto kannattaa tehdä vähintään 2-3 kertaa
vuodessa.
Älä käytä kaupoista saatavia
kalkinpoistoaineita.
-Käytä laitetta kaksi kertaa ohjeen (“Kahvin
valmistus”) mukaisesti. Täytä vesisäiliö tällä
kertaa laimennetulla etikalla (3/4 vettä, 1/4
ruokaetikkaa), äläkä laita suodattimeen
kahvijauhetta.
- Huuhtele keitin kalkin poiston jälkeen
suodattamalla siinä kaksi kertaa pelkkää vettä.
- Pese kannu, kansi ja suodatin. (Katso osaa
“Puhdistus”.)
• Muista varsinkin pyyhkiä vedentuloaukko
kostealla liinalla (kuvat 17, 18).
54
Tärkeää
• Jos tämän laitteen verkkoliitosjohto
vaurioituu, on johto korvattava
erikoisjohdolla. Ota yhteys lähimpään
Philips-myyjään tai Philips-huoltoon.
• Yhdistä laite aina maadoitettuun
pistorasiaan.
•Älä laita keitintä kuumalle alustalle.
• Aseta keitin tukevalle, tasaiselle alustalle.
Varmista, ettei keitin pääse putoamaan
veteen.
•Älä poista kannua suodatuksen aikana:
kuumaa vettä valuu koko ajan
ulostuloaukosta.
• Veden sisäänmenoaukon metalliosa
kuumenee suodatuksen aikana.
Varo koskemasta!
• Pidä huoli, etteivät lapset pääse vetämään
liitosjohdosta tai kaatamaan keitintä.
•Älä pura kannua osiin.
• Kannua ei ole tarkoitettu kylmän veden
(tai kylmän kahvin) kuumentamiseen.
Keittimen toiminta voi mennä sekaisin
pariksi tunniksi, jos kannu liitetään
keittimeen, kun siinä on kylmää nestettä.
• Keittimen ja kannun välinen sähkövirta on
matalajännitteinen ja siten vaaraton.
• Kun kannu asetetaan keittimeen tai
otetaan pois, saattaa näkyä kipinä. Tämä
on normaali ja täysin vaaraton ilmiö.
• Lue käyttöohje ja katsele kuvat, ennen
kuin alat käyttää laitetta.
• Ennen kuin yhdistät keittimen
pistorasiaan, tarkista että laitteen
käyttöjännitemerkintä vastaa paikallista
verkkojännitettä. Ellei näin ole, kysy
neuvoa myyjältä ennen keittimen käyttöä.
• Pidä huoli, etteivät terävät kulmat,
kuumuus tai kemikaalit pääse
vahingoittamaan liitosjohtoa.
• Jos laite on pudonnut veteen, irrota ensin
pistotulppa pistorasiasta, ennen kuin
nostat laitteen vedestä.
• Tarkistuta veteen pudonnut laite
huollossa ennen käyttöönottoa.
• Varo laitteesta purkautuvaa kuumaa
ilmaa tai höyryä.
17
18
Page 53

4222 001 75253
 Loading...