

Page 1
Suncare
Sun Mobile
HB828, HB826
Page 2

2
G
B
R F C
F
H
K
J
A
L O N
ED
I
S
MP
Q
1
Page 3

ENGLISH 4
DEUTSCH 12
NEDERLANDS 20
HB828, HB826
3
Page 4
Introduction
Foldable tanning appliance
With this tanning appliance you can suntan comfortably at home.The tanning lamps emit visible
light, heat and ultraviolet light, giving you the impression you are sunbathing in real sunlight.
The special UV filter only passes UV light that is required to get a tan.
The tanning lamps emit sufficient infrared light to provide a comfortable warmth.
A timer ensures that each tanning session does not last longer than 30 minutes (HB828) or
60 minutes (HB826). Just as with natural sunlight, overexposure must be avoided (see chapter
'Tanning and your health').
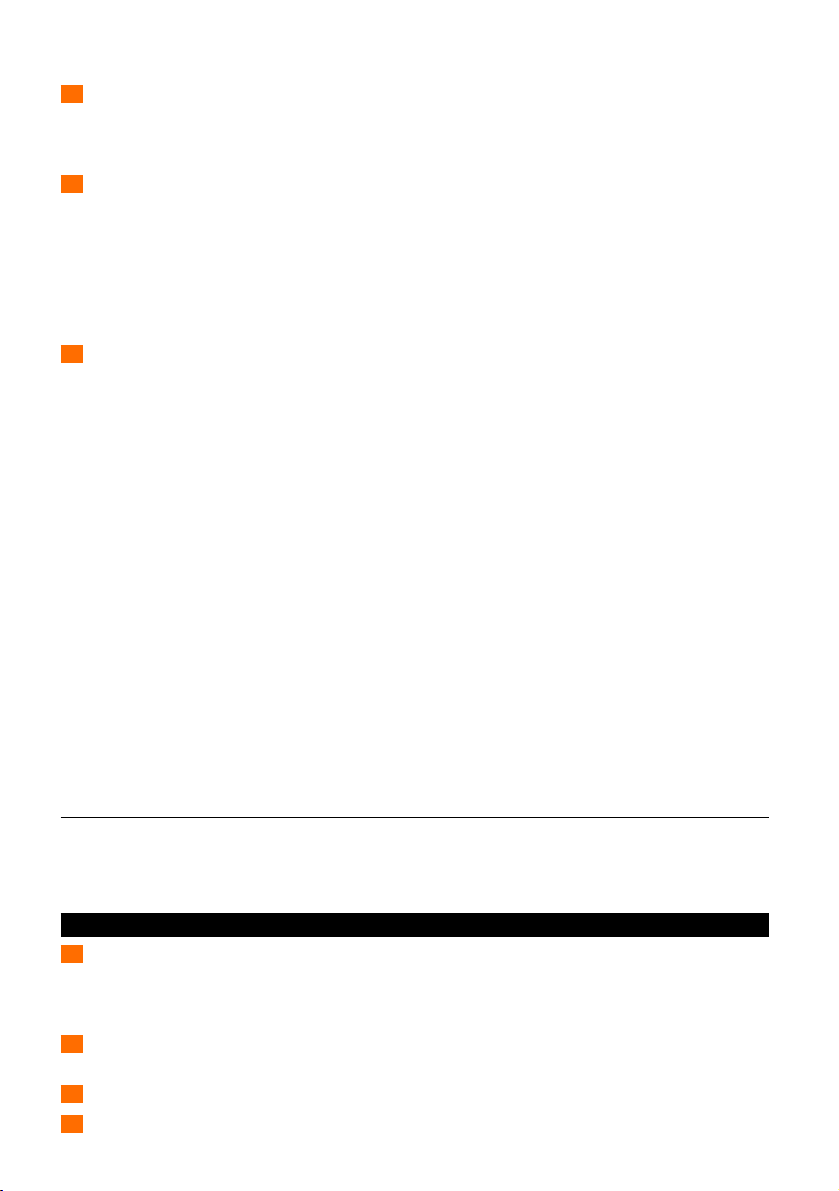
General description (fig. 1)
A Wheels
B Mains cord in storage compartment
C Handgrip
D Timer and remote control unit
- HB826 only:Timer
- HB828 only: Remote control unit
E Memory knobs (for two persons)
F Slides
G Stand
H Locking collar for height adjustment
- (to unlock: slide collar downwards)
I Locking collar for lamp unit
- (to unlock: press down the two lugs)
J Handgrip
K Fan (cooling)
L Lamp unit
M UV filter
N Tanning lamps (type Philips HPA flexpower 400-600)
O Reflector
P Measuring tape
Q Protective goggles (2 pairs)
- (type no. HB072/service no. 4822 690 80147)
R Base
S Type plate
Important
◗ Check if the voltage indicated on the appliance corresponds to the mains voltage in your
home before you connect the appliance.
◗ Water and electricity are a dangerous combination! Do not use this appliance in wet
surroundings (e.g. in the bathroom or near a shower or swimming pool).
◗ If you have just been swimming or have just taken a shower, dry yourself thoroughly before
using the appliance.
◗ Always unplug the appliance after use.
◗ Never use the appliance when the UV filter is damaged,broken or missing or when the timer
is defective.
◗ The UV filter becomes hot during the tanning session. Do not touch it.
◗ Make sure children do not play with the appliance.
ENGLISH4
Page 5

◗ Let the appliance cool down for approx. 15 minutes after use before folding it back into
transport position and storing it.
◗ Only move the tanning appliance when it is folded in.
◗ Make sure the vents in the lamp unit and in the base remain open during use. Keep your hair
away from the air inlet of the lamp unit.
◗ The appliance has been fitted with an automatic protection against overheating.If the
appliance is insufficiently cooled (e.g. because the vents are covered), the appliance will switch
off automatically.
HB826: once the cause of overheating has been removed and the appliance has cooled down, the
appliance will switch on automatically again.
HB828: once the cause of overheating has been removed and the appliance has cooled down, a
new session time has to be set to switch the appliance on again.
◗ Do not exceed the recommended tanning time and the maximum number of tanning hours
(see 'Tanning sessions: how often and how long?').
◗ Do not choose a tanning distance of less than 65 cm.
◗ Do not tan a particular part of your body more than once a day.Avoid excessive exposure to
natural sunlight on the same day.
◗ Do not use the tanning appliance if you have a disease and/or use medication or cosmetics
that increase the sensitivity of your skin. Be extra careful if you are hypersensitive to UV
light. Consult your doctor in case of doubt.
◗ Consult your doctor if ulcers, moles or persistent lumps develop on the skin.
◗ The appliance is not to be used by people who get sunburnt without tanning when exposed
to the sun, by persons suffering from sunburn, by children,or by persons who suffer (or have
previously suffered) from skin cancer or who are predisposed to skin cancer.
◗ Always wear the protective goggles provided with the appliance while tanning to protect
your eyes against overexposure (also see 'Tanning and your health').
◗ Remove creams,lipstick and other cosmetics well in advance of a tanning session.
◗ Do not use any sunscreens or suntan accelerators.
◗ If your skin feels taut after the tanning session, you may apply a moisturising cream.
◗ Colours may fade under the influence of the sun.The same effect may occur when using this
appliance.
◗ Do not expect the appliance to yield better results than the natural sun.
◗ This product has been manufactured to comply with the radio interference requirements laid
down in directives 87/308 and 87/310/EEC.
Tanning and your health
The sun, UV and tanning
The sun
The sun supplies various types of energy.Visible light enables us to see, ultraviolet (UV) light gives us
a tan and the infrared (IR) light in sunrays provides the heat in which we like to bask.
UV and your health
Just as with natural sunlight, the tanning process will take some time.The first effect will only become
visible after a few sessions (see 'Tanning sessions: how often and how long?').
Overexposure to ultraviolet light (natural sunlight or artificial light from your tanning appliance) can
cause sunburn.
Besides many other factors, such as overexposure to natural sunlight, incorrect and excessive use of
a tanning appliance may increase the risk of skin and eye problems.The degree to which these
effects occur is determined by the nature, intensity and duration of the exposure on the one hand
and the sensitivity of the person involved on the other hand.
ENGLISH 5
Page 6

The more the skin and the eyes are exposed to UV light, the higher the risk of keratitis,
conjunctivitis, damage to the retina, cataracts, premature skin ageing and the development of skin
tumours will be. Some medications and cosmetics increase the sensitivity of the skin.
◗ Therefore it is highly important:
- that you follow the instructions given in 'Important' and 'Tanning sessions: how often and how
long?';
- that the tanning distance (distance between the UV filter and the body) is 65 cm;
- that you do not exceed the maximum number of tanning hours per year: i.e. 19 hours or
1140 minutes (also see 'Tanning sessions: how often and how long?');
- that you always wear the goggles provided while tanning.
Tanning sessions: how often and how long?
◗ Take one tanning session a day for five to ten days.Wait at least 48 hours after the first
session before taking the second session.After this 5 to 10-day course, we advise you to give
your skin a rest for a while.
B
Approximately one month after a course, your skin will have lost much of its tan.You can then
start a new course.
B
If you want to keep your tan, do not stop tanning after the course, but continue taking one or
two tanning sessions a week.
Whether you choose to stop tanning for a while or whether you continue tanning on a lower
frequency, always keep in mind that you must not exceed the maximum number of tanning hours.
For this appliance the maximum is 19 tanning hours (= 1140 minutes) a year.
Example
Suppose you are taking a 10-day course, consisting of a 7-minute tanning session on the first day
and a 20-minute tanning session on the following nine days.
◗ The entire course will then last (1 x 7 minutes) + (9 x 20 minutes) = 187 minutes.
B
This means you can take 6 of these courses a year, as 6 x 187 minutes = 1122 minutes.
B
Of course, the maximum number of tanning hours applies to each separate part or side of the
body that is tanned (e.g. the back or front of the body).
Table
As is shown in the table, the first session of a tanning course should always last 7 minutes,
irrespective of the sensitivity of the skin.
If you think that the sessions are too long for you (e.g. if the skin gets taut and tender after the
session), we advise you to reduce the duration of the sessions by e.g. 5 minutes.
For a beautiful all-over tan, turn your body slightly during the session so that the sides of you body
are better exposed to the tanning light.
If your skin feels slightly taut after tanning, you can apply a moisturising cream.
ENGLISH6
Page 7
for persons with less
sensitive skin
7 minutes
30 minutes*
30 minutes*
30 minutes*
30 minutes*
30 minutes*
30 minutes*
30 minutes*
30 minutes*
30 minutes*
for persons with
normal sensitive skin
7 minutes
20-25 minutes
20-25 minutes
20-25 minutes
20-25 minutes
20-25 minutes
20-25 minutes
20-25 minutes
20-25 minutes
20-25 minutes
for persons with very
sensitive skin
7 minutes
10 minutes
10 minutes
10 minutes
10 minutes
10 minutes
10 minutes
10 minutes
10 minutes
10 minutes
Duration of the
tanning session for
each separate part of
the body
1st session
rest of at least 48 hours
2nd session
3rd session
4th session
5th session
6th session
7th session
8th session
9th session
10th session
*) or longer, depending on
your skin sensitivity.
ENGLISH 7
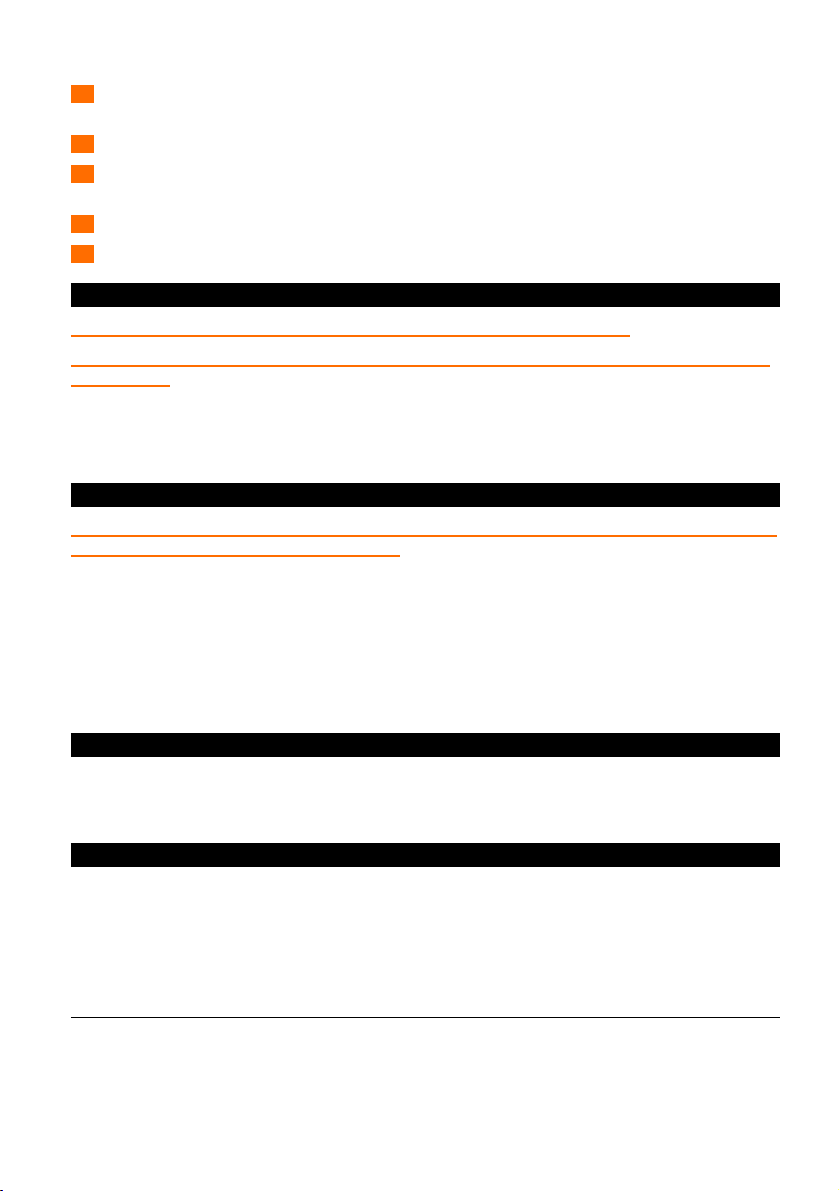
Preparing for use
1 In transport position the appliance can be easily moved and stored because it has wheels
(fig. 2).
B
The appliance is easier to lift if you do so together with another person.
B
NB:The appliance weighs more than 28 kg.
2 Unlock the lamp unit (L) from the base (R) by pushing the slides (F) in the direction of the
arrow (fig.3).
3 Pull the stand (G) and the lamp unit (L) upwards (fig. 4).
4 Put the tanning appliance in the position shown in the picture (fig. 5).
5 Pull the lamp unit (L) up into horizontal position by means of the handgrip (J) (fig. 6).
B
You will hear clicks when you move the lamp unit past certain fixed positions.
6 Instead of using the above step-by-step method described, you can also pull the lamp unit up
by its handgrip in one single movement (fig. 7).
B
Hold the handgrip (J).
7 Turn the lamp unit a quarter turn (fig. 8).
◗ When you have done this,the tanning appliance will have been folded out into the position
shown in the figure (fig. 9).
8 Place the tanning appliance beside a bed as shown in the figure (fig. 10).
9 Unlock the locking collar for height adjustment (H) by sliding the collar downwards. Slide out
the stand (G) with your other hand until the lamp unit (L) is approx.85 cm above the bed
(fig. 11).
Use the measuring tape (P) to check the distance between the bed and the lamp unit.
10 Let go of the collar to lock the lamp unit in position.
Page 8
Using the appliance
Setting the timer (HB826 only)
1 Fully unwind the mains cord.
2 Insert the mains plug into the wall socket.
3 Consult the memory knobs and the table in these instructions for use.
4 Put on the protective goggles supplied.
5 Set the timer to the required tanning time (fig. 12).
6 Lie down under the lamp unit.
◗ Once the set time has elapsed, the timer will switch off the tanning appliance automatically.
B
NOTE: the timer can be set up to a maximum of 60 minutes. If you wish to treat both sides of
your body directly after each other, we advise you to reset the timer just before the set time has
elapsed. By doing this, you can avoid the 3-minute waiting period which would otherwise be
necessary before the lamps can be switched on again.
Remote control unit (HB828 only) (fig.1)
a Time setting button for 1-30 minutes.
b Start button: press this button to switch on the tanning lamps and the timer.
c Pause/repeat button: press this button if you want to interrupt the session(e.g. when the
telephone rings).The tanning lamps will go out and the remaining time of the session will blink in
the display.You can also press this button during the last minute of a session to repeat the set
time (e.g. to treat the other side of the body).
d Blinking signal: this signal is only visible when the timer is counting down the time.
e Pilot light: this light is on when the appliance is connected to the mains.
f Beeper: the beeper indicates that the last minute of the time set for the tanning session has
started.
- If you want the tanning appliance to operate longer than the set time, you will have to set a
new time when you hear the beeper go off.You can also press button T during the last
minute of a session to repeat the set time.
g Display: the display shows the set time. During the session the display shows the remaining time.
B
ATTENTION
In the following cases you will see 00 in the display:
- after you have inserted the plug into the wall socket;
- at the end of the tanning session (blinking during the first three minutes);
- after a mains failure;
- after the overheat protection has come into operation.
In these cases the tanning lamps will not be on.
1 Fully unwind the mains cord and take the remote control unit out of the storage
compartment (B).
2 Insert the mains plug into the wall socket.
3 Consult the memory knobs and the table in these instructions for use.
4 Put on the protective goggles supplied.
ENGLISH8
Page 9
5 Set the duration of the tanning session (fig. 13).
Press + to put the time forward.
Press - to put the time backward.
Keep the button pressed to adjust the time more quickly.
6 Switch on the tanning lamps (fig. 14).
Press button I. Blinking signal d will become visible on the display and the preset session time will
be shown.
The timer will count down the set session time.
During the last minute of the session, the beeper f will sound.
During this minute you can press button T to repeat the session time or set a new time.
By doing this, you can avoid the 3-minute waiting time which is necessary to allow the tanning lamps
to cool down after they have been switched off.
7 Lie down under the lamp unit.
◗ Repeating the session time (during the last minute) (fig. 15).
Press button fi.The previously set tanning session time appears on the display.The beeping stops.
◗ Setting a different session time (during the last minute) (fig. 16).
Set a new tanning session time and then press button I.
As soon as this button has been pressed, the beeping will stop and the new session time will start.
◗ If you do not repeat the session time or set a new session time, the tanning appliance will
switch off automatically as soon as the set session time has elapsed.
Extra facilities
◗ Interruption of the tanning session (e.g. to answer a telephone call) (fig.17).
- Press button fi.
The tanning lamps are switched off. Blinking signal d disappears from the display.
The remaining tanning session time blinks on the display.
- After three minutes, the blinking stops.Then, you can switch on the tanning lamps again by
pressing button I.
◗ If you want to use the tanning appliance shorter than the set time: (fig. 18).
- Press button I.The tanning lamps are switched off and you can set a new session time;
- Wait until the time shown on the display stops blinking.Then press button I again.
After the tanning session
◗ Keep track of the number of sessions you have had by means of the memory knobs.The
appliance has two memory knobs: one per person.
◗ Let the tanning appliance cool down for 15 minutes before folding it in and storing it.
Storage
1 Wind the mains cord and store it in the storage compartment (B). HB828 only: make sure
the cord and remote control are stored properly too.
B
Be careful that the cord(s) and the remote control (HB828 only) do not get stuck between the
base and the lamp unit when you fold the appliance back into transport position.
2 Release the locking collar for height adjustment (H) by sliding the collar downwards with one
hand. Slide in the stand with the other hand and then release the collar (fig. 19).
3 Turn the lamp unit a quarter turn (fig. 20).
4 Lift the lamp unit a little with one hand and unlock the lamp unit by sliding the two lugs (I)
down with the other hand (fig. 21).
ENGLISH 9
Page 10
5 Lower the lamp unit carefully into vertical position (fig. 22).
Release the two lugs.
6 Lower the stand with the lamp unit onto the base (R) (fig. 23).
7 Lock the lamp unit onto the base by pushing the slides (F) in the direction of the arrow
(fig. 24).
8 You can store the tanning appliance horizontally under a bed (fig. 25).
9 You can also store it in a cupboard in upright position (fig. 26).
Cleaning
Always unplug the appliance and let it cool down before you start cleaning it.
Never use scouring pads and abrasive liquids such as scouring agents,petrol or acetone to clean
the appliance.
◗ Clean the outside of the appliance with a damp cloth.
B
Do not let any water run into the appliance.
◗ You can clean the UV filter with a soft cloth sprinkled with some methylated spirits.
Replacement
The UV filter protects against exposure to undesired UV light.It is therefore important to have a
damaged or broken filter replaced right away.
The light emitted by the tanning lamps will become less bright in time (i.e. after a few years in case
of normal use).When this happens, you will notice a decrease in the tanning capacity of the
appliance.You can solve this problem by setting a slightly longer tanning time or by having the
tanning lamps replaced.
Have the tanning lamps, the UV filter and the cord replaced by a service centre authorised by
Philips. Only they have the knowledge and skills required for this job and the original spare parts for
your tanning appliance.
Environment
The lamps of the appliance contain substances that can be harmful to the environment.When you
discard the lamps, do not throw them away with the normal household waste but hand them in at
an official collection point.
Guarantee & service
If you need service or information or if you have a problem, please visit the Philips Web site at
www.philips.com or contact the Philips Customer Care Centre in your country (you will find its
phone number in the worldwide guarantee leaflet). If there is no Customer Care Centre in your
country, turn to your local Philips dealer or contact the Service Department of Philips Domestic
Appliances and Personal Care BV.
Guarantee restrictions
The tanning lamps are not covered by the terms of the international guarantee.
ENGLISH10
Page 11

ENGLISH 11
Possible causes
The plug has not been properly inserted into the wall socket.
The appliance has not been folded out properly.
Perhaps there is a power failure. Check by means of another
appliance.
The lamps are still too hot to go on. Let them cool down for
3 minutes first.
The appliance was not sufficiently cooled and the overheating
protection switched the appliance off automatically. Remove the
cause of overheating (e.g. remove a towel that is blocking one or
more vents).Wait for 10 minutes and switch the appliance on
again (HB828), or continue the session when the lamps come on
again (HB826).
Check the fuse of the circuit to which the tanning appliance is
connected.The correct fuse is a 16A standard fuse or an
automatic fuse.The fuse may also blow because you have
connected too many appliances to the same circuit.
You are using an extension cord that is too long or does not have
the correct current rating (16A). Consult your dealer. Our general
advice is not to use an extension cord.
You are not following the tanning schedule suitable for your skin
type. Check the table in 'Tanning sessions: how often and how
long?'
When the lamps have been used for a long time, the intensity of
the UV light emitted will decrease.This effect only becomes
noticeable after several years.You can solve this problem by
selecting a slightly longer tanning time or by replacing the lamps.
The distance between the body and the UV filter is larger than
65 cm.
Problem
The appliance does not start.
The fuse cuts off the mains power when
the appliance is switched on or during use.
Poor tanning results.
Troubleshooting
If the appliance has not been installed or is not used in accordance with the instructions, it may fail
to work properly. In that case you will be able to solve the problem yourself by following the
troubleshooting tips below.
If the problem is not mentioned in the list, the appliance may not work properly because it has a
defect. In that case we advise you to contact your dealer or a Philips service centre.
Page 12

Einleitung
Zusammenklappbarer Ganzkörperbräuner
Mit diesem Bräunungsgerät können Sie sich ganz bequem zu Hause bräunen. Die UV-Lampen
strahlen sichtbares Licht,Wärme und ultraviolettes Licht ab. Sie werden sich wie in natürlichem
Sonnenlicht fühlen. Der spezielle UV-Filter lässt nur solche UV-Strahlen durch, die zum Bräunen
erforderlich sind.
Die UV-Lampen geben ausreichend Infrarotlicht ab, sodass eine wohlige Umgebungswärme entsteht.
Ein Timer sorgt dafür, dass ein Bräunungsbad nicht länger als 30 Minuten (HB828) bzw. 60 Minuten
(HB826) dauert. Ebenso wie bei natürlichem Sonnenlicht ist ein zu langes UV-Bräunungsbad
unbedingt zu vermeiden (siehe hierzu "Gesundes Bräunen").
Übersicht (Abb.1)
A Räder
B Netzkabel im Aufbewahrungsfach
C Handgriff
D Timer und Fernbedienung
- Nur HB826:Timer
- Nur HB828: Fernbedienung
E Memoknöpfe (für zwei Personen)
F Schieber
G Stativ
H Höhenverriegelung
- (Manschette zum Lösen nach unten schieben)
I Verriegelung für das Lampengehäuse
- (Zum Lösen die beiden Hebel nach unten drücken)
J Griff am Lampengehäuse
K Lüfter (Kühlung)
L Lampengehäuse
M UV-Filter
N UV-Lampen (Philips HPA flexpower 400-600)
O Reflektor
P Maßband
Q Schutzbrille (zwei Stück)
- (Typennummer HB072/Servicenummer 4822 690 80147)
R Basisgerät
S Typenschild
Wichtig
◗ Prüfen Sie, bevor Sie das Gerät anschließen,ob die Spannungsangabe auf dem Gerät mit der
örtlichen Netzspannung übereinstimmt.
◗ Wasser und Elektrizität sind eine gefährliche Kombination! Verwenden Sie das Gerät nicht in
einer feuchten Umgebung, z. B.im Badezimmer bzw. in der Nähe einer Dusche oder eines
Schwimmbeckens.
◗ Trocknen Sie sich gründlich ab, wenn Sie das Gerät nach dem Duschen oder Baden
verwenden wollen.
◗ Ziehen Sie nach Gebrauch stets den Netzstecker.
◗ Benutzen Sie das Gerät auf keinen Fall, wenn der Timer defekt ist oder wenn der UV-Filter
beschädigt ist, gebrochen ist oder fehlt.
◗ Der UV-Filter wird während des Betriebs heiß. Berühren Sie ihn nicht.
DEUTSCH12
Page 13

DEUTSCH 13
◗ Achten Sie darauf, dass Kinder nicht mit dem Gerät hantieren.
◗ Lassen Sie das Gerät nach Gebrauch 15 Minuten lang abkühlen, bevor Sie es zur
Aufbewahrung zusammenklappen.
◗ Bewegen und transportieren Sie das Gerät nur in zusammengeklapptem Zustand.
◗ Die Lüftungsöffnungen im Lampengehäuse und im Basisgerät müssen während des Betriebs
stets frei sein. Halten Sie mit Ihren Haaren Abstand zum Lufteinlass des Lampengehäuses.
◗ Das Gerät ist mit einem automatischen Überhitzungsschutz ausgerüstet. Bei ungenügender
Kühlung (z. B. bei abgedeckten Lüftungsöffnungen) schaltet sich das Gerät automatisch ab.
HB826: Sobald die Ursache der Überhitzung beseitigt ist und sich das Gerät abgekühlt hat, schaltet
es sich automatisch wieder ein.
HB828: Sobald die Ursache der Überhitzung beseitigt ist und sich das Gerät abgekühlt hat, muss
zum Einschalten des Geräts eine neue Bräunungszeit eingestellt werden.
◗ Überschreiten Sie die empfohlene Bräunungszeit und die maximale Anzahl der
Bräunungsstunden nicht (siehe "Das UV-Sonnenbad:Wie oft und wie lange?").
◗ Halten Sie unbedingt einen Abstand von 65 cm zu den UV-Lampen ein.
◗ Bräunen Sie keine Körperpartie mehr als einmal täglich.Vermeiden Sie es, sich am gleichen
Tag übermäßig dem natürlichen Sonnenlicht auszusetzen.
◗ Verwenden Sie das Gerät nicht, wenn Sie gesundheitlich beeinträchtigt sind oder wenn Sie
Medikamente bzw.Kosmetika verwenden, die zu erhöhter Hautempfindlichkeit führen. Seien
Sie besonders vorsichtig, wenn Sie auf UV-Licht überempfindlich reagieren.Wenden Sie sich
im Zweifelsfall an einen Arzt.
◗ Konsultieren Sie Ihren Arzt,wenn sich Geschwüre, Leberflecken oder dauerhafte
Schwellungen zeigen.
◗ Das Gerät darf nicht von Personen verwendet werden, die sich beim Sonnen schnell einen
Sonnenbrand zuziehen, auch ohne zu bräunen, oder die bereits einen Sonnenbrand haben.
Das gleiche gilt für Kinder oder für Personen, die zu Hautkrebs neigen, daran erkrankt sind
oder vorher schon daran erkrankt waren.
◗ Tragen Sie beim Bräunen immer die mitgelieferte Schutzbrille (siehe auch "Gesundes
Bräunen").
◗ Entfernen Sie schon einige Zeit vor der Bräunung Cremes,Lippenstift und andere Kosmetika
von Ihrer Haut.
◗ Verwenden Sie keine Sonnenschutzmittel und keine Bräunungsbeschleuniger.
◗ Spannt Ihre Haut nach der Bräunung, können Sie eine Feuchtigkeitscreme auftragen.
◗ Verschiedene Materialien können sich, genau wie beim natürlichen Sonnenlicht,auch im Licht
der UV-Lampen verfärben.
◗ Erwarten Sie von dem UV-Bräunungsbad keine besseren Ergebnisse als von natürlichem
Sonnenlicht.
◗ Dieses Gerät wurde in Übereinstimmung mit den Funkstörungsvorschriften gefertigt,die in
den EU-Richtlinien 87/308 und 87/310/EEC festgehalten sind.
Gesundes Bräunen
Die Sonne, UV-Licht und Körperbräune
Die Sonne
Die Sonne liefert verschiedene Arten von Energie: Das sichtbare Licht ermöglicht uns zu sehen, das
ultraviolette (UV-)Licht bräunt unsere Haut, und das infrarote (IR-)Licht spendet die Wärme, bei der
wir uns wohlfühlen.
UV und Ihre Gesundheit
Ebenso wie in natürlichem Sonnenlicht dauert der Bräunungsvorgang eine gewisse Zeit. Erste
Effekte werden erst nach einigen Sitzungen sichtbar (siehe "Das UV-Sonnenbad:Wie oft und wie
lange?").
Page 14

Wer sich zu lange dem ultravioletten Licht aussetzt - ob natürlichem Sonnenlicht oder den Strahlen
eines Bräunungsgeräts - kann einen Sonnenbrand bekommen.
Neben vielen anderen Faktoren, etwa dem übermäßigen Kontakt mit natürlichem Sonnenlicht, kann
der unsachgemäße und zu häufige Gebrauch eines Bräunungsgeräts das Risiko von Haut- und
Augenproblemen erhöhen.Wie ausgeprägt sich solche Effekte zeigen, hängt einerseits von der Art,
der Intensität und der Dosis der UV-Strahlen ab und andererseits von der Empfindlichkeit der
betreffenden Person.
Je intensiver Haut und Augen dem UV-Licht ausgesetzt sind, desto höher ist die Gefahr von Hornund Bindehautentzündung, Schäden an der Netzhaut, Katarakt (Grauer Star), vorzeitiger
Hautalterung und Hauttumoren. Bestimmte Medikamente und Kosmetika steigern die
Hautempfindlichkeit.
◗ Darum ist es sehr wichtig, dass Sie ...
- die Hinweise in den Abschnitten "Wichtig" sowie "Das UV-Sonnenbad: Wie oft und wie lange?"
beachten;
- den Bräunungsabstand von 65 cm zwischen UV-Filter und Körper einhalten;
- die maximale Anzahl der Bräunungsstunden pro Jahr nicht überschreiten (19 Stunden oder
1140 Minuten im Jahr, siehe auch "Das UV-Sonnenbad:Wie oft und wie lange?");
- während des Bräunens immer die Schutzbrille tragen.
Das UV-Sonnenbad:Wie oft und wie lange?
◗ Nehmen Sie 5 bis 10 Tage lang einmal täglich ein Bräunungsbad.Warten Sie nach dem
ersten Bräunungsbad mindestens 48 Stunden, bevor Sie das zweite nehmen. Nach einer
5- bis 10-tägigen Kur sollten Sie Ihrer Haut eine Zeit lang Ruhe gönnen.
B
Etwa einen Monat nach Abschluss der Bräunungskur hat Ihre Haut soviel von ihrer Bräune
verloren, dass Sie eine neue Bräunungskur beginnen können.
B
Sie können aber auch anschließend an die Bräunungskur wöchentlich 1 oder 2 Bräunungsbäder
nehmen, um die Bräunung aufrecht zu erhalten.
Ganz gleich, ob Sie sich seltener oder eine Zeit lang gar nicht bräunen, berücksichtigen Sie stets, dass
die maximale Anzahl der Bräunungsstunden nicht überschritten werden darf. Bei diesem Gerät gilt
eine maximale Bräunungszeit von 19 Stunden (1140 Minuten) pro Jahr.
Beispiel
Angenommen, Sie führen eine 10-tägige Kur durch, die aus Bräunungsbädern von 7 Minuten am
ersten Tag und 20 Minuten an den folgenden 9 Tagen besteht.
◗ Die gesamte Kur umfasst dann (1 x 7 Minuten) + (9 x 20 Minuten) = 187 Minuten.
B
Dies bedeutet, dass Sie innerhalb eines Jahres sechs solcher Kuren machen können
(6 x 187
Minuten = 1122 Minuten).
B
Selbstverständlich gilt die maximale Anzahl der Bräunungsstunden für jede Körperpartie
gesondert, also z. B. jeweils für die vordere oder hintere Körperseite.
Tabelle
Aus der folgenden Tabelle ist ersichtlich, dass jede neue Bräunungskur mit einer ersten Bräunung von
7 Minuten beginnt, und zwar unabhängig von der Hautempfindlichkeit.
Wenn Sie die Bräunungsbäder als zu lang empfinden, z. B. weil anschließend Ihre Haut spannt, sollten
Sie die Dauer z. B. um 5 Minuten reduzieren.
Um eine natürlich wirkende Ganzkörperbräune zu erreichen, drehen Sie sich ab und zu in
Seitenlage.
Wenn sich Ihre Haut nach dem Bräunungsbad etwas gespannt anfühlt, können Sie eine
Feuchtigkeitscreme auftragen.
DEUTSCH14
Page 15

DEUTSCH 15
Vor dem Gebrauch
1 Das Gerät ist mit Rädern ausgestattet und kann daher zusammengeklappt ganz einfach
bewegt und verstaut werden (Abb. 2).
B
Heben Sie das Gerät am besten mit Hilfe einer zweiten Person an.
B
Vorsicht: Das Gerät wiegt über 28 kg.
2 Lösen Sie das Lampengehäuse (L) vom Basisgerät (R), indem Sie die Schieber (F) in
Pfeilrichtung drücken (Abb.3).
3 Ziehen Sie das Stativ (G) und das Lampengehäuse (L) hoch (Abb. 4).
4 Klappen Sie das Gerät auf, wie in der Abbildung gezeigt (Abb.5).
5 Ziehen Sie das Lampengehäuse (L) am Handgriff (J) in horizontale Position (Abb. 6).
B
Das Lampengehäuse bewegt sich dabei über verschiedene Einrastpositionen, sodass ein Klicken
zu hören ist.
6 Anstatt schrittweise vorzugehen, wie oben beschrieben, können Sie das Lampengehäuse auch
in einer einzigen Bewegung am Handgriff hochziehen (Abb.7).
B
Fassen Sie den Handgriff (J).
7 Schwenken Sie das Lampengehäuse um eine Vierteldrehung (Abb. 8).
◗ Das Gerät befindet sich dann in der abgebildeten Position (Abb. 9).
8 Stellen Sie das Gerät wie in der Abbildung gezeigt neben einem Bett auf (Abb.10).
9 Lösen Sie die Höhenverriegelung (H), indem Sie die Manschette nach unten schieben.
Schieben Sie mit der anderen Hand das Stativ (G) heraus, bis sich das Lampengehäuse (L) ca.
85 cm über dem Bett befindet (Abb. 11).
Prüfen Sie mit dem Maßband (P) den Abstand zwischen Bett und Lampengehäuse.
10 Lassen Sie die Manschette wieder los. Das Lampenmodul ist nun auf dieser Höhe arretiert.
Bei wenig
empfindlicher Haut
7 Minuten
30 Minuten*
30 Minuten*
30 Minuten*
30 Minuten*
30 Minuten*
30 Minuten*
30 Minuten*
30 Minuten*
30 Minuten*
Bei normaler Haut
7 Minuten
20-25 Minuten
20-25 Minuten
20-25 Minuten
20-25 Minuten
20-25 Minuten
20-25 Minuten
20-25 Minuten
20-25 Minuten
20-25 Minuten
Bei sehr
empfindlicher Haut
7 Minuten
10 Minuten
10 Minuten
10 Minuten
10 Minuten
10 Minuten
10 Minuten
10 Minuten
10 Minuten
10 Minuten
Empfohlene UVBräunungsdauer, für
jede Körperpartie
gesondert
1.Tag
mind. 48 Stunden Pause
2.Tag
3.Tag
4.Tag
5.Tag
6.Tag
7.Tag
8.Tag
9.Tag
10.Tag
*) oder länger, je nach
Empfindlichkeit Ihrer Haut.
Page 16

DEUTSCH16
Der Gebrauch des Geräts
Einstellung des Timers (nur HB826)
1 Wickeln Sie das Netzkabel vollständig ab.
2 Stecken Sie den Netzstecker in die Steckdose.
3 Beachten Sie die Hinweise zu den Memoknöpfen sowie die Tabelle in dieser
Gebrauchsanweisung.
4 Setzen Sie die mitgelieferte Schutzbrille auf.
5 Stellen Sie den Timer auf die erforderliche Bräunungszeit (Abb. 12).
6 Legen Sie sich unter das Lampengehäuse.
◗ Nach Ablauf der eingestellten Zeit schaltet sich das Gerät automatisch aus.
B
HINWEIS: Der Timer kann auf max. 60 Minunten gestellt werden.Wenn Sie beide Seiten ihres
Körpers unmittelbar nacheinander bräunen möchten, empfiehlt es sich, den Timer kurz vor Ablauf
der ersten Bräunung neu einzustellen. Dadurch vermeiden Sie die dreiminütige Wartezeit, die
andernfalls erforderlich wäre, bis die UV-Lampen abgekühlt sind und erneut eingeschaltet
werden können.
Fernbedienung (nur HB828) (Abb.1)
a Taste zur Zeiteinstellung von 1 bis 30 Minuten.
b Starttaste: Drücken Sie diese Taste, um die UV-Lampen und den Timer einzuschalten.
c Pause-/Wiederholungstaste: Drücken Sie diese Taste, wenn Sie das Bräunungsbad unterbrechen
möchten, um z. B. zu telefonieren. Die UV-Lampen werden abgeschaltet, und im Display blinkt
die verbleibende Zeit. Sie können diese Taste auch während der letzten Minute eines
Bräunungsbades drücken, um die eingestellte Zeit zu wiederholen (z. B. für die andere
Körperseite).
d Blinksignal: Dieses Signal ist nur sichtbar, während der Timer die Zeit rückwärts zählt.
e Kontrolllampe: Diese Lampe leuchtet, während das Gerät an das Stromnetz angeschlossen ist.
f Summer: Der Summer meldet, dass die letzte Minute der Bräunungssitzung angebrochen ist.
- Wenn Sie das Gerät länger als die eingestellte Zeit benutzen möchten, müssen Sie eine neue
Zeit einstellen, wenn der Signalton ertönt. Alternativ dazu können Sie während der letzten
Minute eines Bräunungsbades die Taste T drücken, um die eingestellte Zeit zu wiederholen.
g Display: Im Display ist die eingestellte Zeit zu sehen. Während eines Bräunungsbades wird die
verbleibende Zeit angezeigt.
B
ACHTUNG
In den folgenden Fällen wird im Display 00 angezeigt:
- nach dem Anschließen des Netzsteckers;
- am Ende des Bräunungsbades (Blinken während der ersten drei Minuten);
- nach einem Stromausfall;
- nachdem der Überhitzungsschutz aktiviert wurde.
In diesen Fällen sind die UV-Lampen ausgeschaltet.
1 Wickeln Sie das Netzkabel vollständig ab und nehmen Sie die Fernbedienung aus dem
Aufbewahrungsfach (B).
2 Schließen Sie den Netzstecker an die Steckdose an.
3 Beachten Sie die Hinweise zu den Memotasten sowie die Tabelle in dieser
Gebrauchsanweisung.
Page 17

DEUTSCH 17
4 Setzen Sie die mitgelieferte Schutzbrille auf.
5 Stellen Sie die Dauer des Bräunungsbades ein (Abb. 13).
Mit + verlängern Sie die Zeit.
Mit - verkürzen Sie die Zeit.
Wenn Sie die Taste gedrückt halten, wechselt der Einstellwert schneller.
6 Schalten Sie die UV-Lampen ein (Abb.14).
Drücken Sie die Taste I.Auf dem Display wird das blinkende Signal d sichtbar und die zuvor
eingestellte Bräunungszeit angezeigt.
Der Timer zählt die Zeit rückwär ts.
In der letzten Minute ist der Signalton f zu hören.
Während dieser Minute können Sie die Taste T drücken, um die Bräunungszeit zu wiederholen
oder eine neue einzustellen.
Auf diese Weise umgehen Sie die Wartezeit von 3 Minuten, die nötig wäre, um die Lampen nach
dem Ausschalten ausreichend abzukühlen.
7 Legen Sie sich unter die Lampen.
◗ Wiederholung der Bräunungszeit (während der letzten Minute) (Abb.15).
Drücken Sie die Taste fi.Die zuvor eingestellte Zeit erscheint auf dem Display.Der Signalton wird
abgeschaltet.
◗ Einstellen einer neuen Bräunungszeit (während der letzten Minute) (Abb.16).
Stellen Sie eine neue Zeit ein, und drücken Sie die Taste I.
Nach Drücken dieser Taste wird der Signalton abgeschaltet und die Zeit läuft.
◗ Wenn Sie die Bräunungszeit nicht wiederholen und auch keine neue Zeit einstellen, schaltet
sich das Gerät nach Ablauf der eingestellten Bräunungszeit automatisch ab.
Zusätzliche Funktionen
◗ Unterbrechung des Bräunungsbades (z. B. für ein Telefongespräch) (Abb. 17).
- Drücken Sie die Taste fi.
Die UV-Lampen werden ausgeschaltet. Das Signal d verschwindet vom Display.
Im Display blinkt die verbleibende Bräunungszeit.
- Nach drei Minuten hört das Blinken auf. Mit der Taste I können Sie die UV-Lampen wieder
einschalten.
◗ Wenn Sie das Gerät für weniger als die eingestellte Zeit benutzen möchten: (Abb.18).
- Drücken Sie die Taste I. Die UV-Lampen werden ausgeschaltet und Sie können eine neue Zeit
einstellen.
- Warten Sie, bis die Zeitanzeige nicht mehr blinkt. Drücken Sie dann erneut die Taste I.
Nach dem Bräunen
◗ Notieren Sie mit Hilfe Ihres Memoknopfes die Anzahl Ihrer Bräunungsbäder.Am Gerät
befinden sich zwei Memoknöpfe für zwei Personen.
◗ Lassen Sie das Gerät 15 Minuten abkühlen, bevor Sie es zusammenklappen und zur
Aufbewahrung verstauen.
Aufbewahrung
1 Wickeln Sie das Netzkabel auf, und verstauen Sie es im Aufbewahrungsfach (B).Nur HB828:
Vergessen Sie nicht, auch die Fernbedienung zu verstauen.
B
Wenn Sie das Gerät wieder in Transportposition klappen, achten Sie darauf, dass das Netzkabel
und die Fernbedienung (HB828) nicht zwischen Basisgerät und Lampengehäuse eingeklemmt
werden.
Page 18

DEUTSCH18
2 Lösen Sie die Höhenverriegelung (H), indem Sie die Manschette mit einer Hand nach unten
schieben. Schieben Sie das Stativ dann mit der anderen Hand ein, und lassen Sie die
Manschette wieder los (Abb. 19).
3 Drehen Sie das Lampengehäuse um eine Vierteldrehung (Abb. 20).
4 Heben Sie das Lampengehäuse mit einer Hand etwas an und lösen Sie es, indem Sie mit der
anderen Hand die beiden Hebel (l) nach unten ziehen (Abb. 21).
5 Lassen Sie das Lampengehäuse vorsichtig in senkrechte Position hinab (Abb. 22).
Lassen Sie die beiden Hebel los.
6 Lassen Sie das Stativ mit dem Lampengehäuse auf das Basisgerät (R) herab (Abb. 23).
7 Arretieren Sie das Lampengehäuse auf dem Basisgerät, indem Sie die beiden Schieber (F) in
Pfeilrichtung drücken (Abb.24).
8 Sie können das Gerät nun waagerecht unter einem Bett verstauen (Abb. 25).
9 Ebenso kann das Gerät stehend in einem Schrank aufbewahrt werden (Abb. 26).
Reinigung
Ziehen Sie vor jeder Reinigung erst den Netzstecker und lassen Sie gegebenenfalls das Gerät
abkühlen.
Verwenden Sie zur Reinigung des Geräts keine Scheuerschwämme, keine Scheuermittel und
keine aggressiven Flüssigkeiten wie Benzin oder Azeton.
◗ Wischen Sie das Gerät von außen mit einem feuchten Tuch ab.
B
Achten Sie darauf, dass kein Wasser in das Innere des Geräts gelangt.
◗ Reinigen Sie den UV-Filter mit einem feuchten Tuch und etwas Glasreiniger.
Auswechseln der Lampen
Der UV-Filter schützt vor unerwünschter UV-Strahlung. Ein beschädigter oder zerbrochener
Filter muss deshalb umgehend ausgetauscht werden.
Im Laufe der Zeit - bei normalem Gebrauch erst nach mehreren Jahren - sinkt die Intensität der
Lampen allmählich. Sie bemerken es daran, dass die Wirkung der UV-Lampen nachlässt. Sie können
dann die Bräunungszeit etwas verlängern oder die UV-Lampen gegen neue austauschen.
Lassen Sie den Austausch der UV-Lampen, des UV-Filters oder des Netzkabels nur durch eine von
Philips autorisierte Werkstatt durchführen. Nur dann ist sichergestellt, dass diese Arbeiten
fachgerecht und mit Original-Ersatzteilen ausgeführ t werden.
Umweltschutz
Die im Gerät verwendeten Lampen enthalten Substanzen, die möglicherweise umweltschädlich sind.
Wenn Sie Lampen entsorgen müssen, werfen Sie diese nicht in den Hausmüll, sondern geben sie bei
einer geeigneten kommunalen oder behördlichen Einrichtung ab.
Garantie und Kundendienst
Benötigen Sie weitere Informationen oder treten Probleme auf, wenden Sie sich bitte an Ihren
Philips-Händler oder setzen Sie sich mit einem Philips Service-Center in Ihrem Land in Verbindung
(Tel.Nr. 0180/5356767). Besuchen Sie auch die Philips Website www.philips.com.
Einschränkungen zur Garantie
Die Bedingungen der internationalen Garantie gelten nicht für die UV-Lampen.
Page 19

DEUTSCH 19
Mögliche Ursache(n)
Der Netzstecker sitzt nicht richtig in der Steckdose.
Das Gerät wurde nicht richtig auseinander geklappt.
Möglicherweise herrscht Stromausfall. Prüfen Sie mit einem
anderen Elektrogerät, ob die Netzstromversorgung intakt ist.
Die Lampen sind noch zu heiß. Lassen Sie sie erst 3 Minuten lang
abkühlen.
Das Gerät wurde nicht ausreichend gekühlt und deshalb vom
Überhitzungsschutz automatisch abgeschaltet. Beseitigen Sie die
Ursache der Überhitzung (z. B. ein Handtuch, das eine oder
mehrere Lüftungsöffnungen verdeckt).Warten Sie 10 Minuten
und schalten Sie das Gerät wieder ein (HB828) oder setzen Sie
das Bräunungsbad fort, sobald sich die Lampen wieder einschalten
(HB826).
Prüfen Sie die Sicherung des Stromkreises, an den das Gerät
angeschlossen ist. Die Schmelzsicherung und automatische
Sicherung müssen für 16 A ausgelegt sein. Die Sicherung kann
auch dann ausgelöst werden, wenn Sie zu viele Geräte an einen
Stromkreis angeschlossen haben.
Sie verwenden ein Verlängerungskabel, das zu lang ist oder nicht
für eine Strombelastbarkeit von 16 A ausgelegt ist.Wenden Sie
sich an Ihren Fachhändler. Philips rät grundsätzlich, kein
Verlängerungskabel zu verwenden.
Sie halten sich nicht an den für Ihren Hauttyp geeigneten
Bräunungsplan. Beachten Sie die Tabelle "Das UV-Sonnenbad:Wie
oft und wie lange?"
Nach langem Gebrauch der UV-Lampen nimmt die Intensität der
UV-Strahlen ab. Dieser Effekt macht sich jedoch erst nach
mehreren Jahren bemerkbar.Wählen Sie eine geringfügig längere
Bräunungszeit oder tauschen Sie die Lampen aus.
Der Abstand zwischen Ihrem Körper und dem UV-Filter beträgt
mehr als 65 cm.
Problem
Das Gerät startet nicht.
Beim Einschalten des Geräts oder während
des Betriebs schalten die Sicherung die
Stromversorgung ab.
Die Bräunung entspricht nicht der
Erwartung.
Problembehebung
Wenn das Gerät nicht wie in dieser Anweisung beschrieben aufgestellt oder verwendet wird, kann
es zu Funktionsstörungen kommen. Einige Probleme können Sie mit Hilfe der folgenden Tipps selbst
lösen.
Wird Ihr spezielles Problem hier nicht beschrieben, liegt möglicherweise ein Gerätedefekt vor.
Wenden Sie sich in diesem Fall an Ihren Fachhändler oder ein Philips Service Center.
Page 20

NEDERLANDS20
Introductie
Inklapbaar bruiningsapparaat
Met dit apparaat kunt u thuis op comfortabele wijze bruin worden. De bruiningslampen produceren
zichtbaar licht, warmte en ultraviolet licht, waardoor u het gevoel krijgt dat u in echt zonlicht ligt te
zonnebaden. Het speciale UV-filter laat alleen dat licht door dat nodig is om de huid te bruinen.
De bruiningslampen geven voldoende infrarood af om voor een aangename warmte te zorgen.
Een timer zorgt ervoor dat iedere sessie niet langer dan 30 minuten (HB828) of 60 minuten
(HB826) duurt.Want, net als bij de echte zon,dient overmatige blootstelling te worden vermeden
(zie hoofdstuk 'Bruinen en uw gezondheid')
Algemene beschrijving (fig. 1)
A Wielen
B Netsnoer in opbergvak
C Handvat
D Timer en afstandsbediening
- Alleen HB826: timer
- Alleen HB828: afstandsbediening
E Geheugenknoppen (voor twee personen)
F Schuiven
G Statief
H Vergrendelring voor hoogteinstelling
- (schuif ring naar beneden om te ontgrendelen)
I Vergrendelring voor de kap
- (druk de twee lippen naar beneden om te ontgrendelen)
J Handvat
K Ventilator (koeling)
L Kap
M UV-filter
N Bruiningslampen (type Philips HPA flexpower 400-600)
O Reflector
P Meetlint
Q Beschermbrillen (2 stuks)
- (typenummer HB072/servicenummer 4822 690 80147)
R Voetstuk
S Typeplaat
Belangrijk
◗ Controleer of het voltage aangegeven op het apparaat overeenkomt met de netspanning in
uw woning voordat u het apparaat aansluit.
◗ Water en elektriciteit vormen een gevaarlijke combinatie! Gebruik dit apparaat daarom niet
in een vochtige omgeving (bijv. in de badkamer of in de buurt van een douche of zwembad).
◗ Als u zojuist hebt gezwommen of een douche hebt genomen, droogt u zich dan goed af
voordat u het apparaat gaat gebruiken.
◗ Haal na gebruik altijd de stekker uit het stopcontact.
◗ Gebruik het apparaat nooit als het UV-filter beschadigd of gebroken is of volledig ontbreekt,
of wanneer de timer kapot is.
◗ Het UV-filter wordt erg heet tijdens gebruik. Raak het daarom niet aan.
◗ Voorkom dat kinderen met het apparaat spelen.
◗ Laat het apparaat ongeveer 15 minuten afkoelen voordat u het weer inklapt en opbergt.
Page 21

NEDERLANDS 21
◗ Verplaats het apparaat alleen wanneer het ingeklapt is.
◗ Zorg ervoor dat de ventilatieopeningen in de kap en het voetstuk van het apparaat tijdens
gebruik open blijven. Blijf met uw haar uit de buurt van de luchtinlaat in de kap.
◗ Het apparaat is voorzien van een automatische beveiliging tegen oververhitting.Als de koeling
onvoldoende is (bijv. omdat de ventilatieopeningen zijn afgedekt) schakelt het apparaat
automatisch uit.
HB826: Zodra de oorzaak van de oververhitting is weggenomen en het apparaat voldoende is
afgekoeld, schakelt het apparaat automatisch weer in.
HB828: Zodra de oorzaak van de oververhitting is weggenomen en het apparaat voldoende is
afgekoeld, moet u opnieuw de bruiningstijd instellen om het apparaat in te schakelen.
◗ Houd u aan de aanbevolen bruiningstijden en het maximale aantal bruiningsuren (zie
'Bruiningssessies: hoe vaak en hoe lang?').
◗ De afstand tussen lichaam en lampen moet minimaal 65 cm bedragen.
◗ Bruin een bepaald deel van het lichaam niet vaker dan één keer per dag.Vermijd diezelfde dag
overmatige blootstelling aan natuurlijk zonlicht.
◗ Gebruik het apparaat niet als u symptomen van een ziekte vertoont en/of medicijnen of
cosmetica gebruikt die de gevoeligheid van uw huid voor ultraviolet licht vergroten.Wees
extra voorzichtig als u overgevoelig bent voor ultraviolet licht. Raadpleeg in geval van twijfel
uw arts.
◗ Raadpleeg uw arts als er zweren, moedervlekken of hardnekkige knobbels op uw huid
ontstaan.
◗ Dit apparaat mag niet gebruikt worden door mensen waarvan bij blootstelling aan de zon de
huid verbrandt zonder bruin te worden,door mensen die last hebben van zonnebrand, door
kinderen of door mensen die lijden aan (of hebben geleden aan) huidkanker of die er vatbaar
voor zijn.
◗ Draag tijdens het bruinen altijd de beschermbril die bij het apparaat geleverd wordt om uw
ogen tegen overmatige blootstelling te beschermen (zie ook het hoofdstuk 'Bruining en uw
gezondheid').
◗ Ontdoe uw huid geruime tijd voor de bruiningssessie van crèmes, lippenstift en andere
cosmetica.
◗ Gebruik geen zonnebrandmiddelen of middelen die bedoeld zijn om het bruiningsproces te
versnellen.
◗ Als uw huid na de bruiningssessie strak aanvoelt, kunt u een vochtinbrengende crème
opbrengen.
◗ Kleuren kunnen door blootstelling aan de zon verbleken.Hetzelfde effect kan zich voordoen
als u dit apparaat gebruikt.
◗ Verwacht niet dat het apparaat een beter resultaat oplevert dan de zon.
◗ Dit product is zo geproduceerd dat het voldoet aan de eisen neergelegd in de richtlijnen
87/308 en 87/310/EEC.
Bruinen en uw gezondheid
De zon, UV en bruinen
De zon
De zon levert verschillende soorten energie: zichtbaar licht dat ons in staat stelt om te zien,
ultraviolet (UV) licht dat onze huid bruint en infrarood (IR) licht dat zonnestralen de warmte geeft
waar wij ons in koesteren.
UV en uw gezondheid
Net als bij gewoon zonlicht heeft het bruiningsproces bij gebruik van dit apparaat wat tijd nodig.
De eerste resultaten worden pas na een aantal sessies zichtbaar (zie 'Bruiningssessies: hoe vaak en
hoe lang?').
Page 22

Overmatige blootstelling aan ultraviolet licht, of dat nu geproduceerd wordt door de zon of door
een bruiningsapparaat, kan zonnebrand veroorzaken.
Naast vele andere factoren, zoals blootstelling aan natuurlijk zonlicht, kan onjuist en overmatig
gebruik van een bruiningsapparaat het risico van huid- en oogaandoeningen vergroten. De mate
waarin deze effecten optreden wordt aan de ene kant bepaald door de aard, de intensiteit en de
duur van de blootstelling en aan de andere kant door de gevoeligheid van de persoon in kwestie.
Hoe vaker de huid en de ogen worden blootgesteld aan UV-licht, hoe groter de kans op
ontstekingen van het hoornvlies en het bindvlies, beschadigingen van het netvlies,staar, vroegtijdige
veroudering van de huid en de ontwikkeling van huidkanker. Bepaalde medicijnen en cosmetica
vergroten de gevoeligheid van de huid.
◗ Het is daarom belangrijk:
- dat u de instructies in 'Belangrijk' en 'Bruiningssessies: hoe vaak en hoe lang?' volgt;
- dat u zich houdt aan de bruiningsafstand (afstand tussen het UV-filter en het lichaam) van
65 cm;
- dat u het maximale aantal bruiningsuren per jaar (19 uur ofwel 1140 minuten) niet overschrijdt
(zie ook 'Bruiningssessies: hoe vaak en hoe lang?';
- dat u tijdens het bruinen altijd de bijgeleverde beschermbril draagt.
Bruiningssessies: hoe vaak en hoe lang?
◗ Neem niet meer dan één bruiningssessie per dag gedurende vijf tot tien dagen.Wacht na het
eerste zonnebad ten minste 48 uur voordat u een tweede zonnebad neemt.Na deze
5-daagse tot 10-daagse kuur raden we u aan uw huid een tijdje rust te gunnen.
B
Ongeveer een maand na afloop van de kuur zal uw huid veel van zijn bruine kleur hebben
verloren. U kunt dan met een nieuwe kuur beginnen.
B
Als u uw bruine kleur wilt behouden, stop dan niet met de bruiningssessies na afloop van de
kuur, maar ga door met één of twee sessies per week.
Of u er nu voor kiest een tijdje te stoppen met de bruiningssessies of doorgaat, maar dan minder
vaak, onthoud wel dat u het maximale aantal bruiningsuren niet mag overschrijden.Voor dit apparaat
geldt een maximum van 19 bruiningsuren (dat is 1140 minuten) per jaar.
Voorbeeld
Stel dat u een 10-daagse bruiningskuur volgt, met een sessie van 7 minuten op de eerste dag en
sessies van 20 minuten op de 9 dagen die volgen.
◗ De kuur duurt dan (1 x 7 minuten) + (9 x 20 minuten) = 187 minuten.
B
Dit betekent dat u 6 van deze kuren per jaar kunt volgen, omdat 6 x 187 minuten = 1122
minuten.
B
Natuurlijk geldt het maximale aantal bruiningsuren voor iedere zijde van het lichaam (bijv. de
rug en de voorkant van het lichaam).
Tabel
Zoals staat aangegeven in de tabel dient de eerste sessie altijd 7 minuten te duren, onafhankelijk van
de gevoeligheid van de huid.
Als u denkt dat de sessies te lang voor u zijn (bijvoorbeeld omdat uw huid na de sessie trekt en
pijnlijk aanvoelt), raden we u aan de duur van de sessie met bijv. 5 minuten te verkorten.
Als u een mooie bruine tint over uw hele lichaam wilt krijgen, moet u uw lichaam enigszins draaien
tijdens de sessie zodat de zijkanten van het lichaam beter worden blootgesteld aan het bruinende
licht.
Als uw huid enigszins strak aanvoelt na de bruiningssessie, breng dan een vochtinbrengende crème
op.
NEDERLANDS22
Page 23

NEDERLANDS 23
Voor mensen met
een minder gevoelige
huid
7 minuten
30 minuten*
30 minuten*
30 minuten*
30 minuten*
30 minuten*
30 minuten*
30 minuten*
30 minuten*
30 minuten*
Voor mensen met een
normaal gevoelige
huid
7 minuten
20-25 minuten
20-25 minuten
20-25 minuten
20-25 minuten
20-25 minuten
20-25 minuten
20-25 minuten
20-25 minuten
20-25 minuten
Voor mensen met een
gevoelige huid
7 minuten
10 minuten
10 minuten
10 minuten
10 minuten
10 minuten
10 minuten
10 minuten
10 minuten
10 minuten
Duur van
bruiningssessie voor
ieder afzonderlijk
lichaamsdeel
1e sessie
onderbreking van ten
minste 48 uur
2e sessie
3e sessie
4e sessie
5e sessie
6e sessie
7e sessie
8e sessie
9e sessie
10e sessie
*) of langer, afhankelijk van
de gevoeligheid van uw
huid.
Klaarmaken voor gebruik
1 In de transportstand is het apparaat gemakkelijk te verplaatsen en op te bergen omdat het
wielen heeft (fig. 2).
B
Het apparaat is makkelijker op te tillen wanneer u dat samen met iemand anders doet.
B
NB: Het apparaat weegt meer dan 28 kg.
2 Ontgrendel de kap (L) van het voetstuk (R) door de schuiven (F) in de richting van de pijl te
schuiven (fig. 3).
3 Trek het statief (G) en de kap (L) omhoog (fig. 4).
4 Zet het bruiningsapparaat in de stand die aangegeven wordt in de figuur (fig. 5).
5 Trek de kap (L) aan het handvat (J) omhoog totdat hij horizontaal staat (fig. 6).
B
U hoort klikjes wanneer de kap bepaalde vaste standen passeert.
6 In plaats van de hierboven genoemde stap-voor-stap methode, kunt u de kap ook in één
vloeiende beweging aan het handvat omhoog trekken (fig. 7).
B
Houd het handvat (J) vast.
7 Draai de kap een kwartslag (fig. 8).
◗ Wanneer u dit gedaan heeft,is het bruiningsapparaat uitgeklapt in de stand die getoond
wordt in de figuur (fig. 9).
8 Plaats het bruiningsapparaat naast een bed op de aangegeven wijze (fig. 10).
9 Ontgrendel de hoogteinstellingsring (H) door hem naar beneden te schuiven. Schuif met uw
andere hand het statief (G) zo ver uit dat de afstand tussen de kap (L) en het bed ongeveer
85 cm bedraagt (fig. 11).
Gebruik het meetlint (P) om de afstand tussen het bed en de kap te controleren.
10 Laat de ring los om de kap op de ingestelde hoogte te vergrendelen.
Page 24

NEDERLANDS24
Gebruik van het apparaat
Instellen van de timer (alleen HB 826)
1 Wikkel het netsnoer helemaal af.
2 Steek de stekker in het stopcontact.
3 Kijk op de geheugenknoppen en raadpleeg de tabel in deze gebruiksaanwijzing.
4 Zet de bijgeleverde beschermbril op.
5 Stel de timer in op de juiste bruiningstijd (fig. 12).
6 Ga onder de kap liggen.
◗ Wanneer de ingestelde bruiningstijd verstreken is, zal de timer het apparaat automatisch
uitschakelen.
B
NB: De maximale bruiningstijd die met de timer kan worden ingesteld bedraagt 60 minuten.Als
u beide zijden van uw lichaam achter elkaar wilt bruinen, raden we u een nieuwe tijd in te
stellen voordat de ingestelde tijd verstrijkt. Hierdoor vermijdt u de wachttijd van 3 minuten die
anders nodig is voordat de lampen opnieuw kunnen worden ingeschakeld.
Afstandsbediening
a Tijdinstelknop voor 1-30 minuten.
b Startknop: druk op deze knop om de bruiningslampen en de timer in te schakelen.
c Pauze/herhaalknop: druk op deze knop als u de sessie wilt onderbreken (bijv. wanneer de
telefoon gaat). De bruiningslampen gaan dan uit en de overgebleven bruiningstijd wordt
knipperend weergegeven op het display. U kunt tijdens de laatste minuut van de bruiningssessie
op deze knop drukken om de ingestelde tijd te herhalen (bijv. om de andere zijde van het
lichaam te bruinen).
d Knippersignaal: dit signaal is alleen zichtbaar wanneer de timer aftelt.
e Waarschuwingslampje: dit lampje is aan wanneer het apparaat aangesloten is op de netspanning.
f Pieper: de pieper gaat af als de laatste minuut van de ingestelde bruiningstijd is aangebroken.
- Als u het bruiningsapparaat langer wilt gebruiken dan de op dat moment ingestelde
bruiningstijd, dan moet u een nieuwe tijd instellen wanneer u de pieper hoort afgaan. U kunt
ook op knop T drukken tijdens deze laatste minuut om de sessie te herhalen.
g Display: het display toont de ingestelde tijd.Tijdens de sessie toont het display de resterende
minuten.
B
LET OP
In de volgende gevallen ziet u 00 op het display:
- nadat u de stekker in het stopcontact heeft gestoken;
- aan het einde van de bruiningssessie (knippert tijdens de eerste 3 minuten na uitschakelen);
- na een stroomstoring;
- nadat de oververhittingsbeveiliging geactiveerd is.
In deze gevallen zijn de lampen niet aan.
1 Wikkel het netsnoer helemaal af en neem de afstandsbediening uit het opbergvak (B).
2 Steek de stekker in het stopcontact.
3 Kijk op de geheugenknoppen en raadpleeg de tabel in deze gebruiksaanwijzing.
4 Zet de bijgeleverde beschermbril op.
Page 25

NEDERLANDS 25
5 Stel de duur van de bruiningssessie in (fig. 13).
Druk op + om de tijd vooruit te laten lopen.
Druk op - om de tijd terug te laten lopen.
Houd de knop ingedrukt om de tijd sneller in te stellen.
6 Schakel de bruiningslampen in (fig. 14).
Druk op knop I. Het knippersignaal d wordt zichtbaar op het display en de ingestelde
bruiningstijd wordt getoond.
De timer telt nu de ingestelde bruiningstijd af.
Tijdens de laatste minuut van de sessie, gaat pieper f af.
Tijdens deze minuut kunt u op knop T drukken om de sessie te herhalen of een nieuwe tijd in te
stellen.
Door dit te doen kunt u de wachttijd van 3 minuten vermijden die nodig is om de bruiningslampen
te laten afkoelen nadat ze zijn uitgeschakeld.
7 Ga onder de kap liggen.
◗ Herhalen van de bruiningssessie (in te stellen tijdens de laatste minuut) (fig. 15).
Druk op knop fi. De eerder ingestelde bruiningstijd verschijnt op het display en de pieper stopt.
◗ Instellen van een andere bruiningstijd (tijdens de laatste minuut) (fig. 16).
Stel een nieuwe bruiningstijd in en druk vervolgens op knop I.
Zodra op deze knop wordt gedrukt, stopt de pieper en start het aftellen van de nieuwe
bruiningstijd.
◗ Als u tijdens de laatste minuut van de sessie niet op een knop drukt om de sessie te herhalen
of een nieuwe tijd in te stellen, gaat de aftelling door en schakelt het apparaat automatisch uit
als de ingestelde tijd is afgelopen.
Extra mogelijkheden
◗ Onderbreking van de bruiningssessie (bijv. om de telefoon op te nemen) (fig.17).
- Druk op knop fi.
De bruiningslampen worden uitgeschakeld. Het knippersignaal d verdwijnt van het display.
De overgebleven minuten van de bruiningstijd knipperen op het display.
- Na drie minuten stopt het knipperen. U kunt de bruiningslampen opnieuw inschakelen door op
knop I te drukken.
◗ Als u het bruiningsapparaat korter wilt gebruiken dan de ingestelde tijd:(fig. 18).
- druk op knop I. De bruiningslampen worden uitgeschakeld en u kunt een nieuwe bruiningstijd
instellen;
- wacht totdat de tijdsaanduiding op het display stopt te knipperen. Druk dan opnieuw op knop
I.
Na de bruiningssessie
◗ Houd het aantal bruiningssessies dat u hebt gehad bij met behulp van de geheugenknoppen.
Het apparaat heeft twee geheugenknoppen: een per persoon.
◗ Laat het bruiningsapparaat 15 minuten afkoelen voordat u het inklapt en opbergt.
Opbergen
1 Wikkel het netsnoer op en berg het op in het opbergvak (B).Alleen bij HB828: zorg ervoor
dat de afstandsbediening goed wordt opgeborgen.
B
Voorkom dat het netsnoer en bij de HB828 ook de afstandsbediening en het snoer van de
afstandsbediening niet vast komen te zitten wanneer u het apparaat terugklapt en in
transportstand zet.
Page 26

NEDERLANDS26
2 Ontgrendel de vergrendelingsring voor de hoogteinstelling (H) door deze met de hand naar
beneden te schuiven. Schuif het statief met de andere hand naar beneden en laat vervolgens
de ring los (fig. 19).
3 Draai de kap een kwartslag (fig. 20).
4 Til de kap met één hand een beetje op en ontgrendel hem door de twee lippen (I) met de
andere hand naar beneden te duwen (fig. 21).
5 Breng de kap voorzichtig in verticale stand (fig. 22).
Laat de twee lippen los.
6 Laat het statief en de kap voorzichtig op het voetstuk (R) zakken (fig. 23).
7 Bevestig de kap aan het voetstuk door de schuiven (F) op het voetstuk in de richting van de
pijl te duwen (fig. 24).
8 In horizontale stand kunt u het apparaat opbergen onder een bed (fig. 25).
9 In verticale stand kunt u het apparaat opbergen in een kast (fig. 26).
Schoonmaken
Trek altijd de stekker uit het stopcontact en laat het apparaat afkoelen voordat u het gaat
schoonmaken.
Gebruik geen schuursponsjes en geen agressieve vloeistoffen zoals schuurmiddelen,benzine of
aceton om het apparaat schoon te maken.
◗ Maak de buitenkant van het apparaat met een vochtige doek schoon.
B
Laat geen water in het apparaat lopen.
◗ Maak het UV-filter schoon met een zacht doekje besprenkeld met wat spiritus.
Vervanging
Het UV-filter beschermt tegen blootstelling aan ongewenst UV licht. Het is daarom belangrijk een
beschadigd of gebroken filter direct te laten vervangen.
Het licht dat de bruiningslampen afgeven wordt in de loop der tijd minder fel (dit gebeurt bij
normaal gebruik na een paar jaar). U merkt dit doordat het bruiningsvermogen van het apparaat
afneemt. U kunt dit probleem oplossen door een iets langere bruiningstijd in te stellen of door de
bruiningslampen te laten vervangen.
Laat de bruiningslampen, het UV-filter en het netsnoer vervangen door een door Philips
geautoriseerd servicecentrum. Alleen zij beschikken over de kennis en vaardigheden die hiervoor
nodig zijn en hebben originele reserveonderdelen voor het apparaat.
Milieu
De lampen van het apparaat bevatten stoffen die schadelijk kunnen zijn voor het milieu.Als u de
lampen weggooit, gooi ze dan niet bij het normale huisvuil, maar lever ze apart in op een door de
overheid daartoe aangewezen plaats.
Garantie & service
Als u informatie nodig heeft of als u een probleem heeft, bezoek dan onze Website
(www.philips.com), of neem contact op met het Philips Customer Care Centre in uw land (u
vindt het telefoonnummer in het 'worldwide guarantee' vouwblad). Als er geen Customer Care
Centre in uw land is, ga dan naar uw Philips dealer of neem contact op met de afdeling Service van
Philips Domestic Appliances and Personal Care BV.
Page 27

NEDERLANDS 27
Garantiebeperkingen
De bruiningslampen vallen niet onder de internationale garantie.
Problemen oplossen
Het is mogelijk dat het apparaat niet goed werkt omdat het niet volgens de gebruiksaanwijzing is
geïnstalleerd of wordt gebruikt. In dat geval kunt u proberen het probleem zelf op te lossen door de
onderstaande tips op te volgen.
Als het apparaat niet goed werkt kan dit het gevolg zijn van een mankement. In dat geval raden we
u aan contact op te nemen met uw dealer of met een Philips servicecentrum.
Mogelijke oorzaken
De stekker is niet of niet goed in het stopcontact gestoken.
Het apparaat is niet op de juiste wijze uitgeklapt.
Misschien is er een stroomstoring opgetreden. Controleer of dit
zo is door een ander apparaat aan te sluiten.
De lampen zijn nog steeds te warm om aan te gaan. De lampen
moeten eerst 3 minuten afkoelen.
Het apparaat werd onvoldoende gekoeld en de
oververhittingsbeveiliging heeft het apparaat daarom automatisch
uitgeschakeld. Neem de oorzaak van de oververhitting weg (bijv.
door een handdoek die één of meer ventilatieopeningen afdekt
te verwijderen).Wacht 10 minuten en schakel het apparaat
opnieuw in (HB828) of ga door met de bruiningssessie als de
lampen weer aangaan (HB826).
Controleer de zekering van de groep waarop het apparaat is
aangesloten. De juiste zekering heeft een waarde van 16A of is
een automatische zekering. De zekering kan ook springen omdat
u (te veel) andere apparaten op dezelfde groep heeft
aangesloten.
U gebruikt een te lang of te dun verlengsnoer. Raadpleeg uw
dealer. Ons algemene advies is om geen verlengsnoer te
gebruiken.
U volgt niet het bruiningsschema dat past bij uw huidtype.
Raadpleeg de tabel in 'Bruiningssessies: hoe vaak en hoe lang?'.
Als de lampen al lang in gebruik zijn, neemt de hoeveelheid UVlicht die ze produceren af. Dit effect merkt u pas na een paar jaar.
U kunt dit probleem verhelpen door een langere bruiningstijd in
te stellen of de lampen te vervangen.
De afstand tussen het lichaam en het UV-filter is groter dan 65
cm.
Probleem
Het apparaat gaat niet aan.
De zekering sluit de stroomtoevoer af
zodra het bruiningsapparaat ingeschakeld
wordt of tijdens gebruik.
Slechte bruiningsresultaten
Page 28

28
m
10
11 12 13
14 15 16 17
18
19 20
21
2 3 4 5
6 7 8 9
2
85
c
1
2
1
1
3
2
Page 29

29
22 23 24 25
26
Page 30

30
Page 31

31
Page 32

www.philips.com 4222 002 29331
u
 Loading...