

Philips HB591 Service Manual
Sunstudio
HB591
Philips Domestic Appliances and Personal Care
Service Manual
PRODUCT INFORMATION
- THIS SOLARIUM HAS TO BE CONNECTED TO
3-PHASE MAINS!
- MOST REPAIRS HAVE TO BE DONE WITH HELP
OF A SECOND PERSON.
- The acrylic sheets can be cleaned with a moist cloth and
some washing-up liquid.
Avoid the use of alcohol, alcohol based cleaners, petrol
acetone or abrasives! These substances can cause
irreparable damage to the sheets.
- Always use protecting goggles when looking in the
direction of burning lamps.
- Interchange starters, lamps or ballasts to establish
whether they are defective. If they are not defective,
check the internal wiring, especially that connected to
the lamp holders.
- An unusual early blackening of the end of the TL’s points
to a wiring fault or a defective starter.
- New HPA lamps may show colour differences.
This is not a defect, but a characteristic phenomenon of
lamps of this type.
The discolorations disappear after a short period of use.
- When exchanging the HPA lamp, make sure you do
not touch the new lamp with your bare hands, as finger
prints could burn in and reduce the lamp’s performance.
- After repair, always check whether the glass pane has
been properly mounted.
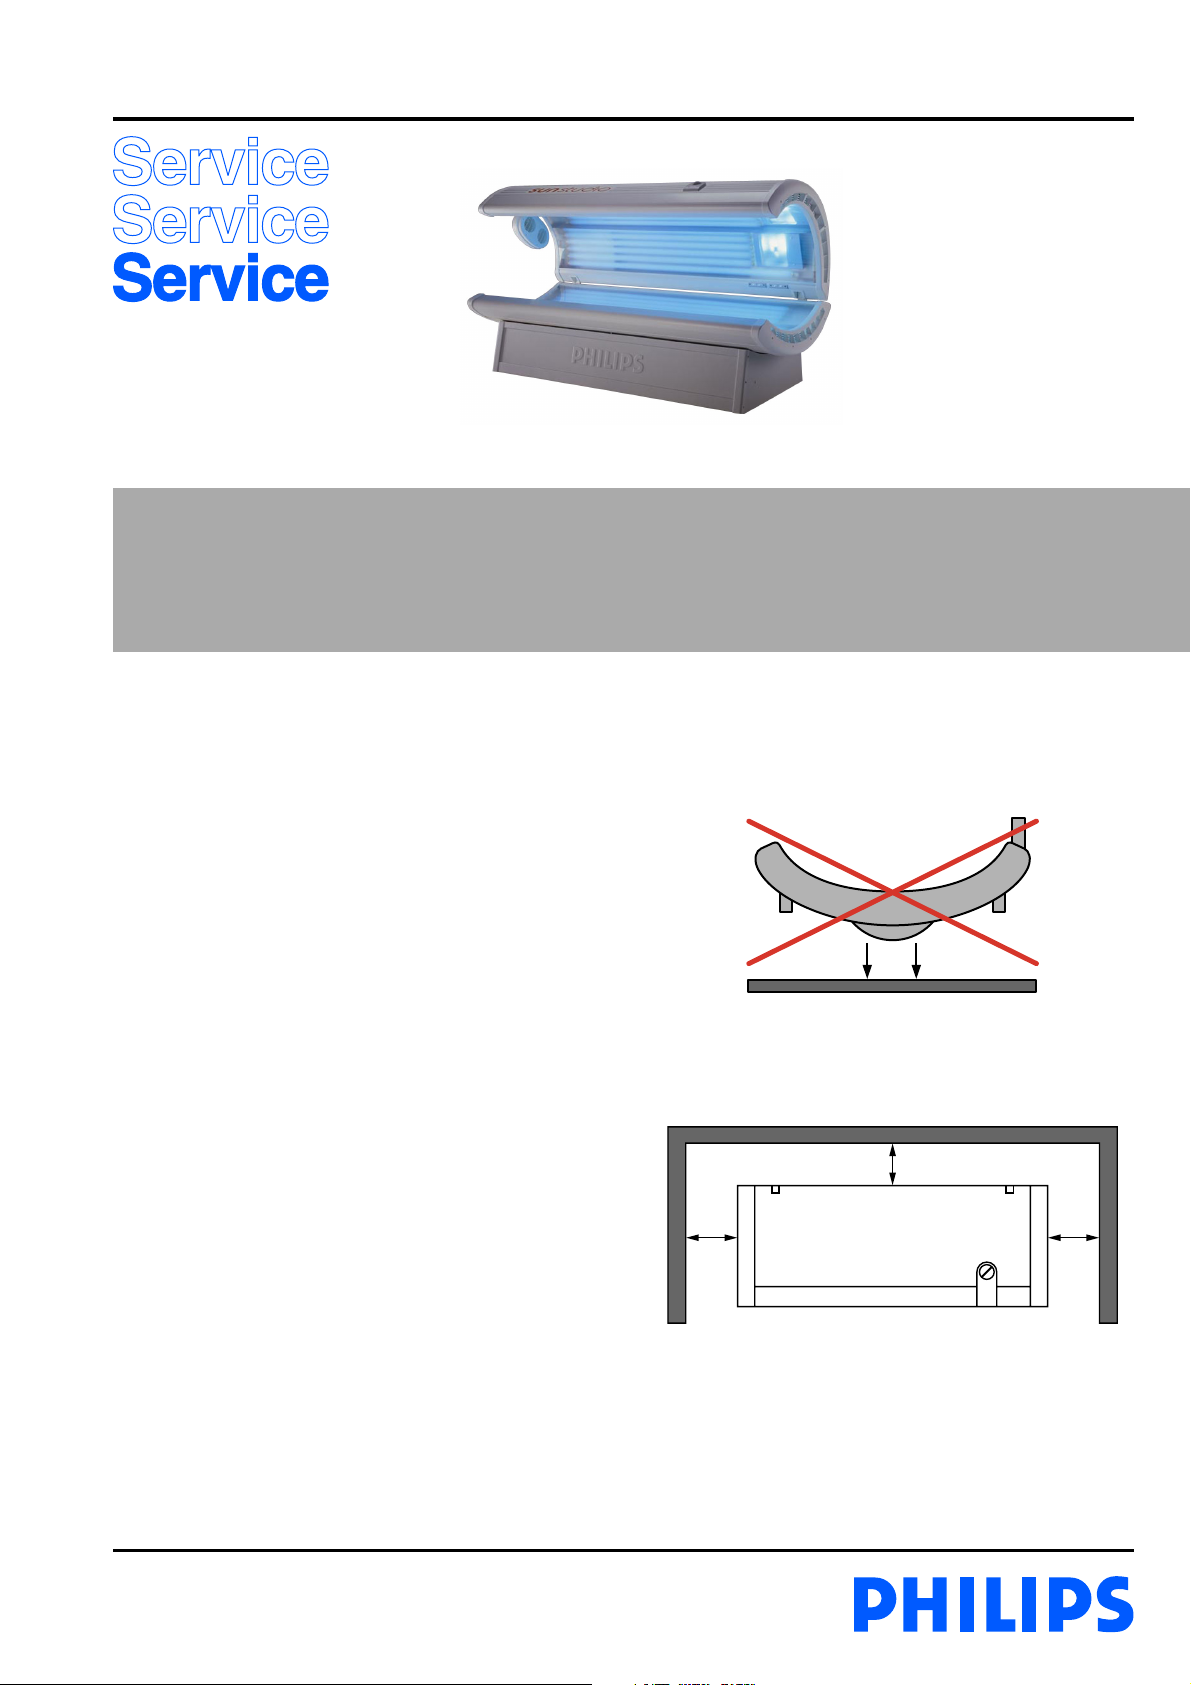
- If the canopy and/or couch have to be placed on the
floor, put them on the floor with the tube lamps facing
downwards to avoid internal damage.
- Used-up or broken lamps are chemical waste and must be
disposed of in the appropriate manner.
Wall
30
50
Free space in cm
50
Published by Philips Domestic Appliances and Personal Care Printed in the Netherlands © Copyright reserved Subject to modification
04/02
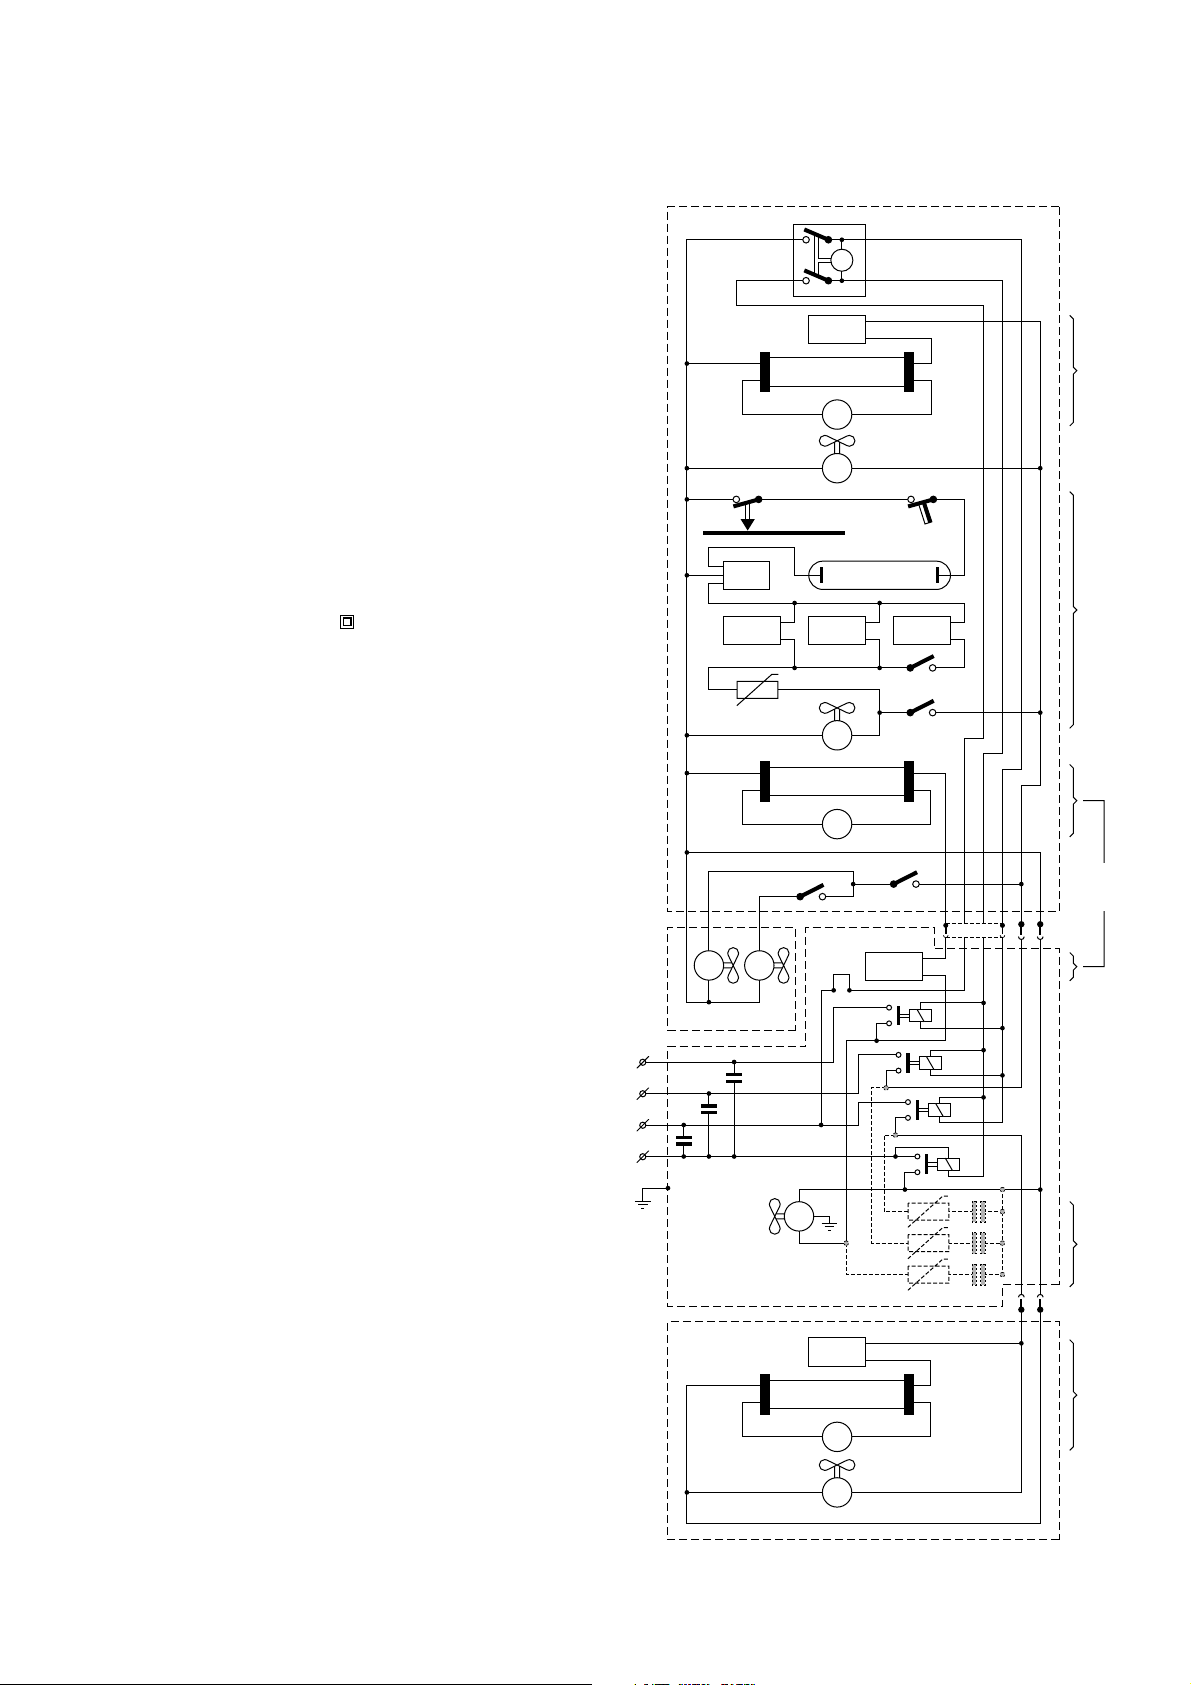
TECHNICAL INFORMATION
- Operating voltage : 3 x 230 V, 50 Hz
- Power consumption : approx. 4450 W
- Lamp canopy : 2 x TL Cleo
Performance 100 W-S-R
: 16 x TL Cleo
Performance 80 W-S-R
: 3 x HPA HP400SH
- Lamp couch : 14 x TL Cleo
Performance 100 W-S-R
- Ballast canopy : 2 x TL + 3 x HPA - 100W
: 3 x TL + 6 x HPA - 80 W
- Ballast couch : 14 x 100 W
- Ballast power unit : 13 x 80 W
- Starter canopy : 18 x S12 / Cleo sunstarter
: 3 x Magnetek ZG 4,5
- Starter couch : 14 x S12 / Cleo sunstarter
- Timer : 30 min. (motor driven)
- Safety :
, Cenelec, UV-type III
- Mains cord : 3 m, 5 x 1.5 mm², class I plug
- Tanning field : 195 x 80 cm
- Dimensions : 214 x 100 x 92 cm (L x W x H)
- Weight canopy : approx. 72 kg
- Weight couch : approx. 67 kg
- Weight power unit : approx. 26 kg
- Protecting goggles : 2 x HB072
Canopy
SK
La
S
L a L b
NTC
La
HB591
M
L
S
M
M
S
TCOSK
La
L c
SK
SK
2 x
100 W
3 x
80 W
3 x
3 x
HPA
260 W
T
S
R
N
M M
Body Cooler
3 x C
Power unit
Couch
SK
SK
L
M
TSN
Re
Re
Re
Re
80 W
2 x
RN
CNTC
L
13 x
La
S
14 x
100 W
M
3 x
2-14
DISASSEMBLY & REPAIR INSTRUCTION
HB591
- Remove the mains plug from the wall socket.
Replacement of lamps/starters
- Remove the end cover at the head of the canopy by undoing
the screws.
- First pull the acrylic sheet approx. 10 cm out of the
appliance. Then undo the snap strip on the rear side of the
canopy. Do the same with the snap strip on the front side.
- Remove the acrylic sheet.
- Now the tube lamps and starters can be removed.
- The lamps and starters of the couch can in principle be
replaced in the same way.
Check on internal wiring
- Remove the push rivets in the top cover with an appropriate
knife or screwdriver.
- Remove the end cover at the head of the canopy by undoing
the screws.
- Pull the top cover approx. 10 cm out of the appliance.
- Pull the top cover on both sides out of the groove of the
side panel and place it on a soft surface.
- Now the ballasts, lamp holders and internal wiring can be
checked.
- The internal wiring of the couch can be checked in the
same way.
- However, the canopy must be removed first with help of a
second person.
- Do not forget to pull the connecting cable out of the socket.
Replacement of gas spring
- Remove the acrylic sheet as described under ‘replacement of
lamps/starters’.
- Remove the top cover as described under ‘check on internal
wiring’.
- Loosen the connecting wires of the body cooler and remove
the end cover by undoing the screws.
- Fold the canopy up and have a second person lock it in this
position.
- Now the gas springs can be removed.
Replacement of timer
- Remove the end cover on the side where the timer is
located.
- Pull the top cover on this side out of the groove of the side
panel.
- Now the timer panel with timer can be taken out.
TANNING MEASUREMENT
- The measuring data indicated below where established with help of an UVX 36 meter and may only be checked with this
equipment, since the values measured are relative values.
- The measurements must be taken after approx. 5 minutes in the centre of the tanning field and at the distance indicated.
- The following aspects must be checked or the following preliminary measurements must be taken:
• Mains voltage: 3 x 230 V, 50 Hz
• Room temperature 22 - 28 °C
• Check the fans for failure-free operation as optimal tanning is only guaranteed at the correct operating temperatures
• Clean the lamps, the acrylic sheets and the glass pane.
- With regard to the minimum values indicated below, you should bear in mind that this is not an absolute value at which the
lamps must be replaced.
- Depending on the skin type, the tanning session may also be extended so that the lamps can be used a little longer.
output in mW/cm²
UVX 36 meter distance in cm
Couch 2.5 cm from acrylic sheet couch 10.5 7.3
Canopy 30 cm from acrylic sheet couch 12.0 8.4
Canopy beneath the
facial tanner
2.5 cm from acrylic sheet couch, and
on 21 cm from edge of the end cover
NEW
(approx.)
9.0 6.3
Output in mW/cm²
MIN
(approx.)
Note: Switch SK1 of facial tanner in position ’HIGH’.
3-14
PARTS LIST COUCH + CANOPY
HB591
Item Service code Description
1
9965 000 19730
2
9280 057 21920
3
4822 320 11909
4
4822 219 80258
5
4822 255 10374
6
4822 255 10375
7
4822 532 12791
8
9965 000 19733
9
9965 000 19735
10
9965 000 19736
11
9965 000 19737
12
4822 502 14539
13
9965 000 19753
14
9965 000 19765
15
9965 000 19772
16
9965 000 19739
17
4822 146 10791
18
9965 000 11520
19
9965 000 11521
20
9965 000 19741
Acrylic sheet couch
TL Cleo Performance 100 W-S-R
Connecting cable
Starter S12/Cleo sunstarter
Lamp/starter holder
Lamp holder
Push rivet
Insulating cover
Insulating prop
Bottom cover couch
End cover couch
S.t. screw 4.8 x 19
Set of legs
Rivet 6 mm
Side cover back couch
Click strip
Ballast 100 W
Fan complete
Fan cover
Side cover front couch/canopy
Item Service code Description
31
4822 146 10792
4822 146 10791
32
9965 000 19745
33
9965 000 19775
34
9965 000 07779
35
9965 000 19746
36
9965 000 19747
37
9965 000 20301
38
4222 062 95570
39
9965 000 19748
40
4222 062 94580
41
4222 062 94570
42
9965 000 01935
43
4822 361 10966
44
9965 000 19749
45
9965 000 19773
46
4822 271 30619
47
4822 252 11301
48
9965 000 16185
49
4822 325 20102
Ballast 80 W
Ballast 100 W
Starter holder
18-c cable
16p. connector male
Gas spring 1500 N
Insulating cover
Timer knob
2p-timer 30 mins
Insulating cover
NTC resistor 22 W
Connector 8S
Rubber sealing
Fan
Timer housing
Fan HPA complete
Micro switch
Aut. cutout 75 °C
HP400SH UVA lamp
Lamp holder HPA
21
9965 000 19767
22
9965 000 01946
23
9965 000 01948
24
9965 000 01947
25
9965 000 19742
26
9965 000 19743
27
9965 000 20441
28
9965 000 19744
29
9965 000 19768
30
9965 000 19769
Set of decorative covers
On/off switch
Switch HPA
Switch body blower
Switch housing
Cover canopy
Side cover back canopy
End cover canopy
Fan complete
Fan housing
50
9965 000 19774
51
4822 214 12272
52
9965 000 20802
53
9280 047 21920
54
4822 265 10944
55
9965 000 07763
56
4822 280 60513
57
9965 000 16366
58
4822 146 10792
9965 000 19776
Refl ector unit
Starter HPA
Acrylic sheet canopy
TL Cleo Performance 80 W-S-R
2-p socket
16p. connector female
Relay
Mains fl ex complete perifl ex 3 m
Ballast 80 W
Mounting set HB590/HB591
4-14
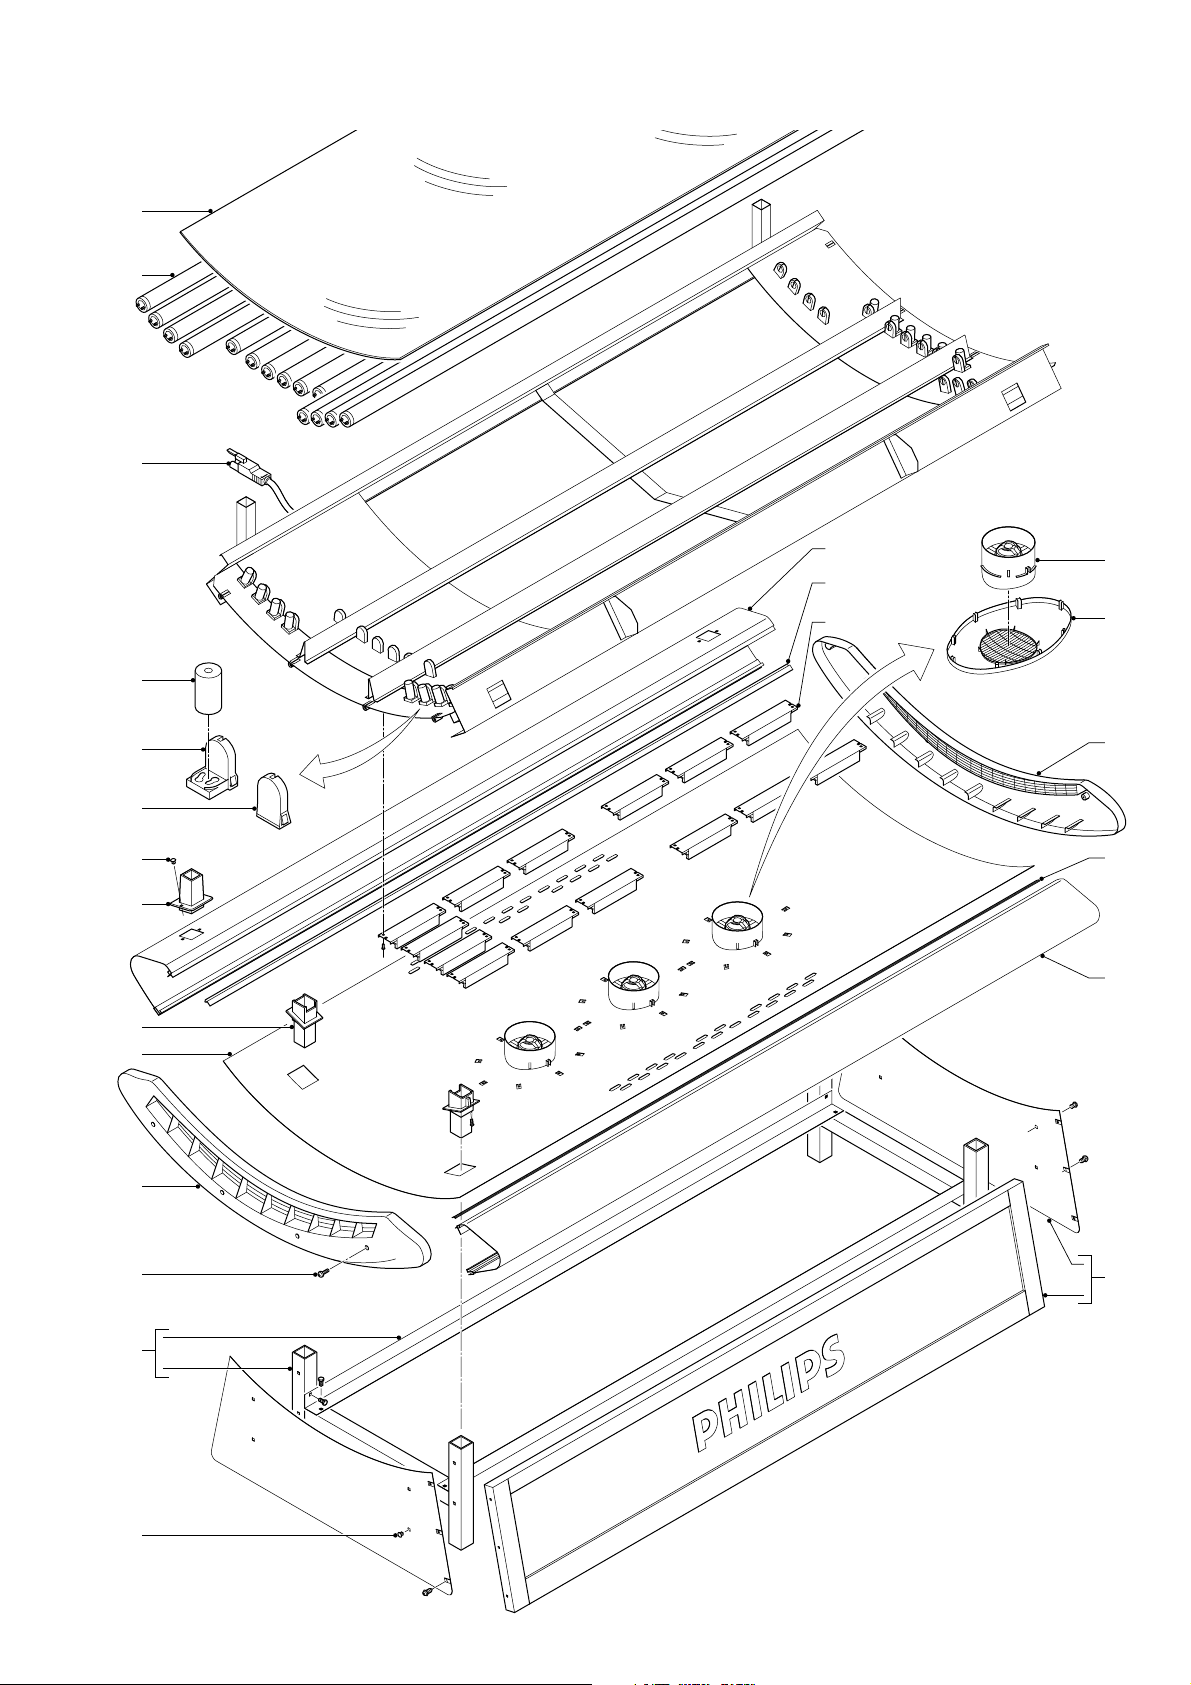
EXPLODED VIEW COUCH
1
2
3
HB591
10
15
16
17
4
5
6
7
8
9
18
19
11
16
20
11
12
13
14
21
5-14
 Loading...