

Page 1

HB591, HB590 Sunstudio
Page 2
2
1
Page 3
ENGLISH 4
DEUTSCH 8
FRANÇAIS 12
NEDERLANDS 16
ESPAÑOL 20
РУССКИЙ 24
HB591, HB590
Page 4

Introduction
Full-body tanner with integrated facial tanning unit
With this tanning appliance you can suntan comfortably at home.The tanning lamps emit visible light, heat and ultraviolet light, giving you the
impression you are sunbathing in real sunlight.This appliance tans your whole body, including the sides, evenly from head to toe.
A timer ensures that each tanning session does not last longer than 30 minutes. Just as with natural sunlight, overexposure must be avoided
(see chapter 'Tanning and your health').
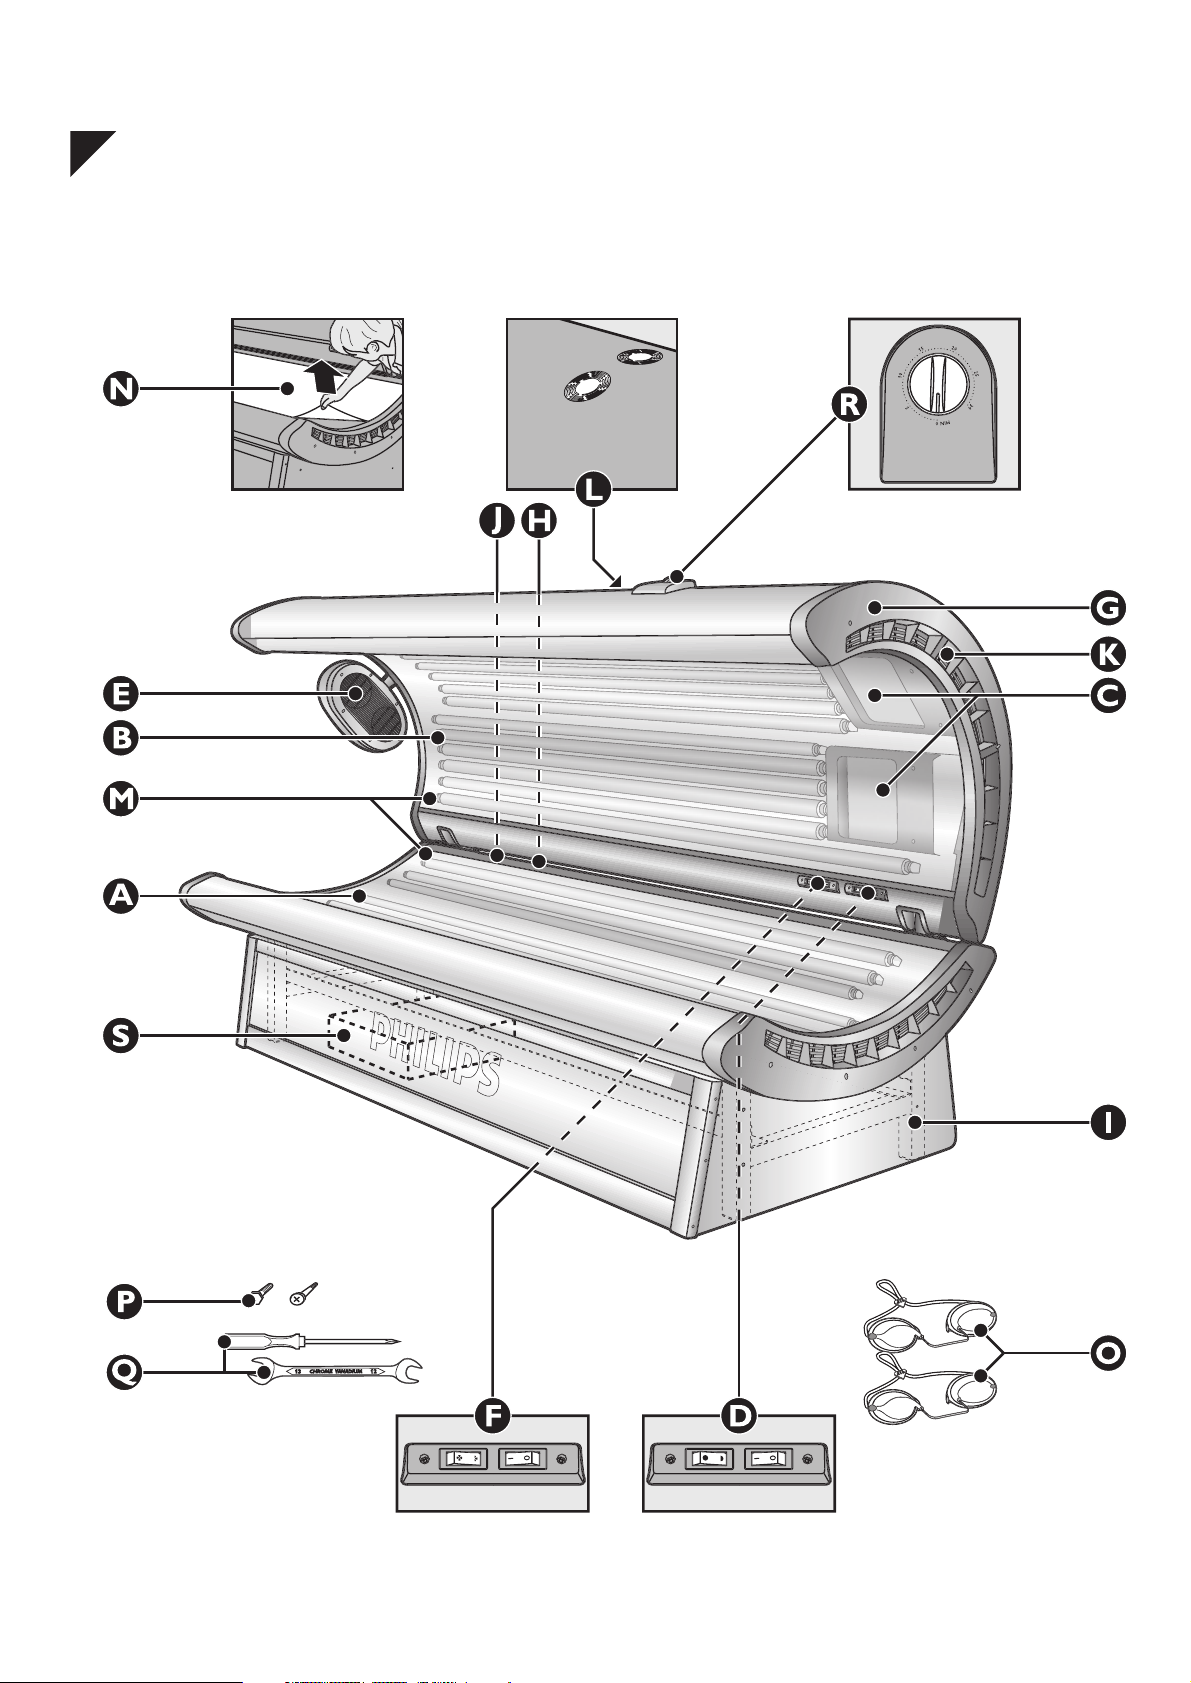
General description (fig. 1)
A Tube lamps and starters of the couch
B Tube lamps and starters of the canopy
C Facial tanner
D Switches for facial tanner
- O = facial tanner off
- I = facial tanner on
- I and , = facial tanner on at 75% of its full intensity
- I and m = facial tanner on at full intensity
E Fan for body cooling
F Switches for fan
- O = fan off
- I = fan on
- I and n = one fan on
- I and b = both fans on
G End cover
H Mains cord
I Legs of the frame
J Connecting cables between power supply unit and couch and canopy
K Fans to cool the facial tanners
L Vents and fans to cool the tube lamps
M Acrylic sheets
N Protective foils
O Protective goggles (2 pairs)
- (type no. HB072/ser vice no. 4822 690 80147)
P Screws, bolts and decorative caps
Q Spanner and screwdriver
R Timer
S Power supply unit
Important
◗ Check if the voltage indicated on the canopy corresponds to the mains voltage in your home before you connect the appliance.
◗ This appliance requires a mains voltage of 400 volts.
◗ A high mains impedance may result in noticeable light intensity changes from light bulbs when the tanning appliance is switched on.To
fulfil the legal EMC requirements on this point, the modulus of the mains impedance has to be lower than 0.3 ohm. For information,
contact your utility.
◗ Water and electricity are a dangerous combination! Do not use this appliance in wet surroundings (e.g. in the bathroom or near a
shower or swimming pool).
◗ If you have just been swimming or have just taken a shower, dry yourself thoroughly before using the appliance.
◗ The appliance must be connected to a three-phase power supply that is protected with 16A standard fuses or automatic fuses.
◗ Always unplug the appliance after use.
◗ Make sure the cord does not become trapped under one of the legs when you move the appliance.
◗ Make sure the vents to cool the tanning lamps in the canopy and in the couch remain open during use.
◗ Never use the appliance when the timer or an acrylic sheet is defective.
◗ Make sure children do not play with the appliance.
◗ Do not exceed the recommended tanning time and the maximum number of tanning hours (see 'Tanning sessions: how often and how
long?').
◗ Do not tan a particular part of your body more than once a day.Avoid excessive exposure to natural sunlight on the same day.
◗ Do not use the tanning appliance if you have a disease and/or use medication or cosmetics that increase the sensitivity of your skin. Be
extra careful if you are hypersensitive to UV light. Consult your doctor in case of doubt.
◗ Consult your doctor if persistent lumps or sores appear on the skin,or if there are changes in pigmented moles.
◗ The appliance is not to be used by people who get sunburnt without tanning when exposed to the sun, by persons suffering from
sunburn, by children, or by persons who suffer (or have previously suffered) from skin cancer or who are predisposed to skin cancer.
◗ Always wear the protective goggles provided with the appliance while tanning to protect your eyes against overexposure (also see
'Tanning and your health').
◗ Remove creams,lipstick and other cosmetics well in advance of a tanning session.
◗ Do not use any sunscreens or suntan accelerators.
◗ If your skin feels taut after the tanning session, you may apply a moisturising cream.
◗ Colours may fade under the influence of the sun.The same effect may occur when using this appliance.
◗ Do not expect the appliance to yield better results than the natural sun.
◗ If the mains cord of this appliance is damaged, it must always be replaced by Philips or a service centre authorised by Philips in order to
avoid hazardous situations.
◗ If you require another type of plug than the one fitted to the appliance,please contact a registered electrician.
ENGLISH4
Page 5

Tanning and your health
The sun, UV and tanning
The sun
The sun supplies various types of energy.Visible light enables us to see, ultraviolet (UV) light gives us a tan and the infrared (IR) light in sunrays
provides the heat in which we like to bask.
UV and your health
Just as with natural sunlight, the tanning process will take some time.The first effect will only become visible after a few sessions (see 'Tanning
sessions: how often and how long?').
Overexposure to ultraviolet light (natural sunlight or artificial light from your tanning appliance) can cause sunburn.
Besides many other factors, such as overexposure to natural sunlight, incorrect and excessive use of a tanning appliance may increase the risk of
skin and eye problems.The degree to which these effects occur is determined by the nature, intensity and duration of the exposure on the one
hand and the sensitivity of the person involved on the other hand.
The more the skin and the eyes are exposed to UV light, the higher the risk of keratitis, conjunctivitis, damage to the retina, cataracts, premature
skin ageing and the development of skin tumours will be. Some medications and cosmetics increase the sensitivity of the skin.
◗ Therefore it is highly important:
- that you follow the instructions given in 'Important' and 'Tanning sessions: how often and how long?';
- that you do not exceed the maximum number of tanning hours per year (see 'Tanning sessions: how often and how long?');
- that you always wear the goggles provided while tanning.
Tanning sessions: how often and how long?
◗ Take one tanning session a day for five to ten days.Wait at least 48 hours after the first session before taking the second session.After
this 5 to 10-day course, we advise you to give your skin a rest for a while.
B
Approximately one month after a course, your skin will have lost much of its tan.You can then start a new course.
B
If you want to keep your tan, do not stop tanning after the course, but continue taking one or two tanning sessions a week.
Whether you choose to stop tanning for a while or whether you continue tanning on a lower frequency, always keep in mind that you must not
exceed the maximum number of tanning hours. For this appliance the maximum is 17 hours (= 1020 minutes) a year.
Example
Suppose you are taking a 10-day course, consisting of a 6-minute tanning session on the first day and a 20-minute tanning session on the
following nine days.
◗ The entire course will then last (1 x 6 minutes) + (9 x 20 minutes) = 186 minutes.
B
This means you can take 5 of these courses a year, as 5 x 186 minutes = 930 minutes.
Ta b l e
As is shown in the table, the first session of a tanning course should always last 6 minutes, irrespective of the sensitivity of the skin.
If you think that the sessions are too long for you (e.g. if the skin gets taut and tender after the session), we advise you to reduce the sessions by
e.g. 5 minutes.
Preparing for use
◗ It requires two people to assemble and move the tanning appliance.
◗ During assembly the appliance becomes heavier and more difficult to move.We therefore advise you to assemble the appliance at the
place where it will be used. Make sure there is enough free space beside (at least 50 cm) and behind (at least 30 cm) the appliance.
◗ If the couch and/or canopy have to be placed on the floor,put them on the floor with the tube lamps facing downwards to avoid
internal damage. Make sure you place them on a soft surface (e.g. a carpet or rug) to prevent damage to the housing (fig. 2).
1 First assemble the legs of the frame by fastening the angle sections with the bolts and then fit the side panels, if applicable (fig. 3).
◗ NB: the holes in the side panels must be on the front side.
ENGLISH 5
for persons with less sensitive
skin
6
25
25
25
25
25
25
25
25
25
for persons with normal
sensitive skin
6
15-20
15-20
15-20
15-20
15-20
15-20
15-20
15-20
15-20
for persons with very sensitive
skin
6
10
10
10
10
10
10
10
10
10
Duration of the tanning session
in minutes
1st session
rest of at least 48 hours
2nd session
3rd session
4th session
5th session
6th session
7th session
8th session
9th session
10th session
Page 6
ENGLISH6
2 Place the couch on the legs carefully.Make sure the legs slide steadily into the appropriate openings in the couch (fig. 4).
◗ NB: the openings for assembling the canopy must be located at the back of the couch.
3 If necessary, you can move the couch slightly by sliding its legs across the floor or by carefully lifting it slightly off the floor together with
another person. Make sure there is enough free space beside (at least 50 cm) and behind (at least 30 cm) the appliance.
◗ Never try to move the appliance in the manner shown in the picture.This could cause the frame to become detached from the couch
(fig. 5).
4 Lift the canopy together with another person and position its connecting tubes over the connecting holes. Slide the tubes steadily into
the connecting holes of the couch (fig. 6).
B
Be careful not to get your fingers stuck between the couch and the canopy.
B
Make sure the cord does not get stuck between the couch and the canopy.
5 Remove the protective foil from the acrylic sheets of the canopy and couch (fig.7).
6 Push the power supply unit under the couch from the front (fig.8).
◗ NB: the plugs should be located at the back of the power supply unit. Make sure the mains cord does not get caught under the wheels.
7 Insert the large plug into the socket of the power supply unit.This will take some effort (fig. 9).
◗ Lock the plug in position by means of the metal handles (fig. 10).
8 Put the plugs of the couch and the canopy in the socket of the power supply (fig.11).
◗ The small plugs are identical and interchangeable.
◗ If you want to remove the small plugs,follow the instructions shown in the picture (fig.12).
9 Place the front panel and fasten it with the screws (fig. 13).
The only purpose of the panel is to enhance the appearance of the appliance.
10 Insert the mains plug of the power supply unit into the wall socket.
Using the appliance
1 Switch the appliance on by setting the required tanning time on the timer (fig. 14).
B
For the correct tanning times, see 'Tanning sessions: how often and how long?'
2 Push the canopy backwards so that you can lie down on the couch.When you are lying on the couch, pull the canopy back into
horizontal position (fig. 15).
B
NB: when the appliance has not been used for some time, the hinges of the canopy may squeak when you open or close the canopy for the first
time.
3 Switch the body cooler on by means of the switch (fig. 16).
◗ Select the desired airflow: n or b (fig. 16).
4 If you like, you can also switch on the facial tanner (fig. 17).
◗ Select , for 75% of the full intensity or m for full intensity (fig. 17).
5 Don't forget to put on the protective goggles provided.
◗ During the last minute of the session you will hear a beeping sound.
Cleaning
Always remove the mains plug from the wall socket and let the tanning appliance cool down before you start cleaning it.
Never use liquids such as alcohol, methylated spirits, petrol or acetone to clean the acrylic sheets as this may cause irreparable damage.
◗ Clean the outside of the appliance with a damp cloth.
B
Do not let any water run into the appliance.
Replacement
The light emitted by the tanning lamps will become less bright in time (i.e. after a few years in case of normal use).When this happens, you will
notice a decrease in the tanning capacity of the appliance.You can solve this problem by setting a slightly longer tanning time or by having the
tanning lamps replaced.
Have the tanning lamps and/or starters replaced by a service centre authorised by Philips.They have the knowledge and skills required for this
job and the original spare parts for your tanning appliance.
◗ If you really insist on replacing the tube lamps and/or starters yourself,you should proceed as follows:
1 Remove the mains plug from the wall socket.
2 Remove the end cover at the head of the canopy by undoing the screws (fig. 18).
3 First pull the acrylic sheet approx. 10 cm out of the appliance (1).Then undo the snap strip on the rear side of the canopy (2) (fig. 19).
4 Do the same with the snap strip on the front side of the canopy.
5 Remove the acrylic sheet (fig. 20).
◗ Now you can remove the tube lamps and the starters.
B
NB: you can now also clean the acrylic sheet, if you wish.
Page 7
7
6 The lamps and/or starters of the couch and the canopy can in principle be replaced in the same way.The starters are located at one of
the lamp ends, except for three starters in the canopy which are located in a different place and which can only be replaced by
removing the three lamps.
7 To remove the lamps, turn them to the left or to the right so that you can lift them out of their holders.
8 The starters can be removed by turning them to the left.
9 Insert new lamps and/or starters and follow the instructions above in reverse direction and order to reassemble the appliance.
10 Do not forget to fasten the end cover with the screws again.
◗ NB: the HPA lamps of the facial tanner may only be replaced by a service centre authorised by Philips.
Coin box or remote control unit
This appliance can also be connected to a coin box or a remote control unit.These devices may only be connected by a registered electrician.
The connection instructions can be found on a sticker on the power supply unit.
Environment
◗ Do not throw the appliance away with the normal household waste at the end of its life, but hand it in at an official collection point for
recycling. By doing this you will help to preserve the environment (fig. 21).
The lamps of this appliance contain substances that may pollute the environment.Always remove them and take them to an official collection
point before you hand the appliance in for recycling.
Guarantee & service
If you need service or information or if you have a problem, please visit the Philips Web site at www.philips.com or contact the Philips
Customer Care Centre in your country (you will find its phone number in the worldwide guarantee leaflet). If there is no Customer Care Centre
in your country, turn to your local Philips dealer or contact the Service Department of Philips Domestic Appliances and Personal Care BV.
Guarantee restrictions
The following parts are not covered by the terms of the international guarantee.
- tanning lamps
- acrylic sheets and the costs of cleaning acr ylic sheets
ENGLISH
Possible causes
The mains plug has not been properly inserted into the wall socket.
The timer has not been set.
Connecting cables (J) have not been plugged in (correctly).
Check the fuses.The correct fuse type is a 16A standard fuse or an automatic fuse.
You are using an extension cord that is too long or does not have the correct current rating.
Consult your dealer. Our general advice is not to use an extension cord.
You are not following the tanning schedule suitable for your skin type. Check the table in
'Tanning sessions: how often and how long?'
When the lamps have been used for a long time, the UV light emitted will decrease. This effect
only becomes noticeable after several years.You can solve this problem by selecting a slightly
longer tanning time or by replacing the lamps.
Problem
The appliance does not start.
One or more fuses of the three-phase power supply system
cut off the power when you switch the appliance on or when it
is in use.
Poor tanning result.
Troubleshooting
If the appliance has not been installed or is not used in accordance with the instructions, it may fail to work properly. In that case you will be
able to solve the problem yourself by following the troubleshooting tips below.
If the problem is not mentioned in the list, the appliance may not work properly because it has a defect. In that case we advise you to contact
your dealer or a Philips service centre.
Page 8

Einleitung
Ganzkörperbräuner mit integriertem Gesichtsbräuner
Mit diesem Bräunungsgerät können Sie sich ganz bequem zu Hause bräunen. Die UV-Lampen strahlen sichtbares Licht, Wärme und ultraviolettes
Licht ab. Sie werden sich wie bei einem natürlichem Sonnenbad fühlen. Ihre Haut wird gleichmäßig von Kopf bis Fuß gebräunt, auch an den
Körperseiten.
Ein Timer sorgt dafür, dass ein Bräunungsbad nicht länger als 30 Minuten dauert. Ebenso wie bei natürlichem Sonnenlicht ist ein zu langes
UV-Bräunungsbad unbedingt zu vermeiden (siehe hierzu "Gesundes Bräunen").
Übersicht (Abb.1)
A UV-Röhren und Starter der Liege
B UV-Röhren und Starter des Sonnenhimmels
C Gesichtsbräuner
D Schalter für Gesichtsbräuner
- O = Gesichtsbräuner aus
- I = Gesichtsbräuner an
- I und , = Gesichtsbräuner ein mit 75 % der vollen Intensität
- I und m = Gesichtsbräuner ein mit voller Intensität
E Ventilator zur Kühlung des Körpers
F Schalter für Ventilator
- O = Ventilator aus
- I = Ventilator ein
- I und n = ein Ventilator ein
- I und b = beide Ventilatoren ein
G Seitenblende
H Netzkabel
I Gestellfüße
J Verbindungskabel zwischen Stromversorgung, Liege und Sonnenhimmel
K Ventilatoren zur Kühlung des Gesichtsbräuners
L Lüftungsöffnungen und Ventilatoren zur Kühlung der UV-Röhren
M Acrylglasplatten
N Schutzfolien
O Schutzbrillen (zwei Stück)
- (Typennummer HB072/Servicenummer 4822 690 80147)
P Schrauben, Bolzen und Zierkappen
Q Schraubenschlüssel und Schraubendreher
R Timer
S Stromversorgung
Wichtig
◗ Prüfen Sie, bevor Sie das Gerät anschließen, ob die Spannungsangabe auf dem Sonnenhimmel mit der örtlichen Netzspannung
übereinstimmt.
◗ Das Gerät erfordert eine Netzspannung von 400 Volt.
◗ Eine hohe Impedanz der Netzstromversorgung kann dazu führen,dass es beim Einschalten des Bräunungsgeräts zu merklichen
Helligkeitsschwankungen der Raumbeleuchtung kommt.Die Einhaltung der EMV-Vorschriften in Bezug auf diesen Aspekt erfordert einen
Impedanznennwert von weniger als 0,3 Ohm.Weitere Informationen hierzu erhalten Sie von Ihrem Energieversorgungsunternehmen.
◗ Wasser und Elektrizität sind eine gefährliche Kombination! Verwenden Sie das Gerät nicht in einer feuchten Umgebung, z. B. im
Badezimmer bzw.in der Nähe einer Dusche oder eines Schwimmbeckens.
◗ Trocknen Sie sich gründlich ab, wenn Sie das Gerät unmittelbar nach dem Duschen oder Baden verwenden wollen.
◗ Das Gerät muss an eine dreiphasige Netzstromversorgung angeschlossen werden, deren Phasen mit 16-A-Sicherungsautomaten oder
gleichwertigen Schmelzsicherungen abgesichert sind.
◗ Ziehen Sie nach Gebrauch stets den Netzstecker.
◗ Wenn Sie das Gerät bewegen, achten Sie darauf, dass sich das Netzkabel nicht unter den Gerätefüßen verfängt.
◗ Die Lüftungsöffnungen zur Kühlung der UV-Lampen in der Liege und dem Sonnenhimmel müssen während des Betriebs stets frei
bleiben.
◗ Nehmen Sie das Gerät nicht in Betrieb, wenn der Timer oder eine Acrylglasplatte defekt ist.
◗ Lassen Sie Kinder nicht mit dem Gerät hantieren.
◗ Überschreiten Sie die empfohlene Bräunungszeit und die maximale Anzahl der Bräunungsstunden nicht (siehe "Das UV-Sonnenbad:
Wie oft und wie lange?")
◗ Bräunen Sie keine Körperpartie mehr als einmal täglich.Vermeiden Sie es, sich am gleichen Tag übermäßig dem natürlichen Sonnenlicht
auszusetzen.
◗ Nehmen Sie kein Bräunungsbad, wenn Sie krank sind oder wenn Sie Medikamente bzw. Kosmetika verwenden, die zu erhöhter
Hautempfindlichkeit führen.Seien Sie besonders vorsichtig, wenn Sie auf UV-Licht überempfindlich reagieren.Wenden Sie sich im
Zweifelsfall an Ihren Arzt.
◗ Konsultieren Sie Ihren Arzt,wenn sich hartnäckige Schwellungen oder Geschwüre auf der Haut zeigen oder wenn Veränderungen an
pigmentierten Muttermalen auftreten.
◗ Das Gerät darf nicht von Personen verwendet werden, die sich beim Sonnen schnell einen Sonnenbrand zuziehen, auch ohne zu
bräunen, oder die bereits einen Sonnenbrand haben. Das gleiche gilt für Kinder oder für Personen, die zu Hautkrebs neigen,daran
erkrankt sind oder früher schon daran erkrankt waren.
◗ Tragen Sie beim Bräunen immer die mitgelieferte Schutzbrille (siehe auch "Gesundes Bräunen").
◗ Entfernen Sie schon einige Zeit vor der Bräunung Cremes,Lippenstift und andere Kosmetika von Ihrer Haut.
◗ Verwenden Sie keine Sonnenschutzmittel oder Bräunungsbeschleuniger.
DEUTSCH8
Page 9

◗ Spannt Ihre Haut nach der Bräunung, können Sie eine Feuchtigkeitscreme auftragen.
◗ Farben können, genau wie bei natürlichem Sonnenlicht, auch im Licht der UV-Lampen verblassen.
◗ Erwarten Sie von dem UV-Bräunungsbad keine besseren Ergebnisse als von einem Bad in der natürlichen Sonne.
◗ Sollte das Netzkabel des Geräts defekt sein, darf dieses aus Sicherheitsgründen nur durch eine von Philips autorisierte Werkstatt
ausgetauscht werden.
◗ Wenn der Stromanschluss am Aufstellungsort einen anderen Netzstecker als den am Gerät angebrachten erfordert, wenden Sie sich an
einen zugelassenen Elektriker.
Gesundes Bräunen
Die Sonne, UV-Licht und Körperbräune
Die Sonne
Die Sonne liefert verschiedene Ar ten von Energie: Das sichtbare Licht ermöglicht uns zu sehen, das ultraviolette (UV-)Licht bräunt unsere Haut,
und das infrarote (IR-)Licht spendet die Wärme, bei der wir uns wohlfühlen.
UV und Ihre Gesundheit
Ebenso wie in natürlichem Sonnenlicht dauer t der Bräunungsvorgang eine gewisse Zeit. Erste Effekte werden erst nach mehreren
Bräunungsbädern sichtbar (siehe "Das UV-Sonnenbad: Wie oft und wie lange?")
Wer sich zu lange dem ultravioletten Licht aussetzt - ob natürlichem Sonnenlicht oder den Strahlen eines Bräunungsgeräts - kann einen
Sonnenbrand bekommen.
Neben vielen anderen Faktoren, etwa dem übermäßigen Kontakt mit natürlichem Sonnenlicht, kann der unsachgemäße und zu häufige Gebrauch
eines Bräunungsgeräts das Risiko von Haut- und Augenproblemen erhöhen. Wie ausgeprägt sich solche Effekte zeigen, hängt einerseits von der
Art, der Intensität und der Dosis der UV-Strahlen ab und andererseits von der Empfindlichkeit der betreffenden Person.
Je intensiver Haut und Augen dem UV-Licht ausgesetzt sind, desto höher ist die Gefahr von Horn- und Bindehautentzündung, Schäden an der
Netzhaut, Katarakt (Grauer Star), vorzeitiger Hautalterung und Hauttumoren. Bestimmte Medikamente und Kosmetika steigern die
Hautempfindlichkeit.
◗ Darum ist es sehr wichtig, dass Sie ...
- die Hinweise in den Abschnitten "Wichtig" sowie "Das UV-Sonnenbad:Wie oft und wie lange?" beachten;
- die maximale Anzahl der Bräunungsstunden pro Jahr nicht überschreiten (siehe "Das UV-Sonnenbad: Wie oft und wie lange?");
- während des Bräunungsbades immer die Schutzbrille tragen.
Das UV-Sonnenbad:Wie oft und wie lange?
◗ Nehmen Sie 5 bis 10 Tage lang einmal täglich ein Bräunungsbad.Warten Sie nach dem ersten Bräunungsbad mindestens 48 Stunden,
bevor Sie das zweite nehmen.Nach einer 5- bis 10-tägigen Kur sollten Sie Ihrer Haut eine Zeit lang Ruhe gönnen.
B
Etwa einen Monat nach Abschluss der Bräunungskur hat Ihre Haut soviel von ihrer Bräune verloren, dass Sie eine neue Bräunungskur beginnen
können.
B
Sie können aber auch anschließend an die Bräunungskur wöchentlich 1 oder 2 Bräunungsbäder nehmen, um die Bräunung aufrecht zu erhalten.
Ganz gleich, ob Sie sich seltener oder eine Zeit lang gar nicht bräunen, berücksichtigen Sie stets, dass die maximale Anzahl der Bräunungsstunden
nicht überschritten werden darf. Bei diesem Gerät gilt eine maximale Bräunungszeit von 17 Stunden (1020 Minuten) pro Jahr.
Beispiel
Angenommen, Sie führen eine 10-tägige Kur durch, die aus Bräunungsbädern von 6 Minuten am ersten Tag und 20 Minuten an den folgenden 9
Tagen besteht.
◗ Die gesamte Kur umfasst dann (1 x 6 Minuten) + (9 x 20 Minuten) = 186 Minuten.
B
Dies bedeutet, dass Sie innerhalb eines Jahres 5 solcher Kuren machen können (5 x 186 Minuten = 930 Minuten).
Tabelle
Aus der folgenden Tabelle ist ersichtlich, dass jede neue Bräunungskur mit einer ersten Bräunung von 6 Minuten beginnt, unabhängig von der
individuellen Hautempfindlichkeit.
Wenn Sie die Bräunungsbäder als zu lang empfinden, z. B. weil anschließend Ihre Haut spannt, sollten Sie die Dauer z. B. um 5 Minuten
reduzieren.
DEUTSCH 9
Bei wenig empfindlicher Haut
6
25
25
25
25
25
25
25
25
25
Bei normaler Haut
6
15-20
15-20
15-20
15-20
15-20
15-20
15-20
15-20
15-20
Bei sehr empfindlicher Haut
6
10
10
10
10
10
10
10
10
10
Dauer der Bräunung in Minuten
1.Tag
mind. 48 Stunden Pause
2.Tag
3.Tag
4.Tag
5.Tag
6.Tag
7.Tag
8.Tag
9.Tag
10.Tag
Page 10
10
Vor dem Gebrauch
◗ Für den Zusammenbau und die Aufstellung des Geräts sind zwei Personen erforderlich.
◗ Je weiter der Zusammenbau fortschreitet,desto schwerer wird das Gerät. Es empfiehlt sich daher, das Gerät am endgültigen
Aufstellungsort zusammenzubauen. Planen Sie genügend freien Raum seitlich vom Gerät (mindestens 50 cm) und hinter dem Gerät
(mindestens 30 cm) ein.
◗ Wenn die Liege und/oder der Sonnenhimmel auf dem Boden abgelegt werden müssen, sollten die UV-Röhren zum Schutz vor
Beschädigung nach unten zeigen. Um das Gehäuse zu schützen, sollte der Bodenbelag weich sein (z.B.Teppich) (Abb. 2).
1 Montieren Sie zunächst die Gestellfüße. Befestigen Sie dazu das Winkelprofil mit den Bolzen und befestigen Sie gegebenenfalls die
Seitenblenden (Abb. 3).
◗ Hinweis: Die Löcher in den seitlichen Sockelblenden müssen nach vorne zeigen.
2 Heben Sie die Liege vorsichtig über die Füße und senken Sie die Liege ab. Die Füße müssen nach und nach in die vorgesehenen
Öffnungen gleiten (Abb. 4).
◗ Hinweis: Die Befestigungsöffnungen des Sonnenhimmels müssen zur Rückseite der Liege zeigen.
3 Falls nötig, können Sie die Liege noch etwas bewegen, indem Sie die Gestellfüße verschieben oder die Liege mithilfe einer zweiten
Person leicht anheben.Achten Sie auf genügend freien Raum seitlich vom Gerät (mindestens 50 cm) und hinter dem Gerät (mindestens
30 cm).
◗ Versuchen Sie auf keinen Fall, das Gerät so zu bewegen, wie in der Abbildung gezeigt. Das Untergestell könnte sich von der Liege lösen
(Abb. 5).
4 Heben Sie den Sonnenhimmel mithilfe einer anderen Person hoch und positionieren Sie die Verbindungsrohre über den
Aufnahmeöffnungen. Schieben Sie die Rohre vorsichtig in die Aufnahmeöffnungen der Liege (Abb. 6).
B
Achten Sie darauf, dass Sie mit Ihren Fingern nicht zwischen Liege und Sonnenhimmel geraten.
B
Achten Sie darauf, dass das Netzkabel nicht zwischen Liege und Sonnenfläche eingeklemmt wird.
5 Entfernen Sie die Schutzfolie von den Acrylglasplatten der Liege und des Sonnenhimmels (Abb. 7).
6 Schieben Sie die Stromversorgungseinheit von vorne unter die Liege (Abb.8).
◗ Hinweis: Die Stecker müssen sich an der Rückseite der Stromversorgungseinheit befinden.Achten Sie darauf, dass sich das Netzkabel
nicht unter den Rollen verfängt.
7 Stecken Sie den großen Stecker in die Buchse der Stromversorgungseinheit. Dies erfordert einen gewissen Kraftaufwand (Abb.9).
◗ Arretieren Sie den Stecker mit den Metallgriffen (Abb. 10).
8 Schließen Sie die Stecker von Liege und Sonnenhimmel an die vorgesehenen Buchsen der Stromversorgungseinheit an (Abb. 11).
◗ Die kleinen Stecker sind identisch und daher austauschbar.
◗ Zum Lösen der Stecker befolgen Sie bitte die Hinweise in der Abbildung (Abb. 12).
9 Setzen Sie die vorderseitige Sockelblende an, und schrauben Sie sie fest (Abb. 13).
Die Blende übernimmt keine mechanische Funktion, sie dient nur der Optik.
10 Stecken Sie den Netzstecker der Stromversorgungseinheit in die Steckdose.
Der Gebrauch des Geräts
1 Schalten Sie das Gerät ein, indem Sie am Timer die erforderliche Bräunungszeit einstellen (Abb. 14).
B
Beachten Sie die Hinweise im Abschnitt "Das UV-Sonnenbad:Wie oft und wie lange?".
2 Schieben Sie den Sonnenhimmel nach hinten und legen Sie sich auf die Liege. Ziehen Sie den Sonnenhimmel dann wieder in horizontale
Position (Abb. 15).
B
Hinweis:Wenn das Gerät für längere Zeit nicht benutzt wurde, kann es sein, dass die Scharniere des Sonnenhimmels beim ersten Bewegen etwas
quietschen.
3 Schalten Sie den Körperventilator ein (Abb. 16).
◗ Wählen Sie die gewünschte Luftstromstärke:n oder b (Abb. 16).
4 Wenn Sie möchten,können Sie auch den Gesichtsbräuner einschalten (Abb. 17).
◗ Wählen Sie , für 75 % der vollen Intensität oder m für volle Intensität (Abb. 17).
5 Vergessen Sie nicht,die mitgelieferte Schutzbrille aufzusetzen.
◗ Im Laufe der letzten Minute der Sitzung hören Sie ein Tonsignal.
Reinigung
Ziehen Sie vor jeder Reinigung erst den Netzstecker und lassen Sie gegebenenfalls das Gerät abkühlen.
Verwenden Sie zur Reinigung der Acrylglasplatten keine aggressiven Flüssigkeiten wie Alkohol, Spiritus oder Azeton, um dauerhafte Schäden
zu vermeiden.
◗ Wischen Sie das Gerät von außen mit einem feuchten Tuch ab.
B
Achten Sie darauf, dass kein Wasser in das Innere des Geräts gelangt.
Auswechseln der Lampen
Im Laufe der Zeit - bei normalem Gebrauch erst nach mehreren Jahren - sinkt die Intensität der Lampen allmählich. Sie bemerken es daran, dass
die Wirkung der UV-Lampen nachlässt. Sie können dann die Bräunungszeit etwas verlängern oder die UV-Lampen gegen neue austauschen.
Lassen Sie den Austausch der UV-Lampen und/oder der Star ter nur durch ein Philips Service Center durchführen. Nur dann ist sichergestellt,
dass diese Arbeiten fachgerecht und mit Original-Ersatzteilen ausgeführt werden.
DEUTSCH
Page 11

11
◗ Wenn Sie UV-Röhren und/oder Starter dennoch selbst austauschen möchten, gehen Sie folgendermaßen vor:
1 Ziehen Sie den Netzstecker aus der Steckdose.
2 Schrauben Sie die Abdeckblende am Kopfende des Sonnenhimmels ab (Abb. 18).
3 Ziehen Sie die Acrylglasplatte ca. 10 cm aus dem Gerät (1). Lösen Sie dann die Federleiste an der Rückseite des Sonnenhimmels (2)
(Abb. 19).
4 Lösen Sie die Federleiste an der Vorderseite des Sonnenhimmels.
5 Nehmen Sie die Acrylglasplatte ab (Abb. 20).
◗ Sie können nun die UV-Röhren und Starter ausbauen.
B
Hinweis: Es empfiehlt sich, bei dieser Gelegenheit die Innenseite der Acrylglasplatte zu reinigen.
6 Die UV-Lampen und/oder Starter von Liegefläche und Sonnenhimmel werden prinzipiell auf dieselbe Weise ausgetauscht. Die Starter
befinden sich jeweils am Ende einer Lampe.Ausgenommen ist eine Gruppe von drei Startern, die an einer anderen Stelle montiert sind
und nur ausgetauscht werden können,nachdem die drei zugehörigen Lampen ausgebaut wurden.
7 Zum Entfernen einer UV-Lampe drehen Sie diese nach links oder rechts, sodass sie aus der Halterung gelöst werden kann.
8 Die Starter werden durch eine Drehung nach links entnommen.
9 Setzen Sie neue Lampen und/oder Starter ein. Führen Sie dann die obigen Schritte in umgekehrter Reihenfolge aus, um das Gerät
wieder zusammenzubauen.
10 Vergessen Sie nicht,die Abdeckblende wieder anzuschrauben.
◗ Hinweis: Die HPA-Lampe des Gesichtsbräuners darf nur durch eine von Philips autorisierte Werkstatt ausgetauscht werden.
Münzautomat oder Fernbedienung
Dieses Gerät kann an einen Münzautomaten oder eine Fenbedienung angeschlossen werden. Die Anschlussarbeiten dürfen nur von einem
zugelassenen Elektriker durchgeführt werden. Eine entsprechende Anleitung befindet sich auf einem Etikett an der Stromversorgungseinheit.
Umweltschutz
◗ Geben Sie das Gerät am Ende der Lebensdauer nicht in den normalen Hausmüll. Bringen Sie es zum Recycling zu einer offiziellen
Sammelstelle.Auf diese Weise helfen Sie die Umwelt zu schonen (Abb.21).
Die Röhren in diesem Gerät enthalten Substanzen, welche die Umwelt gefährden können. Nehmen Sie die Röhren aus dem Gerät und bringen
Sie sie zu einer offiziellen Sammelstelle, bevor Sie das Gerät zum Recycling abgeben.
Garantie und Kundendienst
Benötigen Sie weitere Informationen oder treten Probleme auf, wenden Sie sich bitte an Ihren Philips-Händler oder setzen Sie sich mit einem
Philips Service-Center in Ihrem Land in Verbindung (Tel. Nr. 0180/5356767). Besuchen Sie auch die Philips Website (www.philips.com).
Einschränkungen zur Garantie
Die Bedingungen der internationalen Garantie gelten nicht für die folgenden Teile:
- UV-Lampen
- Acrylglasplatten sowie Reinigungskosten von Acrylglasplatten
DEUTSCH
Mögliche Ursache(n)
Der Netzstecker sitzt nicht richtig in der Steckdose.
Der Timer wurde nicht eingestellt.
Die Verbindungskabel (J) wurden nicht bzw. nicht richtig eingesteckt.
Prüfen Sie die Sicherungen. Schmelzsicherungen und Sicherungsautomaten müssen für 16 A
ausgelegt sein.
Sie verwenden ein Verlängerungskabel, das zu lang ist oder nicht für eine Strombelastbarkeit von
16 A ausgelegt ist.Wenden Sie sich an Ihren Fachhändler. Philips rät grundsätzlich, kein
Verlängerungskabel zu verwenden.
Sie halten sich nicht an den für Ihren Hauttyp geeigneten Bräunungsplan. Beachten Sie die
Tabelle "Das UV-Sonnenbad: Wie oft und wie lange?"
Nach langem Gebrauch der Lampen lässt die Intensität der UV-Strahlen nach. Dieser Effekt
macht sich jedoch erst nach mehreren Jahren bemerkbar.Wählen Sie eine geringfügig längere
Bräunungszeit oder tauschen Sie die Lampen aus.
Problem
Das Gerät startet nicht.
Beim Einschalten des Geräts oder während des Betriebs
sprechen ein oder mehrere Sicherungen der dreihphasigen
Netzversorgung an und schalten die Stromversorgung ab.
Die Bräunung entspricht nicht der Erwartung.
Problembehebung
Wenn das Gerät nicht gemäß dieser Bedienungsanleitung aufgestellt oder betrieben wird, kann es zu Funktionsstörungen kommen. Einige
Probleme können Sie mithilfe der folgenden Tipps selbst lösen.
Wird Ihr spezielles Problem hier nicht beschrieben, liegt möglicherweise ein Gerätedefekt vor.Wenden Sie sich in diesem Fall an Ihren
Fachhändler oder ein Philips Service Center.
Page 12

12
Introduction
Banc solaire avec lampe faciale intégrée
Ce banc solaire vous permet de bronzer confortablement chez vous. Les lampes émettent de la lumière, de la chaleur et des rayons ultraviolets,
tout comme le soleil. Cet appareil garantit un bronzage uniforme de la tête aux pieds, y compris sur les côtés.
Un minuteur coupe automatiquement l'alimentation de l'appareil après 30 minutes de bronzage pour éviter toute surexposition (voir le
chapitre « Bronzage et santé »).
Description générale (fig. 1)
A Tubes UV et star ters du lit
B Tubes UV et star ters du ciel
C Lampe faciale
D Interrupteurs de la lampe faciale
- O = lampe faciale désactivée
- I = lampe faciale activée
- I et , = lampe faciale fonctionnant à 75 % de la capacité maximale
- I et m = lampe faciale fonctionnant à capacité maximale
E Ventilateur
F Interrupteurs du ventilateur
- O = ventilateur désactivé
- I = ventilateur activé
- I et n = un ventilateur activé
- I et b = deux ventilateurs activés
G Panneau de protection
H Cordon d'alimentation
I Pieds du châssis
J Câbles de connexion entre le bloc d'alimentation, le lit et le ciel
K Ventilateurs pour lampes faciales
L Fentes d'aération et ventilateurs pour tubes UV
M Plaques acryliques
N Revêtements de protection
O Lunettes de protection (2 paires)
- (modèle HB072/code service 4822 690 80147)
P Vis, boulons et garnitures
Q Clé et tournevis
R Minuteur
S Bloc d'alimentation
Important
◗ Avant de brancher le banc solaire, vérifiez si la tension indiquée sur le ciel correspond à la tension de votre secteur.
◗ Cet appareil nécessite une tension triphasée de 400 V.
◗ Une impédance secteur élevée peut donner lieu à des variations de l'intensité lumineuse lorsque l'appareil fonctionne. Pour satisfaire
aux normes CEM en vigueur, le facteur de conversion de l'impédance secteur doit être inférieur à 0,3 ohms. Pour plus d'informations,
contactez le fournisseur d'électricité.
◗ L'eau et l'électricité ne font pas bon ménage ! N'utilisez jamais l'appareil dans un environnement humide (dans la salle de bains ou près
d'une douche ou d'une piscine par exemple).
◗ Si vous venez de nager ou de prendre une douche, séchez-vous parfaitement avant d'utiliser l'appareil.
◗ L'appareil se branche sur une source d'alimentation triphasée protégée par des fusibles standard 16 A ou des fusibles automatiques.
◗ Débranchez toujours l'appareil après utilisation.
◗ Veillez à ne pas coincer le cordon sous l'un des pieds de l'appareil lorsque vous le déplacez.
◗ En cours de fonctionnement, n'obturez pas les fentes d'aération des lampes UV du lit et du ciel.
◗ N'utilisez jamais l'appareil en cas de problème au niveau du minuteur ou d'une plaque acrylique.
◗ Veillez à ne pas laisser les enfants jouer avec l'appareil.
◗ Ne dépassez pas les durées de bronzage recommandées,ni le nombre maximum d'heures de bronzage par an (voir le chapitre «
Séances de bronzage : durée et fréquence »).
◗ Évitez de faire bronzer une même partie du corps plus d'une fois par jour et de vous exposer au soleil le jour d'une séance de
bronzage.
◗ N'utilisez pas l'appareil si vous souffrez d'une maladie,prenez des médicaments et/ou utilisez des produits cosmétiques susceptibles
d'augmenter la sensibilité de la peau. Redoublez de prudence en cas d'hypersensibilité aux UV. En cas de doute,consultez votre médecin.
◗ Consultez votre médecin si vous avez des ulcères ou tumeurs de la peau et surtout si vous observez un changement d'aspect ou de
taille des grains de beauté ou si vous observez une pigmentation anormale de la peau.
◗ L'utilisation de l'appareil est strictement interdite aux personnes prédisposées aux coups de soleil,aux personnes souffrant de coups de
soleil, aux enfants, ou aux personnes atteintes (ou ayant souffert) d'un cancer de la peau ou prédisposées au cancer de la peau.
◗ Portez toujours les lunettes fournies afin de protéger vos yeux de la lumière (voir également le chapitre « Bronzage et santé »).
◗ Retirez toute trace de crème, de rouge à lèvres ou de produit cosmétique avant une séance de bronzage.
◗ N'employez pas de lotions ou de crèmes solaires.
◗ Si votre peau est sèche après la séance de bronzage,vous pouvez appliquer une crème hydratante.
◗ Certaines couleurs pâlissent au contact des rayons du soleil. Le même phénomène peut se produire lors de l'utilisation du banc solaire.
◗ Le banc solaire ne garantit pas de meilleurs résultats de bronzage par rapport à une exposition au soleil.
◗ Si le cordon d'alimentation est endommagé, confiez toujours son remplacement à Philips ou à un Centre Service Agréé pour éviter
tout accident.
◗ Si vous avez besoin d'un autre type de prise pour votre appareil, contactez un électricien qualifié.
FRANÇAIS
Page 13

Bronzage et santé
Le soleil, les UV et le bronzage
Le soleil
Le soleil émet un rayonnement complexe : sa lumière nous permet de voir, ses rayons ultraviolets (UV) font bronzer notre peau et ses rayons
infrarouges (IR) génèrent de la chaleur.
Les UV et votre santé
Comme le bronzage naturel, le bronzage aux UV nécessite un certain temps. Les premiers effets ne seront visibles qu'après quelques séances
(voir le chapitre « Séances de bronzage : fréquence et durée »).
Une surexposition aux rayons ultraviolets (du soleil ou du banc solaire) peut engendrer des coups de soleil.
Outre plusieurs autres facteurs, comme la surexposition au soleil, une utilisation incorrecte ou excessive du banc solaire peut augmenter le
risque de maladie de la peau ou des yeux. La gravité de ces maladies dépend d'une part de la nature, de l'intensité et de la durée de
l'exposition, et d'autre part de la sensibilité de chacun.
Une exposition prolongée de la peau et des yeux aux UV augmente le risque d'affections telles que la kératite, la conjonctivite, les dommages à
la rétine, la cataracte, le vieillissement prématuré de la peau et les tumeurs de la peau. Certains médicaments et produits cosmétiques
contribuent à augmenter la sensibilité de la peau.
◗ Il est dès lors très important de :
- suivre les instructions fournies dans les chapitres « Important » et « Séances de bronzage : durée et fréquence » ;
- ne pas dépasser le nombre maximum d'heures de bronzage par an (voir également le chapitre « Séances de bronzage:
durée et fréquence ») ;
- toujours por ter les lunettes fournies pendant le bronzage.
Séances de bronzage : durée et fréquence
◗ Effectuez une séance de bronzage par jour pendant une période de cinq à dix jours. Espacez les deux premières séances de bronzage
d'au moins 48 heures.Après ce programme, laissez reposer votre peau pendant un certain temps.
B
Environ un mois plus tard, votre peau aura perdu une grande partie du bronzage.Vous pouvez alors commencer un nouveau programme.
B
Pour entretenir votre bronzage, effectuez une ou deux séances d'UV par semaine, après avoir suivi le programme initial.
Que vous choisissiez de faire une pause pendant quelques jours ou de continuer le bronzage à une intensité plus faible, il est impératif de ne pas
dépasser le nombre maximum d'heures de bronzage par an. Pour ce banc solaire, le nombre maximum d'heures de bronzage est de 17 heures
(=1 020 minutes) par an.
Exemple
Supposons que vous suiviez un programme de bronzage de 10 jours avec une séance de 6 minutes le premier jour et des séances de
20 minutes les neufs jours suivants.
◗ Ce programme comprend donc (1 x 6 minutes) + (9 x 20 minutes) = 186 minutes.
B
Vous pouvez suivre 5 de ces programmes par an (5 x 186 minutes = 930 minutes).
Tableau
Dans le tableau ci-dessous, vous verrez que la durée de la première séance est toujours de 6 minutes, quelle que soit la sensibilité de la peau.
Si les séances vous semblent trop longues (si vous avez l'impression que votre peau tire en fin de séance par exemple), il est recommandé d'en
réduire la durée d'environ 5 minutes.
FRANÇAIS 13
Pour personnes à peau peu
sensible
6
25
25
25
25
25
25
25
25
25
Pour personnes à peau normale
6
15-20
15-20
15-20
15-20
15-20
15-20
15-20
15-20
15-20
Pour personnes à peau très
sensible
6
10).
10).
10).
10).
10).
10).
10).
10).
10).
Durée de la séance de bronzage
en minutes
1re séance
repos d'au moins 48 heures
2e séance
3e séance
4e séance
5e séance
6e séance
7e séance
8e séance
9e séance
10e séance
Page 14
14
Avant l'utilisation
◗ L'assemblage et le déplacement du banc solaire nécessitent deux personnes.
◗ Au fur et à mesure de l'assemblage, le banc solaire devient plus lourd et plus difficile à déplacer. Il est donc recommandé de l'assembler
à l'endroit où il sera utilisé.Assurez-vous de laisser un espace suffisant autour de l'appareil, à savoir au moins 50 cm sur les côtés et
30 cm à l'arrière.
◗ Si vous devez placer le lit et/ou le ciel sur le sol,veillez à orienter les lampes vers le bas afin d'éviter tout dommage interne. Placez-les
sur une surface douce (sur un tapis par exemple) pour ne pas endommager le boîtier (fig. 2).
1 Commencez par fixer les pieds sur le châssis à l'aide des boulons, puis fixez les panneaux latéraux, le cas échéant (fig. 3).
◗ Remarque : les trous des panneaux latéraux doivent se trouver à l'avant.
2 Placez le lit sur les pieds avec précaution. Glissez les pieds dans les ouvertures correspondantes du lit (fig. 4).
◗ Remarque : les ouvertures permettant de monter le ciel doivent se trouver à l'arrière du lit.
3 Si nécessaire, vous pouvez bouger le lit en le faisant glisser sur le sol ou en le soulevant avec précaution avec l'aide d'une autre
personne.Veillez à laisser un espace suffisant autour de l'appareil, à savoir au moins 50 cm sur les côtés et 30 cm à l'arrière.
◗ Ne déplacez jamais l'appareil comme illustré sur l'image.Vous risqueriez de désassembler le lit et le châssis (fig. 5).
4 Soulevez le ciel avec l'aide d'une autre personne et placez les tubes de connexion au-dessus des ouvertures du lit, puis glissez-les à
l'intérieur (fig. 6).
B
Soyez prudent ! Ne vous coincez pas les doigts entre le lit et le ciel.
B
Veillez à ne pas coincer le cordon d'alimentation entre le lit et le ciel.
5 Retirez le revêtement de protection des plaques acryliques du ciel et du lit (fig. 7).
6 Glissez le bloc d'alimentation sous le lit par l'avant (fig. 8).
◗ Remarque : les prises doivent se trouver à l'arrière du bloc d'alimentation.Veillez à ne pas coincer le cordon d'alimentation sous les
roues.
7 Insérez la grande fiche dans le bloc d'alimentation. Il peut y avoir une légère résistance (fig.9).
◗ Verrouillez la fiche à l'aide des loquets métalliques (fig. 10).
8 Insérez les fiches du lit et du ciel dans le bloc d'alimentation (fig. 11).
◗ Les petites fiches sont identiques et interchangeables.
◗ Pour retirer les petites fiches,suivez les instructions illustrées sur l'image (fig. 12).
9 Placez le panneau avant et fixez-le à l'aide des vis (fig. 13).
Ce panneau n'est monté qu'à des fins esthétiques.
10 Insérez la fiche du bloc d'alimentation dans la prise secteur.
Utilisation de l'appareil
1 Mettez l'appareil en marche en réglant le minuteur sur la durée de bronzage souhaitée (fig.14).
B
Pour connaître les durées de bronzage recommandées, reportez-vous au chapitre « Séances de bronzage : durée et fréquence ».
2 Soulevez le ciel afin de pouvoir vous allonger sur le lit. Ensuite, replacez le ciel en position horizontale (fig.15).
B
Remarque : si vous n'avez pas utilisé l'appareil pendant une longue période, les gonds du ciel peuvent grincer lorsque vous l'ouvrez ou le fermez
pour la première fois.
3 Mettez le ventilateur en marche à l'aide de l'interrupteur (fig. 16).
◗ Sélectionnez le flux d'air désiré : n ou b (fig. 16).
4 Si vous le souhaitez, vous pouvez également mettre la lampe faciale en marche (fig.17).
◗ Sélectionnez la position , pour obtenir 75 % de l'intensité maximale ou m pour bénéficier de l'intensité maximale (fig. 17).
5 N'oubliez pas de mettre les lunettes de protection fournies.
◗ Lors de la dernière minute de la séance vous entendrez un signal sonore.
Nettoyage
Débranchez toujours le banc solaire et laissez-le refroidir avant de le nettoyer.
N'utilisez jamais de produits liquides tels que de l'alcool, de l'alcool dénaturé, de l'essence ou de l'acétone pour nettoyer les plaques
acryliques au risque de les endommager de manière irréparable.
◗ Nettoyez l'extérieur de l'appareil à l'aide d'un chiffon humide.
B
Veillez à ne pas faire pénétrer d'eau dans l'appareil.
Remplacement
Avec le temps (après plusieurs années en cas d'utilisation normale), l'intensité de la lumière émise par les lampes diminue, ainsi que leur
efficacité.Vous pouvez compenser cette perte d'efficacité en augmentant le temps d'exposition ou en remplaçant les lampes.
Confiez toujours le remplacement des lampes et/ou des starters à un Centre Service Agréé Philips. Ces centres disposent de personnel
qualifié pour ce genre d'intervention, ainsi que des pièces de rechange d'origine pour votre banc solaire.
◗ Si vous tenez à remplacer les lampes et/ou les starters vous-même, procédez comme suit :
FRANÇAIS
Page 15

15
Causes possibles
Le cordon d'alimentation n'est pas correctement inséré dans la prise secteur.
Le minuteur n'a pas été réglé.
Les câbles de connexion (J) n'ont pas été branchés (correctement).
Vérifiez les fusibles. Pour votre banc solaire, il doit s'agir de fusibles standard de 16 A ou de
fusibles automatiques.
La rallonge que vous utilisez est trop longue ou ne correspond pas au niveau de puissance
requis. Contactez votre revendeur. Il est toutefois recommandé de ne pas utiliser de rallonge.
Le programme de bronzage que vous suivez n'est pas adapté à votre type de peau. Consultez
le tableau du chapitre « Séances de bronzage : durée et fréquence ».
Après une longue durée d'utilisation (plusieurs années), l'intensité des rayons UV émis par les
lampes diminue.Vous pouvez compenser cette perte d'efficacité en augmentant légèrement les
durées d'exposition ou en remplaçant les lampes.
Problème
Impossible de mettre l'appareil en marche.
L'alimentation a été coupée par un ou plusieurs fusibles du
circuit triphasé lors de la mise en marche ou pendant
l'utilisation du banc solaire.
Résultats de bronzage peu satisfaisants.
Dépannage
Si l'appareil n'a pas été installé ou utilisé conformément aux instructions, il est possible qu'il ne fonctionne pas correctement. Dans ce cas,
consultez les solutions de dépannage ci-dessous pour résoudre le problème.
Si le problème n'est pas mentionné ci-dessous, l'appareil est probablement défectueux. Dans ce cas, contactez votre revendeur ou un Centre
Service Agréé Philips.
1 Retirez le cordon d'alimentation de la prise secteur.
2 Retirez le panneau de protection à l'avant du ciel en dévissant les vis (fig. 18).
3 Commencez par faire glisser la plaque acrylique d'environ 10 cm hors de l'appareil (1), puis détachez la barre encliquetée à l'arrière du
ciel (2) (fig. 19).
4 Procédez de la même manière avec la barre encliquetée à l'avant du ciel.
5 Retirez la plaque acrylique (fig. 20).
◗ Vous pouvez ensuite retirer les tubes et les starters.
B
Remarque : profitez-en pour nettoyer la plaque acrylique si nécessaire.
6 Les lampes et/ou les starters du lit et du ciel se remplacent de la même manière. Les starters sont situés à l'une des extrémités des
lampes, à l'exception de trois starters du ciel qui se trouvent ailleurs et ne peuvent être remplacés qu'une fois les trois lampes retirées.
7 Pour retirer les lampes, faites-les tourner vers la droite ou vers la gauche pour les sortir de leurs supports.
8 Pour retirer les starters, faites-les tourner vers la gauche.
9 Insérez les nouvelles lampes et/ou les nouveaux starters, puis procédez dans l'ordre inverse pour réassembler l'appareil.
10 N'oubliez pas de fixer le panneau de protection à l'aide des vis.
◗ Remarque : les lampes faciales HPA ne peuvent être remplacées que par un Centre Service Agréé Philips.
Boîte à monnaie ou télécommande
Cet appareil peut être raccordé à une boîte à monnaie ou à une télécommande. Ces dispositifs peuvent uniquement être connectés par un
électricien qualifié. Les instructions de connexion sont spécifiées sur l'autocollant du bloc d'alimentation.
Environnement
◗ Lorsqu'il ne fonctionne plus, ne jetez pas l'appareil avec les ordures ménagères mais déposez-le à un endroit assigné à cet effet, où il
pourra être recyclé.Vous contribuerez ainsi à la protection de l'environnement (fig.21).
Les lampes contiennent des substances qui peuvent nuire à l'environnement. Retirez-les toujours avant de confier l'appareil au recyclage et
déposez-les à un endroit assigné à cet effet.
Garantie et service
Si vous souhaitez obtenir des informations supplémentaires, réparer l'appareil ou si vous rencontrez un problème, visitez le site Web de Philips à
l'adresse www.philips.com ou contactez le Service Consommateurs Philips de votre pays (vous trouverez le numéro de téléphone
correspondant sur le dépliant de garantie internationale). S'il n'existe pas de Ser vice Consommateurs Philips dans votre pays, renseignez-vous
auprès de votre revendeur local ou contactez le « Service Department of Philips Domestic Appliances and Personal Care BV ».
Limitation de garantie
Les pièces suivantes ne sont pas couvertes par la garantie internationale :
- les lampes ;
- les plaques acryliques, ainsi que les frais de nettoyage de celles-ci.
FRANÇAIS
Page 16

16
Inleiding
Lichaamsbruiner met geïntegreerde gezichtsbruiner
Met dit apparaat kunt u thuis op comfortabele wijze bruin worden. De bruiningslampen produceren zichtbaar licht, warmte en ultraviolet licht,
waardoor u het gevoel krijgt dat u in echt zonlicht ligt te zonnebaden. Dit apparaat bruint uw gehele lichaam van top tot teen, inclusief de
zijkanten.
Een timer zorgt ervoor dat iedere sessie niet langer dan 30 minuten duurt. Want, net als bij de echte zon, dient overmatige blootstelling te
worden vermeden (zie het hoofdstukken 'Bruinen en uw gezondheid').
Algemene beschrijving (fig. 1)
A TL-lampen en starters van de zonnebank
B TL-lampen en starters van de zonnehemel
C Gezichtsbruiner
D Schakelaars van de gezichtsbruiner
- O = gezichtsbruiner uit
- I = gezichtsbruiner aan
- I en , = gezichtsbruiner ingeschakeld op 75% van de volle sterkte
- I en m = gezichtsbruiner ingeschakeld op volle sterkte
E Ventilator voor lichaamskoeling
F Schakelaars van de ventilator
- O = ventilator uitgeschakeld
- I = ventilator ingeschakeld
- I en n = een ventilator aan
- I en b = beide ventilatoren aan
G Eindkappen
H Netsnoer
I Poten van frame
J Verbindingskabels tussen voedingseenheid, zonnebank en zonnehemel
K Ventilatoren voor koeling van de gezichtbruiner
L Ventilatie-openingen en ventilatoren voor het koelen van de TL-lampen
M Beschermplaten
N Beschermfolie
O Beschermbrillen (2 stuks)
-(typenummer HB072/servicenummer 4822 692 80147)
P Schroeven, bouten en sierdopjes
Q Inbussleutel en schroevendraaier
R Timer
S Voedingseenheid
Belangrijk
◗ Controleer of het voltage aangegeven op de zonnehemel overeenkomt met de netspanning in uw woning voordat u het apparaat
aansluit.
◗ Dit apparaat vereist een netspanning van 400 volt.
◗ Een hoge netimpedantie kan leiden tot zichtbare veranderingen in de lichtsterkte van lampen wanneer het bruiningsapparaat wordt
ingeschakeld. Om aan de wettelijke eisen ten aanzien van electromagnetische compatibiliteit te voldoen,dient de modulus van de
netimpedantie lager te zijn dan 0,3 ohm. Neem voor meer informatie contact op met uw electriciteitsleverancier.
◗ Water en elektriciteit vormen een gevaarlijke combinatie! Gebruik dit apparaat daarom niet in een vochtige omgeving (bijv. in de
badkamer of in de buurt van een douche of zwembad).
◗ Als u zojuist hebt gezwommen of een douche hebt genomen, droogt u zich dan goed af voordat u het apparaat gaat gebruiken.
◗ Het apparaat moet aangesloten worden op een driefasenstroomsysteem dat beveiligd is met standaardzekeringen van 16A of
automatische zekeringen.
◗ Haal na gebruik altijd de stekker uit het stopcontact.
◗ Zorg ervoor dat het snoer niet bekneld raakt onder een van de poten wanneer u het apparaat verplaatst.
◗ Zorg ervoor dat de ventilatie-openingen voor het koelen van de bruiningslampen in de zonnehemel en de zonnebank tijdens gebruik
open blijven.
◗ Gebruik het apparaat nooit als de timer of een van de beschermplaten kapot is.
◗ Voorkom dat kinderen met het apparaat spelen.
◗ Houdt u aan de aanbevolen bruiningstijden en het maximale aantal bruiningsuren (zie 'Bruiningssessies:hoe vaak en hoe lang?').
◗ Bruin een bepaald deel van het lichaam niet vaker dan één keer per dag.Vermijd diezelfde dag overmatige blootstelling aan natuurlijk
zonlicht.
◗ Gebruik het apparaat niet als u symptomen van een ziekte vertoont en/of medicijnen of cosmetica gebruikt die de gevoeligheid van uw
huid voor ultraviolet licht vergroten.Wees extra voorzichtig als u overgevoelig bent voor ultraviolet licht. Raadpleeg in geval van twijfel
uw arts.
◗ Raadpleeg uw arts als er hardnekkige knobbels of zweren op uw huid ontstaan of als zich veranderingen voordoen in gepigmenteerde
moedervlekken.
◗ Dit apparaat mag niet gebruikt worden door mensen waarvan bij blootstelling aan de zon de huid verbrandt zonder bruin te worden,
door mensen die last hebben van zonnebrand, door kinderen of door mensen die lijden aan (of hebben geleden aan) huidkanker of die
er vatbaar voor zijn.
◗ Draag tijdens het bruinen altijd de beschermbril die bij het apparaat geleverd wordt om uw ogen tegen overmatige blootstelling te
beschermen (zie ook het hoofdstuk 'Bruining en uw gezondheid').
◗ Ontdoe uw huid geruime tijd voor de bruiningssessie van crèmes, lippenstift en andere cosmetica.
◗ Gebruik geen zonnebrandmiddelen of middelen die bedoeld zijn om het bruiningsproces te versnellen.
NEDERLANDS
Page 17

◗ Als uw huid strak aanvoelt na de bruiningssessie, kunt u een vochtinbrengende crème opbrengen.
◗ Kleuren kunnen door blootstelling aan de zon verbleken.Hetzelfde effect kan zich voordoen als u dit apparaat gebruikt.
◗ Verwacht niet dat het apparaat een beter resultaat oplevert dan de zon.
◗ Indien het netsnoer van dit apparaat beschadigd is, dient het uitsluitend vervangen te worden door Philips of een door Philips
geautoriseerd servicecentrum om gevaarlijke situaties te voorkomen.
◗ Als u een andere stekker nodig heeft dan de steker die aan het snoer van het apparaat bevestigd is, neem dan contact op met een
erkende installateur.
Bruinen en uw gezondheid
De zon, UV en bruinen
e zon
De zon levert verschillende soorten energie: zichtbaar licht dat ons in staat stelt om te zien, ultraviolet (UV) licht dat onze huid bruint en
infrarood (IR) licht dat zonnestralen de warmte geeft waar wij ons in koesteren.
UV en uw gezondheid
Net als bij gewoon zonlicht heeft het bruiningsproces bij gebruik van dit apparaat wat tijd nodig. De eerste resultaten worden pas na een aantal
sessies zichtbaar (zie 'Bruiningssessies: hoe vaak en hoe lang?').
Overmatige blootstelling aan ultraviolet licht, of dat nu geproduceerd wordt door de zon of door een bruiningsapparaat, kan zonnebrand
veroorzaken.
Naast vele andere factoren, zoals overmatige blootstelling aan natuurlijk zonlicht, kan onjuist en overmatig gebruik van een bruiningsapparaat het
risico van huid- en oogaandoeningen vergroten. De mate waarin deze effecten optreden wordt aan de ene kant bepaald door de aard, de
intensiteit en de duur van de blootstelling en aan de andere kant door de gevoeligheid van de persoon in kwestie.
Hoe vaker de huid en de ogen worden blootgesteld aan UV-licht, hoe groter de kans op ontstekingen van het hoornvlies en het bindvlies,
beschadigingen van het netvlies, staar, vroegtijdige veroudering van de huid en de ontwikkeling van huidkanker. Bepaalde medicijnen en cosmetica
vergroten de gevoeligheid van de huid.
◗ Het is daarom belangrijk:
- dat u de instructies in 'Belangrijk' en 'Bruiningssessies: hoe vaak en hoe lang?' volgt;
- dat u het maximale aantal bruiningsuren per jaar niet overschrijdt (zie 'Bruiningssessies: hoe vaak en hoe lang?');
- dat u tijdens het bruinen altijd de bijgeleverde beschermbril draagt.
Bruiningssessies: hoe vaak en hoe lang?
◗ Neem niet meer dan één bruiningssessie per dag gedurende vijf tot tien dagen.Wacht na het eerste zonnebad ten minste 48 uur
voordat u een tweede zonnebad neemt.Na deze 5-daagse tot 10-daagse kuur raden we u aan uw huid een tijdje rust te gunnen.
B
Ongeveer een maand na afloop van de kuur zal uw huid veel van zijn bruine kleur hebben verloren. U kunt dan met een nieuwe kuur beginnen.
B
Als u uw bruine kleur wilt behouden, stop dan niet met de bruiningssessies na afloop van de kuur, maar ga door met één of twee sessies per week.
Of u er nu voor kiest een tijdje te stoppen met de bruiningssessies of doorgaat, maar dan minder vaak, onthoud wel dat u het maximale aantal
bruiningsuren niet mag overschrijden. Voor dit apparaat geldt een maximum van 17 bruiningsuren (dat is 1020 minuten) per jaar.
Voorbeeld
Stel dat u een 10-daagse bruiningskuur volgt, met een sessie van 6 minuten op de eerste dag en sessies van 20 minuten op de 9 dagen die
volgen.
◗ De kuur duurt dan (1 x 6 minuten) + (9 x 20 minuten) = 186 minuten.
B
Dit betekent dat u 5 van deze kuren per jaar kunt volgen, omdat 5 x 186 minuten = 930 minuten.
Tabel
Zoals staat aangegeven in de tabel dient de eerste sessie altijd 6 minuten te duren, onafhankelijk van de gevoeligheid van de huid.
Als u denkt dat de sessies te lang voor u zijn (bijvoorbeeld omdat uw huid na de sessie trekt en pijnlijk aanvoelt), raden we u aan de sessie met
bijv. 5 minuten te verkor ten.
NEDERLANDS 17
Voor mensen met een minder
gevoelige huid
6
25
25
25
25
25
25
25
25
25
Voor mensen met een normaal
gevoelige huid
6
15-20
15-20
15-20
15-20
15-20
15-20
15-20
15-20
15-20
Voor mensen met een gevoelige
huid
6
10
10
10
10
10
10
10
10
10
Duur van de bruiningssessie in
minuten
1e sessie
onderbreking van ten minste 48 uur
2e sessie
3e sessie
4e sessie
5e sessie
6e sessie
7e sessie
8e sessie
9e sessie
10e sessie
Page 18

18
Klaarmaken voor gebruik
◗ Er zijn twee mensen voor nodig om het bruiningsapparaat in elkaar te zetten en te verplaatsen.
◗ Tijdens het monteren wordt het apparaat zwaarder en minder makkelijk te verplaatsen.We adviseren u daarom het apparaat op de
plaats waar u het gaat gebruiken in elkaar te zetten. Zorg dat er naast (ten minste 50 cm) en achter (ten minste 30 cm) het apparaat
voldoende vrije ruimte is.
◗ Als de zonnebank en/of zonnehemel op de vloer geplaatst moeten worden, leg ze dan met de TL-lampen naar beneden op de vloer om
beschadiging binnenin te voorkomen.Zorg ervoor dat ze op een zacht oppervlak liggen (bijv. tapijt of vloerkleed) om beschadiging van
de behuizing te voorkomen (fig.2).
1 Monteer eerst de poten van het frame door de hoekprofielen met bouten vast te zetten en plaats dan, indien nodig, de zijpanelen (fig.3).
◗ Let op: de gaten in de zijpanelen moeten aan de voorzijde zitten.
2 Plaats de zonnebank voorzichtig op de poten. Zorg ervoor dat de poten gelijkmatig in de daarvoor bestemde openingen in de
zonnebank schuiven (fig. 4).
◗ Let op: de openingen voor het bevestigen van de zonnehemel moeten aan de achterzijde van de zonnebank zitten.
3 Indien nodig, kunt u de zonnebank voorzichtig verplaatsen door de poten over de vloer te schuiven of door het apparaat voorzichtig
samen met een andere persoon een klein stukje van de grond te tillen.Zorg dat er naast (ten minste 50 cm) en achter (ten minste
30 cm) het apparaat voldoende vrije ruimte is.
◗ Probeer het apparaat nooit te verplaatsen op de manier die in het plaatje getoond wordt. Hierdoor zou het frame los kunnen raken van
de zonnebank (fig. 5).
4 Til de zonnehemel samen met een andere persoon op en plaats de verbindingsbuizen boven de gaten en schuif vervolgens de buizen
gelijkmatig in de daarvoor bestemde gaten in de zonnebank (fig. 6).
B
Pas op dat uw vingers niet tussen de zonnebank en de zonnehemel bekneld raken.
B
Zorg ervoor dat het snoer niet klem komt te zitten tussen de zonnebank en de zonnehemel.
5 Verwijder de beschermfolie van de beschermplaten van de zonnebank en de zonnehemel (fig.7).
6 Duw de voedingseenheid vanaf de voorzijde onder de zonnebank (fig. 8).
◗ NB: de stekkers dienen aan de achterzijde van voedingseenheid te zitten. Zorg ervoor dat het netsnoer niet onder de wielen terecht
komt.
7 Steek de grote stekker in de daarvoor bestemde contactdoos van de voedingseenheid. Dit zal enige moeite kosten (fig. 9).
◗ Vergrendel de stekker met behulp van de metalen handvatten (fig. 10).
8 Steek de stekkers van de zonnebank en de zonnehemel in de contactdozen op de voedingseenheid (fig. 11).
◗ De kleine stekkers zijn identiek en onderling uitwisselbaar.
◗ Volg bij het verwijderen van de kleine stekkers de instructies die aangegeven zijn in het plaatje (fig.12).
9 Plaats het voorpaneel en bevestig het met schroeven (fig.13).
Het enige doel van dit paneel is om het apparaat er beter te doen uitzien.
10 Steek de stekker van de voedingseenheid in de wandcontactdoos.
Gebruik van het apparaat
1 Schakel het apparaat in door de juiste bruiningstijd in te stellen op de timer (fig. 14).
B
Voor de juiste bruiningstijd, zie 'Bruiningssessies: hoe vaak en hoe lang?'.
2 Duw de zonnehemel naar achteren zodat u op de zonnebank kunt gaan liggen.Trek zodra u ligt de hemel in horizontale stand (fig.15).
B
N.B. Als het apparaat enige tijd niet gebruikt is, kunnen de scharnieren piepen wanneer u de hemel voor de eerste keer opent of sluit.
3 Schakel de ventilator voor lichaamskoeling in door op de knop te drukken (fig. 16).
◗ Kies de gewenste luchtsnelheid: n of b (fig. 16).
4 Als u wilt, kunt u ook de gezichtbruiner inschakelen (fig. 17).
◗ Kies , voor 75% van de volle sterkte of m voor volle sterkte (fig. 17).
5 Vergeet niet de meegeleverde beschermbril op te zetten.
◗ Tijdens de laatste minuut van de sessie hoort u een piepend geluid.
Schoonmaken
Trek altijd de stekker uit het stopcontact en laat het apparaat afkoelen voordat u het gaat schoonmaken
Gebruik nooit vloeistoffen zoals alcohol, spiritus, benzine of aceton om de beschermplaten te reinigen omdat dit tot onherstelbare schade
kan leiden.
◗ Maak de buitenkant van het apparaat met een vochtige doek schoon.
B
Laat geen water in het apparaat lopen.
Vervanging
Het licht dat de bruiningslampen afgeven wordt in de loop der tijd minder fel (dit gebeurt bij normaal gebruik na enige jaren). U merkt dit
doordat het bruiningsvermogen van het apparaat afneemt. U kunt dit probleem oplossen door een iets langere bruiningstijd in te stellen of door
de bruiningslampen te laten vervangen.
Laat bruiningslampen en/of star ters vervangen door een door Philips geautoriseerd servicecentrum. Zij beschikken over de kennis en
vaardigheden die hiervoor nodig zijn en hebben originele reser veonderdelen voor het apparaat.
NEDERLANDS
Page 19

19
◗ Als u echt zelf de TL-lampen en/of starters wilt vervangen, dient u als volgt te werk te gaan:
1 Haal de stekker uit het stopcontact.
2 Verwijder de eindkap aan het hoofdeinde van de zonnehemel door de schroeven los te draaien (fig. 18).
3 Trek de beschermplaat eerst ongeveer 10 cm uit het apparaat (1) en maak vervolgens de klikstrip aan de achterzijde van de
zonnehemel los (2) (fig. 19).
4 Doe hetzelfde bij de klikstrip aan de voorzijde van de zonnehemel.
5 Verwijder de beschermplaat (fig.20).
◗ U kunt nu de TL-lampen en de starters verwijderen.
B
N.B.: U kunt de beschermplaat nu ook gemakkelijk schoonmaken, mocht u dat willen.
6 De lampen en/of starters van de zonnebank en de zonnehemel kunnen in principe op dezelfde manier vervangen worden. De starters
zitten aan het uiteinde van de lampen, met uitzondering van drie starters in de zonnehemel die op een andere plaats zitten en alleen
vervangen kunnen worden door drie lampen te verwijderen.
7 Om de lampen te verwijderen moet u ze naar links of rechts draaien zodat u ze uit hun houders kunt tillen.
8 De starters kunnen worden verwijderd door ze naar links te draaien.
9 Plaats nieuwe lampen en/of starters in het apparaat en volg de bovenstaande aanwijzingen in omgekeerde volgorde en richting om het
apparaat weer in elkaar te zetten.
10 Vergeet niet om de eindkap weer met schroeven vast te zetten.
◗ N.B. De HPA-lampen van de gezichtsbruiner mogen alleen door een door Philips geautoriseerd servicecentrum worden vervangen.
Muntautomaat of aansluiting op centraal bedieningssysteem
Dit apparaat kan ook worden aangesloten op een muntautomaat of een centraal bedieningssysteem. Deze mogen alleen worden aangesloten
door een erkend installateur. De aansluitinformatie staat op de sticker op de voedingseenheid.
Milieu
◗ Gooi het apparaat aan het einde van zijn levensduur niet weg met het normale huisvuil,maar lever het in op een een door de overheid
aangewezen inzamelpunt om het te laten recyclen.Op deze wijze helpt u het milieu te beschermen (fig. 21).
De lampen van het apparaat bevatten stoffen die schadelijk kunnen zijn voor het milieu.Verwijder ze daarom altijd en lever ze in op een door
de overheid aangewezen inzamelpunt voordat u het apparaat inlevert om het te laten recyclen.
Garantie & service
Als u informatie nodig heeft of als u een probleem heeft, bezoek dan onze Website (www.philips.com), of neem contact op met het Philips
Customer Care Centre in uw land (u vindt het telefoonnummer in het 'worldwide guarantee' vouwblad). Als er geen Customer Care Centre in
uw land is, ga dan naar uw Philips dealer of neem contact op met de afdeling Service van Philips Domestic Appliances and Personal Care BV.
Garantiebeperkingen
De volgende onderdelen vallen niet onder de internationale garantie:
- bruiningslampen
- beschermplaten en de kosten voor het reinigen van de beschermplaten
NEDERLANDS
Mogelijke oorzaken
De stekker is niet goed in het stopcontact gestoken.
De timer is niet ingesteld.
De verbindingskabels (J) zijn niet (goed) in de voedingseenheid gestoken.
Controleer de zekeringen. Het juiste type zekering is een standaardzekering van 16A of een
automatische zekering.
U gebruikt een te lang verlengsnoer of een snoer dat niet de juiste aansluitwaarde heeft (16A).
Raadpleeg uw dealer. Ons algemene advies is om geen verlengsnoer te gebruiken.
U volgt niet het bruiningsschema dat past bij uw huidtype. Raadpleeg de tabel in
'Bruiningssessies: hoe vaak en hoe lang?'.
Als de lampen al lang in gebruik zijn, neemt de hoeveelheid UV-licht die ze produceren af. Dit
effect merkt u pas na verscheidene jaren. U kunt dit probleem verhelpen door een iets langere
bruiningstijd in te stellen of door de lampen te vervangen.
Probleem
Het apparaat gaat niet aan.
Een of meer zekeringen van het driefasenstroomsysteem
schakelen de stroomvoorziening uit wanneer u het apparaat
inschakelt of tijdens gebruik.
Slecht bruiningsresultaat
Problemen oplossen
Het is mogelijk dat het apparaat niet goed werkt omdat het niet volgens de gebruiksaanwijzing is geïnstalleerd of wordt gebruikt. In dat geval
kunt u proberen het probleem zelf op te lossen door de onderstaande tips op te volgen.
Als het apparaat niet goed werkt kan dit het gevolg zijn van een mankement. In dat geval raden we u aan contact op te nemen met uw dealer
of met een Philips servicecentrum.
Page 20

20
Introducción
Solárium de cuerpo entero con unidad de broceado facial.
Con este aparato puede broncearse en su casa con toda comodidad. Las lámparas de bronceado emiten luz visible, calor y luz ultravioleta,
dando la impresión de estar bronceándose bajo la luz solar. Este aparato broncea el cuerpo entero, incluyendo los laterales, de una manera
uniforme de los pies a la cabeza.
Un temporizador garantiza que las sesiones no duren más de 30 minutos. Al igual que con la luz solar natural, se debe evitar la exposición
prolongada (ver el capítulo 'El bronceado y la salud')
Descripción general (fig. 1)
A Tubos y cebadores de la cama solar
B Tubos y cebadores de la cubier ta
C Unidad de bronceado facial
D nterruptores para la unidad de bronceado facial
- O = unidad de bronceado facial apagada
- I = unidad de bronceado facial encendida
- I y , = unidad de bronceado facial al 75% de su intensidad total
- I y m = unidad de bronceado facial a intensidad total
E Ventilador para la refrigeración del cuerpo
F Interruptores para el ventilador
- O = ventilador apagado
- I = ventilador encendido
- I y n = un ventilador encendido
- I y b = ambos ventiladores encendidos
G Cubierta final
H Cable de red
I Patas del marco
J Cables de conexión entre la unidad de alimentación, la cama y la cubier ta
K Ventiladores para enfriar la unidad facial
L Rejillas y ventiladores para refrigerar los tubos.
M Paneles acrílicos
N Láminas protectoras
O Gafas protectoras (2 pares)
- (modelo nº. HB072/nº de servicio 4822 690 80147)
P Tornillos, pernos y tapones decorativos
Q Llave y destornillador
R Temporizador
S Unidad de alimentación
Importante
◗ Antes de conectarlo, compruebe si el voltaje indicado en la cubierta del aparato se corresponde con el voltaje de su hogar.
◗ Este aparato necesita un voltaje de 400 voltios.
◗ Una alta impedancia de red puede provocar cambios visibles en la intensidad de la luz de los tubos cuando se enciende el aparato. Para
cumplir los requisitos legales EMC (compatibilidad electromagnética) al respecto, el módulo de la impedancia de red debe ser inferior a
0,3 ohmios. Contacte con su empresa suministradora para más información.
◗ El agua y la electricidad son una combinación peligrosa. No utilice el aparato en ambientes húmedos (por ejemplo, en el cuarto de baño
o cerca de una ducha o de una piscina).
◗ Si ha estado nadando o acaba de darse una ducha, séquese completamente antes de usar el aparato.
◗ El aparato se debe conectar a una fuente de alimentación trifásica, protegida por fusibles estándar 16A o fusibles automáticos.
◗ Después de usarlo, desenchufe siempre el aparato de la red.
◗ Asegúrese de que el cable no se queda atrapado entre las patas cuando mueva el aparato.
◗ Asegúrese de que las rejillas de ventilación de los tubos de la cubierta y de la cama permanecen abiertos mientras se usa el aparato.
◗ No utilice nunca el aparato si el temporizador o uno de los paneles acrílicos están dañados.
◗ Mantenga el aparato fuera del alcance de los niños.
◗ No supere el tiempo de exposición recomendado ni el número máximo de horas de bronceado (ver capítulo 'Sesiones de bronceado:
frecuencia y duración').
◗ No broncee una misma parte del cuerpo más de una vez al día. Evite la exposición excesiva a la luz solar natural durante el mismo día.
◗ No utilice el aparato si tiene alguna enfermedad y/o si toma medicación o utiliza cosméticos que puedan aumentar la sensibilidad de la
piel.Tenga cuidado especialmente si es hipersensible a los rayos UV. En caso de duda,consulte a su médico.
◗ Consulte a su médico si aparecieran bultos o llagas persistentes en la piel o si se produjeran cambios en lunares pigmentados.
◗ No deben utilizar el aparato las personas que al tomar el sol se queman pero no se broncean,las que sufren quemaduras del sol, los
niños o aquellas personas que padecen (o han padecido) cáncer de piel o están predispuestas a padecerlo.
◗ Durante la sesión de bronceado utilice siempre las gafas protectoras que se suministran junto con el aparato, con el fin de proteger los
ojos de una exposición excesiva (véase también el capítulo 'El bronceado y la salud').
◗ Antes de una sesión de bronceado,quítese las cremas, el lápiz de labios y otros cosméticos.
◗ No utilice filtros solares ni aceleradores del bronceado.
◗ Si nota la piel tirante después de una sesión de bronceado,puede aplicarse una crema hidratante.
◗ Los colores pueden perder intensidad con la luz del sol. Puede ocurrir lo mismo al utilizar este aparato.
◗ No espere que el solárium produzca mejores resultados que el sol natural.
◗ Si el cable de red del aparato estuviera dañado,debe sustituirlo siempre Philips o un Servicio de Asistencia Técnica autorizado por
Philips para evitar situaciones peligrosas.
◗ Si necesita una clavija distinta a la que trae el aparato, póngase en contacto con un electricista autorizado.
ESPAÑOL
Page 21
El bronceado y la salud
El sol, los rayos UV y el bronceado
El sol
El sol proporciona varios tipos de energía. La luz visible nos permite ver, la luz ultravioleta (UV) nos broncea y la luz infrarroja (IR) de los rayos
solares nos da calor.
Los rayos UV y la salud
Al igual que ocurre con la luz solar natural, el proceso de bronceado lleva su tiempo. Los primeros efectos sólo serán visibles tras unas cuantas
sesiones (véase el capítulo: 'Sesiones de bronceado: frecuencia y duración').
La exposición excesiva a los rayos ultravioleta (ya sean de luz solar natural o de luz artificial del solárium) puede provocar quemaduras.
Además de otros factores, como la exposición prolongada a la luz solar, el uso excesivo e incorrecto de un aparato bronceador puede aumentar
el riesgo de padecer enfermedades cutáneas y oculares. La medida en la que esto pueda ocurrir viene determinada, por un lado, por la
naturaleza, intensidad y duración de la radiación y, por otro, por la sensibilidad de la persona que se está bronceando.
Cuanto más tiempo estén los ojos y la piel expuestos a los rayos UV, mayor será el riesgo de padecer queratitis, conjuntivitis, cataratas,
envejecimiento prematuro de la piel, daños en la retina o desarrollo de tumores cutáneos.Algunos medicamentos y cosméticos aumentan la
sensibilidad de la piel.
◗ Por lo tanto es muy importante:
- que siga las instrucciones de los apar tados 'Importante' y 'Sesiones de bronceado: frecuencia y duración';
- que no supere el número máximo de horas de bronceado anuales (véase 'Sesiones de bronceado: frecuencia y duración');
- que utilice siempre las gafas de protección mientras se broncea.
Sesiones de bronceado: frecuencia y duración
◗ Dése una sesión de bronceado una vez al día durante un periodo de cinco a diez días.Espere al menos 48 horas tras la primera sesión
antes de seguir con la segunda sesión. Después de esta serie de 5 a 10 días, le recomendamos que deje descansar la piel durante un
tiempo.
B
Aproximadamente un mes después de realizar un ciclo, la piel habrá perdido gran parte de su bronceado. Entonces podrá comenzar otro ciclo.
B
Si quiere mantener el moreno, no deje de broncearse después de un ciclo, tome una o dos sesiones por semana.
Tanto si elige dejar de broncearse durante un tiempo, como si continúa haciéndolo con menor frecuencia, recuerde que no debe superar el
número máximo de horas de bronceado. Para este aparato el número máximo de horas al año es 17 (=1.020 minutos).
Ejemplo
Supongamos que realiza un tratamiento de bronceado de diez días, con una sesión de 6 minutos el primer día y de 20 los nueve días restantes.
◗ El tratamiento completo durará (1 x 6 minutos) + (9 x 20 minutos) = 186 minutos.
B
Esto significa que puede realizar 5 de estos tratamientos al año, ya que 5 x 186 minutos = 930 minutos.
Ta b l a
En la tabla puede verse que la primera sesión de un tratamiento debe tener una duración de 6 minutos independientemente de la sensibilidad
de la piel.
Si piensa que las sesiones son demasiado largas para usted (por ejemplo, si siente la piel tirante y sensible después de una sesión), le
recomendamos que reduzca la duración de las sesiones 5 minutos, por ejemplo.
ESPAÑOL 21
Para personas con piel poco
sensible
6
25
25
25
25
25
25
25
25
25
Para personas con piel de
sensibilidad normal
6
15-20
15-20
15-20
15-20
15-20
15-20
15-20
15-20
15-20
Para personas con piel muy
sensible
6
10
10
10
10
10
10
10
10
10
Duración de la sesión de
bronceado en minutos
1ª sesión
descanso de al menos 48 horas
2ª sesión
3ª sesión
4ª sesión
5ª sesión
6ª sesión
7ª sesión
8ª sesión
9ª sesión
10ª sesión
Page 22

22
Cómo preparar el aparato
◗ Se necesitan dos personas para montar y mover el aparato.
◗ Durante el montaje, el aparato pesa más y resulta más difícil moverlo. Por lo tanto, le aconsejamos que monte el aparato en el lugar
donde lo vaya a usar. Asegúrese de que queda suficiente espacio por los lados (al menos 50 cm) y detrás del aparato (al menos 30 cm).
◗ Si tiene que colocar la cama y/o la cubierta en el suelo, póngala con los tubos hacia abajo para evitar daños internos.Asegúrese de
colocarlos sobre una superficie suave (por ejemplo, sobre alfombra o moqueta) para evitar que se dañe la carcasa (fig. 2).
1 Primero monte las patas del marco ajustando las secciones angulares con los tornillos y luego coloque los paneles laterales, si los
hubiera (fig. 3).
◗ Nota: los orificios de los paneles laterales deben estar en la parte frontal.
2 Coloque con cuidado la cama sobre las patas.Asegúrese de que las patas se acoplan firmemente en los orificios correspondientes de la
cama (fig. 4).
◗ Nota: los orificios para montar la cubierta deben quedar en la parte trasera de la cama.
3 Si fuera necesario, puede mover ligeramente el aparato deslizando las patas por el suelo o levantándolo con cuidado con ayuda de otra
persona.Asegúrese de que queda suficiente espacio por los lados (al menos 50 cm) y detrás del aparato (al menos 30 cm).
◗ No intente nunca mover el aparato como se muestra en la figura.Si lo hace, el marco se podría soltar de la cama (fig. 5).
4 Levante la cubierta con ayuda de otra persona y coloque sus tubos conectores sobre los orificios de conexión.Acople firmemente los
tubos en los orificios de conexión de la cama (fig. 6).
B
Tenga cuidado de no pillarse los dedos entre la cama y la cubierta.
B
Asegúrese de que el cable no se queda pillado entre la cama y la cubierta.
5 Retire la lámina protectora de los paneles acrílicos de la cama y la cubierta (fig. 7).
6 Empuje la unidad de alimentación debajo de la cama desde la parte frontal (fig. 8).
◗ Nota: los enchufes deben quedar por detrás de la unidad de alimentación.Asegúrese de que el cable no se quede pillado bajo las ruedas.
7 Inserte la clavija grande en la toma de la unidad de alimentación.Tendrá que hacer un poco de fuerza (fig. 9).
◗ Ajuste la clavija mediante las pinzas metálicas (fig. 10).
8 Inserte los enchufes de la cama y de la cubierta en la toma de corriente (fig. 11).
◗ Las clavijas pequeñas son idénticas e intercambiables.
◗ Si desea quitar las clavijas pequeñas, siga las instrucciones de la figura (fig. 12).
9 Coloque el panel frontal y ajústelo con los tornillos (fig. 13).
El único fin de este panel es mejorar el aspecto del aparato.
10 Inserte la clavija de alimentación de red en un enchufe con toma de tierra.
Cómo usar el aparato
1 Encienda el aparato programando el temporizador para una sesión de bronceado (fig. 14).
B
Para elegir los tiempos de bronceado correctos, consulte el capítulo 'Sesiones de bronceado: frecuencia y duración'.
2 Empuje la cubierta hacia atrás, de manera que se pueda tumbar sobre la cama.Una vez que se haya tumbado sobre la cama,vuelva a
poner la cubierta en posición horizontal (fig. 15).
B
Nota: si no utiliza el aparato durante algún tiempo, puede que al abrir o cerrar por primera vez la cubierta, las bisagras de la misma chirríen un
poco.
3 Encienda el refrigerador corporal mediante el interruptor (fig. 16).
◗ Seleccione el flujo de aire deseado: n o b (fig. 16).
4 Si lo desea, puede encender también la unidad facial (fig.17).
◗ Seleccione , para obtener el 75% de la intensidad total o m para lograr una intensidad completa (fig. 17).
5 No olvide ponerse las gafas protectoras que incluye el aparato.
◗ Durante el último minuto de la sesión oirá un pitido.
Cómo limpiar el aparato
Desenchufe siempre el aparato de la toma de corriente y déjelo enfriar antes de empezar a limpiarlo.
No utilice nunca líquidos como alcohol, alcohol de quemar,gasolina o acetona para limpiar los paneles acrílicos, ya que podría provocar un
daño irreparable.
◗ Limpie la parte exterior del aparato con un paño húmedo.
B
No deje que entre agua en el aparato.
Sustitución
La luz de los tubos perderá intensidad con el tiempo (es decir, tras unos años de uso normal). Cuando esto ocurra, notará que la capacidad de
bronceado del aparato disminuye. Puede resolver este problema programando un tiempo de bronceado ligeramente superior o sustituyendo
los tubos.
Póngase en contacto con un Servicio de Asistencia Técnica autorizado de Philips para cambiar los tubos y los cebadores. Ellos tienen los
conocimientos y habilidades necesarios, así como las piezas de repuesto originales para el aparato.
ESPAÑOL
Page 23

23
◗ Si, aún así, insiste en cambiar los tubos y/o los cebadores usted mismo, hágalo de la siguiente manera:
1 Desenchufe el aparato de la toma de corriente.
2 Quite la cubierta final del extremo de la cubierta desenroscando los tornillos (fig. 18).
3 Primero saque el panel acrílico unos 10 cm. del aparato (1).A continuación, quite la tira de cierre de la parte trasera de la cubierta (2)
(fig. 19).
4 Haga lo mismo con la tira de cierre de la parte delantera de la cubierta.
5 Quite el panel acrílico (fig. 20).
◗ Ahora ya puede quitar los tubos y los cebadores.
B
Nota: también puede limpiar el panel acrílico si lo desea.
6 En principio, los tubos y los cebadores de la cubierta se pueden sustituir de la misma manera. Los cebadores están colocados en uno de
los extremos de los tubos, salvo tres cebadores que se encuentran en un lugar diferente y que sólo se pueden sustituir si antes se
quitan los tres tubos.
7 Para quitar los tubos, gírelos hacia la izquierda o hacia la derecha para que pueda sacarlos de sus soportes.
8 Los cebadores se sacan girándolos hacia la izquierda.
9 Para volver a montar el aparato, inserte los tubos y/o cebadores nuevos y siga la instrucciones anteriores, pero al revés.
10 No olvide volver a poner los tornillos en la cubierta final.
◗ Nota: los tubos HPA de la unidad facial sólo se pueden sustituir en un Servicio de Asistencia Técnica autorizado por Philips.
Depósito de monedas o unidad de control remoto
Este aparato también se puede conectar a un depósito de monedas o a una unidad de control remoto. Estos dispositivos sólo los puede instalar
un electricista profesional. Podrá encontrar las instrucciones de conexión en la pegatina de la unidad de alimentación.
Medio ambiente
◗ Cuando vaya a deshacerse de este aparato, no lo tire con la basura normal del hogar; deposítelo en un punto de recogida oficial para su
reciclado.Al hacerlo, contribuirá a preservar el medio ambiente (fig. 21).
Los tubos de este aparato contienen sustancias que pueden contaminar el medio ambiente. Quítelos siempre y llévelos a un punto de recogida
oficial antes de llevar el aparato a un centro de reciclaje.
Garantía y servicio
Si necesita servicio o información, o si tiene algún problema, visite la página web de Philips en www.philips.com, o póngase en contacto con el
Servicio Philips de Información al Consumidor de su país (encontrará el número de teléfono en el folleto de Garantía Mundial). Si en su país no
hay Servicio Philips de Información al Consumidor, consulte a su distribuidor local Philips o póngase en contacto con el Service Department of
Philips Domestic Appliances and Personal Care BV.
Restricciones de la garantía
La garantía internacional no cubre las siguientes piezas:
- tubos de bronceado
- paneles acrílicos y costes de limpieza de los mismos
ESPAÑOL
Causas posibles
La clavija no se ha insertado correctamente en el enchufe.
No ha programado el temporizador.
No se han enchufado (correctamente) los cables de conexión (J).
Compruebe los fusibles. El tipo de fusible correcto es un fusible estándar 16A o un fusible
automático.
Está utilizando un cable alargador demasiado largo o que no tiene la corriente adecuada.
Consulte a su distribuidor. Nuestro consejo general es que no utilice cables alargadores.
No está siguiendo la tabla de bronceado adecuada para su tipo de piel. Consulte la tabla
'Sesiones de bronceado: frecuencia y duración'.
Después de utilizar durante mucho tiempo los tubos, la emisión de rayos UV disminuye. Este
efecto sólo es evidente pasados algunos años. Puede solucionar este problema seleccionando
un tiempo de bronceado mayor o sustituyendo los tubos.
Problema
El aparato no se pone en marcha.
Uno o más fusibles de la fuente de alimentación trifásica corta
la corriente al encender el aparato o mientras se está usando.
Pobres resultados de bronceado.
Guía de problemas y soluciones
Si el aparato no se instala o no se usa tal y como indican estas instrucciones, puede que no funcione correctamente. En ese caso podrá resolver
usted mismo el problema siguiendo las indicaciones que se dan a continuación.
Si el problema no aparece mencionado en la lista, puede que el aparato no funcione bien porque esté defectuoso. En ese caso, le aconsejamos
que se ponga en contacto con su distribuidor o con un Servicio de Asistencia Técnica de Philips.
Page 24

Введение
Солярий для всего тела со встроенным солярием для лица.
Благодаря этому прибору вы можете с комфортом загорать в домашних условиях. Лампы для загара излучают свет видимого спектра,
тепло и ультрафиолет, создавая впечатление, что вы загораете под настоящим солнцем. При использовании этого солярий, все тело
может равномерно загореть сверху донизу, в том числе с обеих сторон.
Таймер обеспечивает продолжительность каждого сеанса загорания не более 30 минут. При пользовании прибором, как и при
загорании на солнце, следует избегать избыточного облучения (см. главу «Загорание и ваше здоровье»).
Общее описание (рис. 1)
A Трубчатые лампы и стартеры ламп кушетки
B Трубчатые лампы и стартеры ламп канапе
C Солярий для лица
D Переключатели солярия для лица
- O = Солярий для лица выключен
- I = Солярий для лица включен
- I и , = солярий для лица включен на 75% мощности
- I и m = солярий для лица включен на полную мощность
E Вентилятор для охлаждения тела
F Выключатели вентилятора
- O = вентилятор выключен
- I = вентилятор включен
- I и n = один вентилятор включен
- I и b = оба вентилятора включены
G Торец крышки
H Шнур питания
I Ножки рамы
J Соединительные кабели кушетки, канапе и блока питания
K Вентиляторы охлаждения солярия для лица
L Вентиляционные отверстия и вентиляторы для охлаждения трубчатых ламп
M Акриловые листы
N Защитная фольга
O Защитные очки (2 пары)
- (модель HB072/сервисный номер 4822 690 80147)
P Винты, болты и декоративные заглушки
Q Гаечный ключ и отвертка
R Таймер
S Блок питания
Внимание
◗ Прежде чем подключить солярий к электросети, убедитесь в том, что напряжение, указанное на канапе, соответствует
напряжению электросети у вас дома.
◗ Для работы этого прибора требуется сетевое напряжение в 400 вольт.
◗ Большое сопротивление электросети может привести к заметному изменению интенсивности света ламп освещения при
включении солярия. Для соблюдения требований EMC по данному вопросу, значение сопротивления электросети должно быть
ниже 0,3 Ом. За справкой обратитесь в свою коммунальную службу.
◗ Вода и электричество - это опасное сочетание! Не пользуйтесь прибором в местах с повышенной влажностью (например, в
ванной комнате,в душе, рядом с бассейном).
◗ После купания или приема душа дайте телу высохнуть полностью, прежде чем пользоваться прибором.
◗ Солярий должен быть подключен к трехфазной сети со стандартным плавким или автоматическим 16 A предохранителем.
◗ Всегда отключайте прибор от электросети после использования.
◗ Когда вы передвигаете солярий, следите чтобы сетевой шнур не попал под его ножку.
◗ Убедитесь в том, что при пользовании прибором вентиляционные отверстия на излучающих блоках канапе и кушетки не
загорожены.
◗ Запрещается пользоваться прибором в случае,если таймер или акриловый лист поврежден.
◗ Не позволяйте детям играть с прибором.
◗ Не превышайте рекомендованной продолжительности сеансов или максимально допустимого количества часов загорания (см.
раздел "Сеансы загорания: как часто и как долго?").
◗ Сеансы загорания для отдельных участков тела следует проводить не чаще одного раза в день. В дни проведения сеансов
загорания избегайте продолжительного воздействия естественного солнечного излучения.
◗ Вам не следует пользоваться солярием, если вы больны и/или если вы проходите курс лечения или используете косметику,
которая повышает чувствительность вашей кожи. Будьте особенно осторожны при повышенной чувствительности кожи к УФ
излучению. Проконсультируйтесь с врачом в случае сомнений.
◗ При появлении на коже опухолей или воспалений, а также изменений пятен пигментации, обратитесь к лечащему врачу.
◗ Запрещается пользоваться прибором лицам, кожа которых подвержена быстрым солнечным ожогам, имеющим солнечные
ожоги, детям, а также страдающим (или ранее страдавшим) от рака кожи или предрасположенным к раку кожи.
◗ При пользовании прибором всегда надевайте защитные очки, входящие в комплект поставки прибора, для предохранения глаз
от чрезмерного воздействия излучения (см. также раздел "Загорание и ваше здоровье").
◗ Удаляйте с лица кремы, губную помаду и другую косметику заблаговременно перед проведением сеанса загорания.
◗ Не пользуйтесь какими-либо кремами от загара или для загара.
◗ Если после проведения сеанса загорания вы ощущаете некоторую сухость кожи, смажьте ее увлажняющим кремом.
◗ Под воздействием солнца краски могут поблекнуть. То же самое может произойти и при пользовании данным прибором.
РУССКИЙ24
Page 25

◗ Не следует ожидать, что солярий обеспечит лучший эффект,чем естественное солнечное излучение.
◗ В случае повреждения сетевого шнура его необходимо заменить только в торговой организации или в уполномоченном
сервисном центре компании «Филипс», чтобы обеспечить безопасную эксплуатацию прибора.
◗ Если вам требуется другая сетевая вилка вместо вилки, входящей в комплект поставки, обратитесь к профессиональному
электрику.
Загорание и ваше здоровье
Солнце, УФ и загорание
Солнце
Солнце излучает энергию различных видов. Видимый свет позволяет нам видеть, ультрафиолет (УФ) загорать, а инфракрасное
излучение (ИК), входящее в спектр солнечного излучения, дает нам приятное тепло.
УФ и ваше здоровье
Для появления загара при пользовании солярием, точно так же как и при загорании на солнце, требуется время. Первый эффект станет
заметен только после нескольких сеансов (см. «Сеансы загорания: как часто и как долго?»).
После продолжительного воздействия УФ лучей (как солнечных, так и от солярия) на коже могут появиться ожоги.
Помимо ряда других факторов, таких как длительное пребывание на солнце, неправильное и продолжительное пользование солярием
может увеличить риск возникновения заболеваний кожи и глаз. Характер, интенсивность и продолжительность облучения, с одной
стороны, и чувствительность человека, с другой, являются решающими при определении степени причиненного вреда.
Чем дольше УФ лучи воздействуют на глаза и кожу, тем больше вероятность появления таких заболеваний, как воспаление роговицы
глаза, конъюнктивит, повреждения сетчатки, катаракта, преждевременное старение кожи и опухоли. Некоторые лекарства и
косметические средства повышают чувствительность кожи к УФ излучению.
◗ Поэтому очень важно:
- следовать инструкциям разделов "Внимание" и "Сеансы загорания: как часто и как долго?".
- не превышать максимально допустимого количества часов загорания в год (см. раздел "Сеансы загорания: как часто и как долго?");
- всегда надевать защитные очки во время сеанса загорания.
Сеансы загорания: как часто и как долго?
◗ Принимайте один сеанс в день в течение 5 - 10 дней. Между первым и вторым сеансами должно пройти не менее 48 часов.
После 5 - 10-дневного курса советуем дать вашей коже немного отдохнуть.
B
Примерно через месяц после прохождения курса большая часть загара сойдет. После этого вы можете начать новый курс.
B
Если вы хотите поддерживать загар, не прекращайте сеансы загорания после завершения курса, продолжайте принимать один или
два сеанса в неделю.
Независимо от того, решили ли вы прекратить сеансы загорания на время или продолжить их с меньшей частотой, помните, что вы не
должны превышать максимально допустимого количества часов загорания. Для данного солярия максимально допустимое количество
составляет 17 часов (=1020 минут) в год.
Пример
Предположим, вы проводите 10-дневный курс загорания, состоящий из 6-минутного сеанса в первый день и 20-минутных сеансов в
течение последующих девяти дней.
◗ Продолжительность всего курса в этом случае составит (1 x6 минут) + (9 x20 минут) = 186 минут.
B
Это означает, что в течение года вы можете провести 5 таких курсов, т.к. 5 x186 минут = 930 минут.
Таблица
Как указано в таблице, продолжительность первого сеанса курса всегда должна составлять 6 минут, вне зависимости от
чувствительности кожи.
Если вы считаете, что продолжительность сеанса слишком велика для вас (например, после сеанса ощущается стянутость кожи или
повышается ее чувствительность), рекомендуем вам уменьшить время сеанса, например, на 5 минут).
РУССКИЙ 25
для лиц с менее
чувствительной кожей
6
25
25
25
25
25
25
25
25
25
для лиц с нормальной кожей
6
15-20
15-20
15-20
15-20
15-20
15-20
15-20
15-20
15-20
для лиц с очень
чувствительной кожей
6
10
10
10
10
10
10
10
10
10
Продолжительность сеанса
загорания в минутах
1-й сеанс
перерыв не менее 48часов
2-й сеанс
3-й сеанс
4-й сеанс
5-й сеанс
6-й сеанс
7-й сеанс
8-й сеанс
9-й сеанс
10-й сеанс
Page 26

26
Подготовка прибора к работе
◗ Для сборки и переноски солярия нужны два человека.
◗ После сборки солярий станет тяжелее и его труднее переносить. Поэтому мы советуем собирать солярий на том месте, где он
будет использоваться. По бокам солярия должно быть достаточно свободного места (не менее 50 см), также должно быть
достаточно свободного места сзади солярия (не менее 30 см).
◗ Если вам требуется поставить кушетку и/или канапе на пол, поверните трубчатые лампы вниз, чтобы предотвратить поломку
внутреннего устройства. Ставьте их на мягкую поверхность (например, на ковер,плед), чтобы предотвратить поломку корпуса
(рис. 2).
1 Сначала установите на раму ножки, закрепив угловые секции болтами, а затем установите, если нужно, боковые панели (рис. 3).
◗ ПРИМЕЧАНИЕ: отверстия боковых панелей должны быть на передней стороне.
2 Осторожно поставьте кушетку на ножки. Проверьте, чтобы ножки плотно вошли в соответствующие отверстия в кушетке (рис.
4).
◗ ПРИМЕЧАНИЕ: отверстия для установки канапе должны размещаться на задней стороне кушетки.
3 При необходимости вы можете слегка сдвинуть кушетку, стоящую на ножках, или слегка приподняв ее вместе с помощником.
Проверьте, чтобы по бокам солярия было достаточно свободного места (не менее 50 см), также должно быть достаточно
свободного места сзади солярия (не менее 30 см).
◗ Запрещается двигать кушетку так, как это изображено на рисунке. Такой способ может привести к отсоединению рамы от
кушетки (рис. 5).
4 Вместе с помощником поднимите канапе и расположите соединительные трубки над соединительными отверстиями. Плотно
вставьте трубки в отверстия кушетки (рис. 6).
B
Соблюдайте меры предосторожности, чтобы исключить попадания пальцев между кушеткой и канапе.
B
Соблюдайте меры предосторожности, чтобы исключить попадание сетевого шнура между кушеткой и канапе.
5 Снимите защитную фольгу с акриловых листов канапе и кушетки (рис. 7).
6 Вдвиньте блок питания под кушетку с ее передней стороны (рис. 8).
◗ ПРИМЕЧАНИЕ: разъемы должны размещаться на задней стороне блока питания. Следите, чтобы сетевой шнур не попадал под
колесики.
7 Вставьте больший разъем в гнездо блока питания. Для этого требуется приложить некоторое усилие (рис. 9).
◗ Зафиксируйте разъем в нужном положении с помощью металлических рычажков (рис. 10).
8 Вставьте разъемы кушетки и канапе в гнездо блока питания (рис. 11).
◗ Меньшие разъемы идентичны и взаимозаменяемы.
◗ Если вам нужно вынуть меньший разъем, следуйте указаниям,данным на рисунке (рис. 12).
9 Установите переднюю панель и прикрепите ее винтами (рис. 13).
Единственное назначение панели состоит в том, чтобы улучшить внешний вид солярия.
10 Вставьте сетевую вилку блока питания в сетевую розетку.
Как пользоваться прибором
1 Включите солярий, установив таймер нужное время (рис. 14).
B
Для правильного выбора времени сеанса обратитесь к разделу "Сеансы загорания: как часто и как долго?".
2 Откиньте канапе назад таким образом, чтобы вы смогли лечь на кушетку. После того, как вы ляжете на кушетку, потяните канапе
назад, расположив его в горизонтальном положении (рис. 15).
B
ПРИМЕЧАНИЕ: если канапе некоторое время не использовалось, его петли могут начать скрипеть при первом открытии и
закрытии канапе.
3 Включите вентилятор охлаждения тела с помощью выключателя (рис. 16).
◗ Задайте нужный режим интенсивности воздушного потока:nили b (рис. 16).
4 Если хотите, вы также можете включить солярий для лица (рис. 17).
◗ Задайте , для 75% мощности или m для полной мощности (рис. 17).
5 Не забудьте надеть защитные очки, входящие в комплект поставки.
◗ В течение последней минуты сеанса вы будете слышать гудящий звук.
Очистка
Перед очисткой солярия обязательно выньте сетевую вилку из сетевой розетки и дождитесь, пока солярий остынет.
Запрещается использовать для очистки акриловых листов такие жидкости,как спирт, метиловый спирт, бензин или ацетон, так как
это может привести к непоправимым повреждениям.
◗ Наружную поверхность прибора можно очищать с помощью влажной ткани.
B
Следите за тем, чтобы вода не попадала внутрь прибора.
Замена
Со временем (через несколько лет при обычном пользовании прибором) излучающая способность УФ ламп постепенно снижается, что
приводит к снижению эффективности работы прибора. Для компенсации старения ламп вы можете несколько увеличить
продолжительность сеансов либо заменить УФ лампы.
РУССКИЙ
Page 27

27
Замену ультрафиолетовых ламп и/или стартеров следует производить в уполномоченном сервисном центре компании «Филипс».
Специалисты этого центра имеют достаточные опыт и квалификацию, необходимые для выполнения такой работы, а также фирменные
запасные части для вашего солярия.
◗ Если же вы настаиваете на самостоятельной замене трубчатых ламп и/или стартеров, вы должны действовать следующим
образом:
1 Отключите вилку шнура питания от сетевой розетки.
2 Снимите торец крышки в головной части канапе, отвернув винты (рис. 18).
3 Сначала вытяните акриловый лист из солярия приблизительно на 10 см (1). Затем расстегните ремень на тыльной стороне
канапе (2) (рис. 19).
4 Сделайте то же самое для ремня на передней стороне канапе
5 Снимите акриловый лист (рис. 20).
◗ Теперь можно снимать трубчатые лампы и стартеры.
B
ПРИМЕЧАНИЕ: при желании вы также можете очистить акриловый лист.
6 Замена ламп для загара и/или пускателей кушетки и канапе в принципе производится таким же образом. Пускатели
расположены на концах ламп для загара, за исключением трех стартеров, расположенных в другой части канапе, которые можно
снять только после того,как сняты три лампы.
7 Для того чтобы снять лампу,поверните ее влево или вправо так, чтобы можно было вынуть ее из держателя.
8 Пускатели можно снять, поворачивая влево.
9 Вставьте новую лампу и/или пускатель и следуйте инструкции, данной выше в обратном порядке.
10 Не забудьте опять прикрепить винтами торец крышки.
◗ ПРИМЕЧАНИЕ: Замена ламп HPA солярия для лица может быть произведена только в уполномоченном сервисном центре
компании «Филипс».
Монетоприемник или пульт дистанционного управления
Данный прибор также может быть подключен к монетоприемнику или к пульту дистанционного управления. Эти устройства может
подсоединить только профессиональный электрик. Инструкцию по подключению можно найти на наклейке на блоке питания.
Защита окружающей среды
◗ По окончании срока службы не выбрасывайте прибор вместе с обычными бытовыми отходами, а сдавайте в специальные
пункты приема. Поступая так вы способствуете делу сохранения окружающей среды (рис. 21).
В приборе установлены лампы, содержащие вещества, которые могут привести к загрязнению окружающей среды. Перед утилизацией
прибора, обязательно извлеките лампы и сдайте их в специальный пункт приема.
Гарантийное обслуживание
По поводу обслуживания, получения дополнительной информации, или в случае возникновения каких-либо проблем, обращайтесь на
Web-сайт компании Филипс по адресу www.philips.com или в Центр по связям с клиентами компании Филипс в вашей стране
(номер телефона центра вы найдете на международном гарантийном талоне). В случае отсутствия в вашей стране Центра по связям с
клиентами, обратитесь в местное представительство компании Филипс или свяжитесь с Отделом обслуживания фирмы Philips Domestic
Appliances and Personal Care BV.
Ограничения гарантии
Действие гарантии не распространяется на следующие детали.
- лампы для загара
- акриловые листы и стоимость очистки акриловых листов
РУССКИЙ
Page 28

28
Возможные неисправности
Сетевая вилка плохо вставлена в розетку.
Не установлен таймер.
Соединительные кабели (J) не были (правильно) подсоединены.
Проверьте предохранители. Правильный тип - стандартный плавкий предохранитель на 16 А
или автоматический предохранитель.
Солярий подключен через слишком длинный или не рассчитанный на требуемую величину
тока удлинительный шнур. Обратитесь в торговую организацию. Не рекомендуем вам
подключать солярий через удлинительный шнур.
Выбранный режим сеансов загорания не соответствует вашему типу кожи. Проверьте режим
по таблице в разделе "Сеансы загорания: как часто и как долго?".
После длительной эксплуатации прибора излучающая способность ламп снижается. Этот
эффект становится заметным только по истечении нескольких лет эксплуатации. Для
компенсации старения ламп вы можете несколько увеличить продолжительность сеансов
загорания либо заменить лампы.
Неисправность
Солярий не включается.
При включении солярия или во время его эксплуатации
срабатывает один или большее количество сетевых
предохранителей трехфазной сети.
Солярий работает неэффективно
Возможные неисправности и методы их устранения
Прибор обнаруживает признаки неисправности, если при его установке или эксплуатации были нарушены соответствующие
инструкции. В этом случае вы можете устранить неисправность самостоятельно, следуя приведенным ниже рекомендациям.
Если неисправности не фигурируют в списке, то, возможно, солярий не работает из-за неисправности. В этом случае мы рекомендуем
связаться с местным представительством или сервисным центром компании "Филипс".
РУССКИЙ
Page 29

293031
Page 30

Page 31

2 3 4 5
6 7 8 9
10 11 12 13
14 15 16 17
18 19 20 21
Page 32

4222 002 29283
u
www.philips.com
 Loading...