

Philips HB580, HB581 User Manual [it]
HB 580/581

2
English Page 4
• Keep page 3 and pages 54 and 55 open when reading these
operating instructions.
Français Page 9
• Pour le mode d’emploi: dépliez la page 3 et les pages 54 et 55.
Deutsch Seite 14
• Schlagen Sie beim Lesen der Gebrauchsanweisung Seite 3 und
Seiten 54 und 55 auf.
Nederlands Pagina 19
• Sla bij het lezen van de gebruiksaanwijzing pagina 3 en de pagina’s
54 en 55 op.
Italiano Pagina 24
• Prima di usare l’apparecchio, aprite la pagina 3 e le pagine 54 e 55
e leggete attentamente le istruzioni per l’uso.
Español Página 29
• Desplegar la página 3 y las páginas 54 y 55 al leer las instrucciones
de manejo.
Português Página 34
• Durante a leitura do modo de emprêgo, desdobre e verifique a
pág. 3 e as pág. 54 e 55.
Dansk Side 39
• Hold side 3 og side 54 og 55 opslået mens De læser
brugsanvisningen.
Svenska Sid 44
• Ha sidan 3 och sidan 54 och 55 utvikt när ni läser
bruksanvisningen.
Suomi Sivu 49
• Pidä sivu 3 ja sivut 54 ja 55 auki samalla kun luet käyttöohjetta.
3
1
KH L
J
G
M
E
B
N
A
G
M
C
F
D
U
S
T
V
I
W
Q
R
O
P

4
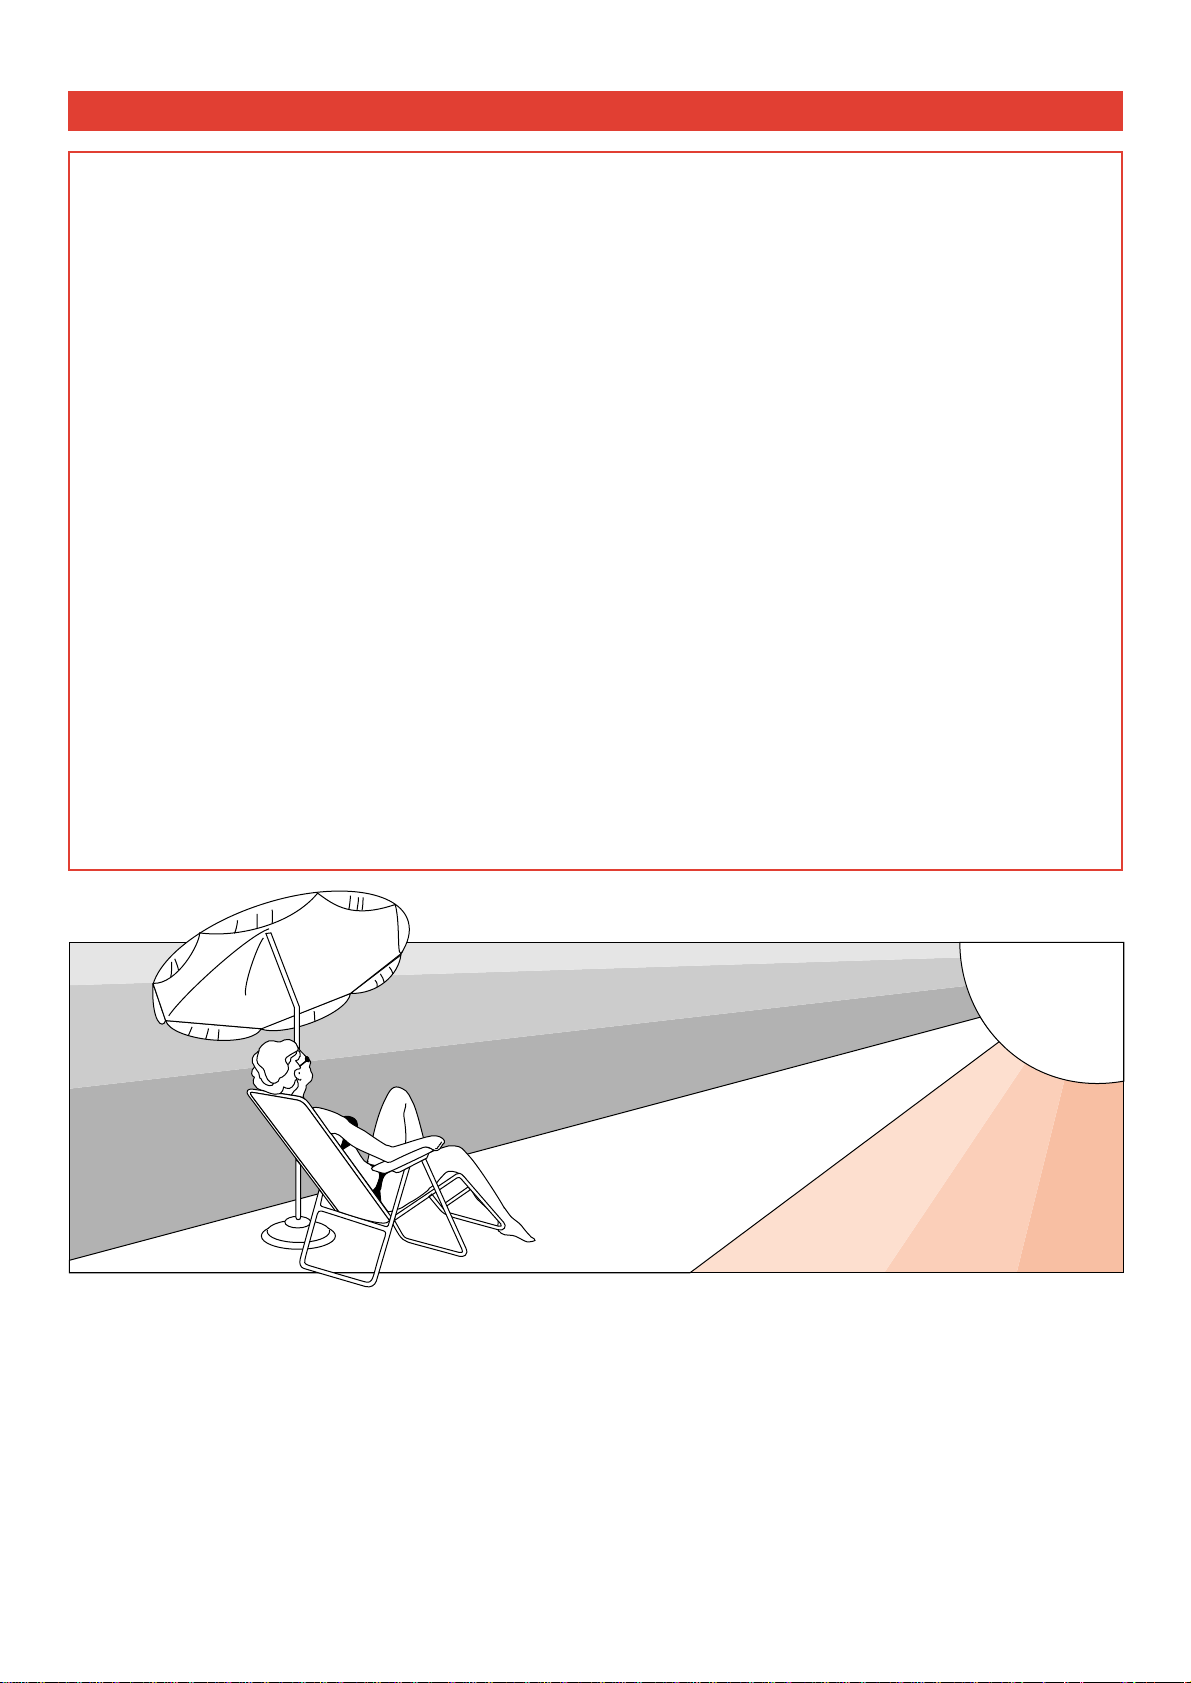
The sun supplies various types of energy. Visible light enables us to
see, ultraviolet (UV) light gives us a tan and the infrared (IR) light in
sunrays provides the heat in which we like to bask.
The combi-solarium
With this solarium you can suntan comfortably at home. The tanning
lamps emit visible light, heat and ultraviolet light, giving you the
impression you are sunbathing in real sunlight. The solarium tans
your whole body, including the sides, evenly from head to toe.
A timer ensures that each tanning session does not last longer than
max. 30 minutes. Just as with natural sunlight, overexposure must be
avoided (see section ‘UV and your health’).
English
Important
• Before you connect the appliance, check if the voltage indicated on the appliance corresponds to the mains voltage in
your home. This appliance requires a mains voltage of 400V.
• Electricity and water are a potentially lethal combination. Do not use this appliance under moist conditions, for
instance in a bathroom or near a swimming pool.
• If you have just taken a swim or a shower, make sure you dry your skin properly before using the appliance.
• The appliance must be connected to a three-phase circuit that is protected with a 16A standard fuse or a slow-blow
automatic fuse (one for each phase).
• Unplug the appliance after use.
• Make sure the cord does not become trapped under one of the legs when you move the appliance.
• Make sure the vents in the canopy and in the couch remain open during use.
• Never use the appliance when the timer switch or the acrylic sheet is defective.
• Never allow children to play with the appliance.
• Stick to the recommended tanning time and the maximum number of tanning hours indicated (see ‘UV tanning
sessions: How often? And how long?’).
• Do not have more than one tanning session a day and avoid excessive exposure to natural sunlight on the same day.
• Do not use the tanning equipment if you have a disease and/or use medication or cosmetics that increase the sensitivity
of your skin. Be extra careful if you are hypersensitive to UV. Consult your doctor in case of doubt.
• Go to you doctor if you notice sores, moles or persistent lumps on your skin.
• People who burn easily and never tan, people whose skin is sunburnt, children and people who suffer from or have
suffered from or who are susceptible to skin cancer are advised not to use the appliance.
• Never use the solarium without wearing the protective goggles provided. By wearing these goggles you will protect
your eyes against overexposure to visible, ultraviolet and infrared light (see ‘UV and your health’).
• Remove all creams, lipstick and other cosmetics from your face and body well before the tanning session.
• Do not use any sunscreens or any quick-tan lotions or creams.
• You may use a moisturising cream if your skin feels a little taut after tanning.
• Just like sunlight, light from this appliance can cause certain materials to discolour.
• Don’t expect the appliance to provide better results than the sun.
• If the mains cord of this appliance is damaged, it must only be replaced by Philips or their service representative, as
special tools and/or parts are required.
• If you require another type of plug than one fitted to the appliance, please contact a registered electrician.
The sun
ULTRAVIOLET (UV)
VISIBLE LIGHT
INFRARED (IR)
5
UV and your health
Just as with natural sunlight, the tanning process will take some time.
The first effect will only become visible after a few sessions (see
section ‘UV tanning sessions: How often? And how long?’).
Overexposure to ultraviolet light (natural sunlight or artificial light
from your solarium) can cause sunburn.
Besides many other factors, such as overexposure to natural
sunlight, incorrect and excessive use of a solarium may increase the
risk of skin and eye problems. The degree to which these effects
occur is determined by the nature, intensity and duration of the
radiation on the one hand and the sensitivity of the person involved
on the other hand.
The more the skin and the eyes are exposed to UV, the higher the
risk of keratisis, conjunctivitis, damage to the retina, cataracts,
premature skin ageing and the development of skin tumours will be.
Some medications and cosmetics increase the sensitivity of the skin.
It is therefore highly important
- that you follow the instructions given under the heading
‘Important’ and ‘UV tanning sessions: How often? And how long?’;
- that you stick to the maximum permissible tanning hours a year
(see section ‘UV tanning sessions: How often? And how long?’);
- that you wear the protective goggles provided during every tanning
session.
UV tanning sessions: How often? And how long?
Take one tanning session a day for five to ten days. Wait at
least 48 hours after the first session before taking the second
session. After this 5 to 10-day course, you may take a break
from tanning.
Approximately one month after a course your skin will have
lost most of its tan again. You can then start a new tanning
course.
If you want to retain your tan, do not stop tanning after the
course but continue taking one or two tanning sessions a
week.
Regardless of the tanning method you choose, always make sure
that you do not exceed the maximum number of tanning
hours, which is XX hours (= XX minutes) a year for this
solarium.
Example:
Suppose you are taking a 10-day course, consisting of an
XX-minute tanning session on the first day and XX-minute
tanning sessions on subsequent nine days.
The total course will last:
(X x X minutes) + (X x XX minutes) = XXX minutes.
• You could take X of these courses a year
(because X x XXX minutes = XXXX minutes.)
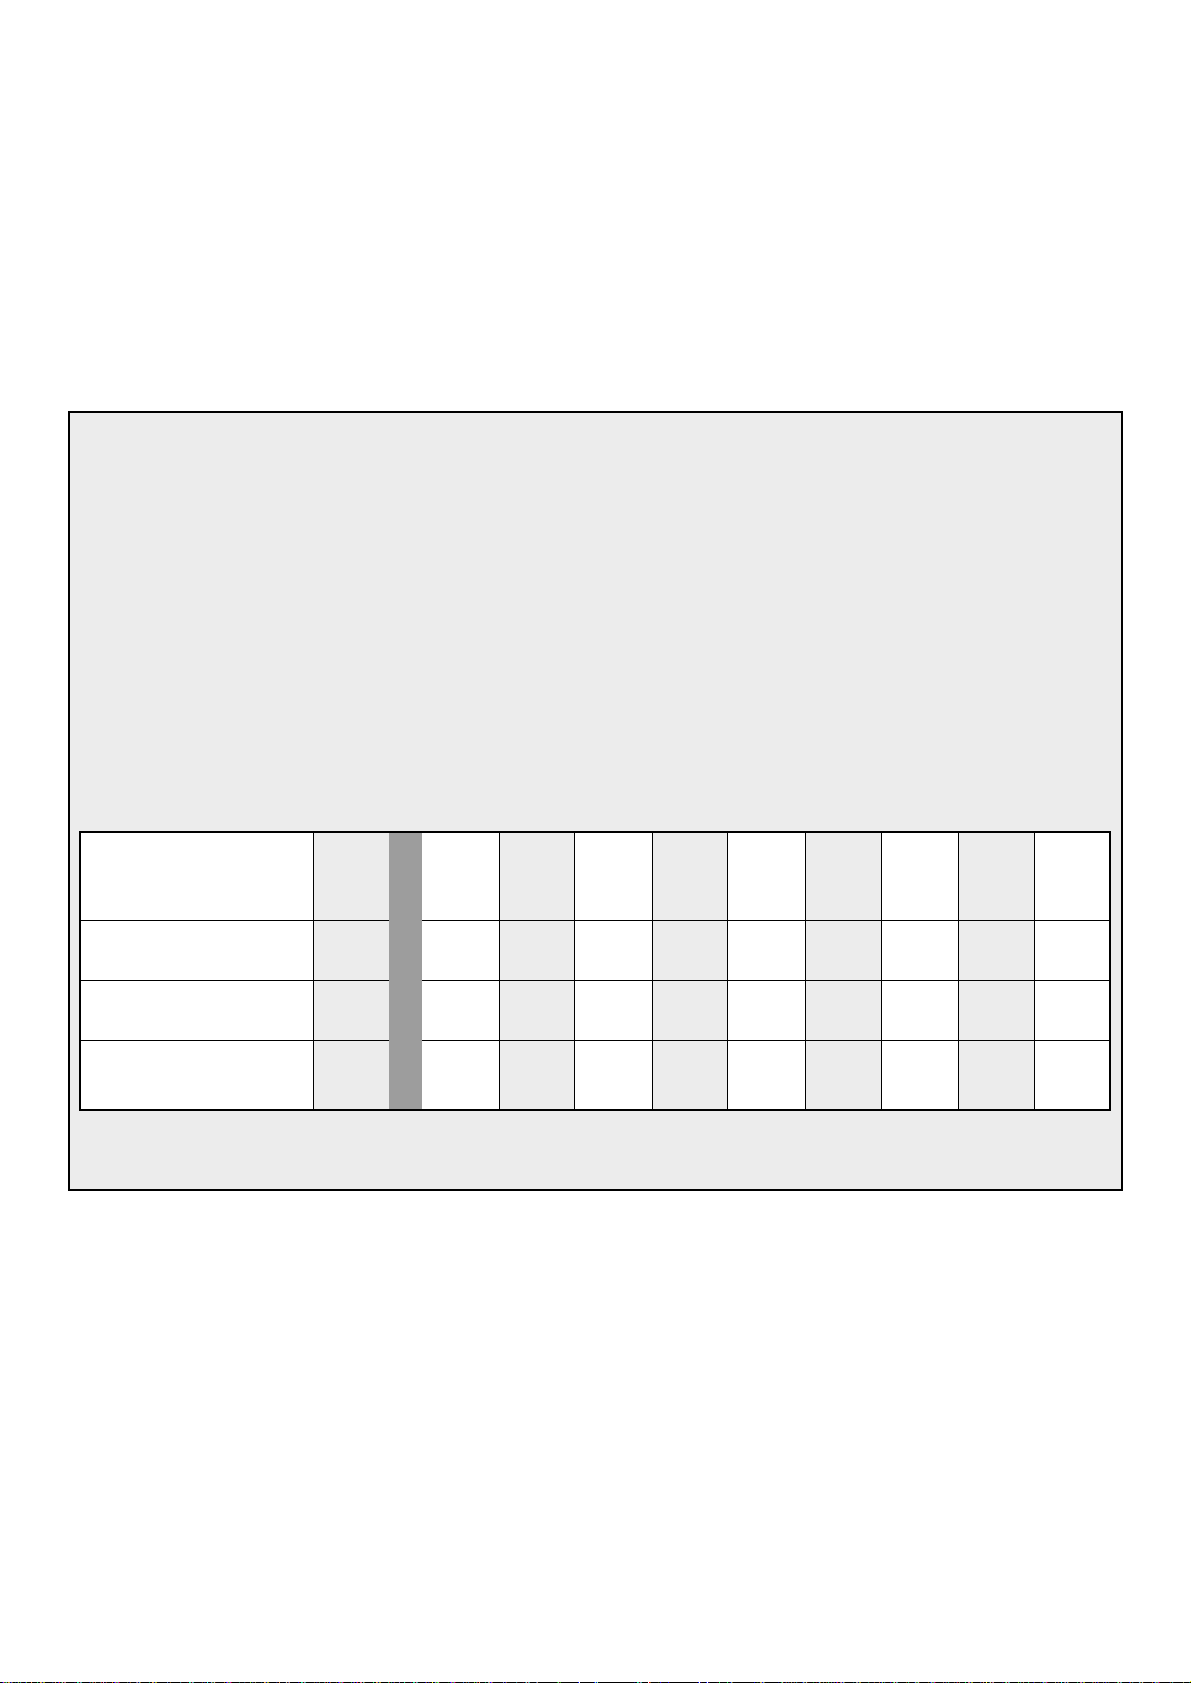
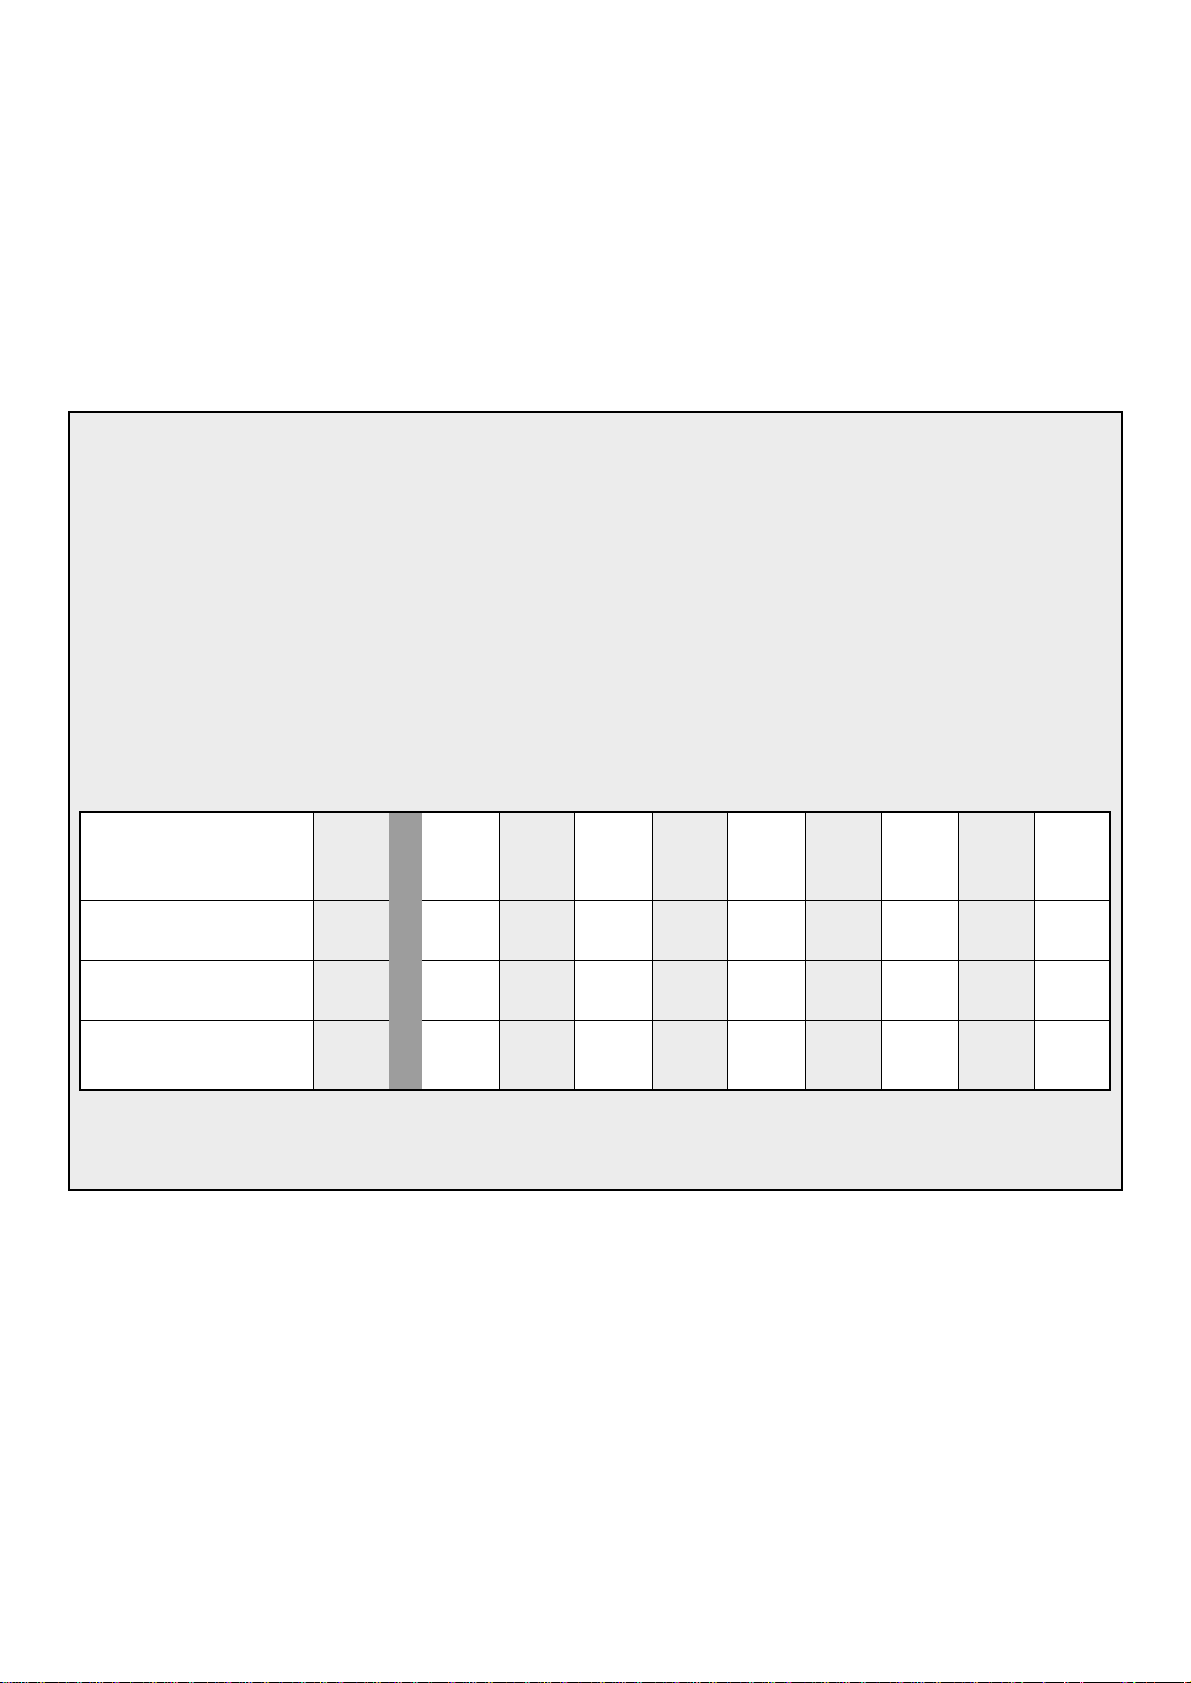
As is shown in the table, the first session of a tanning course
should always last X minutes, irrespective of the sensitivity of
the skin.
If you think that the sessions are too long for you (e.g. if the skin gets taut and tender after the session), we advise you to
reduce the sessions by e.g. 5 minutes.
Duration of the 1st 2nd 3rd 4th 5th 6th 7th 8th 9th 10th
UV session session session session session session session session session session session
in minutes
- for persons with
very sensitive skin: X XXXXXXXXXXXXXXXXXX
- for persons with
normal sensitive skin: X XX-XX XX-XX XX-XX XX-XX XX-XX XX-XX XX-XX XX-XX XX-XX
- for persons with
less sensitive skin: X XX-XX XX-XX XX-XX XX-XX XX-XX XX-XX XX-XX XX-XX XX-XX
rest of min. 48 hours

6
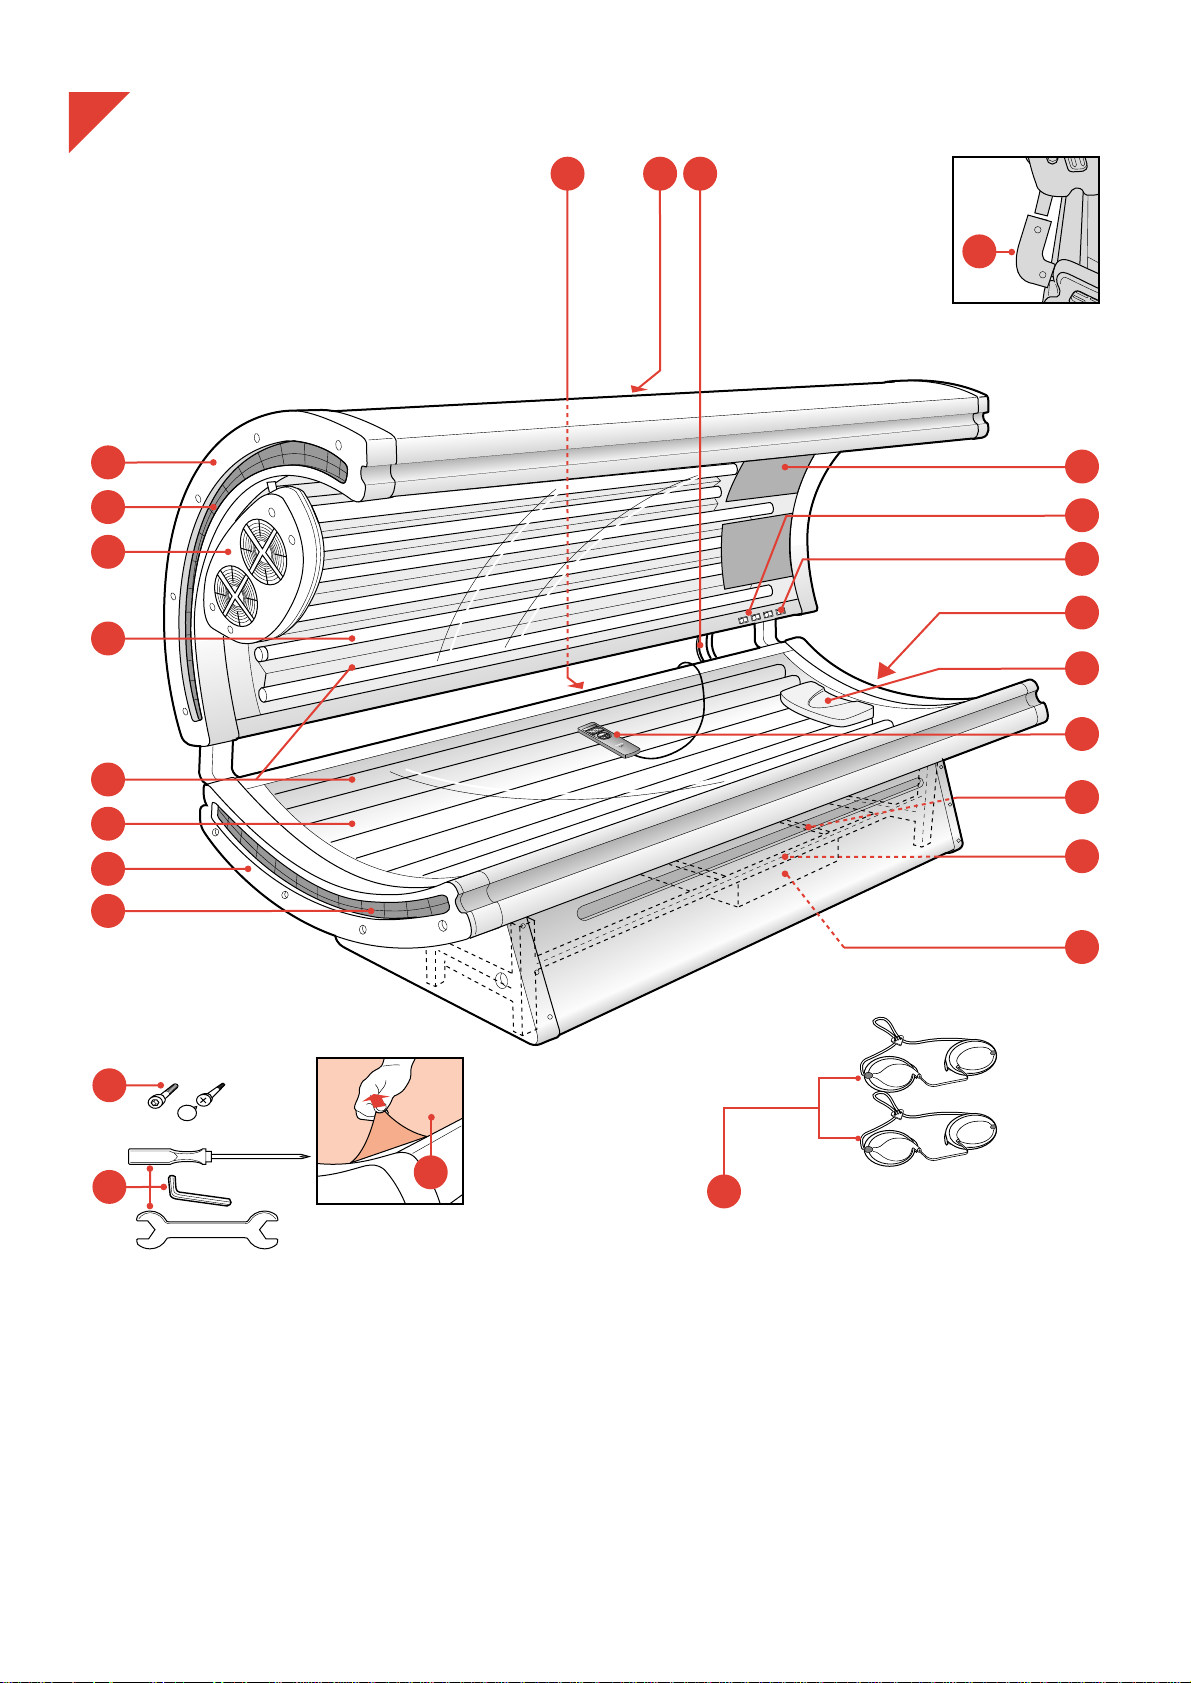
General description (fig. 1, page 3)
A Tube lamps and starters of the couch
B Tube lamps and starters of the canopy
C Facial tanner
D Switch(es) for facial tanner
O = facial tanner off
A and , = facial tanner on at 75% of its full power
A and » = facial tanner on at full power
E Fan for body cooling
F Switches for fan
O = fan off
A and n = fan on at half power
A and b = fan on at full power
G End covers
H Mains cord
I Legs of the frame
J Connecting tubes with protective covers
K Connecting cords between power supply unit and couch and
canopy
L Fans to cool the tube lamps
M Vents
N Acrylic sheets
O Protective foil
P Protective goggles (2 pairs)
(type no. HB 072/service no. 4822 690 80147)
Q Screws, socket-head screws and decorative caps
R Socket-head screw wrench, screwdriver and spanner
S Pillow
T Remote control
U Hour counter
V Guide rails
W Power supply unit
Making the solarium ready for use
• It requires two people to assemble and move the solarium (fig. 2).
• During assembly the solarium becomes heavier and more difficult
to move. We therefore advise you to assemble the solarium at the
place where it will be used. Make sure there is enough free space
beside (at least 50 cm) and behind (at least 30 cm) the solarium.
- Assemble the tubes of the frame by means of socket-head screws
(fig. 3).
• Make sure the larger assembly openings in the legs of the frame are
pointing outward.
- Fasten the guide rails for the power supply to the frame (fig. 4).
• Make sure the locking pins are at the front and pointing inward.
- Pull the locking pins outward, as indicated in fig. 5, and give them a
quarter turn.
- Push the power supply unit some 10 cm along the guide rails
(fig. 6) and give the locking pins a quarter turn back to their
original position. Push the power supply unit further along the
guide rails until you hear a click.
• NB: The plugs should be pointing backwards. Make sure the cords
do not get caught under the wheels of the unit.
- Put the couch on the legs carefully. Make sure the legs slide
steadily into the appropriate openings in the couch (fig. 7).
• NB: The connecting tubes of the couch should be pointing
backward.
- Put the canopy on the floor with the tube lamps pointing
downward (fig. 8).
- Lift the canopy together with another person and position its
connecting tubes over the connecting tubes of the couch (fig. 9).
- Slide the tubes steadily into the connecting tubes of the couch.
- Put the plugs of the power supply unit in the sockets of the couch
and the canopy.
Insert the large plug into the socket of the power supply unit. This
will take some effort. Lock the plug in position by operating the
metal handle (figs. 10 and 11). For undoing the plug, see fig. 12.
The small plugs are identical and interchangeable. Put them in the
appropriate sockets of the power supply unit (fig. 13). For undoing
the small plugs, see fig. 14.
- Pull the remote control forward between the couch and the
canopy.
- Fasten the side panels to the legs of the frame (fig. 15) with the
screws supplied (fig. 16). Slide the front panel behind the edges of
the side panels and fasten it with the screws supplied (fig.17).
Stick to the order indicated in fig. 14 to ensure that side panels (1)
and (2) enclose the edges of the front panel (3).
- Fasten the front panel to the couch and push the decorative caps
onto the screw heads.
• The only purpose of the panels is to enhance the appearance of the
appliance.
- NB: Only move the solarium by carefully sliding its legs across the
floor or by carefully lifting it slightly off the floor together with
another person.
• Never try to move the solarium as shown in fig. 18. This could
cause the frame to couch to become detached.
Making ready for use
- Push the canopy backward (fig. 19) and remove the protective foil
from the acrylic sheet (fig. 20).
- Insert the plug of the power supply unit into the wall socket.

7
Remote control (fig. 21)
a Time setting button 0-30 minutes
b Start button
c Pause button
d Blinking signal
e Pilot lamp
f Buzzer
g Display
• Note that in the following instructions, the buttons to be
used are shown in red.
• In the following cases the number 00 will appear on the
display:
- After you have put the plug in the wall socket;
- At the end of a tanning session;
- After a power failure.
In all these cases, the tanning lamps are out.
- When you put the plug in the wall socket, pilot light e will go on
(fig. 22). This pilot light will stay on as long as the appliance is
connected to the mains. Fully unwind the mains cord.
- First set the time of the tanning session. Push the + button to put
the time forward; push the - button to put the time backward
(fig. 23). Keep the button pressed in to adjust the time more
quickly.
- Switch on the tanning lamps by pressing the start button I
(fig. 24).
• A blinking signal d will appear; the set time is shown on display g
(25 minutes in this case) (fig. 25). The countdown of the set
tanning time will now start.
• You can interrupt the tanning session by pressing pause button fi
(fig. 26). The tanning lamps will be switched off. You can switch
them back on again by pressing start button I (fig. 27).
The remaining tanning time will appear on the display.
• You can shorten the set tanning time by first pressing the start
button I (fig. 28). The tanning lamps are switched off. Set the new
tanning time by means of button a and press start button I.
- The HPA lamp of the facial tanner will not start burning right away,
but will only go on after about 3 minutes.
- During the last minute of the session the buzzer will sound f
(fig. 29). During this minute, the pause function does not work.
• As soon as the set tanning time has elapsed, the solarium will
switch off automatically.
Use
- Push the canopy backward so that you can lie down on the couch
(fig. 30). When you lie on the couch, pull the canopy back into
horizontal position.
• NB: when the solarium has not been used for some time, the
hinges of the canopy may squeak when you push the canopy
backward and forward the first time.
- Switch the appliance on by setting the required tanning time on the
remote control (see section ‘Remote control’).
• For the correct tanning times, see the section ‘UV tanning sessions:
How often? And how long?’
- Switch the body cooler on by means of the switch (fig. 31) and
select the required setting and power (n or b) (fig. 32).
- If you like, you can also switch on the facial tanner (fig. 31). Select
setting , for 75% of its full power or » for full power (fig. 33).
- Don’t forget to put on the protective goggles provided.
Cleaning
• Always unplug the solarium and let it cool down before
you start cleaning it.
• You can clean the outside of the solarium with a damp cloth.
Be careful not to let any water run into the appliance.
• Do not use any scouring agents or scouring pads.
• Never use abrasive liquids like alcohol, methylated spirits,
petrol or acetone to clean the acrylic sheets: this could
cause irreparable damage.
Hour counter
The hour counter indicates the number of hours the lamps have
been on. You can read the counter by removing the end cover at
the head of the couch. See section on ‘Replacing lamps and/or
starters’ for instructions on how to remove the end cover.
Replacing lamps and/or starters
After some time (after a few years in case of normal use) the light
emitted by the tanning lamps will become less bright. When this
happens, you will notice a decrease in the tanning capacity of the
solarium. You can overcome this problem by setting a slightly longer
tanning time or by replacing the lamps or by having them replaced.
• You can have the tube lamps and/or starters replaced by an
authorised Philips Service Centre. They have the knowledge and
skills required for this job and the original spare parts for your
solarium.
• If you want to replace the tube lamps and/or starters yourself, you
should proceed as follows:
- Unplug the appliance.
- Remove the decorative caps and undo the screws of the end cover
at the head of the couch and remove them (fig. 34).
- Pull the acrylic sheet approx. 10 cm out of the appliance.
- Undo the snap strip on the rear side of the couch, starting at the
head (figs. 35 to 36).
- Do the same with the snap strip on the front side of the couch.
- Remove the acrylic sheet (fig. 37).
Now you can replace the tube lamps and starters.
• NB: You can now also clean the acrylic sheet, if you wish.
- To remove the lamps, turn them to the left or to the right so that
you can lift them out of their holders.
- The lamps and/or starters of the canopy can in principle be
replaced in the same way. In the canopy the starters are located
behind the lamps at the head of the canopy. To replace the
starters, you will first have to remove the tube lamps.
- Starters can be removed by turning them to the left.
- New lamps and starters and the acrylic sheet are assembled in
reverse direction and order.
- Do not forget to fasten the end cover with screws again.
• NB: The HPA lamps of the facial tanner may only be replaced by
authorised Philips service personnel.
Coin box or central control unit
This solarium can also be connected to a coin box or a central
control unit at the reception desk. These devices may only be
connected by a registered electrician. The connection instructions
can be found on a sticker on the power supply unit.
The environment
The lamps of solariums contain substances that can be harmful to
the environment. When you discard the lamps, make sure they are
not thrown away with the normal household waste but are handed
in at an official collection point.
8
The solarium does not work properly?
The solarium may fail to work properly because it has not been installed or is not used in accordance with the instructions. In that case
you will be able to solve the problem yourself by following the troubleshooting tips below.
If the problem is not mentioned in the list, your solarium may not work properly because it has a defect. In that case we advise you to
contact your dealer or the Philips Service Centre.
Possible causes
- The plug has not been properly inserted into the wall socket.
- There is a power failure. Check by means of another appliance.
- The timer has not been set.
- Connecting cords K have not been plugged in (correctly).
- Check the fuse of the circuit to which the solarium is connected.
The correct fuse type is a 16A standard fuse or a slow-blow automatic fuse.
- You are using an extension cord that is too long, that is wound up and/or does
not have the correct current rating. Consult your dealer. Our general advice is
not to use an extension cord.
- You are not following the tanning schedule suitable for your skin type.
- When the lamps have been used for a long time, the UV emitted will decrease.
This effect only becomes noticeable after several years. You can overcome this
problem by selecting a longer tanning time or by replacing the lamps.
Problem
• The solarium does not start.
• The sun couch starts, but the canopy
does not or the other way round.
• The fuse cuts off the power when you
switch on the solarium or during use.
• Poor tanning capacity.
9
Le soleil émet un rayonnement complexe. Il est composé
essentiellement de rayons ultraviolets (UV) qui font bronzer notre
peau et de rayons infrarouges (IR) qui génèrent chaleur et bien être.
Le solarium
Votre appareil possède des caractéristiques qui rendent le bronzage
à la maison facile et pratique.
Les lampes solaires émettent de la lumière visible, de la chaleur et
des ultraviolets, tout comme le soleil. Suivant le positionnement du
solarium, vous bronzez tout votre corps de la tête aux pieds.
Pour éviter une surexposition involontaire, la minuterie coupe
automatiquement l’alimentation de l’appareil après 30 minutes de
bronzage (voir chapitre ‘Les UV et votre santé’).
Français
Important
• Avant de brancher votre appareil, vérifiez que la tension indiquée sur la plaque signalétique correspond à la tension de
votre réseau électrique. L’appareil peut être branché sur une tension de 400 V.
• Attention, tout contact d’un appareil électrique avec de l’eau est dangereux ! Donc, n’utilisez pas le solarium dans un
environnement humide, par ex. dans la salle de bain ou près d’une piscine.
• Si votre peau est mouillée (par ex. après avoir pris une douche ou après avoir nagé), séchez-vous parfaitement avant
d’utiliser l’appareil.
• Utilisez une prise murale conforme de 16 ampères + terre. Le circuit doit être protégé par un fusible de 16 ampères
maxi.
• Débranchez toujours le solarium après usage.
• Attention en repliant le solarium à ne pas vous pincer les doigts.
• Pendant le fonctionnement, ne bouchez pas les ouïes de ventilation du support et du ciel.
• N’utilisez jamais le solarium si le verre du filtre UV est endommagé ou si le minuteur est défectueux.
• Faites attention que les enfants ne jouent pas avec le solarium.
• Ne dépassez pas les temps d’exposition recommandés ou le nombre maximum ‘d’heures de bronzage’. (Voir le
chapitre ‘Séances de bronzage: durée et fréquence’.)
• N’exposez pas une même partie du corps plus d’une fois par jour. Evitez de rester longtemps exposé au soleil le jour
même d’une séance de bronzage.
• En cas de symptôme de maladie ou si vous avez pris des médicaments qui augmentent la sensibilité de la peau, il est
recommandé de ne pas faire de séance de bronzage. En cas de doute, consultez votre médecin.
• Consultez votre médecin si vous avez des ulcères, des grains de beauté ou tumeurs de la peau.
• N’utilisez jamais le solarium si vous êtes prédisposé ou si vous avez déjà des coups de soleil, si vous ne bronzez pas, si
vous êtes prédisposé aux cancers de la peau.
• Pendant la séance de bronzage, portez toujours les lunettes fournies.
• Retirez toute trace de crème, de rouge à lèvres ou tout autre produit cosmétique avant le bronzage.
• N’utilisez jamais de lotions ou de crèmes bronzantes ou activateur de bronzage.
• Si votre peau est sèche après les séances de bronzage, il est recommandé d’appliquer une crème nourrissante et
hydratante.
• Certaines couleurs peuvent se décolorer sous les rayons du soleil. Le même phénomène peut se produire lors de
l’utilisation du solarium.
• N’attendez pas du solarium qu’il donne de meilleurs résultats que le soleil.
• Si le cordon d’alimentation est endommagé, il doit être remplacé par un Centre Service Agrée Philips, car des pièces
détachées et/ou des outils spéciaux sont nécessaires.
Le soleil
ULTRAVIOLET (UV)
LUMIÈRE VISIBLE
INFRAROUGE (IR)
10
Les UV et votre santé
Tout comme le soleil, le bronzage avec le solarium n’est visible
qu’après plusieurs séances (voir chapitre ‘Séances de bronzage :
durée et fréquence’).
Une exposition excessive au soleil ou une utilisation incorrecte ou
excessive du solarium peut provoquer des coups de soleil ou
augmenter le risque de maladie de peau ou des yeux.
La nature, l’intensité et la durée de l’exposition ainsi que votre
sensibilité personnelle sont des facteurs décisifs qui peuvent
entraîner des effets indésirables.
Plus la peau et les yeux sont exposés aux UV, plus important est le
risque d’une affection, comme par exemple une inflammation de la
cornée, une conjonctivite, la cataracte, un vieillissement prématuré
de la peau ou des tumeurs de la peau.
De plus, certains médicaments ou même des produits cosmétiques
augmentent la sensibilité de la peau aux UV.
Il est donc de la plus grande importance :
- de lire et de suivre les instructions données dans les chapitres
‘Important’ et ‘Séances de bronzage : durée et fréquence’ ;
- de ne pas dépasser le nombre maximum d’heures d’exposition par
an (voir le chapitre : ‘Séances de bronzage : durée et fréquence’ ;
- de toujours mettre les lunettes qui sont fournies pendant le
bronzage.
Séances de bronzage : durée et fréquence
Vous pouvez faire une séance d’UV par jour, durant un
programme allant de 5 à 10 jours. Attendez au moins 48 heures
entre les 2 premières séances.
Lorsque votre programme de bronzage est terminé, respectez
un intervalle de quelques jours avant de recommencer un
nouveau programme.
Bien entendu, vous pouvez faire une ou deux séances d’UV par
semaine pour entretenir un bronzage durable.
Dans tous les cas, il est impératif de ne pas dépasser un nombre
maximum d’heures de bronzage qui est de XX heures (= XX
minutes) par an pour ce solarium.
Example:
Prenez le cas d’un programme de bronzage durant 10 jours,
avec une séance de XX minutes le premier jour et des
séances de XX minutes sur les 9 jours restants.
Le nombre total de minutes d’exposition pour ce programme est
de (X x X minutes) + (X x XX minutes) = XXX minutes.
La durée de ce course sera de (X x X minutes) + (X x XX
minutes) = XXX minutes.
• Sur une période d’un an, il est possible de faire X fois ce
programme (donc X x X minutes) + (X x XX minutes) =
XXX minutes).
Dans le tableau ci-dessous, la durée de la première séance
est toujours de X minutes. Cette durée est invariable et ne
dépend pas de la sensibilité de la peau.
Si les séances vous semblent trop longues (par exemple si votre peau tend à se déshydrater en fin de séance ou si elle
donne l’impression de ‘tirer’), il est recommandé de réduire les temps d’exposition d’environ 5 minutes par face du
corps.
Durée des séances 1er 2ème 3ème 4ème 5ème 6ème 7ème 8ème 9ème 10ème
UV en minutes jour jour jour jour jour jour jour jour jour jour
- personnes à peau
très sensible : X XXXXXXXXXXXXXXXXXX
- personnes à peau
de sensibilité normale : X XX-XX XX-XX XX-XX XX-XX XX-XX XX-XX XX-XX XX-XX XX-XX
- personnes à peau
peu sensible : X XX-XX XX-XX XX-XX XX-XX XX-XX XX-XX XX-XX XX-XX XX-XX
pause minimale de 48h.

11
Description générale (fig. 1, page 3)
A Tubes UV et starters du Lit
B Tubes UV et starters du Ciel
C Emetteur facial
D Interrupteur(s) pour solarium facial
O = Arrêt
A + , = Marche à 75% de sa puissance
A + » = Marche à pleine puissance
E Ventilateur pour le corps
F Interrupteurs pour le ventilateur
O = Arrêt
A + n = Marche lente
A + b = Marche rapide
G Embouts latéraux
H Cordon secteur
I Pieds
J Tubes connecteurs avec protection
K Connecteurs Lit / Ciel
L Ventilateurs pour les tubes
M Ouïes d’aération
N Filtre acrylique
O Film de protection
P Lunettes protectrices (2 paires)
((HB 072 code service n° 4822 690 80147)
Q Vis et écrous
R Clés / tournevis / Clé
S Repose tête
T Télécommande
U Compteur
V Glissières
W Bloc d’alimentation
Mise en œuvre du solarium
• L’assemblage du solarium nécessite deux personnes (fig. 2).
• Le solarium est un appareil lourd. Nous vous conseillons donc de
l’assembler là ou il sera utilisé. Assurez-vous de laisser
suffisamment d’espace autour de l’appareil pour l’aération (50 cm
au moins sur les côtés et 30 cm derrière).
- Montez les pieds sur le châssis à l’aide des vis (fig. 3).
• Assurez vous que la partie la plus large des pieds est vers
l’extérieur.
- Montez les glissières sur le châssis (fig. 4).
• Assurez-vous que les petits guides soient dirigés vers l’avant et
vers l’intérieur.
- Tirez sur les guides et tournez d’un quart de tour (fig. 5).
- Placez le bloc d’alimentation sur les glissières ; poussez-le de 10cm
puis faites revenir les guides en position initiale (fig. 6). Poussez le
bloc d’alimentation à fond sur les rails jusqu’à ce que vous
entendiez un clic .
• NB : les connecteurs doivent être dirigés vers le bas. Attention à
ne pas pincer les câbles d’alimentation avec les roues ou les
glissières.
- Placez le Lit sur le châssis. Assurez vous que les pieds pénètrent
bien dans les ouvertures appropriées (fig. 7).
• NB : Les connecteurs pour le Lit doivent être dirigés vers le bas.
- Placez le Ciel avec les émetteurs face contre terre (fig. 8).
-A l’aide d’une autre personne positionnez le Ciel sur le Lit en
faisant coïncider les tubes de connexion entre eux (fig. 9).
- Branchez les connecteurs entre le bloc alimentation et le Lit
(fig. 10 et 11) et verrouillez à l’aide de la partie métallique (fig. 12).
Pour retirer le connecteur voir fig. 12a.
- Les petits connecteurs sont identiques et interchangeables.
Branchez-les dans les prises correspondantes (fig. 13). Pour les
retirer voir fig. 13a.
- Faite passer le câble de la télécommande entre le Lit et le Ciel du
solarium.
- Montez les panneaux de côté (fig. 14) sur le châssis à l’aide des vis
fournies (fig. 15). Fixez en le faisant glisser le cache avant (fig. 16).
Assurez vous que les panneaux de côté (1) et (2) s’adaptent bien
aux bords du cache avant (3).
- Montez le panneau avant sur le Lit ainsi que les cache sur les têtes
de vis.
• Ce panneau n’est monté qu’a des fins esthétiques.
- NB : Ne bougez le Lit que très précautionneusement en le faisant
glisser sur le sol ou en le soulevant très légèrement avec l’aide
d’une autre personne.
• Ne le bougez jamais comme indiqué fig. 17. Cela pourrait
désassembler le Lit du châssis lui-même.
Préparation du solarium à l’emploi
- Levez le Ciel (fig.18) et retirez le film de protection du filtre
acrylique (fig. 18a) .
- Insérez le connecteur dans la prise murale.

12
Télécommande (fig. 19)
a Bouton de réglage de durée 0-30 min.
b Bouton de démarrage ‘marche’
c Bouton pause/reprise
d Signal clignotant
e Témoin lumineux
f Signal sonore
g Affichage
• Attention: les instructions suivantes indiquent en rouge le
bouton sur lequel il faut appuyer.
• Dans les cas suivants, l’affichage indique le nombre 00 :
- Quand vous venez de mettre la fiche secteur dans la
prise murale ;
- à la fin d’une séance ;
- après une interruption du circuit.
Dans tous ces cas, les émetteurs à UV s’éteignent.
- Quand vous introduisez la fiche secteur dans la prise murale, le
témoin lumineux e s’allume (fig. 20). Le témoin restera allumé
tant que l’appareil sera connecté. Déroulez entièrement le cordon
secteur.
-Réglez la durée de la séance de bronzage : quand vous appuyez sur
le bouton + cette durée s’allonge. Quand vous appuyez sur le
bouton -, cette durée diminue (fig. 21). Le réglage de durée se
passera plus vite si vous maintenez le bouton enfoncé.
- Allumez les émetteurs ultraviolets en appuyant sur le bouton
‘marche’ I (fig. 22).
• Le signal clignotant d devient visible. A l’affichage g, la durée
d’exposition (dans cet exemple, elle est de 25 minutes) se
décompte à partir de maintenant (fig. 23).
• Vous pouvez appuyer sur le bouton ‘pause/reprise’ fi pour
recommencer la séance d’exposition (fig. 24). Les émetteurs
ultraviolets seront arrêtés. Vous pouvez rallumer les émetteurs
ultraviolets en appuyant sur le bouton ‘marche’ I (fig. 25). Le
temps restant réapparaît à l’affichage.
• Pour raccourcir la séance d’exposition, appuyez d’abord sur le
bouton ‘marche’ I (fig. 26). Les émetteurs ultraviolets s’éteignent.
Réglez la nouvelle durée d’exposition en appuyant sur le bouton a
et le bouton ‘marche’ I.
- Les lampes HPA doivent refroidir pendant 3 minutes avant de
pouvoir les relancer à nouveau.
- Le signal sonore f sonne à la dernière minute de la séance
d’exposition (fig.27). Pendant cette minute le bouton pause ne
fonctionne pas.
• Quand la durée d’exposition s’est écoulée, l’appareil s’arrête
automatiquement.
Utilisation
- Repoussez le Ciel vers l’arrière afin de pouvoir vous allonger plus
facilement sur le Lit (fig. 28), puis replacez le Ciel en position
horizontale au dessus de votre corps.
- Mettez l’appareil en marche en sélectionnant une durée
d’exposition à l’aide de la télécommande (voir section :
Télécommande).
• Pour la durée des séances, voir ‘Séances de bronzage : durée et
fréquence’.
• For the correct tanning times, see the section ‘UV tanning sessions:
How often? And how long?’
- Allumez le ventilateur pour le corps en appuyant sur l’interrupteur
(fig. 29) et sur la vitesse adéquate (n, b) (fig. 30).
- Si vous le souhaitez également vous pouvez mettre en marche le
solarium facial (fig. 29). Sélectionnez , pour 75% de sa puissance ou
» pour pleine puissance (fig. 31).
- Mettez toujours les lunettes de protection fournies.
Nettoyage
• Débranchez toujours le solarium et laissez-le refroidir
avant de le nettoyer.
• Vous pouvez nettoyer l’extérieur du solarium avec un chiffon
humide. Assurez-vous que de l’eau ne pénètre pas dans l’appareil.
• N’utilisez pas d’abrasifs, de tampons à récurer ni de
liquides tels que de l’essence ou de l’acétone. Cela peut
causer des dommages irréparables.
Compteur
Le compteur indique le temps d’utilisation des lampes. Vous pouvez
lire le compteur si vous enlevez les vis de la tête de Lit. Voir section
‘Remplacement des lampes et/ou filtres à UV’.
Remplacement des lampes et/ou filtres à UV
Avec le temps (au bout de quelques années en usage normal)
l’efficacité des lampes UV diminuera progressivement.
Si cela se produit, vous pouvez augmenter la durée des séances de
bronzage ou faire remplacer les lampes UV.
• Faîtes remplacer les lampes et filtres UV uniquement par un
Centre Service Agréé Philips proche de votre domicile ; lui seul
possède la compétence nécessaire et dispose des pièces de
rechange d’origine nécessaires à cette opération.
• Si vous souhaitez remplacer les tubes UV ou les starters par vous
même procédez de la façon suivante :
- Débranchez la fiche de la prise de courant.
- Enlevez les vis de la tête de Lit (fig. 32).
- Tirez le filtre acrylique hors du bâti sur 10 cm environ.
-Défaites la bande de sûreté sur le côté arrière (fig. 33, 34).
- Procédez de la même manière avec le côté avant.
- Retirez le filtre acrylique. Maintenant vous pouvez remplacez les
tubes et les filtres à UV.
• NB : Vous pouvez nettoyer le filtre si vous le souhaitez à l’aide
d’eau savonneuse.
- Retirez les tubes, en tournant d’un quart de tour. Tirez le tube
hors de son support.
- Les tubes UV ainsi que les starters sont remplacés de la même
façon. Les starters se trouvent sous les tubes UV et par
conséquent vous devez retirer le tube avant de remplacer le
starter.
- Pour retirer un starter, tournez d’un quart de tour à gauche.
- Pour le remontage, procédez en sens inverse.
-N’oubliez pas de remonter le boîtier avec les vis de fixation.
• NB : L’émetteur UV-HPA de votre solarium facial ne doit être
remplacé que par une personne qualifiée.
Bloc d’alimentation central
Ce solarium peut être branché sur un bloc d’alimentation central.
Ce dispositif ne peut être branché que par un électricien agréé .
Vous trouverez les instructions de connexion sur le bloc
d’alimentation.
L’environment
Les lampes de solariums contiennent des substances qui risquent de
polluer l’environnement. Quand vous jetez les lampes, prenez soin
de les séparer des ordures ménagères ordinaires et de les placer à
un endroit assigné à cet effet.
13
Votre solarium ne fonctionne pas comme vous le souhaitez :
Cependant, il se peut aussi que votre appareil n’ait pas été installé selon les instructions ou utilisé convenablement. Si c’est le cas, vous
pouvez résoudre le problème immédiatement en consultant le chapitre suivant.
Si le solarium ne fonctionne pas comme souhaité, cela peut être dû à un défaut, sinon appelez votre distributeur ou votre Centre Service
Agréé Philips.
Cause possible
- La fiche secteur n’est pas bien mise dans la prise murale
- Pas de courant secteur. Veuillez vérifier avec un autre appareil.
- Le bouton de réglage de la durée n’a pas été réglé.
- Le cordon d’alimentation K n’a pas été branché.
- Contrôlez le coupe-circuit auquel le solarium a été connecté .
Le modèle adéquat pour votre solarium est un coupe-circuit ordinaire de 16 A ou un
coupe-circuit automatique à réaction lente.
- Vous utilisez une rallonge trop longue, enroulée et/ou ne permettant pas l’alimentation
électrique nécessaire. Veuillez consulter votre distributeur. En général, nous vous
conseillons de ne pas utilisez de rallonge.
- Votre traitement ne convient pas pour votre type de peau.
- Après une longue utilisation, l’émission d’UV diminue. (Si l’utilisation est normale, cela ne
sera pas perceptible avant des années).
Vous pouvez compenser cet effet en réglant des durées de traitement plus longues ou en
faisant remplacer les émetteurs ultraviolets.
Problème
• Le solarium ne s’allume pas
• Le lit fonctionne mais le ciel ne
fonctionne pas.
• Le coupe-circuit interrompt le courant
secteur quand on allume ou en cours
d’utilisation.
• Le bronzage ne répond pas à votre
attente.
14
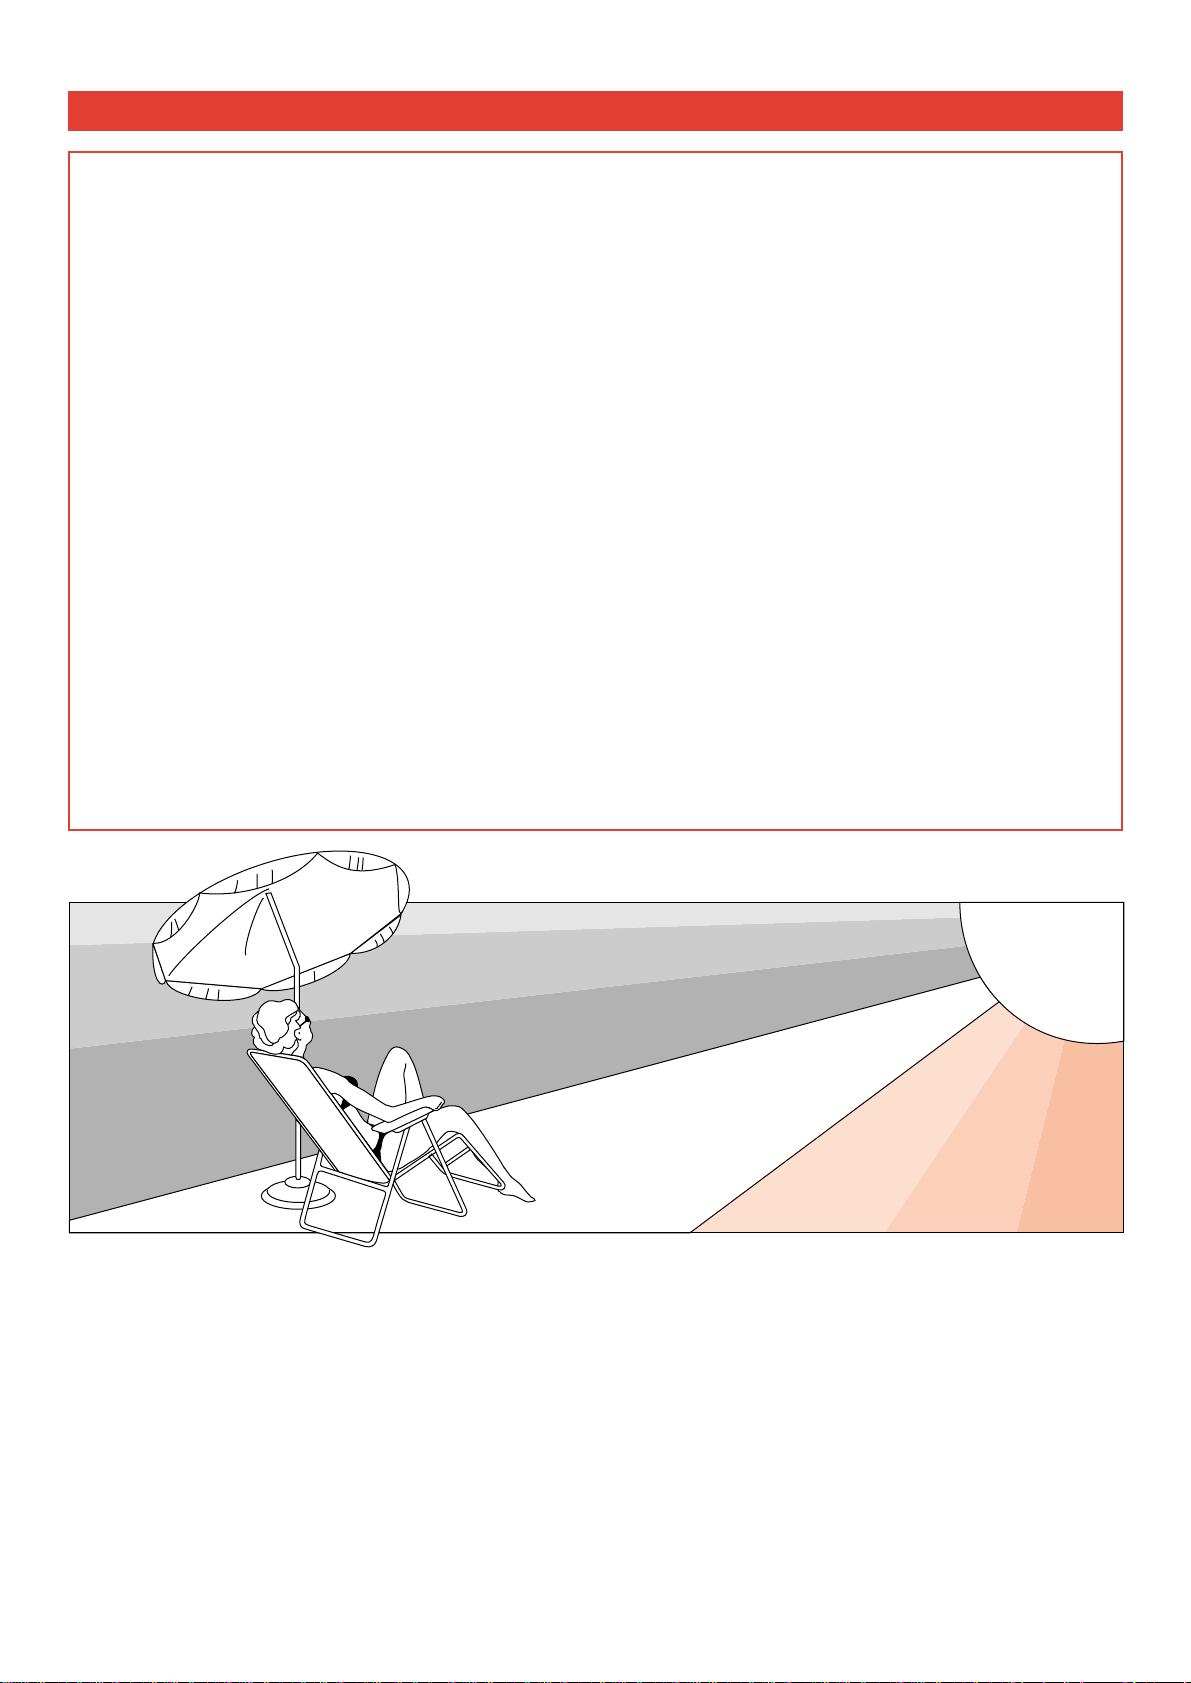
The sun supplies various types of energy. Visible light enables us to
see, ultraviolet (UV) light gives us a tan and the infrared (IR) light in
sunrays provides the heat in which we like to bask.
The combi-solarium
With this solarium you can suntan comfortably at home. The tanning
lamps emit visible light, heat and ultraviolet light, giving you the
impression you are sunbathing in real sunlight. The solarium tans
your whole body, including the sides, evenly from head to toe.
A timer ensures that each tanning session does not last longer than
max. 30 minutes. Just as with natural sunlight, overexposure must be
avoided (see section ‘UV and your health’).
Deutsch
Important
• Before you connect the appliance, check if the voltage indicated on the appliance corresponds to the mains voltage in
your home. This appliance requires a mains voltage of 400V.
• Electricity and water are a potentially lethal combination. Do not use this appliance under moist conditions, for
instance in a bathroom or near a swimming pool.
• If you have just taken a swim or a shower, make sure you dry your skin properly before using the appliance.
• The appliance must be connected to a three-phase circuit that is protected with a 16A standard fuse or a slow-blow
automatic fuse (one for each phase).
• Unplug the appliance after use.
• Make sure the cord does not become trapped under one of the legs when you move the appliance.
• Make sure the vents in the canopy and in the couch remain open during use.
• Never use the appliance when the timer switch or the acrylic sheet is defective.
• Never allow children to play with the appliance.
• Stick to the recommended tanning time and the maximum number of tanning hours indicated (see ‘UV tanning
sessions: How often? And how long?’).
• Do not have more than one tanning session a day and avoid excessive exposure to natural sunlight on the same day.
• Do not use the tanning equipment if you have a disease and/or use medication or cosmetics that increase the sensitivity
of your skin. Be extra careful if you are hypersensitive to UV. Consult your doctor in case of doubt.
• Go to you doctor if you notice sores, moles or persistent lumps on your skin.
• People who burn easily and never tan, people whose skin is sunburnt, children and people who suffer from or have
suffered from or who are susceptible to skin cancer are advised not to use the appliance.
• Never use the solarium without wearing the protective goggles provided. By wearing these goggles you will protect
your eyes against overexposure to visible, ultraviolet and infrared light (see ‘UV and your health’).
• Remove all creams, lipstick and other cosmetics from your face and body well before the tanning session.
• Do not use any sunscreens or any quick-tan lotions or creams.
• You may use a moisturising cream if your skin feels a little taut after tanning.
• Just like sunlight, light from this appliance can cause certain materials to discolour.
• Don’t expect the appliance to provide better results than the sun.
• If the mains cord of this appliance is damaged, it must only be replaced by Philips or their service representative, as
special tools and/or parts are required.
• If you require another type of plug than one fitted to the appliance, please contact a registered electrician.
The sun
ULTRAVIOLET (UV)
SICHTBARES LICHT
INFRAROT

15
UV and your health
Just as with natural sunlight, the tanning process will take some time.
The first effect will only become visible after a few sessions (see
section ‘UV tanning sessions: How often? And how long?’).
Overexposure to ultraviolet light (natural sunlight or artificial light
from your solarium) can cause sunburn.
Besides many other factors, such as overexposure to natural
sunlight, incorrect and excessive use of a solarium may increase the
risk of skin and eye problems. The degree to which these effects
occur is determined by the nature, intensity and duration of the
radiation on the one hand and the sensitivity of the person involved
on the other hand.
The more the skin and the eyes are exposed to UV, the higher the
risk of keratisis, conjunctivitis, damage to the retina, cataracts,
premature skin ageing and the development of skin tumours will be.
Some medications and cosmetics increase the sensitivity of the skin.
It is therefore highly important
- that you follow the instructions given under the heading
‘Important’ and ‘UV tanning sessions: How often? And how long?’;
- that you stick to the maximum permissible tanning hours a year
(see section ‘UV tanning sessions: How often? And how long?’);
- that you wear the protective goggles provided during every tanning
session.
UV tanning sessions: How often? And how long?
Take one tanning session a day for five to ten days. Wait at
least 48 hours after the first session before taking the second
session. After this 5 to 10-day course, you may take a break
from tanning.
Approximately one month after a course your skin will have
lost most of its tan again. You can then start a new tanning
course.
If you want to retain your tan, do not stop tanning after the
course but continue taking one or two tanning sessions a
week.
Regardless of the tanning method you choose, always make sure
that you do not exceed the maximum number of tanning
hours, which is XX hours (= XX minutes) a year for this
solarium.
Example:
Suppose you are taking a 10-day course, consisting of an
XX-minute tanning session on the first day and XX-minute
tanning sessions on subsequent nine days.
The total course will last:
(X x X minutes) + (X x XX minutes) = XXX minutes.
• You could take X of these courses a year
(because X x XXX minutes = XXXX minutes.)
As is shown in the table, the first session of a tanning course
should always last X minutes, irrespective of the sensitivity of
the skin.
Wenn Sie den Eindruck haben, daß die eingestellte Bräunungszeit zu lang ist, z.B. weil Ihre Haut spannt oder stark
gerötet ist, so verkürzen Sie die Bräunungszeit um ca. 5 Minuten.
Dauer der UV- 1. 2. 3. 4. 5. 6. 7. 8. 9. 10.
Bräunung Tag Tag Tag Tag Tag Tag Tag Tag Tag Tag
- bei sehr
empfindlicher Haut: X XXXXXXXXXXXXXXXXXX
- bei normal
empfindlicher Haut: X XX-XX XX-XX XX-XX XX-XX XX-XX XX-XX XX-XX XX-XX XX-XX
- bei wenig
empfindlicher Haut: X XX-XX XX-XX XX-XX XX-XX XX-XX XX-XX XX-XX XX-XX XX-XX
mindestens 48 Stunden aussetzen

16
General description (fig. 1, page 3)
A Tube lamps and starters of the couch
B Tube lamps and starters of the canopy
C Facial tanner
D Switch(es) for facial tanner
O = facial tanner off
A and , = facial tanner on at 75% of its full power
A and » = facial tanner on at full power
E Fan for body cooling
F Switches for fan
O = fan off
A and n = fan on at half power
A and b = fan on at full power
G End covers
H Mains cord
I Legs of the frame
J Connecting tubes with protective covers
K Connecting cords between power supply unit and couch and
canopy
L Fans to cool the tube lamps
M Vents
N Acrylic sheets
O Protective foil
P Protective goggles (2 pairs)
(type no. HB 072/service no. 4822 690 80147)
Q Screws, socket-head screws and decorative caps
R Socket-head screw wrench, screwdriver and spanner
S Pillow
T Remote control
U Hour counter
V Guide rails
W Power supply unit
Making the solarium ready for use
• It requires two people to assemble and move the solarium (fig. 2).
• During assembly the solarium becomes heavier and more difficult
to move. We therefore advise you to assemble the solarium at the
place where it will be used. Make sure there is enough free space
beside (at least 50 cm) and behind (at least 30 cm) the solarium.
- Assemble the tubes of the frame by means of socket-head screws
(fig. 3).
• Make sure the larger assembly openings in the legs of the frame are
pointing outward.
- Fasten the guide rails for the power supply to the frame (fig. 4).
• Make sure the locking pins are at the front and pointing inward.
- Pull the locking pins outward, as indicated in fig. 5, and give them a
quarter turn.
- Push the power supply unit some 10 cm along the guide rails
(fig. 6) and give the locking pins a quarter turn back to their
original position. Push the power supply unit further along the
guide rails until you hear a click.
• NB: The plugs should be pointing backwards. Make sure the cords
do not get caught under the wheels of the unit.
- Put the couch on the legs carefully. Make sure the legs slide
steadily into the appropriate openings in the couch (fig. 7).
• NB: The connecting tubes of the couch should be pointing
backward.
- Put the canopy on the floor with the tube lamps pointing
downward (fig. 8).
- Lift the canopy together with another person and position its
connecting tubes over the connecting tubes of the couch (fig. 9).
- Slide the tubes steadily into the connecting tubes of the couch.
- Put the plugs of the power supply unit in the sockets of the couch
and the canopy.
Insert the large plug into the socket of the power supply unit. This
will take some effort. Lock the plug in position by operating the
metal handle (figs. 10 and 11). For undoing the plug, see fig. 12.
The small plugs are identical and interchangeable. Put them in the
appropriate sockets of the power supply unit (fig. 13). For undoing
the small plugs, see fig. 14.
- Pull the remote control forward between the couch and the
canopy.
- Fasten the side panels to the legs of the frame (fig. 15) with the
screws supplied (fig. 16). Slide the front panel behind the edges of
the side panels and fasten it with the screws supplied (fig.17).
Stick to the order indicated in fig. 14 to ensure that side panels (1)
and (2) enclose the edges of the front panel (3).
- Fasten the front panel to the couch and push the decorative caps
onto the screw heads.
• The only purpose of the panels is to enhance the appearance of the
appliance.
- NB: Only move the solarium by carefully sliding its legs across the
floor or by carefully lifting it slightly off the floor together with
another person.
• Never try to move the solarium as shown in fig. 18. This could
cause the frame to couch to become detached.
Making ready for use
- Push the canopy backward (fig. 19) and remove the protective foil
from the acrylic sheet (fig. 20).
- Insert the plug of the power supply unit into the wall socket.

17
Remote control (fig. 21)
a Time setting button 0-30 minutes
b Start button
c Pause button
d Blinking signal
e Pilot lamp
f Buzzer
g Display
• Note that in the following instructions, the buttons to be
used are shown in red.
• In the following cases the number 00 will appear on the
display:
- After you have put the plug in the wall socket;
- At the end of a tanning session;
- After a power failure.
In all these cases, the tanning lamps are out.
- When you put the plug in the wall socket, pilot light e will go on
(fig. 22). This pilot light will stay on as long as the appliance is
connected to the mains. Fully unwind the mains cord.
- First set the time of the tanning session. Push the + button to put
the time forward; push the - button to put the time backward
(fig. 23). Keep the button pressed in to adjust the time more
quickly.
- Switch on the tanning lamps by pressing the start button I
(fig. 24).
• A blinking signal d will appear; the set time is shown on display g
(25 minutes in this case) (fig. 25). The countdown of the set
tanning time will now start.
• You can interrupt the tanning session by pressing pause button fi
(fig. 26). The tanning lamps will be switched off. You can switch
them back on again by pressing start button I (fig. 27).
The remaining tanning time will appear on the display.
• You can shorten the set tanning time by first pressing the start
button I (fig. 28). The tanning lamps are switched off. Set the new
tanning time by means of button a and press start button I.
- The HPA lamp of the facial tanner will not start burning right away,
but will only go on after about 3 minutes.
- During the last minute of the session the buzzer will sound f
(fig. 29). During this minute, the pause function does not work.
• As soon as the set tanning time has elapsed, the solarium will
switch off automatically.
Use
- Push the canopy backward so that you can lie down on the couch
(fig. 30). When you lie on the couch, pull the canopy back into
horizontal position.
• NB: when the solarium has not been used for some time, the
hinges of the canopy may squeak when you push the canopy
backward and forward the first time.
- Switch the appliance on by setting the required tanning time on the
remote control (see section ‘Remote control’).
• For the correct tanning times, see the section ‘UV tanning sessions:
How often? And how long?’
- Switch the body cooler on by means of the switch (fig. 31) and
select the required setting and power (n or b) (fig. 32).
- If you like, you can also switch on the facial tanner (fig. 31). Select
setting , for 75% of its full power or » for full power (fig. 33).
- Don’t forget to put on the protective goggles provided.
Cleaning
• Always unplug the solarium and let it cool down before
you start cleaning it.
• You can clean the outside of the solarium with a damp cloth.
Be careful not to let any water run into the appliance.
• Do not use any scouring agents or scouring pads.
• Never use abrasive liquids like alcohol, methylated spirits,
petrol or acetone to clean the acrylic sheets: this could
cause irreparable damage.
Hour counter
The hour counter indicates the number of hours the lamps have
been on. You can read the counter by removing the end cover at
the head of the couch. See section on ‘Replacing lamps and/or
starters’ for instructions on how to remove the end cover.
Replacing lamps and/or starters
After some time (after a few years in case of normal use) the light
emitted by the tanning lamps will become less bright. When this
happens, you will notice a decrease in the tanning capacity of the
solarium. You can overcome this problem by setting a slightly longer
tanning time or by replacing the lamps or by having them replaced.
• You can have the tube lamps and/or starters replaced by an
authorised Philips Service Centre. They have the knowledge and
skills required for this job and the original spare parts for your
solarium.
• If you want to replace the tube lamps and/or starters yourself, you
should proceed as follows:
- Unplug the appliance.
- Remove the decorative caps and undo the screws of the end cover
at the head of the couch and remove them (fig. 34).
- Pull the acrylic sheet approx. 10 cm out of the appliance.
- Undo the snap strip on the rear side of the couch, starting at the
head (figs. 35 to 36).
- Do the same with the snap strip on the front side of the couch.
- Remove the acrylic sheet (fig. 37).
Now you can replace the tube lamps and starters.
• NB: You can now also clean the acrylic sheet, if you wish.
- To remove the lamps, turn them to the left or to the right so that
you can lift them out of their holders.
- The lamps and/or starters of the canopy can in principle be
replaced in the same way. In the canopy the starters are located
behind the lamps at the head of the canopy. To replace the
starters, you will first have to remove the tube lamps.
- Starters can be removed by turning them to the left.
- New lamps and starters and the acrylic sheet are assembled in
reverse direction and order.
- Do not forget to fasten the end cover with screws again.
• NB: The HPA lamps of the facial tanner may only be replaced by
authorised Philips service personnel.
Coin box or central control unit
This solarium can also be connected to a coin box or a central
control unit at the reception desk. These devices may only be
connected by a registered electrician. The connection instructions
can be found on a sticker on the power supply unit.
The environment
The lamps of solariums contain substances that can be harmful to
the environment. When you discard the lamps, make sure they are
not thrown away with the normal household waste but are handed
in at an official collection point.

18
Das Gerät arbeitet nicht wie gewünscht?
Wenn das Gerät nicht wie gewünscht funktioniert, kann dies an einem Defekt liegen. Bitte, zögern Sie nicht, sich dann an Ihren Händler
oder das Philips Service Center zu wenden.
Das Gerät könnte aber auch nicht ganz sachgemäß installiert sein. Prüfen Sie deshalb, bevor Sie sich an Ihren Händler oder das Philips
Service Center wenden, anhand der folgenden Liste, ob Sie die Störung selbst beheben können.
Mögliche Ursache
- Der Stecker ist nicht (oder nicht fest genug) in der Steckdose.
- Kein Strom. - Prüfen Sie mit einem anderen Gerät ob die Steckdose Strom führt.
- Es ist keine Bräunungszeit eingestellt.
- Die Verbindungskabel K sind nicht oder nicht richtig angeschlossen.
-Prüfen Sie die Sicherung im Stromkreis, an den das Gerät angeschlossen ist. Es werden für
jede Phase ein 16 A Sicherungsautomat (träge) benötigt.
- Es sind vielleicht zu viele Geräte am selben Stromkreis angeschlossen.
- Sie verwenden ein Verlängerungskabel, das zu lang, nicht völlig abgewickelt oder für die
auftretende Stromstärke nicht geeignet ist. Fragen Sie Ihren Händler. Sie sollten nach
Möglichkeit ganz auf ein Verlängerungskabel verzichten.
- Die Bräunungskur entspricht nicht Ihrem Hauttyp.
- Nach einiger Zeit - bei normalem Gebrauch erst im Laufe mehrerer Jahre - nimmt die
Leistung der UV-Röhren und -Lampen ab. Sie können zum Ausgleich die Bräunungszeit
verlängern oder die Röhren/Lampen auswechseln.
Problem
• Das Gerät schaltet sich nicht ein.
• Die Sonnenliege leuchtet auf, der
Sonnenhimmel aber nicht bzw.
umgekehrt.
• Beim Einschalten oder während des
Gebrauchs fällt der Strom aus.
• Die Bräunung ist ungenügend.
 Loading...