

Page 1

ENGLISH
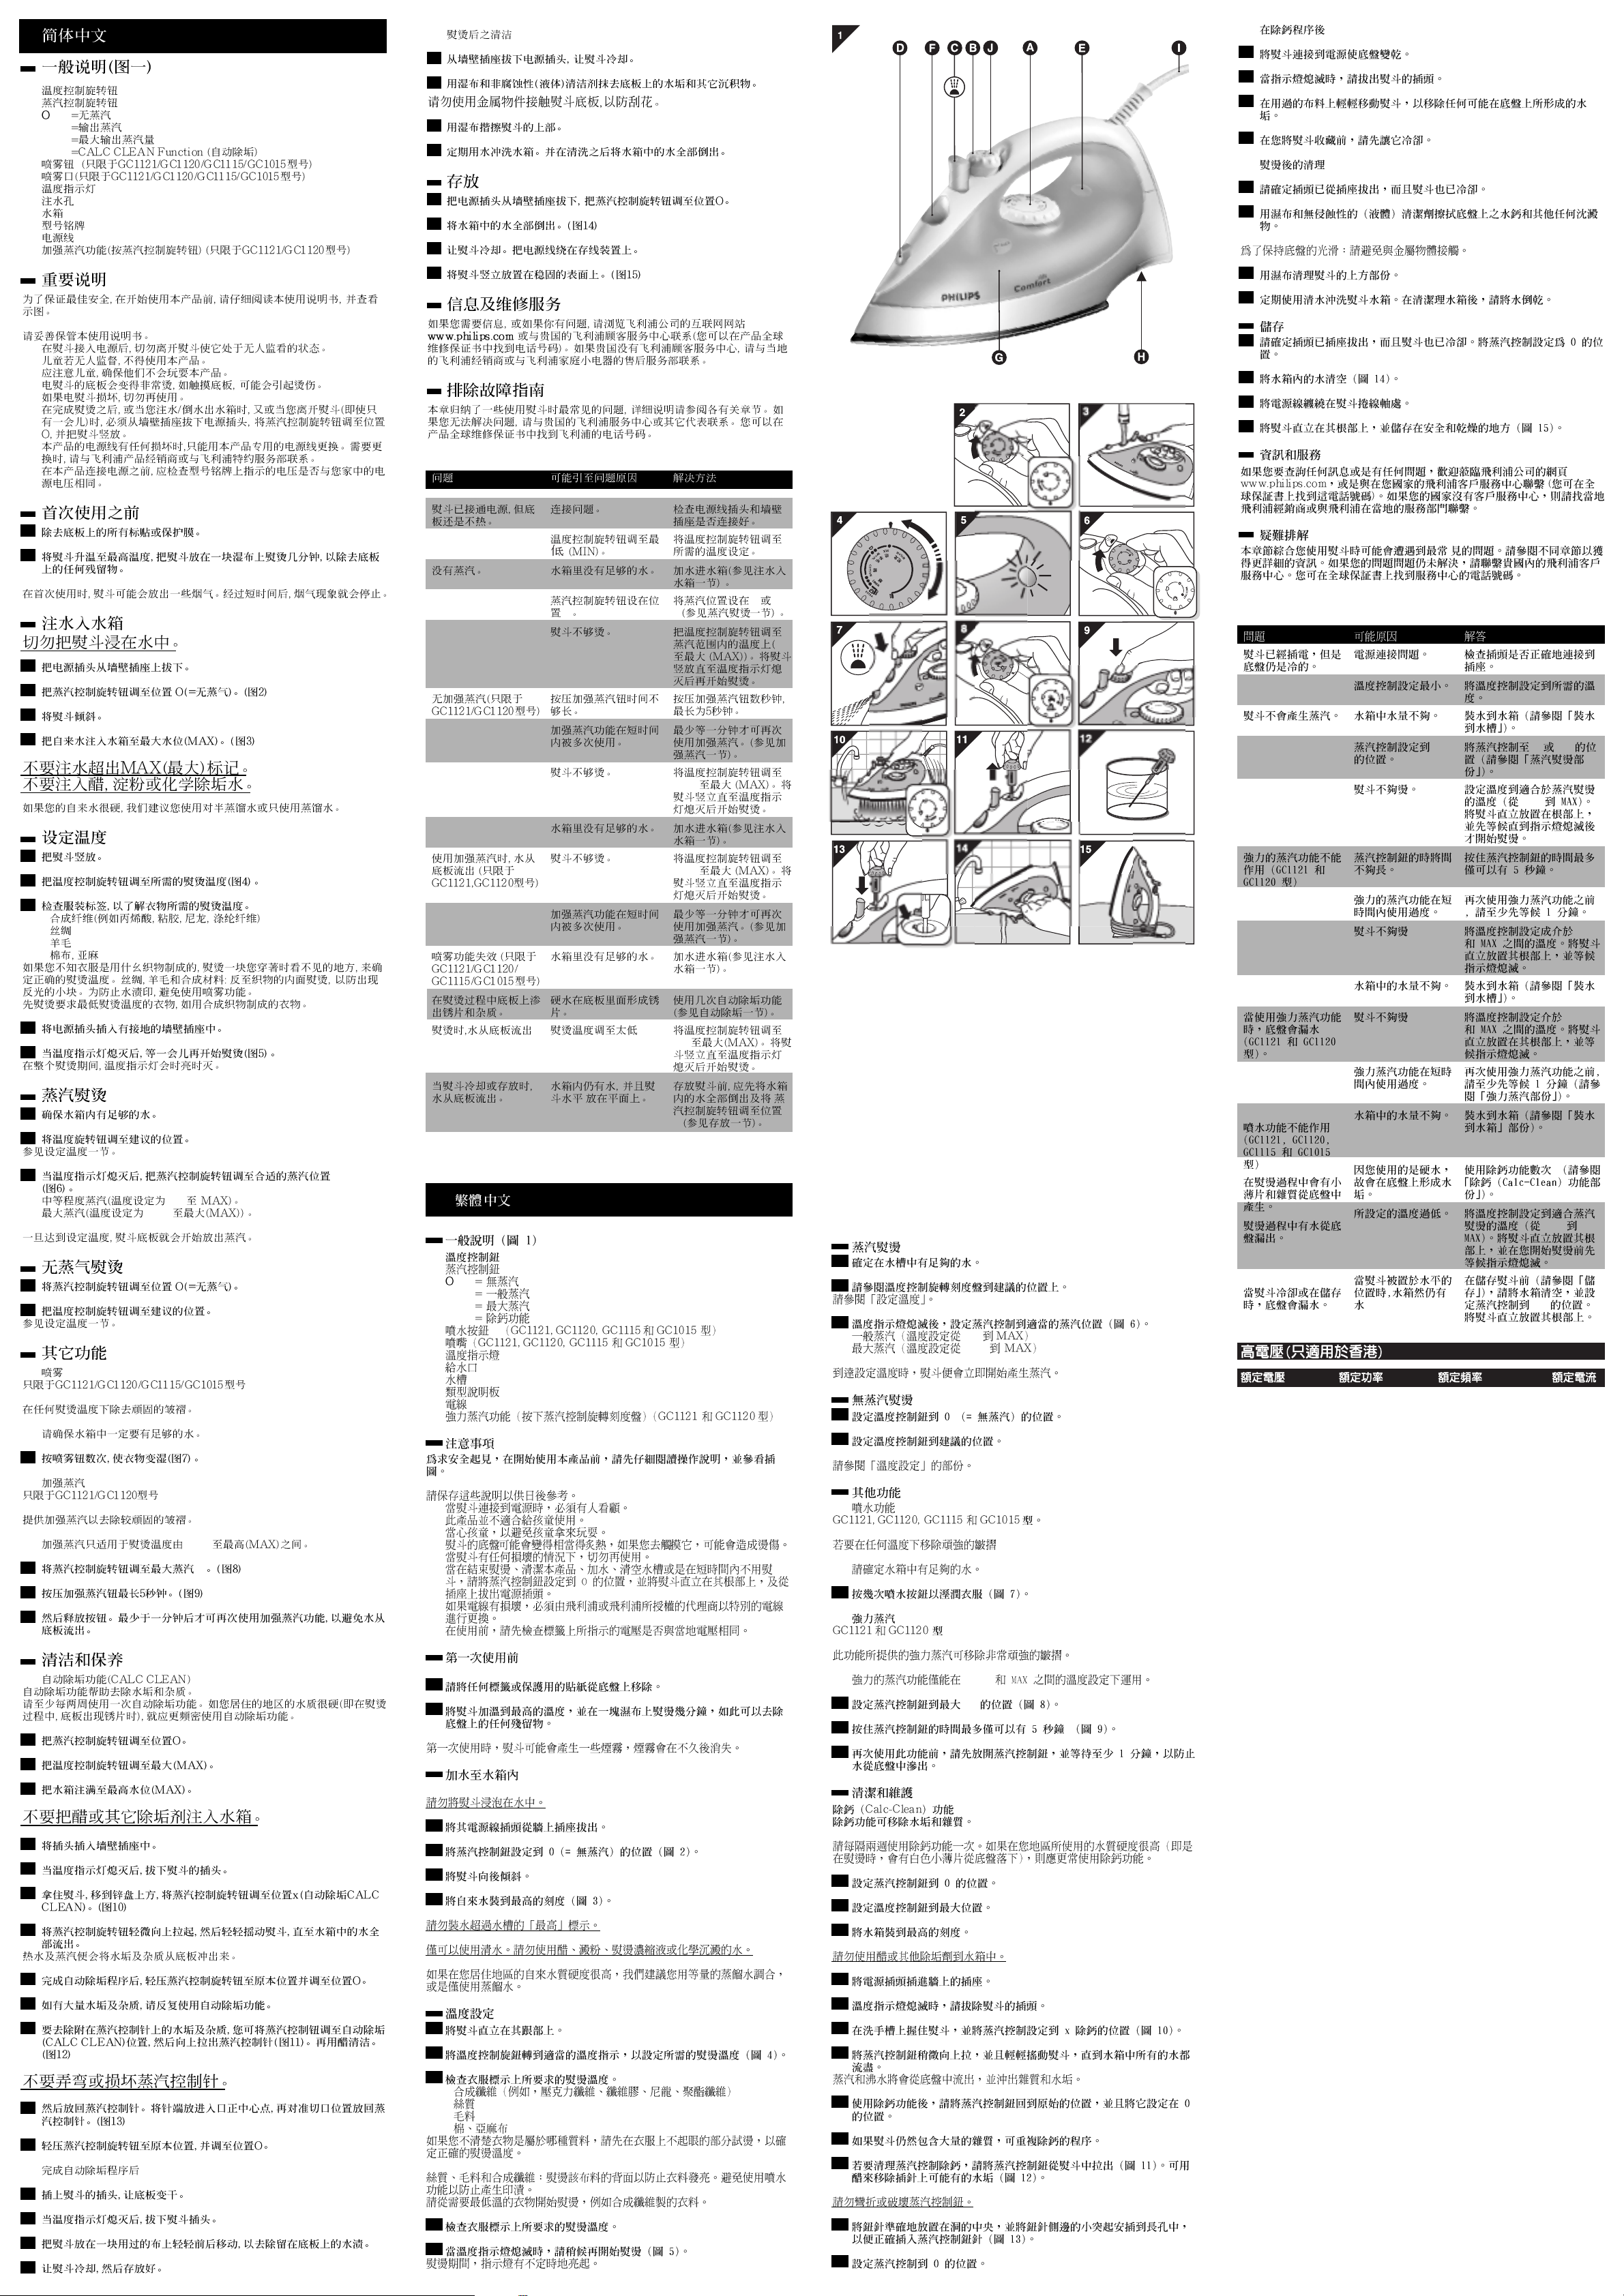
General description (fig. 1).IIIIIIIIIIIIIIIIIIIIIIIIIIIIIIIIIIIIIIIIIIIIIIIIIIIIIIIIIIIIIIIIIIIIIIIIIIIIIIIIIIIIIIIIIIIIIIIIIIIIIIIIIIIIIIIIIIIIIIIIIIIIIIIIIIIIIIIIIIII
A Temperature control dial
B Steam control dial
O = no steam
q = moderate steam
w = maximum steam
x = Calc-Clean function
C Spray button T (types GC1121, GC1120, GC1115 and GC1015)
D Spray nozzle ( types GC1121, GC1120, GC1115 and GC1015)
E Temperature pilot light
F Water filling opening
G Water tank
H Type plate
I Cord
J Extra Steam function (press steam control dial) (type GC1121 and GC1120)
ImportantIIIIIIIIIIIIIIIIIIIIIIIIIIIIIIIIIIIIIIIIIIIIIIIIIIIIIIIIIIIIIIIIIIIIIIIIIIIIIIIIIIIIIIIIIIIIIIIIIIIIIIIIIIIIIIIIIIIIIIIIIIIIIIIIIIIIIIIIIIIIIIIIIIIIIIIIIIIIIIIIIIIIIIIIIIIIIIIIIIIIIIIIIIIIIIIIIIIIIIIIIIIIIIIIIII
For optimal safety, read these instructions carefully and look at the illustrations
before you start using the appliance.
Keep these instructions for future reference.
◗ Never leave the iron unattended when it is connected to the mains.
◗ This appliance is not intended for use by children.
◗ Keep an eye on children to make sure that they do not play with the appliance.
◗ The soleplate of the iron can become extremely hot and may cause burns if
touched.
◗ Never use the appliance if it is damaged in any way.
◗ When you have finished ironing, when you clean the appliance, when you fill or
empty the water tank and also when you leave the iron even for a shor t while:
set the steam control to position O, put the iron on its heel and remove the
mains plug from the wall socket.
◗ If the supply cord is damaged, it must be replaced by a special cord or assembly
available from Philips or a service agent.
◗ Check if the voltage indicated on the type plate corresponds to the local mains
voltage before you connect the appliance.
Before first useIIIIIIIIIIIIIIIIIIIIIIIIIIIIIIIIIIIIIIIIIIIIIIIIIIIIIIIIIIIIIIIIIIIIIIIIIIIIIIIIIIIIIIIIIIIIIIIIIIIIIIIIIIIIIIIIIIIIIIIIIIIIIIIIIIIIIIIIIIIIIIIIIIIIIIIIIIIIIIIIIIIIIIIIIIIIIIIIIIIIIIIIIIIIII
1 Remove sticker or protective foil from the soleplate if there is any.
2 Heat up the iron to the maximum temperature and pass the iron over a piece
of damp cloth for several minutes to remove any residues from the soleplate.
The iron may give off some smoke when you use it for the first time.This will cease
after a short while.
Filling the water tankIIIIIIIIIIIIIIIIIIIIIIIIIIIIIIIIIIIIIIIIIIIIIIIIIIIIIIIIIIIIIIIIIIIIIIIIIIIIIIIIIIIIIIIIIIIIIIIIIIIIIIIIIIIIIIIIIIIIIIIIIIIIIIIIIIIIIIIIIIIIIIIIIIIIIIIIIIIIIIIIIIII
Never immerse the iron in water.
1 Remove the mains plug from the wall socket.
2 Set the steam control to position O (= no steam) (fig. 2).
3 Tilt the iron backwards.
4 Fill the water tank with cold tap water up to the maximum level (fig. 3).
Do not fill the water tank beyond the MAX indication.
Only use water. Do not use vinegar, starch, ironing concentrates or chemically
descaled water.
If the tap water in your area is very hard, we advise you to mix it with an equal
amount of distilled water or to use distilled water only.
Setting the temperatureIIIIIIIIIIIIIIIIIIIIIIIIIIIIIIIIIIIIIIIIIIIIIIIIIIIIIIIIIIIIIIIIIIIIIIIIIIIIIIIIIIIIIIIIIIIIIIIIIIIIIIIIIIIIIIIIIIIIIIIIIIIIIIIIIIIIIIIIIIIIIIIIIIIIIII
1 Put the iron on its heel.
2 Check the garment label for the required ironing temperature:
1 Synthetic fabrics (e.g. acrylic, viscose, polyamide, polyester)
1 Silk
2 Wool
3 Cotton, linen
If you do not know what kind of fabric(s) a garment is made of, determine the right
ironing temperature by ironing a part that will be invisible when you wear the
garment.
Silk, woollen and synthetic materials: iron the reverse side of the fabric to prevent
shiny patches. Avoid using the spray function to prevent stains.
Start ironing the ar ticles that require the lowest ironing temperature, such as those
made of synthetic fibres.
3 Set the temperature control dial to the required ironing temperature by
turning it to the appropriate temperature indication (fig. 4).
4 Put the mains plug in an earthed wall socket.
5 When the temperature pilot light has gone out, wait a while before you start
ironing (fig. 5).
The pilot light will go on from time to time during ironing.
Steam ironingIIIIIIIIIIIIIIIIIIIIIIIIIIIIIIIIIIIIIIIIIIIIIIIIIIIIIIIIIIIIIIIIIIIIIIIIIIIIIIIIIIIIIIIIIIIIIIIIIIIIIIIIIIIIIIIIIIIIIIIIIIIIIIIIIIIIIIIIIIIIIIIIIIIIIIIIIIIIIIIIIIIIIIIIIIIIIIIIIIIIIIIIIIIIIIIIIII
1 Make sure that there is enough water in the water tank.
2 Set the temperature control dial to the recommended position.
See 'Setting the temperature'.
3 After the temperature pilot light has gone out, set the steam control to the
appropriate steam position (fig. 6).
q for moderate steam (temperature settings 2 to MAX)
w for maximum steam (temperature settings 3 to MAX)
The iron will start producing steam as soon as the set temperature has been
reached.
Ironing without steamIIIIIIIIIIIIIIIIIIIIIIIIIIIIIIIIIIIIIIIIIIIIIIIIIIIIIIIIIIIIIIIIIIIIIIIIIIIIIIIIIIIIIIIIIIIIIIIIIIIIIIIIIIIIIIIIIIIIIIIIIIIIIIIIIIIIIIIIIIIIIIIIIIIIIIIIIIIIIIIII
1 Set the steam control dial to position O (= no steam).
2 Set the temperature control dial to the recommended position.
See 'Setting the temperature'.
Other featuresIIIIIIIIIIIIIIIIIIIIIIIIIIIIIIIIIIIIIIIIIIIIIIIIIIIIIIIIIIIIIIIIIIIIIIIIIIIIIIIIIIIIIIIIIIIIIIIIIIIIIIIIIIIIIIIIIIIIIIIIIIIIIIIIIIIIIIIIIIIIIIIIIIIIIIIIIIIIIIIIIIIIIIIIIIIIIIIIIIIIIIIIIIIIIIII
Spray function
Types GC1121, GC1120, GC1115 and GC1015.
To remove stubborn creases at any temperature
◗ Make sure there is enough water in the water tank.
1 Press the spray button several times to moisten the article to be ironed (fig. 7).
Extra Steam
Type GC1121 and GC1120.
This function provides extra steam to remove very stubborn creases.
◗ The Extra Steam function only works at temperature settings between 3
and MAX.
1 Set the steam control dial to the maximum position w (fig. 8).
2 Press and hold the steam control dial for maximal 5 seconds (fig. 9).
3 Release the steam control dial and wait at least 1 minute before using this
function again to prevent water from dripping out of the soleplate.
Cleaning and maintenanceIIIIIIIIIIIIIIIIIIIIIIIIIIIIIIIIIIIIIIIIIIIIIIIIIIIIIIIIIIIIIIIIIIIIIIIIIIIIIIIIIIIIIIIIIIIIIIIIIIIIIIIIIIIIIIIIIIIIIIIIIIIIIIIIIIIIIIIIIIIIII
Calc-Clean function
The Calc-Clean function removes scale and impurities.
Use the Calc-Clean function once every two weeks. If the water in your area is very
hard (i.e. when flakes come out of the soleplate during ironing), you should use the
Calc-Clean function more frequently.
1 Set the steam control dial to position O.
2 Set the temperature control dial to MAX.
3 Fill the water tank to the maximum level.
Do not pour vinegar or other descaling agents into the water tank.
4 Put the plug in the wall socket.
5 Unplug the iron when the temperature pilot light has gone out.
6 Hold the iron over the sink and set the steam control to the Calc-Clean
position x (fig. 10).
7 Pull the steam control dial slightly upwards and gently shake the iron until all
water in the tank has been used up.
Steam and boiling water will come out of the soleplate, flushing out impurities and
scale.
8 Press the steam control dial back to its original position and set it to position
O after having used the Calc-Clean function.
9 Repeat the Calc-Clean process if the iron still contains a lot of impurities.
10 To clean the steam control needle, pull the steam control out of the appliance
(fig. 11). Use vinegar to remove scale, if any, from the needle (fig. 12).
Do not bend or damage the steam control needle.
1 Reinsert the steam control needle by placing the point of the needle exactly
in the centre of the hole and by fitting the small projection on the side of the
needle into the slot (fig. 13).
2 Set the steam control to position O.
After the Calc-Clean process
1 Connect the iron to the mains to let the soleplate dry.
2 Unplug the iron when the pilot light has gone out.
3 Move the iron gently over a piece of used cloth to remove any water stains
that may have formed on the soleplate.
4 Let the iron cool down before you store it.
Cleaning after ironing
1 Make sure the plug has been removed from the wall socket and the iron has
cooled down.
2 Wipe scale and any other deposits off the soleplate with a damp cloth and a
non-abrasive (liquid) cleaner.
Keep the soleplate smooth: avoid contact with metal objects.
3 Clean the upper part of the appliance with a damp cloth.
4 Regularly rinse the water tank with water. Empty the water tank after
cleaning.
StorageIIIIIIIIIIIIIIIIIIIIIIIIIIIIIIIIIIIIIIIIIIIIIIIIIIIIIIIIIIIIIIIIIIIIIIIIIIIIIIIIIIIIIIIIIIIIIIIIIIIIIIIIIIIIIIIIIIIIIIIIIIIIIIIIIIIIIIIIIIIIIIIIIIIIIIIIIIIIIIIIIIIIIIIIIIIIIIIIIIIIIIIIIIIIIIIIIIIIIIIIIIIIIIIIIIIIIIIIIIIIII
1 Make sure the plug has been removed from the wall socket and the iron has
cooled down. Set the steam control to position O.
2 Empty the water tank (fig 14).
3 Wind the mains cord round the cord storage facility.
4 Store the iron standing on his heel in a safe and dry place (fig. 15).
Information & service IIIIIIIIIIIIIIIIIIIIIIIIIIIIIIIIIIIIIIIIIIIIIIIIIIIIIIIIIIIIIIIIIIIIIIIIIIIIIIIIIIIIIIIIIIIIIIIIIIIIIIIIIIIIIIIIIIIIIIIIIIIIIIIIIIIIIIIIIIIIIIIIIIIIIIIIIIIIIIIIII
If you need information or if you have a problem, please visit the Philips Web site at
www.philips.com or contact the Philips Customer Care Centre in your country
(you will find its phone number in the worldwide guarantee leaflet). If there is no
Customer Care Centre in your country, turn to your local Philips dealer or contact
the Service Depar tment of Philips Domestic Appliances and Personal Care BV.
Troubleshooting IIIIIIIIIIIIIIIIIIIIIIIIIIIIIIIIIIIIIIIIIIIIIIIIIIIIIIIIIIIIIIIIIIIIIIIIIIIIIIIIIIIIIIIIIIIIIIIIIIIIIIIIIIIIIIIIIIIIIIIIIIIIIIIIIIIIIIIIIIIIIIIIIIIIIIIIIIIIIIIIIIIIIIIIIIIIIIIIIIIIIIIIII
This chapter summarises the most common problems you could encounter with
your iron. Please read the different sections for more details. If you are unable to
solve the problem, please contact the Philips Customer Care Centre in your country.
You can find its telephone number in the worldwide guarantee leaflet.
Solution(s)
Check if the plug is connected
to the wall socket properly.
Set the temperature control dial
to the required temperature.
Fill the water tank (see 'Filling
the water tank').
Set the steam control dial to
position q or w (see 'Steam
ironing').
Set the temperature control dial
to a temperature suitable for
steam ironing (2 to MAX).
Put the iron on its heel and wait
until the pilot light has gone out
before you start ironing.
Press and hold the steam control
dial for maximal 5 seconds.
Wait at least 1 minute before
using the Extra Steam function
again.
Set the temperature control dial
to a temperature between
3 and MAX. Put the iron on
its heel and wait until the pilot
light has gone out.
Fill the water tank (see 'Filling
the water tank').
Set the temperature control dial
to a temperature between
3 and MAX. Put the iron on
its heel and wait until the pilot
light has gone out.
Wait at least 1 minute before
using the Extra Steam function
again (see 'Extra Steam').
Fill the water tank (see 'Filling
the water tank').
Use the Calc-Clean function a
few times (see 'Calc-Clean').
Set the temperature control dial
to a temperature suitable for
steam ironing (2 to MAX).
Put the iron on its heel and wait
until the pilot light has gone out
before you start ironing.
Empty the water tank and set
the steam control to position O
before storing the iron (see
'Storage'). Place the iron on its
heel
Possible cause(s)
There is a connection
problem.
The temperature
control dial has been
set to MIN.
There is not enough
water in the water tank.
The steam control dial
has been set to position
O.
The iron is not hot
enough.
The steam control dial
has not been pressed
long enough.
The Extra Steam
function has been used
too often in a short
period.
The iron is not hot
enough.
There is not enough
water in the water tank.
The iron is not hot
enough.
The Extra Steam
function has been used
too often in a short
period.
There is not enough
water in the water tank.
You have been using
hard water, which has
caused scale flakes to
develop inside the
soleplate.
The set temperature is
too low.
The iron has been put
in horizontal position
while there is still water
in the water tank.
Problem
The iron is plugged in
but the soleplate is
cold.
The iron does not
produce any steam.
The Extra Steam
function does not
work (type GC1121
and GC1120)
Water leaks from the
soleplate when I use
the Extra Steam
function (type
GC1121, GC1120)
The spray function
does not work (types
GC1121, GC1120,
GC1115 and GC1015)
Flakes and impurities
come out of the
soleplate during
ironing.
Water leaks from the
soleplate during
ironing.
Water leaks from the
soleplate while the
iron is cooling down or
after it has been
stored.
www.philips.com
4239 000 52243
u
Comfort
GC1121, GC1120, GC1115, GC1111,
GC1110, GC1015, GC1010
BAHASA MELAYU
Gambaran am (gamb. 1).
IIIIIIIIIIIIIIIIIIIIIIIIIIIIIIIIIIIIIIIIIIIIIIIIIIIIIIIIIIIIIIIIIIIIIIIIIIIIIIIIIIIIIIIIIIIIIIIIIIIIIIIIIIIIIIIIIIIIIIIIIIIIIIIIIIIIIIIIIIIIIII
A Tombol kawalan suhu
B Tombol kawalan stim
O = tiada stim
q tim sederhana
w = stim maksimum
x = fungsi Calc-Clean
C Butang sembur T (jenis GC1121, GC1120, GC1115 dan GC1015)
D Muncung sembur (jenis GC1121, GC1120, GC1115 dan GC1015)
E Lampu panduan suhu
F Bukaan untuk mengisi air
G Tangki air
H Plat jenis
I Kord
J Fungsi stim tambahan (tekan tombol kawalan stim) (jenis GC1121 dan GC1120)
Penting
IIIIIIIIIIIIIIIIIIIIIIIIIIIIIIIIIIIIIIIIIIIIIIIIIIIIIIIIIIIIIIIIIIIIIIIIIIIIIIIIIIIIIIIIIIIIIIIIIIIIIIIIIIIIIIIIIIIIIIIIIIIIIIIIIIIIIIIIIIIIIIIIIIIIIIIIIIIIIIIIIIIIIIIIIIIIIIIIIIIIIIIIIIIIIIIIIIIIIIIIIIIIIIIIIIIIIIIIIIIII
Untuk perlindungan optimum, baca arahan-arahan ini dengan teliti dan lihat
illustrasinya sebelum mula menggunakan peralatan.
Simpan arahan ini untuk penggunaan di masa depan.
◗ Jangan tinggalkan seterika bila ianya bersambung dengan punca utama.
◗ Alat ini tidak dimaksudkan untuk penggunaan oleh kanak-kanak.
◗ Awasi kanak-kanak untuk memastikan yang mereka tidak bermain dengan alat ini.
◗ Bahagian plat dasar seterika boleh menjadi amat panas dan mungkin
menyebabkan kelecuran jika disentuh.
◗ Jangan sekali-kali gunakan peralatan jika terdapat sebarang kerosakan.
◗ Apabila anda selesai menggunakan seterika, apabila membersihkan seterika itu,
apabila anda mengisi atau mengosongkan tangki air dan juga apabila anda
membiarkan seterika untuk seketika: tetapkan kawalan stim ke kedudukan O,
letakkan seterika di atas tumitnya dan cabut palam utama dari soket dinding.
◗ Jika kord bekalan rosak, ia mesti digantikan dengan kord khas atau pemasangan
yang tersedia di Philips atau sebuah agen khidmat.
◗ Periksa sama ada kuasa voltan yang ditunjukkan di plat jenis berpadanan dengan
voltan utama setempat sebelum anda menyambungkan peralatan.
Sebelum penggunaan pertama
IIIIIIIIIIIIIIIIIIIIIIIIIIIIIIIIIIIIIIIIIIIIIIIIIIIIIIIIIIIIIIIIIIIIIIIIIIIIIIIIIIIIIIIIIIIIIIIIIIIIIIIIIIIIIIIIIIIIII
1 Tanggalkan pelekat atau kertas timah pelindung dari plat dasar jika ada.
2 Panaskan seterika hingga suhu maksimum dan seterikakan sehelai kain lembap
untuk beberapa minit untuk menanggalkan apa-apa baki dari plat dasar itu.
Seterika akan mengeluarkan asap bila anda menggunakannya buat pertama kali. Ianya
akan terhenti selepas beberapa ketika.
Mengisi tangki ai.
IIIIIIIIIIIIIIIIIIIIIIIIIIIIIIIIIIIIIIIIIIIIIIIIIIIIIIIIIIIIIIIIIIIIIIIIIIIIIIIIIIIIIIIIIIIIIIIIIIIIIIIIIIIIIIIIIIIIIIIIIIIIIIIIIIIIIIIIIIIIIIIIIIIIIIIIIIIIIIIIIIIIIIIIIIIIIIIIII
Jangan rendamkan seterika dalam air.
1 Cabutkan palam dari soket dinding.
2 Tetapkan kawalan stim ke kedudukan O (= tiada stim) (gamb. 2).
3 Miringkan seterika ke belakang.
4 Isikan tangki air dengan air paip sejuk sehingga paras maksimum (gamb. 3).
Jangan isikan tangki air melepasi tanda MAKSIMUM.
Gunakan hanya air. Jangan gunakan cuka, kanji, pekatan seterikaan atau air
yangztelah dinyahkapur secara kimia.
Jika air paip di kawasan anda ialah air keras, kami menasihatkan anda supaya
mencampurkannya dengan jumlah air suling yang sama banyak atau gunakan air suling
sahaja.
Menetapkan suhuIIIIIIIIIIIIIIIIIIIIIIIIIIIIIIIIIIIIIIIIIIIIIIIIIIIIIIIIIIIIIIIIIIIIIIIIIIIIIIIIIIIIIIIIIIIIIIIIIIIIIIIIIIIIIIIIIIIIIIIIIIIIIIIIIIIIIIIIIIIIIIIIIIIIIIIIIIIIIIIIIIIIIIIIIIIIIIII
1 Tempatkan seterika pada tumitnya.
2 Periksa label pakaian untuk suhu penyeterikaan yang diperlukan:
1 Fabrik sintetik ( contohnya, akrilik, viskosa, poliamida, poliester)
1 Sutera
2 Kain bulu
3 linen
Jika anda tidak tahu fabrik jenis apa digunakan untuk membuat sesuatu pakaian,
pastikan suhu penyeterikaan yang betul dengan menseterika satu bahagian pakaian
yang tidak akan kelihatan semasa anda memakainya.
Bahan-bahan sutera, bulu dan sintetik: seterikakan bahagian dalam fabrik untuk
mengelakkan tompok berkilat. Elakkan daripada menggunakan fungsi sembur untuk
menjauhkan cemaran.
Mulakan menseterika bahan yang memerlukan suhu terendah, umpamanya yang
diperbuat daripada fiber sintetik.
3 Tetapkan tombol kawalan suhu ke suhu yang dikehendaki dengan memutarkan
ke penunjuk suhu yang sesuai (gamb. 4).
4 Pasangkan palam di soket dinding bersambung bumi.
5 Apabila lampu panduan suhu padam, tunggu sebentar sebelum mula
menseterika (gamb. 5).
Lampu panduan akan ternyala dari masa ke semasa semasa anda menseterika
(gamb. 5).
Menseterika dengan stim
IIIIIIIIIIIIIIIIIIIIIIIIIIIIIIIIIIIIIIIIIIIIIIIIIIIIIIIIIIIIIIIIIIIIIIIIIIIIIIIIIIIIIIIIIIIIIIIIIIIIIIIIIIIIIIIIIIIIIIIIIIIIIIIIIIIIIIIIIIIIII
1 Pastikan air di dalam tangki air mencukupi.
2 Tetapkan tombol kawalan suhu ke kedudukan yang disarankan.
Lihat 'Menetapkan suhu'.
3 Selepas lampu panduan suhu padam, tetapkan kawalan stim ke kedudukan stim
yang sesuai (gamb. 6).
q untuk stim sederhana (tetapan suhu 2 hingga MAX)
w untuk stim maksimum (tetapan suhu 3 hingga MAX)
Seterika akan menghasilkan stim sebaik sahaja suhu tetapan dicapai.
Menseterika tanpa stim
.
1 Tetapkan tombol kawalan stim ke kedudukan O (= tiada stim).
2 Tetapkan tombol kawalan suhu ke kedudukan yang disarankan.
Lihat 'Menetapkan suhu'
Ciri-ciri yang lain
IIIIIIIIIIIIIIIIIIIIIIIIIIIIIIIIIIIIIIIIIIIIIIIIIIIIIIIIIIIIIIIIIIIIIIIIIIIIIIIIIIIIIIIIIIIIIIIIIIIIIIIIIIIIIIIIIIIIIIIIIIIIIIIIIIIIIIIIIIIIIIIIIIIIIIIIIIIIIIIIIIIIIIIIIIIIIIIIIII
Fungsi sembur
Jenis GC1121, GC1120, GC1115 dan GC1015.
Bagi menghilangkan kedutan degil pada sebarang suhu.
◗ Pastikan air di dalam tangki air mencukupi.
1 Tekan butang sembur beberapa kali untuk melembapkan kain yang hendak
diseterika (gamb. 7).
Stim Tambahan
Jenis GC1121 dan GC1120.
Fungsi ini membekalkan stim tambahan untuk menghilangkan kedutan yang sangat
degil.
◗ Fungsi Stim Tambahan hanya berfungsi pada tetapan suhu di antara 3 dan
MAXIMUM.
1 Tetapkan tombol kawalan stim ke kedudukan maksimum w (gamb. 8).
2 Tekan dan jangan lepaskan tombol kawalan stim selama 5 saat maksimum
(gamb. 9).
3 Lepaskan tombol kawalan stim dan tunggu sekurang-kurangnya 1 minit
sebelum menggunakan fungsi ini sekali lagi untuk mengelakkan air menitik
keluar daripada plat dasar.
Pembersihan dan penyelenggaraan
IIIIIIIIIIIIIIIIIIIIIIIIIIIIIIIIIIIIIIIIIIIIIIIIIIIIIIIIIIIIIIIIIIIIIIIIIIIIIIIIIIIIIIIIIIIIIIIIIIIII
Fungsi Calc-Clean
Fungsi Calc-Clean menghilangkan kapuran dan kekotoran.
Gunakan fungsi Calc-Clean sekali setiap dua minggu. Jika air di kawasan anda terlalu
keras (iaitu serpihan keluar dari plat dasar semasa menseterika), anda harus
menggunakan fungsi Calc-Clean dengan lebih kerap.
1 Tetapkan tombol kawalan stim ke kedudukan O.
2 Tetapkan tombol kawalan suhu ke MAK.
3 Isi tangki air sampai paras maksimum.
Jangan curahkan cuka atau agen penyahkapuran ke dalam tangki air.
4 Pasangkan palam di soket dinding.
5 Cabut palam seterika apabila lampu panduan suhu terpadam.
6 Pegang seterika di atas sinki dan tetapkan kawalan suhu ke kedudukan Calc-
Clean x (gamb. 10).
7 Tarik tombol kawalan stim sedikit ke atas atas dan goncangkan seterika
dengan perlahan sehingga semua air di dalam tangki habis digunakan.
Stim dan air mendidih akan terkeluar dari plat dasar dan menyingkirkan kekotoran
dan kapur.
8 Tekan tombol kawalan stim ke kedudukan asalnya dan tetapkannya di
kedudukan O selepas menggunakan fungsi Calc-Clean.
9 Ulangi proses Calc-Clean jika seterika masih mengandungi banyak kekotoran.
10 Untuk membersihkan jarum kawalan stim, tarik kawalan stim keluar dari
peralatan (gamb. 11). Gunakan cuka untuk mengeluarkan kapur pada jarum itu
jika ada (gamb. 12).
Jangan bengkokkan atau rosakkan jarum kawalan stim.
11 Masukkan semula jarum kawalan stim dengan meletakkan mata jarum benar-
benar di tengah lubang dan dengan memuatkan unjuran di sisi jarum itu ke
dalam alur (gamb. 13).
12 Tetapkan kawalan stim ke kedudukan O.
Selepas proses Calc-Clean
1 Sambungkan seterika ke punca utama untuk membolehkan plat dasar
mengering.
2 Buka palam apabila lampu panduan padam.
3 Gerakkan seterika perlahan-lahan di atas sehelai kain terpakai untuk
mengeluarkan sebarang tanda air yang terbentuk pada plat dasarnya.
4 Biarkan seterika menyejuk sebelum menyimpannya.
Pembersihan selepas penseterikaan
1 Pastikan palam telah dicabut dari soket dinding dan seterika telah sejuk.
2 Lap kapur dan apa-apa endapan lain dari plat dasar dengan sehelai kain lembap
dan pencuci cecair yang tidak mengampelas.
Pastikan plat dasar sentiasa licin; elakkan sentuhan dengan objek logam.
3 Bersihkan bahagian atas peralatan dengan kain lembab.
4 Selalu bilas tangki air dengan air. Kosongkan tangki air selepas
membersihkannya.
PenyimpananIIIIIIIIIIIIIIIIIIIIIIIIIIIIIIIIIIIIIIIIIIIIIIIIIIIIIIIIIIIIIIIIIIIIIIIIIIIIIIIIIIIIIIIIIIIIIIIIIIIIIIIIIIIIIIIIIIIIIIIIIIIIIIIIIIIIIIIIIIIIIIIIIIIIIIIIIIIIIIIIIIIIIIIIIIIIIIIIIIIIIIIIIIIIIIIIIII
1 Pastikan palam telah dicabut dari soket dinding dan seterika telah sejuk.
Tetapkan kawalan stim ke kedudukan O.
2 Kosongkan tangki air (gamb. 14).
3 Gulungkan kord utama sekeliling kemudahan penyimpanan kord.
4 Simpan seterika dengan menegakkannya di atas tumitnya di kawasan yang
selamat dan kering (gamb. 15).
Maklumat & perkhidmatan
IIIIIIIIIIIIIIIIIIIIIIIIIIIIIIIIIIIIIIIIIIIIIIIIIIIIIIIIIIIIIIIIIIIIIIIIIIIIIIIIIIIIIIIIIIIIIIIIIIIIIIIIIIIIIIIIIIIIIIIIIIIIIIIIIIIIII
Jika anda memerlukan maklumat atau menghadapi masalah, sila lawati Laman Philips
Web di www.philips.com atau hubungi Pusat Khidmat Pelanggan Philips di negara
anda (anda akan mendapati nombor telefonnya di helaian jaminan sedunia). Jika tiada
Pusat Khidmat Pelanggan di negara anda, sila hubungi pengedar Philips di tempat
anda atau hubungi Jabatan Servis Peralatan Rumah dan Peralatan Peribadi Philips BV.
Penyelesaian masalah
IIIIIIIIIIIIIIIIIIIIIIIIIIIIIIIIIIIIIIIIIIIIIIIIIIIIIIIIIIIIIIIIIIIIIIIIIIIIIIIIIIIIIIIIIIIIIIIIIIIIIIIIIIIIIIIIIIIIIIIIIIIIIIIIIIIIIIIIIIIIIIIIIIIIIIIIIIIIIII
Bab ini meringkaskan masalah-masalah lazim yang mungkin berlaku. Sila baca seksyenseksyen yang berlainan itu untuk butir-butir lanjut. Jika anda tidak dapat menyelesaikan
masalah itu, sila hubungi Pusat Khidmat Pelanggan Philips di negara anda. Anda boleh
mendapatkan nombor telefonnya di dalam risalah jaminan sedunia.
Penyelesaian
Periksa sama ada palam
disambungkan ke soket dinding
dengan betul.
Tetapkan tombol kawalan suhu
ke suhu yang dikehendaki.
Isikan tangki air (lihat 'Mengisi
tangki air').
Tetapkan tombol kawalan stim
ke kedudukan q atau w (lihat
'Menseterika dengan stim')
Tetapkan tombol kawalan suhu
ke suatu suhu yang sesuai untuk
penseterikaan stim (2 hingga
MAK). Letakkan seterika di atas
tumitnya dan tunggu sehingga
lampu panduan padam sebelum
anda mula menseterika.
Tekan dan jangan lepaskan
tombol kawalan stim selama 5
saat maksimum.
Tunggu sekurang-kurangnya 1
minit sebelum menggunakan
fungsi Stim Tambahan sekali lagi.
Tetapkan tombol kawalan suhu
ke suatu suhu di antara 3
dan MAK. Letakkan seterika di
atas tumitnya dan tunggu
sehingga lampu panduan padam.
Isikan tangki air (lihat 'Mengisi
tangki air').
Tetapkan tombol kawalan suhu
ke suatu suhu di antara 3
dan MAK. Letakkan seterika di
atas tumitnya dan tunggu
sehingga lampu panduan padam.
Tunggu sekurang-kurangnya 1
minit sebelum menggunakan
fungsi Stim Tambahan sekali lagi
(lihat 'Stim Tambahan').
Isikan tangki air (lihat 'Mengisi
tangki air').
Gunakan fungsi Calc-Clean
beberapa kali (lihat 'CalcClean').
Tetapkan tombol kawalan suhu
ke suatu suhu yang sesuai untuk
penseterikaan stim (2 hingga
MAK). Letakkan seterika di atas
tumitnya dan tunggu sehingga
lampu panduan padam sebelum
anda mula menseterika.
Kosongkan tangki air dan
tetapkan kawalan stim ke
kedudukan G sebelum
menyimpan seterika (lihat
'Penyimpanan'). Letakkan
seterika di atas tumitnya.
Punca-punca
mungkin
Terdapat masalah
sambungan.
Tombol kawalan suhu
telah ditetapkan ke
MIN.
Air di dalam tangki air
tidak mencukupi.
Tombol kawalan stim
telah ditetapkan ke
kedudukan O.
Seterika tidak cukup
panas.
Tombol kawalan stim
tidak ditekan cukup
lama.
Fungsi Stim Tambahan
terlalu kerap digunakan
dalam tempoh yang
singkat.
Seterika tidak cukup
panas.
Air di dalam tangki air
tidak mencukupi.
Seterika tidak cukup
panas.
Fungsi Stim Tambahan
terlalu kerap digunakan
dalam tempoh yang
singkat.
Air di dalam tangki air
tidak mencukupi.
Anda telah
menggunakan air keras,
dan ini menyebabkan
serpihan kapuran
terbentuk di dalam plat
dasar.
Suhu yang ditetapkan
terlalu rendah.
Seterika telah diletakkan
dalam kedudukan
mendatar semasa tangki
airnya masih
mengandungi air.
Masalah
Seterika dipasang, tetapi
plat dasar masih sejuk.
Seterika tidak
menghasilkan stim.
Fungsi Stim Tambahan
tidak berjalan (jenis
GC1121 dan GC1120)
Air bocor dari plat
dasar apabila saya
menggunakan fungsi
Stim Tambahan (jenis
GC1121, GC1120)
Fungsi sembur tidak
berjalan (jenis GC1121,
GC1120, GC1115 dan
GC1015)
Serpihan dan kekotoran
keluar dari plat dasar
semasa penseterikaan.
Air bocor dari plat
dasar semasa
penseterikaan.
Air bocor dari plat
dasar apabila seterika
sedang menyejuk atau
selepas ia disimpan.
Page 2
IIIIIIIIIIIIIIIIIIIIIIIIIIIIIIIIIIIIIIIIIIIIIIIIIIIIIIIIIIIIIIIIIIIIIIIIIIIIIIIIIIIIIIIIIIIIIIIIIIIIIIIIIIIIIIIIIIIIIIIIIIIIIIIIIIIIIIIIIIIIIIIIIIIIIIIIIIIIIIIIIIIIIIIIIII
A
B
q
w
x
C T
D
E
F
G
H
I
J
IIIIIIIIIIIIIIIIIIIIIIIIIIIIIIIIIIIIIIIIIIIIIIIIIIIIIIIIIIIIIIIIIIIIIIIIIIIIIIIIIIIIIIIIIIIIIIIIIIIIIIIIIIIIIIIIIIIIIIIIIIIIIIIIIIIIIIIIIIIIIIIIIIIIIIIIIIIIIIIIIIIIIIIIIIIIIIIIIIIIIIIIIIIIIIIIIIIIIIIIIIIII
◗
◗
◗
◗
◗
◗
◗
◗
IIIIIIIIIIIIIIIIIIIIIIIIIIIIIIIIIIIIIIIIIIIIIIIIIIIIIIIIIIIIIIIIIIIIIIIIIIIIIIIIIIIIIIIIIIIIIIIIIIIIIIIIIIIIIIIIIIIIIIIIIIIIIIIIIIIIIIIIIIIIIIIIIIIIIIIIIIIIIIIIIIIIIIIIIIIIIIIIIIIII
1
2
IIIIIIIIIIIIIIIIIIIIIIIIIIIIIIIIIIIIIIIIIIIIIIIIIIIIIIIIIIIIIIIIIIIIIIIIIIIIIIIIIIIIIIIIIIIIIIIIIIIIIIIIIIIIIIIIIIIIIIIIIIIIIIIIIIIIIIIIIIIIIIIIIIIIIIIIIIIIIIIIIIIIIIIIIIIIIIIIIIIIIIIIIIIIIIIII
1
2
3
4
IIIIIIIIIIIIIIIIIIIIIIIIIIIIIIIIIIIIIIIIIIIIIIIIIIIIIIIIIIIIIIIIIIIIIIIIIIIIIIIIIIIIIIIIIIIIIIIIIIIIIIIIIIIIIIIIIIIIIIIIIIIIIIIIIIIIIIIIIIIIIIIIIIIIIIIIIIIIIIIIIIIIIIIIIIIIIIIIIIIIIIIIIIIIIIIIIIIIIIIIIIIII
1
2
3
1
1
2
3
4
5
IIIIIIIIIIIIIIIIIIIIIIIIIIIIIIIIIIIIIIIIIIIIIIIIIIIIIIIIIIIIIIIIIIIIIIIIIIIIIIIIIIIIIIIIIIIIIIIIIIIIIIIIIIIIIIIIIIIIIIIIIIIIIIIIIIIIIIIIIIIIIIIIIIIIIIIIIIIIIIIIIIIIIIIIIIIIIIIIIIIIIIIIIIIIIIIIIIIIIIIIIIIII
1
2
3
q 2
w 3
IIIIIIIIIIIIIIIIIIIIIIIIIIIIIIIIIIIIIIIIIIIIIIIIIIIIIIIIIIIIIIIIIIIIIIIIIIIIIIIIIIIIIIIIIIIIIIIIIIIIIIIIIIIIIIIIIIIIIIIIIIIIIIIIIIIIIIIIIIIIIIIIIIIIIIIIIIIIIIIIIIIIIIIIIIIIIIIIIIIIIIIIIIIIIIIII
1
2
IIIIIIIIIIIIIIIIIIIIIIIIIIIIIIIIIIIIIIIIIIIIIIIIIIIIIIIIIIIIIIIIIIIIIIIIIIIIIIIIIIIIIIIIIIIIIIIIIIIIIIIIIIIIIIIIIIIIIIIIIIIIIIIIIIIIIIIIIIIIIIIIIIIIIIIIIIIIIIIIIIIIIIIIIIIIIIIIIIIIIIIIIIIIIIIIIIIIIIIIIIIII
◗
1
◗ 3
1 w
2
3
IIIIIIIIIIIIIIIIIIIIIIIIIIIIIIIIIIIIIIIIIIIIIIIIIIIIIIIIIIIIIIIIIIIIIIIIIIIIIIIIIIIIIIIIIIIIIIIIIIIIIIIIIIIIIIIIIIIIIIIIIIIIIIIIIIIIIIIIIIIIIIIIIIIIIIIIIIIIIIIIIIIIIIIIIIIIIIIIIIIIIIIIIIIIIIIII
1
2
3
4
5
6
7
8
9
10
11
12
1
2
3
4
1
2
3
4
IIIIIIIIIIIIIIIIIIIIIIIIIIIIIIIIIIIIIIIIIIIIIIIIIIIIIIIIIIIIIIIIIIIIIIIIIIIIIIIIIIIIIIIIIIIIIIIIIIIIIIIIIIIIIIIIIIIIIIIIIIIIIIIIIIIIIIIIIIIIIIIIIIIIIIIIIIIIIIIIIIIIIIIIIIIIIIIIIIIIIIIIIIIIIIIIIIIIIIIIIIIIIIIIIIIIIIIIIIIIIIIIIIIII
1
2
3
4
IIIIIIIIIIIIIIIIIIIIIIIIIIIIIIIIIIIIIIIIIIIIIIIIIIIIIIIIIIIIIIIIIIIIIIIIIIIIIIIIIIIIIIIIIIIIIIIIIIIIIIIIIIIIIIIIIIIIIIIIIIIIIIIIIIIIIIIIIIIIIIIIIIIIIIIIIIIIIIIIIIIIIIIII
IIIIIIIIIIIIIIIIIIIIIIIIIIIIIIIIIIIIIIIIIIIIIIIIIIIIIIIIIIIIIIIIIIIIIIIIIIIIIIIIIIIIIIIIIIIIIIIIIIIIIIIIIIIIIIIIIIIIIIIIIIIIIIIIIIIIIIIIIIIIIIIIIIIIIIIIIIIIIIIIIIIIIIIIIIIIIIIIIIIII
q
w
2
3
3
2
O
O
IIIIIIIIIIIIIIIIIIIIIIIIIIIIIIIIIIIIIIIIIIIIIIIIIIIIIIIIIIIIIIIIIIIIIIIIIIIIIIIIIIIIIIIIIIIIIIIIIIIIIIIIIIIIIIIIIIIIIIIIIIIIIIIIIIIIIIIIIIIIIIIIIIIIIIIIIIIIIIIIIIIIIIIIIIIIIIIIIIIIIIIIIII
A
B
q
w
x
C T
D
E
F
G
H
I
J
IIIIIIIIIIIIIIIIIIIIIIIIIIIIIIIIIIIIIIIIIIIIIIIIIIIIIIIIIIIIIIIIIIIIIIIIIIIIIIIIIIIIIIIIIIIIIIIIIIIIIIIIIIIIIIIIIIIIIIIIIIIIIIIIIIIIIIIIIIIIIIIIIIIIIIIIIIIIIIIIIIIIIIIIIIIIIIIIIIIIIIIIIIIIIIIIIIIIIIIIIIIIIIIIIIIIIIIIIII
◗
◗
◗
◗
◗
◗
◗
◗
IIIIIIIIIIIIIIIIIIIIIIIIIIIIIIIIIIIIIIIIIIIIIIIIIIIIIIIIIIIIIIIIIIIIIIIIIIIIIIIIIIIIIIIIIIIIIIIIIIIIIIIIIIIIIIIIIIIIIIIIIIIIIIIIIIIIIIIIIIIIIIIIIIIIIIIIIIIIIIIIIIIIIIIIIIIIIIIIIIIIIIIIIIIIIIIIIIIIIIIII
1
2
IIIIIIIIIIIIIIIIIIIIIIIIIIIIIIIIIIIIIIIIIIIIIIIIIIIIIIIIIIIIIIIIIIIIIIIIIIIIIIIIIIIIIIIIIIIIIIIIIIIIIIIIIIIIIIIIIIIIIIIIIIIIIIIIIIIIIIIIIIIIIIIIIIIIIIIIIIIIIIIIIIIIIIIIIIIIIIIIIIIIIIIIIIIIIIIIIIIIIIIII
1
2
3
4
IIIIIIIIIIIIIIIIIIIIIIIIIIIIIIIIIIIIIIIIIIIIIIIIIIIIIIIIIIIIIIIIIIIIIIIIIIIIIIIIIIIIIIIIIIIIIIIIIIIIIIIIIIIIIIIIIIIIIIIIIIIIIIIIIIIIIIIIIIIIIIIIIIIIIIIIIIIIIIIIIIIIIIIIIIIIIIIIIIIIIIIIIIIIIIIIIIIIIIIIIIIIIIIIIIIIIIIIIII
1
2
3
1
1
2
3
4
5
IIIIIIIIIIIIIIIIIIIIIIIIIIIIIIIIIIIIIIIIIIIIIIIIIIIIIIIIIIIIIIIIIIIIIIIIIIIIIIIIIIIIIIIIIIIIIIIIIIIIIIIIIIIIIIIIIIIIIIIIIIIIIIIIIIIIIIIIIIIIIIIIIIIIIIIIIIIIIIIIIIIIIIIIIIIIIIIIIIIIIIIIIIIIIIIIIIIIIIIIIIIIIIIIIIIIIIIIIII
1
2
3
q 2
w 3
IIIIIIIIIIIIIIIIIIIIIIIIIIIIIIIIIIIIIIIIIIIIIIIIIIIIIIIIIIIIIIIIIIIIIIIIIIIIIIIIIIIIIIIIIIIIIIIIIIIIIIIIIIIIIIIIIIIIIIIIIIIIIIIIIIIIIIIIIIIIIIIIIIIIIIIIIIIIIIIIIIIIIIIIIIIIIIIIIIIIIIIIIIIIIIIIIIIIIIIIIIIIIIIIII
1
2
IIIIIIIIIIIIIIIIIIIIIIIIIIIIIIIIIIIIIIIIIIIIIIIIIIIIIIIIIIIIIIIIIIIIIIIIIIIIIIIIIIIIIIIIIIIIIIIIIIIIIIIIIIIIIIIIIIIIIIIIIIIIIIIIIIIIIIIIIIIIIIIIIIIIIIIIIIIIIIIIIIIIIIIIIIIIIIIIIIIIIIIIIIIIIIIIIIIIIIIIIIIIIIIIIIIIIIIIIII
◗
1
◗ 3
1 w
2
3
IIIIIIIIIIIIIIIIIIIIIIIIIIIIIIIIIIIIIIIIIIIIIIIIIIIIIIIIIIIIIIIIIIIIIIIIIIIIIIIIIIIIIIIIIIIIIIIIIIIIIIIIIIIIIIIIIIIIIIIIIIIIIIIIIIIIIIIIIIIIIIIIIIIIIIIIIIIIIIIIIIIIIIIIIIIIIIIIIIIIIIIIIIIIIIIIIIIIIIIIIIIIIIIIII
1
2
3
4
5
6
7
8
9
10
11
12
q w
2
3
3
2
O
O
1
2
3
4
1
2
3
4
IIIIIIIIIIIIIIIIIIIIIIIIIIIIIIIIIIIIIIIIIIIIIIIIIIIIIIIIIIIIIIIIIIIIIIIIIIIIIIIIIIIIIIIIIIIIIIIIIIIIIIIIIIIIIIIIIIIIIIIIIIIIIIIIIIIIIIIIIIIIIIIIIIIIIIIIIIIIIIIIIIIIIIIIIIIIIIIIIIIIIIIIIIIIIIIIIIIIIIIIIIIIIIIIIIIIIIIIIIIIIIIIIIIIIIIIIII
1
2
3
4
IIIIIIIIIIIIIIIIIIIIIIIIIIIIIIIIIIIIIIIIIIIIIIIIIIIIIIIIIIIIIIIIIIIIIIIIIIIIIIIIIIIIIIIIIIIIIIIIIIIIIIIIIIIIIIIIIIIIIIIIIIIIIIIIIIIIIIIIIIIIIIIIIIIIIIIIIIIIIIIIIIIIIIIIIIIIIIIIIIIIIIIIIIIIIIIIIIIIIIIIIIIIIIII
IIIIIIIIIIIIIIIIIIIIIIIIIIIIIIIIIIIIIIIIIIIIIIIIIIIIIIIIIIIIIIIIIIIIIIIIIIIIIIIIIIIIIIIIIIIIIIIIIIIIIIIIIIIIIIIIIIIIIIIIIIIIIIIIIIIIIIIIIIIIIIIIIIIIIIIIIIIIIIIIIIIIIIIIIIIIIIIIIIIIIIIIIIIIIIIIIIIIIIIIIIIIIIIIIIIIIIIII
220-240V 1200-1440W 50-60HZ 5.5-6.0A
 Loading...