

Page 1
USB Flash Drive
22
www.philips.com
This document is printed on chlorine free produced paper
Data subject to change without notice
Date of purchase - Date de la vente - Verkaufsdatum - Aankoopdatum - Fecha de compra -
Date d’acquisito - Data da adquirição - Gª¹µª µ¹º - Inköpsdatum - Anskaffelsesdato -
Kjøpedato - Oatopäivä
Type: FMxxFD11
Serial nr:
_____________________________________________________________
WARNING
• Keep away from children. If swallowed,promptly see a doctor.
• To prevent fire or shock hazard,do not expose the unit to rain or moisture.
• To avoid electric shock, do not open the cabinet. Refer servicing to qualified
personal only.
Note: Data is safe in the following environments: In X-ray security systems at airports and in
magnetic fields with strengths not exeeding 3,500 Oe.
For customers in the U.S.A.
If you have any questions about this product you may call: 1-888-Philips (744-5477).
Online help: www.usasupport.philips.com.
For customers in Canada
This Class B digital apparatus complies with Canadian ICES-003.
For customers in Europe
This product conforms to the following European Directives, 89/336/EEC, 92/31/EEC (EMC
Directive) 93/68/EEC (CE Marking Directive).
This product complies with EN55022 Class B and EN55024 for use in the following areas;
residential, commercial, and light-industrial.
Notes on Use
• The USB Flash Drive may not function correctly if it is connected to the computer when
the computer is started up, restarted, or restored from sleep mode.Always disconnect the
drive from the computer before performing any of these operations.
• Do not place the drive in locations that are:
– extremely hot or cold – vibrating – exposed to corrosive gases
– dusty or dirty – very humid – exposed to direct sunlight
• Microsoft and Windows are registered trademarks of Microsoft Corporation in the United
States and other countries.
• Mac and Macintosh are trademarks of Apple Computer, Inc., registered in the U.S.and
other countries.
• Other system names and product names that appear in this manual are registered
trademarks or trademarks of their respective owners. Note that the ™ and ®symbols are
not used in this manual.
Important information
EN
Enjoy
Operating the drive
• Once the drive is connected to the USB port of the computer:
– a software package will automatically start up enabling you to activate various
applications. See the software help file for futher instructions.
– the drive icon for the drive will appear.You can now copy and save data on the drive by
dragging files and folders on the drive icon, just like when you copy data to a hard disk,
CD-ROM,DVD or floppy disk.
> When copying data the LED’s light intensity will quickly increase and diminish.
Notes:
– Do not remove the drive from the computer USB port while copying and saving data otherwise
the drive will no longer be recognized by your system.
– When operating under Windows the drive name varies, depending on your Windows version.
Write protection switch (fig. 2)
The write protection switch can protect your files from being accidentally erased or
overwritten. Right - protected position.
Left - unprotected position.
Disconnecting the drive from your computer
Windows®98/98SE
• After confirming that the drive is in standby mode you can remove the drive from the
computer’s USB port.
Windows®ME and Windows® 2000
1 Double-click the Unplug or eject hardware icon in the task bar in the lower right part
of the screen.
2 In the window that appears,select the name of the device that is to be removed, then click
the STOP button.
3 When the Stop a harware device screen appears, make sure the correct information is
displayed,then click the OK button.
4 When a message appears,indicating that the device can be safely removed, remove the
drive from the computer’s USB port.
When running Windows XP
1 Double-click the Safely Remove Hardware icon in the task bar in the lower right part
of the screen.
2 In the window that appears,select the name of the device that is to be removed, then click
the STOP button.
3 When the Stop a hardware device screen appears, make sure the correct information is
displayed,then click the OK button.
4 When the message Safe to Remove Hardware appears, remove the drive from the
computer’s USB port.
Mac OS 9.0 and higher
1 Drag the drive icon to the Trash.
2 After confirming that the drive is in standby mode,remove the drive from the computer’s
USB port.
Guarantuee certificate
Garantiebewijs
Certificado de garantia
Garantibevis
Certificat de garantie
Certificado de garantia
Ǽ
Garantibevis
Garantieschein
Certificato di garanzia
Garanticertifikat
Takuutodistus
year warranty
année garantie
Jahr Garantie
jaar garantie
año garantia
anno garanzia
Á¹Æ¼º Ǽ
år garanti
år garanti
år garanti
vuosi takuu
año garantia
Dealer’s name,address and signature
Nom, adresse et signature du revendeur
Name,Anschrift und Unterschrift des Händlers
Naam, adres en handtekening v.d. handelaar
Nombre, direccion y firma del distribudor
Nome, indirizzo e firma del fornitore
µª¾¸Èªµ, Ç¿¼ ¡ ¿¸µ¹À ¾µ¿
ª¸ ¸¹µª¿¾
Återförsäljarens namn, adress och signatur
Forhandlerens navn,adresse og unterskrift
Forhandlerens navn,adresse og unterskrift
Jälleenmyyjän nimi, osoite ja allekirjoitus
Nome, morada e assinature da loja
Regulatory information:
*This number is for the FCC related matters only.
CAUTION:
You are cautioned that any changes or modifications not expressly approved in
this manual could void your authority to operate this equipment.
Note:
This equipment has been tested and found to comply with the limits for a Class B
digital device, pursuant to part 15 of the FCC Rules.These limits are designed to
provide reasonable protection against harmful interference in a residential
installation.This equipment generates, uses and can radiate radio frequency energy
and, if not installed and used in accordance with the instructions, may cause
harmful interference to radio communications. However, there is no guarantee
that interference will not occur in a particular installation. If this equipment does
cause harmful interference to radio or television reception,which can be
determined by turning the equipment off and on, the user is encouraged to try to
correct the interference by one or more of the following measures:
– Reorient or relocate the receiving antenna.
– Increase the separation between the equipment and receiver.
– Connect the equipment into an outlet on a circuit different from that to which
the receiver is connected.
– Consult the dealer or an experienced radio/TV technician for help.
The shielded interface cable and connectors must be used in order to comply
with the limits for digital device pursuant to subpart B of Part 15 of FCC Rules.
This device complies with part 15 of the FCC rules. Operation is
subject to the following two conditions:
(1) This device may not cause harmful interference, and
(2) this device must accept any interference received, including
interference that may cause undesired operation.
Install
Windows ME,Windows 2000,Windows XP or MAC OS 9.0 or higher:
• The device driver is installed automatically when the drive is connected to a USB port of
the computer. However, with some USB 2.0 cards or boards, you may need to initiate
installation manually. In this case, follow the on screen instructions to search for a suitable
driver. Refer to the operating system's Help file if you need any help.
Note: Do not remove the drive from the computer USB port as long as the download process is in
progress. Be sure that the write protection switch (fig. 2) is in the unprotected (left) position
during installation.
Windows 98/98SE:
1 Download the device driver at http://www.philips.com/storage.
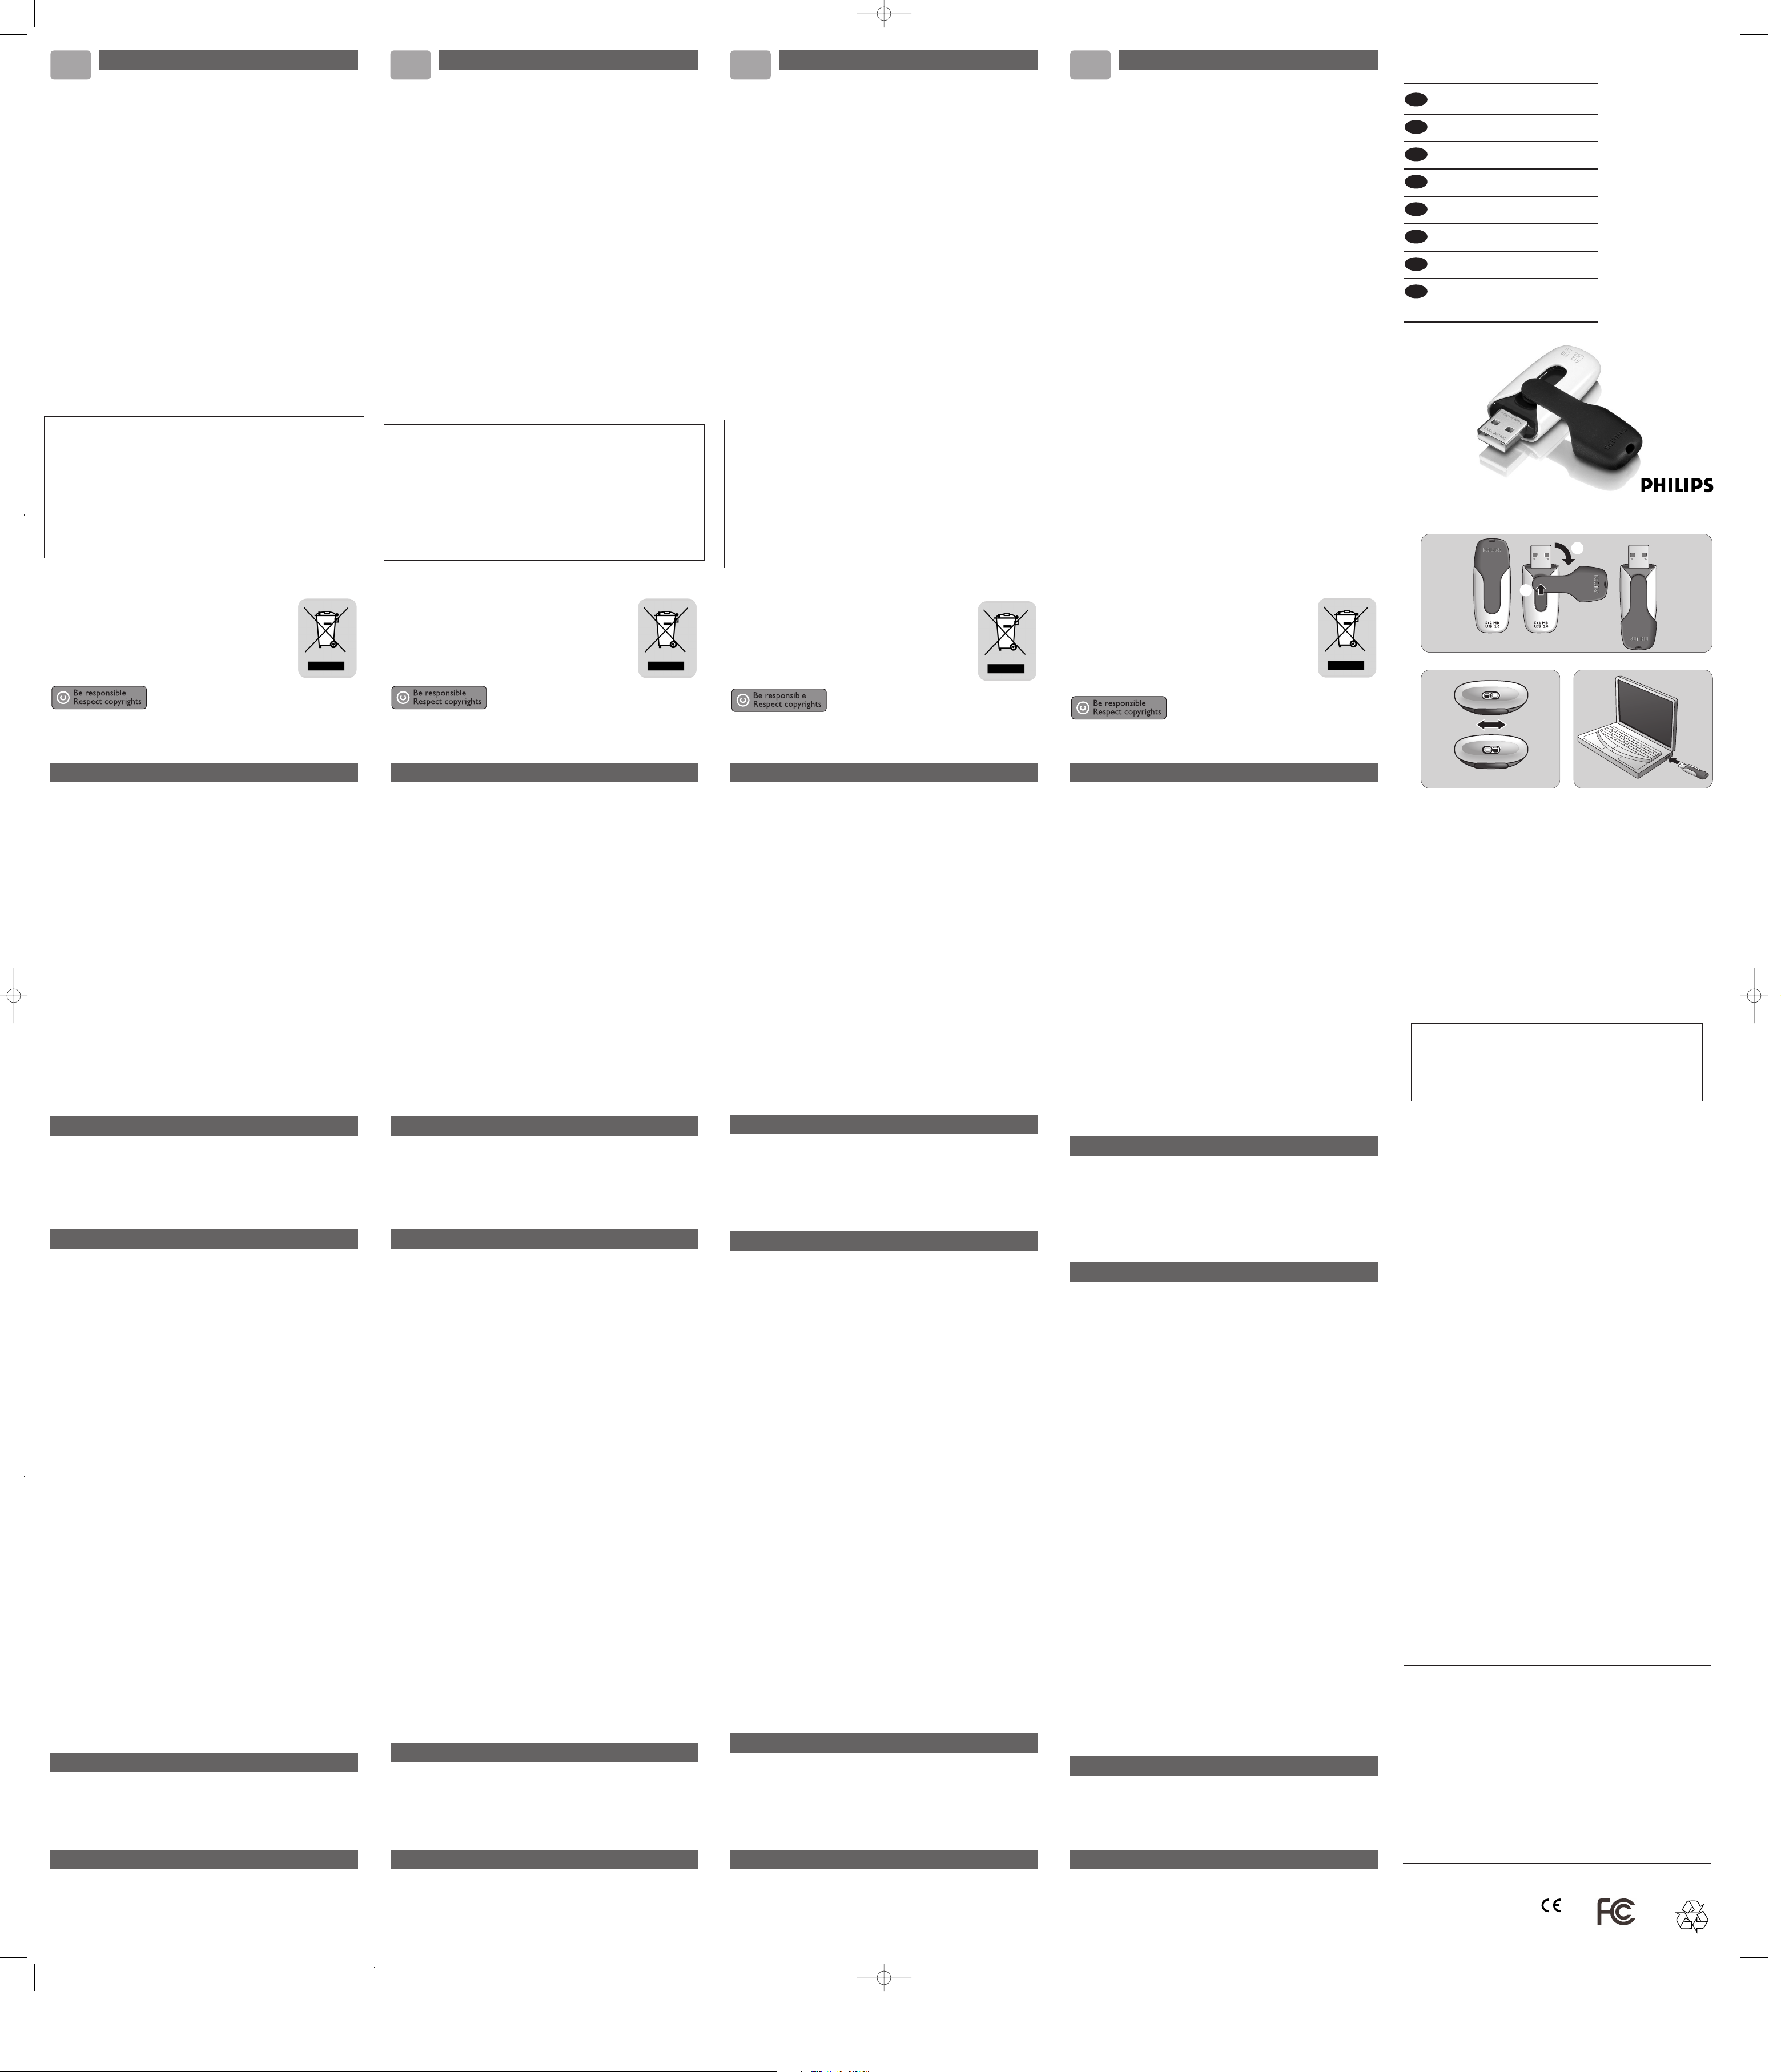
2 Remove the protective cap from the USB connector and turn it backwards (fig. 1).
3 Insert the drive’s USB connector into one of the computer’s USB ports (fig. 3).
> The New Hardware wizard starts and the drive’s LED lights up.The light intensity of the
LED will gradually increase and then diminish again.This will continue for as long as the drive is
connected to the computer.
4 Click the Next button.
5 Click Search for the best driver for your device.Then click the Next button.
6 Click Specify a location.Then click the Browse button.
7 When the dialog box appears, specify the folder where the installation program is stored.
8 Click the OK button to close the dialog box.Then click the Next button.
9 Click the Next button.
10Click the Finish button.
> Installation of the driver starts.
> Once the installation process is complete, a drive icon for the USB Flash Drive appears in the
My Computer window.
11After confirming that the drive is in standby mode you can remove the drive from the
computer’s USB port.
Note: Do not remove the drive from the computer USB port as long as the download process is in
progress. Be sure that the write protection switch (fig. 2) is in the unprotected (left) position
during installation.
• Our product warranty is limited only to the USB flash drive itself,when used normally in
accordance with these operating instructions and with the accessories that were included
with this unit in the specified or recommended system environment.Services provided by
the Company, such as user support, are also subject to these restrictions.
• The Company cannot accept liability for damage or loss resulting from the use of this unit,
or for any claim from a third party.
• The Company cannot accept any liability for: problems with your computer or other
hardware arising from the use of this product;the suitability of this product for specific
hardware, software, or peripherals; operating conflicts with other installed software; data
loss; or other accidental or unavoidable damage.
• The Company cannot accept any liability for financial damages, lost profits, claims from
third parties, etc.,arising from the use of the software provided with this unit.
• The software specifications may be subject to change without notice.
Environmental information
Disposal of your old product
Your product is designed and manufactured with high quality materials and
components, which can be recycled and reused.When this crossed-out
wheeled bin symbol is attached to a product it means the product is
covered by the European Directive 2002/96/EC. Please inform yourself
about the local separate collection system for electrical and electronic
products. Please act according to your local rules and do not dispose of
your old products with your normal household waste.The correct disposal
of your old product will help prevent potential negative consequences for
the environment and human health.
The making of unauthorized copies of copy-protected material,including computer
programmes, files, broadcasts and sound recordings,may be an infringement of copyrights and
constitute a criminal offence.This equipment should not be used for such purposes.
Technical specifications
Interface High-Speed USB 2.0 (backwards compatible with USB 1.1)
Transfer rate Read: 17MB per second / Write:12MB per second
(High-speed USB 2.0 port required to achieve maximum speed)
Compatible OSs • Windows 98SE (with driver), 2000,ME, XP or later
• Mac OS 9.0 or later
• Linux 2.4.0 or later
Need help?
Online help: www.philips.com
For interactive help and frequently asked questions.
For software updates and support: www.philips.com/storage.
Connect
Connecting the drive to your computer
Note: If the USB port of your computer is not easily accessible, you can use the USB extension cable
supplied (not all models) or an optional USB hub to connect the drive to your computer.
1 Remove the protective cap from the USB connector and turn it backwards (fig. 1).
2 Insert the drive’s USB connector into one of the computer’s USB ports (fig. 3).
> The drive’s LED lights up.The light intensity of the LED will gradually increase and then
diminish again.This will continue for as long as the drive is connected to the computer.
Fig. 1
Fig. 2 Fig. 3
②
①
Informations importantes
FR
AVERTISSEMENT
• À tenir à l’écart des enfants. Si avalé, consulter un médecin rapidement.
• Pour éviter tout risque de choc électrique ou d’incendie, protéger cet appareil
contre la pluie et l’humidité.
• Pour éviter les chocs électriques,ne pas ouvrir le boîtier.Confier les
réparations seulement à un réparateur qualifié.
Remarque: Les données ne courent aucun risque dans les environnements suivants: systèmes de sécurité
à rayons X dans les aéroports; champs magnétiques d’une force inférieure à 3 500 Oe.
Pour les clients situés aux États-Unis
Si vous avez des questions sur ce produit, vous pouvez appeler: 1-888-Philips (744-5477).
Aide en ligne: www.usasupport.philips.com.
Pour les clients situés au Canada
Cet appareil numérique de classe B est conforme à la norme canadienne ICES-003.
Pour les clients situés en Europe
Ce produit est conforme aux directives européennes suivantes: 89/336/EEC, 92/31/EEC
(Directive EMC) 93/68/EEC (Directive de marquage CE).
Ce produit est conforme aux normes EN55022 Classe B et EN55024 pour l’utilisation dans
les environnements suivants: résidentiel, commercial et industrie légère.
Remarques sur l’utilisation
• Le lecteur flash USB peut ne pas fonctionner correctement s’il est connecté à l’ordinateur
quand l’ordinateur démarre, redémarre ou sort du mode veille. Déconnectez toujours le
lecteur de l’ordinateur avant d’effectuer ces opérations.
• Ne placez pas le lecteur aux emplacements:
– extrêmement chauds ou froids – soumis à des vibrations – exposés à des gaz corrosifs
– poussiéreux ou sales – très humides – exposés à la lumière directe du soleil
• Microsoft et Windows sont des marques déposées de Microsoft Corporation aux
États-Unis et dans d’autres pays.
• Mac et Macintosh sont des marques commerciales d’Apple Computer, Inc. déposées aux
États-Unis et dans d’autres pays.
• Tous les autres noms de systèmes et de produits qui apparaissent dans ce manuel sont des
marques commerciales ou déposées appartenant à leurs propriétaires respectifs.
Notez que les symboles ™ et ®ne sont pas utilisés dans ce manuel.
• Notre garantie de produit s’applique seulement au lecteur flash USB lui-même, lorsqu’il est
utilisé normalement, conformément à ce mode d’emploi et avec les accessoires livrés avec,
dans l’environnement système spécifié ou recommandé.Les services proposés par la
société, tels que l’assistance utilisateur, sont aussi soumis à ces restrictions.
• La société ne saurait accepter aucune responsabilité pour tout dommage ou perte
éventuels résultant de l’utilisation de cet appareil ni pour toute réclamation d’un tiers.
• La société ne saurait accepter aucune responsabilité pour: les problèmes liés à votre ordinateur
ou un autre matériel émanant de l’utilisation de ce produit;la conformité de ce produit à un
matériel, logiciel ou périphérique spécifique; les conflits de fonctionnement avec d’autres
logiciels installés; les pertes de données ni aucun autre dommage accidentel ou inévitable.
• La société ne saurait accepter aucune responsabilité pour les dommages financiers, pertes de
profit, réclamations de tiers, etc., résultant de l’utilisation du logiciel livré avec cet appareil.
• Les spécifications logicielles peuvent être modifiées sans préavis.
Informations environnementales
Mise au rebut des produits en fin de vie
Ce produit a été conçu et fabriqué avec des matériaux et composants
recyclables de haute qualité.Le symbole d'une poubelle barrée apposé sur un
produit signifie que ce dernier répond aux exigences de la directive
européenne 2002/96/EC. Informez-vous auprès des instances locales sur le
système de collecte des produits électriques et électroniques en fin de vie.
Conformez-vous à la législation en vigueur et ne jetez pas vos produits avec les
déchets ménagers. Seule une mise au rebut adéquate des produits peut
empêcher la contamination de l'environnement et ses effets nocifs sur la santé.
La fabrication de copies non autorisées des éléments protégés contre la copie, y compris les
programmes informatiques, les fichiers, les diffusions et enregistrements de son,peuvent
enfreindre les copyrights et constituer un délit.Cet équipement ne doit pas être utilisé dans
ces buts.
Installation
Windows Me,Windows 2000,Windows XP ou MAC OS 9.0 ou supérieur:
• Le pilote de l’appareil s’installe automatiquement dès que le lecteur est connecté à un port
USB de l’ordinateur. Cependant, avec certaines cartes USB 2.0, il vous faudra lancer
l’installation manuellement. Dans ce cas-là, suivez les instructions à l’écran pour rechercher
le pilote adéquat. Si vous avez besoin d’aide, reportez-vous au Fichier d’aide du système
d’exploitation.
Remarque: Ne retirez pas le lecteur du port USB de l’ordinateur tant que le téléchargement n’est pas
terminé.Veillez à ce que le curseur de protection contre l’écriture (fig. 2) soit en position
non protégée (gauche) durant l’installation.
Windows 98/98 SE:
1 Téléchargez le pilote de l’appareil sur http://www.philips.com/storage.
2 Retirez la protection du connecteur USB et faites-la pivoter vers l’arrière (fig. 1).
3 Insérez le connecteur USB du lecteur dans l’un des ports USB de l’ordinateur (fig.3).
> L’assistant Nouveau matériel détecté s’ouvre et le voyant du lecteur s’allume. L’intensité
lumineuse du voyant augmentera progressivement puis diminuera à nouveau. Ceci continuera
aussi longtemps que le lecteur sera connecté à l’ordinateur.
4 Cliquez sur le bouton Suivant.
5 Cliquez sur Rechercher le meilleur pilote pour votre périphérique.
Cliquez ensuite sur le bouton Suivant.
6 Cliquez sur Indiquez un emplacement. Cliquez ensuite sur le bouton Parcourir.
7 Quand la boîte de dialogue apparaît,indiquez le dossier où le programme d’installation
se trouve.
8 Cliquez sur le bouton OK pour fermer cette boîte de dialogue.
Cliquez ensuite sur le bouton Suivant.
9 Cliquez sur le bouton Suivant.
10Cliquez sur le bouton Terminer.
> L’installation du pilote commence.
> Une fois l’installation terminée, une icône de lecteur flash USB s’affiche dans la fenêtre Poste
de travail.
11Après avoir confirmé que le lecteur est en mode veille, vous pouvez retirer le lecteur du
port USB de l’ordinateur.
Remarque: Ne retirez pas le lecteur du port USB de l’ordinateur tant que le téléchargement n’est pas
terminé.Veillez à ce que le curseur de protection contre l’écriture (fig. 2) soit en position
non protégée (gauche) durant l’installation.
Connexion
Connexion du lecteur à votre ordinateur
Remarque: Si le port USB de votre ordinateur n’est pas facile d’accès, vous pouvez utiliser la rallonge
USB fournie (pas tous les modèles) ou un concentrateur USB (en option) pour connecter
le lecteur à votre ordinateur.
1 Retirez la protection du connecteur USB et faites-la pivoter vers l’arrière (fig. 1).
2 Insérez le connecteur USB du lecteur dans l’un des ports USB de l’ordinateur (fig.3).
> Le voyant du lecteur s’allume. L’intensité lumineuse du voyant augmentera progressivement
puis diminuera à nouveau. Ceci continuera aussi longtemps que le lecteur sera connecté à
l’ordinateur.
C’est prêt!
Utilisation du lecteur
• Une fois le lecteur connecté au port USB de l’ordinateur:
– un logiciel s’ouvrira automatiquement pour vous permettre d’activer diverses
applications. Pour en savoir plus, consultez le fichier d’aide du logiciel.
– l’icône du lecteur apparaîtra.Vous pouvez maintenant copier et enregistrer des données
sur le lecteur en faisant glisser des fichiers et des dossiers jusqu’à l’icône du lecteur,
comme lorsque vous copiez des données sur un disque dur, un CD, un DVD ou une
disquette.
> Quand vous copiez les données, l’intensité lumineuse du voyant augmentera et diminuera
rapidement.
Remarques:
– Ne retirez pas le lecteur du port USB de l’ordinateur pendant la copie ou l’enregistrement de
données. Sinon,le lecteur ne sera plus reconnu par votre système.
– Sous Windows, le nom du lecteur dépendra de votre version de Windows.
Curseur de protection en écriture (fig.2)
Le curseur de protection en écriture peut protéger vos fichiers contre leur effacement ou
leur écrasement accidentel. Droite - position protégée.
Gauche - position non protégée.
Déconnexion du lecteur de votre ordinateur
Windows®98/98 SE
• Après avoir confirmé que le lecteur est en mode veille, vous pouvez retirer le lecteur du
port USB de l’ordinateur.
Windows®Me et Windows® 2000
1 Cliquez deux fois sur l’icône Déconnecter ou éjecter le matériel de la barre des
tâches, dans la partie inférieure droite de l’écran.
2 Dans la fenêtre qui s’affiche,sélectionnez le nom de l’appareil à retirer, puis cliquez sur le
bouton Arrêter.
3 Quand l’écran Arrêter un matériel s’affiche, vérifiez que les informations correctes sont
affichées, puis cliquez sur le bouton OK.
4 Quand un message apparaîtra,indiquant que le matériel peut être retiré sans risques,
retirez le lecteur du port USB de l’ordinateur.
Sous Windows XP
1 Cliquez deux fois sur l’icône Retirer le périphérique en toute sécurité de la barre
des tâches, dans la partie inférieure droite de l’écran.
2 Dans la fenêtre qui s’affiche,sélectionnez le nom de l’appareil à retirer, puis cliquez sur le
bouton Arrêter.
3 Quand l’écran Arrêter un matériel s’affiche, vérifiez que les informations correctes sont
affichées, puis cliquez sur le bouton OK.
4 Quand le message Le matériel peut être retiré en toute sécurité apparaîtra, retirez
le lecteur du port USB de l’ordinateur.
Mac OS 9.0 ou supérieur
1 Faites glisser l’icône du lecteur jusqu’à la Corbeille.
2 Après avoir confirmé que le lecteur est en mode veille, retirez le lecteur du port USB de
l’ordinateur.
Fiche technique
Interface High-Speed USB 2.0 (compatible avec USB 1.1)
Taux de transfert Lecture: 17 Mo par seconde / Écriture: 12 Mo par seconde
(port High speed USB 2.0 nécessaire pour obtenir une vitesse
optimale)
Systèmes d’exploitation
compatibles: • Windows 98 SE (avec pilote), 2000, Me, XP ou ultérieur
• Mac OS 9.0 ou ultérieur
• Linux 2.4.0 ou ultérieur
Besoin d’aide?
Aide en ligne: www.philips.com
Aide interactive et questions fréquemment posées.
Pour les mises à jour de logiciels et l’assistance: www.philips.com/storage.
Información importante
ES
AVISO
• Mantenerla fuera del alcance de los niños.
Si se traga, obtener asistencia médica inmediatamente.
• Para evitar riesgos de incendio o sacudida eléctrica,no exponer la unidad a la
lluvia o la humedad.
• Para evitar una sacudida eléctrica, no abrir la caja.
Encargar el servicio solamente a personal capacitado.
Nota: Los datos están seguros en los entornos siguientes: En sistemas de seguridad de rayos X de
aeropuertos y en campos magnéticos de potencias no superiores a 3.500 Oe.
Para clientes de EE.UU.:
Si quiere hacer alguna pregunta sobre este producto, puede llamar a: 1-888-Philips (744-5477).
Ayuda en línea: www.usasupport.philips.com.
Para clientes del Canadá
Este aparato digital Clase B cumple con la normativa Canadian ICES-003.
Para clientes de Europa
Este producto cumple con las siguientes directivas europeas,89/336/EEC, 92/31/EEC
(Directiva EMC) 93/68/EEC (Directiva de Marca CE).
Este producto cumple con EN55022 Clase B y EN55024 para utilizarse en las áreas
siguientes: residenciales, comerciales y de industria ligera.
Nota sobre el uso
• Es posible que la USB Flash Drive no funcione correctamente si está conectada al ordenador
cuando éste se inicializa, reinicializa o restaura desde el modo de espera. Desconecte siempre
la unidad del ordenador antes de realizar cualquiera de estas operaciones.
• No coloque la unidad en lugares :
– extremadamente calientes o fríos – en los que hay vibraciones – expuestos a gases
corrosivos – polvorientos o sucios – muy húmedos – expuestos directamente al sol
• Microsoft y Windows son marcas comerciales registradas de Microsoft Corporation en los
Estados Unidos y otros países.
• Mac y Macintosh son marcas registradas de Apple Computer,Inc., registradas en los
Estados Unidos y otros países.
• Otros nombres de sistema y nombres de producto que aparecen en este manual son
marcas comerciales registradas o marcas registradas de sus propietarios respectivos.
Sírvase observar que los símbolos ™ y ®no se utilizan en este manual.
• Nuestra garantía de producto se limita solamente a la USB flash drive en sí, cuando se
utiliza normalmente de acuerdo con estas instrucciones de utilización y con los accesorios
incluidos con esta unidad en el entorno del sistema especificado o recomendado. Los
servicios suministrados por la Compañía, como soporte del usuario,también están sujetos
a estas restricciones.
• La Compañía no puede aceptar ninguna responsabilidad por daños o pérdidas relacionadas
con el uso de esta unidad, ni por ninguna demanda de terceros.
• La Compañía no puede aceptar ninguna responsabilidad por: problemas con el ordenador u
otro hardware de usted relacionados con el uso de este producto; la idoneidad de este
producto para hardware, software o periféricos específicos; conflictos de funcionamiento
con otro software instalado; pérdida de datos; u otros años accidentales o inevitables.
• La Compañía no puede aceptar ninguna responsabilidad por daños económicos, pérdidas
de beneficios, demandas de terceros, etc.,en relación con el uso del software suministrado
con esta unidad.
• Las especificaciones de software pueden estar sujetas a cambios sin notificación previa.
Información medioambiental
Desecho del producto antiguo
El producto se ha diseñado y fabricado con materiales y componentes de
alta calidad, que se pueden reciclar y volver a utilizar. Cuando este símbolo
de contenedor de ruedas tachado se muestra en un producto indica que
éste cumple la directiva europea 2002/96/EC. Obtenga información sobre
la recogida selectiva local de productos eléctricos y electrónicos. Cumpla
con la normativa local y no deseche los productos antiguos con los
desechos domésticos. El desecho correcto del producto antiguo ayudará a
evitar consecuencias negativas para el medioambiente y la salud humana.
La realización de copias no autorizadas de materiales protegidos contra copias, incluyendo
programas de ordenador, archivos, emisiones y grabaciones de sonido, puede ser una violación
de derechos de propiedad intelectual y constituir un delito.Este equipo no debe ser utilizado
para dicho propósito.
Instale
Windows ME,Windows 2000,Windows XP o MAC OS 9.0 o superior:
• El controlador del dispositivo se instala automáticamente cuando la unidad está conectada
a un puerto USB del ordenador.Sin embargo, con algunas tarjetas o placas USB 2.0, quizás
necesite iniciar la instalación manualmente. En este caso, siga las instrucciones en pantalla
para buscar un controlador adecuado. Consulte el archivo de ayuda del sistema
operativo si necesita alguna ayuda.
Nota: No retire la unidad del puerto USB durante el proceso de descarga.Asegúrese de que el
interruptor de protección contra escritura (fig. 2) esté en la posición de no protección
(izquierda) durante la instalación.
Windows 98/98SE:
1 Descargue el controlador del dispositivo a http://www.philips.com/storage.
2 Retire la tapa protectora del conector USB y gírela hacia atrás (fig. 1).
3 Inserte el conector USB de la unidad en uno de los puertos USB del ordenador (fig. 3).
> El asistente de Nuevo Hardware se inicializa y el LED de la unidad se enciende. La
intensidad de la luz del LED aumenta gradualmente y después disminuye. Esto continuará
durante todo el tiempo que la unidad esté conectada al ordenador.
4 Haga clic en el botón Siguiente.
5 Haga clic Buscar el mejor controlador para su dispositivo. Haga clic en el botón
Siguiente.
6 Haga clic en Especificar una ubicación.Haga clic en el botón Examinador.
7 Cuando aparece el cuadro de diálogo, especifique la carpeta donde se almacena el
programa de instalación.
8 Haga clic en el botón Aceptar para cerrar el cuadro de diálogo.Después haga clic en el
botón Siguiente.
9 Haga clic en el botón Siguiente.
10Haga clic en el botón Terminar.
> Se inicia la instalación del controlador.
> Cuando el proceso de instalación ha finalizado, aparece un icono de unidad para la USB Flash
Drive en la ventana Mi PC.
11Después de confirmar que la unidad está en modo de espera, puede retirar la unidad del
puerto USBdel ordenador.
Nota: No retire la unidad del puerto USB durante el proceso de descarga.Asegúrese de que el
interruptor de protección contra escritura (fig. 2) esté en la posición de no protección
(izquierda) durante la instalación.
Conecte
Conexión de la unidad a su ordenador
Nota: Si el puerto USB de su ordenador no es fácilmente accesible, puede utilizar el cable de
extensión USB suministrado (no todos los modelos) o un hub USB opcional para conectar la
unidad a su ordenador.
1 Retire la tapa protectora del conector USB y gírela hacia atrás (fig. 1).
2 Inserte el conector USB de la unidad en uno de los puertos USB del ordenador (fig. 3).
> El LED de la unidad se enciende. La intensidad de la luz del LED aumenta gradualmente y
después disminuye. Esto continuará durante todo el tiempo que la unidad esté conectada al
ordenador.
Disfrute
Funcionamiento de la unidad
• Una vez la unidad está conectada al puerto USB del ordenador:
– un paquete de software se inicializa automáticamente, permitiéndole activar diversas
aplicaciones. Para más instrucciones, consulte el archivo de ayuda del software.
– aparecerá el icono de unidad para la unidad.Ahora puede copiar y guardar datos en la
unidad arrastrando archivos y carpetas al icono de la unidad, igual que cuando copia
datos en un disco duro, CD-ROM, DVD o disquete.
> Cuando copia datos, la intensidad de la luz del LED aumenta y disminuye rápidamente.
Notas:
– No retire la unidad del puerto USB del ordenador mientras copia y guarda datos, en caso
contrario la unidad no será reconocida por su sistema.
– Cuando se opera bajo Windows, el nombre de la unidad varía según la versión de Windows.
Interruptor de protección contra escritura (fig. 2)
El interruptor de protección contra escritura puede proteger sus archivos contra borrado o
sobreescritura accidental. Derecha - posición de protección.
Izquierda - posición de no protección.
Desconexión de la unidad de su ordenador
Windows®98/98SE
• Después de confirmar que la unidad está en modo de espera, puede retirarla delpuerto
USB del ordenador.
Windows®ME y Windows® 2000
1 Haga doble clic en el icono Extraer o desconectar hardware,en la barra de tareas
situada en la parte inferior derecha de la pantalla.
2 En la ventana que aparece, seleccione el nombre del dispositivo que debe quitarse, y haga
clic en el botón STOP.
3 Cuando aparece la pantalla de parar un dispositivo de hardware, asegúrese de que
muestre la información correcta,y haga clic en el botón OK.
4 Cuando aparece un mensaje que indica que el dispositivo puede quitarse con seguridad,
retire el dispositivo del puerto USB del ordenador .
Cuando se ejecuta Windows XP
1 Haga doble clic en el icono Quitar hardware de forma segura de la barra de
herramientas, en la parte inferior derecha de la pantalla.
2 En la ventana que aparece, seleccione el nombre del dispositivo que debe suprimirse, y
haga clic en el botón STOP.
3 Cuando aparece la pantalla de parar un dispositivo de hardware, asegúrese de que
muestre la información correcta,y haga clic en el botón OK.
4 Cuando aparece el mensaje Ahora puede quitar el hardware con seguridad retire el
dispositivo del puerto USB del ordenador .
Mac OS 9.0 y superior
1 Arrastre el icono de la unidad a la Papelera.
• Después de confirmar que la unidad está en modo de espera, puede retirarla delpuerto
USB del ordenador.
Especificaciones técnicas
Interfaz USB 2.0 de alta velocidad (compatible de forma retroactiva con
USB 1.1)
Tasa de transferencia Lectura: 17 MB por segundo / Escritura:12 MB por segundo
(USB 2.0 de alta velocidad, se requiere puerto para conseguir la
velocidad máxima)
Sistemas operativos
compatibles • Windows 98SE (con controlador), 2000,ME, XP o posterior
• Mac OS 9.0 o posterior
• Linux 2.4.0 o posterior
¿Necesita ayuda?
Ayuda en línea: www.philips.com
Para obtener ayuda interactiva y preguntas frecuentes.
Para actualizaciones y soporte de software: www.philips.com/support
Wichtige Informationen
DE
WARNHINWEIS
• Von Kindern fern halten. Bei Verschlucken unverzüglich einen Arzt aufsuchen.
• Zur Vorbeugung vor Feuer oder Stromschlaggefahr das Gerät weder Regen
noch Feuchtigkeit aussetzen.
• Das Gehäuse nicht öffnen, um Stromschläge zu vermeiden. Sich bzgl. der
War tung nur an qualifiziertes Personal wenden.
Hinweis: Daten sind in den folgenden Umgebungen sicher: Sicherheits-Röntgensysteme auf Flughäfen
und magnetische Feldstärken nicht über 3.500 Oe.
Für Kunden in Europa
Dieses Produkt entspricht den folgenden europäischen Richtlinien:89/336/EG, 92/31/EG
(EMV-Richtlinie), 93/68/EG (CE-Kennzeichnungsrichtlinie).
Dieses Produkt entspricht EN55022 Klasse B und EN55024 zur Verwendung in den folgenden
Bereichen: privat, gewerblich und leicht industriell.
Nutzungshinweise
• Der USB Flash Drive funktioniert evtl. nicht richtig, wenn er an den Computer
angeschlossen ist und der Computer gestartet, neu gestartet oder aus dem Sleep-Modus
‘geweckt’ wird.Vor Durchführung beliebiger dieser Vorgänge ist das Laufwerk stets vom
Computer zu trennen.
• Das Laufwerk nicht dort aufstellen, wo:
– es äußerst heiß oder kalt ist – es zu Vibrationen kommt
– es zu Kontakt zu ätzende Gase kommt – es staubig oder schmutzig ist
– es zu Kontakt direkte Sonneneinstrahlung kommt – es sehr feucht ist
• Microsoft und Windows sind eingetragene Warenzeichen von Microsoft Corporation in
den Vereinigten Staaten und anderen Ländern.
• Mac und Macintosh sind Warenzeichen von Apple Computer,Inc., die in den U.S.A.und
anderen Ländern eingetragen sind.
• Andere System- und Produktbezeichnungen, die in dieser Anleitung vorkommen, sind
eingetragene Warenzeichen oder Warenzeichen ihrer jeweiligen Eigentümer. Zu beachten
ist, dass die Symbole ™ und ®nicht in dieser Anleitung benutzt werden.
• Unsere Produktgarantie ist allein auf das USB-Flashlaufwerk beschränkt,sofern es im
Einklang mit der vorliegenden Betriebsanleitung und dem mit diesem Gerät ausgelieferten
Zubehör in der spezifizierten oder empfohlenen Systemumgebung normal benutzt wird.
Vom Unternehmen bereitgestellte Dienstleistungen wie z. B.Anwendersupport unterliegen
ebenfalls diesen Einschränkungen.
• Das Unternehmen kann keine Haftung für Schäden oder Verluste, die aus der Benutzung
dieses Gerätes resultieren, oder für irgendwelche Ansprüche Dritter übernehmen.
• Das Unternehmen kann keine Haftung übernehmen für: Probleme mit Ihrem Computer
oder sonstiger Hardware aufgrund der Benutzung dieses Produkts;die Eignung dieses
Produkts für spezifische Hardware, Software oder Peripheriegeräte; betriebliche Konflikte
mit anderer installierter Software; Datenverlust; oder sonstige versehentliche oder
unvermeidliche Schäden.
• Das Unternehmen kann keine Haftung für finanzielle Schäden, Gewinnverluste, Ansprüche
Dritter usw.,die sich aus der Benutzung der mit diesem Gerät gelieferten Software
ergeben, übernehmen.
• Die Softwarespezifikationen unterliegen unangekündigten Änderungen.
Umweltinformationen
Entsorgung Ihres alten Geräts
Ihr Gerät wurde unter Verwendung hochwertiger Materialien und
Komponenten entwickelt und hergestellt,die recycelt und wieder
verwendet werden können.Befindet sich dieses Symbol (durchgestrichene
Abfalltonne auf Rädern) auf dem Gerät, bedeutet dies, dass für dieses Gerät
die Europäischen Richtlinie 2002/96/EG gilt. Informieren Sie sich über die
geltenden Bestimmungen zur getrennten Sammlung von Elektro- und
Elektronik-Altgeräten in Ihrem Land. Richten Sie sich bitte nach den
geltenden Bestimmungen in Ihrem Land, und entsorgen Sie Altgeräte nicht
über Ihren Haushaltsabfall. Durch die korrekte Entsorgung Ihrer Altgeräte
werden Umwelt und Menschen vor möglichen negativen Folgen geschützt.
Die unbefugte Vervielfältigung urheberrechtlich geschützter Werke, einschließlich
Computerprogramme, Dateien, Rundfunksendungen und musikalischer Werke,kann eine
Verletzung des Urheberrechts darstellen und eine Strafbarkeit begründen. Dieses Gerät darf
zu den genannten mißbräulichen Zwecken nicht verwendet werden.
Installation
Windows ME,Windows 2000,Windows XP oder MAC OS 9.0 oder höher:
• Der Gerätetreiber wird automatisch installiert, wenn das Laufwerk an einen USB-Port des
Computers angeschlossen wird. Bei einigen USB 2.0-Karten oder -Platinen müssen Sie die
Installation jedoch u. U. manuell einleiten. In diesem Fall befolgen Sie die Anweisungen auf
dem Bildschirm, um nach einem geeigneten Treiber zu suchen.Falls Sie Hilfe benötigen,
beziehen Sie sich auf die Hilfedatei des Betriebsystems.
Hinweis: Das Laufwerk nicht aus dem USB-Port des Computers herausnehmen, solange das
Downloaden vor sich geht. Darauf achten, dass der Schreibschutzschalter (Abb. 2) während
der Installation in der ungeschützten (linken) Position ist.
Windows 98/98SE:
1 Downloaden Sie den Gerätetreiber unter http://www.philips.com/storage.
2 Entfernen Sie die Schutzkappe vom USB-Verbinder und drehen Sie sie nach hinten
(Abb. 1).
3 Stecken Sie den USB-Verbinder des Laufwerks in einen der USB-Ports des
Computers (Abb. 3).
> Der Neue Hardware-Assistent startet und die LED des Laufwerks leuchtet auf. Die
Lichtintensität der LED nimmt allmählich zu und dann wieder ab. Dies wird fortgesetzt,solange
das Laufwerk an den Computer angeschlossen ist.
4 Klicken Sie auf den Button Weiter.
5 Klicken Sie auf Suche nach dem besten Treiber für Ihr Gerät.Anschließend klicken
Sie auf den Button Weiter .
6 Klicken Sie auf Eine Position angeben.Anschließend klicken Sie auf den Button Browsen.
7 Wenn das Dialogfeld erscheint, geben Sie den Ordner an,wo das Installationsprogramm
gespeichert wird.
8 Klicken Sie auf den Button OK,um das Dialogfeld zu schließen.Anschließend klicken Sie
auf den Button Weiter .
9 Klicken Sie auf den Button Weiter.
10Klicken Sie auf den Button Beenden.
> Die Installation des Treibers beginnt.
> Sobald der Installationsvorgang abgeschlossen ist, erscheint ein Laufwerksymbol für den USB
Flash Drive im Fenster Mein Computer.
11Nach Bestätigung dessen, dass sich das Laufwerk im Standby-Modus befindet, können Sie
das Laufwerk aus dem USB-Port des Computers herausnehmen.
Hinweis: Das Laufwerk nicht aus dem USB-Port des Computers herausnehmen, solange das
Downloaden vor sich geht. Darauf achten, dass der Schreibschutzschalter (Abb. 2) während
der Installation in der ungeschützten (linken) Position ist.
Anschluss
Anschluss des Laufwerks an Ihren Computer
Hinweis:Wenn der USB-Port Ihres Computers nicht einfach zugänglich ist, dann können Sie das
mitgelieferte USB-Verlängerungskabel (nicht bei allen Modellen) oder einen optionalen USBHub zum Anschluss des Laufwerks an Ihren Computer benutzen.
1 Entfernen Sie die Schutzkappe vom USB-Verbinder und drehen Sie sie nach hinten
(Abb. 1).
2 Stecken Sie den USB-Verbinder des Laufwerks in einen der USB-Ports des
Computers (Abb. 3).
> Die LED des Laufwerks leuchtet auf. Die Lichtintensität der LED nimmt allmählich zu und dann
wieder ab. Dies wird fortgesetzt, solange das Laufwerk an den Computer angeschlossen ist.
Los geht’s!
Laufwerkbedienung
• Sobald das Laufwerk an den USB-Port des Computers angeschlossen ist:
– startet ein Softwarepaket automatisch und ermöglicht es Ihnen, die verschiedenen
Anwendungen zu aktivieren.Weiterführende Anweisungen siehe Software-Hilfedatei.
– erscheint das Laufwerksymbol für das Laufwerk. Jetzt können Sie Daten kopieren und auf
dem Laufwerk speichern, indem sie Dateien und Ordner auf das Laufwerksymbol ziehen,
wie Sie es auch beim Kopieren von Daten auf eine Festplatte, CD-ROM,DVD oder
Floppy Disk tun.
> Beim Kopieren von Daten nimmt die Lichtintensität der LED schnell zu und ab.
Hinweise:
– Beim Kopieren und Speichern von Daten nicht das Laufwerk aus dem USB-Port des Computers
herausnehmen; ansonsten wird das Laufwerk nicht mehr von Ihrem System erkannt.
– Beim Betrieb unter Windows variiert die Laufwerkbezeichnung je nach Ihrer Windows-Version.
Schreibschutzschalter (Abb. 2)
Der Schreibschutzschalter kann Ihre Dateien vor versehentlichem Löschen oder
Überschreiben schützen. Rechts - geschützte Position.
Links - ungeschützte Position.
Herausnehmen des Laufwerks aus Ihrem Computer
Windows®98/98SE
• Nach Bestätigung dessen, dass sich das Laufwerk im Standby-Modus befindet, können Sie
das Laufwerk aus dem USB-Port des Computers herausnehmen.
Windows®ME und Windows® 2000
1 Doppelklicken Sie auf das Symbol Hardwarekomponente entfernen oder auswerfen
in der Symbolleiste unten rechts im Bildschirm.
2 Im erscheinenden Fenster wählen Sie die Bezeichnung des herauszunehmenden Gerätes
und klicken Sie anschließend auf den Button Beenden.
3 Wenn der Bildschirm Eine Hardwarekomponente beenden erscheint, achten Sie
darauf, dass die richtigen Informationen angezeigt werden.Anschließend klicken Sie auf den
Button OK.
4 Wenn eine Mitteilung erscheint und angibt, dass das Gerät sicher entfernt werden kann,
entfernen Sie das Laufwerk aus dem USB-Port des Computers.
Wenn Windows XP läuft
1 Doppelklicken Sie auf das Symbol Hardware sicher entfernen in der Symbolleiste unten
rechts im Bildschirm.
2 Im erscheinenden Fenster wählen Sie die Bezeichnung des herauszunehmenden Gerätes
und klicken Sie anschließend auf den Button Beenden.
3 Wenn der Bildschirm Eine Hardwarekomponente beenden erscheint, achten Sie
darauf, dass die richtigen Informationen angezeigt werden.Anschließend klicken Sie auf den
Button OK.
4 Wenn eine Mitteilung erscheint und angibt, dass das Gerät sicher entfernt werden
kann, entfernen Sie das Laufwerk aus dem USB-Port des Computers.
Mac OS 9.0 und höher
1 Ziehen Sie das Laufwerksymbol in die Mülltonne.
2 Nach Bestätigung dessen, dass sich das Laufwerk im Standby-Modus befindet, können Sie
das Laufwerk aus dem USB-Port des Computers herausnehmen.
Technische Angaben
Schnittstelle High-Speed USB 2.0 (rückwärtskompatibel mit USB 1.1)
Transferrate Lesen: 17 MB pro Sekunde / Schreiben:12 MB pro
Sekunde (High-Speed USB 2.0-Port zur Erzielung der
Höchstgeschwindigkeit erforderlich)
Kompatible Betriebssysteme • Windows 98SE (mit Treiber), 2000, ME, XP oder später
• Mac OS 9.0 oder später
• Linux 2.4.0 oder später
Hilfe nötig?
Online-Hilfe: www.philips.com
Für interaktive Hilfe und häufig gestellte Fragen.
Für Software-Updates und Support: www.philips.com/storage.
User manual
Mode d’emploi
Instrucciones de manejo
Bedienungsanleitung
Gebruiksaanwijzing
Instruzioni per l'uso
Manual de utilização
Инструкции по
использованию
RU
PR
IT
NL
DE
ES
FR
EN
USB_FlashDrive_versie_2.qxd 29-08-2005 11:39 Pagina 1
Page 2
Notes
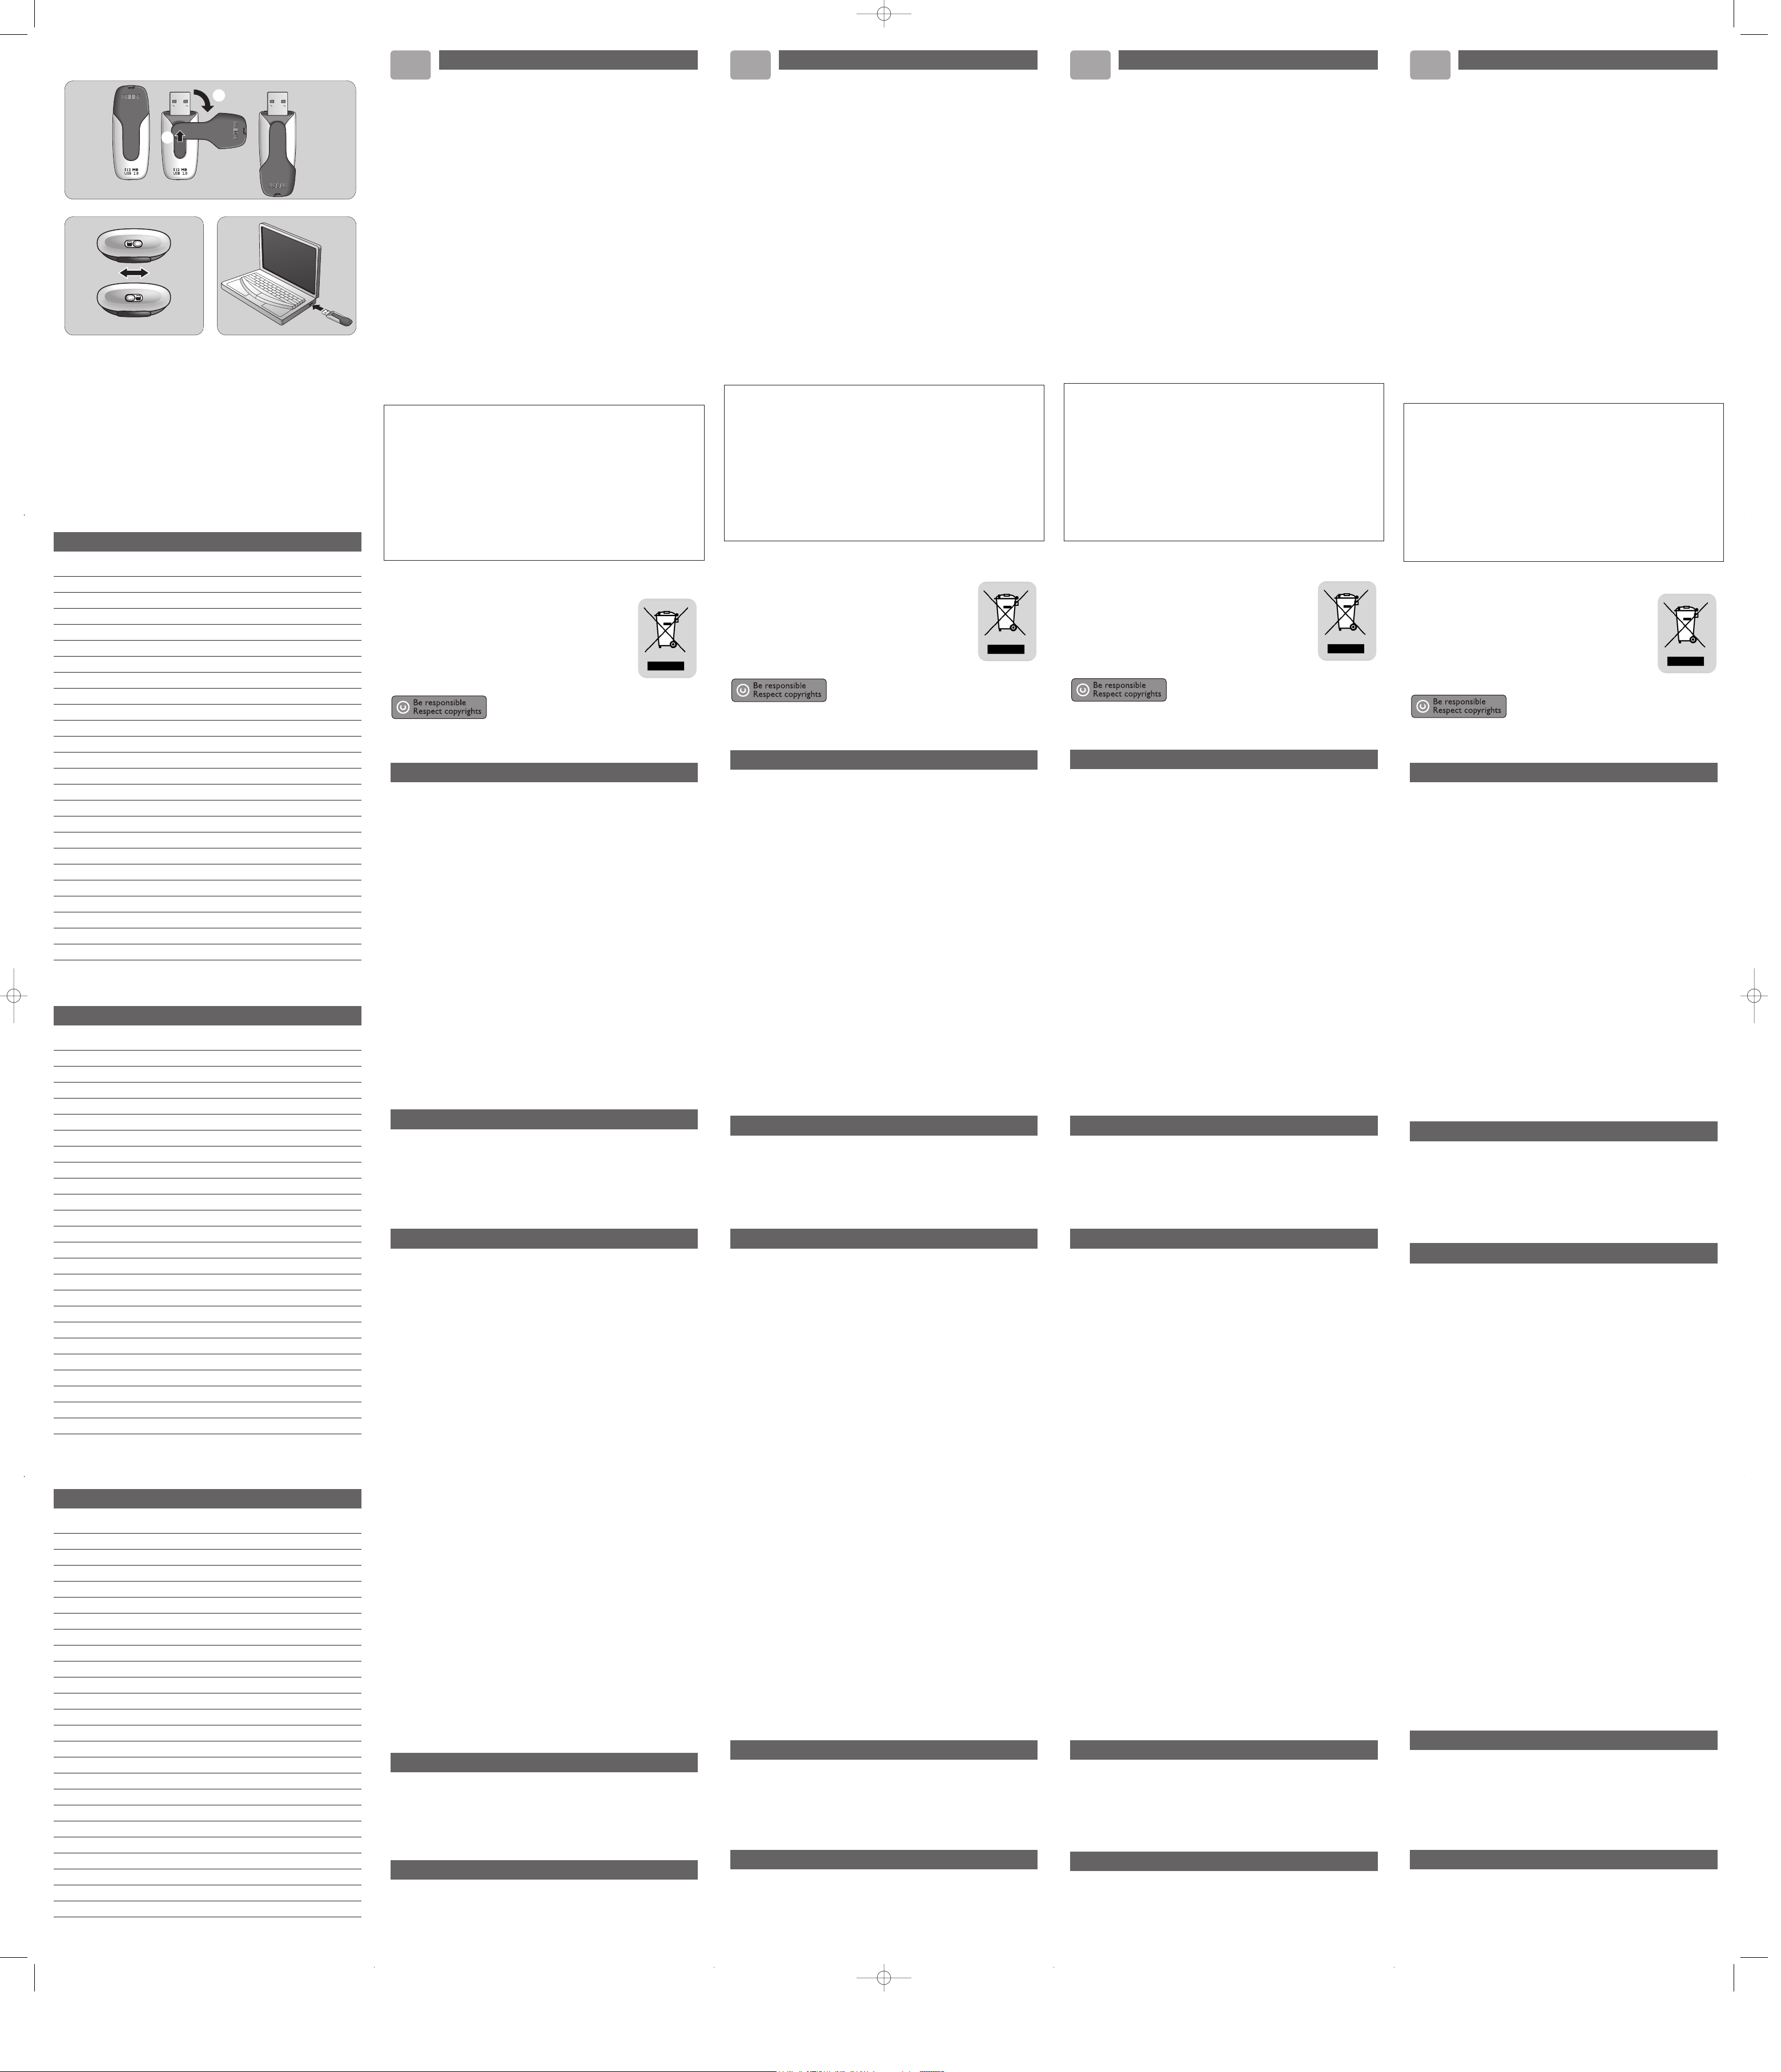
Fig. 1
Fig. 2 Fig. 3
Notes
Notes
②
①
Belangrijke informatie
NL
WAARSCHUWING
• Uit de buurt van kinderen houden. Bij inslikken onmiddellijk een dokter
waarschuwen.
• Bescherm het apparaat tegen regen en vocht om het risico op brand of
elektrische schokken te voorkomen.
• Voorkom elektrische schokken; maak het apparaat niet open.Laat onderhoud
alleen over aan gekwalificeerd personeel.
Opmerking: De gegevens zijn veilig in de volgende omgevingen: Bij beveiligingssystemen met
röntgen-stralen op luchthavens en in magnetische velden met een sterkte die niet hoger
is dan 3.500 Oe.
Voor klanten in Europa
Dit product voldoet aan de volgende Europese richtlijnen:89/336/EEC, 92/31/EEC
(EMC-richtlijn) 93/68/EEC (CE-markeringsrichtlijn).
Dit product voldoet aan de normen EN55022 Klasse B en EN55024 voor gebruik in de
volgende omgevingen: huishoudelijke, handels- en licht-industriële omgevingen.
Opmerkingen over het gebruik
• Het kan zijn dat de USB Flash Drive niet op de juiste manier werkt als hij aangesloten is
op de computer wanneer de computer opgestart wordt, opnieuw opgestart wordt of uit
stand-by komt. Haal de Flash Drive altijd los van de computer voor u één van deze
handelingen uitvoert.
• Plaats de Flash Drive niet op plekken:
– die extreem warm of koud zijn – waar trillingen zijn – die stoffig of vuil zijn
– waar bijtende gassen aanwezig zijn – die zeer vochtig zijn – in de volle zon
• Microsoft en Windows zijn geregistreerde handelsmerken van Microsoft Corporation in de
Ve renigde Staten en andere landen.
• Mac en Macintosh zijn handelsmerken van Apple Computer, Inc., geregistreerd in de V.S. en
andere landen.
• Andere systeemnamen en productnamen die in deze gebruiksaanwijzing voorkomen,zijn
geregistreerde handelsmerken of handelsmerken van hun respectieve eigenaars.
De symbolen ™ en ®worden in deze gebruiksaanwijzing niet gebruikt.
• Onze productgarantie beperkt zich tot de USB Flash Drive zelf, wanneer normaal gebruikt
overeenkomstig deze gebruiksaanwijzing en met de accessoires die bij dit apparaat geleverd
werden in de gespecificeerde of aanbevolen systeemomgeving. De diensten die door het
bedrijf geleverd worden,zoals klantenondersteuning, kennen dezelfde beperkingen.
• Het bedrijf kan niet aansprakelijk gesteld worden voor beschadiging of verlies ten gevolge
van het gebruik van dit apparaat of voor welke vordering dan ook van derden.
• Het bedrijf kan niet aansprakelijk gesteld worden voor: problemen met uw computer of
andere hardware ten gevolge van het gebruik van dit product; de geschiktheid van dit
product voor specifieke hardware, software of randapparatuur; conflicten met andere
geïnstalleerde software; verlies van gegevens; of andere onvoorziene of onvermijdelijke
schade.
• Het bedrijf kan niet aansprakelijk gesteld worden voor financiële schade,winstderving,
vorderingen van derden enzovoort, die het gevolg zijn van het gebruik van de software die
bij dit apparaat geleverd werd.
• Wijzigingen van softwarespecificaties voorbehouden zonder voorafgaande kennisgeving.
Met het oog op het milieu
Verwijdering van uw oude product
Uw product is vervaardigd van kwalitatief hoogwaardige materialen en
onderdelen, welke gerecycled en opnieuw gebruikt kunnen worden.Als u
op uw product een doorstreepte afvalcontainer op wieltjes ziet, betekent
dit dat het product valt onder de EU-richtlijn 2002/96/EC.Win inlichtingen
in over de manier waarop elektrische en elektronische producten in uw
regio gescheiden worden ingezameld. Neem bij de verwijdering van oude
producten de lokale wetgeving in acht en plaats deze producten niet bij het
gewone huishoudelijke afval.Als u oude producten correct verwijdert
voorkomt u negatieve gevolgen voor het milieu en de volksgezondheid.
Het zonder toestemming vervaardigen van kopieën van auteursrechtelijk beschermde werken,
inclusief computer programma's, bestanden, uitzendingen en geluidsopnames, kan een inbreuk
op auteursrechten en een strafbaar feit zijn. De apparatuur dient niet voor dergelijke
doeleinden gebruikt te worden.
Installeren
Windows ME,Windows 2000,Windows XP of MAC OS 9.0 of hoger:
• Het apparaatstuurprogramma wordt automatisch geïnstalleerd wanneer de Flash Drive
aangesloten wordt op een USB-poort van de computer. Bij bepaalde USB 2.0-kaarten echter,
moet u de installatie handmatig opstarten.Volg in dit geval de instructies op het scherm om
een geschikt aanstuurprogramma te vinden. Zie het Help-bestand als u hulp nodig heeft.
Opmerking: Haal de Flash Drive niet uit de USB-poort van de computer zolang het downloadproces
nog bezig is. Let erop dat de ‘write protect’-schakelaar (fig.2) tijdens het installeren in de
onbeveiligde stand staat (links).
Windows 98/98SE:
1 Download het apparaatstuurprogramma vanaf http://www.philips.com/storage.
2 Haal het beschermkapje van de USB-connector en kantel het naar achteren (fig. 1).
3 Steek de USB-connector van de Flash Drive in één van de USB-poorten van de
computer (fig. 3).
> De wizard Nieuwe hardware wordt gestart en de LED van de Flash Drive brandt. De
lichtsterkte van de LED wordt eerst steeds feller en wordt vervolgens weer minder. Dit gaat door
zolang de Flash Drive op de computer aangesloten is.
4 Klik op Volgende.
5 Klik op Zoeken naar het beste stuurprogramma voor dit apparaat. Klik vervolgens
op Volgende.
6 Klik op Een locatie specificeren.Klik vervolgens op Bladeren.
7 Wanneer het dialoogvenster verschijnt, geef dan de map op waarin het
installatieprogramma opgeslagen is.
8 Klik op OK om het dialoogvenster af te sluiten. Klik vervolgens op Volgende.
9 Klik op Volgende.
10Klik op Voltooien.
> De installatie van het stuurprogramma wordt gestart.
> Als het installatieproces voltooid is, dan verschijnt in het venster Deze computer een
pictogram voor het USB Flash Drive-station.
11Nadat bevestigd is dat de Flash Drive in stand-by staat, kunt u deze uit de USB-poort van
de computer halen.
Opmerking: Haal de Flash Drive niet uit de USB-poort van de computer zolang het downloadproces
nog bezig is. Let erop dat de ‘write protect’-schakelaar (fig.2) tijdens het installeren in de
onbeveiligde stand staat (links).
Aansluiten
Aansluiten van de Flash Drive op uw computer
Opmerking:Als u niet makkelijk bij de USB-poort van uw computer kunt komen, dan kunt u gebruik
maken van de bijgeleverde USB-verlengkabel (niet bij alle modellen) of van een los
verkrijgbare USB-hub om de Flash Drive op uw computer aan te sluiten.
1 Haal het beschermkapje van de USB-connector en kantel het naar achteren (fig. 1).
2 Steek de USB-connector van de Flash Drive in één van de USB-poorten van de
computer (fig. 3).
> De LED van de Flash Drive brandt. De lichtsterkte van de LED wordt eerst steeds feller en wordt
vervolgens weer minder. Dit gaat door zolang de Flash Drive op de computer aangesloten is.
Genieten
Bediening van de Flash Drive
• Als de Flash Drive aangesloten is op de USB-poort van de computer, dan
– start automatisch een softwarepakket dat het activeren van verschillende toepassingen
mogelijk maakt. Zie het help-bestand van de sofware voor verdere instructies.
– verschijnt het pictogram van de Flash Drive-station. U kunt nu gegevens naar de Flash
Drive kopiëren en op de Flash Drive opslaan door bestanden en mappen naar het
pictogram van de Flash Drive te slepen, net zoals wanneer u gegevens naar een harde
schijf, cd-rom, dvd of diskette kopieert.
> Tijdens het kopiëren van gegevens, wordt de lichtsterkte van de LED snel feller en daarna weer
minder fel.
Opmerkingen:
– Haal de Flash Drive niet uit de USB-poort van de computer tijdens het kopiëren of opslaan van
gegevens, want anders wordt de Flash Drive niet langer herkend door uw systeem.
– Bij gebruik in Windows kan de naam van de Flash Drive verschillen, afhankelijk van uw Windows-
versie.
‘Write protect’-schakelaar (fig.2)
De ‘write protect’-schakelaar voorkomt dat uw bestanden per ongeluk gewist of overschreven
worden. Rechts - beveiligde stand.
Links - onbeveiligde stand.
Verwijderen van de Flash Drive van uw computer
Windows®98/98SE
• Nadat bevestigd is dat de Flash Drive in stand-by staat,kunt u deze uit de USB-poort van
de computer halen.
Windows®ME en Windows® 2000
1 Dubbelklik op het pictogram Hardware ontkoppelen of uitwerpen in de taakbalk
rechts onderin het scherm.
2 Kies, in het venster dat verschijnt, de naam van het apparaat dat u wilt verwijderen en klik
vervolgens op Stoppen.
3 Als het venster Hardware stopzetten verschijnt, controleer dan of de juiste informatie
weergegeven wordt en klik vervolgens op OK.
4 Wanneer een bericht verschijnt dat aangeeft dat het apparaat veilig verwijderd kan
worden, haal dan de Flash Drive uit de USB-poort van de computer.
Bij Windows XP
1 Dubbelklik op het pictogram Hardware veilig verwijderen in de taakbalk rechts
onderin het scherm.
2 Kies, in het venster dat verschijnt, de naam van het apparaat dat u wilt verwijderen en klik
vervolgens op Stoppen.
3 Als het venster Hardware stopzetten verschijnt, controleer dan of de juiste informatie
weergegeven wordt en klik vervolgens op OK.
4 Wanneer het bericht Veilig om hardware te verwijderen verschijnt, haal dan de UFD
uit de USB-poort van de computer.
Mac OS 9.0 en hoger
1 Sleep het pictogram van de Flash Drive naar de Prullenbak.
2 Nadat bevestigd is dat de Flash Drive in stand-by staat, kunt u deze uit de USB-poort van
de computer halen.
Technische gegevens
Interface Hogesnelheids-USB 2.0 (compatibel met eerdere USB 1.1)
Doorvoersnelheid Lezen: 17MB per seconde / Schrijven:12MB per seconde
(Hogesnelheids-USB 2.0-poort vereist voor het bereiken van
maximale snelheid)
Compatibele
besturingssystemen • Windows 98SE (met driver), 2000, ME, XP of later
• Mac OS 9.0 of later
• Linux 2.4.0 of later
Hulp nodig?
On line-ondersteuning: www.philips.com
Voor interactieve ondersteuning en veelgestelde vragen.
Voor software-updates en ondersteuning: www.philips.com/storage.
Informazioni importanti
IT
ATTENZIONE
• Tenere lontano dalla portata dei bambini. Se ingerito, consultare
immediatamente un dottore.
• Per prevenire pericoli di incendio o scosse elettriche, non esporre l’apparecchio
a pioggia o umidità.
• Per evitare scosse elettriche, non aprire il rivestimento. Per la manutenzione,
rivolgersi unicamente a personale tecnico qualificato.
Nota: I dati sono sicuri nei seguenti ambienti:in sistemi di sicurezza a raggi X degli aeroporti ed in
campi magnetici con forza non superiore a 3.500 Oe.
Per i clienti in Europa
Il presente prodotto è conforme alle seguenti Direttive Europee: 89/336/EEC, 92/31/EEC
(compatibilità elettromagnetica-EMC) 93/68/EEC (marchio CE).
Il presente prodotto è conforme alle normative EN55022 Classe B ed EN55024 per l’utilizzo
nelle seguenti aree: residenziali, commerciali e dell’industria leggera.
Note sull’utilizzo
• Il dispositivo USB Flash Drive potrebbe non funzionare correttamente se si trova collegato
al computer nel momento in cui questo viene acceso, riavviato o riattivato dal modo sleep.
Disinserire l’unità dal computer prima di eseguire una di queste operazioni.
• Non esporre l’unità ad ambienti:
– eccessivamente caldi o freddi – soggetti a vibrazioni – esposti a gas corrosivi
– soggetti alla luce diretta del sole – eccessivamente umidi – polverosi o sporchi
• Microsoft e Windows sono marchi di fabbrica di Microsoft Corporation, registrati negli
Stati Uniti ed in altre nazioni.
• Mac e Macintosh sono marchi di fabbrica di Apple Computer, Inc., registrati negli Stati Uniti
ed in altre nazioni.
• Altri nomi di sistemi e nomi di prodotti menzionati nel presente manuale sono marchi di
fabbrica registrati o marchi di fabbrica dei rispettivi proprietari.
I simboli ™ e ®non vengono utilizzati nel presente manuale.
• La nostra garanzia è limitata esclusivamente al dispositivo USB Flash Drive, se utilizzato in
condizioni normali in conformità con le presenti istruzioni per l’uso e con gli accessori
forniti insieme al prodotto nell’ambiente di sistema specificato o raccomandato.Anche i
servizi forniti dalla Compagnia, quali il supporto all’utente, sono soggetti a tali restrizioni.
• La Compagnia declina ogni responsabilità per i danni o le perdite conseguenti all’utilizzo del
presente dispositivo o per qualsiasi reclamo da parte di terzi.
• La Compagnia declina ogni responsabilità per quanto concerne: problemi con il computer o
altro hardware derivati dall’utilizzo del presente prodotto; adattabilità del presente
prodotto ad un hardware, software o periferica specifica; conflitti operativi con un altro
software installato; perdita di dati; o altri danni involontari o inevitabili.
• La Compagnia declina ogni responsabilità per quanto riguarda danni finanziari, mancato
guadagno, reclami da parte di terzi, ecc., derivati dall’utilizzo del software in dotazione con
il presente dispositivo.
• Le specifiche tecniche riguardanti il software potrebbero essere soggette a modifiche senza
previo avviso.
Informazioni ambientali
Smaltimento di vecchi prodotti
Il prodotto è stato progettato e assemblato con materiali e componenti di
alta qualità che possono essere riciclati e riutilizzati. Se su un prodotto si
trova il simbolo di un bidone con ruote, ricoperto da una X, vuol dire che il
prodotto soddisfa i requisiti della Direttiva comunitaria 2002/96/CE.
Informarsi sulle modalità di raccolta, dei prodotti elettrici ed elettronici, in
vigore nella zona in cui si desidera disfarsi del prodotto.Attenersi alle
normative locali per lo smaltimento dei rifiuti e non gettare i vecchi prodotti
nei normali rifiuti domestici. Uno smaltimento adeguato dei prodotti aiuta a
prevenire l'inquinamento ambientale e possibili danni alla salute.
Copie non autorizzate di materiale protetto da copie, inclusi programmi per computer,
documenti, registrazioni di radiogrammi e suoni, possono essere una violazione del copyright
e costituire un illecito penale. Questa apparecchiatura non può essere utilizzata a tali scopi.
Installazione
Windows ME,Windows 2000,Windows XP o MAC OS 9.0 o superiore:
• Il driver della periferica viene installato automaticamente quando si collega l’unità ad una
porta USB del computer.Tuttavia, con alcune schede USB 2.0,potrebbe essere necessario
eseguire l’installazione manuale. In tal caso, seguire le istruzioni su schermo per cercare un
driver adeguato. In caso di aiuto, consultare il file Guida del sistema operativo.
Nota: Non rimuovere l’unità dalla porta USB del computer finché non termina il processo di
download.Assicurarsi che l’interruttore per la protezione da scrittura (fig. 2) si trovi in una
posizione di non protezione (a sinistra) durante l’installazione.
Windows 98/98SE:
1 Scaricare il driver della periferica da http://www.philips.com/storage.
2 Estrarre la protezione del connettore USB e ruotarla verso il basso (fig. 1).
3 Inserire il connettore USB dell’unità in una delle porte USB del computer (fig.3).
> Si avvia l’Installazione guidata nuovo hardware e si accende il LED dell’unità. L’intensità
della luce del LED aumenta gradualmente, quindi diminuisce di nuovo. Ciò accade per tutta la
durata del collegamento dell’unità al computer.
4 Fare clic sul tasto Avanti.
5 Fare clic su Cerca il miglior driver per la periferica. Quindi fare clic sul tasto Avanti.
6 Fare clic su Specificare un percorso. Quindi fare clic sul tasto Sfoglia.
7 Quando appare la finestra di dialogo, specificare la cartella in cui si trova il programma
di installazione.
8 Fare clic sul tasto OK per chiudere la finestra di dialogo.Quindi fare clic sul tasto
Avanti.
9 Fare clic sul tasto Avanti.
10Fare clic sul tasto Fine.
> Si avvia l’installazione del driver.
> Una volta terminata la procedura di installazione, nella finestra
Risorse del computer appare l’icona del dispositivo USB Flash Drive.
11Dopo aver confermato che l’unità si trova in modo standby, è possibile disinserirla dalla
porta USB del computer.
Nota: Non rimuovere l’unità dalla porta USB del computer finché non termina il processo di
download.Assicurarsi che l’interruttore per la protezione da scrittura (fig. 2) si trovi in una
posizione di non protezione (a sinistra) durante l’installazione.
Collegamento
Collegamento dell’unità al computer
Nota: Se la porta USB del computer non è facilmente raggiungibile, è possibile utilizzare una
prolunga USB in dotazione (non su tutti i modelli) o un hub USB opzionale per collegare l’unità
al computer.
1 Estrarre la protezione del connettore USB e ruotarla verso il basso (fig. 1).
2 Inserire il connettore USB dell’unità in una delle porte USB del computer (fig.3).
> Il LED dell’unità si accende. L’intensità della luce del LED aumenta gradualmente, quindi
diminuisce di nuovo. Ciò accade per tutta la durata del collegamento dell’unità al computer.
Funzionamento
Funzionamento dell’unità
• Una volta collegata l’unità alla porta USB del computer:
– si avvia automaticamente un pacchetto software che consente di attivare varie
applicazioni. Per ulteriori informazioni, consultare il file Guida del software.
– appare l’icona dell’unità. È quindi possibile copiare e salvare i dati sull’unità, trascinando i
file e le cartelle sull’icona dell’unità, come quando si copiano i dati su disco rigido,
CD-ROM,DVD o floppy disk.
> Mentre si copiano i dati, l’intensità della luce del LED aumenta e diminuisce rapidamente.
Note:
– Non rimuovere l’unità dalla porta USB del computer mentre si copiano e salvano i dati. In caso
contrario, l’unità non verrà riconosciuta dal proprio sistema.
– Durante il funzionamento in ambiente Windows, il nome dell’unità cambia a seconda della
versione di Windows.
Interruttore per la protezione da scrittura (fig.2)
L’interruttore per la protezione da scrittura consente di proteggere i file da cancellazione o
sovrascrittura involontaria. Destra - posizione di protezione.
Sinistra - posizione di non protezione.
Disinserimento dell’unità dal computer
Windows®98/98SE
• Dopo aver confermato che l’unità si trova in modo standby, è possibile disinserirla dalla
porta USB del computer.
Windows®ME e Windows® 2000
1 Fare doppio clic sull’icona Scollegare o rimuovere una periferica hardware sulla
barra delle applicazioni nella parte inferiore destra dello schermo.
2 Selezionare il nome della periferica rimossa nella finestra che viene visualizzata,quindi fare
clic sul tasto STOP.
3 Quando appare la schermata Interrompi, assicurarsi che venga visualizzata l’informazione
corretta, quindi fare clic sul tasto OK.
4 Quando appare un messaggio che indica la rimozione sicura della periferica,disinserire
l’unità dalla porta USB del computer.
Windows XP
1 Fare doppio clic sull’icona Rimozione sicura dell’hardware sulla barra delle applicazioni
nella parte inferiore destra dello schermo.
2 Selezionare il nome della periferica rimossa nella finestra che viene visualizzata,quindi fare
clic sul tasto STOP.
3 Quando appare la schermata Interrompi, assicurarsi che venga visualizzata l’informazione
corretta, quindi fare clic sul tasto OK.
4 Quando appare il messaggio È possibile rimuovere l’hardware, disinserire l’unità dalla
porta USB del computer.
Mac OS 9.0 e superiore
1 Trascinare l’icona dell’unità nel Cestino.
2 Dopo aver confermato che l’unità si trova in modo standby,disinserirla dalla porta USB
del computer.
Specifiche tecniche
Interfaccia USB 2.0 High Speed (compatibile USB 1.1)
Velocità di trasmissione Lettura: 17MB al secondo / Scrittura:12MB al secondo
(la porta USB 2.0 High Speed deve raggiungere la velocità
massima)
Sistemi operativi compatibili • Windows 98SE (con driver),2000, ME,XP o successivo
• Mac OS 9.0 o successivo
• Linux 2.4.0 o successivo
Occorre assistenza?
Assistenza online: www.philips.com
Per assistenza interattiva e domande più frequenti.
Per aggiornamenti del software e supporto: www.philips.com/storage.
Informação importante
PR
AVISO
• Mantenha afastado das crianças. Se o objecto for engolido, procure
rapidamente cuidados médicos
• Para impedir perigo de incêndio ou choque, não exponha a unidade à chuva
nem à humidade.
• Para evitar choque eléctrico,não abra o equipamento. Para qualquer
reparação, procure apenas pessoal qualificado para o efeito.
Nota: Os dados não correm perigo nos seguintes ambientes:Em sistemas de segurança de raios X,
e em campos magnéticos com forças não superiores a 3.500 Oe.
Para clientes na Europa
Este produto cumpre as seguintes Directivas Europeias,89/336/EEC, 92/31/EEC
(Directiva EMC) 93/68/EEC (Directiva de Marcação CE).
Este produto cumpre as normas EN55022 Classe B e EN55024 para utilização nos seguintes
tipos de ambientes; residencial, comercial, e de indústria ligeira.
Notas sobre a Utilização
• A USB Flash Drive poderá não funcionar correctamente se estiver ligada ao computador
quando este for inicializado, reinicializado, ou despertado do modo de suspensão.Desligue
sempre a unidade do computador, antes de efectuar este tipo de operações.
• Não coloque a unidade em locais que sejam ou estejam:
– extremamente quentes ou frios – em vibração – expostos a gases corrosivos
– poeirentos ou sujos – muito húmidos – expostos à luz solar directa
• Microsoft e Windows são marcas comerciais registadas da Microsoft Corporation nos
Estados Unidos e noutros países.
• Mac e Macintosh são marcas comerciais da Apple Computer,Inc., registadas nos estados
Unidos e noutros países.
• Outros nomes de sistemas e nomes de produtos que apareçam neste manual são marcas
comerciais registadas, ou marcas comerciais, dos seus respectivos proprietários. Note que
os símbolos ™ e ®não são usados neste manual.
• A nossa garantia de produto está limitada à USB flash drive em si mesma, quando usada
normalmente de acordo com estas instruções de utilização e com os acessórios que foram
incluídos com esta unidade, no ambiente de sistema especificado ou recomendado. Os
serviços prestados pela empresa, tais como apoio ao utilizador, estão também sujeitos a
estas restrições.
• A empresa não aceita responsabilidades por danos ou perdas resultantes da utilização
desta unidade, nem de qualquer reclamação de uma terceira entidade.
• A empresa não pode aceitar responsabilidades por: problemas com o seu computador, ou
outro hardware, resultantes da utilização deste produto; a capacidade deste produto
funcionar com determinado hardware, software, ou periféricos; conflitos de funcionamento
com outro software instalado; perda de dados; ou outros danos acidentais ou inevitáveis.
• A empresa não pode aceitar responsabilidade por quaisquer danos financeiros,perda de
lucros, reclamações de terceiras partes, etc., resultantes da utilização do software fornecido
com esta unidade.
• As especificações do software estão sujeitas a alteração sem aviso.
Informação ambiental
Eliminação do seu antigo produto
O seu produto foi desenhado e fabricado com matérias-primas e
componentes de alta qualidade, que podem ser reciclados e reutilizados.
Quando este símbolo, com um latão traçado, está afixado a um produto
significa que o produto é abrangido pela Directiva Europeia 2002/96/EC.
Informe-se acerca do sistema de recolha selectiva local para produtos
eléctricos e electrónicos.Aja de acordo com os regulamentos locais e não
descarte os seus antigos produtos com o lixo doméstico comum.A
correcta eliminação do seu antigo produto ajuda a evitar potenciais
consequências negativas para o meio ambiente e para a saúde pública.
A produção de cópias não autorizadas de material protegido por direitos de autor, incluindo
programas informáticos, ficheiros, emissões hertzianas e gravações sonoras,pode constituir
uma infracção de direitos de autor e uma ofensa criminal. Este equipamento não deve ser
utilizado para esse tipo de finalidades.
Instalação
Windows ME,Windows 2000,Windows XP ou MAC OS 9.0 ou posterior:
• O ficheiro de controlo é instalado automaticamente quando a flash drive é ligada a uma
porta USB do computador.Contudo, com alguns cartões ou placas do tipo USB 2.0,
poderá precisar de iniciar a instalação manualmente. Neste caso, siga as instruções no ecrã
para procurar um ficheiro de controlo adequado. Consulte o Ficheiro de Ajuda do
sistema operativo, se precisar de alguma ajuda.
Nota: Não retire a flash drive da porta USB do computador enquanto o processo de
descarregamento estiver em decurso. Certifique-se de que o comutador de protecção de escrita
(fig. 2) está na posição de desprotecção (lado esquerdo) durante a instalação.
Windows 98/98SE:
1 Descarregue o ficheiro de controlo a partir do endereço http://www.philips.com/storage.
2 Retire a tampa de protecção do conector USB e rode-a para a parte de trás (fig. 1).
3 Insira o conector USB numa das portas USB (fig. 3) do computador
> Abre-se o Assistente de Novo Hardware e o LED da unidade acende-se.A intensidade do
LED irá gradualmente aumentar, e depois diminuir novamente. Este processo continuará
enquanto a unidade estiver ligada ao computador.
4 Clique no botão Seguinte.
5 Clique em Procurar o melhor controlador para o seu equipamento. Depois clique
no botão Seguinte.
6 Clique em Especificar uma localização. Depois clique no botão Procurar.
7 Quando aparecer a caixa de diálogo,especifique a pasta onde o programa de instalação
está guardado.
8 Clique no botão OK para fechar a caixa de diálogo. Depois clique no botão Seguinte.
9 Clique no botão Seguinte.
10Clique no botão Terminar.
> Tem início a instalação do ficheiro de controlo.
> Logo que o processo de instalação esteja concluído, aparece um ícone representado a unidade
USB Flash Drive, na janela O Meu Computador.
11Depois de confirmar que a unidade está em modo de suspensão, pode retirar a unidade da
porta USB do computador.
Nota: Não retire a flash drive da porta USB do computador enquanto o processo de
descarregamento estiver em decurso. Certifique-se de que o comutador de protecção de escrita
(fig. 2) está na posição de desprotecção (lado esquerdo) durante a instalação.
Ligação
Ligar a unidade ao computador
Nota: Se a porta USB do seu computador não estiver facilmente acessível, pode usar o cabo de
extensão USB fornecido (nem em todos os modelos) ou um concentrador USB opcional para
ligar a unidade ao computador.
1 Retire a tampa de protecção do conector USB e rode-a para a parte de trás (fig. 1).
2 Insira o conector USB numa das portas USB (fig. 3) do computador
> O LED da unidade acende-se.A intensidade do LED irá gradualmente aumentar, e depois
diminuir novamente. Este processo continuará enquanto a unidade estiver ligada ao computador.
Utilização
Utilização da unidade
• Assim que a unidade esteja ligada à porta USB do computador:
– será aberto um programa que lhe permitirá activar várias aplicações. Consulte o ficheiro
de ajuda do software para obter mais instruções.
– aparecerá um ícone representando a unidade. Poderá agora copiar e guardar dados na
unidade, arrastando os ficheiros e as pastas para o ícone da unidade, tal como quando
copia dados para um disco rígido, para um CD ou um DVD.
> Quando copiar dados usando a unidade, a intensidade luminosa do LED irá rapidamente
aumentar e diminuir.
Notas:
– Não remova a unidade da porta USB do computador enquanto estiver a copiar ou a guardar
dados usando a unidade, pois se o fizer a unidade deixará de ser reconhecida pelo sistema.
– Se estiver a usar o sistema Windows, o nome da unidade irá variar,conforme a versão do
Windows em utilização.
Comutador de protecção de escrita (fig. 2)
O comutador de protecção de escrita pode proteger os ficheiros de serem acidentalmente
apagados ou substituídos. Lado direito - posição de protecção.
Lado esquerdo - posição sem protecção.
Desligar do computador a unidade flash drive
Windows®98/98SE
• Depois de confirmar que a unidade está em modo de suspensão, pode retirar a unidade da
porta USB do computador.
Windows®ME e Windows® 2000
1 Faça duplo clique no ícone de Desligar ou ejectar hardware existente na barra de
tarefas, na parte inferior direita do ecrã.
2 Na janela que aparecer, seleccione o nome do equipamento que deseja remover, e depois
clique no botão PARAR.
3 Quando aparecer o ecrã Parar um dispositivo de hardware, certifique-se de estar a
ser mostrada a informação correcta, e depois clique no botão OK.
4 Quando aparecer uma mensagem dizendo que o equipamento pode ser removido em
segurança, remova a unidade da porta USB do computador.
Windows XP
1 Faça duplo clique no ícone de Remover o hardware com segurança existente na
barra de tarefas, na parte inferior direita do ecrã.
2 Na janela que aparecer, seleccione o nome do equipamento que deseja remover, e depois
clique no botão PARAR.
3 Quando aparecer o ecrã Parar um dispositivo de hardware, certifique-se de ser
mostrada a informação correcta, e depois clique no botão OK.
4 Quando aparecer a mensagem É seguro remover o hardware, pode retirar a flash drive
da porta USB do computador.
Mac OS 9.0 e posterior
1 Arraste o ícone da unidade para o Lixo.
2 Depois de confirmar que a unidade está em modo de suspensão,retire a unidade da porta
USB do computador.
Especificações técnicas
Interface USB 2.0 de elevada velocidade (retro-compatível com a norma USB 1.1)
Velocidade de
transferência Leitura: 17 MB por segundo / Escrita:12 MB por segundo (Porta USB 2.0
de elevada velocidade necessária para atingir a velocidade máxima)
Sistemas
operativos
compatíveis • Windows 98SE (com ficheiro de controlo), 2000, ME, XP ou posterior
• Mac OS 9.0 ou posterior
• Linux 2.4.0 ou posterior
Precisa de ajuda?
Ajuda em linha: www.philips.com
Para obter ajuda interactiva e respostas a perguntas frequentes.
Para obter actualizações de software e ajuda: www.philips.com/storage.
Важная информация
RU
ПРЕДУПРЕЖДЕНИЕ
• Храните устройство в месте, недоступном для детей. В случае
проглатывания устройства срочно обратитесь к врачу.
• Чтобы предотвратить опасность пожара или поражения электрическим
током, не подвергайте устройство воздействию дождя или влаги.
• Чтобы избежать поражения электрическим током,не вскрывайте корпус.
Поручайте обслуживание только квалифицированным специалистам.
Примечание: Устройство обеспечивает сохранность данных в следующих средах:в
рентгеновских установках для досмотра багажа в аэропортах,а также в
магнитных полях с напряженностью поля до 3500 эрстед.
Для покупателей в Европе
Данный продукт отвечает требованиям следующих европейских директив:89/336/EEC,
92/31/EEC (директива по электромагнитной совместимости), 93/68/EEC (директива по
маркировке CE). Данный продукт отвечает требованиям норм EN55022 для устройств
класса B и EN55024 при использовании в жилых, коммерческих и легких промышленных
помещениях.
Примечания по использованию
• Данная флэш-память USB может функционировать неправильно,если она
подключается к компьютеру во время его загрузки,перезагрузки или выхода из
спящего режима. Всегда отсоединяйте флэш-память от компьютера перед
выполнением любой из этих операций.
• Не помещайте флэш-память в следующие места:
– с очень высокой или очень низкой температурами; – с вибрацией
– с газами, вызывающими коррозию – запыленные или грязные
– с высокой влажностью – с наличием прямых солнечных лучей
• Microsoft и Windows - зарегистрированные торговые марки компании Microsoft в
Соединенных Штатах и других странах.
• Mac и Macintosh - торговые марки Apple Computer, Inc., зарегистрированные в США и
других странах.
• Другие названия систем и продуктов,упоминаемые в данном руководстве, являются
зарегистрированными торговыми марками или торговыми марками их владельцев.
Учтите, что в данном руководстве не используются символы ™ и ®.
• Наша гарантия на продукт распространяется только на саму флэш-память USB при ее
нормальном использовании в соответствии с данными инструкциями по эксплуатации
с аксессуарами, включенными в комплект поставки данного устройства, в
специфицированной или рекомендованной системной среде. Предоставление
компанией таких услуг, как поддержка пользователей, также ограничено этими условиями.
• Компания не несет ответственности за ущерб или потери,вызванные использованием
данного устройства, а также за любые претензии третьих лиц.
• Компания не несет ответственности за проблемы вашего компьютера или другого
аппаратного обеспечения, вызванные использованием данного продукта; совместимость
данного продукта с определенным аппаратным и программным обеспечением или
периферийными устройствами; конфликты с другим установленным программным
обеспечением; потерю данных или другие случайные или неизбежные виды ущерба.
• Компания не несет ответственности за финансовый ущерб,упущенную прибыль,
претензии третьих лиц и т.п., вызванные использованием программного обеспечения,
поставляемого с данным устройством.
• Спецификации программного обеспечения могут быть изменены без уведомления.
Экологическая информация
Утилизация вашего старого продукта
Ваш продукт сконструирован и изготовлен с использованием
высококачественных материалов и компонентов, которые могут быть
утилизированы и использованы повторно. Если на продукте имеется
данный символ с перечеркнутым контейнером на колесах,это означает,
что продукт отвечает требованиям европейской директивы
2002/96/EC. Пожалуйста, получите информацию о местной системе
раздельного сбора электрических и электронных продуктов.
Пожалуйста, соблюдайте ваши местные правила и не утилизируйте
ваши старые продукты вместе с обычными бытовыми отходами.
Правильная утилизация вашего старого продукта поможет предотвратить отрицательные
последствия для окружающей среды и здоровья людей.
Изготовление неавторизованных копий материалов с защищенными авторскими правами,
включая компьютерные программы, файлы, широковещательные программы и звуковые
записи, может являться нарушением закона об авторском праве и уголовным
преступлением. Данное оборудование не следует использовать в таких целях.
Установка
Windows ME,Windows 2000,Windows XP или MAC OS 9.0 или более новые:
• Драйвер устройства устанавливается автоматически при подключении флэш-памяти к
порту USB компьютера. Однако при использовании некоторых карт или плат USB 2.0
может возникнуть потребность в ручной инициации установки. В этом случае
выполните отображаемые на экране инструкции, чтобы найти подходящий драйвер.
Если вам требуется помощь, см. Справку операционной системы.
Примечание: Не отсоединяйте флэш-память от порта USB компьютера во время процесса
загрузки. Следите за тем, чтобы во время установки выключатель защиты от
записи (рис. 2) находился в левом положении (защита выключена).
Windows 98/98SE:
1 Загрузите драйвер устройства с http://www.philips.com/storage.
2 Снимите защитный колпачок с разъема USB и поверните его назад (рис. 1).
3 Вставьте разъем USB флэш-памяти в один из портов USB компьютера (рис. 3).
> Запускается Мастер установки оборудования и загорается индикатор
флэш-памяти. Яркость свечения индикатора постепенно увеличивается, а затем
снова уменьшается. Это будет продолжаться в течение всего времени, пока флэшпамять подключена к компьютеру.
4 Нажмите кнопку Далее .
5 Нажмите Выполнить поиск наиболее подходящего драйвера для вашего
устройства.Затем нажмите кнопку Далее .
6 Нажмите Укажите размещение.Затем нажмите кнопку Обзор .
7 Когда появится диалоговое окно, укажите папку, в которой сохранена программа
установки.
8 Нажмите кнопку OK,чтобы закрыть диалоговое окно.Затем нажмите кнопку Далее.
9 Нажмите кнопку Далее .
10Нажмите кнопку Го т ово .
> Начинается установка драйвера.
> После завершения установки в окне Мой компьютер появится иконка флэш-памяти
USB.
11Убедившись, что флэш-память находится в ждущем режиме, вы можете отсоединить
ее от порта USB компьютера.
Примечание: Не отсоединяйте флэш-память от порта USB компьютера во время процесса
загрузки. Следите за тем, чтобы во время установки выключатель защиты от
записи (рис. 2) находился в левом положении (защита выключена).
Подключение
Подключение флэш-памяти к вашему компьютеру
Примечание: В случае отсутствия легкого доступа к порту USB вашего компьютера вы
можете использовать поставляемый кабель USB (не со всеми моделями) или
дополнительный концентратор USB для подключения флэш-памяти к вашему
компьютеру.
1 Снимите защитный колпачок с разъема USB и поверните его назад (рис. 1).
2 Вставьте разъем USB флэш-памяти в один из портов USB компьютера (рис. 3).
> Загорится индикатор флэш-памяти. Яркость свечения индикатора постепенно
увеличивается, а затем снова уменьшается. Это будет продолжаться в течение всего
времени, пока флэш-память подключена компьютеру.
Используйте
Эксплуатация флэш-памяти
• После подключения флэш-памяти к порту USB компьютера:
– автоматически запускается пакет программного обеспечения,позволяющий вам
активировать различные приложения.Дополнительные инструкции приведены в
файле справки программного обеспечения.
– появляется иконка флэш-памяти. Теперь вы можете копировать и сохранять данные
во флэш-памяти, перетаскивая файлы и папки на иконку флэш-памяти, как вы
копируете данные на жесткий диск, CD-ROM, DVD или гибкий диск.
> При копировании данных яркость индикатора быстро увеличивается и уменьшается.
Примечания:
– Не отсоединяйте флэш-память от порта USB компьютера во время копирования и
сохранения данных, в противном случае система перестанет узнавать флэш-память.
– При работе под управлением Windows имя флэш-карты может быть разным в
зависимости от вашей версии Windows.
Выключатель защиты от записи (рис. 2)
Выключатель защиты от записи может защищать ваши файлы от случайного стирания
или перезаписи. Правое положение - защита включена.
Левое положение - защита выключена.
Отключение флэш-памяти от вашего компьютера
Windows®98/98SE
• Убедившись, что флэш-память находится в ждущем режиме, вы можете отсоединить
ее от порта USB компьютера.
Windows®ME и Windows® 2000
1 Выполните двойной щелчок на иконке Отключить или извлечь устройство на
панели задач в нижней правой части экрана.
2 Выберите в появившемся окне имя удаляемого устройства, затем нажмите кнопку
ОСТАНОВИТЬ.
3 Когда появится окно Остановка устройства, убедитесь в правильности
отображаемой информации, затем нажмите кнопку OK.
4 Когда появится сообщение, что устройство может быть безопасно извлечено,
отсоедините флэш-память от порта USB компьютера.
При использовании Windows XP
1 Выполните двойной щелчок на иконке Безопасное извлечение устройства на
панели задач в нижней правой части экрана.
2 Выберите в появившемся окне имя удаляемого устройства, затем нажмите кнопку
ОСТАНОВИТЬ.
3 Когда появится окно Остановка устройства, убедитесь в правильности
отображаемой информации, затем нажмите кнопку OK.
4 Когда появится сообщение Безопасное извлечение устройства,отключите флэш-
память от порта USB компьютера.
Mac OS 9.0 и выше
1 Перетащите иконку флэш-памяти в корзину.
2 Убедившись, что флэш-память находится в ждущем режиме, вы можете отсоединить
ее от порта USBкомпьютера.
Технические спецификации
Интерфейс Высокоскоростной USB 2.0 (обратно совместимый с USB 1.1)
Скорость передачи
данных Чтение: 17 МБ/сек. / Запись: 12 МБ/сек.
(Для достижения максимальной скорости требуется
высокоскоростной порт USB 2.0)
Совместимые ОС • Windows 98SE (с драйвером), 2000, ME, XP или более новая
• Mac OS 9.0 или более новая
• Linux 2.4.0 или более новая
Требуется помощь?
Электронная справка: www.philips.com
Для интерактивной помощи и часто задаваемых вопросов.
Для обновлений программного обеспечения и поддержки: www.philips.com/storage.
USB_FlashDrive_versie_2.qxd 29-08-2005 11:39 Pagina 2
 Loading...