

Page 1
FC8710
FC8700
Page 2
2
Page 3
1
2425
23
1
2
3
4
5
6
7
8
9 10
FC8710
FC8710
22
21
20
19
18
17
1516
14
13
11
12
Page 4
2
1
3 4 5
32
1 2 3
100 cm
80 cm
4
6 7 8 9
10 11 12
14
30 cm
15 16 17
2
13
1
18
19
2
20
1
21
Page 5

ENGLISH 6
ҚАЗАҚША 15
РУССКИЙ 24
УКРАЇНСЬКА 33
FC8710, FC8700
Page 6

6
ENGLISH
Introduction
Congratulations on your purchase and welcome to Philips! To fully benet from the support that
Philips offers, register your product at www.philips.com/welcome.
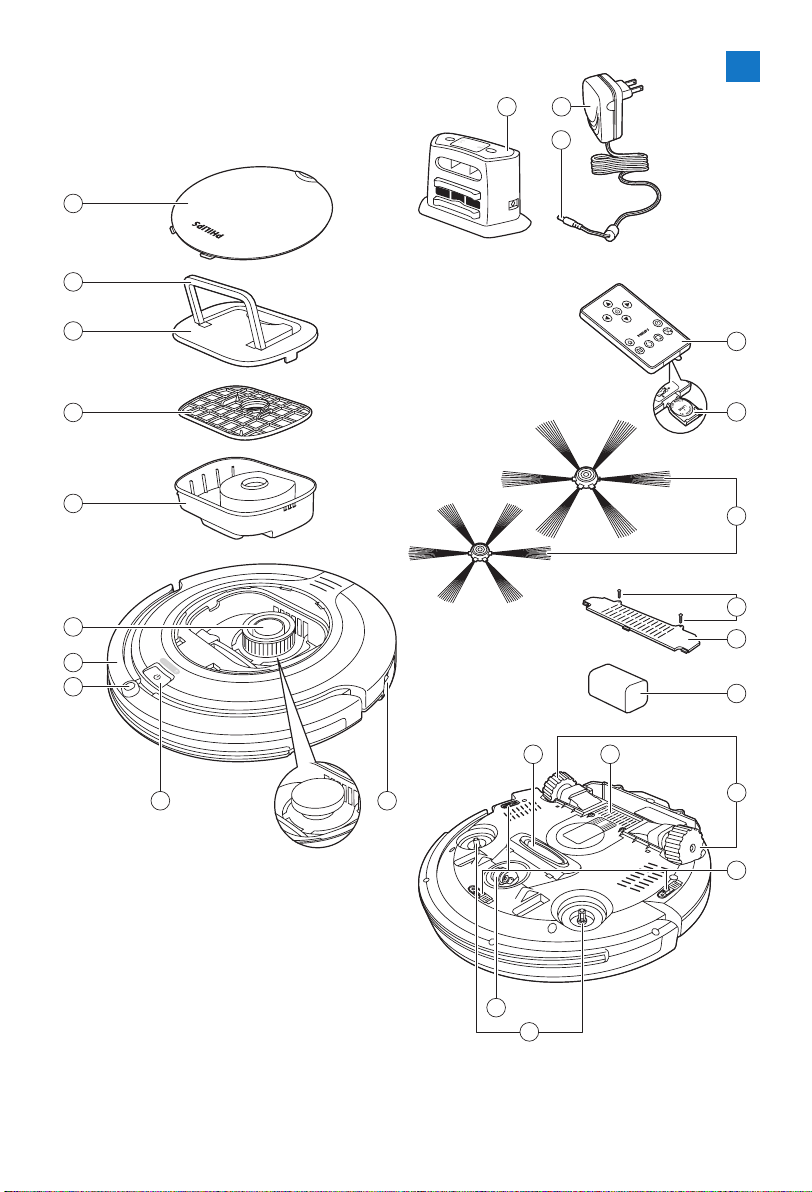
Your robot (Fig. 1)
1 Top cover
2 Handle of dust container lid
3 Dust container lid
4 Filter
5 Dust container
6 Fan
7 Bumper
8 On/off button (switches robot on or to standby)
9 Display
10 Power switch (switches robot on or off)
11 Front wheel
12 Side brush shafts
13 Drop-off sensors
14 Wheels
15 Battery cavity
16 Suction opening
17 Rechargeable battery
18 Battery cavity cover
19 Screws
20 Side brushes
21 Battery holder
22 Remote control (FC8710)
23 Docking station
24 Adapter
25 Small plug
Display and remote control
Display
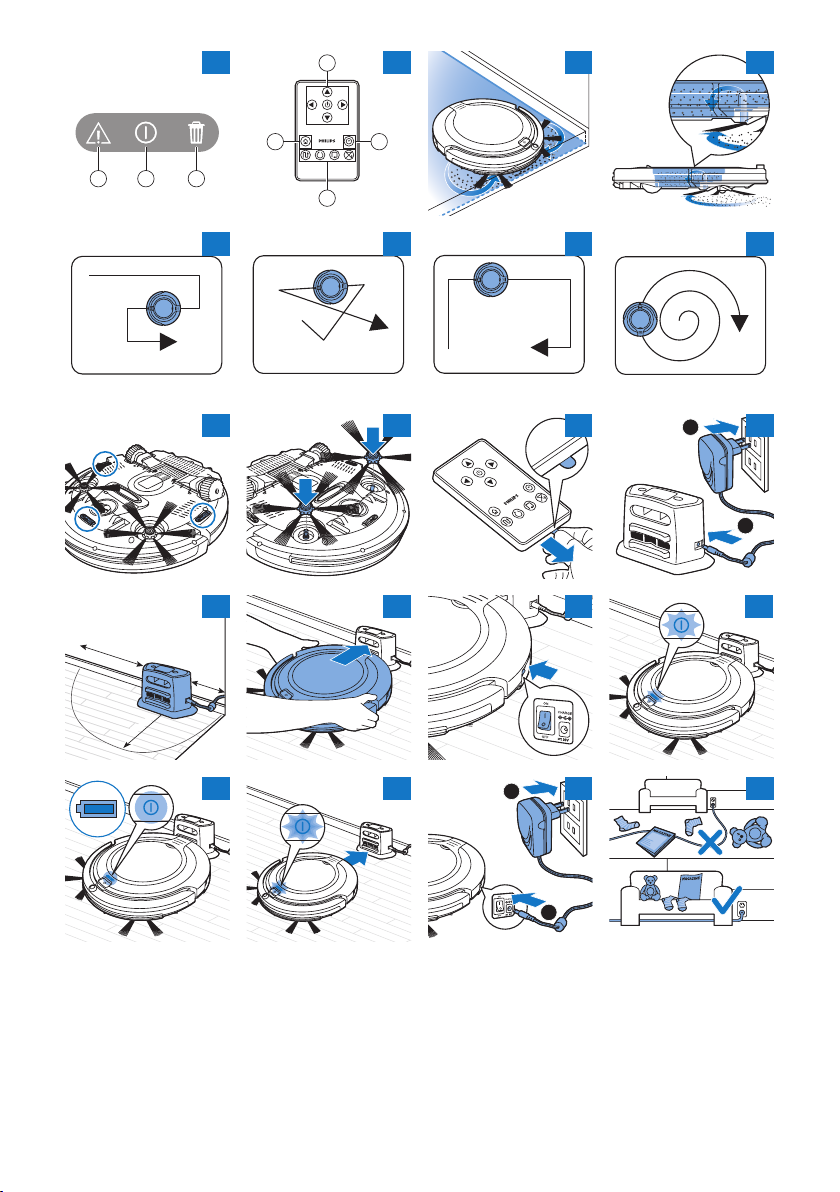
1 Warning indicator (Fig. 2)
2 On/off indicator
3 Dust container full indicator
Remote control (FC8710)
1 Navigation buttons and on/off (Fig. 3)
2 Docking button
3 Cleaning time button
4 Cleaning mode buttons
Page 7
ENGLISH 7
How your robot works
What your robot cleans
This robot is equipped with features that make it a suitable cleaner to help you clean the oors in
your home.
The robot is especially suitable for cleaning hard oors, such as wooden, tiled or linoleum oors.
It may experience problems cleaning soft oors, such as carpet or rugs. If you use the robot on a
carpet or rug, please stay close by the rst time to see if the robot can deal with this type of oor.
The robot also needs supervision when you use it on black and shiny hard oors.
How your robot cleans
Cleaning system
The robot has a 2-stage cleaning system to clean your oors efciently.
- The two side brushes help the robot clean in corners and along walls. They also help to remove
dirt loose from the oor and move it towards the suction opening (Fig. 4).
- The suction power of the robot picks up loose dirt and transpor ts it through the suction
opening into the dust container (Fig. 5).
Cleaning patterns
In its auto cleaning mode, the robot uses an automatic sequence of cleaning patterns to clean each
area of the room optimally. The cleaning patterns it uses are:
1 Z-pattern or zigzag pattern
2 Random pattern
3 Wall-following pattern
4 Spiral pattern
During auto cleaning, the robot uses these patterns in a xed sequence:
1 Z-pattern (Fig. 6)
2 Random pattern (Fig. 7)
3 Wall-following pattern (Fig. 8)
4 Spiral pattern (Fig. 9)
When the robot has completed this sequence of patterns, it starts moving in Z-pattern again.
The robot continues to use this sequence of patterns to clean the room until the rechargeable
battery is empty, or until it is switched off manually.
Note: You can also select each mode individually by pressing the appropriate button on the remote
control (FC8710). For more details, see chapter ‘Using your robot’, section ‘Cleaning modes’.
How your robot avoids height differences
- The robot has three drop-off sensors in its bottom. It uses these drop-off sensors to detect and
avoid height differences such as staircases (Fig. 10).
Note: It is normal for the robot to move slightly over the edge of a height difference, as its front drop-off
sensor is located behind the bumper.
Caution: In some cases, the drop-off sensors may not detect a staircase or other height difference
in time. Therefore monitor the robot carefully the rst few times you use it, and when you
operate it near a staircase or another height difference.
Page 8
ENGLISH8
Before rst use
Mounting the side brushes
1 Unpack the side brushes and place the robot upside down on a table or on the oor.
2 Push the side brushes onto the shafts on the bottom of the robot (Fig. 11).
Note: Make sure you attach the side brushes properly. Press them onto the shaft until you hear them
lock into position with a click.
Removing the protection tag from the remote control
The remote control (FC8710) works on a CR2025 coin-shaped battery. This battery is protected
with a protection tag that has to be removed before use.
Pull the battery protection tag out of the battery compartment of the remote control (Fig. 12).
1
, Now the remote control is ready for use.
Preparing for use
Installing the docking station
1 Insert the small plug of the adapter into the socket on the docking station (1) and insert
the adapter into the wall socket (2). The display of the docking station lights up (Fig. 13).
2 Place the docking station on a horizontal, level oor against the wall (Fig. 14).
Note: Make sure that there are no obstacles or height differences 80cm in front, 30 cm to the right
and 100cm to the left of the docking station.
Charging
When charging for the rst time and when the rechargeable battery of the robot is empty,
the charging time is four hours.
Your robot can be charged in two ways:
- On the docking station, either manually or automatically during use;
- By connecting the robot directly to the mains
Note: When the rechargeable battery is fully charged, your robot can clean for up to 100 minutes.
Charging on the docking station
1 Place the robot on the plugged-in docking station (Fig. 15).
2 Press the power switch to switch on the robot (Fig. 16).
3 The on/off indicator on the display starts ashing (Fig. 17).
4 When the rechargeable battery is fully charged, the on/off indicator on the display stops
ashing (Fig. 18).
Charging automatically during use
1 When the robot has nished cleaning or when only 15% of the battery power remains,
it automatically returns to the docking station to recharge. When the robot returns to
the docking station, the on/off indicator ashes quickly (Fig. 19).
2 When the rechargeable battery is fully charged, the battery indicator on the display of the
robot stops ashing.
Note: The robot only returns to the docking station automatically when it started cleaning from
the docking station.
Page 9
ENGLISH 9
Charging directly from the mains
1 Insert the small plug of the adapter into the socket on the robot (1). Insert the adapter into
a wall socket (2) (Fig. 20).
2 Press the power switch to switch on the robot.
3 When the robot is connected to the mains correctly, the lon/off indicator starts ashing.
This indicates that the robot is charging.
When the rechargeable battery is fully charged, the on/off indicator of the robot stops ashing.
4
Preparing the room for a cleaning run
- Before you start the robot on its cleaning run, make sure that you remove all loose and fragile
objects from the oor (Fig. 21).
Using your robot
Starting and stopping
1 Press the on/off button (Fig. 22).
- You can press the on/off button on the robot.
- You can also press the on/off button on the remote control (FC8710) (Fig. 23).
Tip: If you press the on/off button on the docking station while the robot is charging, the robot starts
cleaning as soon as the rechargeable battery is full (Fig. 24).
2 The on/off indicator starts ashing slowly and the robot starts cleaning (Fig. 25).
3 The robot cleans in auto-cleaning mode until its battery runs low. In auto cleaning mode.
It follows repeated sequences of Z-pattern, random, wall-following and spiral movements (Fig. 26).
Note: To select an individual mode, press one of the mode buttons on the remote control (FC8710).
See section ‘Cleaning mode selection’ for more details.
4 When the battery runs low, the on/off indicator starts ashing quickly and the robot returns
to the docking station to charge (Fig. 19).
5 You can also press the on/off button to interrupt or stop the cleaning run. If you press the
on/off button again and there is still enough energy in the rechargeable battery, the robot
continues cleaning in the auto cleaning mode.
6 To make the robot return to the docking station before the rechargeable battery runs low,
press the docking button on the remote control (FC8710). (Fig. 27)
- The on/off indicator lights up and the robot returns to the docking station (Fig. 28).
Note: If you did not start the robot from the docking station, it does not return to the docking station
automatically when the rechargeable battery runs low. If there is still enough energy in the rechargeable
battery, you can press the docking button on the remote control to make the robot return to the
docking station. If the rechargeable battery is completely empty, you have to place the robot on
the docking station manually.
Page 10

ENGLISH10
Cleaning mode selection (FC8710)
Next to the auto cleaning mode, this robot has four individual cleaning modes that can each be
activated by pressing the appropriate button on the remote control.
Z-pattern mode
- In Z-pattern mode, the robot cleans by making Z-shaped loops through the room to clean
large areas (Fig. 29)
Random mode
- In this mode, the robot cleans the room in a mixed pattern of straight and crisscross
movements. (Fig. 30)
Wall-following mode
- In this mode, the robot follows the walls of the room to give the area alongside the walls an
extra clean (Fig. 31).
Spiral mode
- In this mode, the robot makes a spiral movement with the fan at turbo speed to clean a dirty
area thoroughly (Fig. 32).
Manual driving (FC8710)
1 Use the arrow buttons above and below and to the left and right of the on/off button on the
remote control to navigate the robot through the room (Fig. 33).
Note: Do not press the downward arrow when the robot is close to a height difference or a staircase.
Using the cleaning time buttons
- If you press the 24h button on the docking station, the docking station starts to count down the
24 hours until the next cleaning run. When the countdown is nished, the robot starts cleaning
until its battery runs low and then returns to the docking station automatically to
recharge (Fig. 34).
- Press the cleaning time button on the remote control (FC8710) to make the robot clean for
35 minutes. When the robot is nished, it returns to the docking station to recharge (Fig. 35).
Indicator signals and their meaning
The robot has a display with three indicators: the warning indicator, the on/off indicator and the dust
container full indicator. The table below explains the meaning of the signals these indicators give.
Indicator signal Meaning
The on/off indicator lights up continuously. The robot is cleaning.
The on/off indicator ashes. The rechargeable battery is low.
The dust container full indicator ashes. The dust container is full.
The warning indicator ashes. The robot was lifted while it was cleaning.
The bumper of the robot is stuck.
A wheel or side brush is stuck.
The top cover is not present or is not closed
properly.
The robot cannot nd the docking station.
Page 11
ENGLISH 11
Cleaning and maintenance
Emptying and cleaning the dust container
Empty and clean the dust container when the dust container full indicator ashes.
1 Remove the top cover (Fig. 36).
Note: Make sure the power switch is in ‘off ’ position.
2 Pull up the handle of the dust container lid and lift the dust container out of the dust
container compartment (Fig. 37).
Note: When you remove or reinsert the dust container, take care not to damage the blades of the
motor fan.
3 Carefully lift the lid off the dust container and take out the lter (Fig. 38).
4 Shake the dust container over a dustbin to empty it. Clean the lter and the inside of the
dust container with a cloth or a toothbrush with soft bristles. Also clean the suction opening
in the bottom of the dust container (Fig. 39).
Caution: Do not clean the dust container and the lter with water or in the dishwasher.
5 Put the lter back into the dust container. Then place the lid on the dust container (Fig. 40).
6 Put the dust container back into the dust container compartment and put the top cover
back on the robot (Fig. 41).
Caution: Always make sure the lter is present inside the dust container. If you use the robot
without the lter inside the dust container, the motor will be damaged.
Cleaning sensors, wheels and side brushes
To maintain good cleaning performance, you have to clean the drop-off sensors, the wheels and
the side brushes from time to time.
1 Make sure the power switch is in ‘off ’ position.
2 Place the robot upside down on a at surface.
3 Use a brush with soft bristles (e.g. a toothbrush) to remove dust or uff from the drop-off
sensors. Also check if there is any dirt or uff blocking the suction opening (Fig. 42).
Note: It is important that you clean the drop-off sensors regularly. If the drop-off sensors are dirty,
the robot may fail to detect height differences.
4 Use a brush with soft bristles (e.g. a toothbrush) to remove dust or uff from the front
wheel and side wheels (Fig. 43).
5 To clean the side brushes, grab them by the bristles and pull them off their shafts (Fig. 44).
6 Remove uff, hairs and threads from the shaft and from the side brush with a soft brush
(e.g. a toothbrush) or a cloth (Fig. 45).
7 Check the side brushes and the bottom of the robot for any sharp objects that could
damage your oor.
Page 12
ENGLISH12
Replacement
You can order sparepar ts and accessories at www.shop.philips.com/service or at your Philips
dealer. You can also contact the Philips Consumer Care Centre in your country.
Replacing the lter
Replace the lter if it is ver y dirty or damaged. You can order a new lter under order number CP0108.
See ‘Emptying and cleaning the dust container’ in chapter ‘Cleaning and maintenance’ for instructions
on how to remove the lter from the dust container and how to place it in the dust container.
Replacing the side brushes
Replace the side brushes after some time to ensure proper cleaning results.
Note: Always replace the side brushes when you notice signs of wear or damage. We also recommend
that you replace both side brushes at the same time. You can order spare side brushes as a set under
order number CP0107.
1 Make sure that the on/off switch is in ‘off’ position.
2 To replace the side brushes, grab the old side brushes by the bristles and pull them off
their shafts.
3 Push the new side brushes onto the shafts (Fig. 11).
Replacing the rechargeable battery
Replace the rechargeable battery when you can no longer recharge it or when it runs out of power
quickly. You can order a new rechargeable battery under order number CP0111 for FC8710 and
order number CP0110 for FC8700.
1 Let the robot run until the rechargeable battery is empty to make sure that the rechargeable
battery is completely discharged before you remove it and dispose of it.
2 Undo the screws of the battery cavity cover (Fig. 46).
3 Remove the battery cavity cover (Fig. 47).
4 Place the new rechargeable battery in the battery cavity, put back the battery cavity cover
and tighten the screws (Fig. 48).
Note: Make sure that the print on the battery points upwards and that the connectors point in the
right direction.
5 Place the battery cavity cover back onto the robot and fasten it with the screws.
Replacing the battery of the remote control
The remote control (FC8710) works on a CR2025 coin-shaped battery. Replace the battery when
the robot no longer responds when you press the buttons on the remote control.
1 Hold the remote control upside down. Push the release button on the battery holder and
at the same time slide the battery holder out of the remote control (Fig. 49).
2 Remove the empty battery from the battery holder and place a new battery in the battery
holder. Then slide the battery holder back into the remote control (Fig. 50).
Page 13
ENGLISH 13
Troubleshooting
This chapter summarises the most common problems you could encounter with this appliance.
If you are unable to solve the problem with the information below, visit www.philips.com/support
for a list of frequently asked questions or contact the Consumer Care Centre in your country.
Problem Cause Solution
The robot does
not start cleaning
when I press the
on/off button.
The warning
indicator ashes
quickly.
The robot does
not clean
properly.
The rechargeable battery
is empty.
The small plug is still
inserted in the socket on
the robot.
One or both wheels are
stuck.
One or both side
brushes are stuck.
The top cover is not
present or is not closed
properly.
The bumper is stuck. Press the on/off button. Lift the robot so that
The robot was lifted
while it was cleaning.
The bristles of one or
both side brushes are
crooked or bent.
The lter in the dust
container is dirty.
The suction opening in
the bottom of the dust
container is clogged.
The front wheel is
jammed with hair or
other dirt.
Charge the rechargeable battery
(see chapter ‘Preparing for use’).
The robot does not work on mains power.
It only works on its rechargeable battery.
Therefore, always disconnect the adapter
from the robot and the mains before use.
Set the power switch to ‘off’. Remove the uff,
hair, thread or wire that is caught around the
wheel suspension.
Clean the side brushes (see chapter
‘Cleaning and maintenance’).
When the top cover is not present or is not
closed properly, the robot does not work.
Place the top cover on the robot properly.
its bumper comes free. Place the robot at some
distance from the obstacle and press the on/off
button to make it resume cleaning.
Press the on/off button. Place the robot on the
oor. Then press the on/off button to make the
robot resume cleaning.
Soak the brush or brushes in warm water for
a while. If this does not restore the bristles to
their proper shape, replace the side brushes
(see chapter ‘Replacement’).
Clean the lter in the dust container with a cloth
or a toothbrush with soft bristles.
If brushing does not help to clean the lter,
replace the lter with a new one. We advise
you to replace the lter at least once a year.
Clean the suction opening
(see chapter ‘Cleaning and maintenance’).
Clean the front wheel
(see chapter ‘Cleaning and maintenance’).
Page 14
ENGLISH14
Problem Cause Solution
Press the on/off button and then move the
robot to a lighter coloured piece of the oor.
If the problem continues to occur on lighter
coloured oors, please go to www.philips.com/
support or contact the Consumer Care Centre
in your country.
Close the curtains to block sunlight from entering
the room.
Replace the rechargeable battery (see chapter
‘Replacement’).
For the remote control, you need a CR2025
coin-shaped battery. If the problem persists,
go to www.philips.com/support or contact the
Consumer Care Centre in your country.
The rechargeable
battery can no
longer be
charged or runs
empty very fast.
The battery of
the remote
control runs
empty too fast.
The robot is cleaning a
dark or black surface,
which triggers the dropoff sensors. This causes
the robot to move in an
unusual pattern.
The robot is cleaning a
oor that reects sunlight
quite strongly. This
triggers the drop-off
sensors and causes the
robot to move in an
unusual pattern.
The rechargeable battery
has reached the end of
its life.
Perhaps you did not
insert the correct type of
battery.
Page 15

ҚАЗАҚША
Кіріспе
Өнімді сатып алуыңызбен құттықтаймыз және Philips компаниясына қош келдіңіз! Philips
компаниясы ұсынатын қолдауды толығымен пайдалану үшін өніміңізді www.philips.com/
welcome веб-бетінде тіркеңіз.
Робот (Cурет 1)
1 Үстіңгі қақпақ
2 Шаң контейнері қақпағының тұтқасы
3 Шаң контейнерінің қақпағы
4 Сүзгі
5 Шаң контейнері
6 Желдеткіш
7 Буфер
8 Қосу/өшіру түймесі (роботты қосады немесе күту режиміне өткізеді)
9 Дисплей
10 Қуат қосқышы (роботты қосады немесе өшіреді)
11 Алдыңғы дөңгелек
12 Бүйірлік щетка біліктері
13 Құлау датчиктері
14 Дөңгелектері
15 Батарея қуысы
16 Сору саңылауы
17 Қайта зарядталатын батарея
18 Батарея қуысының қақпағы
19 Бұрандалар
20 Жанындағы қылшықтар
21 Батарея ұстағышы
22 Қашықтан басқару құралы (FC8710)
23 Қондырмалық станса
24 Адаптер
25 Кішкене штепсель
15
Дисплей және қашықтан басқару құралы
Дисплей
1 Ескерту индикаторы (Cурет 2)
2 Қосу/өшіру индикаторы
3 «Шаң контейнері толы» көрсеткіші
Қашықтан басқару құралы (FC8710)
1 Шарлау түймелері және қосу/өшіру (Cурет 3)
2 Қондырма стансаға қою түймесі
3 Тазалау уақыты түймесі
4 Тазалау режимінің түймелері
Page 16

ҚАЗАҚША16
Робот қалай жұмыс істейді
Робот нені тазалайды
Бұл робот үйіңіздегі едендерді тазалауға көмектесетін ыңғайлы тазалау мүмкіндіктерімен
жабдықталған.
Робот ағаш, плиткалар төселген немесе линолеум едендер сияқты қатты едендерді тазалауға
өте қолайлы. Кілем немесе кілемдер сияқты жұмсақ едендерді тазалағанда, онда қиындықтар
болуы мүмкін. Егер роботты кілемде пайдалансаңыз, роботтың сол еден түрінде жұмыс істей
алатынын көру үшін алғашында жанында тұрыңыз. Сондай-ақ, роботты қара және жылтыр қатты
едендерде пайдаланғанда, оны қадағалау қажет.
Робот қалай тазалайды
Тазалау жүйесі
Роботта едендерді тиімді тазалауға арналған 2 кезеңді тазалау жүйесі бар.
- Екі бүйірлік щетка роботқа бұрыштарды және қабырғалардың бойын тазалауға көмектеседі.
Сондай-ақ, олар еденнен бос кірді тазалауға және оны сору саңылауына қарай жылжытуға
көмектеседі (Cурет 4).
- Роботтың сору қуаты бос кірді тартып алады және оны сору саңылауы арқылы шаң
контейнеріне тасымалдайды (Cурет 5).
Тазалау үлгілері
Авто тазалау режимінде робот бөлменің әр аумағын оңтайлы тазалау үшін тазалау үлгілерінің
автоматты реттілігін пайдаланады. Оған пайдаланылатын тазалау үлгілері:
1 Z үлгісі немесе зигзаг үлгісі
2 Кездейсоқ үлгі
3 Қабырғаны қайталайтын үлгі
4 Серіппелі үлгі
Авто тазалау кезінде робот осы үлгілерді бекітілген реттілікпен пайдаланады:
1 Z үлгісі (Cурет 6)
2 Кездейсоқ үлгі (Cурет 7)
3 Қабырғаны қайталайтын үлгі (Cурет 8)
4 Серіппелі үлгі (Cурет 9)
Робот осы үлгілер реттілігін аяқтағанда, қайтадан Z үлгісімен қозғала бастайды.
Робот зарядталмалы батарея таусылғанша немесе қолмен өшіргенше, бөлмені тазалау
үшін осы үлгілер реттілігін пайдалануды жалғастырады.
Ескертпе. Сондай-ақ, қашықтан басқару құралында (FC8710) тиісті түймені басу арқылы әр
режимді жеке-жеке таңдауға болады. Қосымша мәліметтер алу үшін «Роботты пайдалану»
тарауындағы «Тазалау режимдері» бөлімін қараңыз.
Робот биіктіктегі айырмашылықтардан қалай аулақ жүреді
- Роботтың түбінде үш құлау датчигі бар. Ол осы құлау датчиктерін баспалдақтар сияқты
биіктіктегі айырмашылықтарды анықтау және аулақ жүру үшін пайдаланады (Cурет 10).
Ескертпе. Роботтың биіктік айырмашылығы жиегінен аздап шығып қозғалуы қалыпты,
өйткені алдыңғы құлау датчигі буфердің артында орналасқан.
Ескерту. Кейбір жағдайларда құлау датчиктері баспалдақтарды немесе басқа биіктік
айырмашылығын уақытылы анықтамауы мүмкін. Сондықтан бірінші рет пайдаланғанда
және баспалдақтардың немесе басқа биіктік айырмашылығының жанында пайдаланғанда,
роботты мұқият бақылаңыз
Page 17

ҚАЗАҚША 17
Алғаш қолданар алдында
Бүйірлік щеткаларды бекіту
Бүйірлік щеткаларды орамынан шығарыңыз және роботты үстелде немесе еденде аударыңыз.
1
2 Бүйірлік щеткаларды робот түбіндегі біліктерге салыңыз (Cурет 11).
Ескертпе. Бүйірлік щеткаларды тиісінше бекітіңіз. Олар шырт етіп орнына түскенше,
оларды білікке қарай басыңыз.
Қашықтан басқару құралынан қорғау жапсырмасын алу
Қашықтан басқару құралы (FC8710) CR2025 тиын пішінді батареясымен жұмыс істейді.
Бұл қорғау жапсырмасымен қорғалған, оны батарея пайдалану алдында алу керек.
1 Батарея бөлімінің батареяны қорғау жапсырмасын қашықтан басқару құралының батарея
бөлімінен шығарыңыз (Cурет 12).
, Қашықтан басқару құралы енді пайдалануға дайын.
Пайдалануға дайындау
Қондырма стансаны орнату
1 Адаптердің шағын ашасын қондырма стансадағы ұяшыққа кіргізіңіз (1), сөйтіп адаптерді
розеткаға қосыңыз (2). Қондырма стансаның дисплейі жанады (Cурет 13).
2 Қондырма стансаны қабырға жанына көлденең, тегіс еденге қойыңыз (Cурет 14).
Ескертпе. Кедергілер жоқ екенін немесе қондырма стансаның алдында 80 см, оң жағында 30 см
және сол жағында 100 см биіктік айырмашылықтары жоқ екенін тексеріңіз.
Зарядтау
Бірінші рет зарядтағанда және роботтың зарядталмалы батареясы таусылғанда, зарядтау
уақыты төрт сағат болады.
Роботты екі жолмен зарядтауға болады:
- Қондырмалы стансада пайдалану кезінде қолмен немесе автоматты түрде;
- Роботты желіге тікелей қосу арқылы
Ескертпе. Зарядталмалы батарея толығымен зарядталған болса, робот 100 минутқа дейін
тазалай алады.
Қондырма стансада зарядтау
1 Роботты розеткаға қосылған қондырма стансаға қойыңыз (Cурет 15).
2 Роботты қосу үшін қуат қосқышын басыңыз (Cурет 16).
3 Дисплейдегі қосу/өшіру индикаторы жыпылықтай бастайды (Cурет 17).
4 Зарядталмалы батарея толығымен зарядталған болса, дисплейдегі қосу/өшіру индикаторы
жыпылықтауын тоқтатады (Cурет 18).
Пайдалану кезінде автоматты түрде зарядтау
1 Робот тазалауды аяқтағанда немесе батарея қуатының тек 15% қалғанда ол зарядтау
үшін қондырма стансаға автоматты түрде оралады. Робот қондырма стансаға оралғанда,
қосу/өшіру индикаторы жылдам жыпылықтай бастайды (Cурет 19).
2 Зарядталмалы батарея толығымен зарядталғанда, робот дисплейіндегі батарея
индикаторы жыпылықтай бастайды.
Ескертпе. Робот қондырмалы стансадан тазалай бастағанда ғана қондырмалы стансаға оралады.
Page 18

18
ҚАЗАҚША
Тікелей желіден зарядтау
Адаптердің шағын ашасын роботтағы ұяшыққа кіргізіңіз (1). Адаптерді розеткаға қосыңыз
1
(2)
(Cурет 20).
2 Роботты қосу үшін қуат қосқышын басыңыз.
3 Робот желіге дұрыс қосылса, қосу/өшіру индикаторы жыпылықтай бастайды.
Бұл робот зарядталып жатқанын көрсетеді.
4 Зарядталмалы батарея толығымен зарядталған болса, роботтың қосу/өшіру индикаторы
жыпылықтауын тоқтатады.
Бөлмені тазалау бағдарламасына дайындау
- Роботтың тазалау бағдарламасын іске қоспай тұрып, еденнен бүкіл бос және сынғыш
заттарды алыңыз (Cурет 21).
Роботты пайдалану
Іске қосу және тоқтату
1 Қосу/өшіру түймесін басыңыз (Cурет 22).
- Роботтағы қосу/өшіру түймесін басуға болады.
- Сондай-ақ, қашықтан басқару құралындағы (FC8710) қосу/өшіру түймесін басуға
болады (Cурет 23).
Кеңес. Робот зарядталып жатқанда, қондырма стансадағы қосу/өшіру түймесін бассаңыз,
робот зарядталмалы батарея толы болғанда тазалауды бастайды (Cурет 24).
2 Қосу/өшіру индикаторы баяу жыпылықтай бастайды және робот тазалауды бастайды
(Cурет 25).
3 Робот батарея заряды азайғанша, авто тазалау режимінде тазалайды. Авто тазалау
режимінде ол Z үлгісінің, кездейсоқ, қабырғаны қайталайтын және серіппелі
қозғалыстардың қайталанатын реттіліктерін орындайды (Cурет 26).
Ескертпе. Жеке режимді таңдау үшін қашықтан басқару құралындағы (FC8710) режим
түймелерінің біреуін басыңыз. Қосымша мәліметтер алу үшін «Тазалау режимін таңдау»
бөлімін қараңыз.
4 Батарея қуаты азайғанда, қосу/өшіру индикаторы жылдам жыпылықтай бастайды және
батарея зарядтау үшін қондырма стансаға оралады (Cурет 19).
5 Сондай-ақ, тазалау бағдарламасын үзу немесе тоқтату үшін қосу/өшіру түймесін басуға
болады. Егер қосу/өшіру түймесін қайтадан бассаңыз және зарядталмалы батареяда әлі
жеткілікті қуат бар болса, робот тазалауды авто тазалау режимінде жалғастырады.
6 Роботты қондырма стансаға зарядталмалы батарея заряды азаймай тұрып қайтару
үшін қашықтан басқару құралындағы (FC8710) қондырма стансаға орнату түймесін
басыңыз. (Cурет 27)
- Қосу/өшіру индикаторы жанады және робот қондырма стансаға оралады (Cурет 28).
Ескертпе. Егер роботты қондырма стансадан іске қоспаған болсаңыз, ол зарядталмалы
батарея заряды азайғанда қондырма стансаға автоматты түрде оралмайды.
Егер зарядталмалы батареяда әлі жеткілікті қуат бар болса, роботты қондырма
стансаға қайтару үшін қашықтан басқару құралында қондырма стансаға қою
түймесін басуға болады. Егер зарядталмалы батареяның қуаты толығымен таусылса,
роботты қондырма стансаға қолмен қою керек.
Page 19

ҚАЗАҚША
Тазалау режимін таңдау (FC8710)
Авто тазалау режиміне қоса бұл роботта әрқайсысын қашықтан басқару құралында тиісті
түймені басу арқылы белсендіруге болатын төрт жеке тазалау режимі бар.
Z үлгісі режимі
- Z үлгісі режимінде робот үлкен аумақтарды тазалау үшін бөлмеде Z пішінді тұйықтарды
жасау арқылы тазалайды (Cурет 29)
Кездейсоқ режим
- Бұл режимде робот бөлмені түзу және айқас қозғалыстардың аралас үлгісімен тазалайды.
(Cурет 30)
Қабырғаны қайталау режимі
- Бұл режимде робот қабырға бойындағы аумақты ерекше тазалау үшін бөлменің
қабырғаларының бойымен жүреді (Cурет 31).
Серіппелі режим
- Бұл режимде робот лас аумақты мұқият тазалау үшін турбо жылдамдығындағы
желдеткішпен серіппелі қозғалысты орындайды (Cурет 32).
Қолмен жүргізу (FC8710)
1 Роботты бөлмеде жүргізу үшін қашықтан басқару құралындағы қосу/өшіру түймесінің
үстіндегі және астындағы, әрі сол-оң жақтарындағы көрсеткі түймелерді
пайдаланыңыз (Cурет 33).
Ескертпе. Робот биіктік айырмашылығына немесе баспалдақтарға жақын кезде,
төмен көрсеткіні баспаңыз.
Тазалау уақыты түймелерін пайдалану
- Қондырма стансадағы 24 сағ түймесін бассаңыз, қондырма станса келесі тазалау
бағдарламасына дейін 24 сағатты кері санауды бастайды. Кері санақ аяқталғанда,
робот батареясының заряды азайғанша тазалауды бастайды, содан кейін зарядтау үшін
қондырма стансаға автоматты түрде оралады (Cурет 34).
- Робот 35 минут бойы тазалауы үшін қашықтан басқару құралында (FC8710) тазалау уақыты
түймесін басыңыз. Аяқтағанда робот зарядтау үшін қондырма стансаға оралады (Cурет 35).
Индикатор сигналдар және олардың мағыналары
Роботтың дисплейінде үш индикатор бар: ескерту индикаторы, қосу/өшіру индикаторы және
шаң контейнерінің толы болу индикаторы. Төмендегі кестеде осы индикаторлар беретін
сигналдардың мағыналары түсіндірілген.
19
Индикатор сигнал Мәні
Қосу/өшіру индикаторы үздіксіз жанады. Робот тазалауда.
Қосу/өшіру индикаторы жыпылықтайды. Қайта зарядталатын батарея қуаты аз.
Шаң контейнерінің толы болу индикаторы
жыпылықтайды.
Ескерту индикаторы жыпылықтайды. Робот тазалау кезінде көтерілді.
Шаң контейнері толып кеткен болуы мүмкін.
Роботтың буфері толып қалды.
Дөңгелек немесе бүйірлік щетка толып қалды.
Үстіңгі қақпақ жоқ немесе дұрыс жабылмаған.
Робот қондырма стансаны таба алмайды.
Page 20

ҚАЗАҚША
20
Тазалау және күтіп ұстау
Шаң контейнерін босату және тазалау
Шаң контейнерінің толы болу индикаторы жыпылықтаса, шаң контейнерін босатыңыз және
тазалаңыз.
1 Жоғарғы қақпақты алып тастаңыз (Cурет 36).
Ескертпе. Қуат қосқышы «өшірулі» күйінде екенін тексеріңіз.
2 Шаң контейнері қақпағының тұтқасын жоғары тартып, шаң контейнерін шаң контейнері
бөлімінен көтеріп алыңыз (Cурет 37).
Ескертпе. Шаң контейнерін алғанда немесе қайта салғанда қозғалтқыш желдеткішінің
қалақтарын зақымдап алмаңыз.
3 Шаң контейнерінің қақпағын ақырын көтеріңіз және сүзгіні шығарыңыз (Cурет 38).
4 Босату үшін шаң контейнерін себет үстінде шайқаңыз. Сүзгіні және шаң контейнерінің
ішін шүберекпен немесе қылдары жұмсақ тіс щеткасымен тазалаңыз. Сондай-ақ, шаң
контейнерінің түбіндегі сору саңылауын тазалаңыз (Cурет 39).
Ескерту. Шаң контейнерін және суды сумен немесе ыдыс жуу машинасында тазаламаңыз.
5 Сүзгіні қайтадан шаң контейнеріне салыңыз. Содан кейін шаң контейнерін қақпақпен
жабыңыз (Cурет 40).
6 Шаң контейнерін шаң контейнері бөліміне қойыңыз және роботтың үстіңгі қақпағын
қайта жабыңыз (Cурет 41).
Ескерту. Әрқашан шаң контейнерінің ішінде сүзгі бар екенін тексеріңіз. Егер роботты шаң
контейнерінің ішінде сүзгі болмай пайдалансаңыз, қозғалтқыш зақымдалуы мүмкін.
Тазалау датчиктері, дөңгелектер және бүйірлік щеткалар
Жақсы тазалау өнімділігін сақтау үшін кейде құлау датчиктерін, дөңгелектерді және бүйірлік
щеткаларды тазалап тұру керек.
1 Қуат қосқышы «өшірулі» күйінде екенін тексеріңіз.
2 Роботты еден бетіне аударыңыз.
3 Құлау датчиктерінен шаңды немесе мамықты кетіру үшін қылдары жұмсақ щетканы
(мысалы, тіс щеткасын) пайдаланыңыз. Сондай-ақ, сору саңылауын кір немесе мамық
бітеп тұрмағанын тексеріңіз (Cурет 42).
Ескертпе. Құлау датчиктерін жүйелі түрде тазалап тұру маңызды. Құлау датчиктері лас болса,
робот биіктік айырмашылықтарын анықтамауы мүмкін.
4 Алдыңғы дөңгелектен және бүйірлік дөңгелектерден кірді немесе мамықты кетіру үшін
қылдары жұмсақ щетканы (мысалы, тіс щеткасын) пайдаланыңыз (Cурет 43).
5 Бүйірлік щеткаларды тазалау үшін қылшақтарынан ұстаңыз және біліктерден тартып
алыңыз (Cурет 44).
6 Мамықты, шашты және жіптерді біліктен және бүйірлік щеткадан жұмсақ щеткамен
(мысалы, тіс щеткасымен) немесе шүберекпен кетіріңіз (Cурет 45).
7 Бүйірлік щеткаларда және роботтың түбінде еденді зақымдауы мүмкін үшкір заттардың
бар-жоғын тексеріңіз.
Page 21

ҚАЗАҚША
Ауыстыру
Қосалқы бөлшектерге және қосалқы құралдарға www.shop.philips.com/service бетінде
немесе Philips дилерінде тапсырыс беруге болады. Сондай-ақ, еліңіздегі Philips тұтынушыларды
қолдау орталығына хабарласуға болады.
Сүзгіні ауыстыру
Өте лас немесе зақымдалған болса, сүзгіні ауыстырыңыз. CP0108 тапсырыс нөмірі бойынша
жаңа сүзгіге тапсырыс беруге болады. Сүзгіні шаң контейнерінен алу және шаң контейнеріне
салу туралы нұсқауларды «Тазалау және күту» тарауындағы «Шаң контейнерін босату және
тазалау» бөлімінен қарауға болады.
Бүйірлік щеткаларды ауыстыру
Тиісті тазалау нәтижелерін қамтамасыз ету үшін бүйірлік щеткаларды біраз уақыттан кейін
ауыстырыңыз.
Ескертпе. Тозу немесе зақым белгілерін байқағанда, бүйірлік щеткаларды міндетті түрде
ауыстырыңыз. Сондай-ақ, бүйірлік щеткалардың екеуін де бір уақытта ауыстыру ұсынылады.
Қосалқы бүйірлік щеткаларға CP0107 тапсырыс нөмірі бойынша тапсырыс беруге болады.
1 Қосу/өшіру қосқышы «өшірулі» күйінде екенін тексеріңіз.
2 Бүйірлік щеткаларды ауыстыру үшін ескі бүйірлік щеткаларды қылдарынан ұстап,
біліктерінен тартып алыңыз.
3 Жаңа бүйірлік щеткаларды біліктерге итеріңіз (Cурет 11).
Зарядталмалы батареяны ауыстыру
Зарядталмаса немесе заряды жылдам таусылса, зарядталмалы батареяны ауыстырыңыз.
Жаңа зарядталмалы батареяға FC8710 үшін CP0111 тапсырыс нөмірі және FC8700 үшін
CP0110 тапсырыс нөмірі бойынша тапсырыс беруге болады.
1 Алу және қоқысқа лақтыру алдында толығымен зарядсыздануы үшін роботты батарея
таусылғанша жұмыс істетіңіз.
2 Батарея қуысы қақпағының бұрандаларын бұрап алыңыз (Cурет 46).
3 Батарея қуысының қақпағын ашыңыз (Cурет 47).
Батарея қуысына жаңа зарядталмалы батареяны салып, батарея қуысының қақпағын жауып,
4
бұрандаларын қатайтыңыз (Cурет 48).
Ескертпе. Батареядағы мәтін жоғары қарап тұрғанын және жалғағыштан оң жақты көрсетіп
тұрғанын тексеріңіз.
5 Роботта батарея қуысының қақпағын жауып, бұрандалармен бекітіңіз.
Қашықтан басқару құралының батареясын ауыстыру
Қашықтан басқару құралы (FC8710) CR2025 тиын пішінді батареясымен жұмыс істейді. Робот
қашықтан басқару құралындағы түймелерді басуға жауап бермесе, батареяны ауыстырыңыз.
1 Қашықтан басқару құралын аударып ұстаңыз. Батарея ұстағышындағы босату түймесін
басыңыз және сол уақытта батарея ұстағышын қашықтан басқару құралынан сырғытып
шығарыңыз (Cурет 49).
2 Бос батареяны батарея ұстағышынан алып, батарея ұстағышына жаңа батареяны
салыңыз. Содан кейін батарея ұстағышын қашықтан басқару құралына
сырғытыңыз (Cурет 50).
21
Page 22

22
ҚАЗАҚША
Ақаулықтарды жою
Бұл тарауда осы құрылғыда ең жиі кездесетін мәселелер жинақталған. Төмендегі ақпараттың
көмегімен мәселені шеше алмасаңыз, жиі қойылатын сұрақтар тізімін көру үшін
www.philips.com/support сайтына кіріңіз немесе еліңіздегі Тұтынушыларды қолдау
орталығына хабарласыңыз.
Проблема Себебі Шешімі
Қосу/өшіру
қосқышын
басқанда, робот
тазалауды
бастамайды.
Ескерту
индикаторы
жылдам
жыпылықтайды.
Робот дұрыстап
тазаламайды.
Қайта зарядталатын
батарея қуаты
таусылған.
Шағын аша роботтағы
ұяшыққа әлі қосылған.
Дөңгелектердің біреуі
немесе екеуі де тұрып
қалған.
Бүйірлік щеткалардың
біреуі немесе екеуі де
тұрып қалған.
Үстіңгі қақпақ жоқ
немесе дұрыс
жабылмаған.
Буфер тұрып қалды. Қосу/өшіру түймесін басыңыз. Буфері босауы
Робот тазалау кезінде
көтерілді.
Бір немесе екі бүйірлік
щеткалардың
қылшықтары майысқан.
Шаң контейнеріндегі
сүзгі лас.
Шаң контейнерінің
түбіндегі сору саңылауы
бітелген.
Зарядталмалы батареяны зарядтаңыз
(«Пайдалануға дайындау» тарауын қараңыз).
Робот желі қуатынан жұмыс істемейді. Ол тек
өзінің зарядталатын батареясынан жұмыс
істейді. Сондықтан, пайдалану алдында әрқашан
адаптерді роботтан және желіден ажыратыңыз.
Қуат қосқышын «өшірулі» күйіне қойыңыз.
Дөңгелек аспасының айналасында ұсталып
қалған мамықты, шашты, жіптерді немесе
сымдарды кетіріңіз.
Бүйірлік щеткаларды тазалаңыз
(«Тазалау және күту» тарауын қараңыз).
Үстіңгі қақпақ жоқ немесе дұрыс жабылмаған
болса, робот жұмыс істемейді. Роботқа үстіңгі
қақпақты дұрыс қойыңыз.
үшін роботты көтеріңіз. Роботты кедергіден
біраз қашықтықта қойып, тазалауды жалғастыруы
үшін қосу/өшіру түймесін басыңыз.
Қосу/өшіру түймесін басыңыз. Роботты еденге
қойыңыз. Содан кейін робот тазалауды
жалғастыруы үшін қосу/өшіру түймесін басыңыз.
Щетканы немесе щеткаларды біраз уақытқа суға
салып қойыңыз. Егер бұл талшықтардың дұрыс
пішінін қалпына келтірмесе, бүйірлік щеткаларды
ауыстырыңыз («Ауыстыру» тарауын қараңыз).
Шаң контейнеріндегі сүзгіні шүберекпен
немесе қылдары жұмсақ тіс щеткасымен
тазалаңыз.
Сүзгіні тазалау үшін щеткалау көмектеспесе,
сүзгіні жаңасымен ауыстырыңыз. Сүзгіні жылына
кемінде бір рет ауыстыруға кеңес береміз.
Сору саңылауын тазалаңыз («Тазалау және
күту» тарауын қараңыз).
Page 23

Проблема Себебі Шешімі
Зарядталмалы
батареяны
зарядтау мүмкін
емес немесе
қуаты өте тез
таусылады.
Қашықтан
басқару
құралының
батареясы тым
тез таусылады.
Алдыңғы дөңгелекте
шаш немесе басқа кір
кептелген.
Робот күңгірт немесе
қара бетті тазалауда,
бұл құлаудан қорғау
сенсорларын іске
қосады. Бұл роботтың
әдеттен тыс үлгімен
жылжуын тудырады.
Робот күн жарығын
қатты шағылыстыратын
еденді тазалап жатыр.
Бұл құлаудан қорғау
датчиктерін іске қосады
және робот әдеттен
тыс үлгімен қозғалады.
Қайта зарядталатын
батареяның пайдалану
мерзімі аяқталды.
Мүмкін батареяның
дұрыс түрін салмаған
боларсыз.
Алдыңғы дөңгелекті тазалаңыз
(«Тазалау және күту» тарауын қараңыз).
On/off (қосу/өшіру) түймесін басыңыз, одан
кейін роботты еденнің ашық түсті бөлігіне
жылжытыңыз. Ашық түсті едендерде проблема
орын ала берсе, www.philips.com/support
торабына өтіңіз немесе еліңіздегі
Тұтынушыларды қолдау орталығына
хабарласыңыз.
Күн жарығы бөлмеге түспеуі үшін перделерді
жабыңыз.
Зарядталмалы батареяны ауыстырыңыз
(«Ауыстыру» тарауын қараңыз).
Қашықтан басқару құралы үшін CR2025 тиын
кескінді батареясы керек. Проблема қайталанса,
www.philips.com/support торабына өтіңіз
немесе еліңіздегі Тұтынушыларды қолдау
орталығына хабарласыңыз.
ҚАЗАҚША
23
Page 24

24
РУССКИЙ
Введение
Поздравляем с покупкой продукции Philips! Чтобы воспользоваться всеми преимуществами
поддержки Philips, зарегистрируйте прибор на веб-сайте www.philips.com/welcome.
Робот-пылесос (Рис. 1)
1 Верхняя крышка
2 Ручка крышки пылесборника
3 Крышка пылесборника
4 Фильтр
5 Пылесборник
6 Вентилятор
7 Бампер
8 Кнопка включения/выключения (включение робота-пылесоса или переключение в режим
ожидания)
9 Дисплей
10 Переключатель питания (включение/выключение робота-пылесоса)
11 Переднее колесо
12 Валы для боковых щеток
13 Датчики перепада высот
14 Колеса
15 Отделение для элемента питания
16 Всасывающее отверстие
17 Аккумулятор
18 Крышка отделения для элемента питания
19 Винты
20 Боковые щетки
21 Держатель элемента питания
22 Пульт дистанционного управления (FC8710)
23 Док-станция
24 Адаптер
25 Маленький штекер
Дисплей и пульт дистанционного управления
Дисплей
1 Предупреждающий индикатор (Рис. 2)
2 Индикатор питания
3 Индикатор заполнения пылесборника
Пульт дистанционного управления (FC8710)
1 Кнопки навигации и включения/выключения (Рис. 3)
2 Кнопка подключения к док-станции
3 Кнопка времени уборки
4 Кнопки режима уборки
Page 25

РУССКИЙ 25
Принцип работы робота-пылесоса
Области применения робота-пылесоса
Робот-пылесос оснащен полезными функциями, благодаря которым можно выполнить
качественную уборку полов в доме.
Робот-пылесос идеально подходит для уборки твердых напольных покрытий: паркета, плитки
или линолеума. При уборке мягких напольных покрытий, например ковров или ковровых
покрытий, могут возникнуть трудности. Если робот-пылесос используется для уборки
ковровых покрытий или ковров, а также черных или глянцевых напольных покрытий, первое
время понаблюдайте за его работой, чтобы удостовериться, что пылесос справляется с
поставленной задачей.
Функции робота-пылесоса
Система очистки
Робот-пылесос оснащен 2-ступенчатой системой очистки, которая эффективно справляется
с уборкой полов.
- Две боковые щетки робота-пылесоса помогают собрать пыль в углах и вдоль стен,
а также удаляют прилипшую грязь, направляя ее к всасывающему отверстию (Рис. 4).
- Благодаря мощной силе всасывания робот-пылесос собирает сухую грязь, которая
попадает через всасывающее отверстие в пылесборник (Рис. 5).
Программы уборки
В автоматическом режиме уборки робот-пылесос для оптимальной очистки использует набор
программ в определенной последовательности. Используются следующие программы уборки:
1 Z-программа, или зигзагообразная программа
2 Произвольная программа
3 Программа “Вдоль стен”
4 Программа “По спирали”
Во время уборки в автоматическом режиме робот-пылесос использует эти программы
в следующей последовательности:
1 Z-программа (Рис. 6)
2 Произвольная программа (Рис. 7)
3 Программа “Вдоль стен” (Рис. 8)
4 Программа “По спирали” (Рис. 9)
По окончании выполнения этих программ робот-пылесос снова начинает двигаться в режиме
Z-программы. Робот-пылесос будет следовать этой последовательности программ до
разрядки аккумулятора или до отключения вручную.
Примечание. Режим можно выбрать вручную, нажав на соответствующую кнопку на пульте
дистанционного управления (FC8710). Для получения более подробной информации см. главу
“Эксплуатация робота-пылесоса”, раздел “Режимы уборки”.
Как робот-пылесос распознает перепады высот
- В нижней части робота-пылесоса расположено три датчика перепада высот. Эти датчики
помогают обнаруживать и избегать перепада высот, например лестниц (Рис. 10).
Примечание. Робот-пылесос может перемещаться рядом с отличающимся по высоте от пола
объектом, поскольку фронтальный датчик перепада высот расположен за бампером.
Внимание! В некоторых случаях датчики перепада высот не могут вовремя обнаружить
лестницу или другой отличающийся по высоте от пола объект. Поэтому во время первого
использования, а также при проведении уборки рядом с лестницами и другими объектами,
образующими перепад высот, внимательно наблюдайте за роботом-пылесосом.
Page 26

РУССКИЙ26
Перед первым использованием
Установка боковых щеток
1 Извлеките боковые щетки из упаковки, переверните робот-пылесос и поместите его на
стол или на пол.
2 Установите боковые щетки на валы в нижней части робота-пылесоса (Рис. 11).
Примечание. Убедитесь, что боковые щетки правильно установлены. Прижмите их к валам,
чтобы они зафиксировались в необходимом положении (будет слышен щелчок).
Удаление защитного ярлыка с пульта дистанционного управления
Пульт дистанционного управления (FC8710) работает от батареи таблеточного типа CR2025.
Эта батарея защищена ярлыком, который необходимо удалить перед использованием.
1 Потяните за защитный ярлык отсека для батарей в пульте дистанционного управления
(Рис. 12).
, Теперь пульт дистанционного управления готов к использованию.
Подготовка прибора к работе
Установка док-станции
1 Вставьте маленький штекер адаптера в разъем на док-станции (1) и подключите
адаптер к розетке электросети (2). Загорится дисплей док-станции (Рис. 13).
2 Установите док-станцию на горизонтальный участок ровного пола у стены (Рис. 14).
Примечание. Убедитесь, что спереди на расстоянии 80 см, справа на расстоянии 30 см и слева
на расстоянии 100 см от док-станции нет никаких препятствий.
Зарядка
При первой зарядке, а также при зарядке полностью разряженного аккумулятора роботапылесоса время полной зарядки составляет четыре часа.
Робот-пылесос можно заряжать двумя способами.
- На док-станции в ручном режиме или в автоматическом режиме во время использования.
- При подключении робота-пылесоса непосредственно к электросети.
Примечание. Полная зарядка аккумулятора обеспечивает до 100 минут автономной работы
робота-пылесоса.
Зарядка в док-станции
1 Присоедините робот-пылесос к док-станции, подключенной к сети (Рис. 15).
2 Включите робот-пылесос, нажав на переключатель питания на приборе (Рис. 16).
3 Индикатор питания на дисплее начнет мигать (Рис. 17).
4 Когда аккумулятор будет полностью заряжен, индикатор питания на дисплее
перестанет мигать (Рис. 18).
Автоматическая зарядка во время использования
1 По окончании уборки, а также в случае если заряд аккумулятора составляет всего 15 %,
робот-пылесос автоматически возвращается к док-станции для подзарядки. Когда роботпылесос возвращается к док-станции, индикатор питания начинает быстро мигать (Рис. 19).
2 При полной зарядке индикатор заряда аккумулятора на дисплее робота-пылесоса
прекращает мигать.
Page 27

РУССКИЙ 27
Примечание. Робот-пылесос автоматически возвращается на док-станцию, только если цикл
уборки начинался от док-станции.
Зарядка от электросети
1 Вставьте маленький штекер адаптера в соответствующий разъем на роботе-пылесосе
(1). Подключите адаптер к розетке электросети (2) (Рис. 20).
2 Включите робот-пылесос, нажав на переключатель питания на приборе.
3 При правильном подключении к сети индикатор питания на роботе-пылесосе начинает
мигать, указывая на процесс зарядки аккумулятора.
4 Когда аккумулятор будет полностью заряжен, индикатор питания робота-пылесоса
перестанет мигать.
Подготовка помещения к уборке
- Перед включением робота-пылесоса уберите с пола все незакрепленные и хрупкие
предметы (Рис. 21).
Эксплуатация робота-пылесоса
Начало и окончание работы
1 Нажмите кнопку включения/выключения (Рис. 22).
- Нажмите кнопку включения/выключения на роботе-пылесосе.
- Также можно нажать кнопку включения/выключения на пульте дистанционного
управления (FC8710) (Рис. 23).
Совет. При нажатии кнопки включения/выключения на док-станции во время зарядки роботпылесос начнет уборку после окончания процесса зарядки аккумулятора (Рис. 24).
2 Индикатор питания начнет медленно мигать, робот-пылесос начнет уборку (Рис. 25).
3 Уборка будет проводиться в автоматическом режиме до разрядки аккумулятора. В
автоматическом режиме уборки робот-пылесос следует определенной
последовательности программ: Z-программа, произвольная программа, программа
“Вдоль стен” и программа “По спирали” (Рис. 26).
Примечание. Чтобы выбрать конкретный режим, нажмите на одну из кнопок режима на
пульте дистанционного управления (FC8710). Для получения более подробной информации см.
раздел “Выбор режима уборки”.
4 Когда аккумулятор разряжается, индикатор питания начинает быстро мигать и робот-
пылесос возвращается на док-станцию для подзарядки (Рис. 19).
5 Чтобы прервать или остановить цикл уборки, нажмите кнопку включения/выключения.
Если нажать кнопку включения/выключения повторно, при наличии заряда
аккумулятора робот-пылесос продолжит уборку в автоматическом режиме.
Чтобы вернуть робот-пылесос на док-станцию до разрядки аккумулятора, нажмите кнопку
6
подключения к док-станции на пульте дистанционного управления (FC8710). (Рис. 27)
- Загорится индикатор питания, робот-пылесос вернется на док-станцию (Рис. 28).
Примечание. Если уборка начиналась не от док-станции, при разрядке аккумулятора роботпылесос не вернется на док-станцию автоматически. Если заряда аккумулятора достаточно,
для возврата робота-пылесоса на док-станцию нажмите кнопку подключения к док-станции на
пульте дистанционного управления. Если аккумулятор разряжен полностью, необходимо
подключить робот-пылесос к док-станции вручную.
Page 28

РУССКИЙ28
Выбор режима уборки (FC8710)
Кроме автоматического режима, для робота-пылесоса предусмотрено четыре режима, которые
можно активировать с помощью соответствующих кнопок на пульте дистанционного управления.
Z-программа
- При работе по Z-программе робот-пылесос выполняет зигзагообразные перемещения.
Эта программа эффективна для уборки больших помещений (Рис. 29).
Произвольная программа
- В этом режиме робот-пылесос производит уборку помещения, совершая произвольные
перемещения по прямой и крест-накрест. (Рис. 30)
Программа “Вдоль стен”
- В этом режиме робот-пылесос передвигается вдоль стен, обеспечивая более тщательную
уборку данного участка помещения (Рис. 31).
Программа “По спирали”
- В этом режиме робот-пылесос передвигается по спирали, а вентилятор работает с
увеличенной скоростью, что обеспечивает тщательную очистку наиболее загрязненного
участка (Рис. 32).
Ручное управление (FC8710)
1 Для управления передвижением робота-пылесоса по помещению используйте кнопки
со стрелками вверх, вниз, влево и вправо на кнопке включения/выключения пульта
дистанционного управления (Рис. 33).
Примечание. Не нажимайте на кнопку со стрелкой вниз, если робот-пылесос находится рядом
с объектом, образующим перепад высот, или рядом с лестницей.
Использование кнопок времени уборки
- При нажатии на кнопку 24h на док-станции начнется обратный отсчет времени до начала
следующей уборки (24 часа). По истечении указанного времени робот-пылесос начнет
уборку. Когда аккумулятор будет разряжен, робот-пылесос вернется на док-станцию
для подзарядки (Рис. 34).
- Чтобы запрограммировать робот-пылесос на проведение уборки в течение 35 минут,
нажмите кнопку времени уборки на пульте дистанционного управления (FC8710).
По окончании уборки робот-пылесос вернется на док-станцию для подзарядки (Рис. 35).
Сигналы индикаторов и их значения
На дисплее робота-пылесоса имеется три индикатора: предупреждающий индикатор,
индикатор питания и индикатор заполнения пылесборника. В таблице ниже приведены
значения этих индикаторов.
Сигнал индикатора Значение
Индикатор питания горит постоянно. Робот-пылесос совершает уборку.
Индикатор питания мигает. Низкий уровень заряда аккумулятора.
Индикатор заполнения пылесборника мигает.
Предупреждающий индикатор мигает. Вы подняли работающий робот-пылесос.
Пылесборник заполнен.
Заклинило бампер робота-пылесоса.
Заклинило колесо или боковую щетку.
Page 29

РУССКИЙ 29
Сигнал индикатора Значение
Верхняя крышка отсутствует или установлена
неправильно.
Роботу-пылесосу не удается найти док-станцию.
Очистка и уход
Удаление мусора и очистка пылесборника
Если начал мигать индикатор заполнения пылесборника, опустошите и очистите пылесборник.
1 Снимите крышку (Рис. 36).
Примечание. Убедитесь, что переключатель питания установлен в положение Off (Выкл.).
2 Потяните вверх ручку крышки пылесборника и извлеките пылесборник из отделения
для пылесборника (Рис. 37).
Примечание. Извлекая или устанавливая пылесборник, будьте осторожны, не повредите
лопасти вентилятора.
3 Аккуратно поднимите крышку пылесборника и извлеките фильтр (Рис. 38).
4 Извлеките содержимое пылесборника в мусорное ведро. Очистите фильтр и
внутреннюю поверхность пылесборника тканью или зубной щеткой с мягкой щетиной.
Очистите всасывающее отверстие в нижней части пылесборника (Рис. 39).
Внимание! Пылесборник и фильтр нельзя очищать с помощью воды или мыть в
посудомоечной машине.
5 Установите фильтр в пылесборник, пылесборник закройте крышкой (Рис. 40).
6 Установите пылесборник в отделение для пылесборника, закройте робот-пылесос
верхней крышкой (Рис. 41).
Внимание! В пылесборнике должен быть установлен фильтр. При использовании роботапылесоса без фильтра возможно повреждение двигателя.
Очистка датчиков, колес и боковых щеток
Для получения оптимальных результатов уборки необходимо время от времени проводить
очистку датчиков перепада высот, колес и боковых щеток.
1 Убедитесь, что переключатель питания установлен в положение Off (Выкл.).
2 Установите пылесос на ровной поверхности и переверните его.
3 Для удаления грязи и ворсинок с датчиков пе репада высот используйте щетку с
мягкой щетиной (например, зубную щетку). Убедитесь, что всасывающее отверстие не
загрязнено (Рис. 42).
Примечание. Важно регулярно проводить очистку датчиков перепада высот. Если датчики
перепада высот будут загрязнены, робот-пылесос не сможет распознать перепад высот.
4 Для очистки переднего и боковых колес от ворсинок и грязи используйте щетку с
мягкой щетиной (например, зубную щетку) (Рис. 43).
5 Для очистки боковых щеток возьмитесь за щетинки и потяните щетки с валов (Рис. 44).
Page 30

РУССКИЙ30
6 С помощью щетки с мягкой щетиной (например, зубной щетки) или ткани удалите
грязь и пыль с вала и боковой щетки (Рис. 45).
7 Убедитесь, что на боковых щетках и на нижней панели робота-пылесоса нет острых
предметов, которые могут повредить пол.
Замена
Аксессуары и запасные части можно заказать на веб-сайте www.shop.philips.com/service
или в торговой организации Philips. Также вы можете обратиться в центр поддержки
потребителей Philips в вашей стране.
Замена фильтра
Выполняйте замену фильтра при сильном загрязнении или повреждении. Новый фильтр можно
заказать по номеру CP0108. Для получения инструкций по извлечению и установке фильтра в
пылесборник см. раздел “Удаление мусора и очистка пылесборника” главы “Очистка и уход”.
Замена боковых щеток
Для поддержания оптимальных результатов уборки боковые щетки необходимо заменять
через некоторое время после начала использования.
Примечание. Заменяйте боковые щетки при появлении признаков износа или повреждения.
Рекомендуется заменять одновременно обе боковые щетки. Боковые щетки можно заказать
по номеру CP0107.
1 Убедитесь, что переключатель питания установлен в положение Off (Выкл.).
2 Чтобы заменить боковые щетки, возьмитесь за щетинки и потяните щетки с валов.
3 Установите новые боковые щетки на валы (Рис. 11).
Замена аккумулятора
Замену аккумулятора следует выполнять при невозможности зарядки или при слишком
быстрой разрядке аккумулятора. Новый аккумулятор можно заказать по номеру CP0111
(для модели FC8710) или по номеру CP0110 (для модели FC8700).
1 Перед извлечением и утилизацией аккумулятора включите робот-пылесос и оставьте
его включенным до полной разрядки аккумулятора.
2 Открутите винты крышки отделения для элемента питания (Рис. 46).
3 Снимите крышку отделения для элемента питания (Рис. 47).
4 Установите новый аккумулятор в отделение для элемента питания, закройте отделение
крышкой и закрутите винты (Рис. 48).
Примечание. Проверьте правильность установки аккумулятора (наклейкой вверх)
и расположения контактов.
Установите крышку отделения для элемента питания на робот-пылесос и закрутите винты.
5
Замена элемента питания пульта дистанционного управления
Пульт дистанционного управления (FC8710) работает от батареи таблеточного типа CR2025.
Замените батарею, если робот-пылесос перестал реагировать на команды пульта
дистанционного управления.
1 Переверните пульт дистанционного управления. Нажмите кнопку отсоединения на
держателе элемента питания и одновременно выдвиньте держатель из пульта (Рис. 49).
Page 31

РУССКИЙ 31
2 Извлеките старую батарею из держателя элемента питания и установите новую.
Задвиньте держатель в пульт управления (Рис. 50).
Поиск и устранение неисправностей
Данная глава посвящена наиболее распространенным проблемам, возникающим при
использовании прибора. Если описанные ниже действия не помогут решить проблему, см.
список часто задаваемых вопросов на веб-сайте www.philips.com/support или обратитесь
в центр поддержки потребителей в вашей стране.
Проблема Причина Способы решения
После нажатия
кнопки включения/
выключения роботпылесос не начинает
уборку.
Быстро мигает
предупреждающий
индикатор.
Робот-пылесос
убирает
неэффективно.
Аккумулятор
разряжен.
Маленький штекер
адаптера подключен
к роботу-пылесосу.
Заклинило одно или
оба колеса.
Заклинило одну или
обе боковые щетки.
Верхняя крышка
отсутствует или
установлена
неправильно.
Заклинило бампер. Нажмите на кнопку включения/выключения.
Вы подняли
работающий роботпылесос.
Щетина на боковой
(-ых) щетке(-ах)
погнута.
Фильтр в
пылесборнике
загрязнен.
Зарядите аккумулятор (см. главу
“Подготовка прибора к работе”).
Робот-пылесос не работает от сети.
Он работает только от аккумулятора.
Перед включением прибора всегда
отключайте адаптер от сети и от
робота-пылесоса.
Установите переключатель питания в
положение Off (Выкл.). Удалите ворсинки,
волоски, нитки или провода, которые могли
запутаться в соединении колеса.
Очистите боковые щетки (см. главу
“Очистка и уход”).
Робот-пылесос не будет работать, если
верхняя крышка не установлена или
установлена неправильно. Установите
крышку должным образом.
Освободите бампер, подняв робот-пылесос
за корпус. Поместите робот-пылесос на
некотором расстоянии от препятствия и
возобновите уборку, нажав кнопку
включения/выключения.
Нажмите на кнопку включения/выключения.
Поставьте робот-пылесос на пол. Нажмите
на кнопку включения/выключения, чтобы
робот-пылесос возобновил работу.
Замочите щетку или обе щетки в теплой
воде на некоторое время. Если щетина не
восстановит форму, замените боковые
щетки (см. главу “Замена”).
Очистите фильтр пылесборника тканью или
зубной щеткой с мягкой щетиной.
Page 32

РУССКИЙ32
Проблема Причина Способы решения
Если не удалось полностью очистить
фильтр с помощью щеточки, замените его.
Рекомендуется выполнять замену фильтра
не реже, чем один раз в год.
Очистите всасывающее отверстие
(см. главу “Очистка и уход”).
Очистите переднее колесо
(см. главу “Очистка и уход”).
Нажмите кнопку включения/выключения и
переместите робот-пылесос на более
светлый участок. Если это не помогло
решить проблему, перейдите на веб-сайт
www.philips.com/support или обратитесь в
центр поддержки потребителей в вашей
стране.
Закройте шторы, чтобы препятствовать
попаданию солнечного света в помещение.
Замените аккумулятор (см. главу “Замена”).
Пульт ДУ работает от батареи
таблеточного типа CR2025. Если проблема
не решена, перейдите на веб-сайт www.
philips.com/support или обратитесь в центр
поддержки потребителей в вашей стране.
Аккумулятор больше
не заряжается или
слишком быстро
разряжается.
Батарея пульта ДУ
разряжается очень
быстро.
Заблокировано
всасывающее
отверстие в нижней
части пылесборника.
В переднее колесо
попали волосы или
грязь.
Робот-пылесос
выполняет уборку
темного или черного
покрытия. Поэтому
запускаются датчики
перепада высот, и
робот-пылесос
использует
нестандартную
программу уборки.
Робот-пылесос
убирает пол, на
котором сильно
отражается
солнечный свет.
Отражение света
мешает работе
датчиков перепада
высот, и роботпылесос использует
необычную
программу уборки.
Закончился срок
службы аккумулятора.
Возможно,
установлена батарея
неправильного типа.
Page 33

УКРАЇНСЬКА
Вступ
Вітаємо Вас із покупкою та ласкаво просимо до клубу Philips! Щоб у повній мірі скористатися
підтримкою, яку пропонує компанія Philips, зареєструйте свій виріб на веб-сайті
www.philips.com/welcome.
Ваш робот (Мал. 1)
1 Верхня кришка
2 Ручка кришки контейнера для пилу
3 Кришка контейнера для пилу
4 Фільтр
5 Контейнер для пилу
6 Вентилятор
7 Бампер
8 Кнопка “увімк./вимк.” (увімкнення робота або перехід у режим очікування)
9 Дисплей
10 Перемикач живлення (увімкнення або вимкнення робота)
11 Переднє колесо
12 Вали бокових щіток
13 Датчики падіння
14 Колеса
15 Батарейний відсік
16 Отвір всмоктування
17 Акумуляторна батарея
18 Кришка батарейного відсіку
19 Гвинти
20 Бічні щітки
21 Тримач батареї
22 Пульт дистанційного керування (FC8710)
23 Док-станція
24 Адаптер
25 Мала вилка
33
Дисплей і пульт дистанційного керування
Дисплей
1 Індикатор попередження (Мал. 2)
2 Індикатор “увімк./вимк.”
3 Індикатор заповнення контейнера для пилу
Пульт дистанційного керування (FC8710)
1 Навігаційні кнопки та увімкнення/вимкнення (Мал. 3)
2 Кнопка стикування
3 Кнопка часу прибирання
4 Кнопки режимів прибирання
Page 34

УКРАЇНСЬКА34
Як працює Ваш робот
Що чистить Ваш робот
Цього робота обладнано функціями, які роблять його придатним для прибирання підлоги у
Вашій оселі.
Робот особливо підходить для прибирання твердої підлоги – дерев’яної, кахельної або
лінолеумної. Можуть виникати проблеми із чищенням м’яких поверхонь, наприклад килимів
або килимових покриттів. Якщо Ви використовуєте робота на килимі або килимовому
покритті, під час першого використання залишайтеся поруч із ним, щоб побачити, чи робот
зможе впоратися із цим типом підлоги. Нагляд за роботом також потрібен під час
використання його на чорній та блискучій твердій підлозі.
Як Ваш робот чистить підлогу
Система прибирання
Робот має 2-етапну систему прибирання для ефективного очищення підлоги.
- Дві бічні щітки допомагають роботу прибирати в кутках і вздовж стін. Вони також
допомагають видаляти бруд із підлоги і просувати його до отвору всмоктування (Мал. 4).
- Потужність всмоктування робота вловлює частинки бруду та переносить їх через отвір
всмоктування у контейнер для пилу (Мал. 5).
Схеми руху під час прибирання
У режимі автоматичного прибирання робот використовує автоматичну послідовність схем
руху для оптимального прибирання кожної ділянки кімнати. Він використовує такі схеми руху:
1 Z-подібна або зигзагоподібна схема
2 довільна схема
3 схема руху вздовж стін
4 спіральна схема
Під час автоматичного прибирання робот використовує ці схеми в фіксованій послідовності:
1 Z-подібна схема (Мал. 6)
2 довільна схема (Мал. 7)
3 схема руху вздовж стін (Мал. 8)
4 спіральна схема (Мал. 9)
Коли робот завершить рухатися за цією послідовністю схем, він знову почне рухатися за
Z-подібною схемою. Робот продовжує використовувати цю послідовність схем для прибирання
кімнати, поки не розрядиться акумуляторна батарея або поки його вручну не вимкнуть.
Примітка: Можна також самостійно вибрати кожен режим окремо, натискаючи відповідну
кнопку на пульті ДК (FC8710). Більш детальну інформацію читайте в розділі “Використання
робота”, підрозділ “Режими прибирання”.
Як Ваш робот уникає перепадів висоти
- Робот має три датчики падіння на дні. Він використовує ці датчики падіння для виявлення
та уникнення перепадів висоти, наприклад сходів (Мал. 10).
Примітка: Якщо робот пересувається дещо над краєм підвищення, це нормально, адже його
передній датчик падіння знаходиться за бампером.
Увага: У деяких випадках датчики падіння можуть не виявляти сходів чи інших перепадів
висоти вчасно. Тому уважно слідкуйте за роботом протягом перших кількох разів
використання і коли він працює біля сходів чи іншої подібної ділянки із різницею висоти.
Page 35

УКРАЇНСЬКА 35
Перед першим використанням
Кріплення бічних щіток
1 Розпакуйте бічні щітки та поставте робота догори дном на столі або на підлозі.
2 Просуньте бічні щітки на спеціальні вали, що знаходяться на дні робота (Мал. 11).
Примітка: Перевірте, чи належним чином під’єднано бічні щітки. Встановлюйте їх на вали до
фіксації з клацанням.
Видалення захисної етикетки з пульта дистанційного керування
Пульт дистанційного керування (FC8710) працює від батареї таблеткового типу CR2025.
Цю батарею захищено спеціальною етикеткою, яку перед використанням потрібно зняти.
Вийміть захисну етикетку з відділення для батареї пульта дистанційного керування (Мал. 12).
1
, Тепер пультом дистанційного керування можна користуватися.
Підготовка до використання
Встановлення на док-станцію
1 Вставте малу вилку адаптера у роз’єм на док-станції (1), а вилку-адаптер вставте у
розетку на стіні (2). Дисплей на док-станції засвітиться (Мал. 13).
2 Поставте док-станцію на горизонтальну, рівну підлогу біля стіни (Мал. 14).
Примітка: Переконайтеся у відсутності перешкод або перепадів висоти на відстані 80 см
попереду, 30 см праворуч і 100 см ліворуч від док-станції.
Заряджання
Під час першого заряджання і коли акумуляторна батарея робота розрядиться, процес
заряджання триватиме чотири години.
Вашого робота можна заряджати у два способи:
- на док-станції (вручну або автоматично під час використання);
- під’єднавши робота безпосередньо до мережі живлення
Примітка: Коли акумуляторна батарея повністю зарядиться, робот може прибирати
приблизно протягом 100 хвилин.
Заряджання на док-станції
1 Поставте робота на під’єднану до мережі живлення док-станцію (Мал. 15).
2 Натисніть перемикач живлення, щоб увімкнути робота (Мал. 16).
3 Індикатор “увімк./вимк.” на дисплеї починає блимати (Мал. 17).
4 Коли акумуляторна батарея повністю зарядиться, індикатор “увімк./вимк.” на дисплеї
перестане блимати (Мал. 18).
Автоматичне заряджання під час використання
1 Коли робот закінчить прибирати або коли залишиться лише 15% енергії батареї, він
автоматично повернеться на док-станцію для заряджання. Коли робот повернеться
на док-станцію, індикатор “увімк./вимк.” почне швидко блимати (Мал. 19).
2 Коли акумуляторна батарея повністю зарядиться, індикатор батареї на дисплеї робота
перестане блимати.
Примітка: Робот повертається на док-станції автоматично лише в тому разі, якщо він почав
прибирання з док-станції.
Page 36

УКРАЇНСЬКА36
Заряджання безпосередньо від електромережі
1 Вставте малу вилку адаптера у роз’єм на роботі (1). Вставте вилку-адаптер у розетку
на стіні (2) (Мал. 20).
2 Натисніть перемикач живлення, щоб увімкнути робота.
3 Якщо робота під’єднано до розетки належним чином, індикатор “увімк./вимк.”
починає блимати. Це означає, що робот заряджається.
4 Коли акумуляторна батарея повністю зарядиться, індикатор “увімк./вимк.”
на роботі перестане блимати.
Підготовка кімнати до циклу прибирання
- Перед тим як вмикати робота для здійснення циклу прибирання переконайтеся,
що на підлозі немає крихких та легких предметів (Мал. 21).
Використання робота
Запуск і зупинка
1 Натисніть кнопку “увімк./вимк.” (Мал. 22)
- Можна натиснути кнопку “увімк./вимк.” на роботі.
- Також можна натиснути кнопку “увімк./вимк.” на пульті дистанційного керування
(FC8710) (Мал. 23).
Порада: Якщо натиснути кнопку “увімк./вимк.” на док-станції в той час, коли робот
заряджається, робот почне прибирання, як тільки акумуляторна батарея зарядиться (Мал. 24).
2 Індикатор “увімк./вимк.” починає повільно блимати, і робот починає прибирати (Мал. 25).
3 Робот прибирає в режимі автоматичного прибирання, поки не розрядиться батарея.
У режимі автоматичного прибирання він повторювано рухається за Z-подібною,
довільною схемою, вздовж стін і спіральною схемою (Мал. 26).
Примітка: Щоб вибрати власний режим прибирання, натисніть одну з кнопок режиму на
пульті ДК (FC8710). Докладніше читайте в розділі “Вибір режимів прибирання”.
4 Коли батарея розрядиться, індикатор “увімк./вимк.” почне швидко блимати, а робот
повернеться на док-станцію для заряджання (Мал. 19).
5 Щоб перервати або зупинити цикл прибирання, можна також натиснути кнопку
“увімк./вимк.”. Якщо натиснути кнопку “увімк./вимк.” ще раз, коли акумуляторна батарея
міститиме ще достатньо енергії, робот продовжить роботу в режимі автоматичного
прибирання.
6 Щоб робот повернутися на док-станцію перед тим як акумуляторна батарея
розрядиться, натисніть кнопку стикування пульті ДК (FC8710). (Мал. 27)
- Індикатор “увімк./вимк.” засвітиться, а робот повернеться на док-станцію (Мал. 28).
Примітка: Якщо робот почав працювати не з док-станції, він не повернеться на док-станцію
автоматично, коли розрядиться акумуляторна батарея. Якщо акумуляторна батарея
містить ще достатньо енергії, можна натиснути кнопку стикування на пульті ДК,
щоб повернути робота на док-станцію. Якщо акумуляторна батарея повністю розрядиться,
доведеться встановити робота на док-станцію вручну.
Page 37

УКРАЇНСЬКА 37
Вибір режимів прибирання (FC8710)
Крім режиму автоматичного прибирання, цей робот має чотири окремі режими прибирання,
які можна активувати натисненням відповідної кнопки на пульті дистанційного керування.
Режим прибирання за Z-подібною схемою
- У режимі прибирання за Z-подібною схемою руху робот чистить підлогу,
виконуючи Z-подібні петлі по кімнаті для чищення великих площ (Мал. 29)
Режим прибирання за довільною схемою
- У цьому режимі робот прибирає кімнату за змішаною схемою руху по прямій чи навхрест.
(Мал. 30)
Режим прибирання за схемою руху вздовж стін
- У цьому режимі робот рухається вздовж стін кімнати для додаткового прибирання
ділянок поряд зі стінами (Мал. 31).
Режим прибирання за схемою руху по спіралі
- У цьому режимі робот робить рухи по спіралі із вентилятором на турбошвидкості для
ретельного прибирання брудних ділянок підлоги (Мал. 32).
Ручне керування (FC8710)
1 За допомогою кнопок зі стрілками вгорі, внизу, праворуч і ліворуч від кнопки
“увімк./вимк.” на пульті ДК можна керувати пересуванням робота по кімнаті (Мал. 33).
Примітка: Не натискайте стрілку вниз, коли робот знаходиться близько до перепаду висоти
або сходів.
Використання кнопок часу прибирання
- Якщо натиснути кнопку “24h” на док-станції, док-станція почне відлік 24 годин до
наступного циклу прибирання. Коли завершиться відлік часу, робот почне прибирання,
поки не розрядиться батарея, після чого автоматично повернеться на док-станцію для
заряджання (Мал. 34).
- Натисніть кнопку часу прибирання на пульті дистанційного керування (FC8710),
щоб робот почав цикл прибирання на 35 хвилин. Коли робот завершить роботу,
він повернеться на док-станцію для заряджання (Мал. 35).
Сигнали індикаторів та їх значення
Робот має дисплей із трьома індикаторами: індикатор попередження, індикатор “увімк./вимк.”
та індикатор заповнення контейнера для пилу. У наведеній нижче таблиці подано пояснення
значення сигналів цих індикаторів.
Page 38

УКРАЇНСЬКА38
Сигнал індикатора Значення
Індикатор “увімк./вимк.” світиться без
блимання.
Індикатор “увімк./вимк.” блимає. Низький рівень заряду акумуляторної
Індикатор заповнення контейнера для пилу
блимає.
Індикатор попередження блимає. Робота підняли під час прибирання.
Чищення та догляд
Спорожнення і чищення контейнера для пилу
Спорожнюйте і чистіть контейнер для пилу, коли індикатор заповнення контейнера для пилу
блимає.
1 Зніміть верхню кришку (Мал. 36).
Примітка: Переконайтеся, що перемикач живлення знаходиться у положенні “вимк.”.
2 Підніміть ручку кришки контейнера для пилу і витягніть контейнер для пилу із його
відділення (Мал. 37).
Примітка: Виймаючи або встановлюючи контейнер для пилу, будьте обережні, щоб не
пошкодити лопаті вентилятора двигуна.
3 Обережно підніміть кришку контейнера для пилу і вийміть фільтр (Мал. 38).
4 Витрусіть вміст контейнера для пилу над смітником, щоб спорожнити його.
Почистіть фільтр і внутрішню частину контейнера для пилу ганчіркою або зубною
щіткою із м’яким ворсом. Почистіть також отвір всмоктування на дні контейнера
для пилу (Мал. 39).
Увага: Не мийте контейнер для пилу і фільтр водою або у посудомийній машині.
Робот прибирає підлогу.
батареї.
Контейнер для пилу заповнений.
Бампер робота заблоковано.
Колесо або бічну щітку заблоковано.
Немає верхньої кришки або верхню кришку
не закрито належним чином.
Робот не може знайти док-станцію.
5 Вставте фільтр назад у контейнер для пилу. Потім встановіть кришку на контейнер для
пилу (Мал. 40).
6 Поставте контейнер для пилу назад у відділення для контейнера і встановіть верхню
кришку на робота (Мал. 41).
Увага: Завжди перевіряйте, чи фільтр знаходиться всередині контейнера для пилу.
Якщо використовувати робота без фільтра у контейнері для пилу, двигун буде
пошкоджено.
Page 39

УКРАЇНСЬКА 39
Очищення датчиків, коліс і бічних щіток
Для забезпечення хорошої ефективності прибирання необхідно час від часу чистити датчики
падіння, колеса і бічні щітки.
1 Переконайтеся, що перемикач живлення знаходиться у положенні “вимк.”.
2 Поставте робота догори дном на рівну поверхню.
3 За допомогою щітки із м’яким ворсом (наприклад, зубної щітки) почистіть датчики
падіння від пилу або пуху. Також перевірте, чи не заблоковано отвір всмоктування
брудом або пухом (Мал. 42).
Примітка: Важливо регулярно чистити датчики падіння. Якщо датчики падіння брудні,
роботу може не вдатися визначити перехід висоти.
4 За допомогою щітки з м’яким ворсом (наприклад, зубної щітки) почистіть переднє
і задні колеса від пилу або пуху (Мал. 43).
5 Щоб почистити бічні щітки, візьміть їх за щетину і зніміть із валів (Мал. 44).
6 Видаліть пух, волосся та нитки із валів та бічних щіток за допомогою м’якої щітки
(наприклад, зубної щітки) або тканини (Мал. 45).
7 Перевірте, чи на бічних щітках та нижній частині робота немає жодних гострих
предметів, які можуть пошкодити підлогу.
Заміна
Запасні частини і приладдя можна замовити на сайті www.shop.philips.com/service
або у дилера Philips. Крім того, можна звернутися до Центру обслуговування клієнтів Philips
у Вашій країні.
Заміна фільтра
Заміняйте фільтр, якщо він дуже брудний або пошкоджений. Новий фільтр можна замовити за
номером артикулу CP0108. Вказівки щодо виймання фільтра з контейнера для пилу та його
встановлення у контейнер для пилу читайте в підрозділі “Спорожнення і чищення контейнера
для пилу” розділу “Чищення та догляд”.
Заміна бічних щіток
Із часом замініть бічні щітки для забезпечення належних результатів прибирання.
Примітка: Завжди замінюйте бічні щітки, коли помітите на них ознаки зношення чи
пошкодження. Також радимо замінювати одночасно обидві бічні щітки. Запасні бічні щітки
можна замовити за номером артикулу CP0107.
1 Переконайтеся, що перемикач “увімк./вимк.” знаходиться у положенні “вимк.”.
2 Щоб замінити бічні щітки, візьміть старі бічні щітки за щетину і зніміть їх із валів.
3 Вставте нові бічні щітки на вали (Мал. 11).
Page 40

УКРАЇНСЬКА40
Заміна акумуляторної батареї
Замінюйте акумуляторну батарею, коли її вже більше неможливо заряджати або коли вона
швидко розряджається. Нову акумуляторну батарею можна замовити за номером артикулу
CP0111 для FC8710 та номером артикулу CP0110 для FC8700.
1 Перш ніж вийняти та утилізувати акумуляторну батарею, дайте роботу попрацювати,
поки акумуляторна батарея не розрядиться повністю.
2 Відкрутіть гвинти на кришці батарейного відсіку (Мал. 46).
3 Зніміть кришку батарейного відсіку (Мал. 47).
4 Вставте нову акумуляторну батарею у відсік, поставте кришку батарейного відсіку на
місце і закрутіть гвинти (Мал. 48).
Примітка: Переконайтеся, що напис на батареї повернено догори і що конектори повернені у
правильному напрямку.
5 Встановіть кришку батарейного відсіку на місце на роботі і зафіксуйте її гвинтами.
Заміна батареї пульта дистанційного керування
Пульт дистанційного керування (FC8710) працює від батареї таблеткового типу CR2025.
Заміняйте батарею, коли робот перестане реагувати на натиснення кнопок на пульті
дистанційного керування.
1 Тримайте пульт дистанційного керування догори низом. Натисніть кнопку
розблокування на тримачі батареї та одночасно вийміть тримач батареї з пульта
дистанційного керування (Мал. 49).
2 Вийміть розряджену батарею з тримача батареї і вставте в тримач нову батарею.
Потім засуньте тримач батареї у пульт дистанційного керування (Мал. 50).
Усунення несправностей
У цьому розділі зведено основні проблеми, які можуть виникнути під час використання цього
пристрою. Якщо Ви не в змозі вирішити проблему за допомогою інформації, поданої нижче,
відвідайте веб-сайт www.philips.com/support для перегляду списку частих запитань або
зверніться до Центру обслуговування клієнтів у своїй країні.
Page 41

Проблема Причина Вирішення
Після
натиснення
кнопки “увімк./
вимк.” робот не
починає
прибирати.
Індикатор
попередження
швидко блимає.
Робот не
прибирає
належним
чином.
Акумуляторна батарея
розрядилася.
Малу вилку все ще
під’єднано до роз’єму
на роботі.
Один чи два колеса
заблоковано.
Одна чи дві бічні щітки
заблоковано.
Верхньої кришки
немає або її не закрито
належним чином.
Бампер заблоковано. Натисніть кнопку “увімк./вимк.”. Підніміть
Робота підняли під час
прибирання.
Щетина однієї або
двох бічних щіток
викривилася або
зігнулася.
Фільтр у контейнері
для пилу брудний.
Отвір всмоктування на
дні контейнера для
пилу забився.
Переднє колесо
заблоковано волоссям
або іншим брудом.
Зарядіть акумуляторну батарею
(див. розділ “Підготовка до використання”).
Робот не працює від електромережі. Він працює
лише від акумуляторної батареї. Тому перед
використанням завжди від’єднуйте адаптер від
робота та від електромережі.
Встановіть перемикач живлення у положення
“вимк.”. Видаліть пух, волосся, нитки або дріт,
що накопичилися навколо підвіски коліс.
Почистіть бічні щітки (див. розділ “Чищення та
догляд”).
Коли верхньої кришки немає або її не закрито
належним чином, робот не працює. Встановіть
верхню кришку на робота належним чином.
робота, щоб звільнити його бампер. Поставте
робота на відстані від перешкоди і натисніть
кнопку “увімк./вимк.”, щоб відновити прибирання.
Натисніть кнопку “увімк./вимк.”. Покладіть
робота на підлогу. Потім натисніть кнопку
“увімк./вимк.”, щоб робот відновив прибирання.
Замочіть щітку або щетину на якийсь час у
теплій воді. Якщо це не відновить належної
форми щетини, замініть бічні щітки
(див. розділ “Заміна”).
Почистіть фільтр контейнера для пилу
ганчіркою або зубною щіткою з м’якою
щетиною.
Якщо це не допоможе почистити фільтр,
замініть його новим. Рекомендується заміняти
фільтр щонайменше один раз на рік.
Почистіть отвір всмоктування
(див. розділ “Чищення та догляд”).
Почистіть переднє колесо
(див. розділ “Чищення та догляд”).
УКРАЇНСЬКА 41
Page 42

УКРАЇНСЬКА42
Проблема Причина Вирішення
Натисніть кнопку “увімк./вимк.”, а потім
перемістіть робота на ділянку підлоги
світлішого кольору. Якщо проблему не буде
вирішено на поверхні світлішого кольору,
відвідайте сторінку www.philips.com/support
або зверніться до Центру обслуговування
клієнтів у Вашій країні.
Затягніть штори, щоб сонячне світло не
потрапляло до кімнати.
Замініть акумуляторну батарею
(див. розділ “Заміна”).
Для пульта дистанційного керування потрібно
батарею таблеткового типу CR2025. Якщо
проблема виникає й надалі, відвідайте сторінку
www.philips.com/support або зверніться до
Центру обслуговування клієнтів у Вашій країні.
Акумуляторна
батарея більше
не заряджається
або дуже
швидко
розряджається.
Батарея пульта
дистанційного
керування надто
швидко
розряджається.
Робот прибирає чорну
або темну поверхню,
яка активує датчики
падіння. Це спричиняє
рух робота за
незвичайною схемою.
Робот прибирає
підлогу, яка дуже
сильно відбиває
сонячне світло. Це
активує датчики
падіння та спричиняє
рух робота за
незвичайною схемою.
Можливо, закінчився
термін експлуатації
акумуляторної батареї.
Можливо, Ви
встановили батарею
неправильного типу.
Page 43

Page 44

Page 45

22 23 24 25
26 27 28 29
30 31 32 33
34
38
35 36 37
39
40 41
Page 46

42
1
4
2
3
1
43 44 45
3
2
46 47 48 49
50
2
1
3
Page 47

47
Page 48

4222.003.4169.1
 Loading...