

Philips FC8432 User Manual [zh]
City Line

2
3
1 2 3 4
5 6 7 8
9 10 11 12
13 14 15 16
17 18 19 20
1
2

4

ENGLISH 6
ESPAÑOL 10
14
18
CITY LINE

Important
Read these instructions for use carefully before using the appliance and save them for future
reference.
◗ Check if the voltage indicated on the appliance corresponds to the local mains voltage before
you connect the appliance.
◗ Do not use the appliance if the plug, the cord or the appliance itself is damaged.
◗ If the mains cord is damaged, it must be replaced by Philips, a service centre authorised by
Philips or similarly qualified persons in order to avoid a hazard.
◗ Keep the appliance out of the reach of children.
◗ Never suck up water or any other liquid. Never suck up flammable substances and do not
suck up ashes until they are cold.
◗ Do not point the hose at the eyes or ears nor put it in your mouth when the vacuum
cleaner is switched on and the hose is connected to the vacuum cleaner.
◗ When the vacuum cleaner is used to suck up fine dust, the pores of the dustbag may become
clogged, causing the passage of air through the dustbag to become obstructed.As a result, the
dustbag-full indicator will indicate that the dustbag needs to be replaced, even though the
dustbag is not full at all (see chapter 'Replacing the dustbag').
◗ Never use the appliance without the Motor Protection Filter.This could damage the motor
and shorten the life of the appliance.
◗ Only use Philips s-bag` double-layer paper dustbags.
Preparing for use
Connecting accessories
Hose
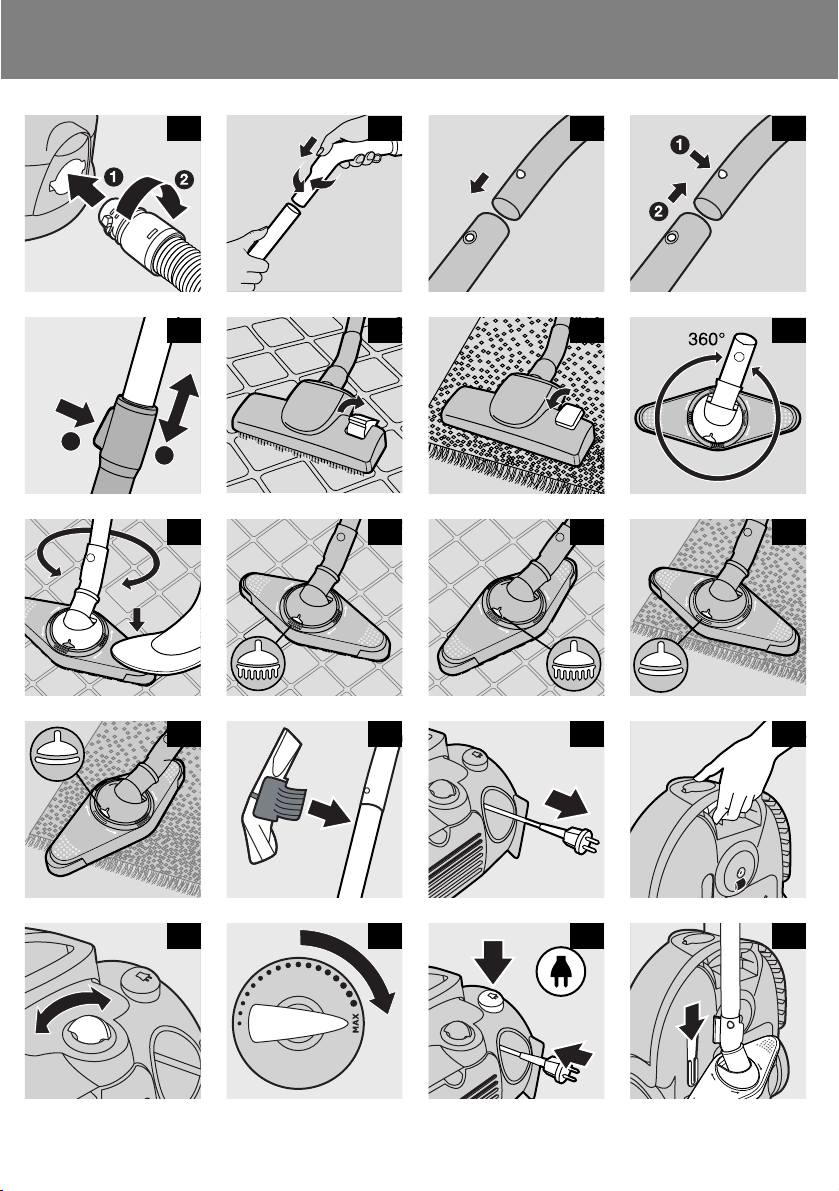
1 To connect the hose to the appliance, push it into the appliance and turn it clockwise (fig. 1).
2 To disconnect the hose from the appliance, turn it anticlockwise and pull it out of the
appliance.
Tu b e
Conical coupling (specific types only)
1 To connect the tube to the handgrip, insert the narrow section into the wider section while
turning it a little (fig. 2).
2 To disconnect the tube, pull while turning it a little.
Use the same methods to connect the accessories to or to disconnect them from the tube or
handgrip.
Button coupling (specific types only)
1 Connect the tube to the handgrip ('click') (fig. 3).
2 To disconnect the tube from the handgrip, push the lock button and pull the tube out of the
handgrip (fig. 4).
Use the same methods to connect the accessories to or to disconnect them from the tube or
handgrip.
Telescopic tube (specific types only)
1 Adjust the tube to the length you find most comfortable during vacuum cleaning (fig. 5).
ENGLISH6

Nozzle
Convertible nozzle (specific types only)
◗ The convertible nozzle can be used on either carpets or hard floors.
1 Connect the convertible nozzle to the tube.
2 Push the rocker switch on top of the convertible nozzle with your foot to make the brush
strip for cleaning hard floors come out of the nozzle housing (fig. 6).
3 Push the rocker switch again to make the brush strip disappear into the convertible nozzle
housing (fig. 7).
Reach & Clean nozzle (specific types only)
◗ The Reach & Clean nozzle can be used on either carpets or hard floors.The nozzle can be
turned 360 degrees to 4 different positions, allowing you to also vacuum clean hard-to-reach
places in an easy way.When the nozzle is positioned lengthwise, the suction power is
concentrated at the front side of the nozzle (fig. 8).
◗ To adjust the nozzle to the type of floor and the area to be cleaned, put your foot on the
indicated spot and then turn the tube until the nozzle is in the required position (fig. 9).
1 Connect the Reach & Clean nozzle to the tube.
2 With the nozzle positioned breadthwise and the brush strip folded out, you can clean large
hard floor areas.Turn the tube until the brush strip pops out of the nozzle housing and the
nozzle is positioned breadthwise (fig. 10).
3 With the nozzle positioned lengthwise and the brush strip folded out, you can vacuum clean
small hard floor areas.Turn the tube 90 degrees anti-clockwise until it is positioned
lengthwise with the brush strip still folded out of the nozzle housing (fig. 11).
4 With the nozzle positioned breadthwise and the brush strip folded in, you can vacuum clean
large soft floor areas.Turn the tube 90 degrees anti-clockwise again to position the nozzle
breadthwise and to make the brush strip disappear into the nozzle housing (fig. 12).
5 With the nozzle positioned lengthwise and the brush strip folded in, you can vacuum clean
small soft floor areas.Turn the tube 90 degrees anti-clockwise again until it is positioned
lengthwise with the brush strip still folded in (fig. 13).
Crevice tool,small nozzle and small brush (specific types only)
1 Connect the crevice tool, small nozzle or small brush directly to the handgrip or to the tube.
Accessory clip (specific types only)
◗ The accessory clip can simply be snapped onto the tube.
◗ The crevice tool and the small nozzle can be snapped onto the clip (fig. 14).
Using the appliance
Vacuum cleaning
1 Pull the cord out of the appliance and put the mains plug in the wall socket (fig. 15).
2 Switch the appliance on by pushing the on/off button on top of the appliance with your foot.
3 The appliance can be carried in two ways:
◗ You can carry the vacuum cleaner vertically by the handle on the front of the appliance
(fig. 16).
◗ You can carry the vacuum cleaner horizontally by the handle on top of the appliance.
ENGLISH 7

Adjusting suction power
You can adjust the suction power while vacuum cleaning.
1 Adjust the suction power by means of the electronic suction power knob (fig. 17).
2 Turn the knob to MAX for maximum suction power (fig.18).
Use maximum suction power for vacuum cleaning very dirty carpets and hard floors.
3 Turn the knob to MIN for minimum suction power.
Use minimum suction power for vacuum cleaning curtains, table carpets, etc.
Storage
1 Switch the appliance off and remove the mains plug from the wall socket.
2 Rewind the mains cord by pressing the cord rewind button (fig. 19).
3 Put the appliance in upright position and attach the nozzle to the appliance by inserting the
ridge on the nozzle into the slot (fig. 20).
Replacing the dustbag
◗ Replace the dustbag as soon as the dustbag-full indicator has changed colour permanently, i.e.
even when the nozzle is not placed on the floor (fig. 21).
1 Switch the appliance off and open the cover (fig. 22).
2 Push the dustbag holder backwards (fig. 23).
3 Remove the full dustbag from the holder by pulling it up by the cardboard tag, which will
cause the dustbag to be sealed (fig. 24).
4 Slide the cardboard front of the new dustbag into the two grooves of the dustbag holder.
Press it down as far as possible (fig. 25).
5 Pull the dustbag holder forwards ('click') (fig. 26).
You cannot close the cover if no dustbag has been inserted.
Ordering dustbags
Philips Classic s-bag` paper dustbags are available under type number FC8021.
Replacing filters
Motor Protection Filter
Replace the Motor Protection Filter once a year.
1 Switch the appliance off and open the cover. Remove the filter.
2 Insert a new filter into the holder with the white side pointing towards the dustbag
compartment (fig. 27).
Super Clean Air Filter (specific types only)
Replace the Super Clean Air Filter ever y 6 months.
1 Open the grille at the back of the appliance and remove it (fig. 28).
2 Remove the old filter and place the sides and the bottom edge of the new filter properly
behind the ridges of the holder on the inside of the grille.
ENGLISH8
 Loading...