

Register your product and get support at
www.philips.com/welcome
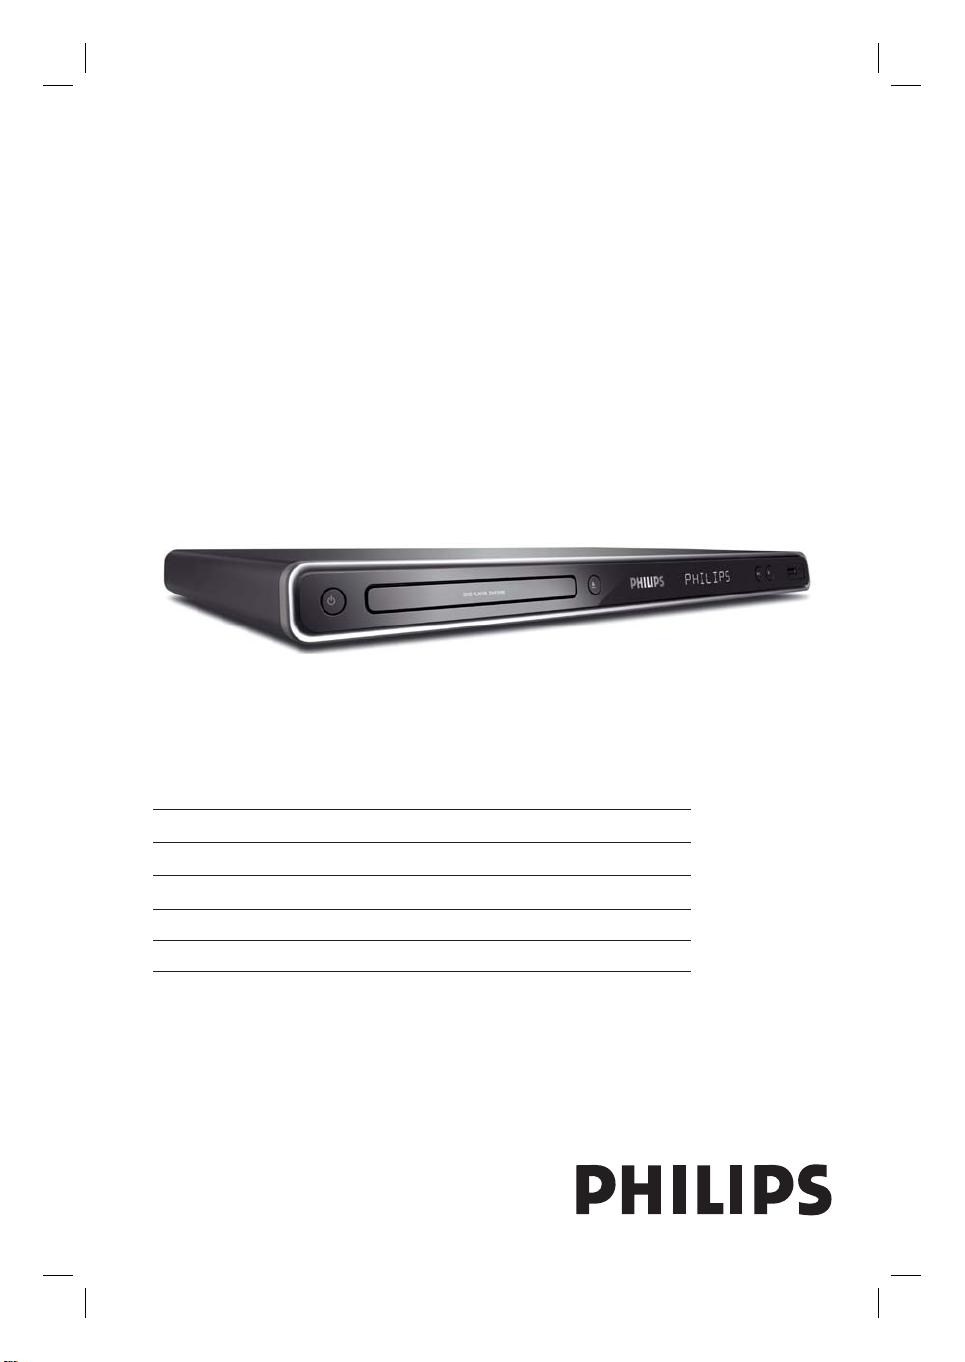
DVP5990
EN DVD Video Player 6
FR Lecteur de DVD 56
ES Reproductor de vídeo DVD 106
DE DVD-Videoplayer 156
NL DVD-videospeler 206
1dvp5990_eu_eng1.indd 11dvp5990_eu_eng1.indd 1 2008-03-10 9:38:56 AM2008-03-10 9:38:56 AM

2
Important notes for users in the
U.K.
Mains plug
This apparatus is tted with an approved 13
Amp plug. To change a fuse in this type of
plug proceed as follows:
1 Remove fuse cover and fuse.
2 Fix new fuse which should be a BS1362
5 Amp, A.S.T.A. or BSI approved type.
3 Ret the fuse cover.
If the tted plug is not suitable for your socket
outlets, it should be cut off and an appropriate
plug tted in its place.
If the mains plug contains a fuse, this should
have a value of 5 Amp. If a plug without a fuse
is used, the fuse at the distribution board
should not be greater than 5 Amp.
Note: The severed plug must be disposed of to
avoid a possible shock hazard should it be
inserted into a 13 Amp socket elsewhere.
How to connect a plug
The wires in the mains lead are coloured with
the following code: blue = neutral (N),
brown = live (L).
As these colours may not correspond with the
colour markings identifying the terminals in
your plug, proceed as follows:
– Connect the blue wire to the terminal
marked N or coloured black.
– Connect the brown wire to the terminal
marked L or coloured red.
– Do not connect either wire to the earth
terminal in the plug, marked E (or e) or
coloured green (or green and yellow).
Before replacing the plug cover, make certain
that the cord grip is clamped over the sheath
of the lead - not simply over the two wires.
Copyright in the U.K.
Recording and playback of material may
require consent. See Copyright Act 1956 and
The Performer’s Protection Acts 1958 to
1972.
ATTENTION!
For Customer Use:
Read carefully the information located at the
bottom or rear of your DVD Video Player and
enter below the Serial No. Retain this
information for future reference.
Model No. DVP5990
Serial No. _______________
Norge
Typeskilt nnes på apparatens underside.
Observer: Nettbryteren er
sekundert innkoplet. Den innebygde
netdelen er derfor ikke frakoplet
nettet så lenge apparatet er
tilsluttet nettkontakten.
For å redusere faren for brann eller elektrisk
støt, skal apparatet ikke utsettes for regn eller
fuktighet.
Italia
DICHIARAZIONE DI CONFORMITA’
Si dichiara che l’apparecchio DVP5990, Philips
risponde alle prescrizioni dell’art. 2 comma 1
del D.M. 28 Agosto 1995 n. 548.
Fatto a Eindhoven
Philips Consumer Electronics
Philips, Glaslaan 2
5616 JB Eindhoven, The Netherlands
Where the MAINS plug or an appliance
coupler is used as the disconnect device, the
disconnect device shall remain readily
operable.
1dvp5990_eu_eng2.indd 2 2008-04-14 9:08:12 AM

DK
Advarsel: Usynlig laserstråling ved
åbning når sikkerhedsafbrydere er ude
af funktion. Undgå utsættelse for
stråling.
Bemærk: Netafbryderen er sekundært
indkoblet og ofbryder ikke strømmen
fra nettet. Den indbyggede netdel er
derfor tilsluttet til lysnettet så længe
netstikket sidder i stikkontakten.
S
Klass 1 laseraparat
Varning! Om apparaten används på
annat sätt än i denna bruksanvisning
speci cerats, kan användaren utsättas
för osynlig laserstrålning, som
överskrider gränsen för laserklass 1.
Observera! Stömbrytaren är sekundärt
kopplad och bryter inte strömmen från
nätet. Den inbyggda nätdelen är därför
ansluten till elnätet så länge
stickproppen sitter i vägguttaget.
SF
Luokan 1 laserlaite
Varoitus! Laitteen käyttäminen muulla
kuin tässä käyttöohjeessa mainitulla
tavalla saattaa altistaa käyttäjän
turvallisuusluokan 1 ylittävälle
näkymättömälle lasersäteilylle.
Oikeus muutoksiin varataan. Laite ei
saa olla alttiina tippu-ja roiskevedelle.
Huom. Toiminnanvalitsin on kytketty
toisiopuolelle, eikä se kytke laitetta irti
sähköverkosta. Sisäänrakennettu
verkko-osa on kytkettynä
sähköverkkoon aina silloin, kun pistoke
on pistorasiassa.
LASER
Type Semiconductor laser
InGaAlP (DVD)
AIGaAs (CD)
Wave length 658 nm (DVD)
790 nm (CD)
Output Power 7.0 mW (DVD)
10.0 mW (VCD/CD)
Beam divergence 60 degrees
CAUTION
VISIBLE AND INVISIBLE LASER RADIATION
WHEN OPEN. AVOID EXPOSURE TO BEAM
ADVARSEL
SYNLIG OG USYNLIG LASERSTRÅLING VED
ÅBNING UNDGÅ UDSÆTTELSE FOR
STRÅLING
VARNING
SYNLIG OCH OSYNLIG LASERSTRÅLNING
NÄR DENNA DEL ÄR ÖPPNAD BETRAKTA
EJ STRÅLEN
VARO!
AVATTAESSA OLET ALTTIINA NÄKYVÄLLE
JA NÄKYMÄTTÖMÄLLE LASER SÄTEILYLLE.
ÄLÄ KATSO SÄTEESEEN
VORSICHT
SICHTBARE UND UNSICHTBARE
LASERSTRAHLUNG WENN ABDECKUNG
GEÖFFNET NICHT DEM STRAHL
AUSSETZEN
ATTENTION
RAYONNEMENT LASER VISIBLE ET
INVISIBLE EN CAS D’OUVERTURE
EXPOSITION DANGEREUSE AU FAISCEAU
The apparatus shall not be exposed to
dripping or splashing and that no objects lled
with liquids, such as vases, shall be placed on
apparatus.
This product complies with the radio
interference requirements of the
European Community.
This product complies with
the requirements of the
following directives and
guidelines: 2006/95/EC +
2004/108/EC
3
1dvp5990_eu_eng1.indd 31dvp5990_eu_eng1.indd 3 2008-03-10 9:39:02 AM2008-03-10 9:39:02 AM
‘CONSUMERS SHOULD NOTE THAT NOT ALL HIGH
DEFINITION TELEVISION SETS ARE FULLY
COMPATIBLE WITH THIS PRODUCT AND MAY CAUSE
ARTIFACTS TO BE DISPLAYED IN THE PICTURE. IN
CASE OF 525 OR 625 PROGRESSIVE SCAN PICTURE
PROBLEMS, IT IS RECOMMENDED THAT THE USER
SWITCH THE CONNECTION TO THE ‘STANDARD
DEFINITION’ OUTPUT. IF THERE ARE QUESTIONS
REGARDING OUR TV SET COMPATIBILITY WITH THIS
MODEL 525p AND 625p DVD PLAYER, PLEASE
CONTACT OUR CUSTOMER SERVICE CENTER.’
Enregistrez votre produit et obtenez de
l’assistance sur le site www.philips.com/
welcome
Registre su producto y obtenga asistencia en
www.philips.com/welcome
Registrieren Sie Ihr Produkt und holen Sie
sich Unterstützung unter www.philips.com/
welcome
Voor registratie van uw product en
ondersteuning kunt u terecht op www.
philips.com/welcome
4
1dvp5990_eu_eng1.indd 41dvp5990_eu_eng1.indd 4 2008-03-10 9:39:02 AM2008-03-10 9:39:02 AM
Laser Safety
This unit employs a laser. Due to possible
eye injury, only a quali ed service person
should remove the cover or attempt to
service this device.
NOTE:
Pictures shown maybe different
between countries.
CAUTION:
WARNING LOCATION: ON THE
BACKPLATE OF THE SET
Index
English ------------------------------------ 6
EnglishFrançaisEspañolDeutschNederlands
Français ----------------------------------56
NEVER MAKE OR CHANGE
CONNECTIONS WITH THE POWER
SWITCHED ON.
Manufactured under license from Dolby
Laboratories. Dolby and the double-D symbol
are trademarks of Dolby Laboratories.
Windows Media and the Windows logo are
trademarks, or registered trademarks of
Microsoft Corporation in the United States
and/or other countries.
DivX, DivX Ultra Certi ed, and associated
logos are trademarks of DivX, Inc. and are
used under license.
The USB-IF Logos are trademarks of
Universal Serial Bus Implementers Forum,
Inc.
HDMI, and HDMI logo and High-De nition
Multimedia Interface are trademarks or
registered trademarks of HDMI licensing LLC.
Español -------------------------------- 106
Deutsch -------------------------------- 156
Nederlands ---------------------------- 206
This product incorporates copyright protection
technology that is protected by method claims of
certain U.S. patents and other intellectual property
rights owned by Macrovision Corporation and
other rights owners. Use of this copyright protection technology must be authorised by Macrovision Corporation, and is intended for home and
other limited viewing uses only unless otherwise
authorised by Macrovision Corporation. Reserve
engineering or disassembly is prohibited.
5
1dvp5990_eu_eng1.indd 51dvp5990_eu_eng1.indd 5 2008-03-10 9:39:02 AM2008-03-10 9:39:02 AM

Table of contents
English
General
General Information ........................................................................................................ 8
Setup precautions .................................................................................................................................................8
Copyright notice ...................................................................................................................................................8
Accessories supplied ...........................................................................................................................................8
Cleaning discs ........................................................................................................................................................8
About recycling .....................................................................................................................................................8
Product Overview
Your DVD Player ...............................................................................................................9
Remote Control ......................................................................................................... 10-12
Using the remote control ................................................................................................................................12
Connections
Basic Connections .....................................................................................................13-16
Step 1: Connecting to television ....................................................................................................................13
Option 1: Using Scart socket (RGB) ......................................................................................................13
Option 2: Using Composite Video sockets (CVBS) ..........................................................................13
Option 3: Using Component Video sockets (Y Pb Pr) .....................................................................14
Option 4: Using HDMI or DVI TV socket ...........................................................................................15
Step 2: Connecting the power cord ..............................................................................................................16
Optional Connections ....................................................................................................17
Connecting to an Analogue Stereo System ................................................................................................17
Connecting to a Digital AV Ampli er/Receiver .........................................................................................17
Basic Setup
Getting Started ..........................................................................................................18-21
Finding the correct viewing channel .............................................................................................................18
Setting language preferences .....................................................................................................................18-19
On-screen display (OSD) language ........................................................................................................18
Audio, Subtitle and Disc Menu language for DVD playback ...........................................................19
Setting up Progressive Scan feature ............................................................................................................. 20
Setting the EasyLink control ...........................................................................................................................21
Disc Playback
Disc Operations ........................................................................................................ 22-33
Playable discs ...................................................................................................................................................... 22
Region codes for DVD discs .......................................................................................................................... 22
Playing a disc ........................................................................................................................................................23
Basic playback controls .....................................................................................................................................23
Selecting various repeat/shuf e functions ...................................................................................................24
Repeating a speci c section (A-B) ................................................................................................................ 25
Other playback features for video discs ............................................................................................... 25-26
Using the Disc Menu ................................................................................................................................. 25
Zooming.........................................................................................................................................................26
Changing sound track language ...............................................................................................................26
Changing subtitle language .......................................................................................................................26
Playback Control (VCD/SVCD) ..............................................................................................................26
6
1dvp5990_eu_eng1.indd 61dvp5990_eu_eng1.indd 6 2008-03-10 9:39:02 AM2008-03-10 9:39:02 AM

Table of contents
Using Display menu options ......................................................................................................................27-28
Selecting title/chapter/track .....................................................................................................................27
Searching by time ........................................................................................................................................27
Viewing playing time .................................................................................................................................. 28
Switching camera angles ........................................................................................................................... 28
Preview function (VCD/SVCD/DVD) ................................................................................................... 28
Special Audio CD feature ................................................................................................................................29
Playing a
Playing a JPEG photo disc (slide show) ........................................................................................................31
Playing a MP3/ WMA/WMV disc ...................................................................................................................32
Playing music and photo les simultaneously .............................................................................................33
USB Playback
USB Operation ............................................................................................................... 34
Create MP3
Create MP3 les .............................................................................................................. 35
Creating audio CD to MP3 format ................................................................................................................35
Setup Options
Setup Menu Options ................................................................................................. 36-47
Accessing the setup menu ................................................................................................................................36
DivX® disc ..............................................................................................................................30
Preview function ..........................................................................................................................................31
Zooming.........................................................................................................................................................31
Flip/Rotate picture ......................................................................................................................................31
General Setup Page .............................................................................................................................37-38
Audio Setup Page .................................................................................................................................39-41
Video Setup Page ................................................................................................................................42-45
Preference Page .................................................................................................................................... 46-47
English
Others
Software upgrade ...........................................................................................................48
Installing the latest software .......................................................................................................................... 48
Troublesho oting ........................................................................................................ 49-52
Speci cations .................................................................................................................. 53
Glossary...................................................................................................................... 54-55
7
1dvp5990_eu_eng1.indd 71dvp5990_eu_eng1.indd 7 2008-03-10 9:39:03 AM2008-03-10 9:39:03 AM
General Information
English
WARNING!
This unit does not contain any userserviceable parts. Please leave all
maintenance work to quali ed
personnel.
Setup precautions
Finding a suitable location
– Place this unit on a at, hard and
stable surface. Never place the unit on a
carpet.
– Never place this unit on top of other
equipment that might heat it up (e.g.,
receiver or ampli er).
– Never put anything under this unit
(e.g., CDs, magazines).
– Install this unit near the AC outlet
where the AC power plug can be easily
reached.
Space for ventilation
– Place this unit in a location with
adequate ventilation to prevent internal
heat build up. Allow at least 10 cm (4”)
clearance from the rear and the top of
this unit and 5 cm (2”) from the left and
right to prevent overheating.
Avoid high temperature, moisture,
water and dust
– This unit must not be exposed to
dripping or splashing.
– Never place any object or items that
can damage this unit (e.g., liquid lled
objects, lighted candles).
Accessories supplied
– 1 remote control with batteries
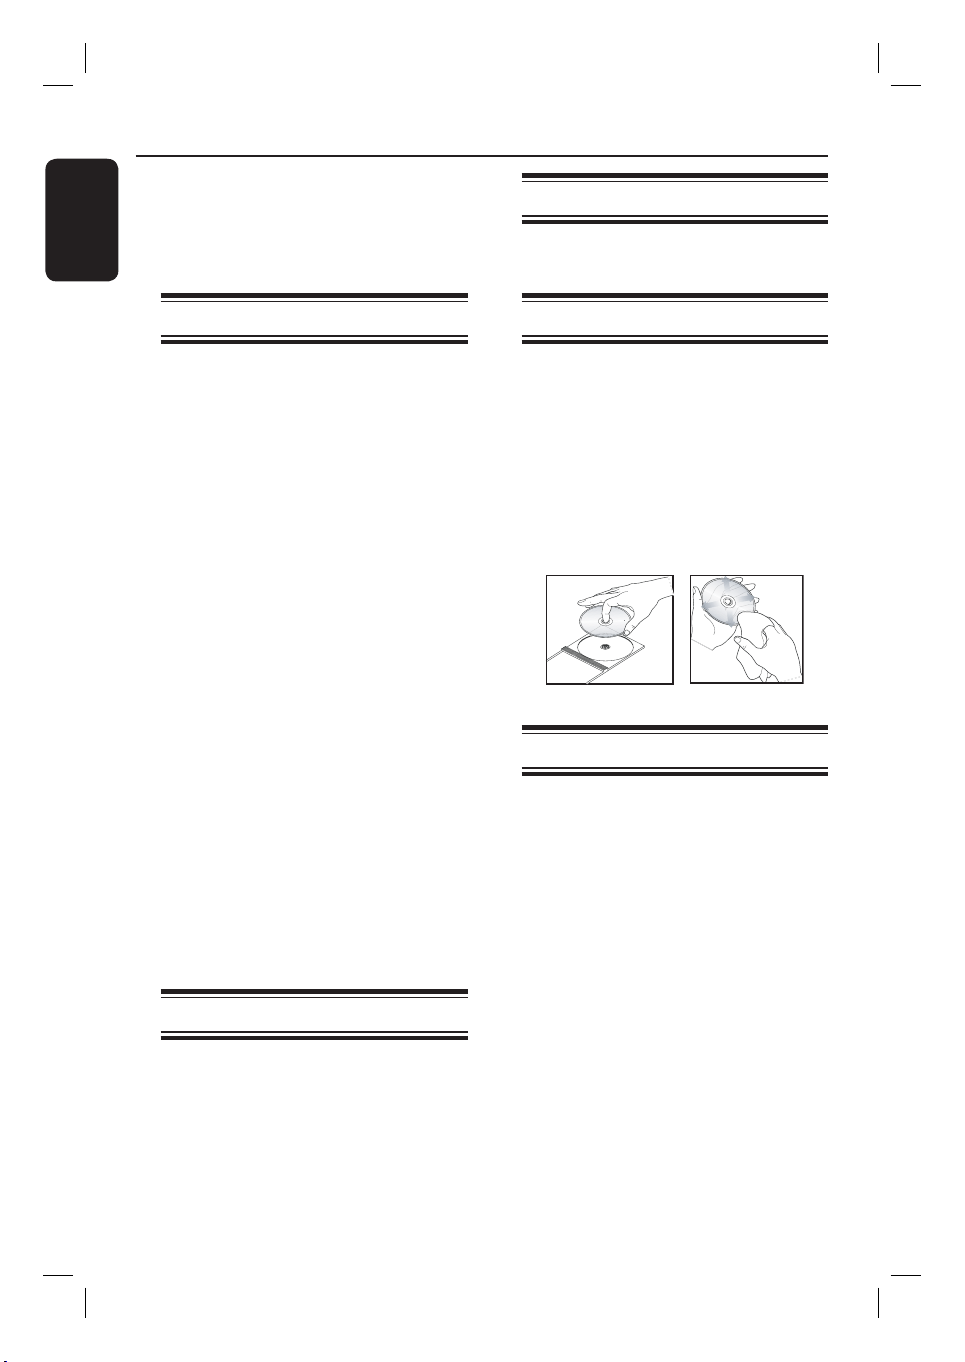
Cleaning discs
CAUTION!
Risk of damage to discs! Never use
solvents such as benzene, thinner,
cleaners available commercially, or antistatic sprays intended for discs.
Wipe the disc with a micro bre cleaning
cloth from the centre to the edge in a
straight line movement.
About recycling
This user manual is printed on nonpolluting paper. This unit contains a large
number of materials that can be recycled.
If you are disposing an old equipment,
please take it to a recycling centre.
Please observe the local regulations
regarding disposal of packaging materials,
exhausted batteries and old equipment.
Copyright notice
The making of unauthorised copies of
copy-protected material, including
computer programmes, les, broadcasts
and sound recordings, may be an
infringement of copyrights and constitute
a criminal offence. This unit should not be
used for such purposes.
8
1dvp5990_eu_eng1.indd 81dvp5990_eu_eng1.indd 8 2008-03-10 9:39:03 AM2008-03-10 9:39:03 AM

Your DVD Player
31 2
a 1 (Standby-On)
– Turns on this unit or turns off to normal
standby mode.
b Disc tray
c ç (Open/Close)
– Opens/closes the disc tray.
d Display panel
– Shows information about the current
status of the unit.
e IR Sensor
– Point the remote control towards this
sensor.
4
5
7
6
f u (Play/Pause)
– Starts/pauses playback.
g
Ç(Stop)
– Stops playback.
h (USB) socket
– Input for USB ash drive or digital
camera.
* Not all brands and models of digital
cameras are supported.
8
English
9
1dvp5990_eu_eng1.indd 91dvp5990_eu_eng1.indd 9 2008-03-10 9:39:03 AM2008-03-10 9:39:03 AM
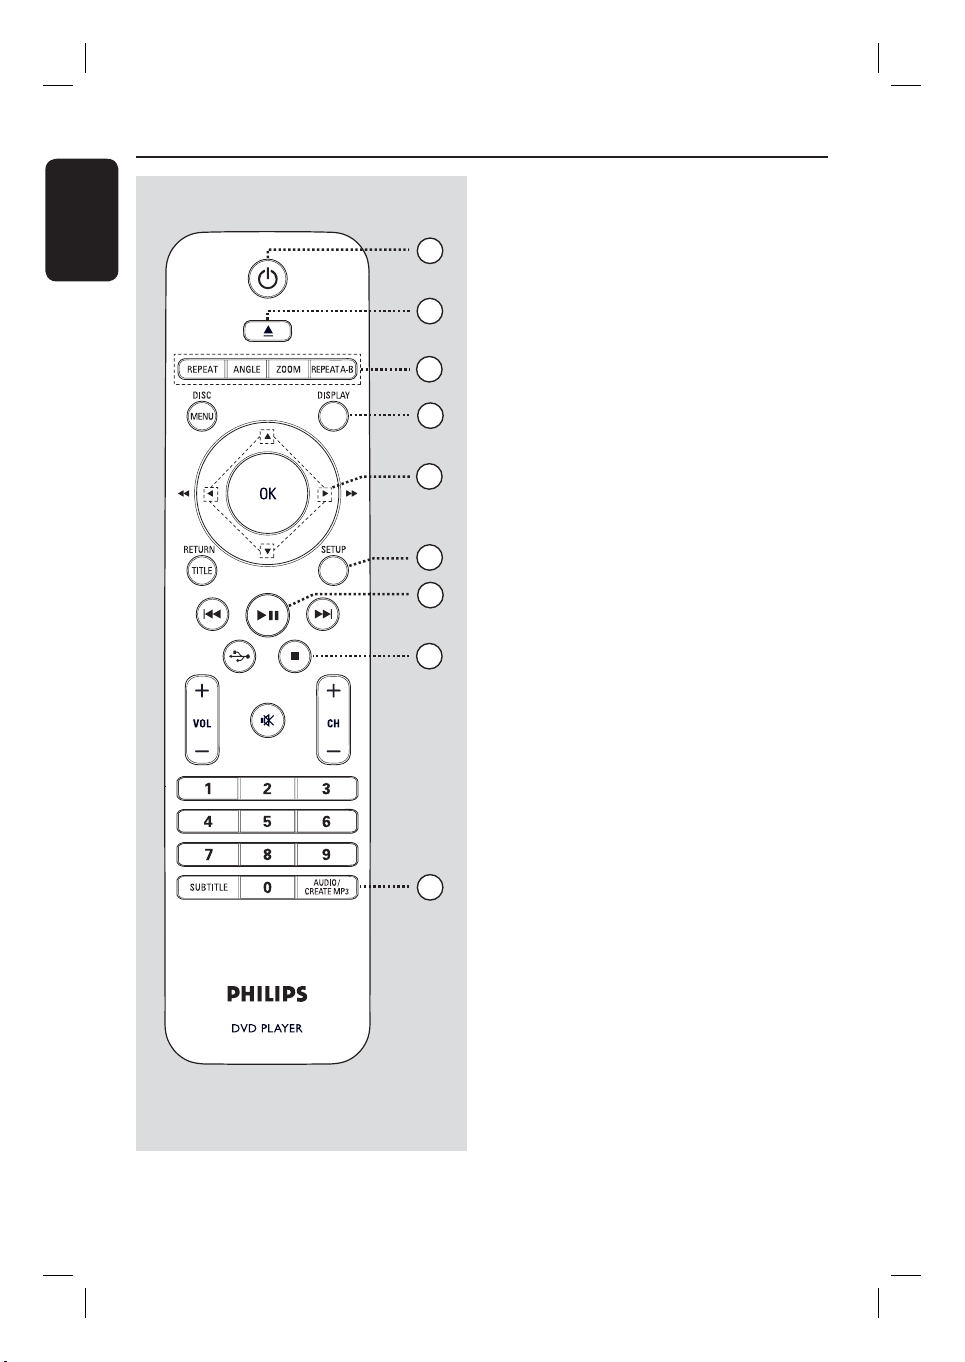
Remote Control
English
a 1 (Standby-On)
– Turns on this unit or turns off to normal
standby mode.
1
b ç (Open/Close)
2
– Opens/closes the disc tray.
c REPEAT
3
4
5
6
7
8
– Selects various repeat modes; turn off
repeat mode.
ANGLE
– Switches between different angles on
DVD.
ZOOM
– Zoom the picture on the TV.
REPEAT A-B
– Repeat a speci c section of a disc.
d DISPLAY
– Displays the current status or disc
information.
e
– Selects movement direction in the menu.
– Press up/down for a slow backward or
forward search.
– Press left/right for fast backward or
forward search.
9
f SETUP
– Enters or exits the disc setup menu.
g u (Play/Pause)
– Starts or pauses playback.
h
Ç(Stop)
– Stops playback.
i AUDIO/CREATE MP3
– Selects an audio language or channel.
– Access create MP3 menu.
10
1dvp5990_eu_eng1.indd 101dvp5990_eu_eng1.indd 10 2008-03-10 9:39:03 AM2008-03-10 9:39:03 AM

DISC MENU
j
– Enters or exits disc contents menu.
– For VCD 2.0 and SVCD, turns on or off
the playback control mode.
k OK
– Con rms an entry or selection.
l RETURN/TITLE
– Returns to the previous menu or shows
title menu
m ./ > (Previous/Next)
– Skips to the previous or next title/
chapter/track.
– Press and hold this button for fast
backward or fast forward.
Remote Control (continued)
English
10
11
n (USB)
– Switches to USB mode and shows the
content of the USB device.
o VOL +/-
– Adjusts the TV volume.
% (Mute)
– Mutes or restores the volume.
CH +/– Selects the next or previous TV channel
or external input source (Video In
channel, etc)
* These buttons can only be used with
Philips TVs.
p Numeric keypad 0-9
– Selects a track or title number of the
disc.
q SUBTITLE
– Selects a DVD subtitle language.
12
13
14
15
16
17
11
1dvp5990_eu_eng1.indd 111dvp5990_eu_eng1.indd 11 2008-03-10 9:39:03 AM2008-03-10 9:39:03 AM
English
12
Remote Control (continued)
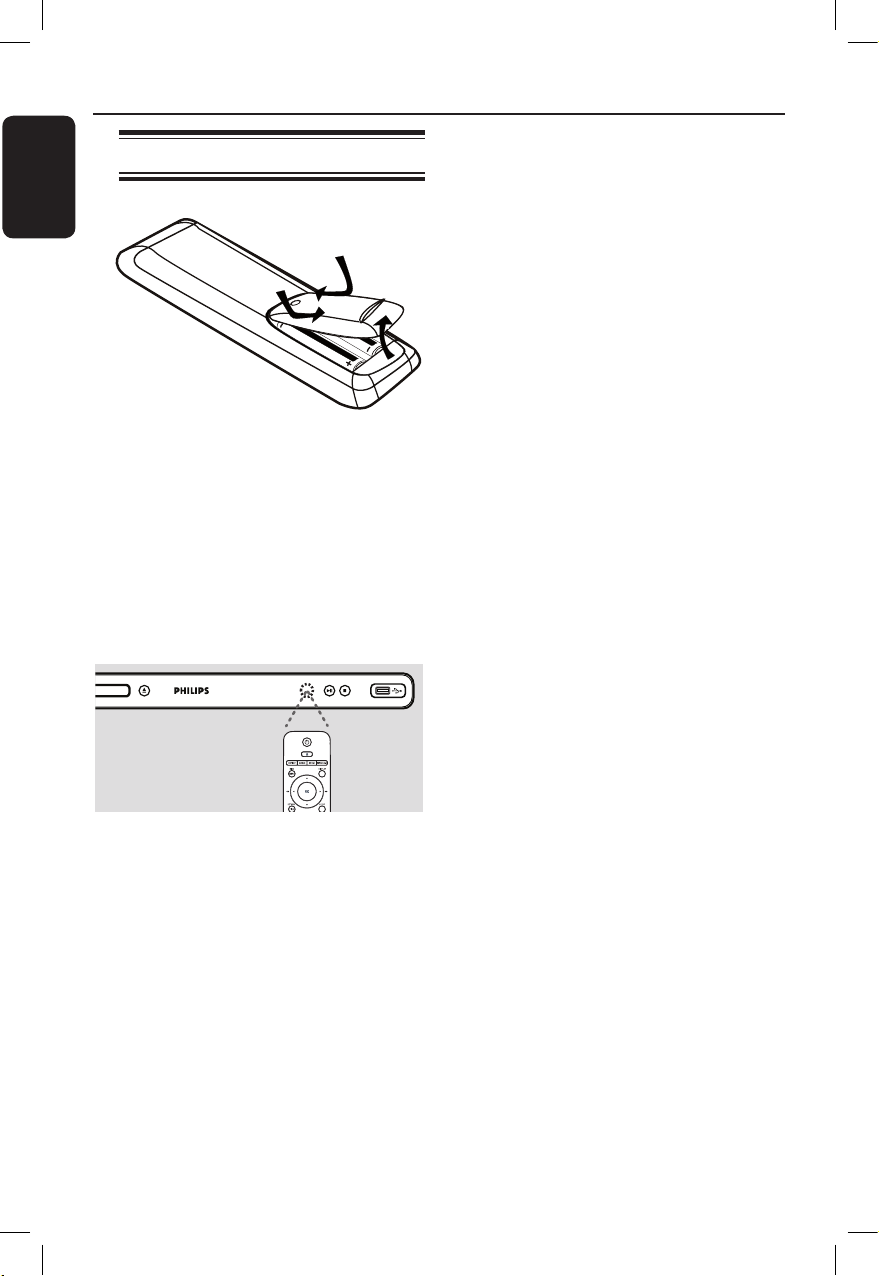
Using the remote control
A Open the battery compartment.
B Insert two batteries type R03 or AAA,
following the indications (+-) inside
the compartment.
C Close the cover.
D Point the remote control directly at the
remote sensor (IR) on the front panel.
Note:
Never place any objects between the
remote control and this unit while
operating.
E Select the desired function (for example
u).
CAUTION!
– Remove batteries if they are
exhausted or if the remote control
is not to be used for a long time.
– Never mix batteries (old and new
or carbon and alkaline, etc.).
– Batteries contain chemical
substances; they should be disposed
of properly.
1dvp5990_eu_eng2.indd 12 2008-04-14 9:08:35 AM
Basic Connections
English
TV
TV
TV
DVD
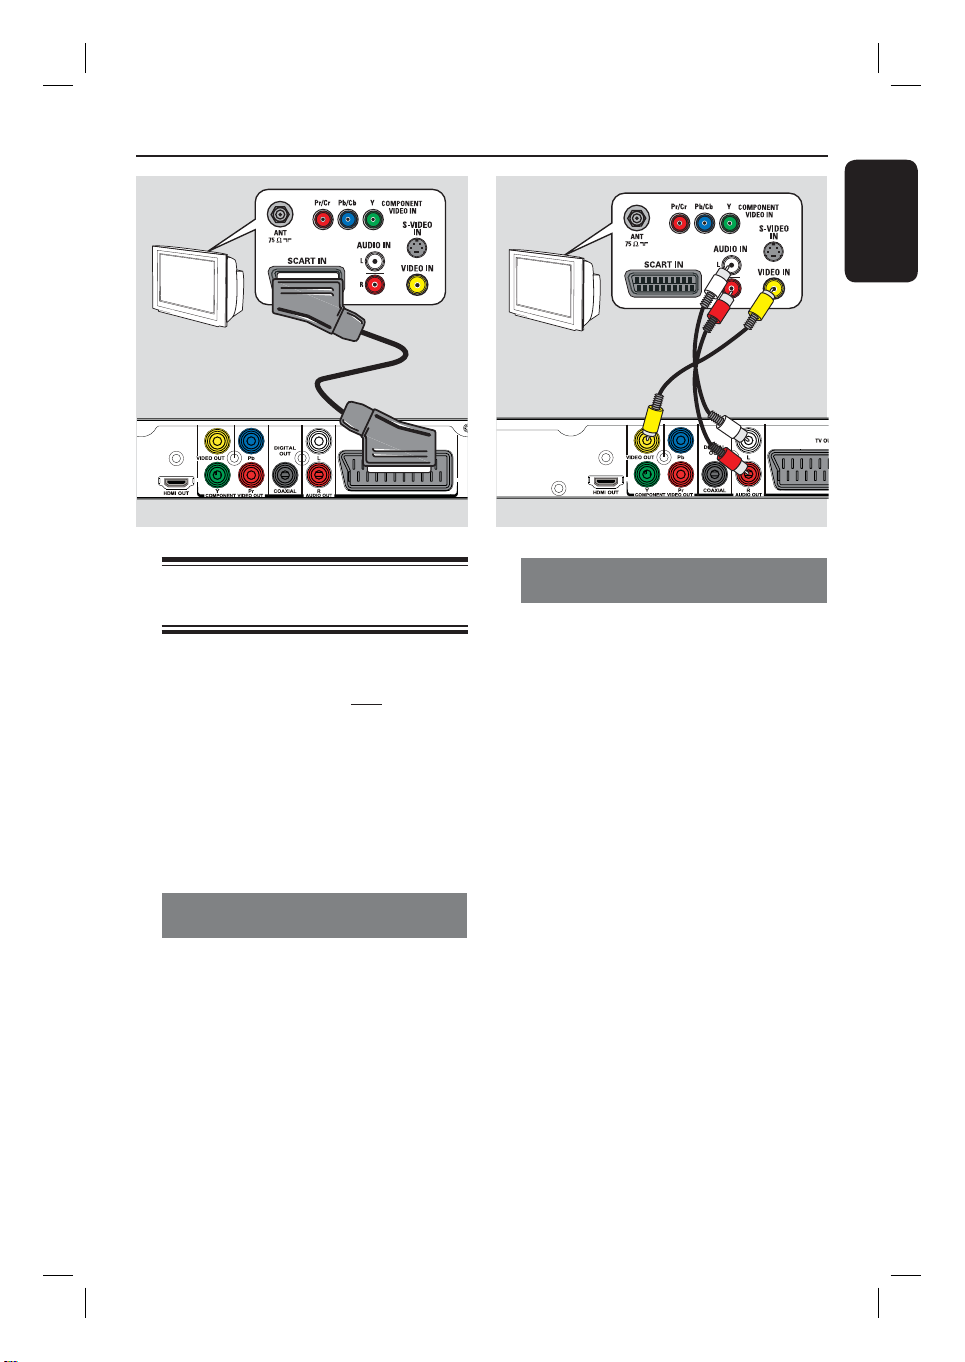
Step 1: Connecting to
television
This connection enables you to view the
video playback from this unit.
You only need to choose one of the
options below to make the video
connection.
– For a standard TV, follow option 1 or
2.
– For a progressive scan TV, follow
option 3.
– For a HDMI TV, follow option 4.
Option 1: Using Scart socket
(RGB)
The scart cable provides both audio and
video features with a single cable
connection.
Audio
(red/white cables)
Video
(yellow cable)
Option 2: Using Composite Video
sockets (CVBS)
You can connect this unit to a TV
through the composite video cable which
provides good picture quality.
Connect the audio/video cables (not
supplied) from the VIDEO OUT and
AUDIO OUT L/R sockets on this
unit to the video input socket (yellow)
and audio input sockets (red/white) on
your TV.
Connect the scart cable (not supplied)
from the TV OUT socket on this unit to
the scart input socket on your TV.
13
1dvp5990_eu_eng1.indd 131dvp5990_eu_eng1.indd 13 2008-03-10 9:39:03 AM2008-03-10 9:39:03 AM
Basic Connections (cont inued)
English
TV
Audio
Video
1
2
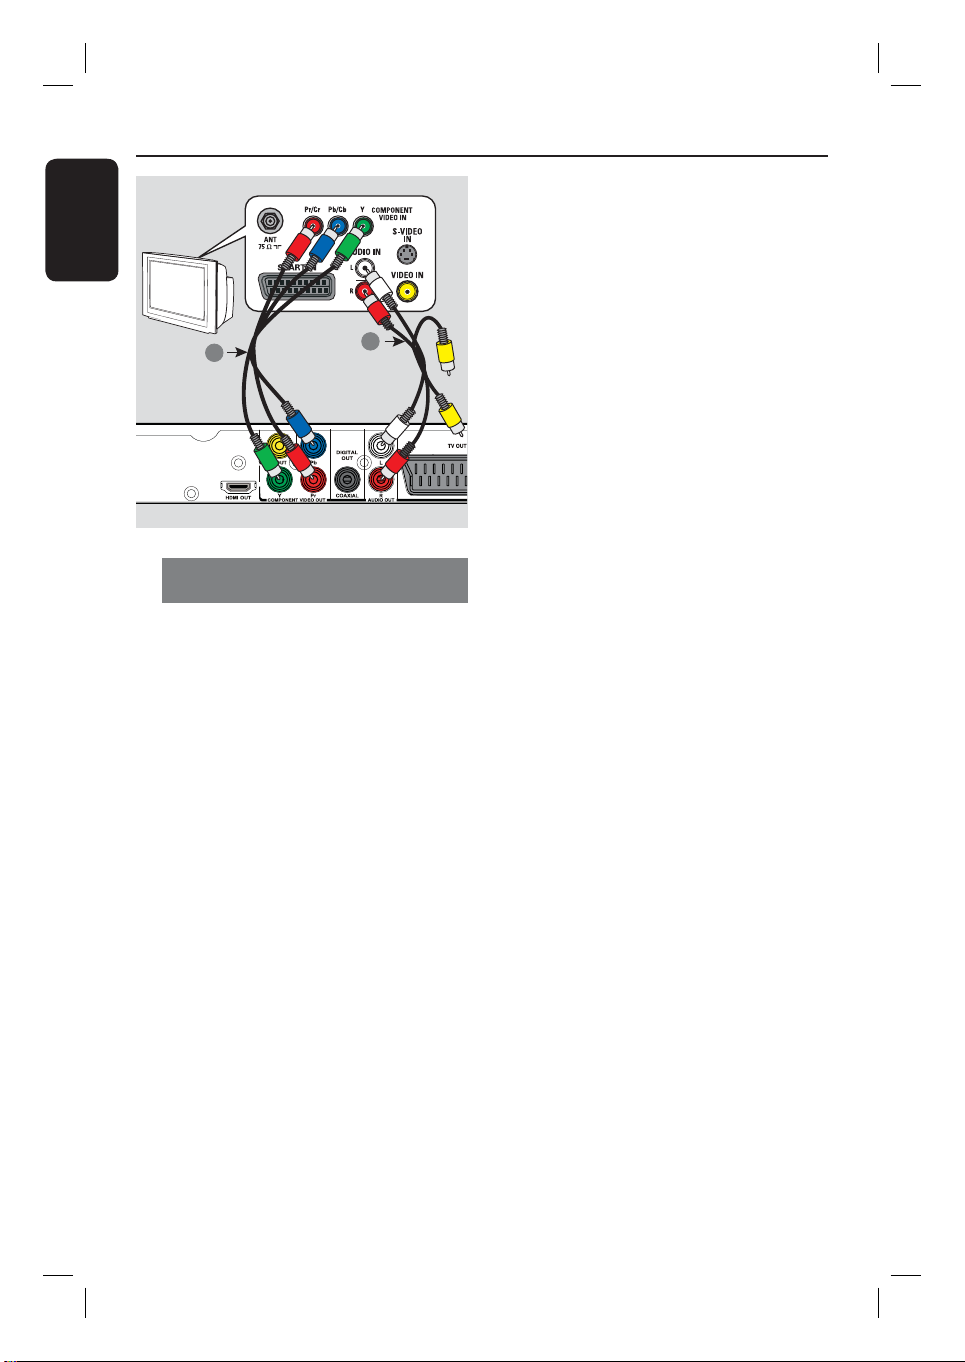
Option 3: Using Component Video
sockets (Y Pb Pr)
You can connect this unit to a TV
through the component video cables
which provides superior picture quality.
The progressive scan video quality is only
available when using Y Pb Pr connection
and a progressive scan TV is required.
A Connect the component video cables
(red/blue/green - not supplied) from the
Y Pb Pr sockets on this unit to the
corresponding component video input
sockets (or labeled as Y Pb/Cb Pr/Cr or
YUV) on your TV.
B Connect the audio/video cable (red/white
- not supplied) from the AUDIO OUT
L/R sockets on this unit to the audio
input sockets (red/white) on your TV.
Leave the yellow video cable
disconnected.
C Proceed to ‘Getting Started - Setting up
Progressive Scan feature’ for detailed
progressive feature setup.
14
1dvp5990_eu_eng1.indd 141dvp5990_eu_eng1.indd 14 2008-03-10 9:39:04 AM2008-03-10 9:39:04 AM

Basic Connections (cont inued)
HDTV/
DVI TV
Option 4: Using HDMI or DVI TV
socket
HDMI (High De nition Multimedia
Interface) is a digital interface that allows
pure digital audio/video transmission
without the loss of image quality.
Connect a HDMI cable (not supplied)
from the HDMI OUT socket on this
unit to the HDMI input socket on a
HDMI-compatible device (e.g., HDMI TV,
HDCP compliant DVI TV).
English
HDMI IN
OR
Note:
– This unit is EasyLink compatible. It
enables connected EasyLink compatible
devices to control each other over
HDMI, see ‘Setup Menu Options { Video Setup > HDMI Setup > EasyLink }’
for details.
– For HDCP compliant or DVI TV, you
need a HDMI-DVI adaptor cable (not
supplied) to connect the DVI input
socket from your TV to the HDMI OUT
socket on this unit.
Helpful Hint:
– The HDMI-DVI cable has only video
output capability. An audio connection is
required for audio output, see ‘Optional
Connections’ for details.
15
1dvp5990_eu_eng1.indd 151dvp5990_eu_eng1.indd 15 2008-03-10 9:39:04 AM2008-03-10 9:39:04 AM

Basic Connections (cont inued)
English
Step 2: Connecting the
power cord
After everything is connected
properly, plug the AC power cord
into the power outlet.
Never make or change any connections
with the power turned on.
Helpful Hint:
– Refer to the type plate at the rear or
bottom of the product for identi cation and
supply ratings.
16
1dvp5990_eu_eng1.indd 161dvp5990_eu_eng1.indd 16 2008-03-10 9:39:04 AM2008-03-10 9:39:04 AM

STEREO
Audio
(red/white cables)
AUDIO
Optional Connections
IN
DIGITAL
AV Receiver
AUDIO
AUDIO
IN
IN
DIGITAL
DIGITAL
English
Connecting to an Analogue
Stereo System
You can connect this unit to a two
channel stereo system (e.g. mini system,
analogue receiver) in order to enjoy
stereo sound output.
A Connect the audio/video cables
(red/white - not supplied) from the
AUDIO OUT L/R socket on this unit
to the audio input sockets (red/white) on
your connecting device. Leave the yellow
video cable disconnected.
B
For video connection, see ‘Basic
Connections - Step 1: Connecting to
television’ for details.
Helpful Hint:
– See ‘Setup Menu Options - Audio Setup
Page’ for optimum audio settings.
Connecting to a Digital AV
Ampli er/Receiver
You can connect this unit to an AV
ampli er/receiver in order to enjoy
quality sound.
A Connect a coaxial cable (not supplied)
from the COAXIAL DIGITAL OUT
socket on this unit to the digital coaxial
input socket of the connected device.
B
For video connection, see ‘Basic
Connections - Step 1: Connecting to
television’ for details.
Helpful Hint:
– You have to set the appropriate Digital
Audio Output setting. Otherwise, no sound or
interference may occur. See ‘Setup Menu
Options - Audio Setup Page - Digital Audio
Setup’ for details.
17
1dvp5990_eu_eng1.indd 171dvp5990_eu_eng1.indd 17 2008-03-10 9:39:04 AM2008-03-10 9:39:04 AM
 Loading...