

Page 1
Register your product and get support at
www.philips.com/welcome
DVP3588K
EN User manual 3
ZH-CNႬ߀൱Ҭ 23
Page 2
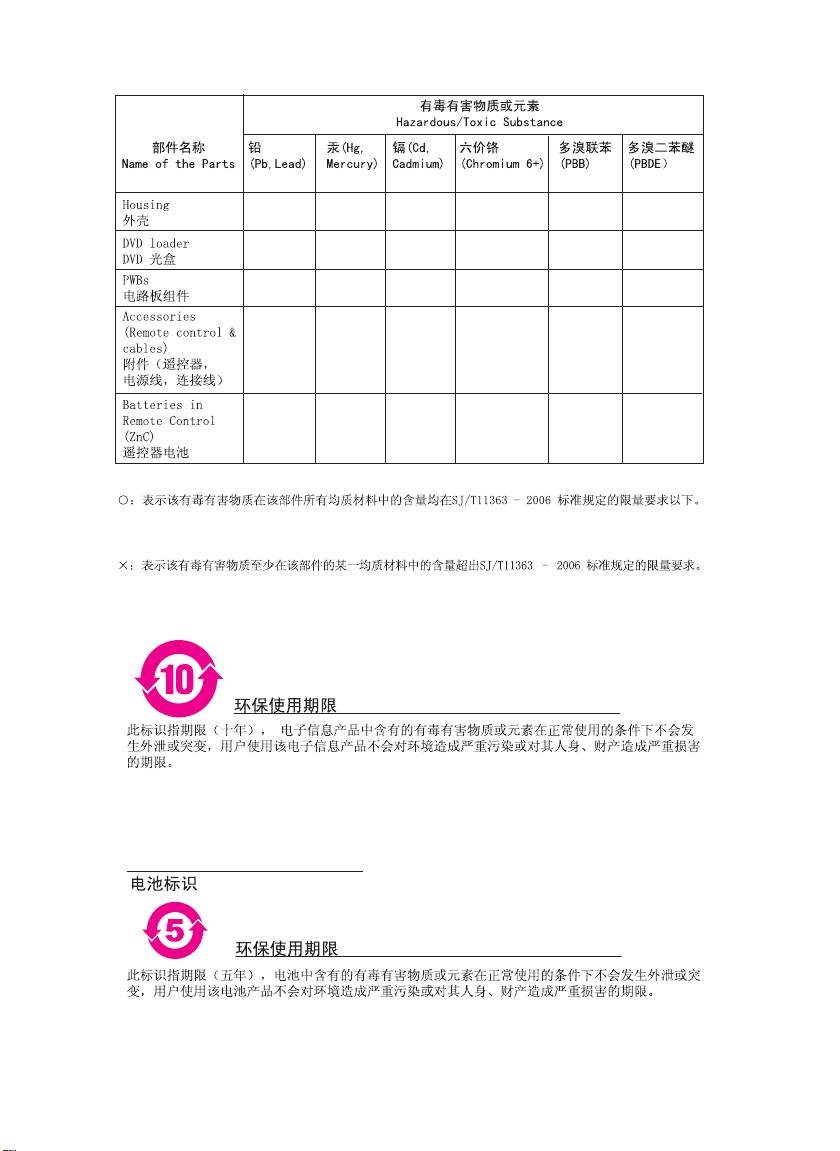
OOO O O O
XOO O O O
XOO O O O
XOO O O O
XOO O O O
O: Indicates that this toxic or hazardous substance contained in all of the homogeneous
materials for this part is below the limit requirement in SJ/T11363 – 2006.
X: Indicates that this toxic or hazardous substance contained in at least one of the
homogeneous materials used for this part is above the limit requirement in SJ/T11363 - 2006.
Environmental Protection Use Period
This logo refers to the period ( 10 years ) during which the toxic or hazardous substances or elements
contained in electronic information products will not leak or mutate so that the use of these [substances or
elements] will not result in any severe environmental pollution, any bodily injury or damage to any assets.
Battery labeling logo
Environmental Protection Use Period
This logo refers to the period ( 5 years ) during which the toxic or hazardous substances or elements
contained in the battery will not leak or mutate so that the use of these [substances or elements] will not
result in any severe environmental pollution, any bodily injury or damage to any assets.
Page 3

Contents
1 Important 4
Safety and important notice 4
Trademark notice 4
2 Your DVD player 5
Playable media 5
Product overview 5
3 Connect 7
Connect audio/video cables 7
Optional audio connections 8
Connect USB fl ash drive 8
Connect power 9
4 Get started 9
Prepare the remote control 9
Find the TV input channel 9
Select a menu display language 9
Turn on progressive scan 9
Use Philips EasyLink 10
5 Play 10
Play a disc 10
Play video 10
Play music 12
Play photo 13
Play from a USB fl ash drive 13
6 Other features 13
Media copy 13
Create MP3 fi les 14
Karaoke 14
English
7 Adjust settings 15
General setup 15
Audio setup 16
Video setup 17
Preferences 18
8 Additional information 20
Update software 20
Care 20
Specifi cations 20
9 Troubleshooting 21
10 Glossary 22
EN
3
Page 4
1 Important
Safety and important notice
Copyright notice
Warning
Risk of overheating ! Never in stall the product in a confi ne d •
space . Always l eave a space of at leas t 4 inches around t he
product for ve ntilat ion. Ensure cur tains or oth er objects
never cover the ventilation slot s on the pr oduct .
Never p lace the produc t, remote contr ol or bat teries near
•
naked fl ames or other heat sources , including direc t sunlight .
Avoid high tempe rature, mois ture , water a nd dust .
•
This unit must not be exp osed to dr ipping o r splas hing.•
Never p lace any object or i tems that can dam age this •
unit (e. g., liquid fi lled objec ts, lighted ca ndles).
Never p lace this p roduc t on othe r electrica l equipm ent.
•
Keep away from th is produ ct dur ing ligh tning s torms .•
Wher e the mains plug or an appliance coupler is used a s •
the dis connec t device , the dis connec t device s hall re main
readily operable.
Visib le and inv isible l aser r adiation when open. Avoi d
•
expos ure to beam.
About Progressive Scan
Consumers should note that not all high defi nition
television sets are fully compatible with this product
and may cause ar tifac ts to be displayed in the
picture. In case of 525 or 625 progressive scan
picture problems, it is recommended that the user
switch the connection to the ‘standard defi nition’
output. If there are questions regarding our TV set
compatibility with this model 525p and 625p DVD
player, please contact our cus tomer service center.
Disposal of your old product and
batteries
Your produc t is designed and manufac tured
with high quality materials and components, which
can be recycled and reused.
Never dispose of your produc t with other household
waste. Please inform yourself about the local rules
on the separate collection of electrical and electronic
products and batteries. The correct disposal of
these products helps prevent potentially negative
consequences on the environment and human health.
Your produc t contains batteries, which cannot be
disposed of with normal household waste.
Please inform yourself about the local r ules on
separ ate collection of batteries. The correct
disposal of batteries helps prevent potentially
negative consequences on the environment and
human health.
Please visit www.recycle.philips.com for additional
information on a recycling center in your area .
This item incorporates copy protection technology
that is protected by U.S. patents and other
intellectual property rights of Rovi Corporation.
Reverse engineering and disassembly are
prohibited.
CLASS 1
LASER PRODUCT
Trademark notice
HDMI, and HDMI logo and
High-Defi nition Multimedia Inter face are
trademarks or registered trademarks of HDMI
licensing LLC.
The USB-IF Logos are trademarks of
Universal Serial Bus Implementers Forum, Inc.
Manufactured under license from
Dolby Laboratories. Dolby and the double-D
symbol are trademarks of Dolby Laboratories.
Manufactured under license under
U.S. Patent #’s: 5,451,942; 5,956,674; 5,974,380;
5,978,762; 6,487,535 & other U. S. and worldwide
patents issued & pending. DTS and the Symbol are
regis tered trademark s & DTS Digital Surround and
the DTS logos are trademar ks of DTS, Inc. Product
includes soft ware. © DTS, Inc. All Rights Reserved.
ABOUT DIVX VIDEO: DivX® is a
digit al video format created by DivX, Inc. This is an
offi cial DivX Certifi ed device that plays DivX video.
Visit www.divx.com for more information and
soft ware tools to convert your fi les into DivX video.
4
EN
Page 5
ABOUT DIVX VIDEO-ON-DEMAND: This DivX
Certifi ed® device must be registered in order to
play DivX Video-on-Demand (VOD) content. To
gener ate the registration code, locate the DivX
VOD section in the device setup menu. Go to vod.
divx.com with this code to complete the registration
process and lear n more about DivX VOD.
DivX®, DivX Cer tifi ed® and associated logos are
regis tered trademarks of DivX, Inc. and are used
under license.
‘DVD Video’ is a trademark of
DVD Format/Logo Licensing Corporation.
Windows Media and the
Windows logo are trademarks, or registered
trademarks of Microsoft Corporation in the United
States and/or other countr ies.
2 Your DVD player
Congratulations on your purchase, and welcome to
Philips! To fully benefi t from the support that Philips
offers, register your product at www.philips.com/
welcome.
Playable media
This product can play:
DVD, DVD -Video, DVD+R /+RW, DVD-R/-•
RW, DVD+R/-R DL (Dual Layer)
Video CD/SVCD•
Audio CD, CD-R /CD-RW, •
MP3 media, WMA media, WMV media, •
DivX (Ultra) media, JPEG fi les
USB fl ash drive•
Region codes
You can play discs with the following region codes.
DVD region code Countries
China
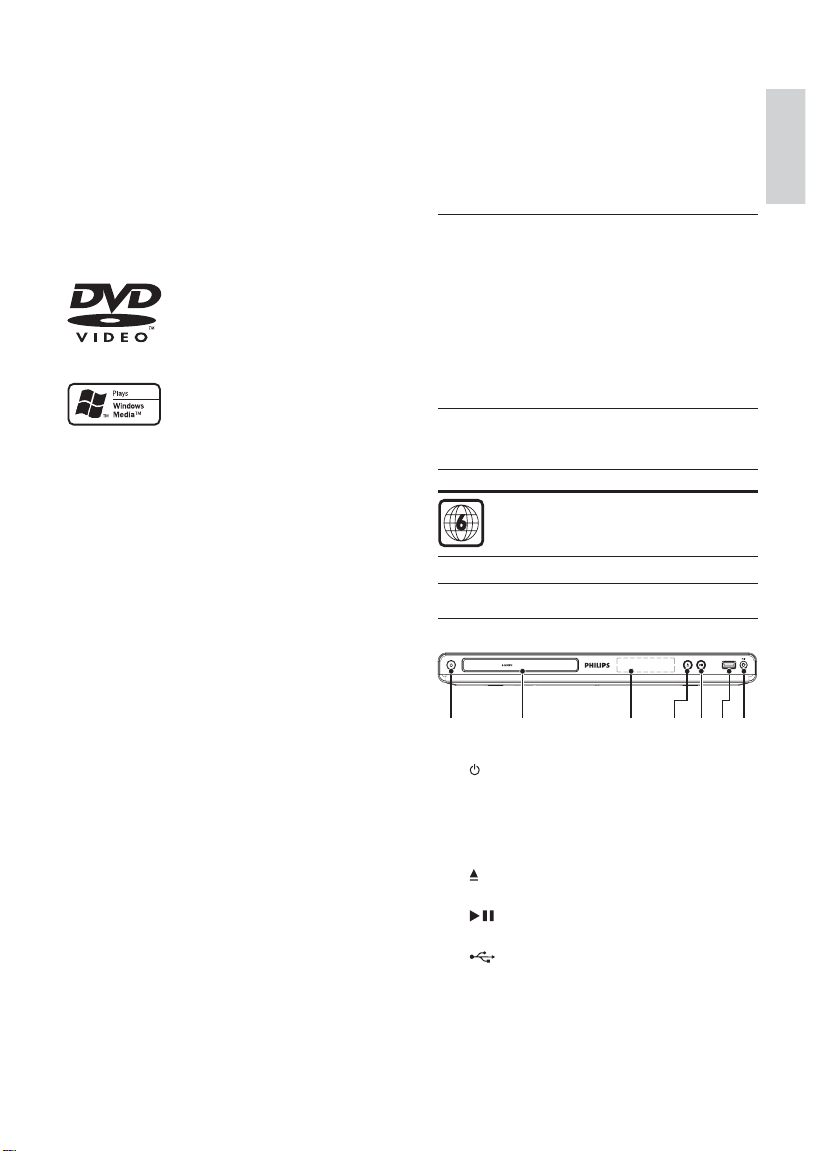
Product overview
Main Unit
DVD PLAYER DVP3588K
English
a b cdefg
a ( Standby-On )
b Disc compartment
c Display panel
d
e
f
g MIC
Turn on the DVD player or switch to •
standby mode.
( Open/Close )
Open or close the disc compar tment.•
( Play/Pause )
Star t, pause or resume disc play. •
( USB )jack
Connect a USB fl ash drive.•
Connect a microphone.•
EN
5
Page 6

Remote control
a
b
c
d
e
f
g
h
i
j
a
b
c
Turn on the unit or switch to standby.•
Open or close the disc compar tment. •
/
Access or exit the disc menu. •
Switch to the disc mode.•
During the play of a photo slideshow, •
switch between the Fun Mode and
Simple Mode.
For VCD and SVCD, turn on or off PBC •
(playback control).
r
q
p
o
n
m
l
k
d
e
f
g
h Numeric buttons
i
j
k
l
m
n
o
p
q OK
r
( Navigation buttons )
Navigate the menus.•
Search fast-forward ( • ) or fast-backward
( ).
Search slow-forward ( • ) or slowbackward ( ).
Retur n to the previous display menu.•
/
Skip to the previous or next title, chapter, •
or track.
Switch to the USB mode.•
Selec t an item to play.•
Select a subtitle language on a disc.•
Access the menu of copying/deleting •
audio fi les in a USB fl ash drive.
Fit the picture display to the TV screen.•
Zoom the picture in or out .•
Record the voice and music dur ing •
karaoke into a USB fl ash drive.
Access or exit the Karaoke setup menu.•
Select an audio language or channel on •
a disc.
Access the menu of creating MP3 fi les.•
Stop play.•
Star t, pause or resume disc play.•
For discs, access the play options or •
display the current disc status.
For slideshows, display a thumbnail view •
of photo fi les.
Confi rm an entr y or selection.•
Access or exit the setup menu.•
6
EN
Page 7

3 Connect
Make the following connections to use this product.
Basic connections:
Video•
Audio•
Optional connections:
Route audio to other devices:•
Digital amplifi er/receiver•
Analog stereo system•
USB fl ash drive•
Connect audio/video cables
Select the best video connection that TV can
support.
• Option 1: Connect to the HDMI jack (for a
HDMI, DVI or HDCP-compliant TV).
• Option 2: Connect to the component video
jacks (for a standard TV or Progressive Scan
TV).
• Option 3: Connec t to the composite video
jack (for a standard TV ).
Option 1: Connect to the HDMI jack
HDMI IN
HDMI OUT
Option 2: Connect to the component
video jacks
Y
Pb
Pr
Pb
Pr
Y
COMPONENT VIDEO OUT
1
Connect the component video cables (not
supplied) to:
the • Y Pb Pr jack s on this product.
the COMPONENT VIDEO input jack s •
on the T V.
2 Connect the audio cables (supplied) to:
the • AUDIO OUT FRONT L/R jacks on
this product.
the audio input jacks on the TV.•
Option 3: Connect to the video (CVBS)
jack
English
Connect an HDMI cable (not supplied) to
1
the • HDMI OUT jack on this product.
the HDMI input jack on the TV. •
Note
If the device sup ports HDMI CEC, you can control •
compliant devices wit h a single r emote control (see “ Get
sta rted ” > “Use Philips EasyLi nk” ).
Connect a composite video cable (supplied) to:
1
the • TV OUT jack on this product.
the video input jack on the TV.•
2 Connect the audio cables (supplied) to:
the • AUDIO OUT FRONT L/R jacks on
this product.
the audio input jacks on the TV.•
EN
7
Page 8

Optional audio connections
Connect the audio from this product to other devices
to enhance sound.
Connect multi channel receiver
FRONT L
REAR L
CENTER
REAR R
FRONT R
Connect the audio cables (not supplied) to:
1
the • AUDIO OUT ( FRONT L/R , REAR
L/R, CENTER and SUBWOOFER) jacks
on this product.
the audio input jacks on the device.•
Connect to a digital AV amplifi er/receiver
Connect to the COAXIAL jack
MULTICHANNEL
AUDIO IN
DIGITAL IN
SUBWOOFER
Connect to the OPTICAL jack
OPTICAL
OPTICAL
1
Connect an optical cable (not supplied) to:
the • OPTICAL jack on this produc t.
the OPTICAL/DIGITAL input jack on the •
device.
Connect an analogue stereo system
AUDIO IN
FRONT L
FRONT R
1
Connect the audio cables (supplied) to:
the • AUDIO OUT FRONT L/R jacks on
this product.
the audio input jacks on the TV.•
Connect USB fl ash drive
DVD PLAYER DVP3588K
COAXIAL
Connect a coaxial cable (not supplied) to:
1
the • COAXIAL jack on this product.
the COAXIAL/DIGITAL input jack on •
the device.
8
EN
1 Connect a USB fl ash dr ive to the jack on
this product.
Note
This produc t can only play/vie w MP3, WM A, WM V, •
DivX (Ultra) or J PEG fi le s that ar e stored on a USB fl ash
drive.
Press the
• but ton to access the cont ent and pl ay
the fi les.
Page 9
Connect power
Select a menu display language
Caution
Risk of produc t damag e! Ensure that the power su pply •
voltage corr esponds to the vol tage pr inted on the back
of the pr oduct.
•
Befor e connec ting the AC power cor d, ensu re you have
completed all ot her conn ections.
Note
The type plate is located on the back of the product .•
1 Connect the AC power cable to the wall
socket.
The product is ready to be set up for use.»
4 Get started
Prepare the remote control
1 Press and push the batter y compar tment to
slide it open (see “1” in the illus tration).
2 Insert two AAA bat teries with correct
polarity (+/-) as indicated.
3 Push and slide back the battery compartment
(see “3” in the illustration).
Note
If this p roduc t is conne cted to a H DMI CEC complia nt •
TV, skip this setting. It switches au tomatically to t he
same OSD menu la nguage a s per your T V setting (if the
langu age set on T V is supported by this produc t).
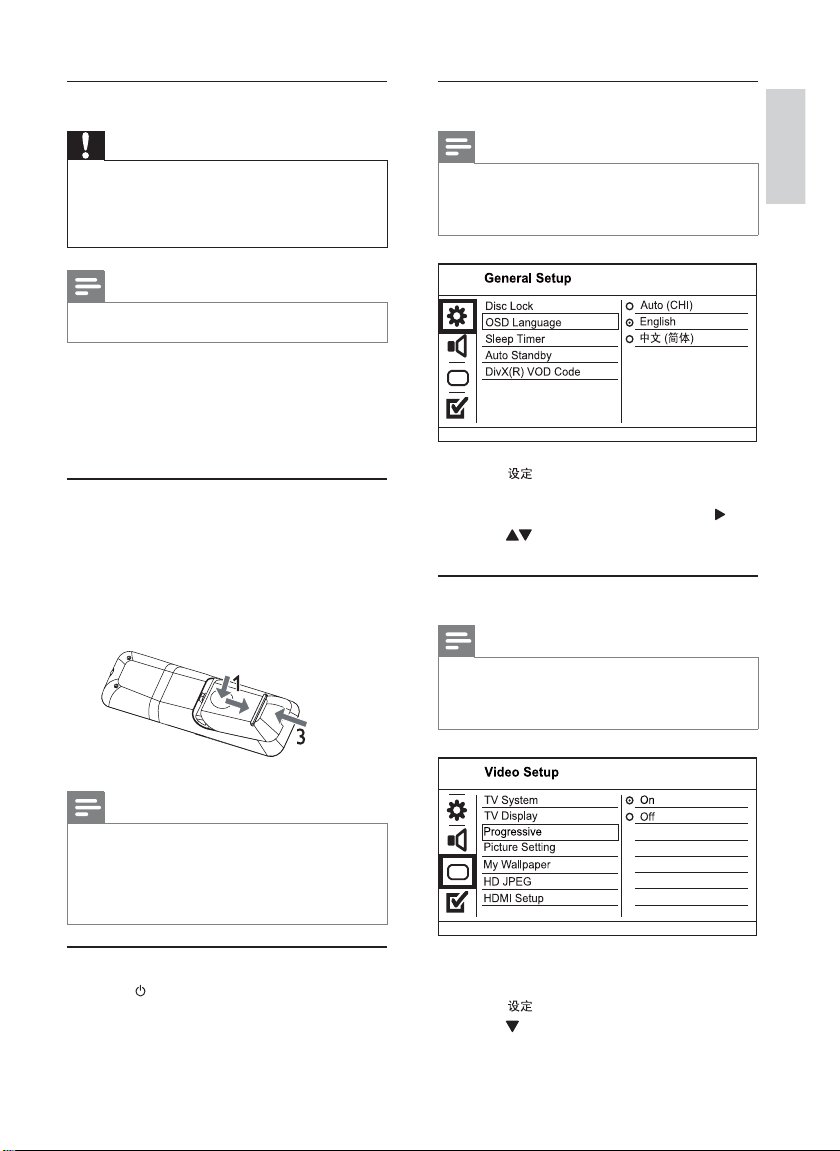
1 Press .
» [General Setup] menu is displayed.
2 Select [OSD Language], and then press .
3 Press to select a language, and then press
OK.
Turn on progressive scan
Note
To use the progress ive scan feature, you mus t connec t a •
progressi ve scan T V with the component video jacks (see
“Conn ect” > “ Connec t audio /video cables” > “Option 2:
Conne ct to the compone nt video jacks” fo r detai ls).
English
Note
If you ar e not going to use the r emote con trol for a l ong •
time , remove t he batt eries .
Do not mi x batte ries (old a nd new or ca rbon and
•
alka line, etc.).
Bat terie s contai n chemic al subs tances, so they s hould be
•
disposed of properly.
Find the TV input channel
1 Press to turn on this product .
2 Turn on the TV and switch to the video input
channel (refer to the TV user manual on how
to select the A /V input channel).
1 Turn on the TV to the correct video input
channel for this product.
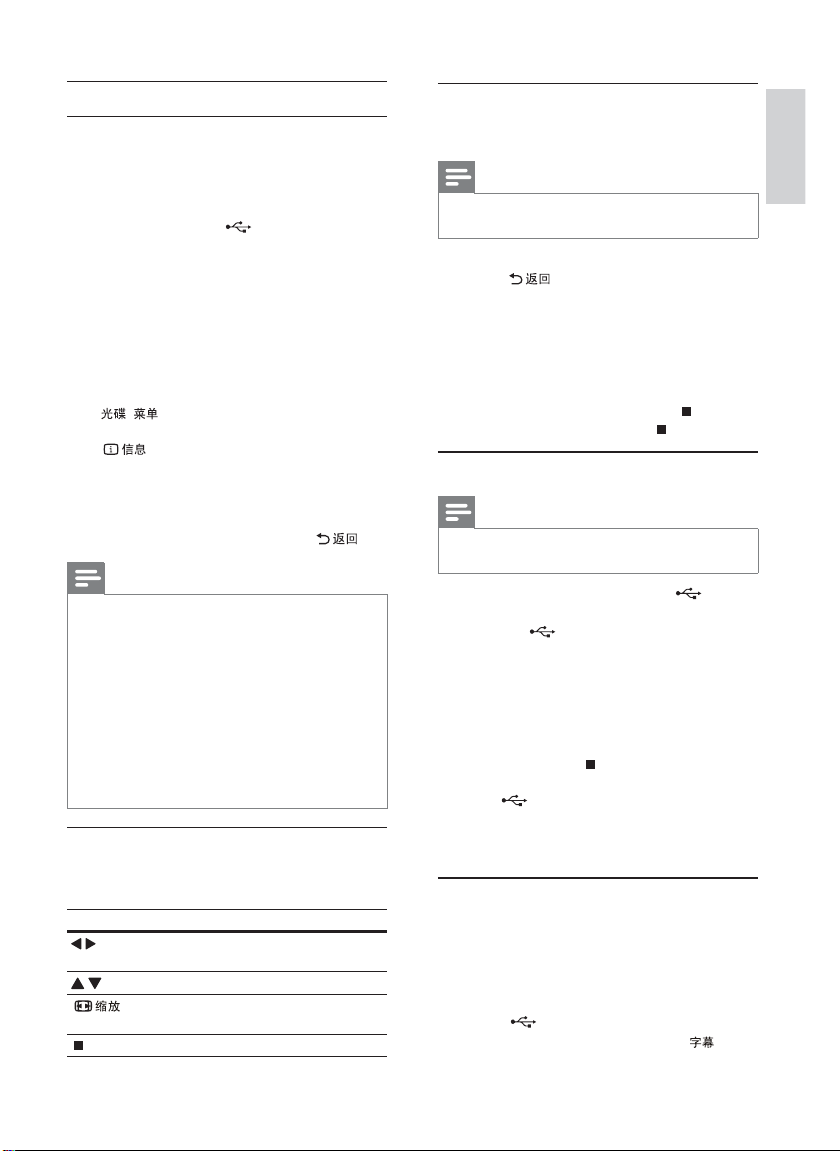
2 Press .
3 Press to select [Video Setup].
EN
9
Page 10

4 Select [Progressive] > [On], and then press
OK.
A warning message is displayed.»
5 To proceed, select [Ok] and then press OK.
The progressive setup is complete.»
Note
If a blan k/dis tor ted screen is displayed, w ait for •
15 seconds for the au to recove ry.
If no pic ture is displayed, tur n off the progressive scan
•
mode as follows:
1) Press
to open t he disc compar tment .
2) Press t he Nume ric button ‘1’.
6 Press to exit the menu.
7 You can now turn on the progressive scan
mode on the TV (see the TV user manual).
One-touch standby
1
Press and hold on the remote control for
more than 3 seconds.
All the connected devices (if the device »
supports one-touch standby) automatically
switch to standby.
Note
Phili ps does not guara ntee 100% inter oper ability with all •
HDMI CEC devices.
5 Play
Play a disc
Note
Duri ng play, whe n the progressive scan mode is on for •
both th is product and t he TV, dis torted picture may
displ ay. In this ca se, turn off th e progr essive s can feat ure
on both t his product an d the TV.
Use Philips EasyLink
This product supports Philips EasyLink which uses the
HDMI CEC (Consumer Electronics Control) protocol.
You can use one single remote control to control
EasyLink-compliant devices that are connected
through HDMI connectors.
Note
To enable the Easy Link fea ture, you must turn on th e •
HDMI CEC oper ation s on the T V and on oth er devices
connected to T V. Refer to th e TVs/devices man ual for
details.
One-touch play
1
Press to turn on this product .
The TV (if supports one-touch play) »
automatically turns on and switches to the
correct video-in channel.
If a disc is loaded in this product, disc play »
automatically starts.
Caution
Do not place any objects ot her than discs into the disc •
compar tment .
Do not touch the disc optical lens inside the d isc
•
compar tment .
1 Press to open the disc compartment.
2 Insert a disc with its label facing up.
3 Press to close the disc compar tment and
start disc play.
Note
Check t he types of discs s uppor ted (see “ Your DVD •
player ” > “Play able media”).
If the pa sswor d entr y menu is d isplayed, enter the
•
pass word before you can play the lo cked or re stri cted
disc (see “Adjust setting s” > “Preference s” > [Parental
Control]).
Play video
Note
Some operat ions may not work wi th some di scs. Se e the •
infor mation accompanying the d isc for details.
Control video play
1
Play a title.
2 Use the remote control to control the play.
EN
10
Page 11

Button Action
Star t, pause or resume disc play.
Stop disc play.
,
,
,
(Screen fi t)
Skip to a previous/nex t title or
chapter.
Search fast-backward or fastforward. Press repeatedly to
change the search speed.
Search slow-forward or slowbackward. Press repeatedly to
change the search speed.
For VCD/SVCD, slow-backward
search is not available.
Select an audio language or
channel available on a disc.
Select a subtitle language available
on a disc.
Fit the picture format to the TV
screen.
Press repeatedly until the image is
scaled to fi t to the TV screen.
Toggle between screen aspect
ratio and different zoom factor.
To pan through the zoomed image,
press the Navigation buttons.
Access the play options and display
the cur rent disc status.
Access DVD menu
1
Press / to access the disc root menu.
2 Select a play option, then press OK.
In some menus, press the • Numeric
buttons to input your selection.
Access VCD menu
The PBC (playback control) feature is available for
VCD/SVCD, which can display the contents menu
for you to select a play option. The PBC is on by
default in the factor y.
Note
See “Adju st set tings” > “ Preferences” > • [PBC] on how
to tur n PBC on or of f.
1 Display the contents menu via one of the
following ways:
If PBC is on, load in a VCD/SVCD.•
During play with PBC on, press • .
2 Press the Numeric buttons to select a play
option, and then press OK to start play.
If PBC is turned off, it skips the menu •
display and starts play from the fi rst
track.
Preview disc contents
1 During play, press .
The disc status menu is displayed.»
2 Select [Preview], and then press .
3 Select a preview option, and then press OK.
A thumbnails preview screen is displayed.»
To go to the next/previous preview •
screen, select [Prev] or [Next], and then
press OK.
To star t play, press • OK at the selected
thumbnail picture.
Skip play to a specifi c time
1
During play, press .
The disc status menu is displayed.»
2 Select an option for the current elapsed
playing time, and then press
• [TT Time] (title time)
• [CH Time] (chapter time)
• [Disc Time]
• [Track Time]
.
3 Press the Numeric buttons to enter the time
to skip to, then press OK.
Display play time
1
During play, press .
The disc status menu is displayed.»
2 Select [Time Disp.], and then press .
The display options vary from disc type.»
3 Select an option, and then press OK.
View DVD play from different angles
1
During play, press .
The disc status menu is displayed.»
2 Select [Angle], and then press .
3 Press the Numeric buttons to change the
angle.
Play changes to the selected angle.»
Note
Applicable only to discs that con tain mu lti-a ngle scenes.•
English
EN
11
Page 12

Repeat play for a specifi c section
1
During play, press .
2 Press to select [REPEAT AB].
3 Press OK to set the start point.
4 Press OK to set the end point.
Repeat play starts.»
To cancel repeat play, press • OK again.
Note
The marked section fo r repea t play is onl y possib le •
within a track/title.
Quick skip play
This feature is only available for audio CDs.
1 During play, press repeatedly to select
an option.
Display Action
[Disc Go To] Skip play to a specifi c time
within the disc.
[Track Go To] Skip play to a specifi c time
within a track.
[Select Track] Skip play to a specifi c track
number.
Play DivX® (Ultra) video
DivX® (Ultra) video is a digital media format
that retains high quality despite a high rate of
compression. You can enjoy DivX® (Ultra) video on
this DivX (Ultra) certifi ed product.
1 Insert a disc or USB fl ash drive that contains
the DivX (Ultra) videos.
For USB , press •
A contents menu is displayed.»
.
2 Select a title to play, then press OK.
You may select subtitle/audio language.•
Note
You can only play DivX (U ltra) video tha t is rented •
or purchased w ith the D ivX regis tration code of this
product (see “Adjust Set tings” > “ Gener al setup” >
[DivX(R) VO D Code]).
Play music
Control a track
1
Play a track .
2 Use the remote control to control the play.
Button Action
Star t, pause or resume disc play.
Stop disc play.
,
,
Skip to a previous/nex t track.
Selec t an item to play.
Searches fas t-back ward or fastforward. Press repeatedly to
change the search speed.
2 Press the numeric buttons to change the time/
number to skip to.
Play MP3/WMA music
MP3/WMA is a type of highly compressed audio fi le
(fi les with .mp3, .wma extensions).
1 Insert a disc or USB fl ash drive that contains
the MP3/WMA music.
For USB , press • .
A contents menu is displayed.»
2 If play does not automatically s tar t, select a
track to play.
To select another track/folder, press •
, then press OK.
Note
For disc record ed in mul tiple se ssions , only th e fi rs t •
session is played.
For a WMA fi le that is protected by Di gital R ights
•
Manag ement ( DRM), i t cannot b e played on t his product.
This produc t does not suppor t MP3PRO audio format.
•
For any special ch arac ter that is prese nt in the M P3 track •
name (ID3) or album n ame, it might not b e display ed
corr ectly o n the scr een because the se character s are not
supported.
Folders/fi les that exceed the supported limit of this
•
product can not be dis played or played.
Repeat play for a specifi c section
For audio CDs,
1 During play, press repeatedly until
[Off ] is displayed.
2 Press to select a repeat option.
For MP3/ WMA fi les,
1 During play, press repeatedly to select
a repeat option.
12
EN
Page 13
Play photo
Play photo as slideshow
You can play JPEG photos (fi les with .jpeg or .jpg
extensions).
1 Insert a disc or USB fl ash drive that contains
the JPEG photos.
For USB , press • .
Slideshow begins (for Kodak disc), or a »
contents menu (for JPEG disc) is displayed.
2 Select a photo, and then press OK to star t
slideshow.
For a photo recorded with the “exif ” »
format, the display orientation is
automatically optimized.
To display photos in color (Fun Mode) or •
in black and white (Simple Mode), press
/ .
To preview the photos in thumbnail, press •
.
To select a photo, press the • Navigation
buttons.
To enlarge the selec ted photo and start •
slideshow, press OK.
To return to the menu, press • .
Note
It may require l onger ti me to disp lay the disc conten t •
on the T V due to th e large n umber of s ongs/photos
compiled onto one disc/USB fl ash dr ive.
•
If the J PEG photo is not reco rded wi th an ‘exif’ t ype
fi le, the actual thum bnail pi cture cannot b e shown on
the scr een. I t is replaced by a ‘bl ue mount ain’ thu mbnail
picture.
This produc t can only display digital camer a pictures
•
accord ing to the J PEG- EXI F format, typically used by
almos t all digital ca mera s. It ca nnot display Moti on JPEG ,
or pic tures in format s other t han JPE G, or sou nd clips
associated wi th pic tures .
Folders/fi les that exceed the supported limit of this
•
product can not be dis played or played.
Play musical slideshow
Create a musical slideshow to play MP3/WMA
music fi les and JPEG photo fi les simultaneously.
Note
To create a mu sical slideshow, you must s tore the MP3/•
WMA an d JPEG fi les on the same dis c/US B fl ash d rive.
1 Play MP3/WMA music.
2 Press to return to the main menu.
3 Navigate to the photo folder/album and press
OK to start slideshow play.
Slideshow begins and continues till the end »
of the photo folder or album.
Audio continues to play until the end of »
the disc.
To stop slideshow play, press •
To stop music play, press • again.
.
Play from a USB fl ash drive
Note
This produc t plays/views MP3, WMA , WMV, DivX •
(Ultra) or JPEG fi les that are s tored on a USB fl ash drive.
1 Connect a USB fl ash dr ive to the jack on
this product.
2 Press the button.
A contents menu is displayed.»
3 If play does not s tar t automatically, selec t a fi le
to play.
For more information, see the chapters •
“Play music”, “Play photo” and “Play
video” for details.
4 To stop play, press .
To switch to the disc mode, press the •
button.
English
Control photo play
1
Play a photo slideshow.
2 Use the remote control to control the play.
Button Action
Rotate a photo anti-clockwise/
/
clockwise.
Rotate a photo horizontally/ver tically.
/
Zoom in or out of a photo.
Play pauses in zoom mode.
Stop a play.
6 Other features
Media copy
You can copy fi les (such as MP3, WMA or JPEG) from
disc to a USB fl ash drive.
1 Insert a disc that contains the MP3/ WMA /
JPEG fi les.
2 In the stop mode, connect the USB fl ash drive
to the jack on this product.
3 Select a fi le to copy, and then press .
13
EN
Page 14

4 Select [Yes] in the menu, then press OK.
00:00/00:00
\MP3
Previous
Track 1
Track 2
Track 3
Track 4
Track 5
Track 6
Do you want
to copy this file
Yes No
5 Select a conversion option in the [OPTIONS]
panel, and then press OK repeatedly to select
an item.
Option Description
[Speed] Selec t a copying speed.
[Bitrate] Select a quality level.
Higher bitrate for bet ter sound
quality and bigger fi le size.
[CRT ID3] Copy track information into the
MP3 fi le.
[Device] The created fi les can only be saved
in a USB fl ash drive.
Once complete, a new folder is created »
automatically in the USB fl ash drive to store
all the new fi les.
5 To stop copy progress, press , then press
OK.
Note
When you copy, never p ress any b utto n.•
Copy- protec ted med ia canno t be copied.•
Create MP3 fi les
With this product, you can convert audio CDs into
MP3 audio fi les. The created MP3 audio fi les are saved
in the USB fl ash drive.
1 Insert an audio CD.
2 Connect a USB fl ash dr ive to the jack on
this product.
3 During disc play, press .
The MP3 creation menu is displayed.»
4 Select [Yes] in the menu, and then press OK.
Create MP3
OPTIONS
Speed Normal
Bitrate 128kbps
CRT ID3 Yes
Device USB 1
SUMMARY
Press [OK] button
to change speed.
Start Exit
TRACK
Track01 04:14
Track02 04:17
Track03 03:58
Track04 04:51
Track05 03:53
Track06 04:09
Track07 04:38
Select all
Deselect all
6 Press to access the [TRACK] panel.
7 Select an audio tr ack, and then press OK.
To select another track, repeat step 7.•
To select all track s, select • [Select all] in
the menu, and press OK.
To deselect all tracks, select • [Deselect
all] in the menu, and press OK.
8 Select [Start] in the menu, and then press OK
to star t to convert.
Once complete, a new folder is created »
automatically in the USB fl ash drive to store
all the new MP3 fi les.
To exit the menu, select • [Exit], and then
press OK.
Note
When you conver t, nev er press any but ton.•
DTS CDs an d copy-pr otected CDs cannot be converted.•
Writer-pr otect ed or password-prote cted USB fl ash •
driv es canno t be used to s tore MP3 fi les .
Karaoke
You can connect a microphone (not supplied) to sing
along with a music source.
Note
Befor e you connect a micr ophone, set the microp hone •
volume to the minimum to pr event howling.
1 Turn on the TV, and select the TV input
channel.
2 Connect a microphone to the MIC jack on this
product.
3 Turn on the microphone sound output (see
“Adjust Karaoke settings”).
14
EN
Page 15

4 Play a Karaoke disc and sing through the
microphone.
Adjust Karaoke settings
Note
You need to tu rn on the microphone sound outpu t in •
the [Microphone] option to activate ka raoke -related
menu options.
1 Press .
The karaoke settings menu is displayed.»
2 Select an option, and then press OK.
3 Change or set a setting, and then press OK.
4 Press again to exit the menu.
[Microphone] - Turn on or off the microphone
sound output .
[MIC Volume] - Adjust the microphone volume.
[Echo] - Adjust the echo level.
[Karaoke Scoring] - Turn off the function of
Karaoke scoring or select a scor ing level (basic /
inter mediate/advance). If a level is selected, the
score is displayed after each song ends.
[Karaoke Idol] - Song contest among 4 singers.
Note
This produc t suppor ts recording to MAS U SB devices •
(MTP/ NAS dev ices are e xcluded ).
1 During Karaoke, press to display
the record menu:
[Start at current time] - start recording
immediately.
[Start from beginning] - start recording from
the beginning of the current song.
To exit without recording, press again •
.
2 Press to select an option, and press OK.
The recording begins, and a recording »
progress bar is displayed.
When the current song ends, the recording »
completes and stops.
During recording, you may press »
instructions to stop the recording.
and follow the on-screen
7 Adjust settings
English
1) In the [Karaoke Scoring] option, select a level
(basic/intermediate/advance).
2) In the [Karaoke Idol] option, turn on the
contest.
The song selection menu is displayed.»
3) Input a track (VCD/SVCD) or a title/chapter
(DVD) as the fi rst song. Up to 4 songs can be
selected.
4) Then select [Start], and press OK to star t play
selected songs.
After all the selected songs end, a contest »
result is displayed.
[Key Shift] - Adjust the pitch level that matches
your voice.
[Vocal] - Select various Karaoke audio modes , or
turn of f original vocal.
Record Karaoke
You can record your singing into a USB fl ash drive.
Each time you can record one song, and all the
recorded songs are saved in .mp3 format.
At the fi rs t time when you record to a USB fl ash
drive, a folder named “PHILIPS” is automatically
created to save the recorded fi les.
Note
If the setup option is grayed out , it means the set ting •
cannot be changed at the current state .
General setup
1 Press .
» [General Setup] menu is displayed.
2 Press to enter the submenu.
3 Select an option, and then press OK.
4 Select a setting, and then press OK.
To return to the previous menu, press •
.
To exit the menu, press • .
EN
15
Page 16

[Disc Lock]
Set the play restriction for a disc which is loaded in
the disc compar tment (maximum 20 discs can be
locked).
• [Lock] - Restrict the access to the current
disc. At the next time when you want to play
this disc or unlock it, you need to enter the
password.
• [Unlock] - Play all discs.
[OSD Language]
Select a language for on-screen menu.
[Sleep Timer]
Switch automatically to standby at the preset time.
• [Off] - Disable sleep mode.
• [15 Mins], [30 Mins], [45 Mins], [60 Mins] Selec t the countdown time for this product to
switch to standby.
[Auto Standby]
Turn on/off the auto standby mode.
• [On] - Switch to s tandby after 15 minutes
of inactivity (for example, in pause or stop
mode).
• [Off] - Disable the auto standby mode.
[DivX(R) VOD Code]
Display the DivX® regis tration code and
deregistration code.
• [Registration] - Obtain a registration code to
regis ter this product on website.
• [Deregistration] - Obtain a deregistration
code to cancel the registration of this product
on website.
Note
Use thi s product’s DivX registration code when you ren t •
or purchase vi deo from www.d ivx.com/vo d. The Di vX
videos rented or purch ased th rough the DivX
(Vi deo On Demand) se rvice can be played only on the
device to which i t is regis tered.
®
VOD
Audio setup
1 Press .
» [General Setup] menu is displayed.
2 Press to select [Audio Setup], and then
press to enter the submenu.
3 Select an option, and then press OK.
4 Select a setting, and then press OK.
To return to the previous menu, press •
.
[Analogue Output]
Select an analogue set ting based on the audio
device that is connected through the analogue
audio jack.
• [LT/RT] - For the surround sound output
• [Stereo] - For the stereo output .
• [Multi Channel] - For multi-channel output.
[Digital Audio]
Select a digital set ting based on the digital amplifi er/
receiver that is connected through the digital jack
(coaxial/digital).
• [Digital Output] - Select a type of digital
• [LPCM Output] - Select the LPCM (Linear
[HDMI Audio]
Selec t the HDMI audio setting when you connect
this product and the TV with an HDMI cable.
• [On] - Allow audio outpu t through the TV and
• [Off] - Disable the audio output from HDMI
To exit the menu, press • .
through two speakers.
output.
• [All] - Support multi-channel audio
formats.
• [Off] - Disable digital output.
• [PCM Only] - Downmix to two-channel
audio format.
Pulse Code Modulation) output sampling rate.
• [48kHZ] - For discs recorded at sampling
rate of 48 kHz.
• [96kHZ] - For discs recorded at sampling
rate of 96 kHz.
Note
•
[LPCM Output] setting is only available if the [Digital
Output] is set to [PCM Only].
The higher the s ampling rate, the bet ter the s ound
•
quality.
the speaker system. If the audio format on the
disc is not suppor ted, it will be downmixed to
two- channel sound (linear-PCM).
devices connected to this player.
16
EN
Page 17

[Audio Sync]
Set the delay time for audio ou tput when you play
a video disc.
1. Press OK.
2. Press to set the delay time.
3. Press OK to confi rm and exit.
[Volume]
Set the default volume level when you play a disc.
1. Press OK.
2. Press to set the volume.
3. Press OK to confi rm and exit.
[Sound Mode]
Select a preset sound ef fect to enhance the audio
output.
• [3D] - Select a vir tual surround sound effect
that is produced from the left and r ight audio
channels.
• [Movie Mode] - Select a sound ef fect for
movies.
• [Music Mode] - Select a sound effect for
music.
[Speaker Setup]
Optimize the sur round output for the connected
speakers.
[CD Upsampling]
For bet ter sound quality in stereo mode, conver t
the music CD to a higher sampling rate.
• [Off] - Turn off CD-upsampling.
• [88.2kHz] - Conver t to twice the original
sampling rate.
• [176.4 kHz] - Convert to four times the original
sampling rate.
[Night Mode]
Make loud sound level softer and sof t sound level
louder so that you can watch the DVD movies at a
low volume, without dis turbing others.
• [On] - Enjoy quiet viewing at night.
• [Off] - Enjoy sur round sound with a full
dynamic range.
Note
Applicable only to Dolby Digit al encod ed DVDs.•
Video setup
English
1 Press .
» [General Setup] menu is displayed.
2 Press to select [Video Setup], and then
press to enter the submenu.
3 Select an option, and then press OK.
4 Select a setting, and then press OK.
To return to the previous menu, press •
.
To exit the menu, press • .
[TV System]
Change this setting if the video does not appear
correctly. By default, this setting matches the most
common setting for TVs in your countr y.
• [PAL] - For a PAL-system T V.
• [Multi] - For TV that is compatible with both
PAL and NTSC.
• [NTSC] - For an NTSC-system TV.
[TV Display]
Select a display format:
• [4:3 Pan Scan] - For a 4:3 screen TV: full-height
display with the trimmed sides.
• [4:3 Letter Box] - For a 4:3 screen TV: widescreen display with black bars on the top and
bottom of the screen.
• [16:9] - For a wide-screen TV: display r atio
16:9.
[Progressive]
If a progressive scan TV is connec ted to this
product, turn on the progressive scan mode.
• [On] - Turn on progressive scan.
• [Off] - Turn off progressive scan mode.
EN
17
Page 18

Note
For mor e detailed descripti on, see “Get st arted” > •
“Turn on p rogressive sc an”.
[Picture Setting]
Selec t a predefi ned set of picture color settings or
customize the personal setting.
• [Standard] - Original color setting.
• [Bright] - Vibrant color setting.
• [Soft] - Warm color setting.
• [Personal] - Customize the color set ting. Set
the level of brightness, contrast, sharpness and
color saturation, and then press OK.
[My Wallpaper]
Select a picture as the wallpaper.
• [Default picture] - The default wallpaper
preset as the Philips logo.
• [Saved picture] - A captured video image or
JPEG photo.
• [Current picture] - Capture a video image or
JPEG photo and save it on the product.
1. Play a video or photo slideshow.
2. Select a video image or photo: press to
pause, and then press .
3. Navigate to the option ( [Video Setup] >
[My Wallpaper] > [Current picture]).
4. Press OK to confi rm.
One video image or JPEG photo is saved as »
wallpaper.
A newly saved image or photo replaces the »
earlier one.
[HD JPEG]
Enjoy untouched and uncompressed JPEG pictures
at its original resolution when you connect this
product and the TV with an HDMI cable.
• [On] - Display high defi nition picture.
• [Off] - Display standard pic ture.
[HDMI Setup]
When you connect this proudct and the TV with an
HDMI cable, select the best HDMI setup that the
TV can suppor t.
• [Resolution] - Select a video resolution that is
compatible with the TV display capability.
• [Auto] - Detect and select the best
supported video resolution automatically.
• [480i],[480p], [576i], [576p],[720p],
[1080i], [10 80p] - Select a video
resolution that is best suppor ted by the
TV. See the TV manual for details.
• [ Wide Screen Format] - Defi ne the wide
screen format for disc play.
• [Super Wide] - Center position of the
screen is stretched less than the side
(applicable only when the video resolution
is set to 720p, 1080 i or 1080p).
• [4:3 Pillar B ox] - No stretching of
picture. Black bars are displayed on both
sides of the screen (applicable only when
the video resolution is set to 720p, 1080i
or 1080p).
• [Off] - Picture is displayed according to
the disc format .
• [EasyLink Setup] - If this product is connected
to HDMI CEC compliant TV/devices, all
connec ted devices can respond to the
following commands simultaneously.
• [EasyLink] - Turn on/off all EasyLink
features.
• [One Touch Play] - Turn on or off the
feature of one-touch play.
When EasyLink is enabled, press
.
This product turns on.»
The TV (if the TV supports one-touch »
play) automatically turns on and
switches to the video-in channel.
Disc play starts if there is a disc in this »
product.
• [One Touch Standby] - Turn on or off
the feature of one-touch standby.
When EasyLink is enabled, press and
hold
for at least three seconds.
All connected HDMI CEC compliant »
devices switch to standby mode.
Note
You must tu rn on the H DMI CEC opera tions on t he TV/•
devices before you can enjoy the EasyLink controls. See
the T V/devices manual for details.
Phili ps does not guara ntee 100% inter oper ability with all
•
HDMI CEC compl iant dev ices.
Preferences
Note
Stop disc play befo re you can a ccess to • [Preferences].
18
EN
Page 19

Preferences
Audio
Subtitle
Disc Menu
Parental Control
PBC
Mp3/Jpeg Nav
Password
DivX Subtitle
1 Press .
» [General Setup] menu is displayed.
2 Press to select [Preferences], and then
press to enter the submenu.
3 Select an option, and then press OK.
4 Select a setting, and then press OK.
To return to the previous menu, press •
.
[Audio]
Selec t an audio language for disc play.
[Subtitle]
Select a subtitle language for disc play.
[Disc Menu]
Select a disc menu language.
[Parental Control]
Restrict access to discs that are unsuitable for
children. These types of discs must be recorded
with ratings.
1. Press OK.
2. Select a rating level, then press OK.
3. Press the numeric but tons to enter the
To exit the menu, press • .
Note
If the language you have set is not available on th e disc, •
the dis c uses it s own defa ult language.
•
For som e DVDs, the subti tle/au dio lang uage can o nly
change from the disc menu.
•
To select t he languages tha t are not listed in t he menu ,
select [Others]. Then check the “ Language Code” list
at the ba ck of this user manu al and enter the re spective
language code.
password.
Note
Rated DVDs above t he level you set in • [Parental
Control] require a pass word to be p layed.
•
The ratings are count ry-d epend ent. To allow all discs to
play, select ‘ 8’.
Some discs have r atings printe d on them b ut are no t
•
recor ded with rati ngs. This func tion has no effec t on
such discs.
[PBC]
Turn on or off the content menu of VCDs/SVCDs
with PBC (playback control) feature.
• [On] - Display the index menu when you load
a disc for play.
• [Off] - Skip the menu and start play from the
fi rst track.
[Mp3/Jpeg Nav]
Select to display the folders or display all the fi les.
• [View Files] - Display all the fi les.
• [View Folders] - Display the folder s of MP3/
WMA fi les.
[Password]
Set or change the password for locked discs and
play res tric ted DVDs.
1. Press the Numeric buttons to enter ‘136900’ or
the last set password at [Old Password] fi eld.
2. Enter the new password at [New Password]
fi eld.
3. Enter the new password again at [Confi rm
PWD] fi eld.
4. Press OK to exit the menu.
Note
If you for get the p assword, enter ‘136900 ’ before you set •
a new pas sword .
English
[DivX Subtitle]
Select a character set that suppor ts the DivX
subtitle.
• [
ᇓ໗IJࡩij
] - Simplifi ed Chinese
EN
19
Page 20

Note
Ensure that the subtitle fi le has the exact same fi le name •
as the m ovie fi le. If for example th e fi le nam e of the
movie is ‘Movie.avi ’, then you need to name the tex t fi le
‘Movie.sub’ or ‘Movie.srt’.
[Version Info]
Display the software version of this product.
Note
This information is re quire d when you w ant to fi nd out •
if a newest software v ersion is available at th e Philip s
websi te that you may downl oad and install o n this
product.
[Default]
Reset all the set tings of this product to factory
default, except for [Disc Lock], [Parental Control]
and [Password] settings.
8 Additional information
Update software
For software updates, check the current software
version of this product to compare with the latest
software (if available) at the Philips website.
Caution
Power supply mus t not be interrupted during sof tware •
upgrade.
1 Press .
2 Select [Preferences] > [Version Info], and
then press OK.
3 Write down the fi le name, and then press
to exit the menu.
4 Visit www.philips.com/suppor t to check for
the latest software version, using the fi le name
for this product.
5 Refer to the upgrade instructions on the
website for more information.
Note
Disconnect t he power cord for a few se conds and •
connect agai n to turn on the product.
Care
Caution
Never u se solve nts such as benze ne, thi nner, clea ners •
available commercially, or anti -sta tic spr ays inte nded
for discs.
Clean discs
Wipe the disc with a micro fi bre cleaning cloth from
the centre to the edge in a straight line movement.
Specifi cations
Note
Speci fi cation and design are subjec t to chang e without •
notice
USB
Compatibility: Hi-Speed USB (2.0)•
Class suppor t: UMS (USB Mass Storage Class)•
Video
Signal system: PAL / NTSC•
Composite video output: 1 Vpp ~ 75 ohm•
Component video output: 0.7 Vpp ~ 75 ohm•
HDMI output: 480i, 480p, 576i, 576p, 720p, •
1080i, 1080p
Audio
Analog stereo output•
Signal to noise ratio (1 kHz): > 90 dB •
(A-weighted)
Dynamic Range (1 kHz): > 80 dB (A-weighted)•
Cross talk (1 kHz): > 90 dB•
Distortion/noise: (1 kHz): > 75 dB•
MP3: MPEG Audio L3•
Digital output•
Optical, Coaxial•
HDMI output•
Main unit
Dimensions (w x h x d): 360 x 39 x 209 (mm)•
Net Weight: approximately 1.49 kg•
Power
Power supply rating: 110-240V, 50/60HZ•
Power consumption: < 10 W•
Power consumption in standby mode: < 0.1 W•
Accessories supplied
Remote control and batteries•
Audio/Video cables•
User Manual•
Quick Start Guide•
Laser specifi cation
Type: Semiconductor laser InGaAIP (DVD), •
AIGaAs (CD)
20
EN
Page 21

Wave length: 655 nm (DVD), 790 nm (CD)•
Output Power: 7.0 mW (DVD), 10.0 mW •
(VCD/CD)
Beam divergence: 60 degrees•
9 Troubleshooting
Warning
Risk of elect ric shock. Never remove the casing of the •
product.
To keep the warranty valid, never try to repair the
product yourself.
If you have problems using this product, check the
following points before you request service. If you
still have a problem, register your product and get
support at www.philips.com/welcome.
If you contact Philips, you will be asked for the model
and serial number of your product. The model
number and serial number are on the back of your
product. Write the numbers here:
Model No. __________________________
Serial No. ___________________________
Main unit
The buttons on this unit do not work.
Disconnect this product from the power •
outlet for a few minutes, then connect again.
No reaction to the remote control.
Connect this product to the power outlet.•
Point the remote control at the IR sensor •
located on the front panel of this product.
Inser t the batteries correctly.•
Inser t new batter ies in the remote control.•
Picture
No picture.
See the TVs user manual on how to select •
the correct input on the TV. Change the TV
channel until you see the Philips screen.
If you have turned on the progressive scan •
setting or change the TV system setting,
switch back to default mode: 1) Press to
open the disc compartment. 2) Press the
Numeric button ‘1’ (for progressive scan) or
the Numeric button’3’ (for TV system).
No picture on HDMI connection.
If this product is connec ted to an unauthorized •
display device with an HDMI cable, the audio/
video signal may not be output.
Check if the HDMI cable is faulty. Replace a •
new HDMI cable.
If this happens when you change the HDMI •
video resolution, you have to switch to its
default mode: 1) Press to open the disc
compar tment. 2) Press the numeric button “1”.
Sound
No audio output from the TV.
Ensure that the audio cables are connected to •
the audio input of the TV.
Assign the audio input of the TV to the •
corresponding video input. See the T V user
manual for details.
No audio output from the loudspeakers of the
audio device (stereo system/amplifi er/receiver).
Ensure that the audio cables are connected to •
the audio input of the audio device.
Turn on the audio device to its correct audio •
input source.
No sound on HDMI connection.
You may not hear any sound from the HDMI •
output if the connected device is non-HDCP
compliant or only DVI-compatible.
Ensure that the • [HDMI Audio] setting is turned on.
No sound during DivX video playback.
The audio codec may not be supported by this •
product.
Play
The disc cannot be played.
The disc is badly scratched, defor med, or dirty. •
Replace or clean the disc.
Use the correct disc for mat or fi le for mat.•
DivX video fi les cannot be played.
Ensure that the DivX video fi le is complete.•
Ensure that the fi le name extension is correct.•
Due to Digital Rights issue, the DRM-protected •
video fi les cannot be played through an analog
video connection (e.g. composite, component and
scar t). Use an HDMI connection to play these fi les.
The aspect ratio of the screen is not aligned with
the TV display setting.
The aspect ratio is fi xed on the disc.•
DivX subtitles are not displayed correctly.
Ensure that the subtitle fi le name is the same •
as the movie fi le name.
Selec t the correct charac ter set.•
Press •
Select • [Preferences] > [DivX Subtitle] in
the menu.
Select the character set that suppor ts the •
subtitle.
.
English
EN
21
Page 22

10 Glossary
A
Aspect ratio
Aspect ratio refer s to the length to height ratio of
TV screens. The ratio of a standard T V is 4:3, while
the ratio of a high-defi nition or wide TV is 16:9.
The letter box allows you to enjoy a picture with a
wider perspective on a standard 4:3 screen.
D
DivX Video-On-Demand
This DivX Certifi ed ® device must be registered
in order to play DivX Video-on-Demand (VOD)
content. To generate the registration code, locate
the DivX VOD section in your device setup menu.
Go to vod.divx .com with this code to complete the
regis tration process and learn more about DivX video.
H
HDMI
High-Defi nition Multimedia Inter face is a high-speed
digit al interface that can transmit uncompressed
high defi nition video and digital multichannel
audio. It delivers high qualit y picture and sound
quality, completely free from noise. HDMI is fully
backward-compatible with DVI.
As required by the HDMI standard, connecting to
HDMI or DVI products without HDCP (Highbandwidth Digital Content Protection) will result in
no Video or Audio output.
J
JPEG
A very common digital still pic ture format. A stillpicture data compression system proposed by the
Joint Photographic Exper t Group, which features
small decrease in image quality in spite of its high
compression ratio. Files are recognized by their fi le
extension ‘.jpg’ or ‘.jpeg.’
M
MP3
A fi le format with a sound data compression
system. MP3 is the abbreviation of Motion Picture
Experts Group 1 (or MPEG-1) Audio L ayer 3. With
the MP3 format, one CD-R or CD-RW can contain
about 10 times more data than a regular CD.
P
PBC
Playback Control. A system where you navigate
through a Video CD/Super VCD with on-screen
menus that are recorded onto the disc. You can
enjoy interactive playback and search.
Progressive scan
The progressive scan displays twice the number of
frames per second than in an ordinary TV system. It
offer s higher picture resolution and quality.
W
WMA
Windows Media™ Audio. Refers to an audio
compression technology developed by Microsoft
Corporation. WMA data can be encoded with
Windows Media player version 9 or Windows
Media player for Windows XP. Files are recognized
by their fi le extension ‘.wma.’
WMV [Windows Media Video]
Refers to a video compression technology
developed by Microsoft Corporation. WMV
content can be encoded by using Windows Media
Encoder 9 series. Files are recognised by their fi le
extension ‘.wmv’.
®
22
EN
Page 23

ଦ
1 ᇛဵྔ༓ 24
П೨ߦሹ႓ቡර 24
൧ҵඔ 24
2 ୡ֩ DVD Ѱ٦ࠓ 25
সӎۄ؇ራ 25
ԣసܢ෯ 25
3 ৹ࢨ 27
ოశ/శྮ 27
সာოశ 28
USB ൜௯ 28
تᅙ 29
4 ൔႬೊ 29
ቻ҃ႌে౸ 29
Ԓᇕتෝനశ 29
ာᆖӴרྣභᄶၟ 29
חঙቑൃ 29
ᄊ Philips EasyLink 30
5 Ѱ٦ 30
ӎۄޝ௯ 30
ӎۄశ 30
ӎۄო 32
ӎۄᇘభ 32
ӎۄ USB ൜௯ሱ؇டച 33
6 ఇ܃ୃ 33
ତບܑሧ 33
֙ࣛ MP3 ༵࣓ 34
গ৺ OK 34
ࡩᇓ໗
7 לᆠഥᇆ 35
ົᄊඃى 35
ოశඃى 36
శඃى 37
ռඃى 38
8 ఇྔ༓ 39
ݙപ࣓ 39
ႃࠛ 39
ޡݎ 40
9 ܧᅴᇙވԭড়ٞى 40
10 Ց 41
ZH-CN
23
Page 24

1 ᇛဵྔ༓
ρಊވᇛဵሃၭ൝ཟ
ۥ
࿎അĞಯཡࣞ҉ԣసПቯᅿۡҠ؇ৄࢹடdརң•
ᅿԣసሽ༘ટսሢ൴ 4 ჩ؇ৄࢹႽҮົۦdѮ֕
ࡩ๓འບӤࡘᇝԣస൪؇ົۦԄd
•
ಯཡࣞԣసcႌে౸ࡩت՟ۄᅿࡧࡩ๓അᅙ
ĥѩ৵ሒൿ؇ၿޝĦܚd
•
ҧ֊ܼ༳cඣ౹cฅߦՅ໔d
ಯཡࣞ҉ቯሤሤᄡؑલࡩࣙฅሱd•
ಯཡᅿ҉ቯሤ൪ۄሤഋߧস็ࠬ҉ቯሤ؇འస•
ĥതĩඛᄗႣບ؇འບcئ؇ৼቓĦd
•
ಯཡࣞ҉ቯሤۄᅿ๓ت౸ඃ҃൪୍d
تມ౹ࢹĩೊᅛ҉ԣసd•
ࣞتᅙԎ໊ࡩඃ҃ߨ౸ᄊٰتඃ҃ඪĩܠٰتඃ•
҃ჭসႽඪᄊd
•
ܠඃ҃חঙඪĩᅿস࣐ࢅӤস࣐؇ࡹޝ۷ൿdҧ
ሒࡹޝd
ܵჃᇳྟ૱࠳ඐ
࿊ېᇢဘቡĩӋۆ๐ᄗܼೄتঊᄲ҉ԣస
೨ࢻചĩಱসࡘሣྣභ༢࿀dത 525 ࡩ
625 ቑൃ࿀սྥ༻ທĩࣛგᄊࠞࣞಯ
࠲༛qҵቻೄཫ٩rෝսdޓᄡགྷମ؇تࡱᄲ
525p ߦ 625p ߞ DVD ӎۄࡱሏࢹ؇ࢻചခĩ
തி࠰ᄗഋߧႲ༻ĩೊᄲགྷମ؇়ࠞ۽རሱ
྄d
ࣼӅވԁ֩ԭড়
҉ԣసӲᄊসࡏᄊ؇ܼခӭߦከ
࣓ሧᆑڙՐd
ಯཡࣞ҉ԣసᄲ๓ඕࡥ৹Ⴄdೊና
״؛ޓᄡەࢄتኒcت౹ԣసࢅت՟؇
ޡىdሀ౻ሤᇥ࿖ԣసᄗቛᄡҧٵߦഈ
ບࣔতᆑՐಐᅿ؇ܗ୍ჷྻd
҉ԣస๐߅؇ت՟ӤᄲႤѐ؇ඕࡥ৹Ⴄ
౻ሤd
ೊና״؛ޓᄡەࢄت՟؇ޡىdሀ
౻ሤت՟ᄗቛᄡҧٵߦഈࣔতᆑՐಐᅿ
؇ܗ୍ჷྻd
ޓᄡி๐ᅿ؛ࡏሱ؇ݙځཱĩೊۂ༻
www.recycle.philips.comd
ϵಇሃၭ൝ཟ
҉൧సӲᄊѓѮࠛ෮ĩଧቧߦ
Rovi Corporation ؇๓ላදԣѮࠛd
ሚڳ࿁ݟՓࡩڳ࡚ҫd
CLASS 1
LASER PRODUCT
ഉїശ
HDMIcHDMI ࡌҵߦܼೄځତບ
ව HDMI Licensing LLC ؇൧ҵࡩቡԊ൧ҵd
USB-IF ࡌҵව Universal Serial Bus
Implementers Forum, Inc ؇൧ҵd
ᅿ٦ғථၴယসྑሧᆑd
qDolbyrߦข D ۺߞව٦ғථၴ؇൧ҵd
ᅿଧ؝ 5,451,942c5,956,674c
5,974,380c5,978,762c6,487,535 ߞቧߦ๓Ⴚ
ቡԊࢅሀᅿඅೊ؇ଧߦඹቧယসྑሧᆑd
DTS ߦ Symbol ව DTS, Inc. ؇ቡԊ൧ҵĩDTS
ንഃඔߦ DTS ࡌҵව DTS, Inc. ؇൧ҵdԣసѩ
৵പ࣓d© DTS, Inc. Ѯટ๐ᄗd
ޓᄡ DIVX శķDivX®වᄐ
DivX, Inc. ֙ࣛ؇Ⴄሷንశݎබdᇥවᄐ
DivX ሀබഌህ؇সӎۄ DivX శ؇ඃ҃dݙځ
ᄗޓ DivX శႽࢅ༵࣓ࣞቩ࠲Ր DivX శݎබ
؇പ࣓ݟ؇ཱĩೊۂ༻ www.divx.comd
24
ZH-CN
Page 25

ޓᄡ DIVX ာశķᇥঢ় DivX Certifi ed®ඃ҃
ңဘቡԊĩӮӎۄ DivX ာశ (VOD) ட
ചd႓ඕՐቡԊĩೊᅿඃ҃ඃሤӴרሱᇕ
DivX VOD Өەdቩሢ vod.divx.comĩᄊְቡ
ԊՐቡԊՓĩӋݙځᄗޓ DivX VOD
؇ཱd
DivX®cDivX Certifi ed®ࢅྯޓࡌҵව DivX, Inc.
؇ቡԊ൧ҵĩӋᅿීྑᄊd
Ӆۄඑ
ᇺሑᇆ
DVD PLAYER DVP3588K
a b cdefg
qDVD Videorව DVD Format/
Logo Licensing Corporation ؇൧ҵd
Windows Media ߦ Windows ࡌҵ
ව Microsoft Corporation ᅿଧߦ/ࡩ๓ࢧ/؛
؇൧ҵࡩቡԊ൧ҵd
2 ୡ֩ DVD Ѱ٦ࠓ
ܭி؇ࡔކĩ࠭ჴޝ PhilipsĞ༛ிիە
ྼ Philips ຖݤ؇ለ՝ĩೊᅿ www.philips.com/
welcome ቡԊி؇ԣసd
Ѱ٦֩ࢾᇍ
҉ԣసসӎۄķ
DVDcDVD-VideocDVD+R/+RWc•
DVD-R/-RWcDVD+R/-R DLĥขԌĦ
VCD/SVCD•
ოశ CDcCD-R/CD-RW•
MP3 ତບcWMA ତບcWMV ତບc•
DivX (Ultra) ତບߦ JPEG ༵࣓
USB ൜௯•
౹მખ
ிসႽӎۄႽྑ؇ޝ௯d
a ( քࠓ-ࠓ )
ِ DVD ӎۄࡱࡩಯ࠲עࡱ୨බd•
b ܿҠ
c ཅ൙૯ϴ
d
( չ/ܵт )
חঙࡩޓҠޝ௯ӿd•
e
( Ѱ٦/ᄤ๘ )
ঙඵcᆂຶࡩࢡဥӎۄޝ௯d•
f
( USB ) Ұ
USB ൜௯d•
g MIC
ૼۦd•
ࡩᇓ໗
DVD ౹მખ ݗࡉ/ֽ౹
ሱט
ZH-CN
25
Page 26

ီచ
a
b
c
d
e
f
g
h
i
j
a
b
c
ِ҉ቯሤࡩಯ࠲עࡱ୨බd•
חঙࡩޓҠޝ௯ӿd•
/
നࡩໞսޝ௯Ӵרd•
ಯ࠲ሢޝ௯୨බd•
ᅿӎۄᇘభ࠺؉భࢹĩᅿqᄰ୨•
බrߦqࣇר୨බrሏࢹಯ࠲d
ٵᄡ VCD ߦ SVCDĩחঙࡩޓҠ•
PBCĥӎۄেሧĦd
r
q
p
o
n
m
l
k
d
ߖӴרd•
ะ࿁ಏ ( • ) ࡩ࿁ࠌ ( ) ศ๎d
ଆ ( • ) ࡩଆໞ ( ) ศ๎d
e
ڴࡏ൪ႤݓྣභӴרd•
/
f
ອሢ൪ႤࡩྑႤҵທcᇅࡩd•
g
ಯ࠲ሢ USB ୨බd•
h ሷσ୪
ာᆖຍىᇅ//ҵທӎۄd•
i
ာᆖޝ௯؇ንᄶၟd•
ۂ༻Ӵרĩܑሧ/൙ք USB ൜௯ሱ؇•
ოశ༵࣓d
j
ࠤ୍ྣභසߨتూd•
ۄטࡩ์࿎ࠤ୍d•
k
ᅿগ৺ OK ࢹࣞᄶოߦოૅሧ•
USB ൜௯ሱd
l
നࡩໞսগ৺ OK ඃሤӴרd•
m
ာᆖޝ௯؇ოశᄶၟࡩඔd•
ۂ༻֙ࣛ MP3 ༵࣓؇Ӵרd•
n
ຶሚӎۄd•
o
ঙඵcᆂຶࡩࢡဥӎۄޝ௯d•
p
ٵᄡޝ௯ĩۂ༻ӎۄာࡩྣභ״ಏ•
ޝ௯ታd
ٵᄡ࠺؉భۄჺĩྣභᇘభ༵࣓؇์•
d
q OK
ഌෝനࡩာᆖd•
r
നࡩໞսඃሤӴרd•
IJ֡ݸσ୪ij
26
ZH-CN
Page 27

3 ৹ࢨ
ࣛႽྑႽҮᄊ҉ԣసd
ࠒЫ৹ࢨń
శ•
ოశ•
࿎৹ࢨń
ࣞოశღሢ๓ඃ҃ķ•
ንݡۄ౸/౸•
୨ບඔ྄ໆ•
USB ൜௯•
࿎ཟ 2ń৹ࢨᇄٷ൮Ұ
Y
Pb
Pr
Pb
Pr
Y
COMPONENT VIDEO OUT
ࡩᇓ໗
৹ࢨၿ/൮ཐ
ာᆖتসለ՝؇ክࢦశd
• ࿎ཟ 1ķሢ HDMI Ԏĥසߨ
HDMIcDVI ࡩ HDCP ࢻചتĦd
• ࿎ཟ 2ķሢەశԎĥසߨҵቻت
ࡩቑൃتĦd
• ࿎ཟ 3ķሢܑߨశԎĥසߨҵቻ
تĦd
࿎ཟ 1ń৹ࢨᇄ HDMI Ұ
HDMI IN
HDMI OUT
ࣞ HDMI تĥ༥ຖݤĦሢķ
1
҉ԣస൪؇• HDMI OUT Ԏd
ت൪؇ HDMI ෝനԎd•
ሃ
തඃ҃ለ՝ HDMI CECĩிসႽົႤݓႌে౸•
েሧࢻചඃ҃ĥೊӷᅩqᄊനବr>qᄊ Philips
EasyLinkrĦd
1
ࣞەశྮĥ༥ຖݤĦሢķ
҉ԣస൪؇• Y Pb Pr Ԏd
ت൪؇ COMPONENT VIDEO ෝന•
Ԏd
2 ࣞოశྮĥႺຖݤĦķ
҉ԣస൪؇• AUDIO OUT FRONT L/R
Ԏd
ت൪؇ოశෝനԎd•
࿎ཟ 3ń৹ࢨᇄ൮ (CVBS) Ұ
ܑࣞߨశྮĥႺຖݤĦሢķ
1
҉ԣస൪؇• TV OUT Ԏd
ت൪؇శෝനԎd•
2 ࣞოశྮĥႺຖݤĦķ
҉ԣస൪؇• AUDIO OUT FRONT L/R
Ԏd
ت൪؇ოశෝനԎd•
ZH-CN
27
Page 28

࿎ၿ৹ࢨ
ࣞოశָ҉ԣసሢ๓ඃ҃ĩႽᆛಞოྻ
࿔d
৹ࢨأശ֥ࢨ൰చ
FRONT L
REAR L
CENTER
REAR R
FRONT R
MULTICHANNEL
AUDIO IN
SUBWOOFER
৹ࢨᇄ OPTICAL Ұ
OPTICAL
1
ࣞޝྚتĥ༥ຖݤĦሢķ
҉ԣస൪؇• OPTICAL Ԏd
ඃ҃൪؇ OPTICAL/DIGITAL ෝന•
Ԏd
৹ࢨଊ৯ശ༦
FRONT L
OPTICAL
AUDIO IN
ࣞოశྮĥ༥ຖݤĦķ
1
҉ԣస؇• AUDIO OUTĥFRONT L/Rc
REAR L/RcCENTER ߦ SUBWOOFERĦ
Ԏd
ඃ҃൪؇ოశෝനԎd•
৹ࢨᇄሷ AV ܃٦చ/ࢨ൰చ
৹ࢨᇄ COAXIAL Ұ
DIGITAL IN
COAXIAL
1
ࣞቂتĥ༥ຖݤĦሢķ
҉ԣస൪؇• COAXIAL Ԏd
ඃ҃൪؇ COAXIAL/DIGITAL ෝന•
Ԏd
28
ZH-CN
FRONT R
1
ࣞოశྮĥႺຖݤĦķ
҉ԣస൪؇• AUDIO OUT FRONT L/R
Ԏd
ت൪؇ოశෝനԎd•
৹ࢨ USB խ
DVD PLAYER DVP3588K
1 ࣞ USB ൜௯ሢ҉ԣస൪؇
d
ሃ
҉ԣసሜᄊᄡӎۄ/Ԓণ USB ൜௯൪և؇ MP3c•
WMAcWMVcDivX (Ultra) ࡩ JPEG ༵࣓d
• Сைۂ༻டചӋӎۄ༵࣓d
С
Page 29

৹ࢨ჻
࿎ᄸҖ֊ཅ൙იခ
ሃၭ
ᅿ็ࠬԣస؇ۦྤĞѮථ࢟تᅙت၄ᄲ҉ԣస•
Ѿ୍ҵභ؇تᅙت၄ྯۺd
•
ᅿ࣮ઢتᅙྮሏಏĩѮႺՐ๐ᄗ๓
d
ሃ
ߞୡ௩༬ᄡ҉ԣసѾ୍d•
1 ࣮ࣞઢتᅙྮሢԎኸd
҉ԣసሜပࣇרඃሤࢉসᄊd»
4 ൔႬೊ
ምХီచ
1 СྑӋ໙ِت՟ߩܤࣞחঙĥೊӷᅩ
ሱq1rĦd
2 СᇘሙභĩႽሀ؇ࢀခ (+/-) Ԏന
AAA ت՟d
3 ໙ِت՟ߩܤࣞࠣࡏᅒ༬ĥೊӷᅩ
ሱq3rĦd
ሃ
ത҉ԣసႺሢ HDMI CEC ࢻച؇تĩೊອ•
ְඃሤd๓ࣞናِಯ࠲༛ᄲت൪ඃሤ؇ OSD Ӵרᄶ
ၟĥത҉ԣసለ՝ت൪ඃሤ؇ᄶၟĦd
1 С d
ࣞྣභ» [Ⴌഥှ] Ӵרd
2 ာᆖ [ཅ൙იခ]ĩࠌС d
3 С ႽာᆖᄶၟĩࠌС OKd
չᇳྟ૱
ሃ
႓ᄊቑൃݡĩிңဘົەశԎ•
ቑൃتĥᄗޓྐྵཱ྇ĩೊӷᅩqr>q
ოశ/శྮr>qာ 2ķሢەశԎ
rĦd
ࡩᇓ໗
ሃ
തிחฺߵԫႤٯඪࢹӤᄊႌে౸ĩೊೞսت՟d•
ೊཡࡣߨᄊت՟ĥت՟ᄲت՟ࡩت՟ᄲࣃခ•
ت՟ĩ؋؋Ħd
•
ت՟߅ᄗࠦဲའራĩმְჭሀd
Ҵᅷ൮ൿೊ֥
1 С Ⴝِ҉ԣసd
2 חঙتӋಯ࠲ሢశෝനశĥೊӷᅩ
ت؇ᄊࠞාԊĩതߧာᆖ A/V ෝന
శĦd
1 חঙتӋغ҉ԣస؇ሀశෝന
శd
2 С d
3 С ာᆖ [൮ഥ]d
4 ာᆖ [ᇳྟ૱]>[]ĩࠌС OKd
ZH-CN
29
Page 30

ࣞྣභႤᆗ݃࿊ཱd»
5 ႓ࢡဥĩೊာᆖ [ಖಮ]ĩࠌС OKd
ቑൃඃሤࢉႺՐd»
ሃ
തూ൪ཏ࿀/࿀චᇩĩೊ؋ע 15 ሴႽҮና•
ِࡍܑd
•
തӤྣභ࿀ĩೊСᇘႽྑӦޓҠቑൃ୨බķ
1) С חঙޝ௯ӿd
2) Сሷσ୪ g1hd
6 С ໞսӴרd
7 ྥᅿிসႽחঙت؇ቑൃ୨බĥೊӷ
ᅩت؇ᄊࠞාԊĦd
ሃ
ӎۄࢹĩ״חঙְԣసߦت؇ቑൃ୨බඪĩ•
সࡘྣභචᇩ࿀dᅿְೈྑĩೊޓҠ҉ԣసߦ
تࡱ൪؇ቑൃݡd
ൔႬ Philips EasyLink
҉ԣసለ՝ᄊ HDMI CECĥ࿊ېتኒেሧĦ࿚
გ؇ Philips EasyLink ݡdிসႽᄊႤݓႌে
౸েሧົ HDMI ౸؇ EasyLink
ࢻചඃ҃d
ሃ
႓ᄊ EasyLink ݡĩңဘᅿت൪Ⴝࢅت•
؇๓ඃ҃൪חঙ HDMI CEC Ԃdྐྵཱ྇ĩೊӷ
ᅩت/ඃ҃؇ฌාԊd
ሃ
Philips ӤѮህ҉ԣసসᄲ๐ᄗ HDMI CEC ඃ҃ࠜ•
Ԃd
5 Ѱ٦
Ѱ٦ܿ
ሃၭ
ಯཡࣞޝ௯Ⴝ؇ഋߧའບۄനޝ௯ӿሱd•
ಯཡ֊ޝ௯ӿட؇ޝ௯ޝဲ໊d•
1 С חঙޝ௯ӿd
2 ҵಈԶ൪ĩԎനޝ௯d
3 С ޓҠޝ௯ӿӋঙඵӎۄޝ௯d
ሃ
ࣁԒለ՝؇ޝ௯ĥೊӷᅩqி؇ DVD ӎۄ•
ࡱr>qসӎۄ؇ራrĦd
•
തྣභୃෝനӴרĩᆗဘෝനୃӮӎۄ
๏ىࡩྭ؇ޝ௯ĥೊӷᅩqغᇾඃሤr>qռඃ
ىr> [ᇉ]Ħd
Ѱ٦൮
ሃ
Ⴄ࿖Ԃসٵ࿖ޝ௯Ӥᄊdᄗޓྐྵೈĩೊӷ•
ᅩޝ௯ܚ؇ཱd
֊ࡳ൘Ѱ٦
1
С Ⴝِ҉ԣసd
تĥതለ՝ר࣑බӎۄĦࣞናِঙ»
ĩӋಯ࠲ሢሀ؇శෝനశd
ത҉ԣసႺᅽനޝ௯ĩᆗࡘናِঙ»
ඵӎۄd
֊ࡳ൘քࠓ
1
Сበႌে౸൪؇ Գ 3 ሴd
๐ᄗඃ҃ĥതለ՝ר࣑බעࡱĦ»
ࣞናِಯ࠲ሢעࡱ୨බd
ZH-CN
30
ᇉ൮Ѱ٦
1
ӎۄҵທd
2 ᄊႌে౸েሧӎۄd
σ୪ Ҥቘ
ঙඵcᆂຶࡩࢡဥӎۄޝ௯d
ຶሚӎۄޝ௯d
ĩ
ĩ
ĩ
ອሢ൪Ⴄ/ྑႤҵທࡩᇅd
ะ࿁ࠌࡩ࿁ಏศ๎dڳܑСস
ݙܡศ๎ะ٩d
ଆࡩଆໞศ๎dڳܑСসݙܡ
ศ๎ะ٩d
ٵᄡ VCD/SVCDĩଆໞศ๎Ӥ
সᄊd
Page 31

σ୪ Ҥቘ
ာᆖޝ௯൪ຖݤ؇؇ოశᄶၟ
ࡩඔd
ာᆖޝ௯൪ຖݤ؇؇ንᄶၟd
ࠤ୍ݎබසߨتూd
ĥසჭూĦ
ڳܑСĩሒሢ࿀೨සߨت
ూd
ᅿూড়ܼғߦӤ์ۄმሏ
ࢹಯ࠲d
႓ᅿ์ۄ؇࿀൪ాႯĩೊС
ߖСைd
ۂ༻ӎۄာӋྣභ״ಏޝ௯
ታd
࣍ೊ DVD Җ֊
1
С / ന DVD ݖӴרd
2 ာᆖӎۄာĩࠌС OKd
ᅿ࿖ӴרሱĩসС• ሷσ୪ෝന
ာᆖd
࣍ೊ VCD Җ֊
PBCĥӎۄেሧĦݡসᄊᄡ VCD/SVCDĩ๓স
ႽྣභடചӴרĩݤிာᆖӎۄာdୱഌೈ
ྑĩPBC ႺᅿսԮඪחঙd
ሃ
ᄗޓതߧחঙࡩޓҠ PBCĩೊӷᅩqغᇾඃሤr>•
qռඃىr> [PBC]d
1 ົႽྑڼڧሏႤྣභடചӴרķ
ത PBC ᄡחঙታĩቯന•
VCD/SVCDd
ᅿ PBC ᄡחঙታྑӎۄඪĩ•
С d
2 Сሷσ୪ာᆖӎۄာĩࠌС OK ঙඵ
ӎۄd
ത PBC ႺޓҠĩᆗࡘອܠӴרĩ•
Ӌָ؝Ⴄݓঙඵӎۄd
ძযܿୁ಼
1
ӎۄඪĩС d
ְඪࣞྣභޝ௯ታӴרd»
2 ာᆖ [ძয]ĩࠌС d
3 ာᆖᅉာĩࠌС OKd
ְඪࣞྣභ์ᅉూd»
႓ቩሢྑႤݓ/൪Ⴄݓᅉూĩೊာ•
ᆖ [ഌ၆] ࡩ [༳၆]ĩࠌС OKd
႓ঙඵӎۄĩೊᅿာى؇์൪С•
OKd
ൔѰ٦๏ᇄฯൌ࡛
1
ӎۄඪĩС d
ְඪࣞྣභޝ௯ታӴרd»
2 ༛״ಏႺӎۄඪࢹာᆖႤݓာĩࠌС d
• [їูൌ࡛]ĥҵທඪࢹĦ
• [ᅧࢯൌ࡛]ĥᇅඪࢹĦ
• [ಊןൌ࡛]
• [౻ଦൌ࡛]
3 Сሷσ୪ෝന႓ອሢ؇ඪࢹĩࠌС OKd
ཅ൙Ѱ٦ൌ࡛
1
ӎۄඪĩС d
ְඪࣞྣභޝ௯ታӴרd»
2 ာᆖ [ൌ࡛ཅ൙]ĩࠌС d
ӎۄာმޝ௯ڙვd»
3 ာᆖႤݓာĩࠌС OKd
՚҆֩࢜؋ܸ DVD Ѱ٦
ӎۄඪĩС d
1
ְඪࣞྣභޝ௯ታӴרd»
2 ာᆖ [࢜؋]ĩࠌС d
3 Сሷσ୪ݙܡࣺ٩d
ӎۄࠤ୍ְඪࣞಯ࠲ሢ๐ာࣺ٩d»
ሃ
සᄊᄡѩ߅ځࣺ٩Ԩ؇ޝ௯d•
ᇛڳѰ٦ฯᅧࢯ
1
ӎۄඪĩС d
2 С ာᆖ [
ᇛڳ AB
]d
3 С OK ඃሤئd
4 С OK ඃሤሶئd
ሹܑӎۄࢉࡘঙඵd»
႓ೞ࿊ሹܑӎۄĩೊᅾֳС• OKd
ሃ
ҵ࢜༛ሹܑӎۄ؇ᇅሜ༬ᄡႤݓ/ҵທሱd•
ࡩᇓ໗
ZH-CN
31
Page 32

Ѱ٦ DivX® (Ultra) ൮
DivX® (Ultra) శවႤሷንତບݎබĩসᅿຖ
ݤܼ၄์؇ඪѮ՝ܼ؇ࠤራdிসᅿ
DivX (Ultra) ഌህ؇҉ԣస൪൨ DivX® (Ultra)
శd
1 Ԏനѩ߅ DivX (Ultra) శ؇ޝ௯ࡩ USB ൜
௯d
ٵᄡ USBĩೊС• d
ࣞྣභૅӴרd»
2 ာᆖ႓ӎۄ؇ҵທĩࠌС OKd
ிসႽာᆖን/ოశᄶၟd•
ሃ
ிসӎۄົ҉ԣస؇ DivX ቡԊኡࡩݵૻ؇•
DivX (Ultra) శĥೊӷᅩqغᇾඃሤr>qົᄊ
ඃىr> [DivX(R)ෟ࿎൮]Ħd
Ѱ٦ၿ
ᇉ౻ଦ
1
ӎۄd
2 ᄊႌে౸েሧӎۄd
2 Сሷσ୪ݙܡ႓ອሢ؇ඪࢹئ/ҫߞd
Ѱ٦ MP3/WMA ၿ
MP3/WMA වႤሷܼ၄์؇ოశ༵࣓ĥ༵࣓৶
ᆼୢ༛ .mp3c.wmaĦd
1 Ԏനѩ߅ MP3/WMA ო؇ޝ௯ࡩ USB ൜
௯d
ٵᄡ USBĩೊС• d
ࣞྣභૅӴרd»
2 ത༥ናِঙඵӎۄĩೊာᆖ႓ӎۄ؇
d
႓ာᆖ๓/༵࣓ࢥĩೊС• ĩ
ࠌСOKd
ሃ
ٵᄡႽځٯૅڼබૅ؇ޝ௯ĩࣞሜӎۄ؝Ⴄٯd•
ንѓޗ (DRM) Ѯࠛ؇ WMA ༵࣓Ӥᅿ҉•
ԣస൪ӎۄd
•
҉ԣసӤለ՝ MP3PRO ოశݎබd
ത MP3 ୢՍ (ID3) ࡩቧࢂୢՍሱ߅ᄗഋߧຍෛ•
ንۺĩ๓সཏڧᅿూ൪ሀྣභĩმ༛Ӥለ՝ᇥ
ንۺd
•
ࣞӤࡘྣභࡩӎۄԳս҉ԣసለ՝ڵ༘؇༵࣓ࢥ/
༵࣓d
σ୪ Ҥቘ
ঙඵcᆂຶࡩࢡဥӎۄޝ௯d
ຶሚӎۄޝ௯d
ĩ
ĩ
ອሢ൪Ⴄ/ྑႤd
ာᆖຍىᇅ//ҵທ
ӎۄd
ะ࿁ࠌࡩ࿁ಏศ๎dڳܑС
সݙܡศ๎ะ٩d
ි๏ላѰ٦
ְݡᅿӎۄოశ CD ඪসᄊd
1 ӎۄࢹĩڳܑС ာᆖာd
ཅ൙ Ҥቘ
[ൌ࡛] ӎۄອሢޝ௯ሱ؇ຍىඪ
ࢹئd
[౻ଦൌ࡛] ӎۄອሢሱ؇ຍىඪ
ࢹئd
[࿎ᄸ౻ଦ] ӎۄອሢຍىҫߞd
32
ZH-CN
ᇛڳѰ٦ฯᅧࢯ
ؗჃၿ CDĶ
1 ᅿӎۄඪĩڳܑС ĩሒሢྣභ
[ܵ]d
2 С ာᆖሹܑӎۄာd
ؗჃ MP3/WMA ໗ࡵĶ
1 ᅿӎۄඪĩڳܑС Ⴝာᆖሹܑӎۄ
ာd
Ѱ٦ᅺ
ၟߜ֫٦ႜٞ൘Ѱ٦ᅺ
ிসӎۄ JPEG ᇘభĥ༵࣓৶ᆼୢ༛ .jpeg ࡩ .jpgĦd
1 Ԏനѩ߅ JPEG ᇘభ؇ޝ௯ࡩ USB ൜௯d
ٵᄡ USBĩೊС• d
ࣞঙඵ࠺؉భۄჺĥٵᄡ Kodak ޝ»
௯ĦĩࡩྣභடചӴרĥٵᄡ JPEG
ޝ௯Ħd
2 ာᆖᇘభĩࠌС OK ঙඵ࠺؉భۄჺd
ٵᄡႽqexifrݎබૅሧ؇ᇘభĩྣභ»
ڼ࿁ࡘናِᄌࠦd
Page 33

႓Ⴝӳെĥᄰ୨බĦࡩ߳фെĥࣇר୨•
බĦྣභᇘభĩೊС / d
႓ᅿ์୨බྑᅉᇘభĩೊС• d
႓ာᆖᇘభĩೊС• ֡ݸσ୪d
႓ۄטာሱ؇ᇘభӋঙඵ࠺؉భۄჺĩ•
ೊС OKd
႓ڴࡏӴרĩೊС•
ሃ
ᄐᄡҫനޝ௯/USB ൜௯ሱ؇݅/ᇘభځĩ•
ᅿت൪ྣභޝ௯டചসပ႓ԫඪࢹd
•
ത JPEG ᇘభӤවႽqexifr؇༵࣓ૅሧ؇ĩᆗ
ూ൪ཏڧྣභථ࢟์dڙႽqെ൘૿r์
ປןd
•
҉ԣసሜྣභۺߨ JPEG-EXIF ݎබ؇ྯࡱᇘ
భĩڙࢍࠎ๐ᄗྯࡱٝᄊܠݎබd๓Ӥྣභ
ِ JPEG ࡩۆ JPEG ݎබ؇ᇘభĩࡩᄲ࿀ྯޓ؇
ඔოࣉࢂd
•
ࣞӤࡘྣභࡩӎۄԳս҉ԣసለ՝ڵ༘؇༵࣓ࢥ/
༵࣓d
d
႓ຶሚ࠺؉భӎۄĩೊС• d
႓ຶሚოӎۄĩೊᅾֳС• d
Ѱ٦ USB խᇓ֩ୁ಼
ሃ
҉ԣసসᄊᄡӎۄ/Ԓণ USB ൜௯൪և؇ MP3c•
WMAcWMVcDivX (Ultra) ࡩ JPEG ༵࣓d
1 ࣞ USB ൜௯ሢ҉ԣస൪؇ d
2 С Сைd
ְඪࣞྣභૅӴרd»
3 ത༥ናِঙඵӎۄĩೊာᆖ႓ӎۄ؇
༵࣓d
ᄗޓྐྵཱ྇ĩೊӷᅩᇅqӎۄო•
rcqӎۄᇘభrߦqӎۄశrd
4 ႓ຶሚӎۄĩೊС d
႓ಯ࠲ሢޝ௯୨බĩೊС• Сைd
ࡩᇓ໗
ᇉᅺѰ٦
1
ӎۄᇘభ࠺؉భd
2 ᄊႌে౸েሧӎۄd
σ୪ Ҥቘ
/
/
ඪᇮ/ชඪᇮဪቩᇘభd
ฅా/֞ሒဪቩᇘభd
ۄטࡩ์࿎ᇘభd
ᅿ์ۄ୨බྑࣞᆂຶӎۄd
ຶሚӎۄd
Ѱ٦տၿ֩ߜ֫
֙ࣛო࠺؉భĩႽӦӎۄ MP3/WMA ო༵
࣓ߦ JPEG ᇘభ༵࣓d
ሃ
႓֙ࣛო࠺؉భĩңဘࣞ MP3/WMA ༵࣓ߦ JPEG ༵•
࣓ևᅿႤᇈޝ௯/USB ൜௯൪d
1 ӎۄ MP3/WMA ოd
2 С ڴࡏቘӴרd
3 ߖᇘభ༵࣓ࢥ/ྯԊĩӋС OK ঙඵ࠺
؉భۄჺd
ࣞঙඵ࠺؉భۄჺĩႤሒӎۄᇘభ༵»
࣓ࢥࡩྯԊ؇୮༣d
ოశࣞ՝ဥӎۄሢޝ௯؇୮༣d»
6 ఇ܃ୃ
ڳᇉ
সႽࣞޝ௯ሱ؇༵࣓ĥത MP3cWMA ࡩ JPEGĦ
ܑሧ USB ൜௯d
1 Ԏനѩ߅ MP3/WMA/JPEG ༵࣓؇ޝ௯d
2 ᅿຶሚ୨බྑĩࣞ USB ൜௯ሢ҉ԣ
స൪؇ Ԏd
3 ာᆖ႓ܑሧ؇༵࣓ĩࠌС d
4 ᅿӴרሱာᆖ [ൢ]ĩࠌС OKd
00:00/00:00
\MP3
Previous
Track 1
Track 2
Track 3
Track 4
Track 5
Track 6
Րࠌĩࣞናِᅿ USB ൜௯ሱ֙ࣛႤ»
ݓ༵࣓ࢥĩᄊᄡև๐ᄗ༵࣓d
5 ႓ຶሚܑሧՓĩೊС ĩࠌС OKd
Do you want
to copy this file
Yes No
ZH-CN
33
Page 34

ሃ
ܑሧඪĩಯཡСഋߧСைd•
ܑሧѮࠛ؇ତບࣞཏڧܑሧd•
Իࡽ MP3 ໗ࡵ
ிসႽᄊ҉ԣసࣞოశ CD ༵࣓ቩ࠲Ր MP3
ოశ༵࣓d๐֙ࣛ؇ MP3 ოశ༵࣓ࣞѮᅿ
USB ൜௯ሱd
1 Ԏനოశ CDd
2 ࣞ USB ൜௯ሢ҉ԣస൪؇
d
3 ӎۄඪĩС d
ࣞྣභ MP3 ֙ࣛӴרd»
4 ᅿӴרሱာᆖ [ൢ]ĩࠌС OKd
Create MP3
OPTIONS
Speed Normal
Bitrate 128kbps
CRT ID3 Yes
Device USB 1
SUMMARY
Press [OK] button
to change speed.
Start Exit
5 ᅿ [࿎ཟ] ୍ђሱာᆖቩ࠲ာĩࠌڳܑ
С OK ာᆖd
࿎ཟ ૱එ
[ි؋] ာᆖܑሧะ٩d
[еฯ] ာᆖራࢋһd
ғຍᅢܼĩოራᅢߜĩ༵࣓
ႛᅢטd
[CRT ID3] ܑཱࣞሧ MP3 ༵࣓
ሱd
[ഥХ] ๐֙ࣛ؇༵࣓ሜѮᅿ USB
൜௯ሱd
6 С ۂ༻ [౻ଦ] ୍ђd
7 ာᆖოశĩࠌС OKd
႓ာᆖ๓ĩೊሹܑӦ 7d•
႓ာᆖ๐ᄗĩೊာᆖӴרሱ؇•
[ಊ࿎]ĩࠌС OKd
TRACK
Track01 04:14
Track02 04:17
Track03 03:58
Track04 04:51
Track05 03:53
Track06 04:09
Track07 04:38
Select all
Deselect all
႓ೞ࿊ာᆖ๐ᄗĩೊာᆖӴרሱ؇•
[ಊҊಀཬ]ĩࠌС OKd
8 ာᆖӴרሱ؇ [ൗ]ĩࠌС OK Ⴝঙඵ
ቩ࠲d
Րࠌĩࣞናِᅿ USB ൜௯ሱ֙ࣛ»
Ⴄݓ༵࣓ࢥĩᄊᄡև๐ᄗ؇ MP3
༵࣓d
႓ໞսӴרĩೊာᆖ• [ԟ]ĩࠌС
OKd
ሃ
ቩ࠲ࢹĩಯཡСഋߧСைd•
ཏڧቩ࠲ DTS CD ߦܑሧѮࠛ؇ CDd•
ӤᄊםᄗѮࠛࡩୃѮࠛ؇ USB ൜௯•
և MP3 ༵࣓d
জ OK
সႽૼۦĥ༥ຖݤĦĩָڙݗო
ᅙԱ݅d
ሃ
ૼۦಏĩೊࣞૼۦოඃ༛ክؐĩႽڿሚս•
ྥᇴୠd
1 חঙتĩࠌာᆖتෝനశd
2 ࣞૼۦሢ҉ԣస൪؇ MIC Ԏd
3 חঙૼۦඔოෝսĥೊӷᅩqלᆠজ
OK ഥᇆrĦd
4 ӎۄগ৺ OK ޝ௯ĩӋٵኄૼۦԱ݅d
לᆠজ OK ഥᇆ
ሃ
ிပ႓חঙ• [ઞڈ] ာሱ؇ૼۦඔოෝսĩࡹࡥ
গ৺ OK ؇ྯޓӴרာd
1 С d
ࣞྣභগ৺ OK ඃሤӴרd»
2 ာᆖႤݓာĩࠌС OKd
3 ݙܡࡩඃىඃሤĩࠌС OKd
4 ᅾֳС ໞսӴרd
[ઞڈ] - חঙࡩޓҠૼۦඔოෝսd
[ઞڈၿ] - غૼۦოd
[߱ၿ] - غࡏოࢋd
34
ZH-CN
Page 35

[জOK࠽ٷ] - ޓҠগ৺ OK ࢛ەݡࡩာᆖ࢛
ەࢋһĥࡰֆ/ሱࢋ/ܼࢋĦdതာᆖࢋһĩ
ᆗଦැ݅ࠌࣞྣභەd
[ۧӓе] - 4 ༬݅ාሏࢹ؇݅Աғഹd
1) ᅿ [জOK࠽ٷ] ာሱĩာᆖࢋһĥࡰֆ/
ሱࢋ/ܼࢋĦd
2) ᅿ [ۧӓе] ာሱĩঙғഹd
ࣞྣභ݅ာᆖӴרd»
3) ෝന (VCD/SVCD) ࡩҵທ/ᇅ (DVD)
༛؝Ⴄැ݅dክځসာᆖ 4 ැ݅d
4) ࠌာᆖ [ൗ]ĩӋС OK ঙඵӎۄာى
݅d
๐ᄗာى݅ӎۄࠌĩࣞྣභғഹ»
d
[ၿל] - ݖி؇ിოغᇾოܼࢋһd
[ࢨӓ] - ာᆖݔሷগ৺ OK ოశ୨බĩࡩޓҠᅒ
ඔd
জ OK ၿ
ிসႽࣞና؇ၨԱૅሧ USB ൜௯ሱd
ଦֳসႽૅሧႤැ݅ĩಱ๐ᄗૅሧ݅ঊႽ
.mp3 ݎබѮd
ැֳૅሧ USB ൜௯ඪĩࡘናِ֙ࣛႤݓୢ
༛qPHILIPSr؇༵࣓ࢥĩᄊᄡѮૅሧ؇༵࣓d
ሃ
҉ԣసለ՝ૅሧ MAS USB ඃ҃ĥMTP/NAS ඃ҃ք•
Ħd
1 ᅿগ৺ OK ࢹĩС ྣභૅሧ
Ӵרķ
[՚ཇᄡൗ] - ࢉঙඵૅሧd
[՚ൗ] - ָ״ಏ݅؇ঙ໊ঙඵૅሧd
႓ໞսڙӤૅሧĩೊС• .
2 С ာᆖာĩࠌС OKd
ૅሧঙඵࠌĩࣞྣභૅሧ٩d»
״ಏ݅ඪĩૅሧࣞՐӋຶሚd»
ᅿૅሧՓሱĩসႽС»
ᇘూ൪؇ฌຶሚૅሧd
Ӌኰ
7 לᆠഥᇆ
ሃ
തඃሤာՑࡉെྣභĩᆗҸභӤᅿ״ಏታྑ•
ݙܡඃሤd
Ⴌഥ
1 С d
ࣞྣභ» [Ⴌഥှ] Ӵרd
2 С നኒӴרd
3 ာᆖႤݓာĩࠌС OKd
4 ာᆖඃሤĩࠌС OKd
႓ڴࡏ൪ႤݓӴרĩೊС• d
႓ໞսӴרĩೊС• d
[ן]
ٵቯനޝ௯ӿ؇ޝ௯ඃىӎۄྭሧĥክځস๏ى
20 ᇈޝ௯Ħd
• [] - ྭሧٵ״ಏޝ௯؇ۂ༻dྑႤֳ႓ӎ
ۄְޝ௯ࡩ๏ඪĩပ႓ෝനୃd
• [] - ӎۄ๐ᄗޝ௯d
[ཅ൙იခ]
ာᆖూӴרᄶၟd
[ඨ૨ൌ]
ᅿᅉඃ؇ඪࢹናِಯ࠲ሢעࡱ୨බd
• [ܵ] - ᄊည୨බd
• [15ٷᇖ]c[30ٷᇖ]c[45ٷᇖ]c[60ٷᇖ] -
ာᆖ҉ԣసಯ࠲עࡱ୨බሏಏ؇࢛ඪ
ඪࢹd
[ስײքࠓ]
חঙ/ޓҠናِעࡱ୨බd
• [] - 15 ەሴӤࡥِĥതĩᄡᆂຶࡩຶ
ሚ୨බĦࠌಯ࠲ሢעࡱ୨බd
• [ܵ] - ᄊናِעࡱ୨බd
ࡩᇓ໗
ZH-CN
35
Page 36

[DivX(R)ෟ࿎൮]
ྣභ DivX®ቡԊߦቡ࿉d
• [ሃҬ] - ࡨೞቡԊႽᅿ་ᇁ൪ቡԊ҉
ԣసd
• [ሃཫ] - ࡨೞቡ࿉Ⴝᅿ་ᇁ൪ቡ࿉҉
ԣసd
• [LPCMൿԟ] -ာᆖ LPCMĥྮခ૿լҫغ
ሧĦෝսӲႄd
• [48kHZ] - සᄊᄡႽ 48 ಆ߮؇Ӳႄૅ
ሧ؇ޝ௯d
• [96kHZ] - සᄊᄡႽ 96 ಆ߮؇Ӳႄૅ
ሧ؇ޝ௯d
ሃ
ָ www.divx.com/vod ኡࡩݵૻశඪĩೊᄊ҉ԣ•
స؇ DivX ቡԊdົ DivX® VODĥာశĦ۽
རኡࡩݵૻ؇ DivX శሜᅿႺቡԊܠ۽ར؇ඃ
҃൪ӎۄd
ၿഥ
1 С d
ࣞྣභ» [Ⴌഥှ] Ӵרd
2 С ာᆖ [ၿഥ]ĩࠌС നኒ
Ӵרd
3 ာᆖႤݓာĩࠌС OKd
4 ာᆖඃሤĩࠌС OKd
႓ڴࡏ൪ႤݓӴרĩೊС• d
႓ໞսӴרĩೊС• d
[ଊൿԟ]
ݖົ୨ოశԎ؇ოశඃ҃ာᆖ୨
ඃሤd
• [ቔ/Ⴛശ֥] - සᄊᄡናݓၺඔ౸؇ഃ
ඔෝսd
• [৯ശ] - සᄊᄡບඔෝսd
• [أശ֥] - ٵᄡځඔෝսd
[ሷၿഥᇆ]
ݖົንԎĥቂ/ንĦ؇ንݡ
ۄ౸/౸ာᆖንඃሤd
• [ሷൿԟ] - ာᆖንෝսd
• [჻ખ] - ለ՝ځඔოశݎබd
• [ܵ] - ᄊንෝսd
• [࣋PCM] - ์ࡣՐขඔოశݎබd
ሃ
ሜᄗࣞ• [ሷൿԟ] ඃሤ༛ [࣋PCM] ඪĩ[LPCMൿԟ]
ඃሤӮসᄊd
•
Ӳႄᅢܼĩოራᅢܼd
[HDMIၿ]
ᄊ HDMI ྮ҉ԣసߦتඪĩೊာᆖ
HDMI ოశඃሤd
• [] - ົتߦၺඔ౸྄ໆෝսოశdത
ޝ௯൪؇ოశݎබӤለ՝ĩ๓ࣞ์ࡣՐ
ขඔඔოĥྮခ PCMĦd
• [ܵ] - ᄊሢ҉ӎۄࡱ؇ HDMI ඃ҃؇
ოశෝսd
[ၿ҈]
ඃሤӎۄశޝ௯ࢹოశෝս؇ၞՠඪࢹd
1. С OKd
2. С ඃሤၞՠඪࢹd
3. С OK ഌӋໞսd
[ၿ]
ඃሤӎۄޝ௯ඪ؇ୱഌოࢋһd
1. С OKd
2. С ඃሤოd
3. С OK ഌӋໞսd
[ശၿଊ൘]
ာᆖᅉඃ؇ო࿔Ⴝᆛಞოశෝսd
• [3D] - ာᆖָኲᄙඔԣඕ؇ဖഃඔ
ო࿔d
• [႙ଊ൘] - ာᆖසߨتჷ؇ო࿔d
• [ၿଊ൘] - ာᆖසߨო؇ო࿔d
[လശచഥ]
ᄌࠦ๐؇ၺඔ౸؇ഃඔෝսd
[CD ഺ]
༛ᅿບඔ୨බྑࡨ؆ݙߜ؇ოራĩೊࣞო
CD ቩ࠲༛ݙܼ؇Ӳႄd
• [ܵ] - ޓҠ CD శd
• [88.2kHz] - ቩ࠲༛ᅒඵӲႄ؇ҁd
• [176.4kHz] - ቩ࠲༛ᅒඵӲႄ؇ปҁd
36
ZH-CN
Page 37

[၄࡛ଊ൘]
ഀט؇ඔოү؆ഞߦĩӋࢨטഞߦ؇ඔოĩ
ிݶႽؐ؇ო൨ DVD ჷభĩӤࡘח
ം๒ഈd
• [] - ᅿႢࢹП؛൨d
• [ܵ] - ൨ᄗ೨ِڵ༘؇ഃບඔd
ሃ
සᄊᄡ٦ғንҫ؇ DVDd•
൮ഥ
1 С d
ࣞྣභ» [Ⴌഥှ] Ӵרd
2 С ာᆖ [൮ഥ]ĩࠌС നኒ
Ӵרd
3 ာᆖႤݓာĩࠌС OKd
4 ာᆖඃሤĩࠌС OKd
႓ڴࡏ൪ႤݓӴרĩೊС• d
႓ໞսӴרĩೊС• d
[൮ᇉ൘]
തశྣභӤሀĩসݙܡְඃሤdୱഌೈ
ྑĩְඃሤᄲி๐ᅿࢧ/؛ሱت؇ክԪ࣐
ඃሤྯదఇd
• [PALᇉ] - සᄊᄡ PAL ሧබتd
• [ስײ] - සᄊᄡඪࢻച PAL ߦ NTSC ؇
تd
• [NTSCᇉ] - සᄊᄡ NTSC ሧබتd
[൮ࠓྜྷ൘]
ာᆖྣභݎබķ
• [ᆢӌ/ಊࣣ] - 4:3 ూتķසᄊᄡԉ୍
Ӭಯ؇ክܼܼ٩ྣභd
• [ᆢӌ/ྔཕ] - 4:3 ూتķසᄊᄡూن
ӨߦؚӨם߳ສ؇ড়ూྣභd
• [ႃଢ] - ড়ూتķྣභғ༛ 16:9d
[ᇳྟ૱]
തࣞቑൃت҉ԣసĩೊחঙቑ
ൃ୨බd
• [] - חঙቑൃd
• [ܵ] - ޓҠቑൃ୨බd
ሃ
ᄗޓྐྵೈĩೊӷᅩqᄊനବr>qחঙቑൃrd•
[߆ᇍഥ]
ာᆖႤຌᅉى؇ࠤ୍െӳඃሤĩࡩᇢናىݓ
ഈඃሤd
• [їም] - ᅒඵെӳඃሤd
• [] - ုെӳඃሤd
• [ೀވ] - െඃሤd
• [۵ྣ߈] - ናىെӳඃሤdඃሤ٩cٵ
ғ٩cೄཫ٩ߦെӳѰߦ٩ĩࠌС OKd
[ాᇀഥ]
ာᆖభᄊҥሞd
• [ଓಮ] - ୱഌҥሞᅉඃ༛ Philips ࡌҵd
• [ၜխ] - ӟࡨ؇శ࿀ࡩ JPEG ᇘభd
• [֖ఱ] - ӟࡨశ࿀ࡩ JPEG ᇘభĩ
ࣞѮᅿ҉ԣస൪d
1. ӎۄశࡩᇘభ࠺؉భd
2. ာᆖశ࿀ࡩᇘభķС ᆂຶӎۄĩ
ࠌС d
3. ߖሢာĥ[൮ഥ] > [ాᇀഥ] >
[֖ఱ]Ħd
4. С OK ഌd
ࣞѮႤᇈశ࿀ࡩ JPEG ᇘభ༛»
ҥሞd
Ѯ؇࿀ࡩᇘభࣞປןሏಏ؇࿀»
ࡩᇘభd
[HD JPEG]
ᄊ HDMI ྮࣞ҉ԣసᄲتĩ
ிҮႽᅒඵەұ൨༥၄์؇ᅒඵ JPEG
࿀d
• [] - ྣභܼೄࠤ୍d
• [ܵ] - ྣභҵቻೄཫ٩ࠤ୍d
ࡩᇓ໗
ZH-CN
37
Page 38

[HDMIഥᇆ]
ᄊ HDMI ྮ҉ԣసߦتඪĩೊာᆖ
تসለ՝؇ክࢦ HDMI ඃሤd
• [ٷѓ] - ာᆖᄲتྣභݡࢻച؇శ
ەұd
• [ስײ] - ናِࣁԋӋာᆖለ՝؇ክࢦ
శەұd
• [480i]c[480p]c[576i]c[576p]c
[720p]c[1080i]c[1080p] - ာᆖتለ
՝؇ክࢦశەұdᄗޓྐྵཱ྇ĩ
ೊӷᅩتාԊd
• [ଢ۰൘] - ىড়ూݎබޝ௯
ӎۄd
• [ӕ] - ూሱၶ؇৺ඇ൴ᄡԉ୍৺ඇ
ĥᅿశەұඃ༛ 720pc1080i ࡩ
1080p ඪසᄊĦd
• [4:3ྔཕ] - Ӥ৺ඇࠤ୍dూԉ
ࣞྣභ߳ສĥᅿశەұඃ༛
720pc1080i ࡩ 1080p ඪසᄊĦd
• [ܵ] - ݖޝ௯ݎබྣභࠤ୍d
• [EasyLink ഥ] - ത҉ԣస؇ව HDMI
CEC ࢻചت/ඃ҃ĩᆗ๐ᄗඃ҃ঊস
ٵႽྑୣઙኵսӦڳჭd
• [EasyLink] - חঙ/ޓҠ๐ᄗ EasyLink
ݡd
• [֊ࡳ൘Ѱ٦] - חঙࡩޓҠר࣑බӎۄ
ݡd
ᄊ EasyLink ࠌĩС
d
҉ԣసِࣞd»
تĥതتለ՝ר࣑බӎۄĦ»
ࣞናِঙĩӋಯ࠲ሢశෝന
శd
ത҉ԣసሱᄗޝ௯ĩࣞঙඵӎ»
ۄޝ௯d
• [֊ࡳ൘քࠓ] - חঙࡩޓҠר࣑බעࡱ
ݡd
ᄊ EasyLink ࠌĩСበ
ሢ൴ഺሴd
๐ᄗႺ؇ HDMI CEC ࢻചඃ҃»
ٝࣞಯ࠲༛עࡱታd
ሃ
ңဘᅿت/ඃ҃൪חঙ HDMI CEC ԂӮᄊ•
EasyLink েሧdᄗޓྐྵཱ྇ĩೊӷᅩت/ඃ҃؇ฌ
ාԊd
•
Philips ӤѮህ҉ԣస೨সႽᄲ๐ᄗ HDMI CEC ࢻച
ඃ҃ࠜԂd
Ԟഥ
ሃ
ပຶሚޝ௯ӎۄӮۂ༻• [Ԟഥှ]d
Preferences
Audio
Subtitle
Disc Menu
Parental Control
PBC
Mp3/Jpeg Nav
Password
DivX Subtitle
1 С d
ࣞྣභ» [Ⴌഥှ] Ӵרd
2 С ာᆖ [Ԟഥှ]ĩࠌС നኒ
Ӵרd
3 ာᆖႤݓာĩࠌС OKd
4 ာᆖඃሤĩࠌС OKd
႓ڴࡏ൪ႤݓӴרĩೊС• d
႓ໞսӴרĩೊС• d
[ശၿ]
༛ޝ௯ӎۄာᆖოశᄶၟd
[ሷଢ]
༛ޝ௯ӎۄာᆖንᄶၟd
[ן࿎֊იခ]
ာᆖޝ௯Ӵרᄶၟd
ሃ
തޝ௯൪ଢᄗ๐ඃሤ؇ᄶၟĩޝ௯ࣞᄊୱഌ•
ᄶၟd
•
ᄗ࿖ DVD ؇ን/ოశᄶၟሜָޝ௯Ӵרݙܡd
႓ာᆖӴרሱ༥ս؇ᄶၟĩೊာᆖ• [ఇ]dࠌࣁ
Ԓ҉ᄊࠞාԊѾ୍؇qLanguage CoderĥᄶၟןĦ
ҸĩӋෝനྯჭ؇ᄶၟןd
[ᇉ]
ྭሧٵӤසߨښໂ؇ޝ௯؇ۂ༻dᇥ࿖؇ޝ
௯ңဘС؋ࢋૅሧd
1. С OKd
2. ာᆖ؋ࢋĩࠌС OKd
3. Сሷσ୪ෝനୃd
38
ZH-CN
Page 39

ሃ
ܼᄡிᅿ• [ᇉ] ሱඃሤ؇؋ࢋ؇ྭࢋ DVD ပ႓
ୃӮӎۄd
•
ບەࢋࢧ/؛ڙىd႓ᅯယӎۄ๐ᄗޝ௯ĩ
ೊာᆖq8rd
•
ᄗ࿖ޝ௯൪შሧ؋ࢋĩ༥ݖܠ؋ࢋૅሧdְݡ
ٵְޝ௯ཏ࿔d
[PBC]
חঙࡩޓҠםᄗ PBCĥӎۄেሧĦݡ؇
VCD/SVCD ؇டചӴרd
• [] - ቯനޝ௯ӎۄඪĩࣞྣභ๎ღ
Ӵרd
• [ܵ] - ອܠӴרĩӋָ؝Ⴄැঙඵ
ӎۄd
[MP3/JPEGѰ٦]
ာᆖְႽྣභ༵࣓ࢥࡩ๐ᄗ༵࣓d
• [Ҵ໗ࡵ] - ྣභ๐ᄗ༵࣓d
• [Ҵ໗ࡵࡇ] - ྣභ MP3/WMA ༵࣓؇༵
࣓ࢥd
[ખ]
ඃሤࡩݙܡ๏ىޝ௯؇ୃĩӎۄྭሧ؇
DVDd
1. Сሷσ୪ ᅿ [ࣼખ] ንٯሱෝ
നq136900rࡩ൪ֳඃى؇ୃd
2. ᅿ [ྑખ] ንٯሱෝനୃd
3. ᅿ [ಖಮખ] ንٯሱᅾֳෝനୃd
4. С OK ໞսӴרd
ሃ
Ѯን༵࣓ᄲჷభ༵࣓ᇢ؇༵࣓ୢ೨ྯd•
തĩതჷభ؇༵࣓ୢවqMovie.avirĩᆗңဘ༵ࣞ҉
༵࣓ୣୢ༛qMovie.subrࡩqMovie.srtrd
[ϵЫྔ༓]
ྣභ҉ԣస؇പ࣓ѓ҉d
ሃ
തிྺላව۰সႽᅿ Philips ་ᇁ൪ྑᅽክ؇പ•
࣓ѓ҉ĩӋࣞПቯᅿ҉ԣస൪ĩပ႓ְཱd
[ಐ഼ᆸ]
ࣞ҉ԣస؇๐ᄗඃሤሹሤ༛սԮୱഌሖĩ
[ן]c[ᇉ] ߦ [ખ] ඃሤքd
8 ఇྔ༓
ۻྑೌࡵ
႓ࡨ؆പ࣓ݙĩೊࣁԒ҉ԣస؇״ಏപ࣓ѓ
҉ĩࣞᄲ Philips ་ᇁ൪؇ክപ࣓ѓ҉ĥത
ᄗĦғd
ሃၭ
പ࣓ࢋՓሱಯཡሱٰتᅙĞ•
1 С d
2 ာᆖ [Ԟഥှ]>[ϵЫྔ༓]ĩࠌС
OKd
3 ࢜ྑ༵࣓ୢĩࠌС ໞսӴרd
4 ۂ༻ www.philips.com/supportĩᄊְԣస
؇༵࣓ୢࣁԒව۰ᄗክ؇പ࣓ѓ҉d
5 ྐྵཱ྇ĩೊӷᅩ་ᇁ൪؇ࢋฌd
ሃ
ٰঙتᅙྮሴĩࠌሹႽِ҉ԣసd•
ࡩᇓ໗
ሃ
തி༏࢜ୃĩೊෝനq136900rĩࠌඃሤ•
ୃd
[DivXሷଢ]
ာᆖለ՝ DivX ን؇ንۺࢄd
• [
ᇓ໗IJࡩij
] - ࣇບሱ༵
ဥ
ಯཡࣞ҈cෆc൧ᄊೄࡩڿتఊཞᄊ•
ᄡޝ௯d
ሃၭ
ZH-CN
39
Page 40

౦ࢵܿ
ᄊ༓ྚ༝ೄӥָޝ௯ሱ࿁ҪᅚՑሒྮӪ
ޝ௯d
ෝսݡķ7.0 ߚ (DVD)ĩ10.0 ߚ•
(VCD/CD)
ڡഽࣺķ60 ٩•
݃۰
ሃ
ޡݎߦඃ࢛തᄗݙܡĩӤઘົላd•
USB
ࢻചခķܼะ USB (2.0)•
һለ՝ķUMSĥUSB ևĦ•
൮
ߞሧබķPAL / NTSC•
ܑߨశෝսķ1 Vpp ~ 75 •
ەశෝսķ0.7 Vpp ~ 75 •
HDMI ෝսķ480ic480pc576ic576pc•
720pc1080ic1080p
ၿ
୨ບඔෝս•
ᆐғĥ1 ಆ߮Ħķ> 90 ەѿĥA ࢨĦ•
ِڵ༘ĥ1 ಆ߮Ħķ> 80 ەѿĥA ࢨĦ•
֓ოĥ1 ಆ߮Ħķ> 90 ەѿ•
චᇩ/ᆐოĥ1 ಆ߮Ħķ> 75 ەѿ•
MP3ķMPEG ოశ؝ 3 Ԍ•
ንෝս•
ቂcޝྚ•
HDMI ෝս•
ᇺሑᇆ
զĥড় x ܼ x ඉĦķ360 x 39 x 209ĥߚାĦ•
ሹķᅡ 1.49 ಆ•
჻
ڏىݡķ
ݡߝķ< 10 •
עࡱ୨බྑ؇ݡߝķ< 0.1 •
ุ܆֩ڼࡵ
ႌে౸ߦت՟•
ოశ/శྮ•
ᄊࠞාԊ•
ะനବሙஔ•
ࠛܿ݃۰
ķјບࡹޝ InGaAIP (DVD)ĩ•
AIGaAs (CD)
ӑԫķ655 எା (DVD)ĩ790 எା (CD)•
9 ܧᅴᇙވԭড়ٞى
ۥ
ᅿ֊ت༔ྤdಯཡԙྑ҉ԣస؇শd•
༛ѮህѮဋ؇ᄗ࿔ခĩಯཡԩና༝ဋ҉
ԣసd
തᅿᄊ҉ԣసඪᄽ༻ທĩೊᅿඅೊ۽རሏ
ಏࣁԒႽྑරdതᄽ༻ທĩೊᅿ www.
philips.com/welcome ႜ୍൪ቡԊி؇ԣసӋࡨ؆
ለ՝d
തிᄲ Philips ྄ĩ်ࣞ༻ி҉ԣస؇ߞߦ
ဟߞdߞߦဟߞসႽᅿ҉ԣస؇Ѿ୍ᇕ
dೊᅿְຣߞķ
ߞ __________________________
ဟߞ ___________________________
ᇺሑᇆ
Ыሑᇆഌ֩σ୪҆ఓቘႬ
ְࣞԣసָتᅙԎኸ൪ٰঙࢍەሴĩࠌ•
ሹd
ؗီచૄႹٕႏ
ࣞ҉ԣసሢتᅙԎኸd•
ࣞႌে౸ሙ࿁҉ԣసሀ୍؇ࠅܭ౸d•
ሀቯനت՟d•
ᅿႌে౸ሱቯനت՟d•
110-240 ۻĩ50/60 ߮ኇ•
߆૯
߆૯
ᄗޓതߧᅿتࡱ൪ာᆖሀෝനᅙ؇•
ཱĩೊӷᅩت؇ᄊࠞාԊdಯ࠲تశ
ሒሢণ Philips ూd
തႺחঙቑൃඃሤࡩݙܡتሧබ•
ඃሤĩೊಯ࠲ࡏୱഌ୨බķ1) С חঙޝ௯
ӿd2) С ሷσ୪ g1hĥٵᄡቑൃت
Ħࡩ ሷσ୪h3hĥٵᄡتሧබĦd
ൔႬ HDMI ৹ࢨൌར
തົ HDMI ྮࣞ҉ԣసሢ༥•
ී؇ӎۄඃ҃ĩᆗসཏڧෝսოశ/
శߞd
ZH-CN
40
Page 41

ࣁԒ HDMI ྮව۰ᄗޅᇒd࠲ᄊ؇•
HDMI ྮd
തᅿݙܡ HDMI శەұඪսྥᇥሷ•
ೈĩᆗңဘࣞಯ࠲ࡏୱഌ୨බķ1) С
חঙޝ௯ӿd2) Сሷσ୪q1rd
ശၿ
൮ၿൿԟ
ѮႺࣞოశتሢت؇ოశෝന•
Ԏd
ࣞت؇ოశෝനەఇሢྯჭ؇శෝനd•
ᄗޓྐྵཱ྇ĩೊӷᅩت؇ᄊࠞාԊd
ၿഥХIJ৯ശ༦/܃٦చ/ࢨ൰చij֩လശ
చૄႹၿൿԟ
ѮოశتႺሢოశඃ҃؇ოశෝ•
നԎd
חঙოశඃ҃ĩغሢሀ؇ოశෝനᅙd•
HDMI ৹ࢨശၿ
ത؇ඃ҃Ӥۺߨ HDCP ҵቻࡩࢻ•
ച DVIĩᆗிসཏڧາ HDMI ෝս؇
ඔოd
ѮႺחঙ• [HDMIၿ] ඃሤd
Ѱ٦ DivX ൮ൌૄႹശၿ
ְԣసসӤለ՝ოశҫ౸d•
Ѱ٦
҆ୃѰ٦ܿ
ޝ௯ၚሹމࠟcүࡩ்ᆅdݙ࠲ࡩೄ•
ޝ௯d
ೊᄊሀ؇ޝ௯ݎබࡩ༵࣓ݎබd•
҆ୃѰ٦ DivX ൮໗ࡵ
Ѯ DivX శ༵࣓වᇾ؇d•
Ѯ༵࣓৶ᆼୢሀd•
ᄐᄡንѓ༻ທĩ DRM Ѯࠛ؇శ•
༵࣓ཏڧົ୨శĥതܑߨc
ەߦ scartĦӎۄdᄊ HDMI ӎۄ
ᇥ࿖༵࣓d
ଢ֩۞еე൮֩ཅ൙ഥᇆ҆ڜ
ޝ௯டച؇ড়ܼғවއى؇d•
DivX ሷଢૄႹᆢಖཅ൙
Ѯን༵࣓ୢᄲتჷ༵࣓ୢྯd•
ာᆖሀ؇ንۺࢄd•
d
С•
ᅿӴרሱာᆖ• [Ԟഥှ] >
[DivXሷଢ]d
ာᆖለ՝ን؇ንۺࢄd•
10 Ց
D
DivX ෟ࿎൮
ְ DivX ഌህ®ඃ҃ңဘቡԊĩӮӎۄ DivX
ာశ (VOD) டചd႓ඕՐቡԊĩೊᅿඃ҃
ඃሤӴרሱᇕ DivX VOD Өەdቩሢ vod.divx.
comĩᄊְቡԊՐቡԊՓĩӋݙځ
ᄗޓ DivX శ؇ཱd
H
HDMI
ܼೄཫ٩ځତບĩවႤሷܼะንĩস
ෝ༥၄์؇ܼೄཫ٩శߦንځඔო
శdসႽෝܼራ؇ࠤ୍ߦოశĩڙ೨ଢᄗ
ഋߧܦംdHDMI ೨࿁ࠌࢻച DVId
ݖ HDMI ҵቻĩሢཏ HDCPĥܼםড়ን
டചѮࠛĦ؇ HDMI ࡩ DVI ԣసࣞሣཏశࡩ
ოశෝսd
J
JPEG
ႤሷԪ࣐؇ንభݎබdߨ࿀ቧࢧ࿎
ከຖս؇Ⴄሷభ၄์྄ໆĩຍئව၄
์ғߵܼĩ࿀ራᄗࣨؐdJPEG ༵࣓؇
৶ᆼୢ༛ .jpg ࡩ .jpegd
M
MP3
Ⴄሷᄗඔო၄์྄ໆ؇༵࣓ݎබdMP3 ව
Motion Picture Experts Group 1ĥࡩՍ MPEG-1Ħ
Audio Layer 3 ؇ࣇՍdᄊ MP3 ݎබĩႤᇈ
CD-R ࡩ CD-RW ޝ௯সႽғႤѐ CD ځևט
ᅡ 10 ҁ؇d
P
PBC
ӎۄেሧdႤሷ྄ໆĩᅿܠ྄ໆྑிসႽᄊ
ૅޝ௯ሱ؇ూӴרᅿ VCD/S-VCD ሱߖd
ிসႽྼِࠜӎۄߦศ๎d
ࡩᇓ໗
ZH-CN
41
Page 42

W
WMA
Windows Media™ ოశdೊӷফ Microsoft
Corporation ঙڡ؇ოశ၄์෮dWMA স
Ⴝᄊ؝ 9 ѓ Windows Media Player ࡩ Windows
Media Player for Windows XP ҫdWMA ༵
࣓؇৶ᆼୢ༛ .wmad
WMV [Windows Media Video]
ሙ Microsoft Corporation ঙڡ؇Ⴄሷశ၄์
෮dWMV டചসົ Windows Media
9 ྄ҫdᇥ࿖༵࣓সົ༵࣓৶ᆼ
ୢq.wmvrදһd
®
Encoder
۞е
ড়ܼғሙتూ؇ԫ٩ᄲܼ٩؇ғdҵቻ
ت؇ғ༛ 4:3ĩڙܼೄཫ٩ߦড়ూت؇ғ
༛ 16:9dqླrӎۄ୨බসႽഀிᅿғ༛
4:3 ؇ҵቻూ൪Ⴝড়ࣺ൨భd
ᇳ
ᇳྟ૱
ቑൃଦྣභ؇ሂවౖົሧබت؇
ҁd๓সႽຖݤܼ؇࿀ەұߦራd
42
ZH-CN
Page 43

Language Code
Abkhazian 6566
Afar 6565
Afrikaans 6570
Amharic 6577
Arabic 6582
Armenian 7289
Assamese 6583
Avestan 6569
Aymara 6589
Azerhaijani 6590
Bahasa Melayu 7783
Bashkir 6665
Belarusian 6669
Bengali 6678
Bihari 6672
Bislama 6673
Bokmål, Norwegian 7866
Bosanski 6683
Brezhoneg 6682
Bulgarian 6671
Burmese 7789
Castellano, Español 6983
Catalán 6765
Chamorro 6772
Chechen 6769
Chewa; Chichewa; Nyanja 7889
9072
Ё᭛
Chuang; Zhuang 9065
Church Slavic; Slavonic 6785
Chuvash 6786
Corsican 6779
Česky 6783
Dansk 6865
Deutsch 6869
Dzongkha 6890
English 6978
Esperanto 6979
Estonian 6984
Euskara 6985
6976
Faroese 7079
Français 7082
Frysk 7089
Fijian 7074
Gaelic; Scottish Gaelic 7168
Gallegan 7176
Georgian 7565
Gikuyu; Kikuyu 7573
Guarani 7178
Gujarati 7185
Hausa 7265
Herero 7290
Hindi 7273
Hiri Motu 7279
Hrwatski 6779
Ido 7379
Interlingua (International)7365
Interlingue 7365
Inuktitut 7385
Inupiaq 7375
Irish 7165
Íslenska 7383
Italiano 7384
Ivrit 7269
Japanese 7465
Javanese 7486
Kalaallisut 7576
Kannada 7578
Kashmiri 7583
Kazakh 7575
Kernewek 7587
Khmer 7577
Kinyarwanda 8287
Kirghiz 7589
Komi 7586
Korean 7579
Kuanyama; Kwanyama 7574
Kurdish 7585
Lao 7679
Latina 7665
Latvian 7686
Letzeburgesch; 7666
Limburgan; Limburger 7673
Lingala 7678
Lithuanian 7684
Luxembourgish; 7666
Macedonian 7775
Malagasy 7771
Magyar 7285
Malayalam 7776
Maltese 7784
Manx 7186
Maori 7773
Marathi 7782
Marshallese 7772
Moldavian 7779
Mongolian 7778
Nauru 7865
Navaho; Navajo 7886
Ndebele, North 7868
Ndebele, South 7882
Ndonga 7871
Nederlands 7876
Nepali 7869
Norsk 7879
Northern Sami 8369
North Ndebele 7868
Norwegian Nynorsk; 7878
Occitan; Provencal 7967
Old Bulgarian; Old Slavonic 6785
Oriya 7982
Oromo 7977
Ossetian; Ossetic 7983
Pali 8073
Panjabi 8065
Persian 7065
Polski 8076
Português 8084
Pushto 8083
Russian 8285
Quechua 8185
Raeto-Romance 8277
Romanian 8279
Rundi 8278
Samoan 8377
Sango 8371
Sanskrit 8365
Sardinian 8367
Serbian 8382
Shona 8378
Shqip 8381
Sindhi 8368
Sinhalese 8373
Slovensky 8373
Slovenian 8376
Somali 8379
Sotho; Southern 8384
South Ndebele 7882
Sundanese 8385
Suomi 7073
Swahili 8387
Swati 8383
Svenska 8386
Tagalog 8476
Tahitian 8489
Tajik 8471
Tamil 8465
Tatar 8484
Telugu 8469
Thai 8472
Tibetan 6679
Tigrinya 8473
Tonga (Tonga Islands) 8479
Tsonga 8483
Tswana 8478
Türkçe 8482
Turkmen 8475
Twi 8487
Uighur 8571
Ukrainian 8575
Urdu 8582
Uzbek 8590
Vietnamese 8673
Volapuk 8679
Walloon 8765
Welsh 6789
Wolof 8779
Xhosa 8872
Yiddish 8973
Yoruba 8979
Zulu 9085
43
Page 44

© 2010 Koninklijke Philips Electronics N.V.
All rights reserved.
DVP3588K_93_UM_V2.0_1025
 Loading...