

Page 1
Register your product and get support at
www.philips.com/welcome
DVP3580
EN User manual 3
DA Brugervejledning 21
DE Benutzerhandbuch 39
EL ƆƣƷƥƩƱƟƤƩƯ ƷƱƞƳƧƲ 59
ES Manual del usuario 79
FI Käyttöopas 97
FR Mode d’emploi 115
IT Manuale utente 133
NL Gebruiksaanwijzing 151
PL Instrukcja obsãugi 169
PT Manual do utilizador 187
SV Användarhandbok 205
TR Kullanım kılavuzu 221
Page 2
LASER
CAUTION:
USE OF CONTROLS OR ADJUSTMENTS OR
PERFORMANCE OF PROCEDURES OTHER
THAN THOSE SPECIFIED HEREIN MAY RESULT
IN HAZARDOUS RADIATION EXPOSURE.
CAUTION:
VISIBLE AND INVISIBLE LASER R ADIATION
WHEN OPEN AND INTERLOCK DEFEATED.
DO NOT STARE INTO BEAM.
LOCATION:
INSIDE, NEAR THE DECK MECHANISM .
Italia
DICHIARAZIONE DI CONFORMITA’
Si dichiara che l’apparecchio DVP3580, Philips
risponde alle prescrizioni dell’art. 2 comma 1 del
D.M. 28 Agosto 1995 n.548.
Fatto a Eindhoven
Philips Consumer Lifestyles
Philips, Glaslaan 25616 JB Eindhoven,
The Nether lands
This product is in compliance with the EEE
directive.
EEE yönergesine uygundur.
Norge
Typeskilt fi nnes på apparatens underside.
Observer: Nettbryteren er sekundert innkoplet.
Den innebygde netdelen er derfor ikke
frakoplet net tet så lenge apparatet er tilsluttet
nettkontakten.
For å redusere faren for brann eller elek trisk
støt, skal apparatet ikke utset tes for regn eller
fuktighet.
DK
Advarsel: Usynlig laserstråling ved åbning når
sikkerhedsaf br ydere er ude af funktion. Undgå
utsættelse for stråling.
Bemærk: Netafbryderen er sekundær t indkoblet
og ofbryder ikke strømmen fra nettet. Den
indbyg gede netdel er derfor tilsluttet til lysnettet
så længe nets tik ket sidder i s tik kontakten.
S
Klass 1 laseraparat
Varning! Om apparaten används på annat sätt
än i denna bruksanvisning specifi cerats, kan
användaren utsättas för osynlig laser strålning, som
överskrider gränsen för laserklass 1.
Obser vera! Stömbr y taren är sekundär t kopplad
och bryter inte strömmen från nätet. Den
inbyggda nätdelen är där för ansluten till elnätet så
länge stickproppen sitter i väg guttaget.
SF
Luokan 1 laserlaite
Varoitus! Laitteen käyttäminen muulla kuin
tässä käy ttöohjeessa mainitulla t avalla saattaa
altistaa käy ttäjän tur vallisuusluok an 1 ylittävälle
näkymättömälle lasersäteilylle.
Oikeus muutoksiin var ataan. Laite ei saa
olla alttiina tippu-ja roiskevedelle. Huom.
Toiminnanvalitsin on k ytket ty toisiopuolelle,
eikä se ky tke laitetta irti sähköverkost a.
Sisäänrakennettu verkko-osa on
kytkettynä sähköver kkoon aina silloin, kun pistoke
on pistorasiassa.
Producent zastrzega moůliwoőĂ wprowadzania
zmian technicznych.
2
Page 3

Trademark notice
Contents
Dolby Labor ator ies. Dolby and the double-D
symbol are trademar ks of Dolby Laboratories.
logo are trademarks, or registered trademarks of
Microsoft Corporation in the United States and/or
other countries.
digit al video for mat created by DivX, Inc. This is an
offi cial DivX Certifi ed device that plays DivX video.
Visit www.div x.com for more infor mation and
soft ware tools to conver t your fi les into DivX video.
ABOUT DIV X VIDEO-ON-DEMAND: This DivX
Certifi ed
play DivX Video-on- Demand (VOD) content. To
gener ate the registration code, locate the DivX
VOD section in the device setup menu. Go to vod.
divx.com with this code to complete the regis tration
process and learn more about DivX VOD.
®
DivX
and DivX Ultra® are registered trademarks
of DivX, Inc., and are used under license.
DVD Format/Logo Licensing Corporation.
Universal Serial Bus Implementers Forum, Inc.
High-Defi nition Multimedia Interface are
trademar ks or registered trademarks of HDMI
licensing LLC.
Manufactured under license from
Windows Media and the Windows
ABOUT DIV X VIDEO: DivX® is a
®
device must be registered in order to
‘DVD Video’ is a trademark of
The USB-IF Logos are trademarks of
HDMI, and HDMI logo and
1 Important 4
Safety and important notice 4
2 Your DVD player 5
Playable media 5
Product overview 5
3 Connect 6
Connect audio/video cables 6
Route audio to other devices 7
Connect USB fl ash drive 7
Connect power 8
4 Get started 8
Prepare the remote control 8
Find the TV input channel 8
Select menu display language 8
Turn on progressive scan 8
Use Philips EasyLink 9
5 Play 9
Play a disc 9
Play video 10
Play music 11
Play photo 12
Play musical slideshow 12
Play from a USB fl ash drive 13
6 Advanced features 13
Media copy 13
Create MP3 fi les 13
7 Adjust settings 14
General setup 14
Audio setup 14
Video setup 15
Preferences 17
8 Additional information 18
Update software 18
Care 18
Specifi cations 19
9 Troubleshooting 19
English
EN
3
Page 4
1 Important
Safety and important notice
Warning
Risk of overheating! Never insta ll the p rodu ct in a •
confi ned space. Always leave a space of at lea st 4 inches
around the produ ct for ventilation. Ensure cu rtains or
other objec ts never cover the ve ntil atio n slot s on the
product.
Never p lace th e prod uct , remote con trol or bat ter ies
•
near na ked fl ames or other h eat sources , incl uding dire ct
sunlight.
•
Avoid high temperatur e, moi sture, water and dus t.
This unit must not b e exposed to dr ipping or splashing.•
Never p lace any objec t or items that can damag e this •
unit (e. g., li quid fi lled o bjec ts, light ed can dles).
•
Never p lace th is pro duc t on other ele ctr ical equipment.
Keep away from this pr oduct during lightning storms.•
Wher e the mains plug or an applia nce coupler is used as •
the dis connect device , the disconn ect d evice s hall r emai n
readily operable.
Visib le and i nvisible la ser r adia tion w hen op en. Avoid
•
expos ure to b eam.
This produc t complies with the radio
interference requirements of the
European Community.
About Progressive Scan
Consumers should note that not all high defi nition
television sets are fully compatible with this product
and may cause ar tifacts to be displayed in the
picture. In case of 525 or 625 progressive scan
picture problems, it is recommended that the user
switch the connection to the ‘standard defi nition’
output. If there are questions regarding our TV set
compatibility with this model 525p and 625p DVD
player, please contact our customer service center.
Disposal of your old product and
batteries
Your produc t is designed and manufactured
with high quality materials and components,
which can be recycled and reused.
When this crossed-out wheeled bin symbol
is attached to a product it means that
the product is covered by the European
Directive 2002/96/EC. Please inform
yourself about the local separate collection system
for electrical and electronic products.
Please act according to your local r ules and do not
dispose of your old products with your nor mal
household waste.
Correct disposal of your old product helps to
prevent potential negative consequences for the
environment and human health.
Your produc t contains batteries covered by
the European Directive 2006/66/EC, which
cannot be disposed with normal household
waste.
Please inform your self about the local rules on
separ ate collection of batteries because correct
disposal helps to prevent negative consequences for
the environmental and human health.
Copyright notice
This item incorporates copy protection technology
that is protec ted by U.S. patents and other
intellectual proper ty rights of Rovi Corporation.
Reverse engineering and disassembly are
prohibited.
CLASS 1
LASER PRODUCT
4
EN
Page 5
2 Your DVD player
Congratulations on your purchase, and welcome to
Philips! To fully benefi t from the support that Philips offers,
register your product at www.philips.com/welcome.
Playable media
This product can play:
DVD, DVD -Video, DVD+R /+RW, •
DVD- R /-RW, DVD+R/-R DL (Dual Layer)
Video CD/SVCD•
Audio CD, CD-R/CD- RW•
MP3 media, WMA media, DivX (Ultra) media, •
JPEG fi les
USB fl ash drive•
Region codes
You can play discs with the following region codes.
DVD region code Countries
Europe
Product overview
Main Unit
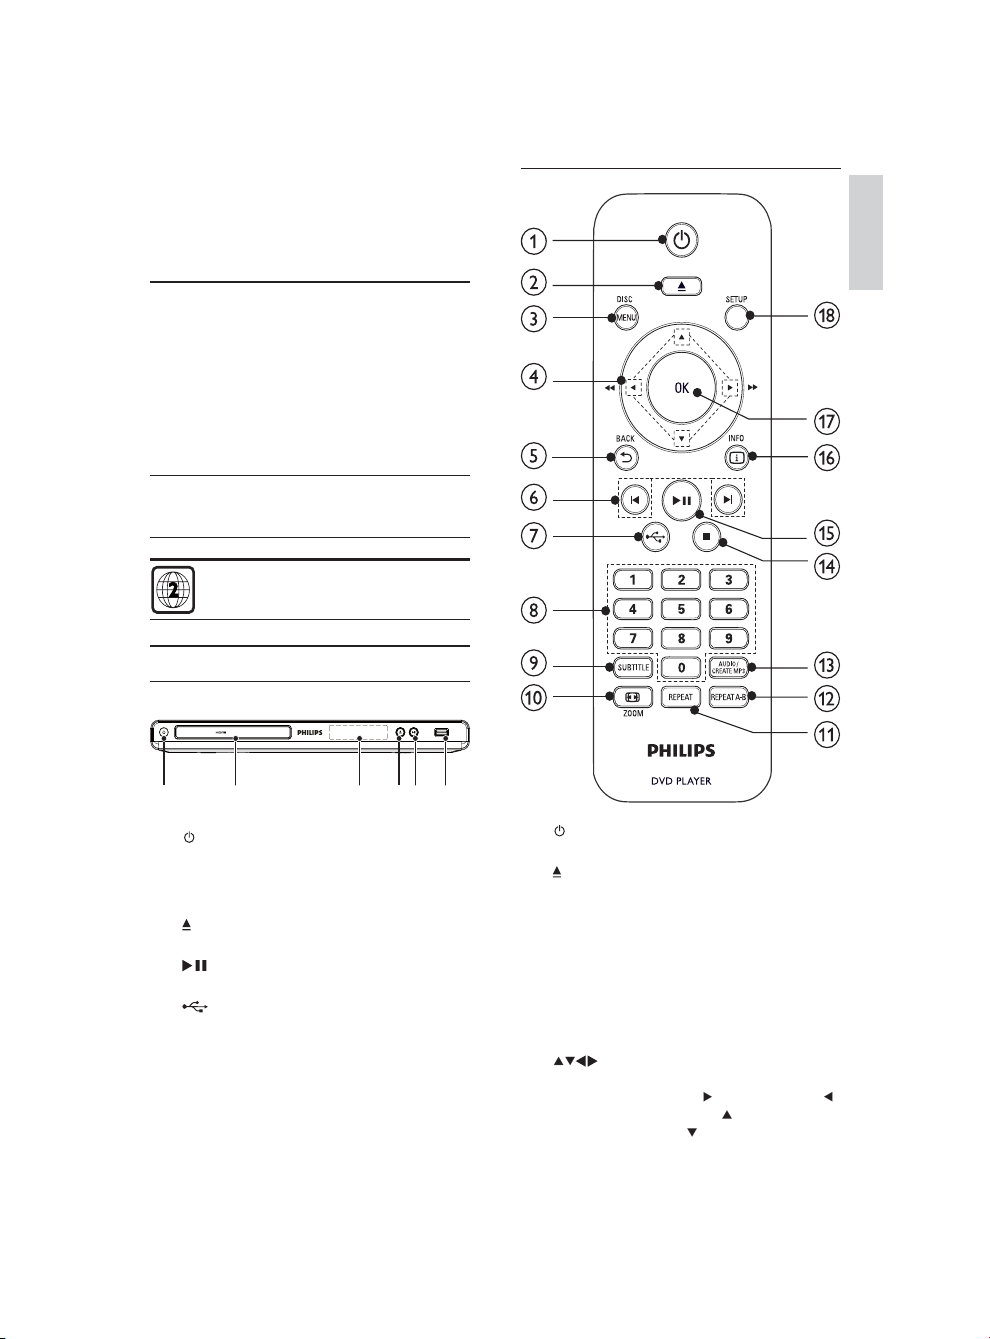
DVD PLAYER DVP3580
Remote control
English
a b cdef
a
b Disc compartment
c Display panel
d
e
f
Turn on the unit or switch to standby.•
Open or close the disc compar tment. •
Star t, pause or resume disc play.•
jack
Connect a USB fl ash drive.•
a
Turn on the unit or switch to standby.•
b
Open or close the disc compar tment. •
c DISC MENU
Access or exit the disc menu. •
Switch to the disc mode .•
During the play of a photo slideshow, •
switch between the Fun Mode and
Simple Mode.
For VCD and SVCD, turn on or of f PBC •
(playback control).
d
Navigate the menus.•
Search fast-forward ( •
Search slow-forward ( •
slow-backward (
) or fas t-backward ( ).
) or
).
EN
5
Page 6
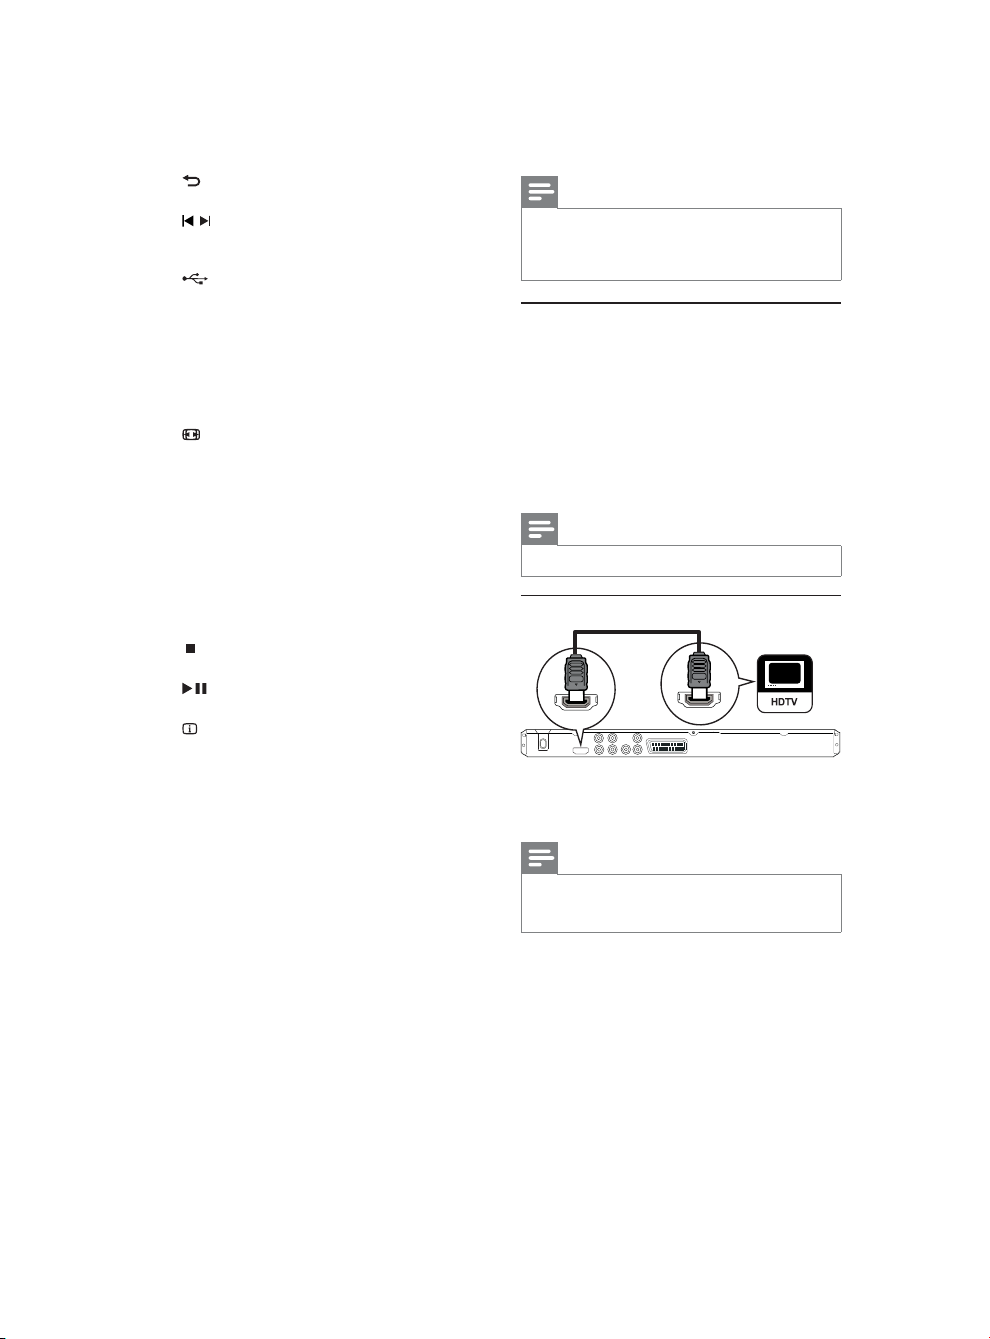
e BACK
Retur n to the previous display menu.•
f
/
Skip to the previous or nex t title, chapter, •
or track.
g
Switch to the USB mode.•
h Numeric buttons
Select an item to play.•
i SUBTITLE
Select a subtitle language on a disc.•
Access the menu of copying/deleting USB •
audio fi les.
ZOOM
j
Fit the picture display to the TV screen.•
Zoom the picture in or out.•
k REPEAT
Select various repeat play modes.•
l REPEAT A-B
Repeat play for a specifi c section.•
m AUDIO/CREATE MP3
Select an audio language or channel on •
a disc.
Access the menu of creating MP3 fi les.•
n
Stop play.•
o
Star t, pause or resume disc play.•
INFO
p
For discs, access the play options or •
display the cur rent disc s tatus.
For slideshows, display a thumbnail view •
of photo fi les.
q OK
Confi rm an entr y or selection.•
r SETUP
Access or exit the setup menu.•
3 Connect
All audio/video cables are sold separately.
Make the following connections to use this product.
Basic connections:
Video•
Audio•
Optional connections:
Route audio to other devices:•
Digital amplifi er/receiver•
Analog stereo system•
USB fl ash drive•
Note
Refer to t he ty pe pla te at th e back or bottom of the •
product fo r iden tifi catio n and su pply r atings.
Befor e you make or cha nge any co nnec tions, en sure t hat
•
all the devices are d isconnected from the power ou tlet.
Connect audio/video cables
Connect this product to TV to view disc play. Select
the bes t video connection that TV can suppor t.
Option 1: Connect to the HDMI jack (for a HDMI,
DVI or HDCP-compliant TV ).
Option 2: Connect to the component video jacks
(for a standard TV or Progressive Scan TV).
Option 3: Connect to the scar t jack (for a standard TV)).
Option 4: Connect to the video (CVBS) jack (for a
standard TV).
Note
You must con nec t this p rodu ct di rec tly to a T V.•
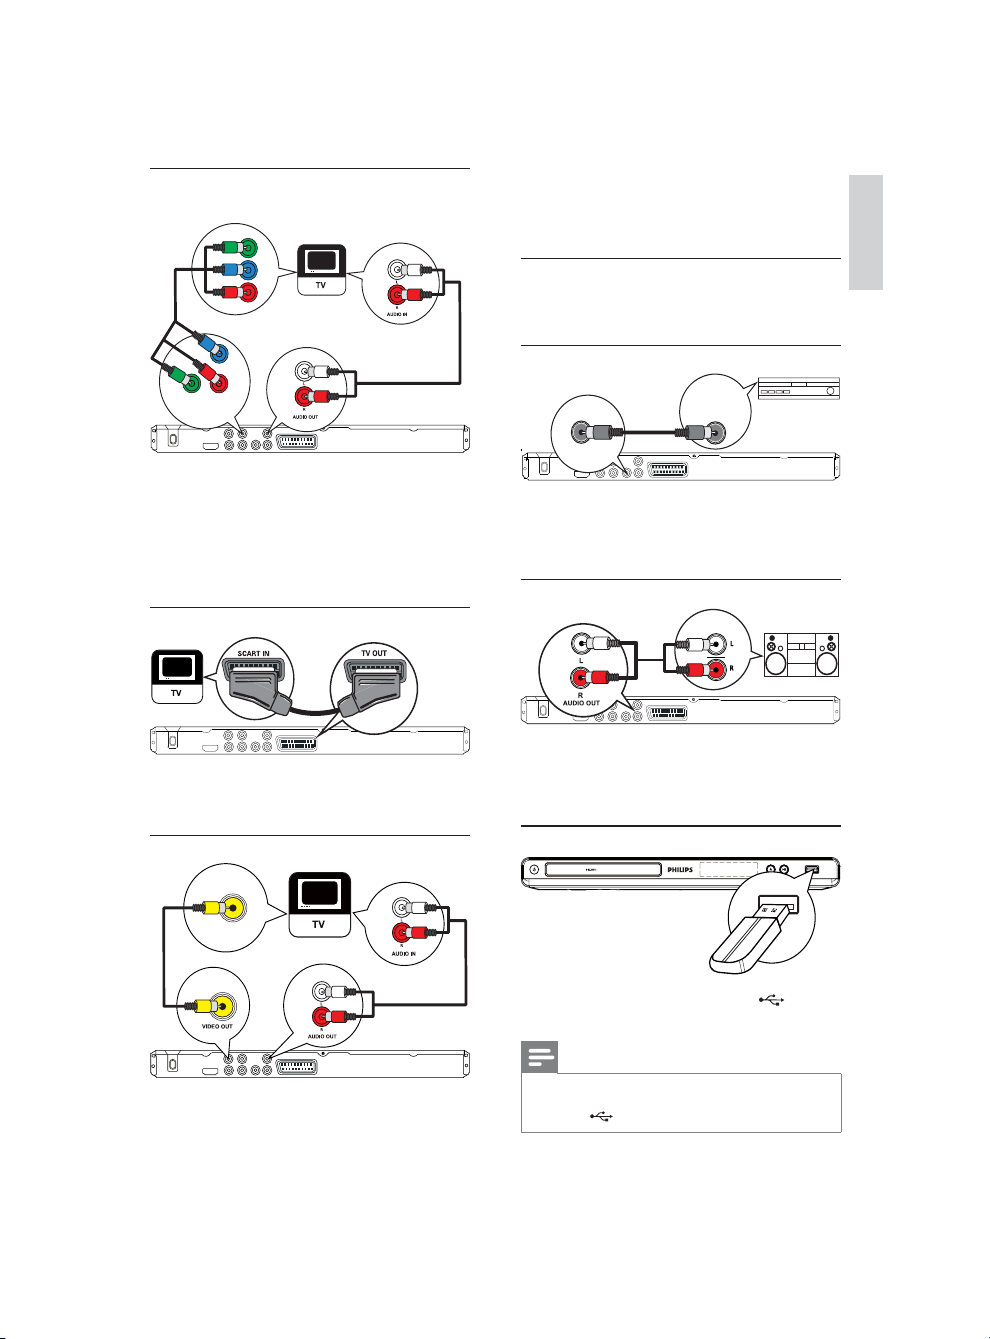
Option 1: Connect to the HDMI jack
HDMI OUT
1
Connect an HDMI cable to:
the • HDMI OUT jack on this product.
the HDMI input jack on the T V. •
Note
If the device support s HDM I CEC , you ca n control •
compliant de vices w ith a s ingle remote control (see “Get
sta rt ed” > “ Use Philips E asy Link”).
HDMI IN
6
EN
Page 7
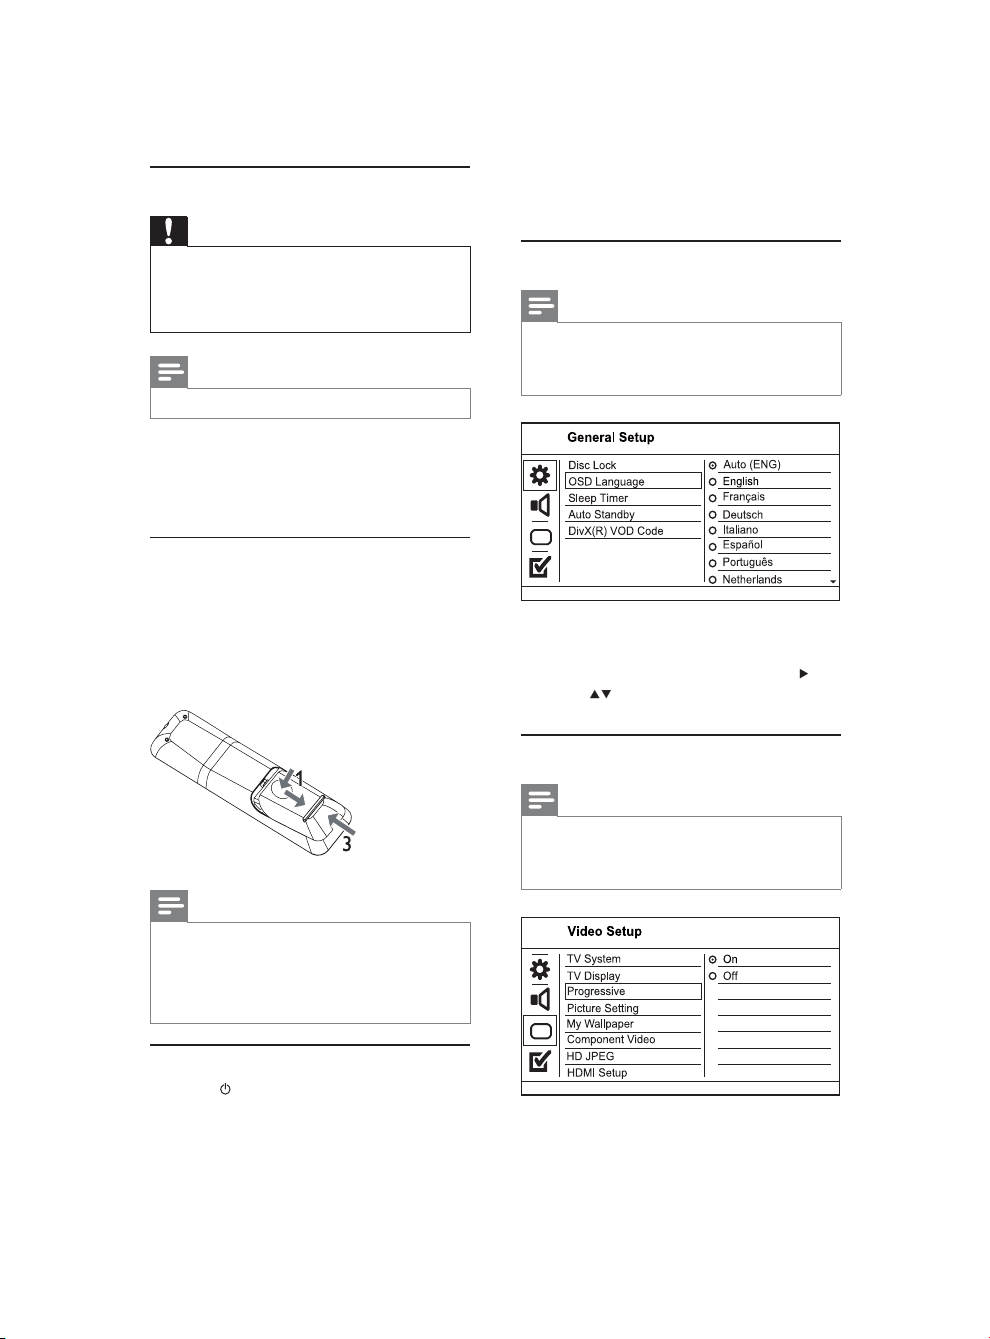
Option 2: Connect to the component
video jack
Y
Pb
Pr
Pb
Pr
Y
COMPONENT VIDEO OUT
Connect the component video cables to:
1
the • Y Pb Pr jack s on this product.
the COMPONENT VIDEO input jacks •
on the T V.
2 Connect the audio cables to:
the • AUDIO OUT L/R jacks on this product.
the audio input jack s on the TV.•
Option 3: Connect to the scart jack
1
Connect a scart cable to:
the • TV OUT jack on this product .
the scart input jack on the TV.•
Option 4: Connect to the video (CVBS) jack
2 Connect the audio cables to:
the • AUDIO OUT L/R jacks on this
product.
the audio input jack s on the TV.•
Route audio to other devices
Route the audio from this product to other devices
to enhance audio play.
Connect to digital amplifi er/receiver
DIGITAL AUDIO
INPUT
COAXIAL
COAXIAL
1
Connect a coaxial cable to:
the • COAXIAL jack on this product .
the COAXIAL /DIGITAL input jack on •
the device.
Connect analogue stereo system
AUDIO IN
1
Connect the audio cables to:
the • AUDIO OUT L/R jacks on this
product.
the audio inpu t jack s on the device.•
Connect USB fl ash drive
DVD PLAYER DVP3580
English
VIDEO IN
1
Connect a composite video cable to:
the • VIDEO OUT jack on this product.
the video input jack on the T V.•
1 Connect a USB fl ash drive to the jack on
this product.
Note
This product can only play/vi ew MP3 , WMA , DivX •
(Ultra) or J PEG fi les tha t are s tored on a US B fl ash drive.
Press the
• but ton to access th e conte nt and p lay the fi les.
EN
7
Page 8
Connect power
Caution
Risk of product damage ! Ensu re that the power supply •
voltage cor res ponds to the voltage pri nted on the back
of the pr oduc t.
•
Befor e connecting the AC power co rd, e nsur e you have
completed all othe r connecti ons.
Note
The type pla te is located on the back of the product .•
1 Connec t the AC power cable to the wall socket.
The product is ready to be set up for use.»
4 Get started
Prepare the remote control
1 Press and push the batter y compartment to
slide it open (see “1” in the illustration).
2 Inser t two AA A bat teries with cor rec t
polarity (+/-) as indicated.
3 Push and slide back the battery compar tment
(see “3” in the illustration).
2 Turn on the TV and switch to the video input
channel (refer to the TV user manual on how
to select the A/ V input channel).
Select menu display language
Note
If this p roduct is connec ted to a HDMI CEC com pliant •
TV, skip this s etting. I t swi tches automatically to the
same OSD menu language as p er your TV se tti ng (if t he
langu age set on TV is supported by th is product).
1 Press SETUP.
» [General Setup] menu is displayed.
2 Select [OSD Language], and then press .
3 Press to select a language, and then press
OK.
Turn on progressive scan
Note
If you ar e not going to use the re mote co ntro l for a lon g •
time , remove the ba tte rie s.
Do not mi x batteries (old an d new or c arbon and
•
alka line , etc.).
Bat teries contain chemical su bst ances , so they shou ld be
•
disposed of pr operly.
Find the TV input channel
1 Press to turn on this product.
8
EN
Note
To use the progressive s can fe atur e, you m ust co nnec t a •
progressive sc an T V wit h the co mponent v ideo j ack s (see
“Conn ect ” > “Connec t audi o/video ca bles” > “ Opti on 2:
Conne ct to t he component vide o jack s” for detai ls).
Page 9
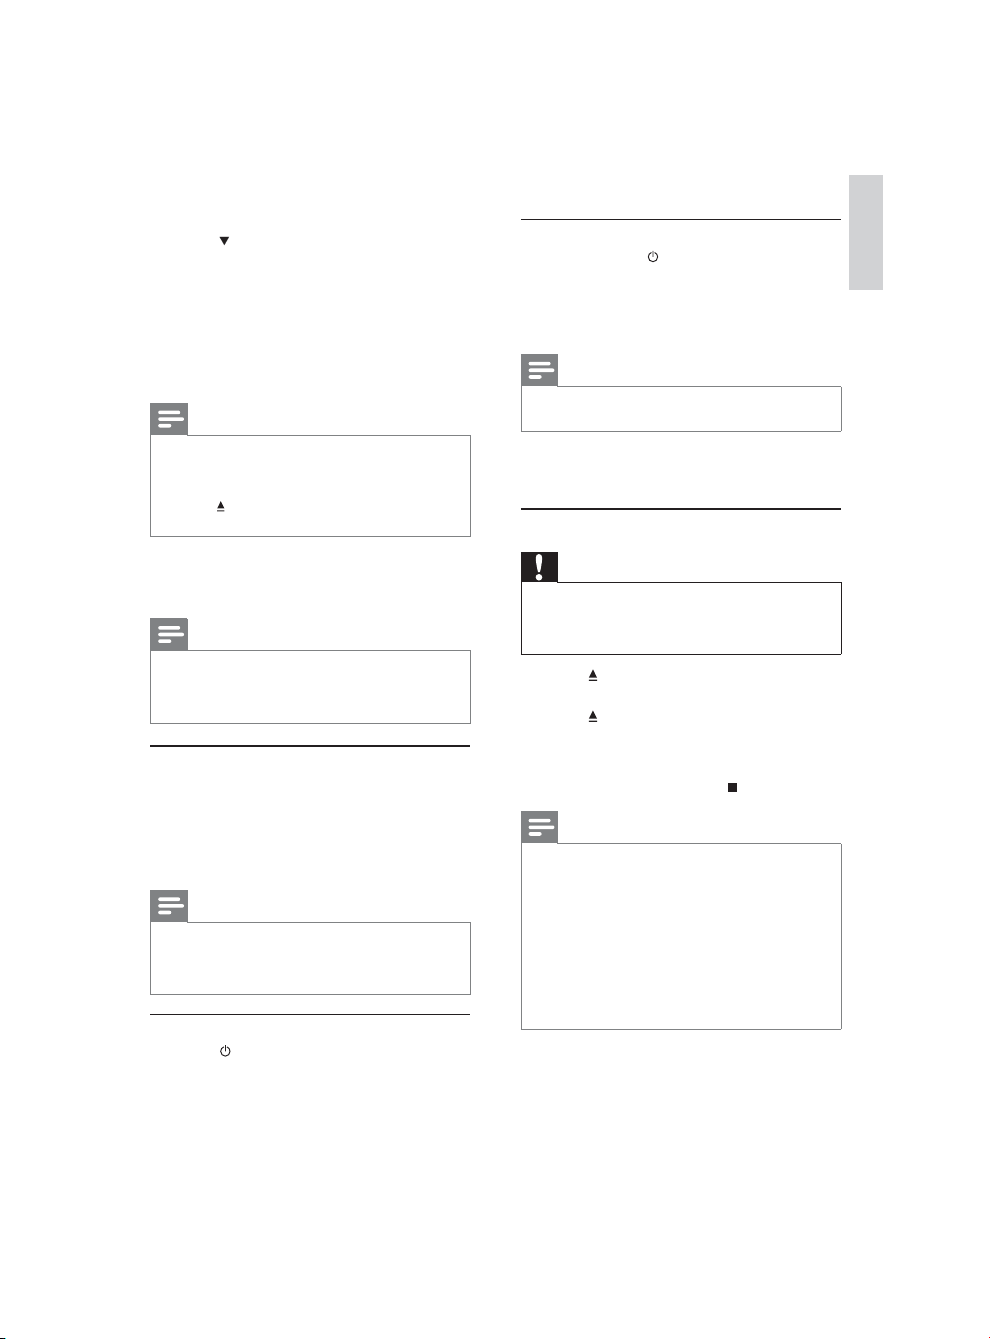
1 Turn on the TV to the cor rect viewing channel
for this product.
2 Press SETUP.
3 Press to select [Video Setup].
4 Select [Component Video] > [Interlaced],
and then press OK.
5 Select [Progressive] > [On], and then press
OK.
A warning message is displayed.»
6 To proceed, select [Ok] and then press OK.
The progressive setup is complete.»
Note
If a blan k/disto rt ed scr een is d isplayed, w ait for •
15 seconds for the a uto recover y.
If no pic tur e is dis played, tur n off t he pro gressive s can
•
mode as follow s:
to open t he dis c compa rtment.
1) Press
2) Press t he Numeric butto n ‘1’.
7 Press SETUP to exit the menu.
8 You can now turn on the progressive scan
mode on the TV (see the TV user manual).
Note
Duri ng play, when the progress ive scan mode is on for •
both th is pro duc t and th e TV, dis tor ted pictur e may
displ ay. In this case , tur n off t he progres sive scan fea ture
on both t his pr oduc t and t he TV.
Use Philips EasyLink
This product supports Philips EasyLink which uses the
HDMI CEC (Consumer Electronics Control) protocol.
You can use one single remote control to control
EasyLink-compliant devices that are connected
through HDMI connectors.
Note
To enable the Eas yLi nk feat ure , you mus t tur n on th e •
HDMI CEC operations o n the T V and on other devices
connected t o TV. Refe r to the TVs/devices m anua l for
details.
One-touch play
1
Press to turn on this product.
The TV (if supports one-touch play) »
automatically turns on and switches to the
correct video-in channel.
If a disc is loaded in this product, disc play »
automatically starts.
One-touch standby
Press and hold on the remote control for
1
more than 3 seconds.
All the connected devices (if the device »
supports one-touch standby) automatically
switch to standby.
Note
Phili ps does not gua ran tee 10 0% int eroperabili ty with al l •
HDMI CEC dev ices .
5 Play
Play a disc
Caution
Do not place any ob jec ts oth er tha n disc s into the disc •
compar tment.
•
Do not touch the d isc optical lens inside t he dis c
compar tment.
1 Press to open the disc compartment.
2 Inser t a disc with its label facing up.
3 Press to close the disc compartment and
start disc play.
To view disc play, turn on the TV to the •
correct viewing channel for this product.
To stop disc play, press •
Note
Check t he ty pes of discs su ppor ted (see “Your DVD •
player ” > “Playable media”).
If the pa ssword en try menu is displ ayed, e nter the
•
pass word b efore you can play the l ocked o r res tri cted
disc (see “Adjust s ett ings” > “ Pre fere nces” > [Parental
Control]).
If you pause or s top a disc, the screen save r appe ars afte r
•
5 minutes of inactivit y. To deact ivat e the screen s aver,
press DISC MENU.
After you pause or s top a disc and no b ut ton is pr essed
•
with in 15 minu tes, this product au tomatically switches
to standby.
.
English
EN
9
Page 10
Play video
Note
Some operation s may not wo rk wi th some disc s. Se e the •
infor mati on accompany ing the disc for details.
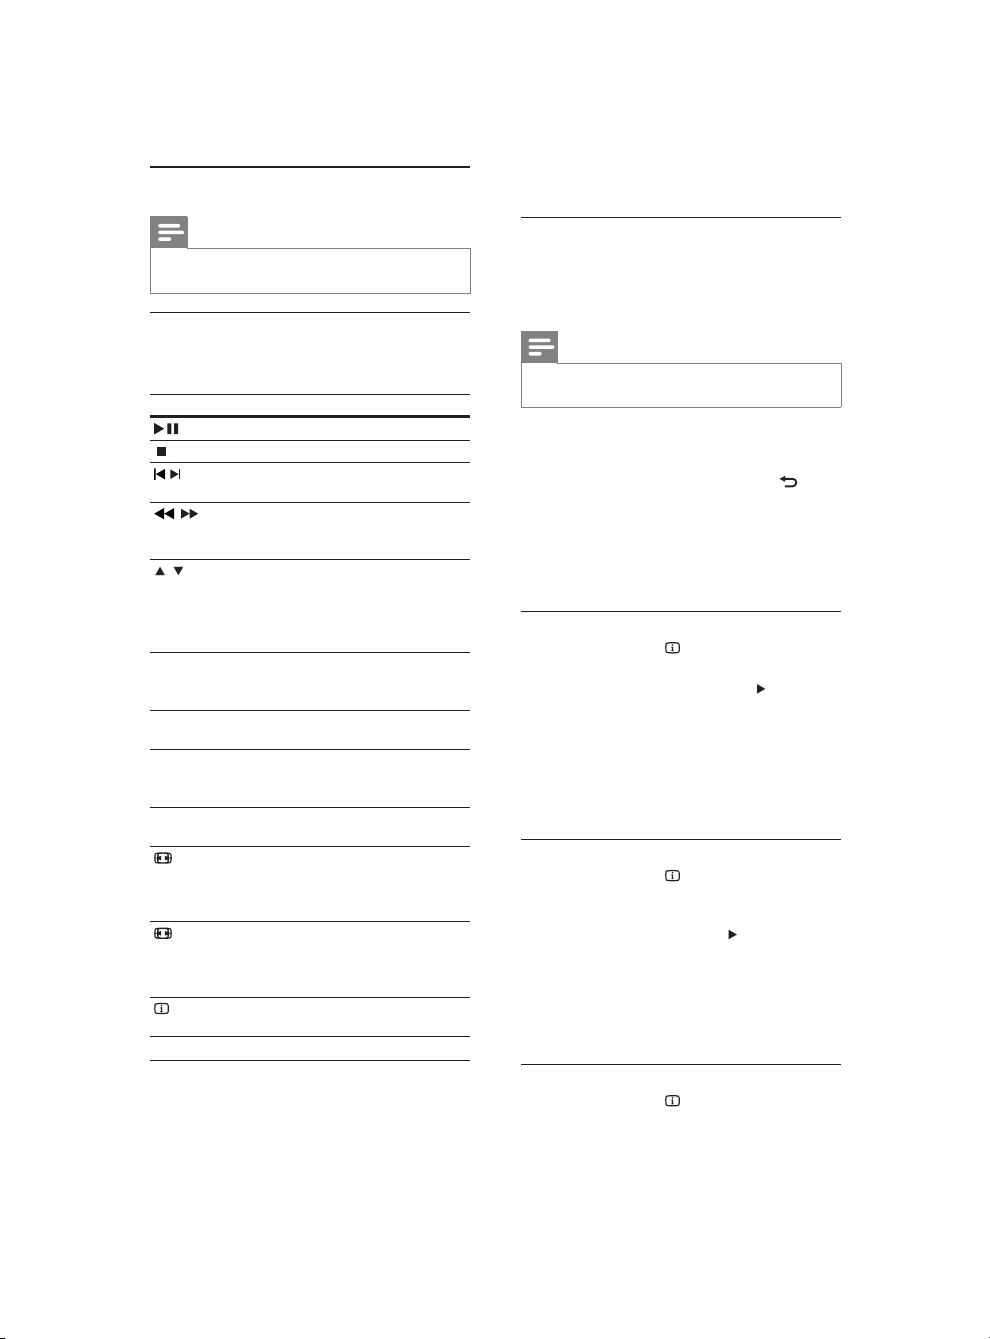
Control video play
1
Play a title.
2 Use the remote control to control the play.
Button Action
Star t, pause or resume disc play.
Stop disc play.
,
,
,
AUDIO/
CREATE
MP3
SUBTITLE Select a subtitle language available
REPEAT Selec t or turn off repeat mode.
REPEAT A-B Repeat a specifi c section within a
ZOOM
(Screen fi t)
ZOOM
INFO
Access DVD menu
1
Press DISC MENU to access the disc root
2 Select a play option, then press OK.
Skip to a previous/next title or
chapter.
Search fas t-backward or fastforward. Press repeatedly to change
the search speed.
Search slow-forward or slowbackward. Press repeatedly to
change the search speed.
For VCD/SVCD, slow-backward
search is not available.
Select an audio language or channel
available on a disc.
on a disc.
Repeat options may vary from disc
type.
track/disc.
Fit the picture format to the T V
screen.
Press repeatedly until the image is
scaled to fi t to the TV screen.
Toggle between screen aspect r atio
and dif ferent zoom factor.
To pan through the zoomed image,
press the Navigation buttons.
Access the play options and display
the cur rent disc status.
menu.
In some menus, press the • Numeric
buttons to input your selection.
Access VCD menu
The PBC (playback control) feature is available for
VCD/SVCD, which can display the contents menu
for you to select a play option. The PBC is on by
default in the factory.
Note
See “Adju st setti ngs” > • [Preferences] > [PBC] on how
to tur n PBC on o r off.
1 Display the contents menu via one of the
following ways:
If PBC is on, load in a VCD/SVCD.•
During play with PBC on, press •
BACK.
2 Press the Numeric buttons to select a play
option, and then press OK to star t play.
If PBC is turned off, it skips the menu •
display and star ts play from the fi rst
track.
Preview disc contents
1
During play, press INFO.
The disc status menu is displayed.»
2 Select [Preview], and then press .
3 Select a preview option, and then press OK.
A thumbnails preview screen is displayed.»
To go to the next/previous preview •
screen, select [Prev] or [Next], and then
press OK.
To star t play, press • OK at the selec ted
thumbnail picture.
Skip play to a specifi c time
During play, press INFO.
1
The disc status menu is displayed.»
2 Select an option for the current elapsed
playing time, and then press
• [T T Time] (title time)
• [CH Time] (chapter time)
• [Disc Time]
• [Track Time]
.
3 Press the Numeric buttons to enter the time
to skip to, then press OK.
Display play time
1
During play, press INFO.
The disc status menu is displayed.»
10
EN
Page 11
2 Select [Time Disp.], and then press .
The display options vary from disc type.»
3 Select an option, and then press OK.
View DVD play from different angles
1
During play, press INFO.
The disc status menu is displayed.»
2 Select [Angle], and then press .
3 Press the Numeric buttons to change the
angle.
Play changes to the selected angle.»
Note
Applicable only t o discs that co ntai n multi-angle scenes .•
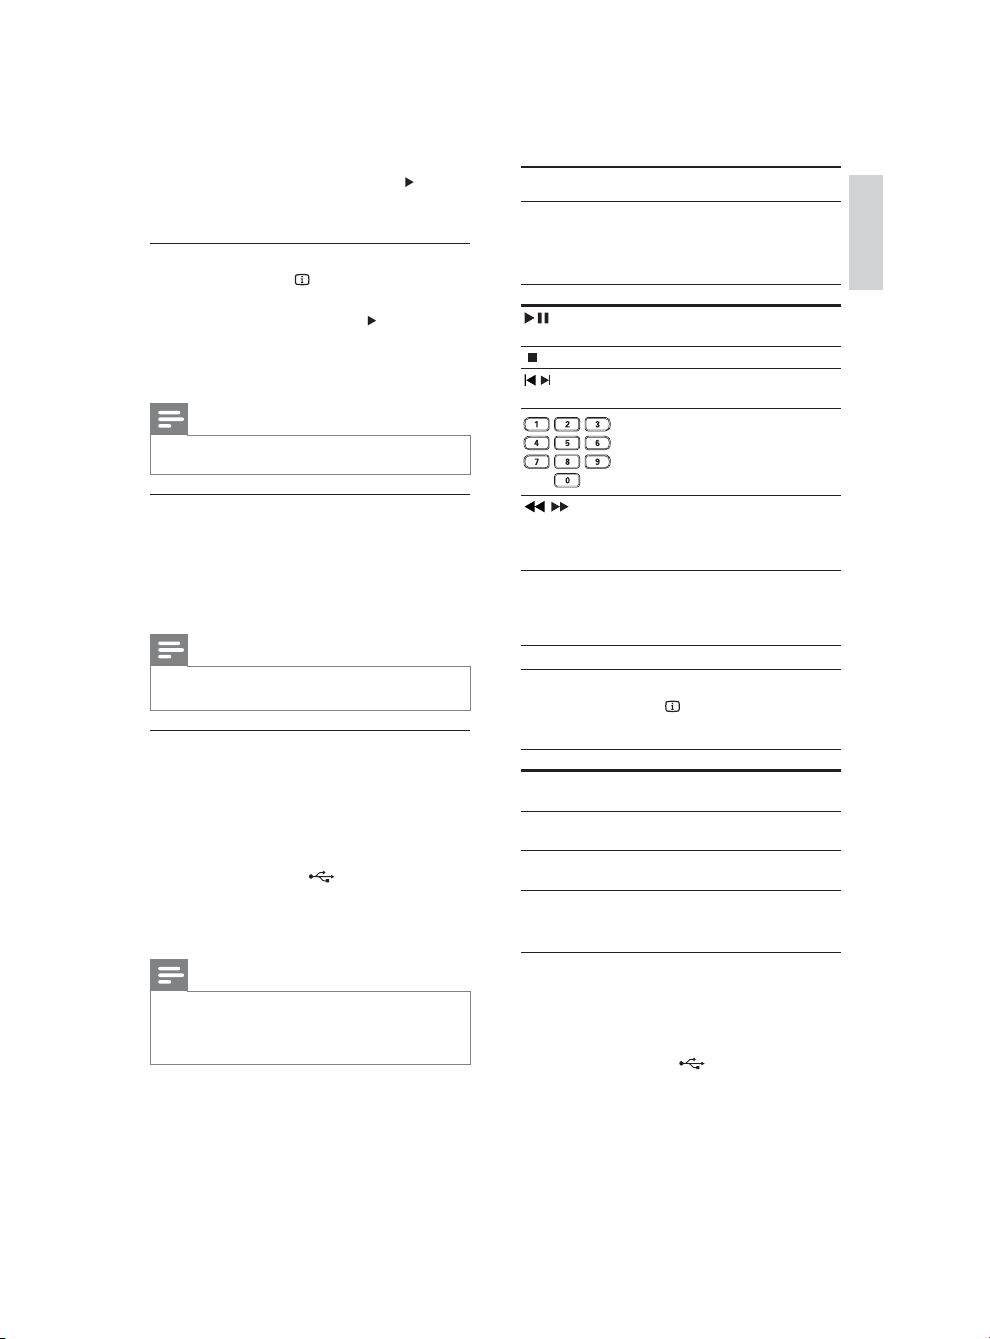
Play music
Control a track
1
Play a track.
2 Use the remote control to control the play.
Button Action
Star t, pause or resume disc
play.
Stop disc play.
,
Skip to a previous/next
track.
Select an item to play.
English
Repeat play a specifi c section
1
During play, press REPEAT A-B at the start
point.
2 Press REPEAT A-B again to set the end point.
Repeat play starts.»
3 To cancel repeat play, press REPEAT A-B again.
Note
The marked s ect ion for r epeat play is only possible •
within a track/title.
Play DivX® (Ultra) video
DivX® (Ultra) video is a digital media format
that retains high quality despite a high rate of
compression. You can enjoy DivX
this DivX (Ultra) certifi ed product.
®
(Ultra) video on
1 Inser t a disc or USB fl ash drive that contains
the DivX (Ultra) videos.
For USB , press •
A contents menu is displayed.»
.
2 Select a title to play, then press OK.
You may select subtitle/audio language.•
Note
You can only play DivX (Ult ra) video that is re nted •
or purchased wit h the DivX regi str ation code of t his
product (see “Adjust Set tings” > [Gener al Set up] >
[DivX(R) VO D Code]).
,
REPEAT Select or turn off repeat
Searches fast-backward
or fast-for ward. Press
repeatedly to change the
search speed.
mode.
Repeat options may vary
from disc type.
Quick skip play
1
During play, press INFO repeatedly to
select an option.
Display Action
[Disc Go To] Skip play to a specifi c time
[Track Go To] Skip play to a specifi c time
[Select Track] Skip play to a specifi c track
within the disc.
within a track.
number.
2 Press the numeric buttons to change the time/
number to skip to.
Play MP3/WMA music
MP3/WMA is a type of highly compressed audio fi le
(fi les with .mp3, .wma ex tensions).
1 Inser t a disc or USB that cont ains the MP3/
WMA music.
For USB , press •
A contents menu is displayed.»
.
EN
11
Page 12
2 If play does not automatically s tart, select a
track to play.
To select another track/folder, press •
then press OK.
Note
For disc recorded in multiple sessions, only the fi rst •
session is played.
For a WMA fi le that is protec ted by Di git al Rig hts
•
Manag ement (DR M), it c anno t be played on this product.
This product does not suppor t MP3PRO audi o format.
•
For any specia l char act er tha t is pre sent i n the MP3 track •
name (ID3) or album name, it might not be displayed
corr ect ly on th e scre en bec ause t hese characte rs ar e not
supported.
Folders/fi les that exceed the supported limit of this
•
product cannot b e disp layed or played .
Play photo
Play photo as slideshow
You can play JPEG photos (fi les with .jpeg or .jpg
extensions).
1 Inser t a disc or USB that cont ains the JPEG
photos.
For USB , press •
Slideshow begins (for Kodak disc), or a »
contents menu (for JPEG disc) is displayed.
2 Select a photo, and then press OK to start
slideshow.
For a photo recorded with the “exif ” »
format, the display orientation is
automatically optimized.
To display photos in color (Fun Mode) or in •
black and white (Simple Mode), press DISC
MENU.
To preview the photos in thumbnail, press •
INFO.
To select a photo, press the • Navigation
buttons.
To enlarge the selected photo and star t •
slideshow, press OK.
To return to the menu, press • BACK.
.
Note
,
It may require longer tim e to dis play th e disc co ntent •
on the T V due to the large nu mber of songs /phot os
compiled ont o one disc/USB fl ash dr ive.
If the J PEG photo is not recor ded with an ‘exif ’ type fi le, the
•
actu al thu mbna il pic tur e cann ot be shown on th e scre en. I t
is replaced by a ‘ blue mount ain’ t humb nail pictu re.
This product can only display digital ca mer a pic ture s
•
accord ing to the JPE G- EXIF for mat, typicall y used by
almos t all digit al cam eras. I t cann ot display Mot ion JPEG,
or pic tures in for mat s other than J PEG , or sou nd clips
associated with pict ures .
Folders/fi les that exceed the supported limit of this
•
product cannot b e disp layed or played .
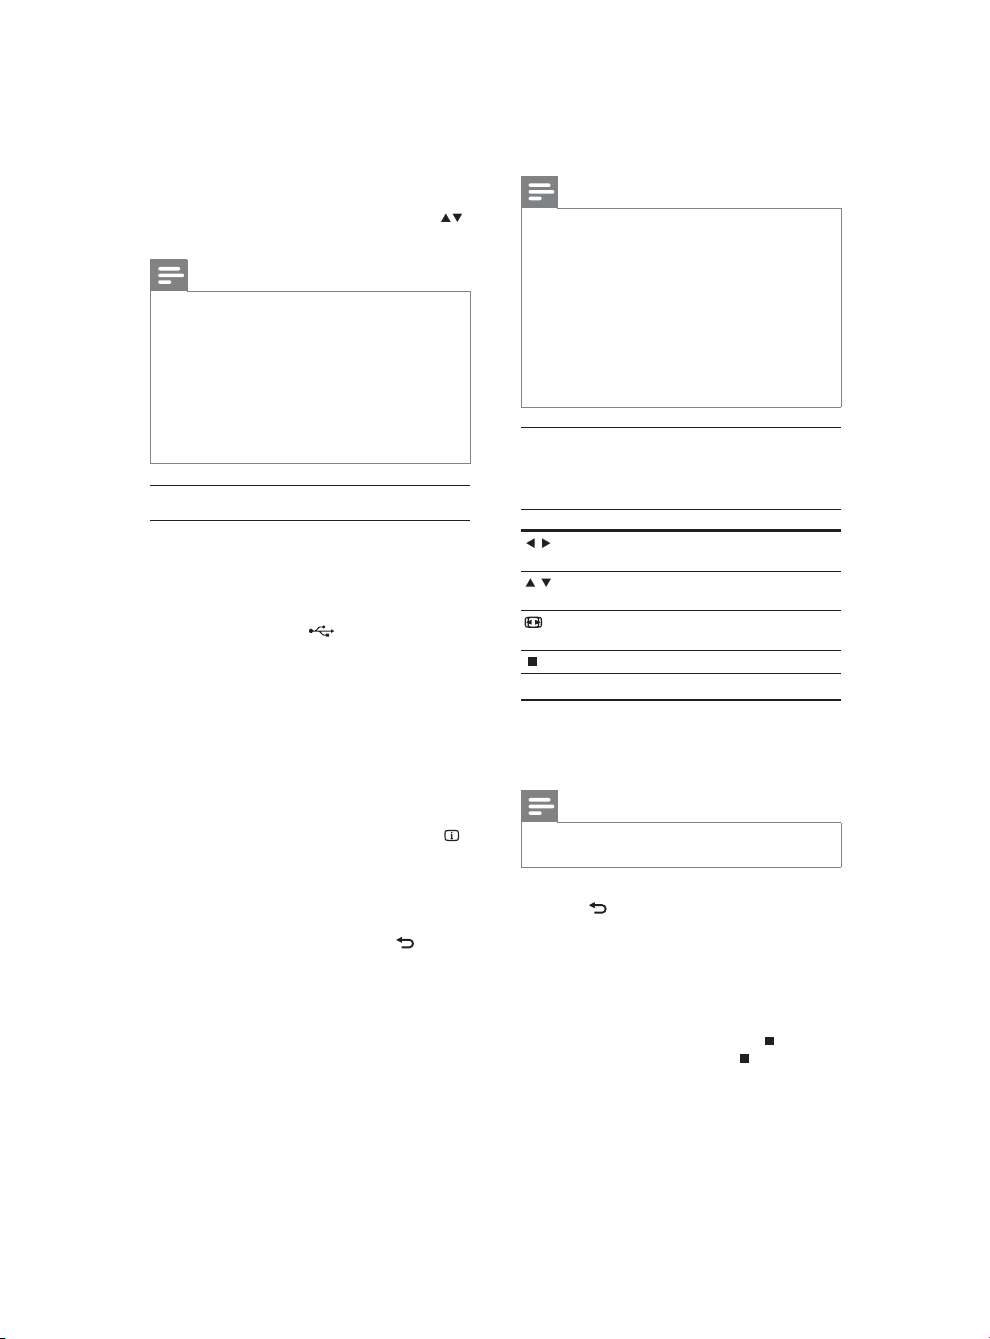
Control photo play
1
Play a photo slideshow.
2 Use the remote control to control the play.
Button Action
/
Rotate a photo anti-clock wise/
clockwise.
/
Rotate a photo horizontally/
vertically.
ZOOM
Zoom in or out of a photo.
Play pauses in zoom mode.
Stop a play.
Play musical slideshow
Create a musical slideshow to play MP3/WMA music
fi les and JPEG photo fi les simultaneously.
Note
To create a mu sica l slideshow, you mus t stor e the M P3/•
WMA an d JPEG fi les on the same disc /USB fl ash dri ve.
1 Play MP3/WMA music.
2 Press BACK to return to the main menu.
3 Navigate to the photo folder/album and press
OK to start slideshow play.
Slideshow begins and continues till the end »
of the photo folder or album.
Audio continues to play until the end of »
the disc.
To stop slideshow play, press •
To stop music play, press •
.
again.
EN
12
Page 13
Play from a USB fl ash drive
Note
This product plays/v iews M P3, WMA, D ivX (Ultr a) or •
JPEG fi les that are s tor ed on a US B fl ash dri ve.
1 Connect a USB fl ash drive to the jack on
this product.
2 Press the button.
A contents menu is displayed.»
3 If play does not start automatically, select a fi le
to play.
For more information, see the chapter s •
“Play music”, “Play photo” and “Play
video” for details.
4 To stop play, press .
To switch to the disc mode, press the •
button.
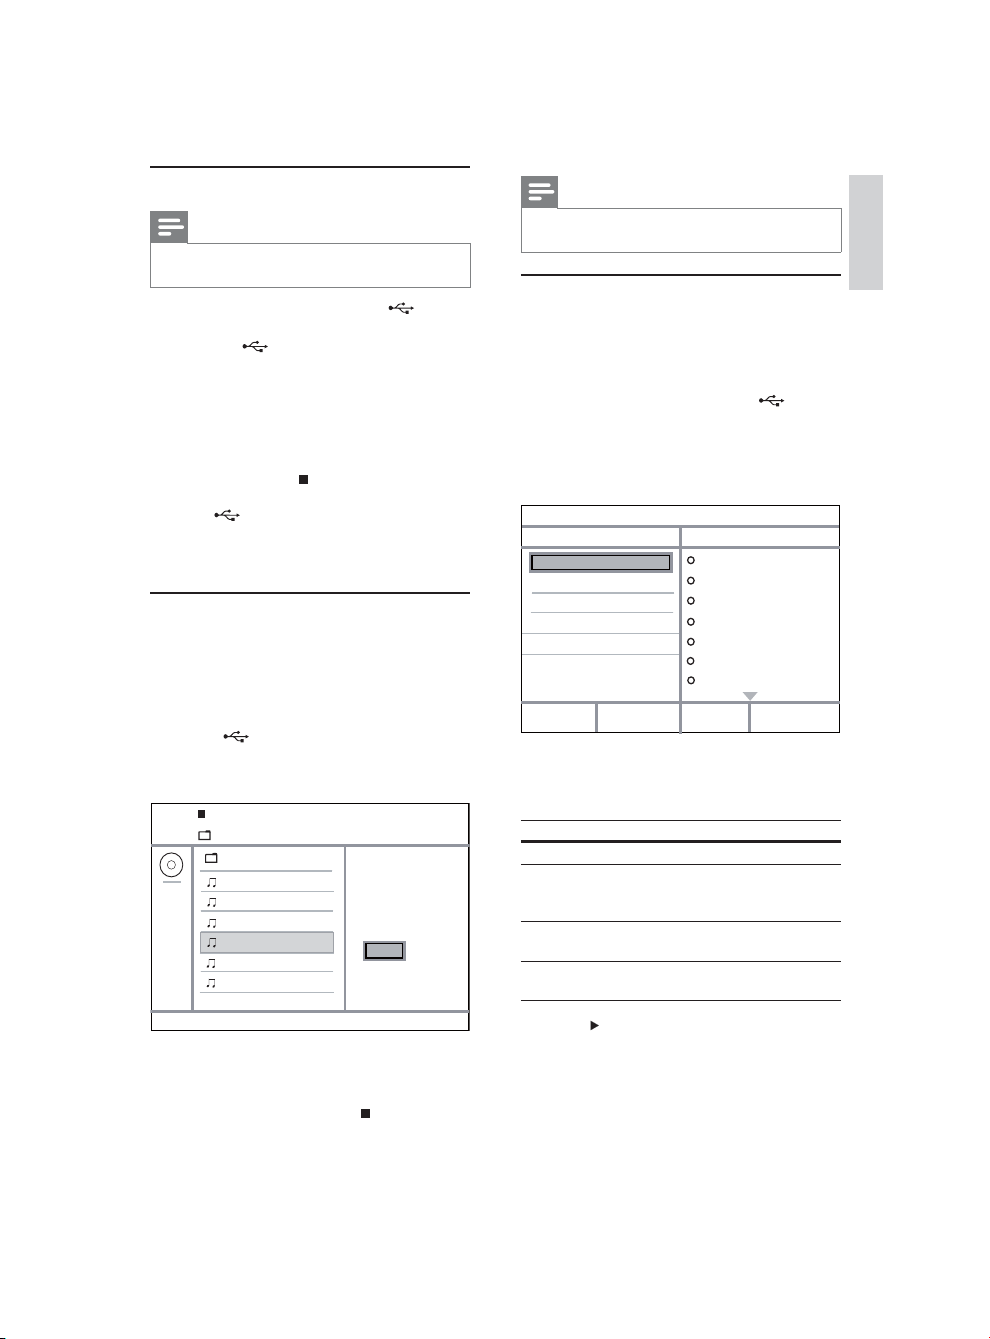
6 Advanced features
Media copy
You can copy fi les (such as MP3, WMA or JPEG) from
disc to a USB fl ash drive.
1 Inser t a disc that contains the MP3/WMA/
JPEG fi les.
2 In the stop mode, connect the USB fl ash drive
to the
3 Select a fi le to copy, then press SUBTITLE.
4 Select [Yes] in the menu, then press OK.
jack on this product.
00:00/00:00 005/030
\MP3
Previous
Track 1
Track 2
Track 3
Track 4
Track 5
Track 6
Do you want
to copy this file
Yes No
Note
When you copy, never pre ss any bu tton.•
Copy- protecte d medi a cann ot be copied.•
Create MP3 fi les
With this product, you can convert audio CDs into
MP3 audio fi les. The created MP3 audio fi les are saved
in the USB fl ash drive.
1 Inser t an audio CD.
2 Connect a USB fl ash drive to the jack on
this product.
3 During disc play, press AUDIO/CREATE MP3.
The MP3 creation menu is displayed.»
4 Select [Yes] in the menu, and then press OK.
Create MP3
OPTIONS
Speed Normal
Bitrate 128kbps
CRT ID3 Yes
Device USB 1
SUMMARY
Press [OK] button
to change speed.
Start Exit
5 Select a conversion option in the [OPTION S]
panel, and then press OK repeatedly to select
an item.
Option Description
[Speed] Selec t a copying speed.
[Bitrate] Selec t a quality level.
[CRT ID3] Copy track information into the
[Device] The created fi les can only be saved
Higher bitrate for better sound
quality and bigger fi le size.
MP3 fi le.
in a USB fl ash drive.
TRACK
Track01 04:14
Track02 04:17
Track03 03:58
Track04 04:51
Track05 03:53
Track06 04:09
Track07 04:38
Select all
Deselect all
English
Once complete, a new folder is created »
automatically in the USB fl ash drive to store
all the new fi les.
5 To stop copy progress, press , then press
OK.
6 Press to access the [TRACK] panel.
7 Select an audio track, and then press OK.
To select another track, repeat step 7.•
To select all tracks, select • [Select all] in
the menu, and press OK.
To deselect all tr acks, select • [Deselect
all] in the menu, and press OK.
EN
13
Page 14
8 Select [Start] in the menu, and then press OK
to star t to convert.
Once complete, a new folder is created »
automatically in the USB fl ash drive to store
all the new MP3 fi les.
To exit the menu, select • [Exit], and then
press OK.
Note
When you convert , neve r press any bu tto n.•
DTS CDs an d copy- protecte d CDs ca nnot b e converted.•
Writer-protecte d or pas swor d-prote cte d USB fl ash •
drives can not be used to s tore M P3 fi les.
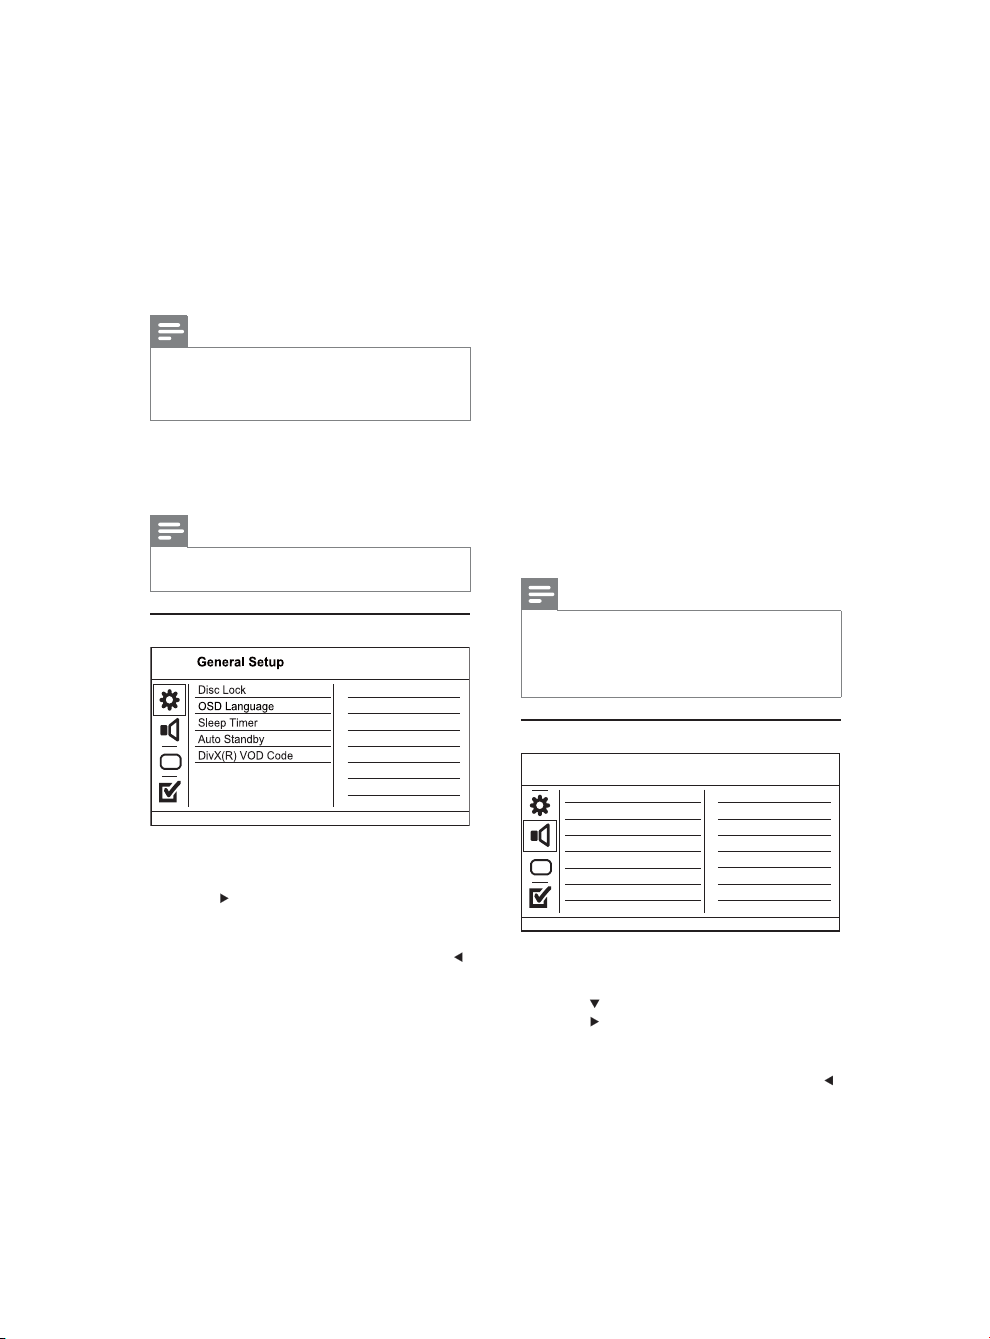
7 Adjust settings
Note
If the setup option is grayed out , it me ans th e set ting •
cannot be changed at t he cur rent state.
General setup
1 Press SETUP.
» [General Setup] menu is displayed.
2 Press .
3 Select an option, and then press OK.
4 Select a setting, and then press OK.
[Disc Lock]
Set the play restriction for a disc which is loaded in
the disc compartment (maximum 20 discs can be
locked).
• [Lock] - Restric t the access to the current
• [Unlock] - Play all discs.
To return to the previous menu, press •
To exit the menu, press • SETUP.
disc. At the nex t time when you want to play
this disc or unlock it, you need to enter the
password.
[OSD Language]
Select a language for on-screen menu.
[Sleep Timer]
Switch automatically to s tandby at the preset time.
• [Of f] - Disable sleep mode.
• [15 Mins], [30 Mins], [45 Mins], [60 Mins] Selec t the countdown time for this product to
switch to standby.
[Auto Standby]
Turn on/off the auto standby mode.
• [On] - Switch to standby af ter 15 minutes
of inactivity (for example, in pause or stop
mode).
• [Of f] - Disable the auto standby mode.
[DivX(R) VOD Code]
Display the DivX
®
regis tration code and
deregistration code.
• [Registration] - Obtain a registration code to
regis ter this product on website.
• [Deregistration] - Obtain a deregistration
code to cancel the registration of this product
on website.
Note
Use thi s prod uct ’s DivX regis tra tion co de when you re nt •
or purchase video from w ww. div x.co m/vod. The D ivX
videos rented or pu rcha sed through the D ivX
(Vi deo On D eman d) service can be played only on t he
device to whic h it is regis tered.
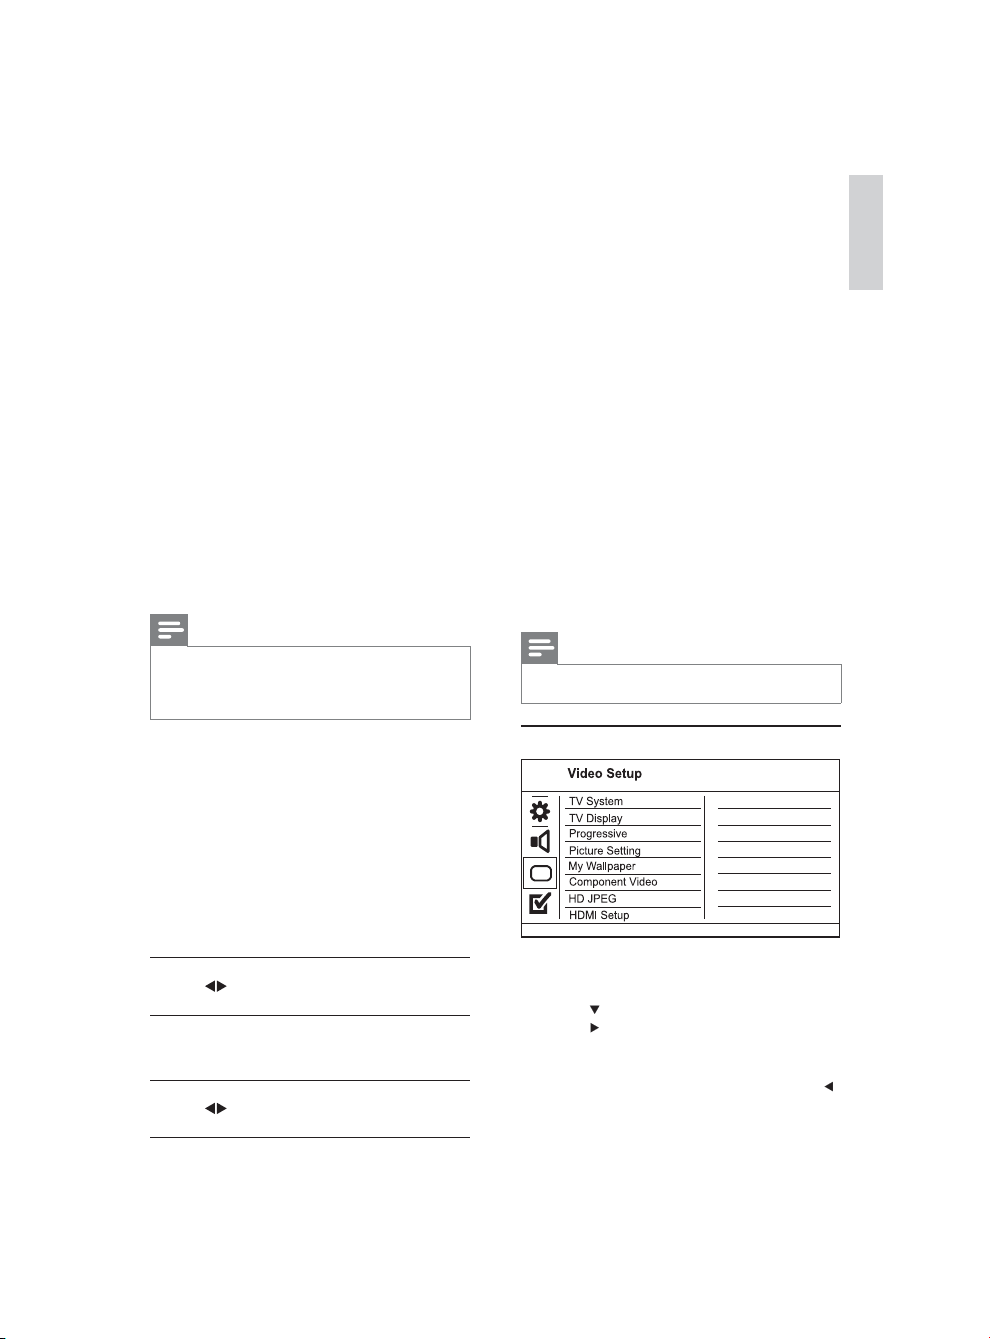
Audio setup
Audio Setup
Analogue Output
Digital Audio
HDMI Audio
Audio Sync
Volume
Sound Mode
CD Upsampling
Night Mode
.
1 Press SETUP.
» [General Setup] menu is displayed.
2 Press to select [Audio S etup], and then
press
.
3 Select an option, and then press OK.
4 Select a setting, and then press OK.
To return to the previous menu, press •
To exit the menu, press • SETUP.
®
VOD
.
14
EN
Page 15
[Analogue Output]
Select an analogue setting based on the audio
device that is connected through the analogue
audio jack.
• [LT/RT] - For the surround sound output
through two speakers .
• [Stereo] - For the stereo output.
[Digital Audio]
Select a digital setting based on the digital amplifi er/
receiver that is connected through the digital jack
(coaxial/digital).
• [Digital Output] - Selec t a type of digital
output.
• [All] - Suppor t multi-channel audio
formats.
• [Of f] - Disable digital output.
• [PCM Only] - Downmix to two-channel
• [LPCM Output] - Select the LPCM (Linear
audio format.
Pulse Code Modulation) output sampling rate.
• [48kHZ] - For discs recorded at sampling
rate of 48 kHz.
• [96kHZ] - For discs recorded at sampling
rate of 96 kHz.
Note
•
[LPCM Output] set ting i s only av aila ble if t he [Digital
Output] is set to [PCM Only].
The higher the sam pling r ate , the better the sound
•
quality.
[Sound Mode]
Select a preset sound effect to enhance the audio
output.
• [3D] - Selec t a virtual surround sound effect
that is produced from the left and right audio
channels.
• [Movie Mode] - Select a sound ef fect for
movies.
• [Music Mode] - Selec t a sound effect for
music.
[CD Upsampling]
For bet ter sound qualit y in stereo mode, conver t
the music CD to a higher sampling rate.
• [Of f] - Turn off CD-upsampling.
• [88.2kHz] - Conver t to twice the original
sampling rate.
• [176.4kHz] - Conver t to four times the original
sampling rate.
[Night Mode]
Make loud sound level softer and sof t sound level
louder so that you can watch the DVD movies at a
low volume, without disturbing others.
• [On] - Enjoy quiet viewing at night.
• [Of f] - Enjoy surround sound with a full
dynamic range.
Note
Applicable only t o Dolby D igit al en coded DV Ds.•
English
[HDMI Audio]
Selec t the HDMI audio setting when you connect
this produc t and the TV with an HDMI cable.
• [On] - Allow audio output through the T V and
the speaker system. If the audio format on the
disc is not supported, it will be downmixed to
two- channel sound (linear-PCM).
• [Of f] - Disable the audio output from HDMI
devices connec ted to this player.
[Audio Sync]
Set the delay time for audio output when you play
a video disc.
1. Press OK.
2. Press
3. Press OK to confi rm and exit.
[Volume]
Set the default volume level when you play a disc.
1. Press OK.
2. Press
3. Press OK to confi rm and exit.
to set the delay time.
to set the volume.
Video setup
1 Press SETUP.
» [General Setup] menu is displayed.
2 Press to select [Video Setup], and then
press
.
3 Select an option, and then press OK.
4 Select a setting, and then press OK.
To return to the previous menu, press •
To exit the menu, press • SETUP.
EN
.
15
Page 16
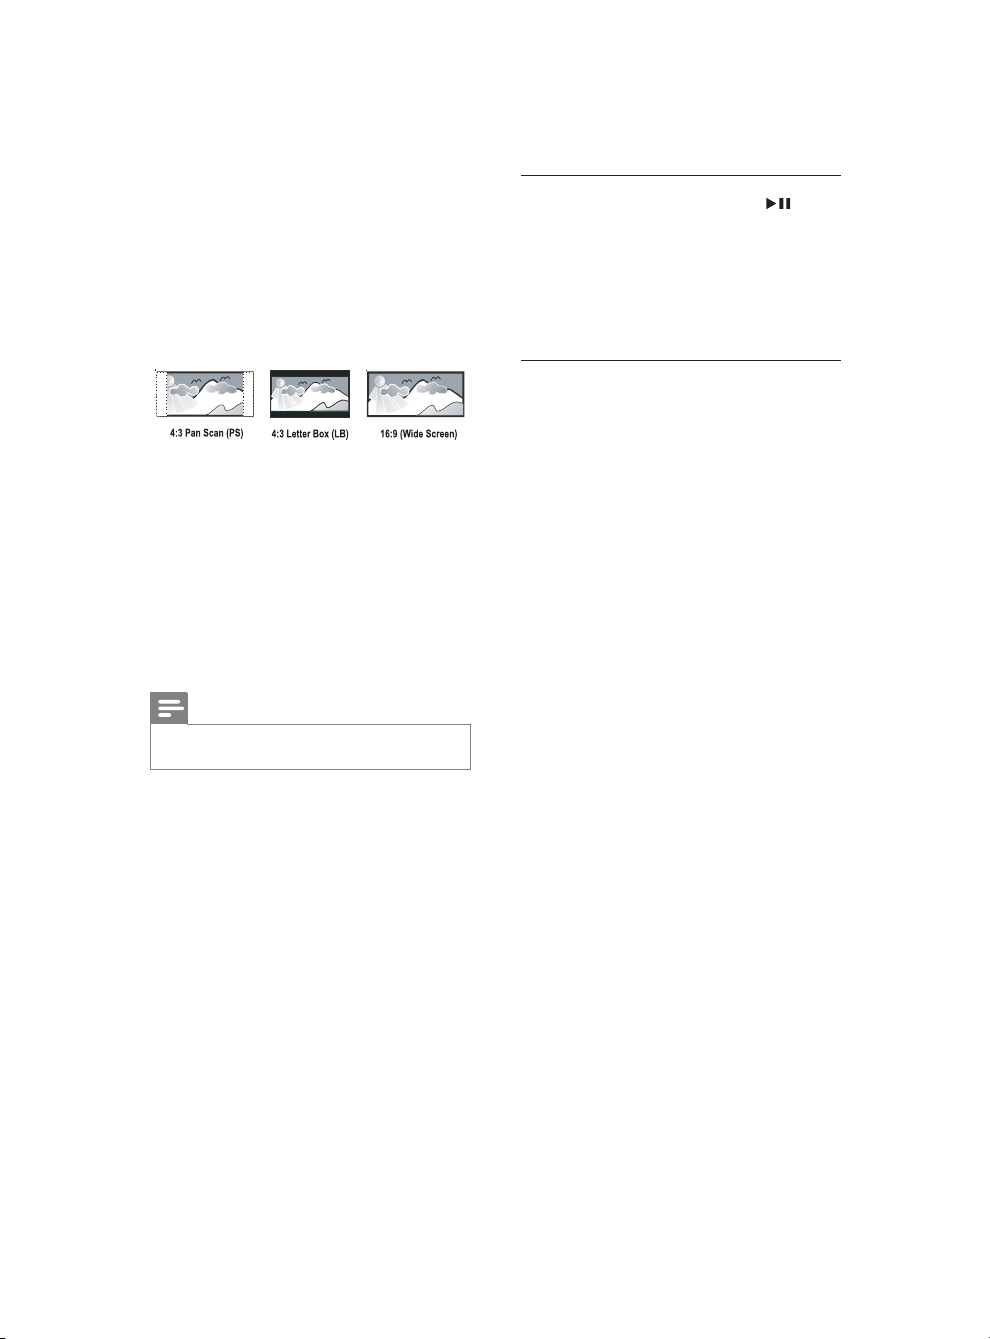
[TV System]
Change this setting if the video does not appear
correctly. By default, this setting matches the most
common setting for T Vs in your countr y.
• [PAL] - For a PAL-system TV.
• [Multi] - For TV that is compatible with both
PAL and NTSC.
• [NTSC] - For an NTSC-sys tem T V.
[TV Display]
Select a display for mat:
• [4:3 Pan Scan] - For a 4:3 screen TV: full-height
display with the trimmed sides.
•
[4:3 Letter Box] - For a 4:3 screen TV: widescreen display with black bars on the top and
bottom of the screen.
• [16:9] - For a wide-screen TV: display ratio
16:9.
[Progressive]
If a progressive scan TV is connected to this
product, turn on the progressive scan mode.
• [On] - Turn on progressive scan.
• [Of f] - Turn off progressive scan mode.
Note
For mor e det ailed descript ion, s ee “Ge t star ted” > •
“Turn on p rogr essi ve sca n”.
[Picture Setting]
Selec t a predefi ned set of picture color settings or
customize the personal setting.
• [Standard] - Original color setting.
• [Bright] - Vibrant color set ting.
• [Soft] - Warm color setting.
• [Personal] - Customize the color setting. Set
the level of brightness, contrast , tint and color
satur ation, then press OK.
[My Wallpaper]
Select a pic ture as the wallpaper.
• [Default picture] - The default wallpaper
preset as the Philips logo.
• [Saved picture] - A captured video image or
JPEG photo.
• [Current picture] - Capture a video image or
JPEG photo and save it on the product.
1. Play a video or photo slideshow.
2. Select a video image or photo: press
to
pause, and then press SETUP.
3. Navigate to the option ( [Video Setup] >
[My Wallpaper] > [Current picture]).
4. Press OK to confi rm.
One video image or JPEG photo is saved as »
wallpaper.
A newly saved image or photo replaces the »
earlier one.
[Component Video]
Select the video output that matches the video
connec tion between this product and the TV.
• [Interlaced] - Component video ( Y Pb Pr)
connec tion.
• [RGB] - Scar t ( TV OUT) connection.
[HD JPEG]
Enjoy untouched and uncompressed JPEG pictures
at its original resolution when you connec t this
product and the T V with an HDMI cable.
• [On] - Display high defi nition picture.
• [Of f] - Display st andard picture.
[HDMI Setup]
When you connect this proudct and the T V with an
HDMI cable, select the best HDMI setup that the
TV can support.
• [Resolution] - Selec t a video resolution that is
compatible with the TV display capability.
• [Auto] - Detect and select the best
supported video resolution automatically.
• [480i],[48 0p], [576i], [576p],[720p],
[1080i], [108 0p] - Selec t a video
resolution that is best supported by the
TV. See the TV manual for details.
• [HDMI Deep Color] - This feature is available
only when the display device is connec ted
by an HDMI cable, and when it supports the
deep color feature.
• [Auto] - Enjoy vivid images in over a billion
colors on a Deep Color enabled TV.
• [Of f] - Output the standard 8-bit color.
• [Wide Screen Format] - Defi ne the wide
screen format for disc play.
• [Super Wide] - Center position of
the screen is s tretched less than the
side (applicable only when the video
resolution is set to 720p, 1080i or
1080p).
• [4:3 Pillar Box] - No stretching of
picture. Black bars are displayed on both
sides of the screen (applicable only when
the video resolution is set to 720p, 1080i
or 1080p).
16
EN
Page 17
• [Of f] - Picture is displayed according to
the disc format.
• [EasyLink Setup] - If this product is connected
to HDMI CEC compliant TV/devices, all
connec ted devices can respond to the
following commands simultaneously.
• [EasyLink] - Turn on/off all EasyLink
features.
• [One Touch Play] - Turn on or off the
feature of one-touch play.
When EasyLink is enabled, press
.
This product turns on.»
The TV (if the TV supports one-touch »
play) automatically turns on and
switches to the video-in channel.
Disc play starts if there is a disc in this »
product.
• [One Touch Standby] - Turn on or off
the feature of one-touch standby.
When EasyLink is enabled, press and
for at least three seconds.
hold
All connected HDMI CEC compliant »
devices switch to standby mode.
Note
You must tu rn on t he HDMI CEC o per ations on the TV/•
devices before you can enjoy the Ea syL ink con trols. Se e
the T V/devices manu al for detai ls.
•
Phili ps does not gua ran tee 10 0% int eroperabili ty with al l
HDMI CEC compliant devi ces.
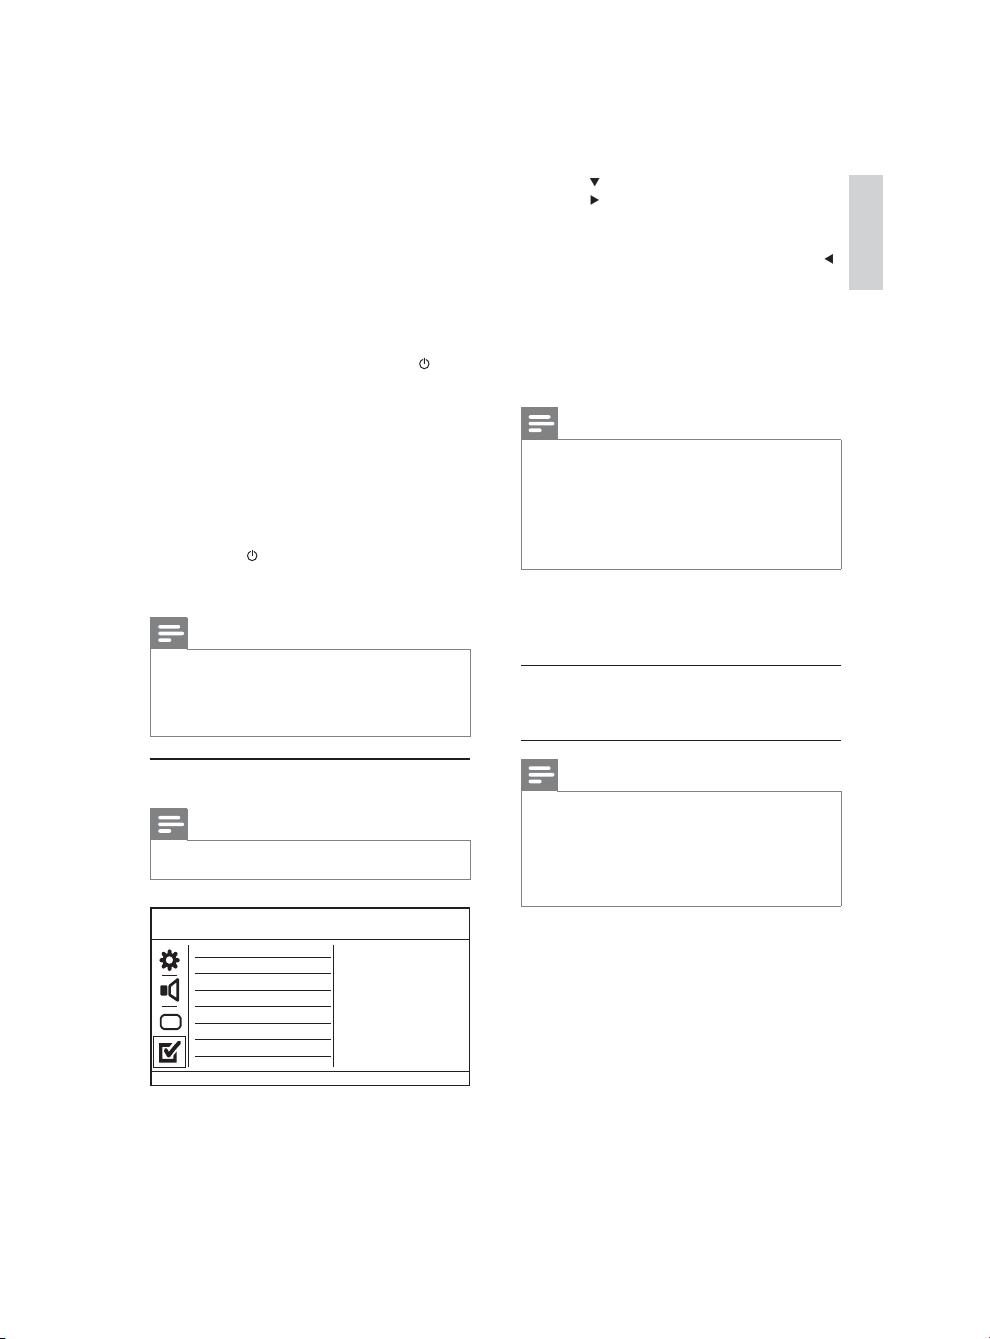
2 Press to select [Preferences], and then
.
press
3 Select an option, and then press OK.
4 Select a setting, and then press OK.
To return to the previous menu, press •
[Audio]
Select an audio language for disc play.
[Subtitle]
Select a subtitle language for disc play.
[Disc Menu]
Select a disc menu language.
[Parental Control]
Restric t access to discs that are unsuitable for
children. These types of discs must be recorded
with ratings.
1. Press OK.
2. Select a r ating level, then press OK.
3. Press the numeric buttons to enter the
password.
To exit the menu, press • SETUP.
Note
If the langua ge you have set is not available on the disc, •
the dis c uses i ts own defau lt language.
For som e DVDs, the su btit le/audio la ngua ge can o nly
•
change from t he disc menu .
To select t he lan guages that are not listed in the menu ,
•
select [Others]. Then check t he Languag e Code list at
the bac k of this u ser ma nual a nd ent er the r espective
language code.
English
.
Preferences
Note
Stop disc play before yo u can access to • [Preferences].
Preferences
Audio
Subtitle
Disc Menu
Parental Control
PBC
Mp3/Jpeg Nav
Password
DivX Subtitle
1 Press SETUP.
» [General Setup] menu is displayed.
Note
Rated DVDs ab ove the l evel you set in • [Parental
Control] require a passwor d to be pl ayed.
The rating s are co untr y-depend ent . To allow all d iscs to
•
play, select ‘ 8 ’.
•
Some discs have rat ings print ed on th em but are not
recor ded with r atings. This fun cti on has n o effe ct on
such discs.
[PBC]
Turn on or off the content menu of VCDs/SVCDs
with PBC (playback control) feature.
• [On] - Display the index menu when you load
a disc for play.
• [Of f] - Skip the menu and start play from the
fi rst track.
[Mp3/Jpeg Nav]
Select to display the folders or display all the fi les.
• [View Files] - Display all the fi les.
• [View Folders] - Display the folders of MP3/
WMA fi les.
EN
17
Page 18
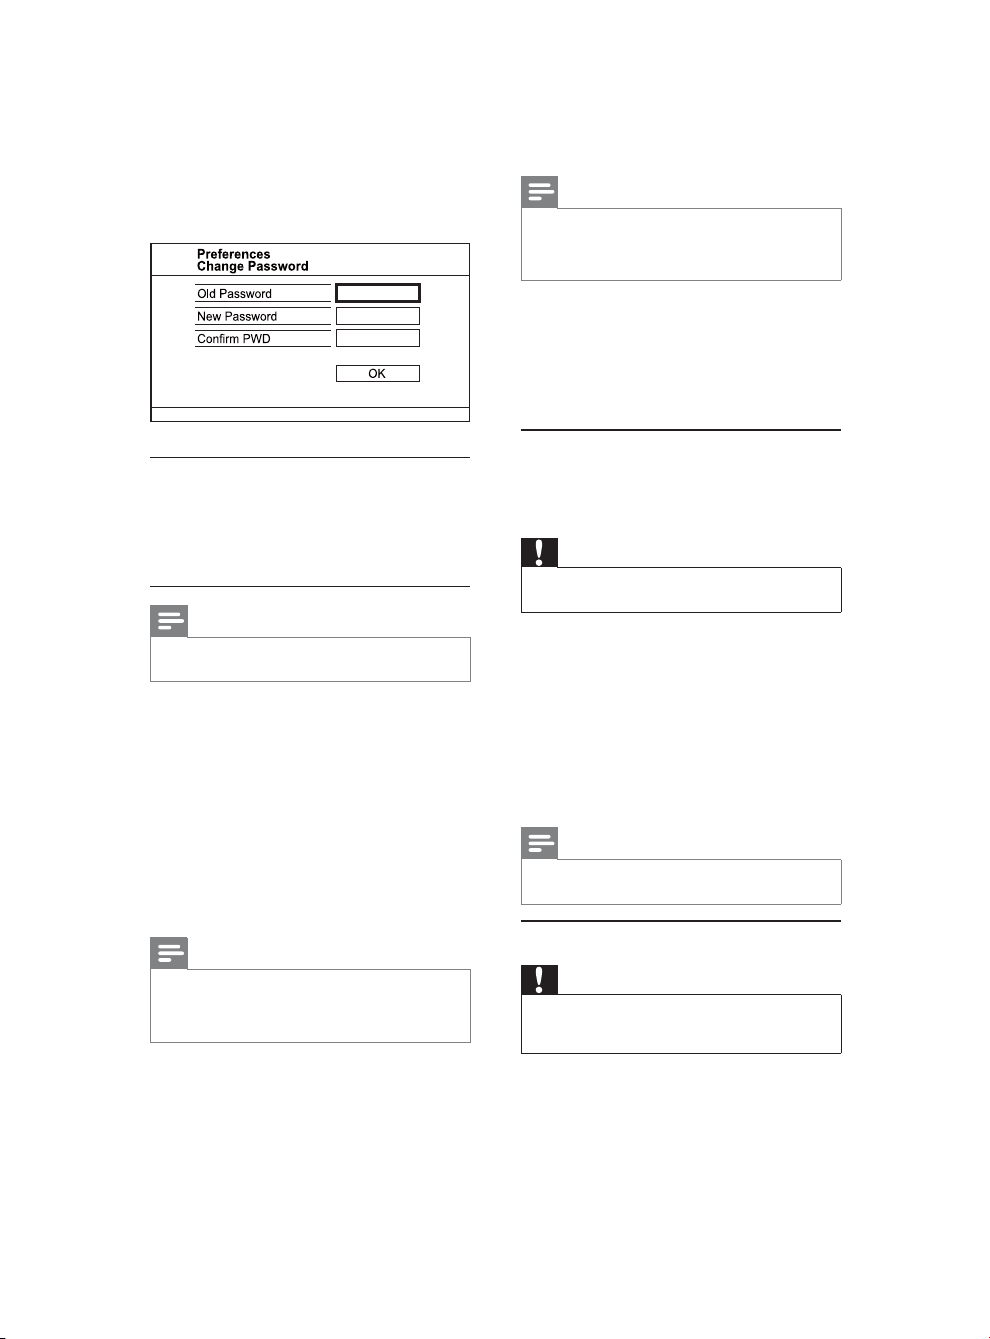
[Password]
Set or change the password for locked discs and
play res tricted DVDs.
1. Press the Numeric buttons to enter ‘136900’ or
the last set password at [Old Password] fi eld.
2. Enter the new password at [New Password]
fi eld.
3. Enter the new password again at
[Confi rm PWD] fi eld.
4. Press OK to exit the menu.
Note
If you for get the pas swor d, enter ‘13690 0’ before you set •
a new pas swor d.
[DivX Subtitle]
Select a character set that supports the DivX
subtitle.
• [Standard] - English, Irish, Danish, Estonian,
Finnish, French, German, Italian, Portuguese,
Luxembourgish, Nor wegian (Bokmål and
Nynorsk), Spanish, Swedish, Turkish
• [Centr al Europe] - Polish, Czech, Slovak ,
Albanian, Hungarian, Slovene, Croatian,
Serbian (Latin script), Romanian
• [Cyrillic] - Belarusian, Bulgarian, Ukrainian,
Macedonian, Russian, Serbian
• [Greek] - Greek
Note
Ensure that the subtitle fi le has the exact same fi le name •
as the m ovie fi le. If fo r example the fi le name of th e
movie is ‘Mov ie. avi’, then you n eed to n ame th e tex t fi le
‘Movie.sub’ or ‘Movie.srt’.
[Version Info]
Display the sof tware version of this product.
Note
This in form atio n is req uired whe n you want to fi nd out •
if a newest sof tw are ve rsi on is ava ilab le at th e Philips
websi te tha t you may download and install on this
product.
[Default]
Reset all the settings of this product to factory
default, except for [Disc Lock], [Parental Control]
and [Password] settings.
8 Additional information
Update software
For software updates, check the current software
version of this product to compare with the latest
software (if available) at the Philips website.
Caution
Power supply must not be inte rr upted during sof tware •
upgrade.
1 Press SETUP.
2 Select [Preferences] > [Version Info], and
then press OK.
3 Write down the fi le name, and then press
SETUP to exit the menu.
4 Visit www.philips.com/support to check for
the latest software version, using the fi le name
for this product.
5 Refer to the upgrade ins tructions on the
website for more information.
Note
Disconnec t the power cor d for a few seconds and •
connect again to tu rn on t he pro duc t.
Care
Caution
Never u se solvent s such a s benzene, t hinn er, cleaners •
available co mmer cially, or ant i-s tatic spr ays intended
for discs.
Clean discs
Wipe the disc with a micro fi bre cleaning cloth from
the centre to the edge in a straight line movement.
18
EN
Page 19
Specifi cations
9 Troubleshooting
Note
Speci fi cation and desi gn are subje ct to change w ithout •
notice
USB
Compatibility : Hi-Speed USB (2.0)•
Class support: UMS (USB Mass Storage Class)•
Video
Signal system: PAL / NTSC•
Composite video output: 1 Vpp ~ 75 ohm•
Component video output: 0.7 Vpp ~ 75 ohm•
HDMI output: 480i, 480p, 576i, 576p, 720p, •
1080i, 1080p
Scart: Euroconnector•
Audio
Analog stereo output•
Signal to noise ratio (1 kHz): > 100 dB •
(A-weighted)
Dynamic Range (1 kHz): > 90 dB (A-weighted)•
Cross talk (1 kHz): > 100 dB•
Distortion/noise: (1 kHz): > 85 dB•
MPEG MP3: MPEG Audio L3•
Scart output•
Digital output•
Coaxial•
HDMI output•
Main unit
Dimensions (w x h x d): 360 x 39 x 209 (mm)•
Net Weight: 1.45 kg•
Power
Power supply rating: 230 V; 50 Hz•
Power consumption: < 10 W•
Power consumption in st andby mode: < 0.45 W•
Accessories supplied
Remote control and batteries•
User Manual•
Quick Star t Guide•
Laser specifi cation
Type: Semiconduc tor laser InGaAIP (DVD), •
AIGaAs (CD)
Wave length: 658 nm (DVD), 790 nm (CD)•
Output Power : 7.0 mW (DVD), 10.0 mW •
(VCD/CD)
Beam divergence: 60 degrees•
Warning
Risk of elec tri c shock. Never re move th e casing of the •
product.
To keep the warranty valid, never try to repair the
product yourself.
If you have problems using this product, check the
following points before you request service. If you
still have a problem, register your product and get
support at www.philips.com/welcome.
If you contact Philips, you will be asked for the model
and serial number of your product. The model
number and serial number are on the back of your
product. Write the numbers here:
Model No. __________________________
Serial No. ___________________________
Main unit
The buttons on this unit do not work.
Disconnect this produc t from the power •
outlet for a few minutes, then connect again.
No reaction to the remote control.
Connect this product to the power outlet.•
Point the remote control at the IR sensor •
located on the front panel of this product.
Inser t the batteries cor rectly.•
Inser t new batteries in the remote control.•
Picture
No picture.
See the TVs user manual on how to selec t •
the correct input on the TV. Change the T V
channel until you see the Philips screen.
If you have turned on the progressive scan •
setting or change the TV system set ting,
switch back to default mode: 1) Press
open the disc compar tment. 2) Press the
Numeric button ‘1’ (for progressive scan) or
the Numeric button’3’ (for TV system).
No picture on HDMI connection.
If this product is connected to an unauthorized •
display device with an HDMI cable, the audio/
video signal may not be output.
Check if the HDMI cable is faulty. Replace a •
new HDMI cable.
If this happens when you change the HDMI •
video resolution, you have to switch to its
default mode: 1) Press
compar tment. 2) Press the numeric button “1”.
to open the disc
to
English
EN
19
Page 20

Sound
No audio output from the T V.
Ensure that the audio cables are connec ted to •
the audio inpu t of the T V.
Assign the audio input of the TV to the •
corresponding video input. See the TV user
manual for details.
No audio output from the loudspeakers of the
audio device (stereo system/amplifi er/receiver).
Ensure that the audio cables are connec ted to •
the audio input of the audio device.
Turn on the audio device to its correct audio •
input source.
No sound on HDMI connection.
You may not hear any sound from the HDMI •
output if the connected device is non-HDCP
compliant or only DVI-compatible.
Ensure that the • [HDMI Audio] setting is
turned on.
No sound during DivX video playback
The audio codec may not be suppor ted by this •
product.
Play
The disc cannot be played.
The disc is badly scratched, deformed, or dirt y. •
Replace or clean the disc.
Use the correct disc format or fi le format.•
DivX video fi les cannot be played.
Ensure that the DivX video fi le is complete.•
Ensure that the fi le name extension is correct.•
Due to Digital Rights issue, the DRM-•
protected video fi les cannot be played through
an analog video connection (e.g. composite,
component and scar t). Use an HDMI
connec tion to play these fi les.
The aspect ratio of the screen is not aligned with
the TV display setting.
The aspect ratio is fi xed on the disc.•
DivX subtitles are not displayed correctly.
Ensure that the subtitle fi le name is the same •
as the movie fi le name.
Selec t the correct character set.•
Press • SETUP.
Select • [Preferences] > [DivX Subtitle] in
the menu.
Select the character set that suppor ts the •
subtitle.
20
EN
Page 21
© 2010 Koninklijke Philips Electronics N.V.
All rights reserved.
DVP3580_12_UM_V2.0_1025
 Loading...