

Philips DVP3516-94, DVP3516 User Manual
Register your product and get support at
www.philips.com/welcome
DVP3516
EN User manual

Contents
1 Important 4
Safety and important notice 4
Trademark notice 4
2 Your DVD player 5
Playable media 5
Product o
3 Connect 6
Connect audio/video cables 6
Optional audio connections 6
Connect power 7
4 Get started 7
Prepare the remote control 7
Find the TV input channel 7
Select a menu display language 8
Turn on progressive scan 8
5 Play 8
Play a disc 8
Play video 8
Play music 10
Play photo 11
6 Adjust settings 11
General setup 11
Audio setup 12
Video setup 12
Preferences 13
verview 5
English
7 Additional information 15
Update software 15
Care 15
Specifications 15
8 Troubleshooting 15
9 Glossar
y 16
EN
3

1 Important
Safety and important notice
Warning
Risk of overheating! Never ins tall the produc t in a •
confined space. Alw ays leave a space of a t leas t 4 inches
around the product for ve ntilation . Ensure cur ta ins or
other objec ts never cover the ventilation sl ots on t he
product.
•
Never p lace th e product , remote control or batte ries
near naked flames or other heat sources, including direct
sunlight.
•
Avoid high temperature, mois ture, water and dust.
This unit must not be exposed to dr ipping or splashing. •
Never p lace any objec t or items tha t can da mage th is •
unit (e.g., liquid filled objects, lighted candles).
•
Never p lace this product o n other elec tri cal equipment.
Keep away from this pr oduc t dur ing lig htning storms. •
Wher e the ma ins plug or an ap pliance coupler is used as •
the disconnect device, t he disconnect device shall remain
readily operable.
•
Visible and i nvisible laser radiation when open. Avoid
exposure to b eam.
About Progressive Scan
Consumers should note that not all high definition
television sets are fully compatible with this product
and may cause ar tifacts to be displayed in the
picture. In case of 525 or 625 progressive scan
picture problems, it is recommended that the user
switch the connection to the ‘standard definition’
output. If there are questions regarding our T V set
compatibility with this model 525p and 625p DVD
player, please contact our customer service center.
Disposal of your old product and
batteries
Please inform yourself about the local rules on
separ ate collection of bat teries. The correct
disposal of bat teries helps prevent potentially
negative consequences on the environment and
human health.
Please visit www.recycle.philips.com for additional
information on a recycling center in your area.
Copyright notice
This item incorporates copy protection technology
that is protec ted by U. S. patents and other
intellectual property rights of Rovi Corporation.
Reverse engineering and disassembly are
prohibited.
CLASS 1
LASER PRODUCT
Trademark notice
Manufactured under license from Dolby
Laboratories. Dolby and the double-D symbol are
trademarks of Dolby Laboratories.
Your product is designed and manufactured with
high quality materials and components, which can
be recycled and reused.
Never dispose of your product with other
household waste. Please inform yourself about the
local rules on the separate collec tion of electrical
and electronic products and batteries. The correct
disposal of these products helps prevent potentially
negative consequences on the environment and
human health.
Your product contains batteries, which cannot be
disposed of with normal household waste.
4
EN
‘DVD Video’ is a trademark of DVD Format/Logo
Licensing Corporation.

2 Your DVD player
Congratulations on your purchase, and welcome to
Philips! To fully benefit from the support that Philips
offers, register your product at www.philips.com/
welcome.
Playable media
This product can play:
DVD-Video, DVD+R/+RW, DVD-R/-RW, •
DVD+R/-R DL (Dual Layer), DVD-RW DL
Video CD/SVCD•
Audio CD, CD-R/CD-RW•
MP3 media, WMA media, JPEG files•
Region codes
You can play discs with the following region codes.
DVD region code Countries
India
Remote control
1
2
3
4
5
6
7
English
18
17
16
15
14
Product overview
Main Unit
a Disc compartment
b Display panel
c
d
e
ab
(Open/Close)
Open or close the disc compar tment. •
(Play/Pause)
Star t, pause or resume disc play.•
(Standby/On)
Turn on the unit or switch to standby.•
cde
8
9
10
a
b
c DISC MENU
d
Turn on this product or switch to •
standby.
Open or close the disc compar tment. •
Access or exit the disc menu. •
During photo slideshow, switch photo •
display between the Fun mode (color)
and the Simple mode (black and white).
For VCD and SVCD, tur n on or off PBC •
(playback control).
Navigate the menus.•
Search fast-forward (•
(
).
Search slow-forward (•
backward (
).
) or fast-backward
) or slow-
13
12
11
EN
5
e BACK
f
g
h Numeric buttons
i SUBTITLE
j
k VOLUME
l REPEAT / REPEAT A-B
m AUDIO
n
o
p
q OK
r SETUP
Retur n to the previous display menu.•
/
Skip to the previous or nex t title, chapter, •
or track.
Mute ot restore audio output.•
Select an item to play.•
Select a subtitle language on a disc.•
ZOOM
Fit the picture display to the TV screen.•
Zoom the picture in or out.•
Display the cur rent volume level and use •
or to set the volume level.
Select various repeat play modes.•
Repeat play for a specific section.•
Select an audio language or channel on •
a disc.
Stop play.•
Star t, pause or resume disc play.•
INFO
For discs: access the play options or •
display the current disc status.
For slideshows: display a thumbnail view •
of photo files.
Confirm an entry or selection.•
Access or exit the setup menu.•
3 Connect
Make the following connections to use this product.
Basic connections:
Video•
Audio•
Optional connections:
Route audio to other devices:•
Digital amplifier/receiver•
Analog stereo system•
Connect audio/video cables
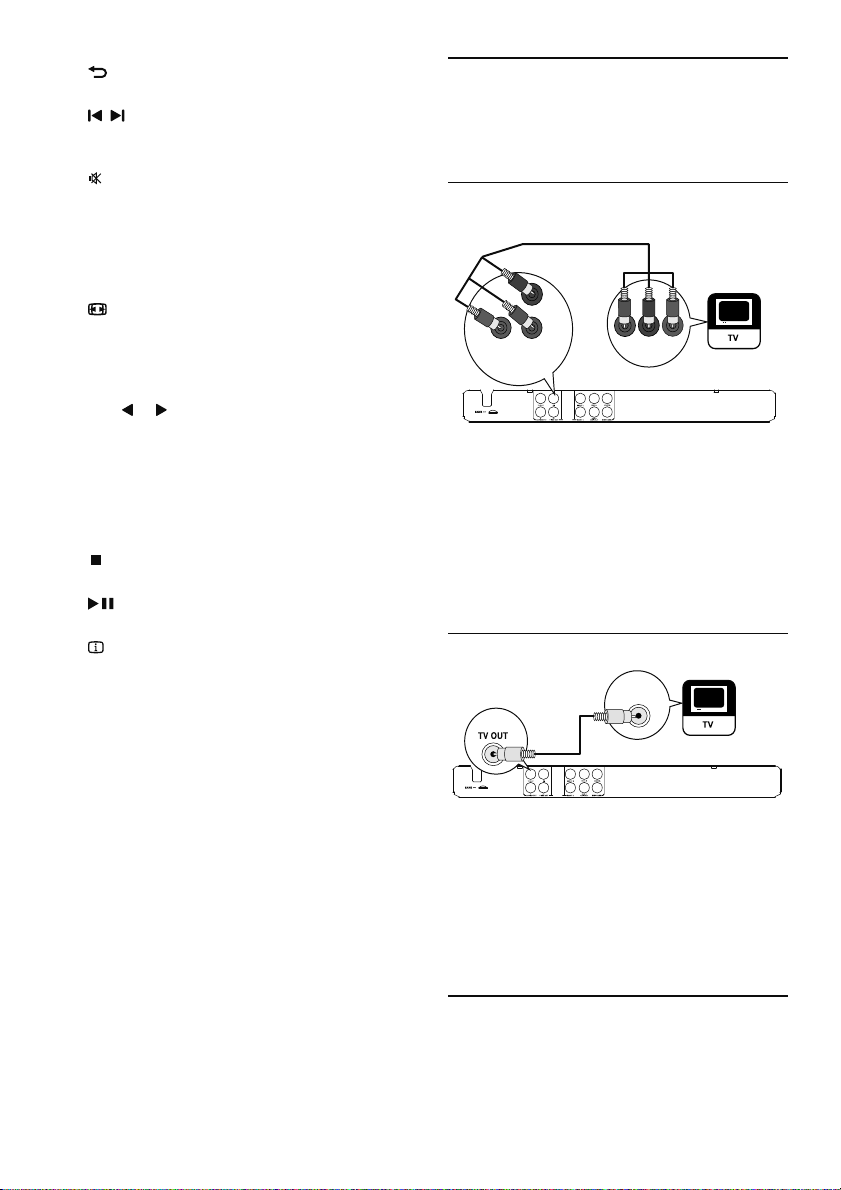
• Option 1: Connect to component video jacks
(for a standard TV or Progressive Scan TV).
• Option 2: Connect to video (CVBS) jack (for a
standard TV).
Option 1: Connect to component video
jacks
Pb
Pr
Y
Pr
Y
COMPONENT VIDEO OUT
Pb
COMPONENT
VIDEO IN
1 Connect the component video cables (not
supplied) to:
the • Y Pb Pr jacks on this product.
the COMPONENT VIDEO input jacks •
on the T V.
2 Connect the audio cables (supplied) to:
Option 2: Connect to video (CVBS) jack
1 Connect a composite video cable (supplied)
2 Connect the audio cables (supplied) to:
Optional audio connections
Connect the audio from this product to other devices
to enhance sound.
the • AUDIO OUT FRONT L /R jacks on
this product.
the audio input jacks on the TV.•
VIDEO IN
to:
the • TV OUT jack on this product.
the video input jack on the TV.•
the • AUDIO OUT FRONT L /R jacks on
this product.
the audio input jacks on the TV.•
EN
6
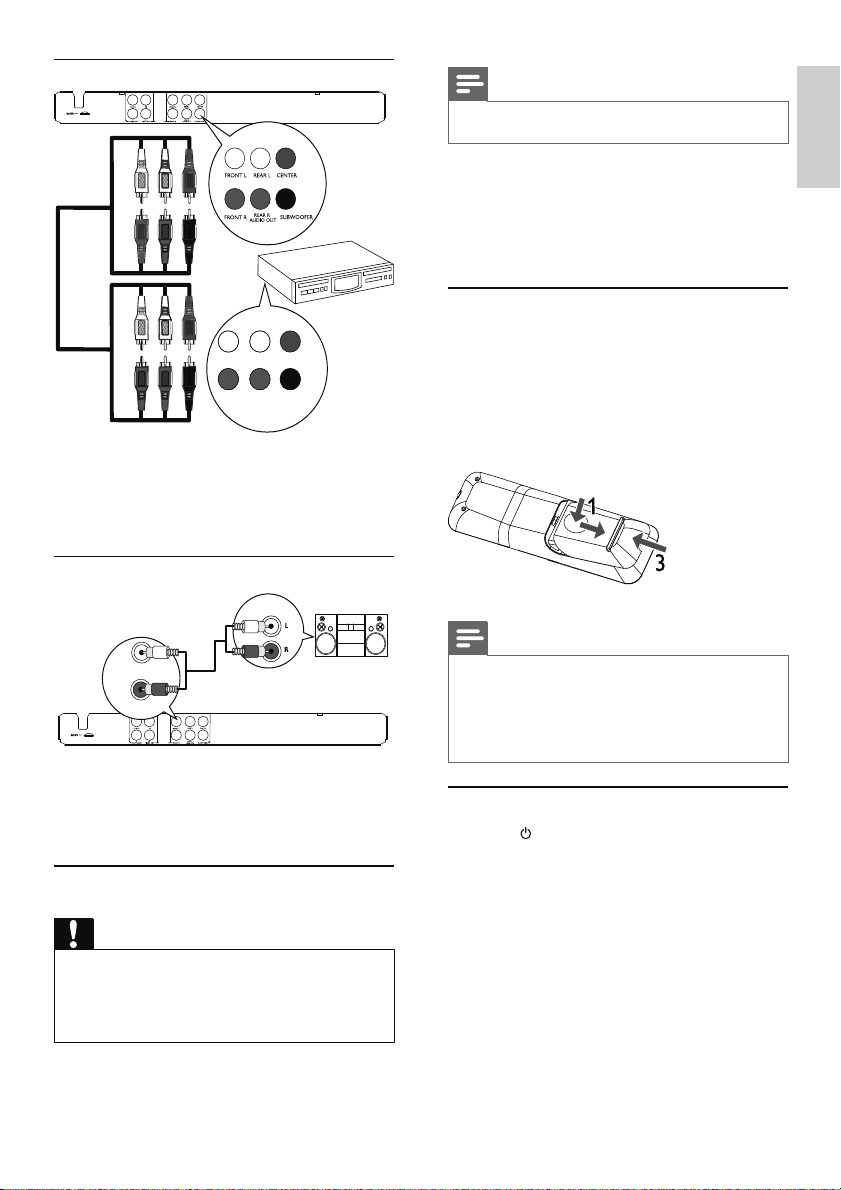
Connect multi channel receiver
FRONT L
REAR L
CENTER
REAR R
FRONT R
1 Connect the audio cables (not supplied) to:
the • AUDIO OUT (FRONT L/R , REAR
L/R, CENTER and SUBWOOFER) jacks
on this product.
the audio input jacks on the device.•
MULTICHANNEL
AUDIO IN
SUBWOOFER
Note
The type pla te is loc ated on the back of the pr oduc t. •
English
1 Connect the AC power cable to the wall
socket.
The product is ready to be set up for use. »
4 Get started
Prepare the remote control
1 Press and push the battery compar tment to
slide it open (see “1” in the illustration).
2 Insert two A AA batteries with correct
polarity (+/-) as indicated.
3 Push and slide back the batter y compartment
(see “3” in the illustration).
Connect an analogue stereo system
AUDIO IN
FRONT L
FRONT R
1 Connect the audio cables (supplied) to:
Connect power
the • AUDIO OUT FRONT L /R jacks on
this product.
the audio input jacks on the TV.•
Caution
Risk of product da mage! Ensur e that t he powe r supply •
voltage cor responds to the vol tage print ed on the back
of the pr oduc t.
•
Befor e connecti ng the AC power cor d, ens ure you have
completed all other connections.
Note
If you ar e not goi ng to use t he remote control fo r a long •
time , remove the batteries .
•
Do not mix batteries (old and new or carbon and
alkaline, etc.).
•
Batteries contain chemical substances, so they should be
disposed of properly.
Find the TV input channel
1 Press to turn on this product.
2 Turn on the TV and switch to the video input
channel (refer to the TV user manual on how
to select the A/V input channel).
EN
7
 Loading...