

Page 1

DIGITAL VIDEO DISC PLAYER &
VIDEO CASSETTE RECORDER
DVP3345V/17
User Manual
E8E20UD_EN1 8/24/07 6:14 PM Page 1
Page 2

English
Registering your model with PHILIPS makes you eligible for all of the valuable benefits listed below, so
don't miss out. Complete and return your Product Registration Card at once, or register online at
www.philips.com/welcome to ensure:
Return your Product Registration Card or register online at
www.philips.com/welcome today to get the very most from your purchase.
Know these
safety symbols
CAUTION: TO REDUCE THE RISK OF
ELECTRIC SHOCK, DO NOT REMOVE COVER (OR
BACK). NO USER-SERVICEABLE PARTS INSIDE.
REFER SERVICING TO QUALIFIED SERVICE
PERSONNEL.
CAUTION
RISK OF ELECTRIC SHOCK
DO NOT OPEN
*Proof of
Purchase
Returning the enclosed card
guarantees that your date of purchase will be on file, so no additional paperwork will be required
from you to obtain warranty service.
*Product Safety
Notification
By registering your product, you'll
receive notification - directly
from the manufacturer - in the
rare case of a product recall or
safety defect.
*Additional
Benefits
Registering your product guarantees that you'll receive all of the
privileges to which you're entitled, including special money-saving offers.
Visit our World Wide Web Site at http://www.philips.com/welcome
For Customer Use
Enter below the Serial No. which is located on the rear
of the cabinet. Retain this information for future
reference.
Model No. ______________________________________
Serial No. ______________________________________
This “bolt of lightning” indicates uninsulated material
within your unit may cause an electrical shock.For
the safety of everyone in your household,please do
not remove product covering.
The “exclamation point” calls attention to features
for which you should read the enclosed literature
closely to prevent operating and maintenance
problems.
WARNING: To reduce the risk of fire or electric
shock, this apparatus should not be exposed to rain or
moisture, and objects filled with liquids, such as vases,
should not be placed on this apparatus.
CAUTION: To prevent electric shock,match wide blade of
plug to wide slot, fully insert.
ATTENTION:Pour éviter les choc électriques, introduire la
lame la plus large de la fiche dans la borne correspondante de
la prise et pousser jusqu’au fond.
Congratulations on your purchase,
and welcome to the “family!”
Dear PHILIPS product owner:
Thank you for your confidence in PHILIPS.
You’ve selected one of the best-built, bestbacked products available today.We’ll do
everything in our power to keep you happy
with your purchase for many years to come.
As a member of the PHILIPS “family,” you’re
entitled to protection by one of the most
comprehensive warranties and outstanding
service networks in the industry.What’s
more, your purchase guarantees you’ll
receive all the information and special offers
for which you qualify, plus easy access to
accessories from our convenient home
shopping network.
Most importantly, you can count on our
uncompromising commitment to your total
satisfaction.
All of this is our way of saying welcome and thanks for investing in a PHILIPS
product.
P.S. To get the most from your
PHILIPS purchase, be sure to
complete and return your Product
Registration Card at once, or
register online at:
www.philips.com/welcome
E8E20UD_EN1 8/23/07 1:25 PM Page 2
Page 3
English
Safety Information 3
IMPORTANT SAFETY INSTRUCTIONS
Read before operating equipment
1. Read these instructions.
2. Keep these instructions.
3. Heed all warnings.
4. Follow all instructions.
5. Do not use this apparatus near water.
6. Clean only with a dry cloth.
7. Do not block any of the ventilation openings. Install in accordance with
the manufacturers instructions.
8. Do not install near any heat sources such as radiators, heat registers,
stoves, or other apparatus (including amplifiers) that produce heat.
9. Do not defeat the safety purpose of the polarized or groundingtype
plug. A polarized plug has two blades with one
wider than the other. A grounding type plug has
two blades and third grounding prong. The wide
blade or third prong are provided for your safety.
When the provided plug does not fit into your
outlet, consult an electrician for replacement of the obsolete outlet.
10. Protect the power cord from being walked on or pinched particularly at
plugs, convenience receptacles, and the point where they exit from the
apparatus.
11. Only use attachments/accessories specified by the manufacturer.
12. Use only with a cart, stand, tripod, bracket, or table specified
by the manufacturer, or sold with the apparatus. When a cart
is used, use caution when moving the cart/apparatus combination to avoid injury from tip-over.
13. Unplug this apparatus during lightning storms or when unused for long
periods of time.
14. Refer all servicing to qualified service personnel. Servicing is required
when the apparatus has been damaged in any way, such as power-supply cord or plug is damaged, liquid has been spilled or objects have fallen into apparatus, the apparatus has been exposed to rain or moisture,
does not operate normally, or has been dropped.
15. This product may contain lead and mercury. Disposal of these materials
may be regulated due to environmental considerations. For disposal or
recycling information, please contact your local authorities or the
Electronic Industries Alliance: www.eiae.org
16. Damage Requiring Service - The appliance should be serviced by
qualified service personnel when:
A. The power supply cord or the plug has been damaged; or
B. Objects have fallen, or liquid has been spilled into the appliance; or
C. The appliance has been exposed to rain; or
D. The appliance does not appear to operate normally or exhibits a
marked change in performance; or
E. The appliance has been dropped, or the enclosure damaged.
17. Tilt/Stability - All televisions must comply with recommended interna-
tional global safety standards for tilt and stability properties of its cabinet design.
●
Do not compromise these design standards by applying excessive pull
force to the front, or top, of the cabinet which could ultimately overturn
the product.
●
Also, do not endanger yourself, or children, by placing electronic
equipment/toys on the top of the cabinet. Such items could unsuspectingly fall from the top of the set and cause product damage and/or personal injury.
18. Wall or Ceiling Mounting - The appliance should be mounted to a
wall or ceiling only as recommended by the manufacturer.
19. Power Lines - An outdoor antenna should be located away from power
lines.
20. OutdoorAntenna Grounding - If an outside antenna is connected to
the receiver, be sure the antenna system is grounded so as to provide
some protection against voltage surges and built up static charges.
Section 810 of the National Electric Code, ANSI/NFPA No. 70- 1984,
provides information with respect to proper grounding of the mast and
supporting structure, grounding of the lead-in wire to an antenna discharge unit, size of grounding connectors, location of antenna-discharge
unit, connection to grounding electrodes, and requirements for the
grounding electrode. See Figure below.
21. Object and Liquid Entry - Care should be taken so that objects do not
fall and liquids are not spilled into the enclosure through openings.
a) Warning: To reduce the risk of fire or electric shock, this apparatus
should not be exposed to rain or moisture and objects filled with liquids, such as vases, should not be placed on this apparatus.
22. Battery Usage CAUTION - To prevent battery leakage that may result
in bodily injury, property damage, or damage to the unit:
●
Install all batteries correctly, with + and - aligned as marked on the
unit.
●
Do not mix batteries (old and new or carbon and alkaline, etc.).
●
Remove batteries when the unit is not used for a long time.
23. Overloading - Do not overload wall outlets, extension cords, or integral
convenience receptacles as this can result in a risk of fire or electric
shock.
24. Object and Liquid Entry - Never push objects of any kind into this
product through openings as they may touch dangerous voltage points
or short-out parts that could result in a fire or electric shock. Never spill
liquid of any kind on the product.
25. Replacement Parts - When replacement parts are required, be sure the
service technician has used replacement parts specified by the manufacturer or have the same characteristics as the original part. Unauthorized
substitutions may result in fire, electric shock, or other hazards.
26. Safety Check - Upon completion of any service or repairs to this prod-
uct, ask the service technician to perform safety checks to determine
that the product is in proper operating condition.
E8E20UD_EN1 8/23/07 1:25 PM Page 3
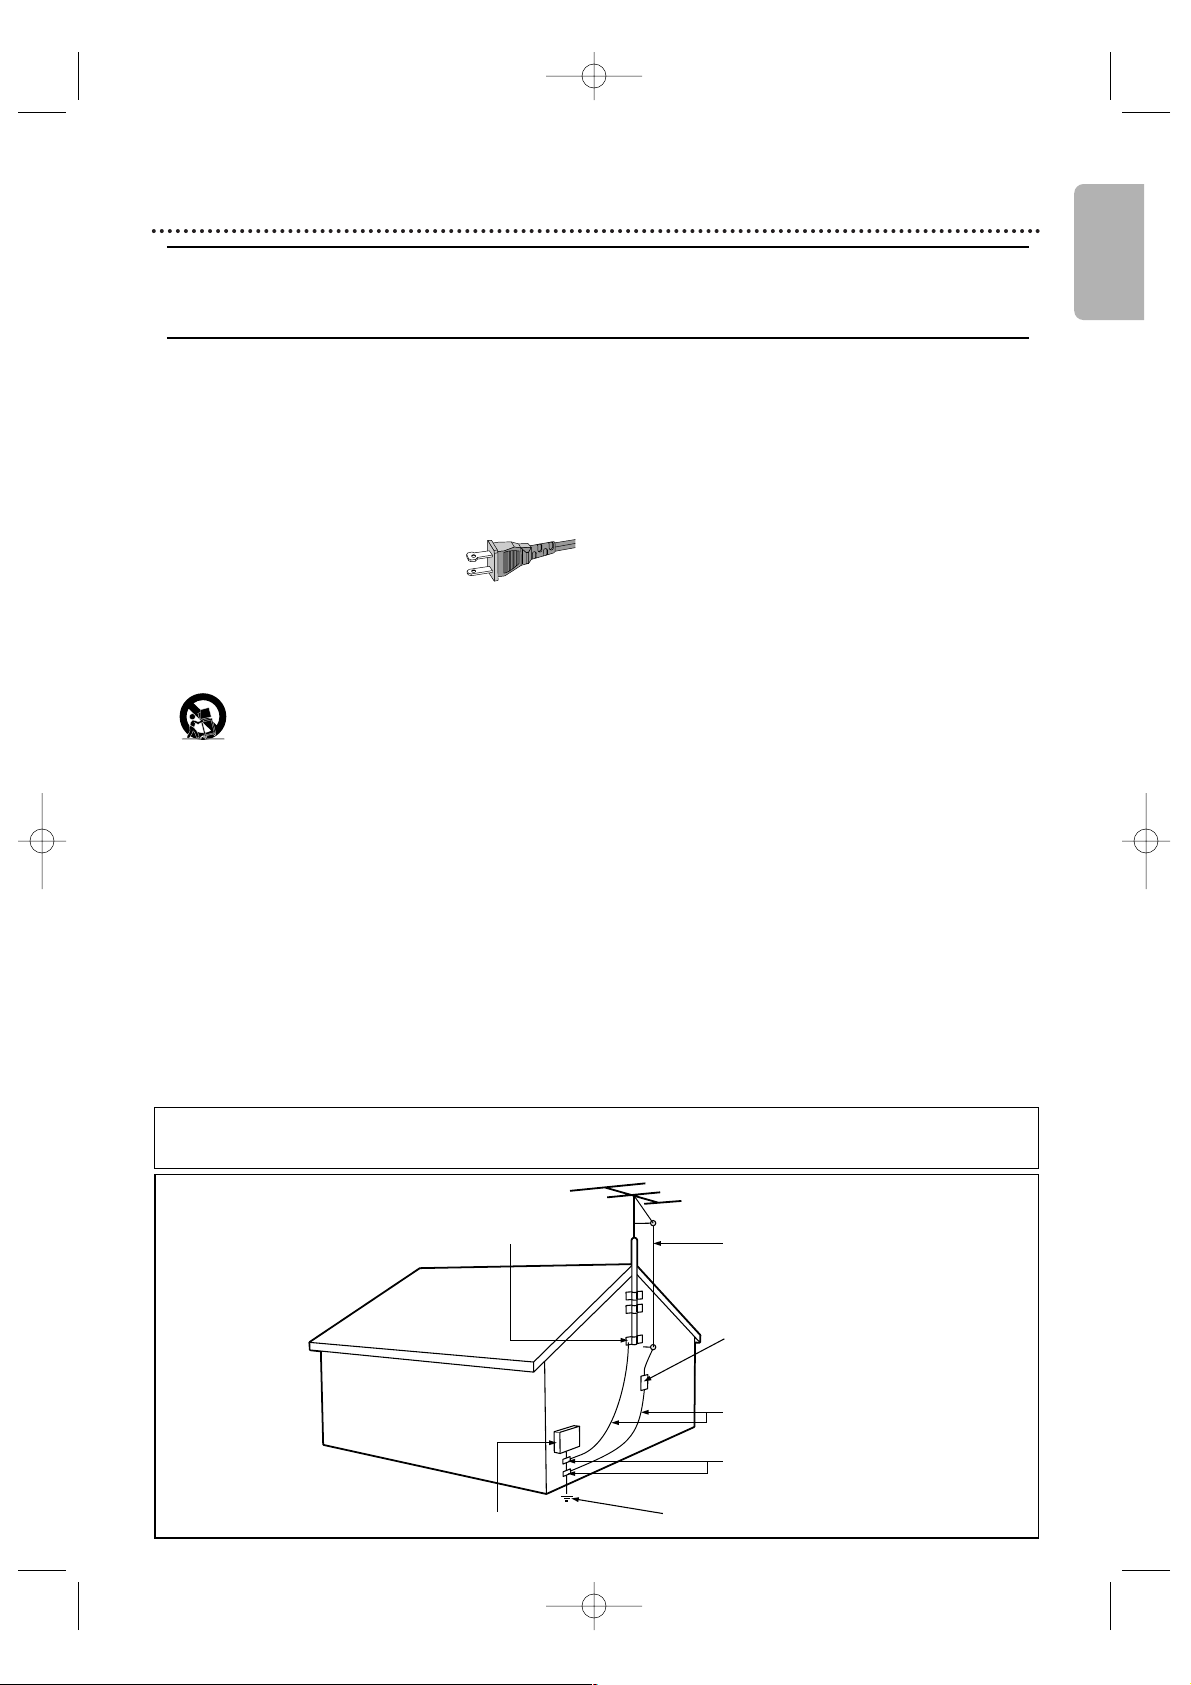
Note to the CATV system installer: This reminder is provided to call the CATV system installer’s attention to Article 820-40 of the NEC
that provides guidelines for proper grounding and, in particular, specifies that the cable ground shall be connected to the grounding system of the
building, as close to the point of cable entry as practical.
AC Polarized
Plug
Example of Antenna Grounding
as per NEC - National Electric Code
GROUND CLAMP
ANTENNA LEAD IN WIRE
ANTENNA DISCHARGE UNIT
GROUNDING CONDUCTORS (NEC SECTION 810-21)
GROUND CLAMPS
ELECTRIC SERVICE EQUIPMENT
POWER SERVICE GROUNDING ELECTRODE SYSTEM (NEC ART 250, PART H)
(NEC SECTION 810-20)
Page 4

English
4 Safety Information (cont’d)
Safety Precautions
Warning: To prevent fire or shock hazard, do not expose this equipment to rain or moisture.
Federal Communications Commission (FCC) Warning: Any unauthorized changes or
modifications to this device void the user’s authority to operate it.
• Do not stand the unit up vertically. Install the unit in a horizontal and stable position.
• Be sure to remove the disc and unplug the AC power cord from the outlet before carrying the unit.
Department of Health and Human Services (DHHS) Certification: Complies with 21 Center
for Radiation (CFR) chapter 1 subchapter J applicable at time of manufacture.
Laser Safety: This unit employs a laser. Only a qualified service person should remove the cover
or attempt to service this device, due to possible eye injury.
CAUTION: USE OF CONTROLS OR ADJUSTMENTS OR PERFORMANCE OF PROCEDURES OTHER
THAN THOSE SPECIFIED HEREIN MAY RESULT IN HAZARDOUS RADIATION EXPOSURE.
CAUTION: VISIBLE AND INVISIBLE LASER RADIATION WHEN OPEN AND INTERLOCK
DEFEATED. DO NOT STARE INTO BEAM. THE BEAM IS LOCATED INSIDE, NEAR THE DECK
MECHANISM.
Special Information for Canadian Users: This Class B digital apparatus complies with
Canadian ICES-003. Cet appareil numérique de la classe B est conforme à la norme NMB-003 du Canada.
Radio/TV Interference: This device has been tested and found to comply with the limits for a
Class B digital device, pursuant to Part 15 of the FCC Rules.These limits are designed to provide
reasonable protection against harmful interference in a residential installation.This device generates, uses,
and can radiate radio frequency energy and, if not installed and used in accordance with the instructions,
may cause harmful interference to radio communications.
However, there is no guarantee that interference will not occur in a particular installation. If this device
does cause harmful interference to radio or television reception,which can be determined by turning the
device off and on, the user is encouraged to try to correct the interference by one or more of the
following measures:
1) Reorient or relocate the receiving antenna.
2) Increase the separation between the device and the receiver.
3) Connect the device into an outlet on a circuit different from that to which the receiver is connected.
4) Consult the dealer or an experienced radio/TV technician for help.
Copyright Notice: T
he making of unauthorized copies of copy-protected material,including
computer programs, files, broadcasts and sound recordings, may be an infringement of copyrights and
constitute a criminal offence. This equipment should not be used for such purposes.
Copyright Protection: Unauthorized copying, broadcasting, public performance, and lending of
Discs are prohibited.
This product incorporates copyright protection technology that is protected by U.S.patents and
other intellectual property rights. Use of this copyright protection technology must be authorized by
Macrovision, and is intended for home and other limited viewing uses only unless otherwise
authorized by Macrovision. Reverse engineering or disassembly is prohibited.
Notice for Progressive Scan Use: Consumers should note that not all high definition
television sets are fully compatible with this product and may cause artifacts to be displayed in the
picture. In case of picture problems with 525 (480) progressive scan output, it is recommended that the
user switch the connection to the ‘standard definition’ output. If there are questions regarding your TV
set compatibility with this 525p (480p) DVD player,please contact our customer service center.
Declaration of Conformity
Model Number: DVP3345V/17
Trade Name: Philips
Responsible Party: Philips Consumer Electronics Company
Marietta, GA 30006-0026
1-888-PHILIPS (744-5477)
Manufactured under license from Dolby Laboratories."Dolby" and the double-D symbol are trademarks of Dolby
Laboratories.
Copyright 2007 Philips. All rights reserved.
E8E20UD_EN1 8/23/07 1:25 PM Page 4
Page 5

Table of Contents 5
General Information
Safety Information . . . . . . . . . . . . . . . . . . . . . . . . .3-4
Table of Contents . . . . . . . . . . . . . . . . . . . . . . . . . . .5
Introduction . . . . . . . . . . . . . . . . . . . . . . . . . . . . . . . .6
Playable Discs and Video Cassettes . . . . . . . . . . . . . .7
Initial DVD/VCR Setup
Hookups . . . . . . . . . . . . . . . . . . . . . . . . . . . . . . .8-12
Remote Control Setup . . . . . . . . . . . . . . . . . . . . . .13
First-time DVD/VCR Setup . . . . . . . . . . . . . . . . . . .14
Basic Playback
Video Cassette Playback . . . . . . . . . . . . . . . . . . . . .15
Disc Playback . . . . . . . . . . . . . . . . . . . . . . . . . . . . . .16
Basic DVD/VCR Controls
Display Panel . . . . . . . . . . . . . . . . . . . . . . . . . . . . .17
Front Panel, Rear Panel and Remote Control . . . . .18
Additional VCR Setup
Clock (VCR) . . . . . . . . . . . . . . . . . . . . . . . . . . . . . .19
Language (VCR) . . . . . . . . . . . . . . . . . . . . . . . . . . . .20
VCR Status Displays . . . . . . . . . . . . . . . . . . . . . . . .20
VCR Recording Options
Videotape Recording . . . . . . . . . . . . . . . . . . . . . . . .21
One-Touch Recording . . . . . . . . . . . . . . . . . . . . . . .22
Rerecording (Tape Duplication) . . . . . . . . . . . . . . . .23
Timer Recording . . . . . . . . . . . . . . . . . . . . . . . .24-25
Satellite Link . . . . . . . . . . . . . . . . . . . . . . . . . . . .26-27
DVD to Videotape Duplication . . . . . . . . . . . . . . . .28
Video Cassette Playing Options
Repeat Playback . . . . . . . . . . . . . . . . . . . . . . . . . . . .29
Ta pe Counter . . . . . . . . . . . . . . . . . . . . . . . . . . . . .29
Time Search, Index Search . . . . . . . . . . . . . . . . . . . .30
Special Effects Playback . . . . . . . . . . . . . . . . . . . . . .31
Automatic Operation Features . . . . . . . . . . . . . . . .31
Additional VCR Features
Hi-Fi Stereo . . . . . . . . . . . . . . . . . . . . . . . . . . . . . . .32
Disc Playback Features
Menus, Playback Control (PBC) Function . . . . . . . .32
Fast Forward/Fast Reverse . . . . . . . . . . . . . . . . . . .33
x1.3 and x0.8 Rapid Play with Voice . . . . . . . . . . . . .33
Title/Chapter/Time Search . . . . . . . . . . . . . . . . . . .34
Track Search . . . . . . . . . . . . . . . . . . . . . . . . . . . . . .35
Paused and Step-by-Step Playback, Resume On . . .36
Repeat, A-B Repeat . . . . . . . . . . . . . . . . . . . . . . . . .37
Markers . . . . . . . . . . . . . . . . . . . . . . . . . . . . . . . . .38
Subtitles, Camera Angles . . . . . . . . . . . . . . . . . . . . .39
Audio Language, Stereo Sound Mode . . . . . . . . . . .40
Slow Motion, Zoom . . . . . . . . . . . . . . . . . . . . . . . .41
Program /Random Playback . . . . . . . . . . . . . . . . . . .42
MP3/Windows Media
TM
Audio/JPEG Playback . . .43-44
On-Screen Displays . . . . . . . . . . . . . . . . . . . . . .45-46
Black Level,Virtual Surround . . . . . . . . . . . . . . . . . .47
Initializing . . . . . . . . . . . . . . . . . . . . . . . . . . . . . . . . .47
DVD Player Setup Options
Language . . . . . . . . . . . . . . . . . . . . . . . . . . . . . . .48-49
Display . . . . . . . . . . . . . . . . . . . . . . . . . . . . . . . .50-51
Progressive Scan . . . . . . . . . . . . . . . . . . . . . . . . . . .51
Audio . . . . . . . . . . . . . . . . . . . . . . . . . . . . . . . . . . . .52
Parental Password . . . . . . . . . . . . . . . . . . . . . . . . . .53
Parental Levels . . . . . . . . . . . . . . . . . . . . . . . . . . . . .54
Others . . . . . . . . . . . . . . . . . . . . . . . . . . . . . . . .55-56
Information You May Need
Glossary . . . . . . . . . . . . . . . . . . . . . . . . . . . . . . . . .57
Helpful Hints . . . . . . . . . . . . . . . . . . . . . . . . . . .58-60
Care and Maintenance . . . . . . . . . . . . . . . . . . . . . . .61
Specifications . . . . . . . . . . . . . . . . . . . . . . . . . . . . . .61
Limited Warranty . . . . . . . . . . . . . . . . . . . . . . . . . . .62
Information Index . . . . . . . . . . . . . . . . . . . . . . . . . .63
English
E8E20UD_EN1 8/23/07 1:25 PM Page 5
Page 6

English
6 Introduction
VCR Features
• Automatic Head Cleaner
• English, French and Spanish Menus and
Displays
• 19 Micron head
• Recording: One-Touch and Timer
• Repeat Playback
• Satellite Link
• Searching:Time, Index, Forward and
Reverse
• Slow Motion
• Still Picture
•Tape Counter
•Tracking Adjustment
Welcome!
This DVD/VCR combines a Digital Video Disc (DVD) player and a Hi-Fi Video Cassette
Recorder (VCR) into one unit, letting you play DVDs, Audio Compact Discs (Audio
CDs), and Video Cassettes on one piece of equipment.
Read this owner’s manual carefully to learn how to use the features listed below.
Package Contents
The following items are provided with your new DVD/VCR.
• Remote Control and two AA batteries
• One set of Audio (red and white tips) and Video (yellow tips) cables
• This Owner’s Manual and Quick Start Guide
DVD Disc Menus...
Some explanations in this manual describe DVD Disc Menus. DVD manufacturers set
the menus, which vary among DVDs. Not all DVDs have menus. If the DVD has a
menu, access it by pressing DVD, then DISC MENU on the remote control.
Details are on page 32.
DVD Player Setup Menu...
Some instructions explain how to use the DVD player’s Setup Menu to set up features
of the DVD player or a DVD. Access the DVD player menu by pressing SETUP on the
remote control when playback is stopped. Even if a feature is set in the DVD player’s
menu, it may not be available if the current DVD does not include that feature.
Available Disc Features...
All features described in this manual are not available on every disc. If the feature is
not available on the disc, you cannot use the DVD/VCR to make it
available. An “X” will appear in the top right corner of the TV screen if
you try to access a feature that is not currently available.
Disc Features
• Audio Language choices *
• Camera Angles *
• DVD menus in a desired
language *
• Markers
• MP3 Playback
• JPEG Playback
• Windows MediaTMAudio
Playback
• Dual Playback
• Parental Control *
• Paused/Fast/Slow/
Step-by-Step Playback
• Program Playback
• Progressive Scan
• Random Playback
• Repeat, A-B Repeat
• Resume On
• Specific Time/Title/
Chapter/Track Search
• Subtitles *
• Zoom
* If available on the disc
E8E20UD_EN1 8/23/07 1:25 PM Page 6
Page 7

English
Playable Discs and Video Cassettes 7
Playable Discs
The DVD player will play Digital Video Discs (DVDs); finalized Digital Video Discs Recordable (DVD+R,DVD-R);
finalized Digital Video Discs Rewritable (DVD+RW, DVD-RW);Video Compact Discs (VCDs);Audio Compact
Discs (CDs); finalized Compact Discs Recordable (CD-R) and Compact Discs Rewritable (CD-RW).
To play a DVD, make sure it meets the requirements for Region Codes and Color Systems as described
below. Discs that have the following logos will play on the DVD player. Other disc types are not guaranteed
to play in the DVD/VCR.
• Do not stand the unit up vertically. Install the unit in a horizontal and stable position.
• Be sure to remove the disc and unplug the AC power cord from the outlet before carrying the unit.
Windows Media is a trademark of Microsoft Corporation.
This unit is not compatible with Multiple Bit Rate
(MBR:a file that contains the same content encoded at several different bit rates).
ABOUT THE PBC FUNCTION OF VIDEO CD
This unit can play Video CD 1.1 (without PBC) and 2.0 (with PBC).
With version 2.0 (with PBC), you can use interactive menu (e.g., playlists) on the TV screen.
When playing a Video CD with PBC, some operations cannot be performed unless the PBC function is
cancelled temporarily. See page 32 for more details.
Region Codes
DVDs must be labeled for ALL regions or for Region 1 in order to play on this DVD player. You cannot play
DVDs that are labeled for other regions.
Look for the symbols below on your DVDs. If these region symbols do not appear on your DVD, you
cannot play the DVD in this player.
The number inside the globe refers to a region of the world. Region 1 represents the
United States, Canada, upper regions of North America, Bermuda, the U.S.Virgin
Islands, and small regions near Australia.
A disc encoded in a specific region format can only play on DVD players with the same region code. For
example, if a disc is labeled for Region 2, you cannot play the DVD on this player.
Color Systems
Different color systems are available throughout the world. The most common color systems are NTSC,
which is used primarily in the United States and North America, PAL, and SECAM.
This DVD player will play both NTSC and PAL DVDs. You cannot play DVDs recorded in other formats.
The color system of the DVD may be listed on the DVD or on the disc case. Your TV must have the NTSC
and/or PAL color system as well.
Playable Video Cassettes
The VCR of this DVD/VCR has a High Quality (HQ) system and is compatible with existing Video Home
System (VHS) equipment. Use only video cassettes that have the mark. The use of other tapes may
result in poor picture quality and excessive deposits on the video heads, which may not be covered by the
warranty if damage occurs.
The VCR also has a 19 micron head, which provides a better picture when you view tapes recorded in slow
speed (SLP).
Unacceptable Discs
If you insert an unacceptable type of disc, a Disc Error message may appear on the TV screen. The following
discs will not play on this DVD player.
• CD-ROM • Compact Disc-Interactive (CD-I) • DVD-RAM
• Video Single Disc (VSD) • DVD-ROM • DVD-Audio
• Unfinalized disc • DVD contains MP3, Windows MediaTMAudio or JPEG files
• Non-compatible recording mode
On the following disc, the sound may not be heard.
• Super Audio CD - Only the sound on the CD layer can be heard. The sound on the high-density Super
Audio CD layer cannot be heard.
DVD
MP3
files
Audio
CD
CD-R
CD-RW
DVD+R DVD+RW Video
CD
DVD-RWDVD-R
E8E20UD_EN1 8/23/07 1:25 PM Page 7
is a trademark of DVD Format/Logo Licensing Corporation.
Page 8

English
8 Hookups
Determining the best possible connection...
Your hookup will be determined primarily by your existing equipment, especially your TV. These guidelines describe
which options have the best picture and sound quality. You will not use all the jacks on the DVD/VCR.
★★★★ If your TV has Component Video In jacks (which could be labeled Y CR CB, Y PR PB or YUV and may be
green, blue and red), use the Component Video jacks (Y C
B/PB CR/PR) for the best picture quality. If you use
only this video connection, only the DVD picture will be available. To see DVD features on the TV, set the TV
to its Component Video In channel. Component Video provides the best picture quality. See page 10.
Progressive Scan provides less flickering and higher image resolution than traditional (525i/480i or interlace)
TV signals.
If your TV has Progressive Scan (525p/480p or progressive), connect the TV to the DVD/VCR’s
COMPONENT VIDEO OUT (Y C
B/PBCR/PR
) jacks. Set Progressive Scan (PROG. SCAN) to ON in the
DVD/VCR’s DISPLAY Menu. See pages 50-5
1
.P.SCAN will appear on the DVD/VCR’s display panel. Set your TV to
Progressive Scan also
.
If your TV does not have Progressive Scan but has Component Video In jacks, connect them to
the DVD/VCR’s COMPONENT VIDEO OUT jacks (Y C
B/PB CR/PR). Set
Progressive Scan (PROG. SCAN)
to
OFF either in the DISPLAY Menu or by pressing and holding PLAY B (DVD) on the front of the DVD/VCR
for more than 5 seconds.See pages 50-51.
★★★ If your TV has an S-Video In jack (which also may be labeled Y/C or S-VHS), use the S-VIDEO OUT jack for
excellent picture quality. If you use only this video connection, only the DVD picture will be available. To see
DVD features on the TV, set the TV to its S-Video In channel. See page 10.
★★ If your TV has a single yellow Video In jack (which also may be labeled CVBS, Composite or baseband), use
the yellow DVD/VCR VIDEO OUT jack for good picture quality.This connection provides a picture for both
the DVD player and the VCR. To see DVD or VCR features on the TV, set the TV to its Video In channel. See
page 9
★★★★ If you have a Stereo with a Coaxial Digital Audio In jack, this provides the clearest sound for the DVD player.
Connect the DVD/VCR’s COAXIAL DIGITAL AUDIO OUT jack to your Stereo for the best sound quality. If
you use only this audio connection,only disc sound (no VCR) will be available. See page 12.
★★★ If digital audio connections are not possible, connect the DVD/VCR’s red and white DVD/VCR AUDIO OUT
jacks to the Audio In jacks of your Stereo or TV. This connection provides sound for both the DVD player
and the VCR. See pages 10-11.
Before you begin...
● Refer to the manuals of your TV, Cable Box,Stereo or other devices as necessary. Note the style of jacks and
connectors on the other equipment. Determine how to choose different Audio and Video In channels on your
other equipment so you can see and hear the DVD/VCR material playing on the TV,Stereo, etc.
● Disconnect all equipment from the power outlets. Connect the equipment to power only after you have finished
hooking up everything. Never make or change connections with equipment connected to power.
Remember...
● Set the TV to the correct Video In channel. Such channels may be called AUX or AUXILIARY IN, AUDIO/VIDEO or
A/V IN, EXT1 or External In, etc. These channels often are located near channel zero (0). Or, your TV’s remote may
have a button or switch that selects the Video Input channel. See your TV manual for details. If you do not see the
DVD or VCR playback on the TV, go to the lowest TV channel (01 or 02) and change channels downward until you
see the DVD or VCR picture on the TV.
To help you find the right Audio/Video In channel, turn on the DVD/VCR. Press DVD to put the DVD/VCR in DVD
mode. With no disc in the player, a large DVD Video logo will appear on the TV screen when you get the TV on the
correct Audio/Video In channel.
● Set the Stereo to the correct channel or “source” mode.
● Depending on your connection, you may need to purchase additional cables or adaptors. If your TV or monitor has
BNC-type connectors, you will need an adaptor.
Once you determine the best option, find your choice on pages 9-12. Follow the steps for the hookup
you choose.Then, go to page 14 to complete the first-time setup.
E8E20UD_EN1 8/23/07 1:25 PM Page 8
Page 9
English
Hookups (cont’d) 9
DIGITAL
AUDIO OUT
COAXIAL
AUDIO
OUT
DVD
L
R
LRL
R
S-VIDEO
OUT
COMPONENT
VIDEO OUT
Y
C
B
/
P
B
AUDIO OUT
DVD/VCR
VCR
VIDEO OUT
AUDIO IN
VIDEO IN
CR /
P
R
AUDIO IN
VIDEO IN
L
R
ANT. IN
AUDIO OUT
LR
VIDEO
OUT
OUTIN
Audio Cable
(not supplied)
RF coaxial cable
(not supplied)
RF coaxial cable
(not supplied)
External tuner
TV Signal
Audio Cable (supplied)
Video Cable
(not supplied)
Video Cable (supplied)
DVD/VCR
Back of TV
Connections
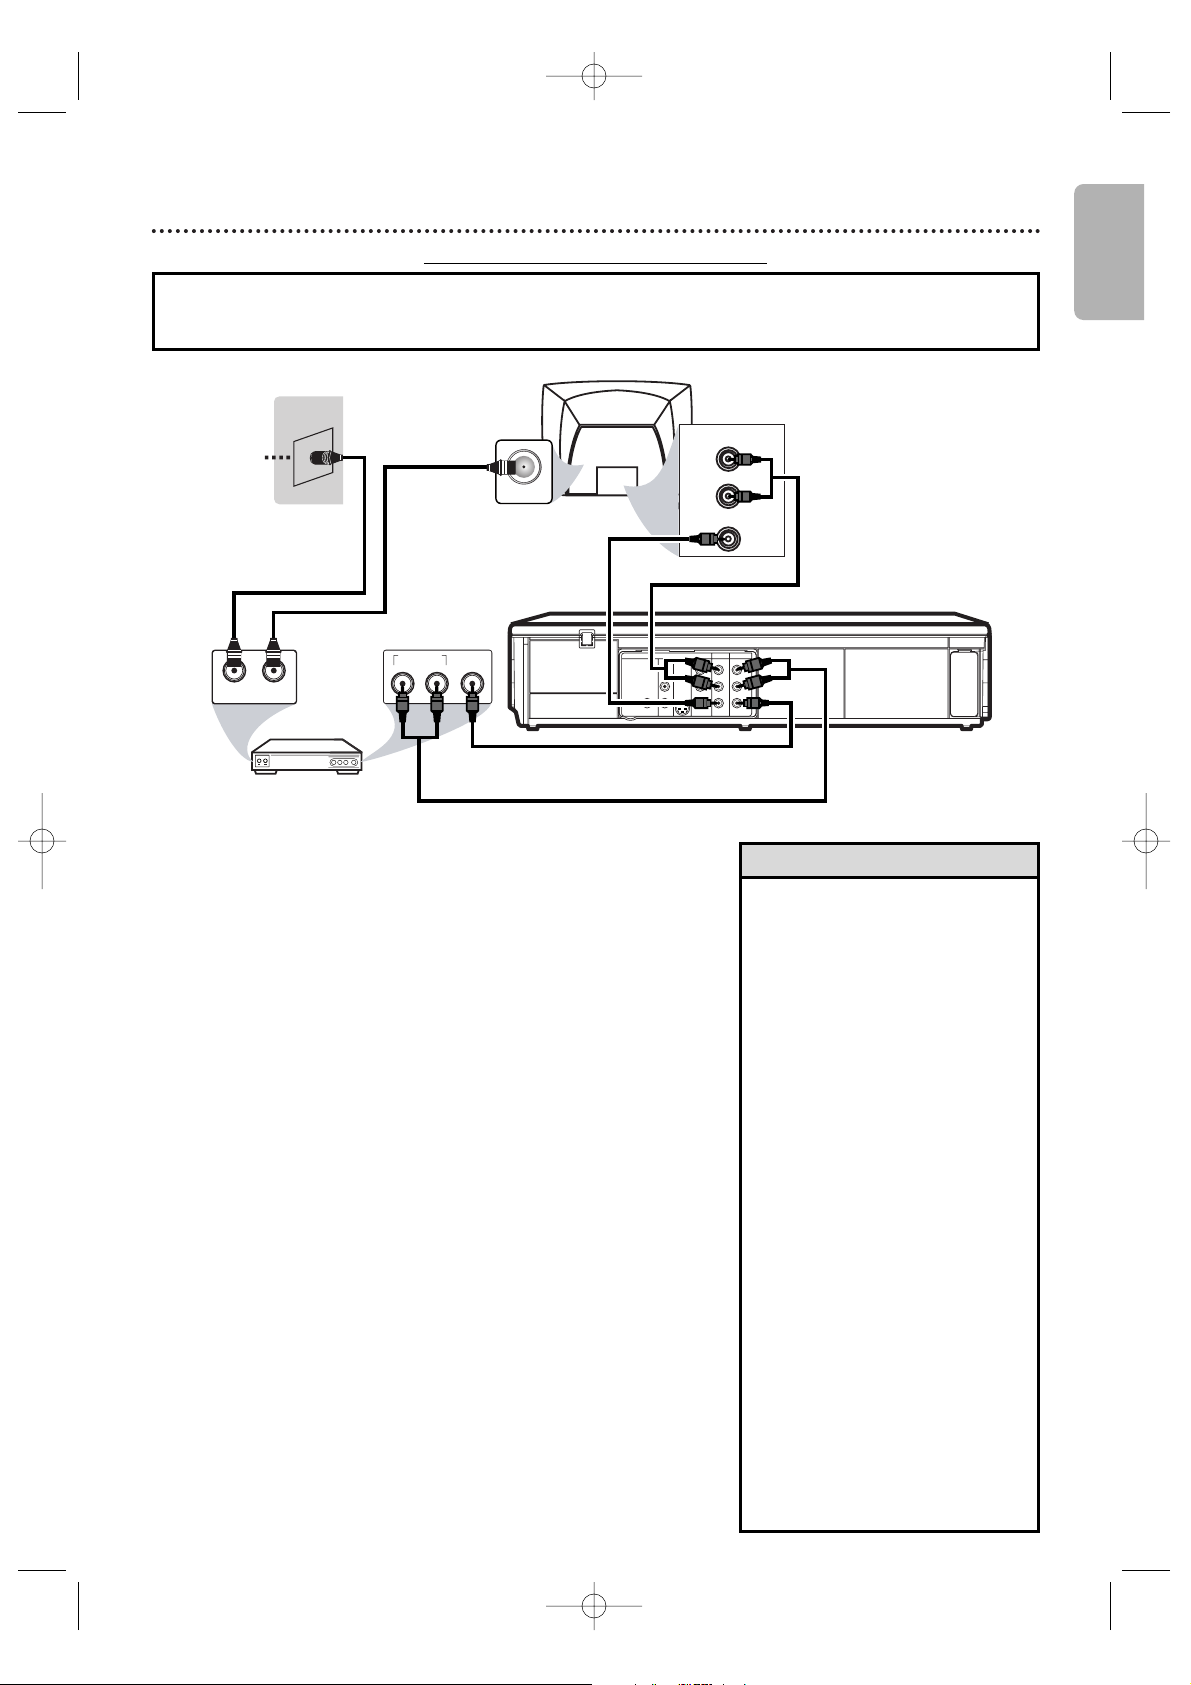
1
Connect a TV signal to the IN jack on the external
tuner.
2
Use an RF coaxial cable (not supplied) to connect
the OUT jack on the external tuner to the ANT. IN
jack on the TV.
3
Connect the red and white audio cable (supplied) to
the red and white AUDIO OUT jacks on the
external tuner and to the red and white VCR
AUDIO IN jacks on the DVD/VCR.
4
Connect the yellow video cable (supplied) to the
yellow VIDEO OUT jack on the external tuner and
to the VCR VIDEO IN jack on the DVD/VCR.
5
Connect another red and white audio cable (not
supplied) to the red and white DVD/VCR AUDIO
OUT jacks on the DVD/VCR and to the red and
white AUDIO IN jacks on the TV.
6
Connect another yellow video cable (not supplied)
to the DVD/VCR VIDEO OUT jack on the DVD/VCR
and to the VIDEO IN jack on the TV.
7
Connect the power cords of the TV and the DVD/VCR
to a power outlet.Turn on the TV and set it to the
correct Video In channel.
8
You are ready to turn on the DVD/VCR. Go to page 14
to complete the first-time setup.
●
You can record any unscrambled channel by selecting the channel
on the external tuner. Be sure that the external tuner is turned on.
●
Signal from the external tuner can be output only on CVBS output
even when the power of the DVD/VCR is off.
●
You cannot record one channel while watching another
channel.
DVD/VCR to An External Tuner
• If your TV has antenna in jack
only, it is still possible to connect
this unit to your TV by using a
commercially available stereo
audio/video RF modulator. Refer
to the manual accompanying the
modulator for more information.
• Required cables and connecting
methods differ depending on the
external tuner.
For more information,please
contact your external tuner
provider.
• Line through output
When an external device, such as
cable/satellite box, is connected
to L1(Rear) jacks of this
DVD/VCR,the signal from the
external device can be output
even when the power of the
DVD/VCR is off.
• Instead of using video out jack of
this DVD/VCR, you can also use
S-video out jack or component
video output jack for connecting
to your TV.
• Refer to the manual
accompanying external devices
for more information.
Helpful Hints
1
2
3
4
5
6
This DVD/VCR does not have a tuner input jack.To record TV programs on your DVD/VCR, you need to
connect this DVD/VCR to an external tuner device (e.g., set top box, cable box or satellite receiver) that
has audio/video output jacks.
e.g.)
E8E20UD_EN1 8/23/07 1:25 PM Page 9
Page 10
English
10 Hookups (cont’d)
DIGITAL
AUDIO OUT
COAXIAL
AUDIO
OUT
DVD
L
R
LRL
R
S-VIDEO
OUT
COMPONENT
VIDEO OUT
Y
C
B /
P
B
AUDIO OUT
DVD/VCR
VCR
VIDEO OUT
AUDIO IN
VIDEO IN
CR /
PR
AUDIO IN
S-VIDEO IN
L
R
Back of TV
Audio and
Video IN Jacks
on TV
Audio Cable
(supplied)
Video Cable
(supplied)
AUDIO IN
Y
Cb/Pb
Cr/Pr
COMPONENT
VIDEO IN
L
R
Back of TV
AUDIO IN
VIDEO IN
L
R
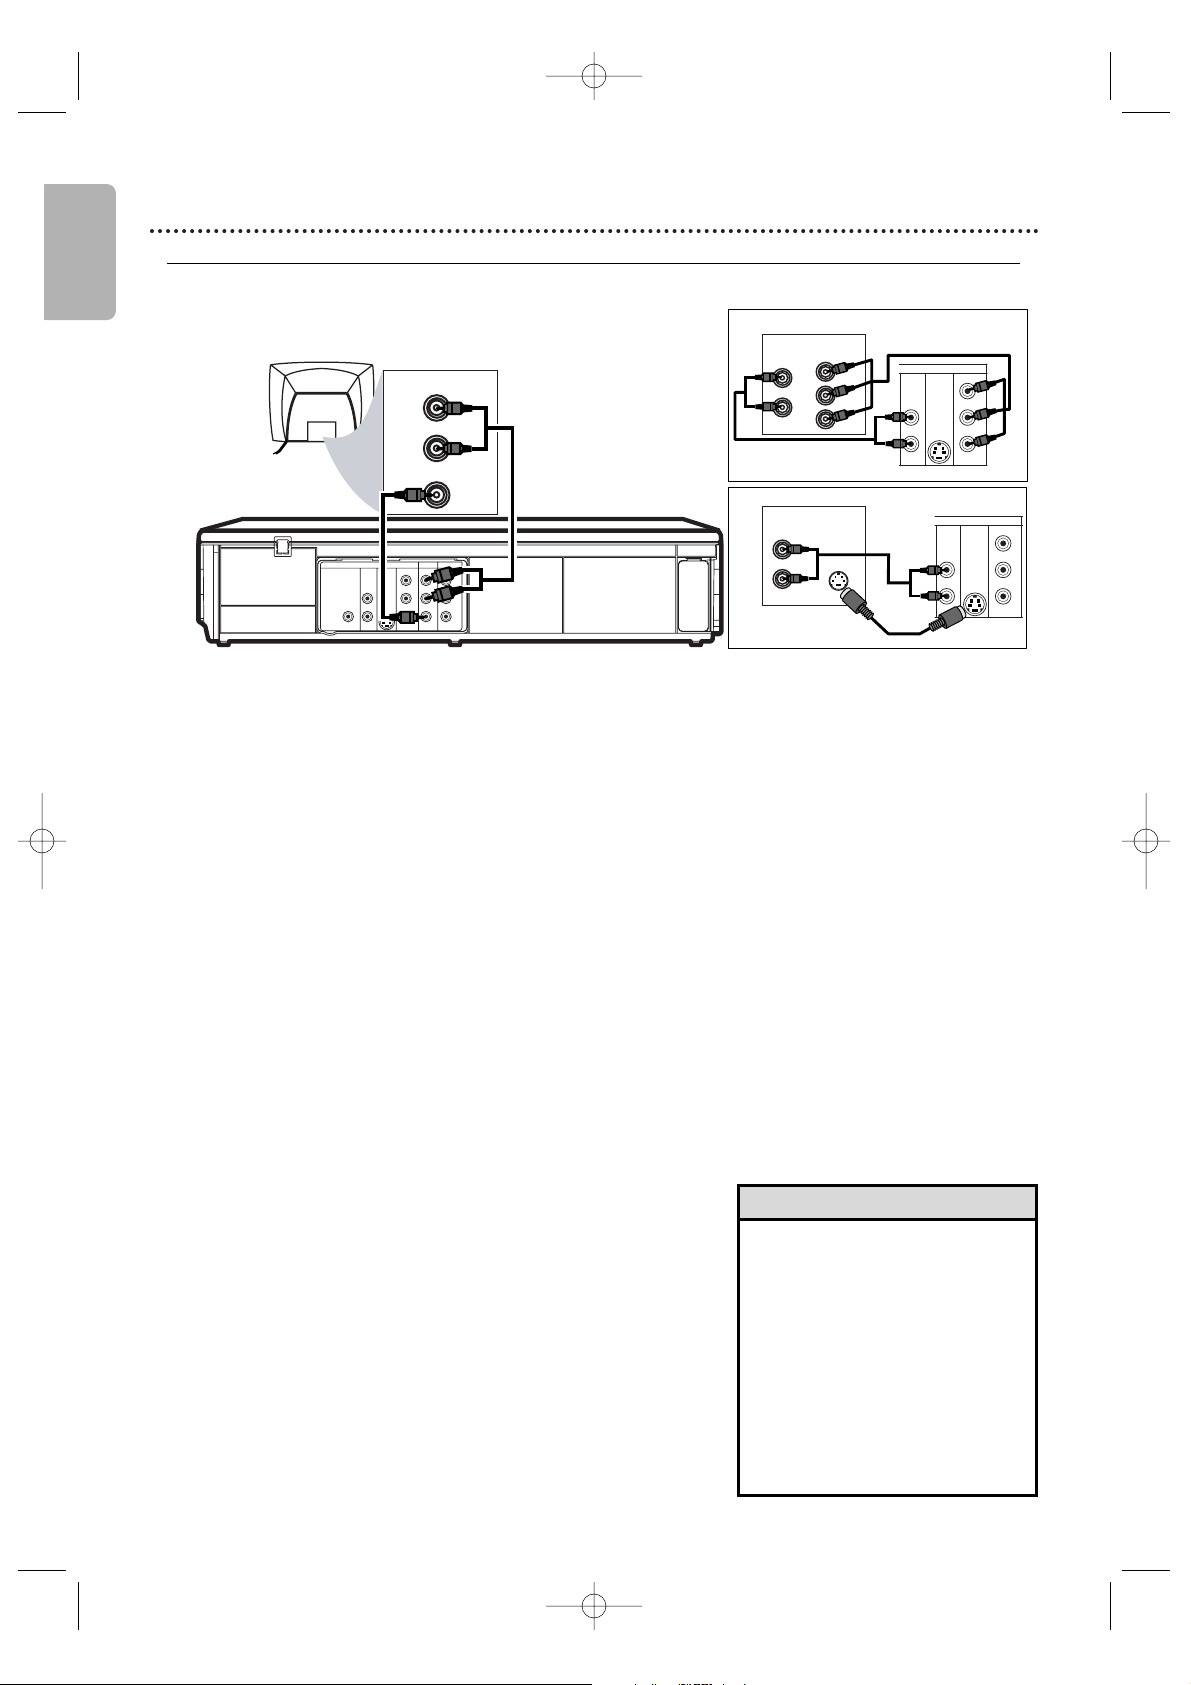
1
1
1
2
b
2
c
2
a
1
Connect the red and white audio cable (supplied) to the
red and white DVD or DVD/VCR AUDIO OUT jacks on
the DVD/VCR and to the red and white AUDIO IN jacks
on the TV.
● If you are using DVD/VCR AUDIO OUT jacks for your
audio connection, use 2a method for your video connection.
If you are using DVD AUDIO OUT jacks for your audio
connection, use 2b or 2c method for your video connection.
2
a
Connect the yellow video cable (supplied) to the
DVD/VCR VIDEO OUT jack on the DVD/VCR and to
the VIDEO IN jack on the TV. TheVIDEO IN jack on the TV
is usual
ly yellow and may be labeled CVBS, Composite or
Baseband video.
2
b
Connect component video cable (not supplied) to the
COMPONENT VIDEO OUT jacks on the DVD/VCR
and to the COMPONENT VIDEO IN jacks on the TV.
The Co
mponent Video In jacks on the TV are usually red,
blue and green.
2
c
Connect an S-Video cable (not supplied) to the
S-VIDEO OUT jack on the DVD/VCR and to the
S-VIDEO IN jack on the TV.
3
Connect the power cords of the TV and the DVD/VCR to
a power outlet.Turn on the TV and set it to the correct
Video In channel.
If you are using the yellow video cable for VCR playback, choose
the Video In channel at your TV. To find the correct Video In
channel, go to your lowest TV channel and change channels
downward until you see VCR playback on the TV screen. To help
you find the right Video In channel, turn on the DVD/VCR. Press
DVD to put the DVD/VCR in DVD mode. With no disc in the
player, a large DVD Video logo will appear on the TV screen when
you get the TV on the correct Video In channel.
4
You are ready to turn on the DVD/VCR. Go to page 14 to
complete the first-time setup.
DVD/VCR to a TV that has Audio/ Video, Component Video or S-Video In jacks
• Match the cable colors to the
jack colors. If the TV has a single
AUDIO IN jack, use the white
audio cable to connect the
DVD/VCR’s white AUDIO OUT
(left) jack to the TV’s AUDIO IN
jack.You will not use the red
cable. Or,purchase a “splitter”
audio cable to go from the
left/right AUDIO OUT jacks of
the DVD/VCR to the TV’s single
AUDIO IN jack.
Helpful Hint
E8E20UD_EN1 8/23/07 1:25 PM Page 10
DVD
COMPONENT
AUDIO
S-VIDEO
VIDEO OUT
OUT
OUT
L
R
DVD
AUDIO
OUT
L
R
S-VIDEO
OUT
Y
B
C
P
B
CR /
P
R
/
COMPONENT
VIDEO OUT
Y
B
/
C
P
B
CR /
R
P
Page 11

Hookups (cont’d) 11
DVD/VCR to a TV and a Stereo
DIGITAL
AUDIO OUT
COAXIAL
AUDIO
OUT
DVD
L
R
LRL
R
S-VIDEO
OUT
COMPONENT
VIDEO OUT
Y
C
B
/
P
B
AUDIO OUT
DVD/VCR
VCR
VIDEO OUT
AUDIO IN
VIDEO IN
CR /
P
R
VIDEO IN
AUDIO (LEFT) IN
AUDIO (RIGHT) IN
1
Connect the supplied red and white audio cable to the red and white
DVD/VCR AUDIO OUT jacks on the DVD/VCR and to the red and
white AUDIO IN jacks on the Stereo. Match the cable colors to the jack
colors.
2
Connect the supplied yellow video cable to the DVD/VCR VIDEO
OUT jack on the DVD/VCR and to the VIDEO IN jack on the TV.
To use Component Video cable or S-Video cable instead for the DVD player,
see page 10. You will still need the yellow video cable for VCR features.
3
Connect the power cords of the DVD/VCR, TV and Stereo to a
power outlet.Turn on the TV and set it to the Video In channel. Or,
simply go to your TV’s lowest channel (01 or 02) and continue changing
channels downward at the TV until you see VCR or DVD playback on the TV
screen.
To help you find the right Video In channel at the TV, turn on the DVD/VCR. Press
DVD to put the DVD/VCR in DVD mode. With no disc in the player, a large DVD
Video logo will appear on the TV screen when you get the TV on the correct
Video In channel.
Turn on the Stereo and set it to the correct auxiliary or source mode.
Check your Stereo manual for details.
4
You are ready to turn on the DVD/VCR. Go to page 14 before
turning on the DVD/VCR.
2
1
English
Back of TV
(example only)
Stereo
Video Cable
(supplied)
Audio Cable
(supplied)
E8E20UD_EN1 8/23/07 1:25 PM Page 11
Page 12

English
1
Connect a coaxial digital audio cable (not supplied) to the DVD/VCR’s
COAXIAL DIGITAL AUDIO OUT jack and to the COAXIAL DIGITAL
AUDIO IN jack on the Stereo.
This digital audio connection only provides sound for the DVD player of the DVD/VCR.
So, in order to use the VCR features, connect the supplied red/white audio cable. To
connect the red/white audio cable, see step 5 on page 9.
2
Connect the supplied yellow video cable to the yellow DVD/VCR VIDEO
OUT jack on the DVD/VCR and to the VIDEO IN jack on the TV. To use
component video cable or S-Video cable instead for the DVD player, see
page 10. You will still need the yellow video cable for VCR features.
3
Plug in the power cords of the Stereo,TV and DVD/VCR.Turn on the
Stereo and select its Auxiliary IN channel. Turn on the TV and set it to
the correct Video In channel. Go to your TV’s lowest channel (01 or 02) and
change channels downward until you see DVD or VCR material on the TV screen.
To help you find the right Video In channel on the TV, turn on the DVD/VCR. Press
DVD to put the DVD/VCR in DVD mode.With no disc in the player, a large DVD
Video logo will appear on the TV screen when you get the TV on the correct Video
In channel.
Make sure
Progressive Scan (PROG. SCAN)
is OFF and P.SCAN does not appear on
the DVD/VCR’s display panel. Disable
Progressive Scan either in the DISPLAY
Menu or by pressing and holding PLAY B (DVD) on the front of the
DVD/VCR for more than 5 seconds. Details are on pages 8 and 51.
4
You are ready to turn on the DVD/VCR.Go to page 14 before turning on
the DVD/VCR.
Remember...
Some DVDs are recorded in Dolby Digital Multi-channel Surround Sound. Select Dolby
Digital Multi-channel Surround Sound in the DVD Disc Menu. If Dolby Digital Surround
Sound is not recorded on the disc, you will not have surround sound available.
If you connect the DVD/VCR to a Dolby Digital Stereo,set DOLBY DIGITAL to
BITSTREAM in the DVD player’s Setup Menu. Details are on page 52. If the DVD/VCR is not
connected to a Dolby Digital-compatible Stereo,set DOLBY DIGITAL to PCM.
Incorrect settings may cause noise distortion and damage the speakers.
12 Hookups (cont’d)
DVD/VCR to a TV and to a Stereo that is Dolby Digital-compatible
Using Digital Audio connections
DIGITAL
AUDIO OUT
COAXIAL
AUDIO
OUT
DVD
L
R
LRL
R
S-VIDEO
OUT
COMPONENT
VIDEO OUT
Y
C
B
/
P
B
AUDIO OUT
DVD/VCR
VCR
VIDEO OUT
AUDIO IN
VIDEO IN
CR /
P
R
VIDEO IN
COAXIAL
DIGITAL
AUDIO IN
1
2
Back of TV
(example only)
Stereo
Video Cable
(supplied)
Coaxial Digital Audio
Cable (not supplied)
E8E20UD_EN1 8/23/07 1:25 PM Page 12
Page 13
English
Remote Control Setup 13
Putting Batteries in the Remote Control
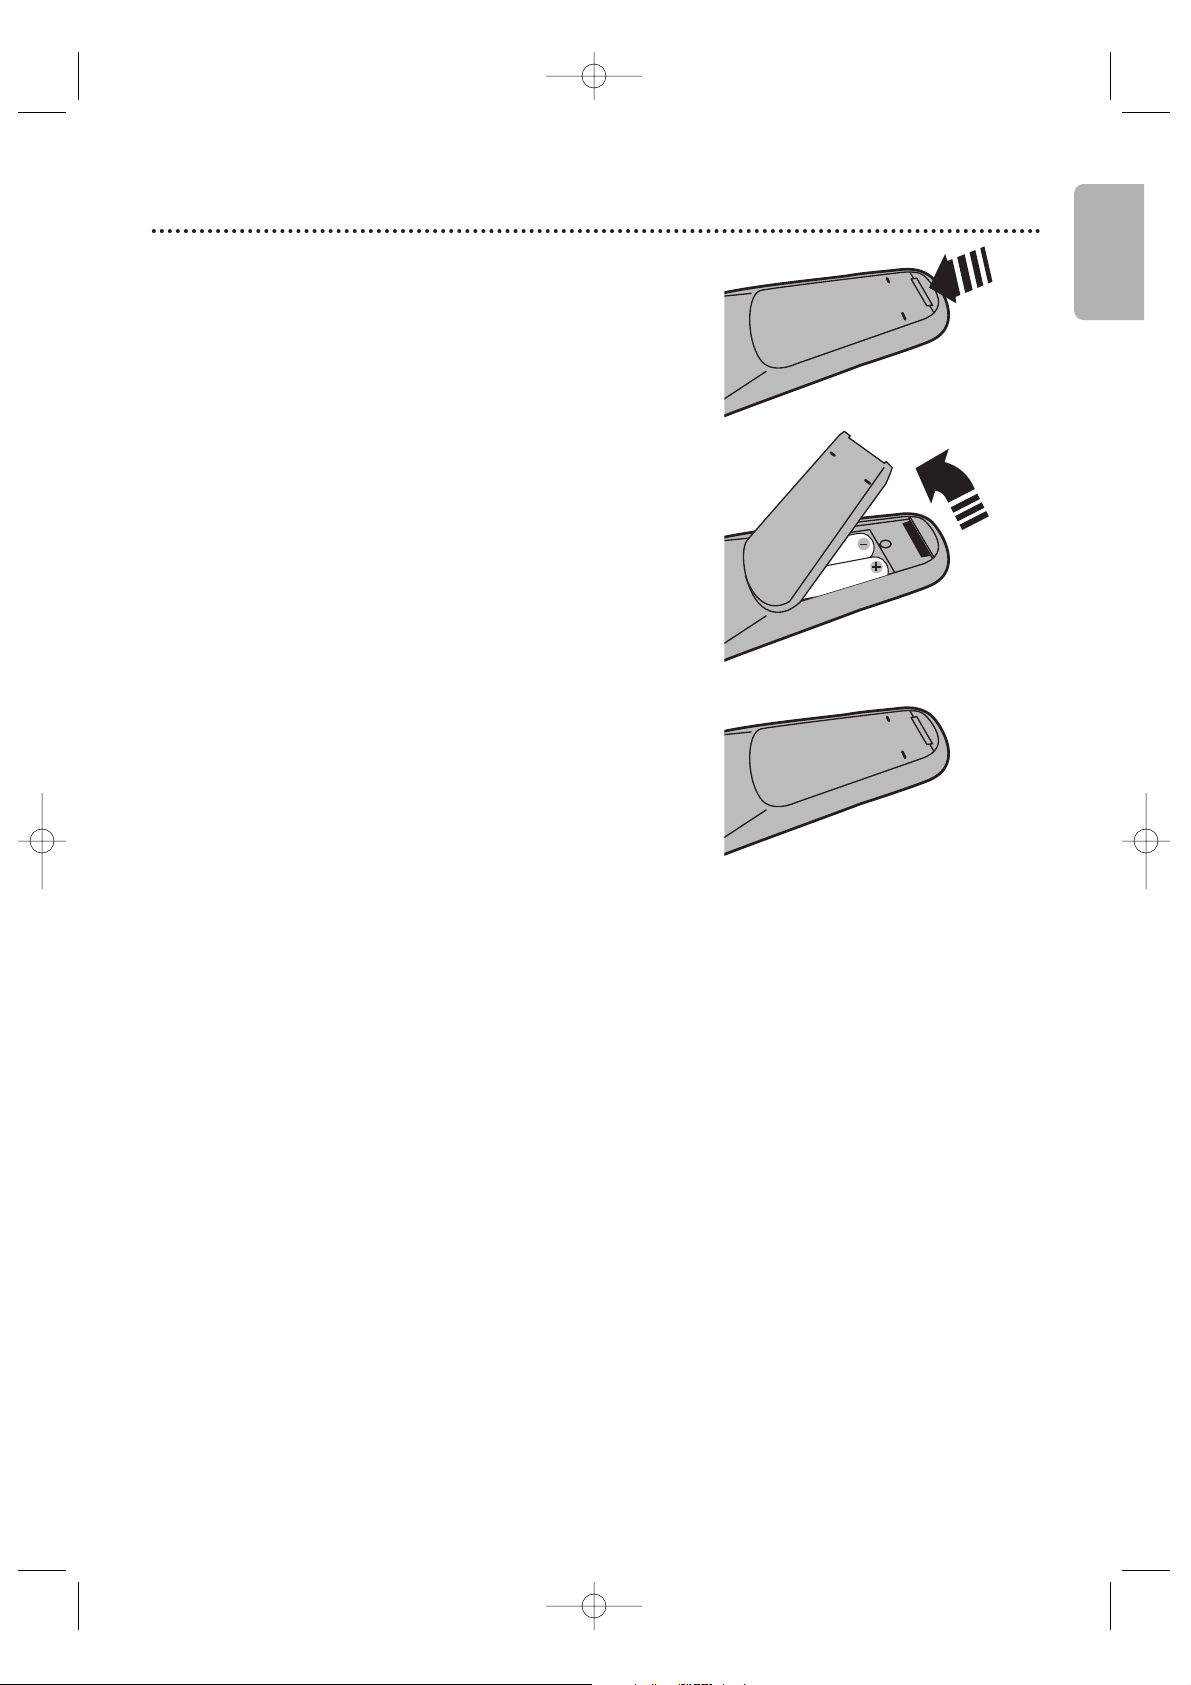
1
Remove the battery compartment lid on the bottom
of the remote control by pressing the tab, then lifting the
lid.
2
Place two AA batteries inside the battery
compartment with their
+ and –
ends aligned as
indicated.
3
Replace the battery compartment lid.
Using the Remote Control
● Point the remote control at the DVD/VCR’s remote sensor (see
page 18) when using the remote to operate the DVD/VCR. Do
not point the remote at the TV.
● Do not put objects between the remote and the DVD/VCR.
Recycling Guidelines/Battery Safety
● Your new product and its packaging contain materials that can
be recycled and reused. Specialized companies can recycle your
product to increase the amount that needs to be properly
disposed. Your product uses batteries that should not be
thrown away when depleted but should be disposed of as small
chemical waste. Please find out about the local regulations on
disposal of your old product, batteries and packaging whenever
you replace existing equipment.
● Battery Usage CAUTION - To prevent battery leakage that may
result in bodily injury, property damage or damage to the unit:
• Install ALL batteries correctly, with the
+ and –
markings on
the battery aligned as indicated on the unit.
• Do not mix batteries, for example, old with new or carbon
with alkaline.
• Remove batteries when the unit will not be used for a long
time.
1
2
3
E8E20UD_EN1 8/23/07 1:25 PM Page 13
Page 14

English
14 First-time DVD/VCR Setup
3
Press K or L to select ENGLISH, FRANCAIS
(French) or ESPAÑOL (Spanish) as the language for
VCR On-Screen Displays and menus. Then, press B.
● To put the DVD/VCR in VCR mode, press VCR so VCR
light appears.
•To skip this feature and play a
tape immediately, insert a tape
with its record tab removed.
• Repeat this process if the power
fails.
Helpful Hints
Before turning on your DVD/VCR, make sure batteries are in the
remote control and the DVD/VCR and TV are connected correctly.
These menus may not appear if you have already turned
on the DVD/VCR.
1
Turn on the TV. Set it to the correct Video In
channel. (Check your TV owner’s manual for details.)
2
Pressy. VCR light will appear on the front of the
DVD/VCR.The display shown below will appear.
These menus may not appear if you have already turned on
the DVD/VCR.You may have turned on the DVD/VCR
before to find the Audio/Video In channel of the TV, for
example. If so, follow the steps on page 20 to select a
language for the VCR menus.
1
Turn on the TV.
2
3
LANGUAGE SELECT
BENGLISH [ON]
FRANCAIS
ESPAÑOL
PUSH B
E8E20UD_EN1 8/23/07 1:25 PM Page 14
12
4
7
+10
INPUT
REW
DISPLAY SUBTITLE ZOOM
ANGLE SEARCH REPEAT
REC SPEED MODE
3
5
6
9
8
CLEAR TITLE
0
PLAYOKFFW
OPEN/CLOSE
TRACKING
DVDVCR SETUP
DISC
MENU
BACKPAUSESTOP
AUDIO
REPEAT
A-B
TIMER SET
Page 15
English
Video Cassette Playback 15
• Other tape playback features are
on pages 29-32.
• If AUTO REPEAT is ON, playback
will begin when you insert a tape,
even when the record tab is
intact. Details are on page 29.
•You must connect the DVD/VCR
to a TV using the audio/video
cables in order to use the VCR
features.These hookups are
explained on pages 9 and 11.
Helpful Hints
Read and follow the steps below to play a tape.
1
Turn on the TV. Set it to the correct Video In
channel. (Check your TV owner’s manual for details.)
Details are on page 8.
2
Insert a tape in the cassette compartment of the
DVD/VCR. VCR light will appear on the front of the
DVD/VCR. If the tape’s record tab has been removed,
playback will start automatically.
If the DVD/VCR power is already on, press VCR to put the
DVD/VCR in VCR mode if necessary.VCR light will appear
on the front of the DVD/VCR.
● If playback does not start automatically, press VCR, then
press PLAY B.
● Press STOP C to stop playback.
● Press REW h to rewind the tape.
● After the tape stops, press STOP/EJECT CA on the front
of the DVD/VCR to remove the tape.
1
2
Turn on the TV.
Insert a tape in the
DVD/VCR.
DVDVCR SETUP
INPUT
MENU
REC SPEED MODE
ANGLE SEARCH REPEAT
DISPLAY SUBTITLE ZOOM
TIMER SET
REPEAT
A-B
AUDIO
BACKPAUSESTOP
PLAYOKFFW
REW
CLEAR TITLE
DISC
TRACKING
OPEN/CLOSE
12
6
5
4
7
8
9
0
+10
3
E8E20UD_EN1 8/23/07 1:25 PM Page 15
Page 16

English
16 Disc Playback
• An “X” may appear at the top right
corner of the TV screen when you
try a feature. Either the feature is
not available on the disc, or the
DVD/VCR cannot access the
feature at this time. This does not
indicate a problem with the
DVD/VCR.
• If a disc is dirty or scratched, the
picture may appear distorted or
playback may stop. In such cases,
remove the disc and turn off the
DVD/VCR. Disconnect the power
cord, then reconnect it. Clean the
disc, then turn on the DVD/VCR
again and reinsert the disc for
playback.
• If a disc has multiple layers, the
picture may freeze occasionally. This
happens when the first layer
switches to the second layer. This is
not a malfunction.
• When the DVD or CD light
appears on the display panel, the
disc is loaded and ready for
playback.
• When you press OPEN/CLOSE A
or PLAY B (DVD) on the front of
the DVD/VCR when the power is
off, the DVD/VCR will turn on in
DVD mode. Otherwise, the
DVD/VCR will turn on in the mode
in which it was turned off.
• If you use PLAY B to close the disc
tray, playback starts automatically. If
you use OPEN/CLOSE A to close
the disc tray, you have to press
PLAY B to start playback.
Helpful Hints
Before you begin, turn on the TV, Stereo and other equipment
connected to the DVD/VCR. Make sure the TV and the Stereo (if
applicable) are set to the correct channel.
Details are on pages 8-12.
1
Pressy to turn on the DVD/VCR.
2
Press DVD so DVD light appears on the front of the
DVD/VCR.
3
Press OPEN/CLOSE A to open the disc tray.
4
Place a disc onto the tray. If the DVD is recorded on
only one side, place the disc on the tray with the label
facing up and the shiny side facing down. Some DVDs are
recorded on both sides. Make sure the label of the side you
want to play is facing up.
5
Press PLAY B to close the tray. The tray will close and
playback will begin. If playback does not start automatically,
press PLAY B again.
If a DVD Menu appears instead, see page 32.
To play MP3, Windows MediaTMAudio or JPEG files, see
pages 43-44.
You also can close the tray by pressing
OPEN/CLOSE A.
● Press STOP C to stop playback.
Insert a disc.
4
REMINDER:This DVD/VCR
will play only certain discs.
See page 7 for details.
1
2
5
3
E8E20UD_EN1 8/23/07 1:25 PM Page 16
5
8
0
OPEN/CLOSE
3
6
TRACKING
9
CLEAR TITLE
DVDVCR SETUP
DISC
MENU
12
4
7
+10
INPUT
PLAYOKFFWREW
BACKPAUSESTOP
Page 17

English
Display Panel 17
Appears after the disc tray
closes if the tray is empty,
if there is an error reading
the disc, or if an unacceptable
disc is installed.
Tr ay is opening or is open.
Tr ay is closing.
Disc is loading.
Appears when Playback
Control is active (Video CD).
Display Messages
STOP PLAY
REW F.FWD PLAY
REC TRACKINGSTOP/EJECT
VIDEO AUDIOLR
ONE TOUCH RECORDING • LONG PLAY
SOURCE
STANDBY-ON
VCR DVD
DVD
DVD PLAYER/VCR DVP3345V
OPEN/CLOSE
REC
PM
GROUP P.SCAN
DVD
VCD
Disc tray
Insert a disc here.
DVD light
This light appears when the DVD/VCR is in
DVD mode. You can only watch DVDs when
DVD light is on. To make DVD light come
on, press SOURCE on the front of the
DVD/VCR or DVD on the remote control.
Display
Messages about current disc operations
appear here. See Display Messages below.
VCR light
This light appears when the DVD/VCR is in VCR mode. You can only
watch videotapes or access VCR features when VCR light is on.
To make VCR light come on, press VCR on the remote control or
SOURCE on the front of the DVD/VCR.
Cassette
Compartment
Insert a video
cassette here.
Appears when a repeat function
is active.
Appears when
A-B Repeat is on.
Appears when
ALL Repeat is on.
(Video CD, CD, MP3,
Windows MediaTM Audio
and JPEG)
Appears when disc playback
is paused.
Appears during Slow Motion
Playback (DVD, Video CD).
Appears during Slow Motion
Playback.
Appears during disc playback.
Displays the current disc type.
• DVD: DVD
• VCD: Video CD
• CD: Audio CD, MP3,
Windows Media
TM
Audio,
JPEG
Appears when Progressive
Scan is active.
Indicates a tape is in the DVD/VCR.
Appears during playback when
the Auto Repeat function is on.
Appears if tape playback
is paused.
Appears during tape playback.
Indicates the elapsed playing time of a tape; also displays a selected
external input channel, tape speed, remaining time for an
OTR or the current time.
Indicates current time is P.M.
There is no A.M. indication.
Appears during recording;
flashes when recording is
paused.
Appears when an OTR, Timer Recording,
or Satellite Link has been set.
Displays the elapsed time of the title
or track.
The number of a new title, chapter, or
track is displayed for 3 seconds when
a chapter or track is switched, or
DISPLAY is pressed during playback.
DVD Display Panel
VCR Display Panel
E8E20UD_EN1 8/23/07 1:25 PM Page 17
Page 18
English
18 Front Panel, Rear Panel and Remote Control
• The DVD S-VIDEO OUT,
DVD COMPONENT
VIDEO OUT, DVD
AUDIO OUT and DVD
COAXIAL DIGITAL
AUDIO OUT jacks are
only useful in DVD mode.
To have sound and picture
in VCR mode, you must
connect the audio/video
cables supplied. Details are
on pages 9-11.
Helpful Hint
•For DVD player features,
press DVD before
pressing other buttons.
To put the DVD/VCR in
DVD mode, press DVD
or SOURCE so DVD
light appears on the front
of the DVD/VCR.
•For VCR features, press
VCR before pressing
other buttons.To put the
DVD/VCR in VCR mode,
press VCR or SOURCE
so VCR light appears on
the front of the
DVD/VCR.
Helpful Hints
STOP PLAY
REW F.FWD PLAY
REC TRACKINGSTOP/EJECT
VIDEO AUDIOLR
ONE TOUCH RECORDING • LONG PLAY
SOURCE
STANDBY-ON
VCR DVD
DVD
DVD PLAYER/VCR DVP3345V
OPEN/CLOSE
VCR AUDIO and
VIDEO IN jacks (L2)
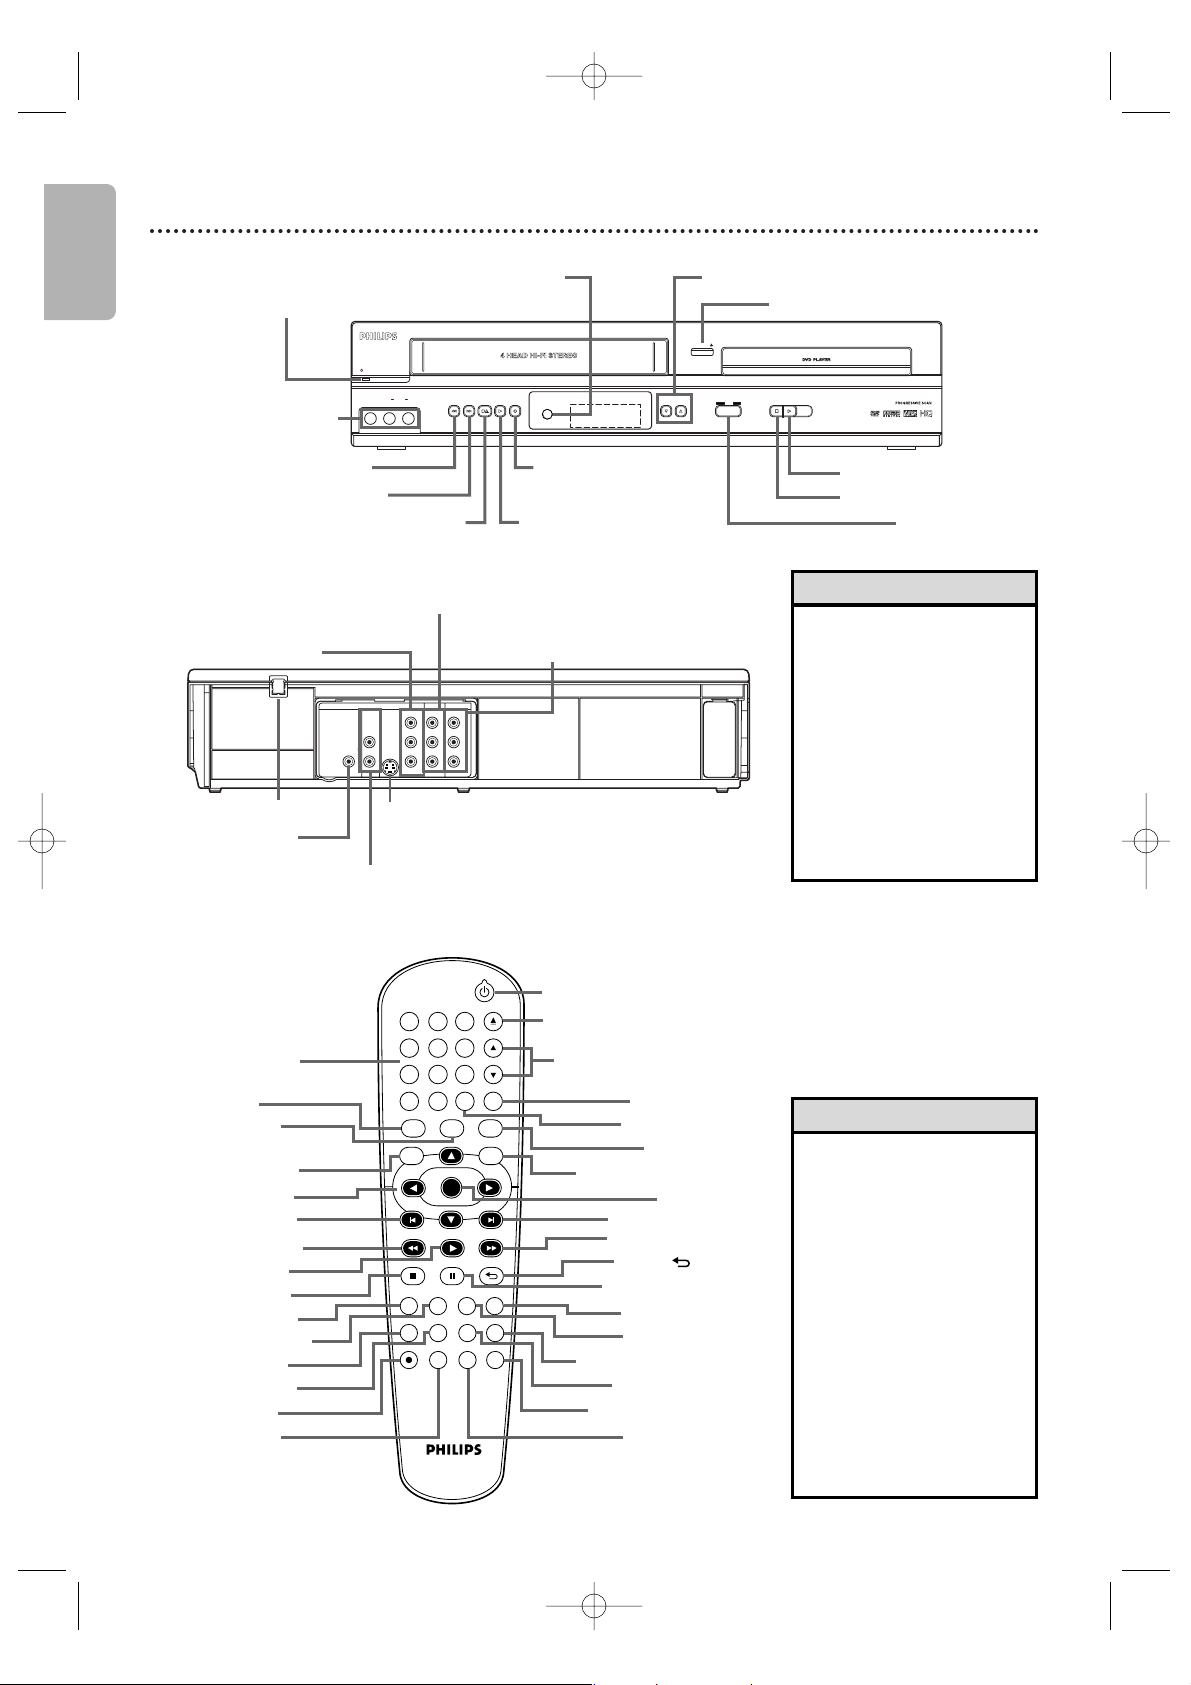
ySTANDBY-ON Button
REW h Button (VCR)
F.FWD g Button (VCR)
STOP/EJECT C A Button (VCR) PLAY B Button (VCR)
REC I
Button (VCR)
SOURCE Button
STOP C Button (DVD)
PLAY B Button (DVD)
OPEN/CLOSE A Button (DVD)
TRACKING
K/L
ButtonsRemote Sensor
DIGITAL
AUDIO OUT
COAXIAL
AUDIO
OUT
DVD
L
R
LRL
R
S-VIDEO
OUT
COMPONENT
VIDEO OUT
Y
C
B /
PB
AUDIO OUT
DVD/VCR
VCR
VIDEO OUT
AUDIO IN
VIDEO IN
CR /
PR
DVD/VCR AUDIO and VIDEO OUT jacks
DVD COMPONENT
VIDEO OUT jacks
DVD AUDIO
OUT jacks
AC Power Cord
DVD COAXIAL
DIGITAL AUDIO
OUT jack
DVD S-VIDEO
OUT jack
VCR AUDIO and
VIDEO IN jacks (L1)
DVDVCR SETUP
INPUT
MENU
REC SPEED MODE
ANGLE SEARCH REPEAT
DISPLAY SUBTITLE ZOOM
TIMER SET
REPEAT
A-B
AUDIO
BACKPAUSESTOP
PLAYOKFFWREW
CLEAR TITLE
DISC
TRACKING
OPEN/CLOSE
12
6
5
4
7
8
9
0
+10
3
SEARCH Button
SUBTITLE Button
SETUP Button
VCR Button
INPUT Button
s B KL Buttons
REW h Button
STOP C Button
PLAY B Button
ANGLE Button
y (
STANDBY-ON
) Button
OPEN/CLOSE 0 Button
TITLE Button
CLEAR Button
DVD Button
DISC MENU Button
OK Button
PAUSE k Button
FFW g Button
REC I Button
w (SKIP) Button
∑ (SKIP) Button
DISPLAY Button
SPEED Button
Number Buttons
AUDIO Button
MODE Button
TRACKING KL Button
ZOOM Button
TIMER SET Button
REPEAT Button
A-B REPEAT Button
BACK Button
Front Panel
Rear Panel
Remote Control
E8E20UD_EN1 8/23/07 1:25 PM Page 18
Page 19

Clock (VCR) 19
- M E N U -
BTIMER PROGRAMMING
SATELLITE LINK
AUTO REPEAT [OFF]
CLOCK SET
LANGUAGE SELECT
English
• If the clock has never been set,
the CLOCK SET Menu may
appear when you press SETUP.
If so, follow the instructions
from step 3 above.
•Press DISPLAY repeatedly to
show the time on the TV
screen.
•Power failures of more than 30
seconds can erase the Clock
Setting.
•To reset the clock, follow steps
1-2. Select the information you
want to change using s or B.
When the information is
flashing, use K or L to enter
the correct information. Press
CLEAR to set the clock.
Helpful Hints
2-9
1
Follow these steps to set the VCR clock. Make sure:
1
Press VCR, then press SETUP so MENU appears. If the
clock has never been set, the CLOCK SET Menu may
appear when you press SETUP. If so, follow the instructions
from step 3 on this page.
2
Press K or L to select CLOCK SET. Then, press B.
3
While the MONTH space is flashing, press K or L
until the month appears. Then, press B.
4
While the DAY space is flashing, press K or L until
the day appears.Then, press B.
5
While the YEAR space is flashing, press K or L
until the year appears.Then, press B. The day of
the week will appear automatically.
6
While the HOUR space is flashing, press K or L
until the hour appears. Then, press B.
7
While the MINUTE space is flashing, press K or L
until the minute appears. Then, press B.
8
While the AM or PM space is flashing, press K or L
to point to AM or PM.
Your selection will flash on the screen in the AM/PM space.
9
Press CLEAR or B to start the clock.
9
E8E20UD_EN1 8/23/07 1:25 PM Page 19
5
8
0
OPEN/CLOSE
3
6
TRACKING
9
CLEAR TITLE
DVDVCR SETUP
DISC
MENU
12
4
7
+10
INPUT
REW
PLAYOKFFW
CLOCK SET
MONTH DAY YEAR
0 3 / – – – – – –
HOUR MINUTE AM/PM
– – : – – – –
BACKPAUSESTOP
DISPLAY SUBTITLE ZOOM
ANGLE SEARCH REPEAT
REC SPEED MODE
AUDIO
REPEAT
A-B
TIMER SET
Page 20

Follow the steps below to change the language of the VCR
On-Screen Displays and menus.
1
Press VCR, then press SETUP so MENU appears.
2
Press K or L to choose LANGUAGE SELECT,
then press B.
3
Press K or L to choose ENGLISH, FRANCAIS
(French) or ESPAÑOL (Spanish).
4
Press CLEAR to remove the menu.
• If you select FRANCAIS
(French), or ESPAÑOL (Spanish)
and need English:
1)Press SETUP so MENU
appears.
2) Press L to choose
SELECTION LANGUE or
SELEC. IDIOMA, then press B.
3) Press K or L to select
ENGLISH.
4) Press CLEAR.
Helpful Hint
LANGUAGE SELECT
BENGLISH [ON]
FRANCAIS
ESPAÑOL
2-3
4
- M E N U -
BTIMER PROGRAMMING
SATELLITE LINK
AUTO REPEAT [OFF]
CLOCK SET
LANGUAGE SELECT
DVDVCR SETUP
INPUT
MENU
PLAYOKFFWREW
CLEAR TITLE
DISC
TRACKING
6
5
4
7
8
9
0
+10
1
English
20 Language (VCR)
DVDVCR SETUP
INPUT
MENU
REC SPEED MODE
ANGLE SEARCH REPEAT
DISPLAY SUBTITLE ZOOM
TIMER SET
REPEAT
A-B
AUDIO
BACKPAUSESTOP
PLAYOKFFW
REW
DISC
1-3
You may access Status Displays by pressing DISPLAY.The displays
may include the current time, external input channel and other
information.
1
Press DISPLAY. The COUNT Display will appear for 5
seconds. After 5 seconds, only the real-time tape counter
will appear. This counter shows you the elapsed playing
time of the tape (from the point at which the counter was
set to 0). The counter also will appear on the display panel
on the front of the DVD/VCR.
2
Press DISPLAY again. The CLOCK Display will appear
for 5 seconds. After 5 seconds, only the time will appear.
The time also will appear on the display panel on the front
of the DVD/VCR.
3
Press DISPLAY again to remove all the displays.
VCR Status Displays
•
You cannot access a Status
Display when viewing a still
picture, during slow motion, or
during Forward and Reverse
Searching.
Helpful Hint
STOP
SLP 0:12:34
STOP 5:40 PM
L2
SLP
E8E20UD_EN1 8/23/07 1:25 PM Page 20
Page 21

Videotape Recording 21
English
Read and follow the steps below to record a television program
onto a videotape.
Before you begin:
● This DVD/VCR does not have a tuner input jack.To
record TV programs on your DVD/VCR, you need to
connect this DVD/VCR to an external tuner device
(e.g., set top box, cable box or satellite receiver) that
has audio/video output jacks. See page 9 on how to connect
the DVD/VCR to the external tuner.
● Make sure the DVD/VCR is in VCR mode. Press VCR so VCR
light appears on the front of the DVD/VCR.
1
Turn on your external tuner, and turn on the TV
and set it to the correct Video In channel. (Check
your TV owner’s manual for details.)
2
Insert a tape with its record tab intact into the
cassette compartment of the DVD/VCR. If tape
playback begins, press STOP C.
3
Press SPEED repeatedly until the desired tape
speed (SP or SLP) appears briefly on the screen.
Details about tape speed are on page 57.
4
Press INPUT to select the appropriate external
input channel (L1/L2) to which your external tuner
is connected.Then select the desired channel to
record on the external tuner.
5
Press REC I to start recording. “REC” will appear on
the DVD/VCR’s display panel.
● To pause the recording, press PAUSE k once. “REC” will
flash.To resume recording, press REC I or press
PAUSE k again.“REC” will reappear.
● To stop recording, press STOP C.
Recording Prevention
Video cassettes have record tabs to ensure that recordings are
not accidentally erased.
● To prevent recording, break off the tab with a screwdriver.
● To allow recording, cover the hole with clear tape.
• Other recording options are on
pages 22-28.
• The VCR will record in a preset
volume.
• Pause will switch to stop after 5
minutes to protect the VCR and
the tape from damage. When a
recording is paused, review the
pause time remaining with
the ■ marks on the screen.
Each ■ mark equals
1 minute remaining. During the
last minute of paused recording,
the ■ mark will flash.
• If any menu is on the TV screen,
REC
I on the remote does not
function. Press CLEAR to
remove the menu.Then, press
REC I.Or, use REC I on the
front of the DVD/VCR.
Helpful Hints
1
Turn on the TV.
2
Insert a tape in the
DVD/VCR.
Remove the
tab to prevent
recording.
Cover the
hole to allow
recording.
4
5
3
DVDVCR SETUP
INPUT
MENU
REC SPEED MODE
ANGLE SEARCH REPEAT
DISPLAY SUBTITLE ZOOM
TIMER SET
REPEAT
A-B
AUDIO
BACKPAUSESTOP
PLAYOKFFW
REW
CLEAR TITLE
DISC
TRACKING
OPEN/CLOSE
12
6
5
4
7
8
9
0
+10
3
E8E20UD_EN1 8/23/07 1:25 PM Page 21
Page 22
English
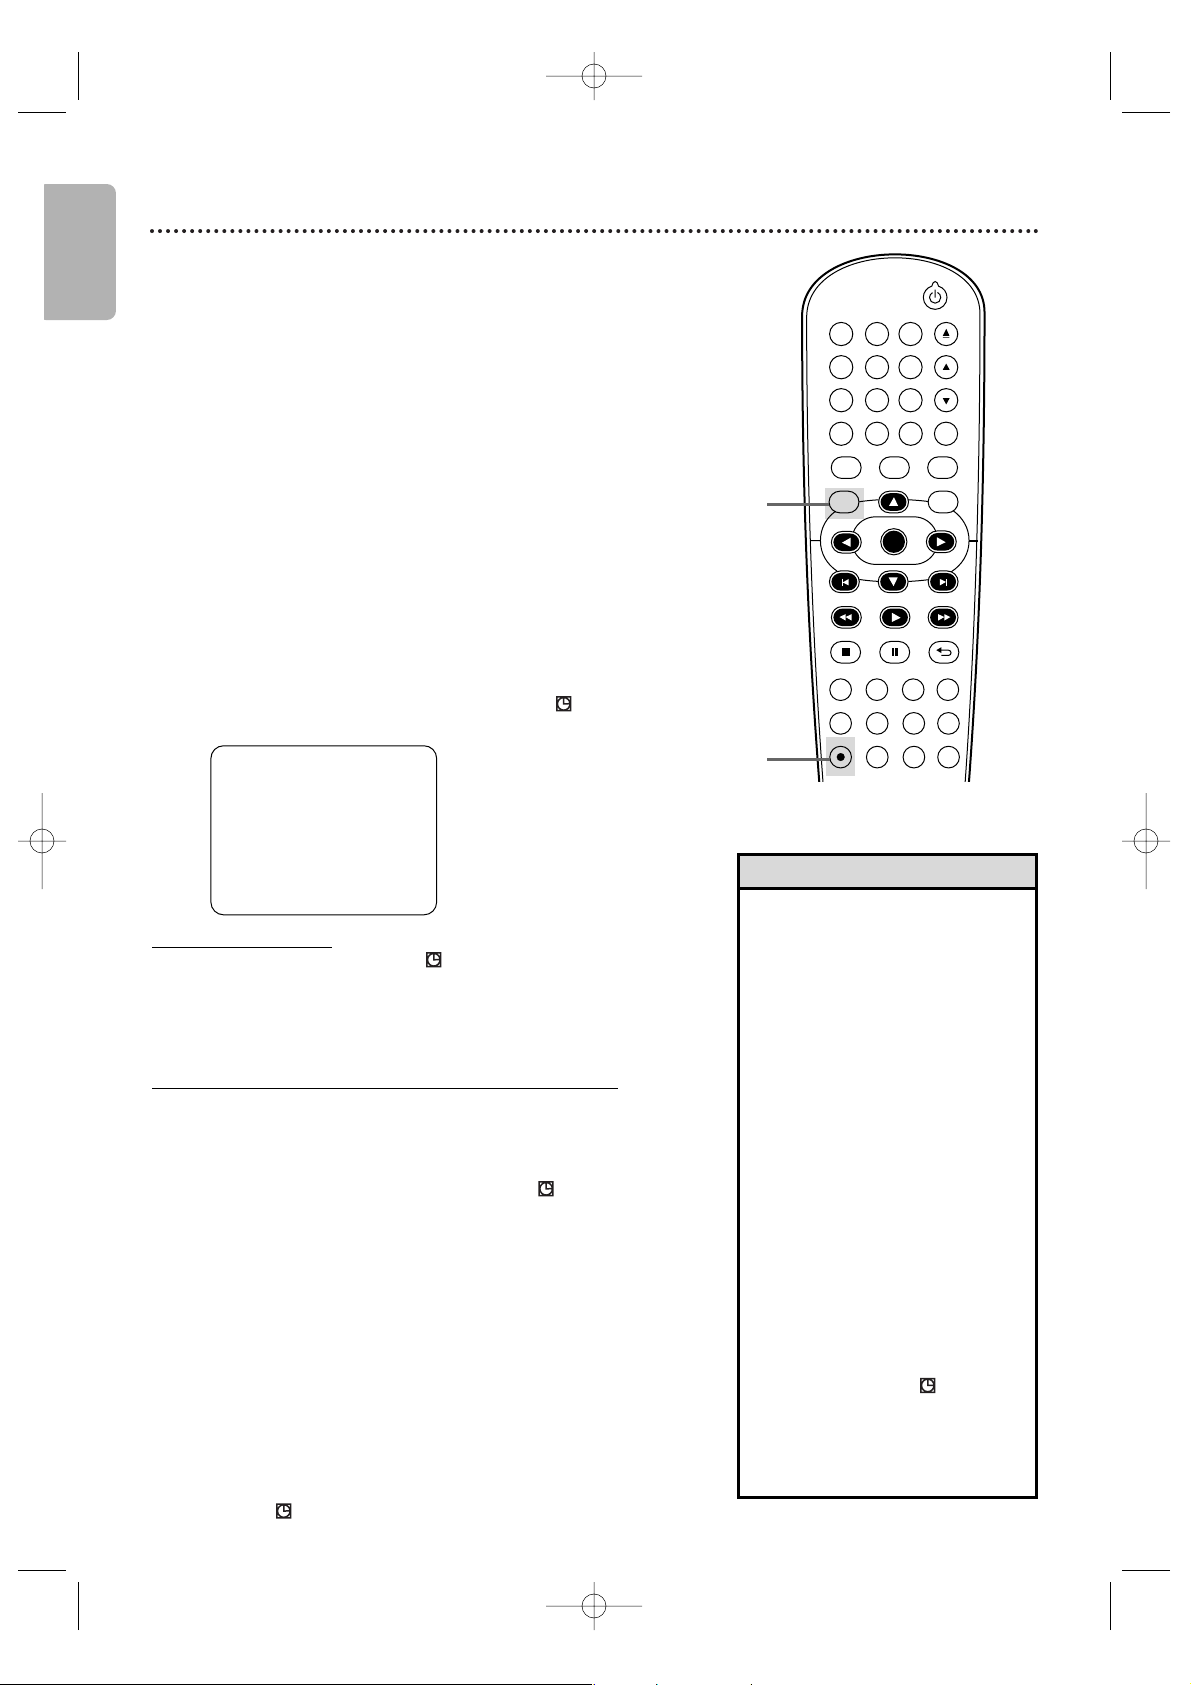
22 One-Touch Recording
OTR (0:30)
SP
One-Touch Recording (OTR) lets you set a timed recording 30
minutes to 8 hours long.
Before you begin:
● This DVD/VCR does not have a tuner input jack.To
record TV programs on your DVD/VCR, you need to
connect this DVD/VCR to an external tuner device
(e.g., set top box, cable box or satellite receiver) that
has audio/video output jacks. See page 9 on how to connect
the DVD/VCR to the external tuner.
● Place the DVD/VCR in VCR mode. Press VCR so VCR light
appears on the front of the DVD/VCR.
● Select a recording speed (SP, SLP) by pressing SPEED.
● Put a videotape in the cassette compartment. Make sure the
tape’s record tab is intact and the tape is long enough to record
the program(s).
1
Press INPUT to select the appropriate external
input channel (L1/L2) to which your external tuner
is connected.Then select the desired channel to
record on the external tuner.
2
Press REC I repeatedly until the desired recording
length (30 minutes to 8 hours) appears on the TV
screen. Recording will begin.“REC” and “ ” will appear
on the DVD/VCR’s display panel.
Stopping an OTR
● To stop an OTR before recording is finished, press STOP C on
the remote control or STOP/EJECT C A on the front of the
DVD/VCR.
● To cancel the OTR but continue recording, press REC I
repeatedly until REC appears in the upper left corner of the TV
screen, and “ ” disappears.
• The remaining recording time
will appear on the display panel
during an OTR. Press DISPLAY
to see it on the TV screen.
•To change the recording length
while an OTR is in progress,
press REC I repeatedly.
•You cannot pause an OTR.
• If the preset time for a Timer
Recording comes up during an
OTR, the OTR has priority. The
Timer Recording will not take
place.
• If the end of the tape is reached
during an OTR, the VCR will
stop recording, eject the tape,
and switch to DVD mode or
turn off.
• If one or more Timer
Recordings are on standby
when one OTR ends, the
DVD/VCR will turn off
automatically and “ ” will
appear on the DVD/VCR’s
display panel indicating that it is
now ready for another Timer
Recording.
Helpful Hints
2
When an OTR ends
The DVD/VCR will turn off and “ ” on the DVD/VCR’s display
panel will flash indicating that the recording is complete, then goes
into the timer standby mode again. (It may switch to DVD mode
automatically.) At this point, you cannot use the VCR unless you
release the DVD/VCR from the timer standby mode.
To r elease the DVD/VCR from timer standby mode
● If the DVD component is active and no more Timer Recordings
are on standby, you can cancel the timer standby mode by
pressing TIMER SET or VCR on the remote control or by
pressing SOURCE or STOP/EJECT C A on the front panel.
● If the DVD component is not active, or the “ ” is not flashing
but lit indicating there are more Timer Recordings on standby,
you can cancel the timer standby mode only by pressing
TIMER SET on the remote control or by pressing
STOP/EJECT C A on the front panel.
● After releasing the DVD/VCR from timer standby mode, you
can use it as usual.
1
E8E20UD_EN1 8/23/07 1:25 PM Page 22
12
4
7
+10
INPUT
REW
DISPLAY SUBTITLE ZOOM
ANGLE SEARCH REPEAT
REC SPEED MODE
3
5
6
9
8
CLEAR TITLE
0
PLAYOKFFW
OPEN/CLOSE
TRACKING
DVDVCR SETUP
DISC
MENU
BACKPAUSESTOP
AUDIO
REPEAT
A-B
TIMER SET
Page 23

English
Rerecording (Tape Duplication) 23
1
Make the connections shown above.
2
DVD/VCR 1 will play your tape. Put a prerecorded tape
into the cassette compartment of DVD/VCR 1.
Press VCR to put the unit in VCR mode if necessary.
3
DVD/VCR 2 will record your tape. Insert a blank tape in
the cassette compartment of DVD/VCR 2. Press VCR
to put the unit in VCR mode if necessary.
4
Turn on the TV and set it to the correct Video In
channel. (Check your TV owner’s manual for details.)
5
Point the remote control at DVD/VCR 2. Press
INPUT to select the appropriate external input
channel. (See Helpful Hints to the right.)
6
Press SPEED to select SP or SLP at DVD/VCR 2.
Details about tape speed are on page 57.
7
Press PLAY B (VCR) on the front of DVD/VCR 1
and REC I on the front of DVD/VCR 2 at the same
time.
● To stop recording, press STOP/EJECT C A on DVD/VCR
2, then press STOP/EJECT C A on DVD/VCR 1.
DIGITAL
AUDIO OUT
COAXIAL
AUDIO
OUT
DVD
L
R
LRL
R
S-VIDEO
OUT
COMPONENT
VIDEO OUT
Y
C
B
/
P
B
AUDIO OUT
DVD/VCR
VCR
VIDEO OUT
AUDIO IN
VIDEO IN
CR /
P
R
DIGITAL
AUDIO OUT
COAXIAL
AUDIO
OUT
DVD
L
R
LRL
R
S-VIDEO
OUT
COMPONENT
VIDEO OUT
Y
C
B
/
P
B
AUDIO OUT
DVD/VCR
VCR
VIDEO OUT
AUDIO IN
VIDEO IN
CR /
P
R
DVD/VCR 1
Playing unit
DVD/VCR 2
Recording unit
1. Audio cable from AUDIO OUT jacks (red and white)
of DVD/VCR 1 to AUDIO IN jacks of DVD/VCR 2
• If you use the AUDIO and
VIDEO IN jacks on the back of
DVD/VCR 2,select L1 at step 5.
• If you use the AUDIO and
VIDEO IN jacks on the front of
DVD/VCR 2,select L2 at step 5.
• Unauthorized recording of
copyrighted television programs,
video tapes or other materials
may infringe on the rights of
copyright owners and violate
copyright laws.
• If a program has copyright
protection, it may not be
recorded clearly.
Helpful Hints
These instructions are made on the premise that the DVD/VCR 1 is already connected to the TV. The
instructions show you how to copy videotapes. The illustration uses two DVD/VCRs. Other VCRs or
Camcorders may operate differently.
2. Video cable from yellow VIDEO
OUT jack of DVD/VCR 1 to
VIDEO IN jack of DVD/VCR 2
E8E20UD_EN1 8/23/07 1:25 PM Page 23
Page 24

English
24 Timer Recording
Follow the steps below to program the VCR of the DVD/VCR to
record TV programs while you’re away from home. Before you begin:
● This DVD/VCR does not have a tuner input jack.To
record TV programs on your DVD/VCR, you need to
connect this DVD/VCR to an external tuner device
(e.g., set top box, cable box or satellite receiver) that
has audio/video output jacks. See page 9 on how to connect
the DVD/VCR to the external tuner.
● Set the clock. Details are on page 19.
● Put a tape in the cassette compartment of the DVD/VCR. Make
sure the tape’s record tab is intact and the tape is long enough
to record the program(s).
● Press VCR so VCR light appears on the front of the DVD/VCR.
● Turn on your external tuner.
1
Press SETUP so MENU appears.
2
Press
K or L
to select TIMER PROGRAMMING.
Then, pressB. Program numbers that do not have a Timer
Recording stored will flash.
3
Press K or L to select an empty program.
Then, press B.
4
Press K or L to select ONCE, DAILY or WEEKLY.
Then, press B.
● ONCE - The VCR will record a TV program on any day you
choose, up to 12 months away.
● DAILY -
The VCR will record a TV program at the same time
on the same channel every day, Monday through Friday.
●
WEEKLY - The VCR will record a TV program at the same time
on the same channel every week, for example, every Monday.
5
To set the recording date and time, press K or L
until the desired setting appears, then press B.
6
Press K or L to select the appropriate external
input channel (L1/L2) to which your external tuner
is connected.Then select the desired channel to
record on the external tuner.
● Leave the external tuner on for the Timer Recording. Details
are on page 9.
•You cannot access the TIMER
PROGRAMMING Menu at step
2 if the clock is not set.The
CLOCK SET Menu will appear.
Follow the steps on page 19 to
set the clock.
• Only programs that will air
Monday-Friday can be recorded
on a DAILY basis. If you select
DAILY at step 4, then enter a
Saturday or Sunday DATE at step
5, the correct program will not
be recorded.The VCR will alter
the recording date and record a
different program than the one
you intended.
• If you connected the external
tuner to the AUDIO and VIDEO
IN jacks on the front of the
DVD/VCR,choose L2. If you
connected the external tuner to
the AUDIO IN and VIDEO IN
jacks on the back of the
DVD/VCR,choose L1.
• Enter the information while the
space is flashing.
•You cannot program more than
one year in advance.
Helpful Hints
2-6
1
E8E20UD_EN1 8/23/07 1:25 PM Page 24
TIMER PROGRAMMING
PROG. 12345678
DATE
START TIME
END TIME
L1/L2
REC SPEED
12
4
7
+10
INPUT
REW
DISPLAY SUBTITLE ZOOM
ANGLE SEARCH REPEAT
REC SPEED MODE
3
5
6
9
8
CLEAR TITLE
0
PLAYOKFFW
OPEN/CLOSE
TRACKING
DVDVCR SETUP
DISC
MENU
BACKPAUSESTOP
AUDIO
REPEAT
A-B
TIMER SET
PROGRAM NUMBER 1
DATE – – / – –
START TIME – – : – – – –
END TIME – – : – – – –
L1/L2 – –
REC SPEED – –
Page 25

English
Timer Recording (cont’d) 25
7
Press K or L to select a recording tape speed. The arrow
will appear beside your choice. The selected speed will flash
beside REC SPEED. Details about tape speed are on page 57.
You must select the recording speed to complete the
timer programming.
•
To stop a started Timer Recording,
press STOP/EJECT C A on the
front of the DVD/VCR. (You cannot
stop a started Timer Recording with
STOP C on the remote.)
•To change incorrect information,
press
s or B to choose the
item you want to change. Press
K or L to adjust the information.
• If there is no tape in the VCR
when you press TIMER SET,
“”will flash. Insert a tape.
• If one or more Timer Recordings
are on standby when one Timer
Recording ends, the DVD/VCR
will turn off automatically and
“”will appear on the
DVD/VCR’s display panel
indicating that it is now ready for
another Timer Recording.
Helpful Hints
8
Press CLEAR to remove the menu.
9
Press TIMER SET.
● In some cases, the DVD/VCR will switch to DVD mode
instead.
You may use the DVD player during a Timer Recording.
● If you want to use the VCR until time for the recording,
don’t press TIMER SET until a few minutes before the
recording should start. Or, press TIMER SET only when you
know you won’t be using the VCR anymore (until after the
recording).
● When “ ” is lit (not flashing), you cannot put the
DVD/VCR in VCR mode by pressing VCR or
SOURCE
.
You must first press TIMER SET on the remote control or
STOP/EJECT C A on the front panel to cancel the Timer
Recording temporarily. Then, you can use the VCR features
again.
When a Timer Recording ends
The DVD/VCR will turn off and “ ” on the DVD/VCR’s display panel
will flash indicating that the recording is complete, then goes into the
timer standby mode again. (It may switch to DVD mode
automatically.) At this point, you cannot use the VCR unless you
release the DVD/VCR from the timer standby mode.
To r elease the DVD/VCR from timer standby mode
●
If the DVD component is active and no more Timer Recordings are
on standby, you can cancel the timer standby mode by pressing
TIMER SET or VCR on the remote control or by pressing SOURCE
or STOP/EJECT C A on the front panel.
●
If the DVD component is not active, or the “ ” is not flashing but
lit indicating there are more Timer Recordings on standby, you can
cancel the timer standby mode only by pressing TIMER SET on the
remote control or by pressing STOP/EJECT C A on the front panel.
● After releasing the DVD/VCR from timer standby mode, you can use
it as usual.
Canceling a Timer Recording Before the Recording Starts
1
PressVCR, then press SETUP so MENU appears.
2
Press K or L to select TIMER PROGRAMMING,
then press B.
3
Press K or L to find the program you want to
cancel.
4
While the program number is flashing, press s to
clear all the information for that program.
5
Press CLEAR to remove the menu.
7
8
9
E8E20UD_EN1 8/23/07 1:25 PM Page 25
ONE TIME PROGRAM
PROGRAM NUMBER 1
DATE 0 8 / 2 9 WED
START TIME 0 7 : 3 0 P M
END TIME 0 8 : 3 0 P M
L1/L2 L2
REC SPEED S P
B SP
SLP
5
8
0
OPEN/CLOSE
3
6
TRACKING
9
CLEAR TITLE
DVDVCR SETUP
DISC
MENU
12
4
7
+10
INPUT
PLAYOKFFW
REW
BACKPAUSESTOP
DISPLAY SUBTITLE ZOOM
ANGLE SEARCH REPEAT
REC SPEED MODE
AUDIO
REPEAT
A-B
TIMER SET
Page 26

English
26 Satellite Link
You can set the DVD/VCR to start recording whenever it detects
a video signal from the external tuner.
Before you begin:
● Set the clock. Details are on page 19.
● Put a tape in the cassette compartment of the DVD/VCR. Make
sure the tape’s record tab is intact and the tape is long enough
to record the program(s).
● Press VCR so VCR light appears on the front of the DVD/VCR.
● Turn on the external tuner.
● Use the VCR AUDIO and VIDEO IN jacks on the rear (L1) to
connect the DVD/VCR to the external tuner. VCR AUDIO and
VIDEO jacks on the front (L2) cannot read any signal from the
external tuner.
● If the external tuner is equipped with some kind of timer
function, set it to output audio/video signals when it comes to
the time you want to start recording and stop when it comes to
the time you want to stop recording. Refer to the tuner’s
manual on how to set the timer.
● If the external tuner is not equipped with timer function, leave it
on for Satellite Link Recording.
1
Press SPEED repeatedly until the desired tape
speed (SP or SLP) appears briefly on the screen.
Details about tape speed are on page 57.
2
In stop mode, press SETUP.
3
Press K or L to
select SATELLITE LINK,
then press B.
TIMER PROGRAMMING
BSATELLITE LINK
AUTO REPEAT [OFF]
CLOCK SET
LANGUAGE SELECT
- M E N U -
L1
External tuner
To audio/video
input jacks
DVD/VCR
Audio/Video Cables
(supplied)
2
4-6
1
E8E20UD_EN1 8/23/07 1:25 PM Page 26
DVD
DVD
DVD
DVD/VCR
VCR
COMPONENT
DIGITAL
DIGITAL
DIGITAL
AUDIO
S-VIDEO
AUDIO
S-VIDEO
AUDIO
S-VIDEO
AUDIO OUT
AUDIO IN
VIDEO OUT
OUT
OUT
OUT
OUT
OUT
OUT
AUDIO OUT
AUDIO OUT
AUDIO OUT
Y
LRL
L
L
L
C
B
/
R
P
B
COAXIAL
COAXIAL
COAXIAL
VIDEO OUT
VIDEO IN
R
R
R
CR /
P
R
12
4
7
+10
INPUT
REW
DISPLAY SUBTITLE ZOOM
ANGLE SEARCH REPEAT
REC SPEED MODE
3
5
6
9
8
CLEAR TITLE
0
PLAYOKFFW
OPEN/CLOSE
TRACKING
DVDVCR SETUP
DISC
MENU
BACKPAUSESTOP
AUDIO
REPEAT
A-B
TIMER SET
Page 27
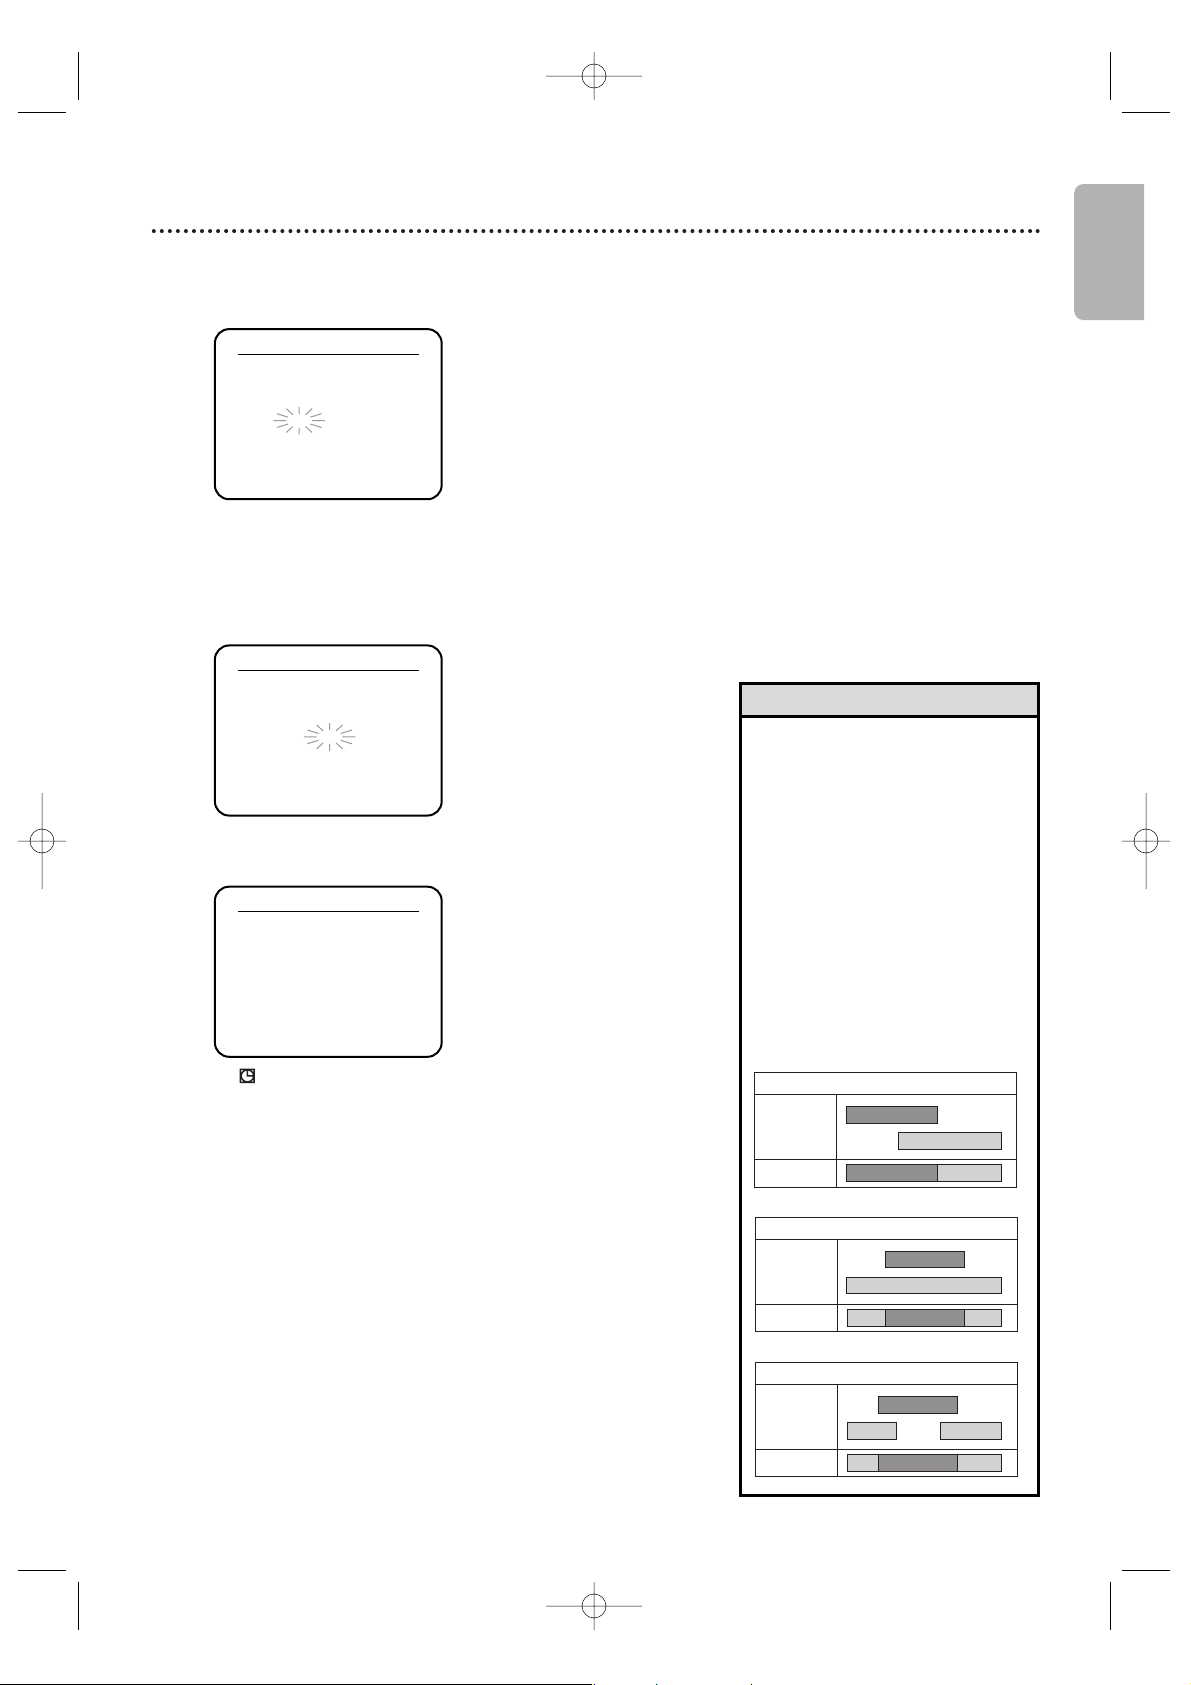
English
• If you have not set the clock,
CLOCK SET menu will appear at
step 3. Refer to “Clock (VCR)”
on page 19.
•You cannot set the ending time
for the Satellite Link Timer
Recording on this DVD/VCR.
• Recording picture will be
distorted if the copy protection
signal is being detected during
Satellite Link Timer Recording.
• When a regular Timer Recording
and the Satellite Link Timer
Recording are overlapped, those
recordings are recorded as
illustrated below.
e.g.) In case of the Timer Recording is overlapped on the
existing Satellite Link Timer Recording.
Timer Recording
recording result
Satellite Link
e.g.) In case of the Timer Recording is programmed in the
middle of the Satellite Link Timer Recording.
Timer Recording
recording result
Satellite Link
e.g.) In case of the Satellite Link Timer Recording is
overlapped on the existing Timer Recording.
Timer Recording
recording result
Satellite Link
Helpful Hints
Satellite Link (cont’d) 27
4
Press K or L to
set the desired start hour,
then press B.
● The hour can be selected from 1-12 with AM or PM.
● When the external tuner signal is stopped, recording will
be stopped also.
5
Press K or L to
set the desired start minutes.
If you wish to go back to the left, press s.
6
Press B to set Satellite Link standby mode.
●
“”
on the DVD/VCR’s display panel lights up and the
DVD/VCR goes to the DVD mode. If you do not use
DVD function, turn off the DVD/VCR.
● If the external tuner is not equipped with timer function,
leave it on for Satellite Link Recording.
●
To cancel the Satellite Link function in standby mode:
Press TIMER SET on the remote control or
STOP/EJECT
C A
on this DVD/VCR.
●
To cancel the Satellite Link function while the Satellite
Link Recording is in progress:
Press STOP/EJECT
C A
on the DVD/VCR.
SATELLITE LINK
0 1 : 3 0 PM
[ON]
SATELLITE LINK
0 1 : 0 0 PM
SATELLITE LINK
1 2 : 0 0 AM
E8E20UD_EN1 8/23/07 1:25 PM Page 27
Page 28
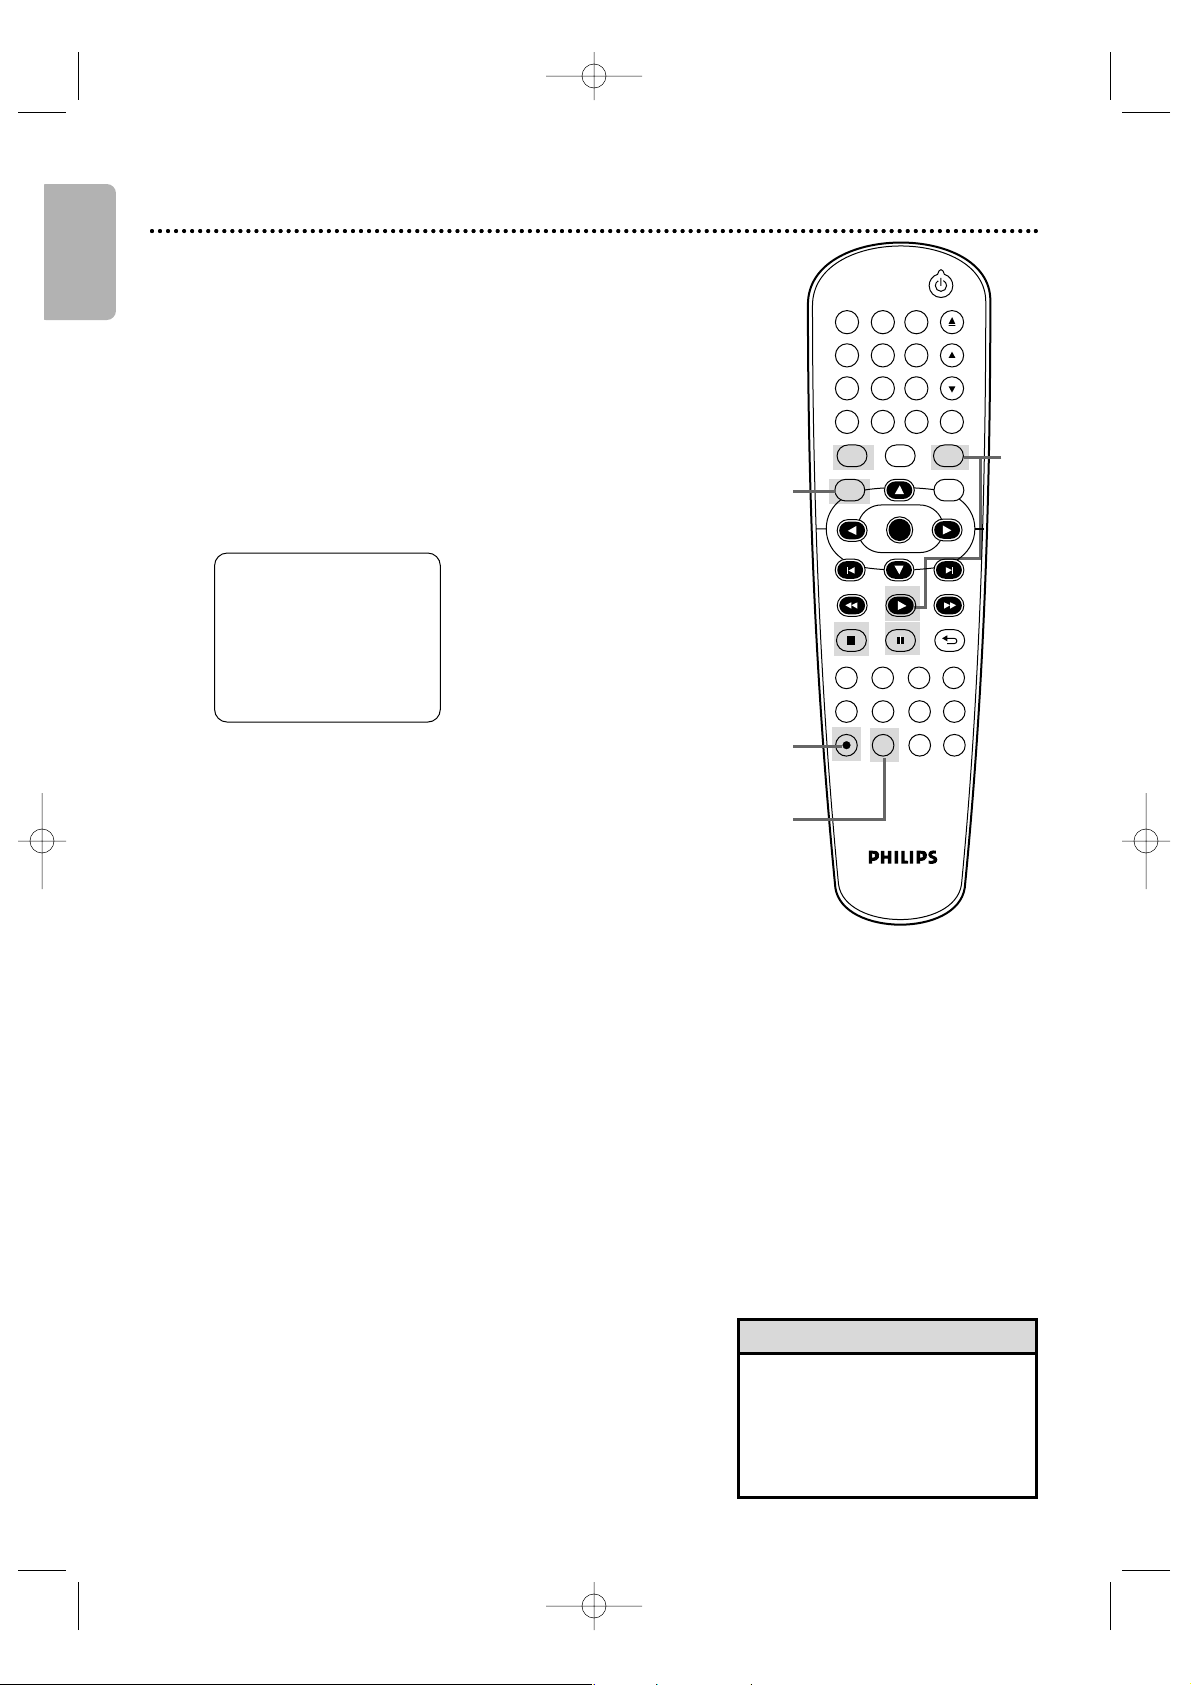
English
28 DVD to Videotape Duplication
Follow the steps below to copy a DVD to a videotape. This will
be possible only if the DVD is not copy protected.
Before you begin:
● Put a videotape in the cassette compartment. Make sure the
tape’s record tab is intact and the tape is long enough to record
the DVD.
● Put the DVD you want to copy in the disc tray.
● Press VCR so VCR light appears on the front of the DVD/VCR.
●
Turn on the TV and set it to the correct Video In channel.
(Check your TV owner’s manual for details.)
1
Press INPUT repeatedly until “DISC” appears on the
TV screen.
2
Press SPEED repeatedly until the desired tape
speed (SP or SLP) appears briefly on the screen.
Details about tape speed are on page 57.
3
Press REC I to start recording. “REC” will appear on
the display panel.
4
Press DVD. Press PLAY B to play the disc.
●
To pause the recording, press VCR, then press
PAUSE konce.“REC”will flash.
●
To r esume recording, press REC Ior press PAUSE
k
again.
“
REC”will reappear.
●
To stop recording, press VCR, then press STOP C.
DISC
2
4
DVDVCR SETUP
INPUT
MENU
REC SPEED MODE
ANGLE SEARCH REPEAT
DISPLAY SUBTITLE ZOOM
TIMER SET
REPEAT
A-B
AUDIO
BACKPAUSESTOP
PLAYOKFFW
REW
CLEAR TITLE
DISC
TRACKING
OPEN/CLOSE
12
6
5
4
7
8
9
0
+10
3
•A Timer Recording or Satellite
Link is not available during DVD
to videotape duplication.
•You cannot copy a DVD to a
videotape if you are using
Progressive Scan.
Helpful Hints
1
3
E8E20UD_EN1 8/23/07 1:25 PM Page 28
Page 29

English
Repeat Playback 29
Follow the steps below to play a videotape repeatedly.
1
Press VCR, then press SETUP so MENU appears.
2
Press K or L to select AUTO REPEAT.
3
Press B so ON appears next to AUTO REPEAT.
Ta pe playback will begin immediately. AUTO REPEAT will
appear on the TV screen briefly. (If you are fast forwarding
or rewinding the tape, press CLEAR to remove the menu,
then press PLAY B to begin tape playback.) The tape will
play to the end, rewind, then play again.
- M E N U -
TIMER PROGRAMMING
SATELLITE LINK
BAUTO REPEAT [ON]
CLOCK SET
LANGUAGE SELECT
•To cancel Auto Repeat, follow
steps 1-2. At step 3, press B
so OFF appears beside AUTO
REPEAT. Press CLEAR.
Helpful Hint
2-3
1
DVDVCR SETUP
INPUT
MENU
PLAYOKFFWREW
CLEAR TITLE
DISC
TRACKING
12
6
5
4
7
8
9
0
+10
3
Tape Counter
•You may only set the counter to
0 at one location at a time.
Setting the counter to zero at a
second location will erase the
previous 0 setting.
• If you remove the tape, the
counter will reset to 0 at the
point at which you last stopped
playback whenever you reinsert
the tape.
Helpful Hints
2,4
1
3
1
STOP
SLP 1 : 23 : 45
Follow the steps below to reset the VCR’s real-time tape counter
to 0 at a tape location you want to refer to later.
1
Press VCR, then play, fast forward or rewind a tape
to the location that you would like to refer to later.
Press STOP C to stop the tape.
2
Press DISPLAY to see the Status Display.
3
While the counter is on the screen, press CLEAR to
reset the counter to 0.
STOP
SLP 0 : 00 : 00
4
When you later want to return to this point on the
tape, press DISPLAY so you can see the counter
(while tape playback is stopped). Press REW h or
FFW g.
As the tape rewinds or forwards, watch the counter.When
it reaches 0, press PLAY B to play the tape.
4
1
E8E20UD_EN1 8/23/07 1:25 PM Page 29
5
4
7
+10
INPUT
REW
6
9
8
CLEAR TITLE
0
PLAYOKFFW
TRACKING
DVDVCR SETUP
DISC
MENU
BACKPAUSESTOP
DISPLAY SUBTITLE ZOOM
ANGLE SEARCH REPEAT
REC SPEED MODE
AUDIO
REPEAT
A-B
TIMER SET
Page 30
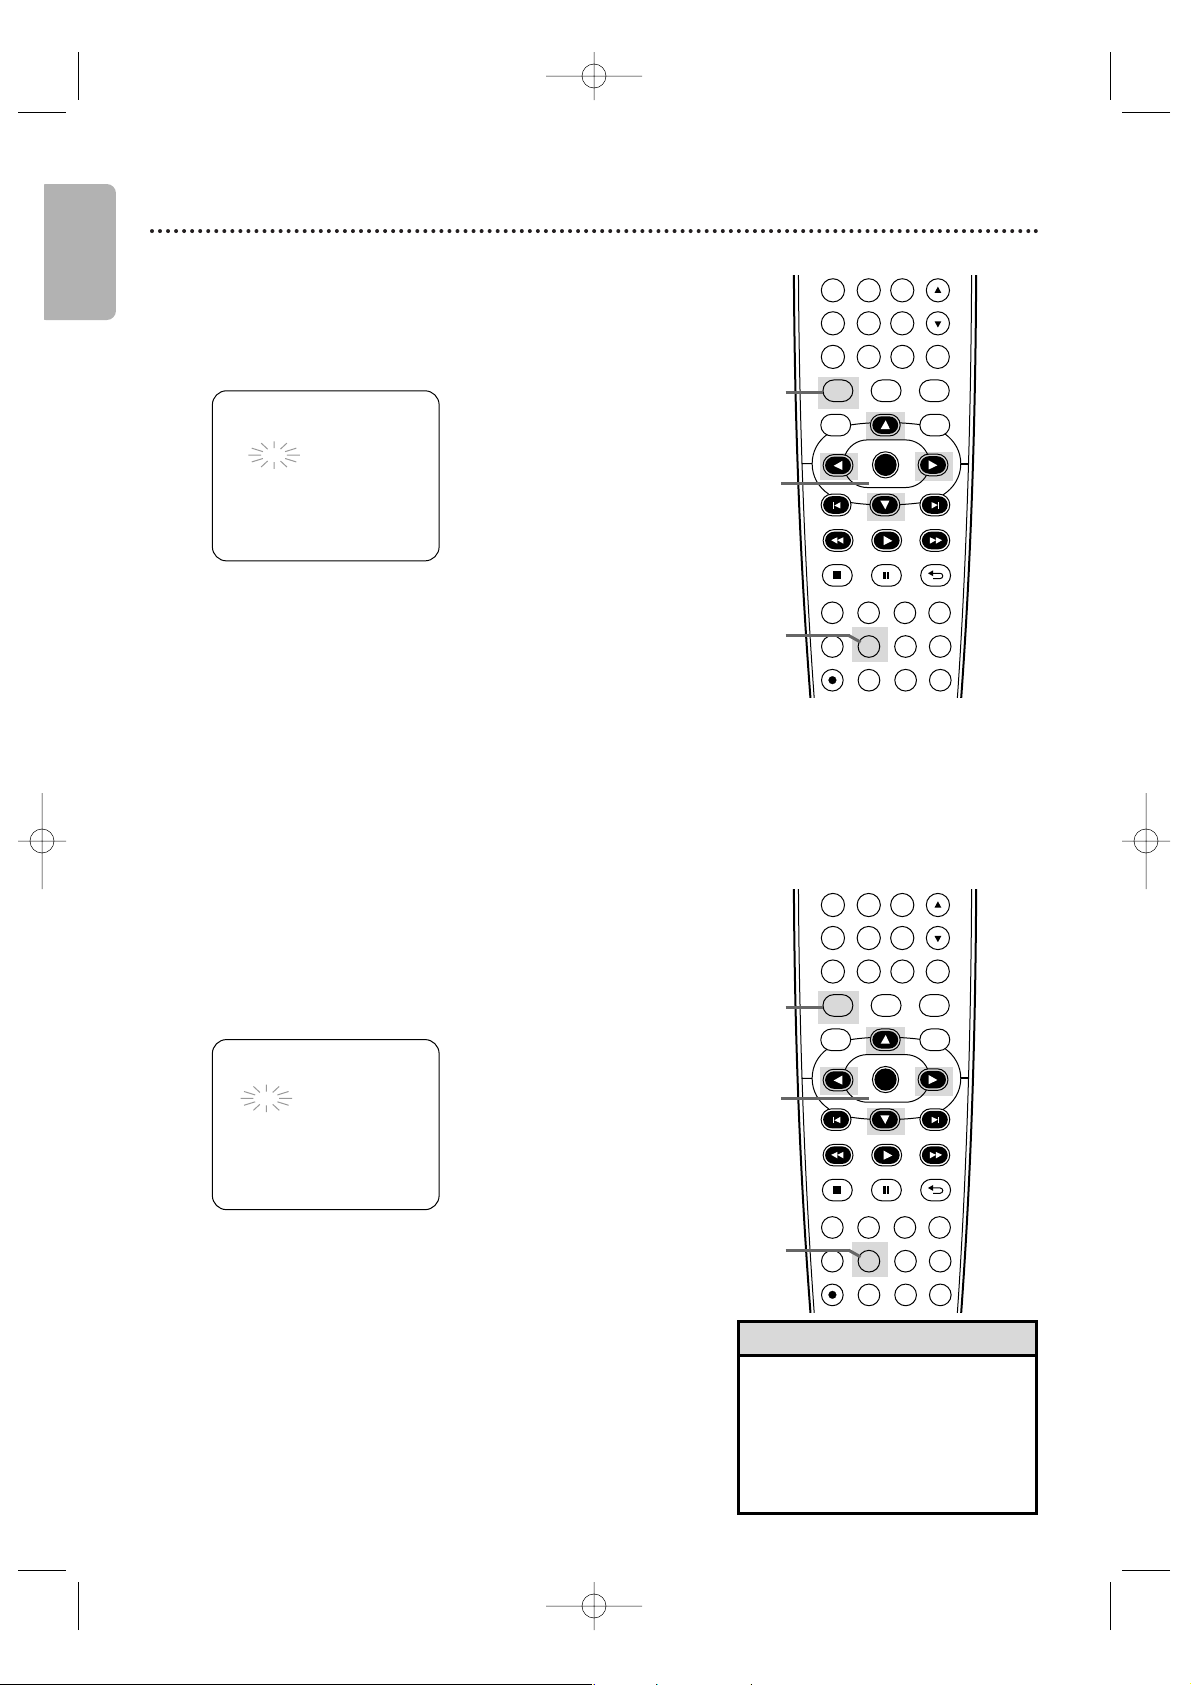
English
30 Time Search, Index Search
Time Search
Follow the steps below to search forward or backward on a tape
a specific length of time. There must be a tape in the cassette
compartment.
1
Press VCR, then press SEARCH repeatedly until the
TIME SEARCH Screen appears.
• Time Search and Index Search
are not available during
recording.
•To remove a Search Display,press
CLEAR.
•To cancel a search, press
STOP C.
Helpful Hints
Index Search
An Index Mark is made automatically at the beginning of each
recording. Essentially, an Index Mark is a “bookmark.” Find the start
of a recording by following these steps.
1
Press VCR, then press SEARCH repeatedly until the
INDEX SEARCH Screen appears.
2
Within 30 seconds, press K or L until the number of
programs you want to skip appears beneath INDEX
SEARCH. Include the current program in your number.
3
Within 30 seconds, press s (for a reverse search) or B
(for a forward search). When the tape finishes rewinding or
forwarding, playback will start.The program numbers will
count down beneath INDEX SEARCH during the search.
If the end of the tape is reached during the search,the search
will stop and the tape may rewind. Details are on page 31.
Recordings should be at least 1 minute long in SP speed and
3 minutes in SLP. Otherwise, the Index Mark will not be
available. Details on tape recording speeds are on page 57.
2-3
1
1
2
Within 30 seconds, press K or L until your desired
length of time appears. Or, press and hold K or L until
you reach the desired length of time.
You can set a Time Search for up to 9 hours and 59 minutes
(9:59).
3
Within 30 seconds, press s (for a reverse search) or B
(for a forward search). The VCR begins rewinding or fast
forwarding the tape.When the tape finishes rewinding or fast
forwarding the time you specified,playback will begin.
The time will count down beneath TIME SEARCH during the
search.
If the end of the tape is reached during the search,the search
will stop and the tape may rewind. Details are on page 31.
2-3
1
1
E8E20UD_EN1 8/23/07 1:25 PM Page 30
TIME SEARCH
- : - -
INDEX SEARCH
– –
5
4
7
+10
INPUT
REW
DISPLAY SUBTITLE ZOOM
ANGLE SEARCH REPEAT
REC SPEED MODE
4
7
+10
INPUT
REW
6
9
8
CLEAR TITLE
0
PLAYOKFFW
5
6
9
8
CLEAR TITLE
0
PLAYOKFFW
TRACKING
DVDVCR SETUP
DISC
MENU
BACKPAUSESTOP
AUDIO
REPEAT
A-B
TIMER SET
TRACKING
DVDVCR SETUP
DISC
MENU
DISPLAY SUBTITLE ZOOM
ANGLE SEARCH REPEAT
REC SPEED MODE
BACKPAUSESTOP
AUDIO
REPEAT
A-B
TIMER SET
Page 31

English
Special Effects Playback 31
●
Before you begin, press VCR so VCR light appears on the front of the
DVD/VCR.
Forward and Reverse Searching (SP/LP/SLP) /
Super High Speed Searching (LP/SLP)
1
During tape playback, press and release FFW g
or REW h. A fast forward or reverse picture search
will begin.
Press FFW g or REW h, then press again.The
search speed will increase. Repeatedly pressing FFW g
or REW h will switch between Regular and High Speed
Searching.
2
To r eturn to normal playback, press PLAY B.
Viewing a Still Picture
1
During tape playback, press PAUSE k. A still picture
will appear on the screen.
● To advance the still picture one frame at a time, press
PAUSE k repeatedly.
● To r elease the still picture and return to playback, press
PLAY B.
Viewing a Slow Motion Picture
1
During tape playback, press PAUSE k, then press
FFW g. The tape will play in slow motion.
● To change the playback speed, press FFW g or
REW h.
● To r eturn to normal playback, press PLAY B.
• Slow and still modes will switch
to stop mode after 5 minutes
to protect the DVD/VCR and
the tape from damage.
•
SP/LP/SLP means this feature will
work with tapes recorded in
Standard Playback, Long Playback or
Super Long Playback. LP/SLP means
this feature will work with tapes
recorded in Long Playback or Super
Long Playback. Tape speed details
are on page 57.
Helpful Hints
The following tape features are available in VCR mode. Press VCR so VCR light appears on the front of the DVD/VCR, if
necessary.
Automatic Playback
When you put a tape in the DVD/VCR, the power will come on. If the tape’s record tab is missing, playback will begin.
If a Timer Recording is set and “ ” is flashing in the display panel, the power will not come on automatically
when you insert a tape with the record tab intact.
If a Timer Recording is set and “ ” is flashing in the display panel, the DVD/VCR will eject the tape if the record
tab is missing.
Automatic Rewind, Eject
When a tape is played, fast forwarded or recorded to its end, the tape will rewind to the beginning, stop and eject
itself. This feature does not operate if AUTO REPEAT is ON. Details are on page 29.
Ta pe Eject
A tape can be ejected with the DVD/VCR power on or off (but the DVD/VCR must be plugged in).
If a Timer Recording is set and “ ” is shown on the display panel, press TIMER SET on the remote control or
STOP/EJECT C A on the front panel to cancel the timer standby mode, and then press STOP/EJECT C A to
remove the tape. Remember to insert a tape and press TIMER SET to reset the Timer Recording.
Automatic Tracking Adjustment
The VCR adjusts tracking automatically to give you the best possible picture quality. With some recordings, however,
you may get a better picture using manual tracking.
Manual Tracking
To manually adjust the tracking during normal playback and Slow Motion Playback of a videotape, press
TRACKING K/L.Tracking will return to Automatic Tracking when you press STOP C or insert a tape. You
can also press TRACKING K/L to remove vertical jitter in a Still picture.
Automatic Operation Features
E8E20UD_EN1 8/23/07 1:25 PM Page 31
12
4
7
+10
INPUT
5
8
0
PLAYOKFFWREW
3
6
TRACKING
9
CLEAR TITLE
DVDVCR SETUP
DISC
MENU
BACKPAUSESTOP
Page 32

English
32 Hi-Fi Stereo
• The audio level of a tape
recorded in Hi-Fi stereo will
differ from the audio level of a
tape not recorded in Hi-Fi stereo.
Helpful Hint
Hi-Fi Stereo
To play in Hi-Fi stereo the tapes recorded in Hi-Fi stereo, press
AUDIO to switch Hi-Fi or MONO.
2
Using the Title Menu
Some DVDs have a Title Menu, which lists the titles available on
the DVD. Use the Title Menu to play a specific title.
1
Press DVD to put the DVD/VCR in DVD mode.
DVD light will appear on the front of the DVD/VCR.
2
Press TITLE. The Title Menu will appear.
If a Title Menu is not available, the “X” may appear on the
TV screen. Or, if the DVD only has a main Disc Menu as
described above, it may appear when you press TITLE.
3
Press K, L, s or B to select a title, then press OK.
Playback will begin at the title you selected.
• Menus vary among discs. Follow
the literature accompanying the
disc for details.
• Not all DVDs have Disc or Title
Menus.
• Some DVDs may refer to
chapters as “scenes.” Some
DVDs may refer to the Title
Menu as the “scene index.”
• TITLE will not be active with all
DVDs.
Helpful Hints
DVD Disc Menus
Some DVDs contain menus that describe the contents of the disc
or allow you to customize disc playback. For example, the menu
may offer choices for subtitle languages, director’s commentary or
Sound Track Playback. To use the DVD Menu and select playback
features, follow these steps.
1
Press DVD to put the DVD/VCR in DVD mode.
DVD light will appear on the front of the DVD/VCR.
2
Press DISC MENU. The DVD’s main Disc Menu will
appear.
3
Press K, L, s or B to select an item, then press OK.
Continue this process to set up all the features you want.
1
2
3
TRACKING
1
3
Playback Control (PBC) Function
When playing a Video CD with PBC (Playback Control), you can
use interactive menu (e.g., playlists) on the TV screen. Refer to
instructions accompanying your Video CD for more details on
PBC.
Some operations cannot be performed unless the PBC function is
cancelled temporarily.
Canceling and calling back the PBC function
1
While playback is stopped, press the Number
Buttons to enter a track number.
PBC function is now cancelled and the playback of the
Video CD will start.
2
To call back the PBC function, press STOP C twice,
then press PLAY B.
The Title Menu will appear on the TV screen.
DVDVCR SETUP
INPUT
MENU
BACKPAUSESTOP
PLAYOKFFWREW
CLEAR TITLE
DISC
TRACKING
12
6
5
4
7
8
9
0
+10
3
1
2
DVDVCR SETUP
INPUT
MENU
OK
DISC
Menus, Playback Control (PBC) Function
E8E20UD_EN1 8/23/07 1:25 PM Page 32
9
8
7
+10
INPUT
CLEAR TITLE
0
OK
DVDVCR SETUP
DISC
MENU
Page 33

English
Fast Forward/Fast Reverse 33
3
1
Press DVD to put the DVD/VCR in DVD mode.
DVD light will appear on the front of the DVD/VCR.
2
During playback, press FFW g or REW h on
the remote control.
● During DVD playback, pressing FFW g or REW h will
forward or reverse the picture at approximately 2, 8, 20,50
or 100 times the normal speed. The speed may vary
depending on the disc. g 1, g 2, g 3, g 4 or
g 5 will appear briefly on the TV screen to indicate
Forward Searching. Or, h 1, h 2, h 3,h 4 or
h 5 will indicate fast reverse.
For DVD playback, the sound will be mute during the
search.
● For Video CDs,Audio CDs, MP3 or Windows Media
TM
Audio playback, pressing FFW g or REW h will
forward or reverse the picture or sound at
approximately 2, 8 or 30 times the normal speed. The
speed may vary depending on the disc.
g 1, g 2 or g 3 will appear briefly on the TV
screen to indicate Forward Searching. Or, h 1, h 2
or h 3 will indicate fast reverse.
For Audio CD, MP3 or Windows MediaTMAudio playback,
the sound will be intermittent during the search.
3
Press PLAY B to return to normal playback.
DVDVCR SETUP
INPUT
MENU
REC SPEED MODE
ANGLE SEARCH REPEAT
DISPLAY SUBTITLE ZOOM
TIMER SET
REPEAT
A-B
AUDIO
BACKPAUSESTOP
PLAYOKFFW
REW
CLEAR TITLE
DISC
TRACKING
OPEN/CLOSE
12
6
5
4
7
8
9
0
+10
3
E
1
Example: Playing a DVD in
reverse at twice the normal
playing speed.
2
1
2
• If you use FFW g or
REW h during Dual Playback,
JPEG playback will be paused.
Helpful Hint
x1.3 and x0.8 Rapid Play with Voice
Rapid Play with Voice is available only during playback on the
discs recorded in the Dolby Digital format. Rapid Play with
Voice plays back in slightly faster/slower speed while keeping
the sound quality as in the normal playback.
1
During playback, press MODE.
The current setting appears.
2
Press OK to switch among (x1.3), (x0.8) and
OFF.
: Plays back approximately at 1.3 times of normal playback.
: Plays back approximately at 0.8 times of normal playback.
OFF : No effects.
● To r esume normal playback, press PLAY B.
• During Rapid Play with Voice;
- Audio Language Setting, Black
Level Setting and Virtual
Surround Setting cannot be
changed.
- Virtual Surround does not
function.
- the PCM sound will be output
if using the digital audio
connection (COAXIAL).
- depending on the scenes you
are playing, Rapid Play with
Voice may be unavailable.
Helpful Hint
E8E20UD_EN2 8/17/07 5:40 PM Page 33
Page 34

English
Time Search
1
Press DVD to put the DVD/VCR in DVD mode.
DVD light will appear on the front of the DVD/VCR.
2
During DVD, Video CD (without PBC) or Audio CD
playback, press SEARCH repeatedly until the Time
Search Display appears.
34 Title/Chapter/Time Search
Title/Chapter Search
1
Press DVD to put the DVD/VCR in DVD mode.
DVD light will appear on the front of the DVD/VCR.
2
During DVD playback, press SEARCH repeatedly
until CH (for chapter) or TT (for title) appears on the TV
screen. The number of available titles or chapters will
appear at the right ( /4, for example).
3
Enter the title or chapter number using the
Number buttons. The title or chapter will play.
● To select a single-digit track number when there are
more than 10 tracks, press OK to play the track.
● If you enter a track number that is not available on the
Disc, playback will not begin (or the current track will
continue to play).
3
Within 30 seconds, use the Number buttons to
enter the elapsed playing time (of the track or title)
at which you want playback to begin. Enter the time
in hours, minutes and seconds. Within a few seconds, playback will start at the specified time.
● Example: 1 hour, 23 minutes and 30 seconds
1 → 2 → 3 → 3 → 0
● Make sure the time you enter is within the total time of
the current title or track. If it is not, the time space will
clear and playback will continue at its current point. The
total time available in the current track or title will
appear in the Time Search Display.
● If you make a mistake entering the time, press CLEAR to
clear the time area. Enter the correct information.
12/17 4 / 4
_:_ _:_ _
1:29:00
3
2
• When playback is stopped, use
the Number buttons to select a
title for immediate playback.
During playback, use the
Number buttons to choose a
chapter for immediate playback.
• Title/Chapter Search is not
available with some DVDs.
• Time Search is not available for
MP3,Windows MediaTMAudio
and JPEG files.
Helpful Hints
1
DVDVCR SETUP
INPUT
MENU
REC SPEED MODE
ANGLE SEARCH REPEAT
DISPLAY SUBTITLE ZOOM
TIMER SET
REPEAT
A-B
AUDIO
BACKPAUSESTOP
PLAYOKFFW
REW
CLEAR TITLE
DISC
TRACKING
OPEN/CLOSE
12
6
5
4
7
8
9
0
+10
3
3
2
1
DVDVCR SETUP
INPUT
MENU
REC SPEED MODE
ANGLE SEARCH REPEAT
DISPLAY SUBTITLE ZOOM
TIMER SET
REPEAT
A-B
AUDIO
BACKPAUSESTOP
PLAYOKFFW
REW
CLEAR TITLE
DISC
TRACKING
OPEN/CLOSE
12
6
5
4
7
8
9
0
+10
3
E8E20UD_EN2 8/17/07 5:40 PM Page 34
Page 35

English
There are three ways to play a specific Video CD (without PBC),
Audio CD, MP3,Windows MediaTMAudio or JPEG track: Use the
Number buttons, the SEARCH button or ∑ and w.
● Before you begin, press DVD so DVD light appears on the front of
the DVD/VCR.
A
Using the Number Buttons
Press the Number buttons to enter a track number.
Playback will start at the selected track.
For tracks 10 and above, press the +10 button so the Search
Display (TR _ _ /12 - an example of total tracks) appears on the
TV screen. Press the Number button of the first digit, then press
the Number button of the second digit. For example, to play track
26, press +10, then Number 2, then Number 6 (Each number must
be pressed within 30 seconds of the previous number).
For single-digit tracks (1-9), press a single Number button.
If you enter a track number that is not available on the disc, play will
not begin (or the current track will continue to play).
B
Using SEARCH
Press SEARCH so the Track Search Display (TR) appears.
Within 30 seconds, press the Number buttons to select the
track number. Playback will begin at the selected track. For a
single-digit track (1-9), enter 0 first. For example, to play track 5,
press 0, 5. You do not have to use the +10 button in search mode.
C
Using∑∑or
ww
During playback, press ∑∑to skip the current track and
move to the next track. The track number will appear briefly
on the DVD/VCR display panel.
Or, during playback, press wwto return to the beginning of
the current track. Press wwrepeatedly to go to previous
tracks. The track number will appear briefly on the DVD/VCR
display panel.
Track Search 35
Helpful Hints
DVDVCR SETUP
INPUT
MENU
REC SPEED MODE
ANGLE SEARCH REPEAT
DISPLAY SUBTITLE ZOOM
TIMER SET
REPEAT
A-B
AUDIO
BACKPAUSESTOP
PLAYOKFFW
REW
CLEAR TITLE
DISC
TRACKING
OPEN/CLOSE
12
6
5
4
7
8
9
0
+10
3
C
A,B
C
• 3 and does not function
when playback is stopped.
•You cannot use 3 to go from
the last track on the disc to the
first track.
• Using 3 or during Dual
Playback will only affect MP3
files. If you want to skip JPEG
files during Dual Playback, press
{ or B. Please note that
pressing 3 or will affect
both MP3 and JPEG files if
SLIDE SHOW is set to MUSIC.
3
3
3
B
E8E20UD_EN2 8/17/07 5:40 PM Page 35
Page 36

English
Resume On
1
Press DVD to put the DVD/VCR in DVD mode.
DVD light will appear on the front of the DVD/VCR.
2
Press STOP C during playback. In a few seconds, the
following Resume message will appear on the TV screen.
3
Press PLAY B. In a few seconds, playback will resume
from the point at which it stopped last.You can Resume
Playing at the same point even if you turn off the
DVD/VCR, then turn it on again later. However, opening the
disc tray will cancel the Resume feature. Playback will start
at the beginning the next time you insert the disc.
For MP3, Windows MediaTMAudio and JPEG playback will
resume from the beginning of the current track.
To cancel Resume and start playing the disc from the
beginning, press STOP C again while playback is in the resume
stop mode.As for MP3,Windows Media
TM
Audio and JPEG
playback, File List will appear when you cancel Resume.
Press PLAY B to start playing the disc from the beginning.
● To r esume playback of a Video CD with PBC function,
you have to cancel the PBC function first. See page 32 on
how to cancel the PBC function.
● The resume information will be cleared if you change the
parental level when the resume information is on.
36
Paused and Step-by-Step Playback, Resume On
Paused and Step-by-Step Playback
1
Press DVD to put the DVD/VCR in DVD mode.
DVD light will appear on the front of the DVD/VCR.
2
During disc playback, press PAUSE k. Playback will
pause and the sound will be mute.
● Pressing PAUSE F once during Dual Playback will pause a
JPEG file only. Pressing PAUSE F one more time will
pause an MP3 playback.
3
When playing a DVD or Video CD, press PAUSE k
repeatedly to see the picture advance one frame
(or step) at a time. The sound will remain mute.
Pressing PAUSE k repeatedly during Audio CD, MP3,
Windows MediaTMAudio or JPEG playback will have no
effect.
4
Press PLAY B to resume playback.
DVDVCR SETUP
INPUT
MENU
REC SPEED MODE
ANGLE SEARCH REPEAT
DISPLAY SUBTITLE ZOOM
TIMER SET
REPEAT
A-B
AUDIO
BACKPAUSESTOP
PLAYOKFFW
REW
CLEAR TITLE
DISC
TRACKING
OPEN/CLOSE
12
6
5
4
7
8
9
0
+10
3
DVDVCR SETUP
INPUT
MENU
REC SPEED MODE
ANGLE SEARCH REPEAT
DISPLAY SUBTITLE ZOOM
TIMER SET
REPEAT
A-B
AUDIO
BACKPAUSESTOP
PLAYOKFFW
REW
CLEAR TITLE
DISC
TRACKING
OPEN/CLOSE
12
6
5
4
7
8
9
0
+10
3
4
2-3
2
3
• Set STILL MODE to FIELD in
the DISPLAY Menu if paused
images are blurry. Details are on
pages 50-51.
Helpful Hint
1
1
For DVD,VideoCD or
AudioCD:
For MP3,
Windows Media
TM
Audio
or JPEG:
E8E20UD_EN2 8/17/07 5:40 PM Page 36
Page 37

English
Repeat, A-B Repeat 37
• Repeat Playback and A-B Repeat
are not available with some discs.
• The entire A-B Repeat section
must be within a single title or
track. If you do not enter Point B
before the end of the track or
title is reached, the end of the
track or title will become Point B
automatically.
•Point B must be later on the
disc than Point A.
• A-B Repeat is not available with
MP3, Windows MediaTMAudio
and JPEG files.
• If you choose GROUP Repeat
during Dual Playback, all tracks
or files in each folder will play
repeatedly. For example if you
choose GROUP Repeat during
Dual Playback of MP3 folder A
and JPEG folder B, all MP3 files
in folder A and all JPEG files in
folder B will be repeated.
Helpful Hints
A-B Repeat
You can play a specified section of a DVD, Video CD or Audio CD
repeatedly. Follow these steps to set up the section you want to
repeat.
1
Press DVD to put the DVD/VCR in DVD mode.
DVD light will appear on the front of the DVD/VCR.
2
Press PLAY B to play the disc to the point at which
you want repeated playback to begin.
3
Press A-B REPEAT to set the starting point (A).
If you make a mistake, press CLEAR. This will erase point A
and let you start over. OFF will appear briefly on the
TV screen.
4
Play the disc to the point at which you want
repeated playback to end, then press A-B REPEAT
again. Within a few seconds, the A-B section will begin to
play repeatedly. The segment will play over and over until
you cancel the A-B Repeat feature.
● To cancel A-B Repeat, press A-B REPEAT. OFF will
appear on the TV screen. Regular playback will resume.
Example: Repeat a
DVD chapter
Example: Repeat a
Video CD or Audio CD track
DVDVCR SETUP
INPUT
MENU
REC SPEED MODE
ANGLE SEARCH REPEAT
DISPLAY SUBTITLE ZOOM
TIMER SET
REPEAT
A-B
AUDIO
BACKPAUSESTOP
PLAYOKFFW
REW
DISC
DVDVCR SETUP
INPUT
MENU
REC SPEED MODE
ANGLE SEARCH REPEAT
DISPLAY SUBTITLE ZOOM
TIMER SET
REPEAT
A-B
AUDIO
BACKPAUSESTOP
PLAYOKFFW
REW
DISC
3-4
1
2
1
2
A –
A – B
Repeat
1
Press DVD to put the DVD/VCR in DVD mode.
DVD light will appear on the front of the DVD/VCR.
2
During DVD, Video CD (without PBC),Audio CD, MP3,
Windows MediaTMAudio or JPEG playback, press REPEAT
repeatedly until the repeat mode you want appears on the
TV screen.
On a DVD, select CHAPTER, TITLE or OFF. On a Video CD
(without PBC) and Audio CD, select TRACK, ALL (all tracks on
the disc) or OFF.
With MP3, Windows MediaTMAudio or JPEG tracks, select
TRACK, GROUP (all tracks in the current folder), ALL or OFF.
Selecting a new track, chapter or title will cancel Repeat Playback.
E8E20UD_EN2 8/17/07 5:40 PM Page 37
Page 38

English
38 Markers
2
Within 30 seconds, press s or B to select a Marker
(1-10). Make sure _ _ :_ _ : _ _ appears beneath the number.
3
When the playback reaches the point you want to
remember, press OK. The title or track number and its
elapsed playing time will appear beneath the Markers.
A checkmark will replace the Marker number. The Marker
Display will disappear in about 30 seconds, or press
BACK to remove it.
4
To r eturn to a Marker during playback, press
SEARCH repeatedly until Marker Display appears.
Press s or B to choose the Marker you want, then
press OK. Disc playback will continue from the marked
point.
• Opening the disc tray or turning
off the DVD/VCR will erase all
the Markers.
•To erase a single Marker, press
SEARCH repeatedly until
Marker Display appears. Press
s or B to select a Marker.
Press CLEAR. Press BACK
to remove the display.
•To erase all the Markers, press
SEARCH repeatedly until
Marker Display appears.
Press B to select AC, then
press OK. Press BACK to
remove the display.
Helpful Hints
2,4
Example: DVD
Example:Video CD
or Audio CD
Example: DVD
Use Markers to remember your favorite places on a DVD, Video
CD (without PBC) or Audio CD.
● Before you begin, place the DVD/VCR in DVD mode. Press
DVD so DVD light appears on the front of the DVD/VCR.
1
Play the disc to within 30 seconds of the point at
which you want to set the Marker. Press SEARCH
repeatedly until Marker Display appears.
3-4
1,4
E8E20UD_EN2 8/17/07 5:40 PM Page 38
12
4
7
+10
INPUT
REW
DISPLAY SUBTITLE ZOOM
ANGLE SEARCH REPEAT
REC SPEED MODE
3
5
6
9
8
CLEAR TITLE
0
PLAYOKFFW
OPEN/CLOSE
TRACKING
DVDVCR SETUP
DISC
MENU
BACKPAUSESTOP
AUDIO
REPEAT
A-B
TIMER SET
Page 39

English
Subtitles
The DVD/VCR allows you to select a language for subtitles during
playback.You may select only languages that are available on the
DVD.
1
Press DVD to put the DVD/VCR in DVD mode.
DVD light will appear on the front of the DVD/VCR.
2
During playback, press SUBTITLE repeatedly to
select a subtitle language. The number of available
languages appears at the right of the Subtitle Display. In the
example below, six languages are available ( /6).After a few
seconds, the subtitles will appear.
Or, press SUBTITLE repeatedly to turn off subtitles.
When no subtitles are available,“NOT AVAILABLE”
appears at the right of the Subtitle Display.
Camera Angles
Some DVDs contain scenes recorded from different angles or
perspectives. The perspective will not change if the DVD does not
contain sequences recorded from different camera angles.
1
Press DVD to put the DVD/VCR in DVD mode.
DVD light will appear on the front of the DVD/VCR.
2
During playback, press ANGLE repeatedly to select
a different perspective. The number of available angles
appears at the right of the Angle Display. In this example,
eight angles are available ( /8).
1
2
Subtitles, Camera Angles 39
• With some DVDs, you must
select a subtitle language in
the Disc Menu.
• If the desired language does
not appear after pressing
SUBTITLE several times, the
disc does not have subtitles in
that language.
• Opening the disc tray will
cancel your Subtitle Setting.
• If the ANGLE ICON Setting is
ON, will appear on the TV
screen when the current
portion of the disc has
multiple camera angles. To set
the ANGLE ICON ON or
OFF, see page 55-56.
Helpful Hints
1
2
E8E20UD_EN2 8/17/07 5:40 PM Page 39
INPUT
REW
PLAYOKFFW
DISPLAY SUBTITLE ZOOM
ANGLE SEARCH REPEAT
REC SPEED MODE
DVDVCR SETUP
DISC
MENU
BACKPAUSESTOP
AUDIO
REPEAT
A-B
TIMER SET
INPUT
PLAYOKFFW
REW
DISPLAY SUBTITLE ZOOM
ANGLE SEARCH REPEAT
REC SPEED MODE
DVDVCR SETUP
DISC
MENU
BACKPAUSESTOP
AUDIO
REPEAT
A-B
TIMER SET
Page 40

English
40 Audio Language, Stereo Sound Mode
Audio Language
You can select a language for DVDs during playback if multiple
languages are available.
1
Press DVD to put the DVD/VCR in DVD mode.
DVD light will appear on the front of the DVD/VCR.
2
During DVD playback, press AUDIO repeatedly to
choose one of the available languages. Audio Display
appears at the top of the TV screen, and the new audio will
be heard. The display will disappear after about 5 seconds.
The Audio Display may show the current settings for the
Dolby Digital or Multi-channel sound, if they are available on
the disc, and the sampling rate of the disc. The number of
available languages appears after the “ / ” at the right of the
display ( /3, for example).
• If a language is not available
after pressing AUDIO several
times, the DVD does not have
that language.
• Some DVDs only let you
change the language in the Disc
Menu.
•Audio languages may be
abbreviated (such as ENG for
English). Or, three dashes (- - -)
may appear instead of an
abbreviation.
• Audio language selection cannot
be made during Rapid Play with
Voice. (Refer to page 33.)
Helpful Hints
Stereo Sound Mode
Adjust Stereo Sound to determine whether you will hear the left
channel, the right channel or both channels (stereo) during Video
CD or Audio CD playback.
If you connected the DVD/VCR to a Stereo using the COAXIAL
DIGITAL AUDIO OUT jack as described on page 12, you cannot
adjust stereo sound mode.
1
Press AUDIO repeatedly during Video CD or Audio
CD playback to choose STEREO, L-ch or R-ch.
Both right and left channels
are heard (stereo).
STEREO
Only the left channel
is heard.
L-ch
Only the right channel
is heard.
R-ch
Example: English audio
1.ENG Dolby D 3/2.1ch 48k/3
1
DVDVCR SETUP
INPUT
MENU
REC SPEED MODE
ANGLE SEARCH REPEAT
DISPLAY SUBTITLE ZOOM
TIMER SET
REPEAT
A-B
AUDIO
BACKPAUSESTOP
PLAYOKFFW
REW
DISC
1
DVDVCR SETUP
INPUT
MENU
REC SPEED MODE
ANGLE SEARCH REPEAT
DISPLAY SUBTITLE ZOOM
TIMER SET
REPEAT
A-B
AUDIO
BACKPAUSESTOP
PLAYOKFFW
REW
DISC
2
E8E20UD_EN2 8/17/07 5:40 PM Page 40
Page 41

English
Slow Motion, Zoom 41
Slow Motion
1
Press PAUSE F during DVD or Video CD playback.
2
Press FFW D or REW h. Slow Motion Playback will
begin. Press FFW D or REW h repeatedly during Slow
Motion Playback to play a DVD forward or backward at
approximately 1/16, 1/8 or 1/2 the normal speed. Reverse
slow motion is not available on a Video CD.
An 1 (1/16), 2 (1/8) or 3 (1/2) will appear
briefly on the TV screen to indicate Slow Forward Playback.
An 1 (1/16), 2 (1/8) or 3 (1/2) will indicate
Slow Reverse Playback.
3
Press PLAY B to return to normal playback.
Example: Playing a DVD forward
at half the normal speed.
3
Zoom
Zooming lets you enlarge the playback image of DVDs, Video CDs
or JPEG files, and lets you pan through the enlarged image.
1
Press ZOOM during playback or when playback is
paused. The picture will appear twice as large. Press
ZOOM again to make the picture four times larger than
normal. Either x2 or x4 will appear beside icon in the
upper left corner of the TV screen.
2
While the picture is enlarged, press K, L, s or B to
move the zoomed image up, down, left or right.
The gray box with an inner blue box that shows during
Zoomed Playback is the position guide. To remove it or
show it, press OK. The position of the blue box inside the
gray box indicates the position of the zoomed image within
the overall picture.
● To r eturn the picture to normal, press ZOOM
repeatedly.
1
DVDVCR SETUP
INPUT
MENU
REC SPEED MODE
ANGLE SEARCH REPEAT
DISPLAY SUBTITLE ZOOM
TIMER SET
REPEAT
A-B
AUDIO
BACKPAUSESTOP
PLAYOKFFW
REW
DISC
2
1
22
3
• Only slow forward is available
for Video CDs.
• The sound will be mute during
Paused or Slow Motion
Playback.
•You cannot zoom a Disc Menu.
• The x4 zooming is not active
with some discs. Only x2
zooming is available for Video
CDs and JPEG files.
•Position guide is not available
for JPEG playback.
Helpful Hints
E8E20UD_EN2 8/17/07 5:40 PM Page 41
12
4
7
+10
INPUT
REW
DISPLAY SUBTITLE ZOOM
ANGLE SEARCH REPEAT
REC SPEED MODE
3
5
6
9
8
CLEAR TITLE
0
PLAYOKFFW
OPEN/CLOSE
TRACKING
DVDVCR SETUP
DISC
MENU
BACKPAUSESTOP
AUDIO
REPEAT
A-B
TIMER SET
Page 42

English
42 Program/Random Playback
Program Playback
You may determine the order in which Audio CD, MP3,
Windows MediaTMAudio or JPEG tracks will play.
Random Playback
You may play the tracks of an Audio CD in Random order instead
of the order in which they are recorded (1,2,3...). You can also
use this feature for MP3, Windows MediaTMAudio and JPEG tracks.
1
Press DVD to put the DVD/VCR in DVD mode.
DVD light will appear on the front of the DVD/VCR.
2
While playback is stopped, press MODE
repeatedly until the PROGRAM/RANDOM Screen
appears.
3
Press K or L to select a track you want to play,
then press OK.
Press CLEAR to erase the last track in the program if you
make an error. Additional tracks may be on other screens.
Press L to go on to the next page, and press K to go back
to the previous page. Repeat this step until you have
selected all the tracks you wish to play in the program.
To see tracks in a program when there are more than 8
tracks, use ∑, w to see all the tracks. For MP3,Windows
MediaTMAudio or JPEG folders, press s or B to go to the
previous or next level of folders. Press TITLE to return to
the first item in the highest level.
4
Press PLAY B. The tracks will play once in the order you
set. Turning off the player or opening the disc tray will
erase the program.
•You cannot use the Number
buttons or SEARCH to select
another track during
Program/Random Playback.Use
∑ or w to select other tracks.
•You cannot combine Random
Playback with a program.
•You may play a program or a
track within a program
repeatedly. During Program
Playback, press REPEAT so ALL
(all tracks in the program) or
TRACK appears.The entire
program or the current track
will play over and over.
•You cannot alter a program
during playback.
•You can start Program Playback
only while in the PROGRAM
Screen.
•A program can have a maximum
of 99 tracks.
•To erase all tracks in the
program, select ALL CLEAR at
step 3.
•Program/Random Playback of
MP3, Windows Media
TM
Audio
or JPEG tracks is not available
while DUAL PLAYBACK is ON.
Helpful Hints
DVDVCR SETUP
INPUT
MENU
REC SPEED MODE
ANGLE SEARCH REPEAT
DISPLAY SUBTITLE ZOOM
TIMER SET
REPEAT
A-B
AUDIO
BACKPAUSESTOP
PLAYOKFFW
REW
CLEAR TITLE
DISC
TRACKING
OPEN/CLOSE
12
6
5
4
7
8
9
0
+10
3
Example: Audio CD
Program Playback
Random Playback
3
While the RANDOM Screen appears, press
PLAY B. The tracks will play in random order. After all
the tracks play once, playback will stop.
Example: MP3
(DUAL PLAYBACK - OFF)
Example: Audio CD
E8E20UD_EN2 8/17/07 5:40 PM Page 42
CD-DA TOTAL 0:00:00
T
1 3:30
T
2 4:30
T
3 5:00
T
4 3:10
T
5 5:10
T
6 1:30
T
7 2:30
OK
PLAY
T
1
CLEAR
CD-DA TOTAL 1:03:30
T
1 3:30
T
2 4:30
T
3 5:00
T
4 3:10
T
5 5:10
T
6 1:30
T
7 2:30
OK
PLAY
T
1
3:30
CLEAR
Disc name
1/4
1/1
3:30
PLAY
T
1 3:30
T
5 5:10
T
10 4:20
T
11 3:00
T
12 3:20
T
17 4:10
T
22 2:50
1/4
2/3
Page 43

English
MP3/Windows Media
TM
Audio/JPEG Playback 43
The DVD/VCR will play MP3, Windows MediaTMAudio and JPEG files
that you record and finalize on a CD-R (Compact Disc-Recordable)
or CD-RW (Compact Disc-Rewritable).
These discs may contain pictures in a JPEG format or audio tracks in
an MP3 or Windows MediaTMAudio format. For example, you may have
photographic film developed by a retailer that places the pictures on a
CD-R for you.These pictures may be in JPEG format. Or, you may copy
or download MP3/Windows MediaTMAudio music files from certain
legal Internet sites, then copy those files onto a CD-R or CD-RW.
You cannot make or record such discs using this DVD/VCR.See your
computer manual for details on recording.
Keep these characteristics in mind when making discs you intend to
play on the DVD player of this DVD/VCR.
● Record MP3 files at a sampling frequency of 44.1 kHz or
48 kHz. Record in a constant bit rate between 32 kbps and 320
kbps.
● Record Windows Media
TM
Audio tracks at a sampling frequency of
44.1kHz or 48kHz. Record in a constant bit rate between 48 kbps
and 192kbps.
● When recording JPEG files, the size of the picture should be
between 32 x 32 and 6300 x 5100 dots.
1
Press DVD to put the DVD/VCR in DVD mode.
DVD light will appear on the front of the DVD/VCR.
2
When you put a CD-R or CD-RW with MP3,
Windows MediaTMAudio or JPEG files in the DVD/VCR,a File
List will appear automatically. Or if the disc is already in the
DVD/VCR and you want to call up the File List, press DISC
MENU. (If you use PLAY B to close the disc tray, Playback
starts automatically.) Press K or L to select a folder, MP3,
Windows MediaTMAudio or JPEG file.
3
If you choose a track or file, press PLAY B or OK.
Starting with the track or file you selected, the tracks/files will
play in the order they were recorded, i.e. 1,2,3.
If you select a folder an
d press OK, the tracks or files
within that folder will appear. Press K or L to select
the track or file you want to play, then press PLAY B
or
OK.
● Press TITLE to return to the first item in the highest level of
folders or files.You also can press { or B to return to
previous or next levels.
● To change the Transition Mode for JPEG playback, press
MODE repeatedly until Transition Mode appears on top of
the TV screen during playback.Then press { , B or OK to
switch CUT IN/OUT and FADE IN/OUT. If you choose
CUT IN/OUT, the images will cut in and out sharply as
playback progresses. If you choose FADE IN/OUT, the
images will fade in and out as playback progresses.
● To change the size of the playback image, press MODE
repeatedly until SIZE MODE appears at the top of the TV
screen during playback. Then press { , B or OK to switch
NORMAL(100%) and SMALL(95%).
● Press MODE or BACK to remove the display.
● During JPEG playback, press ANGLE to rotate a picture 90
degrees clockwise.
● To stop playback, press STOP C.
• MP3/Windows MediaTMAudio
tracks and JPEG images are
known as files. Groups of files
are called folders.
•Folders have the icon, MP3
files have the icon,Windows
MediaTMAudio files have the
icon, and JPEG files have the
icon.
•A maximum of 255 folders can
be recognized. A maximum of
999 files can be recognized.
• If you use PLAY B to close the
disc tray, playback starts
automatically. If you use
OPEN/CLOSE A to close the
disc tray, you have to press
PLAY B to start playback.
• During playback, use the
Number buttons or ∑ and w
to change tracks. If a track is
not available,“X” will appear on
the TV screen, and playback may
resume at an incorrect track or
may continue with its current
track.
•To see the File List during
playback, press DISC MENU.
The current track will be
highlighted.
•Progressive JPEGs (JPEG files
saved in the progressive format)
will not play on this DVD/VCR.
• Copyright protected
Windows Media
TM
Audio files
will not play on this DVD/VCR.
• High resolution JPEG files takes
longer to be displayed.
• SIZE MODE may have no effect
on some files (e.g. files with a
small picture size).
2-3
1
DVDVCR SETUP
INPUT
MENU
BACKPAUSESTOP
PLAYOKFFWREW
DISC
Helpful Hints
E8E20UD_EN2 8/17/07 5:40 PM Page 43
Page 44

English
44
MP3/Windows MediaTMAudio/JPEG Playback (cont’d)
Dual Playback
This feature lets you play MP3 and JPEG files simultaneously.
Available only when DUAL PLAYBACK is ON.
See pages 55-56 on how to set the DUAL PLAYBACK ON
or OFF.
1
Press DVD to put the DVD/VCR in DVD mode.
DVD light will appear on the front of the DVD/VCR.
2
Press DISC MENU during MP3/JPEG playback.
A File List will appear.
3
Press KKor LLto select a desired MP3/JPEG file
from the list and press PLAY B or OK.
● To stop playback, press STOP C.
Folder Playback
You may select to play a folder containing MP3 and JPEG files.
Available only when DUAL PLAYBACK is ON.
See pages 55-56 on how to set the DUAL PLAYBACK ON
or OFF.
1
Press DVD to put the DVD/VCR in DVD mode.
DVD light will appear on the front of the DVD/VCR.
2
While playback is stopped, press MODE.
A Folder List will appear.
3
Press K or L to select a folder, then press
PLAY B or OK.
● MP3 and JPEG files in the selected folder will play
simultaneously.
● If Windows Media
TM
Audio files are in the folder,
those files will be skipped during Folder Playback.
OK
PLAY
DISC NAME
FOLDER LIST
001
001
002
003
ALL
FOLDER
• If you press PLAY B directly
after you inserted a disc which
contains both MP3 and JPEG files
and if the DUAL PLAYBACK
Setting is ON, Dual Playback will
start automatically.
•You can not play Windows
MediaTMAudio and JPEG files
together at the same time. If you
choose a Windows Media
TM
Audio
file during Dual Playback, only
Windows MediaTMAudio file will
play.
•Dual Playback may not function
properly if MP3 and JPEG files on
the disc interfere each other due
to the difference in their data size.
Helpful Hints
1
3
2
DVDVCR SETUP
INPUT
MENU
REC SPEED MODE
ANGLE SEARCH REPEAT
DISPLAY SUBTITLE ZOOM
TIMER SET
REPEAT
A-B
AUDIO
BACKPAUSESTOP
PLAYOKFFW
REW
DISC
1
3
DVDVCR SETUP
INPUT
MENU
REC SPEED MODE
ANGLE SEARCH REPEAT
DISPLAY SUBTITLE ZOOM
TIMER SET
REPEAT
A-B
AUDIO
BACKPAUSESTOP
PLAYOKFFW
REW
DISC
2
E8E20UD_EN2 8/17/07 5:40 PM Page 44
Page 45

English
On-Screen Displays 45
Video CD and Audio CD Displays
1
Press DVD to put the DVD/VCR in DVD mode.
DVD light will appear on the front of the DVD/VCR.
2
Press DISPLAY repeatedly to see the following
displays during Video CD (without PBC) or Audio
CD playback.
3
Press DISPLAY repeatedly
or press
BACK
to
remove the display.
3
Press DISPLAY repeatedly or press BACK to
remove the display.
BIT RATE: The amount of audio
and video data currently being read.
Layer number, appears
only when playing a
two-layered disc.
L0: Layer 0 is playing
L1: Layer 1 is playing
Current Repeat Setting, if active
C: Chapter Repeat
T: Title Repeat
A B: A-B Repeat
C
L0
TR (track):
Current track number/
total tracks
Elapsed playing time
of the current track;
remaining playing time
of the current track
TR 4/12 0:03:21 - 0:02:15
ALL:
Current track number/
total tracks
Elapsed playing time
of the entire disc;
remaining playing time of
the entire disc
Current Repeat Setting, if active
T: Track Repeat
A: All Tracks Repeat
A B: A-B Repeat
ALL 4/12 0:13:45 - 0:45:40
T
CH (chapter):
Current chapter number/
total chapters
Elapsed playing time
of the current chapter;
remaining playing time
of the current chapter
CH 7/49 0:01:46 - 0:03:27
1
DVD Displays
1
Press DVD to put the DVD/VCR in DVD mode.
DVD light will appear on the front of the DVD/VCR.
2
Press DISPLAY repeatedly to see the following
displays during DVD playback.
DVDVCR SETUP
INPUT
MENU
REC SPEED MODE
ANGLE SEARCH REPEAT
DISPLAY SUBTITLE ZOOM
TIMER SET
REPEAT
A-B
AUDIO
BACKPAUSESTOP
PLAYOKFFW
REW
CLEAR TITLE
DISC
TRACKING
OPEN/CLOSE
12
6
5
4
7
8
9
0
+10
3
3
2-3
1
DVDVCR SETUP
INPUT
MENU
REC SPEED MODE
ANGLE SEARCH REPEAT
DISPLAY SUBTITLE ZOOM
TIMER SET
REPEAT
A-B
AUDIO
BACKPAUSESTOP
PLAYOKFFW
REW
CLEAR TITLE
DISC
TRACKING
OPEN/CLOSE
12
6
5
4
7
8
9
0
+10
3
3
2-3
E8E20UD_EN2 8/17/07 5:40 PM Page 45
TT 1/2 0:00:00 - 1:23:45
TT (title):
Current title number/
total titles
Elapsed playing time of the
current title; remaining playing
time of the current title
Page 46

English
only during PROGRAM Playback
only during RANDOM Playback
46 On-Screen Displays (cont’d)
The following may appear to indicate Repeat Playback.
T: The current track will play repeatedly.
G: Tracks in the current folder (group) will play repeatedly.
A: All tracks will play repeatedly.
● Program and Random Playback is available only when
DUAL PLAYBACK is OFF.
● Folder Playback is available only when DUAL PLAYBACK
is ON.
3
Press
DISPLAY
or BACK to remove the display.
or
RANDOM
or
FOLDER PLAYBACK
PROGRAM
only during FOLDER Playback
•For MP3 files recorded with
Variable Bit Rate (VBR), the
elapsed time displayed on the
screen may vary from the
actual elapsed time.
Helpful Hint
MP3/Windows MediaTMAudio/JPEG Displays
1
Press DVD to put the DVD/VCR in DVD mode.
DVD light will appear on the front of the DVD/VCR.
2
Press
DISPLAY
repeatedly until the current track
or file information appears.
2/25 0:01:15
Elapsed playing time
of the current track
(for MP3/Windows Media
TM
Audio only)
TR (track):
Current track number/
total tracks
T
Current Repeat Setting
Example: MP3 playback
JPEG file name
MP3 file name
track name
During JPEG playback
During MP3 playback
During
Windows MediaTMAudio
playback
or
● If Dual Playback is on, MP3
file name will be displayed
after JPEG file name.
1
DVDVCR SETUP
INPUT
MENU
REC SPEED MODE
ANGLE SEARCH REPEAT
DISPLAY SUBTITLE ZOOM
TIMER SET
REPEAT
A-B
AUDIO
BACKPAUSESTOP
PLAYOKFFW
REW
CLEAR TITLE
DISC
TRACKING
OPEN/CLOSE
12
6
5
4
7
8
9
0
+10
3
3
2-3
E8E20UD_EN2 8/17/07 5:40 PM Page 46
title name
artist name
Page 47

English
Black Level,Virtual Surround 47
Initializing
Black Level
Adjust Black Level to brighten the DVD or Video CD picture.
1
Press DVD to put the DVD/VCR in DVD mode.
DVD light will appear on the front of the DVD/VCR.
2
During DVD or Video CD playback, press
MODE so the Black Level icon shows in the top left
corner of the TV screen.
3
While the Black Level icon is shown, press
s, B or OK repeatedly to choose ON or OFF.
ON brightens the dark parts of the picture. OFF
shows the original picture as recorded.The icon will
disappear after about 10 seconds.
Virtual Surround
You can enjoy improved stereo sound when you play DVDs,
Video CDs, Audio CDs, MP3 or Windows MediaTMAudio
files recorded in Dolby Digital or Pulse Code Modulation
(PCM). Check the disc case for details on availability.
1
Press DVD to put the DVD/VCR in DVD mode.
DVD light will appear on the front of the DVD/VCR.
2
During disc playback, press MODE repeatedly
until the Virtual Surround icon appears in the top left
corner of the TV screen.
3
While the Virtual Surround icon is shown, press
s , B or OK to choose 1
(Natural)
, 2 (Emphasized)
or OFF.
The icon will disappear after about 10
seconds. The default setting is OFF.
• Black Level is not available for
a PAL DVD.
• If you want to enjoy Dolby
Digital in Virtual Surround
through coaxial cable
connection, set Dolby Digital
to PCM.
•For Video CDs and Audio
CDs, you can adjust Virtual
Surround only if you set
Stereo Sound to STEREO.
Details are on page 40.
• The Black Level and the Virtual
Surround Settings will be saved
even if the player is turned off.
• When the Virtual Surround
function is active, 96 kHz
sound source will be down
sampled at 48 kHz, and output
as 48 kHz sound.
• The Black Level and Virtual
Surround Settings cannot be
used during x1.3 and x0.8
Rapid Play with Voice (refer to
page 33).
Helpful Hints
ON
OFF
Use INITIALIZE to return all your DVD player’s Setup Menu
items (except PARENTAL) to their default settings.
1
Press DVD to put the DVD/VCR in DVD mode.
DVD light will appear on the front of the DVD/VCR.
2
While playback is stopped, press SETUP.
The QUICK SETUP Screen appears.
QUICK SETUP
OSD LANGUAGE ENGLISH
TV ASPECT
4:3 LETTER BOX
PROG. SCAN OFF
DOLBY DIGITAL BITSTREAM
OK
3
Press s or B to select INIT. (INITIALIZE)
at the top of the menu, then press OK.
● Press
KK
or LLto select YES.Then, press OK twice.To
cancel the process, select NO instead.
4
Press SETUP to remove the menu.
INITIALIZE
Initialize?
NO
YES
OK
3
1
DVDVCR SETUP
INPUT
MENU
REC SPEED MODE
ANGLE SEARCH REPEAT
DISPLAY SUBTITLE ZOOM
TIMER SET
REPEAT
A-B
AUDIO
BACKPAUSESTOP
PLAYOKFFW
REW
CLEAR TITLE
DISC
TRACKING
OPEN/CLOSE
12
6
5
4
7
8
9
0
+10
3
2,4
E8E20UD_EN2 8/17/07 5:40 PM Page 47
Page 48

English
48 Language
You can select different languages for the Audio or Subtitles
of DVDs, as well as languages for DVD Disc Menus and the
Setup Menus of the DVD player.
1
Press DVD to put the DVD/VCR in DVD mode.
DVD light will appear on the front of the DVD/VCR.
2
While playback is stopped, press SETUP.
The QUICK SETUP Screen appears.
3
Press s or B to select CUSTOM at the top of
the menu, then press OK.
5
Press KKor LLto select AUDIO, SUBTITLE, DISC
MENU or OSD LANGUAGE. Press OK. The
language options for the selected item will appear.
AUDIO: The DVD’s audio plays
in the selected language.
The default setting is
ORIGINAL.
SUBTITLE: Subtitles appear in
the selected language.
The default setting is OFF.
DISC MENU: A DVD’s Disc
Menu appears in the selected
language.
The default setting is ENGLISH.
OSD LANGUAGE: The DVD
player’s Setup Menu can be in
English, French or Spanish only.
The default setting is ENGLISH.
AUDIO
SUBTITLE
DISC MENU
OSD LANGUAGE
ORIGINAL
OFF
ENGLISH
ENGLISH
OK
LANGUAGE
AUDIO
ORIGINAL
ENGLISH
FRENCH
SPANISH
GERMAN
ITALIAN
SWEDISH
OK
LANGUAGE
SUBTITLE
OFF
ENGLISH
FRENCH
SPANISH
GERMAN
ITALIAN
SWEDISH
OK
LANGUAGE
DISC MENU
ENGLISH
FRENCH
SPANISH
GERMAN
ITALIAN
SWEDISH
DUTCH
OK
LANGUAGE
OSD LANGUAGE
ENGLISH
FRANÇAIS
ESPAÑOL
OK
AUDIO
SUBTITLE
DISC MENU
OSD LANGUAGE
ORIGINAL
OFF
ENGLISH
ENGLISH
OK
•
If the DVD’s default settings for
Audio and Subtitle are the same
language, the subtitles may not
show unless you turn them on.
•
Use the AUDIO and SUBTITLE
buttons to select Audio and
Subtitles available on the DVD.
Details are on pages 39-40.
•
If you set AUDIO to ORIGINAL,
the default setting of the DVD
Audio will play.
•
If you set OSD LANGUAGE to
FRANÇAIS (French) or
ESPAÑOL (Spanish) and need
English: Follow steps 1-2. At step
3, the IDIOMA or LANGUE
Menu will appear. Press OK.
Press L to select LANGUE OSD
or IDIOMA PANT., then press
OK. Press K to select ENGLISH,
then press OK. The menus will
change to English. Press SETUP to
remove the menus.
•
You can change the OSD
LANGUAGE in the QUICK
SETUP Menu that appears when
you first press SETUP. With
QUICK selected, press OK.
OSD LANGUAGE will be
selected. Press OK. Press K or L
to choose a language, then press
OK. Press SETUP to remove the
menu.
•
The Language Settings may not
take effect until you restart disc
playback from the beginning.
Helpful Hints
4
With (LANGUAGE) selected, press OK.
3-5
1
DVDVCR SETUP
INPUT
MENU
BACKPAUSESTOP
PLAYOKFFWREW
CLEAR TITLE
DISC
TRACKING
OPEN/CLOSE
12
6
5
4
7
8
9
0
+10
3
2
E8E20UD_EN2 8/17/07 5:40 PM Page 48
Page 49

English
Language (cont’d) 49
6
Press K or L to select a language, then press OK.
The language lists may continue on multiple screens. Press
K or L to move to the other screens.
● If you select OTHER for AUDIO, SUBTITLE, or
DISC MENU, press four Number buttons to
enter the code for the language you desire. Use one of
the Language Codes listed below. The language or
language code you select will appear in the Language
Menu beside AUDIO, SUBTITLE, or DISC MENU.
● You can select other languages for AUDIO, SUBTITLE
and DISC MENU only if the language is available on the
disc. If the language you select is not recorded on the
DVD, changing these settings will have no effect.
7
Press SETUP to remove the menu.
LANGUAGE
LANGUAGE CODE
Please enter a 4-digit language code.
OK
A-B
Abkhazian 4748
Afar 4747
Afrikaans 4752
Albanian 6563
Amharic 4759
Arabic 4764
Armenian 5471
Assamese 4765
Aymara 4771
Azerbaijani 4772
Bangla 4860
Bashkir 4847
Basque 5167
Bengali 4860
Bhutani 5072
Bihari 4854
Bislama 4855
Breton 4864
Bulgarian 4853
Burmese 5971
Byelorussian 4851
C-E
Cambodian 5759
Catalan 4947
Chinese 7254
Corsican 4961
Croatian 5464
Czech 4965
Danish 5047
Dutch 6058
English 5160
Esperanto 5161
Estonian 5166
F-H
Faroese 5261
Fiji 5256
Finnish 5255
French 5264
Frisian 5271
Gaelic (Scots) 5350
Galician 5358
Georgian 5747
German 5051
Greek 5158
Greenlandic 5758
Guarani 5360
Gujarati 5367
Hausa 5447
Hebrew 5569
Hindi 5455
Hungarian 5467
I-K
Icelandic 5565
Indonesian 5560
Interlingua 5547
Interlingue 5551
Inupiak 5557
Irish 5347
Italian 5566
Japanese 5647
Javanese 5669
Kannada 5760
Kashmiri 5765
Kazakh 5757
Kinyarwanda 6469
Kirghiz 5771
Kirundi 6460
Korean 5761
Kurdish 5767
L-N
Laothian 5861
Latin 5847
Latvian 5868
Lettish 5868
Lingala 5860
Lithuanian 5866
Macedonian 5957
Malagasy 5953
Malay 5965
Malayalam 5958
Maltese 5966
Maori 5955
Marathi 5964
Moldavian 5961
Mongolian 5960
Nauru 6047
Nepali 6051
Norwegian 6061
O-R
Occitan 6149
Oriya 6164
Oromo (Afan)6159
Panjabi 6247
Pashto 6265
Persian 5247
Polish 6258
Portuguese 6266
Pushto 6265
Quechua 6367
Rhaeto-Romance 6459
Romanian 6461
Russian 6467
S
Samoan 6559
Sangho 6553
Sanskrit 6547
Serbian 6564
Serbo-Croatian
6554
Sesotho 6566
Setswana 6660
Shona 6560
Sindhi 6550
Singhalese 6555
Siswat 6565
Slovak 6557
Slovenian 6558
Somali 6561
Spanish 5165
Sundanese 6567
Swahili 6569
Swedish 6568
T
Tagalog 6658
Tajik 6653
Tamil 6647
Tatar 6666
Telugu 6651
Thai 6654
Tibetan 4861
Tigrinya 6655
Tonga 6661
Tsonga 6665
Turkish 6664
Turkmen 6657
Tw i 6669
U-Z
Ukrainian 6757
Urdu 6764
Uzbek 6772
Vietnamese 6855
Volapuk 6861
Welsh 4971
Wolof 6961
Xhosa 7054
Yiddish 5655
Yoruba 7161
Zulu 7267
Language Codes
7
6
DVDVCR SETUP
INPUT
MENU
REC SPEED MODE
ANGLE SEARCH REPEAT
DISPLAY SUBTITLE ZOOM
TIMER SET
REPEAT
A-B
AUDIO
BACKPAUSESTOP
PLAYOKFFW
REW
CLEAR TITLE
DISC
TRACKING
OPEN/CLOSE
12
6
5
4
7
8
9
0
+10
3
6
E8E20UD_EN2 8/17/07 5:40 PM Page 49
Page 50

English
50 Display
• Selecting a different TV
ASPECT Setting is only
effective if it is available on the
DVD. Check the DVD Disc
Menu or case for details.
•You also can adjust TV
ASPECT in the QUICK
SETUP Menu that appears
when you first press SETUP.
With QUICK selected, press
OK. Press L to select TV
ASPECT, then press OK. Press
K or L to choose a setting,
then press OK. Press SETUP
to remove the menu.
• This unit does not set the TV
aspect automatically.
Helpful Hints
You may adjust the TV Aspect ratio and still mode clarity, and
Progressive Scan compatibility.
1
Press DVD to put the DVD/VCR in DVD mode.
DVD light will appear on the front of the DVD/VCR.
2
When playback is stopped, press SETUP.
The QUICK SETUP Screen will appear.
4
Press s or B to select (DISPLAY), then
press OK.
QUICK SETUP
OSD LANGUAGE ENGLISH
TV ASPECT
4:3 LETTER BOX
PROG. SCAN OFF
DOLBY DIGITAL BITSTREAM
OK
3
Press s or B to select CUSTOM at the top of
the menu, then press OK.
LANGUAGE
AUDIO ORIGINAL
SUBTITLE OFF
DISC MENU ENGLISH
OSD LANGUAGE ENGLISH
OK
5
Press K or L to select an item, then press OK.
● If you selected TV ASPECT, press K or L to
select a setting, then press OK.
Choose 4:3 LETTER BOX if you want to see the
entire, widened picture with black bars at the top and
bottom of the screen. This looks like the picture you
see when watching movies in a theater. This setting is
possible only if the DVD was recorded in the
letterbox or widescreen format.
Choose 4:3 PAN & SCAN for a full height picture,
with both sides trimmed. Some companies refer to
this as reformatting the picture to fit your TV screen
and may call it the regular or normal format.
Choose 16:9 WIDE if you connected a widescreen
TV to the DVD player.
The default setting is 4:3 LETTER BOX.
DISPLAY
TV ASPECT 4:3 LETTER BOX
STILL MODE AUTO
PROG. SCAN OFF
OK
DISPLAY
TV ASPECT
4:3
LETTER BOX
4:3
PAN & SCAN
16:9
WIDE
OK
TV ASPECT
3-5
1
DVDVCR SETUP
INPUT
MENU
REC SPEED MODE
ANGLE SEARCH REPEAT
DISPLAY SUBTITLE ZOOM
TIMER SET
REPEAT
A-B
AUDIO
BACKPAUSESTOP
PLAYOKFFW
REW
CLEAR TITLE
DISC
TRACKING
OPEN/CLOSE
12
6
5
4
7
8
9
0
+10
3
2
E8E20UD_EN2 8/17/07 5:40 PM Page 50
Page 51

English
3
Press
SETUP
to remove the menu.
● If PROG. SCAN is ON, this message appears:
Press
K or L to make a selection, then press OK.
If you select NO, the menu disappears and
PROG. SCAN is OFF. If you select YES, this appears:
Confirm your setting, then press OK. The menu will disappear and the Progressive Scan function will be activated.
If you do not press any buttons for 15 seconds,
Progressive Scan will switch to OFF.
Display (cont’d) 51
Progressive Scan
● If you selected STILL MODE, press K or L to
select a setting, then press OK.
This determines the
quality of an image in still mode.
If you select FIELD, still images will be stabilized but
coarse due to the small amount of data.
If you select FRAME, the images will be highly defined due
to the simultaneous output of two fields.
The default setting is AUTO.
6
Press
SETUP
to remove the menu.
DISPLAY
AUTO
FIELD
FRAME
STILL MODE
OK
STILL MODE
You may adjust the Progressive Scan compatibility.
1
Follow the steps 1-4 in the Display setup on page 50.
2
Press K or L to select
PROG. SCAN, then press OK
repeatedly to turn PROG. SCAN ON or OFF.
Choose ON if your TV has Progressive Scan and if the TV
is connected to the player’s COMPONENT VIDEO OUT
jacks. Choose OFF otherwise.
The default setting is OFF.
Confirm again to use progressive scan.
If Picture is good, Select “YES”.
SELECT: K / L SET:OK
NO
YESNOYES
2-3
•You can set PROG. SCAN to
OFF either in the DISPLAY
Menu or by pressing and
holding PLAY B (DVD) on
the front of the player for
more than 5 seconds.
•You can adjust Progressive
Scan Setting in the QUICK
SETUP Menu that appears
when you first press SETUP.
With QUICK selected, press
OK. Press L to select PROG.
SCAN. Press OK to choose
OFF or ON. Press SETUP to
remove the menu.
Helpful Hints
6
DVDVCR SETUP
INPUT
MENU
OK
CLEAR TITLE
DISC
TRACKING
OPEN/CLOSE
12
6
5
4
7
8
9
0
+10
3
3
E8E20UD_EN2 8/17/07 5:40 PM Page 51
5
8
0
OPEN/CLOSE
3
6
TRACKING
9
CLEAR TITLE
DVDVCR SETUP
DISC
MENU
12
4
7
+10
INPUT
PLAYOKFFWREW
Page 52

English
52 Audio
Change Audio Settings based on other equipment you
connected to the DVD player or according to your disc
sound features. These setting only affect the Audio from the
DVD player of the DVD/VCR.
1
Press DVD to put the DVD/VCR in DVD mode.
DVD light will appear on the front of the DVD/VCR.
2
While playback is stopped, press SETUP.
The QUICK SETUP Screen will appear.
3
Press s or B to select CUSTOM at the top of
the menu, then press OK.
4
Press s or B to select (AUDIO) at the top
of the menu, then press OK.
5
Press KKor LLto select DRC, DOWN
SAMPLING, or DOLBY DIGITAL, then follow
step 6 accordingly.
6
● If you selected DRC, press OK repeatedly to
turn Dynamic Range Control (DRC) ON or
OFF. Choosing ON compresses the range of volume
by suppressing loud sounds and raising low sounds.
DRC is available only on discs recorded in the
Dolby Digital format.
The default setting is ON.
● If you selected DOWN SAMPLING, press OK
repeatedly to choose ON or OFF. Choose ON
to down sample the 96 kHz sound source to 48 kHz.
Choose OFF to output the sound source without
any down sampling.
DOWN SAMPLING is available only when the player
is connected to a Stereo using the COAXIAL
DIGITAL AUDIO OUT jack as described on page 12.
The default setting is ON.
● If you selected DOLBY DIGITAL, press OK
repeatedly to select BITSTREAM or PCM.
Select BITSTREAM if you used the COAXIAL
DIGITAL AUDIO OUT jack to connect the DVD
player to a stereo that is Dolby Digital compatible.
Details are on page 12. Otherwise, choose PCM.
The default setting is BITSTREAM.
7
Press SETUP to remove the menu.
• Dolby Digital sound must be
available on the DVD.
•You can adjust DOLBY
DIGITAL in the QUICK
SETUP Menu that appears
when you first press SETUP.
With QUICK selected, press
OK. Press L to select DOLBY
DIGITAL. Press OK to choose
BITSTREAM or PCM. Press
SETUP to remove the menu.
• When you play a disc that has
copyright protection,
downsampling will be at 48
kHz, even if you set DOWN
SAMPLING to OFF.
Helpful Hints
3-6
1
2,7
E8E20UD_EN2 8/17/07 5:40 PM Page 52
QUICK SETUP
OSD LANGUAGE ENGLISH
TV ASPECT
PROG. SCAN OFF
DOLBY DIGITAL BITSTREAM
OK
LANGUAGE
AUDIO ORIGINAL
SUBTITLE OFF
DISC MENU ENGLISH
OSD LANGUAGE ENGLISH
OK
4:3 LETTER BOX
DRC
DOWN SAMPLING
DOLBY DIGITAL
OK
AUDIO
ON
ON
BITSTREAM
12
4
7
+10
INPUT
REW
DISPLAY SUBTITLE ZOOM
ANGLE SEARCH REPEAT
REC SPEED MODE
3
5
6
9
8
CLEAR TITLE
0
PLAYOKFFW
OPEN/CLOSE
TRACKING
DVDVCR SETUP
DISC
MENU
BACKPAUSESTOP
AUDIO
REPEAT
A-B
TIMER SET
Page 53

English
Parental Password 53
Parental Controls prevents viewing of DVDs that exceed your rating
limits. This feature will not limit viewing if the DVD is not rated or
coded. Check your DVDs and settings before letting children access
the DVD/VCR.You will need a password to change the Parental Settings
or to play a blocked disc. Follow these steps to change your password.
1
Press DVD to put the DVD/VCR in DVD mode.
DVD light will appear on the front of the DVD/VCR.
2
While playback is stopped, press SETUP.
The QUICK SETUP Screen appears.
4
Press ssor BBto select (PARENTAL), then press OK.
● If this is the first time you set a password, this menu will appear.
Press the Number buttons to enter a 4-digit password.
The password will appear on the screen. Write it down so you
will not forget it.
Press OK, and proceed to step 7.
● If you have set a password before, this menu will appear.
Press the Number buttons to enter your current
4-digit password. Asterisks (*) will appear instead of your
password.This protects its identity.Press OK, and proceed to
step 7.
5
If you like to change the password, press K or L to select
PASSWORD CHANGE,then press OK.
6
Press the Number buttons to enter a 4-digit password.
The password numbers will appear on the screen. Write down the
password so you will not forget it. Press OK. The previous menu
will reappear.
7
Press SETUP to remove the menu.
• The default password is 4737. If
you forget your password, press
Number buttons 4, 7, 3, 7 at
step 4. You will be prompted to
enter a new 4-digit password.
Use the Number buttons to
enter a new 4-digit password,
then press OK. PARENTAL
LEVEL will reset to ALL. See
page 54 to reset PARENTAL
LEVEL as you desire.
•A power failure will not erase
your password.
Helpful Hints
3
Press s or B to select CUSTOM, then press OK.
PASSWORD
OK
OK
PARENTAL
PARENTAL LEVEL ALL
PASSWORD CHANGE
OK
QUICK SETUP
OSD LANGUAGE ENGLISH
TV ASPECT
4:3 LETTER BOX
PROG. SCAN OFF
DOLBY DIGITAL BITSTREAM
OK
3-6
1
2,7
4,6
E8E20UD_EN2 8/17/07 5:40 PM Page 53
5
8
0
OPEN/CLOSE
3
6
TRACKING
9
CLEAR TITLE
DVDVCR SETUP
DISC
MENU
12
4
7
+10
INPUT
REW
DISPLAY SUBTITLE ZOOM
ANGLE SEARCH REPEAT
REC SPEED MODE
PLAYOKFFW
BACKPAUSESTOP
AUDIO
REPEAT
A-B
TIMER SET
Page 54

English
54 Parental Levels
Follow these steps to set the rating level for your DVDs.
DVDs whose ratings exceed the level you set will not play.
1
Press DVD to put the DVD/VCR in DVD mode.
DVD light will appear on the front of the DVD/VCR.
2
While playback is stopped, press SETUP.
The QUICK SETUP Screen appears.
5
Press the Number buttons to enter your 4-digit
password.
6
Press K or L to select PARENTAL LEVEL, then
press OK.
QUICK SETUP
OSD LANGUAGE ENGLISH
TV ASPECT
4:3 LETTER BOX
PROG. SCAN OFF
DOLBY DIGITAL BITSTREAM
OK
OK
7
Press K or L to select a level, then press OK.
The rating levels continue on two menu screens. Press
K or L repeatedly to move to the next or previous screen
to find the rating level you want.
After making your selection, the previous menu will appear.
The level you selected will appear beside PARENTAL
LEVEL.
PARENTAL
PARENTAL LEVEL ALL
PASSWORD CHANGE
OK
PAR ENTAL
PARENTAL LEVEL
ALL
8 [ADULT]
7 [NC-17]
6 [R]
5 [PGR]
4 [PG13]
3 [PG]
OK
• When you try to play a DVD
whose rating exceeds the level
you set, an on-screen message
will indicate the DVD cannot
play. Remove the DVD, then set
PARENTAL LEVEL to ALL.
Reload the DVD and begin
playback. Some DVDs may let
you enter your 4-digit
password to begin playback.
Follow the on-screen messages
as prompted.
•You cannot use the default
password (4737) to play a DVD.
• The resume information will be
cleared if you change the
parental level when the resume
information is on.
Helpful Hints
3
Press s or B to select CUSTOM at the top of the
menu, then press OK.
8
Press SETUP to remove the menu.
LANGUAGE
AUDIO ORIGINAL
SUBTITLE OFF
DISC MENU ENGLISH
OSD LANGUAGE ENGLISH
OK
4
Press s or B to select
(PARENTAL),at the top of
the menu,
then press OK.
RATING EXPLANATIONS
•ALL : Parental Control is inactive; all discs
can play.
•
8 [ADULT]: DVD softwares of any grades
(adult/general/children) can be played back.
•
7 [NC-17]: No one under 17 admitted
•
6 [R]: Restricted; under 17 requires
accompanying parent or adult guardian
•
5 [PGR]: Parental Guidance Recommended
•
4 [PG13]: Unsuitable for children under 13
•
3 [PG]: Parental Guidance suggested
•
2 [G]: General Audience
•
1 [KID SAFE]: Suitable for children
3-4,
6-7
1
2,8
5
E8E20UD_EN2 8/17/07 5:40 PM Page 54
12
5
4
8
7
+10
0
INPUT
PLAYOKFFWREW
OPEN/CLOSE
3
6
TRACKING
9
CLEAR TITLE
DVDVCR SETUP
DISC
MENU
BACKPAUSESTOP
Page 55

English
Others 55
You may adjust the Angle Icon,Automatic Power Off,
Dual Playback and Slide Show Settings.
1
Press DVD to put the DVD/VCR in DVD mode.
DVD light will appear on the front of the DVD/VCR.
2
While playback is stopped, press SETUP.
The QUICK SETUP Screen appears.
4
Press s or B to select (OTHERS), then
press OK.
QUICK SETUP
OSD LANGUAGE ENGLISH
TV ASPECT
4:3 LETTER BOX
PROG. SCAN OFF
DOLBY DIGITAL BITSTREAM
OK
3
Press s or B to select CUSTOM at the top of
the menu, then press OK.
LANGUAGE
AUDIO ORIGINAL
SUBTITLE OFF
DISC MENU ENGLISH
OSD LANGUAGE ENGLISH
OK
5
Press K or L to select an item, then press OK.
●
If you selected ANGLE ICON, press OK
repeatedly to select ON or OFF. Choose ON to
see the Angle icon when multiple camera angles are
available during DVD playback. Details are on page 39.
Choose OFF to disable the Angle icon.
The default setting is ON.
OTHERS
ANGLE ICON ON
AUTO POWER OFF ON
DUAL PLAYBACK OFF
SLIDE SHOW 5sec
OK
OTHERS
ANGLE ICON ON
AUTO POWER OFF
ON
DUAL PLAYBACK OFF
SLIDE SHOW 5sec
OK
ANGLE ICON
3-5
1
2
Instructions continue on the next page.
E8E20UD_EN2 8/17/07 5:40 PM Page 55
12
4
7
+10
INPUT
REW
DISPLAY SUBTITLE ZOOM
ANGLE SEARCH REPEAT
REC SPEED MODE
3
5
6
9
8
CLEAR TITLE
0
PLAYOKFFW
OPEN/CLOSE
TRACKING
DVDVCR SETUP
DISC
MENU
BACKPAUSESTOP
AUDIO
REPEAT
A-B
TIMER SET
Page 56

English
● If you selected AUTO POWER OFF, press OK
repeatedly to choose ON or OFF. Choose ON if you
want the player to turn off when there is no activity at
the player or its remote for 30 minutes.
The default setting is ON.
● If you selected DUAL PLAYBACK, press OK to
choose ON or OFF. This feature lets you play MP3 and
JPEG files simultaneously.
The default setting is OFF.
● If you selected SLIDE SHOW, press K or L to
choose 5sec, 10sec or MUSIC, then press OK. This
adjusts the playback speed of the SLIDE SHOW.
Choose 5 sec to display each image for 5 seconds.
Choose 10 sec to display each image for 10 seconds.
Choose MUSIC to display an image for each MP3 sound
file playback when DUAL PLAYBACK is ON.
The default setting is 5 sec.
6
Press SETUP to remove the menu.
• When MUSIC is selected, the
playback speed of the SLIDE
SHOW will be set to 5
seconds under the conditions
listed below:
- When DUAL PLAYBACK is
OFF.
- When DUAL PLAYBACK is
ON, but only the JPEG files
are playing.
Helpful Hint
56 Others (cont’d)
OTHERS
ANGLE ICON ON
AUTO POWER OFF
ON
DUAL PLAYBACK OFF
SLIDE SHOW 5sec
OK
DUAL PLAYBACK
OTHERS
SLIDE SHOW
5 sec
10 sec
MUSIC
OK
SLIDE SHOW
OTHERS
ANGLE ICON ON
AUTO POWER OFF
ON
DUAL PLAYBACK OFF
SLIDE SHOW 5sec
OK
AUTO POWER OFF
6
5
DVDVCR SETUP
INPUT
MENU
REC SPEED MODE
ANGLE SEARCH REPEAT
DISPLAY SUBTITLE ZOOM
TIMER SET
REPEAT
A-B
AUDIO
BACKPAUSESTOP
PLAYOKFFW
REW
CLEAR TITLE
DISC
TRACKING
OPEN/CLOSE
12
6
5
4
7
8
9
0
+10
3
Instructions continued from the previous page.
E8E20UD_EN2 8/17/07 5:40 PM Page 56
Page 57

English
Glossary 57
AUDIO IN/OUT Jacks: jacks on the front and back of the DVD/VCR that receive audio from another
source (IN) or send audio to another system (OUT). These jacks are red (right) and white (left).
CO
AXIAL DIGITAL AUDIO OUT Jack: sends digital audio to a Stereo, allowing you to adjust the
volume at the Stereo. This connection provides the Multi-channel surround sound as heard in movie
theaters. This jack on the DVD/VCR is black.
COMPONENT VIDEO OUT (Y C
B/PBCR/PR
)
Jacks: jacks on the back of the DVD/VCR that send
high-quality DVD video to a TV with Component Video In jacks.This connection provides the best picture
quality for the DVD player of the DVD/VCR.
Dolb
y Digital
:a surround sound system that provides Multi-channel sound as used in movie theaters.
Dub
bing: copying a video cassette using another VCR.
HQ:
high quality; a feature in the VCR circuitry which provides enhanced picture detail.
External Input Channel:
the channel to which you set your DVD/VCR to receive the signal from the
external tuner. If you connected the external tuner to the AUDIO and VIDEO In jacks on the front of the
DVD/VCR, select L2. If you used the AUDIO and VIDEO IN jacks on the back of the DVD/VCR, select L1.
O
TR: One-Touch Recording; a timed recording on the VCR that starts immediately and records for 30
minutes to 8 hours.
S-Video:
produces a clearer DVD picture by sending separate signals for the luminance and the color.
S-Video only provides a picture for the DVD player of the DVD/VCR.
T
ape Speeds: how fast the video cassette travels during a recording or playback. The faster the tape
speed, the better the picture quality. Slower tape speeds affect picture quality, but you can record more
onto a videotape.
• SP (Standard Playback) – fastest tape speed (recording time for a T120 tape is approximately 2 hours);
best picture quality.
• LP (Long Playback) – average tape speed. You cannot record in LP with this VCR. If tapes were recorded
on a different VCR in LP speed, the tape will play in LP on the DVD/VCR.
• SLP (Super Long Playback) – slowest tape speed (recording time for a T120 tape is approximately 6
hours). This speed allows the maximum recording on a single videotape.
VIDEO IN/OUT Jacks:
jacks on the front and back of the DVD/VCR that receive video from another
source (IN) or send video to other video equipment or a TV (OUT). These jacks are yellow.
E8E20UD_EN2 8/17/07 5:40 PM Page 57
Page 58

English
58 Helpful Hints
If you are having problems with your product, check this list of problems and possible solutions before requesting
service. You may be able to solve the problem yourself.
If you need to call a customer service representative, please know the model number and serial number of your
product before you call. This information is displayed on the back of the product. Also, please take a moment to identify
the problem you are having, and be prepared to explain this to the representative. If you believe the representative will
need to help you with operations, please stay near the product. Our representatives will be happy to assist you.
For online reference, please visit our web site at http://www.philips.com/welcome
The DVD/VCR has no power.
•
Make sure the power cord is connected completely to an AC (alternating current) outlet.
•Press y to turn on the DVD/VCR. The DVD/VCR usually turns on in the mode it was in when you
turned it off. If there has been a power failure, it will turn on in VCR mode. Press DVD to put the unit in
DVD mode. Press VCR to put the unit in VCR mode. Or, press SOURCE to switch between the two
modes.
The remote control will not operate the DVD/VCR.
•
Aim the remote control directly at the remote sensor on the front of the DVD/VCR, not toward the TV. Details are
on page 18.
•
Remove all obstacles between the remote control and the DVD/VCR.
•
Inspect and/or replace the batteries in the remote control. Details are on page 13.
•
Use the remote control within 23 feet (7m) of the DVD/VCR.
•
When using the DVD player, press DVD, then try the other DVD feature buttons. Press DVD so DVD light appears
on the front of the DVD/VCR. This means the DVD/VCR is in DVD mode.
•
To use the VCR, press VCR, then try the other VCR feature buttons. Press VCR so VCR light appears on the front of
the DVD/VCR.This means the DVD/VCR is in VCR mode.
There is no picture in DVD mode.
•
Make sure the video cable is connected correctly.You may connect either the yellow video cable (supplied), an
optional S-Video cable, or optional component video cables. Make sure the TV is set to the correct Video In channel
(usually the AUX IN, A/V IN, Auxiliary In, EXT or External In, Component Video In or S-Video In channel). Check
your TV owner’s manual for details. Details are on page 8.
•
Insert a DVD that is playable on this DVD/VCR. Details are on page 7.
•
Make sure the DVD/VCR is in DVD mode. Press DVD or SOURCE so DVD light appears on the front of the
DVD/VCR.
•
Check if Progressive Scan is set correctly according to your connection to a TV. Details are on page 8. Enable
Progressive Scan at the DVD player only if you used the Component Video connection to a TV that has Progressive
Scan. Details are on pages 8, 10 and 51.
Disc cannot be played.
•
Insert a playable disc. Details are on page 7.
•
Place the disc correctly in the disc tray. If the disc is one-sided, place the disc in the tray with the label facing up. If the
disc is two-sided, make sure the label of the side you want to play is facing up.
•
Clean the disc. Make sure the disc is not scratched or warped.
•
Cancel the Parental Controls, enter the password or change the control level. Details are on pages 53-54.
•
Make sure the disc is labeled for use in Region 1 or ALL regions and is NTSC or PAL compatible. Details are on page 7
.
There is no sound.
•
Connect the audio cable firmly. Make sure the cables are connected to the AUDIO IN jacks on the TV or Stereo.
Details are on pages 9-12.
•
Check the Audio Settings of the DVD player. Details are on page 52.
•
Check the Audio Settings of the DVD. For example, you may have selected “soundtrack” playback or an unavailable
Sound Setting (such as Dolby Digital). Details are on pages 40 and 52. Tr y other sound options provided in the DVD
Disc Menu.
The picture is distorted.
•
Connect the DVD/VCR directly to the TV. Details are on pages 8-12. Do not connect the DVD/VCR to a VCR, then
connect the VCR to the TV. Copyright protection systems in the VCR could distort the picture playing on the
DVD/VCR.
•
There are some cases where a disc or videotape picture may be distorted slightly because of the quality in which it
was recorded. This is not a malfunction of the DVD/VCR.
•
Make sure the disc is compatible with the DVD player of the DVD/VCR. Details are on page 7.
• In case of picture problems with 525 (480) progressive scan output,it is recommended that the user switch the
connection to the ‘standard definition’ output. If there are questions regarding your TV set compatibility with this
525p (480p) DVD player,please contact our customer service center.
•
If your TV is not PAL compatible, DVDs recorded in the PAL color system may play only in black and white, the
picture may roll continuously, or the picture may appear distorted.
You cannot change the camera angle of a DVD.
•
The DVD might not contain segments recorded from different camera angles. See if multiple angles are available by
referring to the disc case or DVD Disc Menu. Details are on page 39.
E8E20UD_EN2 8/17/07 5:40 PM Page 58
Page 59

English
Helpful Hints (cont’d) 59
You cannot change the audio or subtitle language of a DVD.
•
The DVD does not contain audio or subtitles in the desired language. Not all DVDs contain audio or subtitles in
multiple languages. See if other languages are available by referring to the disc case or DVD Disc Menu. Details are on
pages 39-40.
An X appears in the top right corner of the TV screen when you try a DVD feature.
•
The operation is not available at the current time or the feature is not available on the disc. Some features are only
available during playback. Others can be accessed only if playback is stopped. Try stopping or playing the disc, then try
the feature again.
The DVD/VCR switches from DVD mode to VCR mode after 30 minutes of no activity.
•
When AUTO POWER OFF is set to ON, the DVD/VCR switches itself from DVD mode to VCR mode if disc
playback stops for more than 30 minutes and you press no buttons on the remote or the DVD/VCR. Details are on
pages 55-56. This prevents possible damage to your TV’s picture tube that can occur if a still image is left on too long.
A screen saver appears on the TV screen during DVD mode.
•
The screen saver appears when you leave the DVD/VCR in stop mode for about five minutes to protect the TV
screen from burn-in.
You want to use the DVD player during a VCR Timer Recording or while “ ” appears on the display
panel.
•Press y to turn on the DVD/VCR. Press DVD to choose DVD mode, then continue with other DVD
features as described in this manual.
A maximum of 999 MP3/Windows MediaTMAudio/JPEG files can be recognized.
Power Failure
•
Clock and language setting will be lost after 30 seconds of power failure. See pages 19-20 to set up the clock and
language again.
The VCR will not record a TV program.
•
This DVD/VCR does not have a tuner to receive TV broadcasting.
•
You must connect this DVD/VCR to an external tuner to record TV programs.
•
Check the connections between the DVD/VCR and the external tuner. Details are on page 9.
•
Put the DVD/VCR in VCR mode. Press VCR or SOURCE so VCR light appears on the front of the DVD/VCR.
•
Make sure the video cassette has a record tab. Details are on page 21.
The VCR will not perform a Timer Recording.
•
Make sure the recording start and stop times are set correctly. Details are on pages 24-25.
•
Make sure a tape is in the VCR and the tape has a record tab. Details are on page 21. If, after programming a Timer
Recording, you press TIMER SET without putting a tape in the DVD/VCR,“ ” will blink on the display panel.
•
If the record tab on a tape is missing, the DVD/VCR will eject the tape.“ ” will blink.
•
Press TIMER SET to put the DVD/VCR in standby mode for the Timer Recording.
•
Make sure the VCR clock is set. Details are on page 19.
•
The VCR may not perform or continue a Timer Recording if the power fails.
•
Finish programming a Timer Recording at least 5 minutes before it is set to begin.
•
12 p.m. is noon; 12 a.m. is midnight.
There is no picture or the picture is noisy or has streaks during video cassette playback.
•
Put the DVD/VCR in VCR mode. Press VCR or SOURCE so VCR light appears on the front of the DVD/VCR.
•
Select the correct Video In channel at the TV. Details are on page 8.
•
Adjust the tracking. Details are on page 31.
•
TVs placed too close to the DVD/VCR can cause interference during tape playback. Move the DVD/VCR away from the TV
.
TV programs cannot be watched normally.
•
Check the connections between the DVD/VCR and the external tuner. Details are on page 9.
You cannot insert a video cassette.
•
Insert the tape, window side up, with the record tab facing you.
•
Make sure that there is no tape on the VCR by pressing STOP/EJECT CA on the front of the DVD/VCR.
•
Gently push on the center of the tape when putting it in the VCR. Never force the tape into the VCR.
•
If a Timer Recording is set, you cannot insert a tape without a record tab.
You cannot remove the tape.
•
Make sure the power plug is completely connected to a power outlet.
•
If a Timer Recording has been set, press TIMER SET on the remote control or STOP/EJECT CA on the front panel to
cancel the timer standby mode temporarily. “ ” will disappear from the display panel.Then, press STOP/EJECT CA
on the front of the DVD/VCR to eject the tape. Insert another tape and press TIMER SET to reset the Timer
Recording.
• Unplug the DVD/VCR power cord for 5 minutes. Then, plug in the power cord again and press y on the
DVD/VCR. Press STOP/EJECT C A on the DVD/VCR 3 to 5 times. If the tape still does not eject, you
may need to have an authorized servicer remove the tape.
E8E20UD_EN2 8/17/07 5:40 PM Page 59
Page 60

English
60 Helpful Hints (cont’d)
DVD/VCR ejects the tape when you press REC I or TIMER SET.
•
Make sure the tape has a record tab. Details are on page 21.
Hi-Fi Stereo Sound
•
During playback, Hi-Fi audio may normally revert to normal audio when you adjust tracking.
•
When connecting the DVD/VCR to a TV with the red and white audio cable, you will only get stereo sound if you
connect the DVD/VCR AUDIO OUT jacks on the DVD/VCR to the AUDIO IN jacks on your TV, and if the TV is on
its Audio/Video In channel. See your TV owner’s manual for details.
•
When you connect the DVD/VCR AUDIO OUT jacks on the DVD/VCR to the AUDIO IN jacks on your TV, the
stereo light on the TV might not glow.
•
Only tapes recorded in Hi-Fi audio will play in Hi-Fi audio. Tapes recorded in normal audio will play in monaural
(single-channel) audio.
Cleaning the video heads
•
Your DVD/VCR automatically cleans the video heads of the VCR each time you insert a tape. However, the heads
may become dirty. If so, have an authorized servicer clean the video heads. Eventually, the heads may need to be
replaced.
The playback picture is too dim, too bright or fluctuates in brightness.
•
Some programs may be broadcast with copyright protection technology in order to protect the rights of copyright
owners. This technology is used on programs that are recorded on video cassettes or DVDs, as well as some
programs broadcast by antenna/cable/satellite television channels. Programs broadcast with copyright protection may
not record clearly. Likewise, if you play a tape that is a recording of a copyright protected program, the picture may
not be clear. Tapes of copyright protected programs may have a picture that is dark or dim, or the brightness of the
picture may fluctuate. Therefore, avoid recording or playing copies of copyright protected programs.
E8E20UD_EN2 8/17/07 5:40 PM Page 60
Page 61

English
Care and Maintenance 61
Cleaning the DVD/VCR
• Wipe the front panel and other exterior surfaces of the DVD/VCR with a soft, slightly damp cloth.
• Never use a solvent, thinner, benzene or alcohol to clean the DVD/VCR. Do not spray insecticide liquid
near the DVD/VCR. Such chemicals may discolor the surface or damage the DVD/VCR.
Cleaning a Disc
• Use a soft, dry cloth to wipe the disc.
• Wipe the disc in a straight line from the center to the edge. Never wipe the disc in a circular motion.
• Do not use detergent or abrasive cleaning agents.
• Handle the discs so fingerprints and dust do not adhere to the discs.
• Always store the disc in its protective case when it is not in use.
Checking the Laser
• If the DVD/VCR does not operate as described in this manual, the DVD player’s laser may be dirty.
Consult an Authorized Service Center for inspection and cleaning of the laser.
Caring for Video Cassettes
• Use only cassettes with the mark.
• Remove any light adhesive stick-on notes from the video cassette before putting the cassette in the VCR.
Removable labels can jam the VCR.
Caring for the VCR’s Video Heads
• Periodic maintenance is required to maintain your DVD/VCR’s excellent performance. The VCR has an
Automatic Head Cleaner. However, the video heads will require replacement eventually. Only an
authorized service center should perform this service.
VCR Video Heads
4 heads - Hi-Fi
DVD Color System
NTSC
Frequency Response
DVD (linear sound):
20 Hz to 22 kHz (sample rate: 48 kHz)
20 Hz to 44 kHz (sample rate: 96 kHz)
Audio CD: 20 Hz to 20 kHz
Signal-to-Noise Ratio
Audio CD: 100 dB JEITIA
(Japan Electronics and Information Technology Industries
Association)
Dynamic Range
DVD (linear sound): 90 dB
Audio CD: 85 dB (JEITIA)
Total Distortion Factor
Audio CD: 0.03% (JEITIA)
DVD: 0.03%
Wow and Flutter
Below the measurement limitation
(±0.001% W PEAK) (JEITIA)
Power Requirement
120V AC +/- 10%, 60 Hz +/- 0.5%
Power Consumption
Power on: 21 W
Power off: 3.8 W
Operating Temperature
41°F (5°C) to 104°F (40°C)
Relative Humidity
30% to 80%
Dimensions
17.1” (W) x 3.7” (H) x 9.2” (D)
(435mm x 94mm x 233mm)
Weight
5.8 lbs. (2.6 kg.)
NOTE: Designs and specifications are subject to change
without notice.
Specifications
E8E20UD_EN2 8/17/07 5:40 PM Page 61
Page 62

English
62 Limited Warranty
Philips, P.O. Box 671539, Marietta, GA. 30006-0026
PHILIPS LIMITED WARRANTY
NINETY (90) DAY
WARRANTY COVERAGE:
PHILIPS warranty obligation is limited to the terms set forth
below.
WHO IS COVERED:
Philips warrants the product to the original purchaser or the
person receiving the product as a gift against defects in materials and workmanship as based on the date of original purchase
(“Warranty Period”) from an Authorized Dealer. The original
sales receipt showing the product name and the purchase date
from an authorized retailer is considered such proof.
WHAT IS COVERED:
The Philips warranty covers new products if a defect arises and
a valid claim is received by Philips within the Warranty Period.
At its option, Philips will either (1) repair the product at no
charge, using new or refurbished replacement parts, or (2)
exchange the product with a product that is new or which has
been manufactured from new, or serviceable used parts and is
at least functionally equivalent or most comparable to the original product in Philips current inventory, or (3) refund the original purchase price of the product.
Philips warrants replacement products or parts provided under
this warranty against defects in materials and workmanship
from the date of the replacement or repair for ninety (90) days
or for the remaining portion of the original product’s warranty,
whichever provides longer coverage for you. When a product
or part is exchanged, any replacement item becomes your
property and the replaced item becomes Philips’ property.
When a refund is given, your product becomes Philips’ property.
Note: Any product sold and identified as refurbished or
renewed carries a ninety (90) day limited warranty.
Replacement product can only be sent if all warranty
requirements are met. Failure to follow all requirements can result in delay.
WHAT IS NOT COVERED - EXCLUSIONS AND LIMITATIONS:
This Limited Warranty applies only to the new products manufactured by or for Philips that can be identified by the trademark, trade name, or logo affixed to it. This Limited Warranty
does not apply to any non-Philips hardware product or any
software, even if packaged or sold with the product. NonPhilips manufacturers, suppliers, or publishers may provide a
separate warranty for their own products packaged with the
bundled product.
Philips is not liable for any damage to or loss of any programs,
data, or other information stored on any media contained within the product, or any non-Philips product or part not covered
by this warranty. Recovery or reinstallation of programs, data
or other information is not covered under this Limited
Warranty.
This warranty does not apply (a) to damage caused by accident,
abuse, misuse, misapplication, or non-Philips product, (b) to
damage caused by service performed by anyone other than
Philips or Philips Authorized Service Location, (c) to a product
or a part that has been modified without the written permission of Philips, or (d) if any Philips serial number has been
removed or defaced, or (e) product, accessories or consumables sold “AS IS” without warranty of any kind by including
refurbished Philips product sold “AS IS” by some retailers.
This Limited Warranty does not cover:
• Shipping charges to return defective product to Philips.
• Labor charges for installation or setup of the product, adjustment of customer controls on the product, and installation
or repair of antenna systems outside of the product.
• Product repair and/or part replacement because of improper
installation, connections to improper voltage supply, abuse,
neglect, misuse, accident, unauthorized repair or other cause
not within the control of Philips.
• Damage or claims for products not being available for use, or
for lost data or lost software.
• Damage occurring to product during shipping.
•A product that requires modification or adaptation to enable
it to operate in any country other than the country for
which it was designed, manufactured, approved and/or
authorized, or repair of products damaged by these modifications.
•A product used for commercial or institutional purposes
(including but not limited to rental purposes).
• Product lost in shipment and no signature verification receipt
can be provided.
• Failure to operate per Owner’s Manual.
TO OBTAIN ASSISTANCE IN THE U.S.A., PUERTO
RICO, OR U.S. VIRGIN ISLANDS…
Contact Philips Customer Care Center at:
1-888-PHILIPS (1-888-744-5477)
TO OBTAIN ASSISTANCE IN CANADA…
1-800-661-6162 (French Speaking)
1-888-PHILIPS (1-888-744-5477) -
(English or Spanish Speaking)
REPAIR OR REPLACEMENT AS PROVIDED UNDER THIS
WARRANTY IS THE EXCLUSIVE REMEDY FOR THE CONSUMER. PHILIPS SHALL NOT BE LIABLE FOR ANY INCIDENTAL OR CONSEQUENTIAL DAMAGES FOR BREACH OF
ANY EXPRESS OR IMPLIED WARRANTY ON THIS PRODUCT. EXCEPT TO THE EXTENT PROHIBITED BY APPLICABLE LAW, ANY IMPLIED WARRANTY OF MERCHANTABILITY OR FITNESS FOR A PARTICULAR PURPOSE ON THIS
PRODUCT IS LIMITED IN DURATION TO THE DURATION
OF THIS WARRANTY.
Some states do not allow the exclusions or limitation of incidental or consequential damages, or allow limitations on how
long an implied warranty lasts, so the above limitations or
exclusions may not apply to you.
This warranty gives you specific legal rights. You may have other rights which vary from state/province to state/province.
3121 233 48791
E8E20UD_EN2 8/17/07 5:40 PM Page 62
Page 63

English
Information Index 63
ac power cord . . . . . . . . . . . . . . . . .18
angle button . . . . . . . . . . . . . . . .18,39
angle icon . . . . . . . . . . . . . . .39, 55-56
arrow buttons . . . . . . . . . . . . . . . . .18
audio button . . . . . . . . . . . . . . . .18,40
audio in/out jacks . . . . . . . .9-12,18,23
audio settings . . . . . . . . . . . . . . . . . .52
auto power off . . . . . . . . . . . . . .55-56
auto repeat . . . . . . . . . . . . . . . . . . .29
automatic
tape playback . . . . . . . . . . . . . . . .31
tape rewind, eject . . . . . . . . . . . . .31
a-b repeat . . . . . . . . . . . . . . . . . . . .37
a-b repeat button . . . . . . . . . . . .18,37
back button . . . . . . . . . . . . . . . . . . .18
batteries . . . . . . . . . . . . . . . . . . . . . .13
bit-rate display . . . . . . . . . . . . . . . . .45
black level . . . . . . . . . . . . . . . . . . . .47
camera angle . . . . . . . . . . . . . . . . . .39
cassette compartment . . . . . . . . . . .17
chapters . . . . . . . . . . . . . . . . . . . . . .34
clear button . . . . . . . . . . . . . . . .18, 19
clock . . . . . . . . . . . . . . . . . . . . . . . .22
coaxial digital audio out jack . . .12, 18
component video out jacks . . . .10, 18
connections . . . . . . . . . . . . . . . . .8-12
contents, table of . . . . . . . . . . . . . . . .5
controls
dvd/vcr . . . . . . . . . . . . . . . . . . . . .18
remote . . . . . . . . . . . . . . . . . . . . .18
copyright protection . . . . . . . .4, 23, 60
counter . . . . . . . . . . . . . . . . . . . .20, 29
disc menu button . . . . . . . . . . . .18, 32
disc menus . . . . . . . . . . . . . .32, 48-49
disc tray . . . . . . . . . . . . . . . . . . . . . .17
display button . . . . . . . . .18, 20, 45-46
display messages . . . . . . . . . . . . . . . .17
display panel . . . . . . . . . . . . . . . . . . .17
displays . . . . . . . . . . . . . . . . .20, 45-46
dolby digital . . . . . . . . . . . . . . . . . . .52
down sampling . . . . . . . . . . . . . . . . .52
drc (dynamic range control) . . . . . .52
dual playback . . . . . . . . . . . . . . . . . .44
duplication (dvd to videotape) . . . . .28
duplication (tape) . . . . . . . . . . . . . . .23
dvd button . . . . . . . . . . . . . . . . . . . .18
dvd light . . . . . . . . . . . . . . . . . . . . . .17
ejecting a tape . . . . . . . . . . . .15,31,60
fast forward . . . . . . . . . . . . . . . .31,33
ffw D button . . . . . . . . . . . . . . . . .18
folder playback . . . . . . . . . . . . . . . . .44
front panel . . . . . . . . . . . . . . . . . . . .17
glossary . . . . . . . . . . . . . . . . . . . . . .57
head cleaner . . . . . . . . . . . . . . . . . . .60
helpful hints . . . . . . . . . . . . . . . .58-60
hi-fi stereo sound . . . . . . . . . . . . . . .32
hookups
cable box/satellite receiver . . . . . .9
component video . . . . . . . . . . . . .10
S-video . . . . . . . . . . . . . . . . . . . . .10
stereo . . . . . . . . . . . . . . . . . . .11-12
tv . . . . . . . . . . . . . . . . . . . . . . .9-12
index search . . . . . . . . . . . . . . . . . . .30
initializing . . . . . . . . . . . . . . . . . . . . .47
input button . . . . . . . . . . . . . . . .18, 21
jpeg display . . . . . . . . . . . . . . . . . . . .46
jpeg playback . . . . . . . . . . . . . . . .43-44
language (dvd) . . . . . . . . . . . . . . .48-49
language (vcr) . . . . . . . . . . . . . . . . . .20
line input mode . . . . . . . . . . . . . . . .24
long playback . . . . . . . . . . . . . . . . . .57
lp . . . . . . . . . . . . . . . . . . . . . . . . . . .57
markers . . . . . . . . . . . . . . . . . . . . . .38
menus . . . . . . . . . . . . . . . . . . . . . .6, 32
mode button . . . . . . . . . . . . . . .18,42
mp3 display . . . . . . . . . . . . . . . . . . .46
mp3 playback . . . . . . . . . . . . . . .43-44
number buttons . . . . . . . . . . . . . . . .18
ok button . . . . . . . . . . . . . . . . . . . . .18
on-screen status displays (vcr) . . . . .20
one-touch recording . . . . . . . . . . . .22
open/close A button . . . . . . . . .16, 18
osd language . . . . . . . . . . . . . . . .48-49
parental . . . . . . . . . . . . . . . . . . . .53-54
parental password . . . . . . . . . . . . . .53
pause button . . . . . . . . . .18,31, 36, 41
play button . . . . . . . . . . . . . .15-16, 18
playing discs . . . . . . . . . . . . . . . . . . .16
playing tapes . . . . . . . . . . . . . . . . . . .15
power
cord . . . . . . . . . . . . . . . . . . . . . . .18
on light . . . . . . . . . . . . . . . . . . . . .18
program . . . . . . . . . . . . . . . . . . . . . .42
progressive scan . . . . . . . . . . . . . . . .51
quick setup . . . . . . . . . . . . . . . . .48-52
random . . . . . . . . . . . . . . . . . . . . . .42
rapid play with voice . . . . . . . . . . . .33
rear panel . . . . . . . . . . . . . . . . . . . . .18
rec I button . . . . . . . . . . . . .18,21-22
recording
basic . . . . . . . . . . . . . . . . . . . . . . .21
prevention . . . . . . . . . . . . . . . . . .21
timer . . . . . . . . . . . . . . . . . . . .24-25
remote control
batteries . . . . . . . . . . . . . . . . . . . .13
buttons . . . . . . . . . . . . . . . . . . . . .18
sensor . . . . . . . . . . . . . . . . . . . . .18
repeat button . . . . . . . . . . . . . . .18,37
repeat (discs) . . . . . . . . . . . . . . . . . .37
repeat (tape) . . . . . . . . . . . . . . . . . .29
rerecording . . . . . . . . . . . . . . . . . . .23
resume on . . . . . . . . . . . . . . . . . . . .36
reverse searching . . . . . . . . . . . .31,33
rew E button . . . . . . . . . . .18,31,33
safety precautions . . . . . . . . . . . . . . .4
satellite link . . . . . . . . . . . . . . . . .26-27
search button . . . . . . . . . .18, 30, 34-35
searching . . . . . . . . . . . . . . . . . . .31,33
sensor (remote) . . . . . . . . . . . . . . . .18
setup button . . . . . . . . . . . . . . . . . .18
skip ∑, skip w . . . . . . . . . . . . .18,35
slow motion . . . . . . . . . . . . . . . .31,41
slp . . . . . . . . . . . . . . . . . . . . . . . . . .57
source button . . . . . . . . . . . . . . . . .18
sp . . . . . . . . . . . . . . . . . . . . . . . . . . .57
specifications . . . . . . . . . . . . . . . . . .61
speed button . . . . . . . . . . . . . . .18,21
standard playback . . . . . . . . . . . . . . .57
standby-on y button . . . . . . . . . . .18
status display (vcr) . . . . . . . . . . . . . .20
step-by-step playback . . . . . . . . . . . .36
stereo sound . . . . . . . . . . . . . . . . . .40
stereo TV hookups . . . . . . . . . . .11-12
still mode . . . . . . . . . . . . . . . . . .50-51
still picture . . . . . . . . . . . . . . . . .31,36
stop C button . . . . . . . . . . . . . . . . .18
stop/eject C A (vcr) button . . . . . . .18
subtitle button . . . . . . . . . . . . . .18,39
super high speed searching . . . . . . .31
super long playback . . . . . . . . . . . . .57
s-video out jack . . . . . . . . . . . . .10, 18
table of contents . . . . . . . . . . . . . . . .5
tape
duplication . . . . . . . . . . . . . . . . . .23
eject . . . . . . . . . . . . . . . . .18,31,59
speed . . . . . . . . . . . . . . . . . . . . . .57
time search . . . . . . . . . . . . . . . . . . .30
timer recording
canceling . . . . . . . . . . . . . . . . . . .25
setting . . . . . . . . . . . . . . . . . . .24-25
timer set button . . . . . . . . . . . . .18, 25
title button . . . . . . . . . . . . . . . . .18,32
titles . . . . . . . . . . . . . . . . . . . . . . . . .32
tracking . . . . . . . . . . . . . . . . . . . . . .31
tracks . . . . . . . . . . . . . . . . . . . . . . . .35
tv aspect . . . . . . . . . . . . . . . . . . .50-51
tv hookups . . . . . . . . . . . . . . . . . .8-12
vcr
button . . . . . . . . . . . . . . . . . . . . .18
light . . . . . . . . . . . . . . . . . . . . . . .17
video in/out jacks . . . . . . . . . . .9-12, 18
virtual surround . . . . . . . . . . . . . . . .47
warranty . . . . . . . . . . . . . . . . . . . . .62
Windows MediaTMAudio display
. . . . . .46
Windows MediaTMAudio playback
. . . .43
zoom . . . . . . . . . . . . . . . . . . . . . . . .41
zoom button . . . . . . . . . . . . . . .18, 41
This owner’s manual is made of recyclable
materials. Remember to recycle!
E8E20UD_EN2 8/17/07 5:40 PM Page 63
Page 64

Español
Al registrar su modelo con PHILIPS usted cumplirá con los requisitos para obtener todos los valiosos beneficios
que se indican a continuación, ¡no se los pierda! Complete y devuelva su Tarjeta de registro de producto o
regístrese en línea en www.philips.com/welcome para asegurarse de:
Devuelva su Tarjeta de registro de producto o regístrese en línea en
www.philips.com/welcome hoy mismo para aprovechar al máximo su compra.
*Comprobante de
Compra
La devolución de la tarjeta
incluida garantiza que se archive
la fecha de compra, de modo que
no necesitará más papeleo para
obtener el servicio de garantía.
*Seguridad del
producto Notificación
Al registrar su producto, recibirá
la notificación (directamente del
fabricante) en el raro caso de un
retiro de productos o de
defectos en la seguridad.
*Beneficios adicionales
Registrar su producto garantiza
que recibirá todos los privilegios
a los cuales tiene derecho,
incluyendo las ofertas especiales
para ahorrar dinero.
Visite nuestro sitio en el World Wide Web en http://www.philips.com/welcome
Sólo para uso del cliente
Escriba a continuación el Nº de serie, el cual se ubica en
la parte posterior del gabinete. Guarde esta información
para futura referencia.
Nº de modelo. __________________________________
Nº de serie. ____________________________________
Este “relámpago” indica material no aislado dentro
de la unidad que puede causar una descarga
eléctrica. Para la seguridad de todos en su hogar,
por favor no retire la cubierta del producto.
El “signo de exclamación” llama la atención hacia
funciones sobre las que debería leer con atención
en la literatura adjunta para evitar problemas
operativos y de mantenimiento.
ADVERTENCIA: Para reducir el riesgo de
incendios o de descarga eléctrica, este aparato no se
debe exponer a la lluvia ni a la humedad, y no se le
deben colocar encima objetos llenos de líquido como
jarrones.
PRECAUCIÓN: Para evitar descargas eléctricas, haga que la
paleta ancha del enchufe coincida con la ranura ancha e
introdúzcala hasta el fondo.
ATTENTION: Pour éviter les chocs électriques, introduire la
lame la plus large de la fiche dans la borne correspondante de
la prise et pousser jusqu’au fond.
¡Felicitaciones por su compra
y bienvenido a la “familia”!
Estimado propietario de un
producto PHILIPS:
Gracias por su confianza en PHILIPS. Usted ha
escogido uno de los productos mejor
construidos y con mejor respaldo disponible
hoy en día. Haremos todo lo que esté a
nuestro alcance por mantenerle satisfecho con
su compra durante muchos años.
Como miembro de la “familia” PHILIPS, usted
tiene derecho a estar protegido con una de las
garantías más completas y redes de servicio
más sobresalientes de la industria. Lo que es
más: su compra le garantiza que recibirá toda
la información y ofertas especiales a las que
tiene derecho, además de un fácil acceso a los
accesorios desde nuestra cómoda red de
compra desde el hogar.
Y lo que es más importante: usted puede
confiar en nuestro irrestricto compromiso con
su satisfacción total.
Todo esto es nuestra manera de decirle
bienvenido y gracias por invertir en un
producto PHILIPS.
P.S.: Para aprovechar al máximo su
compra PHILIPS, asegúrese de llenar
y de devolver inmediatamente su
Tarjeta de registro del producto o
regístrese en línea en
www.philips.com/welcome
Conozca estos
símbolos de
seguridad
E8E20UD_SP1 8/22/07 4:43 PM Page 2
RIESGO DE CHOQUE ELÉCTRICO
AVISO
NO ABRIR
Atención: Para reducir el riesgo de choque
eléctrico, no quite la tapa (o el panel posterior). En
su interior no hay piezas que el usuario pueda
reparar. Para servicio dirijase a personel calificado.
Page 65

Español
Información sobre seguridad 3
1. Lea estas instrucciones.
2. Guarde estas instrucciones.
3. Preste atención a todas las advertencias.
4. Siga todas las instrucciones.
5. No use este aparato cerca del agua.
6. Límpielo solamente con un paño seco.
7. No bloquee ninguno de los orificios de ventilación. Instálelo de acuerdo
con las instrucciones de los fabricantes.
8. No lo instale cerca de fuentes de calor, tales como radiadores, compuer-
tas de tiro (registros) de calor, estufas u otros aparatos (incluidos amplificadores) que generen calor.
9. No anule el objetivo de seguridad del enchufe polarizado o de conexión
a tierra. Un enchufe polarizado tiene dos paletas,
una más ancha que la otra. Un enchufe de conexión a tierra tiene dos paletas y una tercera espiga
de conexión a tierra. La paleta más ancha o la
tercera espiga es entregada para su seguridad. Si
el enchufe suministrado no se ajusta a su tomacorriente, consulte a un electricista para que reemplace el tomacorriente
obsoleto.
10. Evite pisar o apretar el cable de suministro eléctrico, especialmente en
los enchufes, tomacorrientes y el punto en que salen del aparato.
11. Sólo use aditamentos o accesorios especificados por el fabricante.
12. Utilice sólo un carro, soporte, trípode, repisa o mesa especifi-
cados por el fabricante o que se vendan junto con el aparato.
Si usa el carro, tenga precaución cuando mueva la combinación carro/aparato para evitar lesiones si éste se vuelca.
13. Desenchufe este aparato durante las tormentas eléctricas o cuando no se
use durante largos períodos.
14. Deje que personal calificado realice todo el servicio. Es necesario que el
aparato reciba servicio si se ha dañado en algún modo, como cuando se
daña el cable o enchufe de suministro de corriente, se ha derramado
líquido u objetos han caído dentro él, cuando el aparato ha estado
expuesto a lluvia o humedad, no opera bien o se ha caído.
15. Es posible que este producto contenga plomo y mercurio. La elimi-
nación de estos materiales podría estar regulada debido a consideraciones medioambientales. Para obtener información acerca de la eliminación o del reciclaje, póngase en contacto con sus autoridades locales
o con la Alianza de Industrias Electrónicas: en www.eiae.org
16. Daños que requieran servicio - El aparato debe recibir servicio de per-
sonal de servicio calificado cuando:
A. Se ha dañado el cable de alimentación o el enchufe; o
B. Han caído objetos o se ha derramado líquido dentro del aparato; o
C. El aparato ha quedado expuesto a la lluvia; o
D. El aparato parece no funcionar normalmente o su rendimiento ha
cambiado notoriamente; o
E. Se ha dejado caer el aparato o se ha dañado la caja.
17. Inclinación/estabilidad - Todos los televisores deben cumplir con las
normas de seguridad generales recomendadas internacionalmente en
cuanto a las propiedades de inclinación y estabilidad del diseño de su
gabinete.
●
No comprometa estas normas de diseño aplicando una fuerza de tracción excesiva a la parte delantera o superior del gabinete lo que finalmente puede hacer que el producto se vuelque.
●
Además, no se ponga en peligro usted mismo o a sus niños colocando
equipos electrónicos o juguetes sobre el gabinete. Dichos artículos
pueden caer inesperadamente desde la parte superior del producto y
dañar el producto y/o causar lesiones personales.
18. Montaje en la pared o cielorraso - El aparato se debe montar en una
pared o cielorraso únicamente como lo recomienda el fabricante.
19. Líneas de energía eléctrica - Una antena exterior se debe ubicar lejos
de las líneas de energía.
20. Conexión a tierra de la antena exterior - Si se conecta una antena
exterior o un sistema de cable al producto, asegúrese de que la antena o
el sistema de cable estén conectados a tierra para proporcionar cierta
protección contra sobrevoltajes y acumulación de cargas electrostáticas.
En la Sección 810 del Código Eléctrico Nacional, ANSI/NFPA 70, se
proporciona información sobre la adecuada conexión a tierra de las
esteras y estructuras de apoyo, conexión a tierra del alambre de
acometida a una unidad de descarga de antena, tamaño de los conectores de conexión a tierra, ubicación de la unidad de descarga de antena,
conexión a los electrodos y requerimientos del electrodo de conexión a
tierra. Vea la Figura que aparece más abajo.
21. Entrada de objetos y líquidos - Se debe tener cuidado de que no
caigan objetos dentro de los orificios de la caja ni se derramen líquidos
a través de ellos.
a) Advertencia: Para reducir el riesgo de incendios o de descarga eléctrica, este aparato no se debe exponer a la lluvia ni a la humedad, y no se
le deben colocar encima objetos llenos de líquido como jarrones.
22. Uso de las baterías PRECAUCIÓN - Para evitar escapes de las
baterías que pueden resultar en lesiones corporales, daño a la propiedad
o a la unidad:
●
Instale correctamente todas las baterías, con los polos + y - alineados
como está marcado en la unidad.
●
No mezcle las baterías (nuevas con antiguas o de carbono con alcalinas, etc.).
●
Retire las baterías cuando no use la unidad por un largo tiempo
23. Sobrecargas - No sobrecargue los tomacorrientes de pared, los cables
de extensión o los receptáculos de uso general ya que esto puede ser
causa de un riesgo de incendio o de descarga eléctrica.
24. Ingreso de objetos y de líquidos - Nunca deje ingresar objetos de
ningún tipo a este producto a través de aberturas, ya que podrían tocar
puntos con voltajes peligrosos o cortocircuitar piezas que podrían ocasionar un incendio o una descarga eléctrica. Nunca derrame líquidos de
ningún tipo sobre este producto.
25. Piezas de repuesto - Cuando se necesiten piezas de repuesto, asegúrese
de que el técnico de mantenimiento haya utilizado piezas especificadas
por el fabricante o que tengan las mismas características que la pieza
original. Los reemplazos no autorizados pueden ser causa de incendios,
descargas eléctricas u otros peligros.
26. Verificación de seguridad - Luego de completarse cualquier manten-
imiento o reparación a este producto, solicítele al técnico de mantenimiento que realice verificaciones de seguridad para determinar que el
producto se encuentra en condiciones adecuadas de operación.
E8E20UD_SP1 8/22/07 4:43 PM Page 3
INSTRUCCIONES DE SEGURIDAD IMPORTANTES
Lea antes de operar el equipo
Nota para el instalador del sistema CATV: Se hace este recordatorio para llamar la atención del instalador del sistema CATV sobre el
Artículo 820-40 de donde se proporcionan instrucciones para la apropiada conexión a tierra y, en particular, se especifica que la tierra de los cables
se conectará al sistema de conexión a tierra del edificio tan cerca del punto de entrada del cable como sea posible.
Conector macho
de CA polarizado
Ejemplo de conexión a tierra de la
antena según NEC, Código Eléctrico
Nacional
ABRAZADERAS DE TIERRA
CONDUCTOR DE ENTRADA DE LA ANTENA
CAJA DE LA ENTRADA DEL SUMINISTRO ELECTRICO
UNIDAD DE DESCARGA DE LA ANTENA
CONDUCTOR DE TIERRA (NEC SECTION 810-21)
ABRAZADERAS DE TIERRA
SISTEMA DE ELECTRODO DE PUESTA A TIERRA DEL SUMINISTRO ELECTRICO
(NEC SECTION 810-20)
(NEC ART 250, PART H)
Page 66

Español
4 Información sobre seguridad (continuación)
Precauciones de seguridad
Advertencia: Para prevenir riesgos de incendios u descargas eléctricas, no exponga este equipo
a la lluvia o la humedad.
Advertencia de la Comisión Federal de Comunicaciones (FCC): Todo cambio o
modificación no autorizados a este aparato invalidarán la autorización del usuario para operarlo.
•
No coloque el equipo verticalmente. Instale el equipo en una posición horizontal y estable.
•
Asegúrese de extraer el disco y desenchufar el equipo del tomacorriente antes de proceder a
transportarlo.
Certificación del Departamento de Salud y Servicios Humanos (DHHS): Cumple con
el capítulo 21 subcapítulo 1 de la norma del Centro para la Radiación (CFR) vigente en el
momento de la fabricación.
Seguridad sobre láseres: Este equipo utiliza un láser. Debido a posibles lesiones
oculares, sólo personal calificado de servicio deberá retirar la cubierta o tratar de reparar este
aparato.
PRECAUCIÓN: EL EMPLEO DE CONTROLES O AJUSTES O LA REALIZACIÓN DE
PROCEDIMIENTOS QUE NO SEAN AQUELLOS ESPECIFICADOS AQUÍ PUEDE OCASIONAR
UNA EXPOSICIÓN PELIGROSA A LAS RADIACIONES.
PRECAUCIÓN: EXISTE RADIACIÓN LÁSER VISIBLE E INVISIBLE CUANDO SE ABRE EL
EQUIPO SIN QUE SE ENCUENTRE FUNCIONANDO EL CORRESPONDIENTE DISPOSITIVO
CORTACORRIENTE.NO FIJE LA VISTA EN EL HAZ. EL HAZ SE ENCUENTRA UBICADA EN
EL INTERIOR, CERCA DEL MECANISMO REPRODUCTOR DE CINTA.
Información especial para usuarios canadienses: Este aparato digital clase B
cumple con la norma canadiense ICES-003. Cet appareil numérique de la classe B est conforme à
la norme NMB-003 du Canada.
Interferencia de radio y TV: Este dispositivo ha sido comprobado y se lo encontró
comprendido dentro de los límites para un dispositivo digital clase B,según la sección 15 de las
disposiciones FCC. Estos límites están diseñados para proveer una protección razonable contra la
interferencia nociva en una instalación residencial. Este dispositivo genera, utiliza y puede radiar
energía de radiofrecuencia y, si no se lo instala y utiliza de acuerdo con las instrucciones, puede
ocasionar interferencia nociva a las radiocomunicaciones.
Sin embargo, no se puede garantizar que en una instalación específica no tengan lugar
interferencias. Si este dispositivo ocasionara interferencia nociva para la recepción de radio o
televisión, la cual puede ser determinada apagando y volviendo a encender el mismo,se sugiere
tratar de eliminar la interferencia adoptando una o más de las siguientes medidas:
1) Reoriente o reubique la antena receptora.
2) Aumente la separación entre el dispositivo y el receptor.
3) Conecte el dispositivo a un tomacorriente que corresponda a un circuito diferente de aquel al
cual está conectado el receptor.
4) Consulte con el distribuidor o con un técnico de radio/TV experimentado.
Aviso de copyright: La realización de copias no autorizadas de materiales protegidos
contra copias, incluyendo programas de ordenador, archivos, emisiones y grabaciones de sonido,
puede ser una violación de derechos de propiedad intelectual y constituir un delito.Este equipo
no debe ser utilizado para dicho propósito.
Protección de copyright: No se permiten las copias no autorizadas, las emisiones al
aire, la reproducción en público y el préstamo de los discos.
Este producto incorpora tecnología de protección de copyright que está protegida por patentes
de los EE.UU. y otros derechos de propiedad intelectual. El empleo de esta tecnología de
protección de copyright debe estar autorizado por Macrovision, y está concebido solamente para
domicilios y otros lugares de visión limitada a menos que sea autorizado para otros casos por
Macrovision. Se prohiben la descompilación o el desensamblaje.
Aviso para el empleo del barrido progresivo: Los consumidores deberán
observar que no todos los alta definición televisores son totalmente compatibles con este
producto y pueden hacer que a aparezcan en la imagen elementos extraños. En el caso de
problemas de imagen out de barrido progresivo con 525 (480), se recomienda que el usuario pase
la conexión a la out ‘definición convencional’. Si tiene preguntas respecto de la compatibilidad de
su televisor con este reproductor de DVD 525p (480p), comuníquese con nuestro centro de
servicio al cliente.
Declaración de conformidad
Número de modelo: DVP3345V/17
Nombre comercial: Philips
Entidad responsable: Philips Consumer Electronics Company
Marietta, GA 30006-0026
1-888-PHILIPS (744-5477)
Fabricado bajo licencia de Dolby Laboratories.“Dolby” y el símbolo de la doble D son marcas comerciales de Dolby
Laboratories.
Copyright 2007 por Philips.Todos los derechos reservados.
E8E20UD_SP1 8/22/07 4:43 PM Page 4
Page 67

Español
Tabla de contenidos 5
Información general
Información sobre seguridad . . . . . . . . . . . . . . .3-4
Tabla de contenidos . . . . . . . . . . . . . . . . . . . . . . . .5
Introducción . . . . . . . . . . . . . . . . . . . . . . . . . . . . .6
Discos y casetes de video reproducibles . . . . . . . .7
Configuración inicial del DVD/VCR
Conexiones . . . . . . . . . . . . . . . . . . . . . . . . . . .8-12
Configuración del control remoto . . . . . . . . . . . .13
Configuración inicial del DVD/VCR . . . . . . . . . . .14
Reproducción básica
Reproducción de video casetes . . . . . . . . . . . . . .15
Reproducción de discos . . . . . . . . . . . . . . . . . . .16
Controles básicos del DVD/VCR
Panel de exhibición . . . . . . . . . . . . . . . . . . . . . . .17
Panel frontal, Panel trasero y Control remoto . . .18
Configuración de VCR adicional
Reloj (VCR) . . . . . . . . . . . . . . . . . . . . . . . . . . . . .19
Idioma (VCR) . . . . . . . . . . . . . . . . . . . . . . . . . . .20
Exhibiciones del estado del VCR . . . . . . . . . . . . .20
Opciones grabación en VCR
Grabación de cintas de video . . . . . . . . . . . . . . .21
Grabación a un toque . . . . . . . . . . . . . . . . . . . . .22
Grabaciones de
grabaciones (duplicación de cintas) . . . . . . . . . . .23
Grabación con temporizador . . . . . . . . . . . . .24-25
Enlace por satélite . . . . . . . . . . . . . . . . . . . . .26-27
Duplicación de DVD a cinta de video . . . . . . . . .28
Opciones de reproducción de video
casetes
Reproducción repetitiva . . . . . . . . . . . . . . . . . . .29
Contador de cinta . . . . . . . . . . . . . . . . . . . . . . . .29
Búsqueda por tiempo, búsqueda indizada . . . . . . .30
Reproducción con efectos especiales . . . . . . . . .31
Funciones de operación automática . . . . . . . . . . .31
Funciones adicionales de VCR
Estéreo Hi-Fi . . . . . . . . . . . . . . . . . . . . . . . . . . . .32
Funciones de reproducción de discos
Menús, función de control de
reproducción(PBC) . . . . . . . . . . . . . . . . . . . . . . .32
Búsqueda rápida hacia adelante/atrás . . . . . . . . . .33
Reproducción rápida x1,3 y x0,8 con voz . . . . . .33
Búsqueda por título/capítulo/tiempo . . . . . . . . . .34
Búsqueda de pista . . . . . . . . . . . . . . . . . . . . . . . .35
Reproducción con pause y
paso a paso, reanudación activada . . . . . . . . . . . .36
Repetitiva, Repetición A-B . . . . . . . . . . . . . . . . . .37
Marcadores . . . . . . . . . . . . . . . . . . . . . . . . . . . .38
Subtítulos, Ángulos de cámara . . . . . . . . . . . . . . .39
Idioma del audio, Modo de sonido estéreo . . . . .40
Cámara lenta, Zoom . . . . . . . . . . . . . . . . . . . . . .41
Reproducción de programas/
Reproducción aleatoria . . . . . . . . . . . . . . . . . . . .42
Reproducción de MP3/Windows MediaTMAudio/JPEG . .
43-44
Exhibiciones en pantalla . . . . . . . . . . . . . . . . .45-46
Nivel de negro, Sonido envolvente virtual . . . . . .47
Inicialización . . . . . . . . . . . . . . . . . . . . . . . . . . . .47
Opciones de configuración del
reproductor DVD
Idioma . . . . . . . . . . . . . . . . . . . . . . . . . . . . . .48-49
Pantalla . . . . . . . . . . . . . . . . . . . . . . . . . . . . . .50-51
Barrido progresivo . . . . . . . . . . . . . . . . . . . . . . .51
Audio . . . . . . . . . . . . . . . . . . . . . . . . . . . . . . . . .52
Código de acceso paterno . . . . . . . . . . . . . . . . . .53
Niveles de control paterno . . . . . . . . . . . . . . . . .54
Otros . . . . . . . . . . . . . . . . . . . . . . . . . . . . . . .55-56
Información que usted puede llegar a
necesitar
Glosario . . . . . . . . . . . . . . . . . . . . . . . . . . . . . . .57
Sugerencias útiles . . . . . . . . . . . . . . . . . . . . . .58-60
Cuidado y mantenimiento . . . . . . . . . . . . . . . . . .61
Especificaciones . . . . . . . . . . . . . . . . . . . . . . . . . .61
Garantía limitada . . . . . . . . . . . . . . . . . . . . . . . . .62
Índice de información . . . . . . . . . . . . . . . . . . . . .63
E8E20UD_SP1 8/22/07 4:43 PM Page 5
Page 68

Español
6 Introducción
Funciones de VCR
• Configuración de canales
• Menús y exhibiciones en inglés, francés y
español
• Cabeza de 19 micrones
• Grabación: A un toque y con temporizador
• Reproducción repetitiva
• Enlace por satélite
• Búsqueda: Por tiempo, indexada, hacia adelante,
y hacia atrás
• Cámara lenta
• Imagen estática
• Contador de cinta
• Ajuste de pistas
¡Bienvenido!
Este DVD/VCR combina un reproductor de discos de video digital (DVD) y un videograbador
(VCR) Hi-Fi en un sólo equipo, permitiéndole reproducir DVD, discos compactos de audio (CD de
audio), y video casetes en un único aparato.
Lea con atención este manual del propietario para aprender a utilizar las funciones listadas a
continuación.
Contenido del módulo
Con su nuevo DVD/VCR se proveen los siguientes elementos.
• Control remoto y dos baterías AA
•Un juego de cables de audio (puntas roja y blanca) y video (puntas amarillas)
• Este Manual del propietario y una Guía rápida de inicio
Menús de disco DVD...
Algunas explicaciones de este Manual describen los menús de disco DVD. Los fabricantes de
DVD configuran los menús, que varían de un DVD a otro. No todos los DVD tienen menús. Si el
DVD tiene un menú, accédalo presionando DVD, luego DISC MENU en el Control remoto.
Encontrará los detalles en la página 32.
Menú de configuración del reproductor de DVD...
Algunas instrucciones explican cómo utilizar el Menú de configuración reproductor de DVD para
configurar las funciones del reproductor de DVD o un DVD. Acceda el menú del reproductor de
DVD presionando SETUP en el control remoto cuando se detiene la reproducción. Aunque una
función esté configurada en el menú del reproductor de DVD, la misma puede no estar
disponible si el DVD actual no incluye ese característica.
Funciones disponibles de disco...
Todas las funciones descriptas en este manual no están disponibles en cada disco.
Si la función no está disponible en el disco, no se puede utilizar el DVD/VCR para
que comience a estarlo. Si usted trata de acceder a una función que no está
disponible en ese momento, aparecerá una “X” en la esquina superior derecha de
la pantalla de TV.
Funciones de disco
• Opciones de idioma del
audio *
• Ángulos de cámara *
• Menús del DVD en el
idioma deseado *
• Marcadores
• Reproducción de MP3
• Reproducción de JPEG
• Reproducción de Windows
Media
TM
Audio
• Doble reproducción
• Control paterno *
• Reproducción con
pause/rápida/lenta/
paso a paso
• Reproducción de programas
• Barrido progresivo
• Reproducción aleatoria
• Repetición, Repetición A-B
• Reanudación activada
• Búsqueda tiempo
específico/título/capítulo/
pista
• Subtítulos *
• Zoom
* Si está disponible en el disco
E8E20UD_SP1 8/22/07 4:43 PM Page 6
Page 69

Español
Discos y casetes de video reproducibles 7
Discos reproducibles
El reproductor de DVD reproducirá discos de video digital (DVD); discos de video digital grabables (DVD+R, DVD-R);
discos de video digital regrabables (DVD+RW, DVD-RW) finalizados; discos compactos de video (VCD); discos
compactos de audio (CD); discos compactos grabables (CD-R) y discos compactos regrabables (CD-RW) finalizados.
Para reproducir un DVD, asegúrese de que el mismo satisfaga los requisitos de códigos regionales y sistemas de color
tal como se describe más abajo. Los discos que tengan los siguientes logotipos serán reproducidos por el reproductor
de DVD. No se garantiza que el DVD/VCR reproduzca otros tipos de discos.
• No coloque el equipo verticalmente. Instale el equipo en una posición horizontal y estable.
• Asegúrese de extraer el disco y desenchufar el equipo del tomacorriente antes de proceder a transportarlo.
Windows Media es una marca registrada de Microsoft Corporation.
Este equipo no es compatible con MBR (múltiples velocidades de transmisión de bits)
(MBR: un archivo que contiene el mismo contenido codificado en varias velocidades diferentes de transmisión de bits).
SOBRE LA FUNCIÓN PBC DE LOS CD de video
Este equipo puede reproducir CD de video 1,1 (sin PBC) y 2,0 (con PBC).
Con la versión 2,0 (con PBC), usted puede utilizar menús interactivos (por ejemplo, listas de reproducción) en la
pantalla de TV.
Cuando se reproduce un CD de video con PBC, algunas operaciones no pueden ser realizadas a menos que la función
PBC se cancele momentáneamente. Para obtener más detalles consulte la página 32.
Códigos de región
Los DVD deben ser rotulados para TODAS (ALL) las regiones o para la Región 1 para poder ser reproducidos en este
reproductor de DVD. No se pueden reproducir DVD que estén rotulados para otras regiones.
Busque en sus DVD los símbolos mostrados debajo. Si estos símbolos regionales no aparecen en su DVD, no se podrá
reproducir el mismo en este reproductor.
El número presente en el interior el globo se refiere a una región del mundo. La región 1
representa a los Estados Unidos, Canadá, las regiones superiores de Norteamérica, las
Bermudas, las Islas Vírgenes de los EE.UU. y pequeñas regiones cerca de Australia.
Un disco codificado en un formato de una región específica puede ser reproducido únicamente
en reproductores de DVD con el mismo código regional. Por ejemplo, si un disco está rotulado para la región 2, no se
puede reproducir el mismo en este reproductor.
Sistemas de color
En todo el mundo existen distintos sistemas de color. Los sistemas más comunes de color son el NTSC, que se utiliza
principalmente en los Estados Unidos y el esto de Norteamérica, el PAL y el SECAM.
Este reproductor de DVD reproducirá discos DVD tanto NTSC como PAL. No se pueden reproducir discos DVD
grabados en otros formatos. El sistema de color del DVD puede estar listado en el DVD o en el estuche del mismo. Su
televisor debe tener asimismo el sistema de color NTSC y/o PAL.
Video casetes reproducibles
El VCR de este DVD/VCR tiene un sistema de Alta Calidad (HQ) y es compatible con los equipos existentes de Video
Home System (VHS). Utilice únicamente video casetes que tengan la marca . El empleo de otras cintas puede
producir una calidad de imagen deficiente y excesivos depósitos en las cabezas de video, que pueden no estar cubiertos
por la garantía si tuviera lugar algún daño.
Este VCR tiene asimismo una cabeza de 19 micrones, que provee una mejor imagen cuando se reproducen cintas
grabadas a velocidad lenta (SLP).
Discos inaceptables
Si usted inserta un tipo inaceptable de disco, puede aparecer en la pantalla de TV un mensaje de error de disco. En este
reproductor de DVD no se podrán reproducir los siguientes discos.
• CD-ROM • Disco compacto interactivo (CD-I) • DVD-RAM
• Disco simple de video (VSD) • DVD-ROM • DVD-Audio
• Disco sin finalizar • El DVD contiene archivos MP3,Windows Media
TM
Audio o JPEG
• En un modo de grabación no compatible
En el siguiente disco, el sonido puede no llegar a ser escuchado.
• CD de Súper Audio: Sólo se podrá escuchar el sonido de la capa normal del CD. El sonido de la de capa de alta
densidad de un CD de Súper Audio no podrá ser escuchado.
DVD
archivos
MP3
CD de
audio
CD-R
CD-RW
DVD+R DVD+RW CD de
video
DVD-RWDVD-R
E8E20UD_SP1 8/22/07 4:43 PM Page 7
es una marca registrada de la empresa otorgante de la licencia del formato/logotipo del DVD.
Page 70

Español
8 Conexiones
Determinación de la mejor conexión posible...
Su conexión estará determinada principalmente por sus equipos existentes, especialmente su televisor. Estas pautas describen
cuáles opciones producen la mejor calidad de imagen y sonido.Usted no utilizará todos los conectores hembra del
DVD/VCR.
★★★★ Si su televisor tiene conectores hembra para In de video componente (que puede estar rotulada Y CR CB,Y PR PB
o YUV y puede ser verde, azul y roja) utilice los conectores hembra de video componente (
Y CB/PBCR/P
R
) para
obtener la mejor calidad de imagen. Si usted utiliza sólo esta conexión de video, únicamente estará disponible la
imagen del DVD. Para ver funciones del DVD en el televisor, configure el televisor a su canal de In video
componente. El video componente suministra la mejor calidad de imagen. Consulte la página 10.
El barrido progresivo provee menos parpadeo y mayor resolución de imagen que las señales de TV tradicionales
(525i/480i o entrelazado).
Si su televisor tiene barrido progresivo (525p/480p o progresivo), conecte el televisor a los conectores
hembra CONPONENT VIDEO OUT del DVD/VCR (
Y CB/PBCR/P
R
). En el menú PANTALLA del DVD/VCR
configure barrido progresivo (BARRIDO PROGR.) de ENC. Consulte las páginas 50 a 51. En el panel de exhibición
DVD/VCR aparecerá P.SCAN. Configure también su televisor a Barrido progresivo.
Si su televisor no tiene barrido progresivo pero tiene conectores hembra para In de video
componente, conéctelos a los conectores hembra de CONPONENT VIDEO OUT del DVD/VCR (
Y CB/P
B
CR/P
R
). Configure barrido progresivo (BARRIDO PROGR.) a APDO.ya sea en el menú PANTALLA o presionando
y manteniendo presionado PLAY B (DVD) en el frente del DVD/VCR durante más de 5 segundos.Consulte las
páginas 50 a 51.
★★★ Si su televisor tiene un conector hembra In de S-video (que puede también estar rotulado Y/C o S-VHS), utilice el
conector hembra S-VIDEO OUT para obtener una excelente calidad de imagen. Si usted utiliza sólo esta conexión
de video, únicamente estará disponible la imagen del DVD.Para ver funciones del DVD en el televisor, configure el
televisor a su canal de In de S-video. Consulte la página 10.
★★ Si su televisor tiene un solo conector hembra amarillo In de video (que puede también estar rotulado CVBS,
Compuesto o banda base), utilice el conector hembra amarillo DVD/VCR VIDEO OUT para obtener una buena
calidad de imagen. Esta conexión provee una imagen tanto para el reproductor de DVD como para el VCR. Para ver
funciones del DVD o del VCR en el televisor, configure el televisor a su canal de In de video.Consulte la página 9.
★★★★ Si usted tiene un equipo estéreo con un conector hembra In coaxial de audio digital, esto provee el sonido más
claro para el reproductor de DVD. Conecte el conector hembra para COAXIAL DIGITAL AUDIO OUT del
DVD/VCR a su equipo estéreo para obtener la mejor calidad de sonido. Si usted utiliza solamente esta conexión de
audio, sólo estará disponible el sonido del disco (sin VCR). Consulte la página 12.
★★★ Si no es posible efectuar conexiones de audio digital, conecte los conectores hembra rojo y blanco DVD/VCR
AUDIO OUT del DVD/VCR a los conectores hembra In de audio de su equipo estéreo o televisor. Esta conexión
provee sonido tanto para el reproductor de DVD como para el VCR. Consulte las páginas 10 a 11.
Antes de comenzar...
● Consulte los manuales de su televisor, caja de TV por cable, equipo estéreo u otros dispositivos según sea necesario.
Observe el estilo de los conectores hembra y el resto de los conectores en los demás equipos.Determine la manera de
seleccionar diferentes canales de In de audio y video en sus demás equipos de modo que pueda ver y escuchar el material
del DVD/VCR reproduciéndose en el televisor,equipo estéreo, etc.
● Desconecte todos los equipos de sus tomacorrientes. Conecte los equipos a sus tomacorrientes sólo después de que
haya terminado de conectar todo.Nunca realice conexiones ni las cambie con los equipos conectados al suministro de
energía eléctrica.
Recuerde...
● Configure el televisor al canal correcto de In de video.Dichos canales pueden estar denominados AUX o AUXILIAR IN ,
AUDIO/VIDEO o A/V IN, In de EXT1 o de Externo, etc. Estos canales a menudo están ubicados cerca del canal cero (0).
O el control remoto de su televisor puede tener un botón o llave que seleccione el canal de In de video. Para obtener
detalles consulte el manual del propietario de su televisor. Si usted no ve en el televisor la reproducción del DVD o el
VCR, vaya al canal más bajo de TV (01 o 02) y cambie de canales hacia abajo hasta que vea la imagen del DVD o VCR en
el televisor.
Para facilitar la búsqueda del canal correcto de In de Audio/Video, encienda el DVD/VCR.Presione DVD para poner el
DVD/VCR en el modo DVD. Sin ningún disco en el reproductor, aparecerá en la pantalla del televisor un gran logotipo de
DVD video cuando usted sintonice el televisor en el canal correcto de In de Audio/Video.
● Configure el equipo estéreo al modo correcto de canal o “fuente”.
● Según sea su conexión, usted puede tener que adquirir cables o adaptadores adicionales. Si su televisor o monitor tienen
conectores de tipo BNC, necesitará un adaptador.
Una vez que usted determine la mejor opción, busque su selección en las páginas 9 a 12.Siga los pasos para la
conexión que seleccionó. Luego,vaya a la página 14 para completar la configuración inicial.
E8E20UD_SP1 8/22/07 4:43 PM Page 8
Page 71

Español
Conexiones (continuación) 9
DIGITAL
AUDIO OUT
COAXIAL
AUDIO
OUT
DVD
L
R
LRL
R
S-VIDEO
OUT
COMPONENT
VIDEO OUT
Y
C
B
/
P
B
AUDIO OUT
DVD/VCR
VCR
VIDEO OUT
AUDIO IN
VIDEO IN
CR /
P
R
AUDIO IN
VIDEO IN
L
R
ANT. IN
AUDIO OUT
LR
VIDEO
OUT
OUTIN
Cable de audio
(no provisto)
Cable coaxial de RF
(no provisto)
Cable coaxial de RF
(no provisto)
Sintonizador externo
Señal
de TV
Cable de audio (provisto)
Cable de video
(no provisto)
Cable de video (provisto)
DVD/VCR
Parte trasera del televisor
Conexiones
1
Conecte una señal de TV al conector hembra de IN en el
sintonizador externo.
2
Utilice un cable coaxial de RF (no provisto) para conectar
el conector hembra de OUT del sintonizador externo al
conector hembra ANT. IN del televisor.
3
Conecte el cable de audio rojo y blanco (provisto) a los
conectores hembra rojo y blanco AUDIO OUT del
sintonizador externo y a los conectores hembra rojo y
blanco VCR AUDIO IN del DVD/VCR.
4
Conecte el cable amarillo de video (provisto) al conector
hembra amarillo de VIDEO OUT del sintonizador externo
y al conector hembra VCR VIDEO IN del DVD/VCR.
5
Conecte otro cable de audio rojo y blanco (no provisto) a
los conectores hembra rojo y blanco DVD/VCR AUDIO
OUT del DVD/VCR y a los conectores hembra rojo y
blanco AUDIO IN del televisor.
6
Conecte otro cable amarillo de video (no provisto) al
conector hembra DVD/VCR VIDEO OUT del DVD/VCR y al
conector hembra VIDEO IN del televisor.
7
Conecte los cables de alimentación del televisor y del
DVD/VCR a un tomacorriente. Encienda el televisor y
sintonícelo al canal correcto de Ent Video.
8
Usted está listo para encender el DVD/VCR. Vaya a la página
14 para completar la configuración inicial.
●
Usted puede grabar cualquier canal no codificado seleccionando dicho canal
en el sintonizador externo. Asegúrese de que el sintonizador externo esté
encendido.
●
La señal del sintonizador externo se canalizará sólo a la salida CVBS aunque
el DVD/VCR esté apagado.
●
Usted no puede grabar un canal mientras mira otro.
DVD/VCR a un sintonizador externo
• Si su televisor tiene únicamente un
conector hembra de entrada de
antena, es todavía posible conectar
este aparato a su televisor
utilizando un modulador de RF de
video o audio estéreo disponible en
el comercio. Para obtener
información adicional, consulte el
manual de operación que acompaña
al modulador.
•Los cables y métodos de conexión
requeridos difieren en función del
sintonizador externo.
Para obtener información adicional,
póngase en contacto con el
proveedor de su sintonizador
externo.
• Salida pasante de línea
Cuando se conecta un dispositivo
externo, tal como una caja de TV
por cable/satelital, a los conectores
hembra L1 (Trasero) de este
DVD/VCR, la señal del dispositivo
seguirá estando disponible para ser
utilizada aunque el DVD/VCR esté
apagado.
• En lugar de usar el conector
hembra de video de este
DVD/VCR, también puede usar el
conector hembra de S-video o el
conector hembra de la salida de
video componente para conectar
su televisor.
• Para obtener información adicional
consulte el manual de operación
que acompaña los dispositivos
externos.
Sugerencias útiles
1
2
3
4
5
6
ej.)
Este DVD/VCR no cuenta con un conector hembra de entrada para sintonizador. Para grabar programas de televisión en
su DVD/VCR, debe conectar el DVD/VCR a un dispositivo sintonizador externo (por ejemplo, receptor digital externo,
receptor de televisión por cable o receptor satélite) que contenga conectores hembra de salida de audio y video.
E8E20UD_SP1 8/22/07 4:43 PM Page 9
Page 72

Español
10 Conexiones (continuación)
DIGITAL
AUDIO OUT
COAXIAL
AUDIO
OUT
DVD
L
R
LRL
R
S-VIDEO
OUT
COMPONENT
VIDEO OUT
Y
C
B /
P
B
AUDIO OUT
DVD/VCR
VCR
VIDEO OUT
AUDIO IN
VIDEO IN
CR /
PR
AUDIO IN
S-VIDEO IN
L
R
La parte de atrás del televisor
Conectores
hembra ENT
de Audio y
Video
en el televisor
Cable de audio
(provisto)
Cable de video
(provisto)
AUDIO IN
Y
Cb/Pb
Cr/Pr
COMPONENT
VIDEO IN
L
R
La parte de atrás del televisor
AUDIO IN
VIDEO IN
L
R
1
1
1
2
b
2
c
2
a
DVD/VCR a un televisor que tenga conectores hembra de Ent de Audio/
Video,Video componente o S-video
1
Conecte el cable de audio rojo y blanco (provisto) a los
conectores hembra rojo y blanco DVD o DVD/VCR
AUDIO OUT del DVD/VCR y a los conectores hembra
rojo y blanco AUDIO IN del televisor.
● Si utiliza conectores hembra de DVD/VCR AUDIO OUT
para su conexión de audio, utilice el método 2a para su
conexión de video. Si utiliza conectores hembra de DVD
AUDIO OUT para su conexión de audio, utilice el método
2b o 2c para su conexión de video.
2
a
Conecte el cable amarillo de video (provisto) al
conector hembra DVD/VCR VIDEO OUT del
DVD/VCR y al conector hembra VIDEO IN del
televisor. El conector hembra VIDEO IN del televisor es
generalmente amarillo y puede estar rotulado CVBS,
Compuesto,Video de banda base.
2
b
Conecte un cable de video componente (no provisto) a
los conectores hembra de COMPONENT VIDEO OUT
del DVD/VCR y a los conectores hembra
COMPONENT VIDEO IN del televisor. Los conectores
hembra Ent Video componente del televisor son generalmente
rojo, azul y verde.
2
c
Conecte un cable de S-video (no provisto) al conector
hembra S-VIDEO OUT del DVD/VCR y al conector
hembra S-VIDEO IN del televisor.
3
Conecte los cables de alimentación del televisor y del
DVD/VCR a un tomacorriente. Encienda el televisor y
sintonícelo al canal correcto de Ent Video.
Si usted está utilizando el cable amarillo de video para
reproducción en el VCR, seleccione en su televisor el canal ENT
VIDEO. Para encontrar el canal de ENT VIDEO correcto, vaya a su
canal de TV más bajo y cambie de canales hacia abajo hasta que
vea reproducir el VCR en la pantalla del televisor. Para facilitar la
búsqueda del canal correcto de Entrada de Audio/Video, encienda
el DVD/VCR. Presione DVD para poner el DVD/VCR en el modo
DVD. Sin ningún disco en el reproductor, aparecerá en la pantalla
del televisor un gran logotipo de DVD video cuando usted
sintonice el televisor en el canal correcto de Entrada de Video.
4
Usted está listo para encender el DVD/VCR. Vaya a la
página 14 para completar la configuración inicial.
•
Haga coincidir los colores de los
cables con los colores de los
conectores hembra. Si el televisor
tiene un solo conector hembra
AUDIO IN, utilice el cable blanco
de audio para conectar el
conector hembra blanco AUDIO
OUT (izquierda) del DVD/VCR al
conector hembra AUDIO IN del
televisor. Usted no utilizará el
cable rojo. O adquiera un cable
de audio “divisor de señal” para ir
desde los conectores hembra
AUDIO OUT izquierda/derecha
del DVD/VCR hasta el único
conector hembra AUDIO IN del
televisor.
Sugerencia útile
E8E20UD_SP1 8/22/07 4:43 PM Page 10
DVD
AUDIO
OUT
COMPONENT
S-VIDEO
VIDEO OUT
OUT
AUDIO
Y
B
/
C
B
P
CR /
R
P
DVD
COMPONENT
S-VIDEO
VIDEO OUT
OUT
OUT
L
R
Y
B
/
C
P
B
CR /
P
R
L
R
Page 73

Español
Conexiones (continuación) 11
DVD/VCR a un televisor y un estéreo
1
Conecte el cable de audio rojo y blanco provistos a los conectores hembra rojo y blanco
DVD/VCR AUDIO OUT del DVD/VCR y a los conectores hembra rojo y blanco AUDIO
IN del equipo estéreo. Haga coincidir los colores de los cables con los colores de los conectores
hembra.
2
Conecte el cable amarillo de video (provisto) al conector hembra DVD/VCR VIDEO
OUT del DVD/VCR y al conector hembra VIDEO IN del televisor.
Para utilizar en cambio para el reproductor de DVD un cable de Video componente o S-video, vea la
página 10. Para las funciones de VCR usted seguirá necesitando el cable amarillo de video.
3
Conecte los cables de alimentación del DVD/VCR, el televisor y el equipo estéreo a un
tomacorriente. Encienda el televisor y sintonícelo al canal Ent. de Video. O simplemente
vaya al canal más bajo de su televisor (01 o 02) y continúe cambiando de canales hacia abajo en el
mismo hasta que vea reproducir el VCR o el DVD en la pantalla del televisor.
Para facilitar la búsqueda del canal correcto de Entrada de Video en el televisor, encienda el
DVD/VCR. Presione DVD para poner el DVD/VCR en el modo DVD. Sin ningún disco en el
reproductor, aparecerá en la pantalla del televisor un gran logotipo de DVD video cuando usted
sintonice el televisor en el canal correcto de Entrada de Video.
Encienda el equipo estéreo y configúrelo en el modo Auxiliar o Fuente adecuado. Para
obtener detalles consulte el manual de su equipo estéreo.
4
Usted está listo para encender el DVD/VCR.Antes de encender el DVD/VCR diríjase a
la página 14.
DIGITAL
AUDIO OUT
COAXIAL
AUDIO
OUT
DVD
L
R
LRL
R
S-VIDEO
OUT
COMPONENT
VIDEO OUT
Y
C
B
/
P
B
AUDIO OUT
DVD/VCR
VCR
VIDEO OUT
AUDIO IN
VIDEO IN
CR /
P
R
VIDEO IN
AUDIO (LEFT) IN
AUDIO (RIGHT) IN
2
1
Parte trasera del televisor
(ejemplo solamente)
Estéreo
Cable de video
(provisto)
Cable de audio
(provisto)
E8E20UD_SP1 8/22/07 4:43 PM Page 11
Page 74

Español
12 Conexiones (continuación)
DVD/VCR a un televisor y a un equipo estéreo que sea compatible con Dolby Digital
Utilizando conexiones de audio digital
1
Conecte un cable coaxial de audio digital (no provisto) al conector hembra COAXIAL DIGITAL
AUDIO OUT del DVD/VCR y al conector hembra COAXIAL DIGITAL AUDIO IN del equipo
estéreo.
Esta conexión de audio digital sólo suministra sonido al reproductor de DVD del DVD/VCR. Por lo tanto, para usar
las características VCR, conecte el cable de audio rojo y blanco provisto. Para conectar el cable de audio rojo y
blanco, vea el paso 5 en la página 9.
2
Conecte el cable amarillo de video (provisto) al conector hembra amarillo DVD/VCR VIDEO OUT
del DVD/VCR y al conector hembra VIDEO IN del televisor. Para utilizar en cambio para el reproductor de
DVD un cable de Video componente o S-video, vea la página 10. Para las funciones de VCR usted seguirá
necesitando el cable amarillo de video.
3
Conecte el equipo estéreo,el televisor y el DVD/VCR a un tomacorriente. Encienda el equipo estéreo
y seleccione su canal Auxiliay IN. Encienda el televisor y sintonícelo al canal correcto de Entrada de
Video. Vaya al canal más bajo de su televisor (01 o 02) y cambie de canales hacia abajo hasta que vea en la pantalla
del televisor material del DVD o del VCR.
Para facilitar la búsqueda del canal correcto de Entrada de Video en el televisor,encienda el DVD/VCR. Presione
DVD para poner el DVD/VCR en el modo DVD. Sin ningún disco en el reproductor, aparecerá en la pantalla del
televisor un gran logotipo de DVD video cuando usted sintonice el televisor en el canal correcto de Entrada de
Video.
Asegúrese de que no aparezcan en el panel de exhibición del DVD/VCR barrido progresivo (BARRIDO PROGR.)
está APDO. ni P.SCAN. Deshabilite Barrido Progresivo ya sea en el menú PANTALLA o presionando y manteniendo
presionado PLAY B (DVD) en el frente del DVD/VCR durante más de 5 segundos. Encontrará los detalles en las
páginas 8 y 51.
4
Usted está listo para encender el DVD/VCR.Antes de encender el DVD/VCR diríjase a la página 14.
Y recuerde...
Algunos discos DVD son grabados con sonido envolvente Dolby Digital de multicanal. Seleccione en el menú
del disco DVD Sonido envolvente Dolby Digital de multicanal. Si no hay sonido envolvente Dolby Digital
grabado en el disco, usted no tendrá sonido envolvente disponible.
Si usted conecta el DVD/VCR a un equipo estéreo Dolby Digital, en el menú de configuración del reproductor
de DVD configure DOLBY DIGITAL a BITSTREAM.Encontrará los detalles en la página 52. Si el DVD/VCR no
está conectado a un equipo estéreo compatible con Dolby Digital, configure DOLBY DIGITAL a PCM. Una
configuración incorrecta puede ocasionar distorsión en forma de ruido y dañar los parlantes.
DIGITAL
AUDIO OUT
COAXIAL
AUDIO
OUT
DVD
L
R
LRL
R
S-VIDEO
OUT
COMPONENT
VIDEO OUT
Y
C
B
/
P
B
AUDIO OUT
DVD/VCR
VCR
VIDEO OUT
AUDIO IN
VIDEO IN
CR /
P
R
VIDEO IN
COAXIAL
DIGITAL
AUDIO IN
1
2
Parte trasera del televisor
(ejemplo solamente)
Estéreo
Cable de video
(provisto)
Cable coaxial de audio
digital (no provisto)
E8E20UD_SP1 8/22/07 4:43 PM Page 12
Page 75

Español
Configuración del control remoto 13
Colocación de baterías en el control remoto
1
Retire tapa del compartimiento de la batería
ubicada en la parte inferior del control remoto
Presionando la pestaña y luego alzando la tapa.
2
Coloque dos baterías AA en el interior del
compartimiento de la batería con sus extremos
+ y –
alineados tal como se indica.
3
Reponga la tapa del compartimiento de la batería.
Utilización del control remoto
● Cuando utilice el control remoto para operar el DVD/VCR
apunte el control remoto al sensor remoto del DVD/VCR (ver
la página 18). No apunte el control remoto hacia el televisor.
● No coloque objetos entre el control remoto y el DVD/VCR.
Pautas para reciclaje / Seguridad de la batería
● Su nuevo producto y su embalaje contienen materiales que
pueden ser reciclados y reutilizados. Empresas especializado
pueden reciclar su producto para incrementar la cantidad que
debe ser desechada adecuadamente. Su producto utiliza baterías
que no deberán ser descartadas cuando se agoten sino que
deberán ser desechadas como pequeños residuos químicos.
Averigüe sobre las reglamentaciones locales sobre desecho de
su producto anterior, baterías y empaque cada vez que
reemplace equipos existentes.
● PRECAUCIÓN sobre el uso de baterías: Para prevenir fugas de
las baterías que puedan ocasionar lesiones personales, daños a la
propiedad o daños al el equipo.
• Instale TODAS las baterías correctamente, con las marcas
+ y –
de las batería alineados tal como se indica en el equipo.
• No mezcle baterías, por ejemplo, viejas con nuevas o de
carbón con alcalinas.
• Retire las baterías cuando el equipo no se utilizará por
períodos prolongados.
1
2
3
E8E20UD_SP1 8/22/07 4:43 PM Page 13
Page 76

Español
14 Configuración inicial del DVD/VCR
3
Presione KKo LLpara seleccionar ENGLISH, (Inglés),
FRANCAIS (Francés) o ESPAÑOL como idioma para las
exhibiciones en pantalla y los menús del VCR. Luego,
presione B.
● Para poner el DVD/VCR en el modo VCR, presione VCR para
que aparezca la luz de la VCR.
• Para saltar esta función y reproducir
una cinta inmediatamente, inserte
una cinta sin su pestaña de
grabación.
• Repita este proceso si se produce un
corte de suministro eléctrico.
Sugerencias útiles
Antes de encender su DVD/VCR, asegúrese de que haya baterías en
el control remoto y de que el DVD/VCR y el televisor estén
conectados correctamente.
Estos menús pueden no aparecer si usted ya ha encendido
el DVD/VCR.
1
Encienda el televisor. Ajústelo al canal de entrada de
video correcto. (Para obtener detalles consulte el manual
del propietario de su televisor.)
2
Presioney. En el frente del DVD/VCR aparecerá la luz de
la VCR. Aparecerá la pantalla mostrada debajo.
Estos menús pueden no aparecer si usted ya ha encendido el
DVD/VCR. Usted puede haber encendido el DVD/VCR
anteriormente para buscar el canal de AUDIO/VIDEO IN
del televisor, por ejemplo. De ser así, siga los pasos de la
página 20 para seleccionar un idioma para los menús del
VCR.
1
Encienda el televisor.
LANGUAGE SELECT
BENGLISH [ON]
FRANCAIS
ESPAÑOL
PUSH B
2
3
E8E20UD_SP1 8/22/07 4:43 PM Page 14
DISPLAY SUBTITLE ZOOM
12
4
7
+10
INPUT
REW
ANGLE SEARCH REPEAT
REC SPEED MODE
3
5
6
9
8
CLEAR TITLE
0
PLAYOKFFW
OPEN/CLOSE
TRACKING
DVDVCR SETUP
DISC
MENU
BACKPAUSESTOP
AUDIO
REPEAT
A-B
TIMER SET
Page 77

Español
Reproducción de video casetes 15
• Otras funciones de reproducción
de cinta se encuentran en las
páginas 29 a 32.
• Si AUTOREPETIR está ON, la
reproducción comenzará cuando
usted inserte una cinta, aun
cuando la pestaña de grabación
esté intacta. Encontrará los
detalles en la página 29.
• Para utilizar las funciones de VCR
se debe conectar el DVD/VCR a
un televisor con los cables de
audio/video. Estas conexiones
están explicadas en las páginas 9
a 11.
Sugerencias útiles
Para reproducir una cinta lea y siga los pasos siguientes.
1
Encienda el televisor. Ajústelo al canal de entrada
de video correcto. (Para obtener detalles consulte el
manual del propietario de su televisor.) Encontrará los
detalles en la página 8.
2
Inserte una cinta en el compartimiento del casete
del DVD/VCR. En el frente del DVD/VCR aparecerá la luz
de la VCR. Si la pestaña de grabación de la cinta ha sido
removida, la reproducción comenzará automáticamente.
Si el DVD/VCR ya está encendido, presione VCR para
ponerlo en el modo VCR si fuera necesario. En el frente del
DVD/VCR aparecerá la luz de la VCR.
● Si la reproducción no se inicia automáticamente, presione
VCR y luego presione PLAY B.
● Presione STOP C para detener la reproducción.
● Presione REW h para rebobinar la cinta.
● Después de que la cinta se detenga, presione
STOP/EJECT C A en el frente del DVD/VCR para retirar
la cinta.
1
2
Encienda el televisor.
Inserte una cinta en el
DVD/VCR.
E8E20UD_SP1 8/22/07 4:43 PM Page 15
12
4
7
+10
INPUT
REW
DISPLAY SUBTITLE ZOOM
ANGLE SEARCH REPEAT
REC SPEED MODE
3
5
6
9
8
CLEAR TITLE
0
PLAYOKFFW
OPEN/CLOSE
TRACKING
DVDVCR SETUP
DISC
MENU
BACKPAUSESTOP
AUDIO
REPEAT
A-B
TIMER SET
Page 78

Español
16 Reproducción de discos
•Cuando usted intenta ejecutar una
función del DVD puede aparecer una
“X” en la esquina superior derecha de
la pantalla del televisor. Puede suceder
que la función no esté disponible en el
disco, o que el DVD/VCR no pueda
acceder a la misma en ese momento.
Esto no indica un problema del
DVD/VCR.
• Si un disco está sucio o rayado, la
imagen puede aparecer distorsionada o
puede detenerse la reproducción. En
tales casos, retire el disco y apague el
DVD/VCR. Desenchufe el aparato y
luego vuélvalo a enchufar. Limpie el
disco, luego vuelva a encender el
DVD/VCR y reinserte el disco para
reproducirlo.
• Si un disco tiene varias capas, la imagen
puede ocasionalmente congelarse. Esto
sucede cuando se pasa de la primera
capa a la segunda. Eso no constituye un
mal funcionamiento.
• Cuando en el panel de exhibición
aparezca la luz de la DVD o CD, el
disco está cargado y listo para ser
reproducido.
• Cuando usted presione
OPEN/CLOSE A o PLAY B (DVD) en
el frente del DVD/VCR con el aparato
apagado, el DVD/VCR se encenderá en
el modo DVD. Alternativamente, el
DVD/VCR se encenderá en el modo en
el que fue apagado.
• Si usted utiliza PLAY B para cerrar la
bandeja de discos, la reproducción
comienza automáticamente. Si usted
utiliza OPEN/CLOSE A para cerrar la
bandeja de discos, para comenzar la
reproducción tendrá que presionar
PLAY B.
Sugerencias útiles
Antes de comenzar, encienda el televisor, el equipo estéreo y los
demás equipos conectados al DVD/VCR.Asegúrese de que el
televisor y el equipo estéreo (si correspondiera) estén
configurados al canal correcto.
Encontrará los detalles en las páginas 8 a 12.
1
Presioney para encender el DVD/VCR.
2
Presione DVD para que en el frente del DVD/VCR
aparezca la luz de la DVD.
3
Presione OPEN/CLOSE AApara abrir la bandeja de
discos.
4
Coloque un disco en la bandeja. Si el DVD está
grabado sólo de un lado, coloque el disco en la bandeja con
la etiqueta apuntando hacia arriba y la cara brillante hacia
abajo. Algunos discos DVD están grabados en ambos lados.
Asegúrese de que el rótulo de la cara que desee
reproducir esté apuntando hacia arriba.
5
Presione PLAYBBpara cerrar la bandeja. La bandeja
se cerrará y comenzará la reproducción. Si la reproducción
no comienza automáticamente, presione PLAY B
nuevamente.
Si en cambio apareciera un menú de DVD, consulte la
página 32.
Para reproducir archivos MP3,Windows Media™ Audio o
JPEG, consulte las páginas 43 a 44.
Usted también puede cerrar la bandeja presionando
OPEN/CLOSE A.
● Presione STOP C para detener la reproducción.
Inserte un disco.
4
Recuerde, este DVD/VCR
reproducirá sólo ciertos discos.
Consulte la página 7 para obtener
detalles.
1
2
5
3
E8E20UD_SP1 8/22/07 4:43 PM Page 16
5
8
0
OPEN/CLOSE
3
6
TRACKING
9
CLEAR TITLE
DVDVCR SETUP
DISC
MENU
12
4
7
+10
INPUT
PLAYOKFFWREW
BACKPAUSESTOP
Page 79

Español
Panel de exhibición 17
Mensajes de la pantalla
STOP PLAY
REW F.FWD PLAY
REC TRACKINGSTOP/EJECT
VIDEO AUDIOLR
ONE TOUCH RECORDING • LONG PLAY
SOURCE
STANDBY-ON
VCR DVD
DVD
DVD PLAYER/VCR DVP3345V
OPEN/CLOSE
GROUP P.SCAN
DVD
VCD
REC
PM
Aparece cuando está activa una
función repetitiva.
Aparece cuando
está activada
Repetir A-B.
Aparece cuando
está activada Repetir
TODO.
(CD de video, CD,
MP3, Windows Media
TM
Audio y JPEG)
Aparece cuando se hace una
pausa en la reproducción del disco.
Aparece durante la reproducción en
cámara lenta (DVD, CD de video).
Aparece durante la reproducción
en cámara lenta.
Aparece durante la reproducción de discos.
Exhibe el tipo de disco actual.
• DVD: DVD
• VCD: CD de video
• CD: CD de audio, MP3,
Windows Media™ Audio
y JPEG
Aparece cuando está activo
Barrido progresivo.
Indica que hay puesta una cinta en
el DVD/VCR.
Aparece durante la
reproducción cuando la
función de repetición
automática está activada.
Aparece si se hace una
pausa durante una reproducción
de cinta.
Aparece durante la reproducción de cintas.
Indica que la hora actual es
P.M. (después del mediodía)
No hay indicación para A.M.
Aparece durante una
grabación; destella cuando
se hace una pausa en
la grabación.
Aparece cuando se ha configurado una grabación
temporizada o un OTR.
Bandeja de discos
Inserte un disco aquí.
Luz de DVD
Esta luz aparecerá cuando el DVD/VCR esté
en el modo DVD. Sólo se pueden mirar discos
DVD cuando la luz del DVD está encendida.
Para hacer aparecer la luz del DVD, presione
SOURCE en el frente del DVD/VCR o DVD en
el control remoto.
Pantalla
Aquí aparecen los mensajes sobre las operaciones del disco que
está siendo reproducido. Vea Exhibir mensajes más abajo.
Luz de VCR
Esta luz aparecerá cuando el DVD/VCR esté en el modo VCR.
Sólo se pueden mirar cintas de video o acceder a las funciones de VCR
cuando la luz del VCR está encendida.
Para hacer aparecer la luz del VCR, presione VCR
en el control remoto o SOURCE en el frente del DVD/VCR.
Compartimiento
del casete
Inserte un video
casete aquí.
Muestra el tiempo transcurrido del título
o la pista. El número de un nuevo título,
capítulo o pista se presentará durante 3
segundos cuando se cambie un capítulo
o una pista o se pulse DISPLAY durante la
reproducción.
Indica el tiempo transcurrido de reproducción de una cinta;
también exhibe un canal de entrada externo seleccionado, la
velocidad de la cinta, el tiempo restante para una OTR o el tiempo
actual.
Panel de exhibición (DVD)
Panel de exhibición (VCR)
E8E20UD_SP1 8/22/07 4:43 PM Page 17
Aparece cuando la bandeja
del disco se ha cerrado y está
vacía, si se produce un error
de lectura del disco o si se
ha instalado un disco que el
reproductor no admite.
La bandeja se está abriendo o
está abierta.
La bandeja se está
cerrando.
El disco se está cargando.
Aparece cuando el control de
reproducción está activo
(CD de video).
Page 80

Español
18 Panel frontal, Panel trasero y Control remoto
• Los conectores hembra
S-VIDEO del DVD,
COMPONENT VIDEO
OUT del DVD,
AUDIO OUT del DVD y
DVD COAXIAL DIGITAL
AUDIO OUT del DVD
sólo son útiles en el modo
DVD. Para tener sonido e
imagen en el modo VCR,
se deben conectar el cable
de audio/video provistos.
Encontrará los detalles en
las páginas 9 a 11.
Sugerencia útil
• Para acceder a las
funciones del reproductor
de DVD, presione DVD
antes de presionar otros
botones. Para poner el
DVD/VCR en el modo
DVD, presione DVD o
SOURCE para que en el
frente del DVD/VCR
aparezca la luz de la DVD.
• Para acceder a las
funciones del VCR, presione
VCR antes de presionar
otros botones. Para poner
el DVD/VCR en el modo
VCR, presione VCR o
SOURCE para que en el
frente del DVD/VCR
aparezca la luz de la VCR.
Sugerencias útiles
STOP PLAY
REW F.FWD PLAY
REC TRACKINGSTOP/EJECT
VIDEO AUDIOLR
ONE TOUCH RECORDING • LONG PLAY
SOURCE
STANDBY-ON
VCR DVD
DVD
DVD PLAYER/VCR DVP3345V
OPEN/CLOSE
Conectores
VCR AUDIO
y VIDEO IN (L2)
Botóny STANDBY-ON
Botón REW h (VCR)
Botón F.FWD g (VCR)
Botón STOP/EJECT C A (VCR)
Botón PLAY B (VCR)
Botón REC I (VCR)
Botón SOURCE
Botón STOP C (DVD)
Botón PLAY B (DVD)
Botón OPEN/CLOSE A (DVD)
Botones TRACKING
K/L
Sensor remoto
DIGITAL
AUDIO OUT
COAXIAL
AUDIO
OUT
DVD
L
R
LRL
R
S-VIDEO
OUT
COMPONENT
VIDEO OUT
Y
C
B /
P
B
AUDIO OUT
DVD/VCR
VCR
VIDEO OUT
AUDIO IN
VIDEO IN
CR /
PR
Conectores DVD/VCR AUDIO OUT y DVD/VCR VIDEO OUT
Conectores
DVD COMPONENT
VIDEO OUT
Conectores DVD AUDIO OUT
Cable de alimentacíon
de CA
Conector
DVD COAXIAL
DIGITAL AUDIO OUT
Conector DVD S-VIDEO OUT
Conectores VCR AUDIO IN y
VCR VIDEO IN (L1)
DVDVCR SETUP
INPUT
MENU
REC SPEED MODE
ANGLE SEARCH REPEAT
DISPLAY SUBTITLE ZOOM
TIMER SET
REPEAT
A-B
AUDIO
BACKPAUSESTOP
PLAYOKFFWREW
CLEAR TITLE
DISC
TRACKING
OPEN/CLOSE
12
6
5
4
7
8
9
0
+10
3
Botón SEARCH
Botón SUBTITLE
Botón SETUP
Botón VCR
Botón INPUT
Botones s B KL
Botón REW h
Botón STOP C
Botón PLAY B
Botón ANGLE
Botóny (
STANDBY-ON
)
Botón OPEN/CLOSE 0
Botón TITLE
Botón CLEAR
Botón DVD
Botón DISC MENU
Botón OK
Botón PAUSE k
Botón FFW g
Botón REC I
Botón w (SKIP)
Botón ∑ (SKIP)
Botón DISPLAY
Botón SPEED
Botones numéricos
Botón AUDIO
Botón MODE
Botón TRACKING KL
Botón ZOOM
Botón TIMER SET
Botón REPEAT
Botón A-B REPEAT
Botón BACK
Panel frontal
Panel trasero
Control remoto
E8E20UD_SP1 8/22/07 4:43 PM Page 18
Page 81

Español
Reloj (VCR) 19
Siga estos pasos para configurar el reloj del VCR. Asegúrese de que:
1
Presione VCR y luego presione SETUP para que aparezca
MENÚ. Si el reloj nunca fue configurado con anterioridad, cuando
usted presione SETUP, puede aparecer el menú AJUSTE DE
RELOJ. Si así fuera, siga las instrucciones del paso 3 anterior.
4
Mientras el espacio para DIA esté parpadeando, presione
KK
o LLhasta que aparezca el día deseado.Luego, presione BB.
5
Mientras el espacio para AÑO esté parpadeando, presione
KKo LL
hasta que aparezca el año deseado.Presione BB.
Aparecerá automáticamente el día de la semana.
6
Mientras el espacio para HORA esté parpadeando,
presione KKo LLhasta que aparezca la hora deseada.
Luego, presione BB.
7
Mientras el espacio para MINUTO esté parpadeando,
presione KKo LLhasta que aparezca el minuto deseado.
Luego, presione BB.
8
Mientras el espacio para AM o PM esté parpadeando,
presioneKKo LLpara seleccionar AM o PM.
Su selección destellará en la pantalla en el espacio AM/PM.
9
Presione CLEAR o BBpara iniciar el reloj.
• Si el reloj nunca fue configurado
con anterioridad, cuando usted
presione SETUP, puede aparecer
el menú AJUSTE DE RELOJ. Si
así fuera, siga las instrucciones
del paso 3 anterior.
•Para mostrar la hora en la
pantalla del televisor presione
DISPLAY repetidamente.
• Los cortes de suministro
eléctrico de más de 30
segundos de duración pueden
borrar la configuración del reloj.
• Para reinicializar el reloj, siga los
pasos 1-2. Seleccione la
información que desee cambiar
utilizando s o B. Cuando la
información esté parpadeando,
utilice K o L para ingresar la
información correcta. Presione
CLEAR para configurar el reloj.
Sugerencias útiles
MES DIA AÑO
0 3 / – – – – – –
HORA MINUTO AM/PM
– – : – – – –
AJUSTE DE RELOJ
- M E N U -
BPROGRAMAR
CONEXIÓN SATÉLITAL
AUTOREPETIR [OFF]
AJUSTE DE RELOJ
SELEC. IDIOMA
2
Presione KKu LLpara seleccionar AJUSTE DE RELOJ, y
luego presione BB.
3
Mientras el espacio para MES esté parpadeando, presione
KKo LL
hasta que aparezca el mes deseado. Luego,
presione BB.
2-9
1
9
E8E20UD_SP1 8/22/07 4:43 PM Page 19
12
4
7
+10
INPUT
REW
DISPLAY SUBTITLE ZOOM
ANGLE SEARCH REPEAT
REC SPEED MODE
3
5
6
9
8
CLEAR TITLE
0
PLAYOKFFW
OPEN/CLOSE
TRACKING
DVDVCR SETUP
DISC
MENU
BACKPAUSESTOP
AUDIO
REPEAT
A-B
TIMER SET
Page 82

Español
20 Idioma (VCR)
Siga los pasos siguientes para cambiar el idioma de las exhibiciones
en pantalla y los menús del VCR.
1
Presione VCR y luego presione SETUP para que
aparezca MENU.
2
Presione KKo LLpara seleccionar SELEC. IDIOMA,
y luego presione BB.
3
Presione KKo LLpara seleccionar ENGLISH (Inglés),
FRANCAIS (Francés) o ESPAÑOL.
4
Presione CLEAR para eliminar el menú.
• Si usted selecciona ENGLISH
(Inglés), o FRANCAIS (Francés) y
necesita Español:
1) Presione SETUP para que aparezca
MENU.
2) Presione L para seleccionar
LANGUAGE SELECT o
SELECTION LANGUE, y luego
presione B.
3) Presione K o L para seleccionar
ESPAÑOL.
4) Presione CLEAR.
Sugerencia útil
Usted puede acceder a ver los estados presionando DISPLAY. Las
pantallas pueden incluir el tiempo actual y el canal de entrada externo,
entre otra información.
1
Presione DISPLAY. Aparecerá durante 5 segundos la
pantalla CONTEO. Después de los 5 segundos, sólo
aparecerá el contador de cinta en tiempo real. Este
contador le muestra el tiempo de reproducción de la cinta
transcurrido (desde el punto en el cual el contador fue
configurado a 0). El contador aparecerá también en el panel
de exhibición ubicado en el frente del DVD/VCR.
2
Presione DISPLAY de nuevo. Aparecerá durante 5
segundos la pantalla RELOJ. Después de los 5 segundos,
sólo aparecerá la hora. La hora aparecerá también en el
panel de exhibición ubicado en el frente del DVD/VCR.
3
Presione DISPLAY de nuevo para eliminar todas las
exhibiciones.
Exhibiciones del estado del VCR
• Usted no puede acceder a una
exhibición de estados cuando mire
una imagen estática, durante una
reproducción en cámara lenta,o
durante búsquedas hacia adelante y
atrás.
Sugerencia útil
SELEC. IDIOMA
ENGLISH
FRANCAIS
BESPAÑOL [ON]
PARAR
SLP 0:12:34
PARAR 5:40 PM
L2
SLP
2-3
4
DVDVCR SETUP
INPUT
MENU
PLAYOKFFWREW
CLEAR TITLE
DISC
TRACKING
6
5
4
7
8
9
0
+10
1
DVDVCR SETUP
INPUT
MENU
REC SPEED MODE
ANGLE SEARCH REPEAT
DISPLAY SUBTITLE ZOOM
TIMER SET
REPEAT
A-B
AUDIO
BACKPAUSESTOP
PLAYOKFFW
REW
DISC
1-3
- M E N U -
BPROGRAMAR
CONEXIÓN SATÉLITAL
AUTOREPETIR [OFF]
AJUSTE DE RELOJ
SELEC. IDIOMA
E8E20UD_SP1 8/22/07 4:43 PM Page 20
Page 83

Español
Grabación de cintas de video 21
Para grabar un programa de televisión a un cinta de video lea y
siga los pasos indicados a continuación.
Antes de comenzar:
● Este DVD/VCR no cuenta con un conector hembra de
entrada para sintonizador. Para grabar programas de
televisión en su DVD/VCR, debe conectar el DVD/VCR a
un dispositivo sintonizador externo (por ejemplo,
receptor digital externo, receptor de televisión por
cable o receptor satélite) que contenga conectores
hembra de salida de audio y video. Consulte la página 9
para obtener información sobre cómo conectar el DVD/VCR al
sintonizador externo.
● Asegúrese de que el DVD/VCR se encuentre en el modo VCR.
Presione VCR para que en el frente del DVD/VCR aparezca la
luz de la VCR.
1
Encienda el sintonizador externo, encienda el
televisor y ajústelo al canal de entrada de video
correcto. (Para obtener detalles consulte el manual del
propietario de su televisor.)
2
Inserte una cinta con su pestaña de grabación
intacta en el compartimiento del casete del
DVD/VCR. Si diera comienzo la reproducción de la cinta,
presione STOP C.
3
Presione SPEED repetidamente hasta que aparezca
brevemente en la pantalla la velocidad deseada de
la cinta (SP o SLP). Los detalles sobre la velocidad de la
cinta se pueden consultar en la página 57.
4
Presione INPUT para seleccionar el canal de
entrada externo adecuado (L1/L2) al que se
conecta su sintonizador externo. Luego seleccione
el canal deseado para grabar en el sintonizador
externo.
5
Presione REC IIpara comenzar a grabar. En el panel
de exhibición DVD/VCR aparecerá “REC”.
● Para hacer una pause en la grabación, presione PAUSE k
una vez. Destellará “REC”. Para reanudar la grabación,
presione REC I o presione PAUSE k de nuevo.
Reaparecerá “REC”.
● Para detener la grabación, presione STOP C.
Cómo evitar que se grabe
Los video casetes tienen pestañas de grabación para asegurar que
las grabaciones no sean borradas accidentalmente.
● Para evitar una grabación, quite la pestaña con un destornillador.
● Para permitir que se grabe, cubra el agujero con cinta
transparente.
• Otras opciones de grabación se
pueden encontrar en las páginas 22
a 28.
• El VCR grabará en un volumen
preestablecido.
•Toda pause cambiara a Detener
después de 5 minutas para proteger
el VCR y la cinta de cualquier daño.
Cuando se hace una pause en una
grabación, examine el tiempo que
resta de la pause con las marcas ■
de la pantalla. Cada marca ■
equivale a 1 minuto restante.
Durante el último minuto de la
grabación con pause, la marca ■
destellará.
•Si en la pantalla del televisor hay
algún menú, REC I no funcionará
en el control remoto.Presione
CLEAR para eliminar el menú. Luego
presione REC I.O utilice REC I
ubicada en el frente del DVD/VCR.
Sugerencias útiles
1
Encienda el televisor.
2
Inserte una cinta en el
DVD/VCR.
Quite la
pestaña para
impedir la
grabación.
Cubra el
agujero para
permitir la
grabación.
4
5
3
DVDVCR SETUP
INPUT
MENU
REC SPEED MODE
ANGLE SEARCH REPEAT
DISPLAY SUBTITLE ZOOM
TIMER SET
REPEAT
A-B
AUDIO
BACKPAUSESTOP
PLAYOKFFW
REW
CLEAR TITLE
DISC
TRACKING
OPEN/CLOSE
12
6
5
4
7
8
9
0
+10
3
E8E20UD_SP1 8/22/07 4:43 PM Page 21
Page 84

Español
22 Grabación a un toque
OTR (0:30)
SP
La Grabación a un toque (OTR) le permite configurar una grabación
temporizada de entre 30 minutos y 8 horas.
Antes de comenzar:
● Este DVD/VCR no cuenta con un conector hembra de entrada
para sintonizador. Para grabar programas de televisión en su
DVD/VCR,debe conectar el DVD/VCR a un dispositivo
sintonizador externo (por ejemplo, receptor digital externo,
receptor de televisión por cable o receptor satélite) que
contenga conectores hembra de salida de audio y video.
Consulte la página 9 para obtener información sobre cómo conectar el
DVD/VCR al sintonizador externo.
● Coloque el DVD/VCR en el modo VCR. Presione VCR para que en el
frente del DVD/VCR aparezca la luz de la VCR.
● Seleccione una velocidad de grabación (SP, SLP) presionando SPEED.
● Coloque una cinta de video en el compartimiento del casete.Asegúrese
de que la pestaña de grabación de la cinta esté intacta y de que la cinta
sea lo suficientemente larga para grabar el(los) programa(s).
1
Presione INPUT para seleccionar el canal de
entrada externo adecuado (L1/L2) al que se
conecta su sintonizador externo. Luego seleccione
el canal deseado para grabar en el sintonizador
externo.
2
Presione REC IIrepetidamente hasta que aparezca
en la pantalla del televisor la longitud deseada de
grabación (30 minutos a 8 horas). La grabación
comenzará. En el panel de exhibición del DVD/VCR
aparecerán “REC” y “ ”.
Detención de un OTR
● Para detener un OTR antes de que finalice una grabación, presione
STOP C en el control remoto o STOP/EJECT C A en el frente del
DVD/VCR.
● Para cancelar el OTR pero continuar grabando, presione REC I
repetidamente hasta que aparezca “GRABAR” en la esquina superior
izquierda de la pantalla del televisor, y desaparezca
“”.
• Durante un OTR aparecerá en el
panel de exhibición el tiempo
restante de grabación. Presione
DISPLAY para verlo en la pantalla
del televisor.
• Para cambiar la longitud de la
grabación mientras se ejecuta un
OTR, presione REC I
repetidamente.
• Un OTR no se puede pausar.
• Si durante un OTR se arriba al
momento preconfigurado para
una grabación temporizada, el
OTR tiene prioridad. La
grabación temporizada no se
realizará.
• Si durante un OTR se alcanza el
extremo de la cinta, el VCR
dejará de grabar, expulsará la
cinta y pasará al modo DVD o
se apagará.
• Si cuando termina un OTR hay
una o más grabaciones
temporizadas en espera, el
DVD/VCR se apagará
automáticamente y aparecerá
“
” en el panel de exhibición
del DVD/VCR para indicar que
el mismo está listo ahora para
una nueva grabación
temporizada.
Sugerencias útiles
Cuando finaliza un OTR
El DVD/VCR se apagará y destellará “ ” en el panel de exhibición del
DVD/VCR indicando que la grabación está completa, y luego pasará de
nuevo al modo de reposo del temporizador. (Podrá pasar
automáticamente al modo DVD.) En este punto, usted no podrá utilizar el
VCR a menos que libere el DVD/VCR del modo en espera del
temporizador.
Para liberar el DVD/VCR del modo en espera del temporizador
● Si el componente DVD está activo y no hay más grabaciones
temporizadas en espera, usted puede cancelar el modo de
temporizador en espera presionando TIMER SET o VCR en el control
remoto o presionando SOURCE o STOP/EJECT C A en el panel
frontal.
● Si el componente DVD no se encuentra activo, o “ ” no está
destellando pero está iluminado indicando que existen más grabaciones
temporizadas en espera, usted puede cancelar el modo de
temporizador en espera sólo presionando TIMER SET en el control
remoto o presionando STOP/EJECT C A en el panel frontal.
● Luego de liberar el DVD/VCR del modo de temporizador en espera,
usted lo puede utilizar como habitualmente.
2
1
E8E20UD_SP1 8/22/07 4:43 PM Page 22
12
4
7
+10
INPUT
REW
DISPLAY SUBTITLE ZOOM
ANGLE SEARCH REPEAT
REC SPEED MODE
3
5
6
9
8
CLEAR TITLE
0
PLAYOKFFW
OPEN/CLOSE
TRACKING
DVDVCR SETUP
DISC
MENU
BACKPAUSESTOP
AUDIO
REPEAT
A-B
TIMER SET
Page 85

Español
Grabaciones de grabaciones (duplicación de cintas)
23
1
Efectúe las conexiones mostradas más arriba.
2
El DVD/VCR 1 reproducirá su cinta. Coloque una cinta
pregrabada en el compartimiento del casete del
DVD/VCR 1. Presione VCR para poner el equipo en
modo VCR si fuese necesario.
3
El DVD/VCR 2 grabará su cinta. Inserte una cinta en
blanco en el compartimiento del casete de
DVD/VCR 2. Presione VCR para poner el equipo en
modo VCR si fuese necesario.
4
Encienda el televisor y seleccione el canal de
entrada de video correcto. (Para obtener detalles
consulte el manual del propietario de su televisor.)
5
Apuntar el control remoto hacia el DVD/VCR 2.
Presione INPUT para seleccionar el canal de
entrada externo adecuado. (Vea Sugerencias útiles a la
derecha.)
6
Presione SPEED para seleccionar SP o SLP en el
DVD/VCR 2. Los detalles sobre la velocidad de la cinta se
pueden consultar en la página 57.
7
Presione simultáneamente PLAY BB(VCR) en el
frente del DVD/VCR 1 y REC IIen el frente del
DVD/VCR 2.
● Para detener la grabación, presione STOP/EJECT C A
(VCR) en el DVD/VCR 2 y luego presione
STOP/EJECT C A (VCR) en el DVD/VCR 1.
DIGITAL
AUDIO OUT
COAXIAL
AUDIO
OUT
DVD
L
R
LRL
R
S-VIDEO
OUT
COMPONENT
VIDEO OUT
Y
C
B
/
P
B
AUDIO OUT
DVD/VCR
VCR
VIDEO OUT
AUDIO IN
VIDEO IN
CR /
P
R
DIGITAL
AUDIO OUT
COAXIAL
AUDIO
OUT
DVD
L
R
LRL
R
S-VIDEO
OUT
COMPONENT
VIDEO OUT
Y
C
B
/
P
B
AUDIO OUT
DVD/VCR
VCR
VIDEO OUT
AUDIO IN
VIDEO IN
CR /
P
R
DVD/VCR 1
Equipo que
reproduce
DVD/VCR 2
Equipo que graba
1. Cable de audio provenientes de los conectores hembra AUDIO OUT (rojo y blanco) del
DVD/VCR 1 que van a los conectores hembra AUDIO IN de DVD/VCR 2
• Si utiliza los conectores hembra
de AUDIO y VIDEO IN en la
parte trasera del DVD/VCR 2,
seleccione L1 en el paso 5.
• Si utiliza los conectores hembra
de AUDIO y VIDEO IN en la
parte delantera del DVD/VCR 2,
seleccione L2 en el paso 5.
• La grabación no autorizada de
programas de televisión, cintas de
video u otros materiales
protegidos por copyright puede
infringir los derechos de los
propietarios del copyright y
violar leyes de protección de la
propiedad intelectual.
• Si un programa tiene protección
de copyright, tal vez no se lo
pueda grabar con claridad.
Sugerencias útiles
Estas instrucciones se han elaborado suponiendo que el DVD/VCR 1 ya está conectado al televisor. Las
instrucciones le muestran cómo copiar cintas de video. La ilustración utiliza dos equipos DVD/VCR. Otros
VCR o camcorders pueden funcionar de manera diferente.
2. Cable de video proveniente del
conector hembra amarillo VIDEO
OUT del DVD/VCR 1 que va al
conector hembra VIDEO IN del
DVD/VCR 2
E8E20UD_SP1 8/22/07 4:43 PM Page 23
Page 86

Español
24 Grabación con temporizador
Siga los pasos detallados a continuación para programar el VCR del
DVD/VCR de modo que grabe programas de TV mientras usted no se
encuentra en su casa.Antes de comenzar:
● Este DVD/VCR no cuenta con un conector hembra de entrada
para sintonizador. Para grabar programas de televisión en su
DVD/VCR,debe conectar el DVD/VCR a un dispositivo
sintonizador externo (por ejemplo, receptor digital externo,
receptor de televisión por cable o receptor satélite) que
contenga conectores hembra de salida de audio y video.
Consulte la página 9 para obtener información sobre cómo conectar el
DVD/VCR al sintonizador externo.
● Configure el reloj. Encontrará los detalles en la página 19.
● Coloque una cinta en el compartimiento del casete del DVD/VCR.
Asegúrese de que la pestaña de grabación de la cinta esté intacta y de que
la cinta sea lo suficientemente larga para grabar el(los) programa(s).
● Presione VCR para que en el frente del DVD/VCR aparezca la luz de la
VCR.
● Encienda el sintonizador externo.
1
Presione SETUP para que aparezca MENU.
2
PresioneKKo LLpara seleccionar PROGRAMAR. Luego,
presioneBB. Los números de los programas que no tengan
almacenada una grabación temporizada destellarán.
3
PresioneKKo LLpara seleccionar un programa vacío.
Luego, presioneBB.
•Usted no puede acceder al menú
PROGRAMAR en el paso 2 si el
reloj no está configurado.
Aparecerá el menú AJUSTE DE
RELOJ. Para configurar el reloj siga
los pasos detallados en la página
19.
• La grabación DIARIA sólo se puede
efectuar para programas que se
transmitan de lunes a viernes. Si
usted selecciona DIARIO en el paso
4 y luego ingresa un sábado o un
domingo como FECHA en el paso
5, el programa elegido no será
grabado. El VCR modificará la fecha
de grabación y grabará un programa
diferente del que usted quería.
•Si usted conectó el sintonizador
externo de video a los conectores
hembra de AUDIO y VIDEO IN
del frente del DVD/VCR,
seleccione L2. Si usted conectó el
sintonizador externo de video a
los conectores hembra AUDIO IN
y VIDEO IN de la parte posterior
del DVD/VCR, seleccione L1.
• Ingrese la información mientras el
espacio está parpadeando.
•No podrá programar más de un
año por adelantado.
Sugerencias útiles
4
Presione KKo LLpara seleccionar NORMAL, DIARIO o
SEMANAL. Luego, presione BB.
● NORMAL: El VCR grabará un programa de TV en cualquier día
que usted elija, hasta con 12 meses de anticipación.
● DIARIO:
El VCR grabará un programa de TV a la misma hora en el
mismo canal todos los días, de lunes a viernes.
● SEMANAL: El VCR grabará un programa de TV a la misma hora en
el mismo canal cada semana, por ejemplo, cada lunes.
5
Para ajustar la fecha y hora de la grabación,presione KKo
LL
hasta que aparezca el ajuste deseado,luego presione BB.
6
Presione KKo LLpara seleccionar el canal de entrada
externo adecuado (L1/L2) al que se conecta su sintonizador
externo. Luego seleccione el canal deseado para grabar en
el sintonizador externo.
● Deje el sintonizador externo encendido para la grabación con
temporizador. Encontrará los detalles en la página 9.
2-6
1
E8E20UD_SP1 8/22/07 4:43 PM Page 24
PROGRAMAR
PROGRAMA 12345678
FECHA
HORA INICIO
HORA FINAL
L1/L2
VELOCIDAD
12
4
7
+10
INPUT
REW
DISPLAY SUBTITLE ZOOM
ANGLE SEARCH REPEAT
REC SPEED MODE
3
5
6
9
8
CLEAR TITLE
0
PLAYOKFFW
OPEN/CLOSE
TRACKING
DVDVCR SETUP
DISC
MENU
BACKPAUSESTOP
AUDIO
REPEAT
A-B
TIMER SET
NUMERO DE PRG. 1
FECHA – – / – –
HORA INICIO – – :– – – –
HORA FINAL – – : – – – –
L1/L2 – –
VELOCIDAD – –
Page 87

Español
Grabación con temporizador (continuación) 25
Cancelación de una grabación temporizada
antes de que la misma comience
1
Presione VCR y luego presione SETUP para que aparezca
MENU.
2
Presione KKo LLpara seleccionar PROGRAMAR, y luego
presione BB.
3
Presione KKo LLpara buscar el programa que desea
cancelar.
4
Mientras el número de programa está destellando, presione
ss
para borrar toda la información concerniente al mismo.
5
Presione CLEAR para eliminar el menú.
7
Presione KKo LLpara seleccionar una velocidad de cinta para la
grabación. Al lado de su selección aparecerá la flecha respectiva. La
velocidad seleccionada destellará al lado de VELOCIDAD. Los detalles
sobre la velocidad de la cinta se pueden consultar en la página 57.
Para completar la programación del temporizador usted debe
seleccionar la velocidad de grabación.
Cuando una grabación temporizada finaliza
El DVD/VCR se apagará y destellará “ ” en el panel de exhibición del
DVD/VCR indicando que la grabación está completa, y luego pasará de
nuevo al modo de reposo del temporizador. (Podrá pasar automáticamente
al modo DVD.) En este punto, usted no podrá utilizar el VCR a menos que
libere el DVD/VCR del modo en espera del temporizador.
Para liberar el DVD/VCR del modo en espera del temporizador
●
Si el componente DVD está activo y no hay más grabaciones temporizadas en
espera, usted puede cancelar el modo de temporizador en espera presionando
TIMER SET o VCR en el control remoto o presionando SOURCE o
STOP/EJECT C A en el panel frontal.
●
Si el componente DVD no se encuentra activo, o “ ” no está destellando
pero está iluminado indicando que existen más grabaciones temporizadas en
espera, usted puede cancelar el modo de temporizador en espera sólo
presionando TIMER SET en el control remoto o presionando STOP/EJECT C A
en el panel frontal.
● Luego de liberar el DVD/VCR del modo de temporizador en espera,
usted lo puede utilizar como habitualmente.
• Para detener una grabación temporizada
ya iniciada, presione STOP/EJECT C A
en el frente del DVD/VCR.(Usted no
puede detener una grabación
temporizada ya iniciada con STOP C en
el control remoto.)
• Para modificar alguna información
incorrecta, presione s o B para
seleccionar el elemento que desea
modificar. Presione K o L para corregir
la información.
• Si cuando usted presiona TIMER SET no
hay una cinta en el VCR,
“”
destellará.
Inserte una cinta.
• Si cuando termina una grabación
temporizada hay una o más grabaciones
temporizadas en espera, el DVD/VCR se
apagará automáticamente y aparecerá
“”
en el panel de exhibición del
DVD/VCR para indicar que el mismo
está listo ahora para una nueva grabación
temporizada.
Sugerencias útiles
7
8
9
8
Presione CLEAR para eliminar el menú.
9
Presione TIMER SET.
●
En algunos casos, el DVD/VCR pasará a en cambio al modo DVD.
Durante una grabación temporizada usted puede utilizar el reproductor
de DVD.
●
i desea utilizar el VCR hasta el momento de la grabación, no presione
TIMER SET sino hasta unos pocos minutos antes de que deba comenzar
la grabación. O presione TIMER SET sólo cuando sepa que ya no va a
utilizar el VCR (hasta después de la grabación).
●
Cuando “ ” esté iluminado (no destellando), usted no puede poner el
DVD/VCR en modo VCR presionando VCR o SOURCE. Usted debe
primero presionar TIMER SET en el control remoto o STOP/EJECT C A
en el panel frontal para cancelar momentáneamente la grabación
temporizada.
En ese momento recién podrá utilizar de nuevo las funciones del VCR.
E8E20UD_SP1 8/22/07 4:43 PM Page 25
PROGRAMA NORMAL
NUMERO DE PRG. 1
FECHA 0 8 / 29 MIE
HORA INICIO 0 7 : 3 0 P M
HORA FINAL 0 8 : 3 0 P M
L1/L2 L2
VELOCIDAD S P
BSP
SLP
12
4
7
+10
INPUT
REW
DISPLAY SUBTITLE ZOOM
ANGLE SEARCH REPEAT
REC SPEED MODE
3
5
6
9
8
CLEAR TITLE
0
PLAYOKFFW
OPEN/CLOSE
TRACKING
DVDVCR SETUP
DISC
MENU
BACKPAUSESTOP
AUDIO
REPEAT
TIMER SET
A-B
Page 88

Español
26 Enlace por satélite
Puede ajustar el DVD/VCR para que comience a grabar cuando
detecte una señal de video del sintonizador externo.
Antes de comenzar:
● Ajuste el reloj. Encontrará más información en la página 19.
● Coloque una cinta en el compartimento de casete del
DVD/VCR.Asegúrese de que la pestaña de grabación de la cinta
esté intacta y que la cinta sea lo suficientemente larga para la
grabación de los programas.
● Presione VCR para que se encienda la luz de VCR en la parte
delantera del DVD/VCR.
● Encienda el sintonizador externo.
● Utilice los conectores hembra de VCR AUDIO y VIDEO IN en
la parte trasera (L1) para conectar el DVD/VCR al sintonizador
externo. Los conectores hembra de VCR AUDIO y VIDEO en la
parte delantera (L2) no pueden leer ninguna señal del
sintonizador externo.
● Si el sintonizador externo cuenta con algún tipo de función de
temporizador, ajústelo a las señales de salida de audio y video
cuando llegue el momento en que desea comenzar la grabación
y deténgalo cuando llegue el momento en que desea finalizar la
grabación. Consulte el manual del sintonizador para obtener
información sobre cómo ajustar el temporizador.
● Si el sintonizador externo no cuenta con una función de
temporizador, déjelo encendido para la grabación de enlace por
satélite.
1
Presione SPEED repetidamente hasta que aparezca
brevemente en la pantalla la velocidad deseada de
la cinta (SP o SLP). Los detalles sobre la velocidad de la
cinta se pueden consultar en la página 57.
2
En el modo de parada, presione SETUP.
3
Presione K o L para seleccionar el CONEXIÓN
SATÉLITAL, luego presione B.
PROGRAMAR
BCONEXIÓN SATÉLITAL
AUTOREPETIR [OFF]
AJUSTE DE RELOJ
SELEC. IDIOMA
- M E N U -
L1
Sintonizador externo
Para los conectores
hembra de entrada
de audio y video
DVD/VCR
Cables de audio/video
(provisto)
2
4-6
1
E8E20UD_SP1 8/22/07 4:43 PM Page 26
AUDIO OUT
AUDIO OUT
AUDIO OUT
DVD
DVD
DVD
DVD/VCR
VCR
COMPONENT
DIGITAL
DIGITAL
DIGITAL
AUDIO
S-VIDEO
AUDIO
S-VIDEO
AUDIO
S-VIDEO
AUDIO OUT
AUDIO IN
VIDEO OUT
OUT
OUT
OUT
OUT
OUT
OUT
Y
LRL
L
L
L
B /
C
R
PB
COAXIAL
COAXIAL
COAXIAL
VIDEO OUT
VIDEO IN
R
R
R
CR /
P
R
12
4
7
+10
INPUT
REW
DISPLAY SUBTITLE ZOOM
ANGLE SEARCH REPEAT
REC SPEED MODE
3
5
6
9
8
CLEAR TITLE
0
PLAYOKFFW
OPEN/CLOSE
TRACKING
DVDVCR SETUP
DISC
MENU
BACKPAUSESTOP
AUDIO
REPEAT
A-B
TIMER SET
Page 89

Español
Enlace por satélite (continuación) 27
• Si no ha ajustado el reloj,
aparecerá el menú AJUSTE DE
RELOJ en el paso 3. Consulte
“Reloj (VCR)” en la página 19.
• En este DVD/VCR no se puede
ajustar el tiempo de finalización
para la grabación con
temporizador de enlace por
satélite.
•La imagen de la grabación se
distorsionará si se detecta la
señal de protección contra
copias durante la grabación con
temporizador de enlace por
satélite.
• Cuando se superponen la
grabación con temporizador de
enlace por satélite y una
grabación con temporizador
común, esas grabaciones se
graban como se indica a
continuación.
Grabación con
temporizador
Enlace por satélite
ej.) En el caso de que la grabación con temporizador se superponga
con la grabación con temporizador de enlace por satélite existente.
resultados de la
grabación
Grabación con
temporizador
Enlace por satélite
ej.) En el caso de que la grabación con temporizador esté
programada para la mitad de la grabación de enlace por satélite.
resultados de la
grabación
Grabación con
temporizador
Enlace por satélite
ej.) En el caso de que la grabación con temporizador de enlace por
satélite se superponga con la grabación de temporizador existente.
resultados de la
grabación
Sugerencias útiles
4
Presione K o L para seleccionar la hora de inicio
deseada; luego presione B.
● Se puede seleccionar la hora entre 1-12 con AM o PM.
● Cuando se detenga la señal del sintonizador externo,
también se detendrá la grabación.
5
Presione K o L para seleccionar los minutos de inicio
deseados.
Si desea volver a la izquierda, presione s.
6
Presione B para seleccionar el modo de espera del
enlace por satélite.
● Se ilumina el indicador
“”
en el panel de visualización
del DVD/VCR y el DVD/VCR pasa al modo DVD. Si no
utiliza la función de DVD, apague el DVD/VCR.
● Si el sintonizador externo no está equipado con una
función de temporizador, déjelo encendido para la
grabación de enlace por satélite.
●
Cómo cancelar la función de enlace por satélite en el
modo de espera:
Presione TIMER SET en el control remoto o
STOP/EJECT
C A
en este DVD/VCR.
●
Cómo cancelar la función de enlace por satélite mientras
la grabación de enlace por satélite está en progreso:
Presione STOP/EJECT
C A
en el DVD/VCR.
CONEXIÓN SATÉLITAL
0 1 : 3 0 PM
[ON]
CONEXIÓN SATÉLITAL
0 1 : 0 0 PM
CONEXIÓN SATÉLITAL
1 2 : 0 0 AM
E8E20UD_SP1 8/22/07 4:43 PM Page 27
Page 90

Español
28 Duplicación de DVD a cinta de video
Para copiar un DVD a una cinta de video siga los siguientes pasos.
Esto será posible sólo si el DVD no está protegido contra
copia.
Antes de comenzar:
● Coloque una cinta de video en el compartimiento del casete.
Asegúrese de que la pestaña de grabación de la cinta esté
intacta y de que la cinta sea lo suficientemente larga para grabar
el DVD.
● Coloque el DVD que desea copiar en la bandeja de discos.
● Presione VCR para que en el frente del DVD/VCR aparezca la
luz de la VCR.
●
Encienda el televisor y seleccione el canal de entrada de
video correcto. (Para obtener detalles consulte el manual del
propietario de su televisor.)
1
Presione INPUT reiteradamente hasta que aparezca
“DISC” en la pantalla del televisor.
2
Presione SPEED repetidamente hasta que aparezca
brevemente en la pantalla la velocidad deseada de
la cinta (SP o SLP). Los detalles sobre la velocidad de la
cinta se pueden consultar en la página 57.
3
Presione REC IIpara comenzar a grabar. En el panel de
exhibición aparecerá “REC”.
4
Presione DVD. Presione
PLAY
BB
para reproducir el
disco.
● Para pausar la grabación, presione VCR y luego presione
PAUSE k una sola vez. Destellará “REC”.
● Para reanudar la grabación, presione REC I o presione
PAUSE k de nuevo. Reaparecerá “REC”.
● Para detener la grabación, presione VCR y luego presione
STOP C.
DISC
• Durante una duplicación de
DVD a cinta de video no es
posible una grabación
temporizada.
• Usted no podrá copiar un DVD
a una cinta de video si está
utilizando barrido progresivo.
Sugerencias útiles
2
4
DVDVCR SETUP
INPUT
MENU
REC SPEED MODE
ANGLE SEARCH REPEAT
DISPLAY SUBTITLE ZOOM
TIMER SET
REPEAT
A-B
AUDIO
BACKPAUSESTOP
PLAYOKFFW
REW
CLEAR TITLE
DISC
TRACKING
OPEN/CLOSE
12
6
5
4
7
8
9
0
+10
3
3
1
E8E20UD_SP1 8/22/07 4:43 PM Page 28
Page 91

Español
Reproducción repetitiva 29
Para reproducir una cinta de video repetidamente siga los pasos
detallados a continuación.
1
Presione VCR y luego presione SETUP para que
aparezca MENU.
2
Presione KKu LLpara seleccionar AUTOREPETIR.
3
Presione BBpara que ON aparezca junto a
AUTOREPETIR. La reproducción de la cinta comenzará
inmediatamente. En la pantalla del televisor aparecerá
brevemente AUTOREPETIR. (Si usted está avanzando o
rebobinando rápidamente la cinta, presione CLEAR para
eliminar el menú, y luego
presione PLAY B para comenzar
la reproducción de la cinta.) La
cinta se reproducirá hasta el final,
se rebobinará y luego se
reproducirá de nuevo.
Contador de cinta
• Usted puede únicamente
configurar el contador a 0 en una
sola ubicación a la vez. Si
configura el contador a 0 en una
segunda ubicación, se borrará la
configuración anterior.
• Si usted retira la cinta, cada vez
que vuelva a insertar la cinta el
contador se reinicializará a 0 en
el punto en el cual usted detuvo
la reproducción la última vez.
Sugerencias útiles
PARAR
SLP 1 : 23 : 45
Siga los pasos detallados a continuación para reinicializar a 0 el
contador de cinta en tiempo real del VCR en una posición de la
cinta a la que desee referirse más tarde.
1
Presione VCR, y luego reproduzca, avance
rápidamente o rebobine una cinta hasta el lugar al
que desearía referirse más adelante. Presione
STOP CCpara detener la cinta.
2
Presione DISPLAY para ver exhibido el estado.
3
Mientras el contador esté exhibido en la pantalla,
presione CLEAR para reinicializar el mismo a 0.
PARAR
SLP 0 : 00 : 00
4
Cuando usted quiera más adelante retornar a ese
punto de la cinta, presione DISPLAY para que pueda
ver el contador (mientras la reproducción de la cinta
se encuentra detenida). Presione REW
hh
o FFW gg.
A medida que la cinta avanza o retrocede, observe el contador.
Cuando el mismo llegue a 0, presione
PLAY BBpara reproducir la cinta.
• Para cancelar AUTOREPETIR, siga
los pasos 1 y 2. En el paso 3,
presione B para que OFF aparezca
al lado de AUTOREPETIR.
Presione CLEAR.
Sugerencia útil
- M E N U -
PROGRAMAR
CONEXIÓN SATÉLITAL
BAUTOREPETIR [ON]
AJUSTE DE RELOJ
SELEC. IDIOMA
2-3
1
DVDVCR SETUP
INPUT
MENU
PLAYOKFFWREW
CLEAR TITLE
DISC
TRACKING
12
6
5
4
7
8
9
0
+10
3
2,4
1
3
1
4
1
E8E20UD_SP1 8/22/07 4:43 PM Page 29
5
4
7
+10
INPUT
8
0
6
9
CLEAR TITLE
PLAYOKFFW
REW
DISPLAY SUBTITLE ZOOM
ANGLE SEARCH REPEAT
REC SPEED MODE
TRACKING
DVDVCR SETUP
DISC
MENU
BACKPAUSESTOP
AUDIO
REPEAT
A-B
TIMER SET
Page 92

Español
30 Búsqueda por tiempo, búsqueda indizada
Búsqueda por tiempo
Para buscar hacia adelante o hacia atrás en una cinta una longitud específica
de tiempo, siga los pasos detallados a continuación. Debe haber una cinta
colocada en el compartimiento del casete.
1
Presione VCR y luego presione SEARCH repetidamente
hasta que aparezca la pantalla BUSCA HACIA HORA .
• La búsqueda por tiempo y la
búsqueda indizada no se
encuentran disponibles durante
una grabación.
• Para eliminar la exhibición de una
búsqueda, presione CLEAR.
• Para cancelar una búsqueda,
presione STOP C .
Sugerencias útiles
Búsqueda indizada
Al comienzo de cada grabación se efectúa automáticamente una marca de índice.
Esencialmente, una marca de índice es un “marcador.” Encuentre el comienzo de
una grabación llevando a cabo los siguientes pasos.
1
Presione VCR y luego presione SEARCH repetidamente hasta
que aparezca la pantalla BUSCA HACIA INDICE.
2
Dentro de los 30 segundos siguientes, presione KKo LLhasta que
aparezca debajo de BUSCA HACIA INDICE la cantidad de programas
que desea skip. Incluya en esa cantidad el programa corriente.
3
Dentro de los 30 segundos siguientes, presione ss(para una
búsqueda hacia atrás) o BB(para una búsqueda hacia adelante). Cuando
la cinta termine de rebobinarse o avanzar, comenzará la reproducción.
Durante la búsqueda, los números de los programas que aparecen
debajo de BUSCA HACIA INDICE aparecerán en forma descendente.
Si durante la búsqueda se alcanzara el final de la cinta, la búsqueda cesará
y la cinta podría rebobinarse. Encontrará los detalles en la página 31.
Las grabaciones deberán ser de por lo menos 1 minuto de duración en
la velocidad SP y de 3 minutos en la SLP. De lo contrario,la marca de
índice no estará disponible. Los detalles sobre las velocidades de grabación de
las cintas se pueden encontrar en la página 57.
2
Dentro de los 30 segundos siguientes, presione KKo LLhasta que
aparezca la longitud de tiempo deseada. O presione y mantenga
presionado K o L hasta que se alcance la longitud de tiempo deseada.
Usted puede configurar una búsqueda por tiempo de para hasta 9 horas
y 59 minutos (9:59).
3
Dentro de los 30 segundos siguientes, presione ss(para una
búsqueda hacia atrás) o BB(para una búsqueda hacia adelante). El VCR
comenzará a rebobinar o avanzar rápidamente la cinta.Cuando la cinta
termine de rebobinarse o avanzar rápidamente la cantidad de tiempo
que usted especificó, comenzará la reproducción.
Durante la búsqueda el conteo de tiempo mostrado debajo de BUSCA
HACIA HORA irá disminuyendo.
Si durante la búsqueda se alcanzara el final de la cinta, la búsqueda cesará
y la cinta podría rebobinarse. Encontrará los detalles en la página 31.
BUSCA HACIA HORA
- : - -
BUSCA HACIA INDICE
– –
2-3
1
1
2-3
1
1
E8E20UD_SP1 8/22/07 4:43 PM Page 30
5
4
7
+10
INPUT
REW
DISPLAY SUBTITLE ZOOM
ANGLE SEARCH REPEAT
REC SPEED MODE
6
9
8
CLEAR TITLE
0
PLAYOKFFW
TRACKING
DVDVCR SETUP
DISC
MENU
BACKPAUSESTOP
AUDIO
REPEAT
A-B
TIMER SET
5
4
7
+10
INPUT
REW
DISPLAY SUBTITLE ZOOM
ANGLE SEARCH REPEAT
REC SPEED MODE
6
9
8
CLEAR TITLE
0
PLAYOKFFW
TRACKING
DVDVCR SETUP
DISC
MENU
BACKPAUSESTOP
AUDIO
REPEAT
A-B
TIMER SET
Page 93

Español
Reproducción con efectos especiales 31
● Antes de comenzar, presione VCR para que La luz del VCR
aparezca en el frente del DVD/VCR.
Búsqueda hacia adelante y atrás (SP/LP/SLP)/
Búsqueda de velocidad súper alta (LP/SLP)
1
Durante la reproducción de una cinta, presione y
libere FFW
gg
o REW hh. Dará comienzo una
búsqueda rápida de imágenes hacia adelante o hacia atrás.
Presione FFW
gg
o REW hh,y luego presiónelo
otra vez. La velocidad de la búsqueda aumentará.
Presionando repetidamente FFW g o REW h se
alternará entre una búsqueda convencional y una de alta
velocidad.
2
Para retornar a la reproducción normal, presione
PLAY BB.
Visualización de una imagen estática
1
Durante la reproducción de una cinta, presione
PAUSE kk. En la pantalla aparecerá una imagen estática.
● Para avanzar la imagen estática un cuadro por vez,
presione PAUSE k repetidamente.
● Para liberar lo imagen estática y retornar a la
reproducción, presione PLAY B.
Visualización de imágenes en cámara lenta
1
Durante la reproducción de una cinta, presione
PAUSE kky luego presione FFW g. La cinta se
reproducirá en cámara lenta.
● Para cambiar la velocidad de reproducción, presione
FFW g o REW h.
● Para retornar a la reproducción normal, presione
PLAY B.
• Los modos cámara lenta e imagen
estática pasarán al modo Detener
después de 5 minutos para proteger
de daños al DVD/VCR y a la cinta.
• SP/LP/SLP significa que esta función se
podrá utilizar con cintas grabadas en
reproducción convencional,
reproducción larga o reproducción
súper larga. LP/SLP significa que esta
función se podrá utilizar con cintas
grabadas en reproducción larga o
reproducción súper larga. Se podrán
encontrar detalles sobre la velocidad
de las cintas en la página 57.
Sugerencias útiles
Funciones de operación automática
En el modo VCR se proveen las siguientes funciones de cinta. Si fuera necesario, presione VCR para que en el frente del DVD/VCR aparezca
la luz de la VCR.
Reproducción automática
Cuando usted coloca una cinta en el DVD/VCR, el mismo se encenderá. Si falta la pestaña de grabación de la cinta,comenzará la
reproducción de la misma.
Si está configurada una grabación temporizada y “ ” está parpadeando en el panel de exhibición, cuando se inserte una cinta con la
pestaña de grabación intacta el equipo no se encenderá automáticamente.
Si está configurada una grabación temporizada y “ ” está parpadeando en el panel de exhibición, el DVD/VCR expulsará la cinta si a la
misma le falta la pestaña de grabación.
Rebobinado automático y expulsión
Cuando una cinta se reproduce, se avanza de manera rápida o se graba hasta su final, la misma se rebobinará hasta el principio, se detendrá
y será expulsada automáticamente. Este mecanismo no tiene lugar si está ON AUTOREPETIR. Encontrará los detalles en la página 29.
Expulsión de cintas
Una cinta puede ser expulsada con el DVD/VCR encendido o apagado (pero el DVD/VCR debe estar enchufado al tomacorriente).
Si está configurada una grabación temporizada y aparece “ ” en el panel de exhibición, presione TIMER SET en el control remoto o
STOP/EJECT C A en el panel frontal para cancelar el modo de temporizador en espera, y luego presione STOP/EJECT C A para retirar la
cinta. Recuerde insertar una cinta y presione TIMER SET para reinicializar la grabación con temporizador.
Ajuste automático del seguimiento
El VCR ajusta automáticamente el seguimiento para brindarle la mejor calidad de imagen posible. Con algunas grabaciones,sin embargo,
usted puede obtener una imagen mejor utilizando seguimiento manual.
Seguimiento manual
Para ajustar manualmente el seguimiento durante la reproducción normal y la reproducción en cámara lenta de una cinta de video, presione
TRACKING
K/L. El seguimiento retornará a seguimiento automático cuando usted presione STOP C o inserte una cinta. Usted también
puede presionar
TRACKING
K/L para eliminar temblequeo vertical en una imagen estática.
E8E20UD_SP1 8/22/07 4:43 PM Page 31
12
4
7
+10
INPUT
5
8
0
PLAYOKFFWREW
3
6
TRACKING
9
CLEAR TITLE
DVDVCR SETUP
DISC
MENU
BACKPAUSESTOP
Page 94

Español
32
Estéreo Hi-Fi
Estéreo Hi-Fi
Para reproducir en estéreo Hi-Fi las cintas grabadas en estéreo
Hi-Fi, presione AUDIO para elegir Hi-Fi o MONO.
• El nivel de audio de una cinta grabada en
estéreo Hi-Fi diferirá del nivel de audio de
una cinta no grabada en estéreo Hi-Fi.
Sugerencia útil
Menús, función de control de reproducción (PBC)
Utilización del menú Título
Algunos discos DVD tienen un menú Título, que lista los títulos
disponibles en el DVD. Utilice el menú Título para reproducir un
título específico.
1
Presione DVD para poner el DVD/VCR en el modo DVD.
En el frente del DVD/VCR aparecerá la luz de la DVD.
2
Presione TITLE. Aparecerá el menú Título.
Si no hay disponible un menú Título, puede aparecer la “X” en
la pantalla del televisor. O, si el DVD sólo tiene un menú
principal de disco tal como se describe más arriba, el mismo
puede aparecer cuando usted presione TITLE.
3
Presione K, L, s, o B para seleccionar un título, y
luego presione OK. La reproducción comenzará con el
título que usted seleccionó.
• Los menús varían entre discos. Para
obtener detalles consulte la
literatura que acompaña al disco.
• No todos los discos DVD tienen
menús de disco o de títulos.
• Algunos discos DVD pueden
denominar “escenas” a los capítulos.
Algunos discos DVD pueden
denominar “índice de escenas” al
menú de Título.
•TITLE no estará activo con todos los
discos DVD.
Sugerencias útiles
Menús de discos DVD
Algunos discos DVD contienen menús que describen el contenido
del disco o permiten personalizar la reproducción de los mismos.
Por ejemplo, el menú puede ofrecer selecciones de idiomas de
subtítulos, comentario del director o reproducción de pistas de
sonido. Para utilizar el menú del DVD y seleccionar funciones de
reproducción, siga estos pasos.
1
Presione DVD para poner el DVD/VCR en el modo DVD.
En el frente del DVD/VCR aparecerá la luz de la DVD.
2
Presione DISC MENU. Aparecerá el menú principal del
disco DVD.
3
Presione KK,LL,ss,o BBpara seleccionar un elemento, y
luego presione OK. Continúe con este proceso para
configurar todas las funciones que desee.
Función de control de reproducción (PBC)
Cuando se reproduzca un CD de video con PBC (control de
reproducción), usted puede utilizar menús interactivos (por ejemplo,
listas de reproducción) en la pantalla del televisor. Para obtener más
detalles sobre el PBC consulte las instrucciones que acompañan a su
CD de video.
Algunas operaciones no pueden ser efectuadas a menos que la
función PBC se cancele momentáneamente.
Cancelación y recuperación de la función PBC
1
Mientras la reproducción está detenida, presione los
botones numéricos para ingresar un número de pista.
La función PBC estará ahora cancelada y comenzará la
reproducción del CD de video.
2
Para recuperar la función PBC, presione STOP C dos
veces y luego presione PLAY B.
Aparecerá en la pantalla del televisor el menú título.
2
1
2
3
TRACKING
1
3
DVDVCR SETUP
INPUT
MENU
BACKPAUSESTOP
PLAYOKFFWREW
CLEAR TITLE
DISC
TRACKING
12
6
5
4
7
8
9
0
+10
3
1
2
DVDVCR SETUP
INPUT
MENU
OK
DISC
E8E20UD_SP1 8/22/07 4:43 PM Page 32
9
8
7
+10
INPUT
CLEAR TITLE
0
OK
DVDVCR SETUP
DISC
MENU
Page 95

Español
Búsqueda rápida hacia adelante/atrás 33
1
Presione DVD para poner el DVD/VCR en el modo
DVD. En el frente del DVD/VCR aparecerá la luz de la
DVD.
2
Durante la reproducción, presione FFW
gg
o
REW
hh
en el control remoto.
●
Durante la reproducción de un DVD, cuando se presiona
FFW g o REW h la imagen avanzará o retrocederá a
aproximadamente 2, 8, 20, 50 o 100 veces la velocidad normal.
La velocidad puede variar según sea el disco.
g1,g
2,
g3,g
4, o
g
5 aparecerán brevemente en la
pantalla del televisor para indicar búsquedas hacia
adelante. O,
h1,h2,h3,h
4, o
h
5
indicarán búsquedas hacia atrás.
Para la reproducción de discos DVD, durante la búsqueda
el sonido será silenciado.
● Para la reproducción de discos CD de video, discos CD
de audio, MP3 o Windows Media™ Audio, cuando se
presiona
FFW
g o
REW
h la imagen o el sonido
avanzarán o retrocederán a aproximadamente 2, 8 o 30
veces la velocidad normal. La velocidad puede variar
según sea el disco.
g 1, g 2, o g 3, aparecerán brevemente en la
pantalla del televisor para indicar búsquedas hacia
adelante. O h 1, h 2, o h 3 indicarán una
búsqueda hacia atrás.
Para la reproducción de discos CD de audio, MP3,
Windows Media™ Audio, durante la búsqueda el sonido
será intermitente.
3
Presione PLAY BBpara retornar a la reproducción
normal.
La Reproducción rápida con voz está disponible únicamente durante la
reproducción en los discos grabados en el formato Dolby Digital. La
Reproducción rápida con voz reproduce a velocidad levemente más
rápida o más lenta manteniendo al mismo tiempo la calidad del sonido
igual que en la reproducción normal.
1
Durante la reproducción, presione MODE.
Aparecerá la configuración vigente.
2
Presione OK para alternar entre (x1,3), (x0,8) y
OFF.
:Reproduce aproximadamente a 1,3 veces la velocidad normal.
:Reproduce aproximadamente a 0,8 veces la velocidad normal.
OFF : Reproduce sin efectos.
● Para reanudar la reproducción normal, presione PLAY B.
E
1
Ejemplo: Reproducción de un DVD
hacia atrás a una velocidad dos veces
superior a la velocidad normal de
reproducción.
• Si usted utiliza
FFW g o
REW h
durante una Doble
reproducción, reproducción de
JPEG quedará en pause.
Sugerencia útil
•
Durante Reproducción rápida con voz;
-los parámetros de Idioma del
audio, Nivel de negro y
Sonido envolvente virtual no
pueden ser modificados.
- el Sonido envolvente virtual
no funcionará.
- el sonido PCM será emitido si
se utiliza la conexión de audio
digital (COAXIAL),
-
según sean las escenas que se
estén reproduciendo, esta función
puede no estar disponible.
Sugerencia útil
Reproducción rápida x1,3 y x0,8 con voz
3
DVDVCR SETUP
INPUT
MENU
REC SPEED MODE
ANGLE SEARCH REPEAT
DISPLAY SUBTITLE ZOOM
TIMER SET
REPEAT
A-B
AUDIO
BACKPAUSESTOP
PLAYOKFFW
REW
CLEAR TITLE
DISC
TRACKING
OPEN/CLOSE
12
6
5
4
7
8
9
0
+10
3
2
1
2
E8E20UD_SP1 8/22/07 4:43 PM Page 33
Page 96

Español
34 Búsqueda por título/capítulo/tiempo
Búsqueda por tiempo
1
Presione DVD para poner el DVD/VCR en el modo DVD. En el
frente del DVD/VCR aparecerá la luz de la DVD.
2
Durante la reproducción de DVD, CD de video (sin PBC)
o CD de audio, presione SEARCH repetidamente hasta
que aparezca la pantalla Búsqueda por tiempo.
Búsqueda por título/capítulo
1
Presione DVD para poner el DVD/VCR en el modo DVD.En el
frente del DVD/VCR aparecerá la luz de la DVD.
2
Durante la reproducción de un DVD, presione SEARCH
repetidamente hasta que aparezca en la pantalla del televisor
CH (por Capítulo) o TT (por Título). El número de títulos o
capítulos disponibles aparecerá a la derecha (por ejemplo, /4).
3
Ingrese el número del título o capítulo utilizando los
botones numéricos. Se reproducirá ese título o capítulo.
● Para seleccionar un número de pista de un solo dígito cuando
hay más de 10 pistas, presione OK para reproducir la pista.
● Si usted ingresa un número de pista que no está disponible en
el disco, la reproducción no comenzará (o continuará
reproduciéndose la pista corriente).
3
Dentro de los 30 segundos siguientes, utilice los botones
numéricos para ingresar el tiempo transcurrido de
reproducción (de la pista o título) en el cual desea que
comience la reproducción. Ingrese el tiempo en horas,
minutos y segundos. En no más de unos pocos segundos, la
reproducción comenzará a la altura de tiempo especificada.
● Ejemplo: 1 hora, 23 minutos y 30 segundos
1 → 2 → 3 → 3 → 0
● Asegúrese de que el tiempo que ingrese esté comprendido
dentro del tiempo total del título o pista corrientes. Si no lo
está, el espacio tiempo se borrará y la reproducción continuará
en su punto presente. El tiempo total disponible en la pista o
título corrientes aparecerá en la pantalla de Búsqueda por
tiempo.
● Si usted comete un error al ingresar la hora, presione CLEAR
para borrar la zona de la hora. Ingrese la información correcta.
12/17 4 / 4
_:_ _:_ _
1:29:00
•
Cuando se detenga la reproducción, utilice
los botones numéricos para seleccionar
un título para su inmediata reproducción.
Durante la reproducción, utilice los
botones numéricos para seleccionar un
capítulo para su inmediata reproducción.
• La búsqueda por título/capítulo no se
encuentra disponible con algunos discos
DVD.
• La búsqueda por tiempo no se
encuentra disponible para los archivos
MP3,Windows MediaTMAudio y JPEG.
Sugerencias útiles
3
2
1
DVDVCR SETUP
INPUT
MENU
REC SPEED MODE
ANGLE SEARCH REPEAT
DISPLAY SUBTITLE ZOOM
TIMER SET
REPEAT
A-B
AUDIO
BACKPAUSESTOP
PLAYOKFFW
REW
CLEAR TITLE
DISC
TRACKING
OPEN/CLOSE
12
6
5
4
7
8
9
0
+10
3
3
2
1
DVDVCR SETUP
INPUT
MENU
REC SPEED MODE
ANGLE SEARCH REPEAT
DISPLAY SUBTITLE ZOOM
TIMER SET
REPEAT
A-B
AUDIO
BACKPAUSESTOP
PLAYOKFFW
REW
CLEAR TITLE
DISC
TRACKING
OPEN/CLOSE
12
6
5
4
7
8
9
0
+10
3
E8E20UD_SP1 8/22/07 4:43 PM Page 34
Page 97

Español
Búsqueda de pista 35
Existen tres maneras de reproducir una pista específica de un CD de
video (sin PBC), CD de audio, MP3,Windows Media™ Audio o JPEG:
utilizar los botones numéricos, SEARCH, o ∑ y w/.
● Antes de comenzar,presione DVD para que en el frente del
DVD/VCR aparezca la luz de la DVD.
A
Empleo de los botones numéricos
Presione los botones numéricos para ingresar a número de
pista. La reproducción
comenzará en la pista seleccionada.
Para las pistas 10 y superiores, presione el botón +10 para que
aparezca en la pantalla del televisor la pantalla Buscar (TR _ _ /12 - un
ejemplo de las pistas totales). Presione el botón numérico del primer
dígito, y luego presione el botón numérico del segundo dígito.Por
ejemplo, para reproducir la pista 26, presione +10, luego el número 2
y finalmente el número 6.
(Cada número debe ser presionado
dentro de los 30 segundos siguientes al número anterior.)
Para pistas de un solo dígito (1-9), presione un solo botón numérico.
Si usted ingresa un número de pista que no está disponible en el disco, la
reproducción no comenzará (o continuará reproduciéndose la pista
corriente).
B
Empleo de SEARCH
Presione SEARCH para que aparezca la pantalla Buscar
pistas (TR). Dentro de los 30 segundos siguientes, presione
los botones numéricos para seleccionar el número de pista.
La reproducción comenzará en la pista seleccionada. Para una pista
de un solo dígito (1 a 9), ingrese primero un 0. Por ejemplo, para
reproducir la pista 5,presione 0, 5. En el modo Buscar usted no
tiene que utilizar el botón +10.
C
Utilizando ∑ o w
Durante la reproducción, presione ∑ para skip la pista
corriente y pasar a la pista siguiente. El número de pista
aparecerá brevemente en el panel de exhibición del DVD/VCR.
O, durante la reproducción, presione w para retornar al
principio de lo pista actual. Presione w repetidamente
para ir a las pistas anteriores. El número de pista aparecerá
brevemente en el panel de exhibición del DVD/VCR.
• ∑ y w no funcionan cuando la
reproducción está detenida.
• Usted no puede utilizar ∑ para
ir de la última pista del disco a la
primera pista.
• La utilización de ∑ o w durante
Doble reproducción sólo afectará
a los archivos MP3. Si usted desea
omitir los archivos JPEG durante
una doble reproducción, presione
{ o B. Observe que cuando se
presione ∑ o w se afectarán
tanto los archivos MP3 como los
JPEG si VISTA MINIAT. está
configurado a MÚSICA.
Sugerencias útiles
C
A,B
C
B
E8E20UD_SP1 8/22/07 4:43 PM Page 35
3
5
6
9
8
CLEAR TITLE
0
PLAYOKFFW
OPEN/CLOSE
TRACKING
DVDVCR SETUP
DISC
MENU
BACKPAUSESTOP
AUDIO
REPEAT
A-B
TIMER SET
12
4
7
+10
INPUT
REW
DISPLAY SUBTITLE ZOOM
ANGLE SEARCH REPEAT
REC SPEED MODE
Page 98

Español
Reproducción con pause y paso a paso
1
Presione DVD para poner el DVD/VCR en el modo DVD. En
el frente del DVD/VCR aparecerá la luz de la DVD.
2
Durante la reproducción de un disco, presione
PAUSEkk. La reproducción hará una pause y el sonido será
silenciado.
● Se se presiona PAUSE F una sola vez durante una Doble
reproducción, la pause será efectiva únicamente con los
archivos JPEG. Si se presiona PAUSE F una vez más la pause
tendrá efecto sobre la reproducción MP3.
3
Cuando se reproduce un DVD o un CD de video,
presione PAUSE kkrepetidamente para ver la imagen
avanzar un cuadro (o paso) a la vez. El sonido
permanecerá silencioso. La presión repetitiva de PAUSE k
durante la reproducción de un CD de audio, MP3,
Windows Media™ Audio o JPEG no surtirá efecto.
4
Presione PLAY BBpara reanudar la reproducción.
36
Reproducción con pause y paso a paso, reanudación activada
Reanudación activada
1
Presione DVD para poner el DVD/VCR en el modo DVD. En
el frente del DVD/VCR aparecerá la luz de la DVD.
2
Presione STOP CCdurante la reproducción. En unos
pocos segundos, el siguiente mensaje de reanudación
aparecerá en la pantalla del televisor.
3
Presione PLAY BB. En unos pocos segundos,la reproducción se
reanudará desde el punto en el cual fue detenida la última vez.
Usted puede reanudar la reproducción en el mismo punto aún si
apagara el DVD/VCR y luego lo volviese a encender otra vez más
tarde. Sin embargo, la apertura de la bandeja de disco cancelará la
función Reanudar. La próxima vez que usted inserte el disco, la
reproducción comenzará por el principio.
Para MP3,Windows Media™ Audio y JPEG, la reproducción se
reanudará desde el principio de la pista en curso.
Para cancelar Reanudar y comenzar a reproducir el disco desde el
principio, presione STOP C nuevamente mientras se detiene la
reproducción.En lo que respecta a la reproducción de archivos MP3,
Windows Media
TM
Audio y JPEG, cuando usted cancele Reanudación
aparecerá la lista de archivos. Presione PLAY B para comenzar a
reproducir el disco desde el comienzo.
● Para reanudar la reproducción de un CD de video con la
función PBC, usted tiene que cancelar primero la función PBC.
Consulte la página 32 para informarse sobre la manera de
cancelar la función PBC.
● La información de reinicio se eliminará si cambia el nivel
principal cuando la información de resumen está activada.
• Si durante una pause las
imágenes se hacen borrosas,
configure MODO VISTA FIJA a
IMAGEN en el menú
PANTALLA. Encontrará los
detalles en las páginas 50 a 51.
Sugerencia útil
!
"# $ %
!
"# $ %
Para DVD,
CD de video o CD de audio:
Para MP3,
Windows Media™ Audio o JPEG:
4
2-3
2
3
1
1
E8E20UD_SP1 8/22/07 4:43 PM Page 36
3
5
6
9
8
CLEAR TITLE
0
PLAYOKFFW
OPEN/CLOSE
TRACKING
DVDVCR SETUP
DISC
MENU
BACKPAUSESTOP
AUDIO
REPEAT
A-B
TIMER SET
12
4
7
+10
INPUT
REW
DISPLAY SUBTITLE ZOOM
ANGLE SEARCH REPEAT
REC SPEED MODE
5
8
0
OPEN/CLOSE
3
6
TRACKING
9
CLEAR TITLE
DVDVCR SETUP
DISC
MENU
12
4
7
+10
INPUT
REW
PLAYOKFFW
BACKPAUSESTOP
DISPLAY SUBTITLE ZOOM
ANGLE SEARCH REPEAT
REC SPEED MODE
AUDIO
REPEAT
A-B
TIMER SET
Page 99

Español
Repetitiva, Repetición A-B 37
• La reproducción repetitiva y la
repetición A-B no están disponibles en
algunos discos.
•Toda la sección de repetición A-B debe
estar comprendida dentro de un único
título o pista. Si usted no ingresa el punto
B antes de que se alcance el final de la
pista o título, el punto B será establecido
automáticamente en el final de la pista o
del título.
• El punto B debe estar más adelante en
el disco que el punto A.
• La repetición A-B no se encuentra
disponible para los archivos MP3,
Windows Media™ Audio y JPEG.
• Si usted selecciona repetición de
GRUPO durante una Doble
reproducción, todas las pistas o archivos
de cada carpeta serán reproducidas
repetidamente. Por ejemplo, si usted
selecciona repetición de GRUPO
durante una Doble reproducción de la
carpeta A que contiene MP3 y la
carpeta B que contiene JPEG, serán
repetidas todos los archivos MP3 de la
carpeta A y todos los archivos JPEG de
la carpeta B.
Sugerencias útiles
PISTA
Repetición A-B
Usted puede reproducir repetidamente una sección especificada de un DVD,
CD de video o CD de audio. Para configurar la sección que desea repetir
siga estos pasos.
1
Presione DVD para poner el DVD/VCR en el modo DVD. En el
frente del DVD/VCR aparecerá la luz de la DVD.
2
Presione PLAY BBpara reproducir el disco hasta el punto
en el cual desea que comience la reproducción repetitiva.
3
Presione REPEAT A-B para configurar el punto de inicio (A).
Si comete un error, presione CLEAR. Esto borrará el punto A y le
permitirá comenzar de nuevo. En la pantalla del televisor aparecerá
brevemente APDO.
4
Reproduzca el disco hasta el punto en el cual desee que
finalice la reproducción repetitiva, y luego presione otra vez
REPEAT A-B. En no más de unos pocos segundos, la sección A-B
comenzará a ser reproducida repetidamente. El segmento se
reproducirá una y otra vez hasta que usted cancele la función
Repetición A-B.
●
Para cancelar Repetición A-B, presione A-B REPEAT. En la
pantalla del televisor aparecerá APDO. Se reanudará la
reproducción ordinaria.
Ejemplo: Repetir un
capítulo de un DVD
Ejemplo: Repetir una pista de un CD
de video o de un CD de audio
A –
A – B
Repetitiva
1
Presione DVD para poner el DVD/VCR en el modo DVD. En el
frente del DVD/VCR aparecerá la luz de la DVD.
2
Durante la reproducción de DVD, CD de video (sin PBC),
CD de audio, MP3,Windows Media™ Audio o JPEG
presione REPEAT repetidamente hasta que aparezca en la
pantalla del televisor el modo de repetición que desee.
En un DVD, seleccione CAPÍTULO,TÍTULO o APDO. En un CD
de video (sin PBC) y en un CD de audio, seleccione PISTA,TODO
(todas las pistas del disco) o APDO.
Con pistas MP3,Windows Media™ Audio o JPEG, seleccione
PISTA, GRUPO (todas las pistas de carpeta la actual),TODO o
APDO.
La selección de una nueva pista, capítulo o título cancelará la
reproducción repetitiva.
3-4
1
2
1
2
E8E20UD_SP1 8/22/07 4:43 PM Page 37
INPUT
REW
DISPLAY SUBTITLE ZOOM
ANGLE SEARCH REPEAT
REC SPEED MODE
INPUT
REW
DISPLAY SUBTITLE ZOOM
ANGLE SEARCH REPEAT
REC SPEED MODE
DVDVCR SETUP
DISC
MENU
PLAYOKFFW
BACKPAUSESTOP
REPEAT
TIMER SET
MENU
PLAYOKFFW
TIMER SET
AUDIO
A-B
DVDVCR SETUP
DISC
BACKPAUSESTOP
AUDIO
REPEAT
A-B
Page 100

Español
38 Marcadores
2
Dentro de los 30 segundos siguientes, presione sso
BB
para seleccionar un marcador (1-10). Asegúrese de que
debajo del número aparezca _ _ :_ _ : _ _.
3
Cuando la reproducción llegue al punto que desea
recordar, presione OK. Debajo de los marcadores
aparecerán el número de título o de pista y su tiempo
transcurrido de reproducción. el número de marcador
estará reemplazado por un tilde. La pantalla indicadora
desaparecerá aproximadamente en 30 segundos; si no
desaparece, presione BACK para quitarla.
4
Para regresar a un marcador durante una
reproducción, presione SEARCH reiteradamente
hasta que aparezca la pantalla indicadora.
Presione sso BBpara seleccionar el marcador que
desee, y luego presione OK. La reproducción del disco
continuará desde el punto marcado.
• La apertura de la bandeja de
discos o el apagado del
DVD/VCR borrará todos los
marcadores.
• Para borrar un solo marcador,
presione SEARCH
reiteradamente hasta que
aparezca la pantalla indicadora.
Para seleccionar un marcador
presione s o B.Presione
CLEAR. Presione BACK para
suprimir esta pantalla.
• Para borrar todos los
marcadores, presione SEARCH
reiteradamente hasta que
aparezca la pantalla indicadora.
Presione B para seleccionar
AC,y luego presione OK.
Presione BACK para
suprimir esta pantalla.
Sugerencias útiles
Ejemplo: DVD
Ejemplo: CD de video
o CD de audio
Ejemplo: DVD
Utilice marcadores para recordar sus lugares favoritos en un DVD,
CD de video (sin PBC) o CD de audio.
● Antes de comenzar, ponga el DVD/VCR en modo DVD.
Presione DVD para que en el frente del DVD/VCR aparezca la
luz de la DVD.
1
Reproduzca el disco hasta estar a menos de 30
segundos del punto en el cual desea configurar el
marcador. Presione SEARCH reiteradamente hasta
que aparezca la pantalla indicadora.
2,4
3-4
1,4
E8E20UD_SP1 8/22/07 4:43 PM Page 38
12
4
7
+10
INPUT
REW
DISPLAY SUBTITLE ZOOM
ANGLE SEARCH REPEAT
REC SPEED MODE
3
5
6
9
8
CLEAR TITLE
0
PLAYOKFFW
OPEN/CLOSE
TRACKING
DVDVCR SETUP
DISC
MENU
BACKPAUSESTOP
AUDIO
REPEAT
A-B
TIMER SET
 Loading...