

Page 1

3
Enjoy
Digital Video Disc Player &
Video Cassette Recorder
DVP3345V/17
Video Cassette Playback
1 Insert a tape in the cassette compartment of the
DVD/VCR. Playback will start automatically.
If playback does not start automatically, press
Disc Playback
1 Press DVD
2 Press OPEN/CLOSE to open
3 Place a disc onto the tray. If the DVD is
4 Press PLAY to close the tray. The tray
VCR
VCR
Press STOP to stop playback.
Press REW to rewind the tape.
After the tape stops, press STOP/EJECT
on the front of the DVD/VCR to remove
the tape.
appears on the front of the DVD/VCR.
the disc tray.
recorded on only one side, place the disc
on the tray with the label facing up and the
shiny side facing down.
will close and playback will begin. If playback
does not start automatically, press
PLAY again.
You also can close the tray by pressing
OPEN/CLOSE .
Press STOP to stop playback.
If you are trying to play a DVD recorded on
other recorder unit, make sure it is finalized on
that unit.
, then press PLAY .
DVD
so DVD light
VCR
REW
STOP
OPEN/CLOSE
PLAY
Playable Discs
DVD DVD+R DVD+RW DVD-R DVD-RW
Video CD Audio CD CD-R
CD-RW MP3 les
is a trademark of DVD Format/Logo Licensing Corporation.
DVD
Region Codes
DVDs must be labeled for ALL regions or for Region
1 in order to play on this DVD player. You cannot
play DVDs that are labeled for other regions.
Look for the symbols below on your DVDs. If these
region symbols do not appear on your DVD, you
cannot play the DVD in this player.
Quick Start Guide
Connections
Basic Setup
Enjoy
DVD PLAYER/VCR DVP3345V
DVD
What’s in the box?
STANDBY-ON
VIDEO AUDIOLR
REW F.FWD PLAY
ONE TOUCH RECORDING • LONG PLAY
REC TRACKINGSTOP/EJECT
Digital Video Disc Player & Video Cassette Recorder
OPEN/CLOSE
VCR DVD
SOURCE
1
2
3
STOP PLAY
Need help?
User Manual
See the user manual that came with your Philips DVD/VCR.
Online
Go to www.philips.com/welcome.
Video Cable
2007 © Philips Consumer Electronics Company
Marietta, GA 30006 0026
All rights reserved.
Printed in China
12 NC 8239 300 58381
E8E20UD
1VMN23998*****
E8E20UD_QSG_EN.indd 1E8E20UD_QSG_EN.indd 1 8/22/2007 4:19:09 PM8/22/2007 4:19:09 PM
Remote Control
with Batteries
(AAx2)
Audio Cable
User Manual
User Manual
Quick Start Guide
Page 2
Connections
Basic Setup
1
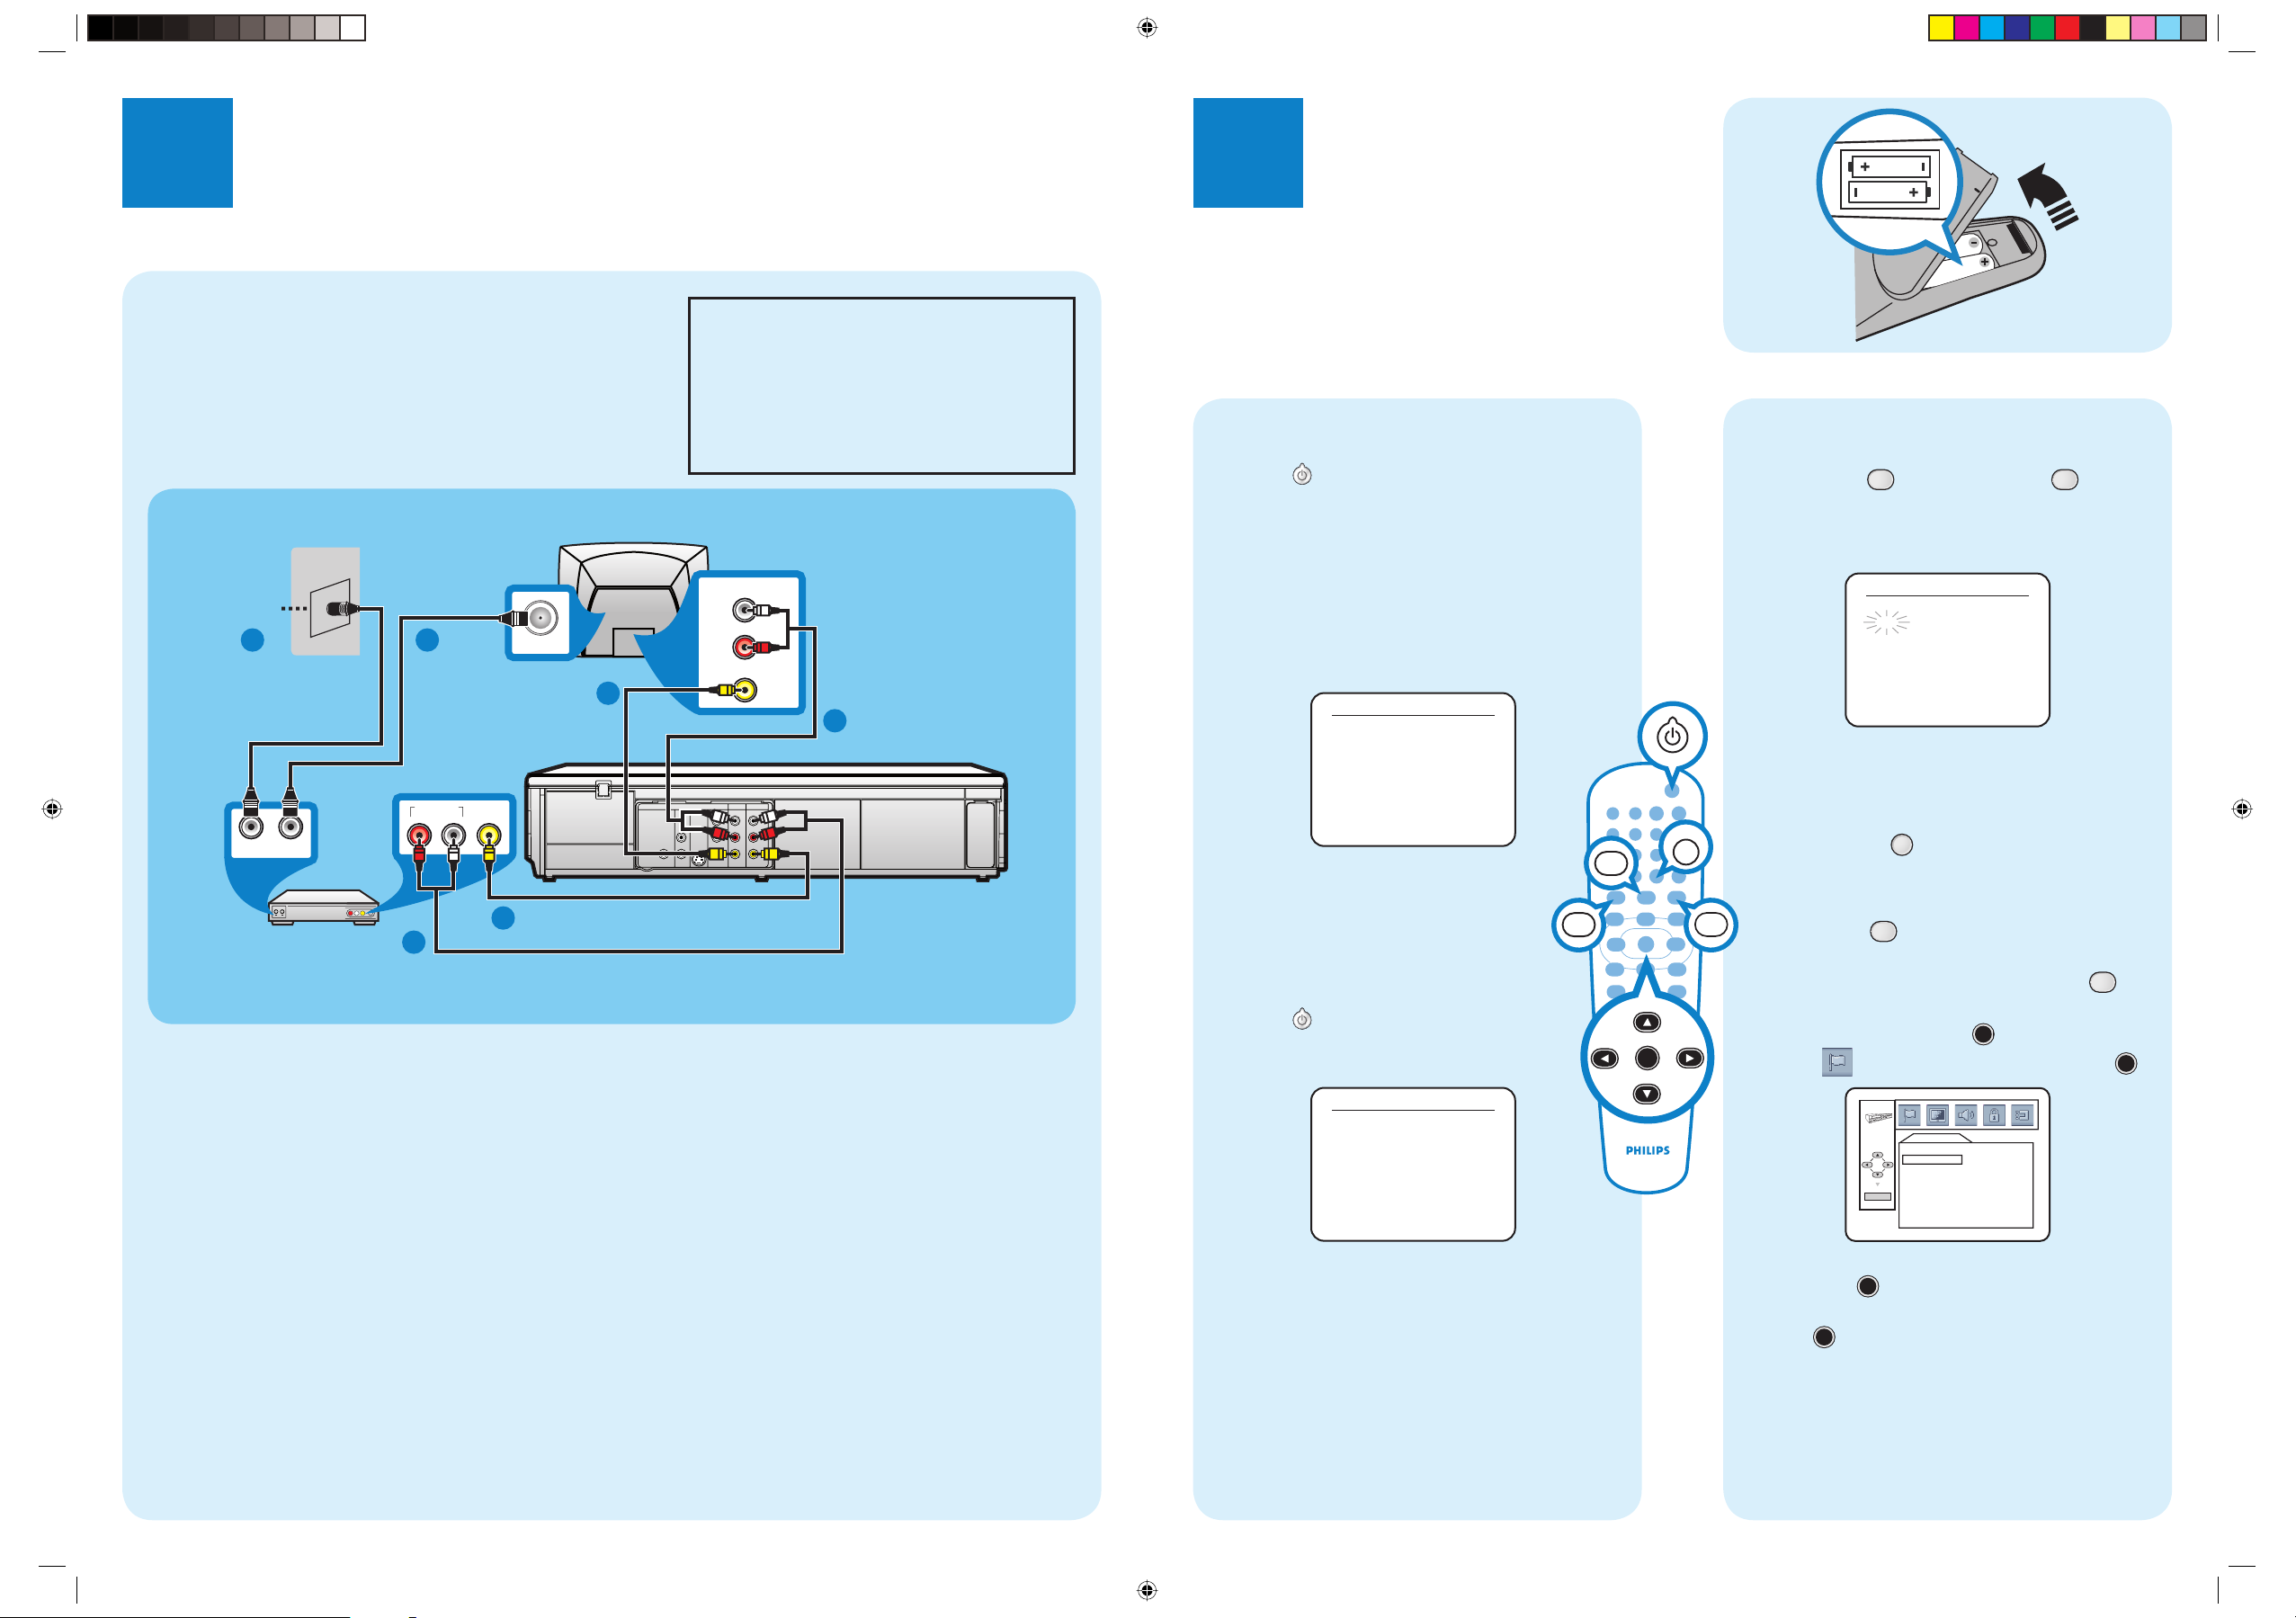
Connection to an External Tuner
Before Connecting
A
Disconnect the power cords of the devices from the AC outlet.
Connecting
B
Make the connection as illustrated below.
Back of TV
RF coaxial cable
TV Signal
1 2
RF coaxial cable
(not supplied)
OUTIN
External tuner
1 Connect a TV signal to the IN jack on the external tuner.
2 Use an RF coaxial cable (not supplied) to connect the OUT jack on the external tuner to the ANT. IN jack on the TV.
3 Connect the red and white audio cable (supplied) to the red and white AUDIO OUT jacks on the external tuner and to
the red and white VCR AUDIO IN jacks on the DVD/VCR.
4 Connect the yellow video cable (supplied) to the yellow VIDEO OUT jack on the external tuner and to the VCR VIDEO
IN jack on the DVD/VCR.
5 Connect another red and white audio cable (not supplied) to the red and white DVD/VCR AUDIO OUT jacks on the
DVD/VCR and to the red and white AUDIO IN jacks on the TV.
6 Connect another yellow video cable (not supplied) to the DVD/VCR VIDEO OUT jack on the DVD/VCR and to the
VIDEO IN jack on the TV. If your TV has antenna in jack only, it is still possible to connect this unit to your TV by using a
commercially available stereo audio/video RF modulator. Refer to the manual accompanying the modulator for more
information.
7 Connect the power cords of the TV and the DVD/VCR to a power outlet. Turn on the TV and set it to the correct Video
In channel.
For additional connection diagrams, see the accompanying User Manual.
(not supplied)
AUDIO OUT
LR
3
VIDEO
OUT
4
ANT. IN
Video Cable
(not supplied)
6
DIGITAL
AUDIO OUT
This DVD/VCR does not have a tuner
input jack. To record TV programs on
your DVD/VCR, you need to connect
this DVD/VCR to an external tuner
device (e.g., set top box, cable box or
satellite receiver) that has audio/video
output jacks.
AUDIO IN
L
R
VIDEO IN
DVD
DVD/VCR
VCR
COMPONENT
AUDIO
S-VIDEO
OUT
L
COAXIAL
R
Video Cable (supplied)
Audio Cable (supplied)
AUDIO IN
AUDIO OUT
VIDEO OUT
OUT
Y
LRL
B
/
C
R
P
B
VIDEO OUT
VIDEO IN
CR /
R
P
Audio Cable
(not supplied)
5
DVD/VCR
2
Finding the Viewing Channel
1 Press to turn on the DVD/VCR.
2 Turn on your TV.
If connected to your VCR, make sure it is
switched off or in standby mode before
proceeding.
3 Press “2” on the TV’s remote control, then press
channel down button repeatedly until you see the
Language Select Menu. This is the correct viewing
channel (Video In channel) for the recorder.
LANGUAGE SELECT
B ENGLISH [ON]
FRANCAIS
ESPAÑOL
PUSH B
Refer to your TV’s user manual for
*
details.
Initial Settings
LANGUAGE - VCR
A
1 Press . VCR light will appear on the front
of the DVD/VCR. The display shown below
will appear.
LANGUAGE SELECT
B ENGLISH [ON]
FRANCAIS
ESPAÑOL
PUSH B
2 Press K or L to select ENGLISH, FRANCAIS
(French) or ESPAÑOL (Spanish) as the language
for VCR On-Screen Displays and menus. Then,
press B.
SETUP
VCR
CLOCK
B
1 Press VCR
VCR
, then press SETUP
SETUP
so
CLOCK SET Menu appear.
2 While the MONTH space is flashing, press K or
L until the month appears. Then, press B.
CLOCK SET
MONTH DAY YEAR
0 3 / – – – – – –
HOUR MINUTE AM/PM
– – : – – – –
3 Likewise, set the DAY, YEAR, HOUR and
MINUTE. Then press B.
4 While the AM or PM space is flashing, press K or
CLEAR
L to point to AM or PM.
5 Press CLEAR or B to start the clock.
LANGUAGE - DVD
C
DVD
1 Press DVD
DVD
to put the DVD/VCR in DVD
mode.
2 While playback is stopped, press SETUP
SETUP
.
3 Press s or B to select CUSTOM at the top of
the menu, then press OK OK.
OK
4 With (LANGUAGE) selected, press OK
LANGUAGE
OK
AUDI O
SUBTITLE
DISC MENU
OSD LANGUAGE
ORIGINAL
OFF
ENGLISH
ENGLISH
OK
.
5 Press K or L to select OSD LANGUAGE.
Press OK OK.
6 Press K or L to select a language, then press
OK OK.
If you select OTHER for AUDIO, SUBTITLE, or
DISC MENU, press four Number buttons to
enter the code for the language you desire. Use
one of the Language Codes listed on page 49 in
the User Manual.
E8E20UD_QSG_EN.indd 2E8E20UD_QSG_EN.indd 2 8/22/2007 4:19:31 PM8/22/2007 4:19:31 PM
 Loading...