

Page 1
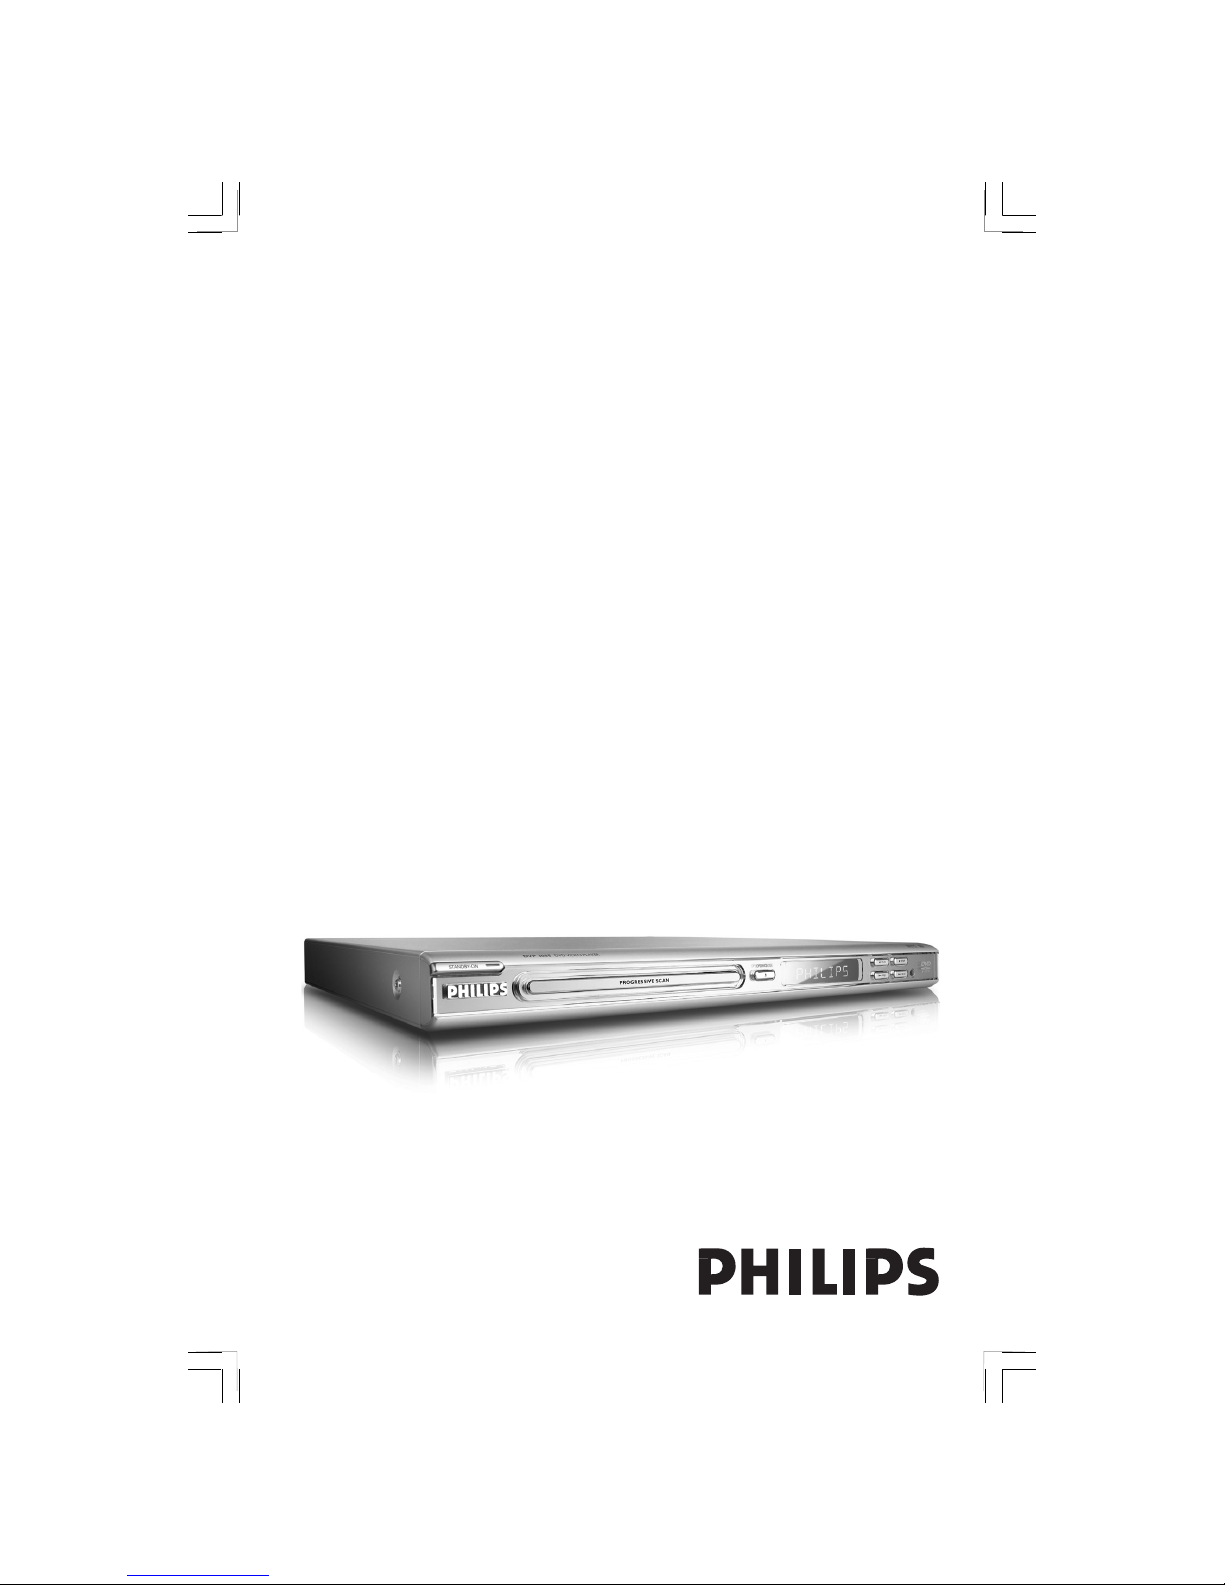
DVD VIDEO PLAYER
DVP3005
User manual
Thank you for choosing Philips.
Need help fast?
Read your User’s Manual first for quick tips that make using
your Philips product more enjoyable.
If you have read your instructions and still need assistance,
you may access our online help at www.philips.com/support
Page 2
Important notes for users in the
U.K.
Mains plug
This apparatus is fitted with an approved 13
Amp plug. To change a fuse in this type of plug
proceed as follows:
1 Remove fuse cover and fuse.
2 Fix new fuse which should be a BS1362 5 Amp,
A.S.T.A. or BSI approved type.
3 Refit the fuse cover.
If the fitted plug is not suitable for your jack
outlets, it should be cut off and an appropriate
plug fitted in its place.
If the mains plug contains a fuse, this should have
a value of 5 Amp. If a plug without a fuse is used,
the fuse at the distribution board should not be
greater than 5 Amp.
Note: The severed plug must be disposed to avoid
a possible shock hazard should it be inserted into a
13 Amp jack elsewhere.
How to connect a plug
The wires in the mains lead are coloured with
the following code: blue = neutral (N),
brown = live (L).
¶ As these colours may not correspond with the
colour markings identifying the terminals in your
plug, proceed as follows:
– Connect the blue wire to the terminal
marked N or coloured black.
– Connect the brown wire to the terminal
marked L or coloured red.
– Do not connect either wire to the earth
terminal in the plug, marked E (or e) or coloured
green (or green and yellow).
Before replacing the plug cover, make certain
that the cord grip is clamped over the sheath of
the lead - not simply over the two wires.
Copyright in the U.K.
Recording and playback of material may require
consent. See Copyright Act 1956 and The
Performer’s Protection Acts 1958 to 1972.
CAUTION
Use of controls or adjustments or
performance of procedures other
than herein may result in hazardous
radiation exposure or other unsafe
operation.
VAROITUS
Muiden kuin tässä esitettyjen
toimintojen säädön tai asetusten
muutto saattaa altistaa vaaralliselle
säteilylle tai muille vaarallisille
toiminnoille.
CAUTION
VISIBLE AND INVISIBLE LASER
RADIATION WHEN OPEN.
AVOID EXPOSURE TO BEAM.
ADVARSEL
SYNLIG OG USYNLIG
LASERSTRÅLING VED ÅBNING
UNDGÅ UDSÆTTELSE FOR STRÅLING
VARNING
SYNLIG OCH OSYNLIG
LASERSTRÅLNING NÄR DENNA DEL
ÄR ÖPPNAD BETRAKTA EJ STRÅLEN
VARO!
AVATTAESSA OLET ALTTIINA
NÄKYVÄLLE JA NÄKYMÄTTÖMÄLLE
LASER SÄTEILYLLE. ÄLÄ KATSO
SÄTEESEEN
VORSICHT
GEFAHR VON SICHTBARER UND
UNSICHTBARER LASERSTRAHLUNG
BEI GEÖFFNETEM GEHÄUSE.
ATTENTION
RAYONNEMENT LASER VISIBLE ET
INVISIBLE EN CAS D’OUVERTURE
EXPOSITION DANGEREUSE AU
FAISCEAU
This compact DVD player is in
conformity with the EMC directive
and low-voltage directive.
The apparatus shall not be exposed to dripping
or splashing and that no objects filled with
liquids, such as vases, shall be placed on
apparatus.
Page 3
3
Index
Due to the inconsistency of disc formats
provided by various disc manufacturers, your
DVD system may require a playability
enhancement or upgrade. As DVD technology
advances, these enhancements will become
common and will be easy to complete.
Go to www.philips.com/support for
software upgrade.
DK
Advarsel: Usynlig laserstråling ved
åbning når sikkerhedsafbrydere er ude
af funktion. Undgå utsættelse for
stråling.
Bemærk: Netafbryderen er sekundært
indkoblet og ofbryder ikke strømmen
fra nettet. Den indbyggede netdel er
derfor tilsluttet til lysnettet så længe
netstikket sidder i stikkontakten.
S
Klass 1 laseraparat
Varning! Om apparaten används på
annat sätt än i denna bruksanvisning
specificerats, kan användaren utsättas
för osynlig laserstrålning, som
överskrider gränsen för laserklass 1.
Observera! Stömbrytaren är sekundärt
kopplad och bryter inte strömmen från
nätet. Den inbyggda nätdelen är
därför ansluten till elnätet så länge
stickproppen sitter i vägguttaget.
SF
Luokan 1 laserlaite
Varoitus! Laitteen käyttäminen muulla
kuin tässä käyttöohjeessa mainitulla
tavalla saattaa altistaa käyttäjän
turvallisuusluokan 1 ylittävälle
näkymättömälle lasersäteilylle.
Oikeus muutoksiin varataan. Laite ei
saa olla alttiina tippu-ja roiskevedelle.
Huom. Toiminnanvalitsin on kytketty
toisiopuolelle, eikä se kytke laitetta irti
sähköverkosta. Sisäänrakennettu
verkko-osa on kytkettynä
sähköverkkoon aina silloin, kun pistoke
on pistorasiassa.
English --------------------------------------- 6
Deutsch ------------------------------------ 34
Polski --------------------------------------- 62
Русский ------------------------------------ 90
English
Русский
Deutsch
Polski
Page 4
General Information
CAUTION
(WARNING LOCATION: ON THE
BACKPLATE OF THE SET)
NEVER MAKE OR CHANGE
CONNECTIONS WITH THE
POWER SWITCHED ON.
Manufactured under license from Dolby
Laboratories. “Dolby”, “Pro Logic” and the
double-D symbol are trademarks of Dolby
Laboratories.
Laser safety
This unit employs a laser. Due to possible
eye injury, only a qualified service person
should remove the cover or attempt to
service this device.
NOTE:
PICTURES SHOWN MAYBE
DIFFERENT BETWEEN
COUNTRIES.
LASER
Type Semiconductor laser
GaAlAs
Wave length 650 nm (DVD)
780 nm (VCD/CD)
Output Power 7 mW (DVD)
10 mW (VCD/CD)
Beam divergence 60 degree
For Customer Use:
Read carefully the information located at
the rear/bottom of your DVD VIDEO
player and enter below the Serial No.
Retain this information for future
reference.
Model No. DVP 3005
Serial No. _______________
Environmental Information
All unnecessary packaging has been
omitted. The packaging has been made
easy to separate into two materials:
cardboard (box, buffer) and polyethylene
(bags, protective foam sheet).
Your DVD player consists of materials
which can be recycled and reused if
disassembled by a specialised company.
Please observe the local regulations
regarding the disposal of packaging
materials, exhausted batteries and old
equipment.
Specifications are subject to change
without notice. Trademarks are the
property of Koninklijke Philips Electronics
N.V. or their respective owners.
This product incorporates copyright
protection technology that is protected by
method claims of certain U.S. patents and
other intellectual property rights owned by
Macrovision Corporation and other rights
owners. Use of this copyright protection
technology must be authorized by
Macrovision Corporation, and is intended
for home and other limited viewing uses
only unless otherwise authorized by
Macrovision Corporation. Reverse
engineering or disassembly is prohibited.
‘CONSUMERS SHOULD NOTE THAT NOT
ALL HIGH DEFINITION TELEVISION SETS
ARE FULLY COMPATIBLE WITH THIS
PRODUCT AND MAY CAUSE ARTIFACTS
TO BE DISPLAYED IN THE PICTURE. IN
CASE OF 525 OR 625 PROGRESSIVE SCAN
PICTURE PROBLEMS, IT IS RECOMMENDED
THAT THE USER SWITCH THE
CONNECTION TO THE ‘STANDARD
DEFINITION’ OUTPUT. IF THERE ARE
QUESTIONS REGARDING OUR TV SET
COMPATIBILITY WITH THIS MODEL 525p
AND 625p DVD PLAYER, PLEASE CONTACT
OUR CUSTOMER SERVICE CENTER.’
Page 5
English
5
Abkhazian 6566
Afar 6565
Afrikaans 6570
Amharic 6577
Arabic 6582
Armenian 7289
Assamese 6583
Avestan 6569
Aymara 6589
Azerhaijani 6590
Bahasa Melayu 7783
Bashkir 6665
Belarusian 6669
Bengali 6678
Bihari 6672
Bislama 6673
Bokmål, Norwegian 7866
Bosanski 6683
Brezhoneg 6682
Bulgarian 6671
Burmese 7789
Castellano, Español 6983
Catalán 6765
Chamorro 6772
Chechen 6769
Chewa; Chichewa; Nyanja 7889
9072
Chuang; Zhuang 9065
Church Slavic; Slavonic 6785
Chuvash 6786
Corsican 6779
Česky 6783
Dansk 6865
Deutsch 6869
Dzongkha 6890
English 6978
Esperanto 6979
Estonian 6984
Euskara 6985
6976
Faroese 7079
Français 7082
Frysk 7089
Fijian 7074
Gaelic; Scottish Gaelic 7168
Gallegan 7176
Georgian 7565
Gikuyu; Kikuyu 7573
Guarani 7178
Gujarati 7185
Hausa 7265
Herero 7290
Hindi 7273
Hiri Motu 7279
Hrwatski 6779
Ido 7379
Interlingua (International)7365
Interlingue 7365
Inuktitut 7385
Inupiaq 7375
Irish 7165
Íslenska 7383
Italiano 7384
Ivrit 7269
Japanese 7465
Javanese 7486
Kalaallisut 7576
Kannada 7578
Kashmiri 7583
Kazakh 7575
Kernewek 7587
Khmer 7577
Kinyarwanda 8287
Kirghiz 7589
Komi 7586
Korean 7579
Kuanyama; Kwanyama 7574
Kurdish 7585
Lao 7679
Latina 7665
Latvian 7686
Letzeburgesch; 7666
Limburgan; Limburger 7673
Lingala 7678
Lithuanian 7684
Luxembourgish; 7666
Macedonian 7775
Malagasy 7771
Magyar 7285
Malayalam 7776
Maltese 7784
Manx 7186
Maori 7773
Marathi 7782
Marshallese 7772
Moldavian 7779
Mongolian 7778
Nauru 7865
Navaho; Navajo 7886
Ndebele, North 7868
Ndebele, South 7882
Ndonga 7871
Nederlands 7876
Nepali 7869
Norsk 7879
Northern Sami 8369
North Ndebele 7868
Norwegian Nynorsk; 7878
Occitan; Provencal 7967
Old Bulgarian; Old Slavonic 6785
Oriya 7982
Oromo 7977
Ossetian; Ossetic 7983
Pali 8073
Panjabi 8065
Persian 7065
Polski 8076
Português 8084
Pushto 8083
Russian 8285
Quechua 8185
Raeto-Romance 8277
Romanian 8279
Rundi 8278
Samoan 8377
Sango 8371
Sanskrit 8365
Sardinian 8367
Serbian 8382
Shona 8378
Shqip 8381
Sindhi 8368
Sinhalese 8373
Slovensky 8373
Slovenian 8376
Somali 8379
Sotho; Southern 8384
South Ndebele 7882
Sundanese 8385
Suomi 7073
Swahili 8387
Swati 8383
Svenska 8386
Tagalog 8476
Tahitian 8489
Tajik 8471
Tamil 8465
Tatar 8484
Telugu 8469
Thai 8472
Tibetan 6679
Tigrinya 8473
Tonga (Tonga Islands) 8479
Tsonga 8483
Tswana 8478
Türkçe 8482
Turkmen 8475
Twi 8487
Uighur 8571
Ukrainian 8575
Urdu 8582
Uzbek 8590
Vietnamese 8673
Volapuk 8679
Walloon 8765
Welsh 6789
Wolof 8779
Xhosa 8872
Yiddish 8973
Yoruba 8979
Zulu 9085
Language Code
Page 6

English
6
Language Code .......................... 5
Introduction
Supplied accessories ....................................... 8
Care and safety information.......................... 8
Connections
Connecting TV ............................................ 9-10
Using SCART jack........................................... 9
Using Composite Video jacks (CVBS) ........ 9
Using Component Video jacks (Pr Pb Y) . 10
Using an accessory RF modulator ............ 10
Connecting the power cord........................ 11
Optional: Connecting to an Audio System...
........................................................................... 12
Stereo system has Dolby Pro Logic or Right
/ Left Audio In jack ....................................... 12
Optional: Connecting Digital AV Receiver ...
........................................................................... 12
Receiver has a PCM, Dolby Digital, or
MPEG2 decoder............................................ 12
Functional Overview
Front and Rear Panels .................................. 13
Remote Control ............................................ 14
Getting Started
Step 1: Inserting batteries into the
Remote Control ............................................ 15
Using the Remote Control to operate the
Player ............................................................... 15
Step 2: Setting up the TV ........................15-17
Setting up Progressive Scan feature (for
Progressive Scan TV only) ........................... 16
To deactivate Progressive manually .......... 17
Selecting the colour system that
corresponds to your TV .............................. 17
Step 3: Setting language preference ...........18
Setting the OSD Language.......................... 18
Setting the Audio, Subtitle and Disc menu
language .......................................................... 18
Disc Operations
Playable Discs ................................................. 19
Region Codes .................................................19
Playing discs..................................................... 19
Basic playback controls................................. 20
Selecting various repeat/shuffle functions 20
Repeat play mode .........................................20
Repeating a section within a chapter/track .
.........................................................................
20
Operations for video playback ...................21
Using the Disc Menu.................................... 21
Zooming in ..................................................... 21
Resuming playback from the last stopped
point ................................................................ 21
Slow motion................................................... 21
OSD (On-Screen Display) .......................... 21
Special DVD features .................................... 22
Playing a Title ................................................. 22
Camera Angle ................................................ 22
Changing the Audio Language ....................22
Subtitles .......................................................... 22
Special VCD & SVCD Features ...................22
Playback Control (PBC) .............................. 22
Playing MP3/JPEG (Kodak) Picture CD ..... 23
General Operation ....................................... 23
Playback selection......................................... 23
Repeat ............................................................. 23
Fast Forward/Reverse (MP3) ..................... 23
Contents
Page 7

English
7
Contents
DVD Setup Menu Options
General Setup menu ..................................... 24
Dimming player’s display panel .................. 24
OSD Language ............................................... 24
Sleep ................................................................ 24
Screen Saver - turning on/off .....................24
Audio Setup Menu ......................................... 25
Setting the Downmix ................................... 25
Digital Audio Setup....................................... 25
Video Setup Menu ...................................26-27
TV Type ........................................................... 26
Setting the TV Display ................................. 26
Progressive - turning on/off........................ 27
Sharpness ........................................................ 27
Brightness/Contrast ..................................... 27
Switching the YUV/RGB .............................. 27
Preference Page........................................ 28-29
Audio, Subtitle, Disc Menu .......................... 28
Restricting playback by Parental Control .....
......................................................................... 28
Changing the Password ...............................29
Restoring to original settings ..................... 29
Troubleshooting ......................... 30–31
Specifications ......................................32
Glossary ......................................................................33
Page 8
English
8
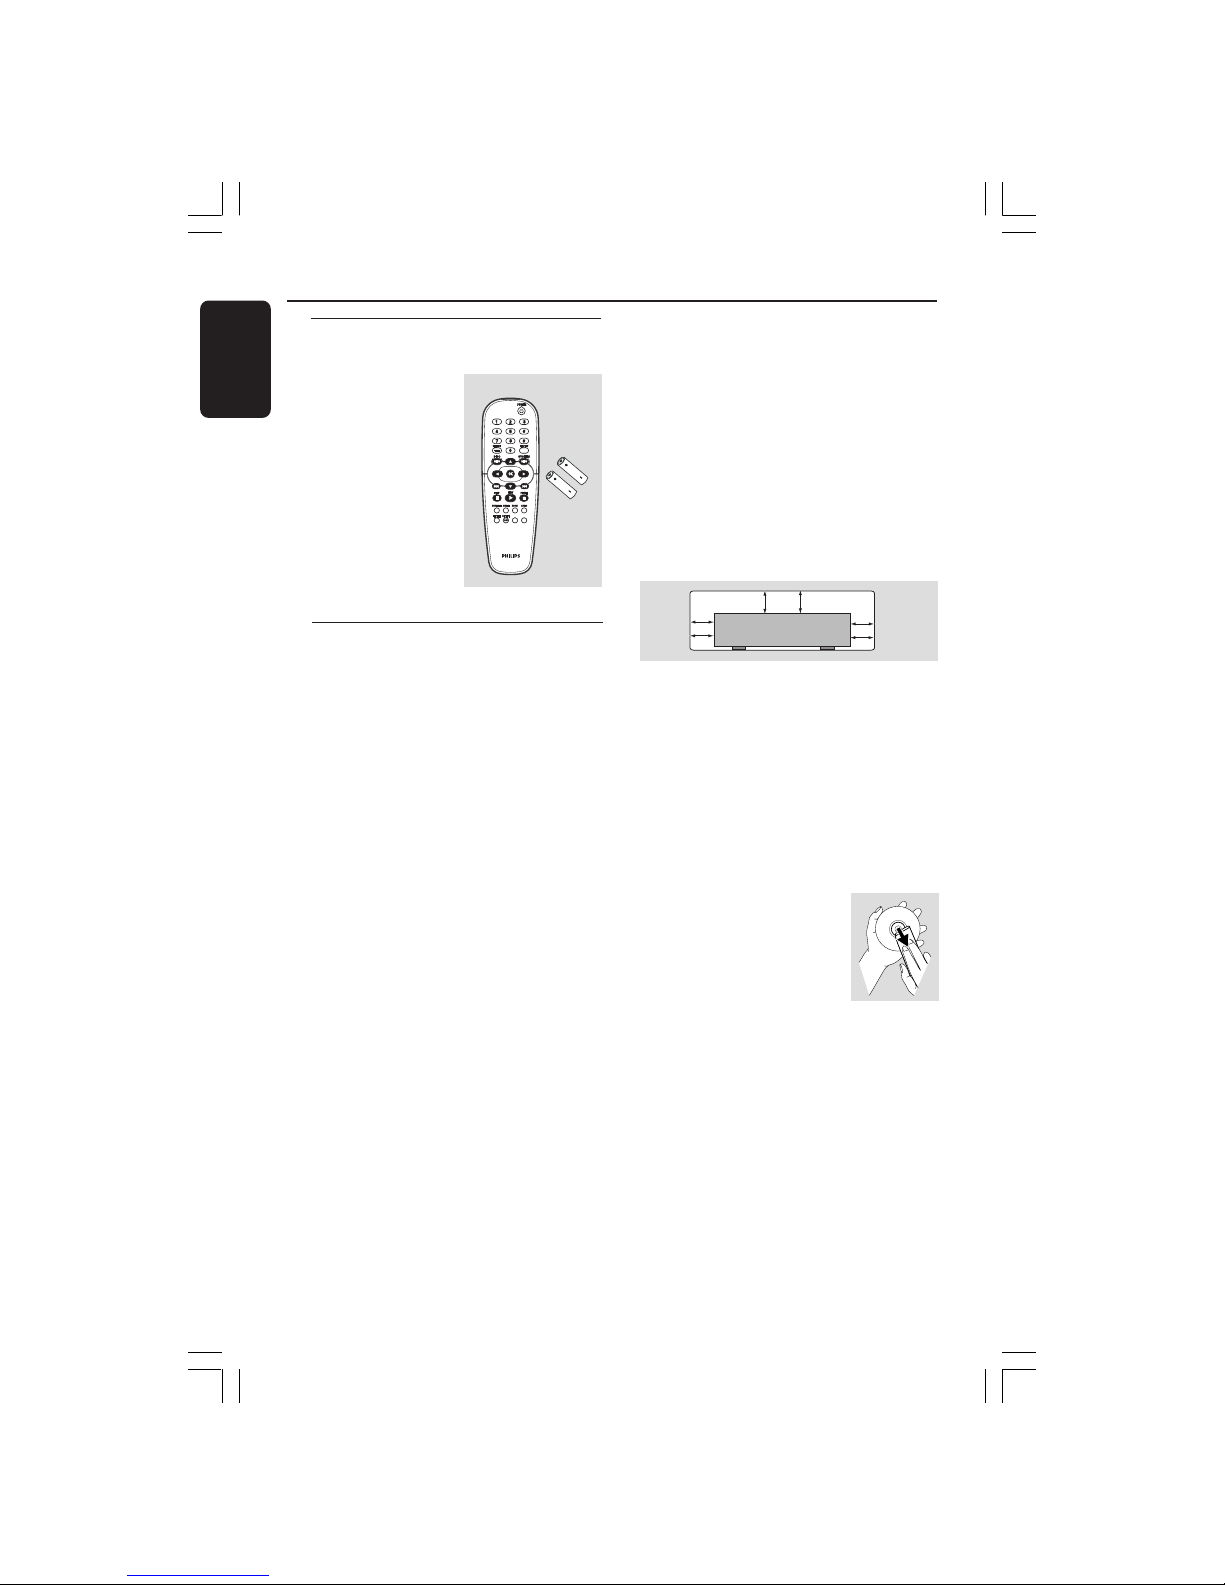
Supplied accessories
Remote Control
and
two AA batteries
Introduction
Care and safety information
● Power consumption
– When the system is switched to
Standby mode, it is still consuming power.
To disconnect the system from the power
supply completely, remove the AC power
plug from the wall jack.
● Avoid high temperatures, moisture,
water and dust
– Do not expose the player, batteries or
discs to humidity, rain, sand or excessive
heat (caused by heating equipment or
direct sunlight.)
PREVIEW
PREVIEW
MUTE
MUTE
● Avoid condensation problem
– The lens may cloud over when the
player is suddenly moved from cold to
warm surroundings, making it impossible
to play a disc. Leave the player in the
warm environment until the moisture
evaporates.
● Do not block the vents
– Do not operate the DVD Player in an
enclosed cabinet, allow about 10 cm (4
inches) of free space all around the player
for adequate ventilation.
10 cm
(4 inches)
10 cm
(4 inches)
10 cm
(4 inches)
PHILIPS
● Care of the cabinet
– Use a soft cloth slightly moistened with
a mild detergent solution. Do not use a
solution containing alcohol, spirits,
ammonia or abrasives.
● Finding a suitable location
– Place the player on a flat, hard, and
stable surface.
● Disc handling
– To clean a CD, wipe it in a
straight line from the center
towards the edge using a soft,
lint-free cloth. A cleaning
agent may damage the disc!
– Write only on the printed
side of a CDR(W) and only with a soft felttipped pen.
– Handle the disc by its edge, do not
touch the surface.
Page 9
English
9
Connections
Connecting TV
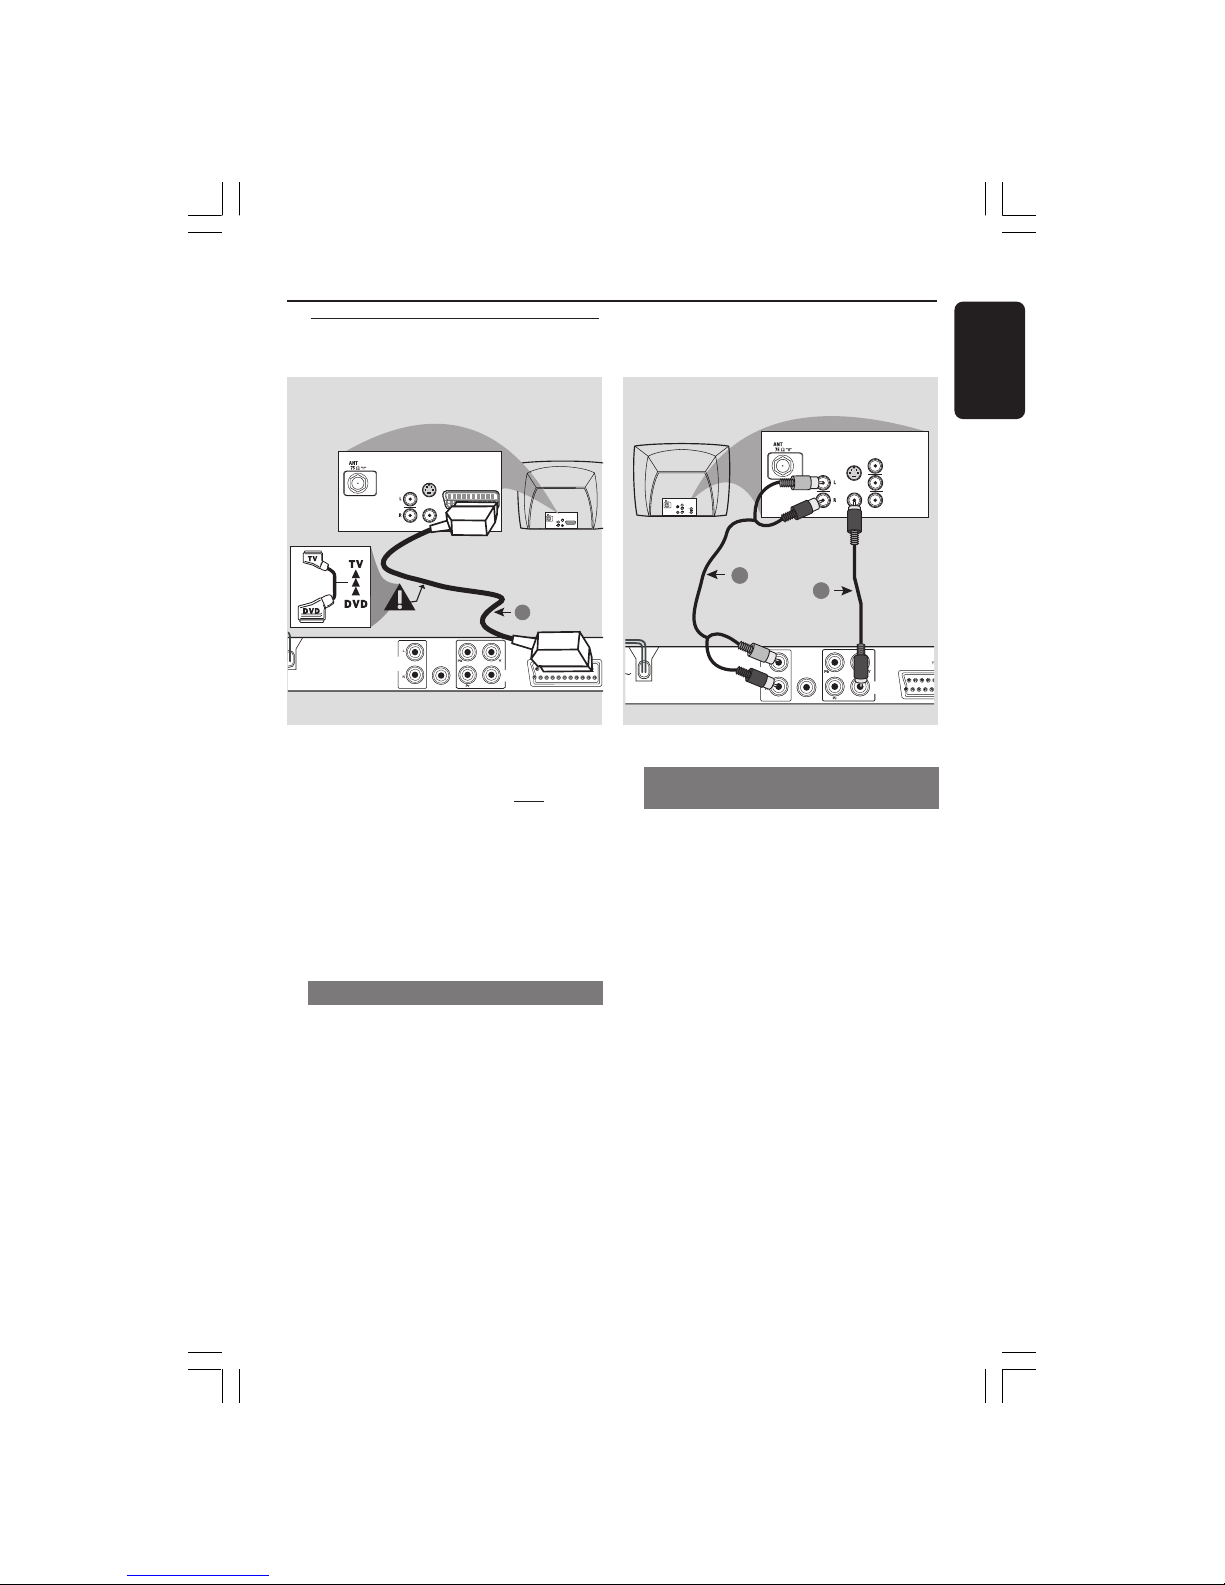
Using Composite Video jacks
(CVBS)
1 Use the composite video cable (yellow) to
connect the DVD Player’s CVBS (VIDEO)
jack to the video input jack (or labeled as
A/V In, Video In, Composite or Baseband)
on the TV (cable not supplied).
2 To hear the sound of this DVD Player
through your TV, use the audio cables
(white/red) to connect AUDIO OUT
(L/R) jacks of the DVD Player to the
corresponding AUDIO IN jacks on the TV
(cable not supplied).
AUDIO
OUT
DIGITAL
OUT
CVBS
VIDEO
OUT
AUDIO
IN
V (Pr/Cr)
U (Pb/Cb)
Y
S-VIDEO
IN
VIDEO IN
COMPONENT
VIDEO IN
AUDIO
OUT
V (Pr/Cr)
U (Pb/Cb)
Y
S-VIDEO
IN
VIDEO IN
COMPONENT
VIDEO IN
2
1
IMPORTANT!
– You only need to make
one video
connection from the following
options, depending on the
capabilities of your TV system.
– Connect the DVD Player directly
to the TV.
– SCART connection will let you
use the features of both the Audio
and Video in the DVD Player.
Using SCART jack
● Use the SCART cable (black) to connect
the DVD Player’s SCART jack (TV OUT)
to the corresponding Scart input jacks on
the TV (cable not supplied).
Helpful Hint:
– Ensure that the “TV” indication on
SCART cable is connected to the TV
set and “DVD” indication on SCART
cable is connected to the DVD Player.
AUDIO
OUT
DIGITAL
OUT
CVBS
VIDEO
OUT
AUDIO
IN
S-VIDEO
IN
VIDEO IN
TV IN
AUDIO
IN
S-VIDEO
IN
VIDEO IN
TV IN
1
Page 10

English
10
OUT
DIGITAL
OUT
CVBS
VIDEO
OUT
AUDIO IN
R L
VIDEO
IN
TO TVINT IN
CH3 CH4
2
1
Connections
IMPORTANT!
– If your TV only has a single
Antenna In jack (or labeled as 75
ohm or RF In,) you will need an RF
modulator in order to view the DVD
playback on the TV. See your
electronics retailer or contact
Philips for details on RF modulator
availability and operations.
Using an accessory RF modulator
1 Use the composite video cable (yellow) to
connect the DVD Player’s CVBS jack to
the video input jack on the RF modulator.
2 Use the RF coaxial cable (not supplied) to
connect the RF modulator to your TV’s
RF jack.
RF coaxial cable to TV
Back of RF Modulator
(example only)
Antenna or
Cable TV signal
AUDIO
OUT
DIGITAL
OUT
CVBS
VIDEO
OUT
AUDIO
IN
V (Pr/Cr)
U (Pb/Cb)
Y
S-VIDEO
IN
VIDEO IN
COMPONENT
VIDEO IN
AUDIO
OUT
V (Pr/Cr)
U (Pb/Cb)
Y
S-VIDEO
IN
VIDEO IN
COMPONENT
VIDEO IN
2
1
IMPORTANT!
– The progressive scan video
quality is only possible when using Y
Pb Pr and a progressive scan TV is
required.
Using Component Video jacks
(Y Pb Pr)
1 Use the component video cables (red/
blue/green) to connect the DVD system’s
Y Pb Pr jacks to the corresponding
Component video input jacks (or labeled
as Y Pb Pr) on the TV (cable not supplied).
2 To hear the sound of this DVD Player
through your TV, use the audio cables
(white/red) to connect AUDIO OUT (L/
R) jacks of the DVD Player to the
corresponding AUDIO IN jacks on the TV
(cable not supplied).
3 Proceed to page 16 for detailed
Progressive Scan set up.
Page 11
English
11
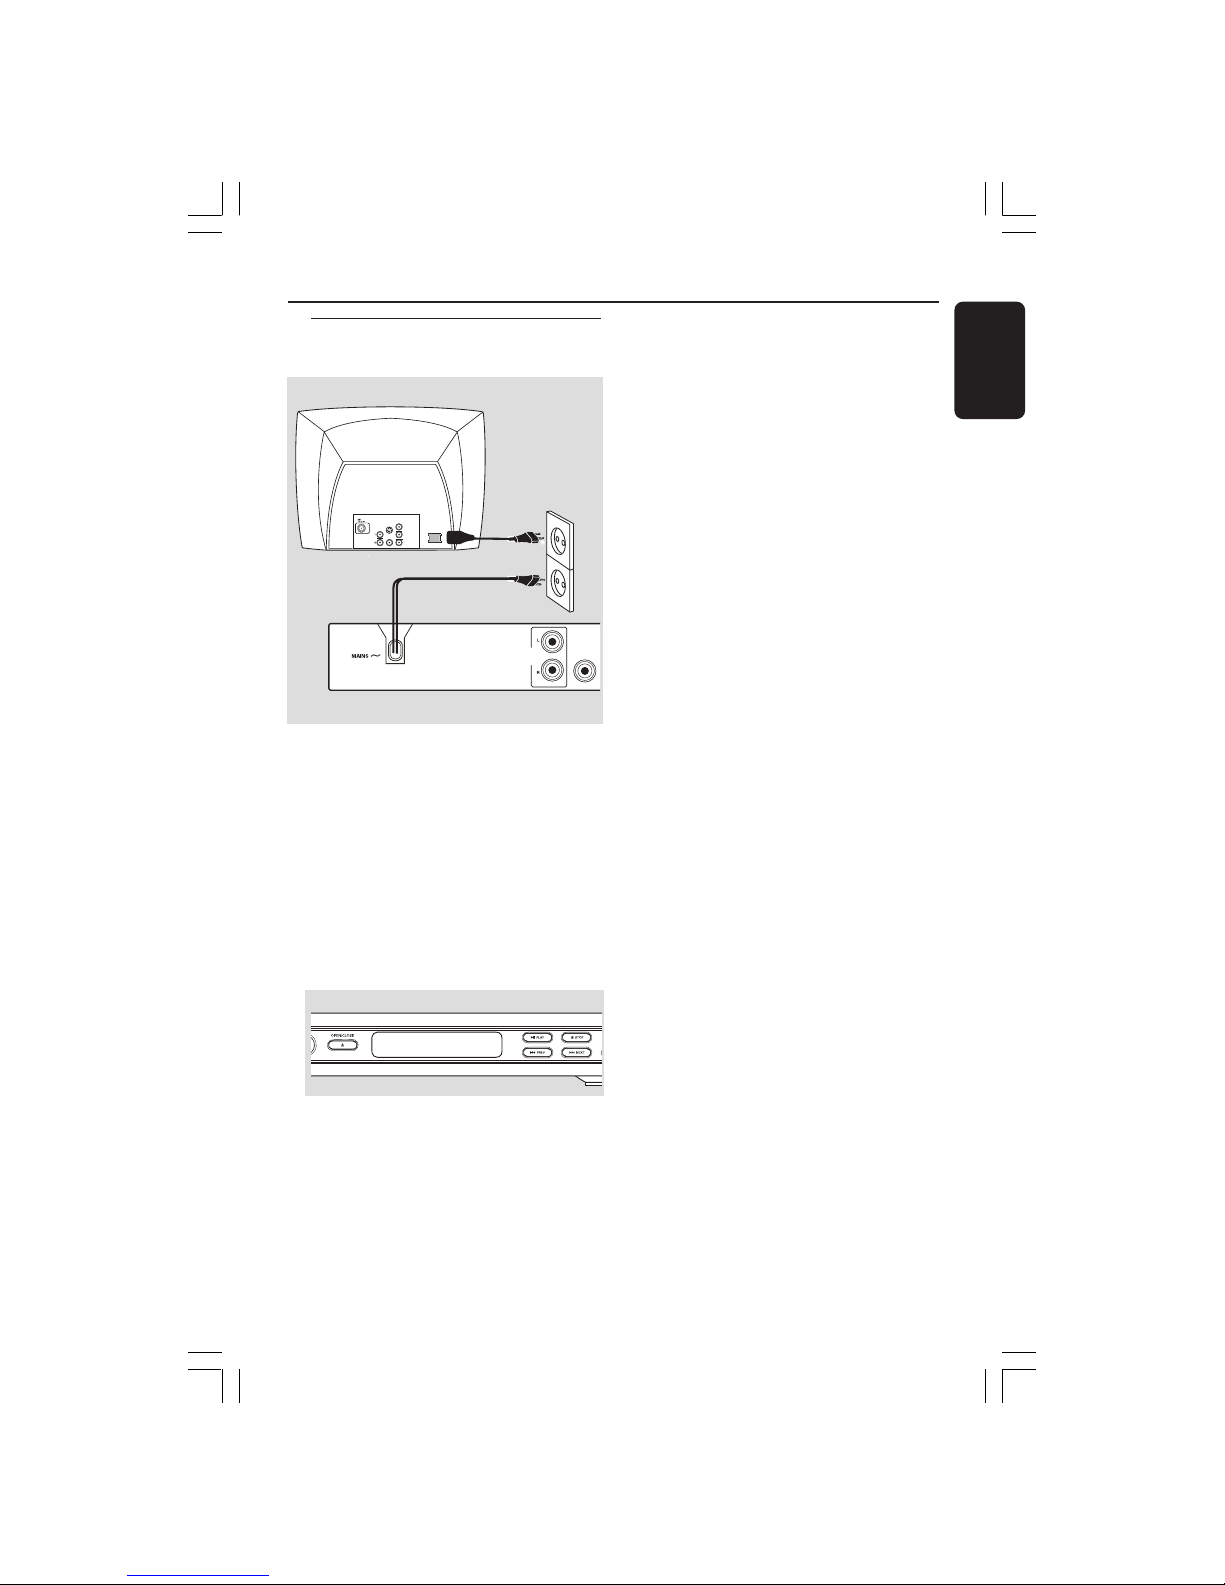
After everything is connected
properly, plug in the AC power cord
to the power outlet.
Never make or change any connections
with the power switched on.
When no disc is loaded, press
STANDBY ON on the DVD Player
front panel,
“NO DISC” may appear on the
display panel.
Connecting the power cord
NO DISC
AUDIO
OUT
DIGITAL
OUT
~ AC MAINS
AUDIO
OUT
V (Pr/Cr)
U (Pb/Cb)
Y
S-VIDEO
IN
VIDEO IN
COMPONENT
VIDEO IN
Connections
Page 12
English
12
Connections
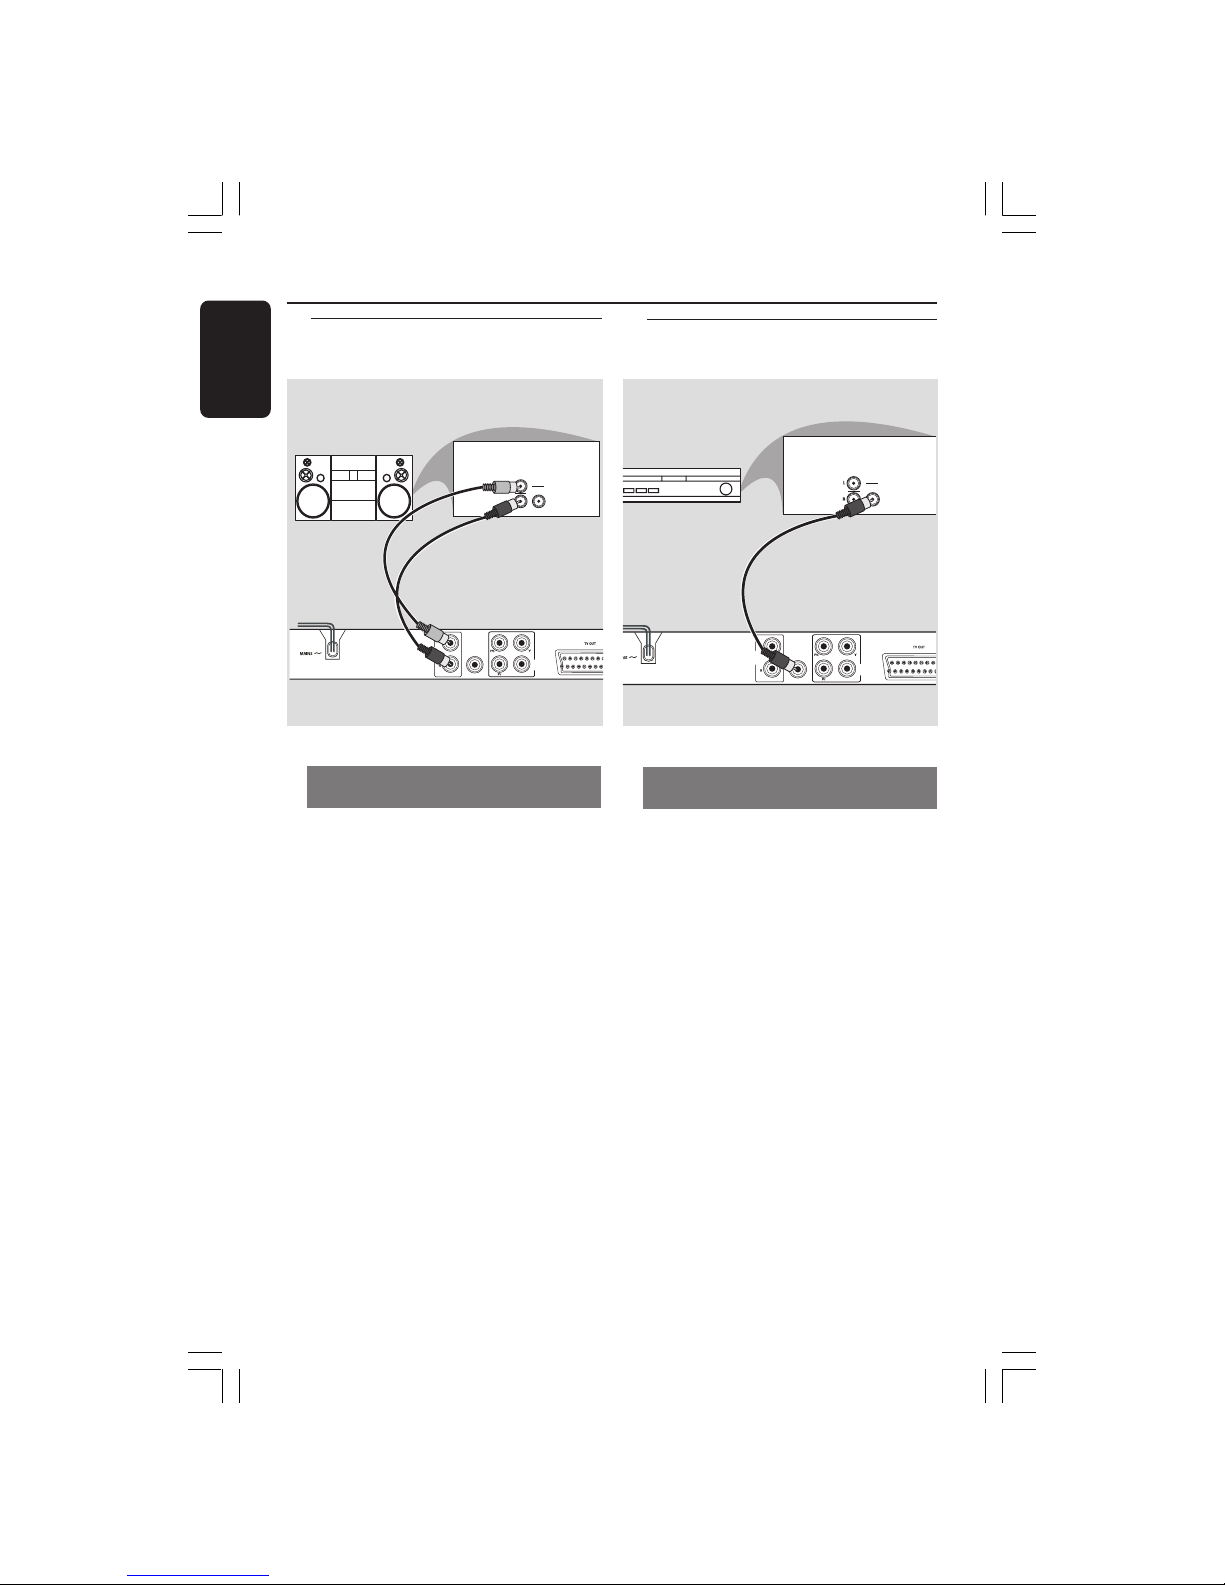
Stereo system has Dolby Pro Logic
or Right / Left Audio In jack
1 Select one of the video connections
(CVBS VIDEO IN or COMPONENT
VIDEO IN) depending on the options
available on your TV.
2 Use the audio cables (white/red) to
connect AUDIO OUT (L/R) jacks of
the DVD Player to the corresponding
AUDIO IN jacks on the stereo system
(cable not supplied).
Optional: Connecting to an
Audio System
Optional: Connecting Digital AV
Receiver
Receiver has a PCM, Dolby Digital,
or MPEG2 decoder
1 Select one of the video connections
(CVBS VIDEO IN or COMPONENT
VIDEO IN) depending on the options
available on your TV.
2 Connect the COAXIAL jack of the DVD
Player to the corresponding Digital Audio
In jack on your Receiver (cable not
supplied).
3 Set the DVD Player’s Digital Output to
PCM-ONLY or ALL depending on the
capabilities of your Receiver (see page 25
“Digital Output”).
Helpful Hint:
– If the audio format of the Digital Output
does not match the capabilities of your
receiver, the receiver will produce a strong,
distorted sound or no sound at all.
AUDIO
OUT
DIGITAL
OUT
CVBS
VIDEO
OUT
AUDIO
IN
STEREO
DIGITAL
AUDIO
OUT
DIGITAL
OUT
CVBS
VIDEO
OUT
AUDIO
IN
DIGITAL
AV Receiver
Page 13
English
13
Functional Overview
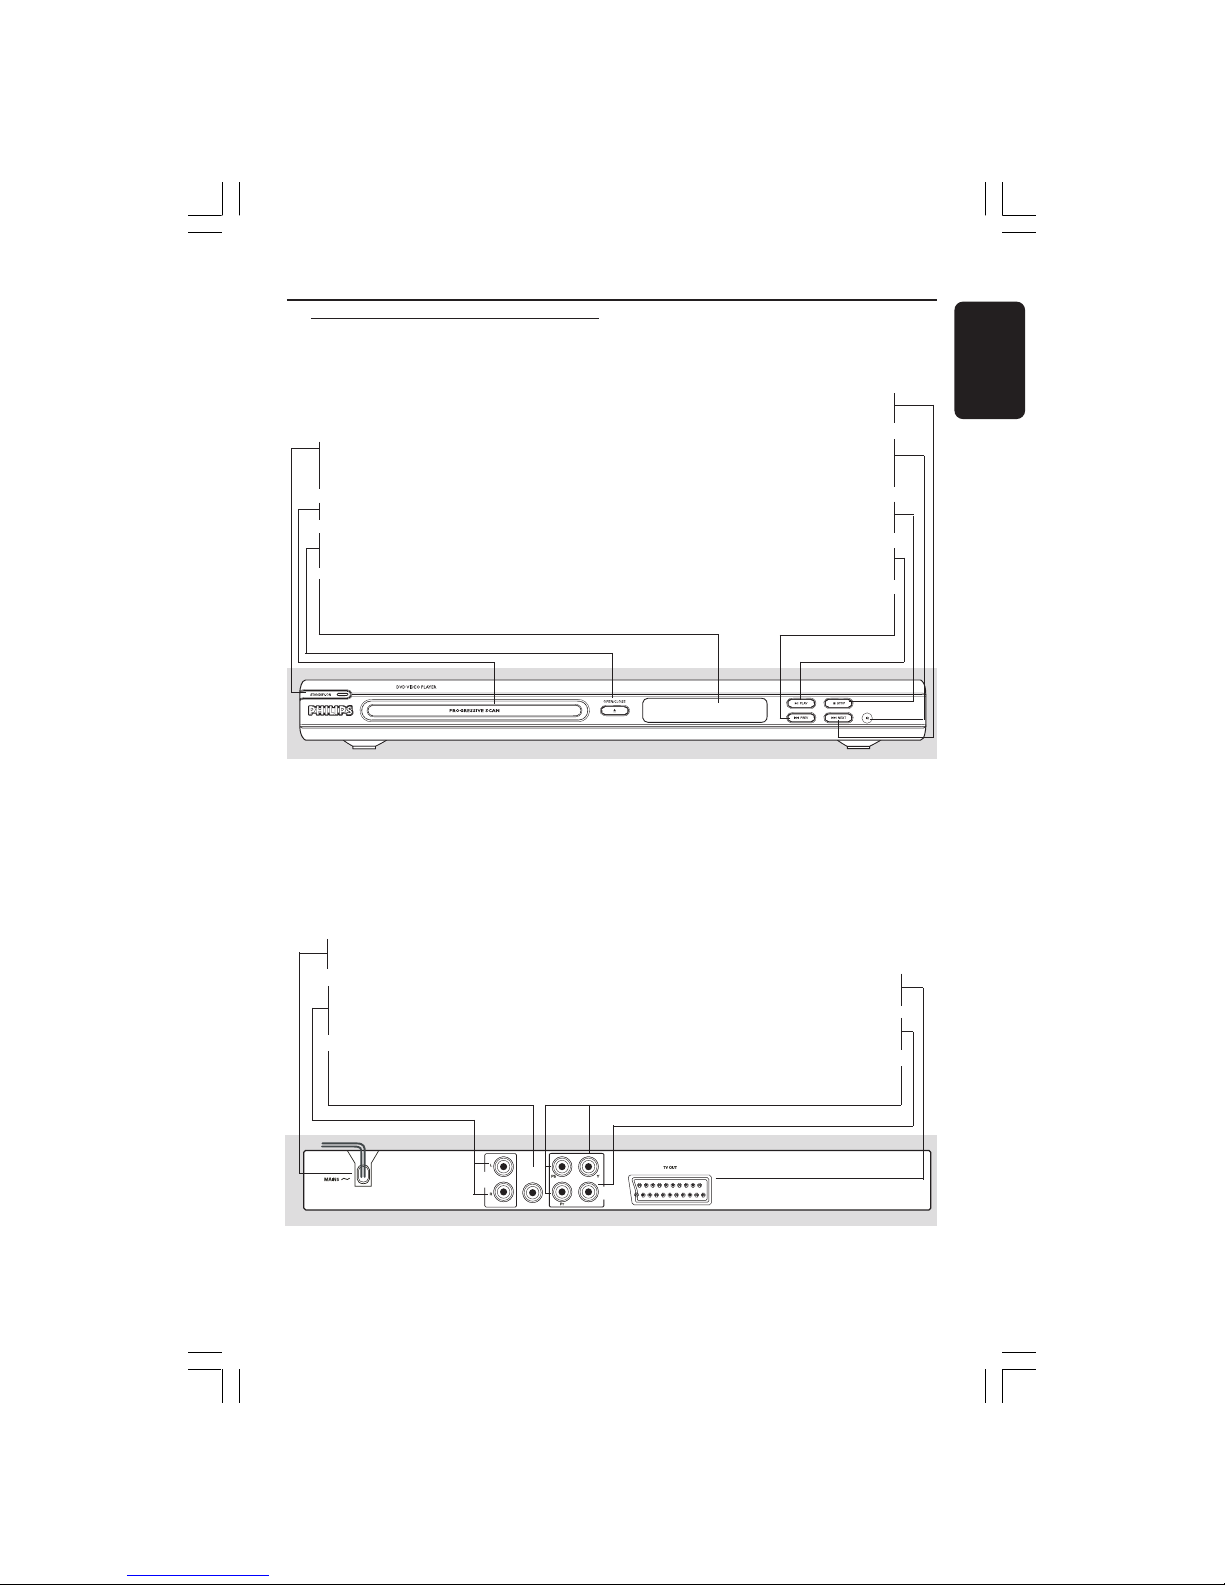
Front and Rear Panels
T NEXT
– To select next chapter or track
IR Sensor
– Point the remote control towards this
sensor
9 STOP
– To stop playback
2; PLAY
– To start or interrupt playback
PREV S
– To select previous chapter or track
STANDBY-ON B
– To switch the DVD Player to Standby
mode or ON
Disc tray
OPEN/CLOSE /
– Open/Close the disc tray
Display
– Shows the current status of the DVD
Player
Caution: Do not touch the inner pins of the jacks on the rear panel.
Electrostatic discharge may cause permanent damage to the unit.
Scart (TV OUT)
– Connect to Scart input of a TV
CVBS (VIDEO Out)
– Connect to CVBS Video input of a TV
YPbPr (Component Video Out)
– Connect to YPbPr input of a TV
AUDIO
OUT
DIGITAL
OUT
CVBS
VIDEO
OUT
Mains (AC Power Cord)
– Connect to a standard AC outlet
Audio Out (Left/Right)
– Connect to AUDIO inputs of an amplifier,
receiver or stereo system
COAXIAL (Digital audio out)
– Connect to coaxial AUDIO input of a
digital audio equipment
Page 14
English
14
Functional Overview
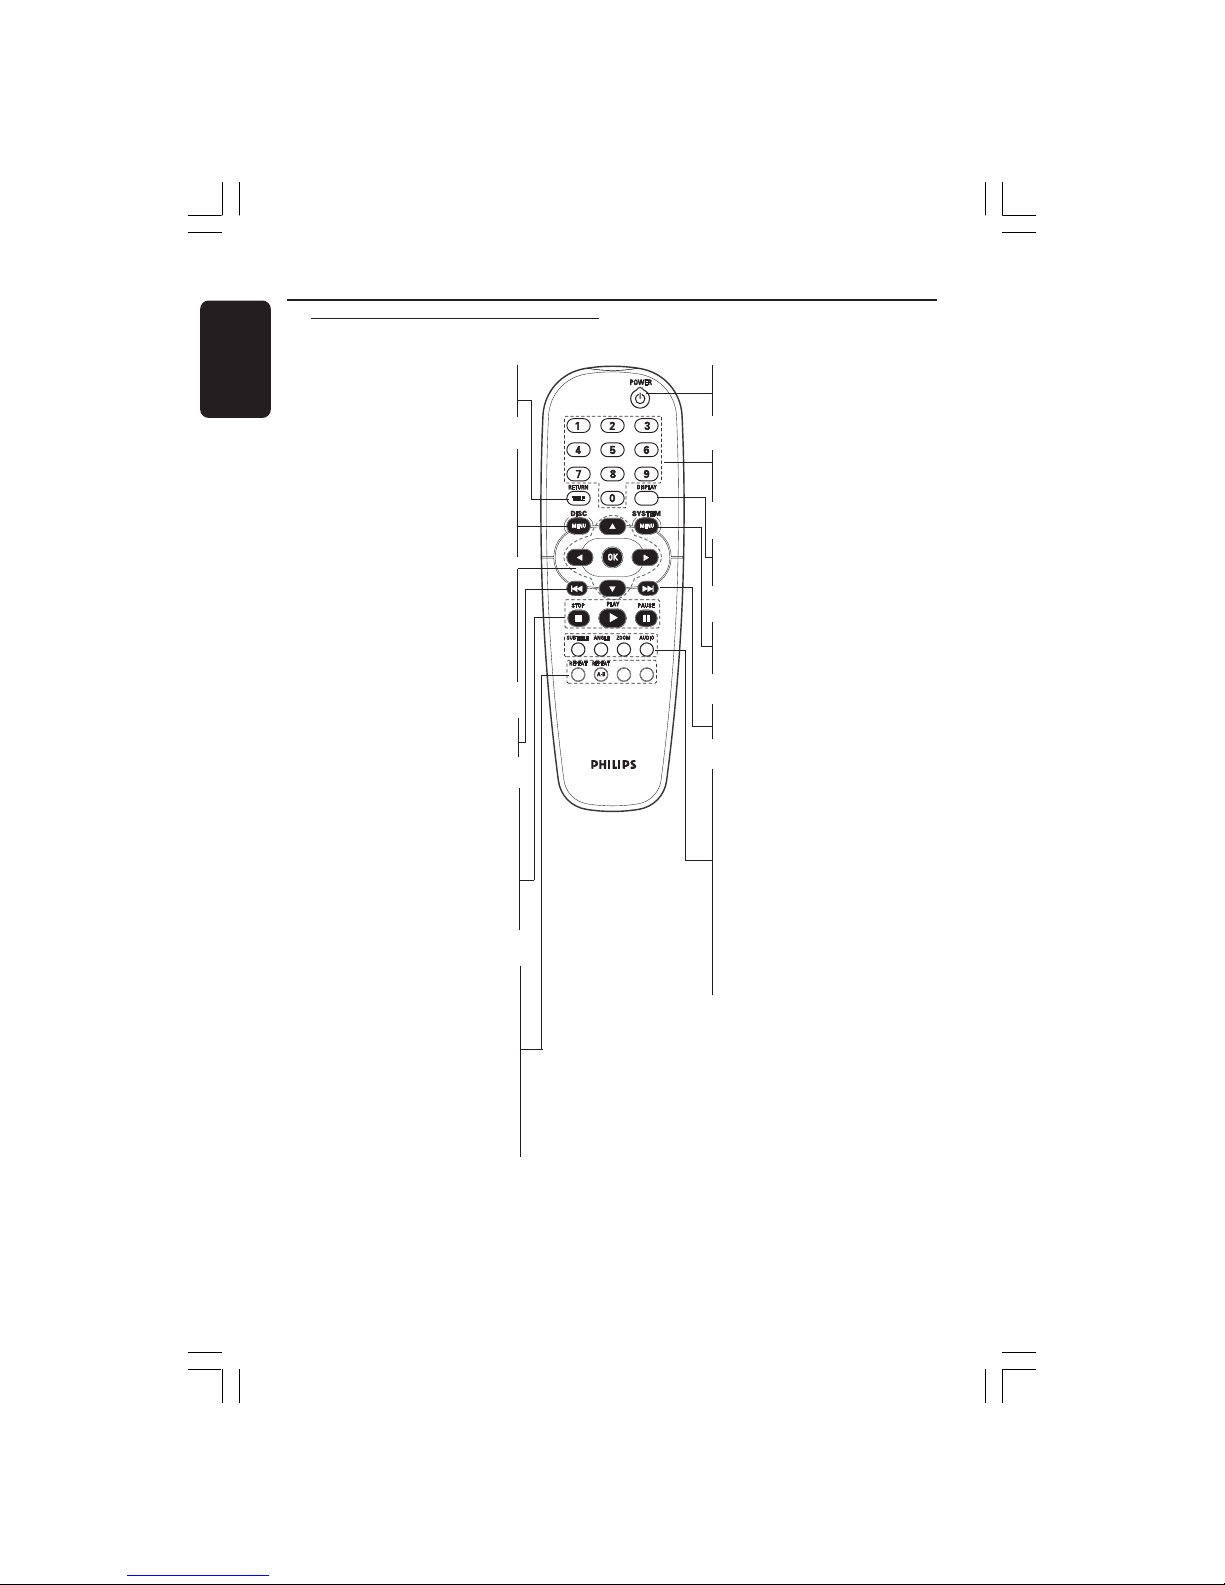
Remote Control
PREVIEW MUTE
RETURN / TITLE
– To go back to previous menu /
show title menu
DISC MENU
– Enters or exits the disc contents
menu
– Switches on or off the playback
control mode (for VCD version
2.0 only)
1 2 3 4
– Selects an item in the menu/
fast backward/forward, slow forward
OK
– Acknowledge menu selection
S
– To select previous chapter or track
STOP ( 9 )
– To stop playback
PLAY ( B )
– To start playback
PAUSE ( ; )
– To pause playback temporarily /
frame-by-frame playback
REPEAT
– Selects various repeat modes
REPEAT (A-B)
– Repeats playback a specific section
on a disc
PREVIEW
– Not applicable for this model
MUTE
– Disables or enables sound output
POWER B
– To switch the DVD player to
standby mode or ON
0-9 numerical key pad
– Selects numbered items in a
menu
DISPLAY
– Displays information on TV
screen during playback
SYSTEM MENU
– Access or exit DVD Player’s
system menu
T
– To select next chapter or track
SUBTITLE
– To access subtitle language in disc
menu
ANGLE
– Selects a DVD camera angle
ZOOM
– Enlarge a picture on the TV
screen
AUDIO
– To access audio language in disc
menu
Page 15
English
15
PREVIEW
PREVIEW
MUTE
MUTE
Getting Started
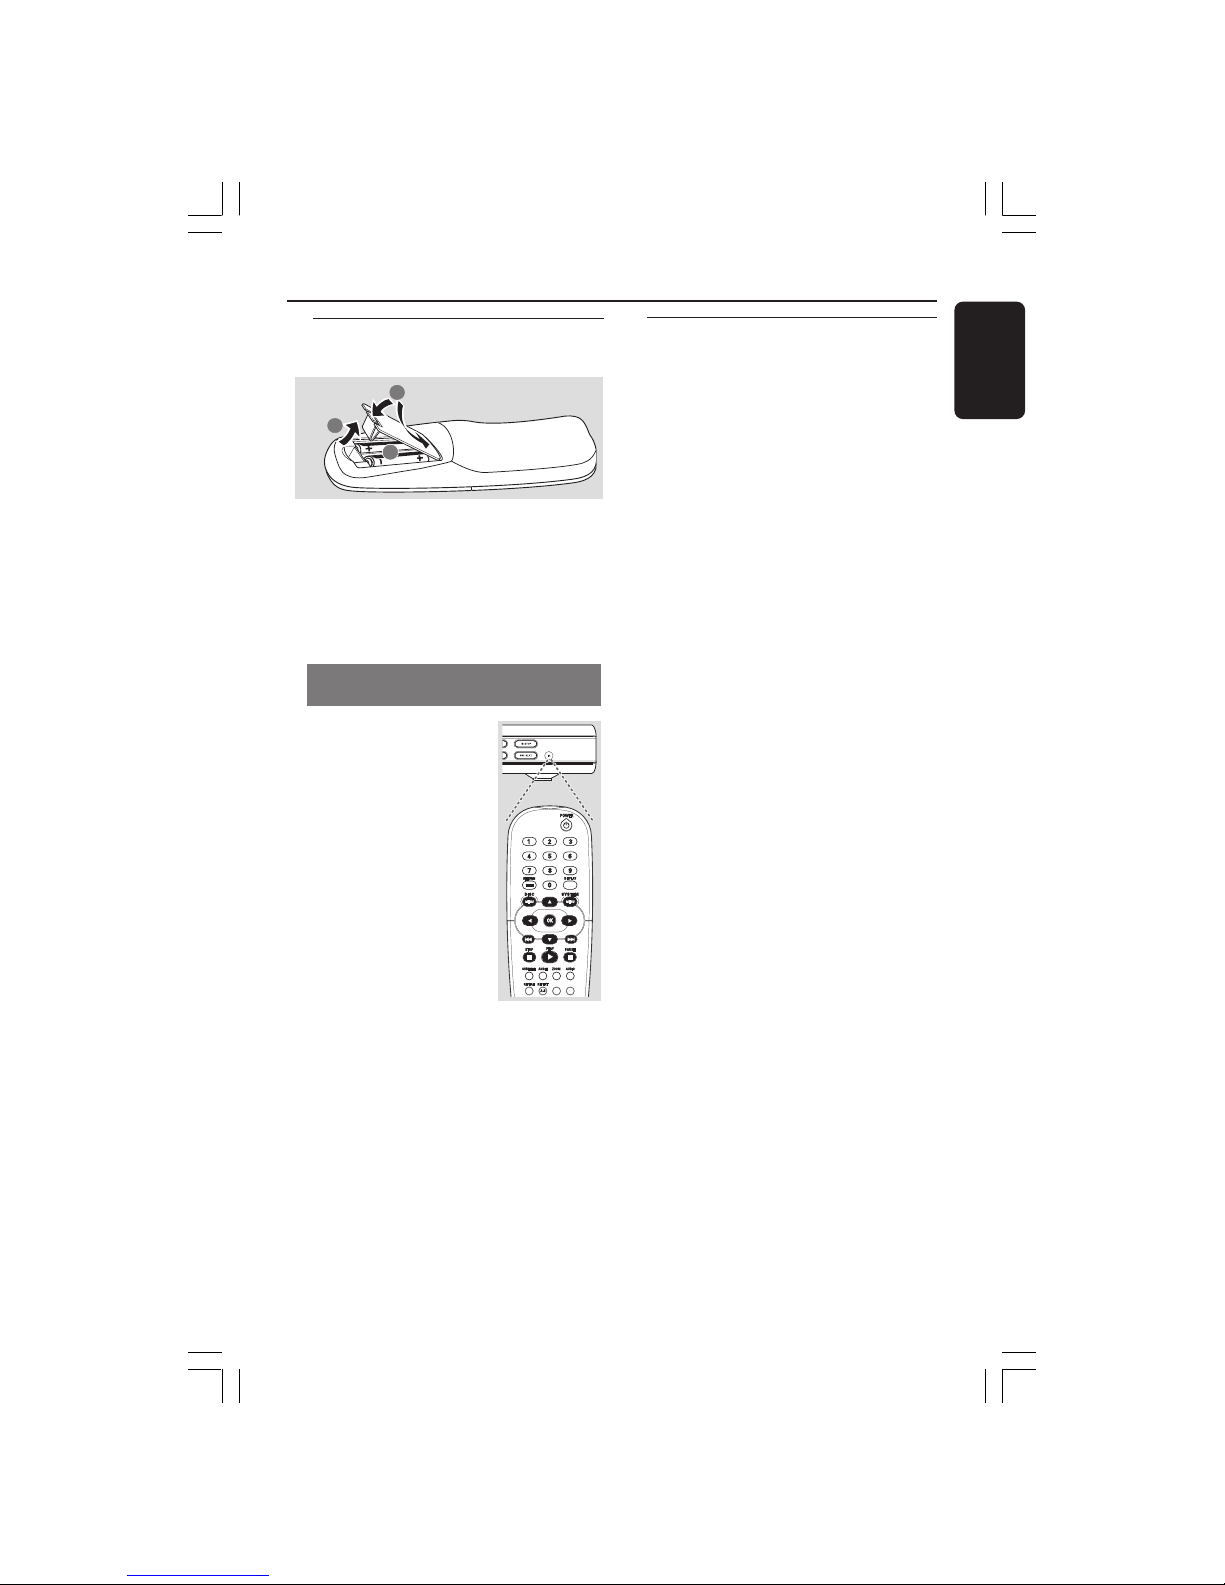
Step 1: Inserting batteries into
the Remote Control
1
3
2
1 Open the battery compartment.
2 Insert two batteries type R06 or AA,
following the indications (+-) inside
the compartment.
3 Close the cover.
Using the Remote Control to
operate the Player
1 Aim the Remote Control
directly at the remote
sensor (IR) on the front
panel.
2 Do not put any objects
between the Remote
Control and the DVD
Player while operating the
DVD Player.
CAUTION!
– Remove batteries if they are
exhausted or if the Remote Control
is not being used for a long time.
– Do not use old and new or
different types of batteries in
combination.
– Batteries contain chemical
substances, so they should be
disposed properly.
Step 2: Setting up the TV
IMPORTANT!
Make sure you have completed all
the necessary connections. (See
pages 9-10 “Connecting TV”).
1 Turn on the TV and set to the correct
video-in channel. You should see the
Philips DVD background screen on the
TV.
2 Usually these channels are between the
lowest and highest channels and may be
called FRONT, A/V IN, or VIDEO. See your
TV manual for more details.
➜ Or, you may go to channel 1 on your
TV, then press the Channel down button
repeatedly until you see the Video In
channel.
➜ Or, the TV Remote Control may have a
button or switch that chooses different
video modes.
➜ Or, set the TV to channel 3 or 4 if you
are using an RF modulator.
3 If you are using external equipment, (eg.
audio system or receiver), turn it on and
select the appropriate input source for
the DVD Player output. Refer to the
equipment owner’s manual for detail.
Page 16
English
16
Getting Started
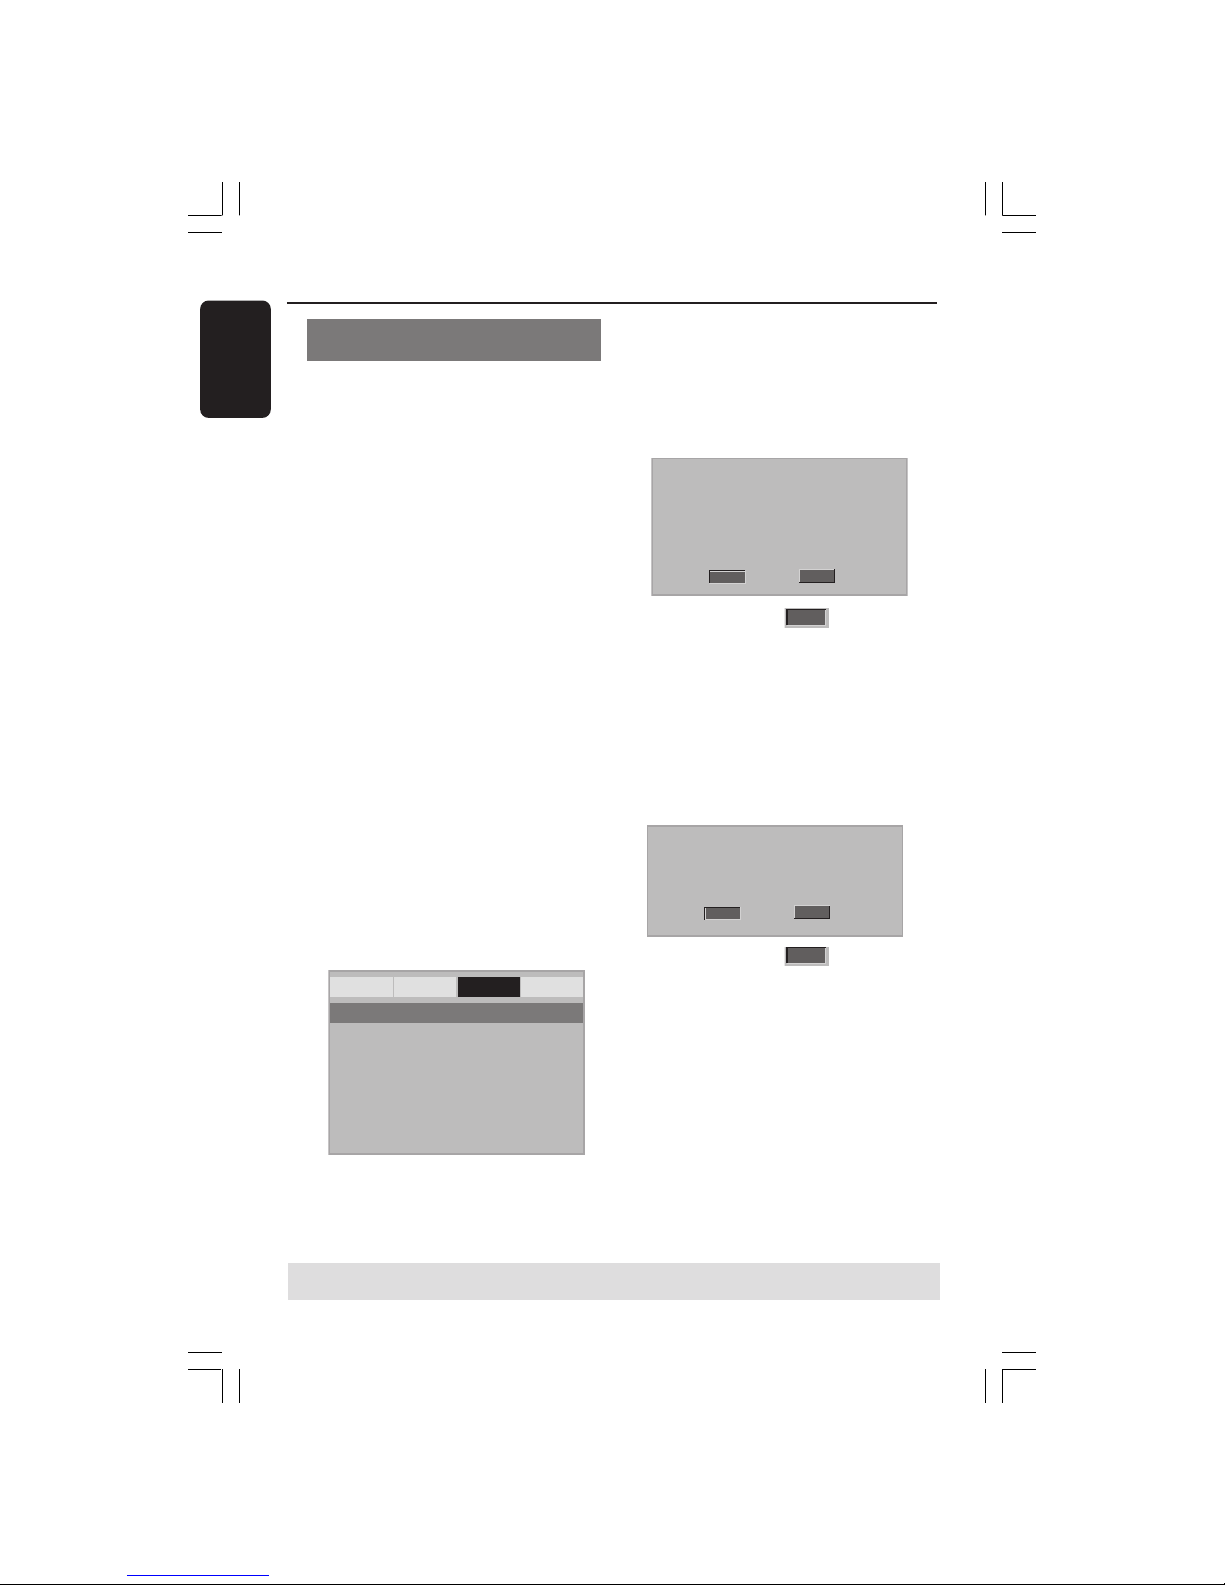
Setting up Progressive Scan feature
(for Progressive Scan TV only)
The progressive scan display twice the
number of frames per seconds than
interlaced scanning (ordinary normal TV
system). With nearly double the number
of lines, progressive scan offers higher
picture resolution and quality.
IMPORTANT!
Before enabling the progressive scan
feature, you must ensure:
1) Your TV can accept progressive signals,
a progressive scan TV is required.
2) You have connected the DVD player to
your TV using Y Pb Pr (see page 10.)
1 Turn on your TV.
2 Turn off your TV progressive scan mode
or turn on interlaced mode (refer to your
TV user manual.)
3 Press POWER on the remote control to
turn on the DVD player.
4 Select the correct Video Input channel.
(See page 15).
➜ The DVD background screen appears
on the TV.
5 Press SYSTEM MENU.
6 Press 2 repeatedly to select {VIDEO
SETUP PAGE}.
General Audio Video Preference
TY Type
TV Display
Progressive On
Sharpness Off
Brightness
Contrast
Component
- - Video Setup Page - -
7 Select {COMPONENT} to {YUV}, then
press OK to confirm.
8 Select {PROGRESSIVE} to {ON}, then OK
to confirm.
➜ The instruction menu appears on the
TV.
1. ENSURE YOUR TV HAS PROGRESSIVE SCAN.
2. CONNECT USING YPBPR (GBR) VIDEO CABLE.
3. IF THERE IS DISTORTED PICTURE,
Cancel
OK
ACTIVATING PROGRESSIVE SCAN:
WAIT 15 SECONDS FOR AUTO RECOVERY.
9 Press 1 to highlight
OK
in the menu
and press OK to confirm.
There will be a distorted picture on
your TV at this state until you turn
on the progressive scan mode on
your TV.
0 Turn on your TV progressive scan mode
(refer to your TV user manual.)
➜ The below menu appears on the TV.
CONFIRM AGAIN TO USE PROGRESSIVE
SCAN. IF THE PICTURE IS GOOD,
PRESS OK BUTTON ON REMOTE.
Cancel
OK
! Press 1 to highlight
OK
in the menu
and press OK to confirm.
➜ The set up is complete now and you
can start enjoy the high quality picture.
TIPS:
To return to the previous menu, press 1.
To remove the menu, press SYSTEM MENU.
Page 17
English
17
Selecting the colour system that
corresponds to your TV
This DVD Player is compatible with both
NTSC and PAL. In order for a DVD disc
to play on this Player, the colour system of
the Disc, the TV and the DVD Player
should match.
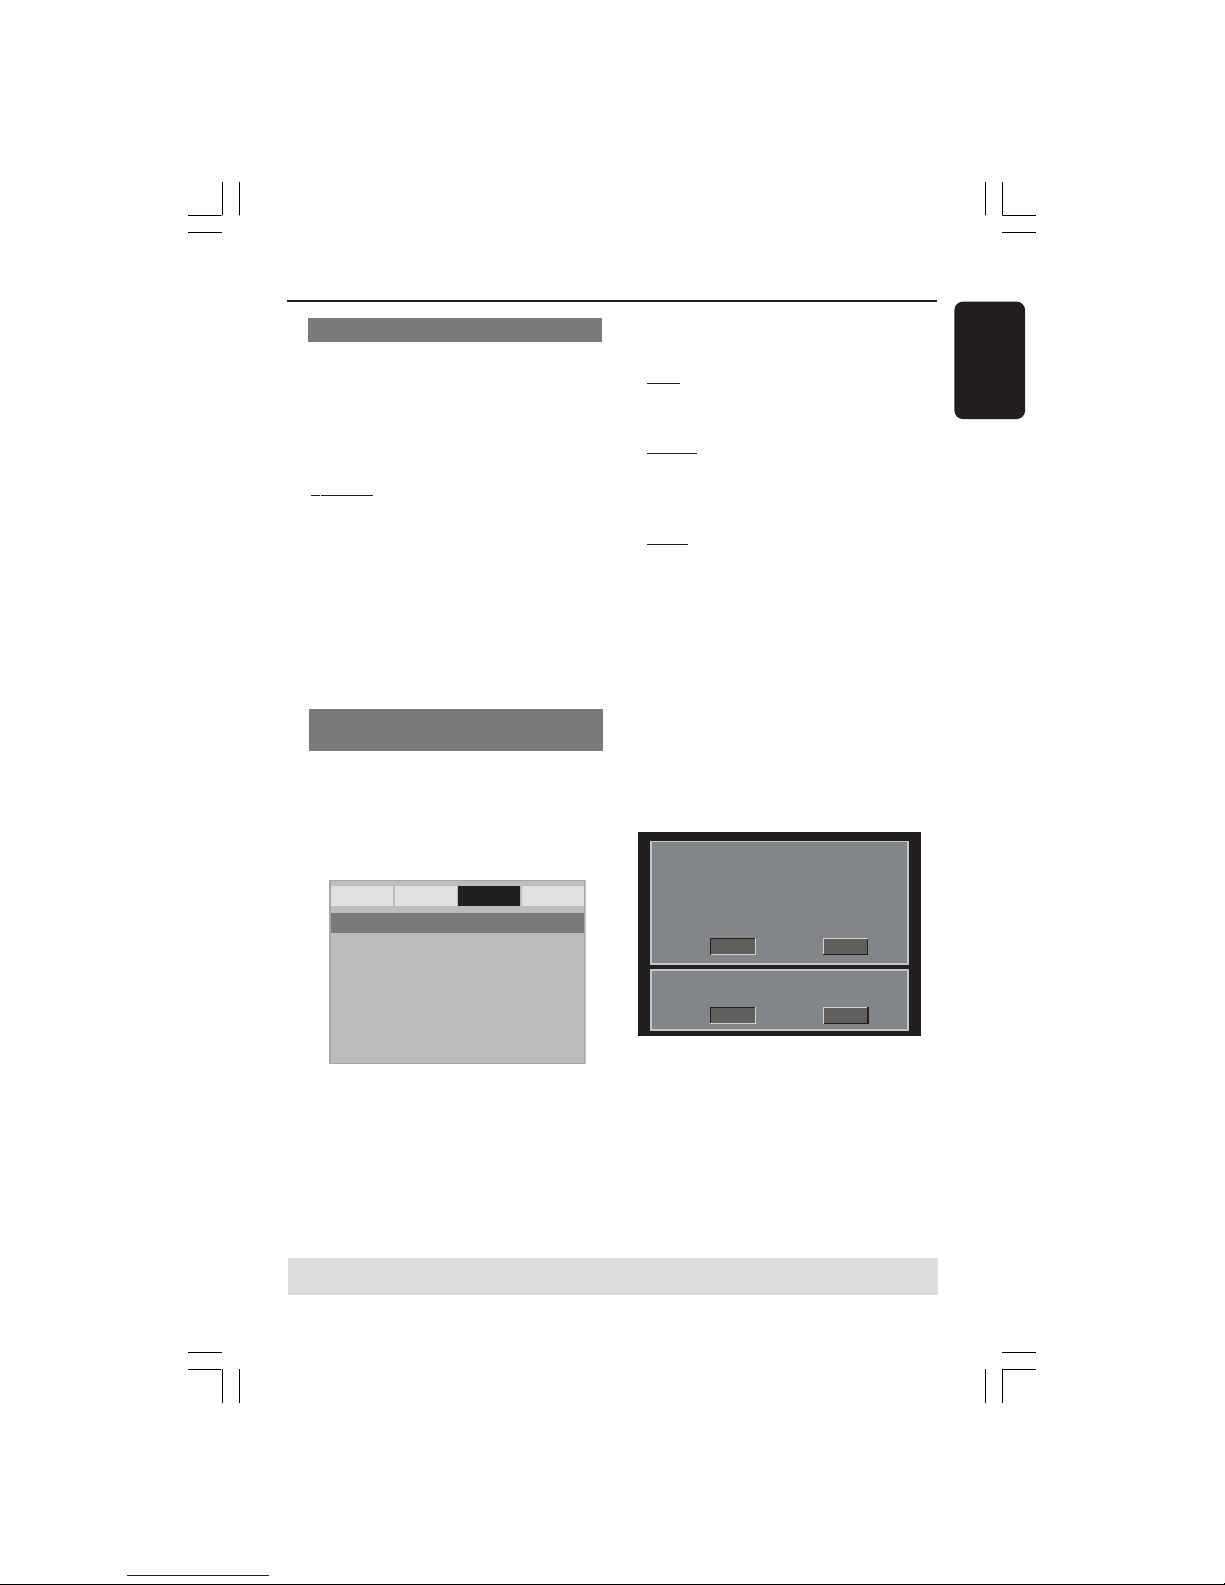
General Audio Video Preference
TY Type PAL
TV Display Multi
Progressive NTSC
Sharpness
Brightness
Contrast
Component
- - Video Setup Page - -
1 Press SYSTEM MENU.
2 Press 2 repeatedly to select {VIDEO
SETUP PAGE}.
3 Press 3 4 to highlight {TV TYPE}, then
press 2.
Getting Started
TIPS:
To return to the previous menu, press 1.
To remove the menu, press SYSTEM MENU.
4 Press 3 4 to highlight one of the options
below:
PAL – Select this if the connected TV is
PAL system. It will change the video signal
of a NTSC disc and output in PAL format.
NTSC – Select this if the connected TV
is NTSC system. It will change the video
signal of a PAL disc (VCD only) and
output in NTSC format.
Multi – Select this if the connected TV is
compatible with both NTSC and PAL
(multi-system). The output format will be
in accordance with the video signal of the
disc.
5 Select an item and press OK.
Helpful Hints:
– Before changing the current TV
Standard setting, ensure that your TV
supports the ‘selected TV Type’ system.
– If there is no proper picture on
your TV, wait for 15 seconds for auto
recovery.
CHANGING PAL TO NTSC:
1. ENSURE THAT YOUR TV SUPPORTS
NTSC STANDARD.
2. IF THERE IS DISTORTED PICTURE
DISPLAYED ON THE TV, WAIT 15
SECONDS FOR AUTO RECOVERY.
CANCELOK
CONFIRM AGAIN TO USE NEW TV
TYPE SETTING.
CANCELOK
To deactivate Progressive manually
● When the distorted picture still
appears on the TV, it may be due to
the connected TV does not accept
progressive signals, and progressive is set
by mistake. You must reset the unit to
interlace format.
1 Turn off your TV progressive scan mode
or turn on to interlaced mode (refer to
your TV user manual.)
2 Press OPEN/CLOSE on the DVD player
to open the disc tray.
3 Press numeric keypad ‘1’ on the
remote control for few seconds.
➜ The DVD blue background screen
will appear on the TV.
Page 18

English
18
Step 3: Setting language
preference
You can select your preferred language
settings. This DVD Player will
automatically switch to the language for
you whenever you load a disc.
Setting the OSD Language
The On-screen language for the system
menu will remain as you set it, regardless
of various disc languages.
Display Dim
OSD Language ENGLISH
Sleep FRANÇAIS
Screen Saver DEUTSCH
NEDERLANDS
- - General Setup Page - -
General Audio Video Preference
1 Press SYSTEM MENU.
2 Press 3 4 to highlight {OSD
LANGUAGE}, then press 2.
3 Press 3 4 to select a language and press
OK.
Getting Started
Setting the Audio, Subtitle and Disc
menu language
You can choose your own preferred
language or soundtrack from audio,
subtitles and disc menu languages. If the
language selected is not available on the
disc, the disc’s default language will be
used instead.
General Audio Video Preference
Audio English
Subtitle Chinese
Disc Menu French
Parental Spanish
Password Portuguese
Default Polish
Turkish
- - Preference Page - -
1 Press STOP twice then, press SYSTEM
MENU.
2 Press 2 repeatedly to select
{PREFERENCE PAGE}.
3 Press 3 4 to highlight one of the options
below at a time, then press 2.
– ‘Audio’ (disc’s soundtrack)
– ‘Subtitle’ (disc’s subtitles)
– ‘Disc Menu’ (disc’s menu)
4 Press 3 4 to select a language and press
OK.
If the language you want is not in the
list, then select {OTHERS},
then use the numeric keypad (0-9) on
the remote to enter the 4-digit language
code ‘XXXX’ (see page 5 “Language
Code”) and press OK.
5 Repeat steps 3~4 for other language
settings.
TIPS:
To return to the previous menu, press 1.
To remove the menu, press SYSTEM MENU.
Page 19
English
19
Disc Operations
IMPORTANT!
– If the inhibit icon (ø) appears on
the TV screen when a button is
pressed, it means the function is not
available on the current disc or at
the current time.
– Depending on the DVD or VIDEO
CD, some operations may be
different or restricted.
– Do not push on the disc tray or
put any objects other than disc on
the disc tray. Doing so may cause
the disc player malfunction.
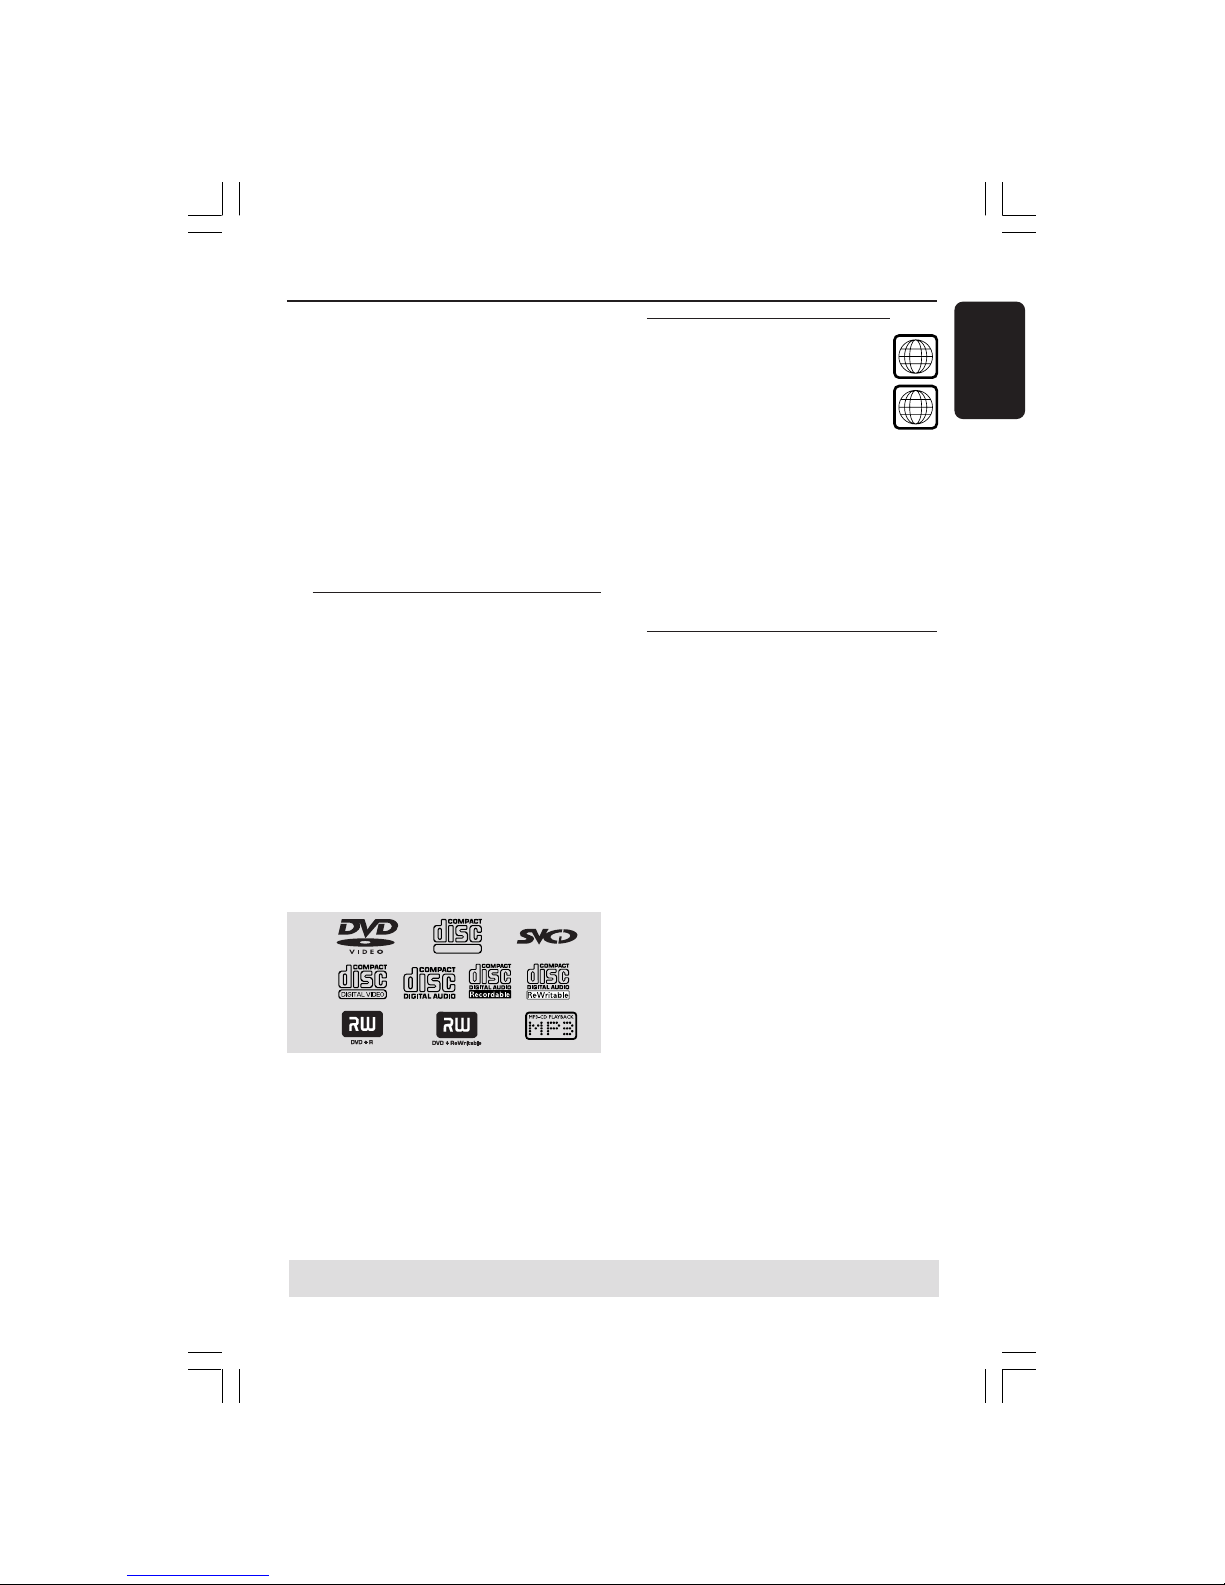
Playable Discs
Your DVD Player will play:
– Digital Versatile Discs (DVDs)
– Video CDs (VCDs)
– Super Video CDs (SVCDs)
– Digital Video Discs +
Recordable[Rewritable] (DVD+R[W])
– Compact Discs (CDs)
– MP3 discs, picture (Kodak, JPEG) files
on CD-R(W).
– JPEG/ISO 9660 format
– Maximum 30 characters display.
– Supported sampling frequencies :
32 kHz, 44.1 kHz, 48 kHz (MPEG-1)
– Supported Bit-rates :
32~256 kbps (MPEG-1), variable bitrates
SUPER VIDEO
Region Codes
DVD discs must be labeled for ALL
regions or Region 5 in order to
play on this Player. You cannot play
Discs that are labeled for other
regions.
Helpful Hints:
– It may not be possible to play CD-R/RW
or DVD-R/RW in all cases due to the type of
disc or condition of the recording.
– If you are having trouble playing a
certain disc, remove the disc and try a
different one. Improper formatted disc will
not play on this DVD Player.
TIPS:
The operating features described here might not be possible for certain discs. Always refer
to the instructions supplied with the discs.
Playing discs
1 Connect the power cords of the DVD
Player and TV (and any optional stereo or
AV receiver) to a power outlet.
2 Turn on the TV power and set to the
correct Video In channel. (See page 15
“Setting up the TV”).
3 Press STANDBY-ON on the DVD Player
front panel.
➜ You should see the Philips DVD
background screen on the TV.
4 Press OPEN/CLOSE 0 button to open
the disc tray and load in a disc, then press
the same button again to close the disc
tray.
➜ Make sure the label side is facing up.
For double-sided discs, load the side you
want to play facing up.
5 Playback will start automatically. If not
press PLAY B.
➜ If a disc menu appears on the TV, see
page 21 “Using the Disc Menu”.
ALL
5
Page 20

English
20
Disc Operations
Basic playback controls
Unless otherwise stated, all operations
described are based on Remote Control
use.
Pausing playback
1 During playback, press PAUSEÅ.
➜ Playback will pause and sound will be
muted.
2 To resume normal playback, press
PLAY B.
Selecting track/chapter
1 Press T / S briefly during playback
to go to the next chapter/track or to
return to the beginning of the current
chapter/track respectively.
2 To go directly to any chapter/track, enter
the chapter/track number using the
numerical keys (0-9).
(e.g. single number of chapter/track with
digit ‘0’ in front, for example ‘06’)
● For DVD
➜ Press S twice briefly to step back
to the previous chapter/track.
● For VCD
➜ It cannot work when PBC is set to
‘ON’.
Searching backward/forward
1 Press 1 2 during playback to select the
required speed: 2X, 4X, 8X, 16X or 32X
(backward or forward).
➜ Sound will be muted (DVD/VCD) or
intermittent (CD).
2 To return to normal speed, press PLAY B
or OK.
Stopping playback
● Press Ç.
TIPS:
The operating features described here might not be possible for certain discs. Always refer
to the instructions supplied with the discs.
Selecting various repeat/shuffle
functions
Repeat play mode
● Press REPEAT continuously to choose a
Repeat mode during playback.
CHAPTER (DVD)
– to repeat playback of the current
chapter.
TRACK/TITLE (SVCD/VCD/DVD)
– to repeat playback of the current
track (SVCD/VCD)/title (DVD).
ALL
– to repeat playback of the disc.
OFF
– to cancel the repeat mode.
● Press REPEAT repeatedly to cancel the
repeat mode.
Helpful Hint:
– REPEAT function is not available for VCD
2.0 when PCB is on.
Repeating a section within a
chapter/track
1 While playing a disc, press REPEAT A-B
at your chosen starting point.
2 Press REPEAT A-B again at your chosen
end point.
➜ The section will now repeat
continuously.
3 To exit the sequence, press REPEAT
A-B.
Page 21

English
21
Operations for video playback
(DVD/VCD/SVCD)
Using the Disc Menu
Depending on the disc, a menu may
appear on the TV screen once you load in
the disc.
To select a playback feature or item
● Use 1 2 3 4 keys or numeric keypad
(0-9) on the remote, then press OK to
start playback.
To access or remove the menu
● Press DISC MENU on the remote.
Zooming in
This function allows you to enlarge the
picture on the TV screen and to pan
through the enlarged picture.
1 During playback, press ZOOM
repeatedly to display the picture with
different scales.
➜ Use 1 2 3 4 keys to pan through the
enlarged picture.
➜ Playback will continue.
2 Press ZOOM repeatedly to return to
the original size.
TIPS:
The operating features described here might not be possible for certain discs. Always refer
to the instructions supplied with the discs.
Disc Operations
Resuming playback from the last
stopped point
During playback, press STOP once (the
disc has not been ejected) to activate the
resume mode.
● Press PLAY B.
➜ Playback will start from the last stop
point.
● Press STOP twice to cancel the resume
mode.
Helpful Hint:
– Resume option may not be available on
some discs.
Slow Motion
1 Press 3 during playback to select the
required speed: 1/2, 1/4, 1/8 or 1/16
(forward).
➜ Sound will be muted.
2 To return to normal speed, press PLAY B.
Helpful Hint:
– Slow backward is not possible on VCDs.
OSD (On-Screen Display)
This function displays disc information on
the TV screen during playback.
1 During playback, press DISPLAY
repeatedly.
➜ A list of available disc information
appears on the TV screen.
2 Use 1 2 keys to select an option.
3 Enter hours, minutes and seconds from
left to right in the time edit box using
remote control numerical key pad.
➜ Playback will change to the chosen time
or to the selected title/chapter/track.
For DVD
➜ {Title CT:TT Chapter XX/TC}: displays
the total available title and chapters in the
disc and enable to select a chapter for
viewing.
➜ {Title CT:TT Time X:XX:XX}: displays
the total available title in the disc and
enable to select the hour, minute and
second of the title.
➜ {Chapter CC:TC Time X:XX:XX}:
displays the total available chapter in the
disc and enable to select the hour, minute
and second of the title.
For Super VCD or VCD
➜ {Disc Go To XX:XX}: enable to select
any part within the disc.
➜ {Track Go To XX:XX}: enable to select
any part within the current track.
➜ {Select Track XX:TT}: enable to select
any track.
Page 22

English
22
Disc Operations
Special DVD Features
Playing a Title
1 Press DISC MENU.
➜ The disc menu appears on the TV
screen.
2 Use 341 2 keys or numeric keypad
(0-9) to select a play option.
3 Press OK key to confirm.
Camera Angle
● Press ANGLE repeatedly to select
different desired angle.
Changing the Audio Language
For DVD
● Press AUDIO repeatedly to select
different audio languages.
Changing the Audio Channel
For VCD
● Press AUDIO to select the available
audio channels provided by the disc
(MONO LEFT, MONO RIGHT, MIXMONO, STEREO).
Subtitles
● Press SUBTITLE repeatedly to select
different subtitle languages.
Special VCD & SVCD Features
Playback Control (PBC)
For VCD with Playback Control (PBC)
feature (version 2.0 only)
● Press DISC MENU to toggle between
‘PBC ON’ and ‘PBC OFF’.
➜ If you select ‘PBC ON’, the disc menu
(if available) will appear on the TV.
➜ Use the
S / T or the numeric
keypad (0-9) to select a play option.
● During playback, pressing RETURN/
TITLE will return to the menu screen (if
PBC is on).
If you want to skip the index menu
and playback directly from the
beginning,
● Press DISC MENU key on the remote
control to switch to PBC off.
TIPS:
The operating features described here might not be possible for certain discs. Always refer
to the instructions supplied with the discs.
Page 23
English
23
Disc Operations
TIPS:
The operating features described here might not be possible for certain discs. Always refer
to the instructions supplied with the discs.
Playing MP3/JPEG (Kodak)
Picture CD
IMPORTANT!
You have to turn on your TV and set to
the correct Video In channel. (See page
15 “Setting up the TV”).
● Load a Picture disc (Kodak Picture CD,
JPEG).
➜ For Kodak disc, the slide show will
begin.
➜ For JPEG disc, the picture menu
appears on the TV screen. Press PLAY B
to start the slide-show playback.
General Operation
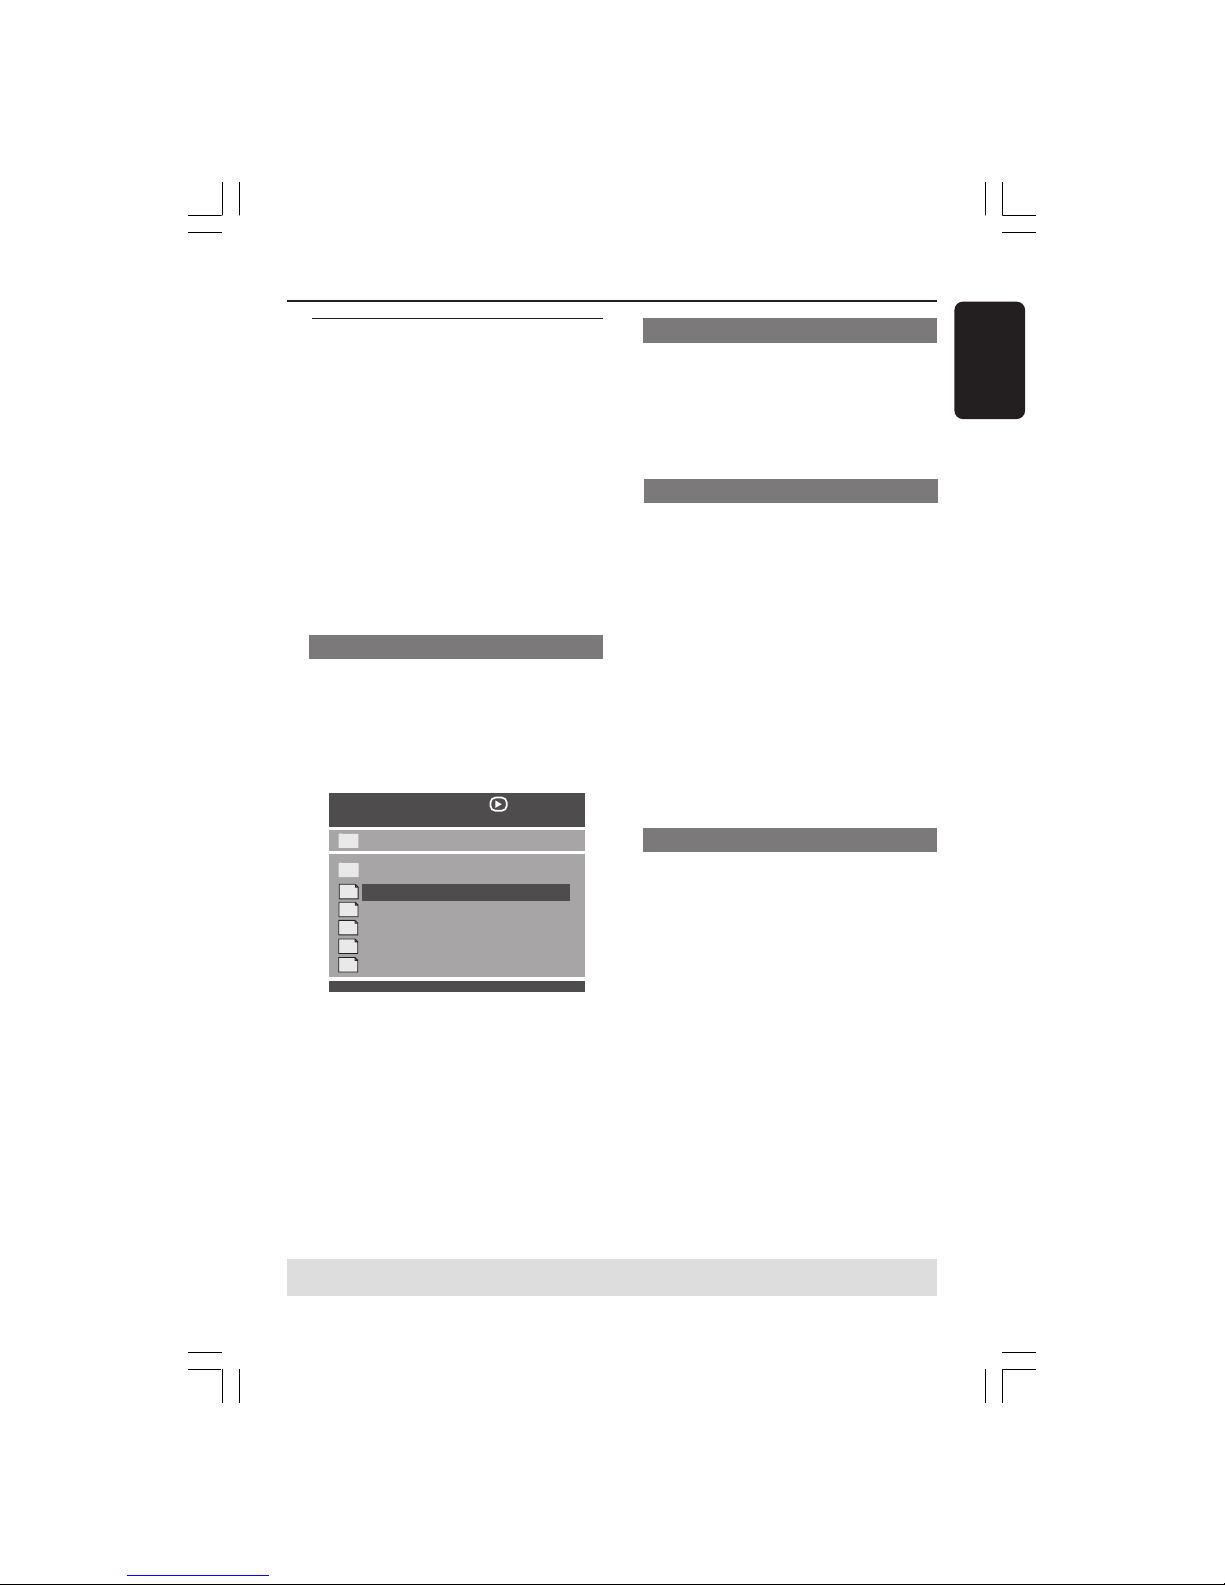
1 Load an MP3/JPEG Picture CD disc.
➜ The data disc menu appears on the TV
screen.
2 Press 3 4 to select the folder and press
OK to open the folder.
00:00 04:52 128Kbps
002/020
Coco - Before
Coco - I love
Coco - Jazz
Coco - Hot spring
Coco - I believe
--
\ Coco Lee \
MP3
MP3
MP3
MP3
MP3
3 Press 3 4 or use the numeric keypad
(0-9) to highlight an option.
4 Press OK to confirm.
➜ Playback will start from the selected
file to the end of the folder.
Playback selection
During playback, you can;
● Press S / T to select another track/
file in the current folder.
● Press ; / B repeatedly to pause/resume
playback.
Repeat
● Press REPEAT continuously to access
different ‘Play Mode’.
In STOP mode (folder view),
™ SINGLE
™ REPEAT ONE
™ REPEAT FOLDER
™ FOLDER
™ SHUFFLE
In PLAY mode,
™ SINGLE
™ REPEAT ONE
™ REPEAT ALL
™ REPEAT OFF
™ SHUFFLE
Fast forward / reverse (MP3)
● During playback, press
1 2 to fast forward
or reverse playback.
● To resume normal playback, press PLAY
B.
Page 24
English
24
DVD Setup Menu Options
TIPS:
To return to the previous menu, press 1.
To remove the menu, press SYSTEM MENU.
Dimming player’s display panel
You can select different levels of
brightness for the display screen.
1 In ‘GENERAL SETUP PAGE’, press 3 4 to
highlight {DISPLAY DIM}, then press 2.
100%
Select this for full brightness.
70%
Select this for medium brightness.
40%
Select this for dimming the display.
2 Press 3 4 to select a setting, then press
OK to confirm your selection.
This DVD Player setup is carried out via
the TV, enabling you to customise the
DVD Player to suit your particular
requirements.
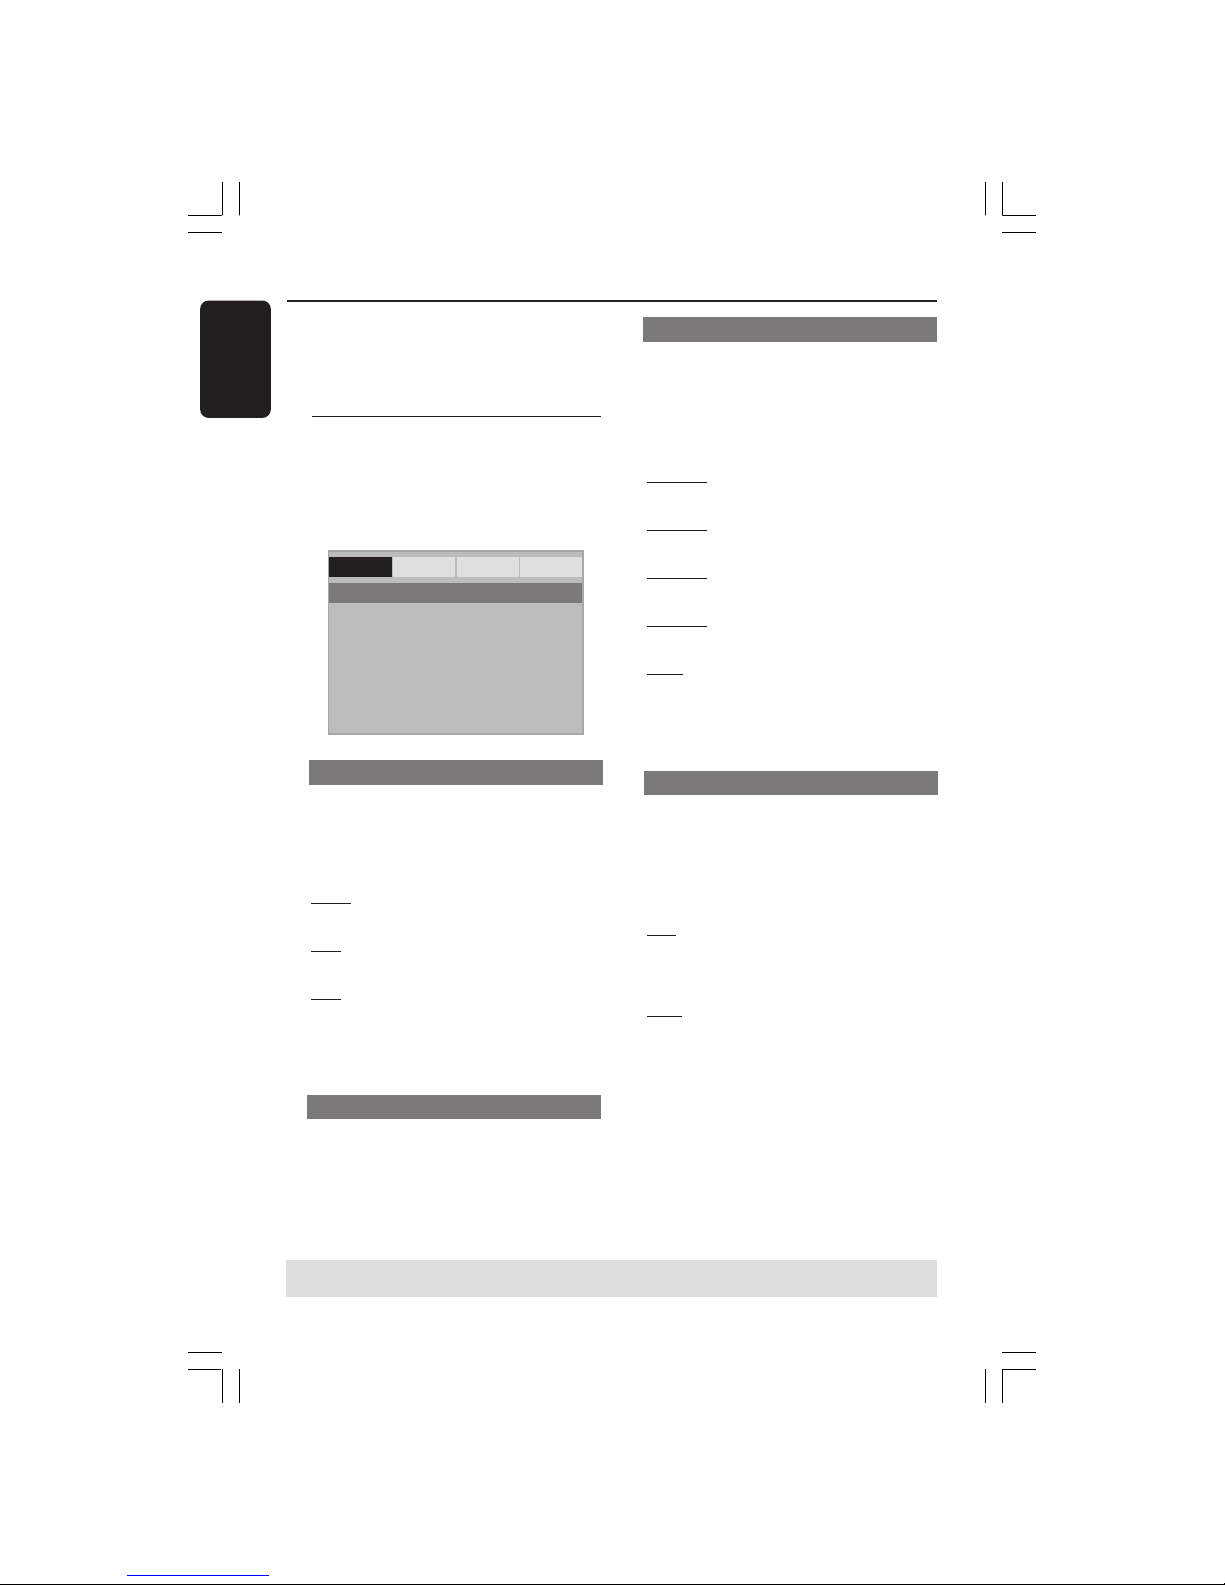
General Setup menu
1 In disc mode, press SYSTEM MENU.
2 Press 1 2 to select ‘General Setup’ icon.
3 Press OK to confirm.
Display Dim
OSD Language
Sleep
Screen Saver
- - General Setup Page - -
General Audio Video Preference
OSD Language
This menu contains various language
options for display language on the screen.
For details, see page 18.
Sleep
Sleep function allows you to turn off the
DVD Player automatically after a preset
time.
1 In ‘GENERAL SETUP PAGE’, press 3 4 to
highlight {SLEEP}, then press 2.
15 Mins
Turn off the DVD Player after 15 minutes.
30 Mins
Turn off the DVD Player after 30 minutes.
45 Mins
Turn off the DVD Player after 45 minutes.
60 Mins
Turn off the DVD Player after 60 minutes.
OFF
Turn off the sleep function.
2 Press 3 4 to select a setting, then press
OK to confirm your selection.
Screen Saver - turning on/off
The screen saver will help to prevent your
TV display device from becoming
damaged.
1 In ‘GENERAL SETUP PAGE’, press 3 4 to
highlight {SCREEN SAVER}, then press 2.
ON
Select this if you wish to turn off the TV
screen when disc playback is stopped or
paused for more than 15 minutes.
OFF
Select this to disable the screen saver
function.
2 Press 3 4 to select a setting, then press
OK to confirm your selection.
Page 25
English
25
DVD Setup Menu Options
TIPS:
To return to the previous menu, press 1.
To remove the menu, press SYSTEM MENU.
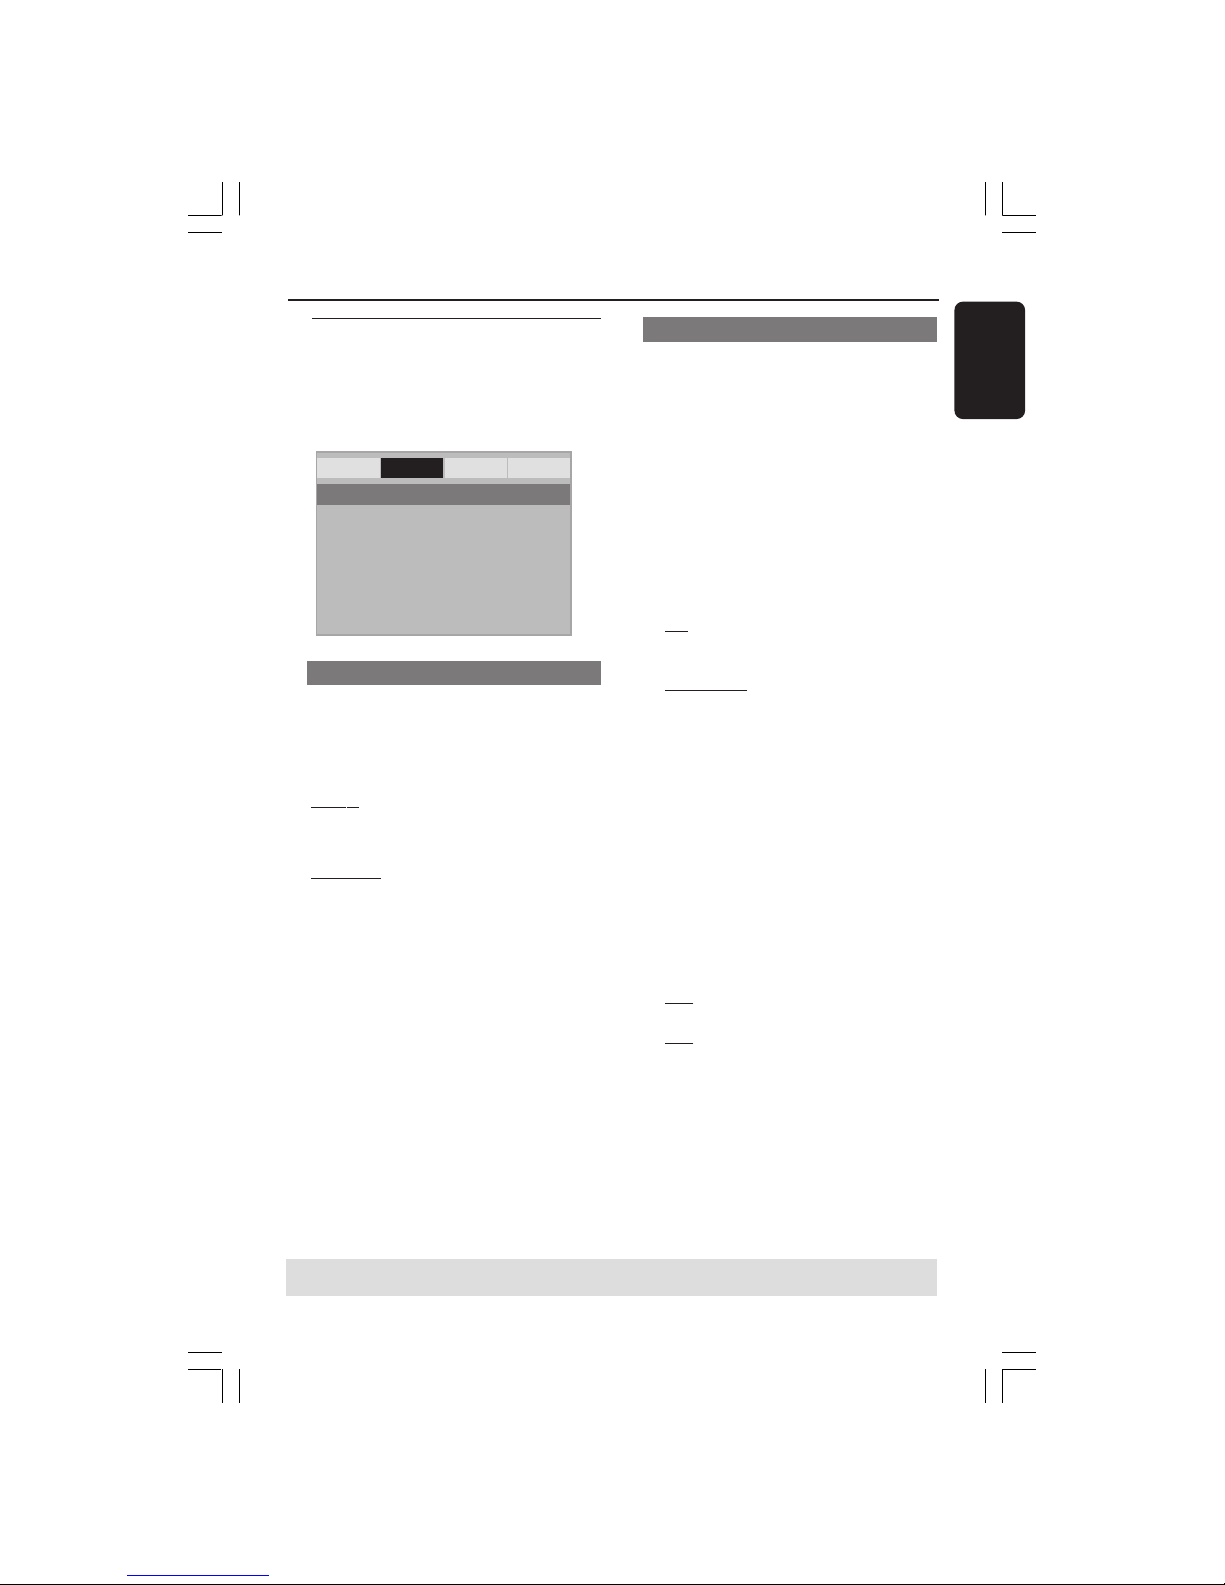
Audio Setup Menu
1 In disc mode, press SYSTEM MENU.
2 Press 1 2 to select ‘Audio Setup’ icon.
3 Press OK to confirm.
General Audio Video Preference
Downmix
Digital Audio
- - Audio Setup Page - -
Setting the Downmix
This options allows you to set the stereo
analog output of your DVD Player.
1 In ‘AUDIO SETUP PAGE’, press 3 4 to
highlight {DOWNMIX}, then press 2.
LT/RT
Select this option if your DVD Player is
connected to a Dolby Pro-Logic decoder.
STEREO
Select this to change channel output to
stereo which delivers sound from only the
two front speakers.
2 Press 3 4 to select a setting, then press
OK to confirm your selection.
Digital Audio Setup
The options included in Digital Audio
Setup are: ‘Digital Audio’ and ‘LPCM’.
1 In ‘AUDIO SETUP PAGE’, press 3 4 to
highlight {DIGITAL AUDIO}, then press 2.
2 Press the 3 4 keys to highlight an option.
3 Enter its submenu by pressing 2.
4 Move the cursor by pressing the 3 4
keys to highlight the selected item.
Digital Output
Set the Digital output according to your
optional audio equipment connection.
➜
All: If you have connected your
DIGITAL AUDIO OUT to a multi-channel
decoder/receiver.
➜
PCM Only: Only if your receiver is
not capable of decoding multi-channel
audio.
Helpful Hints:
– If DIGITAL AUDIO is set to ‘All’, all audio
settings except MUTE are invalid.
LPCM Output
If you connect the DVD Player to a PCM
compatible receiver via the digital
terminals, such as coaxial or optical etc,
you may need to adjust ‘LPCM’.
Discs are recorded at a certain sampling
rate. The higher the sampling rate, the
better the sound quality.
➜
48k: Playback a disc recorded at the
sampling rate of 48kHz.
➜
96k: Playback a disc recorded at the
sampling rate of 96kHz.
Page 26
English
26
Setting the TV Display
Set the aspect ratio of the DVD Player
according to the TV you have connected.
The format you select must be available
on the disc. If it is not, the setting for TV
display will not affect the picture during
playback.
1 In ‘VIDEO SETUP PAGE’, press 34 to
highlight {TV DISPLAY}, then press 2.
2 Press 3 4 to highlight one of the options
below:
4:3 PAN SCAN –
Select this if you have
a normal TV and want
both sides of the
picture to be trimmed or formatted to fit
your TV screen.
4:3 LETTER BOX –
Select this if you have a
normal TV. In this case, a
wide picture with black
bands on the upper and lower portions of
the TV screen will be
displayed.
16:9 – Select this if
you have a widescreen TV.
3 Select an item and press OK.
DVD Setup Menu Options
TIPS:
To return to the previous menu, press 1.
To remove the menu, press SYSTEM MENU.
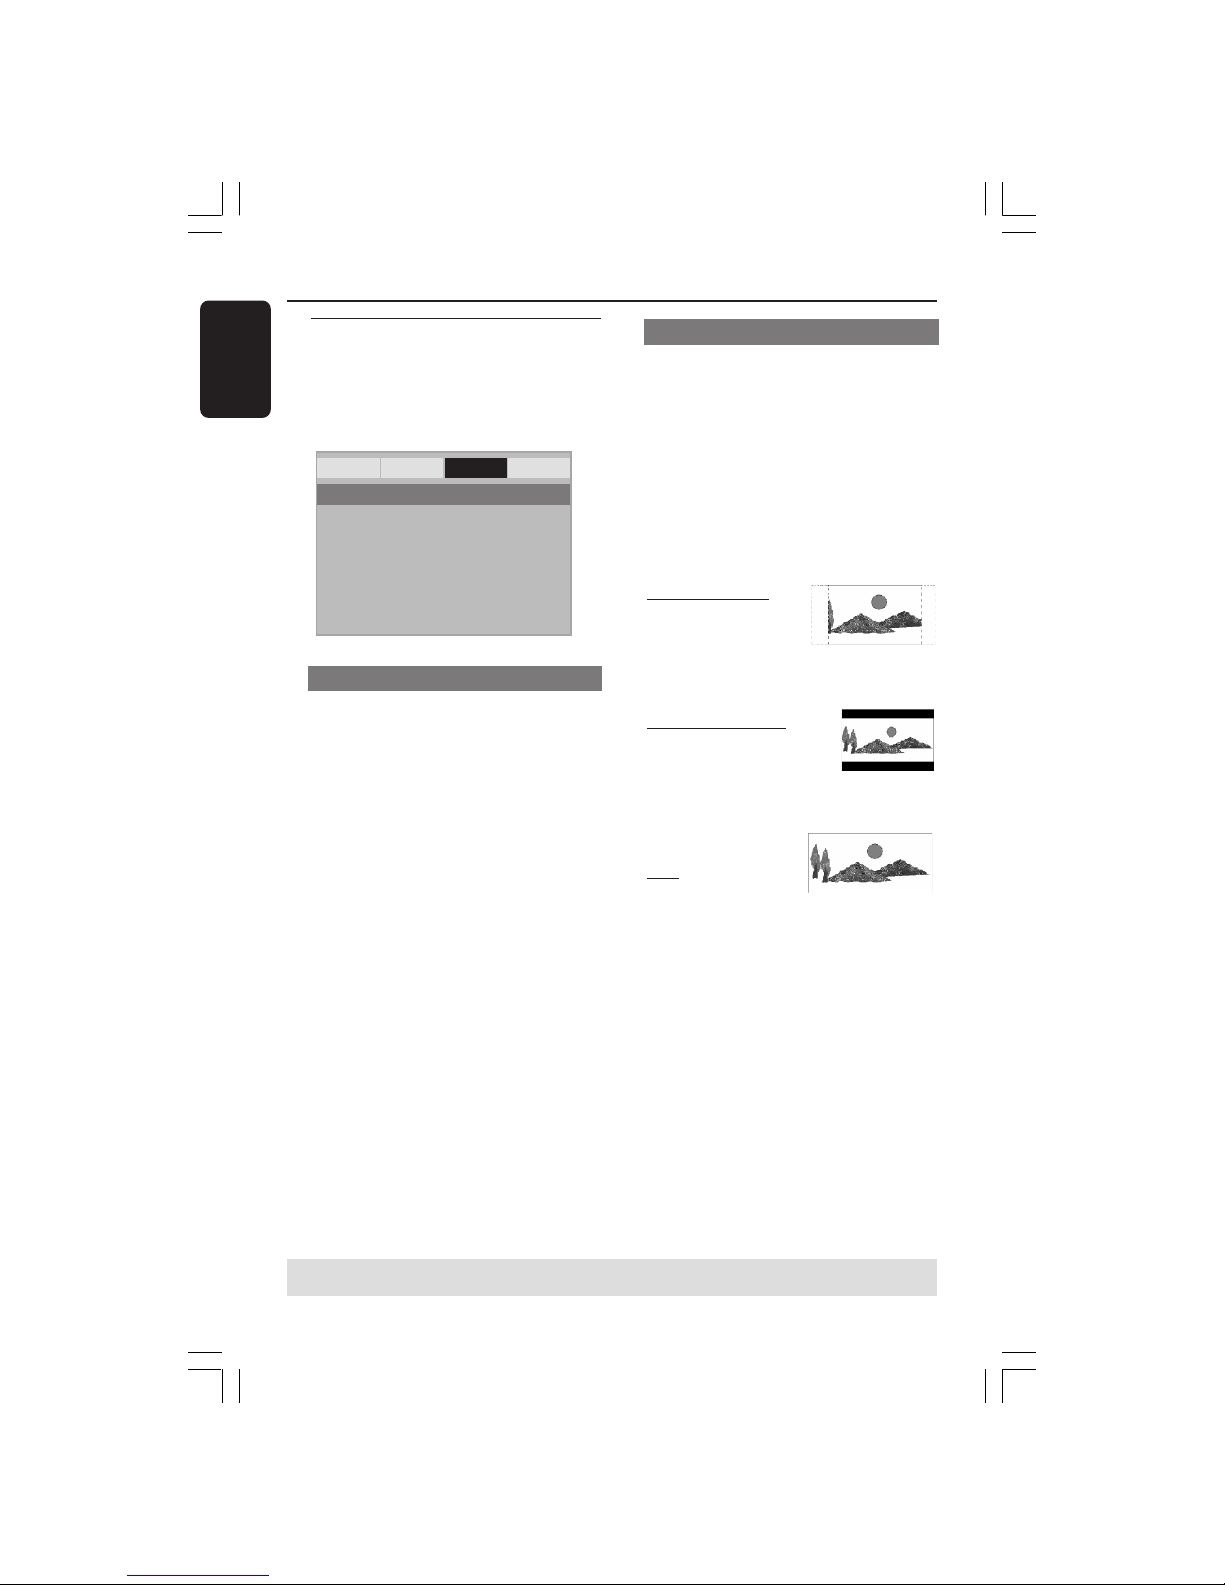
Video Setup Menu
1 In disc mode, press SYSTEM MENU.
2 Press 1 2 to select ‘Video Setup’ icon.
3 Press OK to confirm.
General Audio Video Preference
TY Type
TV Display
Progressive
Sharpness
Brightness
Contrast
Component
- - Video Setup Page - -
TV Type
This menu contains the options for
selecting the colour system that matches
the connected TV. For details, see page
17.
Page 27

English
27
DVD Setup Menu Options
TIPS:
To return to the previous menu, press 1.
To remove the menu, press SYSTEM MENU.
Sharpness
You can personalize your picture colour
by adjusting sharpness.
1 In ‘VIDEO SETUP PAGE’, press 3 4 to
highlight {SHARPNESS}, then press 2.
HIGH
Choose high to make the picture’s edge
sharper.
MEDIUM
Choose medium to get a standard
picture.
LOW
Choose low to make the picture’s edge
softer.
2 Press 3 4 to select a setting, then press
OK to confirm your selection.
Brightness / Contrast
Increasing the value will brighten the
picture or vice versa. Choose zero (0) for
average setting.
1 In ‘VIDEO SETUP PAGE’, press 3 4 to
highlight {BRIGHTNESS} or
{CONTRAST}, then press 2.
➜ The menu appears.
Brightness 0
Contrast 0
2 Press 1 2 to adjust the setting that best
suit your personal preference.
3 Press OK to confirm.
Progressive - turning on/off
In the progressive scan mode, you can
enjoy the high quality picture with less
flickers. It only works when you have
connected the DVD player’s Y Pb Pr jacks
to your TV that supports the progressive
video input. Otherwise, the a distorted
picture will appear on the TV. For proper
progressive scan set up, see page 16.
1 In ‘VIDEO SETUP PAGE’, press 3 4 to
highlight {PROGRESSIVE}, then press 2.
ON
To enable Progressive Scan function.
OFF
To disable Progressive Scan function.
2 Press 3 4 to select a setting, then press
OK to confirm your selection.
➜ Follow the instructions shown on the
TV to confirm the selection (if any).
➜ If a distorted picture appears on the TV
screen, wait for 15 seconds for auto
recovery.
Switching the YUV/RGB
This setting allows you to toggle the
output of the video signal between RGB
(on scart) and Y Pb Pr (YUV).
1 In ‘VIDEO SETUP PAGE’, press 3 4 to
highlight {COMPONENT}, then press 2.
YUV
Select this for Y Pb Pr connection.
RGB
Select this for Scart connection.
2 Press 3 4 to select a setting, then press
OK to confirm your selection.
Warning:
– When the player is set to Y Pb Pr
(YUV), some TV may not properly
synchronise with player on the
SCART connector.
– When RGB is selected,
progressive scan output will be
deactivated.
Page 28

English
28
DVD Setup Menu Options
TIPS:
To return to the previous menu, press 1.
To remove the menu, press SYSTEM MENU.
Preference Page
1 Press Ç twice to stop playback (if any),
then press SYSTEM MENU.
2 Press 1 2 to select the ‘Prefe rence Page’
icon.
3 Press OK to confirm.
General Audio Video Preference
Audio
Subtitle
Disc Menu
Parental
Password
Default
- - Preference Page - -
Audio, Subtitle, Disc Menu
These menus contain various language
options for audio, subtitle and disc menu
which may be recorded on the DVD. For
details, see page 18.
Restricting playback by Parental
Control
Some DVDs may have a parental level
assigned to the complete disc or to
certain scenes on the disc. This feature
lets you set a playback limitation level.
The rating levels are from 1 to 8 and are
country dependent. You can prohibit the
playing of certain discs that are not
suitable for your children or have certain
discs played with alternative scenes.
1 In ‘PREFERENCE PAGE’, press 34 to
highlight {PARENTAL}, then press 2.
General Audio Video Preference
Audio 1 KID SAFE
Subtitle 2 G
Disc Menu 3 PG
Parental 4 PG 13
Password 5 PGR
Default 6 R
7 NC17
8 ADULT
- - Preference Page - -
2 Press 34 to highlight a rating level for the
disc inserted and press OK.
➜ To disable Parental controls and have
all Discs play, select {8 ADULT}.
3 Use the numeric keypad (0-9) to enter
the six-digit password (see page 29
“Changing the password”).
➜ DVDs that are rated above the level
you selected will not play unless you enter
your six-digit password.
Helpful Hints:
– VCD, SVCD, CD have no level indication,
so parental control function has no effect on
these type of discs. This applies to most illegal
DVD discs.
– Some DVDs are not encoded with a
rating though the movie rating may be
printed on the Disc cover. The rating level
feature does not work for such Discs.
Page 29
English
29
DVD Setup Menu Options
Restoring to original settings
Setting the DEFAULT function will reset
all options and your personal settings to
the factory defaults, except your
password for Parental Control.
1 In ‘PREFERENCE PAGE’, press 3 4 to
highlight {DEFAULT}, then press 2 to
select {RESET}.
2 Press OK to confirm.
➜ All settings will now reset to factory
defaults.
TIPS:
To return to the previous menu, press 1.
To remove the menu, press SYSTEM MENU.
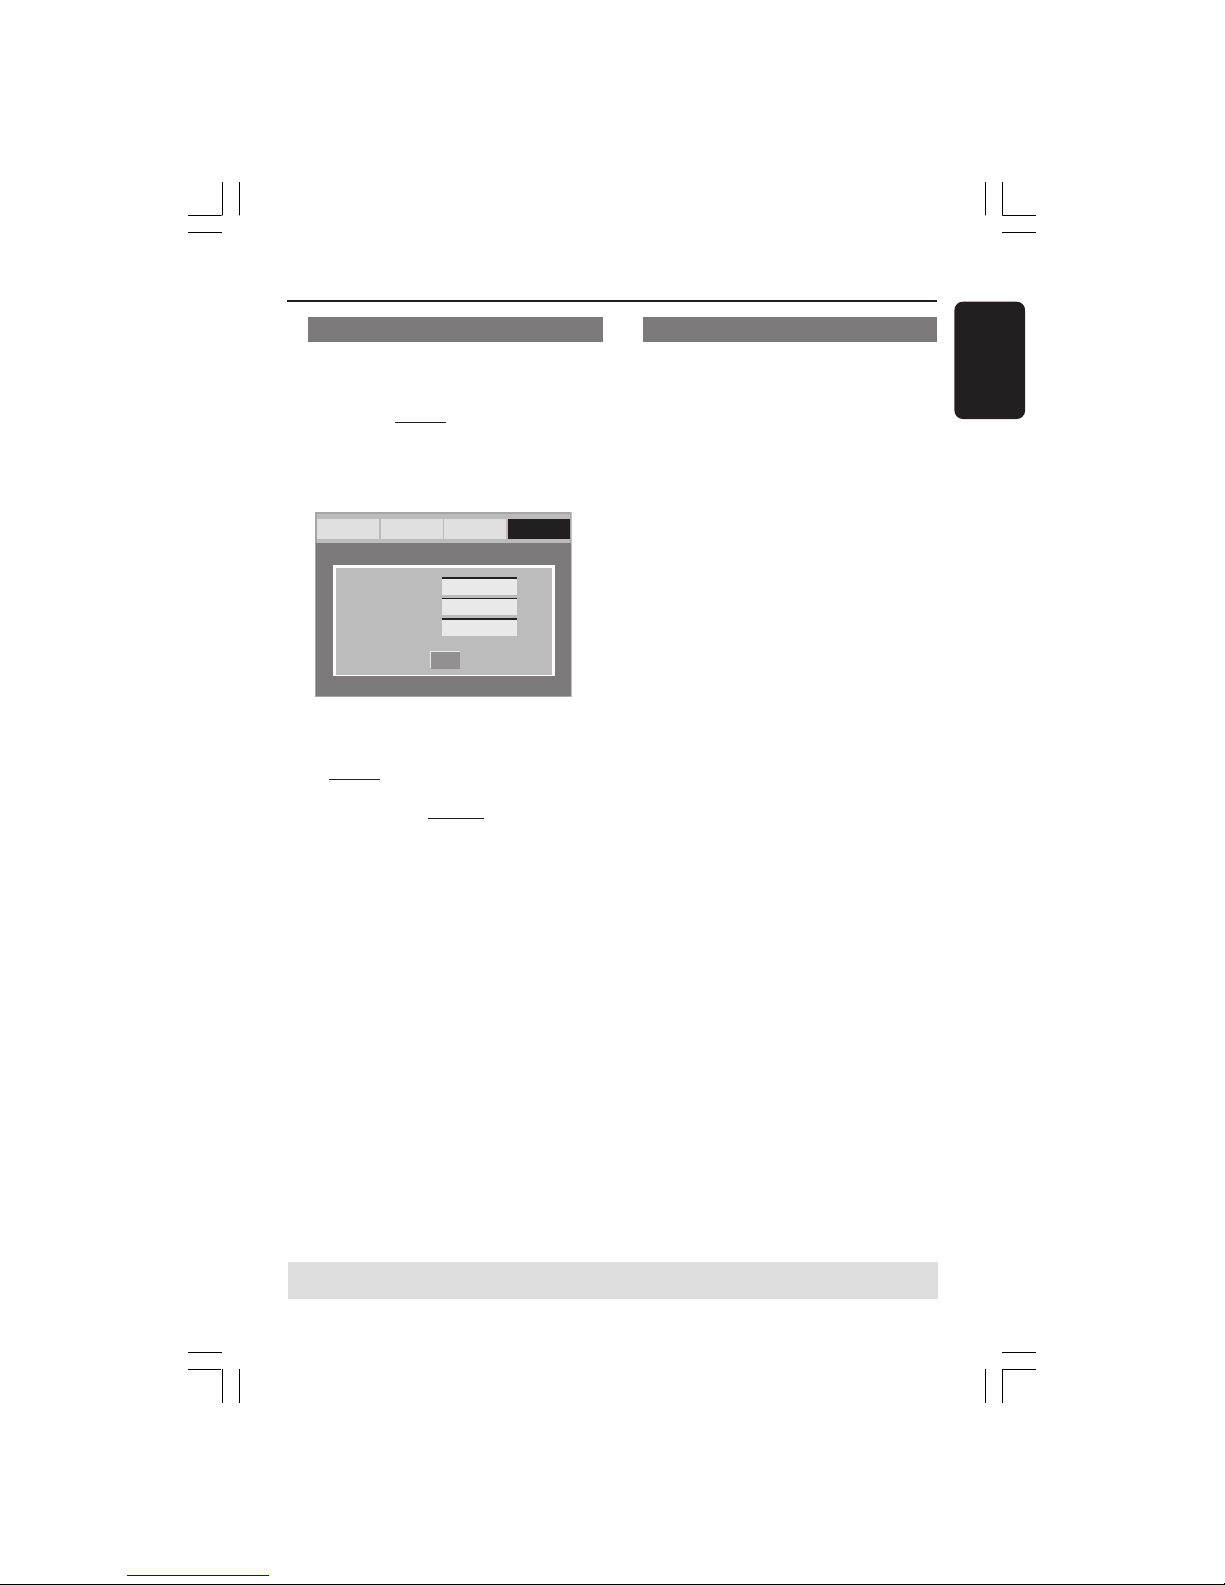
Changing the Password
This feature is used for Parental Control.
Enter your six-digit password when
prompted on the screen. The default
password is
136900.
1 In ‘PREFERENCE PAGE’, press 3 4 to
highlight {PASSWORD}, then press 2 to
select {CHANGE}.
General Audio Video Preference
Old Password
New Password
Confirm PWD
OK
2 Use the numeric keypad (0-9) to enter
your old six-digit password.
➜ When doing this for the first time, key
in ‘
136900’.
➜ If you forget your old six-digit
password, key in ‘
136 900’.
3 Enter the new six-digit password.
4 Enter the new six-digit password a second
time to confirm.
➜ The new six-digit password will now
take effect.
5 Press OK to confirm.
Page 30

English
30
WARNING
Under no circumstances should you try to repair the system yourself, as this will
invalidate the warranty. Do not open the system as there is a risk of electric shock.
If a fault occurs, first check the points listed below before taking the system for repair. If
you are unable to remedy a problem by following these hints, consult your dealer or
Philips for help.
Problem Solution
No power – Check if the AC power cord is properly connected.
– Press the STANDBY ON on the front of the DVD
system to turn on the power.
No picture – Refer to your TV’s manual for correct Video In
channel selection. Change the TV channel until you
see the DVD screen.
– Check if the TV is switched on.
– If the progressive scan feature is activated but the
connected TV does not suppor t progressive signals
or the cables are not connected accordingly, see
page 16 for proper progressive scan set up or
deactivate the progressive scan feature as below:
1) Turn off your TV progressive scan mode or turn on
to interlaced mode.
2) Press OPEN/CLOSE to open the disc tray.
3) Press numeric keypad ‘1’ on the remote control for
few seconds.
Distorted picture – Sometimes a small amount of picture distortion may
appear depending on the disc being played back. This
is not a malfunction.
Completely distorted picture or – Connect DVD Player directly to the TV.
black/white picture with DVD – Make sure the disc is compatible with the DVD/
Player.
– Ensure that the DVD Player’s TV Type is set to match
that of the Disc and your TV.
No sound or distorted sound – Adjust the volume.
– Check that the speakers are connected correctly.
No audio at digital output – Check the digital connections.
– Check if your receiver can decode MPEG-2 and if
not, please make sure the digital output is set to ALL.
– Check if the audio format of the selected audio
language matches your receiver capabilities.
Troubleshooting
Visit us at www.philips.com/support for service support
Page 31

English
31
Disc can’t be played – The DVD+R/CD-R must be finalised.
– Ensure the disc label is facing up.
– Check if the disc is defective by trying another disc.
– Region code incorrect.
Picture freezes momentarily – Check the disc for fingerprints/scratches and
during playback clean with a soft cloth wiping from centre to edge.
No return to start-up screen when – Reset the unit by switching the player off, then on
disc is removed again.
The player does not respond to – Aim the Remote Control directly at the sensor
the Remote Control on the front of the player.
– Reduce the distance to the player.
– Replace the batteries in the Remote Control.
– Re-insert the batteries with their polarities (+/–
signs) as indicated.
Buttons do not work – To completely reset the player, unplug the AC
cord from the AC outlet for 15-20 seconds.
Player does not respond to some – Operations may not be permitted by the disc.
operating commands during playback. Refer to the instructions of the disc jacket.
DVD Player cannot read – Use a commonly available cleaning CD/DVD to
CDs/DVDs clean the lens before sending the DVD Player for
repair.
Menu items cannot be selected – Press STOP twice before selecting System Menu.
– Depending on the disc availability, some menu items
cannot be selected.
Troubleshooting
Problem Solution
Visit us at www.philips.com/support for service support
Page 32
English
32
TV STANDARD (PAL/50Hz) (NTSC/60Hz)
Number of lines 625 525
Playback Multistandard (PAL/NTSC)
VIDEO PERFORMANCE
DA Converter 12 bit, 108 mHz
YPbPr 0.7 Vpp — 75 ohm
Video Output 1Vpp — 75 ohm
RGB (SCART) 0.7 Vpp — 75 ohm
VIDEO FORMAT
Digital Compression MPEG 2 for DVD,SVCD
MPEG 1 for VCD
DVD 50Hz 60Hz
Horiz. resolution 720 pixels 720 pixels
Vertical resolution 576 lines 480 lines
VCD 50Hz 60Hz
Horiz. resolution 352 pixels 352 pixels
Vertical resolution 288 lines 240 lines
AUDIO FORMAT
Digital MPEG/ AC-3/ compressed Digital
PCM 16, 20, 24 bits
fs, 44.1, 48, 96 kHz
MP3(ISO 9660) 96, 112, 128, 256
kbps & variable
bit rate fs, 32, 44.1,
48 kHz
Analog Sound Stereo
Dolby Surround compatible downmix from Dolby Digital
multi-channel sound
Specifications
AUDIO PERFORMANCE
DA Converter 24 bit, 192 kHz
DVD fs 96 kHz 4Hz- 44kHz
fs 48 kHz 4Hz- 22kHz
SVCD fs 48 kHz 4Hz- 22kHz
fs 44.1kHz 4Hz- 20kHz
CD/VCD fs 44.1kHz 4Hz- 20kHz
Signal-Noise (1kHz) > 90 dB
Dynamic range(1kHz) > 90 dB
Crosstalk (1kHz) > 80 dB
Distortion/noise (1kHz) > 70 dB
MPEG MP3 MPEG Audio L3
CONNECTIONS
Scart Output Euroconnector
YPbPr Output Cinch 3x
Video Output Cinch (yellow)
Audio Output(L+R) Cinch (white/red)
Digital Output 1 coaxial
IEC60958 for CDDA / LPCM
IEC61937 for MPEG 1/2,
Dolby Digital
CABINET
Dimensions (w x h x d) 360 x 37 x 265 mm
Weight Approximately 2.0 kg
POWER CONSUMPTION
Power Supply Rating 230V; 50Hz
Power consumption < 10 W
Power consumption in Standby mode < 0.8 W
Specifications subject to change without prior notice
Page 33
English
33
Analog: Sound that has not been turned into
numbers. Analog sound varies, while digital sound has
specific numerical values. These jacks send audio
through two channels, the left and right.
Aspect ratio: The ratio of vertical and horizontal
sizes of a displayed image. The horizontal vs. vertical
ratio of conventional TVs. is 4:3, and that of widescreens is 16:9.
AUDIO OUT Jacks: Jacks on the back of the DVD
System that send audio to another system (TV, Stereo,
etc.).
Bit Rate: The amount of data used to hold a given
length of music; measured in kilobits per seconds, or
kbps. Or, the speed at which you record. Generally,
the higher the bit rate, or the higher the recording
speed, the better the sound quality. However, higher
bit rates use more space on a Disc.
Chapter: Sections of a picture or a music piece on a
DVD that are smaller than titles. A title is composed
of several chapters. Each chapter is assigned a chapter
number enabling you to locate the chapter you want.
Component Video Out Jacks: Jacks on the back of
the DVD System that send high-quality video to a TV
that has Component Video In jacks (R/G/B, Y/Pb/Pr,
etc.).
Disc menu: A screen display prepared for allowing
selection of images, sounds, subtitles, multi-angles, etc
recorded on a DVD.
Digital: Sound that has been converted into
numerical values. Digital sound is available when you
use the DIGITAL AUDIO OUT COAXIAL or
OPTICAL jacks. These jacks send audio through
multiple channels, instead of just two channels as
analog does.
Dolby Digital: A surround sound system developed
by Dolby Laboratories containing up to six channels
of digital audio (front left and right, surround left and
right, center and subwoofer).
DTS: Digital Theatre Systems. This is a surround
sound system, but it is different from Dolby Digital.
The formats were developed by different companies.
JPEG: A very common digital still picture format. A
still-picture data compression system proposed by the
Joint Photographic Expert Group, which features small
decrease in image quality in spite of its high
compression ratio.
MP3: A file format with a sound data compression
system. “MP3” is the abbreviation of Motion Picture
Experts Group 1 (or MPEG-1) Audio Layer 3. By using
MP3 format. one CD-R or CD-RW can contain about
10 times as much data volume as a regular CD can.
Multichannel: DVD is specified to have each sound
track constitute one sound field. Multichannel refers
to a structure of sound tracks having three or more
channels.
Parental Control: A function of the DVD to limit
playback of the disc by the age of the users according
to the limitation level in each country. The limitation
varies from disc to disc; when it is activated, playback
will be prohibited if the software’s level is higher than
the user-set level.
PCM (Pulse Code Modulation): A system for
converting analog sound signal to digital signal for
later processing, with no data compression used in
conversion.
Playback control (PBC): Refers to the signal
recorded on video CDs or SVCDs for controlling
reproduction. By using menu screens recorded on a
Video CD or SVCD that supports PBC, you can enjoy
interactive-type software as well as software having a
search function.
Progressive Scan: It displays all the horizontal lines
of a picture at one time, as a signal frame. This system
can convert the interlaced video from DVD into
progressive format for connection to a progressive
display. It dramatically increases the vertical
resolution.
Region code: A system for allowing discs to be
played back only in the region designated beforehand.
This unit will only play discs that have compatible
region codes. You can find the region code of your
unit by looking on the product label. Some discs are
compatible with more than one region (or ALL
regions).
Title: The longest section of a picture or music
feature on DVD, music, etc., in video software, or the
entire album in audio software. Each title is assigned a
title number enabling you to locate the title you want.
VIDEO OUT jack: Jack on the back of the DVD
System that sends video to a TV.
Glossary
 Loading...