

Page 1
• Einbau dieses Laufwerks in den PC
Verwendung der Software mit diesem Laufwerk
• Comment installercet appareil dans l’ordinateur ?
Comment utiliser les logiciels de cet appareil ?
• Come installare questa unità sul PC
Come usare il software con questa unità
• Hoe installeer ik dit station in mijn PC?
Hoe gebruik ik de programma's?
• ¿Cómo instalar esta unidad en su ordenador?
¿Cómo utilizar el software con esta unidad?
How to install this drive in your PC?
How to use the software with this drive?
For DVD + RW
using
Nero,MyDVD and PowerDVD
Version 1.0
Page 2
Contents - Inhalt - Table des matières - Indice - Inhoud - Índice
2
Installation How to install this drive in my computer? 5
Installation Einbau dieses Laufwerks in den Computer 5
Installation Comment installer ce lecteur dans l’ordinateur? 5
Installazione Come installare questa unità sul computer 5
Installeren Hoe installeer ik dit station in mijn computer? 5
Instalación ¿Cómo instalar esta unidad en el ordenador? 5
Video How to create a DVD-Video or a Video CD from video files
which are on the hard disc, on a CD or a DVD? 19
How to capture video from a digital DV-camcorder? 27
How to play a DVD-Video or a Video CD on my computer? 35
Video Ein DVD-Video oder eine Video-CD aus Videodateien
erstellen, die sich auf einer Festplatte, einer CD oder einer
DVD befinden 19
Videos von einem digitalen DV-Camcorder aufnehmen 27
Ein DVD-Video oder eine Video-CD auf meinem Computer
abspielen 35
Vidéo Comment créer un DVD vidéo ou un Video-CD avec des
fichiers vidéo sur le disque dur, un CD ou un DVD ? 19
Comment acquérir les images vidéo d’une caméra
numérique DV ? 27
Comment lire un DVD vidéo ou un Video-CD sur
l’ordinateur ? 35
Video Come creare un Video DVD o un CD Video da file video
che si trovano sul disco rigido, su un Cd o su un DVD 19
Come registrare un video da una DV-camcorder digitale 27
Come riprodurre un video DVD o un CD video sul
proprio computer 35
Video Hoe brand ik een DVD-Video of een Video CD op basis van
videobestanden die op een harde schijf, op een cd of op een
dvd staan? 19
Hoe kopieer ik de opnames van een digitale DV-camcorder
naar mijn computer? 27
Hoe kan ik een DVD-Video of een Video CD op mijn
computer afspelen? 35
Vídeo Este manual le mostrará cómo crear un DVD-Video o un
Video CD (VCD) a partir de archivos originales grabados en el
disco duro o en uno o más CD o DVD, y que pueden
reproducirse en la mayoría de lectores de DVD. 19
¿Cómo capturar secuencias de vídeo de una videocámara
digital DV? 27
¿Cómo reproducir un DVD-Video o un Video CD en el
ordenador? 35
Page 3
3
Copy How to copy a DVD? 39
How to copy a CD? 45
Kopieren Eine DVD kopieren 39
Eine CD kopieren 45
Copie Comment copier un DVD ? 39
Comment copier un CD ? 45
Copia Come copiare un DVD? 39
Come copiare un CD? 45
Kopiëren Hoe kopieer ik een dvd? 39
Hoe kopieer ik een cd? 45
Copia ¿Cómo copiar un DVD? 39
¿Cómo copiar un CD? 45
Data How to make a Data DVD? 51
How to make a Data CD? 57
Daten Eine Daten-DVD erstellen 51
Eine Daten-CD erstellen 57
Données Comment créer un DVD de données ? 51
Comment créer un disque de données ? 57
Dati Come creare un DVD di dati 51
Come creare un CD di dati? 57
Data Hoe maak ik zelf een data-dvd? 51
Hoe maak ik zelf een data-cd? 57
Datos ¿Cómo crear un DVD de Datos ? 51
¿Cómo crear un CD de datos ? 57
Music How to make an Audio CD? 63
Musik Erstellen einer Audio-CD 63
Musique Comment créer un CD audio? 63
Musica Come creare un CD Audio? 63
Muziek Hoe maak ik zelf muziek-cd's? 63
Música ¿Cómo crear un CD de audio? 63
Information More information about my DVD-Rewriter 69
Information Mehr Informationen über meinen DVD-Rewriter 69
Information Informations ultérieures à propos du DVD-Rewriter 69
Informazione Ulteriori informazioni sul DVD-Rewriter 69
Informatie Verdere informatie over mijn DVD-Rewriter 69
Información Más información acerca de mi DVD-Rewriter 69
?
Page 4

4
Page 5
How to install this drive
in my computer?
Einbau dieses Laufwerks in den Computer
Comment installer ce lecteur dans l’ordinateur ?
Come installare questa unità sul computer
Hoe installeer ik dit station in mijn computer?
¿Cómo instalar esta unidad en el ordenador?
The next pages show how to install
your new DVD-ReWriter in the PC.
Since there are many brands and types
of PC's available, the next photographs
show only examples on how your drive
could be installed.
For specific information on your PC,
please refer to your PC manual or
contact your local dealer.
Auf den nächsten Seiten wird
beschrieben, wie Sie Ihren neuen DVDReWriter in den PC einbauen können.
Da es viele verschiedene PC-Marken
und –Typen gibt, zeigen die folgenden
Fotos nur Beispiele dafür, wie Ihr
Laufwerk eingebaut werden kann.
Für spezielle Informationen zu Ihrem PC
beachten Sie bitte Ihr PC-Handbuch,
oder wenden Sie sich an Ihren Händler
vor Ort.
Les pages qui suivent illustrent la
procédure d’installation de votre nouveau
DVD-ReWriter dans l’ordinateur.
Il existe un grand nombre de marques
et de modèles d’ordinateurs. Les photos
suivantes ne sont présentées qu’à titre
d’illustration de la procédure à suivre
pour installer l’appareil.
Pour des informations spécifiques sur
votre ordinateur, reportez-vous à son
mode d’emploi ou contactez votre
revendeur.
Nelle prossime pagine verranno date
informazioni su come installare DVDReWriter sul PC.
Poiché esistono molte marche e tipi di
PC, le prossime foto mostreranno solo
esempi di come l'unità possa essere
installata.
Per informazioni specifiche sul proprio
PC, fare riferimento al manuale PC o
rivolgersi al proprio rivenditore locale.
De volgende pagina's beschrijven het
installeren van de nieuwe DVDReWriter in uw PC.
Omdat er vele soorten en merken
computers zijn, zullen de hierna volgende
afbeeldingen hoogstwaarschijnlijk niet
exact overeenkomen met uw eigen
situatie. Ze dienen slechts ter illustratie
van het installeren.
Raadpleeg voor specifieke informatie
over uw eigen computer de handleiding
van uw PC, of neem contact op met uw
leverancier.
Las páginas siguientes muestran cómo
instalar su nueva regrabadora en el
DVD-PC.
Puesto que hay muchas marcas y tipos
de ordenadores personales disponibles,
las fotografías siguientes muestran sólo
algunos ejemplos de cómo podría
instalarse la unidad.
Para obtener información específica
sobre su ordenador personal, por favor
consulte el manual de su PC o póngase
en contacto con su distribuidor local.
UK D F
I NL E
5
Page 6

6
Tu rn your computer off.
Schalten Sie Ihren
Computer aus.
Éteignez l’ordinateur.
Spegnere il computer.
Schakel de computer uit.
Apague el ordenador.
Touch a unpainted
metal part (eg.your heating or
an unpainted part of your
computer case) to avoid any
damage to your computer by
electrostatic discharge.
Berühren Sie ein
unbemaltes Metallteil (z.B. Ihre
Heizung oder ein nicht
bemaltes Teil Ihres Computergehäuses), um zu vermeiden,
dass Ihr Computer durch
elektrische Entladung
beschädigt wird.
Touchez une partie
métallique non peinte (p.ex. le
radiateur ou une partie nue
du capot de votre ordinateur)
pour éviter tout risque de décharge électrostatique qu endommagerait l’ordinateur.
Toccare una parte di metallo non verniciata (ad es.il riscaldamento o una parte
non verniciata del telaio del computer) per evitare di danneggiare il computer con
scariche elettrostatiche.
Om uw te computer beschermen tegen elektrostatische ontladingen, moet u altijd
eerst een ongeverfd metalen deel aanraken (bijv. een verwarmingsbuis of het
computerframe) om uzelf te ontladen.
Toque alguna parte metálica sin pintar (por ejemplo: su calefacción o alguna parte
sin pintar de la carcasa del ordenador) para evitar producir daños al ordenador por
descargas electrostáticas.
UK
D
F
I
NL
E
2
1
UK
F
I
NL
E
D
Page 7
Disconnect the power
cable from the PC.
Ziehen Sie das Netzkabel
vom Computer ab.
Débranchez le câble
d’alimentation de l’ordinateur.
Disconnettere il cavo di
alimentazione dal PC.
Trek de netstekker uit de
PC.
Desconecte el cable de
alimentación del PC.
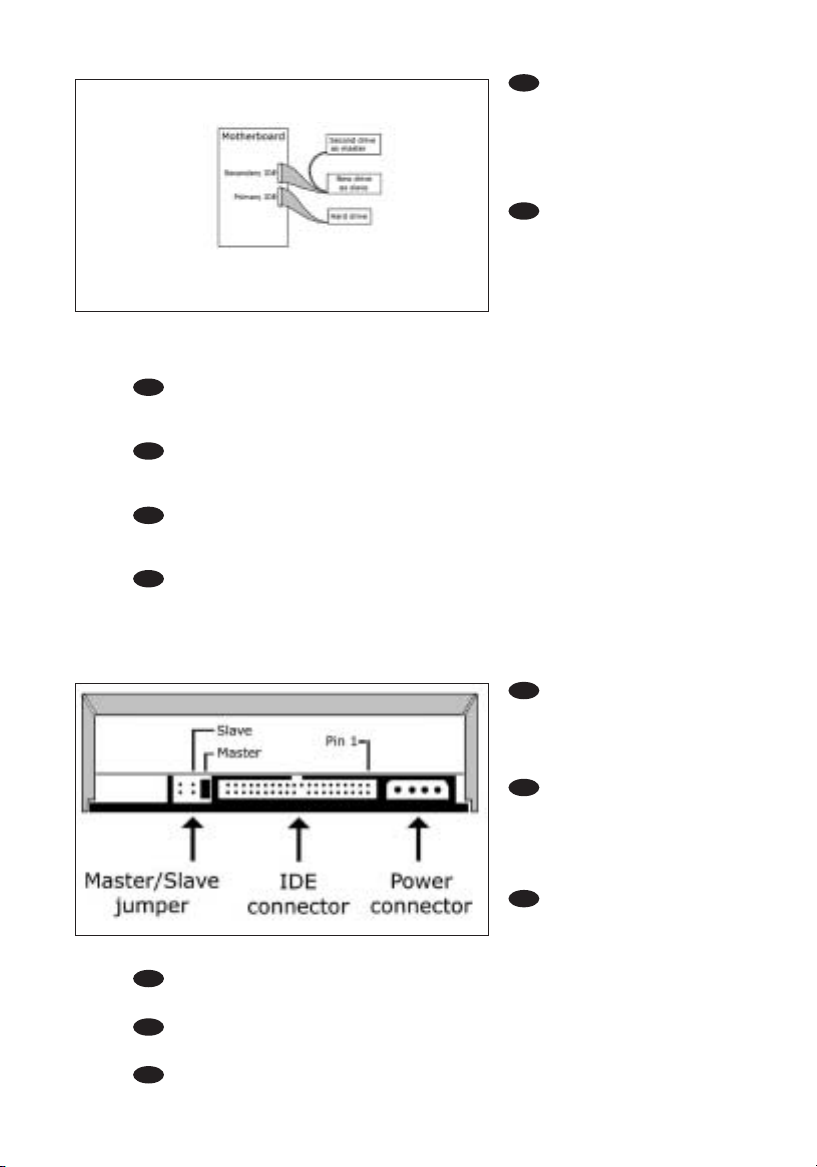
Open your computer.
You may have to unleash screws
which are mostly located at the
back of your computer.
➤ See your computer manual
for more details
Öffnen Sie Ihren
Computer. Eventuell müssen Sie
hierzu Schrauben
herausdrehen, die sich meistens
an der Rückseite Ihres
Computers befinden.
➤Weitere Informationen
hierzu finden Sie in Ihrem
Computerhandbuch.
Ouvrez l’ordinateur. Pour
cela, il peut être nécessaire de
desserrer une ou plusieurs vis à
l’arrière de l’ordinateur.
➤ Pour plus de détail, reportezvous au mode d’emploi de
l’ordinateur.
Aprire il computer. È possibile che si dovranno svitare delle viti che in genere si
trovano sul pannello posteriore del computer.
➤ Per ulteriori informazioni fare riferimento al manuale del computer.
Maak uw computer open. Meestal moet u de schroeven aan de achterkant van uw
computer losschroeven.
➤ Raadpleeg de handleiding van uw PC voor details over het openen van de PC
Abra el ordenador. Tendrá que quitar los tornillos que suelen ir colocados en la
parte posterior del ordenador.
➤ Consulte el manual del ordenador donde econtrará más detalles
4
3
7
UK
F
I
NL
E
D
UK
F
I
NL
E
D
Page 8

8
Ta ke off the cover of the
computer.
Nehmen Sie die
Abdeckung des Computers ab.
Retirez le capot de
l’ordinateur.
Togliere il coperchio del
computer.
Verwijder de kast van
de computer.
Quite la carcasa del
ordenador.
5
UK
F
I
NL
E
D
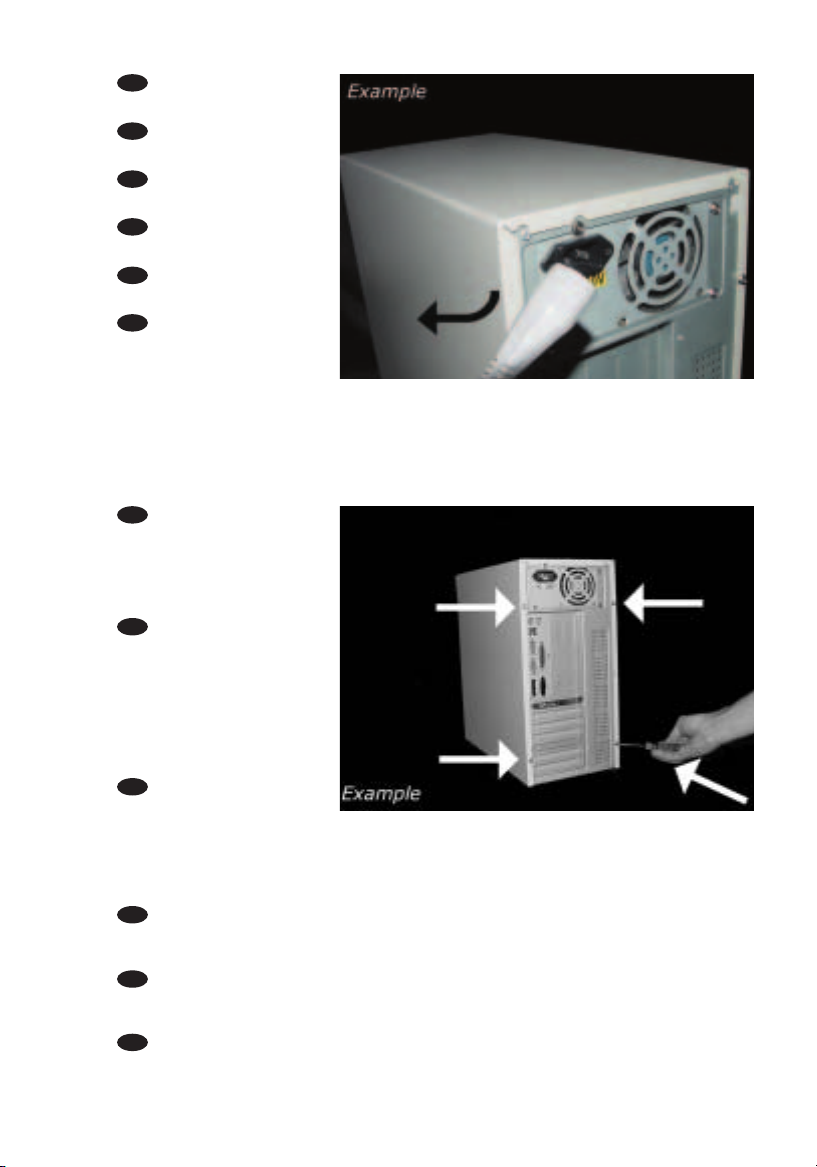
If you already have a
CDROM, DVDROM or other
drive attached to your
computer, go to step 7.
Find the flat ribbon (IDE)
cable, which goes from your
hard disc drive to your
motherboard. Next to the
connection of this cable on
your motherboard is the
second IDE connector/cable.
Attach your new drive to this
second cable, which goes into
the second IDE connector.
Your new drive must be set to
MASTER.
6
UK
Page 9

Wenn bereits ein CD-ROM- oder DVD-ROM- oder ein anderes Laufwerk an
Ihren Computer angeschlossen ist, gehen Sie zu Schritt 7.
Suchen Sie das Bandkabel (IDE-Kabel), das Ihre Festplatte mit Ihrem Motherboard
verbindet.
Neben dem Anschluss dieses Kabels befindet sich am Motherboard der zweite IDEAnschluss/das zweite IDE-Kabel. Befestigen Sie das neue Laufwerk an diesem zweiten
Kabel, das zum zweiten IDE-Anschluss führt. Das neue Laufwerk muss auf MASTER
eingestellt werden.
Si un lecteur de CD-ROM, de DVD-ROM ou un autre lecteur est déjà raccordé à
l’ordinateur, allez à l’étape 7.
Identifiez le câble plat (IDE) qui part du disque dur vers la carte mère.
Le second connecteur de câble IDE se trouve à côté sur la carte mère. Raccordez le
nouveau lecteur à ce second câble qui est branché sur le second connecteur IDE. Le
nouveau lecteur doit être défini en maître (MASTER).
Se si dispone già di un CDROM, DVDROM o altro dispositivo collegato al
computer, passare al punto 7.
Individuare il cavo piatto (IDE) che va dal disco rigido alla scheda madre.
Accanto alla connessione di questo cavo sulla scheda madre, si trova il secondo
cavo/connettore IDE. Collegare la nuova unità a questo secondo cavo,che andrà
connessa sul secondo connettore IDE. La nuova unità andrà impostata su MASTER.
Is er al een CD-ROM, DVD-ROM of een ander station op uw computer
aangesloten, ga dan verder met stap 7
Zoek de platte kabel (IDE-kabel) waarmee de harddisk op het moederbord is
aangesloten.
De tweede IDE-aansluiting of IDE-kabel zit naast deze eerste kabelaansluiting op het
moederbord. Sluit de tweede kabel aan op het nieuwe station en op de tweede IDEaansluiting. Stel het nieuwe station in op MASTER.
Si ya dispone de un lector de CDROM,DVDROM u otra unidad conectada a su
ordenador, vaya al paso 7.
Localice el cable plano (IDE), que va de la unidad de disco duro a la placa principal.
Junto a la conexión de este cable en la placa principal se encuentra el segundo
conector/cable IDE. Conecte la nueva unidad en el segundo cable que entra en el
segundo conector IDE. La nueva unidad debe configurarse como MASTER.
9
F
I
NL
E
D
Page 10
These are the
connections (on the back of
your drive) you will have to
use for connecting the drive
to the computer.
Das sind die Anschlüsse
(an der Rückseite Ihres
Laufwerks), die Sie für den
Anschluss Ihres Laufwerks an
den Computer verwenden
müssen.
Ce sont les connecteurs
(à l’arrière de votre appareil)
que vous devrez utiliser pour
raccorder l’unité à l’ordinateur.
Queste sono le connessioni (sul retro dell'unità) che dovranno essere utilizzate
per collegare l'unità al computer.
Dit zijn de aansluitingen (op de achterkant van het station) die u gebruikt om het
station op de computer aan te sluiten.
Estas son las conexiones (en la parte posterior de la unidad) que tendrá que
utilizar para desconectar la unidad del ordenador.
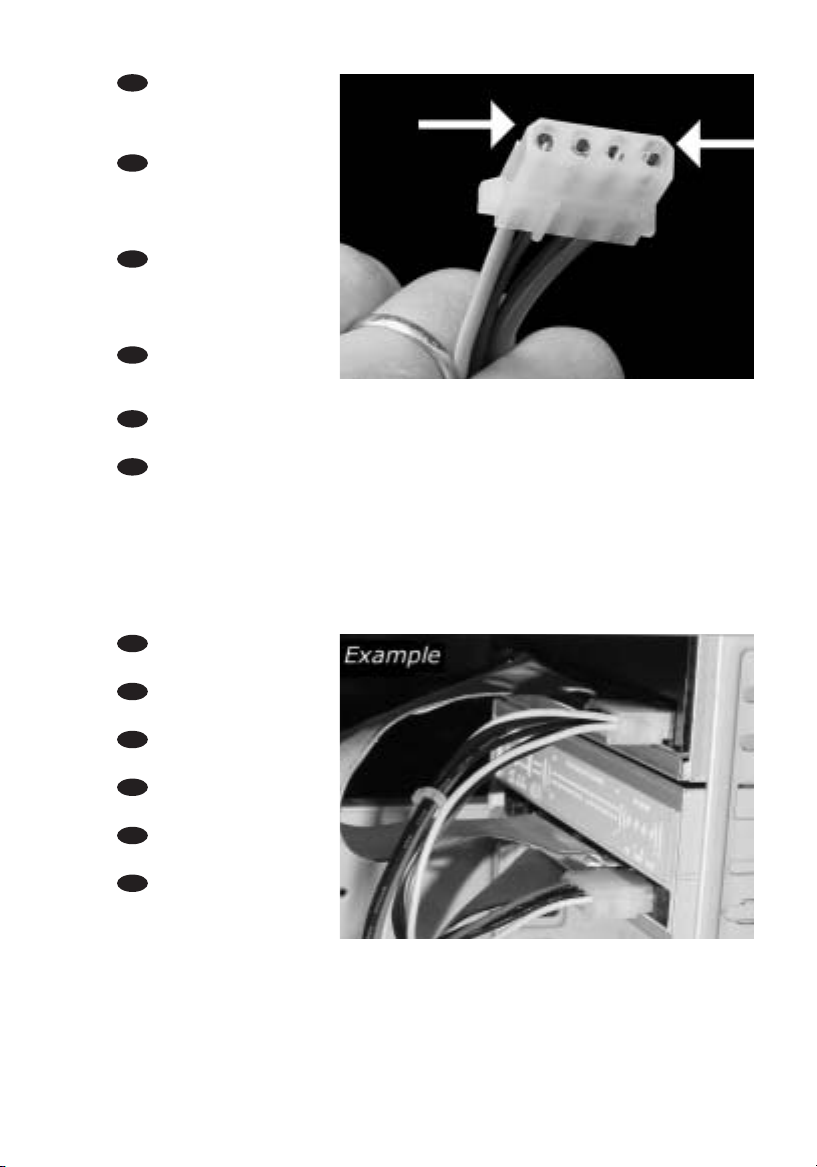
Find the cable that goes
from your motherboard to
your CDROM,DVDROM or
other drive and attach your
new drive as SLAVE onto this
cable.The MASTER/SLAVE
settings will be set in step 9.
Suchen Sie das Kabel,
das Ihr Motherboard mit
Ihrem CD-ROM-, DVDROM- oder einem anderen
Laufwerk verbindet, und
schließen Sie Ihr neues
Laufwerk als SLAVE an dieses
Kabel an. Die
MASTER/SLAVE-Einstellungen
werden in Schritt 9 festgelegt.
Identifiez le câble qui part de la car te mère vers le lecteur de CD-ROM, de DVDROM ou vers un autre lecteur et raccordez le nouveau lecteur comme esclave (SLAVE)
sur ce câble. Le réglage maître/esclave (MASTER/SLAVE) sera effectué à l’étape 9.
Individuare il cavo che collega la scheda madre a CD-ROM,DVD-ROM o altra
unità e collegarvi la nuova unità come SLAVE. Le impostazioni MASTER/SLAVE si
trovano al passo 9.
Zoek de kabel die het bestaande CD-ROM, DVD-ROM of andere station
verbindt met het moederbord,en sluit het nieuwe station als SLAVE aan op deze kabel.
Zo nodig kunt u de MASTER/SLAVE-instelling in stap 9 veranderen.
Localice el cable que va de la placa principal al lector de CD-ROM, DVD-ROM u
otra unidad y conéctelo a su unidad nueva como SLAVE en este cable.En el paso 9 se
configuran los parámetros MASTER/SLAVE.
8
7
UK
F
NL
E
D
UK
D
F
I
NL
E
10
I
Page 11
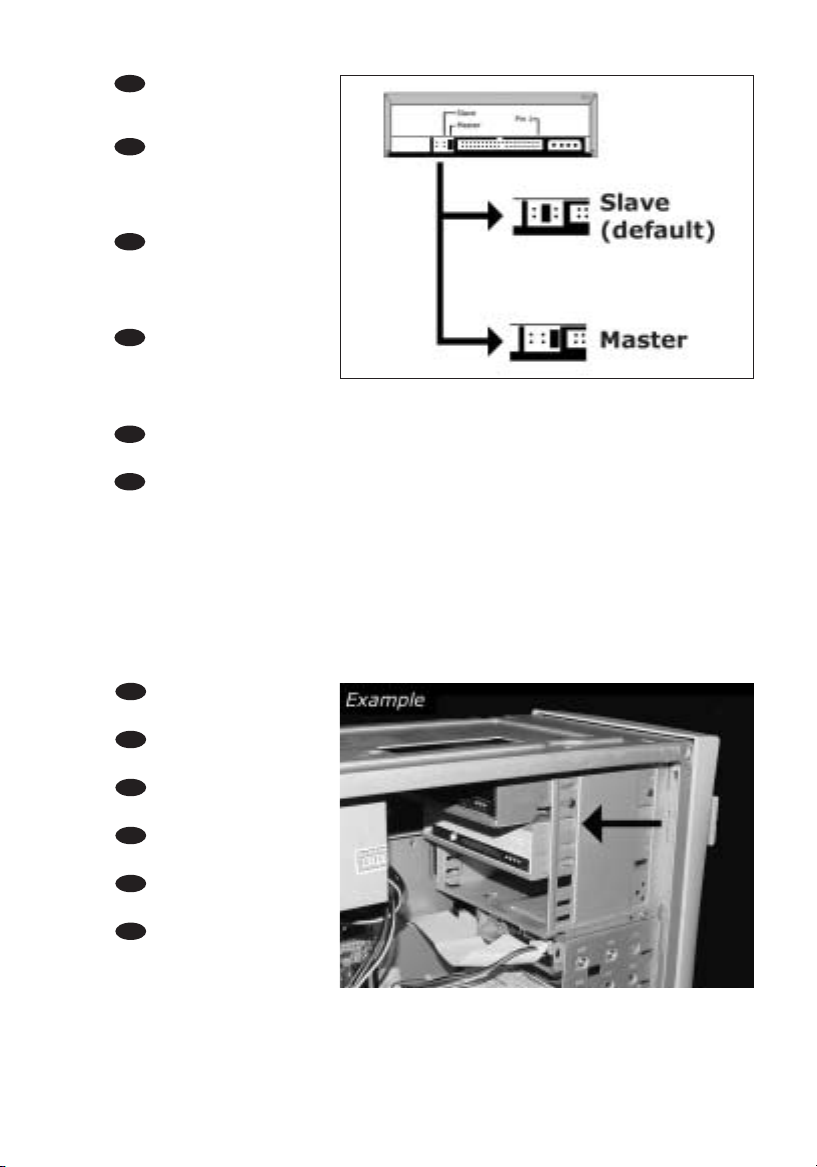
Choose master or slave
(default) for the jumper, as
explained in step 6 or 7.
Wählen Sie für den
Jumper (als Vorgabewert)
MASTER oder SLAVE,gemäß
der Beschreibung in Schritt
6 oder 7.
Choisissez le réglage
maître ou esclave (réglage par
défaut) avec le cavalier, comme
l’explique l'étape
6 ou 7.
Scegliere per il cavallotto
l’impostazione master o slave
(predefinita) secondo le
istruzioni ai passi
6 o 7.
Stel de jumper in op 'master' of 'slave' (standaardinstelling).Hoe u dit doet, leest u
in stap 6 of 7.
Elija la configuración del puente en master o slave (opción predefinida), como se
explicó en el paso 6 o 7.
UK
D
F
I
NL
E
Put the drive into your
computer.
Schieben Sie das
Laufwerk in Ihren Computer.
Montez l’appareil dans
l’ordinateur.
Mettere l'unità nel
computer.
Schuif het station in uw
computer.
Ponga la unidad en el
ordenador.
10
9
11
UK
F
I
NL
E
D
Page 12
Connect the IDE cable
A: Coloured line.
B: Notch and closed hole.
C: Pin1.
Schließen Sie das IDEKabel an.
A: Farbige Leitung.
B: Kerbe und geschlossenes Loch.
C: Pin1.
Raccordez le câble IDE
A : Ligne de couleur
B : Encoche et trou bouché
C : Broche 1
Collegare il cavo IDE
A: Linea colorata.
B:Tacca e foro chiuso.
C: Piedino 1.
De IDE-kabel aansluiten
A: Gekleurde lijn.
B: Nokje plus ontbrekend gat.
C: Pen 1.
Conecte el cable IDE
A: Línea de color.
B: Muesca y orificio cerrado.
C: Patilla 1.
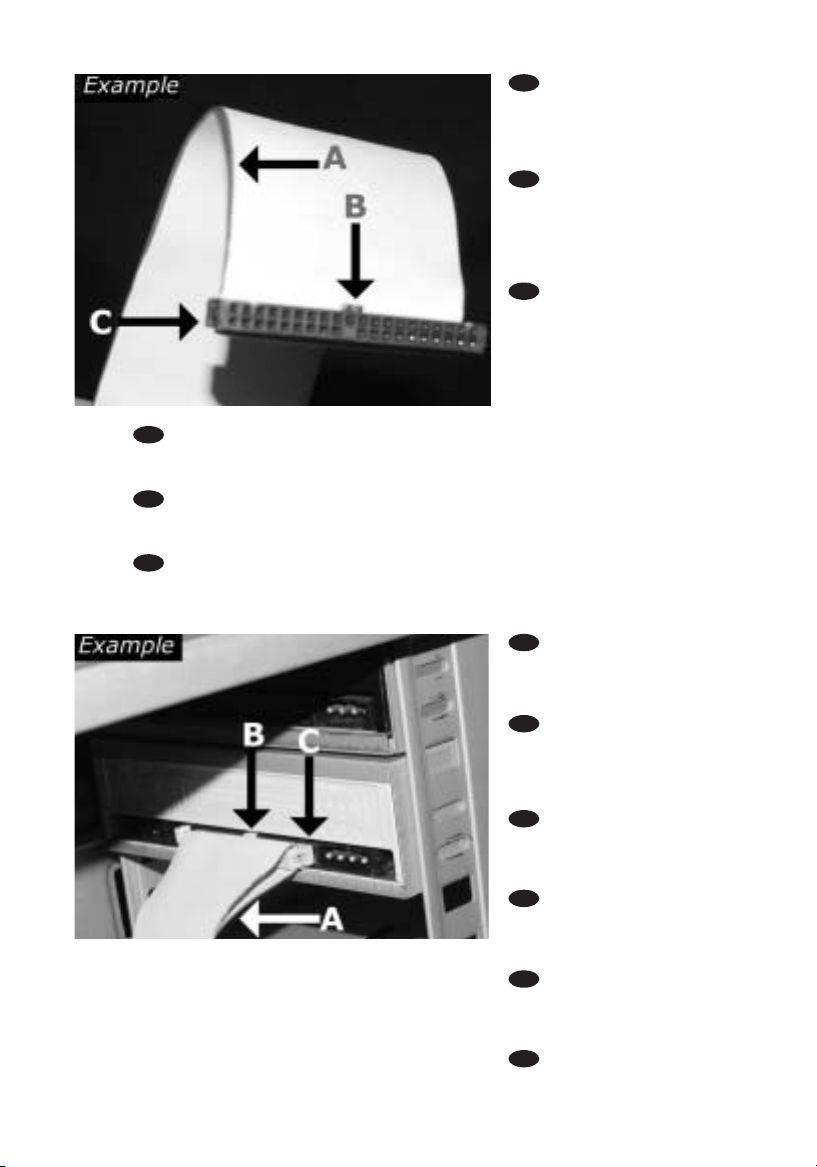
Find the IDE-cable which
may look like this example:
A: Coloured line.
B: Notch and closed hole.
C: Pin1.
Suchen Sie das IDE-Kabel,
das möglicherweise wie in
diesem Beispiel aussieht:
A: Farbige Leitung.
B: Kerbe und geschlossenes Loch.
C: Pin1.
Identifiez le câble IDE.
Celui-ci doit ressembler à celui
présenté dans l’illustration :
A : Ligne de couleur
B : Encoche et trou bouché
C : Broche 1
Individuare il cavo IDE,che potrebbe mostrare A: Linea colorata.
questi segni distintivi: B:Tacca e foro chiuso.
C: Piedino 1.
Zoek de IDE-kabel die lijkt op dit voorbeeld: A:Gekleurde lijn.
B: Nokje plus ontbrekend gat.
C: Pen 1.
Localice el cable IDE, cuya apariencia puede A: Línea de color.
ser la siguiente: B: Muesca y orificio cerrado.
C: Patilla 1.
12
11
UK
D
F
I
NL
E
12
UK
F
I
NL
E
D
Page 13
Find a free power cable
which mostly looks like this
example. Please note the
rounded edges of the connector.
Suchen Sie ein freies
Netzkabel, dass häufig wie in
diesem Beispiel gezeigt aussieht.
Die Kanten des Anschlusses
sind abgerundet.
Recherchez un câble
d’alimentation disposant d’une
fiche libre, comme l’illustre
l’exemple. La fiche présente des
bords arrondis.
Individuare un cavo di
alimentazione libero che
dovrebbe apparire come quello nell'esempio.Notare i bordi arrotondati del connettore.
Zoek een vrije stroomkabel die lijkt op ons voorbeeld. Let op waar de
afgeschuinde hoekjes van de stekker zitten.
Localice un cable de alimentación libre, que se parezca al mostrado en este
ejemplo.Por favor observe los bordes redondeados del conector.
Connect the power cable
into your drive.
Schließen Sie das
Netzkabel an Ihr Laufwerk an.
Raccordez le câble
d’alimentation à l’appareil.
Connettere i cavo di
alimentazione nell'unità.
Sluit de stroomkabel aan
op het station.
Conecte el cable de
alimentación en la unidad.
14
13
13
UK
F
I
D
N
E
UK
F
I
NL
E
D
Page 14

14
Secure the drive with
the screws (if possible on both
sides).
Befestigen Sie das
Laufwerk mit den Schrauben
(wenn möglich an beiden
Seiten).
Fixez l’appareil à l’aide
des vis (si possible des deux
côtés).
Fissare l'unità con le viti
(se possibile su entrambi i lati).
Schroef het station vast
(zo mogelijk aan beide zijden).
Asegure la unidad con
los tornillos (si es posible en
ambos lados).
16
15
Put the cover you took
off in step 5 back on.
Setzen Sie die in Schritt
5 abgenommene Abdeckung
wieder auf.
Replacez le capot que
vous avez retiré à l’étape 5.
Rimettere il coperchio
tolto al punto 5.
Plaats de in stap 5
verwijderde kast weer terug.
Vuelva a instalar la
carcasa que quitó en el paso 5.
UK
F
I
NL
E
D
UK
D
F
I
NL
E
Page 15
17
Restart your computer.
Starten Sie Ihren
Computer neu.
Allumez l’ordinateur.
Riavviare il computer.
Start uw computer
opnieuw op.
Reinicie el ordenador.
18
15
Put the screws (if there
were any) back in. Plug the
power cable back in. If you
disconnected other cables, put
these back in too.
Drehen Sie die Schrauben
(wenn da welche waren) wieder
ein. Stecken Sie das Netzkabel
wieder ein.Wenn Sie weitere
Kabel abgezogen haben, stecken
Sie diese ebenfalls wieder ein.
Resserrez la ou les vis, le
cas échéant. Rebranchez le
cordon d’alimentation. Si vous
avez débranché d’autres
câbles,rebranchez-les également.
Riavvitare le viti (se c'erano) al loro posto.Riconnettere il cavo di alimentazione.
Se sono stati staccati anche altri cavi, riconnetterli.
Draai (zo nodig) de schroeven weer vast.Sluit de netstekker weer aan.
Sluit ook de overige kabels weer aan,als u die had losgemaakt.
Ponga los tornillos (si los tenía puestos) nuevamente en su lugar. Vuelva a conectar
el cable de alimentación.Si ha desconectado otros cables, vuélvalos a conectar en su lugar.
UK
D
F
I
NL
E
UK
F
I
NL
E
D
Page 16
16
Now insert the
installation disc delivered with
the drive in your drive and
follow the instructions.This
disc will install all the software
on your computer.
Legen Sie jetzt die mit
dem Laufwerk gelieferte
Installations-CD in Ihr Laufwerk
ein und befolgen Sie die
Anweisungen. Mit Hilfe dieser
CD installieren Sie die gesamte
Software auf Ihrem Computer.
Introduisez à présent
dans le lecteur le disque
d’installation fourni avec
l’appareil et suivez les
instructions. Le disque lance
l’installation du logiciel sur
l’ordinateur.
Ora inserire il disco di installazione in dotazione all'unità e attenersi alle istruzioni.
Questo disco installerà tutto il software sul computer.
Plaats nu de meegeleverde installatie-CD in het station en voer de aanwijzingen uit
die op het scherm verschijnen. Deze cd installeert alle benodigde programma's op uw
computer.
Coloque ahora el disco de instalación suministrado con la unidad y siga las
instrucciones indicadas. Este disco instalará todo el software en su ordenador.
19
UK
F
I
NL
E
D
Choose the language to
be displayed in the Setup program. (If not,double-click "My
Computer", then the "Philips RW"
drive icon and finally "Setup.exe"
to start the CD.)
Wählen Sie die Sprache für
das Installationsprogramm. (Sollte
dies nicht geschehen, doppelklicken
Sie auf "Arbeitsplatz", dann auf das
Laufwerkssymbol "Philips RW" und
schließlich auf die Datei Setup.exe",
um die CD zu starten.)
Choisissez la langue à afficher dans le programme d’installation. (Si ce n'est pas le cas,
double-cliquez sur Poste de travail,
double-cliquez sur l'icône Philips RW et double-cliquez sur Setup.exe pour lancer l'installation.)
Scegliere la lingua che sarà visualizzata nel programma di installazione. (altrimenti fare
doppio clic su "risorse del computer", quindi sull'icona dell'unità "Philips_RW" e quindi su
"Setup.exe" per avviare il CD).
Kies de taal voor het Setup-programma.(Start de cd niet vanzelf,dubbelklik dan achtereenvolgens op de pictogrammen "Deze computer", "Philips_RW" en "Setup.exe" om de cd te starten.)
Elija el idioma que aparecerá en el programa de configuración. (Si no es así, haga doble clic en
"Mi PC", luego en el icono de la unidad "Philips_RW" y finalmente en "Setup.exe" para iniciar el CD.)
D
F
I
NL
20
UK
E
Page 17

17
Ta ke the box in which
your drive came, and find the
model number.On this example
it is "DVDRW424"
Suchen Sie die
Modellnummer auf der
Ver packung Ihres Laufwerks.
In diesem Beispiel ist das
"DVDRW424".
Prenez note du numéro
de modèle indiqué sur le coffret
d’emballage de l’appareil.
Dans l’exemple illustré,ce
numéro est "DVDRW424".
Recuperare il numero di
modello dalla scatola di
confezione in cui era contenuta
l'unità. In questo esempio è:
"DVDRW424"
Kijk op de verpakking waar het station in zat en kijk wat het typenummer is.
In dit voorbeeld is het typenummer "DVDRW424"
En la caja en la que se suministró la unidad encontrará el modelo. En este ejemplo
es "DVDRW424"
21
UK
F
I
NL
E
D
Choose your product
(according to what you wrote
down in the previous step).
Wählen Sie Ihr Produkt
aus (gemäß der Notiz im vorherigen Schritt).
Choisissez votre produit
(selon vos indications à l’étape
précédente).
Scegliere il prodotto (secondo quanto scritto nel passo
precedente).
Kies uw product (volgens
uw notitie uit de vorige stap).
Elija su producto (según
lo que anotó en el paso anterior).
22
UK
F
I
NL
E
D
Page 18

18
Ta ke the box in which
your drive came, and find the
model number.On this
example it is "DVDRW424"
Suchen Sie die
Modellnummer auf der
Ver packung Ihres Laufwerks.
In diesem Beispiel ist das
"DVDRW424".
Prenez note du numéro
de modèle indiqué sur le
coffret d’emballage de
l’appareil.
Dans l’exemple illustré,ce
numéro est "DVDRW424".
Recuperare il numero di
modello dalla scatola di
confezione in cui era
contenuta l'unità. In questo
esempio è: "DVDRW424"
Kijk op de verpakking waar het station in zat en kijk wat het typenummer is.
In dit voorbeeld is het typenummer "DVDRW424"
En la caja en la que se suministró la unidad encontrará el modelo. En este ejemplo
es "DVDRW424"
24
23
UK
F
I
NL
E
D
UK
F
I
NL
E
D
Congratulations. Your Philips drive is now ready for use.How to use it and what
software applications you need to perform your tasks,is described in the next chapters
of this User Manual.
Gratulation. Ihr Philips-Laufwerk ist jetzt einsatzbereit.Wie Sie es benutzen und
welche Software Sie für Ihre Aufgaben benötigen wird im nächsten Kapitel des Benutzerhandbuchs beschrieben.
Félicitations ! Vous pouvez maintenant utiliser votre graveur Philips. Les chapitres
suivants de ce mode d’emploi décrivent les différentes opérations que vous pouvez
réaliser ainsi que les applications que vous pouvez utiliser avec votre graveur.
Congratulazioni. L'unità Philips ora è pronta all'uso. Nei prossimi capitoli di questo
Manuale utente verranno descritte le applicazioni necessarie per l'esecuzione dei
compiti e come usarle.
Gefeliciteerd! Het Philips-station is nu klaar voor gebruik. Hoe u het station kunt
gebruiken en welke programma's u voor welke toepassing gebruikt, staat beschreven in
de hierna volgende hoofdstukken van de gebruikershandleiding.
Felicitaciones. Su unidad Philips ahora está preparada para ser utilizada. La forma
de utilización y las aplicaciones de software que necesita para llevar a cabo las distintas
operaciones se describen en los siguientes capítulos de este Manual de usuario.
Page 19

How to create a DVD-Video or a Video CD from video
files which are on the hard disc,on a CD or a DVD?
Ein DVD-Video oder eine Video-CD aus Videodateien erstellen, die sich auf einer Festplatte,
einer CD oder einer DVD befinden
Comment créer un DVD vidéo ou un Video-CD avec des fichiers vidéo sur le disque dur,
un CD ou un DVD ?
Come creare un Video DVD o un CD Video da file video che si trovano sul disco rigido,
su un Cd o su un DVD
Hoe brand ik een DVD-Video of een Video CD op basis van videobestanden die
op een harde schijf,op een cd of op een dvd staan?
Este manual le mostrará cómo crear un DVD-Video o un Video CD (VCD) a partir de
archivos originales grabados en el disco duro o en uno o más CD o DVD,
y que pueden reproducirse en la mayoría de lectores de DVD.
This manual will show you how to make a
DVD-Video or a Video CD (VCD) from
source files which are stored on your hard
disc or on one or more CD's or DVD's and
that can be played in most DVD-players.
A DVD Video is a DVD disc with video files
in a special format, which you can play on
a DVD Video Player or on a DVD-ROM.
A VideoCD or a VCD also contains
video files, which you can play on a DVD
Video Player, a DVD-ROM or a CD-ROM.
In diesem Handbuch wird gezeigt, wie ein
DVD-Video oder eine Video-CD (VCD) aus
Quelldateien erstellt wird, die auf Ihrer
Festplatte oder einer oder mehreren CDs
oder DVDs gespeichert sind, und die mit
den meisten DVD-Playern abgespielt
werden können.
Ein DVD-Video ist eine DVD mit Videodateien in einem speziellen Format, die Sie
mit einem DVD-Player oder mit einem
DVD-ROM-Laufwerk abspielen können.
Eine VideoCD oder VCD kann auch Videodateien enthalten, die Sie mit einem DVDPlayer, einem DVD-ROM-Laufwerk oder
einem CD-ROM-Laufwerk abspielen können.
Ce manuel illustre la procédure de création
d’un DVD vidéo ou d’un Video-CD (VCD)
avec des fichiers sources stockés sur le
disque dur ou sur un ou plusieurs CD ou
DVD de façon à pouvoir lire le disque créé
sur la plupart des lecteurs de DVD.
Le DVD vidéo est un disque DVD contenant
des fichiers vidéo dans un format spécial
qui peut être lu par un lecteur de DVD
vidéo ou un lecteur de DVD-ROM.
Le disque Video-CD ou VCD contient
également des fichiers vidéo et peut être
lu par un lecteur de DVD vidéo, un lecteur
de DVD-ROM ou un lecteur de CD-ROM.
UK D F
I NL E
The application software used here is:
MyDVD from Sonic Solutions
Questo manuale mostra come creare un
Video DVD o un CD video (VCD) da un file
sorgente memorizzato sul disco rigido o su
uno o più CD o DVD e che potrà essere
riprodotto sulla maggior parte dei lettori DVD.
Un Video DVD è un disco DVD con un file
video in formato speciale che si può
riprodurre su un lettore di Video DVD o su
DVD-ROM.
Anche il CD video o un VCD contiene file
video e può essere riprodotto da un lettore
di Video DVD, un DVD-ROM o un
CD-ROM.
Deze handleiding beschrijft het branden
van een DVD-Video of van een Video CD
(VCD) op basis van bronbestanden die op
uw harde schijf staan of op één of meer
cd's of dvd's, en die geschikt is om te worden afgespeeld in de meeste dvd-spelers.
Een DVD-Video is een dvd-schijfje gevuld
met videobestanden in een speciaal formaat, dat u kunt afspelen in een dvdspeler of in een DVD-ROM station. Ook
een VideoCD (ook wel VCD genoemd) is
gevuld met videobestanden, die u kunt
afspelen in een dvd-speler, in een DVDROM station of in een CD-ROM station.
¿Cómo crear un DVD-Video o Video CD a
partir de archivos de vídeo que están en el
disco duro, en un CD o un DVD?
Un DVD-Video es un disco DVD con
archivos de vídeo en un formato especial
que se puede reproducir en un lector
DVD-Video o en un DVD-ROM.
Un Video CD o un VCD también contiene
archivos de vídeo que se pueden
reproducir en un lector DVD-Video, DVDROM o CD-ROM.
19
Page 20
20
Start "Sonic MyDVD"
from the desktop.
Starten Sie "Sonic
MyDVD" vom Desktop aus.
Lancez Sonic MyDVD à
partir du bureau.
Avviare "Sonic MyDVD"
dalla scrivania.
Start het programma
"Sonic MyDVD" vanaf het
bureaublad.
Inicie "Sonic MyDVD"
desde el escritorio.
Choose "Create or
Modify a DVD-Movie Project".
Wählen Sie "DVDVideoproject erstellen oder
ändern".
Choisissez "Créer ou
modifier un projet de vidéo
sur DVD".
Scegliere "Crea o
modifica progetto DVD
Video".
Klik op "Een DVDvideoproject maken of
bewerken".
Elija "Crear o modificar
un proyecto de video DVD".
2
1
UK
F
NL
E
D
I
UK
F
I
NL
E
D
Page 21
Choose "Get Movies"
Wählen Sie "Movies
abrufen".
Choisissez "Ajouter clips".
Scegliere "Carica filmati".
Klik op "Films binnenhalen".
Elijà "Buscar películas".
3
21
UK
F
I
NL
E
D
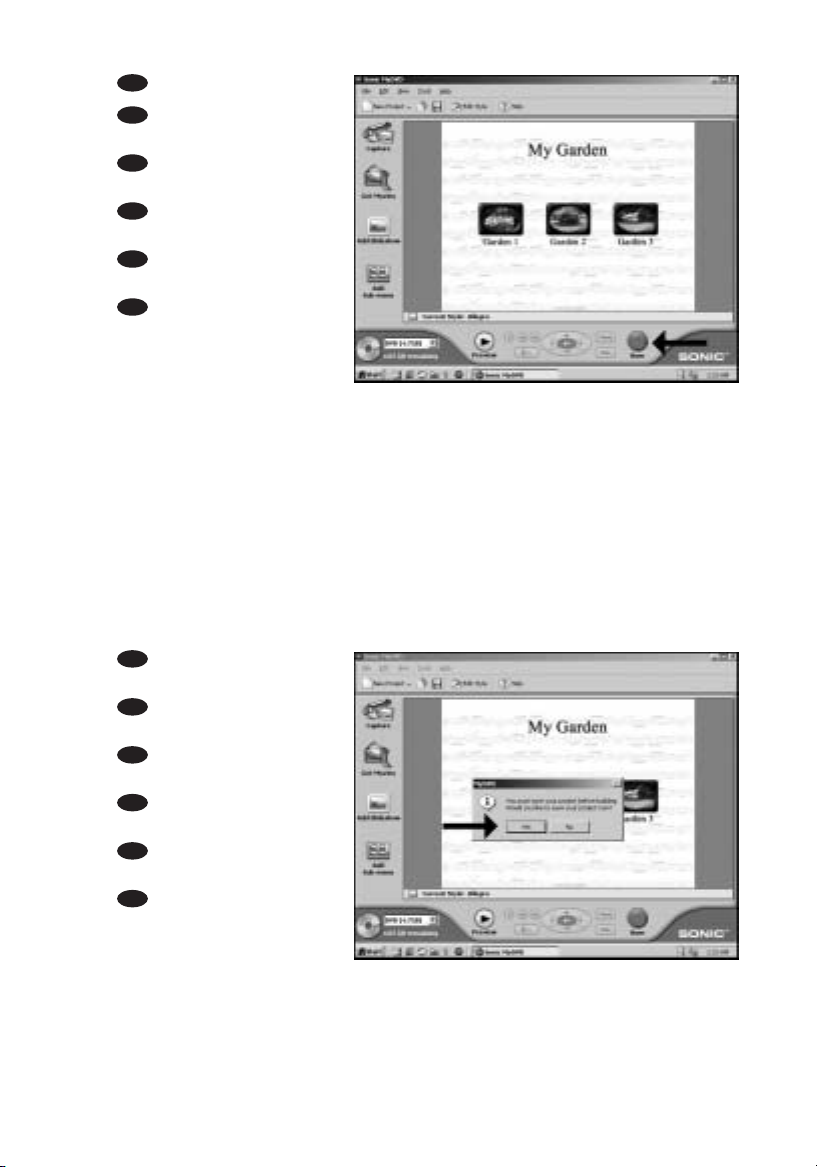
Choose the folder on
your hard disc or CD or DVD
disc that contains the source
video files. Select these file(s)
you want to add to your
compilation. It is advised to put
all files on your hard disc before
starting MyDVD.
Wählen Sie den Ordner
auf Ihrer Festplatte, CD oder
DVD, der die Quellvideodateien
enthält.Wählen Sie die
Datei(en) aus, die Sie zu Ihrer
Zusammenstellung hinzufügen
möchten. Es empfiehlt sich, alle
Dateien auf Ihrer Festplatte zu
speichern, bevor Sie MyDVD
starten.
Choisissez le dossier de
votre disque dur, CD ou DVD
qui contient les fichiers vidéo
sources. Sélectionnez le ou les fichiers à ajouter à la compilation.Il est recommandé de
copier tous les fichiers nécessaires sur le disque dur avant de lancer MyDVD.
Scegliere la cartella del disco rigido o CD o DVD contenente i file video sorgente.
Selezionare il/i file da aggiungere alla compilation. Si consiglia di mettere tutti i file sul
disco rigido prima di avviare MyDVD.
Selecteer de map van uw harde schijf, cd of dvd waarin de video-bronbestanden
staan. Selecteer de bestanden die u aan de compilatie wilt toevoegen.We raden u aan
om alle bestanden naar de harde schijf te kopiëren voordat u het MyDVD-programma
start.
Elija la carpeta del disco duro, CD o DVD que contenga los archivos de vídeo
originales. Seleccione los archivos que desea añadir a la compilación.Se recomienda
poner todos los archivos en el disco duro antes de iniciar MyDVD.
4
UK
F
I
NL
E
D
Page 22

The movies you have
chosen are now visible as
thumbnails on your screen.
Die von Ihnen
gewählten Filme werden jetzt
als Thumbnails auf dem
Bildschirm angezeigt.
Les films que vous avez
choisis sont maintenant
affichés sous forme de
miniatures.
I film prescelti sono
visibili sullo schermo come
provini.
De door u gekozen
films staan nu als miniaturen
op uw scherm.
Las películas que ha
elegido estarán ahora visibles
como miniatura en la pantalla.
22
5
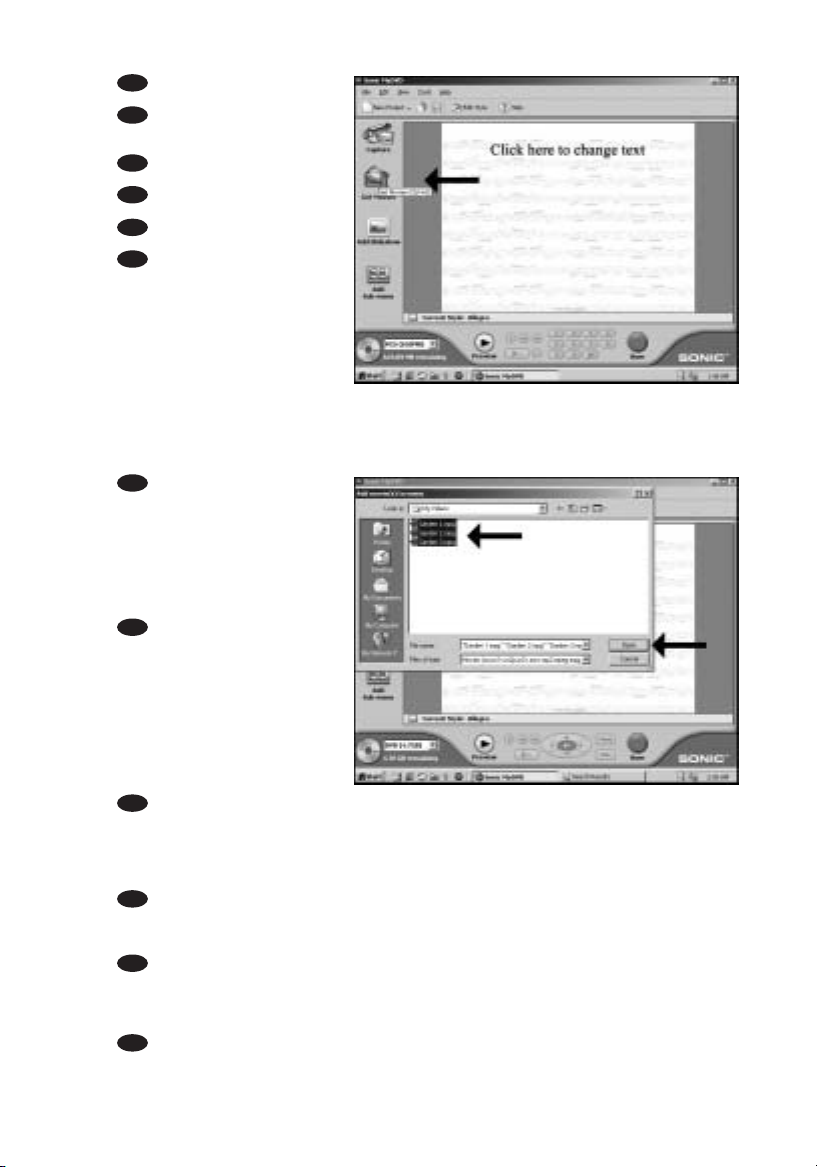
Change the title by
clicking on it.
Ändern Sie den Titel,
indem Sie ihn anklicken.
Modifiez le titre en
cliquant dessus.
Fare clic sul titolo per
cambiarlo.
Klik op de titel om hem
te wijzigen.
Cambie el título
haciendo clic en él.
6
UK
F
I
NL
E
D
UK
F
I
NL
E
D
Page 23
Click the "burn" button.
Klicken Sie auf die
Schaltfläche "Brennen".
Cliquez sur le bouton
Graver.
Fare clic sul pulsante
"Masterizza".
Klik op de knop
"Branden".
Haga clic en el botón
"Grabar".
7
23
Click "yes" to save your
project
Klicken Sie auf "Ja", um Ihr
Projekt zu speichern.
Cliquez sur "Oui" pour
enregistrer le projet
Fare clic su "sì" per salvare
il progetto
Klik op "ja" om uw project
op te slaan
Haga clic en "sí" para
guardar su proyecto
8
UK
F
I
NL
E
D
UK
F
I
NL
E
D
Page 24
24
Save your project.
Speichern Sie Ihr
Projekt.
Enregistrez votre projet.
Salvare il progetto.
Het project opslaan.
Guarde su proyecto.
Choose your drive and
click "OK".
Wählen Sie Ihr
Laufwerk und klicken Sie auf
"OK".
Choisissez votre lecteur
et cliquez sur OK.
Scegliere l’unità e fare
clic su "OK".
Kies een station en klik
op "OK".
Elija su unidad y haga clic
en "OK".
10
9
UK
F
I
NL
E
D
F
I
NL
E
D
E
Page 25

Click "OK"
Congratulations, your DVD disc
is ready now and can be played
in your DVD video player or a
DVD-ROM drive
Klicken Sie auf "OK".
Gratulation, Ihre DVD ist jetzt
fertig und kann mit Ihrem DVDPlayer oder einem DVD-ROMLaufwerk abgespielt werden.
Cliquez sur OK.
Votre disque DVD est à présent
terminé. Il peut être lu sur un
lecteur de DVD vidéo ou sur un
lecteur de DVD-ROM
Fare clic su "OK"
Complimenti, il disco DVD è
pronto per essere riprodotto
nel lettore di DVD o in una unità DVD-ROM
Klik op "OK"
Na afloop van het brandproces kunt u de DVD afspelen in een DVD-speler of in een
DVD-ROM station.
Haga clic en "OK"
Felicitaciones su disco DVD está ahora preparado y podrá reproducirlo en su
reproductor DVD video o un lector DVD-ROM
UK
F
I
NL
E
11
25
D
Page 26

26
Page 27

27
How to capture video from
a digital DV-camcorder?
Videos von einem digitalen DV-Camcorder aufnehmen
Comment acquérir les images vidéo d’une caméra numérique DV ?
Come registrare un video da una DV-camcorder digitale
Hoe kopieer ik de opnames van een digitale DV-camcorder
naar mijn computer?
¿Cómo capturar secuencias de vídeo de una videocámara digital DV?
This manual shows an example on how
to capture video from a digital
DV-camcorder which is connected via
FireWire (IEEE1394) to the computer.
In diesem Handbuch wird an einem
Beispiel gezeigt, wie ein Video von
einem digitalen DV-Camcorder
aufgenommen wird, der über FireWire
(IEEE1394) an den Computer
angeschlossen ist.
Ce manuel illustre la procédure
d’acquisition d’images vidéo à partir
d’une caméra numérique DV connectée
à l’ordinateur par le biais d’un port
FireWire (IEEE1394).
Questo manuale mostra un esempio di
come registrare un video da una
DV-camcorder digitale connessa al
computer via FireWire (IEEE1394).
Deze handleiding beschrijft het
kopiëren van opnames gemaakt met
een digitale DV-camcorder naar de
computer via een FireWire-aansluiting
(IEEE1394).
Este manual muestra un ejemplo que
explica cómo capturar una secuencia
de vídeo de una videocámara digital DV
conectada al ordenador mediante el
puerto FireWire (IEEE1394).
UK D F
I NL E
The application software used here is:
MyDVD from Sonic Solutions
27
Page 28

28
Start "Sonic MyDVD"
from the desktop.
Starten Sie "Sonic
MyDVD" vom Desktop aus.
Lancez Sonic MyDVD à
partir du bureau.
Avviare "Sonic MyDVD"
dalla scrivania.
Start het programma
"Sonic MyDVD" vanaf het
bureaublad.
Inicie "Sonic MyDVD"
desde el escritorio.
Choose "Create or
Modify a DVD-Video Project".
Wählen Sie "DVDVideoproject erstellen oder
ändern".
Choisissez "Créer ou
modifier un projet de vidéo sur
DVD".
Scegliere "Crea o
modifica progetto DVD
Video".
Selecteer "Een DVDvideoproject maken of
bewerken".
Elija "Crear o modificar
un proyecto de video DVD".
2
1
UK
F
I
NL
E
D
UK
F
I
NL
E
D
Page 29

Choose "Capture".
Wählen Sie "Erfassen".
Choisissez "Capture".
Scegliere "Acquisisci".
Selecteer " Vastleggen".
Elija "Capturar".
3
29
Use the knobs (A) to
navigate to the video you want
to capture and click "Start
Capturing" (B).
Verwenden Sie die
Knöpfe (A), um zu dem Video
zu navigieren,dass Sie
aufnehmen möchten, und
klicken Sie auf "Erfassen starten".
Utilisez les boutons (A)
pour naviguer vers la séquence
vidéo à acquérir et cliquez sur
"Début de la capture" (B).
Utilizzare le manopole
(A) per navigare fino al video da
catturare e fare clic su "Inizia
acquisizione" (B).
Met de knoppen (A) kunt u de video bedienen die u wilt opnemen, en met (B)
"Vastleggen starten" kunt u de opname beginnen.
Utilice los botones (A) para navegar al vídeo que desee capturar y haga clic en
"Iniciar la captura" (B).
4
UK
F
I
NL
E
D
UK
F
I
NL
E
D
Page 30

30
Click "Stop Capturing"
when finished.
Wenn Sie die Aufnahme
beenden möchten, klicken Sie
auf "Erfassen beenden".
Cliquez sur Arrêt de la
capture lorsque vous avez
terminé.
Al termine fare clic su
"Interrompi acquisizione".
Klik op "Vastleggen
stoppen" wanneer u wilt
stoppen.
Haga clic en "Detener la
captura" cuando haya
terminado.
5
Save the captured file.
Speichern Sie die
aufgenommene Datei.
Enregistrez le fichier
d'acquisition.
Salvare il file catturato.
Sla het opgenomen
bestand op.
Guarde el archivo
capturado.
6
UK
F
I
NL
E
D
UK
F
I
NL
E
D
Page 31

Click "Done"
Klicken Sie auf "Fertig".
Cliquez sur Terminé.
Fare clic su "Fine".
Klik op "Gereed".
Haga clic en "Preparado".
7
31
Click on the tumbnail.
Klicken Sie auf den
Thumbnail.
Cliquez sur la miniature.
Fare clic sul provino.
Klik op de miniatuur.
Haga clic en la miniatura.
8
UK
F
I
NL
E
D
UK
F
I
NL
E
D
Page 32

32
You can trim the
captured video by moving the
green ] (A) and red [ (B) and
click "OK" (C).
Sie können das
aufgenommene Video
schneiden, indem Sie die
grüne ] (A) und die rote [ (B)
bewegen und auf "OK" (C)
klicken.
Vous pouvez couper
plus précisément la séquence
vidéo acquise en déplaçant
l’indicateur ] vert (A) et
l’indicateur [ rouge (B) et en
cliquant sur OK (C).
È possibile ritoccare il video catturato spostando il simbolo verde ] (A) e il simbolo
rosso [ (B) e facendo clic su "OK" (C).
U kunt het begin- en eindpunt van de opgenomen video veranderen door de
groene ] (A) en de rode [ (B) te verplaatsen, en tot slot op "OK" (C) te klikken.
Podrá recortar la secuencia de vídeo capturada moviendo las marcas verde] (A) y
rojo [ (B) y haciendo clic en "OK" (C).
9
UK
F
I
NL
E
D
Click the "burn" button.
Klicken Sie auf die
Schaltfläche "Brenner".
Cliquez sur le bouton
Graver.
Fare clic sul pulsante
"Masterizza".
Klik op de "Branden"
knop.
Haga clic en el botón
"Grabar".
10
UK
F
I
NL
E
D
Page 33

Click "yes" to save your
project
Klicken Sie auf "Ja", um Ihr
Projekt zu speichern.
Cliquez sur Oui pour
enregistrer le projet
Fare clic su "Sì" per salvare
il progetto
Klik op "Ja" om uw project
op te slaan
Haga clic en "Sí" para
guardar su proyecto
11
Save your project.
Speichern Sie Ihr Projekt.
Enregistrez votre projet.
Salvare il progetto.
Het project opslaan.
Guarde su proyecto.
12
UK
F
I
NL
E
D
33
UK
F
I
NL
E
D
Page 34

Click "OK"
Congratulations, your DVD
disc is burned and ready now
and can be played in your
DVD video player or a DVDROM drive
Klicken Sie auf "OK".
Gratulation, Ihre DVD ist jetzt
gebrannt und kann mit Ihrem
DVD-Player oder einem
DVD-ROM-Laufwerk
abgespielt werden.
Cliquez sur OK.
Votre disque DVD est gravé
et terminé. Il peut à présent
être lu sur un lecteur de DVD
vidéo ou sur un lecteur de
DVD-ROM.
Fare clic su "OK"
Complimenti, il disco DVD è stato registrato e ora è pronto per essere riprodotto nel
lettore di DVD o in una unità DVD-ROM
Klik op "OK"
Na afloop van het brandproces kunt u de DVD afspelen in een DVD-speler of in een
DVD-ROM station.
Haga clic en "OK"
Felicitaciones se ha grabado su disco DVD y ahora está preparado para reproducirlo en
su reproductor DVD vídeo o lector DVD-ROM
34
Choose your drive and
click "OK".
Wählen Sie Ihr
Laufwerk und klicken Sie auf
"OK".
Choisissez votre lecteur
et cliquez sur OK.
Scegliere l’unità e fare
clic su "OK".
Kies een station en klik
op "OK".
Elija su unidad y haga clic
en "OK".
14
13
UK
F
NL
E
D
I
UK
F
I
NL
E
D
Page 35

35
The application software used here is:
PowerDVD from CyberLink
35
This manual shows an example of how
to play a DVD Video or a Video CD on
your JackRabbit.
You can only watch video if your
JackRabbit is attached to a working
USB 2 connector!
A USB 1.x connection does not allow to
transfer enough data for watching video.
Dieses Handbuch zeigt an einem
Beispiel, wie eine DVD-Video oder eine
Video-CD in Ihrem JackRabbit abgespielt wird.
Sie können nur Videos ansehen, wenn
Ihr JackRabbit an einen funktionierenden USB 2-Anschluss angeschlossen ist!
Ein USB 1.x-Anschluss kann nicht
genug Daten übertragen, um Videos
anzusehen.
Ce Manuel présente un exemple de
comment lire un DVD-vidéo ou un
Vidéo-CD sur le JackRabbit.
Vous pouvez lire un disque vidéo seulement si le JackRabbit est raccordé à un
port USB 2 qui fonctionne !
Un raccordement de type USB 1.x ne
permet pas un transfert de données
assez rapide pour pouvoir lire un disque
vidéo.
Questo Manuale illustra un esempio di
come riprodurre un DVD Video o un
Video CD sul JackRabbit.
Si può guardare un video soltanto se il
JackRabbit è collegato a un porto USB
2 funzionante!
Un collegamento di tipo USB 1.x non
permette un trasferimento di dati abbastanza rapido per guardare un video.
Deze handleiding laat u een voorbeeld
zien hoe u een DVD of een Video-CD
kunt afspelen op uw JackRabbit.
U kunt alleen een DVD bekijken als uw
JackRabbit is verbonden met een werkende USB 2-aansluiting!
Met een USB 1.x-verbinding kunnen
niet genoeg data worden overgebracht
om naar een DVD te kijken.
Este manual muestra un ejemplo de
cómo reproducir un DVD Vídeo o un
Vídeo CD en su equipo JackRabbit.
Sólo podrá ver vídeo si su equipo
JackRabbit está conectado mediante
una conexión USB 2 operativa.
Una conexión USB 1.x no permite
transferir datos suficientes para ver
vídeo.
UK D F
I NL E
How to play a DVD-Video
or a Video CD
on my JackRabbit?
Ein DVD-Video oder eine Video-CD auf meinem JackRabbit abspielen
Comment lire un DVD vidéo ou un Video-CD sur JackRabbit?
Come riprodurre un video DVD o un CD video sul proprio JackRabbit?
Hoe kan ik een DVD-Video of een Video CD op mijn JackRabbit afspelen?
¿Cómo reproducir un DVD-Video o un Video CD en el JackRabbit?
Page 36

36
Normally,PowerDVD
will start automatically when a
Video DVD is inserted.
If this is not the case, start
"PowerDVD" from the
desktop.
Normalerweise startet
PowerDVD automatisch,
wenn eine Video-DVD
eingelegt wird.Wenn dies
nicht der Fall ist, starten Sie
PowerDVD vom Desktop aus.
Normalement, Power
DVD démarre
automatiquement lors de
l’introduction d’un DVD vidéo
dans le lecteur. Si ce n’est pas
le cas, lancez PowerDVD à
partir du bureau.
In genere PowerDVD si avvia automaticamente quando viene inserito un DVD
video.Se ciò non accadesse, avviare PowerDVD dalla scrivania.
Normaal gesproken start het programma PowerDVD automatisch als er een
video-DVD in het station wordt geplaatst.Is dit niet het geval, start het programma
PowerDVD dan vanaf het bureaublad.
Normalmente PowerDVD se inicia automáticamente cuando se coloca un disco
de vídeo DVD. Si no fuera así, inicie PowerDVD desde el escritorio.
The start screen of
PowerDVD.
Der Startbildschirm von
PowerDVD.
L’écran d’accueil de
PowerDVD s’affiche.
La finestra di avvio di
PowerDVD.
Dit is het
openingsscherm van
PowerDVD.
La pantalla de inicio de
PowerDVD.
2
1
UK
F
I
NL
E
UK
F
I
NL
E
D
D
Page 37

37
The first time you put a
DVD-Video in your drive,you
will have to choose a region.
Please choose the correct
region (see also step 4).
After you have set the region,
you can change it 4 more times
(the last setting will remain
permanent).
Wenn Sie erstmals ein
DVD-Video in Ihr Laufwerk
einlegen, müssen Sie eine
Region auswählen. Bitte wählen
Sie die richtige Region (siehe
auch Schritt 4). Nachdem Sie
die Region eingestellt haben,
können Sie sie noch 4 Mal
ändern (die letzte Einstellung
bleibt dauerhaft gespeichert).
La première fois que vous introduisez un DVD vidéo dans le lecteur, vous devez
choisir une région. Sélectionnez la région géographique correcte (voir le pas 4).Une fois
la région définie, vous pouvez la modifier 4 fois. Le dernier réglage sera définitif.
La prima volta che si inserisce un video DVD nell'unità, si dovrà scegliere un paese.
Selezionare la regione geografica corretta (vedere anche la Fase 4). Dopo aver
impostato il paese, si potrà cambiarlo ancora 4 volte (l'ultima impostazione sarà quella
che rimarrà permanentemente).
De eerste keer dat u een DVD-Video in het station plaatst, moet u een regio
kiezen. Kies de juiste regio (zie ook stap 4). Heeft u eenmaal een regio gekozen,dan kunt
u hem nog maximaal 4 keer veranderen (na die 4 wijzigingen kunt u de regio-instelling
nooit meer veranderen en blijft de als laatste gekozen regio gelden).
La primera vez que coloca un DVD-Video en la unidad tendrá que elegir una
región. Por favor elija la región correcta (vea también el Paso 4).Una vez configurada la
región podrá cambiarla 4 veces más (la última configuración quedará como permanente).
UK
D
F
I
NL
E
3
Check this map for the
correct region setting.
In dieser Karte finden Sie
die richtigen Regionseinstellungen.
Vérifier cette carte géographique pour une sélection
correcte de la région.
Ver ificare questa carta
geografica per una regolazione
corretta della regione.
Kijk op deze kaart voor
de juiste regio-instelling
Compruebe este mapa
para localizar la región correcta
UK
D
F
I
NL
E
4
Page 38

38
Video can be played by
clicking on the thumbnail(s).
For VideoCD,you will have to
navigate using the extra
controls (see step 6).
Sie können ein Video
abspielen, indem Sie auf die
Thumbnails klicken.
Für eine VideoCD müssen Sie
mit Hilfe von zusätzlichen
Bedienelementen (siehe
Schritt 6) navigieren.
Vous pouvez lancer la
lecture du film vidéo en
cliquant sur les miniatures.
Pour lire un Video-CD, vous
devez utiliser les commandes
de navigation supplémentaires
(voir étape 6).
Il video potrà essere visto facendo clic sulla miniatura. Per un CD video, si dovrà
navigare usando i controlli extra (vedi punto 6).
U kunt de film afspelen door op de afbeeldingspictogrammen te klikken. Gebruik
voor het afspelen van Video CD's de extra bedieningsknoppen (zie stap 6).
Las secuencias de vídeo se pueden reproducir haciendo clic en las miniaturas. En el
caso de vídeo CD tendrá que navegar utilizando controles adicionales (consulte los
pasos 6).
UK
D
F
I
NL
E
The controls from
PowerDVD –
A:Volume control;
B: Play control (play,stop,
pause, forward, …);
C: Extra controls (needed for
VideoCDs).
Die Bedienelemente
von PowerDVD –
A: Lautstärkeregelung;
B:Wiedergaberegelung
(Play, Stop, Pause,usw.);
C: Zusätzliche Bedienelemente (für VideoCDs).
Commandes PowerDVD – A :Commande de volume; B : Commande de lecture
(lecture, arrêt,pause, avance,etc.); C :Commandes supplémentaires (nécessaires pour
les CD vidéo).
I comandi di PowerDVD – A:Volume; B:Riproduzione (play, stop,pause,
forward, …); C:Comandi supplementari (necessari per i VideoCD).
De bedieningsknoppen van PowerDVD – A:Volumeregelaar; B:Weergave
(afspelen, stop, pauze,snel vooruit, …);C: Extra knoppen (alleen voor video-cd's).
Los controles de PowerDVD – A:Control de volumen; B: Control de
reproducción (reproducción, parada, pausa, avance, …);C: Controles adicionales
(necesarios para vídeo CD).
UK
D
F
I
NL
E
6
5
Page 39

How to copy a DVD?
Eine DVD kopieren
Comment copier un DVD ?
Come copiare un DVD?
Hoe kopieer ik een dvd?
¿Cómo copiar un DVD?
This manual shows an example of how
to copy a DVD.
This product is for personal use only.
Unauthorized duplication and
distribution of copyrighted materials is a
violation of copyright law.
In diesem Handbuch wird an einem
Beispiel gezeigt, wie eine DVD kopiert
wird.
Dieses Produkt ist nur für den
persönlichen Gebrauch.
Die ungenehmigte Vervielfältigung und
der Vertrieb von urheberrechtlich
geschützten Materialien stellt eine
Verletzung des Urheberrechts dar.
Ce manuel illustre la procédure de
copie d’un DVD.
Ce produit est à usage personnel
exclusivement.
Toute duplication et diffusion non
autorisée de matières soumises au droit
d’auteur et de copie (copyright)
constituent une violation de la loi sur les
droits d’auteur et de copie (copyright).
Questo manuale contiene informazioni
su come copiare un DVD.
Questo prodotto è destinato ad un uso
esclusivamente personale.
La duplicazione e la distribuzione di
materiali protetti dal diritto d'autore
rappresentano una violazione della
legge sul copyright.
Deze handleiding beschrijft het
kopiëren van een dvd.
Dit product is alleen bedoeld voor eigen
gebruik.
Het zonder toestemming
vermenigvuldigen en verspreiden van
auteursrechtelijk beschermd materiaal
is wettelijk verboden.
Este manual muestra un ejemplo de
cómo copiar un DVD.
Este producto es para uso personal
exclusivamente.
La duplicación y distribución no
autorizada de materiales con copyright
es una violación de las leyes del
copyright.
UK D F
I NL E
The application software used here is:
Nero - Burning Rom from Ahead Software
39
Page 40

40
Start "Nero - Burning
ROM" from the desktop.
Starten Sie "Nero Burning ROM" vom Desktop
aus.
Lancez Nero Burning
ROM à partir du bureau.
Avviare "Nero - Burning
ROM" dalla scrivania.
Start het programma
"Nero - Burning ROM" vanaf
het bureaublad.
Inicie "Nero - Burning
ROM" desde el escritorio.
Choose "DVD" and click
"Next".
Wählen Sie "DVD" und
klicken Sie auf "Weiter".
Choisissez DVD et
cliquez sur "Suivant".
Scegliere "DVD" e fare
clic su "Success".
Selecteer "DVD" en klik
op "Volgende".
Elija "DVD" y haga clic
en "Siguiente".
2
1
UK
F
NL
E
D
I
UK
F
I
NL
E
D
Page 41

41
Choose "Copy a DVD"
and click "Next".
Wählen Sie "Eine DVD
Kopieren" und klicken Sie auf
"Weiter".
Choisissez "Copier un
DVD" et cliquez sur "Suivant".
Scegliere "Copia un DVD"
e fare clic su "Success".
Selecteer "Een DVD
kopiëren" en klik op "Volgende".
Elija "Copiar un DVD" y
haga clic en "Siguiente".
Choose the device in
which you put your source
DVD.This is mostly a DVDROM drive. Insert the disc in
this drive and click "Next".
Wählen Sie das Gerät, in
das Sie Ihre Quell-DVD legen.
Das ist meistens ein DVDROM-Laufwerk. Legen Sie eine
Disk in das Laufwerk und
klicken Sie auf "Weiter".
Choisissez le lecteur dans
lequel le DVD source sera
introduit. Il s’agit le plus souvent
d’un lecteur de DVD-ROM.
Introduisez le disque dans ce
lecteur et cliquez sur Suivant.
Scegliere il dispositivo in cui inserire il DVD sorgente. Di solito si tratta di una unità
DVD-ROM.Inserire il disco nell’unità e fare clic su "Success".
Selecteer het station dat de dvd met het bronmateriaal bevat. Meestal is dit een
DVD-ROM station.Plaats de disc in dit station en klik op "Volgende".
Elija el dispositivo en el que ha puesto su DVD de origen.Normalmente es un
lector DVD-ROM.Introduzca el disco en esta unidad y haga clic en "Siguiente".
4
3
UK
F
I
NL
E
D
UK
F
I
NL
E
D
Page 42

42
Mark the checkbox 'fast
copy" if your DVD-ROM is fast
enough. If you are not sure or if
you have a slower drive, unmark
the checkbox.Click "Next".
Markieren Sie das
Auswahlfeld "Direct Kopie"
(Schnell kopieren), wenn Ihr
DVD-ROM-Laufwerk schnell
genug ist.Wenn Sie nicht sicher
sind oder ein langsameres
Laufwerk besitzen, deaktivieren
Sie das Auswahlfeld.Klicken sie
auf "Weiter".
Cochez la case "Copie
rapide" si votre lecteur de
DVD-ROM présente une
vitesse suffisante. Si vous ne le
savez pas avec cer titude ou si
vous savez que votre lecteur
est plus lent, décochez la case.
Cliquez su "Suivant".
Mettere il segno di spunta sulla casella di controllo "copia veloce" se il proprio
DVD-ROM è abbastanza veloce. Se non si è sicuri o se la propria unità è più lenta,
togliere il segno di spunta dalla casella. Clic su "Success".
U mag een vinkje voor de optie "Snelkopiëren" plaatsen als u zeker weet dat uw
DVD-ROM station snel genoeg is om het branden bij te houden.Weet u het niet zeker
of zit de dvd met bronmateriaal in een langzaam station, laat het keuzevakje dan leeg. Klik
op "Volgende".
Marque la casilla "copia rápida" si su DVD-ROM es rápido.Si no está seguro o si
dispone de una unidad lenta, quite la marca de la casilla correspondiente. Clic en
"Siquiente".
Choose "Burn".
Wählen Sie "Brennen".
Cliquez sur "Graver".
Scegliere "Scrivi".
Klik op "Branden".
Elija "Grabar".
6
5
UK
F
I
NL
E
D
UK
F
I
NL
E
D
Page 43

Insert the source disc in
the drive you chose in step 5.
Insert an empty DVD in your
ReWriter
Legen Sie die Quell-Disk
in das in Schritt 5 gewählte
Laufwerk. Legen Sie eine leere
DVD in Ihren ReWriter.
Introduisez le disque
source dans le lecteur
déterminé à l’étape 5 et insérez
un DVD vierge dans le graveur
ReWriter.
Inserire il disco sorgente
nell’unità scelta al passo 5.
Inserire un disco DVD vergine
nel ReWriter
Plaats de disc met het bronmateriaal in het station dat u in stap 5 heeft gekozen,
en plaats een blanco,opneembare DVD in de brander.
Coloque el disco de origen en la unidad que eligió en el paso 5. Ponga un DVD
vacío en su regrabador
43
7
UK
F
I
NL
E
D
Nero - Burning ROM will
now burn your DVD.
Nero - Burning ROM
brennt jetzt Ihre DVD.
Nero Burning Rom
commence la gravure du DVD.
Nero - Burning ROM ora
inizierà a copiare il DVD.
Nero - Burning Rom zal
nu de dvd voor u branden.
Nero - Burning ROM
grabará ahora su DVD.
8
UK
F
I
NL
E
D
Page 44

44
Click "OK". Your DVD
has been copied successfully.
Choose "Discard" to finish the
copying process.
Klicken Sie auf "OK".
Ihre DVD wurde erfolgreich
kopiert. Wählen Sie
"Verwerfen", um den
Kopiervorgang abzuschließen.
Cliquez sur OK. La
copie du DVD s’est déroulée
correctement. Cliquez sur
"Rejeter" pour clore le
processus de copie.
Fare click su "OK". Il
DVD è stato copiato con
successo.Scegliere "Elimina"
per terminare il processo di
copia.
Klik op "OK". Er is nu een kopie gemaakt van de originele dvd.
Klik op "Verwijderen" om het brandproces af te sluiten.
Haga clic en "OK". Su DVD se ha copiado correctamente.
Elija "Descarbar" para terminar el proceso de copia.
9
UK
F
I
NL
E
D
Page 45

How to copy a CD?
Eine CD kopieren
Comment copier un CD ?
Come copiare un CD?
Hoe kopieer ik een cd?
¿Cómo copiar un CD?
This manual shows an example of how
to copy a CD.
This product is for personal use only.
Unauthorized duplication and
distribution of copyrighted materials is a
violation of copyright law.
In diesem Handbuch wird an einem
Beispiel gezeigt, wie eine CD kopiert
wird.
Dieses Produkt ist nur für den
persönlichen Gebrauch.
Die ungenehmigte Vervielfältigung und
der Vertrieb von urheberrechtlich
geschützten Materialien stellt eine
Verletzung des Urheberrechts dar.
Ce manuel illustre la procédure de copie d’un CD.
Ce produit est à usage personnel
exclusivement.
Toute duplication et diffusion non
autorisée de matières soumises au droit
d’auteur et de copie (copyright)
constituent une violation de la loi sur les
droits d’auteur et de copie (copyright).
Questo manuale contiene informazioni
su come copiare un CD.
Questo prodotto è destinato ad un uso
esclusivamente personale.
La duplicazione e la distribuzione di
materiali protetti dal diritto d'autore
rappresentano una violazione della
legge sul copyright.
Deze handleiding beschrijft het
kopiëren van een cd.
Dit product is alleen bedoeld voor eigen
gebruik.
Het zonder toestemming vermenigvuldigen en verspreiden van
auteursrechtelijk beschermd materiaal
is wettelijk verboden.
Este manual muestra un ejemplo de
cómo copiar un CD.
Este producto es para uso personal
exclusivamente.
La duplicación y distribución no
autorizada de materiales con copyright
es una violación de las leyes del
copyright.
UK D F
I NL E
The application software used here is:
Nero - Burning Rom from Ahead Software
45
Page 46

46
Start "Nero - Burning
ROM" from the desktop.
Starten Sie "Nero Burning ROM" vom Desktop
aus.
Lancez Nero Burning
ROM à partir du bureau.
Avviare "Nero - Burning
ROM" dalla scrivania.
Start het programma
"Nero - Burning ROM" vanaf
het bureaublad.
Inicie "Nero - Burning
ROM" desde el escritorio.
Choose "CD" and click
"Next".
Wählen Sie "CD" und
klicken Sie auf "Weiter".
Choisissez CD et
cliquez sur "Suivant".
Scegliere "CD" e fare
clic su "Success".
Selecteer "CD" en klik
op "Volgende".
Elija "CD" y haga clic en
"Siguiente".
2
1
UK
F
NL
E
D
I
UK
F
I
NL
E
D
Page 47

47
Choose "Copy a CD" and
click "Next".
Wählen Sie "Eine CD
kopieren" und klicken Sie auf
"Weiter".
Choisissez "Copier un
CD" et cliquez sur "Suivant".
Scegliere "Copia un CD"
e fare clic su "Success".
Selecteer "Een CD
kopiëren" en klik op "Volgende".
Elija "Copiar un CD" y
haga clic en "Siguiente".
Choose the device in
which you want to put your
source CD.Mostly this is a CDROM or DVD-ROM drive.
"Click Next".
Wählen Sie das Gerät, in
das Sie die Quell-CD einlegen
möchten. Meistens ist das ein
CD-ROM- oder ein DVDROM-Laufwerk. Klicken Sie auf
"Weiter".
Choisissez le lecteur dans
lequel le CD source sera
introduit. Il s’agit le plus souvent
d’un lecteur de CD-ROM ou de
DVD-ROM.Cliquez sur
"Suivant".
Scegliere il dispositivo su cui si desidera inserire il CD sorgente.In genere si tratta
di un'unità CD-ROM o DVD-ROM.Clic su "Success".
Selecteer het station dat de cd met het bronmateriaal bevat. Meestal is dit een
CD-ROM station of een DVD-ROM station.Klik op "Volgende".
Elija el dispositivo en el que va a colocar el CD original. En la mayoría de los casos
se trata de una unidad CD-ROM o DVD-ROM.Clic en "Siguiente".
4
3
UK
F
I
NL
E
D
UK
F
I
NL
E
D
Page 48

48
Mark the checkbox 'fast
copy" if your CD-ROM or
DVD-ROM is fast enough.If
you are not sure or if you have
a slower drive, unmark the
checkbox.Click "next".
Markieren Sie das
Auswahlfeld "Directkopie",
wenn Ihr CD-ROM- oder
DVD-ROM-Laufwerk schnell
genug ist.Wenn Sie nicht
sicher sind oder ein
langsameres Laufwerk
besitzen, deaktivieren Sie das
Auswahlfeld. Klicken sie auf
"Weiter".
Cochez la case "Copie rapide" si votre lecteur de CD-ROM ou de DVD-ROM
présente une vitesse suffisante. Si vous ne le savez pas avec certitude ou si vous savez
que votre lecteur est plus lent, décochez la case. Cliquez sur "Suivant".
Mettere il segno di spunta sulla casella di controllo "copia veloce" se il proprio
DVD-ROM è abbastanza veloce. Se non si è sicuri o se la propria unità è più lenta,
togliere il segno di spunta dalla casella. Clic su "Success".
U mag een vinkje voor de optie 'Snelkopiëren" plaatsen als u zeker weet dat uw
CD-ROM of DVD-ROM station snel genoeg is om het branden bij te houden.Weet u
het niet zeker of zit de cd met bronmateriaal in een langzaam station, laat het keuzevakje
dan leeg. Klik op "Volgende".
Marque la casilla 'copia rápida" si su CD-ROM o DVD-ROM es rápido. Si no está
seguro o si dispone de una unidad lenta, quite la marca de la casilla correspondiente.
Clic en "Siquiente".
Choose "Burn".
Wählen Sie "Brennen".
Cliquez sur "Graver".
Scegliere "Scrivi".
Klik op "Branden".
Elija "Grabar".
6
5
UK
F
I
NL
E
D
UK
F
I
NL
E
D
Page 49

49
Insert the source disc in
the drive you chose in step 5.
Insert an empty DVD in your
ReWriter
Legen Sie die Quell-Disk
in das in Schritt 5 gewählte
Laufwerk. Legen Sie eine leere
DVD in Ihren ReWriter.
Introduisez le disque
source dans le lecteur
déterminé à l’étape 5 et insérez
un DVD vierge dans le graveur
ReWriter.
Inserire il disco sorgente
nell’unità scelta al passo 5.
Inserire un disco DVD vergine
nel ReWriter
Plaats de disc met het bronmateriaal in het station dat u in stap 5 heeft gekozen,
en plaats een blanco,opneembare DVD in de brander.
Coloque el disco de origen en la unidad que eligió en el paso 5. Ponga un DVD
vacío en su regrabador
7
Nero - Burning ROM will
now burn your CD.
Nero - Burning ROM
brennt jetzt Ihre CD.
Nero Burning Rom
commence la gravure du CD.
Nero - Burning ROM ora
inizierà a copiare il CD.
Nero - Burning Rom zal
nu de cd voor u branden.
Nero - Burning ROM
grabará ahora su CD.
8
UK
F
I
NL
E
D
UK
F
I
NL
E
D
Page 50

50
Click "OK". Your CD has
been copied successfully.
Choose "Discard" to finish the
copying process.
Klicken Sie auf "OK".
Ihre CD wurde erfolgreich
kopiert. Wählen Sie
"Verwerfen", um den
Kopiervorgang abzuschließen.
Cliquez sur OK. La
copie du CD s’est déroulée
correctement. Cliquez sur
"Rejeter" pour clore le
processus de copie.
Fare click su "OK". Il CD
è stato copiato con successo.
Scegliere "Elimina" per
terminare il processo di copia.
Klik op "OK". Er is een kopie gemaakt van de originele cd.Klik op "Verwijderen"
om het brandproces af te sluiten.
Haga clic en "OK". Su CD se ha copiado correctamente. Elija "Descartar" para
terminar el proceso de copia.
9
UK
F
I
NL
E
D
Page 51

51
How to make a Data DVD?
Eine Daten-DVD erstellen
Comment créer un DVD de données ?
Come creare un DVD di dati
Hoe maak ik zelf een data-dvd?
¿Cómo crear un DVD de Datos?
This manual shows you an example of
how to make a Data DVD.
This product is for personal use only.
Unauthorized duplication and
distribution of copyrighted materials is a
violation of copyright law.
In diesem Handbuch wird an einem
Beispiel gezeigt, wie eine Daten-DVD
erstellt wird.
Dieses Produkt ist nur für den
persönlichen Gebrauch.
Die ungenehmigte Vervielfältigung und
der Vertrieb von urheberrechtlich
geschützten Materialien stellt eine
Verletzung des Urheberrechts dar.
Ce manuel illustre la procédure de
création d’un DVD de données.
Ce produit est à usage personnel
exclusivement.
Toute duplication et diffusion non
autorisée de matières soumises au droit
d’auteur et de copie (copyright)
constituent une violation de la loi sur les
droits d’auteur et de copie (copyright).
Questo manuale contiene informazioni
su come creare un DVD di dati.
Questo prodotto è destinato ad un uso
esclusivamente personale.
La duplicazione e la distribuzione di
materiali protetti dal diritto d'autore
rappresentano una violazione della
legge sul copyright.
Deze handleiding beschrijft het maken
van een data-dvd.
Dit product is alleen bedoeld voor eigen
gebruik.
Het zonder toestemming
vermenigvuldigen en verspreiden van
auteursrechtelijk beschermd materiaal
is wettelijk verboden.
Este manual muestra un ejemplo de
cómo crear un DVD de datos.
Este producto es para uso personal
exclusivamente.
La duplicación y distribución no
autorizada de materiales con copyright
es una violación de las leyes del
copyright.
UK D F
I NL E
The application software used here is:
Nero - Burning Rom from Ahead Software
51
Page 52

52
Start "Nero - Burning
ROM" from the desktop.
Starten Sie "Nero Burning ROM" vom Desktop
aus.
Lancez Nero Burning
ROM à partir du bureau.
Avviare "Nero - Burning
ROM" dalla scrivania.
Start het programma
"Nero - Burning ROM" vanaf
het bureaublad.
Inicie "Nero - Burning
ROM" desde el escritorio.
Choose "DVD" and click
"Next".
Wählen Sie "DVD" und
klicken Sie auf "Weiter".
Choisissez DVD et cliquez sur "Suivant".
Scegliere "DVD" e fare
clic su "Success".
Selecteer "DVD" en klik
op "Volgende".
Elija "DVD" y haga clic
en "Siguiente".
2
1
UK
F
I
NL
E
D
UK
F
I
NL
E
D
Page 53

53
Choose "Compile a new
DVD" and click "Next".
Wählen Sie "Eine neue
DVD erstellen" und klicken Sie
auf "Weiter".
Choisissez "Compiler un
nouveau DVD" et cliquez sur
Next "Suivant".
Scegliere "Crea un nuovo
DVD" e fare clic su "Success".
Selecteer "Een nieuwe
DVD compileren" en klik op
"Volgende".
Elija "Compilar un DVD
nuevo" y haga clic en "Siguiente".
3
Choose "Data DVD" and
click "Next".
Wählen Sie "Daten-DVD"
und klicken Sie auf "Weiter".
Choisissez "DVD de
données" et cliquez sur Suivant.
Scegliere "DVD Dati" e
fare clic su "Success".
Selecteer "Data DVD" en
klik op "Volgende".
Elija "DVD de datos" y
haga clic en "Siguiente".
4
UK
F
I
NL
E
D
UK
F
I
NL
E
D
Page 54

54
Choose " Create a new
data-DVD?" and choose "Next".
Wählen Sie "Neue
Daten-DVD zusammenstellen"
und wählen Sie "Weiter".
Choisissez "Compiler un
nouveau DVD de données?"
et cliquez sur "Suivant".
Scegliere "Crea un
nuovo DVD dati?" e fare clic
su "Success".
Selecteer "Een nieuwe
data DVD aanmaken?" en klik
op "Volgende".
Elija i Compilar un
Nuevo DVD de datos? y elija
"Siguiente".
5
Choose "Finish".
Wählen Sie "Fertig".
Cliquez sur "Terminer".
Scegliere "Fini".
Klik op "Voltooien".
Elija "Finalizar".
6
UK
F
I
NL
E
D
UK
F
I
NL
E
D
Page 55

55
Drag the selected file(s)
and/or folder(s) you want to
have on your new DVD to the
left side of the screen.
Ziehen Sie die
gewünschten Dateien und/oder
Ordner, die Sie auf Ihrer neuen
DVD haben möchten,zur linken
Seite des Bildschirms.
Faites glisser le ou les
fichiers ou dossiers sélectionnés
que vous voulez copier sur le
nouveau DVD dans la partie
gauche de l’écran.
Tr ascinare sulla parte
sinistra dello schermo il/i file e/o
cartella/e selezionati che si
desidera avere sul nuovo DVD.
Sleep de door u geselecteerde bestanden en/of mappen die u op de dvd wilt
branden naar het linkervenster.
Arrastre los archivos y/o carpetas seleccionados que desee grabar en su nuevo
DVD a la izquierda de la pantalla.
7
Click on the "Write" icon.
Klicken Sie auf das
Symbol "Schreiben".
Cliquez sur l'icône "Écrire".
Fare clic sull'icona
"Trascrivi".
Klik op het pictogram
voor "CD schrijven".
Haga clic en el icono
"Escribir".
8
UK
F
I
NL
E
D
UK
F
I
NL
E
D
Page 56

Choose "burn" twice.
Wählen Sie zweimal
"brennen".
Choisissez la double
"Graver".
Scegliere di "Scrivi" due
volte.
Selecteer twee keer
"Branden".
Elija la opción "Grabar"
dos veces.
56
9
Click "OK".
Congratulations, your DVD is
ready now.
Choose "Discard" to finish the
Data DVD creation process.
Klicken Sie auf "OK".
Gratulation, Ihre DVD ist jetzt
fertig.
Wählen Sie "Verwerfen", um
die Erstellung der Daten-DVD
abzuschließen.
Cliquez sur OK. Le DVD
est à présent terminé.
Cliquez sur "Rejeter" pour
clore le processus de création
de DVD de données.
Fare click su "OK".
Congratulazioni, il DVD ora è
pronto.
Scegliere "Elimina" per
terminare il processo di
creazione del DVD di dati.
Klik op "OK". Na afloop van het brandproces is uw nieuwe dvd klaar voor gebruik.
Klik op "Verwijderen" om het brandproces af te sluiten.
Haga clic en "OK". Felicitaciones, su nuevo DVD está preparado para ser utilizado.
Elija "Descabar" para terminar el proceso de creación del DVD de datos.
10
UK
F
I
NL
E
D
UK
F
I
NL
E
D
Page 57

575757
How to make a Data CD?
Eine Daten-CD erstellen
Comment créer un disque de données ?
Come creare un CD di dati?
Hoe maak ik zelf een data-cd?
¿Cómo crear un CD de datos ?
This manual shows you an example of
how to make a Data CD.
This product is for personal use only.
Unauthorized duplication and
distribution of copyrighted materials is a
violation of copyright law.
In diesem Handbuch wird an einem
Beispiel gezeigt, wie eine
Daten-CD erstellt wird.
Dieses Produkt ist nur für den
persönlichen Gebrauch.
Die ungenehmigte Vervielfältigung und
der Vertrieb von urheberrechtlich
geschützten Materialien stellt eine
Verletzung des Urheberrechts dar.
Ce manuel illustre la procédure de
création d’un CD de données.
Ce produit est à usage personnel
exclusivement.
Toute duplication et diffusion non
autorisée de matières soumises au droit
d’auteur et de copie (copyright)
constituent une violation de la loi sur les
droits d’auteur et de copie (copyright).
Questo manuale contiene informazioni
su come creare un CD di dati.
Questo prodotto è destinato ad un uso
esclusivamente personale.
La duplicazione e la distribuzione di
materiali protetti dal diritto d'autore
rappresentano una violazione della
legge sul copyright.
Deze handleiding beschrijft het maken
van een data-cd.
Dit product is alleen bedoeld voor eigen
gebruik.
Het zonder toestemming
vermenigvuldigen en verspreiden van
auteursrechtelijk beschermd materiaal
is wettelijk verboden.
Este manual muestra un ejemplo de
cómo crear un CD de datos.
Este producto es para uso personal
exclusivamente.
La duplicación y distribución no
autorizada de materiales con copyright
es una violación de las leyes del
copyright.
UK D F
I NL E
The application software used here is:
Nero - Burning Rom from Ahead Software
57
Page 58

58
Start "Nero - Burning
ROM" from the desktop.
Starten Sie "Nero Burning ROM" vom Desktop
aus.
Lancez Nero Burning
ROM à partir du bureau.
Avviare "Nero - Burning
ROM" dalla scrivania.
Start het programma
"Nero - Burning ROM" vanaf
het bureaublad.
Inicie "Nero - Burning
ROM" desde el escritorio.
Choose "CD" and click
"Next".
Wählen Sie "CD" und
klicken Sie auf "Weiter".
Choisissez CD et cliquez sur "Suivant".
Scegliere "CD" e fare
clic su "Success".
Selecteer "CD" en klik
op "Volgende".
Elija "CD" y haga clic en
"Siguiente".
2
1
UK
F
I
NL
E
D
UK
F
I
NL
E
D
Page 59

59
Choose "Compile a new
CD" and click "Next".
Wählen Sie "Neue CD
erstellen" und klicken Sie auf
"Weiter".
Choisissez "Compiler un
nouveau CD" et cliquez sur
"Suivant".
Scegliere "Crea un nuovo
CD" e fare clic su "Success".
Selecteer "Een nieuwe
CD compileren" en klik op
"Volgende".
Elija "Compilar un CD
nuevo" y haga clic en "Siguiente".
3
Choose "Data CD" and
click "Next".
Wählen Sie "Daten-CD"
und klicken Sie auf "Weiter".
Choisissez "CD de
données" et cliquez sur
"Suivant".
Scegliere "CD dati" e fare
clic su "Success".
Selecteer "Data-CD" en
klik op "Volgende".
Elija "CD de datos" y haga
clic en "Siguiente".
4
UK
F
I
NL
E
D
UK
F
I
NL
E
D
Page 60

60
Choose " Create a new
data-CD?" and choose "Next".
Wählen Sie "Neue
Daten-CD zusammenstellen?"
und wählen Sie "Weiter".
Choisissez Compiler un
nouveau CD de données? et
cliquez sur "Suivant".
Scegliere "Crea un
nuovo CD dati?" e fare clic su
"Success".
Selecteer "Een nieuwe
data CD aanmaken?" en klik
op "Volgende".
Elija "i Compilar un
Nuevo CD de datos?" y elija
"Siguiente".
5
Choose "Finish".
Wählen Sie "Fertig".
Cliquez sur "Terminer".
Scegliere "Fini".
Klik op "Voltooien".
Elija "Finalizar".
6
UK
F
I
NL
E
D
UK
F
I
NL
E
D
Page 61

61
Drag the selected file(s)
and/or folder(s) you want to
have on your new CD to the
left side of the screen.
Ziehen Sie die
gewünschten Dateien und/oder
Ordner, die Sie auf Ihrer neuen
CD haben möchten, zur linken
Seite des Bildschirms.
Faites glisser le ou les
fichiers ou dossiers sélectionnés
que vous voulez copier sur le
nouveau CD dans la partie
gauche de l’écran.
Tr ascinare sulla parte
sinistra dello schermo il/i file e/o
cartella/e selezionati che si
desidera avere sul nuovo CD.
Sleep de door u geselecteerde bestanden en/of mappen die u op de cd wilt
branden naar het linkervenster.
Arrastre los archivos y/o carpetas seleccionados que desee grabar en su nuevo
CD a la izquierda de la pantalla.
7
Click on the "Write" icon.
Klicken Sie auf das
Symbol "Schreiben".
Cliquez sur l'icône
"Écrire".
Fare clic sull'icona
"Trascrivi".
Klik op het pictogram
voor "CD schrijven".
Haga clic en el icono
"Escribir".
8
UK
F
I
NL
E
D
UK
F
I
NL
E
D
Page 62

62
9
Click "OK".
Congratulations, your CD is
ready now.Choose "Discard"
to finish the Data CD creation
process.
Klicken Sie auf "OK".
Gratulation, Ihre CD ist jetzt
fertig.Wählen Sie "Verwerfen",
um die Erstellung der DatenCD abzuschließen.
Cliquez sur OK. Le CD
est à présent terminé. Cliquez
sur "Rejeter" pour clore le
processus de création de CD
de données.
Fare click su "OK".
Congratulazioni, il CD ora è
pronto.Scegliere "Elimina" per terminare il processo di creazione del CD di dati.
Klik op "OK". Na afloop van het brandproces is uw nieuwe cd klaar voor gebruik.
Klik op "Verwijderen" om het brandproces af te sluiten.
Haga clic en "OK". Felicitaciones, su CD está preparado para ser utilizado. Elija
"Descabar" para terminar el proceso de creación del CD de datos.
10
Choose "burn" twice.
Wählen Sie zweimal
"brennen".
Choisissez la double
"graver".
Scegliere di "Serivi" due
volte.
Selecteer twee keer
"Branden".
Elija la opción "Grabar"
dos veces.
UK
F
I
NL
E
D
UK
F
I
NL
E
D
Page 63

63
How to make an
Audio CD?
Erstellen einer Audio-CD
Comment créer un CD audio ?
Come creare un CD Audio?
Hoe maak ik zelf muziek-cd's?
¿Cómo crear un CD de audio?
This manual shows you an example of
how to make an Audio
CD which can be played in any CDPlayer
This product is for personal use only.
Unauthorized duplication and
distribution of copyrighted materials is a
violation of copyright law.
n diesem Handbuch wird beschrieben,
wie eine Audio-CD
erstellt wird, die von jedem CD-Player
abgespielt werden kann.
Dieses Produkt ist nur für den
persönlichen Gebrauch.
Die ungenehmigte Vervielfältigung und
der Vertrieb von urheberrechtlich
geschützten Materialien stellt eine
Verletzung des Urheberrechts dar.
Ce manuel illustre la procédure de
création d’un CD audio qui pourra être
lu sur n’importe lecteur de CD.
Ce produit est à usage personnel
exclusivement.
Toute duplication et diffusion non
autorisée de matières soumises au droit
d’auteur et de copie (copyright)
constituent une violation de la loi sur les
droits d’auteur et de copie (copyright).
Questo manuale contiene informazioni
su come creare un CD Audio
che potrà essere letto da un CD-Player.
Questo prodotto è destinato ad un uso
esclusivamente personale.
La duplicazione e la distribuzione di
materiali protetti dal diritto d'autore
rappresentano una violazione della
legge sul copyright.
Deze handleiding beschrijft het maken
van een muziek-cd om in een normale
cd-speler af te spelen.
Dit product is alleen bedoeld voor eigen
gebruik.
Het zonder toestemming
vermenigvuldigen en verspreiden van
auteursrechtelijk beschermd materiaal
is wettelijk verboden.
Este manual muestra un ejemplo de
cómo crear un CD de audio
que se puede reproducir en cualquier
lector de compact disc.
Este producto es para uso personal
exclusivamente.
La duplicación y distribución no
autorizada de materiales con copyright
es una violación de las leyes del
copyright.
UK D F
I NL E
The application software used here is:
Nero - Burning Rom from Ahead Software
63
Page 64

64
Choose "CD" and click
"Next".
Wählen Sie "CD" und
klicken Sie auf "Weiter".
Choisissez CD et
cliquez sur "Suivant".
Scegliere "CD" e fare
clic su "Success".
Selecteer "CD" en klik
op "Volgende".
Elija "CD" y haga clic en
"Siguiente".
Start "Nero - Burning
ROM" from the desktop.
Starten Sie "Nero Burning ROM" vom Desktop
aus.
Lancez Nero Burning
ROM à partir du bureau.
Avviare "Nero - Burning
ROM" dalla scrivania.
Start het programma
"Nero - Burning ROM" vanaf
het bureaublad.
Inicie "Nero - Burning
ROM" desde el escritorio.
2
1
UK
F
NL
E
D
I
UK
F
I
NL
E
D
Page 65

65
Choose "Compile a new
CD" and click "Next".
Wählen Sie "Neue CD
erstellen" und klicken Sie auf
"Weiter".
Choisissez "Compiler un
nouveau CD" et cliquez sur
"Suivant".
Scegliere "Crea un nuovo
CD" e fare clic su "Success".
Selecteer "Een nieuwe
CD compileren" en klik op
"Volgende".
Elija "Compilar un CD
nuevo" y haga clic en "Siguiente".
UK
D
F
I
NL
E
Choose "Audio CD" and
click "Next".
Wählen Sie "Audio-CD
und klicken Sie auf "Weiter".
Choisissez "CD audio" et
cliquez sur "Suivant".
Scegliere "CD Audio" e
fare clic su "Success".
Selecteer "Audio-CD" en
klik op "Volgende".
Elija "CD de audio" y haga
clic en "Siguiente".
UK
D
F
I
NL
E
4
3
Page 66

66
Choose "Finish".
Wählen Sie "Fertig".
Cliquez sur "Terminer".
Scegliere "Fini".
Klik op "Voltooien".
Elija "Finalizer".
Drag the audio files
(*.wav) you want to have on
your new audio disc to the left
side.
Ziehen Sie die
Audiodateien (*.wav),die Sie
auf Ihrer neuen Audio-CD
haben möchten, zur linken
Seite.
Effectuez un glisser–déposer pour transférer les
fichiers audio (*.wav) à
enregistrer sur le disque dans
la partie gauche de la fenêtre.
Tr ascinare sul lato
sinistro i file audio (*.wav) che
si desiderano avere sul nuovo
disco audio.
Sleep de geluidsbestanden (*.wav) die u op de cd wilt branden naar het
linkervenster.
Arrastre los archivos de audio (*.wav) que desee copiar en su nuevo disco de
audio a la izquierda.
6
5
UK
F
I
NL
E
D
UK
F
I
NL
E
D
Page 67

67
Click on the "Write" icon.
Klicken Sie auf das
Symbol "Schreiben".
Cliquez sur l'icône
"Écrire".
Fare clic sull'icona
"Trascrivi".
Klik op het pictogram
voor "CD schrijven".
Haga clic en el icono
"Escribir".
Choose burn twice.
Wählen Sie zweimal
"brennen".
Choisissez la double
"graver".
Scegliere di "Scrivi" due
volte.
Selecteer twee keer
"Branden".
Elija la opción "Grabar" dos
veces.
8
7
UK
F
I
NL
E
D
UK
F
I
NL
E
D
Page 68

68
9
Click "OK".
Congratulations, your audio
disc is ready now.Choose
"Discard" to finish the audio
disc creation process.
Klicken Sie auf "OK".
Gratulation, Ihre Audio-CD ist
jetzt fertig.Wählen Sie
"Discard" (Verwerfen), um die
Erstellung der Audio-CD
abzuschließen.
Cliquez sur OK. Le
disque audio est à présent
terminé. Cliquez sur Discard
(Rejeter) pour clore le
processus de création de
disque audionumérique.
Fare click su "OK". Congratulazioni,il CD Audio ora è pronto.Scegliere "Elimina"
per terminare il processo di creazione del CD audio.
Klik op "OK". Na afloop van het brandproces is uw nieuwe audio-cd klaar voor
gebruik. Klik op "Verwijderen" om het brandproces af te sluiten.
Haga clic en "Aceptar". Felicitaciones, su disco de audio está preparado para ser
utilizado.Elija "Discard" (Desechar) para terminar el proceso de creación del disco de
audio.
UK
D
F
I
NL
E
10
Nero - Burning Rom is
burning your Audio CD.
Nero - Burning Rom
brennt Ihre Audio-CD.
Nero Burning Rom
commence la gravure du CD
audionumérique.
Nero - Burning Rom sta
copiando il CD Audio.
Nero - Burning Rom zal
nu de Audio-cd voor u branden.
Nero - Burning Rom
está grabando su CD de audio.
UK
D
F
I
NL
E
Page 69

More information
about my DVD-Rewriter
Mehr Informationen über meinen DVD-Rewriter
Informations ultérieures à propos du DVD-Rewriter
Ulteriori informazioni sul DVD-Rewriter
Verdere informatie over mijn DVD-Rewriter
Más información acerca de mi DVD-Rewriter
i
69
Page 70

70
Page 71

Information stored
on my computer
Auf meinem Computer gespeicherte Informationen
Informations mémorisées sur l’ordinateur
Informazioni memorizzate sul computer
Informatie opgeslagen in mijn computer
Información almacenada en mi ordenador
i
71
Page 72

72
On your PC, more
information is stored in following location:
Choose "Start","Programs",
"Philips Internal Drive" and
"More info".
Auf Ihrem PC sind an
folgendem Ort weitere
Informationen gespeichert:
Wählen Sie "Start","Programme", "Internes Philips-Laufwerk"
und "Weitere Informationen".
Sur le PC sont mémorisées d’autres informations
auxquelles vous pouvez
accéder de la façon suivante :
sélectionnez "Start"
(démarrer), "Programs"
(programmes), "Philips Internal Drive" (unité interne Philips) et "More info" (ultérieures
informations).
Sul PC sono memorizzate ulteriori informazioni a cui si può accedere all’indirizzo
seguente: selezionare "Start" (avvìo), "Programs" (programmi),"Philips Internal Drive"
(unità interna Philips) e "More info" (ulteriori informazioni)
Op uw PC is nog meer informatie opgeslagen op de volgende locatie:
Kies "Start","Programma’s", "Philips Intern Station" en "Meer informatie".
En su PC, podrá encontrar más información almacenada en la siguiente ubicación:
Elija "Inicio", "Programas", "Unidad interna Philips" y "Más información".
UK
D
F
I
NL
E
1
Page 73

Information stored
on the internet
Im Internet gespeicherte Informationen
Informations mémorisées sur l’Internet
Informazioni memorizzate sull’Internet
Informatie op het Internet
Información almacenada en Internet
i
73
Page 74

74
Updates and other
information can also be
obtained from the internet. Go
to the Philips website on:
http://www.philips.com/pcstuff
and choose "Download here".
Updates und andere
Informationen können Sie
auch aus dem Internet
erhalten. Gehen Sie auf die
Philips-Website:
http://www.philips.com/pcstuff
"und wählen Sie "Download
here".
Vous pouvez obtenir par
l’internet aussi des mises à jour
et d’autres informations Accédez au site web de Philips sur:
http://www.philips.com/pcstuff et sélectionnez "Down-
load here" (télécharger ici).
Si possono ottenere dall’Internet anche aggiornamenti e altre informazioni.
Attraverso al sito web Philips: http://www.philips.com/pcstuff e selezionare "Download
here" (scaricare qui).
U kunt ook updates en andere informatie krijgen via het internet. Ga naar de Phi-
lips-website: http://www.philips.com/pcstuff en kies "hier Downloaden".
Podrá encontrar actualizaciones y otras informaciones también en Internet.
Mediante al sitio Web de Philips en http://www.philips.com/pcstuff y elija "Descargar
aqui".
Look for the correct
model number you found in
step 20 during installation
Suchen Sie die richtige
Modellnummer, die Sie in
Schritt 20 während der
Installation gefunden haben.
Déterminez le numéro
de modèle trouvé à l’étape 20
pendant l’installation
Cercare il numero del
modello corretto individuato
durante l’installazione al
passo 20
Zoek het correcte typenummer, dit heeft u in stap 20
van de installatie genoteerd
Localice el modelo correcto que encontró en el paso
20, durante la instalación
2
1
UK
F
I
NL
E
D
UK
F
I
NL
E
D
Page 75

75
Type the model number
you found in the previous step,
choose your country and click
Search. If no results appear,
check your model number or
choose "Any Country" and click
"Search".
Geben Sie die Modellnummer ein,die Sie im vorherigen Schritt gefunden haben,
wählen Sie Ihr Land und klicken
Sie auf "Search".Wenn kein
Ergebnis erscheint, überprüfen
Sie Ihre Modellnummer oder
wählen Sie "Any Country" und
klicken Sie auf "Search".
Saisissez le numéro de
modèle trouvé lors du pas précédent, puis sélectionnez votre pays de résidence et
cliquez sur "Search" (rechercher). Si aucun résultant ne devait être affiché, vérifiez le
numéro de modèle ou sélectionnez "Any Country" (n’importe lequel pays) et puis
cliquez sur "Search" (rechercher).
Immettere il numero di modello ritrovato nella fase precedente, selezionare il
proprio paese di residenza ed effettuare un clic su "Search" (ricerca). Se non vengono
visualizzati risultati, verificare il numero del modello o selezionare "Any Country" (paese
indifferente) e confermare con un clic su "Search" (ricerca).
Type het modelnummer in dat u in de vorige stap heeft gevonden, selecteer uw
land en klik op Zoeken.Als er geen resultaten verschijnen, controleer dan nogmaals het
modelnummer of selecteer "Alle Landen" en klik op "Zoeken".
Escriba el número del modelo que ha localizado en el paso anterior,elija su país y
haga clic en Buscar. Si no encuentra ningún resultado,consulte su modelo o elija
"Cualquier país" y haga clic en
"Buscar".
D
F
I
NL
E
3
UK
Page 76

76
Notes
Page 77

77
Notes
Page 78

78
Notes
Page 79

79
Notes
Page 80

Additional information available at our website:
www.philips.com/pcstuff
Specifications subject to change without notice.
All dimensions shown are approximate.
© 2002 Koninklijke Philips Electronics N.V.
All rights reserved.
Reproduction,copying, usage,modifying, hiring,renting,
public performance, transmission and/or broadcasting in whole or part
is prohibited without the written consent of Philips Electronics N.V.
3104 125 2472.1
 Loading...