

Page 1
985
985
Instructions for use
Page 2
Laser safety
This unit employs a laser. To prevent possible eye injury,
only a qualified service person should remove the cover
or attempt to service this device.
USE OF CONTROLS OR ADJUSTMENTS OR
PERFORMANCE OF PROCEDURES OTHER
THAN THOSE SPECIFIED HEREIN MAY
RESULT IN HAZARDOUS RADIATION
EXPOSURE.
WARNING LOCATION: INSIDE ON LASER COVERSHIELD
NEVER MAKE OR CHANGE CONNECTIONS
WITH THE POWER SWITCHED ON.
The DVD recorder is in conformity with
the EMC directive and low-voltage
directive.
CAUTION ONLY QUALIFIED SERVICE PERSONNEL
SHOULD REMOVE THE COVER OR
ATTEMPT TO SERVICE THIS DEVICE.
For Customer Use:
Read carefully the information located on the back of your
DVD recorder and entered below the Serial N°. Retain this
information for future reference.
Model N°. DVDR985
Serial N°. __________________________
CAUTION VISIBLE AND INVISIBLE LASER RADIATION. WHEN OPEN
AVOID EXPOSURE TO BEAM
ADVARSEL
SYNLIG OG USYNLIG LASERSTRÅLING VED ÅBNING
UNDGÅ UDSÆTTELSE FOR STRÅLING
ADVARSEL
SYNLIG OG USYNLIG LASERSTRÅLING NÅR DEKSEL ÅPNES
UNNGÅ EKSPONERING FOR STRÅLEN
VARNING
SYNLIG OCH OSYNLIG LASERSTRÅLNING NÄR DENNA DEL
ÄR ÖPPNAD BETRAKTA EJ STRÅLEN
VARO!
AVATTAESSA OLET ALTTIINA NÄKYVÄLLE JA
NÄKYMÄTTÖMÄLLE LASER SÄTEILYLLE. ÄLÄ KATSO SÄTEESEEN
VORSICHT
SICHTBARE UND UNSICHTBARE LASERSTRAHLUNG
WENN ABDECKUNG GEÖFFNET NICHT DEM STRAHL AUSSETSEN
DANGER
VISIBLE AND INVISIBLE LASER RADIATION. WHEN OPEN
AVOID DIRECT EXPOSURE TO BEAM
ATTENTION
RAYONNEMENT LASER VISIBLE ET INVISIBLE EN CAS
D’OUVERTURE EXPOSITION DANGEREUSE AU FAISCEAU
LASER
Type InGaAlP semiconductor laser (DVD)
AlGaAs semiconductor laser (CD)
Wavelenght 660 nm (DVD)
780 nm (CD)
Output Power 20 mW (DVD writing)
(out of objective) 0.8 mW (DVD reading)
0.3 mW (CD reading)
Beam divergence 82 degrees (DVD)
54 degrees (CD)
General information
Manufactured under license from Dolby
Laboratories. “Dolby”, “Pro Logic” and the
double-D symbol are trademarks of Dolby
Laboratories. Confidential Unpublished Works.
©1992-1997 Dolby Laboratories, Inc. All rights
reserved.
“VIDEO Plus+” and “PlusCode” are registered
trademarks of the Gemstar Development
Corporation. The Video Plus+ system is
manufactured under licence from Gemstar
Development Corporation.
TRUSURROUND,
SSRRSS
, and symbol are
trademarks of SRS Labs,Inc. TRUSURROUND
technology is manufactured under license from
SRS Labs, Inc.
This product incorporates copyright protection
technology that is protected by method claims of
certain U.S. patents and other intellectual
property rights owned by Macrovision
Corporation and other rights owners.
Use of this copyright protection technology must
be authorized by Macrovision Corporation, and is
intended for home and other limited viewing uses
only unless otherwise authorized by Macrovision
Corporation. Reverse engineering or disassembly
is prohibited.
CLASS 1
LASER PRODUCT
Page 3

Contents
Introduction
DVD Video Recorder________________________________________6
Box contents_______________________________________________7
Placement _________________________________________________7
Cleaning discs ______________________________________________7
Remote control ____________________________________________7
Loading the batteries_______________________________________7
Installation
Connections - back side of your DVD recorder __________________8
Connecting to the antenna____________________________________8
Connecting to a TV set ______________________________________8
S-video (Y/C) connection ___________________________________8
Video (CVBS) connection ___________________________________8
Connecting to audio equipment________________________________9
Connecting to A/V receiver or A/V amplifier with digital
Multi-channel decoder______________________________________9
Connecting to a receiver equipped with two channel digital
stereo (PCM)_____________________________________________9
Connecting to a receiver equipped with Dolby Pro Logic _________9
Connecting to a TV set equipped with a Dolby Pro Logic decoder __9
Connecting to a receiver with two channel analogue stereo _______9
Connecting to other equipment ______________________________10
Connections - frontside of your DVD recorder__________________10
Camcorder connection ____________________________________10
Power supply _____________________________________________11
Switching on ______________________________________________11
First time set-up: virgin mode ________________________________11
Automatic setting ________________________________________11
Manual setting ___________________________________________12
English
Functional overview
Front of recorder __________________________________________14
Rear of recorder___________________________________________15
Display___________________________________________________16
Remote control ___________________________________________17
Operation
Important notes for operation________________________________18
Loading discs ______________________________________________18
Disc types _______________________________________________18
The following disc types can be used for recording and playback __18
The following disc types can be used for playback only __________18
The following disc types cannot be used at all, neither for
recording nor for playback _________________________________19
On-screen display information ________________________________19
System menu bar _________________________________________19
User preference menu operation ____________________________20
Status box ______________________________________________20
Tuner info box __________________________________________21
Timer info box __________________________________________21
Warning box ____________________________________________21
Index Picture Screen________________________________________22
User preferences __________________________________________23
Setting user preferences __________________________________23
Picture settings __________________________________________23
Sound settings ___________________________________________23
CONTENTS 3
Page 4

English
Language settings_________________________________________24
Feature settings __________________________________________24
Remote control settings ___________________________________25
Record settings __________________________________________25
Installation ______________________________________________26
Recording
Before you start recording___________________________________28
Manual recording __________________________________________28
Checking input___________________________________________28
Recording_______________________________________________28
Manual audio control _____________________________________29
Recording with automatic switch-off (OTR One-Touch Recording) _30
Timer programming ________________________________________30
Timer programming with the VIDEO Plus+®system_____________30
Timer programming without the VIDEO Plus+ system __________31
Programming with ‘NEXTVIEW Link’ __________________________32
If a timer setting is incorrect _________________________________32
How to check or alter a timer block _________________________33
How to clear a timer block ________________________________33
Playback
Playing a DVD+RW or DVD+R disc ___________________________34
Playing a pre-recorded DVD-Video disc ________________________34
Playing a (Super) Video CD disc ______________________________34
General features ___________________________________________35
Moving to another title/track _______________________________35
Moving to another chapter/index ____________________________35
Slow Motion ____________________________________________35
Still Picture and Step Frame ________________________________36
Search _________________________________________________36
Repeat _________________________________________________36
Repeat A-B _____________________________________________36
Scan ___________________________________________________37
Time search _____________________________________________37
Zoom__________________________________________________37
Special DVD+R(W) features _________________________________38
Recording date and time___________________________________38
Special DVD-Video features __________________________________38
Menus on the disc ________________________________________38
Camera Angle ___________________________________________38
Changing the audio language________________________________38
Subtitles ________________________________________________39
Special VCD-Features_______________________________________39
Playback Control (PBC) ___________________________________39
Playing an audio CD ________________________________________39
Pause __________________________________________________40
Search _________________________________________________40
Moving to another track ___________________________________40
Repeat track/disc _________________________________________40
Repeat A-B _____________________________________________40
Scan ___________________________________________________40
4 CONTENTS
Page 5

Access control
Child Lock (DVD and VCD) _________________________________41
Activating/deactivating the child lock _________________________41
Authorizing discs when Child Lock is activated_________________41
Securing discs ___________________________________________41
Parental Level (DVD-Video only)______________________________42
Activating/Deactivating Parental Control ______________________42
Country__________________________________________________42
Changing the 4-digit code____________________________________43
Managing disc content
Title settings ______________________________________________44
Changing the title name ___________________________________44
Play full title _____________________________________________44
Erasing a title ____________________________________________44
Disc Info Screen ___________________________________________44
Disc Settings ______________________________________________45
Changing the Disc Name __________________________________45
Protection of recordings ___________________________________45
Erasing a disc ____________________________________________45
Finalising a DVD+R disc ___________________________________45
Making your edits DVD compatible __________________________46
Favourite Scene Selection____________________________________46
Calling up the FSS menu ___________________________________46
Inserting chapter markers __________________________________47
Hiding chapters __________________________________________47
Deleting chapter markers __________________________________47
Changing the index picture _________________________________47
Dividing a title ___________________________________________48
Append recording ________________________________________48
English
Troubleshooting
Troubleshooting checklist ___________________________________49
Diagnosis programme _______________________________________51
Instructions _____________________________________________51
System limitations __________________________________________51
Glossary
Appendix
Using your DVD recorder remote control with your TV set _______54
CONTENTS 5
Page 6

Introduction
English
DVD Video Recorder
DVD (Digital Versatile Disc) is the new storage medium
that combines the convenience of the Compact Disc
with the latest advanced digital video technology.
DVD-Video uses state-of-the-art MPEG2 data
compression technology to register an entire movie on a
single 5-inch disc. DVD’s variable bitrate compression,
running at up to 9.8 Mbits/second, captures even the
most complex pictures in their original quality.
The crystal-clear digital pictures have a horizontal
resolution of over 500 lines, with 720 pixels (picture
elements) to each line. This resolution is more than
double that of VHS, superior to Laser Disc, and entirely
comparable with digital masters made in recording
studios.
DVD recording is the next step in video technology.
DVD+ReWritable (DVD+RW) uses phase-change media,
the same technology that formed the basis for CDReWritable. A high-power laser is used to change the
reflectivity of the recording layer. This process can be
repeated more than a thousand times. DVD+Recordable
(DVD+R) uses discs based on an organic dye, a
technology pioneered with the successful CDRecordable format, to produce discs that keep your data
for a lifetime.
With it, you will be able to record TV programmes or
to edit and archive your own camcorder recordings.
Superb digital picture and sound quality, quick access to
the tracks you have recorded and extensive playback
features contribute to a completely new video
experience.
From now on you will enjoy full-length movies with true
cinema picture quality, and stereo or Multi-channel
sound (depending on the disc, and on your playback setup).You will find your recorder remarkably easy to use,
by way of the On-Screen Display on your TV and the
display on the DVD recorder, in combination with the
remote control.
Your Philips DVD recorder is a recorder and player
for digital video discs, with a two-way compatibility
to the universal DVD-Video standard. This means that:
- existing pre-recorded DVD-Video discs can be
played on your Philips DVD recorder and
- recordings, made on your Philips DVD recorder, can
be played on most DVD-Video players and
DVD-ROM drives.
pre-recorded DVD DVD+R(W)
DVD Video
player
Philips DVD
recorder
6 INTRODUCTION
Page 7
Box contents
Cleaning discs
First check and identify the contents of your DVD
recorder package, as listed below:
- DVD recorder
- Remote Control Handset with separately-packed
batteries
- 2-core power cord
- SCART cable
- S-video cable
- Antenna (aerial) cable
- Audio cable
- Video cable
- DVD+RW disc
- User Manual
- Warranty card
If any item should be damaged or missing, please inform
your supplier without delay.
Keep the packaging materials; you may need them to
transport your recorder in the future.
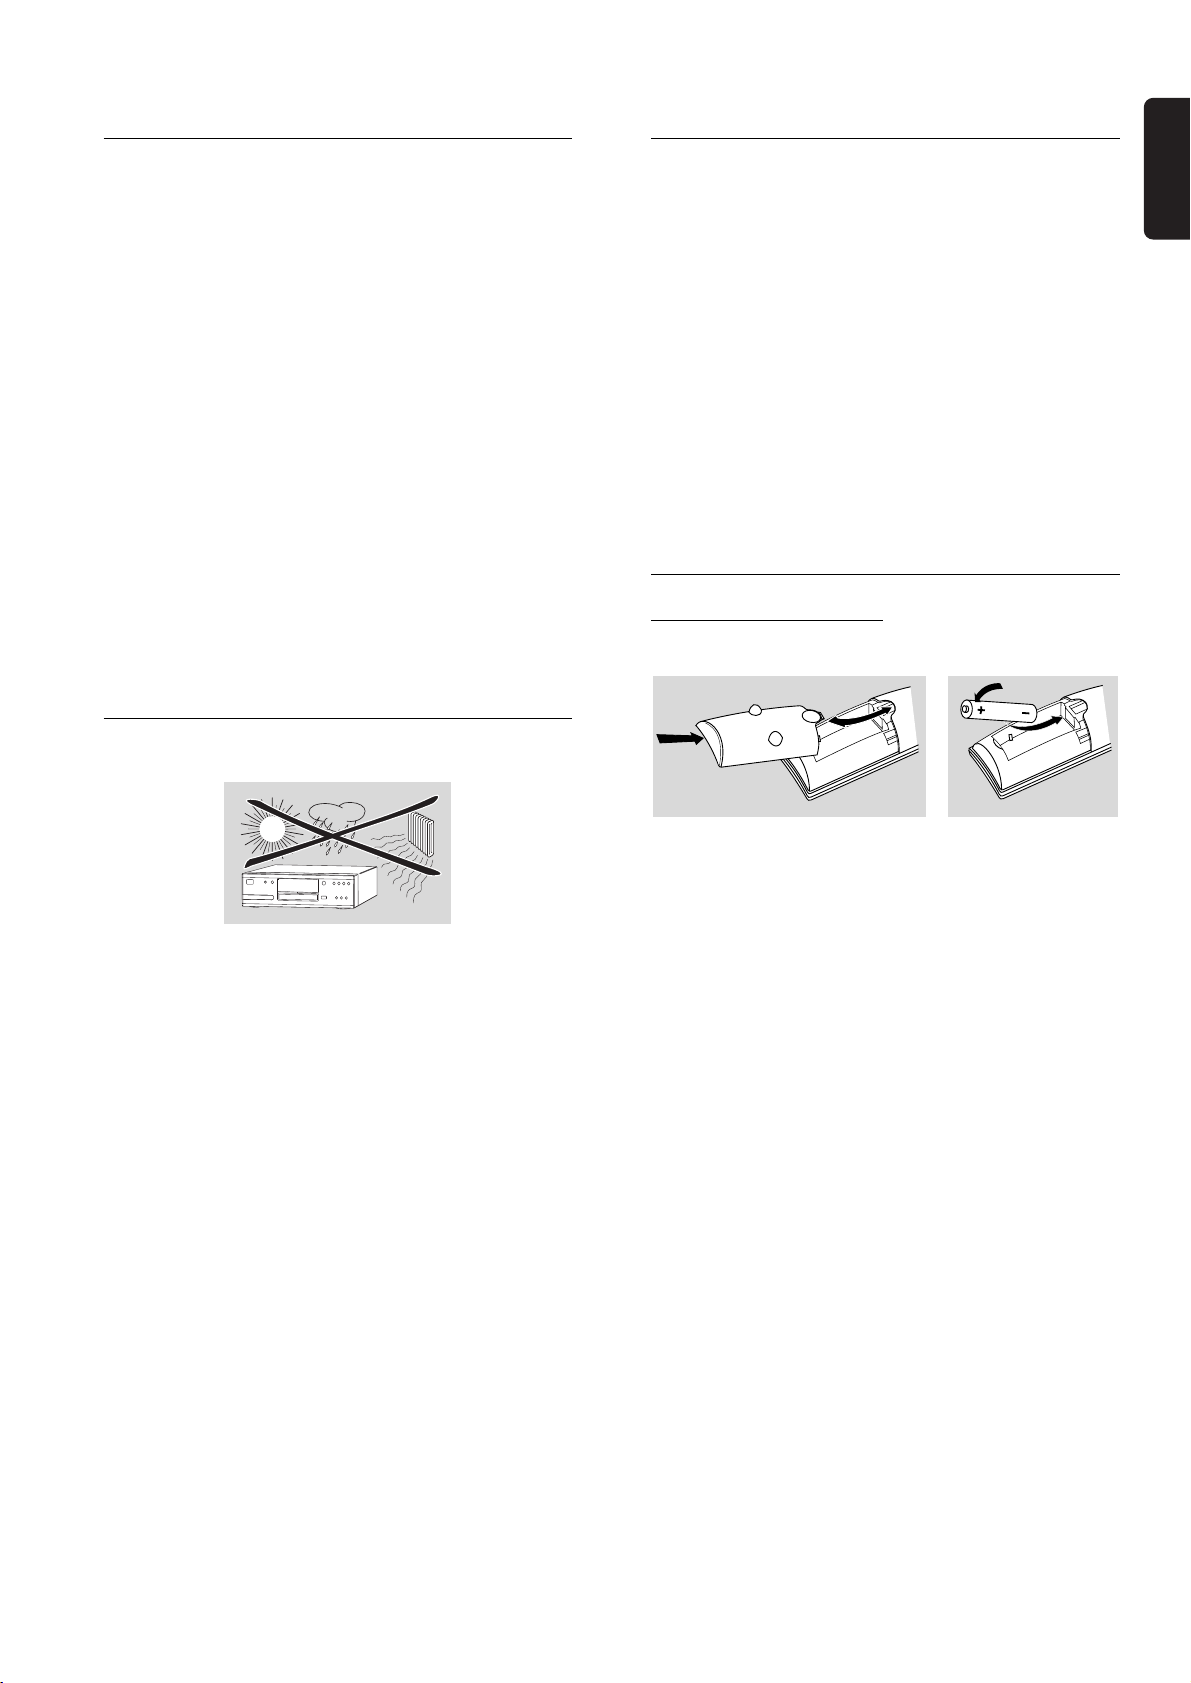
Placement
Some problems may occur because the disc inside the
recorder is dirty. To avoid these problems clean your
discs regularly, in the following way:
l When a disc becomes dirty, clean it with a cleaning
cloth. Wipe the disc from the centre out.
Caution:
Do not use solvents such as benzine, thinner,
commercially available cleaners, or anti-static
spray intended for analogue discs.
Do not use commercially available cleaning discs
to clean the lens, as these discs may damage the
optical unit.
Remote control
Loading the batteries
English
l Place the recorder on a firm, flat surface.
l Keep away from domestic heating equipment and
direct sunlight.
l In a cabinet, allow about 2.5 cm (1 inch) of free
space all around the recorder for adequate
ventilation.
l The lense may cloud over when the DVD recorder
is suddenly moved from cold to warm surroundings.
Playing a CD/DVD is not possible then. Leave the
DVD recorder in a warm environment for two
hours before use, so the moisture can evaporate.
l The recorder should not be exposed to dripping or
splashing, no objects filled with liquids, such as vases,
should be placed on the recorder.
l Open the battery compartment cover.
l Insert two 'AA' (LR-6) batteries as indicated inside
the battery compartment.
l Close the cover.
Caution:
Do not mix old and new batteries. Never mix
different types of batteries (standard, alkaline,
etc.). This may reduce the lifetime of the
batteries.
INTRODUCTION 7
Page 8
English
Installation
Connections - back side of your
S-video (Y/C) connection
DVD recorder
- Please refer to your TV set, VCR, Stereo System and
any other User Manual(s) as necessary to make the
optimal connections.
- Do not connect the power until all other connections
are made.
- Do not connect your DVD recorder to your TV set
via your VCR, because the video quality could be
distorted by the copy protection system.
- For better sound reproduction you can connect the
recorder audio outputs to your amplifier, receiver,
stereo system or A/V equipment. For this see
‘Connecting to A/V receiver or A/V amplifier’.
Caution:
Do not connect the recorder’s audio output to
the phono input of your audio system in order to
avoid damage to your equipment.
Connecting to the antenna
l Remove the antenna (aerial) cable plug from your
TV set and insert it into the antenna socket at the
back of the DVD recorder.
l Plug one end of the antenna (aerial) cable supplied (1)
into the TV socket on the DVD recorder and the other
end into the antenna input socket on your TV set.
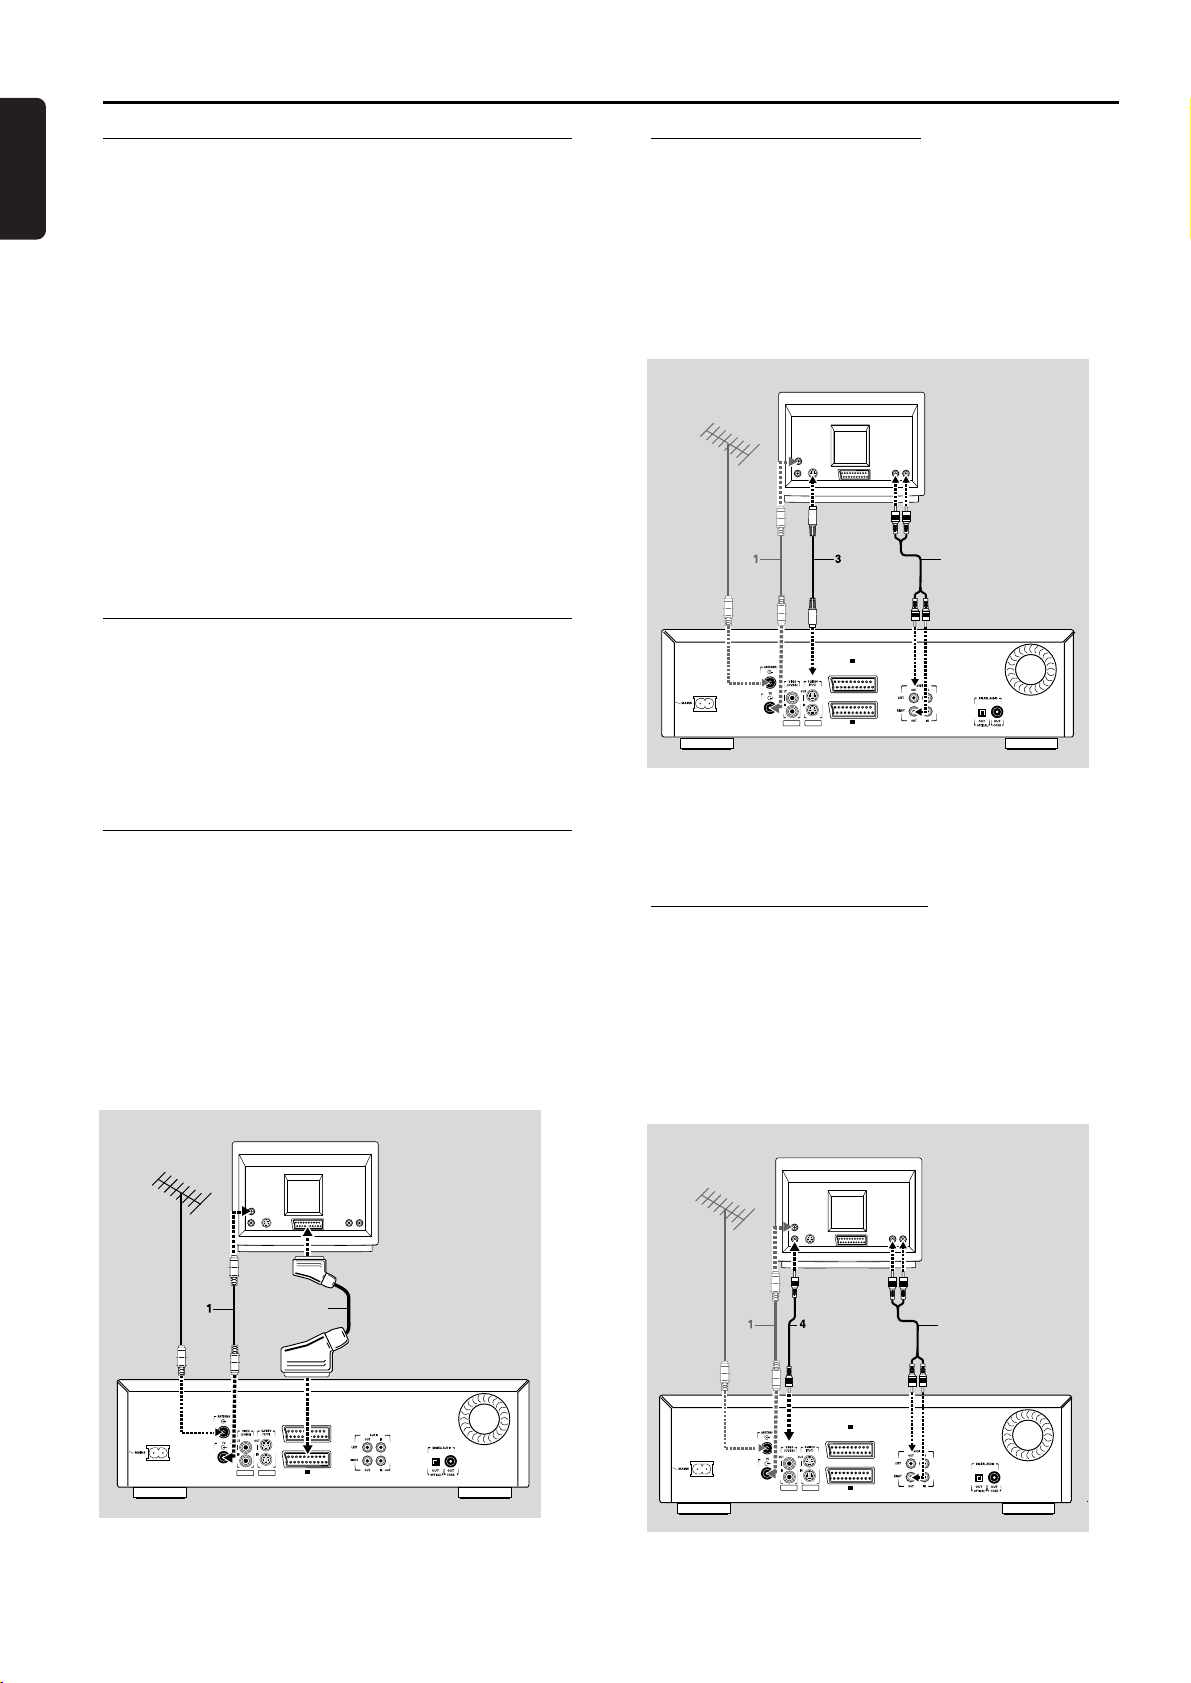
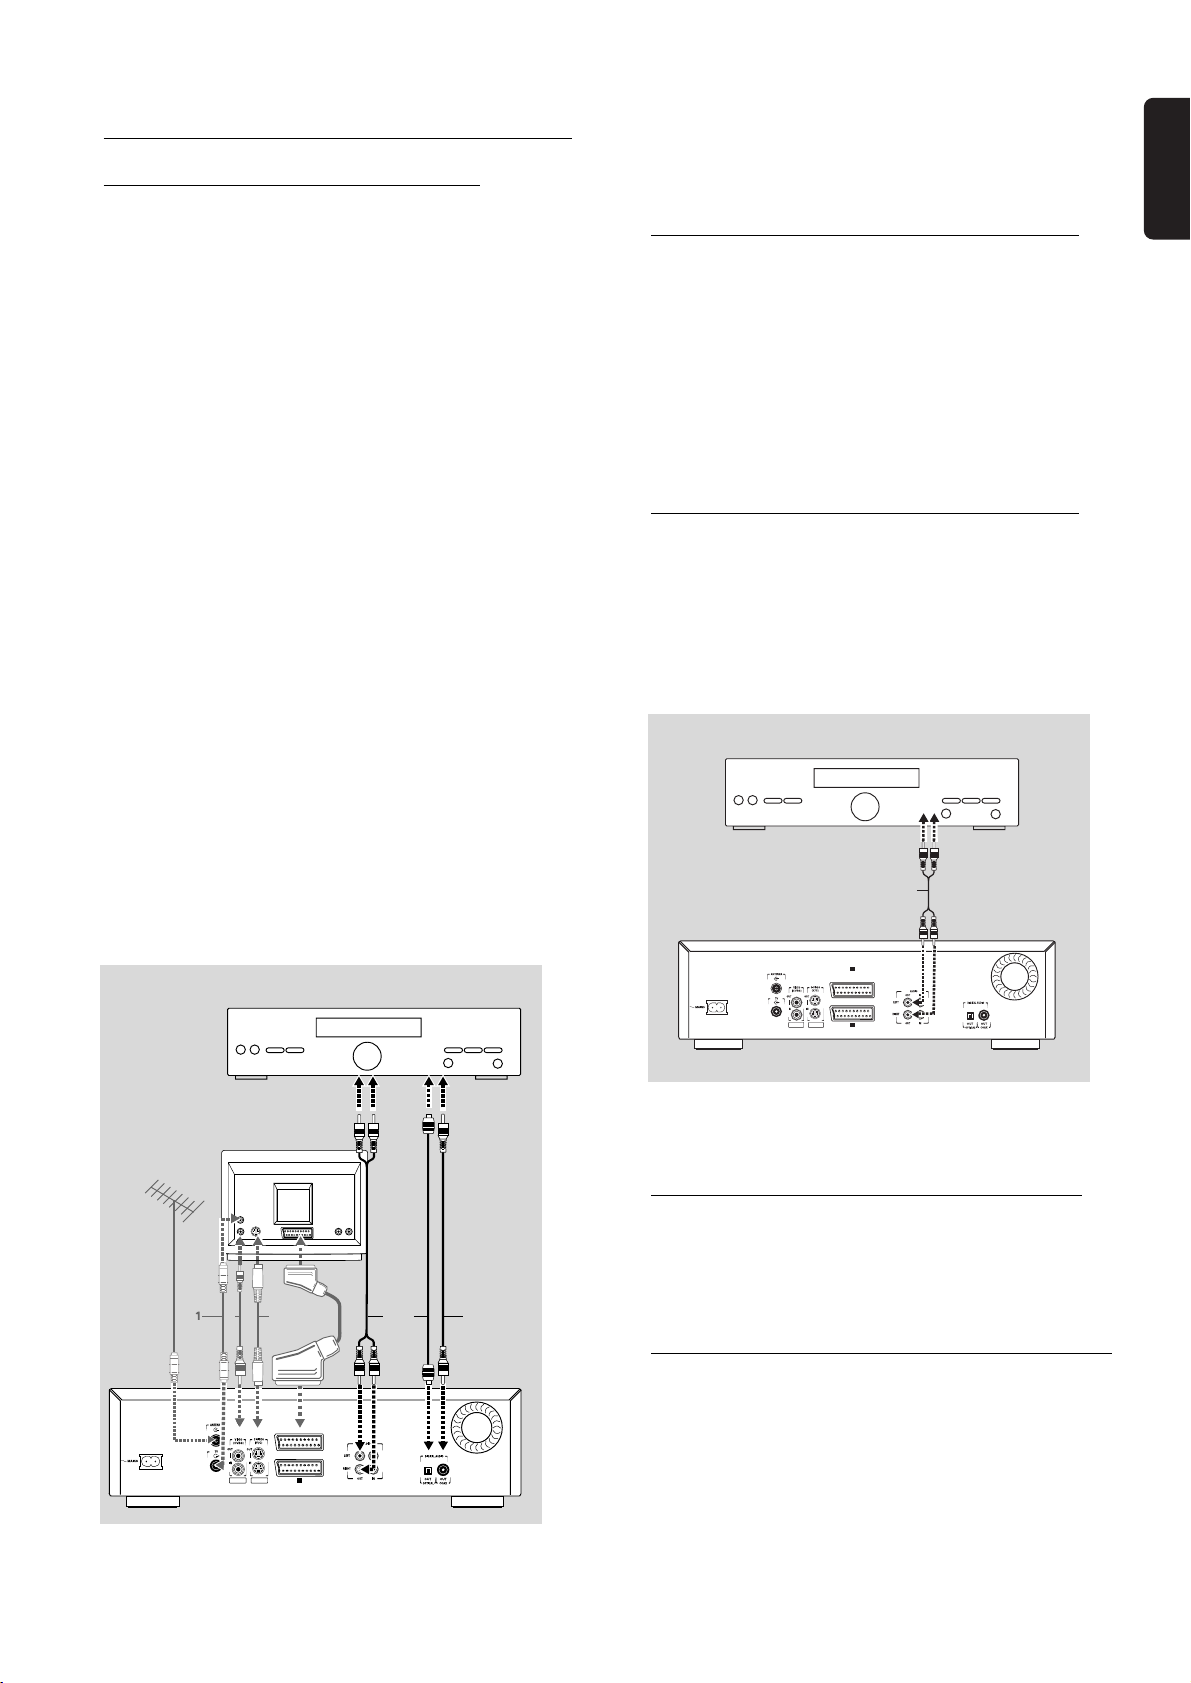
Connecting to a TV set
To obtain the highest possible picture and sound quality
from your TV set it is recommended to use the SCART
connector on both DVD recorder and TV set.
l Connect the bottom SCART connector (EXT 1) to
the TV set, using the SCART cable supplied (2) as
shown in the drawing. If your TV set is equipped
with EasyLink or Cinema Link, make sure you use
the correct scart connector. For this refer to the
user manual of your TV set.
l Connect the S-video output socket to the
corresponding input socket on the TV set, using the
supplied S-video cable (3).
l Connect the audio Left (white) and Right (red)
output sockets to the corresponding sockets on the
TV set using the audio cable supplied (5).
TV
5
AUX- I/0
EXT 2
EXT 4 EXT 3
TO TV I/0
EXT 1
If your TV set is not equipped with S-video sockets, then
connect the DVD recorder with the CVBS sockets to
your TV set.
Video (CVBS) connection
l Connect the Video (CVBS) output socket (yellow)
to the corresponding input socket on the TV set
using the video cable supplied (4).
l Connect the audio Left (white) and Right (red)
output sockets to the corresponding sockets on the
TV set using the audio cable supplied (5).
TV
2
AUX- I/0
EXT 2
EXT 4 EXT 3
TO TV I/0
EXT 1
If your TV set is not equipped with a SCART connector,
you can connect the DVD recorder with the S-video
(Y/C) sockets.
8 INSTALLATION
EXT 4 EXT 3
TV
5
AUX- I/0
EXT 2
TO TV I/0
EXT 1
Page 9
Connecting to audio equipment
Connecting to A/V receiver or A/V
amplifier with digital Multi-channel
decoder
The best possible sound quality is obtained by
connecting your DVD recorder to an A/V receiver with
Multi-channel decoder (Dolby Digital, MPEG 2 and DTS).
Digital Multi-channel sound
Digital Multi-channel connection provides the optimum
sound quality. For this you need a Multi-channel A/V
receiver that supports one or more of the audio types
supported by your DVD recorder (MPEG 2, Dolby
Digital and DTS). For this you can check the receiver
manual and the logos on the front of the receiver.
If you cannot connect your DVD recorder to an A/V
receiver with Multi-channel decoder, choose one of the
following alternatives.
Connecting to a receiver equipped with
two channel digital stereo (PCM)
l Connect the recorder’s digital audio output to the
corresponding input on your receiver. Use the
supplied video (CVBS) cable (7) or an optional
digital optical audio cable (8).
l After installation you will need to activate PCM on
the DVD recorder’s digital output (see ‘User
Preferences’).
Connecting to a receiver equipped with
Dolby Pro Logic
English
l Connect the recorder’s digital audio output to the
corresponding input on the receiver. Use a digital
coaxial cable (7) or a digital optical audio cable (8).
If you do not own a digital coaxial audio cable (not
supplied), you may use the supplied video cable (4).
Note:
If the audio type of the digital output does not match the
capabilities of your receiver, the receiver will produce a
strong, distorted sound. The audio type of the DVD disc in
play is displayed in the Status Window, when changing the
language. 6 Channel Digital Surround Sound via digital
connection can only be obtained if your receiver is equipped
with a Digital Multi-channel decoder.
AMPLIFIER
TV
l Connect the recorder to the TV set and connect the
recorder’s audio Left and Right output sockets to the
corresponding inputs on the Dolby Pro Logic
Audio/Video receiver, using the audio cable supplied (6).
AMPLIFIER
6
AUX- I/0
EXT 2
EXT 4 EXT 3
TO TV I/0
EXT 1
l Make the appropriate Sound settings for Analogue
Output in the user preferences menu.
EXT 4 EXT 3
Connecting to a TV set equipped with a
Dolby Pro Logic decoder
l Connect the recorder to the TV set as described in
643 87
chapter ‘Connecting to a TV set’.
Connecting to a receiver with two channel
analogue stereo
AUX- I/0
EXT 2
l If you have a receiver with two-channel analogue
TO TV I/0
EXT 1
stereo without any of the above mentioned sound
systems, connect the audio Left and Right output
sockets to the corresponding sockets on your
receiver, amplifier or stereo system. Use the audio
cable supplied (6).
INSTALLATION 9
Page 10
English
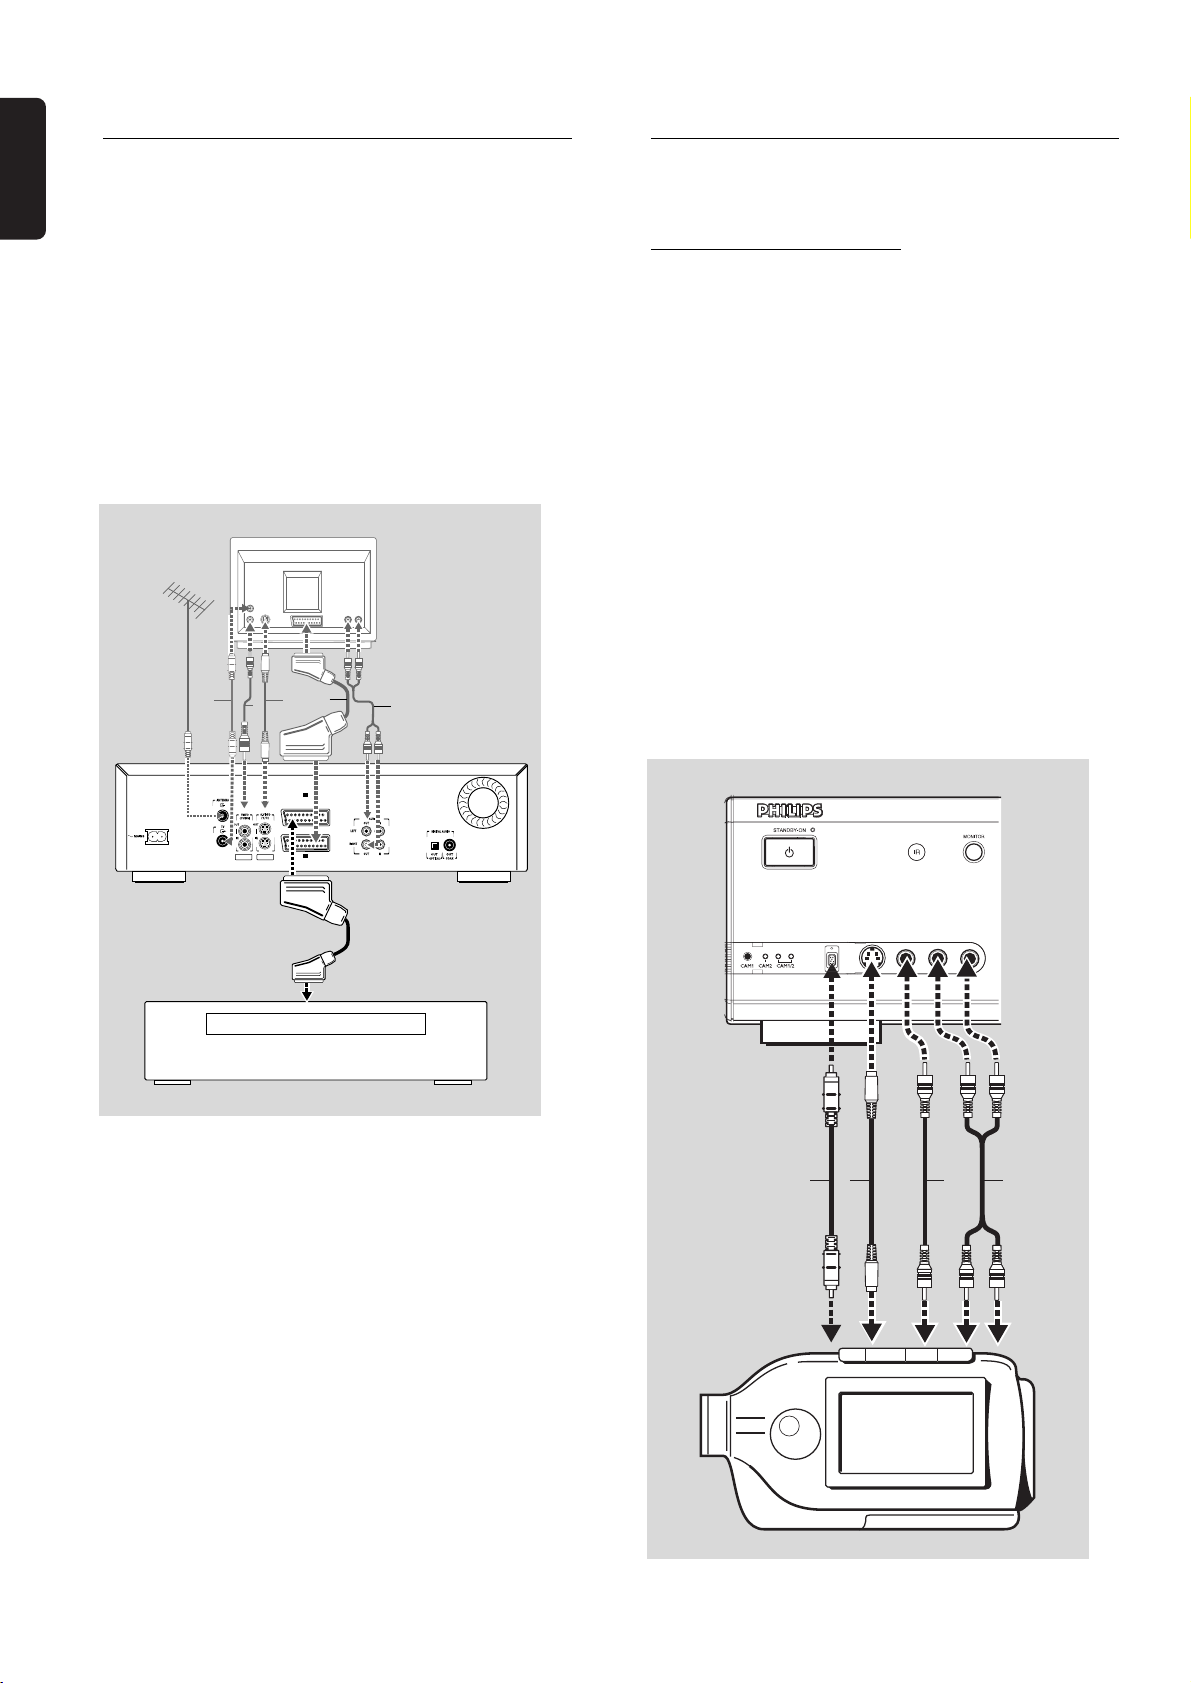
Connecting to other equipment
Connections - frontside of your
Use the top
SCART connector (EXT 2) on your DVD
recorder to make connections to a:
- Satellite receiver or Set top box,
- VCR,
- DVD-Video player
Most pre-recorded video cassettes and DVD discs are
copy protected. If you try to copy them the display
shows ‘COPY PROTECT’.
For installation of a decoder, see ‘User Preferences’ ‘Installation’.
TV
4
32
5
1
DVD recorder
Camcorder connection
l If you have a DV or Digital 8 camcorder, connect
the i-link DV input socket (1) to the corresponding
output socket on the camcorder using the i-link
cable of your camcorder.
l If you have a Hi-8 or S-VHS(C) camcorder, connect
the S-video input socket to the corresponding
output socket on the camcorder, using the S-video
cable supplied (2) and connect the audio cable (4)
supplied.
l Otherwise connect the Video input socket (yellow)
to the corresponding output socket on the
camcorder using the video cable supplied (3) and
connect the audio Left (white) and Right (red) input
sockets to the corresponding sockets on the
camcorder using the audio cable supplied (4).
l If your camcorder has mono sound, use only the left
audio connector. In this case the sound will be
recorded on both audio channels.
AUX- I/0
EXT 2
EXT 4 EXT 3
TO TV I/0
EXT 1
Set top box
Notes:
- If the power is off or Low Power Standby is selected (see
User Preferences - features), the signal from EXT 2 will not
be passed on to the TV set on EXT 1.
- EasyLink functionality will not be available to devices
SCART
connected via the DVD recorder’s EXT 2
connector.
AUDIOS-VIDEO VIDEO
LR
1
DVDR 985 DVD RECORDER
32
4
10 INSTALLATION
Camcorder
Camcorder
Page 11

Power supply
First time set-up: virgin mode
l Make sure that all necessary connections are made
before connecting the DVD recorder to the power
supply.
l Plug the power cable supplied into the Power
connector on the rear of the recorder.
l Plug the mains plug into an AC outlet.
Note:
Always check if the local mains voltage matches the required
220V - 240V.
When the recorder is in the Standby position, it is still
consuming some power.
If you wish to disconnect your DVD recorder completely from
the mains, withdraw the plug from the AC Outlet.
When the DVD recorder is disconnected from the mains, TV
channels and timer data will be stored typically 1 year.
After switching on the DVD recorder for the very first
time the ‘virgin mode screen’ will appear.
In ‘virgin mode’ you may have to set your preferences
for some of the recorder features.
If the ‘virgin mode screen’ does not appear, your DVD
recorder has been installed already. You may still change
the settings via the ‘installation menu’.
Depending on the kind of TV set, preferences will have
to be set manually or they will be taken over
automatically from the TV set.
Automatic setting
When your TV set is equipped with EasyLinkTM, Cinema
LinkTM, NEX
TVIEW Link
MegaLogicTM, the TV settings will be taken over from the
TV set but they cannot be changed manually afterwards.
When preferences are taken over from your TV set, the
message ‘
wait
Easy Link loading data from TV-please
’ will appear.
Menus for which no preferences are available will be
displayed. They have to be set manually.
TM
, SmartLinkTM, Q-LinkTMor
English
Switching on
l Switch on the TV set and select the programme
number that you have chosen for video playback
(see operating manual for your TV set).
l Press B STANDBY/ON.
‰ The recorder display lights up. If you have not yet
installed your DVD recorder, it will enter ‘virgin
mode’. In this mode you will have to set your
personal preferences.
DVDR 985
Note:
Preferences have to be set in the order in which the item
menus will appear on the screen.
If the recorder is switched off while setting user preferences,
all preferences have to be set again after switching the
recorder on again.
The ‘virgin mode’ will only be concluded after the
preferences for the last item have been confirmed.
Follow TV
Easy Link
loading data from TV please wait
INSTALLATION 11
Page 12
English
Manual setting
When a menu is displayed:
l Use the wv (down up cursor) keys to go through
the options in the menu. The icon of the selected
option will be highlighted.
l Use OK to confirm your selection and to select the
next menu.
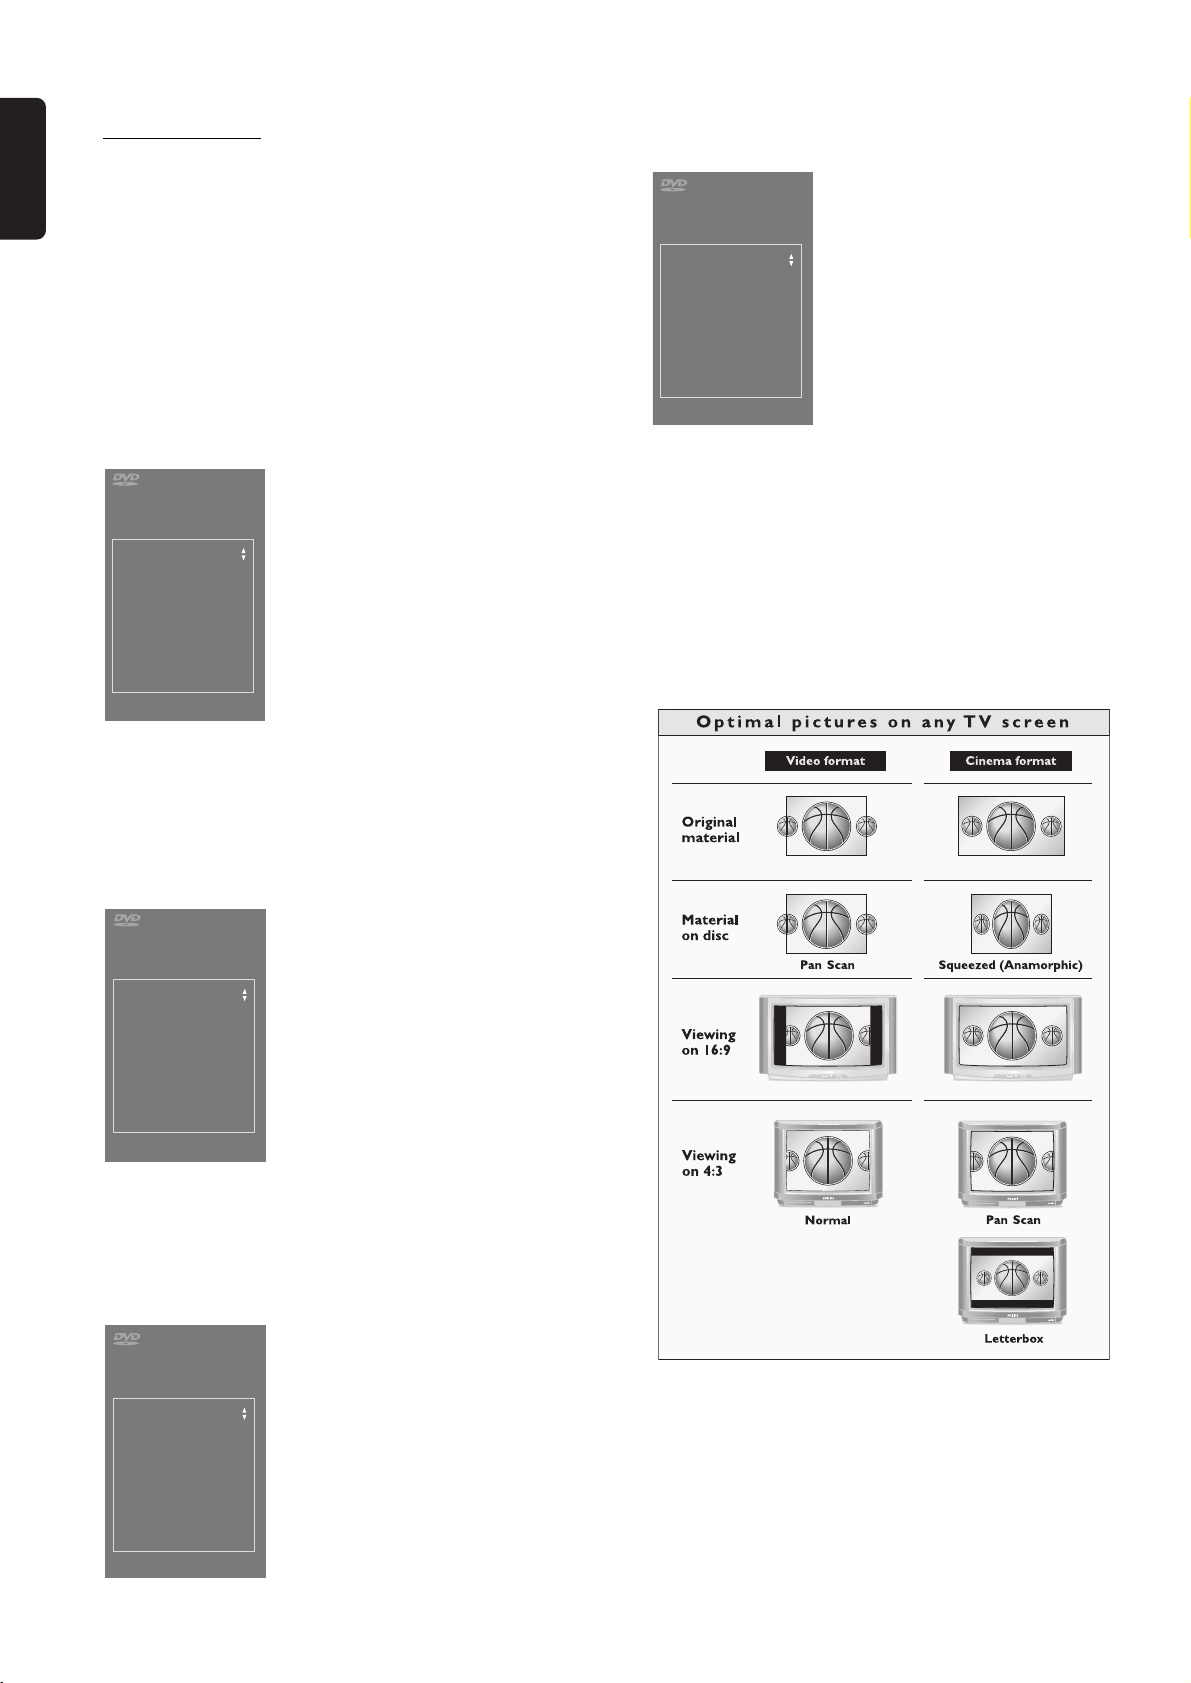
The following items may have to be set in virgin mode:
TV Shape
Virgin mode
TV Shape
4:3 letterbox
4:3 panscan
16:9
Menu language
The on-screen menus of DVD-Video discs will be
displayed in the language you choose.
Virgin mode
Menu language
English
Español
Français
Italiano
Deutsch
Press OK to continue
Audio language
The sound of DVD-Video discs will be in the language
you choose, provided this is available on the disc in play.
If not, speech will revert to the first spoken language on
the disc. Also the DVD-Video disc menu will be in the
language you choose, provided this is available on the disc.
Virgin mode
Audio language
English
Español
Français
Português
Italiano
Press OK to continue
You can choose:
-
16:9
if you have a wide screen (16:9) TV set.
-
4:3
if you have a regular (4:3) TV set. In this case you
can also choose between:
-
Letterbox
for a ‘wide-screen’ picture with black
bars at the top and bottom,
-
Pan Scan
, for a full-height picture with the sides
trimmed. If a disc has Pan Scan, the picture then
moves (pans) horizontally to keep the main action
on the screen.
Press OK to continue
Subtitle language
The subtitles of DVD-Video discs will be in the language
you choose provided this is available on the disc in play. If
not, subtitles will revert to the first subtitle language on
the disc.
Virgin mode
Subtitle language
English
Español
Français
Português
Italiano
Press OK to continue
12 INSTALLATION
Page 13

Country
Select your country. This is used as input for the
‘Parental Control’ feature (see ‘Access Control’) as well
as the searching of TV channels.
Virgin mode
Time/Date
When Channel auto search is completed the actual Time
and Date are also set automatically.
If the time in the DVD recorder display is not correct,
the clock must be set manually.
English
Country
Austria
Belgium
Denmark
Finland
France
Press OK to continue
Auto TV Channel Search
Make sure the antenna is connected. See ‘Connecting to
the antenna’. Your DVD recorder will search for all TV
channels.
It stores channels in the sequence they are found.
l Confirm with OK.
‰ Auto search starts. This can take several minutes.
Autom.search
Searching for TV channels
XX channels found
Autom.search
Autom.search complete
XX channels found
09: 40
2001
02
09
To continue
Press OK
’, ’
Date
’ if required,
l Adjust ’
Time
Year
Month
Date
Time
’, ’
Year
’, ’
Month
with the w (down cursor) or v (up cursor) key.
l Change values with the the t (left cursor) or u
(right cursor) key or the digit keys 0-9.
l To end, press OK.
Note:
All these items may have to be set after first start up (‘virgin
mode’). After that they can always be adapted in the user
preferences menu. When your TV set is equipped with
EasyLink the TV set presets will be taken over from the TV
set but they cannot be changed manually afterwards.
Please wait
‰ When Auto search is completed ‘
search complete
-
XX channels found
Autom.
’ appears
on the TV screen.
After Auto channel search you can have TV channels
stored automatically in the same order as your TV set.
See ‘User preferences installation’ - ‘Follow TV’.
Virgin mode settings are now completed.
All settings can still be changed. See ‘User preferences’.
INSTALLATION 13
Page 14
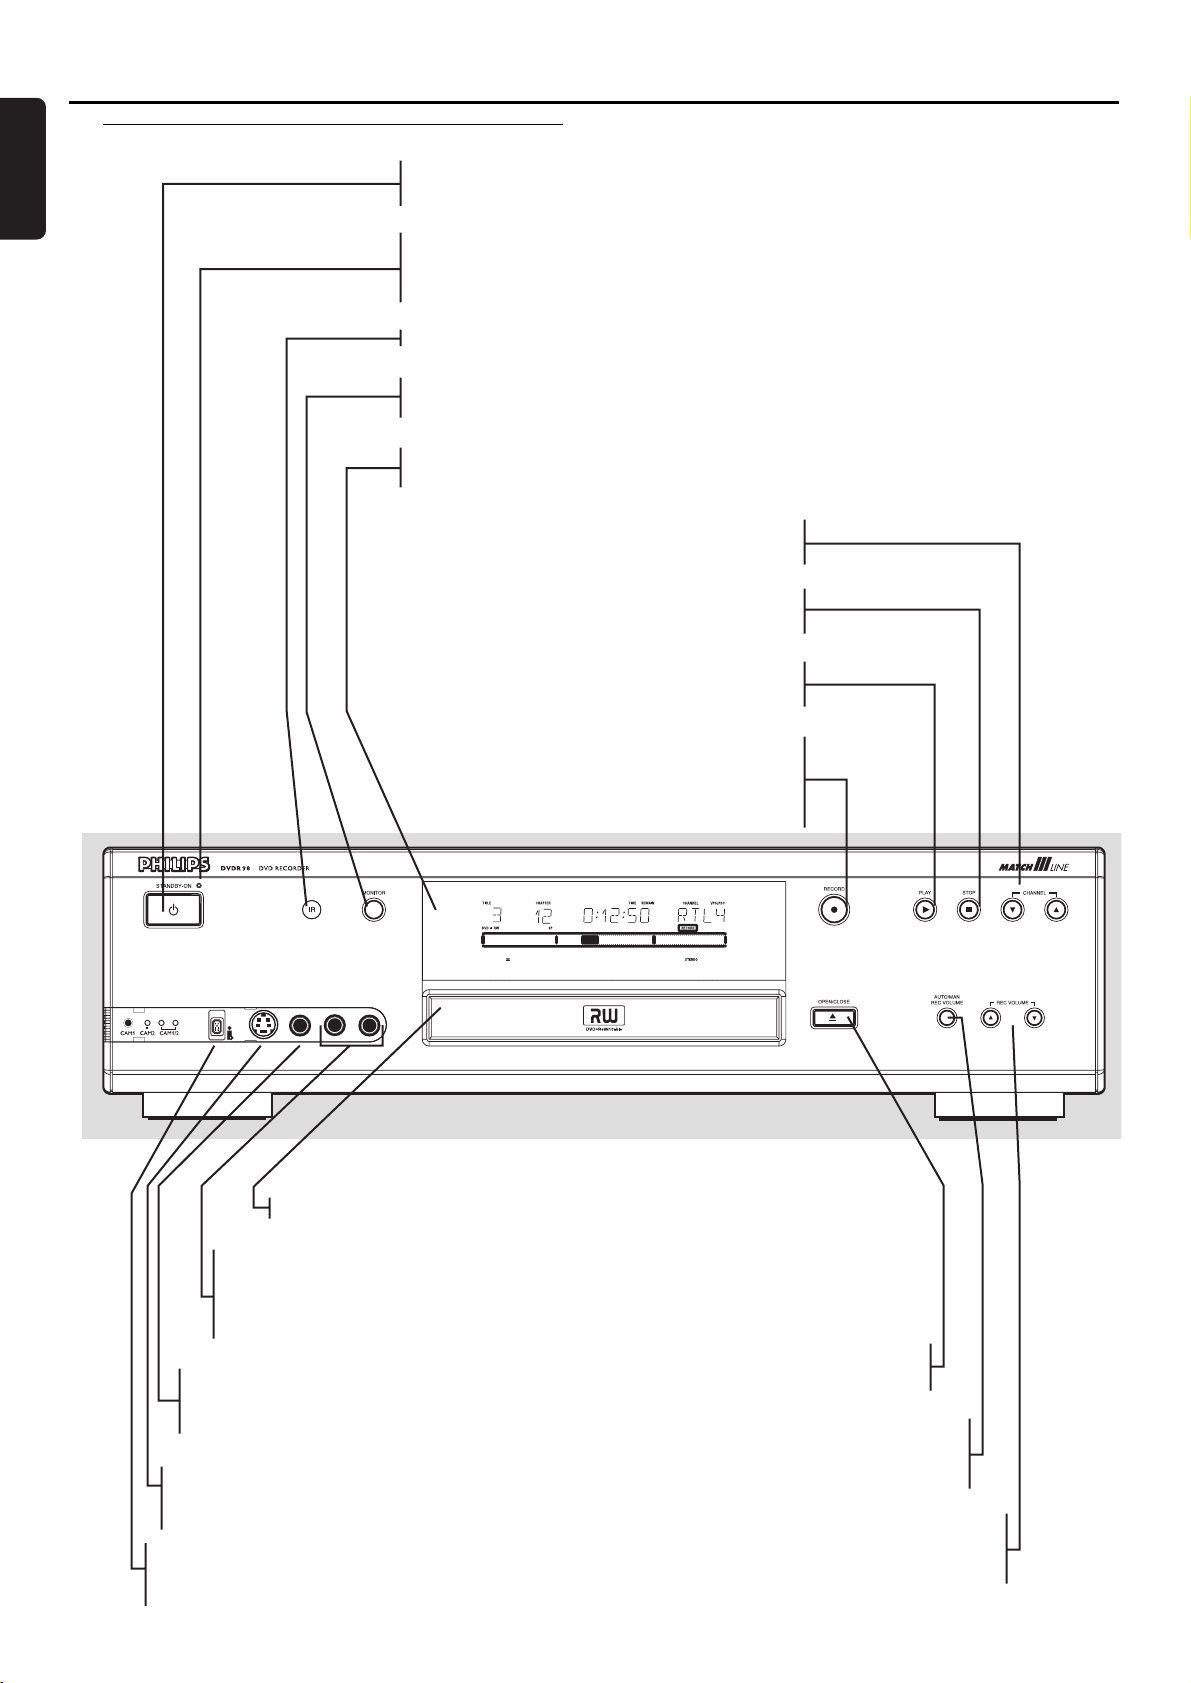
Functional overview
AUDIOS-VIDEO VIDEO
LR
DIGITAL
5
B STANDBY/ON
- switches the recorder to power/standby mode
Standby indicator
- lights up red when the recorder is in standby mode
- lights up green when the recorder is operative
Infrared remote control receiver
MONITOR
- switches between disc mode and monitor mode
Display
- displays the current status of the recorder
CHANNEL
- to select channels manually
9 STOP
- stops video/audio play or recording
2 PLAY
- starts video/audio play
0 RECORD
- direct recording of the selected programme
on TV or the recorder (depending on the
DIRECT RECORD setting)
Disc loading tray
AUDIO (Left/Right)
- Audio input socket left/right to
connect a camcorder or video
recorder
VIDEO (CVBS)
- Video input socket to connect a
camcorder or video recorder
S-VIDEO
- Video input socket to connect a
camcorder or video recorder
DV
-Audio/Video input socket to connect a digital camcorder
/ OPEN/CLOSE
- opens/closes the disc tray
AUTO/MAN REC VOLUME
- to adjust the recording level
automatically or manually
MANUAL
- 3 4 to increase/decrease
the recording level
English
Front of recorder
14 FUNCTIONAL OVERVIEW
Page 15

Apparatus Claims of U. S. Patent Nos.
4,631,603, 4,577,216, 4,819,098, and 4,907,093
licensed for limited viewing uses only.
AUX- I/0
EXT 2
TO TV I/0
EXT 1
EXT 4 EXT 3
MAINS
- connection to the mains
TV
- RF connection to TV set
ANTENNA
- RF connection to antenna/cable TV signal
Video (CVBS)
- OUT: for connection to a TV, receiver or amplifier with CVBS video inputs
- IN: for connecting a video source with CVBS outputs
S-video (Y/C)
- OUT: for connection to a TV, receiver or amplifier with S-video (Y/C) inputs
- IN: for connecting a video source with S-video (Y/C) outputs
AUX I/O (EXT II)
- for connection to a satellite receiver, decoder, video recorder, set top box
etc. via
SCART
TO TV I/O (EXT I)
- for connection to a TV with SCART
AUDIO OUT L/R
- connection to an amplifier, receiver, stereo system or
to a TV that is not equipped with a SCART connector
AUDIO IN L/R
- connection to the audio output of a video source that
is not equipped with a SCART connector
OUT OPTICAL
- connection to an amplifier, receiver or stereo system
with a digital (optical) audio input
OUT COAX
- connection to an amplifier, receiver or stereo system
with a digital (coaxial) audio input
Rear of recorder
English
FUNCTIONAL OVERVIEW 15
Page 16
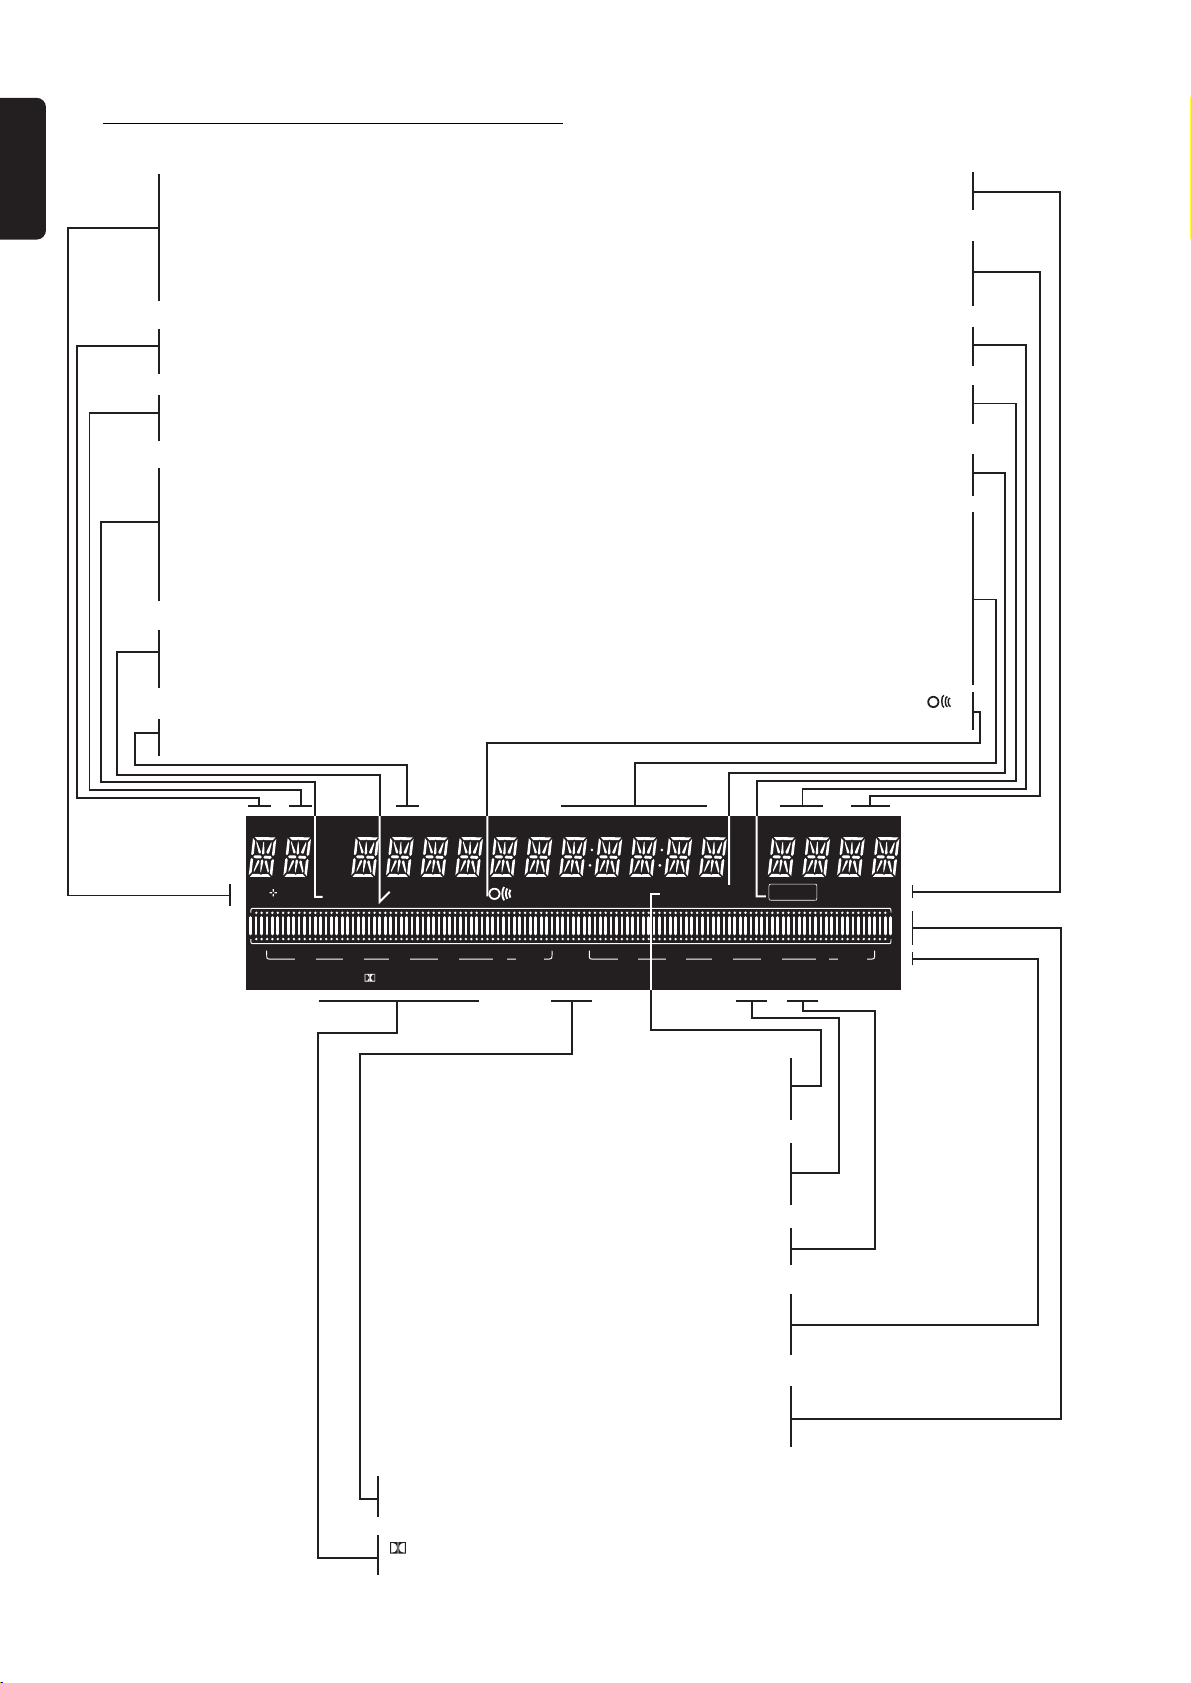
English
Display
DVD
- DVD Video disc inserted
DVD+R
- DVD+Recordable disc inserted
DVD+RW
- DVD+Rewritable disc inserted
TITLE
- DVD title number
TRACK
- VCD/CD track number
VCD
- Video CD inserted
CD
- Audio CD inserted
SVCD
- Super Video CD inserted
HQ - SP - LP - EP
- Selected recording mode: High Quality,
Standard Play, Long Play or Extended Play
CHAPTER
- DVD chapter number
DECODER
- Decoder activated for current preset
VPS/PDC
- Video Programming System/Programme
Delivery Control active on current preset
CHANNEL
- Preset name or number
RECORD
- Recording in progress
TIMER
- Timer programmed or active
TRACK TIME
- Track time in minutes and seconds
TOTAL TIME
- Total playback or recording time in hours,
minutes and seconds
TOTAL REMAIN
- Total remaining playback or recording time
in hours, minutes and seconds
- Remote control active (flashing)
TITLE TRACK
DVD CDVRW
CHAPTER TOTAL TIME REMAINTRACK
SA
HQ
SP LP EP+
TIMER
SAT
PCMDTS DIGITALMPEG
MANUAL
-30-40 -10-20 0 OVER-30-40 -10-20 0 OVER
CHANNEL
RECORD
NICAM STEREO
SAT
VPS/PDC
DECODER
- Recorder prepared for or engaged in satellite
recording
NICAM
- NICAM digital stereo sound on current
preset
STEREO
- Stereo sound from tuner
dB scale
- indicates recording volume when using
manual level control
Disc bar
- Displays disc content, recording level or
formatting progress
16 FUNCTIONAL OVERVIEW
MANUAL
- Manual recording level control
DIGITAL - DTS - MPEG - PCM
- Active audio format
Page 17
(
)
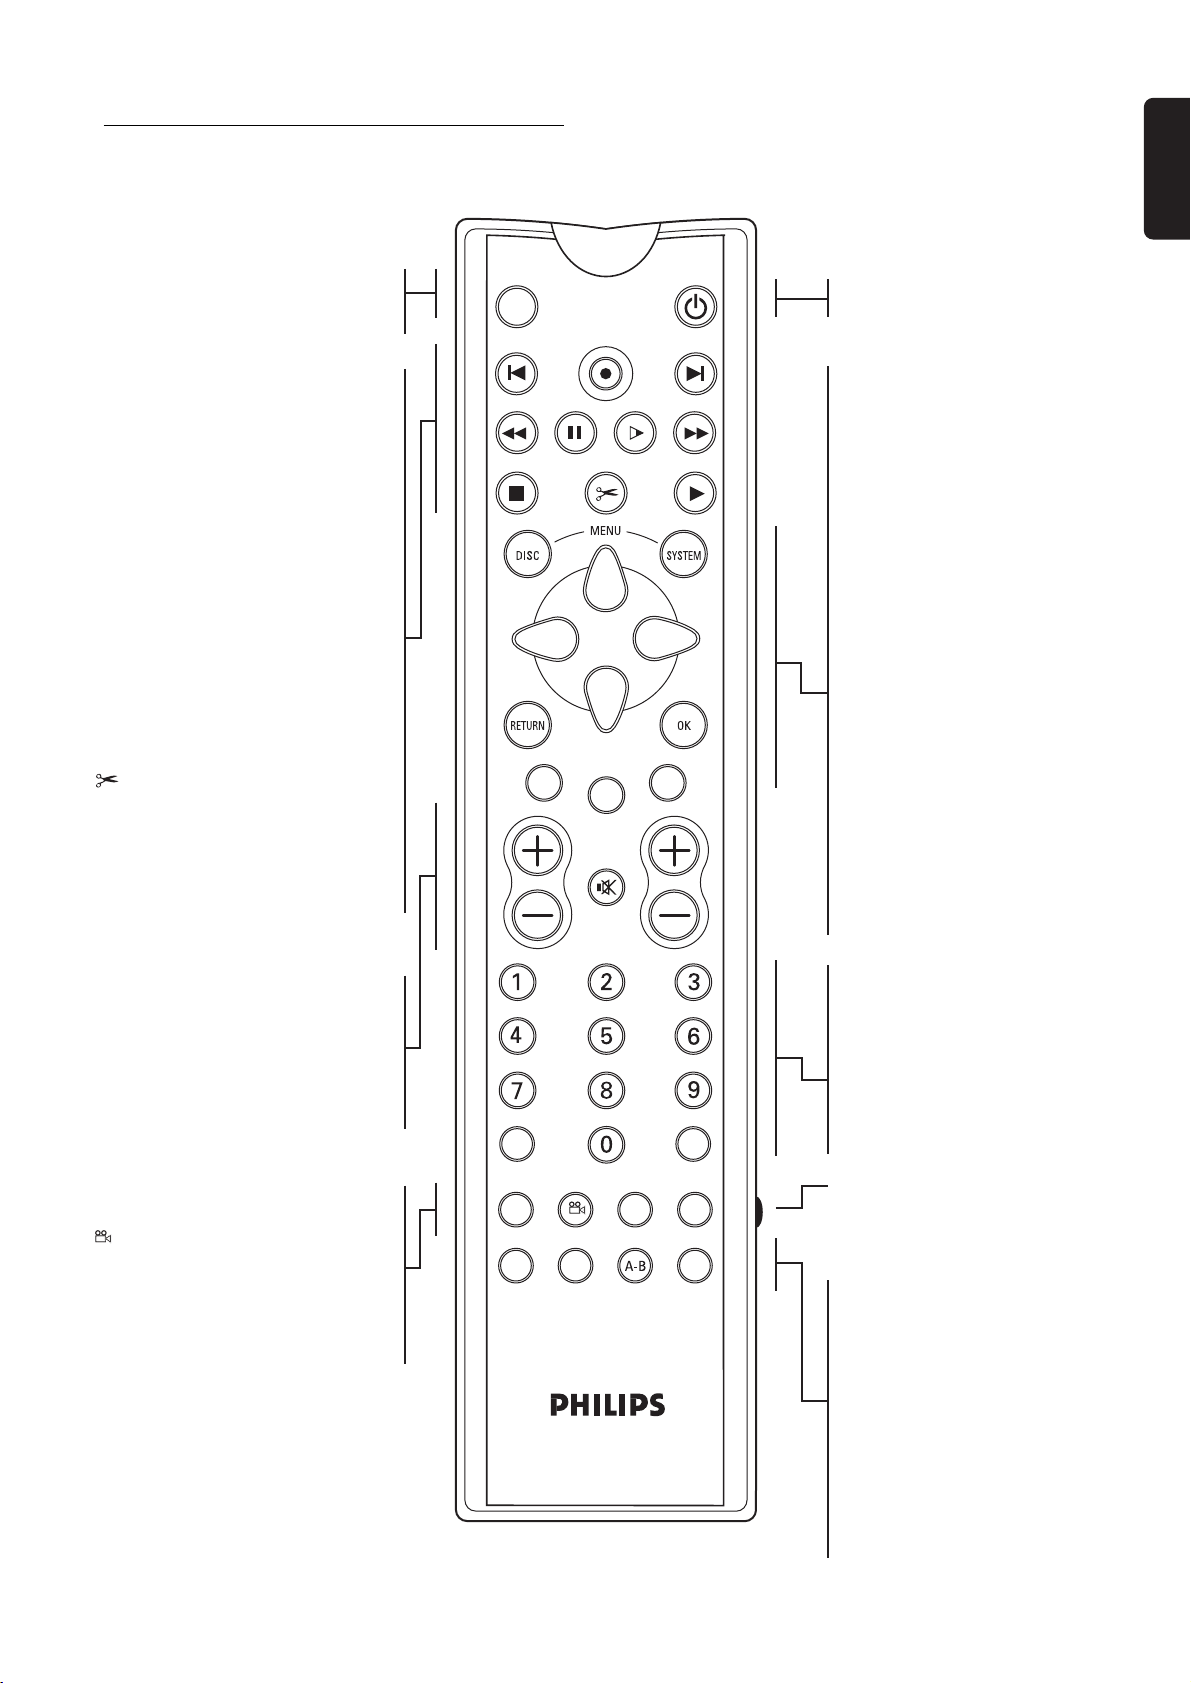
Remote control
English
MONITOR
- switches between disc mode and
monitor mode
J
- previous chapter, track or title
0
- direct recording of the currently
selected programme
K
- next chapter, track or title
Q
- search backward
;
- pause
H
- slow motion
R
- search forward
9
- stop
FSS
- displays Favorite Scene Selection
menu for DVD+RW or DVD+R
disc
2
- play
MONITOR ON/OFF
VOL
PAUSE SLOW
CLEAR
REC/OTR
TIMER
MUTE
NEXT PREVIOUS
FORWARDREVERSE
PLAYSTOP FSS
SELECT
CH
ON/OFF B
DISC MENU
- displays DVD disc menu or index
picture screen
SYSTEM MENU
- displays recorder system menu
bar
w v u t
- down/up/right/left cursor
movement
RETURN
- return to previous menu on
(S)VCD disc
CLEAR
- delete last entry/clear timer
TIMER
- displays the ‘timer menu’
SELECT
- switches between different values
in a menu
- switches between record modes
in the Index Picture Screen and in
monitor mode
OK
- acknowledge menu selection
VOL +/–
- TV volume up/down
c
- TV Mute ON/OFF
CH +/–
- programme up/down
a ZOOM
- enlarge video image
ANGLE
- select DVD camera angle
Z SUBTITLE
- subtitle language selector
Y AUDIO
- audio language selector
T/C
ZOOM ANGLE SUBTITLE AUDIO
DIM REPEAT REPEAT SCAN
A/CH
ZYa
0-9
- numerical key pad
T/C
- select title
- select chapter
A/CH Alternate Channel
- switches to the previous TV
channel
SIDE SWITCH
- enables other keys to operate
the TV set (see Appendix)
DIM
- changes brightness setting of
display
REPEAT
- repeat chapter, track, title, disc
REPEAT A-B
- repeat sequence
SCAN
- playback of the first 10 seconds
of each chapter within a title
(DVD) or the first 10 seconds of
each track on a disc
VCD/CD
FUNCTIONAL OVERVIEW 17
Page 18
English
Operation
Important notes for operation
Disc types
You can switch on the DVD recorder with the
B STANDBY/ON key. Keep your DVD recorder
connected to the mains at all times to ensure that
programmed recordings can be made and that the
television functions normally.
DVDR 985
Both the DVD recorder and the remote control have an
’Emergency interrupt’ button. You can use the
B STANDBY/ON button to interrupt a function.
When you have an operating problem, you can interrupt
the function and start again.
MONITOR ON/OFF
You will recognize the different types of discs, that can
be used in your DVD recorder by the logo. Depending
on the disc type you can either use it for recording and
playback or playback only. Some discs are not suitable at
all to be used in the DVD recorder.
In the next table a summary is given of all excisting disc
types and their DVD recorder compatibility.
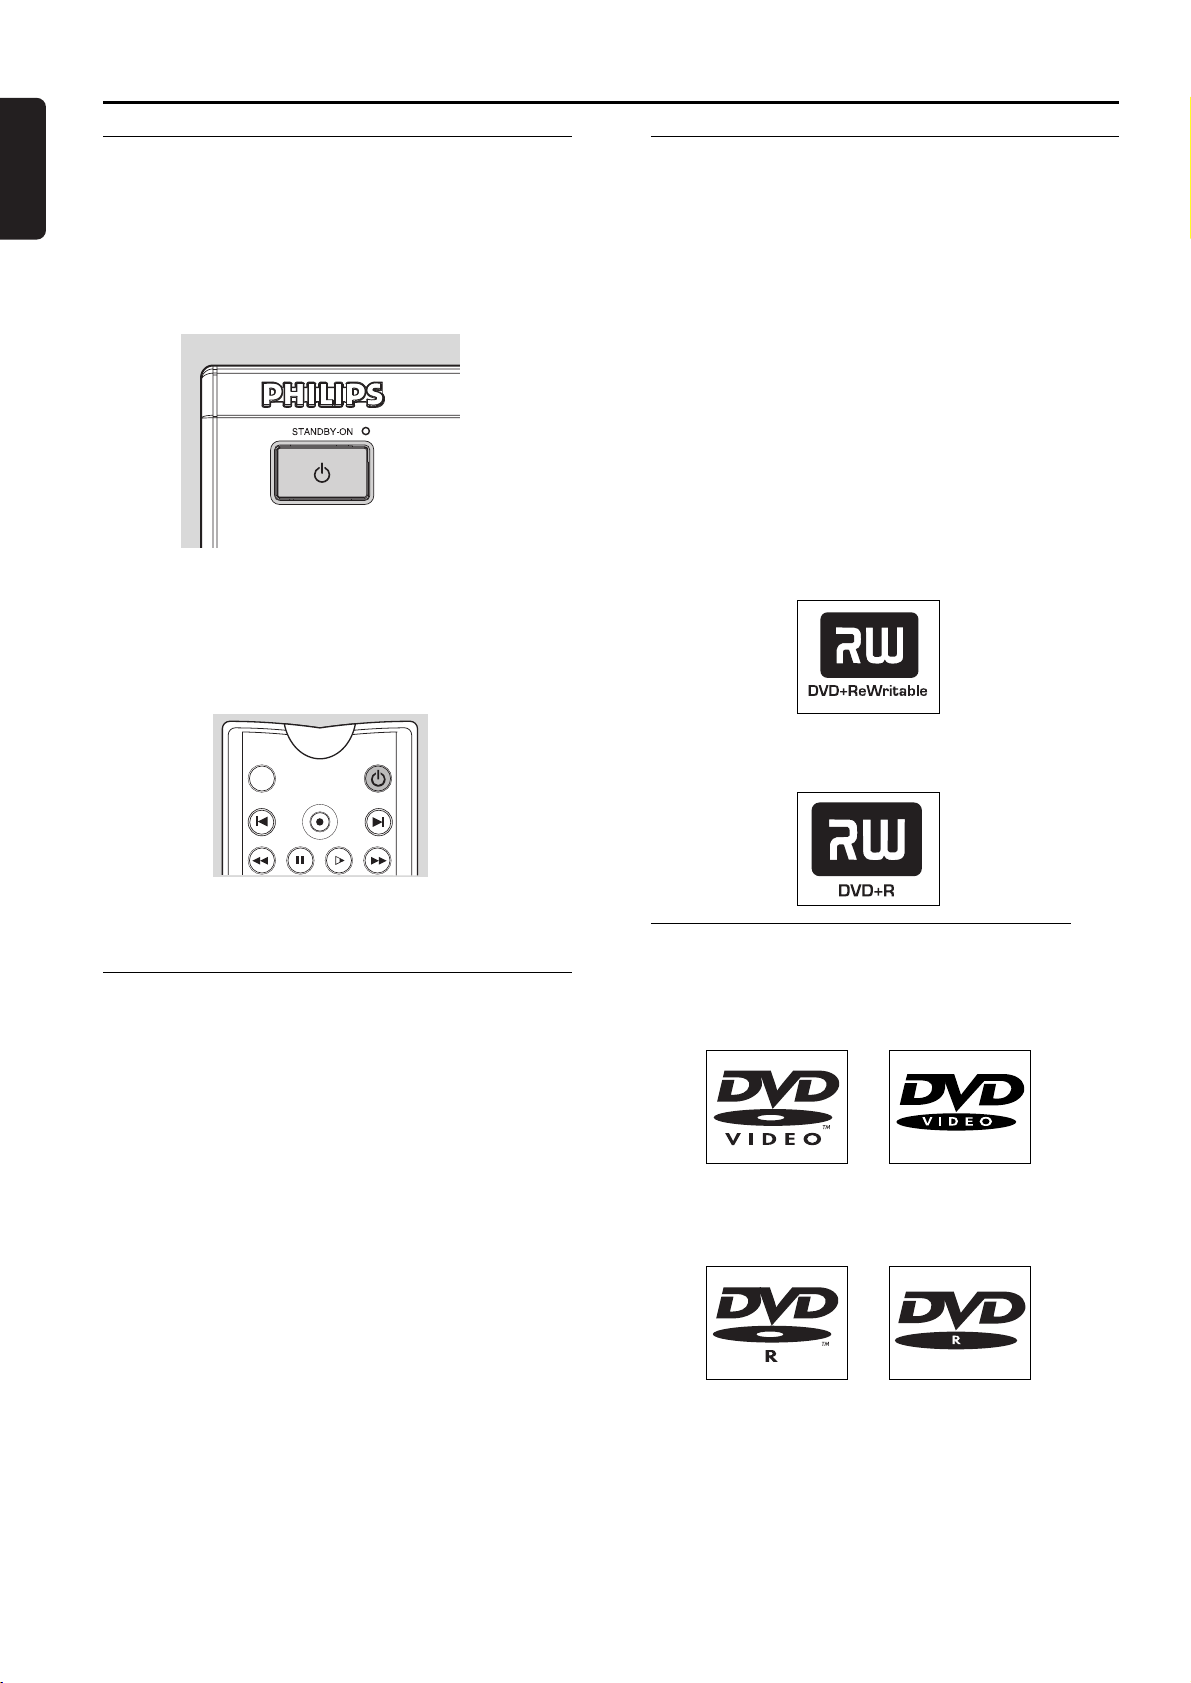
The following disc types can be used for
recording and playback:
DVD+RW
Records and plays; In case of a new blank disc, after the
first recording, some more time (up to two minutes) is
needed to make the disc compatible with DVD-Video
players.
DVD+R
Records and plays.
REC/OTR
PAUSE
SLOW
NEXTPREVIOUS
FORWARDREVERSE
When you switch off the DVD recorder, the display will
briefly show ‘WAIT’.
Loading discs
1 Press / OPEN/CLOSE on the front of the
recorder. The disc loading tray opens.
2 Lay your chosen disc in the tray, label side up.
Make sure it is sitting properly in the correct recess.
3 Press / Open/Close, to close the tray.
‰ ‘READING’ appears in the status box and on the
recorder display. If the inserted disc is pre-recorded
or write-protected, playback always starts
automatically.
You can always unload a disc by pressing
/ OPEN/CLOSE again or pressing 9 STOP on the
remote control for two seconds.
Note:
If ‘Child Lock’ is set to ON and the disc inserted is not in the
‘child safe’ list (not authorized), the PIN code must be entered
and/or the disc has to be authorized. (see ‘Access Control’)
The following disc type can be used for
playback only:
DVD-Video
DVD-R
Only plays if it contains DVD-Video.
18 OPERATION
Page 19

DVD-RW
Only plays if it is recorded in Video mode and has been
finalized.
RW
CD Digital Audio
You can play digital audio CDs in conventional style
through a stereo system, using the keys on the remote
control and/or front panel, or via the TV set using the
on-screen display (OSD).
On-screen display information
English
System menu bar
The system menu bar can be called up by pressing any of
the following keys on the remote control: SYSTEM
MENU, T/C, ANGLE, Z SUBTITLE, Y
AUDIO and a ZOOM.
Super Audio CD
Of hybrid SACD discs, the CD layer can be played.
(Super) Video CD
Depending on the material on the disc (a movie, video
clips, a drama series, etc.) these discs may have one or
more tracks, and tracks may have one or more indexes,
as indicated on the disc case. To make access easy and
convenient, your recorder lets you move between
tracks, and between indexes.
CD-R/CD-RW
Plays if it contains Audio CD.
Recordable
ReWritable
The following disc types cannot be used at
all, neither for recording nor for playback:
DVD-RAM
T/C
ZOOM ANGLE SUBTITLE AUDIO
DIM REPEAT REPEAT SCAN
A/CH
ZYa
Widescreen (16:9) TV sets may show only part of the
system menu bar in certain screen modes. Select a
different screen mode on the TV to see the full menu.
A number of recorder functions can be controlled via
the system menu bar. You can navigate between the two
parts of the system menu bar with the t (left cursor)
and the u (right cursor) key.
System menu bar icons
PART 1 PART 2
User preference Sound
Title/Track Step motion
Chapter/Index Slow motion
Audio language Fast motion
Subtitle language Time search
Angle
Zoom
Temporary Feedback Field
DVD-Audio
The system menu bar contains a ‘Temporary Feedback
Field’ with information concerning prohibited actions,
playback modes, available angles, etc.
OPERATION 19
Page 20

English
Scan
Repeat All
Repeat Title
l You can navigate between the various items of the
user preferences menu with the v (up cursor) and
the w (down cursor) key. To select an item press u
(right cursor) key.
Repeat Track
Repeat Chapter
Repeat A to end
Repeat A-B
Angle
Child Lock On
Child Safe
Resume
Action prohibited
User preference menu operation
l Press SYSTEM MENU on the remote control.
l Select in the system menu bar and press w
(down cursor).
‰ The user preferences menu appears.
l Use the t u v w (left right up down cursor) keys
to toggle through the menus, sub menus and
submenu options.
‰ When a menu item is selected, the cursor keys
(on the remote control) to operate the item are
displayed next to the item.
l Press OK to confirm and return to the main menu.
-- --- off on off
-- --- off on off
l By pressing SYSTEM MENU the system menu bar
will disappear from the screen.
The following functions can be operated via the user
preference menu.
User preference menu icons
Picture settings
Sound settings
Language settings
Feature settings
Remote control settings
Record settings
Installation
20 OPERATION
Status box
The status box on the left hand side of the screen
displays the current status of the recorder and the disc
type loaded for several seconds.
Page 21

Disc type icons
DVD+RW
DVD+R
DVD+R
DVD-Video
Super Video-CD
Video-CD
no disc
Timer info box
The timer info box is located above the tuner info box
and is displayed in monitor mode. It displays the current
status of the timer.
When a timer is programmed it shows a timer indication
and the start time or date of the first programmed
recording.
English
disc error
Disc status icons
0
rec
stop
play
pause
0 ;
pause
erasing
Q
8x
slow
9
2
;
0
R
8x
H
recording
stop
playing
pause play
record pause
erasing
fast forward
fast reverse
slow motion
Tuner info box
The tuner info box is located at the bottom left of the
screen and is displayed in monitor mode (See: Recording
Checking input). It displays the currently selected input.
When the tuner is selected it shows programme number
and/or channel name.
Timer event due today
10: 13 h r
Timer event due on another day
When an OTR recording is in progress it shows the end
time.
OTR recording in progress
10: 15 h r
When no timer is programmed it displays the current
time.
Current time
10: 13 h r
Current channel
12
BBC1
No signal
12 BBC1
Copy-protected signal
Note:
Tuner info box and timer info box disappear during playback
and after recording is started.
Warning box
The warning box will be displayed near the bottom of
the screen when appropriate. For instance: ‘
Disc locked
Disc locked’.’
OPERATION 21
Page 22

English
Index Picture Screen
The Index Picture Screen displays an overview of the
titles recorded on the disc. Each title is represented by
an index picture. Next to the index picture the
programme name, duration, recording mode and
recording date of the title are shown. If no name is
known, the DVD recorder will fill in the source and the
time of the recording instead.
Empty spaces (erased titles, or blank space at the end of
the disc) are also shown as such.
l At maximum three titles will be shown on the
screen at once. If more titles are present, you can
navigate to those with the wv (down up cursor)
keys.
l On the right hand side of the Index Picture Screen,
you can see the disc bar. This gives an overview of
all titles on the disc, as well as any empty spaces.
On the disc bar, an arrow – the disc pointer –
indicates your current position on the disc. From
this point you may resume playback or recording.
l If you navigate trough the list of titles with wv
(down up cursor) or J PREVIOUS / K NEXT, the
disc pointer will move along.
l Press 9 STOP to reset the disc pointer to the
beginning of the disc.
l To move the disc pointer to the end of the last title,
keep K NEXT pressed.
l If you navigate from an Index Picture to the box
right next to it (containing name, rec mode, etc.),
you enter the title settings menu (see under
‘Managing disc content - Title settings’).
Index Picture
- image that represents a recorded title
Title description
- programme name
- duration + recording mode
- recording date
Cue to go to Disc Info Screen
or to title on previous screen
Empty title
Current title
Indication what disc area
will be overwritten by
upcoming timer event
Disc Pointer
- shows number and place
of current title on disc
Other title
ZDF 11:11
00: 00: 55 -SP
Thu 08 02 2001
2
VRT 11:13
00: 00: 57 -SP
Thu 08 02 2001
22 OPERATION
1: 15
hr
01 Z D F
4
Cue to go to title on next screen
Tuner Info Box
- displays the selected channel
Timer Info Box
- displays the current time or time/date
of the next timer programme
Empty title
00: 00: 59-SP
- shows an overview of
all titles on disc
Disc Bar
Page 23

User preferences
Setting user preferences
You can set your user preferences for some of the
recorder features. (See ‘Operation’ - ‘User preferences
menu operation’)
The following items can be adapted:
Picture settings
TV Shape
With TV Shape you can adjust the output of your DVD
Recorder to optimally fit your TV screen. You can
choose:
-
16:9
if you have a wide screen (16:9) TV set.
-
4:3
if you have a regular (4:3) TV set. In this case you
can also choose between:
-
Letterbox
bars at the top and bottom,
-
Pan Scan
trimmed. If a disc has Pan Scan, the picture then
moves (pans) horizontally to keep the main action
on the screen.
: for a ‘wide-screen’ picture with black
: for a full-height picture with the sides
Video shift
Factory setting is such that the video will be centered on
your screen. Use this setting to adjust the position of
the picture on your TV set by scrolling it to the left or
right.
-- --- off on off
Picture
TV shape
Black Level shift
Video shift
SCART video
SCART Video
Factory setting is RGB. Select ‘S-
OK to exit
video
’ (Y/C) via SCART
when connecting to an S-VHS recorder.
Sound settings
English
Digital output
Factory setting ‘
All
’ means that both coaxial and optical
outputs are switched on, and that Dolby Digital Multichannel is fed to the outputs as such MPEG audio is
converted to PCM. If your equipment doesn’t include a
digital Multi-channel decoder, set the digital output to
‘
PCM only
’ (Pulse Code Modulation). Both coaxial and
optical outputs are then switched on, and Dolby Digital
and MPEG audio are converted to PCM. If you are not
connecting equipment with a digital input, change the
setting to ‘
Off
’.
Analogue output
-- --- off on off
Sound
Digital output
Analogue output
Night mode
Stereo
Surround
3D sound
Black level shift (NTSC only)
Adapts the colour dynamics to obtain richer contrasts.
Select ‘
On
’ or ‘
Off
’.
Stereo
Select ‘
’, ‘
setting is Stereo.
Surround
’ or ‘
3D Sound
’. Factory
OPERATION 23
Page 24

English
Surround: Select this setting when using equipment
with a Dolby Surround Pro Logic decoder.
In this setting the 5.1 audio channels (Dolby
Digital, MPEG-2) are downmixed to a
Surround-compatible 2-channel output.
3D Sound: In a set-up without rear speakers (analogue
stereo output), this option remixes the six
channels of digital surround (Dolby Digital,
MPEG-2) into a two speaker output, while
retaining all of the original audio information.
The result is the listening sensation of being
surrounded by multiple speakers.
Connected audio system Digital out Analogue out
Amplifier or TV with two channel Off Stereo
analogue stereo
Amplifier or TV with Dolby Surround Off Surround
or Dolby Pro Logic
Amplifier with two channel digital PCM only Stereo
stereo
A/V receiver with Multi-channel All Stereo or
decoder (Dolby Digital, MPEG, DTS) Surround
Multi-channel A/V receiver with Off Surround
6-ch connectors
Night Mode
Night mode optimizes the dynamics of the sound with
low volume playback for less disturbance in quiet
environments. This only works for Dolby Digital audio
on DVD-Video discs.
Adapt disc format
This option is only available when a DVD+RW or
DVD+R disc recorded on a different brand of recorder
is loaded. You can adapt the menu to your own
recorder.
A DVD+RW video disc that has been recorded on a
different type or brand of recorder can be played, but
may not provide all features commonly available to
DVD+RW discs, such as the on-screen disc bar, the disc
settings menu, the title settings menu, and editing. If the
disc is not write-protected, the disc format can be
adapted to the own recorder, after which these
functions are available.
Status box
The status box displays the current status of the recorder
and the disc type loaded (See ‘Operation’ - ‘On-screen
display information’). You can switch it On or Off.
Off
= always Off.
On
= displayed together with the system menu bar or
displayed temporarily (disappears after time-out)
when changing the playback or record status.
Factory setting is ‘On’.
Auto resume
The Auto resume setting only applies to pre-recorded
DVD-video and Video CD discs only - not only to the
disc in the recorder but also to the last twenty discs you
have played.
If ‘
Auto resume
’ is set to ‘On’, playback will start from
the point where it was stopped the last time the disc
was played.
When ‘
Auto resume
’ is set to ‘
Off
’, the recorder will
start playing from the beginning of a disc. In this case you
can still resume when appears on screen by
pressing 2 PLAY. Factory setting is ‘On’.
r Language settings
The preferred language can be adapted via the system
menu bar. Also see ‘virgin mode’. Settings can be
changed for:
- Playback audio language
- Subtitle language
- Menu language
- Country setting.
Feature settings
Access Control
Access Control contains the following features:
Child Lock - When Child Lock is set on, a 4-digit code
needs to be entered in order to play discs.
Parental Level - Allows the conditional presentation of
DVD discs containing Parental Level information.
Change country - Allows conditional presentation of
DVD-Video discs containing country information.
Change code - To change the pin code.
See ‘Acces Control’.
Low power standby
If low power standby is ‘On’, the recorder will consume
minimum power in standby mode.
Factory setting is ‘
Off
’.
Notes:
When the recorder is in low power standby mode:
- the output of the equipment connected to EXT 2 will not
be passed through to the TV set on EXT 1,
- the Display will be Off,
- the Standby indicator on the recorder will still light up in
standby mode.
-- --- off on off
Features
Access control
Status box
Autoresume
Low power standby
PBC
Enter code...
On
Off
Off
Off
24 OPERATION
Page 25

PBC
This feature is only available when a (Super) Video CD is
loaded. It allows you to disable or enable the PBC
(Playback Control) menu of VCD discs. See under
‘Special VCD features’: Factory settings is ‘
On
’.
Record Settings
Record mode
By selecting a recording mode you define picture quality
of recordings and maximum recording time for a disc.
English
Finalise disc
This option is only available on unfinalised DVD+R discs.
See ‘Managing disc content - Finalising a DVD+R disc’.
Remote Control settings
Key sound
The recorder makes a ‘beep’ sound upon every key
command given via recorder or remote control keys.
Select ‘
Off
’ to disable this sound. Factory setting is ‘On’.
Remote control used
If you want to use the remote control of a Philips DVD
player instead of the standard DVD recorder remote
control, select ‘
recorder
System information
When you move further down in the Remote Control
settings menu, the system status screen will appear.
Press v (cursor up) to go back.
DVD player
’.
’. Factory setting is ‘
DVD
Mode Picture quality Total recording
time
HQ best possible 60 minutes
(High Quality) picture quality
SP pre-recorded 120 minutes
(Standard Play) DVD quality
LP better than 180 minutes
(Long Play) S-VHS picture quality
EP better than 240 minutes
(Extended Play) VHS picture quality
In practice, the DVD recorder may record a few
minutes more than indicated. For playback, the correct
recording mode will automatically be selected. The
HQ
mode is optimised for recording via the i-link DV input.
For all other sources use SP, LPor EP.
l In the record settings menu, select ‘
Record settings
Record mode
’.
Record mode
Direct record
Sat record
Auto chapters
LP/EP rec mode Stndrd
SP
Off
Off
On
To exit press
SYSTEM MENU
l Alter the recording mode with t or u (left right
cursor).
l Confirm with the OK key.
l To end, press SYSTEM MENU.
An alternative way to select the record mode is available
in the Index Picture Screen and in monitor mode:
l Press SELECT.
‰ The new record mode appears on the screen and
the display.
Record Mode: LP
It is not possible to switch record modes during
recording.
OPERATION 25
Page 26

English
Direct record
With the Direct Record function switched ‘On’ and the
DVD recorder switched to standby, the channel number
selected on your television will be automatically taken
over by the DVD recorder, at the moment it starts
recording. This only applies for televisions connected via
scart, which have video output via SCART or which have
EasyLink. Factory setting is ‘
l In the record settings menu, select ‘
l Select ‘On’. If you select ‘
Off’
.
Direct record
Off
’, the function will be
switched off.
l Confirm with OK.
l To end, press SYSTEM MENU.
Sat record
You can only use this function, when you have a satellite
receiver, which can control other equipment by a
’programming’ function. In this mode your DVD
recorder starts recording when the satellite receiver
releases a signal. The start and end of the recording is
controlled via one of the SCART sockets.
l In the record settings menu, select ‘
l Select the
SCART socket to which the satellite
Sat record
’.
receiver is connected with t or u (left right cursor).
l Confirm with OK.
l Insert a recordable DVD+RW disc.
l Press B STANDBY/ON.
‰ When this function is switched on,
SAT appears
on the display.
‰ The DVD recorder is now prepared for
recording.
Factory setting is ‘
Off
’.
Installation
Auto TV Channel Search
Your DVD recorder will search for all TV channels.
It stores channels in the sequence they are found. (See
‘Installation - First time Set-up’)
’.
Note:
All channels stored so far will be erased.
Follow TV
With Follow TV you can programme the same channel
sequence on the DVD recorder as on the TV set.
This only functions if the recorder socket (EXT1) and
the TV set are connected with a SCART cable. Additional
equipment connected to socket EXT2 must be switched
off.
Installation
Autom.search
Follow TV
Manual search
Sort TV channels
Time Date
To exit press
SYSTEM MENU
Auto chapters
If autochapters is ‘On’ every five to six minutes a
chapter marker (beginning of a new chapter) is inserted
during recording. This enables easy navigation through a
title during playback. In either case you can manually
insert chapter markers afterwards. (See ‘Managing disc
content’ - ‘Edit in playback mode’.)
LP/EP rec mode
In long play or extended play recording mode you can
select the ‘
Sport
’ setting to optimize the video
recording for images that contain fast movements, like
sports programmes. The setting does not influence high
quality or standard play recording mode.
Factory setting is ‘
Stndrd
’.
l Press OK.
‰ If the DVD recorder recognizes that the TV set
has been connected with a
SCART cable, ‘TV01’
appears on the display.
TV 01
‰ When ‘NOTV’ (no signal from TV set) appears on
the display, the TV channels can not be allocated
automatically. In this case read ‘Manual TV channel
search’.
l Select programme number ‘1’ on the TV set.
l Confirm with OK on the remote control of the
DVD recorder.
‰ The DVD recorder compares the TV channels on
the TV set and the DVD recorder. If the channels
match, this channel is stored at ‘P01’.
l Wait until 'TV02’ appears and repeat the previous
two steps for programme number 2 and the rest of
the channels you want to store.
l To end, press SYSTEM MENU.
26 OPERATION
Page 27

Manual TV channel search
You can perform a search to select and store TV
channels manually. If the DVD recorder is connected via
EasyLink, this function is not available.
l Press SYSTEM MENU.
l Select ‘
l Select ‘
l In the line ‘
Installation
Manual search
Channel/freq
Freq.
: frequency
CH
: channel
S-CH
: special channel
’.
’.
.’ select the display for:
l If you know the frequency or channel of the desired
TV channel, you can enter the data in line
Entry/search
‘
’ with the digit keys 0-9. If you don’t
know the frequency or channel of the TV channel of
your choice, press u (right cursor) to start channel
search.
l In the line ‘
Programme number
’ select the
programme number you want, using t or u (left
right cursor) or digit keys 0-9.
l If you want to change the TV channel name, press
the u (right cursor) key in line ‘
TV channel name
l Select the character you want to change with the t
(left cursor) or u (right cursor) key.
l Change the character with the w (down cursor) or
v (up cursor) key.
l Press OK to confirm.
This DVD recorder can receive HiFi sound transmissions
in NICAM Stereo. However, if sound distorsion occurs,
due to poor reception, you can switch off NICAM:
l In the line ‘
NICAM
’ select ‘On’ or ‘
Off
’ with the t
(left cursor) or u (right cursor) key.
If you want to change the automatic TV channel setting,
select the line ‘
Fine tuning
’. With the t (left cursor) or
u (right cursor) key you can vary the automatic TV
channel setting.
Important: This re-tuning is only necessary and useful
in special cases, e.g. when stripes appear on your TV
screen when using a cable-TV system.
Sort/Clear TV channels manually
l If the DVD recorder is connected to the TV set
with EasyLink or a similar system, manual sort
English
cannot be executed. In all other cases, you can
select.
l Press SYSTEM MENU.
l Select the line ’
l Select the line ’
Installation
Sort TV channels
Installation
Sort TV channels
’.
’.
...
PO1 NED 1
PO2 NED 2
PO3 NED 3
PO4 RTL 4
PO5 RTL 5
PO6 VERON
...
’.
To sort
Press
l Select the TV channel to which you want to allocate
a programme number (starting with ‘
v (up cursor) or w (down cursor) key and press the
u (right cursor) key.
l Select the desired position with v or w (up down
cursor) key.
l To store, press OK.
l To end, press SYSTEM MENU.
Time/Date
To adjust ‘
Time
’, ‘
Year
digit keys 0-9. Switch between fields with the wv
(down up cursor) keys.
Installation
Time/ Date
To exit press
SYSTEM MENU
’, ‘
Month
’ and ‘
P01
Date
’ with the
’) with the
l Press OK to store the TV channel.
l To end, press SYSTEM MENU.
Connecting a decoder:
l Switch on the TV set and select the programme
number for the DVD recorder.
l Select the TV programme you wish to link with the
decoder function with CH+ or CH-.
l Press SYSTEM MENU
l Select ‘
l Select ‘
l Select ‘
Installation
Manual search
Decoder
’.
’.
’.
l Select ‘On’ with t (left cursor) or u (right cursor).
l Confirm with OK.
‰ ‘DECODER’ apperars on the display.
l To end, press SYSTEM MENU.
Time
Year
Month
Date
09: 38
2001
02
09
To exit press
SYSTEM MENU
OPERATION 27
Page 28

English
Recording
Before you start recording
Recordings on a DVD disc are called ‘titles’. Every title
consists of one or more chapters.
DVD+RW
TITLE 1
CHAPTER 1 CHAPTER 2 CHAPTER 3 CHAPTER 1 CHAPTER 2
TITLE 2
For more information about how to go to other titles or
chapters see ‘Playback - general features’.
Important:
Recordings on a DVD+RW disc are normally
started from the position of the so-called disc
pointer, i.e. the point where the last recording
was stopped. From there on earlier recordings
may be overwritten without notice, unless the
disc is write protected. In this respect your DVD
recorder behaves just like a Video Cassette
Recorder.
If you want to make a recording without the risk
of overwriting earlier recordings use the safe
Record Function (see Manual Recording - Safe
Record)
In the Index Picture Screen you can select the point
where you want to start your recording. Use the wv
(down up cursor) and 5 REVERSE / 6 FORWARD
keys. You can see the the current location on the disc
bar, indicated by the arrow.
Your DVD recorder always checks the disc that you
have inserted:
‰ When a DVD+RW disc is inserted on which
recordings have been made, the Index Picture
Screen is shown on your TV screen.
‰ If the inserted disc is a completely empty
recordable disc, the message ‘EMPTY DISC’ appears
on the display.
‰ If the inserted disc is a DVD+RW disc with a
content that is not DVD-Video compatible (e.g. a
data disc), a dialog box is shown with the option to
erase or eject the disc. You can only record on this
disc after erasing it with the RECORD key.
Note:
- On a disc containing PAL recordings, no NTSC recordings
can be made and vice versa. On an empty disc, either type of
recordings can be made.
- No recordings can be made from so-called ‘Pseudo-PAL’ or
PAL-60 sources.
stop
11: 15
01 B B C 1
Disc is not a DVD video disc
Press OK to open tray or
press REC to erase disc
‰ A disc can hold up to 48 titles (including empty
titles). When this maximum is reached the onscreen message ‘
Too many titles
’ appears, if you
want to make a new recording. You have to erase a
title first next to an empty title. (See ‘Managing Disc
Content’.)
Manual recording
Checking input
Normally, the DVD recorder displays the contents of
the disc on screen.
l Press MONITOR in order to switch to the internal
tuner, or whichever other source is selected, if you
want to check the input before starting a recording.
‰ On the TV screen, you will see the actual picture
quality that you will get if you record: the video has
been encoded and decoded again. This is why you
will see a delay of about 1.5 seconds when using a
‘live’ source such as a camera.
l In monitor mode you can choose programme
numbers directly with the digit keys 0-9 on the
remote control.
l Press SELECT repeatedly to select the desired
record mode.
l Press MONITOR again to go back to disc mode.
Recording
l Insert a recordable DVD+RW or DVD+R disc.
l Normally, the DVD recorder displays the contents
of the disc on the screen.
l Use the MONITOR button to see the currently
selected TV channel.
l Use CHANNEL 3 or CHANNEL 4 (on the
recorder) or CH+, CH- (on the remote control) to
select the programme number (programme name)
from which you wish to record.
‰ When a TV channel transmits a channel name,
it will be shown on the display.
28 RECORDING
Page 29

CHVOL
MUTE
T/C A/CH
MONITOR ON/OFF
REC/OTR
PAUSE SLOW
NEXT PREVIOUS
FORWARDREVERSE
PLAYSTOP FSS
The following programme numbers are provided for
recording from external sources:
l The Index Picture Screen is updated.
‰ ‘MENU UPDATE’ is shown on the display.
l After a short recording on a new DVD+RW disc, a
few minutes will be needed to complete the
formatting of the disc.
Safe Recording
When you start recording on a DVD+RW disc by briefly
pressing the RECORD or REC/OTR key, a recording
on DVD+RW will be made from the current position of
the disc pointer. To prevent this do the following:
l Hold the RECORD key (on the recorder) or
REC/OTR key (on the remote control) press for
about two seconds until ‘SAFE RECORD’ appears
on the display.
l The recorder automatically jumps to the end of the
last title on the disc and starts recording.
‰ If no free space is left. The display will show
‘DISC FULL’. Safe record is not possible then.
Recordings on DVD+RW are always automatically made
after the last title on the disc.
English
‘EXT1’ : TV set via SCART 1 socket
‘EXT2’ : for recording from external sources via
SCART 2 socket
’EXT3’ : rear S-video
‘EXT4’ : rear CVBS
‘CAM1’ : front S-video (Y/C)
‘CAM2’ : front Video (CVBS)
‘CAM3’ : front DV.
l Press RECORD (on the recorder) or REC/OTR
(on the remote control).
‰ RECORD is shown on the display.
‰ The status box is shown on the screen for a few
seconds.
Direct Record
With Direct Record you can start recording immediately
from the programme selected on the TV set.
l Make sure ‘
Direct record
’ is switched ‘On’.
(See record settings).
l On the TV set, select the programme number you
want make the recording from.
l Make sure the DVD recorder is switched to
standby.
l Press RECORD (on the recorder) or REC/OTR
(on the remote control).
Notes :
- Don’t select another programme number on your TV set,
until the ‘WAIT’ on the display of your DVD recorder
disappears. This can take up to one minute.
- When ‘NOTV’ appears on the display, the programme
number could not be found. The DVD recorder switches off
automatically.
- If your loudspeakers are connected (via an amplifier /
receiver) to your DVD recorder, the sound will be delayed
relative to the TV picture when recording directly from the TV
set.
- You can use Direct Record in combination with Safe Record.
l To bring back the status box during recording press
SYSTEM MENU. Pressing SYSTEM MENU once
more will remove the status box again.
l Press
;
PAUSE to pause recording. You can
resume recording by pressing ;PAUSE once more.
The DVD recorder will make a seamless connection.
l Press 9 STOP to stop recording. If you are recording
from a camcorder watch the video output of the
DVD recorder on the TV - instead of the camcorder
viewer - to determine the right moment to stop.
Manual audio control
You can control the audio recording level of your DVD
recorder manually.
l In monitor mode, press AUTO/MAN REC
VOLUME on the DVD recorder.
‰ The display will show the current audio level and
MANUAL appears.
TITLE
DVD RW
CHAPTER TIME
SP
MANUAL
REMAIN
-30-40 -10-20 0 OVER-30-40 -10-20 0 OVER
CHANNEL
RECORD
STEREO
RECORDING 29
Page 30

English
l Adjust the recording level with MANUAL 3 or 4
on the DVD recorder, so that the ‘0 dB’ mark lights
up during the loudest parts of the recording.
l You can switch back to automatic audio level control
by pressing AUTO/MAN REC VOLUME again.
‰ The display will show the current disc position
and MANUAL disappears.
Note :
When DV input is selected, manual volume control is
disabled.
Recording with automatic switch-off (OTR
One-Touch Recording)
CLEAR
T/C A/CH
TIMER
MUTE
SELECT
CHVOL
MONITOR ON/OFF
REC/OTR
PAUSE SLOW
NEXT PREVIOUS
FORWARDREVERSE
PLAYSTOP FSS
When you have programmed the timer, a red line on
the disc bar (both on the display and on the Index
Picture Screen) indicates what part of the disc will be
overwritten by the programmed recording from the
current disc position (on DVD+RW) or after the last
title (on DVD+R).
When all timer blocks are full, the options timer
programming and VIDEO Plus+ programming cannot be
accessed. For clearing a timer block, see ‘How to clear a
timer block’.
What is ’VPS’/‘PDC’?
With ’VPS/PDC’, the TV station controls the
beginning and the length of the programmed
recording. This means that the video recorder
switches itself on and off at the right time even if a
TV programme you have programmed begins earlier
or finishes later than expected.
Usually the start time is the same as the VPS/PDC
time. If, however, in the TV guide, in addition to a TV
programmes start time, a different VPS/PDC time is
given, e.g.: ’20.15 (VPS 20.14)’, you must enter ’20.14’
as the start time exactly to the minute. If you want
to enter a time that differs from the VPS/PDC time,
you must switch off ’VPS/PDC’.
l Insert a recordable DVD+RW or DVD+R disc.
l Use CHANNEL 3 or CHANNEL 4 (on the
recorder) or CH+, CH- (on the remote control) to
select the programme number (programme name)
from which you wish to record.
l Press RECORD (on the recorder) or REC/OTR
(on the remote control) twice.
‰ A recording will be made of 30 minutes.
‰ The required end time of the recording is shown
in the timer box on screen. The remaining recording
time is shown on the display.
10: 15 h r
l Press RECORD or REC/OTR again to obtain a
30 minute increment.
l Shortly after pressing REC/OTR, OTR can be
cancelled by pressing CLEAR.
Timer programming
Timer programming with the VIDEO
Plus+®system
CLEAR SELECT
TIMER
A PlusCode number is a number of up to nine digits,
printed in most TV guides next to the start time of a TV
programme.
All the information required for a programming is
contained encoded in the PlusCode programming number.
l Select ‘
VIDEO Plus+ programming
cursor) or w (down cursor).
Timer
’ with v (up
The DVD recorder needs the following information for
every programmed recording:
- the date on which the recording is to be made;
- the channel;
- the start and stop time of the recording;
- VPS/PDC on or off;
- the recording mode (HQ, SP, LP or EP).
The DVD recorder stores all the information mentioned
above in a timer block. You can programme up to six
timer blocks, one month in advance.
30 RECORDING
VIDEO Plus programming
Timer programming
Timer list
+
l Press u (right cursor).
To exit
Press TIMER
Page 31

Timer
VIDEO Plus programming
PlusCode number
+
Timer
VIDEO Plus programming
Date
09 N E D 1 09: 35 11: 35 S P
+
Prog. Start
VPS
PDC End
Rec
Mode
English
Mo- Fr/ Weekly
Press SELECT
To store
Press OK
l Enter the entire PlusCode number (up to nine digits)
printed in your TV guide next to the start time of a
TV programme. If you made a mistake, you can
correct it with CLEAR.
l Confirm with OK.
l If the VIDEO Plus+ system does not recognize the
TV channel, the message ‘
programme number
Please enter
’ will appear on screen. Select
the required programme number (programme name)
with tu(left right cursor) or the digit keys 0-9 and
confirm with OK.
Timer
VIDEO Plus+ programming
Please enter
programme number
LP/ SP
Press SELECT
To store
Press OK
l Confirm with OK.
‰ The data has been stored in a timer block.
l To end, press TIMER.
l Make sure that you inserted a recordable disc.
If you inserted a write-protected disc recording
will be refused.
l Switch off with B STANDBY/ON.
Timer programming without the VIDEO
Plus+ system
CLEAR SELECT
TIMER
‰ The data will appear on the TV screen.
l Press u (right cursor).
l Use SELECT to select the programming key at
Mo-Fr
daily or weekly intervals.
intervals from Mondays to Fridays inclusive.
: Recording at daily
Weekly
Recording at weekly intervals on the same day of
the week.
l Press u (right cursor).
l Use SELECT to switch VPS/PDC on or off.
‰ When VPS/PDC is switched on, the start time is
marked with an asterisk.
l Press u (right cursor).
l Use SELECT to select the recording mode (‘
‘SP’, ‘LP’, ‘EP’).
HQ
l Press TIMER on the remote control.
l Select ‘
Timer programming
’ with v (up cursor) or
w (down cursor).
Timer
VIDEO Plus programming
Timer programming
:
Timer list
+
To exit
Press TIMER
’,
l Press u (right cursor).
l Enter the date with v (up cursor) or w (down
cursor), or with the digit keys 0-9.
RECORDING 31
Page 32

English
l If desired, select recording at daily or weekly
intervals in the field ‘
Date
’ with SELECT. ‘Mo-Fr’:
Recording to be made from Mondays to Fridays
inclusive. ‘
Weekly
’: Recording at weekly intervals on
the same day of the week.
l Press u (right cursor).
l Enter the programme number from which you want
to record. If you want to record from an external
source, select ‘
‘
CAM2
’ or ‘
EXT1
’, ‘
EXT2
’, ‘
EXT3
CAM3
’ with vw (up down cursor).
’, ‘
EXT4
’, ‘
CAM1
l Press u (right cursor).
l Enter the Start time with vw (up down cursor) or
the digit keys 0-9.
l After entering the Start time, use SELECT to
switch VPS/PDC on or off. With most TV stations
the VPS/PDC time is always the same as the start
time.
‰ When VPS/PDC is switched on, the start time is
marked with an asterisk.
l Press u (right cursor).
l Enter the End time with vw (up down cursor) or
the digit keys 0-9.
l Use SELECT to choose the recording mode ‘HQ’,
‘LP’, ‘SP’ or ‘EP’.
l If you made a mistake, you can go back with t (left
cursor).
Timer
Timer programming
Date
Prog. Start
09 N E D 1 09: 35 11: 35 S P
VPS
PDC End
*
Rec
Mode
Programming with ’NEXTVIEW Link’
This DVD recorder is equipped with the function
’NEXTVIEW Link’. If your television is also equipped with
this function, you can mark TV programmes on the
television for programming. These TV programmes will
automatically be transmitted to a timer block on the
’,
DVD recorder. If you clear the marking of the TV
programme on the television, the corresponding timer
block on the DVD recorder will also be cleared.
For more information, read the instruction manual of
your TV set.
If a timer setting is incorrect
The following warnings can be displayed in the timer
menu:
Collision
recording programme overlaps with another recording
programme.
Solution:
l Ignore by pressing TIMER. The programme
with the earlier start time will be recorded
completely before the later programme starts.
l Edit one or both timers.
l Delete one of the recording programmes.
Please enter programme number
The VIDEO Plus+ system does not recognize the TV
channel.
Solution:
l Select the required programme number
(programme name) with t or u (left right
cursor).
l Confirm with OK.
Mo Fr Weekly
Press SELECT
To store
Press OK
l Confirm with OK .
‰ The data has been stored in a timer block.
l To end, press TIMER .
‰ Make sure that you inserted a disc without write
protection. If you inserted a write-protected
(locked) disc, recording will be refused.
l Switch off with B STANDBY/ON.
PlusCode number wrong
You entered an incorrect PlusCode number or the
incorrect date.
Solution:
l Repeat the entry or end by pressing TIMER.
Weekend programming
-
not possible
Date was incorrectly entered. Daily programming can
only be used for recordings to be made from Mondays
to Fridays inclusive.
Memory full
The maximum number of recording programmes is used.
Solution:
l Delete one of the recording programmes.
32 RECORDING
Page 33

How to check or alter a timer block
How to clear a timer block
l Press TIMER on the remote control.
l Select ‘
Timer list
Timer
VIDEO Plus programming
Timer programming
Timer list
’ with w or v (down up cursor).
+
To exit
Press TIMER
l Press u (right cursor).
Timer
Timer list
Date
Prog. Start
VPS
PDC End
Rec
Mode
CLEAR SELECT
TIMER
l Press TIMER on the remote control.
l Select ‘
Timer list
’ with w or v (down up cursor).
l Press u (right cursor).
l Select the timer block you want to clear with w or
v (down up cursor).
l Press CLEAR.
l Confirm with OK.
l Switch off by pressing TIMER.
English
09
NED 1
12
14
To change
Press
09: 35
RTL 2
21: 00
VRT
20: 30
Total record time 05: 30
11: 35
23: 00
22: 00
SP
SP
SP
*
*
To exit
Press TIMER
l Select the timer block you want to check or alter
with w or v (down up cursor).
l Press u (right cursor).
l Select what you want to check or alter with t or u
(left right cursor).
l Alter data with w or v (down up cursor) or with
the digit keys 0-9.
l Confirm with OK.
l To end, press TIMER.
l Switch off by pressing B STANDBY/ON.
RECORDING 33
Page 34

Playback
English
Playing a DVD+RW or DVD+R
disc
l Insert a DVD+RW or DVD+R disc.
‰ If the inserted disc is write-protected, playback
starts automatically otherwise the Index Picture
Screen appears.
l Press 2 PLAY.
‰ Playback starts automatically from the point
where it was stopped the last time the disc was
played or recorded. If you want to start playback
from the beginning of the disc, you can do so via the
Index Picture Screen (see ‘Index Picture Screen’).
‰ If the disc is a new blank disc, the display will
show ‘EMPTY DISC’.
l To stop playback at any time, press 9 STOP.
‰ You return to the Index Picture Screen.
Notes:
- DVD movies to be released at different times in different
regions of the world, all players have region codes and discs
can have an optional region code. If you load a disc of a
different region code to your recorder, you will see the region
code notice on the screen. The disc will not play, and should
be unloaded.
- The region code is stated on a label on the
back side of your recorder.
- Regional coding is not applicable for
recordable DVD discs.
l The disc may invite you to select an item from a
menu. If the selections are numbered, press the
appropriate numerical key; if not, use the w v u t
(down up right left cursor) keys to highlight your
selection, and press OK.
l To stop play at any time, press 9 STOP.
‰ The default screen will appear, giving information
about the current status of the recorder.
REC/OTR
PAUSE SLOW
NEXT PREVIOUS
FORWARDREVERSE
Playing a pre-recorded DVDVideo disc
Some DVD discs are produced in a way that requires
specific operation or allows only limited operation
during playback. In these cases the recorder may not
respond to all operating commands. When this occurs,
please refer to the instructions in the disc inlay. When a
appears on the TV screen, the operation is not
permitted by the recorder or the disc.
l Insert a pre-recorded DVD-Video disc. Make sure
the label is facing up. If the disc is two-sided, make
sure the label of the side you want to play is facing
up.
‰ When ‘
autoresume
Preferences’) playback starts automatically from the
point where it was stopped, the last time the disc
was played.
‰ When ‘
autoresume
play from the start of the disc. You can however
resume play from the point at which you stopped,
the last time the disc was played, by pressing
2 PLAY when appears on screen.
‰ The currently playing title and chapter number
are displayed on the recorder display. The elapsed
time is shown also.
’ is set to ‘On’ (see ‘User
’ is set to ‘
Off
’, the disc will
PLAYSTOP
FSS
Note:
During playback you can display and enter the menu by
pressing DISC MENU.
Playing a (Super) Video CD disc
l Insert a (Super) Video CD.
‰ When ‘
Preferences’) playback starts automatically from the
point where it was stopped, the last time the disc
was played.
‰ The disc may invite you to select an item from a
menu. If the selections are numbered, press the
appropriate numerical key 0-9.
l To stop play at any time, press 9 STOP.
‰ The default screen will appear.
autoresume
’ is set to ‘On’ (see ‘User
34 PLAYBACK
Page 35

General features
Moving to another chapter/index
Note:
Unless stated otherwise, all operations described are based
on remote control operation. A number of operations can also
be carried out via the system menu bar on the screen. (see
‘System menu bar operation’)
Moving to another title/track
When a disc has more than one title or track, you can
move to another title as follows:
T/C
ZOOM ANGLE SUBTITLE AUDIO
DIM REPEAT REPEAT SCAN
A/CH
ZYa
REC/OTR
PAUSE SLOW
NEXT PREVIOUS
FORWARDREVERSE
PLAYSTOP FSS
When a title on a disc has more than one chapter or a
track has more than one index, you can move to
another chapter/index as follows:
l Press K NEXT during play to select the next
chapter/index.
l Press J PREVIOUS during play to return to the
beginning of the current chapter/index. Rapidly press
J PREVIOUS twice to step back to the previous
chapter/index.
l To go directly to any chapter or index, enter the
chapter or index number using the numerical keys
0-9.
Notes:
- If the number has more than one digit, press the keys in
rapid succession.
- If the system menu bar is on screen, make sure the icon
is selected.
Slow Motion
REC/OTR
PREVIOUS
PAUSE SLOW
STOP
NEXT
FORWARDREVERSE
FSS
PLAY
English
l Press T/C.
l Press K NEXT during play to step forward to the
next title.
l Press J PREVIOUS during play to return to the
beginning of the current title. Rapidly press
J PREVIOUS twice to step back to the previous
title.
l To go directly to any title or track, enter the title
number using the numerical keys 0-9.
Notes:
- If the number has more than one digit, press the keys in
rapid succession.
- If the system menu bar is on screen, make sure the icon
is selected.
DVD VIDEO
TITLE 1
CHAPTER 1 CHAPTER 2 CHAPTER 3 CHAPTER 1 CHAPTER 2
VIDEO CD
TRACK 1 TRACK 2
INDEX 1 INDEX 2 INDEX 3 INDEX 1 INDEX 2
TITLE 2
l Select (Slow motion) in the system menu bar.
l Use the w (down cursor) key to enter the slow
motion menu.
‰ The recorder will now go into pause mode.
- 1 -1/2 -1 / 4 -1 / 8 0 1 / 8 1 / 4 1 / 2 1
l Use the t u (left right cursor) keys to select the
1
required speed: ‘-
’, ‘-1/2’, ‘-1/4’ or ‘-1/8’
(backward); ‘1/8’, ‘1/4’, ‘1/2’ or ‘1’ (forward).
l Select ‘1’ to play at normal speed again.
l If ; PAUSE is pressed, the speed will be set to ‘0’.
l Press 2 PLAY to exit slow motion mode.
l Press v (up cursor) to delete the slow motion menu.
You can also select Slow Motion speeds by using the
SLOW key on the remote control.
PLAYBACK 35
Page 36

English
REC/OTR
Still Picture and Step Frame
NEXT PREVIOUS
PAUSE SLOW
STOP
l Select (picture by picture) in the system menu
bar.
l Use the w (down cursor) key to enter the picture
by picture menu.
‰ The recorder will now go into pause mode.
FORWARDREVERSE
FSS
PLAY
Repeat
ZOOM ANGLE SUBTITLE AUDIO
ZYa
DIM REPEAT REPEAT SCAN
DVD Discs - Repeat chapter/title/disc
l To repeat the currently playing chapter, press
REPEAT.
‰ appears on screen.
l To repeat the currently playing title, press REPEAT
a second time
‰ appears on screen.
l To repeat the entire disc, press REPEAT a third
time
‰ appears on screen.
l To exit repeat mode, press REPEAT a fourth time.
l Use tu(left right cursor) keys to select previous
or next picture.
l Press 2 PLAY to exit picture by picture mode.
l Press v (up cursor) to exit the picture by picture
menu.
You can also step forward by using the ; PAUSE
repeatedly on the remote control.
Search
REC/OTR
PAUSE SLOW
STOP
l Select (Fast motion) in the system menu bar.
l Use the w (down cursor) keys to enter the fast
motion menu.
NEXT PREVIOUS
FORWARDREVERSE
FSS
PLAY
Video CDs - Repeat track/disc
l To repeat the currently playing track, press
REPEAT.
‰ appears on screen.
l To repeat the entire disc, press REPEAT a second
time.
‰ appears on screen.
l To exit repeat mode, press REPEAT a third time.
Repeat A-B
ZOOM ANGLE SUBTITLE AUDIO
ZYa
DIM REPEAT REPEAT SCAN
To repeat or loop a sequence in a title:
l Press REPEAT A-B at your chosen starting point;
‰ appears on screen.
l Press REPEAT A-B again at your chosen end
point;
- 32 -8 -4 1 4 8 32
l Use the t u (left right cursor) keys to select the
32
required speed: ‘‘8’, ‘
32
’ (forward).
’, ‘-8’ or ‘-4’ (backward); ‘4’,
l Select ‘1’ to play at normal speed again.
l Press 2 PLAY to exit fast motion mode.
l Press v (up cursor) to delete the fast motion menu.
To search forward or backward through different speeds,
you can also press 5 REVERSE or 6 FORWARD
again.
36 PLAYBACK
‰ repeat appears on screen, and the repeat
sequence begins.
l To exit the sequence, press REPEAT A-B.
Page 37

Scan
Zoom
ZOOM ANGLE SUBTITLE AUDIO
ZYa
DIM REPEAT REPEAT SCAN
Plays the first 10 seconds of each chapter/index on the
disc.
l Press SCAN.
l To continue play at your chosen chapter/index,
press SCAN again or press 2 PLAY.
Time search
The Time Search function allows you to start playing at
any chosen time stamp.
l Select (Time Search) in the system menu bar.
l Press w (down cursor).
‰ The recorder will now go into pause mode.
‰ A time entry box appears on the screen showing
the elapsed playing time of the current disc.
REC/OTR
NEXT PREVIOUS
FORWARDREVERSE
PLAYSTOP FSS
TIMER
T/C
ZOOM ANGLE SUBTITLE AUDIO
DIM REPEAT REPEAT SCAN
ZYa
PAUSE SLOW
A/CH
CLEAR SELECT
The Zoom function allows you to enlarge the video
image and to pan through the enlarged image.
l Select a Zoom in the system menu bar.
l Press w v (down up cursor) to activate the Zoom
function and select the required zoom factor; 1.33
or 2 or 4.
‰ The recorder will go into pause mode.
‰ The selected zoom factor appears below the
Zoom icon in the system menu bar and ‘
to pan
’ appears below the system menu bar.
Press OK
English
l Use the digit keys 0-9 to enter the required start
time. Enter hours, minutes and seconds in the box.
‰ Each time an item has been entered, the next
item will be highlighted.
l Press OK to confirm the start time.
‰ The time entry box will disappear and play starts
from the selected time position.
press OK to pan
‰ The picture will change accordingly.
l Press OK to confirm the selection.
‰ The panning icons appear on the screen:
wvut(down up right left cursor) and OK.
l Use the wvut(down up right left cursor) keys
to pan all over the screen.
l When OK is pressed only the zoomed picture will
be shown on the screen.
l If you wish to zoom at any moment, press a Zoom
and select the required zoom factor as described
above.
l Press 2 PLAY to exit zoom mode.
PLAYBACK 37
Page 38

English
Special DVD+R(W) features
Recording date and time
If a recording was made from a digital camcorder using
the i.LINK DV input, the original recording date and
time are automatically stored as DVD subtitles.
l Press Z SUBTITLE to display the recording date
and time.
‰ The recording date and time are displayed in the
right bottom corner of the screen.
Camera Angle
If the disc contains sequences recorded from different
camera angles, the angle box appears, showing the
number of available angles, and the angle being shown.
You can then change the camera angle if you wish.
31/ 08/ 2001
14:30
Special DVD-Video features
Menus on the disc
For titles and chapters, selection menus may be included
on the disc.
The DVD’s menu feature allows you to make selections
from these menus. Press the appropriate numerical key;
or use the wvut(down up right left cursor) keys to
highlight your selection, and press OK.
Title menus
l Press DISC MENU.
‰ If the current title has a menu, this appears on
the screen. If no menu is present in the title, the
disc menu will be displayed.
l The menu can list camera angles, spoken language
and subtitle options, and chapters for the title.
l To exit the title menu, press DISC MENU again.
T/C
ZOOM ANGLE SUBTITLE AUDIO
A/CH
ZYa
l Use the wvkeys to select the required angle in the
angle box.
l To go to any angle directly, enter the angle number
using the numerical keys 0-9.
‰ After a small delay, play changes to the selected
angle. The angle box remains displayed until multiple
angles are no longer available.
Changing the audio language
l Select Y (Audio) in the system menu bar.
l Press Y AUDIO or wv(down up cursor)
repeatedly to step through the different languages.
l You can enter the required language number directly
using the numerical keys 0-9.
T/C
ZOOM ANGLE SUBTITLE AUDIO
A/CH
ZYa
Note:
Most DVD discs do not have separate disc and title menus.
Disc menu
T/C
ZOOM ANGLE SUBTITLE AUDIO
A/CH
ZYa
If a DVD-Video disc has separate disc and title menus,
you can navigate to the disc menu as follows:
l Press T/C followed by DISC MENU.
‰ The disc menu is displayed.
l To remove the disc menu, press DISC MENU
again.
38 PLAYBACK
Page 39

Subtitles
Audio disc mode
141 2 78
1 12 78
play track time total tracks total time
repeat track
Special VCD features
English
Playback Control (PBC)
l Select Z (Subtitle) in the system menu bar.
l Press Z SUBTITLE or wv(down up cursor)
repeatedly to step through the different subtitles, or
to switch the subtitles off.
l You can enter the required subtitle number directly
using the numerical keys 0-9.
T/C
ZOOM ANGLE SUBTITLE AUDIO
A/CH
ZYa
REC/OTR
PAUSE SLOW
STOP
NEXT PREVIOUS
FORWARDREVERSE
FSS
PLAY
CLEAR SELECT
TIMER
l Make sure PBC is switched ‘On’. See ‘User
Preferences-features settings’.
l Load a (Super) Video CD with PBC and press
2 PLAY.
‰ The PBC menu appears on screen.
l Go through the menu with the keys indicated on the
TV screen until your chosen passage starts to play.
If a PBC menu consists of a list of titles, you can
select a title directly.
l Enter your choice with the numerical keys 0-9.
l Press RETURN to go back to the previous menu.
Playing an audio CD
l Insert the disc.
‰ After loading the disc, playback starts
automatically.
‰ If the TV set is on, the Audio CD screen appears.
‰ During play, the current track number and its
elapsed playing time will be shown on the screen
and the recorder display.
l To stop play at any time, press 9 STOP.
‰ The number of tracks and the total playing time
will be shown on the screen and the recorder
display.
PLAYBACK 39
Page 40

English
Pause
Repeat track/disc
PAUSE SLOW
FORWARDREVERSE
PLAYSTOP FSS
l Press ; PAUSE during play.
l To return to play, press 2 PLAY.
Search
PAUSE SLOW
l To search forwards or backwards through the disc
at 4x normal speed, press 5 REVERSE or 6
FORWARD.
‰ Search begins.
l To step up to 8x normal speed, press 5 REVERSE
or 6 FORWARD again.
‰ Search goes to 8x speed, and the sound is muted.
l To return to 4x normal speed, press 5 REVERSE
or 6 FORWARD again.
l If the TV set is on, search speed and direction are
indicated on the screen each time 5 REVERSE or
6 FORWARD is pressed.
l To end the search, press 2 PLAYor 9 STOP as
desired.
FORWARDREVERSE
PLAYSTOP FSS
ZOOM ANGLE SUBTITLE AUDIO
ZYa
DIM REPEAT REPEAT SCAN
l To repeat the currently playing track, press
REPEAT.
‰ ‘
Repeat track
’ appears on screen.
l To repeat the entire disc, press REPEAT a second
time.
‰ ‘
Repeat disc
’ appears on screen.
l To exit repeat mode, press REPEAT a third time.
Repeat A-B
ZOOM ANGLE SUBTITLE AUDIO
ZYa
DIM REPEAT REPEAT SCAN
To repeat or loop a sequence:
l Press REPEAT A-B at your chosen starting point;
‰ ‘
Repeat A
l Press REPEAT A-B again at your chosen end
point;
‰ ‘
Repeat A-B
repeat sequence begins.
l To exit the sequence, press REPEAT A-B again.
’ appears on screen.
’ appears on the display, and the
Moving to another track
REC/OTR
PAUSE SLOW
l Press K NEXT during play to step forward to the
next track.
l Press J PREVIOUS during play to return to the
beginning of the current track. Rapidly press
J PREVIOUS twice to step back to the previous
track.
l To go directly to any track, enter the track number
using the numerical keys 0-9.
AUDIO CD
TRACKS
2 3 5 6 7 8 9 10 11 12 ...41
NEXT PREVIOUS
FORWARDREVERSE
Scan
ZOOM ANGLE SUBTITLE AUDIO
ZYa
DIM REPEAT REPEAT SCAN
Plays the first 10 seconds of each track on the disc.
l Press SCAN.
l To continue play at your chosen track, press SCAN
again or press 2 PLAY.
40 PLAYBACK
Page 41

Access control
Child Lock (DVD and VCD)
When activating Child lock, only discs that are authorised
can be played without PIN code.
The recorder memory maintains a list of 50 authorized
(‘Child safe’) disc titles. A disc will be placed in the list
when ‘Play Always’ is selected in the ‘Child protect’ dialog.
Each time a ‘Child safe’ disc is played it will be placed on
top of the list. When the list is full and a new disc is added,
the least recently used will be removed from the list.
Activating/deactivating the child lock
T/C
ZOOM ANGLE SUBTITLE AUDIO
l Select ‘
Access control
’ in the features menu using
wv (down up cursor) and press u (right cursor).
-- --- off on off
A/CH
ZYa
l Select Ç using wv (down up cursor).
l Press OK or t (left cursor) to confirm and press
SYSTEM MENU again to exit the menu.
‰ Now unauthorized discs will not be played unless
the 4-digit code is entered.
l Select É to deactivate the Child Lock.
Note:
Reconfirmation of the 4-digit PIN code is necessary when:
The code is entered for the very first time (see above);
The code is changed (see ‘Changing the 4-digit code’);
The code is cancelled (see ‘Changing the 4-digit code’);
Both Child Lock and Parental Control are switched Off and
the code is requested.
Authorizing discs when Child Lock is
activated
l Insert the disc.
‰ The ‘Child protect’ dialog will appear. You will be
asked to enter your secret code for ‘
‘
Play always
’. If you select ‘
Play once
can be played as long as it is in the recorder and the
recorder is in the On position. If you select ‘
always
’, the disc will become Child safe
(authorized) and can always be played even if the
Child lock is set to ‘On’.
Play once
’ or
’, the disc
Play
English
Features
Access control
Status box
Autoresume
Low power standby
PBC
Enter code
l Enter a 4-digit PIN code of your own choice using
the digit keys 0-9.
l Enter the code a second time.
l Move to ‘
Child lock
’ using wv (down up cursor).
l Move to Ç / É using the u (right cursor) key.
-- --- off on off
Child lock
Access control
Status box
Autoresume
Low power standby
PBC
Parental level
Change country
Change code
Features
locked
Play once
Play always
Choose 'Play always' to insert the disc in
the child-safe list
Access Control
Note:
Double sided DVD discs may have a different ID for each
side. In order to make the disc ‘Child safe’, each side has to
be authorized.
Multi volume VCD disc may have a different ID for each
volume. In order to make the complete set ‘Child safe’, each
volume has to be authorized.
Securing discs
l Insert the disc.
‰ Playback starts automatically.
l Press 9 STOP while { is visible.
‰ | will appear and the disc is now banned i.e. it is
not Child safe any longer.
ACCESS CONTROL 41
Page 42

English
Parental Level (DVD-Video only)
Movies on pre-recorded DVD discs may contain scenes
not suitable for children. Therefore discs may contain
‘Parental Control’ information which applies to the
complete disc or to certain scenes on the disc.
These scenes are rated from 1 to 8 and alternative, more
suitable scenes are available on the disc. Ratings are
country dependent. The ‘Parental Control’ feature allows
you to prevent discs from being played by your children
or to have certain discs played with alternative scenes.
Activating/Deactivating Parental Control
Country
T/C
ZOOM ANGLE SUBTITLE AUDIO
l Select ‘
l Enter the four digit PIN code.
l Move to ‘
l Press u (right cursor).
Access control
’ in the features menu using
wv (down up cursor) and press u (right cursor).
Change country
’ using w (down cursor).
A/CH
ZYa
l Select ‘
Access control
’ in the features menu using
T/C
ZOOM ANGLE SUBTITLE AUDIO
A/CH
ZYa
wv (down up cursor) and press u (right cursor).
l Enter your 4-digit PIN code using the digit keys 0-9.
If necessary enter the code a second time.
l Move to ‘
Parental level
’ using wv (down up cursor).
l Move to the Value Adjustment bar using u (right
cursor).
-- --- off on off
Child lock
Access control
Status box
Autoresume
Low power standby
PBC
Parental level
Change country
Change code
--
Features
-- --- off on off
Austria
Access control
Status box
Auto resume
Low power standby
PBC
Belgium
Denmark.
Finland
l Select a country using wv (down up cursor).
l Press OK or t (left cursor) to confirm and press
SYSTEM MENU again to exit the menu.
l Use the wv(down up cursor) keys or the
numerical keys 0-9 on the remote control to select
a rating from 1 to 8 for the disc inserted.
Rating 0 (displayed as ‘– –’):
Parental Control is not activated. The disc will be played
in full.
Ratings 1 to 8 (1 = childsafe - 8 = adults only):
The disc contains scenes not suitable for children. If you
set a rating for the recorder, all scenes with the same
rating or lower will be played. Higher rated scenes will
not be played unless an alternative is available on the
disc. The alternative must have the same rating or a
lower one. If no suitable alternative is found, play will
stop and the 4-digit code has to be entered.
l Press OK or t (left cursor) to confirm and press
SYSTEM MENU again to exit the menu.
42 ACCESS CONTROL
Page 43

Changing the 4-digit code
English
T/C
ZOOM ANGLE SUBTITLE AUDIO
l Select ‘
Access control
’ in the features menu using
wv (down up cursor) and press u (right cursor).
l Enter the old code.
l Move to ‘
Change code
-- --- off on off
Access control
Status box
Autoresume
Low power standby
PBC
’ using w (down cursor).
Child lock
Parental level
Change country
Change code
A/CH
ZYa
Features
l Press u (right cursor).
l Enter the new 4-digit PIN code.
l Enter the code a second time and reconfirm with OK.
l Press SYSTEM MENU to exit the menu.
Note:
9
If you forgot your code, press
STOP four times while in
the access control PIN code box and exit with OK. Access
control is now switched off. You can then enter a new code
as described above.
ACCESS CONTROL 43
Page 44

English
Managing disc content
Title settings
For each title on a DVD+RW or DVD+R disc the
default settings can be changed to your personal
preference in the title settings menu.
Changing the title name
l In the Index Picture Screen, select the required title
with wv (down up cursor).
l Press u (right cursor) to enter the title settings menu.
Settings for title BBC soccer
Name
Play full title
Erase this title
BBC soccer
l Press OK to confirm.
‰ ‘
Erasing title
...’ is shown until the action is
completed.
‰ After the title has been erased, the Index Picture
Screen will show an empty space instead. If there
was an empty space in front of or behind this title,
then these are combined into one empty space.
Empty spaces of less then one minute will not be
shown.
On DVD+R titles can also be erased but the space
occupied cannot be used anymore. During
finalisation erased titles are removed from the Index
Picture Screen.
Disc Info Screen
l When on the Index Picture Screen, press 9 STOP.
‰ You are now on Title 1.
l Press v (up cursor).
‰ You enter the Disc Info Screen.
l Press w (down cursor) to exit the Disc Info Screen.
l Enter the new name. A name may contain a
maximum of 64 characters.
l Use tu(left right cursor) for the position of the
characters. Use wv(down up cursor) to change
characters.
l Use SELECT to toggle between capitals and lower
case characters.
l Use CLEAR to erase a character.
l Confirm by pressing OK.
Play full title
l In the Index Picture Screen, select the required title
with wv (down up cursor).
l Press u (right cursor) to enter the title settings menu.
l Select ‘
Play full title
’.
When this item is selected the title will be played in full,
including hidden chapters. Follow the instructions on the
screen. (See ‘managing disc content - Favorite Scene
Selection’)
Erasing a title
You may simply erase a title on DVD+RW by recording
over it, but if you want to erase the whole title instantly,
do the following:
l In the Index Picture Screen, select the required title
with wv (down up cursor).
l Press u (right cursor) to enter the title settings menu.
l Select ‘
Erase this title
‰ The message '
title
', '
Press OK to confirm
’
.
This will completely erase this
' is shown.
The Disc Info Screen contains the following
information:
Compatibility status
- indicates compatibility of any edits
with DVD players
Video system
- PAL or SECAM
- NTSC
DVD+R disc status
- unlocked
- locked
- finalised
Unlocked
PAL
DVD playback
23: 13 h r
12 BBC1
Cue to go back to the Index Picture
Screen
- total recording duration
Edits
Disc description
- disc name
- date of last recording
Summer holiday
02: 05: 10 u s e d
S u n 13 12 99
44 MANAGING DISC CONTENT
Page 45

Disc Settings
For each DVD+RW or DVD+R disc the settings can be
changed to your personal preference in the disc settings
menu.
l In the Disc Info Screen press u (right cursor).
‰ You will now enter the ‘disc settings’ menu.
Changing the Disc Name
l In the Disc Info Screen press u (right cursor).
‰ You will now enter the ‘disc settings’ menu.
Settings for Summer holiday
Disc name
Protection
Erase disc
Summer holiday
Unprotected
l Press OK to confirm or t (left cursor) to cancel.
‰ ‘
Erasing disc
’ is shown until the action is
completed.
‰ After the disc has been erased, the Index Picture
Screen will show the free space on the disc.
Finalising a DVD+R disc
While a DVD+RW disc can be played instantly on most
DVD players, a DVD+R disc can be played only on the
DVD recorder until it is finalised. After finalisation no
changes can be made to the disc anymore.
l In the Disc Info Screen press u (right cursor).
‰ You will now enter the ‘disc settings’ menu.
Settings for Summer holiday
Disc name
Pr o t ection
Erase disc
Finalise disc
Summer holiday
Unpr o t ect e d
Pr e ss OK
English
l Enter the new name. A name may contain a
maximum of 64 characters.
l Use tu(left right cursor) for the position of the
characters. Use wv (down up cursor) to change
characters.
l Use SELECT to toggle between capitals and lower
case characters.
l Use CLEAR to erase a character.
l Confirm by pressing OK.
Protection of recordings
l In the Disc Info Screen press u (right cursor).
‰ You will now enter the ‘disc settings’ menu.
l Select ‘
l Select ‘
Protection
Protected
’ and press u (right cursor).
’ with wv(down up cursor).
l Press OK on the remote control to confirm.
‰ No further changes can be made to the disc.
It will also disable most title/disc settings options, as
well as the complete edit menu.
‰ Future editing is only possible after resetting the
Protection feature to ‘
Unprotected
’ again.
Erasing a disc
This option is only aivailable for DVD+RW discs that are
not erase-protected.
l In the Disc Info Screen press u (right cursor).
‰ You will now enter the ‘disc settings’ menu.
l Select ‘
Erase disc
‰ The message '
displayed.
’ and press OK.
This will erase all titles
’ is
l Select ‘
Finalise disc
‰ ‘
Finalise disc
’ and press OK to confirm.
’ is shown until the action is
completed.
‰ After finalisation the Index Picture Screen will
appear.
If the DVD+R disc was recorded on a different brand of
DVD recorder you may not be able to access the Disc
Settings screen. In this case you can use the ‘
disc
’ option in the features menu of the user
Finalise
preferences menu.
-- --- off on off
Features
Access control
Status box
Autoresume
Low power standby
Finalise disc
Enter code...
On
Off
Off
Press OK
MANAGING DISC CONTENT 45
Page 46

English
Making your edits DVD-compatible
Favourite Scene Selection
If one or more titles have been edited (see ‘Favourite
Scene Selection’), then the edits will play on your DVD
recorder, but a DVD player may show the original
versions instead of the edits. You can prepare your
DVD+RW discs so that also a DVD player will show the
edited version. This is not possible with DVD+R discs.
l If the Disc Settings menu shows the option ‘
edits DVD compatible
’, select this option. If the
Make
menu does not show this option, then your
DVD+RW disc is already compatible, and no
conversion is needed.
Settings for Summer holiday
Disc name
Protection
Erase disc
Make edits DVD compatible
Summer holiday
Unprotected
Press OK
The basic function of any edit operations is to improve
accessibility and handling of your recordings. For instance:
scenes you do not want to see during playback (e.g.
commercials during a movie) can be marked as chapters
and made hidden. During playback you will see your
recording without the hidden chapters as one sequence.
Note:
In between the scenes the picture may freeze for a short moment.
Each title consists of chapters. With the FSS menu any
chapter can be made hidden or made visible again.
Normally, during recording, chapter markers are inserted
automatically every five to six minutes (this setting can be
changed in the record settings menu). After the recording
is finished, you can manually add and remove chapter
markers via the FSS menu. Both automatically generated
and manually inserted chapter markers can be removed.
After editing, the modified version of a title is the default
playback version. The original can be accessed via the
‘
Play full title
’ option in the title settings menu. Other
DVD players may still play the original. To guarantee
that the edited version will play on these DVD players,
choose ‘
Make edits DVD
-
compatible
’ in the disc
settings menu (only available on DVD+RW discs).
l Press OK on the remote control to confirm.
‰ The messages ‘
to confirm
’ will appear to indicate how long the
This will take
...’ and ‘
Press OK
action will take.
l Press OK on the remote control to confirm.
‰ ‘
Processing...
’ and a progress bar are shown
until the action is completed.
Calling up the FSS menu
MONITOR ON/OFF
REC/OTR
PAUSE SLOW
l Play the title you want to edit.
l Press the FSS key on the remote control.
‰ The video image is overlayed with a transparant edit
menu. Title and chapter information appear in an
information box at the top of the screen.
Note:
The Favourite Scene Selection menu may disappear after
about five minutes if you do not edit any information.
play
NEXT PREVIOUS
FORWARDREVERSE
PLAYSTOP FSS
CLEAR SELECT
TIMER
1 1
Favourite scene selection
Insert chapter marker
Current chapter
Delete chapter marker
Delete all chapter markers
Use picture as index
Divide title
Press OK
Hidden
46 MANAGING DISC CONTENT
l Use w or v (down up cursor) to toggle through the
menu’s functions.
Page 47

Inserting chapter markers
Deleting chapter markers
l In play mode press FSS on the remote control,
to call up the FSS menu.
l Select ‘
Insert chapter marker
’.
l Press OK on the remote control to insert a marker.
The maximum number of chapter markers is 99.
When this maximum is reached the on-screen message
‘
Too many chapters
’ appears. You have to delete some,
before inserting new chapter markers.
During recording you can add chapter markers by
pressing FSS on the remote control. The message
‘
Chapter marker inserted
’ will appear on the screen.
REC/OTR
PAUSE SLOW
NEXT PREVIOUS
FORWARDREVERSE
PLAYSTOP FSS
Hiding chapters
Initially all chapters are visible. You can hide chapters or
make them visible again on playback. In FSS mode however
hidden chapters are displayed in a dimmed mode.
l In play mode press FSS on the remote control to
call up the FSS menu.
You van combine a chapter with the previous chapter in
the current title by deleting the chapter at the beginning
of the current chapter.
l In play mode press FSS on the remote control
to call up the FSS menu.
l Select ‘
Delete chapter marker
‘.
l Press OK on the remote control to confirm
‰ ‘
Deleting marker
’ will appear.
You can delete all chapter markers (manually and
automatically generated) in the current title.
l In play mode press FSS on the remote control
to call up the FSS menu.
l Select ‘
Delete chapter markers
‘.
l Press OK on the remote control to confirm
‰ ‘
Deleting markers
’ will appear.
Changing the index picture
You can define the current video frame as a miniature
picture to be used for this title’s entry in the Index
Picture Screen.
l In play mode press FSS on the remote control
to call up the FSS menu.
l Select ‘
l You can use ; PAUSE and/or x SLOW to
l Press OK on the remote control to confirm.
New index picture
‘.
accurately choose the desired picture.
‰ ‘
Updating menu
’ will appear.
English
1 2
play
l Select
Insert chapter marker
Current chapter
Delete chapter marker
Delete all chapter markers
Divide title
‘‘Current chapter‘’
Favourite scene selection
Hidden
with w or v (down up
cursor).
l Select ‘
Visible
’ or ‘
Hidden
’ with the u (right cursor)
key.
l You can toggle between ‘
Visible
’ and ‘
directly from any line in the FSS menu with the
SELECT key on the remote control.
Hidden
’
MANAGING DISC CONTENT 47
Page 48

English
Dividing a title
Append recording
On a DVD+RW disc you split one title into two
separate titles. (On DVD+R this is not possible.)
REC/OTR
PAUSE SLOW
NEXT PREVIOUS
FORWARDREVERSE
PLAYSTOP FSS
CLEAR
a P
TIMER
SELECT
l On the Index Picture Screen, select the title you
want to divide.
l Press 2 PLAY.
l Go to the point where you want to divide the title
and press ; PAUSE.
l Press FSS.
‰ The Favourite Scene Selection menu is shown.
l Select ‘
Divide title
1 2
play
Insert chapter marker
Current chapter
Delete chapter marker
Delete all chapter markers
Use picture as index
Divide title
’.
Favourite scene selection
Hidden
Press OK
This function is only available on DVD+RW discs.
REC/OTR
PAUSE SLOW
NEXT PREVIOUS
FORWARDREVERSE
PLAYSTOP FSS
MONITOR ON/OFF
REC/OTR
NEXT PREVIOUS
If you want to append a video recording to an earlier
recorded title, do the following.
l On the Index Picture Screen, select the title to
which you want to add a video recording.
l Press 2 PLAY.
l At the point where you want to append the title
press ; PAUSE.
l To monitor the video input you may press
MONITOR.
l Press RECORD (on the recorder) or REC/OTR
(on the remote control).
The video recording will now be appended from this
point. Video material beyond this point is overwritten.
This may include titles following the current title.
Any remaining video material that is not overwritten,
which may include the last part of the original title, is
maintained. You can access these titles from the Index
Picture Screen.
l Press OK on the remote control to confirm.
Dividing title...
‰ ‘
’ is shown until the action is
completed. This divide operation cannot be undone.
The Index Picture Screen will show two titles instead of
one. Both will have the same name. If you want to
change the name, you can do so in the title settings
menu. For one of the two resulting titles, a new index
picture is created.
If you want to divide one title into more than two titles,
use the above procedure several times.
48 MANAGING DISC CONTENT
Page 49

Troubleshooting
If it appears that the DVD recorder is faulty, first consult this checklist. It may be that something has been overlooked.
Under no circumstances attempt to repair the system yourself; this will invalidate the warranty. Look for the specific
symptom(s). Then perform only the actions listed to remedy the specific symptom(s).
Symptom Remedy
The recorder does not respond to • The remote control may be configured for a second DVD recorder.
the remote control Hold SELECT+1 pressed simultaneously to revert to DVD recorder 1.
• Aim the remote control directly at the sensor on the front of the
recorder.
• Avoid all obstacles which may interfere with the signal path.
• Inspect or replace the batteries.
Keys on the DVD recorder do not work • The DVD recorder may still be in Virgin mode. See ‘First time set-up:
virgin mode’.
• Otherwise disconnect and reconnect the DVD recorder from the
mains.
• If this does not solve the problem, check if the remote control still
works. If so, the recorder is probably in trade mode.
Disconnect the recorder from the mains and reconnect it while holding
/ OPEN/CLOSE and 9 STOP pressed.
English
No picture • Check if the TV set is switched on.
• Check the video connection.
• When the DVD recorder is connected to the TV set via SCART, you
may not see the picture at the DVD recorder after selecting the correct
programme number on your TV set when a timer recording takes place.
• This way, you can still view another device (e.g. a satellite receiver).
• To view the DVD recorder press TV/DVD on the remote control.
Distorted picture distorted sound • Check the disc for fingerprints and clean with a soft cloth, wiping from
centre to edge.
• Sometimes a small amount of picture distortion may appear. This is
not a malfunction.
Recorder does not play disc • Ensure the disc label is upwards and that the right disc type is inserted.
• Clean the disc.
• Check if the disc is defective by trying another disc.
• Check if the region code of the disc matches the region code of the
recorder. (pre-recorded DVD discs only). See ‘playing a pre-recorded
DVD-Video disc’.
• Check if Child Lock is activated.
Distorted sound from HiFi amplifier • Check to make sure that no audio connections are made to amplifier
phono input.
• Check to make sure that analogue input of the amplifier is not
connected to the digital output of the DVD recorder.
Distorted or black and white picture with • The disc format is not according to the TV set used (PAL/NTSC).
DVD or Video CD disc
No audio at digital output • Check the digital connections.
• Check the settings menu to make sure that the digital output is set to
on.
• Check if the audio format of the selected audio language matches your
receiver capabilities.
Recorder does not respond to all • Some operations are not permitted by the disc. Refer to the
operating commands during playback instructions in the disc inlay.
of a DVD-Video disc
TROUBLESHOOTING 49
Page 50

English
The recorder does not record • Make sure that the recorder is switched to standby before the timer
timer programme starts.
No new title can be recorded • Check if the maximum number of titles has been reached (message:
‘
too many titles
’ on screen). If so, delete a title next to a free space.
• Check if the disc is write protected. If so, unlock the disc in the disc
settings menu (message: ‘
Disc locked
’ on screen).
• Check if the (DVD+R) disc has been finalized. If so, no new titles can
be recorded anymore.
Service codes on the display • Clean the disc. The recording was most probably done correctly.
‘Disc warning’ message on screen • A write error has occured, but it could be corrected. No user action
is required.
‘Disc error’ message on screen • A write error has occured from which the recorder could not
recover. Inspect the disc and clean it if necessary (refer to ‘Intoduction Cleaning discs’ for cleaning instruction). Record (overwrite) again over
the same part of the disc to see if the problem is solved
Disc errors • A disc might be corrupted because of dust, scratches or fingerprints.
If the disc cannot be accessed anymore, use the back-up disc erase
procedure to repair it. Proceed as follows:
1. Clean the disc.
2. Put disc in the drawer (do not close the tray).
3. Press and hold CLEAR for several seconds until the tray closes.
Two languages are ‘mixed’ when • When the TV set does not automatically detect the dual-language
recording from a stereo VCR signal,use left/right audio balance on the TV set to amplify the one or
the other language.
The disc cannot be erased because the 1. Open the tray while leaving the disc in.
Index Picture Screen does not appear 2. Hold CLEAR pressed for around 5 seconds until the tray closes. The
disc is technically not yet erased but you can start a new recording like
on a blank disc.
The Index Picture Screen does not appear • Take out the disc. Clear the disc. Insert the disc.
but the titles on the disc can still be played Choose ‘Adapt to own disc format’ (See ‘User Preferences - Features).
A DVD player shows the Index Picture • Press 9 STOP to exit the Index Picture Screen, then press 2 PLAY.
Screen but does not react to
the 2 PLAY key
A DVD+RW disc does not play • There are DVD Players that will not play recordings made with a DVD
on a certain DVD player Recorder. With a special procedure the recorder will solve this problem
for some players. Proceed as follows:
1. Put the disc in the drawer (do not close the tray)
2. Press and hold the 2 key on the remote control for several seconds
until the tray closes. The disc is now modified.
3. If the change has no effect, you may perform the same procedure
with the 3 key on the remote control.
50 TROUBLESHOOTING
Note :
Modifying the disc can solve the problem for a specific player model, but
playback in other DVD players may no longer be possible.
It is therefore recommended to use this procedure carefully and only when
needed.
• To revert the disc to the original state, follow the same procedure
with the 1 key on the remote control0
Page 51

Diagnosis programme
System limitations
If the recorder is still faulty you can start the Diagnosis
Programme in the recorder.
You can operate the Diagnosis Programme by following
the instructions step by step.
Instructions
l Unplug the power cord of the recorder.
l Press the 2 PLAY key and keep them pressed
while you plug the recorder.
‰ On the display the message ‘BUSY’ appears
together with a counter. This counter indicates the
termination of the test when zero is reached.
‰ After a few minutes the message on the local
display changes over from ‘BUSY’ to ‘FAIL’ or to
‘PASS’.
‰ If the message ‘FAIL’ appears on the display,
there is apparently a failure in your recorder and
your recorder should be repaired.
l Consult your dealer or the Philips Customer Care
Centre for the nearest Service Repair Shop in your
country. The phone number is given in your
warranty booklet.
l If the message ‘PASS’ appears on the display, there
is apparently no failure in your recorder, in this case
the failure can be caused by incorrect interpretation
of the operating instructions or a wrong disc is used
or your recorder is not correctly connected. In this
case you should consult your dealer or the Philips
Customer Care Centre for further assistance in
solving the problem.
l If the problem remains, then consult your Philips
Customer Care Centre.
English
DVD+RW and DVD+R discs may not play on certain
DVD Video players.
A DVD+RW video disc that has been recorded on a
different type or brand of recorder can be played, but
may not provide all features commonly available to
DVD+RW discs, such as the on-screen disc bar, the disc
settings menu, the title settings menu, and editing.
Refer to ‘Adapt disc format’. If the disc is writeprotected, the status cannot be changed.
When using manual recording, the DVD recorder will
warn before adapting the format of the disc or removing
non-video data. When using timer recording however,
the DVD recorder will always start to record, unless the
disc is write-protected. Menus, edits and other data
recorded on a different device (e.g. a PC) may be lost.
Because of the Variable Bit Rate, a title map take up less
or more space than the overwritten title, even though
the duration is the same. As a result, a part of the
original title may remain, or a part of the next title may
be lost. The maximum deviation is five minutes.
After a power interruption during recording, the Index
Picture Screen will may not match with the actual video
content on the disc. The last recorded title may be lost.
TROUBLESHOOTING 51
Page 52

English
Glossary
This section explains most important terms, abbreviations, and acronyms used in this document.
Term Explanation
AC-3 Audio Coding 3, also known as Dolby Digital. Multi-channel digital audio
compression system from Dolby Labs.
A/V Audio/Video
Chapter A part of a title.
Disc Bar A graphical representation of the contents of a (DVD+RW) disc.
Disc Pointer An arrow indicating the current playback/recording position on the
DVD+RW disc, displayed on the ‘disc bar’.
DTS Digital Theater System. A high-end Multi-channel audio compression
format.
DV Digital Video. A camcorder format for high-quality video, different from
MPEG. It is converted into MPEG 2 Video when recorded on DVD+RW
DVD Digital Versatile Disc
DVD+R DVD+Recordable. The write-once disc standard used by the DVD
recorder.
DVD+RW DVD+ReWritable. One of the disc standards used by the DVD
recorder.
EasyLink If your TV set and your video recorder are equipped with this feature,
they can exchange information to adjust certain settings to each other,
such as the TV channel order and other user preferences.
FSS Favorite Scene Selection. see ‘Managing disc content’.
i.LINK Also known as ‘FireWire’ and ‘IEEE 1394’. A cable for transfer of high-
bandwidth digital signals, as used by Digital Video camcorders.
Index Picture Screen A screen that gives an overview of a DVD+RW disc, wih ‘index
pictures’ that each represent a recording.
MPEG Motion Picture Experts Group. A collection of compression systems for
digital audio and video.
NEXTVIEW Link A system that enables easy programming of a video recorder via a TV
set. Also see EasyLink.
NICAM System for reception of digital stereo TV sound.
NTSC See TV system.
OSD On-screen Display. The ‘user interface’ by which you can control the
DVD recorder via the TV screen.
OTR One-Touch Recording. With this feature you can easily start a
recording (by pushing just one button) and select the switch-off time in
intervals of 30 minutes.
52 GLOSSARY
Page 53

PAL See TV system.
PBC Playback Control. A special feature on a VCD 2.0 or Super VCD disc
that enables interactive use.
PCM Pulse Code Modulation. A digital audio encoding system.
PDC Program Delivery Control
RGB Red-Green-Blue. A top-quality video connection where red, green and
blue components of a video signal are carried through separate wires.
SCART
cable Also known as Euro-AV cable. This standard cable is an easy way to
connect various AV devices and televisions. In addition to audio and
video it can carry control signals.
SECAM See TV system.
S-video Sometimes also called S-VHS or Super-VHS. A high-quality video
connection standard.
SVCD Super Video Compact Disc.
Title It is the name given to the unit of recording on the disc. A title,
typically, represents one recording.
TruSurround A system for simulating Multi-channel sound reproduction via a two-
channel set-up, by SRS Labs, Inc.
English
TV system There are various systems for transmitting television signals, for example
PAL, PAL-I, PAL-BG, SECAM, SECAM-DK, NTSC, etc. The TV system is
country dependant.
VCD Video Compact Disc
VCR Video Cassette Recorder
VIDEO Plus+ A system by which you can easily program a timer recording by entering
a nine-digit VideoPlus+ number found next to the programme
description in most TV guides.
VPS Video Programming System
GLOSSARY 53
Page 54

Appendix
English
Using your DVD recorder
remote control with your TV set
Your DVD recorder remote control can transmit
several commands to TV sets of different brands.
The following keys will always operate the TV set:
CLEAR
- VOL+ increase TV volume
- VOL - decrease TV volume
cc
-
mute TV
Some other keys normally operate the DVD recorder,
but will operate the TV set when you keep the button
on the side of the remote control pressed:
MONITOR ON/OFF
REC/OTR
PAUSE SLOW
NEXT PREVIOUS
FORWARDREVERSE
PLAYSTOP FSS
- CH + next TV programme number
- CH - previous TV programme number
- 0 - 9 choose TV channel
- B switch TV set to standby
TIMER
SELECT
CHVOL
MUTE
CHVOL
MUTE
T/C
ZOOM ANGLE SUBTITLE AUDIO
DIM REPEAT REPEAT SCAN
A/CH
ZYa
If your TV set does not respond to the remote control,
you can re-programme your remote control. Below you
will find a list of all available remote control codes for
various TV brands. The following procedure reprogrammes your remote control:
l Look up the set-up code for your TV set in the
code list below.
l Press and hold the RETURN and SELECT key
simultaneously for at least 3 seconds.
l Release both keys.
l Enter, within 30 seconds, the correct three-digit
code with the digit keys 0-9.
l If the selected code does not work with your TV
set, or if the brand of your TV set is not in the list,
try out the codes one after the other.
Alternative procedure:
MONITOR ON/OFF
REC/OTR
PAUSE SLOW
NEXT PREVIOUS
FORWARDREVERSE
PLAYSTOP FSS
CLEAR
TIMER
MUTE
SELECT
CHVOL
l Switch on your television set.
l Press and hold the RETURN and SELECT key
simultaneously for at least 3 seconds.
l Release both keys.
l Point the remote control to your TV set.
l Press and hold the B STANDBY key.
‰ Your TV set switches off when the right code is
found.
l When your TV set switches off, immediately release
the B STANDBY key.
‰ Your remote control is now re-programmed.
l This complete procedure may take up to 2 minutes.
Remote control set-up codes
for television
AOC . . . . . . . . . . . . . . 046, 057
Acura . . . . . . . . . . . . . . . . . 036
Admiral . . . . . . . . . . . . 120, 490
Adyson . . . . . . . . . . . . . . . . 244
Aiko . . . . . . . . . . . . . . . . . . 119
Akai . . . . . . . . . . . . . . . . . . 057
Akura . . . . . . . . . . . . . 245, 291
Alaron . . . . . . . . . . . . . 206, 243
Alba . . . 064, 036, 245, 063, 398
Allorgan . . . . . . . . . . . . . . . 321
America Action. . . . . . . . . . 207
Amplivision . . . . . . . . . . . . . 244
Amstrad. . . . 198, 398, 036, 064
Anam . . . . . . . . . . . . . 207, 036
Anitech . . . . . . . . . . . . . . . . 036
Arcam . . . . . . . . . . . . . 243, 244
Asuka . . . . . . . . . . . . . . . . . 245
Atlantic . . . . . . . . . . . . . . . . 233
Audiosonic . . . . . . . . . 064, 136
Audiovox. . . . . . . 119, 207, 478
Autovox . . . . . . . . . . . . . . . 233
BPL . . . . . . . . . . . . . . . . . . . 309
BSR . . . . . . . . . . . . . . . . . . . 321
BTC . . . . . . . . . . . . . . . . . . 245
Bang & Olufsen . . . . . . . . . . 592
Basic Line . . . . . . . . . . 036, 245
Baur. . . . . . . . . . . 064, 037, 581
Baysonic . . . . . . . . . . . . . . . 207
Beaumark . . . . . . . . . . . . . . 205
Beko . . . . . . . . . . . . . . . . . . 397
Belcor . . . . . . . . . . . . . . . . . 046
Bell & Howell . . . . . . . . . . . 181
Beon . . . . . . . . . . . . . . . . . . 064
Binatone . . . . . . . . . . . . . . . 244
Blaupunkt . . . . . . . . . . . . . . 581
Blue Sky . . . . . . . . . . . . . . . 245
Blue Star . . . . . . . . . . . . . . . 309
Boots . . . . . . . . . . . . . . . . . 244
Bradford . . . . . . . . . . . . . . . 207
Brandt. . . . . . . . . . . . . . . . . 136
Britannia . . . . . . . . . . . . . . . 243
Brockwood . . . . . . . . . . . . . 046
Broksonic . . . . . . . . . . 263, 490
Bush . . 064, 398, 245, 036, 063,
. . . . . . . . . . . . . . 309, 321, 401
CCE . . . . . . . . . . . . . . 064, 244
CS Electronics. . . . . . . . . . . 243
CXC . . . . . . . . . . . . . . . . . . 207
Candle. . . . . . . . . . . . . 057, 083
Carnivale. . . . . . . . . . . . . . . 057
Carrefour . . . . . . . . . . . . . . 063
Carver . . . . . . . . . . . . . . . . 081
Cascade . . . . . . . . . . . . . . . 036
Cathay . . . . . . . . . . . . . . . . 064
Celebrity. . . . . . . . . . . . . . . 027
Centurion . . . . . . . . . . . . . . 064
Cimline . . . . . . . . . . . . . . . . 036
Cineral . . . . . . . . . . . . 478, 119
Citizen . . . . 083, 057, 066, 087,
. . . . . . . . . . . . . . . . . . . . . . 119
Clarivox . . . . . . . . . . . . . . . 064
Clatronic. . . . . . . . . . . . . . . 397
Concerto . . . . . . . . . . . . . . 083
Condor . . . . . . . . . . . . 347, 397
Contec. . . . . 036, 063, 207, 243
Craig. . . . . . . . . . . . . . . . . . 207
Crosley . . . . . . . . . . . . . . . . 081
Crown . . . . 397, 036, 064, 066,
. . . . . . . . . . . . . . . . . . 207, 445
Crystal . . . . . . . . . . . . . . . . 458
Curtis Mathes . . . 087, 057, 066,
. . . . . . 074, 078, 081, 083, 120,
. . . . . . . . . . 172, 181, 193, 478
Cybertron. . . . . . . . . . . . . . 245
Daewoo . . . 119, 046, 401, 478,
. . . . . . . . . . . . . . 036, 064, 066
Dainichi. . . . . . . . . . . . . . . . 245
Dansai. . . . . . . . . . . . . . . . . 064
Dayton . . . . . . . . . . . . . . . . 036
Daytron . . . . . . . . . . . . . . . 046
Decca . . . . . . . . . . . . . 064, 099
Denon. . . . . . . . . . . . . . . . . 172
Dixi . . . . . . . . . . . . . . . 036, 064
Dual Tec . . . . . . . . . . . . . . . 244
Dumont. . . . . . . . 044, 046, 097
Electroband. . . . . . . . . . . . . 027
Elin . . . . . . . . . . . . . . . . . . . 064
Elite. . . . . . . . . . . . . . . 245, 347
Elta . . . . . . . . . . . . . . . . . . . 036
Emerson . . . 263, 207, 205, 206,
. . . . . . 490, 309, 066, 046, 181
Envision. . . . . . . . . . . . . . . . 057
Erres . . . . . . . . . . . . . . 039, 064
Expert. . . . . . . . . . . . . . . . . 233
Ferguson . . . . . . . . . . . 136, 064
Fidelity . . . . . . . . . . . . . . . . 243
Finlux . . 064, 132, 097, 099, 206
54 APPENDIX
Page 55

Firstline. . . . 348, 036, 243, 244,
. . . . . . . . . . . . . . . . . . . . . . 321
Fisher . . . . . . . . . 244, 181, 397
Flint. . . . . . . . . . . . . . . . . . . 482
Formenti . . . . . . . . . . . 347, 064
Frontech . . . . . . . . . . . 458, 291
Fujitsu . . . . . . . . . 206, 099, 233
Funai . . 321, 198, 206, 207, 291
Futuretech . . . . . . . . . . . . . 207
GE. . . . 048, 074, 078, 205, 478,
. . . . . . . . . . . . . . . . . . 120, 309
GEC . . . . . . . . . . 099, 064, 244
GPM . . . . . . . . . . . . . . . . . . 245
Geloso . . . . . . . . . . . . . . . . 036
Genexxa . . . . . . . . . . . . . . . 245
Gibralter . . . . . . . 044, 046, 057
GoldStar . . . 064, 046, 057, 205,
. . . . . . . . . . . . . . 244, 083, 136
Goodmans . . . . . 064, 099, 206,
. . . . . . . . . . 398, 063, 244, 401
Gorenje. . . . . . . . . . . . . . . . 397
Gradiente . . . . . . . . . . 083, 080
Granada. . . . . . . . 064, 099, 244
Grandin. . . . . . . . . . . . . . . . 309
Grundig . . . . . . . . 097, 581, 064
Grunpy . . . . . . . . . . . . 206, 207
HCM . . . . . . . . . . . . . . 036, 309
Hallmark . . . . . . . . . . . . . . . 205
Hanseatic. . . . . . . . . . . 064, 347
Harley Davidson . . . . . . . . . 206
Harman/Kardon . . . . . . . . . 081
Harvard. . . . . . . . . . . . . . . . 207
Hinari . . . . . 036, 063, 064, 245,
. . . . . . . . . . . . . . . . . . . . . . 206
Hisawa. . . . . . . . . . . . . 309, 482
Hitachi. . . . . 136, 071, 172, 244,
. . . . . . . . . . . . . . 063, 083, 132
Huanyu . . . . . . . . . . . . 243, 401
Hypson . . . . . . . . 291, 064, 309
ICE . . . . . . . . . . . 244, 291, 398
ICeS . . . . . . . . . . . . . . . . . . 245
ITS . . . . . . . . . . . . . . . . . . . 398
Imperial . . . . . . . . . . . . 445, 397
Indiana. . . . . . . . . . . . . . . . . 064
Infinity . . . . . . . . . . . . . . . . . 081
Inno Hit. . . . . . . . . . . . . . . . 099
Innova . . . . . . . . . . . . . . . . . 064
Inteq . . . . . . . . . . . . . . . . . . 044
Interfunk . . . . . . . . . . . . . . . 064
Intervision . . 064, 129, 244, 291
Isukai. . . . . . . . . . . . . . . . . . 245
JBL . . . . . . . . . . . . . . . . . . . 081
JCB . . . . . . . . . . . . . . . . . . . 027
JVC . . . . . . . 080, 063, 398, 680
KEC . . . . . . . . . . . . . . . . . . 207
KTV . . . . . . . 207, 244, 057, 066
Kaisui . . 245, 244, 036, 243, 309
Kamp . . . . . . . . . . . . . . . . . 243
Kapsch . . . . . . . . . . . . . . . . 233
Kawasho . . . . . . . . . . . . . . . 243
Kendo . . . . . . . . . . . . . . . . . 064
Kenwood. . . . . . . . . . . 057, 046
Kingsley. . . . . . . . . . . . . . . . 243
Korpel. . . . . . . . . . . . . . . . . 064
Koyoda . . . . . . . . . . . . . . . . 036
LG. . . . . . . . . . . . . . . . . . . . 083
LXI . . . . 181, 074, 081, 183, 205
Leyco . . . . . . 099, 064, 291, 321
Liesenk & Tter . . . . . . . . . . 064
Luma . . . . . . . . . . . . . . . . . . 233
Luxman . . . . . . . . . . . . . . . . 083
M Electronic . . . . 132, 244, 036,
. . . . . . . . . . . . . . 064, 136, 401
MGA . . . . . . 177, 046, 057, 205
MTC. . . 087, 057, 046, 083, 243
Magnadyne . . . . . . . . . . . . . 129
Magnafon. . . . . . . . . . . . . . . 129
Magnavox. . . 081, 057, 063, 206
Manesth . . . . . . . . 347, 244, 291
Marantz . . . . . . . . 064, 081, 057
Mark . . . . . . . . . . . . . . . . . . 064
Matsui . 036, 064, 244, 398, 062,
. . . . . . . . . . . . . . 063, 099, 321
Matsushita . . . . . . . . . . 277, 677
Mediator . . . . . . . . . . . 039, 064
Megatron. . . . . . . . . . . 172, 205
Memorex . . 205, 036, 083, 177,
. . . . . . . . . . . . . . 181, 277, 490
Midland . . . . 044, 066, 074, 078
Minerva . . . . . . . . . . . . 097, 581
Minutz . . . . . . . . . . . . . . . . . 048
Mitsubishi . . 063, 135, 177, 205,
. . . . . . . . . . . . . . . . . . 046, 120
Mivar. . . . . . . . . . . . . . . . . . 243
Motorola. . . . . . . . . . . . . . . 120
Multitech . . . 036, 129, 207, 243,
. . . . . . . . . . . . . . . . . . . . . . 244
NAD . . . . . . . . . . 183, 193, 205
NEC . . . 057, 063, 046, 083, 482
NEI . . . . . . . . . . . . . . . 064, 458
NTC . . . . . . . . . . . . . . . . . . 119
Neckermann . . . . . . . . 064, 581
Nesco . . . . . . . . . . . . . . . . . 206
Netsat . . . . . . . . . . . . . . . . . 064
Nikkai . 064, 062, 245, 099, 243,
. . . . . . . . . . . . . . . . . . . . . . 291
Nikko . . . . . . . . . 205, 057, 119
Nobliko. . . . . . . . . . . . . . . . 129
Nordmende . . . . . . . . . . . . 136
Onwa . . . . . . . . . . . . . . . . . 207
Optimus. . . . 277, 193, 181, 677
Optonica . . . . . . . . . . . 120, 192
Orion . 321, 490, 064, 206, 263,
. . . . . . . . . . . . . . . . . . 347, 348
Osaki . . . . . . 099, 244, 245, 291
Oso. . . . . . . . . . . . . . . . . . . 245
Osume . . . . . . . . . . . . . . . . 099
Otto Versand . . . 064, 037, 063,
. . . . . . . . . . . . . . 244, 347, 581
Palladium . . . . . . . . . . . 397, 445
Panama . . . . . . . . . . . . 244, 291
Panasonic. . . . . . . 078, 277, 677
Pathe Cinema . . . . . . . 347, 243
Pausa. . . . . . . . . . . . . . . . . . 036
Penney . . . . 074, 087, 057, 048,
. . . . . . . . . . 205, 078, 066, 046,
. . . . . . . . . . . . . . . . . . 083, 183
Perdio . . . . . . . . . . . . . . . . . 347
Philco . . 172, 046, 057, 081, 490
Philips. . 064, 039, 081, 401, 581
Phonola . . . . . . . . . . . . 064, 039
Pilot . . . . . . . . . . . 046, 057, 066
Pioneer . . . . . . . . . . . . 136, 193
Portland. . . . . . . . 046, 066, 119
Prism. . . . . . . . . . . . . . . . . . 078
Profex . . . . . . . . . . . . . . . . . 036
Proline . . . . . . . . . . . . . . . . 348
Proscan . . . . . . . . . . . . . . . . 074
Protech . . . . 064, 129, 036, 458,
. . . . . . . . . . . . . . 244, 291, 445
Proton. . . . . . . . . . . . . . . . . 205
Pulsar . . . . . . . . . . . . . 044, 046
Pye . . . . . . . . . . . . . . . . . . . 039
Quasar . . . . . 078, 277, 192, 677
Quelle . . . . . 064, 097, 037, 581
Questa . . . . . . . . . . . . . . . . 063
R-Line . . . . . . . . . . . . . . . . . 064
RBM . . . . . . . . . . . . . . . . . . 097
RCA . . . 074, 046, 078, 117, 120
Radio Shack . . . . 192, 207, 057,
. . . . . . . . . . 205, 066, 181, 046,
. . . . . . . . . . . . . . . . . . 074, 083
Radiola . . . . . . . . . . . . 064, 039
Rank Arena . . . . . . . . . . . . . 063
Realistic. . . . 192, 207, 181, 057,
. . . . . . . . . . 066, 205, 046, 083
Revox . . . . . . . . . . . . . . . . . 064
Rex . . . . . . . . . . . . . . . 233, 291
Rhapsody. . . . . . . . . . . . . . . 243
Roadstar . . . 036, 291, 245, 445
Runco . . . . . . . . . . . . . 044, 057
SBR . . . . . . . . . . . . . . . 039, 064
SEG . . . . . . . . . . . 244, 063, 291
SEI . . . . . . . . . . . . 129, 037, 321
SKY. . . . . . . . . . . . . . . . . . . 064
SSS . . . . . . . . . . . . . . . 046, 207
Saba. . . . . . . . . . . . . . . . . . . 136
Saisho . . . . . . . . . 036, 291, 458
Sambers . . . . . . . . . . . . . . . 129
Sampo . . . . . . . . . . . . . 057, 066
Samsung . . . 064, 046, 205, 244,
. . . . . . . . . . 291, 397, 036, 057,
. . . . . . . . . . 066, 083, 087, 117
Samsux . . . . . . . . . . . . . . . . 066
Sandra . . . . . . . . . . . . . . . . . 243
Sansei . . . . . . . . . . . . . . . . . 478
Sansui . . . . . . . . . . . . . . . . . 490
Sanyo. . . . . . . . . . 181, 063, 099
Schneider. . . . . . . 064, 245, 398
Scimitsu. . . . . . . . . . . . . . . . 046
Scotch . . . . . . . . . . . . . . . . . 205
Scott. . . 263, 046, 205, 206, 207
Sears . . 181, 083, 183, 074, 081,
. . . . . . . . . . . . . . 198, 205, 206
Seleco . . . . . . . . . . . . . . . . . 233
Semivox . . . . . . . . . . . . . . . 207
Semp. . . . . . . . . . . . . . . . . . 183
Sentra . . . . . . . . . . . . . . . . . 062
Sharp . . . . . . 120, 192, 063, 066
Shogun . . . . . . . . . . . . . . . . 046
Shorai . . . . . . . . . . . . . . . . . 321
Siarem . . . . . . . . . . . . . . . . . 129
Siemens . . . . . . . . . . . . 581, 064
Silver . . . . . . . . . . . . . . . . . . 063
Sinudyne . . . . . . . 129, 037, 321
Sonoko . . . . . . . . . . . . 036, 064
Sontec. . . . . . . . . . . . . . . . . 064
Sony. . . . . . . . . . . 037, 063, 027
Soundesign. . . . . . 205, 206, 207
Soundwave . . . . . . . . . 064, 445
Squareview . . . . . . . . . . . . . 198
Standard . . . . . . . 244, 245, 036
Starlite. . . . . . . . . . . . . . . . . 207
Stern . . . . . . . . . . . . . . . . . . 233
Sunkai . . . . . . . . . . . . . 321, 348
Supra. . . . . . . . . . . . . . . . . . 083
Supreme . . . . . . . . . . . . . . . 027
Susumu . . . . . . . . . . . . . . . . 245
Sylvania . . . . . . . . . . . . 081, 057
Symphonic. . . . . . . . . . . . . . 198
Sysline . . . . . . . . . . . . . . . . . 064
TMK . . . . . . . . . . . . . . 083, 205
Tandy. . . . . . 245, 099, 244, 120
Tashiko . . . . . . . . . . . . 063, 244
Tatung . . . . . . . . . 099, 244, 064
Tec . . . . . . . . . . . . . . . . . . . 244
Technema . . . . . . . . . . . . . . 347
Technics . . . . . . . 078, 277, 677
Technol Ace . . . . . . . . . . . . 206
Techwood . . . . . . . . . . 078, 083
Teknika . . . . 081, 206, 207, 046,
. . . . . . . 066, 119, 083, 087, 177
Telefunken. . . . . . . . . . 136, 083
Telemeister . . . . . . . . . . . . . 347
Teletech . . . . . . . . . . . . . . . 036
Teleton . . . . . . . . 233, 063, 244
Tensai . . . . . . . . . 245, 321, 347
Texet. . . . . . . . . . . . . . 243, 245
Thomson. . . . . . . . . . . . . . . 136
Thorn . . . . . . . . . 064, 062, 099
Tomashi . . . . . . . . . . . . . . . 309
Toshiba . . . . 062, 183, 063, 097,
. . . . . . . . . . . . . . . . . . 087, 181
Totevision . . . . . . . . . . . . . . 066
Uher . . . . . . . . . . . . . . 233, 347
Ultravox . . . . . . . . . . . . . . . 129
Universum . . 132, 064, 291, 397
Vector Research . . . . . . . . . 057
Vestel . . . . . . . . . . . . . . . . . 064
Victor . . . . . . . . . . . . . . . . . 080
Videotechnic . . . . . . . . . . . . 244
Vidikron . . . . . . . . . . . . . . . 081
Vidtech . . . . . . . . 046, 063, 205
Vision . . . . . . . . . . . . . . . . . 347
Waltham . . . . . . . . . . . . . . . 244
Wards. . . . . 081, 192, 205, 046,
. . . . . . . . . . 048, 057, 083, 206
Watson . . . . . . . . . . . . 347, 064
Watt Radio . . . . . . . . . . . . . 129
Wega . . . . . . . . . . . . . . . . . 063
White Westinghouse . . . . . 347,
. . . . . . . . . . . . . . 064, 243, 490
Yamaha . . . . . . . . . . . . 046, 057
Yoko . . . . . . 244, 064, 291, 458
Zanussi . . . . . . . . . . . . . . . . 233
Zenith . . . . . . . . . 044, 119, 490
English
APPENDIX 55
Page 56

English
Philips Customer Care Centers
Austria
tel: 43-0810 001 203
Belgium
tel: 32-2-070 222 303
Denmark
tel: 808 82 814
Finland
tel: 358-09-6158 0250
France
tel: 33-1-825 889 789
Germany
tel: 49-0-180-535 6767
Greece
tel: 30-0-0800-3122 1280
Ireland
tel: 353-1-7640292
Italy
tel: 800-820026 (Toll Free)
Luxembourg
tel: 352-404061215
Netherlands
tel: 0900-8406
Norway
tel: 22-748 250
Portugal
tel: 352-1-4163063
Spain
tel: 34-902-113 384
Sweden
tel: 08 5985 2250
Switzerland
tel: 0844 800 544
United Kingdom
tel: 44-0-208 665 6350
Poland
tel: 48-22-571 0571
56 APPENDIX
Page 57

Notes
English
NOTES 57
Page 58

English
Notes
58 NOTES
Page 59

Specifications
DISC FORMATS SUPPORTED
Disc type Playback Recording
DVD+RW ••
DVD+R ••
DVD-RW (Video mode) •–
DVD-R •–
DVD-Video •–
SVCD •–
Video CD •–
Audio CD •–
CD-R •–
CD-RW •–
RECORDABLE DISC FORMATS
Medium DVD+RW: Phase-Change ReWritable
DVD+R: dye-based
Diameter 12 cm
Capacity (single side) 4.7 Gbyte
Recording time HQ 60’ 9.72 Mbit/s
SP 120’ 5.07 Mbit/s
LP 180’ 3.38 Mbit/s
EP 240’ 2.54 Mbit/s
TV STANDARD PAL/SECAM NTSC
Scan Frequency 50Hz 60Hz
Number of lines 625 525
Playback ••
Recording ••
Internal tuner •–
VIDEO FORMAT
Digital Compression MPEG2 for DVD
MPEG1 for VCD
VIDEO RESOLUTION 50Hz 60Hz
DVD-Video/DVD+RW(HQ/SP)
-Horiz. Resolution 720 pixels
1
720 pixels
1
-Vertical Resolution 576 lines 480 lines
DVD+RW (LP/EP)
-Horiz. Resolution 360 pixels
2
360 pixels
2
-Vertical Resolution 576 lines 480 lines
VCD
-Horiz. Resolution 352 pixels 352 pixels
-Vertical Resolution 288 lines 288 lines
1
equivalent to 500 lines on your TV
2
equivalent to 250 lines on your TV
VIDEO PERFORMANCE
DA Converter 10-bit
AD Converter 9-bit
Signal handling Components
Video Output 1 Vpp into 75 Ohm
S-video Output Y: 1 Vpp into 75 Ohm
C: 0.300 Vpp into 75 Ohm
RGB Output 0.7 Vpp into 75 Ohm
AUDIO FORMAT
Compressed Digital Playback Recording
-Dolby Digital Multi-channel 2-channel
(AC-3) 16-bit, fs 48 kHz
-DTS Multi-channel –
-MPEG1 2-channel –
SPdif
-PCM 2-channel –
16, 20, 24 bit
fs 48 kHz
AUDIO PERFORMANCE
DA Converter 24-bit
AD Converter 16-bit
DVD fs 96 kHz 4 Hz - 44 kHz
fs 48 kHz 4 Hz - 22 kHz
Video CD fs 44.1 kHz 4 Hz - 20 kHz
Audio CD fs 44.1 kHz 4 Hz - 20 kHz
Signal-Noise (1kHz) 105 dB
Dynamic Range (1kHz) 100 dB
Crosstalk (1kHz) 110 dB
Distortion/Noise (1kHz) 90 dB
FRONT CONNECTIONS
i.LINK DV IEEE 1394 4-pin
S-video Input Hosiden 4-pin
*
Video Input Cinch (yellow)
*
Audio Left/Right Input Cinch (white/red)
*
REAR CONNECTIONS
SCART 1 CVBS, S-video/RGB-out, Decoder
SCART 2 CVBS, S-video/RGB-in, Decoder
S-video Input Hosiden 4-pin
S-video Output Hosiden 4-pin
Video Input Cinch (yellow)
*
Video Output Cinch (yellow)
*
Audio Left/Right Input Cinch (white/red)
*
Audio Left/Right Output Cinch (white/red)
*
Digital Audio Output 1 coaxial*, 1 optical
IEC958 for CDDA / LPCM
IEC1937, Dolby Digital, DTS
RF Antenna Input Coaxial 75 ohms
RF TV Output Coaxial 75 ohms
Mains Standard (IEC type)
*
gold-plated
USER INTERFACE
OSD Languages English, French, German, Dutch, Spanish,
Italian, Swedish
PROGRAMMING
Number of events 6; 1 month; Daily/Weekly
Programming mode OTR, Remote
Record control and
transmitter identification PDC, VPS
Timer programming Manual, VIDEO Plus+, NEXTVIEW Link
DISC RECORDING
- Safe Record
- Direct Record
- One-Touch Record (OTR)
- Append
- Divide
- Erase
- Automatic/Manual Chapter Marker insertion
- Disc write lock
- Favorite Scene Selection
- Index Picture Screen
- Custom Index Pictures
- Automatic/Manual Audio Recording Level
DISC PLAYBACK
- Auto Resume (20 discs)
- Play / Stop / Pause
- Fast Forward/Backward (3 speeds)
- Step Forward/Backward
- Slow (3 speeds)
- Title / Track Select
- Next / Previous Title / Track / Chapter
- Repeat (Chapter / Title / All) or (Track / All)
- A-B Repeat
- Intro Scan
- Perfect Still with digital multi-tap filter
- Zoom (x1,33, x2, x4) with picture enhancement
- Pan
GENERAL FUNCTIONALITY
- 3D sound (SRS TruSurround)
- Beep Feedback for Remote Control
- Backup Presets & Timer Events: 1 year
- Backup Clock & Calendar: 7 hrs
- Time & Date Download
POWER SUPPLY
Power Inlet 220-240 V, 50/60 Hz
Power consumption Operation 33 W
Low-power Standby 3 W
CABINET
Dimensions (W x H x D) 435 X 110 X 330 mm
Net Weight 8.8 kg
Front Panel 3 mm Aluminum
REMOTE CONTROL
- Universal remote for control of main TV functions
Page 60

type no. of product • Numéro de série du produit
DVDR 985
Date of purchase • Date d'achat • Kaufdatum • Koopdatum • Fecha de compra •
Data da compra • Data di acquisto • Købsdato • Kjøpedato • Inköpsdato • Ostopäivä
day • Jour month • Mois year • Année 20
Dealer's name, address and signature • Nom, adresse et signature du revendeur • Name,
Anschrift und Unterschrift des Händlers • Naam, adres en handtekening van de
handelaar • Nombre, dirección y firma del distribuidor • Nome, indirizzo e firma
del fornitore • Nome, morada e assinatura do vendedor • Forhandlerens navn, adresse
og underskrift • Återförsäljarens namn, adress och namnteckning • Myyjän nimi,
osoite ja allekirjoitus
©2002 PHILIPS Printed in Belgium. 3104 125 2445.1
The products and services described herein are not necessarily available in all countries Due to continuous product improvements this document is subject to change without notice.
 Loading...