

Page 1
Quick install guide
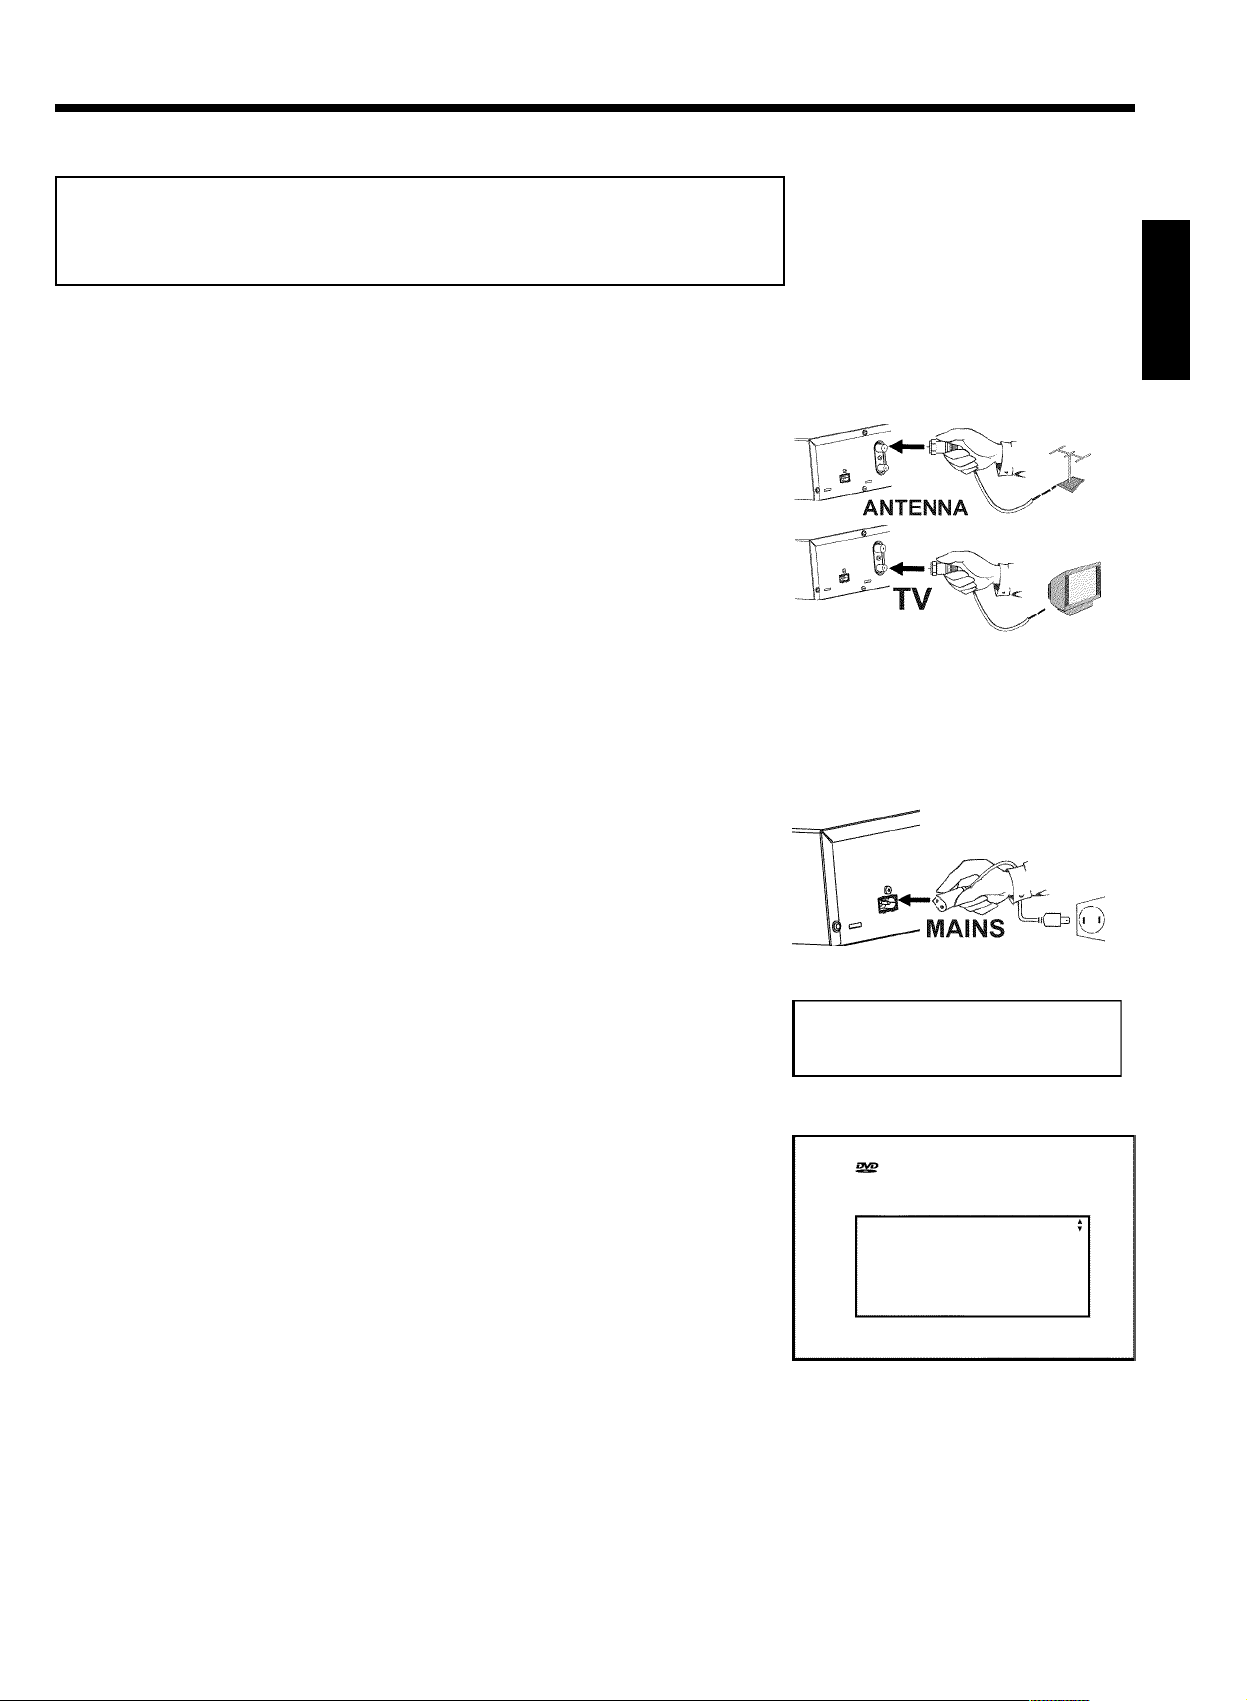
Connecting your DVD Recorder to the
TV/Initial installation
Warning ! Until the initial installation has been completed, the buttons on the front
will not function.
Remove the antenna cable jack from your TV. Insert it into the
ANTENNA IN jack at the back of the DVD recorder.
1
Insert one end of the supplied antenna cable into the TV
2
3
OUT jack at the back of the DVD Recorder and the other end
into the antenna input jack at the back of the TV.
Connect the S-VIDEO OUT / AUDIO L/R OUT jacks or
VIDEO (CVBS) OUT / AUDIO L/R OUT with the
corresponding input jacks of the TV.
Switch on the TV.
4
Connect the mains jack 4MAINS at the back of the DVD
5
Recorder with the power supply using the supplied power cable.
The most important features of the DVD Recorder will appear
on the display. After the initial installation is completed, this
function will be switched off.
ENGLISH
Press STANDBY-ON m on the recorder.
6
'IS TV ON?' will appear on the display.
7
If necessary, select the channel number of the input jack at the
TV.
8
The initial installation menu appears on the screen.
Select your preferred setting using B or A .
Confirm with OK .
9
The initial installation is carried out automatically. Please wait until the procedure is completed.
IS TV ON?
Initial Setup
Menu Language
English
Español
Français
Press OK to continue
Page 2

Making a recording
Press MONITOR to display the selected input signal on the
screen.
1
Select the program number from which the recording is to be
carried out using CHANNEL q or CHANNEL r .
2
Recording via the external jacks
Select either the front jack ('CAM1', 'CAM2') or the jack ('EXT1', 'EXT2',')
at the back of the recorder, from which the recording is to be carried
out, using CHANNEL q or CHANNEL r .
Selecting the recording mode (quality)
You can select between 'M1' (camcorder recordings/1 hour), 'M2'(2
hours), 'M2x' (2,5 hours), 'M3' (3 hours), 'M4' (4 hours) or 'M6'(6
hours) using REC MODE .
SAFE RECORD
Usually, a recording starts at the point where the previous recording
ended. This will delete all subsequent recordings.
If a new recording is to be placed at the end of all recordings, hold
down REC/OTR n until 'SAFE REC' appears on the display.
Press RECORD or REC/OTR n to start the recording.
3
Tip
a 'NO SIGNAL' (no signal) will appear on the display
b Check whether the cable jacks fit correctly.
b If the recording is made from a video recorder, adjust the 'tracking'
setting on the video recorder.
b In case of bad, non-standard video input signals, the DVD Recorder
may not be able to detect the signal.
Programming recordings
Press TIMER s on the remote control.
1
Select line 'Timer Programming' using B or A and confirm
2
with C .
The current data will be displayed.
Select the entry field with D or C .
3
Enter the desired data with B , A or the number buttons
0..9 .
4
Problem
Timer
Timer Programming
Date
Ch.01Start
01/22
Mo-Fr/Weekly
Press SELECT
08:30AM
End
10:00PM
Rec
Mode
M1
To store
Press OK
5
6
7
Confirm with OK .
The data was stored in a TIMER block.
To end, press TIMER s .
Switch off the DVD Recorder with STANDBY m .
A programmed recording will only function if the DVD Recorder
is switched off using STANDBY m .
Page 3

The 'Digital Photo Manager'
Using the 'Digital Photo Manager', you can view and modify JPEG pictures from a memory card,
Picture CD, DVD, or a CD ROM. You can store them on a DVD+RW/+R or on the memory
card.
In addition, you can store the pictures in a so-called album in a specific order, yet without
changing the order in which the pictures are stored on the memory card.
Moreover, you can view the pictures in a slide show at adjustable intervals.
Store the slide show on a DVD+RW/+R so you can view them on a DVD player.
What is the difference between a 'Roll' and 'Albums'?
'Roll'
A folder containing JPEG pictures. It is comparable with a conventional
35mm film for cameras. Rolls will be created automatically from the
digital cameras.
'Albums'
A file containing references to the pictures on the rolls. It is comparable
with a conventional photo album that may contain the pictures of
different films (rolls).
You can delete an album without deleting the pictures of the rolls.
The PC (PCMCIA) Card
?
ENGLISH
In this DVD-Recorder you can use the following types of memory cards with an adapter:
SD memory cards, Multimedia Card, CompactFlash, SmartMedia, Memory Stick/Memory Stick
pro, Micro Drive, xD Picture Card.
Warning !
Insert/Remove the PC Card only when there is no access to the memory card. This
could damage the memory card.
You can recognise the access by:
•) A moving disc symbol lights up on the top left corner of the screen
If you were not sure, press in the 'Digital Photo Manager' the button PHOTO . This will
take you directly into the 'Media menu' screen.
Showing JPEG pictures from a roll
Insert the medium you want to use (CD, DVD+RW/+R, memory
card).
1
Press PHOTO on the remote control. The 'Media menu' will
appear.
2
Use B or A to select the medium you want to process (disc
3
or memory card). If you did not insert the corresponding medium
(disc or memory card), a warning sign will appear above the
symbol on the left hand side of the screen.
4
5
6
Confirm with C .
Select 'Roll' using B or A and confirm with C .
You will see an overview with the first picture of each roll that
contains pictures. The display and the description of the roll will
depend on the camera or the computer program used to create
this roll.
Select the desired roll using B or A and confirm with OK .
Page 4

7
8
The data will be read and then an overview of the stored
pictures will be displayed.
You can select a picture for viewing or editing with D , C ,
B , A .
ENGLISH
Fast browsing trough the pictures
With O or N you can switch one page forward or backward.
You can also select a picture with the number buttons 0..9 on the
remote.
Press OK to select the desired picture.
Tip
9
The picture will be displayed as a full picture on the screen.
10
Making a 'DVD compatible' slide show
Using this function, you can record the pictures in such a way, that you can view the slide show
from a roll or an album on a DVD player.
The slide show will be stored on the DVD+RW/+R as a video title. If you want to store the
photos in the JPEG format in addition to the video title, you must prepare the DVD+RW so
that you can store both pictures and videos.
On a DVD+R you can only store either photos or videos. A combination of JPEG photos and
video is not possible.
Making a slide show from a roll
Each roll will be stored as one video title on the DVD+RW/+R.
If you want to make a video title from different rolls, you have to create an album first. Then
you can store the album as a video title on the DVD+RW/+R.
In the 'Media menu' screen select the memory card (symbol in
the middle) and confirm with C .
1
Select the line 'Rolls' and confirm with C .
2
Select with B , A , the roll from which you want to make a
video title.
3
Press C the 'Roll Settings' menu will appear.
4
Select the line 'Make video title' using B , A an confirm with
5
(WwnnNNNwwnnwWNnwNwnNnNwWnWnnwN) DVDR 77/17
OK .
'SAVING' will appear in the display and the screen will show the
time left until completion.
The new roll will be stored on the DVD+RW/+R as a video title
(movie). It will appear in the index picture screen as a separate
title.
This video title will be recorded automatically after the last
recording. No existing titles will be overwritten.
Ensure that there is enough space on the disc.
3103 605 20981
3354/000
To end, press DISC-MENU .
6
 Loading...