

Quick install guide
Connecting your DVD recorder to the TV
set /Initial installation
Warning ! As long as the initial installation has not been carried out, the buttons on
the front of the DVD recorder remain without function.
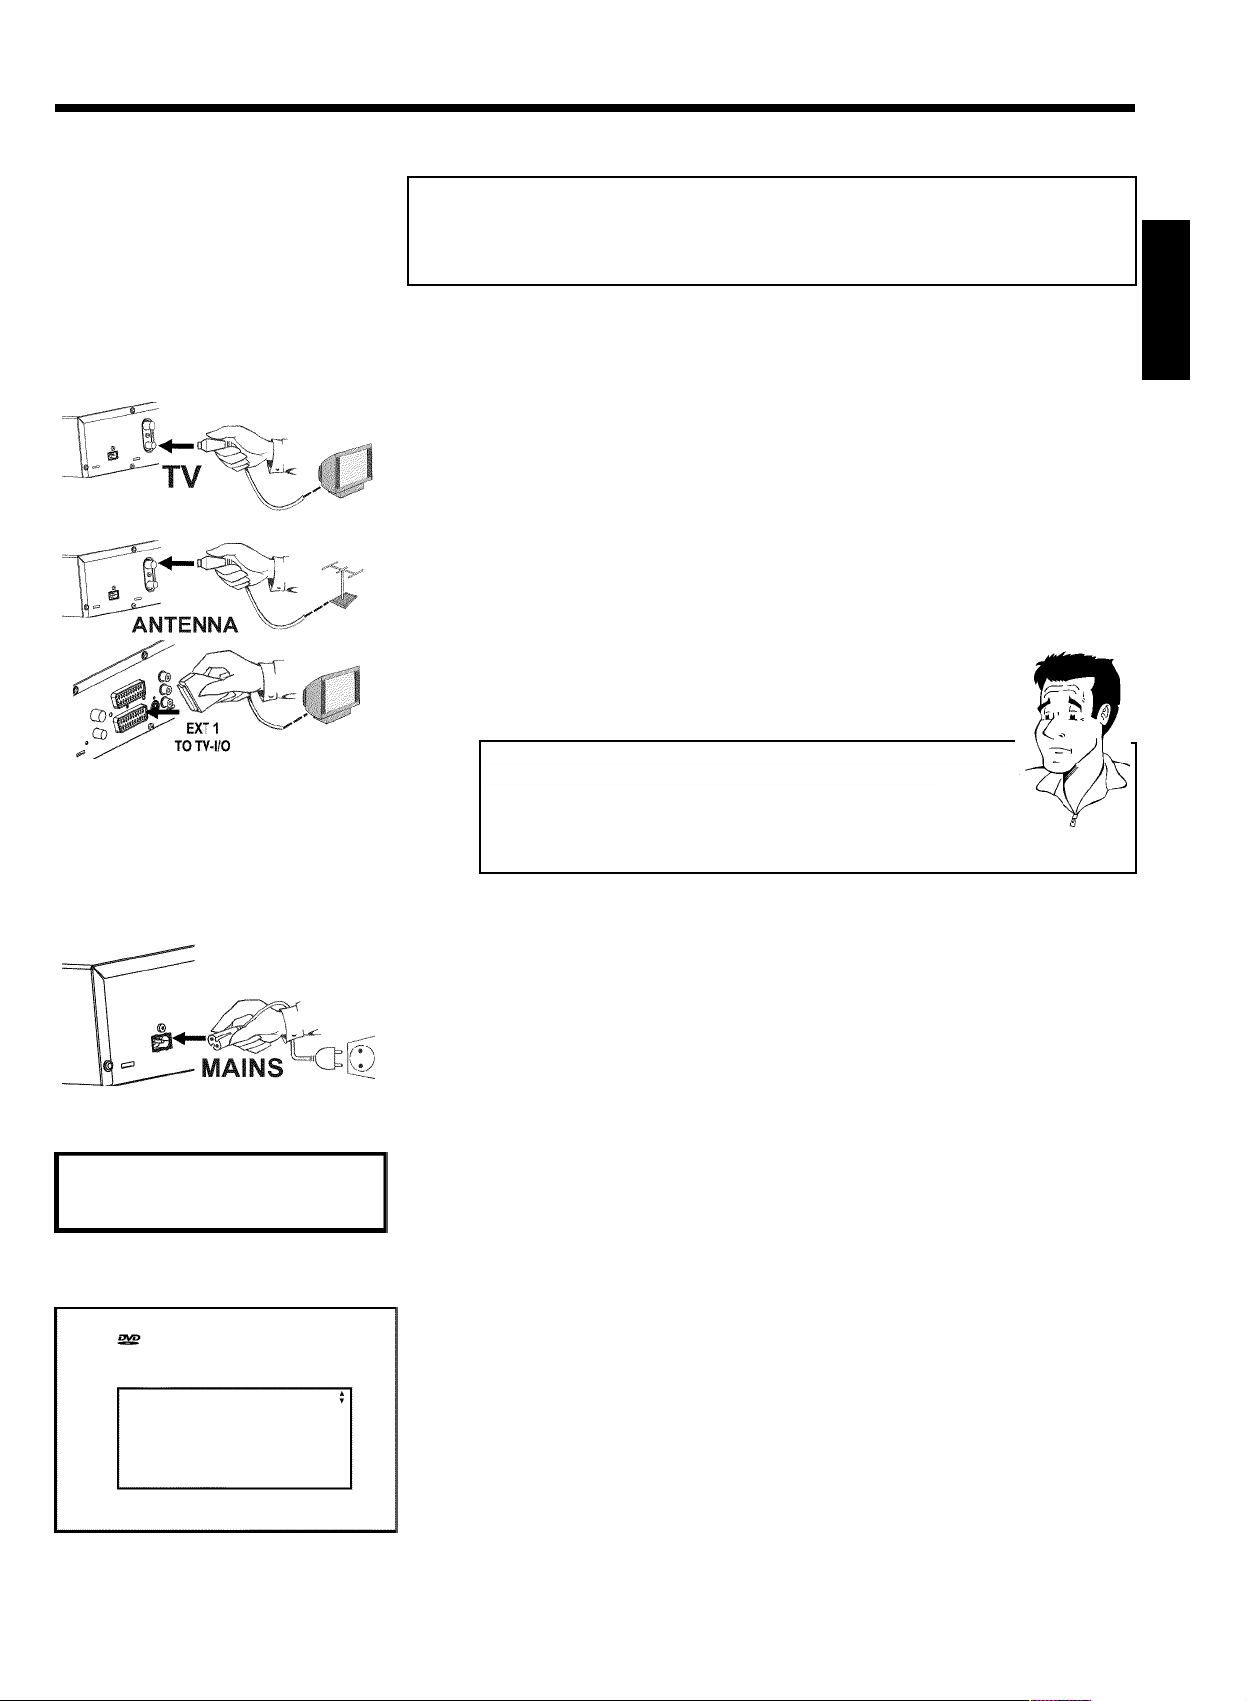
1 Remove the aerial cable plug from your TV set. Insert it into the
ANTENNA IN socket at the back of the DVD recorder
2 Insert one end of the supplied aerial cable into the TV OUT socket at
the back of the DVD recorder and the other end into the aerial input
socket of the TV set.
3 Connect socket EXT 1 TO TV-I/O or sockets OUT S-VIDEO
(Y/C) , OUT VIDEO (CVBS) , OUT L AUDIO R with the
corresponding sockets of your TV set.
My TV sets supports the functions Easy Link, Cinema Link,
NexTView Link, Qlink, Smart Link, Megalogic, Datalogic,...
Connect the scart socket EXT 1 TO TV-I/O at the back of the DVD
recorder with the - suitable for data transfer - scart socket of your TV set
(see the instruction manual of your TV set) using a special cable (suitable for
these data transfers).
?
ENGLISH
IS TV ON?
Menu Language
English
Español
Français
Italiano
Deutsch
Press OK to continue
Virgin mode
4 Switch on the TV set.
5 Use the supplied mains cable to connect the mains socket
4MAINS at the back of the DVD recorder with the wall outlet.
The most important features of the DVD recorder will appear in
scrolling text on the display. After the first installation is completed
this function will be switched off.
6 Switch on the DVD recorder using STANDBY/ON m .
7 'IS TV ON?' will appear on the display.
8 If necessary, select the programme number for the input socket at the
TV set.
The initial installation menu appears on the screen.
9 Select your favourite setting using CH- B or CH+ A .
Confirm with OK .
The initial installation is carried out automatically. Wait until the whole procedure is complete.

ENGLISH
How to make a recording
1 Press MONITOR to view the currently selected input signal on the
screen.
2 Select the programme number from which to record using
CH+ A or CH- B .
Recording via external sockets
Using CH+ A or CH- B , select the front sockets ('CAM1', 'CAM2'(DVDR
75)) or the sockets ('EXT1', 'EXT2') at the back of the DVD recorder, from
which you wish to record.
Selecting the recording mode (quality)
Using REC MODE , you can choose between 'M1' (camcorder recordings/1
hour), 'M2' (2 hours), 'M2x' (2,5 hours), 'M3' (3 hours) or 'M4' (4 hours) or
'M6' (6 hours).
SAFERECORD
Normally, a recording always begins at the position where the previous
recording ended. All subsequent recordings will be erased.
If you want the new recordig to be made at the end of all the other
recordings, hold down REC/OTR n until 'SAFE REC' appears on the display.
3 Press RECORD or REC/OTR n to start the recording.
Tip
Timer
Timer programming
Date01Prog.
BBC1
Start
20:15
VPS
PDC End
21:30
Rec
Mode
M1
a 'NO SIGNAL' (no signal) will appear on the display
b Check whether the cable connectors are properly inserted.
b If the recording is to be made from a video recorder, change the 'tracking'
setting on the video recorder.
b In case of bad or non-standard video input signals, the DVD recorder may
be unable to detect the signal.
How to program a recording
1 Switch on the TV set. If required, select the programme number for
the DVD recorder.
2 Press TIMER on the remote control.
3 Select 'Timer programming' using CH- B or CH+ A and confirm
with C .
The current information is displayed.
4 Select the field using D or C .
5 Enter the data you want using CH- B , CH+ A , or with the
number buttons 0..9 .
Problem
Mo-Fr/Weekly
Press SELECT
(WwnnNwWnNnnwNnWNwwnNnwnNWWwnnN) DVDR 70-75/001-021
3139 246 12731
3103/000
To store
Press OK
6 Confirm with OK .
The information has been stored in a TIMER block.
7 To end, press TIMER .
8 Switch off the DVD recorder using STANDBY m .
A programmed recording functions only if the DVD recorder has been switched off using
STANDBY m .
 Loading...