

Page 1
Connect
??
???
?
??
??
???
?
???
Set up
Enjoy
1
Before you connect
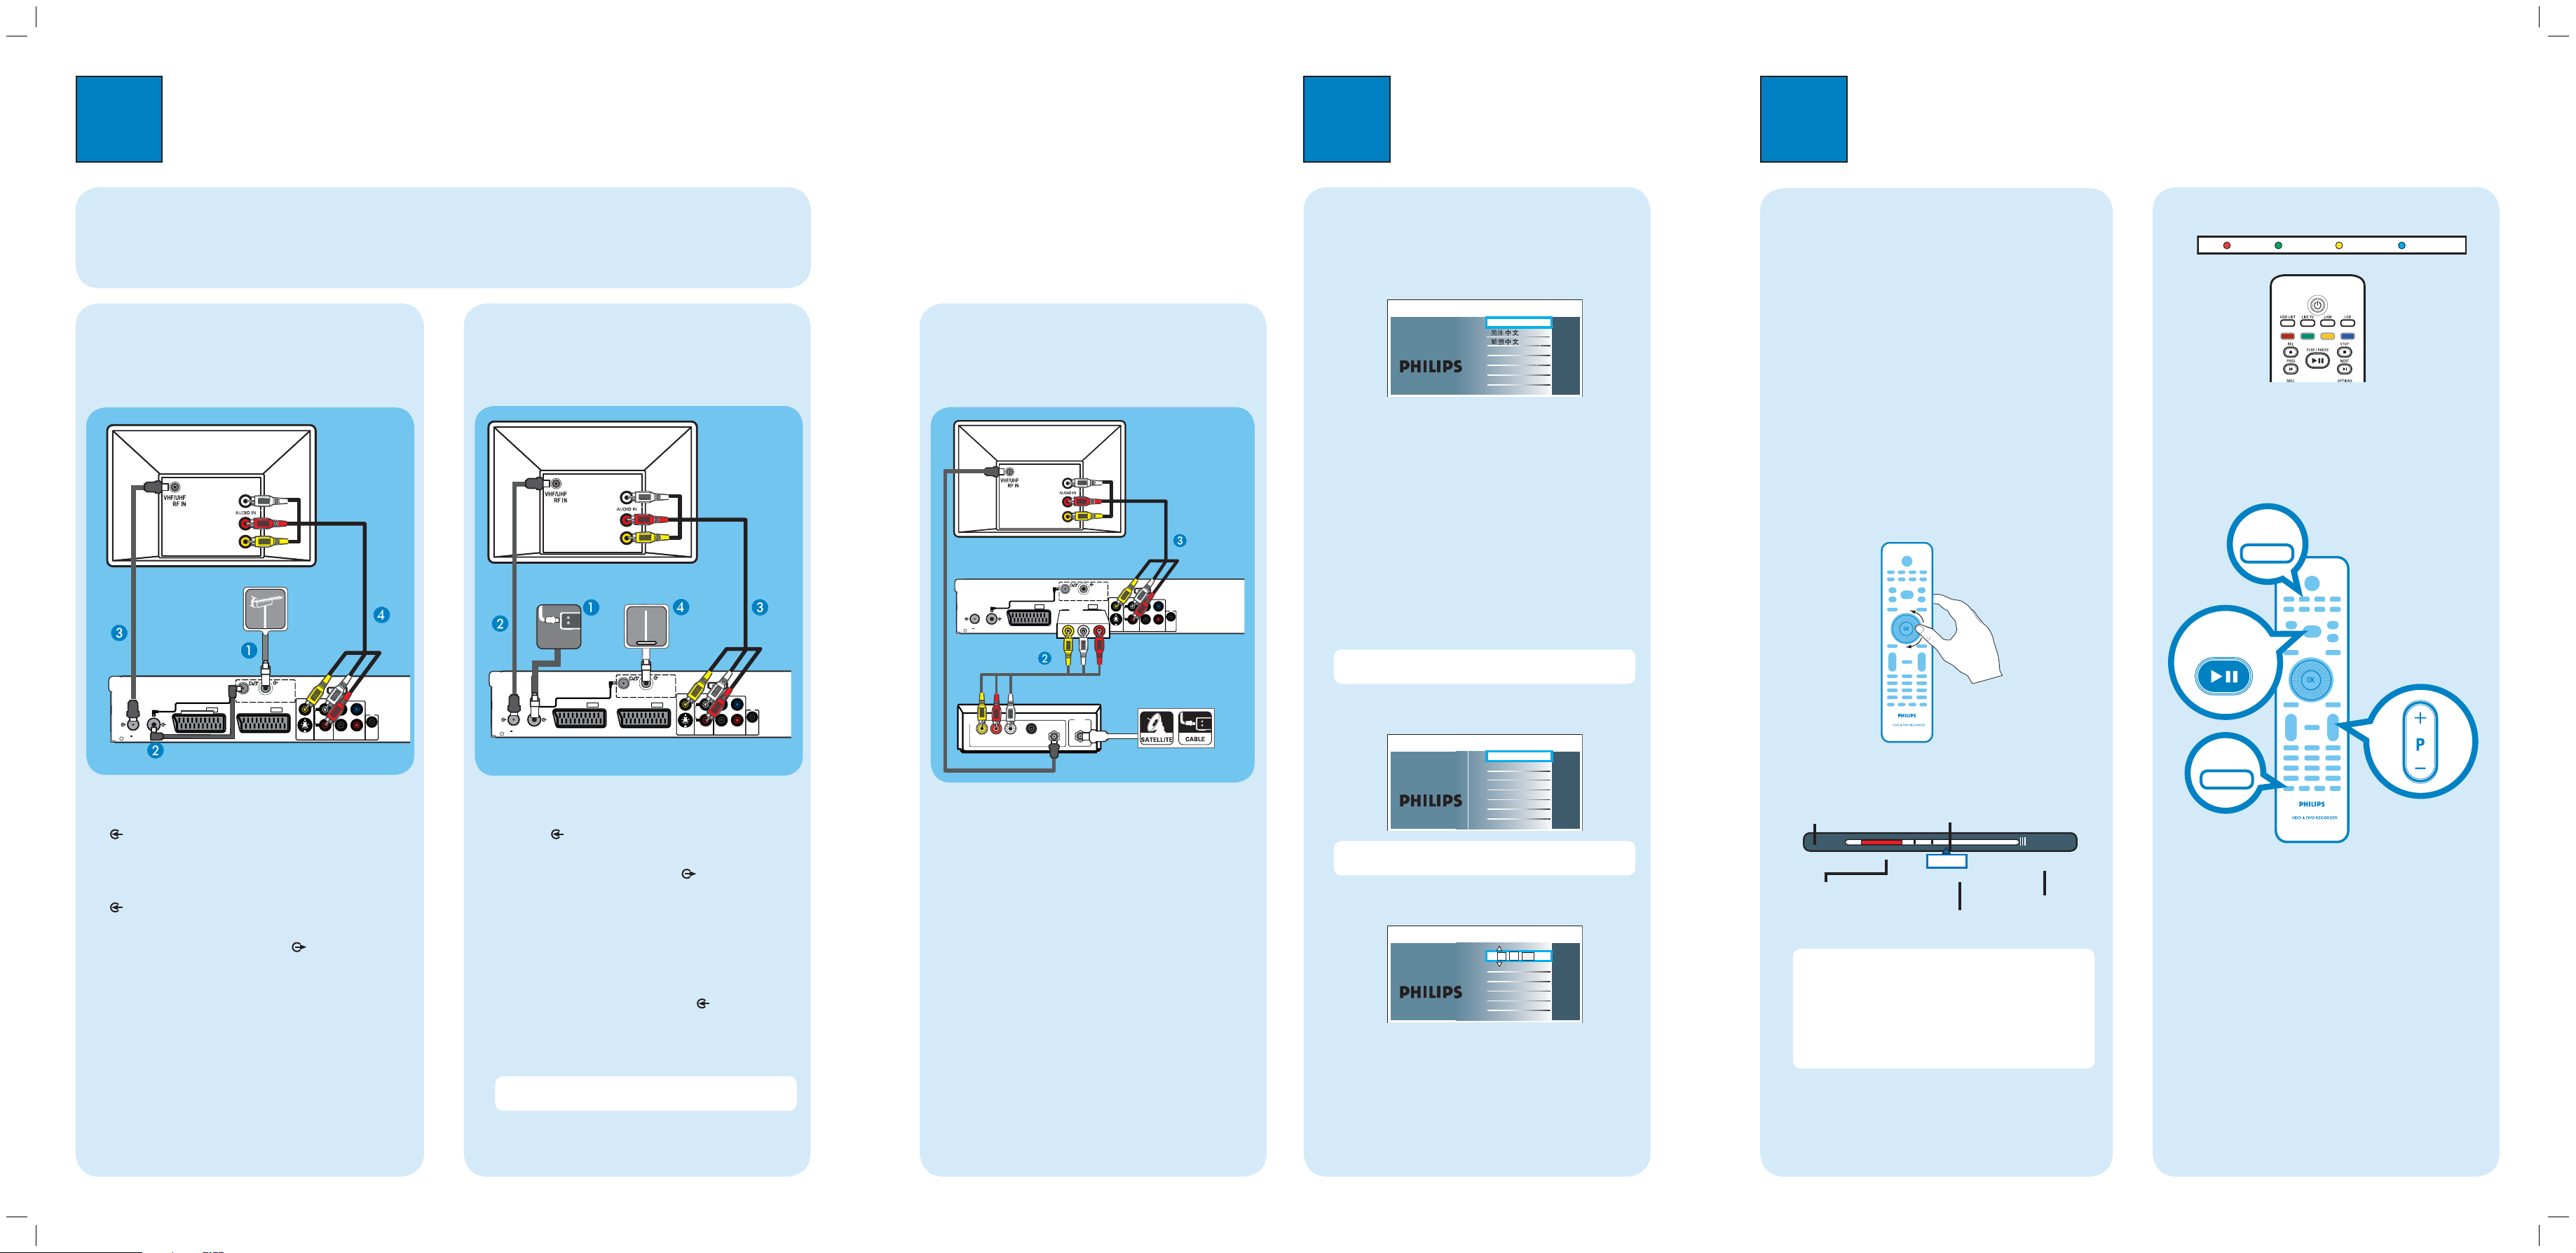
Select the most suitable connection (A or B or C) based on the type of device you have and your home set up.
You can also refer to the accompanying User Manual for other possible connections.
Option A
Connect Recorder and TV with
antenna
Television
(rear)
Antenna
DIGITAL
DIGITAL ANTENNA
LOOP THROUGH
TO VCR/SAT
ANTENNA INPUT
EXT2
G-LINK
TO TV ANTENNA
INPUT
ANALOG
ANTENNA INPUT
ANTENNA INTERCONNECT CABLE
(OPTIONAL, REFER TO MANUAL)
TO TV
EXT1
A Disconnect the existing antenna cable from your TV and
connect it to the DIGITAL ANTENNA INPUT
socket on this recorder.
B Connect the Tuner interlink cable (supplied)
between DIGITAL ANTENNA LOOP
THROUGH and ANALOG ANTENNA INPUT
sockets on this recorder.
C Connect the RF antenna cable (supplied) from the
TO TV ANTENNA INPUT socket on this
recorder to the Antenna In socket on your TV.
D Connect the Audio/Video cables (supplied) from the
CVBS OUT and AUDIO OUT sockets on this
recorder to the video and audio input sockets on
your TV.
E Connect the power cable from this recorder to an
AC power outlet.
HDMI
OUT
CVBS-OUT
L
R
S-VIDEO
OUT
P
Y
B
P
R
COAXIAL
COAXIAL
COMPONENT
AUDIO
OUT
DIGITAL OUT
VIDEO OUT
DIGITAL
IN
Philips Recorder (rear)
Option B
Connect Recorder and Cable TV
Digital TV antenna (optional)
Television
(rear)
EXT1
Digital TV
antenna
DIGITAL
ANTENNA INPUT
DIGITAL ANTENNA
LOOP THROUGH
TO VCR/SAT
EXT2
HDMI
OUT
CVBS-OUT
Y
L
R
COAXIAL
AUDIO
S-VIDEO
OUT
COMPONENT
DIGITAL OUT
OUT
VIDEO OUT
Philips Recorder (rear)
Cable TV
ANTENNA INTERCONNECT CABLE
(OPTIONAL, REFER TO MANUAL)
ANALOG
ANTENNA INPUT
TO TV
G-LINK
TO TV ANTENNA
INPUT
A Disconnect the existing cable TV antenna from your TV
and connect it to the ANALOG ANTENNA
INPUT socket on this recorder.
B Connect the RF antenna cable (supplied) from the
TO TV ANTENNA INPUT socket on this
recorder to the Antenna In socket on your TV.
C Connect the Audio/Video cables (supplied) from the
CVBS OUT and AUDIO OUT sockets on this
recorder to the video and audio input sockets on
your TV.
D If you have a Digital TV antenna, connect it to the
DIGITAL ANTENNA INPUT socket on this
recorder (optional).
E Connect the power cable from this recorder to an
AC power outlet.
Note No digital channels will be found if the digital
antenna is not connected to this recorder.
Option C
Connect Recorder, TV and
Cable Box/Satellite Receiver
2
Find the viewing channel
A
A Press STANDBY-ON on this recorder.
B Turn on the TV.
You should see the installation menu.
Menu Language
Please select your language.
Denes the languages of all
on-screen menu displays.
English
3
Watch TV – Pause live TV
Your Philips recorder allows you to control the TV
programme. You can PAUSE it as if you were in control
of the live broadcast.
A Turn on your recorder, then press P +/- to
select a TV channel.
B Press PAUSE LIVE TV to suspend it.
C Press PAUSE LIVE TV
again to continue.
Colour Softkeys function
Repeat Repeat A-B
D To return to live broadcast, press LIVE TV.
The colour functions shown on the menu can be
accessed by pressing the matching colour buttons on the
remote control.
Television
(rear)
C In case you don’t see the recorder’s setting menu,
press the Channel Down button on the TVs remote
control repeatedly (or AV, SELECT, ° button) until
you see the menu. This is the correct viewing
channel for the recorder.
Intuitive control wheel
Rotate the control wheel on the remote control to skip
backward/forward within the TV programmes that have
been tuned to and broadcast.
LIVE TV
Select basic settings
B
Use the recorder’s remote control and follow the on-
DIGITAL
HDMI
ANTENNA INPUT
OUT
CVBS-OUT
EXT2
S-VIDEO
OUT
P
Y
B
L
P
R
R
COAXIAL
COAXIAL
AUDIO
COMPONENT
DIGITAL
DIGITAL OUT
OUT
VIDEO OUT
IN
G-LINK
TO TV ANTENNA
INPUT
ANALOG
ANTENNA INPUT
ANTENNA INTERCONNECT CABLE
(OPTIONAL, REFER TO MANUAL)
TO TV
EXT1
DIGITAL ANTENNA
LOOP THROUGH
TO VCR/SAT
A
Philips Recorder (rear)
Cable Box /
P
B
P
R
COAXIAL
DIGITAL
IN
OUT
VIDEO
Satellite Receiver (rear)
RF
COAXIAL
AUDIO
R L
DIGITAL OUT
IN
Cable TV or
Satellite wall outlet
A Plug in the scart adaptor (supplied) to the EXT2-
TO VCR/SAT socket on this recorder.
B Connect the Audio/Video cables to the scart
adaptor and the other ends to the audio and video
output sockets on the Cable Box/Satellite Receiver.
C Connect the Audio/Video cables (supplied) from the
CVBS OUT and AUDIO OUT sockets on this
recorder to the video and audio input sockets on
your TV.
screen instructions to complete the installation.
A Select the desired menu language, your country and
the TV shape.
Note Press OK or the Green button on the remote
control to go to the next screen.
B When the [ Channel Search ] menu appears,
select the type of tuner to install and press OK.
Channel search
Automatic Channel search
will find and store all
channels. Make sure to
connect the antenna!
Note If [ No TV install ] is selected, only recordings
from external sources will be possible.
Full installation
Only Analogue TV
Only Digital TV
No TV install
C Once complete, press the Green button to
continue.
Time
Time setting is required for
making recordings.
:
AM
00 00
Enter time (hh.mm)
D Enter the correct time in the entry field, press the
Green button to continue. Proceed the same for
Press INFO to display or hide the Time Shift Buffer.
Start time of the
programme
09:48 PM
Selected clips for
recording
Notes
- Time Shift Buffer (TSB) is a temporary hard disk
storage in your recorder. It stores and retains up to
the last 6 hours of TV programmes when this recorder
is turned on.
- The contents in the time shift video bar will be
cleared when you press STANDBY ON (2).
Programmes
stored in the ‘TSB’
10:04 PM
Current time
of playback
Now
02:08 AM
Present time
PAUSE LIVE TV
INFO
date entry.
E The installation is complete now, press the Green
button to close the menu.
Page 2
Register your product and get support at
Enjoy
3
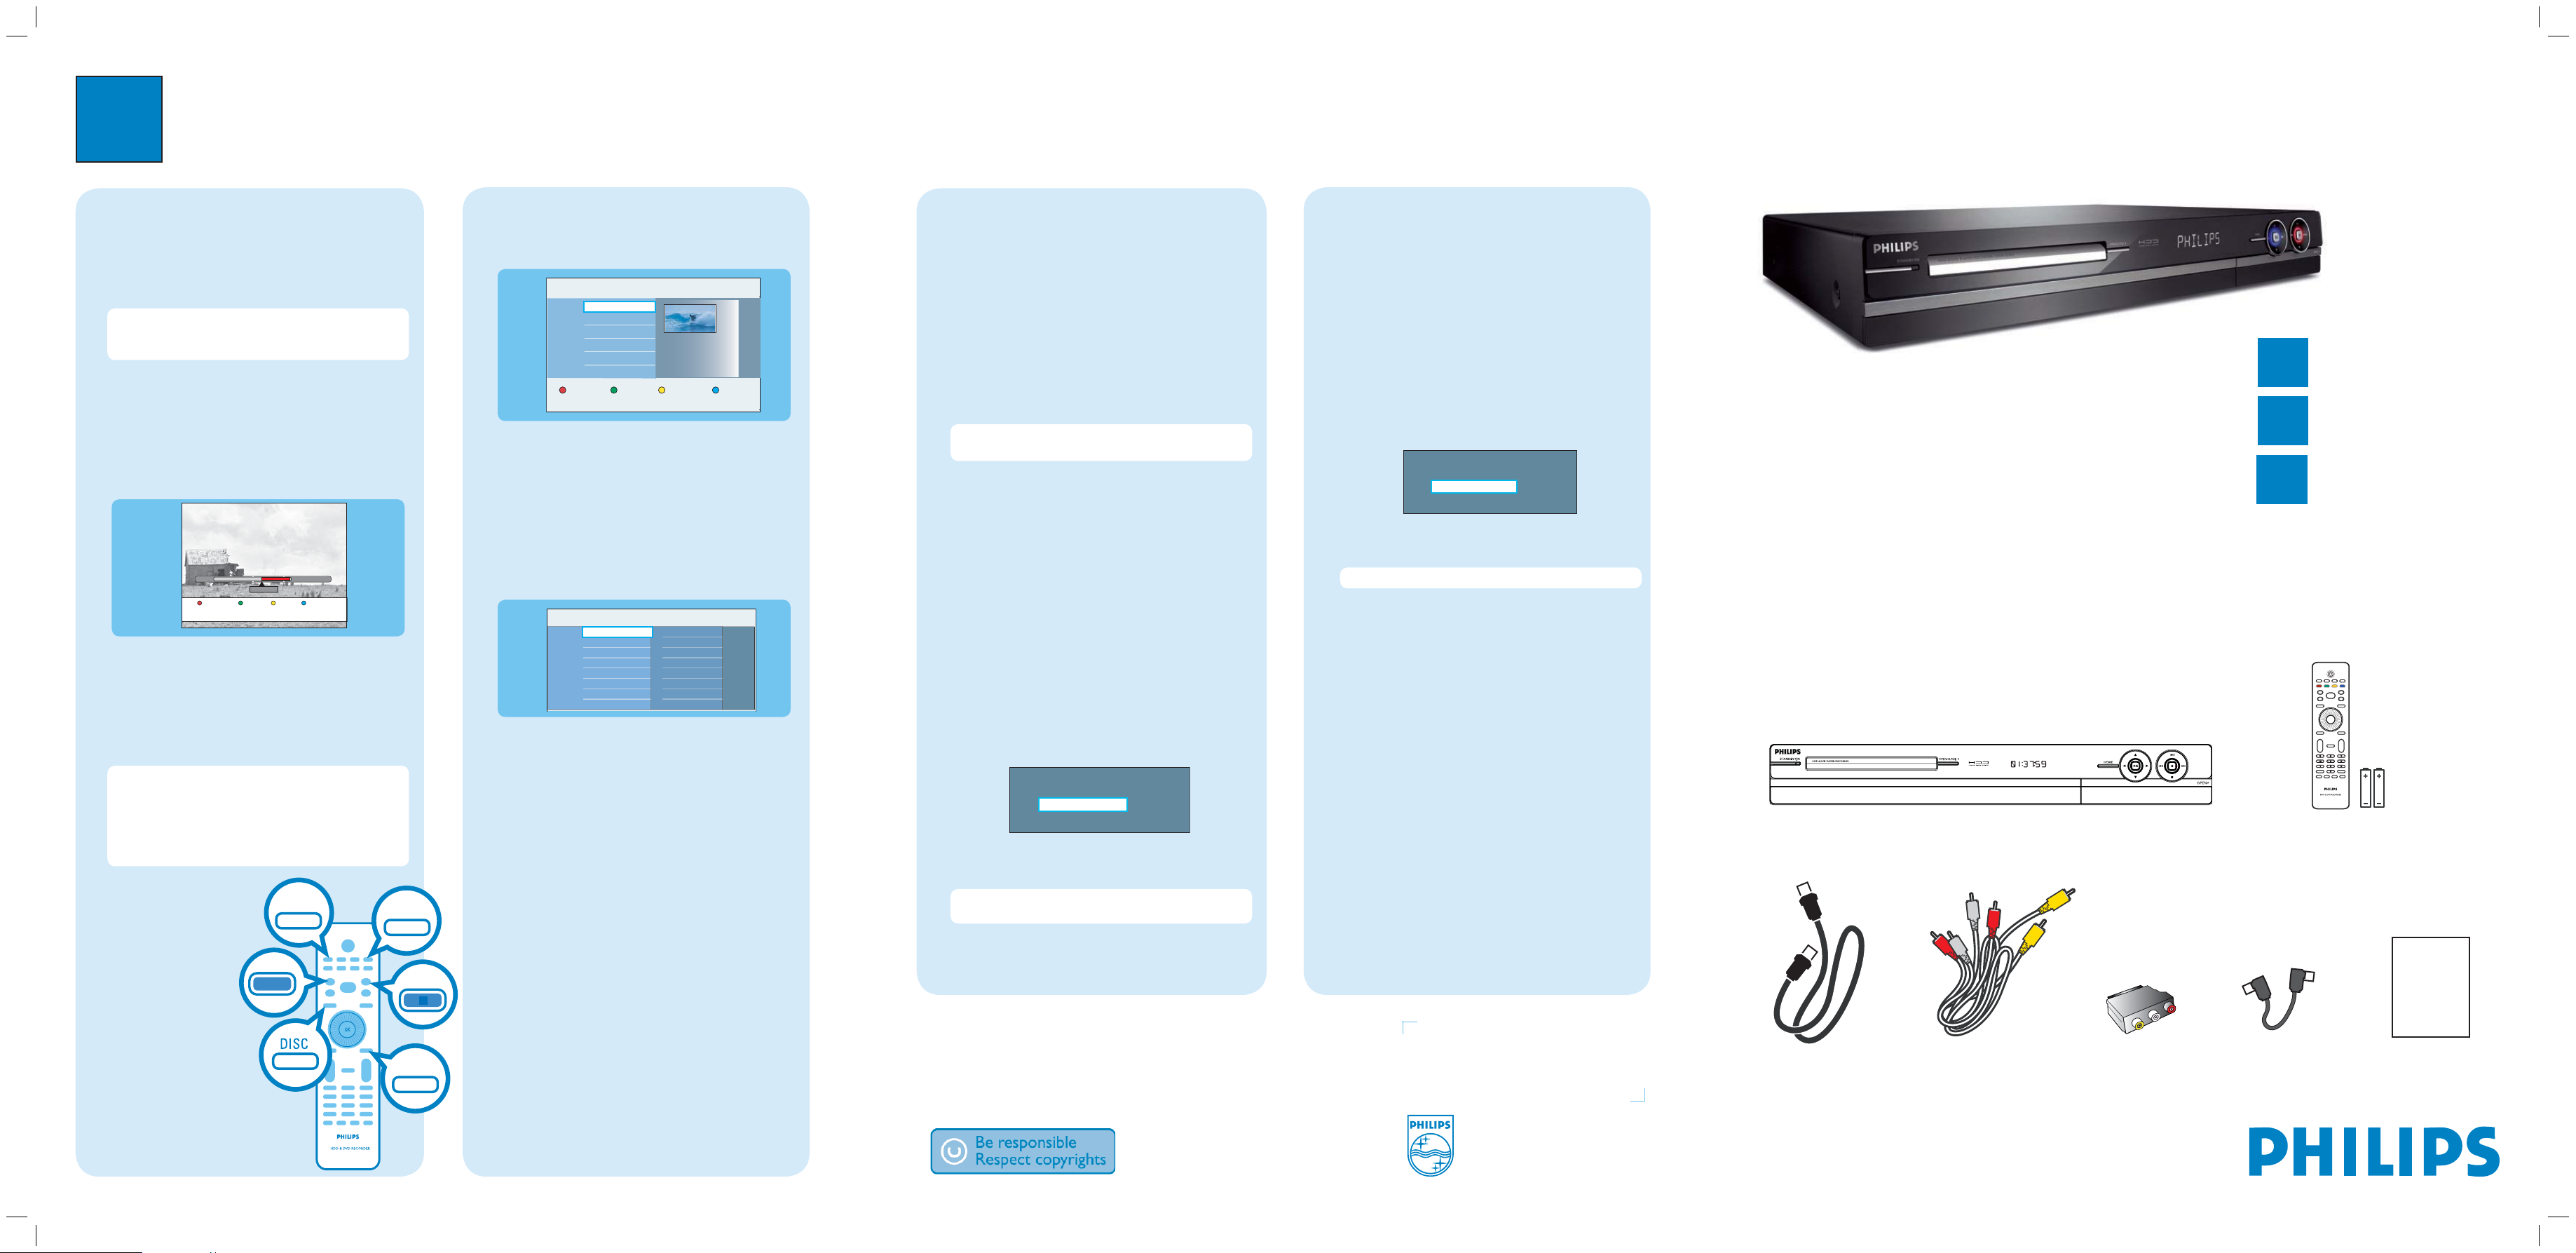
Record to hard disk
Record current TV programme
A Press REC to start recording. It can record up to
6 hours.
Note To set the recording time length, press REC
repeatedly to extend the recording time in 30-minute
increments, up to 6 hours.
B To stop the recording before the scheduled time,
press STOP.
Record a TV programme you have
watched
21:00
Cancel Rec.
A Rotate the control wheel to search for the scene
where you want to record.
B Press REC
C Rotate the control wheel again until you find the
scene where you want to stop recording, press
STOP to mark it.
Notes
- To cancel the recording, press the Red button on
the remote control.
- A red mark appears indicating the marked section.
When the recorder goes into standby, the marked
section appears in the HDD as a recorded title.
to mark the recording from here.
22:13
HDD LIST
23:30
Prog Info
USB
Play the recorded titles
A Press HDD LIST.
Titles Info
Title 1
Title 2
Title 3
Title 4
Title 5
Delete Protect Copy Child Lock
B Press v up or V down to select a recorded title.
C Press
u.
Time 00:37:34 SP
Date 07.07.2007
Genre Others
Select a play media
A Press HOME.
Source Content
Hard Disk
Disc Tray
USB
B Select a media to play, then press B
C Use the cursor keys to reach the title/file you want
to play, then press u.
[ Hard Disk ]
The Hard Disk drive serves as a media jukebox that
stores all sources of recordings (TV programmes,
videos, music and photos).
[ Disc Tray ]
Access to the disc’s title list or contents.
Recordings
Video files
Music
Photo
right
.
Copy recorded titles or les
Copy recorded title from hard disk
A Insert a recordable DVD into this recorder.
B Press HDD LIST on the remote control.
C Select a title to copy.
D
Press the Green button [ Copy ] on the remote
control.
E The making disc copy information appears. Press the
Green button again to start copy.
Copy les from USB
You can only copy the data les (MP3, WMA, DivX and
JPEG) from your USB device to this recorder’s hard disk
drive or recordable DVD.
A Insert your USB device to the USB socket at the
front panel of this recorder.
B Press USB on the remote control to access the
content menu.
C Use the cursor keys to reach the file you want to
copy.
D Press the Green button [ Copy ] on the remote
control.
E Select the destination for copy, then press OK to
confirm.
Note It is not possible to copy the TV recordings to
USB device.
Target for copy.
Choose destination for copy.
To Hard Disk
To Disc
Note If select [ To Disc ], insert an empty
recordable DVD into this recorder.
Copy les from Disc
Copy prohibited contents cannot be copied to this
recorder.
A Insert a CD/DVD into this recorder.
B Press HOME and select [ Disc Tray ].
C Use the cursor keys to reach the title/file you want to
copy.
D Press the Green button [ Copy ] on the remote
control.
Target for copy.
Choose destination for copy.
To Hard Disk
To USB
E Select the destination for copy, then press OK to
confirm.
Note Only data les are able to copy to USB device.
F Press OK again to start copy.
www.philips.com/welcome
Quick Start Guide
What’s in the box?
Hard Disk/ DVD Recorder
1
2
3
Connect
Set up
Enjoy
Remote Control
and 2 batteries
DVDR5520H
DVDR5570H
REC
STOP
HOME
[ USB ]
Access to the USB’s title list or contents.
F Press OK again to start copy.
Need help?
User Manual
See the user manual that came with your Philips Recorder
2008 © Koninklijke Philips N.V.
All rights reserved.
12 NC 3139 245 28762
www.philips.com
RF antenna cable
(connect between
recorder and TV)
Audio/Video
cables
IN
Scart adaptor
User
Manual
Tuner interlink cable
 Loading...