

Page 1
DVD Recorder / VCR
User Manual
Read your Quick Start Guide and/or User Manual first for quick tips
that make using your Philips product more enjoyable.
To fully benefit from the support that Philips offers,
register your product and get support at www.philips.com/welcome
DVDR3510V
DVDR3512V
DVDR3510V_eng_26244.indd 1DVDR3510V_eng_26244.indd 1 2007-08-01 1:46:09 PM2007-08-01 1:46:09 PM
Page 2

Important notes for users in U.K.
Mains plug
This apparatus is tted with an approved 13
Amp plug. To change a fuse in this type of
plug proceed as follows:
1 Remove fuse cover and fuse.
2 Fix new fuse which should be a BS1362
5 Amp, A.S.T.A. or BSI approved type.
3 Re t the fuse cover.
If the tted plug is not suitable for your socket
outlets, it should be cut off and an
appropriate plug tted in its place.
If the mains plug contains a fuse, this should
have a value of 5 Amp. If a plug without a
fuse is used, the fuse at the distribution board
should not be greater than 5 Amp.
Note: The severed plug must be disposed off to
avoid a possible shock hazard should it be
inserted into a 13 Amp socket elsewhere.
How to connect a plug
The wires in the mains lead are coloured with
the following code: blue = neutral (N),
brown = live (L).
Italia
DICHIARAZIONE DI CONFORMITA’
Si dichiara che l’apparecchio DVDR3510V/
DVDR3512V, Philips risponde alle prescrizioni
dell’art. 2 comma 1 del D.M. 28 Agosto 1995 n.
548.
Fatto a Eindhoven
Philips Consumer Electronics
Philips, Glaslaan 2
5616 JB Eindhoven, The Netherlands
Norge
Typeskilt nnes på apparatens underside.
Observer: Nettbryteren er sekundert
innkoplet. Den innebygde netdelen er
derfor ikke frakoplet nettet så lenge
apparatet er tilsluttet nettkontakten.
For å redusere faren for brann eller elektrisk
støt, skal apparatet ikke utsettes for regn eller
fuktighet.
As these colours may not correspond with
the colour markings identifying the terminals
in your plug, proceed as follows:
– Connect the blue wire to the terminal
marked N or coloured black.
– Connect the brown wire to the terminal
marked L or coloured red.
– Do not connect either wire to the earth
terminal in the plug, marked E (or e) or
coloured green (or green and yellow).
Before replacing the plug cover, make certain
that the cord grip is clamped over the sheath
of the lead - not simply over the two wires.
Copyright in the U.K.
Recording and playback of material may
require consent. See Copyright Act 1956 and
The Performer’s Protection Acts 1958 to
1972.
For Customer Use:
Read carefully the information located at the
bottom or rear of your DVD Recorder and
enter below the Serial No. Retain this
information for future reference.
Model No. DVD/VCR RECORDER
DVDR3510V/ DVDR3512V
Serial No. _______________
2
DVDR3510V_eng_26244.indd 2DVDR3510V_eng_26244.indd 2 2007-08-01 1:46:13 PM2007-08-01 1:46:13 PM
Page 3

DK
Advarsel: Usynlig laserstråling ved åbning
når sikkerhedsafbrydere er ude af funktion.
Undgå utsættelse for stråling.
Bemærk: Netafbryderen er sekundært
indkoblet og ofbryder ikke strømmen fra
nettet. Den indbyggede netdel er derfor
tilsluttet til lysnettet så længe netstikket
sidder i stikkontakten.
S
Klass 1 laseraparat
Varning! Om apparaten används på annat
sätt än i denna bruksanvisning
speci cerats, kan användaren utsättas för
osynlig laserstrålning, som överskrider
gränsen för laserklass 1.
Observera! Stömbrytaren är sekundärt
kopplad och bryter inte strömmen från
nätet. Den inbyggda nätdelen är därför
ansluten till elnätet så länge stickproppen
sitter i vägguttaget.
SF
Luokan 1 laserlaite
Varoitus! Laitteen käyttäminen muulla
kuin tässä käyttöohjeessa mainitulla
tavalla saattaa altistaa käyttäjän
turvallisuusluokan 1 ylittävälle
näkymättömälle lasersäteilylle.
Oikeus muutoksiin varataan. Laite ei saa
olla alttiina tippu-ja roiskevedelle.
Huom. Toiminnanvalitsin on kytketty
toisiopuolelle, eikä se kytke laitetta irti
sähköverkosta. Sisäänrakennettu verkkoosa on kytkettynä sähköverkkoon aina
silloin, kun pistoke on pistorasiassa.
CAUTION
VISIBLE AND INVISIBLE LASER
RADIATION WHEN OPEN.
AVOID EXPOSURE TO BEAM
ADVARSEL
SYNLIG OG USYNLIG LASERSTRÅLING
VED ÅBNING UNDGÅ UDSÆTTELSE
FOR STRÅLING
VARNING
SYNLIG OCH OSYNLIG
LASERSTRÅLNING NÄR DENNA DEL
ÄR ÖPPNAD BETRAKTA EJ STRÅLEN
VARO!
AVATTAESSA OLET ALTTIINA
NÄKYVÄLLE JA NÄKYMÄTTÖMÄLLE
LASER SÄTEILYLLE. ÄLÄ KATSO
SÄTEESEEN
VORSICHT
SICHTBARE UND UNSICHTBARE
LASERSTRAHLUNG WENN
ABDECKUNG GEÖFFNET NICHT DEM
STRAHL AUSSETZEN
ATTENTION
RAYONNEMENT LASER VISIBLE ET
INVISIBLE EN CAS D’OUVERTURE
EXPOSITION DANGEREUSE AU
FAISCEAU
Disposal of your old product
Your product is designed and manufactured with high quality materials
and components, which can be recycled and reused.
When this crossed-out wheeled bin symbol is attached to a product it
means the product is covered by the European Directive 2002/96/EC.
Please inform yourself about the local separate collection system for
electrical and electronic products.
Please act according to your local rules and do not dispose of your old products with
your normal household waste. The correct disposal of your old product will help
prevent potential negative consequences for the environment and human health.
3
DVDR3510V_eng_26244.indd 3DVDR3510V_eng_26244.indd 3 2007-08-01 1:46:13 PM2007-08-01 1:46:13 PM
Page 4
4
DVDR3510V_eng_26244.indd 4DVDR3510V_eng_26244.indd 4 2007-08-01 1:46:14 PM2007-08-01 1:46:14 PM
Page 5

This product incorporates copyright protection
technology that is protected by US patents. Use of
this copyright protection technology must be
authorised by Macrovision, and is intended for
home and other limited viewing uses only unless
otherwise authorised by Macrovision. Reverse
engineering or disassembly is prohibited.
U.S. Patent Number 4,631,603; 4,819,098;
4,907,093; 5,315,448; and 6,516,132
Manufactured under license from Dolby
Laboratories. “Dolby” and the double-D
symbol are trademarks of Dolby Laboratories.
SHOWVIEW® is a registered trademark of Gemstar
Development Corporation. The SHOWVIEW®
system is manufactured under license from
Gemstar Development Corporation.
VIDEO Plus+® and PlusCode are registered
trademarks of Gemstar Development
Corporation. The VIDEO Plus+® system is
manufactured under license from Gemstar
Development Corporation.
DivX®, DivX Certi ed, and associated logos are
trademarks of DivX, Inc. and are used under
license.
This product complies with the radio
interference requirements of the
European Community.
This product complies with
the requirements of the
following directives and
guidelines: 73/23/EEC +
89/336/EEC + 93/68/EEC
LASER
Type Semiconductor laser
InGaAlP (DVD)
AIGaAs (CD)
Wave length 658 nm (DVD)
90 nm (CD)
Output Power 30 mW (DVD+RW write)
1.0 mW (DVD read)
1.0 mW (CD read)
Beam divergence 84 degrees (DVD)
61 degrees (CD)
5
DVDR3510V_eng_26244.indd 5DVDR3510V_eng_26244.indd 5 2007-08-01 1:46:14 PM2007-08-01 1:46:14 PM
Page 6

Table of Contents
English
General
Care and Safety Information ............................................................................................. 8
Setup precautions .........................................................................................................................................8
Cleaning discs .................................................................................................................................................8
About recycling ..............................................................................................................................................8
Product Information ........................................................................................................... 9
Introduction ....................................................................................................................................................9
Accessories supplied .................................................................................................................................... 9
Region codes ..................................................................................................................................................9
Copyright notice ...........................................................................................................................................9
Product features ..........................................................................................................................................10
Possible simultaneous operations ..........................................................................................................10
Product Overview
Main Unit .............................................................................................................................11
Remote Control ................................................................................................................12
Using the remote control .........................................................................................................................14
Connections
Step 1: Basic Recorder Connections .............................................................................. 15
Connecting the antenna cables ...............................................................................................................15
Connecting the video cables ....................................................................................................................16
Connecting the audio cables ....................................................................................................................18
Step 2: Optional Connections ......................................................................................... 19
Connecting to a Cable Box or Satellite Receiver ..............................................................................19
Connecting a DV camcorder .................................................................................................................. 20
Connecting another video device.......................................................................................................... 20
Step 3: Installation and Setup.......................................................................................... 21
Finding the correct viewing channel ......................................................................................................21
Setting the OSD language .........................................................................................................................21
Select the country of your residence ................................................................................................... 22
Setting the TV channel programmes .................................................................................................... 22
Setting the date & time ..............................................................................................................................23
Recording
Recor ding ............................................................................................................................ 24
Recording media ..........................................................................................................................................24
Recording settings ....................................................................................................................................25
Recording from various sources .............................................................................................................27
Instant time-off recording ........................................................................................................................29
Watching disc playback during VCR recording ...................................................................................29
Watching another source during recording ........................................................................................29
Timer Recording ................................................................................................................ 30
About timer recording ............................................................................................................................. 30
Timer recording (SHOWVIEW®/ VIDEO Plus+® System) ................................................................... 30
Timer recording (manually) ......................................................................................................................31
Changing/ Deleting a timer recording ...................................................................................................33
6
DVDR3510V_eng_26244.indd 6DVDR3510V_eng_26244.indd 6 2007-08-01 1:46:14 PM2007-08-01 1:46:14 PM
Page 7

Table of Contents
Dubbing
Direct Dubbing (Disc î Tape) ....................................................................................... 34
Dubbing from VCR to DVD .................................................................................................................... 34
Dubbing from DVD to VCR .................................................................................................................... 34
Playback
Disc and USB Playback ..................................................................................................... 35
Playable discs ................................................................................................................................................35
Starting disc playback .................................................................................................................................36
Playback from a USB ash drive/ USB memory card reader ..........................................................39
Additional Disc Playback Features ................................................................................. 40
Changing to another title/chapter/track.............................................................................................. 40
Pausing playback .........................................................................................................................................40
Searching forwards/backwards .............................................................................................................. 40
Using the OPTIONS menu.......................................................................................................................41
VCR Playback ..................................................................................................................... 44
Starting VCR playback ..............................................................................................................................44
Edit Recordings
Edit Recordings - Recordable DVD ................................................................................. 45
About disc editing ...................................................................................................................................... 45
Accessing disc editing menu .................................................................................................................... 45
Playback your recordings (DVD±R) on other DVD players ...........................................................47
About title editing ...................................................................................................................................... 48
Accessing title editing menu.................................................................................................................... 48
About video editing ....................................................................................................................................50
Accessing video editing menu ..................................................................................................................50
English
Other Information
Setup Menu Options ......................................................................................................... 53
Accessing the Setup Menu ........................................................................................................................53
General settings ......................................................................................................................................... 54
Playback settings ..........................................................................................................................................55
Language settings ........................................................................................................................................57
Channel Setup settings ..............................................................................................................................58
Clock settings.............................................................................................................................................. 60
Soft ware Upgrade ............................................................................................................. 61
Installing the latest software ....................................................................................................................61
Troubleshooting ................................................................................................................. 62
Frequently Asked Questions ........................................................................................... 66
Speci cations ..................................................................................................................... 68
Display panel symbols/ messages .................................................................................... 69
Gloss ary .............................................................................................................................. 70
TV System Guide............................................................................................................... 72
7
DVDR3510V_eng_26244.indd 7DVDR3510V_eng_26244.indd 7 2007-08-01 1:46:14 PM2007-08-01 1:46:14 PM
Page 8

Care and Safety Information
English
CAUTION!
High voltage! Do not open the
device. You run the risk of getting
an electric shock.
The machine does not contain any
user-serviceable parts. Please leave
all maintenance work to quali ed
personnel.
Setup precautions
Finding a suitable location
– Place the set on a at, hard and stable
surface. Do not place the set on a carpet.
– Do not place the set on top of other
equipment that might heat it up (e.g.,
receiver or ampli er).
– Do not put anything above or under
the set (e.g., CDs, magazines).
– Install this unit near the AC outlet and
where the AC power plug can be
reached easily.
Space for ventilation
– Keep space allowances of 20 cm around
ventilation openings of the apparatus. Do
not place the device on an unsteady base.
– The mains plug shall remain readily
operable.
5cm (2")
10cm (4")
10cm (4")
Cleaning discs
Some problems occur (frozen picture,
sound disruptions, picture distortions)
because the disc in the apparatus is dirty.
To avoid these problems, discs should be
cleaned on a regular basis.
To clean a disc, use a micro bre cleaning
cloth and wipe the disc from centre to
the edge in straight line movement.
CAUTION!
Do not use solvents such as benzene,
thinner, commercially available cleaners,
or anti-static sprays for discs.
Since the optical unit (laser) of the
recorder operates at a higher power than
regular DVD or CD players, Cleaning CD
intended for DVD or CD players may
damage the optical unit (laser). Therefore,
refrain from using a Cleaning CD.
About recycling
These operating instructions have been
printed on non-polluting paper. This
5cm (2")
electronic equipment contains a large
number of materials that can be recycled.
If you are disposing an old equipment,
Avoid high temperature, moisture,
water and dust
– Apparatus should not be exposed to
any dripping or splashing.
please take it to a recycling centre. Please
observe the local regulations regarding
disposal of packaging materials, exhausted
batteries and old equipment.
– Do not place any object or items that
can damage the apparatus (e.g., liquid
lled objects, lighted candles).
8
DVDR3510V_eng_26244.indd 8DVDR3510V_eng_26244.indd 8 2007-08-01 1:46:14 PM2007-08-01 1:46:14 PM
Page 9

Product Information
ALL
2
Introduction
Your Philips DVD recorder comes with a
built-in VCR deck. It allows recording to
DVD±RW, DVD±R, DVD+R DL and
VHS tape. In addition, enjoy playback of
DVD discs and VHS tapes. The DVD±R
discs have to be nalised before they can
be played on other DVD players.
Before you can start using this recorder,
complete the basic connections and
set-up in three simple steps.
Step 1: Basic recorder connections
Step 2: Optional connections for
other devices
Step 3: Basic installation and
set-up
Please take time to read this user manual
before using your recorder. It contains
important information and notes
regarding operations of the recorder.
Helpful Hints:
– If you have questions or problems occur
during operation, see chapter
‘Troubleshooting’.
– If you need further assistance, please call
the customer support service for your
country. The corresponding telephone
numbers and e-mail addresses are given in
the guarantee booklet.
– Refer to the type plate on the rear or
bottom of the product for identi cation and
supply ratings.
Accessories supplied
– Remote control and batteries
– RF coaxial cable
– Quick Start Guide
Region codes
DVD movies are usually not released at
the same time in all regions of the world,
thus all DVD players are programmed to
a speci c region code.
This device will only play
Region 2 DVDs or DVDs
manufactured to be played in
all regions (‘ALL’). DVDs from
other regions cannot be
played on this recorder.
Copyright notice
The making of unauthorised copies of
copy-protected material, including
computer programmes, les, broadcasts
and sound recordings, may be an
infringement of copyrights and constitute
a criminal offence. This equipment should
not be used for such purposes.
English
9
DVDR3510V_eng_26244.indd 9DVDR3510V_eng_26244.indd 9 2007-08-01 1:46:15 PM2007-08-01 1:46:15 PM
Page 10

Product Information (continue d)
English
Product features
This is a simple programming system for
recorders. To use it, enter the
programming number associated with
your television programme. You can nd
this number in your favourite listings
magazine.
Note: In the UK and Ireland the
S
HOWVIEW
Plus+® system and SHOWVIEW®
Programming Number is known as
PlusCode Programming Number.
i.Link is also known as ‘FireWire’ and
‘IEEE1394’. This connection is used for
transferring of high bandwidth digital
signals used by digital video (DV)
camcorders. It carries all audio and video
signals via a single cable.
®
system is known as VIDEO
Possible simultaneous
operations
Current
Operation
Play DVD
Record on
DVD
Play VCR
Record on
VCR
– When you play a DVD disc, only dubbing
from DVD disc to VCR is possible to
operate simultaneously.
– When you record to a DVD recordable
disc, only VCR playback is possible to
operate simultaneously.
– When you play a VHS tape, only dubbing
from VCR to DVD is possible to operate
simultaneously.
– When you record to a VHS tape, only
DVD playback is possible to operate
simultaneously.
DVD VCR
Play Record Play Record
Philips DVD recorders support ‘dual
media’ recording – the ability to create
recordings on+and-discs (DVD+R/
+RW, DVD+R DL, DVD-R/-RW).
Direct Dubbing
The built-in VCR deck makes it simple to
copy your recordings from VHS tape to
DVD or from DVD to VHS tape with a
single press of a button.
10
DVDR3510V_eng_26244.indd 10DVDR3510V_eng_26244.indd 10 2007-08-01 1:46:15 PM2007-08-01 1:46:15 PM
Page 11
1 2 34 5
Main Unit
English
789 q;
6
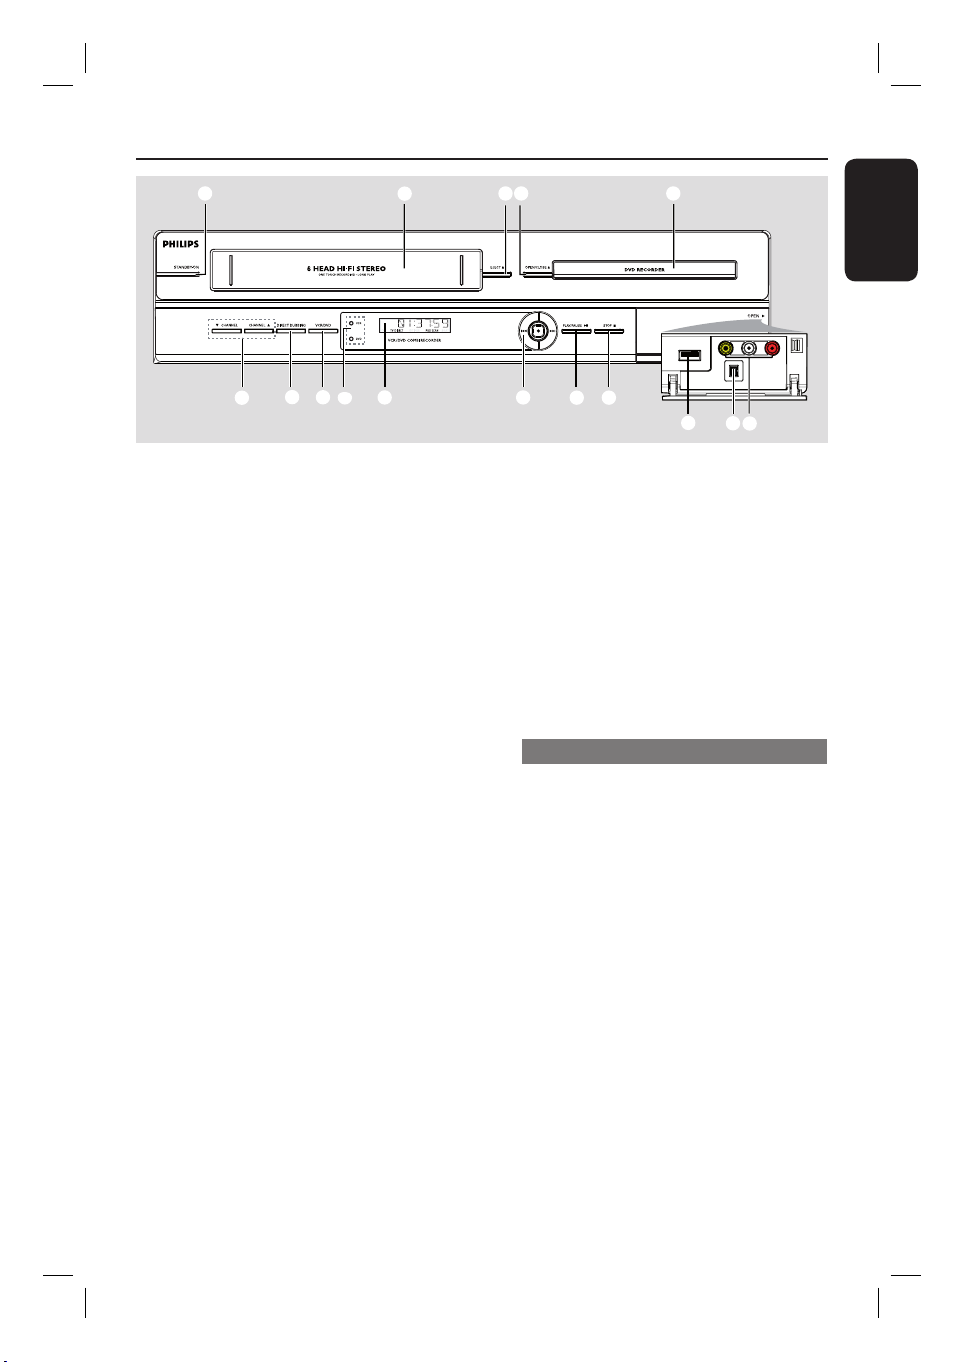
a
STANDBY-ON
– Turns on the recorder or to standby mode.
b
Tape deck
c
EJECT Z
– Ejects the VHS tape.
d
OPEN/CLOSE Z
– Opens/closes the disc tray.
e
Disc tray
f
CHANNEL V v
– In tuner mode, selects the next or
previous TV channel.
– Selects the recorder’s input source
(EXT1, EXT2, TUNER, CAM1, DV).
g
DIRECT DUBBING
– Copies from a VHS tape to a recordable
DVD or vice-versa.
h
VCR/DVD
– Toggles between VCR and DVD modes.
i
VCR indicator
– Lights up while in VCR mode.
DVD indicator
– Lights up while in DVD mode.
j
System display panel
– Shows information about the current
status of the recorder.
k
. / >
– Skips to the previous or next title/
chapter/track.
– Press and hold this button for fast
forward and backward search.
qa
qs qd
qg
qf
REC z
– Start recording the current TV channel
or the current video input source.
– Press repeatedly to set up a One Touch
Recording at 30, 60 or 90 minutes interval.
l
PLAY/PAUSE u
– Starts playback.
– Pauses the playback/recording.
m
STOP x
– Stops playback/recording/dubbing.
Sockets behind the ap
Flip down the door as indicated by the
OPEN B label at the right hand corner.
n
USB
– Input for USB ash drive/ USB memory
card reader.
Press USB on the remote control to
access this input source.
o
DV IN
– Input for digital camcorder or other
suitable devices using this connector.
p
VIDEO
– Video input for camcorder or video
recorder.
AUDIO L/R
– Audio input for camcorder or video
recorder.
qh
11
DVDR3510V_eng_26244.indd 11DVDR3510V_eng_26244.indd 11 2007-08-01 1:46:15 PM2007-08-01 1:46:15 PM
Page 12
Remote Control
English
SCART
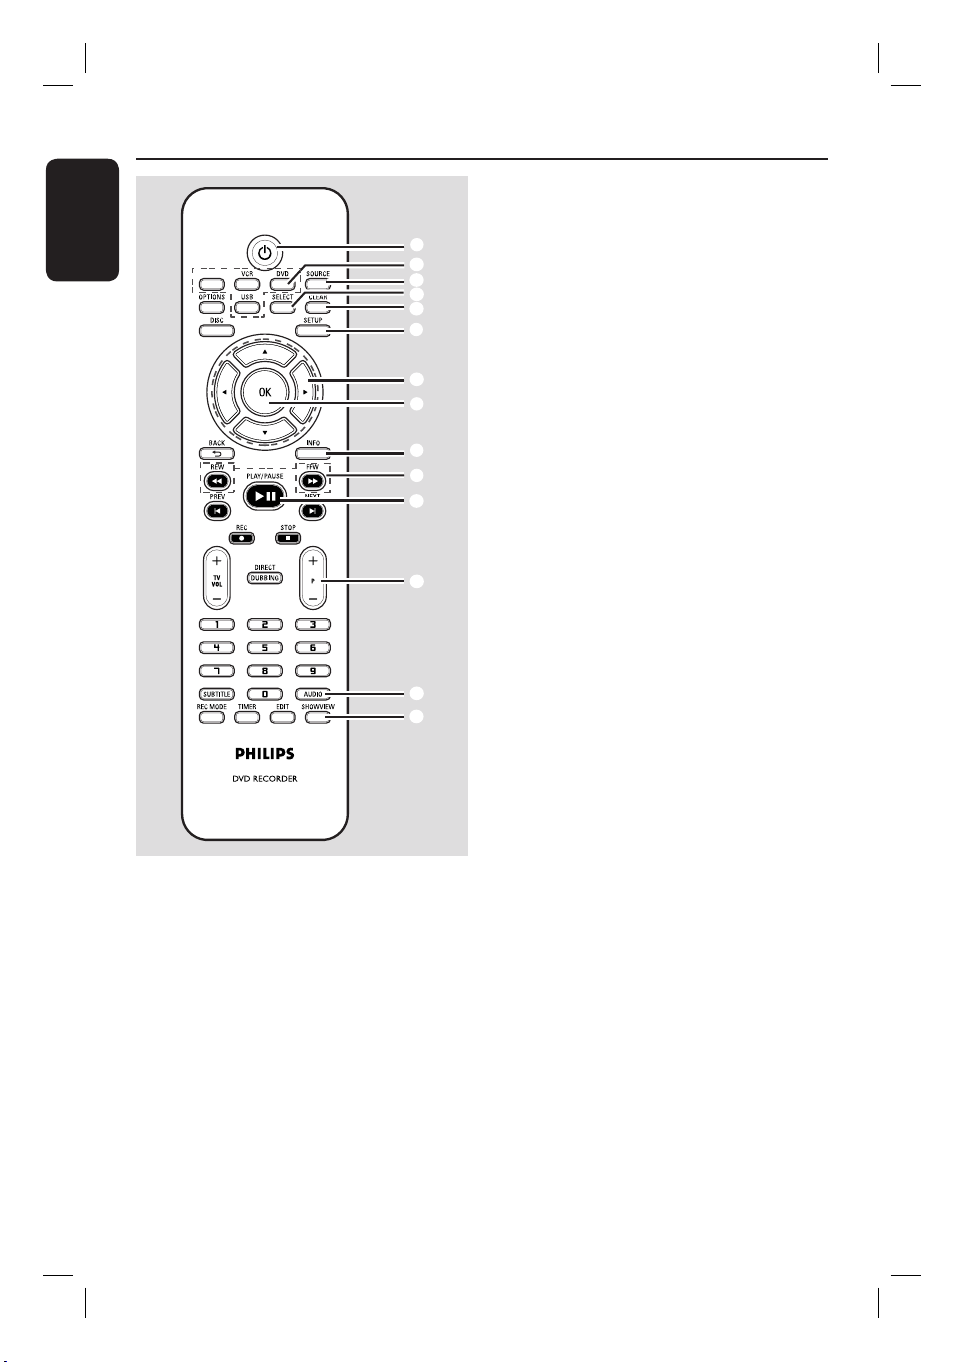
c
SOURCE
– Selects the recorder’s input source
(EXT1, EXT2, TUNER, CAM1, DV).
1
2
3
4
5
6
7
8
d
SELECT
– Selects a track/chapter/ le in the
programme menu.
e
CLEAR
– Clears a track/chapter/ le in the selection
playlist/copylist.
– Clears a timer entry.
– Resets tape counter to zero.
9
q;
qa
f
SETUP
– Enters/exits the system setup menu.
g
W X : Cursor buttons for moving to the
left or right, do a forward/reverse search.
qs
ST : Cursor buttons for moving
up/down or changing the recorder’s TV
tuner channel.
h
OK
– Stores/con rms an entry.
qd
i
qf
INFO
– Displays/removes the status bar.
j
REW m / FFW M
– Fast reverse or fast forward search.
k
PLAY / PAUSE u
– Starts playback.
a
2
– Turns on the recorder or to standby
mode.
b
SCART
– Switch between playback from additional
devices (connected via EXT2 AUX I/O
socket) and playback from the recorder.
DVD
– Switch to DVD mode.
VCR
– Switch to VCR mode.
USB
– Accesses the contents of the connected
– Pauses the playback/recording.
l
P +/-
– While in tuner, select the next or
previous TV channel.
– In VCR playback mode, adjust the picture
quality (tracking).
m
AUDIO
– Selects an audio language (DVD, VCD) or
an audio channel (CD, VHS).
n
SHOWVIEW
– Enters/exits the SHOWVIEW® menu.
VIDEO Plus+ (for UK only)
– Enters/exits the VIDEO Plus+® menu.
USB ash drive/ USB memory card reader.
12
DVDR3510V_eng_26244.indd 12DVDR3510V_eng_26244.indd 12 2007-08-01 1:46:15 PM2007-08-01 1:46:15 PM
Page 13

o
OPTIONS
– Enters/exits the options or disc/title
editing menu.
p
DISC
– Accesses DVD disc menu or Index
Picture screen of a DVD±R/±RW.
– Accesses VCD disc menu when PBC is
turned on.
q
BACK2
– Returns to the previous menu of a video
CD (VCD).
r
PREVí/ NEXTë
– Skips to previous or next chapter/track/
index.
s
REC z
– Start recording the current TV channel
or the current video input source.
– Press repeatedly to set up a One Touch
Recording at 30, 60 or 90 minutes
interval.
STOP
– Stops playback/recording/dubbing.
– Press and hold the button to open/ close
the disc tray.
Remote Control (continued)
English
SCART
qg
qh
qj
qk
ql
w;
wa
ws
wd
wf
wg
wh
t
TV VOL+/ -
– Adjusts the volume of the TV (Philips TV
only).
u
DIRECT DUBBING
– Copies from a VHS tape to a recordable
DVD or vice-versa.
x
REC MODE
– Toggles between recording modes:
HQ, SP, SPP, LP, EP or SLP.
v
Numeric keypad
– Selects a chapter/track number to play.
– Selects the recorder’s preset TV tuner
channel.
w
SUBTITLE
– Selects a DVD subtitle language.
VCR: SP & LP
This determines the quality of recording
and the amount/length of time recorded
on a DVD±R/±RW disc.
y
TIMER
– Enters/exits the timer recording menu.
z
EDIT
– Enters/exits the video editing menu.
13
DVDR3510V_eng_26244.indd 13DVDR3510V_eng_26244.indd 13 2007-08-01 1:46:15 PM2007-08-01 1:46:15 PM
Page 14
Remote Control (continued)
English
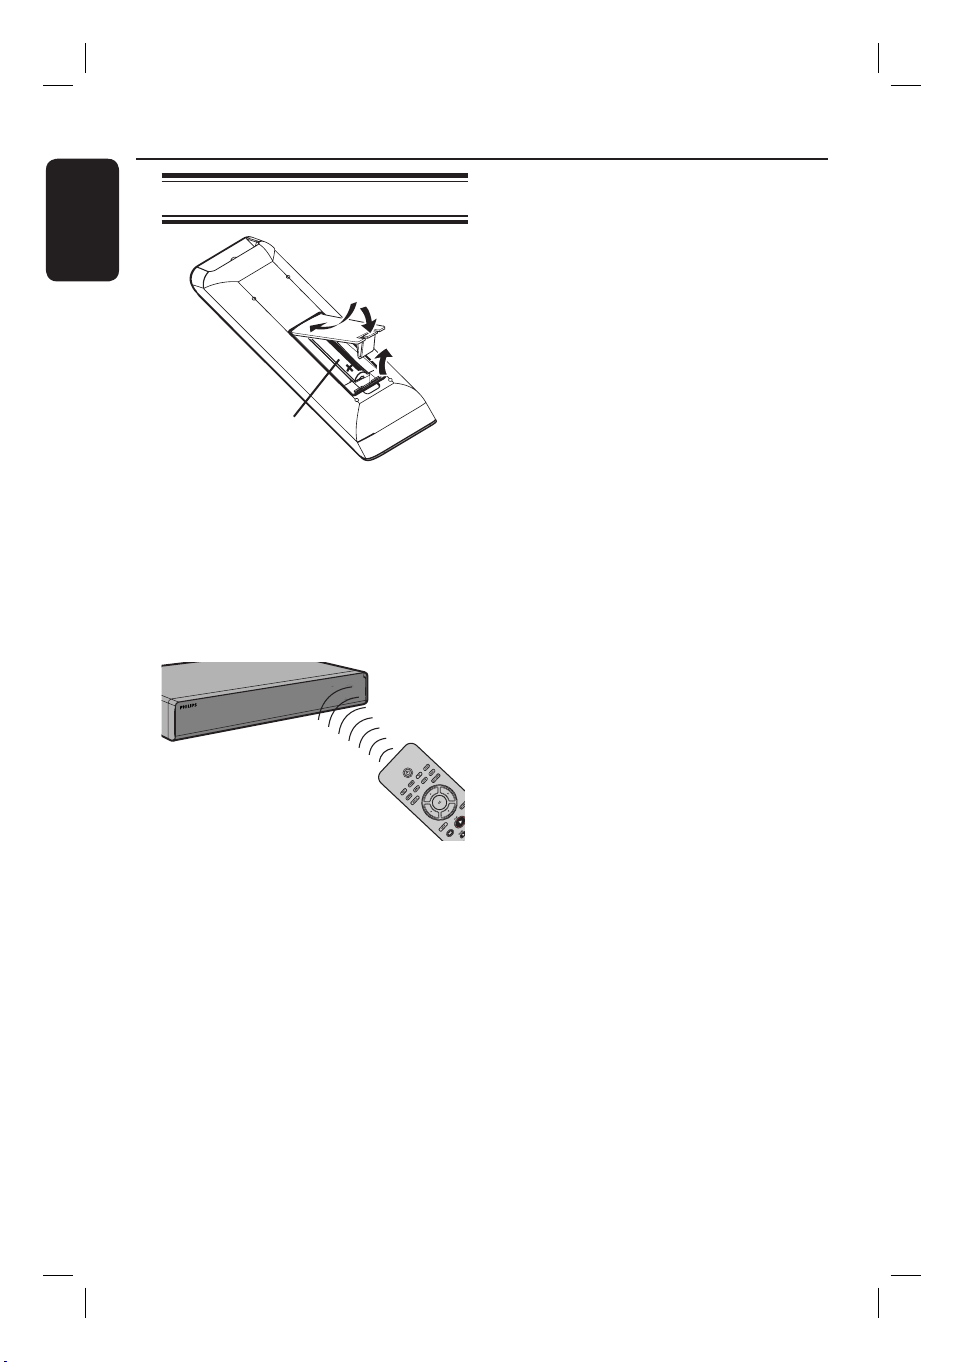
Using the remote control
B
A
Open the battery compartment.
B
Insert two batteries type R03 or AAA,
following the indications (+-) inside
the compartment.
C
Close the cover.
D
Point the remote control directly at the
remote sensor (iR) on the front panel.
C
A
CAUTION!
– Remove batteries if they are
exhausted or if when the remote
control is not to be used for a long
time.
– Do not mix batteries (old and new
or carbon and alkaline, etc.).
– Batteries contain chemical
substances, so they should be
disposed of properly.
E
Select the source you wish to control by
pressing the DVD, VCR or SOURCE
button on the remote control.
F
Then select the desired function (for
example m, M).
14
DVDR3510V_eng_26244.indd 14DVDR3510V_eng_26244.indd 14 2007-08-01 1:46:16 PM2007-08-01 1:46:16 PM
Page 15

Step 1: Basic Recorder Connections
??
???
?
??
??
???
?
???
Cable Satellite Antenna
A
ANTENNA
TV
EXT2
EXT1
AUX - I/O
TO TV - I/O
VIDEO
(
)
CVBS
S-VIDEO
(Y/C)
L
AUDIO
R
AUDIO / VIDEO OUT AUDIO OUT
B
Connecting the antenna
cables
These connections enable you to watch
and record TV programmes using the
recorder. If the antenna signal is
connected via Cable Box or Satellite
Receiver, ensure that these devices are
turned on in order to watch or record
the cable programmes.
If you want to connect to a Cable
Box/Satellite Receiver, see the
chapter “Step 2 : Optional Connections
– Connecting to a Cable Box or Satellite
Receiver” for the complete connections
to your TV.
COMPONENT
VIDEO OUT
English
3139 241 26501
Y
P
B
P
R
COAXIAL
DIGITAL AUDIO OUT
MAINS
TV
A
Connect the existing Antenna/Satellite
Receiver/Cable TV signal (labelled as RF
OUT or TO TV) to the ANTENNA
socket on the recorder.
B
Connect the supplied RF coaxial cable
from the TV socket on the recorder
to the antenna input socket (or labelled
as VHF/UHF RF IN) on your TV.
Helpful Hint:
– Depending on how you have connected
your TV channel (directly from an off-air
antenna or Cable box or VCR), you may have
to disconnect some of the cables before you
make the antenna connection.
TIPS: Before making or changing any connections, make sure that all the devices are disconnected
from the power outlet.
DVDR3510V_eng_26244.indd 15DVDR3510V_eng_26244.indd 15 2007-08-01 1:46:16 PM2007-08-01 1:46:16 PM
15
Page 16

Step 1: Basic Recorder Connections (continued)
English
ANTENNA
TV
EXT2
EXT1
AUX - I/O
TO TV - I/O
VIDEO
(
)
CVBS
S-VIDEO
(Y/C)
L
AUDIO
R
AUDIO / VIDEO OUT AUDIO OUT
COMPONENT
VIDEO OUT
OR OR
Option 1
Option 2
Connecting the video cables
This connection enables you to view the
disc and VHS tape playback from the
recorder. You only need to choose one
of the options below to make your video
connection.
Y
P
B
P
R
COAXIAL
DIGITAL AUDIO OUT
Option 3
TV
Option 2: Using an S-Video cable
Connect an S-video cable (not supplied)
from the S-VIDEO (Y/C) socket on the
recorder to the S-Video input socket (or
labelled as Y/C or S-VHS) on the TV.
Audio connection is required in order
to hear the sound, see next section
“Connecting the audio cables”.
3139 241 26501
Option 1: Using a SCART cable
Option 3: Using a Video (CVBS)
Connect a SCART cable (not supplied)
cable
from the EXT1 TO TV-I/O socket on
Connect a composite video cable (yellow
the recorder to the corresponding
SCART input socket on the TV.
end - not supplied) from the VIDEO
(CVBS) OUT socket on the recorder
Helpful Hints:
– If your TV has several SCART sockets,
select the SCART socket that is suitable for
both video output and video input.
– If your TV displays a selection for the
SCART socket, select ‘VCR’ as the source for
to the video input socket (or labelled as
A/V In, Video In, Composite or
Baseband) on the TV.
Audio connection is required in order
to hear the sound, see next section
“Connecting the audio cables”.
the SCART socket.
– The EXT2 AUX-I/O socket is intended
only for additional devices.
TIPS: Before making or changing any connections, make sure that all the devices are disconnected
from the power outlet.
16
DVDR3510V_eng_26244.indd 16DVDR3510V_eng_26244.indd 16 2007-08-01 1:46:16 PM2007-08-01 1:46:16 PM
Page 17

2
Step 1: Basic Recorder Connections (continued)
ANTENNA
EXT2
AUX - I/O
EXT1
TV
TO TV - I/O
Option 4: Using a Component
(Y Pb Pr) cable
A
Connect a component video cable (red/
blue/green - not supplied) from the Y PB
PR -OUT sockets on the recorder to the
corresponding component video input
sockets (or labeled as Y Pb/Cb Pr/Cr or
YUV) on the TV.
B
If your TV accepts Progressive Scan
signal, see the chapter “Setup Menu
Options – General Settings – Video
Output Settings” for detailed Progressive
Scan set-up.
VIDEO
(
CVBS
S-VIDEO
(Y/C)
AUDIO / VIDEO OUT AUDIO OUT
Option 4
3139 241
English
COMPONENT
VIDEO OUT
Y
P
B
P
R
COAXIAL
DIGITAL AUDIO OUT
TV
)
L
AUDIO
R
IMPORTANT!
The progressive scan video quality is
only available through a Y P
connection and a progressive TV is
required. It is strongly advised to
B PR
complete the recorder installation
rst, before enabling the progressive
scan feature.
17
DVDR3510V_eng_26244.indd 17DVDR3510V_eng_26244.indd 17 2007-08-01 1:46:16 PM2007-08-01 1:46:16 PM
Page 18

Step 1: Basic Recorder Connections (continued)
English
3139 241 26501
ANTENNA
TV
EXT2
EXT1
AUX - I/O
TO TV - I/O
VIDEO
(
)
CVBS
S-VIDEO
(Y/C)
L
AUDIO
R
AUDIO / VIDEO OUT AUDIO OUT
COMPONENT
VIDEO OUT
Option 1
Connecting the audio cables
This connection enables you to listen to
the playback from the recorder.
However, this connection is not required
if the recorder is connected to the TV
using the SCART cable.
Option 1: Using an audio cable
Connect the recorder to a two channel
stereo system (mini system, TV) or
receiver in order to enjoy the stereo
sound system.
Connect an audio cable (red/white ends -
not supplied) from the AUDIO L/R
OUT sockets to the audio input sockets
of the connected device.
Y
P
B
P
R
COAXIAL
DIGITAL AUDIO OUT
MAINS
Option 2
AV ampli er/
receiver
Option 2: Using a coaxial cable
Connect the recorder to an AV ampli er/
receiver with a digital multi-channel
sound decoder in order to enjoy
multi-channel surround sound.
Connect a coaxial cable from the
COAXIAL (DIGITAL AUDIO OUT)
socket on the recorder to the digital
input socket on the ampli er/receiver.
Before you start operating, set the digital
audio output settings accordingly (see the
section “Setup Menu Options – Playback
settings – Digital Audio Output”).
If the setting does not match your
stereo’s capabilities, the stereo may
produce a strong, distorted sound or no
sound at all.
TIPS: Before making or changing any connections, make sure that all the devices are disconnected
from the power outlet.
18
DVDR3510V_eng_26244.indd 18DVDR3510V_eng_26244.indd 18 2007-08-01 1:46:16 PM2007-08-01 1:46:16 PM
Page 19

??
???
?
??
??
???
?
???
Cable
Step 2: Optional Connections
Rear of a Cable Box
A
or Satellite Receiver
(Example only)
English
Satellite
Antenna
ANTENNA
EXT2
EXT1
TV
AUX - I/O
TO TV - I/O
VIDEO
(
)
CVBS
S-VIDEO
(Y/C)
L
AUDIO
R
AUDIO / VIDEO OUT AUDIO OUT
COMPONENT
VIDEO OUT
Connecting to a Cable Box or
Satellite Receiver
Option 1
If your Cable Box/Satellite Receiver
has only an antenna output socket
(RF OUT or TO TV),
see “Step 1: Basic Recorder Connections
– Connecting the antenna cables” for the
complete connections to your TV.
C
3139 241 26501
Y
P
B
P
R
COAXIAL
DIGITAL AUDIO OUT
TV
B
Option 2
If your Cable Box/Satellite Receiver
has a SCART output socket
A
Keep the existing antenna connection
from the Cable Box/Satellite Receiver to
your TV.
B
Connect the SCART cable from the
EXT1 TO TV-I/O socket on the
recorder to the corresponding SCART
input socket on the TV.
C
Connect another SCART cable from the
EXT2 AUX-I/O socket on the recorder
to the SCART output socket (or labelled
as TV OUT or TO TV) on the Cable
Box/Satellite Receiver.
MAINS
To start playback, select the TV channel
directly on the Cable Box/Satellite
Receiver. To view picture from a
connected external device, press the
SCART button on the remote control.
TIPS: Refer to the respective connected device’s user manual for other possible connections.
19
DVDR3510V_eng_26244.indd 19DVDR3510V_eng_26244.indd 19 2007-08-01 1:46:16 PM2007-08-01 1:46:16 PM
Page 20

Step 2: Optional Connections (continued)
English
B
A
Connecting a DV camcorder
Use this if you have a Digital Video or
Digital 8 camcorder. The DV socket
conforms to the i.LINK standard.
Connect an i.LINK 4-pin cable (not
supplied) from the DV IN socket on the
front panel of the recorder to the
appropriate DV OUT socket on the
camcorder.
Before you start operating, press
SOURCE on the remote control
repeatedly to select ‘DV’ as the input
channel.
Helpful hints:
– The DV IN socket does not support
connection to a Personal Computer.
– It is NOT possible to record from the
recorder to your camcorder via the DV IN
socket on your recorder.
Connecting another video
device
Use the front sockets connection to copy
playback from another video device (for
example, camcorder, VCR or DVD
player).
A
Connect a video cable (not supplied)
from the VIDEO socket from the front
panel of the recorder to the Video
output socket of the connected video
device.
B
Connect an audio cable (not supplied)
from the AUDIO L/R sockets to the
audio output sockets of the connected
video device.
Before you start operating, press
SOURCE on the remote control
repeatedly to select ‘CAM 1’ as the input
channel.
TIPS: Refer to the respective connected device’s user manual for other possible connections.
20
DVDR3510V_eng_26244.indd 20DVDR3510V_eng_26244.indd 20 2007-08-01 1:46:16 PM2007-08-01 1:46:16 PM
Page 21

Step 3: Installation and Setup
Before you start...
When you complete the
connections and turn on the
recorder for the rst time, it is
advisable that you perform several
basic settings.
Please see the following pages on using
the system setup menu features to
programme TV channels, menu language
and system clock settings. This will
optimise the performance of this
recorder.
Finding the correct viewing
channel
A
Press STANDBY-ON on the recorder
to turn it on.
B
Turn on the TV and set it to the correct
video-in channel. You should see the blue
DVD background screen.
You may go to Channel 1 of your TV,
then press the Channel Down button on
your TV’s remote control until you see
the Video In channel.
You may press ° button repeatedly
on your TV’s remote control.
Usually this channel is between the
lowest and highest channels and may be
called FRONT, A/V IN, VIDEO. See your
TV manual for more details.
Setting the OSD language
Select the menu language for this
recorder’s on-screen display. The
language options are different depending
on your country or region. It may not
correspond to the illustrations shown on
the user manual.
Language settings can only be
changed when the disc stops playing
or when there is no disc in the disc
tray.
SCART
SETUP
OK
A
Press SETUP.
The system setup menu appears on
the TV.
B
Use ST keys to highlight
{ Setup - Language } and press X to
access the menu.
Setup - Language
On Screen Display Language
Default Disc Menu Language
Default Subtitle Language
Default Audio Language
English
English
Off
English
English
C
Use ST keys to highlight { On Screen
Display Language } and press OK to
access its options.
D
Use ST keys to highlight the desired
language and press OK to con rm.
TIPS: Press X to access the options of an item in the menu.
Press SETUP to exit the menu.
21
DVDR3510V_eng_26244.indd 21DVDR3510V_eng_26244.indd 21 2007-08-01 1:46:17 PM2007-08-01 1:46:17 PM
Page 22

Step 3: Installation and Setup (continued)
English
Select the country of your
residence
Select the country of your area for auto
channel tuning.
A
Press SETUP on the remote control.
The system setup menu appears on
the TV.
B
Use ST keys to highlight
{ Setup - General } and press X.
Setup - General
Screen Saver
Country
Video Output Selection
Restore Factory Settings
C
Select { Country } and press OK.
D
Use ST keys to select the country of
your residence and press OK to con rm.
On
Germany
SCART RGB
OK
Setting the TV channel
programmes
Before the recorder is able to start
recording the TV channel programmes,
you need to search for the available TV
channels and store them in the recorder.
Language settings can only be
changed when the disc stops playing
or when there is no disc in the disc
tray.
Before you start...
Make sure you have successfully made all
the required connections to the
recorder, the TV and Satellite Receiver/
Cable Box (if any) and turned them on.
A
Press SETUP on the remote control.
The system setup menu appears on
the TV.
B
Use ST keys to highlight
{ Setup - Channel Setup } and press
X.
Setup - Channel Setup
Channel Search
Modify Channel Information
Sort Channels
C
Select { Channel Search } and press OK.
The automatic TV channel search starts.
Search
Edit
Sort
This process may take several minutes.
Once complete, the total number of
channels found and stored appears on the
TV.
To modify or sort the TV channels,
see the chapter “Setup Options Channel Setup settings”.
TIPS: Press X to access the options of an item in the menu.
Press SETUP to exit the menu.
22
DVDR3510V_eng_26244.indd 22DVDR3510V_eng_26244.indd 22 2007-08-01 1:46:17 PM2007-08-01 1:46:17 PM
Page 23
Step 3: Installation and Setup (co ntinued)
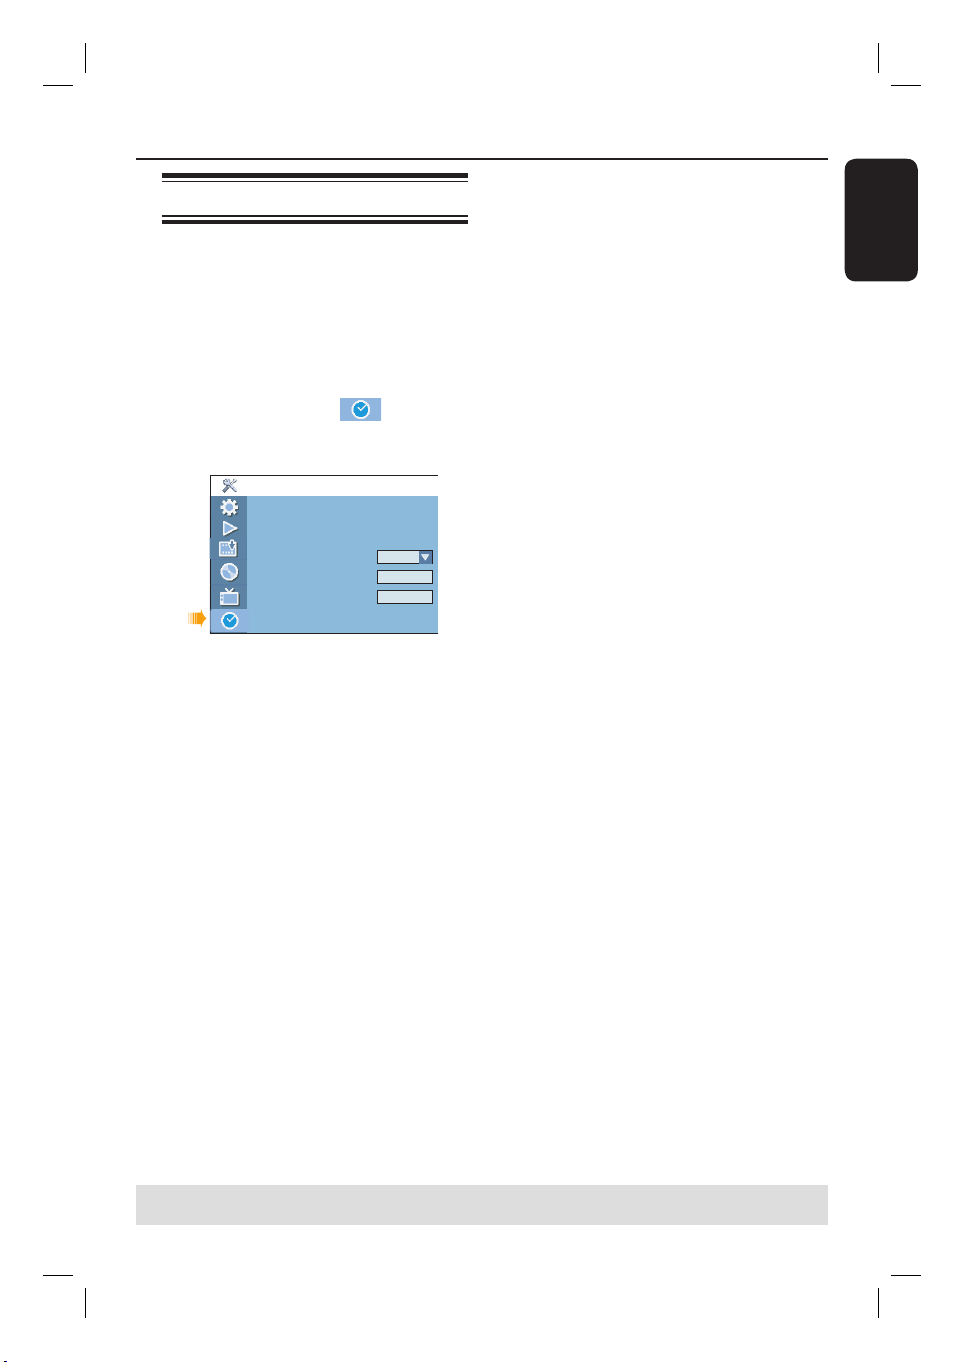
Setting the date & time
This recorder has an automatic date and
time setting feature. If the recorder has
not set the time and date correctly,
further adjust the clock settings.
A
Press SETUP.
The system setup menu appears.
B
Use ST keys to select
{ Setup - Clock } and press X to
con rm.
Setup - Clock
Date (dd / mm / yy)
Time (hh : mm : ss)
Date - Time Setting
Date - Time Preset
Show DivX® Registration Code
C
Select { Date-Time Setting } and press
01/01/06
00:01:08
Auto
P001/Ch003
OK
X.
Use ST keys to highlight { Manual }
and press OK.
D
Select { Date (dd/mm/yy) } and press
OK to edit the date elds.
Use ST keys to change number and
use WX keys to select different entry
elds, then press OK to con rm.
English
Use the numeric keypad 0-9 on the
remote control to key in the numbers.
E
Press OK to con rm.
F
To set { Time (hh:mm:ss) }, repeat
steps D~E.
The basic installation is complete.
TIPS: Press X to access the options of an item in the menu.
Press SETUP to exit the menu.
23
DVDR3510V_eng_26244.indd 23DVDR3510V_eng_26244.indd 23 2007-08-01 1:46:17 PM2007-08-01 1:46:17 PM
Page 24

Recording
English
This recorder can record TV
programmes or copy content from an
external device to a DVD recordable disc
or VHS tape. The storage capacity of the
disc and tape are dependable on the
recording mode selected. This recorder
also incorporates timer recording
function which allows a scheduled
recording to be made.
Recording media
The recording media for this recorder
are DVD±R/±RW/+R DL and VHS tape.
DVD±RW (DVD Rewritable)
– Discs that are rewritable can be used for
multiple recordings once the existing data
is erased.
DVD±R (DVD Recordable)
– Discs can only be used for a single
recording. Each new recording is always
added at the end of all previous
recordings as existing recordings cannot
be overwritten.
– Editing can be done on DVD±R discs as
long as they have not been nalised.
– To playback a DVD±R on other DVD
player, it must be nalised (see the
chapter “Editing/ Finalising Recording –
Playing your recordings (DVD±R) on
other DVD players”). After this is done,
no more data can be added to the disc.
DVD+R DL (DVD+R Double Layer)
– It contains the same usage as DVD+R, the
only difference is the capacity of 8.5 GB.
It offers two recordable layers on a single
DVD disc. The layers are accessible from
the same side of the disc, so recording
can occur completely uninterrupted.
Supported disc type and media
speeds
Disc
DVD+R 1x - 16x
DVD+RW 2.4x - 8x
DVD-R 1x - 16x
DVD-RW 2.4x - 6x
DVD+R DL 2.4x
Media speeds
Helpful Hints:
– It is normal to encounter noise when
recording to discs of higher media speeds.
– Avoid using discs with labels.
VHS Tape
– VHS tapes have record safety tabs to
ensure that recordings will not be
accidentally erased. To prevent
recording, break off the tab. To allow
recording, cover the hole of the tab with
clear tape.
– Without the record safety tab, the VHS
tape will start playback once your insert
the VHS tape into the tape slot.
– The VCR automatically marks the tape
with an index signal at the point where
each recording begins.
Record Safety Tab
24
DVDR3510V_eng_26244.indd 24DVDR3510V_eng_26244.indd 24 2007-08-01 1:46:17 PM2007-08-01 1:46:17 PM
Page 25

IMPORTANT!
Unrecordable contents
Contents with copy protection cannot be
recorded on this recorder. When the
recorder receives a copy guard signal,
recording will be paused.
Recording settings
The default recording settings allow you
to set the auto chapter markers,
preferred recording input source and
recording mode. Any changes made using
the remote control will only apply to the
current recording settings. The default
recording settings will remain unchanged
for the next recording.
A
Press SETUP on the remote control.
The system setup menu appears on
the TV.
Recording (continued)
English
B
Use ST keys to select
{ Setup -
Record } and press X to con rm.
Setup - Record
Auto Chapter Marker
Default Recording Source
DVD Default Recording Mode
VCR Default Recording Mode
C
Use ST keys to select the setting you
On
Tuner
SP
SP
wish to change and press OK to con rm.
Instructions and explanations of the
options are provided in the following
pages.
D
To exit, press SETUP.
25
DVDR3510V_eng_26244.indd 25DVDR3510V_eng_26244.indd 25 2007-08-01 1:46:18 PM2007-08-01 1:46:18 PM
Page 26

Recording (cont inued)
English
Record settings (underlined options are the factory default settings)
Auto Chapter
Marker
Default Recording
Source
Automatically divides a recording (title) into chapters by inserting
chapter markers at a speci c interval. This enables you to access
a speci c point in the recording quickly.
{ On } – Chapter markers will automatically be
inserted within the title during recording at
every 5 ( ve) minutes interval.
– (For DVD+R DL discs) Chapter markers will
automatically be inserted within the title
during recording at every 10 minutes interval.
{ Off } – No chapter marker will be inserted in the
recording.
De ne your frequent source of recording. The recorder will go
to the default source when the SOURCE button is pressed.
{ Tuner } – Input source from TV programmes.
{ CAM1 } – Input source from the device connected to
the V1DEO and AUDIO L/R sockets at the
front panel.
{ DV } – Input source from the device connected to
DV IN socket at the front panel.
{ EXT 1 } – Input source from the device connected to
the EXT1 TO TV-I/O SCART socket at the
rear panel.
{ EXT 2 } – Input source from the device connected to
the EXT2 AUX-I/O SCART socket at the
rear panel.
Note: To change the current recording source without changing the
default setting, press the SOURCE button on the remote control.
DVD Default
Recording Mode
VCR Default
Recording Mode
The recording mode de nes the picture quality of the DVD
recordings and the maximum recording time on a disc. The
factory default setting is SP.
Record Mode
HQ
SP
SPP
LP
EP
SLP
Picture Quality
High Quality
Standard Play
Standard Play Plus
Long Play
Extended Play
Super Long Play
Maximum Recording
Time per Disc (hours)
1
2
2.5
3
4
6
The recording mode de nes the picture quality of VCR
recordings and the maximum recording time on a VHS tape. The
available recording modes for VCR are SP and LP (twice of SP
recording length).
26
DVDR3510V_eng_26244.indd 26DVDR3510V_eng_26244.indd 26 2007-08-01 1:46:18 PM2007-08-01 1:46:18 PM
Page 27

Recording from various
sources
This recorder has various external input
signal terminals that can be used to record
or playback, including Tuner input, S-Video
input, composite video input, DV input,
Scart input and stereo audio input.
Recording (continued)
E
If necessary, press REC MODE
repeatedly to select another recording
mode.
F
Press REC z to start recording.
If the disc contains some recordings,
the new recording will automatically start
after the last recording on the disc.
For VHS tape, it will start recording
from the current stop position.
English
VCR
REC
SCART
DVD
SOURCE
STOP
P +-
REC MODE
Recording TV programmes
A
Turn on the TV to the correct viewing
channel for the recorder (e.g. ‘EXT’, ‘0’,
‘AV’).
B
Press DVD or VCR to select the
destination of recording.
C
Insert a recordable DVD or VHS tape
into the recorder.
For VHS tape, locate the start point
position for recording.
D
Press SOURCE on the remote control
to select { Tuner }, then use P +/-
keys to select the TV channel you wish to
record.
To pause the recording, press u. To
continue recording, press REC z. This
function can be used to avoid recording
commercials.
G
To stop the recording, press STOP x.
Otherwise, recording continues until
the disc or tape is full.
Recording from an external device
(Camcorder/ VCR/DVD Player)
Record video directly from an external
device.
A
Connect the external device to this
recorder. See the chapter “Step 2:
Optional Connections”.
B
Turn on the TV to the correct viewing
channel for the recorder (e.g. ‘EXT’, ‘0’,
‘AV’).
C
Press DVD or VCR to select the
destination of recording.
D
Insert a recordable DVD or VHS tape
into the recorder.
For VHS tape, locate the start point
position for recording.
TIPS: Ensure that there is suf cient space available on the recordable DVD or VHS tape before
recording. You have to nalise the DVD±R before it can be playback on other players.
27
DVDR3510V_eng_26244.indd 27DVDR3510V_eng_26244.indd 27 2007-08-01 1:46:18 PM2007-08-01 1:46:18 PM
Page 28

Recording (cont inued)
English
E
Press SOURCE repeatedly to select the
correct input channel that matches the
connected socket of the device.
{ EXT 1 }
Input source from the device connected
to the EXT1 TO TV-I/O SCART socket
on the rear panel.
{ EXT 2 }
Input source from the device connected
to the EXT2 AUX-I/O SCART socket on
the rear panel.
{ CAM 1 }
Input source from the device connected
to the VIDEO and AUDIO L/R sockets
on the front panel.
F
If necessary, press REC MODE
repeatedly to select another recording
mode.
G
Press REC z to start recording.
To increase recording time in 30 minute
increments, press REC z repeatedly.
H
Start playback on the connected device.
To pause the recording, press u once.
To continue recording, press REC z.
This function can be used to avoid
recording commercials.
I
To stop the recording, press STOP x.
Otherwise, recording continues until
the disc or tape is full.
Recording from an DV camcorder
Record video directly from a connected
DV camcorder to a DVD recordable disc
or VHS tape.
A
Connect the DV camcorder to DV IN
socket at the front of the recorder.
B
Find the footage on the DV camcorder
where you want to start recording and
set the camcorder to pause mode.
C
Turn on the TV to the correct viewing
channel for the recorder (e.g. ‘EXT’, ‘0’,
‘AV’).
D
Press DVD or VCR to select the
destination of recording.
E
Insert a recordable DVD or VHS tape
into the recorder.
For VHS tape, locate the start point
position for recording.
F
Press SOURCE on the remote control
to select { DV }.
G
Press REC z to start recording and
press the PLAY button on the DV
camcorder to start playback.
To pause the recording, press u. To
continue recording, press REC z
H
To stop the recording, press STOP x.
A new title/index will be created when
you begin another recording.
again.
TIPS: Ensure that there is suf cient space available on the recordable DVD or VHS tape before
recording. You have to nalise the DVD±R before it can be playback on other players.
28
DVDR3510V_eng_26244.indd 28DVDR3510V_eng_26244.indd 28 2007-08-01 1:46:18 PM2007-08-01 1:46:18 PM
Page 29

Recording (continued)
Instant time-off recording
This function allows you to make a
recording with a preset length easily
without using the timer programming.
A
Press P +- to select the programme
number to record from, for example
‘P01’.
B
Press DVD or VCR to select the
destination of recording.
C
Insert a recordable DVD or VHS tape
into the recorder.
For VHS tape, locate the start point
position for recording.
D
If necessary, press REC MODE
repeatedly to select another recording
mode.
E
Press REC z to start recording.
To increase recording time in 30 minute
increments, press REC z repeatedly.
F
The recorder will stop recording at the
designated end time and switch to
standby mode automatically.
If you wish to stop the recording before
the scheduled time, press STOP x.
Watching another source
during recording
During recording, watch another TV
channel or playback from another audio/
video device which is connected to this
recorder.
SCART
Watching playback from another
device
This is only possible if the recorder is
connected to the TV using the EXT1 TO
TV-I/O socket.
Press SCART to view the picture from
the device which is connected to the
EXT2 AUX-I/O socket of this DVD
recorder.
Watching another TV channel
If there is no device connected to the
EXT2 AUX-I/O socket, press SCART to
switch to TV mode.
SCART
English
Use the TV’s remote control to change
Watching disc playback
during VCR recording
If you wish to watch the DVD playback
during the VCR recording, press DVD to
switch to DVD mode and perform the
DVD playback.
Note: This function is possible if the
{ Decoder } option is set to { Off }. See
the chapter “Setup Menu Options –
Channel Setup Settings – { Modify
Channel Information }”.
TIPS: Ensure that there is suf cient space available on the recordable DVD or VHS tape before
recording. You have to nalise the DVD±R before it can be playback on other players.
the channels.
The message “TV/LOOP” will be
displayed on the recorder’s system
display panel.
To switch back to recorder mode, press
SCART on the remote control.
Helpful Hint:
– If you want to watch the TV channel
through the recorder or playback the
recorded disc, switch the TV back to its video
input channel.
29
DVDR3510V_eng_26244.indd 29DVDR3510V_eng_26244.indd 29 2007-08-01 1:46:18 PM2007-08-01 1:46:18 PM
Page 30

Timer Recording
English
About timer recording
Use the timer recording to automatically
start and stop a recording at a later
date/time. The recorder will tune to the
right programme channel and begin
recording at the speci ed time.
With this recorder, schedule up to
8 recordings at a time. During timer
recording, changing the recorder’s
channel is not possible.
There are two ways to programme
a timer recording
– Using the S
HOWVIEW
system.
– Using manual timer schedule.
OK
SCART
®
/ VIDEO Plus+®
CLEAR
Timer recording (SHOWVIEW®/
VIDEO Plus+ System)
This is a simple timer programming
system. To use, enter the S
programming number/ PlusCode number
associated with your television
programme. You can nd this number in
your TV listings magazine.
All the information required by this
recorder for programming is contained in
the programming number.
A
Turn on the TV to the correct viewing
channel for the recorder (e.g. ‘EXT’, ‘0’,
‘AV’).
B
Press SHOWVIEW or VIDEO Plus+
on the remote control.
The SHOWVIEW
®
Menu appears.
ShowView System
Enter the ShowView programming
number for the show you wish to
record.
HOWVIEW
/ VIDEO Plus+® Setup
®
TIMER
About ‘VPS/PDC’
(PDC is not available in some countries).
‘VPS’ (Video Programming System) or
‘PDC’ (Programme Delivery Control) is
used to control the start and duration of
TV channel recordings. If a TV
programme starts earlier or ends later
than was scheduled, the recorder will
then turn on and off at the correct time.
SHOWVIEW/
VIDEO Plus+
CANCELCONFIRM
OK
C
Use the numeric keypad 0-9 to enter
the SHOWVIEW® / PlusCode programming
number for the show you wish to record.
(e.g. : 5-312-4 or 5,312 4, key in ‘53124’).
To clear the programming number, press
CLEAR on the remote control.
To cancel the programme, move to
CANCEL
in the menu and press OK.
VPS/PDC is intended to record the entire
programme. To set a timer that is longer/
shorter than the VPS/PDC broadcast
time, you must switch off the VPS/PDC.
Note: ‘PDC’ (Programme Delivery
Control) is not available to users in the
UK.
30
DVDR3510V_eng_26244.indd 30DVDR3510V_eng_26244.indd 30 2007-08-01 1:46:19 PM2007-08-01 1:46:19 PM
Page 31

Timer Recording (cont inued)
D
To con rm your entry, move to
in the menu and press OK.
The programme information will be
shown on the timer editor menu.
Timer Editor 09 : 05 : 56
Source
Dest
Rec Mode
Mode
Date
Start
End
VPS/PDC
OK CANCEL
Ch003
DVDR
SP
Once
01 / 01 / 06
10 : 33
11 : 03
Off
OK
Note: If the SHOWVIEW®/ PlusCode it has
not been assigned a the programming
number, you have to manually key in
channel number. Follow the instructions
on the TV screen.
E
Press T to select { Dest. } in the menu
and press X.
F
Select the recording destination (DVD
or VCR) and press OK.
G
Press TIMER to exit the menu.
H
Insert a recordable DVD or VHS tape
into the recorder.
For VHS tape, locate the start point
position for recording.
I
Press STANDBY-ON to switch the
recorder to standby mode.
The ‘TIMER’ icon will light up on the
display panel if a timer recording is set.
If the recorder is not in standby mode,
a noti cation message will appear three
minutes before the recording begins.
When timer recording ends, the
recorder will automatically power off.
CONFIRM
Timer recording (manually)
A
Turn on the TV to the correct viewing
channel for the recorder (e.g. ‘EXT’, ‘0’,
‘AV’).
B
Press TIMER on the remote control.
The timer schedule list appears.
Timer Schedule 09 : 05 : 56
Source Dest Rec Mode Date Start End VPS
1
P003
SPDVDR
05/01/06
2
P010
DVDR
3
P008
DVDR
4
P005
VCR
5
6
C
Select an empty eld and press OK.
14.00 15.30
EP
25/01/06
02.00
SP
30/01/06
17.00
SP
31/01/06
12.30
The timer editor menu appears.
Timer Editor 09 : 05 : 56
Source
Dest
Rec Mode
Mode
Date
Start
End
VPS/PDC
OK CANCEL
D
Use ST keys or the numeric keypad
Ch003
DVDR
SP
Once
01 / 01 / 06
10 : 33
11 : 03
Off
0-9 to select or enter the recording
information, then press OK to con rm.
{ Source }
Select the TV channel or the correct
input source (DV, EXT1, EXT2 or
CAM1) which you have used to connect
the external device.
{ Dest. }
Select the recording destination, DVD
or VCR.
06.30
18.15
14.00
English
On
Off
On
Off
OK
TIPS: Ensure that there is suf cient space available on the recordable DVD or VHS tape before
recording. You have to nalise the DVD±R before it can be played back on other players.
31
DVDR3510V_eng_26244.indd 31DVDR3510V_eng_26244.indd 31 2007-08-01 1:46:19 PM2007-08-01 1:46:19 PM
Page 32

Timer Recording (cont inued)
English
{ Rec Mode }
Select the recording mode. See the
chapter “Recording – Record settings Default Recording Mode” for more
information.
{ Mode }
Select a desired repeat recording mode
(Once, Daily, Weekly, Mon-Fri, Mon-Sat
or Weekend).
{ Date }
Enter the date for recording (Day/Month/
Year).
{ Start }
Enter the start time of recording (hours :
minutes).
{ End }
Enter the end time of recording (hours :
minutes).
{ VPS/PDC }
Turn on or off the VPS/PDC setting.
Note: VPS/PDC setting is not available
for external receiver.
E
Use ST keys to select
menu and press OK.
The system will store the timer entry
and return to the timer schedule list.
OK
in the
H
Press STANDBY-ON to switch the
recorder to standby mode.
The ‘TIMER’ icon will light up on the
display panel if a timer recording is set.
If the recorder is not in standby mode,
a noti cation message will appear three
minutes before the recording begins.
The recorder will automatically power
off when the timer recording ends.
Helpful Hints:
– Set the timer recording one minute ahead
of the programme’s start time. This helps
ensure the entire programme is recorded as
the disc requires about 30 seconds to
prepare for recording.
– The interval time between two recording
schedules is at least 5 ( ve) minutes.
Otherwise, the very beginning of the later
programme may not be recorded.
– Only PAL/SECAM video signal is possible to
record to a VHS tape on this recorder.
To cancel the above timer setting, move
CANCEL
to
F
Press TIMER to exit the menu.
G
Insert a recordable DVD or VHS tape
in the menu and press OK.
into the recorder.
For VHS tape, locate the start point
position for recording.
TIPS: Ensure that there is suf cient space available on the recordable DVD or VHS tape before
recording. You have to nalise the DVD±R before it can be played back on other players.
32
DVDR3510V_eng_26244.indd 32DVDR3510V_eng_26244.indd 32 2007-08-01 1:46:19 PM2007-08-01 1:46:19 PM
Page 33

Timer Recording (cont inued)
Setting a timer recording from
an external Cable Box/ Satellite
Receiver
If you have a Satellite Receiver/Cable Box
connected to this recorder through the
EXT2 AUX-I/O SCART connection (see
“Step 2: Optional Connections”), follow
the steps described below to programme
the recordings.
A
Select the channel you want to record on
the Satellite Receiver/Cable Box.
B
Programme the recording with the
required information. Follow the steps
A~H
of “Timer Recording (manually)”
on the previous page.
Note: At { Source } entry, select
{ EXT2 } as the input source for
recording.
C
Leave the Satellite Receiver/Cable Box
switched on for the recording.
Changing/ Deleting a timer
recording
A
Turn on the TV to the correct viewing
channel for the recorder (e.g. ‘EXT’, ‘0’,
‘AV’).
B
Press TIMER on the remote control.
The timer schedule list appears.
Timer Schedule 09 : 05 : 56
Source Dest Rec Mode Date Start End VPS
1
P003
SPDVDR
DVDR
DVDR
VCR
05/01/06
EP
25/01/06
SP
30/01/06
SP
31/01/06
2
P010
3
P008
4
P005
5
6
C
Use ST keys to select a timer
programme which you want to change/
delete.
D
To delete the timer entry, press
CLEAR on the remote control.
E
To change the timer schedule, press
OK to enter the timer editor menu of
the selected timer programme.
Timer Editor 09 : 05 : 56
Source
Dest
Rec Mode
Mode
Date
Start
End
VPS/PDC
OK CANCEL
Ch003
DVDR
SP
Once
01 / 01 / 06
10 : 33
11 : 03
Off
14.00 15.30
02.00
06.30
17.00
18.15
12.30
14.00
On
Off
On
Off
OK
English
F
Select the entry eld and make the
necessary changes.
G
Once complete, move to
OK
in the
menu and press OK to save the changes.
H
Press TIMER to exit the menu.
TIPS: Ensure that there is suf cient space available on the recordable DVD or VHS tape before
recording. You have to nalise the DVD±R before it can be played back on other players.
33
DVDR3510V_eng_26244.indd 33DVDR3510V_eng_26244.indd 33 2007-08-01 1:46:19 PM2007-08-01 1:46:19 PM
Page 34

Direct Dubbing (Tape î Disc)
English
Dubbing from VCR to DVD
This allows you to archive your VHS
tapes to a recordable DVD.
DIRECT
DUBBING
A
Insert a recordable DVD.
B
Insert a prerecorded VHS tape.
C
Press VCR on the remote control.
D
Press u to start tape playback. Find
the position where you want to start
recording and press u again to pause
the playback.
E
Press DIRECT DUBBING on the
remote control.
The dubbing menu appears.
Dubbing to DVD
Remaining Time
Rec. Mode
OK Cancel
F
To change the recording mode, press S
to highlight { Rec Mode } in the menu
and press X. Select the desired recording
mode and press OK.
G
Move to
OK to start dubbing.
H
To stop the dubbing, press STOP x.
Otherwise, dubbing will stop
automatically when the VHS tape ends.
OK
in the menu and press
01:54
SP
Dubbing from DVD to VCR
If the disc you are attempting to dub is
copy-protected, you will not be able to
copy the disc. It is not permitted to copy
Macrovision encoded DVDs.
A
Insert a blank VHS tape in the tape deck.
B
Place the disc you want to copy onto the
disc tray.
C
Press DVD on the remote control.
D
Press u to start disc playback. Find the
position where you want to start
recording and press u again to pause
the playback.
E
Press DIRECT DUBBING on the
remote control.
The dubbing menu appears.
Dubbing to VCR
Rec. Mode
F
To change the recording mode, press S
to highlight { Rec Mode } in the menu
OK
and press X. Select the desired recording
mode and press OK.
G
Move to
OK
OK to start dubbing.
H
To stop the dubbing, press STOP x.
You must stop the copy process
manually when the DVD movie ends.
Otherwise, the disc may replay and
record over and over again.
SP
OK CANCEL
OK
in the menu and press
TIPS: Ensure that there is suf cient space available on the recordable DVD or VHS tape before
recording.
34
DVDR3510V_eng_26244.indd 34DVDR3510V_eng_26244.indd 34 2007-08-01 1:46:19 PM2007-08-01 1:46:19 PM
Page 35

Disc and USB Playback
Playable discs
Using this recorder, playback and record
on the following discs:
Recording and Playback
DVD±RW
(DVD Rewritable); can
be recorded on over
and over.
DVD±R
(DVD Recordable);
can be recorded
only once.
DVD+R DL
(DVD+R Double Layer);
same as DVD±R.
Playback only:
DVD Video (Digital Versatile
Disc)
CD-RW (CD-Rewritable)
Audio/ MP3/ JPEG contents
CD-R (CD-Recordable)
Audio/ MP3/ JPEG contents
Audio CD (Compact Disc
Digital Audio)
ReWritable
Recordable
IMPORTANT!
– If the inhibit icon (Error) appears
on the TV screen when a button is
pressed, it means the function is not
available on the current disc or at
the current time.
– DVD discs and players are
designed with regional restrictions.
Before playing a disc, make sure the
disc is for the same region as your
player.
– Do not push on the disc tray or
put any objects other than discs on
the disc tray. It may cause the disc
player to malfunction.
English
MP3/WMA-Disc
Video CD
(Formats 1.0, 1.1, 2.0)
Super Video CD
DivX Disc
(DivX 3.11, 4.x, 5.x, 6.x)
TIPS: Some discs cannot be played on this recorder due to the con guration and characteristics of
the disc, or due to the condition of recording and authoring software.
35
DVDR3510V_eng_26244.indd 35DVDR3510V_eng_26244.indd 35 2007-08-01 1:46:19 PM2007-08-01 1:46:19 PM
Page 36

Disc and USB Playback (cont inued )
English
Starting disc playback
A
Press STANDBY-ON to turn on the
recorder.
B
Press DVD on the remote control.
The DVD indicator lights up.
C
Press OPEN/CLOSE ç at the front
panel.
The disc tray opens.
You can also press and hold the STOP
x button on the remote control to open
and close the disc tray.
D
Place the disc onto the tray with the label
facing up, then press OPEN/CLOSEç.
For double-sided discs, load the side
as indicated on the label.
E
Turn on the TV to the correct viewing
channel for the recorder (e.g. ‘EXT’, ‘0’,
‘AV’).
F
Playback may start automatically.
Otherwise, press u to start playback.
If the pin code entry dialogue appears on
the TV, this means that the parental
control was activated for the inserted
disc. You have to enter your four-digit
pin code (see “Setup Menu Options –
Playback Settings”).
For more playback features, see
“Additional Playback Features”.
Playing a DVD video disc
The DVD disc is usually formatted with a
disc menu. You may have to make your
selection (e.g., subtitle or audio language)
within the disc menu.
A
Insert a DVD disc.
If the disc menu appears, use the
numeric keypad 0-9 to input your
selection or use ST keys to select a
play option and press OK to start
playback.
To access the disc menu
Press DISC on the remote control.
To select the previous or next
chapter
During playback, pressí or ë.
B
To stop playback, press STOP x.
Playing an audio CD
A
Insert an audio CD.
Playback starts automatically.
The track number and elapsed playing
time appear on the display panel.
B
To stop playback, press STOP x.
Helpful Hints:
– If you want to return to tuner mode during
DVD playback, press SOURCE button.
– If you wish to watch the VCR playback,
press VCR to change to VCR mode before
starting playback the tape.
TIPS: Some discs cannot be played on this recorder due to the con guration and characteristics of
the disc, or due to the condition of recording and authoring software.
36
DVDR3510V_eng_26244.indd 36DVDR3510V_eng_26244.indd 36 2007-08-01 1:46:20 PM2007-08-01 1:46:20 PM
Page 37

Disc and USB Playback (cont inued )
Playing a (Super) Video CD
(Super) Video CDs may feature ‘PBC’
(Play Back Control). This allows you to
play the video CDs interactively by
following the menu on the display.
A
Insert a (Super) Video CD.
If the ‘PBC’ is on, the disc index
menu will appear on the TV
B
Use numeric keypad 0-9 to input your
selection or to select a play option.
To return to the previous menu, press
BACK2 on the remote control.
To turn on/off the Playback Control
mode, press OPTIONS on the remote
control during playback to access the
VCD menu. Then use ST keys to select
{ PBC On } or { PBC Off }.
C
To stop playback, press STOP x.
Playing a DVD recordable disc
A
Insert a DVD recordable disc.
The Index Picture screen appears.
B
Use ST keys to select a title to play,
then press u.
C
To stop playback, press STOP x.
Helpful Hint:
– If the message ‘BLANK’ appears on the
display panel, this means that there are no
recordings on this disc.
Playing a DivX disc
This recorder supports the playback of
DivX movies which you can copy from
your computer onto a CD-R/RW,
DVD±R/±RW.
A
Insert a DivX disc.
The disc content menu appears.
If the DivX® movie contains external
subtitles, you have to rst select the
subtitle le from the le list. Use ST
keys to select the les for playback and
press OK to con rm your selection.
B
Press u to start playback.
To select another character set for
the subtitle le,
During playback, press OPTIONS once
to show the disc content menu. Press
OPTIONS again to access various
settings for the DivX slide show playback.
File Play
Type
Mode
Trick
Character
Audio
Time
LANG
Use ST keys to select { Character }
Video
Normal
Play
Standard Set
Stereo
0:01:31/ 0:41:35
Language 1
Western European
Standard
Central European
Cyrillic
Greek
and press X to access the options. Select
the preferred subtitle set and press OK
to con rm.
Helpful Hints:
– Subtitle les with the following le name
extensions (.srt, .smi, .sub, .sami) are
supported.
– It is normal to experience an occasional
pixelation during DivX playback due to poor
clarity of digital contents during internet
downloading.
English
TIPS: Some discs cannot be played on this recorder due to the con guration and characteristics of
the disc, or due to the condition of recording and authoring software.
37
DVDR3510V_eng_26244.indd 37DVDR3510V_eng_26244.indd 37 2007-08-01 1:46:20 PM2007-08-01 1:46:20 PM
Page 38

Disc and USB Playback (cont inued )
English
Playing an MP3/WMA disc
MP3 (MPEG1 Audio Layer-3) les are
highly compressed music les. The MP3
format lets you store about ten times
more data (music, pictures) on a single
CD-ROM than a regular CD.
A
Insert an MP3/WMA CD.
The disc content menu appears.
File Play - Stop 0:00:00 - 0:00:00
Directory Program
Bee Gees
1
Phil Collins
2
Bryan Adams
3
Collin Raye
4
Nat King Cole
5
UB40
6
Eric Clapton
7
Faith Hill
8
Note: It may require a longer time for
the recorder to display the disc content
menu on the TV due to the large number
of songs compiled into one disc.
B
Use ST keys to navigate within the
menu and press OK to access the folder/
album.
C
Use ST keys to select the track/ le to
play.
To move up to the previous level, press
BACK2.
D
To create a playlist, highlight the track/ le
and press SELECT.
The selected tracks/ les will appear
on the right screen.
To remove the track/ le from the
playlist, press CLEAR.
E
To start playback, move the cursor to the
right selection screen and press u.
F
During playback, press í/ë to select
the next/previous track.
G
To stop playback, press STOP x.
Helpful Hint:
– This recorder does not support MP3PRO
audio format.
Playing a picture disc (or musical
slide show)
Display JPEG pictures in the selected roll
automatically one after the other.
A
Insert a JPEG picture disc (CD,
CD-R/RW, recordable DVD).
The disc content menu appears.
B
Use ST keys to navigate within the
menu and press OK to access the
folder/ album.
C
To create a playlist, highlight the track/ le
and press SELECT.
The selected tracks/ les will appear
on the right screen.
To remove the track/ le from the
playlist, press CLEAR.
D
To playback content from the original
disc or from a playlist, use W X keys to
move to the correct screen before
selecting the track/ le for playback.
File Play - Stop 0:00:00 - 0:00:00
Directory Program
Zoo Trip
1
Dad-Birthday
2
File Play - Stop 0:00:00 - 0:00:00
Garden Show
3
Hong Kong
4
5
6
Science Trip
Eco Garden
Directory
..\
P1010001.JPG
1
P1010008.JPG
2
BUTTER-1.JPG
3
NATURE-1.JPG
4
BUTTER-1.JPG
5
P1022500.JPG
6
P1023000.JPG
7
MERLIO-1.JPG
8
Program
TIPS: Some discs cannot be played on this recorder due to the con guration and characteristics of
the disc, or due to the condition of recording and authoring software.
38
DVDR3510V_eng_26244.indd 38DVDR3510V_eng_26244.indd 38 2007-08-01 1:46:20 PM2007-08-01 1:46:20 PM
Page 39

Disc and USB Playback (cont inued )
If the disc contains MP3 music and
JPEG picture les, you can start a
musical slide show playback,
Select an MP3 le and press OK to start
the playback, then select a picture le in
the menu and press OK to start the
musical slide show playback.
E
During playback, press OPTIONS on
the remote control to access various
settings for the slide show playback.
File Play
Type
Mode
Trick
Wipe
Zoom
Rotate
F
To stop playback, press STOP x.
PIC
Normal
Play
Top to bottom.
Fitscreen
Clockwise 0
Top to bottom.
Down to top.
Right to left.
Left to right.
Playable JPEG picture disc
File format:
– The le extension has to be ‘.JPG,’
‘.JPE’ or ‘.JPEG.’
– It can only display DCF-standard still
pictures or JPEG pictures e.g. TIFF.
– It cannot playback moving pictures,
Motion JPEG, progressive JPEG, pictures
in non-JPEG formats and including
pictures associated with sound.
Playback from a USB ash
drive/ USB memory card
reader
The USB port supports the playback of
JPEG/MP3/WMA and DivX les.
A
Insert a USB ash drive or USB memory
card reader into the USB port.
B
Press USB on the remote control to
access the data in the drive.
The content menu appears on the TV.
C
Use ST keys to navigate within the
menu and select the le you want to play,
then press OK.
For more playback information, see the
previous sections on MP3/WMA and
DivX playback in this user manual.
D
To stop playback, press STOP x or
remove the USB ash drive/ USB
memory card reader from the USB port.
English
TIPS: Some discs cannot be played on this recorder due to the con guration and characteristics of
the disc, or due to the condition of recording and authoring software.
39
DVDR3510V_eng_26244.indd 39DVDR3510V_eng_26244.indd 39 2007-08-01 1:46:20 PM2007-08-01 1:46:20 PM
Page 40

Additional Disc Playback Features
English
Changing to another title/
chapter/track
When a disc contains more than one
track, title or chapter, you can change to
a different track, title or chapter as
follows.
During playback,
To go to the next chapter/track, pressë
on the remote control.
To return to the start of the previous
chapter/track, pressí on the remote
control.
OR
To select a speci c title or chapter,
Press OPTIONS to enter the le play
(DVD, VCD) menu and use ST keys to
select { Title } or { Chapter } and use
numeric keypad 0-9 to input the title/
chapter/track number.
Pausing playback
Searching forwards/
backwards
You can fast forward or fast reverse a
disc at two, four, sixteen or thirty two
times the normal playback speed.
A
During playback, press m (REW) or
M (FFW) (or press and hold the button
on the main unit) to switch to the search
function.
The search status bar appears.
It displays the search speed.
The sound will be muted.
B
Press m (REW) or M (FFW) to cycle
through the search speeds.
C
To resume normal playback, press u.
A
During playback, press u to pause
playback.
B
To resume normal playback, press
u again.
TIPS: The operating features described here might not be possible for certain discs.
Always refer to the instructions supplied with the discs.
40
DVDR3510V_eng_26244.indd 40DVDR3510V_eng_26244.indd 40 2007-08-01 1:46:21 PM2007-08-01 1:46:21 PM
Page 41

Additional Disc Playback Features (continue d)
Using the OPTIONS menu
OPTIONS
SCART
SELECT
CLEAR
DISC
INFO
SUBTITLE
Menu options displayed may differ
depending on the disc type.
A
During disc playback, press OPTIONS
on the remote control.
The options menu appears.
DVD
Mode
Trick mode
Title
Chapter
Audio
Subtitle
Angle
Title
B
Use ST keys to select the setting you
want to adjust.
Instructions and explanations of the
options are provided in the following
pages.
If the selection in the menu is greyed
out, that means the feature is not
available or cannot be changed in the
current state.
To hide or show the DVD menu, press
INFO on the remote control.
C
To exit, press OPTIONS.
AUDIO
Normal
Play
01/02
03/12
01/02 - OTH
Off
01/03
00:22:03 / 01:30:26
Selecting various repeat/ shuf e
functions
Select various repeat play or random play
mode during playback.
A
During disc playback, press OPTIONS
on the remote control.
The options menu appears.
B
Use ST keys to select { Mode } and
press OK.
C
Use ST keys to select one of the repeat
options.
{ Repeat A-B } (DVD/VCD)
Repeat the playback of a speci c segment
within a title/chapter/track. Press OK to
mark the start and end of the segment
you want to repeat.
{ Repeat Chapter }
Repeat playback of the current chapter
(DVD, DVD±R/±RW only).
{ Repeat Track/Title }
Repeat playback of the current track/title.
{ Repeat Directory }
Repeat playback of the current folder/
directory (MP3, JPEG, picture disc only).
{ Repeat Disc }
Repeat playback of the entire disc.
{ Shuf e }
Randomly playback all the tracks within
the disc (MP3/DivX/WMA and audio CD
only).
{ Normal }
Cancel the repeat or programmed modes
and return to normal playback.
D
To cancel repeat playback, press STOP
x or select { Normal } and press OK.
English
TIPS: The operating features described here might not be possible for certain discs.
Always refer to the instructions supplied with the discs.
41
DVDR3510V_eng_26244.indd 41DVDR3510V_eng_26244.indd 41 2007-08-01 1:46:21 PM2007-08-01 1:46:21 PM
Page 42

Additional Disc Playback Features (continue d)
English
Creating a playlist
Playback the contents of the disc in the
order you want by creating a playlist.
A
During disc playback, press OPTIONS
on the remote control.
The options menu appears.
B
Select { Mode } > { Program }.
The programme menu appears.
Edit Program Play List
Title Playlist
Title 01
Title 02
Title 03
Title 04
Title 05
Title 06
Title 07
Title 08
C
If the disc is recorded with Titles/Folders/
Albums, press OK to access the tracks/
les/chapters.
D
Use ST keys to select the track/ le/
chapter and press SELECT on the
remote control.
The selected track/ le/ title will
appear in the { Playlist } screen at the
right.
Changing the audio language
This operation works only on DVDs with
multiple soundtrack language or VCDs
with multiple audio channels.
During disc playback, press AUDIO
repeatedly to toggle through the audio
channels on the disc.
OR,
A
During disc playback, press OPTIONS
on the remote control.
The options menu appears.
B
Use ST keys to select { Audio } and
press X to access its options.
C
Use ST keys to select the audio
language and press OK to con rm.
The languages may be numbered or
abbreviated, such as “En” for English.
If the language selected is not available
on the disc, the disc’s default setting for
language will be used instead.
Helpful Hint:
– Some DVDs allow soundtrack language
changes only via the DVD disc menu. To
access the disc menu, press DISC.
To remove from the playlist
E
Move to the right screen, select the item
to remove and press CLEAR on the
remote control.
F
To start playback from the playlist, move
to the right screen and press OK.
Playback will start from the selected
track/ le/ chapter according to the order
of the playlist.
G
To exit playlist play, press STOP x.
TIPS: The operating features described here might not be possible for certain discs.
Always refer to the instructions supplied with the discs.
42
DVDR3510V_eng_26244.indd 42DVDR3510V_eng_26244.indd 42 2007-08-01 1:46:21 PM2007-08-01 1:46:21 PM
Page 43

Additional Disc Playback Features (continue d)
Changing subtitle languages
This operation works only on DVDs with
multiple subtitle languages, change the
language you want during DVD playback.
During disc playback, press SUBTITLE
repeatedly to toggle through the language
options on the disc.
OR
A
During disc playback, press OPTIONS
on the remote control.
The options menu appears.
B
Use ST keys to select { Subtitle } and
press X to access its options.
C
Use ST keys to select the language and
press OK to con rm.
The languages may be numbered or
abbreviated, such as “En” for English.
If the language selected is not available
on the disc, the disc’s default setting
language will be used instead.
Helpful Hint:
– Some DVDs discs allow subtitle language
changes only via the DVD disc menu. To
access the disc menu, press DISC.
Switching camera angles
This option is only available with DVDs
that contain sequences recorded from
different camera angles. This allows you
to view the picture from different angles.
A
During disc playback, press OPTIONS
on the remote control.
The options menu appears.
B
Use ST keys to select { Angle } and
press X to enter its options.
The camera angles available for
selection appears.
C
Use ST keys to select the camera angle
you want to switch to, and press OK to
con rm.
Searching by time
This option allows you to skip to a
speci c point on the current disc.
A
During disc playback, press OPTIONS
on the remote control.
The options menu appears.
B
Use ST keys to select { Search } and
press X to time eld (hours : minutes :
seconds).
C
Use the numeric keypad 0-9 to enter
the time where playback should start and
press OK.
Playback skips to the time entered.
English
TIPS: The operating features described here might not be possible for certain discs.
Always refer to the instructions supplied with the discs.
43
DVDR3510V_eng_26244.indd 43DVDR3510V_eng_26244.indd 43 2007-08-01 1:46:21 PM2007-08-01 1:46:21 PM
Page 44

VCR Playback
English
Starting VCR playback
This VCR uses the VHS system.
A
Press STANDBY-ON to turn on the
recorder.
B
Press VCR on the remote control.
The VCR indicator lights up.
C
Insert a pre-recorded VHS tape into the
tape deck with the window side facing up
and the label side towards the front.
D
Playback will start automatically.
Otherwise, press u.
To pause playback
Press u.
To resume normal playback, press u.
For fast forward/backward search
Press à (REW) or á (FFW).
To resume normal playback, press u.
To search a speci c recording (using
index function)
Press PREV í/ NEXTë to search
the previous or next index marking
within the tape.
Using VCR tools options
During playback, press OPTIONS on
the remote control.
The VCR Control menu appears.
Navigate in the menu and select the
available playback options.
VCR Control
Rec Mode
TRICK
Marks
Time
LP
VCR PLAY
Index
-03:12:05
B
x
X
Fast Forward
Fast Backward
E
To stop playback, press STOP x.
F
To eject the VHS tape, press EJECT ç.
Helpful Hints:
– To return to tuner mode during VCR
playback, press SOURCE button.
– To watch the disc playback, press DVD to
change to DVD mode before starting
playback the disc. If you press VCR to watch
the VCR playback again, playback resumes
from the point where playback was
interrupted.
– When playing back tapes recorded using
the S-VHS system, the playback image may
be distorted.
Reset tape counter
Press CLEAR on the remote control to
set the counter to “0:00:00”.
When you insert a VHS tape in the
recorder, the counter will automatically
reset to “0:00:00”.
Manual tracking
This recorder has automatic tracking
capability that improves picture and
sound playback from poor quality VHS
tapes. However, manual tracking may be
required to further improve playback
quality on certain tapes.
A
Press P +- on the remote control
until you get a better picture/sound
quality.
B
Press STOP x to con rm.
Tracking is automatically reset to
normal when the tape is ejected.
TIPS: The operating features described here might not be possible for certain VHS tapes.
44
DVDR3510V_eng_26244.indd 44DVDR3510V_eng_26244.indd 44 2007-08-01 1:46:21 PM2007-08-01 1:46:21 PM
Page 45

Edit Recordings - Recordable DVD
About disc editing
This recorder offers various disc editing
options for various disc types. You can
change the disc content and settings of a
recorded DVD from the disc editing
menu. The edited contents may not be
available when you play the disc on
another DVD player.
The displayed options in the disc editing
menu varies depending on the type of
disc.
{ Play }
Start playback from the beginning of the
disc.
{ Rename Disc }
Change the name of the disc.
{ Erase Disc } - DVD±RW only
Erase all the recordings on the disc.
{ Record New Title }
Start recording from the last empty title
on the disc.
{ Overwrite Disc } - DVD±RW only
Start a new recording from the beginning
of the disc, all the recorded content will
be overwritten.
{ Make Compatible } - DVD±RW only
To ensure the edited changes remain
when the disc is played back on another
DVD player. (e.g., hidden chapters to
remain hidden).
{ Lock/Unlock Disc } - DVD±RW only
Lock or unlock a disc to prevent
accidental erasure or changes being
made.
{ Finalize Disc } - DVD±R only
Finalise the disc to enable playback on
other DVD players. Further recording
and editing to the disc are not allowed. It
is not possible to un nalise the disc.
Accessing disc editing menu
SCART
OK
A
Insert a recorded disc into the recorder.
The Index Picture screen appears on
the TV.
B
Select the rst title on the disc, press S
on the remote control.
The disc editing menu appears.
C
Press X on the remote control to display
the disc editing options.
The available editing options are
different for DVD±R and DVD±RW
discs.
Play
PAL
DVD
EDIT
D
Use ST keys to access different options
and OK to select.
Instructions and explanations of the
options are provided in the following
pages.
E
To exit from the disc editing menu, press
W once to exit from the disc editing
menu. Press T to return to the disc
Index Picture menu.
Rename Disc
Erase Disc
Record New Title
Overwrite disc
Make Compatible
Lock Disc
Finalize Disc
English
TIPS: No further recording and editing can be carried out on a full or nalised DVD±R.
Press W to go back to the previous menu. Press DISC to exit.
45
DVDR3510V_eng_26244.indd 45DVDR3510V_eng_26244.indd 45 2007-08-01 1:46:21 PM2007-08-01 1:46:21 PM
Page 46

Edit Recordings - Recordable DVD (conti nued)
English
Rename disc
The original disc name is generated
automatically by the recorder. Change
the disc name by following the steps
below.
A In disc editing menu, use ST keys to
select { Rename Disc } and press OK.
The keyboard screen appears.
B
Use W XST keys to highlight a
character on the keyboard and press OK
to select.
The maximum input is up to 20
characters.
Use the following keys on the keyboard
screen to edit your input:
BkSp
: to remove the character to
the left of the cursor.
Delete
: to remove the character to
the right the cursor.
Space
: to create a space between
characters.
Caps
: to toggle between upper and
lower case characters.
Clear
: to clear the entry eld
completely.
C
To con rm your entry, select
the keyboard and press OK.
The info panel is now updated.
To cancel the changes, select
the keyboard and press OK.
OK
EXIT
on
Erase disc (DVD±RW only)
This erases the content of the
DVD±RW. Once the existing content is
erased, it can be used for recording.
A In disc editing menu, use ST keys to
select { Erase Disc } and press OK.
A warning message will appear.
YES
in the menu to proceed or
NO
to abort, then press OK to
Record new title
Overwrite disc (DVD±RW only)
on
B
Select
con rm.
Helpful Hint:
– If the DVD±RW is not compatible with this
recorder, you cannot access to the disc editing
menu. To erase the disc content, switch the
recorder to tuner mode and press REC button.
Follow the instruction on the screen to erase
the disc before it can be used for recording.
This function allows you to start a new
recording at the remaining empty space
in the DVD±RW.
A
In disc editing menu, use ST keys to
select { Record New Title } and press
OK.
B
Select the source you want to record
from and press REC z to start recording.
This function allows you to start a new
recording from the beginning of a
DVD±RW regardless of the contents of
the disc.
A
In disc editing menu, use ST keys to
select { Overwrite disc } and press OK.
B
Select the source you want to record
from and press REC z to start recording.
TIPS: No further recording and editing can be carried out on a full or nalised DVD±R.
Press W to go back to the previous menu. Press DISC to exit.
46
DVDR3510V_eng_26244.indd 46DVDR3510V_eng_26244.indd 46 2007-08-01 1:46:22 PM2007-08-01 1:46:22 PM
Page 47

Edit Recordings - Recordable DVD (conti nued)
Make compatible (DVD±RW only)
The edited DVD±RW may still display
the original titles or hidden scenes when
played back on other DVD players. This
function ensures that the edited changes
of the DVD±RW remain when played
back on other players.
In disc editing menu, use ST keys to
select { Make Compatible } and press
OK to con rm.
Helpful Hint:
– If the option { Make Compatible } is not
available for selection, it means that the disc
is already compatible.
Lock/Unlock disc (DVD±RW only)
Protect the recorded DVD±RW in order
to prevent accidental loss of recordings.
A In disc editing menu, use ST keys to
select { Lock Disc } and press OK.
The disc is locked for this DVD
recorder only.
When the disc is locked, the option in
the disc editing menu will change to
{ Unlock Disc }.
B
If you want to overwrite or edit on the
protected disc, select { Unlock Disc }.
Playback your recordings
(DVD±R) on other DVD
players
It is necessary to nalise a DVD±R disc
before playback on another DVD player.
Otherwise, the DVD±R will only
playback on this recorder.
After a DVD±R disc has been
nalised, no further recordings or
editing can be made to it. Make sure
that you have completed all the
recordings and editing before
nalising the disc.
A In disc editing menu, use ST keys to
select { Finalize Disc } and press OK.
A warning message will appear.
B
Select
to start the process.
Finalisation will take a few minutes,
depending on the length of recordings.
Do not try to open the disc tray or
switch off the power as this may render
the disc unusable.
Otherwise, move to
and press OK to abort the operation.
YES
in the menu and press OK
NO
in the menu
English
TIPS: No further recording and editing can be carried out on a full or nalised DVD±R.
Press W to go back to the previous menu. Press DISC to exit.
47
DVDR3510V_eng_26244.indd 47DVDR3510V_eng_26244.indd 47 2007-08-01 1:46:22 PM2007-08-01 1:46:22 PM
Page 48

Edit Recordings - Recordable DVD (conti nued)
English
About title editing
Change the individual title information or
delete a title (recording) in a recorded
DVD. If a DVD±R has been nalised, it
cannot be edited.
The displayed options in the title editing
menu varies depending on the type of
disc.
{ Play Title }
Start playing a recording.
{ Edit Title }
Access the video editing menu.
{ Rename Title }
Change the name of the recording.
{ Erase Title } - DVD±RW only
Delete the title (recording).
{ Overwrite Title } - DVD±RW only
Start a new recording, the existing title
(recording) will be overwritten.
{ Overwrite Disc } - DVD±RW only
Overwrite from the existing selected title
onwards to the end of the disc.
{ Append Title }
Insert a new recording to the last existing
recording.
Accessing title editing menu
A
Insert a recorded DVD into the
recorder.
The Index Picture screen appears on
the TV.
During playback, press DISC to access
the Index Picture screen.
B
Use ST keys to highlight a title
(recording), and press X.
The title editing menu appears.
1. My movie
Play Title
01 / 01 / 2006
01 : 31 : 53
Edit Title
HQ 00 : 05 : 59
Rename Title
Erase Title
2. Nature
03 / 02 / 2006
Overwrite Title
00 : 30 : 00
SP 01: 05 : 59
Overwrite Disc
Append Title
Empty Title
SP 01:30:50
C
Use ST keys to access different options
and OK to select.
Instructions and explanation of the
options are provided in the following
pages.
D
To exit, press W.
Video editing
This feature allows access to the video
editing menu. See the chapter “Editing/
Finalising Recording – About video
editing” for more information.
In title editing menu, use ST keys to
select { Edit Title } and press OK.
The video editing menu appears.
The recorder will play the selected
title.
TIPS: No further recording and editing can be carried out on a full or nalised DVD±R.
Press W to go back to the previous menu. Press DISC to exit.
48
DVDR3510V_eng_26244.indd 48DVDR3510V_eng_26244.indd 48 2007-08-01 1:46:22 PM2007-08-01 1:46:22 PM
Page 49

Edit Recordings - Recordable DVD (conti nued)
Rename title
The original title name is generated
automatically by the recorder. You can
give a new name to the title by following
the steps below.
A
In title editing menu, use ST keys to
select { Rename Title } and press OK.
The keyboard screen appears.
B
Use W X ST keys to highlight a
character and press OK to select.
The maximum input is up to 9
characters.
You can use the following keys on the
keyboard screen to edit your input:
BkSp
: to remove the character to the
Delete
Space
Caps
Clear
C
To con rm your entry, select
left of the cursor.
: to remove the character to the
right the cursor.
: to create a space between
characters.
: to toggle between upper and
lower case characters.
: to clear the entry eld completely.
OK
the keyboard and press OK.
The info panel is now updated.
To cancel the changes, select
EXIT
the keyboard and press OK.
Erase title
Delete a speci c title (recording) from the
disc. However, for DVD±Rs, the deleted
space cannot be used for further
recording.
A
In title editing menu, use ST keys to
select { Erase Title } and press OK.
A warning message will appear.
B
Select
YES
NO
in the menu to proceed or
to abort, then press OK.
on
on
Overwrite title (DVD±RW only)
This function allows you to record a new
title from the beginning of the current
title on the DVD±RW. The other titles
will not be affected.
Warning! Once the recording has
started, any prior recording from the
current playback point and onwards will
be overwritten.
A
In title editing menu, use ST keys to
select { Overwrite Title } and press OK.
B Select the source you want to record
from and press REC z to start
recording.
Overwrite from the selected title
Select to overwrite only the recordings
from the selected title to the end of the
disc.
In video editing menu, use ST keys to
select { Overwrite Disc } and press OK
to con rm.
Append recording
This function allows you to append
recording to the last existing title.
A
In title editing menu, use ST keys to
select { Append Title } and press OK.
B
Press SOURCE to select the input
channel to append.
C
Press REC z to start append recording.
D
To stop append recording, press
STOP x.
English
TIPS: No further recording and editing can be carried out on a full or nalised DVD±R.
Press W to go back to the previous menu. Press DISC to exit.
49
DVDR3510V_eng_26244.indd 49DVDR3510V_eng_26244.indd 49 2007-08-01 1:46:22 PM2007-08-01 1:46:22 PM
Page 50

Edit Recordings - Recordable DVD (conti nued)
English
About video editing
After a recording has been made, this
recorder allows you to edit the video
content. You can add/delete chapter
markers, hide unwanted scenes, change
the picture in the index picture screen
and split a title (recording) into two.
When you playback a recording in video
edit mode, the entire recording will be
played back including hidden scenes.
The edit functions available in the disc
editing menu are:
{ Title }
Select a title (recording) to play.
{ Chapter }
Select a chapter within the selected title.
{ Chapter Marker }
Insert a chapter marker in the recording
or erase a chapter marker to combine
two chapters.
{ Hide Chapter }
Hide the unwanted scene in the
recording.
{ Index Picture }
Select a scene in the recording as the
index picture screen.
{ Split Title } – DVD±RW only
Divide the recording into two separate
titles.
Accessing video editing menu
SCART
OK
EDIT
A
Insert a recorded DVD into the
recorder.
The Index Picture screen appears on
the TV.
B
Use ST keys to select a title (recording).
C
Press u to start playback.
D
Press EDIT on the remote control.
The video editing menu appears.
Edit Mode
Mode
Title 02/06
Chapter 01/10
Chapter Marker
Hide Chapter
Index Picture
Split Title
E
Use ST keys to access different options
and press OK to select.
Instructions and explanations of the
options are provided on the following
pages.
F
To exit, press EDIT.
TIPS: No further recording and editing can be carried out on a full or nalised DVD±R.
Press W to go back to the previous menu.
50
DVDR3510V_eng_26244.indd 50DVDR3510V_eng_26244.indd 50 2007-08-01 1:46:22 PM2007-08-01 1:46:22 PM
Page 51

Edit Recordings - Recordable DVD (conti nued)
Selecting a title
This option shows the current title and
the total number of titles in the disc. It
also allows you to select a speci c title.
A
During playback, press EDIT to display
the video editing menu.
B
Use ST keys to select { Title } and
press OK.
C
Use the numeric keypad 0-9 to key in
a title and press OK.
The recorder will play the selected
title.
Selecting a chapter
This option shows the current chapter
and the total number of chapters in the
title. It also allows you to select a speci c
chapter within the title.
A
During playback, press EDIT to display
the video editing menu.
B
Use ST keys to select { Chapter } and
press OK.
C
Use the numeric keypad 0-9 to key in
the chapter and press OK.
The recorder will play the selected
chapter.
Creating chapter marker
You can create a chapter by inserting
chapter marker at any point within a title
during playback. This will allow you to
access a speci c point in the recording
easily or set a chapter you wish to hide.
Title
Chapter Chapter Chapter Chapter
chapter markers
A
During playback, press EDIT to display
the video editing menu.
B
Use ST keys to select { Chapter
Marker } and press OK.
C
Use ST keys to select one of the
options and press OK to con rm.
{ Insert Marker }
Select this to insert a new chapter
marker at the current point of playback.
{ Delete Marker }
Select this to delete the current chapter
marker (it refers to the closest marker
before the current point of playback).
The current chapter will then combine
with the chapter before it.
{ Delete All Markers }
Select this to delete all the chapter
markers in the current title.
English
TIPS: No further recording and editing can be carried out on a full or nalised DVD±R.
Press W to go back to the previous menu.
51
DVDR3510V_eng_26244.indd 51DVDR3510V_eng_26244.indd 51 2007-08-01 1:46:23 PM2007-08-01 1:46:23 PM
Page 52

Edit Recordings - Recordable DVD (conti nued)
English
Hiding/unhiding an unwanted
chapter
You can choose to hide certain scenes
from playback (e.g. skipping a commercial
scene) or make it visible again.
A
Create a chapter marker at the start and
end of the scene you want to hide. (See
previous page on “Creating Chapter
Marker”).
B
Select the chapter you want to hide and
start playback. (See previous page on
“Selecting a chapter”).
C
During playback, press EDIT to display
the video editing menu.
D
Use ST keys to select { Hide Chapter }
and press OK.
The current chapter will be hidden.
To unhide a chapter
A
Press EDIT on the remote control
during playback.
The video editing menu appears.
While in editing mode, the hidden
chapter/chapters will be played back.
B
Wait for the chapter you want to unhide
to occur or use à á keys on the
remote control to make a fast search.
C
Use ST keys to select { Unhide
Chapter } and press OK.
The current chapter will be visible
during playback.
Changing Index Picture
The index picture is the picture of the
title you will see when the recorder loads
up the Index menu. Normally, the rst
frame of a recording is shown as the
title’s index picture.
A
During playback, press EDIT to display
the video editing menu, then use ST
keys to highlight { Index Picture }.
B
Press u to pause playback.
C
Press X to search for the desired frame
and press OK to select the current frame
as the index picture for the title.
Splitting a title (DVD±RW only)
You can divide the current title into two
new titles. Each of these titles is
characterised by its own index picture.
Warning! Once a title is divided, the
process cannot be reversed.
A
During playback, press EDIT to display
the video editing menu, then use ST
keys to highlight { Split Title }.
B
Press u to pause playback.
C
Press X to search for the desired frame,
and press OK to divide the title at the
current frame.
A new title will be shown at the Index
Picture screen.
Helpful Hints:
– All the hidden chapters will be played back
while in video editing mode.
– To locate a speci c frame during playback,
press u and the X key to forward search
to the frame that you want.
TIPS: No further recording and editing can be carried out on a full or nalised DVD±R.
Press W to go back to the previous menu.
52
DVDR3510V_eng_26244.indd 52DVDR3510V_eng_26244.indd 52 2007-08-01 1:46:23 PM2007-08-01 1:46:23 PM
Page 53

Setup Menu Options
Accessing the Setup Menu
The system setup menu provides various
options for you to adjust the recorder to
suit your preferences.
SCART
SETUP
OK
A
Press SETUP on the remote control.
The system setup menu appears on
TV.
B
Use ST keys to highlight a menu item
and press X to access its options.
C
Use ST keys to highlight the setting you
wish to change and press OK to con rm
and go back to the previous menu item.
Instructions and explanations of the
options are provided in the following
pages.
D
To exit, press SETUP.
Setup - General
Screen Saver
Country
Video Output Selection
Restore Factory Settings
On
Germany
SCART RGB
OK
Setup - Record
Auto Chapter Marker
Default Recording Source
DVD Default Recording Mode
VCR Default Recording Mode
On
Tuner
SP
SP
Read the chapter “Recording” on
“Record Settings”
Setup - Language
On Screen Display Language
Default Disc Menu Language
Default Subtitle Language
Default Audio Language
English
English
Off
English
See this chapter – “Language Settings”
Setup - Channel Setup
Channel Search
Modify Channel Information
Sort Channels
Search
Edit
Sort
See this chapter “Channel Setup Settings”
Setup - Clock
Date (dd / mm / yy)
Time (hh : mm : ss)
Date - Time Setting
Date - Time Preset
Show DivX® Registration Code
01/01/06
00:01:08
Auto
P001/Ch003
OK
English
See this chapter – “General Settings”
See this chapter “Clock Settings”
Setup - Playback
TV Aspect Ratio
Parental Rating Level
Digital Audio Output
4:3 Letterbox
Off
All
See this chapter – “Playback Settings”
53
DVDR3510V_eng_26244.indd 53DVDR3510V_eng_26244.indd 53 2007-08-01 1:46:23 PM2007-08-01 1:46:23 PM
Page 54

Setup Menu Options (continued)
English
General settings (underlined options are the factory default settings)
Screen Saver
The screen saver prevents damage to the TV screen by avoiding
exposure to a static image for too long.
{ On } – Switches to TV screen saver mode when
playback has been stopped or paused for
more than 15 minutes.
{ Off } – Turns off the screen saver function.
Country
Select the country of your area for auto channel tuning.
(See section “Step 3: Installation and Setup - Select the country of
your residence”).
Video Output
Selection
{ YUV Progressive } – For component video connection to
Restore Factory
Settings
Select the type of video output that matches the video connection
between this recorder and your TV.
{ SCART RGB } – For SCART connection.
{ YUV Interlaced } – For component video connection.
progressive scan TV.
Note: Video output setting is not required for S-Video or Composite
(CVBS) video connection.
Restore all the settings of this recorder, except for the PIN code.
Restore Factory Settings can only be changed when there
is no disc in the disc tray.
1) Press OK to con rm the default restore.
2) A warning message will appear. Select
proceed or
CANCEL
to abort, then press OK to con rm.
OK
in the menu to
54
DVDR3510V_eng_26244.indd 54DVDR3510V_eng_26244.indd 54 2007-08-01 1:46:23 PM2007-08-01 1:46:23 PM
Page 55

Setup Menu Options (continued)
Playback settings (underlined options are the factory default settings)
TV Aspect Ratio
Parental Rating
Level
Enter Password
* * * *
CANCELOK
Set Rating Level
4. PG 13
5. PG R
4. PG 13
New password
Set the aspect ratio of the recorder according to the TV type you
have connected.
{ 16:9 } – Select this for wide screen TV
(frame ratio 16:9).
{ 4:3 Letterbox } – Select this for a ‘wide screen’ display
with black bands on the upper and
lower portions of the TV screen.
{ 4:3 Panscan } – Select this for a full-height
picture with both side trimmed.
Some DVDs may have a parental level assigned to the entire disc
or to certain scenes on the disc. This feature allows you to
set a playback limitation level.
1) Use ST keys to select { Parental Rating Level } and press
OK.
OK
2) Use the numeric keypad 0-9 to enter your four-digit pin
code.
Note: When doing this for the rst time or if you forget your four-digit
pin code, enter the default password '3308'.
OK
in the menu and press OK on the remote
New
OK
OK
3) Move to
control. The set rating level menu appears.
4) Use ST keys to select the desired parental level, then move
OK
to
in the menu and press OK on the remote control
to con rm.
Notes:
The rating levels range from 1 to 8 and are country dependent.
–
that are rated higher than the level you have selected will not play unless
you enter your four-digit pin code.
To disable parental controls and allow all discs to play, select { Off }.
–
– VCD, SVCD, CDs have no level indication, so parental control has no
effect on these type of discs. This also applies to most illegal DVDs.
– Some DVDs are not coded with a rating though the movie rating may
be printed on the disc cover. The rating level feature does not prohibit
playback of such discs.
English
DVDs
55
DVDR3510V_eng_26244.indd 55DVDR3510V_eng_26244.indd 55 2007-08-01 1:46:23 PM2007-08-01 1:46:23 PM
Page 56

Setup Menu Options (continued)
English
Playback settings (underlined options are the factory default settings)
Parental Rating
Level
New Password
New password
* * * *
Confirm password
Digital Audio
Output
To change/ reset the password
1) Use ST keys to select { Parental Rating Level } and
press OK.
2) Use the numeric keypad 0-9 to enter your four-digit pin
OK
CANCEL
3) Move to
OK
code.
OK
in the menu and press OK on the remote
control. The set rating level menu appears.
4) Move to
New
in the menu and press OK to access new
password menu.
5) Use the numeric keypad 0-9 to enter your new four-digit
pin code, then press T to select the next entry eld and
enter the same pin code a second time.
6) Move to
Note: To abort the change, select
OK
in the menu and press OK to con rm.
CANCEL
and press OK .
Adjust the digital output setting only if you have connected other
devices to the coaxial socket on the recorder.
{ ALL } – Select this if you have used the COAXIAL
socket on the recorder to connect to a
stereo receiver that has a built in
multichannel decoder.
{ LPCM } – Select this if the connected audio equipment
is not capable of decoding multichannel audio
Dolby Digital and MPEG-2 multi-channel
signals are converted to PCM (Pulse Code
Modulation).
56
DVDR3510V_eng_26244.indd 56DVDR3510V_eng_26244.indd 56 2007-08-01 1:46:24 PM2007-08-01 1:46:24 PM
Page 57

Language settings
Setup Menu Options (continued)
On Screen Display
Language
Default Disc Menu
Language
Default Subtitle
Language
Default Audio
Language
Select the menu language for this recorder’s on-screen display.
Select the preferred disc menu language for DVD playback.
Select the preferred subtitle language for DVD playback.
Select the preferred audio language for DVD playback
Notes:
– If the selected audio/subtitle language is not available on the disc, the
disc’s default setting language will be used instead.
– For some DVDs, the subtitle/audio language can only be changed via the
DVD disc menu.
.
English
57
DVDR3510V_eng_26244.indd 57DVDR3510V_eng_26244.indd 57 2007-08-01 1:46:25 PM2007-08-01 1:46:25 PM
Page 58

Setup Menu Options (continued)
English
Channel Setup settings
Channel Search
Setup - Channel Setup
Channel Search
Modify Channel Information
Sort Channels
Modify Channel
Information
Channel
Name
Scan mode
Frequency
TV System
NICAM
Audio
Decoder
Skip
Fine-tune
P001/Ch003
Frequency
585.26MHz
PAL B/G
On
DUAL A
Off
No
OK
CANCEL
This option automatically scans all the receivable analogue local
TV channels and stores these channels on the recorder.
Search
Press OK on the remote control to start the automatic TV
channel search process and replace all previously stored analogue
Edit
Sort
TV channels. This process may take several minutes.
Adjust a stored TV channel to your preference and improve the
reception and the sound quality of that TV channel.
1) Use ST keys to highlight { Modify Channel Information }
and press OK to view the channel menu.
2) Use ST keys to select one of the options and press OK.
{ Name } – Use the numeric keypad 0-9 to select the
channel preset number that you wish to
OK
change.
– To rename the channel, press X.
– Use W X ST keys to highlight a character
in the keyboard screen and press OK to
select.
– Select
Note: The maximum input is up to 5 ( ve)
characters.
OK
on the keyboard to con rm
your entry or select
EXIT
press OK to exit.
{ Scan Mode } – Select TV channel search mode based on
channel allocation or frequency (Frequency,
Channel or S-Channel) and press OK to
con rm.
to abort, then
{ Frequency } – Show the frequency of the current TV
channel. If required, use W X keys to start
the automatic frequency search and press
OK to con rm.
{ TV System } – Use ST keys to select a suitable TV system
that produces the least distortion of picture
and sound, then press OK to con rm. (See
chapter “TV System Guide” at the back of
this manual for more information).
58
DVDR3510V_eng_26244.indd 58DVDR3510V_eng_26244.indd 58 2007-08-01 1:46:25 PM2007-08-01 1:46:25 PM
Page 59

Channel Setup settings
Setup Menu Options (continued)
Channel
Name
Scan mode
Frequency
TV System
NICAM
Audio
Decoder
Skip
Fine-tune
{ NICAM } – NICAM is a digital sound transmission
P001/Ch003
Frequency
585.26MHz
PAL B/G
On
DUAL A
Off
No
OK
CANCEL
OK
system. It can transmit either one stereo
channel or two separate mono channels.
{ On } – Improve the sound transmission
of the TV channel.
{ Off } – Select this if the reception is poor
and the sound is distorted.
English
{ Audio } – For bilingual TV programmes, switch
between stereo (original) and additional
audio language.
{ DUAL A } – Original broadcast language.
{ DUAL B } – Additional audio language.
{ Decoder } – If the current TV channel is transmitted by
coded TV signals that can only be viewed
properly with a decoder which is connected
to the EXT2 AUX-I/O socket, you need to
activate the connected decoder.
{ On } – Select this to allocate the connected
{ Off } – Turn off the decoder feature.
decoder to this TV channel.
{ Skip } – Select this to set the channel to be skipped.
{ No } – The TV channel can be accessible
{ Yes } – The TV channel can only be
using the P + − on the remote
control.
accessible by pressing the
corresponding number button on
the remote control.
{ Fine-Tune } – Select this to ne-tune the TV channel
manually if the reception is poor. Use W X
keys to adjust the frequency and press OK
to con rm.
Sort Channels
Sort Channels
P001
BC020
Skip
P002
SW006
Unskip
P003
CH008
Unskip
Unskip
Skip
Unskip
Unskip
Unskip
P003 CH008 Unskip
P004
CH004
P005
CH006
P006
CH010
P007
CH012
P008
CH005
Rearrange the stored TV channels.
1) Use ST keys to highlight { Sort Channels } and press OK
to show a list of TV channel programmes.
2) Use ST keys to highlight the channel you want to change
and press OK.
3) Use ST keys to shift the TV channel to the desired position
and press OK again. The selected channel will be inserted
before the current position.
Note: Press
menu.
BACK2
on the remote control to go back to the previous
59
DVDR3510V_eng_26244.indd 59DVDR3510V_eng_26244.indd 59 2007-08-01 1:46:25 PM2007-08-01 1:46:25 PM
Page 60

Setup Menu Options (continued)
English
Clock settings (underlined options are the factory default settings)
Date (dd/mm/yy)
Time (hh:mm:ss)
Date-Time Setting
Date-Time Preset
Show DivX®
Registration code
Use ST keys to change the number and use W X keys to select
different entry elds, then press OK to con rm.
Use ST keys to change the number and use W X keys to select
different entry elds, then press OK to con rm.
Enable/disable the automatic setting of date and time.
is dependent on your local broadcaster.
{ Auto } – Select this to activate automatic setting of date
and time. The date and time setting will be
updated according to the broadcast channel
information of the selected programme
number under the { Date-Time Preset }.
{ Manual } – Select this to manually set the date and time.
This option is available only if you have selected { Auto } for
{ Date-Time Setting }.
Press X keys to display the options. Use ST keys to select the
preset programme number for automatic time/date settings.
Press OK to con rm.
Display the DivX® VOD (Video On Demand) registration code
that allows you to rent and purchase videos using the DivX®
VOD service. For more information, visit us at
www.divx.com/vod.
1) Press X to display the registration code.
2) Use the registration code to purchase or rent videos from
DivX® VOD service at www.divx.com/vod. Follow the
instructions and copy the video from your computer onto a
CD-R/RW or recordable DVD disc for playback on this
recorder.
This feature
60
DVDR3510V_eng_26244.indd 60DVDR3510V_eng_26244.indd 60 2007-08-01 1:46:25 PM2007-08-01 1:46:25 PM
Page 61

Installing the latest software
Software Upgrade
The software installed in your recorder is
continuously being re ned for greater
stability and compatibility of the set.
Periodically, Philips will issue upgrades for
the software which you copy onto a CD
and install the software of your recorder.
Caution! Power supply must not be
interrupted during upgrade!
A
Get the version information of this
recorder by pressing the number keypad
‘0009’ and press OK on the remote
control.
Write down the information for your
current software version.
B
Visit the Philips website
‘www.philips.com/support’ to check the
availability of the latest software upgrade.
Download the software to a CD-R.
Note: When checking for the latest
software upgrade, please also check for
any accompanying instructions on
installing the software.
English
61
DVDR3510V_eng_26244.indd 61DVDR3510V_eng_26244.indd 61 2007-08-01 1:46:25 PM2007-08-01 1:46:25 PM
Page 62

Tro u bles h ooti ng
English
WARNING
Under no circumstances should you try to repair the system yourself, as this
will invalidate the warranty. Do not open the system as there is a risk of
electric shock.
If a fault occurs, rst check the points listed below before taking the system for
repair. If you are unable to remedy a problem by following these hints, consult
your dealer or Philips for help.
Problem (General) Solution
No power.
Remote control does not
work.
No picture.
– Press STANDBY-ON button on the front of the
recorder to turn on the system.
– Make sure the AC outlet has power.
– Aim the remote control directly at the sensor on the
front of the DVD recorder (not towards TV).
– Remove any obstacles between the recorder and the
remote control. Aim the remote control towards the
set at different angles and/or distances.
– Batteries are weak, replace the batteries.
– Press SOURCE on the remote control to select an input
source.
– Turn on your TV and set to the correct Video In
channel. Switch the TV channel until you see the DVD
screen. Read chapter “Step 3 - Installation and Setup –
Finding the correct viewing channel” for details.
– Check the video connection between the recorder and
the TV.
– Your recorder might have been set to Progressive Scan
mode while your TV does not support Progressive Scan.
You may see ‘Pro Scan’ on the display panel. Follow the
steps below:
1) Connect a SCART cable from the EXT2 AUX I/O
socket on the rear panel of the recorder to the SCART
In socket on the TV.
2) Turn on the TV and use the TV’s remote control to
select the corresponding video-in channel on the TV.
(eg., AV, EXT1).
3) Turn on the DVD recorder and wait until the TV
displays the recorder screen.
4) Eject and remove any disc from the disc tray. The
display panel will show ‘NO DISC’. Enter the code
“116811” and wait for the screen to be refreshed after a
few seconds. The ‘Pro Scan’ icon on the display panel
will disappear. Turn off Progressive Scan using the Setup
Menu. Read “Setup Menu Options –General Settings –
Video Output Selection”.
62
DVDR3510V_eng_26244.indd 62DVDR3510V_eng_26244.indd 62 2007-08-01 1:46:25 PM2007-08-01 1:46:25 PM
Page 63

Tro u bles h ooti ng (cont inued)
Problem (General) Solution
No sound.
No TV signal received
from the recorder.
TV channel is fuzzy or
distorted.
Unable to eject disc tray.
The recorder clock
settings are different from
the current time.
– Check the audio connections, the red and white sockets.
Read chapters “Getting Started - Connecting the audio
cables” for details.
– Set the Digital output correctly, based on the equipment
you connected to the DVD recorder. Read chapter
“Setup Menu Options – Playback settings – Digital Audio
Output” for details.
– Have your antenna or cable TV signal checked.
– Install the TV channel. Read chapter “Step 3: Installation
and Setup - Setting the TV channel programmes” for
details.
– Check the video connection between the DVD recorder
and the TV.
– Further ne-tune the signal of the TV channel. Read
chapter on “Setup Menu Options - Channel Setup
Settings - Modify Channel Information”.
– Press P +/- to search for the same TV channel which
may have a clearer picture.
– Exit from any system or recording menu until you see
the Philips wallpaper on the screen.
– Press STOP to stop any playback or recording. Then
press OPEN/CLOSE to eject the disc tray.
– The power supply to the recorder may have been
disconnected. Reconnect the power supply
– Set the system clock correctly. See the chapter “Setup
Menu Options - Clock Settings”.
– Check that the desired timer recording is correct. See
chapter “Recording - Timer Recording”.
English
63
DVDR3510V_eng_26244.indd 63DVDR3510V_eng_26244.indd 63 2007-08-01 1:46:25 PM2007-08-01 1:46:25 PM
Page 64

Tro u bles h ooti ng (cont inued)
English
Problem (Playback) Solution
Disc does not play.
Distorted sound coming
from a connected hi-
system or ampli er.
Unable to play DivX
movies.
The picture is distorted
or black and white during
playback.
– Insert the disc with the label facing up.
– Wrong region code. The DVD must be coded for ALL
regions or Region 2 in order to play on this DVD
recorder.
– There is no recording on the disc or wrong disc type.
Read chapter “DVD Playback - Playable discs” for
details.
– Make sure the disc is not scratched or warped. Clean
the disc or replace a new one.
– Check if the disc is defective by trying another disc.
– Do not connect any cables from the recorder to the
‘Phono’ input of your ampli er.
– If you are playing a DTS CD, you have to connect the
COAXIAL socket of this recorder to a Hi-Fi system or
ampli er.
– Ensure that the DivX le is encoded according to the
‘Home Theatre Pro le’ with the DivX encoder.
– Check that the DivX movie downloaded is a complete
le.
– The disc is dirty, clean the disc.
– Sometimes a small amount of picture distortion may
appear. This is not a malfunction.
– For VCR, clean the video heads. If the condition
persists, the video heads may have to be replaced.
– Check if the VHS tape is defective by playing other VHS
tapes.
There is picture or sound
interference with the TV
reception.
The message
‘UNKNOWN DISC’
appears.
– Have your antenna or cable TV signal checked.
– Do not tie the cables of the connected devices together.
– Fine-tune your TV channel. Read chapter “Step 3:
Installation and Setup - Setting the TV channel
programmes” for details.
– This message may appear if you insert a disc that may
have encountered one of the following:
– Error during recording: The title may be missing.
– Error while changing the title/index picture: The original
title/index picture may be visible.
– Error while nalising or the disc has not been nalised.
64
DVDR3510V_eng_26244.indd 64DVDR3510V_eng_26244.indd 64 2007-08-01 1:46:25 PM2007-08-01 1:46:25 PM
Page 65

Tro u bles h ooti ng (cont inued)
Problem (Recording) Solution
The wrong TV channel
was decoded (recorded)
after you programmed a
recording using the
HOWVIEW® / VIDEO
S
Plus+® system.
Picture is fuzzy and
brightness varies when
copying DVD Video discs
or prerecorded video
tapes.
Recordings are not
occurring as scheduled.
New recordings cannot be
made.
1) Press SHOWVIEW (or VIDEO Plus+) on the remote
control, enter the S
HOWVIEW® programming or
PlusCode number of the desired TV channel.
2) Press OK to con rm.
3) Check the channel number in the {Program #} input
eld. If this does not correspond to the desired TV
channel, select this entry eld and change the channel
number.
4) Press OK to con rm.
– This happens if you try to copy DVDs or video tapes
that have been copy-protected. Even though the picture
on the TV is ne, but the recording on the DVD
recordable disc is faulty. This interference is unavoidable
with copy-protected DVDs or video tapes.
– The DVD recordable disc has a limited recording
lifetime, please change a new disc for recording.
– The TV channel you want to record is not stored or
you have selected the wrong programme number.
Check TV channels stored.
– If you adjust the clock after you have set a timer
recording, you have to reset the timer recording.
– If the recorder cannot read the disc, you cannot record.
– You cannot use the recorder to duplicate copyrighted
materials (DVDs or videotapes) onto a DVD±R/±RW.
– A nalised DVD±R has been inserted. Change disc.
English
A DVD±R/±RW recorded
on this DVD recorder
does not playback on a
DVD player.
– If a recording is too short, it is possible that a DVD
player cannot detect it.
– You have to nalise the DVD±R. See the chapter
“Playing your recordings (DVD±R) on other DVD
players” for details.
The picture on my
decoder appears to be
distorted during
– If you are recording a programme from your decoder
box, view the same programme by pressing the SCART
on the recorder’s remote control.
recording.
The VHS tape is ejected
when you press REC
button.
– If the safety tab has been removed, cover the tab hole
with clear tape.
– Make sure the VHS tape is not at its end.
65
DVDR3510V_eng_26244.indd 65DVDR3510V_eng_26244.indd 65 2007-08-01 1:46:25 PM2007-08-01 1:46:25 PM
Page 66

Frequently Asked Questions
English
What kind of disc should I use for
recording?
You can record on DVD±R, DVD±RW
or DVD+R DL discs. They are
compatible with DVD-Video players and
DVD-ROM drives in computers.
What is the capacity of a DVD±R/
+RW disc?
4.7GB, or equivalent to six CDs. You can
store only one hour of recordings on a
single disc at the highest quality (DVD
standard) and about 6 hours recording at
the lowest quality (VHS standard). The
recording mode indicates the number of
hours that will t on a single disc.
What is the difference between
DVD±R and DVD±RW?
DVD±R is “recordable” and DVD±RW is
“erasable” and “rewritable”. With a
DVD±R, record multiple sessions on the
same disc, but when the disc is full, no
more recordings can be made to the disc.
The DVD±RW allows you to record
over the same disc repeatedly.
How do I check the remaining space
available on a recordable DVD disc?
In disc menu mode, press REC MODE on
the remote control repeatedly to display
the remaining recording time in different
recording mode.
What is DV?
Using DV, also known as i.LINK, connect
a DV-equipped camcorder to this
recorder using a single DV cable for input
and output of audio, video, data and
control signals.
– This recorder is only compatible with
DV-format (DVC-SD) camcorders.
Digital satellite tuners and Digital VHS
video recorders are not compatible.
– Never connect more than one DV
camcorder at a time to this recorder.
– Avoid controlling this recorder from
the external equipment connected via the
DV IN socket.
Can I copy a VHS tape or DVD
from an external player?
Yes, but only if the VHS tape or DVD is
not copy protected.
What are Titles and Chapters?
A DVD disc contains Titles and Chapters,
which are similar to the Titles and
Chapters of a book. A Title is often a
complete movie and is broken down into
Chapters, or individual scenes from the
movies.
Title
Chapter
Title
Chapter Chapter Chapter Chapter
chapter markers
Programmes are recorded as a single
title, it may consist of one chapter or a
few chapters within a title, depending on
the recording settings.
66
DVDR3510V_eng_26244.indd 66DVDR3510V_eng_26244.indd 66 2007-08-01 1:46:25 PM2007-08-01 1:46:25 PM
Page 67

Frequently Asked Questions (continued)
How do I set up Titles and
Chapters?
The recorder automatically creates a new
Title every time you start a new
recording. You can then add Chapters to
these recordings manually or have them
automatically inserted at 5-minute
intervals.
What does “ nalising” a disc mean?
Finalising a disc locks the disc so it can no
longer be recorded upon, only required
for DVD±R. It will then be compatible
with any DVD player. To close a disc
without nalising it, simply stop recording
and eject the disc. You will still be able to
record on the disc if there is room for
more recordings.
How good is the quality of the
recording?
There are a few quality levels to choose
from, ranging from “1 hour mode” (High
Quality) to “6 hours mode” (Super Long
Play). Press REC MODE button on the
remote control to choose the quality
level that best suits your purpose and the
length of material.
What is ‘index’ for VHS tape?
When you make a recording to a VHS
tape, an index is automatically marked on
the tape when recording starts. These
index markings can help to locate a
speci c recording quickly and easily.
English
Record Mode
HQ
SP
SPP
LP
EP
SLP
Picture Quality
High Quality
Standard Play
Standard Play Plus
Long Play
Extended Play
Super Long Play
Maximum Recording
Time per Disc (hours)
1
2
2.5
3
4
6
67
DVDR3510V_eng_26244.indd 67DVDR3510V_eng_26244.indd 67 2007-08-01 1:46:25 PM2007-08-01 1:46:25 PM
Page 68

Speci cations
English
Picture/Display
• Aspect ratio: 4:3, 16:9
• D/A converter: 10 bit, 54 MHz
• A/D converter: 10 bit, 27 MHz
• Picture Enhancement: Progressive Scan
Sound
• D/A converter: 24 bit, 192 kHz
• A/D converter: 24 bit, 48 kHz
Video Recording
• Recording system: PAL, SECAM
• Compression formats: MPEG2
• Recording modes:
High Quality : HQ
Standard Play : SP
Standard Play Plus : SPP
Long Play : LP
Extended Play : EP
Super Long Play : SLP
• Audio compression: Dolby Digital
Video Playback
• Disc playback media: CD, CD-R/-RW, DVD,
DVD-Video, DVD+R/+RW, DVD-R/-RW
SVCD, Video CD, DVD+R DL
• Compression formats: MPEG2, MPEG1,
DivX 3/4/5/6
• Video disc playback system: NTSC, PAL
• Video tape playback system: PAL, SECAM,
ME-SECAM, NTSC
Audio Playback
• Disc playback media: CD, CD-R/-RW,
MP3-CD, MP3-DVD, WMA
• Compression formats: Dolby Digital, MP3,
MPEG2 Multichannel, PCM
• MP3 bit rates: 32~256 kbps and VBR
Tuner/Reception/Transmission
• TV system: PAL, SECAM
• Aerial Input: 75 Ohm coaxial (IEC75)
Connectivity
Rear Connections:
• EXT 1 Scart
• EXT 2 Scart
• S-Video Out
• Composite video (CVBS) Out
• Audio left/right Out
• Component video (YPbPr)Out
• Digital audio out (coaxial)
• RF antenna in
• RF TV out
• Mains
Front Connections:
• i.LINK DV in (IEEE 1394 4-pin)
• Composite video (CVBS) In (CAM1)
• USB In
• Audio left/right In
Convenience
• Programming/Timer Enhancements: Daily/
Weekly, Repeat Programme, Manual Timer,
One Touch Recording, SHOWVIEW
VIDEO Plus+
• Programmable events: 8
®
®
/
Power
• Power supply: 220–240V; ~50 Hz
• Consumption: 32 W (typical)
• Standby power consumption: < 5W
Cabinet
• Dimensions (wxhxd) : 435 x 100 x 344 mm
• Net Weight : 5.2 kg
Still Picture Playback
• Disc formats: DVD+R/+RW, DVD-R/-RW,
CD-R/RW
• Picture compression formats: JPEG
• Picture enhancement: Rotate, Zoom,
Slideshow with music playback
Storage Media
• Recording media: DVD+R, DVD+RW,
DVD-R, DVD-RW, DVD+R DL, VHS tape
68
DVDR3510V_eng_26244.indd 68DVDR3510V_eng_26244.indd 68 2007-08-01 1:46:26 PM2007-08-01 1:46:26 PM
Page 69

Display panel symbols/ messages
The following symbols/ messages may
appear on your recorder display:
00:00:00
Multi-function display/ text line
– Title/ track number
– Total/ elapsed/remaining title/track time
– Disc/title name
– Additional information regarding the
disc
– TV channel number or source of video
– Clock (This is displayed in Standby
mode).
– TV programme title
BLANK
There are no recordings in the disc on
the tray.
FULL
Disc is full. There is no more storage
space for new recordings.
LOADING
Disc is being recognised by the recorder.
MENU
The system setup menu, disc menu, title
menu or timer menu display is on.
REGION
When the DVD inserted is in a wrong
region code as the recorder.
STOP
When playback / recording is stopped.
X TIMER
A timer recording has been programmed
or is active.
UPDATE
The recorder is writing to the disc.
UNKNOWN
The recorder has encountered an error
in handling the disc inserted.
English
NO DISC
No disc has been inserted. If a disc has
been inserted, then it is possible that the
disc cannot be read.
OPEN
Disc tray is opening or opened.
PHOTO
A picture disc has been inserted.
STARTUP
The recorder has been turned on.
69
DVDR3510V_eng_26244.indd 69DVDR3510V_eng_26244.indd 69 2007-08-01 1:46:26 PM2007-08-01 1:46:26 PM
Page 70

Glossary
English
Analogue: Sound that has not been turned
into numbers. Analogue sound varies, while
digital sound has speci c numerical values.
These sockets send audio through two
channels, the left and right.
Aspect ratio: The ratio of vertical and
horizontal sizes of a displayed image. The
horizontal vs. vertical ratio of conventional
TVs. is 4:3, and that of wide-screens is 16:9.
AUDIO OUT Sockets: Red and white
sockets on the back of the system that send
audio to another system (TV, Stereo, etc.).
Chapter: Sections of a picture or a music
piece on a DVD that are smaller than titles.
A title is composed of several chapters. Each
chapter is assigned a chapter number
enabling you to locate the chapter you want.
Digital: Sound that has been converted into
numerical values. Digital sound is available
when you use the DIGITAL AUDIO OUT/
COAXIAL. These sockets send audio
through multiple channels, instead of just
two channels as analogue does.
Index
Picture Screen: A screen that gives
an overview of a DVD±RW or DVD±R. An
Index Picture represents each recording.
JPEG: A very common digital still picture
format. A still-picture data compression
system proposed by the Joint Photographic
Expert Group, which features small decrease
in image quality in spite of its high
compression ratio.
MP3: A le format with a sound data
compression system. “MP3” is the
abbreviation of Motion Picture Experts
Group 1 (or MPEG-1) Audio Layer 3. By
using the MP3 format, one CD-R or CD-RW
can contain about 10 times more data then a
regular CD.
MPEG: Motion Picture Experts Group. A
collection of compression systems for digital
audio and video.
Multichannel: DVDs are formatted to have
each sound track constitute one sound eld.
Multichannel refers to a structure of sound
tracks having three or more channels.
Disc menu: A screen display prepared for
allowing selection of images, sounds,
subtitles, multi-angles, etc. recorded on a
DVD.
DivX: The DivX code is a patent pending,
MPEG-4 based video compression
technology, developed by DivX Inc., that can
shrink digital video to sizes small enough to
be transported over the internet, while
maintaining high visual quality.
Dolby Digital: A surround sound system
developed by Dolby Laboratories containing
up to six channels of digital audio (front left
and right, surround left and right, centre and
subwoofer).
PBC: Playback Control. Refers to the signal
recorded on video CDs or SVCDs for
controlling playback. By using menu screens
recorded on a Video CD or SVCD that
supports PBC, enjoy interactive playback and
searching.
PCM: Pulse Code Modulation. A digital
audio encoding system.
70
DVDR3510V_eng_26244.indd 70DVDR3510V_eng_26244.indd 70 2007-08-01 1:46:26 PM2007-08-01 1:46:26 PM
Page 71

Parental control: Limits disc play according
to the age of the users or the limitation level
in each country. The limitation varies from
disc to disc; when it is activated, playback will
be prohibited if the software’s level is higher
than the user-set level.
Region code: A system allowing discs to be
played only in the region designated. This
unit will only play discs that have compatible
region codes. Find the region code of your
unit by looking on the product label. Some
discs are compatible with more than one
region (or ALL regions).
S-Video: Produces a clear picture by
sending separate signals for the luminance
and the colour. Use the S-Video only if your
TV has an S-Video In socket.
Surround: A system for creating realistic
three dimensional sound elds full of realism
by arranging multiple speakers around the
listener.
Title: The longest section of a movie or
music feature on DVD. Each title is assigned
a title number, enabling you to locate the
title you want.
Glossary (continued)
English
VIDEO OUT socket: Yellow socket on
the back of the DVD system that sends the
DVD picture video to a TV.
WMA : WMA is short for Windows Media
Audio and refers to an audio compression
technology developed by Microsoft
Corporation. WMA data can be encoded by
using Windows Media Player version 9 or
Windows Media Player for Windows XP.
Files are recognised by their le extension,”.
wma” or “.WMA”.
71
DVDR3510V_eng_26244.indd 71DVDR3510V_eng_26244.indd 71 2007-08-01 1:46:26 PM2007-08-01 1:46:26 PM
Page 72

TV System Guide
English
COUNTRY VHF UHF DVD REGIONS
AFGHANISTAN PAL/SECAM B
ALBANIA PAL B PAL G 2
ALGERIA PAL B PAL G 5
ANGOLA PAL I 5
ARGENTINA PAL N PAL N 4
AUSTRALIA PAL B PAL H 4
AUSTRIA PAL B PAL G 2
AZORES PAL B
BAHAMAS NTSC M 4
BAHRAIN PAL B PAL G 2
BANGLADESH PAL B 5
BARBADOS NTSC M 4
BELGIUM PAL B PAL H 2
BERMUDA NTSC M
BOLIVIA NTSC M NTSC M 4
BOTSWANA PAL I 5
BRAZIL PAL M PAL M 4
BRUNEI PAL B PAL B
BULGARIA 2
BURKINA FASO SECAM K1 5
BURMA NTSC M
BURUNDI SECAM K1 5
CAMBODIA NTSC M 3
CAMEROON PAL B PAL G 5
CANADA NTSC M NTSC M 1
CANARY ISLANDS PAL B 2
CHAD SECAM K1 5
CHILE NTSC M NTSC M 4
CHINA PAL D 6
COLOMBIA NTSC M NTSC M 4
COSTA RICA NTSC M NTSC M 4
CROATIA PAL B PAL G 2
CUBA NTSC M NTSC M 4
CYPRUS PAL B PAL G
CZECH REPUBLIC PAL D PAL K 2
DAHOMEY SECAM K1
DENMARK PAL B PAL G 2
DJIBOUTI SECAM B SECAM G 5
DOMINICAN REP NTSC M NTSC M 4
ECUADOR NTSC M NTSC M 4
EGYPT SECAM B/PAL B SECAM G/PAL G 2
EL SALVADOR NTSC M NTSC M 4
EQUAT. GUINEA PAL B 5
ESTONIA PAL B (was SECAM) PAL D 5
ETHIOPIA PAL B PAL G 5
FIJI PAL B
FINLAND PAL B PAL G 2
FRANCE SECAM L SECAM L 2
FRENCH POLYNESIA SECAM K1
GABON SECAM K1 5
GAMBIA PAL I 5
GERMANY PAL B PAL G 2
GHANA PAL B PAL G 5
GIBRALTAR PAL B PAL H 2
GREECE PAL B (was SECAM) PAL G 2
GREENLAND NTSC/PAL B 2
GUADELOUPE SECAM K1
GUAM NTSC M 1
GUATEMALA NTSC M NTSC M 4
GUINEA PAL K 5
GUYANA (FRENCH) SECAM K1 4
HONDURAS NTSC M NTSC M 4
PAL B PAL G
5
72
DVDR3510V_eng_26244.indd 72DVDR3510V_eng_26244.indd 72 2007-08-01 1:46:26 PM2007-08-01 1:46:26 PM
Page 73

TV System Guide (continue d)
COUNTRY VHF UHF DVD REGIONS
LIBYA SECAM B SECAM G 5
LITHUANIA PAL D (was SECAM) PAL K 5
LUXEMBOURG PAL B/SECAM L PAL G/SEC L 2
MADAGASCAR SECAM K1 5
MADEIRA PAL B
MALAGASY SECAM K1
MALAWI PAL B PAL G 5
MALAYSIA PAL B 3
MALI SECAM K1 5
MALTA PAL B PAL H 2
MARTINIQUE SECAM K1
MAURITANIA SECAM B 5
MAURITIUS SECAM B 5
MEXICO NTSC M NTSC M 4
MONACO SECAM L 2
MONGOLIA SECAM D 5
MOROCCO SECAM B 5
MOZAMBIQUE PAL B 5
NAMIBIA PAL I 5
NEPAL PAL B
NETHERLANDS PAL B PAL G 2
NETH. ANTILLES NTSC M NTSC M
NEW CALEDONIA SECAM K1
NEW GUINEA PAL B PAL G 4
NEW ZEALAND PAL B PAL G 4
NICARAGUA NTSC M NTSC M 4
NIGER SECAM K1 5
NIGERIA PAL B PAL G 5
NORWAY PAL B PAL G 2
OMAN PAL B PAL G 2
PAKISTAN PAL B 5
PANAMA NTSC M NTSC M 4
PARAGUAY PAL N PAL N 4
PERU NTSC M NTSC M 4
PHILIPPINES NTSC M NTSC M 3
POLAND PAL D PAL K 2
PORTUGAL PAL B PAL G 2
PUERTO RICO NTSC M NTSC M 1
QATAR PAL B 2
REUNION SECAM K1
RUMANIA PAL D PAL K 2
RUSSIA SECAM D SECAM K 5
RWANDA SECAM K1 5
SABAH/SAWARA PAL B
ST. KITTS NTSC M NTSC M
SAMOA (US) NTSC M 1
SAUDI ARABIA SECAM-B/PAL-B SECAM G 2
SENEGAL PAL 5
SEYCHELLES PAL B PAL G 5
SIERRA LEONE PAL B PAL G 5
SINGAPORE PAL B PAL G
SLOVAK REPUBLIC PAL PAL 2
SOMALIA PAL B PAL G 5
SOUTH AFRICA PAL I PAL I 2
SPAIN PAL B PAL G 2
SRI LANKA PAL B 5
SUDAN PAL B PAL G 5
SURINAM NTSC M NTSC M 4
SWAZILAND PAL B PAL G
SWEDEN PAL B PAL G 2
SWITZERLAND PAL B PAL G 2
SYRIA SECAM B 2
English
73
DVDR3510V_eng_26244.indd 73DVDR3510V_eng_26244.indd 73 2007-08-01 1:46:26 PM2007-08-01 1:46:26 PM
Page 74

English
Meet Philips at the Internet
http://www.philips.com/welcome
DVDR3510V
DVDR3512V
CLASS 1
LASER PRODUCT
3139 245 26244
SGP-0731/05/31-1
DVDR3510V_eng_26244.indd 74DVDR3510V_eng_26244.indd 74 2007-08-01 1:46:26 PM2007-08-01 1:46:26 PM
 Loading...