

Page 1

DVD Player/ Recorder
User Manual 6
Manual del Usuario 66
Manual do Usuário 126
DVDR3380
Page 2
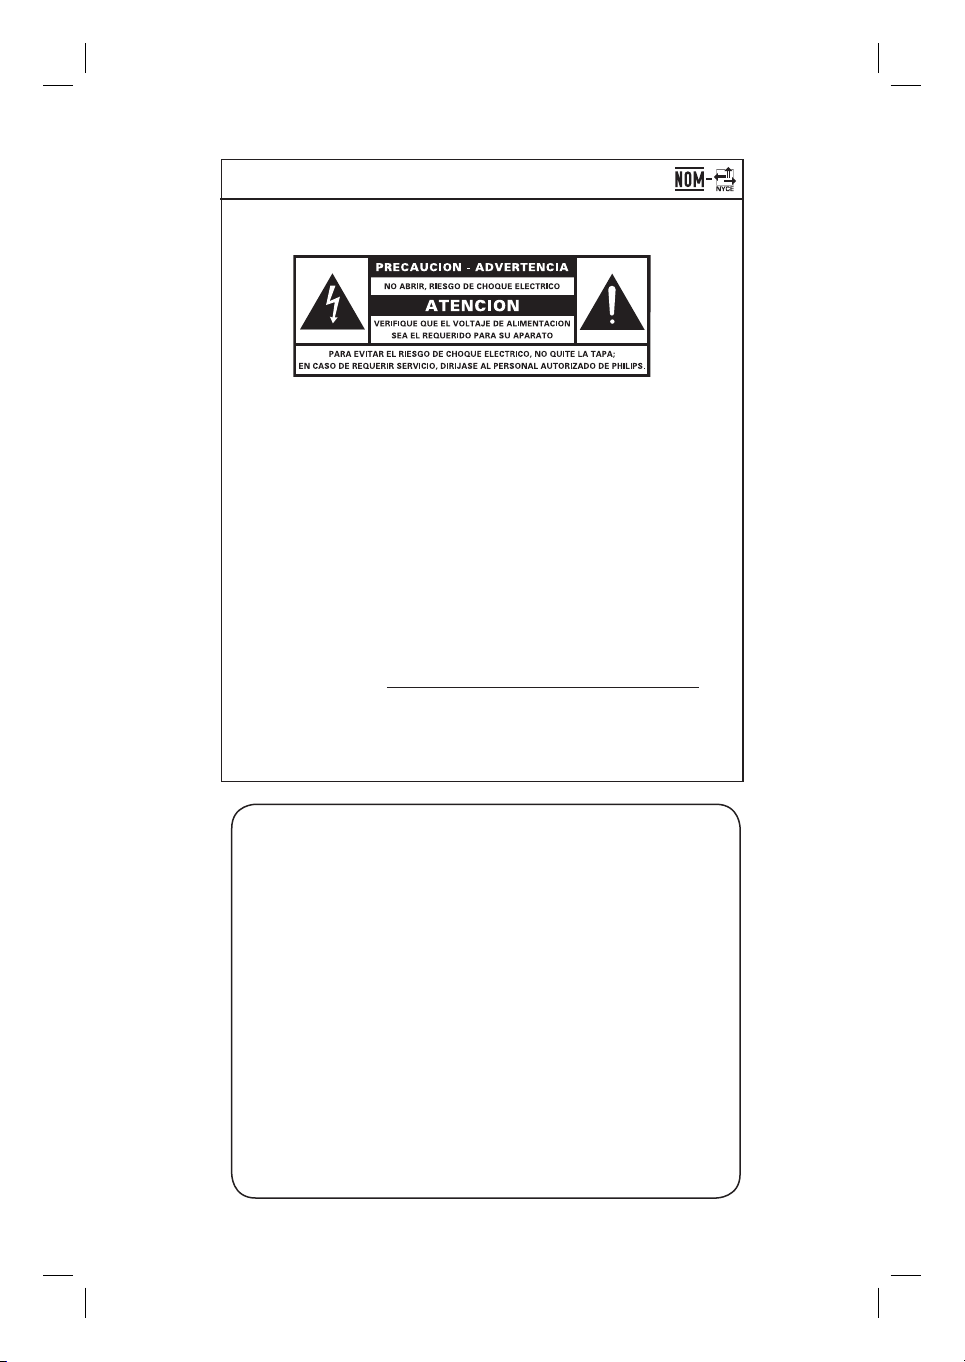
México
Es necesario que lea cuidadosamente su instructivo de manejo.
Descriptión: DVD Player/ Recorder
Modelo: DVDR 3380
Alimentacón: 110 - 240V; 50~60Hz
Consumo: 25 W
Importador: Philips Mexicana, S.A. de C.V.
Domicilio: Av. La Palma No. 6,
Col. San Fernando, La Herradura
Huixquilucan, Edo de Mexico
C.P. 52784, Mexico
Localidad y Tel.: Tel. 52 69 90 00
Exportador: Philips Electronics HK, Ltd.
País de Origen: China
o
N
de Serie:
LEA CUICADOSAMENTE ESTE INSTRUCTIVO
ANTES DE USAR SU APARATO.
AVISO IMPORTANTE
Philips Mexicana, S.A. de C.V. no se hace
responsable por daños o desperfectos causados por:
– Maltrato, descuido o mal uso, presencia de
insectos o roedores (cucarachas, ratones etc.).
– Cuando el aparato no haya sido operarado
de acuerdo con el instructivo del uso, fuera
de los valores nominales y tolerancias de las
tensiones (voltaje), frecuencia (ciclaje) de
alimentación elétrica y las características
que deben renuir las instalaciones auxiliares.
– Por fenómenos naturales tales como:
temblores, inundaciones, incendios, descargas
electricas, rayos etc. o delitos causados por
terceros (choques asaltos, riñas, etc.).
2
Page 3

Laser safety
This unit employs a laser. Due to possible
eye injury, only a quali ed service person
should remove the cover or attempt to
service this device.
USE OF CONTROLS OR
ADJUSTMENTS OR PERFORMANCE
OF PROCEDURES OTHER THAN
THOSE SPECIFIED HEREIN MAY
RESULT IN HAZARDOUS
RADIATION EXPOSURE.
NOTE:
PICTURES SHOWN MAYBE
DIFFERENT BETWEEN COUNTRIES.
English
LASER
Type Semiconductor laser
InGaAlP (DVD)
AIGaAs (CD)
Wave length 658 nm (DVD)
790 nm (CD)
Output Power 30 mW(DVD±RW write)
1.0 mW (DVD read)
1.0 mW (CD read)
Beam divergence 84 degrees (DVD)
61 degrees (CD)
CAUTION
Use of controls or adjustments or performance
of procedures other than herein may result in
hazardous radiation exposure or other unsafe
operation.
The apparatus shall not be exposed to dripping
or splashing and no objects lled with liquids,
such as vases, shall be placed on apparatus.
For Customer Use:
Read carefully the information located at
the bottom or rear of your DVD Recorder
and enter below the Serial No. Retain this
information for future reference.
Model No. DVD Player/ Recorder
DVDR3380
Serial No. _______________
3
Page 4
‘CONSUMERS SHOULD NOTE THAT NOT ALL HIGH
DEFINITION TELEVISION SETS ARE FULLY
COMPATIBLE WITH THIS PRODUCT AND MAY CAUSE
ARTIFACTS TO BE DISPLAYED IN THE PICTURE. IN
CASE OF 525 OR 625 PROGRESSIVE SCAN PICTURE
PROBLEMS, IT IS RECOMMENDED THAT THE USER
SWITCH THE CONNECTION TO THE ‘STANDARD
DEFINITION’ OUTPUT. IF THERE ARE QUESTIONS
REGARDING OUR TV SET COMPATIBILITY WITH THIS
MODEL 525p AND 625p DVD PLAYER, PLEASE
CONTACT OUR CUSTOMER SERVICE CENTER.’
4
Page 5
Index
This product incorporates copyright protection
technology that is protected by US patents. Use
of this copyright protection technology must be
authorised by Macrovision, and is intended for
home and other limited viewing uses only, unless
otherwise authorised by Macrovision. Reverse
engineering or disassembly is prohibited.
U.S. Patent Number: 4,631,603; 4,819,098;
4,907,093; 5,315,448; and 6,516,132
Manufactured under license from Dolby
Laboratories. “Dolby” and the double-D symbol
are trademarks of Dolby Laboratories.
VCR Plus+® and PlusCode are registered
trademarks of Gemstar Development
Corporation. The VCR Plus+® system is
manufactured under license from Gemstar
Development Corporation.
US patent Nr.: 6,466,734; 6,430,359; 6,091,882;
6,049,652; 5,335,079; 5,307,173; 4,908,713;
4,751,578, 4,706,121.
English ------------------------------------------6
EnglishEspañolB. Português
Español --------------------------------------- 66
B. Português --------------------------------126
DivX®, DivX Certi ed, and associated logos are
trademarks of DivX Networks, Inc and are used
under license.
i.Link is also known as ‘FireWire’ and ‘IEEE1394’.
This connection is used for the transfer of high
bandwidth digital signals as used by digital video
(DV) camcorders. It carries all audio and video
signals via a single cable.
5
Page 6

Table of Contents
English
General
Care and Safety Information ..........................................................................................8
Setup precautions .................................................................................................................................................8
Cleaning discs ........................................................................................................................................................8
About recycling ..................................................................................................................................................... 8
Product Information ........................................................................................................ 9
Intro duct ion ........................................................................................................................................................... 9
Accessories supplied ...........................................................................................................................................9
Region codes ..........................................................................................................................................................9
Copyright notice ...................................................................................................................................................9
Product Overview
Remote Control ............................................................................................................. 10
Using the remote control ................................................................................................................................12
Main Unit ......................................................................................................................... 13
Connections
Step 1: Basic Recorder Connections ............................................................................ 14
Connecting the antenna cables ......................................................................................................................14
Connecting the video cables ...........................................................................................................................15
Connecting the audio cables ...........................................................................................................................16
Step 2: Optional Connections ....................................................................................... 17
TV has only an antenna input jack .................................................................................................................17
Connecting to a Cable Box or Satellite Receiver .....................................................................................18
Connecting to a VCR or other similar device ............................................................................................19
Connecting to a VCR and Cable Box/Satellite Receiver ........................................................................ 20
Connecting a camcorder ..................................................................................................................................21
Step 3: Installation and Setup .......................................................................................23
Finding the correct viewing channel ............................................................................................................ 23
Setting the OSD language ............................................................................................................................... 23
Setting your TV channel programs ................................................................................................................24
Setting the date & time .................................................................................................................................... 25
Recording
Record ing .........................................................................................................................26
Discs for recording ........................................................................................................................................... 26
Recording settings ........................................................................................................................................... 26
RECORD settings .......................................................................................................................................27
Manual recording ............................................................................................................................................... 28
One Touch Recording - automatic turn-off ............................................................................................... 28
About timer recording ......................................................................................................................................29
Timer recording (manually) .............................................................................................................................29
Timer recording ( VCR Plus+
Changing/ Deleting a timer recording ..........................................................................................................32
Watching another TV program during recording .....................................................................................32
®
System) ........................................................................................................31
6
Page 7

Table of Contents
Playback
Playback ...........................................................................................................................33
Playable discs .......................................................................................................................................................33
Inser ting a disc ....................................................................................................................................................33
Starting disc playback ....................................................................................................................................... 34
Additional Playback Features ....................................................................................... 38
Changing to another chapter/ track ............................................................................................................ 38
Pausing playback and step play ..................................................................................................................... 38
Searching forwards /backwards ..................................................................................................................... 38
Zooming in .......................................................................................................................................................... 38
Using T/C options ..............................................................................................................................................39
Edit Recordings
Editing/ Finalizing Recording ........................................................................................42
About disc editing ............................................................................................................................................. 42
Accessing disc editing menu ........................................................................................................................... 42
Playing your recordings (DVD±R) on other DVD players .................................................................... 44
About title editing ............................................................................................................................................. 45
Accessing title editing menu ........................................................................................................................... 45
About video editing ...........................................................................................................................................47
Accessing video editing menu .........................................................................................................................47
Other Information
DVD System Menu Options ..........................................................................................50
Accessing the System Menu ........................................................................................................................... 50
GENERAL settings .....................................................................................................................................51
PLAYBACK settings ...................................................................................................................................53
RECORD settings ......................................................................................................................................55
LANGUAGE settings .................................................................................................................................55
CHANNEL SETUP settings .................................................................................................................... 56
CLOCK settings ..........................................................................................................................................57
Software Upgrade ..........................................................................................................58
Installing the latest software .......................................................................................................................... 58
Troublesho oting .............................................................................................................. 59
Speci cations .................................................................................................................. 62
Frequently Asked Questions .........................................................................................63
Glossary ...........................................................................................................................64
Display panel symbols/ messages ................................................................................. 65
TV System Guide .......................................................................................................... 186
English
7
Page 8
Care and Safety Information
English
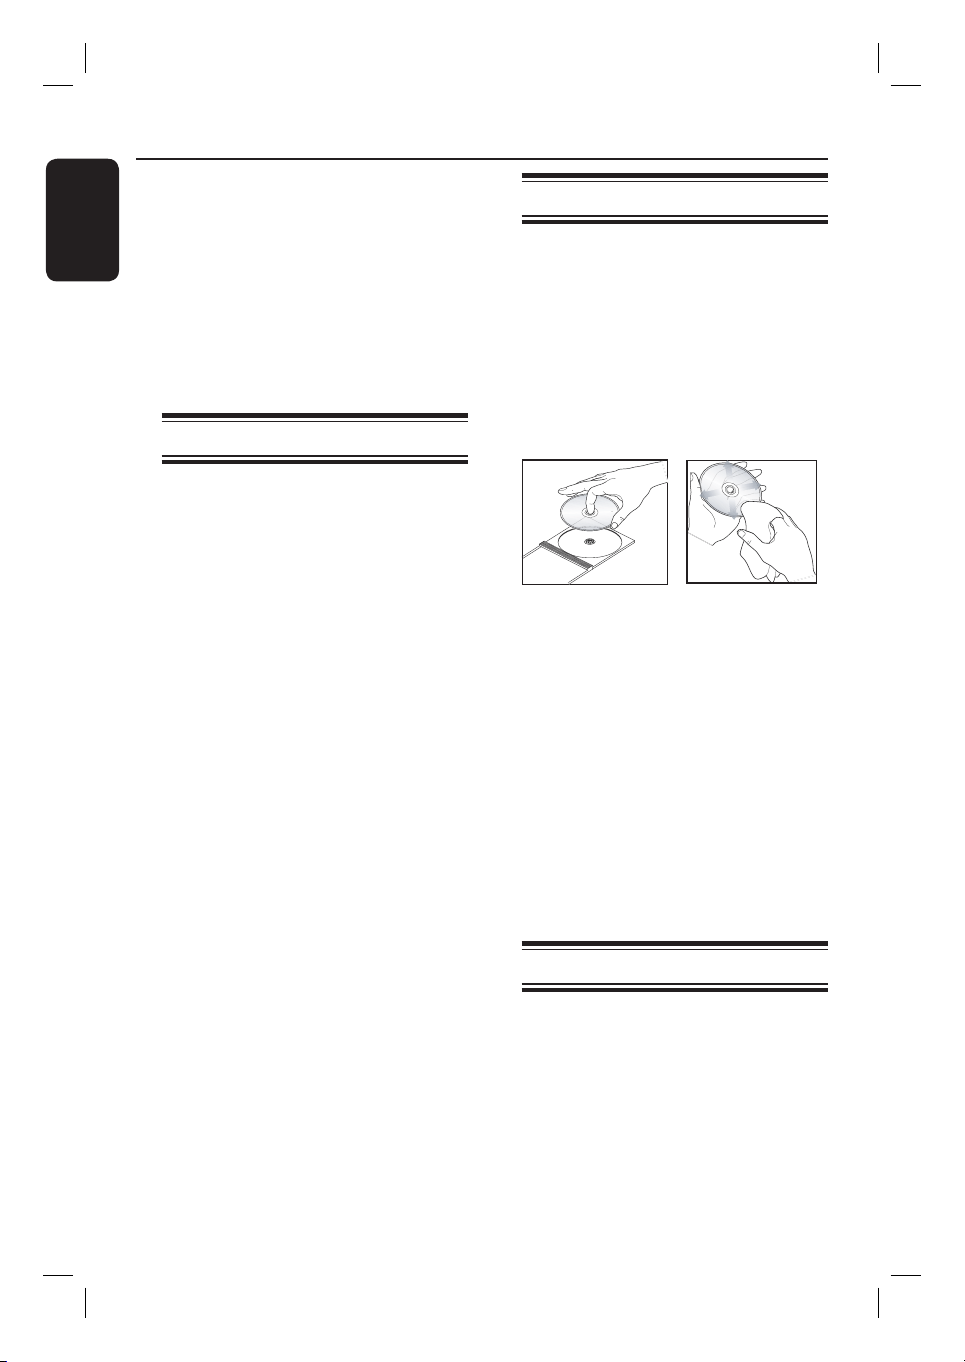
CAUTION!
High voltage! Do not open the
device. You run the risk of getting
an electric shock.
The machine does not contain any
user-serviceable parts. Please leave
all maintenance work to quali ed
personnel.
Setup precautions
Finding a suitable location
– Place the set on a at, hard and stable
surface. Do not place the set on a carpet.
– Do not position the set on top of
other equipment that might heat it up
(e.g., receiver or ampli er).
– Do not put anything above or under
the set (e.g., CDs, magazines).
– Install this unit near the AC outlet and
where the AC power plug can be
reached easily.
Space for ventilation
– Place the apparatus in a location with
adequate ventilation to prevent internal
heat build up. Allow at least 10 cm (4”)
clearance from the rear and the top of
the set and 5 cm (2”) from the left and
right to prevent overheating.
Cleaning discs
Some problems occur because the disc
inside the recorder is dirty (frozen
picture, sound disruptions, picture
distortions). To avoid these problems,
discs should be cleaned on a regular
basis.
To clean a disc, use a micro bre cleaning
cloth and wipe the disc from the centre
to the edge in a straight line.
CAUTION!
Do not use solvents such as benzene,
thinner, commercially available cleaners,
or anti-static sprays intended for
analogue discs.
Since the optical unit (laser) of the
recorder operates at a higher power than
regular DVD or CD players, cleaning
CDs intended for DVD or CD players
may damage the optical unit (laser).
Therefore, refrain from using a cleaning
CD.
Avoid high temperatures, moisture,
water and dust
– Apparatus shall not be exposed to
dripping or splashing.
– Do not place any sources of danger
on the apparatus (e.g., liquid lled
objects, lighted candles).
8
About recycling
These operating instructions have been
printed on non-polluting paper. This
electronic equipment contains a large
number of materials that can be recycled.
If you are disposing of an old machine,
please take it to a recycling centre. Please
observe the local regulations regarding
disposal of packaging materials, exhausted
batteries, and old equipment.
Page 9
Product Information
ALL
4
Introduction
Your Philips recorder allows you to
record the TV programs or duplicate
camcorder recordings to a DVD±RW or
DVD±R and play pre-recorded DVDs.
The recordings you make on the
recorder will play on DVD players and
DVD-ROM drives. The DVD±R discs
have to be nalized before they can be
played back on other DVD players.
Before you start using this recorder,
complete the basic connections and
set-up in three easy steps.
Step 1: Basic recorder connections
Step 2: Optional connections for
other devices
Step 3: Basic installation and set-up
Please take time to read this user manual
before using your recorder. It contains
important information and notes
regarding the operations of the recorder.
Helpful Hints:
– If you have questions or if problems come
up during operation, please see the chapter
‘Troubleshooting’.
– If you need further assistance, please call
the customer support service for your
country. The corresponding telephone
numbers and email addresses are given in
the guarantee booklet.
– Refer to the type plate on the rear or
bottom of the product for identi cation and
supply ratings.
Accessories supplied
– Remote control and batteries
– Audio/video cable
– RF coaxial cable
– Quick Start Guide
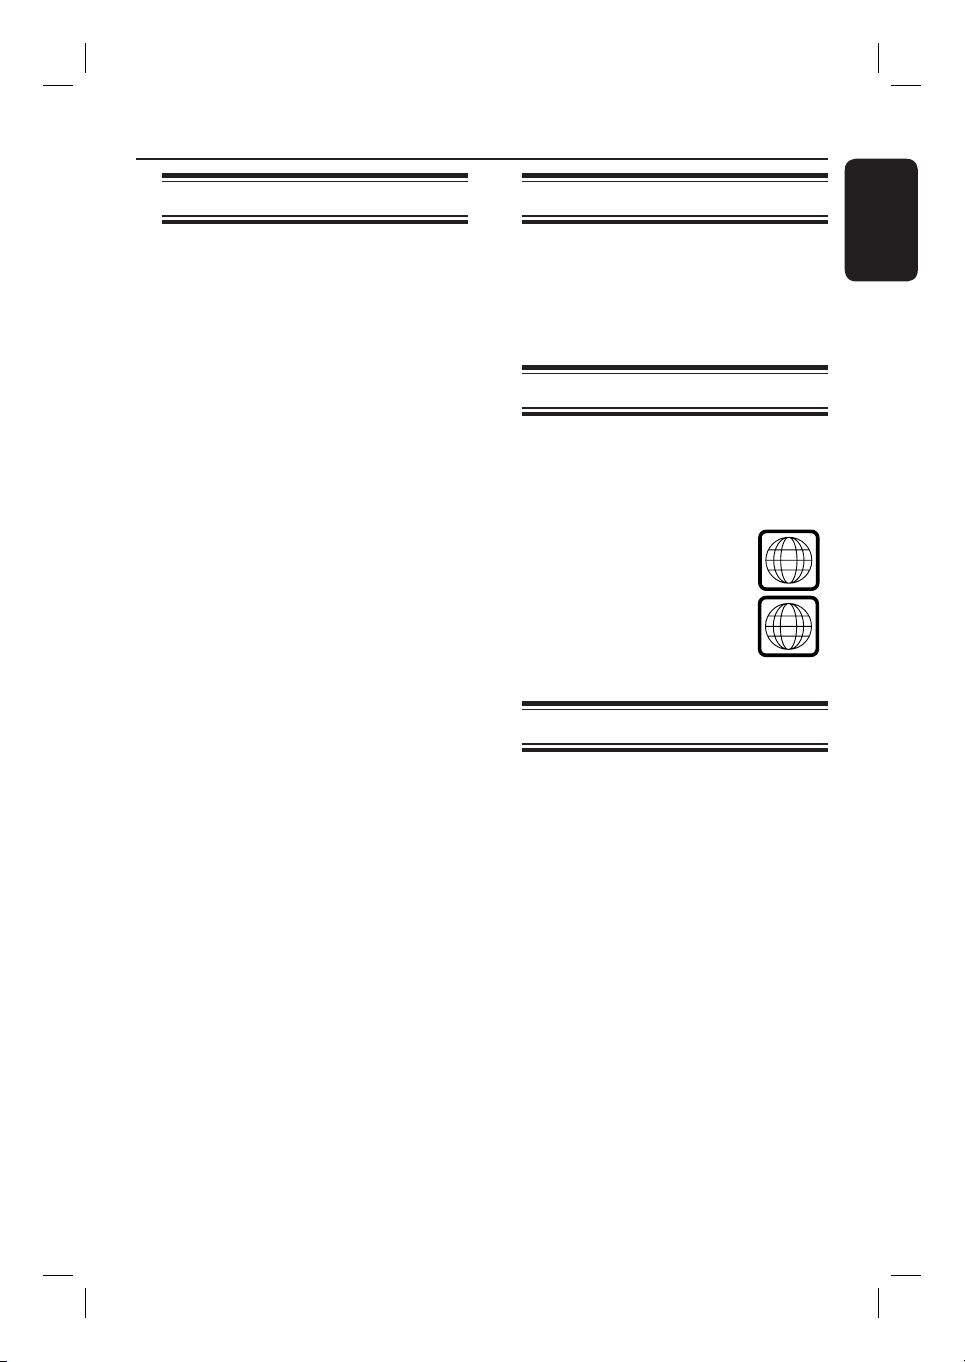
Region codes
DVD lms are usually not released at the
same time in all regions of the world,
thus all DVD players are keyed to a
speci c region code.
This device will only play
Region 4 DVDs or DVDs
manufactured to be played in
all regions (‘ALL’). DVDs from
other regions cannot be
played on this recorder.
Copyright notice
The making of unauthorized copies of
copy-protected material, including
computer programs, les, broadcasts and
sound recordings, may be an infringement
of copyrights and constitute a criminal
offence. This equipment should not be
used for such purposes.
English
9
Page 10
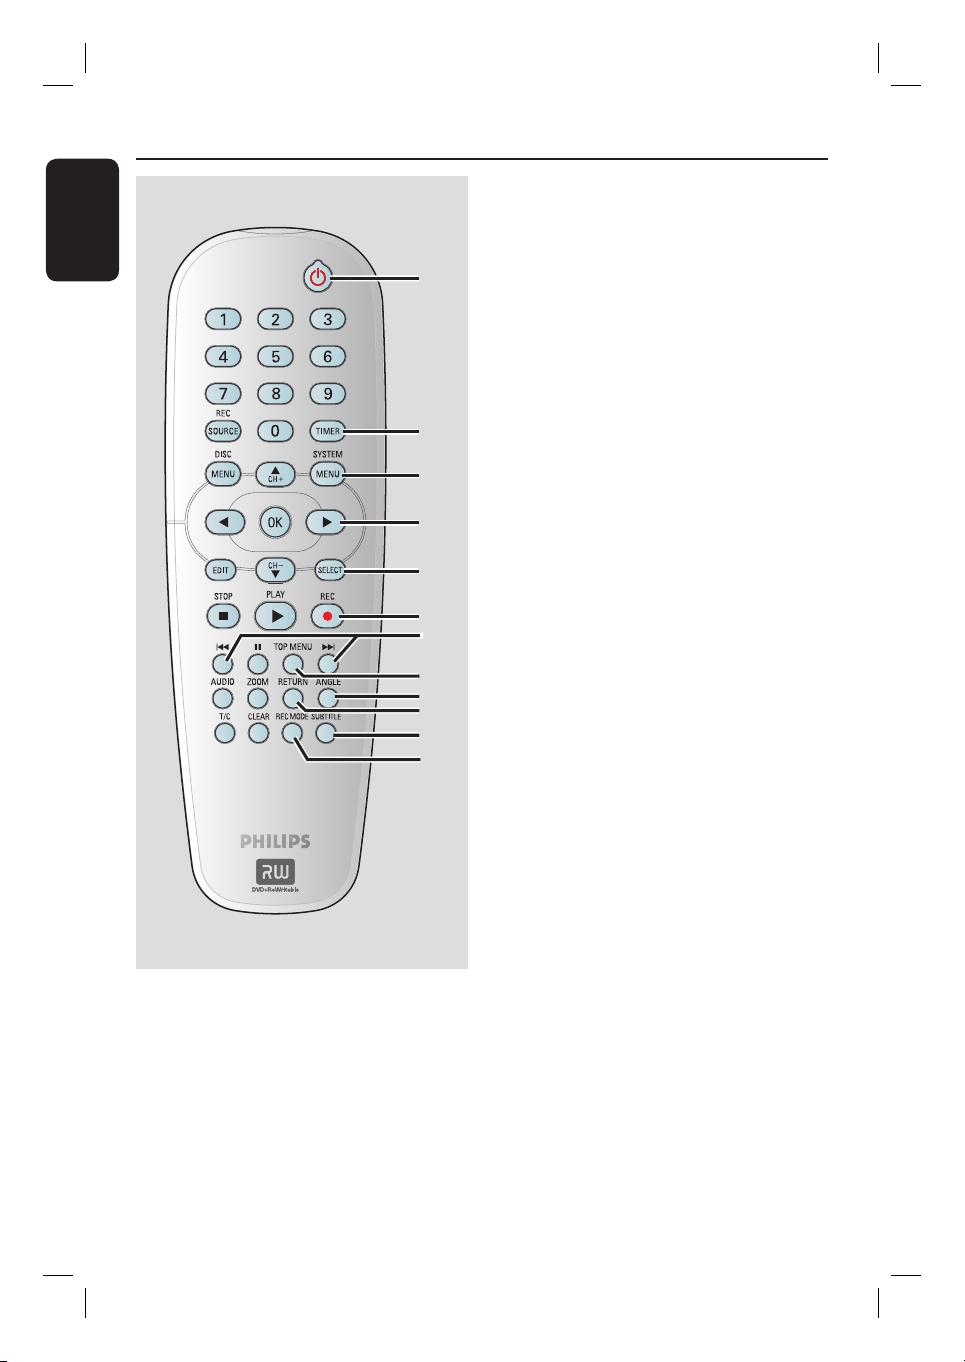
Remote Control
English
a
b
c
d
e
f
g
h
i
j
k
l
a
STANDBY-ON 2
– Turns on the recorder or switches to
standby mode.
b
TIMER
– Enters/exits the timer recording menu.
c
SYSTEM-MENU
– Enters/exits the system menu.
d
W X : Cursor keys for moving to the left
or right, or making a forward/reverse
search.
ST : Cursor keys for moving up/down
or changing the recorder’s TV tuner
channel.
e
SELECT
– Selects a track/chapter/ le in the program
menu.
f
REC
– Starts recording the current TV channel
– Press repeatedly to set up a One Touch
g
. >
– Skips to previous or next chapter/track.
– Press and hold to make a fast forward/
h
TOP MENU (For DVD±R/±RW only)
– Enters the disc editing menu.
i
ANGLE
– Selects a DVD disc camera angle
j
RETURN
– Returns to the previous menu of a video
k
SUBTITLE
– Selects a DVD subtitle language.
l
REC MODE
– Toggles between recording modes :
This determines the quality of the
or the current video input source.
Recording at 30, 60 or 90 minutes
interval.
fast reverse search.
(if available).
CD (VCD) or some DVDs.
HQ, SP, EP or SLP.
recording and the amount/length of time
you can record on a DVD±R/±RW.
10
Page 11
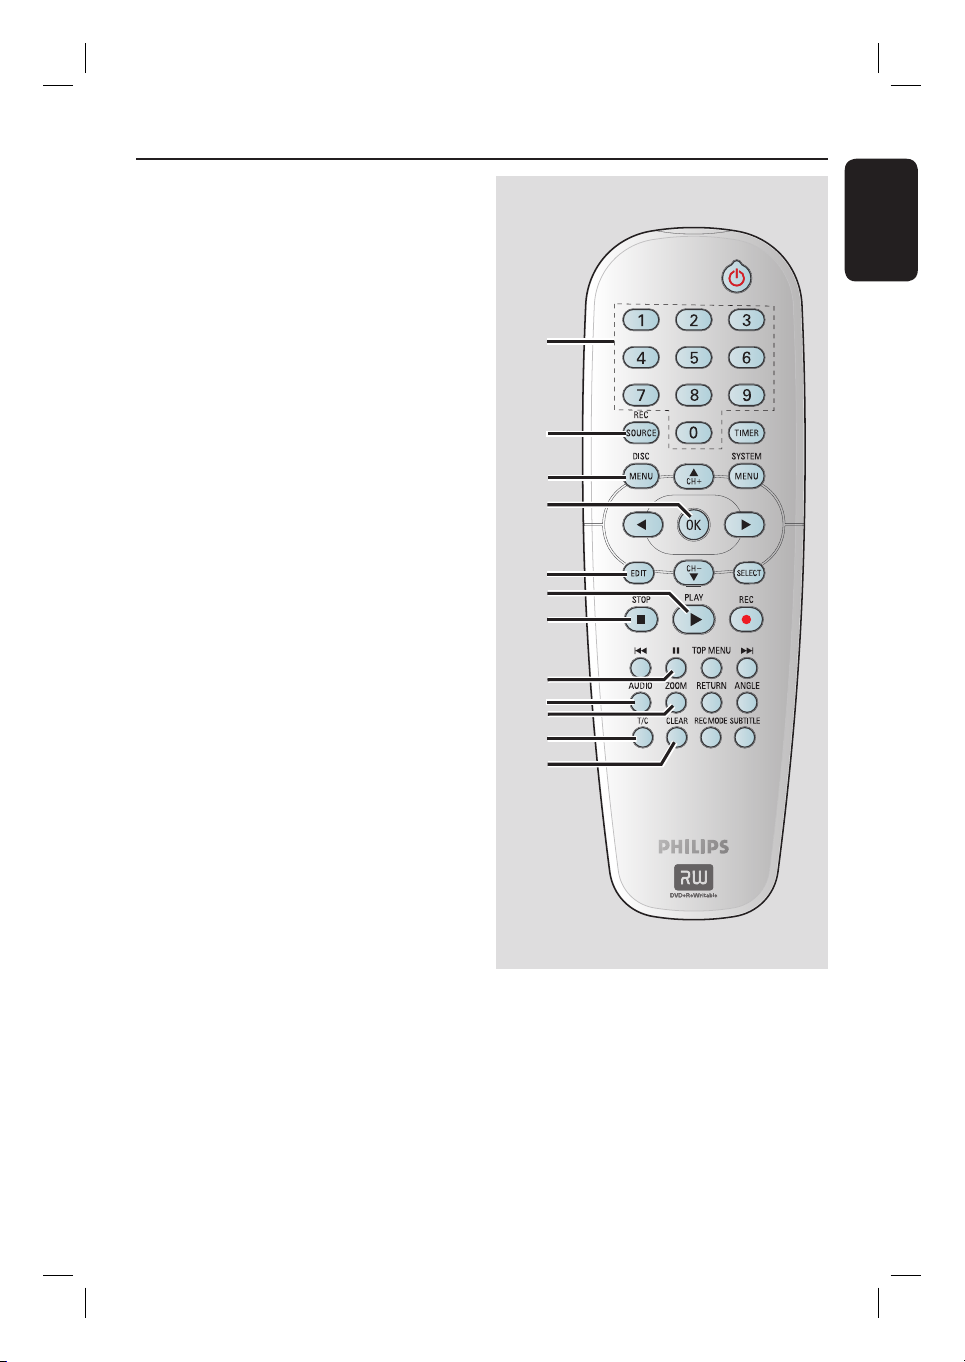
m
Numeric keypad
– Selects a chapter/track number to play.
– Selects the recorder’s preset TV tuner
channel.
n
REC SOURCE
– Selects the recorder’s input source.
o
DISC MENU
– Access the DVD disc menu or Index
Picture screen of a DVD±R/±RW.
– Access the VCD disc menu when PBC is
turned on.
p
OK
– Stores/con rms an entry.
– Displays/removes the status bar.
q
EDIT (For DVD±R/±RW only)
– Enters/exits the video editing menu.
r
PLAY
É
– Plays a disc.
– Plays a recording
s
STOP
– Stops playback/recording.
– Press and hold the button to open/close
t
– Pauses the playback or recording.
– Press repeatedly to advance a paused
u
AUDIO
– Selects an audio language (DVD, VCD) or
– TUNER: toggles bewteen stereo, mono
v
ZOOM
– Enlarges a picture on the TV screen.
w
T/C (Title/Chapter)
– Enters/exits the T/C menu.
x
CLEAR
– Clears a track/chapter/ le in the program
menu.
– Clears a timer entry.
the disc tray.
Å
picture one frame at a time.
an audio channel.
and SAP (refer to your TV manual for
available sound modes).
Remote Control (continued)
English
m
n
o
p
q
r
s
t
u
v
w
x
11
Page 12
Remote Control (continued)
English
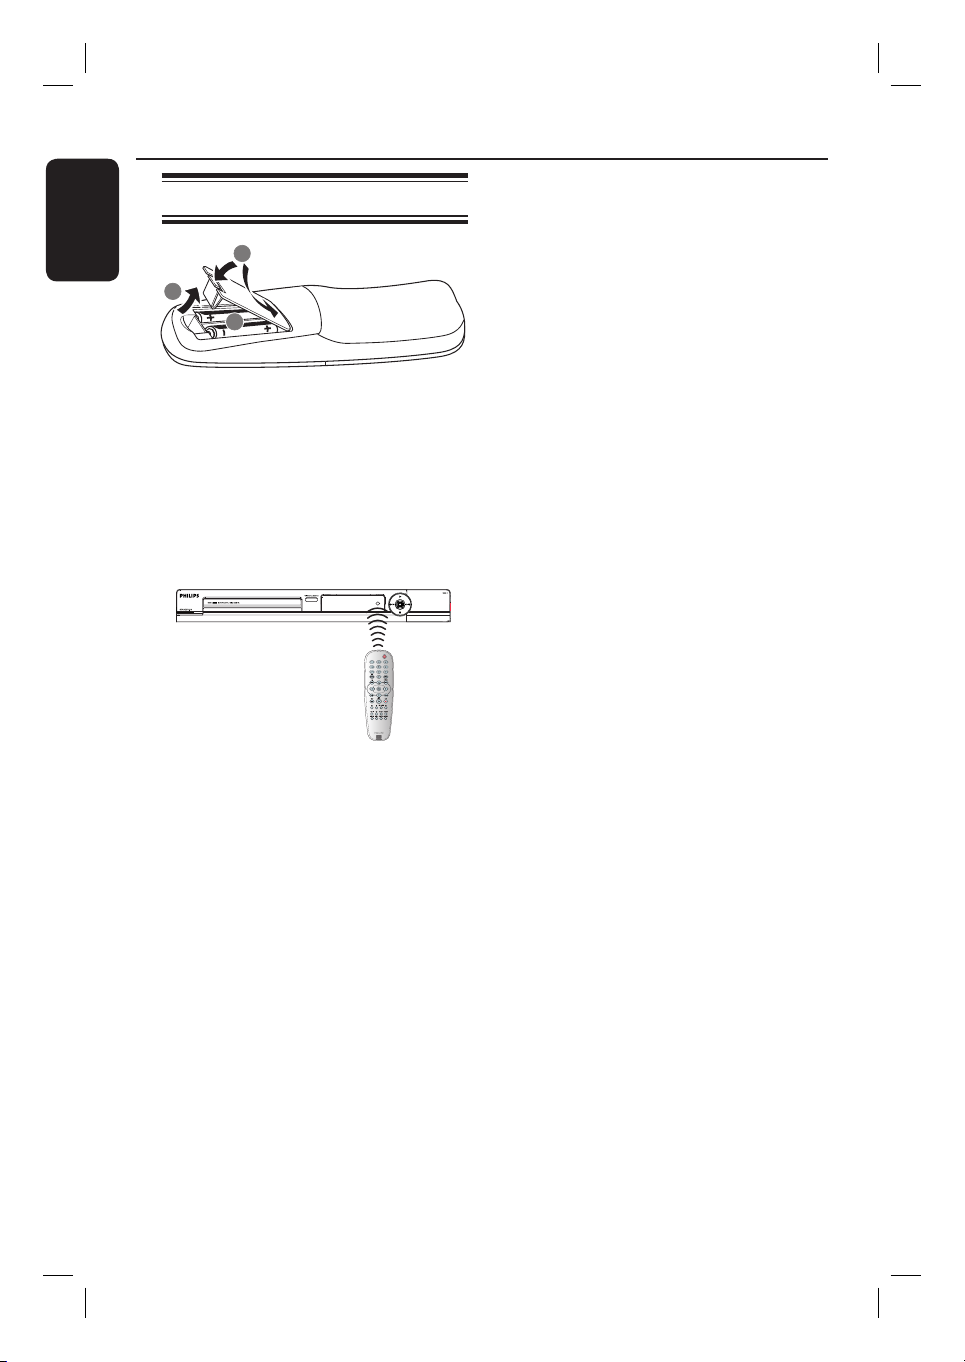
Using the remote control
3
1
2
A
Open the battery compartment.
B
Insert two batteries of type R06 or AA,
following the indications (+-) inside
the compartment.
C
Close the cover.
D
Aim the remote control directly at the
remote sensor (IR) on the front panel.
CAUTION!
– Remove batteries if they are
exhausted or if the remote control
is not to be used for a long time.
– Do not mix batteries (old and new
or carbon and alkaline, etc).
– Batteries contain chemical
substances, so they should be
disposed of properly.
E
Select the source you want to control by
pressing the REC SOURCE button on
the remote control.
F
Select the desired function (for example
., >).
12
Page 13
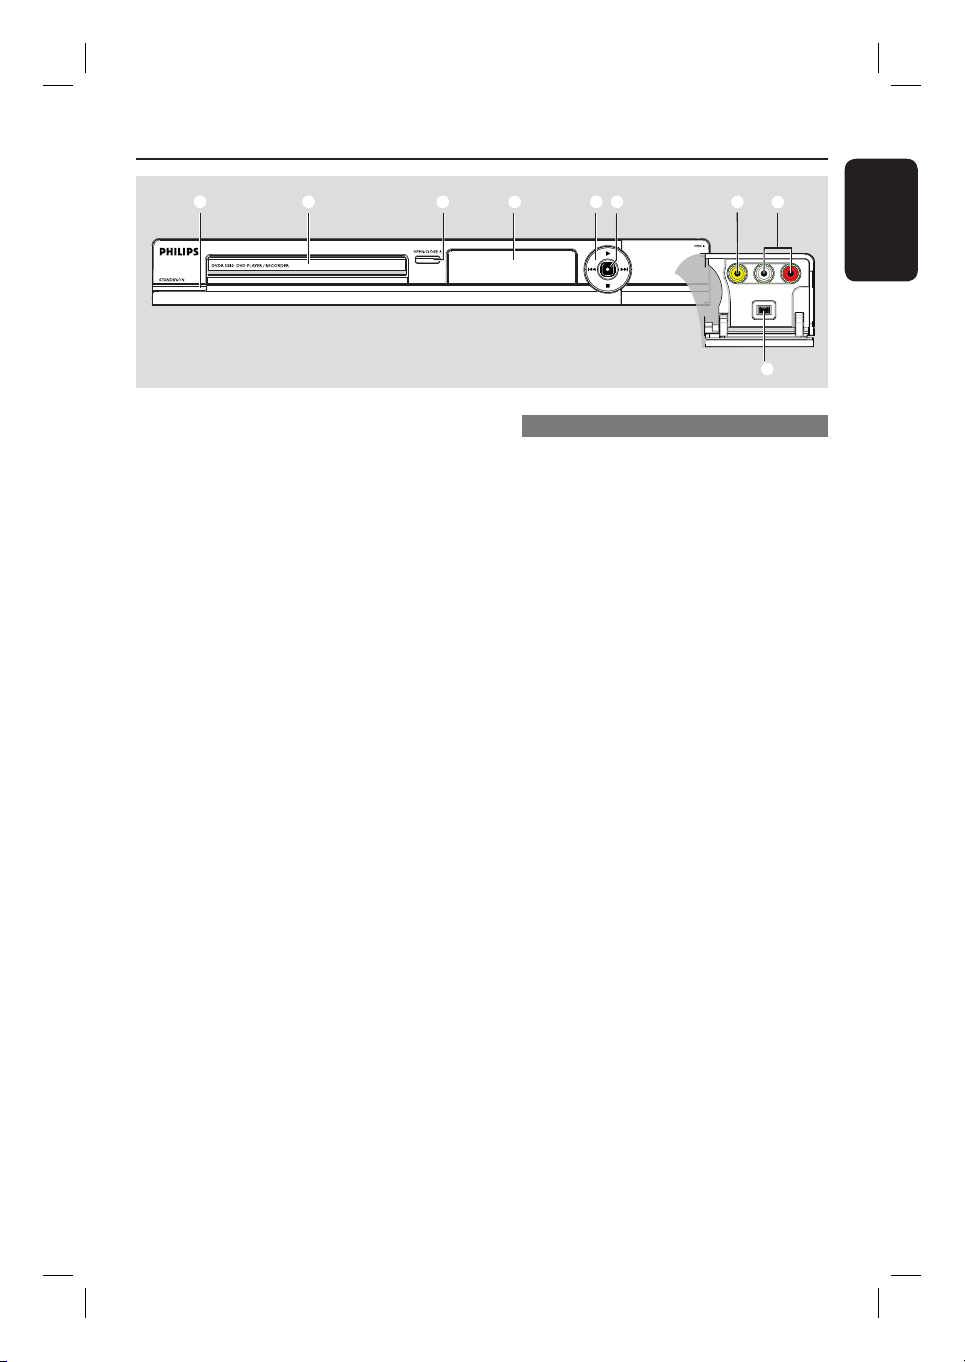
Main Unit
a b c d e f
a
STANDBY-ON
– Turns on the recorder or switch to
standby mode.
b
Disc tray
c
OPEN/CLOSE
– Opens/closes the disc tray.
d
System display panel
– Shows information about the current
status of the recorder.
e
.(PREV) / > (NEXT)
– Go to the previous/next chapter or track.
Press and hold to make a forward/
reverse search.
(PLAY)
É
– Plays a disc.
– Plays a recording.
(STOP)
– Stops playback/recording.
ç
g
h
i
Jacks behind the ap
Flip down the door as indicated by the
OPEN X label at the right hand corner.
g
VIDEO
– Video input for camcorders or video
recorders.
Press REC SOURCE on the remote
control to select ‘CAM1’ in order to
view the input source.
h
L/R AUDIO
– Audio input for camcorders or video
recorders.
i
DV IN
– Input for digital camcorders or other
suitable devices using this connector.
Press REC SOURCE on the remote
control to select ‘DV’ in order to view
the input source.
English
f
(RECORD)
– Starts recording the current TV channel
or the current video input source.
– Press repeatedly to set up a One Touch
Recording at 30, 60 or 90 minutes
interval.
13
Page 14
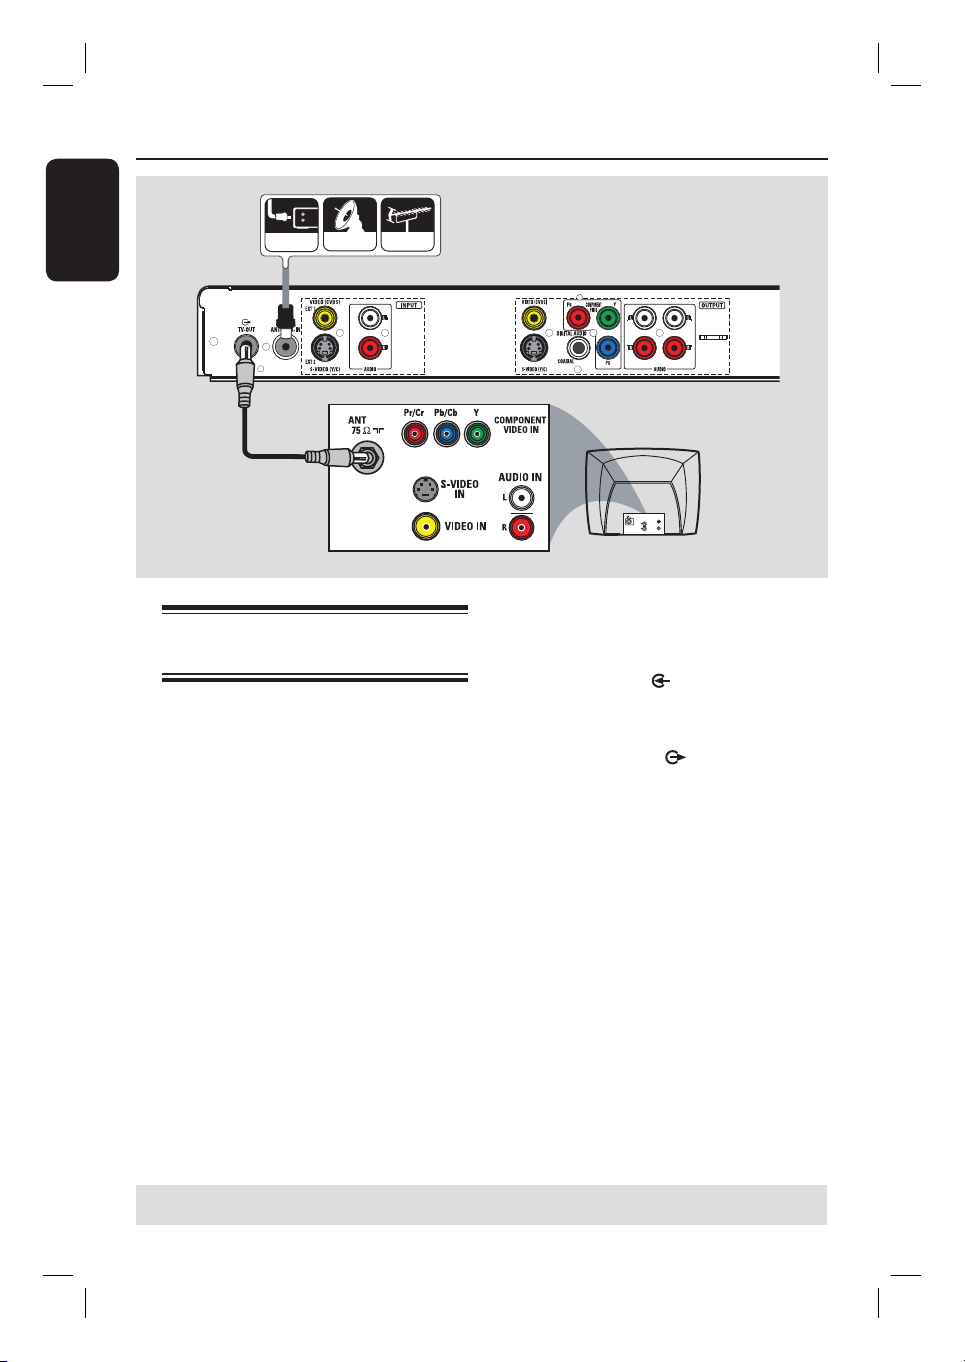
Step 1: Basic Recorder Connections
English
CABLE
SATELLITE
ANTENNA
A
B
Connecting the antenna
cables
These connections enable you to watch
and record TV programs using the
recorder. If the antenna signal is
connected via a VCR, Cable Box or
Satellite Receiver, ensure that these
devices are turned on in order to watch
or record the cable programs.
If you want to connect to a VCR
and/or Cable Box/Satellite Receiver,
see the chapter “Step 2 : Optional
Connections” for the complete
connections to your TV.
TV
S-VID E O
IN
AUDIO
OUT
VIDEO IN
A
Connect the existing Antenna/Cable TV
signal (or from the Cable Box/Satellite
Receiver {RF OUT or TO TV}) to the
ANTENNA-IN
recorder.
B
Use the supplied RF coaxial cable to
connect TV-OUT
recorder to the antenna input jack on
your TV (VHF/UHF RF IN).
Helpful Hint:
– Depending on how you have currently
connected your TV channel (directly from an
off-air antenna or Cable box or VCR), you
will have to disconnect some of the cables
before you make the above connection.
jack on the
jack on the
TIPS: Before making or changing any connections, make sure that all the devices are disconnected
from the power outlet.
14
Page 15
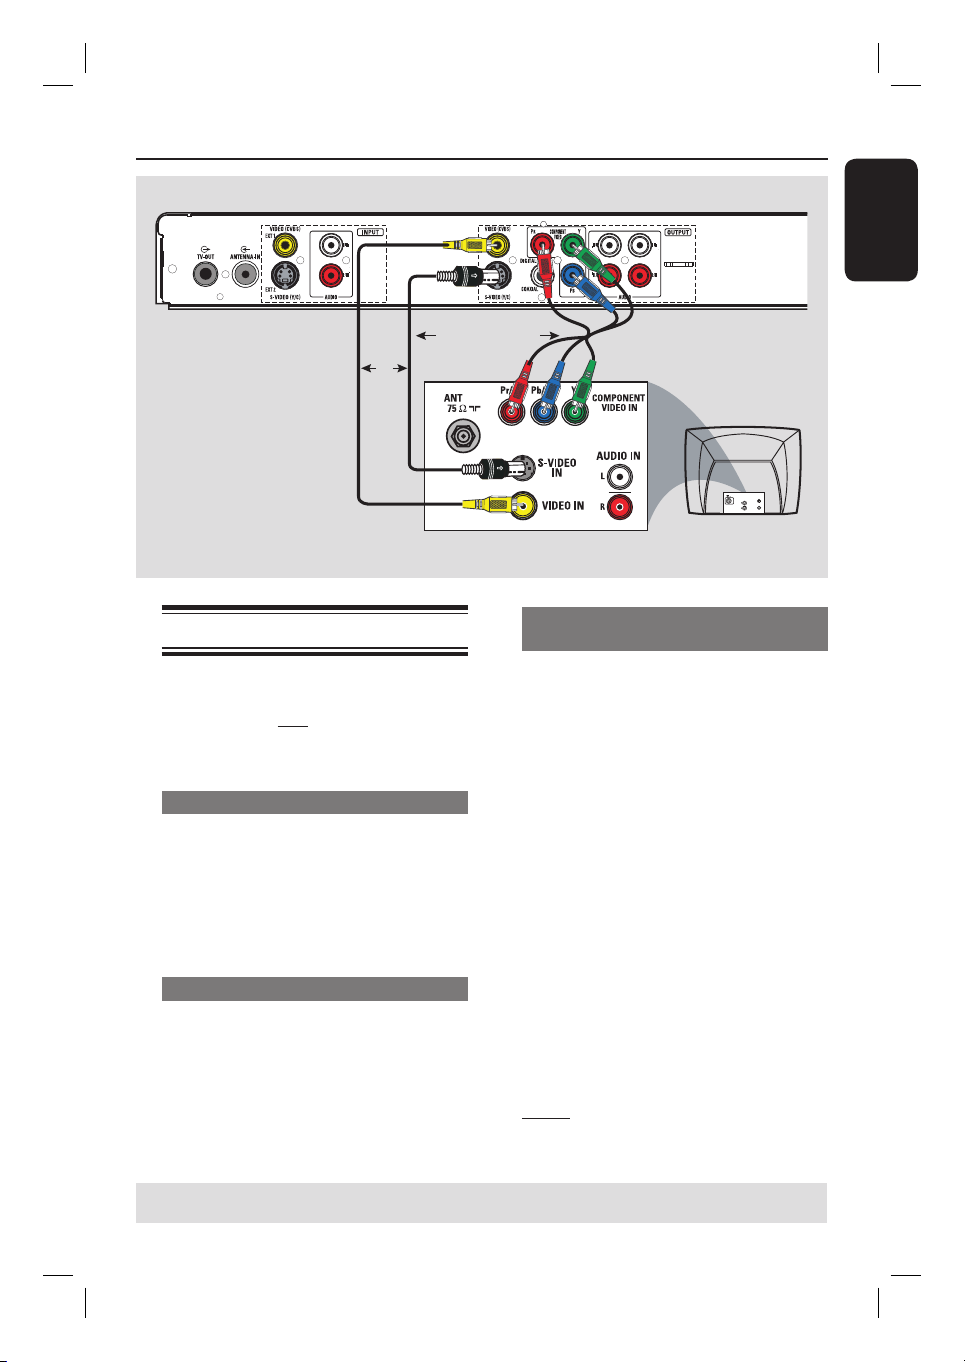
Step 1: Basic Recorder Connections (continued)
English
OR
Option 1
Option 2
Connecting the video cables
This connection enables you to view the
disc playback from the recorder. You only
need to choose one of the options below
to make your video connection.
Option 1: Using Video (CVBS) jack
Use the supplied audio/video cable
(yellow plug) to connect the VIDEO
(CVBS)-OUTPUT jack on the
recorder to the video input jack (or
labeled as A/V In, Video In or Composite)
on the TV.
Option 2: Using an S-Video cable
Use an S-video cable (not supplied) to
connect the S-VIDEO (Y/C) OUTPUT jack on the recorder to the
S-Video input jack (or labeled as Y/C or
S-VHS) on the TV.
OR
Option 3
TV
S-VID E O
IN
AUDIO
OUT
VIDEO IN
Option 3: Using a Component
(Y Pb Pr) cable
A
Use the component video cable (red/
blue/green - not supplied) to connect the
Y PB PR -OUTPUT jacks on the
recorder to the corresponding
component video input jacks (or labeled
as Y Pb/Cb Pr/Cr or YUV) on the TV.
B
If your TV accepts Progressive Scan
signal, see the chapter “DVD System
Menu Options – GENERAL Settings” for
detailed Progressive Scan set-up.
IMPORTANT!
The progressive scan video quality is
only available through a Y PB P
connection and a progressive TV is
required. It is strongly advised to
complete the recorder installation
rst, before enabling the progressive
scan feature.
Note: Audio connection is required in
order to hear the sound, see next section
“Connecting the audio cables”.
R
TIPS: Before making or changing any connections, make sure that all the devices are disconnected
from the power outlet.
15
Page 16
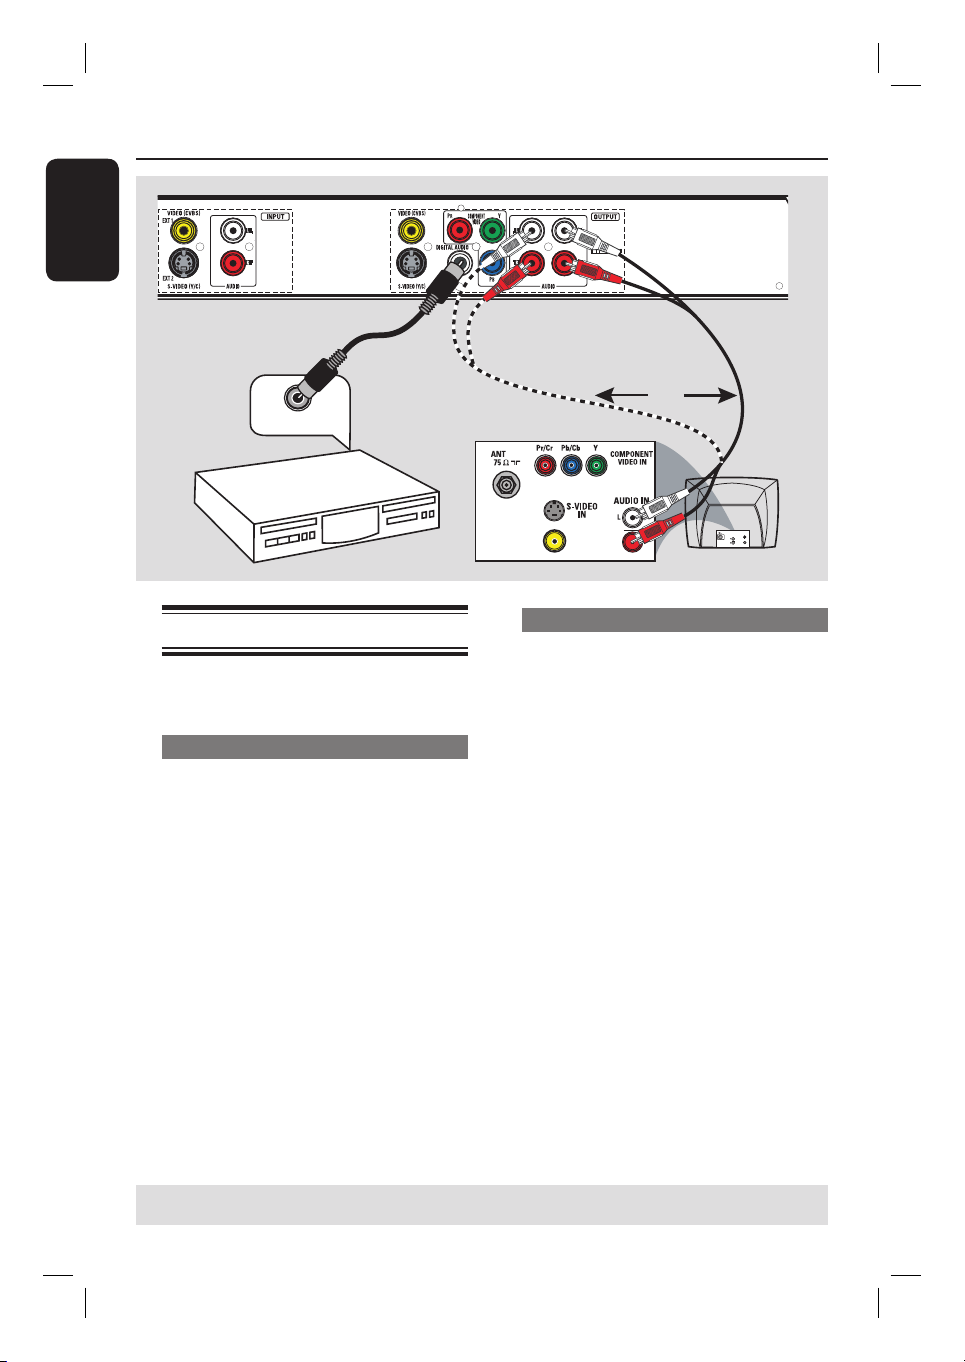
Step 1: Basic Recorder Connections (continued)
English
Option 2
DIGITAL IN
AV ampli er/
receiver
Connecting the audio cables
This connection enables you to listen to
the sound.
Option 1: Using an audio cable
You can connect the recorder to a two
channel stereo system or receiver in
order to enjoy the stereo sound system.
Use an audio cable (red/white ends) to
connect the AUDIO L/R OUTPUT
jacks to one of the following devices with
the same input jacks.
– a stereo system (for example, TV or
mini system).
– a receiver with two channel analogue
stereo.
Option 1
OR
TV
S-VIDE O
IN
AUDIO
OUT
VIDEO IN
Option 2: Using a coaxial cable
You can connect the recorder to an AV
ampli er/receiver with a digital
multichannel sound decoder in order to
enjoy multichannel surround sound.
Use a coaxial cable (not supplied).
Connect the DIGITAL AUDIO
COAXIAL OUTPUT jack on the
recorder to the digital input of the
receiver/ampli er.
Before you start operating, set the digital
audio output settings accordingly (see the
chapter “DVD System Menu Options PLAYBACK settings). If the audio setting
does not match your stereo’s capabilities,
the stereo may produce a strong,
distorted sound or no sound at all.
Helpful Hint:
– Do not connect your TV’s audio output
jacks to the AUDIO-L/-R INPUT jacks on this
recorder, this may cause unwanted
noise.
TIPS: Before making or changing any connections, make sure that all the devices are disconnected
from the power outlet.
16
Page 17
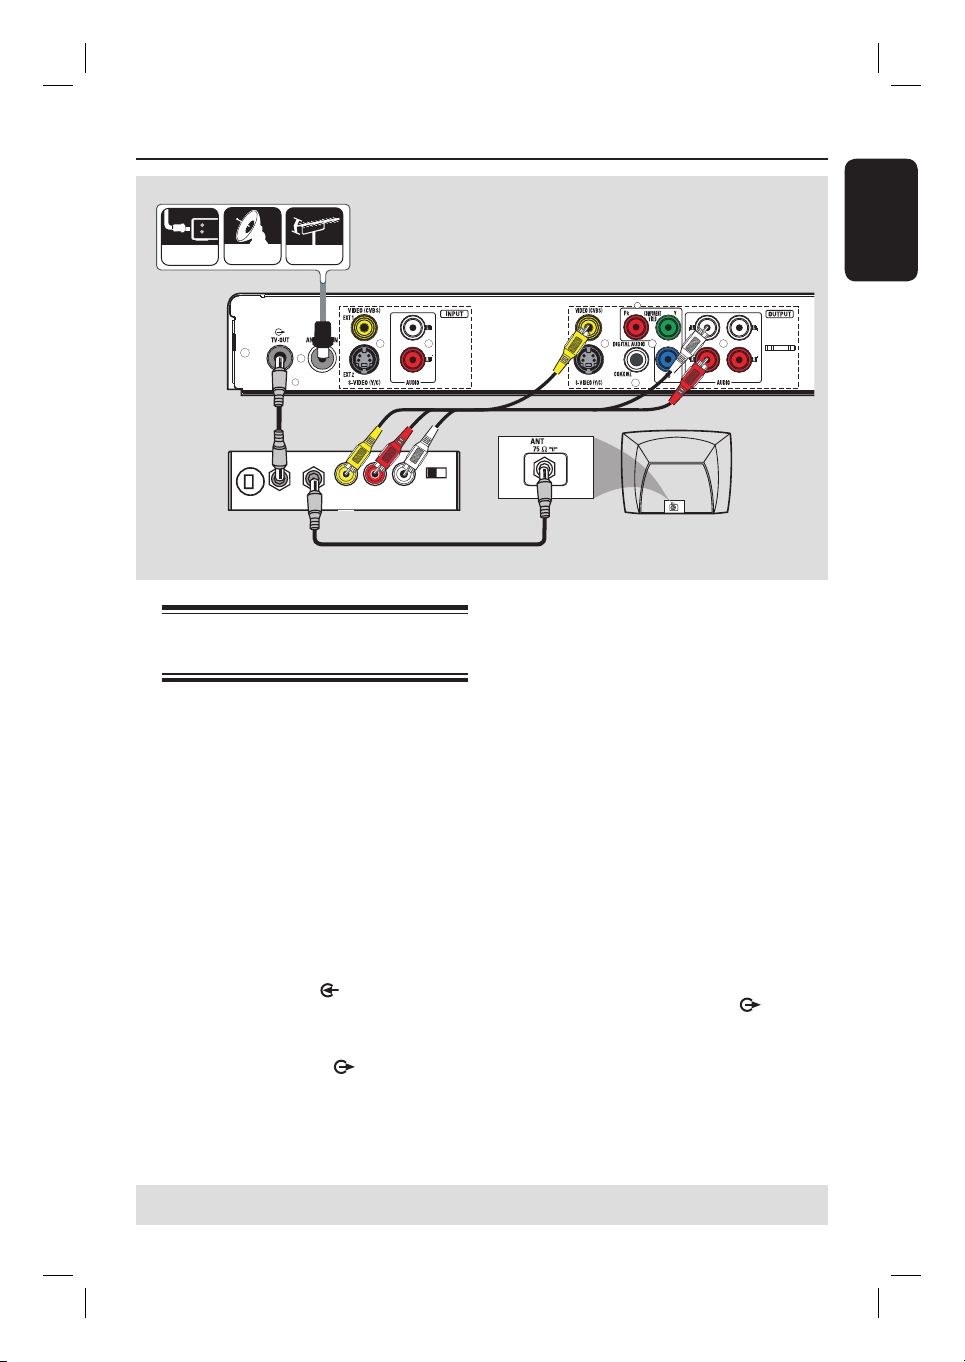
Step 2: Optional Connections
CABLE
SATELLITE
ANTENNA
A
B
TO TV
R L
VIDEO
AUDIO IN
Rear of an RF
Modulator
(Example only)
ANT IN
IN
TV has only an antenna input
jack
Use this connection if your TV has only a
single Antenna In jack (or labeled as
75 ohm or RF In) and does not have any
audio/video jacks.
For this type of connection, you
need an RF modulator in order to
view the disc playback.
A
If you have an Antenna/Cable TV signal
(or from the Cable Box/Satellite
Receiver/VCR) connected to your TV’s
antenna input jack (VHF/UHF RF IN.)
Remove it from the TV and connect it to
the ANTENNA-IN jack on the
recorder.
B
Use the supplied RF coaxial cable to
connect the TV-OUT jack on the
recorder to the antenna input jack on the
RF modulator.
CH3 CH4
D
E
TV
C
C
Use a RF coaxial cable (not supplied) to
connect the TO TV jack on the RF
modulator to the antenna input jack on
your TV.
D
Use the supplied AV cables (yellow plug)
to connect the VIDEO(CVBS)
OUTPUT jack on the recorder to the
video input jack (or labeled as A/V In,
Video In, Composite or Baseband) on the
RF modulator.
E
Use the supplied AV cables (red/white
plugs) to connect the AUDIO
OUTPUT jacks on the recorder to the
audio input jack (or labeled as AUDIO IN
or LINE IN) on the RF modulator.
Helpful Hints:
– If you have used the TV-OUT jack to
connect your recorder to TV, set your TV to
channel 3 or 4. If you have used VIDEO/
AUDIO OUTPUT connection, set the TV to
the appropriate video input channel.
– See your electronics retailer for details on
RF modulator availability and operations.
English
TIPS: Before making or changing any connections, make sure that all the devices are disconnected
from the power outlet.
17
Page 18
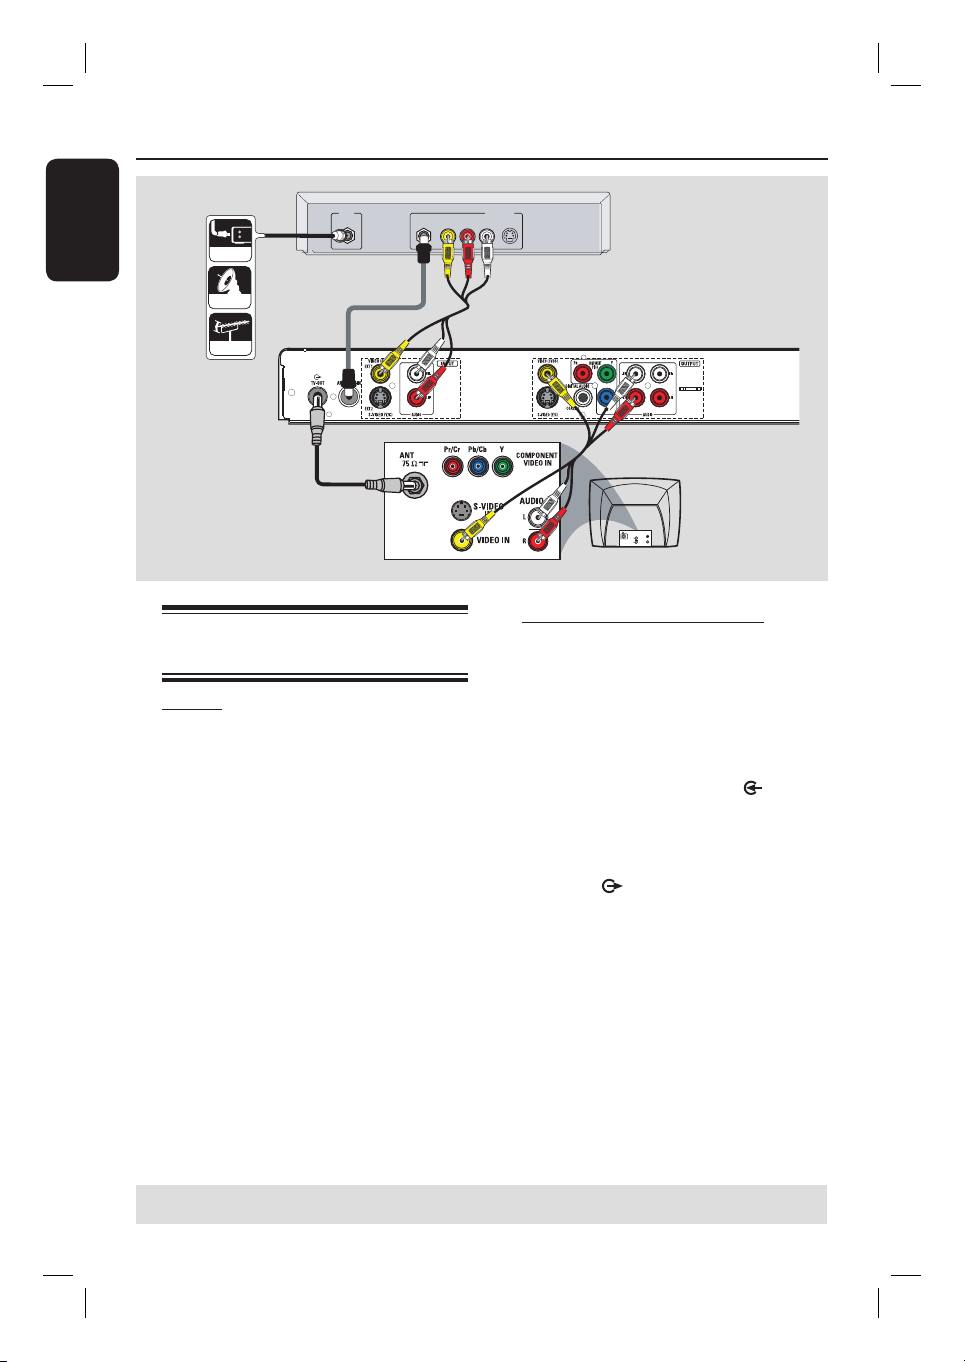
Step 2: Optional Connections (continued)
English
CABLE
SATELLITE
ANTENNA
IN
A
B
VIDEO
RF
C
Connecting to a Cable Box or
Satellite Receiver
Option 1
If your Cable Box/Satellite Receiver
has only an antenna output jack
(RF OUT or TO TV),
see the section “Step 1: Basic Recorder
Connections – Connecting the antenna
cables” for the complete connections to
your TV.
AUDIO
R L
OUT
S-VIDEO
Back of a Cable Box
or Satellite Receiver
(Example only)
D
C
E
TV
S-VIDE O
IN
AUDIO
OUT
VIDEO IN
Option 2 (see the above illustration)
If your Cable Box/Satellite Receiver
has video/audio output jacks,
A
Keep the existing antenna connection
from the Antenna/Cable TV to the Cable
Box/Satellite Receiver.
B
Use the supplied RF coaxial cable to
connect the ANTENNA-IN
the recorder to the RF OUT jack on the
Cable Box/Satellite Receiver.
C
Use a RF coaxial cable to connect the
TV-OUT jack on the recorder to
the antenna input jack on your TV (VHF/
UHF RF IN).
D
Use the audio/video cables to connect
the VIDEO/AUDIO INPUT on the
recorder to the matching VIDEO/AUDIO
output jacks on the Cable Box/Satellite
Receiver.
E
Use the audio/video cables to connect
the VIDEO/AUDIO OUTPUT on the
recorder to the matching VIDEO/AUDIO
input jacks on the TV.
jack on
TIPS: Before making or changing any connections, make sure that all the devices are disconnected
from the power outlet.
18
Page 19
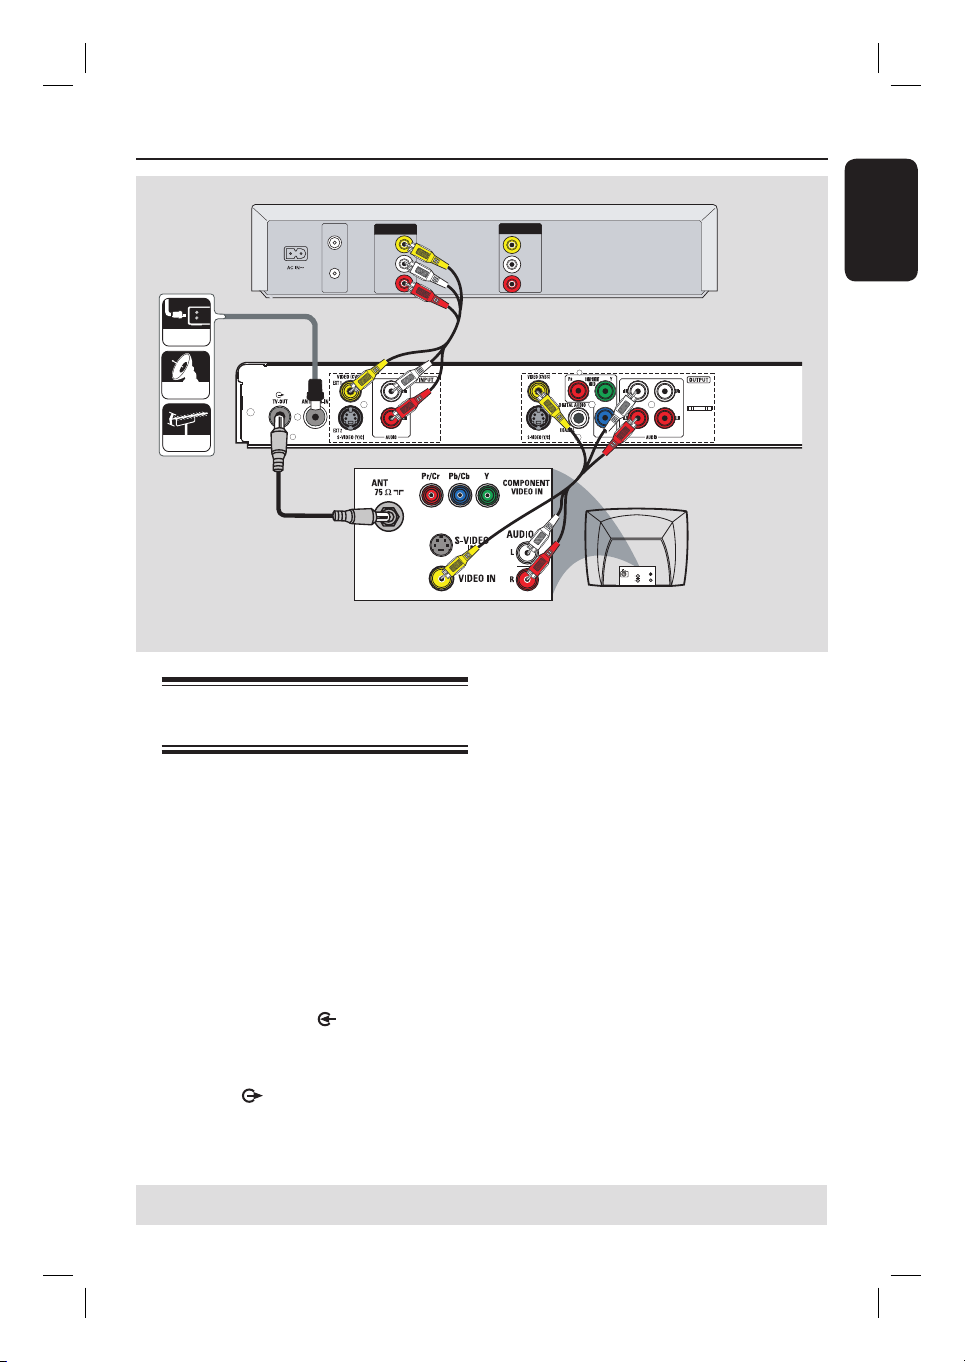
Step 2: Optional Connections (continued)
A
CABLE
SATELLITE
ANTENNA
A
VHF/UHF
VHF/UHF
RF OUT
OUT
RF IN
VIDEO
OUT
AUDIO
L
AUDIO
R
B
Connecting to a VCR or
other similar device
This connection enables you to record
from video tape to a DVD±R/±RW and
allows the VCR to be used for playback if
the recorder is turned off.
IMPORTANT!
Your new recorder can replace the
VCR for all your recording needs.
Just unplug all the connections to
your VCR.
A
Connect the Antenna/Cable TV signal to
the ANTENNA-IN
recorder.
B
Use a RF coaxial cable to connect the
TV-OUT jack on the recorder to
the antenna input jack on your TV (VHF/
UHF RF IN).
jack on the
IN
VIDEO
IN
AUDIO
L
AUDIO
R
Back of a VCR
(Example only)
English
C
D
TV
S-VIDE O
IN
AUDIO
OUT
VIDEO IN
C
Use the audio/video cables to connect
the VIDEO /AUDIO INPUT (red/
white/yellow) on the recorder to the
matching VIDEO/AUDIO output jacks on
the VCR.
D
Use the audio/video cables to connect
the VIDEO/AUDIO OUTPUT (red/
white/yellow) on the recorder to the
matching VIDEO/AUDIO input jacks on
the TV.
Helpful Hints:
– Most commercial video cassettes and
DVDs are copy-protected and therefore
cannot be recorded.
– Connect the recorder directly to the
TV. If there is a VCR or an additional device
in between, the picture quality may be poor
because of the copy protection system built
into the recorder.
TIPS: Before making or changing any connections, make sure that all the devices are disconnected
from the power outlet.
19
Page 20
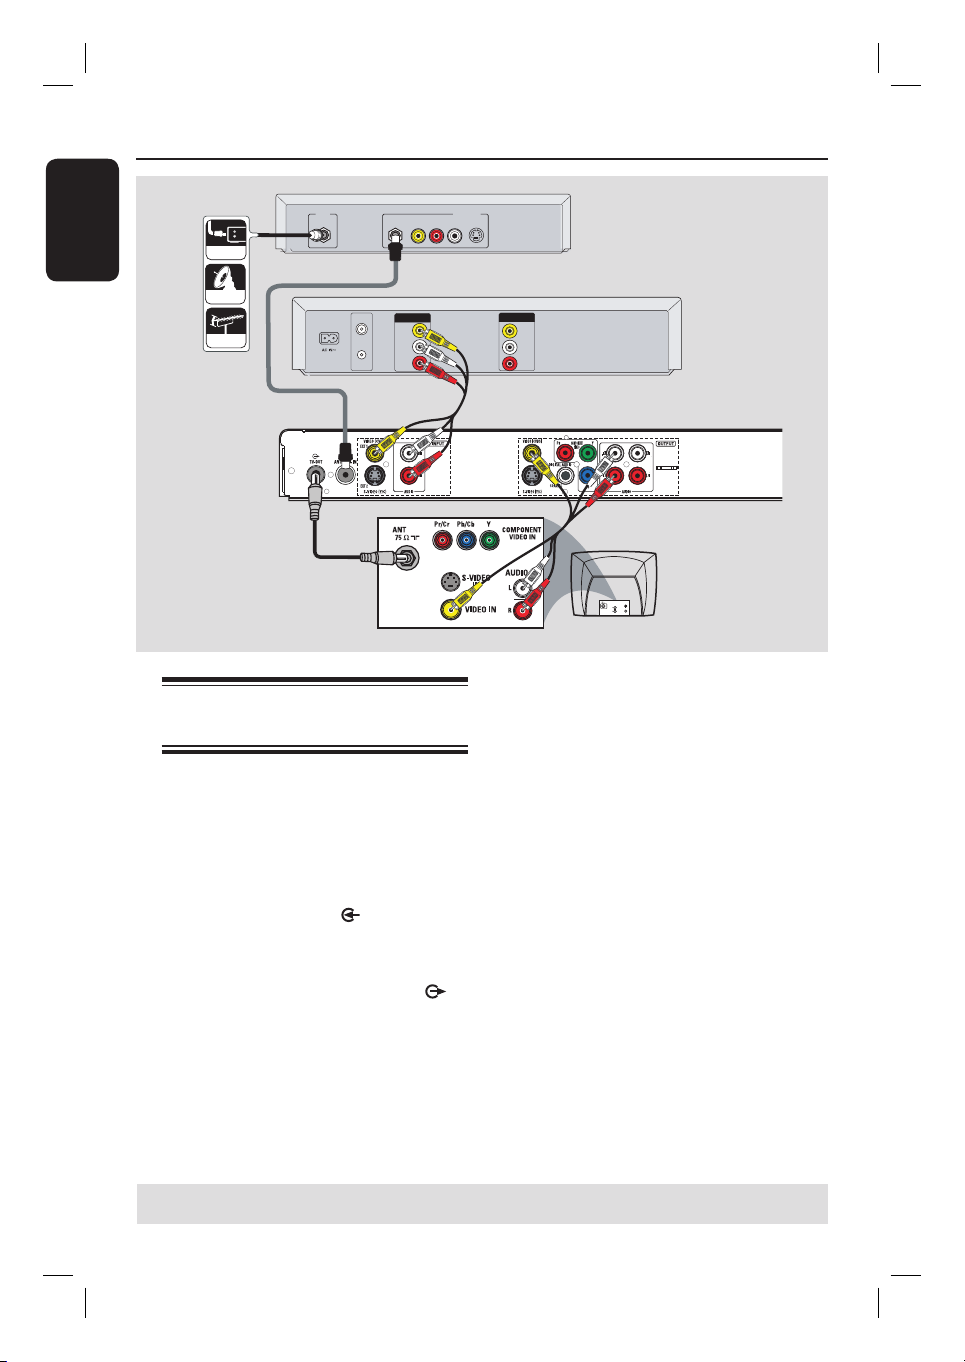
Step 2: Optional Connections (continued)
English
A
CABLE
SATELLITE
ANTENNA
IN
C
Connecting to a VCR and
Cable Box/Satellite Receiver
A
Connect the Antenna/Cable TV signal to
the antenna input (RF IN) jack on the
Cable Box/Satellite Receiver.
B
Use the supplied RF coaxial cable to
connect the antenna output (RF OUT)
jack on the Cable Box/Satellite Receiver
to the ANTENNA-IN
recorder.
C
Use another RF coaxial cable (not
supplied) to connect the TV-OUT
jack on the recorder to the antenna input
jack on the TV.
RF
B
VHF/UHF
OUT
RF IN
VIDEO
OUT
AUDIO
L
AUDIO
VHF/UHF
R
RF OUT
jack on the
VIDEO
R L
D
AUDIO
OUT
S-VIDEO
Back of a Cable Box
or Satellite Receiver
(Example only)
IN
VIDEO
IN
AUDIO
L
AUDIO
R
Back of aVCR
(Example only)
E
TV
S-VIDEO
IN
AUDIO
OUT
VIDEO IN
D
Use the audio/video cables to connect
the VIDEO/AUDIO INPUT (red/
white/yellow) on the DVD recorder to
the matching VIDEO/AUDIO output
jacks on the VCR.
E
Use the audio/video cables to connect
the VIDEO/AUDIO OUTPUT (red/
white/yellow) on the DVD recorder to
the matching VIDEO/AUDIO input jacks
on the TV.
Helpful Hints:
– You may use the S-VIDEO (Y/C) jack
instead of VIDEO (CVBS) jack if the
connected device has the same S-VIDEO
input/output jack. This video connection
provides better picture quality.
TIPS: Before making or changing any connections, make sure that all the devices are disconnected
from the power outlet.
20
Page 21
Step 2: Optional Connections (continued)
DV OUT
English
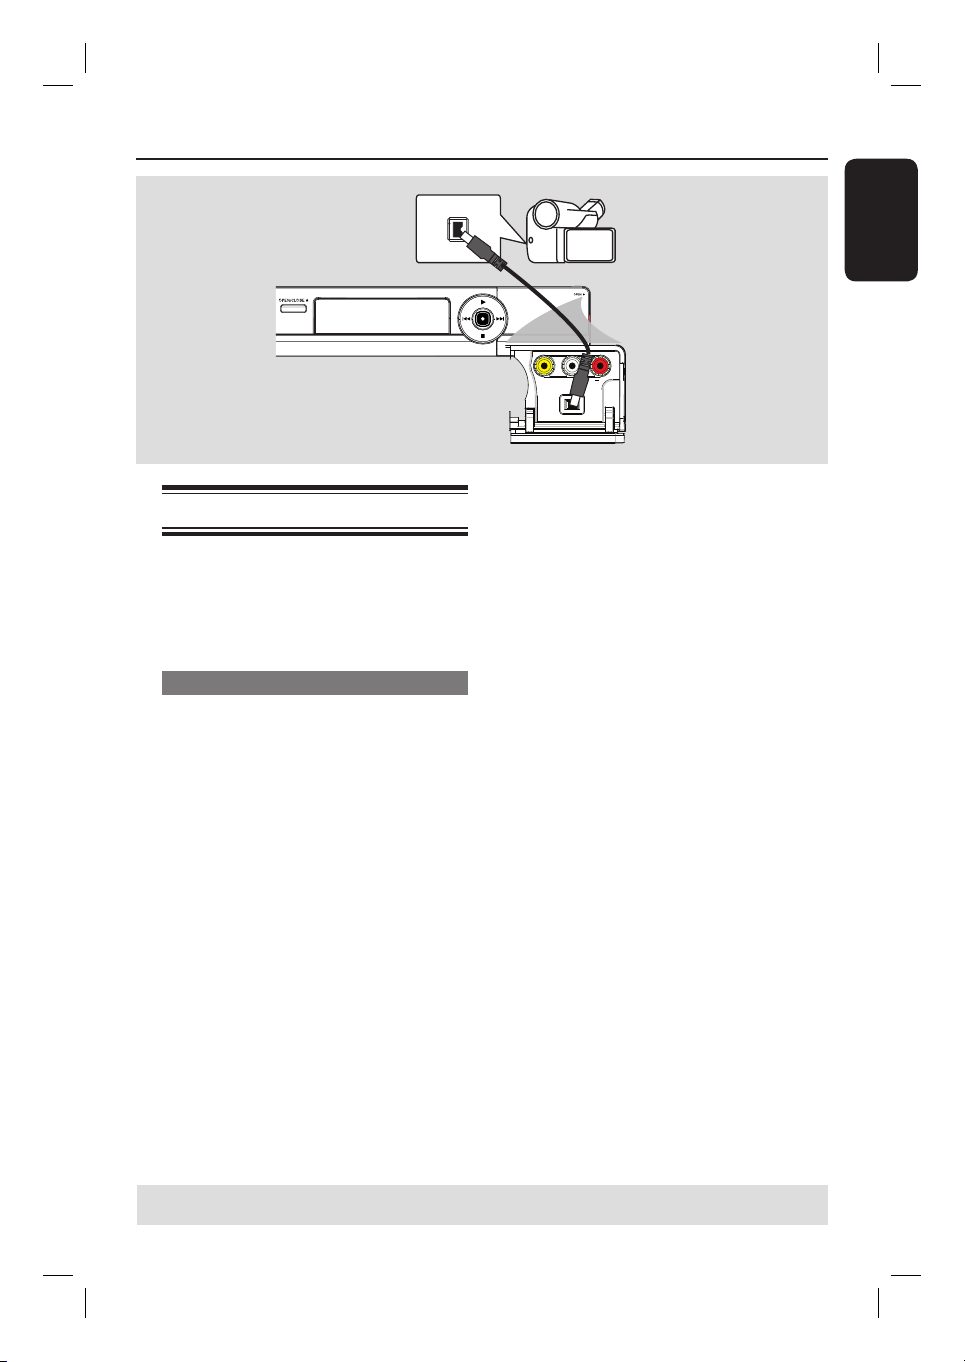
Connecting a camcorder
You can use the front jacks to copy
camcorder recordings. These jacks are
located behind the ap on the right and
provides convenient connections for a
camcorder.
Option 1: Using the DV IN jack
Use this connection if you have a Digital
Video or Digital 8 camcorder. The DV
jack conforms to the i.LINK standard.
Use an i.LINK 4-pin cable (not supplied)
to connect the DV IN jack on the
recorder to the appropriate DV OUT
jack on the camcorder.
Before you start operating, press REC
SOURCE on the remote control
repeatedly to select ‘DV’ as the input
channel. See the chapter “Recording” for
details.
Helpful Hints:
– The DV IN jack does not support a
connection to a Personal Computer.
– It is not possible to record from the
recorder to your camcorder via the DV IN
jack on your recorder.
TIPS: Before making or changing any connections, make sure that all the devices are disconnected
from the power outlet.
21
Page 22
Step 2: Optional Connections (continued)
English
A
TV-OUT
Rear panel of
recorder
L
R
ANTENNA-IN
VIDEO (CVBS)
EXT 1
EXT 2
S-VIDEO (Y/C)
B
INPUT
L
R
AUDIO
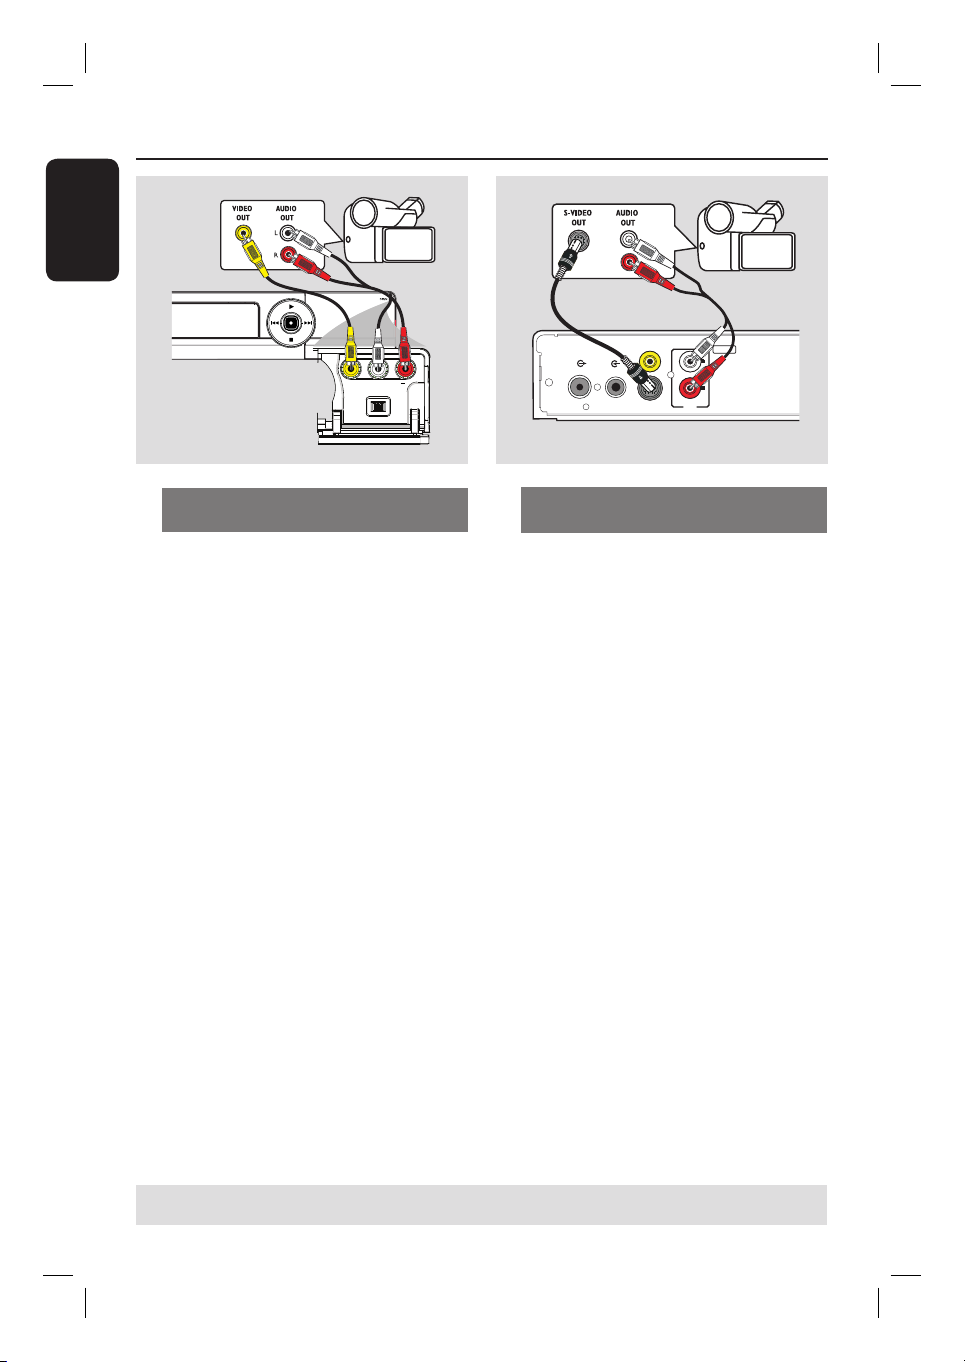
Option 2: Using the VIDEO In
jack
Use the VIDEO connection if your
camcorder has only a single video output
(Composite Video, CVBS).
A
Connect the VIDEO(CAM1) jack on
the front panel of the recorder to the
corresponding S-VHS or Video output
jack on the camcorder.
B
Use an audio cable (red/white ends) to
connect the AUDIO L/R jacks on the
front panel of the recorder to the audio
output jacks on the camcorder.
Before you start operating, press REC
SOURCE on the remote control
repeatedly to select ‘CAM1’ as the input
channel, depending on your connections.
See the chapter “Recording” for details.
Option 3: Using the S-VIDEO In
jack
Use the S-VIDEO connection if you have
a Hi8 or S-VHS(C) camcorder. It
provides good picture quality.
A
Use an S-Video cable (not supplied.)
Connect the S-VIDEO (Y/C) EXT2
jack on the rear panel of the recorder to
the corresponding S-VHS output jack on
the camcorder.
B
Use an audio cable (red/white plugs) to
connect the AUDIO L/R jacks on the
recorder to the audio output jacks on
the camcorder.
Before you start operating, press REC
SOURCE on the remote control
repeatedly to select ‘EXT2’ as the input
channel, depending on your connections.
For details, see “Recording – RECORD
settings”.
TIPS: Before making or changing any connections, make sure that all the devices are disconnected
from the power outlet.
22
Page 23
Step 3: Installation and Setup
Before you start...
When you complete the
connections and switch on the
recorder for the rst time, it is
advisable that you make several
basic settings.
Please see the following pages on using
the system menu features to program TV
channels, menu language and system
clock settings. This will optimize the
performance of this recorder.
Finding the correct viewing
channel
A
Press STANDBY-ON on the recorder
to switch it on.
B
Switch on the TV set and set it to the
correct video-in channel. You should see
the blue DVD background screen.
You may go to Channel 1 on your TV,
then press the Channel Down button on
your TV’s remote control until you see
the Video In channel.
You may press ° button repeatedly
on your TV’s remote control.
Usually this channel is between the
lowest and highest channels and may be
called FRONT, A/V IN, VIDEO. See your
TV manual for more details.
Setting the OSD language
Select the menu language for this
recorder’s on-screen display. The
language options are different depending
on your country or region. It may not
correspond to the illustrations shown in
the user manual.
The menu language (on-screen display)
for the system will remain as you set it.
Language settings can only be
changed when there is no disc in the
disc tray.
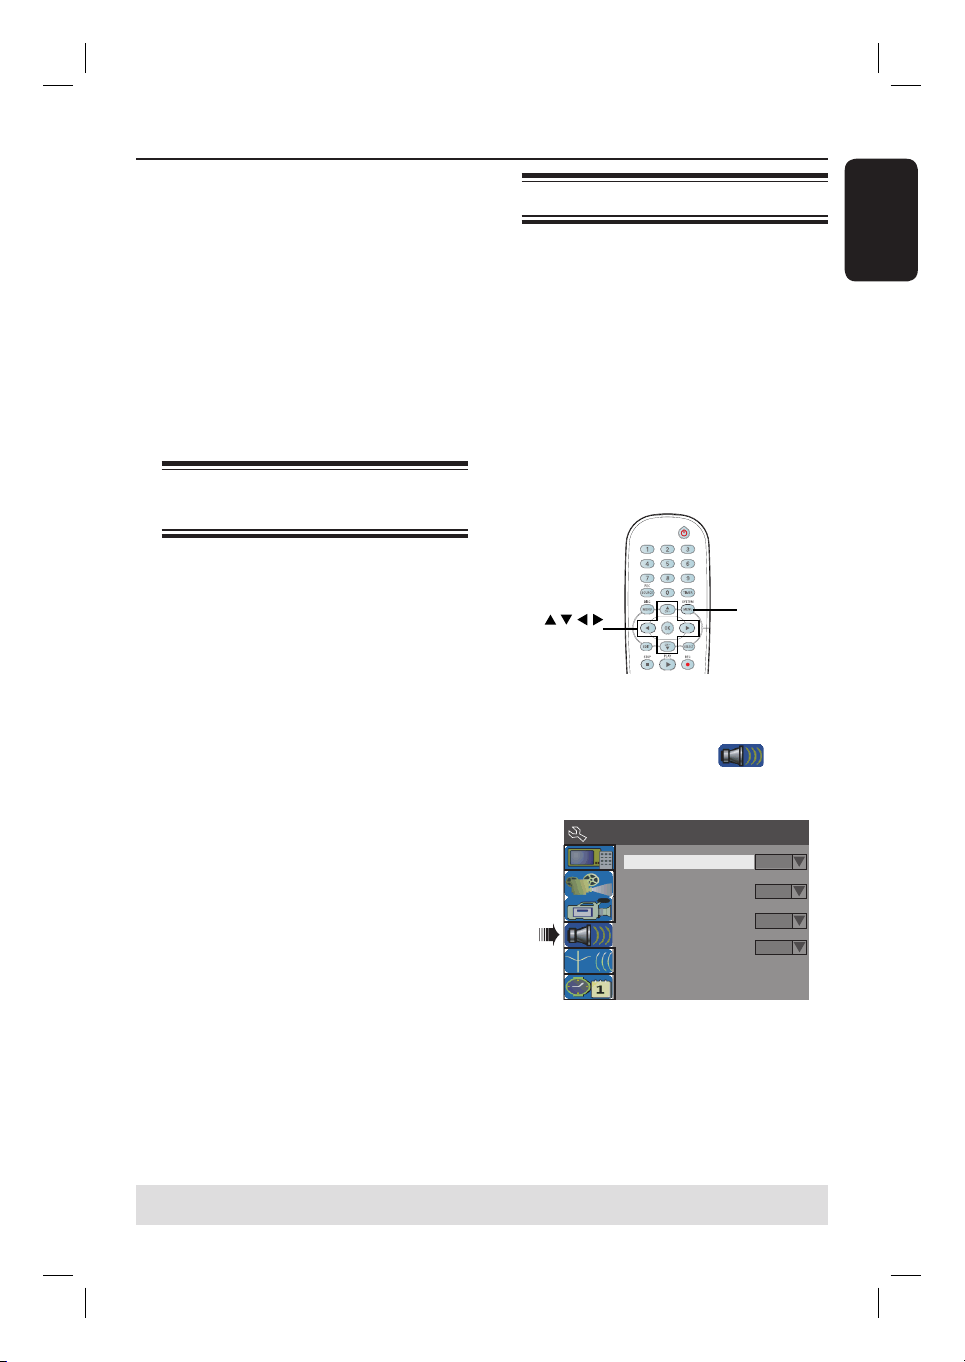
SYSTEM
MENU
OK
A
Press SYSTEM-MENU.
The system menu appears.
B
Use ST keys to highlight
{ System Menu - Language } and
press X to access the menu.
System Menu - Language
On Screen Display Language
Default Disc Menu Language
Default Subtitle Language
Default Audio Language
English
English
Off
English
English
C
Use ST keys to highlight { On Screen
Display Language } and press OK to
access its options.
D
Use ST keys to highlight the desired
language and press OK to con rm.
TIPS: Press X to access the options of an item in the menu.
Press SYSTEM-MENU to exit the menu.
23
Page 24
Step 3: Installation and Setup (continued)
English
Setting your TV channel
programs
Before the recorder can start recording
the TV channel programs, you need to
search for the available TV channels and
store them in the recorder.
Note: Make sure you have successfully
made all the required connections to the
recorder, the TV and Satellite Receiver/
Cable Box (if any) and switched them on.
Tuner settings can only be changed
when there is no disc in the disc tray.
OK
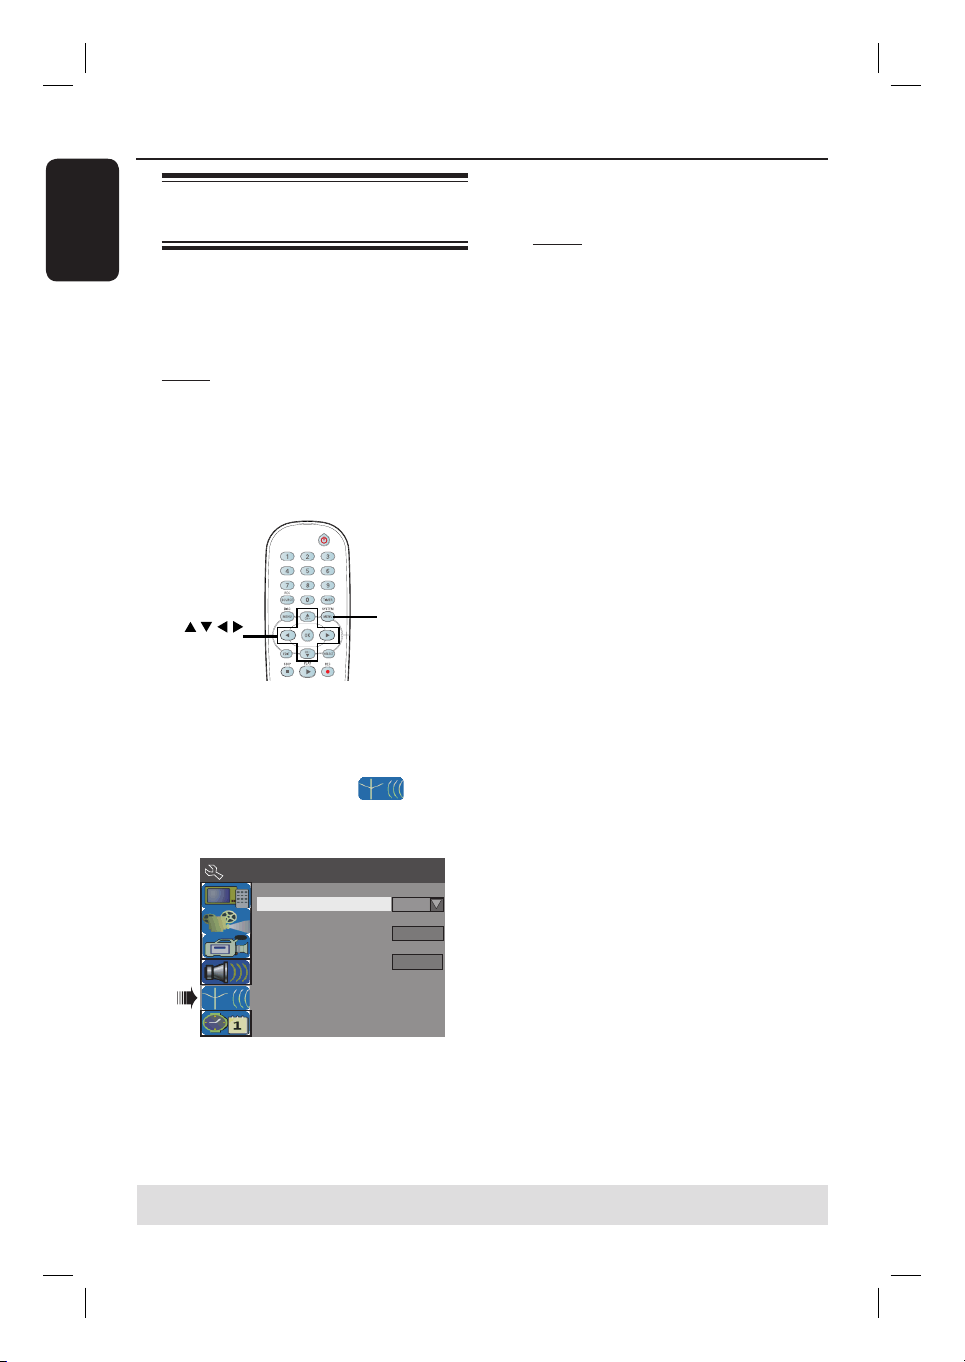
A
Press SYSTEM-MENU on the remote
control.
The system menu appears on the TV.
SYSTEM
MENU
C
Use ST keys to highlight { Tuner
Input Source } and press OK.
{ Cable }
Select this if the DVD recorder is
connected directly to the cable signal or
through a set-top box.
{ Air }
Select this if the DVD recorder is
connected directly to an indoor or
outdoor antenna.
D
Press OK to con rm.
E
Use ST keys to highlight { Channel
Search } and press OK.
The automatic TV channel search
starts. This process may take several
minutes. Once complete, the total number
of channels found will appear on the TV.
To modify or sort the TV channels,
see the chapter “DVD System Menu
Options – CHANNEL SETUP
settings.”
B
Use ST keys to highlight
{ System Menu - Channel Setup }
and press X.
System Menu - Channel Setup
Tuner Input Source
Channel Search
Modify Channel Information
TIPS: Press X to access the options of an item in the menu.
Press SYSTEM-MENU to exit the menu.
Cable
Search
Edit
24
Page 25
Step 3: Installation and Setup (continued)
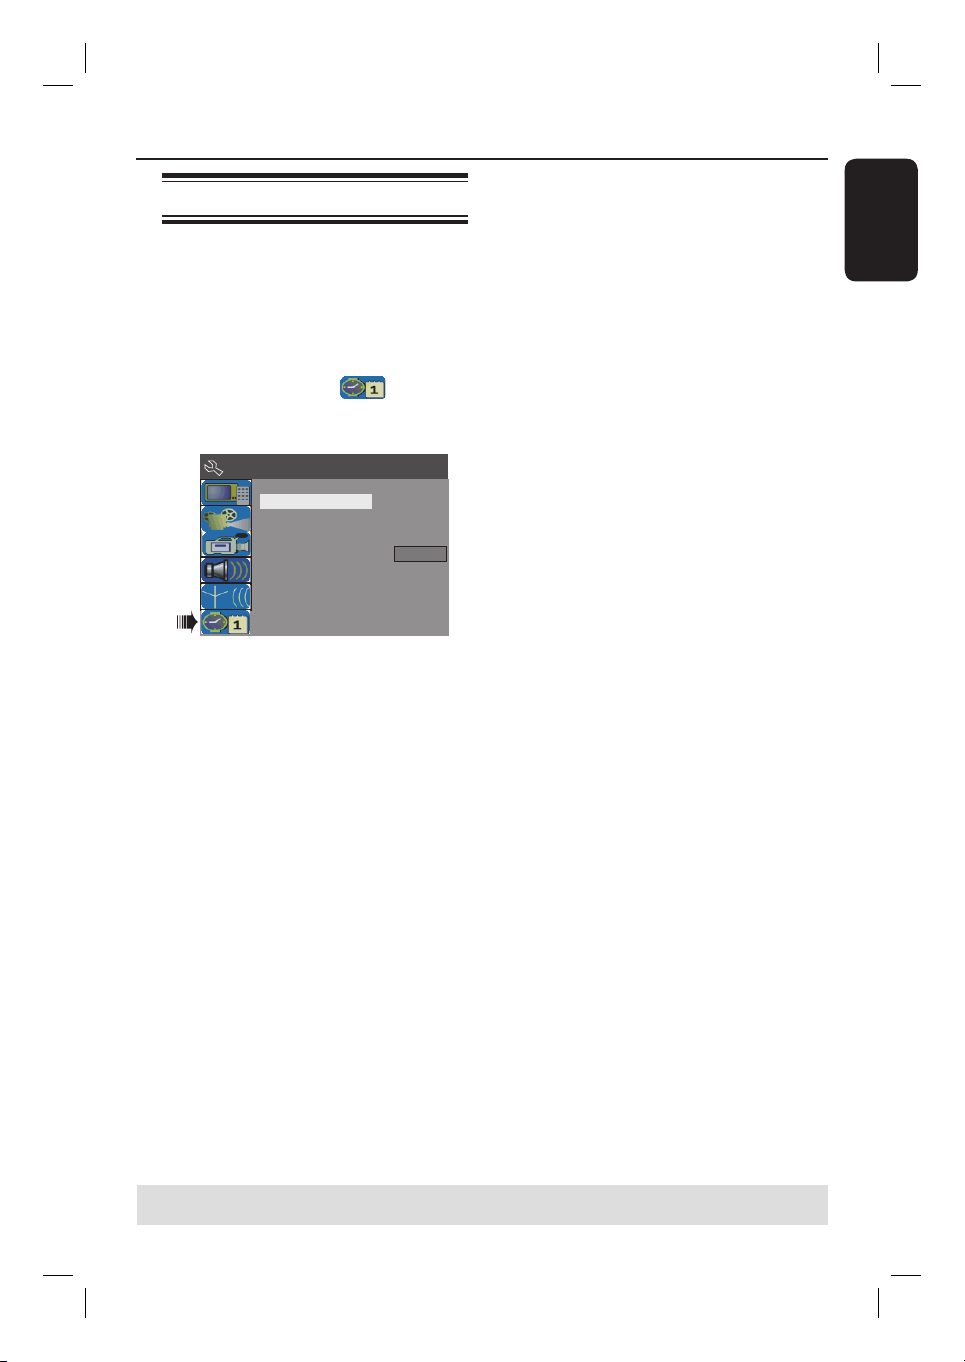
Setting the date & time
If the recorder has not set the time
and date correctly, set the clock manually
by following the steps below.
A
Press SYSTEM-MENU.
The system menu appears.
B
Use ST keys to select
{ System Menu - Clock } and press X
to con rm.
System Menu -
Date(dd/mm/yy)
Time(hh:mm:ss)
C
Use ST keys to highlight
Clock
01/01/06
10 : 33 : 57 AM
OKShow DivX registration code:
{ Date (dd/mm/yy) } and press OK.
D
Use ST keys to change the numbers
and use W X keys to select different
entry elds. Press OK to con rm.
Alternatively, you can key in the numbers
using the numeric keypad 0-9 on the
remote control.
E
To con rm all changes, press OK.
F
Move to { Time (hh:mm:ss) } and
repeat step D~E.
English
TIPS: Press X to access the options of an item in the menu.
Press SYSTEM-MENU to exit the menu.
25
Page 26
Recording
English
Discs for recording
Several different formats of DVD
recordable discs can be used with this
recorder:
DVD±RW (DVD Rewritable)
– Discs that are rewritable can be used
for multiple recordings once the existing
data has been erased.
DVD±R (DVD Recordable)
– Discs can only be used for a single
recording. Each new recording is always
added at the end of all previous
recordings as existing recordings cannot
be overwritten.
– Editing can be made on any DVD±R
discs as long as they have not been
nalized. It is also possible to create
additional chapter markers.
– To play a DVD±R on another DVD
player, it must be nalized (See the
chapter “Editing/ Finalizing Recording –
Playing your recordings (DVD±R) on
other DVD players”). After this is done,
no more data can be added to the disc.
IMPORTANT!
Unrecordable pictures
Television programs, lms, video tapes,
discs, and other materials may be copyprotected and therefore cannot be
recorded on this recorder.
Recording settings
The default recording settings allow you
to set the auto chapter markers,
preferred recording input source and
recording mode. Any changes made using
the remote control will only apply to the
current recording settings. The default
recording settings will remain unchanged
for the next recording.
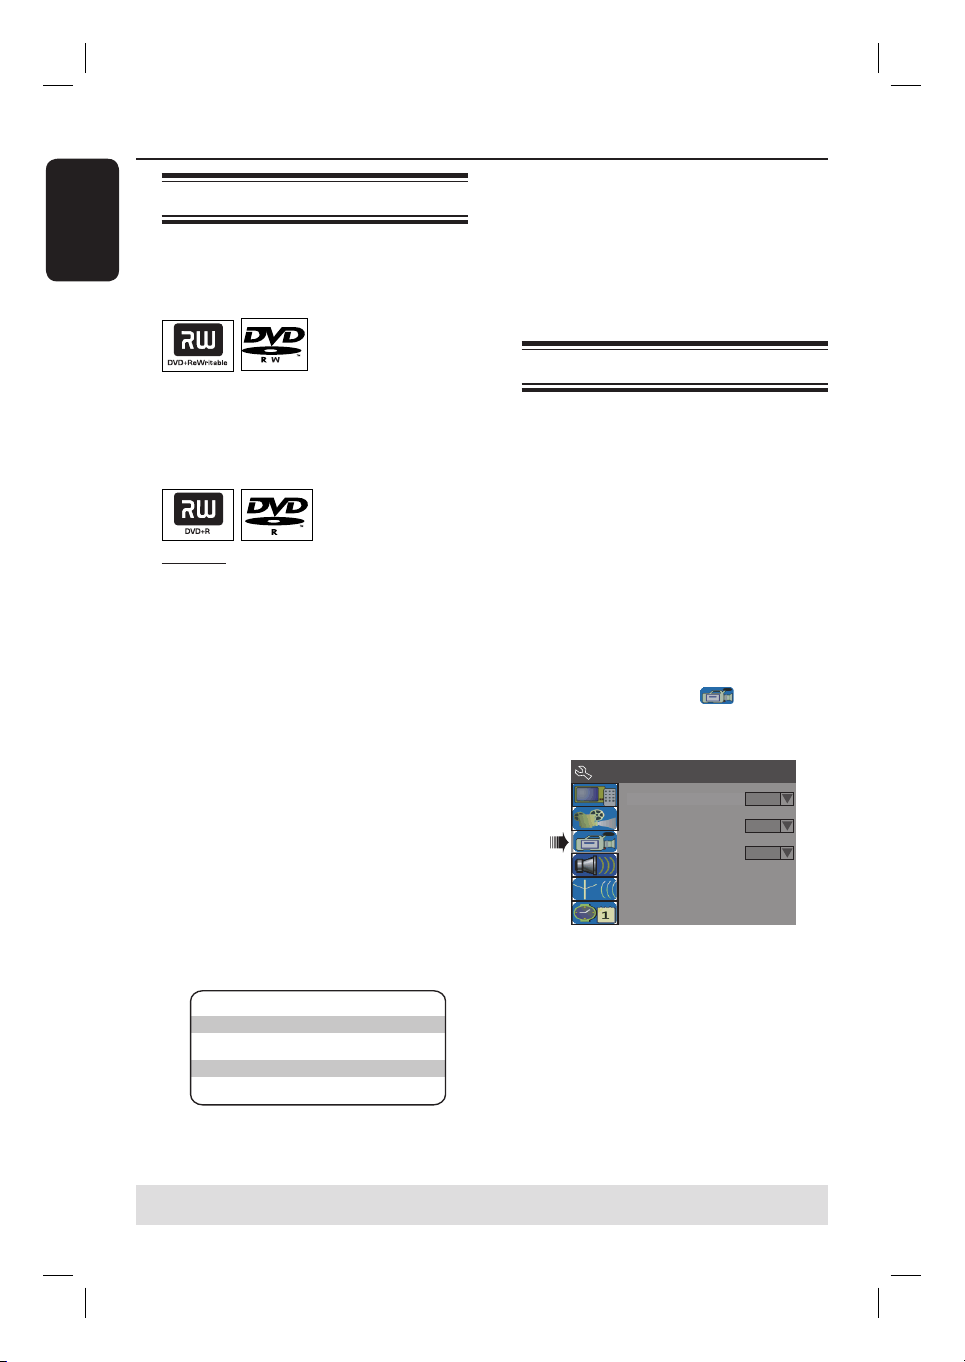
A
Press SYSTEM-MENU on the remote
control.
The system menu appears on the TV.
B
Use ST keys to select
Menu - Record } and press X to
con rm.
System Menu - Record
Auto Chapter Marker
Default Recording Source
Default Recording Mode
{ System
On
Tuner
SP
Supported disc types and media
speeds
Disc
DVD+R 1x - 16x
DVD+RW 2.4 x - 4x
DVD-R 1x - 16x
DVD-RW 2x - 4x
TIPS: Press W to go back to previous menu item.
Press SYSTEM MENU to exit the menu item.
Media speeds
26
C
Use ST keys to select the setting you
wish to change and press OK to con rm.
Instructions and explanation of the
options are provided in the following
pages.
D
To exit, press SYSTEM-MENU.
Page 27
Recording (continued)
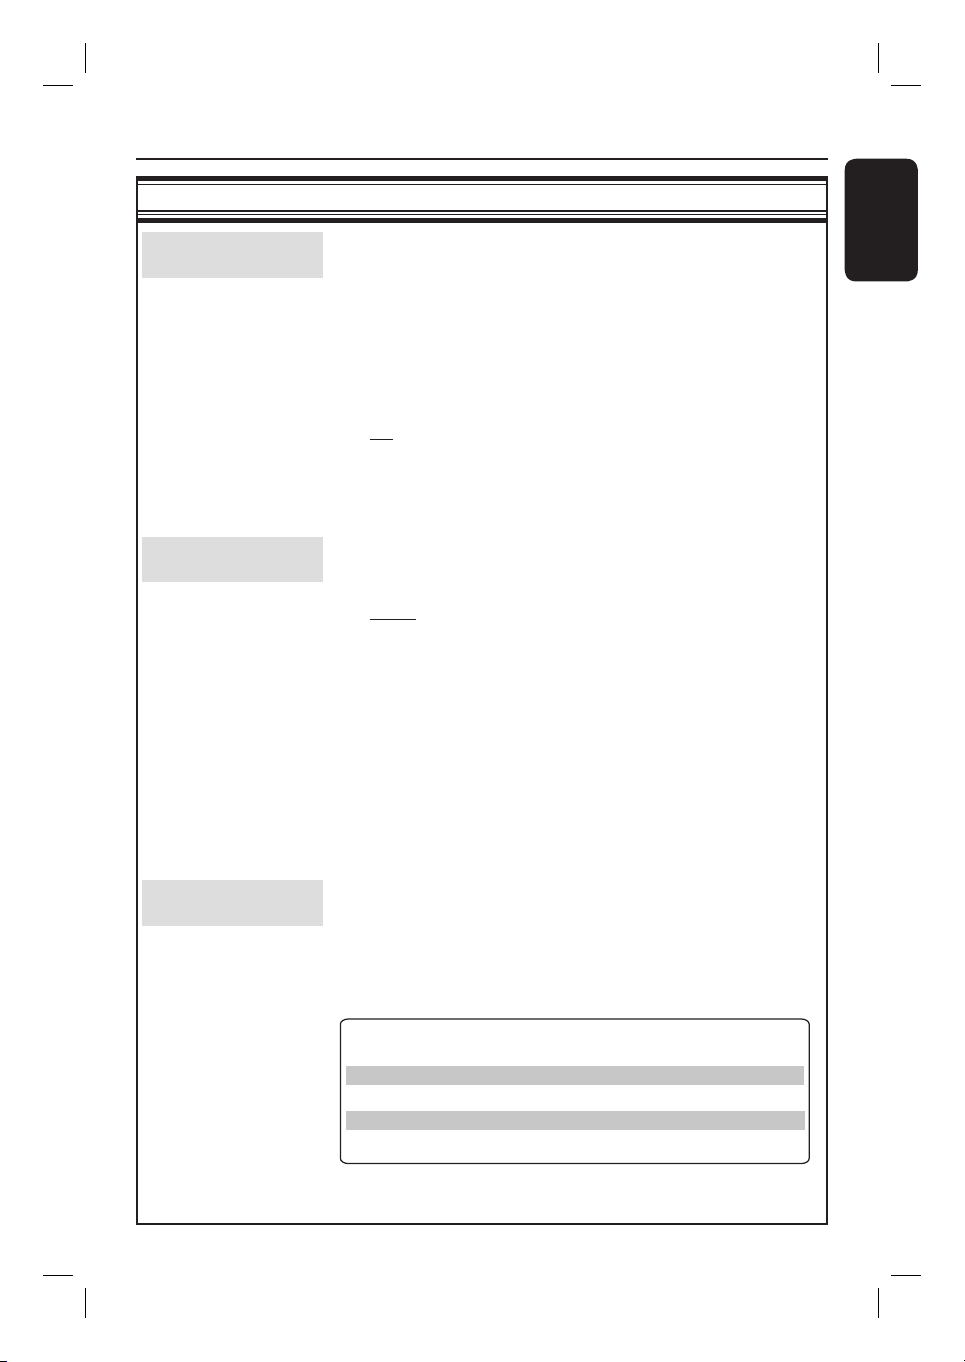
RECORD settings (underlined options are the factory default settings)
Auto Chapter
recording. This helps you to access speci c points on the
Marker
Automatically insert chapter markers within a title during
recorded disc as you would choose a chapter on other DVDs.
This allows you access to speci c points on the recording.
1) Use ST keys to select one of the options:
{ Off } – Disable this feature.
{ On } – Chapter markers will automatically be inserted
within the title during recording at every 5
minutes interval.
2) Press OK to con rm your selection.
Default Recording
Source
De ne your preferred source of recording.
1) Use ST keys to select one of the options:
{ Tuner } – Input source from TV programs.
{ CAM1 } – Input source from the device connected to the
VIDEO and AUDIO L/R jacks on the front panel.
{ DV } – Input source from the device connected to DV
IN jack on the front panel.
{ EXT 1 } – Input source from the device connected to the
VIDEO (CVBS) EXT1 jack on the back panel.
{ EXT 2 } – Input source from the device connected to the
S-VIDEO (Y/C) EXT2 jack on the back panel.
2) Press OK to con rm your selection.
English
Default Recording
Mode
De ne your preferred mode of recording.
This function can also be accessed via the REC MODE on the
remote control.
1) Use ST keys to select one of the options:
Record
Mode
HQ
SP
EP
SLP
Picture Quality
High quality
DVD quality-Standard Play
VHS quality-Extended Play
VHS quality-Super Long Play
Maximum Recording
Time per Disc
1 hour
2 hours
4 hours
6 hours
2) Press OK to con rm your selection.
27
Page 28
Recording (continued)
English
Manual recording
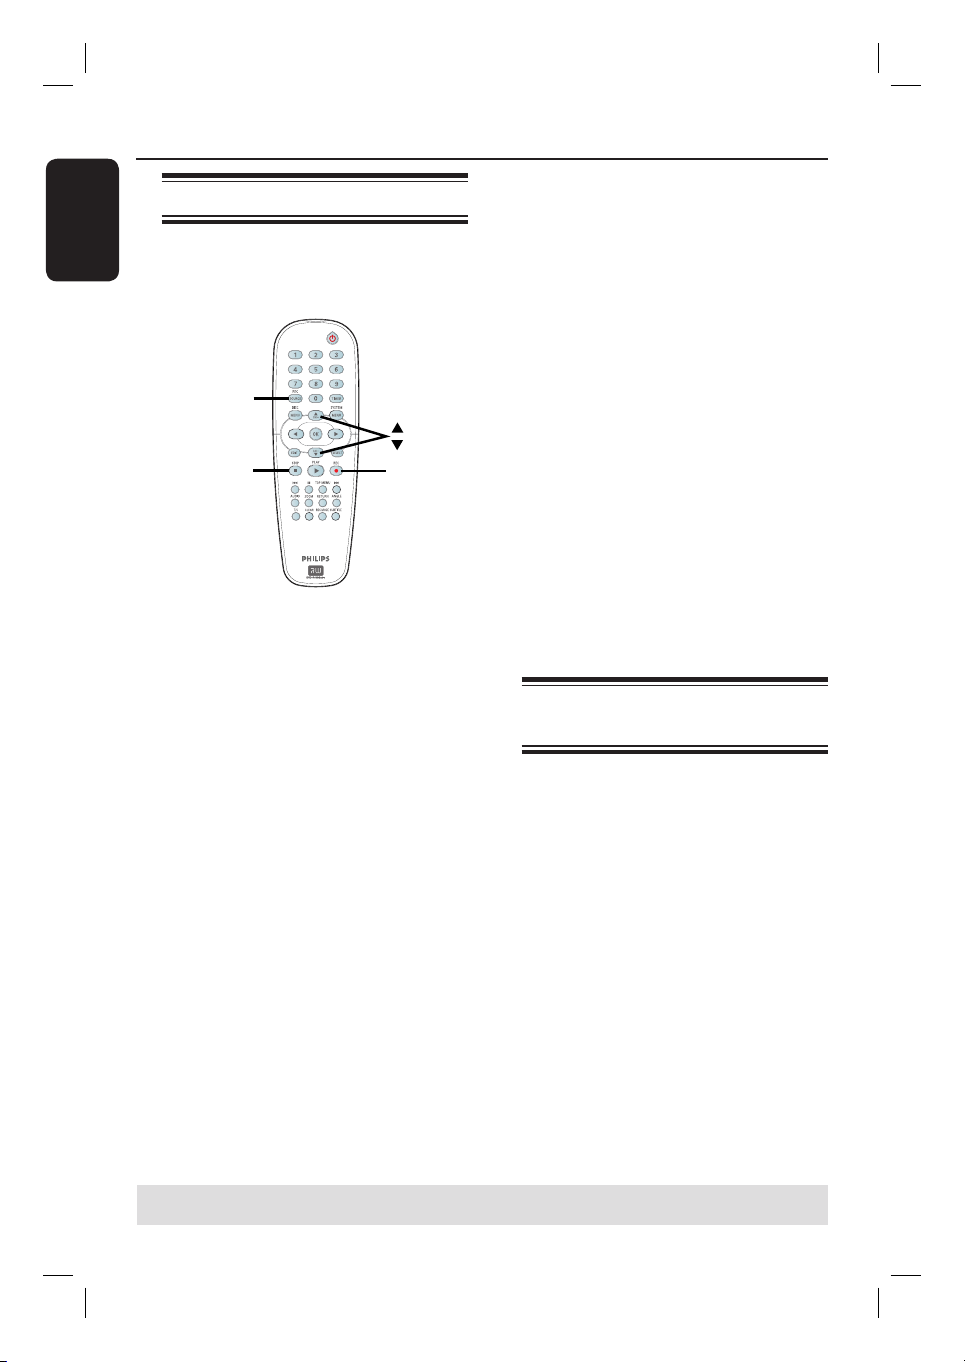
Use this feature to start recording
immediately (e.g., to record a TV show
already in progress).
REC
SOURCE
STOP
A
Switch on the TV set. Select the correct
Video In channel on the TV.
B
Insert a DVD±R/±RW into the recorder.
C
Press REC SOURCE on the remote
control to select { Tuner }, then use
ST keys to select the TV channel you
wish to record.
To record from an external device,
press REC SOURCE repeatedly to
select the correct input channel that
matches the jack which is connected to
the recorder.
{ CAM1 }
Input source from the device connected
to the CAM1 and AUDIO L/R jacks on
the front panel.
{ DV }
Input source from the device connected
to DV IN jack on the front panel.
REC
{ EXT 1 }
Input source from the device connected
to the VIDEO (CVBS) EXT1 jack on the
back panel.
{ EXT 2 }
Input source from the device connected
to the S-VIDEO (Y/C) EXT2 jack on the
back panel.
D
Press REC to start recording.
The recording will automatically start
after the last recording on the
DVD±R/±RW.
E
To stop the recording, press STOP .
Pausing a recording
A
During a recording, press PAUSEÅ.
You can use this function to avoid
recording commercials.
B
To resume recording, press REC .
One Touch Recording automatic turn-off
A
Follow the steps A~C of “Manual
Recording” in the previous section.
B
Press REC repeatedly to toggle
between OTR 30, 60 or 90- minutes
recording options.
The recorder will stop recording at
the designated end time and switch off
automatically.
To interrupt the recording, press
STOP
.
TIPS: Press W to go back to previous menu item.
Press SYSTEM MENU to exit the menu item.
28
Page 29
Recording (continued)
About timer recording
Use ‘Timer Recording’ to automatically
start and stop a recording at a later date/
time. The recorder will tune to the right
program channel and start recording at
the speci ed time.
With this recorder, you can pre-program
up to 20 recordings. During timer
recording, changing the channel that is
being recorded is not possible.
To make a timer recording, your
recorder needs to know:
– The date you want to make the
recording.
– The recording input source.
– The start and stop time of the
recording.
– The recording mode, see the section
“RECORD settings – Default
Recording Mode” in this chapter.
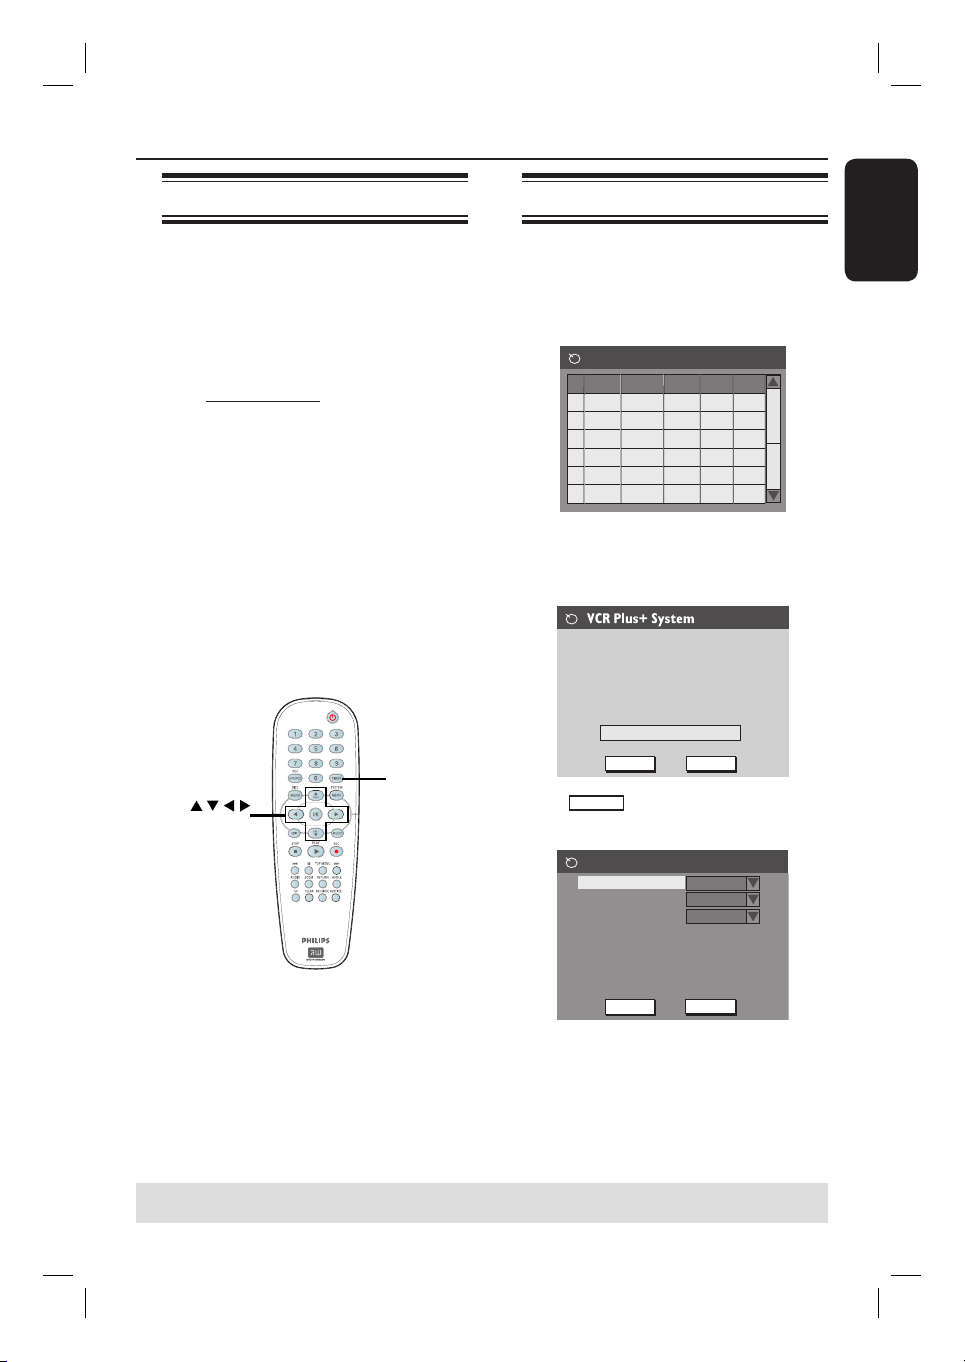
TIMER
OK
Timer recording (manually)
A
Switch on the TV set. Select the correct
Video In channel at the TV.
B
Press TIMER on the remote control.
The timer schedule appears.
Timer Schedule
Source RecMode Date Start End
1
CH003
2
CH010
3
CH008
4
CH005
5
6
C
Press OK on the remote control.
The VCR Plus+
appears.
Enter the PlusCode programming
number for the show you wish to
record or select CANCEL for manual
timer recording. To go back to timer
schedule, press [RETURN].
D
CANCEL
Select
The timer editor menu appears.
14/01/06
SP
HQ
EP
SP
CONFIRM CANCEL
02.00 PM 03.30 PM
04.00 PM
10.00 AM
02.30 AM
06.30 PM
11.15 AM
04.00 AM
25/01/06
30/01/06
01/02/06
®
System menu
in the menu and press OK.
English
Timer Editor
Source
Rec Mode
Mode
Date
Start
End
OK
TIPS: Ensure that there is enough space on the DVD±R/±RW before recording. Before you playback the DVD±R on
another player, nalize the disc. See “Playing your recordings (DVD±
R) on other DVD players”.
Ch003
SP
Once
01 / 01 / 06
10 : 30 AM
11 : 00 AM
Cancel
OK
29
Page 30

Recording (continued)
English
E
Use ST keys to select an entry in the
menu and press X to enter its options.
{ Source }
– Use ST keys to select the recording
input source.
{ Rec Mode }
– Use ST keys to select your option.
See the chapter “Recording – RECORD
settings - Default Recording mode”.
{ Mode }
– Use ST keys to select { Once },
{ Daily }, { Weekly }, { Mon-Fri }
(Monday to Friday, ) { Mon-Sat }
(Monday to Saturday) or { Weekend }
(Saturday and Sunday) recordings.
{ Date }
– Use ST keys or the numeric
keypad 0-9 to enter the date for
recording.
{ Start }
– Use ST keys or the numeric
keypad 0-9 to enter the start time of
recording.
{ End }
– Use ST keys or the numeric
keypad 0-9 to enter the end time of
recording.
F
Select
OK.
The system will store the timer entry
and return to the timer schedule list.
To cancel the above timer setting, select
CANCEL
G
Press TIMER to exit the menu.
H
Insert a DVD±R/±RW into the DVD
recorder.
OK
in the menu and press
in the menu and press OK.
I
Press STANDBY-ON to switch off the
recorder to standby mode.
If the DVD recorder is not in standby
mode, a warning message will appear
three minutes before the recording
starts.
The ‘TIMER’ icon will light up on the
display panel if a timer recording is set.
Helpful Hint:
– Set the timer recording one minute ahead
of the program’s start time. This helps
ensure the entire program is recorded as
the disc requires about 30 seconds to
prepare for recording.
Setting a timer recording from
an external Cable Box/ Satellite
Receiver
If you have a Satellite Receiver/Cable Box
connected to this DVD recorder via the
S-VIDEO (Y/C) or VIDEO (CVBS), (see
“Step 2: Optional Connections”), follow
the steps described below to program
the recordings.
A
Select the channel you want to record at
the Satellite Receiver/Cable Box.
B
Program the recording with the required
information. Follow the steps
A~D
“Timer Recording (manually)” on the
previous page.
{ Source }
– Use ST keys to select { EXT 1 } or
{ EXT2 } as the input channel and press
OK to con rm.
C
Leave the Satellite Receiver/Cable Box
switched on for the recording.
of
TIPS: Ensure that there is enough space on the DVD±R/±RW before recording. Before you playback the DVD±R on
another player, nalize the disc. See “Playing your recordings (DVD±R) on other DVD players”.
30
Page 31
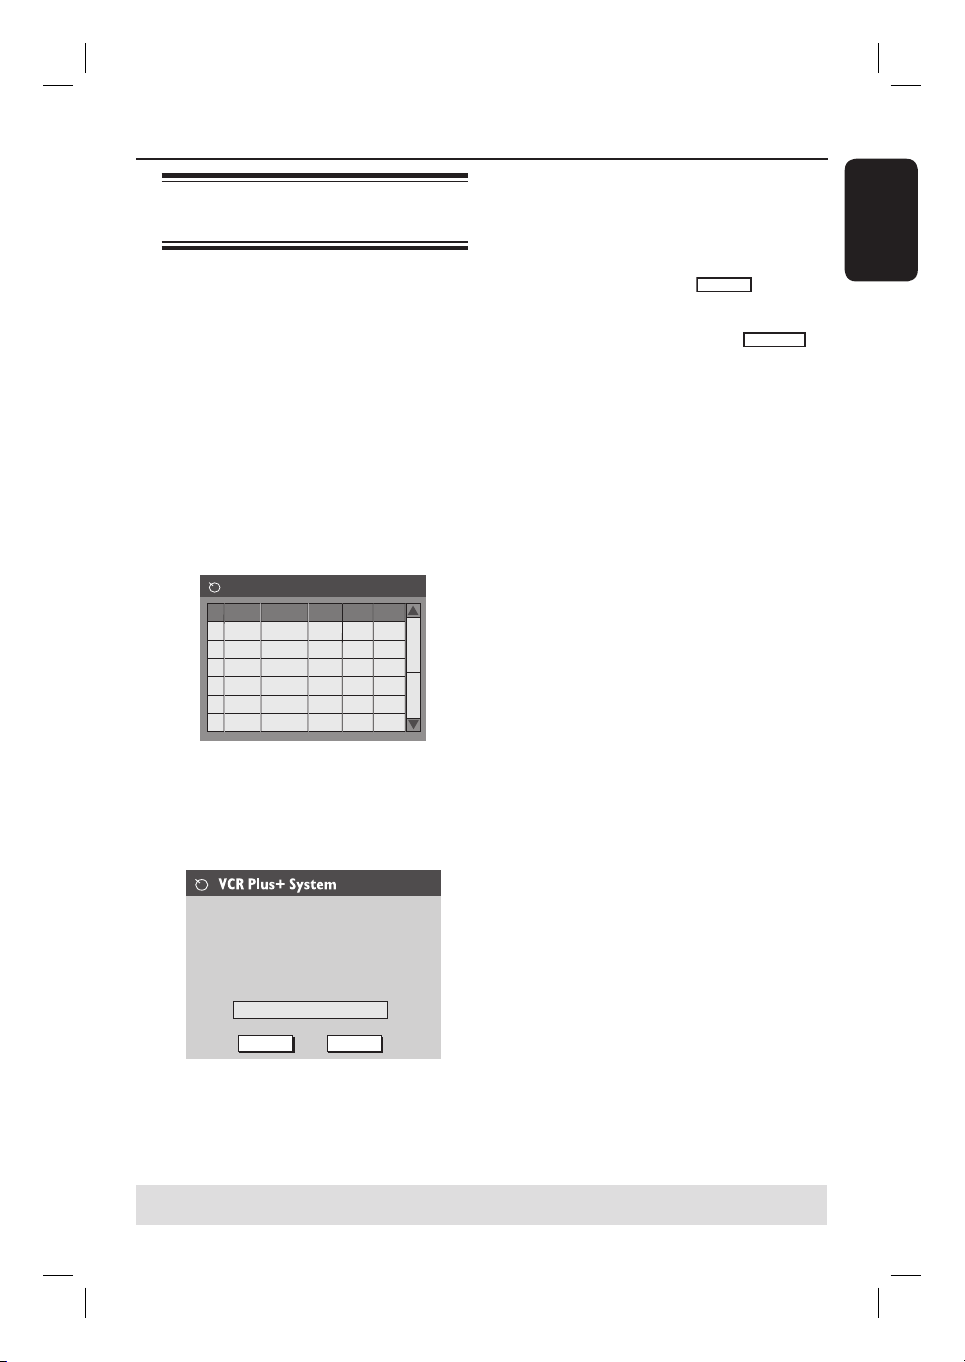
Timer recording (VCR Plus+®
System)
This is a simple programming system for
recorders. To use it, enter the PlusCode
programming number associated with
your television program. You can nd
this number in your TV listings magazine.
All the information needed by the
recorder for programming is contained in
the programming number.
A
Switch on the TV set. Select the correct
Video In channel on the TV.
B
Press TIMER on the remote control.
The timer schedule appears.
Timer Schedule
Source RecMode Date Start End
1
2
3
4
5
6
C
Press OK to con rm.
Alternatively, press T key to go to the
next available empty slot and press OK.
The VCR Plus+
appears.
®
System menu
Recording (continued)
To clear the VCR Plus+® programming
number, press CLEAR on the remote
control.
To cancel the VCR Plus+® programming ,
use ST keys to select
menu and press OK.
E
To con rm your entry, select
the menu and press OK.
The system will store the timer entry
and return to the timer editor menu.
If the channel number of the TV channel
has not been assigned to the
programming number, you will have to
manually key in the channel number that
is assigned to the VCR Plus+
Follow the instructions on the TV.
F
Press TIMER to exit the menu.
G
Insert a DVD±R/±RW into the recorder.
H
Press STANDBY-ON to switch off the
recorder to standby mode.
If the recorder is not in standby mode,
a warning message will appear three
minutes before the recording starts.
The ‘TIMER’ icon will light up on the
display panel if a timer recording is set.
CANCEL
®
in the
CONFIRM
code.
English
in
Enter the PlusCode programming
number for the show you wish to
record or select CANCEL for manual
timer recording. To go back to timer
schedule, press [RETURN].
CONFIRM CANCEL
D
Use the numeric keypad 0-9 to enter
the G-
®
CODE
programming number for
the show you wish to record.
(e.g. : 5-312-4 or 5,312 4, key in ‘53124’).
TIPS: Ensure that there is enough space on the DVD±R/±RW before recording. Before you playback the DVD±R on
another player, nalize the disc. See “Playing your recordings (DVD±R) on other DVD players”.
31
Page 32
Recording (continued)
English
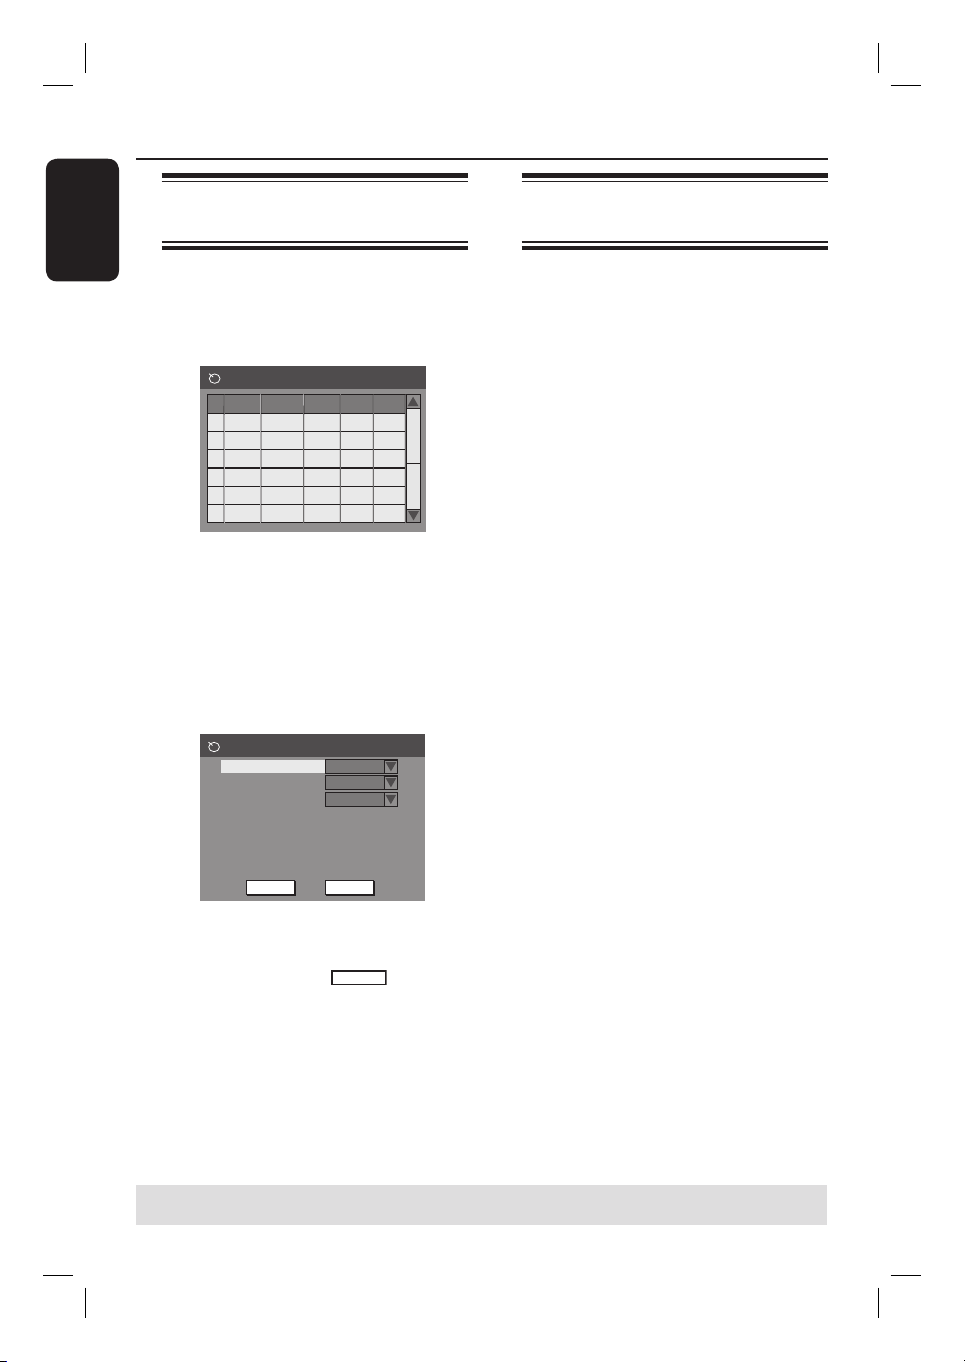
Changing/ Deleting a timer
recording
A
Switch on the TV set. Select the correct
Video In channel at the TV.
B
Press TIMER on the remote control.
The timer schedule appears.
Timer Schedule
Source RecMode Date Start End
1
CH003
2
CH010
3
CH008
4
CH005
5
6
C
Use ST keys to select a timer program
which you want to change/ delete.
D
To delete the timer entry, press
CLEAR on the remote control.
E
To change the timer schedule, press
OK to enter the timer editor menu of
the selected timer program.
Timer Editor
Source
Rec Mode
Mode
Date
Start
End
14/01/06
SP
25/01/06
HQ
30/01/06
EP
01/02/06
SP
Ch003
SP
Once
01 / 01 / 06
10 : 30 AM
11 : 00 AM
02.00 PM 03.30 PM
06.30 PM
04.00 PM
11.15 AM
10.00 AM
04.00 AM
02.30 AM
Watching another TV
program during recording
You can watch another TV channel while
recording is in progress by using the TV’s
remote control to change the TV
channels.
Helpful Hint:
– Remember to switch the TV back to its
video input channel if you want to watch the
TV channel through the recorder or playback
the recorded disc.
OK
F
Select the entry eld and make the
Cancel
OK
necessary changes.
G
Once complete, select
OK
in the
menu and press OK to save the changes.
H
Press TIMER to exit the menu.
TIPS: Ensure that there is enough space on the DVD±R/±RW before recording. Before you playback the DVD±R on
another player, nalize the disc. See “Playing your recordings (DVD±R) on other DVD players”.
32
Page 33
Playback
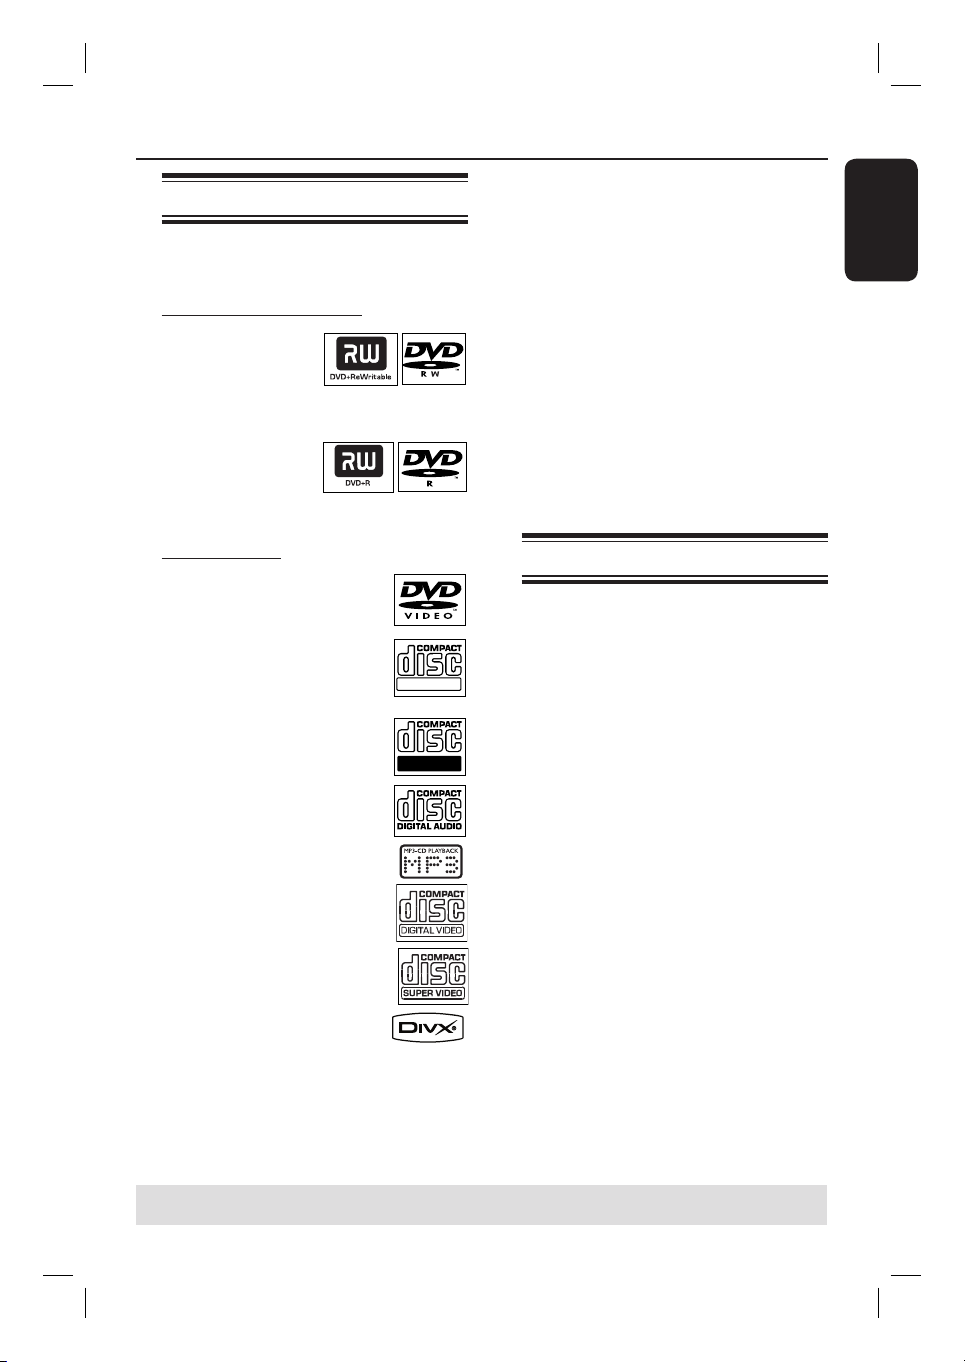
Playable discs
Using this recorder, you can play and
record on the following discs:
Recording and Playback
DVD±RW (DVD
Rewritable); can be
recorded on over
and over again.
DVD±R (DVD
Recordable);
can be recorded
only once.
Playback only:
DVD Video (Digital Versatile
Disc)
CD-RW (CD-Rewritable)
Audio/ MP3/ JPEG contents
CD-R (CD-Recordable)
Audio/ MP3/ JPEG contents
Audio CD (Compact Disc
Digital Audio)
MP3-Disc
Video CD
(Formats 1.0, 1.1, 2.0)
Super Video CD
DivX Disc
(DivX 3.11, 4.x, 5.x, 6)
ReWritable
Recordable
IMPORTANT!
– If the inhibit icon (Error) appears
on the TV screen when a button is
pressed, it means the function is not
available on the current disc or at
the current time.
– DVD discs and players are
designed with regional restrictions.
Before playing a disc, make sure the
disc is for the same region as your
player.
– Do not push on the disc tray or
put any objects other than discs on
the disc tray. It may cause the disc
player to malfunction.
Inserting a disc
A
Press STANDBY-ON to switch on the
recorder.
B
Press OPEN/CLOSE ç.
The disc tray opens.
C
Carefully place the disc into the tray with
the label facing up, then press
OPEN/CLOSEç.
Make sure the disc label is facing up.
For double-sided discs, load the side as
indicated on the label.
D
Switch on the TV set. Select the correct
Video In channel at the TV (See the
chapter “Step 3: Installation and Setup –
Finding the correct viewing channel”).
E
Playback will start automatically or a
dialogue will appear on the TV (see next
page).
English
TIPS: Some discs cannot be played on this recorder due to the con guration and characteristics of the disc, or due
to the condition of recording and authoring software.
33
Page 34

Playback (continued)
English
Starting disc playback
Playback will begin automatically. If the
disc has its own menu this will be loaded,
otherwise the recorder will launch an
index screen.
If the pin code entry dialogue appears on
the TV, this means that the parental
control was activated for the inserted
disc (See the chapter “DVD System Menu
Options – PLAYBACK settings”).
Use the numeric keypad 0-9 on the
remote control to enter your pin code
(password).
For more playback features, see the
chapter “Additional Playback Features”.
Playing a DVD video disc
A
Insert a DVD disc.
If the disc menu appears on the TV
Use numeric keypad 0-9 to input your
selection or use W XST keys to select
a play option and press OK to start
playback.
To select the previous or next
chapter/title marker
During playback, press ./> to go to
the previous/next chapter/track.
B
To stop playback, press STOP .
Playing a (Super) Video CD
(Super) Video CDs may feature the ‘PBC’
(Play Back Control). This allows you to
play the video CDs interactively by
following the menu on the display.
A
Insert a (Super) Video CD.
If the ‘PBC’ is on, the disc index
menu will appear on the TV
B
Use numeric keypad 0-9 to input your
selection or to select a play option.
Press RETURN on the remote control
to return to the previous menu.
To turn on/off the Playback Control
mode, press T/C on the remote control
during playback to access the T/C menu.
Then use ST keys to select { PBC On }
or { PBC Off }.
C
To stop playback, press STOP .
Playing an audio CD
A
Insert an audio CD.
Playback starts automatically.
The track number and elapsed playing
time appear on the display panel.
B
To stop playback, press STOP .
TIPS: Some discs cannot be played on this recorder due to the con guration and characteristics of the disc, or due
to the condition of recording and authoring software.
34
Page 35
Playing a DVD±R/±RW disc
A
Insert a DVD±R/±RW disc.
The Index Picture screen appears.
B
Use ST keys to select a title and press
PLAY X to start playback.
C
To stop playback, press STOP .
Helpful Hint:
– If the message ‘BLANK’ appears on the
display panel, this means that there are no
recordings on this disc..
Playing an MP3 disc
A
Insert an MP3 CD.
The disc content menu appears.
File Play - Stop 0:00:00/ 0:00:00
Directory Selection
Bee Gees
1
Phil Collins
2
Bryan Adams
3
Collin Raye
4
Nat King Cole
5
UB40
6
Jordan Hill
7
Faith Hill
8
Playback (continued)
D
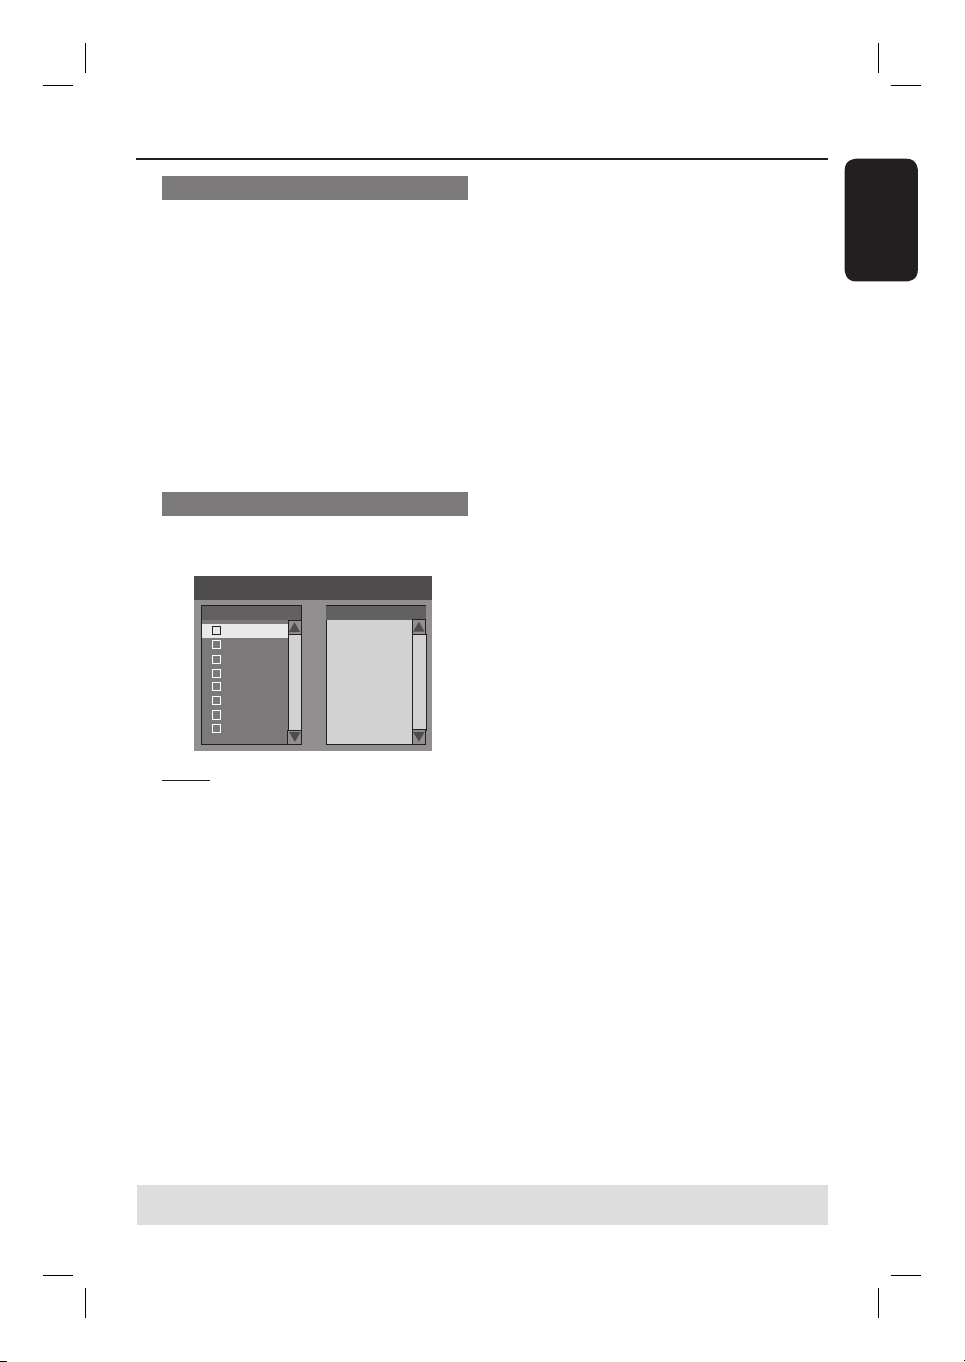
To create a playlist, highlight the track/ le
and press SELECT.
The selected tracks/ les will appear
on the right screen.
Use WX keys to toggle between the
left and right screen.
To remove the track/ le from the
selected playlist, press CLEAR.
E
To start playback from the playlist, move
the cursor to the right selection screen,
press PLAY X .
F
During playback, you can press ./ >
to select the next/previous track.
G
To stop playback, press STOP .
Helpful Hint:
– Only the rst session of a multi-session
CD will playback.
English
Note: It may require a longer time for
the recorder to display the disc content
menu on the TV due to the large number
of songs/pictures compiled into one disc.
B
Use ST keys to navigate within the
menu and press OK to access the folder/
album.
C
Use ST keys to select the track/ le to
playback.
To move up to the previous level, press
RETURN.
TIPS: Some discs cannot be played on this recorder due to the con guration and characteristics of the disc, or due
to the condition of recording and authoring software.
35
Page 36
Playback (continued)
English
Playing a picture disc (or musical
slide show)
You can display JPEG pictures in the
selected roll automatically one after the
other.
A
Insert a JPEG picture disc (CD,
CD-R/RW, DVD±R/±RW).
The disc content menu appears.
B
Use ST keys to navigate within the
menu and press OK to access the folder/
album.
C
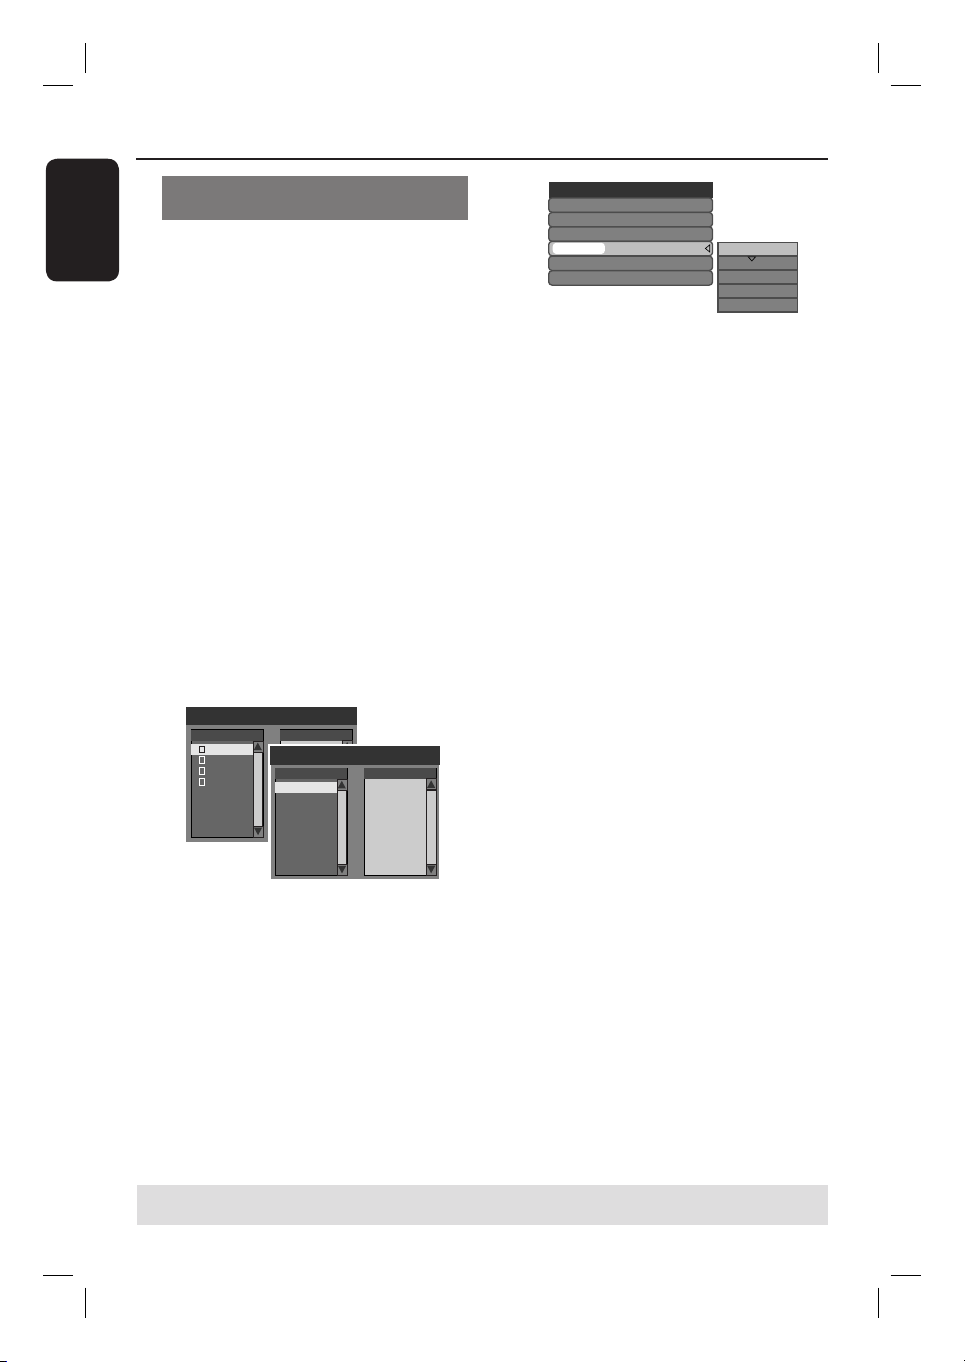
To create a playlist, highlight the track/ le
and press SELECT.
The selected tracks/ les will appear
on the right screen.
To remove the track/ le from the
playlist, press CLEAR.
You can select to playback from the
original disc content or from the playlist.
Use WX keys to move to the correct
screen before selecting the track/ le for
playback.
File Play - Stop 0:00:00/ 0:00:00
Directory Selection
Japan trip
1
Bryan Bday
2
My songs
3
Hot Hits
4
File Play - Stop 0:00:00/ 0:00:00
Directory Selection
..\
P1010001.JPG
1
P1010008.JPG
2
BUTTER-1.JPG
3
NATURE-1.JPG
4
BUTTER-1.JPG
5
P1022500.JPG
6
P1023000.JPG
7
MERLIO-1.JPG
8
If the disc contains MP3 music and
JPEG picture les, you can start a
musical slide show playback,
Select an MP3 le and press OK to start
playback, then select a picture le in the
menu and press OK to start the musical
slide show playback.
File Play
Type
Mode
Trick
Wipe
Zoom
Rotate
D
During playback, press T/C once to show
PIC
Normal
Play
Top to bottom
Fitscreen
Clockwise 0
Top to bottom
Down to top
Left to right
Right to left
Extend center V.
the disc content menu. Press T/C again
to access various settings for the slide
show playback.
The selected animation settings will
appear in the top left corner of the TV
screen.
E
To stop playback, press STOP .
Playable JPEG picture disc
This recorder can read JPEG pictures
stored on a CD-ROM, Picture CD, or
DVD.
File format:
– The le extension has to be ‘.JPG,’
‘.JPE’ or ‘.JPEG.’
– Only DCF-standard still pictures or
JPEG pictures e.g. TIFF are supported.
– Moving pictures, Motion JPEG,
progressive JPEG, pictures in non-JPEG
formats and including pictures associated
with sound are not supported.
TIPS: Some discs cannot be played on this recorder due to the con guration and characteristics of the disc, or due
to the condition of recording and authoring software.
36
Page 37

Playing a DivX ® disc
This DVD system supports the playback
®
of DivX
movies which you have copied
from your computer onto a CD-R/RW,
DVD±R/±RW.
A
Insert a DivX ® disc.
The disc content menu appears.
If the DivX
®
movie contains external
subtitles, you have to rst select the
subtitle le from the le list.
B
Press PLAY X to start playback.
During playback, you can press T/C to
display the disc content menu.
Helpful Hints:
– Subtitle les with the following lename
extensions (.srt, .smi, .sub, .sami) are
supported.
– It is normal to experience an occasional
pixelation during DivX ® playback due to
poor clarity of digital contents during
internet downloading
Playback (continued)
English
TIPS: Some discs cannot be played on this recorder due to the con guration and characteristics of the disc, or due
to the condition of recording and authoring software.
37
Page 38

Additional Playback Features
English
Changing to another
chapter/ track
When a disc contains more than one
chapter or track, you can change to a
different chapter or track as follows.
During playback,
> to go to the next chapter/
Press
track.
Press .to return to the start of the
previous chapter/track.
OR
Use the numeric keypad 0-9 to input
the title/chapter/track number.
OR
Press T/C to enter the T/C menu and use
ST keys to select { Title } or
{ Chapter } and use numeric keypad
0-9 to input the title/chapter/track number.
Pausing playback and step
play
A
During playback, press PAUSEÅto pause
playback and display a still picture.
B
Press PAUSEÅagain to move one frame
forward.
C
To resume normal playback, press
PLAY X.
Searching forwards/
backwards
You can search forward or backward on
a disc at two, four, sixteen or thirty two
times the normal playback speed.
A
During playback, press W (reverse) or
X (forward) to switch to the search
function.
The search status bar appears.
It displays the search speed (FREV x2,
FREV x4, FREV x16, FREV x32, FFWD
x2, FFWD x4, FFWD x16, FFWD x32)
The sound will be muted.
B
Use W X keys to cycle through the
search speeds.
C
To resume normal playback, press
PLAY X.
Zooming in
This option allows you to enlarge the
picture on the screen and pan through
the enlarged picture.
A
Press ZOOM repeatedly on your
remote control to activate zoom.
B
Use WXST keys to pan through the
zoomed picture.
C
To exit, press ZOOM until the picture
returns to the normal size.
TIPS: The operating features described here might not be possible for certain discs.
Always refer to the instructions supplied with the discs.
38
Page 39
Additional Playback Features (continued)
Using T/C options
Selecting various repeat/ shuf e
functions
You can select various repeat play or
random play mode during playback.
A
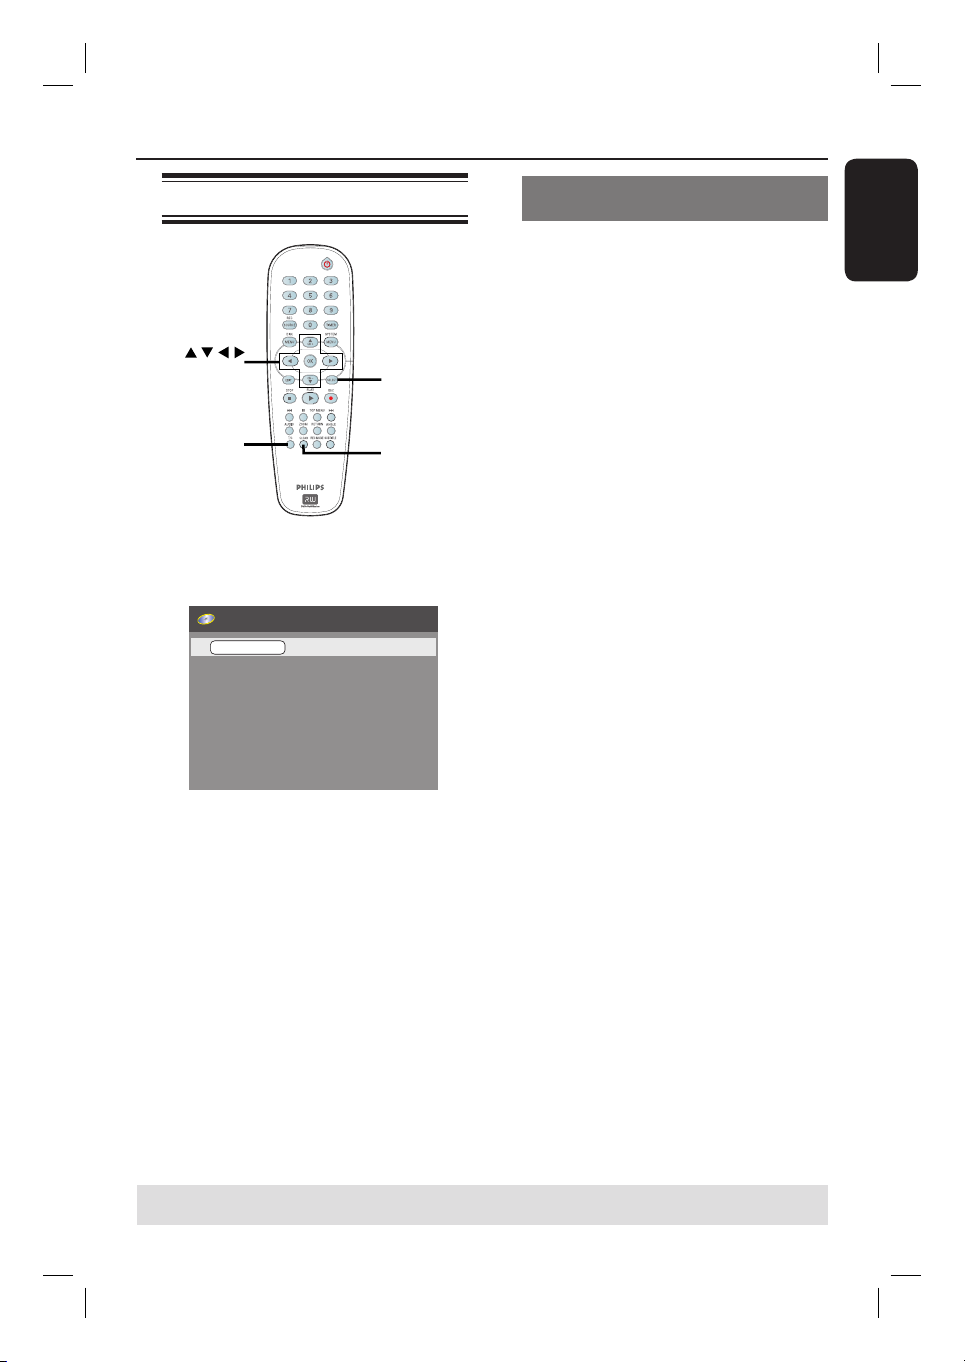
During disc playback, press T/C on the
remote control.
The T/C menu appears.
OK
SELECT
B
Use ST keys to select { Mode } and
press OK.
C
T/C
CLEAR
Use ST keys to select one of the repeat
options.
{ Normal }
Select this to cancel the repeat mode and
A
During playback, press T/C on the
remote control.
The T/C menu appears on the TV.
DVD
Mode
Trick mode
Title
Chapter
Audio
Subtitle
Angle
Title
Normal
Play
02/05
01/22
01/02 - OTH
Off
01/03
00:22:03 / 01:27:24
return to normal playback.
{ Repeat A-B }
Select this to repeat the playback of a
speci c segment within a title/chapter/
track. Press OK to mark the start and
end of the segment you want to repeat.
{ Repeat Chapter }
Select this to repeat playback of the
current chapter (DVD, DVD±R/±RW
only).
{ Repeat Track/Title }
Select this to repeat playback of the
B
Use ST keys to select the setting you
want to adjust.
Instructions and explanation of the
options are provided in the following
pages.
C
To exit, press T/C.
current track/title.
{ Repeat Directory }
Select this to repeat playback of the
current folder/directory (MP3, JPEG,
picture disc only).
{ Repeat Disc }
Select this to repeat playback of the
entire disc. (MP3, JPEG, SVCD and
CDDA discs only).
{ Shuf e }
Select this to randomly playback all the
tracks within the disc (MP3 and audio CD
only).
D
To cancel repeat playback, press STOP
or select { Normal } and press OK.
TIPS: The operating features described here might not be possible for certain discs.
Always refer to the instructions supplied with the discs.
English
39
Page 40

Additional Playback Features (continued)
English
Creating a playlist
You can play the contents of the disc in
the order you want by programming the
tracks to be played.
A
Press T/C on the remote control.
The T/C menu appears.
B
Select { Mode } > { Program }.
The program menu appears.
DVD
Title Selection
Title 1
Title 2
Title 3
Title 4
Title 5
Title 6
Title 7
Title 8
C
If the disc is recorded with Titles/Folders/
Albums, press OK to access the tracks/
les/chapters.
Pressing OK at the highlighted track/ le/
chapter will start playback.
Use W X keys to toggle between the left
and right screen.
To program your favourite track/
le/chapter
D
Use ST keys to select the track/ le/
chapter to program and press SELECT
on the remote control.
The selected track/ le/title will appear
at the right screen.
The order on the right screen will be
the order of program playback.
To remove the programmed item
from your selection
E
Press X key to move to the right screen.
Select the track/ le/chapter and press
CLEAR on the remote control.
To start program play
F
Press X key to move to the right screen
and press OK.
Playback will start from the selected
track/ le/chapter according to the
programmed sequence.
To exit program play
G
Press STOP to exit program play.
Changing the audio soundtrack
language
This operation works only on DVDs with
multiple soundtrack language or VCDs
with multiple audio channels.
During disc playback, press AUDIO
repeatedly to toggle through the audio
channels on the disc.
OR,
A
Press T/C on the remote control.
The T/C menu appears.
B
Use ST keys to select { Audio } and
press X to access its options.
C
Use ST keys to select the audio
language and press OK to con rm.
The languages may be numbered or
abbreviated, such as “En” for English.
If the language selected is not available
on the disc, the disc’s default setting for
language will be used instead.
Helpful Hint:
– Some DVDs allow soundtrack language
changes only via the DVD disc menu. To
access the Disc Menu, press DISC MENU.
TIPS: The operating features described here might not be possible for certain discs.
Always refer to the instructions supplied with the discs.
40
Page 41

Additional Playback Features (continued)
Changing subtitle language
This operation works only on DVDs with
multiple subtitle languages, you can
change the language you want while
playing the DVD.
During disc playback, press SUBTITLE
repeatedly to toggle through the language
options on the disc.
OR,
A
Press TC on the remote control.
The T/C menu appears.
B
Use ST keys to select { Subtitle } and
press X to enter the menu and nd the
different available options.
C
Use ST keys to select the language and
press OK to con rm.
The languages may be numbered or
abbreviated, such as “En” for English.
If the language selected is not available
on the disc, the disc’s default setting
language will be used instead.
Helpful Hint:
– Some DVDs discs allow subtitle language
changes only via the DVD disc menu. To
access the disc menu, press DISC MENU.
Switching camera angles
This option is only available with DVDs
that contain sequences recorded from
different camera angles. This allows you
to view the picture from different angles.
A
Press T/C on the remote control.
The T/C menu appears.
B
Use ST keys to select { Angle } and
press X to enter its options.
The camera angles available for
selection appears.
C
Use ST keys to select the camera angle
you want to switch to, then press OK to
con rm.
Time search
This option allows you to skip to a
speci c point in the current disc.
A
Press T/C on the remote control.
The T/C menu appears.
B
Use ST keys to select { Title } and
press X to select time search by { Title }
or { Chapter }. To con rm search
option, press OK.
C
Use the numeric keypad (0-9) to
enter the time required.
Playback skips to the selected time.
English
TIPS: The operating features described here might not be possible for certain discs.
Always refer to the instructions supplied with the discs.
41
Page 42
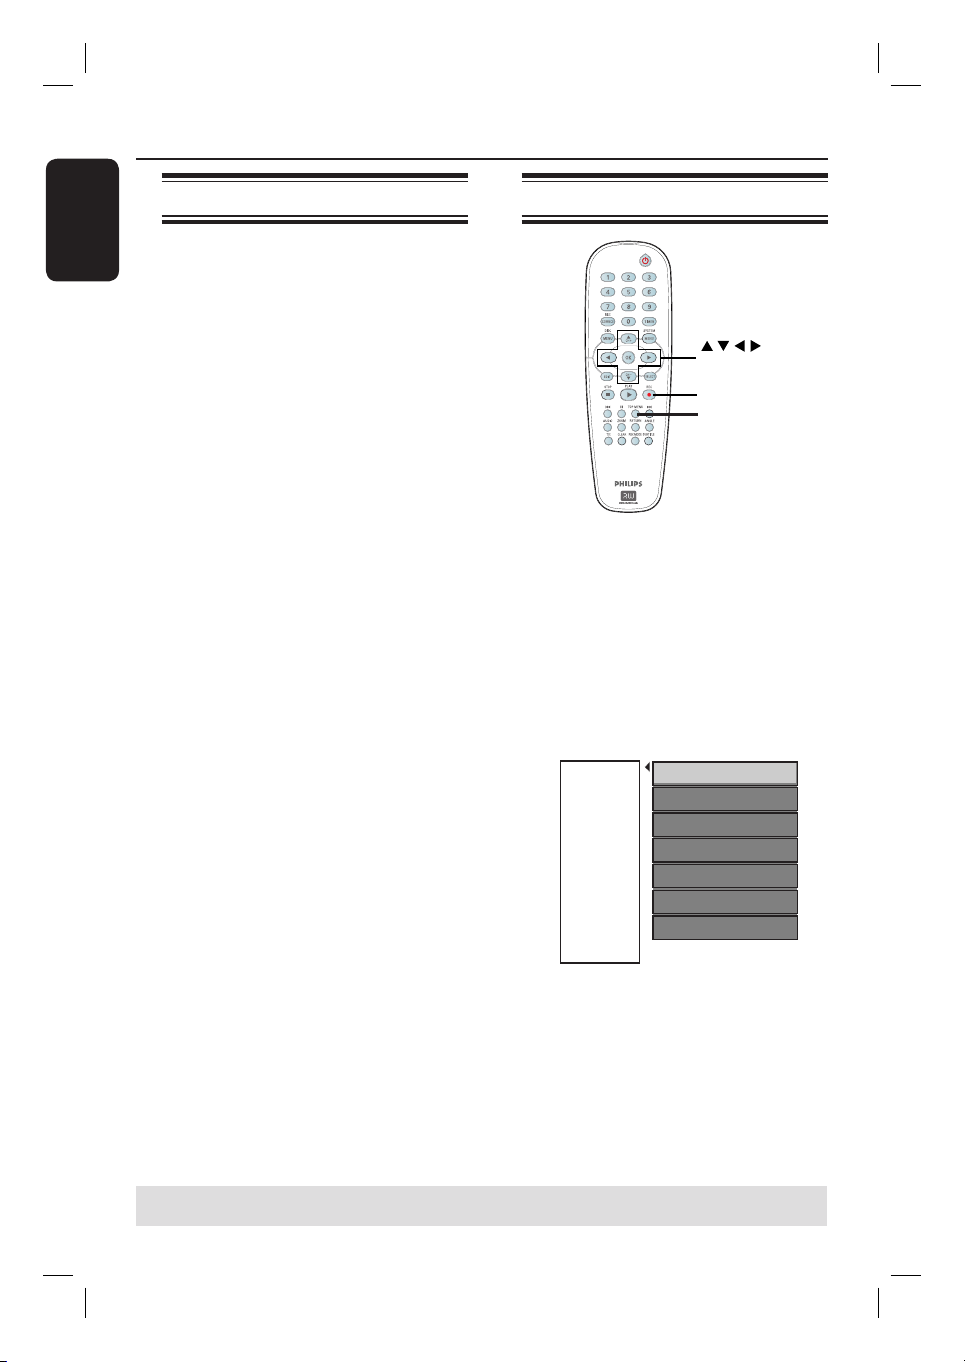
Editing/ Finalizing Recording
English
About disc editing
This recorder offers various disc
editing options for various disc types.
You can change the disc content and
settings of a recorded DVD±R/±RW
from the disc editing menu. The edited
contents may not be available when you
play the disc on an another DVD player.
The displayed options in the disc editing
menu differ depending on the type of
disc.
{ Play }
Start playing from the beginning of the
disc.
{ Rename Disc }
Change the name of the disc.
{ Erase Disc } - DVD±RW only
Erase all the recordings on the disc.
{ Record New Title }
Start recording from the last empty title
on the disc.
{ Overwrite Disc } - DVD±RW only
Start a new recording from the beginning
of the disc, all the recorded content will
be overwritten.
{ Make Compatible } - DVD±RW only
To ensure the edited changes remain
when the disc is played back on another
DVD player. (eg., hidden chapters to
remain hidden).
{ Lock/Unlock Disc } - DVD±RW only
Lock or unlock a disc to prevent
accidental erasure or changes being
made.
{ Finalize Disc } - DVD±R only
Finalize the disc to enable playback on
other DVD players. Further recording
and editing to the disc are not allowed. It
is not possible to un nalize the disc.
Accessing disc editing menu
OK
REC
TOP MENU
A
Insert a recorded DVD±R/±RW into the
recorder.
The Index Picture screen appears on
the TV.
B
Press TOP MENU on the remote
control.
The disc editing menu appears. The
available editing options are different for
DVD±R and DVD±RW discs.
Play
NTSC
DVD
EDIT
C
Use ST keys to access different options
and OK to select.
Instructions and explanation of the
options are provided in the following
pages.
D
To exit, press TOP MENU to go back
to the disc Index Picture screen.
Rename Disc
Erase Disc
Record New Title
Overwrite disc
Make Compatible
Lock Disc
TIPS: No further recording and editing can be carried out on a full or nalized DVD±R.
Press W to go back to the previous menu.
42
Page 43
Editing/ Finalizing Recording (continued)
Rename disc
The original disc name is generated
automatically by the recorder. You
can change the disc name by following
the steps below.
A
Press TOP MENU, then use ST keys
to select { Rename Disc } and press OK.
The keyboard screen appears.
B
Use W XST keys to highlight a
character on the keyboard and press OK
to select.
The maximum input is up to 9
characters.
You can use the following keys on the
keyboard screen to edit your input:
Space
: to create a space between the
Caps
BkSp
Delete
Clear
C
To con rm your entry, select
characters.
: to toggle between upper and
lowercase characters.
: to remove the character to
the left of the cursor.
: to remove the character to
the right of the cursor.
: to clear the entry eld
completely.
OK
the keyboard and press OK.
The info panel is now updated.
To cancel the changes, select
EXIT
the keyboard and press OK.
on
on
Erase disc (DVD±RW only)
This erases the content of the DVD±RW
including those that was not recorded on
this recorder. Once the existing content
is erased, it can be used again for
recording.
A
Press TOP MENU, then use ST keys
to select { Erase Disc } and press OK.
A warning message will appear.
B
Select
YES
NO
in the menu to proceed or
to abort, then press OK to
con rm.
Record new title
This function allows you to start a new
recording at the remaining empty space
on the DVD±R/±RW.
A
Press TOP MENU, then use ST keys to
select { Record New Title } and press
OK.
B
Select the source you want to record
from and press REC
to start
recording.
Overwrite disc (DVD±RW only)
This function allows you to start a new
recording from the beginning of a
DVD±RW regardless of the contents of
the disc.
English
A
Press TOP MENU, then use ST keys
to select { Overwrite disc } and press
OK.
B
Select the source you want to record
from and press REC to start
recording.
TIPS: No further recording and editing can be carried out on a full or nalized DVD±R.
Press W to go back to the previous menu.
43
Page 44

Editing/ Finalizing Recording (continued)
English
Make compatible (DVD±RW only)
The edited DVD±RW may still display
the original titles or hidden scenes when
playbacked on other DVD players. This
function ensures that the edited changes
of the DVD±RW remain when played
back on other players.
Press TOP MENU, then use ST keys to
select { Make Compatible } and press
OK to con rm.
Helpful Hint:
– If the option {Compatible} is not available
for selection, it means that the disc is already
compatible.
Lock/Unlock disc (DVD±RW only)
You can choose to protect the recorded
DVD±RW in order to prevent accidental
loss of recordings.
A
Press TOP MENU, then use ST keys
to select { Lock Disc } and press OK.
The disc is locked for this DVD
recorder only.
When the disc is locked, the option in
the disc editing menu will change to
{ Unlock Disc }.
B
If you want to overwrite or edit on the
protected disc, select { Unlock Disc }.
Playing your recordings
(DVD±R) on other DVD
players
It is necessary to nalize a DVD±R disc
before you can play it on any other DVD
player. Otherwise, the DVD±R will only
playback on this recorder.
After a DVD±R disc has been
nalized, no further recordings or
editing can be made to it. Make sure
that you have completed all the
recordings and editing before
nalizing the disc.
A
Press TOP MENU, then use ST keys
to select { Finalize Disc } and press
OK.
A warning message will appear.
B
Select
to start the process.
Finalization will take a few minutes.
Do not try to open the disc tray or turn
the power off as this may render the disc
unusable.
C
Select
YES
in the menu and press OK
NO
to abort.
TIPS: No further recording and editing can be carried out on a full or nalized DVD±R.
Press W to go back to the previous menu.
44
Page 45
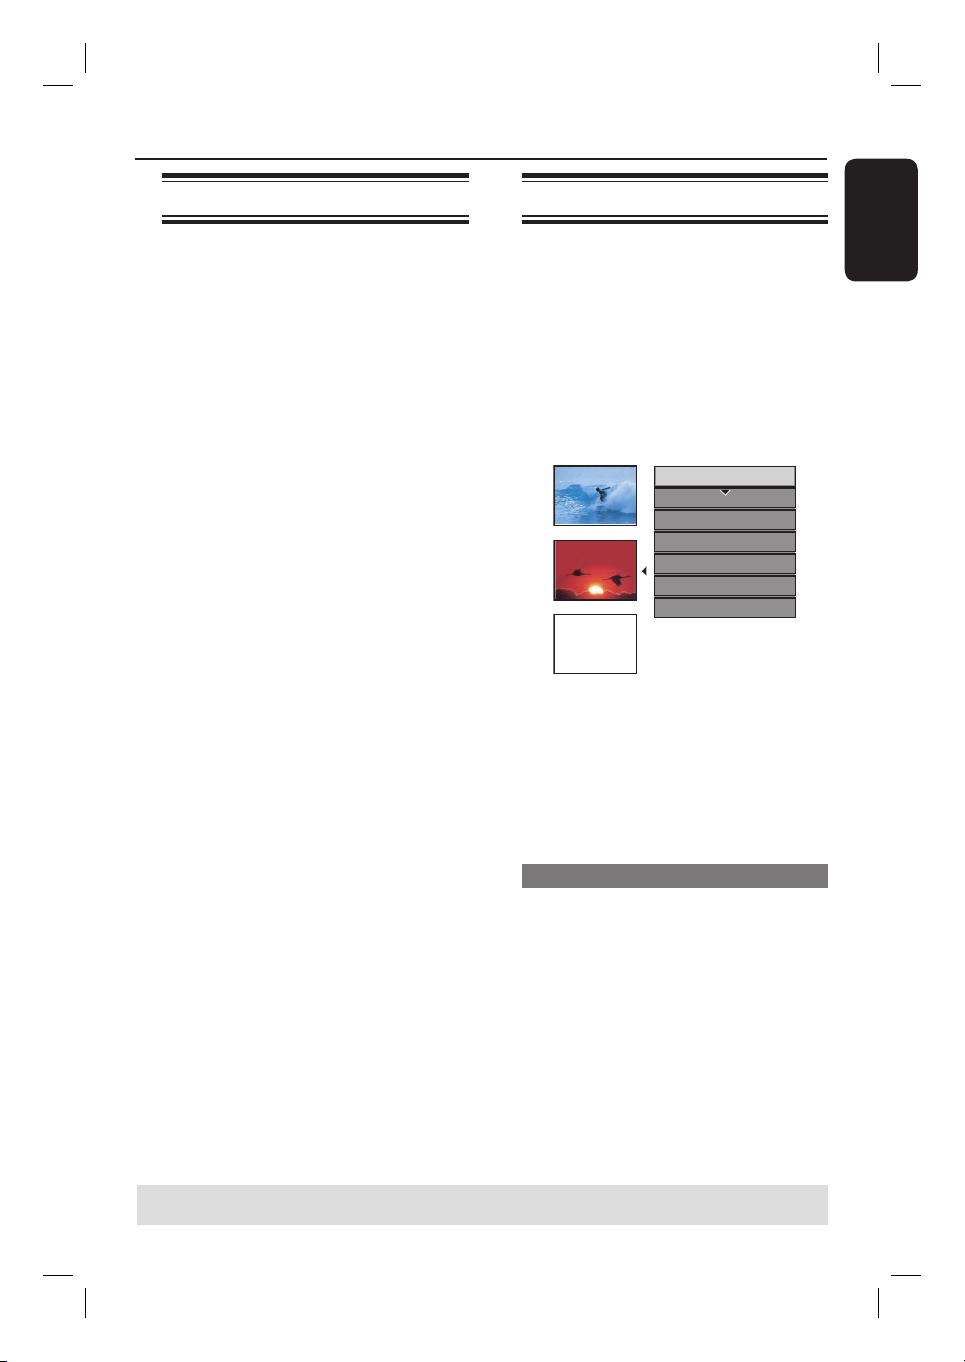
Editing/ Finalizing Recording (continued)
About title editing
You can change the individual title
information or delete a title (recording)
in a recorded DVD±R/±RW. If a DVD±R
has been nalized, it cannot be edited.
The displayed options in the title editing
menu differ depending on the type of
disc.
{ Play Title }
Start playing a recording.
{ Edit Title }
Access the video editing menu.
{ Rename Title }
Change the name of the recording.
{ Erase Title } - DVD±RW only
Delete the title (recording).
{ Overwrite Title } - DVD±RW only
Start a new recording, the existing title
(recording) will be overwritten.
{ Overwrite Disc } - DVD±RW only
Overwrite from the selected title
onwards to the end of the disc.
{ Append Title }
Insert a new recording to the last existing
recording.
Accessing title editing menu
A
Insert a recorded DVD±R/±RW into the
recorder.
The Index Picture screen appears on
the TV.
During playback, press DISC MENU to
access the Index Picture screen.
B
Use ST keys to highlight a title
(recording), and press X.
The title editing menu appears.
Play Title
Edit Title
Rename Title
Erase Title
Overwrite Title
Overwrite Disc
Append Title
2. My movie
Empty Title
C
Use ST keys to access different options
and OK to select.
Instructions and explanation of the
options are provided in the following
pages.
D
To exit, press W.
10 / 01 / 2006
12 : 31 : 53
HQ 00 : 05 : 59
English
Editing video
This feature allows access to the video
editing menu. See the chapter “Editing/
Finalizing Recording – About video
editing” for more information.
In title editing menu, use ST keys to
select { Edit Title } and press OK.
The video editing menu appears.
The recorder will play the
selected title.
TIPS: No further recording and editing can be carried out on a full or nalized DVD±R.
Press W to go back to the previous menu.
45
Page 46
Editing/ Finalizing Recording (continued)
English
Rename title
The original title name is generated
automatically by the recorder. You can
give a new name to the title by following
the steps below.
A
In title editing menu, use ST keys to
select { Rename Title } and press OK.
The keyboard screen appears.
B
Use W X ST keys to highlight a
character and press OK to select.
The maximum input is up to 9
characters.
You can use the following keys on the
keyboard screen to edit your input:
Space
: to create a space between the
Caps
BkSp
Delete
Clear
characters.
: to toggle between upper and
lowercase characters.
: to remove the character to
the left of the cursor.
: to remove the character to
the right of the cursor.
: to clear the entry eld
completely.
C
To con rm your entry, select
the keyboard and press OK.
The info panel is now updated.
To cancel the changes, select
the keyboard and press OK.
Erase title (DVD±RW only)
You can delete a speci c title (recording)
from the disc.
A
In title editing menu, use ST keys to
select { Erase Title } and press OK.
A warning message will appear.
B
Select
YES
NO
in the menu to proceed or
to abort, then press OK to
con rm.
OK
EXIT
on
on
Overwrite title (DVD±RW only)
This function allows you to record a new
title from the beginning of the selected
title in the DVD±RW. The other titles
will not be affected.
A
In title editing menu, use ST keys to
select { Overwrite Title } and press OK.
B
Select the source you want to record
from and press REC
to start
overwriting.
Overwrite disc
You can select to overwrite only the
recordings from the selected title to the
end of the disc.
In title editing menu, use ST keys to
select { Overwrite Disc } and press OK
to con rm.
Append recording
This function allows you to add a
recording to the last existing title.
A
In title editing menu, use ST keys to
select { Append Title } and press OK.
B
Press REC SOURCE to select the input
channel to append.
C
Press REC to start append recording.
D
To stop append recording, press
STOP
.
TIPS: No further recording and editing can be carried out on a full or nalized DVD±R.
Press W to go back to the previous menu.
46
Page 47
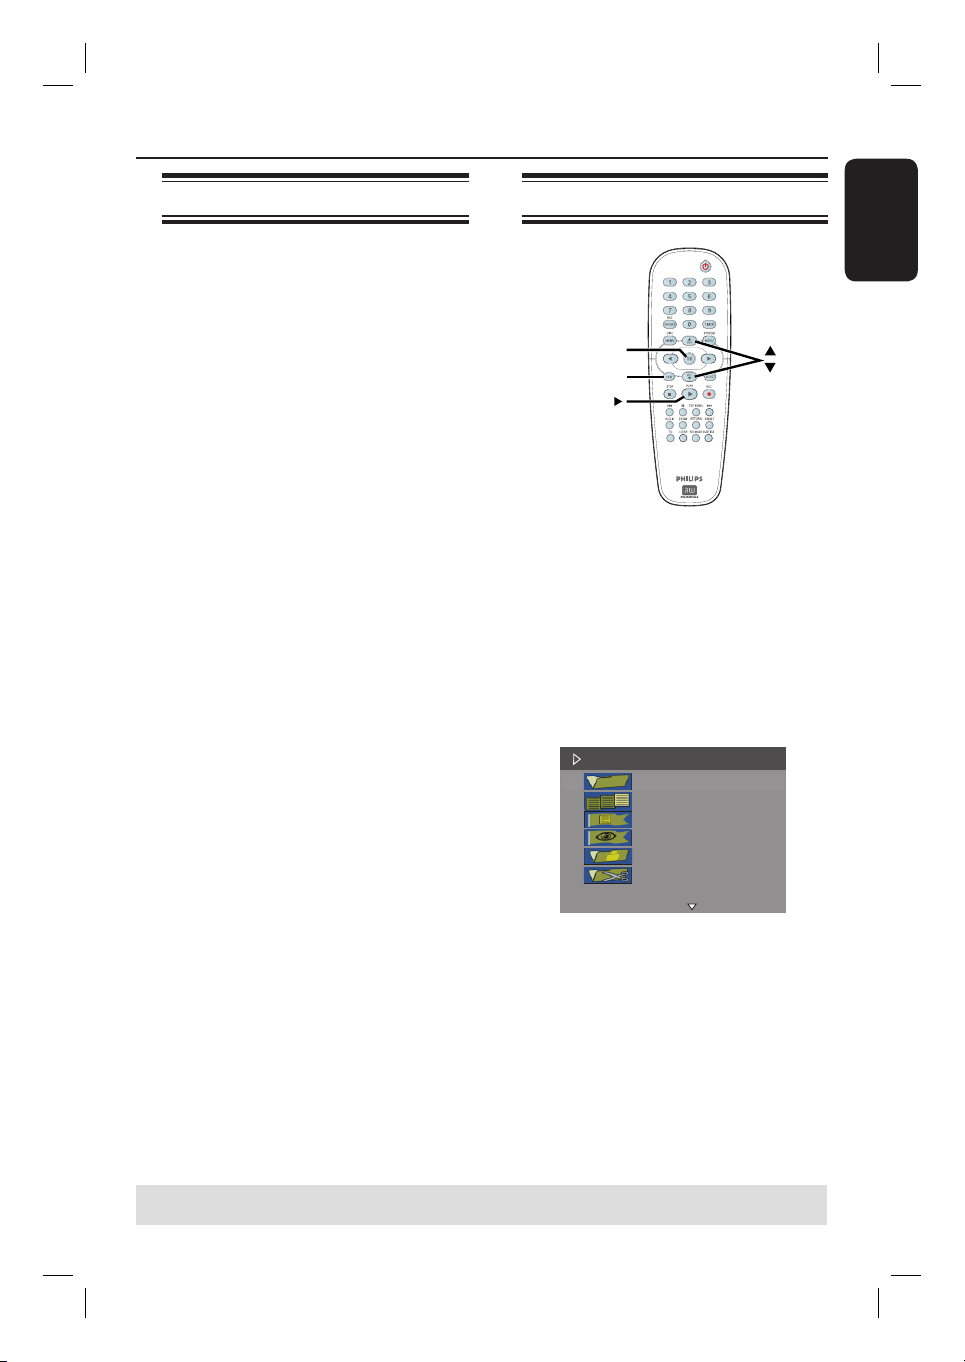
Editing/ Finalizing Recording (continued)
About video editing
After a recording has been made, this
recorder allows you to edit the video
content. You can add/delete chapter
markers, hide unwanted scenes, change
the picture in the index picture screen and
split a title (recording) into two.
When you playback a recording in video
edit mode, the entire recording will be
played back including hidden scenes.
The edit functions available in the disc
editing menu are:
{ Title }
Select a title (recording) to playback.
{ Chapter }
Select a chapter within the selected title.
{ Chapter Marker }
Insert a chapter marker in the recording
or erase a chapter marker to combine
two chapters.
{ Hide Chapter }
Hide the unwanted scene in the
recording.
{ Index Picture }
Select a scene in the recording as the
index picture screen.
{ Split Title } - DVD±RW only
Divide the recording into two under
separate titles.
Accessing video editing menu
OK
EDIT
PLAY
A
Insert a recorded DVD±R/±RW into the
recorder.
The Index Picture screen appears on
the TV.
B
Use ST keys to select a title (recording).
C
Press PLAY X to start playback.
D
Press EDIT on the remote control.
The video editing menu appears.
Edit Mode
Title 02/06
Chapter 01/10
Chapter Marker
Hide Chapter
Index Picture
Split Title
E
Use ST keys to access different options
and press OK to select.
Instructions and explanation of the
options are provided in the following
pages.
F
To exit, press EDIT.
English
TIPS: No further recording and editing can be carried out on a full or nalized DVD±R.
Press W to go back to the previous menu.
47
Page 48
Editing/ Finalizing Recording (continued)
English
Selecting a title
This option shows the current title and
the total number of titles on the disc.
A
During playback, press EDIT to display
the video editing menu, then useST
keys to select
OK.
B
Use the numeric keypad 0-9 to key in
a title and press OK.
The recorder will playback the
selected title.
Selecting a chapter
This option shows the current chapter
and the total number of chapters in the
title.
A
During playback, press EDIT to display
the video editing menu, then use ST
keys to select
press OK.
B
Use the numeric keypad 0-9 to key in
the chapter and press OK.
The recorder will playback the
selected chapter.
{ Title } and press
{ Chapter } and
Creating chapter marker
You can create a chapter by inserting
chapter markers at any point within a
title during playback. This will allow you
to access a speci c point in the recording
easily or set a chapter you wish to hide.
Title
Chapter Chapter Chapter Chapter
chapter markers
A
During playback, press EDIT to display
the video editing menu, then use ST
keys to select
Marker } and press OK.
B
Use ST keys to select one of the
options and press OK to con rm.
{ Insert Marker }
Select this to insert a new chapter
marker at the current point of playback.
{ Delete Marker }
Select this to delete the current chapter
marker (it refers to the closest marker
before the current point of playback).
{ Delete All Markers }
Select this to delete all the chapter
markers in the current title.
{ Chapter
TIPS: No further recording and editing can be carried out on a full or nalized DVD±R.
Press W to go back to the previous menu.
48
Page 49

Editing/ Finalizing Recording (continued)
Hiding unwanted scenes
You can choose to hide certain scenes
from playback (e.g. skipping commercials)
or make it visible again.
A
Create a chapter marker at the start and
end of the scene you want to hide. ( See
previous page on “Creating Chapter
Markers”).
B
Select the chapter you want to hide and
start playback. (See previous page on
“Selecting a chapter”).
C
During playback, press EDIT to display
the video editing menu, then use ST
keys to select { Hide Chapter }
and press OK.
The current chapter will be hidden.
If the video editing menu does not show,
press EDIT on the remote control.
To unhide a chapter
A
Press EDIT on the remote control
during playback.
The video editing menu appears.
While in editing mode, the hidden
chapter/chapters will be played back.
B
Wait for the chapter you want to unhide
to occur or use .> keys on the
remote control to make a fast search.
C
Use ST keys to select { Unhide
Chapter } and press OK.
The current chapter will be visible
during playback.
Changing Index Picture
The index picture is the picture of the
title you will see when the recorder
loads up the Index menu. Normally, the
rst frame of a recording is shown as the
title’s index picture.
A
During playback, use W X keys on the
remote control to search for the scene
to use, then press PAUSE
Press PAUSE
forward to next pause scene.
B
Press EDIT to display the video editing
menu, then use ST keys to select
{ Index Picture } and press OK
to select the current scene as the index
picture for the title.
Splitting a title (DVD±RW only)
You can divide the current title into two
new titles. Each of these titles is
characterized by its own index picture.
Warning! Once a title is divided, the
process cannot be reversed.
During playback, press EDIT to display
the video editing menu, then useST
keys to select
press OK to divide the title at the
current playback position.
A new title will be shown at the Index
Picture screen.
again to move
Å
.
Å
{ Split Title } and
English
Helpful Hint:
– All the hidden chapters will be played
back while in video editing mode.
– To locate a speci c frame during playback,
press PAUSE
search to the frame that you want.
TIPS: No further recording and editing can be carried out on a full or nalized DVD±R.
Press W to go back to the previous menu.
Årepeatedly to forward
49
Page 50
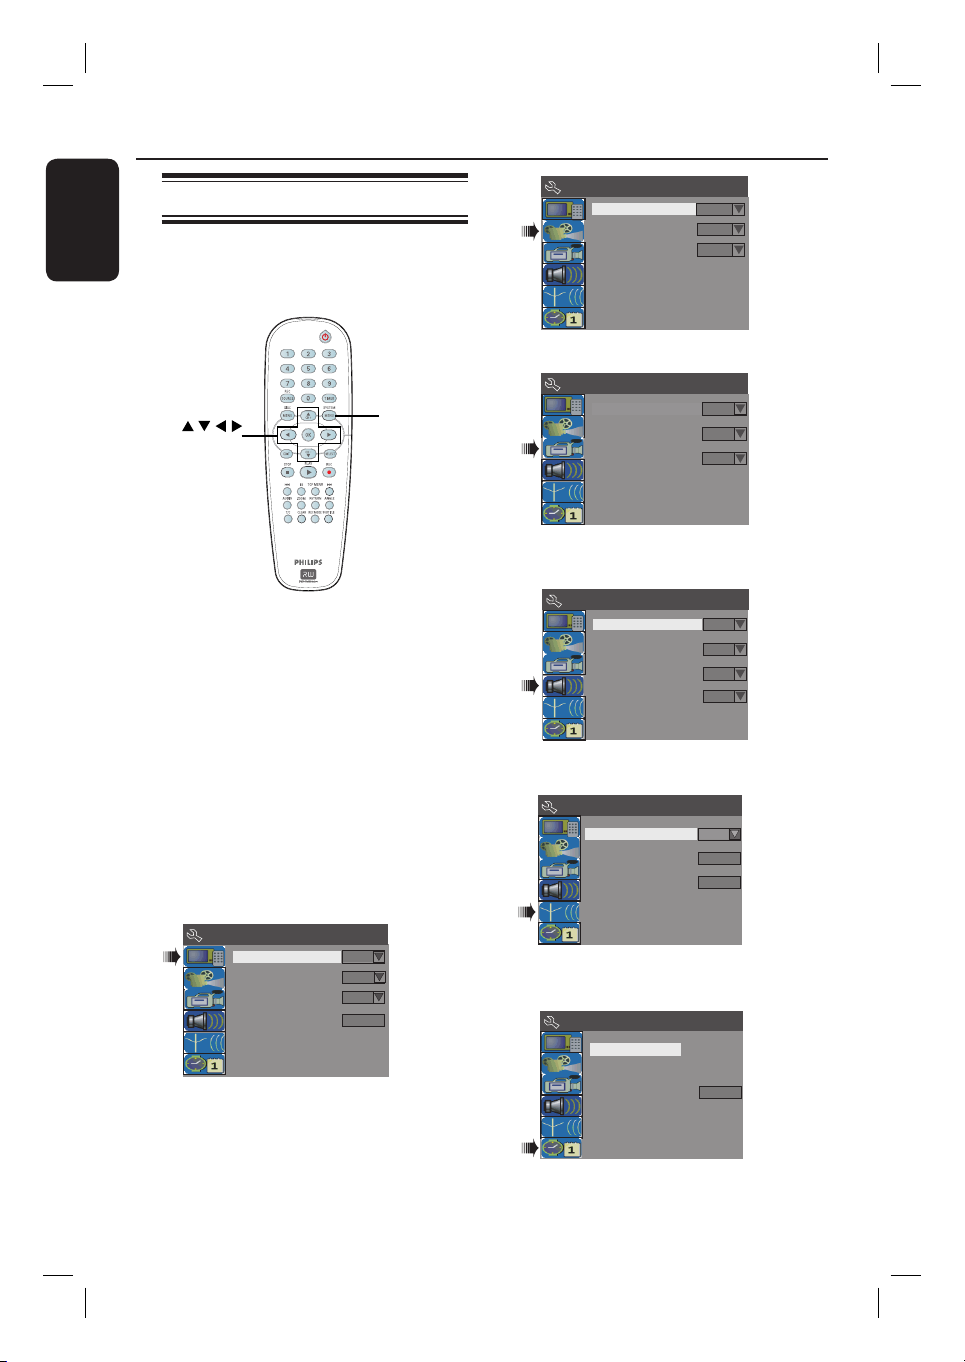
DVD System Menu Options
English
Accessing the System Menu
The system menu provides various
options for you to adjust the recorder to
suit your preferences.
OK
A
Press SYSTEM MENU on the remote
control.
The system menu appears on TV.
B
Use ST keys to highlight a menu item
and press X to access its options.
C
Use ST keys to highlight the setting you
wish to change and press OK to con rm
and return to the previous menu item.
Instructions and explanation of the
options are provided in the following
pages.
D
To exit, press SYSTEM MENU.
SYSTEM
MENU
System Menu - Playback
TV Aspect Ratio
Parental Rating Level
Digital Audio Output
4:3 Letterbox
Off
All
See this chapter “ PLAYBACK settings”.
System Menu - Record
Auto Chapter Marker
Default Recording Source
Default Recording Mode
On
Tuner
SP
See the chapter “Recording – RECORD
settings”.
System Menu - Language
On Screen Display Language
Default Disc Menu Language
Default Subtitle Language
Default Audio Language
English
English
Off
English
See this chapter “LANGUAGE settings”.
System Menu - Channel Setup
Tuner Input Source
Channel Search
Modify Channel Information
Cable
Search
Edit
System Menu - General
See the next page.
50
Screen Saver
Progressive/Interlaced
Video Output Format
Restore Factory Settings
On
Interlaced
NTSC
OK
See this chapter “CHANNEL SETUP
settings”.
System Menu -
Date(dd/mm/yy)
Time(hh:mm:ss)
Clock
01/01/06
10 : 33 : 57 AM
OKShow DivX registration code:
See this chapter “CLOCK settings”.
Page 51

DVD System Menu Options (continued)
GENERAL settings (underlined options are the factory default settings)
Screen Saver
A screen saver prevents damage to the TV screen by avoiding
exposure to a static image for too long.
1) Use ST keys to select one of the options.
{ On } – Select this if you wish to turn off the TV screen
after playback had been stopped or paused for
longer than 15 minutes.
{ Off } – Select this to disable the screen saver.
2) Press OK to con rm your selection.
Progressive/
Interlaced
standard interlaced TV channel scan. It only works when you
Progressive scan delivers a higher picture quality than the
have connected the recorder’s Y Pb Pr jacks to your TV that
supports the progressive video input. Otherwise, the image may
not appear or will be distorted. Please check your TV user
manual for more information.
1) Use ST keys to select one of the options.
{ Interlaced } – Select to enable interlaced feature.
{ Progressive } – Select to enable progressive scan feature.
2) Press OK to con rm your selection.
Video Output
Format
match. Only then will it be possible to play a DVD on this
The colour system of the DVD system, DVD and TV should
system. Before changing the TV system, determine the colour
system of your TV set.
1) Use ST keys to select one of the options.
{ NTSC } – Select this if the connected TV set has the
NTSC colour system. It will change the video
signal of a PAL disc and output it to NTSC
format.
{ PAL } – Select this if the connected TV set has the PAL
colour system. It will change the video signal of
an NTSC disc and output it to PAL format.
{ PAL-N } – Select this if the connected TV set has the
PAL N colour system. It will change the video
signal of an NTSC disc and output it to PAL N
format.
2) Press OK to con rm your selection.
English
Helpful Hint:
– If a blank/distorted TV screen appears, wait for 10 seconds for the auto
recovery.
51
Page 52
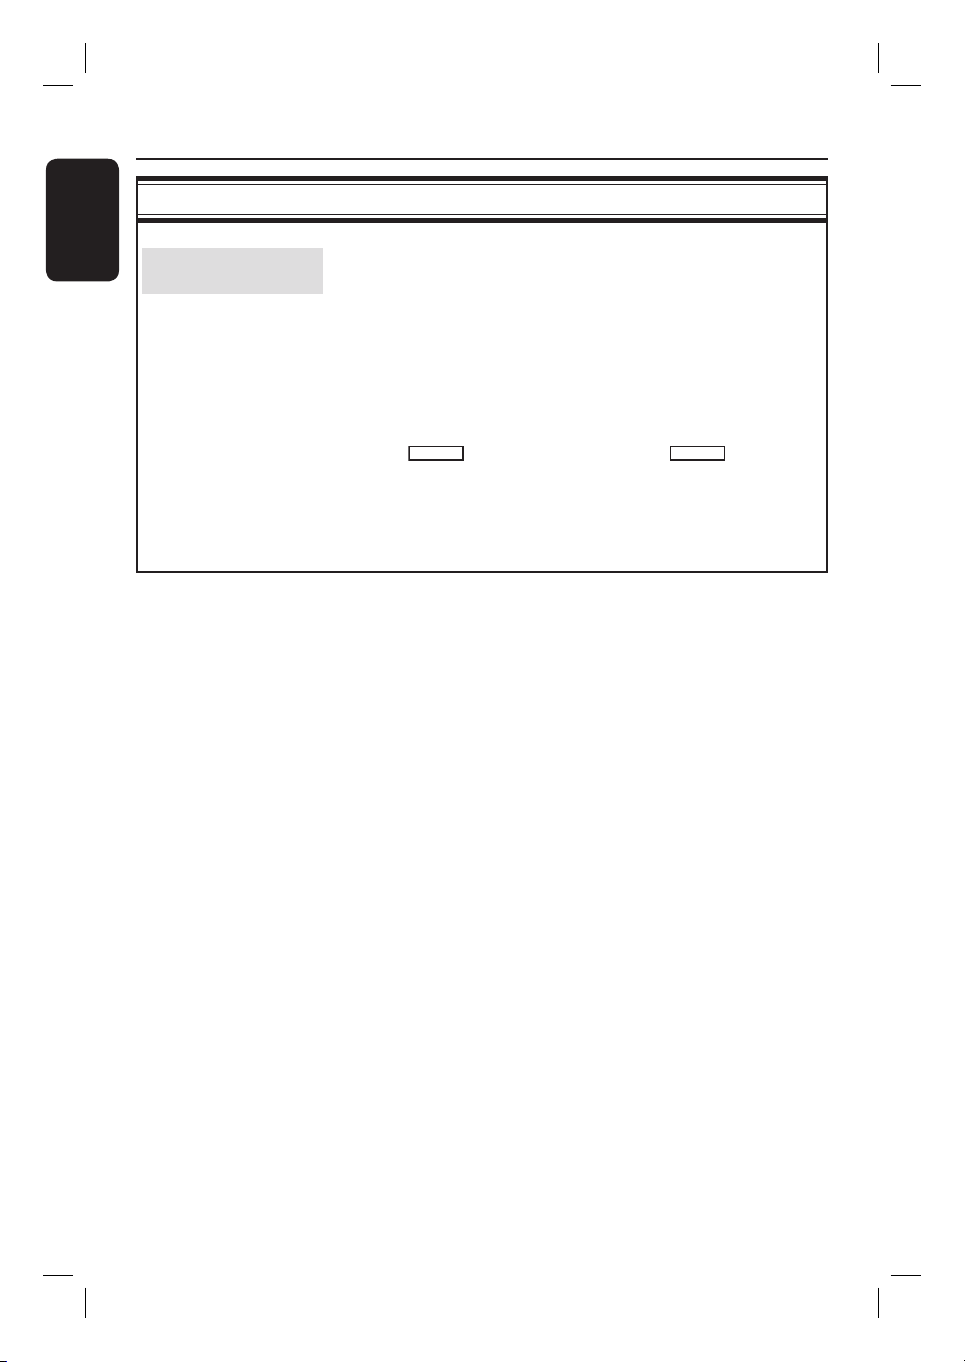
DVD System Menu Options (continued)
English
GENERAL settings
Reset Factory
Settings
for the PIN code.
This option will restore all the settings of this recorder, except
Restore Factory settings can only be changed when
there is no disc in the disc tray.
1) Use ST keys to select { Restore Factory Settings } and
press OK.
A warning message will appear.
2) Select
OK
then press OK to con rm.
in the menu to proceed or
CANCEL
to abort,
52
Page 53
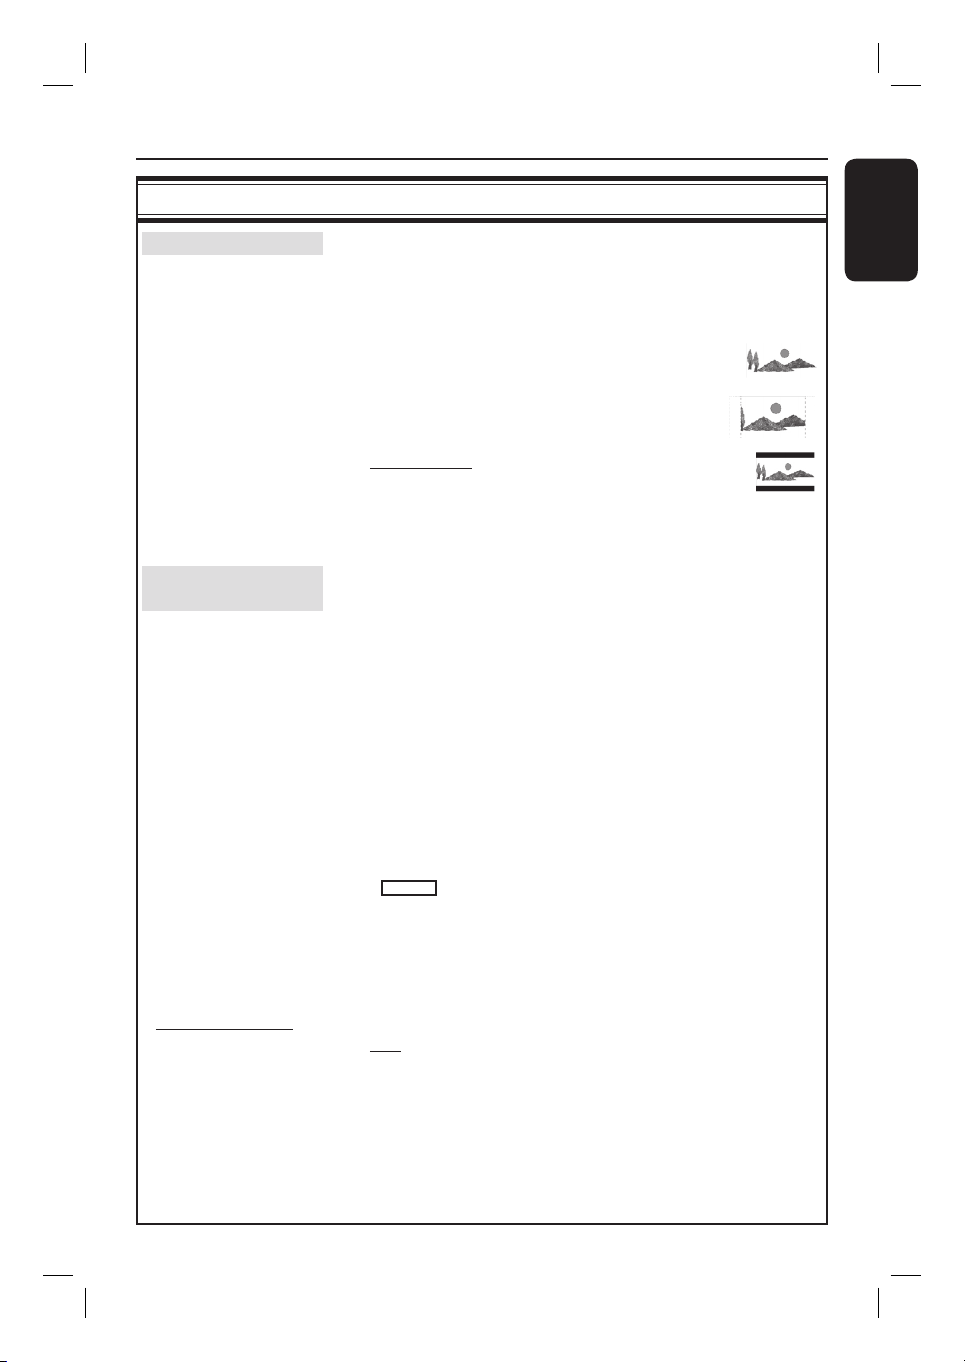
DVD System Menu Options (continued)
PLAYBACK settings (underlined options are the factory default settings)
TV Aspect Ratio
Set the aspect ratio of the recorder according to the TV type
you have connected.
1) Use ST keys to select one of the options.
{ 16:9 } – Select this for wide screen TV
(frame ratio 16:9).
{ 4:3 Panscan } – Select this for a full-height
picture with both side trimmed.
{ 4:3 Letterbox } – Select this for a ‘wide screen’ display
with black bands on the upper and
lower portions of the TV screen.
2) Press OK to con rm your selection.
Parental Rating
Level
disc or to certain scenes on the disc. This feature lets you set a
Some DVDs may have a parental level assigned to the complete
playback limitation level.
1) Press OK to access this menu and you will be prompted to
enter your four-digit pin code.
2) Use the numeric keypad 0-9 to enter your four-digit pin code.
When doing this for the rst time, enter the default
password ‘3308’ .
The set rating level menu appears.
If you forget your four-digit pin code, the default password is
3308.
3) Use ST keys to select the desired parental level, then move
OK
to
in the menu and press OK on the remote control
to con rm.
To disable parental controls and allow all discs to play, select {
Off }.
Press X to access this menu and use ST keys to select one
Rating explanations
of the options.
{ Off } – Parental control is not active.
1. Kid Safe } ~ { 2. G } – Childsafe; acceptable for viewers of all
{
ages.
{ 3. PG } – Parental Guidance suggested.
{ 4. PG13 } – Unsuitable for children under age 13.
{ 5. PG R } ~ { 6. R } – Restricted; recommended that parents
restrict children under 17 from viewing or allow
to view only when supervized by a parent or
adult guardian.
English
53
Page 54
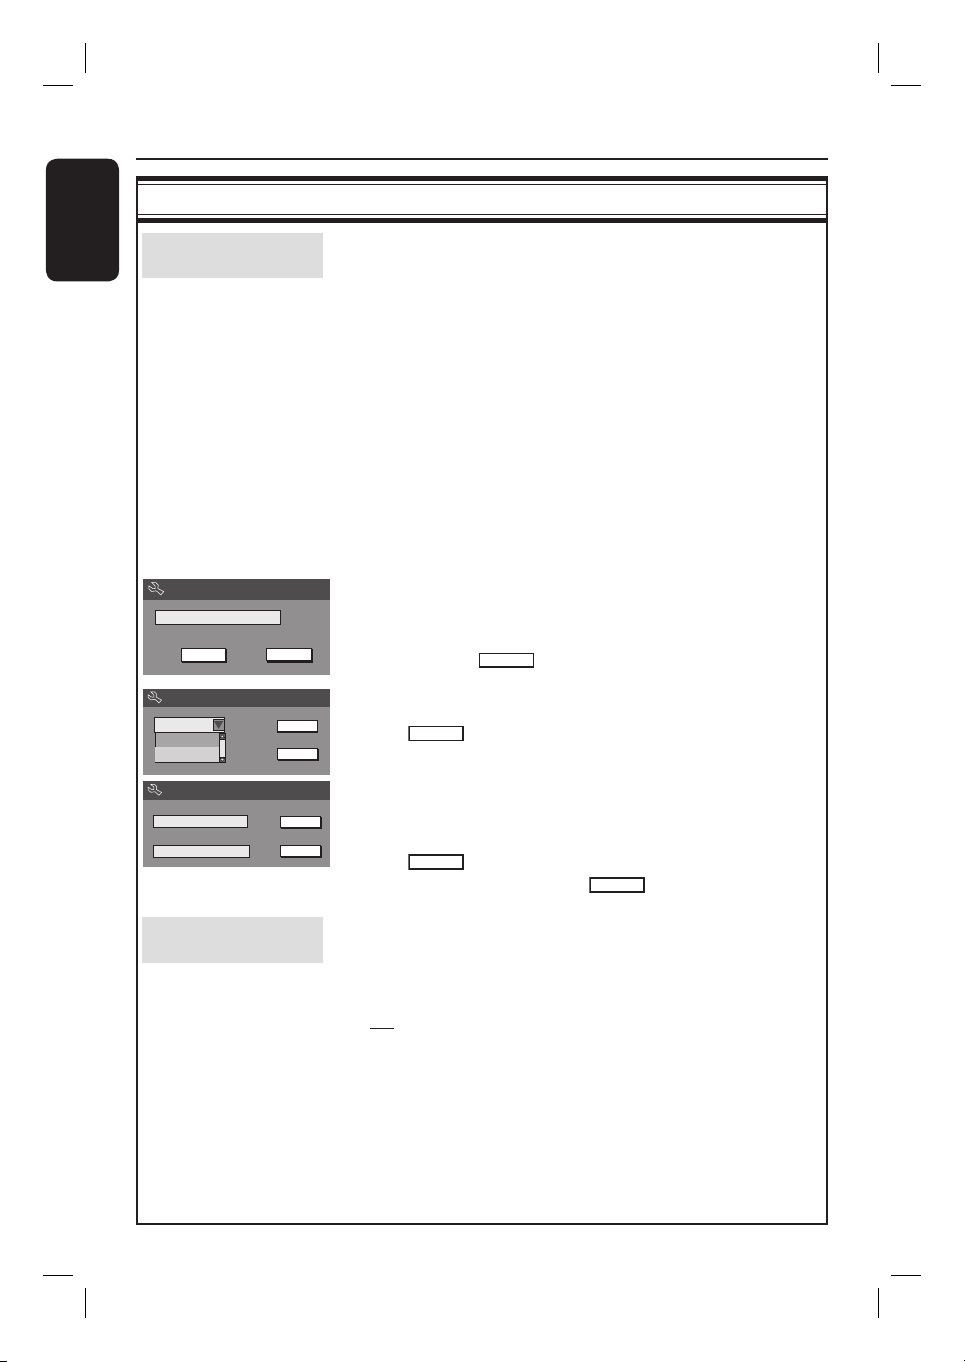
DVD System Menu Options (continued)
English
PLAYBACK settings (underlined options are the factory default settings)
Parental Rating
Level
To change your password
Enter Password
* * * *
Set Rating Level
4. PG 13
5. PG R
4. PG 13
New password
New Password
New password
* * * *
Confirm password
{ 7. NC 17 } – No children under age 17; not recommended
viewing for children under age 17.
{
8. Adult } – Mature material; should be viewed only by
adults due to graphic sexual material, violence or
language.
DVDs that are rated higher than the level you have selected
will not play unless you enter your four-digit pin code.
Helpful hints:
– VCD, SVCD, CDs have no level indication, so parental control has no effect
on these type of discs. This also applies to most illegal DVDs.
– Some DVDs are not coded with a rating though the movie rating may be
printed on the disc cover. The rating level feature does not prohibit play of
such discs.
1) Select { Parental Rating Level } and press OK.
You will be prompted to enter your four-digit pin code.
2) Use the numeric keypad 0-9 to enter your four-digit pin
CancelOK
OK
code and select
OK
in the menu and press OK on the
remote control to con rm.
The set rating level menu appears.
OK
New
3) Select
OK
password menu.
New
in the menu and press OK to access new
4) Use the numeric keypad 0-9 to enter your new four-digit
OK
Cancel
pin code, then press T to select the next entry eld and enter
the same pin code a second time.
OK
5) Select
OK
in the menu and press OK to con rm.
To abort the change, select
CANCEL
and press OK.
Digital Audio
other devices to the coaxial jack on the recorder.
Output
Adjust the digital output setting only if you have connected
1) Use ST keys to select one of the options.
{ All } – Select this if you have used the COAXIAL
jack on the recorder to connect to a stereo
receiver that has a built in multichannel decoder.
{
LPCM } – Select this if the connected audio equipment is
not capable of decoding multichannel audio
Dolby Digital and MPEG-2 multichannel signals
are converted to PCM (Pulse Code Modulation).
2) Press OK to con rm your selection.
54
Page 55
RECORD settings
DVD System Menu Options (continued)
Auto Chapter
Marker
This allows you access to speci c points on the recording.
See the chapter “Recording – RECORD settings”.
Default Recording
The default source is selected when the recorder is switched on.
Source
Default Recording
Mode
LANGUAGE settings
On-Screen Display
Language
Default Disc Menu
Language
Insert chapter markers within a title during recording.
De ne your preferred source of recording.
See the chapter “Recording – RECORD settings”.
De ne your preferred mode of recording.
See the chapter “Recording – RECORD settings”.
Select the menu language for this recorder on-screen display.
Select the preferred disc menu language for DVD playback.
English
Default Subtitle
Language
Default Audio
Language
Select the preferred subtitle language for DVD playback.
Select the preferred audio language for DVD playback.
Helpful Hints:
– If the selected audio/subtitle language is not available on the disc, the disc’s
default setting language will be used instead.
– For some DVDs, the subtitle/audio language can only be changed via the DVD
disc menu.
55
Page 56
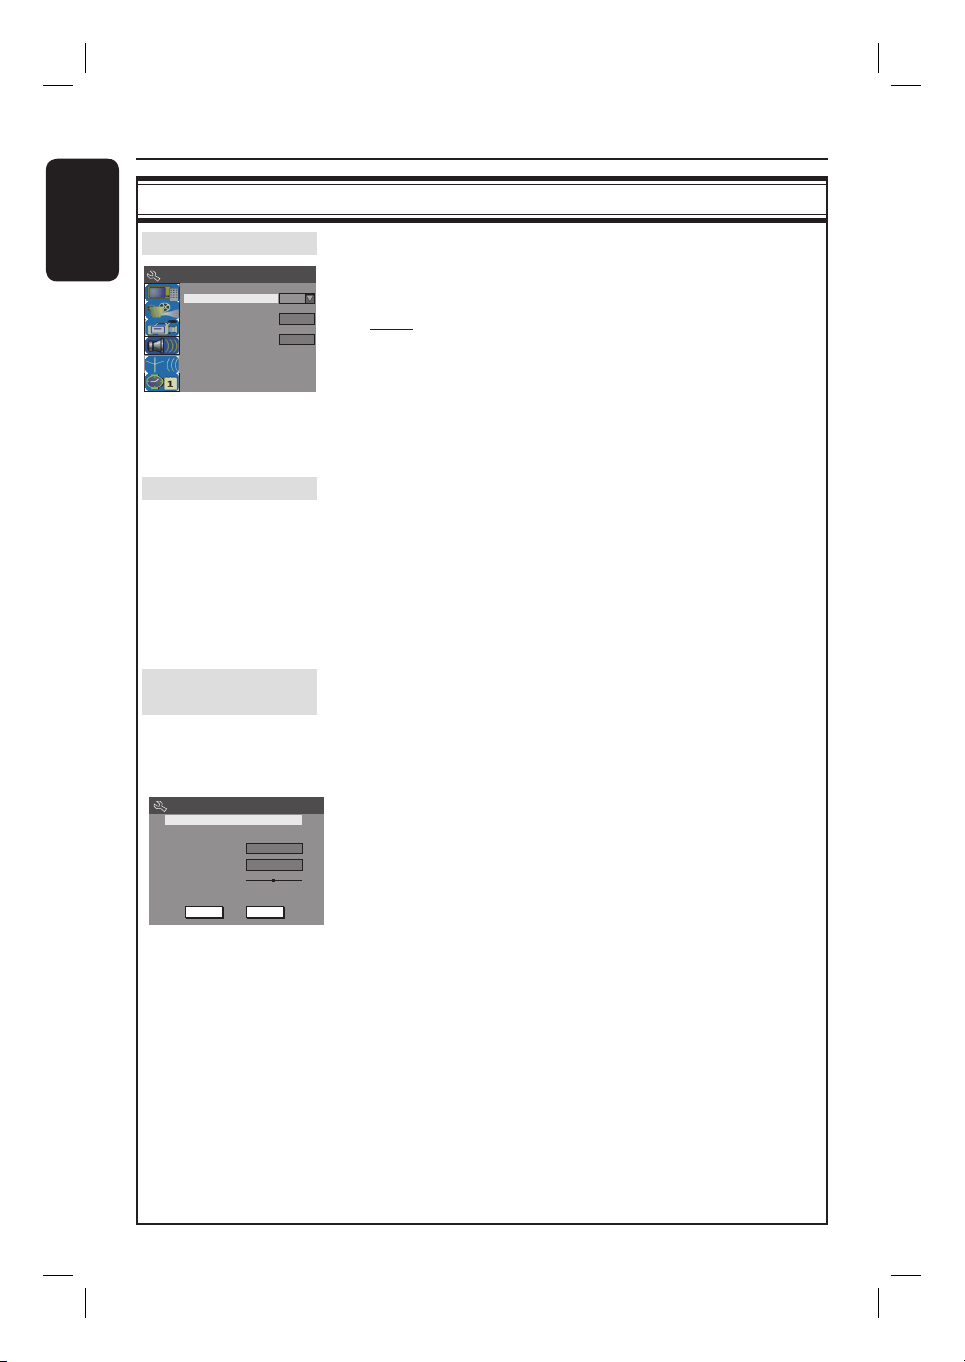
DVD System Menu Options (continued)
English
CHANNEL SETUP settings (underlined options are the factory default settings)
Tuner Input Source
System Menu - Channel Setup
Tuner Input Source
Channel Search
Modify Channel Information
Set the tuner input source for the recorder.
1) Use ST keys to highlight { Tuner Input Source } and
Cable
Search
Edit
press X to access the options:
{ Cable } – Select this if the recorder is connected via
a cable box/satellite receiver.
{ Air } – Select this if the recorder is connected
directly to the antenna wall outlet.
2) Press OK to con rm your selection and press W to return to
the previous screen.
Channel Search
Automatically scans all the receivable analog local TV channels
and store them on the recorder.
1) Use ST keys to highlight { Channel Search - Search }
and press OK on the remote control.
The automatic TV channel search will start. This process
may take several minutes. Once complete, the total number of
channels found will appear on the TV.
Modify Channel
reception and the sound quality of that TV channel.
Information
Adjust a stored TV channel to your preference, improve the
1) Use ST keys to highlight { Modify Channel Information
- Edit } and press X .
The channel menu appears.
Channel
Name
Frequency
TV System
Skip
Fine tune
Ch003
55.26MHz
PAL B/G
No
OK
Cancel
2) Use ST keys to select one of the options and press X .
{
Name } – Use numeric keypad 0-9 to enter the TV
channel and press OK to con rm.
{ Frequency } – Adjust the frequency of the channel.
OK
– Use WX keys to start manual search. Press
OK on the remote control to con rm the
setting.
{ TV System } – Set the TV system that produces the least
distortion of picture and sound.
– Use ST keys to select a suitable sound mode
and press OK to con rm. (See chapter “TV
System Guide” at the back of this manual for
` more information).
56
Page 57
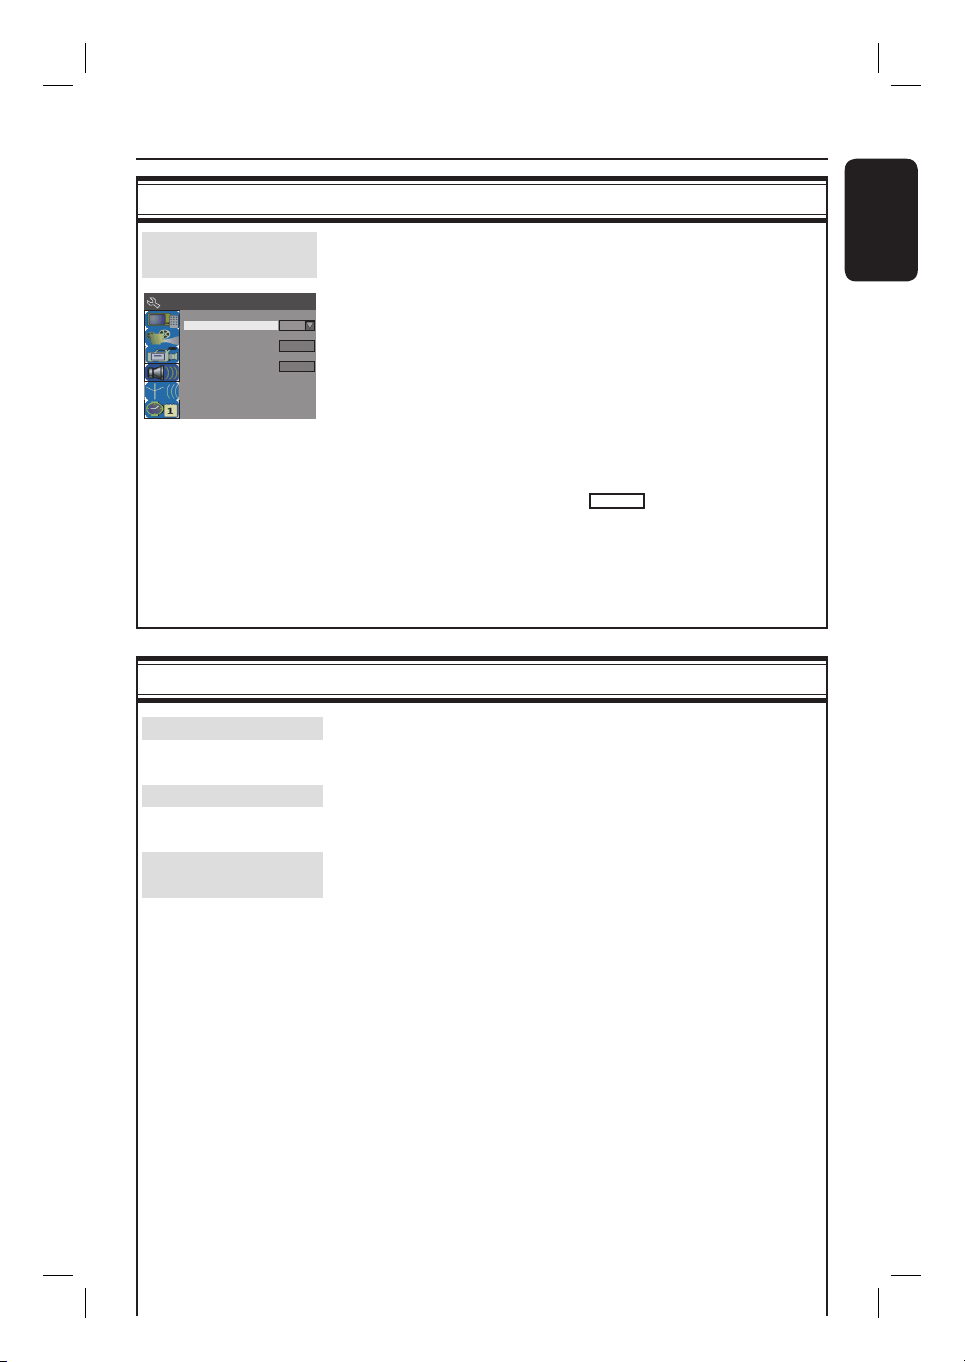
DVD System Menu Options (continued)
CHANNEL SETUP settings (underlined options are the factory default settings)
Modify Channel
reception and the sound quality of that TV channel.
Information
System Menu - Channel Setup
Tuner Input Source
Channel Search
Modify Channel Information
Adjust a stored TV channel to your preference, improve the
{ Skip } – Set the channel to be skipped. The skipped
Cable
Search
Edit
channels can only be accessed by pressing the
corresponding number button on the remote
control.
– Use WX keys to select { Yes } if you wish to
skip this channel.
{ Fine-tune } – Fine-tune the TV channel manually if the
reception is poor.
– Use WX keys to ne-tune the frequency.
3) To con rm the changes, select
OK
and press OK on the
remote control to return to the previous screen.
CLOCK settings (underlined options are the factory default settings)
Date (dd/mm/yy)
Use ST keys to change the number and use WX keys to
select different entry elds, then press OK to con rm.
Time (hh:mm:ss)
Use ST keys to change the number and use WX keys to
select different entry elds, then press OK to con rm.
English
Show DivX®
registration code that allows you to rent and purchase videos
Registration code
Select to view the DivX® VOD (Video On Demand)
using the DivX® VOD service. For more information, visit us at
www.divx.com/vod.
1) Press X to display the registration code.
2) Use the registration code to purchase or rent videos from
DivX® VOD service at www.divx.com/vod. Follow the
instructions and copy the video from your computer onto a
CD-R/RW or recordable DVD disc for playback on this
recorder.
57
Page 58

Software Upgrade
English
Installing the latest software
The software installed in your recorder is
continuously being re ned for greater
stability and compatibility of the set.
Periodically, Philips will issue upgrades for
the software which you copy onto a CD
and install the software of your recorder.
Caution! Power supply must not be
interrupted during upgrade!
Visit Philips’ website at
‘www.philips.com/support’ to check for
the availability of the latest software
upgrade.
Note: When checking for the latest
software upgrade, please also check for
any accompanying instructions on
installing the software.
58
Page 59

Troubleshooting
WARNING
Under no circumstances should you try to repair the system yourself, as this will
invalidate the warranty. Do not open the system as there is a risk of electric shock.
If a fault occurs, rst check the points listed below before taking the system for repair.
If you are unable to remedy a problem by following these hints, consult your dealer or
Philips for help.
Problem (General) Solution
No power.
Remote control does not
work.
– Press STANDBY-ON button on the front of the recorder to
switch on the system.
– Make sure the AC outlet has power.
– Aim the remote control directly at the sensor on the front of
the DVD recorder (not towards TV).
– Remove any obstacles between the recorder and the remote
control. Aim the remote control towards the set at different
angles and/or distances.
– Batteries are weak, replace the batteries.
– Press REC SOURCE on the remote control to select an input
source.
English
No picture.
No sound.
No TV signal received from
the recorder.
A TV channel installed during
the DVD recorder’s
automatic TV channel search
is fuzzy or distorted.
Unable to eject tray
– Switch on your TV and set to the correct Video In channel.
Switch the TV channel until you see the DVD screen. Read
chapter “Step 3 - Installation and Setup – Finding the correct
viewing channel” for details.
– Check the video connection between the recorder and the TV.
– If the recorder is connected to a progressive scan TV, ensure
you have enabled the { Progressive } option. Read the chapter
“DVD System Menu Options – GENERAL Settings.”
– Check the audio connections, the red and white jacks. Read
chapters “Step 1 : Basic Reorder Connections - Connecting the
audio cables” for details.
– Set the Digital output correctly, based on the equipment you
connected to the recorder. Read chapter “DVD System Menu
Options - PLAYBACK settings – Digital Audio Output” for
details.
– Have your antenna or cable TV signal checked.
– Install the TV channel. Read chapter “Step 3: Installation and
Setup - Setting your TV channel programs” for details.
– Check the video connection between the DVD recorder and
the TV.
– You can further ne-tune the signal of the TV channel. Read
chapter on “DVD System Menu Options – CHANNEL SETUP
Settings”
– Press CH +/– to search for the same TV channel which may
have a clearer picture.
– Exit from any on-screen menu until you see the Philips
wallpaper
– Press STOP to stop any playback or recording, then press
EJECT on the set.
59
Page 60

Tro ub le sh ooting (continued)
English
Problem (Playback) Solution
Disc does not play.
Distorted sound coming from
a connected hi- system or
ampli er.
Unable to play DivX movies.
The picture is distorted or
black and white during
playback.
A DVD±R/±RW recorded on
this DVD recorder does not
play on a DVD player.
There is picture or sound
interference with the TV
reception.
– Insert the disc with the label facing up.
– Wrong region code. The DVD must be coded for ALL regions
or Region 4 in order to be played back on this DVD recorder.
– There is no recording on the disc or wrong disc type. Read
chapter “Playback - Playable discs” for details.
– Make sure the disc is not scratched or warped. Clean the disc
or replace a new one.
– Check if the disc is defective by trying another disc.
– Do not connect any cables from the recorder to the ‘Phono’
input of your ampli er.
– Check that the DivX le is encoded according to the ‘Home
Theatre Pro le’ mode with DivX encoder.
– Check that the DivX movie downloaded is a complete le.
– The disc does not match with the TV colour system standard
(PAL/NTSC).
– The disc is dirty, clean the disc.
– Sometimes a small amount of picture distortion may appear.
This is not a malfunction.
– If a recording is too short, it is possible that a DVD player
cannot detect it. Please observe the following ‘minimum
recording times’. Recording mode : {HQ} – 5 mins, {SP} – 10
mins, {EP} – 20 mins, {SLP} – 30 mins.
– You have to nalize the DVD±R. Refer to chapter “Playing your
recordings (DVD±R) on other DVD players” for details.
– Have your antenna or cable TV signal checked.
– Fine-tune your TV channel. Read chapter “Step 3 : Installation
and Setup - Setting your TV channel programs” for details.
The message ‘UNKNOWN
DISC’ appears.
60
– This message may appear if you insert a disc that may have
encountered one of the following:
– Error during recording: The title may be missing.
– Error while changing the title/index picture: The original title/
index picture may be visible.
– Error while nalizing or the disc has not been nalized.
Page 61

Tro ub le sh ooting (continued)
Problem (Recording) Solution
The wrong TV channel was
decoded (recorded) after you
programmed a recording
using the VCR Plus+ System.
1) Enter the PlusCode programming number of the desired TV
channel.
2) Press OK to con rm.
3) Check the channel number in the {Program #} input eld. If this
does not correspond to the desired TV channel, select this
entry eld and change the channel number.
4) Press OK to con rm.
English
Picture is fuzzy and
brightness varies when
copying DVD Video discs or
prerecorded video cassettes.
Recordings are not occurring
as scheduled. New recordings
cannot be made.
– This happens if you try to copy DVDs or video cassettes that
have been copy-protected. Even though the picture on the TV is
ne, but the recording on the DVD recordable disc is faulty.
This interference is unavoidable with copy-protected DVDs or
video cassettes.
– The DVD recordable disc has a limited recording lifetime, please
change a new disc for recording.
– The TV channel you want to record is not stored or you
selected the wrong program number. Check the TV channels
stored.
– You have to reset the timer recording after adjusting the clock
setting.
– You cannot use the recorder to duplicate copy-protected
materials (DVDs or videotapes) onto a DVD recordable disc.
61
Page 62

Speci cations
Picture/Display
English
• Aspect ratio: 4:3, 16:9
• D/A converter: 10 bit, 54 MHz
• A/D converter: 10 bit, 27 MHz
• Picture enhancement: Progressive Scan
Sound
• D/A converter: 24 bit, 192 kHz
• A/D converter: 24 bit, 96 kHz
• Signal to noise ratio: 106
• Crosstalk (1kHz): 105 dB
• Dynamic Range (1kHz): 90 dB
Video Recording
• Recording system: NTSC
• Compression formats: MPEG2
High Quality : HQ
Standard Play : SP
Extended Play : EP
Super Long Play : SLP
• Audio compression: Dolby Digital, PCM
Video Playback
• Disc playback media: CD, CD-R/-RW, DVD,
DVD-Video, DVD+R/+RW, DVD-R/-RW
SVCD, Video CD
• Compression formats: MPEG2, MPEG1,DivX
• Video disc playback system: NTSC, PAL
Audio Playback
• Disc playback media: CD, CD-R/-RW,
MP3-CD, MP3-DVD
• Compression formats: Dolby Digital, MP3,
MPEG2 Multichannel, PCM
• MP3 bit rates: 32~256 kbps and VBR
Still Picture Playback
• Disc formats: DVD+R/+RW, DVD-R/-RW,
Picture CD
• Picture compression formats: JPEG
• Picture enhancement: Rotate, Zoom
Tuner/Reception/Transmission
• TV system: NTSC
• Aerial Input: 75 Ohm coaxial (IEC75)
Connectivity
Rear Connections:
• Audio left/right In
• Audio left/right Out (2x)
• Component Video (YPbPr) Out
• Composite video (CVBS) Input
• Composite video (CVBS) out
• Digital audio coaxial Out
• S-Video In/ Out
• RF antenna In
• RF TV Out
• Mains
Front Connections:
• i.LINK DV in (IEEE 1394 4-pin)
• Video In (CAM1)
• Audio left/right In
Convenience
• Programming/Timer Enhancements: Daily/
Weekly, Repeat Program, Manual Timer, One
Touch Recording, VCR Plus+
• Programmable events: 20
Power
• Power supply: 110 – 240V; 50 - 60 Hz
• Consumption: 25 W (typical)
• Standby power consumption: < 3W
Cabinet
• Dimensions (W x H x D) : 360 x 43 x 322 mm
• Net Weight : 3 kg
Storage Media
• Recording media: DVD+R, DVD+RW,
DVD-R, DVD-RW
62
Page 63
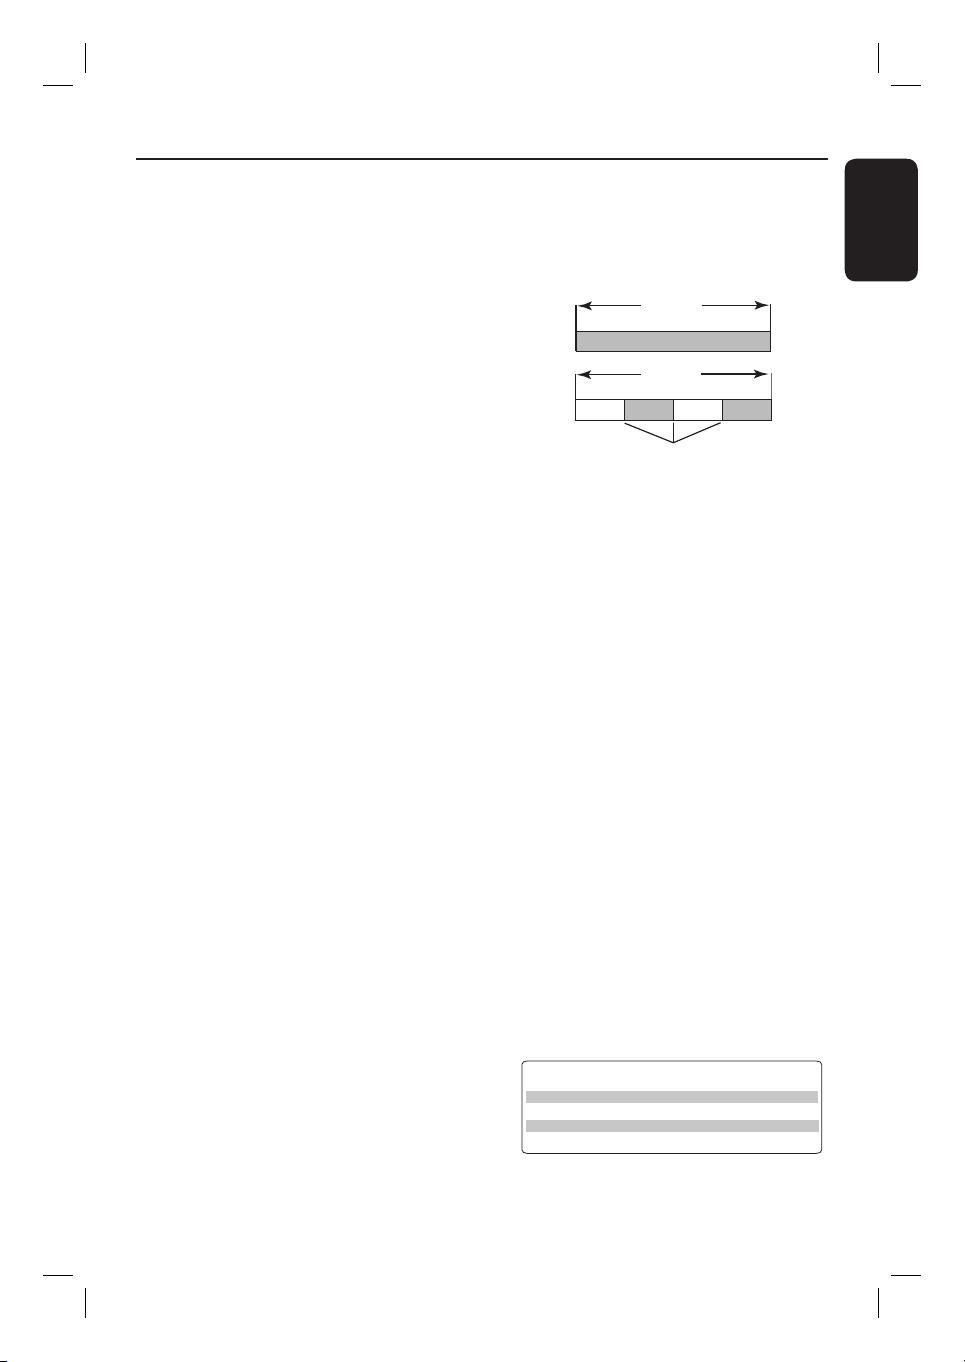
Frequently Asked Questions
What kind of disc should I use for
recording?
You can record on both DVD±R and
DVD±RW discs. They are compatible with
DVD-Video players and DVD-ROM drives in
computers.
What is the capacity of a DVD±R/±RW
disc?
4.7GB, or equivalent to six CDs. You can
store only one hour of recordings on a single
disc at the highest quality (DVD standard) and
about 6 hours recordings at the lowest quality
(VHS standard).
What is the difference between DVD±R
and DVD±RW?
DVD±R is “recordable” and DVD±RW is
“rewritable”. With a DVD±R, you can record
multiple sessions on the same disc, but when
the disc is full, you cannot record any more on
the disc. The DVD±RW allows you to record
over the same disc repeatedly.
What is DV?
Using DV, also known as i.LINK, you can
connect a DV-equipped camcorder to this
recorder using a single DV cable for input and
output of audio, video, data and control
signals.
This recorder is only compatible with DV-
–
format (DVC-SD) camcorders. Digital satellite
tuners and Digital VHS video recorders are
not compatible.
– You cannot connect more than one DV
camcorder at a time to this recorder.
– You cannot control this recorder from
external equipment connected via the DV IN
jack.
Can I copy a VHS tape or DVD from an
external player?
Yes, but only if the VHS tape or DVD is not
copy protected.
What are Titles and Chapters?
A DVD disc contains Titles and Chapters,
which are similar to the Titles and Chapters of
a book. A Title is often a complete movie and
is broken down into Chapters, or individual
scenes from the movies.
Title
Chapter
Title
Chapter Chapter Chapter Chapter
chapter markers
Programs are recorded as a single title, it may
consist of one chapter or a few chapters within
a title, depending on the recording settings.
How do I set up Titles and Chapters?
The recorder automatically creates a new Title
every time you start a new recording. You can
then add Chapters to these recordings manually
or have them automatically inserted at 5minutes intervals.
What does “ nalizing” a disc do?
Finalizing a disc locks the disc so it can no
longer be used for recording. This is only
required for DVD±R discs. It will then be
compatible with virtually any DVD player. To
remove a disc without nalizing it, simply stop
recording and eject the disc. You will still be
able to record on the disc if there is storage
space for more recordings.
How good is the quality of the
recording?
There are a few quality levels to choose from,
ranging from “HQ” - High Quality (1 hour
mode) to “SLP” - Super Long Play (6 hours
mode). Press the REC MODE button on the
remote control to choose the quality level that
best suits your purpose and the length of
material.
Record
Mode
HQ
SP
EP
SLP
Picture Quality
High quality
DVD quality-Standard Play
VHS quality-Extended Play
VHS quality-Super Long Play
Maximum Recording
Time per Disc
1 hour
2 hours
4 hours
6 hours
English
63
Page 64

Glossary
Analogue: Sound that has not been turned into
English
numbers. Analogue sound varies, while digital sound
has speci c numerical values. These jacks send audio
through two channels, the left and right.
Aspect ratio: The ratio of vertical and horizontal
sizes of a displayed image. The horizontal vs. vertical
ratio of conventional TVs. is 4:3, and that of widescreen is 16:9.
AUDIO OUT jacks: Red and white jacks on
the back of the system that send audio to another
system (TV, Stereo, etc).
Chapter: Sections of a picture or a music piece
on a DVD that are smaller than titles. A title is
composed of several chapters. Each chapter is
assigned a chapter number enabling you to locate
the chapter you want.
Digital: Sound that has been converted into
numerical values. Digital sound is available when
you use the DIGITAL AUDIO OUT COAXIAL.
These jacks send audio through multiple channels,
instead of just two channels as analogue does.
Disc menu: A screen display prepared for
allowing selection of images, sounds, subtitles,
multi-angles, etc recorded on a DVD.
DivX 3.11/4.x/5.x/6: The DivX code is a
patentpending, MPEG-4 based video compression
technology, developed by DivXNetworks Inc., that
can shrink digital video to sizes small enough to be
transported over the internet, while maintaining
high visual quality.
Dolby Digital: A surround sound system
developed by Dolby Laboratories containing up to
six channels of digital audio (front left and right,
surround left and right, centre and subwoofer).
Index Picture Screen: A screen that gives an
overview of a DVD±RW or DVD±R. An Index
Picture represents each recording.
JPEG: A very common digital still picture format.
A still-picture data compression system proposed
by the Joint Photographic Expert Group, which
features small decrease in image quality in spite of
its high compression ratio.
MP3: A le format with a sound data compression system. “MP3” is the abbreviation of Motion
Picture Experts Group 1 (or MPEG-1) Audio Layer
3. By using the MP3 format, one CD-R or CD-RW
can contain about 10 times more data then a
regular CD.
MPEG: Motion Picture Experts Group. A
collection of compression systems for digital audio
and video.
Multichannel: DVDs are formatted to have each
sound track constitute one sound eld.
Multichannel refers to a structure of sound tracks
having three or more channels.
PBC: Playback Control. Refers to the signal
recorded on video CDs or SVCDs for controlling
playback. By using menu screens recorded on a
Video CD or SVCD that supports PBC, you can
enjoy interactive playback and searching.
PCM: Pulse Code Modulation. A digital audio
encoding system.
Parental control: Limits disc play according to
the age of the users or the limitation level in each
country. The limitation varies from disc to disc;
when it is activated, playback will be prohibited
if the software’s level is higher than the user-set
level.
Region code: A system allowing discs to be
played only in the region designated. This unit will
only play discs that have compatible region codes.
You can nd the region code of your unit by
looking on the product label. Some discs are
compatible with more than one region (or ALL
regions).
S-Video: Produces a clear picture by sending
separate signals for the luminance and the colour.
You can use S-Video only if your TV has an S-Video
In jack.
Surround: A system for creating realistic three
dimensional sound elds full of realism by
arranging multiple speakers around the listener.
Title: The longest section of a movie or music
feature on DVD. Each title is assigned a title
number, enabling you to locate the title you want.
VIDEO OUT jack: Yellow jack on the back of
the DVD system that sends the DVD picture video
to a TV.
64
Page 65

Display panel symbols/ messages
The following symbols/ messages may
appear on your recorder display:
00:00:00
Multifunction display/ text line
– Title/ track number
– Total/ elasped/remaining title/track time
– Additional information regarding the
disc
– TV channel number or source of video
– Clock (This is displayed in Standby
mode).
– TV program title
BLANK
There are no recordings on the disc in
the tray.
FULL
Disc is full. There is no storage space for
new recordings.
LOADING
Disc is being recognized by the recorder.
MENU
The system setup menu, disc menu, title
menu or timer menu display is on.
STARTUP
The recorder has been turned on.
STOP
When playback / recording is stopped.
TOPMENU
The recorder is in TOP MENU mode.
X TIMER
A timer recording has been programmed
or is active.
UPDATE
The recorder is writing to the disc.
UNKNOWN
The recorder has encountered an error
in handling the disc inserted.
English
NO DISC
No disc has been inserted. If a disc has
been inserted, then it is possible that the
disc cannot be read.
OPEN
Disc tray is opening or opened.
PHOTO
A picture disc has been inserted.
REGION
When the DVD inserted is in a wrong
region code as the recorder.
65
 Loading...