

Page 1
Quick Start Guide
2006 © Koninklijke Philips N.V.
All rights reserved.
12 NC 3139 245 21021
www.philips.com
Need help?
User Manual
See the user manual that came with your Philips recorder.
Online
Go to www.philips.com/support.
3
Enjoy
DVD Player/ Recorder DVDR3380
Connect
Set up
Enjoy
1
2
3
What’s in the box?
DVD Player/ Recorder
RF Coaxial Cable
Remote Control
and 2 batteries
Audio/Video Cable
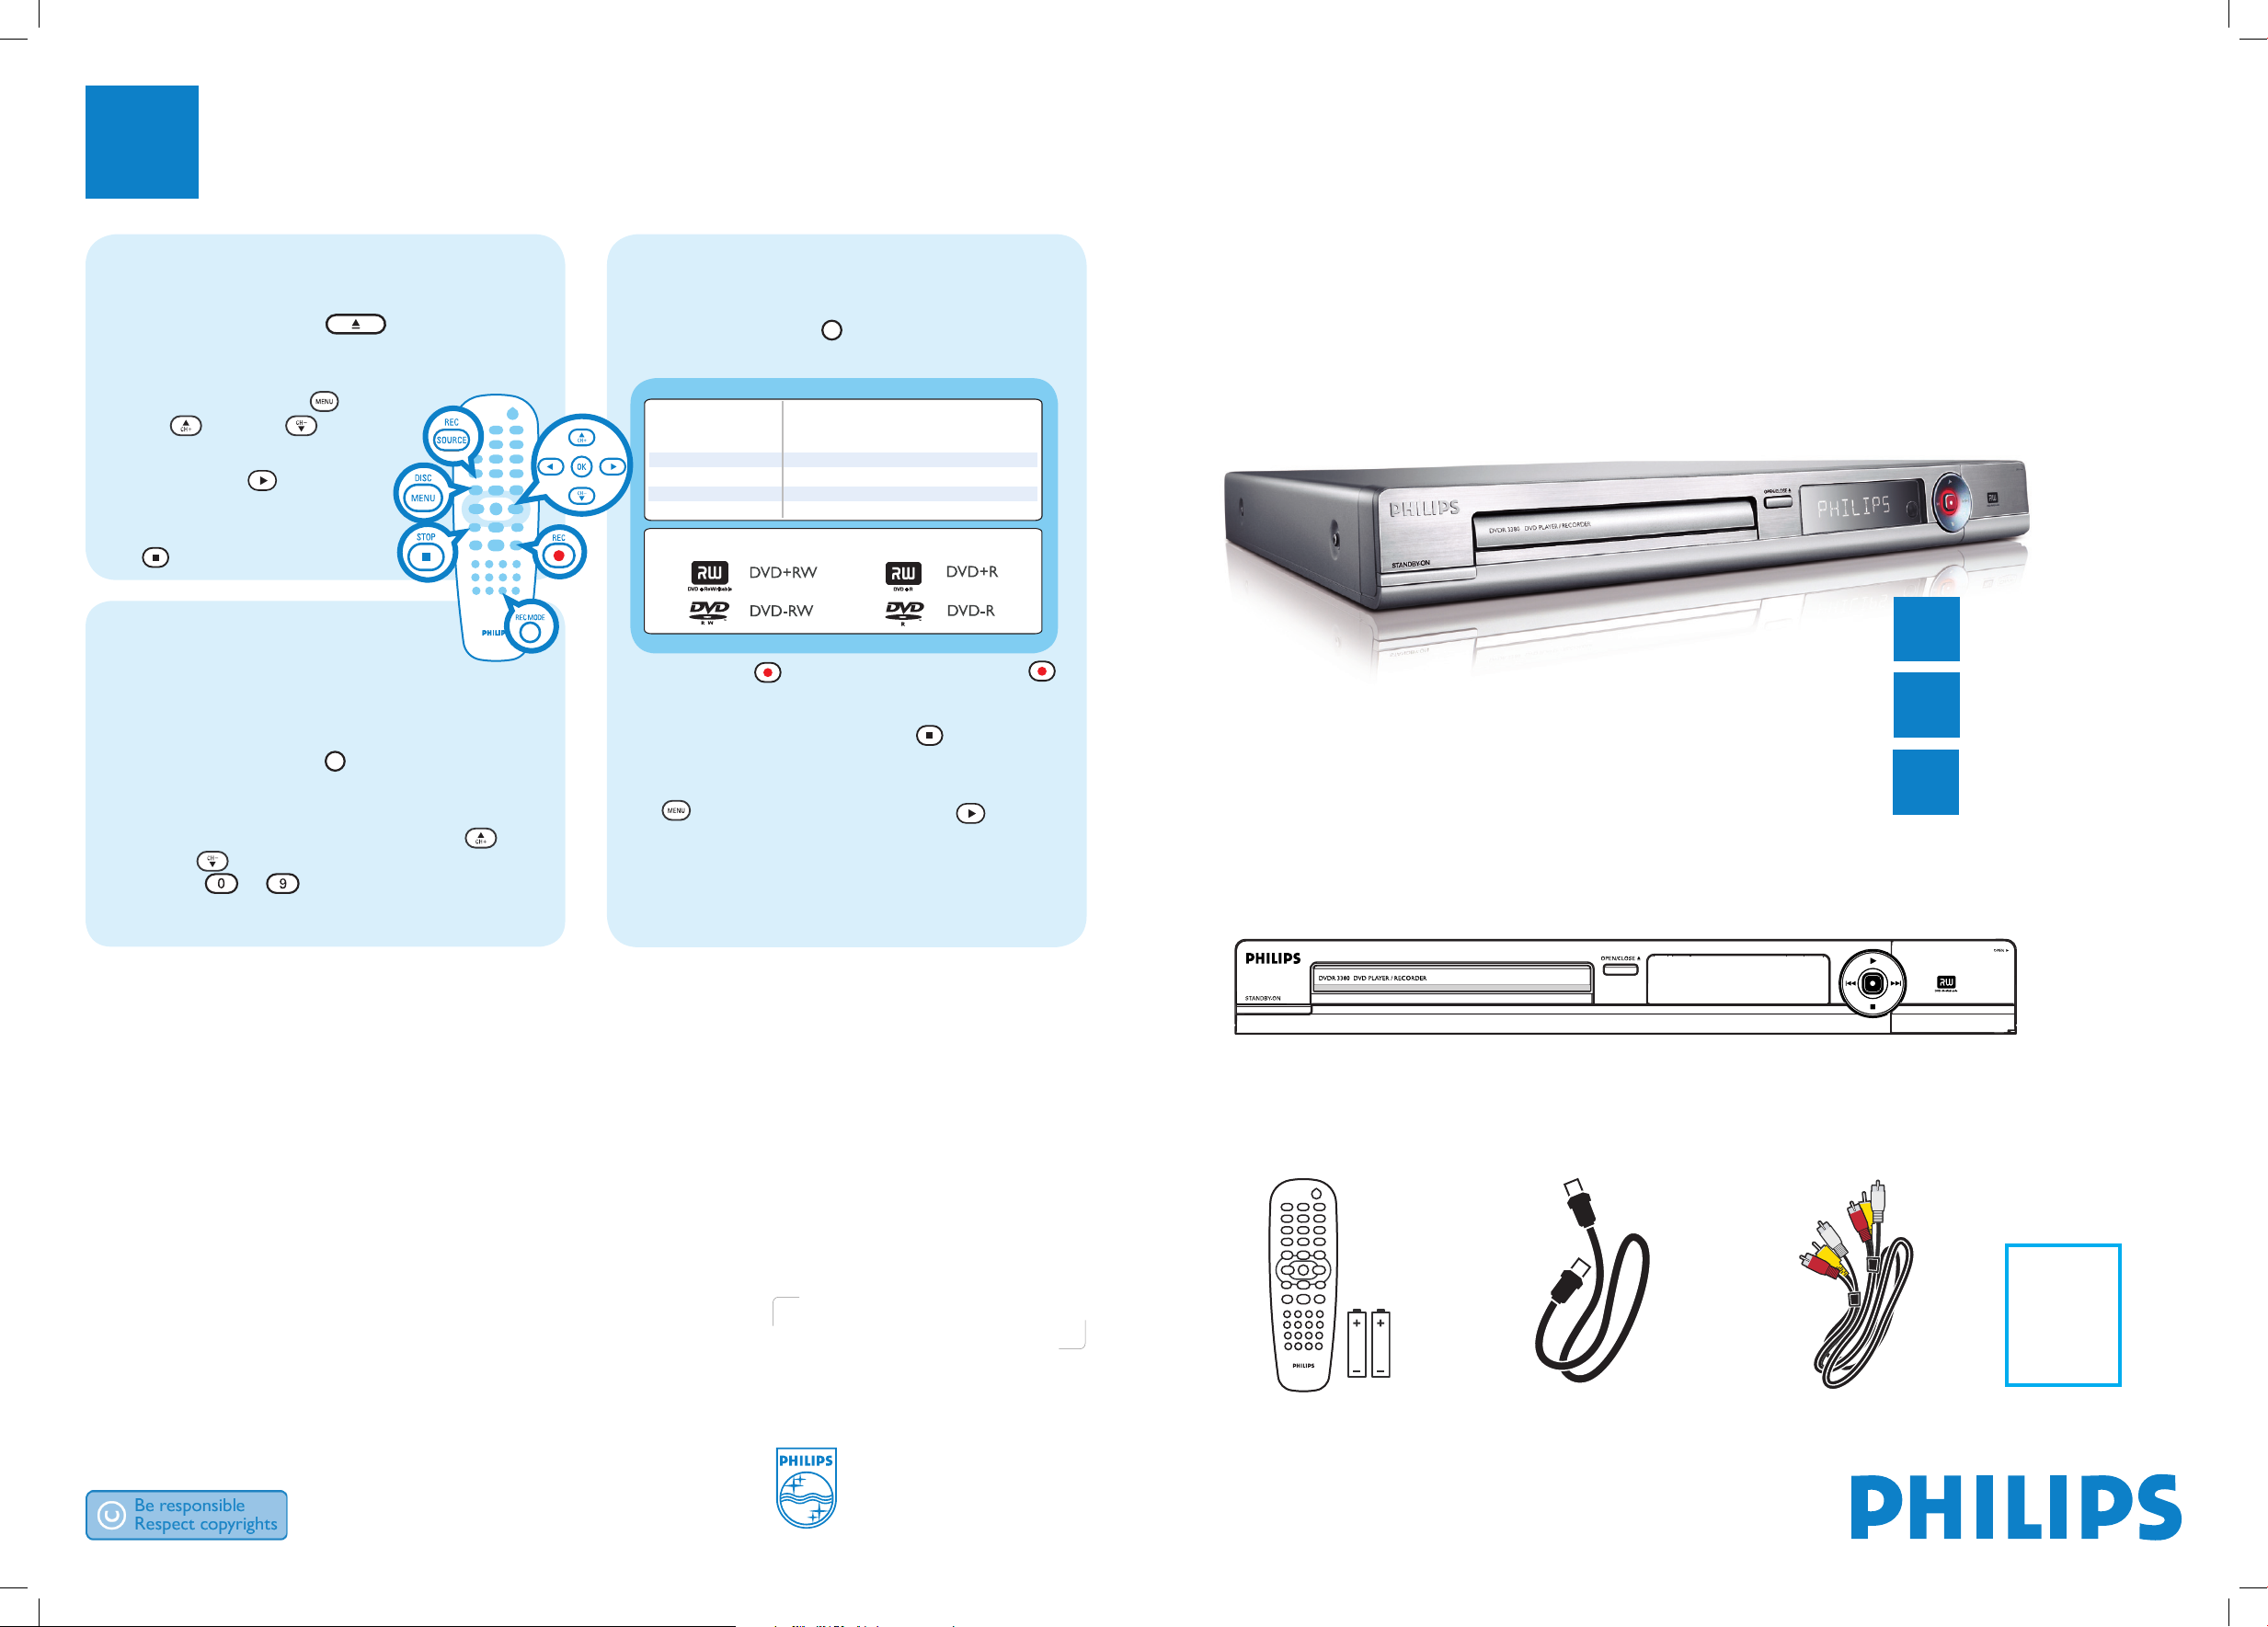
Start playback
A
Press OPEN/CLOSE
on the front of
the recorder
, load in a disc and close the disc
tray.
B Press
DISC MENU
and use
up
or
down
keys to
select a title.
C Press
PLAY
to start
playback.
D To stop playback, press
STOP
.
Start Recording
Recording from the TV or an
external device
A Insert a recordable DVD disc in the tray.
B Press
REC SOURCE
repeatedly to select the
source to record from. (eg, TUNER, CAM1, DV,
EXT1 or EXT2).
To record a TV programme, use up
or
down
keys to scroll through the channels, or
press 0 -9 to select the channel that you
want to record.
Recording from the TV or an external
device (continued)
C Press REC MODE repeatedly to select the
record mode.
E Press
REC
to start recording, press
REC
again to automatically record 30 minutes.
F To end recording, press
STOP
. ‘UPDATE’
will be displayed on the recorder.
G To playback the recording, press
DISC MENU
, select the title and press
PLAY
.
User
Manual
Record Quality
High Quality HQ
Standard Play SP
Extended Play EP
Super Long Play SLP
Hours of Recording that can be storedHours of Recording that can be stored
4.7 GB DVD±R/±RW disc
1
2
4
6
Types of discs for recording
Page 2
1
Connect
2
Set up
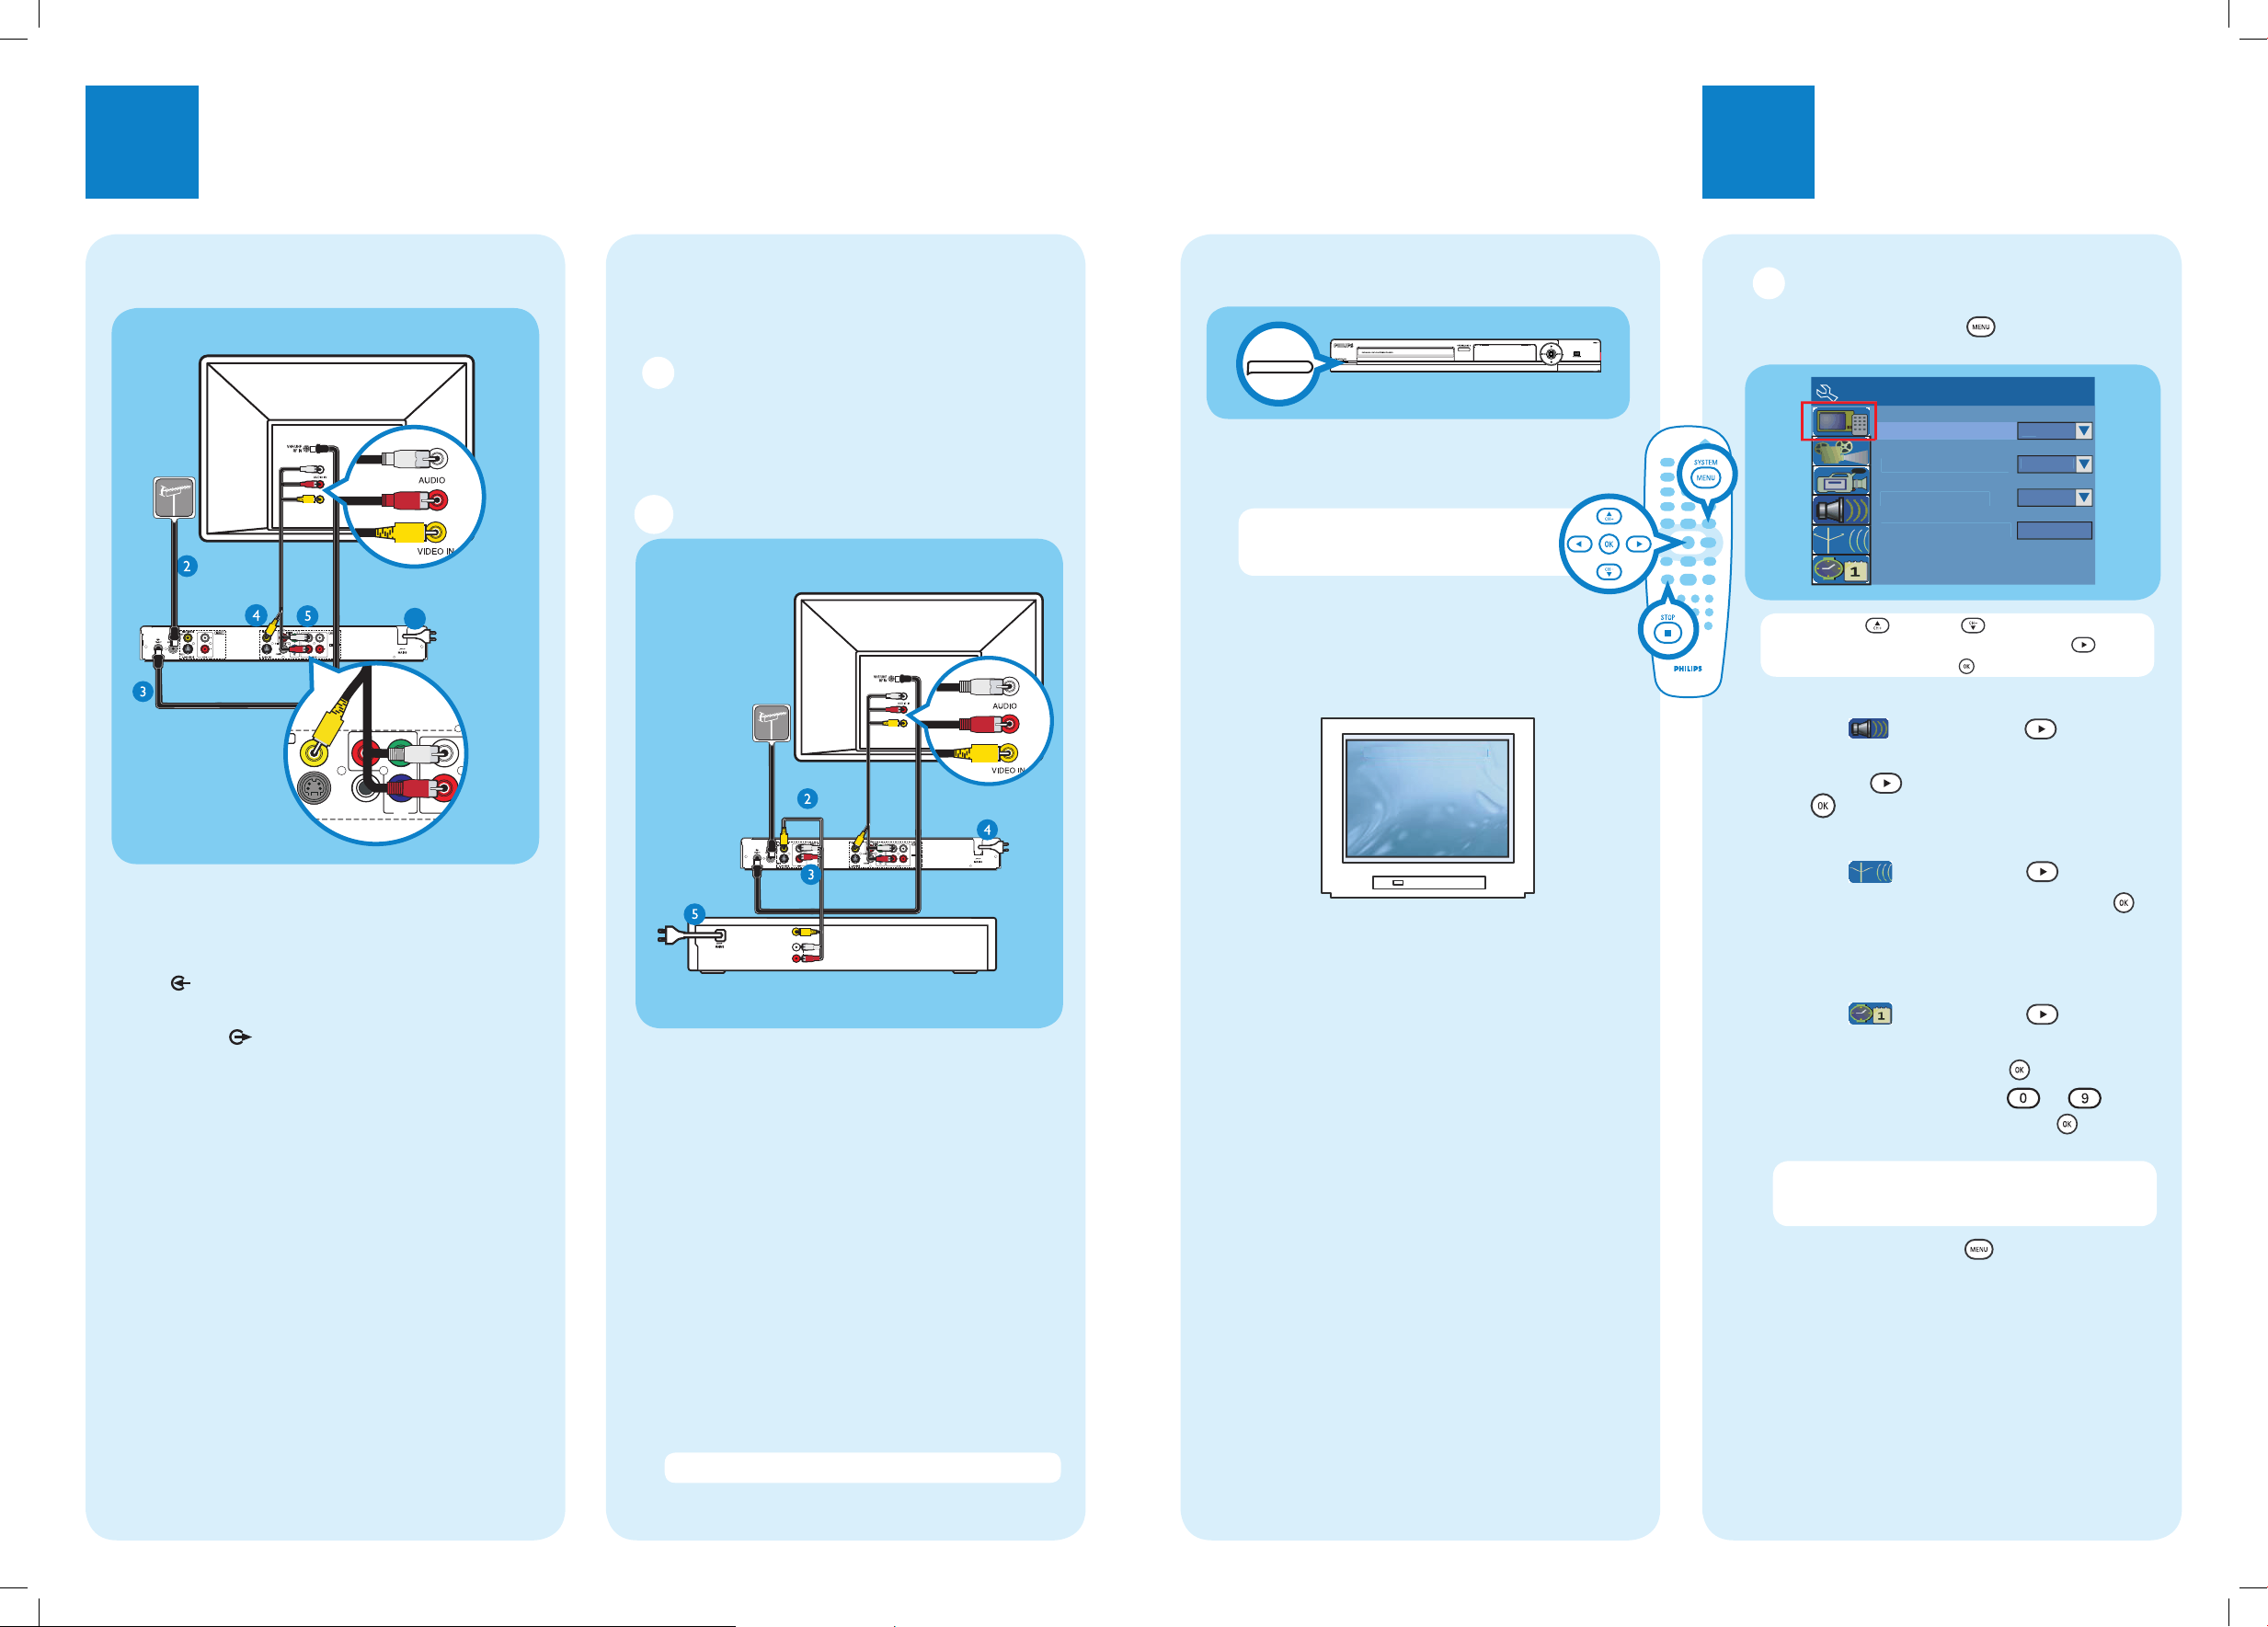
Start with the ‘Basic Connection.’
If you have a VCR, follow the instructions for ‘Connection with a VCR or similar device’.
B Initial Installation
A Press SYSTEM MENU on the remote
control.
d
On
aced
t
gs
S
r
OK
Note Use up or down keys to toggle through
the options. Select an item by pressing right
. To
con rm a setting, press OK
.
B
Select the OSD language.
Highlight and press right
.
Select {
On-Screen Display Language
} and
press right to access the options. Press
OK
to confirm your selection.
C
Setup and install TV channels.
Highlight and press right .
Select { Channel Search } and press OK
on the remote control to start automatic TV
channel search.
D
Setting the date and time.
Highlight and press right .
Select { Date (dd/mm/yy) } or { Time
(hh/mm/ss) } and press OK
.
Use the numeric keypad 0
-9 to
input the date/time, then press OK to
con rm.
Note The settings will be updated according to the
broadcast channel information of preset Programme
Number 1.
E Press SYSTEM MENU to exit.
Connection with a VCR or
similar device
A Before Connecting
Your new Philips recorder replaces the VCR for your
recording needs. First, unplug all the connections
from your VCR.
B Connecting
Y
P
B
P
R
COMPONENT
VIDEO
VIDEO (CVBS
)
S-VIDEO (Y/C
)
AUDIO
COAXIAL
R
L
OUT 3
(DIGITAL AUDIO)
UT
UT 2
UT 1
Television (rear)
To antenna
or set-top
box
Basic Connection
A Before connecting, unplug the antenna cable that
is currently connected to your TV.
B Connect the antenna cable to the ANTENNA-
IN jack on the recorder.
C Use the supplied RF coaxial cable to connect the
TV-OUT jack on this recorder to the
Antenna In jack on the TV.
D Use the supplied audio/video cable (yellow plug)
to connect the VIDEO (CVBS) -OUT1 jack
on this recorder to the VIDEO IN jack on the
TV.
E Use the supplied audio/video cable (red/ white
plugs) to connect the AUDIO OUTPUT jacks
on this recorder to the AUDIO IN jacks on the
TV.
F Connect the power cable from the recorder to
an AC power outlet.
Philips recorder
(rear)
To AC
power
Television (rear)
Philips recorder
(rear)
VCR or similar
device (rear)
A Follow steps A to E of ‘Connecting’ under
‘Basic Connections’ to connect the recorder
before you proceed to step B below.
B Use a yellow video cable (not supplied) to
connect the VIDEO (CVBS) EXT 1 jack on
this recorder to the yellow VIDEO OUT jack on
the VCR.
C Use another red and white audio cable (not
supplied) to connect the AUDIO INPUT jacks
on this recorder to the red and white AUDIO
OUT jacks on the VCR.
D Connect the power cable from your VCR to an
AC power outlet.
E Connect the power cable from the recorder to
an AC power outlet.
Note In this setup, the VCR cannot record TV programs.
For additional connection diagrams, see the
accompanying User Manual.
To AC
power
Philips recorder (front panel)
A
Finding the viewing channel
A Press STANDBY-ON on the recorder.
B Switch on the TV set.
Note If connected to your VCR, make sure it
is switched off or in standby mode before
proceeding.
C Press “0” and then the Channel Down
button on the TV’s remote control repeatedly (or
AV, SELECT, ° button) until you see this screen.
This is the correct viewing channel for the
recorder.
To antenna or
set-top box
To AC
power
R
6
P
B
COAXIAL
)
(DIGITAL AUDIO)
S-VIDEO (Y/C
OUT 3
AUDIO
P
B
COAXIAL
)
(DIGITAL AUDIO)
OUT 3
S-VIDEO (Y/C
VIDEO IN
(
)
CVBS
L
AUDIO OUT
R
STANDBY-ON
System Menu - General
creen Save
Progressuve/ Interlace
Video Output Forma
Restore Factory Settin
Interl
R
AUDIO
 Loading...