

Page 1
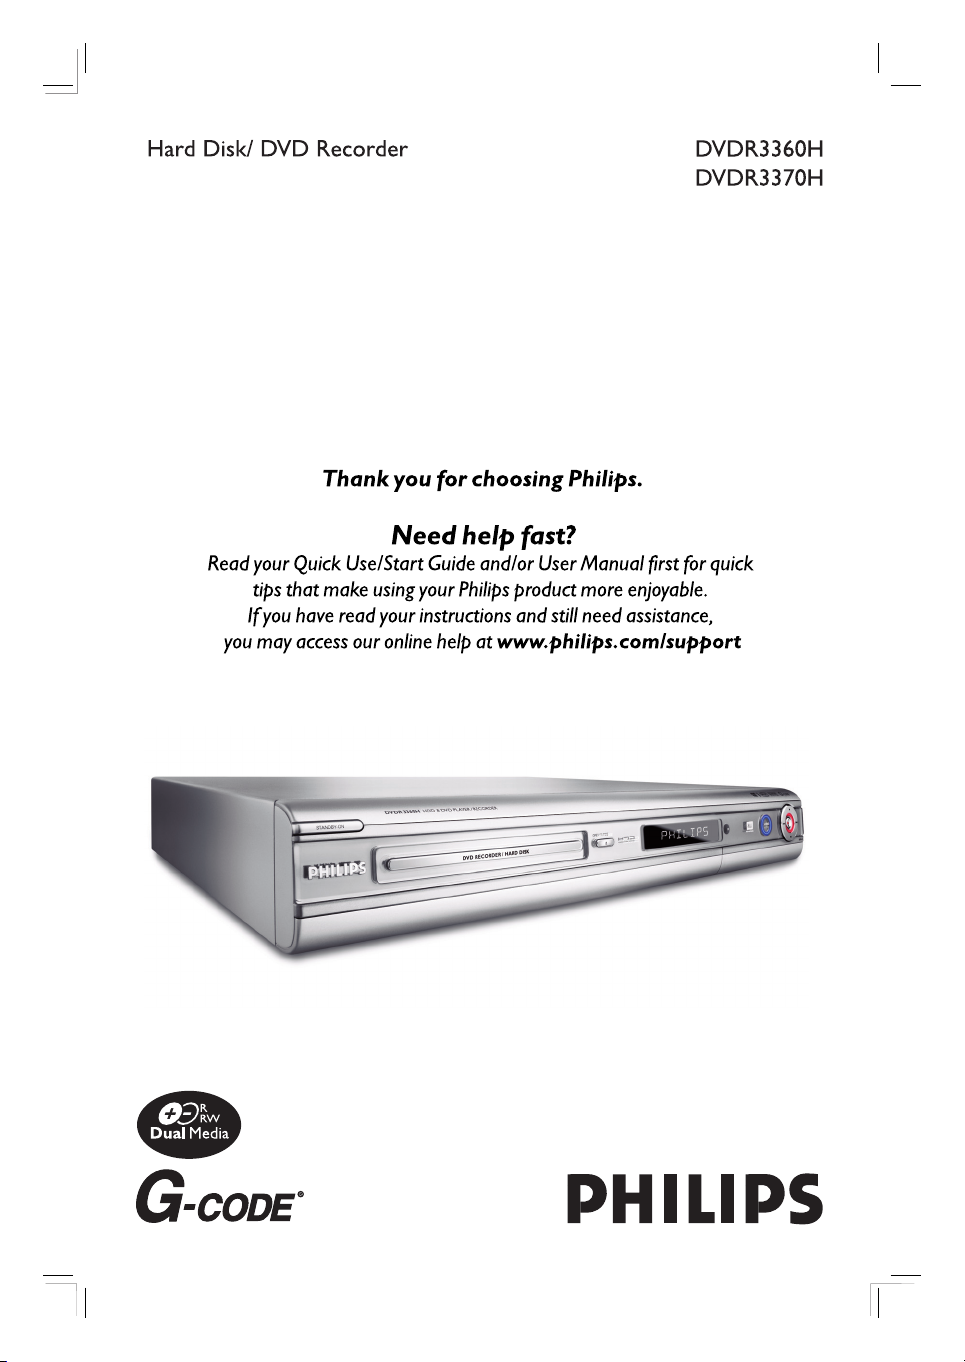
User Manual
Page 2
LASER
Type Semiconductor laser
InGaAlP (DVD)
AIGaAs (CD)
Wave length 658 nm (DVD)
790 nm (CD)
Output Power 30 mW(DVD±RW write)
1.0 mW (DVD read)
1.0 mW (CD read)
Beam divergence 84 degrees (DVD)
61 degrees (CD)
‘CONSUMERS SHOULD NOTE THAT NOT ALL HIGH
DEFINITION TELEVISION SETS ARE FULLY
COMPATIBLE WITH THIS PRODUCT AND MAY C AUSE
ARTIFACTS TO BE DISPLAYED IN THE PICTURE. IN
CASE OF 525 OR 625 PROGRESSIVE SCAN PICTURE
PROBLEMS, IT IS RECOMMENDED THAT THE USER
SWITCH THE CONNECTION TO THE ‘STANDARD
DEFINITION’ OUTPUT. IF THERE ARE QUESTIONS
REGARDING OUR TV SET COMPATIBILITY WITH THIS
MODEL 525p AND 625p DVD PLAYER, PLEASE
CONTACT OUR CUSTOMER SERVICE CENTER.’
CAUTION
Use of controls or adjustments or
performance of procedures other than
herein may result in hazardous radiation
exposure or other unsafe operation.
For Customer Use:
Read carefully the information located at
the bottom or rear of your HDD/ DVD
Recorder and enter below the Serial No.
Retain this information for future reference.
Model No. DVDR 3360H / DVDR 3370H
Serial No. _______________
2
Page 3

This product incorporates copyright protection
technology that is protected by US patents. Use of
this copyright protection technology must be
authorized by Macrovision, and is intended for
home and other limited viewing uses only unless
otherwise authorized by Macrovision. Reverse
engineering or disassembly is prohibited.
U.S. Patent Number 4,631,603; 4,819,098;
4,907,093; 5,315,448; and 6,516,132
Manufactured under license from Dolby
Laboratories. “Dolby” and the double-D symbol
are trademarks of Dolby Laboratories.
G-CODE® is a registered trademark of Gemstar
Development Corporation. The G-
CODE
®
system is
manufactured under licence from Gemstar
Development Corporation.
DivX®, DivX Certi ed, and associated logos are
trademarks of DivX, Inc and are used under license.
3
Page 4

Table of Contents
English
General
Special Features ................................................................................................................6
Frequently Asked Questions ...........................................................................................7
Care and Safety Information ..........................................................................................8
Setup precautions .................................................................................................................................................8
Cleaning discs ........................................................................................................................................................ 8
HDD (Hard Disk Drive) handling care ..........................................................................................................8
General Information ........................................................................................................ 9
Intro duct ion ........................................................................................................................................................... 9
Accessories supplied ........................................................................................................................................... 9
Region codes ..........................................................................................................................................................9
Copyright notice ...................................................................................................................................................9
Product Overview
Remote Control ............................................................................................................. 10
Inserting Batteries .............................................................................................................................................. 12
Main Unit ......................................................................................................................... 13
Connections
Step 1: Basic Recorder Connections ............................................................................ 14
Connecting the antenna cables ......................................................................................................................14
Connecting the video cable .............................................................................................................................15
Connecting the audio cables ...........................................................................................................................16
Step 2: Optional Connections ....................................................................................... 17
Connecting to a Cable Box or Satellite Receiver .....................................................................................17
Connecting to a VCR or other similar device ............................................................................................18
Connecting to a VCR and Cable Box /Satellite Receiver .........................................................................19
Connecting a camcorder to the front jacks ............................................................................................... 20
Step 3: Installation and Setup ....................................................................................... 21
Finding the viewing channel .............................................................................................................................21
Setting your TV channel programs ................................................................................................................21
GENERAL settings .................................................................................................................................... 22
Setting the language ...........................................................................................................................................24
Setting the time & date .....................................................................................................................................24
LANGUAGE settings ................................................................................................................................ 25
DATE/ TIME settings ................................................................................................................................. 25
Watch TV
Control TV programs ....................................................................................................26
Switching on to TV program .......................................................................................................................... 26
Pause live TV function ...................................................................................................................................... 26
Instant Replay function .................................................................................................................................... 26
Recording
Before Recording ............................................................................................................27
About temporary HDD storage (Time Shift Buffer) .................................................................................27
Accessing the HDD ( Hard Disk Storage) Setup Menu ......................................................................... 28
HDD set tings ...............................................................................................................................................29
Default Recording settings ............................................................................................................................ 30
GENERAL settings .....................................................................................................................................31
4
Page 5

Tab le o f Co nte nts
Record on Hard Disk ...................................................................................................... 32
Recording TV programs ...................................................................................................................................32
Recording from a DV camcorder ...................................................................................................................32
Recording from an external device (Camcorder/VCR/ DVD player) .................................................33
Record on DVD Recordable Disc .................................................................................. 35
Copying from HDD to a recordable DVD ................................................................................................. 35
Discs for recording ........................................................................................................................................... 35
Recording from various sources ................................................................................................................... 36
Timer Recording ............................................................................................................. 38
About timer recording ..................................................................................................................................... 38
Timer recording (G -CODE® System) ............................................................................................................. 38
Timer recording (manually) ............................................................................................................................ 40
Changing/ Deleting a timer recording ..........................................................................................................41
Playback
Playback from Hard Disk ............................................................................................... 42
Playback your HDD recordings ..................................................................................................................... 42
Playback from Disc ......................................................................................................... 43
Playable discs ...................................................................................................................................................... 43
Inser ting a disc ................................................................................................................................................... 43
Starting disc playback .......................................................................................................................................44
Additional Playback Features ....................................................................................... 47
Changing to another title /chapter/track .....................................................................................................47
Pausing playback and step play ......................................................................................................................47
Searching forward/backward ..........................................................................................................................47
Zooming in ...........................................................................................................................................................47
Using m(INFO) options ................................................................................................................................ 48
Edit Recordings
Edit Recordings - HDD ................................................................................................... 51
About HDD title edit menu ............................................................................................................................51
Accessing the HDD title edit menu ..............................................................................................................51
Edit Recordings - Recordable DVD .............................................................................. 54
About disc edit menu ....................................................................................................................................... 54
Accessing disc editing menu ........................................................................................................................... 54
Playing your recordings (DVD±R) on other DVD players .................................................................... 56
About DVD title editing ...................................................................................................................................57
Accessing DVD title edit menu ......................................................................................................................57
About video editing ...........................................................................................................................................59
Accessing video editing menu .........................................................................................................................59
English
Other Information
Setup Menu Options ....................................................................................................... 62
Accessing the Setup Menu ...............................................................................................................................62
VIDEO settings ........................................................................................................................................... 63
PREFERENCES settings ............................................................................................................................ 64
AUDIO settings .......................................................................................................................................... 65
Firmware Upgrade ......................................................................................................... 66
Installing the latest rmware .......................................................................................................................... 66
Troublesho oting .............................................................................................................. 67
Speci cations .................................................................................................................. 70
Glossary ........................................................................................................................... 71
Display panel symbols/ messages ................................................................................. 72
TV System Guide ............................................................................................................ 74
5
Page 6

Special Features
English
‘Time Shift Buffer’
As soon as you turn on this recorder, the
program shown on the TV will be stored into
the ‘Time Shift Buffer’. It acts as a
temporary HDD storage of your recordings.
The contents will automatically be deleted
after 3 hours, when you turn off this recorder
or when you switch it to standby mode. To
store the contents on the hard disk, you have
to mark the segment in the ‘Time Shift Buffer’
for recording to prevent them from being
deleted.
Instant Replay’
‘
You can repeat a scene of a live TV program
by pressingÑ button on the remote control,
as often as you like.
To return to the live TV program, press and
holdÉ.
‘Pause Live TV’
A live TV program is now under your control.
You can pause the program by pressing
PAUSEÅ button. Resume playback at the
scene it was interrupted by pressing the
PLAYÉbutton.
To return to the live TV program, press and
holdÉ.
This is a simple programming system for
recorders. To use it, enter the programming
number associated with your television
program. You can nd this number in your
favourite listings magazine.
i.Link is also known as ‘FireWire’ and
‘IEEE1394’. This connection is used for the
transfer of high bandwidth digital signals as
used by digital video (DV) camcorders. It
carries all audio and video signals via a single
cable.
‘
Direct Recording to DVD’
This feature enables you to record content
directly on to a recordable DVD disc.
Press the DVD REC button on the remote
control to activate direct recording to the
recordable DVD disc.
6
Page 7

Frequently Asked Questions
What kind of disc should I use for
recording?
You can only record on both DVD±R and
DVD±RW discs. DVD±R/±RW is the most
compatible recordable DVD format on the
market today. They are fully compatible to
most of the existing DVD-Video players and
DVD-ROM drives in computers.
What is the capacity of a
DVD recordable disc?
4.7GB, or equivalent to 6 CDs. You can store
only one hour of recordings on a single disc at
the highest quality (DVD standard) and about
6 hours recordings at the lowest quality
(VHS standard.)
The mode of record quality indicates the
number of hours that will t on a single disc.
What is the difference between
DVD±R and DVD±RW?
DVD±Rs are “recordable” discs and
DVD±RWs are “rewritable” discs. With a
DVD±R disc, you can record multiple sessions
on the same disc, but when the disc is full, you
cannot record any more content on the disc.
The DVD±RW disc allows you to record over
the same disc repeatedly.
What is DV?
Using DV, also known as i.LINK, you can
connect a DV-equipped camcorder to this
recorder using a single DV cable for input and
output of audio, video, data and control signals.
– This recorder is only compatible with
DV-format (DVC-SD) camcorders. Digital
satellite tuners and Digital VHS video
recorders are not compatible.
– You cannot connect more than one DV
camcorder at any one time to this recorder.
– You cannot control this recorder from
external equipment connected via the
DV IN jack.
Can I copy a VHS tape or DVD
from an external player?
Yes, but only if the VHS tape or DVD is not
copy-protected.
What are Titles and Chapters?
A DVD disc contains Titles and Chapters,
which are similar to the Titles and Chapters of
a book. A Title is often a complete movie and
is broken down into Chapters, or individual
scenes from the movies.
Title
Chapter
Title
Chapter Chapter Chapter Chapter
chapter markers
A program is recorded as a single title, it may
consist of one chapter or a few chapters
within a title, depending on the recording
settings.
How do I set up Titles and Chapters?
The recorder will automatically create a new
Title each time you start a new recording.
– For DVD recordings, you can add chapters
manually.
– For HDD recordings, you can preset
chapters to be automatically inserted at
5-minutes intervals.
What does “ nalizing” a disc do?
Finalizing a disc locks the disc so it can no
longer be recorded, only required for
DVD±Rs. It will then be compatible with
virtually any DVD player. To close a disc
without nalizing it, simply stop recording and
eject the disc. You will still be able to record
on the disc if there is capacity for more
recordings.
How good is the quality of the
recording?
There are six modes of record quality levels
to choose from, ranging from “HQ” (1 hour
recording at high quality) to “SLP” (6 hours
recording at VHS quality) on a recordable
DVD. Choose the quality level that best suits
your purpose and the length of material.
Record Quality
HQ High Quality
SP Standard Play
SP+ Standard Play Plus
LP Long Play
EP Extended Play
SLP Super Long Play
Values are estimates only. Parts of the HDD storage capacity will be reserved for
the operations of this recorder and time shifting.
Hours of Recording that can be stored
DVDR3360H
160GB HDD
34
68
85
102
136
204
DVDR3370H
250GB HDD
106
132
159
212.5
318
DVD±R/
DVD±RW
53
1
2
2.5
3
4
6
English
7
Page 8
Care and Safety Information
English
CAUTION!
High voltage! Do not open the
device. You run the risk of getting
an electric shock.
The machine does not contain any
user-serviceable parts. Please leave
all maintenance work to quali ed
personnel.
Setup precautions
Finding a suitable location
– Place the set on a at, hard and stable
surface. Do not place the set on a carpet.
– Do not position the set on top of
other equipment that might heat it up
(e.g., receiver or ampli er.)
– Do not put anything under the set
(e.g., CDs, magazines.)
– Install this unit near the AC outlet and
where the AC power plug can be reached
easily.
Space for ventilation
– Place the apparatus in a location with
adequate ventilation to prevent internal
heat build up. Allow at least 10 cm (4”)
clearance from the rear and the top of
the set and 5 cm (2”) from the left and
right to prevent overheating.
Avoid high temperatures, moisture,
water and dust
– Apparatus must not be exposed to
dripping or splashing.
– Do not place any sources of danger
on the apparatus (e.g., liquid lled
objects, lighted candles.)
Cleaning discs
Some problems occur because the disc
inside the recorder is dirty (frozen picture,
sound disruptions, picture distortions.) To
avoid these problems, discs should be
cleaned on a regular basis.
To clean a disc, use a micro bre cleaning
cloth and wipe the disc from the center
to the edge in a straight line.
CAUTION!
Do not use solvents such as benzene,
thinner, commercially available cleaners,
or anti-static sprays intended for discs.
HDD (Hard Disk Drive)
handling care
The HDD is a fragile piece of device that
is easily prone to damage due to its long
recording capacity and high speed
operation.
– Do not move the unit while it is turned
on.
– Do not remove the AC power plug
from the power outlet during operation.
– Do not use the unit in excessively hot
or humid places. It may cause
condensation to form inside the unit.
If the HDD fails, playback and recording
will not be possible. In this case, it will be
necessary to replace the HDD unit.
WARNING!
The HDD is not a device for storing
recorded content permanently. We
recommend that you copy the important
video content to a recordable DVD as
backup.
8
Page 9

General Information
ALL
3
ALL
4
Introduction
This recorder has a built-in hard disk
drive (HDD). You can record up to
204 ~ 318 hours of video in SLP (Super
Long Play) record quality mode.
Model
DVDR3360H 160 GB 204
Note: These values are estimates only. Parts of the HDD
storage capacity will be reserved for the operations of this
recorder and time-shifting.
Internal hard
disk drive
250 GBDVDR3370H
This recorder allows you to enjoy the
exibility to keep recordings in the HDD
or copy to a recordable DVD for future
playback.
Furthermore, you can take advantage of
features like ‘Instant Replay’, or ‘Pause
Live TV’; see the section “Control TV
programmes”.
Before you can start using this recorder,
you must complete the basic connections
and set-up in three easy steps.
Step 1: Basic recorder connections
Step 2: Optional connections for
other devices
Step 3: Basic installation and set-up
Please take time to read this user manual
before using your recorder. It contains
important information and notes
regarding operations of the recorder.
Helpful Hints:
– If you have any questions or if problems
occur during operation, see the chapter
‘Troubleshooting’.
– If you need further assistance, please call
the customer support service for your
country. The corresponding telephone
numbers and e-mail addresses are given in
the guarantee booklet.
– Refer to the type plate on the rear or
bottom of the product for identi cation and
supply ratings.
Maximum
recording hours
318
Accessories supplied
– Remote control and batteries
– Audio/video (AV) cables
– RF coaxial cable
– Quick Start Guide
Region codes
DVD lms are usually not released at the
same time in all regions of the world,
thus all DVD players are keyed to a
speci c region code.
The regional code is shown on the back
panel of this device. If the DVD is
marked with a different region code, it
cannot be played back on this device.
Region
DVD that can
be played
Asia Paci c,
Taiwan, Korea
Australia,
New Zealand,
Latam
Copyright notice
The making of unauthorized copies of
copy-protected material, including
computer programs, les, broadcasts and
sound recordings, may be an infringement
of copyrights and constitute a criminal
offence. This equipment should not be
used for such purposes.
English
9
Page 10

Remote Control
English
a
STANDBY-ON
– Turns on the recorder or switch to standby
mode.
b
CH + / -
– While in tuner mode, selects the next/
previous TV channel.
c
OK
– Stores/con rms an entry.
– Con rms a selection.
2
a
b
c
d
e
f
g
h
i
j
k
l
m
n
d
– Cursor buttons for moving to the left/ right or
making a forward/reverse search.
– In time shift mode, use button to jump
forward 30 seconds and button to jump
backward by 10 seconds.
: Cursor buttons for moving up/down.
e
m (INFO)
– Displays the Time Shift video bar. It shows the
timing of the TV programs stored in the
temporary HDD storage.
– Displays the on-screen help text.
f
PLAY
– Plays a disc.
– Plays a recording.
g
– Starts recording the current TV channel or the
h
– Skips to previous or next Chapter/Track.
i
– Returns to the previous menu of a video CD
j
– Switches to random playback of an audio CD,
– In HDD title menu, select to sort the titles.
– In tuner mode, selects between dual language
k
– Select to repeat title playback in HDD mode.
– Select to repeat playback of title, chapter,
l
– In tuner or DVD REC mode, selects the
( EXT1, CAM1, CAM2.)
m
– Activates the ‘direct recording to DVD’ mode.
n
– Switches to the recorder’s tuner mode
(TV channel.)
É
REC
RETURN
SHUFFLE
REPEAT
SOURCE
DVD REC
TUNER
current video input source.
. >
(VCD) or some DVDs.
Video CD (VCD), picture CD or DVD disc.
broadcasts.
track or disc in DVD mode.
recorder’s video input source from the TV
channel or external sources.
10
Page 11

o
Numeric keypad
– Selects a chapter/track number to play.
– Selects the recorder’s preset TV tuner
channel.
p
TV VOL +/ –
– Adjust the volume of the TV set (Philips TV
only.)
q
SETUP
– Enters/exits the system setup menu.
r
STOP
– Stops playback/recording.
– Hold down the button to open and close the
disc tray.
s
PAUSE
– Pauses the playback.
– Pauses ‘Live TV’ viewing.
t
ZOOM
– Enlarges a picture on the TV screen.
u
T/C
– Displays title/chapter information.
v
SELECT
– Selects a track/chapter/ le in the program
– In HDD title menu, marks titles for copying to
w
TIMER
– Enters/exits the timer recording menu.
x
HDD
– Enters the HDD content menu.
y
DVD
– Switches to disc mode or displays the disc
z
DV
– Switches to ‘camera mode’ for camcorder
Å
menu.
a DVD recordable disc.
content menu.
connected to DV IN jack. Recording can be
made directly onto the HDD/DVD.
Remote Control (continued)
English
o
p
q
r
s
t
u
v
w
x
y
z
11
Page 12

Remote Control (continued)
English
Inserting Batteries
3
1
2
A
Open the battery compartment.
B
Insert two batteries type R06 or AA,
following the indications (+-) inside
the compartment.
C
Close the cover.
CAUTION!
– Remove batteries if they are
exhausted or if the remote control
will not be used for a long time.
– Do not mix batteries (old and new
or carbon and alkaline, etc.).
– Batteries contain chemical
substances and should be
disposed of properly.
Using the remote control to
operate the system
A
Aim the remote control directly at the
remote sensor (iR) on the front panel.
B
Select the source you want to control by
pressing the TUNER, HDD or DVD
button on the remote control.
C
Select the desired function (for example
., >.)
12
Page 13
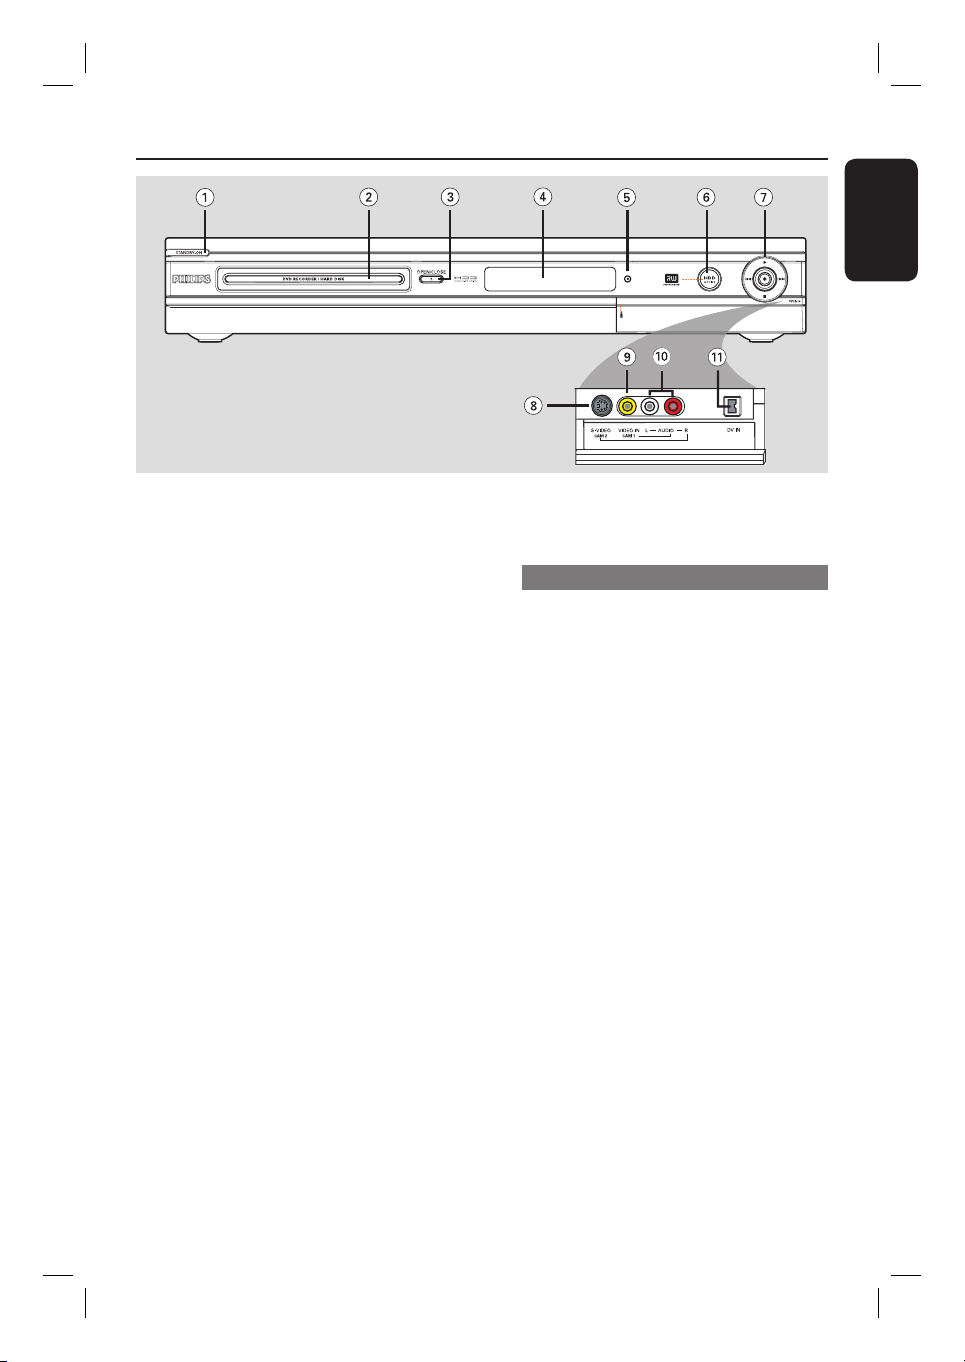
Main Unit
English
a
STANDBY-ON 2
– Turns on the recorder or switch to
standby mode.
b
Disc tray
c
OPEN/CLOSE ç
– Opens/closes the disc tray.
d
Display panel
– Show information about the current
status of the recorder.
e
IR
– Point the remote control towards this
sensor
f
HDD Active indicator
– Blue ring lights up while temporary
recording to the time shift buffer is in
progress.
g
– Starts recording the current TV channel
or the current video input source.
– Red ring lights up while recording to the
HDD or DVD recordable disc is in
progress.
É
– Starts playback of the selected title/track.
. / >
– Skips to the previous or next chapter/
track, or hold down the button to make
a reverse/forward search.
– Stops playback/recording.
Jacks behind the ap
Flip down the door as indicated by the
OPENÉlabel at the right hand corner.
h
S-VIDEO
– S-video input for SVHS/Hi8 camcorders
or SVHS/Hi8 video recorders.
In tuner mode, press SOURCE on the
remote control repeatedly to select
‘CAM2’ when using this input source.
i
VIDEO
– Video input for camcorders or video
recorders.
In tuner mode, press SOURCE on the
remote control repeatedly to select
‘CAM1’ when using this input source.
j
L/R AUDIO
– Audio input for camcorder or the audio/
video device which is connected to the
S-VIDEO or VIDEO jack.
k
DV IN
– Input for digital camcorders or other
suitable devices using this connector.
Press DV on the remote control when
using this input source.
13
Page 14

Step 1: Basic Recorder Connections
English
ANTENNA
SATELLITE
CABLE
A
~
MAINS
Connecting the antenna
cables
These connections enable you to watch
and record TV programs using this
recorder. If the antenna signal is
connected via a VCR, Cable Box or
Satellite Receiver, ensure that these
devices are turned on in order to watch
or record the cable programs.
If you want to connect to a VCR
and/or Cable Box/Satellite Receiver,
see page 17~18 for the complete
connection to your TV.
B
ANTENNA
TV
VIDEO
(
)
CVBS
L
AUDIO
R
EXT1
S-VIDEO
VIDEO
(
)
CVBS
(Y/C)
L
AUDIO
R
OUT 2
Y
P
B
P
R
AUDIO
DIGITAL AUDIO OUT
OUT 1
TV
A
Connect the existing Antenna/Cable TV
signal (or from the Cable Box/Satellite
Receiver {RF OUT or TO TV}) to the
ANTENNA
B
Use the supplied RF coaxial cable to
connect the TV
jack on the recorder.
jack on the recorder
to the antenna input jack on your TV
(VHF/UHF RF IN.)
Helpful Hint:
– Depending on how you have currently
connected your TV channel (directly from an
off-air antenna or Cable box or VCR), you
will have to disconnect some of the cables
before you make the above connection.
COAXIAL
S-VIDEO
IN
AUDIO
OUT
VIDEO IN
TIPS: Before making or changing any connections, make sure that all the devices are disconnected
from the power outlet.
14
Page 15
Step 1: Basic Recorder Connections (continued)
ANTENNA
TV
VIDEO
(
CVBS
L
R
EXT1
Option 1
Connecting the video cable
This connection enables you to view the
disc playback from the recorder.
You only need to choose one of the
options below to make your video
connection.
Option 1: Using Video (CVBS) jack
Use the supplied audio/video cable
(yellow plug) to connect the VIDEO
(CVBS)-OUT2 jack on the recorder to
the video input jack (or labeled as A/V In,
Video In or Composite) on the TV.
Option 2: Using S-Video jack
Use an S-video cable (not supplied) to
connect the S-VIDEO (Y/C) - OUT2
jack on the recorder to the S-Video input
jack (or labeled as Y/C or S-VHS) on the
TV.
)
AUDIO
OR
Option 2
S-VIDEO
(Y/C)
VIDEO
(
)
CVBS
L
AUDIO
R
OUT 2
Y
P
B
P
R
AUDIO
OUT 1
COAXIAL
DIGITAL AUDIO OUT
OR
Option 3
TV
AUDIO
OUT
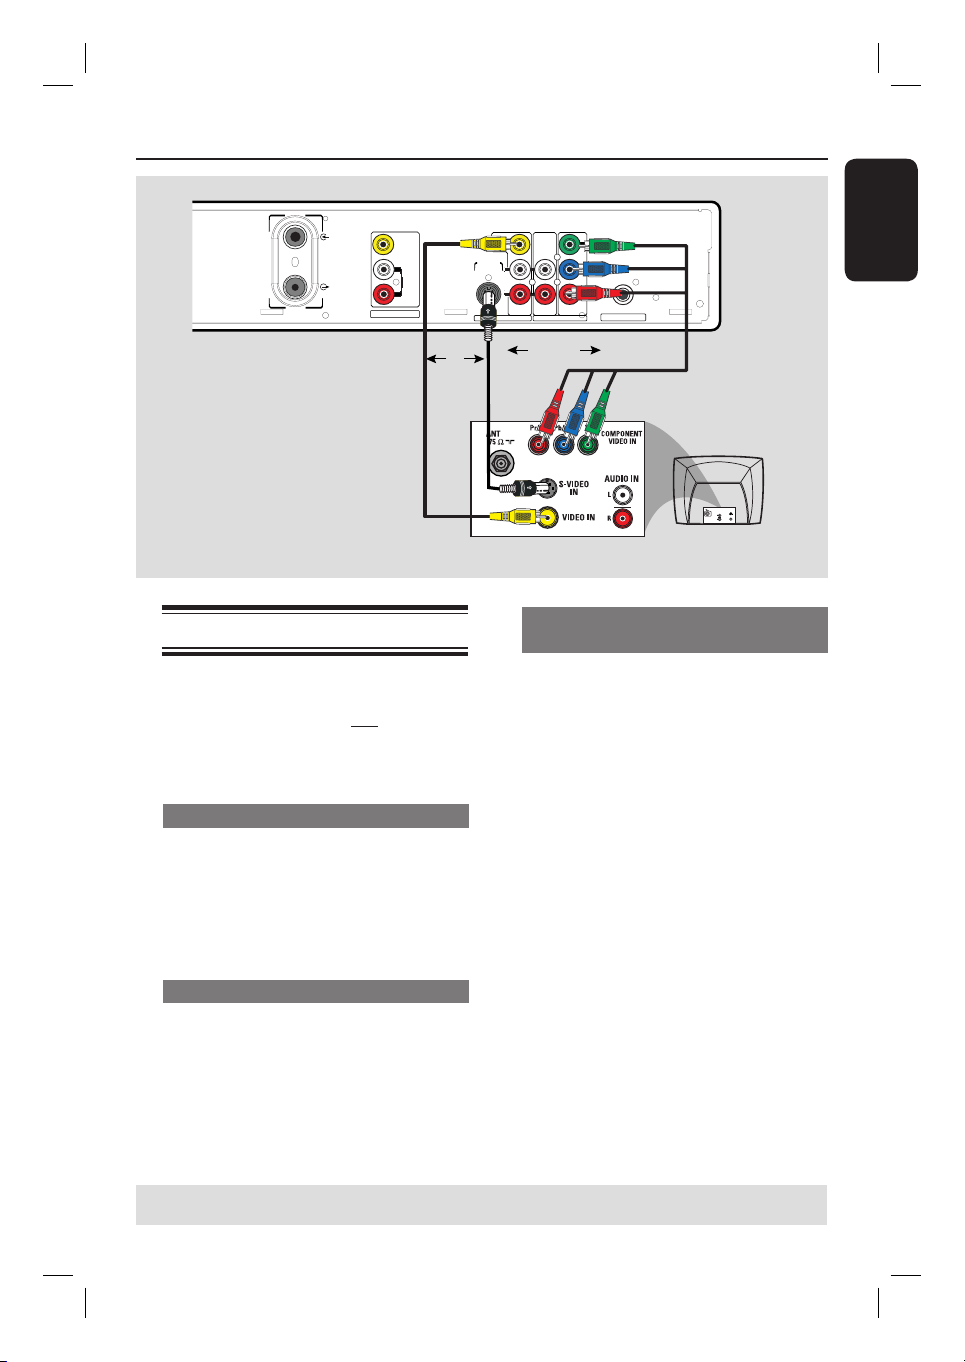
Option 3 : Using Component Video
jack
A
Use the component video cable (red/
blue/green - not supplied) to connect the
Y PB PR -OUT1 jacks on the recorder
to the corresponding component video
input jacks (or labeled as Y Pb/Cb Pr/Cr
or YUV) on the TV.
B
If your TV accepts Progressive Scan
signal, see page 63 for detailed
Progressive Scan set up.
IMPORTANT!
The progressive scan video quality is
only available through a Y P
connection and a progressive TV is
required. It is strongly advised to
complete the recorder installation
rst, before enabling the progressive
scan feature.
English
S-VIDE O
IN
VIDEO IN
B PR
TIPS: Before making or changing any connections, make sure that all the devices are disconnected
from the power outlet.
15
Page 16
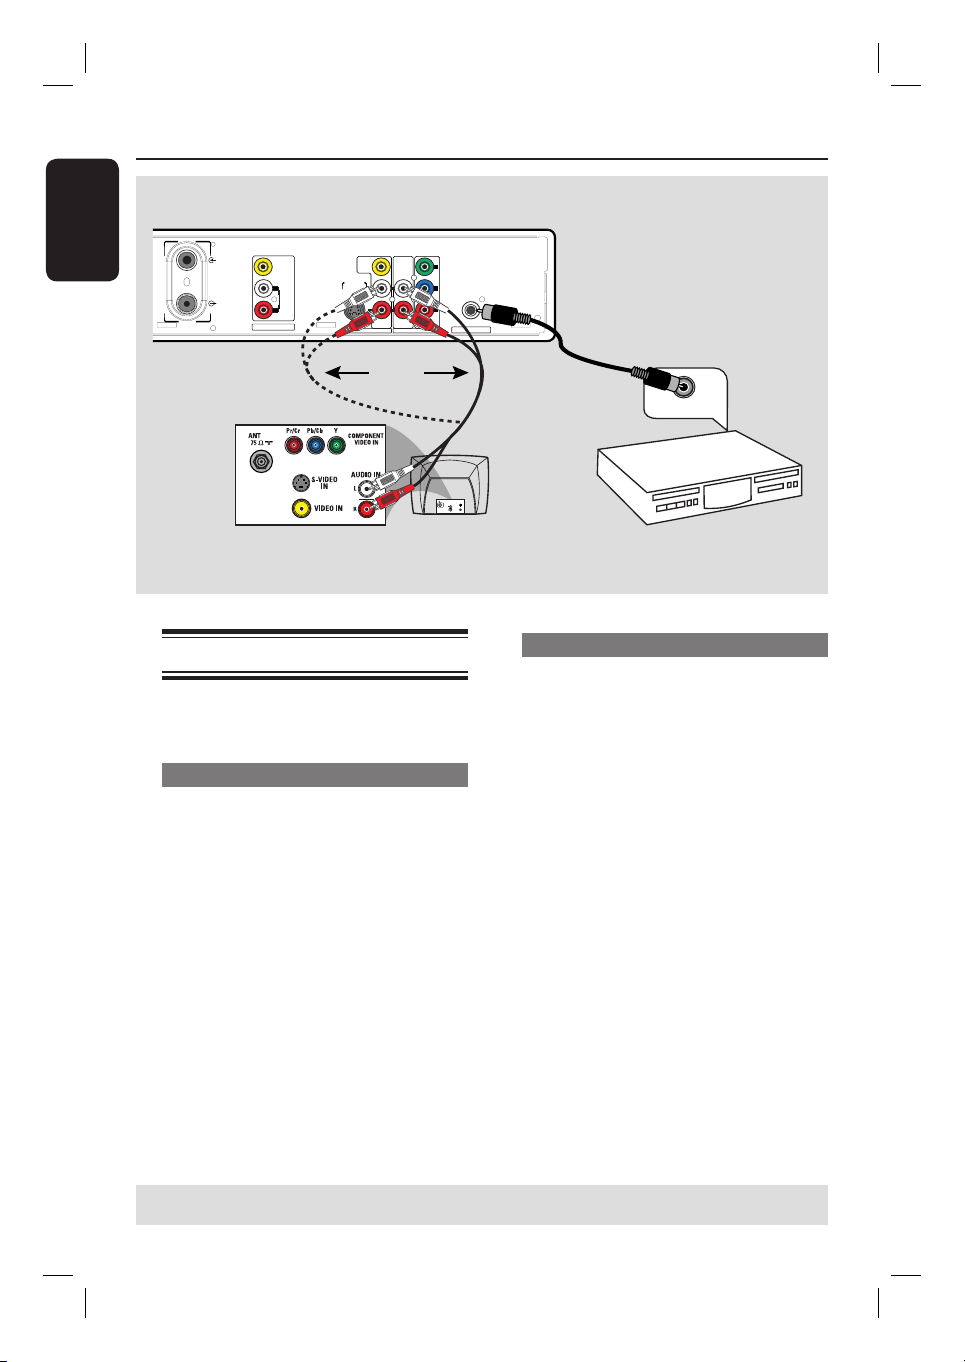
Step 1: Basic Recorder Connections (continued)
English
ANTENNA
TV
VIDEO
(
)
CVBS
L
AUDIO
R
EXT1
S-VIDEO
VIDEO
(
)
CVBS
(Y/C)
L
AUDIO
R
OUT 2
Y
P
B
P
R
AUDIO
OUT 1
OR
Option 1
TV
Connecting the audio cables
This connection enables you to listen to
the sound.
Option 1: Using an Audio cable
You can connect the recorder to a two
channel stereo system or receiver in
order to enjoy the stereo sound system.
COAXIAL
DIGITAL AUDIO OUT
S-VIDEO
IN
AUDIO
OUT
VIDEO IN
Option 2
DIGITAL IN
AV ampli er/
receiver
Option 2: Using a Coaxial cable
You can connect the recorder to an AV
ampli er/receiver in order to enjoy
multichannel surround sound.
Use a coaxial cable (not supplied) to
connect the COAXIAL jack to the
digital input on the AV ampli er/receiver
with a digital multichannel sound
decoder.
Use the supplied audio cable (red/white
ends) to connect the AUDIO L/R
OUT1 or -OUT2 jacks to these devices
with the same input jacks.
Before you start operating, set the audio
settings accordingly (see page 65.)
If the AUDIO settings do not match your
ampli er’s capabilities, the ampli er may
produce a strong, distorted sound or no
sound at all.
Helpful Hint:
– Do not connect your TV’s audio output
jacks to the AUDIO L/R (IN-EXT) jacks on
this recorder, this may cause unwanted
noise.
TIPS: Before making or changing any connections, make sure that all the devices are disconnected
from the power outlet.
16
Page 17

Step 2: Optional Connections
CABLE
SATELLITE
A
ANTENNA
IN
B
~
MAINS
C
Connecting to a Cable Box or
Satellite Receiver
Option 1
If your Cable Box/Satellite Receiver
has only an antenna output jack
(RF OUT or TO TV),
refer to “Connecting the antenna cables”
on page 14 for the complete connection
to your TV.
RF
R L
S-VIDEO
OUT
VIDEO
AUDIO
Back of a Cable
Box or Satellite
Receiver (Example
only)
D
ANTENNA
TV
VIDEO
(
)
CVBS
L
AUDIO
R
EXT1
S-VIDEO
VIDEO
(
)
CVBS
(Y/C)
L
AUDIO
R
AUDIO
OUT 1
OUT 2
Option 2
If your Cable Box/Satellite Receiver
has video/audio output jacks,
A
Keep the existing antenna connection
from the Cable Box/Satellite Receiver to
your TV.
B
Use the supplied RF coaxial cable to
connect the ANTENNA
recorder to the RF OUT jack on the
Cable Box/Satellite Receiver.
C
Use a RF coaxial cable to connect the
TV
jack on the recorder to the
antenna input jack on your TV (VHF/UHF
RF IN.)
D
Use the audio/video cables to connect
the VIDEO/AUDIO -EXT1 on the
recorder to the matching VIDEO/AUDIO
output jacks on the Cable Box/Satellite
Receiver.
E
Use the audio/video cables to connect
the VIDEO/AUDIO -OUT2 on the
recorder to the matching VIDEO/AUDIO
input jacks on the TV.
Y
P
P
R
B
DIGITAL AUDIO OUT
E
COAXIAL
TV
AUDIO
OUT
jack on the
English
S-VIDEO
IN
VIDEO IN
TIPS: Before making or changing any connections, make sure that all the devices are disconnected
from the power outlet.
17
Page 18

Step 2: Optional Connections (continued)
English
CABLE
~
MAINS
SATELLITE
A
ANTENNA
Connecting to a VCR or
other similar device
This connection enables you to record
from a video tape to the HDD or a DVD
recordable disc and allows the VCR to be
used for playback if the recorder is
turned off.
IMPORTANT!
Your new recorder can replace the
VCR for all your recording needs.
Just unplug all the connections to
your VCR.
A
Connect the Antenna/Cable TV signal to
the ANTENNA jack on the recorder.
B
Use a RF coaxial cable to connect the
TV
jack on the recorder to the
antenna input jack on your TV (VHF/UHF
RF IN.)
VHF/UHF
RF IN
VHF/UHF
RF OUT
ANTENNA
TV
Back of a VCR
(Example only)
VIDEO
AUDIO
AUDIO
OUT
OUT
L
R
IN
VIDEO
IN
AUDIO
L
AUDIO
R
C
S-VIDEO
VIDEO
(
CVBS
(Y/C)
OUT 2
Y
)
P
L
B
AUDIO
P
R
R
COAXIAL
AUDIO
DIGITAL AUDIO OUT
OUT 1
VIDEO
(
)
CVBS
L
AUDIO
R
EXT1
D
B
C
Use the audio/video cables to connect
TV
S-VIDEO
IN
AUDIO
OUT
VIDEO IN
the VIDEO/AUDIO -EXT1 on the
recorder to the matching VIDEO/AUDIO
output jacks on the VCR.
D
Use the audio/video cables to connect
the VIDEO/AUDIO -OUT2 on the
recorder to the matching VIDEO/AUDIO
input jacks on the TV.
Helpful Hints:
– Most commercial video cassettes and
DVDs are copy-protected and therefore
cannot be recorded.
– Connect the recorder directly to the
TV. If there is a VCR or an additional device
in between, the picture quality may be poor
because of the copy protection system built
into the recorder.
TIPS: Before making or changing any connections, make sure that all the devices are disconnected
from the power outlet.
18
Page 19
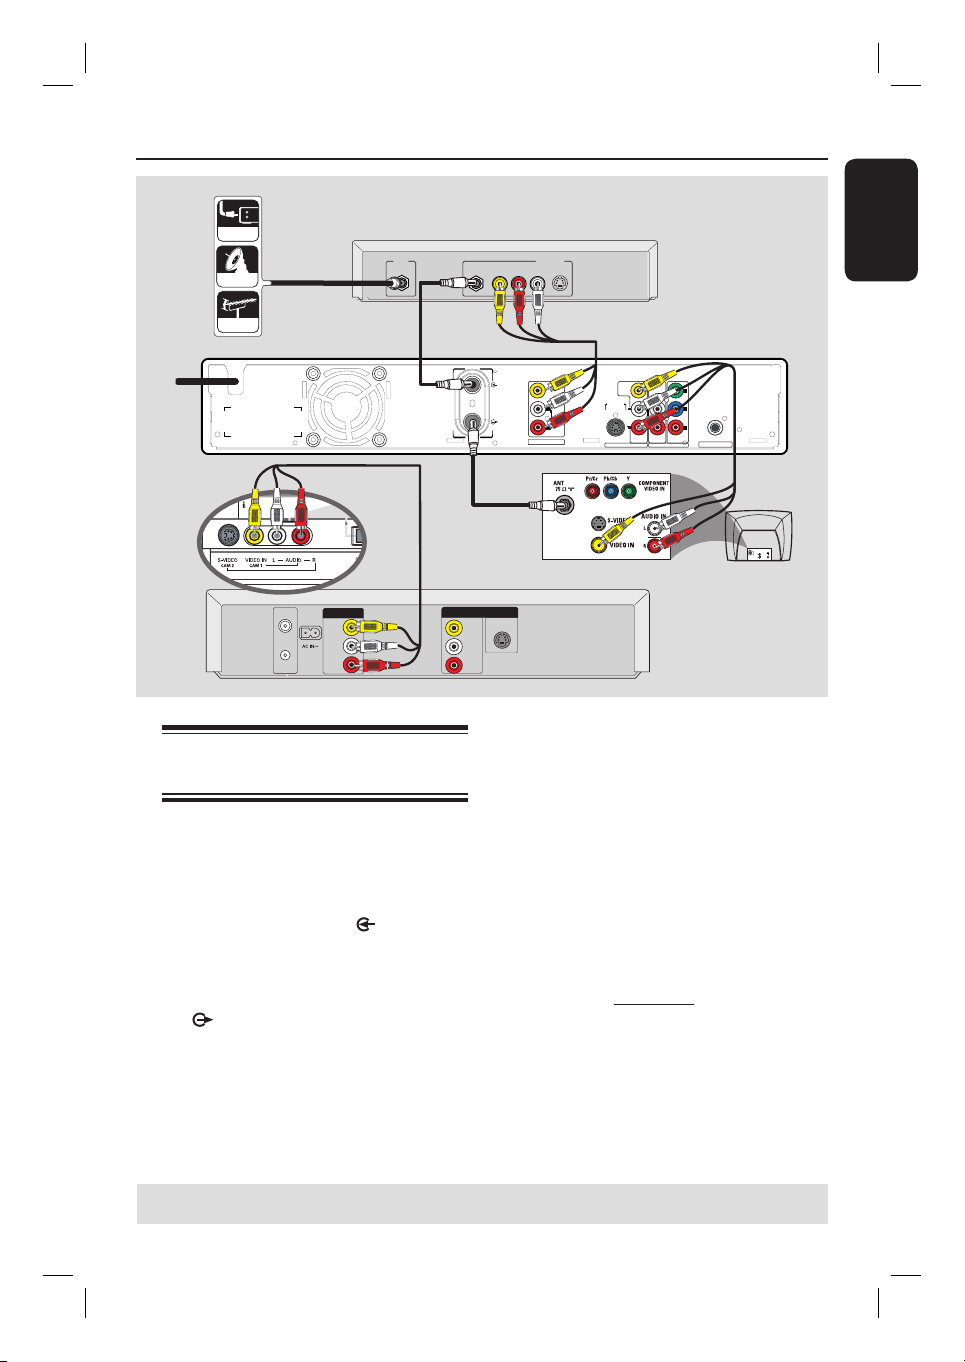
Step 2: Optional Connections (continued)
CABLE
SATELLITE
ANTENNA
~
MAINS
A
IN
Front Panel of
HDD recorder
F
VHF/UHF
VHF/UHF
RF IN
RF OUT
VIDEO
AUDIO
AUDIO
OUT
OUT
L
R
Connecting to a VCR and
Cable Box/Satellite Receiver
A
Connect the Antenna/Cable TV signal to
the antenna input (RF IN) jack on the
Cable Box/Satellite Receiver.
B
Use the supplied RF coaxial cable to
connect the ANTENNA jack on the
recorder to the RF OUT jack on the
Cable Box/ Satellite Receiver.
C
Use a RF coaxial cable to connect the
TV jack on the recorder to the
antenna input jack on your TV (VHF/UHF
RF IN.)
B
RF
R L
S-VIDEO
OUT
VIDEO
AUDIO
Back of a Cable Box
or Satellite Receiver
F
(Example only)
D
ANTENNA
TV
VIDEO
(
)
CVBS
L
AUDIO
R
EXT1
S-VIDEO
VIDEO
(
CVBS
(Y/C)
OUT 2
Y
)
P
L
B
AUDIO
P
R
R
AUDIO
DIGITAL AUDIO OUT
OUT 1
C
IN
S-VIDEO
VIDEO
IN
AUDIO
L
AUDIO
R
D
Use the supplied audio/video cables to
Back of a VCR
(Example only)
connect the VIDEO/AUDIO -EXT1
jacks on the recorder to the matching
VIDEO/AUDIO output jacks on the
Cable Box/ Satellite Receiver.
E
Use the audio/video cables to connect
the VIDEO/AUDIO OUT2 on the
recorder to the matching VIDEO/AUDIO
input jacks on the TV.
F
Use another set of audio/video cables to
connect the VIDEO IN/L-AUDIO-R
jacks on the front panel of the recorder
to the to the matching VIDEO/AUDIO
output jacks on the VCR.
English
COAXIAL
E
TV
S-VIDEO
IN
AUDIO
OUT
VIDEO IN
TIPS: Before making or changing any connections, make sure that all the devices are disconnected
from the power outlet.
19
Page 20

Step 2: Optional Connections (continued)
English
DV OUT
A
OR
L
B
R
Connecting a camcorder to
the front jacks
VIDEO In jack
Use the S-VIDEO connection if you have a
Hi8 or S-VHS(C) camcorder. It provides
Option 2: Using the S-VIDEO In or
You can use the front jacks to copy
good picture quality.
camcorder recordings. These jacks are
located behind the ap on the right hand
side and provides convenient connections
for a camcorder.
Alternatively, you can use the VIDEO
connection if your camcorder has only a
single video output (Composite Video,
CVBS.)
Option 1: Using the DV IN jack
Use this connection if you have a Digital
Video or Digital 8 camcorder. The DV
jack conforms to the i.LINK standard.
It provides the best picture quality.
Use an i.LINK 4-pin cable (not supplied)
to connect the DV IN jack on the
recorder to the appropriate DV OUT
jack on the camcorder.
Before you start operating, press DV on
the remote to select ‘DV’ as the input
channel. For recording, see pages 27~37.
A
Connect the S-VIDEO or VIDEO jack
on the front panel of the recorder to the
corresponding S-VHS or Video output
jack on the camcorder.
B
Use an audio cable (red/white ends) to
connect the AUDIO L/R jacks on the
front panel of the recorder to the audio
output jacks on the camcorder.
Before you start operating, press
SOURCE on the remote control
repeatedly to select ‘CAM1’ or ‘CAM2’
as the input channel, depending on your
connections. For recording, see pages
Helpful Hints:
27~37.
– The DV IN jack does not support a
connection to a Personal Computer.
– It is not possible to record from the
recorder to your camcorder via the DV IN
jack on your recorder.
TIPS: Before making or changing any connections, make sure that all the devices are disconnected from the power
outlet.
20
Page 21
Step 3: Installation and Setup
IMPORTANT!
When you complete the
connections and turn on the
recorder for the rst time, it is
advisable that you make several
basic settings.
Please see the following pages on using
the Setup Menu features to program TV
channels, menu language and system
clock settings. This will improve the
performance of this recorder
considerably.
Finding the viewing channel
A
Press STANDBY-ON 2 on the
recorder to turn it on.
B
Turn on the TV and set it to the correct
video-in channel. You should see the blue
DVD background screen.
Usually this channel is between the
lowest and highest channels and may be
called FRONT, A/V IN, VIDEO. See your
TV’s manual for more details.
Or, you may go to Channel 1 on your
TV, then press the Channel down button
repeatedly until you see the Video In
channel.
Or, the TV remote control may have
a button or switch that chooses different
video modes.
Setting your TV channel
programs
Before the recorder can start recording
any TV channel programs, you need to
search for the available TV channels and
store them in this recorder.
Note: Ensure that you have successfully
made all the required connections to the
recorder, TV and Satellite Receiver/
Cable Box (if any) and have switched
them on.
Tuner settings can only be changed
when the recorder is not playing or
recording.
SETUP
A
Press SETUP on the remote control.
The setup menu appears on the TV.
B
Use keys to highlight
{ SETUP MENU - GENERAL } and
press .
English
OK
TIPS: Press to access the options of an item in the menu.
Press SETUP to exit the menu.
21
Page 22
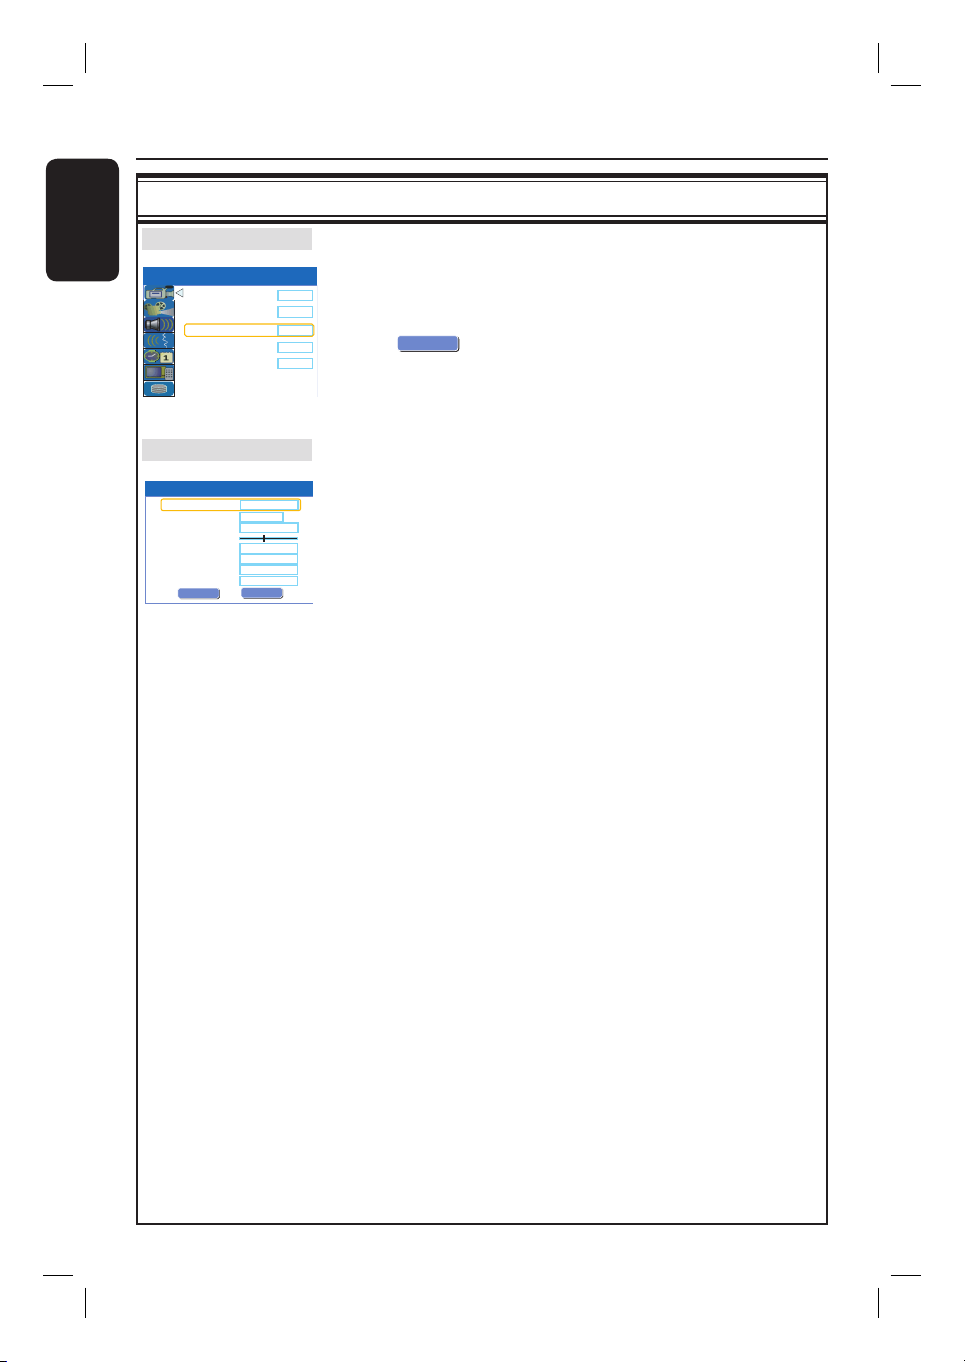
Step 3: Installation and Setup (continued)
English
GENERAL settings (underlined options are the factory default settings)
Auto Program
SETUP MENU - GENERAL
Auto Chapter Marker
Record Quality
Auto Program
Manual Program
Sort
Manual Program
Manual Program
Program Number
Name
Frequency
Fine Tuning
Standard
NICAM
Audio
Skip
OK
P001
C h 0 0 1
0 5 8 . 9 8 Mhz
PAL B/ G
On
Dual A
No
OK
CANCEL
OK
Select to start automatic TV channel programming.
1)
Use keys to highlight { Auto Program - Search } and
5min.
SP
Search
Edit
OK
press .
A warning message will appear.
OK
2)
Select
OK
and press OK on the remote control
The automatic TV channel search will start. This process may
take several minutes. Once complete, the total number of
channels found will appear on the TV.
Select to modify your preset TV channels.
1)
Use keys to highlight { Manual Program - Edit } and
press .
The modify channel options will be displayed.
2)
Use keys to select one of the options and press .
{ Program Number } – Use CH+/ CH– to select by the program
number for modifying.
{ Name } – Use to select by the channel name for
modifying. Press OK on the remote control to
confirm the selection.
{ Frequency } – Select this to adjust the frequency of the channel.
– Use keys to search for the next frequency or
use the numeric keypad 0-9 to change the
frequency. Press OK on the remote control to
confirm the setting.
{ Fine Tuning }– Select this to ne-tune the TV channel manually if
the reception is poor.
– Use keys to ne-tune the frequency.
{ Standard } – Select this to set the system that produces the least
distortion of picture and sound. Press OK on the
remote control to confirm the setting. (See chapter
“TV System Guide” at the back of this manual for
information.)
{ NICAM } – Select this to receive dual language broadcasts and to
improve the sound quality of the TV channel.
– Use keys to select { On } or { Off }, then press
OK on the remote control to confirm the setting.
22
Page 23

Step 3: Installation and Setup (continued)
GENERAL settings (underlined options are the factory default settings)
Manual Program
(continued)
Sort
Sort
OK
P001
BC020
P002
SW006
OK
CANCEL
P003
CH008
CH004
GG006
CH010
CH012
CH005
P009 CH001
P004
P005
P006
P007
P008
Select to modify your preset TV channels.
{ Audio } – For dual language broadcasts, select this to switch
between stereo (original) and the additional audio
language.
– Use keys to select { Dual A } or { Dual B },
then press OK on the remote control to confirm
the setting. This is the default language during timer
recording.
{ Skip } – Select this to set the channel to be skipped. The
skipped channels can only be accessed by pressing
the corresponding number button on the remote
control.
– Use keys to select { Yes } if you wish to skip
the channel and press OK on the remote control to
confirm the setting.
OK
3)
To con rm all the changes, select
OK
and press OK on
the remote control to exit to the previous screen.
Select to sort your stored TV channels.
1)
Use keys to highlight { Sort - OK } and press .
The list of TV channel programmes appears.
2)
Use keys to highlight the channel you want to shift and
press .
The selected channel will move to the right side of the screen.
3)
Use keys to shift the TV channel to the desired position,
Use to highlight
OK
OK
and press OK on the remote
control.
The selected channel will be inserted before the current position.
OK
To cancel the change, highlight
4)
Repeat steps 2~3 until you have sorted all the TV channels you
CANCEL
and press OK.
want.
English
23
Page 24
Step 3: Installation and Setup (continued)
English
Setting the language
You can select the language for subtitles
and audio for DVD playback. For some
DVDs, the subtitle/audio language can
only be changed via the DVD disc menu.
If the selected language is not available on
the disc, the disc’s default language will be
used instead.
The menu language (on-screen display)
for the system will remain as you set it.
Language settings can only be
changed when the recorder is not
playing or recording.
A
Press SETUP.
The setup menu appears.
B
Use keys to highlight
{ SETUP MENU - LANGUAGE } and
press to access the menu.
SETUP MENU - LANGUAGE
System Language
Audio Language
Subtitle Language
Disc Menu Language
C
Use keys to highlight one of the
options and press . See next page for
details.
D
Use keys to highlight the desired
setting and press OK to con rm.
English
English
Off
English
Setting the time & date
If the recorder has not set the time and
date correctly, set the clock manually by
following the steps below.
A
Press SETUP.
The setup menu appears.
B
Use keys to highlight
{ SETUP MENU - DATE / TIME} and
press to access the menu.
SETUP MENU -
C
Use keys to highlight one of the
DATE / TIME
Date(dd/mm/yyyy)
Time(hh:mm)
options and press to access the
options.
If the recorder has not set the time and
date correctly, you can further adjust the
clock settings, see next page for details.
D
Once complete, press to return to the
previous menu.
E
Press SETUP to exit.
31 12 2005
15 : 33
TIPS: Press to access the options of an item in the menu.
Press SETUP to exit the menu.
24
Page 25

Step 3: Installation and Setup (continued)
LANGUAGE settings (underlined options are the factory default settings)
System Language Selects the menu language for this recorder on-screen display.
Audio Language Selects the preferred audio language for DVD playback.
Subtitle Language Selects the preferred subtitle language for DVD playback.
Disc Menu Language Selects the preferred disc menu language for DVD playback
Helpful Hints:
DATE/ TIME settings (underlined options are the factory default settings)
Date (dd/mm/yy)
Time (hh/mm)
The basic installation is now complete. This recorder is ready for use!
– If the selected audio/subtitle language is not available on the disc, the disc’s
default setting language will be used instead.
– For some DVDs, the subtitle/audio language can only be changed via the DVD
disc menu.
Use keys to change the number and use keys to
select different entry elds, then press OK to con rm.
Use keys to change the number and use keys to
select different entry elds, then press OK to con rm.
English
25
Page 26

Control TV programs
LIVE
English
Switching on to TV program
A
Turn on the TV to the correct program
number for the recorder (e.g. ‘EXT’, ‘0’,
‘AV’).
B
Press STANDBY-ON 2 to turn on
the recorder.
If no TV program appears on the
screen, press TUNER on the remote
control.
C
Press CH +/- to select a TV channel.
The selected TV channel will appear
on the status window.
The active TV programs will be stored
automatically to the temporary
HDD storage in this recorder. This
information is shown on the Time Shift
video bar.
To display or remove the Time Shift
video bar, press the
07:15:36
For more information about the
temporary HDD storage (Time
Shift Buffe), see next page.
m key repeatedly.
CH + /
TUNER
10:15:36
LIVE
Pause live TV function
You may be interrupted whilst watching
your favourite TV program. You can
pause the show by pressing PAUSE
and pressing PLAY
Éto resume
Å
playback of the program at the scene it
was interrupted. You can ‘pause’ the live
TV broadcast up to a maximum period of
3 hours. It behaves exactly as if you were
in control of the live broadcast.
If you want to return to the live TV
program, press and hold
É.
Instant Replay function
Whilst watching a live TV program, you
can press
jump back 10 seconds upon every single
press for instant replay.
If you want to return to the live TV
program, press and hold
Ñon the remote control to
É.
TIPS: Press m to display the time shift video bar or help text.
26
Page 27

Before Recording
LIVE
About temporary HDD
storage (Time Shift Buffer)
As soon as you switch on this recorder,
the currently selected TV program will
be stored in a temporary hard disk
storage called ‘Time Shift Buffer’ (TSB),
up to 3 hours of programs.
In tuner mode, the Time Shift video bar
will appear on the screen, it indicates the
status and timing of the TV programs
stored in the temporary HDD storage.
You can choose to display or remove the
video bar by pressing the
remote control.
a
b
c
d
07:15:36
The Time Shift video bar consists of the
following information :
a
Content temporarily saved in the time
shift buffer.
b
The TV program start time.
Once it has exceeded 3 hours, the
content stored at the beginning will be
deleted and the start time will be updated
accordingly.
c
Status of source of video input.
“LIVE” or the time of current playback
being viewed “HH:MM:SS”.
d
Icon which shows the status of the time
shift buffer.
– playback of content stored in the
time shift buffer.
– marks the beginning of content
recording.
– marks the current recording in
progress.
– the current screen has been paused
from playback. (This will not pause
recording.)
m key on the
10:15:36
LIVE
WARNING!
The TV programs stored in the
temporary HDD storage will be deleted
once it has exceeded the storage buffer
or when you press STANDBY-ON
to turn off the recorder.
In addition, executing the following
actions will also clear the contents in the
temporary HDD storage:
Press DV, DVD REC or SOURCE on
the remote control.
OR
Use the option { Delete HDD } to
erase all contents of your hard disk
storage. See “Before Recording – HDD
Settings” for details.
English
2
TIPS: Press m to display the time shift video bar or help text.
27
Page 28

Before Recording (continued)
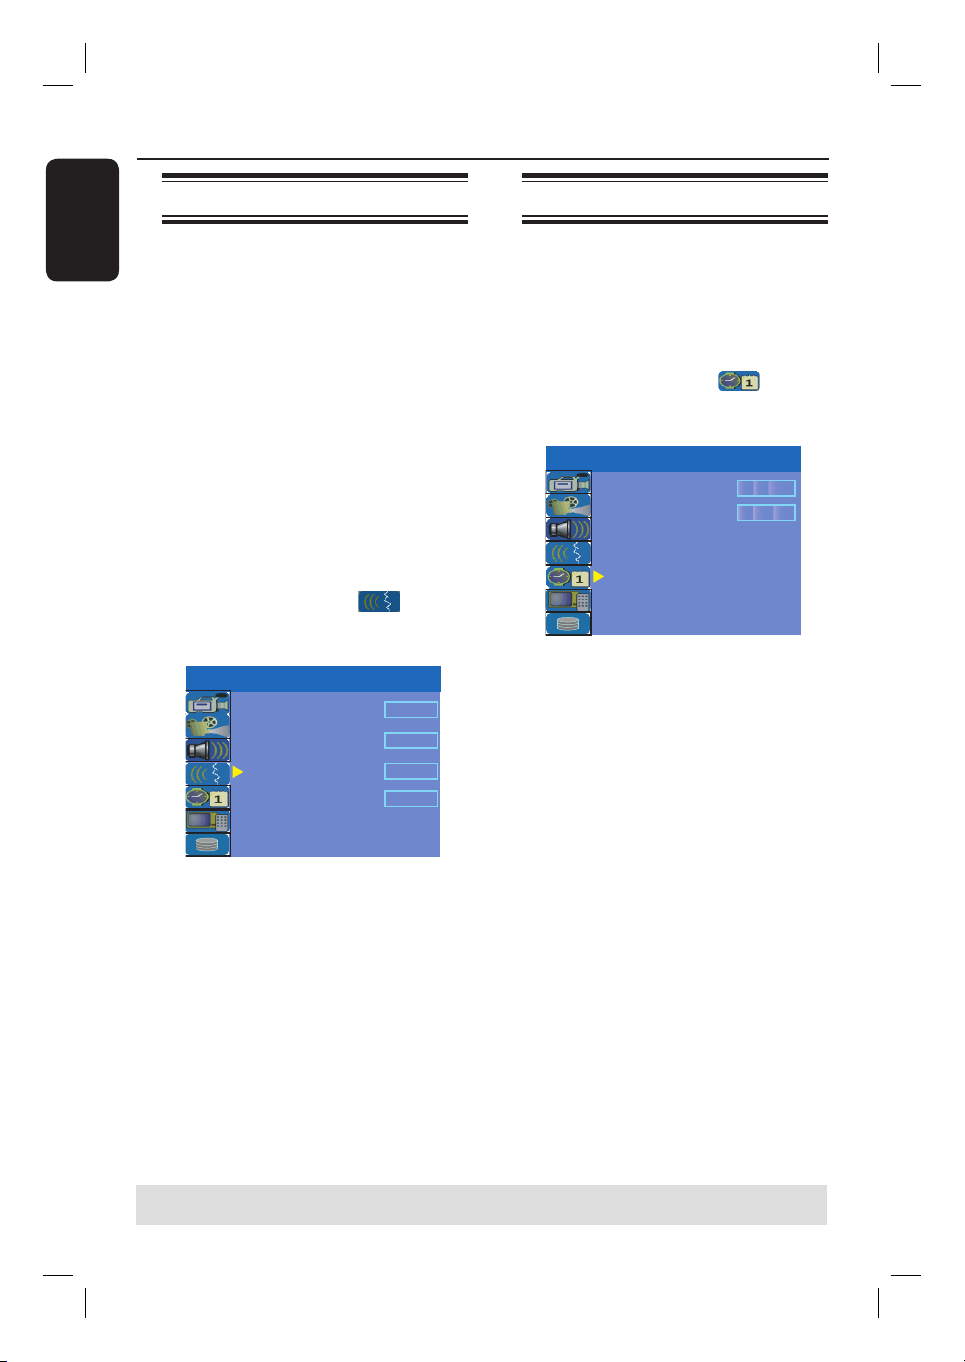
English
Accessing the HDD (Hard
Disk Storage) Setup Menu
You can preset the behavior of your hard
disk storage of the recorder. This
recorder offers various options for easy
management of your hard disk recording.
SETUP
A
Press SETUP.
The system setup menu appears.
B
Use keys to highlight
{ SETUP MENU - HDD } and press
to access the menu.
SETUP MENU - HDD
Save Time Shift Buffer
HDD Info
Space Management
Delete HDD
Delete Optical Disc
C
Use keys to highlight the option and
press to access its options.
D
To exit, press .
OK
No
Show
Automatic
OK
OK
TIPS: Press to go back to the previous menu item.
Press SETUP to exit the menu.
28
Page 29

Before Recording (continued)
HDD settings (underlined options are the factory default settings)
Save Time Shift
Buffer
HDD Info
Space Management
Delete HDD
This option allows you to control the behavior of the Time Shift
Buffer.
{ Yes } – Select to retain the contents in the temporary HDD
storage when you switch the tuner’s TV channel or
external video input source.
{ No } – Select to clear the contents in the temporary HDD
storage.
Press OK to display information on:
– Hard disk size in MB ( Megabytes).
– Used space in MB ( Megabytes).
– Remaining space in MB ( Megabytes).
– Number of titles stored on the HDD.
This option determines how the recorder will respond when
the HDD is full of recordings.
{ Automatic }–During recording, when the HDD is full, the
recorder will proceed to overwrite any unprotected
recordings in the HDD. The oldest unprotected
recordings will be deleted rst.
{ Manual } – During recording, when the HDD is full, recording
will be stopped. A warning message { The hard disk
is full. Please erase some programs to allow
further recording. } will appear on the screen.
This option will erase all marked/ unmarked recordings on the
HDD. This option is not available when recording to HDD is in
progress.
Press to highlight OK.
A warning message will appear. Select
OK
CANCEL
mode.
to abort. Once complete, the recorder will switch to standby
OK
OK
to proceed or
English
Delete Optical Disc
This option will erase all content on a DVD±RW disc, including
those that were not recorded on this recorder. This option
is only available in tuner mode.
Press to highlight OK.
A warning message will appear. Select
OK
CANCEL
to abort.
OK
OK
to proceed or
29
Page 30

Before Recording (continued)
English
Default Recording settings
The default recording settings will allow
you to preset auto chapter markers and
the preferred mode of recording quality
for HDD recording.
A
Press SETUP on the remote control.
The setup menu appears on the TV.
B
Use keys to highlight
{ SETUP MENU - GENERAL } and
press to con rm.
SETUP MENU - GENERAL
Auto Chapter Marker
Record Quality
Auto Program
Manual Program
Sort
C
Use keys to select the setting you
wish to change and press OK to con rm.
Instructions and explanation of the
options are provided in the following
pages.
D
To exit, press SETUP.
5min.
SP
Search
Edit
OK
Auto Chapter Markers
You can insert chapter markers within a
title during recording. This allows you to
access to speci c points on the
recording.
A
Use keys to highlight { Auto
Chapter Marker } and press to
access its options.
B
Use keys to select your preferred
setting.
C
Press OK to con rm.
Default Recording Quality
The setting de nes the picture quality of
recordings and the maximum recording
time on the HDD.
Important! When copying from the
HDD to a DVD recordable disc, the
mode of record quality for the selected
recording in the HDD will automatically
be transferred, selecting another mode of
record quality is not possible.
A
Use keys to highlight { Record
Quality } and press to access its
options.
B
Use keys to select your preferred
mode of record quality.
C
Press OK to con rm.
TIPS: Press to go back to previous menu item.
Press SETUP to exit the menu.
30
Page 31

Before Recording (continued)
GENERAL settings (underlined options are the factory default settings)
Auto Chapter
Markers
Record Quality
Auto Program
You can insert chapter markers within a title during recording.
English
This lets you access to speci c points on the recording.
Press to access the menu and use keys to select one of the
options.
{ 5min. } – Chapter markers are inserted during recording at
every 5 minutes interval.
{ 10min. } – Chapter markers are inserted during recording at
every 10 minutes interval.
{ 20min. } – Chapter markers are inserted during recording at
every 20 minutes interval.
{ 30min. } – Chapter markers are inserted during recording at
every 30 minutes interval.
{ Off } – The feature is disabled.
Select this option to preset your preferred mode of record
quality.
Press to access the menu and use keys to select one of the
options.
Record Quality
HQ High Quality
SP Standard Play
SP+ Standard Play Plus
LP Long Play
EP Extended Play
SLP Super Long Play
Values are estimates only. Parts of the HDD storage capacity will be reserved for
the operations of this recorder and time shifting.
Hours of Recording that can be stored
DVDR3360H
160GB HDD
34
68
85
102
136
204
DVDR3370H
250GB HDD
53
106
132
159
212.5
318
DVD±R/
DVD±RW
2.5
1
2
3
4
6
Select to make automatic TV channel programming.
See section “Step 3: Installation and Setup – Setting your TV
channel programs”.
Manual Program
Sort
Select to modify your preset TV channels.
See section “Step 3: Installation and Setup – Setting your TV
channel programs”.
Select to sort your stored TV channels.
See section “Step 3: Installation and Setup – Setting your TV
channel programs”.
31
Page 32

Record on Hard Disk
English
IMPORTANT!
Unrecordable pictures
Television programs, lms, video tapes,
discs, and other materials may be
copy-protected and therefore cannot be
recorded on this recorder.
Recording TV programs
Follow the instructions below to record
TV programs onto the HDD, where you
can store for future viewing or copy to a
DVD recordable disc if required.
A
In tuner mode, press the m key on the
remote control to display the time shift
video bar.
B
Use . / > keys to search for the
beginning of the scene in the temporary
HDD storage where you want to start
recording.
C
Press RECâ on the remote control to
start recording.
To cancel, press SELECT.
To save all current programs stored in
the time shift buffer, press and hold
RECâ.
D
To stop recording, press STOPÇon the
remote control.
Recording from a DV
camcorder
You can record video directly from a
connected DV camcorder onto the
HDD, where you can edit it easily and
copy to a recordable DVD if required.
CH
STOP
PAUSE
IMPORTANT!
– If you press DV on the remote
control, the unmarked contents in
the TSB will be removed.
REC
DV
To record directly to a recordable
DVD disc, see page 35.
TIPS: Set the appropriate mode of record quality for HDD recording. The same record quality will be transferred
from HDD to a recordable DVD, see page 30~31.
32
Page 33

Record on Hard Disk (continued)
A
Connect the DV camcorder to the
DV IN jack on the front panel of this
recorder.
B
Find the footage on the DV camcorder
that you want to start recording from
and set the camcorder to pause mode.
C
Turn on the TV to the correct program
number for the recorder (e.g. ‘EXT’, ‘0’,
‘AV’.)
D
Turn on the recorder and press DV on
the remote control.
An information box will be displayed.
System State: Stop DV State: Stop
Record to Hard Disk As Standard Play
Elapsed Time: 00:00:00 Remaining Time: 00:00:00
Press SELECT repeatedly to change the
mode of record quality.
E
Press RECâ to start recording and
press the PLAY button on the DV
camcorder to start playback.
To pause the recording, press PAUSE Å.
To resume recording, press PLAY
again.
A new chapter marker is created
after recording restarts.
F
To stop recording, press STOPÇ.
A new title will be created when you
begin another recording.
To record directly to a recordable
DVD disc, see page 35.
Recording from an external
device (Camcorder/VCR/
DVD player)
A copy protection system has been built
into this recorder to prevent the transfer
of data from pre-recorded DVDs or
other copy protected material onto the
recordable DVD. You can only store the
contents in the temporary HDD storage
of this recorder.
Note: Set the preferred mode of record
quality before proceeding, see “Before
Recording - Default Recording Settings.”
PAUSE
A
Connect the external device to this
recorder (see pages 17 ~ 20).
B
Turn on the TV to the correct program
number for the recorder (e.g. ‘EXT’, ‘0’,
‘AV’).
C
Press STANDBY-ON 2 to turn on
the recorder.
If no TV program appears on the
screen, press TUNER on the remote
control.
D
Press SOURCE repeatedly to select the
correct input channel that matches the
connected jack of the device.
– { EXT 1 } : EXT 1 jack at the back.
– { CAM 1 } : VIDEO jack on the
front.
– { CAM 2 } : S-VIDEO jack on the
front.
REC
SOURCE
TUNER
English
TIPS: Set the appropriate mode of record quality for HDD recording. The same record quality will be transferred
from HDD to a recordable DVD, see page 30~31.
33
Page 34

Record on Hard Disk (continued)
English
E
Press RECâ to start recording.
You can also press RECâ
repeatedly to increase the recording time
in 30-minute increments.
F
Start playback on the connected device.
The content on the connected device
will be recorded.
G
To stop the recording before the
scheduled ending, press STOP
To record directly to a recordable
DVD disc, see page 35.
Ç.
TIPS: Set the appropriate mode of record quality for HDD recording. The same record quality will be transferred
from HDD to a recordable DVD, see page 30~31.
34
Page 35

Record on DVD Recordable Disc
IMPORTANT!
Unrecordable pictures
Television programs, lms, video tapes,
discs, and other materials may be copyprotected and therefore cannot be
recorded on this recorder.
Copying from HDD to a
recordable DVD
You can copy a recorded title(s) from the
HDD (hard disk drive) to a recordable
DVD disc.
The time taken to copy content from the
HDD to a recordable DVD depends on
the record quality of the HDD
recordings.
It is not possible to change the mode of
record quality during the copying
process. As such, it is important that you
choose the appropriate record quality
when you rst set up the recording to
the HDD.
The copying process is done at a higher
speed than the recording.
Discs for recording
There are several formats of DVD
recordable discs which can be used with
this recorder:
DVD±RW (DVD ReWritable discs)
– Discs that are rewritable can be used
for multiple recordings once the existing
data has been erased.
DVD±R (DVD Recordable discs)
– Discs that can only be used for a single
recording. Each new recording is always
added at the end of all previous
recordings as existing recordings cannot
be overwritten.
– Editing can be made on DVD±R discs
as long as they have not been nalized.
– To play a DVD±R disc on another
DVD player, it must be nalized (see page
56.) After this is done, no more content
can be added to the disc.
English
The following information will be stored
on the disc :
– Title/name of recording
– Date of recording
– Time of recording
– Record quality mode/ length of
recording
– Index picture of title
TIPS: Ensure that there is suf cient space available on the DVD±R before recording.
You have to nalize the DVD±R before it can be played on other players, see page 56.
35
Page 36

Record on DVD Recordable Disc (continued)
English
Recording from various
sources
You can choose to copy your recordings
from the HDD or an external device to a
DVD recordable disc. The storage
capacity of the disc depends on the
record quality that was selected for the
recording in the recorder or device, see
page 30.
STOP
PAUSE
SELECT
HDD
REC
DVD REC
SOURCE
DV
Recording from the HDD
A
Turn on the TV to the correct program
number for the recorder (e.g. ‘EXT’, ‘0’,
‘AV’).
B
Insert a DVD recordable disc into the
recorder.
C
Press HDD on the remote control.
The HDD content menu appears on
the screen.
HDD 16 Titles
Date Time
Ch.
No
20/05/05
001 CH001
002
CH003
14/05/05
CH009
003
25/04/05
004
30/04/05
CH004
CH002
28/03/05
005
CH008
12/04/05
006
CH012
05/08/05
007
CH010
30/06/05
008
For other options, press [DVD], [DV],
[TUNER] keys. Press [RIGHT] to edit menu.
D
Use keys to highlight the title/titles
14.00
16.00
20.30
03.30
08.30
11.00
21.30
22.30
Title
Travel
News
Drama
Nature
News
Title 3
News
Discover
1. Press [SELECT] to
mark or unmark
recordings.
2. Press [HDD] to
copy selected
recordings to DVD.
Press [SHUFFLE] to
sort by title.
and press SELECT to mark the titles to
copy to DVD.
If you have many HDD title recordings,
use .( fast reverse) or > (fast
forward) to view the previous/ next page of
HDD titles for selection.
E
Press HDD on the remote control.
Recording to the DVD recordable disc
will begin. The dubbing icon will be
displayed at the bottom right corner of
the screen.
Once complete, the icon will not be
shown.
F
To stop recording, press STOPÇ on
the remote control.
25%
00:20:20
SP PAL
Helpful Hint:
– During selection of recordings for copying,
press SHUFFLE on the remote control to sort
according to the titles of recording.
TIPS: Ensure that there is suf cient space available on the DVD±R before recording.
You have to nalize the DVD±R before it can be played on other players, see page 56.
36
Page 37

Record on DVD Recordable Disc (continued)
Recording from an external device/
VCR/ DV Camcorder
A
Turn on the TV to the correct program
number for the recorder (e.g. ‘EXT’, ‘0’,
‘AV’).
B
Insert a DVD recordable disc into the
recorder.
C
Press DVD REC to switch to direct
recording mode.
An information box will be displayed
on the screen.
System State: Stop
Record to Optical Disc As Standard Play Plus
Elapsed Time: 00:00:00 Remaining Time: 00:00:00
D
Press SOURCE repeatedly to select
from the various options:
{ Tuner }
Input source from TV programs.
{ CAM 1 }
Input source from the device connected to the
VIDEO and AUDIO L/R jacks on the front
panel.
{ CAM 2 }
Input source from the device connected to the
S-VIDEO and AUDIO L/R jacks on the front
panel.
{ EXT 1 }
Input source from the device connected to the
VIDEO (CVBS)-IN-EXT and AUDIO L/R jacks
on the back panel.
OR
Press DV to record from the DV
camcorder connected to the
the front panel.
DV IN jack on
E
Press SELECT to toggle between the
different modes of record quality.
Record Quality
HQ High Quality
SP Standard Play
SP+ Standard Play Plus
LP Long Play
EP Extended Play
SLP Super Long Play
Values are estimates only. Parts of the HDD storage capacity will be reserved for
the operations of this recorder and time shifting.
F
Press RECâon the remote control.
Recording to the DVD recordable disc
Hours of Recording that can be stored
DVDR3360H
160GB HDD
DVDR3370H
250GB HDD
34
68
106
85
102
136
204
132
159
212.5
318
DVD±R/
DVD±RW
53
will be begin.
G
To stop recording, press STOPÇ on
the remote control.
Helpful Hint:
– All title selections and settings will be lost
once you replace or remove the recordable
DVD.
To edit your recordings on the
DVD recordable disc, see pages
54~61.
English
1
2
2.5
3
4
6
TIPS: Ensure that there is suf cient space available on the DVD±R before recording.
You have to nalize the DVD±R before it can be played on other players, see page 56.
37
Page 38

odeDate
o
Timer Recording
English
About timer recording
Use ‘Timer Recording’ to automatically
start and stop a recording at a later
date/ time. The recorder will tune to the
right program channel and begin
recording at the speci ed time.
With this recorder, you can pre-program
up to 20 recordings.
To make a timer recording, your
recorder needs to know:
– The date you want to make the
recording.
– The recording input source.
– The start and stop time of the
recording.
– The mode of record quality, see
page 31.
OK
Timer recording (G-CODE®
System)
This is a simple programming system for
recorders. To use it, enter the Gprogramming number associated with
your television program. You can nd
this number in your TV listings magazine.
All the information needed by the
recorder for programming is contained in
the programming number.
A
Turn on the TV power. Select the
correct Video In channel at the TV.
If you are recording directly to a
DVD disc, insert the DVD recordable
disc before proceeding to step
B
Press TIMER on the remote control.
The timer schedule list appears.
Timer Schedule
SourceRec M
3
4
5
6
StartEndRec T
B
CODE
.
®
C
SELECT
TIMER
Use keys to highlight the next
available empty slot and press OK.
The G-CODE
®
System setup menu
appears.
G-
CODE
System
Enter the G-CODE programming
number for the show you wish to
record. Press CANCEL for manual
timer recording. To go back to timer
schedule press [RETURN].
OK
CONFIRM
TIPS: Set the appropriate mode of record quality for HDD recording, the same record quality will be transferred
from HDD to a recordable DVD.
OK
CANCEL
38
Page 39

Timer Recording (continued)
D
Use the numeric keypad 0-9 to enter
the G-
®
CODE
programming number for
the show you wish to record and press
OK. (e.g. : 5-312-4 or 5,312 4, key in
‘53124’.)
To cancel the G-
keys to select
®
CODE
programming, use
OK
CANCEL
in the menu
and press OK.
E
To con rm your entry, select
CONFIRM
the menu and press OK.
The timer editor menu appears.
Timer Editor
Source
Rec To
Rec Mode
Mode
Date
Start
End
Title
OK
OK
F
Use keys to select an entry in the
Ch003
HDD
SP
Once
31 / 01 / 0 5
21 : 3 3
22 : 0 3
M y T i t l e 0
OK
CANCEL
menu and press to enter its options.
{ Source }
– Use keys to select the recording input
source.
{ Rec To }
– Use keys to select { HDD } or
{ DVD } to enter the recording destination.
{ Rec Mode }
– Use keys to select your option.
{ Mode }
– Use keys to select { Once },
{ Daily }, { Weekly }.
{ Date }
– Use keys or the numeric keypad
0-9 to enter the date for recording.
{ Start }
– Use keys or the numeric keypad
0-9 to enter the start time of recording.
{ End }
– Use keys or the numeric keypad
0-9 to enter the end time of recording.
{ Title }
– Use keys to select the
alphanumeric options to enter the title of your
recording.
OK
G
OK
in
OK
Select
in the menu and press
OK.
The system will store the timer entry
English
and return to the timer schedule list.
H
Press TIMER to exit the menu.
I
Press STANDBY-ON2 to turn off
the recorder.
If the recorder is not in standby mode,
a warning message will appear three
minutes before the recording starts.
The ‘TIMER’ icon will light up on the
display panel if a timer recording is set.
TIPS: Set the appropriate mode of record quality for HDD recording, the same record quality will be transferred
from HDD to a recordable DVD.
39
Page 40

odeDate
o
Timer Recording (continued)
English
Timer recording (manually)
A
Turn on the TV power. Select the
correct Video In channel at the TV.
If you are recording directly to a
DVD disc, insert the DVD recordable
disc before proceeding to step
B
Press TIMER on the remote control.
The timer schedule list appears.
Timer Schedule
SourceRec M
3
4
5
6
C
Use keys to highlight the next
available empty slot and press OK.
The G-CODE
appears.
G-
CODE
System
Enter the G-CODE programming
number for the show you wish to
record. Press CANCEL for manual
timer recording. To go back to timer
schedule press [RETURN].
OK
CONFIRM
StartEndRec T
®
System setup menu
OK
CANCEL
D
Select
OK
in the menu and press
CANCEL
OK.
The timer editor menu appears.
Timer Editor
Source
Rec To
Rec Mode
B
.
E
Mode
Date
Start
End
Title
OK
OK
Use keys to select an entry in the
Ch003
HDD
SP
Once
31 / 01 / 0 5
21 : 3 3
22 : 0 3
M y T i t l e 0
OK
CANCEL
menu and press to enter its options.
{ Source }
– Use keys to select the recording input
source.
{ Rec To }
– Use keys to select { HDD } or
{ DVD } to enter the recording destination.
{ Rec Mode }
– Use keys to select your option.
{ Mode }
– Use keys to select { Once },
{ Daily }, { Weekly }.
{ Date }
– Use keys or the numeric keypad
0-9 to enter the date for recording.
{ Start }
– Use keys or the numeric keypad
0-9 to enter the start time of recording.
{ End }
– Use keys or the numeric keypad
0-9 to enter the end time of recording.
{ Title }
– Use keys to select the
alphanumeric options to enter the title of your
recording.
OK
F
Select
OK
in the menu and press
OK.
The system will store the timer entry
and return to the timer schedule list.
TIPS: Set the appropriate mode of record quality for HDD recording, the same record quality will be transferred
from HDD to a recordable DVD.
40
Page 41

To cancel the above timer setting, press
CH003
5
33
03
SELECT on the remote control.
G
Press TIMER to exit the menu.
H
Press STANDBY-ON 2 to turn off
the recorder.
If the recorder is not in standby mode,
a warning message will appear three
minutes before the recording starts.
The ‘TIMER’ icon will light up on the
display panel if a timer recording is set.
Helpful Hint:
– Set the timer recording one minute ahead
of the program’s start time. This helps
ensure the entire program is recorded as
the disc requires about 30 seconds to
prepare for recording.
Setting a timer recording from an
external Cable Box/
Satellite Receiver
If you have a Satellite Receiver/Cable Box
connected to this recorder via the
VIDEO (CVBS) (see page 17,) follow the
steps described below to program the
recordings.
A
Select the channel you want to record at
the Satellite Receiver/Cable Box.
B
Program the recording with the required
information. Follow the steps
A~D
“Timer Recording (manually)” on the
previous page.
When selecting options for { Source }
choose { EXT 1 } as the input channel
and press OK to con rm.
C
Keep the Satellite Receiver/Cable Box
switched on for the recording.
D
Press STANDBY-ON 2 to turn off
the recorder.
Timer Recording (continued)
Changing/ Deleting a timer
recording
A
Turn on the TV power. Select the
correct Video In channel at the TV.
B
Press TIMER on the remote control.
The timer schedule list appears.
Timer Schedule
Source
Rec Mode
Date Start End
of
SP31/01/0
2
EXT 1
EPSP25/04/05
3
CH008
4
5
6
C
Use keys to select a timer program
which you want to change/ delete.
D
To delete the timer entry, press
SELECT on the remote control.
E
To change the timer schedule, press
OK to enter the timer editor menu of
the selected timer program.
Timer Editor
Source
Rec To
Rec Mode
Mode
Date
Start
End
Title
OK
F
Select the entry eld and make the
OK
necessary changes.
G
Once complete, select
menu and press OK to save the changes.
H
Press TIMER to exit the menu.
30/01/05
21.
16.00
10.00
Ch003
HDD
SP
Once
31 / 01 / 0 5
21 : 3 3
22 : 0 3
M y T i t l e 0
OK
CANCEL
OK
OK
22.
17.30
11.15
English
Rec To
DVD
HDD
in the
TIPS: Set the appropriate mode of record quality for HDD recording, the same record quality will be transferred
from HDD to a recordable DVD.
41
Page 42

Playback from Hard Disk
English
Playback your HDD
recordings
Each recording stored on the HDD is
displayed in the HDD content menu with
an index picture.
A
Press HDD on the remote control.
The HDD content menu appears.
B
Use keys to highlight a title and
press OK on the remote control to start
playback.
If you have many HDD title recordings,
use .( fast reverse) or > (fast
forward) to view the previous/ next page of
HDD titles for selection.
HDD 16 Titles
Date Time
Ch.
No
20/05/05
001 CH001
002
CH003
14/05/05
CH009
003
25/04/05
004
30/04/05
CH004
CH002
28/03/05
005
CH008
12/04/05
006
CH012
05/08/05
007
CH010
30/06/05
008
For other options, press [DVD], [DV],
[TUNER] keys. Press [RIGHT] to edit menu.
C
During playback, you can use the
following keys on the remote control to
access additional playback features.
14.00
16.00
20.30
03.30
08.30
11.00
21.30
22.30
Title
Travel
News
Drama
Nature
News
Title 3
News
Discover
1. Press [SELECT] to
mark or unmark
recordings.
2. Press [HDD] to
copy selected
recordings to DVD.
Press [SHUFFLE] to
sort by title.
00:20:20
SP PAL
00:00:00
00:38:36
01:15:30
.>
– move to the beginning or previous/ next
chapter.
– hold down this button to start fast
backward/ forward search, press the button
again to increase the search speed.
– jump forward by 30 seconds.
– jump backward by 10 seconds.
PLAY
– starts playback
PAUSE Å
– view a still picture.
m
– displays the Time Shift video bar. Press
repeatedly to remove the video bar display.
– displays the help text for the selected
function.
STOPÇ
– stop playback.
ZOOM
– zoom in and out of a still/paused picture.
42
STOP
PAUSE
ZOOM
PLAY
Helpful Hint:
– During selection of recordings for
playback, press SHUFFLE on the remote
control to sort according to the titles of
recording.
Page 43

Playback from Disc
Playable discs
Using this recorder, you can play and
record on the following discs:
Recording and Playback
DVD±RW
(DVD ReWritable);
can be recorded on
and overwritten repeatedly.
DVD±R
(DVD Recordable);
can be recorded on
only once.
Playback only:
DVD Video
(Digital Versatile Disc)
CD-RW (CD-ReWritable)
Audio/ MP3/ JPEG contents
CD-R (CD-Recordable)
Audio/ MP3/ JPEG contents
Audio CD (Compact Disc
Digital Audio)
MP3-Disc
Video CD
(Formats 1.0, 1.1, 2.0)
Super Video CD
DivX Disc
(DivX 3.11, 4.x, 5.x)
ReWritable
Recordable
IMPORTANT!
– If the inhibit icon (
appears on the TV screen when a
button is pressed, it means the
function is not available on the
current disc or at the current time.
– DVD discs and players are
designed with regional restrictions.
Before playing a disc, make sure the
disc is for the same region as your
player.
– Do not push on the disc tray or
put any objects other than discs on
the disc tray. It may cause the disc
player to malfunction.
Error )
Inserting a disc
A
Press STANDBY-ON 2 to turn on
the recorder.
B
Press OPEN CLOSE ç on the front of
the recorder.
The disc tray opens.
C
Carefully place the disc onto the tray
with the label facing up, then press
OPEN CLOSEç.
Make sure the disc label is facing up.
For double-sided discs, load the disc as
indicated on the label.
D
Turn on the TV power. Select the
correct Video In channel at the TV (see
page 21.)
E
Playback will start automatically or a
dialog will appear on the TV (see next
page.)
English
TIPS: Some discs cannot be played on this recorder due to the con guration and characteristics of the disc,
or due to the condition of recording and authoring software.
43
Page 44

Playback from Disc (continued)
English
Starting disc playback
Press DVD on the remote control.
Playback will begin automatically. If the
disc has its own menu this will be loaded,
otherwise the recorder will launch an
index screen.
If the pin code entry dialog appears on
the TV, this means that the parental
control was activated for the inserted
disc (see page 64.)
Use the numeric keypad 0-9 on the
remote control to enter your pin code
(password.)
For more playback features, see pages
47~50 “Additional Playback Features”.
Playing a DVD video disc
The DVD disc is usually formatted with a
disc menu. You may have to make your
selection (e.g., subtitle or audio language)
within the disc menu.
A
Insert a DVD disc. Press DVD on the
remote control.
If the disc menu appears on the TV
Use the numeric keypad 0-9 to input
your selection or use keys to
select a play option and press OK to
start playback.
Playing a (Super) Video CD
(Super) Video CDs may feature ‘PBC’
(Play Back Control.) This allows you to
play the video CDs interactively,
following the menu on the display.
A
Insert a (Super) Video CD. Press DVD
on the remote control.
If the ‘PBC’ is on, the disc index
menu will appear on the TV
B
Use numeric keypad 0-9 to input your
selection or to select a play option.
Press RETURN on the remote control
to return to the previous menu.
To turn on/off the Playback Control
mode, press
control twice during playback to access
the playback menu options.
Use keys to select { PBC } and
press to select either { PBC On } or
{ PBC Off }.
C
To stop playback, press STOP .
Playing an audio CD
A
Insert an audio CD. Press DVD on the
remote control.
Playback starts automatically.
B
To stop playback, press STOP .
m key on the remote
To select a speci c chapter/title
marker
During playback, press T/C on the
remote control repeatedly to toggle
bewteen { Title }, { Chapter } or
{ Time }. Use the numeric keypad 0-9
to input your selection of title/chapter
number or speci c time during playback.
B
To stop playback, press STOP .
TIPS: Some discs cannot be played on this recorder due to the con guration and characteristics of the disc,
or due to the condition of recording and authoring software.
44
Page 45

Playback from Disc (continued)
Playing a DVD±R/±RW disc
A
Insert a recorded DVD±R/±RW disc.
Press DVD on the remote control.
The Index Picture screen appears.
B
Use keys to select a title and press
PLAY to start playback.
C
To stop playback, press STOP .
Helpful Hint:
– If the message ‘BLANK’ appears on the
display panel, this means that there are no
recordings on this disc.
Playing a MP3 disc
A
Insert a MP3 CD. Press DVD on the
remote control.
The disc content menu appears.
File Play - Stop 0:00:00/ 0:00:00
Directory Playlist
Bee Gees
1
Phil Collins
2
Bryan Adams
3
Collin Raye
4
Nat King Cole
5
UB40
6
Jordan Hill
7
Faith Hill
8
Note: It may require a longer time for
Playing a DivX disc
This recorder supports the playback of
DivX movies which you can copy from
your computer onto a CD-R/RW or
DVD±R/±RW disc.
A
Insert a DivX disc. Press DVD on the
remote control.
The disc content menu appears.
If the DivX movie contains external
subtitles, you have to rst select the
subtitle le from the le list.
Use keys to select the les for
playback and press SELECT to con rm
your selection.
B
Press PLAY to start playback.
During playback, you can press
m on
the remote control to display the disc
content menu.
the recorder to display the disc content
menu on the TV due to the large number
of songs/pictures compiled into one disc.
B
Use keys to navigate within the menu
and press OK to access the folder/ album.
C
Use keys to select the track/ le to
play.
To go to the previous menu, press
RETURN.
D
To create a playlist, highlight the track/ le
and press SELECT.
The selected tracks/ les will appear
on the right screen.
Use keys to toggle between the
left and right screens.
E
Press PLAY to start playback.
F
During playback, you can press ./
> to select the next/previous track.
Helpful Hints:
G
To stop playback, press STOP .
– Subtitle les with the following lename
extensions (.srt, .smi, .sub, .sami) are
supported.
– It is normal to experience an occasional
pixelation during MPEG-4/DivX playback
due to poor encoding of the content.
Helpful Hints:
– Only the rst session of a multi-session
CD will play back.
– It is normal to experience an occasional
“skip” while listening to your MP3 disc.
– Further album, track and artist information
will also be displayed on the TV if included in
the ID tag.
TIPS: Some discs cannot be played on this recorder due to the con guration and characteristics of the disc,
or due to the condition of recording and authoring software.
English
45
Page 46

Playback from Disc (continued)
English
Playing a picture disc (or musical
slide show)
You can display JPEG pictures in the
selected roll automatically one after the
other.
A
Insert a JPEG picture disc (CD,
CD-R/RW, DVD.) Press DVD on the
remote control.
The disc content menu appears.
B
Use keys to navigate within the
menu and press OK to access the folder/
album.
C
To create a playlist, highlight the track/ le
and press SELECT.
The selected tracks/ les will appear
on the right screen.
To remove the track/ le from the
playlist, press SELECT once.
D
You can select to playback from the
original disc content or from the playlist,
just use keys to move to the correct
screen before selecting the track/ le for
playback.
File Play - Stop 0:00:00/ 0:00:00
Directory Playlist
Japan trip
1
2
3
4
Bryan Bday
My songs
Hot Hits
File Play - Stop 0:00:00/ 0:00:00
Directory Playlist
..\
P1010001.JPG
1
P1010008.JPG
2
BUTTER-1.JPG
3
NATURE-1.JPG
4
BUTTER-1.JPG
5
P1022500.JPG
6
P1023000.JPG
7
MERLIO-1.JPG
8
E
During playback, you can press m on
the remote control to access various
settings for the slide show playback.
File Play
Press ZOOM on the remote control to
Type
Mode
Trick
Wipe
Zoom
Rotate
PIC
Normal
Play
Top to bottom
Fitscreen
Clockwise 0
Top to bottom
Down to top
Left to right
Right to left
Extend center V.
enlarge the picture.
F
To stop playback, press STOP .
Playable JPEG picture disc
This recorder can read JPEG pictures
stored on a CD-ROM, Picture CD, or
DVD.
File format:
– The le extension has to be ‘.JPG,’
‘.JPE’ or ‘.JPEG.’
– It can only display DCF-standard still
pictures or JPEG pictures e.g. TIFF. It
cannot play back moving pictures, Motion
JPEG, progressive JPEG and other
formats, or pictures in formats other
than JPEG, or pictures associated with
sound.
– It may require a longer time for the
recorder to display the disc content on
the TV due to the large number of songs/
pictures compiled onto one disc.
If the disc contains MP3 music and
JPEG picture les, you can start a
musical slide show playback,
Select an MP3 le and press OK to start
playback, then select a picture le in the
menu and press OK to start the musical
slide show playback.
TIPS: Some discs cannot be played on this recorder due to the con guration and characteristics of the disc,
or due to the condition of recording and authoring software.
46
Page 47

Additional Playback Features
Changing to another title/
chapter/track
When a disc contains more than one
track, title or chapter, you can change to a
different track, title or chapter as follows.
During playback,
Press
> to go to the next title/chapter/
track.
Press
. to return to the start of the
previous title/chapter/track.
OR
Press T/C repeatedly to toggle between
{ Title }, { Chapter } or { Time }. Then
use the numeric keypad 0-9 to input
the title/chapter/track number.
Pausing playback and step
play
A
During playback, press PAUSEÅto
pause playback and display a still picture.
B
Press PAUSEÅagain to move one
frame forward.
C
To resume normal playback, press
PLAY .
Searching forward/backward
You can fast forward or fast reverse a
disc at two, four, sixteen or thirty two
times the normal playback speed.
A
During playback, press and hold .(fast
reverse) or > (fast forward) to switch
to the search function.
B
During disc playback, press (RIGHT)
to access the playback menu.
Use keys to highlight { Trick
Mode - Play } and press (RIGHT) to
access the search speed options:
– FREV x32, FREV x16, FREV x4, FREV
x2, FFWD x2, FFWD x4, FFWD x16,
FFWD x32.
The sound will be muted.
C
To resume normal playback, press
PLAY .
Zooming in
This option allows you to enlarge the
picture on the screen and pan through
the enlarged picture.
A
Press ZOOM on your remote control to
activate zoom.
B
Use keys to pan through the
zoomed picture.
C
To exit, press ZOOM repeatedly until
the picture returns to the normal size.
English
TIPS: The operating features described here might not be possible for certain discs.
Always refer to the instructions supplied with the discs.
47
Page 48

Additional Playback Features (continued)
English
Using m (INFO) options
SELECT
A
During playback, press m twice on the
remote control.
The playback menu appears on the TV.
DVD
Mode
Trick mode
Title
Chapter
Audio
Subtitle
Angle
Title Time
B
Use keys to select the setting you
want to adjust.
Instructions and explanation of the
options are provided in the following
pages.
C
To exit, press m.
Normal
Play
02/05
01/22
01/02 - OTH
Off
01/03
00:22:03 - 00:27:24
OK
Selecting various repeat functions
You can select various repeat play or
random play mode during playback.
This function can also be accessed via the
REPEAT key on the remote control.
A
During disc playback, press m twice on
the remote control.
The playback menu appears.
B
Use keys to select { Mode } and
press OK.
C
Use keys to select one of the repeat
options.
{ Normal }
Select this to cancel the repeat mode and
return to normal playback.
{ Repeat A-B }
Select this to repeat the playback of a speci c
segment within a title/chapter/track. Press OK
to mark the start and end of the segment you
want to repeat.
{ Repeat Chapter }
Select this to repeat playback of the current
chapter (DVD, recordable DVDs only.)
{ Repeat Track/Title }
Select this to repeat playback of the current
track/title.
{ Repeat Directory }
Select this to repeat playback of the current
folder/directory (MP3, JPEG, picture disc
only.)
{ Repeat Disc }
Select this to repeat playback of the entire
disc.
{ Shuf e }
Select this to randomly playback all the tracks
within the disc.
D
To cancel repeat playback, press STOP,
then press PLAY . Alternatively,
A
repeat steps select
to C and select
{ Normal } and press OK.
TIPS: The operating features described here might not be possible for certain discs.
Always refer to the instructions supplied with the discs.
48
Page 49

Additional Playback Features (continued)
Programming disc tracks
You can play the contents of the disc in
the order you want by programming the
tracks to be played.
A
Press m on the remote control.
The playback menu appears.
B
Select { Mode } > { Program }.
The program menu appears.
DVD
Title Playlist
Title 1
Title 2
Title 3
Title 4
Title 5
Title 6
Title 7
Title 8
C
If the disc is recorded with Titles/Folders/
Albums, press OK to access the tracks/
les/chapters.
Pressing OK at the highlighted track/ le/
chapter will start playback.
Use keys to toggle between the left
and right screen.
To program your favourite track/
le/chapter
D
Use keys to select the track/ le/
chapter to program and press SELECT
on the remote control.
The selected track/ le/title will appear
at the right screen.
The order on the right screen will be
the order of program playback.
To start program play
F
Press key to move to the right screen
and press OK.
Playback will start from the selected
track/ le/ chapter according to the
programmed sequence.
To exit program play
G
Press STOP to exit program play.
Changing the audio soundtrack
language
This operation works only on DVDs with
multiple soundtrack language or VCDs
with multiple audio channels.
A
Press m on the remote control.
The playback menu appears.
B
Use keys to select { Audio } and
press to access its options.
C
Use keys to select the audio
language and press OK to con rm.
The languages may be numbered or
abbreviated, such as “En” for English.
If the language selected is not available
on the disc, the disc’s default setting for
language will be used instead.
Helpful Hint:
– Some DVDs allow soundtrack language
changes only via the DVD disc menu. To
access the disc menu, press DVD on the
remote control.
English
To remove the programmed item
from your selection
E
Press key to move to the right screen.
Use keys to select the track/ le/
chapter to program and press SELECT
on the remote control.
TIPS: The operating features described here might not be possible for certain discs.
Always refer to the instructions supplied with the discs.
49
Page 50

Additional Playback Features (continued)
English
Changing subtitle language
This operation works only on DVDs with
multiple subtitle languages, you can
change the language you want while
playing back the DVD.
A
Press m on the remote control.
The playback menu appears.
B
Use keys to select { Subtitle } and
press to enter the menu and nd the
different available options.
C
Use keys to select the language and
press OK to con rm.
The languages may be numbered or
abbreviated, such as “En” for English.
If the language selected is not available
on the disc, the disc’s default setting
language will be used instead.
Helpful Hint:
– Some DVDs discs allow subtitle language
changes only via the DVD disc menu. To
access the disc menu, press DVD.
Switching camera angles
This option is only available with DVDs
that contain sequences recorded from
different camera angles. This allows you
to view the picture from different angles.
Time search
This option allows you to skip to a
speci c point on the current disc.
A
Press T/C on the remote control
repeatedly to display
{ Time : – : – – : – – } on the top left
corner of the screen.
Use the numeric keypad (0-9) to
enter the time required.
Playback skips to the selected time.
A
Press m on the remote control.
The playback menu appears.
B
Use keys to select { Angle } and
press to enter its options.
The camera angles available for
selection appears.
C
Use keys to select the camera angle
you want to switch to, then press OK to
con rm.
TIPS: The operating features described here might not be possible for certain discs.
Always refer to the instructions supplied with the discs.
50
Page 51

Edit Recordings - HDD
About HDD title edit menu
In the HDD title edit menu, you can
change the title name, hide unwanted
scenes, delete titles, split a title or change
the title index picture.
The edit options in the HDD title edit
menu are:
{ Play Title }
– Select a title (recording) to play.
{ Delete Title}
( For unprotected and unlocked titles only )
– Delete the title (recording).
{ Divide Title }
– Divide the recording into two separate
titles.
{ Edit Title }
– Hide the unwanted scene in the
recording
{ Change Index Picture }
( For unprotected and unlocked titles only )
– Select a scene in the recording to
replace the existing index picture screen.
{ Rename }
– Change the name of a title (recording).
{ Lock/ Unlock }
– Lock or unlock a title (recording) to
prevent/allow playback.
{ Protect/ Unprotect }
– Protect or unprotect a title (recording)
to prevent/allow erasure or changes
being made.
Accessing the HDD title edit
menu
OK
SELECT
HDD
A
Press HDD on the remote control.
The HDD content menu appears.
B
Use keys to highlight a title
(recording) and press .
The HDD title edit menu appears.
HDD 16 Titles
Date Time
Ch.
No
001 CH001
20/05/05
002
CH003
14/05/05
003
CH009
25/04/05
CH008
004
30/04/05
CH002
005
28/03/05
006
CH008
12/04/05
CH012
05/08/05
007
CH010
008
30/06/05
Press [OK] to play title.
If you have many HDD title recordings,
use .( fast reverse) or > (fast
forward) to view the previous/ next page of
HDD titles for selection.
C
Use keys to access the different
options and press OK.
Instructions and explanation of the
options are provided in the following pages.
D
To exit, press to go back to the HDD
title menu screen.
14.00
16.00
20.30
03.30
08.30
11.00
21.30
22.30
Title
Travel
News
Drama
Nature
CSI
Title 3
News
Discover
Play Title
Delete Title
Divide Title
Edit Title
Press [SELECT] to
mark or unmark
Change Index Picture
recordingS.
Press [HDD] to
Rename
copy selected
recordings to DVD.
Lock
Press [SHUFFLE] to
Protect
sort by name or time.
00:20:20
SP NTSC
English
TIPS: Press to go back to the previous menu.
Note: Any title/ recording which has been
edited will be marked with an edited icon
next to the selected title’s index
picture.
51
Page 52

Edit Recordings - HDD (continued)
English
Dividing a Title
You can divide the current title into two
new titles. Each of these titles is
characterized by its own index picture.
Warning! Once a title is divided, the
process cannot be reversed.
A
In HDD title edit mode, use keys to
highlight { Divide Title } and press OK.
The edit title playback screen appears.
B
During playback, use keys to
navigate through the title. Press OK to
divide the title at the desired playback
position.
A warning message will appear.
C
To con rm, select
OK
OK
and press OK.
A new title will be shown in the HDD
title menu.
D
To abort, select
OK
CANCEL
Hiding/ unhiding unwanted scenes
You can choose to hide certain scenes
from playback (e.g. skipping a commercial
scene) or make it visible again.
A
In HDD title edit mode, use keys to
highlight { Edit Title } and press OK.
The edit title playback screen appears.
B
During playback, press PAUSEÅand
use . > keys to navigate through
the title. Press OK to mark the beginning
of a segment to hide.
C
Press OK again to mark the end of
segment to hide.
To hide more segments, repeat steps
C
to
for each segment you want to hide.
in the menu
and press OK.
B
To unhide the scenes,
D
In HDD title edit mode, use keys to
highlight { Edit Title } and press OK.
The edit title playback screen appears.
E
During playback, use keys to
navigate through the title. Press OK at
the beginning of the marked segment.
F
Press repeatedly until you reach the
end of the marked segments and press
OK.
Helpful Hints:
– All hidden scenes will be played back in
HDD title edit mode.
– The { Edit Title } option is only available if
the title is unlocked or unprotected.
Change Index Picture
The index picture is the picture of the
title you will see when the recorder loads
up the Index menu. Normally, the rst
frame of a recording is shown as the
title’s index picture.
A
In HDD title edit mode, use keys to
highlight { Change Index Picture } and
press OK.
The edit title playback screen appears.
B
During playback, use keys on the
remote control to search for the scene
to use. Press OK to con rm the current
scene as the index picture for the title.
The new index picture will be shown
in the HDD content menu.
Rename a
TIPS: Press to go back to the previous menu.
52
Page 53

Edit Recordings - HDD (continued)
Rename a title
The original title name is automatically
generated by the recorder. You can
change the disc name by following the
steps below.
A
In HDD title edit mode, use keys to
highlight { Rename } and press OK.
The keyboard screen appears.
B
Use keys to highlight a
character on the keyboard and press OK
to select.
The maximum input is up to 255
characters. However, only 12 characters
will be displayed at any one time in the
HDD title menu.
You can use the following keys on the
keyboard screen to edit your input:
: to remove a character to the
BkSp
left of the cursor.
Space
: to create a space between
characters.
: to toggle between upper and
Caps
lower case characters .
: to clear the entry eld
Clear
completely.
Exit
: to exit the keyboard screen.
C
To con rm your entry, select
OK
OK
the keyboard and press OK.
The info panel is now updated.
Exit
To exit, select
on the keyboard
and press OK.
on
Lock/Unlock a title
You can choose to lock a title to prevent
any unauthorized playback of the
recording.
If a title has been locked, the user will be
prompted to enter a 4-digit password
preset in the system setup menu.
For details, see “Parental Rating Level.”
In HDD title edit mode, use keys to
highlight { Lock } and press OK.
The locked title will have a Lock icon
next to its index picture.
When the title is locked, the option in
the HDD title edit menu will change to
{ Unlock }.
Protect/ Unprotect a title
You can choose to protect the title in
order to prevent accidental loss of
recordings.
In HDD title edit mode, use keys to
highlight { Protect } and press OK.
The protected title will have a Safe
Box icon
When the title is protected, the
next to its index picture.
option in the HDD title edit menu will
change to { Unprotect }.
English
TIPS: Press to go back to the previous menu.
53
Page 54

Edit Recordings - Recordable DVD
English
About disc edit menu
Accessing disc editing menu
This recorder offers various disc edit
options for various disc types. You can
change the disc content and settings of a
DVD recordable disc from the disc
editing menu. The edited contents may
not be available if you play the disc on
another DVD player.
The displayed options in the disc editing
menu may differ depending on the type of
disc.
{ Play }
– Start playing from the beginning of the
DVD
disc.
{ Rename Disc }
– Change the name of the disc.
{ Erase Disc } - DVD±RWs only
– Erase all the recordings in the disc.
{ Record New Title }
– Start recording from the last empty
title in the disc.
{ Overwrite Disc } - DVD±RWs only
– Start a new recording from the
beginning of the disc, all the recorded
content will be overwritten.
A
Insert a recorded DVD±R/±RW disc into
the recorder. Press DVD on the remote
control.
The Index Picture screen appears on
the TV.
B
Select the rst title on the disc, press and
hold on the remote control.
The disc editing menu appears. Press
to access the options. The available
editing options may vary for DVD±R and
DVD±RW discs.
{ Finalize Disc } - DVD±Rs only
– Finalize the disc to enable playback on
other DVD players. Further recording
and editing to the disc are not allowed. It
is not possible to un nalize the disc.
{ Make Compatible } - DVD±RWs only
– To ensure the edited changes remain
when the disc is played back on another
DVD player. (eg., hidden chapters to
remain hidden).
{ Lock/Unlock Disc } - DVD±RWs only
– Lock or unlock a disc to prevent
accidental erasure or changes being
made.
C
Use keys to access different options
and OK to select.
Instructions and explanation of the
options are provided in the following pages.
D
To exit, press DVD to go back to the
disc Index Picture screen.
TIPS: No further recording and editing can be carried out on a nalized recordable DVD.
Press DVD to return to the index picture screen.
54
PAL
DVD
EDIT
OK
REC
Play
Rename Disc
Erase Disc
Record New Title
Overwrite disc
Finalize Disc
Make Compatible
Lock Disc
Page 55

Edit Recordings - Recordable DVD (continued)
Rename disc
The original disc name is generated
automatically by the recorder. You
can change the disc name by following
the steps below.
A
In disc editing menu, use keys to
select { Rename Disc } and press OK.
The keyboard screen appears.
B
Use keys to highlight a
character on the keyboard and press OK
to select.
The maximum input is up to 9
characters.
You can use the following keys on the
keyboard screen to edit your input:
: to remove a character to the
BkSp
left of the cursor.
Space
: to create a space between
characters.
: to toggle between upper and
Caps
lower case characters .
: to clear the entry eld
Clear
completely.
Exit
: to exit the keyboard screen.
C
To con rm your entry, select
OK
the keyboard and press OK.
The info panel is now updated.
Exit
To exit, select
on the keyboard
and press OK.
Erase disc (DVD±RWs only)
This erases the content of the
DVD±RW disc including those that was
not recorded on this recorder. Once
English
the existing content is erased, it can be
used for recording.
A
In disc editing menu, use keys to
select { Erase Disc } and press OK.
A warning message will appear.
B
Select
or
OK
YES
in the menu to proceed
, to abort, then press OK to
OK
NO
con rm.
Helpful Hint:
– To erase content that cannot be played
back on this recorder, please use the option
{ Delete Optical Disc } under the setup
menu.
Record a new title
This function allows you to start a new
recording at the remaining empty space
in the DVD recordable disc.
A
In disc editing menu, use keys to
on
OK
select { Record New Title } and press
OK.
B
Select the source you want to record
from and press REC
to start
recording.
Overwrite disc (DVD±RWs only)
This function allows you to start a new
recording from the beginning of a
DVD±RW regardless of the contents of
the disc.
A
In disc editing menu, use keys to
select { Overwrite disc } and press OK.
B
Select the source you want to record
from and press REC to start
recording.
TIPS: No further recording and editing can be carried out on a nalized recordable DVD.
Press DVD to return to the index picture screen.
55
Page 56

Edit Recordings - Recordable DVD (continued)
English
Make compatible (DVD±RW only)
The edited DVD±RW may still display
the original titles or hidden scenes when
playbacked on other DVD players. This
function ensures that the edited changes
of the DVD±RW remain when played
back on other players.
In disc editing menu, use keys to
select { Make Compatible } and press
OK to con rm.
Helpful Hint:
– If the option {Compatible} is not available
for selection, it means that the disc is already
compatible.
Lock/Unlock disc (DVD±RWs only)
You can choose to protect the
recordings on the DVD±RW disc in
order to prevent accidental loss of
recordings.
A
In disc editing menu, use keys to
select { Lock Disc } and press OK.
The disc is locked for this DVD
recorder only.
When the disc is locked, the option in
the disc editing menu will change to
{ Unlock Disc }.
B
If you want to overwrite or edit on the
protected disc, select { Unlock Disc }.
Playing your recordings
(DVD±R) on other DVD
players
It is necessary to nalize a DVD±R disc
before you can play it on any other DVD
player. Otherwise, the disc will only
playback on this recorder.
After a DVD±R disc has been
nalized, no further recordings or
editing can be made to it. Make
sure you have completed all the
recordings and editing before
nalizing the disc.
A
In disc editing menu, use keys to
select { Finalize Disc } and press OK.
A warning message will appear.
B
Select
OK to start the process.
Finalization will take a few minutes.
Do not try to open the disc tray or turn
the power off as this may render the disc
unusable.
C
Select
OK
YES
in the menu and press
to abort.
OK
NO
TIPS: No further recording and editing can be carried out on a nalized DVD±R.
Press DVD to return to the index picture screen.
56
Page 57

Edit Recordings - Recordable DVD (continued)
About DVD title editing
You can change the individual title
information or delete a title (recording)
on a recorded DVD disc. If the
recordable DVD disc has been nalized,
it cannot be edited.
The displayed options in the title editing
menu may differ depending on the type of
disc.
{ Play Title }
– Start playing a recording.
{ Edit Title }
– Access video editing menu.
{ Rename Title }
– Change the name of the recording.
{ Erase Title } - DVD±RWs only
– Delete the title (recording.)
{ Overwrite Title } - DVD±RWs only
– Start a new recording and the existing
title (recording) will be overwritten.
{ Overwrite Disc } - DVD±RWs only
– Overwrite from existing selected title
onwards to the end of the disc.
{ Append Title }
– Insert a new recording to the last
existing recording.
Accessing DVD title edit
menu
A
Insert a recorded DVD±R/±RW disc into
the recorder. Press DVD on the remote
control.
The Index Picture screen appears on
the TV.
During playback, press DVD to access
the Index Picture screen.
B
Use keys to highlight a title
(recording), and press .
The title editing menu appears.
Play Title
Edit Title
Rename Title
Erase Title
Overwrite Title
Overwrite Disc
Append Title
3. My movie
Empty
C
Use keys to access different options
and OK to select.
Instructions and explanation of the
options are provided in the following
pages.
D
To exit, press .
11 / 04 / 2004
12 : 31 : 53
HQ 00 : 05 : 59
English
Editing video
This feature allows access to the video
editing menu. See “About video editing”
on pages 59~61 for more information.
In title editing menu, use keys to
select { Edit Title } and press OK.
The video editing menu appears.
The recorder will play the
selected title.
TIPS: No further recording and editing can be carried out on a nalized DVD±R.
Press to go back to the previous menu.
57
Page 58

K
Edit Recordings - Recordable DVD (continued)
English
Rename title
The original title name is generated
automatically by the recorder. You can
give a new name to the title by following
the steps below.
A
In title editing menu, use keys to
select { Rename Title } and press OK.
The keyboard screen appears.
B
Use keys to highlight a
character and press OK to select.
The maximum input is up to 9
characters.
You can use the following keys on the
keyboard screen to edit your input:
: to remove a character to the
BkSp
left of the cursor.
Space
: to create a space between
characters.
: to toggle between upper and
Caps
lower case characters .
: to clear the entry eld
Clear
completely.
Exit
: to exit the keyboard screen.
C
To con rm your entry, select
the keyboard and press OK.
The info panel is now updated.
To exit, select
Exit
and press OK.
Erase title
You can delete a speci c title (recording)
from the disc. However, for the DVD±R
disc, the deleted space cannot be used for
further recording.
A
In title editing menu, use keys to
select { Erase Title } and press OK.
A warning message will appear.
B
Select
or
NO
OK
in the menu to proceed
OK
YES
to abort, then press OK to
con rm.
on
O
OK
on the keyboard
Overwrite title (DVD±RW only)
This function allows you to record a new
title from the beginning of the current
title in the DVD±RW disc.
A
In title editing menu, use keys to
select { Overwrite Title } and press
OK.
B
Select the source you want to record
from and press REC to start
recording.
Overwrite from the selected title
You can select to overwrite only the
recordings from the selected title to the
end of the disc.
A
In title editing menu, use keys to
select { Overwrite Disc } and press OK
to delete.
Append recording
This function allows you to append
recording to the last existing title.
Note: Under the { Append Title }
option, it is not possible to select the
mode of record quality when a recording
is appended to an existing title on a DVD.
The recording quality will always be
determined by the quality mode of the
existing title.
A
In title editing menu, use keys to
select { Append Title } and press OK.
B
Press SOURCE to select the input
channel to append.
C
Press REC to start append recording.
D
To stop append recording, press
STOP .
TIPS: No further recording and editing can be carried out on a nalized DVD±R.
Press to go back to the previous menu.
58
Page 59

Edit Recordings - Recordable DVD (continued)
About video editing
After a recording has been made, this
recorder allows you to edit the video
content. You can add/delete chapter
marker, hide unwanted scenes, change
the picture in the index picture screen
and split a title (recording) into two.
When you playback a recording in video
edit mode, the entire recording will be
played back including hidden scenes.
The edit functions available in the disc
editing menu are:
{ Title }
– Select a speci c title (recording) to
play.
{ Chapter }
– Select a chapter within the selected
title.
{ Chapter Marker }
– Insert a chapter marker in the
recording or erase a chapter marker to
combine two chapters.
{ Hide Chapter }
– Hide the unwanted scene in the
recording.
{ Index Picture }
– Select a scene in the recording as the
index picture screen.
{ Split Title } - DVD±RWs only
– Divide the recording into two under
separate titles.
Accessing video editing menu
OK
PLAY
SELECT
DVD
A
Insert a recorded DVD±R/±RW disc into
the recorder. Press DVD on the remote
control.
The Index Picture screen appears on
the TV.
B
Use keys to highlight a title
(recording), and press to access the
menu.
The title editing menu appears.
C
Use keys to select { Edit Title }
and press OK.
The edit mode menu appears.
Edit Mode
Title 02/06
Chapter 01/10
Play
Chapter Marker
Hide Chapter
Index Picture
Split Title
Title Elapsed 0:20:45
English
D
Use keys to access different options
and press OK to select.
Instructions and explanation of the
options are provided in the following
pages.
E
To exit, press DVD.
TIPS: No further recording and editing can be carried out on a nalized DVD±R.
Press to go back to the previous menu.
59
Page 60

Edit Recordings - Recordable DVD (continued)
English
Selecting a title
It shows the current title and the total
number of titles in the disc. It also allows
you to select another title.
A
In edit mode, use keys to select
{ Title } and press OK.
B
Use the numeric keypad 0-9 to key in
a title and press OK.
The recorder will play the selected
title.
Selecting a chapter
It shows the current chapter and the
total number of chapters in the title. It
also allows you to select another chapter
within the title.
A
In edit mode, use keys to select
{ Chapter } and press OK.
B
Use the numeric keypad 0-9 to key in
the chapter and press OK.
The recorder will play the
selected chapter.
Creating chapter markers
You can create a chapter by inserting
chapter marker at any point within a title
during playback. This will allow you to
access a speci c point in the recording
easily or set a chapter you wish to hide.
Title
Chapter Chapter Chapter Chapter
chapter markers
A
In edit mode, use keys to select
{ Chapter Marker } and press
OK.
B
Use keys to select one of the
options and press OK to con rm.
{ Insert Marker }
Select this to insert a new chapter
marker at the current point of playback.
{ Delete Marker }
Select this to delete the current chapter
marker (it refers to the closest marker
before the current point of playback.)
The current chapter will then combine
with the chapter before it.
{ Delete All Markers }
Select this to delete all the chapter
markers in the current title.
TIPS: No further recording and editing can be carried out on a nalized DVD±R.
Press to go back to the previous menu.
60
Page 61

Edit Recordings - Recordable DVD (continued)
Hiding an unwanted chapter
You can choose to hide certain scenes
from playback (e.g. skipping a commercial
scene) or make it visible again.
A
Create a chapter marker at the scene
you are going to hide. ( See previous page
on “Creating chapter markers”.)
B
Select the chapter you want to hide and
start playback. ( See previous page on
“Selecting a chapter”.)
C
In edit mode, use keys to select
{ Hide Chapter } and press OK.
The current chapter will be hidden.
To unhide a chapter
A
In edit mode, use keys to select
{ Unhide Chapter } and press
OK.
The video editing menu appears.
While in editing mode, the hidden
chapter/chapters will play.
B
Wait for the chapter you want to unhide
to occur or use keys on the remote
control to make a fast search.
The current chapter will be visible
during playback.
Helpful Hint:
– All the hidden chapters will be played
back while in video editing mode.
Changing Index Picture
The index picture is the picture of the
title you will see when the recorder loads
up the Index menu. Normally, the rst
frame of a recording is shown as the
title’s index picture.
A
In edit mode, use keys to select
{ Index Picture } and press OK.
The display will be in playback mode.
B
Use keys on the remote control to
search for the scene to use, then press
OK to con rm the current scene as the
index picture for the title.
The new index picture will be shown
in the title menu.
Splitting a title (DVD±RWs only)
You can divide the current title into two
new titles. Each of these titles will be
characterized by its own index picture.
Warning! Once a title is divided, the
process cannot be reversed.
In edit mode, use keys to select
{ Split Title } and press OK to
divide the title at the current playback
position.
A new title will be shown at the Index
Picture screen.
English
TIPS: No further recording and editing can be carried out on a nalized DVD±R.
Press to go back to the previous menu.
61
Page 62

Setup Menu Options
English
Accessing the Setup Menu
The setup menu provides various options
for you to adjust the recorder to suit
your preferences.
SETUP
A
Press SETUP on the remote control.
The setup menu appears on TV.
B
Use keys to highlight a setup option
and press to access.
C
Use keys to highlight the setting you
wish to change and press OK to con rm
and go back to the previous menu item.
Instructions and explanation of the
options are provided in the following
pages.
D
To exit, press SETUP.
SETUP MENU - GENERAL
Auto Chapter Marker
Record Quality
Auto Program
Manual Program
Sort
5min.
SP
Search
Edit
OK
OK
Pages
22-23,
31
SETUP MENU - VIDEO
TV System
TV Shape
Progressive Scan
DivX(R) Video on Demand
SETUP MENU - AUDIO
SPDIF Output
LPCM Output
SETUP MENU - LANGUAGE
System Language
Audio Language
Subtitle Language
Disc Menu Language
SETUP MENU -
SETUP MENU - PREFERENCES
SETUP MENU - HDD
DATE / TIME
Date(dd/mm/yyyy)
Time(hh:mm)
Parental Level
Change Password
Reset Menu Settings
Screensaver
Save Time Shift Buffer
HDD Info
Space Management
Delete HDD
Delete Optical Disc
PAL
4:3 LB
Off
OK
RAW
LPCM 96Hz
English
English
Off
English
31 12 2005
15 : 33
Off
OK
OK
On
No
Show
Automatic
OK
OK
Page 63
Page 65
Page 25
Page 25
Page 64
Page 29
62
Page 63

Setup Menu Options (continued)
VIDEO settings (underlined options are the factory default settings)
TV System
TV Shape
Progressive Scan
The colour system of the DVD system, DVD and TV should match.
Only then will it be possible to play a DVD on this system. Before
changing the TV system, determine the colour system of your TV.
Press to access this menu and use keys to select one of
the options.
{ NTSC } – Select this if the connected TV has the NTSC colour
system. It will change the video signal of a PAL disc and
output it to NTSC format.
{
PAL } – Select this if the connected TV has the PAL colour
system. It will change the video signal of an NTSC disc
and output it to PAL format.
The picture shape can be adjusted to t your TV.
Press to access this menu and use keys to select one of
the options.
{ 4:3 LB } – For a ‘wide screen’ display with black bars on
the top and bottom of the screen.
{ 4:3 PS } – For a full-height picture with sides trimmed.
{ 16:9 WS } – For wide screen TV (frame ratio 16:9.)
Progressive scan delivers a higher picture quality than the standard
interlaced TV channel scan. It only works when you have connected the
recorder’s Y Pb Pr jacks to your TV that supports the progressive video
input. Otherwise, the image may not appear or will be distorted. Please
check your TV user manual for more information.
Press to access this menu and use keys to select one of the
options.
{ Off } – Select this to disable progressive scan feature.
{ On } – Select this to enable progressive scan feature.
If a blank/distorted TV screen appears, wait for 10 seconds for the auto recovery.
English
DivX® Video on
Demand
Philips provides you with the DivX® VOD (Video On Demand)
registration code that allows you to rent and purchase videos
using the DivX® VOD service. For more information, visit us at
www.divx.com/vod.
1) Press to display the registration code.
2) Use the registration code to purchase or rent videos from DivX®
VOD service at www.divx.com/vod. Follow the instructions and
copy the video from your computer onto a CD-R/RW for playback
on this recorder.
63
Page 64

Setup Menu Options (continued)
English
PREFERENCES settings
(underlined options are the factory default settings)
Parental Level
Rating explanations
Change Password
Some DVDs may have a parental level assigned to the complete
disc or to certain scenes on the disc. This feature lets you set a
playback limitation level.
The rating levels range from 1 to 8 and are country dependent.
You can prohibit the playing of certain discs that are not
suitable for your children, or have certain discs played with
alternative scenes.
Press to access this menu and use keys to select one of
the options.
{ 1. Kid Safe } ~ { 2. G } – Childsafe; acceptable for viewers of all
ages.
{
3. PG } – Parental Guidance suggested.
{ 4. PG13 } – Unsuitable for children under age 13.
5. PG R } ~ { 6. R } – Restricted; recommended that parents
{
restrict children under 17 from viewing or allow to
view only when supervized by a parent or adult
guardian.
{
7. NC 17 } – No children under age 17; not recommended viewing
for children under age 17.
8. Adult } – Mature material; should be viewed only by adults due
{
to graphic sexual material, violence or language.
{ Off } – Parental Control is not active.
DVDs that are rated higher than the level you have selected will not
play unless you enter your four-digit pin code.
This option allows you to change your password setting for
parental control.
New Password
Enter password
Enter new password
Re-enter password
64
1)
Use keys to highlight { Change Password } and press OK.
* * * *
* * * *
You will be prompted to enter your four-digit pin code.
2)
Use the numeric keypad 0-9 to enter your four-digit pin code.
When doing this for the rst time, enter the default password
OK
OK
CANCEL
‘3308’.
If you forget your four-digit pin code, the default password is 3308.
3)
Enter your new password and press .
4)
Re-enter your new password and select
, then press OK on
OK
OK
the remote control to con rm.
Page 65

Setup Menu Options (continued)
PREFERENCES settings (underlined options are the factory default settings)
Reset Menu
Settings
Screensaver
Press to reset the menu settings of this recorder.
A warning message will appear. Select
OK
proceed or
CANCEL
to abort, then press OK to con rm.
The screen saver prevents damage to the TV screen by
avoiding exposure to a static image for too long.
Press to access this menu and use keys to select one of
the options.
{ On } – Select this if you wish to turn off the TV screen, after
playback had been stopped or paused for more than
15 minutes.
Off } – Select this to disable the screen saver.
{
AUDIO settings (underlined options are the factory default settings)
SPDIF Output
Press to access this menu and use keys to select one of
the options.
{ RAW } – Select this if you have used the recorder’s COAXIAL
OUT jack to connect to a multichannel receiver.
{ LPCM } – Select this if you have used the recorder’s COAXIAL
OUT jack to connect to a stereo or audio/video
system.
OK
OK
in the menu to
English
LPCM Output
This setting allows you to select between two levels:
{ LPCM 48 kHz} – Select this if the connected audio device is
capable of processing digital signal input with
sampling rates of 48 kHz. In addition, the disc
you are playing back must be recorded in 48kHz
LPCM format.
{ LPCM 96 kHz} – Select this if the connected audio device is
capable of processing digital signal input with
sampling rates of 96 kHz.In addition, the disc
you are playing back must be recorded in 96kHz
LPCM format.
65
Page 66

Firmware Upgrade
English
Installing the latest rmware
Periodically, Philips will issue upgrades for
the rmware that was initially installed in
your recorder as the rmware is
continuously re ned for greater stability
and compatibility of the recorder.
Caution! Power supply must not be
interrupted during upgrade!
Visit Philips’ website at
‘www.philips.com/support’ to check for
the availability of the latest rmware
upgrade.
Note: When checking for the latest
rmware upgrade, please also check for
any accompanying instructions on
installing the rmware.
66
Page 67

Troubleshooting
WARNING
Under no circumstances should you try to repair the system yourself, as this will
invalidate the warranty. Do not open the system as there is a risk of electric shock.
If a fault occurs, rst check the points listed below before taking the system for repair.
If you are unable to remedy a problem by following these hints, consult your dealer or
Philips for help.
Problem Solution
English
No power.
The recorder does not
respond.
Remote control does not
work.
No picture.
– Press STANDBY-ON button on the front of the recorder to
turn on the system.
– Make sure the AC outlet has power.
– There is a technical problem. Disconnect the recorder from the
power outlet for 30 seconds, then reconnect and switch on the
recorder again.
– Aim the remote control directly at the iR sensor on the front of
the recorder (not towards TV).
– Remove any obstacles between the recorder and remote
control.
– Batteries are weak, replace the batteries.
– Turn on your TV and set to the correct Video In channel for
the recorder. You may go to Channel 1 on your TV, then press
the channel down button on your TV’s remote control until you
see the TV program.
– Check the video connection between the recorder and the TV.
– Your recorder might have been set to Progressive Scan mode
while your TV does not support Progressive Scan.
Follow the steps below:
1) Connect the supplied AV cable (red/white/yellow) from your
recorder OUT2 on the rear panel to the TV’s Video In and
Audio In jacks.
2) Turn on the TV and use the TV’s remote control to select
the corresponding video-in channel on the TV. (eg., AV, EXT1.)
3) Turn on the recorder and wait till the display panel shows a
channel number. Press SETUP on the remote control once. The
message ‘MENU’ will be shown on the display panel. Enter the
code “1168” and wait for the screen to be refreshed after a few
seconds. The “PRO SCAN” icon on the display panel will
disappear.
No sound.
No TV signal received from
the recorder.
– Check the recorder audio connections. Read chapter “Basic
Recorder Connections - Connecting the audio cables” for
details.
– Set the option for Digital audio output correctly, based on the
device you have connected to the recorder. Read chapter
“Setup Menu Options - AUDIO settings” for details.
– Have your antenna or cable TV signal checked.
– Install the TV channel. Read chapter “Installation and Setup -
Setting your TV channel programs” for details.
67
Page 68

Troublesh oot ing (continued)
English
Problem Solution
Disc will not play.
The picture is distorted or
black and white during
playback.
There is picture or sound
interference with the TV
reception.
Distorted sound coming from
a connected hi- system or
ampli er.
Recordings are not occurring
as scheduled. New recordings
cannot be made.
The wrong TV channel was
decoded (recorded) after you
programmed a recording
using the G-
CODE
®
system.
– Insert the disc with the label facing up.
– Wrong region code. The DVD must be coded for ALL regions
or Region 3 or 4 in order to play on this recorder.
– There is no recording on the disc or it is not a supported type
of disc. Read chapter “Playback from Disc - Playable discs” for
details.
– Make sure the disc is not scratched or warped. Clean the disc
or replace a new one.
– Check if the disc is defective by trying another disc.
– The disc does not match with the TV colour system standard
(PAL/NTSC).
– The disc is dirty, clean the disc.
– Sometimes a small amount of picture distortion may appear.
This is not a malfunction.
– Have your antenna or cable TV signal checked.
– Fine-tune your TV channel. Read chapter “Installation and Setup
- Setting your TV channel programs” for details.
– Do not connect any cables from the recorder to the ‘Phono’
input of your ampli er.
– If you are playing a DTS CD, you have to connect the COAXIAL
jack of this recorder to a Hi-Fi system or ampli er.
– The TV channel you want to record is not stored. Or, you may
have selected the wrong program number. Check the TV
channels stored.
– You have to reset the timer recording after adjusting the clock
setting.
– You cannot use the recorder to duplicate copy-protected
materials (DVDs or videotapes) onto a DVD recordable disc.
– The hard disk could be full. Delete some titles to create space
for new recordings.
®
G-CODE
1) Enter the
programming number of the desired TV
channel.
2) Press OK to con rm.
3) Check the channel number in the {Program #} input eld. If this
does not correspond to the desired TV channel, select this
entry eld and change the channel number.
4) Press OK to con rm.
The recorded DVD cannot
be played back on another
DVD player.
68
– If a recording is too short, it is possible that a DVD player/
recorder cannot detect it. Please observe the following
‘minimum recording times’. Mode of record quality: {High
Quality - HQ} – 5 minutes, {Standard Play - SP} – 10 minutes,
{Standard Play Plus - SP+} – 13 minutes, {Long Play - LP} – 15
minutes, {Extended Play - EP} – 20 minutes, {Super Long Play -
SLP} – 30 minutes.
– You have to nalize the DVD±R. Refer to chapter “Playing your
recordings on other DVD players” for details.
Page 69

Troublesh oot ing (continued)
Problem Solution
The message ‘UNKNOWN
DISC’ appears.
Picture is fuzzy and
brightness varies when
copying DVD Video discs or
prerecorded video cassettes.
The message ‘This will clear
the time shift buffer’ appears.
There is a power failure
during the formatting of the
recorder’s HDD.
There is a power failure
during the copying of les to
a DVD±R disc.
During recording from the
time shift buffer, it is not
possible to start or stop a
recording.
– This message may appear if you insert a disc that may have
encountered one of the following:
– Error during recording: The title may be missing.
– Error while changing the title/index picture: The original title/
index picture may be visible.
– Error while nalizing or the disc has not been nalized.
– This happens if you try to copy DVDs or video cassettes that
have been copy-protected. Even though the picture on the TV is
ne, but the recording on the DVD recordable disc is faulty.
This interference is unavoidable with copy-protected DVDs or
video cassettes.
– The DVD recordable disc has a limited recording lifetime, please
change a new disc for recording.
– The requested action requires that the time shift buffer
(temporary HDD storage) to be cleared. All contents that were
not marked for recording will be deleted.
– You have to reselect the { Delete HDD } option and delete the
HDD contents again.
– The titles that were previously recorded will be deleted and the
space used for recording cannot be re-used. The disc can be
used as a normal blank disc. You have to re-copy the les to the
disc again.
– Parts of the signal may be copy-protected by the
broadcaster. This portion of the time shift video bar will be
shown in a different color. You can only start or stop a
recording if the selected portion does not contain any
copyright content.
– Use
non-protected portion and press REC to start a recording.
To end a recording, press STOP.
– Press SELECT to clear a recording at any time.
keys or .> keys to navigate to a
English
69
Page 70

Speci cations
English
Video Recording
• Recording System: PAL / NTSC
• Compression formats: MPEG2
• Modes of Record Quality:
High Quality : HQ (M1)
Standard Play : SP (M2)
Standard Play Plus : SP+ (M2x)
Long Play : LP (M3)
Extended Play : EP (M4)
Super Long Play : SLP (M6)
• Recording enhancements:
Auto Chapter Marker Insertion, Divide Title,
Erase, Manual Chapter Marking, One Touch
Record
• Audio compression: Dolby Digital
Video Playback
• Disc Playback Media: CD, CD-R/CD-RW, DVD,
DVD-Video, DVD+R, DVD+RW, DVD-R,
DVD-RW, MP3-CD, Video CD, SVCD
• Compression formats: MPEG2, MPEG1, MPEG4,
DivX
• Video disc playback system: PAL, NTSC
Audio Playback
• Disc Playback Media: MP3-CD, CD, CD-R/
CD-RW
• Compression formats: Dolby Digital, DTS, MP3,
PCM,
• MP3 bit rates: 32 - 256 kbps
Still Picture Playback
• Disc Playback Media: Picture CD
• Picture compression format: JPEG
• Picture enhancement: Rotate, Zoom, Slideshow
TV systems
• Playback: PAL/NTSC
• Recording: PAL/NTSC
• Internal tuner: PAL/NTSC
Video Performance
• D/A Converter 10 bit, 54 MHz
• A/D Converter 10 bit, 27 MHz
• Picture Enhancement: Progressive Scan
Audio Performance
• DA Converter 24 bit, 192 kHz
• AD Converter 24 bit, 96 kHz
• Signal / Noise (1kHz) 100 dB
• Dynamic range (1kHz) 95 dB
• Crosstalk (1kHz) 105 dB
Tuner/Reception/ Transmission
• TV System: PAL, NTSC
• Aerial input: 75 ohm coaxial (IEC75)
Storage Media
• Recording :
– DVD+R, DVD+RW, DVD-R, DVD-RW,
• Hard Disk Capacity:
– DVDR 3360H : 160GB
– DVDR 3370H : 250GB
• HDD recording enhancements:
– Instant Replay, Time Shift Buffer
• Extra Hard Disk Technology:
– Pause Live TV, Simultaneous Record and
Playback, Direct Record to DVD
• HDD to DVD archiving: high speed (direct copy)
Connectivity
• Rear Connections
– S-video out
– Component Video out
– Video (CVBS) out
– Analog audio left/right out
– Antenna in
– TV out
– Digital audio out (coaxial)
Front Connections
•
– i.LINK DV in (IEEE 1394 4-pin)
– S-Video in
– Video (CVBS) in
– Analog audio left/right in
Timer Recording
• Programmable events: 20
• Repeat modes: Once, Daily, Weekly
• Enhancement: Manual Timer, G-CODE®
Convenience
• Direct Record to optical disc
• Child Protection: Parental Control
Power
• Power Supply: 110V~240V, 50~60 Hz
• Power Consumption: 28 W
• Standby power consumption: < 3.0 W
Dimensions
• Set dimension (W x H x D) : 435 x 65 x 340 mm
• Set Weight : 4.3 kg
70
Page 71

Glossary
Analog: Sound that has not been turned into
numbers. Analog sound varies, while digital sound
has speci c numerical values. These jacks send audio
through two channels, the left and right.
Aspect ratio: The ratio of vertical and
horizontal sizes of a displayed image. The horizontal vs. vertical ratio of conventional TVs. is 4:3,
and that of wide-screens is 16:9.
AUDIO OUT Jacks: Red and white jacks
on the back of the system that send audio to
another system (TV, Stereo, etc.)
Chapter: Sections of a picture or a music piece
on a DVD that are smaller than titles. A title is
composed of several chapters. Each chapter is
assigned a chapter number enabling you to locate
the chapter you want.
Component Video Out Jacks: Jacks on
the back of the DVD System that send high-quality
video to a TV that has Component Video In
jacks (R/G/B, Y/Pb/Pr, etc.)
Digital: Sound that has been converted into
numerical values. Digital sound is available when
you use the DIGITAL AUDIO OUT COAXIAL.
These jacks send audio through multiple channels,
instead of just two channels as analog does.
Disc menu: A screen display prepared for
allowing selection of images, sounds, subtitles,
multi-angles, etc recorded on a DVD.
DivX 3.11/4.x/5.x: The DivX code is a
patent-pending, MPEG-4 based video compression
technology, developed by DivXNetworks Inc., that
can shrink digital video to sizes small enough to be
transported over the internet, while maintaining
high visual quality.
Dolby Digital: A surround sound system developed by Dolby Laboratories containing up to six
channels of digital audio (front left and right,
surround left and right, center and subwoofer.)
DTS: Digital Theatre Systems. This is a surround
sound system, but it is different from Dolby Digital.
The formats were developed by different companies.
Index Picture Screen: A screen that gives an
overview of a DVD±RW or DVD±R. An Index
Picture represents each recording.
JPEG: A very common digital still picture format.
A still-picture data compression system proposed
by the Joint Photographic Expert Group, which
features small decrease in image quality in spite of
its high compression ratio.
MP3: A le format with a sound data compression
system. “MP3” is the abbreviation of Motion
Picture Experts Group 1 (or MPEG-1) Audio
Layer 3. By using the MP3 format, one CD-R or
CD-RW can contain about 10 times more data
then a regular CD.
MPEG: Motion Picture Experts Group. A
collection of compression systems for digital audio
and video.
Multichannel: DVDs are formatted to have each
sound track constitute one sound eld.
Multichannel refers to a structure of sound tracks
having three or more channels.
PBC: Playback Control. Refers to the signal
recorded on video CDs or SVCDs for controlling
playback. By using menu screens recorded on a
Video CD or SVCD that supports PBC, you can
enjoy interactive playback and searching.
PCM: Pulse Code Modulation. A digital audio
encoding system.
Parental control: Limits disc play according to
the age of the users or the limitation level in each
country. The limitation varies from disc to disc;
when it is activated, playback will be prohibited if
the software’s level is higher than the user-set
level.
Region code: A system allowing discs to be
played only in the region designated. This unit will
only play discs that have compatible region codes.
You can nd the region code of your unit by
looking on the product label. Some discs are
compatible with more than one region (or ALL
regions.)
S-Video: Produces a clear picture by sending
separate signals for the luminance and the color.
You can use S-Video only if your TV has an S-Video
In jack.
Surround: A system for creating realistic three
dimensional sound elds full of realism by
arranging multiple speakers around the listener.
Title: The longest section of a movie or music
feature on DVD. Each title is assigned a title
number, enabling you to locate the title you want.
VIDEO OUT jack: Yellow jack on the back
of the DVD system that sends the DVD picture
video to a TV.
71
English
Page 72

Display panel symbols/ messages
English
The following symbols/messages may
appear on your recorder display:
00:00
Multifunction display/ text line
– Title/track number
– Total/elapsed/remaining title/track time
– Disc/title name
– Additional information regarding the disc
– TV channel number or source of video
– Clock (This is displayed in Standby mode).
– TV program title
X TIMER
A timer recording has been programmed
or is active.
BLANK
No recordings on the disc.
CLOSING
Disc tray is closing.
EMPTY
No recordings in the hard disk drive.
UPDATE
Please wait until the blinking message
disappears. The disc is being formatted or
data is being written to it.
PRO SCAN
Lights up when progressive scan is
activated.
READING
Disc is being recognized by the recorder.
PHILIPS
The recorder has been turned on.
SCANXXX
Please wait until this message disappears.
The recorder is busy processing an
operation. XXX indicates the number of
found channels, and is constantly updated
¡_CHXXX
In time shift mode, where XXX indicates
the input video source or channel
number of tuner input.
MENU
The system setup menu, disc menu or
title menu display is on.
HDDMENU
The hard disk menu display is on.
NO DISC
No disc has been inserted. If a disc has
been inserted, then it is possible that the
disc cannot be read.
OPEN
Disc tray is opened or opening.
72
Page 73

73
Page 74

TV System Guide
English
COUNTRY VHF UHF DVD REGIONS
AFGHANISTAN PAL/SECAM B
ALBANIA PAL B PAL G 2
ALGERIA PAL B PAL G 5
ANGOLA PAL I 5
ARGENTINA PAL N PAL N 4
AUSTRALIA PAL B PAL H 4
AUSTRIA PAL B PAL G 2
AZORES PAL B
BAHAMAS NTSC M 4
BAHRAIN PAL B PAL G 2
BANGLADESH PAL B 5
BARBADOS NTSC M 4
BELGIUM PAL B PAL H 2
BERMUDA NTSC M
BOLIVIA NTSC M NTSC M 4
BOTSWANA PAL I 5
BRAZIL PAL M PAL M 4
BRUNEI PAL B PAL B
BULGARIA SECAM D SECAM K 2
BURKINA FASO SECAM K1 5
BURMA NTSC M
BURUNDI SECAM K1 5
CAMBODIA NTSC M 3
CAMEROON PAL B PAL G 5
CANADA NTSC M NTSC M 1
CANARY ISLANDS PAL B 2
CHAD SECAM K1 5
CHILE NTSC M NTSC M 4
CHINA PAL D 6
COLOMBIA NTSC M NTSC M 4
COSTA RICA NTSC M NTSC M 4
CROATIA PAL B PAL G 2
CUBA NTSC M NTSC M 4
CYPRUS PAL B PAL G
CZECH REPUBLIC PAL D PAL K 2
DAHOMEY SECAM K1
DENMARK PAL B PAL G 2
DJIBOUTI SECAM B SECAM G 5
DOMINICAN REP NTSC M NTSC M 4
ECUADOR NTSC M NTSC M 4
EGYPT SECAM B/PAL B SECAM G/PAL G 2
EL SALVADOR NTSC M NTSC M 4
EQUAT. GUINEA PAL B 5
ESTONIA PAL B (was SECAM) PAL D 5
ETHIOPIA PAL B PAL G 5
FIJI PAL B
FINLAND PAL B PAL G 2
FRANCE SECAM L SECAM L 2
FRENCH POLYNESIA SECAM K1
GABON SECAM K1 5
GAMBIA PAL I 5
GERMANY PAL B PAL G 2
GHANA PAL B PAL G 5
GIBRALTAR PAL B PAL H 2
GREECE PAL B (was SECAM) PAL G 2
GREENLAND NTSC/PAL B 2
GUADELOUPE SECAM K1
GUAM NTSC M 1
GUATEMALA NTSC M NTSC M 4
GUINEA PAL K 5
GUYANA (FRENCH) SECAM K1 4
HONDURAS NTSC M NTSC M 4
74
5
Page 75

TV System Guide (continued)
COUNTRY VHF UHF DVD REGIONS
LIBYA SECAM B SECAM G 5
LITHUANIA PAL D (was SECAM) PAL K 5
LUXEMBOURG PAL B/SECAM L PAL G/SEC L 2
MADAGASCAR SECAM K1 5
MADEIRA PAL B
MALAGASY SECAM K1
MALAWI PAL B PAL G 5
MALAYSIA PAL B 3
MALI SECAM K1 5
MALTA PAL B PAL H 2
MARTINIQUE SECAM K1
MAURITANIA SECAM B 5
MAURITIUS SECAM B 5
MEXICO NTSC M NTSC M 4
MONACO SECAM L 2
MONGOLIA SECAM D 5
MOROCCO SECAM B 5
MOZAMBIQUE PAL B 5
NAMIBIA PAL I 5
NEPAL PAL B
NETHERLANDS PAL B PAL G 2
NETH. ANTILLES NTSC M NTSC M
NEW CALEDONIA SECAM K1
NEW GUINEA PAL B PAL G 4
NEW ZEALAND PAL B PAL G 4
NICARAGUA NTSC M NTSC M 4
NIGER SECAM K1 5
NIGERIA PAL B PAL G 5
NORWAY PAL B PAL G 2
OMAN PAL B PAL G 2
PAKISTAN PAL B 5
PANAMA NTSC M NTSC M 4
PARAGUAY PAL N PAL N 4
PERU NTSC M NTSC M 4
PHILIPPINES NTSC M NTSC M 3
POLAND PAL D PAL K 2
PORTUGAL PAL B PAL G( was SECAM D ) 2
PUERTO RICO NTSC M NTSC M 1
QATAR PAL B 2
REUNION SECAM K1
RUMANIA PAL D PAL K 2
RUSSIA SECAM D SECAM K 5
RWANDA SECAM K1 5
SABAH/SAWARA PAL B
ST. KITTS NTSC M NTSC M
SAMOA (US) NTSC M 1
SAUDI ARABIA SECAM-B/PAL-B SECAM G 2
SENEGAL PAL 5
SEYCHELLES PAL B PAL G 5
SIERRA LEONE PAL B PAL G 5
SINGAPORE PAL B PAL G
SLOVAK REPUBLIC PAL PAL 2
SOMALIA PAL B PAL G 5
SOUTH AFRICA PAL I PAL I 2
SPAIN PAL B PAL G 2
SRI LANKA PAL B 5
SUDAN PAL B PAL G 5
SURINAM NTSC M NTSC M 4
SWAZILAND PAL B PAL G
SWEDEN PAL B PAL G 2
SWITZERLAND PAL B PAL G 2
SYRIA SECAM B 2
English
75
Page 76

English
These Warranty conditions are valid for the following consumer electronics products:
Colour Televisions, Projection TV, Plasma & LCD TV, Video Cassette Recorders, CD Recorders &
Players, DVD Players, DVD Recorders, Audio Systems, Home Theatre systems & Portable Audio.
The benefits given to the purchaser by this warranty are in addition to
all other rights and remedies, which the purchaser has in respect of the
product under the Trade Practices Act or other Commonwealth or State
Philips Consumer Electronics warrants its products to the purchaser as
follows and subject to the stated conditions.
Colour Television, Plasma Television, LCD Television, Projection Television
DVDR/VCR Combo, DVD Recorder, DVD Recorder with Hard Drive, LCD Projectors
Portable Audio, MP3 Infotainment products, Video Cassette Recorders
Conditions of Repair Warranty
1. All claims for warranty service should be made to your nearest Philips Authorised
Service Centre. Reasonable evidence of date of purchase must be provided.
2. This warranty extends only to defects in material or workmanship occurring under
normal use of the product when operated in accordance with the instructions.
3. If a replacement product is supplied under the repair policy it is warranted, under
this warranty, for the remainder of the warranty of the original purchased product
only.
4. Home service is provided only within the normal service area of one of our
recommended Authorised Service Centres (ASC). It will be provided for television
receivers only, regardless of size or type (i.e. CRT, LCD, PTV, PDP). All other
products are to be taken or sent by the consumer to the workshop of your nearest
ASC (at the Consumer’s expense).
5. This Manufacturers Warranty is limited to 3 months for above listed Consumer
Electronics products if used in commercial applications.
6. Philips may, at its discretion choose to replace rather than repair any product
covered by this warranty.
7. This Manufacturers Warranty is neither transferable nor valid in countries other
than Australia.
The conditions contained in this warranty card replace and override the provision of the Philips World-Wide Guarantee for
Version 6: 1 April 2006 Warranty valid for all new products purchased after 1st April 2006
s Free Repair Service – at Philips ASC
33 YYeeaarrs
r Free Repair Service – at Philips ASC
11 YYeeaar
Audio Systems & Home Theatre Systems.
r Free Replacement – at your Retailer
11 YYeeaar
DVD Player, DVD/VCR Combo Player, Portable DVD/LCD player.
Law.
Wireless Audio Systems
products purchased in Australia and used in Australia.
This warranty does not
a) Mileage or travel outside the
normal service area covered by
selected Authorised Service
Centre.
b) Service costs arising from failure
to correctly adjust the controls of
the product or to observe the
instructions, or inspections that
reveal that the product is in
normal working order.
c) Product failures caused by
misuse, neglect, accidental
breakage, transit damage,
inexpert repairs or modification
by un-authorised persons,
external fires, lightning strikes,
floods, vermin infestation or
liquid spillage.
d) Cleaning of video or audio
heads.
e) Inadequate receiving antenn ae.
f) Replacement of worn or used
batteries or other consumables.
g) Consumer products used in
commercial applications (This
warranty is limited to 3 months
only)
h) Second hand products.
cover:
1
76
Page 77

Philips Consumer Electronics a division of Philips Electronics Australia Limited ABN 24 008 445 743,
Service is provided through more than 100 accredited Authorised Service Centres throughout Australia.
For direct contact with the nearest recommended Authorised Service Centre in capital & regional cities/towns
Level 1, 65 Epping Road NORTH RYDE NSW 2113.
AAuutthhoorriisseedd SSeerrvviiccee CCeennttrree NNeettwwoorrkk
Customer support is provided in Australia by our trained call centre staff
For assistance with product features and specifications, please call
TTeecchhnnoollooggyy CCaarree CCeennttrree
Please record the following information for your records and keep in a safe place.
We recommend retaining your purchase receipt to assist with any warranty claim
Model number : ………………………………………………………..
Serial number : ………………………………………………………..
Date of purchase : ………………………………………………………..
Retailer : ………………………………………………………..
English
Version 6: 1 April 2006 Warranty valid for all new products purchased after 1
st
April 2006
2
77
Page 78

English
78
Page 79

English
79
Page 80

English
Meet Philips at the Internet
http://www.philips.com
http://www.philips.com/support
DVDR3360H
DVDR3370H
CLASS 1
LASER PRODUCT
3139 246 20532
Sgp-0623/75-1
 Loading...