

Page 1

User Manual 4
58
3345
Page 2

LASER
Due to the inconsistency of disc formats provided
by various disc manufacturers, your DVD system/
player/recorder may require a playability
enhancement or upgrade. As DVD technology
advances, these enhancement will become
common and will be easy to complete.
Go to www.philips.com/support for software upgarde.
‘CONSUMERS SHOULD NOTE THAT NOT ALL HIGH
DEFINITION TELEVISION SETS ARE FULLY
COMPATIBLE WITH THIS PRODUCT AND MAY CAUSE
ARTIFACTS TO BE DISPLAYED IN THE PICTURE. IN
CASE OF 525 OR 625 PROGRESSIVE SCAN PICTURE
PROBLEMS, IT IS RECOMMENDED THAT THE USER
SWITCH THE CONNECTION TO THE ‘STANDARD
DEFINITION’ OUTPUT. IF THERE ARE QUESTIONS
REGARDING OUR TV SET COMPATIBILITY WITH THIS
MODEL 525p AND 625p DVD PLAYER, PLEASE
CONTACT OUR CUSTOMER SERVICE CENTER.’
Type Semiconductor laser
InGaAlP (DVD)
AIGaAs (CD)
Wave length 658 nm (DVD)
790 nm (CD)
Output Power 30 mW(DVD±RW write)
1.0 mW (DVD read)
1.0 mW (CD read)
Beam divergence 84 degrees (DVD)
61 degrees (CD)
Microsoft, Windows Media, and the
Windows logo are trademarks, or registered
trademarks of Microsoft Corporation in the
United States and/or other countries.
CAUTION
Use of controls or adjustments or
performance of procedures other than
herein may result in hazardous radiation
exposure or other unsafe operation.
For Customer Use:
Read carefully the information located at
the bottom or rear of your DVD Recorder
and enter below the Serial No. Retain this
information for future reference.
Model No. DVD RECORDER DVDR 3345
Serial No. _______________
2
Page 3

This product incorporates copyright
protection technology that is protected
by US patents. Use of this copyright
protection technology must be authorized by
Macrovision, and is intended for home and
other limited viewing uses only unless otherwise authorized by Macrovision. Reverse
engineering or disassembly is prohibited.
U.S. Patent Number 4,631,603; 4,819,098;
4,907,093; 5,315,448; and 6,516,132.
Index
English ------------------------------------------4
English
------------------------------- 58
Page 4

Special Features
English
Manufactured under license from Dolby
Laboratories. “Dolby” and the double-D
symbol are trademarks of Dolby
Laboratories.
This connection is also known as ‘FireWire’
and ‘IEEE 1394.’ This connection is used for
the transfer of high bandwidth digital signals
as used by digital video (DV) camcorders.
Audio and video signals are transmitted using
a cable.
4
Page 5
Title
Chapter
Title
Chapter Chapter Chapter Chapter
chapter markers
Record
Mode
Picture Quality
Maximum Recording
Time per Disc
1 Hour Mode
2 Hour Mode
4 Hour Mode
6 Hour Mode
HQ(High quality)
SP(DVD quality-Standard Play)
EP(VHS quality-Extended Play)
SLP(VHS quality-Super Long Play)
1 hour
2 hours
4 hours
6 hours
Frequently Asked Questions
What kind of disc should I use for
recording?
You can only record on a DVD±R and
DVD±RW discs. DVD±R/±RW is the most
compatible recordable DVD format on the
market today. They are fully compatible with
most of the existing DVD-Video players and
DVD-ROM drives in computers.
What is the capacity of a
DVD±R/±RW disc?
4.7GB, or equivalent to 6CDs. You can store
only one hour of recordings on a single disc at
the highest quality (DVD standard) and about
6 hours recordings at the lowest quality (VHS
standard).
The recording mode indicates the number of
hours that will t on a single disc.
What is the difference between
DVD±R and DVD±RW?
DVD±R is “recordable” and DVD±RW is
“erasable” and “rewritable”. With a DVD±R,
you can record multiple sessions on the same
disc, but when the disc is full, you cannot
record any more on the disc. The DVD±RW
allows you to record over the same disc
repeatedly.
What is DV?
Using DV, also known as i.LINK, you can
connect a DV-equipped camcorder to this
recorder using a single DV cable for input and
output of audio, video, data and control signals.
– This recorder is only compatible with
DV-format (DVC-SD) camcorders. Digital
satellite tuners and Digital VHS video
recorders are not compatible.
– You cannot connect more than one DV
camcorder at one time to this recorder.
– You cannot control this recorder from the
external equipment connected via the
DV IN jack.
Can I copy a VHS tape or DVD
from an external player?
Yes, but only if the VHS tape or DVD is not
copy protected.
What are Titles and Chapters?
A DVD disc contains Titles and Chapters,
which are similar to the Titles and Chapters of
a book. A Title is often a complete movie and
is broken down into Chapters, or individual
scenes from the movies.
Programs are recorded as a single title; it may
consist of one chapter or a few chapters
within a title, depending on the recording
settings.
How do I set up Titles and Chapters?
The DVD recorder automatically creates a
new Title every time you start a new
recording. You can then add Chapters to these
recordings manually or have them
automatically inserted at 5-minute intervals.
What does “nalizing” a disc do?
Finalizing a disc locks the disc so it can no
longer be recorded and is only required for
DVD±R. It will then be compatible with
virtually any DVD player. To close a disc
without nalizing it, simply stop recording and
eject the disc. You will still be able to record
on the disc if there is room for more
recordings.
How good is the quality of the
recording?
There are a few quality levels to choose from,
ranging from “1 hour mode” (High Quality) to
“6 hours mode” (VHS quality). Press REC
MODE button on the remote control to
choose the quality level that best suits your
purpose and the length of material.
English
5
Page 6

Contents
English
Index ................................................ 3
Main Unit ....................................... 17
Jacks behind the ap ....................................17
Special Features .............................4
Remote control ............................ 18
Frequently Asked Questions ........ 5
Display window ............................. 21
Care and Safety Information
Setup ..............................................................8
Cleaning discs ..............................................8
About recycling ...........................................8
General Information
Introduction .................................................9
Accessories supplied ..................................9
Region codes ................................................9
Copyright notice .........................................9
Basic Connections - DVD recorder
Step 1: Connecting the antenna cables 10
Step 2: Connecting the video cable .....
Option 1: Using Video(CVBS) jack ........ 11
Option 2: Using S -Video jack .................. 11
Option 3 : Using Component Video
jack ..................................................................11
11
Step 3: Connecting the audio cables ...12
Option 1: Using Audio jacks .....................12
Option 2: Using Coaxial jack .................... 12
Optional Connections
Connecting to a Cable Box or
Satellite Receiver ......................................13
Connecting to a VCR or other
similar device..............................................14
Getting Started
Step 1 : Inserting Batteries .................... 22
Using the remote control to operate
the system ......................................................22
Step 2 : Finding your viewing channel 22
Step 3 : TV channel programming ....... 23
Automatic TV channel search ..................23
Modif ying Channel Information ...............24
Sorting the TV channels .............................25
Step 4 : Setting the time & date ...... 25
Recording
Discs for recording .................................. 26
Recording settings .................................. 26
Auto Chapter Markers ...............................27
Default Source ..............................................27
Default Recording Qualit y .........................27
Manual recording ................................ 28
One Touch Recording - automatic
turn-off ....................................................... 28
About timer recording ........................... 29
Timer recording (manually)................... 29
Setting a timer recording from an
external Cable Box/ Satellite Receiver ..30
Changing/ Deleting a timer recording .31
Watching another TV channel
during recording ........................................31
Connecting to a VCR and Cable Box/
Satellite Receiver ......................................15
Connecting a camcorder to the
front jacks ...................................................16
Option 1: Using DV IN jack ......................16
Option 2: Using S -VIDEO In or
VIDEO In jack ...............................................16
Editing/Finalizing Recording
About Disc editing ................................... 32
Accessing disc editing menu .................. 32
Rename disc ........................................................33
Erase disc (DVD±RW only) ......................33
Record new title ...........................................33
Overwrite disc (DVD±RW only) ............33
Make compatible (DVD±RW only) .........34
Lock/Unlock disc (DVD±RW only) ........34
6
Page 7

Contents
Playing your recordings (DVD±R) on
other DVD players .................................. 34
About title editing ................................... 35
Accessing title editing menu ................. 35
Editing video ..................................................35
Rename title ..................................................36
Erase title .......................................................36
Overwrite title (DVD±RW only) ............36
Overwrite from the selected title ..........36
Append recording .......................................36
About video editing ............................ 37
Accessing video editing menu............... 37
Selecting a title ..............................................38
Selecting a chapter .......................................38
Creating chapter marker ...........................38
Hiding an unwanted chapter .....................39
Changing Index Picture ..............................39
Splitting a title (DVD±RW only) ..............39
Playback
Playable discs ............................................. 40
Inserting a disc .......................................... 40
Starting disc playback...............................41
Playing a DVD video disc ...........................41
Playing a (Super) Video CD .......................41
Playing an audio CD ....................................41
Playing a DVD±R/±RW disc ...................... 41
Playing an MP3 disc ......................................42
Playing a picture disc (or musical
slide show) .....................................................42
DVD System Menu Options
Accessing System Menu - General ..... 48
Screen Saver ..................................................48
Progressive/ Interlace .................................49
Video Output Format .................................49
Restore Factory settings ............................49
Accessing System Menu -Playback . 50
TV Aspect Ratio ...........................................50
Parental rating level ..................................... 51
Setting or changing the password ...........52
Digital Audio Output ..................................52
Accessing System Menu - Record........ 53
Accessing System Menu - Channel
Setup ........................................................... 53
Accessing System Menu - Clock .......... 53
Date and Time ..............................................53
Specications ................................54
Troubleshooting .................... 55~56
Glossary .........................................57
English
Additional Playback Features
Changing to another title/chapter/
track ............................................................44
Pausing playback and step play ............ 44
Searching forward/backward ................ 44
Zooming in ................................................ 44
Using TITLE options ............................... 45
Selecting various repeat/shufe
functions .........................................................45
Programming disc tracks ............................46
Changing the audio soundtrack language 46
Changing subtitle language ........................47
Switching camera angles .............................47
Time search ...................................................47
7
Page 8

Care and Safety Information
10cm (4.5")
10cm (4.5")
5cm (2.3")
5cm (2.3")
English
CAUTION!
High voltage! Do not open
the device. You run the risk of
getting an electric shock.
The machine does not contain
any user-serviceable parts. Please
leave all maintenance work to
qualied personnel.
Setup
Finding a suitable location
– Place the set on a at, hard and stable
surface. Do not place the set on a carpet.
– Do not position the set on top of
other equipment that might heat it up
(e.g., receiver or amplier).
– Do not put anything under the set
(e.g., CDs, magazines).
– Install this unit near the AC outlet and
where the AC power plug can be reached
easily.
Space for ventilation
– Place the apparatus in a location with
adequate ventilation to prevent internal
heat build up. Allow at least 10 cm (4.5”)
clearance from the rear and the top of
the set and 5cm (2.3”) from the left and
right to prevent overheating.
Cleaning discs
Some problems occur because the disc
inside the recorder is dirty (frozen
picture, sound disruptions, picture
distortions). To avoid these problems,
discs should be cleaned on a regular
basis.
To clean a disc, use a micro bre
cleaning cloth and wipe the disc from the
center to the edge in a straight line.
CAUTION!
Do not use solvents such as benzene,
thinner, commercially available cleaners,
or anti-static sprays intended for analog
discs. Since the optical unit (laser) of the
DVD recorder operates at a higher
power than regular DVD or CD players,
cleaning CDs intended for DVD or CD
players may damage the optical unit
(laser). Therefore, refrain from using a
cleaning CD.
Avoid high temperatures, moisture,
water and dust
– Apparatus shall not be exposed to
dripping or splashing.
– Do not place any sources of danger
on the apparatus (e.g., liquid lled objects,
lighted candles).
8
About recycling
These operating instructions have been
printed on non-polluting paper. This
electronic equipment contains a
large number of materials that can be
recycled. If you are disposing of an old
machine, please take it to a recycling
center. Please observe the local
regulations regarding disposal of
packaging materials, exhausted batteries,
and old equipment.
Page 9

General Information
ALL
6
Introduction
Your Philips DVD recorder allows you to
record the TV programs or duplicate
camcorder recordings to a DVD±RW or
DVD±R and play pre-recorded DVDs.
The recordings you make on the
recorder will play on most of the DVD
players and DVD-ROM drives. The
DVD±R discs have to be nalized before
they can be played on other DVD players.
Please take time to read this user manual
before using your DVD recorder. It
contains important information and notes
regarding operation.
Helpful Hints:
– If you have questions or if problems come
up during operation, please see the chapter
‘Troubleshooting’.
– If you need further assistance, please call
the customer support service for your
country. The corresponding telephone
numbers and e-mail addresses are given in
the guarantee booklet.
– Refer to the type plate on the rear or
bottom of the product for identication and
supply ratings.
Accessories supplied
– Remote control and batteries
– Audio/Video (AV) cables
– RF coaxial cable
– Quick Start Guide
– User Manual
Region codes
DVD lms are usually not released at the
same time in all regions of the world,
thus all DVD players are keyed to a
specic region code.
The regional code is shown at the back
panel of this device. If the DVD is
marked with a different region code, it
cannot be played on this device.
Region
China, Calcos Islands,
Walls and Futuna
Islands
DVD that can
be played
English
Copyright notice
The making of unauthorised copies of
copy-protected material, including
computer programmes, les, broadcasts
and sound recordings, may be
infringement of copyrights and constitute
a criminal offence. This equipment
should not be used for such purposes.
9
Page 10
Basic Connections - DVD recorder
AC IN ~
AUDIO
OUT
S-VIDEO
IN
VIDEO IN
TV
ANT OUT
RF OUT
ANT IN
RF IN
English
VCR/Cable Box/
Satellite Receiver
A
B
Step 1: Connecting the
antenna cables
These connections enable you to watch
and record TV programs using the
DVD recorder. If the antenna signal is
connected via a VCR, Cable Box or
Satellite Receiver, ensure that these
devices are turned on in order to watch
or record the cable programs.
Antenna/
cable TV signal
A Connect existing Antenna/Cable TV
signal (or from the Cable Box/Satellite
Receiver {RF OUT or TO TV}) to the
ANTENNA IN jack on the DVD
recorder.
B Use the supplied RF coaxial cable to
connect ANTENNA OUT jack on the
DVD recorder to the antenna input jack
on your TV (VHF/UHF RF IN).
l If you want to connect to a VCR
and/or Cable Box/Satellite Receiver,
see page 13~15 for the complete
connection to your TV.
TIPS: Before making or changing any connections, make sure that all the devices are disconnected
from the power outlet.
10
Page 11
Basic Connections - DVD recorder (continued)
AUDIO
OUT
S-VIDEO
IN
VIDEO IN
TV
Option 1
Option 2
Option 3
English
Step 2: Connecting the
video cable
This connection enables you to view the
disc playback from the DVD recorder.
You only need to choose one of the
options below to make your video
connection.
Option 1: Using Video(CVBS) jack
(good picture quality)
Option 3 : Using Component Video
jack (best picture quality)
AUse the component video cables (red/
blue/green - not supplied) to connect the
Y Pb Pr -OUT jacks on the DVD
recorder to the corresponding
component video input jacks (or labeled
as Y Pb/Cb Pr/Cr or YUV(Y/Pb/Pr)) on
the TV.
B If your TV accepts Progressive Scan signal,
see page 49 for detailed Progressive Scan
set up.
l Use the supplied audio/video cables (yellow
plug) to connect VIDEO (CVBS)-OUT
jack on the DVD recorder to the video
input jack (or labeled as A/V In, Video In or
Composite) on the TV.
Option 2: Using S-Video jack
(excellent picture quality)
l Use an S-video cable (not supplied) to
connect S-VIDEO jack on the
DVD recorder to the S-Video input
jack (or labeled as Y/C or S-VHS) on
the TV.
TIPS: Before making or changing any connections, make sure that all the devices are disconnected
from the power outlet.
IMPORTANT!
The progressive scan video quality is
only available through Y Pb Pr
connection and a progressive TV is
required. It is strongly advised to
complete the DVD recorder
installation rst, before enabling the
progressive scan feature.
11
Page 12
Basic Connections - DVD recorder (continued)
AUDIO
OUT
S-VIDEO
IN
VIDEO IN
TV
DIGITAL IN
English
Option 2
Option 1
AV amplier/
receiver
Step 3: Connecting the
audio cables
This connection enables you to listen to
the sound.
Option 2: Using a Coaxial cable
You can connect the DVD recorder to
an AV amplier/receiver in order to
enjoy multichannel surround sound.
l Use a coaxial cable (not supplied) to
connect the COAXIAL socket on the
Option 1: Using an Audio cable
You can connect the DVD recorder to a
two channel stereo system or receiver in
order to enjoy the stereo sound system.
l Use the supplied audio cable (red/white
ends) to connect AUDIO L/R OUT
jacks to one of the following devices with
the same input jacks.
– a stereo system (for example, TV or
mini system).
– a receiver with two channel analog
stereo.
DVD recorder to the digital input on the
AV amplier/ receiver with a digital multichannel sound decoder.
Before you start operating, set the Digital
Audio Output accordingly (see page 55).
If the Digital Output setting does not
match your stereo’s capabilities, the
stereo may produce a strong, distorted
sound or no sound at all.
Helpful Hint:
– Do not connect your TV’s audio output
jacks to the AUDIO L/R (IN-EXT) jacks on
this DVD recorder as this may cause
unwanted noise.
TIPS: Before making or changing any connections, make sure that all the devices are disconnected
from the power outlet.
12
Page 13

Antenna/
RF
S-VIDEO
OUT
IN
AUDIO
R L
VIDEO
AUDIO
OUT
S-VIDEO
IN
VIDEO IN
TV
cable TV signals
Optional Connections
Back of a Cable Box or
Satellite Receiver
(Example only)
B
English
A
Connecting to a Cable Box or
Satellite Receiver
Option 1
If your Cable Box/Satellite Receiver
has only an antenna output jack
(RF OUT or TO TV),
refer to “Connecting the antenna cables”
on page 10 for the complete connection
to your TV.
C
Option 2
If your Cable Box/Satellite Receiver
has video/audio output jacks,
A Keep the existing antenna connection
from the Cable Box/Satellite Receiver to
your TV.
B Use the audio/video cables to connect
the VIDEO/AUDIO IN-EXT on the
DVD recorder to the matching VIDEO/
AUDIO output jacks on the Cable Box/
Satellite Receiver.
C Use the audio/video cables to connect
the VIDEO/AUDIO OUT on the DVD
recorder to the matching VIDEO/AUDIO
input jacks on the TV.
TIPS: Before making or changing any connections, make sure that all the devices are disconnected
from the power outlet.
13
Page 14

Optional Connections (continued)
VIDEO
IN
•• •
••
AUDIO
L
AUDIO
R
VIDEO
OUT
AUDIO
L
AUDIO
R
VHF/UHF
RF IN
VHF/UHF
RF OUT
SPLITTER
AUDIO
OUT
S-VIDEO
IN
VIDEO IN
TV
English
Antenna/
cable TV signals
A
B
Back of a VCR
(Example only)
C
D
Connecting to a VCR or
other similar device
C Use the audio/video cables to connect
the VIDEO/AUDIO IN-EXT on the
DVD recorder to the matching VIDEO/
AUDIO output jacks on the VCR.
This connection enables you to record
from video tape to a DVD±R/±RW and
allows the VCR to be used for playback if
the DVD recorder is turned off.
A Connect the Antenna/Cable TV signal to
the antenna input (RF IN) jack on the
VCR, then connect the antenna
output(RF out) jack on the VCR to the
ANTENNA IN jack on the DVD
recorder.
B Use the supplied RF coaxial cable to
connect the ANTENNA OUT jack on
the DVD recorder to the antenna input
jack on the TV.
D Use the audio/video cables to connect
the VIDEO/AUDIO OUT on the DVD
recorder to the matching VIDEO/AUDIO
input jacks on the TV.
Helpful Hints:
– You may use the S-VIDEO (Y/C) jack
instead of VIDEO (CVBS) jack if the
connected device has the same S-VIDEO
input/output jack. This video connection
provides better picture quality.
– Most commercial video cassettes and
DVDs are copy-protected and therefore
cannot be recorded.
– Connect the DVD recorder directly to the
TV. If there is a VCR or an additional device
in between, the picture quality may be poor
because of the copy protection system built
into the DVD recorder.
TIPS: Before making or changing any connections, make sure that all the devices are disconnected
from the power outlet.
14
Page 15

AC IN ~
VIDEO
IN
•• •
• •
AUDIO
L
AUDIO
R
VIDEO
OUT
AUDIO
L
AUDIO
R
VHF/UHF
RF IN
VHF/UHF
RF OUT
SPLITTER
RF
S-VIDEO
OUT
IN
AUDIO
R L
VIDEO
AUDIO
OUT
S-VIDEO
IN
VIDEO IN
TV
Antenna/cable
TV signals
A
Optional Connections (continued)
Back of a VCR
(Example only)
B
D
C
Back of a Cable Box or
Satellite Receiver
(Example only)
E
English
D Use the audio/video cables to connect
Connecting to a VCR and
Cable Box/Satellite Receiver
the VIDEO/AUDIO IN-EXT on the
DVD recorder to the matching VIDEO/
AUDIO output jacks on the VCR.
A Connect the Antenna/Cable TV signal to
the antenna input (RF IN) jack on the
VCR.
B Connect the antenna output (RF OUT)
jack on the VCR to the input(RF in) jack
on the Cable Box/Satellite Receiver.Then
connect the RF out on the Cable Box/
Satellite receiver to the ANTENNA IN
jack on the DVD recorder.
C Use the supplied RF coaxial cable to
connect the ANTENNA OUT jack on
E Use the audio/video cables to connect the
VIDEO/AUDIO OUT on the DVD
recorder to the matching VIDEO/AUDIO
input jacks on the TV.
Helpful Hints:
– You may use the S-VIDEO (Y/C) jack
instead of VIDEO (CVBS) jack if the
connected device has the same S-VIDEO
input/output jack. This video connection
provides better picture quality.
the DVD recorder to the antenna input
jack on the TV .
TIPS: Before making or changing any connections, make sure that all the devices are disconnected
from the power outlet.
15
Page 16

Optional Connections (continued)
DV OUT
English
A
OR
Connecting a camcorder to
the front jacks
You can use the front jacks to copy
camcorder recordings. These jacks are
located behind the ap on the right hand
side; it provides convenient connections
for a camcorder.
Option 1: Using DV IN jack
Use this connection if you have a Digital
Video or Digital 8 camcorder. The DV
jack conforms to the i.LINK standard.
It provides the best picture quality.
l Use an i.LINK 4-pin cable (not supplied)
to connect DV IN jack on the DVD
recorder to the appropriate DV OUT
jack on the camcorder.
Before you start operating, press REC
SOURCE on the remote control
repeatedly to select ‘DV’ as the input
channel. For recording, see pages 26~28.
Helpful Hints:
– The DV IN jack does not support a
connection to a Personal Computer.
– It is not possible to record from the DVD
recorder to your camcorder via the DV IN
jack on your DVD recorder.
TIPS: Before making or changing any connections, make sure that all the devices are disconnected
from the power outlet.
Option 2: Using S-VIDEO In or
VIDEO In jack
Use S-VIDEO connection if you have a
Hi8 or S-VHS(C) camcorder. It provides
better picture quality.
Alternatively, you can use VIDEO
connection if your camcorder has only a
single video output (Composite Video,
CVBS).
A Connect the S-VIDEO or VIDEO jack
at the front panel of the DVD recorder
to the corresponding S-VHS or Video
output jack on the camcorder.
B Use an audio cable (red/white ends) to
connect the AUDIO L/R jacks at the
front panel of the DVD recorder to the
audio output jacks on the camcorder.
Before you start operating, press
SOURCE on the remote control
repeatedly to select ‘Front S-VIDEO’ or
‘Front CVBS’ as the input channel,
depending on your connections.
For recording, see pages 26~28.
B
16
REC
Page 17
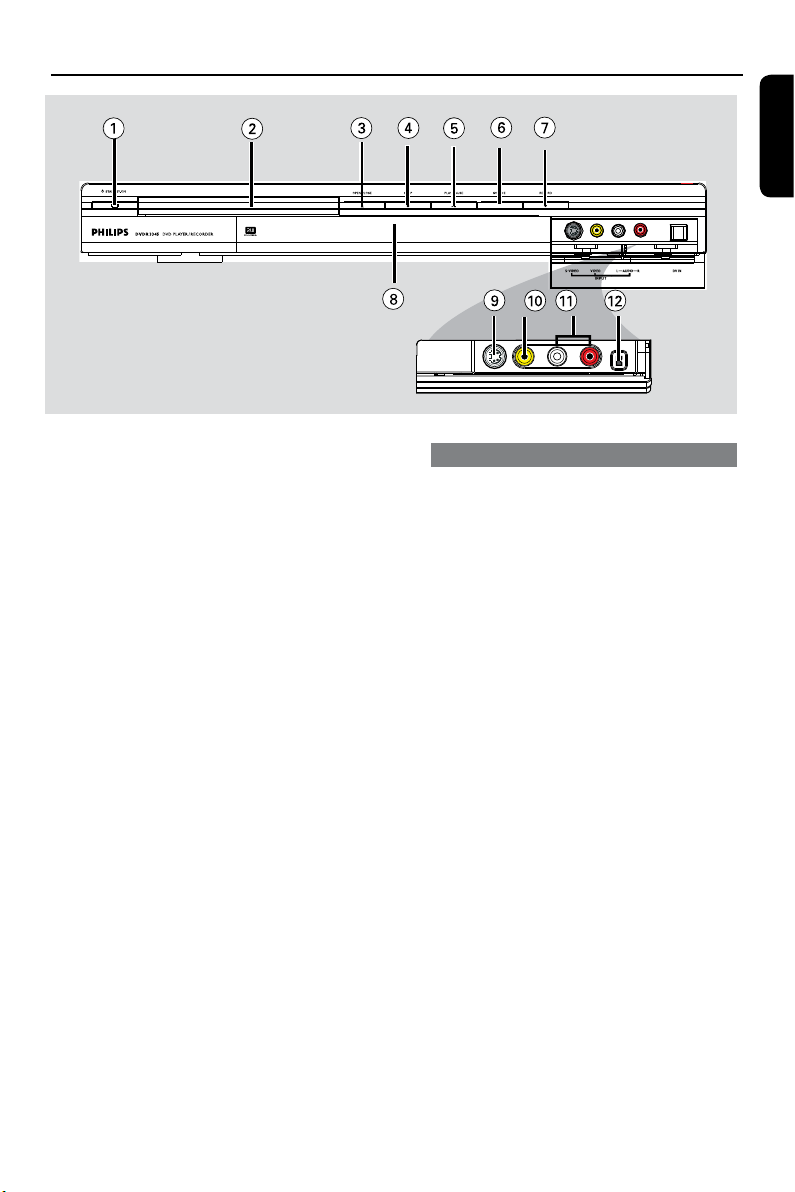
Main Unit
English
a STANDBY-ON 2
– Turns on or off the DVD recorder.
b Disc tray
c OPEN CLOSE ç
– Opens/closes the disc tray.
d n STOP
– Stop playback/recording.
e ÉPLAY/ ÅPAUSE
– Play a disc.
– Pauses the playback or recording.
f SOURCE
– Selects the recorder’s input source.
g RECORD l
– Start recording the current TV channel
or the current video input source.
– Press repeatedly to set up a One Touch
Recording at 30 minutes interval.
h System display panel
– Show information about the current
status of the DVD recorder.
Jacks behind the ap
Flip down the door as indicated by the
OPEN label at the right hand corner.
i S-VIDEO
– S-video input for SVHS/Hi8 camcorders
or SVHS/Hi8 video recorders.
Press REC SOURCE on the remote
control to select ‘Front S-Video’ in order
to view the input source.
j VIDEO
– Video input for camcorders or video
recorders.
Press REC SOURCE on the remote
control to select ‘Front CVBS’ in order
to view the input source.
k L/R AUDIO
– Audio input for camcorders or video
recorders.
l DV IN
– Input for digital camcorders or other
suitable devices using this connector.
Press REC SOURCE on the remote
control to select ‘DV’ in order to view
the input source.
17
Page 18

Remote Control
English
a STANDBY-ON 2
– Turns on the DVD recorder or to
standby mode.
b TIMER
– Enters/exits the timer recording menu.
c SYSTEM-MENU
– Enters/exits the system menu.
d : Cursor buttons for moving to the
left or right.
: Cursor buttons for moving up/
down.
e REC
– Starts recording the current TV channel
f
– Skips to previous or next Chapter/Track.
g TOP MENU (For DVD±R/±RW only)
– Enters the disc editing menu.
h AUDIO
– Selects an audio language (DVD, VCD) or
i SUBTITLE
– Selects a DVD subtitle language.
j REC MODE
– Toggles between recording modes :
This determines the quality of the
l
or the current video input source.
an audio channel.
1, 2, 4 and 6 hour mode.
recording and the amount/length of time
you can record on a DVD±R/±RW.
18
Page 19
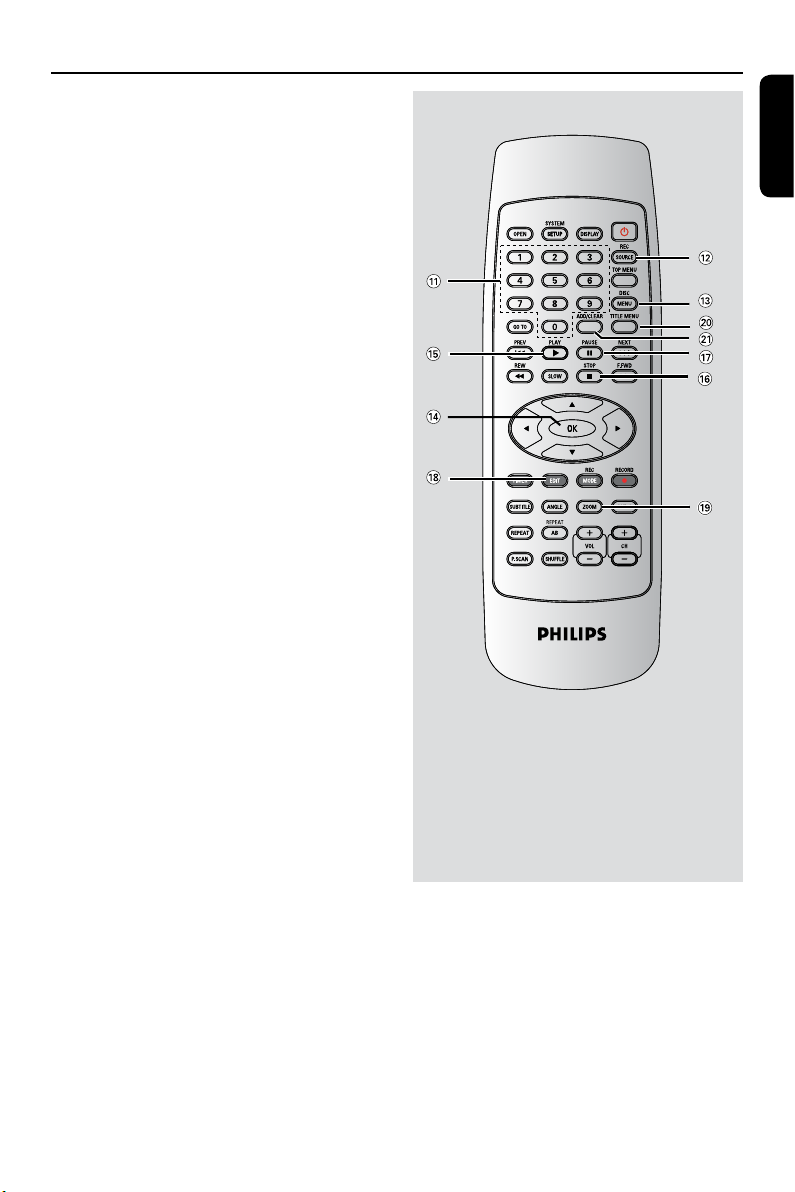
k Numeric keypad
– Selects a chapter/track number to play.
– Selects the recorder’s preset TV tuner
channel.
l REC SOURCE
– Selects the recorder’s input source.
m DISC-MENU
– Access DVD disc menu or Index Picture
screen of a DVD±R/±RW.
– Switch PBC on or off.
n OK
– Stores/conrms an entry.
– Conrms a selection.
o PLAY
– Plays a disc.
p STOP
– Stops playback/recording.
– Access VCD disc menu when PBC is
q
– Pauses the playback or recording.
– Press repeatedly to advance a paused
r EDIT (For DVD±R/±RW only)
– Enters/exits the video editing menu.
s ZOOM
– Enlarges a picture on the TV screen.
t TITLE MENU
– Enters/exits the TITLE menu.
u ADD/CLEAR
– Selects/Removes a track/chapter/le in
– Clears a timer entry.
É
n
turned on (For VCD 2.0/SVCD only).
Å
picture one frame at a time.
the program menu.
Remote Control (continued)
English
19
Page 20
Remote Control (continued)
22
24
25
28
29
31
33
26
23
30
32
27
34
English
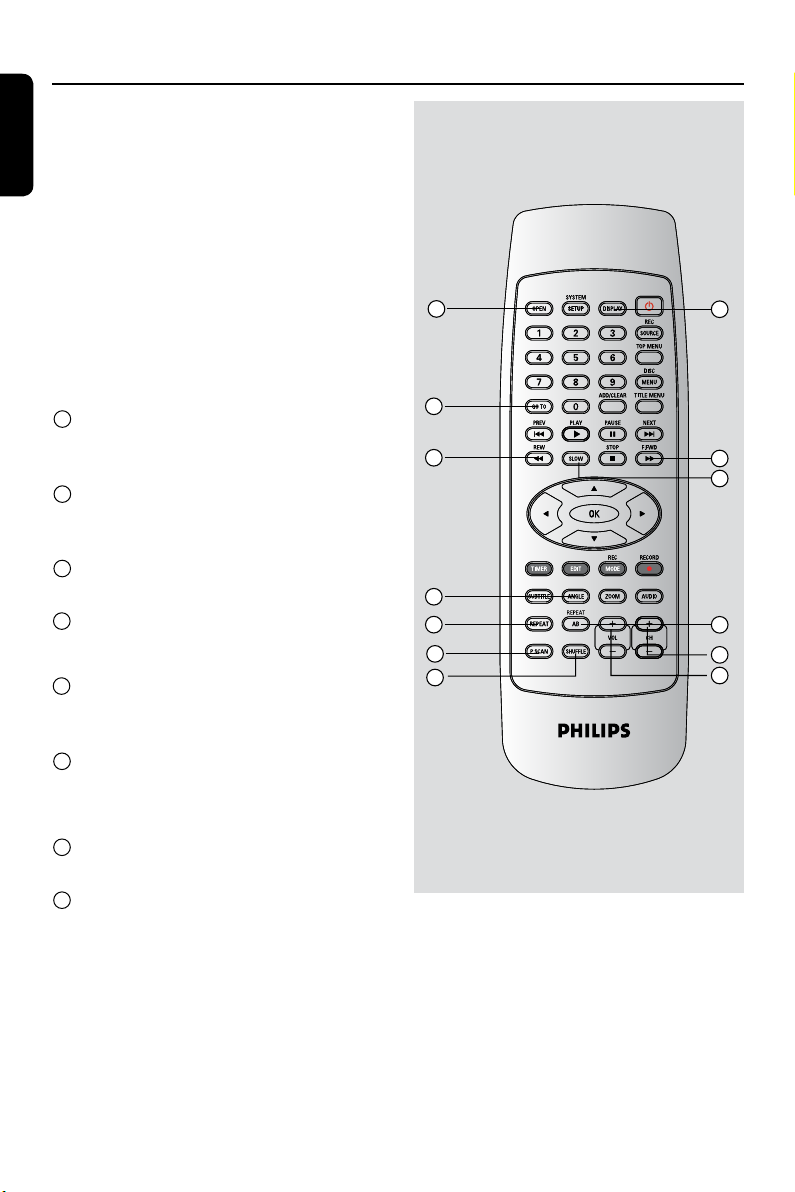
v OPEN
– Open/close the disc tray.
w DISPLAY
– Show and adjust the playback status.
x GO TO
– Go to desired title/chapter/time and play.
y REW
– Fast reverse, there are four modes: 2X,
4X, 16X, 32X.
z F.FWD
– Fast forward, there are four modes: 2X,
4X, 16X, 32X.
27 SLOW
– Slow forward, there are four modes: 1/2,
1/4, 1/8,1/16.
28 ANGLE
– Change camera angle (must be supported
by the disc).
29 REPEAT
– Set repeat functions.
30 REPEAT AB
– Repeat specied program segment.
31 P.SCAN
– Switch the scanning mode of video
output (Progressive/Interlace).
32 CH+/-
– Select TV channel or external signal
source.
33 SHUFFLE
– Play program in random sequence.
34 VOL+/-
– Adjust the audio output volume.
20
Page 21
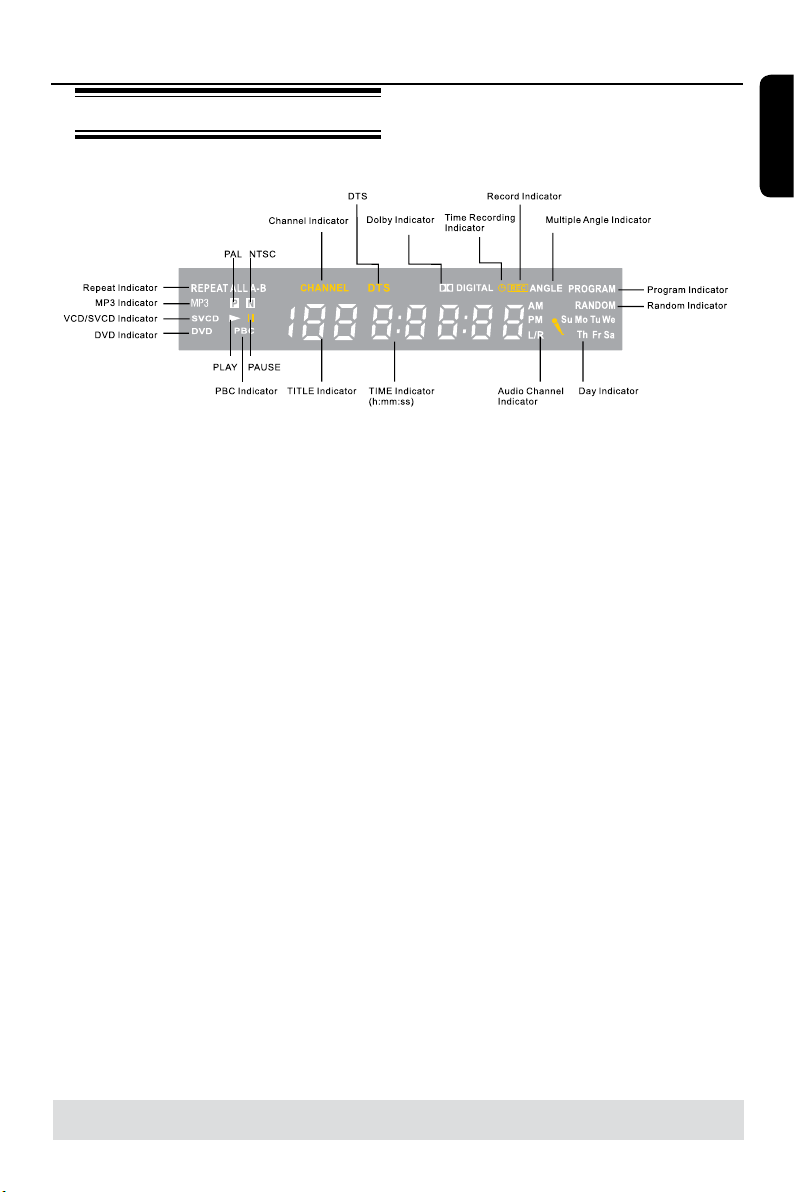
Display window
Display window
English
TIPS: DTS discs are supported via passthrough mode through Digital Coaxial connection only.
21
Page 22
Getting Started
+
1
3
2
English
Step 1 : Inserting Batteries
A Open the battery compartment.
B Insert two batteries type R03 or AAA,
following the indications (+-) inside
the compartment.
C Close the cover.
CAUTION!
– Remove batteries if they are
exhausted or if the remote is not to
be used for a long time.
– Do not use old and new or
different types of batteries in
combination.
– Batteries contain chemical
substances, so they should be
disposed of properly.
Using the remote control to
operate the system
Step 2 : Finding your viewing
channel
A Press STANDBY-ON 2 on the DVD
recorder to turn it on.
B Turn on the TV and set it to the correct
video-in channel. You should see the blue
DVD background screen.
Usually this channel is between the
lowest and highest channels and may be
called FRONT, A/V IN, VIDEO. See your
TV’s manual for more details.
Or, you may go to channel 1 on your
TV, then press the Channel down button
repeatedly until you see the Video In
channel.
Or, the TV remote control may have
a button or switch that chooses different
video modes.
IMPORTANT!
When you complete the
connections and turn on the DVD
recorder for the rst time, it is
advisable that you make several
basic settings.
Please see the following pages on
using the System Menu features
to program TV channels and
menu language settings. This will
improve the performance of this
DVD recorder considerably.
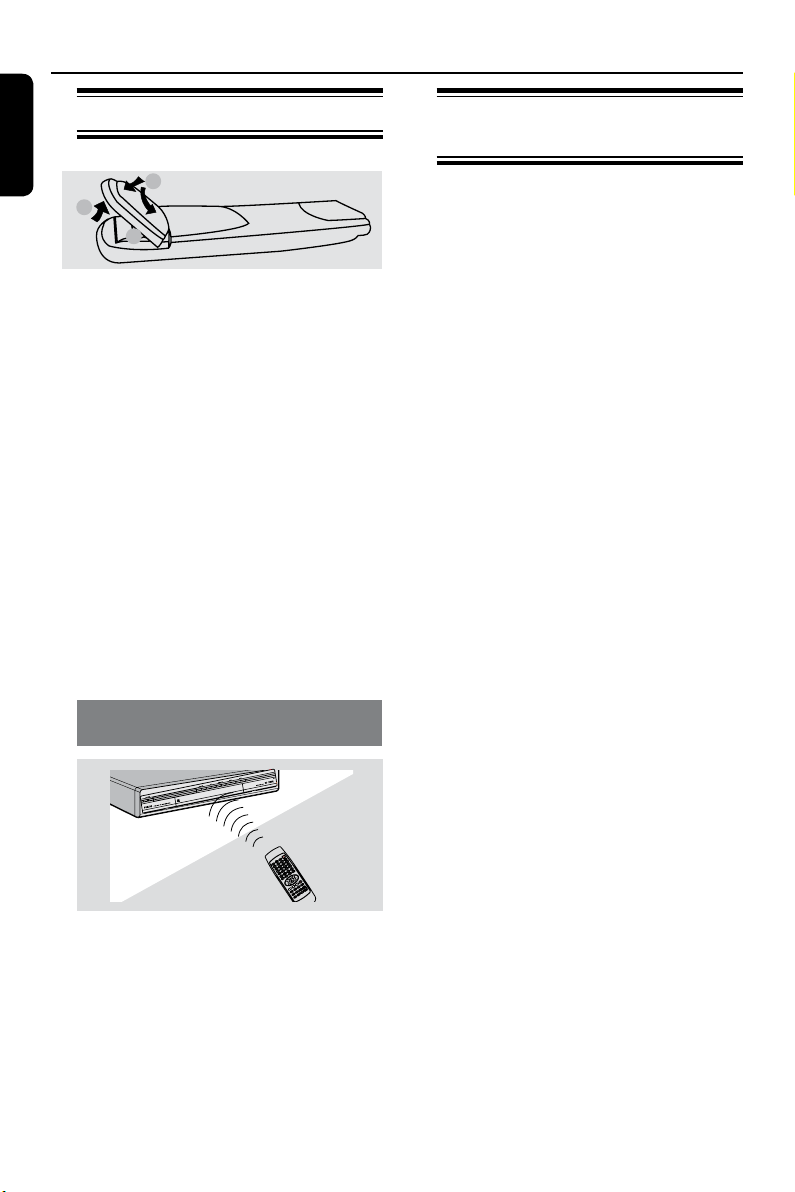
A Aim the remote control directly at the
remote sensor (IR) on the front panel.
B Press the REC SOURCE button on the
remote control to select the mode you
wish to control (for example FrontCVBS).
22
Page 23

Getting Started (continued)
SYSTEM
MENU
OK
Step 3 : TV channel
programming
Before the DVD recorder can start
recording the TV channel programs,
you need to search for the available TV
channels and store them in the recorder.
Note: Make sure you have successfully
made all the required connections to the
DVD recorder, the TV and Satellite
Receiver/ Cable Box (if any) and switched
them on.
Tuner settings can only be changed
when there is no disc in the disc tray.
Automatic TV channel search
This will automatically scan all the
receivable TV channels and the cable
programs from the Cable Box/Satellite
Receiver and store these channels on the
DVD recorder.
A Press SYSTEM-MENU on the remote
control.
The system menu appears on the TV.
B Use keys to highlight
{ System Menu - Channel Setup }
and press OK.
C Use keys to highlight { Channels
Search } and press OK.
The automatic TV channel search starts.
This process may take several minutes.
Once complete, the total number of
channels found appears on the TV.
English
TIPS: Press to go back to previous menu item.
Press
SYSTEM-MENU to exit the menu.
23
Page 24

Getting Started (continued)
OK
CANCEL
English
Modifying Channel Information
You can set a TV channel to your
preference and improve the reception
and the sound quality of the TV channel.
A Press SYSTEM-MENU.
The system menu appears.
B Use keys to highlight { System
Menu - Channel Setup } and press
OK.
C Use keys to highlight { Modify
Channel Information } and press OK.
The channel menu appears.
D Use keys to select one of the
options and press OK.
{ Name }
You can use the numeric keypad 0-9
to select the channel preset number
which you wish to change.
– Use keys to change alphabet/
number and use keys to select
different entry elds, then press OK to
conrm.
{ Scan Mode }
Select TV channel search mode based on
channel allocation or frequency.
– Use keys to select { Channel },
{ S-Channel } (Special Channel) or
{ Frequency }, then press OK to conrm.
{ Frequency }
Shows the frequency of the current TV
channel.
– If required, use keys to start the
automatic frequency search and press
OK to conrm.
TIPS: Press to go back to previous menu item.
Press
SYSTEM-MENU to exit the menu.
24
{ Sound mode }
Set the TV system that produces the
least distortion of picture and sound.
– Use keys to select a suitable sound
mode, then press OK to conrm.
(See chapter “TV System Guide” at the
back of this manual for more information).
{ Skip }
Select this to set the channel to be
skipped.
The skipped channels can only be
accessed by pressing the corresponding
number button on the remote control.
– Use
keys to choose { Yes } if you
wish to skip this channel, then press OK
to conrm.
{ Fine Tune }
Select this to ne-tune the TV channel
manually if the reception is poor.
– Use keys to adjust the frequency.
E Once complete, select
in the
menu and press OK to conrm and exit
to the previous menu page.
If you do not wish to save any
changes, select
TIPS: By default, PAL D/K is TV System for most parts of China.
Change to PAL I if you are sure your area support PAL I.
and press OK.
Page 25

Getting Started (continued)
Sorting the TV channels
You may not agree with the sequence in
which the individual TV channels have
been allocated to the program
numbers. You can use this function to
rearrange all the stored TV channels.
A Press SYSTEM-MENU.
The system menu appears.
B Use keys to highlight
{ System Menu - Channel SEARCH }
and press OK.
C Use keys to highlight
{ Sort Channels } and press OK.
The list of TV channel programs
appears.
D Use keys to highlight the channel
you want to change and press OK or ..
The selected channel will move to the
right side of the screen.
E Use keys to shift the TV channel to
the desired position and press OK or .
The selected channel will be inserted
before the current position.
F Repeat steps D~E until you have sorted
all the TV channels you want.
Step 4 : Setting the time &
date
If the DVD recorder has not set the time
and date correctly, set the clock manually
by following the steps below.
A Press SYSTEM-MENU.
The system menu appears.
B Use keys to select
{ System Menu - Clock } and press
OK to conrm.
C Press OK to set { Date (dd/mm/yy) }.
D Use keys to change number and use
keys to select different entry elds,
then press OK to conrm.
l Alternatively, you can key in the numbers
using the numeric keypad 0-9 on the
remote control.
E Press OK to conrm.
F Move to { Time (hh:mm:ss) } and
repeat step D~E.
English
TIPS: Press to go back to previous menu item.
Press
SYSTEM-MENU to exit the menu.
25
Page 26

Recording
English
Discs for recording
Several formats of DVD recordable discs
can be used with this DVD recorder:
DVD±RW (DVD ReWritable)
– Discs that are re-writable can be used
for multiple recordings once existing data
is erased.
DVD±R (DVD Recordable)
– Discs can only be used for a single
recording. Each new recording is always
added at the end of all previous
recordings as existing recordings cannot
be overwritten.
– Editing can be made on any DVD±R
discs as long as they have not been
nalized. It is also possible to create
additional chapter markers.
– You can also delete unwanted
recordings. However, the disc space
occupied by the deleted recordings
cannot be recovered for further
recording.
– To play a DVD±R on other DVD
player, it must be nalized (see page 34
“Playing your recordings (DVD±R) on
other DVD players”). After this is done,
no more data can be added to the disc.
IMPORTANT!
Unrecordable pictures
Television programs, lms, video tapes,
discs, and other materials may be
copy-protected and therefore cannot be
recorded on this recorder.
Recording settings
The default recording settings allow you
to set the auto chapter markers,
preferred recording input source and
recording mode. Any changes made using
the remote control will only apply to the
current recording settings, the default
recording settings will remain for the
next recording.
A Press SYSTEM-MENU on the remote
control.
The system menu appears on the TV.
B Use keys to select
{ System Menu - Record } and press
OK to conrm.
C Use keys to select the setting you
wish to change and press OK to conrm.
Instructions and explanation of the
options are provided in the following
pages.
D To exit, press SYSTEM-MENU.
TIPS: Press to go back to previous menu item.
Press
SYSTEM-MENU to exit the menu.
26
Page 27

Recording (continued)
English
Auto Chapter Markers
You can insert chapter markers within a
title during recording. This lets you
access specic points on the recorded
disc as you would choose a chapter on
other DVDs.
A Use keys to select { Auto Chapter
Marker } and press OK to access its
options.
B Use keys to select one of the
options.
{ Off }
Disable this feature.
{ On }
A chapter marker will be automatically
inserted during recording. The interval
depends on the recording mode selected.
C Press OK to conrm.
Default Quality
The recording mode denes the picture
quality of recordings and the maximum
recording time for a disc.
This function can also be accessed via the
REC MODE button on the remote
control.
A Use keys to select { Default
Recording Quality } and press OK to
access its options.
B Use keys to select one of the
following recording mode.
Record
Mode
Picture Quality
Maximum Recording
Time per Disc
1 Hour Mode
2 Hour Mode
4 Hour Mode
6 Hour Mode
HQ(High quality)
SP(DVD quality-Standard Play)
EP(VHS quality-Extended Play)
SLP(VHS quality-Super Long Play)
1 hour
2 hours
4 hours
6 hours
C Press OK to conrm.
27
TIPS: The underlined option is the factory default setting.
Press
to go back to previous menu item. Press SYSTEM-MENU to exit the menu.
Page 28

Recording (continued)
REC
SOURCE
STOP
REC
English
Manual recording
Use this feature to start recording
immediately (e.g., to record a TV show
already in progress).
{ Rear CVBS }
Input source from the device connected to the
VIDEO (CVBS)-IN-EXT and AUDIO L/R jacks
on the back panel.
{ Rear S-Video }
Input source from the device connected to the
S-VIDEO (Y/C)-IN-EXT and AUDIO L/R jacks
on the back panel.
{ DV }
Input source from the device connected to DV
IN jack at the front panel.
{ YUV(Y/Pb/Pr) }
Input source from the device connected to the
YUV(Y/Pb/Pr) jacks on the back panel.
TIPS: Cannot record if YUV(Y/Pb/Pr) source
is P.SCAN singnal input.
D Press REC l to start recording.
The recording will start automatically
after the last recording on the
DVD±R/±RW.
E To stop the recording, press STOP n.
A Turn on the TV power. Select the
correct Video In channel at the TV.
B Insert a DVD±R/±RW into the DVD
recorder.
C Press REC SOURCE on the remote
Pausing a recording
A During a recording, press Å.
You can use this function to avoid
recording commercials.
B To resume recording, press REC l.
control to select { Tuner }, then use
CH+ and CH- keys to select the TV
channel you wish to record.
l To record from an external device, press
REC SOURCE repeatedly to select the
correct input channel that matches the
jack which is connected to the DVD
recorder.
Select from one of the following
recording sources:
{ Front CVBS }
Input source from the device connected to the
VIDEO and AUDIO L/R jacks on the front
panel.
{ Front S-Video }
Input source from the device connected to the
S-VIDEO and AUDIO L/R jacks on the front
panel.
TIPS: Ensure that there is sufcient space available on the DVD±R/±RW before recording.
You have to nalize the DVD±R, before it can be played on other players, see page 35.
One Touch Recording automatic turn-off
A Follow the steps A~C of “Manual
Recording” on page 28.
B Press REC l twice to start a 30 minutes
recording. Each time you press REC l
after that, you will add 30 minutes to the
recording time.
The recorder will stop recording at
the designated end time and turn off
automatically.
l Press STOP n if you wish to stop the
recording.
28
Page 29

Recording (continued)
TIMER
OK
About timer recording
Use ‘Timer Recording’ to automatically
start and stop a recording at a later date/
time. The DVD recorder will tune to the
right program channel and begin
recording at the specied time.
To make a timer recording, your
DVD recorder needs to know:
– The date you want to make the
recording.
– The recording input source.
– The start and stop time of the
recording.
– The recording quality, see
page 27.
Timer recording (manually)
A Turn on the TV power. Select the
correct Video In channel at the TV.
B Press TIMER on the remote control.
The timer schedule list appears.
C Press OK on the remote control.
The timer editor menu appears.
D Use keys to select an entry in the
menu and press OK to enter its options.
English
TIPS: Ensure that there is sufcient space available on the DVD±R/±RW before recording.
You have to nalize the DVD±R, before it can be played on other players, see page 35.
29
Page 30

Recording (continued)
OK
CANCEL
English
{ Source }
– Use keys to select the recording input
source.
{ Rec Mode }
– Use keys to select your option.
See pages 26~27 on “Recording settings Default Recording Mode”).
{ Mode }
– Use keys to select { Once },
{ Daily }, { Weekly }, { Mon-Fri } (Monday
to Friday, ) { Mon-Sat } (Monday to Saturday)
or { Weekend } (Saturday and Sunday)
recordings.
{ Date }
– Use keys or the numeric keypad
0-9 to enter the date for recording.
{ Start }
– Use keys or the numeric keypad
0-9 to enter the start time of recording.
{ End }
– Use keys or the numeric keypad
0-9 to enter the end time of recording.
E Select
The system will store the timer entry
in the menu and press OK.
and return to the timer schedule list.
l To cancel the above timer setting, select
in the menu and press OK.
F Press TIMER to exit the menu.
G Insert a DVD±R/±RW into the DVD
recorder.
H Press STANDBY-ON to turn off the
DVD recorder.
If the DVD recorder is not in standby
mode, a warning message will appear
three minutes before the recording
starts.
If you ignore the warning message,
the DVD recorder will automatically
switch to standby mode to prepare for
timer recording at the designated time.
The ‘ TIMER ’ icon will light up on
the display panel if a timer recording is
set.
Helpful Hint:
– Set the timer recording one minute ahead
of the program’s start time. This helps to
ensure the entire program is recorded as
the disc requires about 30 seconds to
prepare for recording.
Setting a timer recording from
an external Cable Box/ Satellite
Receiver
If you have a Satellite Receiver/Cable Box
connected to this DVD recorder via the
S-VIDEO (Y/C) or VIDEO (CVBS) (see
page 13), follow the steps described
below to program the recordings.
A Select the channel you want to record at
the Satellite Receiver/Cable Box.
B Program the recording with the required
information. Follow the steps A~H of
“Timer Recording (manually)” on pages
29~30.
{ Source }
– Use keys to select { Rear
S-Video } or { Rear CVBS } as the input
channel and press OK to conrm.
C Leave the Satellite Receiver/Cable Box on
for the recording.
TIPS: Ensure that there is sufcient space available on the DVD±R/±RW before recording.
You have to nalize the DVD±R, before it can be played on other players, see page 35.
30
Page 31

Recording (continued)
OK
Changing/ Deleting a timer
recording
A Turn on the TV power. Select the
correct Video In channel at the TV.
B Press TIMER on the remote control.
The timer schedule list appears.
C Use keys to select a timer program
which you want to change/ delete.
D To delete the timer entry, press
ADD/CLEAR on the remote control.
E To change the timer schedule, press OK
to enter the timer editor menu of the
selected timer program.
Watching another TV channel
during recording
English
You can watch another TV channel while
recording is in progress by using the TV’s
remote control to change the TV
channels.
Helpful hint:
– Remember to turn the TV back to its video
input channel if you want to watch the TV
channel through the DVD recorder or
playback the recorded disc.
F Select the entry eld and make the
necessary changes.
G Once complete, select
menu and press OK to save the changes.
H Press TIMER to exit the menu.
TIPS: Ensure that there is sufcient space available on the DVD±R/±RW before recording.
You have to nalize the DVD±R, before it can be played on other players, see page 35.
in the
31
Page 32

TOP MENU
REC
OK
Editing/Finalizing Recording
English
About Disc editing
Accessing disc editing menu
This DVD recorder offers various disc
edit options for various disc types. You
can change the disc content and settings
of a recorded DVD±R/±RW from the
disc editing menu. The edited contents
may not be available if you play the disc
on another DVD player.
The displayed options in the disc editing
menu differ depending on the type of
disc.
{ Play }
Start playing from the beginning of the disc.
{ Erase Disc } - DVD±RW only
Erase all the recordings in the disc.
{ Rename Disc }
Change the name of the disc.
{ Make Compatible } - DVD±RW only
Make the recording contents compatible on
other DVD players.
{ Record New Title }
Start recording from the last empty title in the
disc.
A Insert a recorded DVD±R/±RW into the
DVD recorder.
The Index Picture screen appears on
the TV.
B Press TOP MENU on the remote
control.
The disc editing menu appears. The
edit options are varied for DVD±R and
DVD±RW.
{ Overwrite Disc } - DVD±RW only
Start a new recording from the beginning of
the disc; all the recorded content will be
overwritten.
{ Lock/Unlock Disc } - DVD±RW only
Lock or unlock a disc to prevent accidental
erasure or changes being made.
{ Finalize Disc } - DVD±R, DVD-RW
Finalize the disc to enable playback on other
DVD players. Further recording and editing to
the disc are not allowed. It is not possible to
unnalize the disc.
C Use keys to access different options
and OK to select.
Instructions and explanation of the
options are provided on the following pages.
D To exit, press TOP MENU to go back
to the disc Index Picture screen.
TIPS: No further recording and editing can be carried out on a nalized DVD±R.
Press to go back to the previous menu. Press DISC MENU to exit.
32
Page 33

BkSp
DELETE
SPACE
CAPS
CLEAR
OK
EXIT
YES
NO
Editing/Finalizing Recording (continued)
Rename disc
The original disc name is generated
automatically by the DVD recorder. You
can change the disc name by following
the steps below.
A Press TOP MENU, then use keys
to select { Rename Disc } and press OK.
The keyboard screen appears.
B Use keys to highlight a
character on the keyboard and press OK
to select.
The maximum input is up to 9
characters.
l You can use the following keys on the
keyboard screen to edit your input:
: to remove the character to
the left of the cursor.
: to remove the character to
the right the cursor.
: to create a space between
characters.
: to toggle between upper and
lower case characters.
: to clear the entry eld
completely.
C To conrm your entry, select
the keyboard and press OK.
The info panel is now updated.
l To cancel the changes, select
the keyboard and press OK.
on
Erase disc (DVD±RW only)
This erases the content of the
DVD±RW including those that was not
recorded on this DVD recorder. Once
the existing content is erased, it can be
used for recording.
A Press TOP MENU, then use keys
to select { Erase Disc } and press OK.
A warning message will appear.
B Select
in the menu to proceed or
, to abort, then press OK to
conrm.
Record new title
This function allows you to start a new
recording at the remaining empty space
in the DVD±RW.
A Press TOP MENU, then use keys
to select { Record New Title } and
press OK.
B Select the source you want to record
from and press REC l to start
recording.
on
Overwrite disc (DVD±RW only)
This function allows you to start a new
recording from the beginning of a
DVD±RW regardless of the contents of
the disc.
A Press TOP MENU, then use keys
to select { Overwrite disc } and press
OK.
B Select the source you want to record
from and press REC l to start
recording.
English
TIPS: No further recording and editing can be carried out on a nalized DVD±R.
Press to go back to the previous menu. Press DISC MENU to exit.
33
Page 34

YES
NO
Editing/Finalizing Recording (continued)
English
Make compatible (DVD±RW only)
The edited DVD±RW may still display
the original titles or hidden scenes when
played back on other DVD players. This
function allows you to make an edited
DVD±RW compatible with other players.
l Press TOP MENU, then use keys to
select { Make Compatible } and press
OK to conrm.
Helpful Hint:
– If the option {Compatible} is not available
for selection, it means that the disc is already
compatible.
Lock/Unlock disc (DVD±RW only)
You can choose to protect the recorded
DVD±RW in order to prevent accidental
loss of recordings.
A Press TOP MENU, then use keys to
select { Lock Disc } and press OK.
The disc is locked for this DVD
recorder only.
When the disc is locked, the option in
the disc editing menu will change to
{ Unlock Disc }.
B If you want to overwrite or edit on the
protected disc, select { Unlock Disc }.
Finalize disc (DVD±R,DVD-RW only)
l Press TOP MENU, then use keys to
select { Finalize Disc } and press OK.
Playing your recordings
(DVD±R) on other DVD
players
It is necessary to nalize a DVD±R or
DVD-RW disc before you can play it on
any other DVD player. Otherwise, the
DVD±R or DVD-RW will only playback
on this DVD recorder.
After a DVD±R or DVD-RW disc
has been nalized, no further
recordings or editing can be made
to it. Make sure that you have
completed all the recordings and
editing before nalizing the disc.
A Press TOP MENU, then use keys to
select { Finalize Disc } and press OK.
A warning message will appear.
B Select
to start the process.
Finalization will take a few minutes.
Do not try to open the disc tray or turn
the power off as this may render the disc
unusable.
C Select
in the menu and press OK
to abort.
TIPS: No further recording and editing can be carried out on a nalized DVD±R.
Press to go back to the previous menu. Press DISC MENU to exit.
34
Page 35

Editing/Finalizing Recording (continued)
About title editing
You can change the individual title
information or delete a title (recording)
in a recorded DVD±R/±RW. If a DVD±R
has been nalized, it cannot be edited.
The displayed options in the title editing
menu differ depending on the type of
disc.
{ Play Title }
Start playing a recording.
{ Erase Title } - DVD±RW only
Delete the title (recording).
{ Edit Title }
Access video editing menu.
{ Rename Title }
Change the name of the recording.
{ Overwrite Title } - DVD±RW only
Start a new recording, the existing title
(recording) will be overwritten.
{ Append Title }
Insert a new recording to the last existing
recording.
{ Overwrite Disc }
Overwrite from existing selected title onwards
to the end of the disc.
Accessing title editing menu
A Insert a recorded DVD±R/±RW into the
DVD recorder.
The Index Picture screen appears on
the TV.
l During playback, press DISC MENU to
access the Index Picture screen.
B Use keys to highlight a title
(recording), and press .
The title editing menu appears.
C Use keys to access different options
and OK to select.
Instructions and explanation of the
options are provided in the following
pages.
D To exit, press .
English
Editing video
This feature allows access to the video
editing menu. See “About video editing”
on pages 37~39 for more information.
l In title editing menu, use keys to
select { Edit Title } and press OK.
The video editing menu appears.
The DVD recorder will play the
selected title.
TIPS: No further recording and editing can be carried out on a nalized DVD±R.
Press to go back to the previous menu.
35
Page 36

Editing/Finalizing Recording (continued)
BkSp
DELETE
SPACE
CAPS
CLEAR
OK
EXIT
YES
NO
English
Rename title
The original title name is automatically
generated by the DVD recorder. You can
give a new name to the title by following
the steps below.
A In title editing menu, use keys to
select { Rename Title } and press OK.
The keyboard screen appears.
B Use keys to highlight a
character and press OK to select.
The maximum input is up to 9
characters.
l You can use the following keys on the
keyboard screen to edit your input:
: to remove the character to
the left of the cursor.
: to remove the character to
the right the cursor.
: to create a space between
characters.
: to toggle between upper and
lower case characters.
: to clear the entry eld
completely.
C To conrm your entry, select
the keyboard and press OK.
The info panel is now updated.
l To cancel the changes, select
the keyboard and press OK.
Erase title
You can delete a specic title (recording)
from the disc. However, for DVD±R, the
deleted space cannot be used for further
recording.
on
on
Overwrite title (DVD±RW only)
This function allows you to record a new
title from the beginning of the current
title in the DVD±RW.
A In title editing menu, use keys to
select { Overwrite Title } and press
OK.
B Select the source you want to record
from and press REC l to start
recording.
Overwrite from the selected title
You can choose to overwrite only the
recordings from a selected title to the
end of the disc.
A In video editing menu, use keys to
select { Overwrite Disc } and press OK
to delete.
Append recording
This function allows you to append
recording to the last existing title.
A In title editing menu, use keys to
select { Append Title } and press OK.
B Press REC SOURCE to select the input
channel to append.
C Press REC l to start append recording.
Warning! Once the recording has
started, any prior recording from the
point of the playback onwards will be
overwritten.
D To stop append recording, press
STOP n.
A In title editing menu, use keys to
select { Erase Title } and press OK.
A warning message will appear.
B Select
in the menu to proceed or
to abort, then press OK to
conrm.
TIPS: No further recording and editing can be carried out on a nalized DVD±R.
Press to go back to the previous menu.
36
Page 37

EDIT
PLAY
OK
Editing/Finalizing Recording (continued)
About video editing
After a recording has been made, this
DVD recorder allows you to edit the
video content. You can add/delete
chapter markers, hide unwanted scenes,
change the picture in the index picture
screen and split one title (recording) into
two.
When you playback a recording in video
edit mode, the entire recording will be
played back including hidden scenes.
The edit functions available in the disc
editing menu are:
{ Title }
Select a title (recording) to play.
{ Chapter }
Select a chapter within the selected title.
{ Play }
Select to playback a chapter.
{ Chapter Marker }
Insert a chapter marker in the recording or
erase a chapter marker to combine two
chapters.
{ Hide Chapter }
Hide the unwanted scene in the recording.
{ Index Picture }
Select a scene in the recording as the index
picture screen.
{ Split Title }
Divide the recording into two under
separate titles.
{ T-Elapsed:x:xx:xx }
Display the elapsed time.
Accessing video editing menu
English
A Insert a recorded DVD±R/±RW into the
DVD recorder.
The Index Picture screen appears on
the TV.
B Use keys to select a title (recording).
C Press PLAY to start playback.
D Press EDIT on the remote control.
The video editing menu appears.
E Use keys to access different options
and press OK to select.
Instructions and explanation of the
options are provided in the following
pages.
F To exit, press EDIT.
TIPS: No further recording and editing can be carried out on a nalized DVD±R.
Press to go back to the previous menu.
37
Page 38

Editing/Finalizing Recording (continued)
Title
Chapter
Title
Chapter Chapter Chapter Chapter
chapter markers
English
Selecting a title
It shows the current title and the total
number of titles in the disc. It also allows
you to select another title.
A During playback, press EDIT to display the
video editing menu, then use keys to
select
{ Title } and press OK.
B Use the numeric keypad 0-9 to key in
a title and press OK.
The DVD recorder will play the
selected title.
Selecting a chapter
It shows the current chapter and the
total number of chapters in the title. It
also allows you to select another chapter
within the title.
A During playback, press EDIT to display
the video editing menu, then use
keys to select { Chapter } and
press OK.
B Use the numeric keypad 0-9 to key in
the chapter and press OK.
The DVD recorder will play the
selected chapter.
Selecting a playback mode
You can fast forward/fast backward at
two, four, eight, sixteen, or thirty two
times the normal playback speed. You
also can slow forward at 1/2, 1/4, 1/8, or
1/16 time the normal playback.
A During playback, press EDIT to display
the video editing menu, then use
keys to select { Play } and press
OK.
B Use keys to select a playback mode
and press OK.
Creating chapter marker
You can create a chapter by inserting
chapter marker at any point within a title
during playback. This will allow you to
access a specic point in the recording
easily or set a chapter you wish to hide.
A During playback, press EDIT to display
the video editing menu, then use keys
to select
{ Chapter Marker } and
press OK.
B Use keys to select one of the
options and press OK to conrm.
{ Insert Chapter Marker }
Select this to insert a new chapter marker at
the current point of playback.
{ Delete Chapter Marker }
Select this to delete the current chapter
marker (it refers to the closest marker before
the current point of playback).
The current chapter will then combine with
the chapter before it.
{ Delete All Chapter Marker }
Select this to delete all the chapter
markers in the current title.
TIPS: No further recording and editing can be carried out on a nalized DVD±R.
Press to go back to the previous menu.
38
Page 39

Editing/Finalizing Recording (continued)
Hiding an unwanted chapter
You can choose to hide certain scene
from playback (e.g. skipping a commercial
scene) or make it visible again.
A Create a chapter marker at the scene
you are going to hide. ( See previous page
on “Insert Chapter Marker”).
B Select the chapter you want to hide and
start playback. ( See previous page on
“Selecting a chapter”).
C During playback, press EDIT to display
the video editing menu, then use
keys to select { Hide Chapter }
and press OK.
The current chapter will be hidden.
l If the video editing menu does not show,
press EDIT on the remote control.
To unhide a chapter
A Press EDIT on the remote control
during playback.
The video editing menu appears.
While in editing mode, the hide
chapter will play.
BUse keys to select { Unhide
Chapter } and press OK.
The current chapter will be visible
during playback.
Changing Index Picture
The index picture is the picture of the
title you will see when the DVD recorder
loads up the Index menu. Normally, the
rst frame of a recording is shown as the
title’s index picture.
l Press EDIT to display the video editing
menu, then use keys to select
{ Index Picture } and press OK
to select the current scene as the index
picture for the title.
Splitting a title (DVD±RW only)
You can divide the current title into two
new titles. Each of these titles is
characterized by its own index picture.
Warning! Once a title is divided, it
cannot be reversed.
l During playback, press EDIT to display
the video editing menu, then use
keys to select { Split Title } and
press OK to divide the title at the
current playback position.
A new title will be shown at the Index
Picture screen.
English
Helpful Hint:
– All the hidden chapters will be played
back while in video editing mode.
TIPS: No further recording and editing can be carried out on a nalized DVD±R.
Press to go back to the previous menu.
39
Page 40

Playback
ReWritable
Recordable
English
Playable discs
IMPORTANT!
– If the inhibit icon (Error) appears
on the TV screen when a button is
Using this DVD Recorder, you can play
and record on the following discs:
Recording and Playback
DVD±RW (DVD Rewritable);
can be recorded on over and
over.
DVD±R (DVD Recordable);
can be recorded only once.
Playback only:
DVD Video (Digital Versatile
pressed, it means the function is not
available on the current disc or at
the current time.
– DVD discs and players are
designed with regional restrictions.
Before playing a disc, make sure the
disc is for the same region as your
player.
– Do not push on the disc tray or
put any objects other than discs on
the disc tray. It may cause the disc
player to malfunction.
Disc)
CD-RW (CD-Rewritable)
Inserting a disc
Audio/ MP3/ JPEG contents
A Press STANDBY-ON to turn on the
CD-R (CD-Recordable)
Audio/ MP3/ JPEG contents
DVD recorder.
B Press OPEN CLOSE ç on the front of
the DVD recorder.
Audio CD (Compact Disc
Digital Audio)
MP3-Disc
Video CD
(Formats 1.0, 1.1, 2.0)
Super Video CD
The disc tray opens.
C Carefully place the disc into the tray with
the label facing up, then press
OPEN CLOSEç.
Make sure the disc label is facing up.
For double-sided discs, load the side
which you want to play facing up.
D Turn on the TV power. Select the correct
Video In channel at the TV (see page 23).
E Playback will start automatically or a
dialog will appear on the TV (see next
page).
TIPS: Some discs cannot be played on this DVD recorder due to the conguration and characteristics of the disc,
or due to the condition of recording and authoring software.
40
Page 41

Playback (continued)
Starting disc playback
l Playback will begin automatically. If the
disc has its own menu this will be loaded,
otherwise the DVD recorder will launch
an index screen.
l If the pin code entry dialog appears on
the TV, this means that the parental
control was activated for the inserted
disc (see page 55).
Use the numeric keypad 0-9 on the
remote control to enter your pin code
(password).
l For more playback features, see pages
47 ~ 50 “Additional Playback Features”.
Playing a DVD video disc
The DVD disc is usually formatted with a
disc menu. You may have to make your
selection (e.g., subtitle or audio language)
within the disc menu.
A Insert a DVD disc.
If the disc menu appears on the TV
l Use numeric keypad 0-9 to input your
selection or use keys to select
a play option and press OK to start
playback.
Playing a (Super) Video CD
(Super) Video CDs may feature ‘PBC’
(Play Back Control). This allows you to
play the video CDs interactively,
following the menu on the display.
A Insert a (Super) Video CD.
If the ‘PBC’ is on, the disc index
menu will appear on the TV
B Use numeric keypad 0-9 to input your
selection or to select a play option.
l Press STOP on the remote control to
return to the previous menu.
l To turn on/off the Playback Control
mode, press DISPLAY twice on the
remote control during playback to access
the VCD display menu. Then use
keys to select
{ PBC On } or { PBC Off }.
C To stop playback, press STOP n.
Playing an audio CD
A Insert an audio CD.
Playback starts automatically.
B To stop playback, press STOP n.
The track number and elapsed playing
time will appear on the display panel.
English
To select the previous or next
chapter/title marker
l During playback, press DISPLAY on the
remote control to access the DVD
display menu. Then use keys to
select { Title } or { Chapter } and input
your title/chapter number using the
numeric keypad 0-9.
B To stop playback, press STOP n.
TIPS: Some discs cannot be played on this DVD recorder due to the conguration and characteristics of the disc,
or due to the condition of recording and authoring software.
Playing a DVD±R/±RW disc
A Insert a DVD±R/±RW disc.
The Index Picture screen appears.
B Use keys to select a title and press
PLAY to start playback.
C To stop playback, press STOP n.
Helpful Hint:
– If the message ‘BLANK’ appears on the
display panel, this means that there are no
recordings on this disc.
41
Page 42

Playback (continued)
File Play - Stop 0:00:00/ 0:00:00
Directory Selection
Bee Gees
Phil Collins
Bryan Adams
Collin Raye
Nat King Cole
UB40
Jordan Hill
Faith Hill
1
2
3
4
5
6
7
8
File Play - Stop 0:00:00/ 0:00:00
Directory Selection
Japan trip
Bryan Bday
My songs
Hot Hits
1
2
3
4
File Play - Stop 0:00:00/ 0:00:00
Directory Selection
P1010001.JPG
P1010008.JPG
BUTTER-1.JPG
NATURE-1.JPG
BUTTER-1.JPG
P1022500.JPG
P1023000.JPG
MERLIO-1.JPG
1
2
3
4
5
6
7
8
..\
English
Playing an MP3 disc
A Insert an MP3 CD.
The disc content menu appears.
Playing a picture disc (or musical
slide show)
You can display JPEG pictures in the
selected roll automatically one after the
other.
A Insert a JPEG picture disc (CD,CD-R/RW,
DVD±R/±RW).
The disc content menu appears.
B Use keys to navigate within the
menu and press OK to access the folder/
album.
Note: It may require longer time for the
DVD recorder to display the disc content
menu on the TV due to the large number
of songs/pictures compiled into one disc.
B Use keys to navigate within the
menu and press OK to access the folder/
album.
C Use keys to select the track/le to
play.
l To go to the previous menu, press DISC
MENU.
C To create a playlist, highlight the track/le
and press DISC MENU.
The selected tracks/les will appear
on the right screen.
To remove the track/le from the
playlist, press ADD/CLEAR.
You can select to playback from the
original disc content or from the playlist,
just use keys to move to the correct
screen before selecting the track/le for
playback.
D To create a playlist, highlight the track/le
and press ADD/CLEAR.
The selected tracks/les will appear
on the right screen.
Use keys to toggle between the
left and right screen.
E Press PLAY to start playback.
F During playback, you can press / to
select the next/previous track.
G To stop playback, press STOP n.
Helpful Hints:
– Only the rst session of a multi-session
CD will play back.
– It is normal to experience an occasional
“skip” while listening to your MP3 disc.
– Further information on the album, track
and artist will also be displayed on the TV if
included in the ID tag.
Playing a picture disc (or musical
TIPS: Some discs cannot be played on this DVD recorder due to the conguration and characteristics of the disc,
slide show)
or due to the condition of recording and authoring software.
42
If the disc contains MP3 music and
JPEG picture les, you can start a
musical slide show playback,
l Select an MP3 le and press OK to start
playback, then select a picture le in the
menu and press OK to start the musical
slide show playback.
E During playback, you can press
DISPLAY twice on the remote control
to access various settings for the slide
show playback.
Page 43

File Play
PIC
Normal
Play
Top to bottom
Fitscreen
Clockwise 0
Type
Mode
Trick
Wipe
Zoom
Rotate
Top to bottom
Down to top
Left to right
Right to left
Extend center V.
l Press ANGLE on the remote control
repeatedly to choose a slide show
playback animation.
The selected animation settings will
appear in the top left corner of the TV
screen.
l Press ZOOM on the remote control to
enlarge the picture.
F To stop playback, press STOP n.
File format:
– The le extension has to be ‘.JPG,’
‘.JPE’ or ‘.JPEG.’
– It can only display DCF-standard still
pictures or JPEG pictures e.g. TIFF. It
cannot play back moving pictures, Motion
JPEG, progressive JPEG and other formats,
or pictures in formats other than JPEG, or
pictures associated with sound.
– It may require a longer time for the
DVD recorder to display the disc content
on the TV due to the large number of
songs/ pictures compiled into one disc.
Playback (continued)
English
TIPS: The operating features described here might not be possible for cerain discs.
Always refer to the instructions supplied with the discs.
43
Page 44

Additional Playback Features
English
Changing to another title/
chapter/track
When a disc contains more than one
track, title or chapter, you can change to a
different track, title or chapter as follows.
During playback,
l Press to go to the next title/chapter/
track.
l Press to return to the start of the
previous title/chapter/track.
OR
l Use the numeric keypad 0-9 to input
the title/chapter/track number.
OR
l Press TITLE MENU to enter the title
menu and use keys to select { Title
} or { Chapter } and use numeric
keypad 0-9 to input the title/chapter/
track number.
Pausing playback and step
play
A During playback, pressÅto pause
playback and display a still picture.
B Press Åagain to move one frame
forward.
C To resume normal playback, press
PLAY .
Searching forward/backward
You can fast forward or fast reverse a
disc at two, four, sixteen or thirty two
times the normal playback speed.
A During playback, press (REW) or
(F.FWD) to switch to the search
function.
The search status bar appears.
It displays the search speed:
2x,4x,16x,32x(backward or forward)(only
for DVD/VCD);
2x,4x(backward or forward)(only for
CD);
2x,4x,8x,16x,32x(backward or
forward)(only for MP3);
The sound will be muted(DVD/VCD/
WMA) or intermittent(CD).
B Press (reverse) or (forward) to
cycle through the search speeds.
C To resume normal playback, press
PLAY .
Zooming in
This option allows you to enlarge the
picture on the screen and pan through
the enlarged picture.
A Press ZOOM on your remote control to
activate zoom : 150% or 200%.
B Use keys to pan through the
zoomed picture.
C To exit, press ZOOM repeatedly until
the picture returns to the normal size.
TIPS: The operating features described here might not be possible for cerain discs.
Always refer to the instructions supplied with the discs.
44
Page 45

Additional Playback Features (continued)
TITLE MENU
ADD/CLEAR
OK
Using TITLE options
A During playback, press DISPLAY twice
on the remote control.
The TITLE menu appears on the TV.
B Use keys to select the setting you
want to adjust.
Instructions and explanation of the
options are provided in the following
pages.
C To exit, press DISPLAY.
Selecting various repeat/shufe
functions
You can select various repeat play or
random play mode during playback.
A During disc playback, press DISPLAY
twice on the remote control.
The TITLE menu appears.
B Use keys to select { Mode } and
press OK.
C Use keys to select one of the repeat
options.
{ Repeat A-B }
Select this to repeat the playback of a specic
segment within a title/chapter/track. Press OK
to mark the start and end of the segment you
want to repeat.
{ Chapter Repeat }
Select this to repeat playback on the current
chapter (DVD, DVD±R/±RW only).
{ Repeat Track/Title }
Select this to repeat playback on the current
track/title.
{ Repeat Directory }
Select this to repeat playback on the current
folder/directory (MP3, JPEG, picture disc only).
{ Repeat Disc }
Select this to repeat playback on the entire
disc.
{ Program }
Select this to program playback all the tracks
within the disc.
{ Shufe }
Select this to randomly playback all the tracks
within the disc.
{ Normal }
Select this to cancel the repeat mode and
return to normal playback.
D To cancel repeat playback, press STOP n
or select { Normal } and press OK.
English
TIPS: The operating features described here might not be possible for cerain discs.
Always refer to the instructions supplied with the discs.
45
Page 46

Additional Playback Features (continued)
DVD
Title Program
Title 1
Title 2
Title 3
Title 4
Title 5
Title 6
Title 7
Title 8
English
Programming disc tracks
You can play the contents of the disc in
the order you want by programming the
tracks to be played.
A Press DISPLAY twice on the remote
control.
The TITLE menu appears.
B Use keys to select { Mode } > {
Program } and press OK.
The program menu appears.
C If the disc is recorded with Titles/Folders/
Albums, press OK to access the tracks/
les/chapters.
l Pressing OK at the highlighted track/le/
chapter will start playback.
l Use keys to toggle between the left
and right screen.
To program your favourite track/
le/chapter
D Use keys to select the track/le/
chapter to program and press ADD/
CLEAR on the remote control.
The selected track/le/title will appear
at the right screen.
The order on the right screen will be
the order of program playback.
To start program play
F Press key to move to the right screen
and press OK.
Playback will start from the selected
track/le/chapter according to the
programmed sequence.
To exit program play
G Press STOP n to exit program play.
Changing the audio soundtrack
language
This operation works only on DVDs with
multiple soundtrack language or VCDs
with multiple audio channels.
This function can also be accessed via the
AUDIO button on the remote control.
A During playback, press DISPLAYon the
remote control.
The T/C menu appears.
B Use keys to select { Audio } and
press to access its options.
C Use keys to select the audio
language and press OK to conrm.
The languages may be numbered or
abbreviated, such as “En” for English.
If the language selected is not available
on the disc, the disc’s default setting for
language will be used instead.
Helpful Hint:
– Some DVDs allow soundtrack language
changes only via the DVD disc menu. To
access the Disc Menu, press DISC-MENU.
To remove the programmed item
from your selection
E Press key to move to the right screen.
Select the track/le/chapter and press
ADD/CLEAR on the remote control.
TIPS: The operating features described here might not be possible for cerain discs.
Always refer to the instructions supplied with the discs.
46
Page 47

Additional Playback Features (continued)
Changing subtitle language
This operation works only on DVDs with
multiple subtitle languages, you can
change the language you want while
playing the DVD.
This function can be also accessed via
SUBTITLE key on the remote control.
A Press DISPLAY twice on the remote
control.
The TITLE menu appears.
B Use keys to select { Subtitle } and
press to enter the menu and nd the
different available options.
C Use keys to select the language and
press OK to conrm.
The languages may be numbered or
abbreviated, such as “En” for English.
If the language selected is not available
on the disc, the disc’s default setting
language will be used instead.
Helpful Hint:
– Some DVDs discs allow subtitle language
changes only via the DVD disc menu. To
access the disc menu, press DISC-MENU.
Time search(except WMA disc)
This option allows you to skip to a
specic point in the current disc.
A Press GOTO repeatedly on the remote
control.
The time search screen appears.
B Use the numeric keypad (0-9) to
enter the time required and press OK to
conrm.
Playback skips to the selected time.
English
Switching camera angles
This option is only available with DVDs
that contain sequences recorded from
different camera angles. This allows you
to view the picture from different angles.
A Press DISPLAY twice on the remote
control.
The TITLE menu appears.
B Use keys to select { Angle } and
press to enter the menu.
The camera angles available for
selection appears.
C Use keys to select the camera angle
you want to switch to, then press OK to
conrm.
TIPS: The operating features described here might not be possible for cerain discs.
Always refer to the instructions supplied with the discs.
47
Page 48

DVD System Menu Options
SYSTEM
MENU
OK
English
Accessing System Menu General
A Press SYSTEM-MENU on the remote
control.
The system menu appears on the TV.
B Use keys to select
{ System Setup - General } and press
to access its options.
Screen Saver
A screen saver prevents damage to the
TV screen by avoiding exposure to a
static image for too long.
A In ‘System Setup-General’, use keys
to highlight { Screen Saver } and press
OK.
{ On }
Select this if you wish to turn off the TV
screen, after playback has been stopped or
paused for more than 5 minutes.
{ Off }
Select this to disable the screen saver.
B Use keys to select a setting and
press OK to conrm.
C Use keys to select the setting you
wish to change and press OK to conrm.
Instructions and explanation of the
options are provided in the following
pages.
D To exit, press SYSTEM-MENU.
TIPS: The underlined option is the factory default setting.
Press to go back to previous menu item. Press SYSTEM MENU to exit the menu item.
48
Page 49

DVD System Menu Options (continued)
OK
CANCEL
Progressive/ Interlace
Progressive scan delivers a higher picture
quality than the standard interlaced TV
channel scan. It only works when you
have connected the DVD recorder
Y Pb Pr jacks to your TV that supports
the progressive video input. Otherwise,
the image may not appear or will be
distorted. Please check your TV user
manual for more information.
A In ‘System Menu-General’, use keys
to select { Progressive / Interlaced }
and press OK.
{ Interlaced }
Select this to enable interlaced feature.
{ Progressive }
Select this to enable progressive scan feature.
B Use keys to select a setting and
press OK to conrm.
Helpful Hints:
– Follow the instructions shown on the TV to
conrm the selection (if any).
– If a blank/distorted TV screen appears,
wait for 10 seconds for the auto recovery.
Video Output Format
The colour system of the DVD system,
DVD and TV should match. Only then
will it be possible to play a DVD on this
system. Before changing the TV system,
determine the colour system of your TV.
A In ‘System Menu-General’, use keys
to select { Video Output Format } and
press OK.
{ PAL }
Select this if the connected TV has the PAL
colour system. It will change the video signal of
an NTSC disc and output it to PAL format.
{ NTSC }
Select this if the connected TV has the NTSC
colour system. It will change the video signal of
a PAL disc and output it to NTSC format.
B Use keys to select a setting and
press OK to conrm.
Helpful Hint:
– If a blank/distorted TV screen appears,
wait for 10 seconds for the auto recovery.
Restore Factory settings
This will restore all the settings of this
DVD Recorder, except for the PIN code.
English
A In ‘System Menu-General’, use keys
to select { Restore Factory Settings }
and press OK.
A warning message will appear
B Select
to abort, then press OK to
conrm.
TIPS: The underlined option is the factory default setting.
Press to go back to previous menu item. Press SYSTEM MENU to exit the menu item.
in the menu to proceed or
49
Page 50

DVD System Menu Options (continued)
SYSTEM
MENU
OK
Parental Rating Level
Digital Audio Output
Off
All
TV Aspect Ratio
4:3Panscan
System Menu - Playback
English
Accessing System Menu Playback
A Press SYSTEM-MENU on the remote
control.
The system menu appears on the TV.
B Use keys to select { System Menu
- Playback } and press to access its
options.
TV Aspect Ratio
Set the aspect ratio of the DVD recorder
according to the TV type you have
connected. The format you select must
also be available on the disc. If it is not,
the setting for TV display will not affect
the picture during playback.
A In ‘System Menu-Playback’, use keys
to select { TV Aspect Ratio } and press
OK.
{ 16:9 }
Select this for wide
screen TV (frame
ratio 16:9).
{ 4:3 Letterbox }
Select this for a ‘wide
screen’ display with black
bands on the upper and
lower portions of the TV
screen.
{ 4:3 panscan }
Select this for a fullheight picture with
both side trimmed.
B Press to select a setting and press
OK to conrm.
C Use keys to select the setting you
wish to change and press OK to conrm.
Instructions and explanation of the
options are provided in the following
pages.
D To exit, press SYSTEM-MENU.
TIPS: The underlined option is the factory default setting.
Press to go back to previous menu item. Press SYSTEM MENU to exit the menu item.
50
Page 51

DVD System Menu Options (continued)
* * * *
Enter Password
OK
CancelOK
Set Rating Level
New password
4. PG 13
5. PG R
4. PG 13
OK
New
OK
OK
Rating level
Some DVDs may have a parental level
assigned to the complete disc or to
certain scenes on the disc. This feature
lets you set a playback limitation level.
The rating levels are from 1 to 8 and are
country dependent. You can prohibit the
playing of certain discs that are not
suitable for your children, or have certain
discs played with alternative scenes.
A In ‘System Setup-Playback’, use keys
to select { Rating Level } and press OK.
You will be prompted to enter your
four-digit pin code.
B Use the numeric keypad 0-9 to enter
your four-digit pin code.
When doing this for the rst time,
enter the default password ‘3308’ .
The set rating level menu appears.
l If you forget your four-digit pin code, the
default password is 3308.
C Use keys to select the top eld and
press OK to conrm.
D Use keys to select the desired
parental level, then move to
the menu and press OK on the remote
control to conrm.
To disable parental controls and allow
all discs to play, select { Off }.
in
Rating explanations
{ Off }
– Parental Control is not active.
{ 1. Kid Safe } ~ { 2. G }
– Childsafe; acceptable for viewers of all ages.
{ 3. PG }
– Parental Guidance suggested.
{ 4. PG13 }
– Unsuitable for children under age 13.
{ 5. PG R } ~ { 6. R }
– Restricted; recommended that parents
restrict children under 17 from viewing or
allow to view only when supervised by a
parent or adult guardian.
{ 7. NC 17 }
– No children under age 17; not recommended
viewing for children under age 17.
{ 8. Adult }
– Mature material; should be viewed only by
adults due to graphic sexual material, violence
or language.
l DVDs that are rated higher than the level
you selected will not play unless you
enter your four-digit pin code.
Helpful hints:
– This feature will not limit viewing if the disc
manufacturer did not code the disc.
– VCD, SVCD, CD have no level indication,
so parental control has no effect on these
type of discs. This also applies to most illegal
DVDs.
– Some DVDs are not coded with a rating
though the movie rating may be printed on
the Disc cover. The rating level feature does
not prohibit play of such Discs.
English
TIPS: The underlined option is the factory default setting.
Press to go back to previous menu item. Press SYSTEM MENU to exit the menu item.
51
Page 52

DVD System Menu Options (continued)
* * * *
Enter Password
OK
CancelOK
New
New password
Confirm password
* * * *
New Password
OK
Cancel
OK
OK
CANCEL
English
Setting or changing the password
You need to enter your four-digit
password to play a prohibited disc or if
prompted for a pin code.
A In ‘System Setup-Playback’, use keys
to select { Parental Rating Level } and
press OK.
You will be prompted to enter your
four-digit pin code.
B Move to
in the menu and press
OK to access new password menu.
C Use the numeric keypad 0-9 to enter
your new four-digit pin code, then press
to select the next entry eld and enter
the same pin code a second time.
D Move to
in the menu and press
OK to conrm.
To abort the change, select
and press OK.
Digital Audio Output
After connecting the DVD recorder to
your TV and other devices, you may need
to change the digital output setting.
Adjust the Digital Output only if you used
the DVD recorder’s coaxial jack.
A In ‘System Setup Playback’, use keys
to select { Digital Audio Output } and
press OK.
{ ALL }
Select this if you use the COAXIAL jack to
connect the DVD recorder to a stereo
receiver that has a built in Multi-Channel
decoder.
{ LPCM }
Select this if the connected audio equipment is
not capable of decoding multichannel audio
Dolby Digital and MPEG-2 multi - channel
signals are converted to PCM (Pulse Code
Modulation).
B Use keys to select a setting and
press OK to conrm.
TIPS: The underlined option is the factory default setting.
Press to go back to previous menu item. Press SYSTEM MENU to exit the menu item.
52
Page 53

DVD System Menu Options (continued)
Accessing System Menu Record
See pages 26~28 on “Recording settings”.
Accessing System Menu Channel Setup
See pages 23~25 on “TV channel
programming”
Accessing System Menu
- Clock
Date and Time
See page 25 on “Setting the time & date”.
English
TIPS: The underlined option is the factory default setting.
Press to go back to previous menu item. Press SYSTEM MENU to exit the menu item.
53
Page 54

Specications
English
Picture/Display
• Aspect ratio: 4:3, 16:9
• D/A converter: 10 bit, 54 MHz
• A/D converter: 10 bit, 27 MHz
• Picture enhancement: Progressive Scan
Sound
• D/A converter: 24 bit, 96 kHz
• A/D converter: 24 bit, 96 kHz
• Signal to noise ratio: 90 dB
• Crosstalk (1kHz): 80 dB
• Dynamic Range (1kHz): 80 dB
Video Recording
• Recording system: PAL, NTSC
• Compression formats: MPEG2
• Recording modes: 1 hour (high quality),
2 hours (DVD quality), 4 hours ( VHS
quality), 6 hours (VHS quality)
• Audio compression: Dolby Digital
Video Playback
• Disc playback media: CD, CD-R/-RW,
DVD, DVD-Video, DVD±R/±RW, SVCD,
Video CD
• Compression formats: MPEG2, MPEG1,
• Video disc playback system: PAL. NTSC
Audio Playback
• Disc playback media: CD, CD-R/-RW,
MP3-CD, MP3-DVD
• Compression formats: Dolby Digital, MP3,
MPEG2 Multichannel, PCM
• MP3 bit rates: 32~256 kbps and VBR
Tuner/Reception/Transmission
• TV system: PAL
• Aerial Input: 75 Ohm coaxial (IEC75)
Connectivity
Rear Connections:
• S-Video Out
• Video (CVBS) Out
• Audio left/right Out
• Digital audio out (coaxial)
• RF antenna in
• RF TV out
• Y, Pb, Pr out
• S-Video in
• Video(CVBS) in
• Y, Pb, Pr in
• Audio left/right/ in
Front Connections:
• i.LINK DV in (IEEE 1394 4-pin)
• S-Video In
• Video In
• Audio left/right In
Convenience
• Programming/Timer Enhancements:
Daily/Weekly, Repeat Program, Manual
Timer, One Touch Recording,
• Timer recording events: 20
Power
• Power supply: 110 – 240 V~; 50-60 Hz
• Consumption: 28 W (typical)
• Standby power consumption: < 4W
Still Picture Playback
• Disc formats: DVD±R/±RW, Picture CD
• Picture compression formats: JPEG
• Picture enhancement: Rotate
Storage Media
• Recording media: DVD±R, DVD±RW
• Recording speed: 2.4x
54
Cabinet
• Dimensions (wxhxd) : 435 x 53 x 300 mm
• Net Weight : < 4 kg
Page 55

Troubleshooting
WARNING
Under no circumstances should you try to repair the system yourself, as this
will invalidate the warranty. Do not open the system as there is a risk of
electric shock.
If a fault occurs, rst check the points listed below before taking the system for
repair. If you are unable to remedy a problem by following these hints, consult
your dealer or Philips for help.
Problem Solution
English
No power.
Remote control does not
work.
Disc does not play.
No sound.
Distorted sound coming
from a connected hi-
amplier.
No picture.
– Press STANDBY-ON button on the front of the DVD
recorder to switch on the system.
– Make sure the AC outlet has power.
– Aim the remote control directly at the sensor on the front
of the DVD recorder (not towards TV).
– Remove any obstacles between DVD recorder and the
remote control.
– Batteries are weak, replace the batteries.
– Press REC SOURCE on the remote control to select an
input source.
– Insert the disc with the label facing up.
– Wrong region code. The DVD must be coded for ALL
regions or Region 6 in order to play on this DVD recorder.
– There is no recording on the disc or wrong disc type. Read
chapter “Playback - Playable discs” for details.
– Make sure the disc is not scratched or warped. Clean the
disc or replace a new one.
– Check if the disc is defective by trying another disc.
– Check the audio connections, the red and white jacks. Read
chapters “Getting Started - Connecting the audio cables” for
details.
– Set the Digital output correctly, based on the equipment you
connected to the DVD recorder. Read chapter “Accessing
System Menu - Digital Audio Output” for details.
– Do not connect any cables from the DVD recorder to the
‘Phono’ input of your amplier.
– Do not connect the DVD recorder’s Coaxial DIGITAL
AUDIO OUT jack to an analog jack (red/white) on the
connecting devices.
– Switch on your TV and set to the correct Video In channel.
Change the TV channel until you see the DVD screen. Read
chapter “Getting Started - Finding your viewing channel”
for details.
– Check the video connection between the DVD recorder
and the TV.
55
Page 56

Troubleshooting (continued)
English
Problem Solution
The picture is distorted or
black and white during
playback.
Recordings are not
occurring as scheduled.
New recordings cannot be
made.
No TV signal received from
the DVD recorder.
A DVD±R/±RW recorded on
this DVD recorder does not
play on a DVD player.
Picture is fuzzy and brightness
varies when copying DVD Video
discs or prerecorded video
cassettes.
– The disc does not match with the TV colour system
standard (PAL/NTSC).
– The disc is dirty, clean the disc.
– Sometimes a small amount of picture distortion may appear.
This is not a malfunction.
– If you set the Record Mode to a low-quality speed, change
to a higher-quality speed after you nish recording. Leaving
the DVD recorder set to a low-quality speed may affect the
picture quality when playing DVDs later. Read chapter
“Recording - Recording settings” for details.
– The recording can be made in colour only when the TV
channels or the connected additional device sends a colour
signal. In some situations, programs that are broadcast in
black and white cannot be recorded.
– The TV channel you want to record is not stored or you
selected the wrong program number. Check TV channels
stored.
– If you adjust the clock after you set a timer recording, you
have to reset the timer recording.
– If the DVD recorder cannot read the disc, you cannot
record.
– You cannot use the DVD recorder to duplicate copyrighted
materials (DVDs or videotapes) onto a DVD±R/±RW.
– A nalized DVD±R has been inserted. Change disc.
– Install the TV channel. Read chapter “Step 3 : TV channel
programming” for details.
– If a recording is too short, it is possible that a DVD player
cannot detect it. Please observe the following ‘minimum
recording times’. Recording mode : {1 hour} – 5 minutes,
{2 hours} – 10 minutes, {4 hours} – 20 minutes, {6 hours} –
30 minutes.
– You have to nalize the DVD±R. Refer to chapter “Playing
your recordings (DVD±R) on other DVD players” for
details.
– This happens if you try to copy DVDs or video cassettes
that have been copy-protected. Even though the picture on
the TV is ne, but the recording on a DVD±R/±RW is
faulty. This interference is unavoidable with copy-protected
DVDs or video cassettes.
– The DVD±R/±RW has recording lifetime, please change a
new disc for recording.
56
Page 57

Glossary
Analog: Sound that has not been turned into
numbers. Analog sound varies, while digital sound
has specic numerical values. These jacks send audio
through two channels, the left and right.
Aspect ratio: The ratio of vertical and
horizontal sizes of a displayed image. The
horizontal vs. vertical ratio of conventional TVs is
4:3, and that of wide-screens is 16:9.
AUDIO OUT Jacks: Red and white jacks
on the back of the system that send audio to
another system (TV, Stereo, etc).
Chapter: Sections of a picture or a music piece
on a DVD that are smaller than titles. A title is
composed of several chapters. Each chapter is
assigned a chapter number enabling you to locate
the chapter you want.
Component Video Out Jacks: Jacks on the back
of the DVD System that send high-quality video to
a TV that has Component Video In jacks (R/G/B,
Y/Pb/Pr, etc).
Digital: Sound that has been converted into
numerical values. Digital sound is available when
you use the DIGITAL AUDIO OUT COAXIAL.
These jacks send audio through multiple channels,
instead of just two channels as analog does.
Disc menu: A screen display prepared for
allowing selection of images, sounds, subtitles,
multi-angles, etc recorded on a DVD.
Dolby Digital: A surround sound system
developed by Dolby Laboratories containing up to
six channels of digital audio (front left and right,
surround left and right, center and subwoofer).
Index Picture Screen: A screen that gives an
overview of a DVD±RW or DVD±R. An Index
Picture represents each recording.
JPEG: A very common digital still picture format.
A still-picture data compression system proposed
by the Joint Photographic Expert Group, which
features small decrease in image quality in spite of
its high compression ratio.
MP3: A le format with a sound data compression
system. “MP3” is the abbreviation of Motion
Picture Experts Group 1 (or MPEG-1) Audio
Layer 3. By using the MP3 format, one CD-R or
CD-RW can contain about 10 times more data
then a regular CD.
MPEG: Motion Picture Experts Group. A
collection of compression systems for digital audio
and video.
Multichannel: DVDs are formatted to have each
sound track constitute one sound eld.
Multichannel refers to a structure of sound tracks
having three or more channels.
PBC: Playback Control. Refers to the signal
recorded on video CDs or SVCDs for controlling
playback. By using menu screens recorded on a
Video CD or SVCD that supports PBC, you can
enjoy interactive playback and searching.
PCM: Pulse Code Modulation. A digital audio
encoding system.
Parental control: Limits disc play according to
the age of the users or the limitation level in each
country. The limitation varies from disc to disc;
when it is activated, playback will be prohibited if
the software’s level is higher than the user-set
level.
Region code: A system allowing discs to be
played only in the region designated. This unit will
only play discs that have compatible region codes.
You can nd the region code of your unit by
looking on the product label. Some discs are
compatible with more than one region (or ALL
regions).
S-Video: Produces a clear picture by sending
separate signals for the luminance and the color.
You can use S-Video only if your TV has an S-Video
In jack.
Surround: A system for creating realistic threedimensional sound elds full of realism by
arranging multiple speakers around the listener.
Title: The longest section of a movie or music
feature on DVD. Each title is assigned a title
number, enabling you to locate the title you want.
VIDEO OUT jack: Yellow jack on the back
of the DVD system that sends the DVD picture
video to a TV.
English
57
Page 58

特别功能
凭 Dolby Laboratories 的授权制造。
“Dolby”和双 D 符号为 Dolby Laboratories
的商标。
这种连接亦称为“FireWire”和“IEEE
1394”,用于数位摄像机 (DV) 等高频宽的数
位信号传输。影音频号通过电缆进行传输。
58
Page 59

Title
Chapter
Title
Chapter Chapter Chapter Chapter
chapter markers
录像模式
影像品质
每片光碟最长
录像时间
一小时模式
两小时模式
四小时模式
六小时模式
HQ(高品质)
SP(DVD 品质 – 标准播放)
EP(VHS 品质 – 延长播放时间)
SLP(VHS 品质 – 超长播放时间)
一小时
两小时
四小时
六小时
常见问题解答
录制时该使用何种光碟?
您只能使用 DVD±R 和 DVD±RW 光碟进行
录制。DVD±R/±RW 是目前市场上相容性最
高的 DVD 录制格式。这些格式与大多数
现有的 DVD 播放机和电脑的 DVD 光碟机
完全兼容。
DVD±R/±RW 光碟的容量如何?
4.7GB ,或相当于 6 片光碟。单片光碟
上最高品质 (DVD 标准) 可录一小时,
最低品质 (VHS 标准)可录六小时。选定
录像模式后,会标出单片光碟能够录制的
时数。
DVD±R 和 DVD±RW 有何差异?
DVD±R 属于“可录制”光碟,DVD±RW 则
属于“可删除”及“可重写”光碟。使用
DVD±R,您可以在同一张光碟上录制多个
段落,但光碟被录满时无法再继续录制。
DVD±RW 却可让您在同一张光碟上重复录
制上百次。
什么是 DV?
使用 DV (又称为 i.LINK),您可以通过
单一的 DV 电缆,将 DV 摄像机和本 DVD
录放像机连接,即可传输影音、数据和控
制信号。
– 本 DVD 录放像机仅可与 DV 格式
(DVC-SD) 的摄像机相容,不能与数位卫
星调谐器和数位 VHS 录放像机相容。
– 本 DVD 录放像机一次仅可连接一台
DV 摄像机。
– 您无法经 DV IN 插孔外接的设备来控
制本 DVD 录放像机。
我可以从外接的播放机拷贝 VHS 录像
带或 DVD 吗?
可以,但仅限于不受版权保护的 VHS 录像
带或 DVD。
什么是标题和章节?
DVD 光碟包含标题和章节,与书的标题
和章节类似。标题通常是指一部完整的影
片,影片再细分为数个章节或个别片段。
节目是以单一标题录制,标题下可能含有
一个或数个章节,视录制的设定而定。
如何设定标题和章节?
每次开始录制新的节目时,本 DVD 录放像
机便会自动建立一个新标题。然后您就可
以手动添加章节,或以 5 分钟的间隔让其
自动插入章节。
光碟“最终化处理”是做什么?
光碟最终化处理会将光碟锁定,使其无法
继续录制,只有 DVD±R 才需这个步骤。随
后光碟即可与几乎任何 DVD 播放机相容。
如欲在不要最终化处理的情况下关闭该光
碟,只需停止录制并将光碟退出即可。如
果光碟内仍有空间,您还可以继续录制。
录制的品质如何?
您可以在“一小时模式”(高品质) 与“六
小时模式”(VHS 品质)范围内,选择数种
品质等级。按动遥控器上的 REC MODE 按
钮,选择最适合您的用途与题材长度的品
质等级。
59
Page 60

目录
索引 ...........................60
特别功能 .......................58
常见问题解答 ...................59
保养和安全信息
设定 ......................... 62
清洁光碟 ..................... 62
关于回收 ..................... 62
一般信息
简介 ......................... 63
随附配件 ..................... 63
区域码 ....................... 63
版权声明 ..................... 63
基本连接 – DVD 录放像机
步骤一:连接天线 ............... 64
步骤二:连接视频电缆 ........... 65
选项一:使用普通视频 (CVBS) (良好
影像品质) .......................65
选项二:使用 S-VIDEO 插孔 (更好
影像品质) ..................... 65
选项三:使用色差视频 (PrPbY) 插孔
(最好影像品质) ................ 65
步骤三:连接音频电缆 ........... 66
选项一:使用音频电缆 ..............66
选项二:使用同轴电缆 ..............66
选择性连接
连接至电缆电视转换器或卫星
接收器 ....................... 67
连接至 VCR 或其他类似的装置 ... 68
连接至 VCR 和电缆电视转换器/
卫星接收器 .................... 69
连接摄像机和前方插孔 .......... 70
选项一:使用 DV IN 插孔 ........ 70
选项二:使用 S-VIDEO 或 VIDEO
输入插孔 ...................... 70
主机
门盖后面的插孔 ................ 71
遥控器 .......................
72~74
显示窗口 .......................75
快速入门
步骤一:放入电池 ............... 76
使用遥控器操作系统............. 76
步骤二:查找收看频道 .......... 76
步骤三:电视频道设定 ........... 77
自动电视频道搜寻 .............. 77
修改频道信息 .................. 78
电视频道排序 .................. 79
步骤四:设定时间和日期 .......... 79
录像
录像光碟 ..................... 80
录像设定 ..................... 80
自动章节标记 .................. 81
预设来源 ...................... 81
预设录影品质 .................. 81
手动录像 ..................... 82
单键录像 – 自动关闭 ............
82
关于定时录像 .................. 83
定时录像 (手动) ................
外接有线电视转换器/卫星接收器的
定时录像设定 .................. 84
83
变更/删除定时录像 ............. 86
录像期间观看另一个电视频道 ..... 85
录像的编辑/最终化处理
关于光碟编辑 .................. 86
浏览光碟编辑菜单 .............. 86
重新命名光碟 .................. 87
删除光碟 (仅限于 DVD±RW) ....... 87
录制新标题 .................... 87
重写光碟 (仅限于 DVD±RW) ....... 87
兼容性处理 (仅限于 DVD±RW) ..... 88
锁定光碟/解除锁定 (仅限于
DVD±RW) ....................... 88
在其他DVD 播放机上播放录像光碟
(DVD±R) ...................... 88
关于标题编辑 .................. 89
60
Page 61

目录
浏览标题编辑菜单 .............. 89
編輯录影 ...................... 89
重新命名标题 .................. 90
清除标题 ...................... 90
重写标题 (仅限于 DVD±RW) ....... 90
从选定的标题开始重写 ........... 90
添加录影 ...................... 90
关于录像编辑 ...................91
浏览影像编辑菜单 .............. 92
选择标题 ...................... 92
选择章节 ...................... 92
制作章节标记 .................. 92
隐藏不要的章节 ................ 93
变更索引影像 .................. 93
分割标题 (仅限于 DVD±RW) ....... 93
播放
播放光碟 ..................... 94
放入光碟 ..................... 94
开始光碟播放 .................. 95
播放 DVD 影音光碟 ............. 95
播放超级影音光碟 (SVCD) ........ 95
播放音乐光碟 .................. 95
播放 DVD±R/±RW 光碟 ........... 95
播放 MP3 光碟 ................. 96
播放图片光碟 (或音乐幻灯片) .... 96
高级播放功能
转到另一个标题/章节/曲目 ....... 97
暂停播放和逐步播放 ............ 97
前进/倒转搜寻 ................. 98
放大 ......................... 98
使用标题/章节选项 ............. 98
选择各种重复/随机播放的功能 .... 99
设定光碟曲目 .................. 99
变更音讯声道语言 ............. 100
变更字幕语言 ................. 100
切换拍摄角度 ................. 100
时间搜寻 ......................101
DVD 系统菜单选项
浏览系统菜单 – 一般 ..........101
屏幕保护程序 ................. 102
顺序扫描/交错扫描 ............. 102
视频輸出格式 ................. 103
恢复原厂设定 ................. 103
浏览系统菜单 – 播放 ...........103
電視長寬比 ................... 104
家长分级控制 ................. 104
设定或变更密码 ............... 105
数码音讯输出 ................. 106
浏览系统菜单 – 录像 ...........106
浏览系统菜单 – 频道设定 ........
浏览系统菜单 – 时钟 ...........
106
106
规格 ..........................107
故障排除 ..................108~109
词汇表 ........................ 110
61
Page 62

保养和安全信息
10cm (4.5")
10cm (4.5")
5cm (2.3")
5cm (2.3")
警告!
高电压!请勿打开机盖。您会有触电
的危险。
本机器内不存在客户可自行维修的部
件。所有维修工作请交由专业人员处
理。
设定
寻找合适的位置
– 将本机置于平稳坚固的表面。请勿将本
机放在地毯上。
– 请勿将本机置于其他可能导致其温度升
高的设备上面 (如接收器或扩音器)。
– 请勿在机器下放置任何东西 (如 CD
和杂志)。
– 将此设备安置在 AC 电源插座附近以及
容易够着 AC 电源插头的地方。
通风空间
– 请将机器置于通风良好的地方,以免内
部温度升高。机器后侧和上部请保持至少
10 公分 (4.5 英吋) 的空隙,左右两侧
保持 5 公分 (2.3 英吋) 的空隙,以免
过热。
清洁光碟
有些问题(如影像冻结、声音中断、图像变
形)属机内光碟不够清洁所致 。欲避免这
类问题,应定期清洁光碟。
清洁光碟时,请使用微纤维清洁布,由中
间向外缘直线擦拭。
警告!
请勿使用苯、稀释剂、市售清洁剂或模拟
光碟专用的抗静电喷雾剂等溶剂。由于本
机的光学组件 (镭射) 与一般的 DVD 或
CD 播放机相比需要较高的功率,用 DVD
或 CD 播放机专用的清洁光碟来清洁本机
可能损坏光学组件 (镭射)。因此,请避免
使用清洁光碟。
关于回收
本操作说明采用无污染纸张印制。本电子
装置含有多种可回收材料。如果您要丢弃
旧的机器,请将它送至回收中心。请遵守
当地有关包装材料、废电池和旧设备的弃
置规定。
避免接触高温、湿气、水份和尘埃
– 避免让本机遭到滴水或溅水。
– 请勿在本机上放置任何危险物体 (如盛
满液体的物体、点燃的蜡烛)。
62
Page 63

一般信息
ALL
6
简介
本飞利浦 DVD 录放像机可以录制电视节目
或将摄像机所录制的影片复制到 DVD±RW
或 DVD±R,并可播放预录的 DVD。本机所
录下的影片可在大多数的 DVD 播放机和
DVD 光碟机上播放。DVD±R 光碟必须进行
最终化处理,才可以在其他的 DVD 播放
机上播放。
使用本机之前,请抽空阅读此说明书。它
包含了跟操作有关的重要信息及注意事
项。
提示:
– 使用时如有疑问或遇到问题,请参
阅“故障排除”一节。
– 如需进一步协助,请致电所在国家的客
户支持服务中心。相关的电话号码和电邮
地址请参阅保证书。
– 请参考产品后部或底部的类型标志牌上
的标示信息和供电额定值。
随附配件
– 遥控器和电池(两节)
– 音频/视频 (AV) 连接线
– RF 同轴电缆
– 快速使用指南
– 用户手册
区域码
DVD 影片通常不会在世界各地同一时间发
行,因此所有的 DVD 播放机均由特定区
域码锁定。
区域码标示在本机背面。如果 DVD 上标示
的是其它区域码,则无法在本机上播放。
区域
可以播放的 DVD
中国、Calcos
Islands、Walls
和 Futuna Islands
版权声明
任何没有获得许可而对有版权保护的内容
(包括电脑软件,广播,和音响制录等)进行
的抄录行为可属版权侵犯,并构成刑事责
任。此机器不应当被使用于以上行为。
63
Page 64

基本连接 – DVD 录放像机
AC IN ~
AUDIO
OUT
S-VIDEO
IN
VIDEO IN
TV
ANT OUT
RF OUT
ANT IN
RF IN
VCR/ 电缆电视转换器/
卫星接收 器
天线/电 缆电
视信号
A
English
B
A 将现有的天线/电缆电视信号 (或从电缆
步骤一:连接天线
此连接可让您使用本 DVD 录放像机收看
和录制电视节目。如果天线信号是经由
VCR、电缆电视转换器或卫星接收器连接
的,请确定这些装置均有开启,才能收看
或录制电缆电视节目。
如欲连接到 VCR 或机顶盒/卫星接收
l
,请参阅第 67~69 页,了解与电视的完
器
整连接方式。
电视转换器/卫星接收器 {RF OUT 或
TO TV}) 连接到 DVD 录放像机的
ANTENNA IN
插孔上。
B 使用随附的 RF 同轴电缆,连接 DVD 录放
像机的
ANTENNA OUT
输入插孔 (VHF/UHF RF IN)。
插孔和电视的天线
提示:
64
在进行或变更任何连接之前,请确定拔下所有装置的电源插头。
Page 65

选项 3
AUDIO
OUT
S-VIDEO
IN
VIDEO IN
TV
基本连接 – DVD 录放像机 (继续)
选项 1
选项 2
步骤二:连接视频电缆
此连接可让您观看 DVD 录放像机播放的
光碟。只需选择下列其中一项进行视频连
接。
选项一:使用视频(CVBS)插孔 (良好
影像品质)
使用随附的音频/视频电缆 (黄色接头),
l
连接 DVD 录放像机的
插孔和电视的视频输入插孔 (或标示
OUT
为 A/V In、Video In 或 Composite)。
选项二:使用 S-VIDEO 插孔 (更好影
像品质)
使用 S-VIDEO电缆 (未提供),连接 DVD
l
录放像机的
VIDEO输入插孔 (标示为 R/C 或 S-VHS)。
提示:
S-VIDEO
在进行或变更任何连接之前,请确定拔下所有装置的电源插头。
VIDEO (CVBS)-
插孔和电视的 S-
选项三:使用色差视频插孔 (最好影
像品质)
A 使用色差视频电缆 (红/蓝/绿 – 未
提供),连接 DVD 录放像机的
插孔和电视对应的色差视频输入
-OUT
插孔 (标示为 Y Pb/Cb Pr/Cr 或 YUV(
Y/Pb/Pr))。
Y Pb Pr
B 如果您的电视可以接收逐行扫描信号,请
参阅第 99 页,了解详细的逐行扫描设
定。
重要!
逐行扫描视频品质仅可通过 Y Pb Pr
连接才能使用,且电视机需具有逐行
扫描的功能。建议最好先完成 DVD 录
放像机的安装,然后再启动逐行扫描
功能。
65
Page 66

基本连接 – DVD 录放像机 (继续)
AUDIO
OUT
S-VIDEO
IN
VIDEO IN
TV
DIGITAL IN
选项 2
选项 1
步骤三:连接音频电缆
此连接可让您听到声音。
选项一:使用音频电缆
您可以将 DVD 录放像机连接到双声道的
立体音响系统或接收器,以享受立体音效
系统。
使用随附的音频电缆 (红/白接头),连接
l
AUDIO L/R OUT
其中一个具有相同输入插孔的装置。
– 立体音响系统 (如电视或迷你音响系
统)。
– 双声道模拟立体声接收器。
(音频输出) 插孔和下列
AV 扩 音器/
接收器
选项二:使用同轴电缆
连接 DVD 录放像机和 AV 扩音器/接收
器,即可享受多声道的环绕音效。
使用同轴电缆 (未提供),连接
l
插孔和具有相同输入插孔的装置 (COAXIAL
IN 或 DIGITAL IN)。
– AV 扩音器/接收器,具有数位多声道
的音效解码器。
在开始使用之前,请按照说明设定数码音
频输出 (请参阅第 106 页)。如果数位输
出设定不符合您的立体声性能,立体声可
能会发出强大刺耳的声音,或者无任何声
音。
提示:
– 请勿将电视的音频输出插孔连接到 DVD
录放像机的 AUDIO L/R (IN-EXT) 插孔
上,因为这会产生刺耳的噪音。
COAXIAL
提示:
66
在进行或变更任何连接之前,请确定拔下所有装置的电源插头。
Page 67

天线/电 缆电
RF
S-VIDEO
OUT
IN
AUDIO
R L
VIDEO
AUDIO
OUT
S-VIDEO
IN
VIDEO IN
TV
视信号
选择性连接
电缆电视 转换器或
卫星接收 器背面
(仅供范 例参考)
B
A
连接至机顶盒或卫星接收器
选项一
如果机顶盒/卫星接收器只有一个天线输
出插孔 (RF OUT 或 TO TV)
请参阅第 64 页的“连接天线”,了解与
电视的完整连接方式。
,
C
选项二
如果机顶盒/卫星接收器有多个视
频/音频输出插孔,
A 请保留机顶盒/卫星接收器上现有天线和电
视的连接。
B 使用音频/视频电缆,连接 DVD 录放像机
的
VIDEO/AUDIO IN-EXT
星接收器对应的 VIDEO/AUDIO 输出插孔。
和机顶盒/卫
C 使用音频/视频电缆,连接 DVD 录放像
机的
VIDEO/AUDIO OUT
VIDEO/AUDIO 输入插孔。
和电视对应的
提示:
在进行或变更任何连接之前,请确定拔下所有装置的电源插头。
67
Page 68

选择性连接 (继续)
VIDEO
IN
•• •
••
AUDIO
L
AUDIO
R
VIDEO
OUT
AUDIO
L
AUDIO
R
VHF/UHF
RF IN
VHF/UHF
RF OUT
SPLITTER
AUDIO
OUT
S-VIDEO
IN
VIDEO IN
TV
分配器
天线/电 缆电
A
视信号
B
连接至 VCR 或其他类似的装置
此连接可让您从录像带转录到 DVD±R/±RW,
而且如果 DVD 录放像机关闭的话,也可以
使用 VCR 来播放。
A 连接天线/电缆电视信号到 VCR 的天线
输入 (RF IN) 插孔,然后连接VCR 的天
线输出 (RF OUT) 插孔到 DVD 刻录机的
ANTENNA IN
B 使用随附的 RF 同轴电缆,连接 DVD 刻录
机的
ANTENNA OUT
天线输入插孔。
插孔上。
插孔和电视的
VCR 背面 (仅供范例参 考)
C
D
C 使用音频/视频电缆,连接 DVD 录放像机
的
VIDEO/AUDIO IN-EXT
的 VIDEO/AUDIO 输出插孔。
和 VCR 对应
D 使用音频/视频电缆,连接 DVD 录放像
机的
VIDEO/AUDIO OUT
VIDEO/AUDIO 输入插孔。
提示:
– 如果所连接的装置具有相同的 S-VIDEO
输入/输出插孔,您可以使用 S-VIDEO
(Y/C) 插孔,代替视频 (CVBS) 插孔。
此视频连接可提供较佳的影像品质。
– 多数市售的卡式录像带和 DVD 均有版权
保护,因此不可转录。
– 将 DVD 录放像机直接连接至电视。如
果在中间连接 VCR 或其他装置,由于 DVD
录放像机内含版权保护系统,影像品质可
能不理想。
和电视对应的
提示:
68
在进行或变更任何连接之前,请确定拔下所有装置的电源插头。
Page 69

AC IN ~
VIDEO
IN
•• •
• •
AUDIO
L
AUDIO
R
VIDEO
OUT
AUDIO
L
AUDIO
R
VHF/UHF
RF IN
VHF/UHF
RF OUT
SPLITTER
RF
S-VIDEO
OUT
IN
AUDIO
R L
VIDEO
AUDIO
OUT
S-VIDEO
IN
VIDEO IN
TV
天线/电 缆电
视信号
分配器
A
B
C
D
选择性连接 (继续)
VCR 背面
(仅供范 例参考)
电缆电视 转换器或卫星接收器背面
(仅供范 例参考)
E
连接至 VCR 和机顶盒/卫星接收器
A 连接天线/电缆电视信号到 VCR 的天线输
入 (RF IN) 插孔上。
B 使用 RF 同轴电缆,连接 VCR 的天线输
出 (RF OUT) 插孔和机顶盒/卫星接收器的
天线输入 (RF IN) 插孔,然后,连接机顶
盒/卫星接收器的天线输出 (RF OUT) 插
孔和 DVD 刻录机的
孔。
C 使用随附的 RF 同轴电缆,连接 DVD 刻录
机的
ANTENNA OUT
天线输入插孔。。
提示:
在进行或变更任何连接之前,请确定拔下所有装置的电源插头。
ANTENNA IN
插孔和电视的
D 使用音频/视频电缆,连接 DVD 录放像机
的
VIDEO/AUDIO IN-EXT
的 VIDEO/AUDIO 输出插孔。
E 使用音频/视频电缆,连接 DVD 录放像
机的
VIDEO/AUDIO OUT
VIDEO/AUDIO 输入插孔。
提示:
– 如果所连接的装置具有相同的 S-VIDEO
插
输入/输出插孔,您可以使用 S-VIDEO
(Y/C) 插孔,代替视频 (CVBS) 插孔。
此视频连接可提供较佳的影像品质。
和 VCR 对应
和电视对应的
69
Page 70

选择性连接 (继续)
DV OUT
连接摄像机和前方插孔
您可以使用前方插孔来拷贝摄像机的录像
记录。这些插孔位于右侧门盖的后面,便
于连接摄像机。
选项一:使用 DV IN 插孔
如果您有 DV 或 D8 数位摄像机,即可
使用此连接。DV 插孔符合 i.LINK 的标
准,可提供最佳的影像品质。
使用 i.LINK 4 针 电缆 (未提供),连接
l
DVD 录放像机的
应的 DV OUT 插孔。
在开始使用之前,重复按下遥控器上的
REC SOURCE
道。欲进行录像,请参阅第80~82 页。
提示:
– DV IN 插孔不支持与个人电脑的连接。
– 您无法通过 DVD 录放像机上的 DV IN
插孔,从 DVD 录放像机转录到摄像机。
,并选择“DV”作为输入通
插孔和摄像机相
DV IN
A
或
B
选项二:使用 S-VIDEO 或 VIDEO 输
入插孔
如果您有 Hi8 或 S-VHS(C) 摄像机,即
可使用 S-VIDEO 连接。此连接可提供较
佳的影像品质。
或者,如果摄像机只有一个视频输出
(Composite Video、CVBS),请使用
VIDEO 连接。
A 连接 DVD 录放像机前方面板上的
S-VIDEO
S-VHS 或视频输出插孔。
或
插孔和摄像机对应的
VIDEO
B 使用音频连接线 (红/白接头),连接 DVD
录放像机前方面板上的
和摄像机的音频输出插孔。
在开始使用之前,重复按下遥控器上
的
REC SOURCE
S-VIDEO”或“Front CVBS”作为输入通
道,视连接的方式而定。欲进行录像,请
参阅第 80~82 页。
AUDIO L/R
,并选择“Front
插孔
提示:
70
在进行或变更任何连接之前,请确定拔下所有装置的电源插头。
Page 71

主机
(播放/暂停)
(录像)
(待机 – 开启)
(开启/关闭)
a STANDBY-ON 2
– 启动或关闭 DVD 录放像机。
b
光碟托盘
c OPEN CLOSE ç
– 开启/关闭光碟托盘。
d n STOP
– 停止播放/录像。
e
PLAY / PAUSE
– 播放暂停/录像。
f SOURCE
– 选择录象放机的输入信号源。
(停止)
(信号源)
g RECORD l
– 开始录制目前的电视频道或目前的影像输
入来源。
– 重复按下按钮,即可设定 30 分钟间隔的
单键录像功能。
h
系统显示面板
– 显示有关 DVD 录放像机目前状态的信息。
门盖后面的插孔
按照右边角落
开门盖。
i S-VIDEO
– SVHS/Hi8 摄像机或 SVHS/Hi8 录放像机
的 S 视频输入。
按一下遥控器上的
择“Front S-Video”,设定输入源。
j VIDEO
– 摄像机或录放像机的视频输入。
按一下遥控器上的
择“Front CVBS”,设定输入源。
(S 视频)
(视频)
k L/R AUDIO
– 摄像机或录放像机的音频输入。
l DV IN
– 数位摄像机或其他适合此连接装置的输
按一下遥控器上的
(数位摄像机输入)
入。
择“DV”,设定输入源。
标签的指示,打
OPEN
REC SOURCE
REC SOURCE
(左/右音频)
REC SOURCE
并选
键并选
并选
71
Page 72

遥控器
a STANDBY-ON 2
– 启动 DVD 录放像机或切换至待机模式。
b TIMER
– 进入/退出定时录像菜单。
(定时录像)
c SYSTEM-MENU
– 进入/退出系统菜单。
(待机 – 开启)
(系统 菜单)
d : 左右键可以向左向右移动搜寻。
: 上下键可以向上向下移动搜寻。
e REC l
– 开始录制目前的电视频道或目前的影像输
入来源。
(录像)
f
– 跳到前一个或下一个章节/曲目。
g TOP MENU
DVD±R/±RW)
– 进入光碟编辑菜单。
h AUDIO
– 选择音频语言 (DVD、VCD) 或声道。
i SUBTITLE
– 选择 DVD 的字幕语言。
j REC MODE
– 在录像模式间切换:
1 小时、2 小时、4 小时和 6 小时模式。
这会决定您在 DVD±R/±RW 上录制的品质和
时间长短。
(编辑菜单)
(音频)
(字幕)
(录像模式)
(仅限于
72
Page 73

k
数字键盘
– 选择要播放的章节/曲目号码。
– 选择录放像机的预设电视调谐频道。
遥控器 (继续)
l REC SOURCE
– 选择录放像机的输入来源。
m DISC-MENU
– 浏览 DVD 的光碟菜单或 DVD±R/±RW 的索
引画面。
– 切换PBC ON和OFF状态。
(录像输入源)
(光碟 菜单)
n OK
– 储存/确认输入。
– 确认选取。
o PLAY
– 播放光碟。
p STOP
– 停止播放/录像。
– 在启动 PBC 时,可浏览 VCD 的光碟菜单
仅限于VCD2.0/SVCD
(
q
Å
– 暂停播放或录像。
– 重复按下按钮,将暂停画面逐次前进一
帧。
r EDIT
– 进入/退出影像编辑菜单。
s ZOOM
(播放)
É
n
(编辑)
(缩放)
(停止)
)。
(仅限于 DVD±R/±RW)
– 放大电视画面的影像。
t TITLE MENU
– 进入/退出标题/章节菜单。
u ADD/CLEAR
– 清除设定菜单中的曲目/章节/文件。
– 清除定时录像。
(标题/章节)
(清除)
73
Page 74

遥控器 (继续)
22
24
25
28
29
31
33
26
23
30
32
27
34
v Open
– 打开/关闭碟片仓。
w DISPLAY
– 显示或调节播放状态。
x GO TO
– 按照标题/章节/时间进行搜索播放。
y REW
– 快退,有四种模式:2X,4X,16X,32X。
z F.FWD
– 快进,有四种模式:2X,4X,16X,32X。
27 SLOW
– 慢进,有四种模式:1/2,1/4,1/8,
1/16。
28 ANGLE
– 对具有多角度镜头的碟片进行角度切换。
29 REPEAT
– 设置重复功能。
30 REPEAT AB
– AB段重复功能设置。
31 P.SCAN
– 切换本机视频输出的扫描方式(隔行/逐
行)。
32 CH+/-
– 选择电视频道及外部信号输入源。
33 SHUFFLE
– 乱序播放功能。
34 VOL+/-
– 音量加/减。
74
Page 75

显示窗口
显示窗口
提示:
只有在数字同轴连接是时,通过直通模式支持DTS碟片。
75
Page 76

快速入门
+
1
3
2
步骤一:放入电池
A 打开电池盒盖。
B 请按照盒内的正负极 (+-) 指示放入两
颗 R03 或 AAA 电池。
C 盖上电池盖。
警告!
- 如果电池耗尽或遥控器长时间不用,
请将电池取出。
- 请勿将新旧电池或不同种类的电池混
合使用。
- 电池含有化学物质,因此应妥善弃
置。
使用遥控器操作系统
步骤二:查找收看频道
A 在 DVD 录放像机上按一下
将其启动。
B 打开电视机并设定正确的视频输入通道。
您应该会看到蓝色的 DVD 背景画面。
通常该通道是介于最低和最高之间的通
道,可称为 FRONT、A/V IN 和 VIDEO。详
情请参阅电视机的使用手册。
或者,转到电视的第一频道,然后重
复按“Channel Down”按钮,直到出现
Video In 通道。
或者,电视遥控器可能有选择不同视频
模式的按钮或开关。
重要!
在完成连接后初次启动 DVD 录放像机
时,建议您先作几个基本设定。
请参阅下列页面有关使用系统菜单功
能来设定电视频道和进行菜单语言设
定。这将能大幅提升 DVD 录放像机的
性能表现。
STANDBY-ON
2
A 将遥控器直接对准前方面板的遥感器 (iR)。
B 按一下遥控器上的
需的控制模式 (如 Front-CVBS)。
76
REC SOURCE
并选择所
Page 77

快速入门 (继续)
SYSTEM
MENU
OK
步骤三:电视频道设定
在 DVD 录放像机可以开始录制电视频道
节目之前,您需要搜寻可以观看的电视频
道,然后将这些频道储存在本机中。
请确认 DVD 录放像机、电视、卫
注意:
星接收器/电缆电视转换器 (如有) 所有必
要的连接均已妥善接好,且已开启。
当光碟托盘中没有光碟时,才可以变
更调谐器的设定。
自动电视频道搜寻
这会自动扫描所有可以接收到的电视频道
以及电缆电视转换器/卫星接收器上的电缆
电视节目,并将这些频道储存在 DVD 录
放像机上。
A 按一下遥控器上的
电视上会显示系统菜单。
B 使用 键选取
- Channel Setup }
描)并按一下 OK。
C 使用 键选取
}(扫台)
开始自动搜寻电视频道。此步骤可能需
要几分钟的时间。
搜寻完毕,电视上会显示搜寻到的频道数
目。
SYSTEM-MENU
(系统设置-频道扫
{ Channel Search
并按一下OK。
{ System Menu
。
提示:
按一下
按一下 回到前一个菜单项目。
SYSTEM-MENU
退出菜单。
77
Page 78

OK
CANCEL
快速入门 (继续)
修改频道信息
您可以根据您的喜好设定电视频道,并调
整电视频道的收讯和音效。
A 按一下
SYSTEM-MENU
将出现系统菜单。
B 使用 键选取
- Channel Setup }
描)并按一下 。
C 使用 键选取
Information }
。
OK
将出现频道菜单。
D 使用 键选择其中一项并按
{ Name }
使用
设号码。
– 使用 键变更字母/号码,然后使
用 键选择不同的输入栏目并按一下
OK
(名称)
数字键盘 0-9
确认。
{ Scan Mode }
根据频道的位置或频率选择电视频道的搜
寻模式。
– 使用 键选择
道)、
{ S-Channel }
{ Frequency }
认。
{ Frequency }
显示目前电视频道的频率。
– 必要时,请使用 键开始自动频
率搜寻并按一下 OK 确认。
。
{ System Menu
(系统设置-频道扫
{ Modify Channel
(修改频道信息)并按
OK
选择要变更频道的预
(扫台方式)
{ Channel }
(特殊频道) 或
(频率),然后按 OK 确
(频率)
。
{ Sound Mode}
将电视系统的影像和音效调整至最低失真
的情况。
– 使用 键选择最适合的声音模
式,然后按 OK 确认。
(详情请参阅本手册后面的“电视系统指
南”章节)。
{ Skip }
选择此项设定要略过的频道。您只能按下
遥控器上相关的号码才可以使用跳过的频
道。
– 如果要略过此频道,请使用 键
选择
{ Yes }
{ Fine Tune }
如果收讯不良,请选择此项手动微调电视
频道。
– 使用 键调整频率。
E 完成后,在菜单内选择
确认并退出回到前一个菜单页面。
OK
如果不要储存变更,选择
按 OK。
(频
(声音模式)
(跳台)
,然后按 OK 确认。
(微调)
,然后按
并
提示:
按一下 回到前一个菜单项目。
按一下
78
SYSTEM-MENU
退出菜单。
提示:
在中国大部分地区的电视默认制式为PAL D/K制式。如果你确
信你所在地区支持PAL I制式,请将你的电视设置为PAL I制式。
Page 79

快速入门 (继续)
电视频道排序
您可能不赞同各电视频道所分配设定号码
的顺序。您可以使用此功能重新安排所有
储存的电视频道。
A 按一下
SYSTEM-MENU
将出现系统菜单。
B 使用 键选取
。
{ System Menu
- Channel Search }(系统设置-频道
,然后按一下 。
扫描)
C 使用 键选取
(频道排序)
将出现电视频道节目表。
{ Sort Channels }
,然后按一下OK。
D 使用 键选取要变更的频道,然后按
一下 OK。
选定的频道将移至画面右侧。
E 使用 键将电视频道移至所需位置,
然后再按一下 OK。
选定的频道将会安插在目前位置之前。
F 重复步骤 D 至 E,直到将所有的电视频
道按所需位置排好为止。
步骤四:设定时间和日期
如果 DVD 录放像机尚未正确设定时间和日
期,请按照以下步骤手动设定时钟。
A 按一下
SYSTEM-MENU
将出现系统菜单。
B 使用 键选取
- Clock }(系统设置-时间)
确认。
C 按一下
OK
设定
(日期:(日/月/年))
D 使用 键变更号码,并使用 键
选择不同的输入栏目,然后按 OK 确认。
或者,使用遥控器上的
l
入号码。
E 按一下
F 移至
确认。
OK
{ Time (hh:mm:ss) }(时间(
时/分/秒))
E。
。
{ System Menu
并按一下
{ Date (dd/mm/yy) }
。
数字键盘 0-9
,然后重复步骤 D 至
输
提示:
按一下 回到前一个菜单项目。
按一下
SYSTEM-MENU
退出菜单。
79
Page 80

录像
录像光碟
本 DVD 录放像机可使用几种可录制的
DVD 光碟格式:
DVD±RW (可重写 DVD)
– 可重写光碟指当现有资料被删除后,可
多次录写的光碟。
DVD±R (可录制 DVD)
– 此种光碟只能录写一次。每次新的录像
会接在之前所有录像的后面,因为现有的
录像是无法被重写的。
– 任何 DVD±R 光碟只要未经最终化处
理,便可进行编辑。而且还可以附加章节
标记。
– 您也可以删除不要的录像。但是,被删
除的录像所占用的光碟空间无法被收回用
于今后录制。
– 欲在其他 DVD 播放机上播放 DVD±R,
该 DVD±R 必须进行最终化处理 (请参阅
第 89 页的“在其他 DVD 播放机上播放
录制光碟 (DVD±R)”)。完成此程序后,
该光碟就无法再增加任何数据了。
重要!
不可录制影像
电视节目、影片、录像带、光碟和其他资
料可能有版权保护,不可在本机上录制。
录像设定
预设录像设定可以设定自动章节标记、所
需影像输入来源和录像模式。使用遥控器
所做的任何变更仅适用于目前的录像设
定,下次录像仍会使用预设的录像设定。
A 按一下遥控器上的
电视上会显示系统菜单。
B 使用 键选择
SYSTEM-MENU
{ System Menu
- Record }(系统设置-录制)
按一下 确认。
C 使用 键选择您要变更的设定,然后
按 OK 确认。
下列页面将有选项的指示说明。
。
,然后
提示:
按一下 回到前一个菜单项目。
按一下
80
SYSTEM-MENU
退出菜单。
D 欲退出菜单,按一下
SYSTEM-MENU
。
Page 81

录像 (继续)
自动章节标记
录像时,您可以在标题内插入章节标记。
这样您就可以在录制好的光碟上浏览特定
片段,就如同您在其他 DVD 上选择章节
一样。
A 使用 键选择
{ Auto Chapter
Marker }(自动分章节)
,然后按一下
浏览其中的选项。
B 使用 键选择其中一项。
{ Off }
(关闭)
关闭此功能。
{ On }
(开启)
章节标记会在录像期间自动插入。其时间
间隔则取决于所选择的录像模式而定。
C 按一下
OK
确认。
预设录影品质
录像模式会限定录像的影像品质和光碟最
长可容纳多少录像时间。您也可以按下遥
控器上的
REC MODE
使用此功能。
A 使用 键选择
{ Default
Recording Quality }(默认刻录质
量)
,然后按一下 浏览其中的选项。
B 使用 键选择下列其中一个录像模
式。
录像模式
影像品质
每片光碟最长
录像时间
一小时模式
两小时模式
四小时模式
六小时模式
HQ(高品质)
SP(DVD 品质 – 标准播放)
EP(VHS 品质 – 延长播放时间)
SLP(VHS 品质 – 超长播放时间)
一小时
两小时
四小时
六小时
C 按一下
OK
确认
81
提示:
有下划线标示的选项是指原厂预设值。
按一下
回到前一个菜单项目。按一下
SYSTEM-MENU
退出菜单。
Page 82

录像 (继续)
REC
SOURCE
STOP
REC
手动录像
使用此功能立即开始录像 (如录下播放中
的电视节目)。
A 打开电视机电源。选择电视正确的视频输
入通道。
B 在 DVD 录放像机中放入一片 DVD±R/±RW。
C 按一下遥控器上的
REC SOURCE
{ Tuner }(电视频道)
CH+ 和 CH-
道。
欲从外接装置进行录像,重复按下
l
SOURCE
机的插孔相符合的正确输入通道。
选择下列其中一个录像来源:
{ Front CVBS }
跟前方面板的 VIDEO 和 AUDIO L/R 插孔
相连接的输入来源。
{ Front S-Video }
跟前方面板的 S-VIDEO 和 AUDIO L/R 插
孔相连接的输入来源。
键选择所要录像的电视频
,并选择跟连接至本 DVD 录放像
(前置 CVBS)
(前置 S 视频)
并选择
,然后使用
REC
{ Rear CVBS }
跟背后面板的 VIDEO (CVBS)-IN-EXT 和
AUDIO L/R 插孔相连接的输入来源。
{ Rear S-Video }
跟背后面板的 S-VIDEO (Y/C)-IN-EXT 和
AUDIO L/R 插孔相连接的输入来源。
(数位摄像机)
{ DV }
跟前方面板的 DV IN 插孔相连接的输入
来源。
(后置 CVBS)
(后置 S 视频)
{ YUV }(YUV端子)
跟背后面板的 YUV(Y/Pb/Pr) 插孔相连接
的输入来源。
提示:如果YUV(Y/Pb/Pr)信号源为逐行扫
描信号输入则不能刻录。
D 按一下
将接着 DVD±R/±RW 上次录像的最后部
份自动开始录制。
E 欲停止录像,按一下
l 开始录像。
REC
STOP
n。
暂停录像
A 录像时,按一下
您可以使用此功能,避免录下广告片
段。
B 欲继续录像,按一下
Å
。
REC
l。
单键录像 – 自动关闭
A 请按照第 82 页的“手动录像”步骤 A
至 C 进行。
B 按两次
后每按一次
录像时间。
录放像机会在指定的结束时间停止录
像,并会自动关闭。
如要停止录像,请按一下
l
l 开始 30 分钟的录像。之
REC
l,就会增加 30 分钟的
REC
STOP
n。
提示:
82
录像之前请确定 DVD±R/±RW 有足够的空间。您必须先将 DVD±R 最终化处理,才可以在其他播
放机上播放,请参阅第 88 页。
Page 83

录像 (继续)
TIMER
OK
关于定时录像
使用“定时录像”可在稍后的日期/时间
自动开始和停止录像。DVD 录放像机会转
到正确的节目频道,并于指定的时间开始
录像。
使用本 DVD 录放像机,您可以预设多达
20 个预录排程
欲进行定时录像,DVD 录放像机需要
知道:
– 您想要录像的日期。
– 影像输入来源。
– 录像开始和结束时间。
– 录像品质,请参阅第 81 页。
。
定时录像 (手动)
A 打开电视机电源。选择电视正确的视频输
入通道。
B 按一下遥控器上的
将出现定时录像的排程清单。
C 在菜单上选择想要编辑的一项并按
将出现定时录像编辑菜单。
TIMER
。
。
OK
D 使用 键在菜单上选择一个项目,然
后按 进入该选项。
提示:
录像之前请确定 DVD±R/±RW 有足够的空间。您必须先将 DVD±R 最终化处理,才可以在其他播
放机上播放,请参阅第 88 页。
83
Page 84

录像 (继续)
OK
CANCEL
{ Source }
– 使用 键选择影像输入来源。
{ Rec Mode }
– 使用 键选择您的选项。请参阅
第 80~81 页的“录像设定 – 预设录影
品质”。
{ Mode }
– 使用 键选择
次)、
{ Daily }
(每周)、
{ Mon-Sat }
{ Weekend }
{ Date }
– 使用 键或
录像日期。
{ Start }
– 使用 键或
录像开始时间。
{ End }
– 使用 键或
录像结束时间。
F 在菜单上选择
系统将储存定时录像的输入项目,然后
回到定时录像的排程清单。
欲取消上述的定时录像设定,请在菜单上
l
选择
G 按一下
(输入源)
(录像模式)
(模式)
(每天)、
{ Mon-Fri }
(星期一至六) 或
(星期六日) 录像。
(日期)
(开始)
(结束)
并按 OK。
退出菜单。
TIMER
{ Once }
{ Weekly }
(星期一至五)、
数字键盘 0-9
数字键盘 0-9
数字键盘 0-9
并按 OK。
(一
输入
输入
输入
H 在 DVD 录放像机中放入一片 DVD±R/±RW。
I 按一下
STANDBY-ON
如果 DVD 录放像机不是处于待机模
式,在开始录像之前将会出现警告讯息,
并持续三分钟。
如果您忽略此警告讯息,DVD 录放像机
将自动切换至待机模式,以备在指定时间
进行定时录像。
如果设定了定时录像,显示面板上
的“
提示:
– 将定时录像设定比节目开始时间早一分
钟。由于光碟约需 30 秒钟准备录像,这
样可确保录下完整节目。
”图示将会亮起。
TIMER
关闭 DVD 录放像机。
外接有线电视转换器/卫星接收器的定
时录像设定
如果有通过 S-VIDEO (Y/C) 或 VIDEO
(CVBS) 将卫星接收器/机顶盒连接到 DVD
录放像机 (请参阅第 67 页),请按照以
下步骤设定录像。
A 选择要在卫星接收器/电缆电视转换器上录
像的频道。
B 设定录像所需信息。请按照第 83 页
的“定时录像 (手动)”步骤 A 至 I 进
行。
{ Source }
– 使用 键选择
或
{ Rear CVBS }
按 OK 确认。
(来源)
{ Rear S-Video }
作为输入频道,然后
C 将卫星接收器/电缆电视转换器开启以备录
像。
提示:
84
录像之前请确定 DVD±R/±RW 有足够的空间。您必须先将 DVD±R 最终化处理,才可以在其他播
放机上播放,请参阅第88 页。
Page 85

录像 (继续)
OK
变更/删除定时录像
A 打开电视机电源。选择电视正确的视频输
入通道。
B 按一下遥控器上的
将出现定时录像的排程清单。
C 使用 键选择要变更/删除的定时录像
节目。
D
欲删除定时录像输入项目
器上的
ADD/CLEAR
E 欲变更定时录像排程,请按一下
所选定时录像节目的定时录像编辑菜单。
TIMER
。
。
,请按一下遥控
进入
OK
录像期间观看另一个电视频道
在录像期间,您可以使用电视遥控器变更
电视频道,观看另一个频道。
提示:
– 如果您想通过 DVD 录放像机观看电视频
道或播放录制好的光碟,记得将电视转回
其视频输入通道。
F 选择输入栏目,并进行必要的变更。
G 完成后,在菜单上选择
储存变更。
H 按一下
提示:
录像之前请确定 DVD±R/±RW 有足够的空间。您必须先将 DVD±R 最终化处理,才可以在其他播
放机上播放,请参阅第 89 页。
TIMER
退出菜单。
并按 OK
85
Page 86

TOP MENU
REC
OK
录像的编辑/最终化处理
关于光碟编辑
本 DVD 录放像机为不同光碟类型提供多
种光碟编辑选项。您可以从光碟编辑菜单
中,变更已录制 DVD±R/±RW 的光碟内容
和设定。光碟经编辑后,如果在其它 DVD
播放机上播放,其内容可能无法读出。
光碟编辑菜单中所显示的选项会根据光碟
类型而有所不同。
{ Play }
从光碟头开始播放。
{ Rename Disc }
变更光碟的名称。
{ Erase Disc }
– 仅限于 DVD±RW
删除光碟内的所有录制内容。
{ Record New Title }
从光碟最后的空标题开始录像。
{ Overwrite Disc }
– 仅限于 DVD±RW
从光碟头开始新的录像;所有先前录制的
内容将被重写。
{ Make Compatible }
– 仅限于 DVD±RW
使录制的内容能与其他的 DVD 播放机相
容。
{ Lock/Unlock Disc }
解除锁定) – 仅限于 DVD±RW
锁定光碟或解除锁定以避免发生意外删除
或变更。
{ Finalize Disc }
– 仅限于 DVD±R,DVD-RW
将光碟最终化处理,使其能在其他的 DVD
播放机上播放。此后无法再继续录像或编
辑该光碟。最终化处理无法取消。
(播放)
(重新命名光碟)
(删除光碟)
(录制新标题)
(重写光碟)
(相容性处理)
(锁定光碟/
(光碟最终化处理)
浏览光碟编辑菜单
A 在 DVD 录放像机中放入一片录制好的
DVD±R/±RW。
电视上会显示索引影像的画面。
B 按一下遥控器上的
将出现光碟编辑菜单。有各种 DVD±R
和 DVD±RW 的编辑选项。
TOP MENU
C 使用 键浏览不同的选项并按
行选取。
下列页面将有选项的指示说明。
D 欲退出,按一下
引影像画面。
TOP MENU
。
OK
回到光碟的索
进
提示:
按一下
DVD±R 经过最终化处理后便无法再继续录制和编辑。
回到前一个菜单项目。按一下
DISC MENU
退出。
86
Page 87

BkSp
DELETE
SPACE
CAPS
CLEAR
OK
EXIT
YES
NO
录像的编辑/最终化处理 (继续)
重新命名光碟
光碟原本的名称是由 DVD 录放像机自动
产生的。您可以按照以下步骤变更光碟的
名称。
A 按一下
TOP MENU
{ Rename Disc }(碟片重命名)
按 OK。
将出现键盘画面。
,使用 键选择
并
B 使用 键在键盘上点选一个字符
并按 OK 进行选取。
最多可以输入 9 个 字符。
您可以使用以下键盘画面上的按键来编辑
l
输入:
: 删除光标左边的一个字符。
: 移除光标前面的字符。
: 在字符之间插一个空格。
: 切换大小写。
: 删除整个输入栏目。
C 欲确认输入项目,在键盘上选择
并按 OK。
信息面板已立即更新。
欲取消变更,在键盘上选择
l
。
OK
并按
删除光碟 (仅限于 DVD±RW)
这会删除 DVD±RW 的内容,包括非在本
DVD 录放像机所录制的内容。一旦现有内
容删除完毕后,即可再进行录像。
A 按一下
TOP MENU
{ Erase Disc }(擦除碟片)
。
OK
将出现警告讯息。
B 在菜单中选择
中止,然后按 OK 确认。
录制新标题
此功能可让您在 DVD±RW 内剩余的空间录
制新的内容。
A 按一下
TOP MENU
{ Record a New Title }(录制一个
新标题)
B 选择要录像的来源并按一下
录像。
并按 OK。
重写光碟 (仅限于 DVD±RW)
不管光碟的内容为何,此功能可让您从
DVD±RW 的片头开始新的录像。
,使用 键选择
并按
继续进行或选择
,使用 键选择
开始
REC
l
提示:
DVD±R 经过最终化处理后便无法再继续录制和编辑。
按一下
87
回到前一个菜单项目。按一下
A 按一下
TOP MENU
,使用 键选择
{ Overwrite disc }(覆盖整碟)
按 OK。
B 选择要录像的来源并按一下
录像。
DISC MENU
退出。
REC
l
并
开始
Page 88

YES
NO
录像的编辑/最终化处理 (继续)
兼容性处理 (仅限于 DVD±RW)
编辑过的 DVD±RW 在其他 DVD 播放机上
播放时,可能还会显示原本的标题或隐
藏的画面。此功能可让您处理编辑过的
DVD±RW,使其与其它的播放机兼容。
按一下
l
TOP MENU
,使用 键选择
{ Make Compatible }(兼容性处理)
并按 OK。
提示:
– 如果 {Compatible}(兼容性处理) 选
项无法进行选取,即表示该光碟已可以相
容。
锁定光碟/解除锁定 (仅限于
DVD±RW)
您可以选择保护录制好的 DVD±RW,以避
免发生意外录像损失。
A 按一下
TOP MENU
,使用 键选择
{ Lock Disc }(碟片加锁)
。
OK
该片光碟将被锁定,仅限在本 DVD 录
放像机上使用。
当光碟被锁定时,光碟编辑菜单中的
选项将变为
锁)
{ Unlock Disc }(碟片解
。
并按
在其他DVD 播放机上播放录像光碟
(DVD±R)
DVD±R 或 DVD-RW 光碟必须先进行最终化
处理,才可以在其他 DVD 播放机上播放。
否则,该 DVD±R 或 DVD-RW 只能在本
DVD 录放像机上播放。
DVD±R 或 DVD-RW 光碟在进行最终化
处理后则无法再继续录制或编辑。在
光碟进行最终化处理之前,请确定已
完成所有的录制和编辑。
A 按一下
TOP MENU
{ Finalize Disc } (封盘)
。
OK
将出现警告讯息。
B 在菜单中选择
行。
最终化处理需要几分钟时间。请勿开启
光碟托盘或关闭电源,因为这样可能会使
得该光碟无法使用。
C 选择
,使用 键选择
并按 OK 开始进
中止播放。
并按
B 如果您想在防护的光碟上进行重写或编
辑,请选择
锁)
{ Unlock Disc }(碟片解
。
最终化处理光碟 (仅限于 DVD±R,
DVD-RW)
l
按一下
TOP MENU
,使用 键选择
{ Finalize Disc }(封盘)
。
OK
提示:
DVD±R 经过最终化处理后便无法再继续录制和编辑。
按一下
回到前一个菜单项目。按一下
并按
DISC MENU
退出。
88
Page 89

录像的编辑/最终化处理 (继续)
关于标题编辑
您可以在录制好的 DVD±R/±RW 中变更个
别的标题信息或删除标题 (录像)。如果
DVD±R/DVD-RW 已经进行最终化处理,则
无法再编辑。
标题编辑菜单中所显示的选项会根据光碟
类型而有所不同。
{ Play Title }
开始播放录像。
{ Edit Title }
浏览影像编辑菜单。
{ Rename Title }
变更录像的名称。
{ Erase Title }
于 DVD±RW
删除标题 (录像)。
{ Overwrite Title }
– 仅限于 DVD±RW
开始新的录像,现有标题 (录像) 将会被
重写。
{ Overwrite Disc }
从光碟现有选取的标题开始重写到最后部
份。
{ Append Title }
在上一次现有录像的最后部份插入新的录
像。
(播放标题)
(编辑标题)
(重新命名标题)
(删除标题) – 仅限
(重写标题)
(重写光碟)
(添加标题)
浏览标题编辑菜单
A 在 DVD 录放像机中放入一片录制好的
DVD±R/±RW。
电视上会显示索引影像的画面。
播放期间,按一下
l
影像的画面。
DISC MENU
B 使用 键选取一个标题 (录像),然后
按一下 。
将出现标题编辑菜单。
C 使用 键浏览不同的选项并按
行选取。
下列页面将有选项的指示说明。
D 欲退出,按一下 。
編輯錄影
此功能可让您浏览影像编辑菜单。详情
请参阅第91页的“关于录像编辑”。
浏览索引
进
OK
提示:
DVD±R 经过最终化处理后便无法再继续录制和编辑。
按一下
89
回到前一个菜单项目。
在标题编辑菜单中,使用 键选择
l
{ Edit Title }(编辑标题)
。
OK
将出现影像编辑菜单。
DVD 录放像机将播放选定的标题。
并按
Page 90

录像的编辑/最终化处理 (继续)
BkSp
DELETE
SPACE
CAPS
CLEAR
OK
EXIT
YES
NO
重新命名標題
标题原本的名称是由 DVD 录放像机自动
产生的。您可以按照以下步骤为标题制订
新名称。
A 在标题编辑菜单中,使用 键选择
{ Rename Title }(标题重命名)
按 OK。
将出现键盘画面。
B 使用 键点选一个字符并按
进行选取。
最多可以输入 9 个 字符。
您可以使用以下键盘画面上的按键来编辑
l
输入:
: 删除光标左边的一个字符。
: 移除光标前面的字符。
: 在字符之间插一个空格。
: 切换大小写。
: 删除整个输入栏目。
OK
C 欲确认输入项目,在键盘上选择
并按 OK。
信息面板已立即更新。
欲取消变更,在键盘上选择
l
。
OK
并按
清除标题
您可以删除光碟上的特定标题 (录像)。但
对于 DVD±R,删除后的空间无法再继续用
于录制。
A 在标题编辑菜单中,使用 键选择
{ Erase Title }(擦除标题)
按 OK。
将出现警告讯息。
并
重写标题 (仅限于 DVD±RW)
此功能可以让您从 DVD±RW 目前的标题片
头开始录制一个新标题。
A 在标题编辑菜单中,使用 键选择
{ Overwrite Title }(覆盖标题)
并
并按 OK。
B 选择要录像的来源并按一下
录像。
从选定的标题开始重写
您可以选择只从光碟选定的标题开始重写
到最后部份。
A 在影像编辑菜单中,使用 键选择
{ Overwrite Disc }(覆盖整碟)
按 OK 进行删除。
添加录影
此功能可让您接续上一次现有标题的最后
部份添加新的录像。
A 在标题编辑菜单中,使用 键选择
{ Record a New Title }(录制一个
新标题)
B 按一下
道。
C 按一下
警告!
之前所录制的内容将会被重写。
并按 OK。
REC SOURCE
l 开始添加录像。
REC
一旦开始录像,从播放点开始任何
选择要添加的输入频
D 欲停止附加录像,按一下
REC
STOP
l 开始
并
n。
B 在菜单中选择
提示:
按一下
继续进行或选择
中止,然后按 OK 确认。
DVD±R 经过最终化处理后便无法再继续录制和编辑。
回到前一个菜单项目。
90
Page 91

EDIT
PLAY
OK
录像的编辑/最终化处理 (继续)
关于录像编辑
录像结束后,本 DVD 录放像机可让您编辑
录像的内容。您可以在索引影像画面中添
加/删除章节标记、隐藏不要的画面、变更
影像以及将标题 (录像) 一分为二。
当您在录像编辑模式中播放录像时,系统
将会播放整个录制的内容,包括隐藏的画
面。
光碟编辑菜单所提供的编辑功能如下:
{ Title }
选择要播放的标题 (录像)。
{ Chapter }
在选定的标题内选择一个章节。
{ Play }
播放选择要播放的标题 (录像)。
{ Chapter Marker }
在录像中插入一个章节或删除一个章节标
记,将两个章节合并起来。
{ Hide Chapter }
隐藏不要的录像画面。
{ Index Picture }
选择一个录像画面,作为索引影像的画
面。
{ Split Title }
将录像分为两个个别的标题。
(标题)
(章节)
(播放)
(章节标记)
(隐藏章节)
(索引影像)
(分割标题)
浏览影像编辑菜单
A 在 DVD 录放像机中放入一片录制好的
DVD±R/±RW。
电视上会显示索引影像的画面。
B 使用 键选择一个标题 (录像)。
C 按一下
D 按一下遥控器上的
将出现影像编辑菜单。
开始播放。
PLAY
EDIT
。
{ T-Elapsed:x:xx:xx }(标题播
放:x:xx:xxx)
显示播放的时间。
提示:
DVD±R 经过最终化处理后便无法再继续录制和编辑。
按一下
回到前一个菜单项目。
91
E 使用 键浏览不同的选项并按
行选取。
下列页面将有选项的指示说明。
F 欲退出,按一下
EDIT
。
OK
进
Page 92

录像的编辑/最终化处理 (继续)
Title
Chapter
Title
Chapter Chapter Chapter Chapter
chapter markers
选择标题
系统将显示光碟内目前的标题和总标题
数,同时还可让您选择另一个标题。
A 播放期间,按一下
单,然后使用 键选择
{ Title }(标题)
B 使用
数字键盘 0-9
DVD 录放像机将会播放选定的标题。
显示影像编辑菜
EDIT
并按 OK。
输入标题并按 OK。
选择章节
系统将显示标题内目前的章节和总章节
数。您还可以在标题内选择另一个章节。
A 播放期间,按一下
单,然后使用 键选择
{ Chapter }(章节)
B 使用
数字键盘 0-9
DVD 录放像机将播放选定的章节。
显示影像编辑菜
EDIT
并按 OK。
输入章节并按 OK。
选择播放模式
你可以选择2,4,8,16,或32倍速进
行快进或快退播放。 你可以选择1/2,
1/4,1/8,或1/16倍速进行慢放。
A 播放期间,按一下
单,然后使用 键选择
{ PLAY }(播放)
显示影像编辑菜
EDIT
并按 OK。
B 使用 键选择播放模式并按
OK
制作章节标记
播放期间,您可以在标题的任何片段插入
章节标记来制作章节。这样您就可以轻松
浏览录像的特定片段或设定您要隐藏的章
节。
A 播放期间,按一下
单,然后使用 键选择
{ Chapter Marker }(章节标记)
按 OK。
B 使用 键选择其中一项并按
认。
{ Insert Chapter Marker }
章节标记)
选择此项在目前的播放点插入一个新的章
节标记。
{ Delete Chapter Marker }
章节标记)
选择此项删除目前的章节标记 系指最靠近
目前播放点之前的标记)。目前的章节将与
之前的章节合并起来。
{ Delete All Chapter Marker }
(删除所有章节标记)
选择此项删除目前标题内的所有章节标记。
。
显示影像编辑菜
EDIT
确
OK
(插入
(删除
并
提示:
DVD±R 经过最终化处理后便无法再继续录制和编辑。
按一下
回到前一个菜单项目。
92
Page 93

录像的编辑/最终化处理 (继续)
隐藏不要的章节
您可以选择将特定片段 (如略过广告片
段)隐藏起来不播放,或让该片段再度显
现。
A 在要隐藏的片段制作一个章节标记。(请参
阅前一页的“插入章节标记”)。
B 选择要隐藏的章节并开始播放。(请参阅前
一页的“选择章节”)。
C 播放期间,按一下
单,然后使用 键选择
{ Hide Marker }(隐藏章节)
按 OK。
目前的章节将被隐藏起来。
如果没有显示影像编辑菜单,按一下遥控
l
器上的
EDIT
。
显示影像编辑菜
EDIT
并
欲取消隐藏章节
A 播放时按一下遥控器上的
将出现影像编辑菜单。
在编辑模式中,将会播放隐藏的章节。
B 使用 键选择
}(显示章节)
目前的章节会在播放时出现。
提示:
– 所有隐藏的章节皆能在录像编辑模式中
进行播放。
{ Unhide Chapter
并按 OK。
EDIT
。
变更索引影像
索引影像是指当 DVD 录放像机载入索引
菜单时您将会看到的标题影像。通常,录
像的第一个画面会显示作为标题的索引影
像。
按一下
l
后使用 键选择
Picture }(标题图片)
,以选择目前画面为标题的索引影像。
OK
显示影像编辑菜单,然
EDIT
{ Index
并按一下
分割标题 (仅限于 DVD±RW)
您可以将目前的标题分成两个新的标题。
每个标题均有各自的索引影像。
标题一旦进行分割,就无法回复。
警告!
播放期间,按一下
l
单,然后使用 键选择
显示影像编辑菜
EDIT
{ Split Title }(切分标题)
在目前的播放位置分割标题。
OK
索引影像画面将会显示新的标题。
并按
提示:
DVD±R 经过最终化处理后便无法再继续录制和编辑。
按一下
93
回到前一个菜单项目。
Page 94

播放
ReWritable
Recordable
播放光碟
使用本 DVD 录放像机,您可以播放和录制
下列光碟:
录像和播放
DVD±RW
可反复录制。
DVD±R
仅可单次录制。
仅作播放:
DVD Video
光碟)
CD-RW
音乐/ MP3/ JPEG 内容
CD-R
音乐/ MP3/ JPEG 内容
Audio CD
光碟)
MP3-Disc
Video CD
(格式 1.0、1.1、2.0)
(可重写 DVD)
(可录制 DVD)
(数位多功能
(可重写光碟)
(可录制光碟)
(数位音乐压缩
(MP3 光碟)
(影音光碟)
;
;
重要!
– 按下按钮时如果电视画面上出现禁
止图示 (错误),即表示目前光碟上或
目前时间下不提供该功能。
– DVD 光碟和播放机的设计有区域性
限制。播放光碟之前,请确定光碟与
您的播放机属于同一区域。
– 请勿推压光碟托盘或放入光碟以外
的其他物件。这样可能会使光碟播放
机发生故障。
放入光碟
A 按一下
STANDBY-ON
B 按一下 DVD 录放像机前面的
ç。
CLOSE
将开启光碟托盘。
C 小心将光碟放入拖盘中,印标签面朝上,
然后按一下
请确定将光碟标签面朝上。
对于双面光碟,将要播放的一面朝上放
置。
D 打开电视机电源。选择电视正确的视频输
入通道 (请参阅第 76 页)。
E 将自动开始播放,或电视上会显示对话框
(请参阅下一页)。
启动 DVD 录放像机。
OPEN CLOSE
OPEN
ç。
Super Video CD
(超级影音光碟)
提示:
有些光碟由于光碟的配置和特性或因录制情况和制作软体而无法在本 DVD 录放像机上播放。
94
Page 95

播放 (继续)
开始光碟播放
将自动开始播放。如果光碟本身备有菜
l
单,系统将会载入该菜单,否则 DVD 录放
像机将会开启索引画面。
如果电视上出现密码输入对话框,即表示
l
该放入光碟有家长控制功能 (请参阅第
104 页)。
使用遥控器上的
的密码。
欲了解更多的播放功能,请参阅第 98~102页
l
的“高级播放功能”。
数字键盘 0-9
播放 DVD 影音光碟
DVD 光碟通常备有光碟菜单。您可能需要
在此光碟菜单中进行选择 (如字幕或声音
语言)。
A 放入 DVD 光碟。
如果电视上显示光碟菜单
使用
数字键盘 0-9
l
键选择播放项目并按 OK 开始播
放。
输入您的选择或使用
欲选择前一个或下一个章节/标题标记
播放期间,按两下遥控器上的
l
单。使用 键选择
或
题)
使用
{ Chapter }(章节)
数字键盘 0-9
B 欲停止播放,按一下
{ Title }(标
输入标题/章节号码。
STOP
输入您
DISPLAY
,然后
n。
播放超级影音光碟 (SVCD)
超级影音光碟 (SVCD) 可能具有“PBC”(播
放控制) 功能。此功能可让您以互动方式,
按照显示的菜单播放影音光碟。
A 放入一片超级影音光碟。
如果“PBC”功能开启,电视上将会显
示光碟索引的菜单
B 使用
数字键盘 0-9
播放项目。
按一下遥控器上的
l
单。
欲开启/关闭播放控制模式,播放时请按两
l
下遥控器上的
键选择
输入您的选择或选择
STOP
DISPLAY
{ PBC On }(PBC开)
{ PBC Off }(PBC关)
C 欲停止播放,按一下
STOP
播放音乐光碟
A 放入一片音乐光碟。
将自动开始播放。
B 欲停止播放,按一下
显示面板上将会显示曲目号码和已播放
菜
的时间。
STOP
播放 DVD±R/±RW 光碟
A 放入一片 DVD±R/±RW 光碟。
将显示索引影像画面。
B 使用 键选择标题,然后按一下
开始播放。
PLAY
C 欲停止播放,按一下
STOP
回到上一个菜
菜单。然后使用
或
。
n。
n。
n。
提示:
95
提示:
– 如果显示面板上出现“BLANK”(空白)
的讯息,即表示该光碟内没有录像。
有些光碟由于光碟的配置和特性或因录制情况和制作软体而无法在本 DVD 录放像机上播放。
Page 96

播放 (继续)
File Play - Stop 0:00:00/ 0:00:00
Directory Selection
Bee Gees
Phil Collins
Bryan Adams
Collin Raye
Nat King Cole
UB40
Jordan Hill
Faith Hill
1
2
3
4
5
6
7
8
File Play - Stop 0:00:00/ 0:00:00
Directory Selection
Japan trip
Bryan Bday
My songs
Hot Hits
1
2
3
4
File Play - Stop 0:00:00/ 0:00:00
Directory Selection
P1010001.JPG
P1010008.JPG
BUTTER-1.JPG
NATURE-1.JPG
BUTTER-1.JPG
P1022500.JPG
P1023000.JPG
MERLIO-1.JPG
1
2
3
4
5
6
7
8
..\
File Play
PIC
Normal
Play
Top to bottom
Fitscreen
Clockwise 0
Type
Mode
Trick
Wipe
Zoom
Rotate
Top to bottom
Down to top
Left to right
Right to left
Extend center V.
播放 MP3 光碟
A 放入一片 MP3 光碟。
将出现光碟内容菜单。
由于光碟含有众多的歌曲/影像,
注意:
因此 DVD 录放像机可能需要较长的时间,
才能在电视上显示光碟的内容菜单。
B 使用 键浏览菜单,然后按一下
OK
浏览文件夹/专辑。
C 使用 键选择要播放的曲目/文件。
欲回到前一个菜单,请按一下
l
MENU
。
DISC
D 欲建立播放清单,请选取曲目/文件并按一
下
ADD/CLEAR
选定的曲目/文件将会显示在右画面
中。
使用 键切换左右画面。
E 按一下
PLAY
。
开始播放。
F 播放期间,您可以按一下 / 选择
下一个/前一个曲目。
G 欲停止播放,请按一下
STOP
n。
DVD±R/±RW)。
将出现光碟内容菜单。
B 使用 键浏览菜单,然后按一下
存取文件夹/专辑。
C 欲建立播放清单,请选取曲目/文件并按一
下
DISC MENU
选定的曲目/文件将会显示在右画面
中。
欲删除播放清单的曲目/文件,按一下
ADD/CLEAR
。
。
D 您可以从原本的光碟内容或播放清单选
择播放,只要使用 键移至正确的画
面,然后选择要播放的曲目/文件即可。
如果光碟含有 MP3 音乐和 JPEG 图片
文件,您可以使用音乐幻灯片的播放
形式。
选择一个 MP3 文件,按 OK 开始播放,然
l
后在菜单中选择一个图片文件并按一下
即可开始播放音乐幻灯片。
E 播放期间,您可以按两下遥控器上的
DISPLAY
浏览连续播放的各种设定。
OK
OK
提示:
– 仅会播放多段落光碟的第一个段落。
– 收听 MP3 光碟时,偶尔会出现“跳
跃”的情形是很正常的。
– ID 标签如有专辑、曲目和演唱者的详细
信息,该信息也会显示在电视上。
播放图片光碟 (或音乐幻灯片)
您可以在选定的片中自动连续播放 JPEG
图片。
A 放入一片 JPEG 图片光碟 (CD、CD-R/RW、
提示:
有些光碟由于光碟的配置和特性或因录制情况和制作软体而无法在本 DVD 录放像机上播放。
重复按下遥控器上的
l
ANGLE
并选择幻灯
片播放动画。
选定的动画设定将会显示在电视屏幕的
左上角。
按一下遥控器上的
l
ZOOM
放大影像。
96
Page 97

播放 (继续)
F 欲停止播放,请按一下
STOP
n。
可播放 JPEG 图片光碟
文件格式:
– 文件的后缀必须为“.JPG”、
“.JPE”或“.JPEG”。
– 仅可显示 DCF 标准的静态图片或
JPEG 图片,如 TIFF 。但无法播放移动
影像、动态 JPEG、渐进式 JPEG 和其他
格式,或是 JPEG 以外的影像格式或影音
等。
– 由于光碟含有众多的歌曲/影像,因此
DVD 录放像机可能需要较长的时间,才能
在电视上显示光碟的内容菜单。
转到另一个标题/章节/曲目
当光碟含有一个以上的曲目、标题或章
节,您可以按照以下方式转到不同的曲
目、标题或章节。
播放期间,
按一下 到下一个标题/章节/曲目。
l
按一下 回到上一个标题/章节/曲目的
l
开始。
或者
使用
数字键盘 0-9
l
号码。
或者
按一下
l
单,使用 键选择
题)
使用
号码。
TITLE MENU
或
{ Chapter }(章节)
数字键盘
输入标题/章节/曲目
进入标题/章节菜
{ Title }(标
输入标题/章节/曲目
0-9
暂停播放和逐步播放
,然后
提示:
此处所提及的操作功能可能不适用于某些光碟。
请务必参阅光碟的随附说明。
97
A 播放期间,按一下
止畫面。
B 再按一下
将会往前转一个画面。
Å
暫停播放並顯示靜
Å
C 欲继续一般播放,请按一下
PLAY
。
Page 98

高级播放功能
TITLE MENU
ADD/CLEAR
OK
前进/倒转搜寻
您可以将光碟以一般播放速度的 2 倍、4
倍、16 倍或 32 倍进行快进或快倒。
A 播放期间,按一下 (快退) 或
(快进) 转到搜寻功能。
将出现搜寻状态栏,并显示搜寻速度:
2x,4x,16x,32x(向后或向前)(适用于
DVD/VCD);
2x,4x(向后或向前)(适用于CD);
2x,4x,8x,16x,32x(向后或向前)(适用
于MP3);
声音将变成静音(DVD/VCD/WMA)或间歇
(CD)的模式。
B 按一下 (快退) 或 (快进) 将循
序变更搜寻速度。
C 欲继续一般播放,请按一下
PLAY
。
放大
此选项可让您放大屏幕影像并在放大影像
中作平移调整。
A 按一下遥控器上的
150% 或 200%。
B 使用 键平移放大的影像。
C 欲退出,按一下
的大小为止。
启动放大功能:
ZOOM
直到影像回到原来
ZOOM
使用标题/章节选项
A 播放期间,按两下遥控器上的
电视上将出现标题/章节菜单。
B 使用 键选择想要调整的设定。
下列页面将有选项的指示说明。
C 欲退出,按一下
DISPLAY
DISPLAY
。
。
提示:
此处所提及的操作功能可能不适用于某些光碟。
请务必参阅光碟的随附说明。
98
Page 99

高级播放功能 (继续)
DVD
Title Program
Title 1
Title 2
Title 3
Title 4
Title 5
Title 6
Title 7
Title 8
选择各种重复/随机播放的功能
您可以在播放时选择各种重复播放或随机
播放的模式。
A 播放期间,按两下遥控器上的
将出现标题/章节菜单。
B 使用 键选择
{ Mode }
DISPLAY
并按 OK。
C 使用 键选择其中一个重复选项。
{ Repeat A-B }
选择此项重复播放标题/章节/曲目中的特
定片段。按一下 OK 标注要重复的片段起
始和结束点。
{ Chapter Repeat }
选择此项重复播放目前的章节 (仅限于
DVD、DVD±R/±RW)。
{ Repeat Track/Title }
目/标题)
选择此项重复播放目前的曲目/标题。
{ Repeat Directory }
选择此项重复播放目前的文件夹/菜单
(仅限于 MP3、JPEG 和影像光碟)。
{ Disc Repeat }
选择此项重复播放整个光碟。
{ Program }
选择此项进行编程。
{ Shuffle }
选择此项随机播放光碟的所有曲目 (仅限
于 MP3 和音乐光碟)。
{ Normal }
选择此项取消重复播放模式,然后回到一
般播放。
D 欲取消重复播放,按一下
择
{ Normal }(一般)
(重复 A-B)
(重复章节)
(重复光碟)
(编程)
(随机播放)
(一般)
(重复曲
(重复菜单)
STOP
或选
n
并按 OK。
设定光碟曲目
您可以设定的曲目播放顺序来播放光碟内
容。
A 按两下遥控器上的
。
将出现标题/章节菜单。
B 使用 键选择
{ Program }(编程)
将出现设定菜单。
DISPLAY
{ Mode }(模式)
并按 OK。
C 如果光碟有录制标题/文件夹/专辑,按一
下 OK 浏览曲目/文件/章节。
在选取的曲目/文件/章节上按一下 OK 开
l
始播放。
使用 键切换左右画面。
l
设定喜爱的曲目/文件/章节
D 使用 键选择曲目/文件/章节进行设
定,然后按一下遥控器上的
选定的曲目/文件/标题将会显示在右画
面中。
右画面中的顺序将是设定播放的顺序。
删除选择的设定项目
E 按一下 键移至右画面。
选择曲目/文件/章节,然后按一下遥控器
上的
ADD/CLEAR
。
。
ADD/CLEAR
>
。
提示:
请务必参阅光碟的随附说明。
99
此处所提及的操作功能可能不适用于某些光碟。
Page 100

高级播放功能 (继续)
欲开始设定播放
F 按一下 键移至右画面并按
将按照设定的顺序,从选定的曲目/文
件/章节开始播放。
OK
。
欲退出设定播放
G 按一下
STOP
退出设定播放。
n
变更音讯声道语言
此操作仅适用于具有多声道语言的 DVD 或
多音频声道的 VCD。
您也可以按遥控器上的
能。
A 按两下遥控器上的
B 使用 键选择
,然后按一下 浏览选项。
频)
DISPLAY
{ Audio }(音
C 使用 键选择声音语言并按
认。
语言会以号码或缩写表示,如“En”即
表示英文。
如果光碟上没有所选择的语言,则会使
用光碟的预设语言。
提示:
– 有些 DVD 只能从 DVD 的光碟菜单才可
以变更声道语言。欲浏览光碟菜单,按一
下 DISC-MENU。
AUDIO
。
使用此功
OK
确
变更字幕语言
此操作仅适用于具有多字幕语言的 DVD,
您可以在播放 DVD 时变更字幕语言。
您也可以按遥控器上的
此功能。
A 按两下遥控器上的
将出现标题/章节菜单。
B 使用 键选择
幕),按 进入菜单查找可供使用的各个
选项。
C 使用 键选择语言,按
选择。
语言会以号码或缩写表示,如“En”即
表示英文。
如果光碟上没有所选择的语言,则会使
用光碟的预设语言。
提示:
– 有些 DVD 只能从 DVD 的光碟菜单才可
以变更字幕语言。欲浏览光碟菜单,按一
下 DISC-MENU。
SUBTITLE
DISPLAY
。
{ Subtitle}
OK
确定所作
切换拍摄角度
此选项仅适用于含有不同拍摄角度所录制
片段的 DVD。您可以从不同的角度检视
影像。
A 按两下遥控器上的
将出现标题/章节菜单。
DISPLAY
。
使用
(字
提示:
此处所提及的操作功能可能不适用于某些光碟。
请务必参阅光碟的随附说明。
B 使用 键选择
按 进入菜单。
将出现可选择的拍摄角度。
{ Angle }
(角度),
C 使用 键选择要切换的拍摄角度,然
后按
OK
确认。
100
 Loading...