

Page 1
QUICK USE GUIDE
ANTENNA/
CABLE SIGNAL
1
2
AERIAL
RF.OUT
4
3
DVD recorder
back panel
DVDR3320VR
SGP/SL/0512_02
English
DVD VCR
OPEN/CLOSE
TV/VIDEO
DISPLAY
RETURN
LIST/DISC
SYSTEM
MENU
MENU
OK
PLAY
STOP
PAUSE/STEP
2
STANDBY
ON
OPEN
OPEN/CLOSE
VCR
DVD
DIRECT
VCR
DUBBING
DVD
CHANNEL
RECORD PAUSE
SOURCE
DVD
VCR
D.DUBBING REW FWD RECORD
THUMBNAIL
CHAPTER
TIMER REC MODE
REPEAT
TITLE
AUDIO ZOOM
SEARCH MARKER
SHOWVIEW
CLEAR
VIDEOPLUS +
EJECT
REWSTOP
PLAY
F.FWD
OK
3
1
1 3
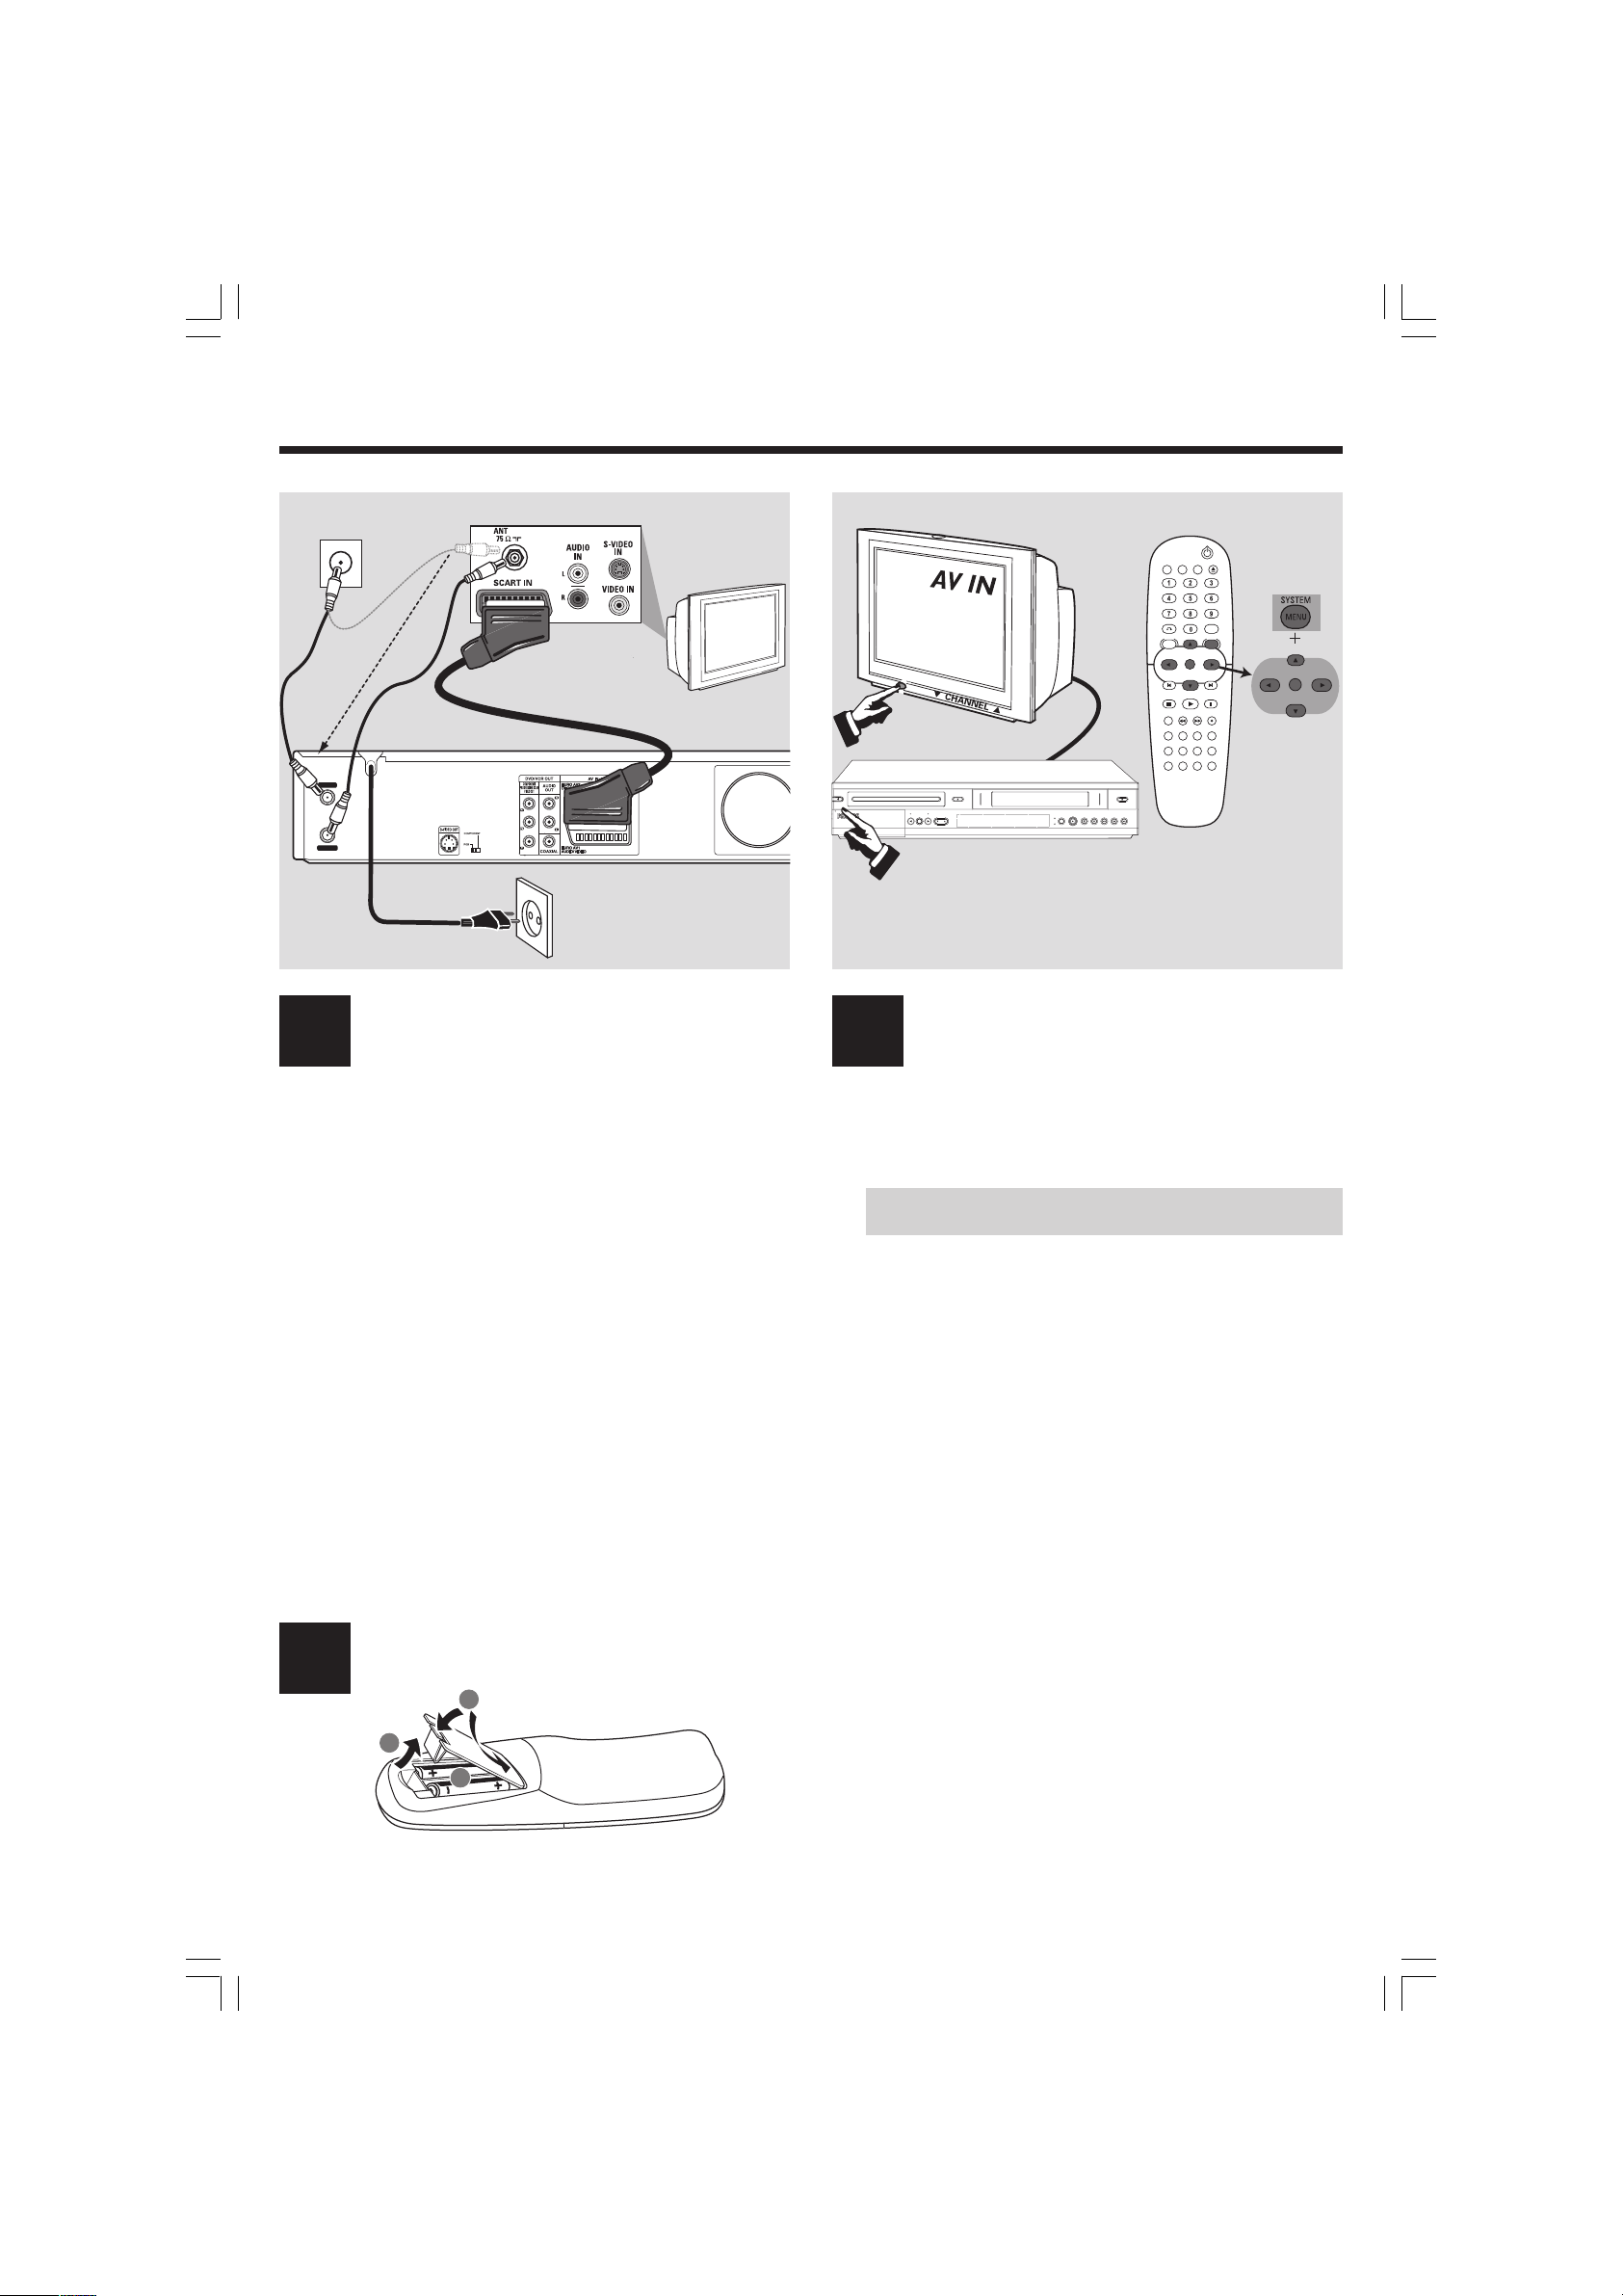
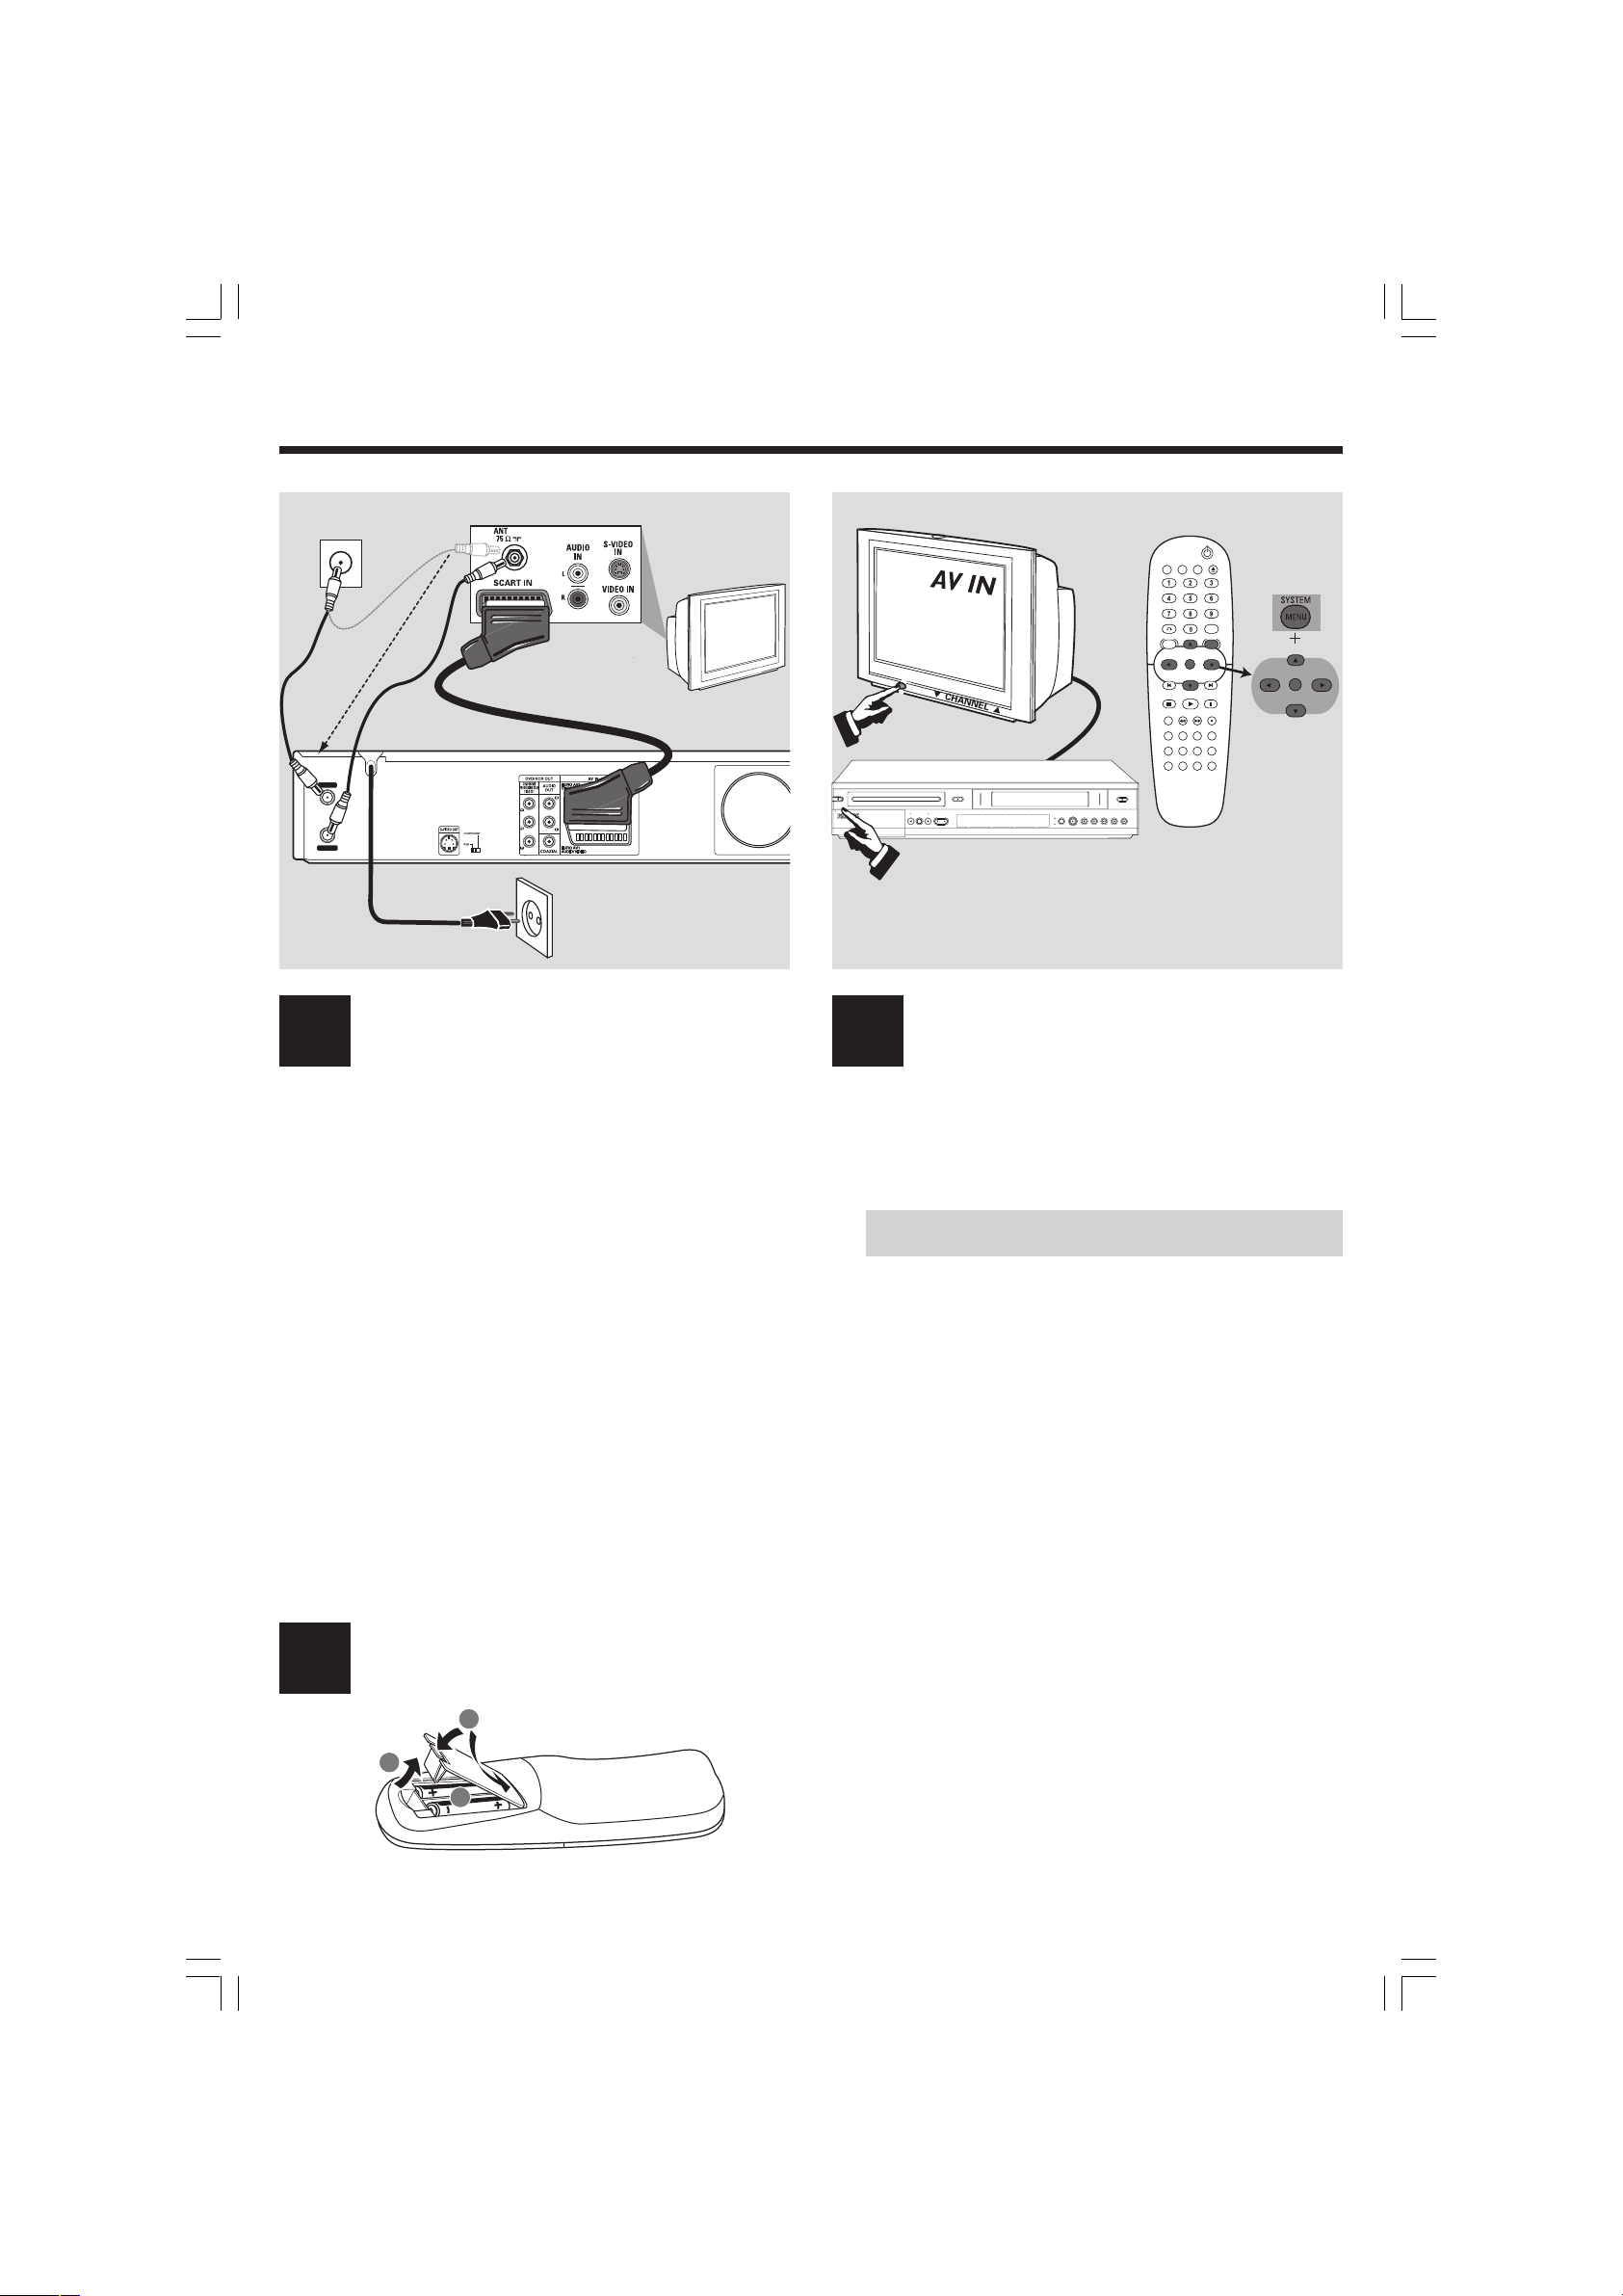
1 Remove the antenna cable plug from your TV (or Satellite
Receiver/Cable Box). Connect it to the AERIAL input
socket at the back of the DVD recorder.
2 Use the supplied antenna cable to connect the DVD
recorder’s RF.OUT output socket to the antenna input
socket at the back of your TV set.
3 Use the scart cable to connect the DVD recorder’s EURO
AV1 AUDIO/VIDEO socket to the SCART socket at the
back of your TV set.
4 Connect the power cable from the DVD recorder’s
~ MAINS to the power supply.
Helpful Hints:
If your TV does not have the above-mentioned
connectors, please refer to the user manual for more
information on others possible connection to your
TV set.
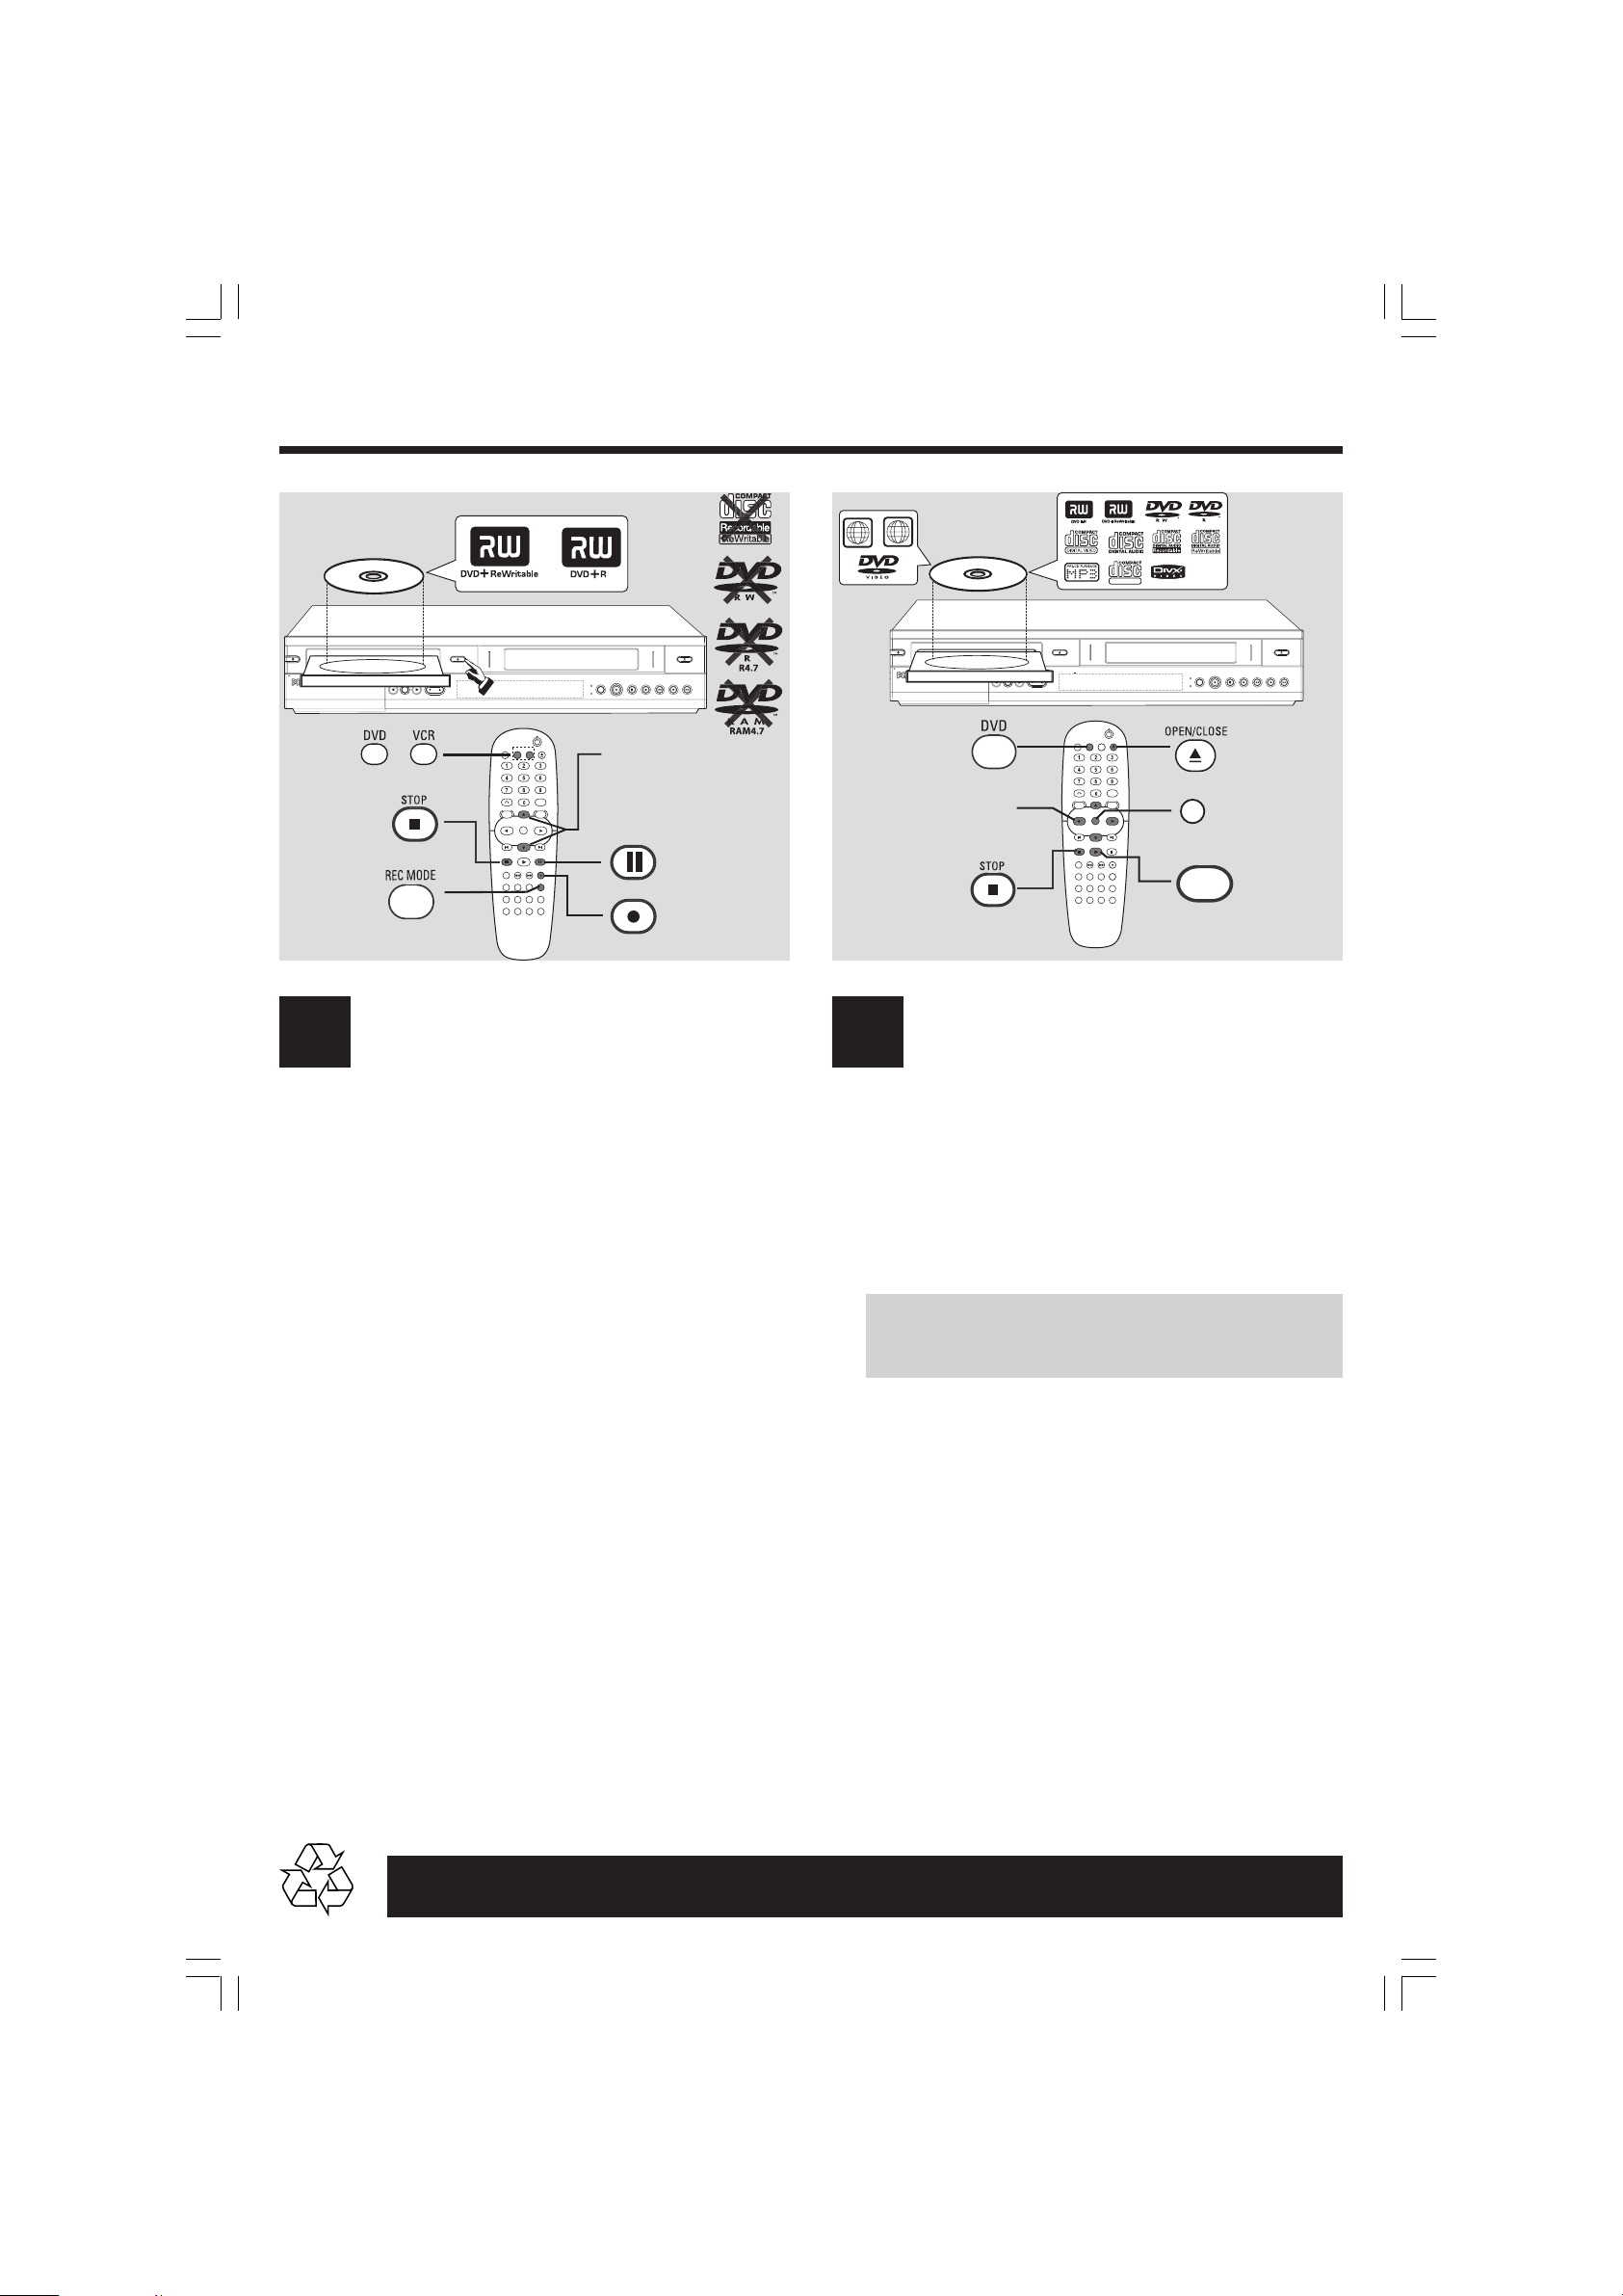
Prepare the remote control
1 Press STANDBY-ON 2 on the DVD recorder to switch
2 Switch on the TV set and select the correct video in channel.
3 Press SYSTEM MENU to access the setup menu.
● Channel auto search,
● Clock set,
2
3
Start first installation Connect DVD recorder
it on.
NO PICTURE! Press the CHANNEL 3 4 button on the TV to
select the correct video in channel, for example, 'EXT', '0', or 'AV'.
Press 3 4 to select an item in the menu.
Press 2 to access the next level options.
Press 1 to go back previous level options.
When you complete, press OK to confirm your selections
and press SYSTEM MENU to exit.
In {GENERAL} select {Auto Programming}.
Press 2 to start automatic TV channel search.
Once the TV channel search complete, the total number of
channels will be saved in the tuner’s memory.
In {GENERAL} select {Clock Set}.
Press OK to confirm the time and clock setting.
Press 3 4 to change the first digit and press 1 2 to go to the
previous or next digit field.
Once complete, press OK to confirm.
1
2
The DVD recorder is ready for use!
See next page for basic recording and playback.
Page 2
... cont.
ALL
LABEL
ALL
2
LABEL
SUPER VIDEO
STANDBY
ON
OPEN
VCR
DVD
1
6
2
OPEN/CLOSE
DVD
DIRECT
VCR
CHANNEL
DUBBING
DVD VCR
OPEN/CLOSE
OR
TV/VIDEO
RETURN
LIST/DISC
MENU
OK
PLAY
STOP
D.DUBBING REW FWD RECORD
THUMBNAIL
CHAPTER
TIMER REC MODE
REPEAT
TITLE
AUDIO ZOOM
SEARCH MARKER
CLEAR
SYSTEM
PAUSE/STEP
SHOWVIEW
VIDEOPLUS +
DISPLAY
MENU
RECORD PAUSE
SOURCE
DVD
VCR
3 4
PAUSE/STEP
RECORD
REWSTOP
3
5
4
EJECT
PLAY
F.FWD
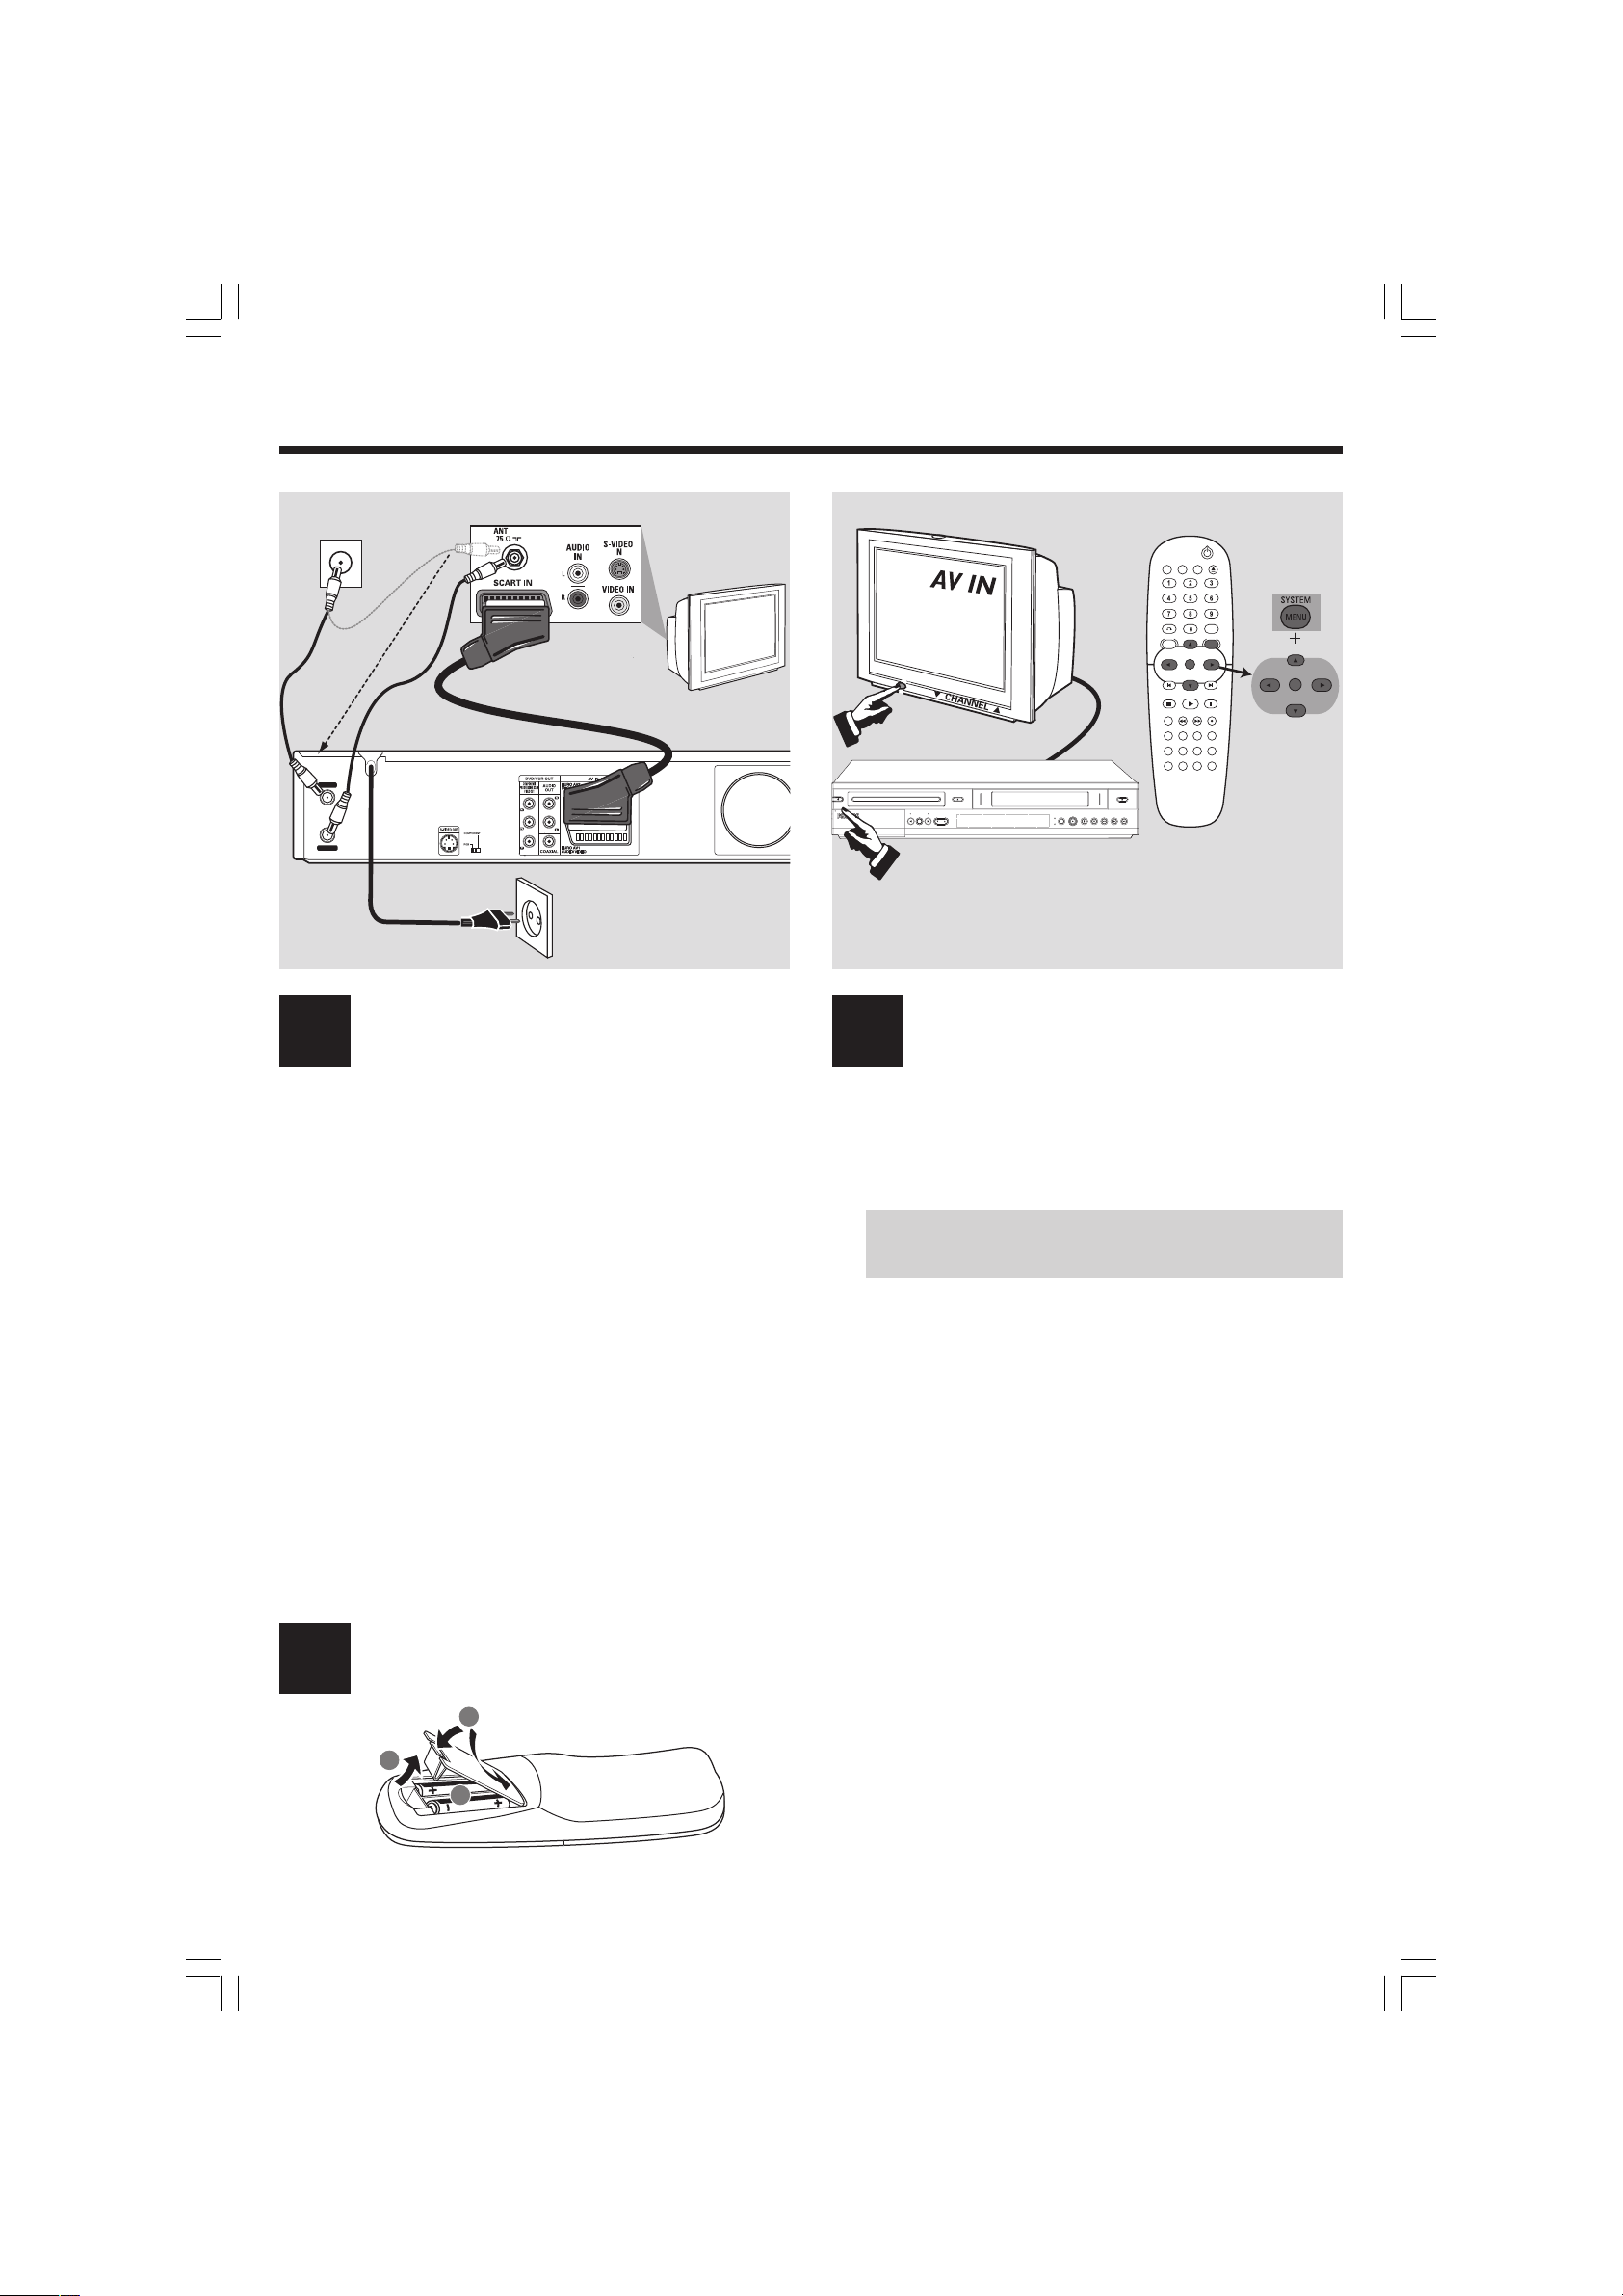
Basic recording from a TV
4
1 Switch on the DVD Recorder, press VCR or DVD button to
select (VCR or DVD) mode for recording. Insert a
recordable DVD+R(W) with the label side facing up.
2 Press REC MODE repeatedly to select a desired recording
mode. It defines the picture quality and the maximum
recording time for a disc.
DVD: SP (Standard quality),
LP (Low quality),
XP (High quality),
EP (Extended quality),
VCR: SP (Standard play),
LP (Long play).
3 Press CHANNEL 3 4 to select the TV programme
number you wish to record.
➜ If you wish to record from additional device (e.g. Video Cassette
Recorder), press 3 4 on the remote control to select the
correspond external input channel.
For example, select { AV2 } if you have connected the VCR to
EURO AV2 DECODER scart socket at the back of the DVD
recorder.
STANDBY
ON
OPEN
VCR
DVD
12
3
1 2 3 4
4
OPEN/CLOSE
DVD
DIRECT
VCR
CHANNEL
DUBBING
OPEN/CLOSE
DVD VCR
TV/VIDEO
DISPLAY
RETURN
LIST/DISC
SYSTEM
MENU
MENU
OK
PLAY
STOP
PAUSE/STEP
D.DUBBING REW FWD RECORD
THUMBNAIL
CHAPTER
TIMER REC MODE
REPEAT
TITLE
AUDIO ZOOM
SHOWVIEW
SEARCH MARKER
CLEAR
VIDEOPLUS +
DVD
VCR
OK
SOURCE
OR
PLAY
2
RECORD PAUSE
3
EJECT
REWSTOP
PLAY
F.FWD
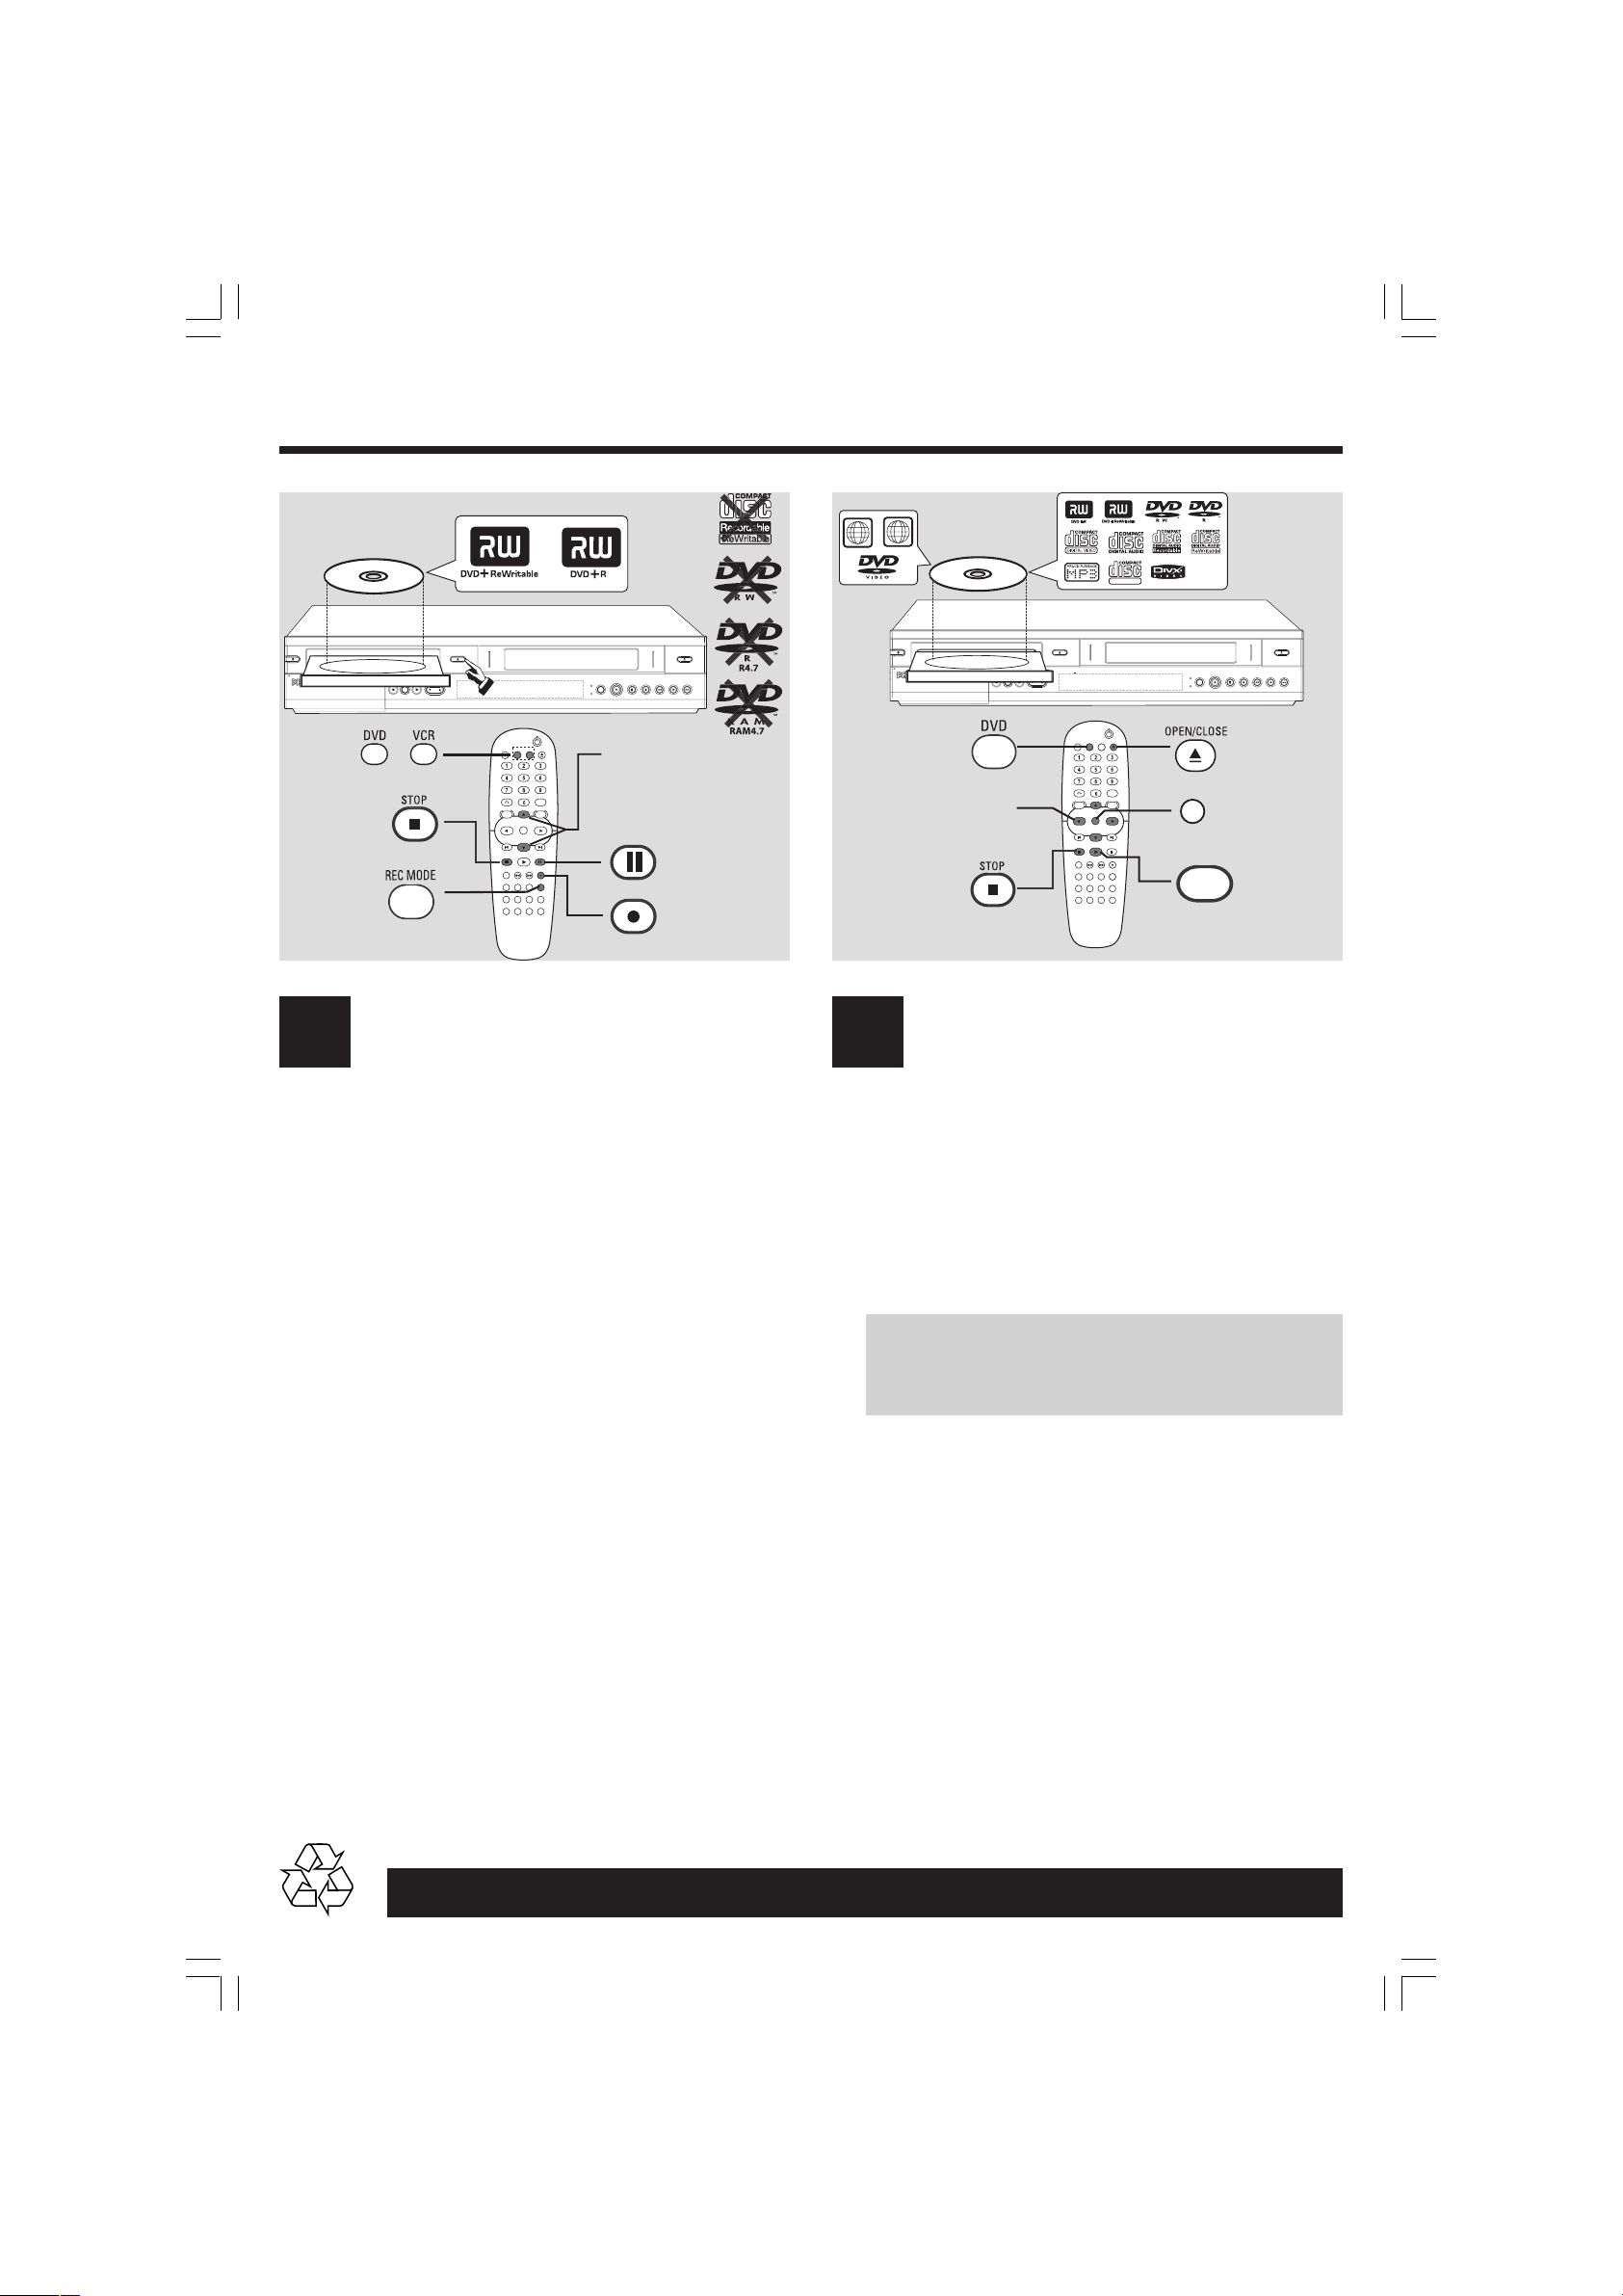
Start Playback a disc
5
1 Press DVD to select DVD mode.
2 Press OPEN/CLOSE / to open the disc tray, then insert a
disc with the label side facing up.
Press OPEN/CLOSE / again to close the disc tray.
3 Playback will start automatically.
➜ If a disc menu appears, press 1 2 3 4 to navigate within the
menu, highlight a title and press OK or PLAY 2 to start playback.
NO SOUND! Connect the AUDIO L/R (red/white) sockets at
the back of the DVD recorder to the correspond AUDIO input
sockets on a TV set, stereo system or receiver. Turn on the
connected system and select the appropriate channel.
4 To stop playback, press STOP 9.
Before using the Remote Control,
● Press DVD on the remote control for DVD functions.
● Press VCR on the remote control for VCR functions.
4 Press RECORD 0 to start recording.
● If required, you can press RECORD 0 repeatedly to
recording time length.
5 During recording, you may press PAUSE/STEP ; to pause
the recording and press RECORD 0 to continue.
6 To stop the recording, press STOP 9.
Detailed playback features and additional functions are described in the
accompanying user manual.
To play the DVD+R on other DVD players,
you must finalise it first
1 Press SYSTEM MENU on the remote control.
2 Press 3 4 to select { Finalise } in the menu and press OK
to start finalising the DVD+R.
Once the DVD+R is finalised, no further recordings
and editings can be made to the disc. Unfinalise a
DVD+R is not possible.
Page 3
GUIDE D’UTILISATION RAPIDE
Signal TV câble/
satellite ou antenne
1
2
AERIAL
RF.OUT
4
3
Face arrière du
DVD recorder
2
STANDBY
ON
OPEN
OPEN/CLOSE
VCR
DVD
DIRECT
VCR
DUBBING
DVD
CHANNEL
SOURCE
DVD
VCR
RECORD PAUSE
EJECT
REWSTOP
PLAY
F.FWD
1
DVD VCR
OPEN/CLOSE
TV/VIDEO
RETURN
LIST/DISC
SYSTEM
MENU
OK
PLAY
STOP
PAUSE/STEP
D.DUBBING REW FWD RECORD
THUMBNAIL
CHAPTER
TIMER REC MODE
REPEAT
TITLE
AUDIO ZOOM
SEARCH MARKER
CLEAR
VIDEOPLUS +
DVDR3320VR
SGP/SL/0512_02
Français
DISPLAY
MENU
OK
3
SHOWVIEW
1 3
1 Débranchez le câble de l’antenne de votre téléviseur (ou de
votre récepteur satellite/boîtier-décodeur). Insérez le câble
dans la prise AERIAL située à l’arrière du DVD Recorder.
2 Utilisez le câble d’antenne fourni pour raccorder la sortie
RF.OUT du DVD Recorder à l’entrée de l’antenne située à
l’arrière du téléviseur.
3 Connectez la prise EURO AV1 AUDIO/VIDEO du
DVD Recorder à la prise péritel à l’arrière du téléviseur à
l’aide du câble péritel.
4 Branchez le cordon d’alimentation (à partir de la prise
~ MAINS) du DVD Recorder sur la prise secteur.
Conseils :
Si votre téléviseur n’est pas équipé des connecteurs
mentionnés ci-dessus, reportez-vous au manuel
d’utilisation pour plus d’informations sur d’autres
possibilités de connexion à votre téléviseur.
1 Appuyez sur la touche STANDBY-ON 2 du DVD Recorder
2 Mettez le téléviseur sous tension, puis sélectionnez le canal
3 Appuyes sur SYSTEM MENU pour accéder au menu de
● Recherche automatique de chaînes,
Première Installation Connexion du DVD Recorder
pour allumer ce dernier.
d’entrée vidéo correct.
ABSENCE D’IMAGE! Appuyez sur la touche CHANNEL 3 4
du téléviseur pour sélectionner le canal d’entrée vidéo correct (par
exemple, ‘EXT’, ‘0’ ou ‘AV’).
configuration.
Appuyez sur 3 4 pour sélectionner une option de menu.
Appuyez sur 2 pour accéder aux options de l’élément sélectionné.
Appuyez sur 1 pour confirmer votre sélection.
Une fois l’opération terminée, appuyez sur OK pour confirmer les
sélections, puis sur SYSTEM MENU pour quitter le menu.
Sous {GENERAL}, sélectionnez {Auto Programming}
(Programmation automatique).
Appuyez sur la touche 2 pour lancer la recherche automatique des
chaînes TV. Une fois la recherche terminée, le nombre total de
chaînes trouvées apparaît à l’écran.
Préparation de la
2
télécommande
3
1
2
● Réglage de l’horloge,
Sous {GENERAL}, sélectionnez {Clock Set} (Réglage de l’horloge).
Appuyez sur OK pour confirmer.
Appuyez sur la touches 3 4 pour modifier le premier chiffre, puis sur
la touche 1 2 pour passer au chiffre suivant. Une fois l’opération
terminée, appuyez sur OK.
Le DVD Recorder est prêt à être utilisé !
Reportez-vous à la page suivante pour obtenir des
informations sur les fonctions de lecture et d’enregistreme
Page 4
... suite
ALL
LABEL
ALL
2
LABEL
SUPER VIDEO
STANDBY
ON
OPEN
VCR
DVD
1
6
2
OPEN/CLOSE
DVD
DIRECT
VCR
CHANNEL
DUBBING
DVD VCR
OPEN/CLOSE
OR
TV/VIDEO
RETURN
LIST/DISC
MENU
OK
PLAY
STOP
D.DUBBING REW FWD RECORD
THUMBNAIL
CHAPTER
TIMER REC MODE
REPEAT
TITLE
AUDIO ZOOM
SEARCH MARKER
CLEAR
SYSTEM
PAUSE/STEP
SHOWVIEW
VIDEOPLUS +
DISPLAY
MENU
RECORD PAUSE
SOURCE
DVD
VCR
3 4
PAUSE/STEP
RECORD
REWSTOP
3
5
4
EJECT
PLAY
F.FWD
Enregistrement de base à
4
partir d’un téléviseur
1 Mettez le DVD Recorder sous tension, appuyez sur la touche
VCR ou DVD pour sélectionner le mode magnétoscope ou
DVD pour l’enregistrement. Insérez un DVD+R(W) inscriptible
en veillant à orienter l’étiquette vers le haut.
2 Appuyez plusieurs fois sur REC MODE pour sélectionner
un mode d’enregistrement. Cette option définit la qualité de
l’image et la durée maximale d’enregistrement sur un disque.
DVD: SP (qualité standard),
LP (qualité faible),
XP (qualité éleveé),
EP (qualité supérieure),
VCR: SP (lecture standard),
LP (lecture longue durée).
3 Appuyez sur la touche CHANNEL 3 4 pour sélectionner
le numéro de la chaîne à enregistrer.
➜ Pour enregistrer à partir d’un appareil auxiliaire (magnétoscope,
par exemple), appuyez sur la touche 3 4 de la télécommande pour
sélectionner le canal d’entrée externe adéquat.
Par exemple, sélectionnez { AV2 } si le magnétoscope est raccordé à la
prise péritel EURO AV2 DECODER , située à l’arrière du
DVD Recorder.
STANDBY
ON
OPEN
VCR
DVD
12
3
1 2 3 4
4
OPEN/CLOSE
DVD
DIRECT
VCR
CHANNEL
DUBBING
OPEN/CLOSE
DVD VCR
TV/VIDEO
DISPLAY
RETURN
LIST/DISC
SYSTEM
MENU
MENU
OK
PLAY
STOP
PAUSE/STEP
D.DUBBING REW FWD RECORD
THUMBNAIL
CHAPTER
TIMER REC MODE
REPEAT
TITLE
AUDIO ZOOM
SHOWVIEW
SEARCH MARKER
CLEAR
VIDEOPLUS +
DVD
VCR
OK
SOURCE
OR
PLAY
2
RECORD PAUSE
3
EJECT
REWSTOP
PLAY
F.FWD
Début de la lecture
5
1 Appuyez sur DVD pour sélectionner le mode DVD.
2 Appuyez sur le bouton OPEN/CLOSE / pour ouvrir le tiroir,
puis insérez un disque avec l’étiquette orientee vers le haut.
Appuyez à nouveau sur OPEN/CLOSE / pour refermer le
tiroir.
3 La lecture commence automatiquement.
➜ Si le menu du disque s’affiche, appuyez sur 1 2 3 4 pour
parcourir les options et sélectionner un titre, puis appuyez sur OK
ou sur PLAY 2 pour lancer la lecture.
ABSENCE DE SON ! Raccordez les prises AUDIO L/R (rouge/
blanc) situées à l’arrière du DVD Recorder aux entrées AUDIO
appropriées du téléviseur, de la chaîne stéréo ou du récepteur.
Mettez l’appareil connecté sous tension et sélectionnez le canal
correspondant.
4 Pour arrêter la lecture, appuyez sur la touche STOP 9.
Avant d'utiliser la télécommande,
● Appuyez sur la touche DVD pour utiliser le lecteur de DVD.
● Appuyez sur la touche VCR pour utiliser le magnétoscope.
4 Appuyez sur la touche RECORD 0 pour lancer
l’enregistrement.
● Si nécessaire, vous pouvez appuyer plusieurs fois sur
RECORD 0 pour définir la dureé d’enregistrement.
5 Pendant l’enregistrement, vous pouvez appuyer sur PAUSE/
STEP ; pour suspendre l’enregistrement et sur RECORD
0 pour le reprendre.
6 Pour interrompre l’enregistrement, appuyez sur la touche
STOP 9.
Les programmes de lecture détaillés et les fonctions supplémentaires sont décrits dans le manuel
Pour lire le DVD+R sur d’autres lecteurs de
DVD, vous devez d’abord le finaliser.
1 Appuyez sur la touche SYSTEM MENU de la télécommande.
2 Appuyez sur 3 4 pour sélectionner l’option { Finaliser}
dans le menu, puis appuyez sur OK pour lancer la finalisation
du DVD+R.
Une fois la finalisation terminée, vous ne pourrez
plus effectuer d’enregistrement ni d’édition sur le
DVD+R. Il est impossible de définaliser un DVD+R.
d’utilisation fourni.
Page 5
KURZANLEITUNG
Antennen- oder Satellitenbzw. Kabel-TV-Signal
1
2
AERIAL
RF.OUT
4
3
Rückseite des
DVD-Recorders
DVDR3320VR
SGP/SL/0512_02
Deutsch
DVD VCR
OPEN/CLOSE
TV/VIDEO
DISPLAY
RETURN
LIST/DISC
SYSTEM
MENU
MENU
OK
PLAY
STOP
PAUSE/STEP
2
STANDBY
ON
OPEN
OPEN/CLOSE
VCR
DVD
DIRECT
VCR
DUBBING
DVD
CHANNEL
RECORD PAUSE
SOURCE
DVD
VCR
D.DUBBING REW FWD RECORD
THUMBNAIL
CHAPTER
TIMER REC MODE
REPEAT
TITLE
AUDIO ZOOM
SEARCH MARKER
SHOWVIEW
CLEAR
VIDEOPLUS +
EJECT
REWSTOP
PLAY
F.FWD
OK
3
1
1 3
Recorder an
1 Ziehen Sie das Antennenkabel vom Fernseher (bzw.
1 Drücken Sie am DVD-Recorder die Taste STANDBY-ON 2,
Satellitenempfänger oder Kabelkonverter) ab. Schließen Sie
das Kabel an der Buchse AERIAL an der Rückseite des
DVD-Recorders an.
2 Schalten Sie das Fernsehgerät ein, und wählen Sie den
2 Verwenden Sie das mitgelieferte Antennenkabel, um die
Buchse RF.OUT des DVD-Recorders mit der
Antenneneingangsbuchse an der Rückseite Ihres
Fernsehgeräts zu verbinden.
3 Drücken Sie SYSTEM MENU, um das Setup-Menü zu öffnen.
3 Verbinden Sie die Buchse EURO AV1 AUDIO/VIDEO am
DVD-Recorder mit der Scart-Buchse auf der Rückseite des
Fernsehers. Verwenden Sie dazu das Scart-Kabel.
4 Verbinden Sie die Buchse ~ MAINS am DVD-Recorder
über das Netzkabel mit der Steckdose.
Nützliche Tipps:
Wenn der Fernseher nicht über die oben genannten
Anschlüsse verfügt, lesen Sie im Handbuch nach,
welche anderen möglichen Verbindungen mit dem
Fernseher hergestellt werden können.
● Automatische Kanalsuche,
Starten der Erstinstallation Schließen Sie den DVD-
um ihn einzuschalten.
richtigen Videoeingangskanal.
KEIN BILD! Drücken Sie die Taste CHANNEL 3 4, um den
richtigen Videoeingangskanal auszuwählen (z. B. ‘EXT’, ‘0’ oder ‘AV’).
Drücken Sie 3 4, um einen Menüpunkt auszuwählen.
Drücken Sie 2, um die nächste Ebene an Optionen aufzurufen.
Drücken Sie 1, um zur vorherigen Ebene an Optionen
zurückzukehren.
Wählen Sie zum drücken Sie zur Bestätigung Ihrer Auswahl
auf OK, und drücken Sie zum Beenden auf SYSTEM MENU.
Wählen Sie unter {GENERAL} (Allgemein) die Option {Auto
Programming} (Auto-Programm.).
Drücken Sie die Taste OK, um den automatischen Sendersuchlauf zu
starten. Nach der Beendigung wird die Gesamtzahl der gefundenen
Kanäle auf dem Fernseher angezeigt.
Bereiten Sie die
Fernbedienung vor
2
3
1
2
● Uhrzeiteinstellung,
Wählen Sie unter {GENERAL} (Allgemein) die Option {Clock Set}
(Uhrzeiteinstellung).
Drücken Sie OK um Ihre Auswahl zu bestätigen.
Drücken Sie die Tasten 3 4 um die erste Ziffer einzustellen, und
drücken Sie die Taste 1 2 um zum nächsten Ziffernfeld zu wechseln.
Drücken Sie zum Beenden die Taste OK.
Der DVD-Recorder ist nun einsatzbereit.
Grundlegende Informationen zu Wiedergabe- und
Aufnahmefunktionen finden Sie auf der nächsten Seite
Page 6

... Fortsetzung
ALL
LABEL
ALL
2
LABEL
SUPER VIDEO
STANDBY
ON
OPEN
VCR
DVD
1
6
2
OPEN/CLOSE
DVD
DIRECT
VCR
CHANNEL
DUBBING
DVD VCR
OPEN/CLOSE
OR
TV/VIDEO
RETURN
LIST/DISC
MENU
OK
PLAY
STOP
D.DUBBING REW FWD RECORD
THUMBNAIL
CHAPTER
TIMER REC MODE
REPEAT
TITLE
AUDIO ZOOM
SEARCH MARKER
CLEAR
SYSTEM
PAUSE/STEP
SHOWVIEW
VIDEOPLUS +
DISPLAY
MENU
RECORD PAUSE
SOURCE
DVD
VCR
3 4
PAUSE/STEP
RECORD
REWSTOP
3
5
4
EJECT
PLAY
F.FWD
Standardaufzeichnungen von
4
einem Fernseher
1 Schalten Sie den DVD-Recorder ein, und drücken Sie die
Taste VCR oder DVD, um den VCR- oder DVD-Modus zur
Aufnahme auszuwählen. Legen Sie eine beschreibbare
DVD+R(W) mit der bedruckten Seite nach oben in das Fach ein.
2 Drücken Sie weiderholt auf REC MODE, um einen
Aufnahmemodus auszuwählen. Er definiert die Bildqualität
und die maximale Aufnahmezeit auf einer Disc.
DVD: SP (Standardqualität - Standard),
LP (niedrige Qualität - Low),
XP (hohe Qualität - High),
EP (maximale Qualität - Extended),
VCR: SP (Standard play),
LP (Long play).
3 Drücken Sie CHANNEL 3 4 um die Nummer des
aufzunehmenden Programms auszuwählen.
➜ Wenn Sie von einem zusätzlichen Gerät (z. B. Videorecorder)
aufzeichnen möchten, drücken Sie auf der Fernbedienung die Taste
3 4, um den entsprechenden externen Eingangskanal
auszuwählen. Wählen Sie z. B. { AV2 }, wenn Sie den Videorecorder
an die SCART-Buchse EURO AV2 DECODER an der Rückseite
des DVD-Recorders angeschlossen haben.
STANDBY
ON
OPEN
VCR
DVD
12
3
1 2 3 4
4
OPEN/CLOSE
DVD
DIRECT
VCR
CHANNEL
DUBBING
OPEN/CLOSE
DVD VCR
TV/VIDEO
DISPLAY
RETURN
LIST/DISC
SYSTEM
MENU
MENU
OK
PLAY
STOP
PAUSE/STEP
D.DUBBING REW FWD RECORD
THUMBNAIL
CHAPTER
TIMER REC MODE
REPEAT
TITLE
AUDIO ZOOM
SHOWVIEW
SEARCH MARKER
CLEAR
VIDEOPLUS +
DVD
VCR
OK
SOURCE
OR
PLAY
2
RECORD PAUSE
3
EJECT
REWSTOP
PLAY
F.FWD
Starten Sie die Wiedergabe
5
1 Drücken Sie auf DVD , um den DVD-Modus auszuwählen.
2 OPEN/CLOSE / drücken, um die Disk-Lade zu offnen, und
legen Sie eine Disc mit der bedruckten Seite nach oben ein.
OPEN/CLOSE / erneut drücken, um die Lade zu schließen.
3 Die Wiedergabe startet automatisch.
➜ Wenn ein Disc-Menü angezeigt wird, drücken Sie 1 2 3 4, u m
im Menü zu navigieren, markieren Sie einen Titel, und drücken Sie
OK oder PLAY 2, um die Wiedergabe zu starten.
KEIN TON! Verbinden Sie die Buchsen AUDIO L/R (rot/weiß) an
der Rückseite des DVD-Recorders mit den entsprechenden AudioEingangsbuchsen an einem Fernsehgerät, einem Stereosystem oder
einem Receiver. Schalten Sie das System ein, und wählen Sie den
entsprechenden Kanal.
4 Um die Wiedergabe abzubrechen, drücken Sie die Taste
STOP 9.
Vor der Verwendung der Fernbedienung,
● Drücken Sie die Taste ‘DVD’, um auf DVD-Funktionen
zuzugreifen.
● Drücken Sie die Taste ‘VCR’, um auf
Videorecorderfunktionen zuzugreifen.
4 Drücken Sie die Taste RECORD 0, um die Aufnahme zu
starten.
● Falls nötig, können Sie die taste wiederholt auf RECORD 0
um die Aufnahmedauer festzulegen.
5 Während der Aufnahme können Sie die Taste PAUSE/
STEP ; drücken, um die Aufnahme anzuhalten. Zum
Fortfahren drücken Sie RECORD 0.
6 Um die Aufnahme abzubrechen, drücken Sie die Taste STOP 9.
Detaillierte Wiedergabe-Funktionen und zusätzliche Funktionen sind im begleitenden
Benutzerhandbuch erläutert.
Um die DVD+R auf anderen DVD-Playern abspielen
zu können, müssen Sie sie erst finalisieren.
1 Drücken Sie auf der Fernbedienung die Taste SYSTEM MENU.
2 Drücken Sie 3 4, um im Menü die Option { Finalisieren }
auszuwählen. Drücken Sie anschließend OK, um mit der
Finalisierung der DVD+R zu beginnen.
Nach der Finalisierung können auf der DVD+R keine
weiteren Aufnahmen hinzugefügt oder bestehende
Aufnahmen bearbeitet werden. Es ist nicht möglich,
die Finalisierung einer DVD+R aufzuheben.
Page 7

Skeócona instrukcja obsługi
Sygnał z anteny/ anteny satelitarnej/
kablowej sieci telewizyjnej
1
2
AERIAL
RF.OUT
4
3
Tylny panel
nagrywarki DVD
2
STANDBY
ON
OPEN
OPEN/CLOSE
VCR
DVD
DIRECT
VCR
DUBBING
DVD
CHANNEL
1
DVDR3320VR
SGP/SL/0512_02
Polski
DVD VCR
OPEN/CLOSE
TV/VIDEO
DISPLAY
RETURN
LIST/DISC
SYSTEM
MENU
MENU
OK
PLAY
STOP
PAUSE/STEP
D.DUBBING REW FWD RECORD
THUMBNAIL
CHAPTER
TIMER REC MODE
REPEAT
TITLE
AUDIO ZOOM
SEARCH MARKER
SHOWVIEW
CLEAR
VIDEOPLUS +
EJECT
RECORD PAUSE
REWSTOP
SOURCE
PLAY
DVD
VCR
F.FWD
OK
3
Podłącz nagrywarkę DVD
1 3
1 Odłącz kabel antenowy od telewizora (lub odbiornika telewizji
satelitarnej albo dekoder telewizji kablowej). Podłącz ten kabel
do gniazda AERIAL w tylniej części nagrywarki DVD.
2 Użyj załączonego do zestawu kabla antenowego, aby połączyć
gniazdo RF.OUT nagrywarki do gniazda wejścia antenowego
w tylniej części telewizora.
3 Użyj do zestawu kabla SCART, aby połączyć gniazdo EURO
AV1 AUDIO/VIDEO nagrywarki do gniazda SCART w
tylniej części telewizora.
4 Podłącz przewód zasilający wychodzący z gniazda ~ MAINS
nagrywarki DVD do gniazda źródła zasilania.
Przydatne wskazówki:
Jeśli w telewizorze nie ma wyżej wymienionych
gniazd, należy sprawdzić w instrukcji obsługi
telewizora, jakie możliwości podłączenia on posiada.
Przygotuj pilota
1 Naciśnij przycisk STANDBY-ON 2 na nagrywarce DVD,
2 Włącz telewizor i wybierz właściwy kanał wejściowy wideo.
3 Naciśnij przycisk SYSTEM MENU, aby przejść do menu
● Automatyczne wyszukiwanie kanałów TV,
● Ustawianie zegara,
2
3
Rozpocznij pierwszà
instalacj´
aby ją włączyć.
BRAK OBRAZU! Za pomocą przycisku CHANNEL 3 4 w telewizorze
wybierz właściwy kanał wejściowy wideo, np. “EXT”, “0” lub “AV”.
ustawień.
Za pomocą przycisków 3 4 wybierz żądaną pozycję menu.
Naciśnij przycisk 2 aby przejść do następnej listy opcji.
Naciśnij przycisk 1 aby przejść do poprzedniej listy opcji.
Naciśnij przycisk OK, aby potwierdzić wybór, a następnej
przycisk SYSTEM MENU, aby zamknąć menu.
W pozycji {GENERAL} (Ogólne) zaznacz opcję {Auto Programming}
(Automatyczne programowanie).
Naciśnij przycisk 2
telewizyjnych. Po zakończeniu procedury na ekranie telewizora zostanie
podana liczba znalezionych kanałów.
W pozycji {GENERAL} (Ogólne) zaznacz opcję {Clock Set}
(Ustawianie zegara).
Naciśnij przycisk OK, aby potwierdzić wybór.
Za pomocą przycisków 3 4 zmień pierwszą cyfrę, a następnie
1 2 , aby przejść do pola następnej cyfry. Po zakończeniu
naciśnij
wprowadzania, naciśnij przycisk OK.
, aby rozpocząć automatyczne wyszukiwanie kanałów
1
2
Nagrywarka DVD jest gotowa do użytku!
Podstawowe informacje dotyczące odtwarzania i
nagrywania znajdują się na następnej stronie.
Page 8

... c.d
ALL
LABEL
ALL
2
LABEL
SUPER VIDEO
STANDBY
ON
OPEN
VCR
DVD
1
6
2
OPEN/CLOSE
DVD
DIRECT
VCR
CHANNEL
DUBBING
DVD VCR
OPEN/CLOSE
OR
TV/VIDEO
RETURN
LIST/DISC
MENU
OK
PLAY
STOP
D.DUBBING REW FWD RECORD
THUMBNAIL
CHAPTER
TIMER REC MODE
REPEAT
TITLE
AUDIO ZOOM
SEARCH MARKER
CLEAR
SYSTEM
PAUSE/STEP
SHOWVIEW
VIDEOPLUS +
DISPLAY
MENU
RECORD PAUSE
SOURCE
DVD
VCR
3 4
PAUSE/STEP
RECORD
REWSTOP
3
5
4
EJECT
PLAY
F.FWD
Nagrywanie zwykłe z
4
telewizora
1 Włącz nagrywarkę DVD, naciśnij przycisk VCR lub DVD, aby
wybrać tryb magnetowidu lun nagrywarki DVD w celu
nagrywania. Włóż płytę DVD+R(W) etykietą do góry.
2 Naciśnij kilkakrotnie przycisk REC MODE, aby wybrać tryb
nagrywania. Wybrany tryb określa jakość obrazu i maksymalny
czas nagrywania na płycie. Więcej informacji na ten temat można
znaleźć w części "Ustawienia nagrywania" w tym podręczniku
użytkownika.
DVD: SP (standardowa jakość),
LP (niska jakość),
XP (wysoka jakość),
EP (jakość trybu odtwarzania rozszerzonego),
VCR: SP (tryb odtwarzania standardowego),
LP (tryb odtwarzania zwolnionego).
STANDBY
ON
OPEN
VCR
DVD
12
3
1 2 3 4
4
OPEN/CLOSE
DVD
DIRECT
VCR
CHANNEL
DUBBING
OPEN/CLOSE
DVD VCR
TV/VIDEO
DISPLAY
RETURN
LIST/DISC
SYSTEM
MENU
MENU
OK
PLAY
STOP
PAUSE/STEP
D.DUBBING REW FWD RECORD
THUMBNAIL
CHAPTER
TIMER REC MODE
REPEAT
TITLE
AUDIO ZOOM
SHOWVIEW
SEARCH MARKER
CLEAR
VIDEOPLUS +
DVD
VCR
OK
SOURCE
OR
PLAY
2
RECORD PAUSE
3
EJECT
REWSTOP
PLAY
F.FWD
Rozpocznij odtwarzanie
5
1 Naciśnij przycisk DVD, aby wybrać tryb DVD.
2 Wciśnij OPEN/CLOSE / w celu otwarcia przedziału płyty.
Włóź płytę, z etykieta skierowaną do góry. Wciśnij ponownie
OPEN/CLOSE / w celu zamknięcia przedziału płyty.
3 Odtwarzanie rozpocznie się automatycznie.
➜ Jeśli zostanie wyświetlone menu płyty, za pomocą przycisków
1 2 3 4 zaznacz tytuł i naciśnij przycisk OK lub PLAY 2, aby
rozpocząć odtwarzanie.
BRAK DŹWIĘKU! Połącz gniazda AUDIO L/ R (czerwone/ białe),
znajdujące się z tyłu nagrywarki DVD, z odpowiednimi gniazdami
wejściowymi AUDIO w telewizorze, zestawie stereofonicznym lub
amplitunerze. Włącz podłączone urządzenie i wybierz właściwy kanał.
4 W celu zakończenia odtwarzania naciśnij przycisk STOP 9.
3 Naciśnij przycisk CHANNEL 3 4 wybierz numer programu,
z którego chcesz nagrywać.
➜ Jeśli chcesz nagrywać z urządzenia dodatkowego (np.
magnetowidu), naciśnij na pilocie przycisk 3 4 wybierz odpowiedni
zewnętrzny kanał wejściowy.
Jeśli na przykład magnetowid został podłączony do gniazda SCART
EURO AV2 DECODER, znajdującego się z tyłu nagrywarki DVD,
należy wybrać kanał { AV2 }.
4 Naciśnij przycisk RECORD 0, aby rozpocząć nagrywanie.
● W razie potrzeby naciśnij kilkakrotnie przycisk RECORD 0, aby
ustawić długość czasu nagrywania.
5 W trakcie nagrywania można nacisnąć przycisk PAUSE/
STEP ; aby wstrzymać nagrywanie, a następnie nacisnąć
przycisk RECORD 0, aby je kontynuować.
6 Aby zatrzymać nagrywanie, naciśnij przycisk STOP 9.
Zaawansowane funkcje odtwarzania oraz funkcje dodatkowe opisano w dołączonej do
zestawu instrukcji obsługi.
Zanim użyjesz pilota zdalnego sterowania,
● Naciśnij przycisk DVD, aby wyświetlić funkcje DVD.
● Naciśnij przycisk VCR, aby wyświetlić funkcje magnetowidu.
Aby płytę DVD+R można było odtwarzać w innych
odtwarzaczach DVD, musi ona zostać najpierw
zamknięta.
1 Naciśnij przycisk SYSTEM MENU na pilocie.
2 Za pomocą przycisków 3 4 wybierz w menu opcję { Finalise }
(Zamknij płytę) i naciśnij przycisk OK, aby rozpocząć zamykanie
płyty DVD+R.
Po zamknięciu płyty DVD+R nie można
dokonywać na niej żadnych dalszych nagrań lub
edycji. Cofnięcie zamknięcia płyty DVD+R nie
jest możliwe.
Page 9

STRUČNÝ NÁVOD K POUŽITÍ
ANTÉNA/
KABELOVÝ SIGNÁL
1
2
AERIAL
RF.OUT
4
3
DVD rekordér
zadní panel
2
STANDBY
ON
OPEN
OPEN/CLOSE
VCR
DVD
DIRECT
VCR
DUBBING
DVD
CHANNEL
SOURCE
DVD
VCR
RECORD PAUSE
EJECT
REWSTOP
PLAY
F.FWD
1
DVD VCR
OPEN/CLOSE
TV/VIDEO
RETURN
LIST/DISC
SYSTEM
MENU
OK
PLAY
STOP
PAUSE/STEP
D.DUBBING REW FWD RECORD
THUMBNAIL
CHAPTER
TIMER REC MODE
REPEAT
TITLE
AUDIO ZOOM
SEARCH MARKER
CLEAR
VIDEOPLUS +
DVDR3320VR
SGP/SL/0512_02
Czech
DISPLAY
MENU
OK
3
SHOWVIEW
1 3
1 Vyjměte zástrčku anténního kabelu z televizoru (nebo
satelitního přijímače/kabelového přijímače). Připojte ji do
vstupní zásuvky AERIAL na zadní straně DVD rekordéru.
2 K propojení výstupní zásuvky RF.OUT DVD rekordéru se
vstupní zásuvkou antény na zadní straně televizoru použijte
dodaný anténní kabel.
3 K propojení EURO AV1 AUDIO/VIDEO DVD rekordéru
se zásuvkou SCART na zadní straně televizoru použijte dodaný
kabel SCART.
4 Připojte síťový napájecí kabel ~ MAINS DVD rekordéru ke
zdroji napájení.
Praktické tipy:
Pokud televizor není vybaven výše zmíněnými
konektory, v návodu k použití naleznete další
informace o jiných možnostech připojení televizoru.
1 Stisknutím tlačítka STANDBY-ON (POHOTOVOSTNÍ
2 Zapněte televizor a zvolte správný kanál pro vstup videa.
3 Stisknutím tlačítka SYSTEM MENU (NABÍDKA SYSTÉMU)
● Automatické vyhledávání kanálu,
Spusťte instalaci Připojení DVD rekordéru
REŽIM-ZAPNUTO) 2 na DVD rekordéru jej zapněte.
ŽÁDNÝ OBRAZ! Stisknutím tlačítka CHANNEL (KANÁL)
3 4 na televizoru zvolte správný kanál pro vstup videa, např.
„EXT“, „0“, nebo „AV“.
vstoupíte do nabídky nastavení.
Stisknutím tlačítka 3 4 zvolte položku v nabídce.
Stisknutím tlačítka 2 vstoupíte do další úrovně výběru možností.
Stisknutím tlačítka 1 se vrátíte do předchozí úrovně možností
výběru.
Po dokončení nastavení potvrďte výběr stisknutím tlačítka OK
a nabídku opusťte stisknutím tlačítka SYSTEM MENU.
V nabídce {GENERAL} (OBECNÉ) zvolte možnost {Auto
Programming} (Automatické programování).
Stisknutím tlačítka 2 spusťte automatické vyhledávání televizního kanálu.
Po dokončení vyhledávání televizního kanálu se celkový počet
kanálů uloží do paměti tuneru.
Připravte dálkový ovladač
2
3
1
2
● Nastavení hodin,
V nabídce {GENERAL} (OBECNÉ) zvolte možnost {Clock Set}
(Nastavení hodin).
Stisknutím tlačítka 3 4 změňte první číslici a stisknutím tlačítka 1 2
se přesuňte na předchozí nebo další pole s číslicí.
Po dokončení nastavení stiskněte tlačítko OK pro potvrzení.
DVD rekordér je připravený k použití!
Na další straně naleznete informace o základním
nahrávání a přehrávání.
Page 10

Pokračovat...
ALL
LABEL
ALL
2
LABEL
SUPER VIDEO
STANDBY
ON
OPEN
VCR
DVD
1
6
2
OPEN/CLOSE
DVD
DIRECT
VCR
CHANNEL
DUBBING
DVD VCR
OPEN/CLOSE
OR
TV/VIDEO
RETURN
LIST/DISC
MENU
OK
PLAY
STOP
D.DUBBING REW FWD RECORD
THUMBNAIL
CHAPTER
TIMER REC MODE
REPEAT
TITLE
AUDIO ZOOM
SEARCH MARKER
CLEAR
SYSTEM
PAUSE/STEP
SHOWVIEW
VIDEOPLUS +
DISPLAY
MENU
RECORD PAUSE
SOURCE
DVD
VCR
3 4
PAUSE/STEP
RECORD
REWSTOP
3
5
4
EJECT
PLAY
F.FWD
Základní nahrávání z
4
televizoru
1 Zapněte DVD rekordér, stisknutím tlačítka VCR nebo DVD
zvolte režim VCR nebo DVD pro nahrávání. Vložte
zapisovatelný disk DVD+R(W) štítkem nahoru.
2 Pro výběr požadovaného režimu nahrávání opakovaně
stiskněte tlačítko REC MODE (REŽIM NAHRÁVÁNÍ). Režim
definuje kvalitu obrazu a maximální délku nahrávání na disk.
DVD: SP (Standardní kvalita),
LP (Nižší kvalita),
XP (Vyšší kvalita),
EP (Rozšířená kvalita),
VCR: SP (Standardní přehrávání),
LP (Prodloužené přehrávání).
3 Stisknutím tlačítka CHANNEL (KANÁL) 3 4 zvolte číslo
televizního programu, který chcete nahrávat.
➜ Pokud hodláte nahrávat z přídavného zařízení (např.
videorekordéru), opakovaným stisknutím tlačítka 3 4 na dálkovém
ovladači zvolte odpovídající externí vstupní kanál.
Zvolte například { AV2 }, pokud jste připojili VCR k zásuvce EURO
AV2 DECODER typu SCART na zadní straně DVD rekordéru.
4 Pro spuštění nahrávání stiskněte a tlačítko RECORD 0.
● V případě potřeby je možné opakovaně stisknout tlačítko
RECORD 0 a zobrazit délku nahrávacího času.
5 Během nahrávání můžete stisknutím tlačítka PAUSE/STEP ;
pozastavit nahrávání a stisknutím tlačítka RECORD 0 v
nahrávání pokračovat.
6 Chcete-li nahrávání zastavit, stiskněte tlačítko STOP 9.
STANDBY
ON
OPEN
VCR
DVD
12
3
1 2 3 4
4
OPEN/CLOSE
DVD
DIRECT
VCR
CHANNEL
DUBBING
OPEN/CLOSE
DVD VCR
TV/VIDEO
DISPLAY
RETURN
LIST/DISC
SYSTEM
MENU
MENU
OK
PLAY
STOP
PAUSE/STEP
D.DUBBING REW FWD RECORD
THUMBNAIL
CHAPTER
TIMER REC MODE
REPEAT
TITLE
AUDIO ZOOM
SHOWVIEW
SEARCH MARKER
CLEAR
VIDEOPLUS +
DVD
VCR
OK
SOURCE
OR
PLAY
2
RECORD PAUSE
3
EJECT
REWSTOP
PLAY
F.FWD
Spuštění přehrávání disku
5
1 Pro výběr režimu DVD stiskněte tlačítko DVD.
2 Stisknutím tlačítka OPEN/CLOSE / otevřete přihrádku pro
disk a vložte disk štítkem nahoru. Opětovným stisknutím
tlačítka OPEN/CLOSE / zavřete přihrádku pro disk.
3 Přehrávání se spustí automaticky.
➜ Pokud se zobrazí nabídka disku, procházejte jí pomocí tlačítek 1 2
3 4, označte název a stisknutím tlačítka OK nebo PLAY 2 pusťte
přehrávání.
ŽÁDNÝ ZVUK! Propojte zásuvky AUDIO L/R (červená/bílá)
na zadní straně DVD rekordéru s odpovídajícími vstupními
zásuvkami AUDIO na televizoru, stereofonním systému nebo
přijímači. Zapněte propojený systém a zvolte příslušný kanál.
4 Pro zastavení přehrávání stiskněte tlačítko STOP 9.
Než začnete používat dálkový ovladač,
● Stisknutím tlačítka DVD na dálkovém ovladači se spouští
funkce DVD.
● Stisknutím tlačítka VCR na dálkovém ovladači se spouští
funkce VCR.
Aby bylo možné přehrávat disk DVD+R na
jiných DVD přehrávačích, musíte jej nejprve
finalizovat.
1 Stiskněte tlačítko SYSTEM MENU na dálkovém ovladači.
2 Stisknutím tlačítka 3 4 zvolte v nabídce možnost { Finalise
(Finalizovat)}a stisknutím tlačítka OK spusťte finalizaci disku
DVD+R.
Po dokončení finalizace disku DVD+R nebude možné
na disk dále nahrávat ani na něm provádět úpravy.
„Odfinalizovat“ disk DVD+R zpět není možné.
Podrobné funkce přehrávání a další funkce jsou popsány v přiloženém návodu k použití.
Page 11

SNABBGUIDE
Antenn- eller satellit-/
kabel-TV-signal
1
2
AERIAL
RF.OUT
4
3
DVD-inspelarens
bakpanel
DVDR3320VR
SGP/SL/0512_02
Svenska
DVD VCR
OPEN/CLOSE
TV/VIDEO
DISPLAY
RETURN
LIST/DISC
SYSTEM
MENU
MENU
OK
PLAY
STOP
PAUSE/STEP
2
STANDBY
ON
OPEN
OPEN/CLOSE
VCR
DVD
DIRECT
VCR
DUBBING
DVD
CHANNEL
RECORD PAUSE
SOURCE
DVD
VCR
D.DUBBING REW FWD RECORD
THUMBNAIL
CHAPTER
TIMER REC MODE
REPEAT
TITLE
AUDIO ZOOM
SEARCH MARKER
SHOWVIEW
CLEAR
VIDEOPLUS +
EJECT
REWSTOP
PLAY
F.FWD
OK
3
1
Anslut DVD-inspelaren
1 3
1 Lossa antennkabelns kontakt från TV-apparaten (eller
satellitmottagaren/kabel-TV-mottagaren). Anslut den till
anslutningen AERIAL på baksidan av DVD-inspelaren.
2 Med den medföljande antennkabeln ansluter du DVD-
inspelarens anslutning RF.OUT till antennuttaget på
baksidan av TV-apparaten.
3 Använd den SCART-kabeln till att ansluta DVD-inspelarens
anslutning EURO AV1 AUDIO/VIDEO till SCART-uttaget
på TV-apparatens baksida.
4 Anslut strömkabeln från ~ MAINS på DVD-inspelaren till
eluttaget.
Praktiska tips:
Om TV-apparaten saknar de ovannämnda
anslutningarna läser du i användarhandboken efter
mer information om andra möjliga
anslutningsmöjligheter för TV-apparaten.
Förbered fjärrkontrollen
1 Sätt på DVD-inspelaren genom att trycka på
2 Sätt på TV:n och välj rätt videokanal.
3 Tryck på SYSTEM MENU om du vill gå till inställningsmenyn.
● Automatisk sökning efter kanaler,
● Inställning av klockan,
2
3
Starta den första
installationen
STANDBY-ON 2 på den.
INGEN BILD! Tryck på knappen CHANNEL 3 4 på TV:n och välj
rätt videokanal, t.ex. “EXT”, “0” eller “AV”.
Använd 3 respektive 4 till att välja ett alternativ på menyn.
Tryck på 2 om du vill få åtkomst till nästa nivå med alternativ.
Tryck på 1 om du vill gå tillbaka till föregående nivå med
alternativ.
När du är klar bekräftar du dina val genom att trycka på OK
och trycker sedan på SYSTEM MENU.
I {GENERAL} (allmänt) väljer du {Auto Programming} (automatisk
programmering).
Tryck på 2 när du vill påbörja den automatiska TV- kanalssökningen.
När den är slutförd visas det totala antalet hittade kanaler på TVapparaten.
I {GENERAL} (allmänt) väljer du {Clock Set} (Inställning av
klockan).
När du är klar bekräftar du tidsinställningarna genom att tryck på
OK.
Använd 3 4 till att ändra den första siffran och 1 2 till att
markera nästa sifferfält. När du är klar trycker du på OK.
1
2
DVD-inspelaren är nu klar att använda!
Mer information om uppspelning och inspelning finns på
nästa sida.
Page 12

... forts.
ALL
LABEL
ALL
2
LABEL
SUPER VIDEO
STANDBY
ON
OPEN
VCR
DVD
1
6
2
OPEN/CLOSE
DVD
DIRECT
VCR
CHANNEL
DUBBING
DVD VCR
OPEN/CLOSE
OR
TV/VIDEO
RETURN
LIST/DISC
MENU
OK
PLAY
STOP
D.DUBBING REW FWD RECORD
THUMBNAIL
CHAPTER
TIMER REC MODE
REPEAT
TITLE
AUDIO ZOOM
SEARCH MARKER
CLEAR
SYSTEM
PAUSE/STEP
SHOWVIEW
VIDEOPLUS +
DISPLAY
MENU
RECORD PAUSE
SOURCE
DVD
VCR
3 4
PAUSE/STEP
RECORD
REWSTOP
3
5
4
EJECT
PLAY
F.FWD
Inspelning från TV
4
1 Starta DVD-inspelaren och välj sedan video- eller DVD-läge
för inspelningen genom att trycka på VCR respektive DVD.
Sätt in en inspelningsbar DVD+R(W)-skiva med etiketten
vänd uppåt.
2 Tryck på REC MODE fler gånger när du vill välja
inspelningsläge. Med hjälp av det definierar du bildens kvalitet
och den maximala inspelningstiden för en skiva.
DVD: SP (standardkvalitet)
LP (låg kvalitet)
XP (hög kvalitet)
EP (utökad kvalitet)
VCR: SP (standarduppspelning)
LP (Long Play-uppspelning)
STANDBY
ON
OPEN
VCR
DVD
12
3
1 2 3 4
4
OPEN/CLOSE
DVD
DIRECT
VCR
CHANNEL
DUBBING
OPEN/CLOSE
DVD VCR
TV/VIDEO
DISPLAY
RETURN
LIST/DISC
SYSTEM
MENU
MENU
OK
PLAY
STOP
PAUSE/STEP
D.DUBBING REW FWD RECORD
THUMBNAIL
CHAPTER
TIMER REC MODE
REPEAT
TITLE
AUDIO ZOOM
SHOWVIEW
SEARCH MARKER
CLEAR
VIDEOPLUS +
DVD
VCR
OK
SOURCE
OR
PLAY
2
RECORD PAUSE
3
EJECT
REWSTOP
PLAY
F.FWD
Starta uppspelning
5
1 Välj DVD-läge genom att trycka på DVD.
2 Tryck på OPEN/CLOSE / för att öppna skivfacket, och
sätt in en skiva med etiketten vänd uppåt.
Tryck på OPEN/CLOSE / för att stänga skivfacket.
3 Uppspelningen startar automatiskt.
➜ Om en skivmeny visas trycker du på 1 2 3 4 för att bläddra
inom menyn. Markera en titel och tryck sedan på OK eller på
PLAY 2 om du vill starta uppspelningen.
INGET LJUD! Anslut uttagen AUDIO L/R (röd/vit) på baksidan av
DVD-inspelaren till motsvarande AUDIO-uttag på en TV, stereo
eller mottagare. Sätt på det anslutna systemet och välj lämplig kanal.
4 Stoppa uppspelning genom att trycka på STOP 9.
3 Tryck på CHANNEL 3 4 när du vill välja sedan det
programnummer som du vill spela in genom
➜ Om du vill spela in från en annan enhet (t.ex. en
videobandspelare) trycker du på knappen 3 4 på fjärrkontrollen
och sedan väljer du motsvarande extern ingångskanal.
Om du exempelvis har anslutit videobandspelaren till
EURO AV2 DECODER SCART-kontakten på baksidan av DVDinspelaren väljer du { AV2 }.
4 Tryck på RECORD 0 när du vill påbörja inspelningen.
● Ange inspelningslängden genom att trycka på RECORD 0
flera gånger.
5 Under inspelningen kan du trycka på PAUSE/STEP ; om
du vill göra en paus i inspelningen och RECORD 0 när du
vill fortsätta.
6 När du vill stoppa inspelningen trycker du på STOP 9.
För detaljer om avspelnings- och andra funktioner, se den medföljande bruksanvisningen.
Innan du använder fjärrkontrollen,
● Tryck på DVD för DVD-funktioner.
● Tryck på VCR för VCR-funktioner.
Om du vill spela upp DVD+R-skivan i en annan
DVD-spelare måste du första färdigställa den
1 Tryck på SYSTEM MENU på fjärrkontrollen.
2 Använd 3 4 till att välja {Finalize} (färdigställ) på menyn
och påbörja färdigställandet av DVD+R-skivan genom att
trycka på OK.
När DVD+R-skivan har färdigställts kan inga
ytterligare inspelningar eller redigeringar göras.
Det går inte att ångra färdigställande av en
DVD+R-skiva.
Page 13

HURTIGBRUGSGUIDE
Antenne- eller
satellitkabel tv-signal
1
2
AERIAL
RF.OUT
4
3
Bagsiden af
DVD-optageren
2
STANDBY
ON
OPEN
VCR
DVD
1
DVDR3320VR
SGP/SL/0512_02
Dansk
DVD VCR
OPEN/CLOSE
TV/VIDEO
DISPLAY
RETURN
LIST/DISC
SYSTEM
MENU
MENU
OK
PLAY
STOP
PAUSE/STEP
D.DUBBING REW FWD RECORD
THUMBNAIL
CHAPTER
TIMER REC MODE
REPEAT
TITLE
AUDIO ZOOM
SEARCH MARKER
SHOWVIEW
CLEAR
VIDEOPLUS +
OPEN/CLOSE
DVD
DIRECT
VCR
DUBBING
CHANNEL
SOURCE
DVD
VCR
RECORD PAUSE
EJECT
REWSTOP
PLAY
F.FWD
OK
3
1 3
1 Fjern antennekabelstikket fra tv’et (eller satellitmodtageren/
kabelboksen). Tilslut det til stikket AERIAL bag på dvdoptageren.
2 Brug det vedlagte antennekabel til at tilslutte dvd-optagerens
stik RF.OUT til antenneindgangsstikket bag på tv’et.
3 Brug det SCART-kabel til at tilslutte dvd-optagerens stik
EURO AV1 AUDIO/VIDEO til SCART-stikket bag på
tv’et.
4 Tilslut strømkablet fra dvd-optagerens ~ MAINS til
stikkontakten.
Nyttige tip:
Hvis tv’et ikke har de ovennævnte stik, skal du se i
brugervejledningen efter yderligere oplysninger om
andre typer tilslutninger til tv’et.
1 Tryk på STANDBY-ON 2 på dvd-optageren for at tænde
2 Tænd tv’et, og vælg den korrekte Video In-kanal.
3 Tryk på SYSTEM MENU for at få adgang til
● Automatisk indstilling af kanaler,
Start den første installation Tilslut dvd-optageren
enheden.
INTET BILLEDE! Tryk på knappen CHANNEL 3 4 på tv’et for
at vælge den korrekte Video In-kanal, f.eks. ‘EXT’, ‘0’ eller ‘AV’.
konfigurationsmenuen.
Tryk på 3 4 for at vælge et punkt i menuen.
Tryk på 2 for at få adgang til funktionerne på næste niveau.
Tryk på 1 for at vende tilbage til funktionerne på forrige
niveau.
Når du er færdig, skal du trykke på OK for at bekræfte dine
valg og derefter på SYSTEM MENU for at afslutte.
Vælg {Auto Programming} under {GENERAL}.
Tryk på 2 for at starte den automatiske tv-kanalsøgning.
Når søgningen er udført, vises det samlede antal fundne
kanaler på tv’et.
Hav fjernbetjening klar
2
3
1
2
● Indstilling af ur,
Vælg {Clock Set} under {GENERAL}.
Tryk på OK for at bekræfte indstillingen af tiden.
Tryk på 3 4 tfor at ændre det første ciffer, og tryk på 1 2 for at
gå til det næste cifferfelt.
Når indstillingen er fuldført, skal du trykke på OK.
The DVD recorder is ready for use!
See next page for basic recording and playback.
Page 14

... fortsat
ALL
LABEL
ALL
2
LABEL
SUPER VIDEO
STANDBY
ON
OPEN
VCR
DVD
1
6
2
OPEN/CLOSE
DVD
DIRECT
VCR
CHANNEL
DUBBING
DVD VCR
OPEN/CLOSE
OR
TV/VIDEO
RETURN
LIST/DISC
MENU
OK
PLAY
STOP
D.DUBBING REW FWD RECORD
THUMBNAIL
CHAPTER
TIMER REC MODE
REPEAT
TITLE
AUDIO ZOOM
SEARCH MARKER
CLEAR
SYSTEM
PAUSE/STEP
SHOWVIEW
VIDEOPLUS +
DISPLAY
MENU
RECORD PAUSE
SOURCE
DVD
VCR
3 4
PAUSE/STEP
RECORD
REWSTOP
3
5
4
EJECT
PLAY
F.FWD
Simpel optagelse fra tv
4
1 Tænd for dvd-optageren, tryk på knappen VCR eller DVD for
at vælge enten vcr- eller dvd-tilstand for optagelsen. Ilæg en
skrivbar dvd+r(w) med etiketsiden opad.
2 Tryk på REC MODE flere gange for at vælge en
optagelsestilstand. Denne knap anvendes til at definere
billedkvaliteten og den maksimale optagelsestid for en disk.
DVD: SP (Standardkvalitet),
LP (Lav kvalitet),
XP (Høj kvalitet),
EP (Meget høj kvalitet),
VCR: SP (Standard play),
LP (Long play).
3 Tryk på CHANNEL 3 4 for at vælge det programnummer,
du vil optage.
➜ Hvis du vil optage fra en anden enhed (f.eks. en videobåndoptager),
skal du trykke på knappen 3 4 for at vælge den tilsvarende eksterne
indgangskanal.
Vælg f.eks. { AV2 }, hvis du har sluttet videobåndoptageren til
EURO AV2 DECODER-scartstikket bag på dvd-optageren.
STANDBY
ON
OPEN
VCR
DVD
12
3
1 2 3 4
4
OPEN/CLOSE
DVD
DIRECT
VCR
CHANNEL
DUBBING
OPEN/CLOSE
DVD VCR
TV/VIDEO
DISPLAY
RETURN
LIST/DISC
SYSTEM
MENU
MENU
OK
PLAY
STOP
PAUSE/STEP
D.DUBBING REW FWD RECORD
THUMBNAIL
CHAPTER
TIMER REC MODE
REPEAT
TITLE
AUDIO ZOOM
SHOWVIEW
SEARCH MARKER
CLEAR
VIDEOPLUS +
DVD
VCR
OK
SOURCE
OR
PLAY
2
RECORD PAUSE
3
EJECT
REWSTOP
PLAY
F.FWD
Start afspilningen
5
1 Tryk på DVD for at vælge dvd-tilstand.
2 Tryk på OPEN/CLOSE / for at åbne diskskuffen, og
derefter ilæg en disk med etiketsiden opad.
Tryk på OPEN/CLOSE / igen for at lukke skuffen.
3 Afspilningen starter automatisk.
➜ Hvis der vises en diskmenu, skal du trykke på 1 2 3 4 for at
navigere i menuen, markere en titel og trykke på OK eller PLAY 2
for at starte afspilningen.
INGEN LYD! Slut AUDIO L/R-stikkene (rød/hvid) bag på dvdoptageren til de tilsvarende AUDIO-indgangsstik på et tv, et
stereoanlæg eller en modtager. Tænd det tilsluttede system, og vælg
den rigtige kanal.
4 Hvis du vil stoppe afspilningen, skal du trykke på STOP 9.
Inden du bruger fjernbetjeningen, skal du,
● Trykke på "DVD" for at få adgang til dvd-funktioner.
● Trykke på "VCR" for at få adgang til vcr-funktioner..
4 Tryk på RECORD 0 for at starte optagelsen.
● Hvis det er nødvendigt, kan du trykke på RECORD 0 flere
gange for at indstille optagetid.
5 Under optagelsen kan du trykke på PAUSE/STEP ; for at
afbryde optagelsen midlertidigt, og tryk på RECORD 0 for
at fortsætte.
6 Hvis du vil stoppe optagelsen, skal du trykke på STOP 9.
Detaljerede afspilningsfinesser og yderligere funktioner er beskrevet i den
medfølgende brugsanvisning.
Hvis du vil afspille DVD+R’en på en anden dvdafspiller, skal du først færdiggøre den
1 Tryk på SYSTEM MENU på fjernbetjeningen.
2 Tryk på 3 4 for at vælge { Finalise } (Færdiggør) i menuen,
og tryk på OK for at starte færdiggørelsen af DVD+R’en.
Når disken er færdiggjort, kan du ikke optage eller
redigere yderligere på DVD+R’en. Du kan ikke
annullere færdiggørelsen af en DVD+R.
Page 15

PIKAKÄYTTÖOHJE
Antennin tai satellitti- tai
kaapelitelevision signaali
1
2
AERIAL
RF.OUT
4
3
DVD-tallentimen
takapaneeli
DVDR3320VR
SGP/SL/0512_02
Suomi
DVD VCR
OPEN/CLOSE
TV/VIDEO
DISPLAY
RETURN
LIST/DISC
SYSTEM
MENU
MENU
OK
PLAY
STOP
PAUSE/STEP
2
STANDBY
ON
OPEN
OPEN/CLOSE
VCR
DVD
DIRECT
VCR
DUBBING
DVD
CHANNEL
RECORD PAUSE
SOURCE
DVD
VCR
D.DUBBING REW FWD RECORD
THUMBNAIL
CHAPTER
TIMER REC MODE
REPEAT
TITLE
AUDIO ZOOM
SEARCH MARKER
SHOWVIEW
CLEAR
VIDEOPLUS +
EJECT
REWSTOP
PLAY
F.FWD
OK
3
1
1 3
yhdistäminen
1 Irrota antennikaapeli televisiosta (tai
1 Käynnistä tallentava DVD-soitin painamalla painiketta
satelliittivastaanottimesta/kotipäätteestä). Yhdistä
antennikaapeli tallentavan DVD-soittimen takana olevaan
AERIAL-liitäntään.
2 Kytke televisioon virta ja valitse oikea videotulokanava.
2 Liitä tallentavan DVD-soittimen RF.OUT -liitäntä TV-
vastaanottimen takana olevaan antennituloon laitteen
mukana toimitetulla antennikaapelilla.
3 Tuo asetusvalikko näyttöön painamalla SYSTEM MENU -
3 Liitä tallentavan DVD-soittimen EURO AV1 AUDIO/
VIDEO -liitäntä televisiovastaanottimen takana olevaan
SCART-liitäntään.
4 Liitä tallentavan DVD-soittimen ~ MAINS -liitäntä
virtalähteeseen.
Hyödyllisiä vinkkejä:
Jos televisiovastaanottimessasi ei ole yllä mainittuja
liitäntöjä, katso television käyttöoppaasta, mitä
muita liitäntöjä vastaanotin saattaa tukea.
● Kanavien automaattihaku,
Aloita ensiasennus Tallentavan DVD-soittimen
STANDBY-ON 2.
Kuvaa ei näy. Paina television painiketta CHANNEL 3 4 ja valitse
oikea videotulokanava. Kanavan nimi saattaa olla esimerkiksi EXT, 0
tai AV.
painiketta.
Valitse valikosta kohta painamalla painikkeita 3 4.
Siirry käsittelemään seuraavan tason asetuksia painamalla
painiketta 2.
Palaa edellisen tason asetuksiin painamalla painiketta 1.
Kun olet valmis, vahvista valinnat OK-painikkeella ja poistu
painamalla SYSTEM MENU -painiketta.
Valitse {GENERAL}-valikossa {Auto Programming}.
Aloita automaattinen televisiokanavien haku valitsemalla 2.
Kun toiminto on suoritettu, löytyneiden kanavien
kokonaismäärä näkyy televisiossa.
Kauko-ohjaimen
2
valmisteleminen
3
1
2
● Automaattikellon määrittäminen,
Valitse {GENERAL}-valikossa {Clock Set}.
Vahvista aika- ja kelloasetus painamalla OK-painiketta.
Vaihda ensimmäistä numeroa painikkeilla 3 4 ja siirry sitten
seuraavaan numerokenttään painamalla painiketta 1 2.
Kun olet valmis, paina OK-painiketta.
DVD-tallennuslaitteesi on nyt käyttövalmis.
Seuraavalla sivulla on perusohjeet toistoa ja tallennusta
varten.
Page 16

... jatkoa
ALL
LABEL
ALL
2
LABEL
SUPER VIDEO
STANDBY
ON
OPEN
VCR
DVD
1
6
2
OPEN/CLOSE
DVD
DIRECT
VCR
CHANNEL
DUBBING
DVD VCR
OPEN/CLOSE
OR
TV/VIDEO
RETURN
LIST/DISC
MENU
OK
PLAY
STOP
D.DUBBING REW FWD RECORD
THUMBNAIL
CHAPTER
TIMER REC MODE
REPEAT
TITLE
AUDIO ZOOM
SEARCH MARKER
CLEAR
SYSTEM
PAUSE/STEP
SHOWVIEW
VIDEOPLUS +
DISPLAY
MENU
RECORD PAUSE
SOURCE
DVD
VCR
3 4
PAUSE/STEP
RECORD
REWSTOP
3
5
4
EJECT
PLAY
F.FWD
Tavallinen tallentaminen
4
televisiosta
1 Kytke tallentavaan DVD-soittimeen virta ja valitse
tallennusmuodoksi DVD- tai videonauhuritallennus
painamalla VCR- tai DVD-painiketta. Aseta DVD+R(W)-levy
soittimeen tekstipuoli ylöspäin.
2 Paina REC MODE -painiketta toistuvasti. Kuvanlaatu ja
levylle tallennettavan aineiston enimmäispituus määräytyvät
tallennustilan perusteella.
DVD: SP (vakiolaatu),
LP (matala laatu)
XP (korkea laatu),
EP (laajennettu laatu),
VCR: SP (vakiotoisto),
LP (pitkä toisto).
3 Valitse sitten tallennettava kanava painikkeilla CHANNEL 3 4.
➜ Jos haluat tallentaa ohjelmaa lisälaitteesta (esimerkiksi
videonauhurista), paina kauko-ohjaimen painiketta 3 4.
Valitse esimerkiksi vaihtoehto { AV2 }, jos olet liittänyt
videonauhurin tallentavan DVD-soittimen takana olevaan EURO
AV2 DECODER -SCART-liitäntään.
4 Käynnistä tallennus painamalla painiketta RECORD 0.
● Paina painiketta RECORD 0 toistuvasti, kunnes
tallennusaika näkyy.
5 Voit keskeyttää tallennuksen painamalla painiketta PAUSE/
STEP ; . Voit jatkaa tallennusta painamalla painiketta
RECORD 0.
6 Voit lopettaa tallennuksen painamalla painiketta STOP 9.
STANDBY
ON
OPEN
VCR
DVD
12
3
1 2 3 4
4
OPEN/CLOSE
DVD
DIRECT
VCR
CHANNEL
DUBBING
OPEN/CLOSE
DVD VCR
TV/VIDEO
DISPLAY
RETURN
LIST/DISC
SYSTEM
MENU
MENU
OK
PLAY
STOP
PAUSE/STEP
D.DUBBING REW FWD RECORD
THUMBNAIL
CHAPTER
TIMER REC MODE
REPEAT
TITLE
AUDIO ZOOM
SHOWVIEW
SEARCH MARKER
CLEAR
VIDEOPLUS +
DVD
VCR
OK
SOURCE
OR
PLAY
2
RECORD PAUSE
3
EJECT
REWSTOP
PLAY
F.FWD
Toiston aloittaminen
5
1 Valitse DVD-tila painamalla DV D-painiketta.
2 Paina OPEN/CLOSE / levypesän avaamiseksi. Aseta levy
soittimeen tekstipuoli ylöspäin.
Paina OPEN/CLOSE / uudelleen levypesän sulkemiseksi.
3 Toisto alkaa automaattisesti.
➜ Jos kuvaruutuun tulee näkyviin levyvalikko, korosta valikosta
haluamasi nimike siirtymällä sen kohdalle painikkeilla 1 2 3 4 ja
aloita toisto painamalla OK tai PLAY 2.
Ääntä ei kuulu. Liitä tallentavan DVD-soittimen takana olevat
AUDIO L/R (punainen ja valkoinen) -liittimet television,
stereojärjestelmän tai vastaanottimen vastaavaan AUDIOtuloliitäntään. Kytke järjestelmään virta ja valitse haluamasi kanava.
4 Lopeta toisto painamalla STOP 9.
Ennen kauko-ohjaimen käyttöä,
● Paina DVD-painiketta, jos haluat käyttää DVD-toimintoja.
● Paina VCR-painiketta, jos haluat käyttää videonauhurin
toimintoja.
DVD+R-levyn toistaminen muilla DVDsoittimilla edellyttää sen viimeistelemistä
1 Paina kauko-ohjaimen painiketta SYSTEM MENU.
2 Aloita DVD+R-levyn viimeistely valitsemalla valikosta
vaihtoehto { Finalise } (Viimeistele) painikkeilla 3 4 ja
valitse sitten OK.
Viimeistelyn jälkeen levylle ei voi enää tallentaa
mitään, eikä levyn sisältöä voi muokata. DVD+Rlevyn viimeistelemistä ei voi peruuttaa.
Toisto-ominaisuudet ja muut toiminnot on selostettu tarkemmin mukana tulevassa käyttöohjeessa.
 Loading...