

Page 1
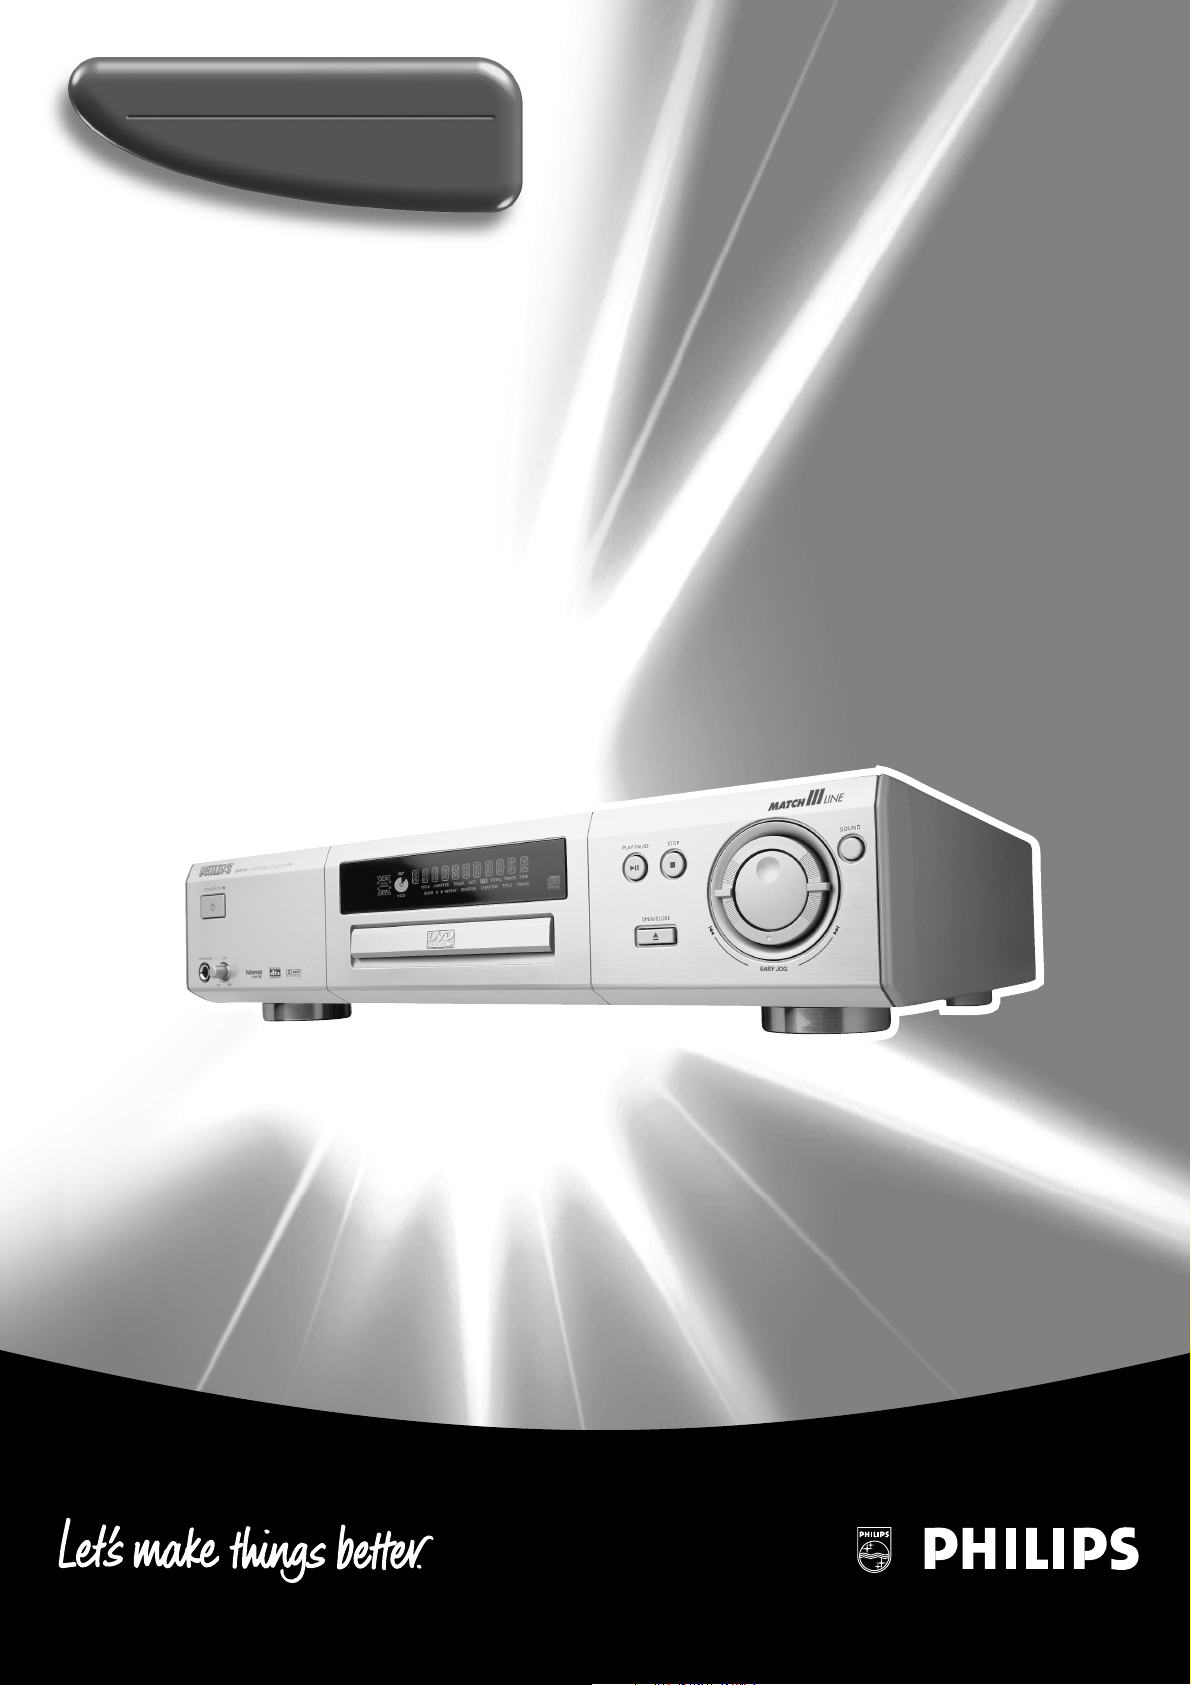
DVD Video player
DVD951
1
Page 2
LASER SAFETY
This unit employs a laser. Due to possible eye injury, only
a qualified service person should remove the cover or
attempt to service this device.
USE OF CONTROLS OR ADJUSTMENTS OR
PERFORMANCE OF PROCEDURES OTHER
THAN THOSE SPECIFIED HEREIN MAY
RESULT IN HAZARDOUS RADIATION
EXPOSURE.
Manufactured under license from Dolby Laboratories.
“Dolby” and the double-D symbol are trademarks of Dolby
Laboratories. Confidential Unpublished Works. ©19921997 Dolby Laboratories, Inc. All rights reserved.
This product incorporates copyright protection technology
that is protected by method claims of certain U.S. patents
and other intellectual property rights owned by Macrovision
Corporation and other rights owners. Use of this copyright
protection technology must be authorized by Macrovision
Corporation, and is intended for home and other limited
viewing uses only unless otherwise authorized by
Macrovision Corporation. Reverse engineering or
disassembly is prohibited.
Manufactured under license from Digital Theater Systems,
Inc. US Pat. No. 5,451,942 and other world-wide patents
issued and pending. “DTS” and “DTS DIGITAL SURROUND”
are trademarks of Digital Theater Systems, Inc. © 1996
Digital Theater Systems, Inc. All rights reserved.
2
LASER
Type Semiconductor laser GaAlAs
Wave length 650 nm (DVD)
780 nm (VCD/CD)
Output Power 7 mW (DVD)
10 mW (VCD/CD)
Beam divergence 60 degree
TruSurround and the SRS symbol are trademarks of SRS
Labs., Inc. TruSurround technology is manufactured under
license from SRS Labs., Inc.
Page 3
Index
English -------------------------------------------------------- 5
English
Français ------------------------------------------------------ 23
Français
Español ------------------------------------------------------ 42
Español
Português --------------------------------------------------- 61
The region code for this set is 4.
Since it is usual for DVD movies to be released at
different times in different regions of the world, all
players have region codes and discs can have an optional
region code. If you load a disc of a different region code
to your player, you will see the region code notice on
the screen. The disc will not play and should be
unloaded.
NOTE:
PICTURES SHOWN MAYBE DIFFERENT
BETWEEN COUNTRIES.
NEVER MAKE OR CHANGE CONNECTIONS
WITH THE POWER SWITCHED ON.
4
Portuguê s
CAUTION
VISIBLE AND INVISIBLE LASER RADIATION
WHEN OPEN AVOID EXPOSURE TO BEAM
(WARNING LOCATION: INSIDE ON LASER
COVERSHIELD OR THE BACKPLATE OF SET)
For Customer Use:
Read carefully the information located at the bottom of your DVD-VIDEO player and enter below the Serial No. Retain
this information for future reference.
Model No. DVD-VIDEO 951 Serial No. __________________________
INDEX
3
Page 4

Contents
English
Introduction
Philips DVD-Video Introduction ------------------------- 5
Unpacking ---------------------------------------------------- 5
Remote Control battery installation -------------------- 5
Safety Information ------------------------------------------ 5
Cleaning Discs ---------------------------------------------- 5
Functional overview
Front panel and Display ----------------------------------- 6
Remote control --------------------------------------------- 7
Rear panel --------------------------------------------------- 8
Preparation
General notes ----------------------------------------------- 9
Connecting to a TV ---------------------------------------- 9
Connecting to optional equipment------------------ 9-10
NTSC/PAL Settings ---------------------------------------- 10
General explanation -------------------------------------- 10
Menu bar/Status window--------------------------------- 11
Temporary feedback field icons ------------------------- 11
Personal Preferences---------------------------------- 11-12
Operation
Loading discs ----------------------------------------------- 13
Playing a DVD-Video and Video CD disc -------------- 13
General Features --------------------------------------13-15
Special DVD features ------------------------------------- 16
Special VCD features -------------------------------------- 16
Playing an Audio CD ----------------------------------16-17
FTS Program ----------------------------------------------- 17
Access Control
Access Control: child lock ------------------------------- 18
Access Control: parental control ------------------- 18-19
Before requesting service
Before requesting service -------------------------------- 20
Appendix
Speaker Settings ----------------------------------------- 21
4
CONTENTS
Specifications
Specifications -----------------------------------------------22
Page 5
Introduction
Philips DVD-Video
Introduction
Your Philips DVD-Video player will play digital video discs
conforming to the universal DVD-Video standard. With it,
you will be able to enjoy full-length movies with true
cinema picture quality, as well as stereo or multi-channel
sound (depending on the disc and your playback setup).
The unique features of DVD-Video, such as selection of
sound track, subtitle languages and different camera angles
(again depending on the disc), are all included.
In addition to DVD-Video discs, you will be able to play all
Video CDs and Audio CDs (including finalized CD
Recordable and CD Rewritable).
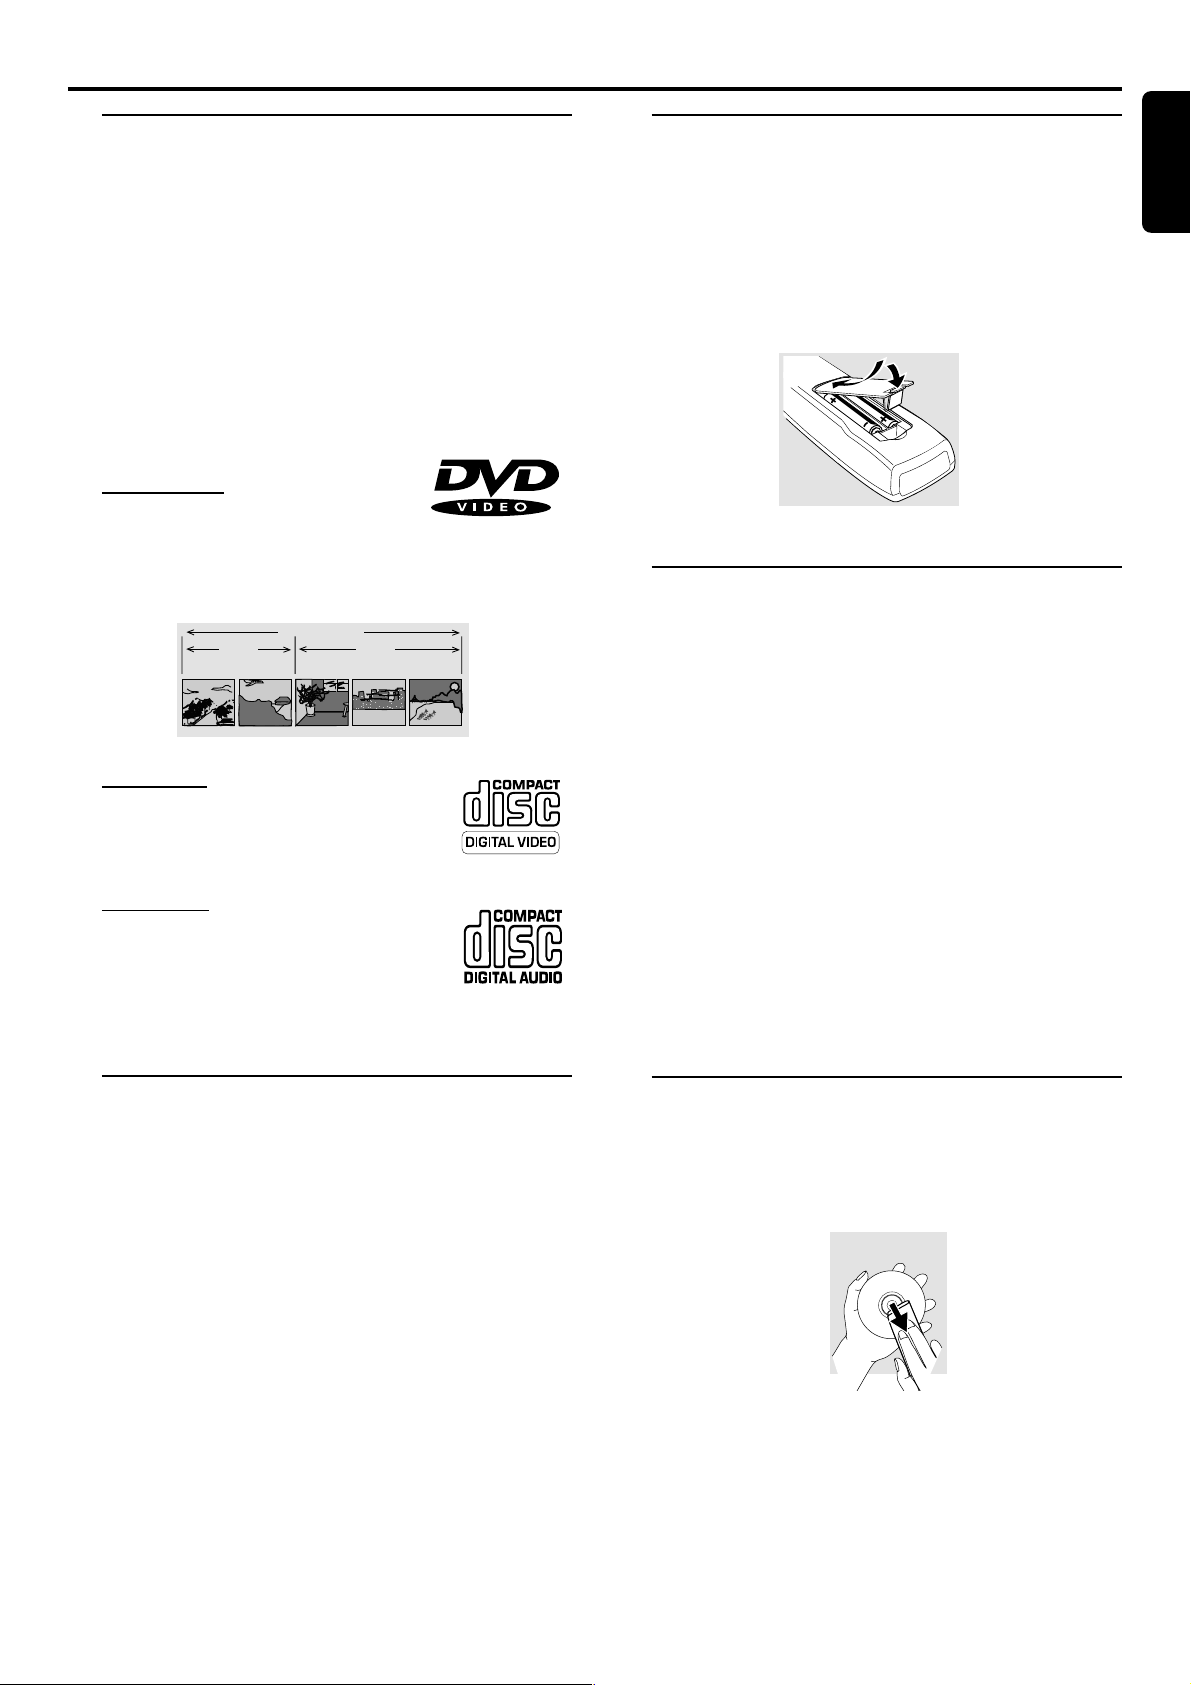
DVD-Video
You will recognize DVD-Video discs by the logo shown.
Depending on the material on the disc (a movie, video clips,
a drama series, etc.) the disc may have one or more Titles.
DVD-VIDEO DISC
TITLE 1 TITLE 2
CHAPTER 1 CHAPTER 2 CHAPTER 1 CHAPTER 2 CHAPTER 3
Video CD
You will recognize Video CDs by the logo
shown.
Audio CD
Audio CDs contain music tracks only.
You will recognize Audio CDs by the logo
shown.
Remote control battery
installation
English
¶ Insert batteries as indicated inside the battery
compartment.
Caution: Do not mix old and new batteries. Never
mix different types of batteries (standard, alkaline,
etc.).
Safety Information
¶ Do not expose the system to excessive moisture, rain, sand,
or heat sources.
¶ Place the player on a firm, flat surface.
¶ Keep the player away from domestic heating equipment
and direct sunlight.
¶ In a cabinet, allow about 2.5 cm (1 inch) of free space all
around the player for adequate ventilation.
¶ If the DVD-Video player cannot read CDs/DVDs correctly,
use a commonly available cleaning CD/DVD to clean the
lens before taking the DVD-Video player to be repaired.
Other cleaning methods may destroy the lens. Always keep
the tray closed to avoid dust on the lens.
¶ The lens may cloud over when the DVD-Video player is
suddenly moved from cold to warm surroundings. Playing a
CD/DVD is not possible then. Leave the power on for
about one hour with no disc in the unit until normal
playback is possible.
Unpacking
First check and identify the contents of your DVD-Video
player package.
You should have the following items.
– DVD-Video player
– Remote Control with batteries
– AC power cord
– Audio cable
– Video cable
– Instructions for use
If any item is damaged or missing, contact your retailer or
Philips.
Keep the packaging material; for future transpor tation.
Cleaning discs
¶ When a disc becomes dirty, clean it with a cleaning cloth.
Wipe the disc from the center out.
¶ Do not use solvents such as benzine, thinner, commercially
available cleaners, or anti-static spray intended for analog
discs.
INTRODUCTION
5
Page 6

Functional Overview
English
Front panel and Display
POWER ON/OFF
– switches the player to ON or OFF
STANDBY INDICATOR
– lights red when the player is in Standby
mode
DISPLAY
– shows the current status of the player
DVD951
POWER ON/OFF
HEADPHONE
MIN
LEVEL
DVD/VIDEO CD/CD PLAYER
MAX
SOUND
– select Stereo, Dolby Surround, 3D sound
(TruSurround) or multi-channel
ST EASY JOG
– controls Fast Forward/Rewind/Previous/
Next and Slow motion in various steps
9 STOP
– stops video/audio playback
2; PLAY/PAUSE
– starts or interrupts playback
PLAY/PAUSE
STOP
TITLE
CHAPTER
TRACK
SCAN
SHUFFLE
-BA
CD
V
REPEAT
CHAPTER
TIMETRACKTOTAL
TRACKTITLE
OPEN/CLOSE
EASY JOG
SOUND
LEVEL
– headphone volume control
HEADPHONE
– for connecting headphones
TITLE
CD
V
SCAN
DVD inserted
CD
V
Video CD or Audio CD inserted
Indicates current player function:
Playback, Pause, Search, etc.
Front (left and right) and Center
speakers active
CHAPTER
-BA
REPEAT
TRACK
SHUFFLE
DISC TRAY
/ OPEN/CLOSE
– opens/closes the disc tray
TIMETRACKTOTAL
CHAPTER
TRACKTITLE
Remote control active (flashing)
FTS active
SCAN active
REPEAT A-B active
SHUFFLE active
SCAN
-BA
REPEAT
SHUFFLE
6
FUNCTIONAL OVERVIEW
Test tone active
Active audio format
Surround (left and right) and
Subwoofer speakers active
Page 7

Remote control
TV ON/OFF
– switches TV to ON/OFF mode
TV VOL (+/–)
– to turn TV volume up/down
PBC (ON/OFF)
– activate/deactivate PBC
FTS
– activate FTS
DISC LOCK ( Ç )
– to activate/deactivate an
authorized disc
RESUME
– to continue playback from
STOP/PAUSE mode
TV P (+/–)
– to turn TV program up/down
DISC MENU
– access menu of a DVD disc
SYSTEM MENU
– access or remove player’s menu
1 2 3 4
– (left/right/up/down) cursor
movement for selection
STOP ( 9 )
– to stop playback
PLAY ( 2 )
– to start playback
TV
2
ON/OFF
+
TV VOL
-
1
4
7
DISC
MENU
RETURN
PBC
ON/OFF
FTS
DISC / LOCK
RESUME
2
5
8
0
ON/OFF
SYSTEM
MENU
OK
É
É
É
É
Ç
á
í
SUBTITLE ANGLE TTL/CHAP AUDIO
i
REPEAT REPEAT SHUFFLE SCAN
A-B
SLOW ZOOM
Ö
É
Å
ë
T-C
TIMEBIT
SEARCHRATE
DVD
2
TV P
3
6
9
DVD ON/OFF
English
– switches DVD to ON/OFF mode
0-9 numerical key pad
+
-
– direct numerical inputs
RETURN
– go back to previous menu
OK
– acknowledge menu selection
Q O
– search backward* / go to
previous chapter or track
;
PLAYSTOP
– pause playback temporarily /
frame-by-frame playback
R P
á
– search forward* / go to next
chapter or track
REPEAT
– repeat chapter, track, title, disc
REPEAT (A-B)
– repeat sequence
SHUFFLE
– play tracks in random order
SCAN
– play of the first 10 seconds of
each track/chapter within a disc
SUBTITLE ( Z )
– subtitle language selector
ANGLE ( } )
– select DVD camera angle
TTL/CHAP (T-C)
– select title/chapter
AUDIO ( Y )
– audio language selector
* Press and hold key for about 2 seconds
SLOW ( x )
– slow motion
BIT RATE
– displays bit rate indicator during
playback
TIME SEARCH
– start playback at a specific time
ZOOM ( a )
– enlarge video image
FUNCTIONAL OVERVIEW
7
Page 8
English
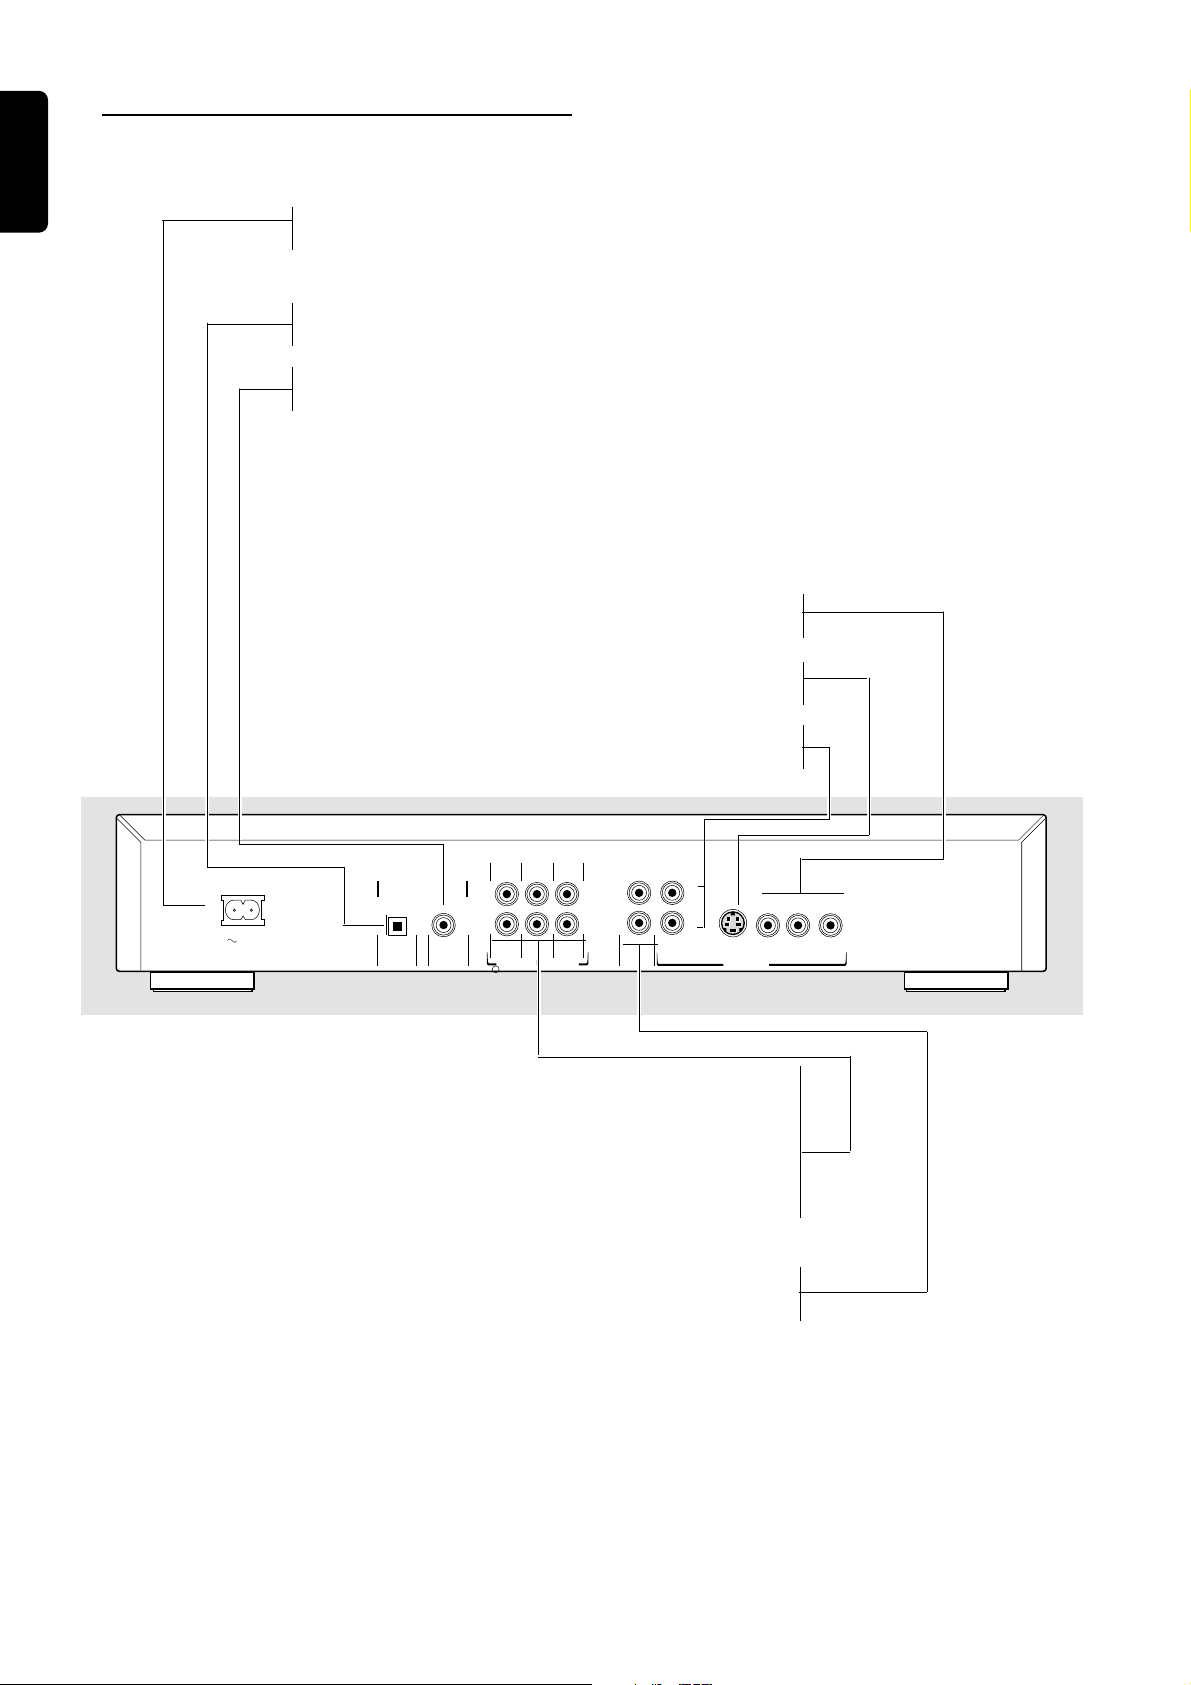
Rear panel
MAINS (AC)
– connect to power source
OPTICAL (Digital Audio Out)
– connect to digital (optical) equipment
COAXIAL (Digital Audio Out)
– connect to digital (coaxial) equipment
Y CB CR
– connect to TV with Y CB CR inputs
S-VIDEO OUT (Y/C)
– connect to TV with S-Video (Y/C) inputs
MAINS
VIDEO OUT (CVBS)
– connect to TV with CVBS video inputs
SURROUND FRONT
DIGITAL AUDIO OUT
PCM/MPEG2/AC-3/DTS
COAXIALOPTICAL
CENTER
L
R
SURROUND FRONT
SUB WF
MULTICHANNEL AUDIO OUT
L
L
R
R
AUDIO OUT
CVBS
1
2
S-VIDEO
VIDEO OUT
MULTICHANNEL AUDIO OUT
(For connection to a multichannel receiver)
– center speaker connection
– subwoofer connection
– front speakers connections
– surround speakers connections
AUDIO OUT (Left/Right)
– connect to amplifier, receiver or stereo system
C
R
Y
B
C
8
FUNCTIONAL OVERVIEW
Caution: Do not touch the inner pins of the jacks
on the rear panel. Electrostatic discharge may
cause permanent damage to the unit.
Page 9
Preparation
General notes
¶ Depending on your TV and other equipment you wish to
connect, there are various ways you could connect the
player.
¶ Please refer to the manuals of your TV, VCR, Stereo System
or other devices as necessary to make the best
connections.
¶ For better sound reproduction, connect the player’s audio
out jacks to the audio in jacks of your amplifier, receiver,
stereo or audio/video equipment. See ‘Connecting to
optional equipment’.
Caution:
– Do not connect the player’s audio out jack to
the phono in jack of your audio system.
– Do not connect your DVD-player via your VCR.
The DVD image could be distorted by the copy
protection system.
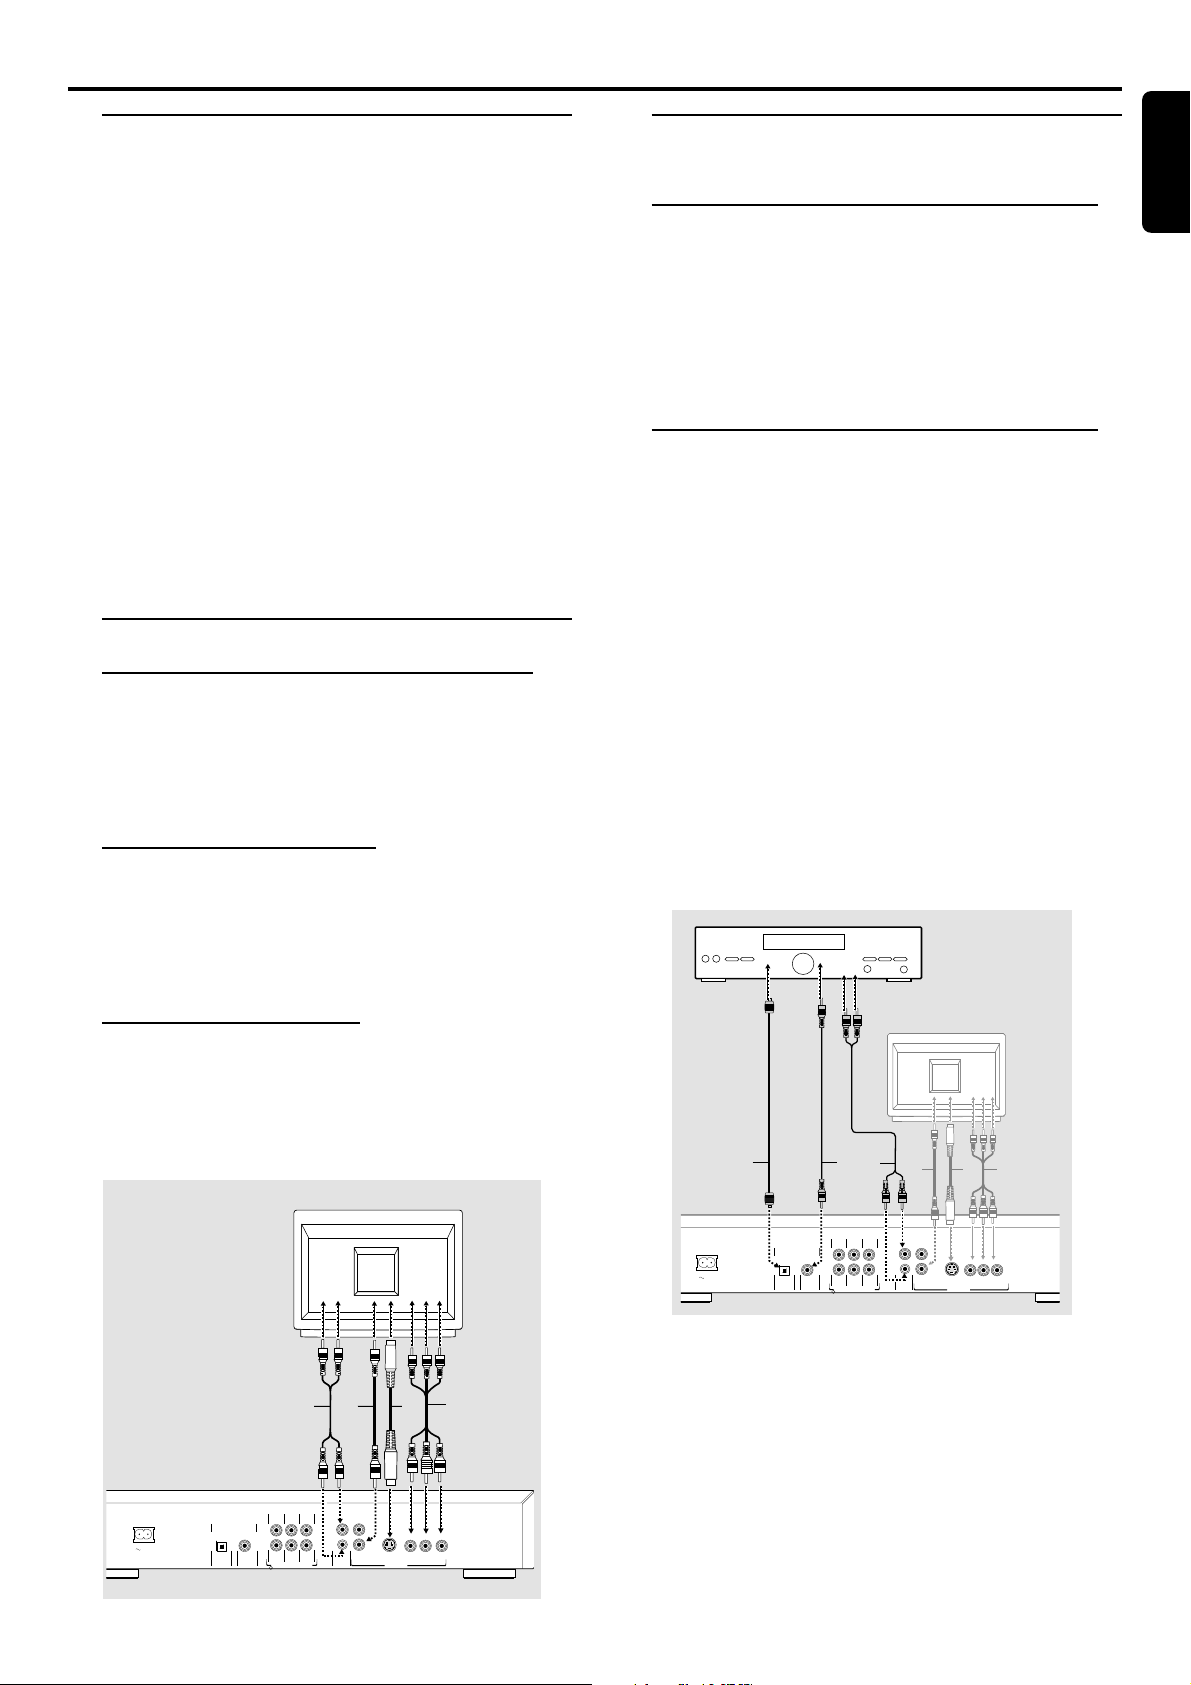
Connecting to a TV
Component Video (Y CB CR) connection
1
Connect the Y, CB, CR out jacks on the DVD-player to the
corresponding in jacks on the TV using optional Y, CB, CR cable (Z).
2 Connect the Left and Right audio out jacks to the audio
left/right in jacks on the TV (A).
S-Video (Y/C) connection
1 Connect the S-Video out jack on the DVD-player to the S-
Video in jack on the TV using an optional S-Video cable (Y).
2 Connect the Left and Right audio out jacks to the audio
left/right in jacks on the TV (A).
Connecting to optional
equipment
English
Connecting to an amplifier equipped with
two channel analog stereo or Dolby
Surround
1 Connect the Left and Right audio out jacks of the DVD
player to the audio left and right in jacks on your amplifier,
receiver or stereo system, using the optional audio cable
(A).
Connecting to an amplifier equipped with
two channel digital stereo (PCM) or to an
Audio/Video receiver equipped with a
multi-channel decoder (Dolby Digital™,
MPEG 2 and DTS)
1 Connect the player’s digital audio out jack (optical G or
coaxial F) to the corresponding in jack on your amplifier.
Use an optional digital (optical G or coaxial F) audio cable.
2 You will need to activate the player’s digital output (see
‘Personal Preferences’).
Digital Multi-channel sound
The digital multi-channel connection provides the best
sound quality. For this you need a multi-channel A/V
receiver that supports one or more of the audio formats
supported by your DVD player (MPEG 2, Dolby Digital™
and DTS). Check the receiver manual and the logos on the
front of the receiver.
AMPLIFIER
Video CVBS connection
1 Connect the Video out (CVBS) jack on the player to the
video in jack on the TV using the video cable supplied (X).
2 Connect the Left and Right audio out jacks to the audio
left/right in jacks on the TV (A).
TV
Z
YXA
SURROUND FRONT
COAXIALOPTICAL
CENTER
L
R
SURROUND FRONT
SUB WF
MULTICHANNEL AUDIO OUT
L
1
L
R
2
R
CVBS
S-VIDEO
C
R
Y
B
VIDEO OUT
C
AUDIO OUT
DIGITAL AUDIO OUT
PCM/MPEG2/AC3/DTS
MAINS
TV
G
DIGITAL AUDIO OUT
PCM/MPEG2/AC3/DTS
MAINS
COAXIALOPTICAL
F
SURROUND FRONT
CENTER
L
R
SURROUND FRONT
SUB WF
MULTICHANNEL AUDIO OUT
A
L
1
L
R
2
R
CVBS
AUDIO OUT
Z
YX
S-VIDEO
C
R
Y
B
C
VIDEO OUT
Warning:
Due to DTS Licensing agreement, the digital
output will also be in DTS digital out when DTS
audio stream is selected.
PREPARATION
9
Page 10
English
Note:
– If the audio format of the digital output does not match the
capabilities of your receiver, the receiver will produce a strong,
distorted sound or no sound at all.
– The selected audio format of the DVD is displayed in the
Status Window when the SYSTEM MENU is activated or when
the Audio button is pressed.
– Six Channel Digital Surround Sound via digital connection
can only be obtained if your receiver is equipped with a Digital
Multi-channel decoder.
– To see the selected audio format of the current DVD in the
Status Window, press the SYSTEM MENU or the Audio
Language selector button.
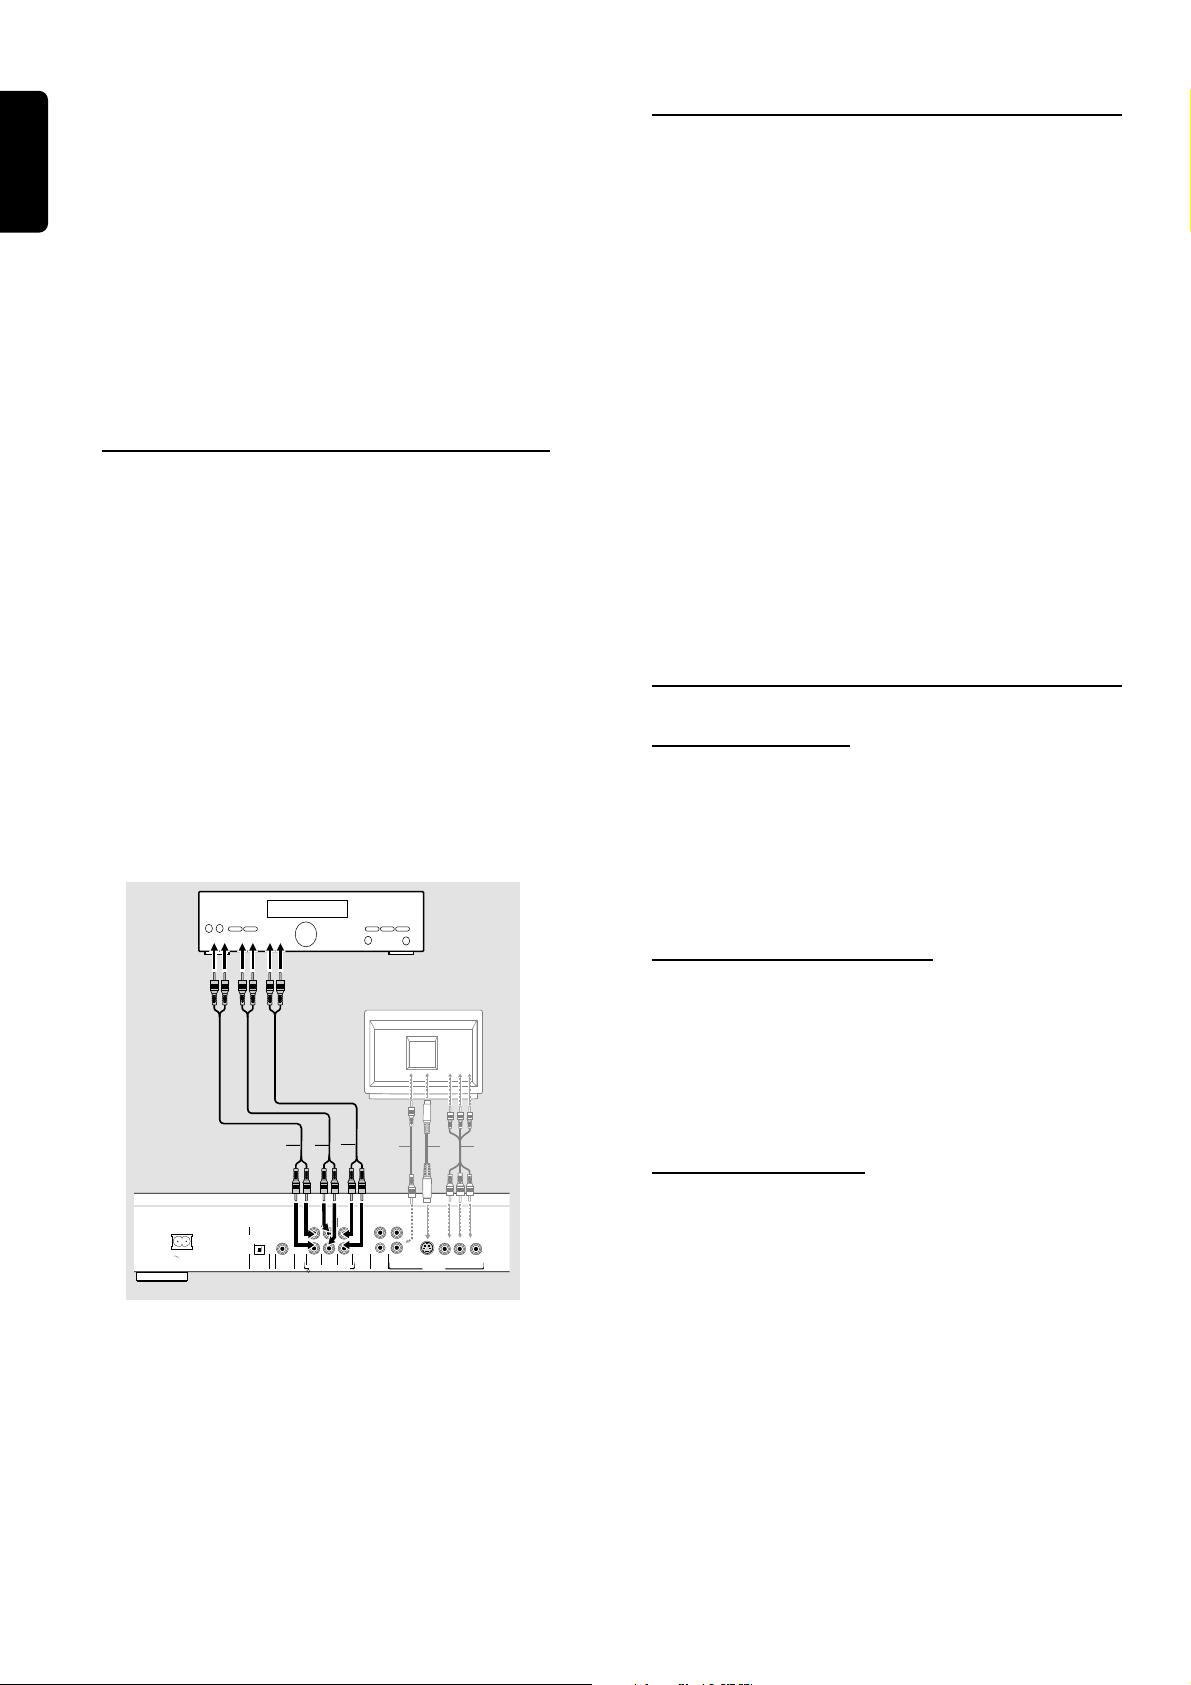
Analog connection to a multi-channel A/V
receiver with 6 Channel connectors (Dolby
Digital / DTS)
This DVD player contains a multi-channel decoder. This
enables playback of DVDs recorded in Multi-channel
Surround without the need for an optional decoder.
1 Connect the audio out jacks for the Center speaker and
the Subwoofer connection (C) to the corresponding in
jacks on your receiver.
2 Connect the Left and Right audio out jacks for the Front
speaker (B) to the corresponding in jack on your receiver.
3 Connect the Left and Right audio out jacks for Surround
speaker (D) to the corresponding in jacks on your receiver.
4 Make the appropriate Sound settings for Analog Output
and Speaker Settings in the Personal Preferences menu.
AMPLIFIER
NTSC/PAL Settings
You can switch the NTSC/PAL setting of the DVD player to
match the video signal of your TV. This setting only affects
the television’s on-screen display that shows the stop and
setup modes. You may select either NTSC or PAL. To
change the DVD player setting to PAL or NTSC, follow the
steps below.
1 Press the POWER ON/OFF button on the front panel of
the DVD player to turn OFF the DVD player.
2 Press and hold 9 and SOUND, on the front of the DVD
player. While holding 9 and SOUND, press POWER ON/
OFF.
3 After PAL or NTSC appears on the display panel of the
DVD player, release 9 and SOUND, at the same time.
The PAL or NTSC indicator that appears on the display
panel indicates the current setting.
4 To change the setting, press SOUND, within three
seconds. The new setting (PAL or NTSC) will appear on the
display panel.
General explanation
About this manual
This manual gives the basic instructions for operating the
DVD player. Some DVDs require specific operation or
allow only limited operation during playback. When this
occurs, the symbol Ä appears on the TV screen, indicating
that the operation is not permitted by the player or the
disc.
Remote control operation
TV
B
C
D
Z
YX
¶ Unless stated, all operations can be carried out with the
remote control. Always point the remote control directly at
the player, making sure there are no obstructions between
the remote and the player.
Corresponding keys on the front panel of the player can
also be used.
Menu bar operation
SURROUND FRONT
COAXIALOPTICAL
CENTER
L
R
SURROUND FRONT
SUB WF
MULTICHANNEL AUDIO OUT
L
1
L
R
2
R
CVBS
S-VIDEO
C
R
Y
B
VIDEO OUT
C
AUDIO OUT
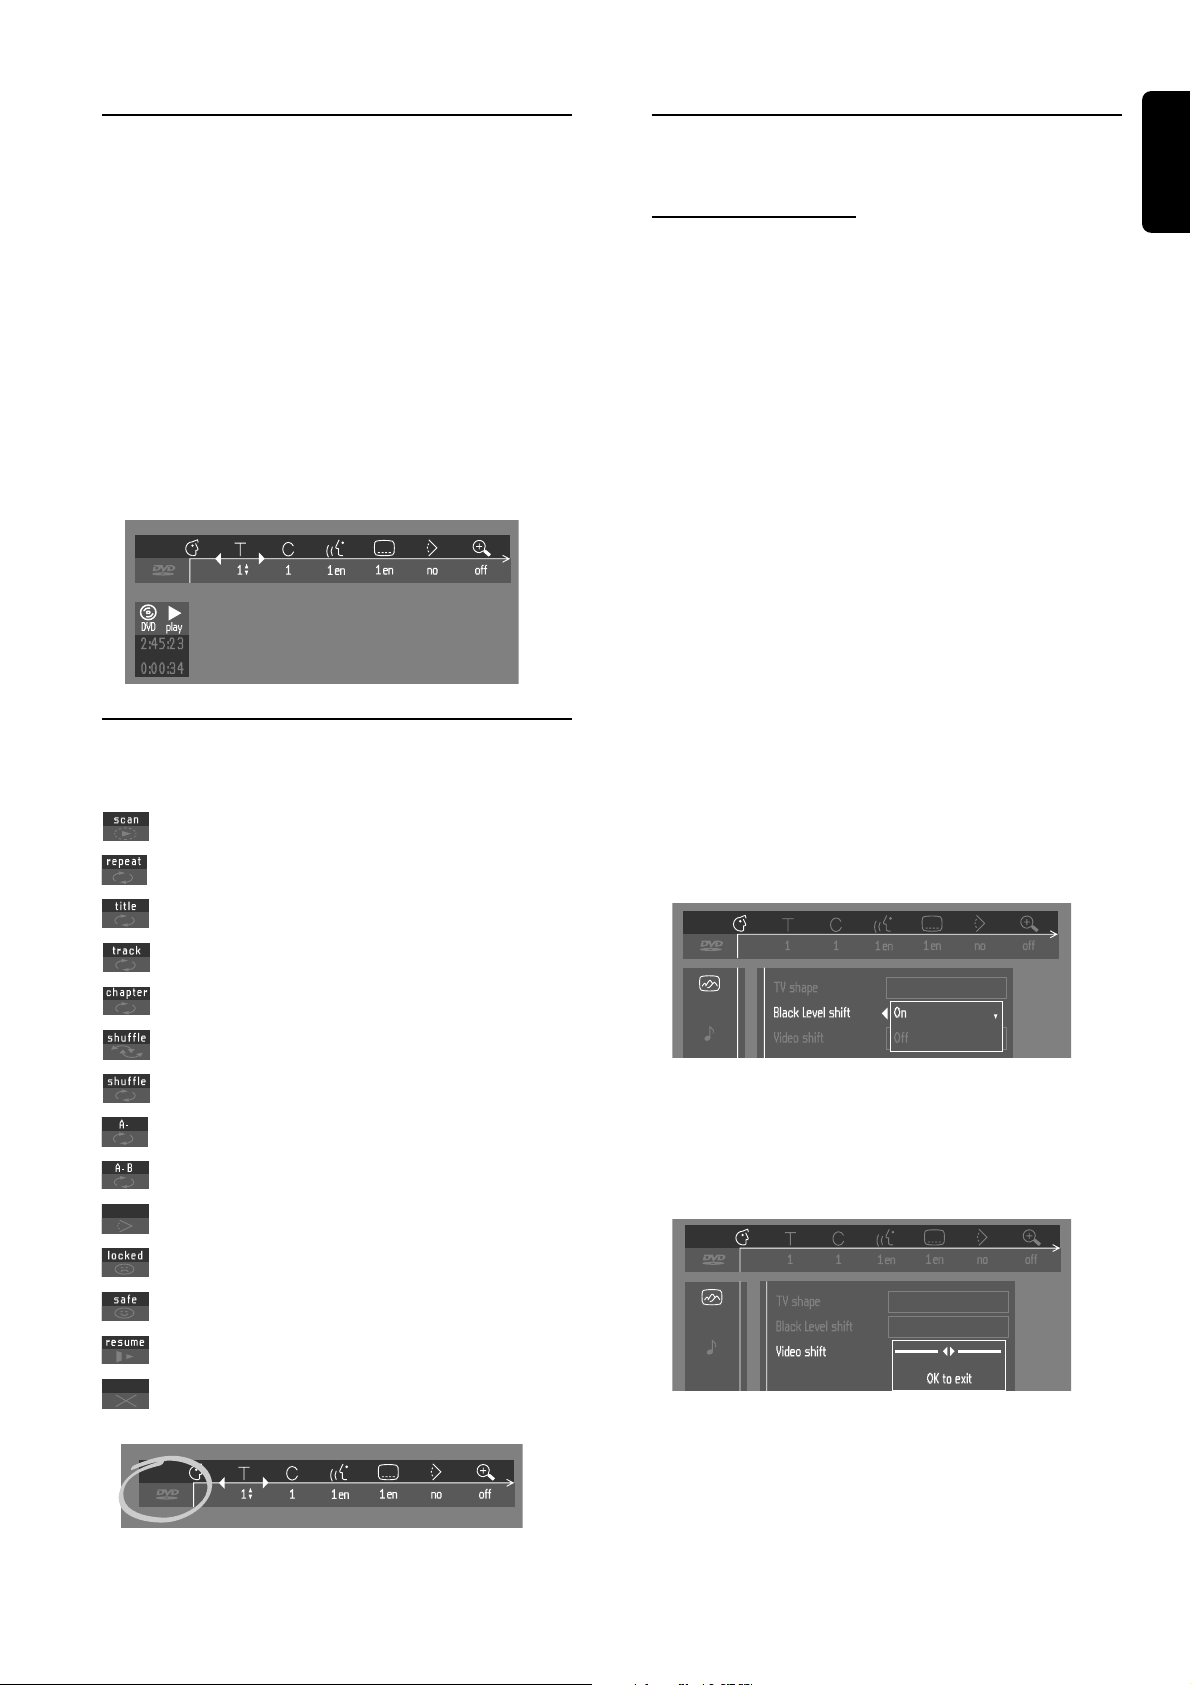
¶ A number of operations can be carried out via the menu
bar on the screen. The menu bar can be accessed by
pressing the cursor keys on the remote control.
¶ Pressing SYSTEM MENU while the menu bar is displayed
will clear the menu bar from the screen.
¶ The selected item will be highlighted and the appropriate
cursor keys to operate will be displayed below the icon.
¶ The symbols < or > indicates that more items are available
at the left/right of the menu bar. Press t or u to select
these items.
DIGITAL AUDIO OUT
PCM/MPEG2/AC3/DTS
MAINS
10
PREPARATION
Page 11
Menu bar/Status window
Personal Preferences
V Personal Preferences
W Title/Track
X Chapter/Index
Y Audio language
Z Subtitle language
} Angle
a Zoom
b Color Settings (Smart Picture)
c Video Program
d Sound
e Picture by Picture
f Slow motion
g Fast motion
h Time search
Temporary Feedback Field
icons
You can set your own personal preferences on the player.
English
General operation:
¶ Press SYSTEM MENU on the remote control.
¶ Select V in the menu bar.
➜ The Personal Preferences menu appears.
¶ Use the t u w v keys to move through the menus,
submenus and submenu options.
➜ When a menu item is selected, the cursor keys (on the
remote control) needed to operate the item are displayed
next to the item.
¶ Press OK to confirm your selection and return to the main
menu.
The following items can be adapted:
Picture
– TV Shape
If you have a wide screen (16:9) TV, select 16:9.
If you have a regular (4:3) TV, select 4:3.
If you have a 4:3 TV, you can also select between:
Letterbox for a ‘wide-screen’ picture with black bars at the
top and bottom of the screen, or Pan Scan, for a full-height
picture with the sides trimmed. If a disc supports the
format, the picture will be shown accordingly.
Scan
Repeat All
Repeat Title
Repeat Tr ack
Repeat Chapter
Shuffle
Shuffle Repeat
Repeat A to end
Repeat A-B
Angle
Child Lock On
Child Safe
Resume
Action prohibited
– Black level shift (NTSC users only)
Select ON for adapting the color dynamics to obtain richer
contrasts.
– Video shift
The factory centers the video on your screen. Use this
setting to personalize the position of the picture on your
TV by moving it to the left or right.
PREPARATION
11
Page 12
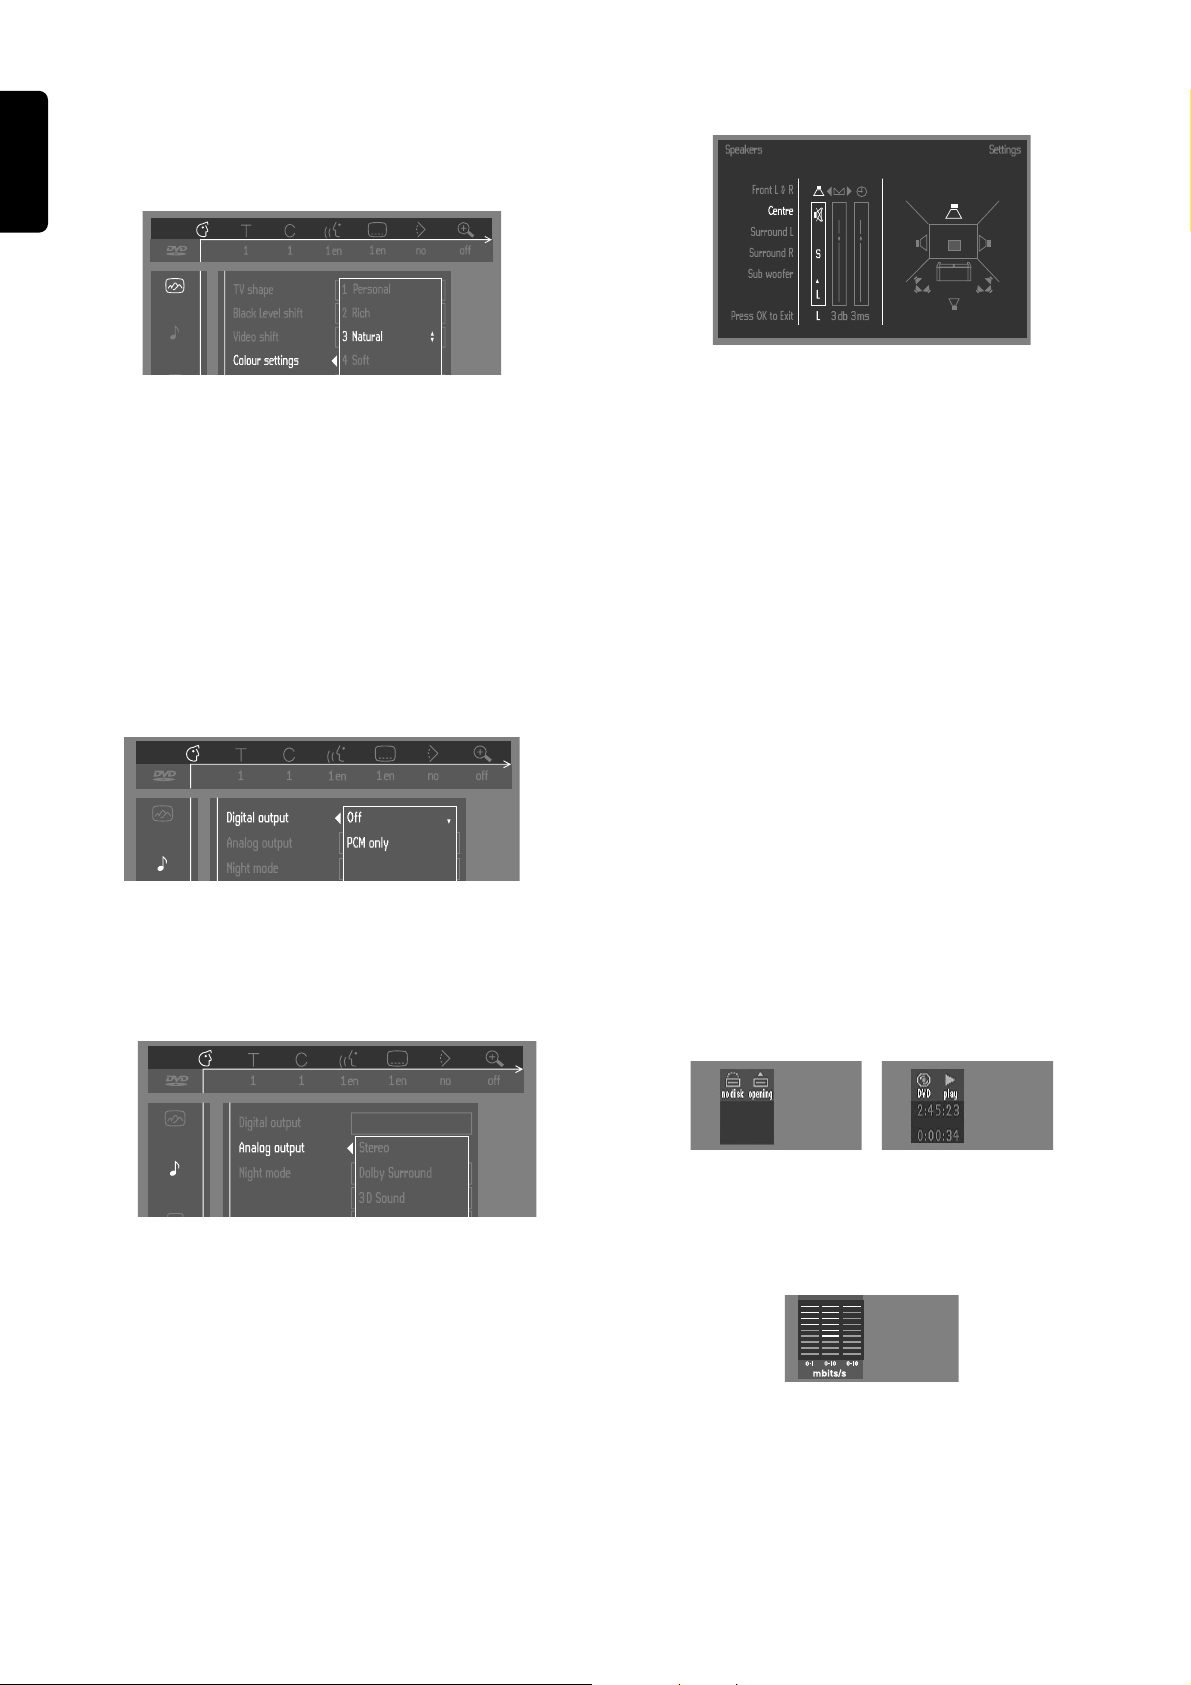
English
– Color settings (Y CB CR connection only)
You can select one of five predefined sets of color settings
or define one set (Personal) yourself.
– Personal color (Y CB CR connection only)
Allows you to fine-tune saturation, brightness and contrast
of the selected color settings.
– Karaoke vocal
Put this setting to ON only when a multi-channel karaoke
DVD is being played. The karaoke channels on the disc will
then be mixed into a normal stereo sound.
Sound
– Digital output
Factory setting: ALL. This means that both coaxial and
optical outputs are on. If you are not connecting equipment
with a digital input, change the setting to OFF.
If your equipment doesn't include a digital multi-channel
decoder, set the digital output to PCM (Pulse Code
Modulation).
All
– Analog output
Select Stereo, Dolby Surround, 3D sound (TruSurround) or
multi-channel output to match your system’s playback
capability.
Language
Select the required Menu, Audio and Subtitle language.
Audio language and Subtitle language can also be adapted
using the Menu bar.
Features
– Access Control
Access Control contains the following features:
Child Lock - When Child Lock is set to ON, a 4-digit code
must be entered in order to play discs.
Parental control - Allows the conditional viewing of DVDs
containing Parental Control information (see ‘Access
Control’).
– Status Window
Displays the current status of the player and is displayed
with the menu bar. When disc playback is stopped, it is
displayed with the ‘Temporary Feedback Field’ in the default
screen. See ‘On-Screen Display’ information.
The factory setting is ON. Select OFF to suppress display of
the Status Window.
– Night Mode
Optimizes the dynamics of the sound for low volume
playback.
– Speaker settings
Allows you to select speaker settings including volume
balance and delay time and to test the speaker settings.
Speaker settings are only active on the Analog MultiChannel Output. (See appendix)
12
PREPARATION
– Bit Rate Indicator
When activated, the bit rate for video and audio as well as
the total bit rate is displayed. This is only applicable during
playback of DVD and SVCD discs.
– Beeper
The beeper can be set to ON or OFF.
Page 13
Operation
PLAYSTOP
Å
PLAYSTOP
Loading discs
1 Press OPEN/CLOSE on the front of the player to open the
disc tray.
2 Load your chosen disc in the tray, label side up (also when a
double sided DVD is inserted).
3 Press OPEN/CLOSE again to close the tray.
➜ READ appears in the status window and on the player
display, and playback starts automatically.
Note:
– If ‘Child Lock’ is set to ON and the disc inserted is not in
the ‘child safe’ list (not authorized), the 4-digit code must be
entered and/or the disc must be authorized (see ‘Access
Control’).
Playing a DVD and Video CD
disc
Playing a disc
¶ After inserting the disc and closing the tray, playback starts
automatically and the status window of the player display
shows the type of disc loaded, as well as the disc’s
information and playing time.
¶ The disc may invite you to select an item from a menu. If
the selections are numbered, press the appropriate
numerical key; if not, use the w/v, t/u keys to highlight
your selection, then press OK.
¶ The number if the current title and chapter are displayed.
¶ Playback may stop at the end of the Title, and you may
return to the DVD menu. To go to the next title, press 2.
¶ To stop playback, press 9.
➜ The default screen will appear, giving information about
the current status.
¶ You can resume playback from the point at which you
stopped playback. Press 2; when you see the Resume icon
. on the screen, press 2 again.
➜ The RESUME feature applies not only to the disc in the
player, but also to the last four discs you have played. Simply
reload the disc and press RESUME on the remote control
or; press 2 when you see the Resume icon . on the
screen, press 2 again.
Note:
– DVDs may be labeled with a region code.
– Your player will not play discs that are labeled with a region
code different from your player.
General features
Note:
– Unless stated, all operations described are based on remote
control use. Some operations can be carried out using the
menu bar on the screen.
Moving to another title/track
When a disc has more than one title or
track, you can move to another title as
follows:
¶ Press T-C (TTL/CHAP), then press P
or O briefly during playback to select the next or to return
to the beginning of the current title/track.
¶ Press O twice briefly to step back to the previous title/
track.
Moving to another chapter/index
When a title on a disc has more than one
chapter or a track has more than one
index , you can move to another chapter/
index as follows:
¶ Press P or O briefly during playback to select the next or
to return to the beginning of the current chapter/index.
¶ Press O twice briefly to step back to the previous chapter/
index.
¶ To go directly to any chapter or index, select T-C (TTL/
CHAP), then enter the chapter/index number using the
numerical keys (0-9).
Note:
– For two digit numbers, press the keys in rapid succession.
Slow Motion
¶ Select f (SLOW MOTION) in the
menu bar.
¶ Use the w keys to enter the SLOW
MOTION menu.
➜ The player will now go into PAUSE mode.
¶ Use the cursor keys t u to select the required speed: -1, -
1/2, -1/4 or -1/8 (backward), or +1/8, +1/4, +1/2 or +1
(forward).
¶ Select 1 to playback at normal speed again.
¶ If ; is pressed, the speed will be set to zero (PAUSE).
¶ To exit slow motion mode, press 2 and v.
You can also select Slow Motion speeds by using the H
button on the remote control.
É
Ç
É
Å
á
ë
í
SUBTITLE ANGLE TTL/CHAP AUDIO
T-C
i
REPEAT REPEAT SHUFFLE SCAN
A-B
É
Ç
Å
á
ë
í
SUBTITLE ANGLE TTL/CHAP AUDIO
T-C
i
REPEAT REPEAT SHUFFLE SCAN
A-B
á
ë
í
SUBTITLE ANGLE TTL/CHAP AUDIO
T-C
i
REPEAT REPEAT SHUFFLE SCAN
A-B
TIMEBIT
SLOW ZOOM
Ö
SEARCHRATE
á
É
á
á
English
OPERATION
13
Page 14
English
Å
Å
Å
Å
Å
É
Å
Still Picture and Frame-by-frame playback
¶ Select e (PICTURE BY PICTURE)
in the menu bar.
¶ Use the w key to enter the picture by
picture menu.
➜ The player will now go into PAUSE mode.
¶ Use the cursor keys t u to select the previous or next
picture frame.
¶ To exit PICTURE BY PICTURE mode, press 2 or v.
You can also step forward by pressing ; repeatedly on the
remote control.
Scan
Plays the first 10 seconds of each
chapter/tracks on the disc.
¶ Press SCAN.
¶ To continue playback at your chosen chapter/tracks, press
SCAN again or press 2.
SUBTITLE ANGLE TTL/CHAP AUDIO
REPEAT REPEAT SHUFFLE SCAN
SLOW ZOOM
Search
¶ Select g (FAST MOTION) in the
menu bar.
¶ Use the w key to enter the FAST
MOTION menu.
¶ Use the t u keys to select the required speed: -32, -8 or -4
(backward), or +4, +8, +32 (forward).
¶ Select 1 to play at normal speed again.
¶ To exit FAST MOTION mode, press 2 or v.
To search forward or backward through different speeds,
you can also hold down Q or R.
SUBTITLE ANGLE TTL/CHAP AUDIO
Repeat
DVD-Video Discs - Repeat chapter/
title/disc
¶ To repeat the currently playing chapter,
press REPEAT.
➜ REPEAT CHAPTER appears on the display.
¶ To repeat the title currently playing , press REPEAT a
second time.
➜ REPEAT TITLE appears on the display.
¶ To repeat the entire disc, press REPEAT a third time.
➜ REPEAT appears on the display.
¶ To exit Repeat mode, press REPEAT a fourth time.
SUBTITLE ANGLE TTL/CHAP AUDIO
REPEAT REPEAT SHUFFLE SCAN
SLOW ZOOM
É
É
É
Ç
Å
á
ë
í
á
ë
í
T-C
i
A-B
TIMEBIT
Ö
SEARCHRATE
á
ë
í
T-C
i
REPEAT REPEAT SHUFFLE SCAN
A-B
TIMEBIT
SLOW ZOOM
Ö
SEARCHRATE
á
ë
í
T-C
i
A-B
TIMEBIT
Ö
SEARCHRATE
á
Repeat A-B
PLAYSTOP
É
á
To repeat a sequence in a title:
¶ Press REPEAT A-B at your chosen starting
point.
➜ A- appears briefly on the screen.
í
SUBTITLE ANGLE TTL/CHAP AUDIO
i
REPEAT REPEAT SHUFFLE SCAN
SLOW ZOOM
Ö
á
ë
T-C
A-B
TIMEBIT
SEARCHRATE
¶ Press REPEAT A-B again at your chosen end point.
➜ A-B REPEAT appears briefly on the display, and the repeat
sequence begins(A-B REPEAT is displayed on the front panel
of the player).
¶ To exit the sequence, press REPEAT A-B.
á
Shuffle
á
DVD-Video discs
This shuffles the playing order of chapters
í
SUBTITLE ANGLE TTL/CHAP AUDIO
i
REPEAT REPEAT SHUFFLE SCAN
SLOW ZOOM
Ö
within a title, if the title has more than
á
ë
T-C
A-B
TIMEBIT
SEARCHRATE
one chapter.
¶ Press SHUFFLE during playback.
➜ SHUFFLE appears on the screen for about two
seconds.
¶ To return to normal playback, press SHUFFLE again.
á
Video CDs
¶ Press SHUFFLE during playback.
➜ SHUFFLE appears on the screen for about two
seconds.
¶ To return to normal playback, press SHUFFLE again.
Time search
The Time Search function allows you to
start playing at any chosen time on the
disc.
á
í
SUBTITLE ANGLE TTL/CHAP AUDIO
i
REPEAT REPEAT SHUFFLE SCAN
SLOW ZOOM
Ö
á
ë
T-C
A-B
TIMEBIT
SEARCHRATE
¶ Select h (TIME SEARCH) in the menu bar.
á
¶ Press w.
➜ The player will now go into PAUSE mode.
➜ A time edit box appears on the screen, showing the
elapsed playing time of the current disc.
¶ Use the numerical keys to enter the required start time.
Enter hours, minutes and seconds from left to right in the
box.
➜ Each time an item has been entered, the next item will
be highlighted.
¶ Press OK to confirm the start time.
➜ The time edit box will disappear and playback starts
from the selected time on the disc.
Video CDs - Repeat track/disc
¶ To repeat the track currently playing , press REPEAT.
➜ REPEAT TRACK appears on the display.
¶ To repeat the entire disc, press REPEAT a second time.
➜ REPEAT appears on display and screen.
¶ To exit Repeat mode, press REPEAT a third time.
14
OPERATION
Page 15
Zoom
Å
The Zoom function allows you to enlarge
the video image and to move through
á
í
SUBTITLE ANGLE TTL/CHAP AUDIO
i
REPEAT REPEAT SHUFFLE SCAN
SLOW ZOOM
Ö
á
ë
T-C
A-B
TIMEBIT
SEARCHRATE
the enlarged image.
¶ Select a (ZOOM).
¶ Press w/v to activate the ZOOM function and select the
required zoom factor: 1.33, 2 or 4.
➜ The player will go into Pause mode.
➜ The selected zoom factor appears below the Zoom icon
in the menu bar and ‘Press OK to pan’ appears below the
menu bar.
➜ The picture will change accordingly.
¶ Press OK to confirm the selection.
➜ The panning icons appear on the screen.
¶ Use the t u w v keys to move across the screen.
¶ When OK is pressed, only the zoomed picture will be
shown on the screen.
¶ To exit ZOOM mode:
– Press 2 to resume playback, STOP or SYSTEM
MENU.
FTS-Video
¶ The FTS-Video function allows you to store your favorite
titles and chapters (DVD) and favorite tracks and indexes
(VCD) for a particular disc in the player memory.
¶ FTS program can contain 20 items (titles, chapters).
¶ A programmed FTS will be placed on top of the list when
playback is activated. When the list is full, a new program
will replace the last program on the list.
¶ The selections can be chosen and played at any time.
Storing a FTS-Video Program
¶ When playback is stop, select VIDEO FTS c in the menu
bar.
¶ Press w to open the menu.
➜ The VIDEO FTS menu appears.
¶ Press u or t or FTS to select ON or OFF.
Storing titles/tracks
¶ Press w to select TITLES.
¶ Use u and t to select the required title.
¶ Press OK if you wish to store the entire title.
➜ The title number will be added to the list of selections.
English
Easy Jog
EASY JOG consists of JOG and SHUTTLE control
which allows you to playback in various steps:
¶ In playback mode - search forward/backward within a
chapter/index or move to the next/previous chapter/index.
➜ SHUTTLE control: +4x, +8x, +32x, Next (clockwise
direction), -4x, -8x, -32x, Previous (anti-clockwise direction).
¶ In pause mode - change playback speed or select next/
previous frame-by-frame picture.
➜ SHUTTLE control: +1/8x, +1/4x, +1/2x, (clockwise
direction), -1/8x, -1/4x, -1/2x, (anti-clockwise direction).
➜ JOG control: to select Next Picture Frame (clockwise
direction), or Previous Picture Frame (anti-clockwise
direction).
PLAY/PAUSE
SHUTTLE
STOP
OPEN/CLOSE
SOUND
JOG
EASY JOG
Storing chapters/indexes
¶ Press w on the selected title number.
➜ The title number will be marked and the highlight moves
to the first available chapter number for this title.
¶ Use u and t to select the required chapter.
¶ Press OK to confirm the selection.
➜ The title/chapter selection will be added to the list of
selections.
¶ Press SYSTEM MENU to exit the VIDEO FTS c menu.
Erasing a FTS-Video Program
¶ When playback is stop, select VIDEO FTS c in the menu
bar.
¶ Use w to select PROGRAM.
¶ Use u and t to select the required number.
¶ Press OK to erase the selection.
¶ Press SYSTEM MENU to exit.
If you wish to erase all selections:
¶ When playback is stop, select VIDEO FTS c in the menu
bar.
¶ Use w to select CLEAR ALL.
¶ Press OK.
➜ All selections will now be erased.
¶ Press SYSTEM MENU to exit.
OPERATION
15
Page 16
English
É
Å
Special DVD features
Special VCD Features
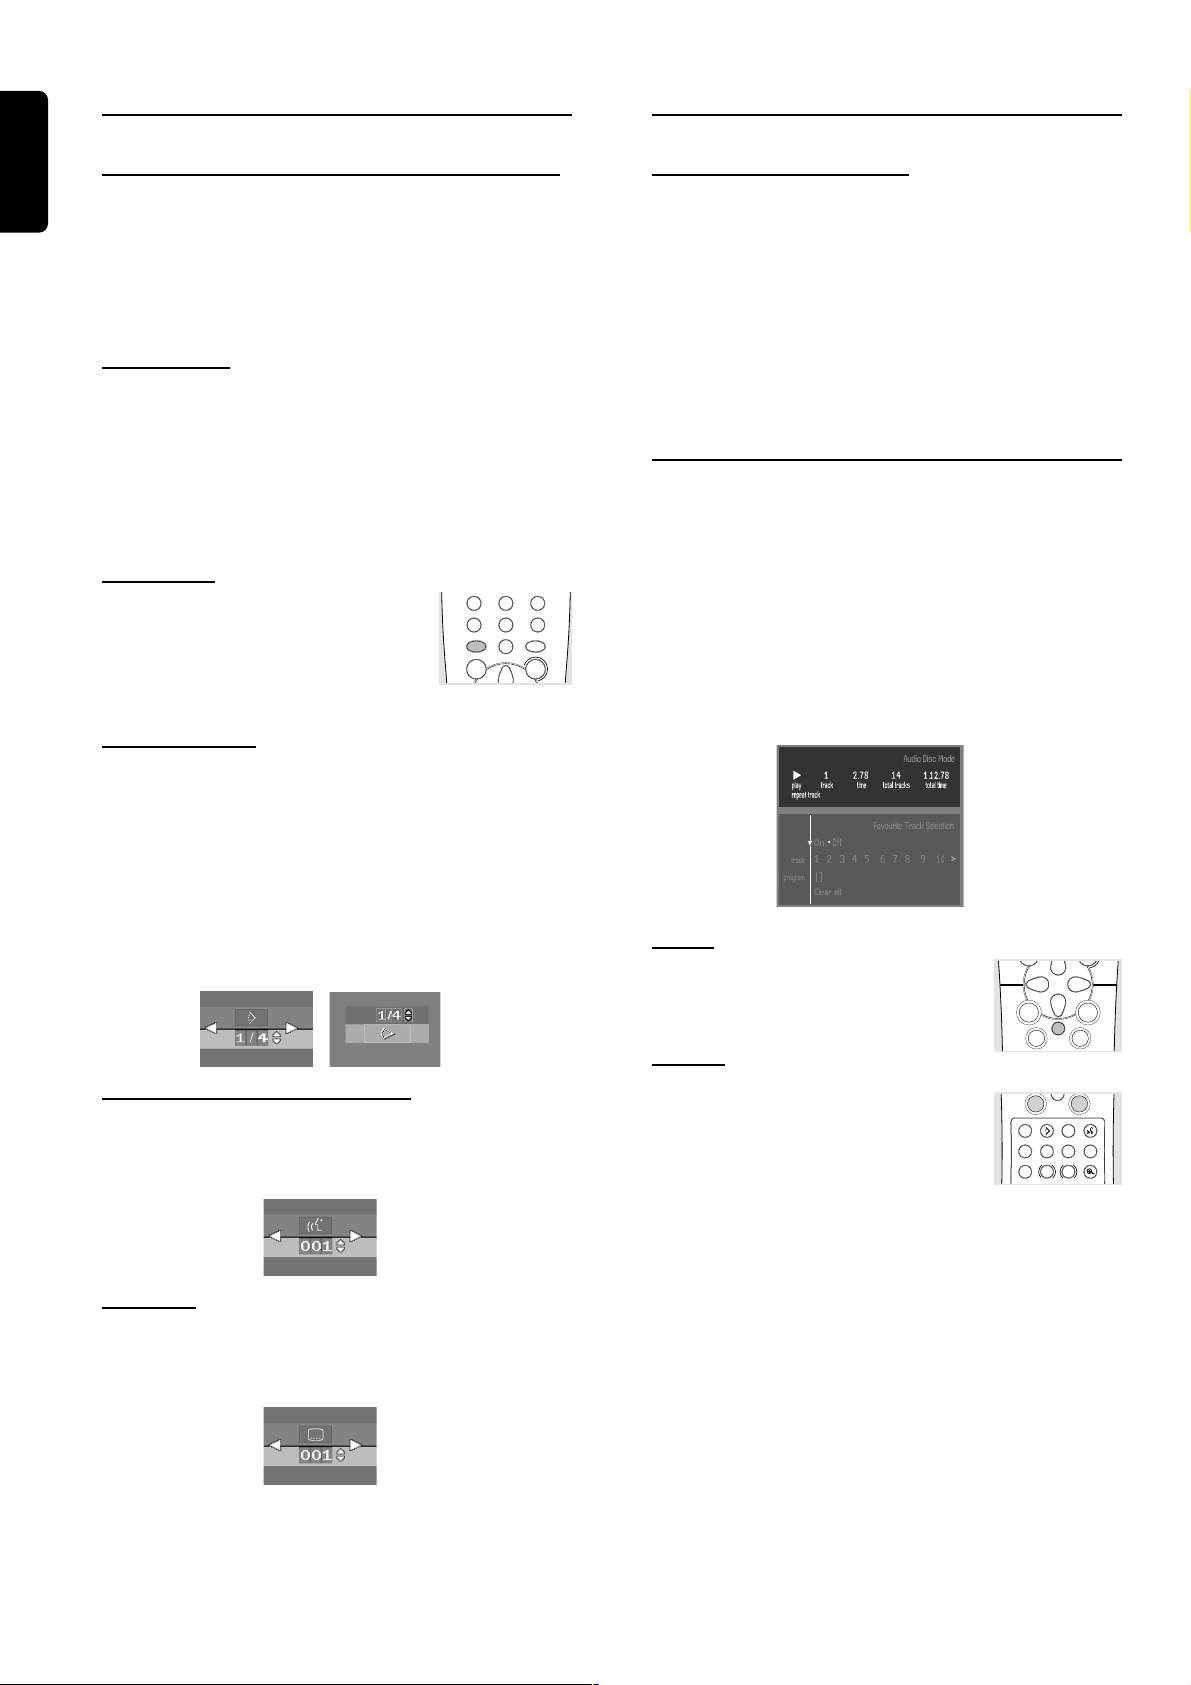
Checking the contents of DVD-Video discs:
Menus
DVDs may contain menus to access special features. To use
the disc menu, press the appropriate numerical key; or, use
the w, v, u, t keys to highlight your selection, then press
OK.
Title menus
¶ Press DISC MENU.
➜ If the current title has a menu, the menu will appear on
the screen. Otherwise, the disc menu will be displayed.
¶ The menu can list camera angles, spoken language and
subtitle options, and chapters for the title.
¶ To remove the title menu, press DISC MENU again.
Disc menu
¶ Press T-C, then press DISC MENU.
➜ The disc menu is displayed.
¶ To remove the disc menu, press T-C, then
MENU
RETURN
4
5
8
7
DISC
0
É
press DISC MENU.
Camera Angle
SYSTEM
Playback Control (PBC)
¶ Load a Video CD with PBC and press 2.
¶ Go through the menu with the keys indicated on the TV
screen until your chosen passage starts to play. If a PBC
menu includes titles, you can select a title directly.
¶ Enter your choice with the numerical keys (0-9).
¶ Press RETURN to go back to the previous menu.
¶ You may also set to PBC OFF under Personal
Preferences.
Playing an audio CD
¶ After loading the disc, playback starts automatically.
¶ If the TV is on, the Audio CD screen appears.
¶ The number of tracks and the total playing time of the disc
6
9
MENU
OK
will be shown on the screen.
¶ During playback, the current track number and its elapsed
playing time will be shown on the screen and on the player
display.
¶ Playback will stop at the end of the disc.
¶ To stop playback at any other time, press 9.
If the disc contains sequences recorded from different
camera angles, the angle icon appears, showing the number
of available angles and the angle being shown currently. You
can then change the camera angle if you wish.
¶ Use the w/v keys to select the required angle icon.
➜ After a while, playback changes to the selected angle. The
angle icon remains displayed until multiple angles are no
longer available.
Changing the audio language
¶ Select Y (AUDIO) in the menu bar.
¶ Press Y or w/v repeatedly to see the different languages.
Subtitles
¶ Select Z (SUBTITLE) in the menu bar.
¶ Press Z or w/v repeatedly to see the different subtitles.
Pause
É
É
É
¶ Press ; during playback.
¶ To return to playback, press 2.
Ç
á
í
PLAYSTOP
É
Å
á
ë
Search
á
í
¶ To search forward or backward through
the disc at four times the normal speed,
hold down 5 or 6 for about one
SUBTITLE ANGLE TTL/CHAP AUDIO
i
REPEAT REPEAT SHUFFLE SCAN
SLOW ZOOM
Ö
second during playback.
➜ Search begins, and sound is partially muted.
¶ To step up to eight times the normal speed, press 5 or 6
again.
➜ Search goes to eight times the speed, and the sound is
muted.
¶ To return to four times the normal speed, press 5 or 6
again.
¶ If the TV is on, search speed and direction are indicated on
the screen each time 5 or 6 is pressed.
¶ To end the search, press 2 to resume playback or 9 to stop
playback.
á
ë
T-C
A-B
TIMEBIT
SEARCHRATE
16
OPERATION
Page 17
Å
Å
Å
Å
á
Å
ë
Moving to another track
¶ Press P or O briefly during playback to
go to the next track or to return to the
í
SUBTITLE ANGLE TTL/CHAP AUDIO
T-C
i
REPEAT REPEAT SHUFFLE SCAN
A-B
TIMEBIT
SLOW ZOOM
Ö
SEARCHRATE
beginning of the current track.
¶ Press O twice briefly to step back to the previous track.
¶ To go directly to any track, enter the track number using
the numerical keys (0-9).
á
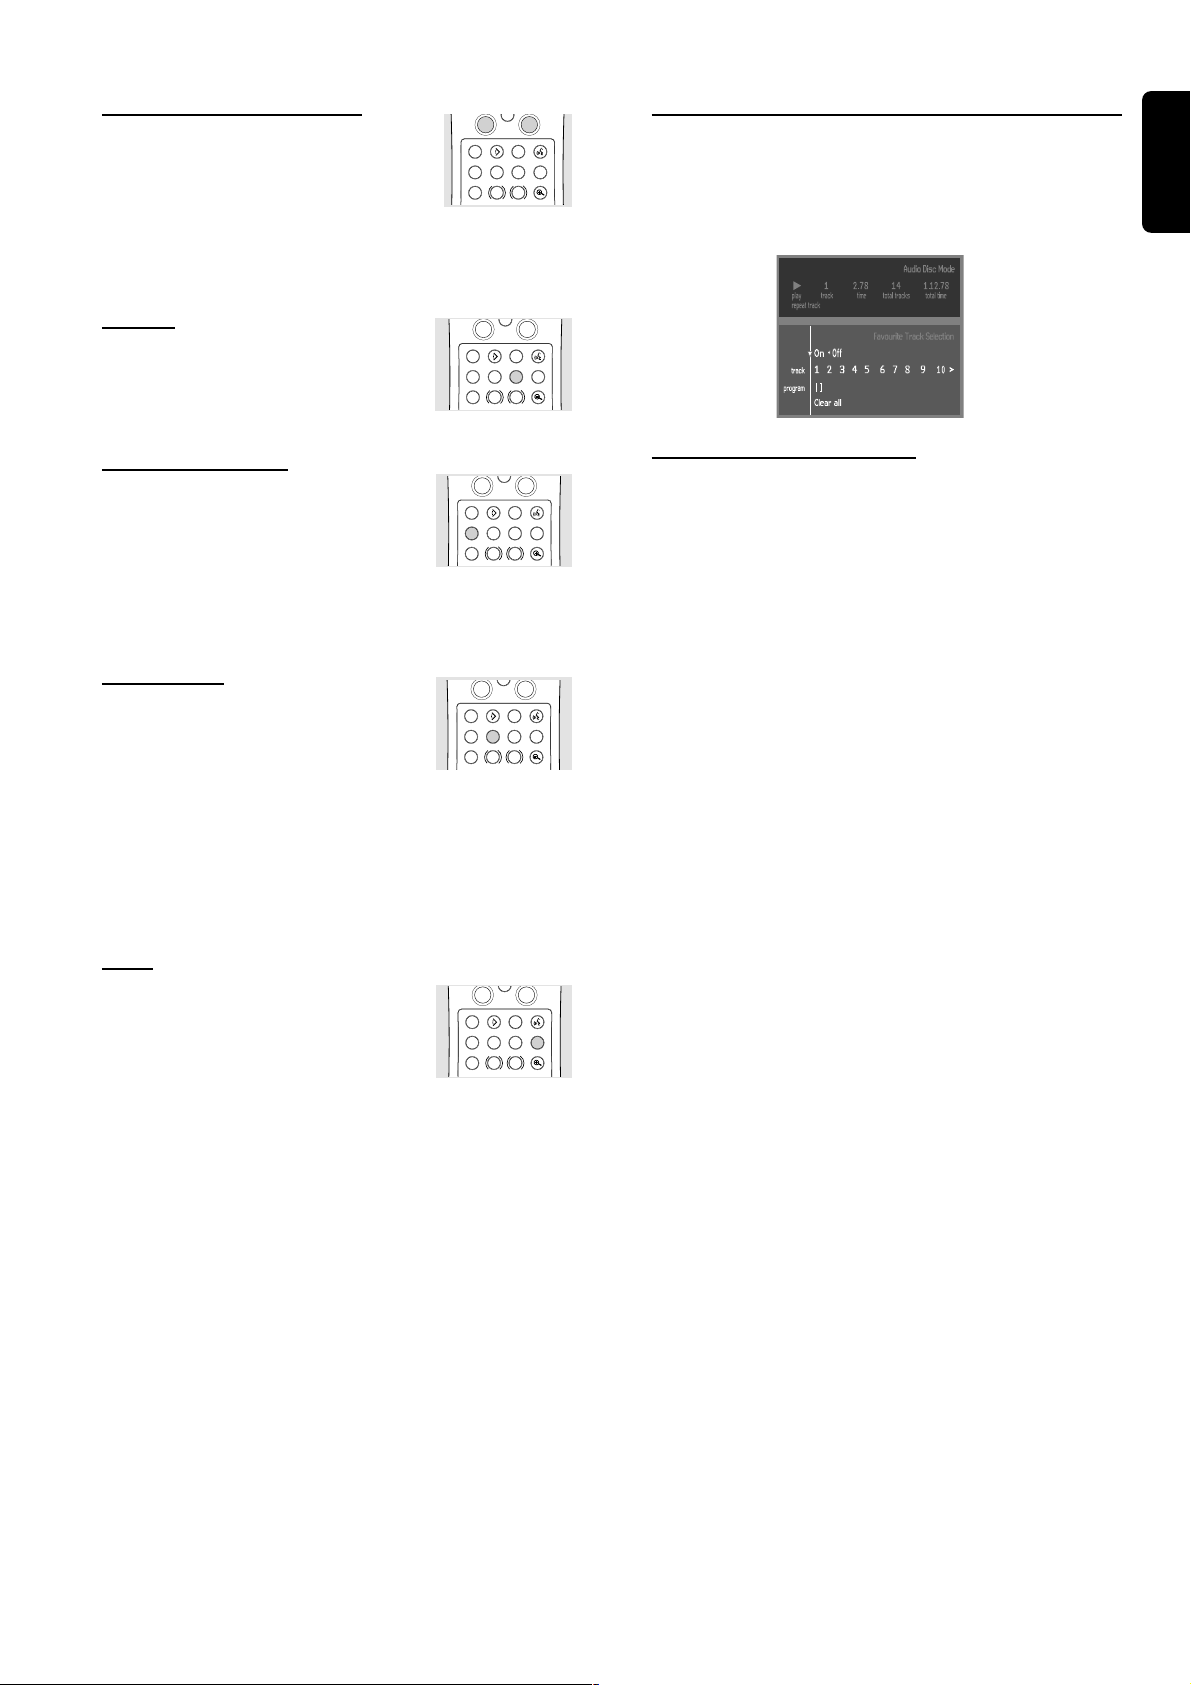
FTS Program
¶ FTS Program allows you to store your favorite tracks for a
particular disc in the player memory.
English
¶ Each FTS Program can contain 20 tracks.
á
í
Shuffle
¶ Press SHUFFLE during playback.
➜ The order of the tracks is changed.
SUBTITLE ANGLE TTL/CHAP AUDIO
T-C
i
REPEAT REPEAT SHUFFLE SCAN
A-B
TIMEBIT
SLOW ZOOM
Ö
SEARCHRATE
¶ To return to normal playback, press SHUFFLE again.
á
Repeat track/disc
¶ To repeat the track currently playing,
press REPEAT.
➜ REPEAT TRACK appears on the display.
í
SUBTITLE ANGLE TTL/CHAP AUDIO
T-C
i
REPEAT REPEAT SHUFFLE SCAN
A-B
TIMEBIT
SLOW ZOOM
Ö
SEARCHRATE
¶ To repeat the entire disc, press REPEAT a second time.
➜ REPEAT appears on the display.
¶ To exit Repeat mode, press REPEAT a third time.
á
Repeat A-B
To repeat a sequence:
¶ Press REPEAT A-B at your chosen starting
í
SUBTITLE ANGLE TTL/CHAP AUDIO
T-C
i
REPEAT REPEAT SHUFFLE SCAN
A-B
TIMEBIT
SLOW ZOOM
Ö
SEARCHRATE
point.
➜ A- appears on the player display.
¶ Press REPEAT A-B again at your chosen end point.
➜ A-B appears on the display, and the sequence begins to
play repeatedly.
¶ To exit the sequence and return to normal play, press
REPEAT A-B again.
á
ë
á
ë
Storing an FTS Program
1 Load a disc and stop playback.
2 Use w to go to the list of available tracks.
3 Use u or t to select tracks from the list.
To go directly to any track, enter the track number using
the numerical keys (0-9).
4 Store each track by pressing OK.
á
ë
➜ The track numbers will be added to the list.
➜ The number of tracks and the playing time of the
program will be shown on the screen and the player display.
When your FTS Program is complete, press 2 to start
playback or v to stop playback. In either case, the FTS
Program will be automatically memorized.
Switching FTS ON/OFF
1 Use v w to move to the FTS ON/OFF selection.
2 Use u or t to select either ON or OFF.
Scan
Plays the first 10 seconds of each track
on the disc.
¶ Press SCAN.
á
ë
í
SUBTITLE ANGLE TTL/CHAP AUDIO
T-C
i
REPEAT REPEAT SHUFFLE SCAN
A-B
TIMEBIT
SLOW ZOOM
Ö
SEARCHRATE
¶ To continue playback at your chosen chapter/track, press
SCAN again or press 2.
á
Erasing a track from an FTS Program
1 Use w to go to the list of selected tracks.
2 Use u and t to select the track number you wish to erase.
3 Press OK.
➜ The track number will be erased from the list of selected
tracks.
Erasing the complete program
1 Use w to select CLEAR ALL, then press OK.
➜ The complete FTS Program for the disc will be erased.
OPERATION
17
Page 18
Access Control
English
Access control; child lock
(DVD and VCD)
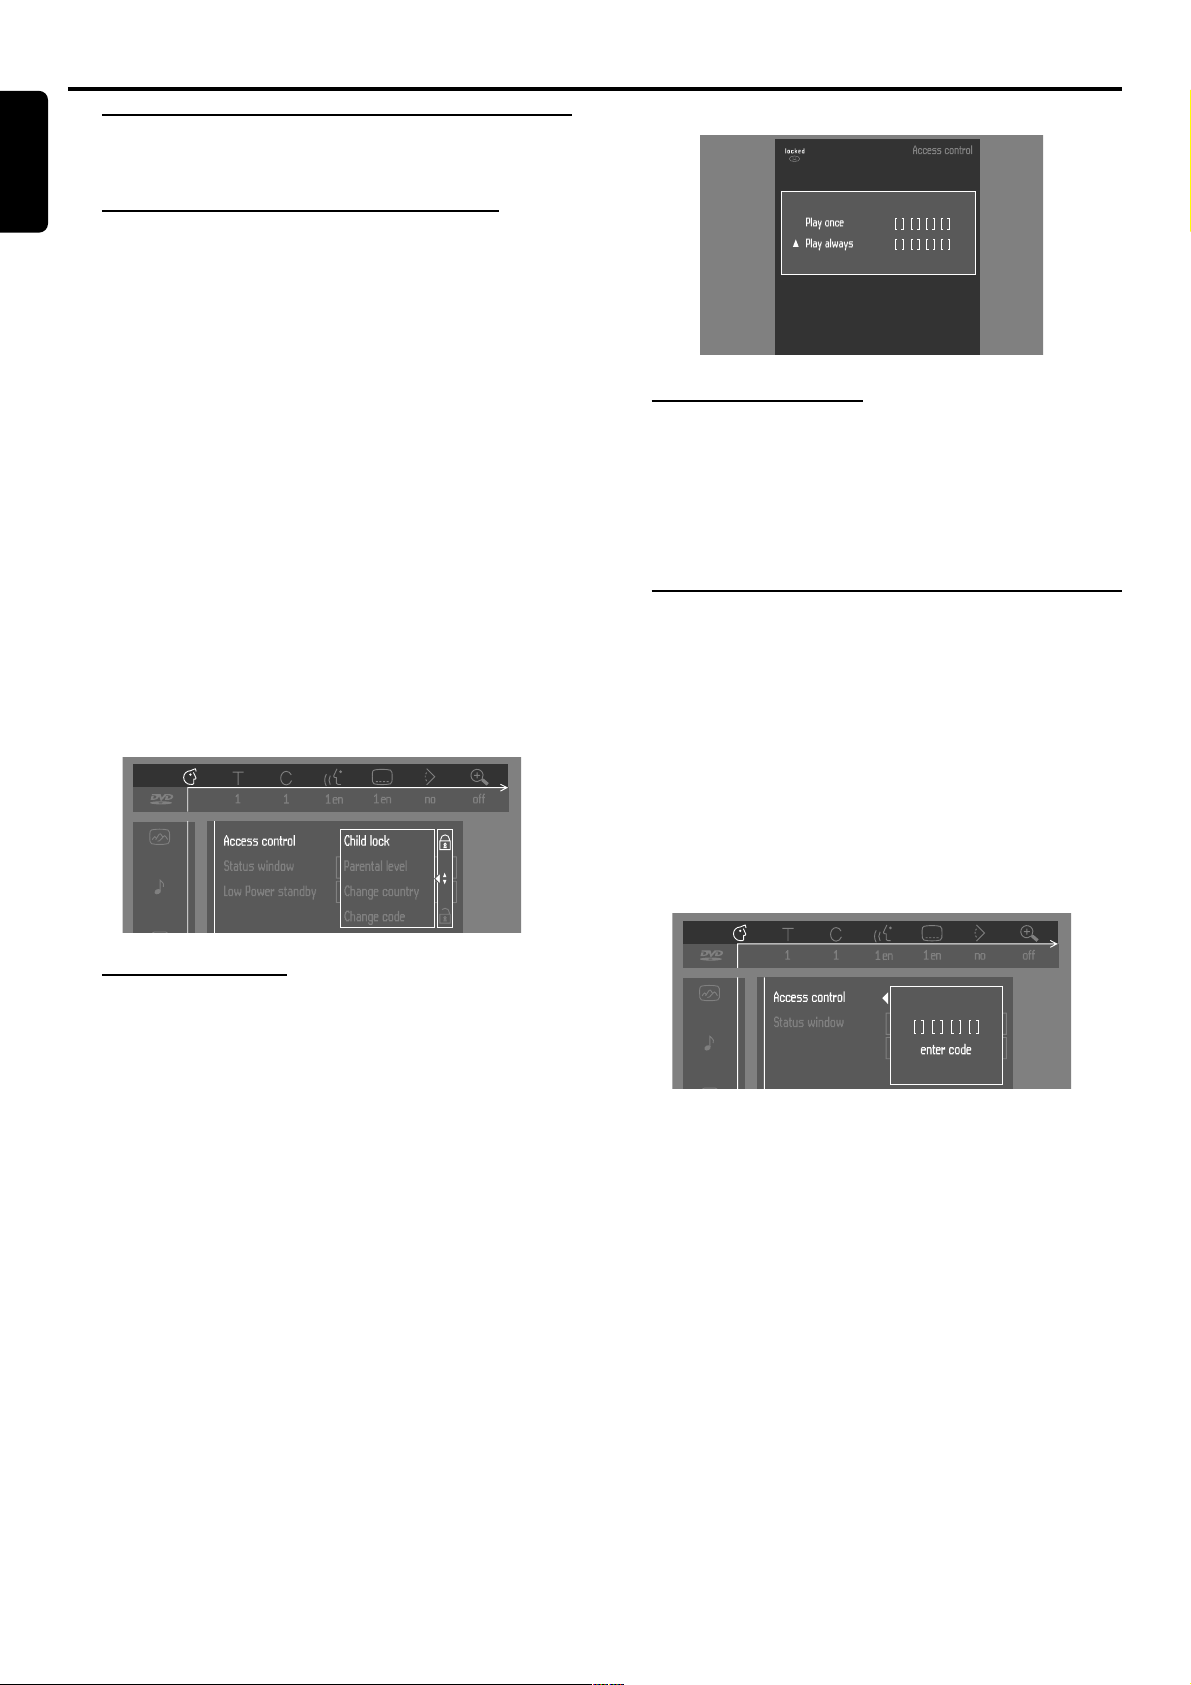
Activating/deactivating the child lock
1 When disc playback is stopped, select ACCESS
CONTROL in the features menu using the w/v keys.
¶ Alternatively, you can press DISC LOCK on the remote
control if the child lock has been activated.
2 Enter a 4-digit code of your own choice.
3 Enter the code a second time.
4 Move to “CHILD LOCK” using the w/v keys.
5 Move to LOCK/UNLOCK using the u key.
6 Select LOCK using the w/v keys.
7 Press OK or t to confirm, then press t again to exit the
menu.
➜ Now unauthorized discs will not be played unless the
4-digit code is entered.
8 Select UNLOCK to deactivate the CHILD LOCK.
Note: Confirmation of the 4-digit code is necessary when:
– The code is entered for the very first time (see above),
– The code is changed (see ‘Changing the 4-digit code’),
– The code is cancelled (see ‘Changing the 4-digit code’).
Choose 'Play always' to remove the disk from the
child-safe list
Deauthorizing discs
¶ Insert the disc. See ‘Loading discs’.
➜ Playback starts automatically.
¶ Press 9 while { is visible.
➜ The | will appear and the disc is now deauthorized.
Access control; Parental
control (DVD only)
Movies on DVDs may contain scenes not suitable for
children. Therefore, discs may contain ‘Parental Control’
information which applies to the complete disc or to
certain scenes on the disc. These scenes are rated from 1
to 8, and alternative, more suitable scenes are available on
the disc. Ratings are country dependent. The ‘Parental
Control’ feature allows you to prevent discs from being
played by your children or to have certain discs played with
alternative scenes.
Authorizing discs
¶ Insert the disc. See ‘Loading discs’.
➜ The ‘child protect’ dialog will appear.
You will be asked to enter your 4-digit code for ‘Playback
Once’ or ‘Playback Always.’ If you select ‘Playback Once’, the
disc can be played as long as it is in the player and the
player is ON. If you select ‘Playback Always’, the disc will
become child safe (authorized) and can always be played,
even if the Child Lock is set to ON.
Notes:
– The player memory maintains a list of 120 authorized
(‘Child safe’) disc titles. A disc will be placed in the list when
‘Playback Always’ is selected in the ‘child protect’ dialog.
– Each time a ‘child safe’ disc is played, it will be placed on
top of the list. When the list is full and a new disc is added, the
last disc in the list will be removed from the list.
– Double sided DVDs may have a different ID for each side.
In order to make the disc ‘child safe’, each side has to be
authorized.
– Multi-volume VCDs may have a different ID for each
volume. In order to make the complete set ‘child safe’, each
volume has to be authorized.
18
ACCESS CONTROL
Page 19
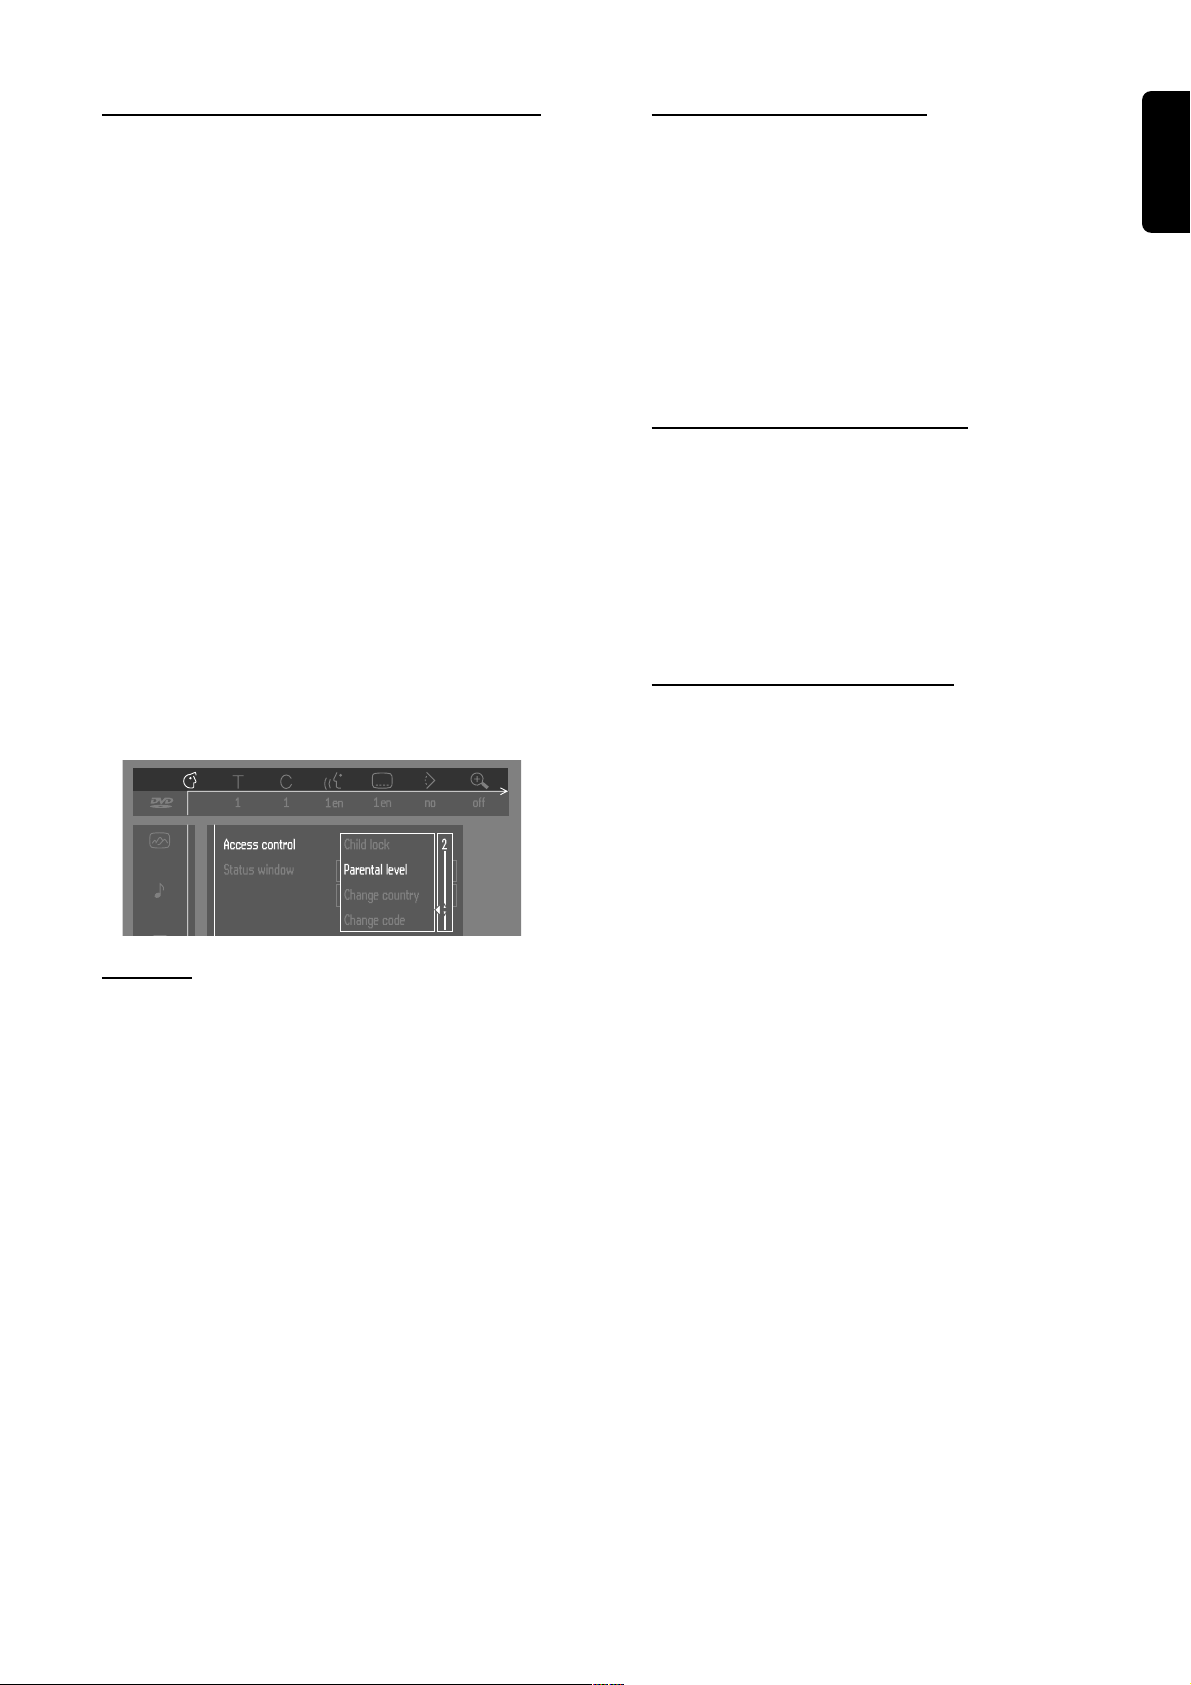
Activating/Deactivating Parental Control
Changing the 4-digit code
1 When disc playback is stopped, select ACCESS
CONTROL in the features menu using the w/v keys.
2 Enter your 4-digit code. If necessary, enter the code a
second time.
3 Move to Parental Level using the w/v keys.
4 Move to VALUE ADJUSTMENT (1-8) using the u key.
5 Then use the w/v keys or the numerical keys on the
remote control to select a rating from 1 to 8 for the disc
inserted.
Rating 0 (displayed as ‘– –’):
Parental Control is not activated. The Disc will be played in
full.
Ratings 1 to 8:
The disc contains scenes not suitable for children. If you set
a rating for the player, all scenes with the same rating or
lower will be played. Higher rated scenes will not be played
unless an alternative is available on the disc. The alternative
must have the same rating or a lower one. If no suitable
alternative is found, playback will stop and the 4-digit code
has to be entered.
6 Press OK or t to confirm, then press t again to exit the
menu.
Country
1 When disc playback is stopped, select ACCESS
CONTROL in the features menu using the w/v keys.
2 Enter the 4-digit code.
3 Move to CHANGE COUNTRY using the w key.
4 Press the u key.
5 Select a country using w/v.
6 Press OK or t to confirm, then press t again to exit the
menu.
1 When disc playback is stopped, select ACCESS
CONTROL in the features menu using the w/v keys.
2 Enter the old code.
3 Move to CHANGE CODE using the w key.
4 Press the u key.
5 Enter the new 4-digit code.
6 Enter the code a second time and reconfirm by pressing
OK.
7 Press t to exit the menu.
If you forget your 4 digit code
1 Press 9 to exit ‘Child Protect’ screen.
2 Select ACCESS CONTROL in the features menu using
the w/v keys.
3 The 4-digit code can be cancelled by pressing 9 four times
in the ‘Access Control’ dialog.
4 You can then enter a new code (twice!) as described above
(Changing the 4 digit code).
Parental Control Disclaimer
This DVD player features the PARENTAL CONTROL
system which is intended to be active when playing DVD
discs with certain software coding. This is according to
technical standards adopted by the set maker and disc
content industries.
Please note that the PARENTAL CONTROL system
will not operate a DVD which does not have with the
appropriate software coding. Also note that at the time of
release of this DVD player, certain aspects of the technical
standards had not been settled between set makers and
the disc industries.
On this basis Philips cannot guarantee the functioning of
PARENTAL CONTROL and denies any liability
associated with unintended watching of disc content.
If in doubt, please make sure the disc plays according to
your PARENTAL CONTROL settings before you allow
children access.
English
ACCESS CONTROL
19
Page 20
Before Requesting Service
English
If it appears that the DVD-Video player is faulty, first consult this checklist. It may be that something has been overlooked. Under
no circumstances should you attempt to repair the system yourself; this will invalidate the warranty.
Look for the specific symptom(s). Then perform only the actions listed to remedy the specific symptom(s).
Symptom Remedy
No power – Make sure the mains cord (AC) is properly connected.
– Check if there is power at the AC outlet by plugging in another appliance.
No picture – Check if the TV is switched on.
– Check the video connection.
Distorted picture – Check the disc for fingerprints and clean with a soft cloth, wiping from center
to edge.
– Sometimes a small amount of picture distortion may appear .This is not a
malfunction.
Completely distorted picture – If the picture is distorted completely or if the picture rolls vertically,
or no color with player menu. make sure the NTSC/PAL setting at the DVD player matches the video
signal of your television.
– If your TV video signal is NTSC, select the NTSC setting at the DVD player.
– If your video signal is PAL, select the PAL setting - see NTSC/PAL SETTINGS.
Distorted or Black/White picture – The disc format does not match your TV’s video signal (PAL/NTSC).
with DVD or Video CD.
No sound – Check audio connections.
– If you are using a HiFi amplifier, try another sound source.
Distorted sound from HiFi – Check to make sure that no audio connections are made to the amplifier
amplifier. phono input.
No audio at digital output. – Check the digital connections.
– Check the settings menu to make sure the digital output is set to ALL or
PCM.
– Check if the audio format of the selected audio language matches your
receiver capabilities.
Disc can’t be played. – Ensure the disc label is facing up.
– Clean the disc.
– Check if the disc is defective by trying another disc.
– Check to see if the disc is defective, badly scratched or warped (not flat)
No return to start-up screen when – Reset by switching the player off, then on again.
disc is removed. – Check to see if the program requires another disc to be loaded.
The player does not respond to – Aim the remote control directly at the sensor on the front of the player.
the remote control. – Remove any obstacles between the player and the remote control.
– Inspect or replace the batteries in the remote control.
Buttons do not work. – In order to completely reset the player, unplug the AC cord from the AC
outlet. (Please ensure that the set is not in Initial Setup mode)
Player does not respond to some – Operations may not be permitted by the disc. Refer to the instructions of
operating commands during the disc.
playback.
DVD-Video player cannot read – Use a commonly available cleaning CD/DVD to clean the lens before
CDs/DVDs sending the DVD-Video player for repaired.
20
BEFORE REQUESTING SERVICE
Page 21
Appendix
0 ms
0 ms
0 ms
0 ms
5 ms
10 ms
15 ms
15 ms
15 ms
0
0
0 ms
0 ms
0 ms
0 ms
-5 ms
Preferred
Acceptable
Not recommended
-10 ms
5 10152025303540
5
10
15
20
25
30
35
40
Differential
arrival time
Digital Surround Delay
Distance from surround speakers (feet)
Distance from front speakers (feet)
10ms5
ms
Speaker Settings
6 Channel settings
Front speaker
L (Large): When the front speakers can reproduce
low frequency signals below 120Hz
S (Small): When the front speakers cannot produce
low frequency signals below 120Hz
Center Speaker*
L (Large): When the center speaker can reproduce
low frequency signals below 120Hz
S (Small): When the center speaker cannot produce
low frequency signals below 120Hz
Off: When the center speaker is not connected
Surround speakers
L (Large): When the surround speakers can
reproduce low frequency signals below
120Hz
S (Small): When the surround speakers cannot
produce low frequency signals below
120Hz
Off: When the surround speakers are not
connected
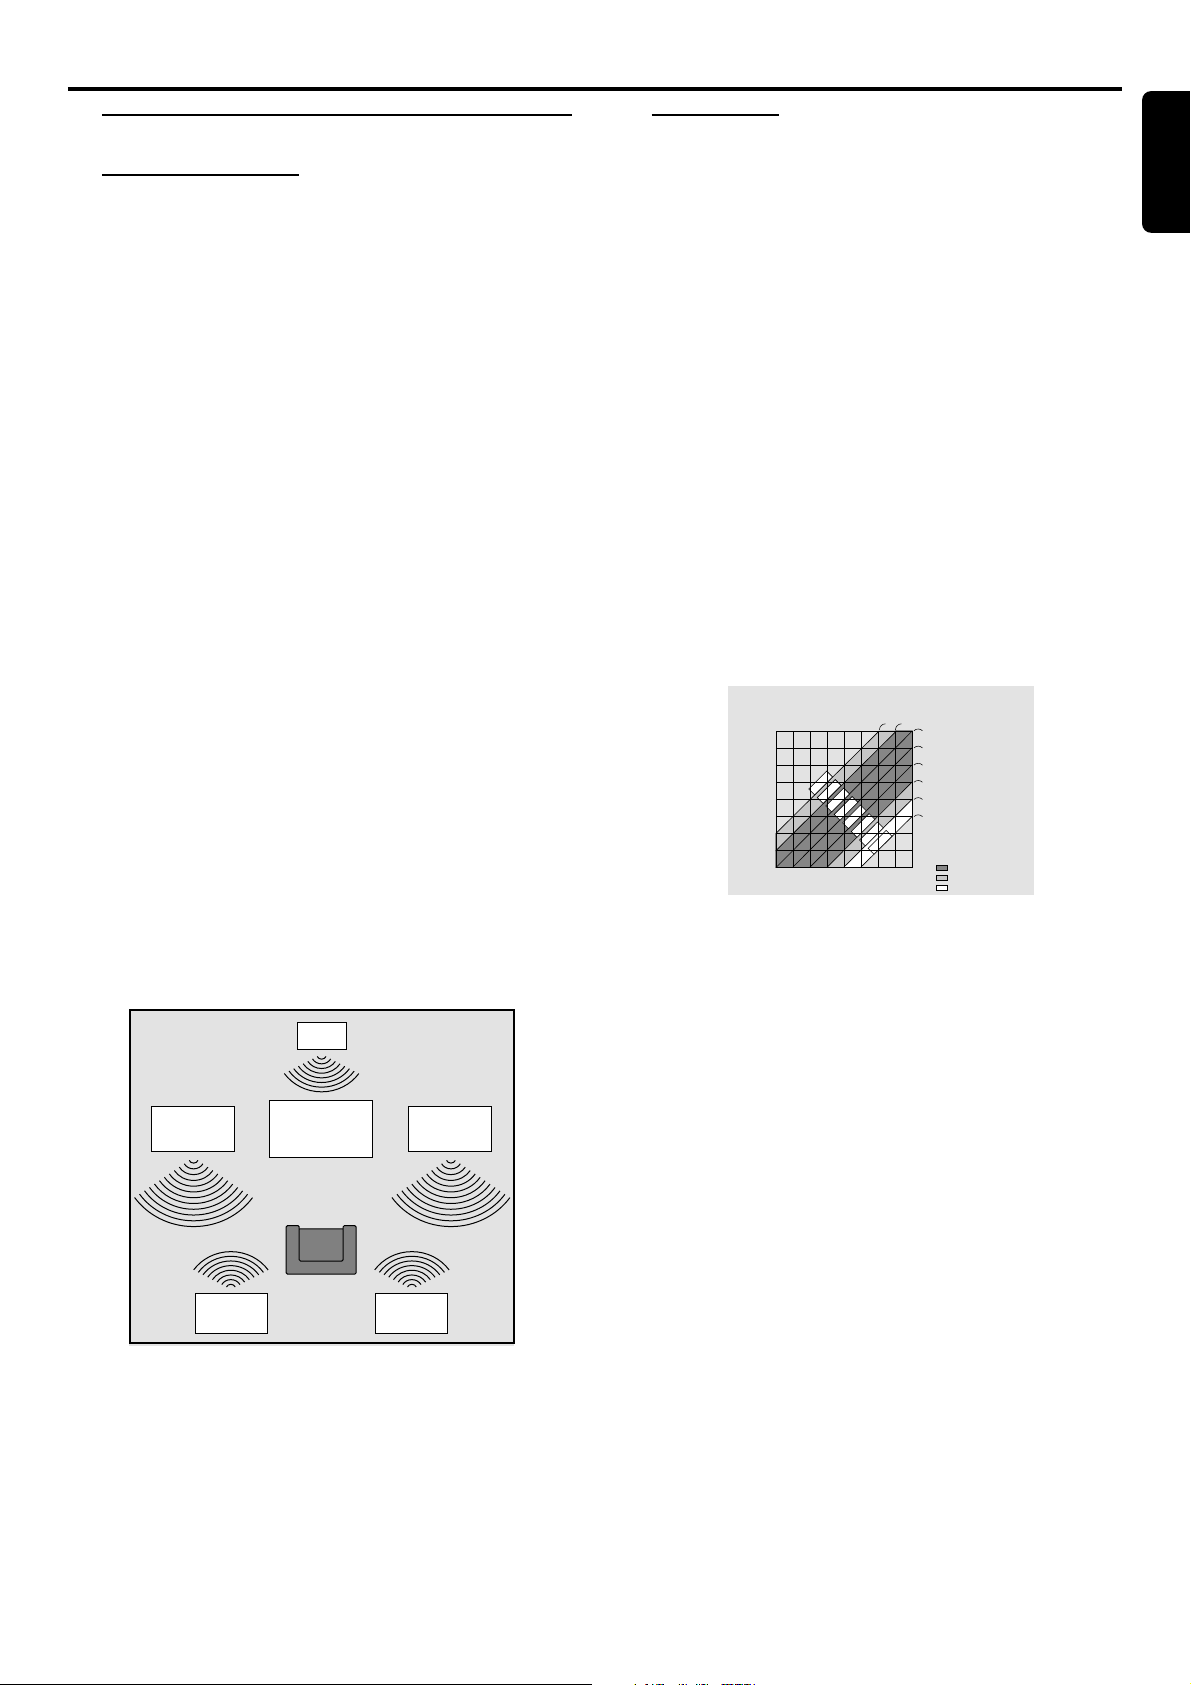
Delay times
The DVD player is set to reproduce correctly synchronized
Digital Surround Sound in a listening area where the
surround speakers are about 150cm nearer to the listening
position than the front speakers, and the center speaker is
in line with the front speakers. To adjust for other listening
area arrangements, adapt delay times according to the
following instructions:
Digital Surround
Measure the distances in centimeters from the front
speaker and the surround speaker to the listening
positioning.
Subtract the surround distance from the front distance and
divide by 30. The result is the required Surround Channel
delay time in milliseconds.
If the center speaker is in line with the front speaker, no
center speaker delay is needed. If, however, it is nearer the
listening position, measure the distance in centimeters
between the front and center speaker planes, and divide by
30. The result is the required Center Channel delay time in
milliseconds.
English
Subwoofer
On: When you connect a subwoofer
Off: When a subwoofer is not connected
Note:
– Certain speaker settings are prohibited by the Dolby Digital
licensing agreement.
Center
speaker
Front speaker
left
Rear speaker
(left surround)
TV
Front speaker
Rear speaker
(right surround)
right
APPENDIX
21
Page 22
Specifications
English
PLAYBACK SYSTEM
DVD-Video
Video CD
CD (CD-R and CD-RW)
DVD+RW
OPTICAL READOUT SYSTEM
Lasertype Semiconductor AlGaAs
Numerical Aperture 0.60 (DVD)
Wavelength 650 nm (DVD)
DVD DISC FORMAT
Medium Optical Disc
Diameter 12cm (8cm)
Playing time One layer 2.15 h*
(12cm) Dual layer 4 h*
0.45 (VCD/CD)
780 nm (VCD/CD)
Two side 4.30 h*
Single layer
Two side 8 h*
Dual layer
CONNECTIONS
Y Output Cinch (green)
B (U) Output Cinch (blue)
C
CR (V) Output Cinch (red)
S-Video Output Mini DIN, 4 pins
Video Output Cinch (yellow)
Audio L+R output Cinch (white/red)
6 Channel Analog Output
Audio Front Left/Right Cinch (white/red)
Audio Surround Left/Right Cinch (white/red)
Audio Center Cinch (blue)
Audio Subwoofer Cinch (black)
Digital Output 1 coaxial, 1 optical
Headphone 6.3 mm Jack
CABINET
Dimensions (w x h x d) 17.12 x 3.94 x 12.64 inch
Weight Approx. 8.8 pounds
IEC958 for CDDA / LPCM
IEC1937 for MPEG1/2, Dolby Digital and DTS
435 x 100 x 321mm
Approx. 4 Kg
VIDEO FORMAT
DA Converter 10 bits
Signal handling Components
Digital Compression MPEG2 for DVD,
MPEG1 for VCD
TV STANDARD (PAL/50Hz) (NTSC/60Hz)
Number of lines 625 525
Playback Multistandard (PAL/NTSC)
DVD
Horiz. Resolution 720 pixels 720 pixels
Vertical Resolution 576 lines 480 lines
VCD
Horiz. Resolution 352 pixels 352 pixels
Vertical Resolution 288 lines 240 lines
VIDEO PERFORMANCE
Video output 1 Vpp into 75 ohm
S-Video output Y: 1 Vpp into 75 ohm
C: 0.3 Vpp into 75 ohm
Y CB CR (YUV) output Y: 1 Vpp into 75 ohm
CB CR: 0.7 Vpp into 75 ohm
Black Level Shift On/Off
Video Shift Left/Right
AUDIO FORMAT
Digital MPEG Compressed Digital
DTS/Dolby Digital
PCM 16, 20, 24 bits
fs, 44.1, 48, 96 kHz
Analog Sound Stereo
2 channel downmix from DTS multi-channel sound
Dolby Pro Logic downmix from Dolby Digital multi-channel sound
Full decoding of Dolby Digital and DTS multi-channel surround sound
3D Sound (TruSurround) for vir tual 5.1 channel sound on 2 speakers
GENERAL FUNCTIONALITY
Stop / Play / Pause
Fast Forward / Backward
Time Search
Step Forward / Backward
Slow Motion
Title / Chapter / Track Select
Skip Next / Previous
Repeat (Chapter / Title / All) or (Track / All)
A-B Repeat
Shuffle
Scan
Enhanced ease of use graphical interface
Perfect Still with digital multi-tap filter
Zoom (xl.33, x2. x4) with picture enhancement
Smart Picture (Personal Colour Settings)
3D Sound (TruSurround)
5.1 Channels user defined speaker settings
Easy Jog
Audio and video bit rate indicator
Beeper
DVD FUNCTIONALITY
Multi-angle Selection
Audio Selection (1 out of max. 8 languages)
Subtitles Selection (1 out of max. 32 languages)
Aspect Ratio conversion (16:9, 4:3 Letterbox, 4:3 Pan Scan)
Parental Control and Disk Lock
Disc Menu support (Title Menu and Access Control)
Resume (5 discs) after stop / standby
Programming Titles/chapter s with Favorite Selection
VIDEO CD FUNCTIONALITY
Playback Control for VCD 2.0 discs
Disc Lock
Resume (5 discs) after stop / standby
Programming Tracks with Favorite Selection
AUDIO PERFORMANCE
DA Converter 24 bits
DVD fs 96 kHz 4 Hz - 44 kHz
Video CD fs 44.1 kHz 4 Hz - 20 kHz
CD fs 44.1 kHz 4 Hz - 20 kHz
Signal-Noise (1kHz) 103 dB
Dynamic Range (1kHz) 100 dB
Crosstalk (1kHz) 113 dB
Distortion and Noise (1kHz) 92 dB
Headphone 30mW at 32 Ohm load,
22
SPECIFICATIONS
fs 48 kHz 4 Hz - 22 kHz
headphone imp. 8-2k Ohm
AUDIO CD FUNCTIONALITY
Time Display (Total / Track / Remaining Track Time)
Full audio functionality with remote control
Programming with Favorite Track Selection
* typical playing time for movie with 2 spoken languages and 3 subtitle languages.
Specifications subject to change without prior notice
 Loading...