

Page 1
AAA AAA
R
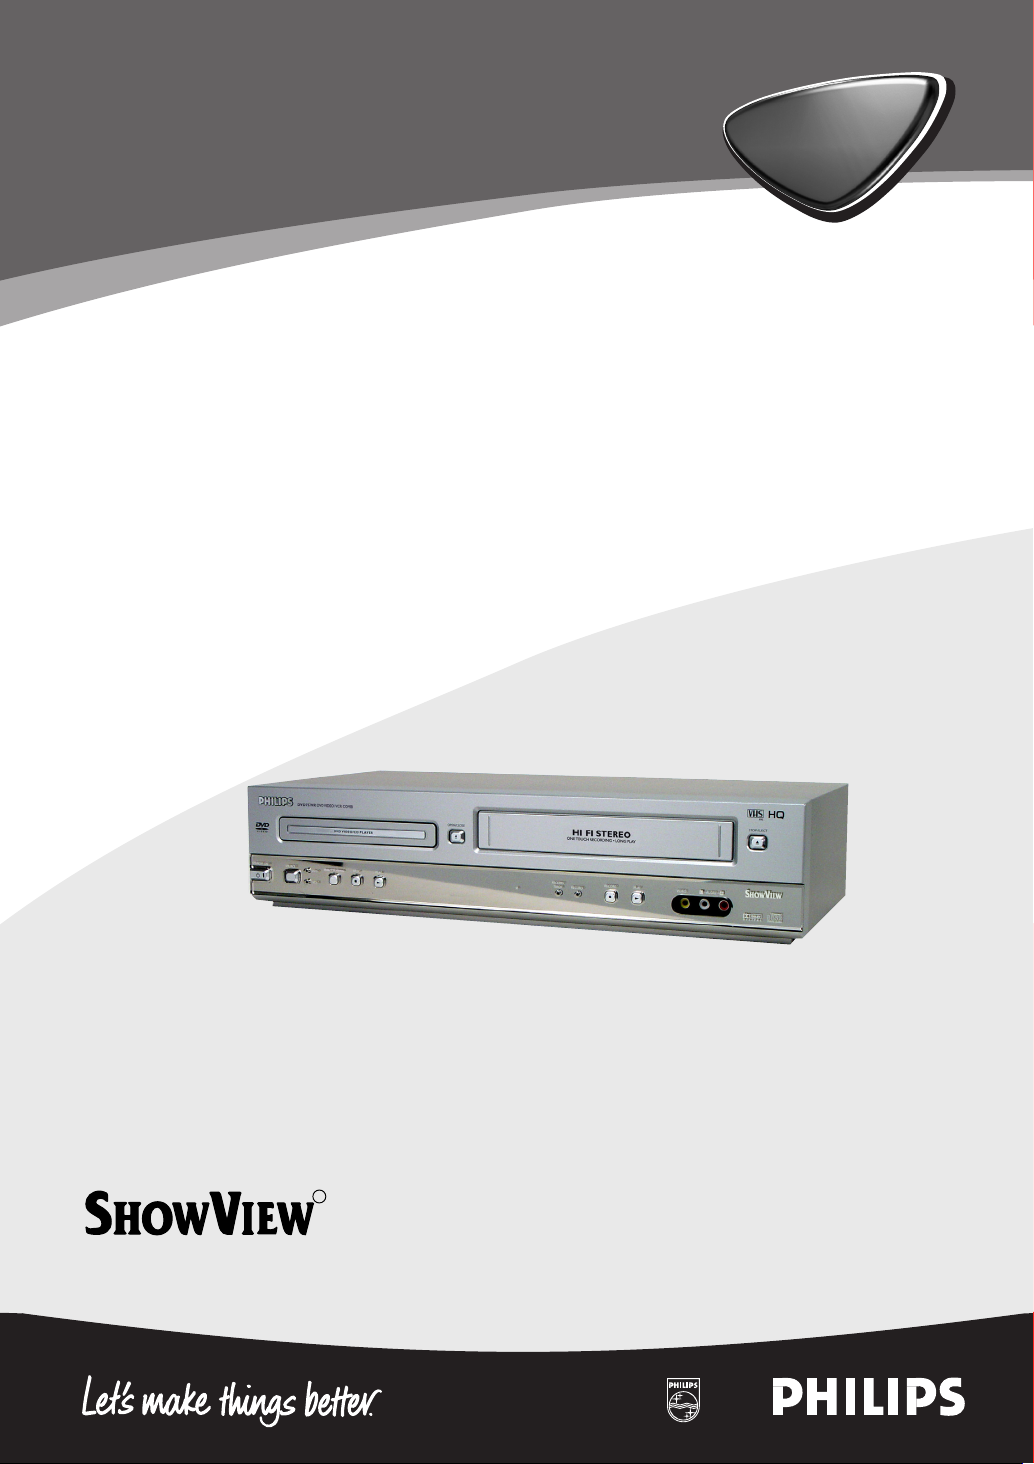
DVD 757VR
Digital Video Disc Player &
Video Cassette Recorder
DVD 757VR
1
Page 2
General Information
2
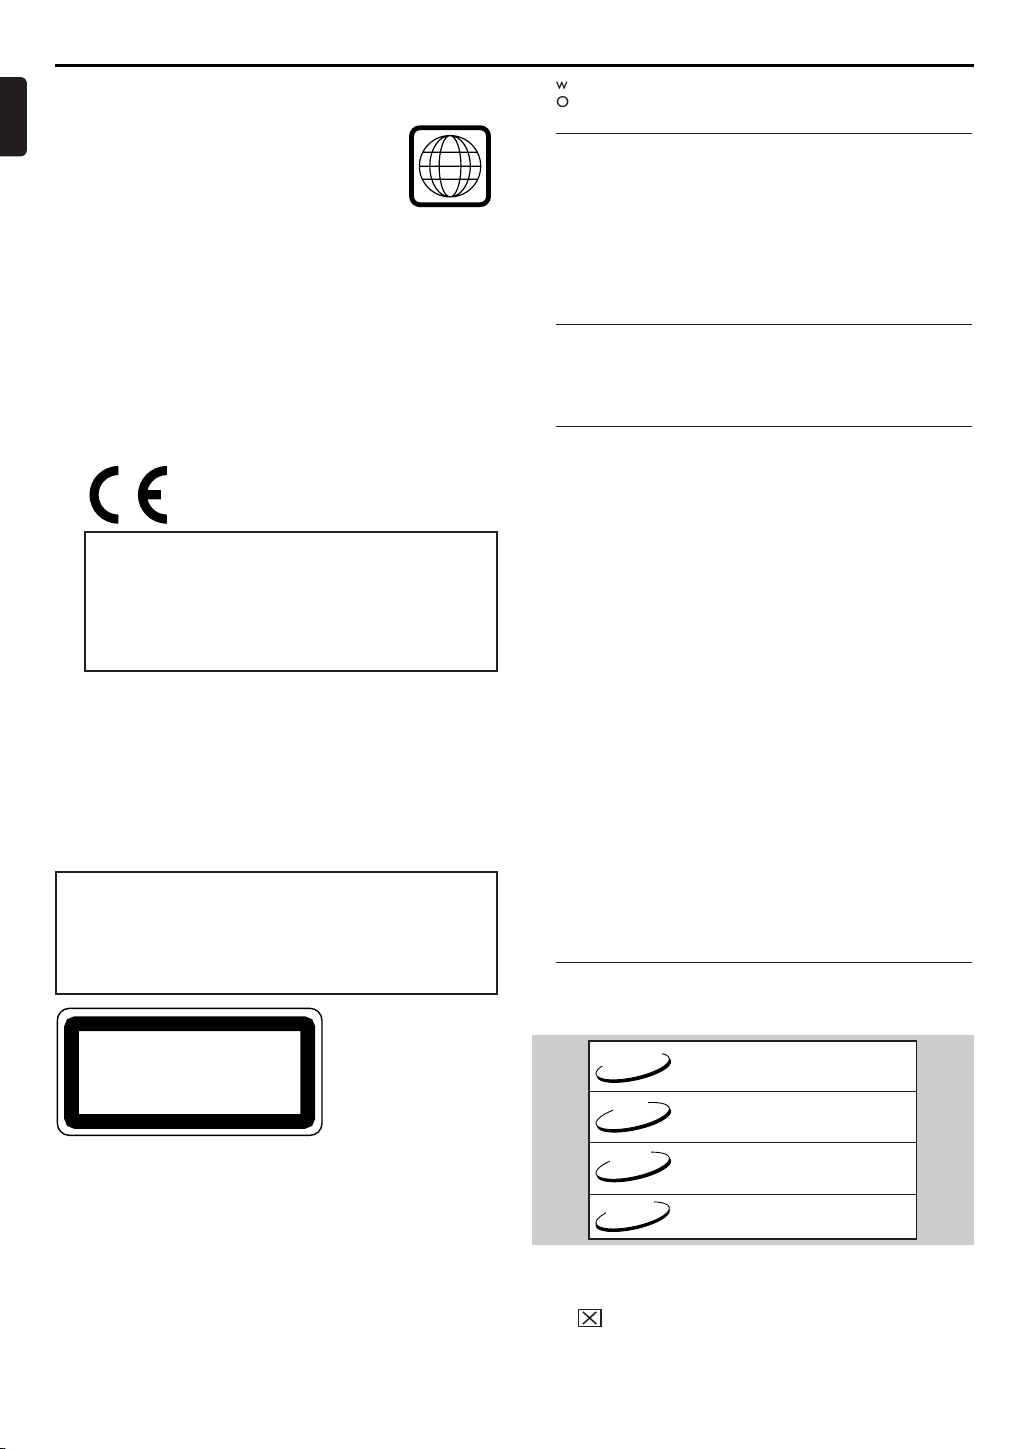
CLASS 1 LASER PRODUCT
KLASSE 1 LASER PRODUKT
KLASS 1 LASER APPARAT
CLASSE 1 PRODUIT LASER
– Description refers to playback of DVD-video discs
– Description refers to playback of Audio CDs
– Description refers to playback of MP3 files
– Description refers to playback of video CDs.
CD
MP3
VCD
DVD-V
Introduction
English
The region code for this set is 2.
Since it is usual for DVD movies to be released
at different times in different regions of the
world, all players have region codes and discs can
have an optional region code. If you load a disc
of a different region code to your player, you will
see the region code notice on the screen.The
disc will not playback, and should be unloaded.
Manufactured under license from Dolby Laboratories.“Dolby”
and the double-D symbol are trademarks of Dolby
Laboratories.
This product incorporates copyright protectiontechnology that
is protected by method claims of certain U.S. patents and other
intellectual property rights owned by Macrovision Corporation
and other rights owners. Use of this copyright protection technology must be authorised by Macrovision Corporation, and is
intended for home and other limited viewing uses only unless
otherwise authorised by Macrovision Corporation. Reverse
engineering or disassembly is prohibited.
The DVD/VCR is in conformity with the
EMC directive and low-voltage
directive.
For Customer Use:
Read carefully the information located at the bottom of
your DVD/VCR and enter below the Serial No.Retain this
information for future reference.
Model No. DVD/VCR
Serial No. ________________________________________
Laser safety
This unit employs a laser. Due to possible eye injury, only a
qualified service person should remove the cover or attempt
to service this device.
USE OF CONTROLS OR
ADJUSTMENTS OR PERFORMANCE OF PROCEDURES OTHER THAN THOSE SPECIFIED HEREIN
MAY RESULT IN HAZARDOUS RADIATION EXPOSURE.
LASER
Type Semiconductor laser GaAlAs
Wave length 655 nm (DVD)
Output Power 0.8 mW (DVD)
790 nm (VCD/CD)
0.5 mW (VCD/CD)
(WARNING LOCATION: ON THE
BACKPLATE OF
SET)
wThank you for purchasing this Philips DVD/ VCR.This
Owner’s Manual explains the basic operation of this DVD/VCR.
Environmental Information
All unnecessary packaging has been omitted.
Packaging has been made easy to separate into three materials:
cardboard (box), polystyrene foam (buffer) and polyethylene
(bags, protective foam sheet).
Your DVD/VCR consists of materials which can be recycled
and reused if disassembled by a specialised company. Please
observe the local regulations regarding the disposal of packaging materials, exhausted batteries and old equipment.
Supplied Accessories
• Remote control •
• SCART cable
• RF Coaxial cable • Owner’s Manual
Batteries (two AA size) for remote control
(not available for all versions)
• Audio Cable
Safety Information
• To reduce the risk of fire or electric shock, do not expose
this device to rain or moisture.
• Before operating the DVD/VCR, check that the operating
voltage indicated on the typeplate (or the voltage indication
beside the voltage selector) is identical with the voltage of
your local power supply. If not, please consult your dealer.
• Place the DVD/VCR on a flat, hard and stable surface.
• There must be sufficient room in front of the player for the
disc tray to be opened.
• In cabinet, allow about 2.5cm (1 inch) of free space all around
the player for adequate ventilation.
• Do not expose your player to extreme of temperature or
humidity.
• If the DVD/VCR is brought directly from a cold to a warm
location, or is placed in a very damp room, moisture may
condense on the lens of the disc unit inside the DVD/VCR
player. Should this occur, the DVD/VCR would not operate
normally. Leave the player on for about one hour with no disc
in the DVD/VCR until normal playback is possible.
• The mechanical parts of the set contain self-lubricating bearings and must not be oiled or lubricated.
• Never spill liquid of any kind on this unit. If liquid is spilled
into the unit, consult qualified service engineer.
• When the DVD/VCR is switched to Standby mode, it
is still consuming some power. To disconnect the system from the power supply completely, remove the
AC power plug from the wall socket.
Symbols Used in this Manual
The below symbols appear in some headings and notes with
the following meanings:
About the PBC Function of VIDEO CD
This unit conforms to ver.1.1 and ver.2.0 of VIDEO CD standard,
with PBC function.
Ver.1.1 (without PBC function):You can enjoy playback picture as
well as music CD.
Ver.2.0 (with PBC function):When using a VIDEO CD with PBC
function,“PBC” appears on the display.
What is PBC? “PBC” stands for the
PlayBack Control.
You can play interactive software using a menu screens. Refer to
instructions of VIDEO CD.
2
Helpful Hints!
• Some DVD video discs require specific functions or allow
only limited functions during playback.
•
“ ” may appears on the TV screen which means that
the function is not available on that specific DVD video
disc.
Page 3
Contents
R
Introduction
Environmental Information. . . . . . . . . . . . . . . . . . . . . 2
Supplied Accessories . . . . . . . . . . . . . . . . . . . . . . . . . . 2
Safety Information. . . . . . . . . . . . . . . . . . . . . . . . . . . . 2
Symbols Used in this Manual . . . . . . . . . . . . . . . . . . . 2
Functional Overview
Front Panel . . . . . . . . . . . . . . . . . . . . . . . . . . . . . . . . . 4
Rear Panel . . . . . . . . . . . . . . . . . . . . . . . . . . . . . . . . . . 4
Remote Control . . . . . . . . . . . . . . . . . . . . . . . . . . . . . 5
Setting Up your DVD/VCR
Basic Connections . . . . . . . . . . . . . . . . . . . . . . . . . . . . 6
Connecting to a TV . . . . . . . . . . . . . . . . . . . . . . . . . . . 6
Simplest connection using only supplied
black RF coaxial cable . . . . . . . . . . . . . . . . . . . . . . . . . 6
Connecting to an Audio System(for DVD features). . 6
Connecting to Optional Equipment
(for DVD features). . . . . . . . . . . . . . . . . . . . . . . . . . . . 6
External Input Mode (for VCR features). . . . . . . . . . . 7
Inserting batteries into the Remote Control . . . . . . . 7
Using the Remote Control . . . . . . . . . . . . . . . . . . . . . 7
Playable Video Cassette Tapes. . . . . . . . . . . . . . . . . . . 7
Turning on your DVD/VCR . . . . . . . . . . . . . . . . . . . . . 7
Video Channel Setting . . . . . . . . . . . . . . . . . . . . . . . . 7
Automatic Channel Setup. . . . . . . . . . . . . . . . . . . . . . 8
Manual Channel Preset . . . . . . . . . . . . . . . . . . . . . . . . 8
Follow TV (Automatic TV channels sorting) . . . . . . . . 8
Sorting and clearing TV channels manually . . . . . . . . 8
Setting the language . . . . . . . . . . . . . . . . . . . . . . . . . . 8
Setting the clock . . . . . . . . . . . . . . . . . . . . . . . . . . . . . 9
Setting the RF out channel . . . . . . . . . . . . . . . . . . . . . 9
Decoder allocation . . . . . . . . . . . . . . . . . . . . . . . . . . . 9
VCR Playback
Playing cassettes . . . . . . . . . . . . . . . . . . . . . . . . . . . 10
Playing back NTSC cassettes . . . . . . . . . . . . . . . . . 10
Displaying current tape position. . . . . . . . . . . . . . . 10
Searching for a tape position with picture
(scanning) . . . . . . . . . . . . . . . . . . . . . . . . . . . . . . . . 10
Still picture / slow motion. . . . . . . . . . . . . . . . . . . . 10
Searching for tape position without picture
(forward wind and rewind) . . . . . . . . . . . . . . . . . . . 10
Index search . . . . . . . . . . . . . . . . . . . . . . . . . . . . . . 10
Manual Tracking . . . . . . . . . . . . . . . . . . . . . . . . . . . 10
VCR Manual Recording
General information . . . . . . . . . . . . . . . . . . . . . . . . 10
Recording without automatic switch-off . . . . . . . . 10
Lining up recordings (assemble cut). . . . . . . . . . . . 11
Selecting the recording speed (SP or LP) . . . . . . . 11
Automatic controlled recording from a satellite
receiver (RECORD LINK) . . . . . . . . . . . . . . . . . . . 11
'Direct Record' . . . . . . . . . . . . . . . . . . . . . . . . . . . . 11
Switching 'Direct Record' on or off . . . . . . . . . . . . 11
Direct dubbing . . . . . . . . . . . . . . . . . . . . . . . . . . . . 11
Recording (From DVD To VCR) . . . . . . . . . . . . . . . 11
Programming a Recording (TIMER)
General information . . . . . . . . . . . . . . . . . . . . . . . . 12
Programming a recording
(with the 'S
Programming a recording
(without the SHOWVIEW system) . . . . . . . . . . . . . . 12
OTR (One Touch Recording). . . . . . . . . . . . . . . . . . 12
How to check, or delete
a programmed recording (TIMER). . . . . . . . . . . . . 13
How to change
a programmed recording (TIMER). . . . . . . . . . . . . 13
Hints for Timer Recording . . . . . . . . . . . . . . . . . . . 13
Other Functions
Switching the status display off or on . . . . . . . . . . . . 13
Blue Background on or off . . . . . . . . . . . . . . . . . . . . 13
Clock Display . . . . . . . . . . . . . . . . . . . . . . . . . . . . . . . 13
Selecting the sound channel . . . . . . . . . . . . . . . . . . . 13
Playing a Disc
Basic Playback . . . . . . . . . . . . . . . . . . . . . . . . . . . . . . 14
General Features. . . . . . . . . . . . . . . . . . . . . . . . . . . . 14
Pause . . . . . . . . . . . . . . . . . . . . . . . . . . . . . . . . . . . . . 14
Disc Menus. . . . . . . . . . . . . . . . . . . . . . . . . . . . . . . . . 14
Title Menu . . . . . . . . . . . . . . . . . . . . . . . . . . . . . . . . . 14
Calling Up a Menu During Playback . . . . . . . . . . . . . 14
Step by Step Playback . . . . . . . . . . . . . . . . . . . . . . . . 14
Resume . . . . . . . . . . . . . . . . . . . . . . . . . . . . . . . . . . . 14
Fast Forward / Reverse Search . . . . . . . . . . . . . . . . . 14
Slow Forward / Slow Reverse . . . . . . . . . . . . . . . . . . 14
Zoom . . . . . . . . . . . . . . . . . . . . . . . . . . . . . . . . . . . . . 15
Track . . . . . . . . . . . . . . . . . . . . . . . . . . . . . . . . . . . . . 15
Title / Chapter Search. . . . . . . . . . . . . . . . . . . . . . . . 15
Time Search . . . . . . . . . . . . . . . . . . . . . . . . . . . . . . . 15
Repeat . . . . . . . . . . . . . . . . . . . . . . . . . . . . . . . . . . . . 15
Program. . . . . . . . . . . . . . . . . . . . . . . . . . . . . . . . . . . 16
Random Playback . . . . . . . . . . . . . . . . . . . . . . . . . . . 16
MP3/JPEG Playback . . . . . . . . . . . . . . . . . . . . . . . . . . 16
On-Screen Information . . . . . . . . . . . . . . . . . . . . . . . 16
Track Selection . . . . . . . . . . . . . . . . . . . . . . . . . . . . . 16
Random Playback . . . . . . . . . . . . . . . . . . . . . . . . . . . 16
Program. . . . . . . . . . . . . . . . . . . . . . . . . . . . . . . . . . . 16
Audio Language. . . . . . . . . . . . . . . . . . . . . . . . . . . . . 16
Stereo Sound Mode. . . . . . . . . . . . . . . . . . . . . . . . . . 16
Subtitle Language . . . . . . . . . . . . . . . . . . . . . . . . . . . 17
Camera Angle . . . . . . . . . . . . . . . . . . . . . . . . . . . . . . 17
Changing the On-Screen Display . . . . . . . . . . . . . . . 17
Parental Control . . . . . . . . . . . . . . . . . . . . . . . . . . . . 17
Marker Setup Screen. . . . . . . . . . . . . . . . . . . . . . . . . 17
DVD Setup
Audio Setting. . . . . . . . . . . . . . . . . . . . . . . . . . . . . . . 18
Virtual Surround . . . . . . . . . . . . . . . . . . . . . . . . . . . . 18
Language Setting. . . . . . . . . . . . . . . . . . . . . . . . . . . . 18
Display Setting. . . . . . . . . . . . . . . . . . . . . . . . . . . . . . 18
Information
Maintenance . . . . . . . . . . . . . . . . . . . . . . . . . . . . . . . 18
Specifications . . . . . . . . . . . . . . . . . . . . . . . . . . . . . . . 19
Troubleshooting. . . . . . . . . . . . . . . . . . . . . . . . . . . . . 19
HOWVIEW® system') . . . . . . . . . . . . . . . 12
English
SHOWVIEW is a registered trademark of Gemstar Development
Corporation.
The SHOWVIEW system is manufactured under licence from
Gemstar Development Corporation.
3
Page 4
Functional Overview
STANDBY-ON
SOURCE
DVD
VCR
STOP
DIRECT DUBBING PLAY
OPEN/CLOSE
RECORD
TIMER
RECORD
RECORD PLAY
VIDEO
AUDIO
IR
TITLE CHP. TRK.
VCD
PBC
REPEAT
A – B
12 3 4
56
8
79
10
2726
24 252318 19 20 21 22
11
12
14
13
15
16
17
AERIAL
RF OUT
AV2 (DECODER)
DVD/VCR
AV1 (TV)
DVD OUTPUT ONLY
DIGITAL
AUDIO OUT
LRCOAXIAL OPTICAL
ANALOG
AUDIO OUT
S-VIDEO
OUT
VCR
213456789
Appears after the disc tray closes if the tray is empty, if
there is an error reading the disc, or if an unacceptable
disc is installed.
Tray is opening or is open.
Tray is closing. This also may appear as the Player tries
to load a Disc.
Disc is loading.
English
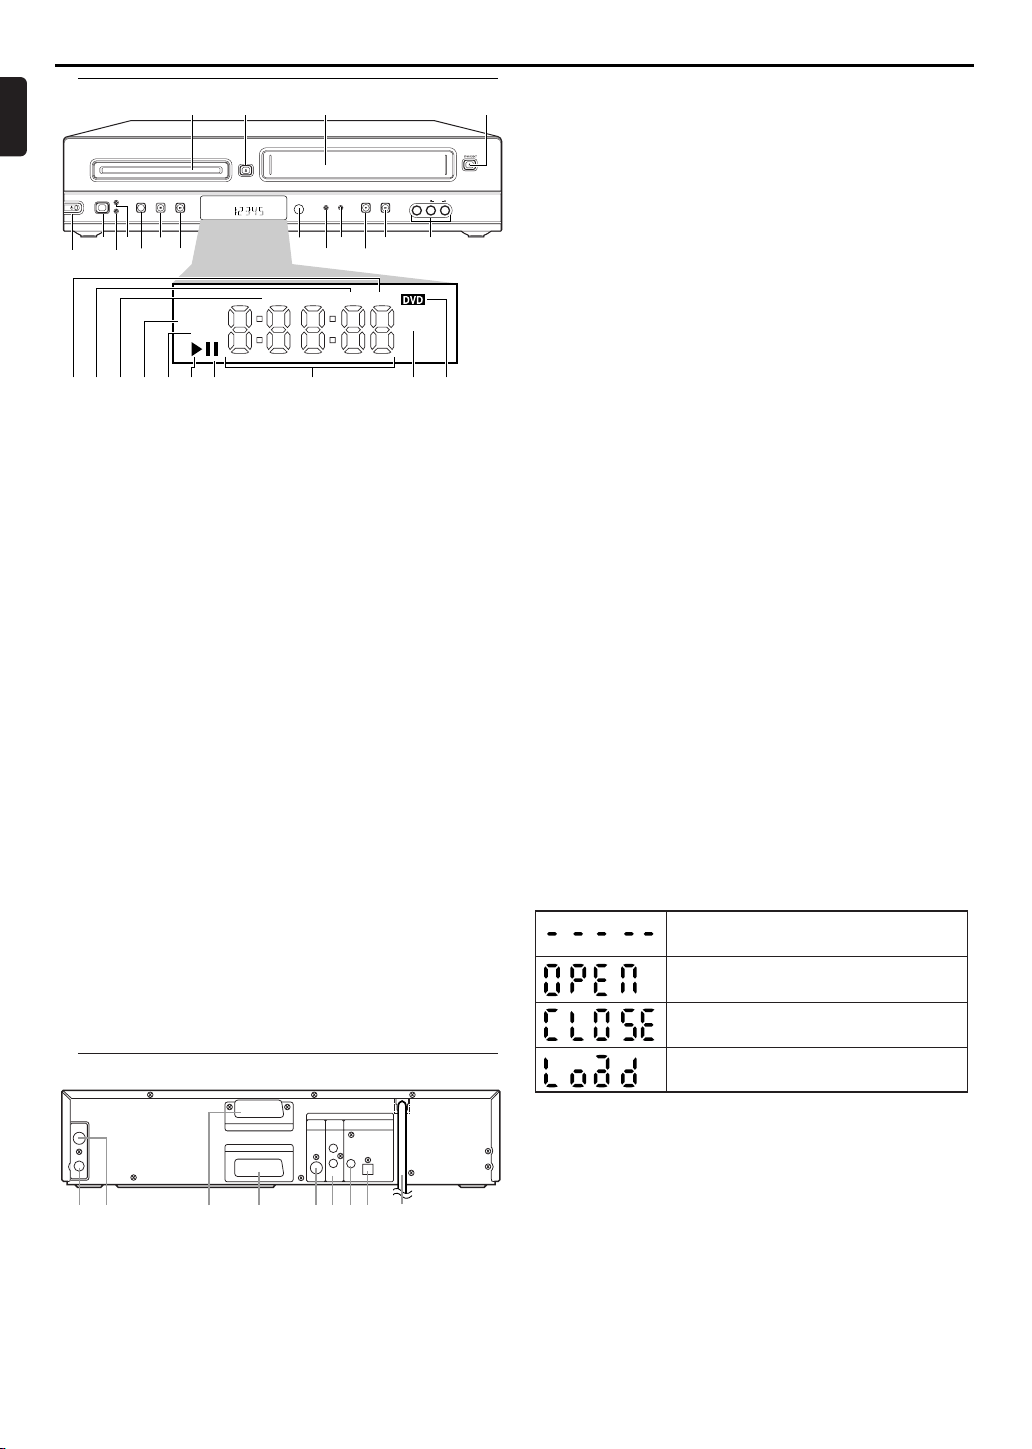
Front Panel
1. Disc Tray (DVD)
insert a disc here
2. A OPEN/CLOSE button (DVD)
to open/close the disc tray
3. Cassette Compartment (VCR)
insert a tape here
4. A STOP/EJECT button (VCR)
when playback is stopped, press to eject the tape
5. AUDIO and VIDEO in jacks
connect to AUDIO and VIDEO OUT of an audio source
6. B PLAY button (VCR)
to play a tape
7. RECORD button (VCR)
Press once to start recording, repeatedly to start an OneTouch Recording
8. RECORD light (VCR)
light appears during recording, it flashes when a recording is
paused
9. RECORD TIMER light (VCR)
light appears when DVD/VCR is in standby mode for a timer
recording(also light appears during timer recording)
10. IR (Infrared) Remote Sensor (DVD,VCR)
receive signals from remote control
11. B PLAY button (DVD)
to start, pause or resume disc playback
12. C STOP button (DVD)
to stop playback
13. DIRECT DUBBING button (VCR)
to play DVD disc and record its’ content to video cassette
tape at the same time
14. DVD light (DVD)
light appears when DVD/VCR in DVD mode
15. VCR light (VCR)
light appears when DVD/VCR in VCR mode
16. SOURCE button (DVD,VCR)
to select between DVD and VCR mode
17. ySTANDBY-ON button (DVD,VCR)
to switch the player to ON or OFF
STANDBY-ON light (DVD,VCR)
light appears when DVD/VCR turns on.
18. TRK (DVD)
Stays on when repeat track function is on.
19. CHP. (DVD)
Stays on when repeat chapter function is on.
20. TITLE (DVD)
Stays on when repeat title function is on.
21. REPEAT (DVD)
Stays on when the repeat function is on.
22. A-B REPEAT (DVD)
Stays on when the A-B repeat function is on.
23. B (DVD,VCR)
Stays on when the inserted disc or cassette is being played back.
24. k (DVD,VCR)
Lights up when the inserted disc comes to a pause.(DVD)
Lights up when the playback is in a still or in a slow
mode.(VCR)
25. Digital Display (DVD,VCR)
Displays how long a current title or track has been played
back.When a chapter or track has switched, the number of a
new title, chapter or track is displayed.(DVD)
Works as a clock, or a tape counter. Also displays a channel
number, and remaining time for OTR.(VCR)
26. CD
Lights up when a CD is inserted on the tray.
VCD
Lights up when a VCD is inserted on the tray.
PBC
Lights up when a VCD(with PBC function) is inserted on the
tray.
27. DVD
Lights up when a DVD is inserted on the tray.
Display Message
Rear Panel
1. RF OUT jack
use supplied RF coaxial cable to connect to the ANTENNA
IN on your TV, cable box or Direct Broadcast System
2. AERIAL jack
3. AV2 (DECODER) jack (VCR only)
4
connect to an antenna or cable
connect SCART cable from another DVD/VCR, camcoder or
an audio/video source
4. AV1 (TV) jack
connect SCART cable to a TV
5. S-Video Out jack (DVD only)
connect to a TV with S-Video inputs
6. AUDIO OUT (Left/Right) jacks (DVD only)
connect to AUDIO inputs of an amplifier, receiver or stereo
system
7. COAXIAL (Digital audio out) jack (DVD only)
connect to AUDIO inputs of a digital (coaxial) audio equipment
8. OPTICAL (Digital audio out) jack (DVD only)
connect to digital (optical) audio equipment
9. MAINS (AC Power Cord)
connect to a standard AC outlet
Page 5
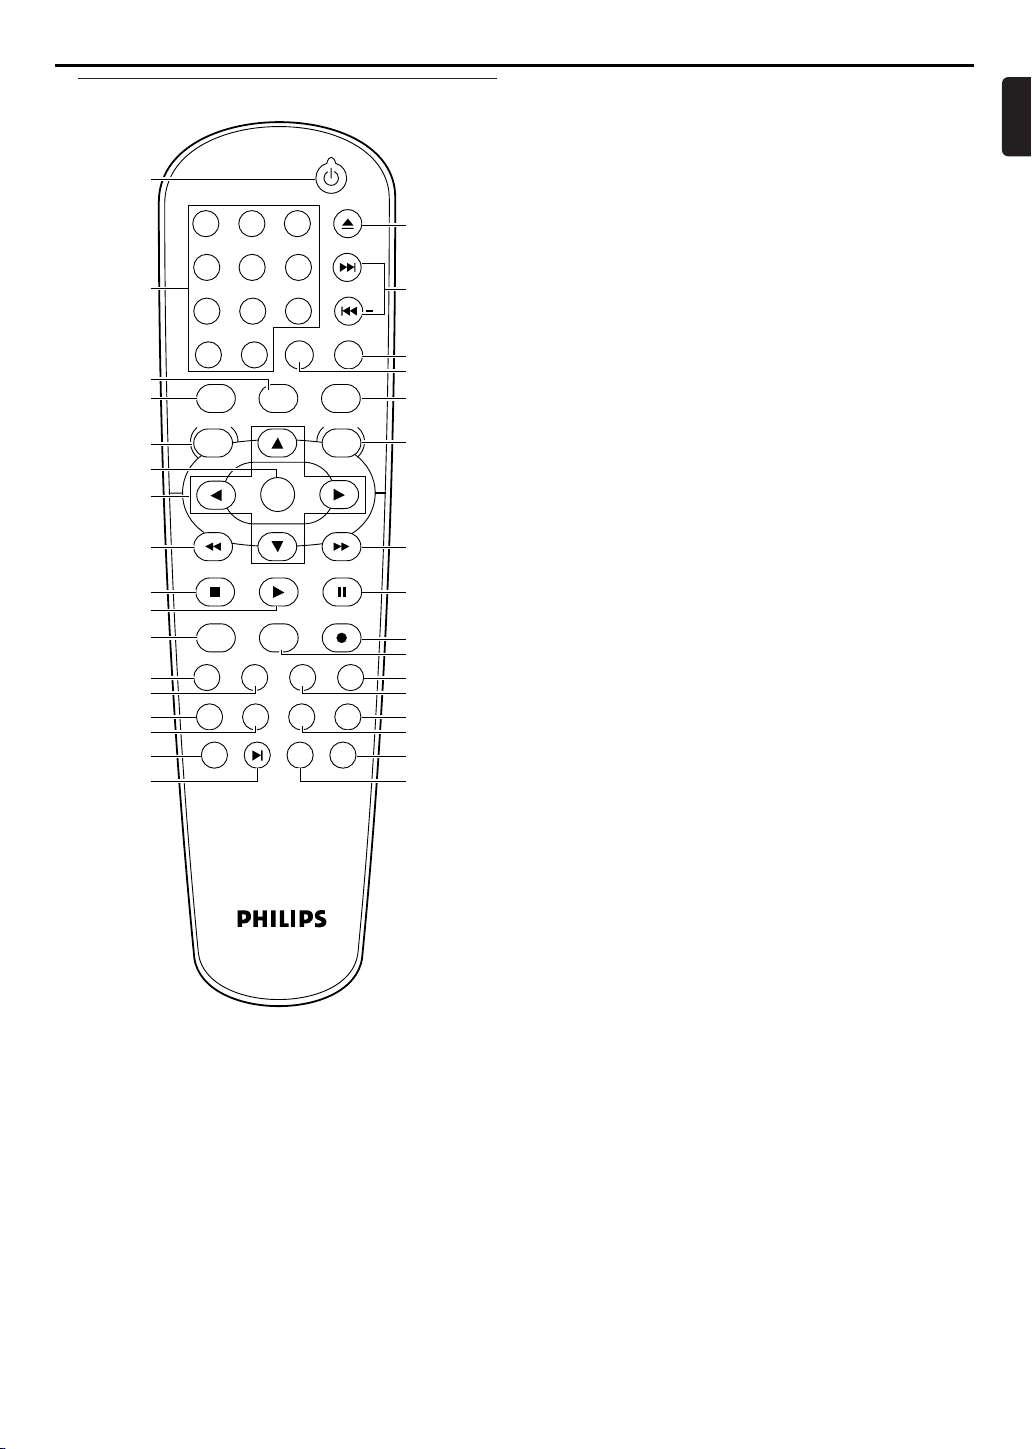
Functional Overview
STANDBY-ON
OPEN/CLOSE
EJECT
PLAY
SYSTEM
VCR
DVD
OK
MENU MENU
SYSTEM
CLEARDISPLAY
STATUS/EXIT
SKIP / P
DISC/VCR
PAUSESTOP
SLOW RECORDSV / V+
TITLE ANGLE RETURN AUDIO
MODE REPEAT REPEAT ZOOM
TIMER
SET
INDEX SUBTITLE SEARCH
MODE
+10
0
1 2 3
6
5
4
+
7
8
9
A-B
3
1
2
4
5
7
8
9
11
12
13
14
15
16
17
23
24
25
26
27
29
30
31
32
33
22
21
20
19
18
10
28
6
Remote Control
1. ySTANDBY-ON
switch DVD/VCR ON or OFF
2. 0-9 numerical key pad/+10
select numbered items in a menu
use +10 button to enter number 10 and above (DVD)
to select TV channels in VCR mode
3. SYSTEM
4. DVD
5. SYSTEM MENU
6. OK
7. {BKL
doesn’t work on this model
press to put the DVD/VCR in DVD mode and before using
the remote control for DVD features
to access or remove the DVD setup menu (DVD)
acknowledge menu selection (DVD)
(left/right/up/down) select an item in the menu
8. h
to view DVD picture in fast reverse motion (DVD)
to rewind the tape (VCR)
9. STOP ( C )
to stop a DVD disc playback (DVD)
to stop playback, recording(VCR)
10. PLAY ( B )
to start a DVD disc playback (DVD)
to start a tape playback(VCR)
11. SV/V+
to programme timer recording with the SHOWVIEW system
(VCR)
12. TITLE
to display title menu of a disc (DVD)
13. ANGLE
select DVD camera angle (DVD)
14. MODE
to set up programmed or random playback (Audio CD)
15. REPEAT
repeat chapter, track, title, disc (DVD)
16. TIMER SET
to put the DVD/VCR into standby mode for a timer recording
17. INDEX SEARCH
to fast forward or rewind the tape at index number (VCR)
18. SUBTITLE
subtitle language DVD selector (DVD)
19. SEARCH MODE
to access or remove search display (DVD)
20. REPEAT (A-B)
repeat a specific segment (DVD)
21. ZOOM
enlarge DVD video image (DVD)
22. RETURN
to return previous or remove setup menu (DVD)
23. AUDIO
to choose audio languages or sound modes (DVD)
to choose sound modes (VCR)
24. SLOW
to view tape playback in slow motion (VCR)
25. RECORD
to record the TV channel selected at this moment or press
repeatedly to start a One-Touch Recording (VCR)
26. PAUSE ( k )
pause playback temporarily / frame-by-frame playback (DVD)
pause playback and during recording temporarily (VCR)
27. g
to view DVD picture in fast forward motion (DVD)
to fast forward the tape (VCR)
28. DISC/VCR MENU
to display the menu of the DVD disc or to access VCR menu
29. VCR
press to put the DVD/VCR in VCR mode and before using
the remote control for VCR features
30. DISPLAY STATUS/EXIT
to access or remove the display screen during DVD or Audio
CD playback(DVD)
to access or remove VCR’s on-screen status display(VCR)
to remove VCR’s menu(VCR)
31. CLEAR
to reset the setting (DVD)
to reset the counter (VCR)
to delete last entry/Clear programmed recording (TIMER)
(VCR)
32. SKIP/P (j/ – /i/ + )
to skip chapter/tracks (DVD)
to change TV channels (VCR)
33. OPEN/CLOSE EJECT
to insert discs into or remove them from the tray (DVD)
to remove the tape from the VCR (VCR)
English
5
Page 6
Setting Up your DVD/VCR
AERIAL
RF OUT
AV2 (DECODER)
DVD/VCR
AV1 (TV)
DVD OUTPUT ONLY
DIGITAL
AUDIO OUT
LRCOAXIAL OPTICAL
ANALOG
AUDIO OUT
S-VIDEO
OUT
VCR
OR
ANTENNA IN
AERIAL
RF OUT
AV2 (DECODER)
DVD/VCR
AV1 (TV)
DVD OUTPUT ONLY
DIGITAL
AUDIO OUT
LRCOAXIAL OPTICAL
ANALOG
AUDIO OUT
S-VIDEO
OUT
VCR
VIDEO
L/MONO
AUDIO
R
in
1
Antenna In
(on back of TV)
example only
OR
Antenna
Indoor/Outdoor
(300 ohm)
Cable
(75 ohm)
75
ANT
CABLE
Back of DVD/VCR
Black RF
coaxial cable
(Supplied)
AERIAL
RF OUT
AERIAL
RF OUT
AV2 (DECODER)
DVD/VCR
AV1 (TV)
DVD OUTPUT ONLY
DIGITAL
AUDIO OUT
LRCOAXIAL OPTICAL
ANALOG
AUDIO OUT
S-VIDEO
OUT
VCR
STEREO
AUDIO (LEFT) IN
AUDIO (RIGHT) IN
AERIAL
RF OUT
AV2 (DECODER)
DVD/VCR
AV1 (TV)
DVD OUTPUT ONLY
DIGITAL
AUDIO OUT
LRCOAXIAL OPTICAL
ANALOG
AUDIO OUT
S-VIDEO
OUT
VCR
COAXIAL DIGITAL
AUDIO IN
OPTICAL DIGITAL
AUDIO IN
AUDIO RECEIVER
English
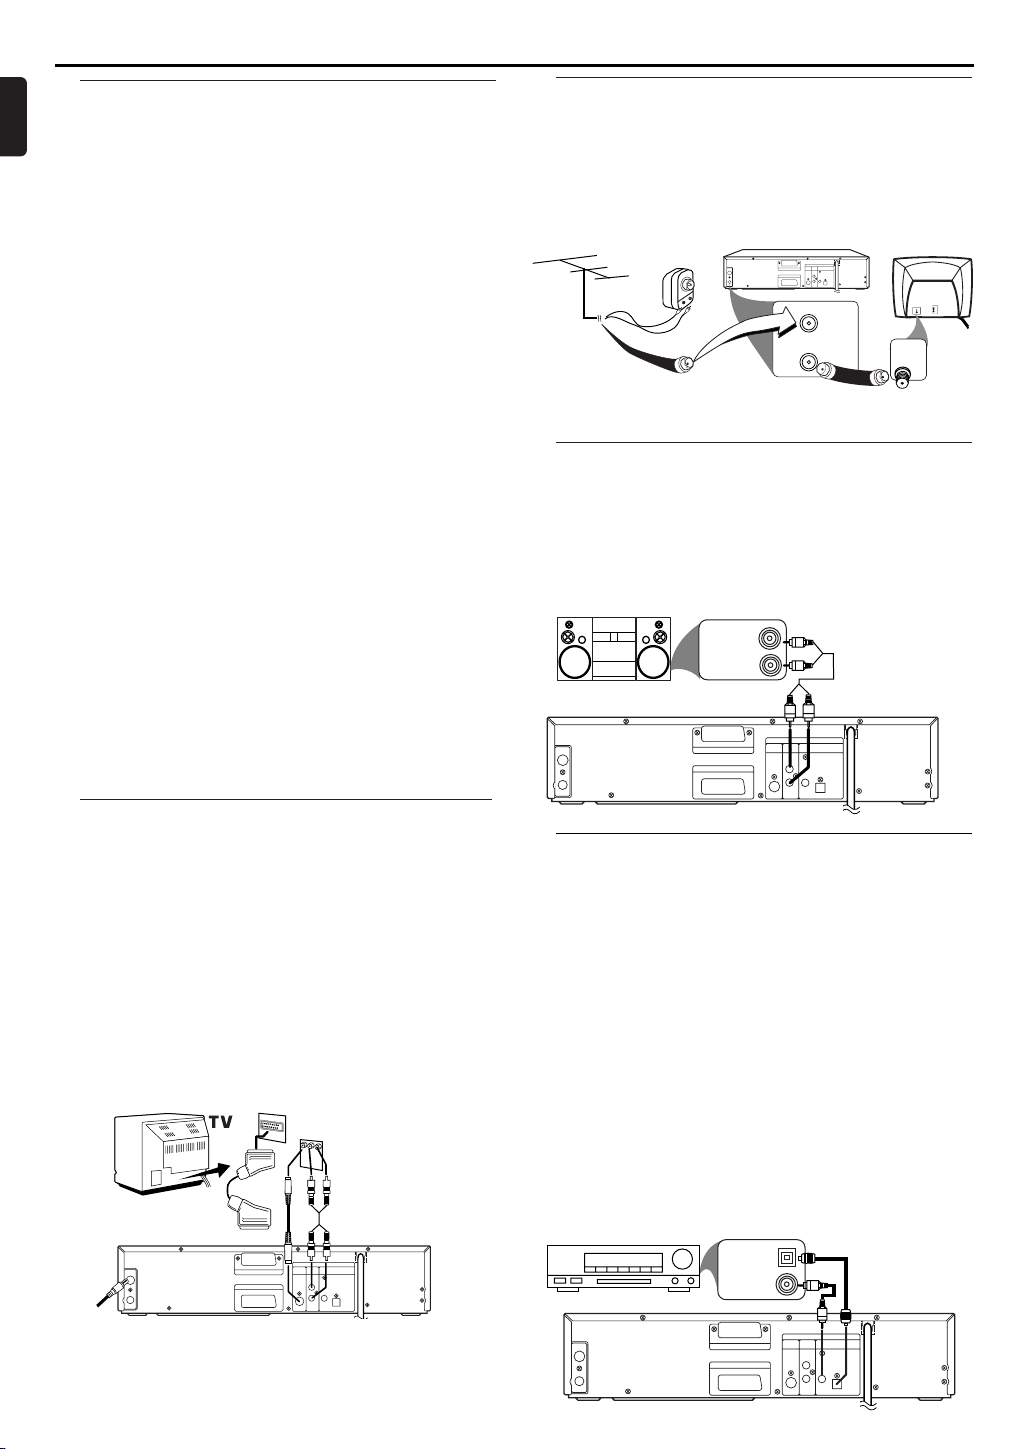
Basic Connections
• Please refer to the instruction books of your TV,VCR, Stereo
System or other devices as necessary to make the best connections.
• Make one of the following connections, depending on the
capabilities of your existing equipment.
The following guidelines are options for the best picture and
sound quality available on your DVD/VCR.
Picture
1 Use SCART RGB Output (DVD/VCR(AV1 TV)) for best pic-
ture quality (for DVD features).
2 Use S-VIDEO Output for the better picture quality (for DVD
features only).
3 Use SCART Composite Output for good picture quality (for
DVD and VCR features).
4 If your TV only has a RF-style (Antenna IN or 75 ohm) input,
use the RF OUT for connection and set your TV to channel
22 ~ 69 with the same channel for DVD/VCR is set (for DVD
and VCR features).
Sound
1
Digital audio connections provide the clearest sound. Connect
the DVD/VCR DIGITAL AUDIO OUT (either COAXIAL or
OPTICAL) to your amplifier or receiver (for DVD features only).
2 Use SCART Output (DVD/VCR(AV1 TV)) for better sound
quality (for DVD and VCR features).
If digital connections are not possible, connect the DVD/VCR
ANALOG AUDIO OUT(Left and Right) to your amplifier,
receiver, stereo or TV (for DVD features only).
Warning!
– Never make or change connections with the power
switched on.
– Connect the DVD/VCR directly to your TV, instead of eg.
a VCR, to avoid distortion because DVD video discs are
copy protected.
– Do not connect the ANALOG AUDIO OUT of DVD/VCR
to PHONO IN of your amplifier or receiver.
– If you use the Euro audio/video cable, it is not necessary
to connect the analog audio cable.
Simplest connection using only supplied
black RF coaxial cable
1 Disconnect the antenna or cable from your TV.
2
Connect the antenna or cable to the AERIAL of your DVD/VCR.
3 Connect black RF coaxial cable to the RF OUT on the rear
panel of the DVD/VCR and to the ANTENNA IN on the TV.
4 Plug in the power cords of the TV and DVD/VCR.
Connecting to an Audio System(for DVD
features)
1 You can also listen to the sound of audio CDs and DVD video
discs by connecting to an optional stereo system.
2 Connect DVD/VCR ANALOG AUDIO OUT (Left and Right)
to the audio in on the stereo system.
Connecting to a TV
1
Connect the antenna or cable to the AERIAL of your DVD/VCR.
2 Connect the DVD/VCR (AV1 TV) on the DVD/VCR to the
corresponding connector on the TV.
Note:
– Ensure that the “TV” indication on SCART cable is con-
nected to the TV set and “DVD ” indication on SCART
cable is connected to the DVD/VCR.
If your TV is not equipped with a SCART input, you can select
the following connection:
If your TV has a S-Video input connector,
1
Connect the antenna or cable to the AERIAL of your DVD/VCR.
2 Connect the S-Video out on the DVD/VCR to the S-Video in
on the TV.
3 Connect the ANALOG AUDIO OUT on the DVD/VCR to the
Left and Right audio in on the TV.
Note:
– You will still need the SCART cable or RF coaxial cable
for VCR features.
6
Connecting to Optional Equipment (for
DVD features)
• A digital component with a built-in MPEG 2 or Dolby
DigitalTMdecoder allows you to enjoy the surround sound
while producing the effect of being in a movie theater or a
concert hall.
• The player outputs the surround sound signals from the DIGITAL OUT COAXIAL or OPTICAL connector.
If your receiver has a MPEG 2 or Dolby Digital™ decoder,
1 Connect the COAXIAL or OPTICAL DIGITAL AUDIO OUT
of the DVD/VCR to the COAXIAL or OPTICAL DIGITAL
AUDIO IN on your receiver.
Note:
– If the audio format of the digital output does not match
the capabilities of your receiver, the receiver will produce a strong, distorted sound or no sound at all.
– MP3 Audio is not available on the Digital Output.
– You will still need the video cable or RF coaxial cable for
VCR features.
Page 7
Setting Up your DVD/VCR
1
2
External Input Mode (for VCR features)
To receive the signal from an external input (decoder, satellite
receiver, video camera, another VCR etc.), connect to the AV2
(DECODER) socket, and enter “002” with numerical key pads
button to appear “AV2” on the TV screen.
If you use the AV1 (TV) socket, enter “001” with numerical key
pads to appear “AV1” on the TV screen.
If you use the front AUDIO/VIDEO input jacks, enter “003” with
numerical key pads to appear “AV3 ” on the TV screen.
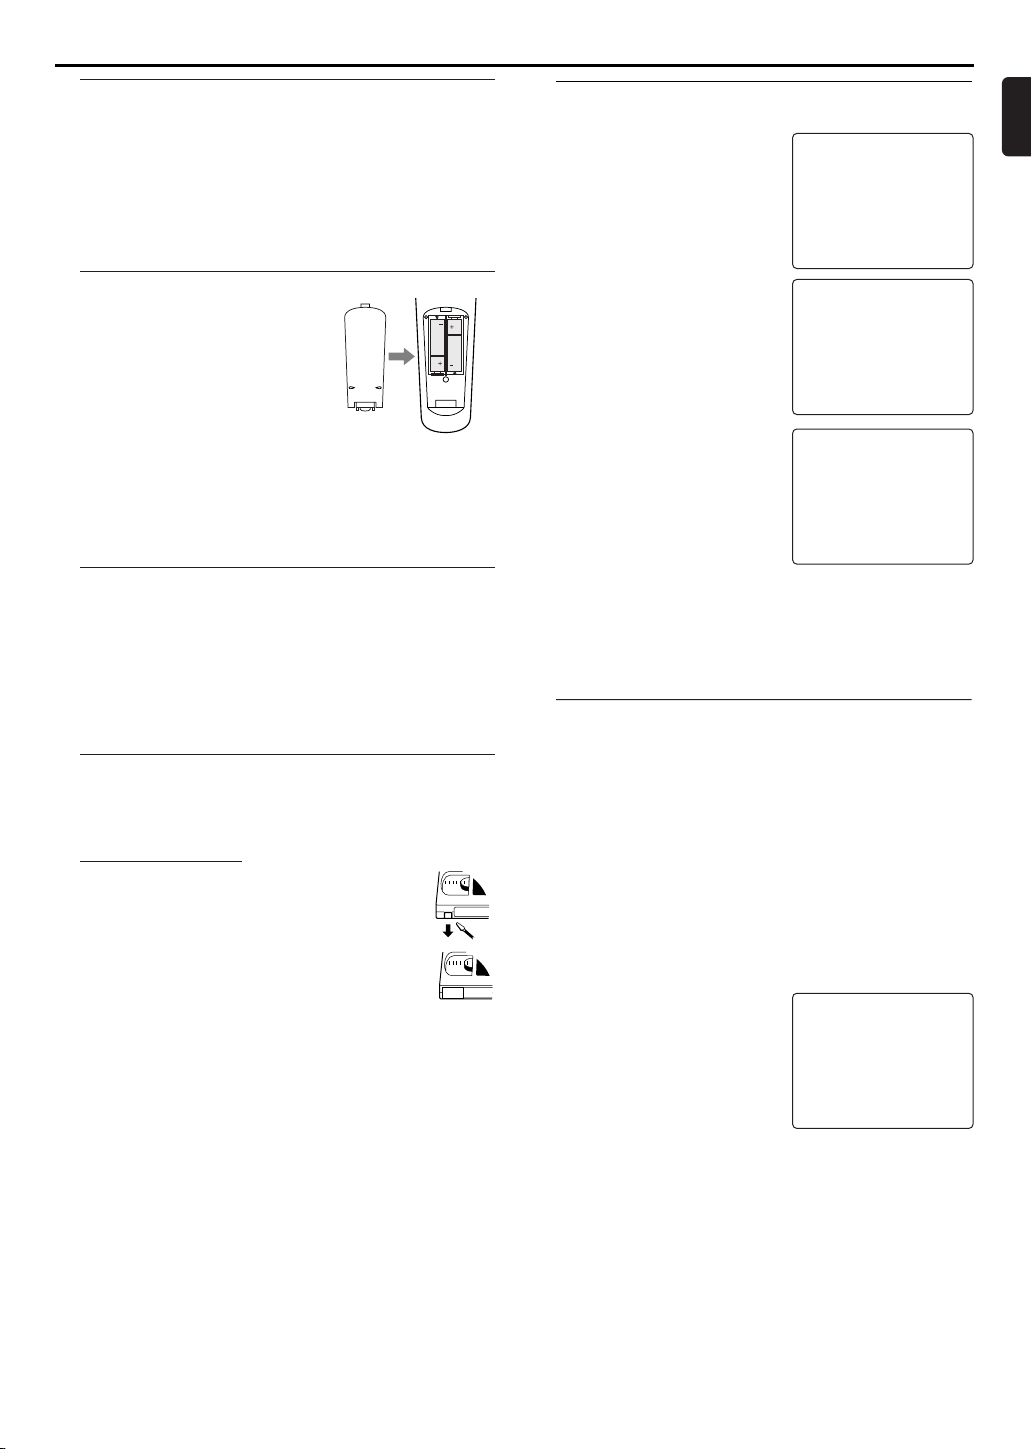
Inserting batteries into the Remote Control
1 Open the battery cover.
2 Insert batteries (AA size) with the
correct polarity as indicated by the
+ and - symbols inside the battery
compartment.
3 Close the cover.
CAUTION!
– Remove batteries if they are exhausted or not to be used
for a long time.
– Do not use old and new or different types of batteries in
combination.
– Batteries contain chemical substances, so they should be
disposed off properly and kept away from children.
Using the Remote Control
• Direct the remote control at the remote sensor of the
DVD/VCR.
• Do not drop the remote control.
• Do not leave the remote control near extremely hot or
humid place.
• Do not spill water or put anything wet on the remote control.
Playable Video Cassette Tapes
Philips Consume Electronics recommends that only video cassette tapes that have the VHS mark and High Quality (HQ) system is compatible with this DVD/VCR.This
DVD/VCR has an Automatic Head Cleaner.
Recording Prevention
Video cassette tapes have record tabs to
ensure recordings are not erased accidentally.
1 To prevent recording, break off the tab with a
screw-driver.
2 To allow recording, cover the hole with cello-
phane tape.
Notes:
– Use only tapes with VHS mark.
– Remove any adhesive stick-on notes from the tape
before inserting into the DVD/VCR.
– Periodic maintenance is required to maintain your
DVD/VCR performance.
– Video heads will require replacement after a period of
time. Only an authorised service center should perform
this service.
Turning on your DVD/VCR
The following steps only be performed when you insert the AC
PLUG at the first time.
1 Turn on the TV and select the
video channel on the TV.
2
Plug in the DVD/VCR.
3 Press K/L repeatedly to select
your desired language.
4 Press DISC/VCR MENU.
5 Confirm with P+.
The automatic TV channel search
starts.
6 'TIME' and 'DATE' will appear on
the TV screen.
7 Check 'TIME'. If required, please
change the time with numerical key
pads.
8 Check if the displayed settings for
'DAY', 'MONTH' and 'YEAR' are
correct.
9 When all information is correct,
save by pressing STATUS/EXIT.The
preparation for use is now complete.
Notes:
– If the DVD/VCR has been completed AUTO TUNING at
this procedure, this initial menu has never shown even if
power failure is occured or inserted AC plug again.)
SELECT KL
→ ENGLISH
FRANÇAIS
ESPAÑOL
DEUTSCH
ITALIANO
SVENSKA
NEDERLANDS
PUSH MENU TO CONTINUE
PLEASE WAIT
START FINISH
❚❚❚❚❚❚❚❚❚❚❚
END=EXIT
❚❚❚❚❚❚❚❚❚❚❚❚❚
TIME --:--
DATE --/--/--
SMART CLOCK [ON]
Video Channel Setting
Video channel setting will be necessary, if your DVD/VCR is
connected to the TV via the coaxial cable.
1 Insert a pre-recorded tape into the DVD/VCR.The DVD/VCR
will turn on and start playback automatically.
If playback does not start, press PLAY B .
2 Select and adjust your TV to channel 36.
• If the playback picture appears on the TV screen, continue
with step 8.
• If channel 36 is employed for broadcasting, or interference
lines appear on the picture, the RF converter must be set to
a different channel between CH22 and CH69. Continue with
step 3.
3 Press DISC/VCR MENU.
4 Press K/L to select INITIAL SET
UP.Then, press B.
5 Press K/L to select RF OUT. Then,
press B twice.
6 Press K/L to select a channel
which is not used for broadcasted
between channel 22 and channel 69
in your area, then press B.
• You can also see the selecting RF channel in the display
7 Press STATUS/EXIT to exit.
Set the TV channel to the RF OUT CHANNEL which was
selected on the DVD/VCR.A picture from the VCR will appear
on the TV screen. If a picture does not appear, repeat steps 3
to 7 using a different channel which is not used for broadcast-
ed.
8 Press STOP C to stop the tape.
Note:
– You may also access the RF OUT CH menu by pressing
and holding DISC/VCR MENU for 3 seconds during power
off until the RF OUT CH menu appears.
SELECT KL CHOOSE B
→ RF OUT CH 36
SET=0-9
END=EXIT
English
7
Page 8
Setting Up your DVD/VCR
English
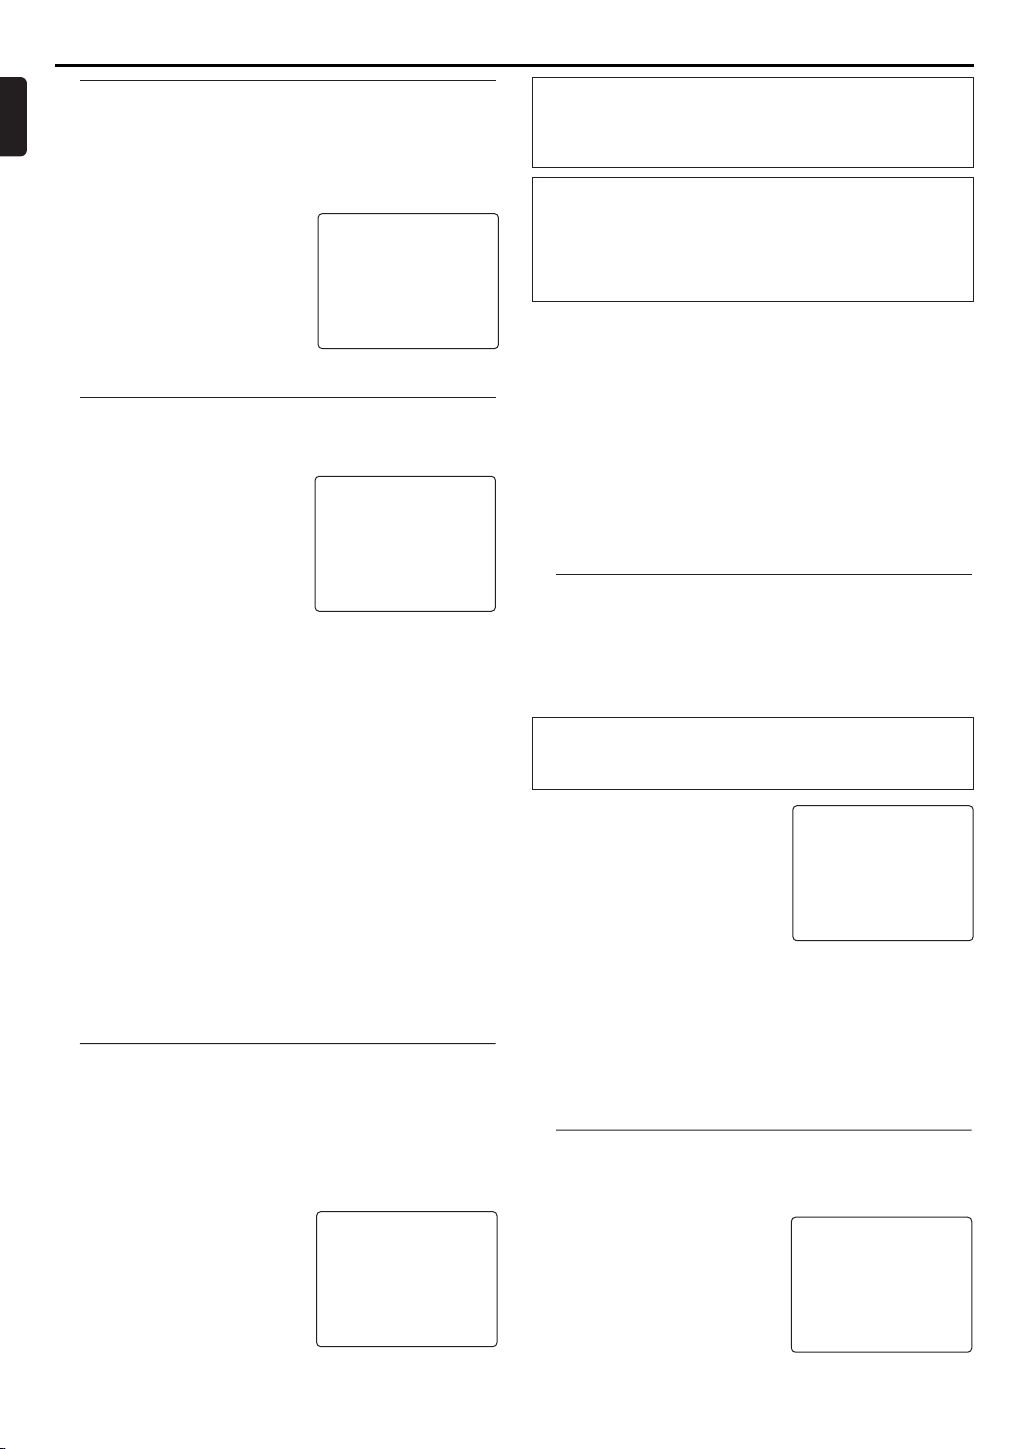
Automatic Channel Setup
You can programme the tuner to scan only the channels that
you can receive in your area.
1 Turn on the TV and select the video out channel on your TV.
2 Press VCR, then DISC/VCR MENU.
3 Press K/L to select TUNER SET UP, then press B.
4 Press K/L to select AUTO TUN-
ING, then press
• The tuner scans and memorizes
all the active channels in your
area.After scanning, the tuner
stops on the lowest memorized
B.
PLEASE WAIT
START FINISH
❚❚❚❚❚❚❚❚❚❚❚❚
channel.
5 Press P +/– or numerical key pads
to scan through channels you have received.
Manual Channel Preset
1 Press VCR, then DISC/VCR MENU.
2 Press K/L to select TUNER SET UP, then press B.
3 Press K/L to select MANUAL
TUNING, then press B.
4 Press K/L to select PROG., then
press B.
5 Press K/L or numerical key pads
to select your desired programme
number, then press B.
MANUAL TUNING
→PROG. P55
CHANNEL 055
DECODER [OFF]
SKIP [OFF]
SET=
KL OR 0 – 9
END=EXIT
• You can select programme number 01-99.
6
Press
K/L
to select CHANNEL, then press B.
7 Press K/L.The DVD/VCR tuner will begin to search up or
down automatically.When a channel is found, the DVD/VCR
will stop searching and the picture will appear on the TV
Screen.
• You can select desired channel number by using numerical
key pads.You must refer to the channel plan and press three
digits to select the channel number. (To select channel 24,
first press “0” button then press “2” and “4”).
• If this is the channel you want, press B.
• If you want to remove scrambled signals, press K/L to select
DECODER.Then, press B to select [ON].
8 Press STATUS/EXIT to exit.
Note:
– To confirm that a channel has been added, press the P
+/– buttons.
– You should select the satellite channels to be received by
the satellite receiver directly on the receiver itself.
Follow TV (Automatic TV channels sorting)
When the automatic channel search function is activated, the
TV channels are saved in a specific order.This may vary from
the order of TV channels on the TV.
This function changes the order of TV channels saved in the
DVD/VCR to match that of the TV.
Make sure that the DVD/VCR and the TV are connected by a
scart cable.
1 Press VCR, then DISC/VCR MENU.
2 Press K/L to select TUNER SET
UP, then press B.
3 Press K/L to select 'FOLLOW TV'
, then press B.
4 'P:01' will appear in the DVD/VCR
display.
SELECT KL CHOOSE B
AUTO TUNING
MANUAL TUNING
→FOLLOW TV
MOVE
END=EXIT
❚❚❚❚❚❚❚❚❚❚❚❚
I cannot switch my TV set to programme number '1'
* If you have connected additional devices to socket
AV2(DECODER), please disconnect these devices. Because of
other connected devices, the TV set could switch to the programme number of the scart socket.
'NO TV SIGNAL' will appear in the TV screen.The
DVD/VCR is not receiving a video signal from the TV.
Check the plug on the scart cable.
Check your TV's operating instructions to see which scart socket
is used for video signals.
If this does not help, it's not possible to use this function. Please
read the section 'Sorting TV channels manually'.
5 Select programme number '1' on the TV.
6 Confirm with B on the DVD/VCR remote control.The
DVD/VCR compares the TV channels on the TV and the
DVD/VCR.
If the DVD/VCR finds the same TV channel as on the TV, then
it stores it at 'P01'.
7 Wait until the next number, e.g. 'P:02' appears in the display.
8 Select the next programme number on the TV, e.g. '2'.
9 Confirm with B.
10 Repeat steps 7 to 9 until you have assigned a programme num-
ber to all TV channels.
11 To end, press STATUS/EXIT.
Sorting and clearing TV channels manually
After you have performed the automatic channel search you
may not agree with the sequence in which the individual TV
channels have been allocated to the programme positions (programme numbers) of the DVD/VCR.You can use this function
to individually sort the TV channels already saved or to delete
unwanted TV channels or those with poor reception.
The clock resets automatically
If you save a TV channel that transmits TXT/PDC on programme
number ‘P01’, date and time will constantly be updated.As a result,
time changes, i.e. daylight savings time, will be set automatically.
1 Press VCR, then DISC/VCR MENU.
2 Press K/L to select 'TUNER SET
UP' , then press B.
3 Press K/L to select 'MOVE' , then
press B.
4 Press K/L to select the saved TV
channel that you want to change.
MOVE
→P01: 02 P06: 90
P02: 03 P07: 99
P03: 05 P08: 121
P04: 10 P09: 124
P05: 74 P10: 130
SELECT
KL CHOOSE B
END=EXIT
5 Confirm with B.
6 Move the selected channel with K/L to the programme num-
ber you want to assign.
7 Confirm with B.
8 To assign other TV channels to a programme number, repeat
steps 4 to 7.
9 Confirm the assignment of the TV channel with MOVE menu.
10 To exit the MOVE menu, press STATUS/EXIT.
Setting the language
You have the option of setting one of the displayed languages
for the on-screen menu (OSD). However, the DVD/VCR display will only display English text regardless of this setting.
1 Press VCR, then DISC/VCR MENU.
2 Press K/L to select 'INITIAL SET
UP' , then press B.
3 Press K/L to select 'LANGUAGE'
, then press B.
4 Select the desired language with
K/L.
5 To end, press STATUS/EXIT.
SELECT KL
→ ENGLISH
FRANÇAIS
ESPAÑOL
DEUTSCH
ITALIANO
SVENSKA
NEDERLANDS
END=EXIT
8
Page 9
Setting Up your DVD/VCR
Setting the clock
If the display shows an incorrect time or ' --:-- ', the time and
date must be reset manually.
If a TV channel that transmits TXT/PDC (teletext/PDC) is
stored under programme number 'P01', time/date will automatically be taken from the TXT/PDC information. (SMART
CLOCK)
1 Press VCR, then DISC/VCR MENU.
2 Press K/L to select 'INITIAL SET UP' , then press B.
3 Press K/L to select 'CLOCK' , then press B.
4 Check the time in 'TIME'. If
required, please change the time
with numerical key pads.
5 Check 'DAY', 'MONTH' and 'YEAR'
in the same way.
6 Choose ‘SMART CLOCK’ ON or
OFF with B.
7 To end, press STATUS/EXIT.
TIME --:--
DATE --/--/--
SMART CLOCK [ON]
END=EXIT
Setting the RF out channel
In some reception locations it is possible that a TV channel will
be sent on the same or similar frequency as the DVD/VCR.
Result:As soon as the DVD/VCR is switched on, the reception
quality for this or several other TV channels will decrease.
The following steps will show you how to change the pre-set
'transmission' (RF out channel) frequency on the DVD/VCR.
1 Press VCR, then DISC/VCR MENU.
2 Press K/L to select 'INITIAL SET UP' , then press B.
What is RF out channel?
This electronic component in the DVD/VCR allows the device to
transmit audio and video signals via the aerial cable.These signals
can be received on a TV set just like TV channels.
What is RF out channel frequency?
This frequency or channel indicates the channel on which the
audio or video signal is transmitted.
Decoder allocation
Some TV channels transmit encoded TV signals which can only
be viewed with a purchased or rented decoder.You can connect such a decoder to this DVD/VCR.The following function
will automatically activate the connected decoder for the
desired TV channel.
1 Switch the TV on. If applicable, select the programme number
for the DVD/VCR operation.
2 Press K/L or numerical key pads to select the TV channel
which you would like to allocate the decoder to.
3 Press DISC/VCR MENU.The main menu will appear.
4 Press K/L to select 'TUNER SET UP'.Then press B.
5 Press K/L to select 'MANUAL
TUNING'.Then press B.
6 Press K/L to select 'DECODER'.
7 Press B to select 'ON' (Decoder
switched on).
How can I switch off the decoder?
Use B to select 'OFF' (Decoder switched off).
8 To end, press STATUS/EXIT.
The decoder has now been allocated to this TV channel.
MANUAL TUNING
PROG. P55
CHANNEL 055
→DECODER [OFF]
SKIP [OFF]
SELECT KL CHOOSE B
END=EXIT
English
3 Press K/L to select 'RF OUT' ,
then press B.
4 Press B.
5 Press K/L or numerical key pads
SELECT KL CHOOSE B
→RF OUT CH 36
to select a free (not allocated)
channel between channel 22 and 69
in your area.
6 Press B.
END=EXIT
7 To end, press STATUS/EXIT.
If you cannot get an interference-free picture and sound, switch
the built-in modulator off.
Press L repeatedly until "--" appears next to "RF OUT CH" on
the TV screen.
Then confirm with B. In that case, please connect your VCR to
your TV with a Scart cable.
9
Page 10
VCR Playback
English
Playing cassettes
You can use this DVD/VCR to play back recorded VHS videocassettes.You can operate the DVD/VCR using the remote
control or the buttons on the front of the DVD/VCR.
If you press PLAY, STOP, FWD or REW while the set is in
Stand-by, the power will be automatically turned on.
Additionally, if a cassette was already inserted, the corresponding operation will be performed.
Your DVD/VCR can only record and play standard VHS cassettes.
1 Put a cassette into the cassette slot.The cassette is inserted
automatically.
2 Press PLAY to view the tape.
3 To stop the playback, press STOP or STOP/EJECT on the DVD/
VCR.
4 To eject the cassette, press EJECT or STOP/EJECT on the
DVD/ VCR when the DVD/ VCR stops the playback.
DIGITAL STUDIO PICTURE CONTROL
Philips has developed a system which produces the best possible
playback quality. For old and often-used video cassettes, this system reduces interference. For new or high quality cassettes, it
emphasises the details.
Picture/ sound quality is poor
When playing rental videos or older, poorer quality cassettes, it
may not be possible to completely filter out picture and sound
interference.This is not a fault in your machine. Read the section
'VCR Manual tracking'.
Do I need to change the playback speed when playing
back LP recordings?
During playback, the correct speed will automatically be selected.
For more information, please read the section 'Selecting the
recording speed (SP or LP)' in the chapter 'VCR Manual recording'.
Playing back NTSC cassettes
This DVD/VCR can also play back cassettes that have been
recorded in SP [Standard Play] or SLP [Super Long Play] mode
in the NTSC standard (for example,American cassettes).
However, this only works on PAL-television sets that are suitable for a picture frequency of 60Hz.
Displaying current tape position
The following information is displayed on the screen: e.g.:
0:02:45 shows the counter in hours, minutes and seconds.
SP/LP: will show the recorded speed of your cassette
'REM 0:06': will show the actual amount of playing/recording
time left on the tape in hours and minutes.
When you play an NTSC cassette, the DVD/VCR will show
'REM -:--'.
How can I set the counter to '0:00:00'?
You can set the counter to '0:00:00' with CLEAR.
When you put a cassette in the DVD/VCR, the counter will automatically reset to '0:00:00'.
The counter does not move
This occurs when there are no recordings on a portion of a tape.
This is not a fault in your DVD/VCR.
The screen shows '-0:01:20'
If you rewind a cassette from the tape position '0:00:00', the
counter will show for instance, '-0:01:20' (the cassette was
rewound to 1 minute and 20 seconds before '0:00:00').
('-'(minus) is not shown in the display.)
'-:--' is displayed in the 'REM' counter
This counter will automatically recognise the length of the tape. In
addition, when you put in a cassette the DVD/VCR must first calculate the time played.Therefore, '-:--' appears first and only after
the tape has been running for a few seconds, the correct playing
time will be shown.
Searching for a tape position with picture
(scanning)
1 While a cassette is playing, press h(rewind) or g(for-
ward) one or more times.
2 Press PLAY B to resume playback.
Still picture / slow motion
1 During playback, press PAUSE kto stop the tape and display a
still picture.
2 During playback, press SLOW to play the tape in slow motion.
3 Press PLAY B to resume playback.
Scanning and still/slow motion interferes with the picture quality.The sound is switched off.This is not a fault in your
DVD/VCR.
Searching for tape position without picture
(forward wind and rewind)
1 Stop the tape with STOP C.
2 Press h(rewind) or g(forward).
3 To stop the tape, press STOP C.
Index search
Every time a tape is recorded an index marking is written on
the tape.
These marked positions can be found again quickly and easily
later.
1 To search for the previous marking, press INDEX 3 and then
.
h
2 For the next marking, press INDEX 3 and then g.
3 As soon as the DVD/VCR finds this marking, it automatically
switches to playback.
Manual Tracking
To manually adjust the tracking during playback and slow
motion playback, press P+ or P-.
Tracking will return to Automatic Tracking Adjustment when
you press STOP C, insert a tape, or press PLAY B.
To remove vertical jitter in a Still picture, press P+ or P-.
General information
Use 'Manual Recording' to make a spontaneous recording
(for example, a programme currently being shown).
If you want to start and stop a recording manually, read the
section 'Recording without automatic switch-off'.
If you want to start a recording manually but have it stopped
automatically, read the section
Read the section 'Direct record' if you want to record a pro-
gramme currently being shown.
Read the section 'Automatic controlled recording from a
satellite receiver (RECORD LINK)', if you want a recording to be controlled automatically by a satellite receiver.
Recording without automatic switch-off
1 Insert a cassette.
2 Use P+/P- to select the programme number you want to
record, for example, 'P01'.
3 To start recording, press RECORD I.
4 Stop recording with STOP C.
10
Page 11
VCR Manual Recording
Linking up recordings (assemble cut)
When you add a further recording to a cassette, which already
has a recording on it, a short blank (flicker) can appear between
the old and the new recording or the picture itself can flicker.
To help reduce these from occurring, proceed as follows:
1 Find the tape position of the old recording where you want to
insert the new recording.
2 Look at the last minute of the old recording (playback).
3 Press PAUSE kat the tape position where the new recording
is to go and press RECORD
I.
4 Now start recording as usual by pressing RECORD I on the
remote control.
5 Stop recording with STOP C.
Selecting the recording speed (SP or LP)
LP allows to double the recording duration on tape (for example six hours instead of three hours on an E180 cassette).
1 Switch on the TV set. If required, select the programme num-
ber for the DVD/VCR.
2 Press DISC/VCR MENU.The main
menu will appear.
3 Select 'RECORD SETUP' using
SELECT KL CHOOSE B
→RECORD SPEED [SP]
DIRECT RECORD [OFF]
RECORD LINK [OFF]
K/L and confirm with B.
4
Select 'RECORD SPEED' using K/L.
5 Select the required recording
speed with B.
END=EXIT
'SP'/'LP' /'AUTO'
'SP': StandardPlay (normal recording speed) offers the usual firstclass picture quality.
'LP': LongPlay (half recording speed, double recording time). 6
hours can be recorded on a 3-hour cassette (E180) with a somewhat reduced picture quality.
'AUTO': AUTOmatic Long Play. If there is not enough space on
the tape to record a programmed recording in standard speed,
the recording is automatically done in 'LP'
(Longplay). Otherwise, the recording speed will be 'SP'
(Standardplay).
6 To end, press STATUS/EXIT.
Automatic controlled recording from a
satellite receiver (RECORD LINK)
This function automatically starts recording on the switched-off
DVD/VCR when a video signal is recognised through the connected scart cable. If your satellite receiver has a programming
function, the recording will start automatically (as long as the
satellite receiver is switched on).
1 Use a scart cable to connect scart socket AV2(DECODER) on
the DVD/VCR to the corresponding scart socket on the satellite receiver.
2 Switch on the TV. If required, select the programme number for
the DVD/VCR.
3 Press DISC/VCR MENU.The main menu will appear.
4 Select 'RECORD SET UP' with K/L and confirm with B.
5 Select 'RECORD LINK' with K/L.
6 Select function 'ON' with B.
7 To end, press STATUS/EXIT.
8 Insert a cassette.
9 Programme the satellite receiver
with the required information (programme number of the TV channel,
start time, end time).
If necessary, please see the operating instructions for your
satellite receiver.
10 Press TIMER SET.
The DVD/VCR is now ready to record.The beginning and end
of the recording is controlled via scart socket
AV2(DECODER).
SELECT KL CHOOSE B
RECORD SPEED [SP]
DIRECT RECORD [OFF]
→RECORD LINK [OFF]
END=EXIT
'Direct Record'
With Direct Record, you can record the right TV channel in
seconds even if your DVD/VCR is switched off. If the recording
is started manually, the DVD/VCR uses the current TV channel
set on the TV.You will find more information on how to switch
'Direct Record' on or off in the next section. Make sure that
your DVD/VCR socket (AV1/TV) and the TV are connected by
a scart cable.
1 On the TV, select the programme number you want make the
recording from.
2 Press RECORD I with the DVD/VCR switched off.
3 Stop recording with STOP C.
How does Direct Record work?
The DVD/VCR compares the TV channel selected on the TV set
with its stored TV channels via the scart cable. If the same TV
channel is found, it switches the DVD/VCR to the corresponding
programme number and starts recording. Please do not change
the TV channel on the TV set during the search so as not to
affect the process.
Switching 'Direct Record' on or off
1 Switch on the TV. If required, select the programme number for
the DVD/VCR.
2 Press DISC/VCR MENU.The main menu will appear.
3 Select 'RECORD SET UP' with
K/L and confirm with B.
4 In 'DIRECT RECORD', select 'OFF'
(Direct Record off) or 'ON'
SELECT KL CHOOSE B
RECORD SPEED [SP]
→DIRECT RECORD [OFF]
RECORD LINK [OFF]
(Direct Record on) with B.
5 To end, press STATUS/EXIT.
6 Press STANDBY-ON.
END=EXIT
Direct dubbing
Follow the steps below to copy a DVD or video disc to a
videotape.This will be possible only if the DVD is not copy
protected.
1 Put a videotape in the cassette compartment. Make sure the
tape’s record tab is intact and the tape is long enough to
record the disc.
2 Press VCR.
3 Select the recording speed.
Details are at “Selecting the recording speed (SP or LP)”.
4 Put the DVD you want to copy in the disc tray.
5 Press DVD.
6 Press PLAY B.While disc is playing, press PAUSE k at the
point you wish to start recording.
7 Press DIRECT DUBBING to record.
To pause the recording.
Press PAUSE k.
To resume recording.
Press PAUSE k again.
To stop the recording.
Press STOP C.
Recording(From DVD To VCR)
1 Insert a DVD without copyright protection in the tray.
2 Insert a video cassette tape with its erase prevention tab in
place.
3 Select the recording speed.
Details are at “Selecting the recording speed (SP or LP)”.
4 Enter “004” with numerical key pads to appear “DISC” on the
TV screen.
5 Press RECORD I.
6 Change to DVD operation mode.
7 Press DVD, then PLAY B to begin the playback of a DVD.
8 Press VCR, then STOP C to stop recording.
English
11
Page 12
R
Programming a Recording (TIMER)
English
General information
Use a TIMER programming to automatically start and stop a
recording at a later time or date.The DVD/VCR will switch to
the right programme number and begin recording at the correct time.With this DVD/VCR, you can pre-programme up to
eight recordings within a period of one year.To make a programmed recording, your DVD/VCR needs to know:
* the date you want to make the recording
* the programme number of the TV channel
* the start and stop time of the recording
* VPS or PDC on or off
This information is saved in a TIMER block.
What is 'VPS/PDC'?
'VPS' (Video Programming System)/ 'PDC' (Programme Delivery
Control) are used to control the start and duration of TV channel
recordings. If a TV programme starts earlier or ends later than
scheduled, the DVD/VCR will turn on and off at the correct time.
What do I need to know about 'VPS/PDC'?
Usually the VPS or PDC time is the same than the start time. But
if your TV guide shows a VPS or PDC time which is different from
the programme’s scheduled start time, e.g. 20.10 (VPS/PDC
20.14), you must enter the VPS/PDC time exact to the minute. If
you want a start time different from the VPS/PDC time, you must
switch VPS/PDC off.
Programming a recording (with the
'SHOWVIEW® system')
You no longer need to tediously enter the date, programme
number, start and end time.All the information needed for programming is contained in the SHOWVIEW-programming number.
You can find this SHOWVIEW number in most TV listing magazines written next to the concerned programme.
1 Press SV/V+.
2 Enter the entire SHOWVIEW num-
ber.This number is up to 9 digits
long and can be found next to the
start time of the TV programme in
your TV listing magazine. [e.g: 1234-5 or 1 234 5]
If you make a mistake, you can
clear your input with CLEAR.
3 Press SV/V+.
4 Select ONCE, DAILY, or WEEKLY
recording with K/L.Then press B.
ShowView system
ShowView No.
12345
SET=SV/V+
CORRECT=CLEAR
END=EXIT
ShowView system
→ONCE
DAILY
WEEKLY
– – – –
5 The decoded data appears after confirmation.You can go back
to change the data. Select the corresponding input field using
B or CLEAR. Change the data with numerical key pad.
6 When all inputs are correct, press STATUS/EXIT. The program-
ming information is stored in a Timer block.
Switching on 'VPS/PDC' in the 'START' input field
Select 'VPS/PDC' using B or CLEAR. Press '1' to switch off
'VPS/PDC' or press '2' to switch on 'VPS/PDC'.
7 Insert a cassette with an intact security tab (unprotected).
8 Press TIMER SET.
'RECORD TIMER' will light up on the DVD/VCR display.
Programming a recording (without the
SHOWVIEW® system)
1 Press VCR, then DISC/VCR MENU.
2 Select 'TIMER' with K/L.Then
press B.
3 Select ONCE, DAILY, or WEEKLY
recording with K/L.Then press B.
If all Timer blocks are in use,‘FULL’
will appear on the OSD.
4 Select the desired Timer block with
numerical key pads. (The flashing
number indicates an empty TIMER block.)
Selecting once/daily/weekly recordings
Using K/L, select from the following options:
'ONCE': Recording once
'DAILY': Repeated daily recordings (Monday to Friday)
'WEEKLY.': Repeated weekly recordings (every week on the same
day)
5 Enter the Start time (START) End time (STOP), Programme
number (PROG.),VPS/PDC information and the Date with
numerical key pads.
Programme numbers of the ' AV1 ' , ' AV2 ' and ' AV3'
scart socket
You can also programme recordings from external sources via
scart socket AV1(TV),AV2 (DECODER) or AV3(FRONT).
6 When all inputs are correct, press STATUS/EXIT. The program-
ming information is stored in a TIMER block.
7 Insert a cassette with an intact security tab (unprotected).
8 Press TIMER SET.
SELECT KL CHOOSE B
→ONCE
DAILY
WEEKLY
TIMER LIST
END=EXIT
SELECT
KL CHOOSE B
END=EXIT
Selecting once/daily/weekly recordings
Using K/L, select from the following options:
'ONCE': Recording once
'DAILY': Repeated daily recordings (Monday to Friday)
'WEEKLY.': Repeated weekly recordings (every week on the same
day)
'- -' appears at PROG. .
* The programme number of the TV channel has not yet been
assigned to the S
HOWVIEW number. Using the numerical key
pads, select the corresponding programme number (name) of
the TV channel.
The following message appears on the screen:'ERROR'
* The entered SHOWVIEW number is incorrect. Correct your input
or end with STATUS/EXIT.
* Check the time/date (see chapter 'Installing your video', section
'Setting the time and date').
* A daily recording was entered for the wrong day. Daily pro-
gramming can only be used for recordings to be made from
Monday to Friday.
The following message appears on the screen:'TIMER
NOT COMPLETED'
* The channel is wrong.
12
OTR (One Touch Recording)
This function enables you to set a recording length simply by
pressing RECORD on the DVD/VCR.
1 Follow steps 1 to 2 in “Recording without automatic switch-
off” section.
2 Press RECORD on the DVD/VCR repeatedly until the desired
recording length appears.
0:00 0:30 1:00.... 7:30 8:00
REC (Normal recording)
• Recording stops when 0:00 is reached.
To check time remaining during an OTR
Press DISPLAY.
To change the recording length during an OTR
Press RECORD until the desired length appears.
To stop an OTR before recording is finished
Press STOP.
To cancel the OTR but continue recording
Press RECORD repeatedly until “REC” appears in the upper
left corner of the TV screen.
Page 13
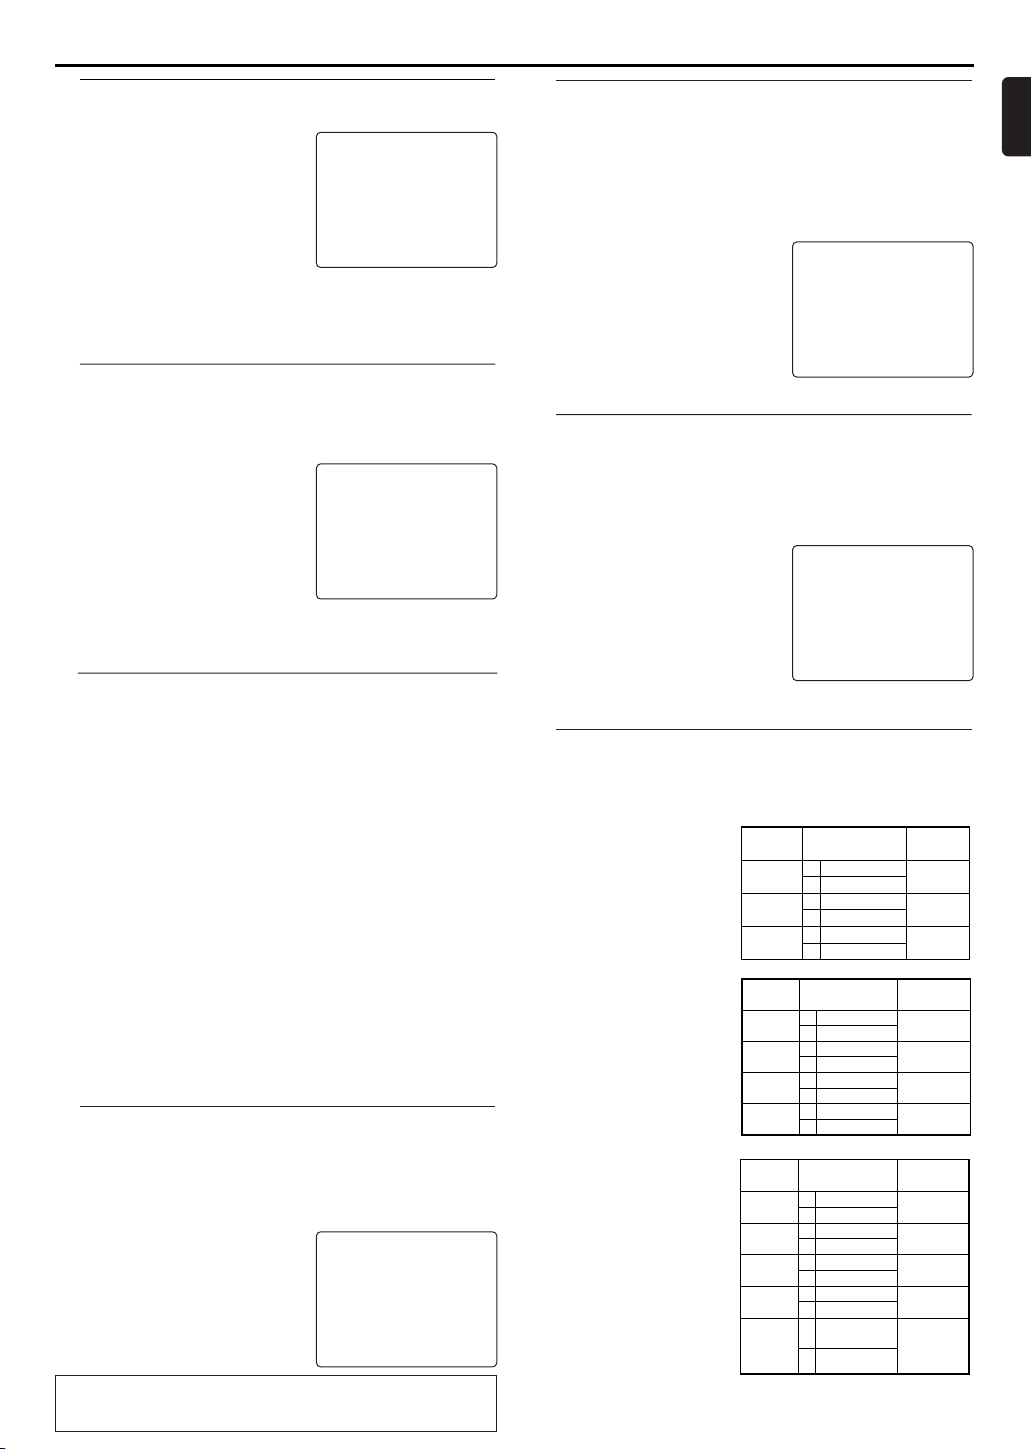
Other Functions
•
During reception of bilingual broadcasts:
Display on
the TV screen
Mode
MAIN
SUB
MAIN
SUB
MAIN
SUB
MAIN
SUB
Main Audio
Main Audio
Sub Audio
Sub Audio
Main Audio
Sub Audio
L
R
L
R
L
R
AUDIO OUTPUT
How to check, or delete a programmed
recording (TIMER)
1 Press VCR, then DISC/VCR MENU.
2 Press K/L to select 'TIMER'.Then
press B.
3 Press K/L to select 'TIMER LIST' ,
then press B.
4 Select timer block with B.
5 To cancel the recording, press
CLEAR.
6 To end, press STATUS/EXIT.
7 Press TIMER SET.
SELECT KL CHOOSE B
ONCE
DAILY
WEEKLY
→TIMER LIST
END=EXIT
How to change a programmed recording
(TIMER)
1 Press VCR, then DISC/VCR MENU.
2 Press K/L to select 'TIMER' ,then press B.
3 Press K/L to select ONCE, DAILY,
or WEEKLY recording with K/L ,
then press B.
ONCE
TIMER - 1 2 3 4 5 6 7 8 -
4 Select a TIMER block with numeri-
cal key pads. (The flashing number
indicates an empty TIMER block.)
5 Press CLEAR to delete information
and input correct information with
SELECT TIMER NUMBER
END=EXIT
numerical key pads.
6 To end, press STATUS/EXIT.
7 Press TIMER SET.
Hint for Timer Recording
• If there is a power failure or the DVD/VCR is unplugged for more than
1 minute, the clock setting and all timer settings will be lost.
• If a tape ends during TIMER RECORDING, the DVD/VCR will stop,
eject the tape, and switch to the DVD mode automatically as the
TIMER light blinks. (If the DVD power is off, the DVD/VCR will become
the STANDBY status).
• If a tape is not in the DVD/VCR or does not have a record tab, the
TIMER light flashes and timer recording will not operate. Please insert a
recordable tape.
• When timer recordings are set, the TIMER light will come on.To use
the DVD/VCR as usual until the time for the recording,press TIMER
SET so that the TIMER light disappears. Press DVD/VCR to choose
VCR or DVD modes, then continue with the other features as
described in this manual.
'PRESS TIMER SET BUTTON FOR TIMER RECORDING' appears on
the screen
* Press TIMER SET on several minutes before the start of a pro-
grammed recording.
Error message: 'FULL'
• If this error message appears after you select 'ONCE', 'DAILY', or 'WEEKLY' on TIMER menu and press
grammed. No more recordings can be programmed. If you want to clear or
check a programmed recording (TIMER block),select the programme number on TIMER LIST menu and press CLEAR.
B, then all TIMER blocks are already pro-
Switching the status display off or on
Along with the on screen menu, the status display also displays
information on the current operating status (counter, playback,
recording,TV channel, etc.) on the TV screen.You can switch
off the information about the operating status so that the status display is not recorded when copying videocassettes.
1 Press VCR, then DISC/VCR MENU.
2 Press K/L to select 'VCR SET UP'
, then press B.
3 Press K/L to select 'STATUS DIS-
PLAY' , then press B.
4 Press K/L to select 'ON' or 'OFF'
, then press B.
5 To end, press STATUS/EXIT.
Which settings can I choose?
'ON': Shows the status display for a few seconds only.
'OFF': Switches off the status display.
SELECT KL CHOOSE B
→STATUS DISPLAY [ON]
BLUE BACKGROUND
CLOCK DISPLAY [ON]
END=EXIT
[ON]
Blue Background on or off
If you want the TV screen to be solid blue when a weak signal
is received, set BLUE BACKGROUND to ‘ON’.The screen will
be blue and the sound will be muted. Or, if you want to receive
the weak signal, set BLUE BACKGROUND to ‘OFF’.
1 Press VCR, then DISC/VCR MENU.
2 Press K/L to select 'VCR SET UP' , then press B.
3 Press K/L to select 'BLUE BACK-
GROUND' , then press B.
4 Select 'OFF' (no blue background)
or 'ON' (blue background on) with
B.
SELECT KL CHOOSE B
STATUS DISPLAY [ON]
→
BLUE BACKGROUND
CLOCK DISPLAY [ON]
5 To end, press STATUS/EXIT.
END=EXIT
Clock Display
This function allows you to switch the VCR display off. It is
useful in case you feel disturbed by the display-brightness while
watching TV in a dark room. It also reduces the power consumption.
1 Press VCR, then DISC/VCR MENU.
2 Press K/L to select 'VCR SET UP'
, then press B.
3 Press K/L to select 'CLOCK DIS-
PLAY' , then press B.
SELECT KL CHOOSE B
STATUS DISPLAY [ON]
BLUE BACKGROUND
→CLOCK DISPLAY [ON]
4 Select 'OFF' (no clock display) or
'ON' (clock display on) with B.
5 To end, press STATUS/EXIT.
END=EXIT
Selecting the sound channel
You can select the desired sound channel during playback or
while receiving TV channels via the DVD/VCR.This allows you
to select a desired language for multi-language
transmissions.
1 Press AUDIO.This will
show the current sound
setting.
2 Press AUDIO until the
desired setting appears in
the display.
•
Reception of stereo broadcasts:
Mode
AUDIO OUTPUT
L Audio
L
Stereo
Monaural
• During playback of the recorded tape in Hi-Fi mode:
Mode
Stereo
Monaural
MIX
L
R
L
R
R Audio
R
L Audio
L
L Audio
R
R Audio
L
R Audio
R
L
+R Audio
L
R
L
+R Audio
AUDIO OUTPUT
Hi Fi L Audio
L
Hi Fi R Audio
R
Hi Fi L Audio
L
Hi Fi L Audio
R
Hi Fi R Audio
L
Hi Fi R Audio
R
Normal Audio
L
Normal Audio
R
Hi Fi L Audio
L
+
Normal Audio
Hi Fi R Audio
R
+
Normal Audio
Display on
the TV screen
Display on
the TV screen
STEREO
English
[ON]
[ON]
STEREO
LEFT
RIGHT
NONE
LEFT
RIGHT
MONO
MIXED
13
Page 14
VCD
Playing a Disc
POWER ON/OFF
DVD-V
CD
DVD-V
CD
DVD-V
DVD-V
DVD-V
DVD-V
DVD-V
CD
DVD-V
CD
MP3
DVD-V
VCD
VCD
VCD
VCD
VCD
VCD
English
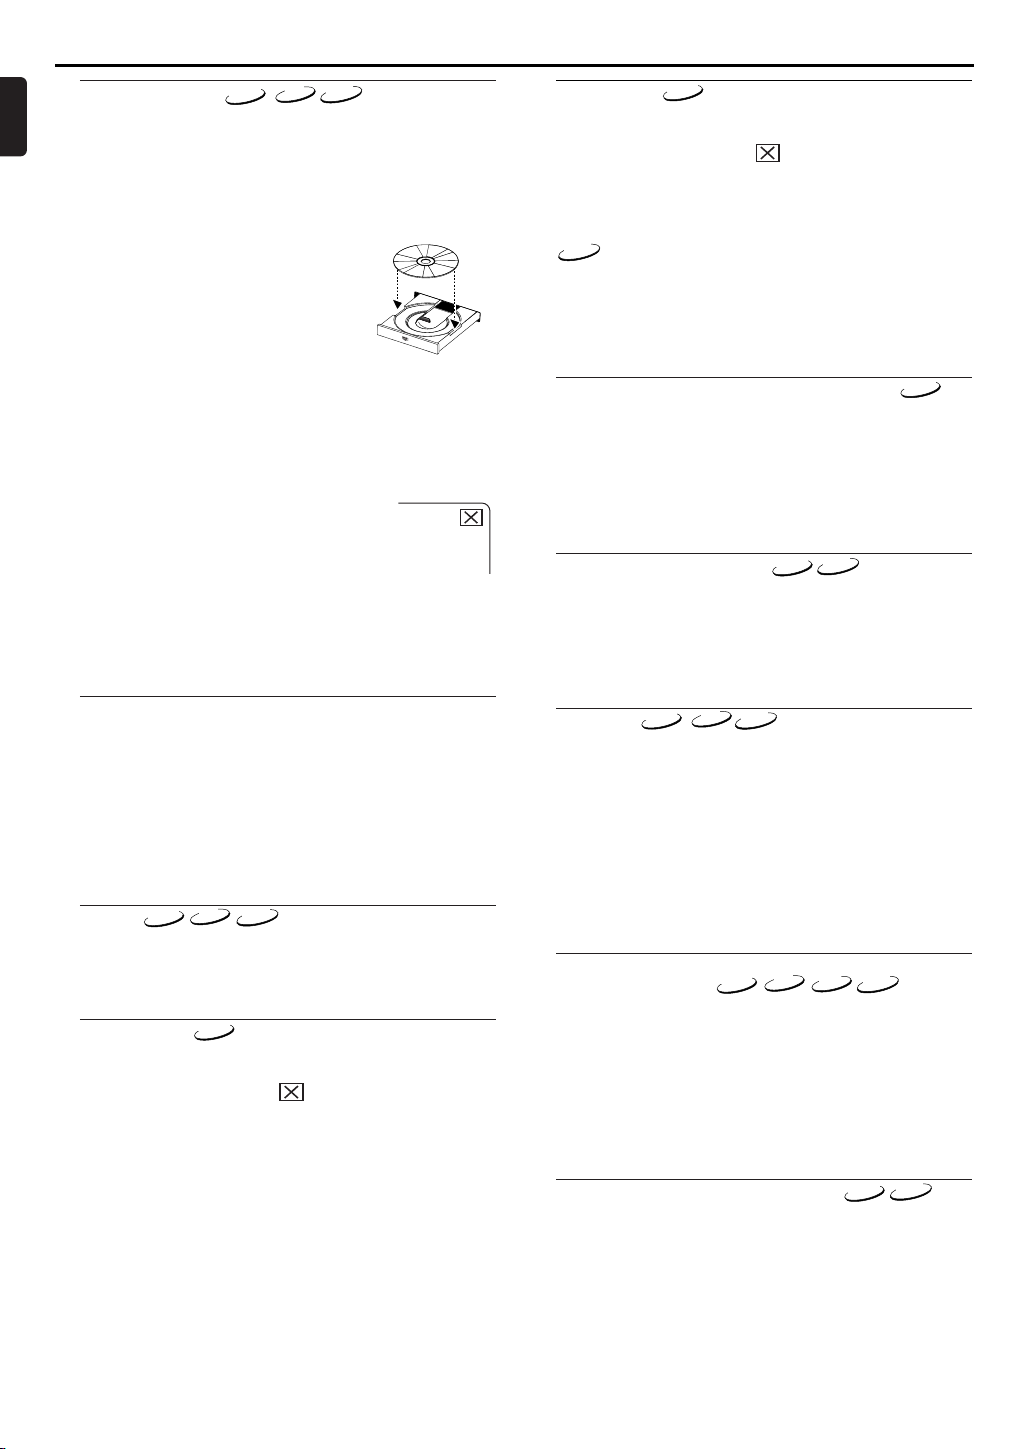
Basic Playback
Getting Started
Turn on the power of the TV, amplifier and any other components which are connected to the DVD/VCR.
Make sure the TV and audio receiver (commercially available)
are set to the correct channel.
1 Press STANDBY-ON.
2 Press DVD, then OPEN/CLOSE to open disc loading tray.
3 Place the chosen disc in the tray, with the
label facing up.
4 Press PLAYBB.
• The tray will close automatically, and
playback will then start from the first
chapter or track of the disc. If the playback does not start automatically, press
PLAY B.
• When you playback the DVD which a title menu is recorded,
it may appear on the screen. In this case, refer to “TITLE
MENU”.
5 Press STOP C to stop playback.
Notes:
- A “prohibited icon” may appear at the top-right on the
TV screen during operation, warning that
a prohibited operation has been encountered by the DVD/VCR or the disc.
- With DVDs that use some titles for playback program signals, playback may start
from the second title, or it may skip these titles.
- During the playback of two layered disc, pictures may
stop for a moment.This happens when the 1st layer
switches to the 2nd layer.This is not a malfunction.
Title Menu
1 Press DVD, then TITLE.
• The title menu will appear.
2 If the feature is not available, symbol may appear on the
TV screen.
3 Press Arrow ( L / K / B / s ) to select an item, and OK to
confirm selection.
• Playback will begin at the selected Title.
1 The title menu will appear.
2 Press numerical key pads to select the menu.
• Playback will start.
Calling Up a Menu During Playback
• Press DISC/VCR MENU to call up the DVD main menu.
• Press TITLE to call up the title menu.
Note:
- Contents of menus and corresponding menu operations
may vary between discs. Refer to the manual accompanying the disc for details.
Step by Step Playback
1 During playback, press PAUSE k.
• Playback will pause and sound will be muted.
2 The disc goes forward by one frame each time PAUSE is
pressed.
3 To exit step by step playback, press PLAY B.
General Features
DVD or video CDs may contain menus to navigate the disc
and access special features. Press the appropriate numerical key
pads or use Arrow ( L / K / B / s ) to highlight your selection
in the DVD main menu and press OK to confirm.
Note:
- Unless stated, all operations described are based on
remote control use. Some operations can be carried out
using the menu bar on the TV screen.
Pause
1 During playback, press PAUSE k.
• Playback will pause and sound will be muted.
2 To continue playback, press PLAYBB.
Disc Menus
1 Press DVD, then DISC/VCR MENU.
• The DVD main menu will appear.
2 If the feature is not available, symbol may appear on the
TV screen.
3 If disc menu is available on the disc, audio language, subtitle
options, chapters for the title and other options will appear for
selection.
4 Press Arrow ( L / K / B / s ) to select an item, and OK to
confirm selection.
Resume
1 During playback, press STOP C.
• Resume message will appear on the TV screen.
2 Press PLAY B, playback will resume from the point at which
playback was stopped.
• To cancel resume, press STOP C twice.
Note:
- If you turn the DVD/VCR off, Resume function will be
cancelled.
- Some Video CDs with PBC function resume playback
from the beginning of the track.
Fast Forward / Reverse Search
1
During playback, press
FWDgorREVh
repeatedly to select
the required forward or reverse speed: x2, x8, x50, x100.
• For video CDs, the speed is fixed at
• For audio CDs, the speed is fixed at
• For MP3, the speed is fixed at
x2, x8, x30.
x16.
x8.
2 To return to normal playback, press PLAY B.
Slow Forward / Slow Reverse
1 During playback, press PAUSE k.
2 Press g or h .
•
Slow motion playback will begin and sound will be muted.
3 Press g or h repeatedly to select the required speed:
1/16, 1/8, 1/2 of the normal playback.
4 To return to normal playback, press PLAY B.
Note:
- Slow Reverse is not available on video CDs.
14
Page 15
Playing a Disc
DVD-V
CD
/2
DVD-V
DVD-V
DVD-V
CD
CD
VCD
VCD
VCD
VCD
VCD
CD
MP3
Zoom
The Zoom function allows you to enlarge the video image and to
pan through the enlarged image.
1 Press ZOOM during playback.
• Playback will continue.
2 Press ZOOM repeatedly to select the required zoom factor:
x2, x4 or OFF.
3 Use Arrow ( L / K / B / s )to move the zoomed picture
across the screen.
4 To exit zoom mode, press ZOOM to OFF.
Notes:
- Zooming function does not work while disc menu is
shown.
- x4 zoom is not available on some discs.
- only x2 zoom is available on video CDs.
Track
(without PBC function)
There are three ways to begin playback on an Audio CD at a specific Track.
Using the Numerical key pads
1 Press numerical key pads to enter the desired Track number.
• Playback will start at the selected track.
• For single digit tracks (1-9), press a single number (eg. track 3,
press 3).
•
To play track 26, press +10, 2, 6 on the numerical button.
Using the SEARCH MODE
1 Press SEARCH MODE.
• The track search display appears.
2 Within 30 seconds, select a desired track number using
numerical key pads. For single digits press “0” first.
• Playback will start at the selected track.
Using the SKIP HG
During playback, press
repeatedly to skip subsequent tracks. Press
SKIP
G
to move to the next track. Press it
SKIP
H
to go back to
the beginning of the current track. Press it repeatedly to go to the
previous tracks
•
.
Track number will appear briefly on the DVD display panel.
• If SKIP is pressed while the playback is paused, the playback
will be paused again after skipping to the next track.
Note:
• SKIP HGare not available when playback is
stopped.
Title / Chapter Search
1 Press SEARCH MODE once for
the Chapter search, twice for the
Title search during playback.
2 Enter the desired chapter/title
number using numerical key pads.
Time Search
1 During playback, press SEARCH MODE three times
(CD/VCD: twice) to display the Time Search on the TV screen.
2 Within 30 seconds, enter a desired disc time using numerical
key pads.
• Playback will start at the specified time.
3 Press CLEAR to erase the incorrect input.
(without PBC function)
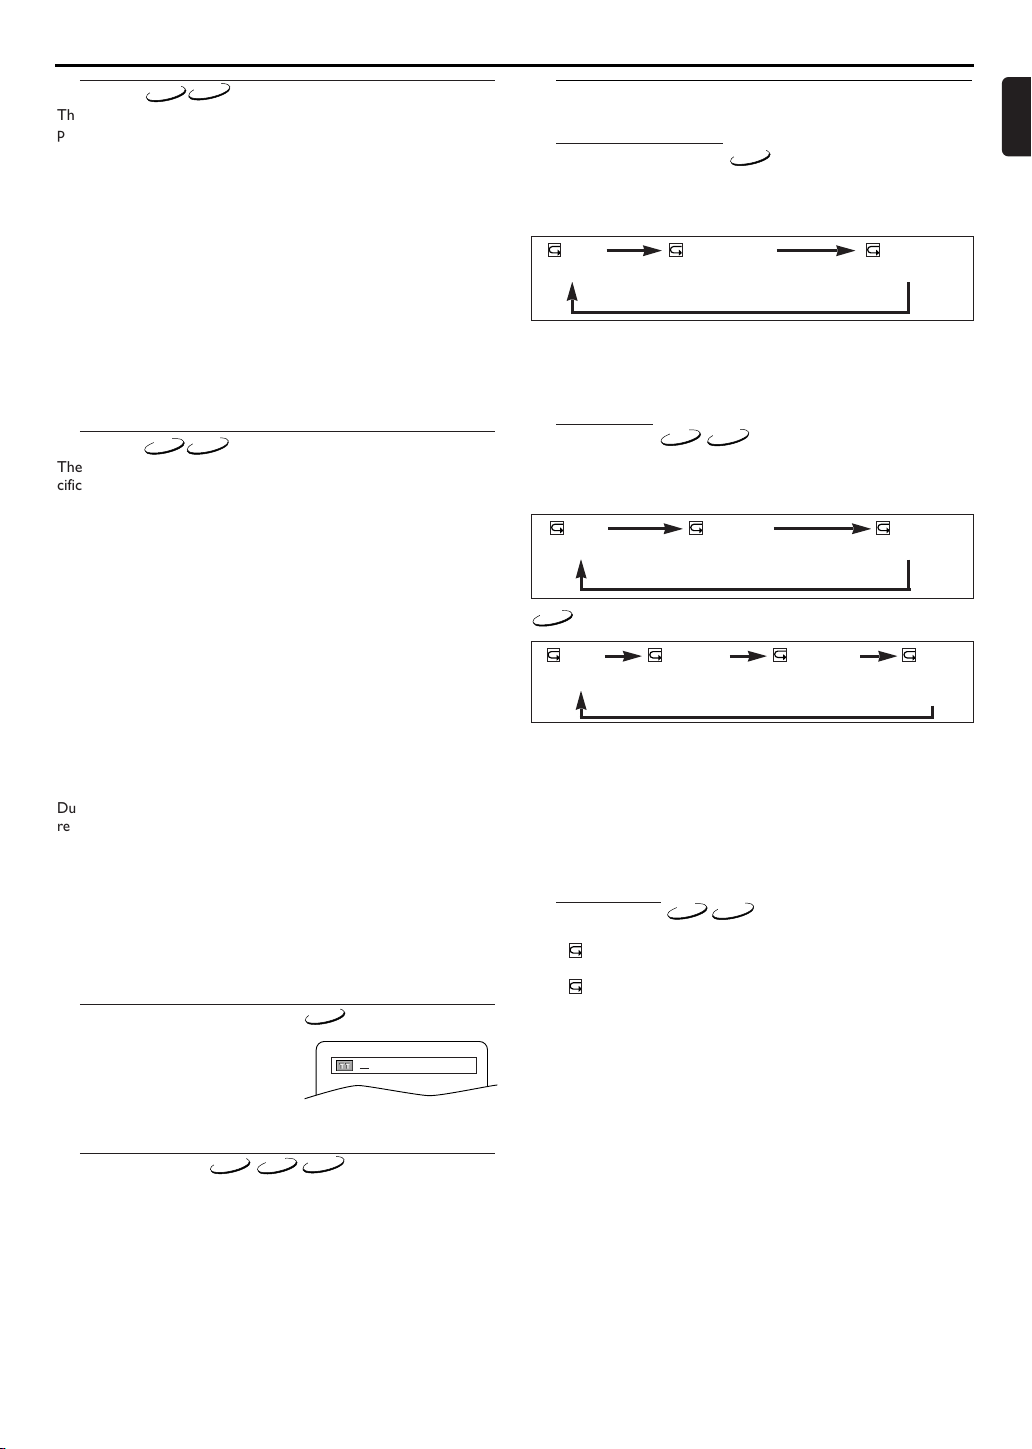
Repeat
• REPEAT are available only during playback.
Repeat Title / Chapter
To activate the repeat function, press REPEAT during playback.
• The repeat mode changes as described below every time you
press the button.
CHAPTER TITLEOFF
(repeat off)
Notes:
- Repeat Title/Chapter is not available with some scenes.
- The REPEAT setting will be cleared when moving to
other title or chapter.
Repeat Track
To activate the repeat function, press REPEAT during playback.
• The repeat mode changes as described below every time you
press the button.
(repeat
(repeat off)
Notes:
- The REPEAT setting will be cleared when moving to
other track.
- Repeat playback does not function during repeat A-B
playback.
- Repeat playback is not available when you play the
Video CD with PBC function.
Repeat at A-B
1 Press REPEAT A-B at your chosen starting point.
• A- appears briefly on the TV screen.
2
Press REPEAT A-B again at your chosen end point.
• A-B appears briefly on the TV screen, and the repeat
sequence begins.
3 To exit the sequence, press REPEAT A-B.
Notes:
- The repeat A-B section can only be set within the current title (for DVDs), or current track (for audio CDs).
- Repeat A-B is not available with some scenes in DVD.
- To cancel the A point which was set, press CLEAR.
- Repeat A-B playback does not function during title,
chapter, track or all repeat playback.
(current chapter repeat) (current title repeat)
(without PBC function)
TRACK ALLOFF
off)
(current track repeat) (entire disc repeat)
TRACK ALLOFF
(current track
repeat)
GROUP
(entire group
repeat)
(entire disc
repeat)
English
15
Page 16
Playing a Disc
OK
T
T
T
T
T
T
T
T
T
TOTAL
3
MP3
MP3
MP3
DVD-V
CD
VCD
VCD
English
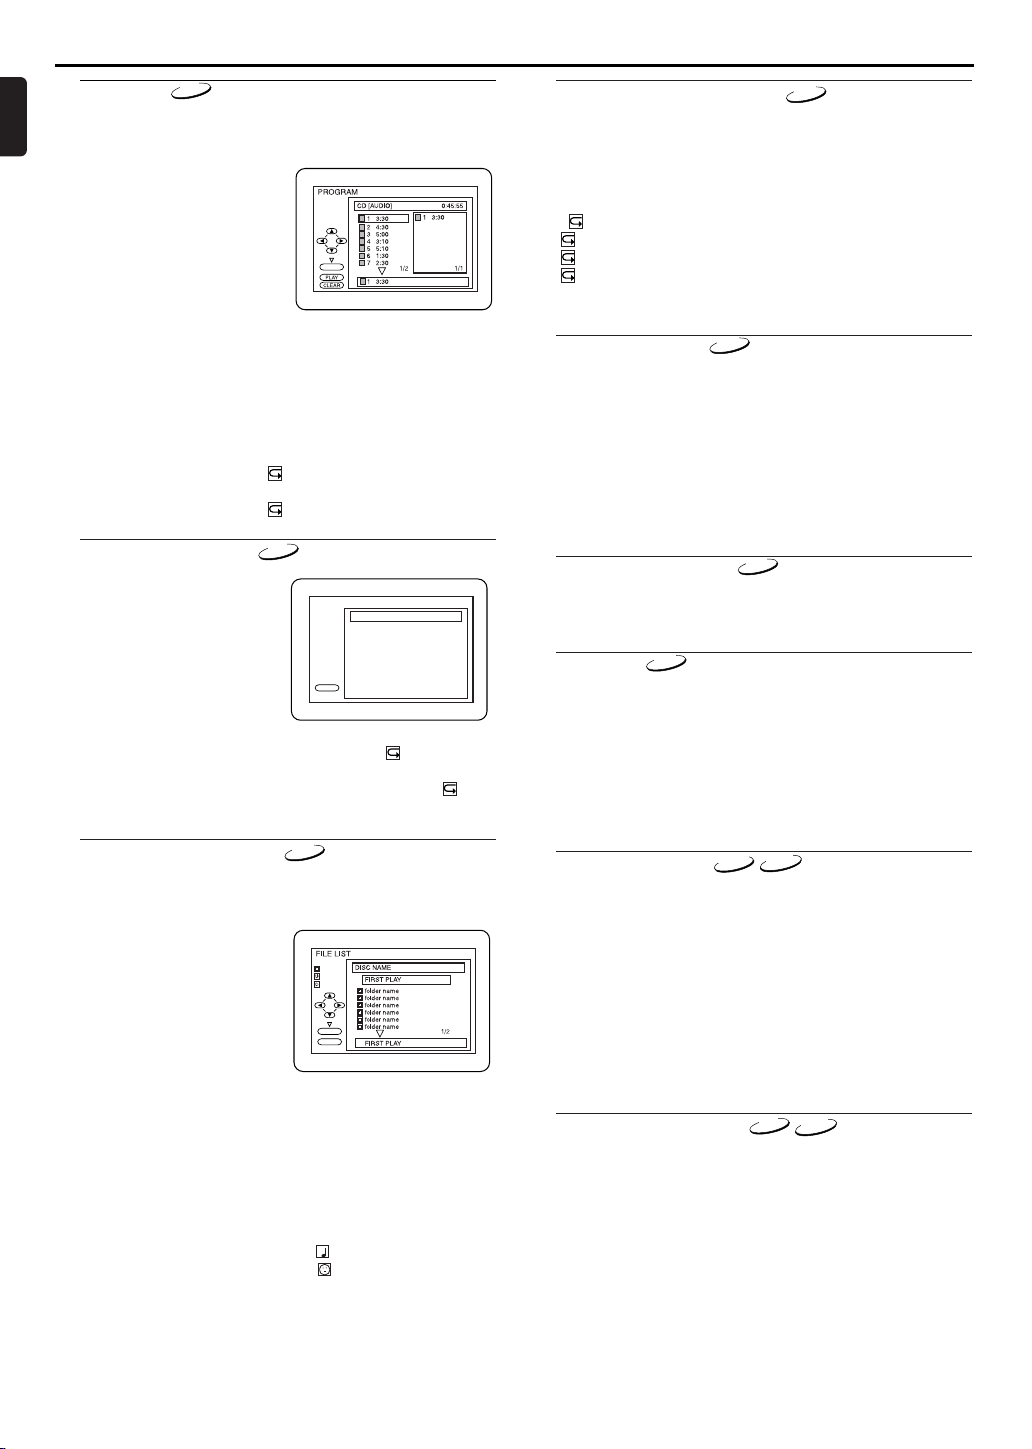
Program
You may determine the order in which tracks will play.
1 In stop mode press MODE.
• The PROGRAM screen will appear.
2 Press ▲ or ▼ to select a track,
then press OK.
• Press CLEAR to erase the The
most recently entered program.
3 Press PLAY B to play the pro-
grammed tracks.
Notes:
- While the program is being
played back, the STOP C works as follows.
- Press STOP C once and then PLAYBagain, playback will
restart from the point where STOP C was pressed.
(Program continued)
- Press STOP C twice and then PLAYBagain, playback will
restart from the track in the usual way. (Program cleared)
- Up to 99 programs can be entered.
- If you like to repeat the current track in the program, press
REPEAT repeatedly until TRACK appears during playback. If you like to repeat the entire program press
REPEAT repeatedly until ALL appears during playback.
Random Playback
This shuffles the playing order
of tracks instead of playback in
the sequence.
1 In stop mode, press MODE
twice.
•
RANDOM screen appears
2 Press PLAY B to start ran-
dom playback.
Notes:
- If you like to repeat the current track in the random
selection, press REPEAT repeatedly until TRACK
appears during playback. If you like to repeat the entire
random selection press REPEAT repeatedly until ALL
appears during playback.
MP3/JPEG Playback
When a CD with MP3 or JPEG files is inserted in the
DVD/VCR, the MP3 or JPEG menu will appear on the TV
screen, and number of tracks is displayed on the front panel.
1 In stop mode, press K or L to
select the desired group, MP3
track or JPEG file.
• If a group is selected, press
PLAY B or OK to go on to
the track selection screen.
Press K or L to choose a
track, then press PLAY B or
OK.
• If a track is selected, press PLAY B or OK to start playing
tracks. Starting from the one you’ve just chosen the subsequent tracks will be played.
• Choose FIRST PLAY to start playback from the beginning of
the listed tracks.
• Press TITLE to return to the first item.
2 Press STOP C to stop playback.
Notes:
- Folders are known as Groups; files are known as Tracks.
- MP3 files are accompanied by icon.
- JPEG files are accompanied by icon.
- Maximum of 255 folders can be recognized.
- Maximum of 256 files can be recognized.
- Up to 8 hierarchies can be created.
This player recommends the use of files recorded at the below
specifications:
• Sampling frequency: 44.1kHz or 48kHz
• Constant bit rate: 112kbps ~ 320kbps.
16
CD
On-Screen Information
MP3
You can check the MP3 files during playback.
1 Press DISPLAY.
• The name of the file currently in play will be displayed.
2 Press DISPLAY again to show the track number, the elapsed
time, the repeat status, and the playback status at the top of
the screen.
• will be displayed when the repeat play has been selected.
T - indicates Track repeat
G - indicates Group (folder) repeat
A - indicates Disc repeat
3 Press DISPLAY again to exit.
Track Selection
1 Press SEARCH MODE during playback.
• The FILE LIST will appear.
2 Select a desired track using Arrow
(L/K/B/s)
.
• Press B when you want to go to the next hierarchy.
• Press s when you want to go back to the previous hierarchy.
3 Press PLAY B to start playing
Notes:
- Press SEARCH MODE to EXIT.
- Some selections may take a while to be recognized.
CD
Random Playback
RANDOM
CD [AUDIO] TOTAL 0:45:55
RANDOM PROGRAM
.
PLAY
MP3
FOLDER
MP3
JPEG
-- no indication --
OK
PLAY
1 Press MODE twice while playback is stopped.
2 Press PLAY B to play the tracks in random order.
Program
This feature allows you to program a mp3 disc to play in a
desired sequence.
1 Press MODE during playback is stopped.
• The PROGRAM screen will appear.
2 Press K or L to select a track, then press OK, to save it in a
program.
• Press CLEAR to erase the incorrect input.
3 Press PLAY B to start programmed playback.
Audio Language
The DVD/VCR allows you to select a language during DVD
disc (if multi language available) playback.
1 Press AUDIO during playback.
2 Press AUDIO repeatedly to select your desired language.
Notes:
- Pressing AUDIO may not work on some DVDs with multiple
audio languages (e.g. DVDs which allow audio language
setting on the disc menu).
- Some discs allow audio language setting on the disc menu.
(Operation varies between discs, so refer to the manual
accompanying the disc.)
Stereo Sound Mode
1 Press AUDIO repeatedly during playback to select between
STEREO, L-CH or R-CH.
STEREO - both right and left channels are active (stereo)
L-CH - only left channel is active
R-CH - only right channel is active
Note:
- If the Virtual Surround setting is ON, the sound mode
will be fixed to STEREO, and can not be changed.
Page 17
DVD-V
PARENTAL
PARENTAL LEVEL ALL
Playing a Disc
CD
DVD-V
DVD-V
DVD-V
DVD-V
CD
VCD
VCD
Subtitle Language
The DVD/VCR allows you to select a language for subtitle during DVD disc (if available) playback.
1 Press DVD, then SUBTITLE during playback.
2 Press SUBTITLE repeatedly to select your desired subtitle lan-
guage.
• The selected language will be displayed on the display bar at
the top of the screen.
3 To turn off subtitles, press SUBTITLE repeatedly until OFF
appears.
Notes:
- Some discs allow subtitle language setting on the disc
menu. (Operation varies between discs, so refer to the
manual accompanying the disc.)
- If the desired language is not shown after pressing SUBTITLE several times, the disc does not have subtitles in that
language.
- If you choose a Language that has a 3 letter language
code, the code will be displayed every time you change the
Subtitle language setting. If you choose any other languages, ‘---’ will be displayed instead. (Refer to back inside-
cover.)
Camera Angle
Some DVD discs contain scenes which have been shot simultaneously from various angles.You can change the camera angle
when the ( ) icon appears on the screen.
1 Press DVD, then ANGLE during playback.
• The selected angle will be displayed on the display bar at the
top of the screen.
2 Press ANGLE repeatedly to select your desired angle.
Changing the On-Screen Display
You can check information about the current
disc by pressing DISPLAY on the remote
control.
1 Press DISPLAY during playback to show current Chapter.
a The elapsed and remaining playing time of the current chapter will be displayed.
2 Press DISPLAY again to show current Title.
a The elapsed and remaining playing time of the current title
will be displayed.
3 Press DISPLAY the third time.
a The BIT RATE, layer number (if available) and the current
repeat setting will be displayed.
4 Press DISPLAY the fourth time to remove the display.
(without PBC function)
1 Press DISPLAY during playback, the current Track will be dis-
played on the TV screen.
a The elapsed and remaining playing time of the current total
track will be displayed.
2 Press DISPLAY again to show current Total Track.
a The elapsed and remaining playing time of the current total
track will be displayed.
3 Press DISPLAY the third time to remove the display.
Parental Control
Parental Control limits the disc viewing that exceed your settings. (with a password or playback will stop.)
This feature allows you to prevent discs with alternative scenes
from being played by your children.
Parental Level
Parental Level allows you to set the rating level of your DVD
discs. Playback will stop if the disc’s ratings exceed the level
you set.
1 Press SYSTEM MENU in STOP mode.
2 Press B to select CUSTOM, then press OK.
3 Press s or B to select PARENTAL, then press OK.
4 Enter your four-digit password then press OK.
5 Press K or L to select PARENTAL
LEVEL, then press OK.
6 Press K or L to select the desired
level, then press OK.
7 Press SYSTEM MENU to exit.
Notes:
- When doing this for the first time, enter any 4 digits.
(except for 4737) That number will be used as the password from the second time onward.
- To change the password, press K or L to select CHANGE,
then press OK. Enter the four-digit pass-word, then press
OK.
- With some DVDs, it may be difficult to find if they are compatible with parental lock. Be sure to check if the parental
lock function operates in the way that you have set.
- Record the password in case you forget it.
If You Forget the Password
1 Press 4, 7, 3, 7 at step 4.
• Password will be cleared and parental level will be set to ALL.
2 Proceed the above steps 4-5 again.
Control Levels
ALL
All parental lock is cancelled.
Level 8
DVD software of any grade (adult/general/children) can be
played back.
Levels 7 to 2
Only DVD software intended for general use and children can
be played back.
Level 1
Only DVD software intended for children can be played back,
with those intended for adult and general use prohibited.
Marker Setup Screen
Use markers to memorise your favourite places on a disc.
1
Press SEARCH MODE four times (CD: three times) during playback.
•
The display screen and Markers will appear on the TV screen.
2
Press s or B to select 1, 2, 3, 4, 5, 6, 7, 8, 9, or 10 and ensure that
“-- -- : --” appears in the display.
3 When reaches the desired point, press OK.
• The Title or Track and elapsed playing time will appear in the
TV screen.
4 To return to the Marker later, press SEARCH MODE four times
(CD/VCD: three times)
the desired marker, then press OK.
Notes:
-
Opening the disc tray or turning off the power or select
AC at step 2 and press OK will erase all Markers.
-
To clear a marker, using s or B, position the cursor on
to the marker number to be cleared and press CLEAR.
-
You can mark up to 10 points.
5 Press SEARCH MODE or RETURN to exit.
during playback and s or B to choose
(without PBC function)
English
17
Page 18
DVD Setup
AUDIO
DRC OFF
DOLBY DIGITAL ON
DOWN SAMPLING ON
MPEG OFF
DVD-V
OFF
CD
MP3
VCD
English
Audio Setting
Choose the appropriate Audio settings for your equipment as it
only affect during the playback of DVD discs of the DVD/VCR.
1 Press SYSTEM MENU in STOP mode.
2 Press B to select CUSTOM, then press OK.
CUSTOM mode will appear.
3 Press s or B to select AUDIO, then OK to confirm.
4 Press K or L to select the below items, then press OK.
DRC (Dynamic Range Control) :
To compress the range of sound volume.
The default setting is OFF.
Dolby Digital :
QUICK
Set to ON when the player is connected to Dolby Digital Decoder.
(ON : Output by Dolby Digital)
(OFF : Convert the Dolby Digital to PCM)
The default setting is ON.
DOWN SAMPLING :
Set to ON when outputting in 48kHz.
The default setting is ON.
When playing disc with copyright Protection
• If you select OFF, copyright protection will be activated and
sound will be down sampled at 48kHz.
MPEG :
Set to ON when the player is connected MPEG Decoder.
(ON: Output by MPEG)
(OFF: Convert the MPEG to PCM)
• The default setting is OFF.
5 Press SYSTEM MENU to exit.
Virtual Surround
You can enjoy stereophonic visual space on your existing stereo
system.
1 Press MODE during playback.
2 Press OK to set it 1(Natural effect),
2(Emphasized effect) or OFF.
3 Press MODE or RETURN to exit.
Note (for CD play only):
-
Virtual Surround will not be effective if the sound mode
is set to something other than STEREO.
Language Setting
Language options are not available with some discs.
1
Press SYSTEM MENU in STOP mode.
2
Press B to select CUSTOM, then press OK.
• CUSTOM mode will appear.
3 Press s or B to select LANGUAGE, then OK to confirm.
4 Press K or L to select the below items, then press OK.
AUDIO :
Sets the audio language.
SUBTITLE :
Sets the subtitle language.
DISC MENU :
Sets the language for DVD Menu.
PLAYER MENU :
Sets the language for the On-Screen display.
DVD-V
QUICK
5 Press K or L to select a setting, then press OK.
• If OTHER is selected in the AUDIO, SUBTITLE or DISC
MENU screen, press four-digit number to enter the code for
the desired language. (Refer to the language code list on back
inside cover).
• Only the languages supported by the disc can be selected.
6 Press SYSTEM MENU to exit.
Note:
- Language Setting for Audio and Subtitle is not available
with some discs.Then use AUDIO and SUBTITLE. Details
are on pages 16-17.
Display Setting
DVD-V
Use markers to memorise your favourite places on a disc.
1
Press SYSTEM MENU in STOP mode.
2
Press B to select CUSTOM, then press OK.
• CUSTOM mode will appear.
3 Press s or B to select DISPLAY, then OK to confirm.
4 Press K or L to select the below items, then press OK.
TV Aspect :
QUICK
Press K or L for an item selection,
then press OK.
Select 4:3 LETTER BOX for a black
bars appears on top and bottom of
DISPLAY
TV ASPECT
ANGLE ICON ON
AUTO POWER OFF ON
the screen.
Select 4:3 PAN & SCAN for a full height picture with both sides
trimmed.
Select 16:9 WIDE if a wide-screen TV is connected to the
DVD/VCR.
The default setting is 4:3 LETTER BOX.
Angle Icon :
Press OK repeatedly to turn Angle icon ON or OFF.
The default setting is ON.
Auto Power Off :
Press OK repeatedly to turn Auto Power off ON or OFF.
The default setting is ON and it will turn the DVD/VCR to off
automatically after 35 minutes of no use.
5 Press SYSTEM MENU to exit.
Notes:
- Be sure to press SYSTEM MENU, or the setting will not
work.
- You can also choose the item by pressing the numbers.
4:3 LETTER BOX
Maintenance
Cleaning the Cabinet
• Use a soft cloth slightly moistened with a mild detergent solution. Do not use a solution containing alcohol, spirits, ammonia or abrasives.
Cleaning Discs
• When a disc becomes dirty, clean it with a cleaning cloth.Wipe the disc from the centre out. Do not wipe in a circular motion.
• Do not use solvents such as benzine, thinner, commercially available cleaners, or antistatic spray intended for analogue records.
Cleaning the disc lens
• After prolonged use, dirt or dust may accumulate at the disc lens.To ensure good playback quality, clean the disc lens with Philips CD
Lens Cleaner or any commercially available cleaner. Follow the instructions supplied with the cleaner.
18
Page 19
Specifications
PLAYBACK SYSTEM
DVD Video,Audio CD, DVD+RW, DVD-R/RW,
DVD+R, CD-R/RW,VIDEO CD
TV STANDARD (PAL/50Hz) (NTSC/60Hz)
Number of lines 625 525
Playback Multistandard (PAL/NTSC)
VIDEO PERFORMANCE
Video output 1 Vpp into 75 ohm
RGB (SCART) output 0.7 Vpp into 75 ohm
Video Shift Left/Right
VIDEO CASSETTE RECORDER
Video heads Four heads Hi-Fi
Antenna VHF/UHF - 75 ohm
VHF output 75 ohm unbalanced
AUDIO FORMAT
Digital MPEG Compressed
Dolby Digital 16, 20, 24 bits
Analogue Stereo Sound
Dolby Surround-compatible downmix from Dolby Digital multi-channel
sound
3D Sound for virtual 5.1 channel sound on 2 speakers
AUDIO PERFORMANCE
DA Converter 24 bits
PCM fs, 44.1, 48, 96 kHz
Digital
Troubleshooting
DVD fs 96 kHz 20 Hz - 44 kHz
CD fs 44.1 kHz 20 Hz - 20 kHz
Signal-Noise (1kHz) 70 dB
Dynamic Range (1kHz) 70 dB
Distortion and Noise (1kHz) 0.1%
CONNECTIONS
SCART 2x Euroconnector
S-Video OutputMini DIN, 4 pins
Audio L+R output 2x Cinch (white/red)
Digital Output 1 coaxial, 1 optical
CABINET
Dimensions (w x h x d) 435 x 99 x 218 mm
Weight Approximately 3.8 Kg
POWER SUPPLY (UNIVERSAL)
Power inlet 220 ~ 240 V , 50 Hz
Power usage Approx. 30 W
Power usage standby 9.2 W
Specifications subject to change without prior notice
fs 48 kHz 20 Hz - 22 kHz
IEC958 for CDDA / LPCM
IEC1937 for MPEG1/2, Dolby
Digital
(standby : 5.0 W)
(When CLOCK DISPLAY set to OFF.)
English
Problem
No power
No picture
Distorted picture
Completely distorted picture or
black/white picture with DVD
No sound or distorted sound
No audio at digital output
No DTS audio at analog output
No sound and picture
Picture freezes momentarily during
playback
Disc can’t be played
No return to start-up screen when disc is
removed
The DVD/VCR does not respond to the
remote control
Buttons do not work or DVD/VCR stops
responding
DVD/VCR does not respond to some operating
commands during playback.
DVD/VCR cannot read CDs/DVDs
The DVD/VCR switches from DVD mode to
VCR mode after 35 minutes
The VCR do not record a TV program
The DVD/VCR do not perform a timer
The motor (cylinder) rotates even when tape
playback is stopped
You cannot insert a tape
You cannot remove a tape
DVD/VCR ejects the tape when you press
RECORD or TIMER SET for a timer recording.
Solution
– Check if the AC power cord is properly connected.
– Check if the TV is switched on.
– Check the video connection.
– Sometimes a small amount of picture distortion may appear.This is not a malfunction.
– Connect DVD/VCR directly to the TV.
– Make sure the disc is compatible with the DVD/VCR.
– Adjust the volume.
– Check that the speakers are connected correctly.
– Check the digital connections.
– Check if the audio format of the selected audio
language matches your receiver capabilities.
– Use a DIGITAL AUDIO OUT jack when outputting the DTS audio.
– Check that the SCART cable is connected to the correct device (See Connecting to a TV)
– Check the disc for fingerprints/scratches and clean with a soft cloth wiping from centre
edge.
– This may happen when you use the disc recorded in the non-seamless manner.This is not a
malfunction.
– Ensure the disc label is facing up.
– Check if the disc is defective by trying another disc.
– Reset the unit by switching the DVD/VCR off, then on again.
– Aim the remote control directly at the sensor on the front of the DVD/VCR.
– Reduce the distance to the DVD/VCR.
– Replace the batteries in the remote control.
– Re-insert the batteries with their polarities (+/– signs) as indicated.
– To completely reset the DVD/VCR, unplug the AC cord from the AC outlet for 5-10 sec-
onds.
– Operations may not be permitted by the disc.
Refer to the instructions of the disc.
– Use a commonly available cleaning CD/DVD to clean the lens before sending the DVD/VCR
for repair.
– Playback will stop for more than 35 minutes and no button is pressed.
– Make sure the tape has a record tab.
– Make sure the DVD/VCR is in VCR position.
– Check the TV and the DVD/VCR channel are similar.
– Make sure the recording start and stop times are set correctly.
– Make sure the tape has a record tab.
– Make sure the clock is set.
– The DVD/VCR may not perform or continue a timer recording if the power fails for more
than 1 minute.
– To enable quick play mechanism, the cylinder will rotate for about five minutes.This is nor-
mal.
– Insert a tape, window side up with the record tab facing you.
– Gently push on the center of the tape when putting into the DVD/VCR.
– Make sure the power plug is completely connected to a power outlet.
– Make sure the tape has a record tab.
If you are unable to remedy a problem by following these hints, consult your dealer or service centre (HOTLINE).
19
Page 20

Language Code Language Code Language Code Language Code
A-B
Abkhazian 4748
Afar 4747
Afrikaans 4752
Albanian 6563
Amharic 4759
Arabic 4764
Armenian 5471
Assamese 4765
Aymara 4771
Azerbaijani 4772
Bashkir 4847
Basque 5167
Bengali;Bangla 4860
Bhutani 5072
Bihari 4854
Bislama 4855
Breton 4864
Bulgarian 4853
Burmese 5971
Byelorussian 4851
C-E
Cambodian 5759
Catalan 4947
Chinese [CHI] 7254
Corsican 4961
Croatian 5464
Czech 4965
Danish [DAN] 5047
Dutch [DUT] 6058
English [ENG] 5160
Esperanto 5161
Estonian 5166
F-H
Faroese 5261
Fiji 5256
Finnish [FIN] 5255
French [FRE] 5264
Frisian 5271
Galician 5358
Georgian 5747
German [GER] 5051
Greek [GRE] 5158
Greenlandic 5758
Guarani 5360
Gujarati 5367
Hausa 5447
Hebrew 5569
Hindi 5455
Hungarian [HUN] 5467
I-K
Icelandic [ICE] 5565
Indonesian 5560
Interlingua 5547
Interlingue 5551
Inupiak 5557
Irish [IRI] 5347
Italian [ITA] 5566
Japanese [JPN] 5647
Javanese 5669
Kannada 5760
Kashmiri 5765
Kazakh 5757
Kinyarwanda 6469
Kirghiz 5771
Kirundi 6460
Korean [KOR] 5761
Kurdish 5767
L-N
Laothian 5861
Latin 5847
Latvian;Lettish 5868
Lingala 5860
Lithuanian 5866
Macedonian 5957
Malagasy 5953
Malay 5965
Malayalam 5958
Maltese 5966
Maori 5955
Marathi 5964
Moldavian 5961
Mongolian 5960
Nauru 6047
Nepali 6051
Norwegian [NOR] 6061
O-R
Occitan 6149
Oriya 6164
Oromo(Afan) 6159
Panjabi 6247
Pashto;Pushto 6265
Persian 5247
Polish 6258
Portuguese [POR] 6266
Quechua 6367
Rhaeto-Romance 6459
Romanian [RUM] 6461
Russian [RUS] 6467
S
Samoan 6559
Sangho 6553
Sanskrit 6547
Scots Gaelic 5350
Serbian 6564
Serbo-Croatian 6554
Sesotho 6566
Setswana 6660
Shona 6560
Sindhi 6550
Singhalese 6555
Siswat 6565
Slovak 6557
Slovenian 6558
Somali 6561
Spanish [SPA] 5165
Sundanese 6567
Swahili 6569
Swedish [SWE] 6568
T
Tagalog 6658
Tajik 6653
Tamil 6647
Tatar 6666
Telugu 6651
Thai 6654
Tibetan 4861
Tigrinya 6655
Tonga 6661
Tsonga 6665
Turkish [TUR] 6664
Turkmen 6657
Twi 6669
U-Z
Ukrainian 6757
Urdu 6764
Uzbek 6772
Vietnamese 6855
Volapuk 6861
Welsh 4971
Wolof 6961
Xhosa 7054
Yiddish 5655
Yoruba 7161
Zulu 7267
Page 21
PHILIPS NORGE AS
Sandstuveien 70,
PO Box 1, Manglerud
N-0612 Oslo
NORWAY
Phone: 2274 8250
OY PHILIPS AB
Sinikalliontie 3,
02630 Espo
Helsinki
FINLAND
puh. 09 615 80 250
PHILIPS KUNDTJÄNST
Kollbygatan 7,
Akalla,
16485 Stockholm
SWEDEN
Phone: 08-598 52 250
PHILIPS
Österreichische Philips Industrie
GmbH
Triesterstrasse 64
1101 Wien
AUSTRIA
Tel: 0810 001 203
PHILIPS INFO CENTER
Alexanderstrasse 1
20099 Hamburg
GERMANY
Tel: 0180-53 56 767
SERVICE CONSOMMATEURS
PHILIPS
BP 0101
75622 Paris Cédex 13
FRANCE
Phone: 0825-889 789
PHILIPS PORTUGUESA, S.A.
Consumer Information Center
Rua Dr.António Loureiro Borge, nr.5
Arquiparque, Miraflores
P-2795 L-A-VEHLA
PORTUGAL
Phone: 021-4163063
PHILIPS CE,The Philips Centre,
420 - 430 London Road,
Croydon, Surrey
CR9 3QR
UNITED KINGDOM
Phone: 0208-665-6350
CONSUMER SERVICES
Prags Boulevard 80. PO Box 1919,
DK-2300 Copenhagen S
DANMARK
TIf: 32 88 32 00
PHILIPS POLSKA
AL. Jerozolimskie 195B
02-222 Warszawa
POLSKA
Tel.: (022)-571-0-571
PHILIPS SERVICE
V Mezihori 2
180 00 Prage
CZECH REPUBLIC
Phone: (02)-3309 9240
PHILIPS Iberia, S.A.
C/Martinez Villergas, 49
28027 MADRID
SPAIN
Phone: 902-11 33 84
PHILIPS ELECTRONICS
IRELAND LIMITED
Consumer Information Center
Newstead, Clonskeagh
DUBLIN 14
Phone: 01-7640292
PHILIPS CONSUMER
ELECTRONICS
Servizio Consumatori
Via Casati 23
20052 Monza - Milano
ITALY
Phone: 800 820026
PHILIPS MÁRKASZERVIZ
Kinizsi U 30 - 36
Budapest 1092
HUNGARY
Phone: (01)-2164428
PHILIPS REPRESENTATION
OFFICE
Ul. Usacheva 35a
119048 MOSCOW
RUSSIA
Phone: 095-937 9300
PHILIPS INFO CENTER
Fegistrasse 5
8957 Spreitenbach
SUISSE
Tel.: 0844-800 544
PHILIPS CUSTOMER CARE
CENTER
Twee Stationsstraat 80/
80 Rue des Deux Gares
1070 BURSSEL/BRUXELLES
BELGIUM (for BENELUX)
Tel: 070-222303
Meet Philips at the Internet
http://www.philips.com
The products and services described herein are not necessarily
available in all countries
Due to continuous product improvements this document is
subject to change without notice.
Printed in China
0VMN03761 / H9520ED*****
 Loading...