

Page 1
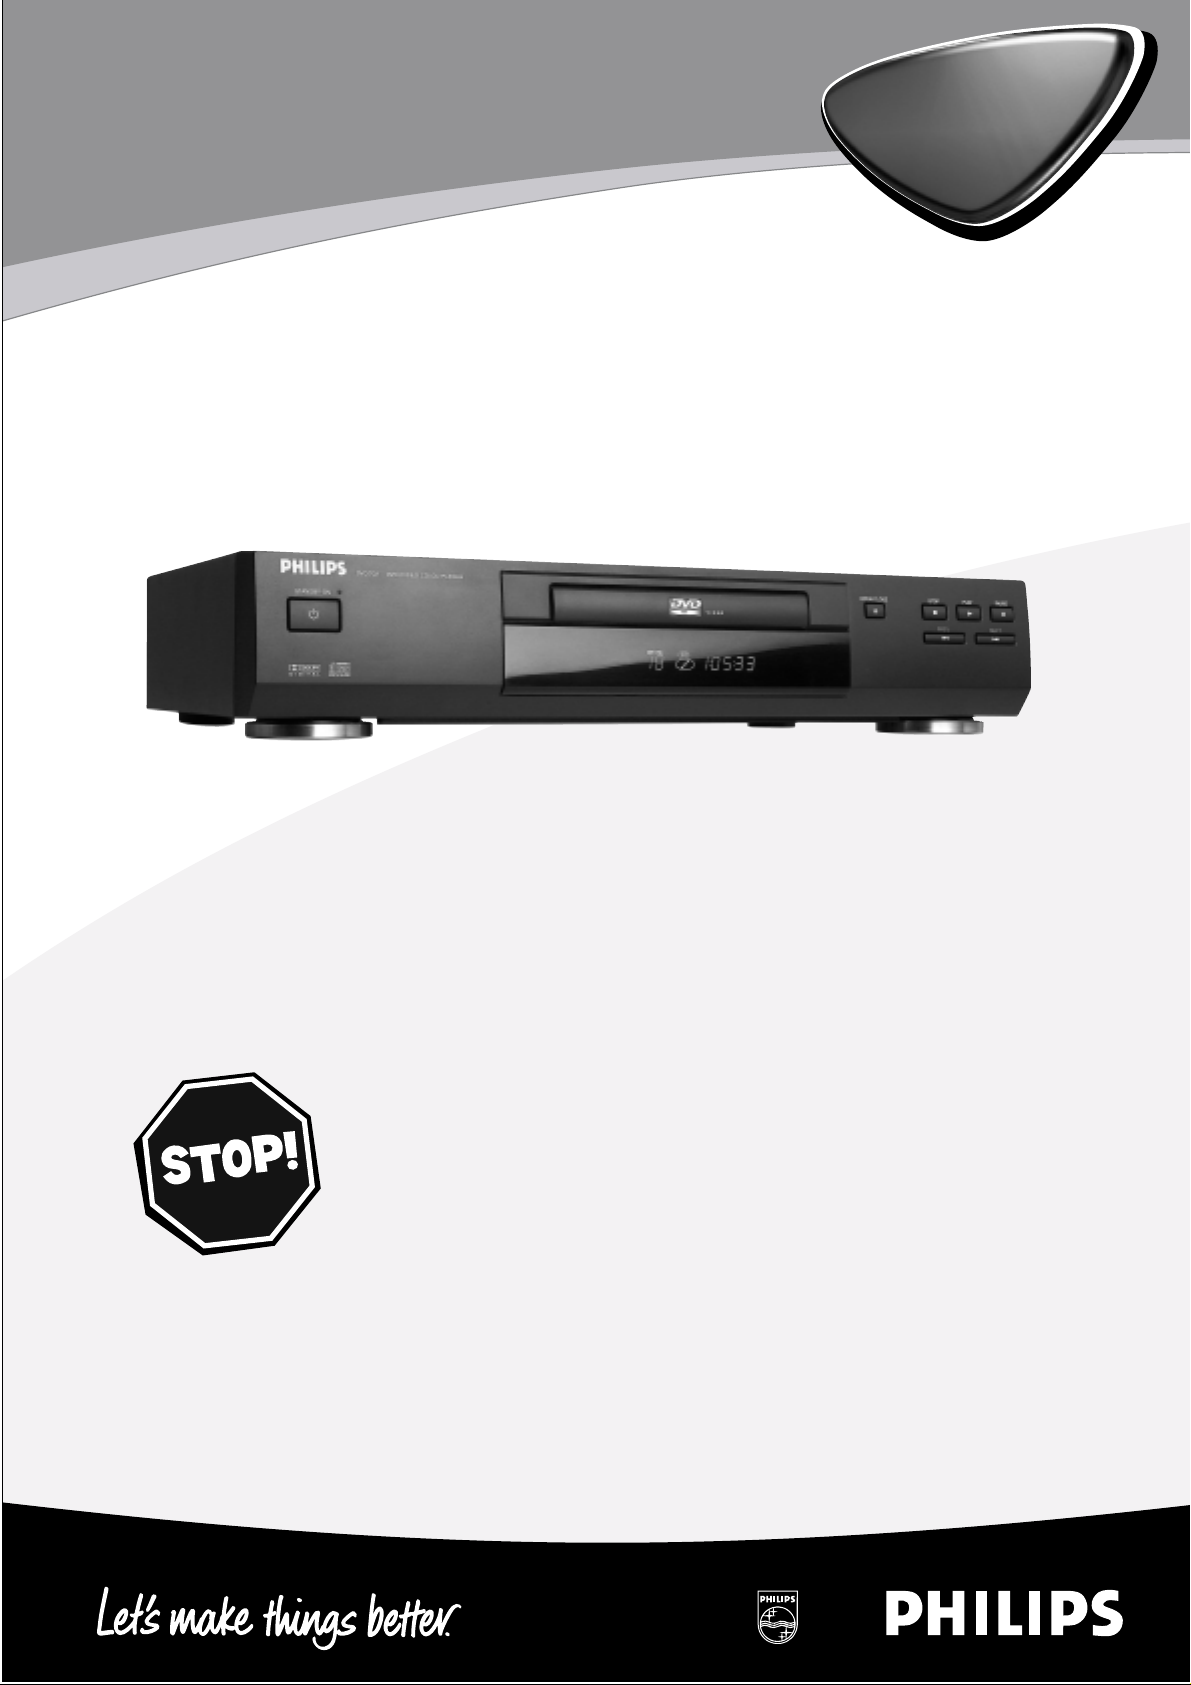
Digital Video Disc Player
Owner’s Manual
DVD702
Read this manual first!
Congratulations on purchasing this Philips product.
We’ve included everything you need to get started.
If you have any problems,Philips Representatives can
help you get the most from your new product by explaining:
• Hookups,
• First Time Setup,and
• Feature Operation.
Do not attempt to return this product to the store.
For fast help,call us first!
1-800-531-0039
Thank you for making Philips a part of your home!
1
Page 2
Return your Warranty Registration car d toda y to
R
E
G
I
S
T
R
A
T
I
O
N
N
E
E
D
E
D
W
I
T
H
I
N
1
0
D
A
Y
S
Hurry!
ensure y ou r eceive all the
benefits
you’re entitled to .
Once your PHILIPS purchase is registered,you’re eligible to receive all the privileges of owning a
PHILIPS product.So complete and return the Warranty Registration Card enclosed with your purchase at once.And take advantage of these important benefits.
Warranty
Verification
Registering your product within
10 days confirms your right to maximum protection under the
terms and conditions of your
PHILIPS warranty.
Owner
Confirmation
Your completed Warranty
Registration Card serves as
verification of ownership in the
event of product theft or loss.
Model
Registration
Returning your Warranty
Registration Card right away guarantees you’ll receive all the information
and special offers which you qualify
for as the owner of your model.
Know these
safety
Congratulations on your purchase, and
welcome to the “family!”
symbols
Dear PHILIPS product owner:
Thank you for your confidence in PHILIPS.You’ve selected one of
the best-built,best-backed products available today.And we’ll do
everything in our power to keep you happy with your
purchase for many years to come.
As a member of the PHILIPS “family,” you’re entitled to
protection by one of the most comprehensive warranties and
outstanding service networks in the industry.
What’s more,your purchase guarantees you’ll receive all the
information and special offers for which you qualify, plus easy
access to accessories from our convenient home shopping
network.
And most importantly you can count on our uncompromising
commitment to your total satisfaction.
All of this is our way of saying welcome-and thanks for investing
in a PHILIPS product.
Sincerely,
Lawrence J.Blanford
President and Chief Executive Officer
P.S. Remember, to get the most from your PHILIPS
product,you must return your Warranty
Registration Card within 10 days.So please mail
2
it to us right now!
Visit our World Wide Web Site at http://www.philips.com
This “bolt of lightning” indicates uninsulated material
t
within your unit may cause an
electrical shock. For the safety
of everyone in your household,
please do not remove product
covering.
The “exclamation point”
calls attention to features
s
for which you should read
the enclosed literature closely
to prevent operating and maintenance problems.
WARNING: TO PREVENT
FIRE OR SHOCK HAZARD,
DO NOT EXPOSE THIS
EQUIPMENT TO RAIN OR
MOISTURE.
CAUTION: To prevent electric shock, match wide blade of
plug to wide slot,fully insert.
ATTENTION: Pour éviter les
choc électriques, introduire la
lame la plus large de la fiche
dans la borne correspondante
de la prise et pousser jusqu’au
fond.
For Customer Use
Enter below the Serial No.
which is located on the rear of
the cabinet.Retain this information for future reference.
Model No.________________
Serial No. ________________
Page 3
Index
LASER SAFETY
This unit employs a laser. Due to possible eye injury, only
a qualified service per son should remove the cover or
attempt to ser vice this device.
USE OF CONTROLS OR ADJUSTMENTS OR
PERFORMANCE OF PROCEDURES OTHER
THAN THOSE SPECIFIED HEREIN MAY
RESULT IN HAZARDOUS RADIATION
EXPOSURE.
LASER
Type Semiconductor laser GaAlAs
Wave length 650 nm (DVD)
780 nm (VCD/CD)
Output Power 7 mW (DVD)
10 mW (VCD/CD)
Beam divergence 60 degree
The region code for this set is 1.
Since it is usual for DVD movies to be released at
different times in different regions of the world, all
players have region codes and discs can have an optional
region code. If you load a disc of a different region code
to your player, you will see the region code notice on
the screen. The disc will not play and should be
unloaded.
NOTE:
PICTURES SHOWN MAY BE DIFFERENT
BETWEEN COUNTRIES.
1
Manufactured under license from Dolby Laboratories.
“Dolby,” “Pro Logic ,” and the double-D symbol are
trademarks of Dolby Laboratories. Confidential Unpublished
Works. Copyright 1992-1997 Dolby Laboratories, Inc. All
rights reser ved.
This product incorporates copyright protection technology
that is protected by method claims of certain U.S. patents
and other intellectual property rights owned by Macrovision
Corporation and other rights owners. Use of this copyright
protection technology must be authorized by Macrovision
Corporation, and is intended for home and other limited
viewing uses only unless otherwise authorized by
Macrovision Corporation. Rever se engineering or
disassembly is prohibited.
“DTS” and “DTS Digital Out” are trademarks of Digital
Theater Systems, Inc.
For Customer Use:
NEVER MAKE OR CHANGE CONNECTIONS
WITH THE POWER SWITCHED ON.
CAUTION
VISIBLE AND INVISIBLE LASER RADIATION
WHEN OPEN AVOID EXPOSURE TO BEAM
(WARNING LOCATION: INSIDE ON LASER
COVERSHIELD OR THE BACKPLATE OF SET)
Read carefully the information located at the back of your DVD Video Player and enter below the Serial Number. Retain
this information for future reference.
Model No. DVD VIDEO 702 Serial No. __________________________
INDEX
3
Page 4
General Information
CAUTION
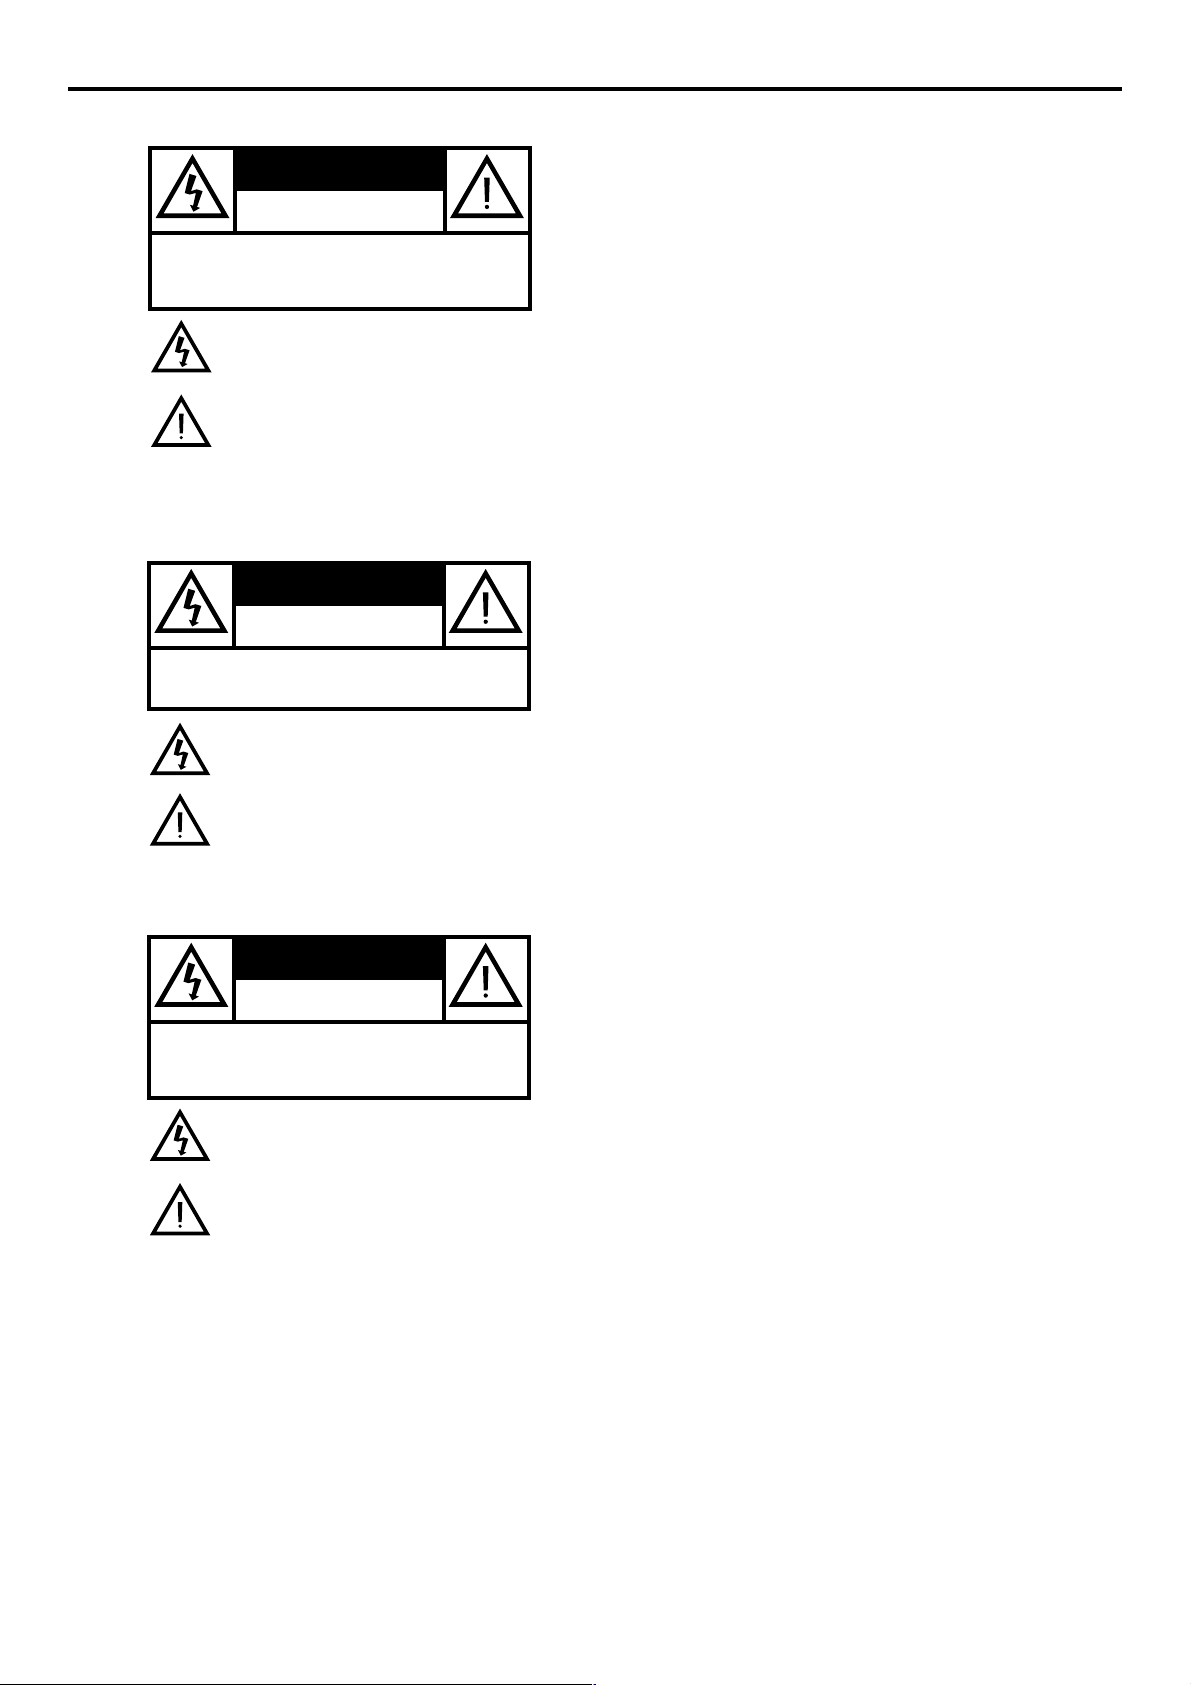
RISK OF ELECTRIC SHOCK
DO NOT OPEN
CAUTION: TO REDUCE THE RISK OF ELECTRIC SHOCK,
DO NOT REMOVE COVER (OR BACK).
NO USER-SERVICEABLE PARTS INSIDE.
REFER SERVICING TO QUALIFIED SERVICE PERSONNEL.
This symbol warns the user that uninsulated voltage
within the unit may have sufficient magnitude to cause
electric shock. Therefore, it is dangerous to make
any kind of contact with any inside part of this unit.
This symbol alerts the user that important literature
concerning the operation and maintenance of this
unit has been included. Therefore, it should be read
carefully in order to avoid any problems.
WARNING
To reduce the risk of fire or electric shock, do not expose
this appliance to rain or moisture.
CAUTION
Use of controls or adjustments or performance of
procedures other than herein may result in hazardous
radiation exposure.
The set complies with the FCC-Rules, Part 15 and with 21
CFR 1040.10.
Canada
This digital apparatus does not exceed the Class B limits for
radio noise emissions from digital apparatus as set out in
the Radio Interference Regulations of the Canadian
Department of Communications.
AVIS
RISQUE DE CHOCS ÉLECTRIQUES
NE PAS OUVRIR
Attention: Afin de prévenir le risque de chocs électriques,
Toute réparation devrait être confiée à un personnel qualifié.
ne pas retirer les vis.
Ce symbole indique la présence d’une tension
suffisamment élevée pour engendrer un risque de
chocs électriques.
Ce symbole indique que le manuel d’installation
fourni avec l’appareil contient d’importantes
recommandations quant au fonctionnement et
à l’entretien de ce dernier.
AVISO
RIESGO DE CHOQUE ELÉCTRICO
Atención: Para reducir el riesgo de choque elécrico,
En su interior no hay piezas que el usuario pueda reparar.
no quite la tapa (o el panel posterior).
Para servicio dirijase a personal calificado.
Este símbolo tiene por finalidad advertir al usuario de
la presencia de tensión peligrosa no aislada dentro de
la caja del aparato, que puede ser lo suficientemente
fuerte para constituir un peligro de choque eléctrico.
Este símbolo sirve para advertir al usuario de la
presencia de instrucciones de manejo y
mantenimiento (servicio) importantes en el manual
que acompaña al aparato.
NO ABRIR
AVISO
Para reducir el riesgo de fuego o choque eléctrico, no
exponga el aparato a la lluvia o humedad.
ATENCIÓN
El uso de mando o ajustes o la ejecucción de métodos que
no sean los aquí descritos puede ocasionar peligro de
exposición a radiación.
El aparato cumple las normas FCC, Parte 15 y 21 CFR
1040.10.
AVIS
Afin de réduire tout risque d’incendie ou de choc
électrique, il ne faut pas exposer cet appareil à la pluie ou à
l’humidité.
ATTENTION
L'utilisation des commandes ou réglages ou le non-respect
des procédures ci-incluses peuvent se traduire par une
exposition dangereuse à l'irradiation.
L'appareil répond aux normes FCC, Part 15 et 21 CFR
1040.10.
Canada
Cet appareil numérique n'emet pas de bruits
radioélectriques dépassant les limites applicables aux
appareils numériques de Class B prescrites dans le
Règlement sur le Brouillage Radioélectrique édicté par le
Ministère des Communications du Canada.
4
GENERAL INFORMATION
Page 5
IMPORTANT SAFETY INSTRUCTIONS
– Read before operating equipment
This product was designed and manufactured to meet strict
quality and safety standards.There are,however, some
installation and operation precautions which you should be
particularly aware of.
1. Read these instructions – All the safety and operating
instructions should be read before the appliance is
operated.
2. Keep these instructions – The safety and operating
instructions should be retained for future reference.
3. Heed all warnings – All warnings on the appliance and in
the operating instructions should be adhered to.
4. Follow all instructions – All operating and use
instructions should be followed.
5. Do not use this apparatus near water – for example,
near a bathtub,washbowl,kitchen sink, or laundry tub, in a wet
basement, near a swimming pool, etc.
6. Clean only with a damp cloth.The appliance should
be cleaned only as recommended by the manufacturer.
7. Install in accordance with the manufacturer's
instructions.Do not block any of the ventilation
openings. For example, the appliance should not be
situated on a bed,sofa, rug,or similar surface or placed in a
built-in installation,such as a bookcase or cabinet that may
impede the flow of air through the ventilation openings.
8. Do not install near any heat sources such as
radiators, heat registers, stoves,or other apparatus
(including amplifiers) that produce heat.
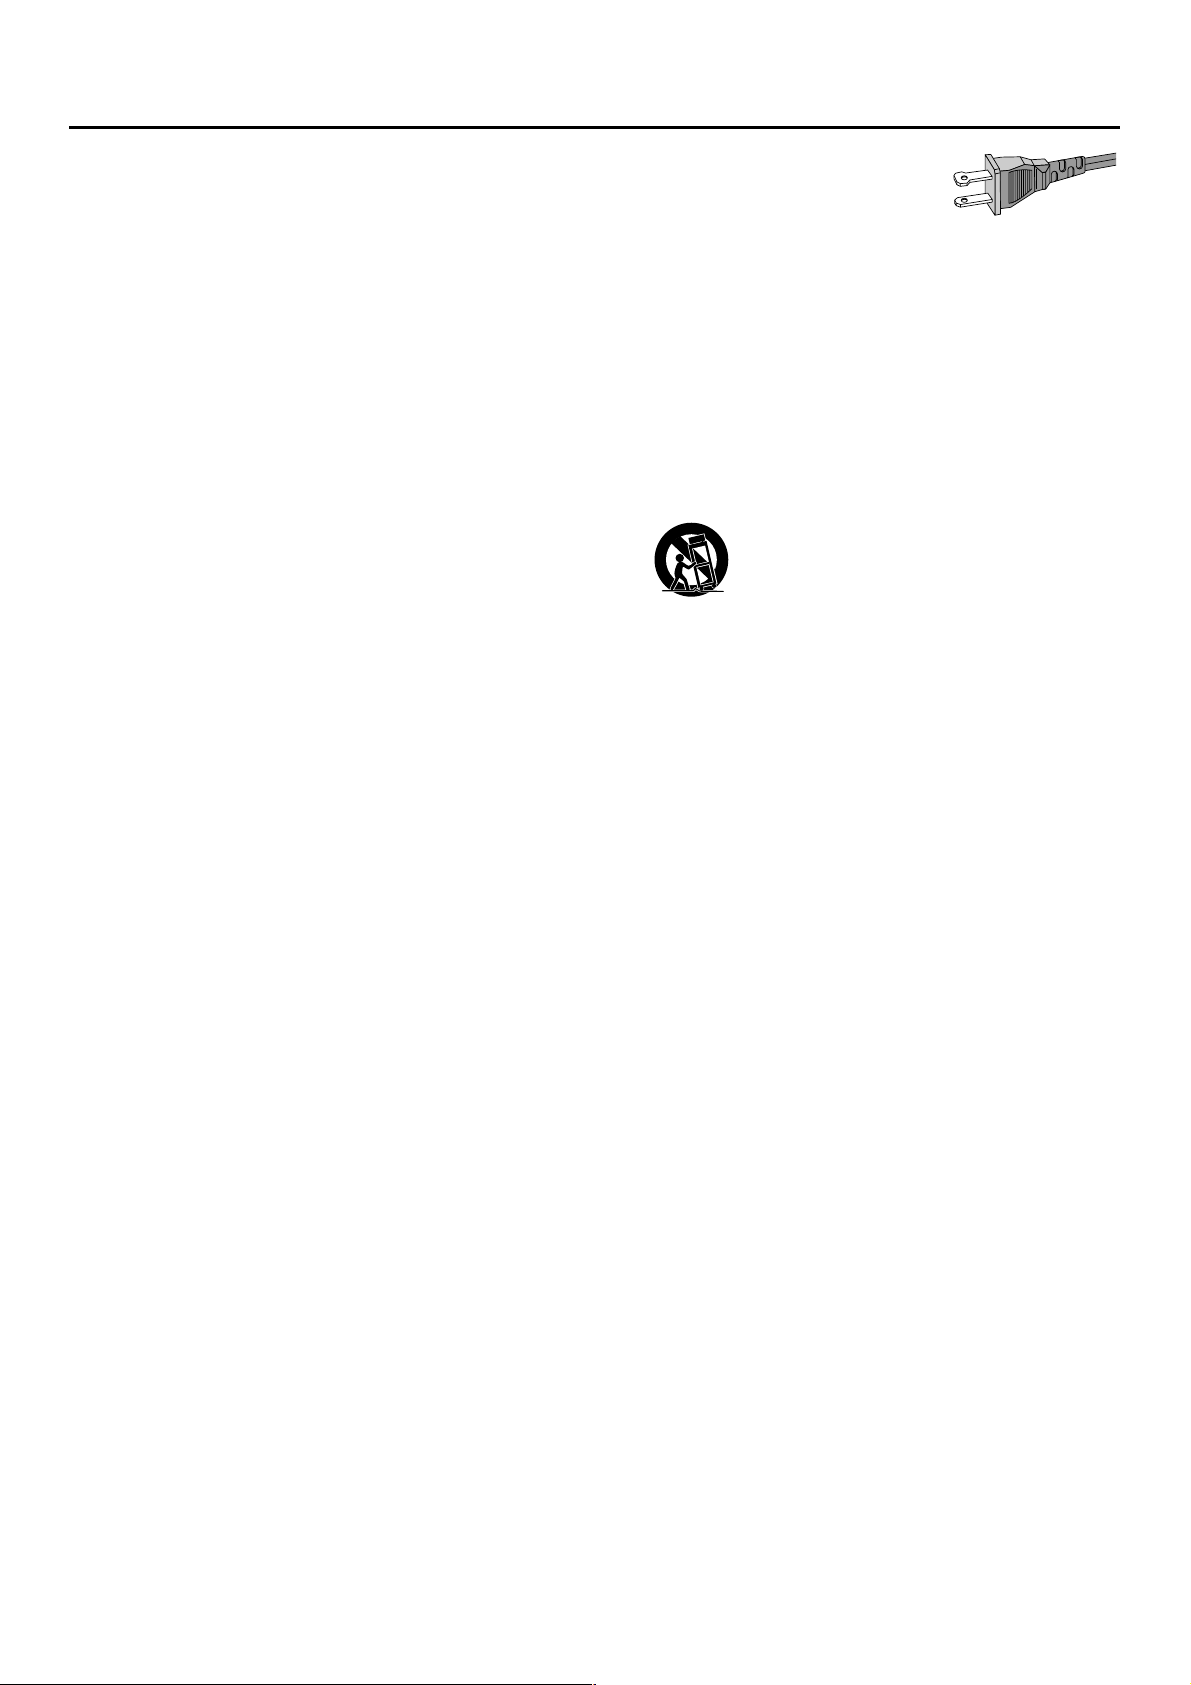
9. Do not defeat the safety
purpose of the polarized or
grounding-type plug.A polarized plug
has two blades with one wider than
the other.A grounding type plug has two blades and a third
grounding prong.The wide blade or the third prong are
provided for your safety.When the provided plug does not
fit into your outlet,consult an electrician for replacement of
the obsolete outlet.
AC Polarized
Plug
10.Protect the power cord from being walked on or
pinched, particularly at plugs,convenience receptacles, and
the point where they exit from the apparatus.
11.Only use attachments/accessories specified by the
manufacturer.
12. Use only with a cart,stand, tripod,bracket,
or table specified by the manufacturer or sold
with the apparatus.When a cart is used,use
caution when moving the cart/apparatus
combination to avoid injury from tip-over.
13.Unplug this apparatus during lightning storms or when
unused for long periods of time.
14.Refer all servicing to qualified service personnel.
Servicing is required when the apparatus has been
damaged in any way, such as if the power-supply cord or plug
is damaged, liquid has been spilled or objects have fallen into
the apparatus, the apparatus has been exposed to rain or
moisture,
been dropped.
or if the unit does not operate normally or has
15. Battery usage CAUTION – To prevent battery leakage
that may result in bodily injury or damage to the unit:
● Install all batteries correctly, + and - as marked on the unit.
● Do not mix batteries (old and new or carbon and
alkaline,etc.).
● Remove batteries when the unit is not used for a long time.
EL 6475-E001:00/8
IMPORTANT SAFETY INSTRUCTIONS
5
Page 6
Contents
Introduction
Philips DVD Video Introduction ------------------------- 7
Unpacking---------------------------------------------------- 7
Remote Control Battery Installation ------------------- 7
Safety Information------------------------------------------ 7
Cleaning Discs ---------------------------------------------- 7
Functional Overview
Front Panel and Display ----------------------------------- 8
Remote Control-------------------------------------------- 9
Rear Panel --------------------------------------------------10
Preparation
General Notes ---------------------------------------------11
Connecting to a TV ---------------------------------------11
Connecting to Optional Equipment--------------------12
General Explanation --------------------------------------13
On-Screen Display ----------------------------------------13
Temporary Feedback Field Icons -----------------------13
Personal Preferences----------------------------------13-15
Operation
Loading Discs-----------------------------------------------16
Playing DVD and Video CD discs -----------------------16
General Features --------------------------------------16-18
Special DVD Features-------------------------------------18
Special VCD Features -------------------------------------19
Playing an Audio CD --------------------------------------19
Program -----------------------------------------------------20
Playing MP3 Recordings ------------------------------20-21
Before Requesting Service
Before Requesting Service -------------------------------22
Specifications
Specifications -----------------------------------------------23
Limited W arranty
Limited Warranty --------------------------------------24-25
6
CONTENTS
Page 7
Introduction
Philips DVD Video Introduction
Your Philips DVD Video Player will play digital video discs
conforming to the universal DVD Video standard. With it,
you will be able to enjoy full-length movies with true
cinema picture quality, as well as stereo or multi-channel
sound (depending on the disc and your playback setup).
The unique features of DVD Video, such as selection of
sound track, subtitle languages and different camera angles
(again, depending on the disc), are all included.
In addition to DVD Video discs, you will be able to play all
Video CDs and Audio CDs (including finalized CD
Recordable (CD-R) and CD Rewritable (CD-RW)).
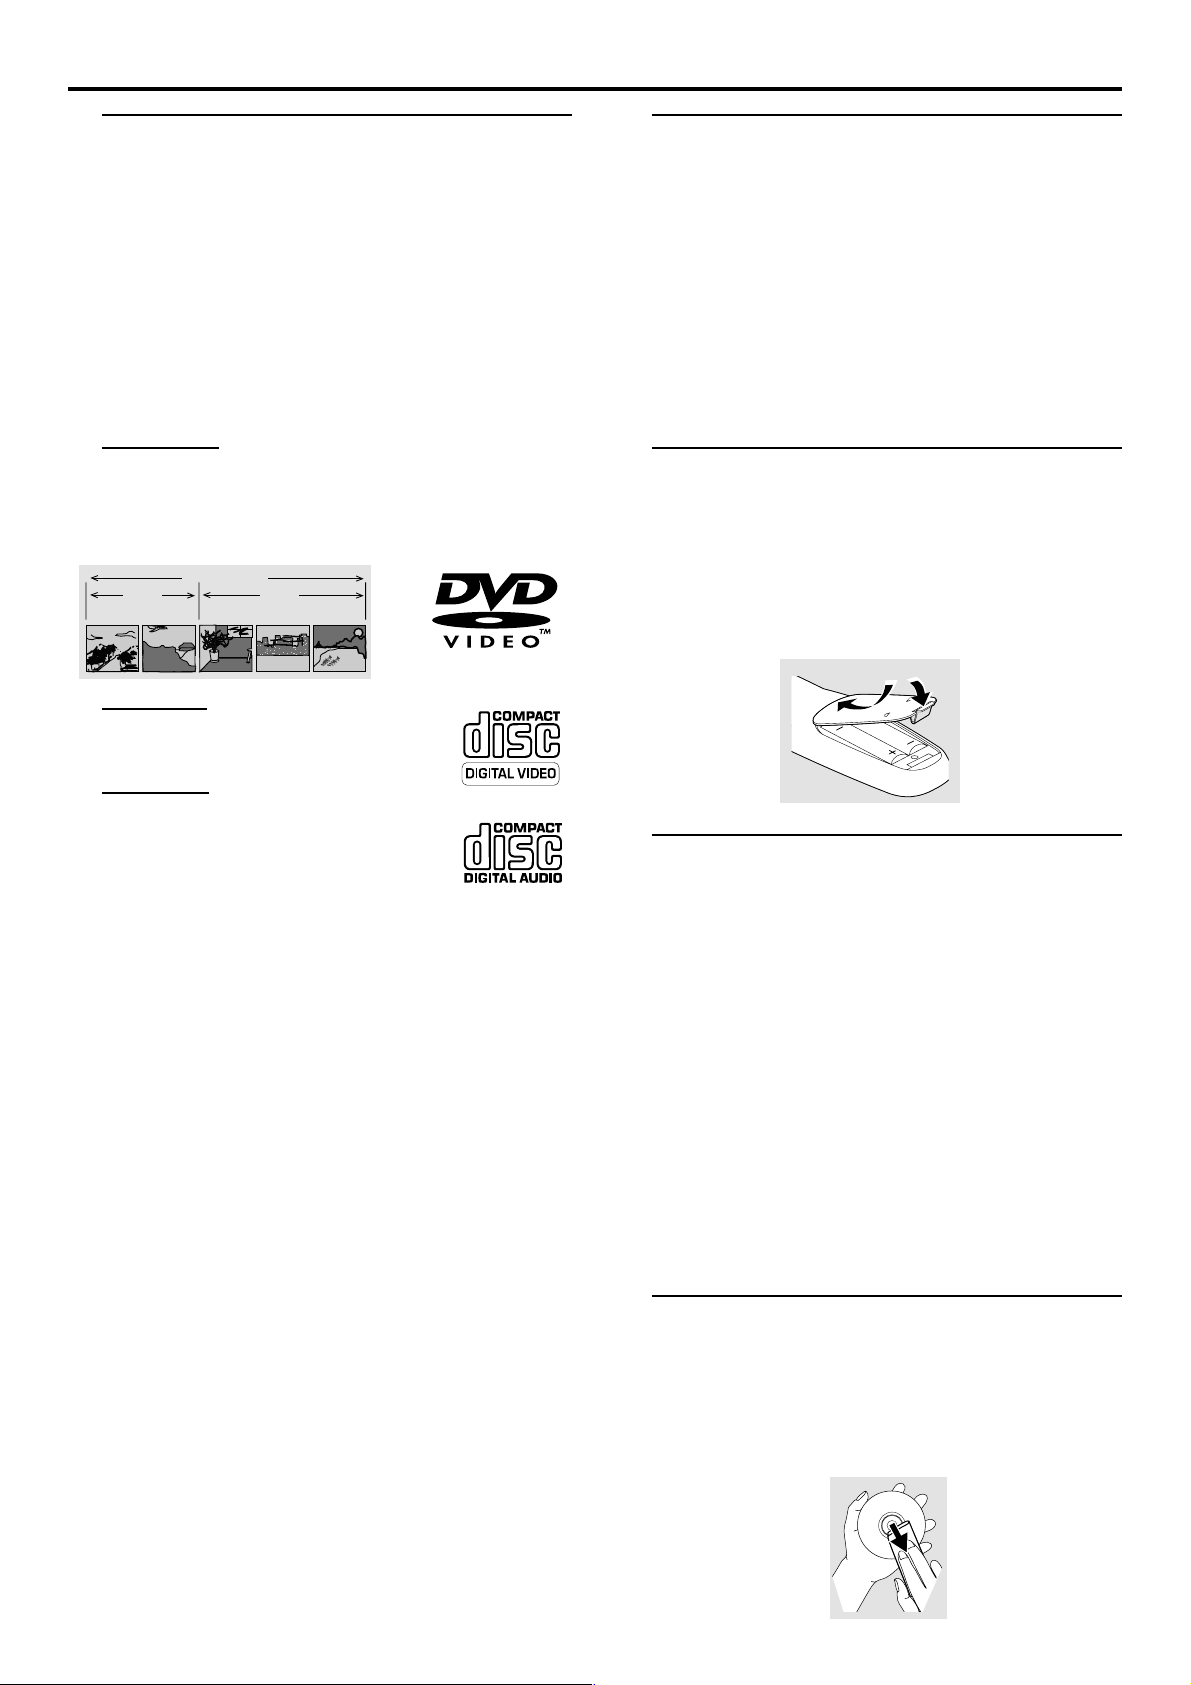
DVD Video
You will recognize DVD Video discs by the logo shown.
Depending on the material on the disc (a movie, video clips,
a drama series, etc.), the disc may have one or more Titles.
DVD-VIDEO DISC
TITLE 1 TITLE 2
CHAPTER 1 CHAPTER 2 CHAPTER 1 CHAPTER 2 CHAPTER 3
Unpacking
First check and identify the contents of your DVD Player’s
package. You should have the following items:
– DVD Player
– Remote Control with batteries
– Audio cable
– Video cable
– Instructions for use
If any item is damaged or missing, contact your retailer or
Philips.
Keep the packaging material for future transportation.
Remote Control Battery
Installation
¶ Insert batteries as indicated inside the battery compartment.
Caution: Do not mix old and new batteries. Never
mix different types of batteries (standard, alkaline,
etc.).
Video CD
You will recognize Video CDs by this logo.
Audio CD
Audio CDs contain music tracks only.
You will recognize Audio CDs by this logo.
In addition, this unit can play a CD-R, CD-RW or MP3 data.
Notes:
¶ Depending on the conditions of the recording equipment or
the CD-R/CD-RW, some CD-R/CD-RW can not be played on
this unit.
¶ The unit can not play CD-R/CD-RW that contain no data or
data other than MP3.
Safety Information
¶ Do not expose the system to excessive moisture, rain, sand,
or heat sources.
¶ Place the player on a firm, flat surface.
¶ Keep the player away from domestic heating equipment
and direct sunlight.
¶ In a cabinet, allow about 2.5 cm (1 inch) of free space all
around the player for adequate ventilation.
¶ If the DVD Player cannot read CDs/DVDs correctly, use a
commonly available cleaning CD/DVD to clean the lens
before taking the DVD Player to be repaired. Other
cleaning methods may destroy the lens. Always keep the
tray closed to avoid dust on the lens.
¶ The lens ma y cloud ov er when the D VD Player is suddenly
moved from cold to warm surroundings. Pla ying a CD/D VD is
not possible then. Lea v e the pow er on for about one hour with
no disc in the unit until normal playback is possible.
Cleaning Discs
¶ When a disc becomes dirty , clean it with a cleaning cloth.
Wipe the disc from the center out.
¶ Do not use solvents such as benzine, thinner, commercially
available cleaners, or anti-static spray intended for analog
discs.
INTRODUCTION
7
Page 8

Functional Overview
A
Front Panel and Display
STANDBY-ON
– switches the player to ON or OFF
STANDBY INDICATOR
– lights red when the player is in Standby
mode (off)
DISPLAY
– shows the current status of the player
DISC TRA Y
– insert a disc here
; PAUSE
– interr upts playback
2 PLAY
– starts playback
9 STOP
– stops playback
/ OPEN/CLOSE
– opens/closes the disc tr ay
TITLEMP3 VCD CD A
DVD
CHP/TRK
PROG.
RANDOM ALL
AB
Indicates current player function:
Playback, Pause, etc.
MP3 MP3 disc inserted
VCD Video CD inserted
CD Audio CD inserted
DVD
DVD inserted
ANGLE active
DVD
Remote Sensor
– go to beginning of cur rent title/chapter/
TITLEMP3 VCD CD
CHP/TRK
S PREV
track or to PREVious title/chapter/track
press and hold for a fast reverse search
T NEXT
– go to NEXT title/chapter/track
press and hold for a fast forward search
PROG.
RANDOM ALL
AB
TITLE Current Title number
CHP/TRK Current Chapter or Track number
PROG. PROGRAM playback active
RANDOM RANDOM playback active
B
REPEAT A-B active
ALL
REPEAT active
8
FUNCTIONAL OVERVIEW
Page 9
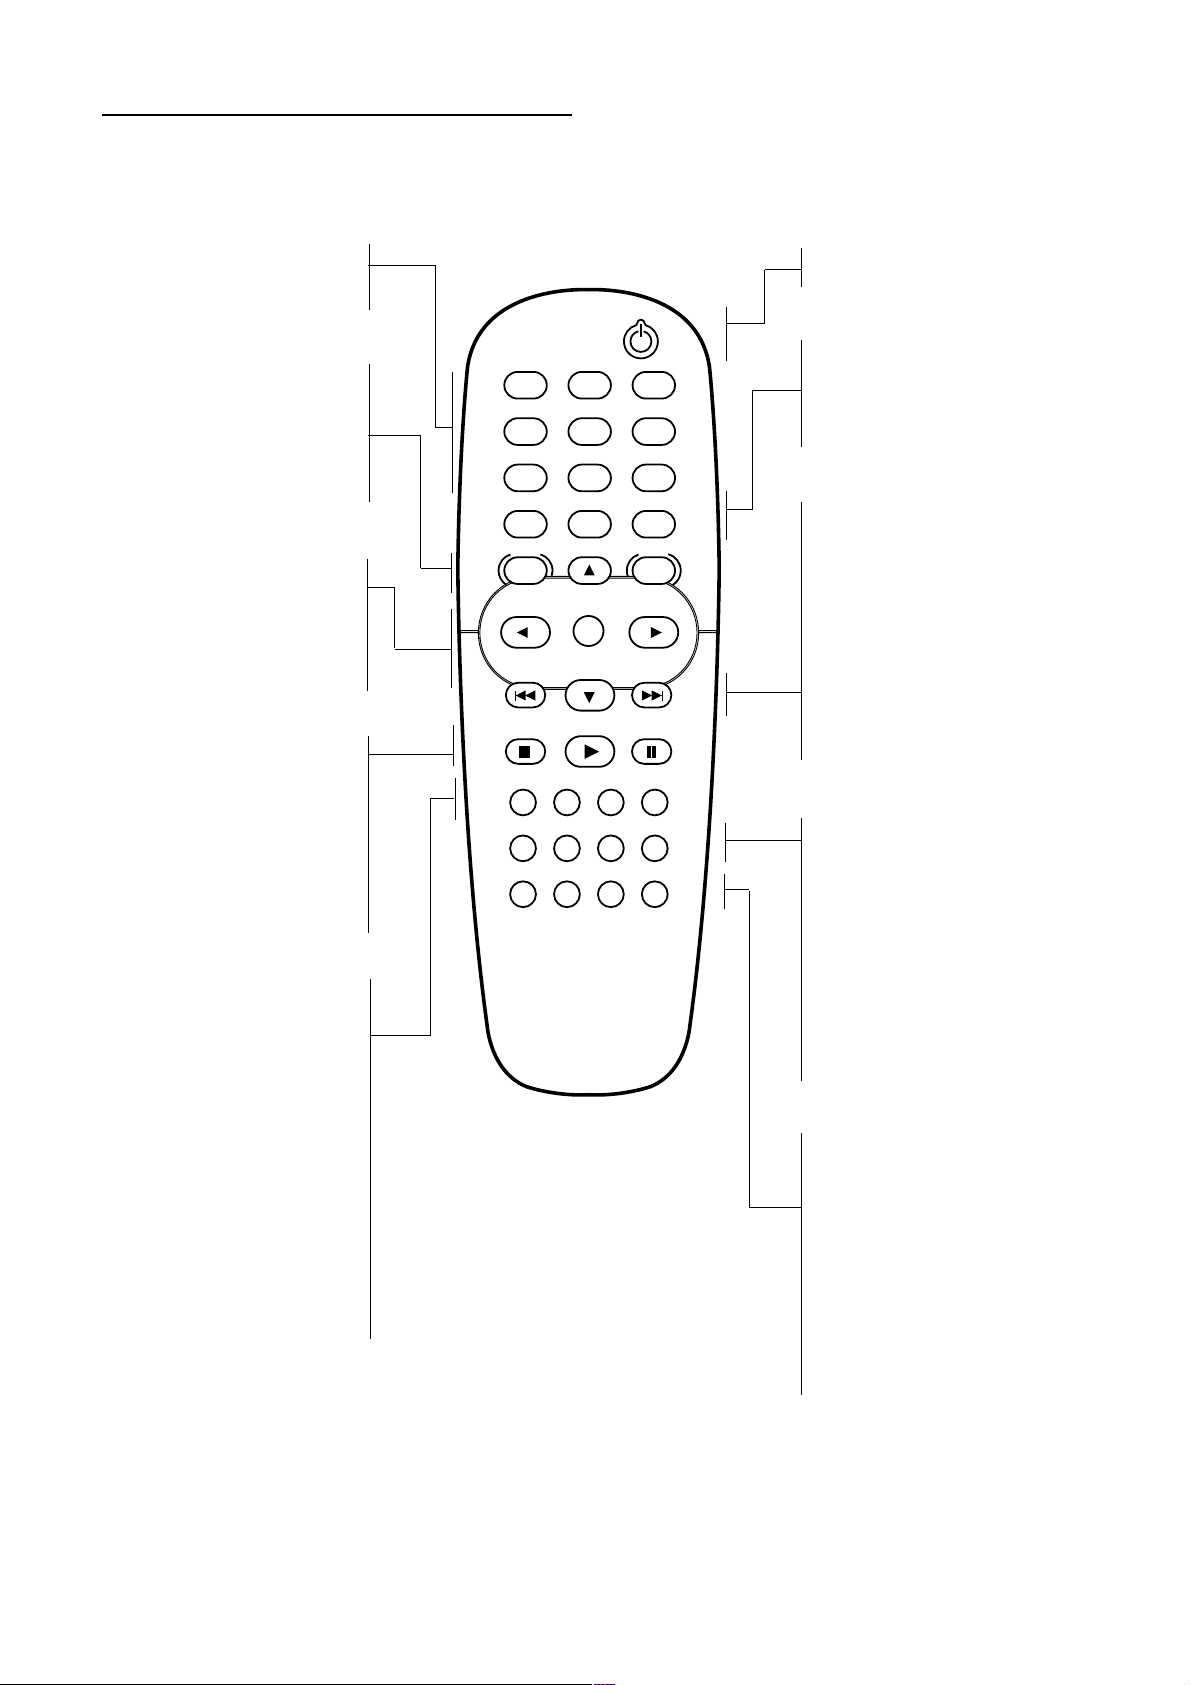
Remote Control
0-9 numerical key pad
– select numbered items in a
menu
DISC MENU
– access menu of a DVD disc
SYSTEM MENU
– access or remove DVD Player’s
menu
1 2 3 4
– (left/right/up/down) select an
item in the menu
OK
– acknowledge menu selection
STOP ( 9 )
– stops playback
PLAY ( 2 )
– star ts playback
PAUSE ( ; )
– pause playback temporarily /
frame-by-frame playback
POWER
123
456
789
RETURN
DISC SYSTEM
MENU
STOP
CLEAR MARKER FTS TITLE
SUBTITLE ANGLE ZOOM AUDIO
REPEAT A-B RANDOM SOUND
0
OK
PLAY
DISPLAY
MENU
PAUSE
POWER
– switch DVD Player ON or OFF
RETURN
– remove the DVD Player’s menu
DISPLAY
– access the On-Screen Display
T
– search forward* / go to next
chapter or track
S
– search backward* / go to
beginning of current chapter or
track or go to previous chapter
or track
* Press and hold key for about two
seconds
SUBTITLE
– select a subtitle language
ANGLE
– select DVD camera angle
CLEAR
– clear a track number on the
PROGRAM menu or a mark on
the MARKER SEARCH menu
MARKER
– access or remove MARKER
SEARCH menu
FTS (PROGRAM)
– access or remove PROGRAM
menu
TITLE
– display the Title menu of the
disc if available
ZOOM
– enlarge video image
AUDIO
– select an audio language (DVD)
or an audio channel (Audio CD)
REPEAT
– repeat chapter, track, title , disc
A-B
– repeat sequence
RANDOM
– play tracks in random order
SOUND
– select 3D SURROUND during
disc playback
FUNCTIONAL OVERVIEW
9
Page 10
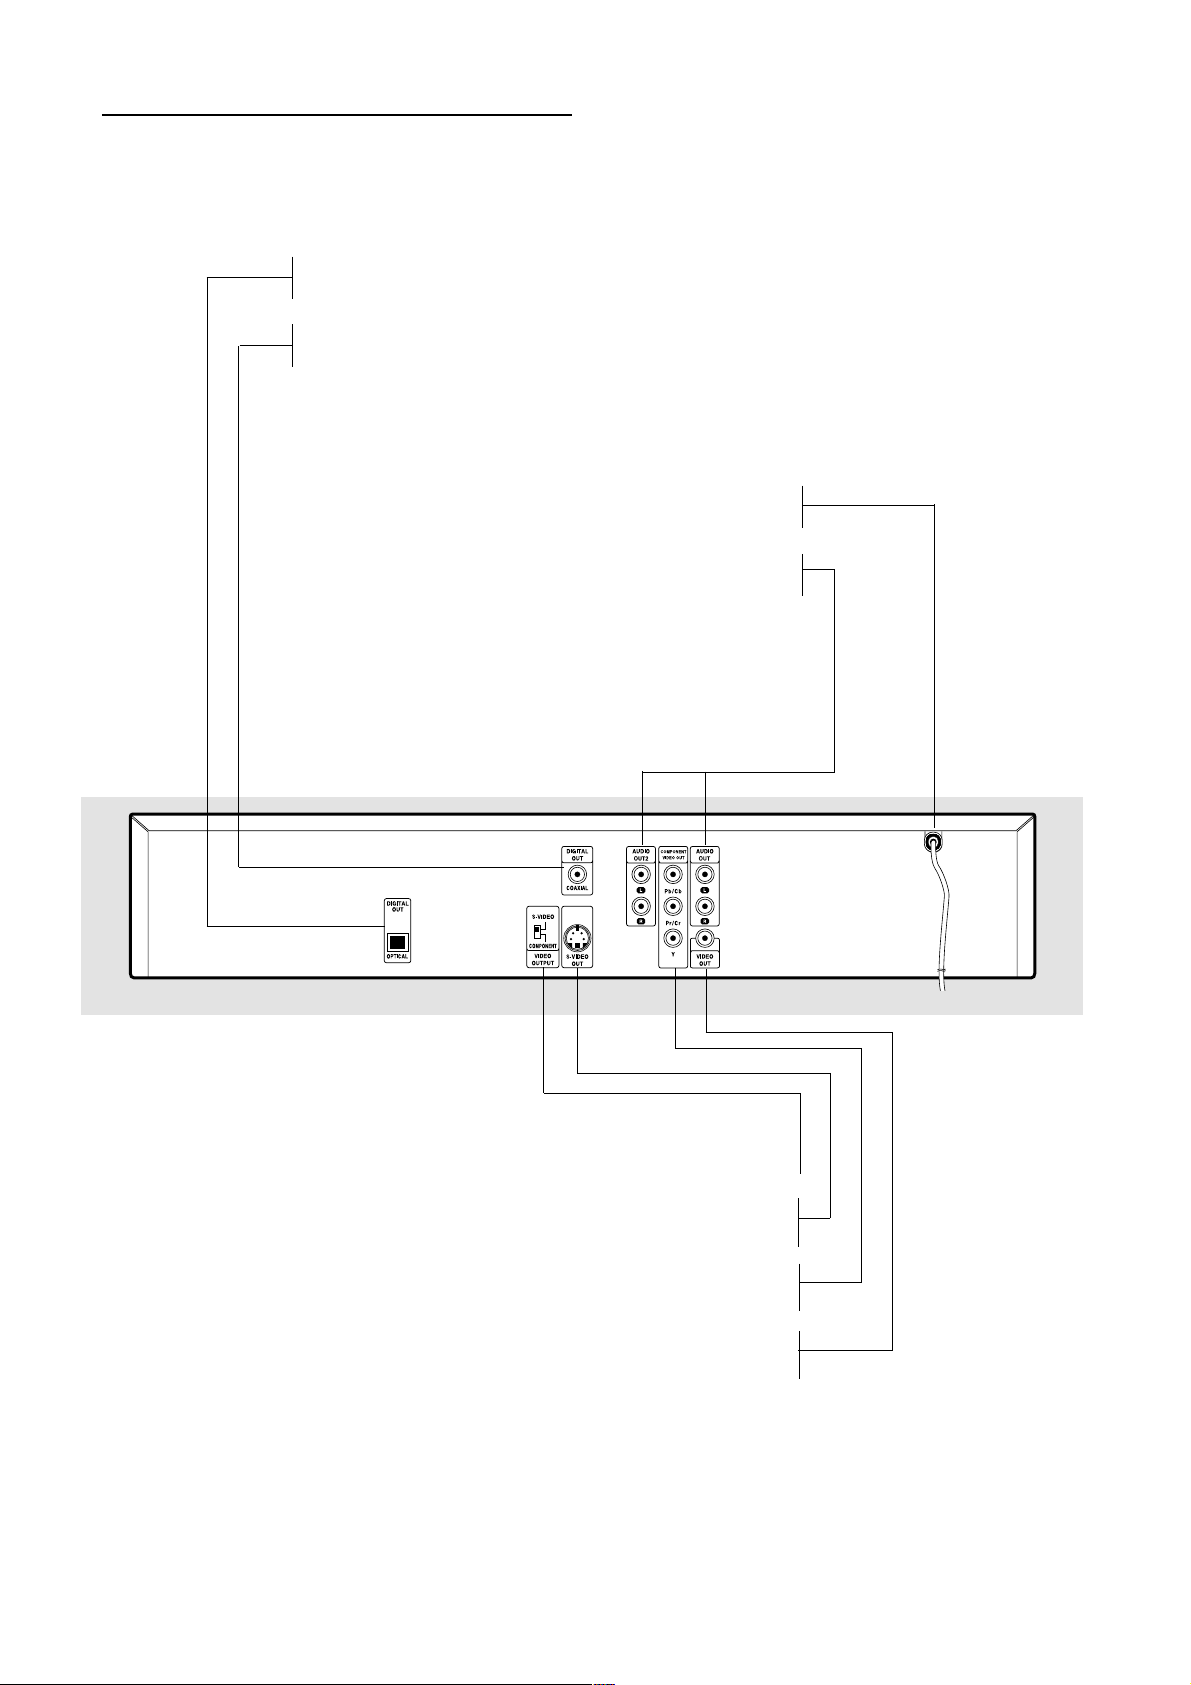
Rear Panel
OPTICAL (Digital audio out jack)
– connect to digital (optical) audio equipment
COAXIAL (Digital audio out jack)
– connect to digital (coaxial) audio equipment
AC Power Cord
– connect to a power source
AUDIO OUT (Left/Right) 1, 2
– connect to an amplifier, receiver or stereo system
10
FUNCTIONAL OVERVIEW
VIDEO OUTPUT Switch
–
select either S-Video Out or Component Video Out,
depending on how you connected the DVD Player to the TV
S-VIDEO OUT (Y/C)
– connect to a TV with S-Video (Y/C) inputs
COMPONENT VIDEO OUT Y PR/CR PB/CB
– connect to a TV with Y PB/CB PR/CR inputs
VIDEO OUT (CVBS)
– connect to a TV with CVBS video inputs
Caution: Do not touch the inner pins of the jacks
on the rear panel. Electrostatic discharge may
cause permanent damage to the unit.
Page 11
Preparation
General Notes
¶ Depending on your TV and other equipment you wish to
connect, there are various ways you could connect the
player. Use only one of the connections described below.
¶ Please refer to the manuals of your TV, VCR, Stereo System
or other devices as necessary to make the best
connections.
¶ For better sound reproduction, connect the player’s audio
out jacks to the audio in jacks of your amplifier, receiver,
stereo or audio/video equipment. See ‘Connecting to
optional equipment.’
Caution:
– Make sure the DVD Player is connected
directly to the TV. Set the TV to the correct video
input channel.
– Do not connect the DVD Player’s audio out
jack to the phono in jack of your audio system.
– Do not connect your DVD Player via your
VCR. The DVD image could be distorted by the
copy protection system.
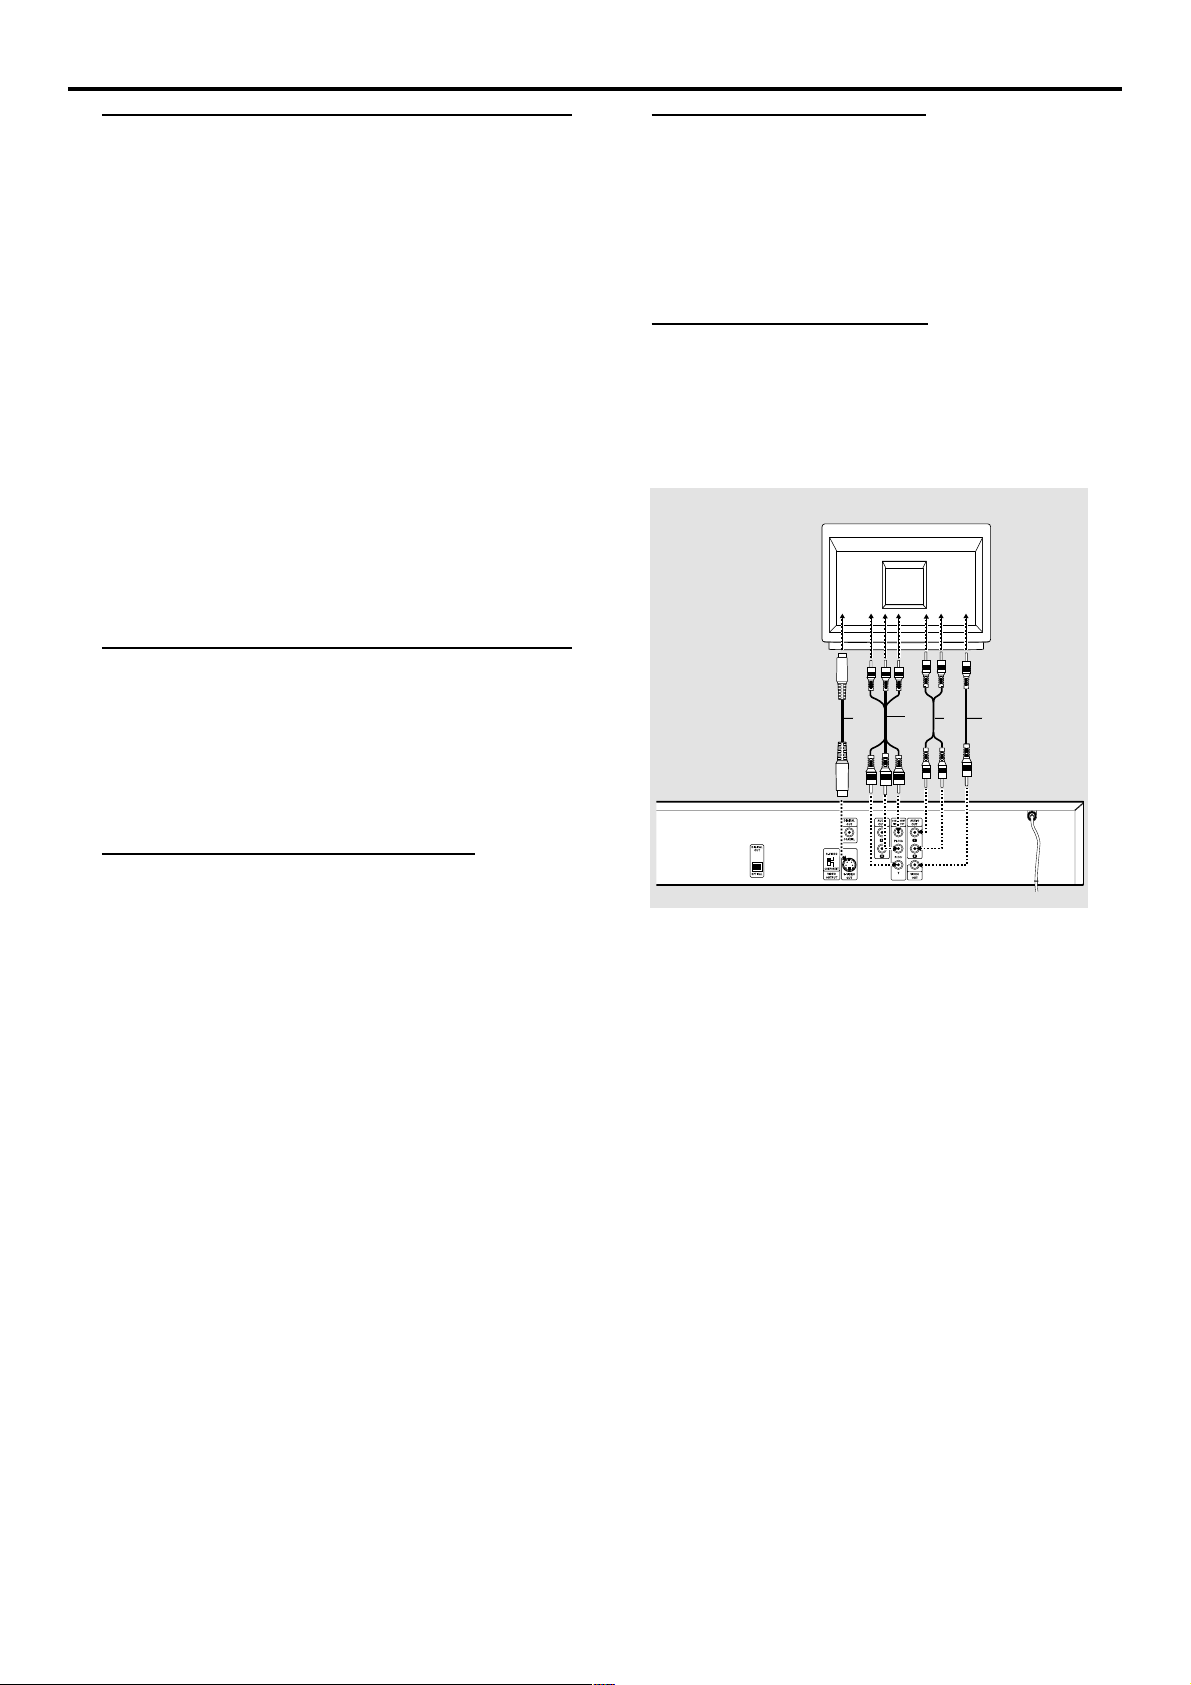
Connecting to a TV
¶ Make one of the following connections, depending on the
capabilities of your existing equipment.
¶ When using the COMPONENT VIDEO OUT jacks, set the
VIDEO OUTPUT switch to COMPONENT. When using
the S-VIDEO OUT jack, set the VIDEO OUTPUT switch to
S-VIDEO.
S-Video (Y/C) connection
1 Connect the S-VIDEO OUT jack on the DVD Player to the
S-Video in jack on the TV using an optional S-Video cable
(Y).
2 Connect the Left and Right AUDIO OUT jacks (1 or 2) of
the DVD Player to the audio left/right in jacks on the TV
(A) using the supplied audio cables.
Video (CVBS) connection
1 Connect the VIDEO OUT jack on the D VD Player to the
video in jack on the TV using the video cable supplied (X).
2 Connect the Left and Right AUDIO OUT jacks (1 or 2) of
the DVD Player to the audio left/right in jacks on the TV
(A) using the supplied audio cables.
TV
Z
YXA
Component Video ( Y PR/CR PB/CB)
connection
1 Connect the PB/CB PR/CR Y COMPONENT VIDEO OUT
jacks on the DVD Player to the corresponding in jacks on
the TV using an optional PR/CR PB/CB Y cable (Z).
2 Connect the Left and Right AUDIO OUT jacks (1 or 2) of
the DVD Player to the audio left/right in jacks on the TV
(A) using the supplied audio cables.
PREPARATION
11
Page 12
Connecting to Optional
Equipment
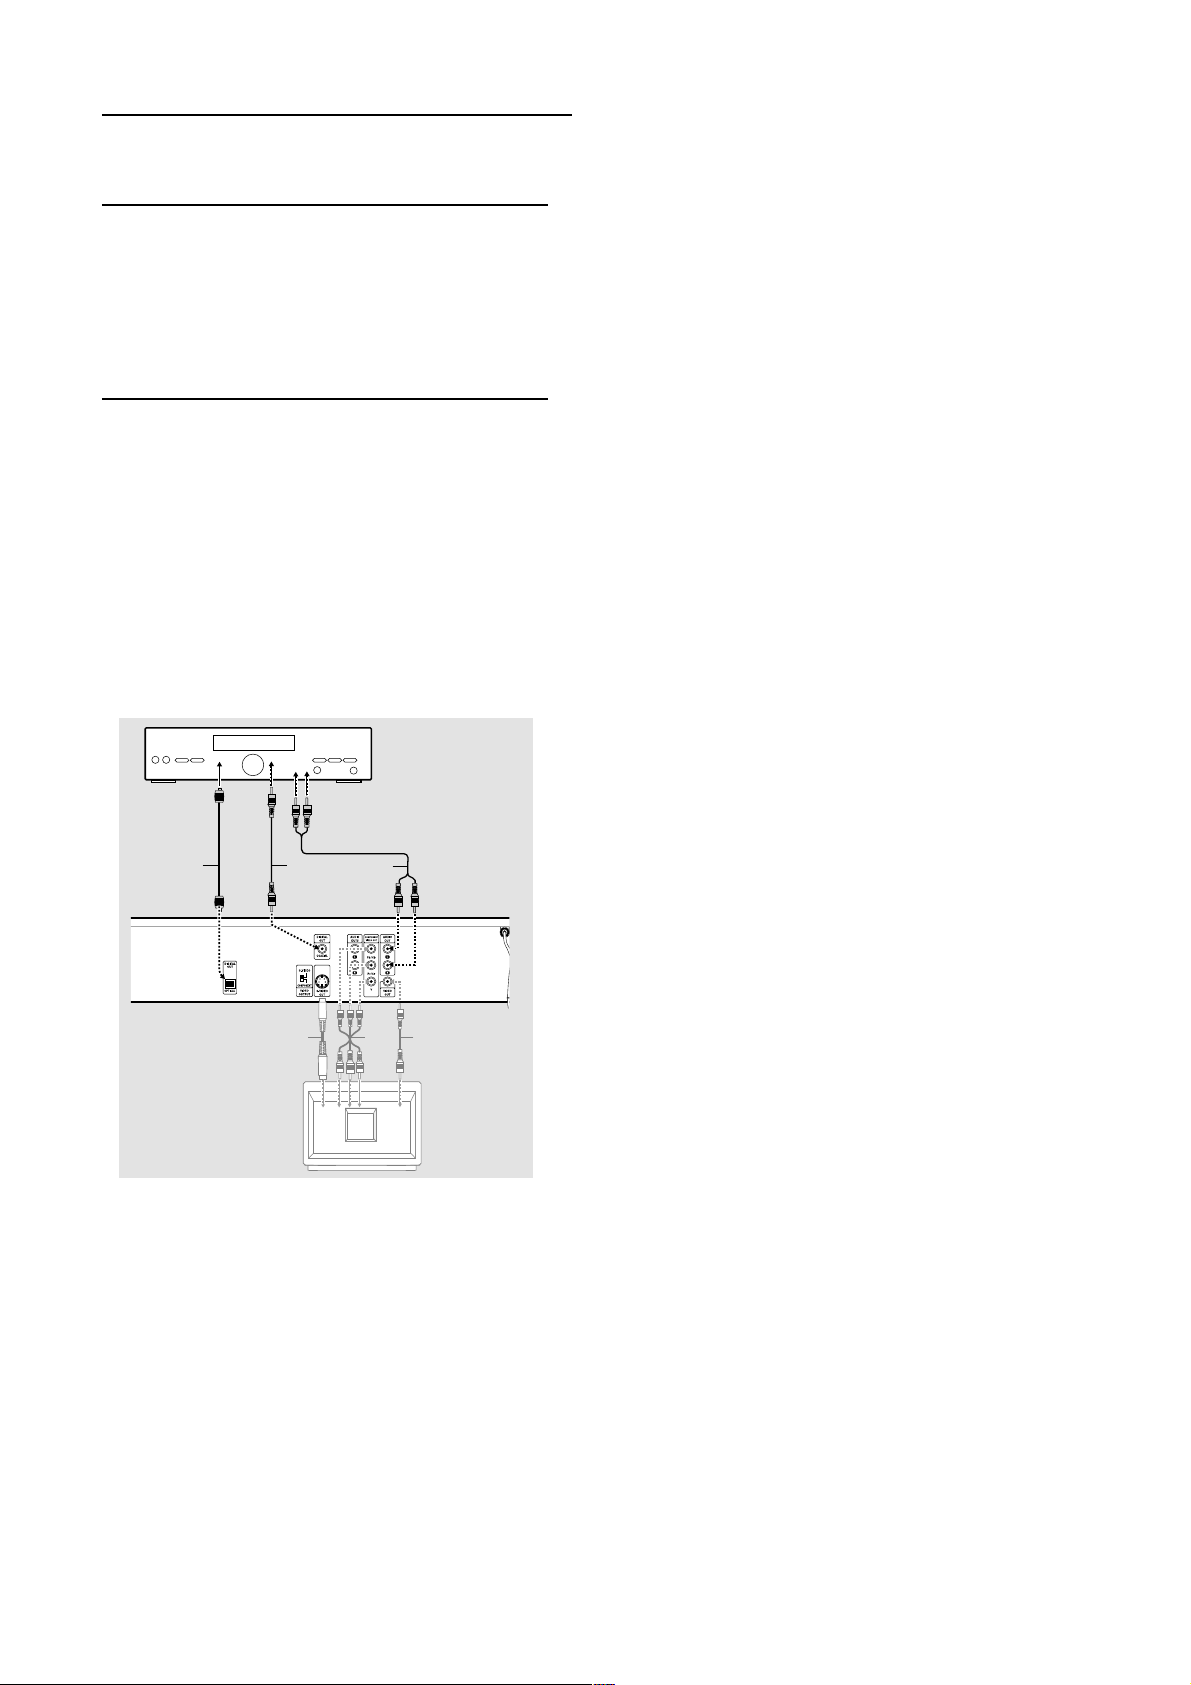
Connecting to an amplifier equipped with
two channel analog stereo or Dolby
Surround
Digital Multi-channel sound
A digital multi-channel connection provides the best sound
quality. For this you need a multi-channel Audio/Video
receiver that supports one or more of the audio formats
supported by your DVD Player (MPEG 2, Dolby Digital
TM
and DTS). Check the receiver manual and the logos on the
front of the receiver.
1
Connect the Left and Right AUDIO OUT jacks of the DVD
Player to the audio left and right in jacks on your amplifier,
receiver or stereo system, using the supplied audio cables (A).
Connecting to an amplifier equipped with
two channel digital stereo (PCM) or to an
Audio/Video receiver equipped with a
multi-channel decoder (Dolby Digital™,
MPEG 2 or DTS)
1 Connect one of the DVD Player’s DIGITAL AUDIO OUT
jacks (OPTICAL G or COAXIAL F) to the corresponding
in jack on your amplifier. Use an optional digital (optical G
or coaxial F) audio cable.
2 You will need to activate the player’s digital output (see
‘Personal Preferences’ on page 14).
AMPLIFIER
G
F
A
Warning:
Due to the DTS Licensing agreement, the digital
output will be in DTS digital out when DTS audio
stream is selected.
Notes:
– If the audio format of the digital output does not match the
capabilities of your receiver, the receiver will produce a strong,
distorted sound or no sound at all.
– Six Channel Digital Surround Sound via digital connection
can only be obtained if your receiver is equipped with a Digital
Multi-channel decoder.
– To see the selected audio format of the current DVD in the
Display, press SYSTEM MENU or AUDIO.
Y
Z X
TV
12
PREPARATION
Page 13
General Explanation
TITLE
CHAPT
A B
Temporar y Feedback Field
This manual gives the basic instructions for operating the
DVD Player. Some DVDs require specific operation or
allow only limited operation during playback. When this
occurs, the symbol
appears on the TV screen, indicating
that the operation is not permitted by the DVD Player or is
not available on the disc.
Remote control operation
¶ Unless stated, all operations can be carried out with the
remote control. Always point the remote control directly at
the player, making sure there are no obstructions between
the remote and the player.
Corresponding keys on the front panel of the player can
also be used.
On-screen display operation
¶ A number of operations can be carried out via the on-
screen display on the screen. Access the on-screen display
by pressing the DISPLAY button on the remote control.
¶ Pressing DISPLAY again will clear the on-screen display
from the screen.
¶ Press 3 or 4 to select an item; the selected item will be
highlighted.
¶ Press 1 or 2 to change the setting of an item. For some
functions, the setting will be registered immediately; for
others, OK must be pressed.
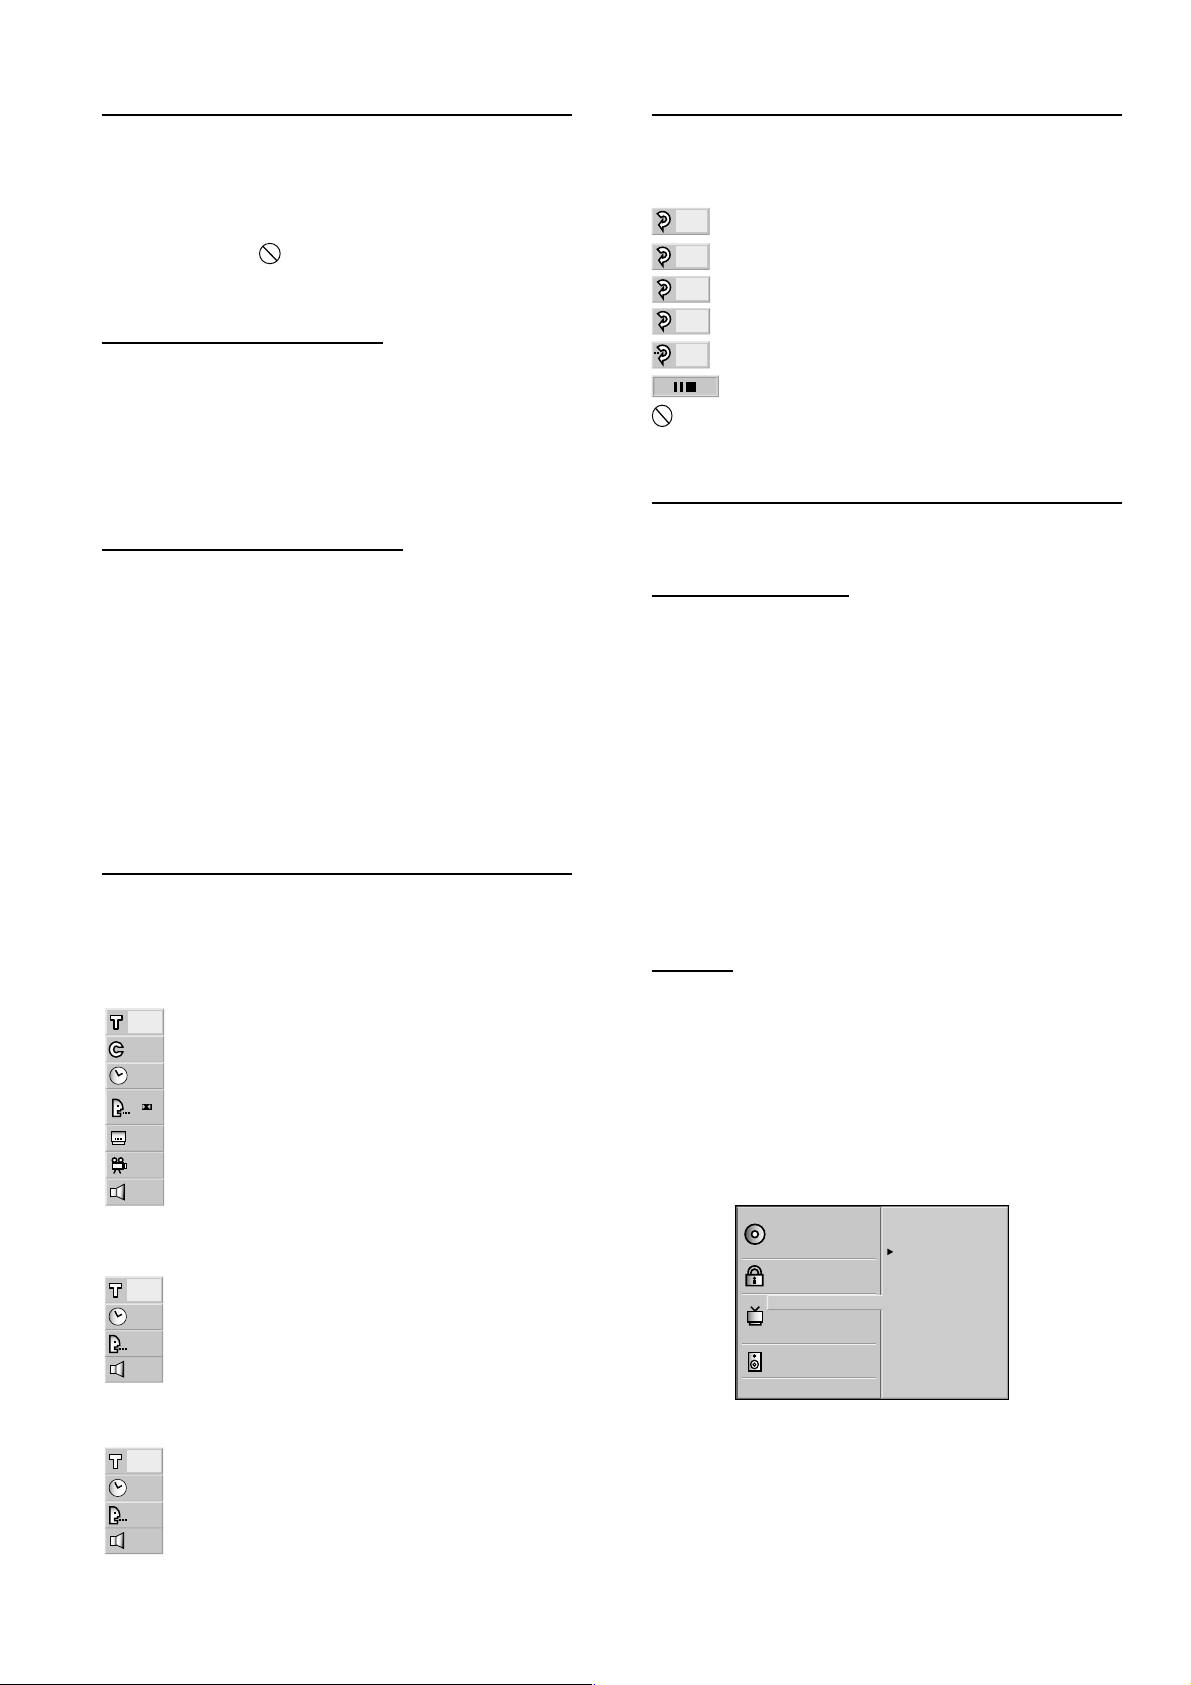
On-Screen Display
The following information will appear for about 10 seconds
when you press the DISPLAY button on the remote control.
Icons
Repeat Title
Repeat Chapter
ALL
TRACK
Repeat All
Repeat T rack
Repeat A-B
Resume play from this point
Action prohibited or not available
Personal Preferences
You can set your own personal preferences on the player.
General operation
1 Press SYSTEM MENU on the remote control.
➜ The Personal Preferences menu appears.
2 Press 3/4 to select the desired item.
➜ The screen will show the current setting for the
selected item, as well as alternate setting(s).
3 While the desired item is selected, press B, then 3/4 to
select the desired setting.
4 Press OK to confirm your selection.
The following items can be adapted.
5 Press SYSTEM MENU to remove the menu when you are
finished.
DVD
1
Title
1
Chapter
0:16:57
1 ENG
6 CH
NORM.
D
OFF
Time search
Audio language and Digital Audio Output mode
Subtitle language
1
Angle
Sound
Audio CD/Video CD without PBC (Playback Control)
Tracks
1
0:16:57
STER.
NORM.
Elapsed playback time
Audio channel
Sound
Video CD with PBC
PBC
0:16:57
STER.
NORM.
PBC ON
Elapsed playback time
Audio channel
Sound
Picture
– TV Aspect
If you have a widescreen (16:9) TV, select 16:9 Wide.
If you have a regular (4:3) TV, select 4:3 Letterbox for a
‘wide-screen’ picture with black bars at the top and bottom
of the screen, or select 4:3 Panscan for a full-height picture
with the sides trimmed. If a disc supports the format, the
picture will be shown accordingly.
Disc Audio
Disc Subtitle
Disc Menu
Rating
Password
TV Aspect
Menu Language
Progressive Scan
Digital Audio Output
5.1 Speaker Setup
Others
4:3 Letterbox
4:3 Panscan
16:9 Wide
PREPARATION
13
Page 14
Sound
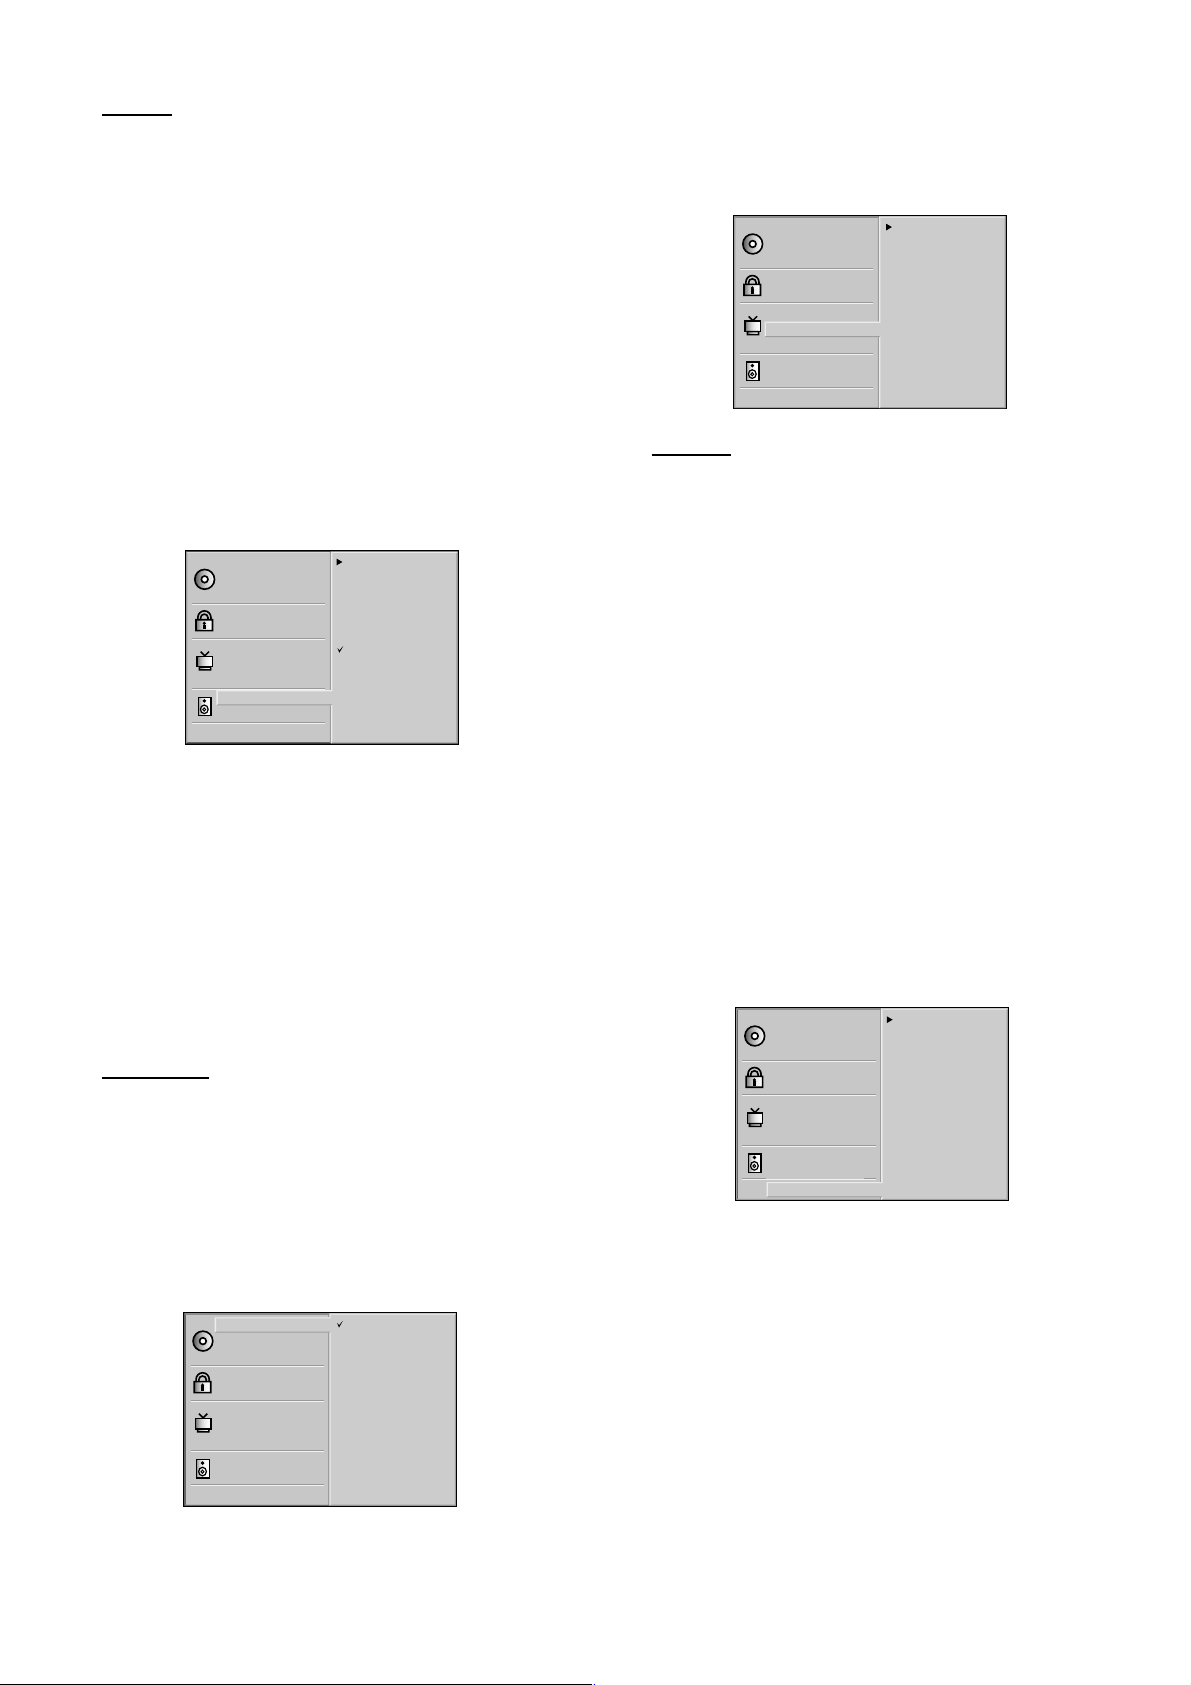
– Digital Audio Output
Each DVD disc has a variety of audio output options. Set
the player’s Digital Audio Output according to the type of
audio system you use.
DOLBY DIGITAL/PCM: Select “DOLBY DIGITAL/ PCM” if
you connected the DVD Player’s DIGITAL OUT jack to a
Dolby Digital decoder (or an amplifier or other equipment
with a Dolby Digital decoder).
Stream/PCM: Select “Stream/PCM” if you connected the
DVD Player’s DIGITAL OUT jack to an amplifier or other
equipment with a DTS decoder, Dolby Digital decoder or
MPEG decoder.
PCM: Select “PCM” if you connected the DVD Player’s
DIGITAL OUT jack to an amplifier or other equipment with
linear PCM only (or Mini Disc (MD) recorder or Digital
Audio Tape (DAT) deck).
DOLBY
/PCM
Disc Audio
Disc Subtitle
Disc Menu
Rating
Password
TV Aspect
Menu Language
Progressive Scan
Digital Audio Output
5.1 Speaker Setup
Others
DIGITAL
Stream/PCM
PCM
Sample Freq.
48 KHz
96KHz
– Sample Frequency
To change the Sample Frequency setting, first select the
desired Digital Audio Output as indicated above.
If your receiver or amplifier is NOT capable of handling
96KHz signals, select 48KHz. When this choice is made, this
unit will automatically convert any 96KHz signals to 48KHz
so your system can decode them.
If your receiver or amplifier is capable of handling 96KHz
signals, select 96KHz. When this choice is made, this unit will
pass each type of signal through without any further
processing.
Language
– Language (Disc Audio, Disc Subtitle and Disc
Menu)
Select a language for the disc’s Menu, Audio and Subtitle.
Audio language and Subtitle language also can be adapted
using the Menu bar. Press the 3/4 buttons to select an
item, then press the 1/2 buttons to choose a setting in the
On-Screen Display (menu bar).
– Menu Language
Select the language for the DVD Player’s Menu. This is the
menu you see when you press the SYSTEM MENU button.
Disc Audio
Disc Subtitle
Disc Menu
Rating
Password
TV Aspect
Menu Language
Progressive Scan
Digital Audio Output
5.1 Speaker Setup
Others
English
Spanish
French
Others
– Dynamic Range (DRC)
With the DVD format, you can hear a program’s
soundtrack in the most accurate and realistic presentation
possible, thanks to digital audio technology. However, you
may wish to compress the dynamic range of the audio
output (the difference between the loudest sounds and the
quietest ones). Then, you may listen to a movie at a lower
volume without losing dialog intelligibility. Set DRC to On
for this effect.
– PBC
Set Playback Control (PBC) to On or Off.
- On: Video CDs with PBC are played according to the
PBC.
- Off: Video CDs with PBC are played the same way as
Audio CDs.
– Vocal
Set Vocal to On only when a multi-channel karaoke DVD is
playing. The karaoke channels on the disc will mix into a
normal stereo sound.
Disc Audio
Disc Subtitle
Disc Menu
Rating
Password
TV Aspect
Menu Language
Progressive Scan
Digital Audio Output
5.1 Speaker Setup
Others
DRC Off
Vocal On
PBC On
14
PREPARATION
Disc Audio
Disc Subtitle
Disc Menu
Rating
Password
TV Aspect
Menu Language
Progressive Scan
Digital Audio Output
5.1 Speaker Setup
Others
Original
English
French
German
Spanish
Italian
Chinese
Polish
Hungarian
Russian
Other — — — —
Page 15
Parental control (DVD only)
Movies on DVDs may contain scenes not suitable for
children. Therefore, discs may contain ‘Parental Control’
information that applies to the complete disc or to
certain scenes on the disc. These scenes are rated from 1
to 8, and alternative, more suitable scenes are available on
some discs. Ratings are country dependent. The ‘Parental
Control’ feature allows you to prevent discs from being
played by your children or to have certain discs played with
alternative scenes.
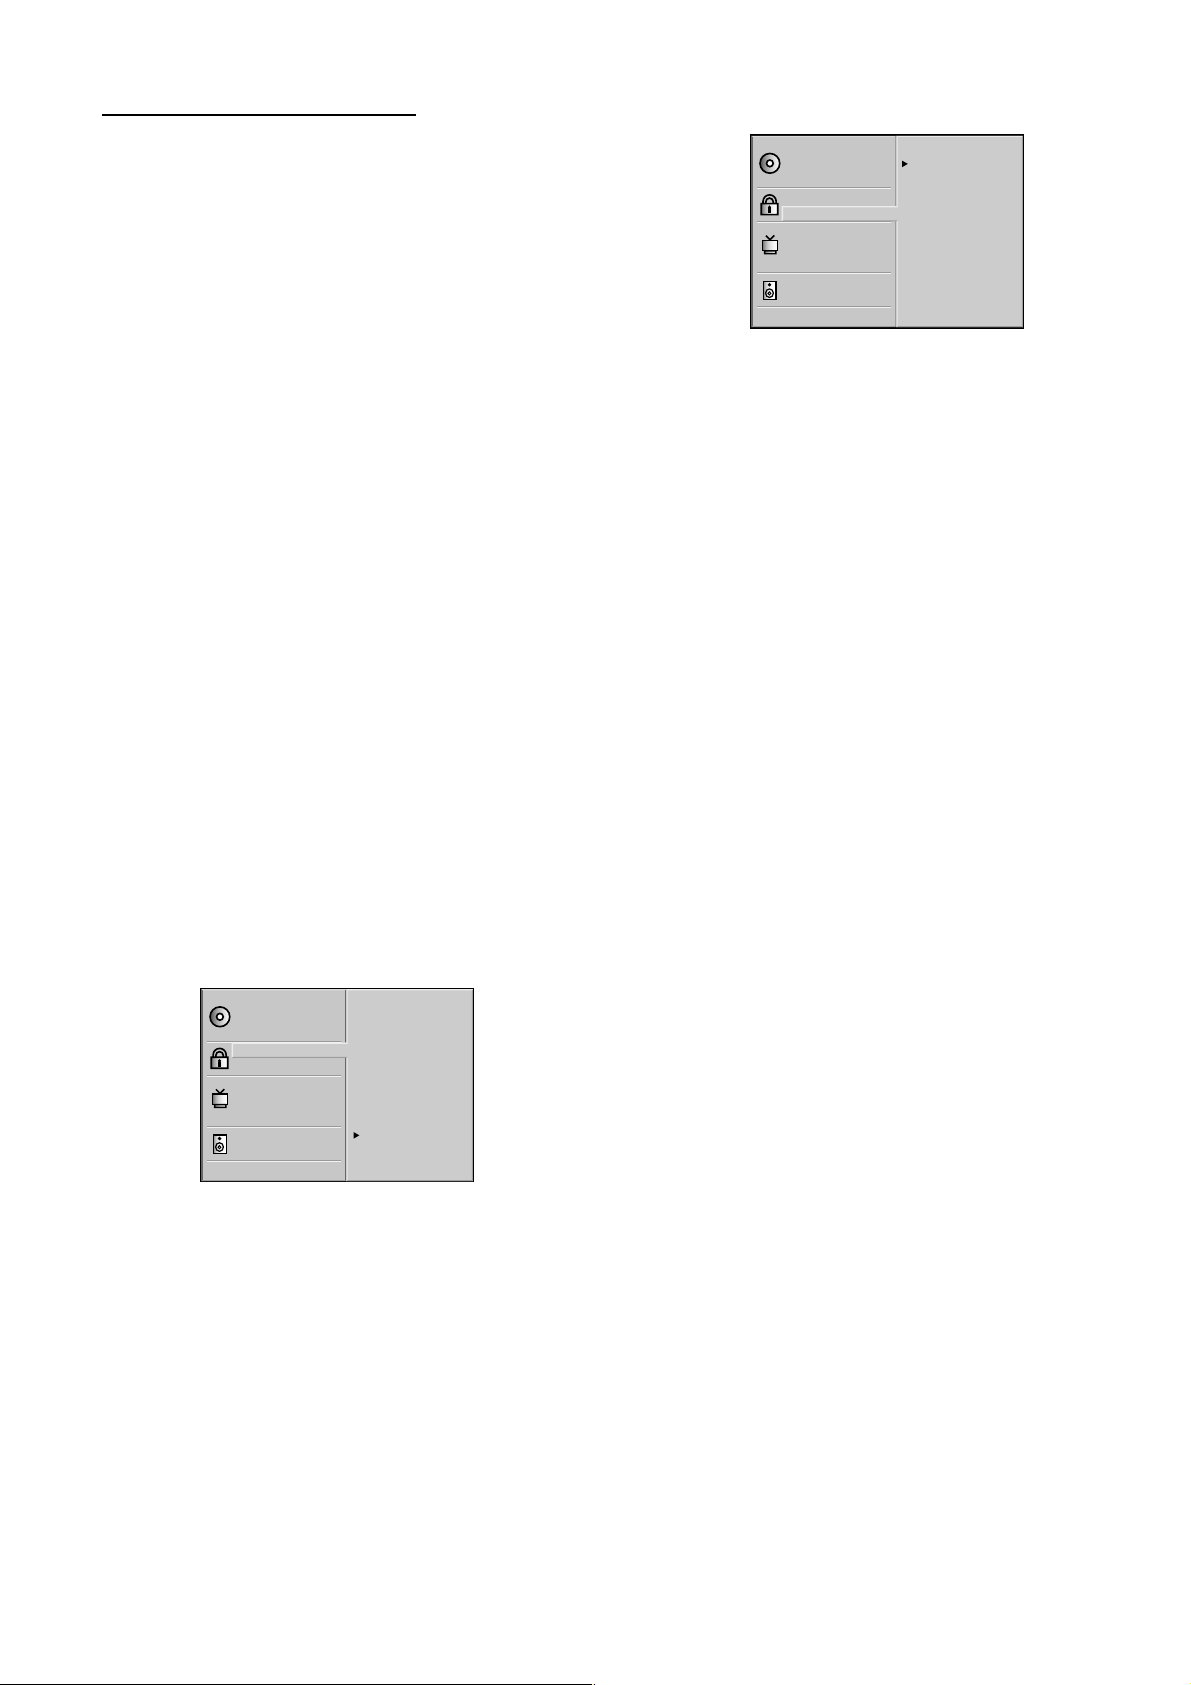
– Rating
1 Press SYSTEM MENU to display the DVD Player’s Menu.
2 Select Rating using the 3/4 keys.
3 While Rating is selected, press B.
4 Enter your 4-digit password now. Use the numerical keys to
enter your code, then press OK.
5 Select a rating from 1 to 8 using the 3/4 keys.
Unlock:
If you select Unlock, Parental Control is not active. The Disc
will play in full.
Disc Audio
Disc Subtitle
Disc Menu
Rating
Password
TV Aspect
Menu Language
Progressive Scan
Digital Audio Output
5.1 Speaker Setup
Others
New
— — — —
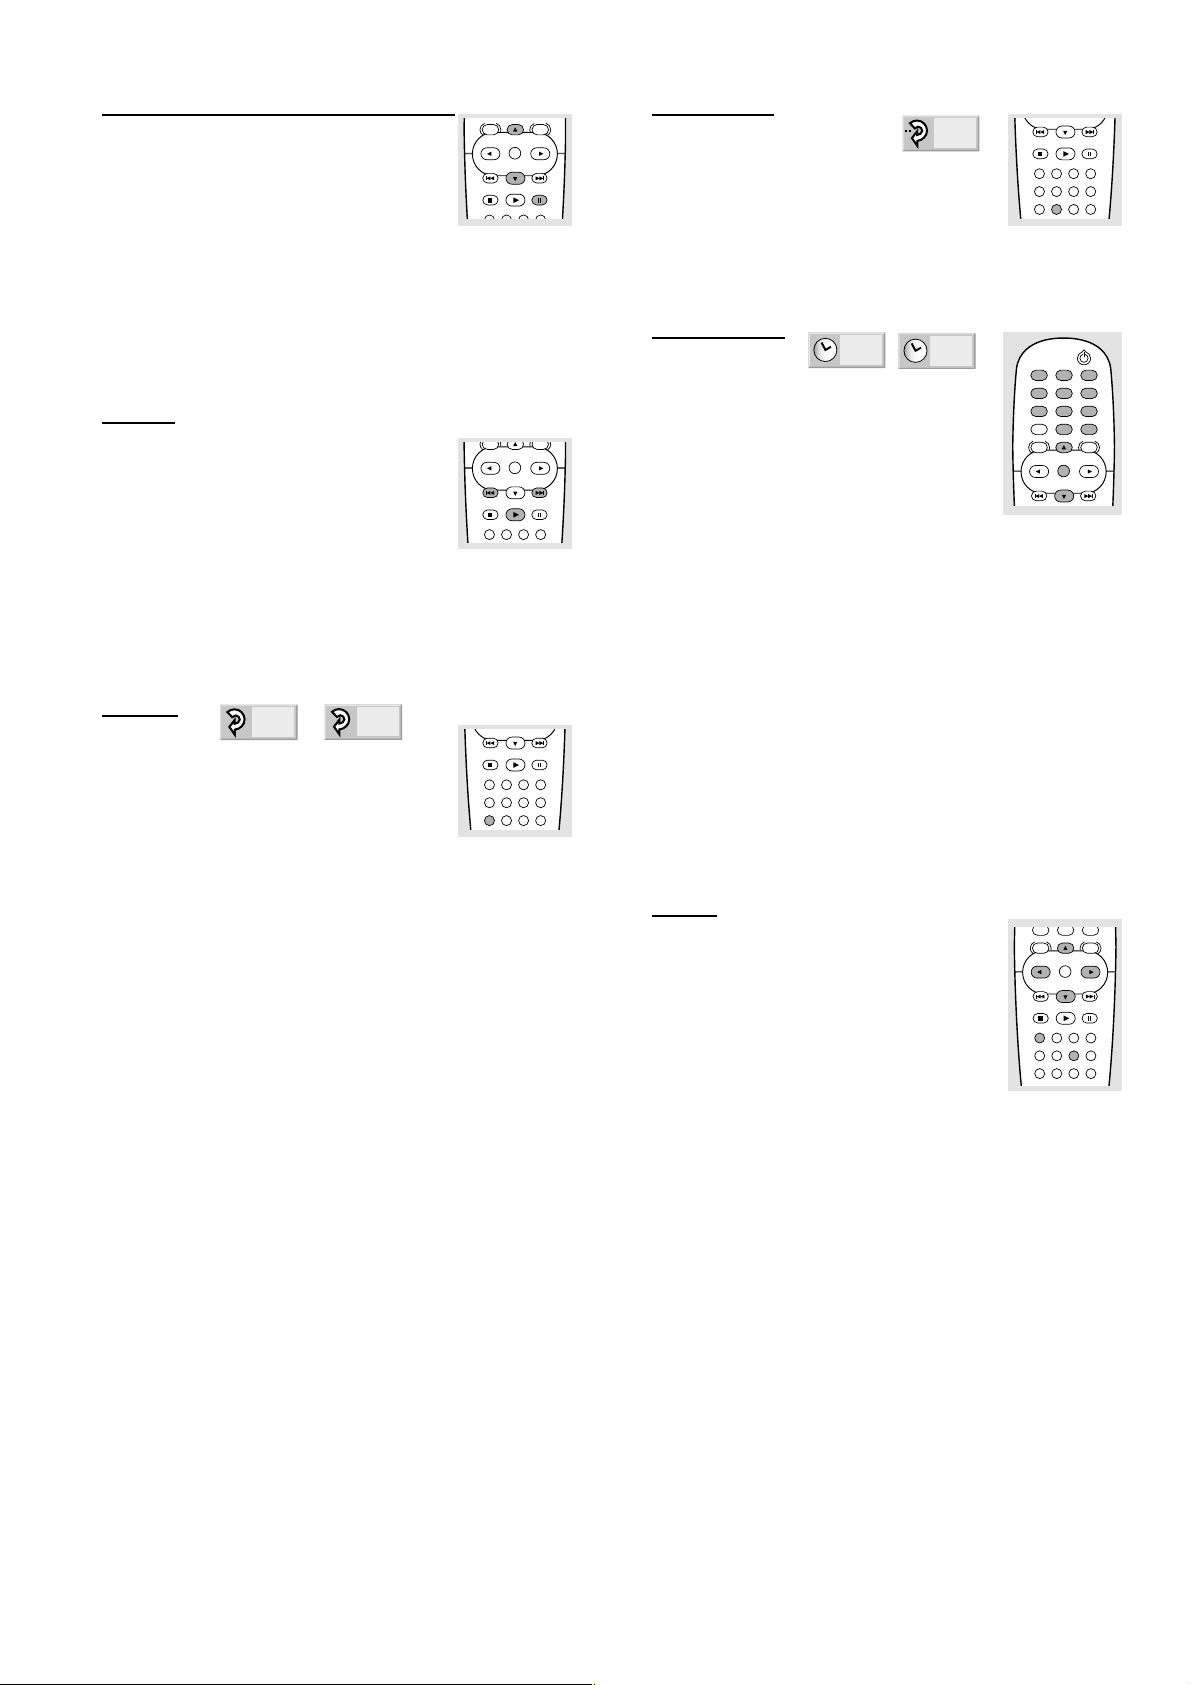
– Changing the 4-digit code
1 Press SYSTEM MENU to display the DVD Player’s Menu.
2 Select Password using the 3/4 keys.
3 While Password is selected, press B.
4 Enter the old code, then press OK.
5 Select Change using the 3/4 keys.
6 Press OK.
7 Enter the new 4-digit code, then press OK.
8 Enter exactly the same code a second time and verify by
pressing OK.
9 Press SYSTEM MENU to exit the menu.
Ratings 1 to 8:
Some discs contain scenes not suitable for children. If you
set a rating for the player, all disc scenes with the same
rating or lower will be played. Higher rated scenes will not
be played unless an alternative scene is available on the disc.
The alternative must have the same rating or a lower one. If
no suitable alternative is found, playback will stop. You must
enter the 4-digit code or change the rating level in order to
play the disc.
6 Press OK to confirm your rating selection, then press
SYSTEM MENU to exit the menu.
Disc Audio
Disc Subtitle
Disc Menu
Rating
Password
TV Aspect
Menu Language
Progressive Scan
Digital Audio Output
5.1 Speaker Setup
Others
8
7
6
5
4
3
2
1
Unlock
– Password
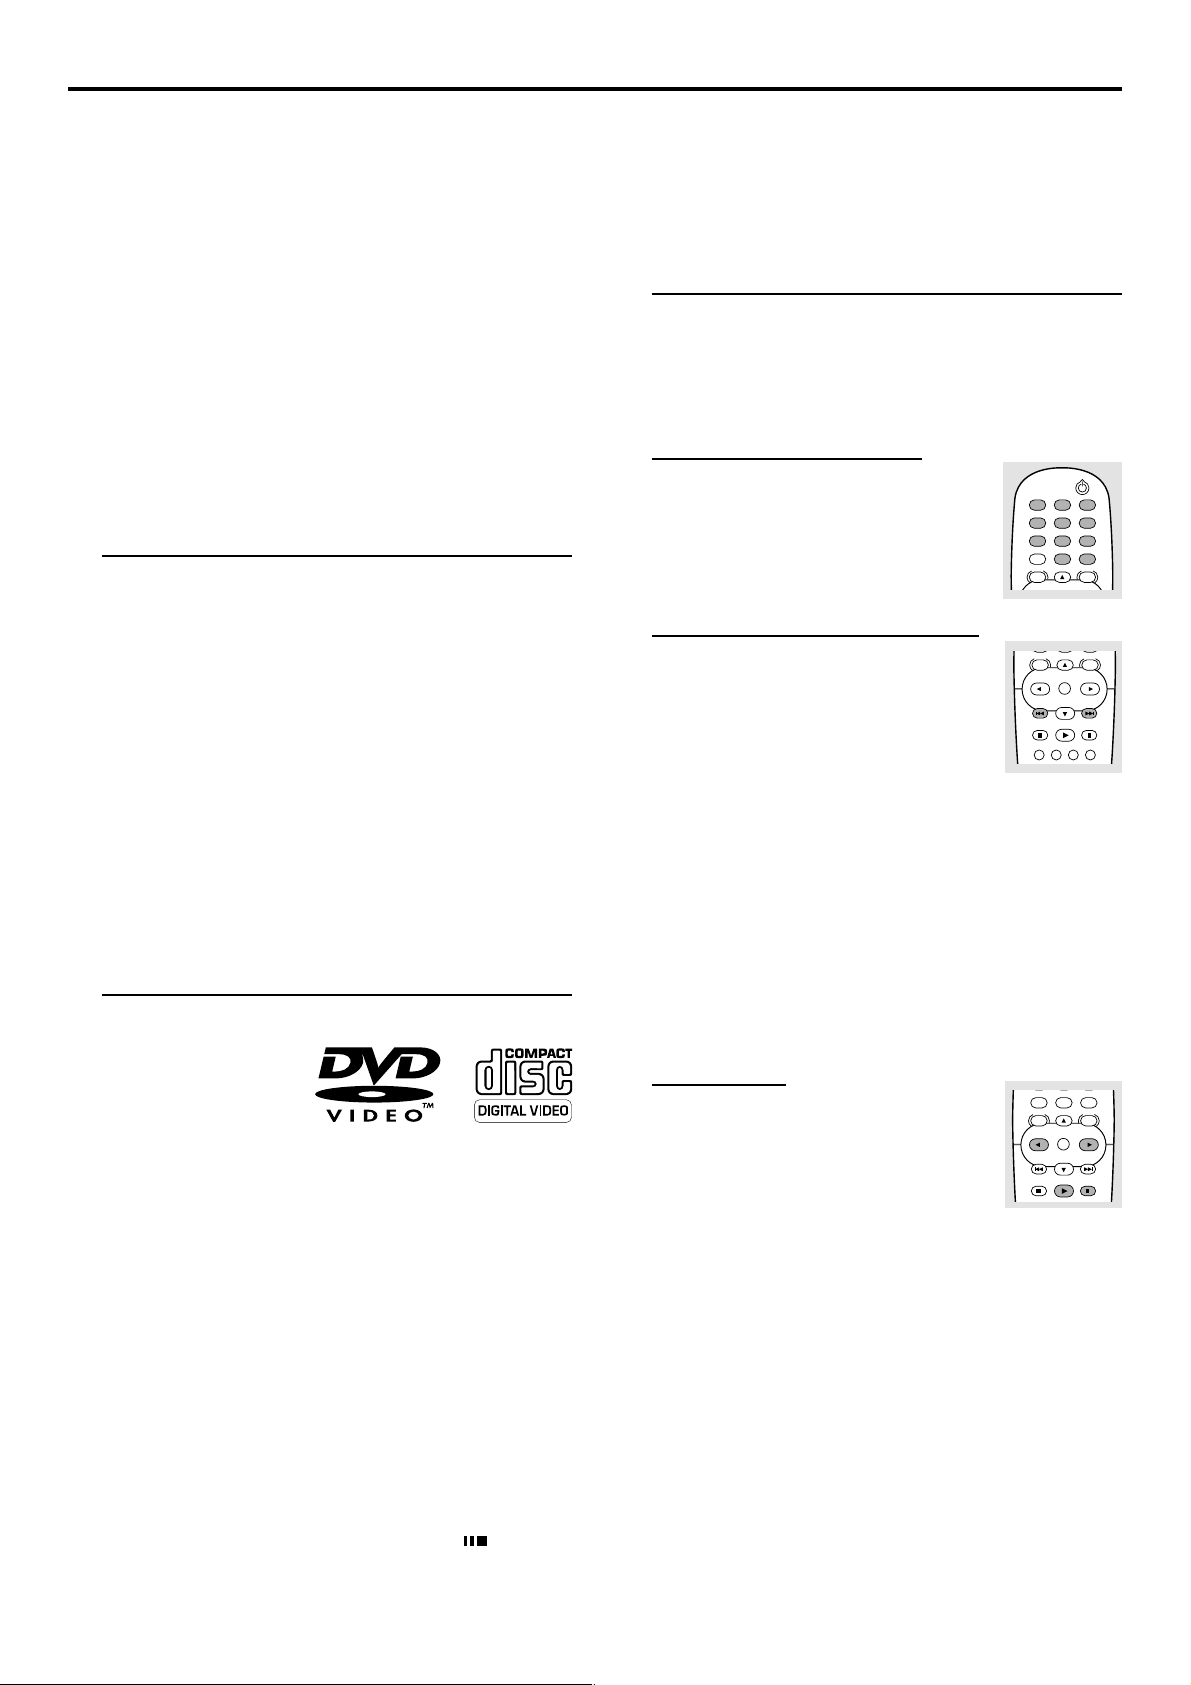
1 To set the Password for the first time, press SYSTEM
MENU to display the DVD Player’s Menu.
2 Select Password using the 3/4 keys.
3 While Password is selected, press B.
4 Enter the 4-digit password using the numeric keys (0-9),
then press OK.
5 Enter the 4-digit password again to verify it, then press OK.
6 Press SYSTEM MENU to remove the menu.
Note: Confirmation of the 4-digit code is necessary when the
code is changed (see ‘Changing the 4-digit code’).
– If you forget your 4-digit code
If you forget your password, to clear the current password,
follow the procedure below.
1 Press SYSTEM MENU to display the DVD Player’s Menu.
2 Enter the 6-digit number “210499” .
➜ The 4-digit password is cleared. “P CLr” appears on the
display. The message will appear if the disc tray is closed. It
will be on the display until you try another feature.
3 Enter a new code as described at left (Password).
– If a Disc will not play
If you insert a disc that exceeds the rating level you set, you
may see the message "Parental Control Limit." If so, you
must set "Rating" to "Unlock" in the DVD Player menu.
Follow steps 1-6 for Parental Control Rating, choosing
"Unlock" at step 5. After you set "Rating" to "Unlock," the
disc will play as usual.
Or, you may see this message if you insert a disc that
exceeds the rating level: "The parental setting of this player
prohibits play. Would you like to allow this disc to play?"
Press the 1/2 buttons to select "Yes" or "No," then press
the OK button. If you select "No," a message will remind
you that the disc will not play. Press the OPEN/CLOSE
button to remove the disc.
Or, if you select "Yes," next press the numerical keys to
enter your four-digit password, then press the OK button.
The disc will be available for playback as usual.
Notes:
– The messages will vary among discs.
– After you clear a message as described above, the disc will
play as usual. However, if you turn off the DVD Player or open
the disc tray, you will repeat these steps again if you try to play
the same disc later.
PREPARATION
15
Page 16
Operation
– Parental Control Disclaimer
This DVD Player features the PARENTAL CONTROL
system, which is intended to be active when playing DVD
discs with certain software coding. This is according to
technical standards adopted by the set maker and disc
content industries.
Please note that PARENTAL CONTROL will not control a
DVD that does not have the appropriate software coding.
At the time of release of this DVD Player, certain aspects of
the technical standards had not been settled between set
makers and the disc content industries.
For these reasons, Philips cannot guarantee the functioning
of PARENTAL CONTROL and denies any liability
associated with unintended watching of discs.
If in doubt, please make sure the disc plays according to
your PARENTAL CONTROL settings before you allow
children access to the DVD Player.
Loading Discs
1 Press OPEN/CLOSE on the front of the player to open the
disc tray.
2 Load your chosen disc in the tray, with the label facing up.
When a double-sided DVD is inserted, make sure the side
you want to play is facing up.
3 Press OPEN/CLOSE again to close the tray.
➜ READING appears on the TV screen, and playback
starts automatically. In some cases, the disc menu might
appear instead.
Note:
– If ‘Parental Control’ is set and the disc is not within the
‘Rating’ settings (not authorized), the 4-digit code must be
entered and/or the disc must be authorized (see ‘Parental
Control’ on page 15).
Playing DVD and Video CD
discs
Notes:
– DVDs may have a region code.
– Your player will not play discs that have a region code
different from your player. The region code for this player is 1
(one).
General Features
Note:
– Unless stated, all operations described are based on remote
control use. Some operations can be carried out using the
DVD Player’s menu.
Moving to another TITLE
When a disc has more than one title, you
can move to another title as follows:
¶ Press DISPLAY when playback is stopped,
then press the appropriate numerical key
(0-9) to select a title number.
Moving to another CHAPTER/
TRACK
When a title on a disc has more than one
chapter or a disc has more than one track,
you can move to another chapter/track as
follows:
¶ Press T or S briefly during playback to select the
next chapter/track or to return to the beginning of the
current chapter/track.
¶ Press S twice briefly to step back to the previous
chapter/track.
¶ To go directly to any chapter during DVD playback, press
DISPLA Y . Then, press 3/4 to select C (chapter) (or for a
Video CD, select T for track). Then, enter the chapter/track
number using the numerical keys (0-9).
Note:
– For two-digit numbers, press the keys in rapid succession.
POWER
123
456
789
RETURN
DISPLAY
0
DISC SYSTEM
MENU
DISC SYSTEM
MENU
OK
PLAY
STOP
CLEAR MARKER FTS TITLE
MENU
PAUSE
MENU
¶ After inserting the disc
and closing the tray,
playback starts automatically, depending on the disc. The
player’s display shows the type of disc loaded, as well as the
disc’s information and playing time.
¶ The disc may invite you to select an item from a menu. If
the selections are numbered, press the appropriate
numerical key; if not, use the 3/4, 1/2 keys to highlight
your selection, then press OK.
¶ The number of the current title and chapter are displayed.
¶ Playback may stop at the end of the Title, and you may
return to the disc menu. To go to the next title, press PLAY.
¶ To stop playback, press STOP.
➜ The default screen will appear.
➜ The screen saver picture appears when you leave the
DVD Player in stop mode for about five minutes.
➜ After the Screen Saver has been engaged for about five
minutes, the DVD Player will automatically turn itself off.
¶ You can resume playback from the point at which you
stopped playback. If you see the Resume icon on the
screen when you stop playback, press PLAY to resume
playback from that point.
16
OPERATION
RETURN
Slow Motion
¶ Press PAUSE during playback.
➜ The player will enter PAUSE mode.
¶ Use the 1/2 keys to enter the SLOW
DISPLAY
0
DISC SYSTEM
MENU
MENU
OK
PLAY
STOP PAUSE
mode.
¶ Use the 1/2 keys to select the required speed: , 1/16, ,
1/8, , 1/4 or , 1/2 (backward), or
. 1/16, . 1/8, . 1/4 or . 1/2 (forward).
¶ If PAUSE is pressed again, the speed will be set to zero
(PAUSE) and playback will pause.
¶ To exit slow motion mode, press PLAY.
Note:
– Slow motion playback in reverse is not applicable for Video
CD.
Page 17
DISC SYSTEM
MENU
Still Picture and Frame-by-frame
playback
¶ Press PAUSE during playback.
➜ The player will now go into PAUSE mode.
OK
PLAY
STOP
CLEAR MARKER FTS TITLE
MENU
PAUSE
¶ You can advance the picture frame by frame by pressing
PAUSE or 3 repeatedly on the remote control.
¶ You can reverse the picture frame by frame by pressing 4
repeatedly on the remote control.
Note:
– You can not reverse the picture frame by frame for Video
CD.
Search
¶ Press and hold T or S for about two
seconds during playback.
➜ The player will now go into SEARCH
MENU MENU
OK
PLAY
STOP
CLEAR MARKER FTS TITLE
PAUSE
mode.
¶ Press and hold T or S repeatedly to select the
required speed: 5X2, 5X4, 5X16, 5X100 (backward)
or 6X2, 6X4, 6X16, 6X100 (forward).
¶ To exit SEARCH mode, press PLAY.
¶ With a Video CD, the Search speed changes: 5X2, 5X4,
5X8 (backward) or 6X2, 6X4, 6X8 (forward).
Repeat
TITLE
DVD Video Discs - Repeat Chapter/
Title/Off
¶ To repeat the currently playing chapter, press
TRACK
PLAY
STOP
CLEAR MARKER FTS TITLE
SUBTITLE ANGLE ZOOM AUIDO
REPEAT A-B RANDOM SOUND
PAUSE
REPEAT.
➜ The Repeat Chapter icon appears on the TV screen.
¶ To repeat the title currently playing, press REPEAT a second
time.
➜ The Repeat Title icon appears on the TV screen.
¶ To exit Repeat mode, press REPEAT a third time.
➜ The Repeat Off icon appears on the TV screen.
Video CDs - Repeat Track/All/Off
¶ To repeat the track currently playing, press REPEAT.
➜ The Repeat T rack icon appears on the TV screen.
¶ To repeat the entire disc, press REPEAT a second time.
➜ The Repeat All icon appears on the TV screen.
¶ To exit Repeat mode, press REPEAT a third time.
➜ The Repeat Off icon appears on the TV screen.
Note:
– On a Video CD with PBC, you must set PBC to Off under
Personal Preference to use the Repeat function. See page 14.
Repeat A-B
To repeat a sequence in a title:
¶ Press A-B at your chosen starting point.
➜ A- appears briefly on the TV screen.
A B
PLAY
STOP
CLEAR MARKER FTS TITLE
SUBTITLE ANGLE ZOOM AUIDO
REPEAT A-B RANDOM SOUND
PAUSE
¶ Press A-B again at your chosen end point.
➜ A-B appears briefly on the TV screen, and the repeat
sequence begins(a-b repeat appears on the player’s display).
¶ To cancel the sequence, press A-B.
Time search
0:16:57
-:--:--
The Time Search function allows you to
start playing at any chosen time on the disc.
¶ Press DISPLAY during playback. The on-
screen display appears on the screen.
➜ The Time Search box shows the elapsed
POWER
123
456
789
RETURN
DISPLAY
0
DISC SYSTEM
MENU
MENU
OK
playing time of the current disc.
¶ Press 3/4 to select the Time Search icon in the on-screen
display.
➜ The “-:--:--” appears in the Time Search box.
¶ Use the numerical keys to enter the required start time.
Enter hours, minutes and seconds from left to right in the
box.
➜ If you enter the wrong numbers, press CLEAR to
remove the numbers you entered. Then enter the correct
numbers.
¶ Press OK to confirm the start time.
➜ Playback starts from the selected time on the disc. If you
enter an invalid time, playback will continue from the
current point.
Note:
– Time Search is not supported for Video CD.
Zoom
The Zoom function allows you to enlarge
0
DISC SYSTEM
MENU
MENU
OK
the video image and to move through the
PLAY
STOP
enlarged image.
¶ Press ZOOM during playback or still
playback to activate the Zoom function.
PAUSE
CLEAR MARKER FTS TITLE
SUBTITLE ANGLE ZOOM AUIDO
REPEAT A-B RANDOM SOUND
➜ If you press ZOOM repeatedly, the
magnification level increases up to six times.
¶ Use the 1 2 3 4 keys to move through the zoomed
picture.
¶ Press CLEAR to resume normal playback or return to the
paused image.
OPERATION
17
Page 18
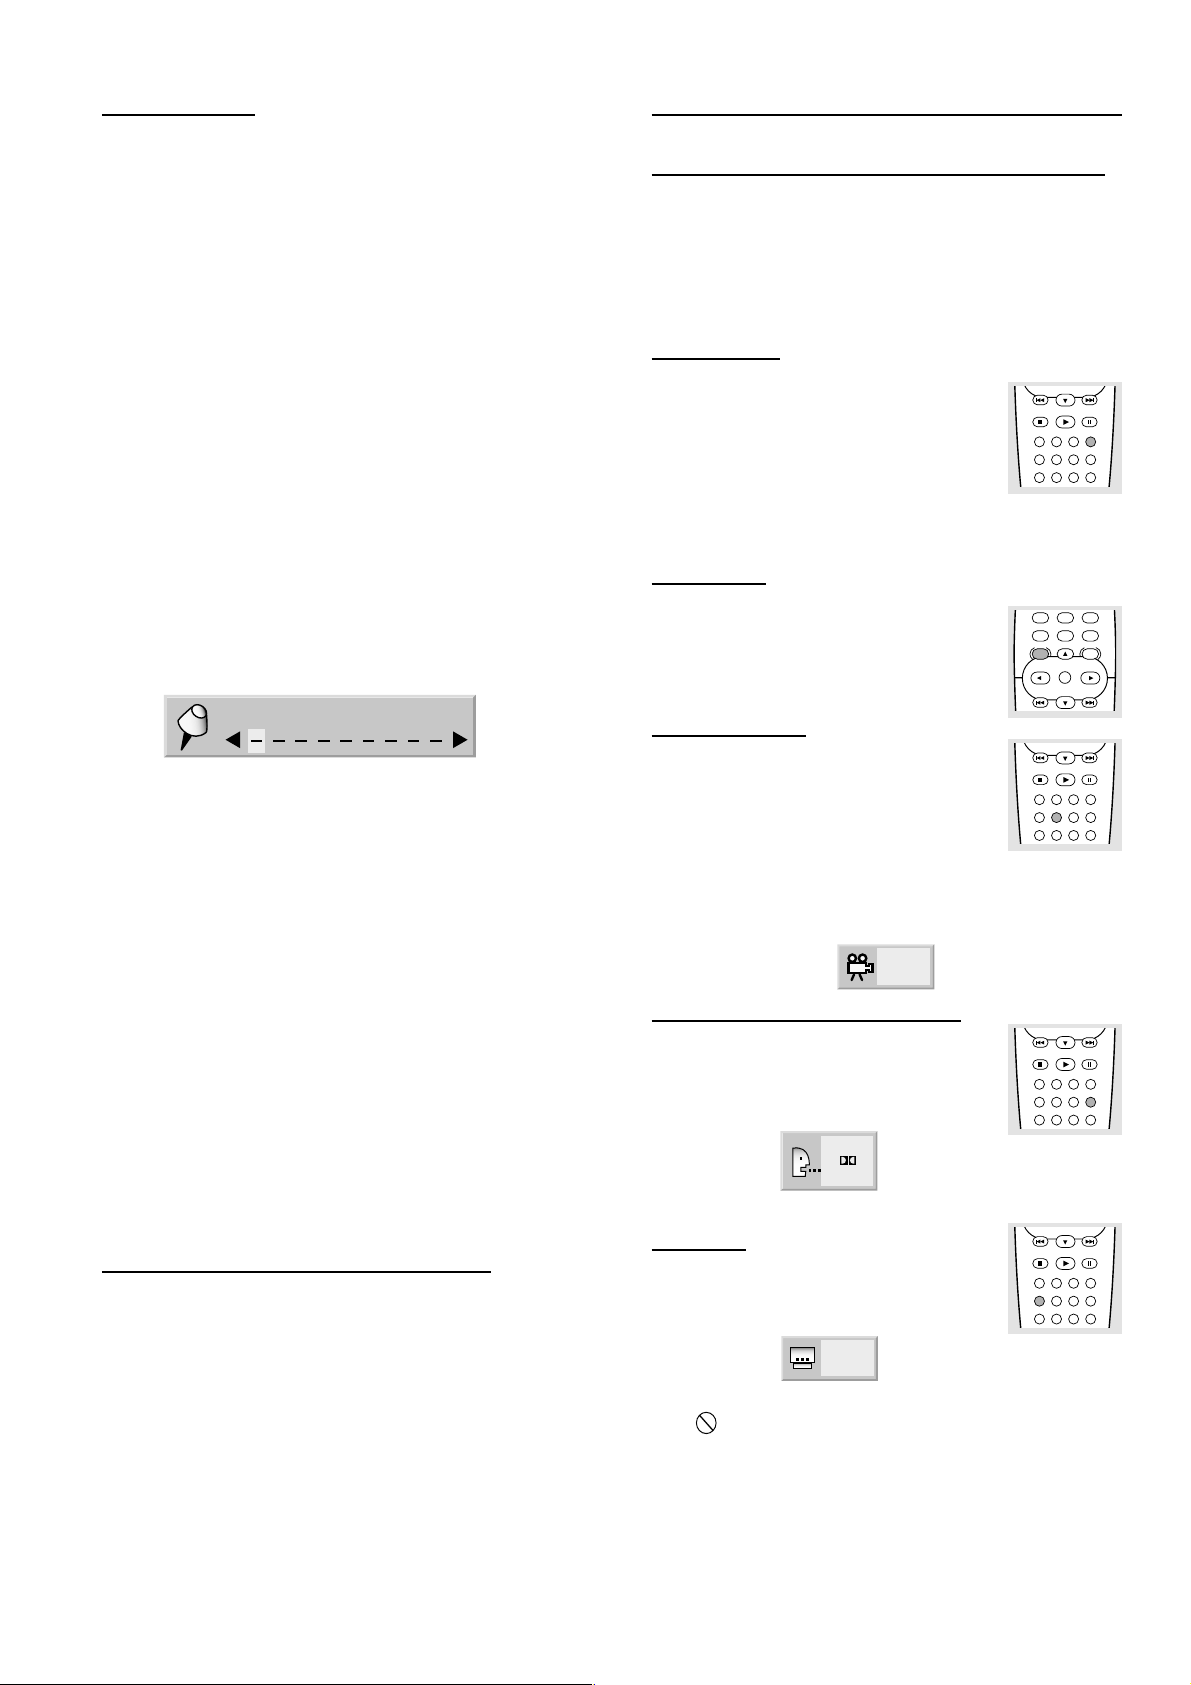
Marker search
You can start playback from a memorized point. Up to nine
points can be memorized.
To enter a mark, follow these steps.
1 During disc playback, press MARKER.
➜ The MARKER SEARCH menu will appear on the TV
screen briefly.
2 During playback , press OK when playback reaches the spot
that you want to memorize.
➜ The Marker number appears.
3 To enter additional Marker points, press 1/2 until another
empty point on the MARKER SEARCH menu is highlighted,
then press OK.
4 Repeat steps 2 and 3 to enter up to nine Marker points on
a disc.
5 To remove the MARKER SEARCH menu, press MARKER.
The marked spots will remain in the player’s memory as
long as the disc is not changed. The Marker memory will
remain active if the disc is stopped. It will be lost if the disc
is removed from the player, if the disc tray is opened, or if
the DVD Player is turned off.
MARKER SEARCH
Special DVD Features
Checking the contents of DVD Video discs:
Menus
DVDs may contain menus that allow you to access special
features. To use the disc menu, press the appropriate
numerical key; or, use the 3 4 1 2 keys to highlight your
selection, then press OK.
Title menus
¶ Press TITLE.
➜ If the current title has a menu, the menu
will appear on the screen. Otherwise, the
disc menu will be displayed.
¶ The menu can list camera angles, spoken
language and subtitle options, and chapters for the title.
¶ To remove the title menu, press TITLE again.
Disc menu
¶ Press DISC MENU.
➜ The disc menu is displayed.
¶ To remove the disc menu, press DISC
MENU again.
PLAY
STOP
CLEAR MARKER FTS TITLE
SUBTITLE ANGLE ZOOM AUIDO
REPEAT A-B RANDOM SOUND
789
RETURN
0
DISC SYSTEM
MENU
OK
PAUSE
DISPLAY
MENU
– To Recall a Marked Scene
1 During disc playback, press MARKER.
➜ The MARKER SEARCH menu will appear on the screen.
2
Press 1/2 to select a Marker number that you want to recall.
3 Press OK.
➜ Playback will start from the Marked scene.
4 To remove the MARKER SEARCH menu, press MARKER.
– To clear a Marked Scene
1 During disc playback, press MARKER.
➜ The MARKER SEARCH menu will appear on the screen.
2 Press 1/2 to select the Marker number that you want to
erase.
3 Press CLEAR.
➜ The Marker number will be erased from the list.
4 Repeat steps 2 and 3 to erase additional Marker numbers.
5 To remove the MARKER SEARCH menu, press MARKER.
Memorizing Settings for Viewed disc
(Condition Memory)
This player memorizes the last scene for the last disc you
have watched. Settings remain in memory even if you
remove the disc from the player or switch off the player. If
you load a disc that has its settings memorized, the latest
stop position is automatically recalled.
Camera Angle
If the disc contains sequences recorded from
different camera angles, the angle icon blinks
on the display. You can then change the
camera angle if you wish.
¶ Press ANGLE repeatedly during playback to select a
desired angle.
➜ The number of the current angle appears on the display.
1
STOP
CLEAR MARKER FTS TITLE
SUBTITLE ANGLE ZOOM AUIDO
REPEAT A-B RANDOM SOUND
Changing the audio language
¶ Press AUDIO repeatedly during playback to
hear a different audio language or audio
track.
1 ENG
D
6 CH
Subtitles
¶ Press SUBTITLE repeatedly during playback
to see the different subtitle languages.
1 ENG
Note:
– If appears, the feature is not available on the disc.
STOP
CLEAR MARKER FTS TITLE
SUBTITLE ANGLE ZOOM AUIDO
REPEAT A-B RANDOM SOUND
STOP
CLEAR MARKER FTS TITLE
SUBTITLE ANGLE ZOOM AUIDO
REPEAT A-B RANDOM SOUND
PLAY
PAUSE
PLAY
PAUSE
PLAY
PAUSE
Notes:
– Settings are stored in memory for use any time.
– Switching of the audio mode, etc., is automatic on some
discs.
– This player does not memorize settings if you switch off the
player when a DVD or title menu appears on the TV screen.
18
OPERATION
Page 19
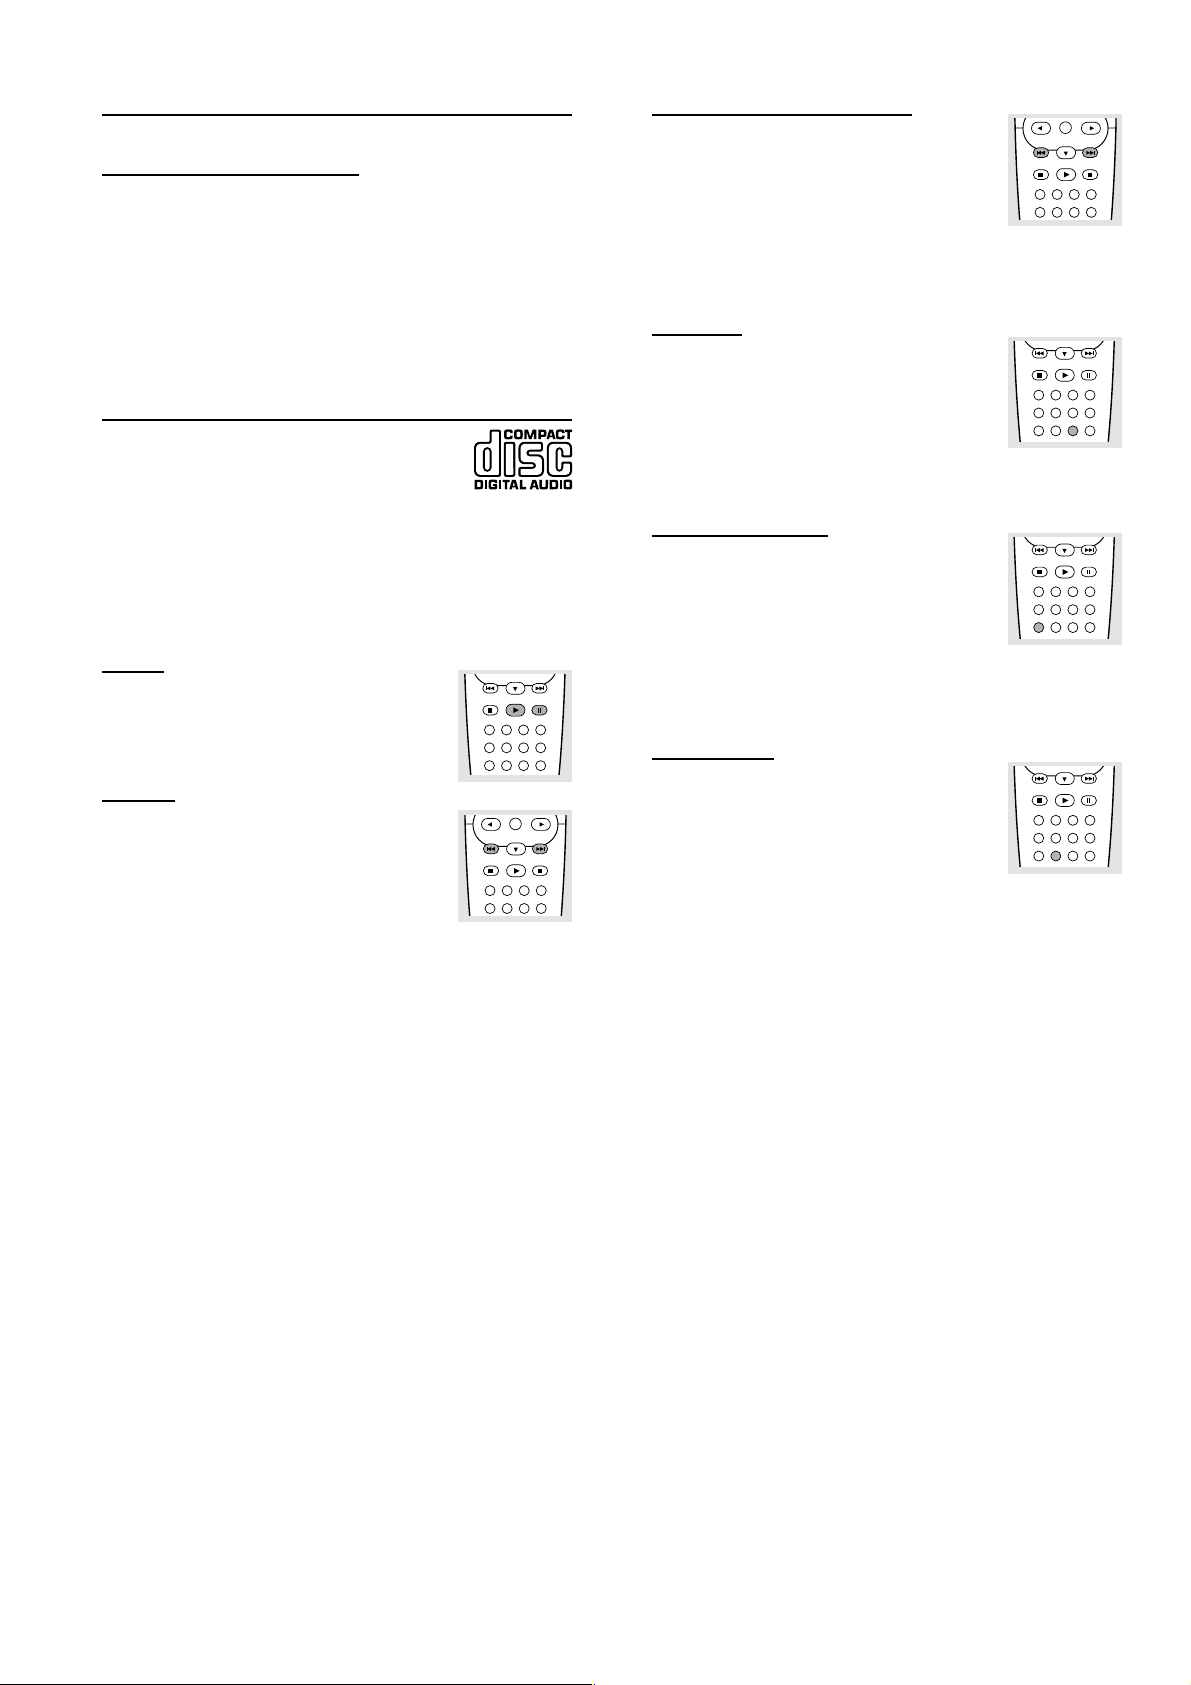
Special VCD Features
Playback Control (PBC)
¶ Load a Video CD with PBC and press PLAY.
¶ Go through the menu with the keys indicated on the TV
screen until your chosen passage starts to play. If a PBC
menu includes titles, you can select a title directly.
¶ Enter your choice with the numerical keys (0-9).
¶ Press RETURN to go back to the previous menu.
¶ You also may set PBC to Off under Personal Preferences.
Playing an Audio CD
¶ After inserting the Audio CD and closing the
tray, the number of total tracks and the total
playing time of the disc will appear on the display. Press
PLAY to start playback.
¶ During playback, the current track number and its elapsed
playing time will appear on the display.
¶ Playback will stop at the end of the disc.
¶ To stop playback at any other time, press STOP.
Pause
¶ Press PAUSE during playback.
¶ To return to playback, press PLAY.
Search
¶ To search forward or backward through the
disc at two times the normal speed, hold
down T or S for about two seconds
during playback.
➜ Search begins, and sound is partially muted.
¶ To step up to four times the normal speed, hold down
T or S again.
➜ Search goes to four times the speed, and the sound is
partially muted.
¶ To step up to eight times the normal speed, hold down
T or S again.
➜ Search goes to eight times the speed, and the sound is
partially muted.
¶ To return to two times the normal speed, hold down T
or S again.
¶ If the TV is on, search speed and direction are indicated on
the screen each time T or S is pressed.
¶ To end the search, press PLAY to resume playback or STOP
to stop playback. The search will stop if the beginning or
end of the disc is reached. If the beginning of the disc is
reached, playback may begin again.
PLAY
STOP
CLEAR MARKER FTS TITLE
SUBTITLE ANGLE ZOOM AUIDO
REPEAT A-B RANDOM SOUND
OK
PLAY
STOP
CLEAR MARKER FTS TITLE
SUBTITLE ANGLE ZOOM AUIDO
PAUSE
PAUSE
Moving to another track
¶ Press T or S briefly during playback
to go to the next track or to return to the
beginning of the current track.
OK
PLAY
STOP
PAUSE
CLEAR MARKER FTS TITLE
SUBTITLE ANGLE ZOOM AUIDO
¶ Press S twice briefly to step back to the
previous track.
¶ To go directly to any track, enter the track number using
the numerical keys (0-9) during playback.
Random
¶ Press RANDOM during playback or when
playback is stopped.
➜ The unit automatically begins Random
PLAY
STOP
CLEAR MARKER FTS TITLE
SUBTITLE ANGLE ZOOM AUIDO
REPEAT A-B RANDOM SOUND
PAUSE
Playback and RANDOM appears on the
display.
¶ To return to normal playback, press RANDOM again.
Repeat T rack/All
¶ To repeat the track currently playing, press
REPEAT.
➜ ∫ appears on the player display.
PLAY
STOP
CLEAR MARKER FTS TITLE
SUBTITLE ANGLE ZOOM AUIDO
REPEAT A-B RANDOM SOUND
PAUSE
¶ To repeat the entire disc, press REPEAT a
second time.
➜ ALL and ∫ appears on the player display.
¶ To exit Repeat mode, press REPEAT a third time.
Repeat A-B
To repeat a sequence:
¶ During disc playback, press A-B at your
chosen starting point.
PLAY
STOP
CLEAR MARKER FTS TITLE
SUBTITLE ANGLE ZOOM AUIDO
REPEAT A-B RANDOM SOUND
PAUSE
➜ A ∫ appears on the player display.
¶ Press A-B again at your chosen end point.
➜ A ∫ B appears on the display, and the sequence
begins to play repeatedly.
¶ To exit the sequence and return to normal play, press A-B
again.
OPERATION
19
Page 20
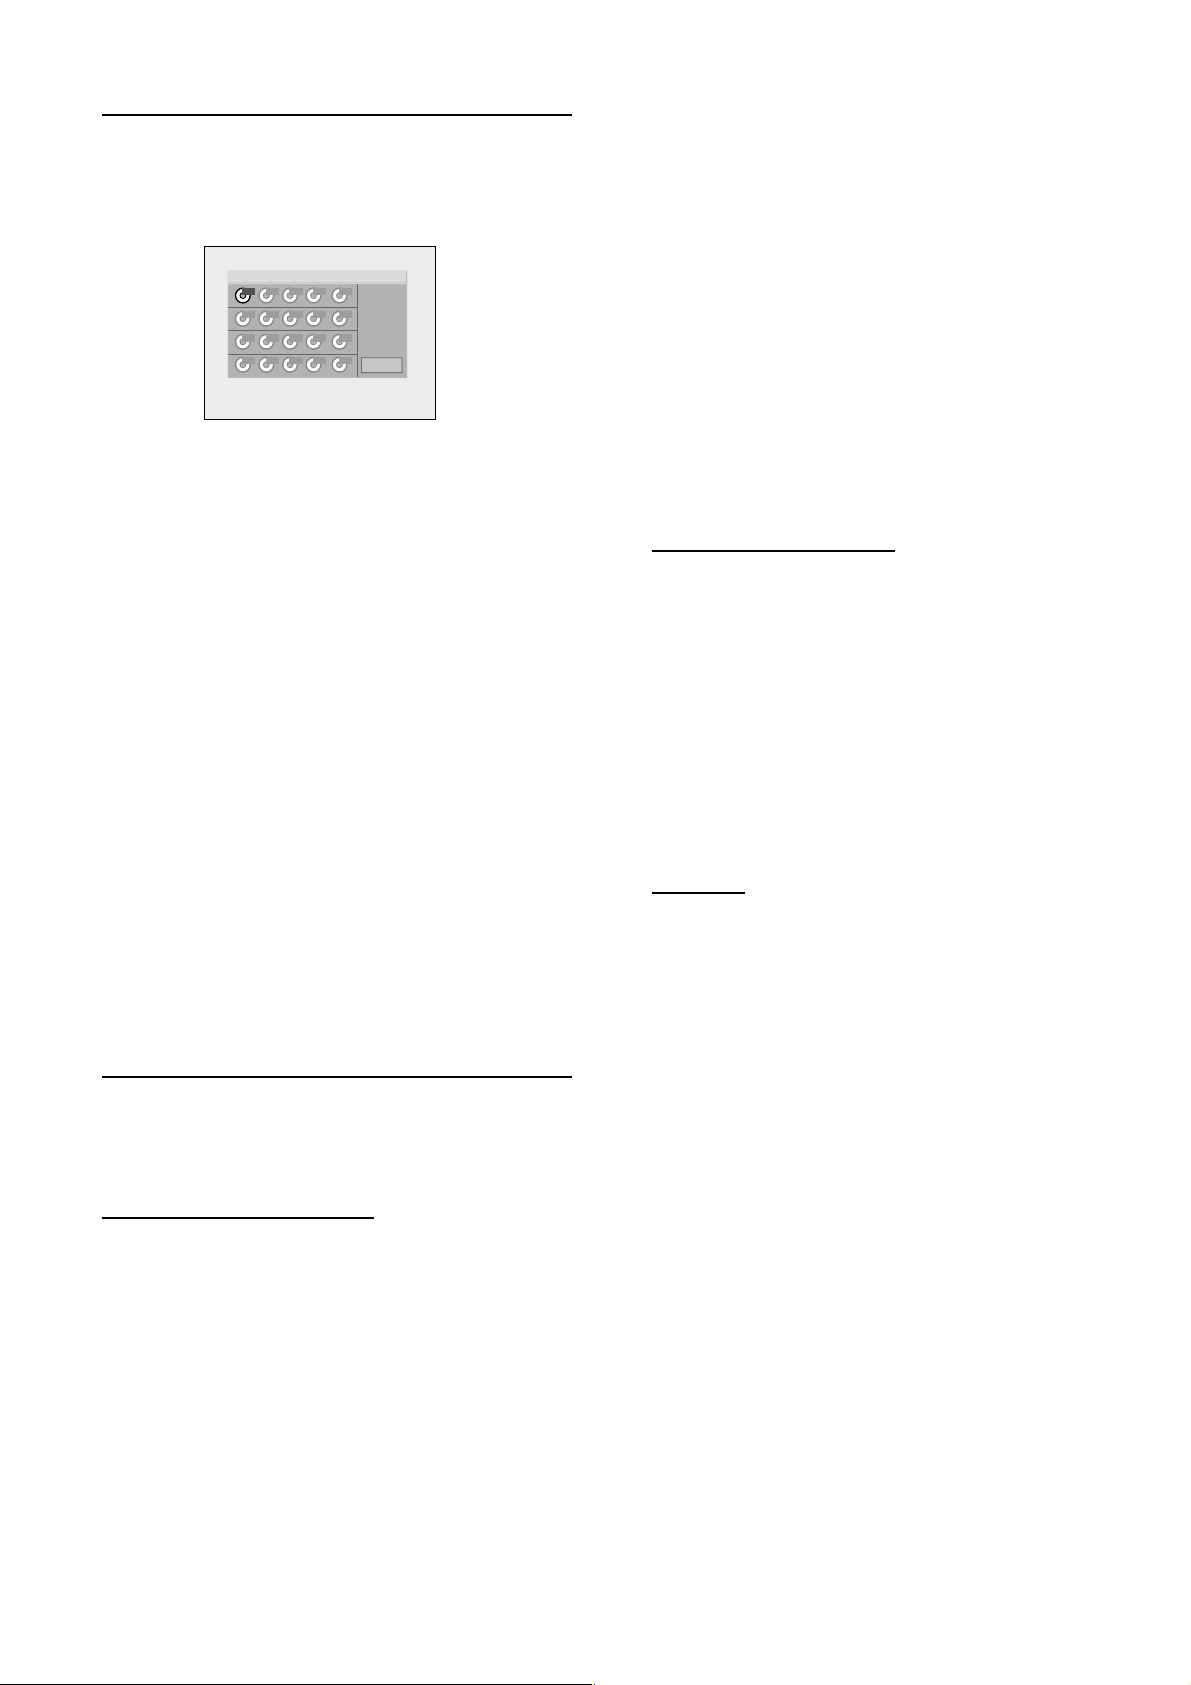
Program
¶ Program allows you to store your favorite tracks for a
particular disc in the player memory.
¶ A Program can contain 20 tracks.
Program FTS
Step
Total Time
0:00:00
1
– The restriction of playing MP3
¶ This unit can play up to 200 files per disc. A disc having
more than 200 files cannot be played.
¶ The unit may not play MP3 files in the order that you
recorded them on the disc.
¶ With a multi-session disc, the player plays only the last
session.
¶ It may take over 30 seconds to read the MP3 files,
depending on the contents of the disc.
Clear All
– Storing a Program
1 Load a disc and stop playback.
2 Press FTS.
➜ The program menu appears on the screen
3 Enter the track number using the numerical keys (0-9).
4 Press 2 to move to the next slot, then repeat step 3 to
enter other tracks.
➜ The number of tracks and the playing time of the
program will be shown on the screen.
5 Press PLAY or OK to exit the screen. Playback will begin
immediately.
– Erasing a track from a Program
1 Press FTS to display the program menu.
2 Use 1 2 3 4 to select the track number you wish to
erase.
3 Press CLEAR.
➜ The track number will be erased from the track list.
– Erasing the complete Program
1 Use 1 2 3 4 to select Clear All, then press OK.
➜ The complete Program for the disc will be erased.
Playing MP3 Recordings
The DVD Player can play MP3 format recordings on CDROM, CD-R or CD-RW discs.
Before playing MP3 recordings, read the following notes.
– The limitation of indications
¶ Up to 8 characters are displayed for the name of a track.
¶ Characters other than uppercase letters (“A” to “Z”),
numericals (“0” to “9”) and underscore (“_”) may not be
displayed, or may be displayed in different characters.
¶ The elapsed playing time on the display may not be correct
when playing MP3 files.
Tips on recording MP3
To enjoy high quality sound, convert to MP3 files with a
sampling frequency of 44.1kHz and a fixed bit rate of 128
kbps.
To play MP3 files in the order that you recorded
them
1 Writing software that is capable of recording MP3 files in
numerical and alphabetical order is required.
2 Include a two or three digit number at the beginning of
each file name. (e.g. “01,” “02,” ... or “001,” “002,” ...)
3 It’s recommended that you use only the root folder (do not
create a child folder under the root folder).
Glossary
Extension:
An extension is the last three characters that divide a file
name by a period. The extension shows the attribution of
the file or the software in which the file was created.
Session:
A session is one section on a disc between the beginning of
data and the end of written data.
A multi-session disc has more than two sessions.
Notes on MP3 recordings
– About MP3
¶ An MP3 file is audio data compressed by using MPEG1, the
audio layer-3 file-coding scheme. We call files that have the
“.mp3” file extension “MP3 files.”
¶ The player can not read an MP3 file that has a file extension
other than “.mp3.”
¶ Noises may be heard if you play a non-MP3 file that has the
“.mp3” extension.
20
OPERATION
Page 21
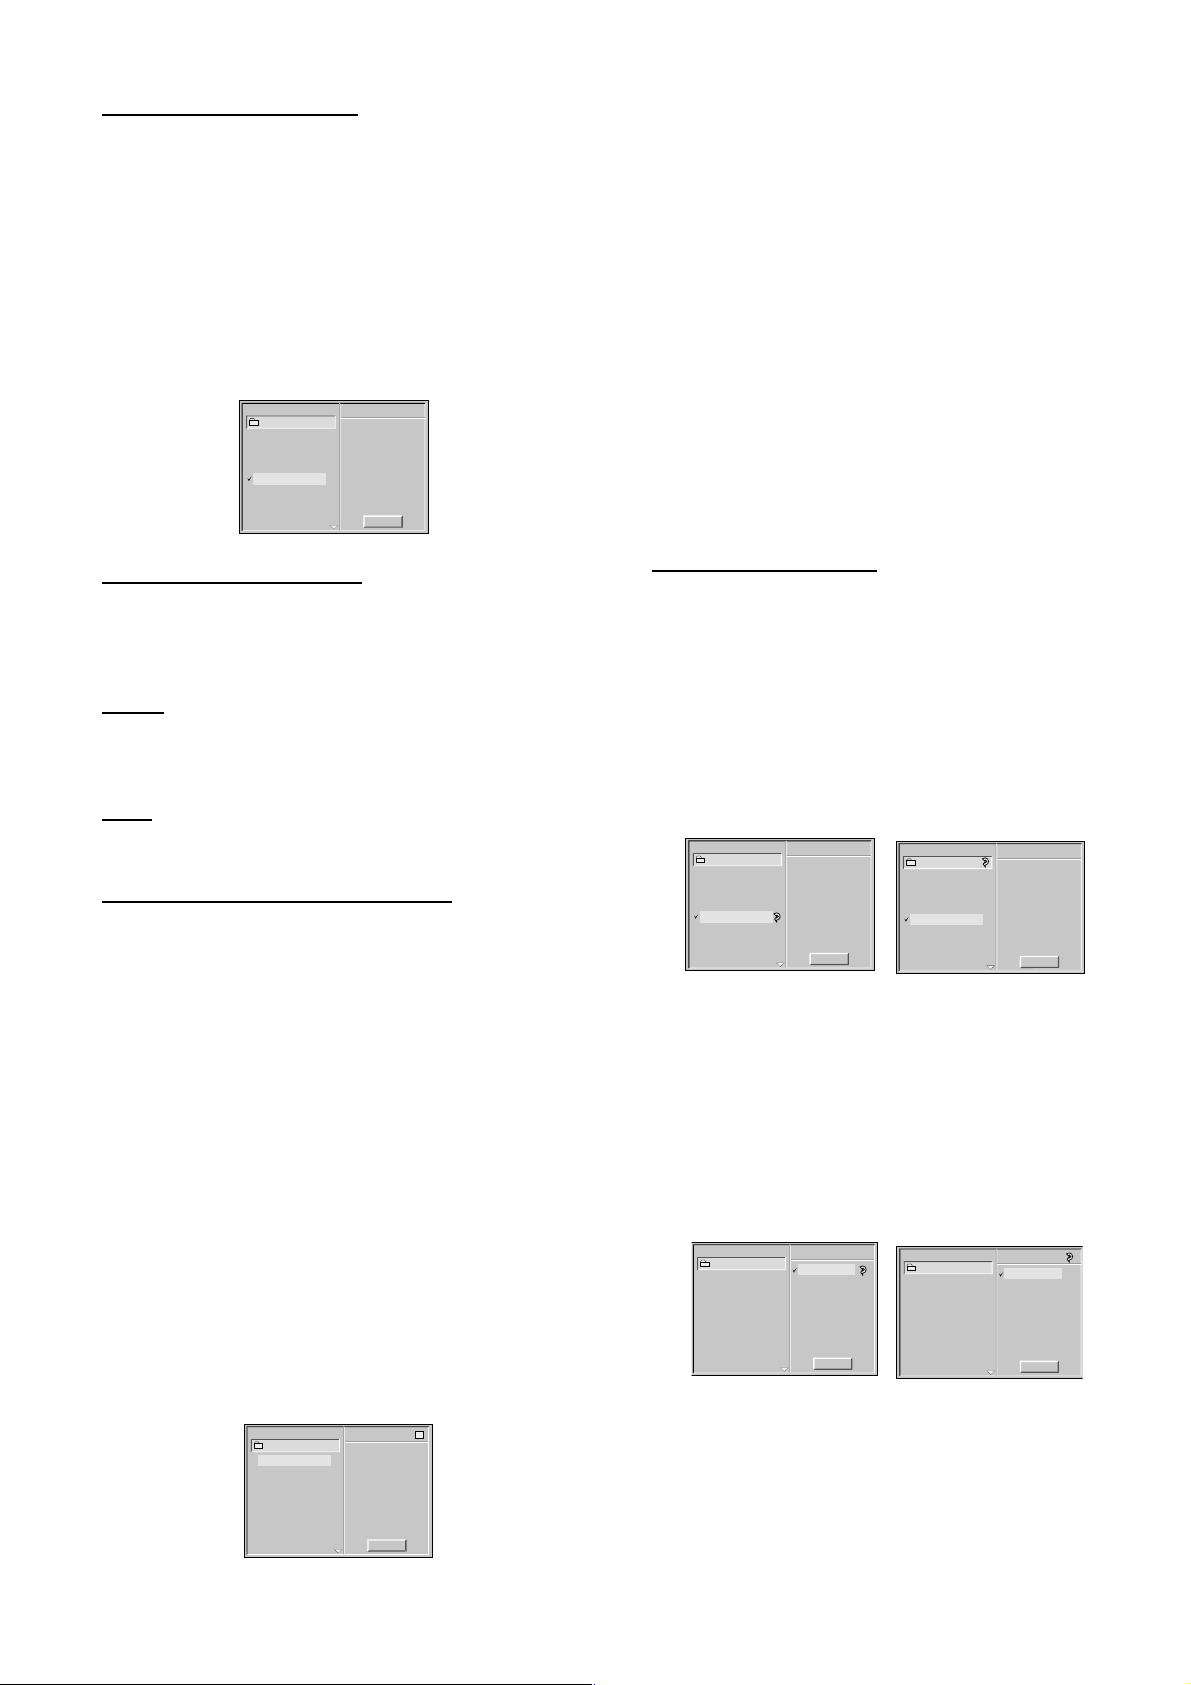
Playing MP3 Recordings
Program
MP3-1
MP3
Clear All
TRACK 1.mp3
TRACK 2.mp3
TRACK 2.mp3
TRACK 3.mp3
TRACK 4.mp3
TRACK 6.mp3
TRACK 6.mp3
TRACK 7.mp3
TRACK 7.mp3
TRACK 8.mp3
TRACK 9.mp3
TRACK 9.mp3
TRACK 5.mp3
1 Insert a disc and close the tray.
➜ The MP3 menu appears on the TV screen.
Note
– It may take over 30 seconds to read the MP3 files,
depending on the contents of the disc.
2 Press 3/4 to select the MP3 file you want to play.
3 Press PLAY.
➜ Playback starts; playback will end when all tracks on the
disc have played.
MP3
MP3-1
TRACK 1.mp3
TRACK 2.mp3
TRACK 3.mp3
TRACK 4.mp3
TRACK 5.mp3
TRACK 6.mp3
TRACK 7.mp3
TRACK 8.mp3
TRACK 9.mp3
Program
Clear All
– Erasing a track from a Program
1 Press FTS while playback is stopped.
➜ The E mark will appear.
2 Press 2 to move to the Program list.
3 Use 3/4 to select the track that you wish to erase from
the Program list.
4 Press CLEAR.
➜ The track will be erased from the Program.
– Erasing the complete Program
1 Press FTS while playback is stopped.
➜ The E mark will appear.
2 Use 1/2 to select Clear All, then press OK.
➜ The complete Program for the disc will be erased.
➜ The programs are also cleared when the disc is
removed.
Moving to another track
¶ Press T or S briefly during playback to go to the
next track, or press 3/4 to select the desired track in the
menu and press PLAY.
Pause
¶ Press PAUSE during playback.
¶ To return to playback, press PLAY or PAUSE again.
Stop
¶ Press STOP during playback.
Programmed playback with MP3
1 Insert the disc and close the tray.
➜ The MP3 menu is displayed on the TV screen.
2 Press FTS while playback is stopped to enter the Program
Edit mode.
➜ The E mark will appear to the right of the word Program
on the right side of the MP3 menu.
Note
– Press RETURN or FTS to exit the Program Edit mode;
the E mark will disappear.
3 Press 3/4 to select a track.
4 Press OK to place the selected track on the MP3 Program.
➜ Repeat steps 3 to 4 to place additional tracks in the
program.
5 Press PLAY to start.
➜ Playback begins in the order in which you programmed
the tracks.
➜ Playback stops after all of the tracks on the Program
have played once.
MP3
MP3-1
TRACK 1.mp3
TRACK 2.mp3
TRACK 3.mp3
TRACK 4.mp3
TRACK 5.mp3
TRACK 6.mp3
TRACK 7.mp3
TRACK 8.mp3
TRACK 9.mp3
Program
TRACK 2.mp3
TRACK 7.mp3
TRACK 6.mp3
TRACK 9.mp3
E
Clear All
MP3-Repeat track/all
– MP3 - Repeat track/all
¶ To repeat the track currently playing, press REPEAT.
➜ The Repeat icon appears to the right of the track name.
¶ To repeat all the tracks, press REPEAT a second time.
➜ The Repeat icon appears to the right of the directory
name.
¶ To exit Repeat mode, press REPEAT a third time.
➜ The Repeat icon disappears.
MP3
MP3-1
TRACK 1.mp3
TRACK 2.mp3
TRACK 3.mp3
TRACK 4.mp3
TRACK 5.mp3
TRACK 6.mp3
TRACK 7.mp3
TRACK 8.mp3
TRACK 9.mp3
Program
Clear All
MP3
MP3-1
TRACK 1.mp3
TRACK 2.mp3
TRACK 3.mp3
TRACK 4.mp3
TRACK 5.mp3
TRACK 6.mp3
TRACK 7.mp3
TRACK 8.mp3
TRACK 9.mp3
Program
Clear All
– MP3 - Repeat Programs
¶ During Program playback, to repeat the current track, press
REPEAT.
➜ The Repeat icon appears to the right of the track name.
¶ To repeat all of the programmed tracks, press REPEAT a
second time.
➜ The Repeat icon appears to the right of Program.
¶ To exit Repeat mode, press REPEAT a third time.
➜ The Repeat icon disappears.
MP3
TRACK_1
TRACK_2
TRACK_3
TRACK_4
TRACK_5
TRACK_6
TRACK_7
TRACK_8
TRACK_9
MP3-1
Program
TRACK_2
TRACK_7
TRACK_6
TRACK_9
Clear All
OPERATION
21
Page 22
Before Requesting Service
If it appears that the DVD Player is faulty, first consult this checklist. It may be that something has been overlooked. Under no
circumstances should you attempt to repair the system yourself; this will invalidate the warranty.
Look for the specific symptom(s). Then perform only the actions listed to remedy the specific symptom(s).
Symptom Remedy
No power – Make sure the power cord is connected properly.
– Make sure there is power at the AC outlet by plugging in another
appliance.
No picture – Check if the TV is on.
– Check the video connection.
Distorted picture – Check the disc for fingerprints. Clean the disc with a soft cloth, wiping from
center to edge.
– Sometimes a small amount of picture distortion may appear. This is not a
malfunction.
No sound – Check audio connections.
– If you are using a HiFi amplifier, try another sound source.
– If you are using a Receiver, select the DVD Player as the sound source at the
receiver.
Distorted sound from HiFi amplifier – Make sure no audio connections are made to the amplifier’s phono input.
No audio at digital output – Check the digital connections.
– Check the settings menu to make sure the digital output is set correctly.
– Check if the audio format of the selected audio language matches your
receiver capabilities.
Disc can not be played. – Ensure the disc label is facing up.
– Clean the disc.
– Check if the disc is defective by trying another disc.
– Check if the disc is badly scratched or warped (not flat).
No return to start-up screen when – Reset by switching the DVD Player off, then on again.
disc is removed
The DVD Player does not respond to – Aim the remote control directly at the DVD Player.
the remote control. – Remove any obstacles between the DVD Player and the remote control.
Buttons do not work. – In order to completely reset the player, unplug the AC power cord from the
DVD Player does not respond to some – Operations may not be permitted by the disc. Refer to the instructions or
operating commands during menu of the disc. If appears, the feature is not available on the disc.
playback.
DVD Player cannot read – Use a commonly available cleaning CD/DVD to clean the lens before
CDs/DVDs. sending the DVD Player for repair.
– Check to see if the Program requires another disc to be loaded.
– Inspect or replace the batteries in the remote control.
AC outlet.
– You can only play finalized discs. If you are using CD-Rom, CD-R or CD-RW
discs, make sure you have finalized the discs. Refer to your CD Recorder
owner’s manual for details.
22
BEFORE REQUESTING SERVICE
Page 23
Specifications
PLAYBACK SYSTEM
DVD Video
Video CD and SVCD
Audio CD (CD-R and CD-RW)
DVD+RW
MP3
OPTICAL READOUT SYSTEM
Lasertype FDA CFR21
Numerical Aperture 0.60 (DVD)
0.43 (VCD/CD)
Wavelength 650 nm (DVD)
780 nm (VCD/CD)
DVD DISC FORMAT
Medium Optical Disc
Diameter 12cm (8cm)
Playing time (12cm) One layer 2.15 h*
Dual layer 4 h*
Two side 4.30 h*
Single layer
Two side 8 h*
Dual layer
VIDEO FORMAT
DA Converter 10 bits
Signal handling Components
Digital Compression MPEG2 for DVD ,
MPEG1 for VCD
TV Standard NTSC
Number of lines 525/60Hz
Playback Multistandard(PAL/NTSC)
DVD
Horizontal Resolution 720 pixels
Vertical Resolution 480 lines
VCD
Horizontal Resolution 352 pixels
Vertical Resolution 240 lines
VIDEO PERFORMANCE
Component video output Y: 1 Vpp into 75 ohm
PR/CR PB/CB: 0.7 Vpp into 75 ohm
Video output 1 Vpp into 75 ohm
S-Video output Y: 1 Vpp into 75 ohm
C: 0.286 Vpp into 75 ohm
AUDIO FORMAT
Digital MPEG/AC-3/DTS/ Compressed Digital,
PCM 16, 20, 24 bits
fs, 44.1, 48, 96 kHz
Analog Sound Stereo
Dolby Surround downmix from Dolby Digital multi-channel sound
3D Sound on two speakers
CONNECTIONS
Y Output Cinch (green)
P
R Output Cinch (red)
PB Output Cinch (blue)
S-Video Output Mini DIN, 4 pins
Video Output Cinch (yellow)
Audio L+R output Cinch (white/red)
Digital Output 1 coaxial, 1 optical
POWER SUPPLY
Power Inlet 120V, 60Hz
Power usage 16 Watt
Power usage standby less than 3 Watt
CABINET
Dimensions (w x h x d) 16.93 x 3.45 x 9.72 inches
Weight Approx. 6.6 pounds
GENERAL FUNCTIONALITY
Stop / Play / Pause
Fast Forward / Backward
Time Search (DVD)
Step Forward/Backward
Slow Motion
Title / Chapter / Track Select
Skip Next / Previous
Repeat (Chapter / Title) or (Track / All)
A-B Repeat
Random (Shuffle)
Enhanced ease of use graphical interface
Zoom (6 steps)
3D Surround Sound
DVD FUNCTIONALITY
Multi-angle Selection
Audio Selection (1 out of maximum eight languages)
Subtitles Selection (1 out of maximum 32 languages)
Aspect Ratio conversion (16:9, 4:3 Letterbox, 4:3 Panscan)
Parental Control
Disc Menu support (Title Menu and Root Menu)
Resume (one disc) after stop / standby
Marker & Search with Favorite Scene
VIDEO CD FUNCTIONALITY
Playback Control for VCD 2.0 discs
Resume (one disc) after stop / standby
Programming Tracks (PBC Off)
AUDIO CD FUNCTIONALITY
Time Display (Track)
Full audio functionality with remote control
Programming with Favorite Track Selection
IEC958 for CDDA / LPCM
IEC1937 for MPEG1/2, AC-3, DTS
430 x 88 x 247 mm
Approx. 3.0 Kg
AUDIO PERFORMANCE
DA Converter 24 bits
DVD fs 96 kHz 4 Hz - 44 kHz
fs 48 kHz 4 Hz - 22 kHz
Video CD fs 44.1 kHz 4 Hz - 20 kHz
CD fs 44.1 kHz 4 Hz - 20 kHz
SVCD fs 44.1 kHz 4 Hz - 20 kHz
fs 48 kHz 4 Hz - 22 kHz
Signal-Noise (1kHz) 100 dB
Dynamic Range (1kHz) 95 dB
Crosstalk (1kHz) 90 dB
Distortion and Noise (1kHz) 0.008%
MP3 FUNCTIONALITY
Time Display (Track)
Programming with Favorite Track Selection
* typical playing time for movie with two spoken languages and three subtitle
languages.
Specifications subject to change without prior notice.
SPECIFICATIONS
23
Page 24

Limited W arranty
90 days Free Exchange / 91 days–One Year Reduced-Cost Exc hange
Digital Video Disc Player
WHO IS COVERED?
You must have proof of the date of purchase to
exchange your product.A sales receipt or other document showing the date that you purchased the product
is considered such proof.
WHAT IS COVERED?
Warranty coverage begins the day you buy your product.For 90 days thereafter, you may exchange the defective product for a new or renewed product at the store
from which it was purchased or through Philips.Either
exchange is made at no cost to you.
From 91 days to one year from the date of purchase, you
will pay a preset exchange fee to obtain a new or
renewed product.Follow the exchange procedures on
the next page.This exchange opportunity ends one year
after the date of purchase. The replacement product is
covered only for the warranty period of the original
product.When the warranty on the original product
expires,the warranty on all replaced products also
expires.
WHAT IS EXCLUDED?
Your warranty does not cover:
• shipping charges to return defective product.
• labor charges for installation or setup of the prod-
uct,adjustment of customer controls on the product,and installation or repair of antenna systems
outside of the product.
• product repair and/or part replacement because of
improper installation,abuse, neglect,misuse , accident,
unauthorized repair or other cause not within the
control of Philips Consumer Electronics.
• a product that requires modification or adaptation
to enable it to operate in any country other than
the country for which it was designed, manufactured,
approved and/or authorized, or repair of products
damaged by these modifications.
• incidental or consequential damages resulting from
the product.(Some states do not allow the exclusion of incidental or consequential damages,so the
above exclusion may not apply to you.This includes,
but is not limited to,prerecorded material,whether
copyrighted or not copyrighted.)
• a product that is used for commercial or institutional purposes (including but not limited to rental purposes).
WHERE IS EXCHANGE AVAILABLE?
Warranty exchange is available in all countries where
the product is officially distributed by Philips Consumer
Electronics.In countries where Philips Consumer
Electronics does not distribute the product,the local
Philips service organization will attempt to exchange the
product,although there may be a delay if the appropriate product is not readily available .
MAKE SURE YOU KEEP...
Please keep your sales receipt or other document
showing proof of date of purchase.Attach it to the
owner’s manual and keep both nearby.Also keep the
original box and packing material in case you need to
return your product.
BEFORE EXCHANGING THE PRODUCT...
Please check your owner’s manual before exchanging
the product. Adjustments of the controls discussed
there may save you time and money.
LIMITATION OF LIABILITY AND REMEDY...
Philips is not liable under any circumstances for any
direct,indirect,special, incidental,or consequential damages,howsoever incurred,even if notified of the possibility of such damages.
To the extent permitted by local law, the remedies provided in this warranty statement are your sole and
exclusive remedy.
This limited warranty gives you specific legal rights,and
you may also have other rights which vary from
state/province to state/province.
TO EXCHANGE YOUR PRODUCT IN THE U.S.A.,
PUERTO RICO,OR U.S. VIRGIN ISLANDS...
Follow the instructions stated previously in the “What is
Covered” section,or refer to the exchange instructions
on the next page.
In the U.S.A.,Puerto Rico,and U.S. Virgin Islands, all
implied warranties,including the implied warranties of
non-infringement,merchantability and fitness for a particular purpose, are specifically disclaimed,and to the
extent inconsistent with law of the locality of the user,
limited in duration to the duration of this express warranty.Because some states do not allow limitations on
how long an implied warranty may last, this limitation
may not apply to you.
TO EXCHANGE A PRODUCT IN CANADA...
Please contact Philips at:
1-800-661-6162 (French Speaking)
1-800-363-7278 (English Speaking)
In Canada,this warranty is given in lieu of all other warranties. There are no other warranties,express or
implied,including any implied warranties of merchantability or fitness for a particular purpose.
TO GET OUT-OF-WARRANTY EXCHANGE...
In the U.S.A.,Puerto Rico,or U.S. Virgin Islands, contact
Philips Service Solutions Group at 1-800-531-0039 to
obtain the cost of out-of-warranty exchange.
REMEMBER...
Please record below the model and serial numbers
found on the product. Also,please fill out and mail your
warranty registration card promptly.It will be easier for
us to notify you if necessary.
MODEL#__________________________________
SERIAL#__________________________________
Philips Service Solutions Group, P.O.Box 2976, Longview, Texas 75606, (903) 242-4800
24
EL6478E001 /2-01
Page 25
Limited W arranty (cont’d)
EXCHANGE INSTRUCTIONS
If your product is defective, you may be able to exchange it at the store from which it was purchased.
Most stores display a Return Policy.If not, ask the manager or sales associate how many days you have to
exchange a product with them. After the store’s return period has expired,or if the store does not have an
exchange program,you may exchange the product with Philips if you have your original sales receipt.
To exchange your product with Philips (per the warranty conditions stated previously), remember :
• If you exchange the product within 90 days of the original purchase,there is no cost to you.
• If you exchange the product more than 90 days after but less than one year after the day of original purchase,
contact Philips Service Solutions Group (PSSG) at 1-800-531-0039 to determine the preset cost for exchange.
• After 12 months from the day of original purchase, contact PSSG at 1-800-531-0039 for information regarding
out-of-warranty exchange.
• If you do not have your original sales receipt,or if you have any questions,call PSSG at 1-800-531-0039.
To obtain a replacement product from Philips:
1. Contact PSSG at 1-800-531-0039 to determine the cost for exchange.
2. Complete the Exchange Form below.
3. Pack the product and its accessories in the original box or a suitable alternative. You will receive replacement
accessories with your replacement product. For packing details,call 1-800-531-0039.
4. Put the completed Exchange Form,a copy of the original sales receipt,and the proper payment amount into
an envelope.DO NOTSEND CASH. Do not staple or clip these items together.Label the envelope “Return
Documents Enclosed.” Place this envelope in the box with the product.
5. Seal the box with packing tape and return the product via United Parcel Service (UPS),insured and freight
prepaid,to:
Philips Recovery Center
Rojas 6
12420 Mercantile Avenue
El Paso,TX 79928
ATTENTION: DVD PLAYER EXCHANGE
A replacement will be sent to you via UPS within 48 business hours of Philips’ receipt of the product.
EXCHANGE FORM
Your Address (street address to which replacement should be delivered,no P.O. boxes allowed):
Name:
Street Address: Apt.#:
City: State/Province: Zip Code/Postal Code:
Phone (day): Phone (night):
Exchange Fee:
+ Sales Tax: = Total:
Method of Payment: (Check one . Please , no cash or CODs.)
_____ Check/Money order Check/Money order No.
Account number Expiration date
_____ American Express ___________________________ __________
_____ Visa ___________________________ __________
_____ Novus/Discover ___________________________ __________
_____ Mastercard ___________________________ __________
Signature: _____________________________________________________________
Detailed reason for return,use additional paper if necessar y: _____________________________________________
_______________________________________________________________________________________________
Model Number Serial Number
Remember, the return box should include the following:
• The product,
• Completed Exchange Form and sales receipt,
• Accessories supplied with the product,and
• Payment, if applicable.
25
Page 26
PHILIPS CONSUMER ELECTRONICS COMPANY
A Division of Philips Electronics North America Corporation, Knoxville, Tennessee 37914-1810, USA
DVD702
CLASS 1
LASER PRODUCT
IB8293E001
The products and ser vices described herein are not
necessarily available in all countries.
Due to continuous product improvements, this
document is subject to change without notice.
26
Printed in China
SL-0109/17-1
P/N: 3834RS0018W
 Loading...