

Page 1
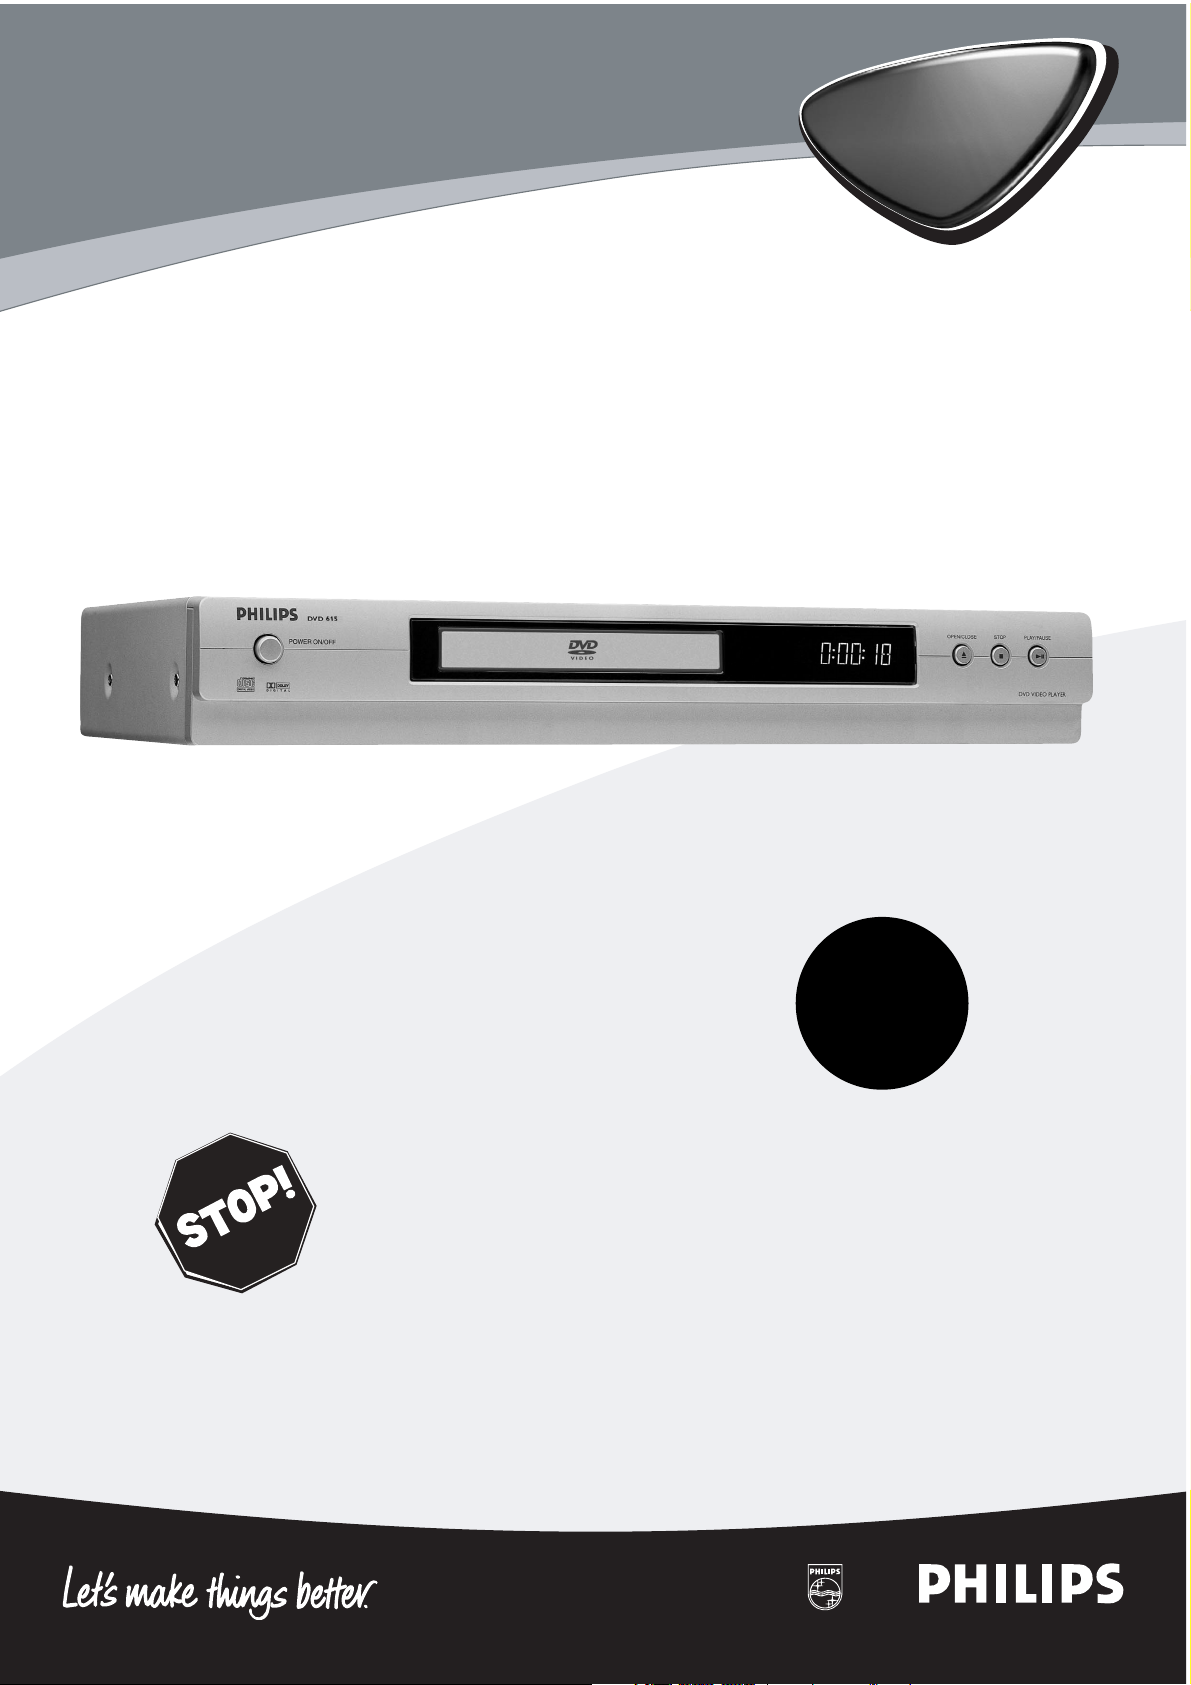
DVD615
Digital Video Disc Player
Owner's Manual
Read this manual first!
Congratulations on purchasing this Philips product.
We’ve included everything you need to get started.
If you have any problems, Philips Representatives can
help you get the most from your new product by explaining:
• Hookups,
• First Time Setup, and
• Feature Operation.
Do not attempt to return this product to the store.
For fast help, call us first!
1-800-531-0039
Thank you for making Philips a part of your home!
Important!
Return your
Warranty
Registration Card
within 10 days.
See why inside.
Page 2
Once your PHILIPS purchase is registered, you’re eligible to receive all the privileges of owning a PHILIPS product.
So complete and return the Warranty Registration Card enclosed with your purchase at once. And take advantage
of these important benefits.
Return your Warranty Registration card today to
ensure you receive all the
benefits
you’re entitled to.
For Customer Use
Enter below the Model No. and
Serial No., which are located on the
rear of the cabinet. Retain this information for future
reference.
Model No. ____________________
Serial No. ____________________
Congratulations on your purchase,
and welcome to the “family!”
Dear PHILIPS product owner:
Thank you for your confidence in PHILIPS. You’ve selected one of the
best-built, best-backed products available today. We’ll do everything in
our power to keep you happy with your purchase for many years to
come.
As a member of the PHILIPS “family,” you’re entitled to protection by
one of the most comprehensive warranties and outstanding service
networks in the industry. What’s more, your purchase guarantees you’ll
receive all the information and special offers for which you qualify, plus
easy access to accessories from our convenient home shopping
network.
Most importantly, you can count on our uncompromising commitment
to your total satisfaction. All of this is our way of saying welcome - and
thanks for investing in a PHILIPS product.
Sincerely,
Lawrence J. Blanford
President and Chief Executive Officer
P.S. Remember, to get the most from your PHILIPS
product, you must return your Warranty
Registration Card within 10 days. So please mail
it to us right now!
Know these
safetysymbols
This “bolt of lightning” indicates
uninsulated material within your
unit may cause an electrical shock. For
the safety of everyone in your household, please do not remove product
covering.
The “exclamation point” calls
attention to features for which
you should read the enclosed
literature closely to prevent operating
and maintenance problems.
WARNING: TO PREVENT FIRE OR
SHOCK HAZARD, DO NOT
EXPOSE THIS EQUIPMENT TO RAIN
OR MOISTURE.
CAUTION: To prevent electric
shock, match wide blade of plug to
wide slot, fully insert.
ATTENTION: Pour éviter les choc
électriques, introduire la lame la plus
large de la fiche dans la borne correspondante de la prise et pousser
jusqu’au fond.
CAUTION
RISK OF ELECTRIC SHOCK
DO NOT OPEN
CAUTION: TO REDUCE THE RISK OF ELECTRIC SHOCK, DO NOT
REMOVE COVER (OR BACK). NO USER-SERVICEABLE PARTS
INSIDE. REFER SERVICING TO QUALIFIED SERVICE PERSONNEL.
Warranty
Verification
Registering your product within 10 days
confirms your right to maximum
protection under the terms and
conditions of your PHILIPS warranty.
Owner
Confirmation
Your completed Warranty Registration
Card serves as verification of ownership
in the event of product theft or loss.
Model
Registration
Returning your Warranty Registration
Card right away guarantees you’ll
receive all the information and special
offers which you qualify for as the
owner of your model.
Visit our World Wide Web Site at http://www.philips.com
t
s
R
E
G
I
S
T
R
A
T
I
O
N
N
E
E
D
E
D
W
I
T
H
I
N
1
0
D
A
Y
S
Hurry!
Page 3

Contents 3
Getting Started
Contents . . . . . . . . . . . . . . . . . . . . . . . . . . . . . . . . . . . . . . . . . . . . . . . . . . . . . . . . . . . . . . . . . . . . . . .3
Safety Information . . . . . . . . . . . . . . . . . . . . . . . . . . . . . . . . . . . . . . . . . . . . . . . . . . . . . . . . . . . . . . .4-5
Introduction . . . . . . . . . . . . . . . . . . . . . . . . . . . . . . . . . . . . . . . . . . . . . . . . . . . . . . . . . . . . . . . . . . . . .6
Playable Discs . . . . . . . . . . . . . . . . . . . . . . . . . . . . . . . . . . . . . . . . . . . . . . . . . . . . . . . . . . . . . . . . . . . .7
General Information . . . . . . . . . . . . . . . . . . . . . . . . . . . . . . . . . . . . . . . . . . . . . . . . . . . . . . . . . . . . . . .8
Hookups . . . . . . . . . . . . . . . . . . . . . . . . . . . . . . . . . . . . . . . . . . . . . . . . . . . . . . . . . . . . . . . . . . . . .9-14
Quick Disc Playback
Quick Disc Playback . . . . . . . . . . . . . . . . . . . . . . . . . . . . . . . . . . . . . . . . . . . . . . . . . . . . . . . . . . . . . .15
DVD Player Controls
Remote Control Buttons . . . . . . . . . . . . . . . . . . . . . . . . . . . . . . . . . . . . . . . . . . . . . . . . . . . . . . . . . .16
Front Panel . . . . . . . . . . . . . . . . . . . . . . . . . . . . . . . . . . . . . . . . . . . . . . . . . . . . . . . . . . . . . . . . . . . . .17
Rear Panel . . . . . . . . . . . . . . . . . . . . . . . . . . . . . . . . . . . . . . . . . . . . . . . . . . . . . . . . . . . . . . . . . . . . .18
Disc Playback and Features
Title/Disc Menus, Chapter/Track Selection . . . . . . . . . . . . . . . . . . . . . . . . . . . . . . . . . . . . . . . . . . . .19
Slow Motion, Fast Forward and Fast Reverse . . . . . . . . . . . . . . . . . . . . . . . . . . . . . . . . . . . . . . . . . . .20
Still Picture/Frame-by-Frame Playback, Time Search . . . . . . . . . . . . . . . . . . . . . . . . . . . . . . . . . . . . . .21
Zoom, Camera Angle . . . . . . . . . . . . . . . . . . . . . . . . . . . . . . . . . . . . . . . . . . . . . . . . . . . . . . . . . . . . .22
Repeat, Repeat A-B . . . . . . . . . . . . . . . . . . . . . . . . . . . . . . . . . . . . . . . . . . . . . . . . . . . . . . . . . . . . . .23
DVD Audio Language . . . . . . . . . . . . . . . . . . . . . . . . . . . . . . . . . . . . . . . . . . . . . . . . . . . . . . . . . . . . .24
DVD Subtitle Language . . . . . . . . . . . . . . . . . . . . . . . . . . . . . . . . . . . . . . . . . . . . . . . . . . . . . . . . . . . .25
DVD Disc Menu Language . . . . . . . . . . . . . . . . . . . . . . . . . . . . . . . . . . . . . . . . . . . . . . . . . . . . . . . . .26
Parental Controls Password . . . . . . . . . . . . . . . . . . . . . . . . . . . . . . . . . . . . . . . . . . . . . . . . . . . . . . . .27
Parental Controls Disc Lock . . . . . . . . . . . . . . . . . . . . . . . . . . . . . . . . . . . . . . . . . . . . . . . . . . . . . . .28
Parental Controls Levels . . . . . . . . . . . . . . . . . . . . . . . . . . . . . . . . . . . . . . . . . . . . . . . . . . . . . . . . . .29
Programmed Playback . . . . . . . . . . . . . . . . . . . . . . . . . . . . . . . . . . . . . . . . . . . . . . . . . . . . . . . . . . . .30
Preview . . . . . . . . . . . . . . . . . . . . . . . . . . . . . . . . . . . . . . . . . . . . . . . . . . . . . . . . . . . . . . . . . . . . . . .31
Smart Navigator, JPEG and MP3 Features . . . . . . . . . . . . . . . . . . . . . . . . . . . . . . . . . . . . . . . . . . . . .32
DVD Player Setup Options
TV Display . . . . . . . . . . . . . . . . . . . . . . . . . . . . . . . . . . . . . . . . . . . . . . . . . . . . . . . . . . . . . . . . . . . . .33
Video Output . . . . . . . . . . . . . . . . . . . . . . . . . . . . . . . . . . . . . . . . . . . . . . . . . . . . . . . . . . . . . . . . . . .34
Video Mode . . . . . . . . . . . . . . . . . . . . . . . . . . . . . . . . . . . . . . . . . . . . . . . . . . . . . . . . . . . . . . . . . .34-35
TV Type (NTSC/PAL) . . . . . . . . . . . . . . . . . . . . . . . . . . . . . . . . . . . . . . . . . . . . . . . . . . . . . . . . . . . .36
Speaker Setup, 3D Sound . . . . . . . . . . . . . . . . . . . . . . . . . . . . . . . . . . . . . . . . . . . . . . . . . . . . . . . . . .37
SPDIF Out, LPCM 96K . . . . . . . . . . . . . . . . . . . . . . . . . . . . . . . . . . . . . . . . . . . . . . . . . . . . . . . . . . . .38
DVD Player On-Screen Display Language . . . . . . . . . . . . . . . . . . . . . . . . . . . . . . . . . . . . . . . . . . . . . .39
Display Dim, Screen Saver . . . . . . . . . . . . . . . . . . . . . . . . . . . . . . . . . . . . . . . . . . . . . . . . . . . . . . . . .40
DVD Player Defaults . . . . . . . . . . . . . . . . . . . . . . . . . . . . . . . . . . . . . . . . . . . . . . . . . . . . . . . . . . . . .41
Information You May Need
Helpful Hints . . . . . . . . . . . . . . . . . . . . . . . . . . . . . . . . . . . . . . . . . . . . . . . . . . . . . . . . . . . . . . . . .42-43
Glossary . . . . . . . . . . . . . . . . . . . . . . . . . . . . . . . . . . . . . . . . . . . . . . . . . . . . . . . . . . . . . . . . . . . . . . .44
Specifications . . . . . . . . . . . . . . . . . . . . . . . . . . . . . . . . . . . . . . . . . . . . . . . . . . . . . . . . . . . . . . . . . . .45
Limited Warranty . . . . . . . . . . . . . . . . . . . . . . . . . . . . . . . . . . . . . . . . . . . . . . . . . . . . . . . . . . . . .46-47
Information Index . . . . . . . . . . . . . . . . . . . . . . . . . . . . . . . . . . . . . . . . . . . . . . . . . . . . . . . . . . . . . . . .48
Page 4

Safety Precautions
Warning: To prevent fire or shock hazard, do not expose this equipment to rain or moisture.
Federal Communications Commission (FCC) Warning: Any unauthorized changes or modifications to this
equipment void the user’s authority to operate it.
Laser Safety
This unit employs a laser. Only a qualified service person should remove the cover or attempt to service this device,
due to possible eye injury.
CAUTION: Use of controls or adjustments or performance of procedures other than those specified herein may
result in hazardous radiation exposure. The set complies with the FCC-Rules, Part 15 and with 21 CFR 1040.10.
CAUTION: Visible and invisible laser radiation when open and interlock defeated. Do not stare into the beam. The
beam is located inside, near the deck mechanism.
Special Information for Canadian Users
This digital apparatus does not exceed the Class B limits for radio noise emissions from digital apparatus as set out
in the Radio Interference Regulations of the Canadian Department of Communications.
CET APPAREIL NUMÉRIQUE N'ÉMET PAS DE BRUITS RADIOÉLECTRIQUES DÉPASSANT LES LIMITES APPLICABLES DANS LA RÈGLEMENT SUR LE BROUILLAGE RADIOÉLECTRIQUES ÉDICTÉ PAR LE MINISTÈRE DES
COMMUNICATIONS DU CANADA.
Radio/TV Interference
This equipment has been tested and found to comply with the limits for a Class B digital device, pursuant to Part 15
of the FCC Rules. These limits are designed to provide reasonable protection against harmful interference in a residential installation. This equipment generates, uses, and can radiate radio frequency energy and, if not installed and
used in accordance with the instructions, may cause harmful interference to radio communications. However, there
is no guarantee that interference will not occur in a particular installation. If this equipment does cause harmful interference to radio or television reception, which can be determined by turning the equipment off and on, try to correct the interference by one or more of the following measures:
1) Reorient or relocate the receiving antenna.
2) Increase the separation between the equipment and the receiver.
3) Connect the equipment into an outlet on a circuit different from that to which the receiver is connected.
4) Consult the dealer or an experienced radio/TV technician for help.
WARNING:
This device complies with Part 15 of the FCC rules. Operation is subject to the following two conditions:
1) This device may not cause harmful interference.
2) This device must accept any interference received, including interference that may cause undesired operation.
IMPORTANT:
This product was FCC verified under test conditions that included use of shielded cables and connectors between
system components. Use shielded cables to reduce the possibility of causing interference to radios, televisions, and
other electronic devices. If you have any problems, contact your supplier.
Copyright Protection
Unauthorized copying, broadcasting, public performance, and lending of Discs are prohibited. This product incorporates copyright protection technology that is protected by method claims of certain U.S. patents and other intellectual property rights owned by Macrovision Corporation and other rights owners. Use of this copyright protection
technology must be authorized by Macrovision Corporation and is intended for home and other limited viewing uses
only unless otherwise authorized by Macrovision Corporation. Reverse engineering or disassembly is prohibited.
Note to Cable TV Installer
This reminder is provided to call the Cable TV system installer’s attention to Section 820-40 of the National
Electrical Code (NEC), which provides guidelines for proper grounding and, in particular, specifies that the cable
ground shall be connected to the grounding system of the building, as close to the point of cable entry as practical.
Declaration of Conformity
Model Number: DVD615
Trade Name: Philips
Responsible Party: Philips Consumer Electronics North America
P.O. Box 14810, Knoxville, TN 37914-1810
(865) 521-4316
4 Safety Information
Page 5
Safety Information (cont’d) 5
IMPORTANT SAFETY INSTRUCTIONS
1. Read instructions. Read all the safety and operating instructions before operating the product.
2. Retain instructions. Keep the safety and operating instructions for future reference.
3. Heed warnings. Adhere to all warnings on the product and
in the operating instructions.
4. Follow instructions. Follow all operating and use instructions.
5. Cleaning – Unplug this product from the wall outlet before
cleaning. Do not use liquid cleaners or aerosol cleaners. Use
a damp cloth for cleaning.
6. Attachments – Do not use attachments not recommended
by the product manufacturer as they may cause hazards.
7. Water and Moisture – Do not use this product near water for example, near a bathtub, washbowl, kitchen sink, or
laundry tub, in a wet basement, near a swimming pool, etc.
8. Accessories – Do not place this product on an unstable cart,
stand, tripod, bracket, or table. The product may fall, causing
serious injury to a child or adult, and serious damage to the
product. Use only with a cart, stand, tripod, bracket, or
table recommended by the manufacturer or sold with the
product. Any mounting of the product should follow the
manufacturer’s instructions and should use a mounting
accessory recommended by the manufacturer.
9. Move a product and cart combination with care. Quick
stops, excessive force, and uneven surfaces may
cause the product and cart combination to overturn.
10. Ventilation – Slots and openings in the cabinet provide ventilation, ensure reliable operation of the product, and protect
it from overheating. Do not block or cover these openings.
The openings should never be blocked by placing the product on a bed, sofa, rug, or other similar surface. Do not
place this product in a built-in installation such as a bookcase
or rack unless proper ventilation is provided or the manufacturer’s instructions have been adhered to.
11. Power Sources – This product should be operated only
from the type of power source indicated on the marking
label. If you are not sure of the type of power supply to
your home, consult your product dealer or local power
company. For products intended to operate from battery
power, or other sources, refer to the operating instructions.
12. Grounding or Polarization – This product may be equipped
with a polarized alternating-current line plug (a plug having
one blade wider than the other). This plug will fit into the
power outlet only one way. This is a safety feature. If you
are unable to insert the plug fully into the outlet, try reversing the plug. If the plug still fails to fit, contact your electrician to replace your obsolete outlet. Do not defeat the safety purpose of the polarized plug.
13. Power-Cord Protection – Route power supply cords so
they are not likely to be walked on or pinched by items
placed upon or against them, paying particular attention to
cords at plugs, convenience receptacles, and the point where
they exit from the product.
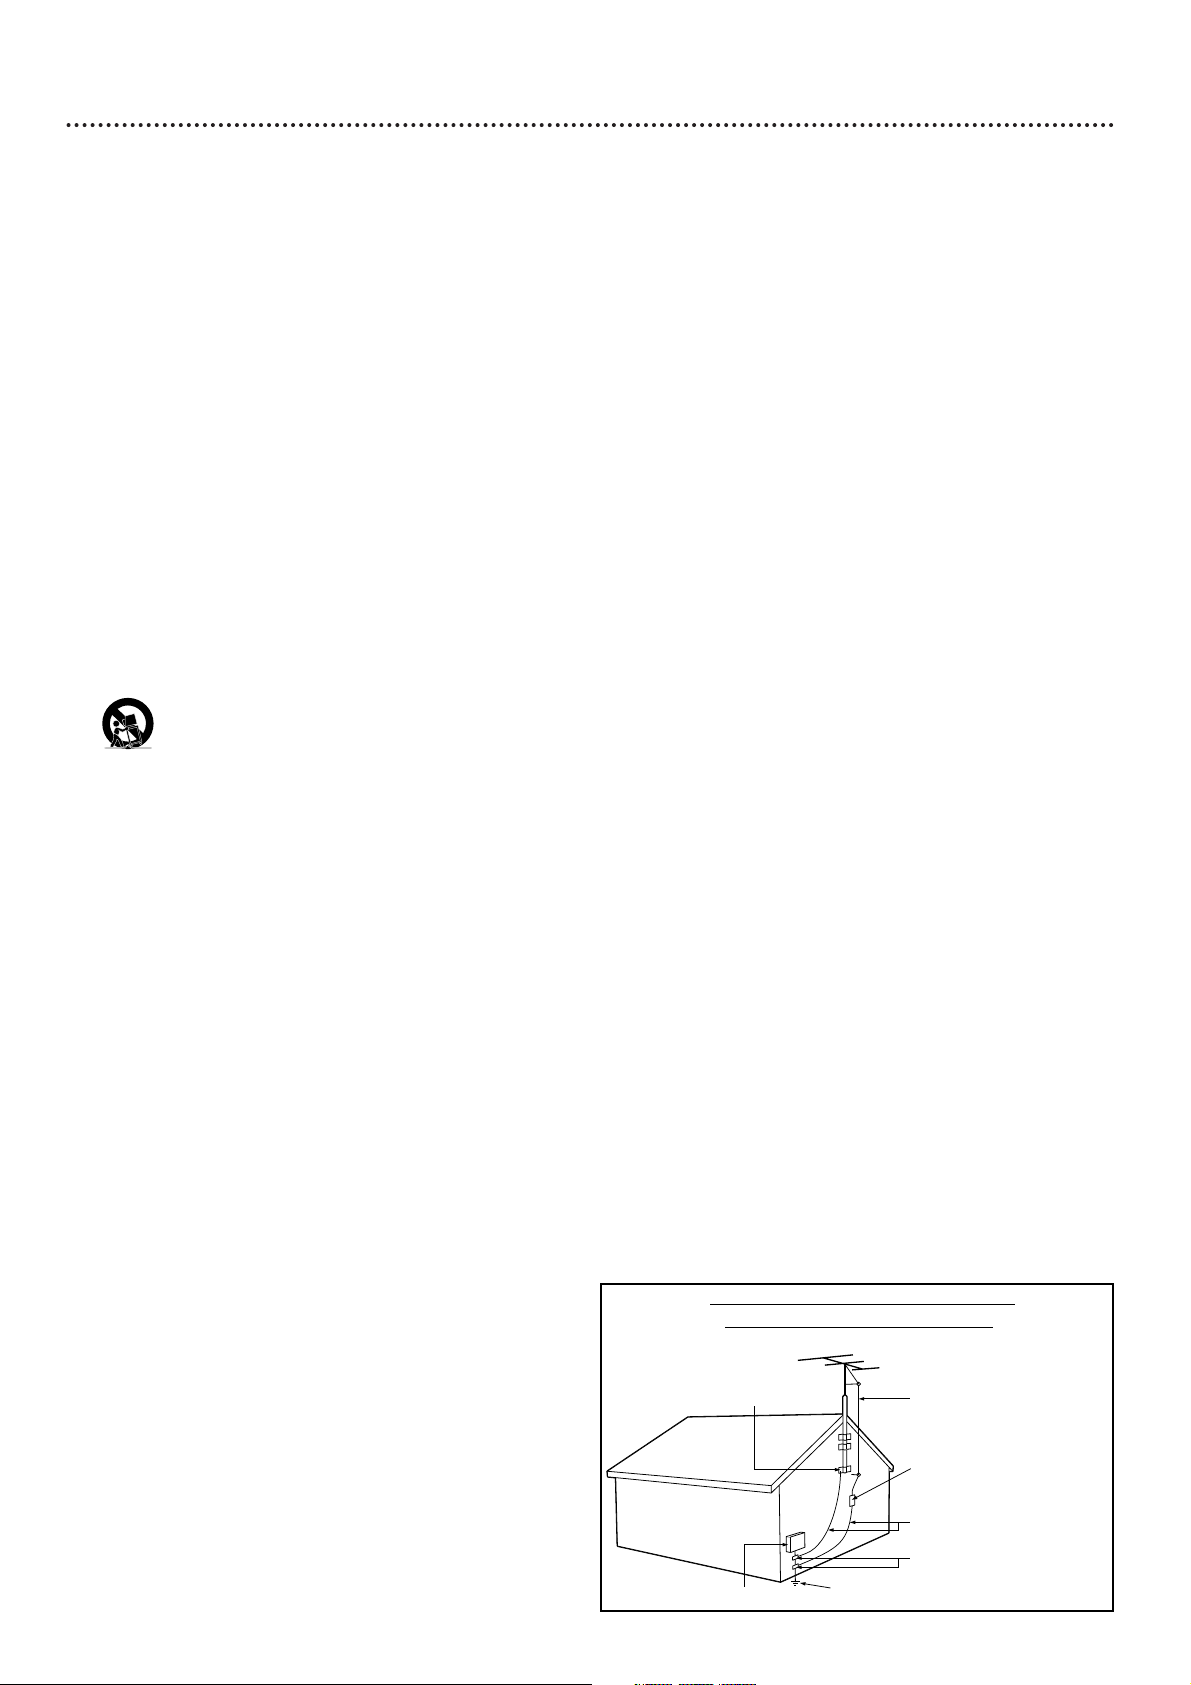
14. Outdoor Antenna Grounding – If an outside antenna or
cable system is connected to the product, be sure the
antenna or cable system is grounded so as to provide some
protection against voltage surges and built-up static charges.
Article 810 of the National Electrical Code, ANSI/NFPA 70,
provides information with regard to proper grounding of the
mast and supporting structure, grounding of the lead-in wire
to an antenna discharge unit, size of grounding conductors,
location of antenna-discharge unit, connection to grounding
electrodes, and requirements for the grounding electrode.
See figure at right.
15. Lightning – For added protection for this product during a
lightning storm, or when it is left unattended and unused for
long periods of time, unplug it from the wall outlet and disconnect the antenna or cable system. This will prevent damage to the product due to lightning and power-line surges.
16. Power Lines – An outside antenna system should not be
located in the vicinity of overhead power lines or other
electric light or power circuits, or where it can fall into such
power lines or circuits. When installing an outside antenna
system, take extreme care to keep it from touching such
power lines or circuits; contact with them might be fatal.
17. Overloading – Do not overload wall outlets, extension
cords, or integral convenience receptacles. This can result in
a risk of fire or electric shock.
18. Object and Liquid Entry – Never push objects of any kind
into this product through openings; they may touch dangerous voltage points or short out parts, resulting in a fire or
electric shock. Never spill liquid of any kind on the product.
19. Servicing – Do not attempt to service this product yourself.
Opening or removing covers may expose you to dangerous
voltage or other hazards. Refer all servicing to qualified service personnel.
20. Damage Requiring Service – Unplug this product from the
wall outlet and refer servicing to qualified service personnel
under the following conditions:
a) When the power supply cord or plug is damaged,
b) If liquid has spilled or objects have fallen into the product,
c) If the product has been exposed to rain or water,
d) If the product does not operate normally by following the
operating instructions. Adjust only those controls covered
by the operating instructions. An improper adjustment of
other controls may result in damage and will often require
extensive work by a qualified technician to restore the product to its normal operation,
e) If the product has been dropped or damaged in any way,
f) When the product exhibits a distinct change in performance. This indicates a need for service.
21. Replacement Parts – When replacement parts are required,
be sure the service technician uses replacement parts specified by the manufacturer or having the same characteristics
as the original part. Unauthorized substitutions may result in
fire, electric shock, or other hazards.
22. Safety Check – Upon completion of any service or repairs
to this product, ask the service technician to perform safety
checks to determine that the product is in proper operating
condition.
23. Wall or Ceiling Mounting – Mount the product to a wall or
ceiling only as recommended by the manufacturer.
24. Heat - Situate this product away from heat sources, such as
radiators, heat registers, stoves, or other products (including
amplifiers) that produce heat.
25. Battery usage CAUTION - To prevent battery leakage that
may result in bodily injury or damage to the unit:
• Install all batteries correctly, with + and - aligned as
marked on the unit.
• Do not mix batteries (old/new, carbon/alkaline, etc.).
• Remove batteries when the unit is not used for a long
time.
Example of Antenna Grounding
per National Electrical Code
GROUND CLAMP
ELECTRIC SERVICE EQUIPMENT
POWER SERVICE GROUNDING ELECTRODE SYSTEM (NEC ART 250, PART H)
ANTENNA LEAD IN WIRE
ANTENNA DISCHARGE UNIT
GROUNDING CONDUCTORS (NEC SECTION 810-21)
GROUND CLAMPS
(NEC SECTION 810-20)
Page 6

6 Introduction
Welcome!
This Digital Video Disc Player will allow you to enjoy better picture quality, clearer sound, and endless
playback features on Digital Video Discs (DVDs). Expanding technology allows you to add options to
your viewing - watch a director’s cut of a movie, listen to the producer’s comments, or play your
favorite scene repeatedly. Hear a movie in different languages, or listen only to the soundtrack. The
possibilities are limited only by your choices and the materials available on the DVD.
Of course, you can listen to your favorite Audio Compact Discs (CDs) on this Player, too. Determine
the order in which you want to hear the songs, or play the Disc repeatedly - all while seeing the status
of the Audio CD on your television.
We hope you enjoy this Player and learn to use its features. To get the most from the Player, read this
manual carefully. It will describe how you can access these features.
Package Contents
● DVD Player
● Remote control with two AA batteries
● One audio cable (red and white)
● One composite video cable (yellow)
● This owner’s manual and registration materials
Environmental Information
Your system has materials that can be recycled and reused if disassembled by a specialized company.
Please observe the local regulations regarding the disposal of packaging materials, exhausted batteries,
and old equipment.
Safety Information
● Do not expose the system to excessive moisture, rain, sand, heat, or humidity.
● Place the Player on a firm, flat surface.
● Keep the Player away from domestic heating equipment and direct sunlight.
● When placing the Player in a cabinet, allow about one inch of space all around the Player for ventila-
tion. Leave enough room in front of the Player for the disc tray to open completely.
● If the Player is brought directly from a cold to a warm location, or is placed in a very damp room,
moisture may condense on the lens inside the Player. If this occurs, the Player will not operate normally. Leave the power on for about one hour with no disc in the Player until normal playback is
possible.
● The mechanical parts of the set contain self-lubricating bearings and must not be oiled or lubricated.
● When the Player is turned off, it is still consuming some power. To disconnect the system from the
power supply completely, remove the AC power plug from the wall socket.
● Always keep the tray closed to avoid dust on the lens.
Cleaning Discs
● When a Disc becomes dirty, clean it with a cleaning cloth. Wipe the Disc from the center out, in a
straight line. Do not wipe the Disc in a circular pattern.
● Do not use solvents such as benzine, thinner, commercially available cleaners, or anti-static spray
intended for analog discs.
Manufactured under license from Dolby Laboratories. “Dolby,” “Pro Logic,” and the double-D symbol are trademarks of Dolby
Laboratories. Confidential unpublished works. Copyright 1992-1999 Dolby Laboratories. All rights reserved.
Copyright 2002 Philips Consumer Electronics North America.
Features
● Language options for Audio, Subtitles, and
Menus*
● MP3 and JPEG File Playback
● Parental Controls*
● Paused/Fast/Slow/Step-by-Step/Zoomed
Playback
● Programmed Playback
● Preview*
● Repeat and Repeat A-B Playback
● Screen Saver
* Options must be available on Disc
Page 7
Playable Discs 7
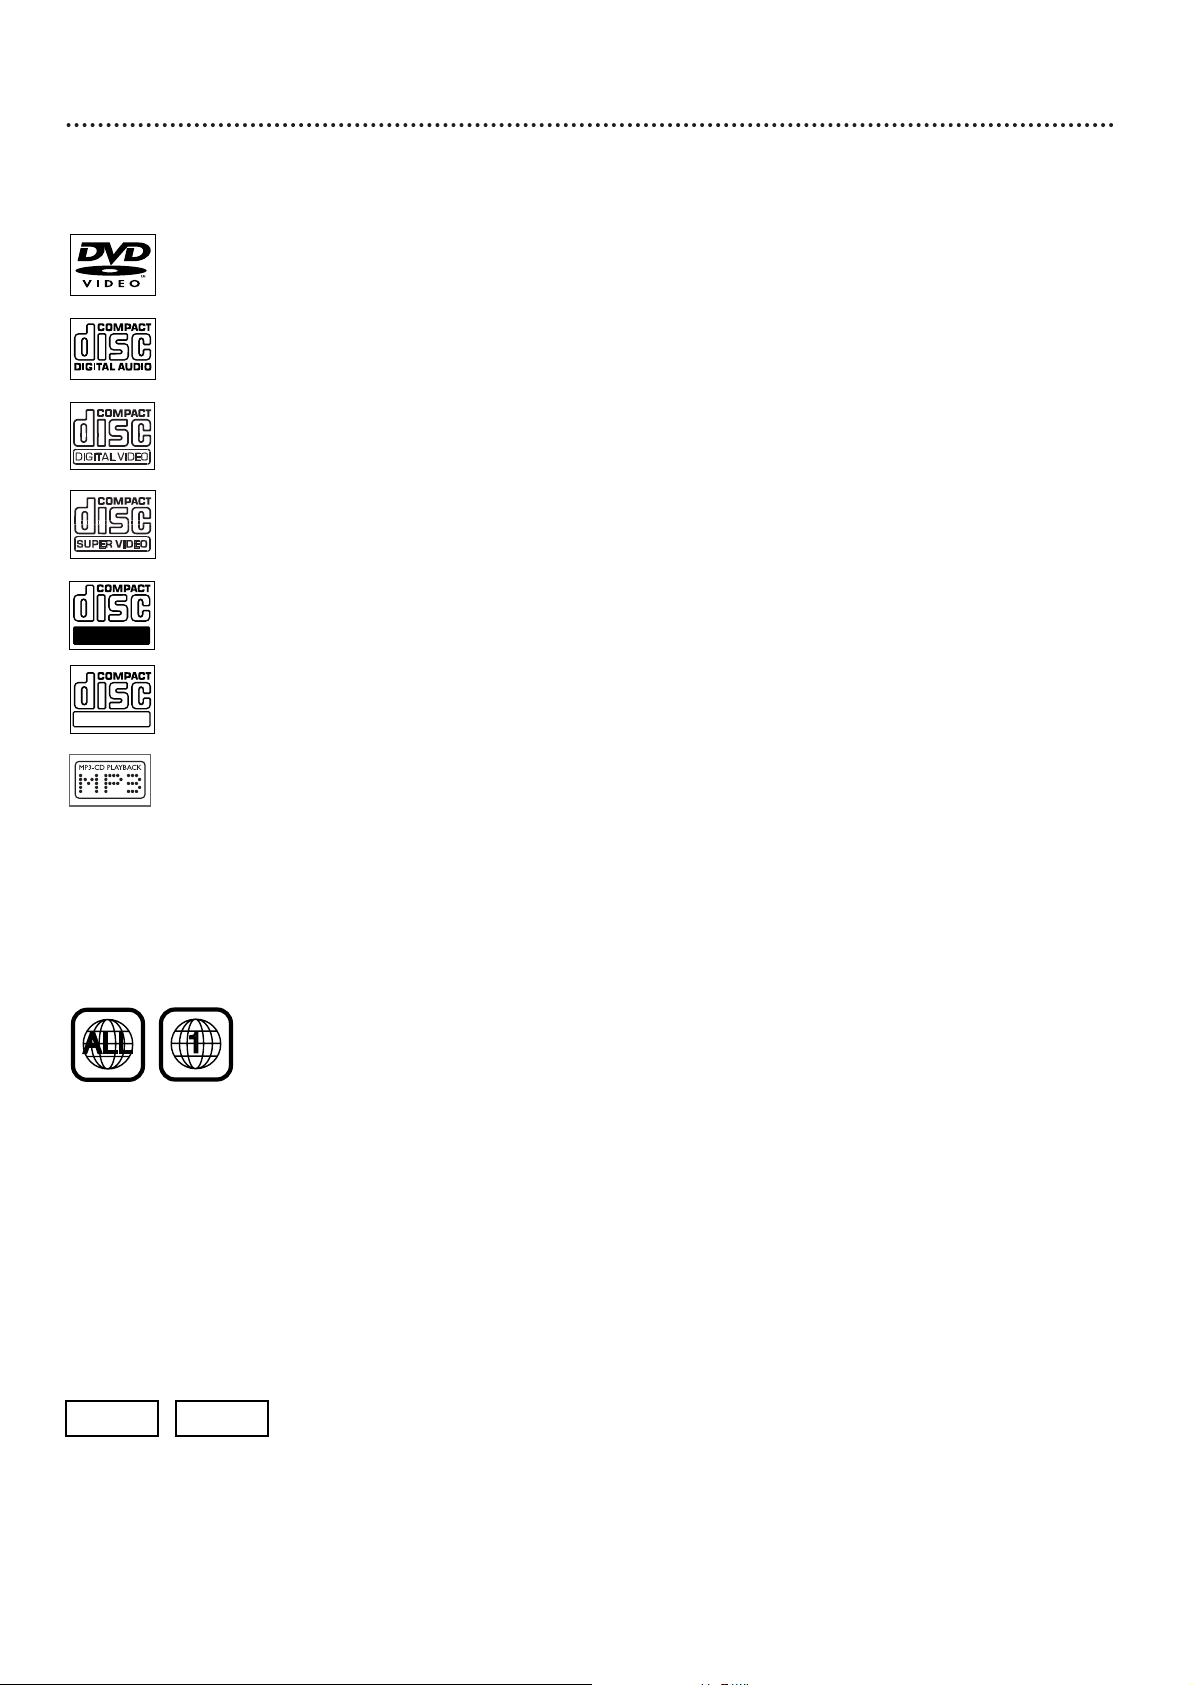
Region Codes
DVDs must meet the requirements for Region Codes before you can use them with the Player. DVDs
must be labeled for ALL regions or for Region 1 in order to play on this DVD Player. You cannot play
Discs that are labeled for other regions. These symbols must appear on your DVDs or on the DVD
case; otherwise you cannot play the DVD in this Player.
The number inside the globe refers to a region of the world. Region 1 represents the United States,
Canada, upper regions of North America, Bermuda, the U.S. Virgin Islands, and small regions near
Australia.
Color Systems
Recordings are made according to different color systems throughout the world. The most common
color systems are NTSC, which is used primarily in the United States and North America, PAL, and
SECAM.
This Player is compatible with NTSC and PAL. Make sure the Discs you play were recorded in NTSC
or PAL and your TV is NTSC or PAL compatible. You must set the Player’s TV TYPE to be compatible with your TV and the Disc. Details are on page 36. The color system of the DVD may appear on
the DVD or on the Disc case.
Playable Discs
This Player will play various types of Discs. Look for these logos on your Discs to determine whether
the Disc will play on the Player.
DVD
(Digital Video Disc)
Audio CD
(Compact Disc Digital Audio)
Video CD
Super Video CD
CD-R (CD-Recordable)
CD-RW (CD-Rewritable)
MP3 files
NTSC
PAL
Recordable
ReWritable
Page 8
8 General Information
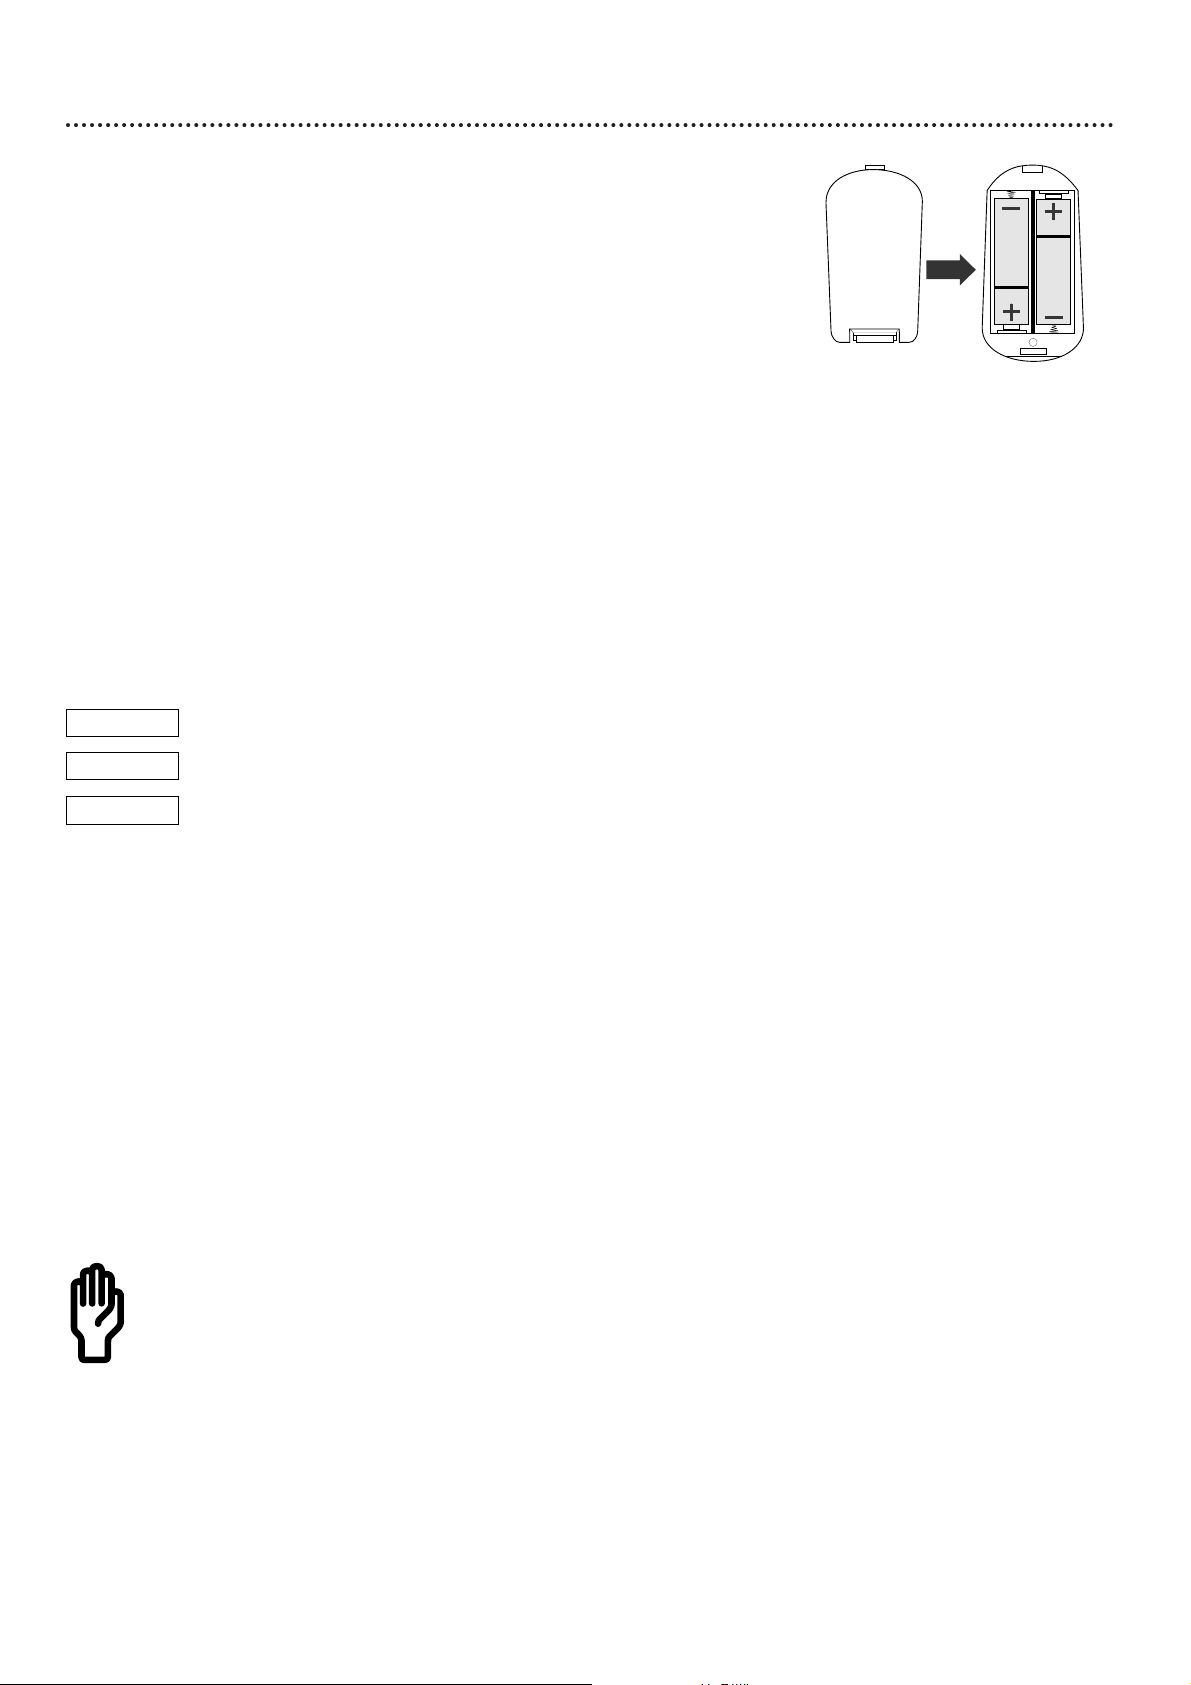
Battery Installation
1
Remove the battery compartment lid on the rear of the
remote control by pressing in the tab, then lifting off the lid.
2
Place two AA batteries inside the battery compartment
with their +and –ends aligned as indicated. Do not mix old
and new batteries or different types of batteries (standard, alkaline,
etc.).
3
Replace the battery compartment lid.
Using the Remote Control
Unless stated otherwise, the remote control can operate all the features of
the DVD Player. Always point the remote control directly at the remote
sensor on the front of the Player, not the TV. Details are on page 17. Make
sure there are no barriers between the remote control and the DVD
Player.
When referring to this manual, remember...
The feature is available on some Digital Video Discs.
The feature is available on some Audio Compact Discs.
The feature is available on some Video Compact Discs or
Super Video CDs.
DVD Disc Menus...
Some explanations in this manual describe the DVD Disc Menus, which
vary among DVDs. Movie producers set these menus, and not all DVDs
have menus. If the DVD has a menu, access the Disc Menu by pressing
DISC MENU on the remote control. Details are on page 19.
DVD Player Menus...
Some instructions explain how to use the Player’s Setup menu to set up
features of the Player or the Disc. You get to the Setup Menu by pressing
SYSTEM MENU on the remote control. Even if a feature is set up in the
Player’s menu, it will not be available if the current Disc does not include
that feature.
To adjust features in the Player’s Setup Menu, see pages 24-30 and 32-41.
Available Disc Features...
Features in this manual may not be available on every Disc. If the
feature is not available, you cannot use the Player to make the
feature available. A stop hand will appear in the top left corner of
the TV screen if you try to access a feature that is not available
on the current Disc.
DVD
AUDIO CD
VIDEO CD
Page 9

Hookups 9
Determining the best possible connection...
The capabilities of your existing equipment, especially your TV, will determine your connection possibilities.
However, the following guidelines describe which options provide the best picture and sound quality.
HHHHHHHH
Component Video provides the best picture quality. Details are on page 12.
HHHHHH
S-Video provides excellent picture quality. Details are on page 11.
HHHH
Composite Video (a yellow Video jack) provides good picture quality. Details are on page 10.
HHHH
Your TV may have only an RF-style jack, usually labeled Antenna In or 75 ohm or
RF In. You will need an RF modulator in order to view the Player at your TV. See
your electronics retailer for details on RF modulator availability and operations.
HHHHHHHH
Digital audio connections provide the clearest sound, but you must have a digital Stereo.
Connect the Player’s black COAXIAL Digital Audio Out jack to your Stereo for the best
sound quality. Details are on page 14.
HHHHHH
If a digital connection is not possible, connect the Player’s red and white AUDIO OUT jacks
to the Audio In jacks of your Stereo or TV. Details are on pages 10-13.
Before you begin...
● Refer to the manuals of your TV, Stereo, or other equipment as necessary. Note the style of jacks and
connectors on the other equipment. Determine how to choose different Audio and Video In channels
on your other equipment so you can see and hear the Player on the TV, Stereo, etc.
● Disconnect all equipment from the power outlets. Connect the equipment to the power outlets only
after you have finished hooking up everything. Never make or change connections with equipment
connected to the power outlet.
Remember...
● Connect the Player directly to the TV. For example, do not connect the Player to a VCR, then con-
nect the VCR to a TV. This type of connection may distort the picture and sound. Also, your VCR
might have the copy protection system, which could distort the DVD image or prevent playback of
some Discs.
● Set the TV to the correct Video In channel. Such channels may be called AUX or AUXILIARY IN,
AUDIO/VIDEO or A/V IN, EXT1 or EXT2 or External In, etc. These channels are often near channel
00. Your TV or its remote control may have a Video or Auxiliary switch/button that allows you to
choose the correct Video In channel. See your TV manual for details. Or, change TV channels until you
see the blue Philips DVD background screen or the Player’s screen saver on the TV screen.
● Set the Stereo to the correct channel or “source” mode.
● Do not connect the DVD Player’s AUDIO OUT jacks to the PHONO IN jack of your Stereo.
● You only need one audio connection and one video connection between the Player and your TV
and/or Stereo. So, you might not use all the jacks on the Player.
Once you determine the best option, find your choice on pages 10-14. Follow the
steps for the hookup you choose.
Page 10
10 Hookups (cont’d)
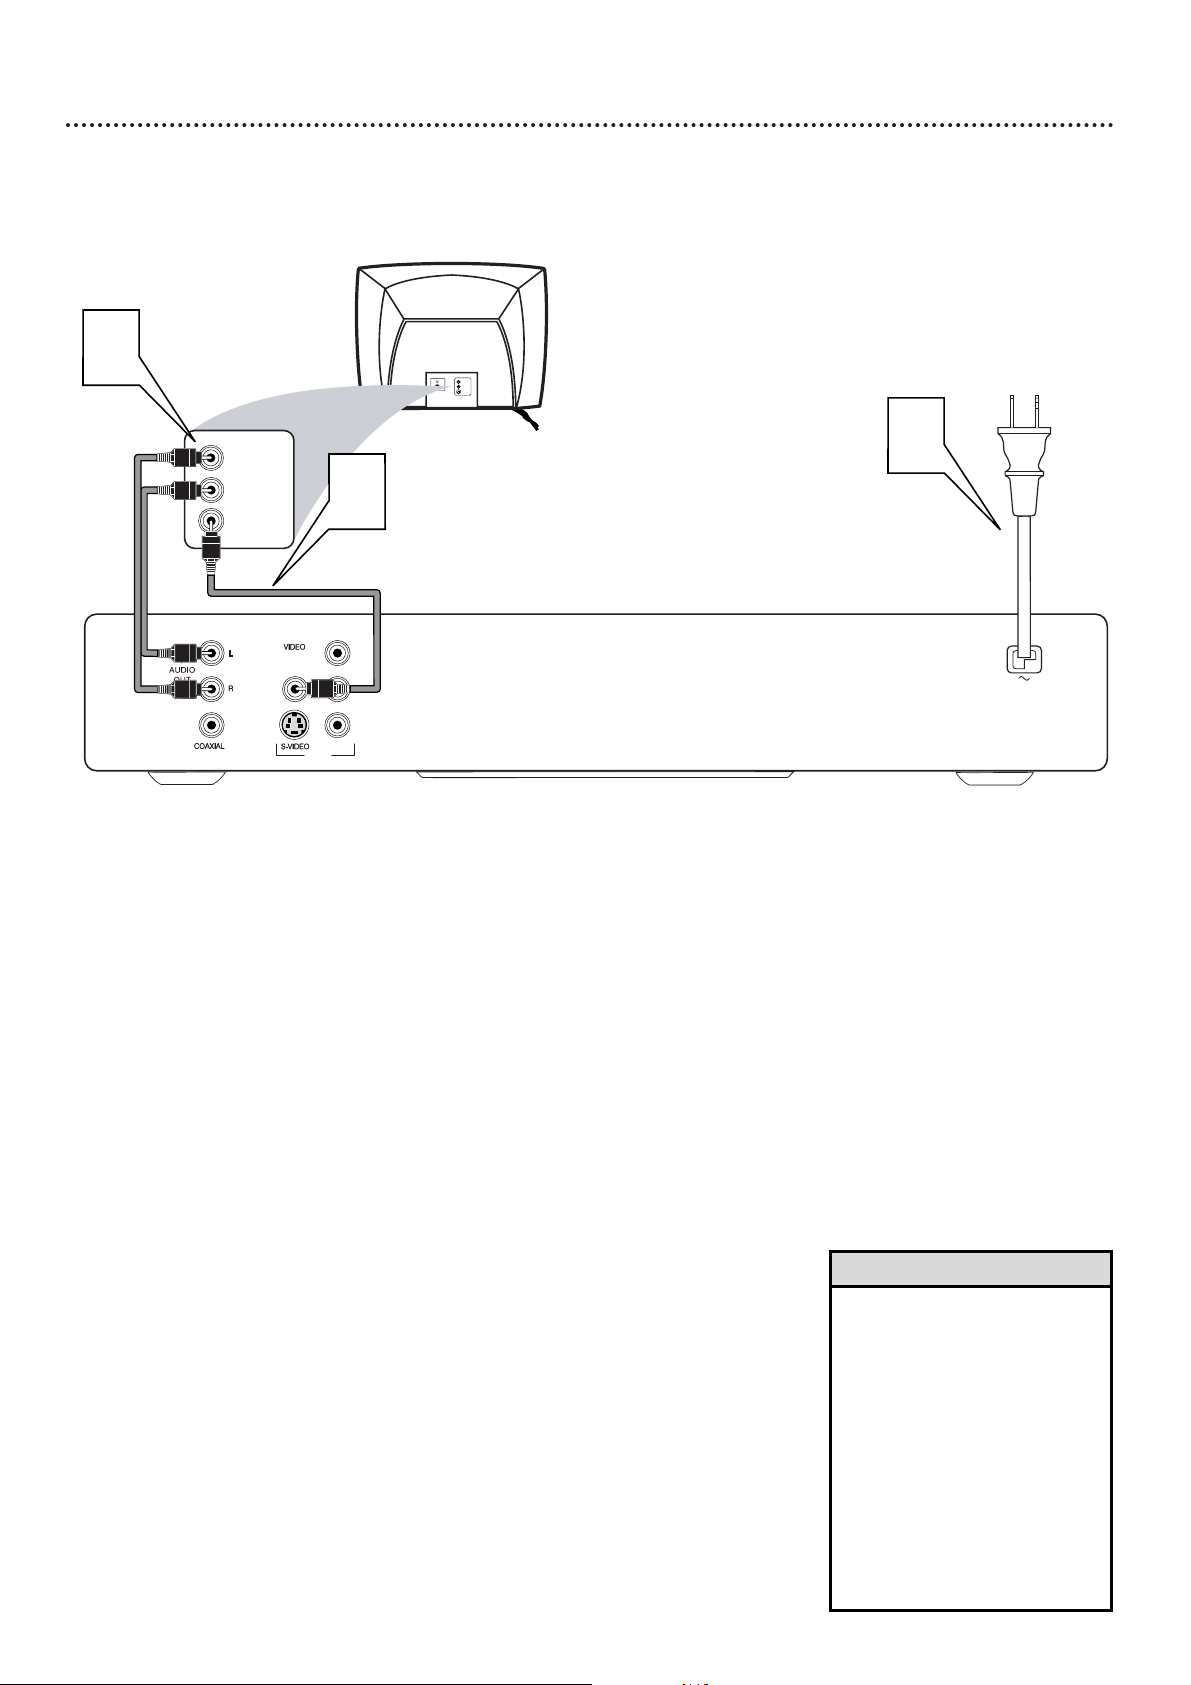
Connecting to a TV Only
TV has a yellow Video In jack
Back of TV
(example only)
LEFT AUDIO IN
VIDEO IN
RIGHT AUDIO IN
LEFT AUDIO IN
S-VIDEO IN
RIGHT AUDIO IN
2
1
3
Y
Pb
Pr
VIDEO
OUT
1
Connect the yellow VIDEO (VIDEO OUT) jack of the Player
to the corresponding VIDEO IN jack on your TV. Use the sup-
plied video cable, which has yellow ends.
2
Connect the supplied audio cable to the red and white
AUDIO OUT (right and left) jacks on the Player and to the
right/left AUDIO IN jacks on the TV. The supplied audio cable
has red and white ends. Match the cable colors to the jack colors.
The red jack is the Right audio channel and the white jack is the Left
audio channel.
3
Plug the power cords of the Player and the TV into an
active power outlet.
Press down POWER ON/OFF on the front of the Player to
turn on the Player.
4
Turn on the TV power. Set the TV to the correct Video In
channel. See your TV owner’s manual for details. Or, change chan-
nels at the TV until you see the blue Philips DVD background
screen or the Player’s screen saver on the TV.
• On the TV, the Video In jack is
usually yellow and might be
labeled video, CVBS, composite,
or baseband.
• If your TV has a single Audio In
jack instead of separate left/right
Audio In jacks, you will need a
different audio cable. You need a
“splitter” audio cable to go from
the left/right AUDIO OUT jacks
of the Player to the single Audio
In jack on your TV. See your
electronics retailer for details.
Helpful Hints
Page 11
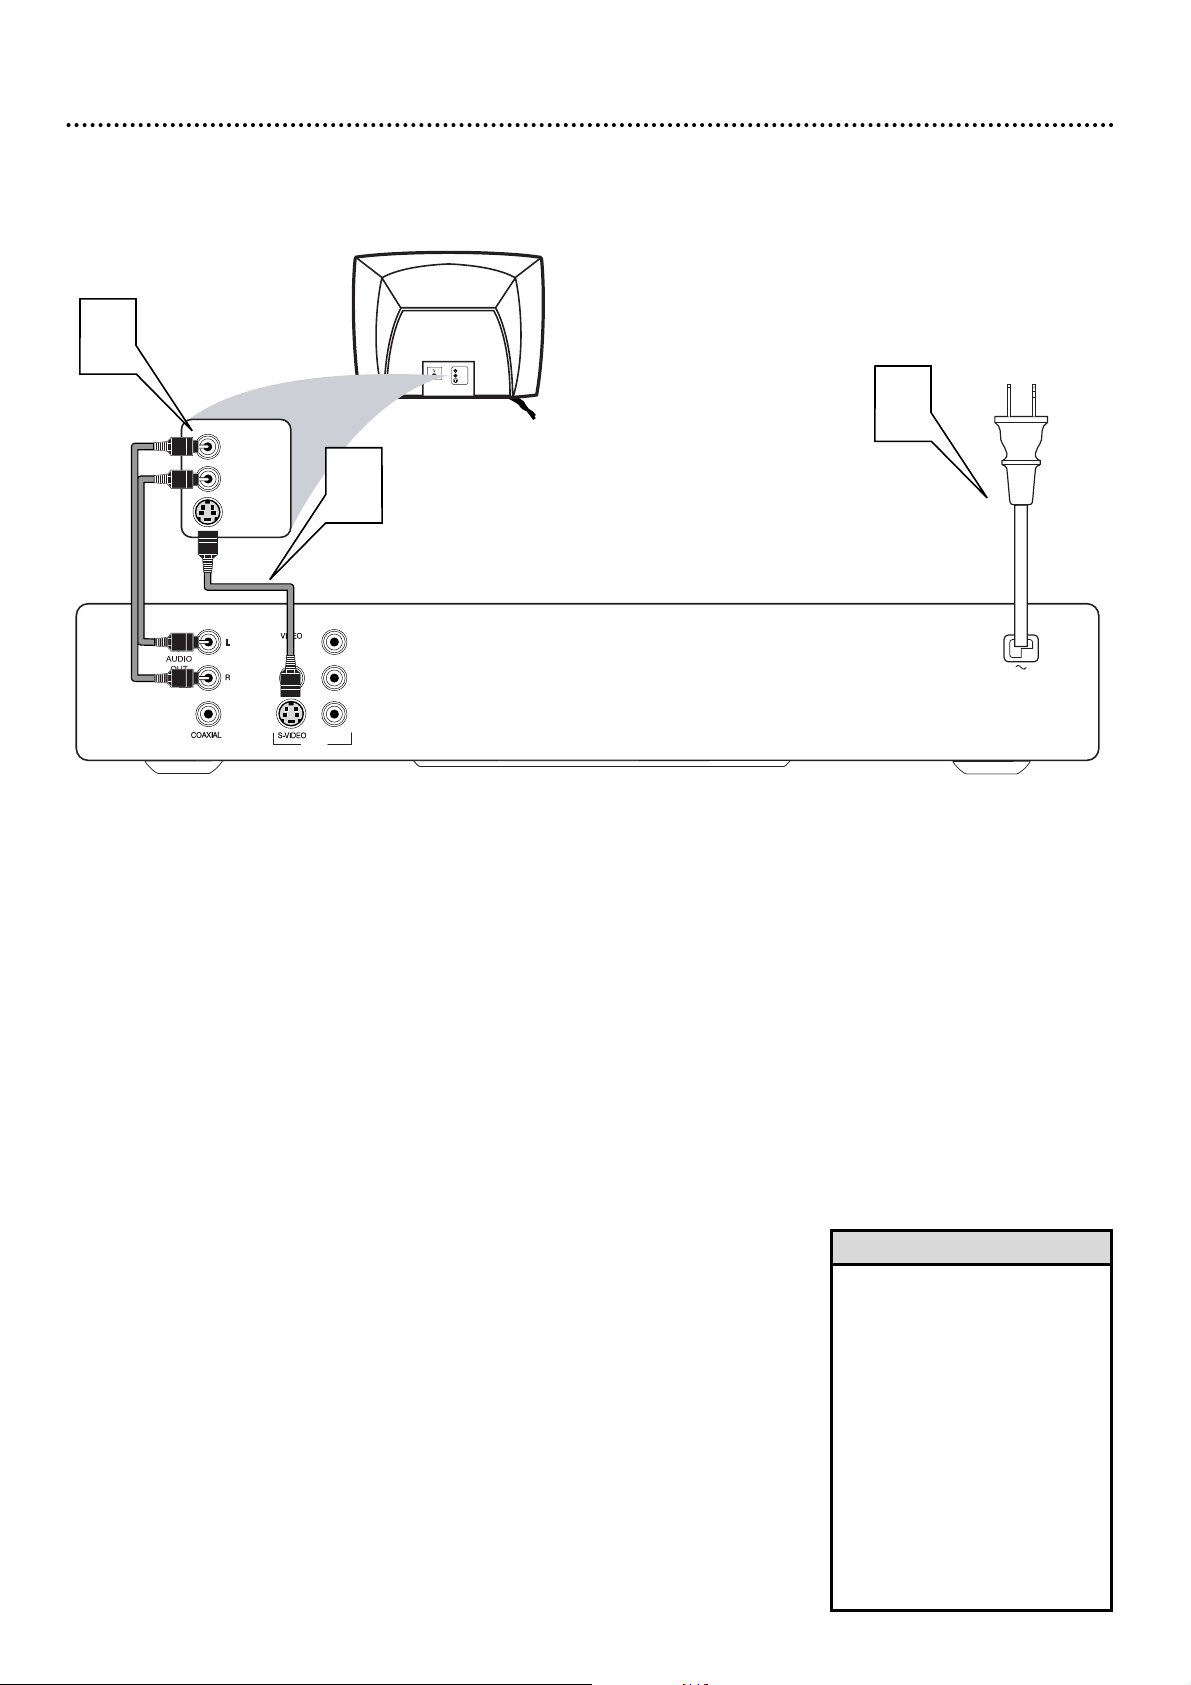
1
Connect an S-Video cable (not supplied) to the S-VIDEO
(VIDEO OUT) jack of the Player and to the TV’s S-VIDEO
IN jack.
2
Connect the supplied audio cable to the red and white
AUDIO OUT (right and left) jacks on the Player and to the
right/left AUDIO IN jacks on the TV. The supplied audio cable
has red and white ends. Match the cable colors to the jack colors.
The red jack is the Right audio channel and the white jack is the Left
audio channel.
3
Plug the power cords of the Player and the TV into an
active power outlet.
Press down POWER ON/OFF on the front of the Player to
turn on the Player.
4
Turn on the TV power. Set the TV to the correct S-Video
In channel. See your TV owner’s manual for details. Or, change
channels at the TV until you see the blue Philips DVD background
screen or the Player’s screen saver on the TV.
Hookups (cont’d) 11
Connecting to a TV Only
TV has an S-Video In Jack
Back of TV
(example only)
LEFT AUDIO IN
S-VIDEO IN
RIGHT AUDIO IN
LEFT AUDIO IN
S-VIDEO IN
RIGHT AUDIO IN
2
1
3
Y
Pb
Pr
VIDEO
OUT
• On the TV, the S-Video In jack
may be labeled Y/C, S-Video, or
S-VHS (super video).
• If your TV has a single Audio In
jack instead of separate left/right
Audio In jacks, you will need a
different audio cable. You need a
“splitter” audio cable to go from
the left/right AUDIO OUT jacks
of the Player to the single Audio
In jack on your TV. See your
electronics retailer for details.
• Set VIDEO OUTPUT to S-VIDEO.
Details are on page 34.
Helpful Hints
Page 12
12 Hookups (cont’d)
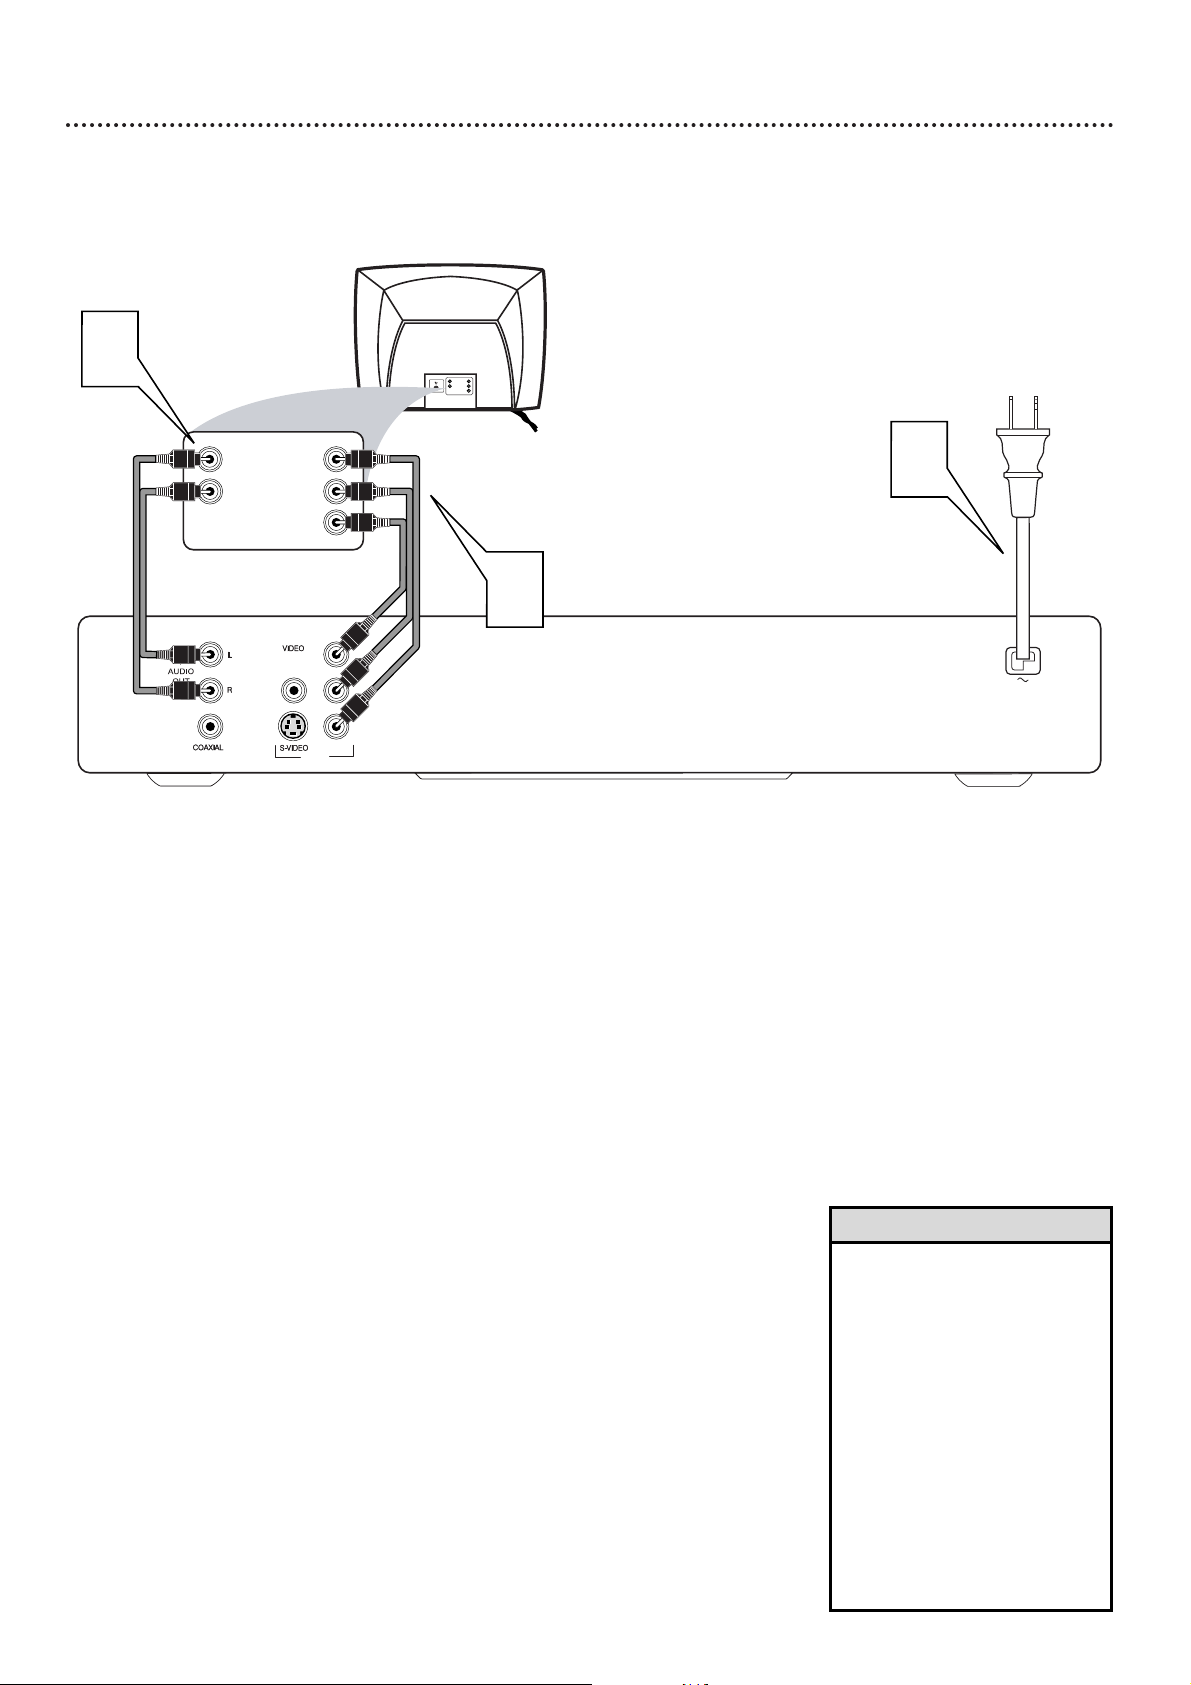
Connecting to a TV Only
TV has Component Video In Jacks (green, blue, and red)
Back of TV
(example only)
LEFT AUDIO IN
RIGHT AUDIO IN
Pr/Cr
Y
Pb/Cb
LEFT AUDIO IN
RIGHT AUDIO IN
Pr/Cr
Y
Pb/Cb
1
2
3
Y
Pb
Pr
VIDEO
OUT
1
Connect the Player’s green, blue, and red Y Pb Pr (VIDEO
OUT) jacks to the corresponding COMPONENT VIDEO IN
jacks on the TV. Use component video cable (not supplied).
2
Connect the Player’s red and white AUDIO OUT (right
and left) jacks to the right/left AUDIO IN jacks on the TV.
Use the supplied audio cables. Match the cable colors to the jack
colors. The red jack is the Right audio channel and the white jack is
the Left audio channel.
3
Plug the power cords of the Player and the TV into an
active power outlet.
Press down POWER ON/OFF on the front of the Player to
turn on the Player.
4
Turn on the TV power. Set the TV to the correct
Component Video In channel. See your TV owner’s manual for
details. Or, change channels at the TV until you see the blue Philips
DVD background screen or the Player’s screen saver on the TV.
•
On the TV, the component
video in jacks may be labeled
YUV or Y Pb/Cb Pr/Cr and may
be green, blue, and red.
• Set VIDEO OUTPUT to YPBPR.
Details are on page 34.
• If your TV has a single Audio In
jack instead of separate
left/right Audio In jacks, you will
need a different audio cable.
You need a “splitter” audio
cable to go from the left/right
AUDIO OUT jacks of the Player
to the single Audio In jack on
your TV. See your electronics
retailer for details.
Helpful Hints
Page 13
Hookups (cont’d) 13
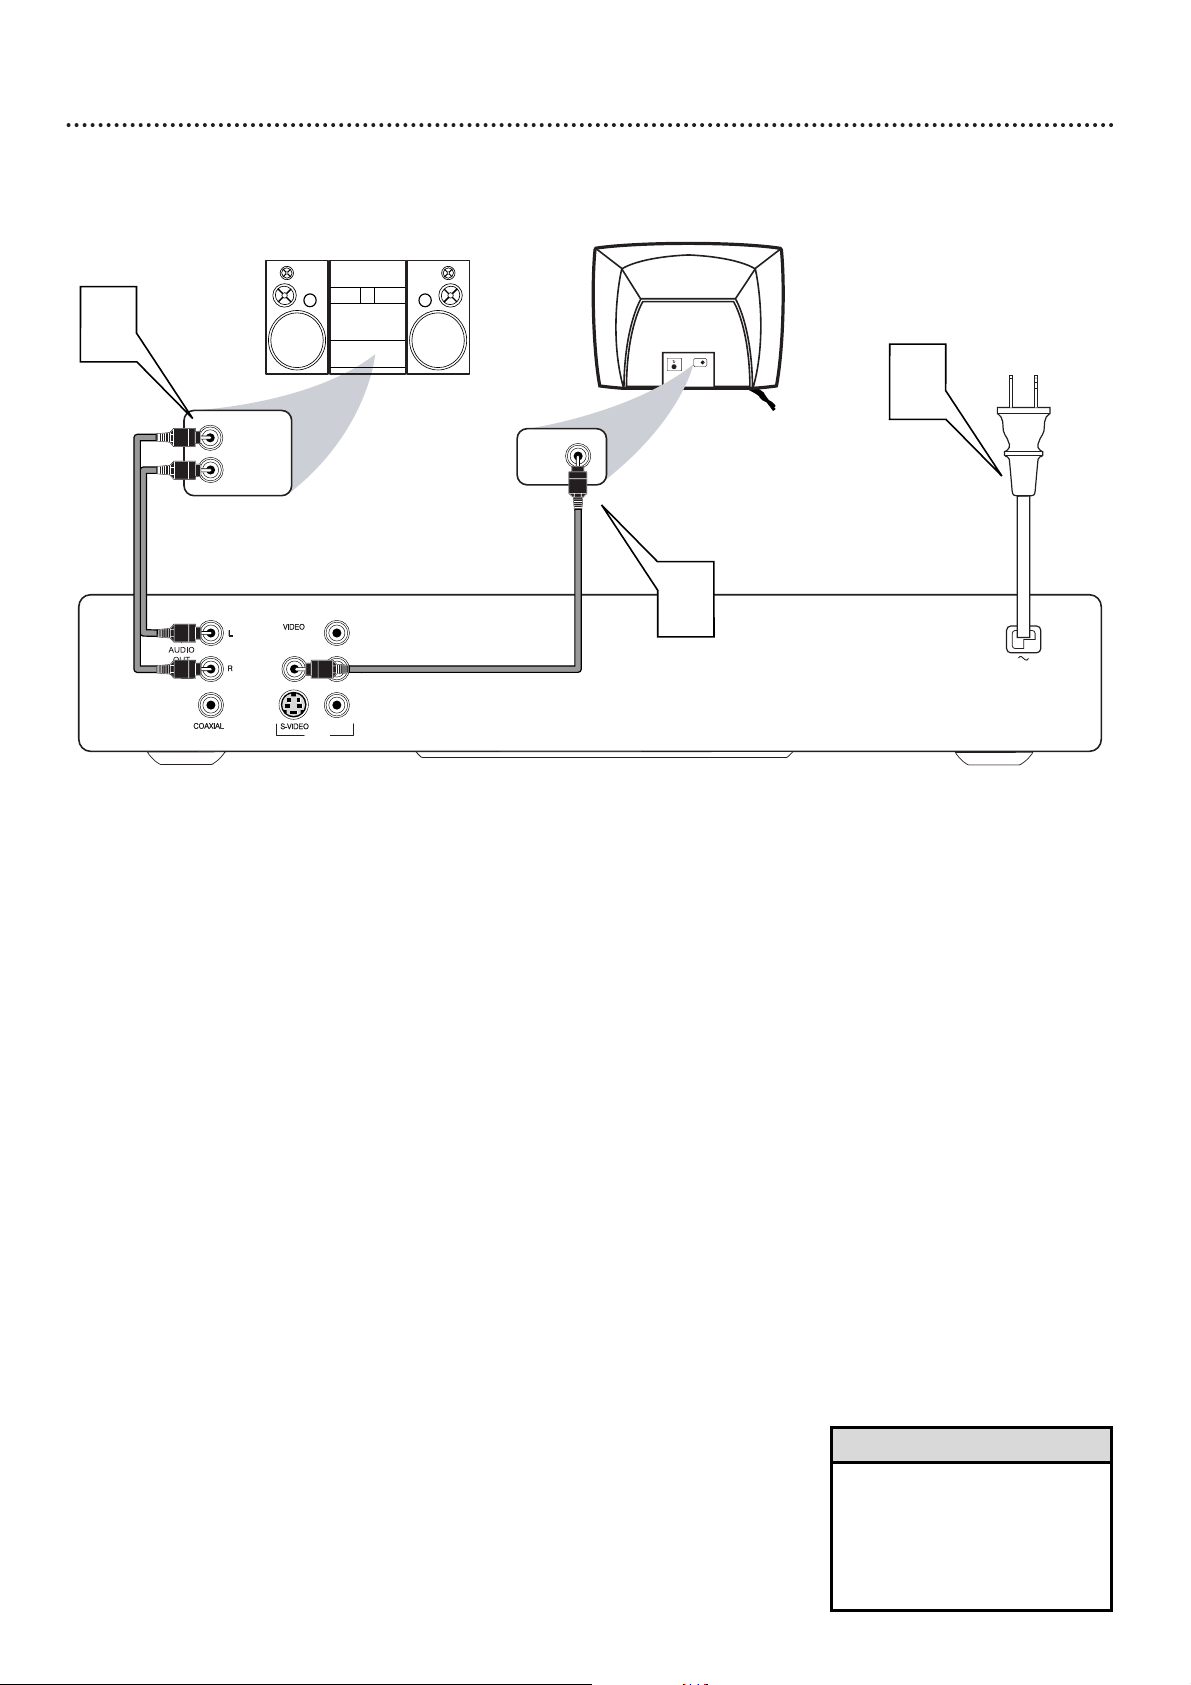
Connecting to a TV and a two-channel Stereo
(Stereo has Dolby Pro Logic or right/left Audio In jacks)
Back of TV
(example only)
LEFT AUDIO IN
RIGHT AUDIO IN
1
Stereo
(example only)
VIDEO IN
2
VIDEO IN
3
Y
Pb
Pr
VIDEO
OUT
1
Connect the supplied video cable to the yellow VIDEO
(VIDEO OUT) jack of the Player and to the TV’s
VIDEO IN jack. The supplied video cable has yellow ends.
2
Connect the supplied audio cable to the red and white
AUDIO OUT (right and left) jacks on the Player and to the
right/left AUDIO IN jacks on the Stereo. The supplied audio
cable has red and white ends. Match the cable colors to the jack
colors. The red jack is the Right audio channel and the white jack is
the Left audio channel.
3
Plug the power cords of the Player, Stereo, and the TV into
an active power outlet.
Press down POWER ON/OFF on the front of the Player to
turn on the Player.
4
Turn on the Stereo power and set your Stereo to the correct Audio In channel or sound source. Refer to the Stereo
owner’s manual for details.
5
Turn on the TV power. Set the TV to the correct Video In
channel. See your TV owner’s manual for details. Or, change chan-
nels at the TV until you see the blue Philips DVD background
screen or the Player’s screen saver on the TV.
• If you prefer or need to use the
S-VIDEO or Y Pb Pr jacks
instead, see pages 11-12. You
only need one video connection
between the TV and the Player.
Helpful Hint
Page 14
14 Hookups (cont’d)
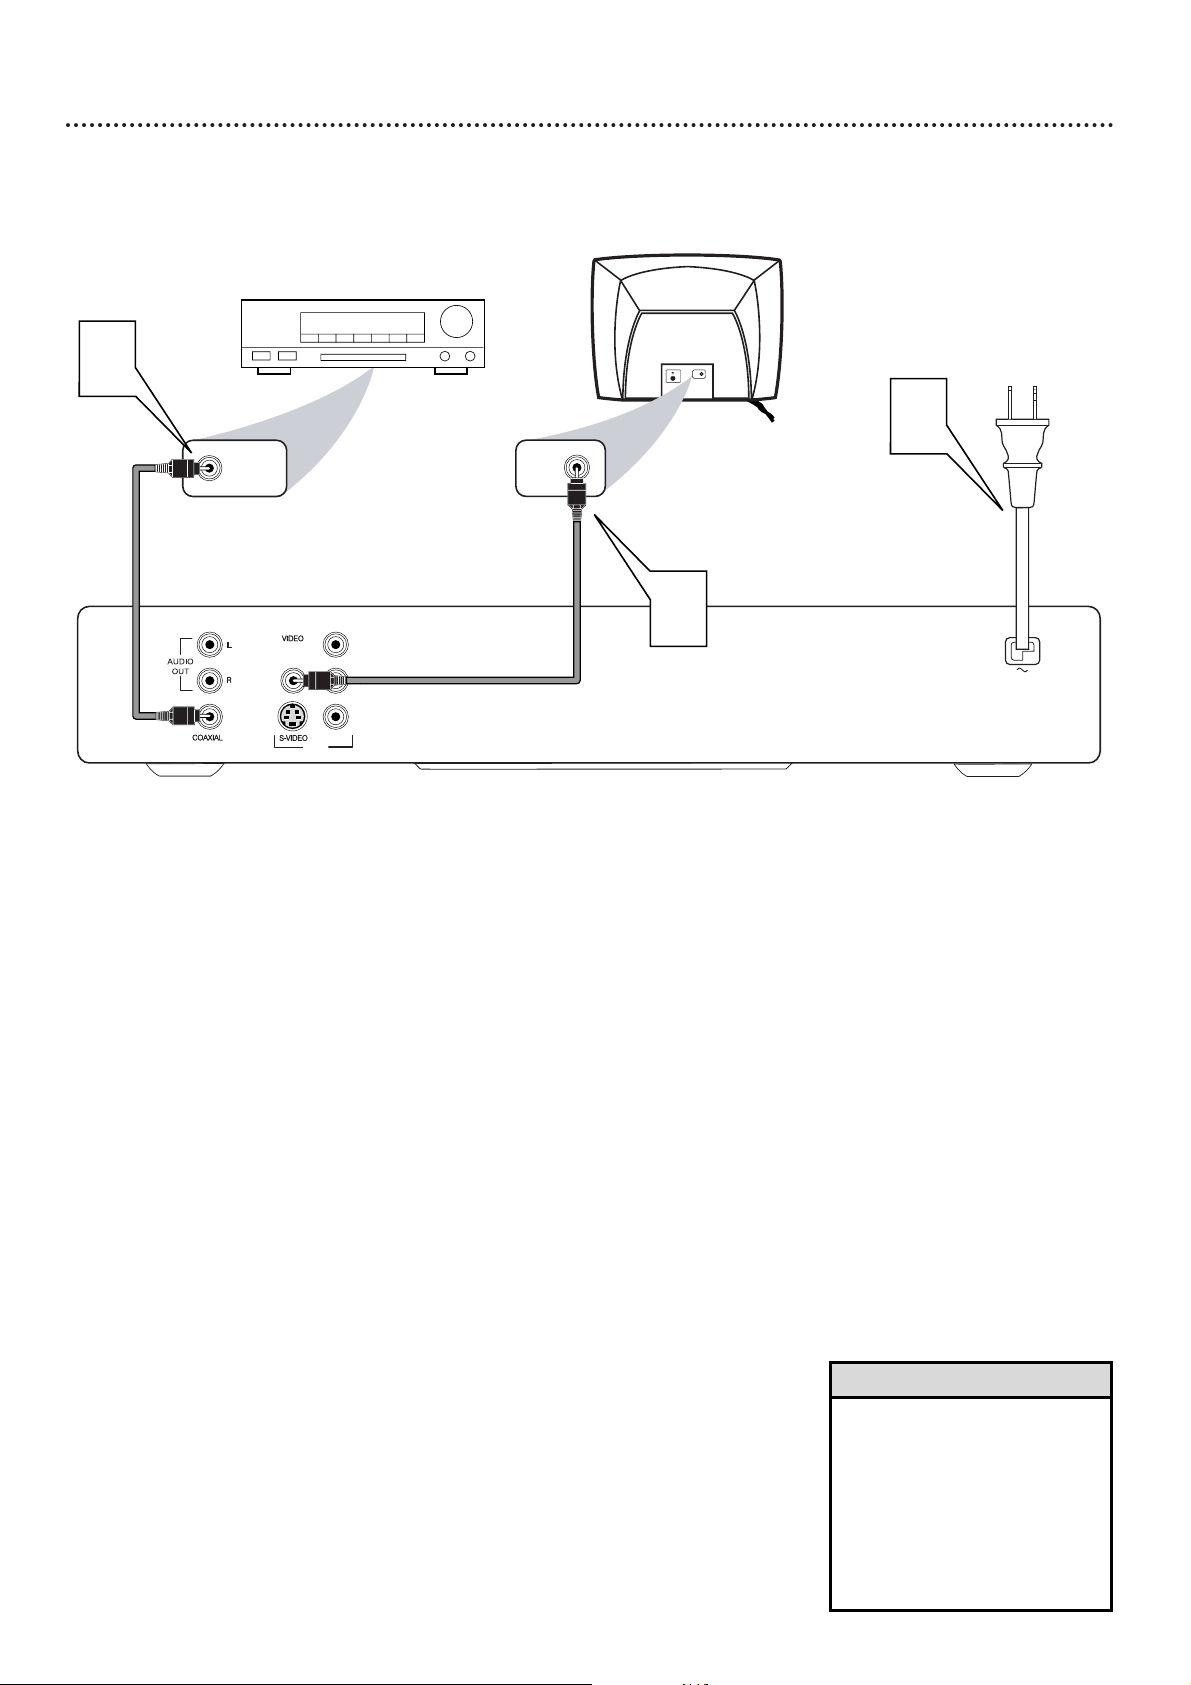
Connecting to a TV and a Digital Stereo
(Stereo has Dolby Digital
TM
or MPEG2)
Back of TV
(example only)
COAXIAL DIGITAL
AUDIO IN
2
1
Stereo
(example only)
VIDEO IN
VIDEO IN
3
Y
Pb
Pr
VIDEO
OUT
1
Connect the COAXIAL Digital Audio Out jack of the
Player to the COAXIAL DIGITAL AUDIO IN jack on your
Stereo. Use a digital coaxial audio cable (not supplied).
2
Connect the supplied video cable to the yellow VIDEO
(VIDEO OUT) jack of the Player and to the TV’s
VIDEO IN jack. The supplied video cable has yellow ends.
3
Plug the power cords of the Player, Stereo, and the TV into
an active power outlet.
Press down POWER ON/OFF on the front of the Player to
turn on the Player.
4
Turn on the Stereo power and set your Stereo to the correct Audio In channel or sound source. Refer to the Stereo
owner’s manual for details.
5
Turn on the TV power. Set the TV to the correct Video In
channel. See your TV owner’s manual for details. Or, change chan-
nels at the TV until you see the blue Philips DVD background
screen or the Player’s screen saver on the TV.
• Set SPDIF OUT and LPCM 96K
accordingly.
Details are on page 38.
• Your Stereo must support
MPEG2 or Dolby Digital
TM
.
Check the Stereo’s manual.
• If you prefer or need to use the
S-VIDEO or Y Pb Pr jacks
instead, see pages 11-12.
Helpful Hints
Page 15
Quick Disc Playback 15
There are many playback features and options available on Discs. After
familiarizing yourself with the Player as described on pages 16-18, see pages
19 and following to try additional playback features.
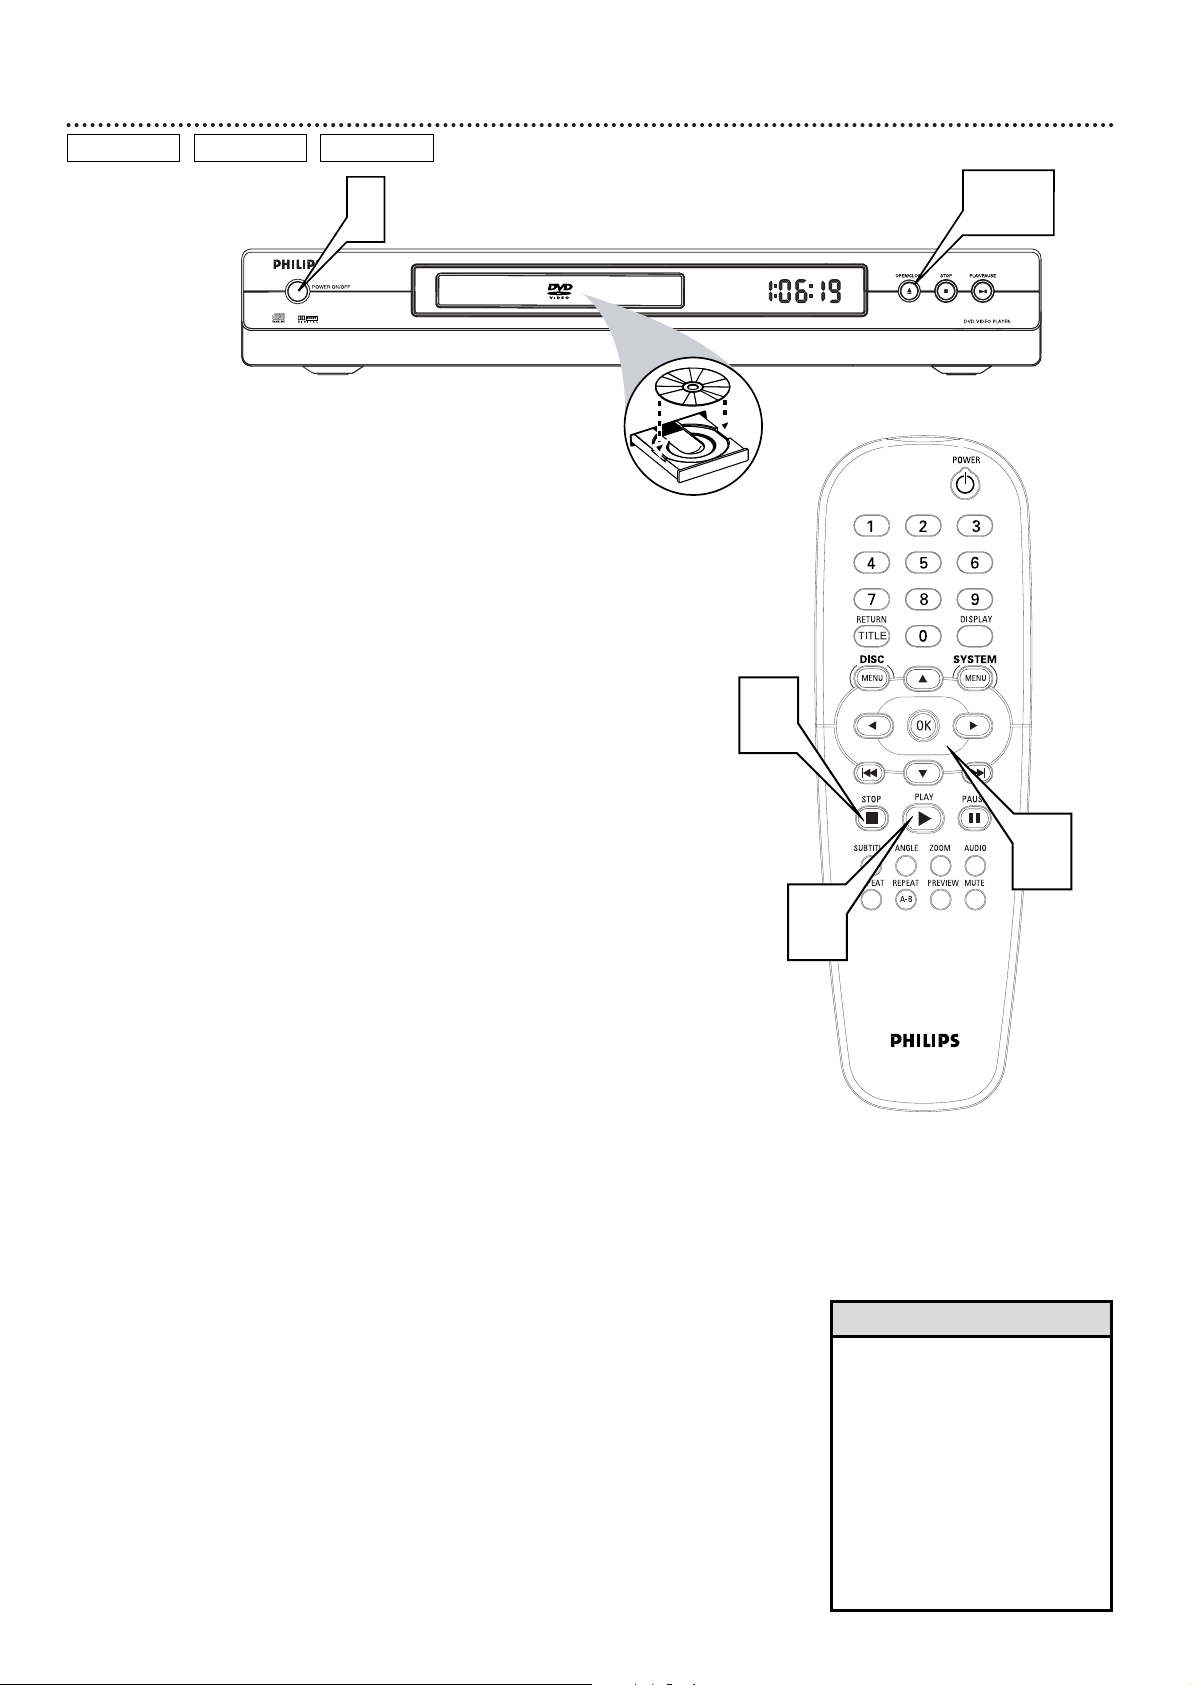
1
Press down POWER ON/OFF on the front of the Player to
turn on the Player. (You can turn on the Player using the
POWER yybutton on the remote only if the POWER ON/OFF
button on the front of the Player is pressed down.)
Turn on your TV. Set it to the correct Video In channel.
You should see the blue Philips DVD background screen or the
Player’s screen saver on the TV (if no Disc is in the Player).
2
Press OPEN/CLOSE A on the front of the Player to open the
disc tray.
Load your Disc in the tray with the label facing up and the shiny
side facing down. If the Disc is two-sided, make sure the side you
want to play is facing up.
3
Press OPEN/CLOSE A again to close the tray.
4
Playback may start automatically. If not:
• If you are playing a DVD, a Disc menu may appear. If the Title or
Chapter selections are numbered, press a Number button to
select an item. Or, press 9 8 ; : to select an item, then press
OK. Playback will begin. Or, follow the on-screen instructions as
detailed in the DVD Disc menu.
• If you are playing an Audio CD, press PLAY : to start playback.
• If you are playing a Video CD that has Playback Control, press
DISC MENU to access the menu or index of the Video CD. Press
the 9, 8, ;, :, or Number buttons to select an item, then press
OK. Follow the instructions provided by the Video CD. Not all
Video CDs have Playback Control. See the Disc case or menus
for details.
5
To stop playback at any time, press STOP C.
If you press STOP C only once, playback will resume at the same
point if you press PLAY : later to restart playback. This is known
as the Resume feature.
If you press STOP C more than once to stop playback, play will
start at the beginning of the Disc again if you press PLAY : later to
restart playback.
• If the Disc is locked by Parental
Controls, you must enter your
password or unlock the Disc.
Details are on pages 27-29.
• DVDs have a region code. Your
Player will not play DVDs that
have a region code other than
ALL or 1 (one). Details are on
page 7.
• Opening the disc tray or turning
off the Player’s power will cancel
the Resume feature.
Helpful Hints
2,3
1
DVD
AUDIO CD VIDEO CD
4
4
5
Page 16
16 Remote Control Buttons
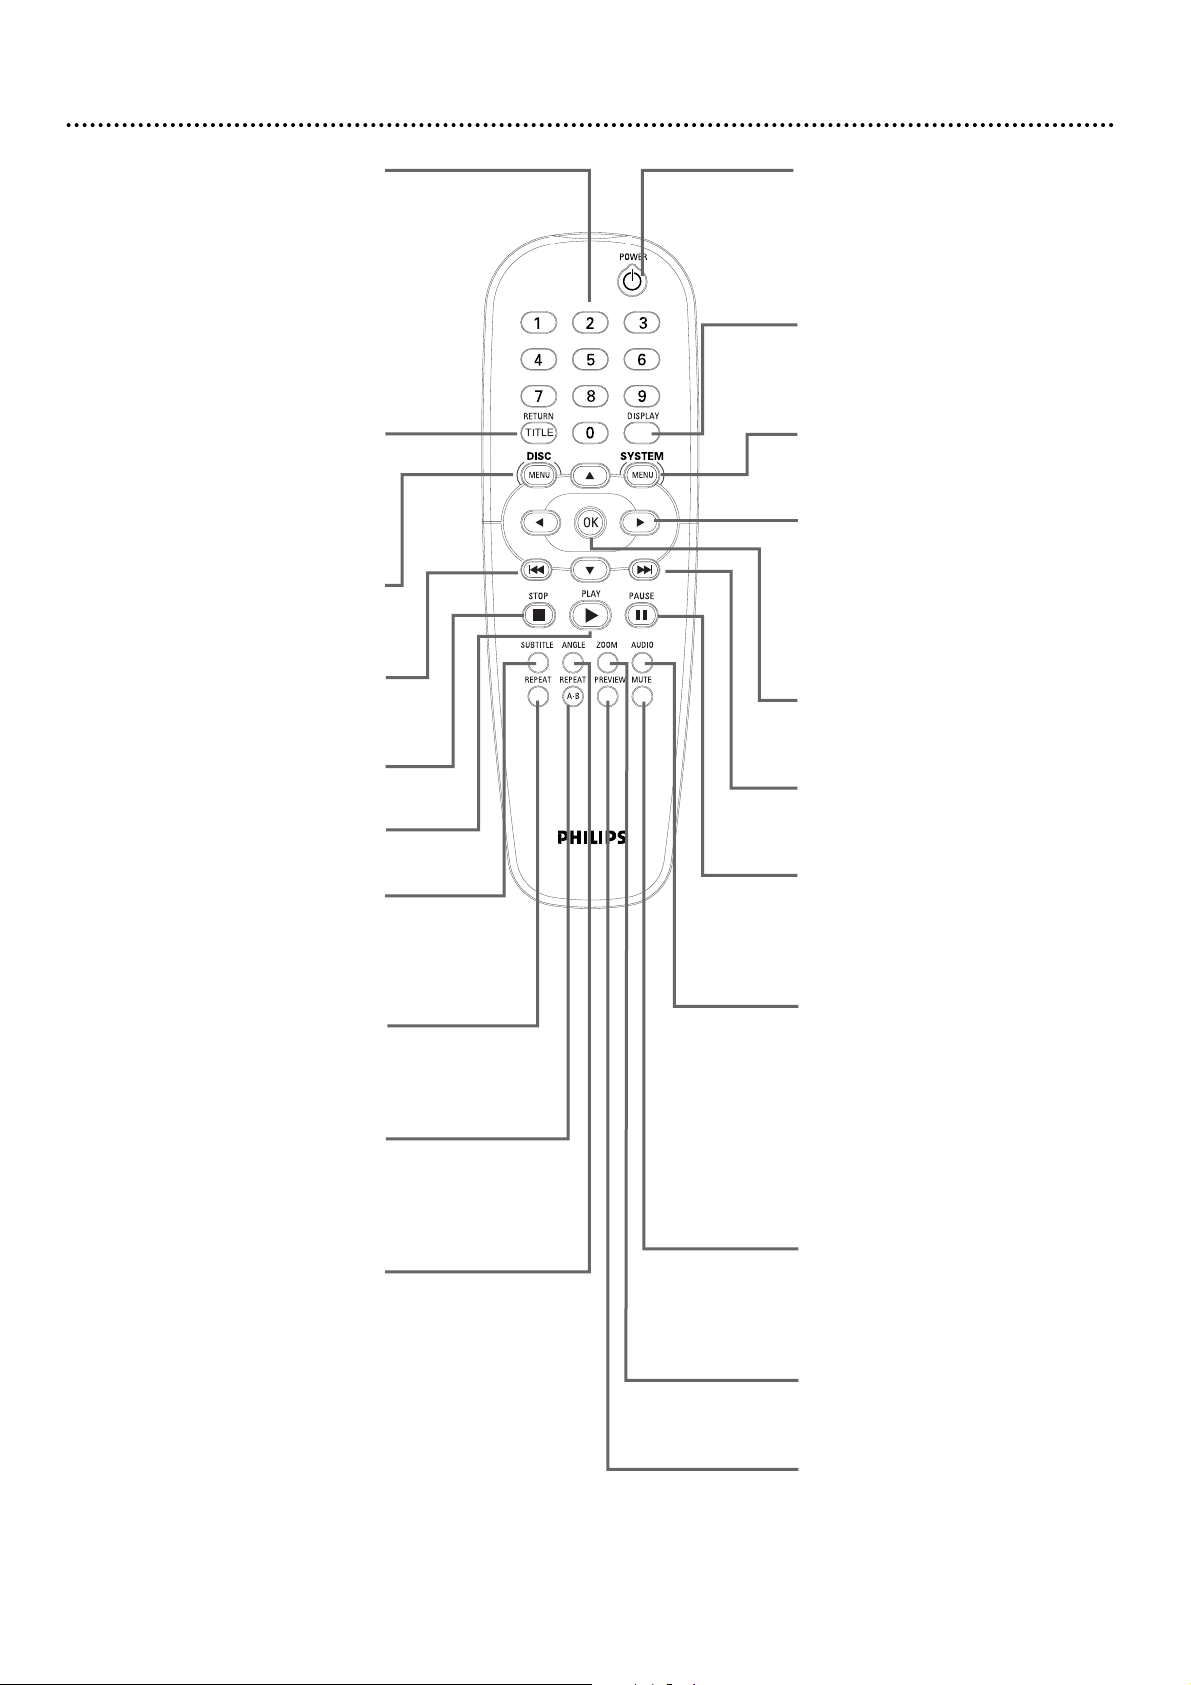
Number Buttons
Press to select numbered items in a
Disc menu. During playback, press the
Number buttons to select a Chapter
(within the current Title) or Track for
playback, then press OK.
Details are on page 19.
Press and hold the Number 1 button
for three seconds (or until OPEN or
CLOSE appears on the display panel)
to open or close the disc tray.
RETURN/TITLE Button
Press during DVD playback to go to
the Title menu. This option varies
among DVDs and may not be available
with all DVDs.
Press to go back to a previous menu.
DISC MENU Button
Press to access a DVD’s Disc menu.
Details are on page 19.
Previous
jj´´
Button
Press to go to the previous Chapter
or Track. Details are on page 19.
STOP C Button
Press to stop Disc playback.
PLAY : Button
Press to begin Disc playback.
SUBTITLE Button
Press repeatedly during playback to
select a subtitle language from those
available on the current Disc.
Details are on page 25.
REPEAT Button
Press repeatedly to play a Chapter,
Title, Track, or Disc repeatedly.
Details are on page 23.
REPEAT A-B Button
Press to set up Repeat A-B playback,
in which a certain segment of the
Track or Chapter plays repeatedly.
Details are on page 23.
ANGLE Button
Press to select a different camera
angle during DVD playback. Multiple
angles must be available on the Disc.
Details are on page 22.
POWER yyButton
Press to turn on or off the power of
the Player. (To turn on the Player, the
POWER ON/OFF button on the front
of the Player must be depressed, and a
: will appear on the display panel.)
DISPLAY Button
Press during playback to see current
disc information on the TV screen.
Details are on pages 19, 21, and 37.
SYSTEM MENU Button
Press to access or remove the Setup
Menu of the Player.
98;:Buttons
Press to select items in a menu. Press
; or : for fast reverse or fast forward searching. Details are on page 20.
Press 8 or 9 during DVD playback
for forward or reverse slow motion
playback. Details are on page 20.
OK Button
Press to acknowledge or approve a
menu selection.
Next GGButton
Press to skip to the next Chapter or
Track. Details are on page 19.
PAUSE k Button
Press once to pause playback. Press
repeatedly to advance a paused picture
one frame at a time (frame-by-frame
playback). Details are on page 21.
AUDIO Button
Press to select a different audio language or soundtrack during DVD playback. Multiple languages or soundtracks must be available on the DVD.
Details are on page 24.
With some Video CDs and Audio
CDs, press AUDIO repeatedly to
choose an audio channel.
Details are on page 24.
MUTE Button
Press to silence the volume. Press
again to restore the volume. Point the
remote control at the Player, not your
TV.
ZOOM Button
Press to enlarge the picture during
playback. Details are on page 22.
PREVIEW Button
When playback is stopped, press to
enter the Preview menu for a Video
CD or Super Video CD.
Details are on page 31.
Page 17
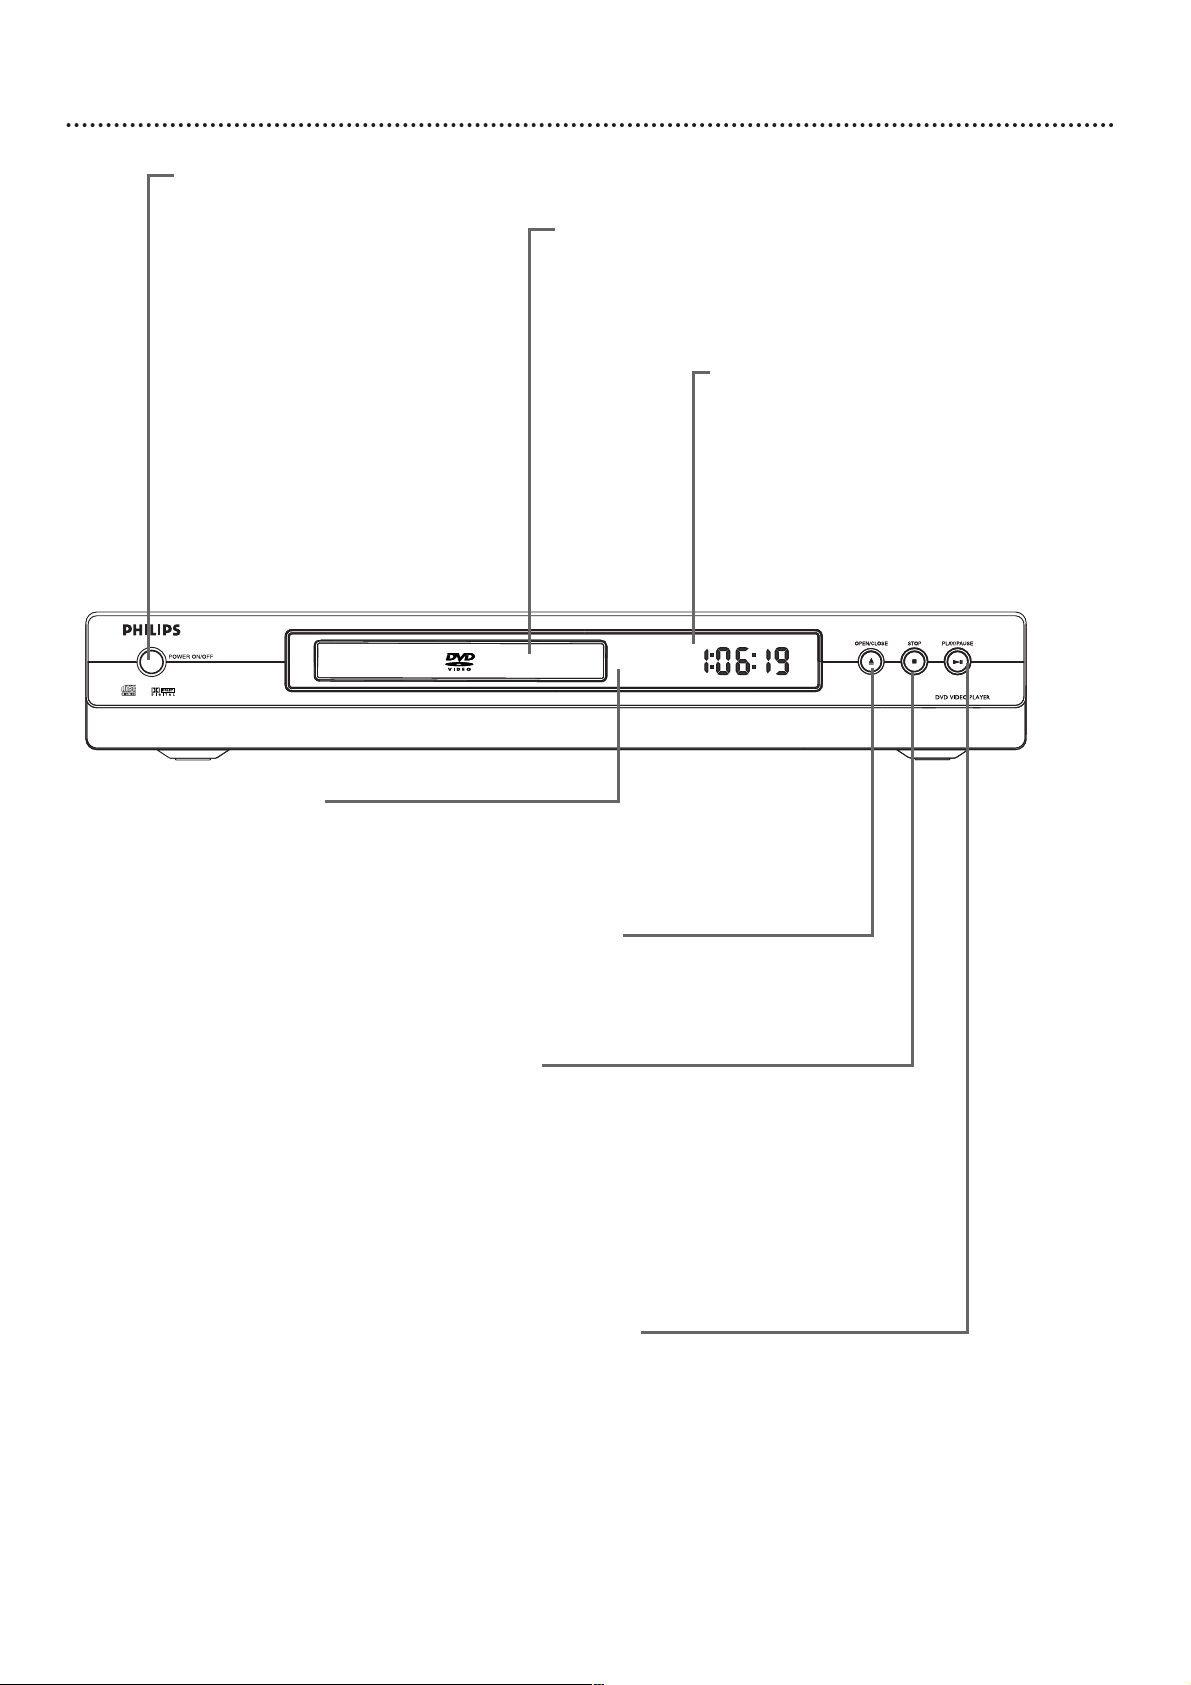
Front Panel 17
Disc Tray
Insert a Disc here. Load the
Disc with the label facing up.
Details are on page 15.
Display
Current Disc information appears here, including elapsed playing time, current Track number,
or active feature (LOAD while the Player is
reading a Disc, NEXT when you move to the
next Chapter, RPT ALL when playing a Disc
repeatedly, LOCKED if Parental Controls is
active, etc.).
The display will be dark and empty if VFD DIM
is OFF. Details are on page 40.
POWER ON/OFF
Press to turn the Player on
or off.
The button is depressed
when the Player is On (also
known as Standby or lowpower mode); the : will
appear on the display panel.
The button is released when
the power is completely off
(the display panel will be
dark or empty, with no :).
To use the POWER yybutton on the remote control
to turn the Player on, the
POWER ON/OFF button on
the front of the Player must
be depressed (the : will show
on the display panel).
OPEN/CLOSE A button
Press to open or close the Disc tray. You also can
open or close the disc tray by pressing and holding
the Number 1 button on the remote control for
three seconds.
STOP 77button
To use the Resume feature, press STOP 77once to
stop Disc playback. Play will resume from the same
point the next time you start playback (if you do not
turn off the Player or open the disc tray).
Or, press STOP 77twice to stop Disc playback. Play
will resume from the beginning of the Disc the next
time you start playback.
You must stop playback by pressing STOP 77twice in
order to access PREFERENCES in the Player’s Setup
menu.
PLAY/PAUSE
3388
button
Press to start playing a Disc. Press once during playback to pause play; press again to resume play from
the same point.
Remote Sensor
Point the Player’s remote control here when using the remote
to operate the Player.
Page 18
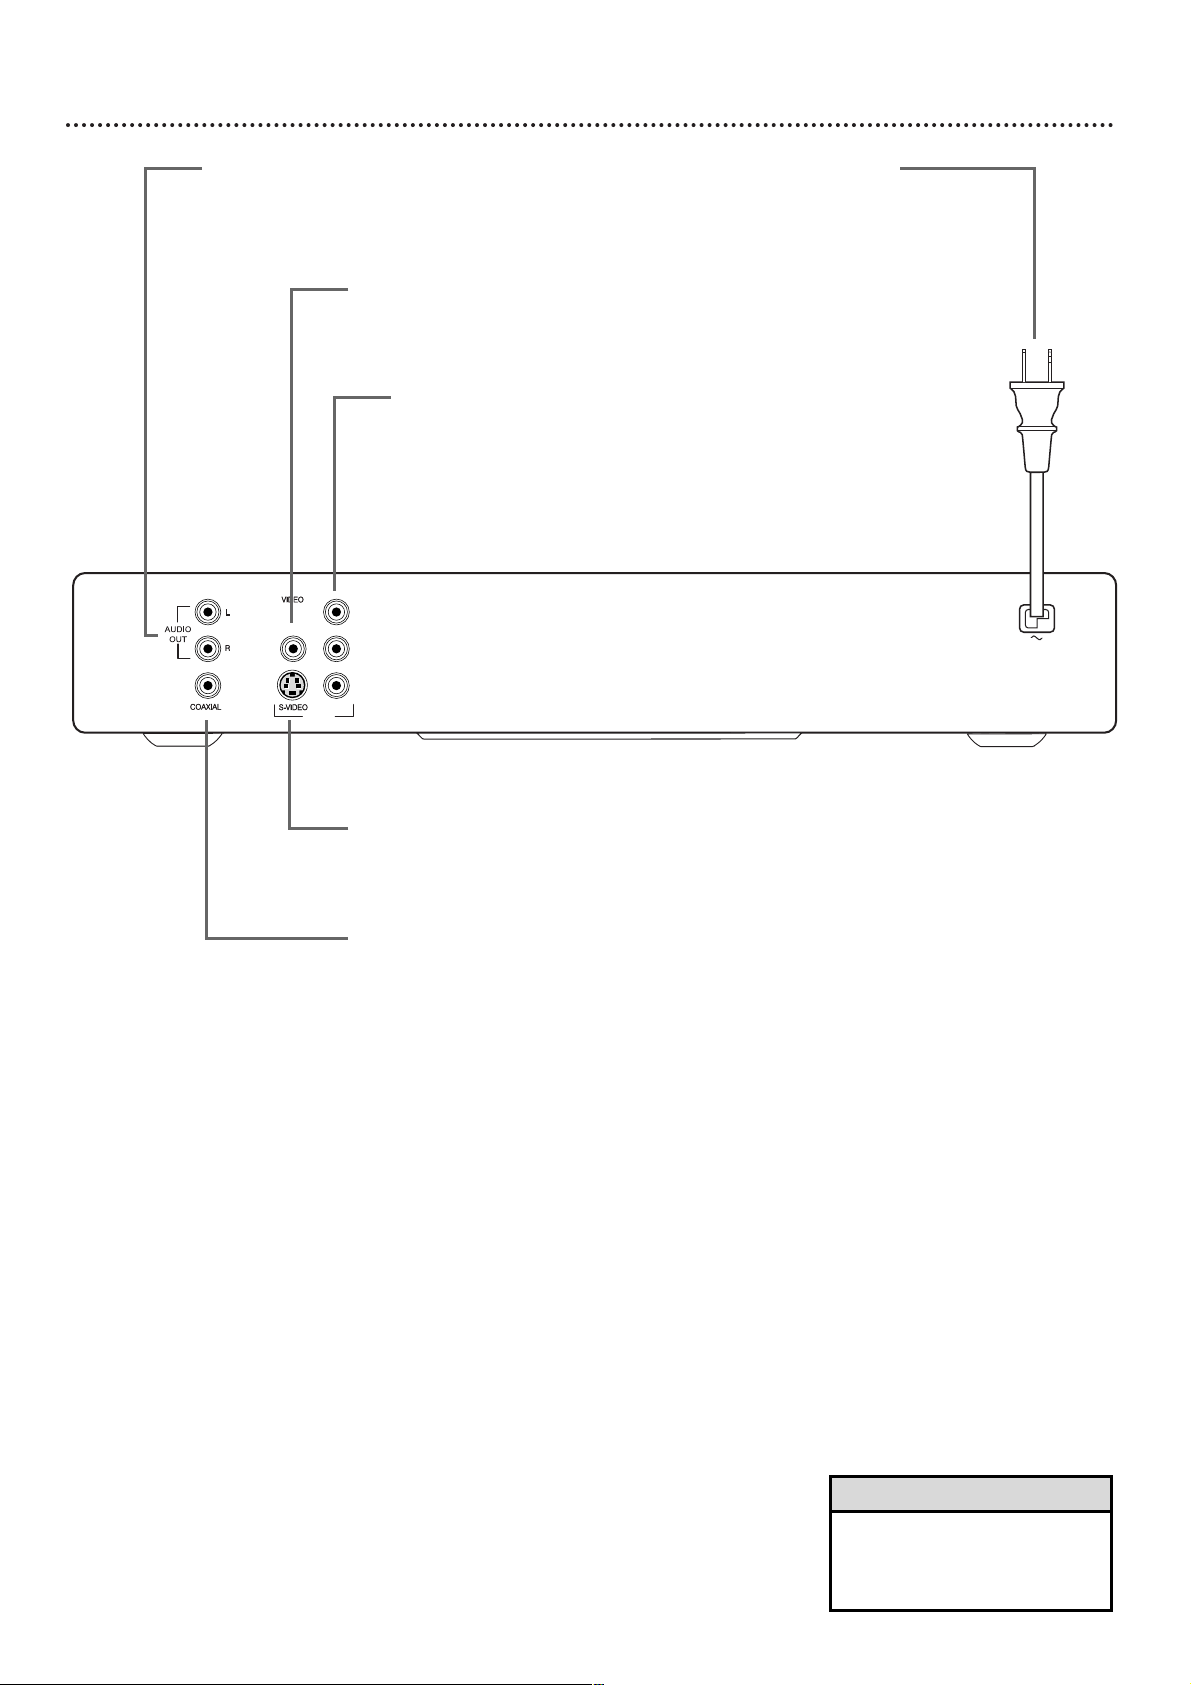
18 Rear Panel
Y
Pb
Pr
VIDEO
OUT
Y Pb Pr (VIDEO OUT) jacks
Connect component video cables (not supplied)
here and to the Component Video In jacks of a TV.
Details are on page 12.
VIDEO (VIDEO OUT) jack
Connect the supplied video cable here and to the TV’s
Video In jack. Details are on page 10.
AC Power cord
Connect to a standard AC
power outlet after completing
all other connections.
AUDIO OUT (right/left) jacks
Connect the supplied audio cables here and to
the AUDIO IN jacks on your TV or Stereo.
Details are on pages 10-13.
S-VIDEO (VIDEO OUT) jack
Use an S-video cable (not supplied) to
connect this jack to the S-Video In jack
of your TV. Details are on page 11.
COAXIAL Digital Audio Out jack
Connect a digital audio coaxial cable
(not supplied) here and to the Digital
Audio Coaxial In jack of a Stereo.
Details are on page 14.
• You only need one audio and
one video connection, so you will
not use all the jacks on the
Player.
Helpful Hint
Page 19
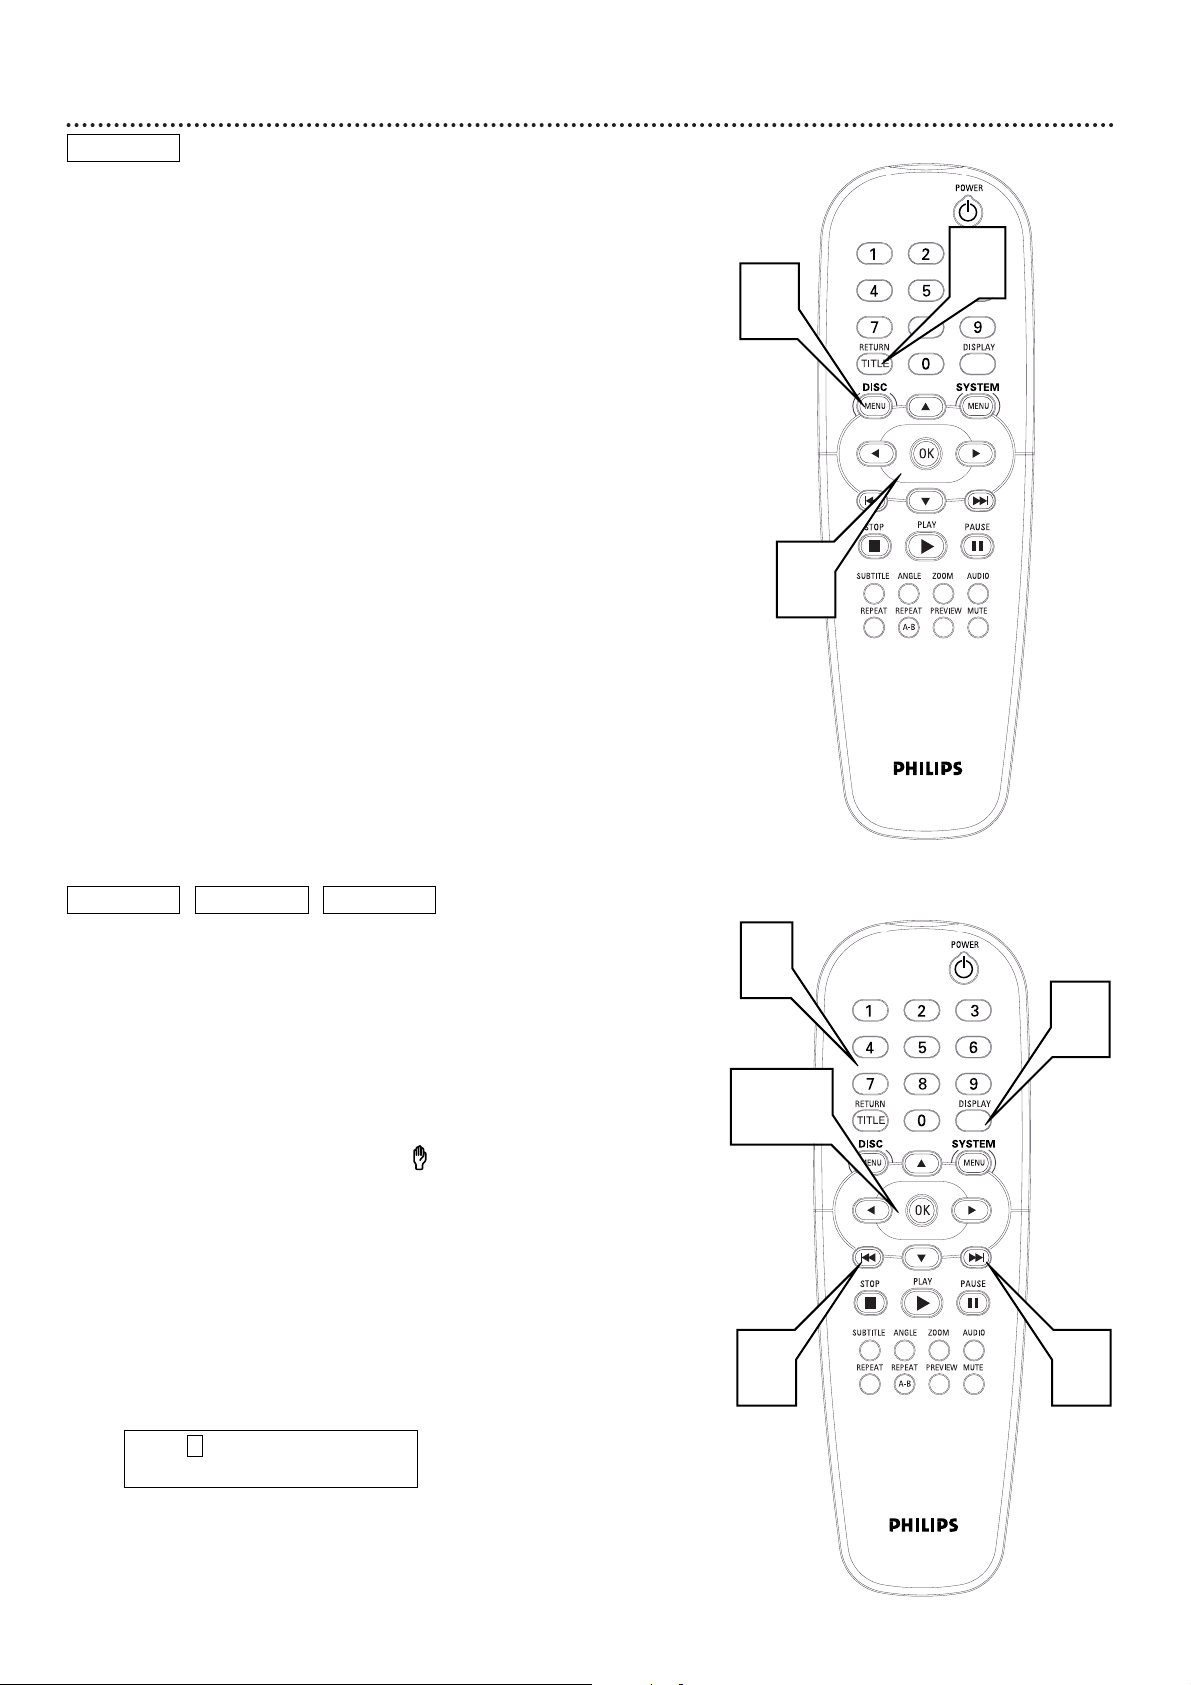
Title/Disc Menus, Chapter/Track Selection 19
Title/Disc menus
1
Press DISC MENU. The main Disc menu (or Root menu) will
appear. The menu may list camera angles, spoken language and subtitle options, and Chapters for the Title.
Or, if the current Title has a specific Title menu, press
RETURN/TITLE to access the Title menu. Title menus are
not available on all Discs.
2
Press 98 ; : to select items in the menu, then press OK.
Continue until you set up all the features you want or until playback
begins. If Chapters or options are numbered, press the appropriate
Number button to select the item (you also may have to press OK).
Some DVDs may not allow you to operate the Disc menu this way.
Follow the instructions on the Disc.
Chapter/Track Selection
There are three different ways to move to other Tracks or Chapters during playback. Choose the one you prefer.
A
Press Next ¢ to go to the next Track/Chapter.
Press Previous 4 to go to previous Tracks/Chapters.
B
Press the Number buttons to enter the Track/Chapter
number, then press OK. Play will resume from the beginning of
the Track/Chapter you selected.
If you enter an invalid number, the may appear in the top left corner of the TV screen. The current Track/Chapter will continue to
play. Or, an incorrect Track/Chapter may begin to play. Make sure
the Track/Chapter number you enter is available on the Disc. Make
sure a Chapter is available within the current Title.
C
Press DISPLAY, then press : if necessary to select the area
beside T (Title or Track) or C (Chapter). Press 9 or 8 to
select the Track, Title, or Chapter number you want. Play
will begin immediately at the Track, Title, or Chapter you selected.
Press DISPLAY again to remove the information from the top of the
screen.
DVD
AUDIO CD
VIDEO CDDVD
2
1
B
A
C
A
B,C
1
T: 1 / 3 C: 12 / 30
TC: 00:37:58 3D OFF
DVD Example
Page 20
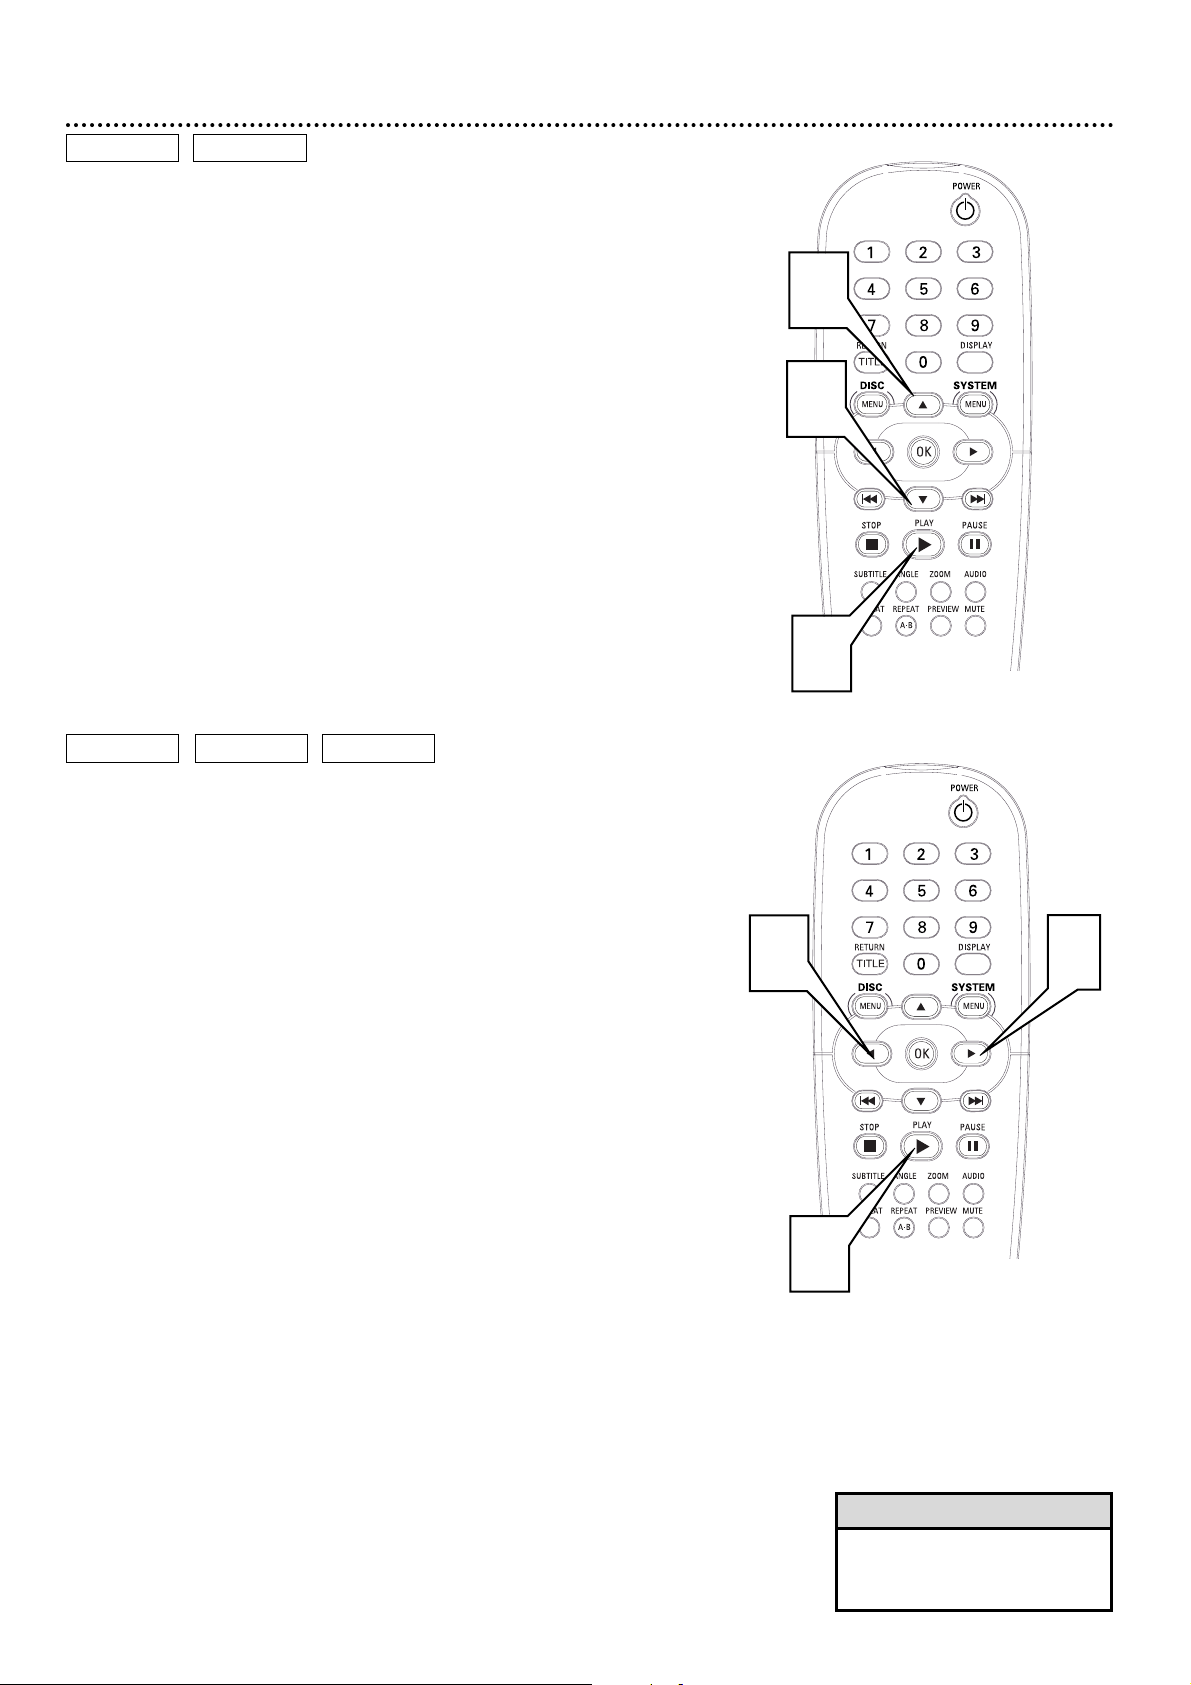
Fast Forward and Fast Reverse
1
To fast forward a DVD or Video CD at twice the normal
playback speed, press :. Press : repeatedly to fast forward the
DVD or Video CD at four, six, or eight times the normal playback
speed. FF 2X, FF 4X, FF 6X, or FF 8X will appear on the TV screen.
FF represents Fast Forward. Sound will be mute.
Or, press ; to play the DVD or Video CD backward at
twice the normal speed. Press ; repeatedly to fast reverse the
DVD or Video CD at four, six, or eight times the normal playback
speed. FR 2X, FR 4X, FR 6X, or FR 8X will appear on the TV
screen. FR represents Fast Reverse. The sound will be mute.
To fast forward an Audio CD at twice, four, six, or eight
times the normal playback speed, press : repeatedly during playback. Sound will be intermittent and FF 2X, FF 4X, FF 6X,
or FF 8X will appear on the TV screen. FF represents Fast Forward.
There will be no sound at FF 8X.
To fast reverse an Audio CD at twice, four, six, or eight
times the normal speed, press ; repeatedly during playback. Sound will be intermittent and FR 2X, FR 4X, FR 6X, or
FR8X will appear on the TV screen. FR represents Fast Reverse.
When you reach the beginning of a Track during Fast Reverse, normal playback resumes automatically. You can not use Fast Reverse
to go to previous Tracks.
2
To return to normal playback speed, press PLAY :.
20 Slow Motion, Fast Forward and Fast Reverse
DVD
VIDEO CD
VIDEO CD
AUDIO CDDVD
Slow Motion
1
During Disc playback, press 8 repeatedly to play the disc at
1/2, 1/4, 1/6, or 1/8 the normal speed. SF 2X, SF 4X, SF 6X, or
SF 8X will appear on the TV screen. SF represents Slow Forward.
The sound will be mute during slow motion playback.
Or, press 9 repeatedly to play a DVD backward at 1/2, 1/4,
or 1/8 the normal speed. SR 2X, SR 4X, or SR 8X will appear on
the TV screen. SR represents Slow Reverse. Slow reverse is not
possible on Video CDs.
2
To return to normal playback, press PLAY :.
2
1
1
1
1
2
• DVDs can play at SF 2X, SF
4X, or SF 8X. Video CDs can
play at SF 2X, SF 4X, or SF 6X.
Helpful Hint
Page 21
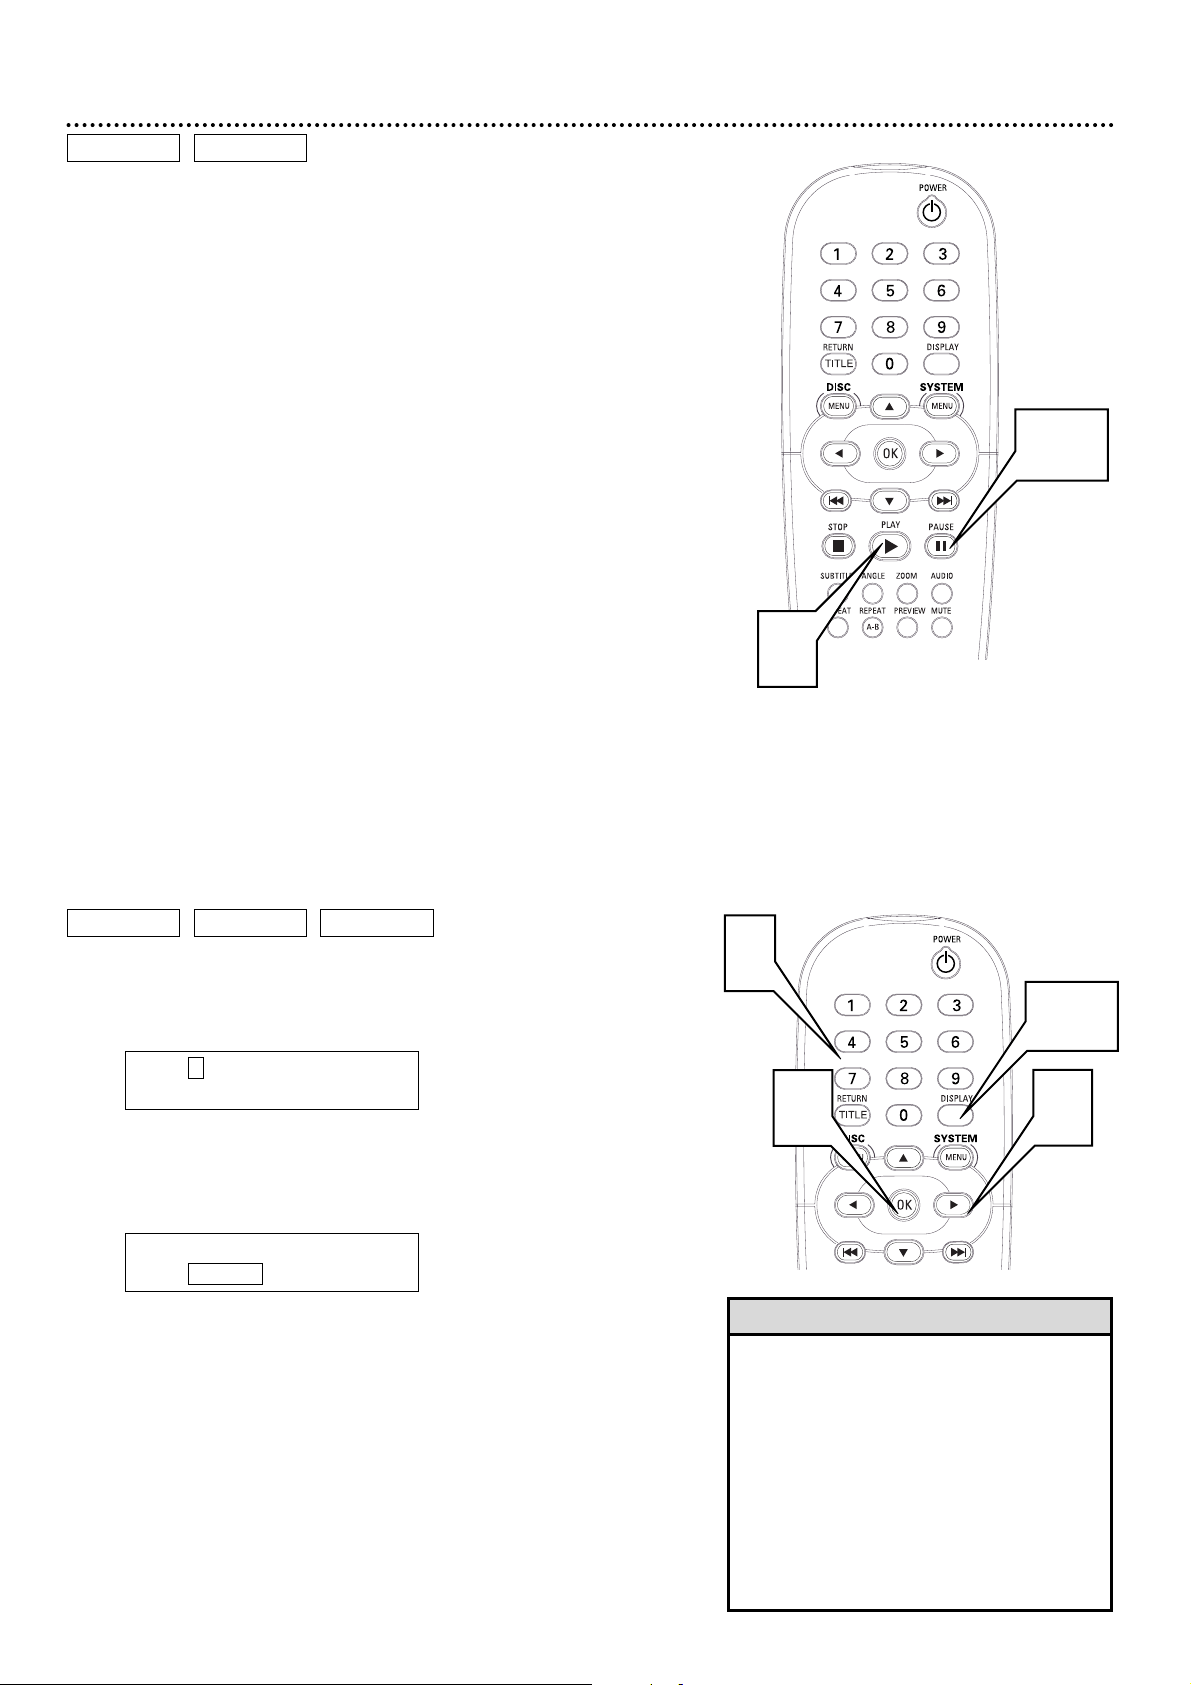
Still Picture/Frame-by-Frame Playback, Time Search 21
Still Picture/Frame-by-Frame Playback
1
To pause a DVD or Video CD picture, press PAUSE k on
the remote control during playback.
2
Press PAUSE k repeatedly to advance the still picture one
frame at a time.
3
Press PLAY : to resume regular playback.
DVD
VIDEO CD
3
Time Search
1
Press DISPLAY during playback. Current playback information
will appear at the top of the screen.
DVD example
2
Press : repeatedly to select the counter numbers beside
TC. This shows the amount of time that the Title or Track has
been playing, or the elapsed playing time.
3
Press the Number buttons to enter the elapsed playing time
at which you want to resume playback, then press OK.
Enter the elapsed playing time in hours, minutes, and seconds.
For example, if the current DVD is a two-hour movie and you want
to jump to the middle of the movie, press 0,1,0,0,0,0, then press
OK. The movie will resume playing at an hour into the movie.
4
Press DISPLAY to remove the information from the top of
the screen.
DVD
VIDEO CD AUDIO CD
T: 1 / 3 C: 12 / 30
TC: 00:37:58 3D OFF
T: 1 / 3 C: 12 / 30
TC: 00:37:58 3D OFF
3
1,4
2
3
• When you press DISPLAY, the counter will appear in
the Information box at the top of the screen. TC usually appears beside the counter. You can change the
counter type by pressing ; or : to choose TC, then
pressing 8 or 9 to choose CC, CR, TC, TR, DC, or
DR. The counter will change to represent:
CC - elapsed playing time of current Chapter;
CR - remaining playing time of current Chapter;
TC - elapsed playing time of current Title or Track;
TR - remaining playing time of current Title or Track;
DC - elapsed playing time of current Disc; or
DR - remaining playing time of current Disc.
The counters will be available according to the type of
Disc that is in the Player.
Helpful Hint
1-2
Page 22
22 Zoom, Camera Angle
Zoom
Zooming lets you enlarge the video image during playback and scan
through the enlarged image.
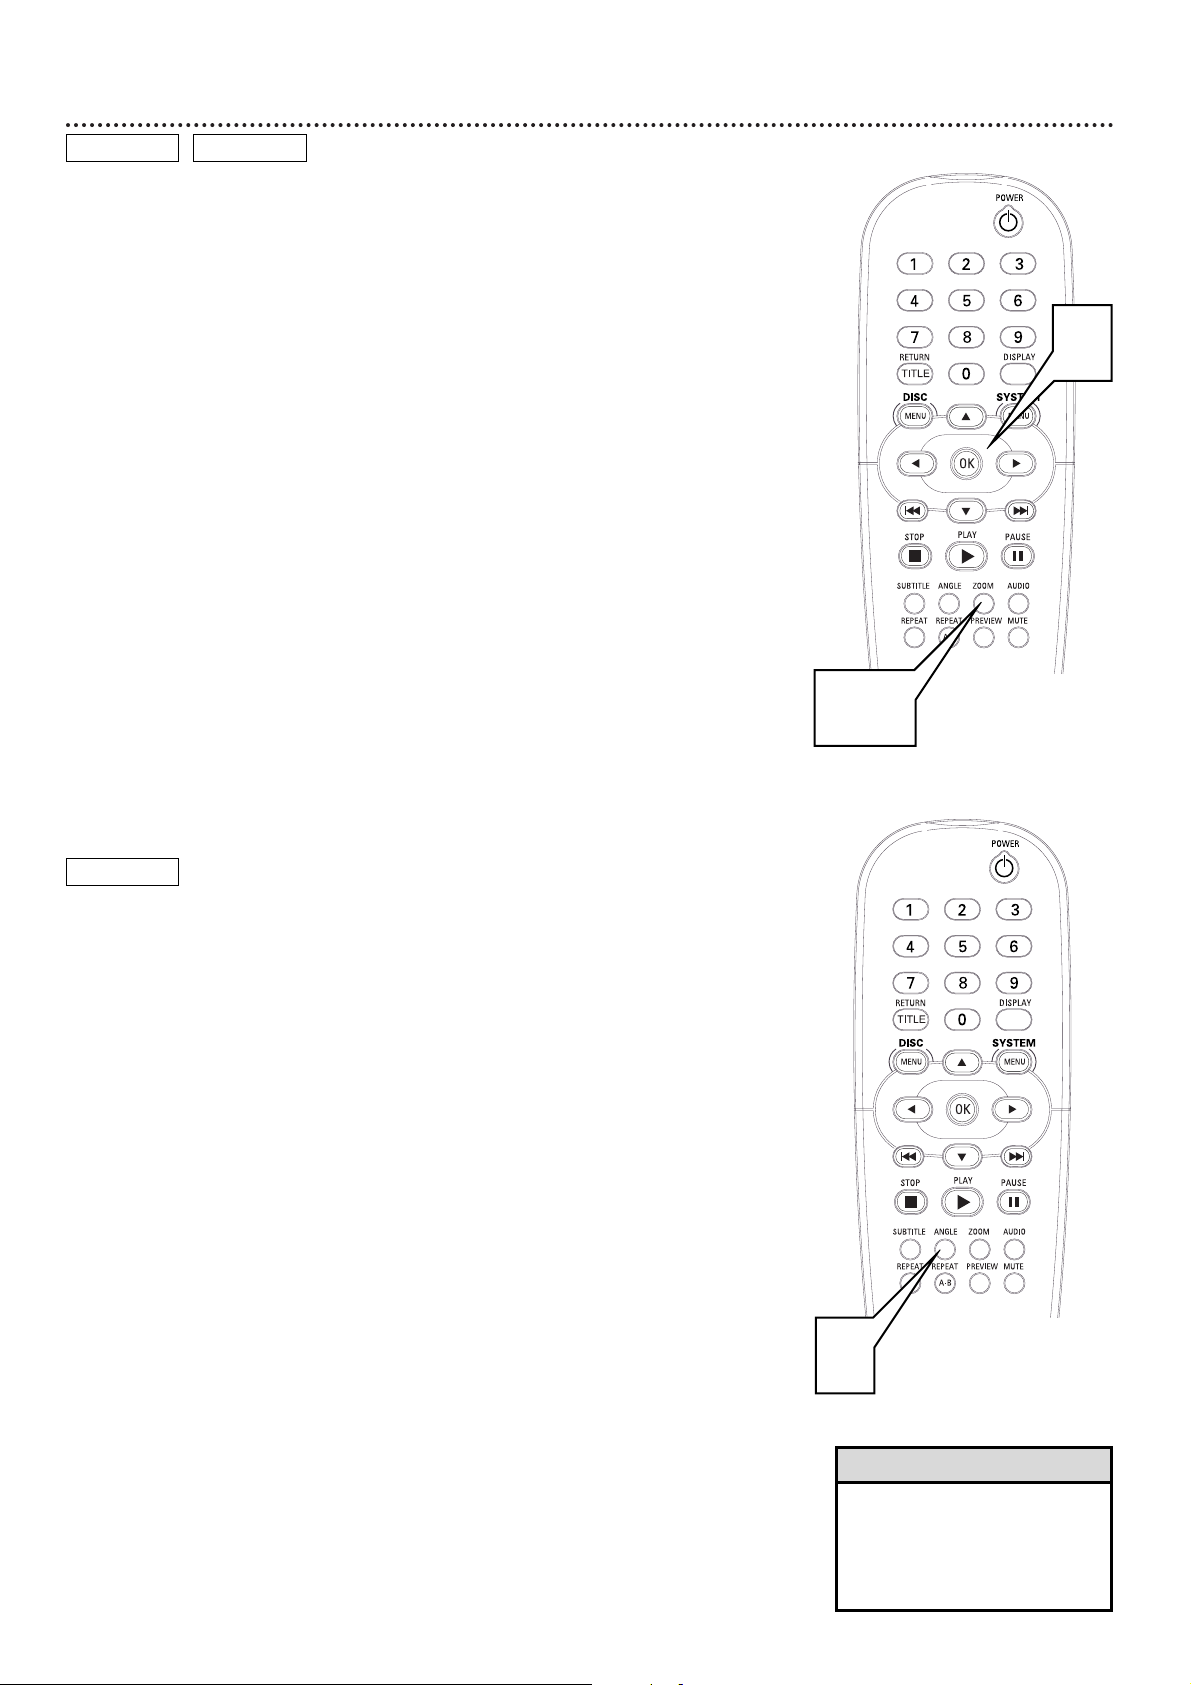
1
Press ZOOM repeatedly during Disc playback to choose
ZOOM X2 or ZOOM X4. ZOOM X2 or Z00M X4 will appear in
the top left corner of the TV screen briefly. The picture will be
twice (ZOOM X2) or four (ZOOM X4) times as large.
2
To shift the enlarged picture on the TV screen, press 98
; or :, whichever is appropriate for the direction in which you
want to move the picture.
3
To return the picture to regular size, press ZOOM so
ZOOM OFF appears briefly in the top left corner of the TV
screen.
DVD
Camera Angle
Some DVDs include scenes recorded from different angles. To watch segments from a different angle, follow these steps. The DVD must have multiple angles available. Check the DVD Disc case or Disc menu for details
and availability.
1
During DVD playback, press ANGLE repeatedly to select a
different angle.
2
In a few seconds, playback changes to the selected angle.
DVD
VIDEO CD
2
1
1,3
• Zooming may not be possible
on all DVDs.
• Zooming is not available on
DVDs that have the PAL color
system.
Helpful Hints
Page 23
Repeat, Repeat A-B 23
Repeat
You may play a Chapter, Track, Title, or entire Disc repeatedly.
1
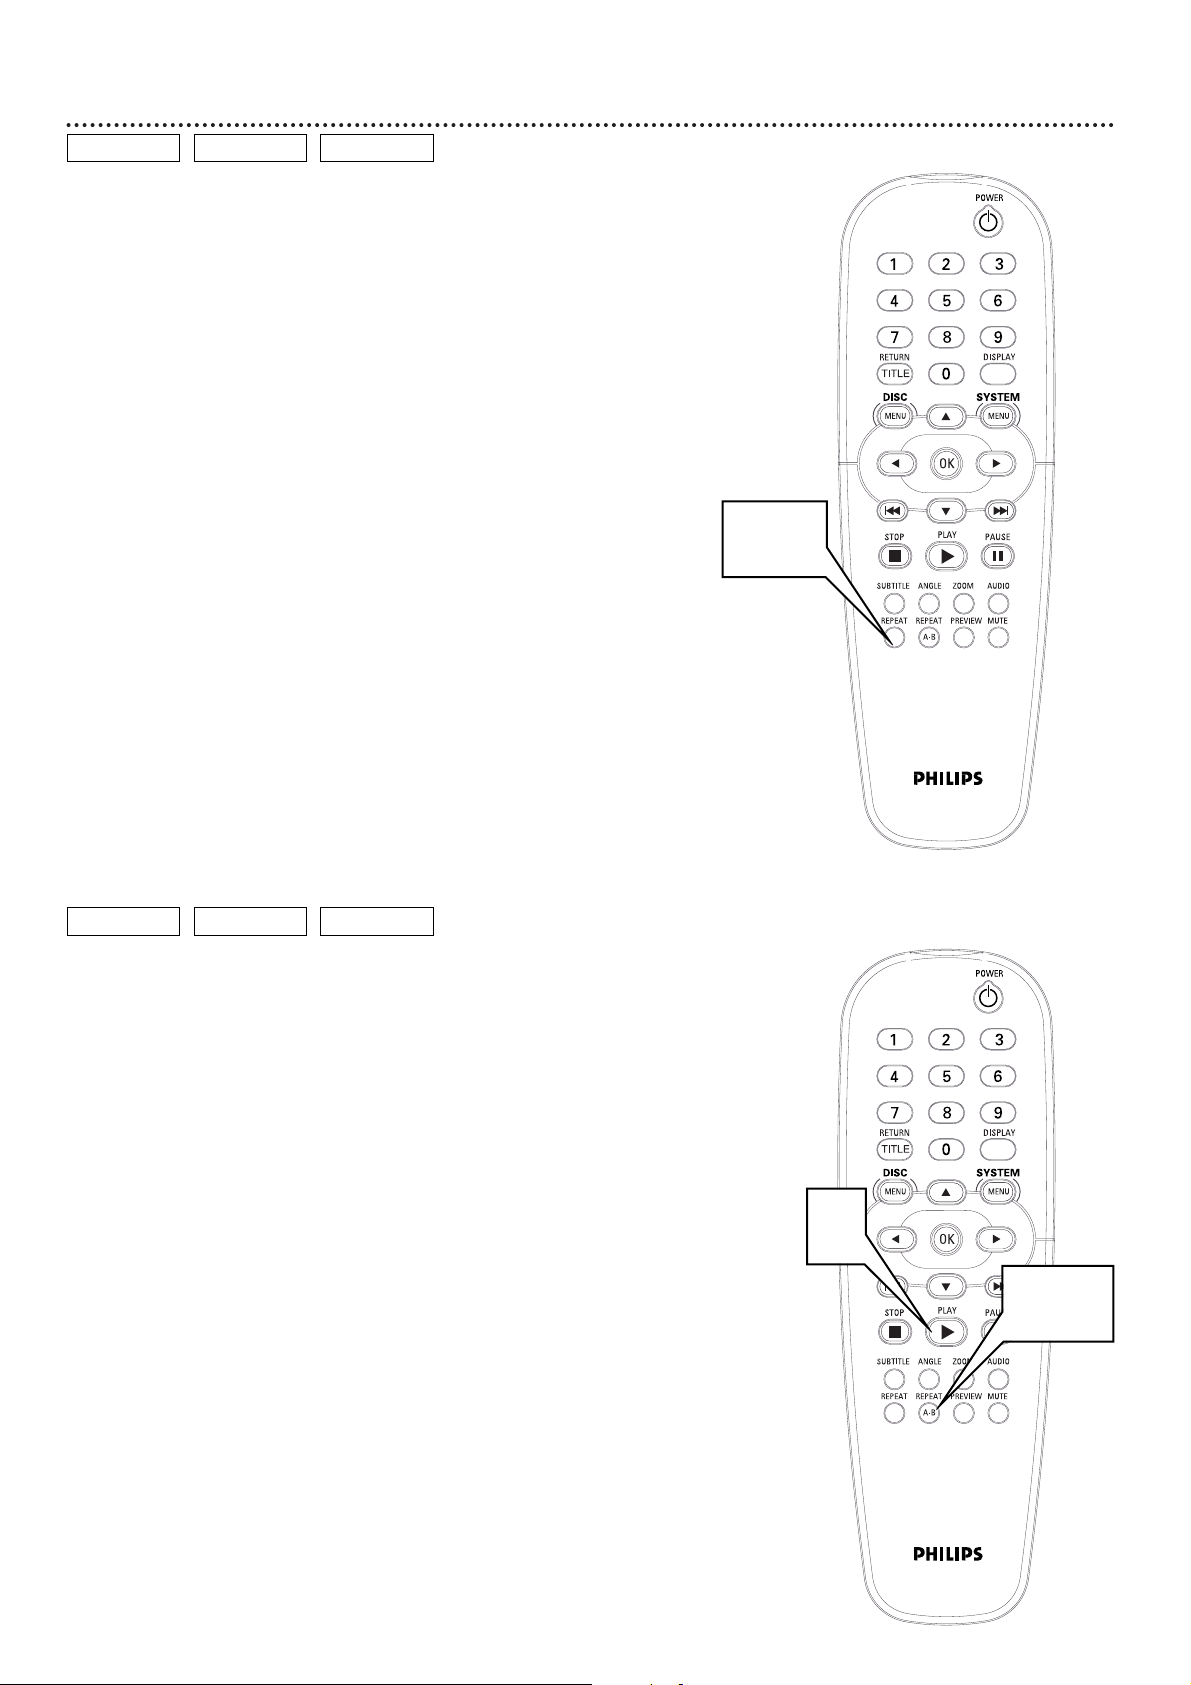
During Disc playback, press REPEAT repeatedly to choose
a Repeat option. Depending on the type of Disc, you may choose
to play the Chapter (CHAPTER REPEAT ON), Track (REP-ONE),
Title (TITLE REPEAT ON), or Disc (REP-ALL) repeatedly.
2
To cancel repeat playback, repeatedly press REPEAT until
REPEAT OFF appears in the top left corner of the TV screen.
Repeat A-B
You may set the Player to play only a specific portion of a Title, Chapter,
or Track repeatedly. Follow these steps.
1
Press PLAY : to start Disc playback.
2
When the Disc reaches the point at which you want repeated playback to begin, press REPEAT A-B. “A TO B SET A”
will appear in the top left corner of the TV screen briefly.
3
When the Disc reaches the point at which you want to end
the segment, press REPEAT A-B again. “A TO B SET B” will
appear in the top left corner of the TV screen briefly. The segment
will begin playing repeatedly.
On a DVD, make sure the entire A-B segment is within a single
Title. On a Video CD or Audio CD, the A-B segment should be
within a single Track. If you do not enter the B setting before the
end of the Track is reached, “A TO B CANCELLED” may appear
in the top left corner of the TV screen.
4
To resume regular playback, press REPEAT A-B again.
“A TO B CANCELLED” will appear in the top left corner of the TV
screen briefly. Regular playback will resume from the current point.
DVD
VIDEO CD AUDIO CD
DVD
VIDEO CD AUDIO CD
1-2
2-4
1
Page 24
24 DVD Audio Language
Some DVDs are recorded in multiple languages; some may have extra audio
options such as a director’s commentary or a music soundtrack. You can
choose the language or the soundtrack that you want to hear by adjusting
AUDIO in the Player’s PREFERENCES PAGE. To do so, follow the steps
below.
Or, the easiest way to choose a different audio language or soundtrack is to
press AUDIO on the remote control repeatedly during DVD playback. The
audio will change immediately to the language or soundtrack you select.
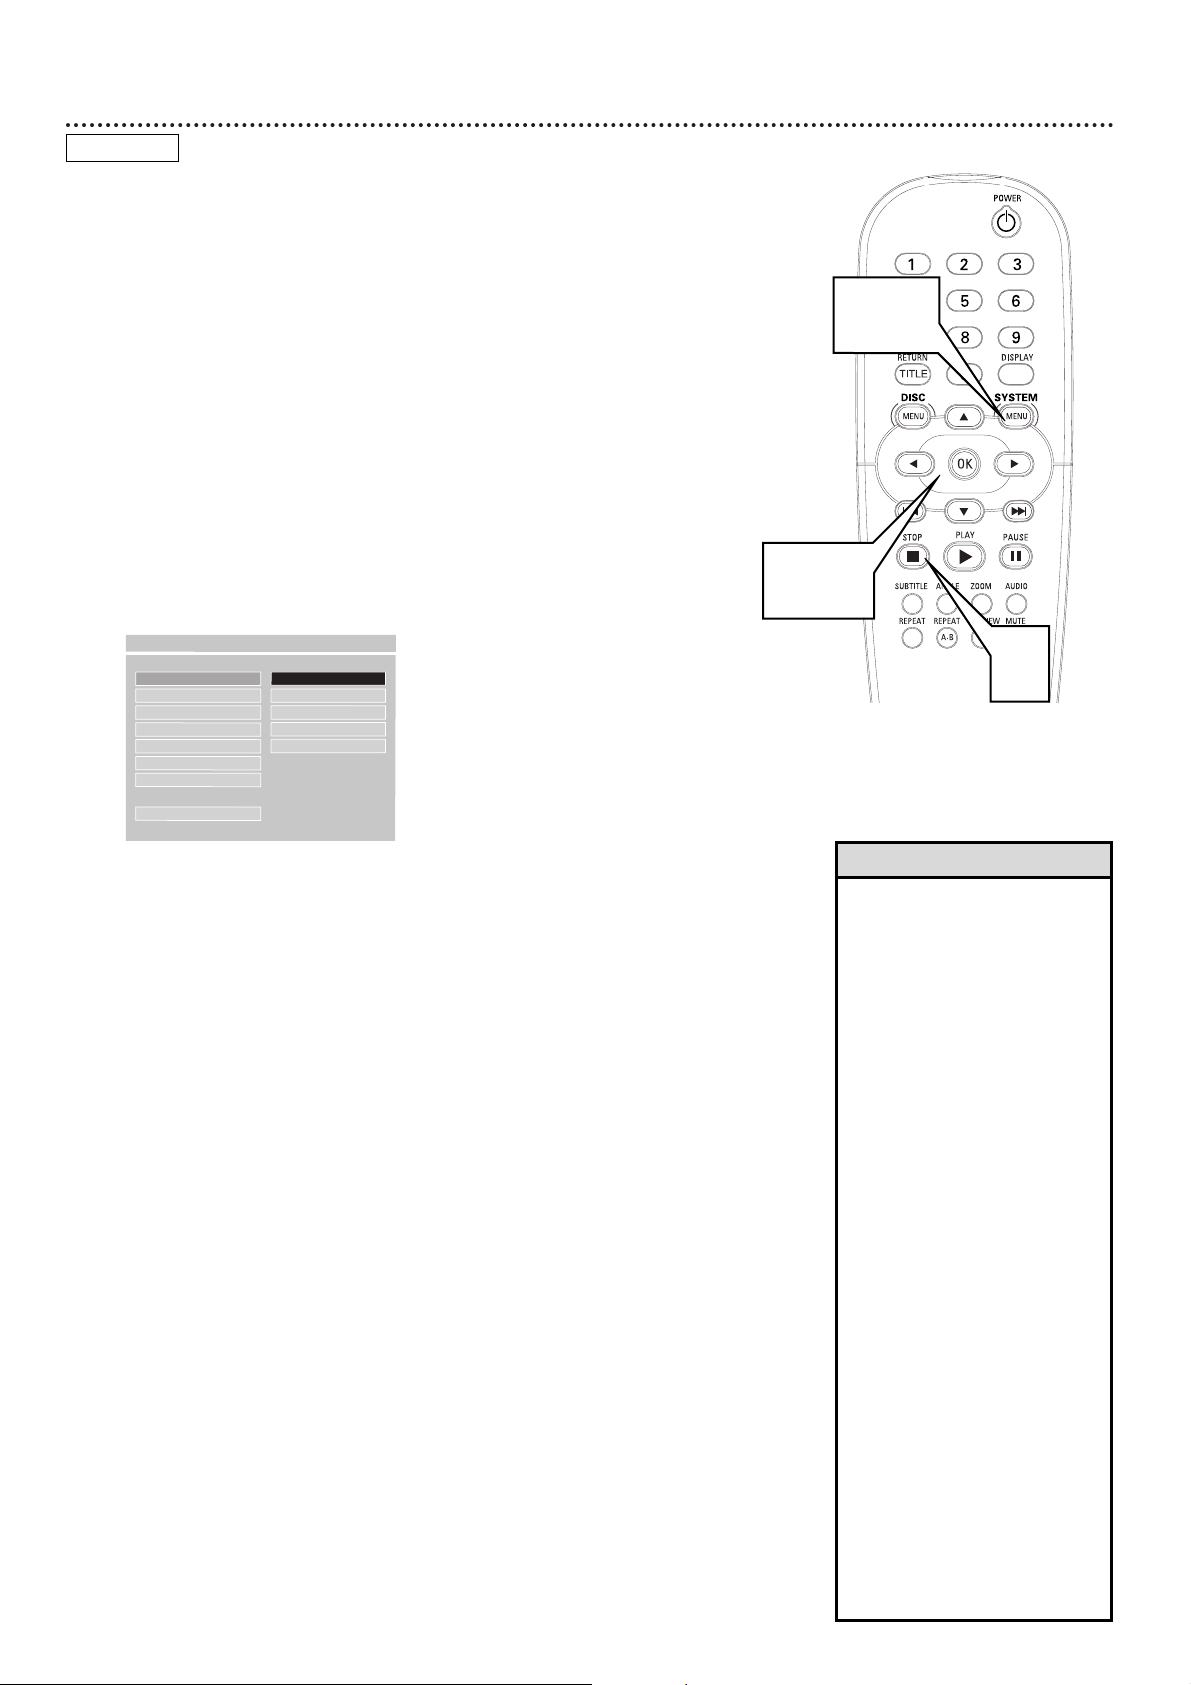
1
Press STOP C twice to stop DVD playback.
2
Press SYSTEM MENU.
3
Press 9 repeatedly to select PREFERENCES, then press OK.
You can select PREFERENCES only if you have completely stopped
DVD playback by pressing STOP C twice as directed in step 1.
4
AUDIO will be selected. Press :.
5
Language options will appear to the right of AUDIO. Press 8 or 9
to choose the language you want, then press OK.
Although the Player shows ENGLISH, FRENCH, SPANISH, CHINESE,
and JAPANESE, you can only hear the selected language if that language is recorded on the DVD. If there is another language or soundtrack on the DVD that does not show in this AUDIO menu, choose
the language at the DVD Disc menu or by pressing AUDIO on the
remote control repeatedly. Details on DVD Disc menus are on page 19.
6
Press SYSTEM MENU to remove the menus.
DVD
AUDIO
F
ENGLISH
SUBTITLE FRENCH
DISC MENU SPANISH
PARENTAL CHINESE
PASSWORD JAPANESE
DEFAULTS
SMART NAV
MAIN PAGE
- - PREFERENCES PAGE - -
2, 6
3-5
1
• Some Audio CDs, Video CDs, or
Super Video CDs are recorded
on multiple audio channels. For
example, a Karaoke Disc may
record music on the left channel
and vocals on the right channel.
Press AUDIO repeatedly during
playback to choose an audio
channel. Choose STEREO to
hear both channels simultaneously (for example, the music
and the vocals together).
Options may include LEFT
VOCAL, RIGHT VOCAL, MONO
LEFT, MONO RIGHT, or
STEREO. Check your Disc case
for details.
• If adjusting the Audio language
as described on this page does
not change the Audio, change
the settings in the DVD’s Disc
menu or by pressing AUDIO
repeatedly during DVD playback. Make sure the language
you want is available on the current DVD.
• When you press STOP Ctwice
to stop DVD playback so you
can adjust AUDIO, this cancels
the Resume feature. When you
play the DVD again, playback
starts at the beginning of the
DVD.
Helpful Hints
Page 25
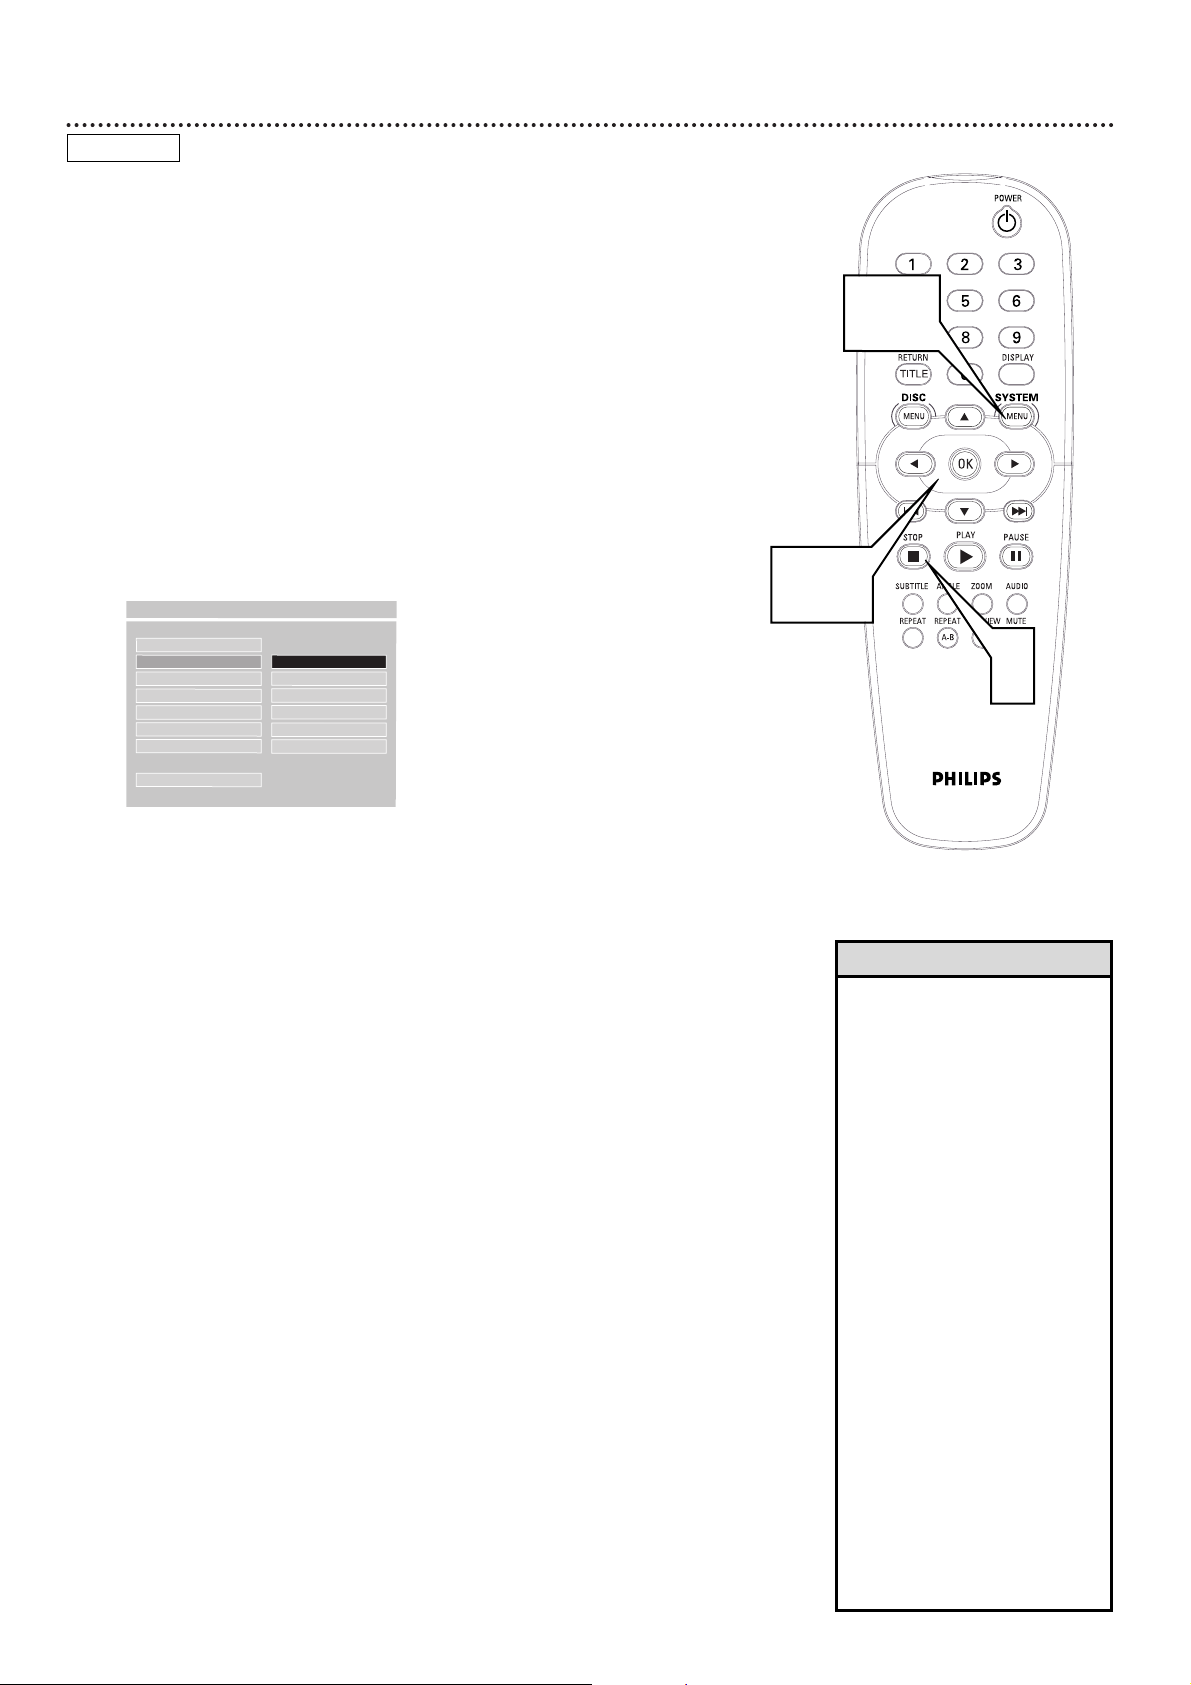
DVD Subtitle Language 25
Some DVDs include subtitles. Choose the language you want for available
subtitles by adjusting SUBTITLE in the Player’s PREFERENCES PAGE. To
do so, follow the steps below.
Or, the easiest way to choose subtitles is to press SUBTITLE on the
remote control repeatedly during DVD playback. The subtitles will appear
in the language you select.
1
Press STOP C twice to stop DVD playback.
2
Press SYSTEM MENU.
3
Press 9 repeatedly to select PREFERENCES, then press
OK. You can select PREFERENCES only if you have completely
stopped DVD playback by pressing STOP C twice as directed in
step 1.
4
Press 9 to select SUBTITLE, then press :.
5
Language options will appear to the right of SUBTITLE. Press 8 or
9 to choose the language in which you want subtitles to
appear, or choose OFF if you do not want to see any subtitles during DVD playback. Then, press OK.
Although the Player shows ENGLISH, FRENCH, SPANISH, CHINESE, and JAPANESE, you can see subtitles in the selected language
only if they are available on the current DVD. Check the DVD case
for details on available subtitle languages.
If the DVD has subtitles in languages other than those listed in the
SUBTITLE menu, choose the language in the DVD Disc menu or by
pressing SUBTITLE on the remote control repeatedly. Details on
DVD Disc menus are on page 19.
6
Press SYSTEM MENU to remove the menus.
DVD
AUDIO
SUBTITLE
F
ENGLISH
DISC MENU FRENCH
PARENTAL SPANISH
PASSWORD CHINESE
DEFAULTS JAPANESE
SMART NAV OFF
MAIN PAGE
- - PREFERENCES PAGE - -
2,6
3-5
1
• Some DVDs only allow you to
choose Subtitle languages in
the DVD Disc menu. If adjusting the Subtitle language as
described on this page does
not change the Subtitle during
DVD playback, change the settings in the DVD’s Disc menu
or by pressing SUBTITLE
repeatedly during DVD playback. Make sure the language
you want is available on the
current DVD.
• When you press STOP
C
twice to stop DVD playback so
you can adjust SUBTITLE, this
cancels the Resume feature.
When you start to play the
DVD again, playback automatically starts at the beginning of
the DVD.
• Press and hold SUBTITLE on
the remote control for two seconds to turn the subtitles on or
off during playback. SUBTITLE
ON or SUBTITLE OFF will
appear briefly in the top left
corner of the TV screen.
Helpful Hints
Page 26
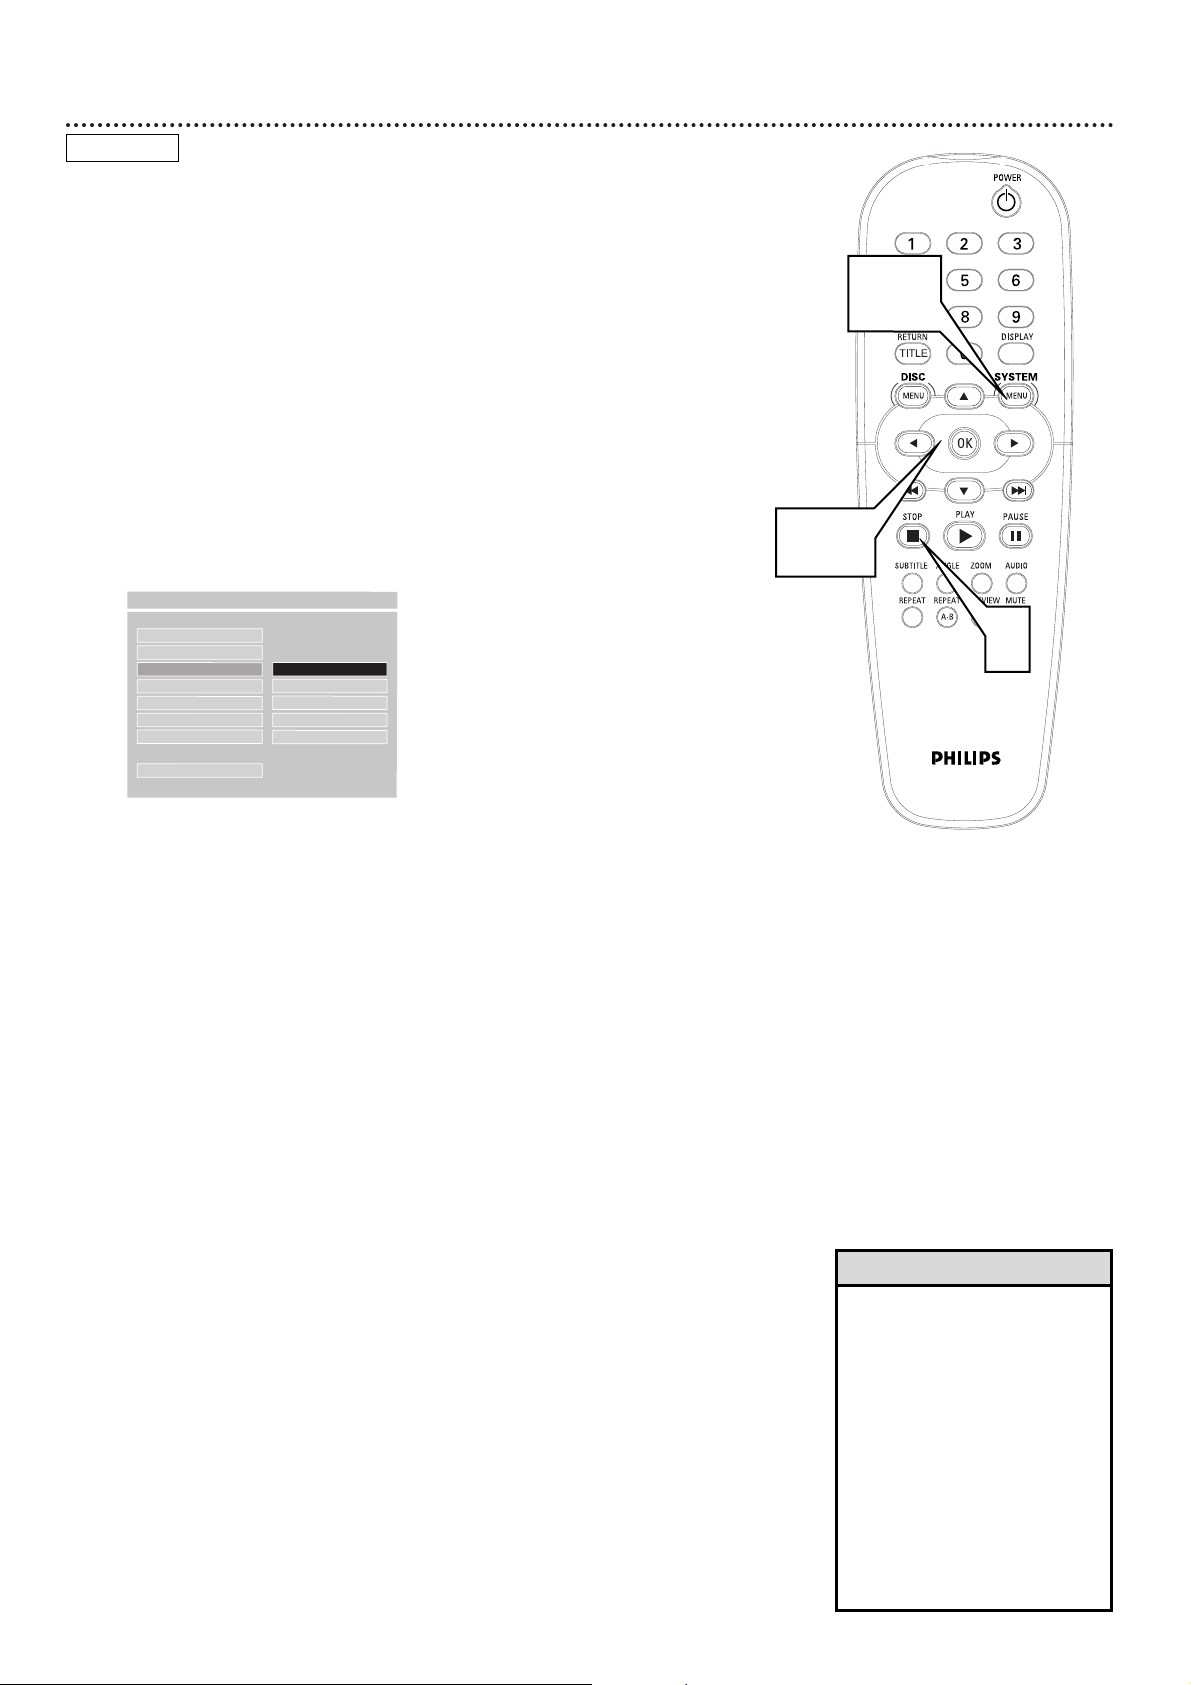
26 DVD Disc Menu Language
DVDs have a Disc menu that allows you to choose options such as Audio
Language, Subtitles, or other special features. Features vary among DVDs, so
the Disc menus are different for every DVD.
Some DVD Disc menus may be available in multiple languages. To choose a
language for a Disc menu using the Player’s PREFERENCES PAGE, follow the
steps below.
1
Press STOP C twice to stop DVD playback.
2
Press SYSTEM MENU.
3
Press 9 repeatedly to select PREFERENCES, then press OK.
You can select PREFERENCES only if you have completely stopped
DVD playback by pressing STOP C twice as directed in step 1.
4
Press 9 repeatedly to select DISC MENU, then press :.
5
Language options will appear to the right of DISC MENU. Press 8
or 9 to choose the language in which you want the DVD
Disc menu to appear. Then, press OK.
Although the Player shows ENGLISH, CHINESE, FRENCH, SPANISH,
and JAPANESE, the Disc menu will appear in the selected language
only if it is available on the current DVD. Check the DVD case for
details on available languages.
If the Disc menu is available in languages other than those listed for
DISC MENU, choose the language in the DVD Disc menu. Details on
DVD Disc menus are on page 19.
6
Press SYSTEM MENU to remove the menus.
AUDIO
SUBTITLE
DISC MENU
F
ENGLISH
PARENTAL CHINESE
PASSWORD FRENCH
DEFAULTS SPANISH
SMART NAV JAPANESE
MAIN PAGE
- - PREFERENCES PAGE - -
• If adjusting the Disc menu language as described on this
page does not change the language as you preferred,
change the settings in the
DVD’s Disc menu. Make sure
the language you want is available on the current DVD.
• When you press STOP
C
twice
to stop DVD playback so you
can adjust DISC MENU, playback automatically starts at
the beginning of the DVD
when you start playback again.
Helpful Hints
2,6
3-5
1
DVD
Page 27
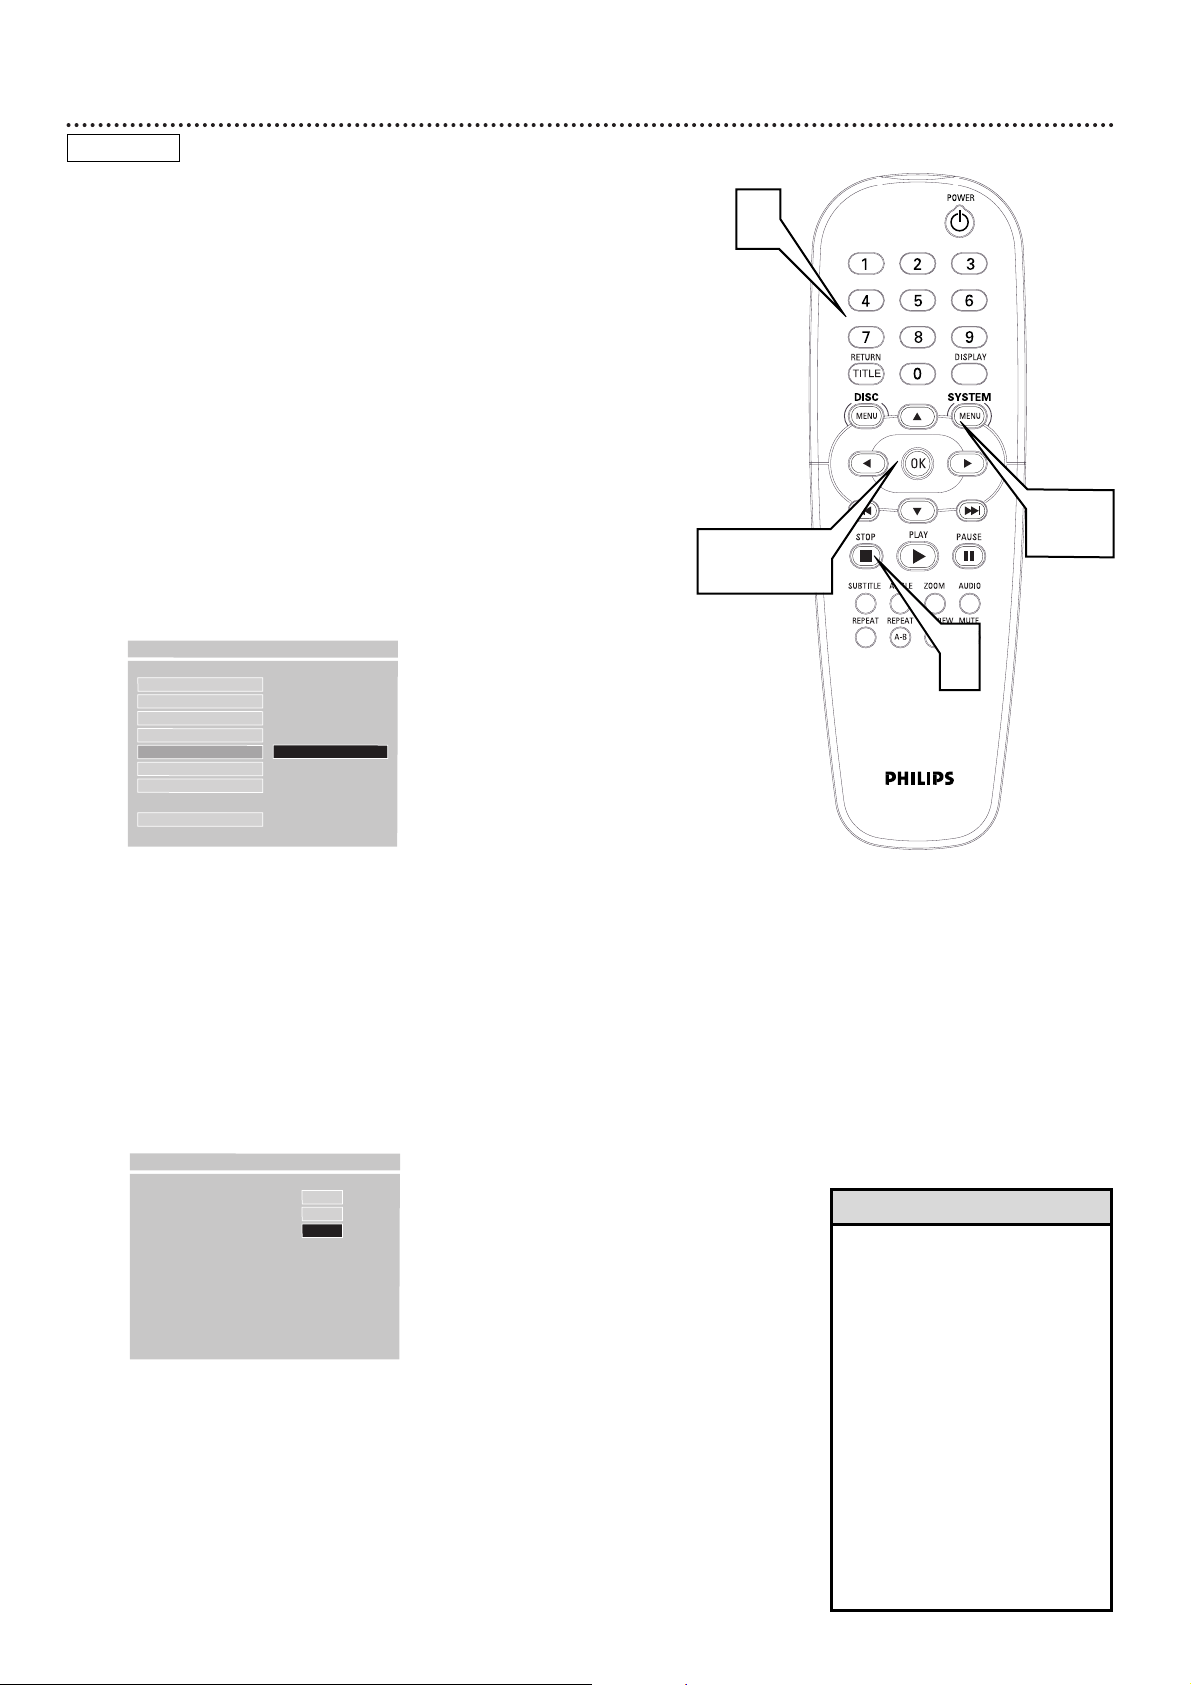
Parental Controls Password 27
Parental Controls limits viewing of DVDs. When a DVD has been Locked or
if a DVD has a movie rating that exceeds the Parental Level you select, a
viewer must enter a password before viewing the DVD. To set your password, follow the steps below.
To adjust the PARENTAL level so DVDs cannot play if they exceed that level,
see page 29.
To prevent specific DVDs from playing, regardless of how you set the
PARENTAL level, see page 28.
1
Press STOP C twice to stop DVD playback.
2
Press SYSTEM MENU.
3
Press 9 repeatedly to select PREFERENCES, then press OK.
You can select PREFERENCES only if you have completely stopped
DVD playback by pressing STOP C twice as directed in step 1.
4
Press 9 repeatedly to select PASSWORD, then press :.
5
CHANGE will be highlighted. Press OK.
6
A box beside OLD PASSWORD will be highlighted.
Press the Number buttons to enter your old four-digit
password. (If this is the first time you have set a password, press
3,3,0,8.) The box beside NEW PASSWORD will be highlighted
automatically. Press the Number buttons to enter a new four-
digit password of your choice. The box beside CONFIRM PWD.
will be highlighted automatically. Press the Number buttons to
enter the same new four-digit password you just entered for the
NEW PASSWORD.
7
Press OK to save the new password.
8
Press SYSTEM MENU to remove the menus.
DVD
• The default or factory preset
password is 3 3 0 8. You can
use it to play a Locked Disc or
enter it as the old password. The
3 3 0 8 password is acceptable
even after you set your own personal password.
• Philips denies any liability associated with unintended watching of
Discs. Make sure your Discs play
according to your Parental
Controls settings before you allow
children access to the Player.
• An “X” will appear on the screen
instead of the password number
to protect the identity of the
password.
Helpful Hints
AUDIO
SUBTITLE
DISC MENU
PARENTAL
PASSWORD
F
CHANGE
DEFAULTS
SMART NAV
MAIN PAGE
- - PREFERENCES PAGE - -
OLD PASSWORD : XXXX
NEW PASSWORD : XXXX
CONFIRM PWD : X
PASSWORD CHANGE PAGE
3-5,7
1
2,8
6
Page 28
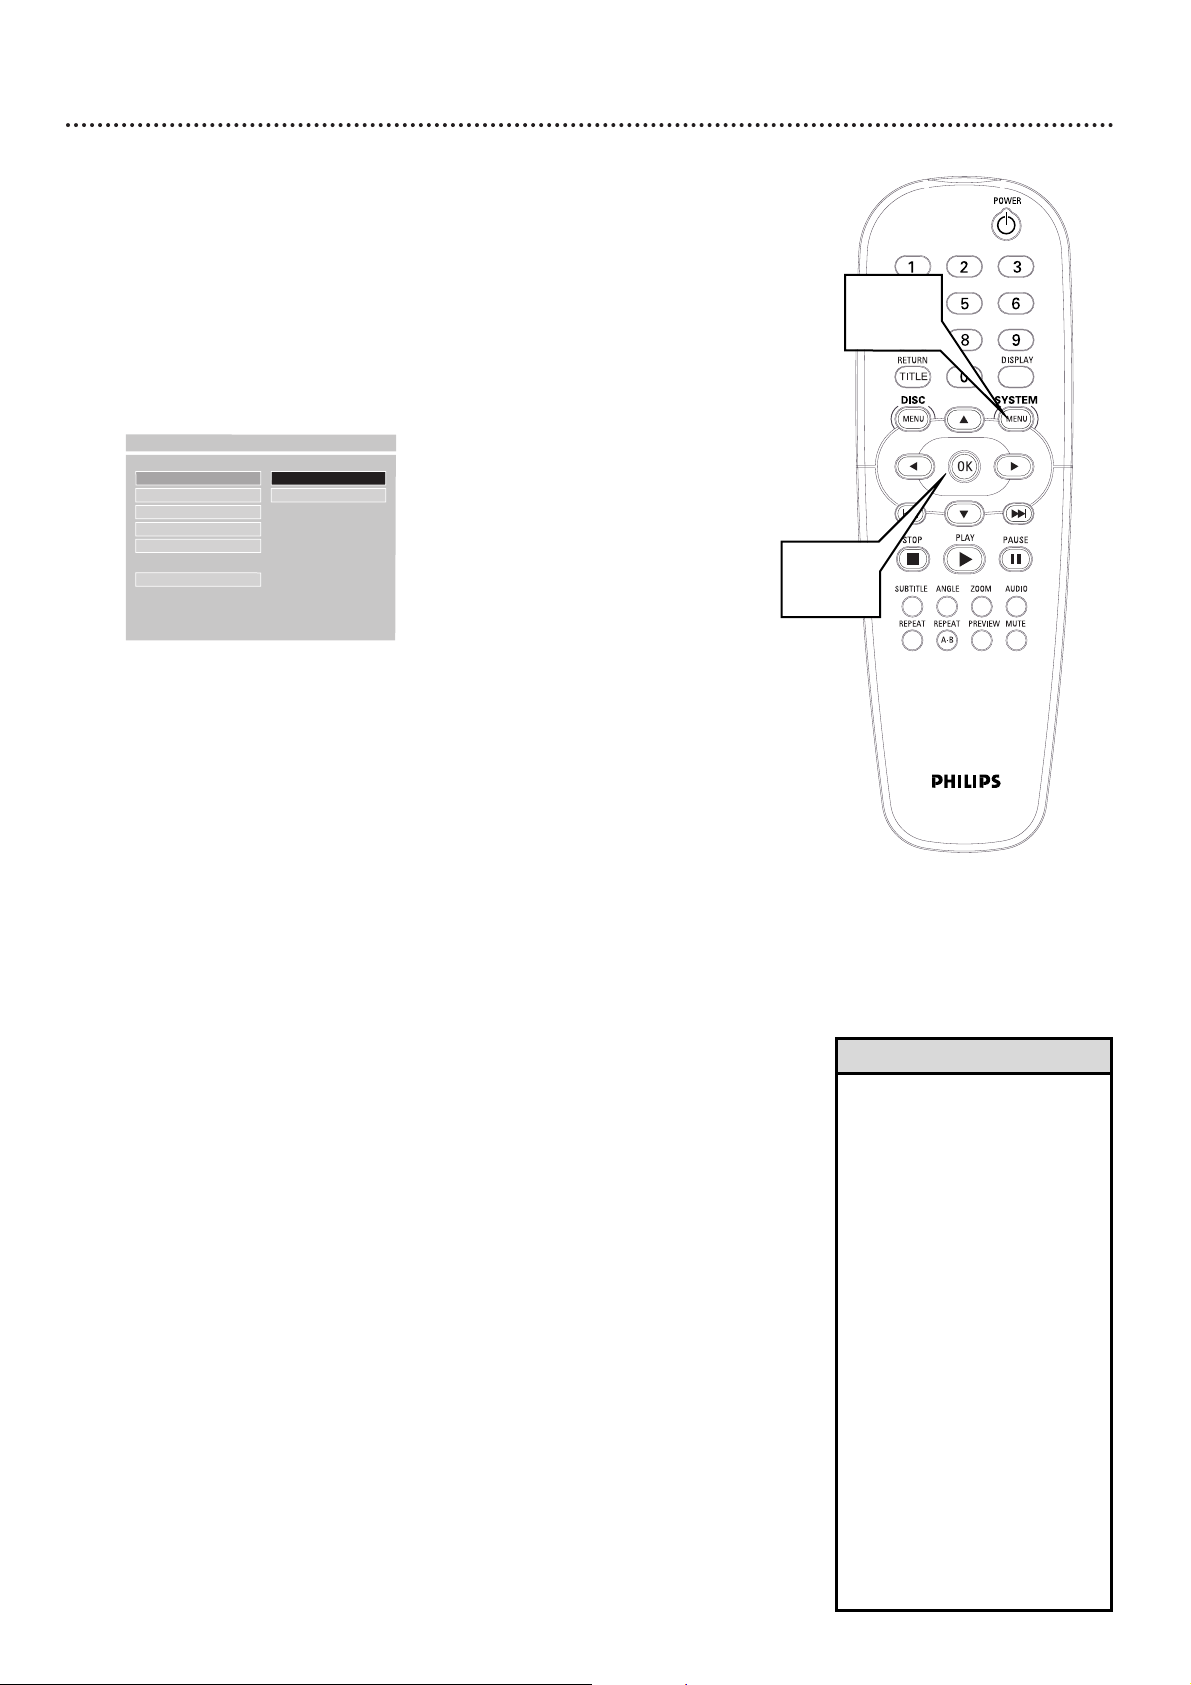
28 Parental Controls Disc Lock
Not all DVDs are rated or coded by the Disc maker. You can specifically
lock or unlock a DVD, regardless of its rating. If you lock a specific DVD,
you must enter your Password before you can watch the DVD on this
Player. Password details are on page 27.
1
Press SYSTEM MENU.
2
GENERAL SETUP will be selected. Press OK.
3
DISC LOCK will be selected. Press -.
4
Press 8 or 9 to select UNLOCK or LOCK, then press OK.
If you choose UNLOCK, the DVD that is currently in the Player will
be unlocked for future viewing. You can view the DVD without having to enter your four-digit password.
If you choose LOCK, the DVD that is currently in the Player cannot
play unless you enter your four-digit password. INPUT PASSWD
will appear on the TV screen to prompt you to enter your password. LOCKED will show on the Player’s display panel. Password
details are on page 27.
You may have to turn the Player off and on or open and close the
disc tray before the LOCK or UNLOCK setting will take effect.
5
Press SYSTEM MENU to remove the menus.
DISC LOCK
F
UNLOCK
PROGRAM LOCK
VFD DIM
OSD LANG
SCR SAVER
MAIN PAGE
- - GENERAL PAGE - -
1,5
2-4
• Parental Controls blocks viewing
of the Locked DVD on this
Player. The DVD will play on
other Players.
• Two-sided DVDs have a different ID for each side, so unlock
each side. Multi-volume Video
CDs or DVD sets have a different ID for each volume or Disc.
Unlock each volume or Disc.
• Once you enter your password
to play a Locked Disc, you can
stop and resume playback without reentering the password
every time you resume play.
However, if you open the disc
tray or turn off the Player, you
will have to enter the password
again to play the Disc.
• If you try to play a DVD that
has been Locked, PARENTAL
VIOLATION (or a similar message, depending on the DVD)
may appear on the screen.
Helpful Hints
Page 29
Parental Controls Levels 29
You can set the Player to block or allow DVD playback according to the
movie rating of the DVD. If someone tries to play a DVD that has a rating
that exceeds the level you selected, they must know your password. You
must enter the password before the DVD will play. Password details are on
page 27.
Not all DVDs conform to the levels you select, as not all DVDs are coded
or protected by the DVD manufacturer. Therefore, make sure the DVD
plays according to your Parental level choice before you allow children
unlimited access to the Player or DVDs.
To prevent specific DVDs from playing on this Player, regardless of how you
set the PARENTAL level, see page 28.
1
Press STOP C twice to stop DVD playback.
2
Press SYSTEM MENU.
3
Press 9 repeatedly to select PREFERENCES, then press OK.
You can select PREFERENCES only if you have completely stopped
DVD playback by pressing STOP C twice as directed in step 1.
4
Press 9 repeatedly to select PARENTAL, then press :.
5
Press 8 or 9 to choose the Parental level at which you want
to restrict playback, then press OK.
For example, if you do not want children to watch movies rated
above PG, select 3 PG. DVDs rated PG can play without entering a
password; however, DVDs rated PG-13, R, NC-17, or X (ADULT)
cannot play unless you enter your password. (Follow additional
instructions provided by the DVD if necessary.)
Select NO PARENTAL if you want the Player to play all DVDs,
regardless of their movie rating. You will not have to enter a password in order to play a DVD. (However, you still can lock specific
DVDs to prevent playback. Details are on page 28.)
6
A screen will prompt you to enter your password. Press the
Number buttons to enter your four-digit password, then
press OK. Password details are on page 27.
7
Press SYSTEM MENU to remove the menus.
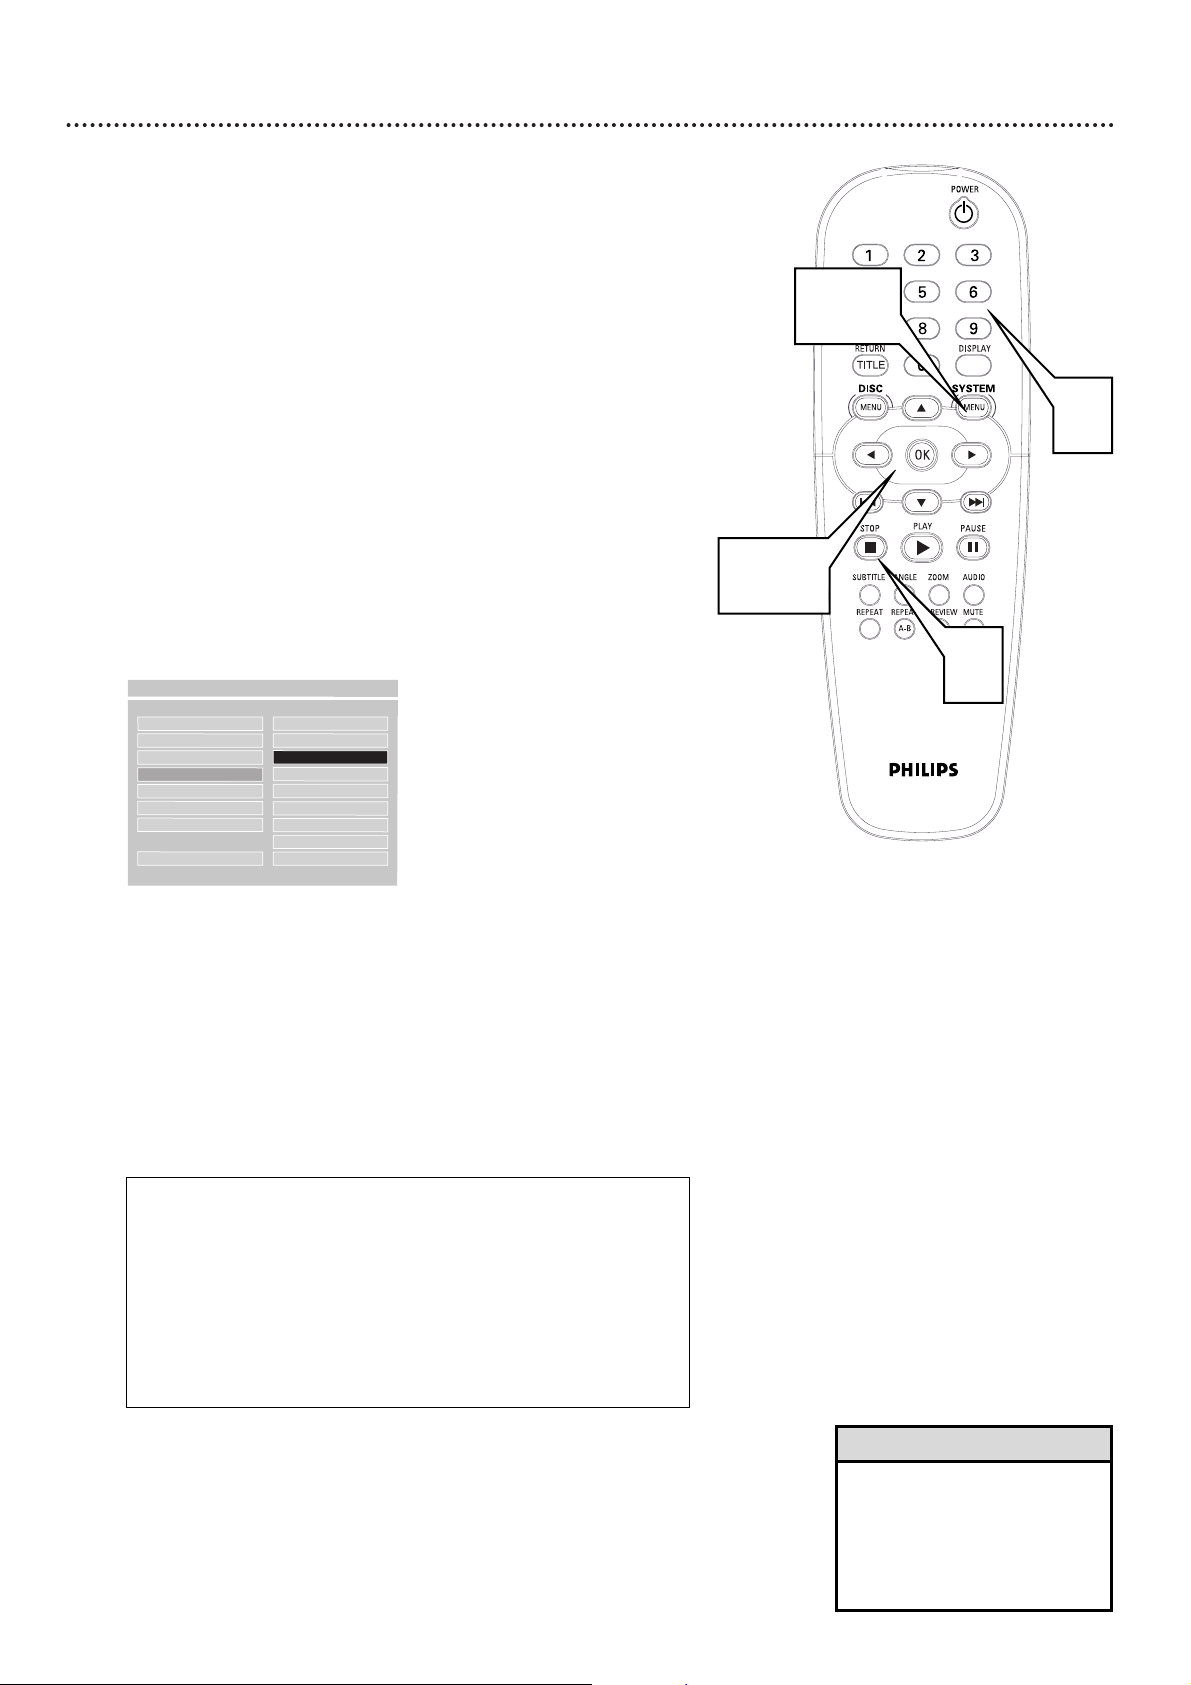
AUDIO 1 G
SUBTITLE 2
DISC MENU 3PG
PARENTAL
F
4 PG 13
PASSWORD 5
DEFAULTS 6 PG-R
SMART NAV 7 NC-17
8 ADULT
MAIN PAGE NO_PARENTAL
- - PREFERENCES PAGE - -
RATING EXPLANATIONS
• ADULT - Mature material; should be viewed only by adults due to graphic
sexual material, violence, or language.
• NC-17 - No children under age 17; not recommended viewing for children under age 17.
• PG-R - Parental Guidance - Restricted; recommended that parents restrict
children under age 17 from viewing or allow children to view only when
supervised by a parent or adult guardian.
• PG 13 - Material is unsuitable for children under age 13.
• PG - Parental Guidance suggested.
• G - General Audience; recommended as acceptable for viewers of all ages.
2,7
3-6
1
6
• When you press STOP Ctwice
to stop DVD playback so you
can adjust the PARENTAL level,
playback automatically starts at
the beginning of the DVD when
you resume playback.
Helpful Hint
Page 30
30 Programmed Playback
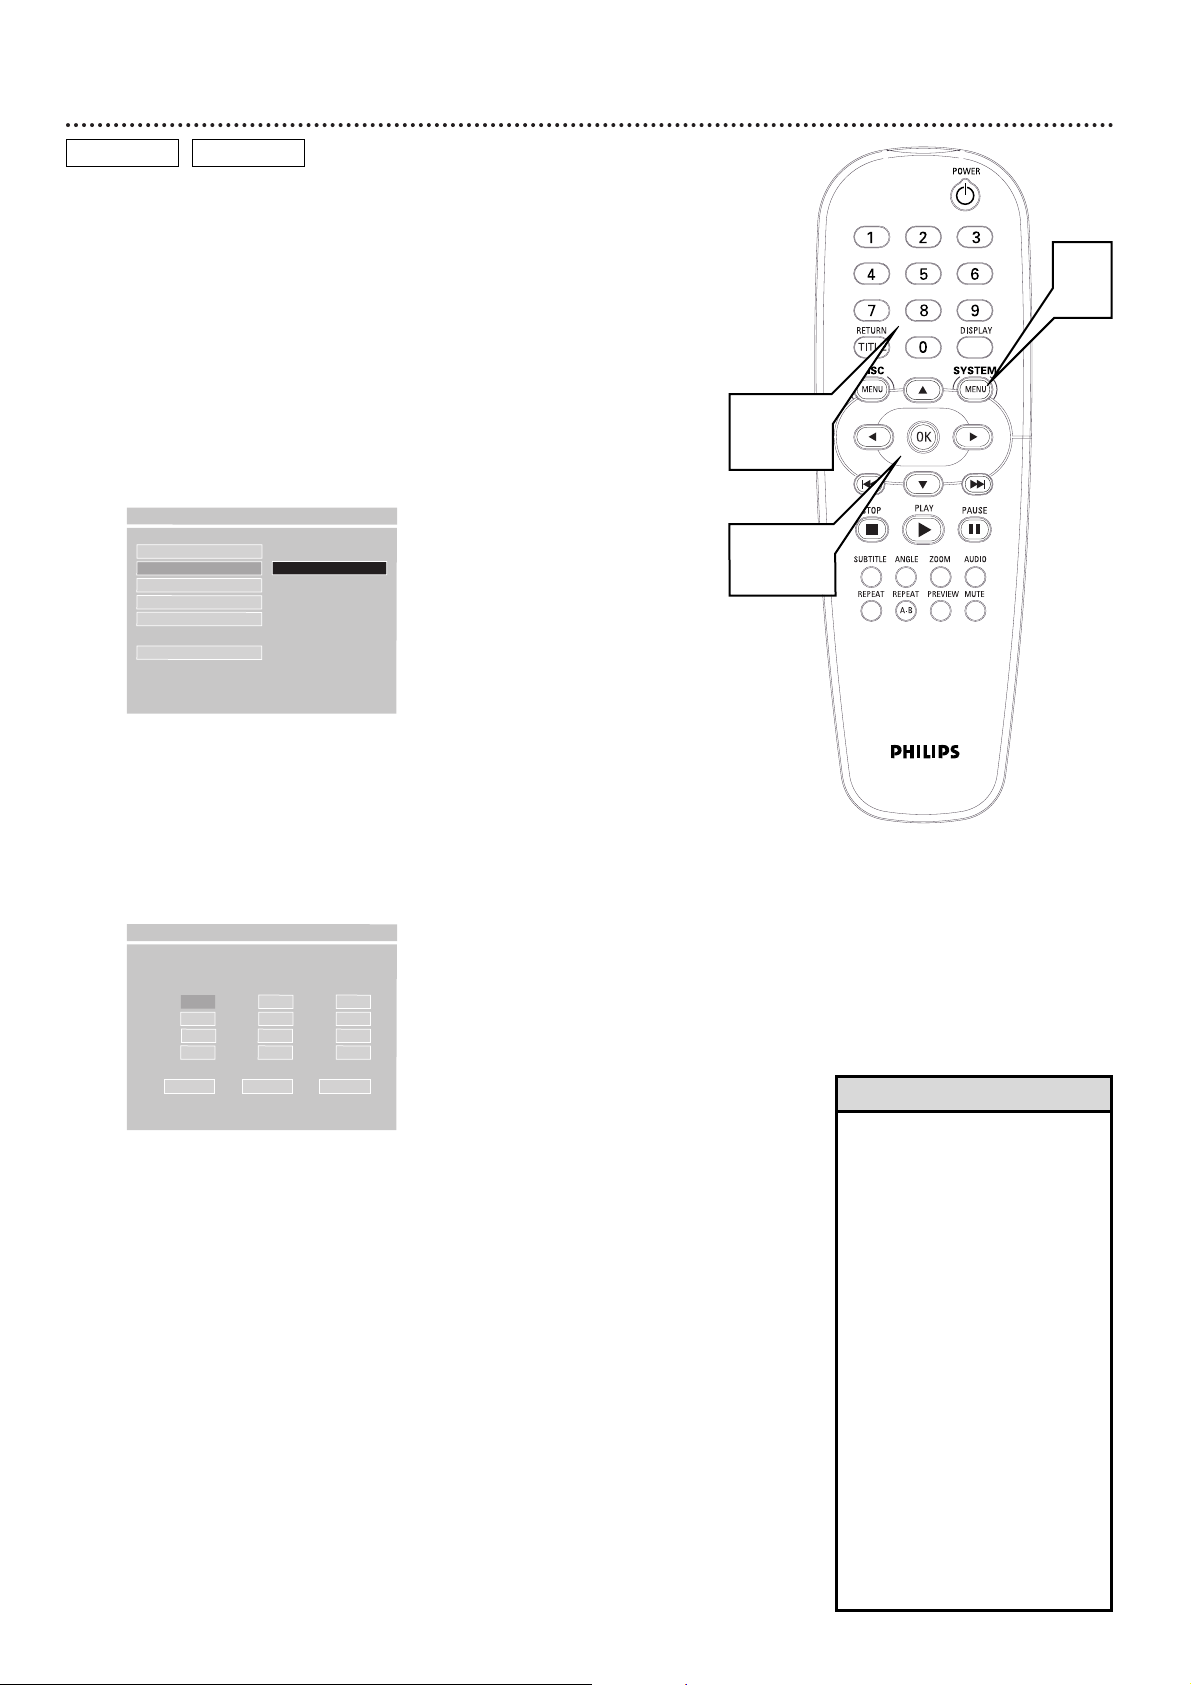
You may play Tracks in an order you specify instead of playing the Tracks
in normal order (1, 2, 3, etc.). The order in which you set the Tracks to
play is a Program. For example, if you want to set up an Audio CD so
Track 12 will play first, put Track 12 in Program position number one (1).
To set up a Program, follow these steps.
1
Press SYSTEM MENU.
2
GENERAL SETUP will be selected. Press OK.
3
Press 9 to select PROGRAM, then press - to select ON.
You cannot select PROGRAM when a DVD is in the Player.
4
Press OK. The PROGRAM PLAY PAGE will appear. This is where
you enter the Track numbers in the order in which you want to
play them. The Number 1 space will be selected automatically as
your starting point.
While the Number 1 space is highlighted, press the
Number buttons to enter the Track number you want to
play first. The Track number will appear in the box beside the
number 1.
5
Use the 8, 9, ;, : buttons to move to the next Program
position, then use the Number buttons on the remote control to enter your other Tracks. Repeat this process until
you have entered all the Tracks you want in the Program.
If you enter an incorrect Track number in one of the previous
Program positions, press 89 ; : to select the Program position.
Press any Number button to clear the box. Use the Number buttons to reenter the correct Track number you want.
6
When you have entered all the Tracks you want in the
Program, press 9, ;, and/or : to select PROG at the bottom of the PROGRAM PLAY PAGE. Then, press OK. This
will store the Tracks in the Program. The Program may start playing
automatically. If not, press PLAY - to start playing the Program.
The Program will play repeatedly until you stop playback.
To resume normal playback, press STOP C twice to stop playing
the Program. When you press PLAY -, Tracks will play in normal
order again, starting at the beginning of the Disc.
PLEASE INPUT 001 - - - 029
112 5 9
2610
3711
4812
CLEAR PROG QUIT
PROGRAM PLAY PAGE
2-6
DISC LOCK
PROGRAM
F
ON
VFD DIM
OSD LANG
SCR SAVER
MAIN PAGE
- - GENERAL PAGE - -
• You can enter a maximum of
96 Tracks in a Program. To
access the PROGRAM PLAY
PAGES for positions 13-96,
press Previous 4 or Next
¢ .
• To erase all the Tracks from the
Program, press 9 and/or ; to
select CLEAR at the bottom of
the PROGRAM PLAY PAGE,
then press OK. This clears all
the Program positions.
• To stop entering Tracks in the
Program, press 9 and/or : to
select QUIT at the bottom of
the PROGRAM PLAY PAGE,
then press OK. When you play
the Disc, Tracks will play in normal order (1, 2, 3, etc.).
• The Program will accept a Track
number only if it is available on
the current Disc.
Helpful Hints
1
4-5
AUDIO CD
VIDEO CD
Page 31
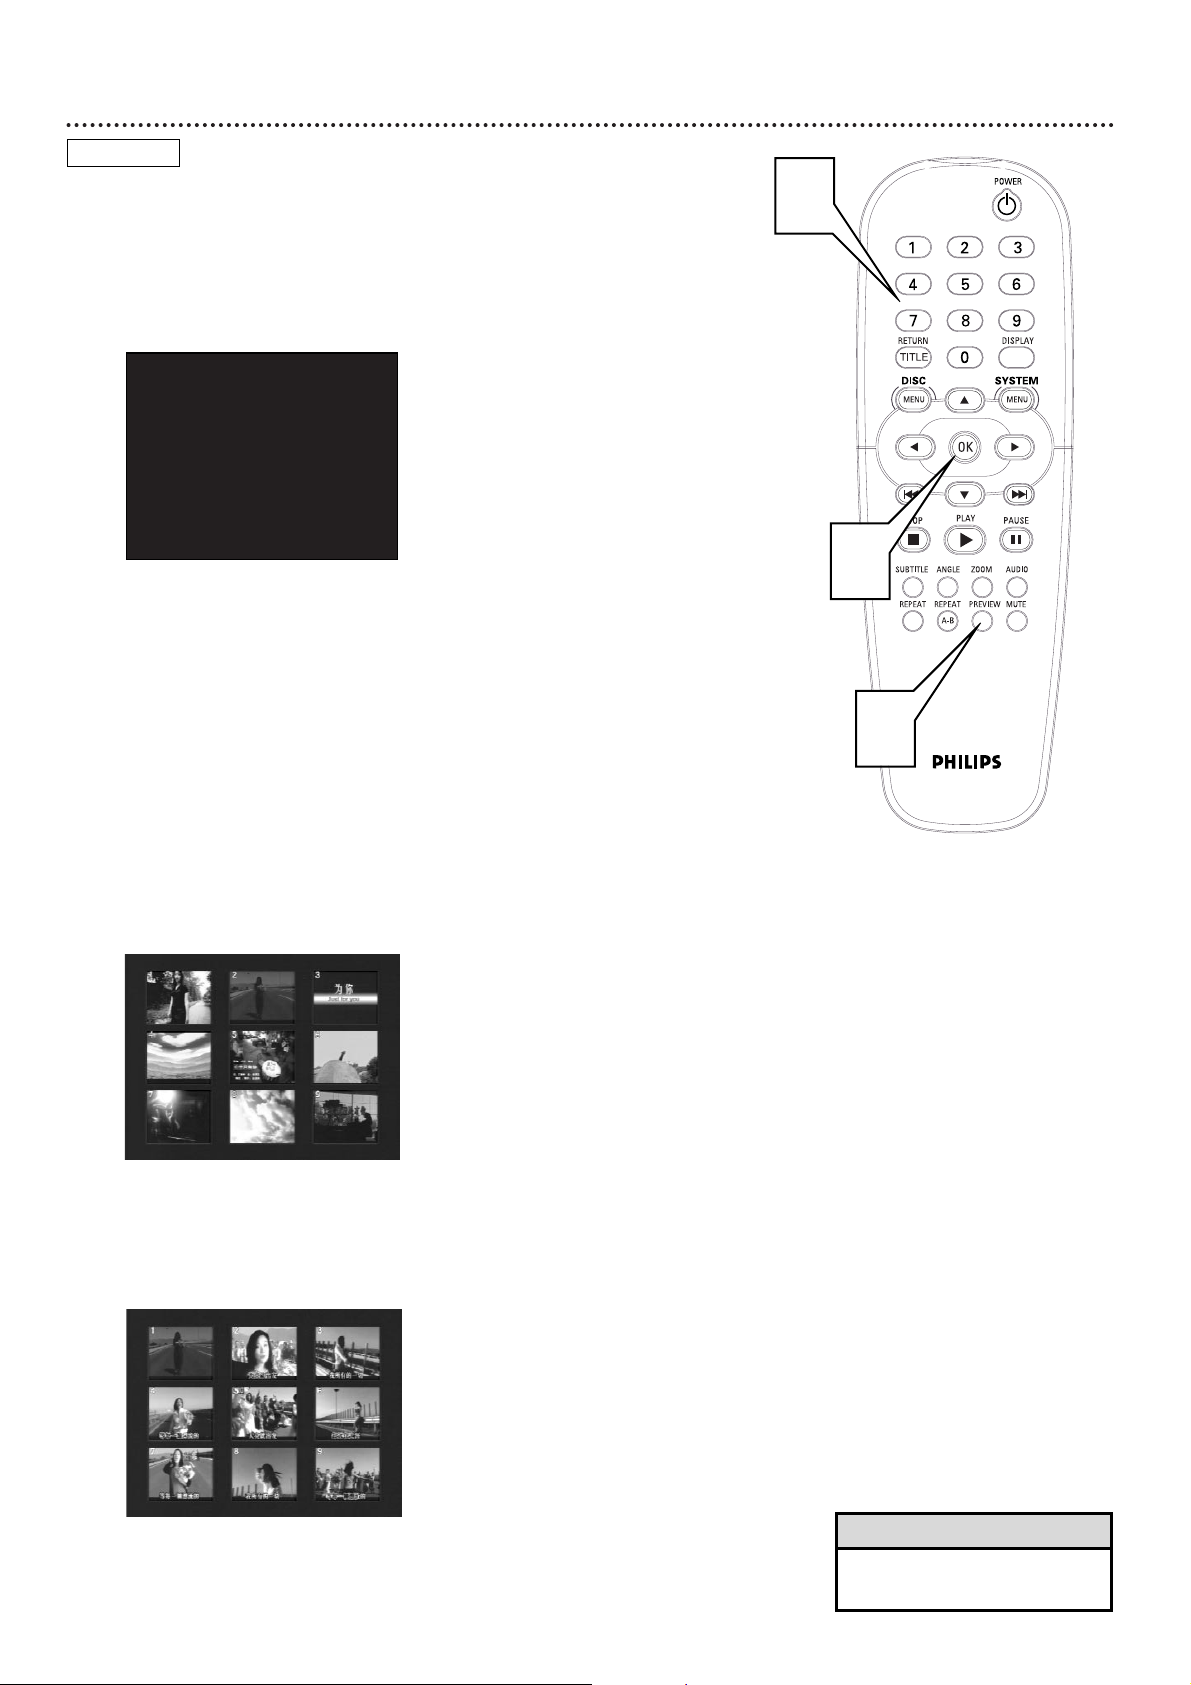
Preview 31
Some Video CDs or Super Video CDs may contain preview or introductory information. If you are not sure of the contents of a Video CD or its
Tracks, use the Preview features to see the content of the Tracks. Not all
Video CDs contain this information. See your Disc case for details.
1
While playback is stopped, press PREVIEW. The following
menu will appear.
2
Press the corresponding Number button on the remote control to
select INTRO, DISC, TRACK, or EXIT, then press OK. Specific
steps for each option are as follows:
• INTRO - Press Number button 1 to select INTRO, then
press OK. The first 10 seconds of each Track will play, introduc-
ing you to the content of each Track.
Press STOP C to stop the Track review, or the review will stop
automatically after the last Track.
• DISC - Press Number button 2 to select DISC, then press
OK. This accesses a screen showing up to nine miniature pictures.
Each picture represents a Track; the picture will likely be a scene
from the beginning of the Track.
Select a Track by pressing Previous j, Next i, or a Number
button, then press OK to start playing that Track. This will be
useful if you want to go directly to a Track but cannot remember
the Track number of the segment you are seeking.
• TRACK - Press Number button 3 to select TRACK, then
press OK. This will divide a single Track into nine parts and dis-
play a miniature picture representing each part.
Press a Number button to select one of the parts of the Track,
then press OK to begin playing the Track from the point you
selected.
• EXIT - Press Number button 4 to select EXIT, then press
OK to remove the Preview menu.
1. INTRO 3. TRACK
2. DISC 4. EXIT
1
2
VIDEO CD
• You also can use the INTRO
feature on some Audio CDs.
Helpful Hint
2
Page 32
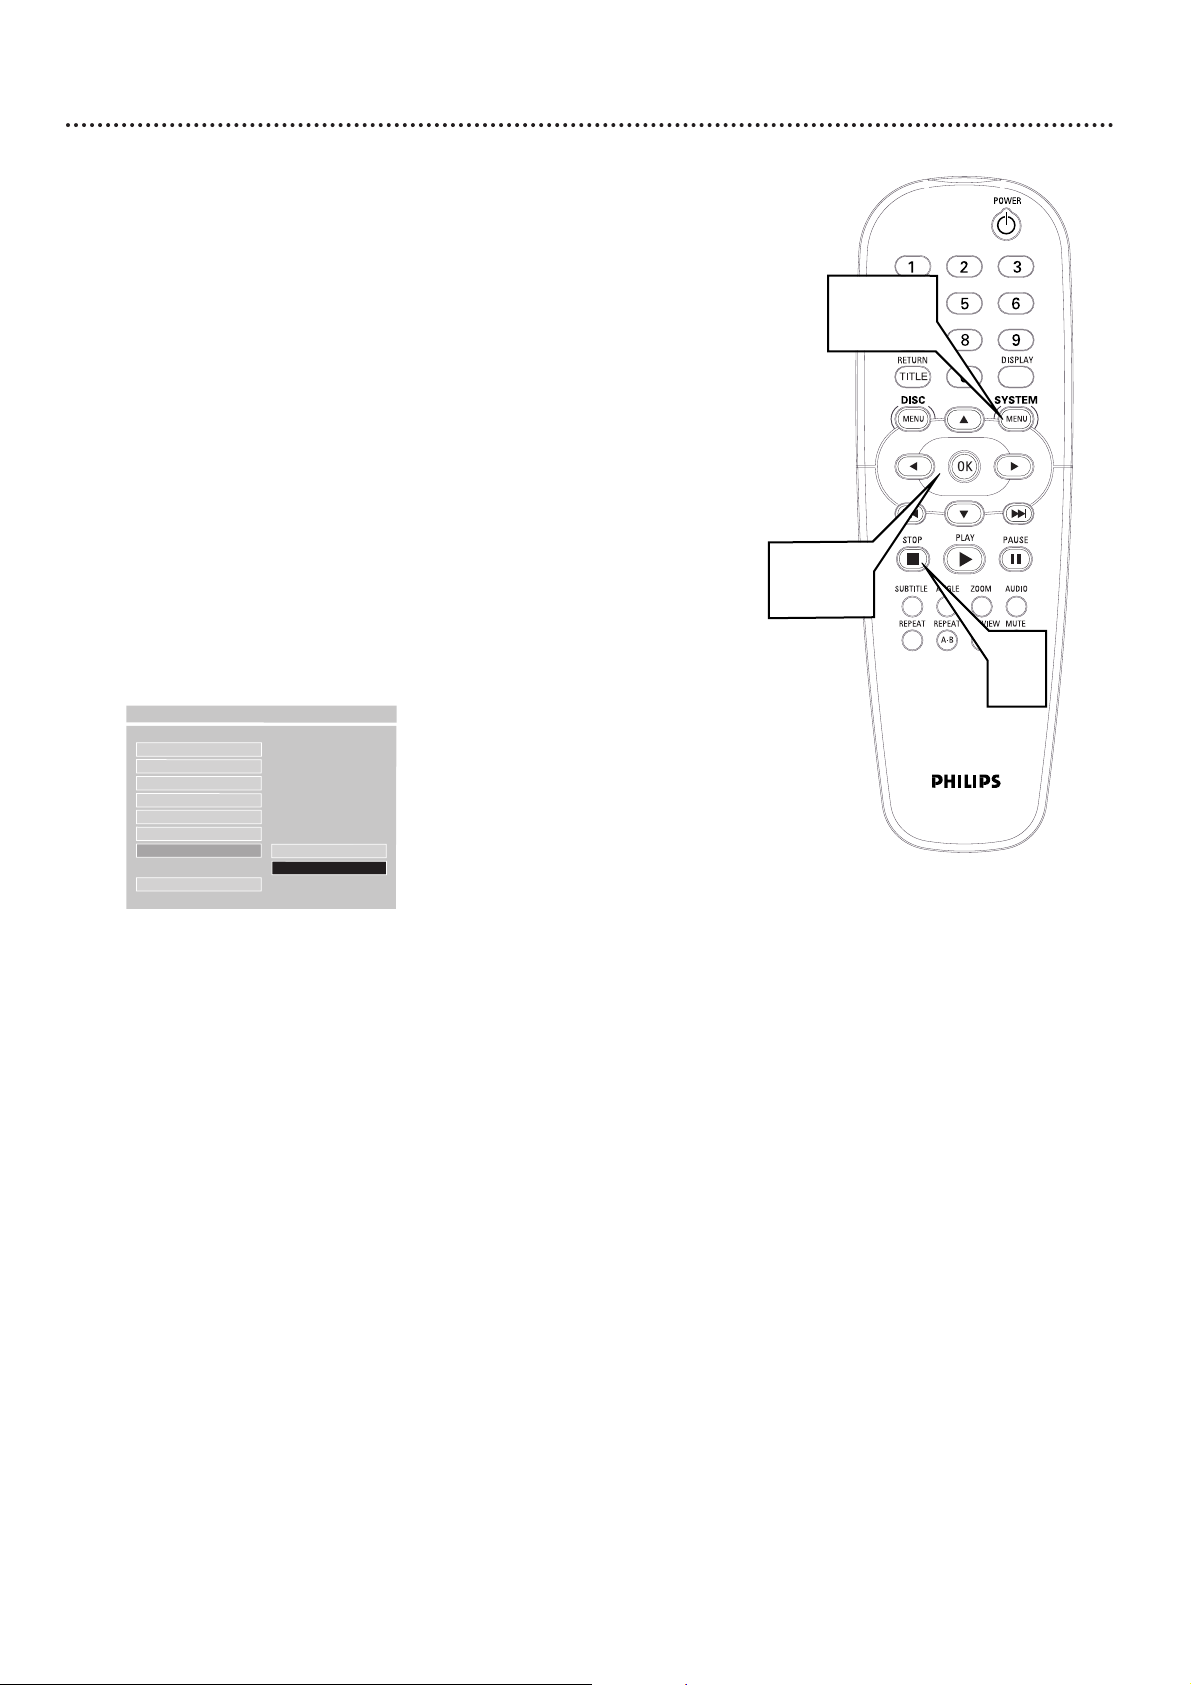
32 Smart Navigator, JPEG and MP3 Features
Smart Navigator
This Player can play some Compact Disc-Recordables (CD-Rs) that contain
JPEG pictures or MP3 audio files/tracks. For example, your photographer or
film developer may put your pictures on a CD-R; these pictures may be in
JPEG format. Or, you may copy MP3 music from legal Internet sites onto a
CD-R. (You cannot make or record such CD-Rs using this Player.)
When playing MP3 or JPEG files on this Player, you can use Smart Navigator
or the other features described below.
1
Press STOP C twice to stop Disc playback completely.
2
Press SYSTEM MENU.
3
Press 9 repeatedly to select PREFERENCES, then press OK.
4
Press 9 repeatedly to select SMART NAV (Smart
Navigator), then press :. Press 8 or 9 to select NO MENU
or WITH MENU, then press OK.
If you select NO MENU, the SMART NAV menu will list and play the
JPEG/MP3 files in the order in which they are recorded on the Disc
(1, 2, 3, etc.). Select WITH MENU to see the JPEG or MP3 files in
their assigned folders in the SMART NAV menu.
5
Press SYSTEM MENU to remove the menu.
JPEG Features
• After you play or open one JPEG picture, subsequent images will appear
automatically.
To change the length of time an image stays on the screen, press B
repeatedly. Choose 1 SEC/PIC, 2 SEC/PIC, 5 SEC/PIC, or 20 SEC/PIC to
make each picture appear for one, two, five, or 20 seconds. Or, to freeze
the picture on the screen, press B to select STILL. Press STOP C to see
the Smart Navigator (SMART NAV) menu again.
• Press PREVIEW to access a Preview screen that shows up to nine miniature pictures, each representing a JPEG image. The file you were viewing
when you pressed PREVIEW will appear in the first box.
Go to other Preview screens by pressing Previous j or Next i.
• Press o, p, or s to flip or rotate a JPEG image.
• Press ZOOM repeatedly to enlarge or reduce a JPEG image.
• Use the Number buttons on the remote to select a numbered JPEG
image for immediate playback. Press a Number button, then press OK to
begin playback.
MP3 Features
• During playback, press Next ∑ or Previous w to move to different MP3
Tracks.
• Press STOP/RETURN CCto stop playback.
• When playback is stopped, press o, p, B or s to select a Track or
Folder. Press OK to open a Folder or to start playing a Track.
• Use the Number buttons on the remote to select a numbered MP3
Track for immediate playback. Press a Number button, then press OK to
begin playback.
- - PREFERENCES PAGE - -
AUDIO
SUBTITLE
DISC MENU
PARENTAL
PASSWORD
DEFAULTS
SMART NAV
F
NO MENU
WITH MENU
MAIN PAGE
2,5
3,4
1
Page 33
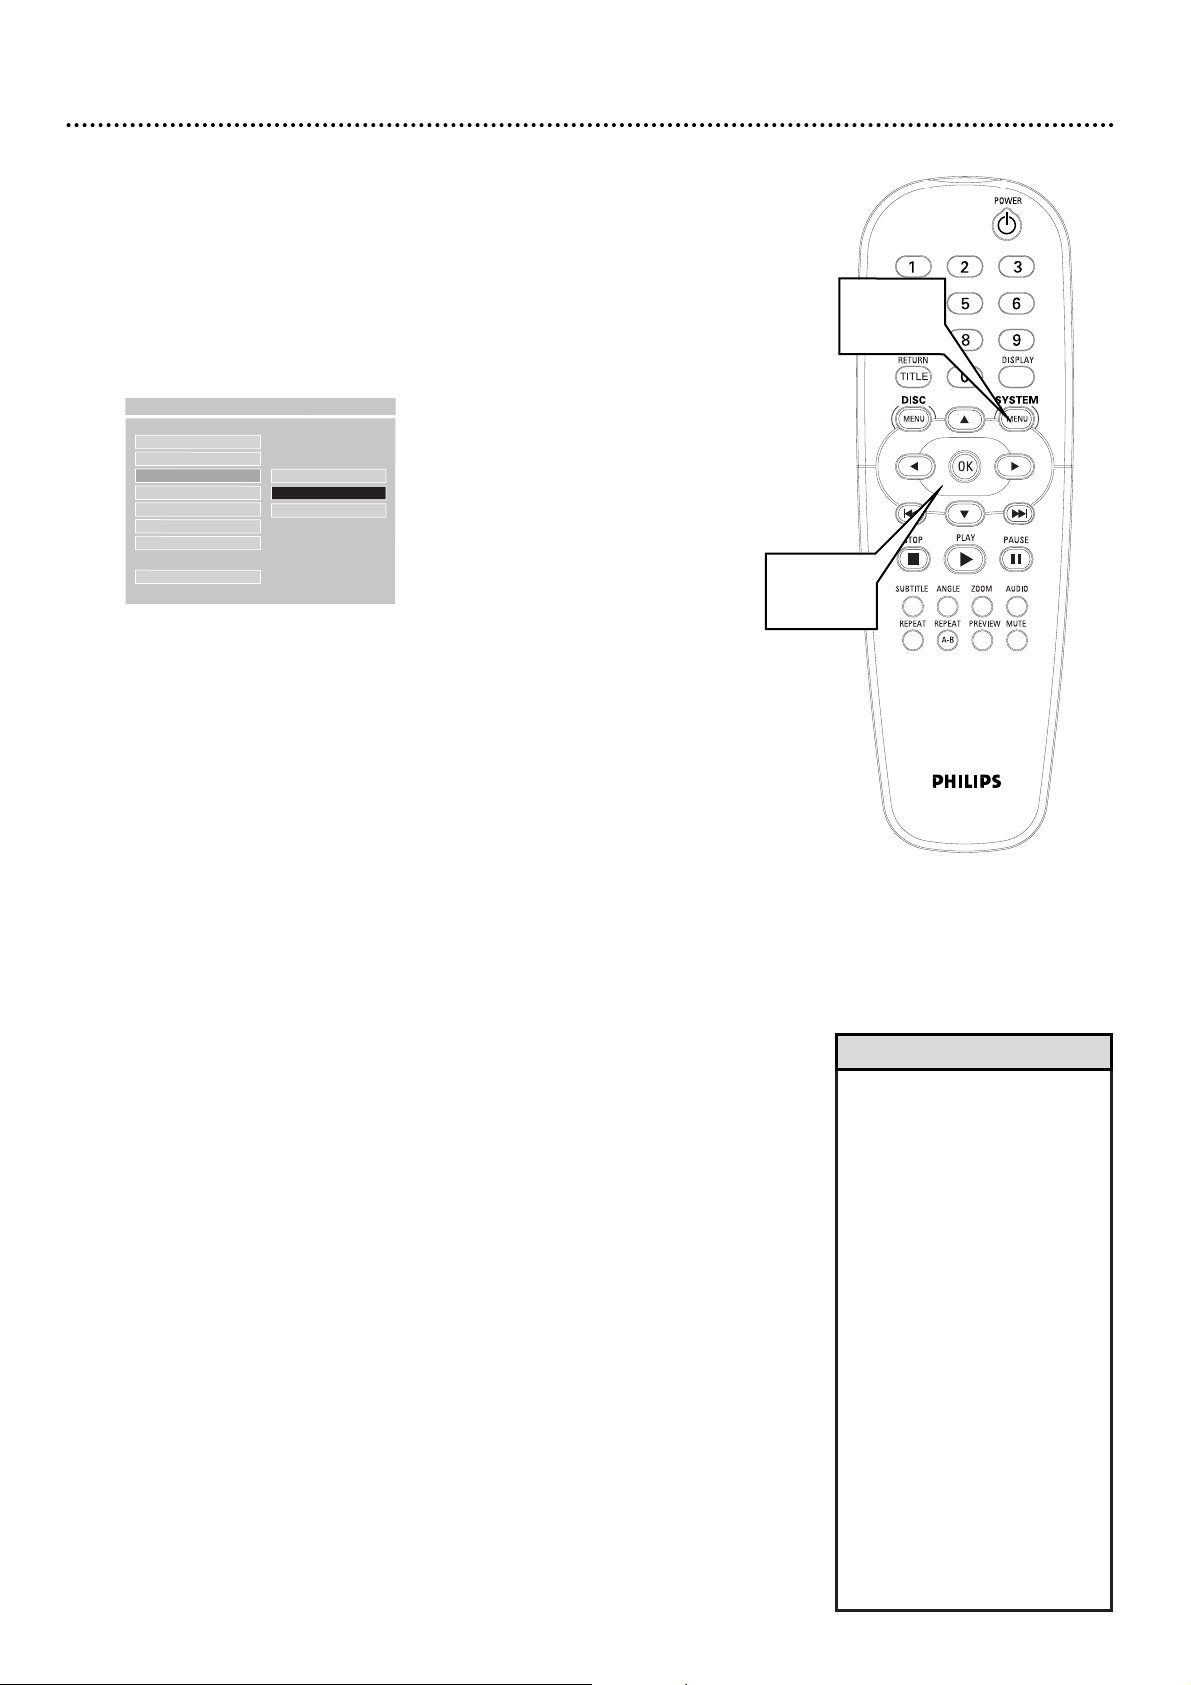
• Most DVDs only play in the
format in which they were
recorded. For example, if the
DVD case says the DVD is
recorded in Letterbox or
Widescreen format, you can
play the DVD only with the
black bars showing at the top
and bottom of the picture.
Even if you set TV DISPLAY to
NORMAL/PS, the picture will
still show in the wide format.
• The format you select must be
available on the Disc. If it is
not, the settings for TV DISPLAY will not affect the picture
during playback.
• Some widescreen TVs may
show only part of the Player’s
menu. This is not an error of
the Player settings. Adjust the
screen mode on your TV. See
your TV owner’s manual for
details.
Helpful Hints
TV Display 33
You may set the Player to display the picture in one of three formats:
Letterbox, Pan & Scan, or Wide. To choose a format, follow these steps.
1
Press SYSTEM MENU.
2
Press 9 repeatedly to select SETUP VIDEO OUTPUT, then
press OK.
3
Press 9 repeatedly to select TV DISPLAY, then press :.
4
Press 89 to select NORMAL/PS, NORMAL/LB, or WIDE,
then press OK.
• Select NORMAL/PS (pan & scan) if you want both sides of the picture to be trimmed or formatted to fit your TV screen. This setting
is possible only if the DVD is recorded in pan & scan or regular format. Check the Disc case for details.
• Select NORMAL/LB (letterbox) if you want to see the picture with
black bars at the top and bottom of the screen. This looks like the
picture you see when watching movies in a theater. This setting is
possible only if the DVD was recorded in the letterbox or
widescreen format. Check the Disc case for details.
• Select WIDE if you connected the Player to a widescreen TV.
5
Press SYSTEM MENU to remove the menus.
TV TYPE
VIDEO OUTPUT
TV DISPLAY
F
NORMAL/PS
VIDEO MODE NORMAL/LB
BRIGHTNESS WIDE
CONTRAST
SATURATION
MAIN PAGE
- - VIDEO OUTPUT PAGE - -
1, 5
2-4
Page 34
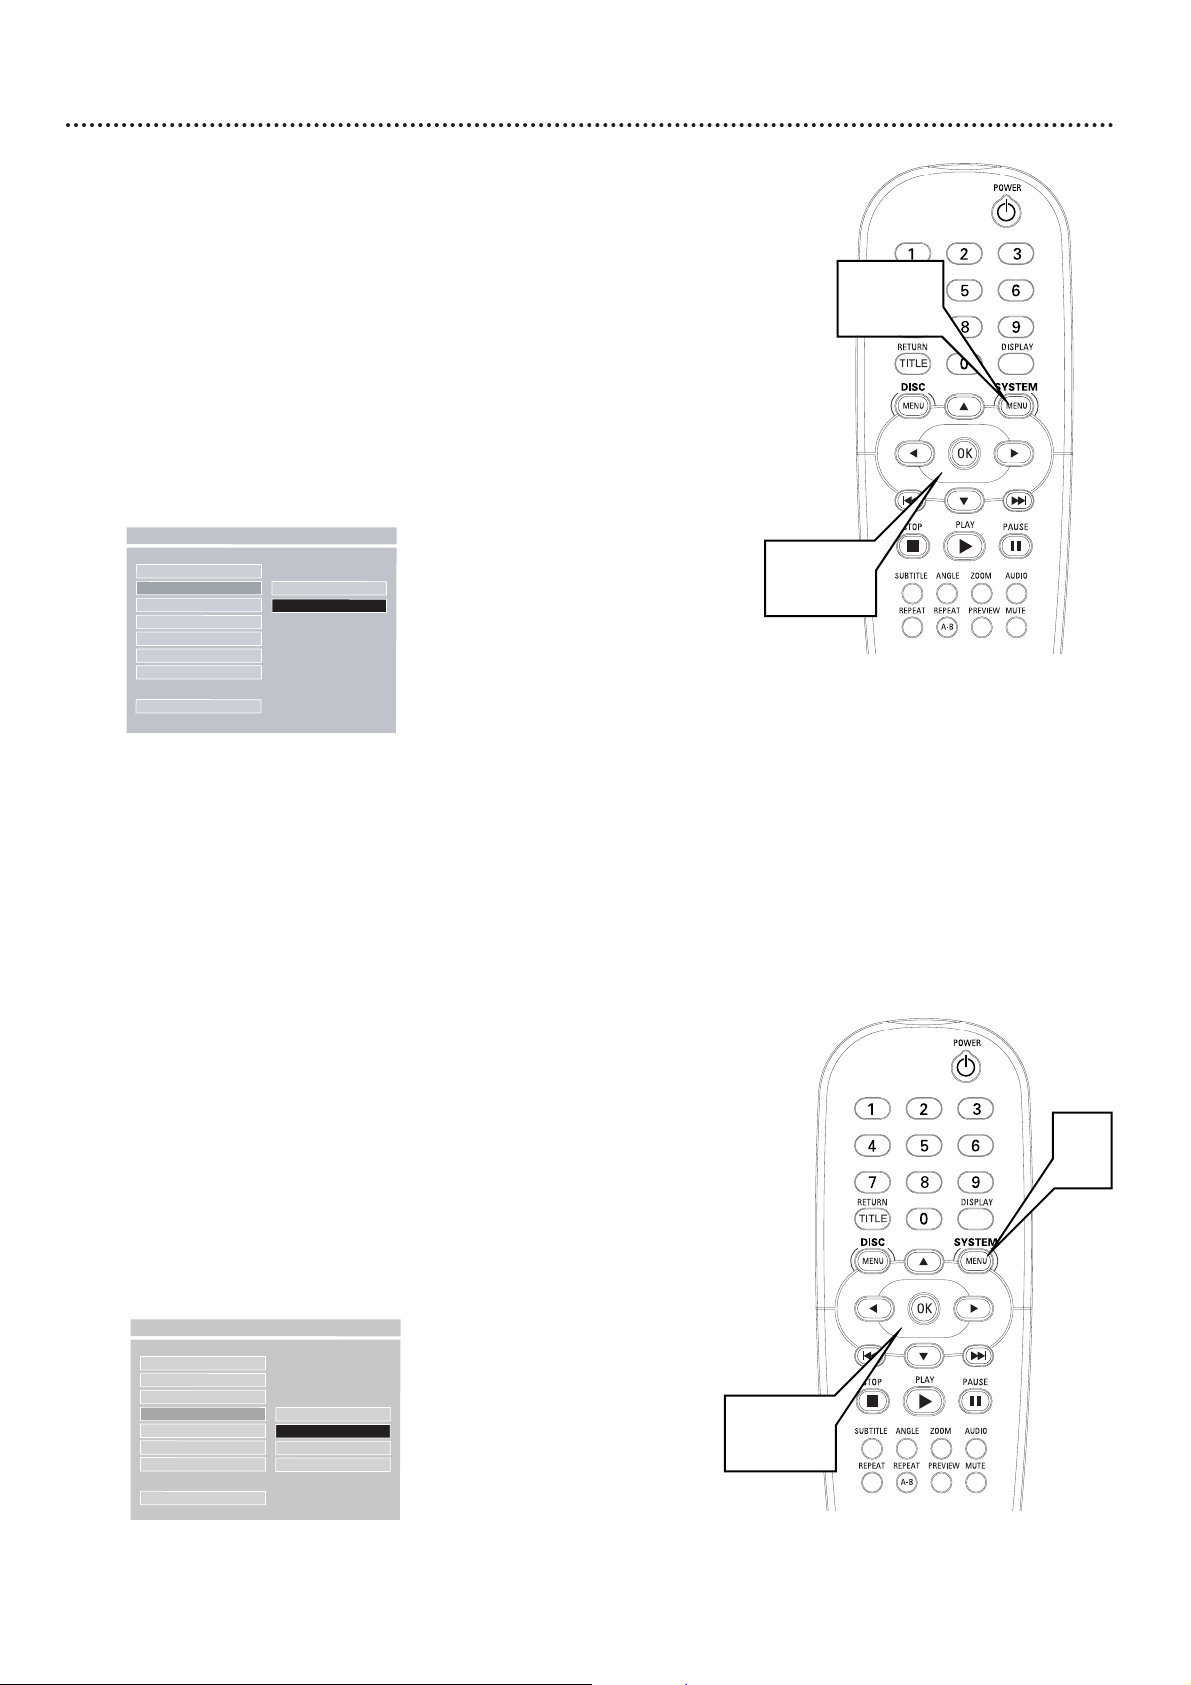
34 Video Output, Video Mode
Video Mode
Just as you can adjust your picture on your TV, you can adjust some picture elements at the Player. Choose a picture setting that best displays the
Disc you are playing.
1
Press SYSTEM MENU.
2
Press 9 repeatedly to select SETUP VIDEO OUTPUT,
then press OK.
3
Press 9 repeatedly to select VIDEO MODE, then press -.
4
Press 8 or 9 to select BRIGHT, STANDARD, SOFT, or
PERSONAL, then press OK. Continue to step 5 on page 35.
TV TYPE
VIDEO OUTPUT
TV DISPLAY
VIDEO MODE
F
BRIGHT
BRIGHTNESS STANDARD
CONTRAST SOFT
SATURATION PERSONAL
MAIN PAGE
- - VIDEO OUTPUT PAGE - -
2-4
Video Output
If you used S-Video or Component Video connections as described on pages
11-12, set VIDEO OUTPUT to S-VIDEO or YPBPR (for Component Video)
by following the steps below. You only need one video connection between
the TV and the Player. You cannot use S-Video and Component Video at the
same time.
If you used the yellow VIDEO (VIDEO OUT) jack on the Player to connect
the Player to the TV, you do not need to adjust the VIDEO OUTPUT setting.
1
Press SYSTEM MENU.
2
Press 9 repeatedly to select SETUP VIDEO OUTPUT, then
press OK.
3
Press 9 to select VIDEO OUTPUT, then press -.
4
Press 9 or 8 to select S-VIDEO or YPBPR, then press OK.
Choose S-VIDEO if you connected the Player’s S-VIDEO (VIDEO
OUT) jack to the TV’s S-Video In jack as described on page 11.
Choose YPBPR if you connected the Player’s Y Pb Pr (VIDEO OUT)
jacks to your TV’s Component Video In jacks as described on page 12.
5
Press SYSTEM MENU to remove the menus.
1,5
2-4
- - VIDEO OUTPUT PAGE - -
TV TYPE
VIDEO OUTPUT
F
S-VIDEO
TV DISPLAY YPBPR
VIDEO MODE
BRIGHTNESS
CONTRAST
SATURATION
MAIN PAGE
1
Page 35
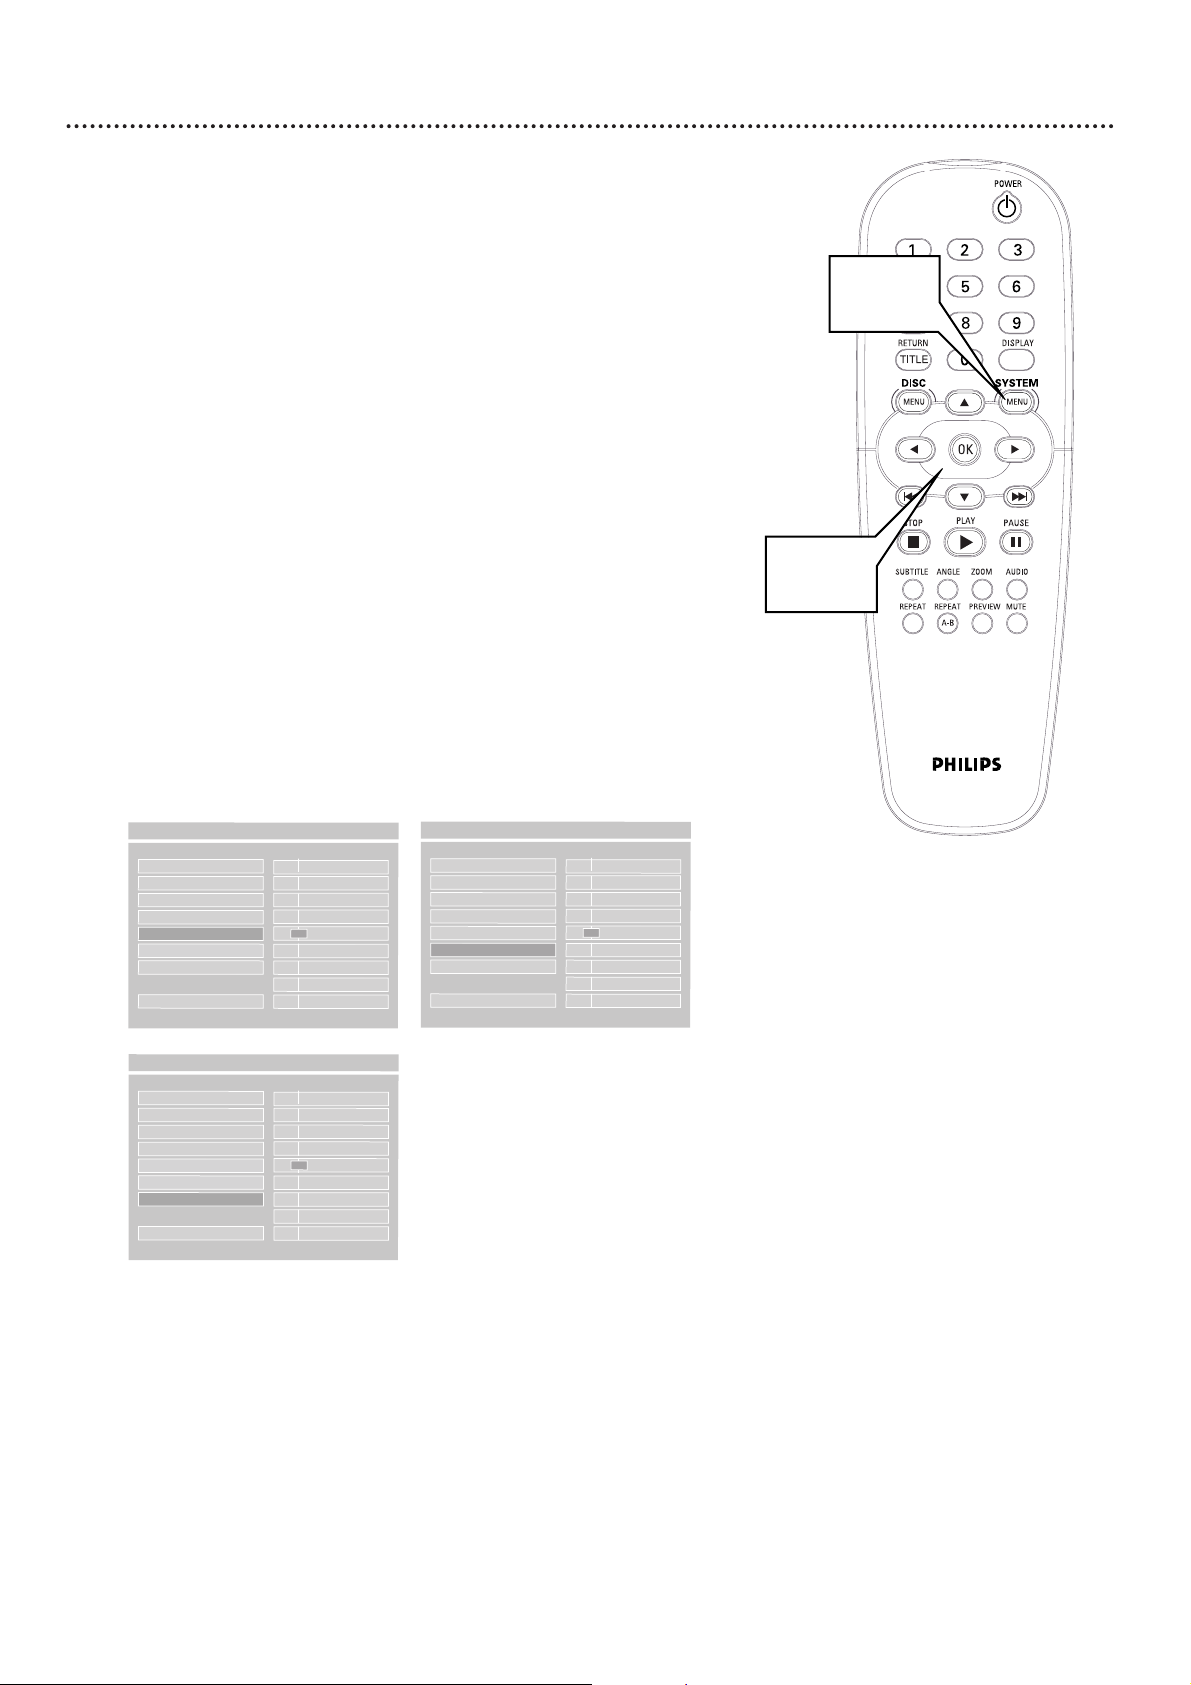
Video Mode (cont’d) 35
5
If you selected BRIGHT, STANDARD, or SOFT, you are finished. Press SYSTEM MENU to remove the menus. Play a
Disc for a few minutes in each setting to decide which you prefer.
If you selected PERSONAL, you can adjust specific picture
elements for your preference. Go to step 6.
6
Press ; to reselect VIDEO MODE.
7
Press 9 or 8 to choose BRIGHTNESS, CONTRAST, or
SATURATION. Then, press :.
8
Press 9 or 8 to adjust the setting you chose, then press OK.
Press ; to go back and select another picture setting
(BRIGHTNESS, CONTRAST, or SATURATION) as needed.
Repeat steps 7-8 until the picture appears as you want it.
• For BRIGHTNESS, choosing a more positive value (+1 to +4) adds
white to the picture. Choosing a more negative value (-1 to -4) darkens the picture. Choose zero (0) for the average setting.
• For CONTRAST, choosing a more positive value (+1 to +4) adds
more contrast or noticeable difference between the black and white
in your picture. Increasing the CONTRAST sharpens the picture.
Choose a more negative CONTRAST value (-1 to -4) to blur the distinction between black and white in the picture. The picture will not
seem as sharp.
• For SATURATION, choose a more positive value (+1 to +4) to
increase the color in your picture. To decrease the color in the picture, choose a more negative value (-1 to -4). More negative values
make the picture more black and white. Choose zero (0) to balance
the color.
9
When you are finished, press SYSTEM MENU to remove the
menus.
TV TYPE - - +4
VIDEO OUTPUT - - +3
TV DISPLAY - - +2
VIDEO MODE - - +1
BRIGHTNESS
F
-- 0
CONTRAST - - -1
SATURATION - - -2
-- -3
MAIN PAGE - - -4
- - VIDEO OUTPUT PAGE - -
TV TYPE - - +4
VIDEO OUTPUT - - +3
TV DISPLAY - - +2
VIDEO MODE - - +1
BRIGHTNESS - - 0
CONTRAST
F
-- -1
SATURATION - - -2
-- -3
MAIN PAGE - - -4
- - VIDEO OUTPUT PAGE - -
TV TYPE - - +4
VIDEO OUTPUT - - +3
TV DISPLAY - - +2
VIDEO MODE - - +1
BRIGHTNESS - - 0
CONTRAST - - -1
SATURATION
F
-- -2
-- -3
MAIN PAGE - - -4
- - VIDEO OUTPUT PAGE - -
6-8
5,9
Page 36
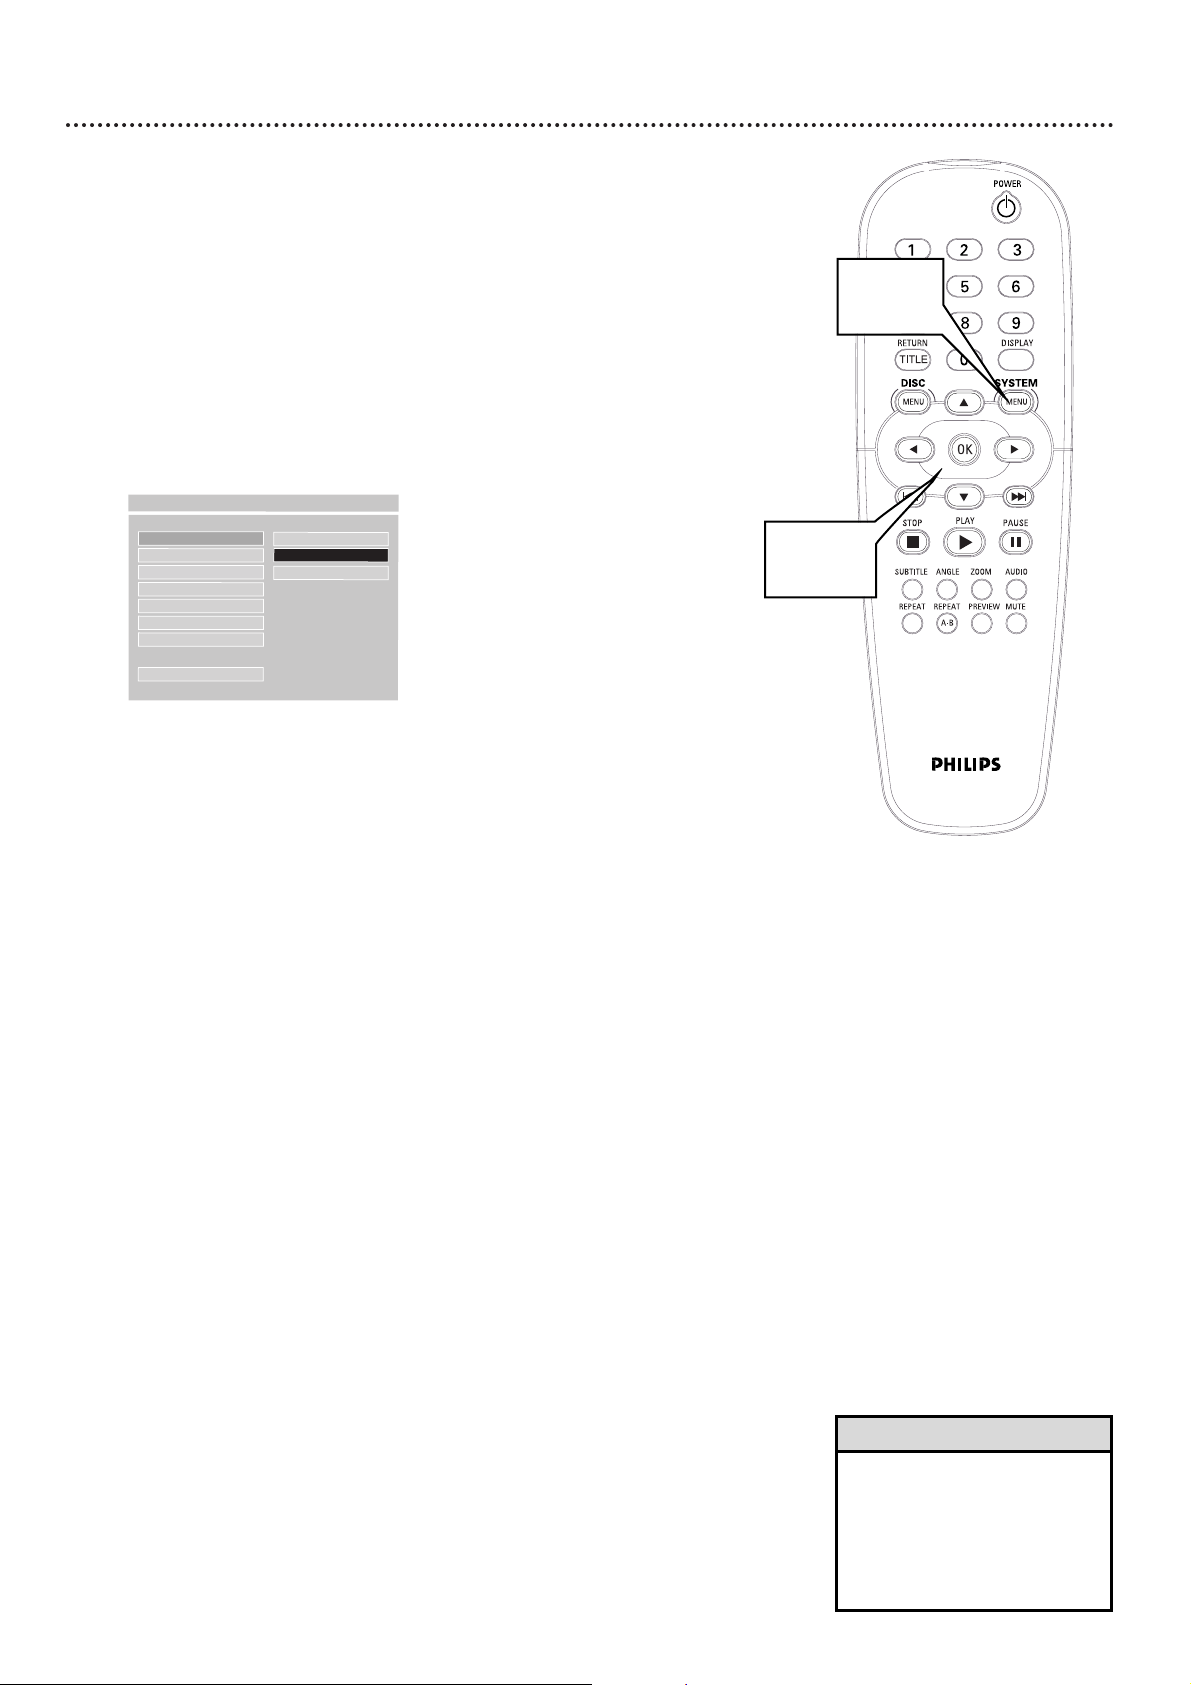
36 TV Type (NTSC/PAL)
DVDs are recorded according to a color system, the most common of which are
NTSC and PAL. NTSC is the most common in the United States. Your TV also
operates according to a color system.
This Player is compatible with NTSC and PAL. However, in order for a DVD to
play on this Player, the color system of the DVD, the TV, and the Player should
match. If all three are not the same, the DVD may play in only black and white,
the picture may roll continuously, or the picture may appear distorted. TV TYPE
lets you set the Player to match the color systems of your DVD and your TV.
1
Press SYSTEM MENU.
2
Press 9 repeatedly to select SETUP VIDEO OUTPUT,
then press OK.
3
TV TYPE will be selected. Press -.
4
Press 8 or 9 to select MULTI, NTSC, or PAL, then press
OK. Choose NTSC if your TV is NTSC-compatible and your DVDs
are recorded in NTSC. Choose PAL if your TV is PAL-compatible
and your DVDs are recorded in PAL. Choose MULTI if want the
Player to automatically select the color system of the current DVD.
5
Press SYSTEM MENU to remove the menus.
- - VIDEO OUTPUT PAGE - -
TV TYPE
F
MULTI
VIDEO OUTPUT NTSC
TV DISPLAY PAL
VIDEO MODE
BRIGHTNESS
CONTRAST
SATURATION
MAIN PAGE
1,5
2-4
• Your DVD must be recorded in
NTSC or PAL. Discs recorded in
other color systems will not play
on this Player. Check the Disc
case for details. NTSC or PAL
may appear on the inside ring of
the DVD or on the case.
Helpful Hint
Page 37
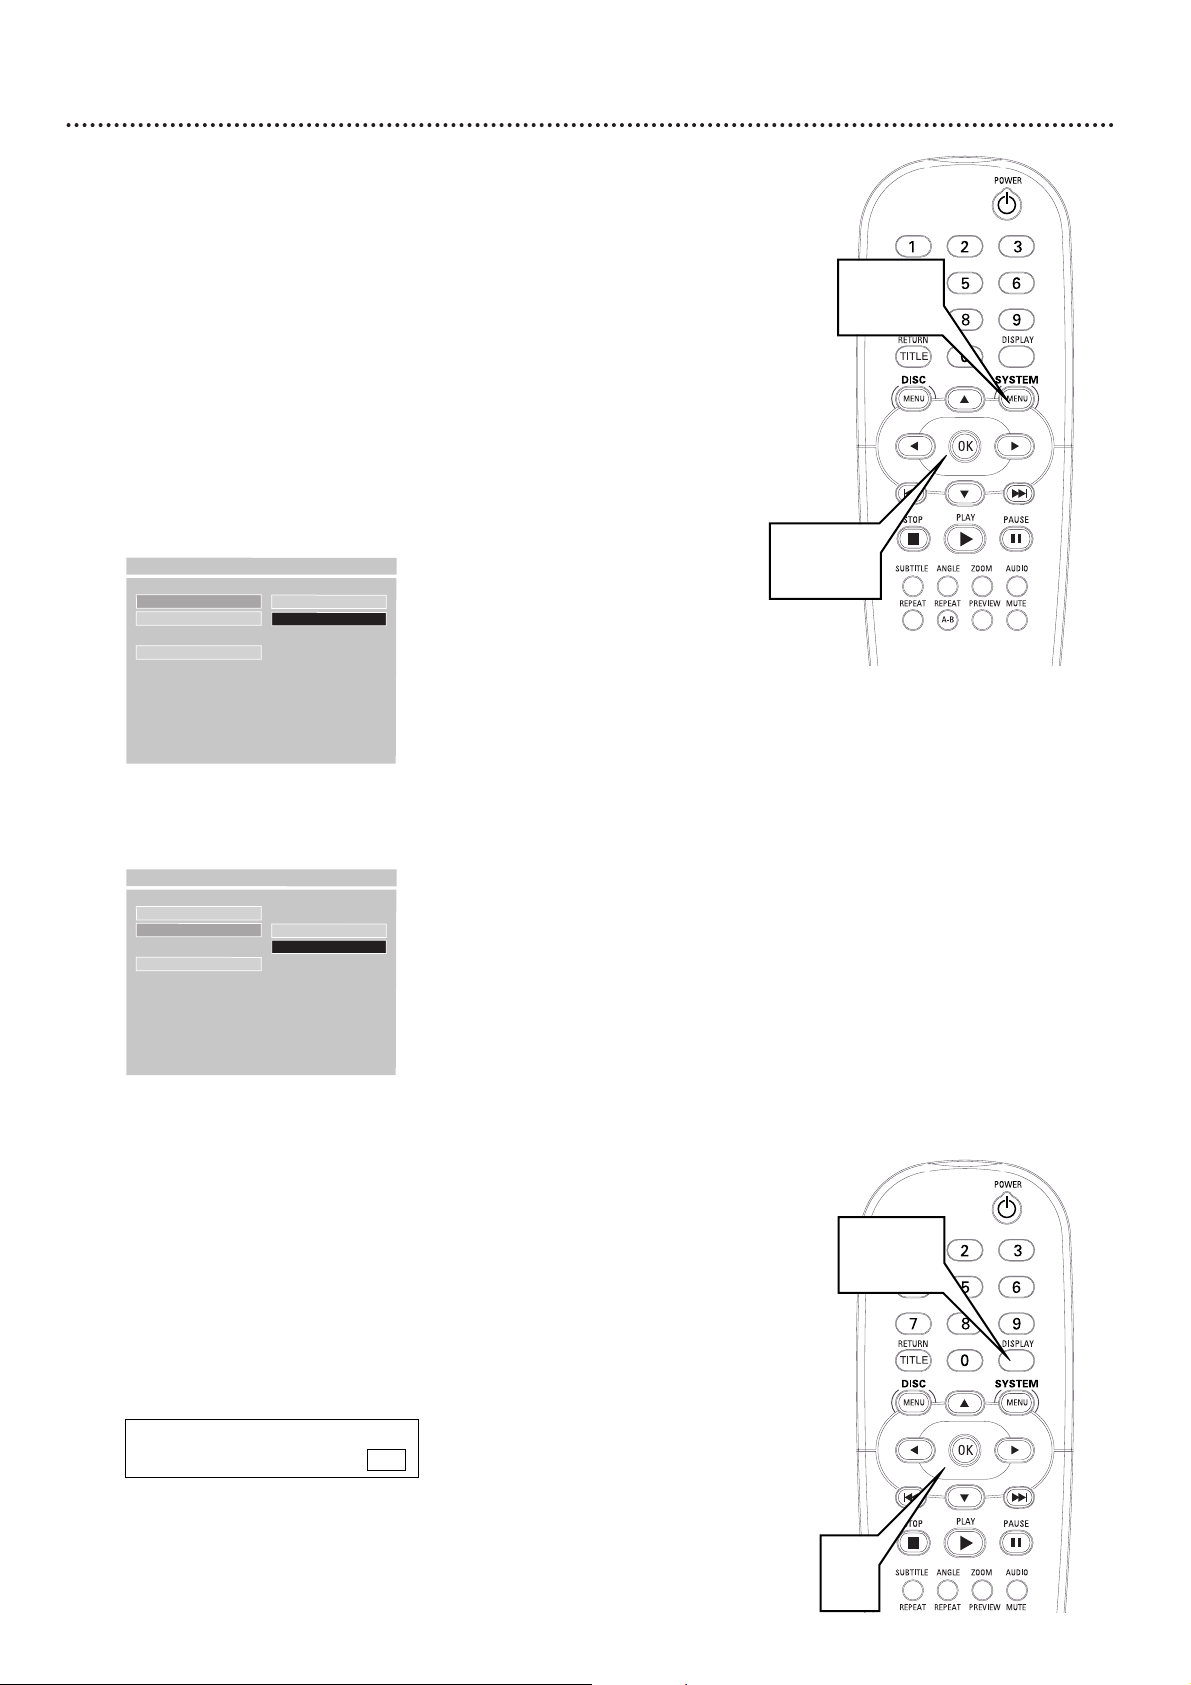
Speaker Setup, 3D Sound 37
Speaker Setup
Adjust DOWNMIX according to how you connected the Player to your TV
and/or Stereo. Balance the volume during playback by adjusting Dynamic Range
Control (D.R.C.).
1
Press SYSTEM MENU.
2
Press 9 to select SPEAKER SETUP, then press OK.
3
Press 8 or 9 to select DOWNMIX or D.R.C., then
press - and follow step 4 according to your choice.
4
• If you selected DOWNMIX, press 8 or 9 to select LT/RT
(left/right) or STEREO, then press OK. Choose LT/RT if you
connected the Player to a Stereo that has Dolby Pro Logic. Select
STEREO if you connected the Player to a TV or Stereo that has left
and right Audio In jacks but does not have Dolby Pro Logic.
• If you selected D.R.C., press 8 or 9 to select ON or OFF, then
press OK. To level the volume during Disc playback, choose ON. There
will not be such a large range between the loudest and softest parts of the
sound. To hear the highs and lows of the volume, set D.R.C. to OFF.
5
Press SYSTEM MENU to remove the menus.
DOWNMIX
F
LT/RT
D . R . C . STEREO
MAIN PAGE
- - SPEAKER SETUP PAGE - -
DOWNMIX
D . R . C .
F
ON
OFF
MAIN PAGE
- - SPEAKER SETUP PAGE - -
1,5
2-4
3D Sound
Once you set DOWNMIX to LT/RT or STEREO, you can choose whether
to activate the fuller 3D (three-dimensional) sound during Disc playback.
1
Press DISPLAY.
2
Press - repeatedly to select ON or OFF beside 3D. Then,
press 8 or 9 to choose ON or OFF.
DVD example
3
Press DISPLAY to remove the information box.
1,3
T: 1 / 3 C: 12 / 30
TC: 00:37:58 3D ON
2
Page 38
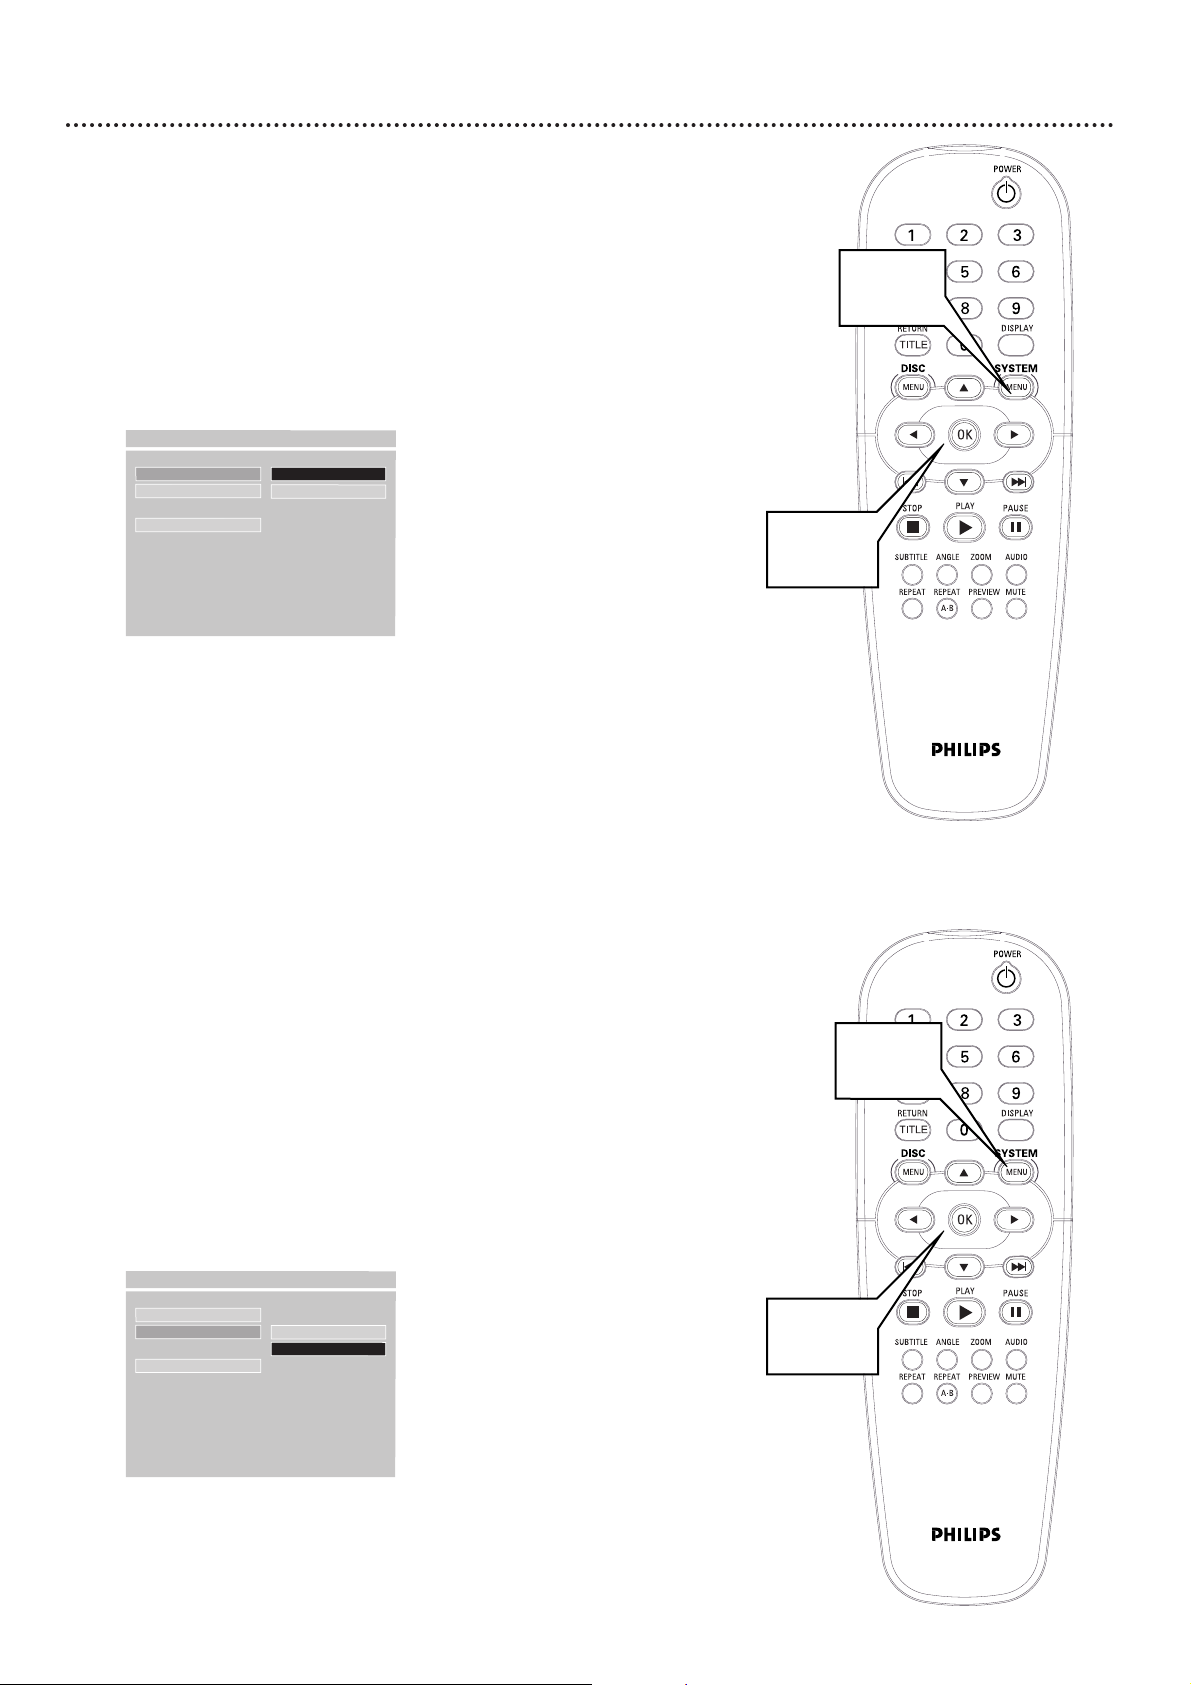
38 SPDIF Out, LPCM 96K
LPCM 96K
If you connected the Player to a Stereo using the COAXIAL jack as shown on
page 14, you may need to adjust the LPCM 96K setting.
Discs are recorded in a certain sampling rate. (The higher the sampling rate, the
better the sound quality.) Some Discs are recorded in a high sampling rate of 96
kHz. Set LPCM 96K to ON if you want the Player to detect the sampling rate of
Discs during playback and automatically choose the best sound available.
1
Press SYSTEM MENU.
2
Press 9 repeatedly to select SPDIF SETUP, then press
OK.
3
Press 9 to select LPCM 96K, then press -.
4
Press 8 or 9 to select OFF or ON, then press OK.
5
Press SYSTEM MENU to remove the menus.
SPDIF OUT
LPCM 96K
F
OFF
ON
MAIN PAGE
- - SPDIF SETUP - -
1,5
2-4
SPDIF Out
SPDIF is the Sony Philips Digital Interface, or a method of transferring digital audio. If you connected the DVD Player to a Stereo using the COAXIAL jack as shown on page 14, adjust the SPDIF OUT setting as described
below. If you are not using the COAXIAL jack, no adjustment is necessary.
1
Press SYSTEM MENU.
2
Press 9 repeatedly to select SPDIF SETUP, then press
OK.
3
SPDIF OUT will be selected. Press -.
4
Press 8 or 9 to select RAW or PCM, then press OK. Choose RAW
to select the original default audio settings as received by most Stereos.
However, if the sound is distorted, your Stereo may need to receive audio in
the PCM (pulse code modulation) format. Choose PCM if your Stereo is
PCM-compatible. Refer to your Stereo owner’s manual for details.
5
Press SYSTEM MENU to remove the menus.
SPDIF OUT
F
RAW
LPCM 96K PCM
MAIN PAGE
- - SPDIF SETUP - -
1,5
2-4
Page 39
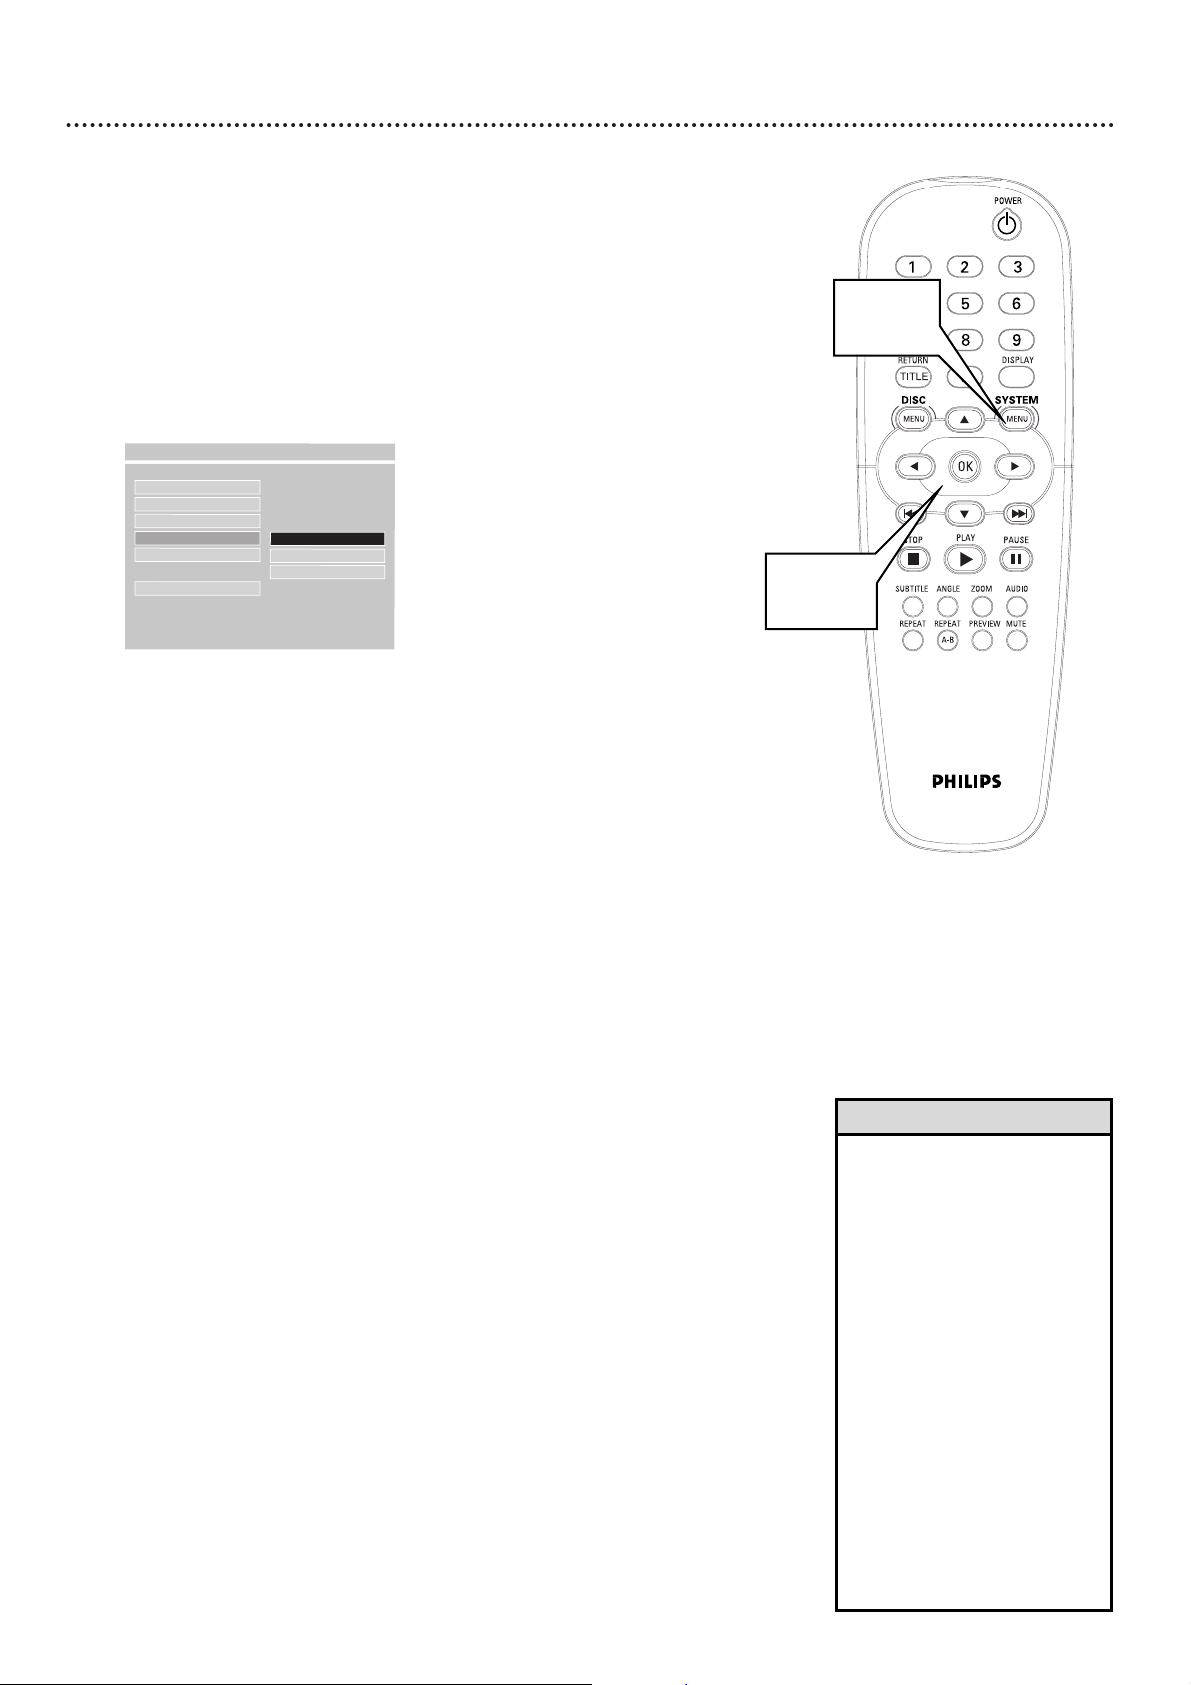
DVD Player On-Screen Display Language 39
You can set the Player’s Setup menus and on-screen messages to appear in
English, French, or Spanish. This language selection will not affect the languages of DVD Disc or Title menus or any audio or subtitle languages. To
change the Player’s Setup menu language, follow these steps.
1
Press SYSTEM MENU.
2
GENERAL SETUP will be selected. Press OK.
3
Press 9 repeatedly to select OSD LANG (on-screen display
language), then press -.
4
Press 8 or 9 to select ENGLISH, FRENCH, or SPANISH,
then press OK.
5
Press SYSTEM MENU to remove the menus.
- - GENERAL PAGE - -
DISC LOCK
PROGRAM
VFD DIM
OSD LANG
F
ENGLISH
SCR SAVER FRENCH
SPANISH
MAIN PAGE
1,5
2-4
• If you accidentally select
FRENCH or SPANISH and
need ENGLISH, follow these
steps.
1) Press SYSTEM MENU.
2)The top line (RÉGLAGE
GÉNÉRAL or GENERAL CONFIGURACIÓN) will be selected.
Press OK.
3)The top line (DISC VERR. or
DISC BLOQ.) will be selected.
Press 9 repeatedly to select
the fourth item in the menu
(LANGUE OSD or OSD
IDIOMA), then press :.
4) Press 8 to select the top
line (ANGLAIS or INGLÉS),
then press OK. The menus will
change to English.
5) Press SYSTEM MENU to
remove the menus.
Helpful Hint
Page 40
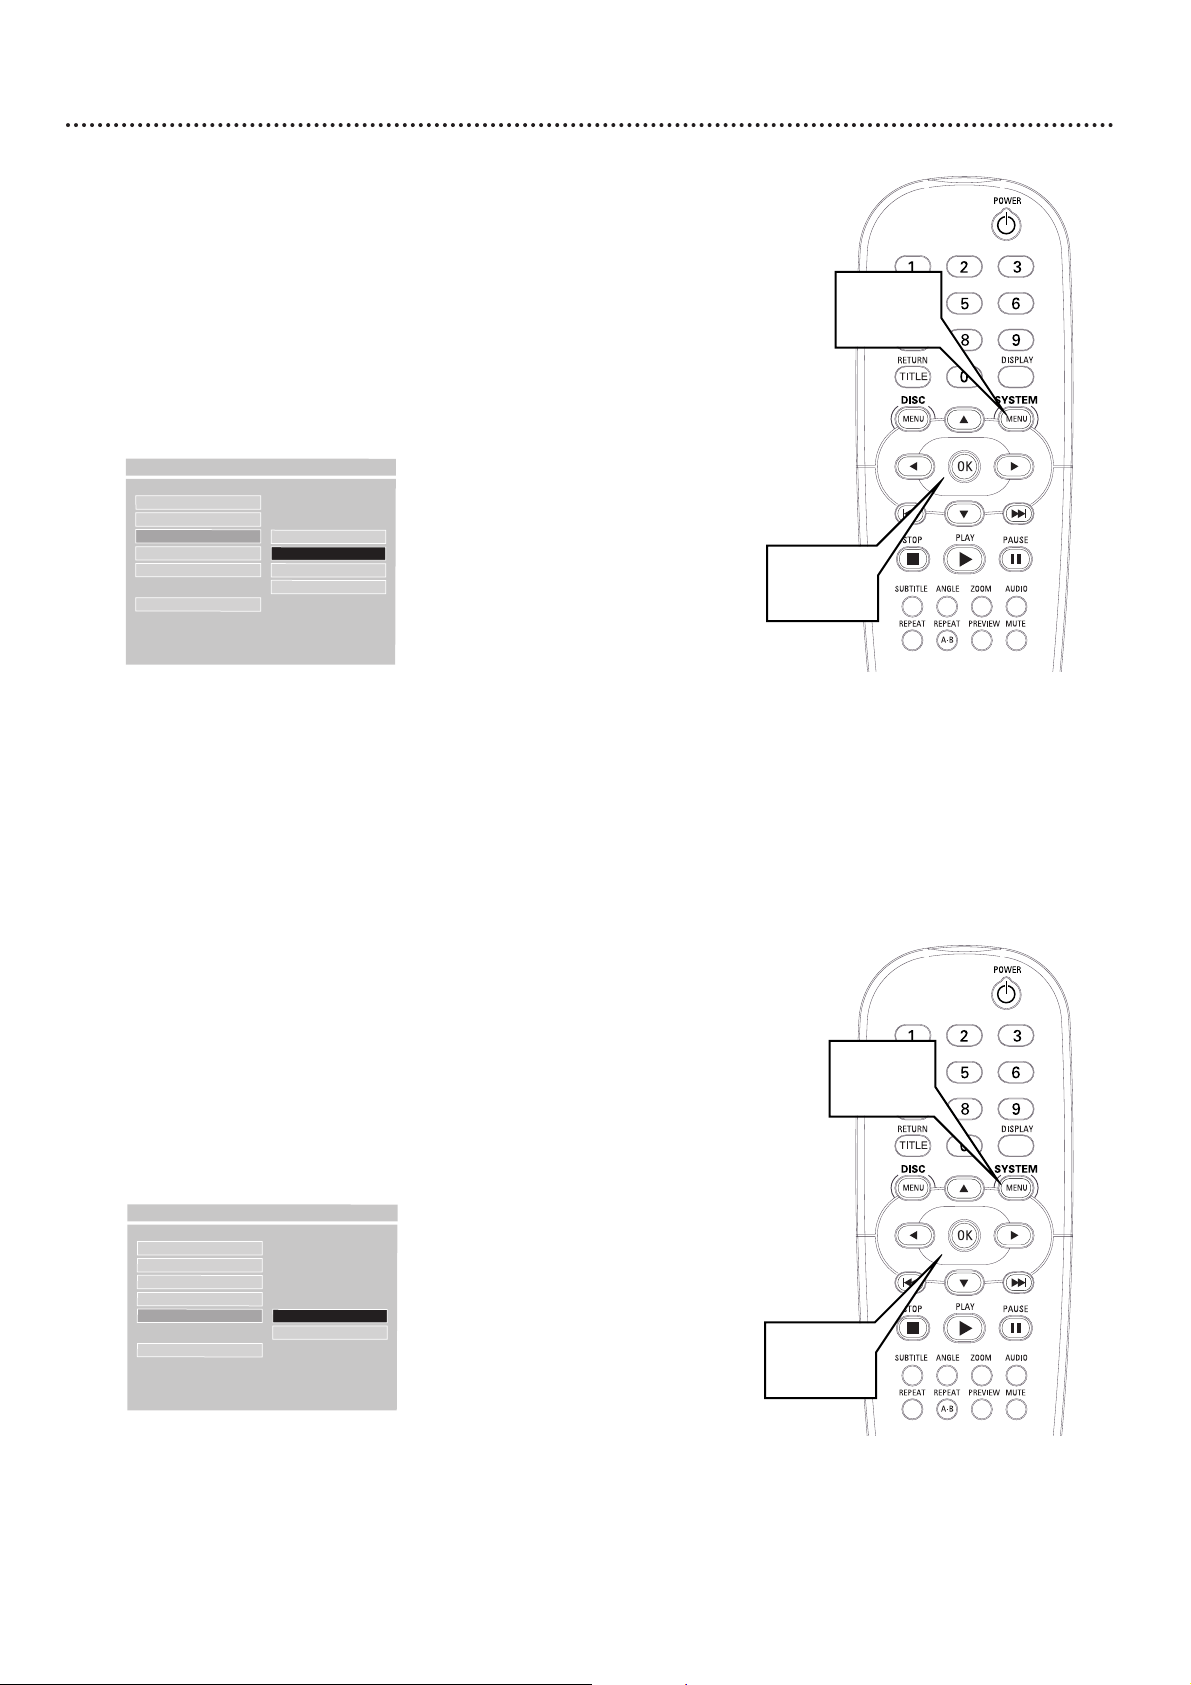
40 Display Dim, Screen Saver
Display Dim
You can adjust the brightness of the display panel on the front of the Player.
Choose the setting that best enables you to see the display information from a
distance. Or, you may want to disable the display completely so it is always
dark. Follow the steps below to adjust the brightness of the display panel
according to your preference.
1
Press SYSTEM MENU.
2
GENERAL SETUP will be selected. Press OK.
3
Press 9 to select VFD DIM, then press -.
4
Press 8 or 9 to select 100 (full brightness), 70 (70% of highest
brightness), 40 (40% of highest brightness), or OFF (display
panel is dark and shows no information). Then, press OK. The
display will dim or brighten according to your choice.
5
Press SYSTEM MENU to remove the menus.
DISC LOCK
PROGRAM
VFD DIM
F
100
OSD LANG 70
SCR SAVER 40
OFF
MAIN PAGE
- - GENERAL PAGE - -
1,5
2-4
Screen Saver
The Screen Saver is the moving DVD logo that appears on your TV screen
when Disc playback is stopped and you do not use the Player or its remote
control for about five minutes. The screen saver prevents damage to your TV
screen caused by leaving a still image on the TV too long.
1
Press SYSTEM MENU.
2
GENERAL SETUP will be selected. Press OK.
3
Press 9 repeatedly to select SCR SAVER (screen saver), then
press -.
4
Press 8 or 9 to select ON or OFF, then press OK. Choose ON
to have the Screen Saver appear on your TV screen when you have not
used the Player for approximately five minutes. To disable the screen
saver, choose OFF. A dark blue Philips DVD background screen will
appear when playback is stopped and you are not using the Player.
5
Press SYSTEM MENU to remove the menus.
DISC LOCK
PROGRAM
VFD DIM
OSD LANG
SCR SAVER
F
ON
OFF
MAIN PAGE
- - GENERAL PAGE - -
1,5
2-4
Page 41
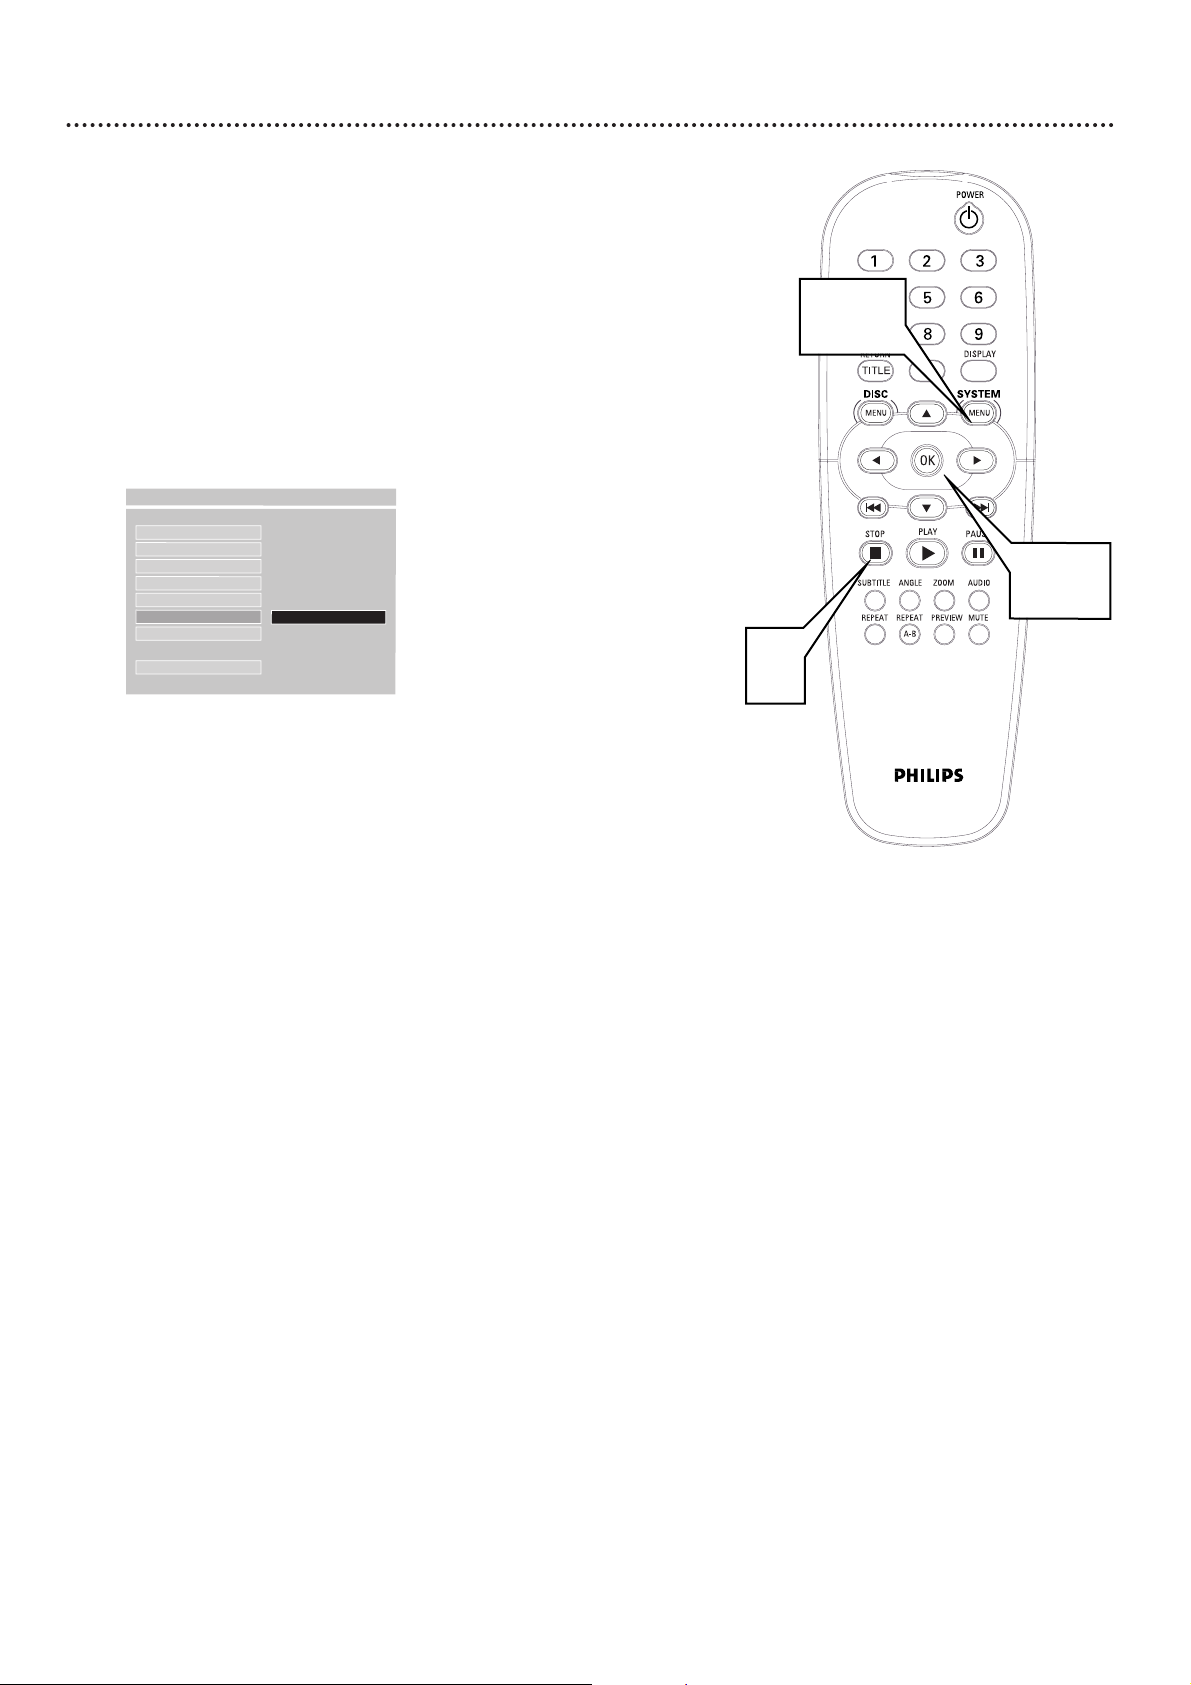
DVD Player Defaults 41
To restore the original settings of the Player, follow the steps below.
1
Press STOP L twice to stop Disc playback completely.
2
Press SYSTEM MENU.
3
Press 9 repeatedly to select PREFERENCES, then press OK.
You can select PREFERENCES only if you have completely stopped
DVD playback by pressing STOP C twice as directed in step 1.
4
Press 9 repeatedly to select DEFAULTS, then press : to
select RESET, then press OK. This restores the original settings
of the Player.
5
Press SYSTEM MENU to remove the menus.
AUDIO
SUBTITLE
DISC MENU
PARENTAL
PASSWORD
DEFAULTS
F
RESET
SMART NAV
MAIN PAGE
- - PREFERENCES PAGE - -
2,5
1
3,4
Page 42

42 Helpful Hints
If you are having problems with your product, check this list of problems and possible solutions before
requesting service. You may be able to solve the problem yourself.
If you need to call a customer service representative, please know the model number and serial number of
your product before you call. This information is on the rear of the product. Also, please take a moment to
identify the problem you are having, and be prepared to explain this to the representative. If you believe the
representative will need to help you with operations, please stay near the product. Our representatives will
be happy to assist you.
No power
• Press down POWER ON/OFF on the front of the Player. To use the POWER yybutton on the remote
control to turn on the Player, the POWER ON/OFF button on the front of the Player must be
depressed (the : will show on the display panel).
• Make sure you connected the Player’s power cord to an AC power outlet.
• Make sure the AC outlet has power by trying another appliance in the same outlet.
No picture
• Make sure the TV power is on.
• Check the video cables. Make sure the cable(s) are fastened securely to the Player and to the TV.
• Set your TV to the correct Video In channel. These channels are usually near channel 00. Or, you may
have a button on the TV remote control that selects an Auxiliary or A/V IN channel. See your TV
owner’s manual for details. Or, just change channels at the TV until you see DVD playback or the blue
Philips DVD background screen or the Player’s screen saver on the TV.
• You only need one video connection between the Player and the TV. Details are on page 9.
• Adjust VIDEO OUTPUT if you used S-Video or Component Video. Details are on page 34.
Distorted picture
• Check the Disc for fingerprints. Clean the Disc with a soft cloth, wiping from the center to the edge in
a straight line.
• Sometimes a small amount of picture distortion may appear. This is not a malfunction.
The picture is distorted, the picture rolls, or the picture is only black and white.
• TVs have a color system standard, usually NTSC in the United States. If the Disc’s or Player’s color system is different than your TV’s color system, the picture may be distorted or colorless. Adjust the TV
TYPE setting. Details are on page 36.
• Check the VIDEO OUTPUT setting. Details are on page 34. If you connected the Player to a TV using S-
Video cable (as described on page 11), set VIDEO OUTPUT to S-VIDEO. If you connected the Player
to a TV using Component video cable (red, green, and blue as described on page 12), set VIDEO OUTPUT to YPBPR.
If VIDEO OUTPUT is incorrect (for example, you used S-Video cable but VIDEO OUTPUT is set to
YPBPR), the picture may be black and white until you correct the VIDEO OUTPUT setting.
If you connected the Player to a TV using the supplied yellow video cable (as described on page 10) or
with an RF modulator, adjusting VIDEO OUTPUT does not affect the picture.
The sound is distorted or there is no sound during Disc playback.
• Make sure you did not connect any cables from the Player to a Stereo’s “PHONO IN” jack.
• Make sure you did not connect the COAXIAL Digital Audio Out jack on the Player to an analog jack on
the Stereo. (Analog audio jacks are usually labeled as such and are usually red and white.)
• Press AUDIO on the remote control to choose a different audio option.
No sound
• Check the audio connections. Details are on pages 9-14. Remember, you only need one audio connec-
tion. See page 9 to see what connection best suits your situation.
• Make sure cables are connected firmly to all equipment.
• Select another channel, sound source, or Auxiliary station at your Stereo or TV. See your Stereo’s man-
ual or TV’s manual for details. Or, just continue selecting the different sound sources or modes on the
Stereo or TV until you hear sound from the Disc that is in the Player. Details are on pages 9-14.
• Make sure your SPDIF OUT and SPEAKER SETUP settings match the capabilities of your Stereo or TV.
Details are on pages 37-38.
• Check the Audio setting of a DVD in the DVD Disc Menu, if available, and adjust as necessary.
• Press AUDIO on the remote control to choose a different audio option.
Page 43

Helpful Hints (cont'd) 43
Disc will not play.
• Make sure the Disc label is facing up. If you are playing a two-sided Disc, make sure the side you want
to play is facing up when you place the Disc in the Player. Details are on page 15.
• Check the Parental Controls. Details are on pages 27-29.
• Check the Region Code of the DVD. The DVD must be coded for All regions or Region 1 in order to
play on this Player. Details are on page 7.
• See if the Disc is defective by trying another Disc. Make sure the Disc is not scratched or warped.
Carefully clean the Disc. Details are on page 6.
An Audio CD will not play.
• Some Audio CDs available on the market are copy protected. These discs will not play on this Player.
See your retailer for options regarding non-protected Audio CDs.
The DVD logo does not appear on the TV screen after you remove a Disc.
• Reset the Player by switching it off, then on again.
The Player does not respond to the remote control.
• Aim the remote control directly at the remote sensor on the front of the Player. Details are on page 17.
Point the remote control toward the Player, not your TV.
• Remove any obstacles between the Player and the remote control.
• Inspect or replace the batteries in the remote control. Details are on page 8.
The Player will not select some features, such as Angles, Subtitles, or multi-language Audio.
• The feature may not be available on the Disc. If it is not, the will appear on the TV screen. Check the
Disc case to see if the Disc has the feature. If the Disc does not have the feature, the Player cannot create the feature. This is not a malfunction of the Player.
• If you are not seeing closed captions on the TV screen during DVD playback, press SUBTITLE to access
the subtitles of the DVD. The DVD must include subtitles in order for you to access the subtitle text.
The Player does not work.
• Disconnect the power cord from the power outlet for a few minutes. Reconnect the power cord and
try to operate the Player again as usual.
Strange codes appear on the Player’s display.
• Remove and reinsert the Disc.
• Clean the Disc.
• Disconnect the power cord from the power outlet for a few minutes, then reconnect the cord and try
playback as usual.
Page 44

Analog: Sound that has not been turned into numbers. Analog sound varies, while digital sound has specific
numerical values. Analog sound is available when you use the red and white audio jacks on your equipment.
These jacks send audio through two channels, the left and right.
AUDIO OUT Jacks:
Jacks on the rear of the Player that send audio to another system (TV, Stereo, etc.).
CD
: Compact Disc.
Chapter:
A part of a Title.
COAXIAL jack:
Sends digital audio to a Stereo, allowing you to adjust the volume at the Stereo. The
Stereo must have a Coaxial In jack. This connection provides the 5.1 channel surround sound as heard in
movie theaters.
Color system:
There are various systems for transmitting television signals, for example PAL, SECAM, and
NTSC. NTSC is the most common color system in the United States of America.
Component Video Y Pb Pr Jacks
: Green, blue, and red jacks on the rear of the Player that send high-
quality video to a TV that has Component Video In jacks.
Digital:
Sound that has been converted into numerical values. Digital sound is available when you use the
Player’s COAXIAL jack, which sends audio through multiple channels instead of two channels as analog does.
Dolby Digital:
A surround sound system that provides 5.1 channel sound as used in movie theaters.
DVD
: Digital Video Disc.
Letterbox:
Widescreen format; a TV aspect ratio setting (4:3). Displays the video in full-width, with black
bars at the top and bottom of the TV screen. This format is similar to seeing a movie in a theater. If the Disc
does not include a letterbox format, selecting 4:3 letterbox may have no effect. (For example, some DVDs
are two-sided, with one side playing in widescreen format and the other side playing in a normal format.)
Pan & Scan:
A TV aspect ratio setting (4:3). Displays the video with full-height picture with one or both
sides of the picture trimmed to fit on your TV screen. Some movie companies refer to this as “reformatting
the picture to fit your TV screen.”
PBC:
Playback Control. A special feature on some Video CDs/Super Video CDs that enables interactive use.
PCM:
Pulse Code Modulation. A digital audio encoding system.
RGB:
Red-Green-Blue. A top-quality video connection where red, green, and blue components of the pic-
ture are carried through separate wires. This also is referred to as the component video connection.
S-Video:
Produces a clearer picture by sending separate signals for the luminance and the color.
Title:
A unit of recording on a DVD.
VCD:
Video Compact Disc.
VIDEO OUT Jack:
Jack on the rear of the Player that sends video (picture) to a TV.
Widescreen:
A TV aspect ratio setting (16:9). Displays the video appropriately when you connect the
Player to a widescreen TV.
44 Glossary
Page 45

Specifications 45
PLAYABLE DISCS
DVD-Video
Super Video CD
Video CD
Audio CD
CD Recordable (CD-R)
CD Rewritable (CD-RW)
MP3-CD
Picture CD
TV STANDARD PAL/50Hz NTSC/60Hz
Number of lines 625 525
Playback Multistandard (PAL/NTSC)
VIDEO PERFORMANCE
VIDEO (VIDEO OUT) 1 Vpp---75Ω
S-VIDEO (VIDEO OUT) Y: 1 Vpp---75Ω
C: 0.3 Vpp---75Ω
Y Pb Pr Y: 1 Vpp---75Ω
Pr: 0.7 Vpp---75Ω
Pb: 0.7 Vpp---75Ω
CABINET
Approximate dimensions: 17.13 x 9.25 x 2.8 inches (w x d x h)
(435 x 235 x 71 mm)
Approximate weight: 5.5 lbs (2.5 kg)
AUDIO FORMAT
Digital MPEG/AC-3/
DTS Compressed Digital/PCM 16, 20, 24 bits
fs, 44.1, 48, 96 kHz
MP3 (ISO 9660) 24, 32, 56, 64, 96, 128,
256 kbps & variable
bit rate fs, 16, 22.05,
24, 32, 44.1, 48kHz
Analog Sound Stereo
Dolby Digital Multichannel Surround Sound downmix two channels
AUDIO PERFORMANCE
DA Converter 24 bit
Signal to Noise (1kHz) 90dB
Dynamic range (1kHz) 80dB
DVD fs 96 kHz 4 Hz -44 kHz
fs 48 kHz 4 Hz -22 kHz
Super Video CD fs 48 kHz 4 Hz -22 kHz
fs 44.1 kHz 4 Hz -20 kHz
Video CD/Audio CD fs 44.1 kHz 4 Hz -20 kHz
REAR CONNECTIONS
Component Video Out Cinch (YPbPr) (green/blue/red)
S-Video Out Mini DIN 4-pins
Video Out Cinch (yellow)
Audio Out Cinch (white/red, left/right)
Digital Audio Out 1 coaxial
IEC958 for Audio CD/LPCM/MPEG1
IEC1937 for MPEG2, Dolby Digital,
and DTS
Page 46

46 Limited Warranty
Digital Video Disc Player
90 days Free Product Exchange / 91 days–One Year Reduced-Cost Exchange
WHO IS COVERED?
You must have proof of the date of purchase to exchange
your product. A sales receipt or other document showing
the date that you purchased the product is considered such
proof.
WHAT IS COVERED?
Warranty coverage begins the day you buy your product.
For 90 days thereafter, you may exchange the defective product for a free new or renewed product through Philips.
From 91 days to one year from the date of purchase, you will
pay a preset exchange fee to obtain a new or renewed
product. Follow the exchange procedures on the next page.
This exchange opportunity ends one year after the date of
purchase. The replacement product is covered only for the
warranty period of the original product. When the warranty on the original product expires, the warranty on all
replaced products also expires.
When it is necessary for you to ship the product to Philips for
exchange, you will pay the shipping costs for shipment to Philips.
Philips will pay the shipping costs when returning a product to
you.
WHAT IS EXCLUDED?
Your warranty does not cover:
• shipping charges to return defective product.
• labor charges for installation or setup of the product,
adjustment of customer controls on the product, and
installation or repair of antenna systems outside of the
product.
• product repair and/or part replacement because of
improper installation, abuse, neglect, misuse, accident,
unauthorized repair or other cause not within the control of Philips.
• a product that requires modification or adaptation to
enable it to operate in any country other than the country for which it was designed, manufactured, approved
and/or authorized, or repair of products damaged by
these modifications.
• incidental or consequential damages resulting from the
product. (Some states do not allow the exclusion of incidental or consequential damages, so the above exclusion
may not apply to you. This includes, but is not limited
to, prerecorded material, whether copyrighted or not
copyrighted.)
• a product used for commercial or institutional purposes
(including but not limited to rental purposes).
WHERE IS EXCHANGE AVAILABLE?
Warranty exchange is available in all countries where the
product is officially distributed by Philips. In countries
where Philips does not distribute the product, the local
Philips service organization will attempt to exchange the
product, although there may be a delay if the appropriate
product is not readily available.
MAKE SURE YOU KEEP...
Please keep your sales receipt or other document showing
proof of date of purchase. Attach it to the owner’s manual
and keep both nearby. Also keep the original box and packing material in case you need to return your product.
BEFORE EXCHANGING THE PRODUCT...
Please check your owner’s manual before exchanging the
product. Adjustments of the controls discussed there may
save you time and money.
LIMITATION OF LIABILITY AND REMEDY...
PHILIPS IS NOT LIABLE UNDER ANY CIRCUMSTANCES
FOR ANY DIRECT, INDIRECT, SPECIAL, INCIDENTAL,
OR CONSEQUENTIAL DAMAGES, HOWSOEVER
INCURRED, EVEN IF NOTIFIED OF THE POSSIBILITY OF
SUCH DAMAGES.
TO THE EXTENT PERMITTED BY LOCAL LAW, THE
REMEDIES PROVIDED IN THIS WARRANTY STATEMENT ARE YOUR SOLE AND EXCLUSIVE REMEDY.
THIS LIMITED WARRANTY GIVES YOU SPECIFIC LEGAL
RIGHTS, AND YOU MAY ALSO HAVE OTHER RIGHTS
WHICH VARY FROM STATE/PROVINCE TO
STATE/PROVINCE.
TO EXCHANGE YOUR PRODUCT IN THE U.S.A.,
PUERTO RICO, OR U.S. VIRGIN ISLANDS...
FOLLOW THE INSTRUCTIONS STATED PREVIOUSLY IN
THE “WHAT IS COVERED” SECTION, OR REFER TO
THE EXCHANGE INSTRUCTIONS ON THE NEXT PAGE.
IN THE U.S.A., PUERTO RICO, AND U.S. VIRGIN
ISLANDS, ALL IMPLIED WARRANTIES, INCLUDING THE
IMPLIED WARRANTIES OF NON-INFRINGEMENT, MERCHANTABILITY AND FITNESS FOR A PARTICULAR
PURPOSE, ARE SPECIFICALLY DISCLAIMED, AND TO
THE EXTENT INCONSISTENT WITH LAW OF THE
LOCALITY OF THE USER, LIMITED IN DURATION TO
THE DURATION OF THIS EXPRESS WARRANTY.
BECAUSE SOME STATES DO NOT ALLOW LIMITATIONS ON HOW LONG AN IMPLIED WARRANTY MAY
LAST, THIS LIMITATION MAY NOT APPLY TO YOU.
TO EXCHANGE A PRODUCT IN CANADA...
Please contact Philips at:
1-800-661-6162 (French Speaking)
1-800-531-0039 (English or Spanish Speaking)
In Canada, this warranty is given in lieu of all other warranties. There are no other warranties, express or implied,
including any implied warranties of merchantability or fitness for a particular purpose.
REMEMBER...
Please record below the model and serial numbers found
on the product. Also, please fill out and mail your warranty
registration card promptly. It will be easier for us to notify
you if necessary.
MODEL #__________________________________
SERIAL #__________________________________
Philips, P.O. Box 520890, Miami, FL 33152 (402) 536-4171
EL6478E003 / 3-02
Page 47

Limited Warranty (cont’d) 47
To exchange your product with Philips (per the warranty conditions stated previously), remember:
• If you exchange the product within 90 days of the original purchase, there is no cost to you.*
• If you exchange the product more than 90 days after but less than one year after the day of original purchase, contact
Philips at 1-800-531-0039 to determine the preset cost for exchange.
• If you do not have your original sales receipt, or if you have any questions, call Philips at 1-800-531-0039.
To obtain a replacement product from Philips:
1. Contact Philips at 1-800-531-0039 to determine the cost for exchange.
2. Complete the Exchange Form below.
3. Pack the product and its accessories in the original box or a suitable alternative. You will receive replacement acces-
sories with your replacement product. For packing details, call Philips at 1-800-531-0039.
4. Put the completed Exchange Form, a copy of the original sales receipt, and the proper payment amount into an envelope. DO NOT SEND CASH. Do not staple or clip these items together. Label the envelope “Return Documents
Enclosed.” Place this envelope in the box with the product.
5. Seal the box with packing tape and return the product via United Parcel Service (UPS), insured and freight prepaid, to:
Philips Recovery Center
Rojas 6
12420 Mercantile Avenue
El Paso, TX 79928
ATTENTION: DVD PLAYER EXCHANGE
A replacement will be sent to you via UPS within 48 business hours of Philips’ receipt of the product.
*When it is necessary for you to ship the product to Philips for exchange, you will pay the shipping costs for shipment to Philips.
Philips will pay the shipping costs when returning a product to you.
EXCHANGE INSTRUCTIONS
EXCHANGE FORM
Your Address (street address to which replacement should be delivered, no P.O. boxes allowed):
Name:
Street Address: Apt. #:
City: State/Province: Zip Code/Postal Code:
Phone (day): Phone (night):
Exchange Fee:
+ Sales Tax: = Total:
Method of Payment: (Check one. Please, no cash or CODs.)
_____ Check/Money order Check/Money order No.
Account number Expiration date
_____ American Express ___________________________ __________
_____ Visa ___________________________ __________
_____ Novus/Discover ___________________________ __________
_____ Mastercard ___________________________ __________
Signature: _____________________________________________________________
Detailed reason for return, use additional paper if necessary: _____________________________________________
_______________________________________________________________________________________________
Model Number
Serial Number
Remember, the return box should include the following:
• The product,
• Completed Exchange Form and sales receipt,
• Accessories supplied with the product, and
• Payment, if applicable.
Page 48

IB8377E001
3141 015 20681
Printed in China
This owner’s manual is made of recyclable materials.
Remember to recycle!
AC power cord . . . . . . . . . . . . . . . . . . . . . . . . . . . . . . . . .18
ANGLE button . . . . . . . . . . . . . . . . . . . . . . . . . . . . . . .16, 22
Arrow KLs B buttons . . . . . . . . . . . . . . . . . . . . .16, 19-20
AUDIO button . . . . . . . . . . . . . . . . . . . . . . . . . . . . . . .16, 24
AUDIO OUT (left/right) jacks . . . . . . . . . . . . . . . . .10-13, 18
Battery installation . . . . . . . . . . . . . . . . . . . . . . . . . . . . . . . .8
Camera angle . . . . . . . . . . . . . . . . . . . . . . . . . . . . . . . . . . .22
Chapter selection . . . . . . . . . . . . . . . . . . . . . . . . . . . . . . . .19
Cleaning discs . . . . . . . . . . . . . . . . . . . . . . . . . . . . . . . . . . . .6
COAXIAL jack . . . . . . . . . . . . . . . . . . . . . . . . . . . .14, 18, 38
Color systems . . . . . . . . . . . . . . . . . . . . . . . . . . . . . . . . . . .7
Contents, table of . . . . . . . . . . . . . . . . . . . . . . . . . . . . . . . .3
Defaults . . . . . . . . . . . . . . . . . . . . . . . . . . . . . . . . . . . . . . .41
DISC MENU button . . . . . . . . . . . . . . . . . . . . . . . . . . .16, 19
Disc menus . . . . . . . . . . . . . . . . . . . . . . . . . . . . . . . . . . . .19
Disc tray . . . . . . . . . . . . . . . . . . . . . . . . . . . . . . . . . . . .15, 17
Display . . . . . . . . . . . . . . . . . . . . . . . . . . . . . . . . . . . . . . . .17
DISPLAY button . . . . . . . . . . . . . . . . . . . . . . . .16, 19, 21, 37
Display dim . . . . . . . . . . . . . . . . . . . . . . . . . . . . . . . . . . . .40
Downmix . . . . . . . . . . . . . . . . . . . . . . . . . . . . . . . . . . . . . .37
Dynamic Range Control (D.R.C.) . . . . . . . . . . . . . . . . . . . .37
Environmental information . . . . . . . . . . . . . . . . . . . . . . . . . .6
Exchange instructions/exchange form . . . . . . . . . . . . . . . . .47
Fast forward and fast reverse . . . . . . . . . . . . . . . . . . . . . . .20
Features . . . . . . . . . . . . . . . . . . . . . . . . . . . . . . . . . . . . . . . .6
Frame-by-frame playback . . . . . . . . . . . . . . . . . . . . . . . . . .21
Front panel . . . . . . . . . . . . . . . . . . . . . . . . . . . . . . . . . . . . .17
Glossary . . . . . . . . . . . . . . . . . . . . . . . . . . . . . . . . . . . . . . .44
Helpful hints . . . . . . . . . . . . . . . . . . . . . . . . . . . . . . . . .42-43
Hookups . . . . . . . . . . . . . . . . . . . . . . . . . . . . . . . . . . . . .9-14
Determining the best possible connection . . . . . . . . . . .9
TV has a yellow CVBS video in jack . . . . . . . . . . . . . . .10
TV has an S-video in jack . . . . . . . . . . . . . . . . . . . . . . .11
TV has component video in jacks . . . . . . . . . . . . . . . . .12
Connecting to a TV and a two-channel stereo . . . . . . .13
Connecting to a TV and a digital stereo . . . . . . . . . . . .14
JPEG files and features . . . . . . . . . . . . . . . . . . . . . . . . . . . .32
Language settings
DVD audio language . . . . . . . . . . . . . . . . . . . . . . . . . . .24
DVD disc menu language . . . . . . . . . . . . . . . . . . . . . . .26
DVD player on-screen display language . . . . . . . . . . . .39
DVD subtitle language . . . . . . . . . . . . . . . . . . . . . . . . .25
Limited warranty . . . . . . . . . . . . . . . . . . . . . . . . . . . . . .46-47
LPCM 96K . . . . . . . . . . . . . . . . . . . . . . . . . . . . . . . . . . . . .38
MP3 . . . . . . . . . . . . . . . . . . . . . . . . . . . . . . . . . . . . . . . . . .32
MUTE button . . . . . . . . . . . . . . . . . . . . . . . . . . . . . . . . . . .16
NTSC . . . . . . . . . . . . . . . . . . . . . . . . . . . . . . . . . . . . . . .7, 36
Number buttons . . . . . . . . . . . . . . . . . . . . . . . . . . . . . .16, 19
OK button . . . . . . . . . . . . . . . . . . . . . . . . . . . . . . . . . . . . .16
OPEN/CLOSE button . . . . . . . . . . . . . . . . . . . . . . . . . . . . .17
Package contents . . . . . . . . . . . . . . . . . . . . . . . . . . . . . . . . .6
PAL . . . . . . . . . . . . . . . . . . . . . . . . . . . . . . . . . . . . . . . .7, 36
Parental controls disc lock . . . . . . . . . . . . . . . . . . . . . . . . .28
Parental controls levels . . . . . . . . . . . . . . . . . . . . . . . . . . .29
Parental controls password . . . . . . . . . . . . . . . . . . . . . . . .27
PAUSE button . . . . . . . . . . . . . . . . . . . . . . . . . . . . . . .16, 21
PCM SPDIF setting . . . . . . . . . . . . . . . . . . . . . . . . . . . . . . .38
PLAY button . . . . . . . . . . . . . . . . . . . . . . . . . . . . . . . . .15-16
PLAY/PAUSE button . . . . . . . . . . . . . . . . . . . . . . . . . . . . .17
Playable discs . . . . . . . . . . . . . . . . . . . . . . . . . . . . . . . . . . . .7
POWER button . . . . . . . . . . . . . . . . . . . . . . . . . . . . . . . . .16
POWER ON/OFF button . . . . . . . . . . . . . . . . . . . . . . . . . .17
Preview . . . . . . . . . . . . . . . . . . . . . . . . . . . . . . . . . . . . . . .31
PREVIEW button . . . . . . . . . . . . . . . . . . . . . . . . . . . . .16, 31
Program . . . . . . . . . . . . . . . . . . . . . . . . . . . . . . . . . . . . . . .30
Quick disc playback . . . . . . . . . . . . . . . . . . . . . . . . . . . . . .15
RAW SPDIF setting . . . . . . . . . . . . . . . . . . . . . . . . . . . . . .38
Rear panel . . . . . . . . . . . . . . . . . . . . . . . . . . . . . . . . . . . . .18
Region codes . . . . . . . . . . . . . . . . . . . . . . . . . . . . . . . . . . . .7
Remote control batteries . . . . . . . . . . . . . . . . . . . . . . . . . . .8
Remote control buttons . . . . . . . . . . . . . . . . . . . . . . . . . . .16
Remote sensor . . . . . . . . . . . . . . . . . . . . . . . . . . . . . . . . . .17
Repeat . . . . . . . . . . . . . . . . . . . . . . . . . . . . . . . . . . . . . . . .23
REPEAT button . . . . . . . . . . . . . . . . . . . . . . . . . . . . . .16, 23
Repeat A-B . . . . . . . . . . . . . . . . . . . . . . . . . . . . . . . . . . . . .23
REPEAT A-B button . . . . . . . . . . . . . . . . . . . . . . . . . . .16, 23
RETURN/TITLE button . . . . . . . . . . . . . . . . . . . . . . . . . . .16
Safety information . . . . . . . . . . . . . . . . . . . . . . . . . . . . . . .4-5
Safety symbols . . . . . . . . . . . . . . . . . . . . . . . . . . . . . . . . . . .2
Screen saver . . . . . . . . . . . . . . . . . . . . . . . . . . . . . . . . . . . .40
Slow motion . . . . . . . . . . . . . . . . . . . . . . . . . . . . . . . . . . . .20
Smart navigator . . . . . . . . . . . . . . . . . . . . . . . . . . . . . . . . .32
SPDIF . . . . . . . . . . . . . . . . . . . . . . . . . . . . . . . . . . . . . . . . .38
Speaker setup . . . . . . . . . . . . . . . . . . . . . . . . . . . . . . . . . . .37
Specifications . . . . . . . . . . . . . . . . . . . . . . . . . . . . . . . . . . .45
Still picture . . . . . . . . . . . . . . . . . . . . . . . . . . . . . . . . . . . . .21
STOP button . . . . . . . . . . . . . . . . . . . . . . . . . . . . . . . . . . .16
SUBTITLE button . . . . . . . . . . . . . . . . . . . . . . . . . . . . .16, 25
Subtitles . . . . . . . . . . . . . . . . . . . . . . . . . . . . . . . . . . . . . . .25
S-VIDEO (video out) jack . . . . . . . . . . . . . . . . . . . .11, 18, 34
SYSTEM MENU button . . . . . . . . . . . . . . . . . . . . . . . . . . .16
3D sound . . . . . . . . . . . . . . . . . . . . . . . . . . . . . . . . . . . . . .37
Time search . . . . . . . . . . . . . . . . . . . . . . . . . . . . . . . . . . . .21
Title menus . . . . . . . . . . . . . . . . . . . . . . . . . . . . . . . . . . . .19
Track selection . . . . . . . . . . . . . . . . . . . . . . . . . . . . . . . . . .19
TV display . . . . . . . . . . . . . . . . . . . . . . . . . . . . . . . . . . . . .33
TV type . . . . . . . . . . . . . . . . . . . . . . . . . . . . . . . . . . . . . . .36
VFD DIM . . . . . . . . . . . . . . . . . . . . . . . . . . . . . . . . . . . . . .40
VIDEO (video out) jack . . . . . . . . . . . . . . . . . . . . . . . .10, 18
Video mode . . . . . . . . . . . . . . . . . . . . . . . . . . . . . . . . .34-35
Video output . . . . . . . . . . . . . . . . . . . . . . . . . . . . . . . . . . .34
Warranty . . . . . . . . . . . . . . . . . . . . . . . . . . . . . . . . . . .46-47
Y Pb Pr (video out) jacks . . . . . . . . . . . . . . . . . . . . . . .12, 18
Zoom . . . . . . . . . . . . . . . . . . . . . . . . . . . . . . . . . . . . . . . . .22
ZOOM button . . . . . . . . . . . . . . . . . . . . . . . . . . . . . . .16, 22
48 Information Index
 Loading...