

Page 1
User Guide
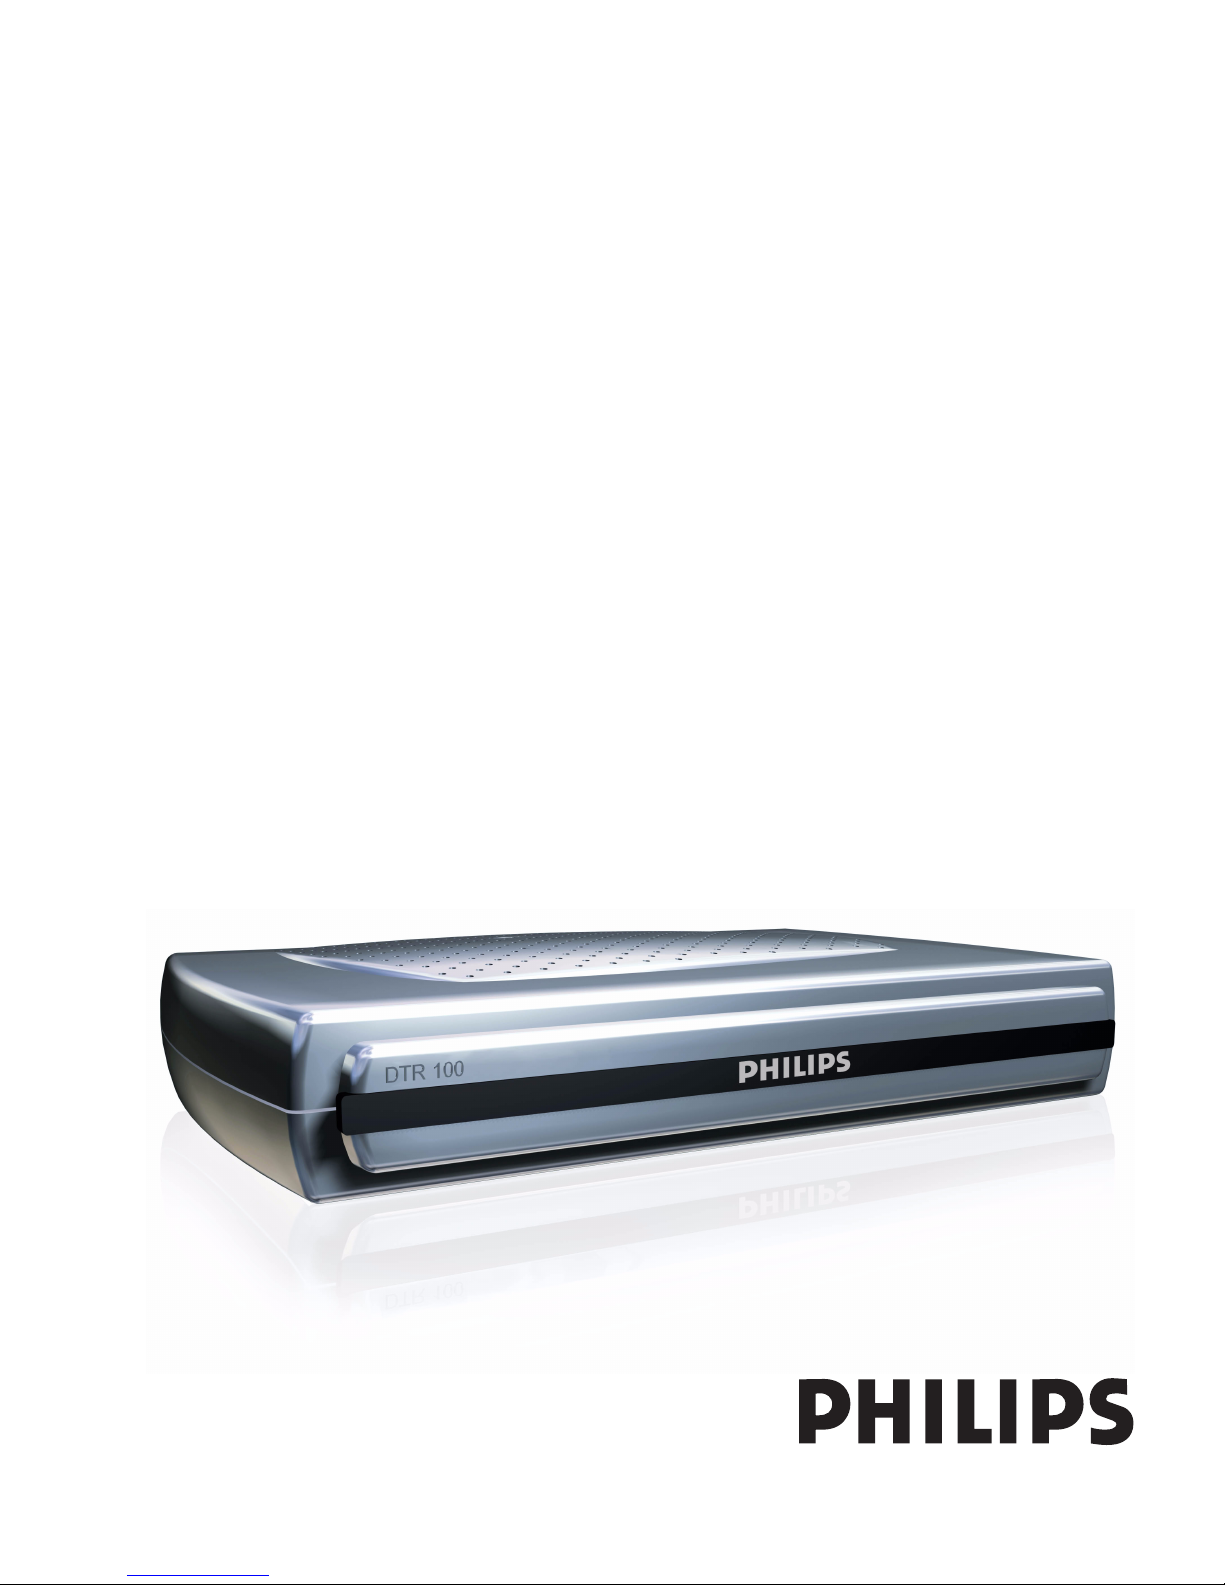
DTR 100Digital Set Top Box
Page 2
2 C
ONTENTS
E
n
g
l
i
s
h
Contents
Quick Guide.................................................................... 3
Connecting to a Television....................................... 3
Connecting to a Television and VCR .................... 3
Introduction.................................................................... 4
About This User Guide.............................................. 4
What is Freeview? ....................................................... 4
Safety is Important....................................................... 4
Safety Considerations................................................. 4
Cleaning........................................................................... 4
Ventilation ...................................................................... 4
Servicing .......................................................................... 4
Electrical Information .......................................... 4
Environmental Markings .................................... 5
Getting Started ............................................................ 6
In the Box ....................................................................... 6
Identification of Parts........................................... 6
Remote Control........................................................... 6
Digital Set Top Box ..................................................... 7
Mains Adaptor............................................................... 7
The Remote Control ............................................ 7
Using the Remote Control ....................................... 7
Mains adaptor ........................................................... 7
Connecting Your Digital Set Top Box to
other equipment ..................................................... 8
Connecting to a Television and DVD ................... 8
Connecting to a TV and a Stereo System............ 9
Switching on for the first time...................... 10
Using the Set Top Box........................................... 11
Channel List ............................................................. 11
To Watch a channel.................................................. 11
To Delete a Channel................................................. 11
To Edit a channel name............................................ 11
To Lock a channel...................................................... 12
To Add a channel to your Favourites list........... 12
Changing Channels .................................................... 12
Channel browse buttons ......................................... 12
Number buttons (0-9).............................................. 12
Channel list .................................................................. 12
Configuration .......................................................... 13
Receiver Upgrade....................................................... 13
Parental Settings ......................................................... 13
Language.................................................................... 14
Timers ......................................................................... 14
Electronic Program Guide .............................. 15
Favourites.................................................................. 15
Additional Functions........................................... 16
Information / Help button....................................... 16
Volume .......................................................................... 16
Mute ............................................................................... 16
Swap............................................................................... 16
Text/MHEG ................................................................. 16
Help and Advice......................................................... 17
Error .............................................................................. 17
Possible cause.............................................................. 17
Remedy ......................................................................... 17
Technical Data............................................................ 18
General.......................................................................... 18
Base specification ....................................................... 18
Input /Output .............................................................. 18
Power Supply............................................................... 18
Accessories.................................................................. 18
Temperature ............................................................... 18
Guarantee...................................................................... 19
Page 3
Q
UICK QUIDE
3
E
n
g
l
i
s
h
Quick Guide
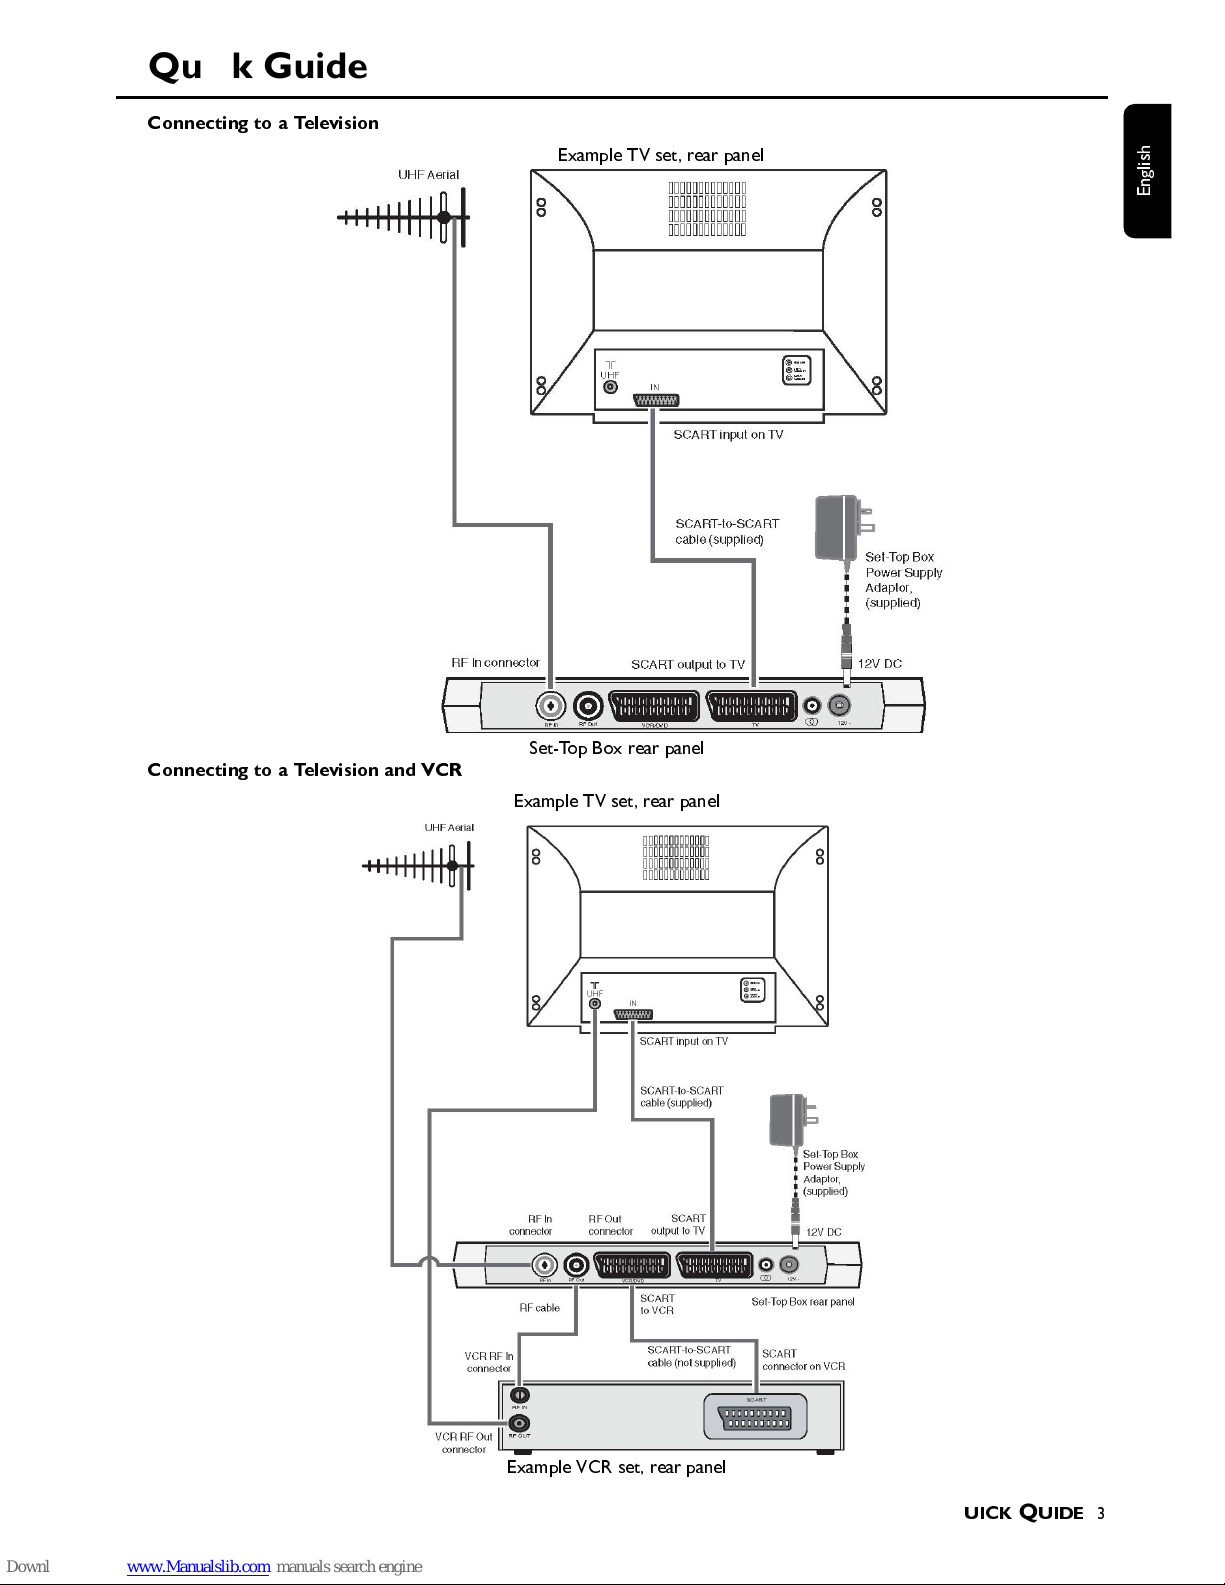
Connecting to a Television
Connecting to a Television and VCR
Example TV set, rear panel
Set-Top Box rear panel
Example TV set, rear panel
Example VCR set, rear panel
Page 4
4
I
NTRODUCTION
E
n
g
l
i
s
h
Introduction
Thank you for purchasing this product which has been
designed and manufactured to give you many years of
trouble-free service.
About This User Guide
This user guide contains all the information you need to
know about how to setup and watch available 'Freeview'
channels using your set top box.
What is Freeview?
It is the new, free digital service currently providing up to
30 free digital TV channels, over 20 digital radio stations
plus a whole new world of interactive services. It's broad-
cast from transmitters and received via a rooftop aerial.
It works like traditional TV, but because the signals are
Digital you need a set top box to convert them. This
means more channels can be transmitted with extra fea-
tures such as interactivity and widescreen pictures.
Safety is Important
To ensure your safety and the safety of others, please
ensure you read the Safety Instructions before you oper-
ate this product.
Note: Keep this information in a safe place for future refer-
ence.
Safety Considerations
Position the cables so that they cannot be walked on or
pinched by items placed on or against them.
- Do not use the set top box in humid or damp condi-
tions.
- Do not allow the set top box to get wet.
- Do not expose the set top box to dripping or splashing.
- Do not place water filled objects such as vases on top of
the set top box.
- Do not place naked flame sources, such as candles, on
top of the set top box.
Cleaning
- ALWAYS unplug the set top box before you clean it.
- Do not use liquid or aerosol cleaners.
- Clean the set top box with a soft, damp (not w et) cloth.
Ventilation
- The slots and openings on the set top box are for venti-
lation. Do not cover or block them as it may cause
overheating.
- NEVER let children push anything int o the holes or slots
on the case.
Servicing
- There are no user serviceable parts in this set top box.
- When servicing, refer to qualified service personnel.
- Consult your dealer if you are ever in doubt about the
installation, operation or safety of this set top box.
Electrical Information
Warning:
Read these electrical safety instructions carefully
befor e conn ecti ng th e ada pter t o the main s suppl y .
- This digital set top box is supplied with a mains adapter.
- This mains adapter is designed to operate on 230V AC
50Hz supply only. Connecting it to any other power
sources may damage the set top box.
- The mains adapter is designed for indoor use only.
- The mains adapter is a sealed unit. There are no user
serviceable parts inside and it does not require any elec-
trical adjustments.
- Do not attempt to open the mains adapter.
- If the mains adapter is not suitable for your socket, or
becomes damaged, it must be replaced and disposed of
in a safe and environmentally protective way. Always
refer to qualified personnel.
- Periodically inspect the mains adapter for damage. Do
not use if faults or damage are found. Refer to qualified
personnel.
This symbol indicates that the adaptor is a Class
II appliance and does not require an earth con-
nection.
This symbol indicates that the adapter is for
indoor use only.
This symbol indicates that the adapter conforms
to CE regulations.
Page 5
I
NTRODUCTION
5
E
n
g
l
i
s
h
Environmental Markings
The „Batteries marking symbol“ means used bat-
teries must not be disposed together with your
household waste. Please, inquire about the local
regulations regarding disposal of used batteries. For infor-
mation: the PHILIPS batteries supplied with your receiver
remote do not contain hazardous substances such as Mer-
cury, Cadmium, or Lead.
The „Material recyclability symbol“ means the
package cardboard or user manual paper is recy-
clable.
The „Green dot“ affixed on cardboard means
PHILIPS pays a financial duty to the „Avoidance
and Recovery of Packaging Waste“ organization.
This receiver contains a large number of materials that can
be recycled. If you are disposing of an old product, please
take it to a recycling center.
Page 6
6
G
ETTING STARTED
E
n
g
l
i
s
h
Getting Started
Remove your Digital Set Top Box carefully from the box,
and remove the packaging from each part.
In the Box
You will find the following items:
- Digital Set Top Box
- Remote Control (AAA batteries)
- Power supply 230 V AC/50 Hz to 12 V DC
- SCART-to-SCART cable
(for Digital Set Top Box to SCART input connector on
TV set)
- User Guide (This publication)
If any of these items are damaged or missing, please con-
tact the help line on:
0870 900 9070
Hours of Operation:
Monday to Friday 8:30 am to 6 pm
Saturday 9 am to 6 pm
Cost per Minute: national rate
Please make sure that you ha ve the model number of you r
set top box, before contacting us. The label showing the
type and serial number is underneath your receiver.
Identification of Parts
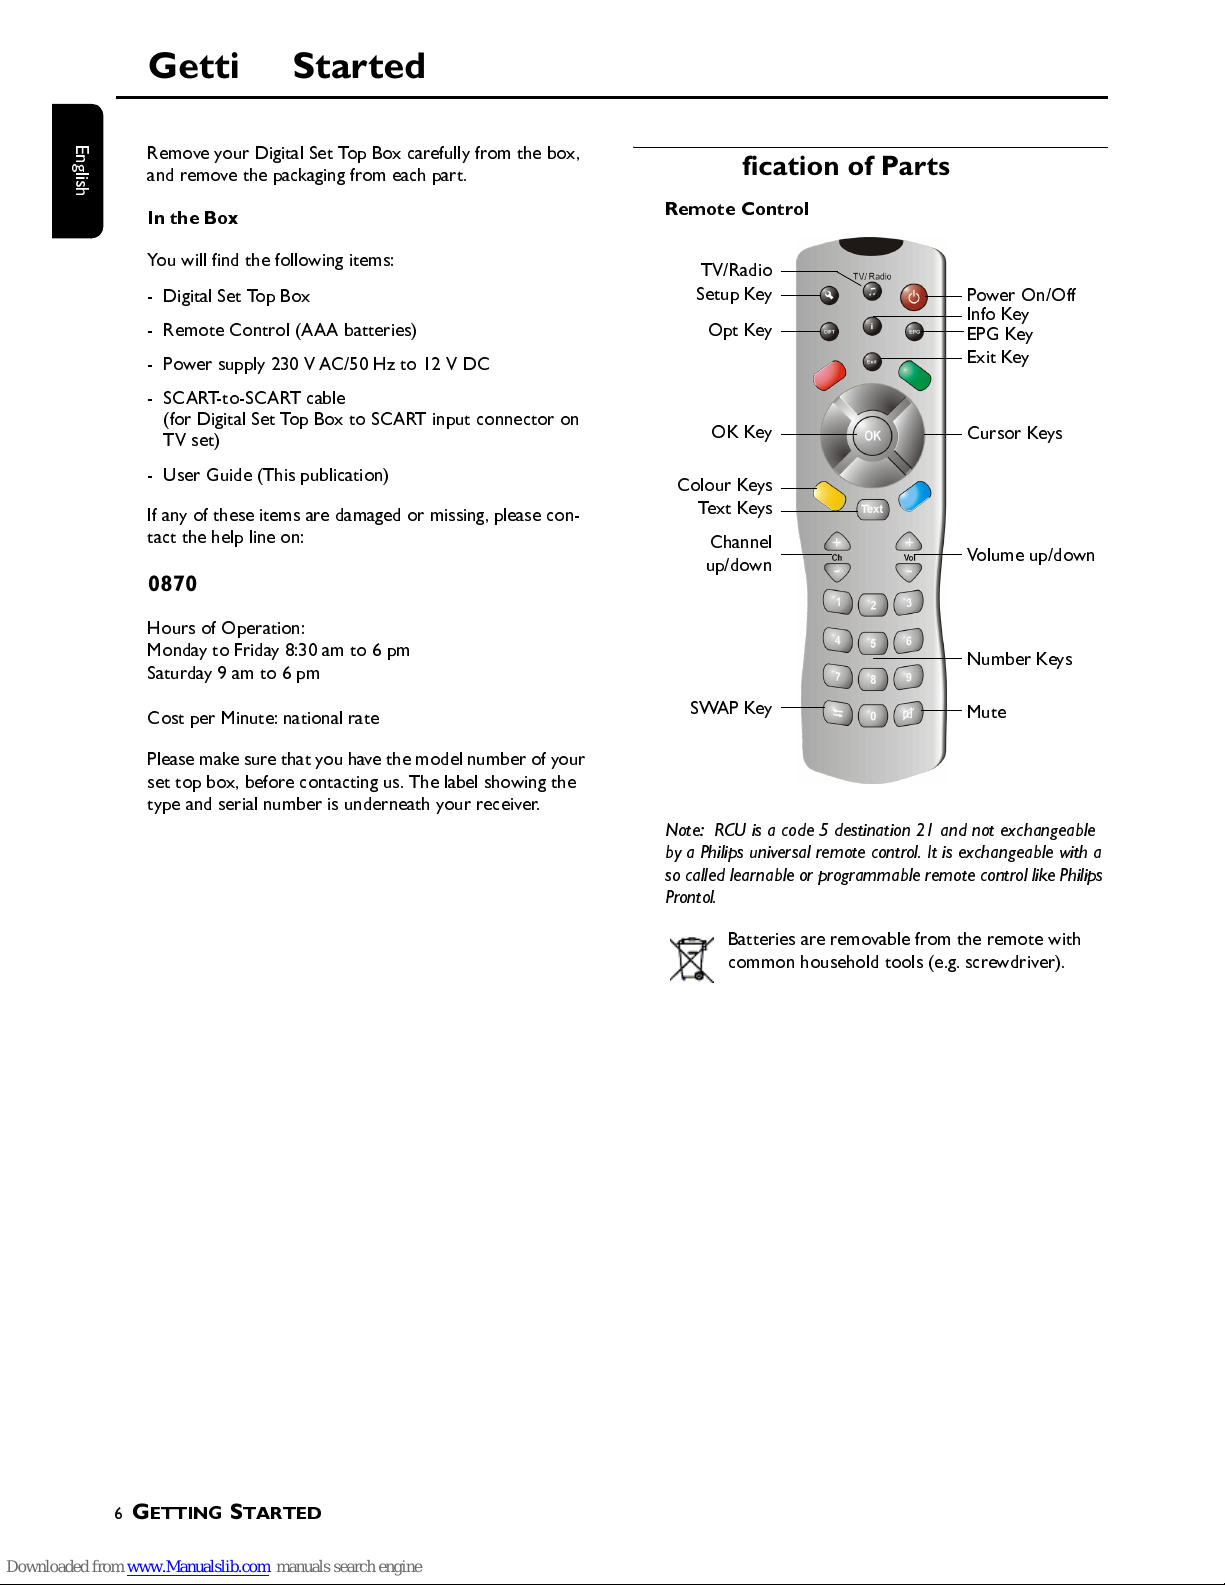
Remote Control
Note: RCU is a code 5 destination 21 and not exc hangeable
by a Philips universal remote control. It is exchangeable with a
so called learnable or programmable remote control like Phil ips
Prontol.
Batteries are removable from the remote with
common household tools (e.g. screwdriver).
Power On/ Off
Info Key
EPG Key
Exit Key
Cursor Keys
Volume up/down
Number Keys
SWAP Key
Channel
up/down
OK Key
Opt Key
TV/Radio
Mute
Setup Key
Text Keys
Colour Keys
Page 7
G
ETTING STARTED
7
E
n
g
l
i
s
h
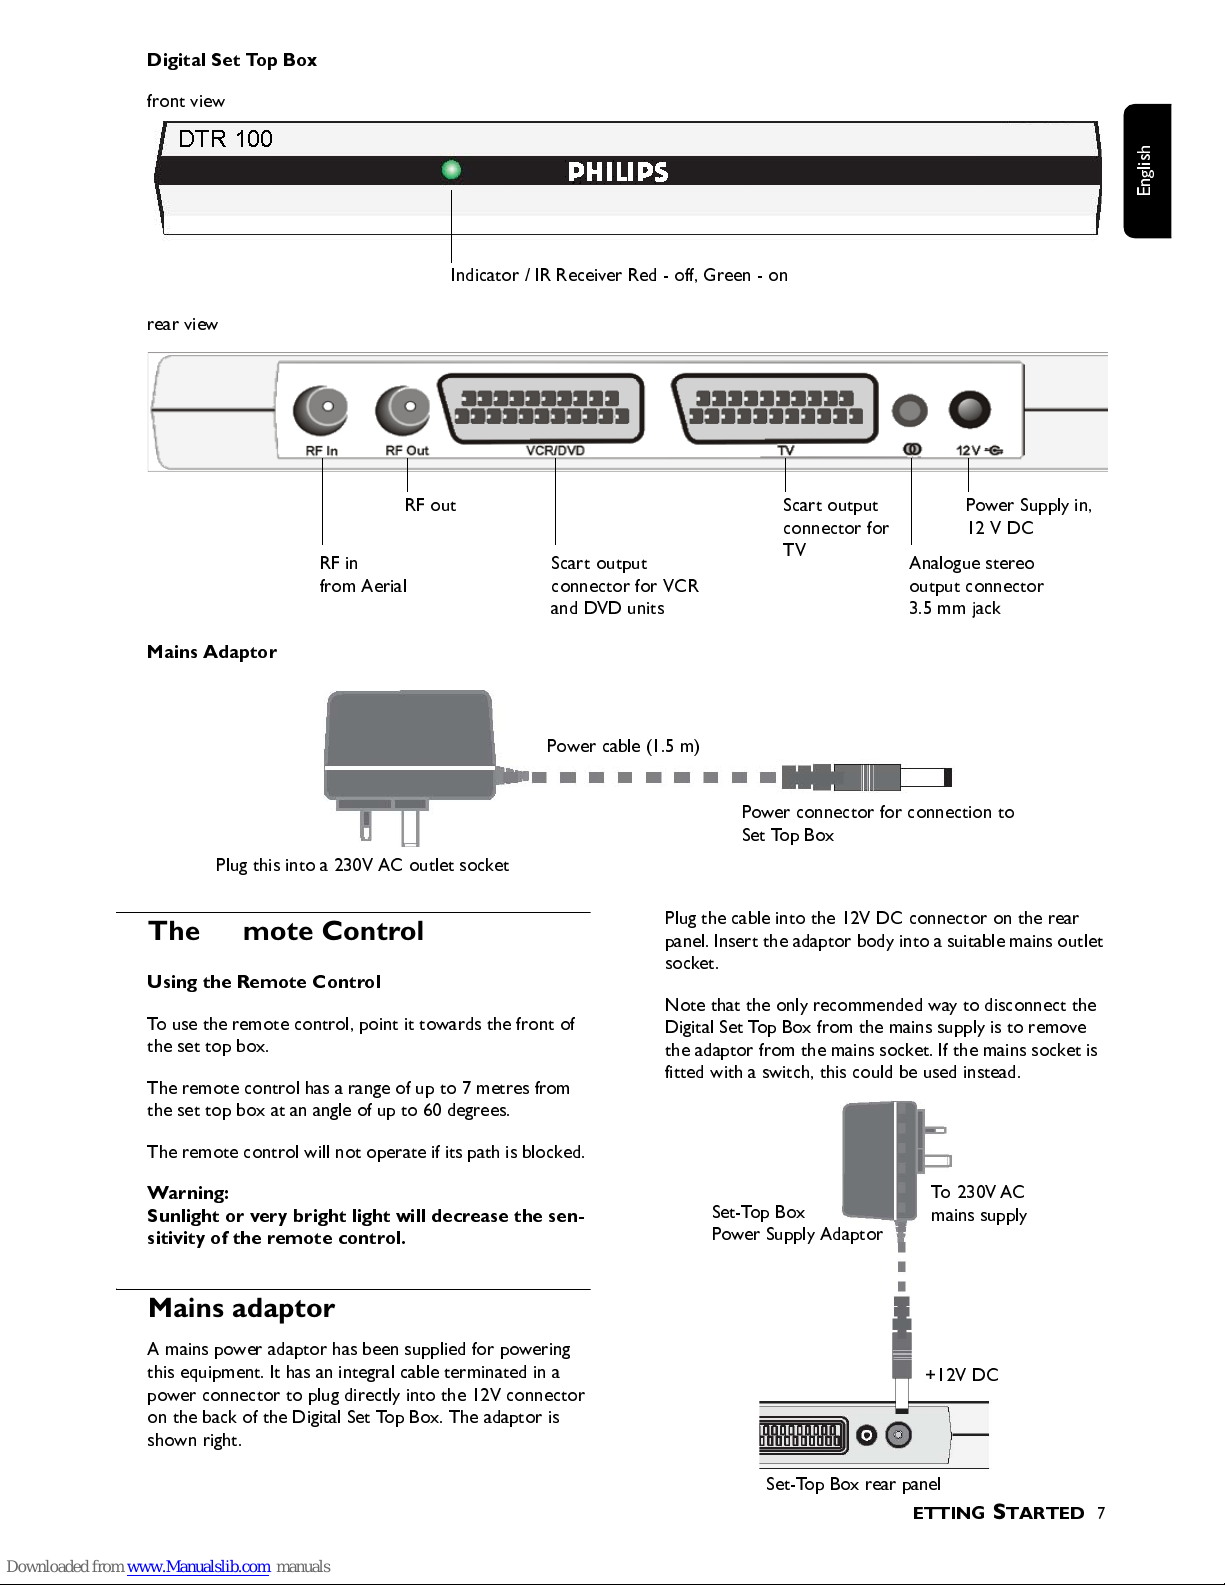
Digital Set Top Box
front view
rear view
Mains Adaptor
The Remote Control
Using the Remo te C o ntrol
To use the remote control, point it towards the front of
the set top box.
The remote control has a range of up to 7 metres from
the set top box at an angle of up to 60 degrees.
The remote control will not operate if its path is blocked.
Warning:
Sunlight or very bright light will decrease the sen-
sitivity of the remote control.
Mains adaptor
A mains power adaptor has been supplied for powering
this equipment. It has an integral cable terminated in a
power connector to plug directly into the 12V connector
on the back of the Digital Set Top Box. The adaptor is
shown right.
Plug the cable into the 12V DC connector on the rear
panel. Insert the adaptor body into a suitable mains outlet
socket.
Note that the only recommended way to disconnect the
Digital Set Top Box from the mains supply is to remove
the adaptor from the mains socket. If the mains socket is
fitted with a switch, this could be used instead.
Indicator / IR Receiver Red - off, Green - on
RF in
from Aerial
Power Supply in,
12 V DC
Analogue stereo
output connector
3.5 mm jack
Scart output
connector for
TV
Scart output
connector for VCR
and DVD units
RF out
Power c able (1. 5 m)
Power connector for connection to
Set Top Box
Plug this into a 230V AC outlet socket
Set-Top Box rear panel
+12V DC
To 230V AC
mains supply
Set-Top Box
Power Supply Adaptor
Page 8
8
G
ETTING STARTED
E
n
g
l
i
s
h
Connecting Your Digital Set Top Box to other equipment
The following diagrams are of typical configurations only, and ma y differ slightly to you r existing external equipmen t. If y ou are
unsure on how to connect to your set top box, always consult your manufacturer's user guide supplied with your equipment.
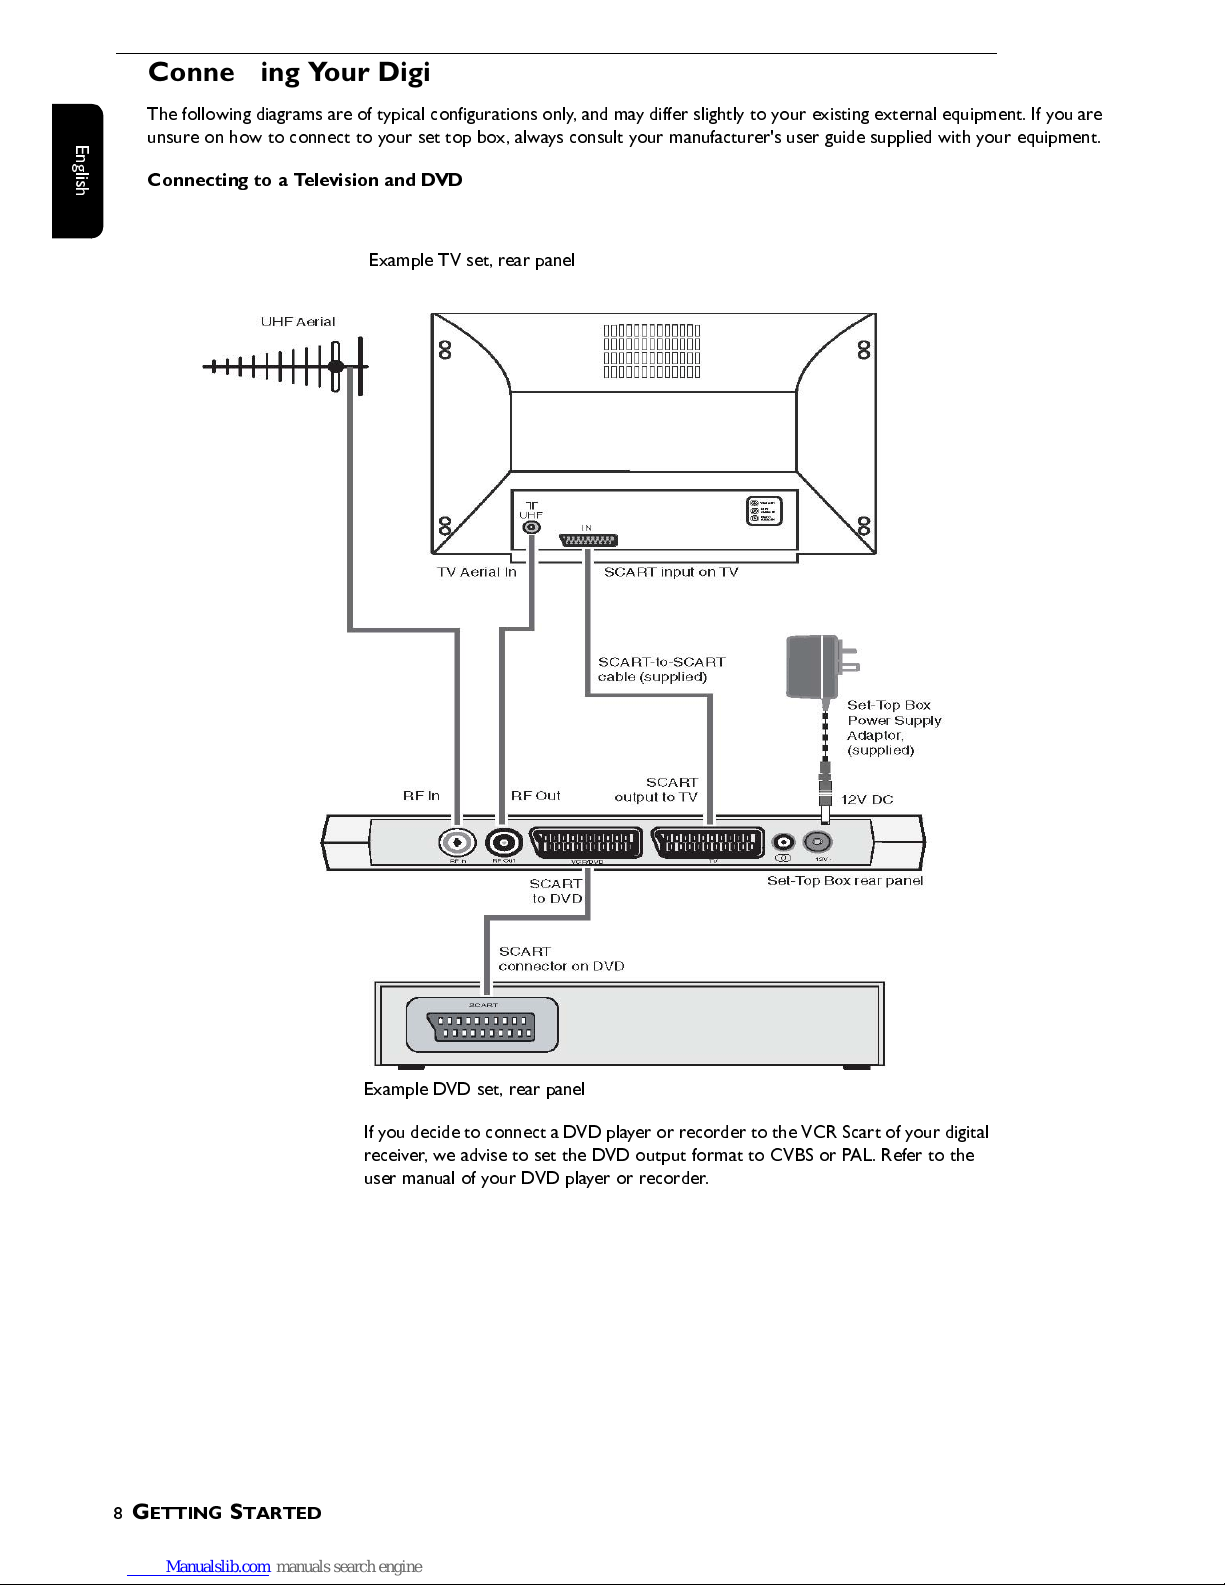
Connecting to a Television and DVD
Example TV set, rear panel
Example DVD set, rear panel
If you decide to connect a DVD pla yer or r ecorder to the VCR Scart of your digital
receiver, we advise to set the DVD output format to CVBS or PAL. Refer to the
user manu a l of your DVD player or rec o rder.
Page 9
G
ETTING STARTED
9
E
n
g
l
i
s
h
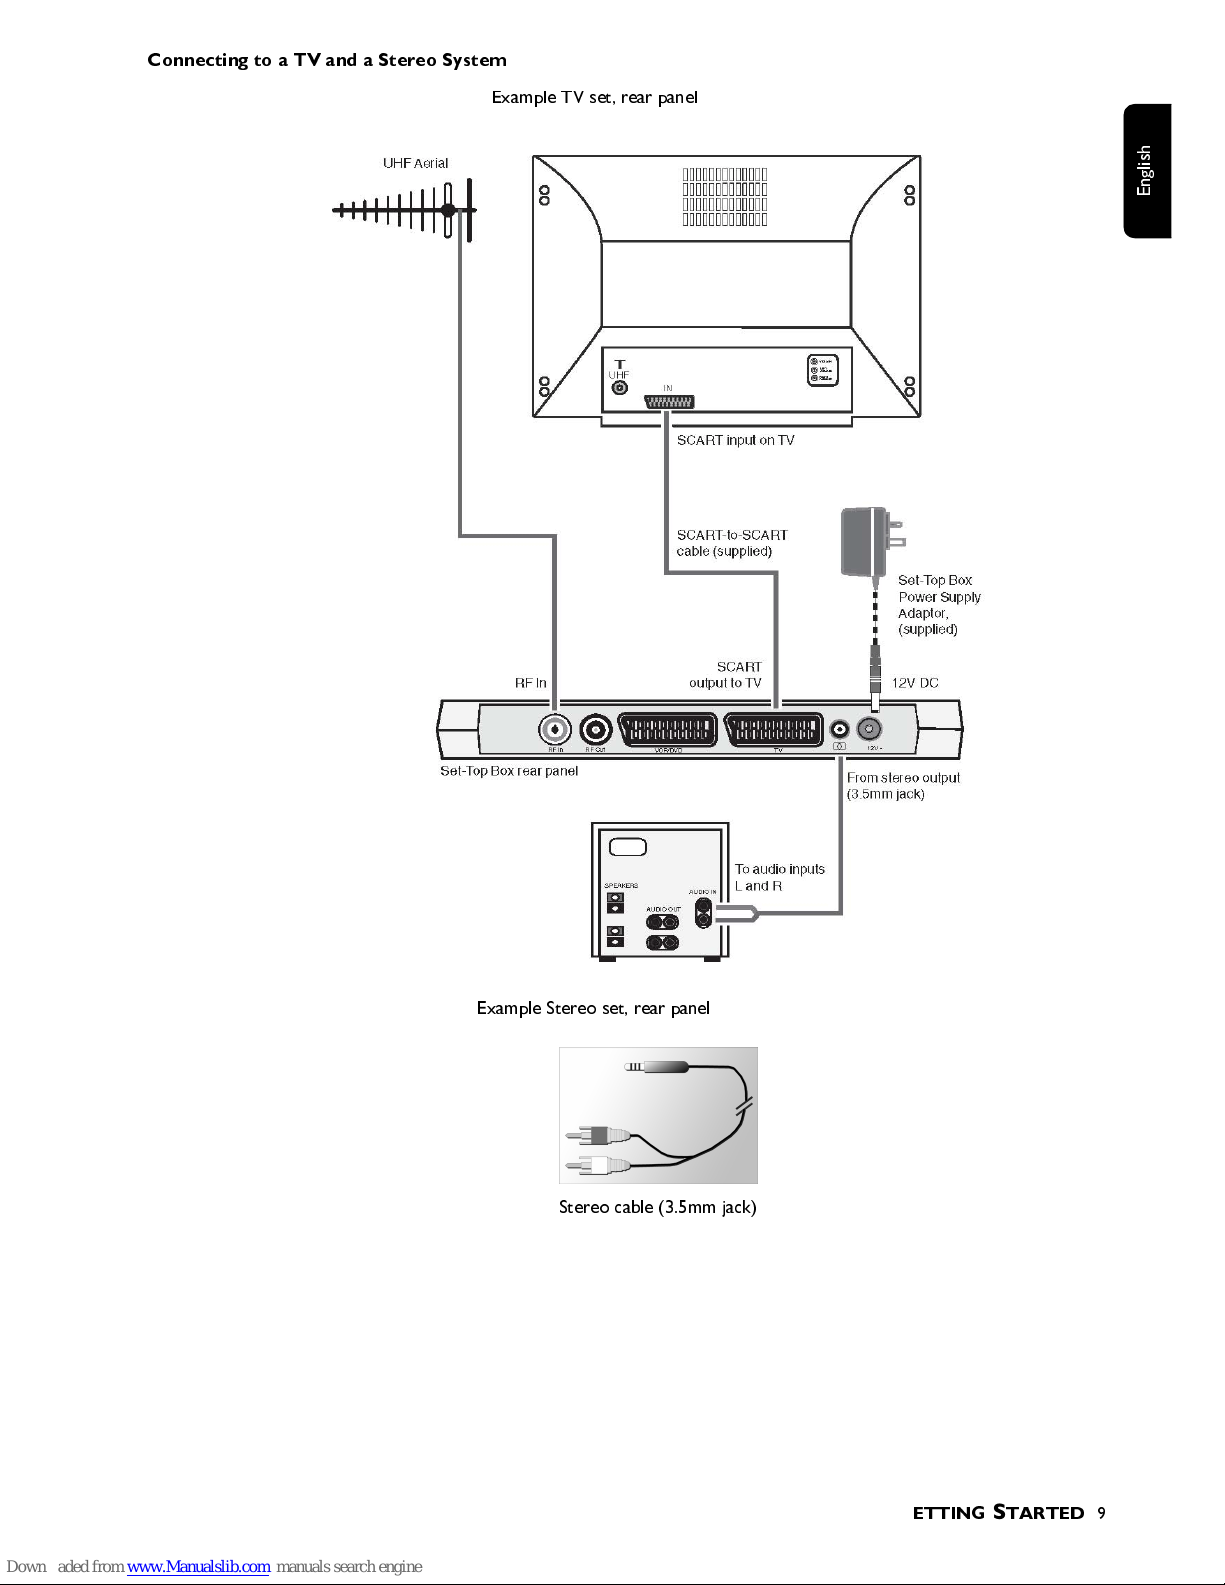
Connecting to a TV and a Stereo System
E
xample TV set, rear pa nel
Example Stereo set, rear panel
Stereo cable (3.5mm jack)
Page 10
10
G
ETTING STARTED
E
n
g
l
i
s
h
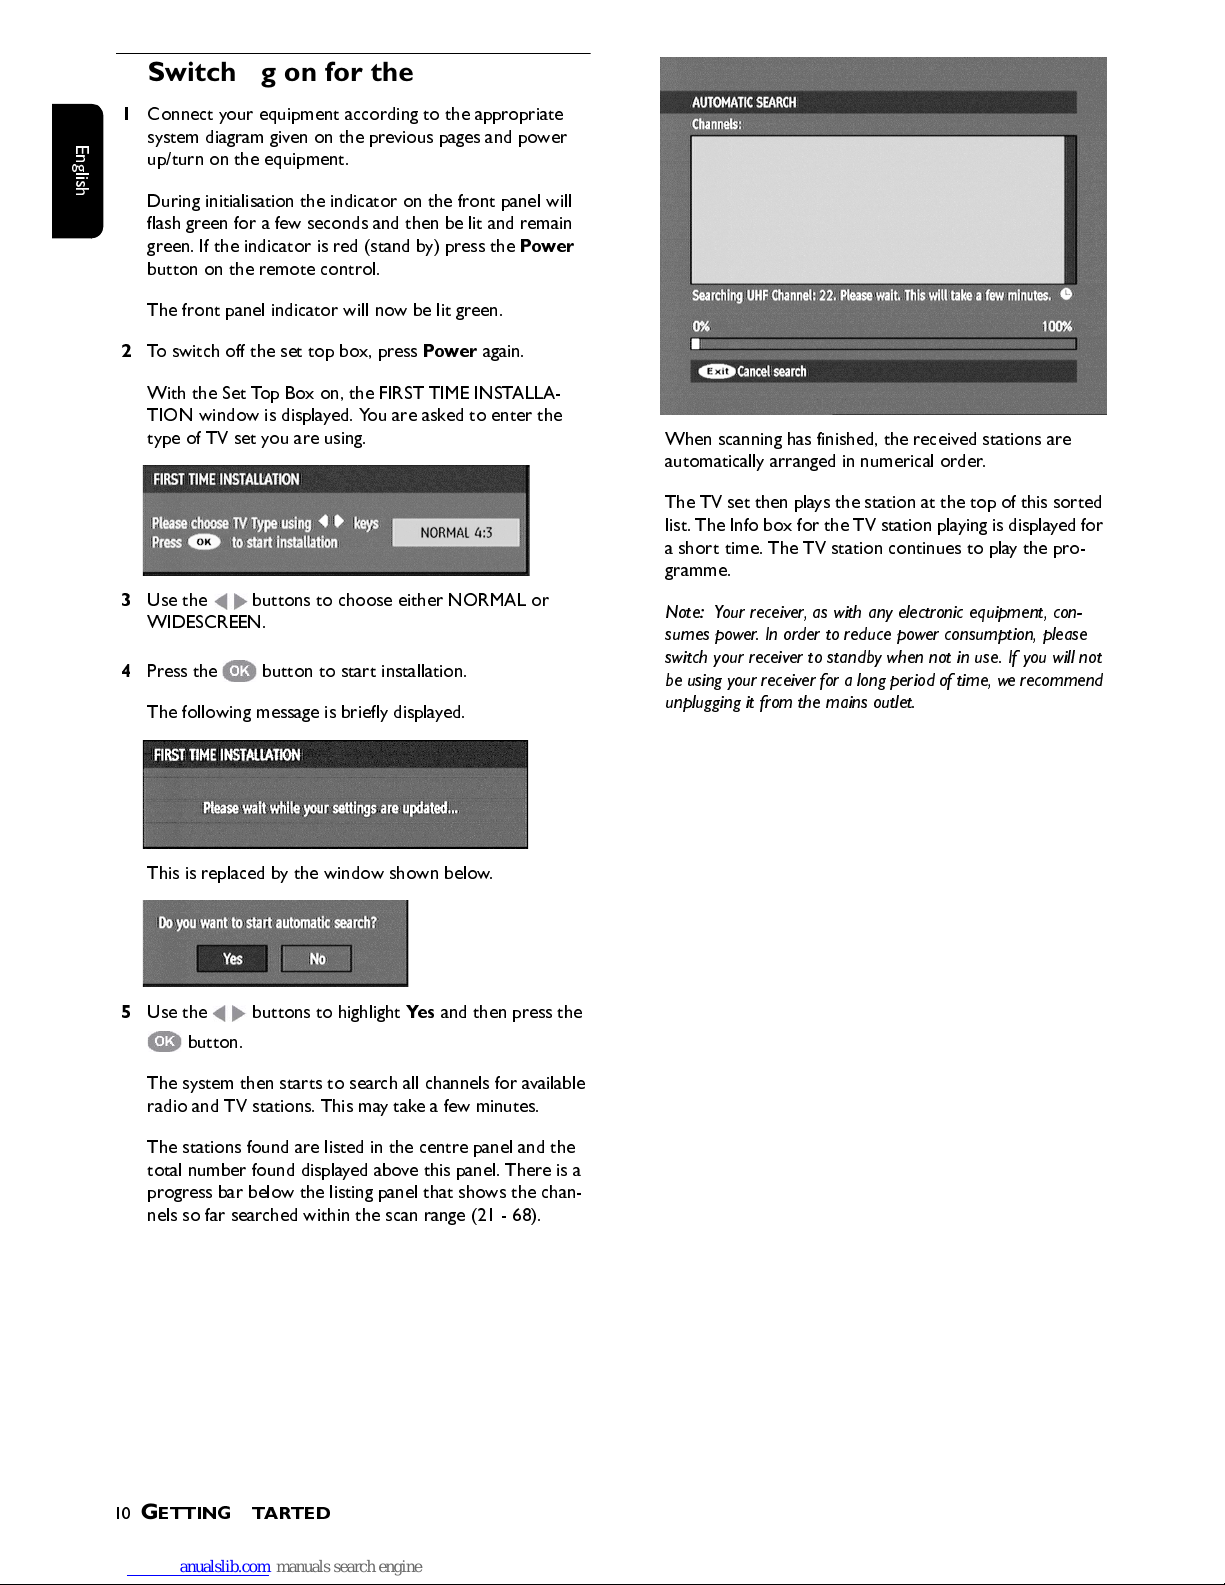
Switching on for the first time
1
Connect your equipment according to the appropriate
system diagram given on the previous pages and power
up/turn on the equipment.
During initialisation the indicator on the front panel will
flash green for a few seconds and then be lit and remain
green. If the indicator is red (stand by) press the
Power
button on the remote control.
The front panel indicator will now be lit green.
2
To switch off the set top box, press
Power
again.
With the Set Top Box on, the FIRST TIME INSTALLA-
TION window is displayed. You are asked to enter the
type of TV set you are using.
3
Use the buttons to choose either NORMAL or
WIDESCREEN.
4
Press the button to start installation.
The following message is briefly displayed.
This is replaced by the window shown below.
5
Use the buttons to highlight
Yes
and then press the
button.
The system then starts to search all channels for available
radio and TV stations. This may take a few minutes.
The stations found are listed in the centre panel and the
total number found displayed above this panel. There is a
progress bar below the listing panel that shows the chan-
nels so far searched within the scan range (21 - 68).
When scanning has finished, the received stations are
automatically arranged in numerical order.
The TV set then plays the station at th e top of this sorted
list. The Info box f or th e TV station playing is displayed for
a short time. The TV station continues to play the pro-
gramme.
Note: Your receiver, as with any electronic equipment, con-
sumes power. In order to reduce power consumption, please
switch your receiver to standby when not in use. If you will not
be using your r ecei ver f o r a long peri od of t ime, w e r ec ommen d
unplugging it from the mains outlet.
Page 11
U
SING THE SET TOP BOX
11
E
n
g
l
i
s
h
Using the Set Top Box
Channel List
The Channel List presents a list of all channels found dur-
ing the channel search described earlier. The list com-
prises radio and TV channels. They have been allocated a
channel (reference) number and are listed in this numeri-
cal order.
The Channel List can be used to watch and listen to the
selected channels, delete them from the list, edit the name
of the channel, set a password to access the channel, and
to add the channel to your list of favourite channels.
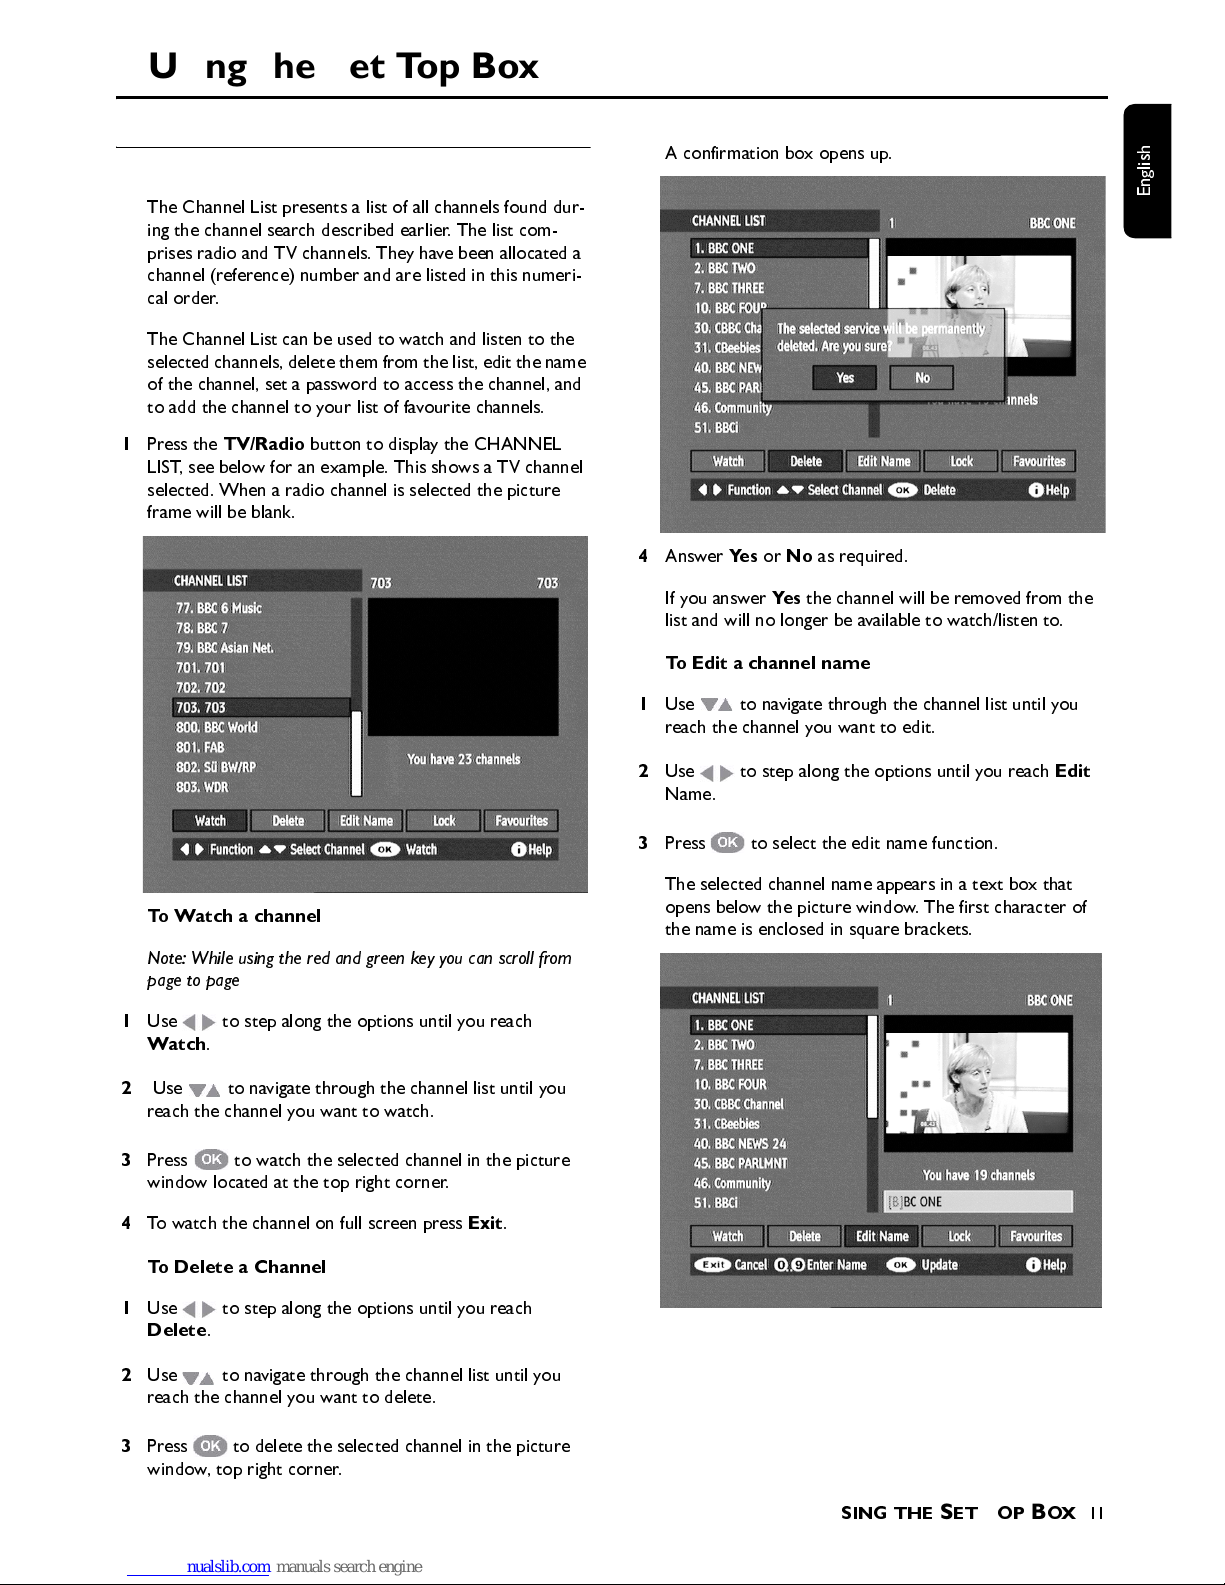
1
Press the
TV/Radio
button to display the CHANNEL
LIST, see below for an example. This shows a TV channel
selected. When a radio channel is selected the picture
frame will be blank.
To Watch a channel
Note: While using the red and green key you can scroll from
page to page
1
Use to step along the options until you reach
Watch
.
2
Use to navigate through the channel list until you
reach the channe l you want to wa tch.
3
Press to watch the selected channel in the picture
window located at the top right corner.
4
To watch the channel on full screen press
Exit
.
To Delete a Channel
1
Use to step along the options until you reach
Delete
.
2
Use to navigate through the channel list until you
reach the channe l you want to delete.
3
Press to delete the selected channel in the picture
window, top right corner.
A confirmation box opens up.
4
Answer
Yes
or No as required.
If you answer
Yes
the channel will be removed from the
list and will no longer be available to watch/listen to.
To Edit a channel name
1
Use to navigate through the channel list until you
reach the channel you want to edit.
2
Use to step along the options until you reach
Edit
Name.
3
Press to select the edit name function.
The selected channel name appears in a text box that
opens below the picture window. The first character of
the name is enclosed in square brackets.
Page 12
12
U
SING THE SET TOP BOX
E
n
g
l
i
s
h
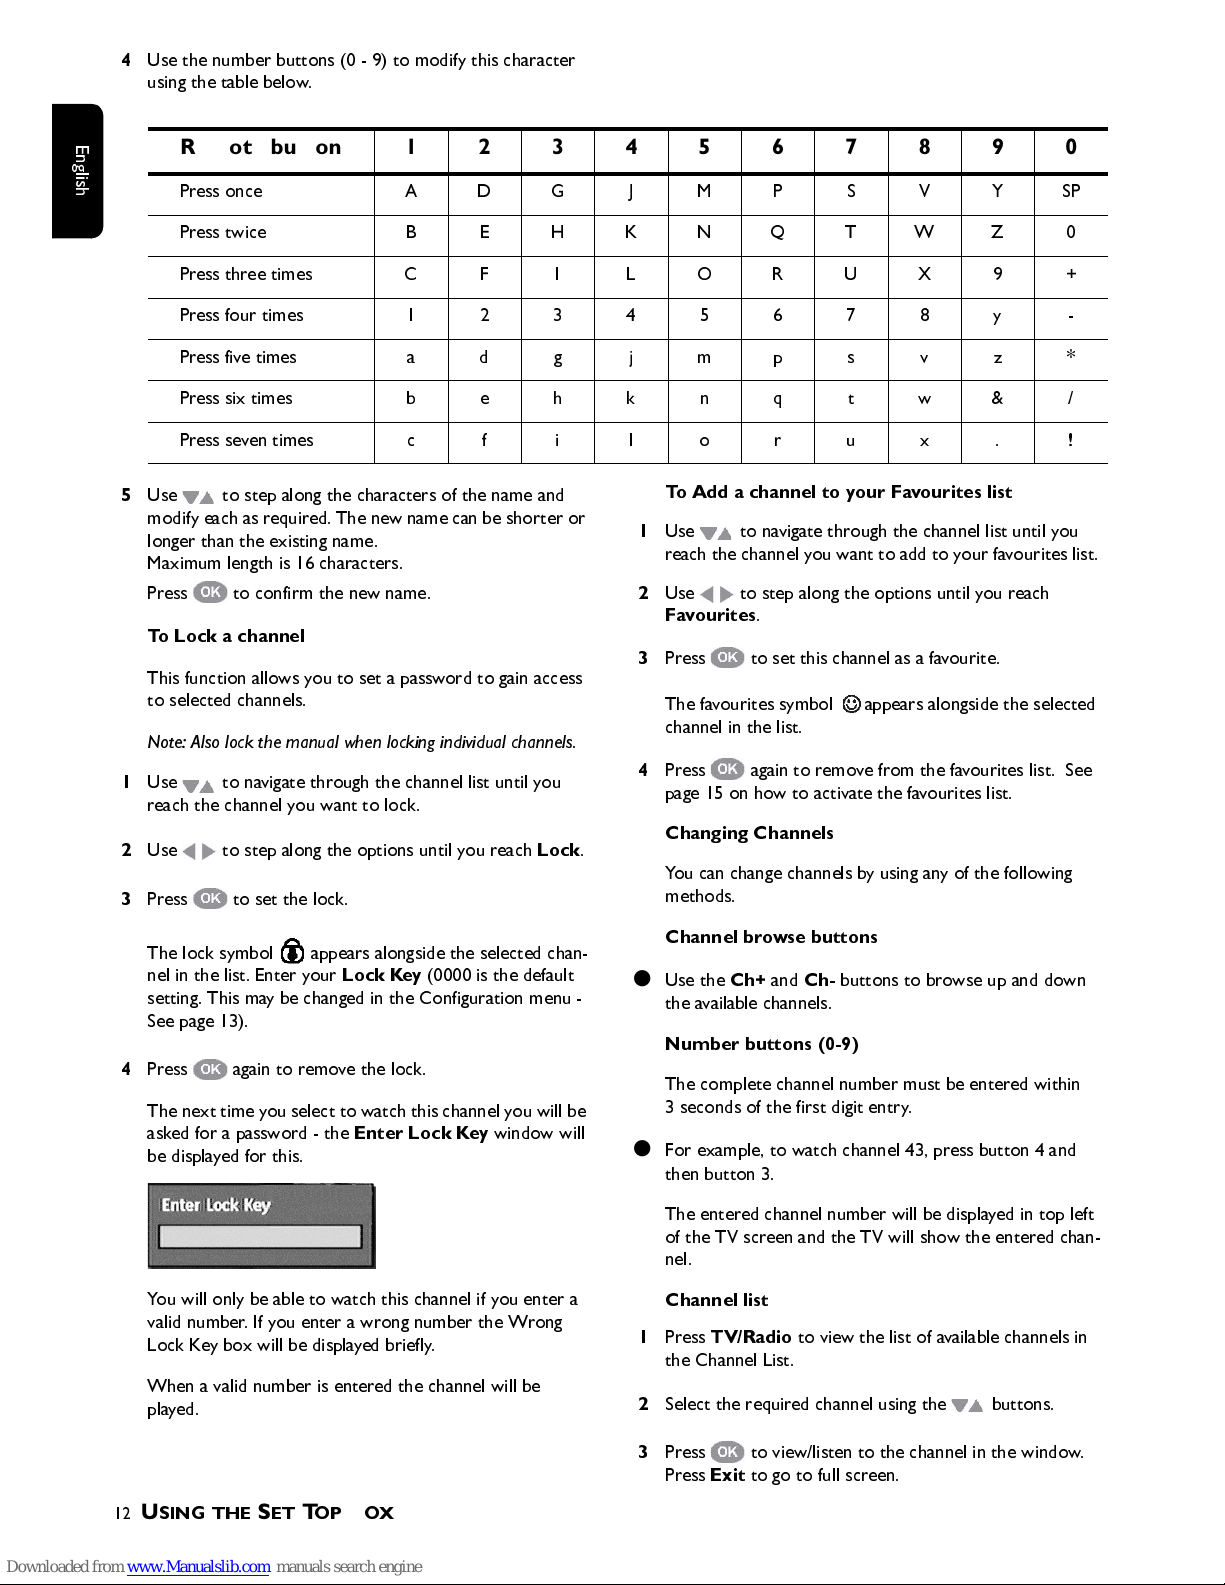
4
Use the number buttons (0 - 9) to modify this character
using the table below.
5
Use to step along the characters of the name and
modify each as required. The ne w name can be shorter or
longer than the existing name.
Maximum length is 16 characters.
Press to confirm the new name.
To Lock a channel
This function allows you to set a password to gain access
to selected channels.
Note: Also lock t he manual when locking individual channels.
1
Use to navigate through the channel list until you
reach the channe l you want to lock.
2
Use to step along the options until you reach
Lock
.
3
Press to set the lock.
The lock symbol appears alongside the selected chan-
nel in the list. Enter your
Lock Key
(0000 is the default
setting. This may be changed in the Configuration menu -
See page 13).
4
Press again to remove the lock.
The next time you select to watch this channel you will be
asked for a password - the
Enter Lock Key
window will
be displayed for this.
You will only be able to watch this channel if you enter a
valid number. If you enter a wrong number the Wrong
Lock Key box will be displayed briefly.
When a valid number is entered the channel will be
played.
To Add a channel to your Favourites list
1
Use to navigate through the channel list until you
reach the channel you want to add to y our favourites list.
2
Use to step along the options until you reach
Favourites
.
3
Press to set this channel as a favourite.
The favourites symbol appears alongside the selected
channel in the list.
4
Press again to remove from the favourites list. See
page 15 on how to activate the favourites list.
Changing Channels
You can change channels by using any of the following
methods.
Channel browse buttons
●
Use the
Ch+
and
Ch-
buttons to browse up and down
the available channels.
Number buttons (0-9)
The complete channel number must be entered within
3 seconds of the first digit entry.
●
For example, to watch channel 43, press button 4 and
then button 3.
The entered channel number will be displayed in top left
of the TV screen and the TV will show the entered chan-
nel.
Channel list
1
Press
TV/Radio
to view the list of available channels in
the Channel List.
2
Select the required channel using the buttons.
3
Press to view/listen to the channel in the window.
Press
Exit
to go to full screen.
Remote button 1234567890
Press once A D G J M P S V Y SP
Press twice B E H K N Q T W Z 0
Press three times C F I L O R U X 9 +
Press four times 12345678y-
Press five times adgjmpsvz*
Press six times b e h k n q t w & /
Press seven times c f i l o r u x . !
Page 13
U
SING THE SET TOP BOX
13
E
n
g
l
i
s
h
Configuration
The Configuration window allows you to customise vari-
ous settings.
1
Press the
OPT
button to displa y th e Configura tion windo w .
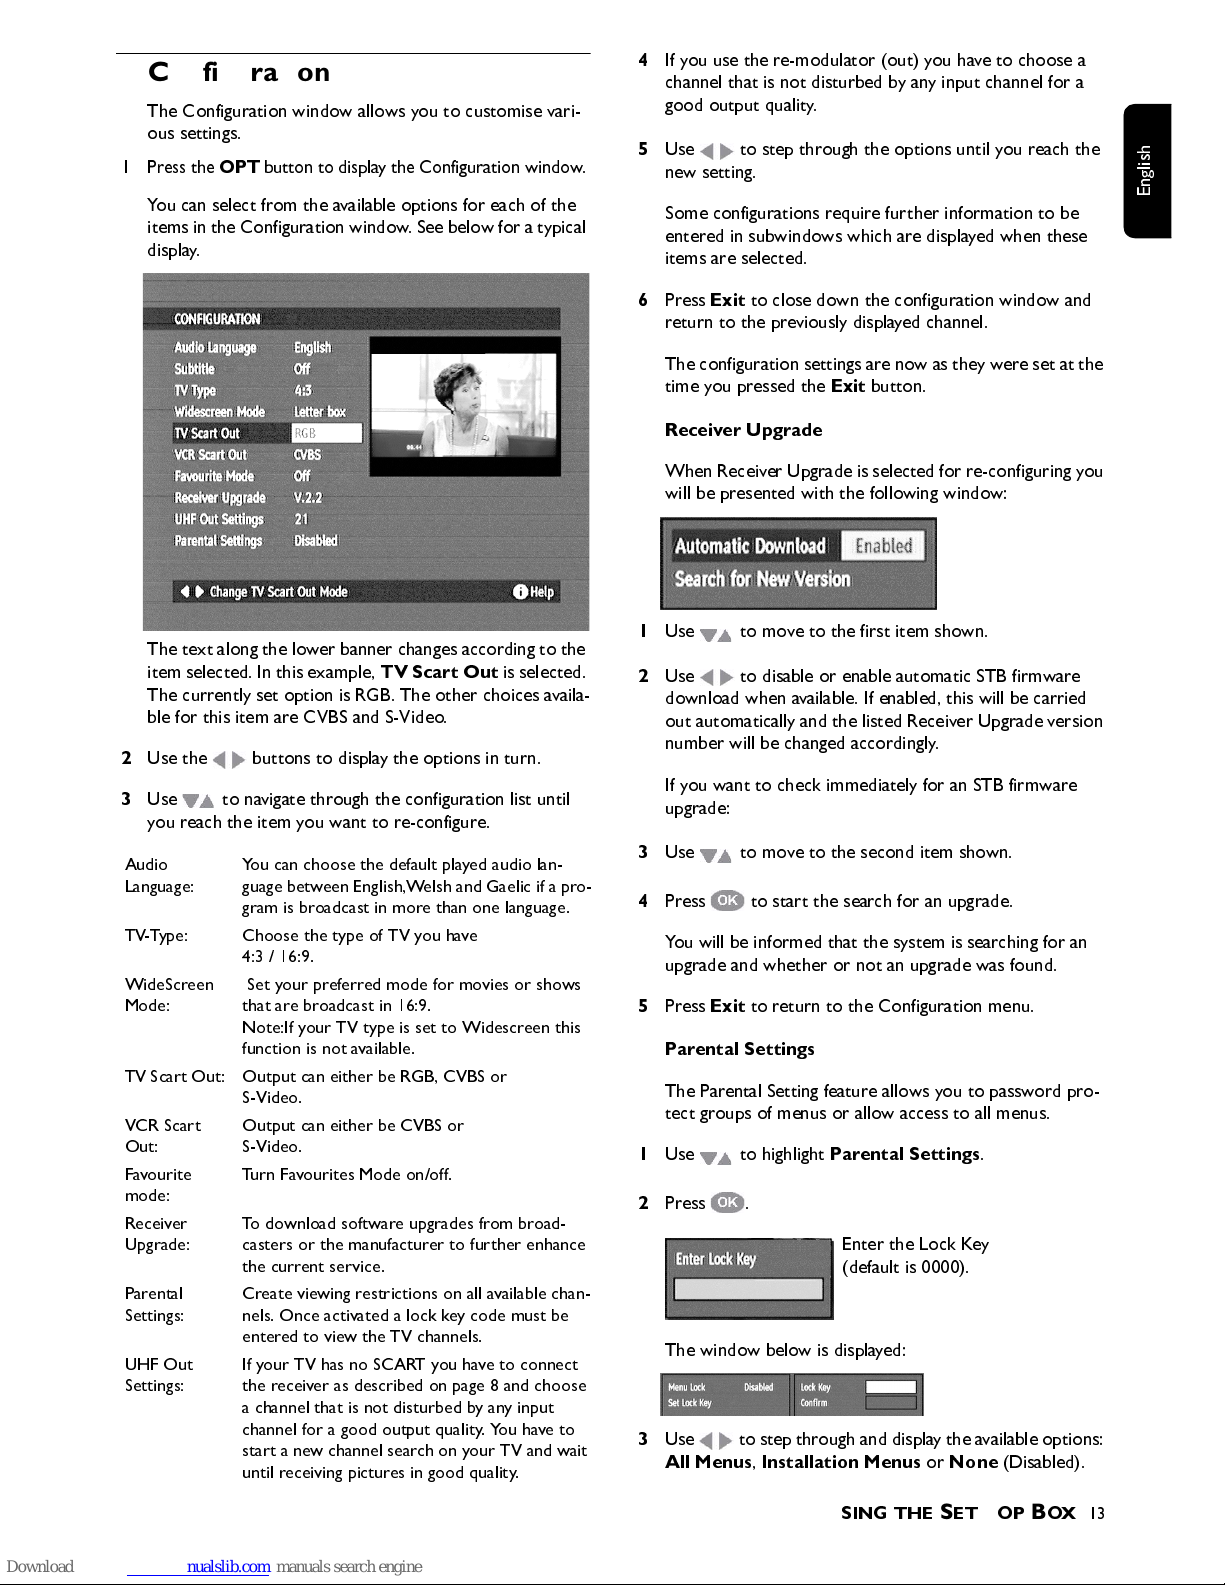
You can select from the available options for each of the
items in the Configuration window . See below for a typical
display.
The text along the lower banner changes according to the
item selected. In this example,
TV Scart Out
is selected.
The currently set option is RGB. The other choices availa-
ble for this item are CVBS and S-Video.
2
Use the buttons to display the options in turn.
3
Use to navigate through the configuration list until
you reach the item you want to re-configure.
4
If you use the re-modulator (out) you have to choose a
channel that is not disturbed by any input channel for a
good output quality.
5
Use to step through the options until you reach the
new setting.
Some configurations require further information to be
entered in subwindows which are displayed when these
items are selected.
6
Press
Exit
to close down the configuration window and
return to the previously displayed channel.
The configuration settings are now as t hey w er e set at the
time you pressed the
Exit
button.
Receiver Upgrade
When Receiver Upgrade is selected for re-configuring you
will be presented with the following window:
1
Use to move to the first item shown.
2
Use to disable or enable automatic STB firmware
download when available. If enabled, this will be carried
out automatically and the listed Receiver Upgrade version
number will be changed accordingly.
If you want to check immediately for an STB firmware
upgrade:
3
Use to move to the second item shown.
4
Press to start the search for an upgrade.
You will be informed that the system is searching for an
upgrade and whether or not an upgrade was found.
5
Press
Exit
to return to the Configuration menu.
Parental Settings
The Parental Setting feature allows you to password pro-
tect groups of menus or allow access to all menus.
1
Use to highlight
Parental Settings
.
2
Press .
Enter the Lock Key
(default is 0000).
The window below is displayed:
3
Use to step through and displa y the a vailable options:
All Menus, Installation Menus
or
None
(Disabled).
Audio
Language:
You can choose the default played audio lan-
guage between English,Welsh and Gaelic if a pro-
gram is broadcast in more than one language.
TV-Type: Choose the type of TV you have
4:3 / 16:9.
WideScreen
Mode:
Set your preferred mode for movies or shows
that are broadcast in 16:9.
Note:If your TV type is set to Widescreen this
function is not available.
TV Scart Out: Output can either be RGB, CVBS or
S-Video.
VCR Scart
Out:
Output can either be CVBS or
S-Video.
Favourite
mode:
Turn Favourites Mode on/off.
Receiver
Upgrade:
To download software upgrades from broad-
casters or the manufacturer to further enhance
the current service.
Parental
Settings:
Create viewing restrictions on all a vailable chan-
nels. Once activated a lock key co de must be
entered to view the TV channels.
UHF Out
Settings:
If your TV has no SCART you have to connect
the receiver as described on page 8 and choose
a channel that is not disturbed by any input
channel for a good output quality. You have to
start a new channel search on y our TV and wait
until receiving pictures in good quality.
Page 14
14
U
SING THE SET TOP BOX
E
n
g
l
i
s
h
4
Use to highlight
Set Lock Key
.
5
Press .
A second sub-window is displayed, above right.
6
Enter the Lock Key code in the code entry box using the
number buttons (0-9).
Input now switches to the Confirm code entry box.
7
Enter the same Lock Key code in this window using the
number buttons (0-9).
The second sub-window displays Key Lock Changed and
then closes.
8
Press
Exit
to Apply Setting and return to the Configura-
tion me nu.
Language
To check what is available:
1
Press the
Setup
button to display the Main menu.
2
Use to select
Language
.
3
Press .
4
If alternatives are available use to select the desired
language.
5
Press to apply these settings and exit this function.
This change is only temporarily for the current program.
Timers
You can use the Timer function to turn your Set Top Box
on and off in Stand-by and also to automatically switch
channels when your Set Top Box is on.
Press the
Menu
button to display the Main menu.
1
Use to select
Timers
.
2
Press .
The following typical
Timer Menu
is displayed.
Note: To record on a VCR / DVDR you must also set the timer
of the VCR / DVDR to record the desired program in the nor-
mal way. Make sure the timer program of the VCR / DVDR is
set to the correct EXT socket for the set top box.
To play back a recording from the VCR / DVDR, please make
sure the Set Top Box is in standby.
Use to select one of the five timer settings available.
3
Press .
The following typical Timer Menu is displayed which
shows Name box channel highlighted for selection.
4
Use to step through the list of loaded channels until
the channel to be set for timed turn on/off is displayed.
5
Use to step to the
Start
time.
Page 15
U
SING THE SET TOP BOX
15
E
n
g
l
i
s
h
6
Use the number buttons (0 - 9) to set the start time
7
Use to step to the
End
time.
8
Use the number buttons (0 - 9) to set the end time
9
Use to step to the
Date
.
10
Use the number buttons (0 - 9) to set the date
11
Press to apply changes and move the enter ed data to
the main timing list, as shown below.
Electronic Program Guide
The Electronic Program Guide provides the user with a
brief description of the currently selected program in the
list of channels. The five channels listed are a window on
all stored channels.
1
To display the Electronic Program Guide, press the
EPG
button. An example of an EPG window is given below.
2
Use to navigate through Channels.
A brief description of the highlighted channel name
appears in the upper left panel of the window with its
name and broadcast time.
3
Use to step to the
Next Event
.
The upper left panel now contains the details of the
Next
Event
.
Reminder: When
Next Event
has been selected, there is
an opportunity to set a reminder for a particular program.
Press OK on the selected program and a clock symbol is
shown.
During viewing a reminder is displayed that the selected
program is about to start.
4
Use to return to the
Current
Event.
5
Press to watch the currently selected event in the
upper right panel in this window.
6
Press
Exit
to view the current channel on full screen.
Favourites
When Favourites are enabled (see the Configuration win-
dow earlier), then only the channels that you selected as
your favourite channels will be stepped thr ough when you
use the channel browse buttons,
Ch+
and
Ch-
.
Page 16
16
U
SING THE SET TOP BOX
E
n
g
l
i
s
h
Additional Functions
Information / Help button
The has two functions according to the current sta-
tus.
1
When a TV or Radio channel is playing, press the
button to display program information:
- Channel name and number.
- Current program name, start and end play times.
- Next program name and start and end play times.
- Signal level for current channel.
-Time of day.
- TV or Radio icon.
2
To get help about the current selection in a window, press
the button for relevant information.
Volume
To increase or decrease the volume of the channel p laying,
press the
Vol+
and
Vol-
buttons respectively. The maxi-
mum volume is set by the volume control setting on the
TV.
A volume slider icon appears on the TV screen for visual
feedback.
Mute
Press the
Mute
button to turn of the sound. Press again
to restore the sound to the previous level.
Swap
Press the
Swap
button to switch between the two previ-
ously selected channels.
Text/ M H E G
With the text button you can access certain Text and Mul-
timedia contents.
MHEG (Multimedia and Hypermedia Expert Group) is a
standard that offers you information about various con-
tents like life style, shopping or sports events and results.
1
Press the
Text
or Red button to bring up the text menu
for the current channel.
2
Use the buttons to navigate through the menu.
3
Use to select an item.
Additionally you now have the four colour buttons (Red,
Green, Yellow and Blue) to navigate through the content
of the page. How they will be used will vary for different
stations; read their meaning from the bottom line (usually)
or wherever they appear on the screen and use them as
required.
4
Press the Text button again to leave the MHEG, or press
the
Exit
button.
Page 17
H
ELP AND ADVICE
17
E
n
g
l
i
s
h
Help and Advice
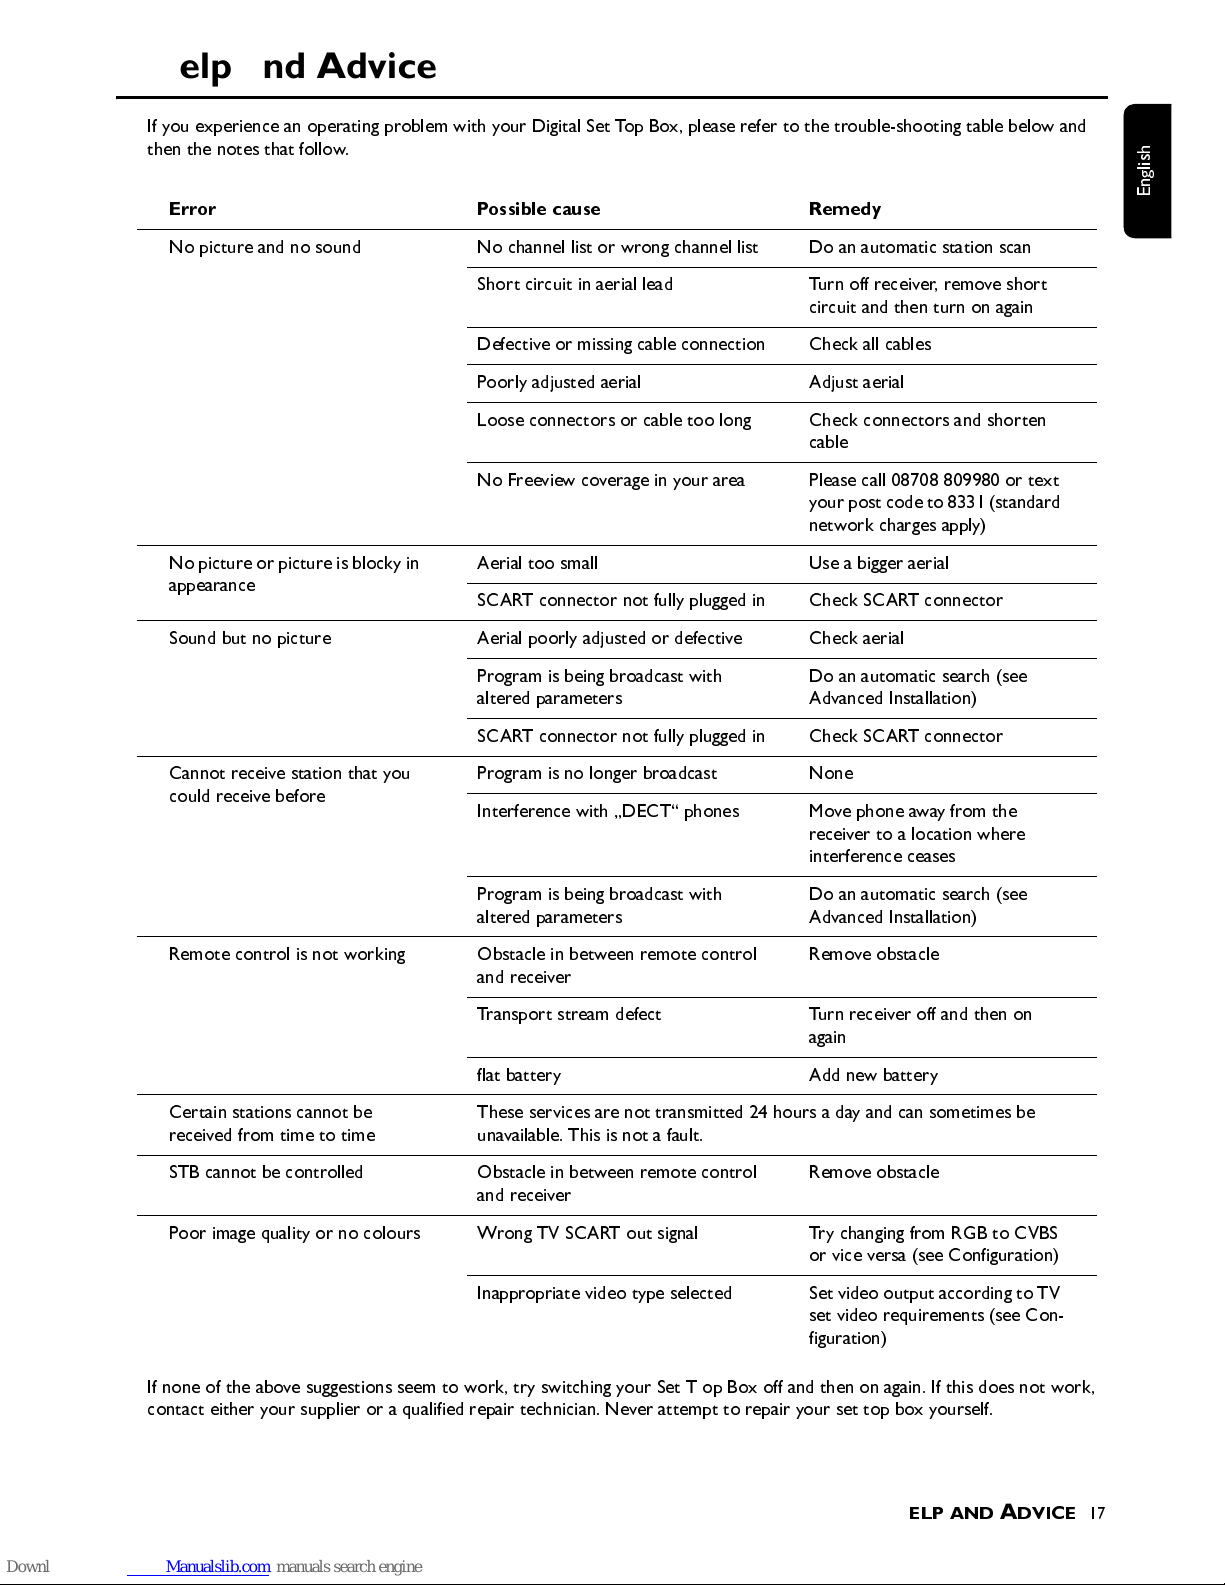
If you experience an operating problem with your Digital Set Top Box, please refer to the trouble-shooting table below and
then the notes that follow.
If none of the above suggestions seem to work, try switching your Set T op Box off and then on again. If this does not work,
contact either your supplier or a qualified repair technician. Never attempt to repair your set top box yourself.
Error Possible cause Remedy
No picture and no sound No channel list or wrong channel list Do an automatic station scan
Short circuit in aerial lead Turn off receiver, remove short
circuit and then turn on again
Defective or missing cable connection Check all cables
Poorly adjusted aerial Adjust aerial
Loose connectors or cable too long Check connectors and shorten
cable
No Freeview coverage in your area Please call 08708 809980 or text
your post code to 8331 (standard
network charges apply)
No picture or picture is blocky in
appearance
Aerial too small Use a bigger aerial
SCART connector not fully plugged in Check SCART connector
Sound but no picture Aerial poorly adjusted or defective Check aerial
Program is being broadcast with
altered parameters
Do an automatic search (see
Advanced Installation)
SCART connector not fully plugged in Check SCART connector
Cannot receive station that you
could receive before
Program is no longer broadcast None
Interference with „DECT“ phones Move phone away from the
receiver to a location where
interference ceases
Program is being broadcast with
altered parameters
Do an automatic search (see
Advanced Installation)
Remote control is not working Obstacle in between remote control
and receiver
Remove obstacle
Transport stream defect Turn receiver off and then on
again
flat battery Add new battery
Certain stations cannot be
received from time to time
These services are not transmitted 24 hours a day and can sometimes be
unavailable. This is not a fault.
STB cannot be controlled Obstacle in between remote control
and receiver
Remove obstacle
Poor image quality or no colours Wrong TV SCART out signal Try changing from RGB to CVBS
or vice versa (see Configuration)
Inappropriate video type selected Set video output according to TV
set video requirements (see Con-
figuration)
Page 18
18
H
ELP AND ADVICE
E
n
g
l
i
s
h
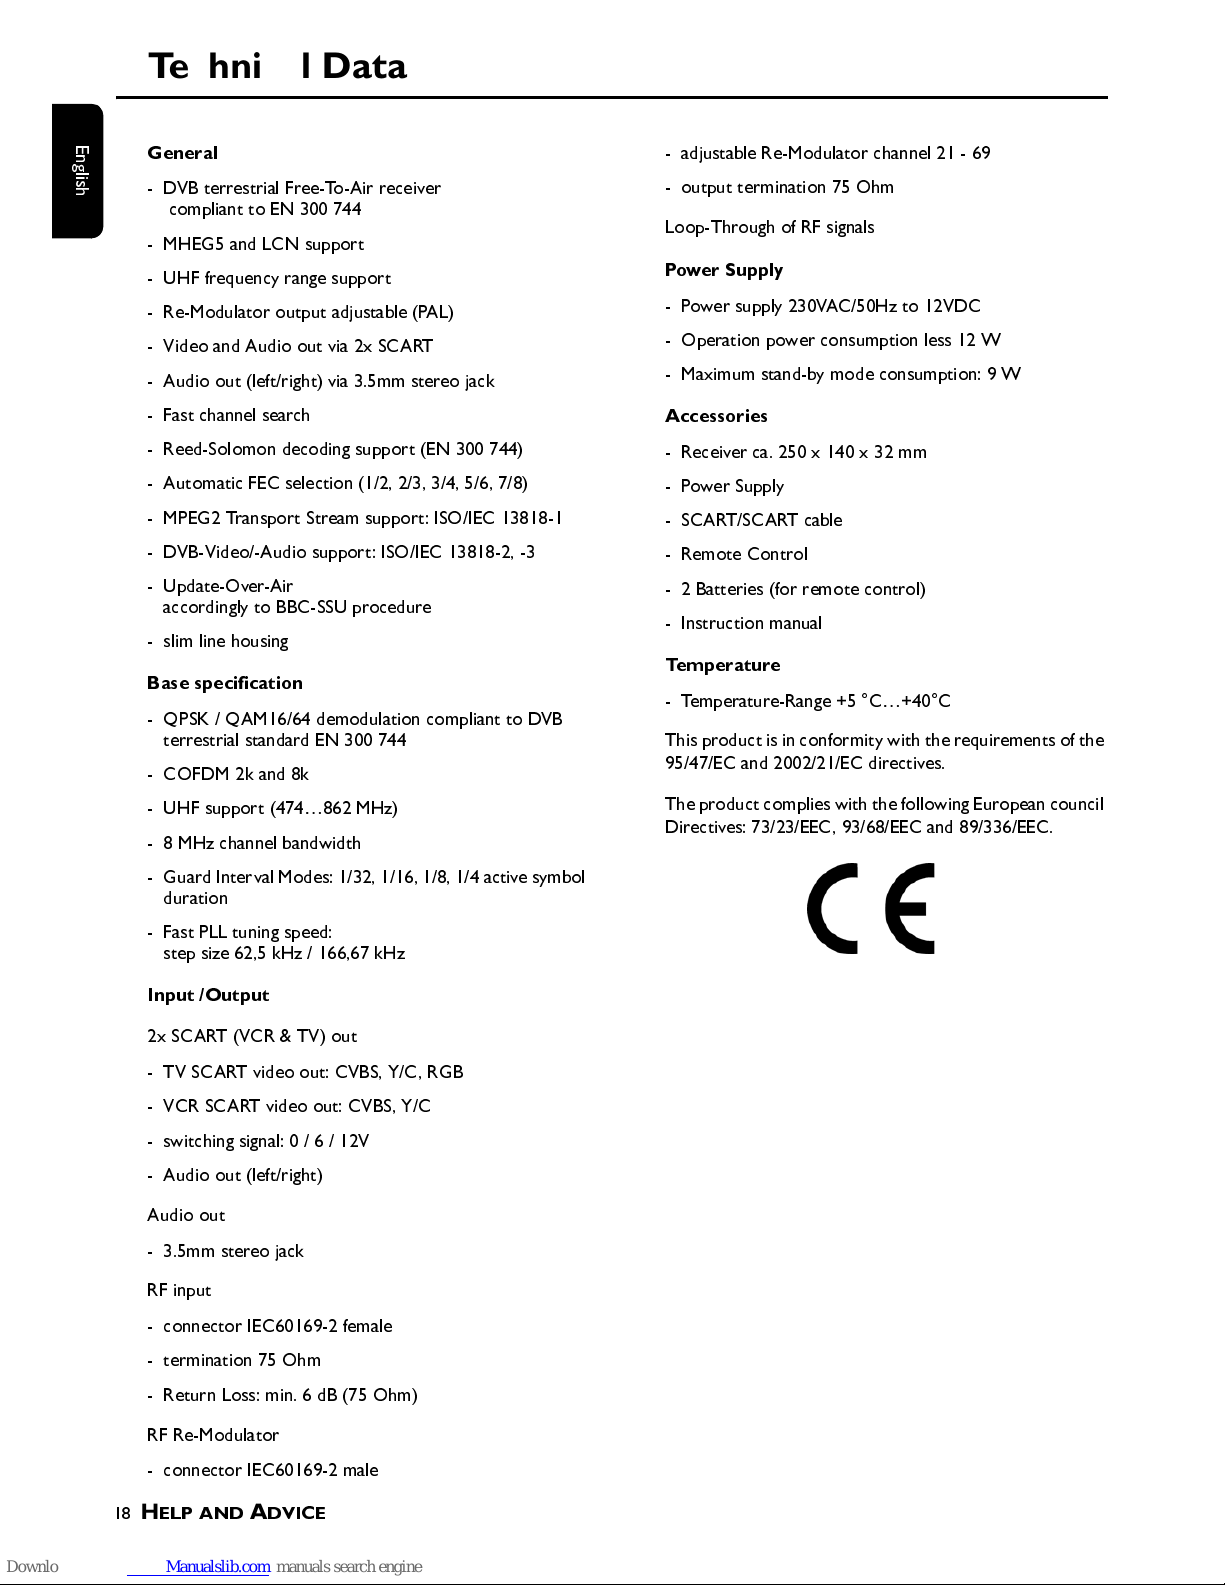
Technical Data
General
- DVB terrestrial Free-To-Air receiver
compliant to EN 300 744
- MHEG5 and LCN support
- UHF frequency range support
- Re-Modulator output adjustable (PAL)
- Video and Audio out via 2x SCART
- Audio out (left/right) via 3.5mm stereo jack
- Fast channel search
- Reed-Solomon decoding support (EN 300 744)
- Automatic FEC selection (1/2, 2/3, 3/4, 5/6, 7/8)
- MPEG2 Transport Stream support: ISO/IEC 13818-1
- DVB-Video/-Audio support: ISO/IEC 13818-2, -3
- Update-Over-Air
accordingly to BBC-SSU procedure
- slim line housing
Base specification
- QPSK / QA M16/64 demodulation compliant to DVB
terrestrial standard EN 300 744
- COFDM 2k and 8k
- UHF support (474…862 MHz)
- 8 MHz c hannel ba ndwidth
- Guard Interval Modes: 1/32, 1/16, 1/8, 1/4 active symbol
duration
- Fast PLL tuning speed:
step size 62,5 kHz / 166,67 kHz
Input /Output
2x SCART (VCR & TV) out
- TV SCART video out: CVBS, Y/C, RGB
- VCR SCART video out: CVBS, Y/C
- switching signal: 0 / 6 / 12V
- Audio out (left/right)
Audio out
- 3.5mm stereo jack
RF input
- connector IEC60169-2 female
- termination 75 Ohm
- Return Loss: min. 6 dB (75 Ohm)
RF Re-Modulator
- connector IEC60169-2 male
- adjustable Re-Modulator channel 21 - 69
- output termination 75 Ohm
Loop-Through of RF signals
Power Supply
- Power supply 230VAC/50Hz to 12VDC
- Operation power consumption less 12 W
- Maximum stand-by mode consumption: 9 W
Accessories
- Receiver ca. 250 x 140 x 32 mm
-Power Supply
- SCART/SCART cable
- Remote Control
- 2 Batteries (for remote control)
- Instruction manual
Temp e r atu r e
- Temperature-Range +5 °C…+40°C
This product is in conformity with the requ irements of the
95/47/EC and 2002/21/EC directives.
The product complies with the following European council
Directives: 73/23/EEC, 93/68/EEC and 89/336/EEC.
Page 19
H
ELP AND ADVICE
19
E
n
g
l
i
s
h
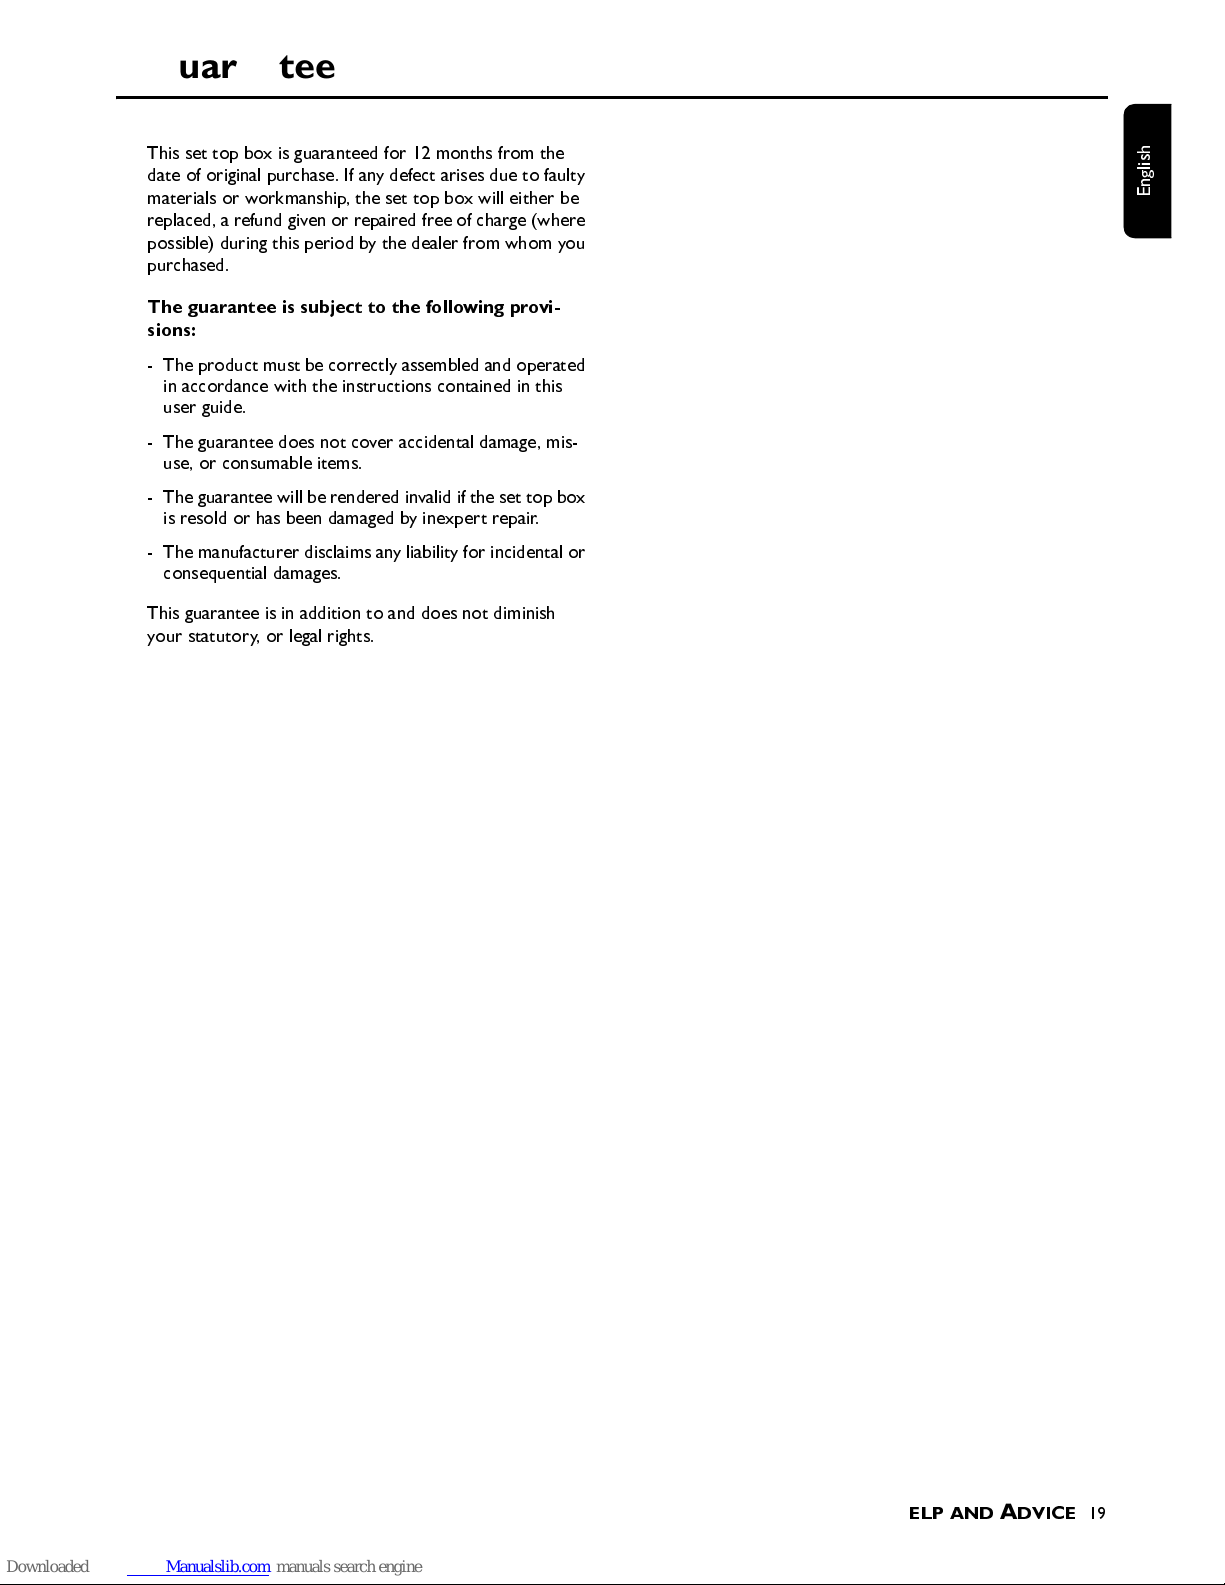
Guarantee
This set top box is guaranteed for 12 months from the
date of original purchase. If any defect arises due to faulty
materials or workmanship, the set top box will either be
replaced, a refund given or repaired free of charge (wher e
possible) during this period by the dealer from whom you
purchased.
The guarantee is subject to the following provi-
sions:
- The product must be correctly assembled and operated
in accordance with the instructions contained in this
user guide.
- The guarantee does not cover accidental damage, mis-
use, or c o n s umable it e m s .
- The guarantee will be rendered invalid if the set top box
is resold or has been damaged by inexpert repair.
- The manufacturer disclaims any liability for incidental or
consequential damages.
This guarantee is in addition to and does not diminish
your sta tutory, or legal rights.
Page 20

 Loading...