

Page 1
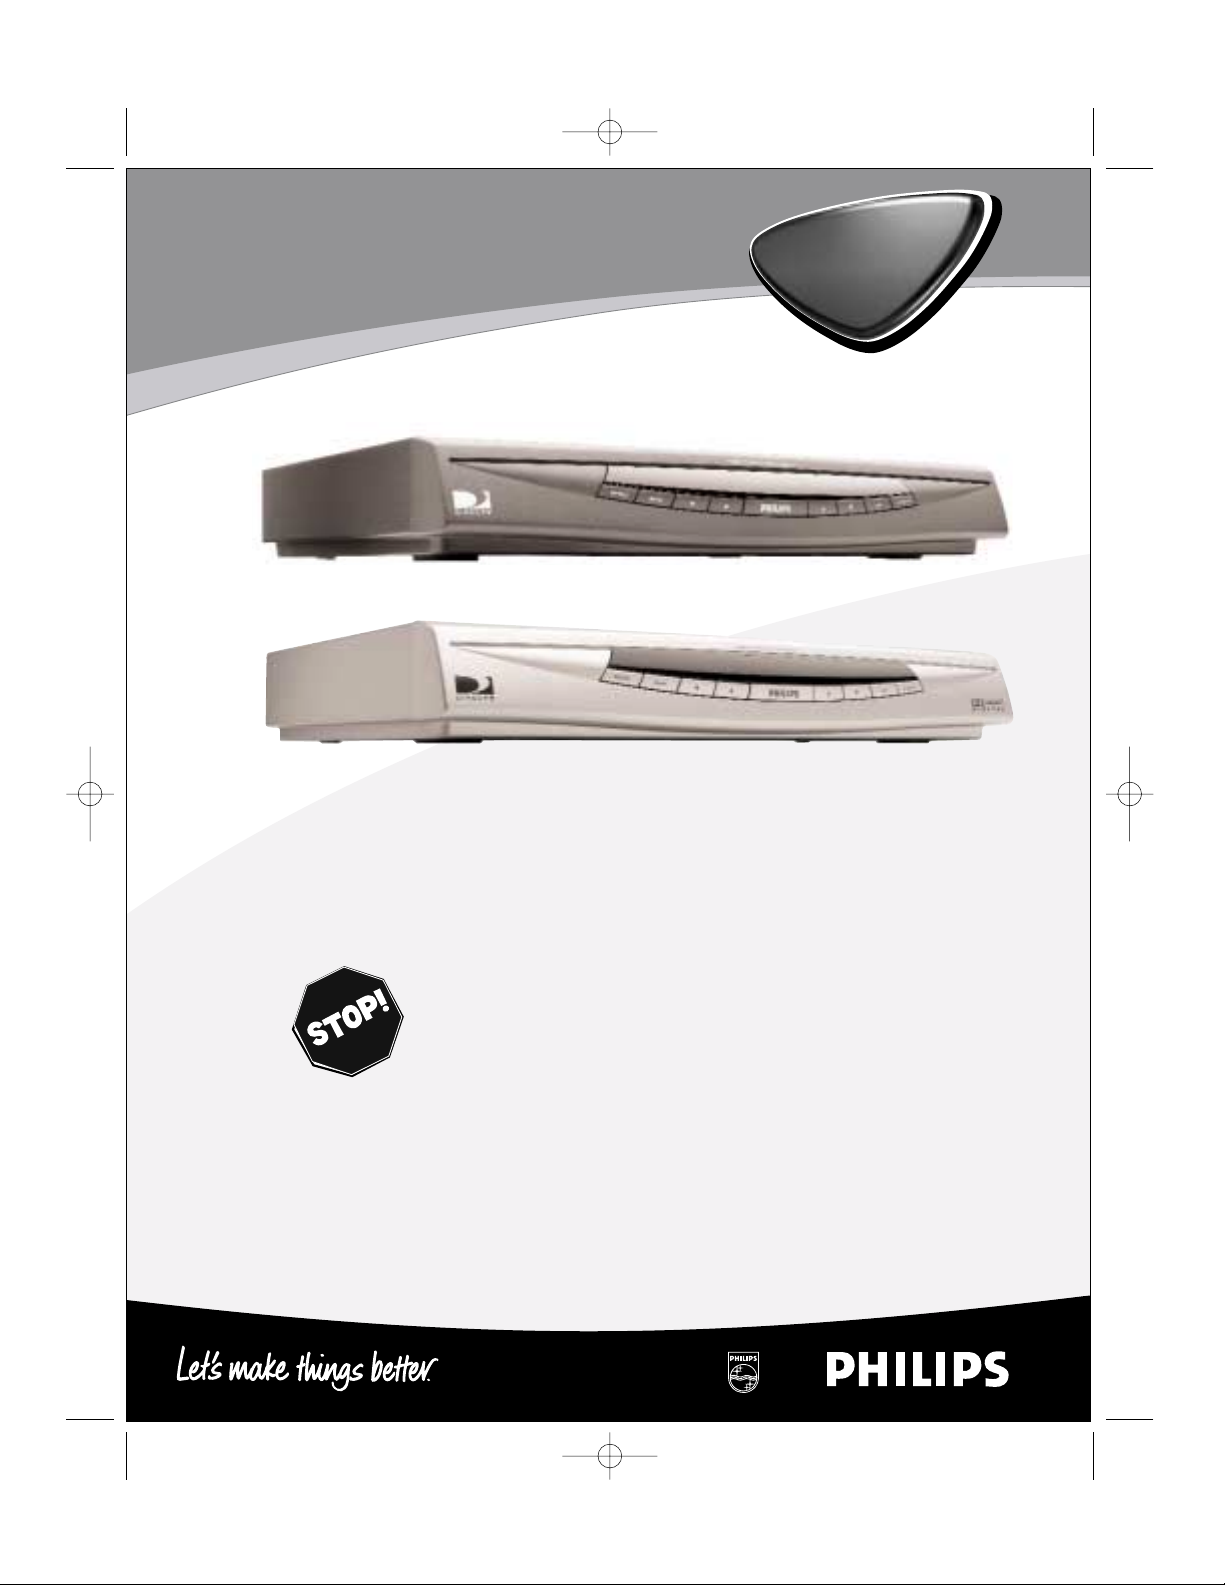
DSX 5500
DSX 5540
DIRECTV
®
Receiver
User Manual
Read this manual first!
Congratulations on purchasing this Philips product.
We’ve included everything you need to get started.
If you have any problems, Philips Representatives can
help you get the most from your new product by explaining:
• Hookups,
• First Time Setup, and
• Feature Operation.
Do not attempt to return this product to the store.
For fast help, call us first!
1-800-464-1131
Thank you for making Philips a part of your home!
3111 176 50891
DSX5500_5540 11/13/02 12:21 PM Page 1
Page 2
For Customer Use
Enter below the Model, Serial and Access Card Number
and Receiver ID located on the rear panel of the
DIRECTV®Receiver. Retain this information for future
reference.
Model No. ________________________________________
Serial No. ________________________________________
Access Card No. __________________________________
Receiver ID ______________________________________
Congratulations on your purchase, and welcome to the “family!”
Dear PHILIPS product owner:
Thank you for your confidence in PHILIPS. You’ve selected one of the best-built, best-backed products available today.
And we’ll do everything in our power to keep you happy with your purchase for many years to come.
As a member of the PHILIPS “family,” you’re entitled to protection by one of the most comprehensive warranties and
outstanding service networks in the industry.
What’s more, your purchase guarantees you’ll receive all the information and special offers for which you qualify, plus
easy access to accessories from our convenient home shopping network.
And most importantly you can count on our uncompromising commitment to your total satisfaction.
All of this is our way of saying welcome-and thanks for investing in a PHILIPS product.
Sincerely,
Lawrence J. Blanford
President and Chief Executive Officer
Know these
safety symbols
CAUTION
RISK OF ELECTRIC SHOCK
DO NOT OPEN
CAUTION: TO REDUCE THE RISK OF ELECTRIC SHOCK, DO NOT
REMOVE COVER (OR BACK). NO USER-SERVICEABLE PARTS
INSIDE. REFER SERVICING TO QUALIFIED SERVICE PERSONNEL.
Visit our World Wide Web Site at http://www.philips.com
CAUTION: To prevent electric shock, match wide blade of
plug to wide slot of the outlet and fully insert.
ATTENTION: Pour éviter les choc électriques, introduire
la lame la plus large de la fiche dans la borne correspondante
de la prise et pousser jusqu’au fond.
This “bolt of lightning” indicates uninsulated material
within your unit may cause an electrical shock. For the
safety of everyone in your household, please do not remove
product covering.
The “exclamation point” calls attention to features for
which you should read the enclosed literature closely
to prevent operating and maintenance problems.
WARNING: TO PREVENT FIRE OR SHOCK HAZARD,
DO NOT EXPOSE THIS EQUIPMENT TO RAIN OR
MOISTURE.
t
s
DSX5500_5540 11/13/02 12:21 PM Page 2
Page 3
Safety Instructions - Read Before Operating Equipment
3
WARNING: TO PREVENT FIRE OR SHOCK HAZARD, DO NOT
EXPOSE ANY ELECTRICALEQUIPMENT TO RAIN OR MOISTURE.
1. Read Instructions – All the safety and operating instructions
should be read before the appliance is operated.
2. Retain Instructions – The safety and operating instructions
should be retained for future reference.
3. Heed Warnings – All warnings on the appliance and in the oper-
ating instructions should be adhered to.
4. Follow Instructions – All operating and use instructions should
be followed.
5. Attachments – Do not use attachments not recommended by the
manufacturer as they may cause hazards.
6. Water and Moisture – Do not use this product near water –
for example, near a bath tub, wash bowl, kitchen sink, or laundry
tub, in a wet basement, near a swimming pool, etc.
7. Accessories – Do not place this product on an unstable cart,
stand, tripod, bracket, or table. The product may fall, causing serious injury to a child or adult, and serious damage to the appliance.
Use only with a cart, stand, tripod, bracket, or table recommended
by the manufacturer or sold with the product. Any mounting of the
appliance should follow the manufacturer's instructions, and should
use a mounting accessory recommended by the manufacturer.
7A. An appliance and cart combination should be moved with
care. Quick stops, excessive force, and uneven surfaces may
cause the appliance and cart combination to overturn.
8. Ventilation – Slots and openings on the cabinet are provided for
ventilation and to ensure reliable operation of the product and to
protect it from overheating. These openings must not be blocked
or covered. The openings should never be blocked by placing the
product on a bed, sofa, rug, or other similar surface. This product
should not be placed near or over a radiator or heat register. This
product should not be placed in a built-in installation such as a
bookcase or rack unless proper ventilation is provided or the manufacturer’s instructions have been adhered to.
9. Power Sources – This product should be operated only from the
type of power source indicated on the marking label. If you are not
sure of the type of power supply to your home, consult your appliance dealer or local power company.
10. Grounding or Polarization – This product is equipped with a
polarized alternating-current line plug (a plug having one blade
wider than the other). This plug will fit into the power outlet only
one way. This is a safety feature. If you are unable to insert the plug
fully into the outlet, try reversing the plug. If the plug should still fail
to fit, contact your electrician to replace your obsolete outlet. Do
not defeat the safety purpose of the polarized plug.
11. Power Cord Protection – Route power supply cords so that
they are not likely to be walked on or pinched by items placed
upon or against them. Pay particular attention to cords at plugs,
convenience receptacles, and the point where they exit from the
appliance.
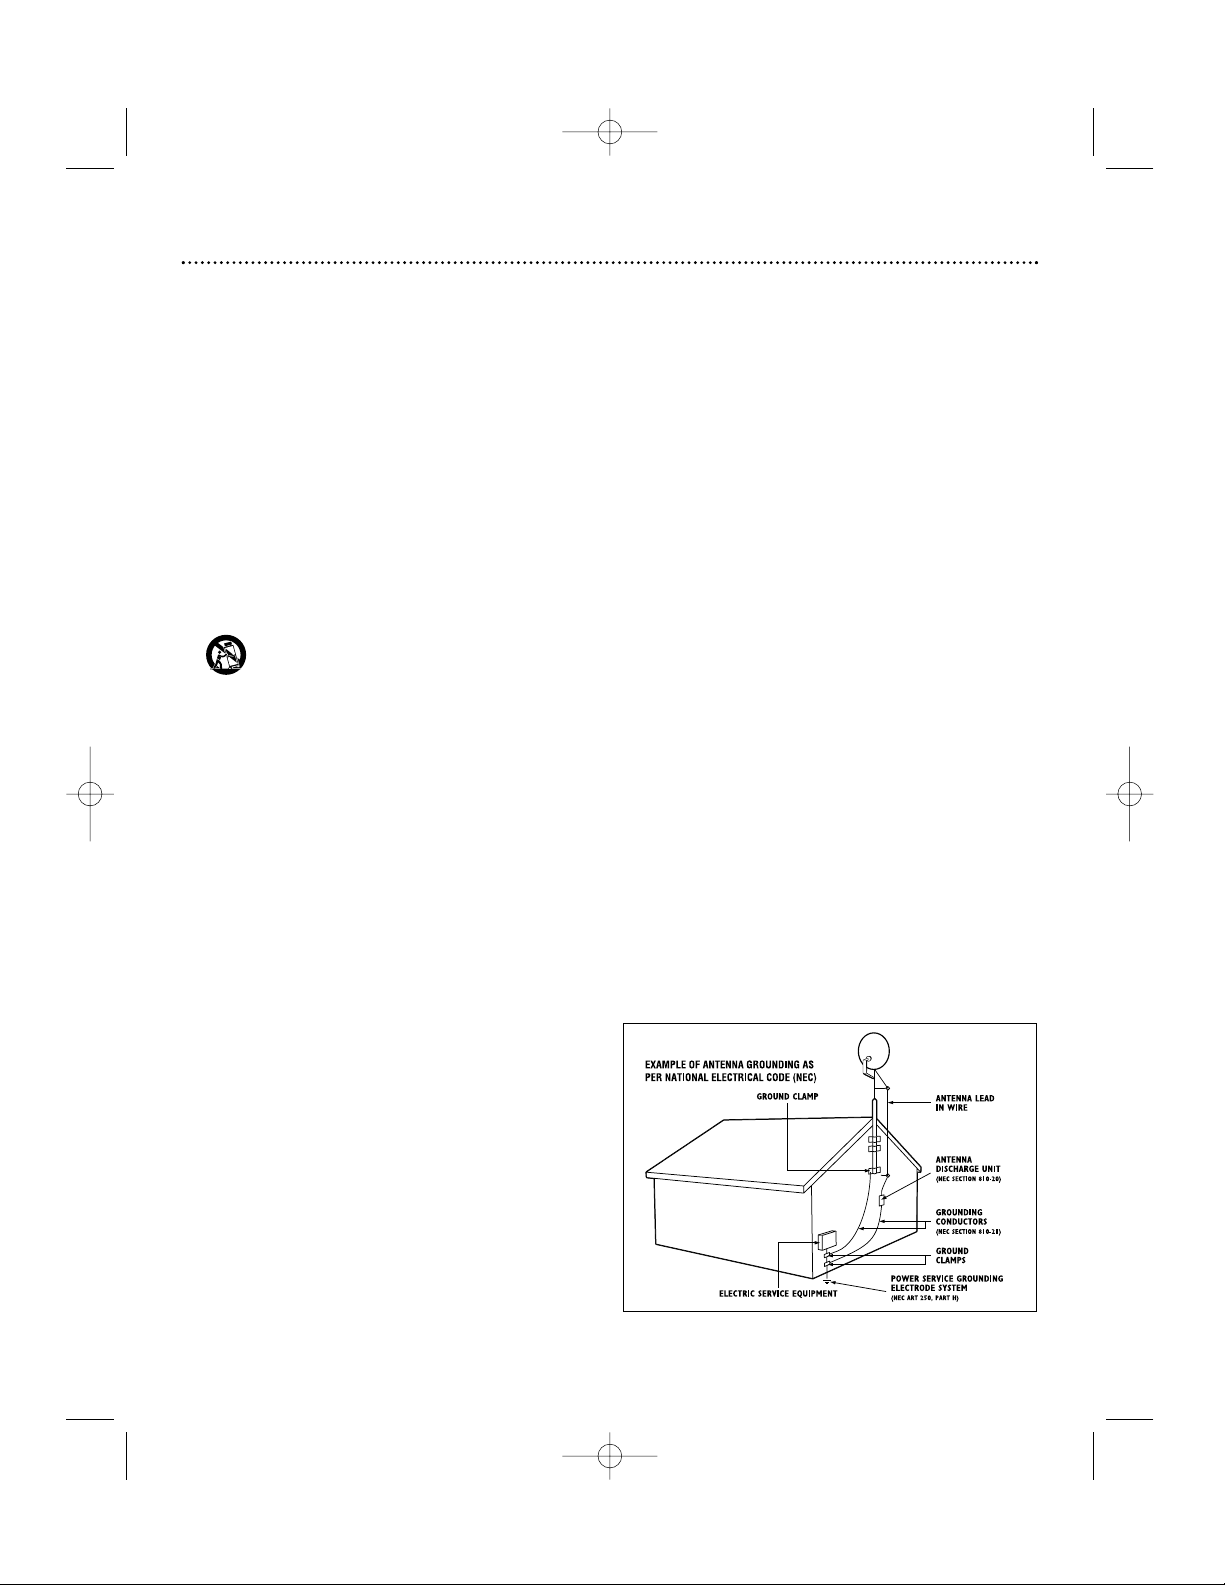
12. Outdoor Antenna Grounding – If an outside antenna or cable
system is connected to the product, be sure the antenna or cable
system is grounded to provide protection against voltage surges
and built-up static charges.
Section 810 of the National Electrical Code, ANSI/NFPA 70, provides information with regard to proper grounding of the mast and
supporting structure, grounding of the lead-in wire to an antenna
discharge unit, size of grounding conductors, location of antennadischarge unit, connection to grounding electrodes, and requirements for the grounding electrode. See Figure A.
13. Phone Line Use – Avoid using a telephone (other than a cordless
type) during an electrical storm. There may be a remote risk of
electric shock from lightning. Do not use the telephone to report a
gas leak in the vicinity of the leak.
14. Lightning – For added protection for this product during a light-
ning storm or when it is left unattended and unused for long periods of time, unplug it from the wall outlet and disconnect the
antenna or cable system. This will prevent damage to the product
from lightning and power line surges.
15. Power Lines – An outside antenna system should not be located
in the vicinity of overhead power lines or other electric light or
power circuits, or where it can fall onto such power lines or circuits. When installing an outside antenna system, extreme care
should be taken to keep from touching such power lines or circuits
as contact with them might be fatal. Refer to Satellite Dish Antenna
Assembly & Alignment Guide.
16. Overloading – Do not overload wall outlets and extension cords
as this can result in a risk of fire or electric shock.
17. Object and Liquid Entry – Never push objects of any kind into
this product through openings as they may touch dangerous voltage
points or short-out parts that could result in a fire or electric
shock. Never spill liquid of any kind on the product.
18. Servicing – Do not attempt to service this product yourself, as
opening or removing covers may expose you to dangerous voltage
or other hazards. Refer all servicing to qualified service personnel.
19. Damage Requiring Service – Unplug this product from the wall
outlet and refer servicing to qualified service personnel under the
following conditions:
a. When the power supply cord or plug is damaged.
b.If liquid has been spilled, or objects have fallen into the product.
c. If the product has been exposed to rain or water.
d.If the product does not operate normally when following the operat-
ing instructions. Adjust only those controls that are covered by the
operating instructions, as an improper adjustment of other controls
may result in damage and will often require extensive work by a
qualified technician to restore the product to its normal operation.
e.If the product has been dropped or the cabinet has been dam-
aged in any way.
f. When the product exhibits a distinct change in performance –
this indicates a need for service.
20. Replacement Parts – When replacement parts are required, be
sure the service technician has used replacement parts specified by
the manufacturer or which have the same characteristics as the
original part. Unauthorized substitutions may result in fire, electric
shock or other hazards.
21. Safety Check – Upon completion of any service or repairs to this
product, ask the service technician to perform safety checks to
determine that the product is in proper operating condition.
22. Carts and Stands – The appliance should be used only with a
cart or stand recommended by the manufacturer.
23. Heat – The product should be situated away from heat sources
such as radiators, heat registers, stoves, or other products that
produce heat.
Figure A
Operating Temperature: 40 to 110°F
Storage Temperature: 15 to 155°F
DSX5500_5540 11/13/02 12:21 PM Page 3
Page 4

Safety Instructions (cont’d), General Information
4
This device incorporates an anticopy process technology that is protected by U.S. patents and other intellectual property rights. The
anticopy process is licensed for non-commercial, home use only. Reverse engineering or disassembly is prohibited.
NOTE TO CATV SYSTEM INSTALLER
Article 820-40 of the NEC (National Electrical Code) provides guidelines for proper grounding and, in particular, specifies that the
cable ground shall be connected to the grounding system of the building, as close to the point cable entry as practical.
WARNING
This device complies with Part 15 of the FCC (U. S. A.) Rules.
Operation is subject to the following two conditions:
(1) This device may not cause harmful interference, and
(2) This device must accept any interference received, including interference that may cause undesired operation.
FCC Regulations and Information
This equipment has been tested and found to comply with the limits for a Class B digital device, pursuant to Part 15 of the FCC
Rules. These limits are designed to provide reasonable protection against harmful interference in a residential installation. This
equipment generates, uses and can radiate radio frequency energy and, if not installed and used in accordance with the
instructions, may cause harmful interference to radio communications.
However, there is no guarantee that interference will not occur in a particular installation. If this equipment does cause interference
to radio or television reception (which you can determine by turning the equipment off and on), you are encouraged to try to correct
the interference by one or more of the following measures:
1. Change the position of the DIRECTV
®
Receiver with respect to the radio or television equipment that is receiving the interference.
2. Move the DIRECTV Receiver away from the equipment that is receiving the interference.
3. Plug the DIRECTV Receiver into a different outlet so that the DIRECTV Receiver and the equipment receiving the interference are
on different branch circuits.
4. Use shielded cables and I/O cords with this equipment to comply with the relevant FCC regulations.
5. If these measures do not eliminate the interference, you should consult your dealer or an experienced radio/television technician
for help.
IMPORTANT
Any change or modifications to the equipment by the user not expressly approved by the warranty or manufacturer could void the
user’s authority to operate the equipment.
Domestic use U. S. A – For units used at 110V, use only the power supply cord which is supplied with the product.
ANALOG DEVICE WARNINGS
Federal Communication Commission (FCC) Part 68 and Administrative Council for Terminal Attachments (ACTA)
This device complies with Part 68 of the FCC rules and the requirements adopted by the ACTA. A label on the rear panel of this
equipment contains, among other information, a product identifier in the format US:AAAEQ##TXXXX. If requested, this information
must be provided to the telephone company. The REN is used to determine the number of devices that may be connected to the
telephone line. Excessive RENs on the telephone line may result in the devices not ringing in response to an incoming call. In
most, but not all areas, the sum of RENs should not exceed five (5.0). To be certain of the number of devices that may be
connected to a line, as determined by the total RENs, contact the local telephone company.The REN for this product is part of the
product identifier that has the format US:AAAEQ##TXXXX. The digits represented by ## are the REN without a decimal point. For
the DSX 5500 or DSX 5540, 01 means a REN of 0.1.
Note: RENs are associated with loop-start and ground-start ports. Do not use for E & M or digital ports.
This equipment uses the following USOC jack: RJ-11C.
No modular plug is provided with this equipment.
If the DSX 5500 or DSX 5540 causes harm to the telephone network, the telephone company will notify you in advance that temporary
interruption of service may be required. But if advance notice isn't practical, the telephone company will notify the customer as
soon as possible. Also, you will be advised of your right to file a complaint with the FCC if you believe it is necessary.
The telephone company may make changes in its facilities, equipment, operations or procedures that could affect the operation of
the equipment. If this happens, the telephone company will provide advance notice in order for you to make necessary
modifications to maintain uninterrupted service.
If the equipment is causing harm to the telephone network, the telephone company may request that you disconnect the
equipment until the problem is resolved.
This equipment cannot be used on public coin phone service provided by the telephone company. Connection to party line service
is subject to state tariffs (Contact the state public utility commission, public service commission or corporation commission for
information).
If your home has specially wired alarm equipment connected to the telephone line, ensure the installation of this DSX 5500 or
DSX 5540 does not disable your alarm equipment. If you have questions about what will disable alarm equipment, consult your telephone company or a qualified installer.
For repair or warranty information on hardware service only, please call: 1-800-464-1131.
DSX5500_5540 11/13/02 12:21 PM Page 4
Page 5

Contents
5
NOTE: This owner's manual may be used with several different models. Not all features (or drawings) discussed in this manual will necessarily match those found with your system. This is normal and does not
require you contacting your dealer or requesting service.
DIRECTV programming sold separately. ACTIVATION OF PROGRAMMING MAY BE SUBJECT TO CREDIT APPROVAL AND
REQUIRES VALID SERVICE ADDRESS, SOCIAL SECURITY NUMBER AND/OR MAJOR CREDIT CARD. DEPOSIT OR PREPAYMENT MAY BE REQUIRED. Programming subject to change. DIRECTV service not available outside the U.S. DIRECTV programming is
sold separately and independently of DIRECTV System hardware. A valid programming subscription is required to operate DIRECTV
System hardware. Activate your DIRECTV programming today at 1-800-DIRECTV (1-800-347-3288)
DIRECTV and the Cyclone Design logo, ADVANCED PROGRAM GUIDE and DIRECTV INTERACTIVE are trademarks of DIRECTV,
Inc., a unit of Hughes Electronics Corp., and are used with permission.
Philips is a registered trademark of Koninklijke Philips Electronics, NV.
This product includes software developed by the University of California, Berkeley and its contributors.
Copyright (c) 1982, 1986, 1988, 1990, 1993
The Regents of the University of California. All rights reserved.
Redistribution and use in source and binary forms, with or without modification, are permitted provided that the following conditions
are met:
1. Redistribution of source code must retain the above copyright notice, this list of conditions and the following disclaimer.
2. Redistribution in binary form must reproduce the above copyright notice, this list of conditions and the following disclaimer in the
documentation and/or other materials provided with the distribution.
3. All advertising materials mentioning features or use of this software must display the following acknowledgment: This product
includes software developed by the University of California, Berkeley and its contributors.
4. Neither the name of the University nor the names of its contributors may be used to endorse or promote products derived from
this software without specific prior written permission.
THIS SOFTWARE IS PROVIDED BY THE REGENTS AND CONTRIBUTORS "AS IS" AND ANY EXPRESS OR IMPLIED WARRANTIES,
INCLUDING, BUT NOT LIMITED TO, THE IMPLIED WARRANTIES OF MERCHANTABILITY AND FITNESS FOR A PARTICULAR PURPOSE ARE DISCLAIMED. IN NO EVENT SHALL THE REGENTS OR CONTRIBUTORS BE LIABLE FOR ANY DIRECT, INDIRECT, INCIDENTAL, SPECIAL, EXEMPLARY, OR CONSEQUENTIAL DAMAGES (INCLUDING, BUT NOT LIMITED TO, PROCUREMENT OF SUBSTITUTE GOODS OR SERVICES; LOSS OF USE, DATA, OR PROFITS; OR BUSINESS INTERRUPTION) HOWEVER CAUSED AND ON
ANY THEORY OF LIABILITY, WHETHER IN CONTRACT, STRICT LIABILITY, OR TORT (INCLUDING NEGLIGENCE OR OTHERWISE) ARISING IN ANY WAY OUT OF THE USE OF THIS SOFTWARE, EVEN IF ADVISED OF THE POSSIBILITY OF SUCH DAMAGE.
Package Contents ......................................................6
Front and Rear Panels ..............................................7
Access Card ................................................................8
Connections
Antenna and Phone ................................................9
Video ......................................................................10
Audio ......................................................................11
A/V Matrix..............................................................12
Preparing your Remote Control..........................13
Remote Control Use........................................13-17
Setup Wizard ................................................................18
Watching TV ................................................................19
Enhanced User Features
EZ Search PPV ......................................................20
SmartSurf ..............................................................20
Favorite Channels..................................................21
Program Guide
DIRECTV ADVANCED PROGRAM GUIDE™
............................................................................22-23
Reminders ..............................................................23
PPV (Pay Per View) ..............................................23
Guide Menu ........................................................24-25
Main Menu
Using the Main Menu ............................................26
Interactive services................................................26
Preferences ......................................................27-29
Preferred Language ............................................27
Screen Format ....................................................27
Banner Duration..................................................28
Set Favorite Channels ........................................28
A/V Matrix ............................................................28
Remote Control ID ............................................28
Digital Audio (DSX 5540 only) ..........................29
Parental Controls ............................................29-30
Lock the System..................................................29
Channel Locks......................................................29
Set Spending Limit..............................................30
Set Rating Limit ..................................................30
Replace Access Card ..........................................30
Purchases ..............................................................31
Setup..................................................................32-33
System Upgrades ..................................................33
Messages ................................................................34
Caller ID ................................................................34
Troubleshooting ......................................................35
Limited Warranty....................................................36
The software included in this product is based in part on the work of the Independent JPEG-Group and on the PNG Reference Library
which is copyright © 1998-2001 Glenn Randers-Pehrson, copyright © 1996, 1997 Andreas Dilger, and copyright © 1995, 1996 Guy Eric
Schalnat, Group 42, Inc.
For the software in this product no license under Philips IPR is granted, except for the use of the software in combination with this
product.
DSX5500_5540 11/13/02 12:21 PM Page 5
Page 6
Package Contents
6
DIRECTV®Receiver
Infrared (IR) Universal
Remote Control with
Two AA Batteries
Access Card
DSX 5500
DSX 5540
DIREC
TV
®
Receiver
User Manual
R
ead
this m
a
nual first!
C
o
n
g
r
a
tu
la
t
io
n
s
o
n
p
u
r
c
h
a
s
in
g
t
h
is
P
h
ilip
s
p
ro
d
u
c
t
.
W
e
’v
e
in
c
lu
d
e
d
e
v
e
ry
th
in
g
y
o
u
n
e
e
d
to
g
e
t
sta
r
te
d
.
If y
o
u
h
a
v
e
a
n
y
p
ro
b
le
m
s
, P
h
ilip
s
R
e
p
re
s
e
n
ta
tiv
e
s
c
a
n
h
e
lp
y
o
u
g
e
t
th
e
m
o
s
t fr
o
m
y
o
u
r n
e
w
p
ro
d
u
c
t b
y
e
x
p
la
in
in
g
:
•
H
o
o
k
u
p
s
,
•
F
ir
s
t T
im
e
S
e
tu
p
, a
n
d
•
F
e
a
tu
r
e
O
p
e
ra
tio
n
.
D
o
n
o
t a
tte
m
p
t to
re
tu
r
n
th
is
p
r
o
d
u
c
t t
o
th
e
s
to
r
e
.
Fo
r fast help, call us first!
1-800-464-1131
T
h
a
n
k
y
o
u
fo
r
m
a
k
in
g
P
h
ilip
s
a
p
a
rt o
f y
o
u
r h
o
m
e
!
3
1
1
1
1
7
6
5
0
8
9
1
Important!
Return your
Warranty
Registration Card
within 10 days.
See why inside.
1
0
/
1
6
/
0
2
1
:
2
6
P
M
P
a
g
e
1
User Manual
Power Supply Cord
RF Coaxial Cable
RCA Type Audio/Video
Connecting Cable
RJ-11 Telephone Cord
S-Video Connecting Cable
(not included with all products)
DSX5500_5540 11/13/02 12:21 PM Page 6
TO TV/VCR
VIDEO AUDIO
PHONE
LR
S-VIDEO
Page 7
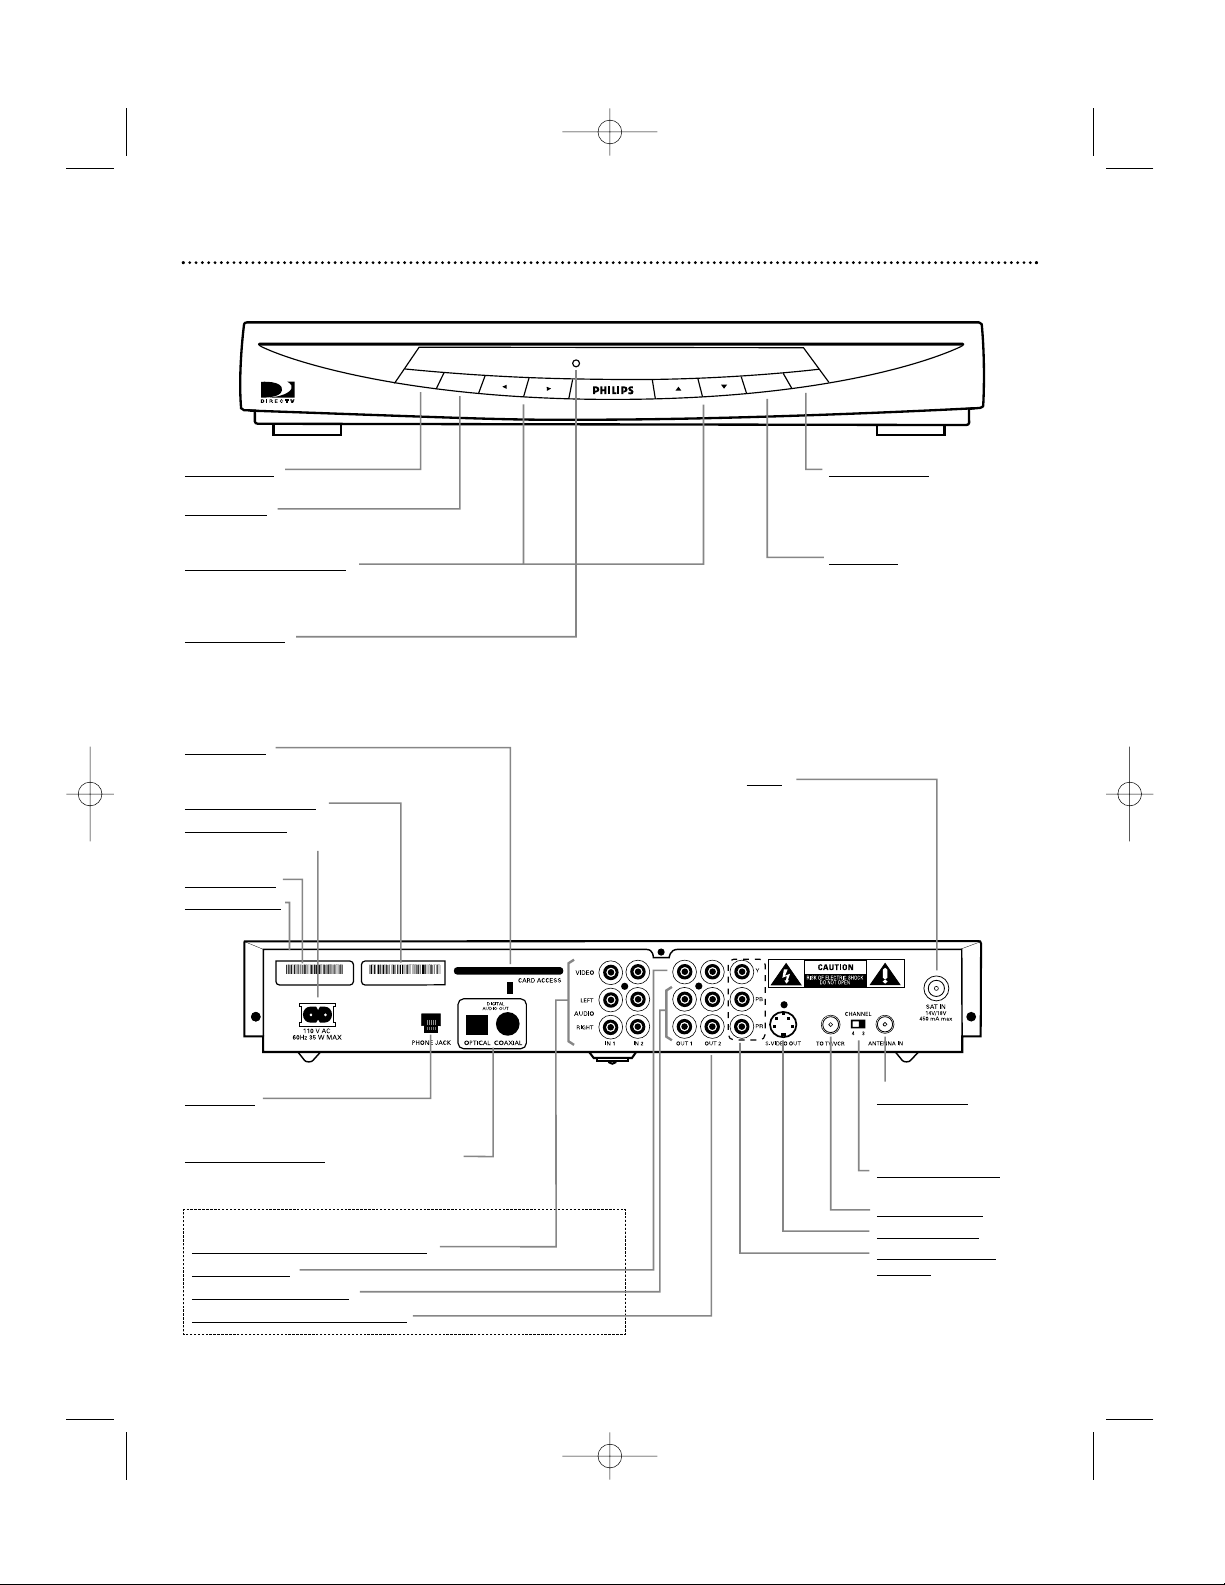
A/V Matrix (refer to page 12)
Left/Right Audio/Video Inputs 1 and 2
Video output 1
Left/right Audio output 1
Secondary Audio/Video Outputs
Front and Rear Panels
7
Front Panel
POWER button
Press to turn the DIRECTV
®
Receiver on or press to place
the DIRECTV Receiver in
Standby.
OK button
Confirms a selection in the
menus or Program Guide.
MENU button
Displays the Main Menu.
INFO button
Switches between program information in the
banner and the program details screen.
Arrow buttons (
)
Use to navigate through the Guide and menus.
While watching Satellite programming, use the
arrows to channel up or down.
Power indicator
Lights when the DIRECTV Receiver is on.
Rear Panel
Phone jack
Connect the supplied phone cord here and
to a wall phone jack in your home.
Dolby Digital outputs* (optical and coaxial)
* DSX 5540 only
Card Access
Install Access Card here.
Details are on page 8.
Receiver ID Number
AC power input
Connect the supplied power
cord here.
Serial Number
Model Number
Sat In
Connect the coaxial cable
from the Satellite Dish
antenna here. Details are
on page 9.
Antenna Input
Connect to an off-air
antenna or analog
cable system.
Channel 3/4 switch
Details on page 10.
TV/VCR Output
S-Video Output
Component Video
Output*
* DSX 5540 only
DSX5500_5540 11/13/02 12:21 PM Page 7
M
E
N
U
I
N
F
O
Digital Multi-Satellite Receiver
R
E
W
O
P
K
O
MODEL NUMBER: DSX 5540
Serial No : 81476039DSX 5540C Receiver ID No : 1234 5678 9012
Page 8
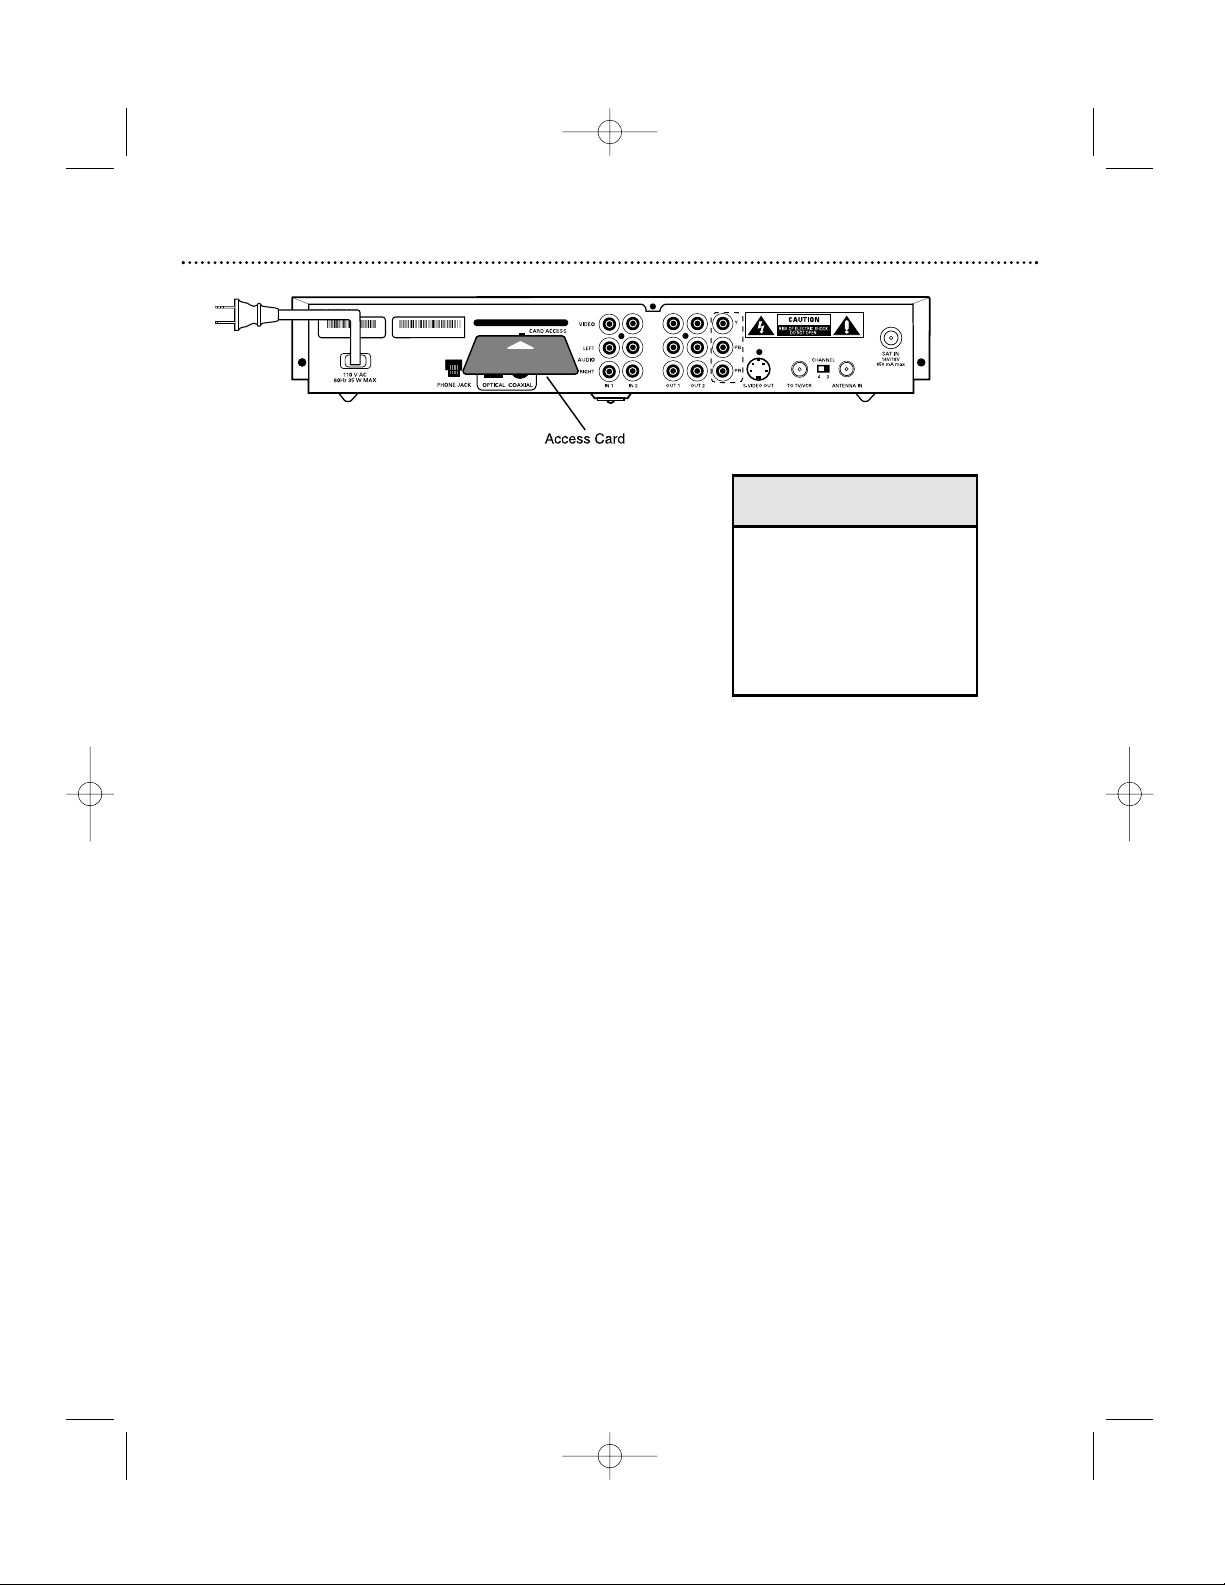
Access Card
8
• YOUR ACCESS CARD IS
FRAGILE.
• ALWAYS INSERT CORRECTLY
AND CAREFULLY.
• DO NOT BEND.
• DO NOT REMOVE AND
RE-INSERT UNNECESSARILY.
• NEVER SUBMERGE IN LIQUID
OR APPLY CLEANING FLUIDS.
Caution
The access card provided with your system includes information about your purchase authorization and other data. To watch channels, your viewing access card
needs to be inserted in the access card slot on the rear of your DIRECTV
®
Receiver.
The access card needs to be inserted during system setup and generally does not
need to be removed. Each access card has a unique number. Be sure to record
this number in the space provided on the second page of this manual in the “For
Customer Use” section for future reference.
1. Hold the card with the arrow facing upwards and pointing toward the slot in
the DIRECTV Receiver rear panel.
2. Gently push the card into the slot until it meets the stop. Do not use undue
force when inserting. The end will be visible outside of the slot.
3. Keep your access card permanently inserted in your DIRECTV Receiver.
If you have to reinsert the card, you should have the arrow facing forward
into the box and the gold chip facing down.
s
DSX5500_5540 11/13/02 12:21 PM Page 8
MODEL NUMBER: DSX 5540
Serial No : 81476039DSX 5540C Receiver ID No : 1234 5678 9012
Page 9
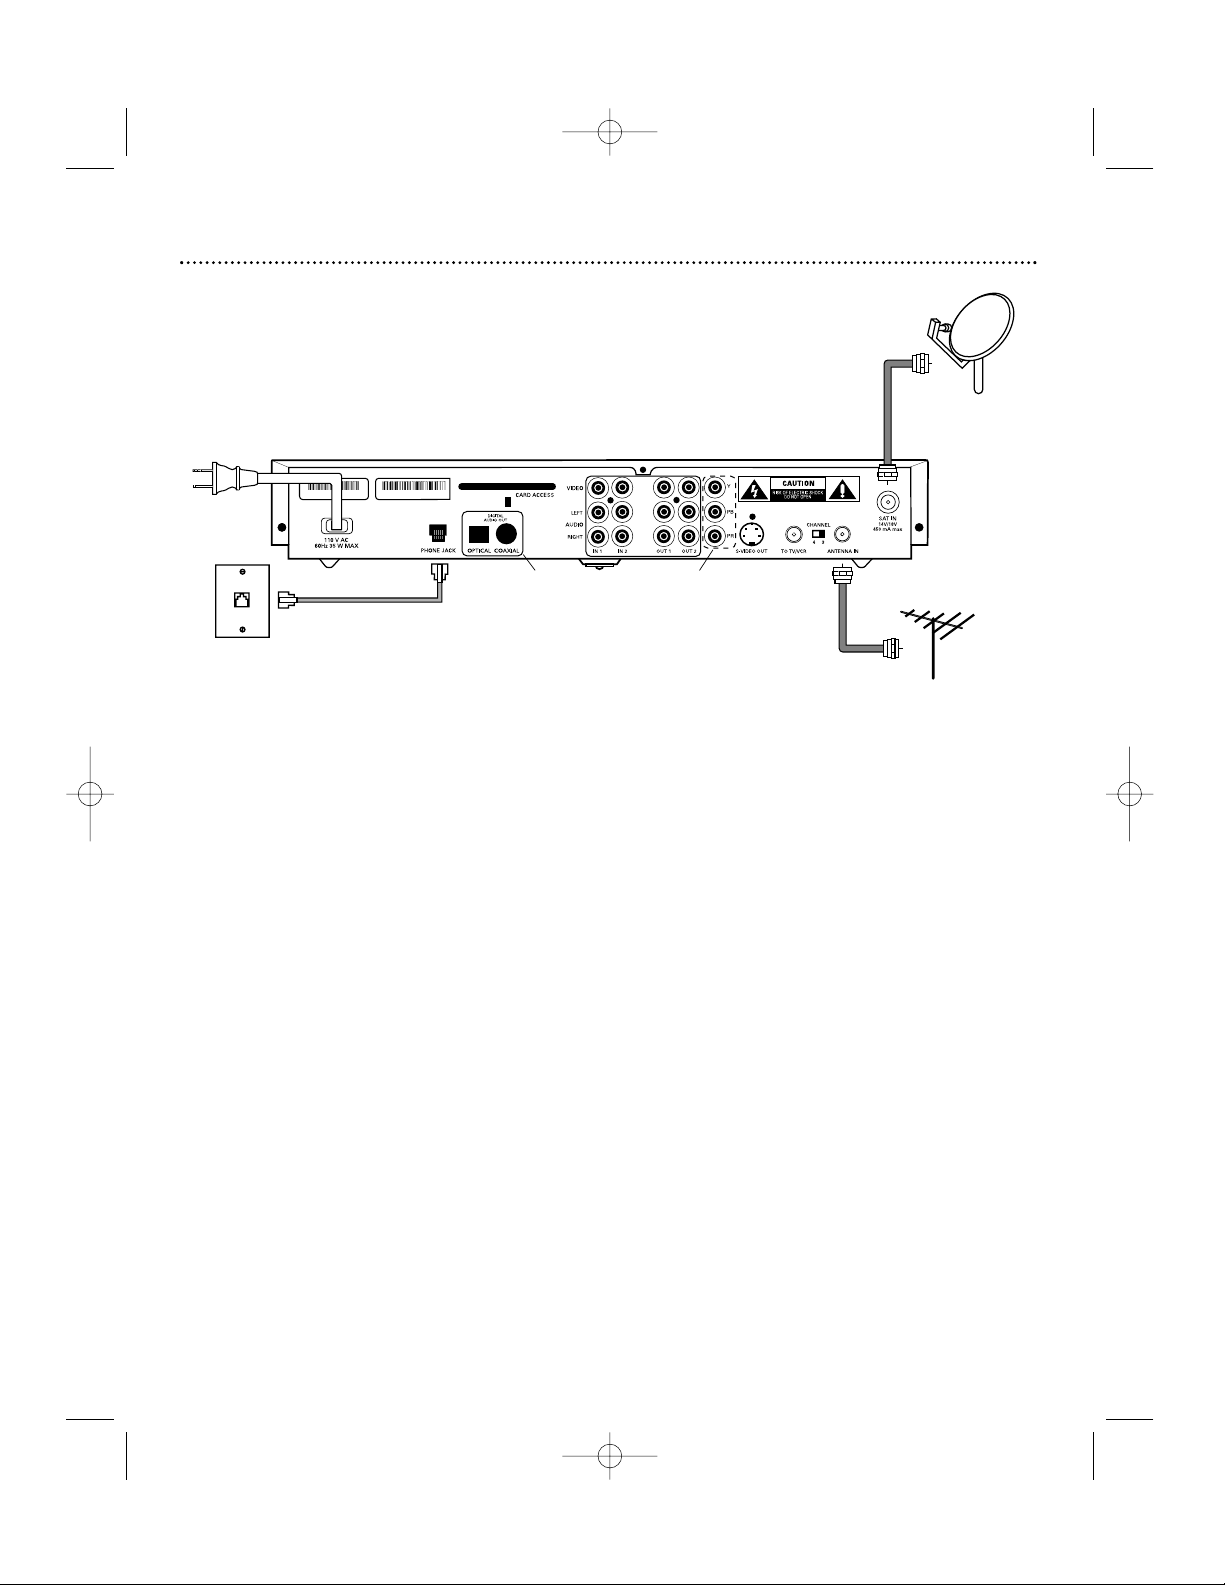
9
Connections
MODEL NUMBER: DSX 5540
Serial No : 81476039DSX 5540C Receiver ID No : 1234 5678 9012
Satellite
Dish Antenna
Cable or Off-air Antenna
Rear of DIRECTV
®
Receiver
RJ11 Modular
Phone Jack
DSX 5540 OnlyDSX 5540 Only
Unplug all equipment from the AC outlet before making connections.
1. Connect the RF c oa xial cable from the satellite dish to the SAT IN jack.
2. If you have cable (CATV) or an off-air antenna, connect its RF coaxial cable to the ANTENNA IN jack.
3. Using the telephone cord (supplied), connect one end of it to a phone jack in your home. Connect the other end to
the PHONE JACK input on the rear of the Receiver. To enjoy uninterrupted programming and to order pay per view
programs, the DIRECTV
®
Receiver must be continuously connected to a land-based phone line.
4. Connect one end of the AC power cord (supplied) to the Receiver’s AC IN jack.
Antenna and Phone
DSX5500_5540 11/13/02 12:21 PM Page 9
Page 10
10
Connections (cont’d)
MODEL NUMBER: DSX 5540
Serial No : 81476039DSX 5540C Receiver ID No : 1234 5678 9012
DSX 5540 Only
DSX 5540 Only
VHF/UHF
AUDIO
VIDEO Y
PB
PR
IN
Rear of TV
S-VIDEO IN
VHF/UHF
S-VIDEO IN
AUDIO
VIDEO
IN
Y
PB
PR
COMPONENT
IN
COMPONENT
IN
Rear of
DIRECTV® Receiver
A
C
B
D
Unplug all equipment from the AC outlet before making connections.
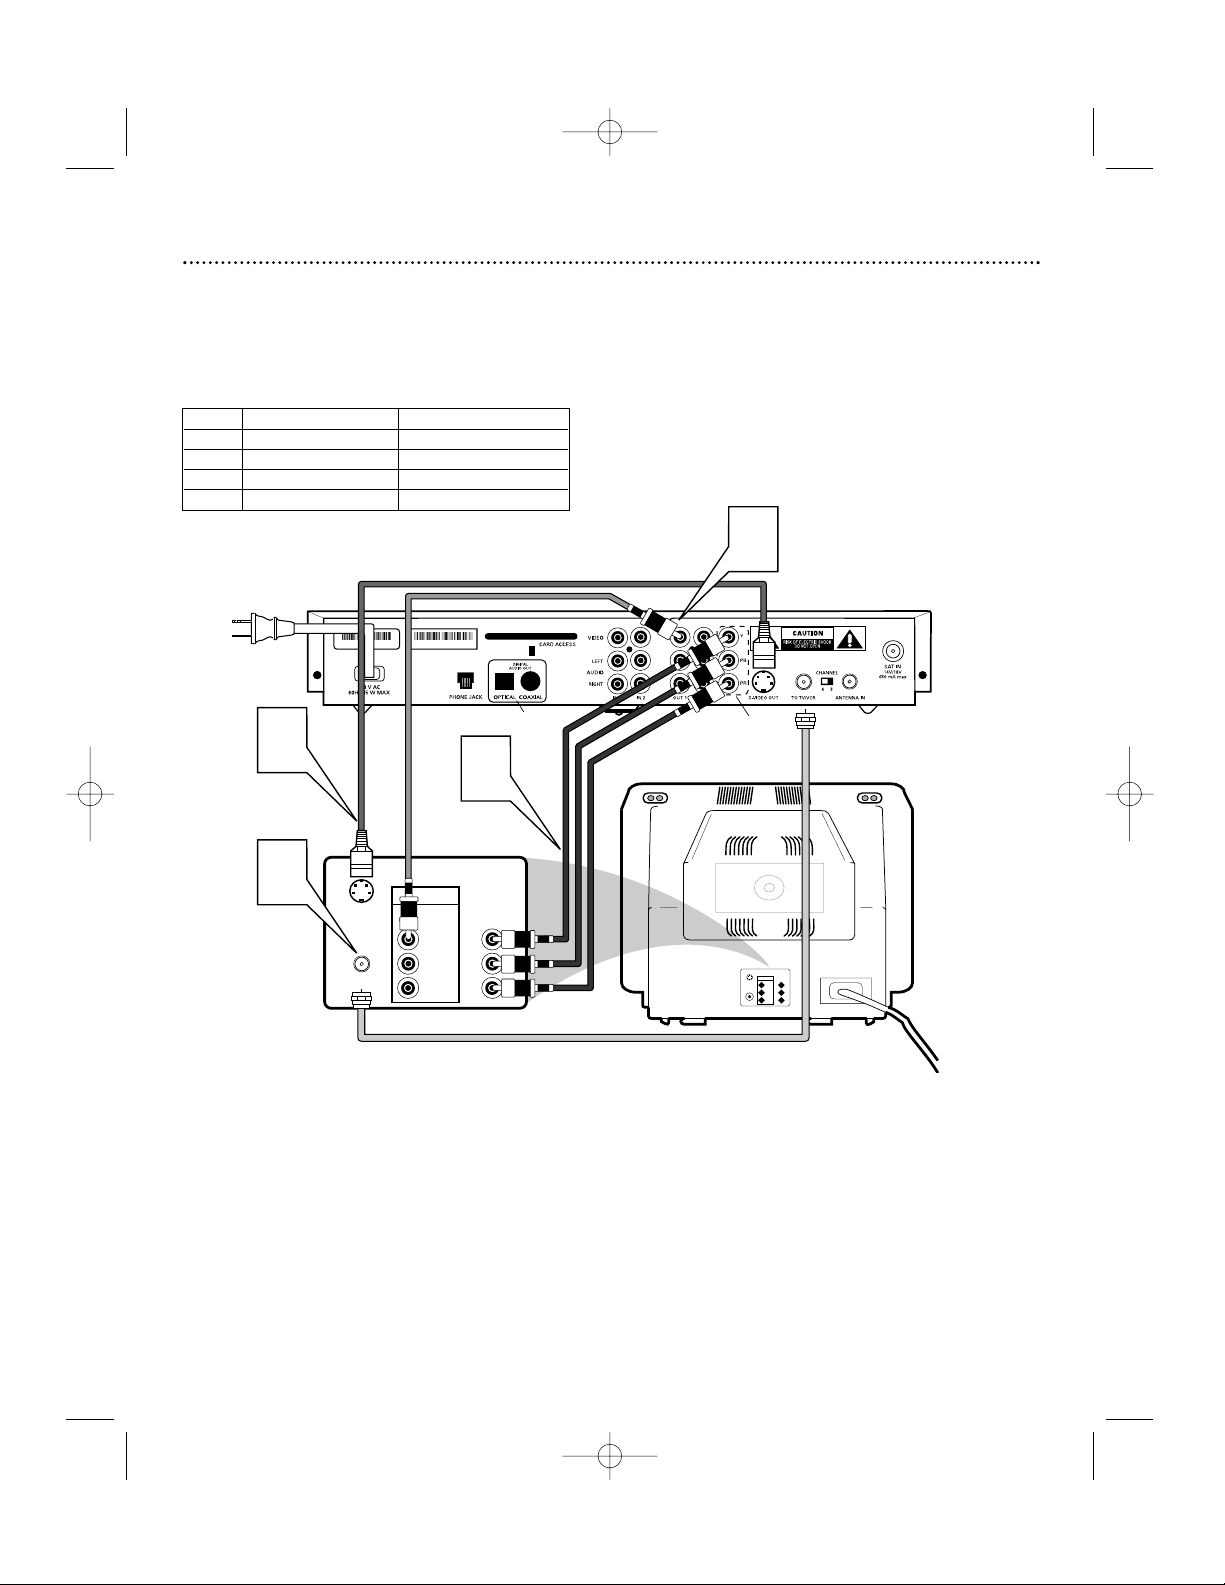
There are several options for connecting the video and audio outputs of your DIRECTV® Receiver, depending on the
type of equipment you want to connect and the quality of signal you want to achieve. The following chart summarizes
your options for video connections. Select either A, B, C or D and refer to the illustration and steps below to connect.
Option Video Signal Quality Video Output
A Excellent Component * (Y, PB, PR)
B Very Good S-VIDEO OUT
C Good VIDEO OUT1
D Standard TO TV/VCR
* DSX 5540 Only
Note: The TV rear jack panel shown above has jacks for all possible connections. Your TV’s rear jack panel may differ.
A. (For model DSX 5540 only.) Using a component cable (not included), connect the jacks on one end to the component
Y (green), PB (blue), PR (red) jacks on the rear of the Receiver. Connect the other ends to the TV’s COMPONENT
IN jacks. Select the proper input on your TV.
B. Using a S-VIDEO cable, connect one end to the S-VIDEO OUT jack on the Receiver to the S-VIDEO IN on the TV.
Select the proper input on your TV.
C. Using the RCA type connector (supplied), connect one end to the OUT 1 VIDEO jack (yellow) on the Receiver to the
VIDEO IN on the TV. Select the proper input on your TV.
D. Using the RF coaxial cable (supplied), connect one end to the TO TV/VCR jack on the Receiver to the RF IN jack on
the TV. Turn the TV on and select channel 3 or 4, whichever is not used or least used in your area. Set the
CHANNEL switch on the back of the Receiver to the same channel.
Video
DSX5500_5540 11/13/02 12:21 PM Page 10
Page 11
11
Connections (cont’d)
MODEL NUMBER: DSX 5540
Serial No : 81476039DSX 5540C Receiver ID No : 1234 5678 9012
Pr/Cr
Pb/Cb
Y
DSX 5540 Only
Rear of DIRECTV® Receiver
A
B
C
Rear of Home Theater Stereo Receiver or TV
Unplug all equipment from the AC outlet before making connections.
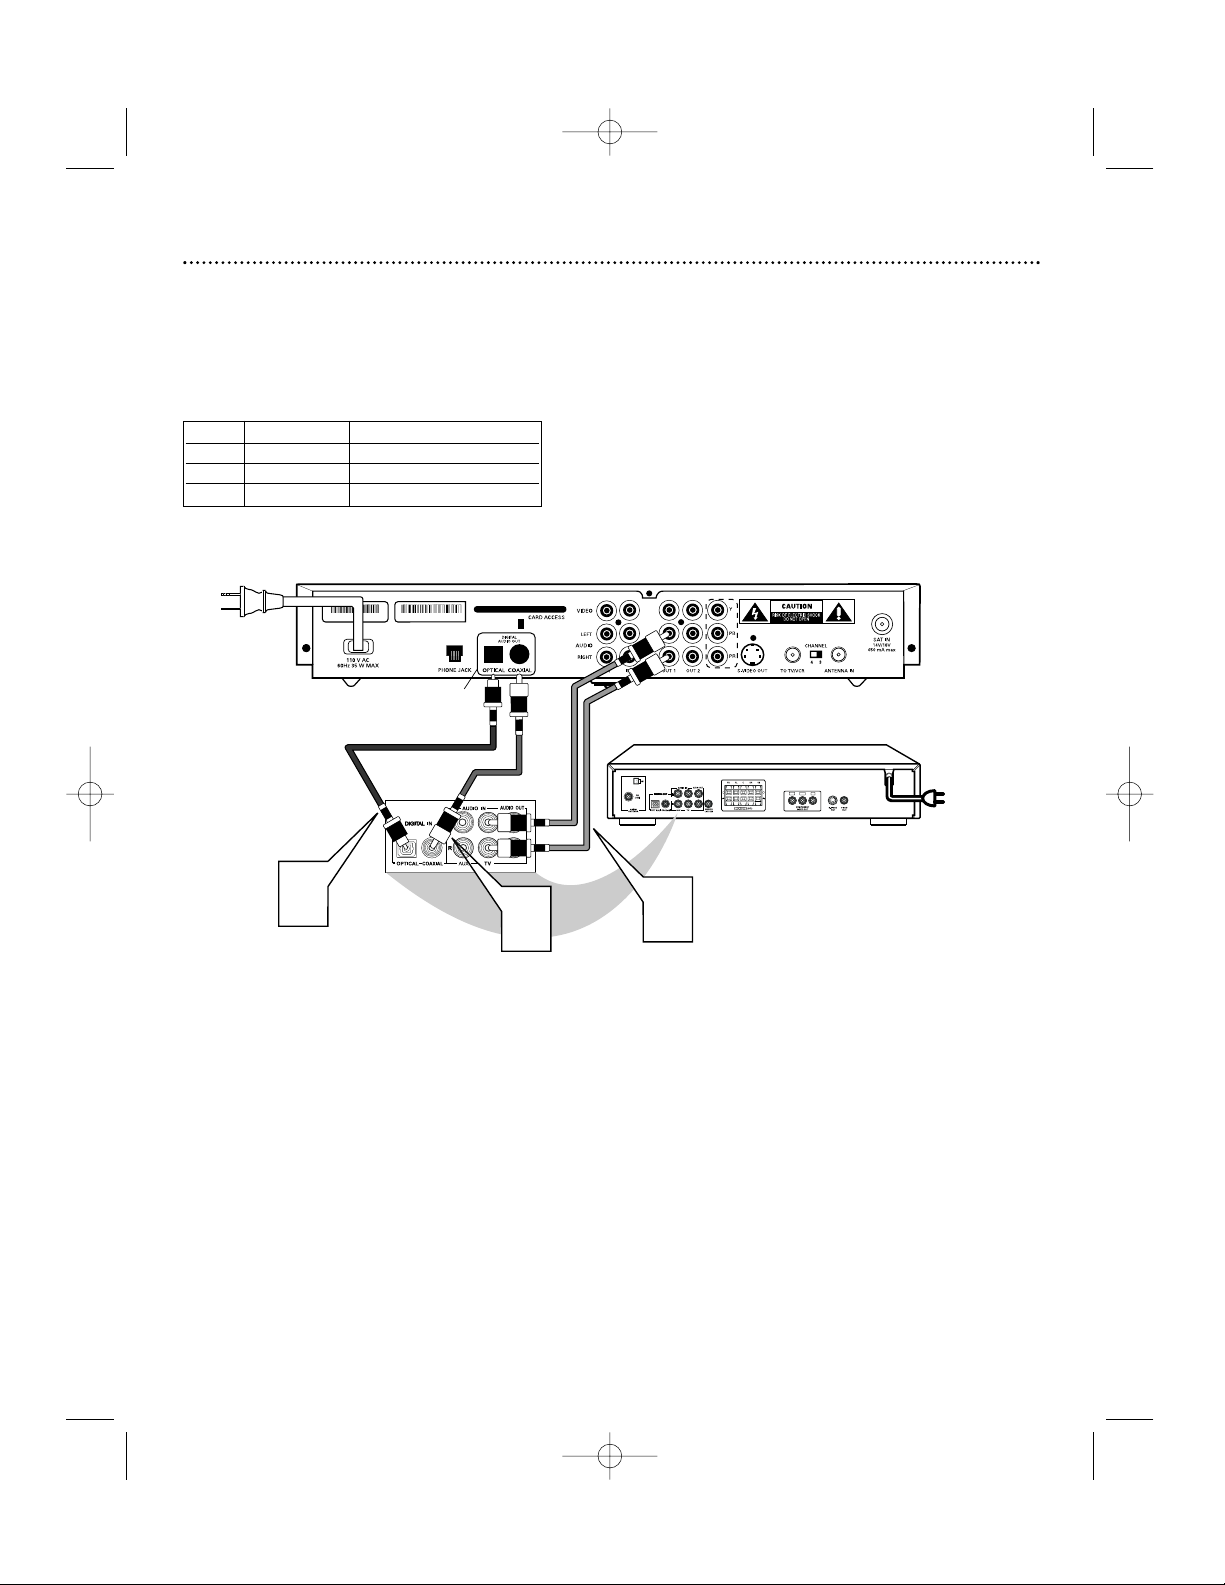
There are several options for connecting the audio outputs of your DIRECTV® Receiver, depending on the type of
equipment you want to connect. If you connected video with option D on page 10, you will get audio from your TV
when using that input. The following chart summarizes your additional options for audio connections. Select either A, B,
or C and refer to the illustration and steps below to connect.
Option Audio Signal Audio Output
A Dolby Digital* OPTICAL
B Dolby Digital* COAXIAL
C Stereo AUDIO LEFT/RIGHT OUT1
* DSX 5540 Only
A. (For model DSX 5540 only.) Using an OPTICAL cable (not included), connect one end to the OPTICAL DIGITAL
AUDIO OUT on the Receiver to the home theater stereo receiver or TV’s OPTICAL IN jack.
B. (For model DSX 5540 only.) Using a COAXIAL cable (not included), connect one end to the COAXIAL DIGITAL
AUDIO OUT on the Receiver to the home theater stereo receiver or TV’s COAXIAL DIGITAL IN jack.
C. Using the RCA type connectors (supplied), connect the left (white) and right (red) jacks of one end of the cables to
the OUT 1 AUDIO LEFT and RIGHT jacks on the Receiver and the other ends to the left and right AUDIO IN on
the home theater stereo receiver or TV. Select the proper input on the home theater stereo receiver or TV.
Audio
Note: This illustration shows a home theater stereo receiver and TV rear jack panel for possible connections. Your
home theater system stereo receiver or TV rear jack panel may differ.
DSX5500_5540 11/13/02 12:21 PM Page 11
Page 12

12
Connections (cont’d)
MODEL NUMBER: DSX 5540
Serial No : 81476039DSX 5540C Receiver ID No : 1234 5678 9012
Rear of VCR
Rear of DVD
COAXIAL OPTICAL
VIDEO
S-VIDEO
Y
PbPr
12V
FL SL CENTER
FR SR SUBW.
LEFT OUT
RIGHT OUT
MULTI-5.1
CH3 CH4
OUT
IN
ANT
V OUT
L OUT
R OUT
CH3CH4
OUT
IN
ANT
V IN
L IN
R IN
VIDEO
LEFT OUT
RIGHT OUT
Audio cables
Video cable
Audio
cables
Video
cable
Video cable
Rear of DIRECTV
®
Receiver
Output options for
VCR recording
A/V Matrix
Unplug all equipment from the AC outlet before making connections.
Does your TV have only one video or RF input but you own a VCR, DVD player or other video equipment? Philips
offers the industry’s first A/V Matrix that allows you to command and control other video devices such as a DVD player
or a VCR without additional equipment. You can use this DIRECTV® Receiver as the video gateway of your entertainment center.
1. Connect the outputs of your other devices (such as a DVD player or VCR) to the corresponding VIDEO and AUDIO
LEFT/RIGHT inputs (IN1 or IN2) of the A/V Matrix on the rear of the DIRECTV Receiver.
2. To record satellite programming, connect the VIDEO and AUDIO LEFT/RIGHT outputs of OUT2 on the rear of the
DIRECTV Receiver to the corresponding video and audio inputs on the VCR. These outputs always output satellite
programming and are not affected by the A/V Matrix. Alternatively, you can connect the TO TV/VCR RF output to
the RF input on the VCR but this output will output the selected video source of the A/V Matrix when this feature is
enabled.
3. To use the A/V Matrix, you must use video output option C (VIDEO OUT1) or D (TO TV/VCR) from page 10 and
you must first enable it in the Main Menu (refer to page 28).
Note: For additional hookups and operation information, refer to the owner’s manuals for the devices you are
connecting to the DIRECTV Receiver.
DSX5500_5540 11/13/02 12:21 PM Page 12
Page 13

13
Remote Control
SAT
Press SAT to control the DIRECTV®
Receiver. LED will blink when other
buttons are pressed while in satellite
mode.
PPV
Use the EZ Search PPV function to
view list of PPV programs and events
for purchasing.
SOURCE
Switches between the inputs of the
A/V Matrix (refer to page 12 and 28).
MENU
Displays the Main Menu.
EXIT
Returns to video and cancels the
transaction.
INFO
Displays program or channel
information.
Navigates through the Guide and
menus.
0-9
Lets you enter numeric values or
channel numbers.
POWER
Switches the DIRECTV® Receiver
between active and standby modes.
MOVIES, SPORTS, NEWS, KIDS
Predefined SmartSurf buttons (refer to
page 20).
SmartSurf
Displays categories you can use for
Guide and channel surfing.
FAVORITES
Allows you to select one of four custom lists to view or edit.
GUIDE
Switches between the “DIRECTV
ADVANCED PROGRAM GUIDE™”
and the “Guide Menu”.
OK
Confirms a selection.
CHANNEL
Displays the next or previous channel.
While in the guide or menu, allows you
to page up and down.
BACK
While in the menu or guide, returns
you to the previous screen. While
watching TV, pressing BACK will jump
you to the previous channel.
DIRECTV INTERACTIVE™ powered
by Wink Communications™.
Press this button when the
DIRECTV INTERACTIVE icon appears
on the screen to access interactive
services.
Battery Installation
1. Remove the battery compartment
cover. Insert the two batteries
(type/AA) supplied.
2. Position them in the battery com-
partment, as shown in the diagram.
3. Replace the cover.
Preparing Your Remote Control
Satellite Functions
DSX5500_5540 11/13/02 12:21 PM Page 13
Page 14

Remote Control (cont’d)
14
Programming the Universal Remote control
Your remote control may already operate your TV, VCR or DVD player. If the remote control does not properly operate
your TV, VCR or DVD player, follow the steps below. These instructions guide you through setting the remote control to
operate your TV. For VCR and DVD player, follow the same steps, but press the VCR or DVD button at step 3.
1. Point the remote control at your TV and press the TV button. Then, press the POWER button. If your TV turns on
or off, try the other TV function buttons (see page 16). If the other functions work, the remote is ready to operate
the TV without any more steps. If your TV does not turn on or off, or if the other buttons do not work, go to step 2.
2. Find the brand and code number(s) of your TV on page 15.
3. Press the TV button.
4. Press and hold the number 1 & number 3 buttons simultaneously for 3 seconds. The LED will blink twice and remain on.
5. Enter the 4-digit code from step 2 within one minute. The LED will blink after each button press. Note: If the 4-digit code is
not entered within one minute, the LED will turn off and the remote control will return to the previously programmed
code.
6. After a valid 4-digit code has been entered, the LED will turn off and blink twice to confirm the new 4-digit code has
been programmed. The LED will then turn off.
7. If an invalid 4-digit code has been entered, the LED will turn off.
8. Press the POWER button. If the remote control operates your TV, you’re finished.
9. If the remote control doesn’t operate your TV and if there is more than 1 code for your TV brand, repeat steps 2-8.
10.For future reference, list the 4 digit code numbers you program into your remote:
TV code: __ __ __ __
VCR code: __ __ __ __
DVD code: __ __ __ __
11.If you cannot find a code that operates your TV, If the remote still does not operate your TV, follow the Automatic
Search steps below.
Automatic Search
To automatically program your remote control to operate your TV, VCR or DVD player, follow the steps below. For a VCR
and DVD player, follow the same steps but substitute that component for the TV.
1. Turn on your TV. Stand close to your TV (within 5 to 10 feet) and point your remote control towards the remote
sensor on your TV. Press the TV button. Press and hold the number 1 and the number 3 buttons simultaneously for 3
seconds. The TV LED will blink twice and remain on.
2. Press the POWER button. The LED will turn off. If the POWER button is not pressed within 1 minute, the remote
will return to the previously programmed code. The automatic search will begin after the POWER button has been
released.
3. Each time a code is transmitted, the LED will blink. This process could take several minutes.
4. When the correct code is found, the TV should turn off. Immediately press the POWER button. The LED will blink twice,
then turn off. If all codes have been tried and the TV has not turned on or off the LED will stay on briefly, then turn off.
Note: To stop the search process at any time, press any button other than the POWER button. The LED will give a long
blink and turn off. There is no guarantee that the remote control will work with your TV, VCR or DVD player.
DSX5500_5540 11/13/02 12:21 PM Page 14
Page 15

Remote Control (cont’d)
15
Admiral ........................................0075, 0236
Adventura................................................0027
Aiko..........................................................0305
Aiwa ..................................0334, 0027, 0064
Akai ..............................................0133, 0068
America Action......................................0305
American High ......................................0062
Asha..........................................................0267
Audiovox ................................................0064
Beaumark ................................................0267
Bell & Howell ........................................0131
Broksonic..............0148, 0211, 0029, 0236
CCE ..............................................0099, 0305
Calix..........................................................0064
Canon ......................................................0062
Capehart..................................................0047
Carver......................................................0108
Cineral......................................................0305
Citizen..........................................0305, 0064
Colt ..........................................................0099
Craig ..........0064, 0099, 0074, 0267, 0298
Curtis Mathes ....0062, 0068, 0087, 0189,
..................................................................0787
Cybernex ................................................0267
Daewoo ................0305, 0588, 0047, 0072
Daytron....................................................0047
Denon......................................................0069
Dynatech ................................................0027
Electrohome ..........................................0064
Electrophonic ........................................0064
Emerex ....................................................0059
Emerson....0211, 0029, 0236, 0305, 0148,
................................0588, 0027, 0064, 0070
Fisher............................................0074, 0131
Fuji ................................................0060, 0062
Funai ........................................................0027
GE.............. 0062, 0087, 0075, 0267, 0787
Garrard....................................................0027
Go Video ................................................0553
GoldStar ......................................0064, 0065
Gradiente................................................0027
HI-Q ........................................................0074
Harley Davidson....................................0027
Harman/Kardon........................ 0065, 0108
Harwood ................................................0099
Headquarter ..........................................0073
Hitachi ..............................0069, 0027, 0068
Hughes Network Systems......................0069
JVC................................................0094, 0068
Jensen ......................................................0068
KEC ..............................................0064, 0305
KLH ..........................................................0099
Kenwood..........................0068, 0094, 0065
Kodak............................................0062, 0064
LXI ............................................................0064
Lloyd’s......................................................0027
Logik ........................................................0099
MEI............................................................0062
MGA..............................................0070, 0267
MGN Technology..................................0267
MTC..............................................0027, 0267
Magnasonic..............................................0305
Magnavox ....0062, 0108, 0027, 0066, 0176
Magnin......................................................0267
Marantz ........................................0108, 0062
Marta........................................................0064
Matsushita....................................0062, 0189
Memorex ............0131, 0074, 0027, 0064,
........0075, 0062, 0073, 0267, 0334, 0066,
........................................................0189, 0236
Minolta ....................................................0069
Mitsubishi..........................0070, 0075, 0094
Motorola......................................0062, 0075
Multitech......................................0027, 0099
NEC ......................0065, 0068, 0094, 0131
Nikko........................................................0064
Noblex ....................................................0267
Olympus ..................................................0062
Optimus......................0189, 0075, 0064, 0131
Orion ................................0029, 0211, 0236
Panasonic..............0062, 0189, 0252, 0643
Penney........0062, 0267, 0064, 0069, 0065
Pentax ......................................................0069
Philco............................................0062, 0236
Philips................................0108, 0062, 0645
Pilot ..........................................................0064
Pioneer ....................................................0094
Portland ..................................................0047
Profitronic ..............................................0267
Proscan ........................................0087, 0787
Protec ......................................................0099
Pulsar........................................................0066
Quarter....................................................0073
Quartz......................................................0073
Quasar ..........................................0062, 0189
RCA ..........0087, 0176, 0069, 0062, 0075,
............................................0133, 0267, 0787
Radio Shack ............................................0027
Radix ........................................................0064
Randex ....................................................0064
Realistic................0027, 0131, 0074, 0075,
............................................0064, 0062, 0073
ReplayTV......................................0641, 0643
Runco ......................................................0066
STS............................................................0069
Samsung........................................0072, 0267
Sanky ............................................0066, 0075
Sansui..........0068, 0027, 0094, 0236, 0298
Sanyo......................0074, 0073, 0131, 0267
Scott ......................0211, 0148, 0070, 0072
Sears..........0064, 0069, 0027, 0062, 0073,
........................................................0074, 0131
Semp ........................................................0072
Sharp ........................................................0075
Shintom....................................................0099
Shogun......................................................0267
Singer........................................................0099
Sony........................0060, 0059, 0027, 0062
Sylvania ..................0062, 0108, 0027, 0070
Symphonic ..............................................0027
TMK..........................................................0267
Tatung......................................................0068
Teac ..............................................0027, 0068
Technics ......................................0062, 0189
Teknika ............................0027, 0062, 0064
Thomas....................................................0027
Tivo ..........................................................0645
Toshiba ........................................0072, 0070
Totevision....................................0064, 0267
Unitech ....................................................0267
Vector......................................................0072
Vector Research....................................0065
Video Concepts ....................................0072
Videosonic ..............................................0267
Wards ......0062, 0087, 0027, 0074, 0267,
........0069, 0075, 0099, 0108, 0176, 0787
White Westinghouse................0305, 0236
XR-1000 ..........................0099, 0027, 0062
Yamaha ....................................................0065
Zenith....................0066, 0027, 0060, 0236
AOC..............................................0046, 0057
Admiral ........................................0120, 0490
Aiko ........................................................ 0119
Akai.......................................................... 0057
Alaron ......................................................0206
Ambassador............................................0204
America Action......................................0207
Ampro......................................................0778
Anam ...................................................... 0207
Audiovox ..........................0119, 0207, 0478
Baysonic ..................................................0207
Belcor ......................................................0046
Bell & Howell..............................0043, 0181
Bradford ..................................................0207
Brockwood ............................................0046
Broksonic ....................................0263, 0490
CXC ........................................................0207
Candle ..........................................0057, 0083
Carnivale..................................................0057
Carver......................................................0081
Celebrity..................................................0027
Cineral ..........................................0478, 0119
Citizen........0083, 0057, 0066, 0087, 0119
Concerto ................................................0083
Contec ....................................................0207
Craig ........................................................0207
Crosley ....................................................0081
Crown..........................................0066, 0207
Curtis Mathes ................0087, 0057, 0043,
........0066, 0074, 0078, 0081, 0083, 0120,
....................0172, 0181, 0193, 0478, 0774
Daewoo ................0119, 0046, 0478, 0066
Daytron....................................................0046
Denon......................................................0172
Dumont........................................0044, 0046
Dwin..............................................0747, 0801
Electroband ............................................0027
Emerson ..............0263, 0207, 0205, 0206,
..........0490, 0204, 0309,0066, 0046, 0181
Envision....................................................0057
Fisher........................................................0181
Fujitsu............................................0206, 0710
Funai..................................0207, 0198, 0206
Futuretech ..............................................0207
GE ............ 0048, 0074, 0078, 0205, 0478,
................................0120, 0162, 0309, 0774
Gibralter ..........................0044, 0046, 0057
GoldStar................0205, 0046, 0057, 0083
Gradiente ....................................0083, 0080
Grunpy..........................................0206, 0207
Hallmark..................................................0205
Harley Davidson....................................0206
Harman/Kardon.................................... 0081
Harvard....................................................0207
Hitachi ..................0172, 0178, 0083, 0043
Infinity ......................................................0081
Inteq..........................................................0044
JBL ............................................................0081
JCB............................................................0027
JVC............................................................0080
KEC ..........................................................0207
KTV....................................0207, 0057, 0066
Kenwood ....................................0057, 0046
LG............................................................ 0083
LXI......0181, 0074, 0081, 0183, 0205, 0774
Logik ........................................................0043
Luxman ....................................................0083
MGA ......................0177, 0046, 0057, 0205
MTC ......................0087, 0057, 0046, 0083
Magnavox..........................0081, 0057, 0206
Majestic....................................................0043
Marantz ........................................0081, 0057
Matsushita ..............................................0277
Megatron......................................0172, 0205
Memorex ............0205, 0043, 0083, 0177,
............................................0181, 0277, 0490
Midland ..0044, 0066, 0074, 0078,0162, 0774
Minutz ......................................................0048
Mitsubishi ..............0177, 0205, 0046, 0120
Motorola..................................................0120
Multitech..................................................0207
NAD..................................0183, 0193, 0205
NEC ..................................0057, 0046, 0083
NTC..........................................................0119
Nikko ................................0205, 0057, 0119
Onwa........................................................0207
Optimus............................0277, 0193, 0181
Optonica......................................0120, 0192
Orion ................................0490, 0206, 0263
Panasonic ....................................0078, 0277
Penney ........0074, 0087, 0057, 0048, 0162,
0205, 0078, 0066, 0046, 0083, 0183, 0774
Philco..........0172, 0046, 0057, 0081, 0490
Philips ......................................................0081
Pilot....................................0046, 0057, 0066
Pioneer ....................................................0193
Portland............................0046, 0066, 0119
Prism ........................................................0078
Proscan ........................................0074, 0774
Proton......................................................0205
Pulsar............................................0044, 0046
Quasar ..............................0078, 0277, 0192
RCA ..........0074, 0162, 0046, 0078, 0117,
........................................................0120, 0774
Radio Shack ........0192, 0207, 0057, 0205,
........0066, 0181, 0046, 0074, 0083, 0774
Realistic ....0192, 0207, 0181, 0057, 0066,
............................................0205, 0046, 0083
Runco............................................0044, 0057
SSS ................................................0046, 0207
Sampo ..........................................0057, 0066
Samsung ....0087, 0046, 0205, 0057, 0083
Samsux ....................................................0066
Sansei........................................................0478
Sansui........................................................0490
Sanyo........................................................0181
Scimitsu....................................................0046
Scotch ......................................................0205
Scott ..........0263, 0046, 0205, 0206, 0207
Sears..........0181, 0083, 0183, 0074, 0081,
................................0198, 0205, 0206, 0774
Semivox ..................................................0207
Semp ........................................................0183
Sharp..................................0120, 0192, 0066
Shogun......................................................0046
Signature..................................................0043
Sony..........................................................0027
Soundesign ......................0205, 0206, 0207
Squareview..............................................0198
Starlite......................................................0207
Supreme ..................................................0027
Sylvania ........................................0081, 0057
Symphonic ..............................................0198
TMK ..................................0083, 0204, 0205
Tandy........................................................0120
Technics ......................................0078, 0277
Technol Ace ..........................................0206
Techwood....................................0078, 0083
Teknika ................0043, 0081, 0206, 0207,
........0046, 0066, 0119, 0083, 0087, 0177
Telefunken ..............................................0083
Toshiba ............................0183, 0087, 0181
Totevision................................................0066
Vector Research....................................0057
Victor ......................................................0080
Vidikron ..................................................0081
Vidtech ........................................0046, 0205
Wards ..................0081, 0192, 0205, 0043,
....................0046, 0048, 0057, 0083, 0206
White Westinghouse ...................... 0490
Yamaha ........................................0046, 0057
Zenith....................0044, 0043, 0119, 0490
TV Codes
VCR Codes
Aiwa..........................................................0668
Apex ........................................................0699
Arcam ......................................................0759
B & K............................................0682, 0689
Denon ..........................................0517, 0661
Fisher........................................................0697
GE ............................................................0549
Go Video ................................................0742
Gradiente................................................0678
Harman/Kardon..........................0609, 0729
Hitachi ..........................................0600, 0691
Hiteker ....................................................0699
JVC................................................0650, 0585
Kenwood..........................0764, 0709, 0561
Konka ....................0746, 0738, 0747, 0748
Magnavox ....................................0530, 0702
Marantz....................................................0566
Mitsubishi ................................................0548
Onkyo ..........................................0654, 0530
Optimus ..................................................0598
Oritron....................................................0678
Panasonic..........................0517, 0704, 0659
Pelican Accessories ..............................0758
Philips............................................0566, 0530
Pioneer..............................0598, 0552, 0659
Princeton ................................................0701
Proscan....................................................0549
RCA ..................................0549, 0598, 0731
Saitek........................................................0758
Samsung ..................................................0600
Sharp ........................................................0657
Sherwood................................................0660
Sony..........................................................0560
Technics ..................................................0517
Techwood ..............................................0719
Theta Digital ..........................................0598
Toshiba ....................................................0530
Yamaha ........................................0517, 0572
Zenith ..........................................0618, 0530
DVD Codes
DSX5500_5540 11/13/02 12:21 PM Page 15
Page 16

Remote Control (cont’d)
16
TV
Press to put the remote control in TV
mode. LED will blink when other buttons
are pressed while in TV mode.
VOL +/-
Increases and decreases volume.
0-9
Allows direct number entry for tuning to
a channel.
TV INPUT
Switch through TV inputs (if applicable).
POWER
Press to turn TV on or off.
CH+/CH-
Change channel up or down
MUTE
Switches audio on and off.
Once programmed (refer to page 14), your DIRECTV®Remote Control should control certain functions of your TV.
Be sure to press the TV button before operating your TV.
TV Functions
Note: All features on your TV may not be supported by this remote.
DSX5500_5540 11/13/02 12:21 PM Page 16
Page 17

Remote Control (cont’d)
17
VCR
Press to put the remote control in VCR
mode. LED will blink when other buttons
are pressed while in VCR mode.
REWIND
VCR - When tape playback is stopped,
press to rewind at high speed. During tape
playback, press to rewind the tape while
the picture stays on the screen.
DVD - Press and release to select previous
chapter. Press and hold to scan
backwards.
STOP
Press to stop the tape or disc.
RECORD (VCR only)
Press once to start a recording.
0-9
Allows direct number entry for tuning to
a channel or chapter.
POWER
Press to turn VCR or DVD player on
or off.
DVD
Press to put the remote control in
DVD mode. LED will blink when other
buttons are pressed while in DVD
mode.
FF
VCR - When tape playback is stopped,
press to advance the tape at high speed.
During tape playback, press to advance
the tape while the picture stays on the
screen.
DVD - Press and release to select next
chapter. Press and hold to scan
forward.
PLAY
Press to play a tape or disc.
PAUSE
Press to pause a tape or disc.
CH+/CH- (VCR only)
Change channel up or down
Once programmed (refer to page 14), your DIRECTV®Remote Control should control certain functions of your VCR
or DVD. Be sure to press the VCR or DVD button before operating each unit.
VCR/DVD Functions
Note: All features on your VCR or DVD player may not be supported by this remote.
DSX5500_5540 11/13/02 12:21 PM Page 17
Page 18

Setup Wizard
18
If your equipment has been professionally installed, skip this first
time setup section and go to page 19.
After the DIRECTV® Receiver has been connected to your components, it is time to turn the DIRECTV Receiver on.
1. Press the SAT button on the remote control. The LED will
blink.
2. Press the POWER button on the remote control.
3. Use the ▲▼ buttons to select your preferred language of the
on screen menus and guide and press OK.
4. When the Welcome screen displays, press the OK button on
the remote control to start the Setup Wizard. The Setup
Wizard is a first time setup that automatically steps you through
the installation process. This screen will ONLY appear the very
first time your DIRECTV Receiver is turned on.
a. Enter the ZIP code.
Note: The ZIP code is critical to point your dish accurately
(refer to page 32).
b. Configure the dish (refer to page 32).
c. Point the dish (refer to page 32).
d. Test the System (refer to page 33).
5. After you have installed your DIRECTV System, you should
contact DIRECTV to order DIRECTV
®
programming at
1-800 DIRECTV (1-800-347-3288).
DSX5500_5540 11/13/02 12:21 PM Page 18
Select a preferred language for the
text display in the menus and
program guide.
Seleccione un idioma para ver el
texto de los menúes y la guía
de programa.
English
Spanish
Welcome
Follow these 4 easy steps and
be on your way to enjoying a
new viewing experience.
Select OK to go the
Setup Wizard.
Skip the Setup Wizard
by pressing down then OK.
Go to Setup Wizard
Skip Setup Wizard
Page 19

All Day Ticket (Pay Per View)
Alternate Audio Track
Closed Captioning
Dolby Digital (DSX 5540 only)
New Incoming Messages
Letterbox format
System Locked
System Temporarily Unlocked
Pay Per View
DIRECTV Interactive Service
Watching TV
19
The Info Banner shows information on the currently tuned program such as the rating, title, start and end time, program
description, and channel number. It also displays the current time and date and indicates if any special features are currently enabled, such as Favorite Channels (page 21) or SmartSurf (page 20).
Channel Number
& Name
Start/End Time
& Date
Channel Icon
Program Name
& Description
Rating
Current Time
& Date
Current Alternate
Audio Track
- The alternate
audio icon indicates an alternate
audio track is
available. To
change audio
tracks, press the
or button
on the remote.
Favorites (page
21) status
SmartSurf (page
20) statue
On screen
Display (OSD)
message space
indicates error
messages or
status or song ID
information
(when you select
a channel that
contains audio
only).
Watching TV
To do this…. Do this….
Display the banner Press INFO button on the remote
View program details 1. Press INFO to display the banner
2. Press INFO again to display program details
View other channels with You can see or “browse” what is on other channels without tuning away from the
the Browse Banner currently viewed program with the Browse Banner.
1. While watching a program, press the INFO button on the remote to display the
banner.
2. While the banner is displayed. press the ▲▼ buttons to see what is showing on
other channels.
3. Press OK to switch to the new channel displayed in the Banner or exit to remove
the banner.
Note: When Favorite Channels (page 21) or SmartSurf (page 20) is in use, the
Browse Banner will only show programs from those lists.
DSX5500_5540 11/13/02 12:21 PM Page 19
106 PPV
5:30PM-7:15PM Jun 14, PG-13
Young Father
Movies, Horror (2001) Seth Hill stars in this tale of a young father
facing otherworldly intruders in a secluded mansion during the
waning days of World War II.
5:22PM Jun 14
Spanish
News List 1
Press OK to purchase
Page 20

SmartSurf™
Choosing SmartSurf is an easy way to highlight the
programs whose categories or themes match your
choice in the guide. Also, when changing channels, you will go only
to the channels containing programs that have the selected category.
When SmartSurf is active, the SmartSurf icon displays in the lower
right hand corner of the banner.
There are four pre-defined SmartSurf categories. Refer to the
buttons on the remote.
Pre-defined Smartsurf icons:
Movies Sports News Kids
To select specific SmartSurf category:
1. Press SmartSurf on the remote control. You have a choice to
clear an existing setting (if active already), cancel, or continue with
setting the SmartSurf.
2. Press the ▲▼ buttons to highlight the desired category or sub-
category. The presence of subcategories is indicated by an arrow
to the right of the category. To view the subcategories, press the
button.
3. Press OK to select the category or subcategory.
Note: To turn off SmartSurf, press any of the SmartSurf keys, select
“Clear SmartSurf” and press OK. When the POWER button is
pressed and the receiver goes into standby, SmartSurf is automatically turned off.
Enhanced User Features
20
EZ Search Pay Per View (PPV)
Philips offers a unique feature for searching pay per views. By
pressing the PPV button on the remote, a listing of all pay per
view programs starting within a chosen time period will be displayed alphabetically.
1. Press the PPV button on the remote.
2. Use the ▲▼ to select a time period to search in (Note: The
full 3.5 day search takes about 10 seconds and cannot be
interrupted) and press OK.
3. Use the ▲▼ to select a pay per view program and press OK.
View details about your selected pay per view program,
purchase it or display other showings of your selection.
Select time period for pay per view search
List of pay per views starting within chosen time period
SmartSurf options
List of categories for SmartSurf
DSX5500_5540 11/13/02 12:21 PM Page 20
Pay Per View
Arrow up/down to scroll.
Press OK to select.
BACK to previous.
PPV startng in next:
3 Hours
12 Hours
3.5 Days
Pay Per View
Arrow up/down to scroll.
Press OK to select.
BACK to previous menu.
Movie 1 12:30p - 2:47p Mon, Cct 14
Movie 2 Noon - 2:35p Mon, Oct 14
Movie 3 2:00p - 3:33p Mon, Oct 14
Movie 4 1:30p - 3:22p Mon, Oct 14
Movie 5 3:00a - 4:23a Mon, Oct 14
SmartSurf
MOVIES SPORTS NEWS KIDS
Continue
Clear SmartSurf
Cancel
Main
Movies
Sports
Interests
Lifestyles
News
Themes
Show Types
Age Appropriate
- To choose a category for channel surfing
and for highlighting in the guide.
- To deactivate any SmartSurf settings.
- To keep current settings.
SmartSurf by Category
Arrow up/down to scroll.
Press OK to select.
BACK to previous menu.
View a list of pay per
view programs and
events that start
within the predefined
times on the left.
Note: searching the
entire 3.5 days will
take about 10 seconds
and cannot be
interrupted
DC FE
SMARTSURF
- indicates
subcategories. View
them by pressing the
right arrow. Press OK
to select one category
or subcategory.
Page 21

Enhanced User Features (cont’d)
Favorite Channels
Favorite Channels is an easy way to customize the listing
of channels. Once Favorites is configured, the Favorites
icon displays in the banner and programs displayed in the
Program Guide are only those in the selected list. When using
the CH+ and CH- buttons, you are limited to channels in
the Favorites list; however, you can access any channel by enter-
ing its number directly on the remote control. You can save up to
four different favorite channel lists. This way, members of a
household can each set their own favorite channel list.
To access Favorite Channels:
1. Press FAVORITES (FAV) on the remote.
Or from the Main menu:
1. Press MENU.
2. Use the ▼ button to select “Preferences” and press OK.
3. Use the ▼ button to select “Set Favorite Channels” and press
OK.
Then, to select or edit a Favorite channel list:
1. Press the ▲▼ buttons to highlight the desired list, and press
OK. Or, to turn off any previously selected Favorites list,
highlight “All Channels”, and press OK
2. Then, use the ▲▼ buttons to highlight “Select” to activate
your Favorite list and press OK. Or, to edit the name or customize a Favorite channel list, select “Select and Edit” and
press OK.
Select & Edit: Change List Name:
1. Select “Change List Name” and press OK.
2. Use the buttons to scroll through the alphabet.
When the letter you want is selected, press OK. Repeat until
you have spelled the list name..
3. When finished, select “Done” on the on-screen keyboard and
press OK.
Select & Edit: Customize Favorites:
1. Select “Customize Favorites” and press OK.
2. You can manually select/deselect channels by highlighting a
channel and pressing OK. Use the ▲▼ buttons to navigate
through the list, or use the PAGE +/- buttons to scroll the list
up or down by a complete page.
“Select All” selects all channels in the list. You can then manually
deselect any channel.
“Deselect All” deselects all the channels in the list. You can then
manually select any channel.
3. When customization is complete, Select “Save Changes” and press
OK. Press BACK to return to the previous menu without saving your changes.
21
Set Favorite Channels: Change List Name
Press OK to select.
Up/down or left/right to highlight.
Press EXIT to cancel.
J K L M N O P Q
R
S T U V W X Y Z
0
1 2 3 4 5 76 89
A B C D E F G H I
Space
Clear
Backspace
Done
Change List Name
Customize Favorites
List 2
Customize Favorites
Change List Name
To access Favorites from the Main Menu, press MENU
and select “Preferences”
Select “Set Favorite Channels” in the “Preferences” menu
DSX5500_5540 11/13/02 12:21 PM Page 21
Main Menu
Arrow up/down to scroll.
Press OK to select.
BACK to exit.
Guide
Interactive Services
Preferences
Parental Controls
Purchases
Setup
System Upgrades
Messages
Caller ID
Preferences: Set Favorite Channels
Arrow up/down to scroll.
Press OK to select.
BACK to exit.
Preferred Language
Screen Format
Banner Duration
Set Favorite Channels
A/V Matrix
Remote Control ID
Dolby Digital
All Channels
List 1
List 2
List 3
List 4
List 1: Customize Favorites
Arrow up/down to scroll.
Press OK to select.
BACK to previous menu.
Select All
Deselect All
Save Changes
100 DTV
101 PPV
102 PPV
103 FREE
104 PPV
105 DTV
106 PPV
107 PPV
Select
Select & Edit
Page 22

Using the Guide
To do this…. Do this….
Display the Guide Press the GUIDE button on the remote control or select “Guide” from the Main
Menu.
Scroll through the Press the ▲▼ buttons. You can use the PAGE+/- buttons to scroll a full page at
Program List a time.
Scroll to another time slot Press the buttons. Program information displays in the banner.
Choose a program to view Press the arrow buttons until the program you want to view is highlighted in the
Guide. If the program is in the current time slot, pressing OK tunes to the selected
channel and displays the information for the program in the banner.
If the program is in a future time slot, you are given the option to set a Reminder
(refer to page 23). If the selected future program is pay per view, you are also given
the option to purchase the program.
View program details You can toggle between the guide and program details by pressing the
INFO button on the remote.
DIRECTV ADVANCED PROGRAM GUIDE™
22
DIRECTV ADVANCED PROGRAM GUIDE
The DIRECTVADVANCED PROGRAM GUIDE offers complete TV listings for up to 3 1/2 days plus access to much more.
The Guide lists programs according to their time slot and channel. With it, you can tune to a program, be notified when a
program is about to start, order pay per view programs, search through listings by the type of program you’re looking for,
and set reminders for future viewing.
The Channel Scroll Bar shows the position of the channel relative to the total number of channels.
The Channel List shows the channels available.
Arrows indicate that the program extends beyond the time slot shown.
The Clock indicates that a Reminder for the program has been set for future viewing. If a Reminder is set, it will always dis-
play in the Guide cell. You will get notification before the program starts so that you can tune to it.
The Program List shows all the programs airing in a given time slot. If program names are too long to fit into a guide cell,
they may be shortened. When a program is selected, its full name appears in the banner.
The Banner in the guide shows information on the highlighted program such as the rating, title, start and end time, pro-
gram description, and channel number. It also displays the current time and date and indicates if any special features are
currently enabled, such as Favorite Channels (page 21) or SmartSurf (page 20).
Channel Number
& Name
Currently Tuned
Channel
Picture in Guide
Time Slot
Selected Date
Channel Scroll
Bar
Channel List
Program List
Current
Time and
Date
Icons
Refer to page 19.
Start/End Time
& Date
Banner
Rating
Highlighted
Program
Arrows
Guide Menu
Buttons
DSX5500_5540 11/13/02 12:21 PM Page 22
Default
Young Father
Movies, Horror (2001) Seth Hill stars in this
tale of a young father facing otherworldly
intruders in a secluded mansion during the
waning days of World War II.
Fri Jun 14 5:00P 5:30P
106 PPVGThe... Young Father
107 PPV
108 PPV
109 PPV
110 PPV
111 PPV All
Press Guide View Search Help
106 PPV 5:22PM Jun 14
5:30PM-7:15PM Jun 14
Rating: PG-13All Channels
G
Young Father
G
Young Father
G
ALLDAY
All
G
All
ALLDAY
ALLDAY
ALLDAY
ALLDAY
Page 23

DIRECTV ADVANCED PROGRAM GUIDE™ (cont’d)
23
PPV (Pay Per View)
Pay per view programs include special programming, movies, and sporting programs and are indicated by a "$" in the banner. In the Guide, you can preview currently airing PPV programs, purchase current and future PPV programs, and cancel
a purchase. From the Main Menu, you can view the purchase history, cancel purchases, and restrict this feature by setting
rating and spending limits.
To purchase a PPV program:
1. Highlight the program in the Guide and press OK.
2. Select "Buy" and press OK. The price will display on the button. If you have locked your DIRECTV Receiver and the rating
or spending limit is exceeded, you must enter your access code to temporarily unlock the receiver (refer to page 29)
before you can purchase it.
3. Select “Showings” to see a list of alternate show times. Press the ▲▼ buttons to move to the next selectable showing (if
available), then press the OK button to select it.
4. Press OK to confirm your purchase.
Note: To order PPV, the DIRECTV Receiver must be continuously connected to a land-based phone line.
Using the Guide (cont’d)
To do this…. Do this….
Set a Reminder for future You can set up your viewing schedule ahead of time, so that you will be automatically
notified of the shows you want to see. In the Guide, Reminders display as a clock to
the right of the program title.
If you wish to record a program using your VCR, set the VCR’s timer recording also.
Refer to your VCR’s owner’s manual for timer recording instructions. The
DIRECTV® Receiver will turn on at the correct time and tune to the channel if a
Reminder is set.
To set a Reminder for a 1. Highlight a future program in the guide and press OK. In the Reminder screen,
choose whether you want to select this program once, daily, weekly, or MondayFriday. Remember, you are actually setting the Reminder by the time slot, so if
the program moves to a different time slot, you will need to reset the Reminder.
2. Press OK.
If the program is in the same time slot as another Reminder, the system will prompt
you that a conflict exists.
To set a Reminder for a 1. When a future pay per view is purchased, you are given the option to set a
Reminder in the purchase details screen. If you set the Reminder for a purchased
pay per view, you will be charged when the event airs.
To cancel a Reminder for a 1. Highlight the program in the guide and press OK.
2. Choose “Once” if you want to cancel a Reminder program for one
time slot only, or “Always” if a program has been set as a Reminder more than
once, for example, a program that airs every day. Then, press OK.
viewing
non-pay per view program
pay per view program
program
DSX5500_5540 11/13/02 12:21 PM Page 23
Page 24

Guide Menu
24
Guide Menu
The bottom of the Guide screen (refer to page 22) contains three
buttons that can be accessed by pressing the GUIDE button on
the remote control when the Guide is already displayed.
• Use the buttons to highlight a button and press OK to
view its list of options.
• To close the list of options and select another Guide Menu but-
ton, press BACK.
• To return to the Guide press BACK again or GUIDE.
• To exit to watch TV, press Exit.
106 PPV 5:22PM Jun 14
5:30PM-7:15PM Jun 14
Fri Jun 14 5:00P 5:30P
Default
Press Guide View Search Help
Young Father
Movies, Horror (2001) Seth Hill stars in this
tale of a young father facing otherworldly
intruders in a secluded mansion during the
waning days of World War II.
Rating: PG-13All Channels
106 PPVGThe... Young Father
107 PPV
G
Young Father
108 PPV
G
Young Father
109 PPV
G
All
110 PPV
G
All
111 PPV All
ALLDAY
ALLDAY
ALLDAY
ALLDAY
ALLDAY
Guide Menu: View
Selecting “View” displays “Go To Time, Pay Per View, Reminder
List and Time Reminder.” Use the ▲▼ buttons to select from
the View options. Press OK or
to select an option.
Jump to specific time slot in guide
EZ Search Pay Per View (see page 20)
List of Reminders set (see page 23)
Set a Reminder by specific date, time
and duration
Category
Title, Actor, Director
Guide Menu: Search
Selecting “Search” allows you to search programs based on
Category, Title, Actor and Director. Use the
▲▼ buttons to
select from the Search options, and press OK or
to select a
search option.
Access the Guide Menu by pressing the GUIDE button
while in the Guide
“View” menu options
“Search” menu options. “Help” menu available by
selecting “Help” and pressing OK
Guide Menu: Help
Displays help information on screen. Use the ▲▼ arrows to
select a topic and press OK. Press the PAGE+/- to scroll
through help information.
DSX5500_5540 11/13/02 12:21 PM Page 24
106 PPV 5:22PM Jun 14
5:30PM-7:15PM Jun 14
Young Father
Movies, Horror (2001) Seth Hill stars in this
tale of a young father facing otherworldly
intruders in a secluded mansion during the
waning days of World War II.
Default
Default
Fri Jun 14 5:00P 5:30P
106 PPVGThe... Young Father
G
107 PPV
108 PPV
109 PPV
110 PPV
111 PPV All
Press Guide View Search Help
Young Father
Movies, Horror (2001) Seth Hill stars in this
tale of a young father facing otherworldly
intruders in a secluded mansion during the
waning days of World War II.
Fri Jun 14 5:00P 5:30P
106 PPVGThe... Young Father
107 PPV
108 PPV
109 PPV
110 PPV
111 PPV All
Press Guide View Search Help
Young Father
G
Young Father
Go To Time
G
ALLDAY
All
Pay Per View
G
All
ALLDAY
Reminder List
ALLDAY
Time Reminder
106 PPV 5:22PM Jun 14
5:30PM-7:15PM Jun 14
G
Young Fathers
G
Young Fathers
G
ALLDAY
All
G
All
ALLDAY
ALLDAY
ALLDAY
ALLDAY
ALLDAY
ALLDAY
Category
Title
Actor
Director
Rating: PG-13All Channels
Rating: PG-13All Channels
Page 25

Guide Menu (cont’d)
25
Guide Menu: Search: Category
A category search allows you to choose from a predefined list of
categories and subcategories. The arrow indicates the category
has subcategories.
1. Use the ▲▼ buttons to highlight a category or the arrow
to view a list of subcategories.
2. Press OK to select one category or subcategory to search.
Guide Menu: Search Results
Once your search is completed you will see a list of results on
the screen. Use the buttons to highlight a program and
press INFO to view the program details or OK to view a list of
program showing times.
In addition to the icons on page 19, the list of program showing
times includes additional icons to reflect the available alternate
audio tracks.
Guide Menu: Search: Title/Actor/Director
To search for a specific title, actor or director:
1. Use the buttons to scroll through the alphabet.
Highlight the letter you want, and press OK. Repeat until you
have spelled part or all of the title, actor or director’s name.
2. When finished, highlight “Done” on the on-screen keyboard
and press OK.
Note: Ignore punctuation and accents. For example, enter
JOHN’S as JOHNS and DAY-TO-DAY as DAYTODAY. When
entering a full name, enter FIRST <space> LAST.
Choose a category to search
Enter the name of the title, actor or director with the
on-screen keyboard
“Search Results” screen
“Showings” screen
English
Spanish
French
German
Italian
Japenese
Korean
Chinese
DSX5500_5540 11/13/02 12:21 PM Page 25
Search for a Category
Arrow up/down to scroll.
Press OK to select.
BACK to previous menu.
Main
Movies
Sports
Interests
Lifestyles
News
Themes
Show Types
Age Appropriate
Search for an Actor
Press OK to select.
Arrow up/down to scroll.
Press EXIT to cancel.
A B C D E F G H I
J K L M N O P Q
S T U V W X Y Z
1 2 3 4 5 76 89
Space
Clear
PROGRAMS:
News1
News2
News3
News4
News5
News6
News7
News8
News9
11:30a-1:22p Tue, Nov 05 109 PPV
Noon-1:52p Tue, Nov 05 106 PPV
12:30p-2:22p Tue, Nov 05 107 PPV
1:00p-2:52p Tue, Nov 05 108 PPV
1:30p-3:22p Tue, Nov 05 109 PPV
R
0
Backspace
Done
Search Results: NEWS
Arrow up/down to scroll.
Press OK to select.
BACK to previous menu.
Showings: Young Father
Arrow up/down to scroll.
Press OK to select.
BACK to previous menu.
- indicates
subcategories. View
them by pressing the
right arrow. Press OK
to select one category
or subcategory.
Note: Ignore
punctuation and
accents. For example,
enter JOHN'S as JOHNS
and DAY-TO-DAY as
DAYTODAY. For
entering a full name,
enter FIRST <space>
LAST.
Page 26

Main Menu
26
Using the Main Menu
The Main Menu lets you customize the features of your
DIRECTV®Receiver.
To access the Main Menu from the Guide or TV:
Press the MENU button on the remote control.
To exit the menu:
Press the MENU button or EXIT.
To navigate through the menus:
Use the ▲▼ buttons to highlight an option. Then press OK or
to confirm the selection and display a sub-menu. Selecting
items in a sub-menu displays options in which you can change or
review settings.
Interactive Services
DIRECTV INTERACTIVE™ powered by Wink Communications®
offers an interactive television service that lets you use your
remote control to access up-to-the-minute news, sports and
weather, get program trivia, respond to free offers and shop, all
while you watch TV. Look for the flashing and press OK to
open the interactive window.
To learn more about the DIRECTV INTERACTIVE™ services:
1. Press MENU.
2. Use ▼ to highlight “Interactive Services” and press OK.
3. Press the OK button to tune directly to the DIRECTV INTER-
ACTIVE™ Center (channel 499) to get more information
about: Getting Started, Interactive Channels, Shopping Sign
Up, Order History, Messages, Help & Settings, and About
DIRECTV.
DIRECTV INTERACTIVE™ service only available on select
model receivers. Receiver must be connected to a phone line.
Wink and Wink Logo are registered trademarks of Wink
Communications Inc.
Press MENU button to view Main Menu
DSX5500_5540 11/13/02 12:21 PM Page 26
Main Menu
Arrow up/down to scroll.
Press OK to select.
BACK to exit.
Guide
Interactive Services
Preferences
Parental Controls
Purchases
Setup
System Upgrades
Messages
Caller ID
Page 27

Main Menu (cont’d)
27
The Preferences option in the Main Menu lets you change the “Preferred Language”, screen format, or banner duration,
set or edit the favorite channels list, enable/disable the A/V Matrix and set the remote control ID. To change your preferences, select “Preferences” in the Main Menu and press OK. In the sub-menus that display, use the ▲▼ buttons to highlight your selection. Press BACK to return to the Main Menu.
Preferences: Preferred Language
Many programs are broadcast with program information and
audio tracks in different languages. You can choose the preferred
language for the text in the Menu and Guide and for the audio
tracks of programs.
Note: Not all programs offer multiple languages. If the selected
program is not available in the language you prefer, it defaults to
English.
To choose a language:
1. Press MENU. The Guideoption will be highlighted. Press ▼ to
select “Preferences” and press OK.
2. Select “Preferred Language” and press OK.
3. Use the ▲▼ buttons to choose either “Menu & Guide” or “Audio
Track” and press OK. The currently selected language has a checkmark to its right.
4. Use the ▲▼ buttons to choose a language from the list.
Press OK.
If desired, repeat steps 3-4 to change the other option.
Note: Once the language of the “Menu & Guide” menu is changed,
the Receiver will reset and the new language will be used.
Preferences: Screen Format
To select a screen format:
1. Press MENU.
2. Press ▼ to select “Preferences” and press OK.
3. Press ▼ to select the “Screen Format” and press OK.
4. Use the ▲▼ buttons to choose from the options.
5. Once you have made your selection, press OK.
Note: Most standard TVs are 4:3 and that is the recommended set-
ting. If you have a widescreen TV, select 16:9.
Preferred Language: Audio Track
Arrow up/down to scroll.
Press OK to select.
BACK to previous menu.
Menu & Guide
Audio Track
English
Spanish
French
German
Italian
Japenese
Korean
Chinese
Main Menu: Preferences
Select preferred language of text in the Menus and
Guide in the “Menu & Guide” menu
Select preferred language of every program in the
“Audio Track” menu
Preferred Language: Menu & Guide
Arrow up/down to scroll.
Press OK to select.
BACK to previous menu.
Menu & Guide
Audio Track
English
Spanish
Preferences: Screen Format
Arrow up/down to scroll.
Press OK to select.
BACK to previous menu.
Preferred Language
Screen Format
Banner Duration
Set Favorite Channels
A/V Matrix
Remote Control ID
Full screen (4:3)
Wide (16:9)
“Screen Format” menu
DSX5500_5540 11/13/02 12:21 PM Page 27
Page 28

28
Main Menu (cont’d)
Preferences: Banner Duration
Banner durations define how long the banner remains on the
screen after you press INFO. Options are 5, 10, 15, or 20
seconds. The default value is 10 seconds.
To select the banner duration:
1. Press MENU.
2. Press ▼ to select “Preferences” and press OK.
3. Press ▼ to select “Banner Duration” and press OK.
4. Use the ▲▼ buttons to choose from the options.
5. Once you have made your selection, press OK.
Preferences: Set Favorite Channels
Refer to Enhanced User Features section, page 21.
Preferences: A/V Matrix
If you connected the A/V matrix as described in the
Connections portion of the user manual (refer to page 12), then
you must enable the A/V Matrix in the DIRECTV®Receiver
before you can use it.
To enable/disable the A/V Matrix:
1. Press MENU.
2. Press ▼ to select “Preferences” and press OK.
3. Press ▼ to select “A/V Matrix” and press OK.
4. Select “Enable” and press OK.
Once enabled and connected, pressing the SOURCE button on
the remote will switch between the video source(s) connected
to Video IN1 and Video IN2 and satellite programming.
Note: If a video source is not connected or turned on and the
A/V Matrix is enabled, pressing the SOURCE button will still
point to that video input. Your TV will go blank. Hit the
SOURCE button to cycle to the next video input or to satellite
programming.
Preferences: Remote Control ID
If you purchase two DSX 5500 or DSX 5540 receivers and use
them in close proximity of each other, control them independently by assigning a separate ID number to each remote.
To change the ID number of the remote control:
1. Press MENU.
2. Press ▼ to select “Preferences” and press OK.
3. Press ▼ to select “Remote Control ID” and press OK.
4. The only option available is the alternate ID. Select and press OK.
5. Press and hold down the SAT and MUTE buttons on the
remote until the SAT light stays on.
6. To set the ID number to 1, enter “111” or to set the ID to 0,
enter “000”. The SAT button will blink twice to confirm the
entry.
7. Point the remote at the Receiver and press OK to complete
the process.
Note: It is important at the end of the procedure to point the
remote at the corresponding DIRECTV Receiver and press OK.
Otherwise, the remote control will change its ID but the Receiver
will not and communication will be lost between the two.
Preferences: Banner Duration
Arrow up/down to scroll.
Press OK to select.
BACK to previous menu.
Preferred Language
Screen Format
Banner Duration
Set Favorite Channels
A/V Matrix
Remote Control ID
5 Seconds
10 seconds
15 Seconds
20 seconds
Preferences: A/V Matrix
Arrow up/down to scroll.
Press OK to select.
BACK to previous menu.
Preferred Language
Screen Format
Banner Duration
Set Favorite Channels
A/V Matrix
Remote Control ID
Enable
Disable
Preferences: Remote Control ID
Arrow up/down to scroll.
Press OK to select.
BACK to previous menu.
Preferred Language
Screen Format
Banner Duration
Set Favorite Channels
A/V Matrix
Remote Control ID
Set Remote Control ID to 1
Independently control 2 receivers
in range of each other by setting
a separate ID to each remote.
“Banner Duration” menu options
“A/V Matrix” menu
“Remote Control ID” menu
DSX5500_5540 11/13/02 12:21 PM Page 28
Page 29

Main Menu (cont’d)
Preferences: Digital Audio (DSX 5540 only)
To get the full theater experience with Dolby Digital surround sound
(when available), connect one or both of your digital audio outputs
(refer to page 11) to your home theater equipment.
To access this feature:
1. Press MENU.
2. Press ▼ arrow to select “Preferences” and press OK.
3. Press ▼ arrow to select “Digital Audio” and press OK.
4. Use the ▲▼ arrows to select whether you want the outputs to only
output Dolby Digital or PCM au dio or if y ou want the DIRECTV
®
Receiver to auto-detect the type of audio stream present.
Note: The Dolby Digital audio track will always be the default
audio track when enabled. If an alternate audio track is desired as
the default selection, you must select the “PCM only” option.
“Dolby” and the double-D symbol are trademarks of Dolby Laboratories.
Manufactured under license from Dolby Laboratories.
Main Menu: Parental Controls
If you want to control what channels and programs are being watched or how much is being spent on each pay per view
purchase, Parental Controls allows you to do this with channel locks, spending limits, and rating limits. Parental Controls
are protected by a 4-digit numeric password that you set.
To access this feature:
1. Press MENU.
2. Press ▼ to select “Parental Controls” and press OK.
3. Use the ▲▼ buttons to choose from the options and press OK.
Parental Controls: Lock The System
(Lock/Unlock The DIRECTV
®
Receiver)
Once any Parental Control setting has been configured, the
DIRECTV Receiver must be locked in order for those
changes to take effect. Your DIRECTV Receiver can be locked
or unlocked. When it is locked, the system will prompt you to enter
the password whenever you want to change settings in the following
menus: “Channel Locks”, ”Set Rating Limits”, or “Set Spending
Limits”. The lock icon in the banner indicates a locked system.
To lock or unlock the system:
1. Choose “Lock The System” or “Unlock The System” from the
“Parental Controls” menu.
2. When the system prompts you for a password, enter it using the
numeric buttons on the remote control. If locking the system,
you will need to confirm it before it takes effect. If you have forgotten or lost your password, contact your service provider.
Parental Controls: Channel Locks
Locking channels prevents a viewer from accessing the channels
by requiring a password. You must lock the DIRECTV Receiver to
enforce these settings (see above).
To set Channel Locks:
1. Choose “Channel Locks” from the “Parental Controls” menu
and press OK.
2. To lock /unlock all channels, use the ▲▼ buttons to select
“Lock All”, or “Unlock All” and press OK.
3. To manually lock/unlock individual channels, press . Then, use
the ▲▼ buttons to select a channel and press OK to toggle
between lock and unlock.
4. Use the PAGE +/- buttons to scroll the channel list by a full page.
5. To store your new settings, select “Save Changes” and press OK.
Preferences: Digital Audio
Arrow up/down to scroll.
Press OK to select.
BACK to previous menu.
Preferred Language
Screen Format
Banner Duration
Set Favorite Channels
A/V Matrix
Remote Control ID
Digital Audio
Setting for optical and coaxial
audio outputs.
Dolby Digital only
PCM only
Auto Selection
Off
Parental Controls: Lock The System
Arrow up/down to scroll.
Press OK to select.
Changes will take effect only after you lock the
system in the Parental Controls menu
Lock The System
Channel Locks
Set Spending Limit
Set Rating Limits
Replace Access Card
Parental Controls: Channel Locks
Arrow up/down to scroll.
Press OK to select.
Changes will take effect only after you lock the
system in the Parental Controls menu
Lock All
Unlock All
Save Changes
100 DTV
101 PPV
102 PPV
103 FREE
104 PPV
105 DTV
106 PPV
107 PPV
29
Options in the “Digital Audio” menu
“Parental Controls” menu
“Channel Locks” menu
DSX5500_5540 11/13/02 12:21 PM Page 29
Page 30

Main Menu (cont’d)
30
Parental Controls: Set Spending Limit
You can set a per purchase spending limit on pay per view programs. It is not a cumulative limit. You must lock the DIRECTV
®
Receiver to enforce this setting (refer to page 29).
To set the Spending Limit:
1. Choose “Set Spending Limit” from the “Parental Controls”
menu and press OK. The current purchase limit displays.
2. Enter the spending limit using the numeric buttons on the
remote. Or, use the buttons to move from one digit to
another, then use the ▲▼ buttons to set the value for each
digit.
Parental Controls: Set Rating Limit
You can restrict viewing by setting the rating limits to certain
levels. Ratings help you determine programming content, similar
to the way films are rated. For example, a rating of "G" is a program suitable for general audiences, while a rating of "R" might
be suitable for adults only. You must lock the system to enforce
these settings. To view a locked program, you must first enter a
password.
To set the Rating Limits:
1. Choose “Set Rating Limits” from “Parental Controls” menu
and press OK.
2. There are three rating systems to set: Children-TV, Entire
Audience-TV, and MPAA-Movies. You can lock or unlock all
ratings in each system. When you lock a particular rating, all
ratings exceeding the locked rating are automatically locked as
well. For example, if you lock "R", "NC-17” and “X”" will be
automatically locked. Press ▲▼ to select the desired limit and
press OK to lock or unlock it. The Children-TV and Entire
Audience-TV options contain sublevel ratings that can further
identify the programming content.
Parental Controls: Replace Access Card
Use this menu to replace your current card with a new one, sent
by your service provider. Be sure to follow the on-screen instructions. For information on inserting access cards, see page 8.
To replace your access card:
1. Press MENU.
2. Use the buttons on the remote control to highlight
“Parental Controls”. Press OK.
3. Choose “Replace Access Card”, then press OK. Be sure the
current access card is inserted in the DIRECTV Receiver.
"Copying OLD access card information" will appear on the
screen.
4 When prompted, remove the old card, insert the new card,
then press OK.
5. When this process is completed, press OK to return to the
previous menu.
6. Discard the old card since it no longer works.
Parental Controls: Set Spending Limit
Arrow up/down or #0-9 to enter number
Press OK to accept and go to next number.
Changes made will take effect only after you
lock the system in the Parental Controls menu.
Lock The System
Channel Locks
Set Spending Limit
Set Rating Limits
Replace Access Card
Spending limit per program:
0 1 0 0 0
$
.
Set Rating Limits: Children - TV
Up/down or left/right to highlight.
Press OK to lock a rating level or content.
Fantasy violence is present in this program.
Lock All
Unlock All
Save Changes
TV-Y
TV-Y7
TV-Y7
F.Violence
Set Rating Limits: Entire Audience - TV
Press OK to lock a rating level.
Dialogue cautions are present.
Lock All
Unlock All
Save Changes
TV-G
TV-PG
TV-14
TV-MA
Ç
TV-PG
Dialogue
Language
Sex
Violence
Set Rating Limits: MPAA - Movies
Press OK to lock a rating level or content.
This material is intended to be viewed
only by adults.
Lock All
Unlock All
Save Changes
G
PG
PG-13
R
NC-17
Ç
X
Ç
“Set Spending Limit” menu
“Children-TV” rating system
“Entire Audience” rating system
“MPAA-Movies” rating system
DSX5500_5540 11/13/02 12:21 PM Page 30
Page 31

Main Menu (cont’d)
31
Main Menu: Purchases
Purchases: Past Purchases
The Past Purchases menu displays a summary of your past pay per
view purchases. It includes the program name and channel number,
program date, start and end time, price, and whether the program
was viewed or cancelled. Information for all past purchases is stored
on the access card and displayed with the most recent purchase first.
To view past purchases:
1. Press MENU.
2. Choose “Purchases” from the main menu and press OK.
3. Use the ▲▼ buttons to choose “Past Purchases” and press OK.
4. A list of past purchases displays indicating whether they were
viewed or cancelled. You can scroll through the list using the ▲▼
buttons or using the PAGE+/- buttons to scroll by a full page.
Purchases: Upcoming Purchases
The Upcoming Purchases menu displays all future pay per view
programs that you have purchased but not cancelled. You may
cancel any pay per view program you have not yet watched that
was purchased through the DIRECTV Receiver.
Note: You cannot cancel a PPV purchase if you have already tuned to
the program.
To cancel purchases:
1. Press MENU.
2. Choose “Purchases” from the main menu and press OK.
3. Choose “Upcoming Purchases” and press OK.
4. A list displays of upcoming purchases that were ordered but
not viewed. You can scroll through the list using the ▲▼ buttons or using the PAGE+/- buttons to scroll by a full page.
5. To delete a pending purchase, highlight it and press OK. A
checkmark will appear.
6. Select “Save Changes” and press OK to cancel all checked
programs from the upcoming purchases list.
7. You can verify the purchase was cancelled by checking in the
“Past Purchases” menu.
Purchases: Past Purchases
Arrow up/down to scroll.
Press OK to select for deletion.
BACK to previous menu.
Past Purchases
Upcoming Purchases
Jun 14, 2002 5:30 - 7:15 pm 106
Young Father
$3.95 PG
Purchases: Upcoming Purchases
Arrow up/down to scroll.
Press OK to select for deletion.
BACK to previous menu.
Delete All
Undelete All
Save changes
Jun 14, 2002 5:30 - 7:15 pm 106
Young Father
$3.95 PG
“Past Purchases” menu
“Upcoming Purchases” menu
DSX5500_5540 11/13/02 12:21 PM Page 31
Page 32

Main Menu (cont’d)
32
Main Menu: Setup
Use this menu to run through the setup process (professional installation is highly recommended). Configure each setting
within “Enter ZIP Code” and “Dish Configuration.” Use “Point Dish” and “System Test” to confirm your setup.
To view Setup options:
1. Press MENU.
2. Select “Setup” and press OK.
3. Use the 89 buttons to select one of the “Setup” menu
options.
Setup: Enter ZIP Code
Use this function to correctly position the satellite antenna.
To enter your ZIP code:
1. At the “Setup” menu, select “Enter ZIP Code” and press OK.
2. Enter the ZIP code using the numeric buttons on the remote,
or use the 89 buttons to select each digit in the ZIP code
field. Press the : button to move to the next field.
Setup: Dish Type
Use this function to identify your type of satellite antenna dish.
To select your dish type:
1. At the “Setup” menu, select “Dish Type” and press OK.
2. Use the 89 buttons to select “Manual Selection” if you know
the type of dish you have. Otherwise, contact your installer or
select “Auto Selection” and press OK.
3. Use the 89 buttons to manually select your dish type and
press OK.
Setup: Point Dish
Use this function to manually point the dish and correctly align it
with the satellite(s). You may want to have a helper to read the
onscreen displays for you during this procedure. Signal strength
readings change approximately 2 seconds after each adjustment is
made.
Note: Single dish installations often show higher signal strength
than installations that receive signals from two or three satellites.
The onscreen display will tell you how to align your dish based on
your ZIP code.
To point your dish:
1. At the Setup menu, select “Point Dish” and press OK.
2. A signal strength meter displays. Adjust the dish until the signal
strength meter stabilizes at a maximum reading. The range is 0 to
100. It is recommended to obtain a signal strength of at least 60.
An audible tone will help with this procedure. The tones or beeps
get faster as the signal strength increases until it becomes a continuous sound. If you have problems getting a signal, refer to the
troubleshooting section of the user manual (page 35).
Note: Use the 8 or 9 buttons to switch between
satellites. Use the ; or : buttons to switch between
transponders for the selected satellite.
“Manual Selection” menu options
Helpful Hint
• Your ZIP code is critical to the
installation process.
Dish Type: Manual Selection
Arrow up/down to scroll.
Press OK to select.
BACK to previous menu.
Manual Selection
Auto Selection
Round dish configured for
1 satellite location
Oval dish configured for
2 satellite locations
Oval dish configured for
3 satellite locations
Setup: Point Dish
Manually point your dish to the direction below.
Change satellite with arrow up/down.
Arrow left/right changes transponder.
BACK to previous menu.
Enter Zip Code
Dish Type
Point Dish
System Test
System Information
Point dish at 154 degrees azlmuth,
51 degrees elevation and 101 degrees
tilt based on zip code 91914.
101"(A) 100 2
119"(B) 0
110"(C) 0
Setup: Enter ZIP Code
Arrow up/down or #0-9 to enter number
Press OK to accept and go to next number.
Press BACK to previous menu.
Enter ZIP Code
Dish Type
Point Dish
System Test
System Information
Please enter your zip code.
9 2 1 2 7
“Enter ZIP Code” menu
DSX5500_5540 11/13/02 12:21 PM Page 32
Page 33

Main Menu (cont’d)
33
Setup: System Test
This option performs a test of the system. This information is useful
in troubleshooting if you need to contact customer service.
To run a system test:
1. At the Setup menu, select “System Test” and press OK. A mes-
sage “Test in progress, Please Wait . . .” may appear. After a
few seconds, the test results will display.
Setup: System Information
This option shows information about your hardware and software
that will be useful in troubleshooting if you need to contact customer service.
To view system information:
1. At the Setup menu, select “System Information” and press OK.
2. Use the PAGE +/- buttons to scroll the information.
Main Menu: System Upgrades
Your DIRECTV®Receiver is able to receive upgrades or modifications to some of its features and functions. These modifications will occur automatically, usually at times when the DIRECTV Receiver is not likely to be in use. If your DIRECTV
Receiver is on when an upgrade or modification is sent, reception may be interrupted for a minute or two. Reception
should return to normal after the modification is complete. Your DIRECTV Receiver must be plugged in to receive an
upgrade. Do not unplug your DIRECTV Receiver while an upgrade is in progress. Consult the System Upgrades Menu to
find a schedule of upgrades or modifications planned by DIRECTV.
To view past or future upgrades:
1. Press MENU.
2. Select “System Upgrades” in the Main Menu and press OK.
3. Use the 89 buttons to select “Past Upgrades” or “Future Upgrades” and press OK.
Setup: System Test
BACK to previous menu.
Enter ZIP Code
Dish Type
Point Dish
System Test
System Information
Tunung: OK
Signal Strength: 0
Access Card status: OK
Valid card
Access Card ID: 395015639
Modem status:
Line is in use
Setup: System Information
Page +/- for more information.
BACK to previous menu.
Enter ZIP Code
Dish Type
Point Dish
System Test
System Information
Jan 1, 1980 12:01:06 am
Daylight Savings:
Inactive
Manufacturer Brand: PHILIPS
IRD Model:
DSX5500
IRD Serial #: 12345678
IRD Receiver ID #:
9999-9999-9999
“System Test” menu
“System Information” menu
DSX5500_5540 11/13/02 12:21 PM Page 33
Page 34

Main Menu (cont’d)
34
Main Menu: Messages
When you receive a new message, the New Incoming
Messages icon appears in the banner. You can view and
delete messages. Each message includes the date and
time it was sent. When new messages are received, the
oldest message is automatically deleted if the maximum amount
of messages (30) is exceeded. The banner on the Message screen
indicates how many messages you have.
To view messages:
1. Press MENU.
2. Use the ▲▼ buttons to choose “Messages” and press OK.
3. Use the ▲▼ buttons to select and view a message.
4. When a message is displayed, press OK to delete a message
(the torn envelope icon indicates a deleted message).
5. When you press BACK or EXIT, all deleted messages are
removed permanently and will not display the next time you
view messages.
Main Menu: Caller ID
Note: You must have phone line connected to your Receiver and
be subscribed to Caller ID service from your phone service
provider.
When a phone call comes in, a display will appear containing call
information.
To enable or disable Caller ID:
1. Press the MENU button. Use the ▲▼ buttons to select “Caller
ID”and press OK.
2. Use the ▲▼ buttons to select “Enable/Disable” and press OK.
3. Use the ▲▼ buttons to select either “Enable” or “Disable”
and press OK.
To view Caller ID history:
At the Caller ID screen, use the ▲▼ buttons to select “Call
History” and press OK. The history information will be displayed.
Messages:Message 1 of 18
Arrow up/down to highlight and see messages.
Page +/- to view entire message.
Press Ok to select for deletion.
DIRECTV offers great programming!
Caller ID: Enable/Disable
Arrow up/down to scroll.
Press OK to select.
BACK to previous menu.
Enable/Disable
Call History
Enable
Disable
“Messages” menu
“Caller ID” options
DSX5500_5540 11/13/02 12:21 PM Page 34
Page 35

Troubleshooting
1. Press the POWER button on the front panel of the DIRECTV® Receiver if the power indicator LED is not on.
2. Make sure TV power is on.
3. Check TV connection from the DIRECTV Receiver.
a. If using RF output, tune TV to channel 3 or 4 to match the channel switch on the rear
panel of the DIRECTV Receiver.
b.If using composite, S-Video, or component outputs, select the proper input on your TV.
4. Make sure the SAT IN coaxial cable is properly connected to the antenna's LNB or multiswitch. Check the cable for kinks.
5. Check the satellite antenna's signal strength (see page 32). To ensure a quality picture, make sure
the output signal is coming directly from the DIRECTV Receiver and not through your VCR.
6. If the A/V Matrix is enabled, press the SOURCE button on the remote to select from satellite programming, VIDEO IN1, or VIDEO IN2.
7. Turn DIRECTV Receiver off, unplug, wait 10 to 15 seconds, and plug back in.
Note: Adverse weather conditions may affect picture quality.
1. Make sure that the TV volume is not set to mute.
2. Check audio connections from the DIRECTV Receiver to the TV.
a. If using AUDIO LEFT/RIGHT OUT1, select the proper inputs on your TV.
b.If using DIGITAL AUDIO OUT (optical or coaxial – DSX 5540 only), select the proper
input(s) on your home theater receiver.
3. Check if the problem exists on other channels. If so, turn DIRECTV Receiver off, unplug,
wait 10 to 15 seconds, and plug back in.
1. Make sure the batteries are inserted correctly (see page 13) and are not dead.
2. Be sure you are within operating range of the DIRECTV Receiver.
3. Make sure no objects obstruct the line of sight between the remote and the DIRECTV
Receiver.
4. Press the SAT button on the remote.
5. If remote control ID was changed so the DIRECTV Receiver and the remote no longer communicate, change the ID number back to the previous ID number (see page 28).
1. Cannot order a. It may be too late to purchase the program. Check for other show times.
b.Check phone cord connection on rear panel of the DIRECTV Receiver and at the wall
jack. Keep phone cord connected.
2. Cannot cancel - you cannot cancel pay per view orders that you've watched or tuned to, or
ones not ordered through your DIRECTV Receiver.
• The system must be locked before your Parental Controls settings will take effect
(see page 29).
• The system must be unlocked before you can make changes to the Parental Controls
settings.
Cannot disable – press the POWER button to go into standby and press the POWER again to
bring DIRECTV Receiver out of standby.
1. Check the default language settings (see page 27).
2. The program provider may not provide audio in all the languages listed in the “Preferred
Language” menu.
3. If using a DSX 5540, a Dolby audio track will always be the default audio track for the
“Dobly Digital Only” setting. If an alternate audio track is desired as the default selection,
change the Digital Audio setting to “PCM only” in the “Preferences” menu.
1. Check that you are subscribing to the station to which you want to tune to.
2. Be sure the system is not locked as indicated by a lock icon in the banner.
3. Make sure SmartSurf and/or Favorites is not turned on. See “Favorites/SmartSurf” above for
instructions to cancel either feature.
Where To Find Help
General help is available by highlighting the "HELP" button in the Guide menu and pressing OK.
No picture / poor
picture
No sound
Remote does not
work
Ordering or cancelling pay per view
Parental Controls
Favorites /
SmartSurf
Audio track
incorrect
Cannot access
channel(s)
35
DSX5500_5540 11/13/02 12:21 PM Page 35
Page 36

Limited Warranty
Digital Satellite Receiver
90 Days Free Exchange / 91 Days-One Year Nominal Fee Exchange
This product must be carried in for repair.
EL6471E002 / 8-02
This warranty gives you specific legal rights. You may have other rights which vary from state/province to state/province.
Philips, P. O. Box 520890, Miami, FL 33152 (402) 536-4171
WHO IS COVERED?
You must have proof of purchase to receive warranty service.
A sales receipt or other document showing that you purchased
the product is considered proof of purchase.
WHAT IS COVERED?
Warranty coverage begins the day you buy your product. For
90 days from the date of purchase, the Digital Satellite Receiver
will be replaced with a new, repaired, renewed, or comparable
product (whichever is deemed necessary) if it becomes defective or inoperative. This exchange is done at no charge to you.
From 91 days to one year from the date of purchase, you must pay
a nominal fee for a new or renewed product. This exchange
offer ends one year after the date of purchase.
All products, including replacement products, are covered only
for the original warranty period. When the warranty on the
original product expires, the warranty on the replacement
product also expires.
WHAT IS EXCLUDED?
Your warranty does not cover:
• labor charges for installation or setup of the product.
• installation, performance of, or repair of audio/video cabling,
telephone line, or accessory attachments used in accessory
ports outside of the product.
• product replacement because of misuse, accident, lightning
damage, unauthorized repair, or other cause not within the
control of Philips.
• incidental or consequential damages resulting from the product. (Some states do not allow the exclusion of incidental or
consequential damages, so the above exclusion may not apply
to you.)
• reception transmission problems caused by signal conditions,
telephone line, or cable or antenna systems outside the unit.
• a product that requires modification or adaptation to enable
it to operate in any country other than the country for
which it was designed, manufactured, approved and/or
authorized, or repair of products damaged by these
modifications.
• a product used for commercial or institutional purposes.
• DIRECTV service is separate and distinct from this product
(hardware) warranty.
WHERE IS EXCHANGE AVAILABLE?
You may exchange the product in all countries where the product is officially distributed by Philips. In countries where Philips
does not distribute the product, the local Philips service organization will attempt to provide a replacement product (although
there may be a delay if the appropriate product is not readily
available).
MAKE SURE YOU KEEP...
Please keep your sales receipt or other document showing
proof of purchase. Attach it to this owner’s manual and keep
both nearby. Also keep the original box and packing material in
case you need to return your product.
BEFORE REQUESTING EXCHANGE...
Please check your owner’s manual before requesting exchange.
Adjustments of the controls discussed there may save you a
call.
TO EXCHANGE YOUR PRODUCT...
An exchange will be managed by Philips. If you believe you need
to exchange your Digital Satellite Receiver, contact Philips at
1-800-464-1131. A representative will go through a diagnostic
checklist with you. If it is determined that the product needs to
be exchanged, you will receive a return authorization number.
The representative will give you complete shipping details.
TO GET OUT-OF-WARRANTY EXCHANGE...
To exchange your product after the warranty expires, contact
Philips at 1-800-464-1131 to determine the cost of out-of-warranty exchange for your product.
All implied warranties, including implied warranties of merchantability
and fitness for a particular purpose, are limited in duration to the
duration of this express warranty. Some states do not allow limitations on how long an implied warranty lasts, so the above limitation
may not apply to you.
3111 176 50891 Printed in Mexico
DSX5500_5540 11/13/02 12:21 PM Page 36
 Loading...