

Page 1
DSR 5600
Page 2

Page 3

Inhaltsverzeichnis
1 Sicherheitsanweisungen ______________________3
2 Auspacken __________________________________3
3 Produktbeschreibung ________________________4
3.1 Vorderansicht ______________________________4
3.2 Rückseite __________________________________5
3.3 CA (Conditional Access) Modul ________________5
4 Vorbereiten, einstellen und verwenden Ihrer
Fernbedienung ______________________________6
4.1 Einlegen der Batterien ________________________6
4.2 Einstellen der Fernbedienung. __________________6
4.2.1 Modus einstellen _____________________________6
4.2.2 Regelung der Lautstärke- und Stummschaltungsfunktion 6
4.2.3 Änderung der Markeneinstellung Ihrer Fernbedienung
auf veschiedene A/V Geräte (TV, VCR, DVD oder
Verstärker/Tuner) _____________________________6
4.3 Benutzen Ihrer Fernbedienung zur Steuerung des
Satelliten-Receivers - die Fernbedienung ist auf den
STB-Modus geschaltet. ________________________7
5 Anschlüsse und Installation ___________________8
5.1 Anschlüsse _________________________________8
5.1.1 Anschliessen des Satelliten-Receivers an das
Fernsehgerät und den Videorecorder. _____________8
5.1.2 Anschliessen der HiFi-Anlage ____________________8
5.1.3 Anschliessen des Satelliten-Receivers an die
Telefonleitung (für zukünftige Nutzung) _____________8
5.2 Kurzanleitung zur schnellen Inbetriebnahme _______9
5.3 Umfassende Installation des Receivers ___________9
5.3.1 Umfassende Installation des Receivers _____________9
5.3.2 Ihre Installation umfasst einen DiSEqC Umschalter ___10
6 Grundfunktionen ___________________________11
6.1 Ein- und Ausschalten des Receivers _____________11
6.2 Aktivieren oder schalten des Receivers auf Standby. 11
6.3 Auswählen von Fernseh- oder RADIO-Betrieb ____11
6.4 Umschalten zwischen den Kanallisten ___________11
6.5 Verwenden des Kanalbanners _________________12
6.5.1 Kanalbannerzeichen __________________________12
6.5.2 Programmwahl _____________________________12
6.5.3 Kanalwahl __________________________________13
6.6 Änderung der Optionen des gerade angesehenen
Programms _______________________________13
6.7 Aufrufen weiterer Informationen zu dem gerade
angeschauten Programm _____________________13
6.8 Verwenden der Taste TV/STB ________________14
6.9 Starten/stoppen/verbergen einer ausgestrahlten
MHP-Anwendung ___________________________14
6.10 Erinnerungsfunktion und Timers _______________14
6.10.1 Unterschied zwischen Erinnerungs- und
Timerfunktionen ____________________________14
6.10.2 Aufnahme Erinnerungs-/Timerfunktionen _________15
6.10.3 Erinnerung/Timer Kollision 15
6.10.4 Timer _____________________________________16
7 Hauptmenü _______________________________17
7.1 Menüstruktur ______________________________17
8 Ändern der Einstellungen des Receivers _______19
8.1 Kanal-Manager _____________________________19
8.1.1 Kanalliste organisieren ________________________19
8.1.2 Kanalliste ändern ____________________________20
8.2 Kindersicherung ____________________________21
8.2.1 Ihr PIN-Code ______________________________21
8.3 Benutzer (persönliche) -Einstellungen ___________22
8.3.1 Anzeige-Option _____________________________22
8.3.2 Sprachen-Optionen __________________________22
8.4 Installation _________________________________22
8.4.1 Einstellungen _______________________________23
8.4.2 Installation / Antennenkonfiguration ______________24
8.4.3 Installation / LNB-Konfiguration _________________25
8.4.4 Installation / Kanalsuche _______________________26
8.4.5 Installation / Receiver Status ____________________26
9 Fortgeschrittene Einstellungen _______________28
9.1 Easy recording _____________________________28
9.2 Änderung der Fernbedienungs- und
Receiverseinstellungen _______________________29
9.3 Master PIN Code ___________________________29
10 Upgrade der Receiver-Software ______________30
INHALTSVERZEICHNIS 1
Wilkommen beim digitalen Fernsehen
Herzlichen Glückwunsch zu Ihrer Entscheidung für den digitalen Satelliten-Receiver DSR 5600 von Philips. Dieser Receiver
wird Ihnen sowohl Zugang zu FTA- (kostenlosen) als auch zu verschlüsselten digitalen Satelliten-, Radioprogrammen und
interaktiven Kanäle bieten. Dank der integrierten MHP-Funktion eignet sich Ihr Receiver für MHP interaktive TV
Applikationen daß an manchen Kanälen ausgestrahlt werden.
Wenn Sie verschlüsselte Programme empfangen möchten, benötigen Sie ein spezielles Zugangsmodul (CA Modul) und ein
entsprechendes Abonnement. Das CA-Modul ist nicht im Lieferumfang Ihres Receivers enthalten. Nähere Informationen
über CA-Modul Benutzung finden Sie weiter in diesem Benutzerhandbuch.
Hinweis: die Bezeichnung Dekoder" wird in allen Menü-Bildschirmen benutzt. Diese Bezeichnung bedeutet auch STB (Set-Top Box)",
Receiver" digitaler Receiver". Alle Beschreibungen in diesem Benutzerhandbuch beziehen sich auf Receiver".
Deutsch
Page 4

2 INHALTSVERZEICHNIS
11 Programmieren der Fernbedienung für Ihr STB,
Fernsehgerät, Ihren Videorekorder, DVD und
Verstärker/Tuner. ___________________________31
11.1 Einrichten der Fernbedienung _________________31
11.2 Verwenden der Fernbedienung für das
Fernsehgerät _______________________________32
11.3 Verwenden der Fernbedienung für den
Videorecorder _____________________________33
11.4 Verwenden der Fernbedienung für den
DVD-Spieler ______________________________34
11.5 Verwenden der Fernbedienung für den TunerVerstärker _________________________________35
12 Fehlersuche _______________________________36
13 Technische Daten ___________________________37
14 CODE LIST FÜR VERCHIEDEN MARKEN _____38
Deutsch
Page 5

SICHERHEITSANWEISUNGEN 3
1 Sicherheitsanweisungen
Deutsch
Alle Sicherheitsanweisungen und Anmerkungen zu dem
Betrieb sind sorgfältig durchzulesen und verstanden
bevor Sie den Receiver zum ersten Mal in Betrieb
nehmen.
Stellen Sie den Receiver weit von Wärmequelle oder
dem Heizkörper. Lassen Sie mindestens 3 cm Abstand
rund um den Receiver um Luftzirkulation zu versichern.
Prüfen Sie dabei auch, ob die Entlüftungsschlitzen nicht
gedeckt sind.
Der Recorder ist ausschliesslich für Heimanwendung
geeignet und muß gegen Überhitzung, übermäßige
Feuchtigkeit und Dampf geschützt sein. Stellen Sie sicher,
daß keine Gegenstände oder Flüssigkeiten durch die
Entlüftungsschlitzen in das Gehäuse nicht gelangen. Sollte
dies geschehen, so trennen Sie das Gerät von der
Netzspannung und wenden Sie sich an Ihren Händler.
Verwenden Sie zum Reinigen ein feuchtes Fensterleder.
Benutzen Sie nie ein Scheuertuch, Scheuerschwamm
oder scheuernde Reinigungsmittel.
Achten Sie beim Herstellen und Trennen von
Kabelverbindungen immer darauf, dass der Receiver von
der Netzspannung getrennt ist.
Bitte warten Sie noch mit dem Anschließen Ihres
Receivers und lesen Sie weiter.
Öffnen Sie nicht das Gerät, da gibt es keine Teile, die von
dem Benutzer repariert werden können.
Anschluss
Bevor das Gerät an die Netzspannung angeschlossen
wird, muss geprüft werden, ob die Netzspannung mit der
auf auf der Rückseite des Receivers angegebenen
Spannung übereinstimmt. Ist dies nicht der Fall, so
wenden Sie sich an Ihren Händler.
Bitte warten Sie noch mit dem Anschließen Ihres
Receivers und lesen Sie weiter.
Wenn Sie Ihren Receiver auspacken, prüfen Sie, ob
folgende Kabel und Zubehörteile da sind:
- Fernbedienung mit separat gepackten, alkalischen
Philips Batterien
- Netzkabel
- SCART-Kabel
- Telefonkabel
- Benutzerhandbuch
- Philips Garantiekarte
Achtung: Plastiktüten können gefährlich sein. Um
Erstickungsgefahr zu vermeiden, aufbewahren Sie die
Plastiktüte außer Kinderreichweite.
2 Auspacken
Page 6
3 Produktbeschreibung
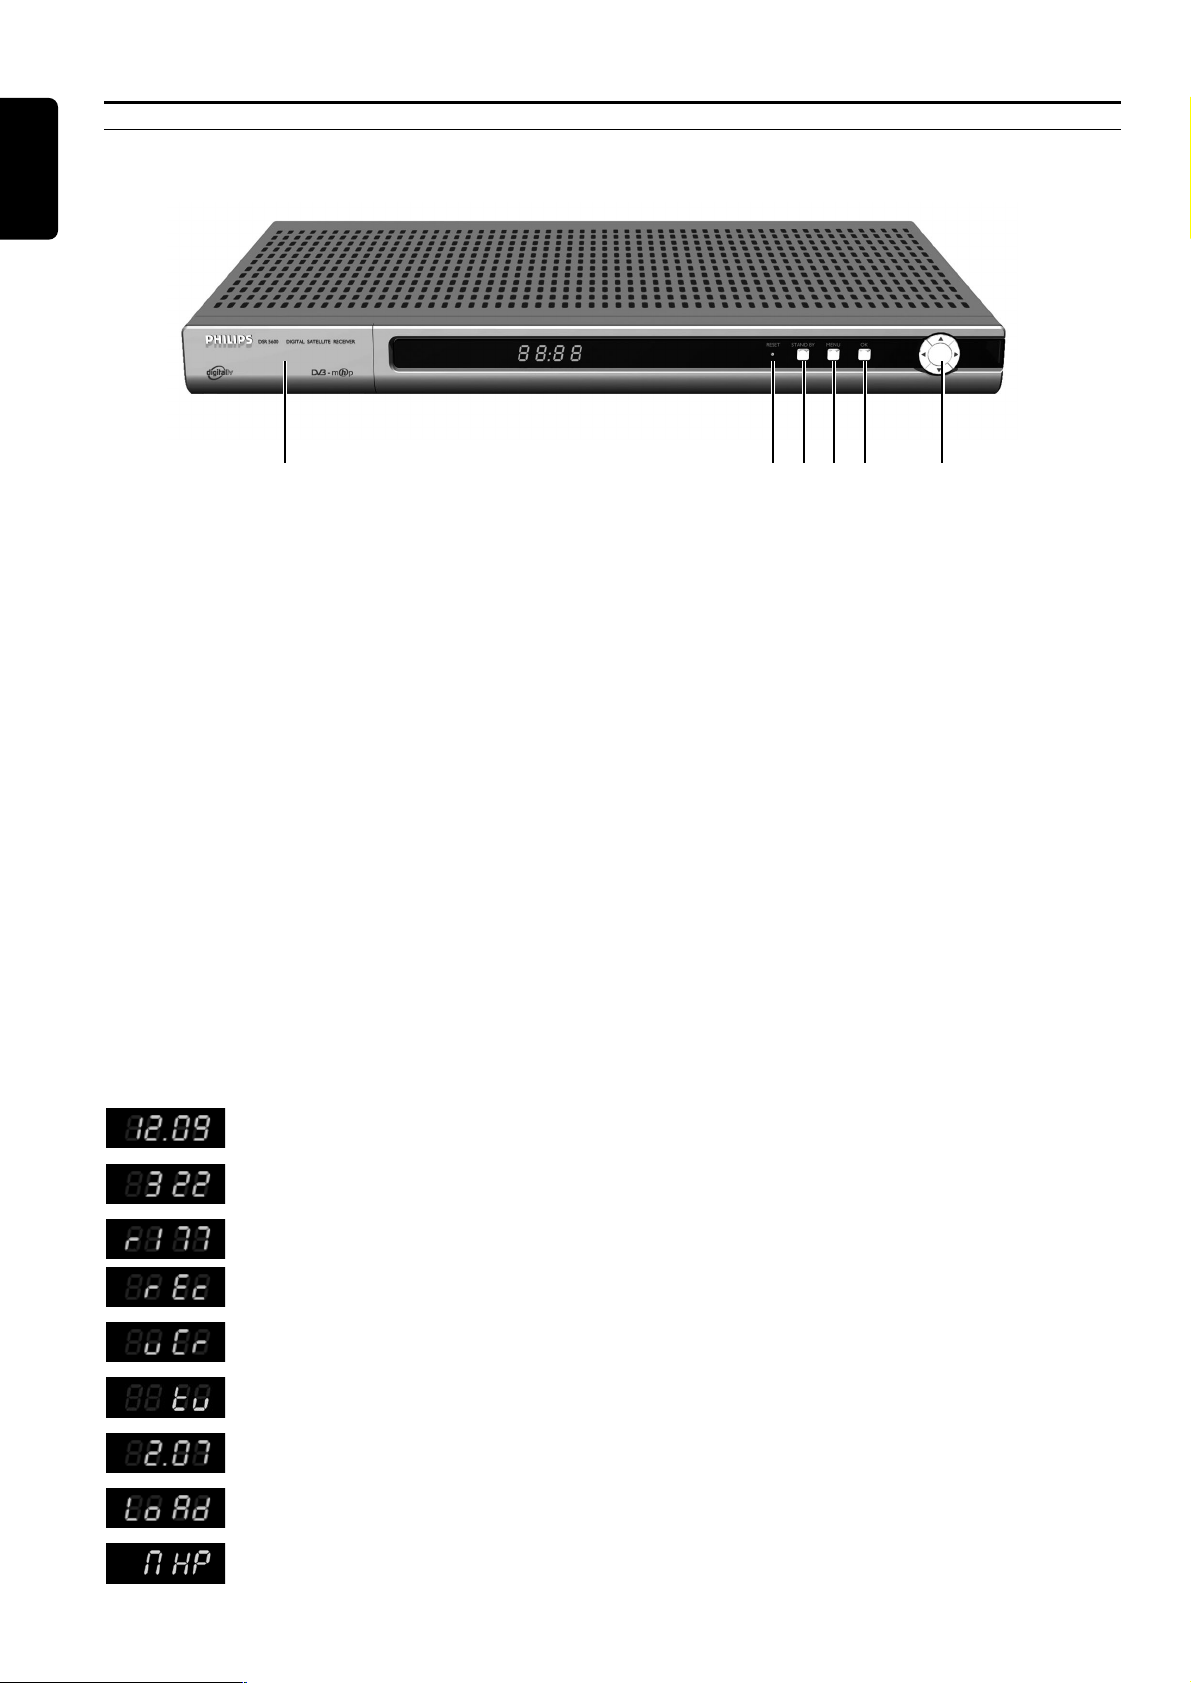
3.1 Vorderansicht
1 Tür Verstecks CI Modulschlitze.
2 Reset-Taste Diese Taste (Rückstelltaste) setzt die Einstellungen Ihres Receivers zurück (Ihr Receiver
arbeitet so, als ob Sie ihn ausgeschaltet und wieder eingeschaltet haben).
3 Standby-Taste Schaltet den Receiver aus dem digitalen TV Modus zu Standby-Modus.
4 MENU Ruft Menü auf oder blendet es ein.
5OK ● Im Menü-System, wählt Menü-Optionen oder bestätigt Ihre Wahlen.
● Im Kanalbanner diese Taste stellt das gewählte Programm ein oder stellt ein/lösches
Erinnerungsfunktion für das nächste Programm.
6 Links/rechts ● Im Schau-Modus, erhöht/verringert die Lautstärke.
● Im Kanalbanner schaltet zwischen der aktuellen/nächsten Programme.
● Im Menü, bewegt das Bildschirm-Ereignis links/rechts oder schaltet zwischen den
gespeicherten Werten um.
6 hoch/runter ● Im Standby-Modus schaltet den Receiver ein.
● Im Schau-Modus oder im Kanalbanner stellt das Programm oben/unten auf fortlaufende
Kanäle ein.
● Im Menü-System bewegt das vorderfinierte Bildschirm-Ereignis hoch/runter.
Vorderseite
Die LED-Anzeige gibt Ihnen Informationen über den aktuellen Gerätestatus.
Status indicator table
Aktuelle Zeit in 24-Stunden-Format wenn der Receiver in Standby-Modus ist.
Der Receiver ist auf einen der TV-Kanäle eingestellt.
Der Receiver ist auf einen der Radio-Kanäle eingestellt.
Die Aufnahme ist im Gange.
Der VCR ist an den VCR SCART Ihres Receivers angeschlossen und gibt gerade Cassette
wieder. Stoppen Sie Ihren VCR um zurück zu Receiver-Fernsehmodus zu kehren.
Der Receiver ist im TV-Betrieb. Durch drücken der TV/SAT-Fernbedienungstaste gelangen
Sie wieder in den normalen SAT-Betrieb.
Punkt in der Mitte blinkt wenn Sie Fernbedienungstasten betätigen.
Receiver-upgrade ist im Gange.
Auf dem gerade eingestellten Kanal eine der interaktiven Applikationen (MHP-Anwendung)
ist verfügbar.
4 PRODUKTBESCHREIBUNG
Deutsch
123546
Page 7
PRODUKTBESCHREIBUNG 5
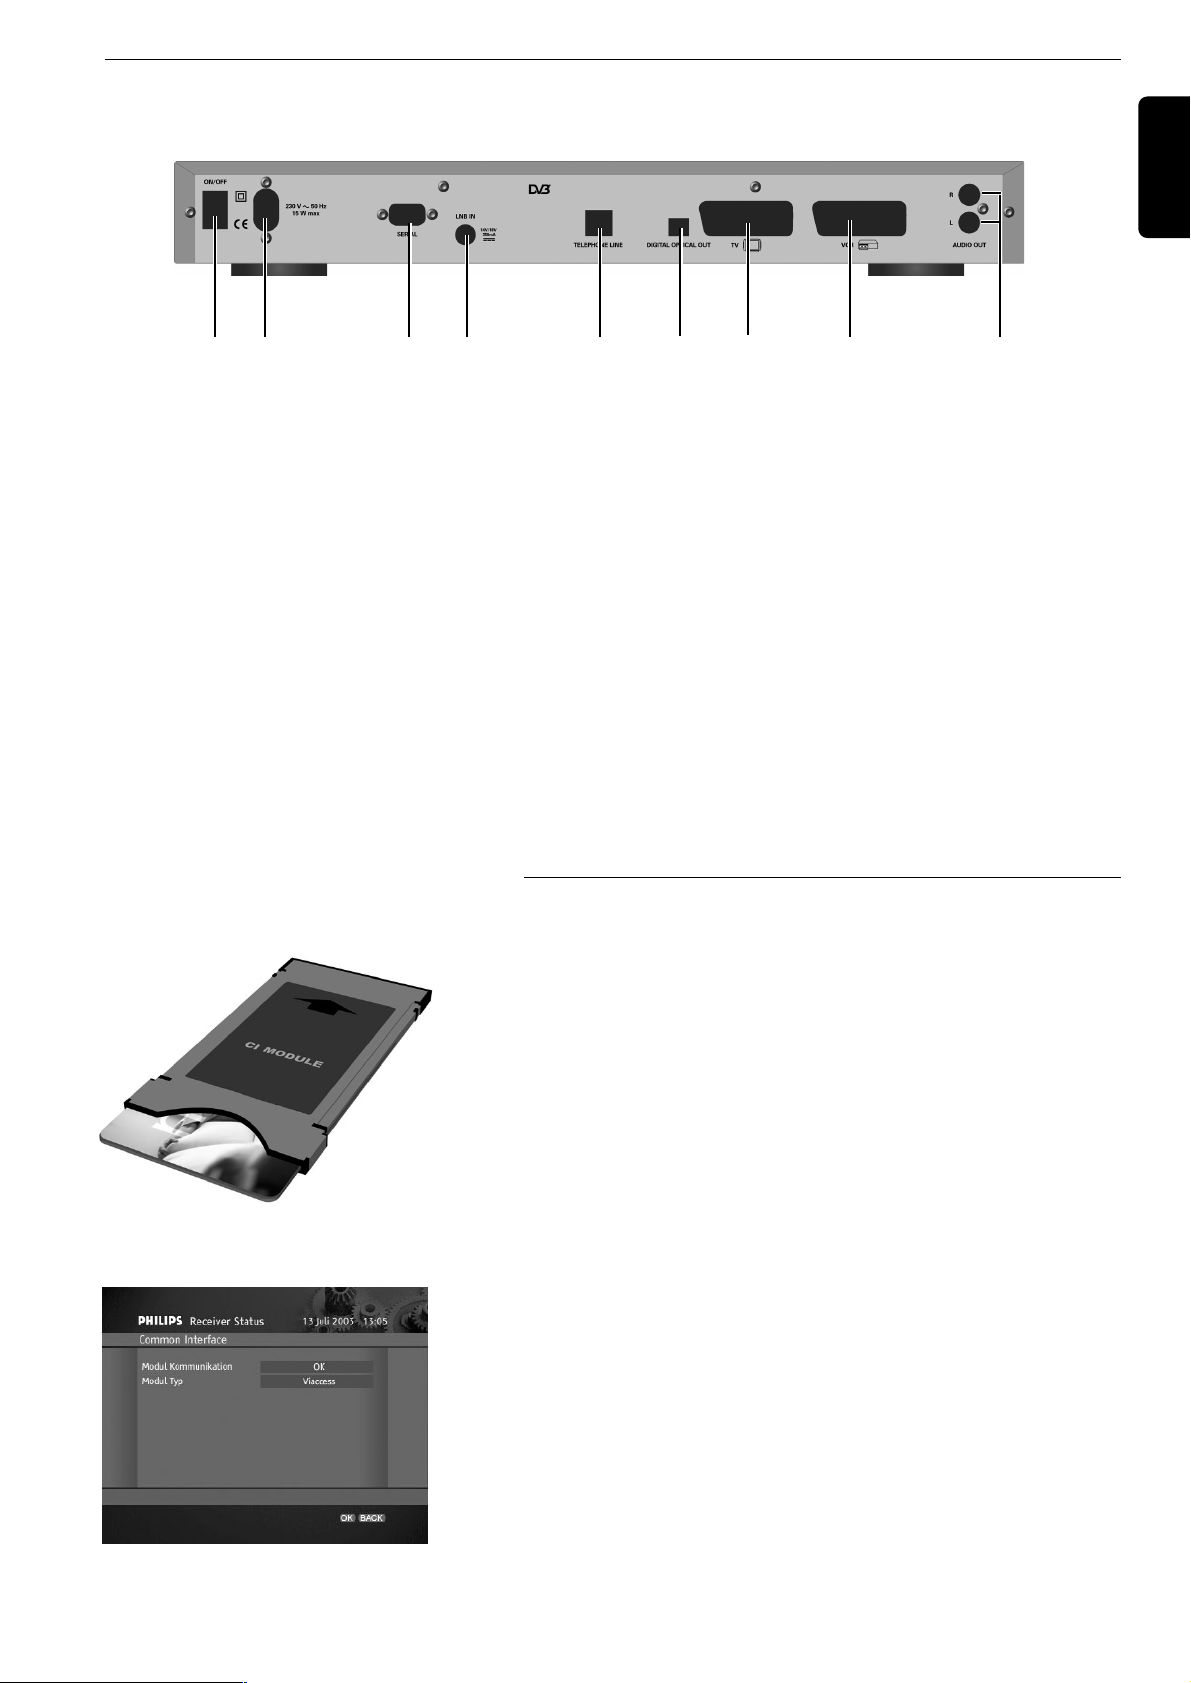
3.2 Rückseite
1 ON/OFF-Taste Zum Ein- und Ausschalten des Receivers.
2 Netzeingangsbuchse (HV) Verbindet den Netzkabel mit der Netzbuchse.
3 RS232 (SELV) Benutzt für Datenübertragung beim Service.
4 LNB IN (SELV) Zum Anschließen des Satellitenantennenkabels.
5 Telefonleitung (TNV3) Zum Anschließen der Telefonleitung.
6 Optisches Audio (SELV) Wenn Sie Fremdaudio-Receiver für digitales Signal- Entschlüsselung
haben, anschließen Sie ihn hier.
7 TV SCART (SELV) (1) (2) Hier verbinden Sie Ihr TV mit Hilfe von eingefügten SCART-Kabel.
8 VCR SCART (SELV) (1) Zum Anschließen Ihr VCR.
9 L/R Audio-Ausgang (SELV) Links/Rechts Audio-Ausgänge für HIFI/Audio- Receiver System.
SELV: Safety Extra Low Voltage (Schutzkleinspannung)
HV: Hazardous Voltage.
TNV 3: Telekommunikations-Netzwerk 3.
(1) SCART wird auch Eurokonnektor oder Peritel genannt.
(2) Der SCART Anschlussdraht ist RGB Format anpassend, was die beste Bildqualität ermöglicht. Prüfen Sie Ihren TV
Benutzerhandbuch für einen RGB fähigen SCART Buchseneingang.
3.3 CA (Conditional Access) Modul
Es ist auch möglich, ein separates CA (Conditional Access)- Modul an den
Receiver anzuschließen. Sie müssen das Modul in die CI-Modulschlitze
auf der linken Seite des Receivers-Vorderseite schieben (die CIModulschlitze befindet sich hinter der Tür). Das CA-Modul zusammen
mit entsprechender Smart Card (Chipkarte) ermöglicht den Empfang von
verschlüsselten Kanälen die Sie im Abonnement vorhanden haben.
Das Modul hat eigene Smart Card und verfügt über Menüs, die in diesem
Benutzerhandbuch nicht beschrieben werden können. Um Zugang zu
Smart Card Informationen zu erhalten, drücken Sie MENU Taste und
wählen Sie Installation aus dem Hauptmenü. Aus dem InstallationUntermenü, das angezeigt wird, wählen Sie Receiver-Status, und dann
wählen Sie Common Interface. Das gibt Ihnen Zugang zu allen
Informationen die auf der Smart Card gespeichert sind.
Schutz der Smart Card
Die Card ist brüchig, beachten Sie also folgende Hinweise:
● Biegen und drehen Sie die Card nicht.
● Setzen Sie die Card nicht direktem Sonnenlicht aus.
● Lassen Sie die Card stets im Schlitz.
● Reinigen Sie die Card mit einem trockenen und weichen Lappen.
Common Interface Bildschirm
Deutsch
12 3 547896
CA-Modul und seine Karte
Page 8
6 VORBEREITEN
, EINSTELLEN UND VERWENDEN IHRER FERNBEDIENUNG
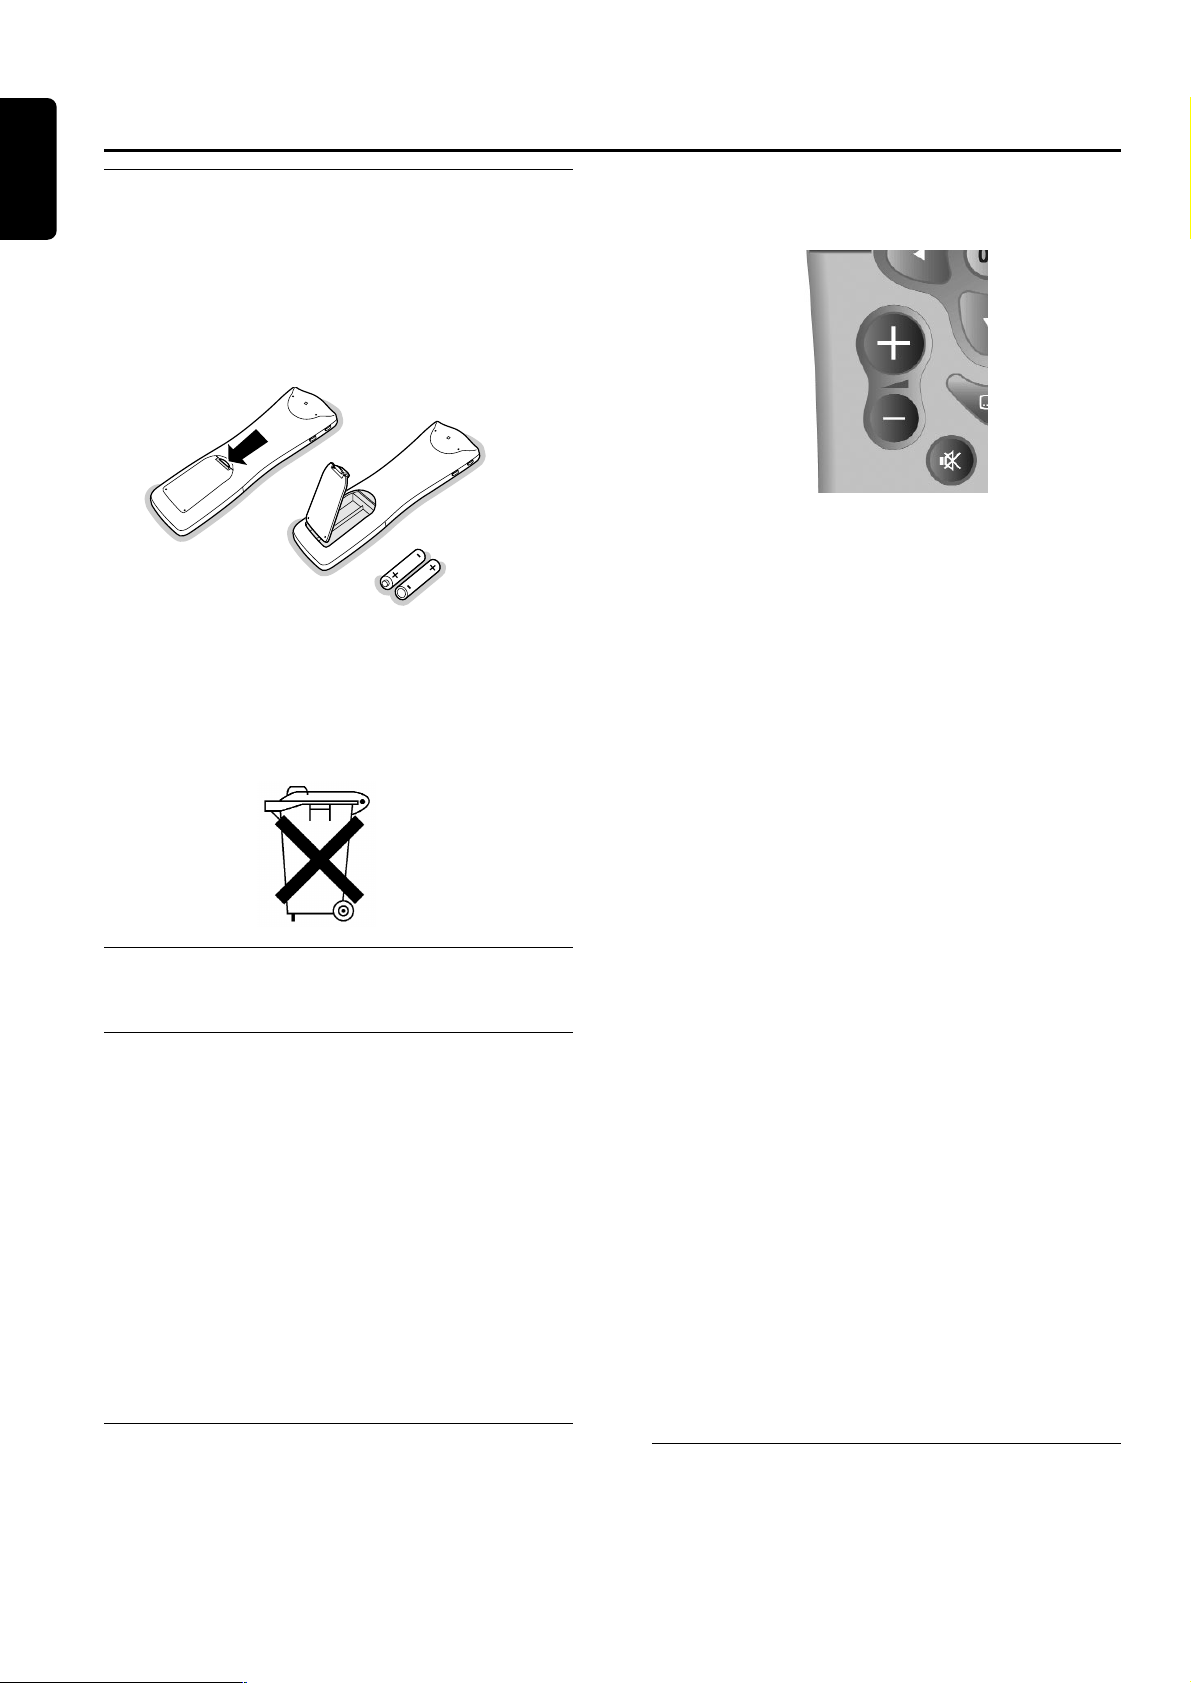
4.1 Einlegen der Batterien
● Nehmen Sie die Abdeckung auf der Rückseite der
Fernbedienung ab.
● Legen Sie die beiden mitgelieferten Batterien (Typ R06 /
AA - 1.5 V) ein.
● Positionieren Sie die Batterien entsprechend der
Abbildung im Batteriefach.
● Bringen Sie die Abdeckung wieder an.
Die mit der Fernbedienung des Receiver mitgelieferten
Philips Batterien enthalten keine Schwermetale wie
Quecksilber oder Nickel-Cadmium. Dennoch dürfen in
vielen Ländern erschöpfte Batterien nicht im Hausmüll
entsorgt werden. Bitte sorgen Sie dafür, daß die
erschöpften Batterien entsprechend den lokalen
Vorschriften entsorgt werden.
4.2 Einstellen der
Fernbedienung.
4.2.1 Modus einstellen
Mit Ihrer 5-in-1-Fernbedienung können Sie die meisten
Ihrer A/V Geräte über verschiedene Betriebsarten
steuern: Satelliten-Receiver, als STB (Set Top Box-das ist
Ihr Receiver) bezeichnet, TV , VCR (Videorecorder) und
Verstärker-Tuner.
Wenn Sie die MODE-Taste einmal drücken, wird der
active Modus durch blinkende Leuchtanzeigen angezeigt:
links für STB, in der Mitte für TV, rechts für VCR
(Videorecorder), links/Mitte für DVD und Mitte/rechts
für Verstärker-Tuner.
Zum Einstellen des Modus drücken Sie die MODE-Taste
mehrmals, bis der gewünschte Modus durch die
Leuchtanzeige(n) angezeigt wird. Die Reihenfolge dabei
ist: STB ->TV->VCR-> DVD-> Verstärker -Tuner.
4.2.2 Regelung der Lautstärke- und
Stummschaltungsfunktion
Wenn die Fernbedienung auf den STB-Modus eingestellt
ist, können die Lautstärke + / Lautstärke - /
Stummschalten- Tasten entweder die entsprechenden
TV-Funktionen oder entsprechende Receiver-Funktionen
steuern. Mehr dazu in Kapiteln: 4.2.2.1 or 4.2.2.2.
Hinweis: wir empfehlen Lautstärke- und
Stummschaltensteuerung über den digitalen Receiver. Mehr zu
Einstellungen in Kapitel 4.2.2.2.
4.2.2.1 Wenn Sie Ihre Fernbedienung zur Regelung
der Lautstärke- und
Stummschaltungsfunktion über Ihren
Fernseher benutzen wollen/Einstellen der
Lautstärkeregelung zum Benutzen über den
Fernseher.
Werksseitig ist die Lautstärkesteuerung der
Fernbedienung auf ein Fernsehgerät der Marke Philips
eingestellt. Wenn Sie ein Fernsehgerät einen anderen
Herstellers verwenden, prüfen Sie auf der TV Code-Liste
für verschiedene Marken welche Coden Sie benutzen
können, und dann ändern Sie die
Fernbedienungseinstellungen der Methode entsprechend,
die im Kapitel 10 beschrieben wurde.
Hinweis: um Lautstärke/Stummschaltungsfunktion auf TVSteuerung zurückzustellen.
1 wählen Sie STB-Modus
2 drücken Sie Zifferntasten 1 und 9 gleichzeitig bis LED
zweimal blinkt, dann lassen Sie die Tasten los.
3 Geben Sie 993 Code ein, LED blinkt einmal nach jeder
Betätigung.
4 Drücken Sie gelb"-Taste, LED soll zweimal blinken um
die neuen Einstellungen zu bestätigen.
4.2.2.2 Wenn Sie Ihre Fernbedienung zum
Lautstärkeregelung und
Stummschaltungsfunktion über Ihren digitalen Receiver einstellen wollen (empfohlen).
Um Lautstärke/Stummschaltungsfunktion auf STBSteuerung einzustellen:
1 Wählen Sie STB-Modus
2 Drücken Sie Zifferntasten 1 und 9 bis LED zweimal
blinkt, dann lassen Sie die Tasten los.
3 Geben Sie 993 Code ein, LED blinkt einmal nach jeder
Betätigung.
4 Drücken Sie grün"-Taste, LED soll zweimal blinken um
die neuen Einstellungen zu bestätigen.
4.2.3 Änderung der Markeneinstellung
Ihrer Fernbedienung auf veschiedene
A/V Geräte (TV, VCR, DVD oder
Verstärker/Tuner)
Gehen Sie zum Kapitel 11 für Markeneinstellung über.
4 Vorbereiten, einstellen und verwenden Ihrer
Fernbedienung
Deutsch
Page 9
VORBEREITEN
, EINSTELLEN UND VERWENDEN IHRER FERNBEDIENUNG 7
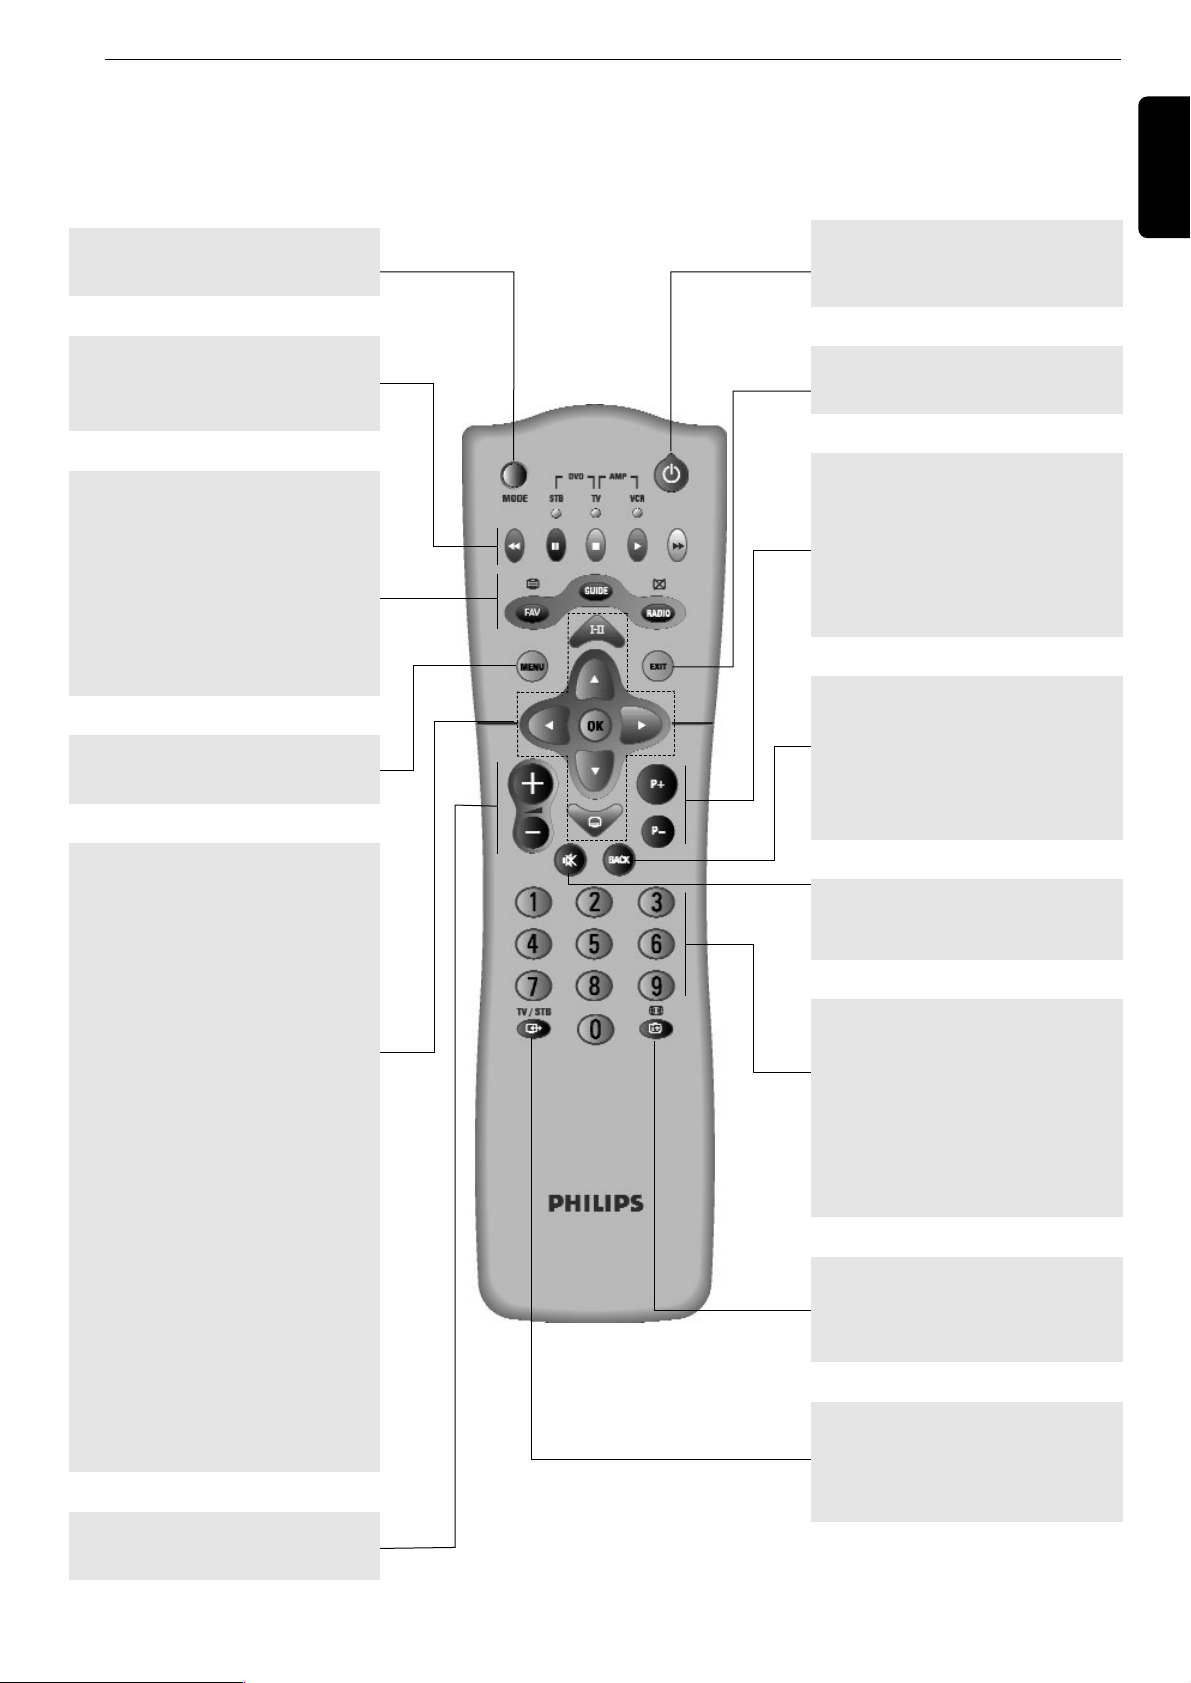
4.3 Benutzen Ihrer Fernbedienung zur Steuerung des SatellitenReceivers - die Fernbedienung ist auf den STB-Modus geschaltet.
Deutsch
MODE
Wählt Fernbedienungsmodus.
MENU
Ruft auf/blendet das Menü ein.
FAV
Ruft auf/blendet aktuelle Kanalliste
ein.
GUIDE
Nicht verfügbar mit dieser Version
der Applikation.
RADIO
Schaltet zwichen TV- und Radio-
Modi.
Rot, grün, gelb, blau, weiss
Kontexttasten für MHPApplikationen.
AA
+/-
Erhöht/verringert die Lautstärke.
44
Ruft das Optionen-Menü auf um
augenblicklich übertragene:
soundtrack/Untertitel/Teletext/
Anzeige-Format Einstellungen zu
ändern.
VW
- Schaltet den Kanalbanner in den
erweiterten Modus um.
- Verschiebt die Markierung
hoch/runter im Menü oder in der
Kanalliste.
CB
- Im Kanalbanner, schaltet
zwischen aktuellem und nächstem
Programm
- In Menü-Bildschirmen, wählt
zwischen gespeicherten
Einstellungen.
OK
Bestätigt Ihre Wahlen.
ii
Ruft das Optionen-Menü auf um
augenblicklich übertragene:
soundtrack/Untertitel/Teletext/
Anzeige-Format Einstellungen zu
ändern.
**
Zurück zu Fernsehenmodus.
mm
Schaltet zwischen Fernsehen-Modus,
Kanalbanner, und Kanalbanner
mit erweiterten Informationen um.
TV/STB
aa
TV/STB: schaltet zwischen digitalen
Satellitenprogramme über den
Receiver und standard analog
Programme um.
0-9
- Im Fernsehen-Modus: wählt
Kanäle.
- Im Menü: Wählt einen Menüpunkt
oder stellt neuen Parameterswert
ein.
- Im Standby-Modus schaltet den
Receiver ein.
BACK
- Im Fernsehen-Modus: zurück zu
dem zuletzt eingestellten Kanal.
- Im Menü-Modus: zurück zu dem
vorherigenBildschirm.
- Im Standby-Modus schaltet den
Receiver ein.
EXIT
Returns to normal viewing mode.
H
Schaltet den Ton auf dem TV oder
Receiver aus.
P+ P-
- Im Fernsehen-Modus: stellt sich
auf höheren/unteren Kanal auf der
selben Kanalliste.
- blättert in der Kanalliste eine Seite
hoch oder runter.
- Im Standby-Modus schaltet den
Receiver ein.
Page 10
5 Anschlüsse und Installation
5.1 Anschlüsse
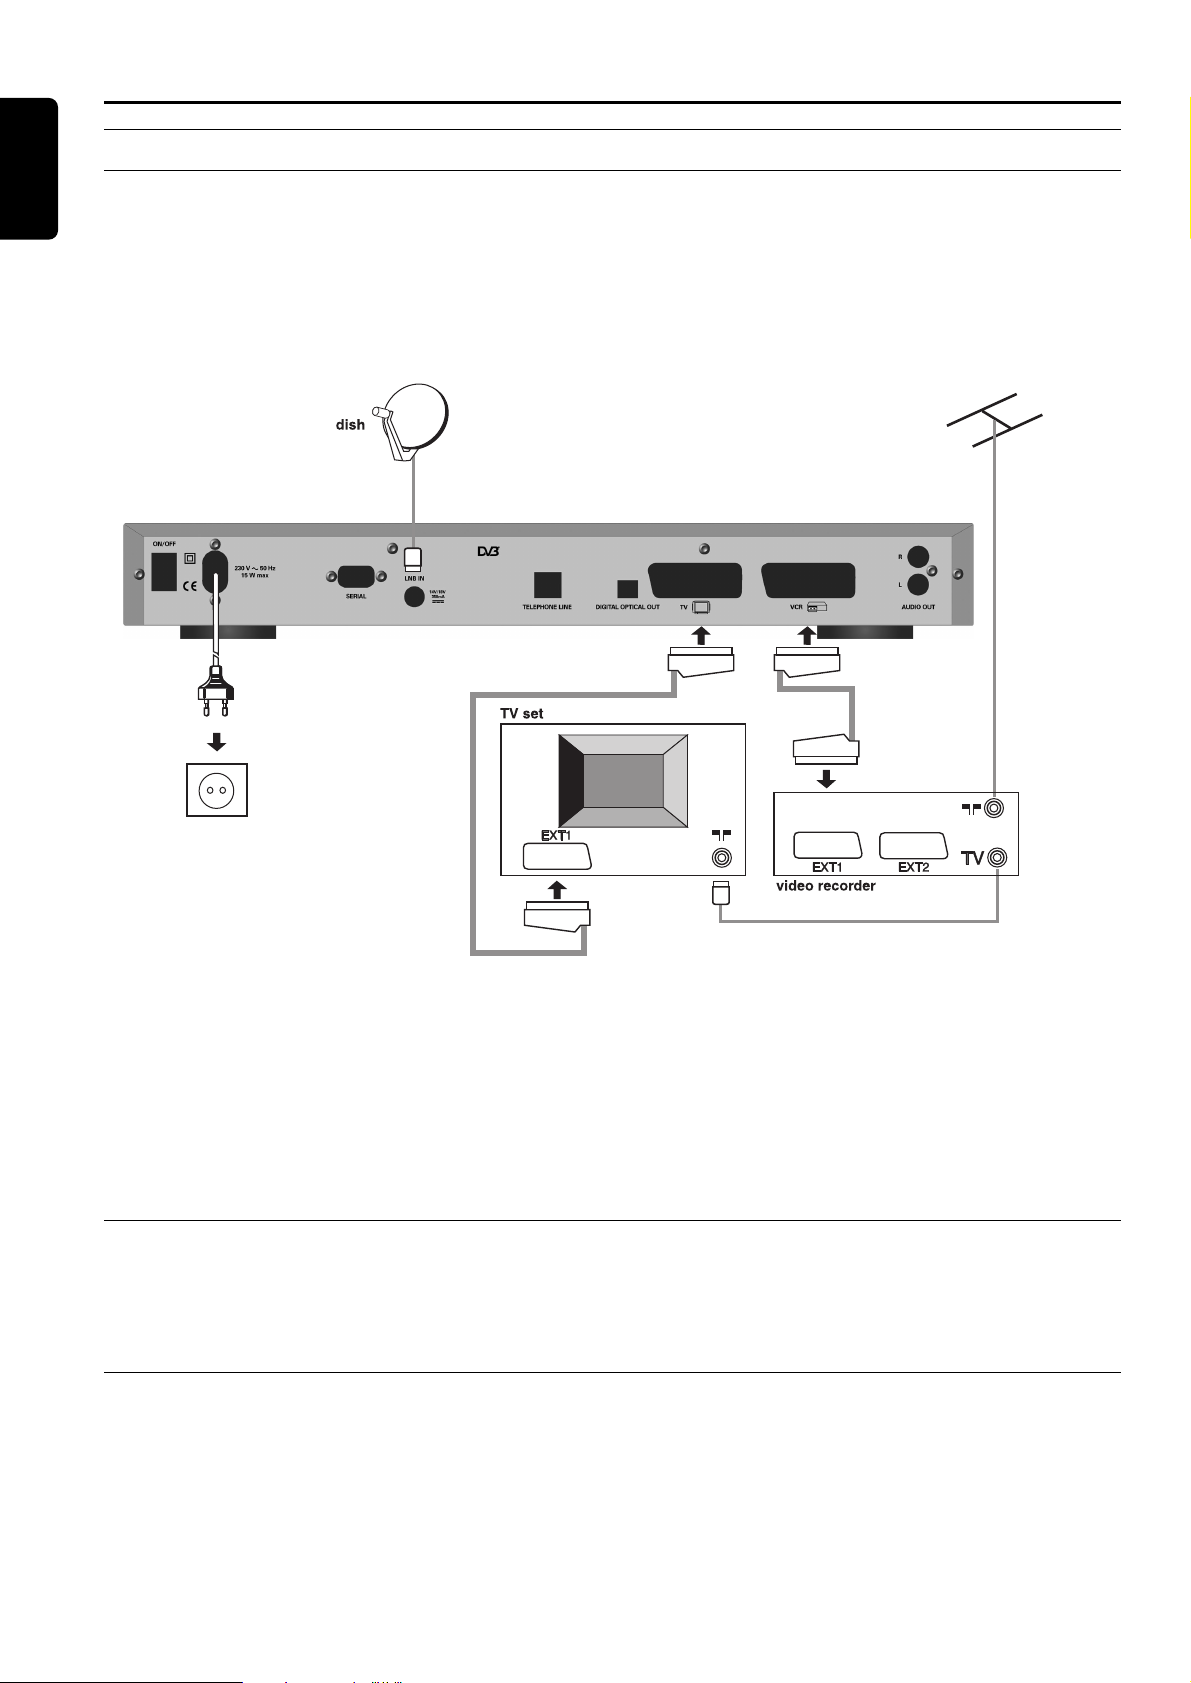
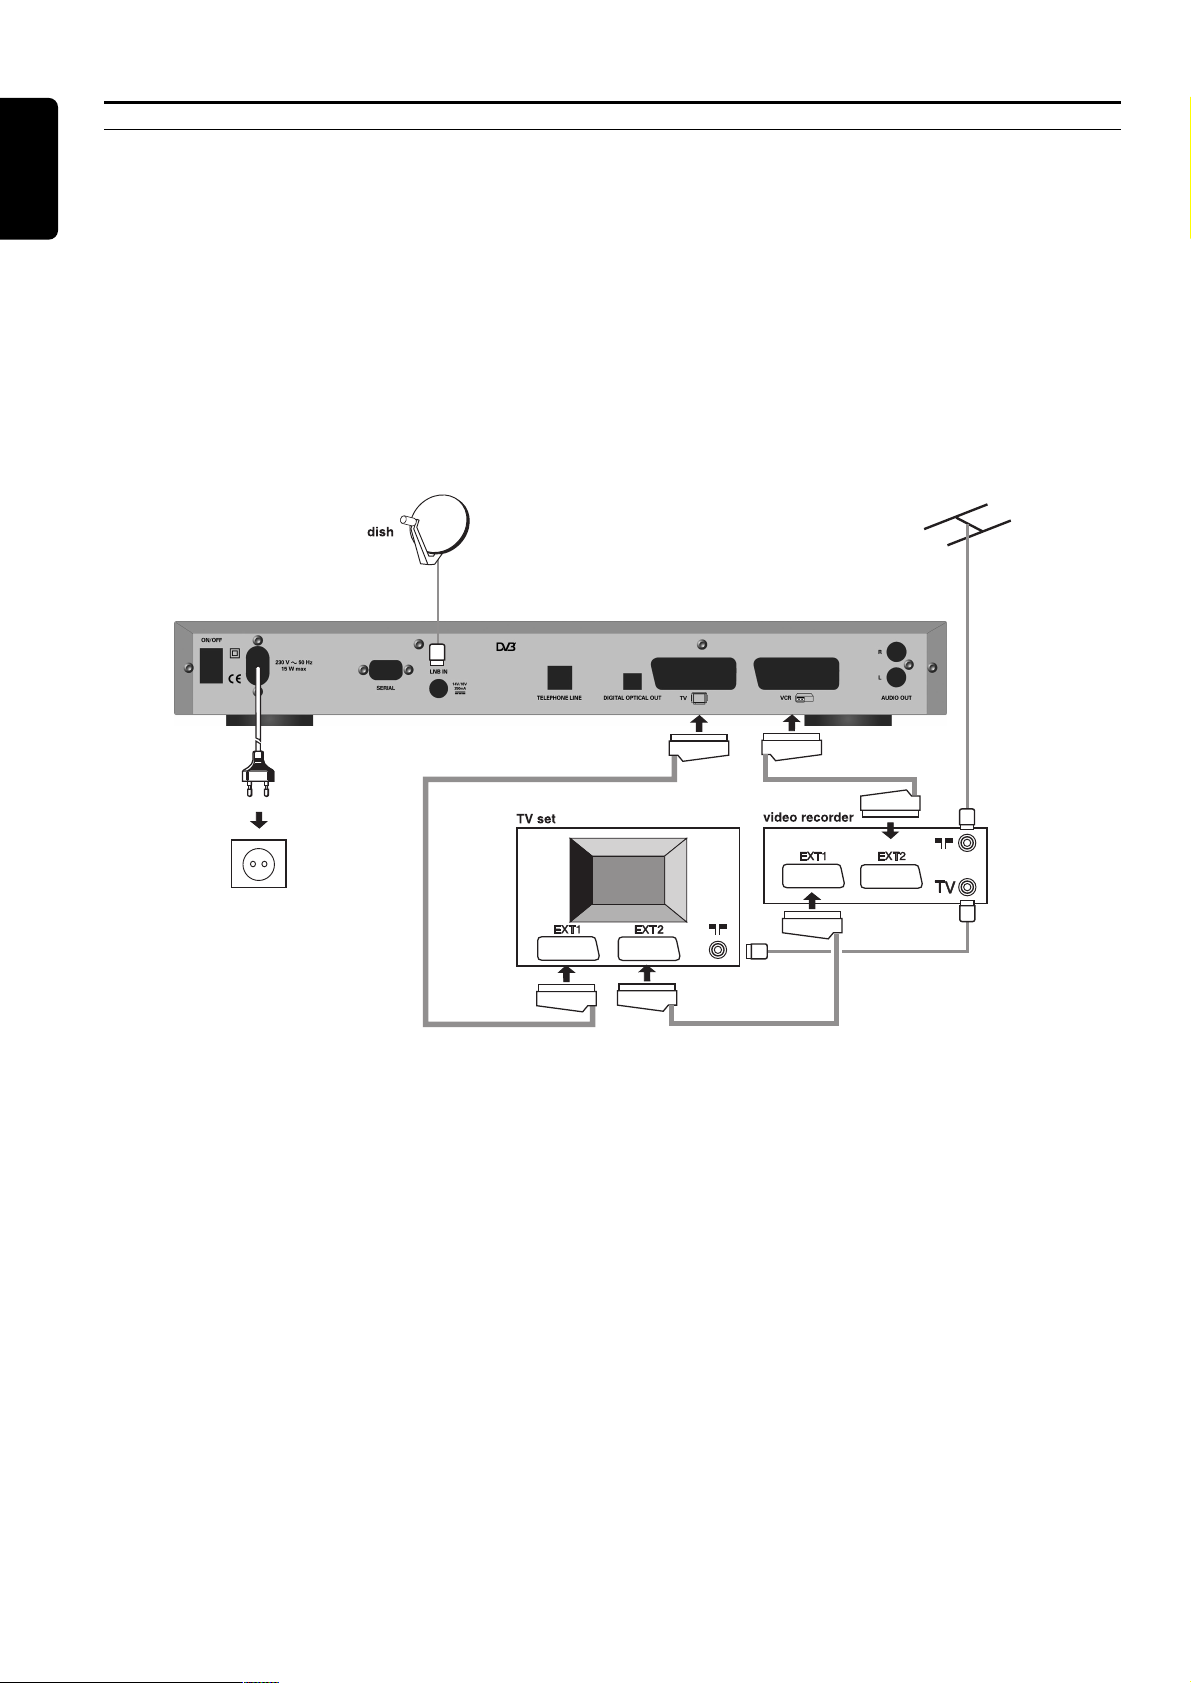
5.1.1 Anschliessen des Satelliten-Receivers an das Fernsehgerät und den Videorecorder.
1 Trennen Sie vor dem Herstellen der Kabelverbindungen alle Geräte (Fernsehgerät ebenso wie Videorecorder und / oder
DVD, falls vorhanden) von der Netzspannung.
Hinweis : Prüfen Sie die derzeitige Verkabelung, bevor Sie mit dem Herstellen der Kabelverbindungen beginnen, denn Sie können die
koaxiale Verbindung zwischen Ihrem Fernsehgerät und Ihrem Videorecorder beibehalten, wenn diese Geräte wie nachstehend dargestellt
angeschlossen sind. Diese Verbindung gewährleistet, dass Sie bei Bedarf immer noch Ihre aktuellen terrestrischen Kanäle empfangen und
aufnehmen können
2 Verbinden Sie Ihren Receiver in Ihrer vorhandenen Anlage wie oben dargestellt.
- Verbinden Sie das mitgelieferte Netzkabel mit der Netzeingangsbuchse (230 V 50 Hz) Ihres Satelliten-Receivers
- Verbinden Sie den EXT1 Anschluss des Fernsehgeräts über das mitgelieferte SCART-Kabel mit dem Anschluss TV
SCART Ihres Satelliten-Receivers.
- Wenn Sie über einen Videorecorder verfügen, verbinden Sie den Anschluss EXT1 des Videorecorders über ein SCARTKabel mit dem Anschluss VCR SCART Ihres Satelliten-Receivers.
- Verbinden Sie den Stecker des Kabels von der Satellitenantenne mit der Buchse LNB IN an Ihrem Satelliten-Receiver..
3 Verbinden Sie anschließend alle Ihre Geräte, auch den Satelliten-Receiver, mit der Netzspannung.
5.1.2 Anschliessen der HiFi-Anlage
Verbinden Sie die AUDIO-Ausgangsbuchsen L/R (Links / Rechts) Ihres Satelliten-Receivers über ein doppeltes CINCH-Kabel
(nicht mitgeliefert) mit den betreffenden analogen L/R-Audio-Eingangsbuchsen der HiFi-Anlage.
Verbinden Sie bei Bedarf die digitale AUDIO-Ausgangsbuchse Ihres Satelliten-Receivers über ein einzelnes CINCH-Kabel
(nicht mitgeliefert) mit der koaxialen Digital-CINCH-Eingangsbuchse der Hifi-Anlage.
5.1.3 Anschliessen des Satelliten-Receivers an die Telefonleitung (für zukünftige Nutzung)
Verbinden Sie die RJ11/Telefonleitungsbuchse Ihres Satelliten-Receivers über das mitgelieferte Telefonkabel mit der TelefonWandsteckdose.
Hinweis: Dieses Gerät wurde gemäß der Entscheidung 99/303/EG des Rates europaweit zur Anschaltung als einzelne Endeinrichtung an
das öffentliche Fernsprechnetz zugelassen. Aufgrund der zwischen den öffentlichen Fernsprechnetzen verscheidener Staaten bestehenden
Unterscheide stellt diese Zulassung an sich jedoch keine unbedingte Gewähr für einen erfolgreichen Betrieb des Geräts an jedem
Netzabschlußpunkt dar.
Falls beim Betrieb Probleme auftreten, sollten Sie sich zunächst an ihren Fachhändler wenden.
8 ANSCHLÜSSE UND INSTALLATION
Deutsch
Satellite recever
Page 11

ANSCHLÜSSE UND INSTALLATION 9
Deutsch
5.2 Kurzanleitung zur schnellen
Inbetriebnahme
● Sie besitzen bereits eine Satellitenantenne.
● Ihre Antenne ist ordnungsgemäß auf den Satelliten Astra,
Orbitalposition 19.2° Ost, ausgerichtet.
● Sie möchten nur Programme von Astra, Orbitalposition
19.2° Ost, empfangen.
● Ihre bevorzugte Menüsprache ist Deutsch.
● Sie haben die Verbindungen entsprechend Kapitel 5.1.1
hergestellt.
● Ihre Fernbedienung ist im STB-Modus und der
Beschreibung im Kapitel 4.2 gemäß eingestellt.
Wenn dies nicht der Fall ist, lesen Sie, bevor Sie mit der
schnellen Inbetriebnahme fortfahren, das Kapitel 4.2.
Hinweis : Ein Upgrade Ihres Satelliten-Receivers ist nur über
das Herunterladen von Software über den Satelliten Astra,
Orbitalposition 19.2° Ost, möglich. Wenn Sie also von weiteren
Upgrades profitieren möchten, sollten Sie Ihren Receiver
zumindest auf den Empfang von Astra, Orbitalposition 19.2°
Ost, einrichten.
Wenn die obigen Bedingungen erfüllt sind, können Sie mit
der schnellen Inbetriebnahme Ihres Satelliten-Receivers
fortfahren; also:
Hinweis: Wenn Sie einen DiSEqC 1.0 Schalter in Ihrem
Antennen-Setup haben, können Sie mit dieser schnellen
Inbetriebnahme fortfahren, sofern Sie den Stecker des Kabels
von der Antenne, die auf Astra 19.2° OST ausgerichtet ist,
direkt mit der Buchse LNB IN des Satelliten-Receivers
verbinden. Andernfalls lesen Sie bei Kapitel 5.3.1 weiter.
Wenn die obigen Bedingungen erfüllt sind, fahren Sie
folgendermaßen mit der schnellen Inbetriebnahme Ihres
Satelliten-Receivers fort:
1 Alle Ihre Geräte, auch Ihr digitaler Satelliten-Receiver,
sind mit der Netzspannung verbunden.
2 Stellen Sie ON/OFF-Taste auf der Rückseite Ihres
Receivers in ON" Position. Die LED-Anzeige and der
Vorderseite wird leuchten, Nach einigen Sekunden wird
Willkommen" Bildschirm angezeigt und gleich danach die
'Erstinstallation' -Bildschirm. Wählen Sie Ihre bevorzügten
Land mit Hilfe von V / W Tasten und drücken Sie OK.
Ihr Receiver ist auf Ihr Land inkl. entsprechende MenüSprache konfiguriert/eingestellt.
Hinweis: Nach dem Einschalten des Gerätes über den
Hauptschalter (auf der Rückseite) erlischt die Anzeige im
Frontdisplay während des Boot-Vorgangs für wenige Sekunden
und erscheint anschließend mit dem Hinweis "MHP".
3 Um Satelliten-TV zu sehen, drücken Sie eine Zifferntaste
oder die Taste P+ oder P- oder BACK; der Receiver
wird auf ein Programm abgestimmt.
4 Von jetzt an können Sie sich am Satellitenfernsehen
erfreuen.
Näheres über die BENUTZUNG DES SATELLITENRECEIVERS können Sie in Kapitel 6 finden.
Anmerkung: Landessprachen-Auswahl siehe Kapitel 8.3.2.
5.3 Umfassende Installation des
Receivers
Warum ist eine umfassende Installation des
Satelliten-Receivers erforderlich?
➤ Ihre Satellitenantenne ist ordnungsgemäß auf einen
anderen Satelliten als auf Astra, Orbitalposition 19.2°
Ost, ausgerichtet.
➤ Ihre Antenne ist nicht installiert und nicht
ordnungsgemäß auf Astra 19.2° Ost ausgerichtet.
➤ Ihr Antennen-Setup umfasst einen DiSEqC 1.0 Schalter.
➤ In diesem Kapitel wird erläutert, wie Sie Ihren Receiver
entsprechend den Gegebenheiten Ihrer Anlage und
Ihren Anforderungen einstellen können. Wenn Sie
Probleme mit der in den Abschnitten 5.3.1 und 5.3.2
beschriebenen Installation haben, wenden Sie sich bitte
an Ihren Fachhändler.
5.3.1 Umfassende Installation des Receivers
1 Verbinden Sie das mitgelieferte Netzkabel mit der
Netzeingangsbuchse Ihres Satelliten-Receivers. Schalten
Sie das Fernsehgerät ein und wählen Sie ein Programm.
Stellen Sie ON/OFF-Taste auf der Rückseite Ihres
Receivers in ON" Position um. Die LED-Anzeige and der
Vorderseite wird leuchten.
2 Jetzt soll "Willkommen" - Bildschirm auf Ihrem
Fernsehgerätsbildschirm erscheinen. Nach einigen
Sekunden wird dieser Bildschirm einblenden.
3 Danach erscheint ein weiterer Bildschirm, an dem Sie
Ihren Land wählen sollen. Wählen Sie Ihren Land indem
Sie V / W drücken und dann drücken Sie OK. Weiter
werden Sie gebeten, Ihre Wahl zu bestätigen. Drücken
Sie OK um zu bestätigen, oder BACK um anderen Land
zu wählen.
4 Drücken Sie MENU Taste um Hauptmenü aufzurufen.
Wählen Sie Installation und drücken Sie OK.
5 Wählen Sie Antennen-Konfiguration aus dem
Installation-Untermenü. Verändern Sie welche Werte der
Antennenausrichtung nach Bedarf. Drücken Sie dann OK
um die Änderungen zu speichern und kehren Sie zu dem
Installation-Untermenü zurück.
6 Wählen Sie LNB-Konfiguration aus dem Installation-
Untermenü. Wählen Sie dann Ihren Satelliten indem Sie
C/ B drücken. Wenn Sie Signalstärke und Signalqualität
prüfen wollen, drücken Sie die rote Taste. Verändern Sie
die LNB-Konfigurationswerte nach Bedarf.
7 Wählen Sie Kanalsuche aus dem Installation-Untermenü.
Auf dem aufgerufenen Bildschirm wählen Sie Neue
Kanalsuche-Option. Drücken Sie OK. Dann wählen Sie
Kanaltype und drücken Sie erneut OK Dies startet die
Kanalsucheprozedur. Wenn die Prozedur zu Ende ist,
folgen Sie entsprechende Anweisungen auf dem
Bildschirm.
8 Alle gefundenen Kanäle werden in Kanal Pool
gespeichert. Sie müssen alle Kanäle auf Ihre Liste der
Favoriten (bevorzugten) Kanallisten verschieben. Weitere
Informationen dazu finden Sie im Kapitel 8.1 dieses
Benutzerhandbuches.
9 Jetzt können Sie Ihren digitalen Receiver benutzen.
Gehen Sie zu Kapitel 6 über, um weitere Informationen
über Ihren digitalen Receiver zu bekommen. .
Page 12
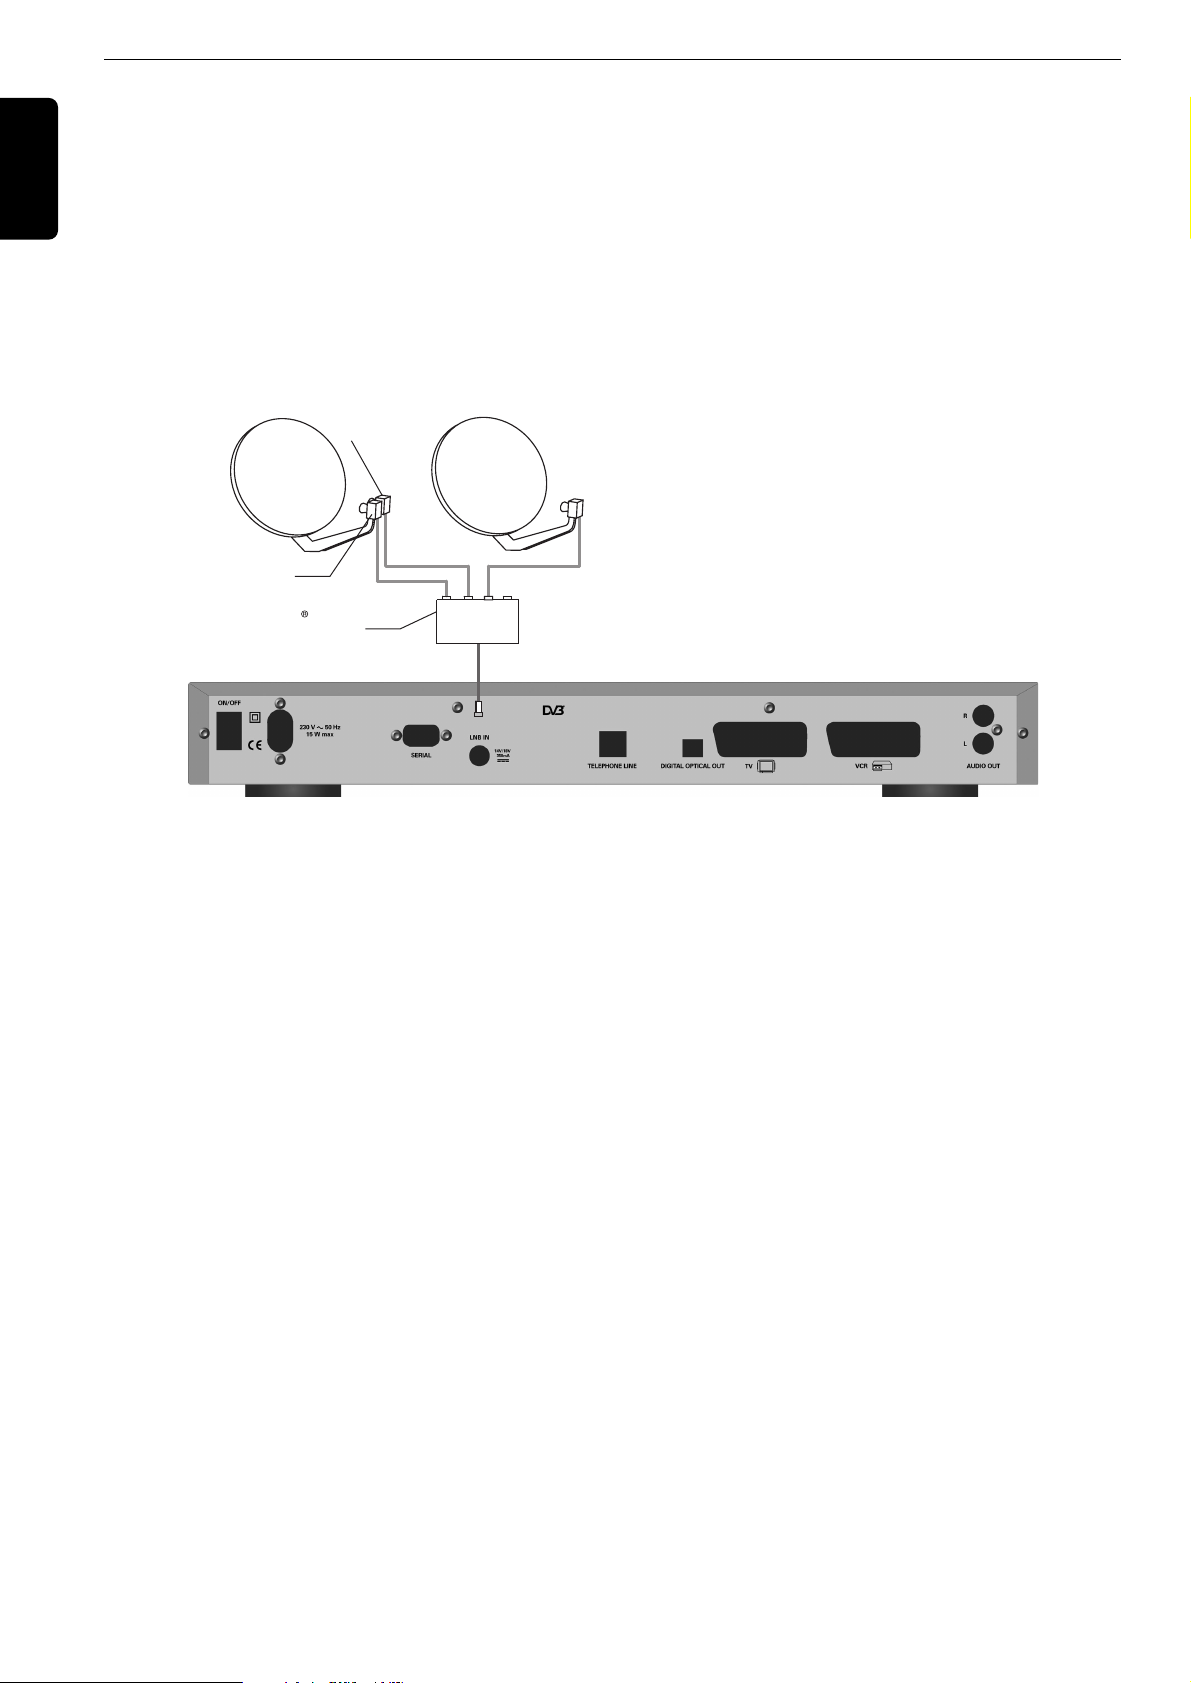
5.3.2 Ihre Installation umfasst einen DiSEqC Umschalter
Um Programme von anderen Satelliten empfangen zu können, muss Ihre Antennenanlage über einen DiSEqC-Schalter
verfügen. Ein DiSEqC-Schalter hat 2 oder 4 Eingänge und einen Ausgang. Die Eingänge sind bei einem Schalter mit 2
Eingängen mit A / B oder 1 / 2 bezeichnet. Bei einem Schalter mit 4 Eingängen sind die Eingänge mit A / B / C /
D oder 1 / 2 / 3 / 4 bezeichnet.
Jedes LNB muss über ein geeignetes Koaxialkabel mit Steckern des Types F mit einem Eingang des Schalters verbunden
werden, während der Ausgang des Schalters über ein geeignetes Koaxialkabel mit Steckern des Types F mit dem LNBEingang des Satelliten-Receivers zu verbinden ist.
In dem nachstehenden Anschlussdiagramm ist dargestellt, wie ein DiSEqC-Schalter in eine Antennenanlage eingefügt werden
kann, die 2 LNBs umfasst. Die abgebildete gängige Konfiguration besteht aus einer Antenne, die mit 2 LNBs für den Empfang
von den Satelliten Astra 19.2° Ost und Hot Bird 13° Ost ausgestattet ist. Achten Sie auf die jeweilige Position der Astra- und
Hot Bird-LNBs in der Anlage das System sollte auf Anhieb richtig in Betrieb genommen werden. .
Gehen Sie zur Installationsprozedur beschrieben im Kapitel 5.3.1 über.
Im 5 Schritt der Antennenkonfiguration stellen Sie "Antenne-Steuerung" Menü-Option ein:
- entweder auf "Tone Burst" wenn Sie Tone Bursts Schalter und 2 LNBs zur Kontrolle haben,
- oder auf "DiSEqC 1.0" wenn Sie DiSEqC -Schalter und mehr als 4 LNBs zur Kontrolle haben.
Im 6 Schritt wählen Sie, welche LNB aktiv werden sollen. Wenn der Cursor auf aktivem LNB ist, drücken Sie OK was
entsprechende "LNB-Konfiguration"-Menü öffnen wird, wo Sie die Einstellungen so ändern können, wie es Ihnen entspricht.
Da können Sie auch gleich Signalqualität prüfen.
Hinweis:
- Weiteres über mögliche Optioneneinstellungen finden Sie in Kapiteln 8.4.2 "Installation / Antennenkonfiguration" und 8.4.3 "Installation /
LNB-Konfiguration". Die korrekte Antenneninstallation erfordert:
anpassen der LNB Nummer zu dem Satellitennamen (z.B. Astra 19.2 wird LNB1 zugeschrieben)
eine richtige physische Verbindung zwischen LNB, der an den gewählten Satelliten gezielt ist, und entsprechendem Eingang von
DiSEqC Schalter. Im Installation/LNB Konfiguration" Menü (Kapitel 8.4.3): LNB1 bedeutet der LNB, der an Eingang 1 von DiSEqC
Schalter angeschlossen ist", LNB2 bedeutet: der LNB, der an Eingang 2 von DiSEqC Schalter angeschlossen ist" usw.
- Wenn Ihre Installation mit einer Zusammensetzung von 2 LNBs und einem DiSEqC in einem Block (sogenannter mono-block) verfügt,
prüfen Sie das Benutzerhandbuch um jeden Satelliten korrekt an entsprechenden Eingang von DiSEqC Schalter zu zuordnen (z.B. Hot
Bird beziehungsweise Astra 19.2 Ost Satellit kann zu dem Eingang 1 beziehungsweise Eingang 2 des DiSEqC Schalters zugeordnet
werden). Stellen Sie sicher, ob der Satellitenname (z.B. Hot Bird) zu korrekter LNB Nummer (z.B. LNB1) zugeschrieben ist.
10 ANSCHLÜSSE UND INSTALLATION
Deutsch
HOT BIRD
TELECOM
ASTRA
DiSEqC switch
(4 inputs)
Satellite recever
A B C D
Page 13
GRUNDFUNKTIONEN 11
6 Grundfunktionen
6.1 Ein- und Ausschalten des Receivers
Ihr Receiver ist mit Netz und ON/OFF-Taste verbunden, die sich auf der
Rückseite Ihres Receivers befindet und in OFF"-Position ist.
● Um Ihr Receiver einzuschalten, stellen Sie ON/OFF-Taste auf ON"
Position. Die LED-Anzeige and der Vorderseite wird leuchten, nach
einigen Sekunden soll "Willkommen" - Bildschirm erscheinen. Dann wird
sich Ihr Receiver entweder in Standby- oder Fernsenen-Modus
umschalten.
● Um Ihr Receiver auszuschalten, stellen Sie ON/OFF-Taste in OFF"
Position.
Hinweis: Nach dem Einschalten des Gerätes über den Hauptschalter (auf der
Rückseite) erlischt die Anzeige im Frontdisplay während des Boot-Vorgangs für
wenige Sekunden und erscheint anschließend mit dem Hinweis "MHP".
6.2 Aktivieren oder schalten des Receivers
auf Standby.
● Sie sehen fern oder hören Radio, drücken Sie Standby-Taste um den
Receiver auf Standby zu schalten.
● Ihr Receiver ist auf Standby geschaltet, um es zu aktivieren:
- entweder drücken Sie P+ oder P- Taste
- oder drücken Sie eine Zifferntaste
6.3 Auswählen von Fernseh- oder RADIOBetrieb
Ihr Receiver kann entweder im Radio- oder im Fernsehbetrieb arbeiten.
Um zwischen diese zwei Modi zu wählen, drücken Sie die RADIO Taste.
Wenn Sie auf einem der TV-Kanälen fernsehen, drücken der RADIO
Taste stellt den Receiver auf das zuvor gehörte Radiokanal ein, daß zu
der vorher gewählten Kanalliste gehört. Erneutes Drücken der RADIO
Taste schaltet den Receiver auf TV-Betrieb zurück - auf das zuvor
eingestellte TV-Kanal. Wenn Modus-Umstellung, Kanalbanner erscheint
zur Zeitüberschreitung. Im Radio-Betrieb, ein "Radio-Bildschirmschoner"
erscheint/blendet ein in unterschiedlichen Positionen auf dem Bildschirm
um Ihren TV-Bildschirm vor Schaden zu schützen
Radio Bildschirm
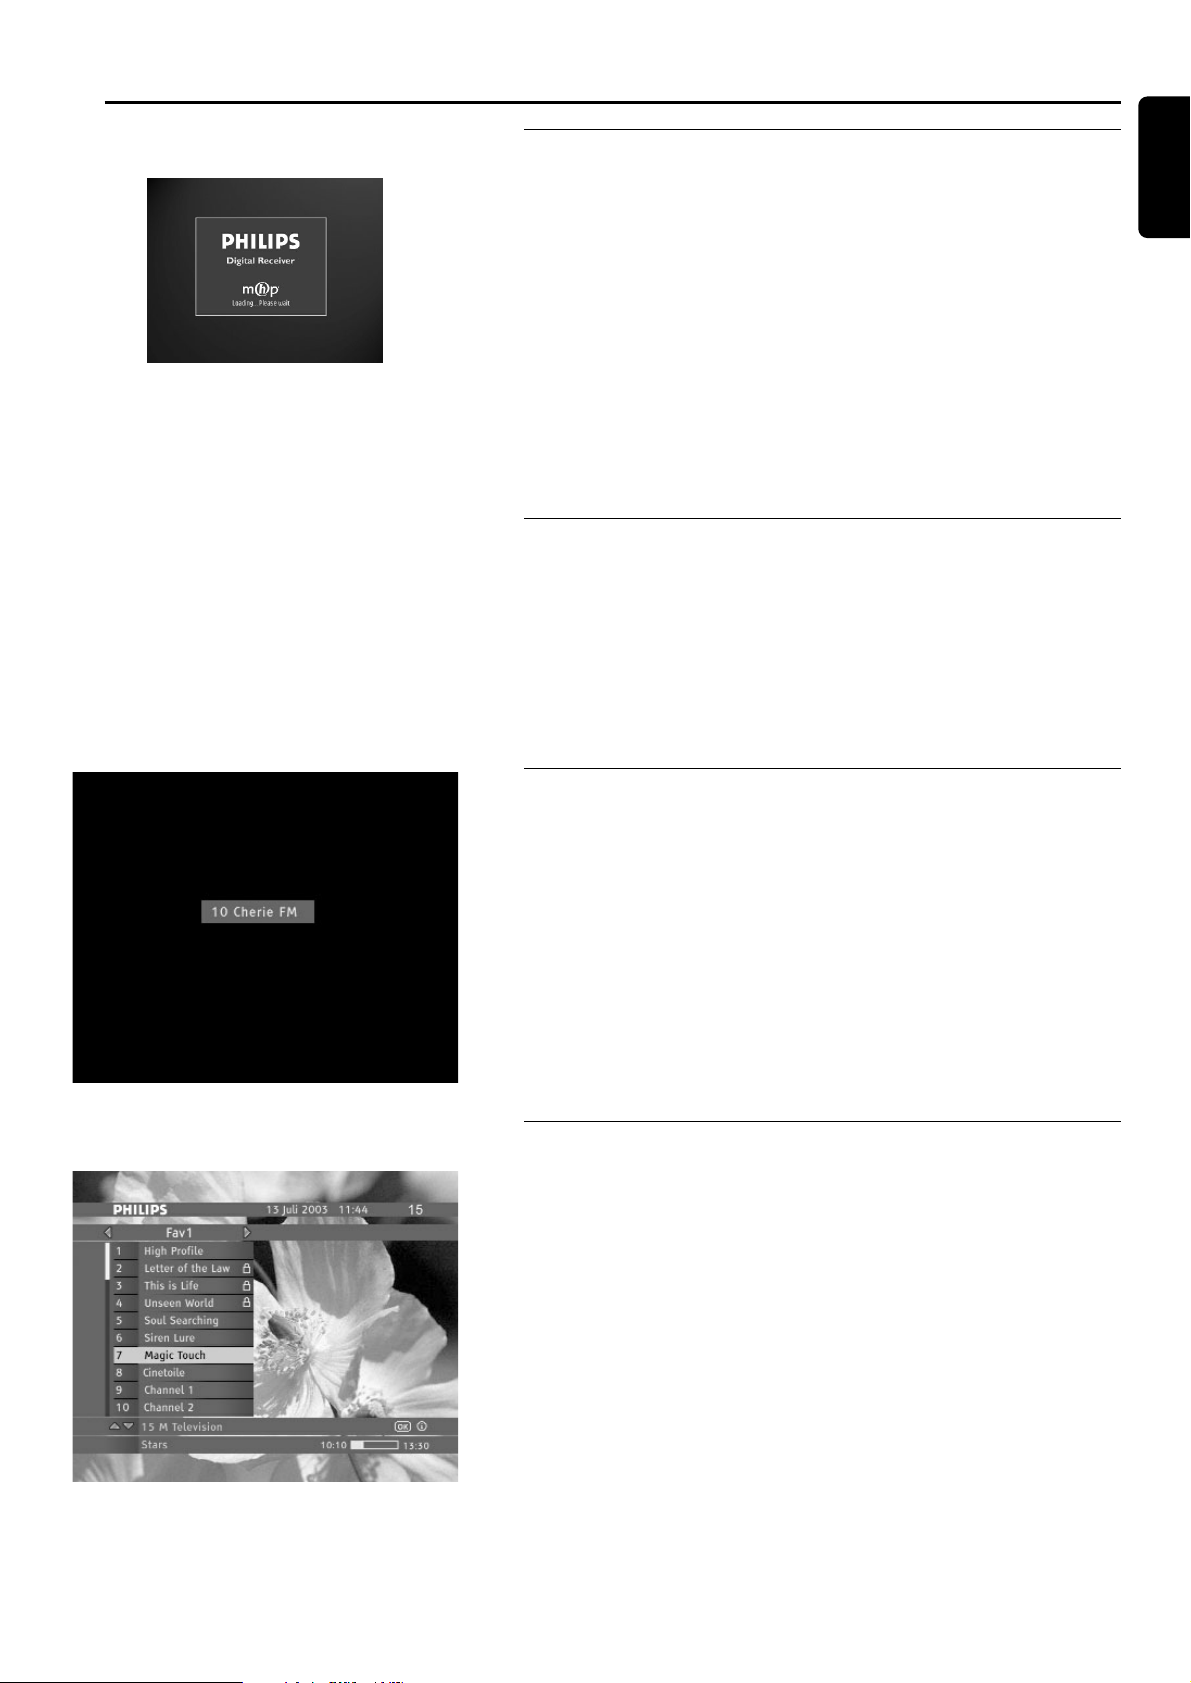
6.4 Umschalten zwischen den Kanallisten
Ihr Receiver gibt Ihnen Zugang zu über 6 TV-Kanallisten und zu über 6
Radio-Kanallisten. Zum Anzeigen der gewählten Kanalliste, drücken Sie
FAV Taste. Zum Umschalten zwischen allen verfügbaren nicht leeren
Kanallisten im bestimmten Modus (TV oder Fernseh-Betrieb), drücken
Sie C / B. Der Name der gewählten Liste wird oben auf dem
Kanalliste-Bildschirm erscheinen. Wählen Sie dann den Kanal mit Hilfe
von V / W oder Zifferntastendruck. Jedesmal wenn Sie nicht aktuelle
Kanalliste markieren, im Kanalbanner wird das [OK] Zeichen
erscheinen. Um den Kanal einzustellen, drücken Sie OK.
Liste der TV Kanäle
Hinweis: Kanallisten ermöglichen Ihnen die Arbeit in dem sogenannten
Erweiterten Modus". In diesem Modus bleibt der Receiver auf dem selben Kanal
eingestellt, wobei Sie erweiterte Programme und Kanäle blättern" können.
Deutsch
Page 14
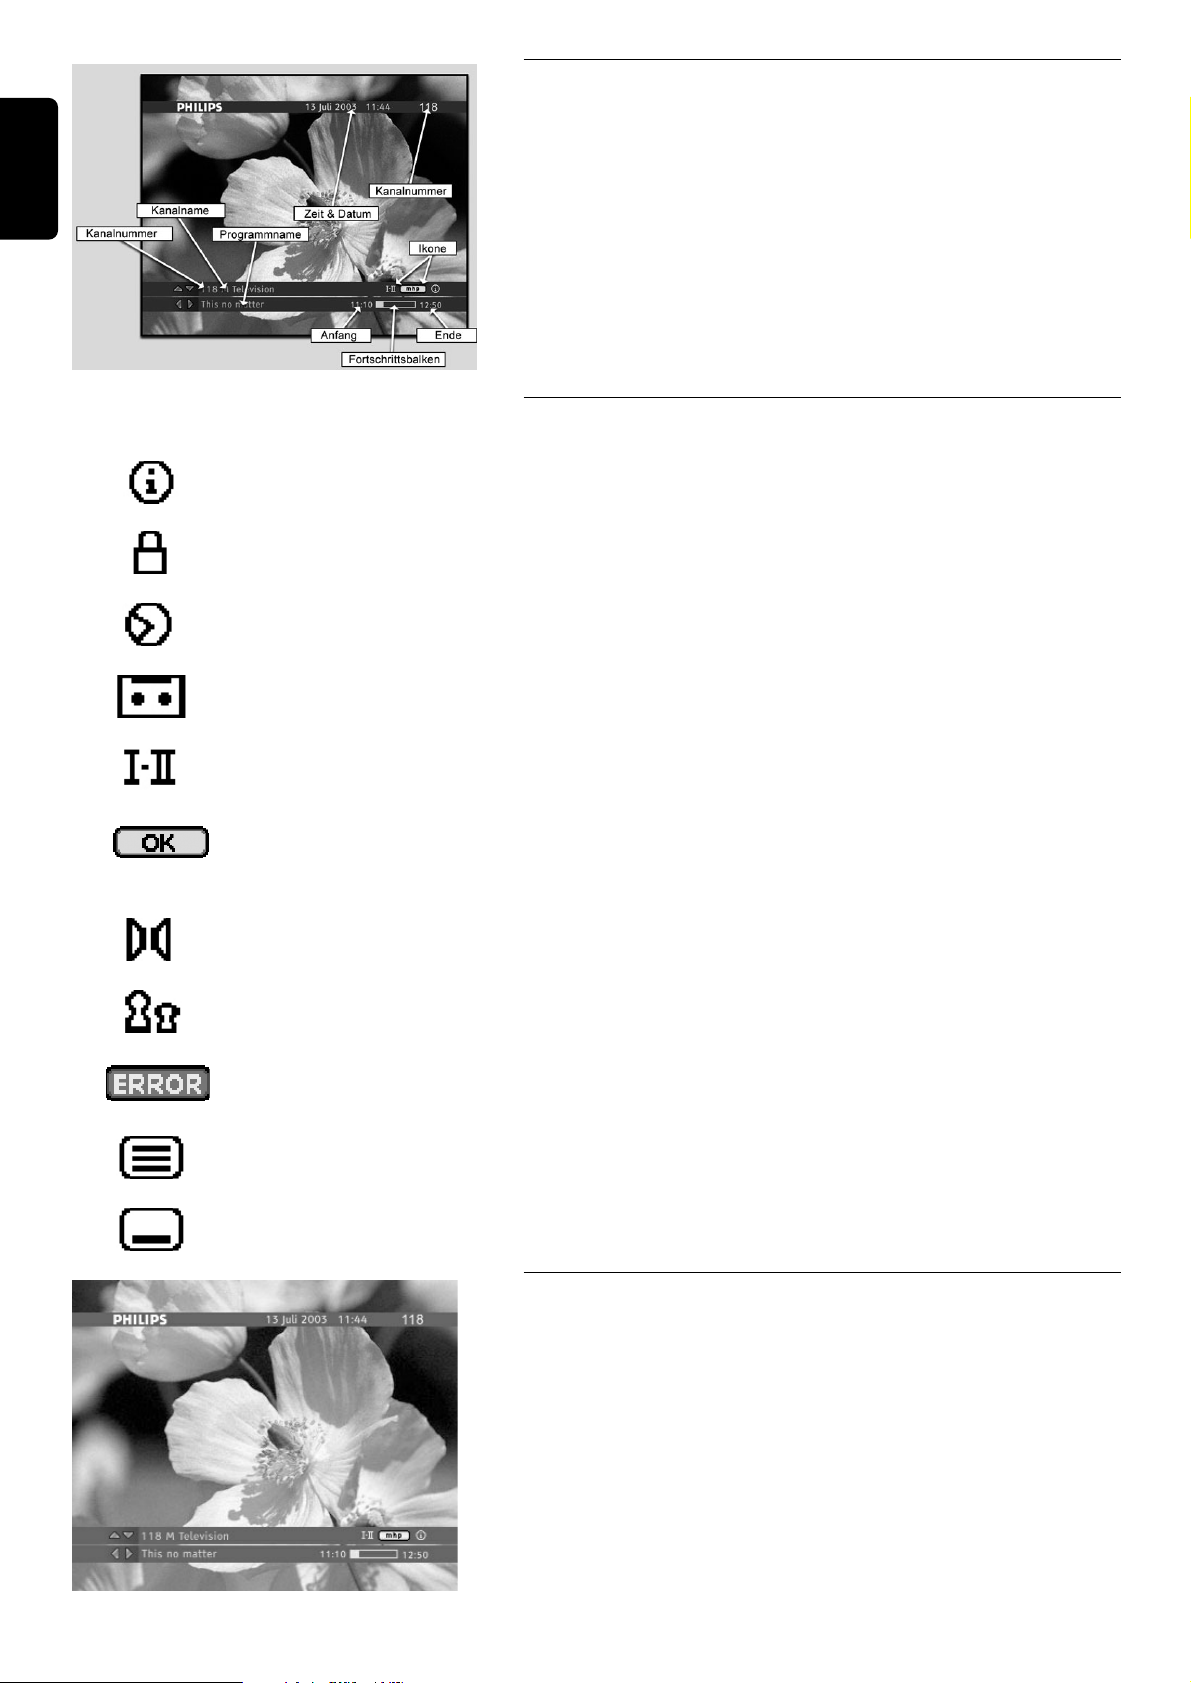
6.5 Verwenden des Kanalbanners
Kanalbanner erscheint unten am Bildschirm wenn Sie einen Ihren
Receiver auf einen neuen Kanal einstellen oder wenn Sie mmTaste
drücken. Es bietet Ihnen Informationen über einzelne Kanäle an und
erleichtert das Verschieben in den Kanal- und Programmlisten. Wenn Sie
im Kanalbanner sind, können Sie nur zwischen Kanälen blättern", die
zu der gerade gewählten Kanalliste gehören. Kanalbanner blendet
automatisch nach einigen Sekunden aus, oder wenn Sie EXIT drücken.
6.5.1 Kanalbannerzeichen
Dieses Zeichen informiert, daß für den im Kanalbanner gezeigten
Programm manche zusätzlichen Programminformationen verfügbar sind.
Dieses Zeichen informiert, daß der Kanal gesperrt ist.
Dieses Zeichen informiert, daß die Erinnerungsfunktion für bestimmtes
Programm eingestellt wurde.
Dieses Zeichen informiert, daß die Aufnahme Erinnerungsfunktion für
bestimmtes Programm eingestellt wurde.
Dieses Zeichen informiert, daß ein Programm mit mehr als einen
Soundtrack übertragen wird.
Dieses Zeichen informiert, daß OK Drücken stellt den Receiver zu dem
Kanal, auf den sich Kanalbanner bezieht, oder stellt ein/löscht die
Erinnerungsfunktion.
Dieses Zeichen informiert, daß dieses Programm mit Surround-Klang
übertragen wird.
Dieses Zeichen informiert, daß das Programm Kindersicherungssperre
hat.
Dieses Zeichen informiert, daß Sie externe Applikationen starten
können, wenn Sie OK drücken
Dieses Zeichen informiert, daß Teletext auf dem gerade eingestellten
Kanal verfügbar ist.
Dieses Zeichen informiert, daß Sie Untertitelsprache für das Programm
einschalten können.
6.5.2 Programmwahl
Das Kanalbanner ermöglicht Ihnen, Informationen über aktuelles oder
nächstes Programm auf dem gewählten Kanal anzusehen. Drücken SieC
/ Bum zu prüfen, was als Nächstes auf demselben Kanal übertragen
wird.
Wenn Sie einen der vorgehenden Programme wählen, OK drücken wird
Ihnen helfen, die Erinnerungsfunktion einzustellen/löschen. Weiteres dazu
finden Sie im Kapitel 6.10 Reminders und Timers weiter in diesem
Benutzerhandbuch.
Information zum laufenden Programm
12 GRUNDFUNKTIONEN
Deutsch
Page 15
GRUNDFUNKTIONE 13
6.5.3 Kanalwahl
Es gibt 3 Möglichkeiten, den Kanal umzuschalten.
- Drücken Sie V oder W um in der Liste der empfangbaren Kanäle zu
verschieben. Bitte beachten Sie, daß Ihr Receiver auf denselben Kanal
eingestellt bleibt.
- Wenn Sie P+ / P- drücken, wird Ihr Receiver im Bereich derselben
Kanalliste den Kanal hoch-/runterschalten.
- Sie können die Kanäle auch durch die Kanalnummereingabe direkt
auswählen. Wenn Sie die Zifferntasten drücken, erscheint die
Kanalnummer in der rechten Ecke oben auf dem Bildschirm.
● Bitte beachten Sie, daß BACK drücken ermöglicht Ihnen das
Umschalten zwischen dem gerade gesehenen und dem vorher
eingestellten Kanal im Bereich derselben Kanalliste.
Kanalnummer Eingabe Bildschirm
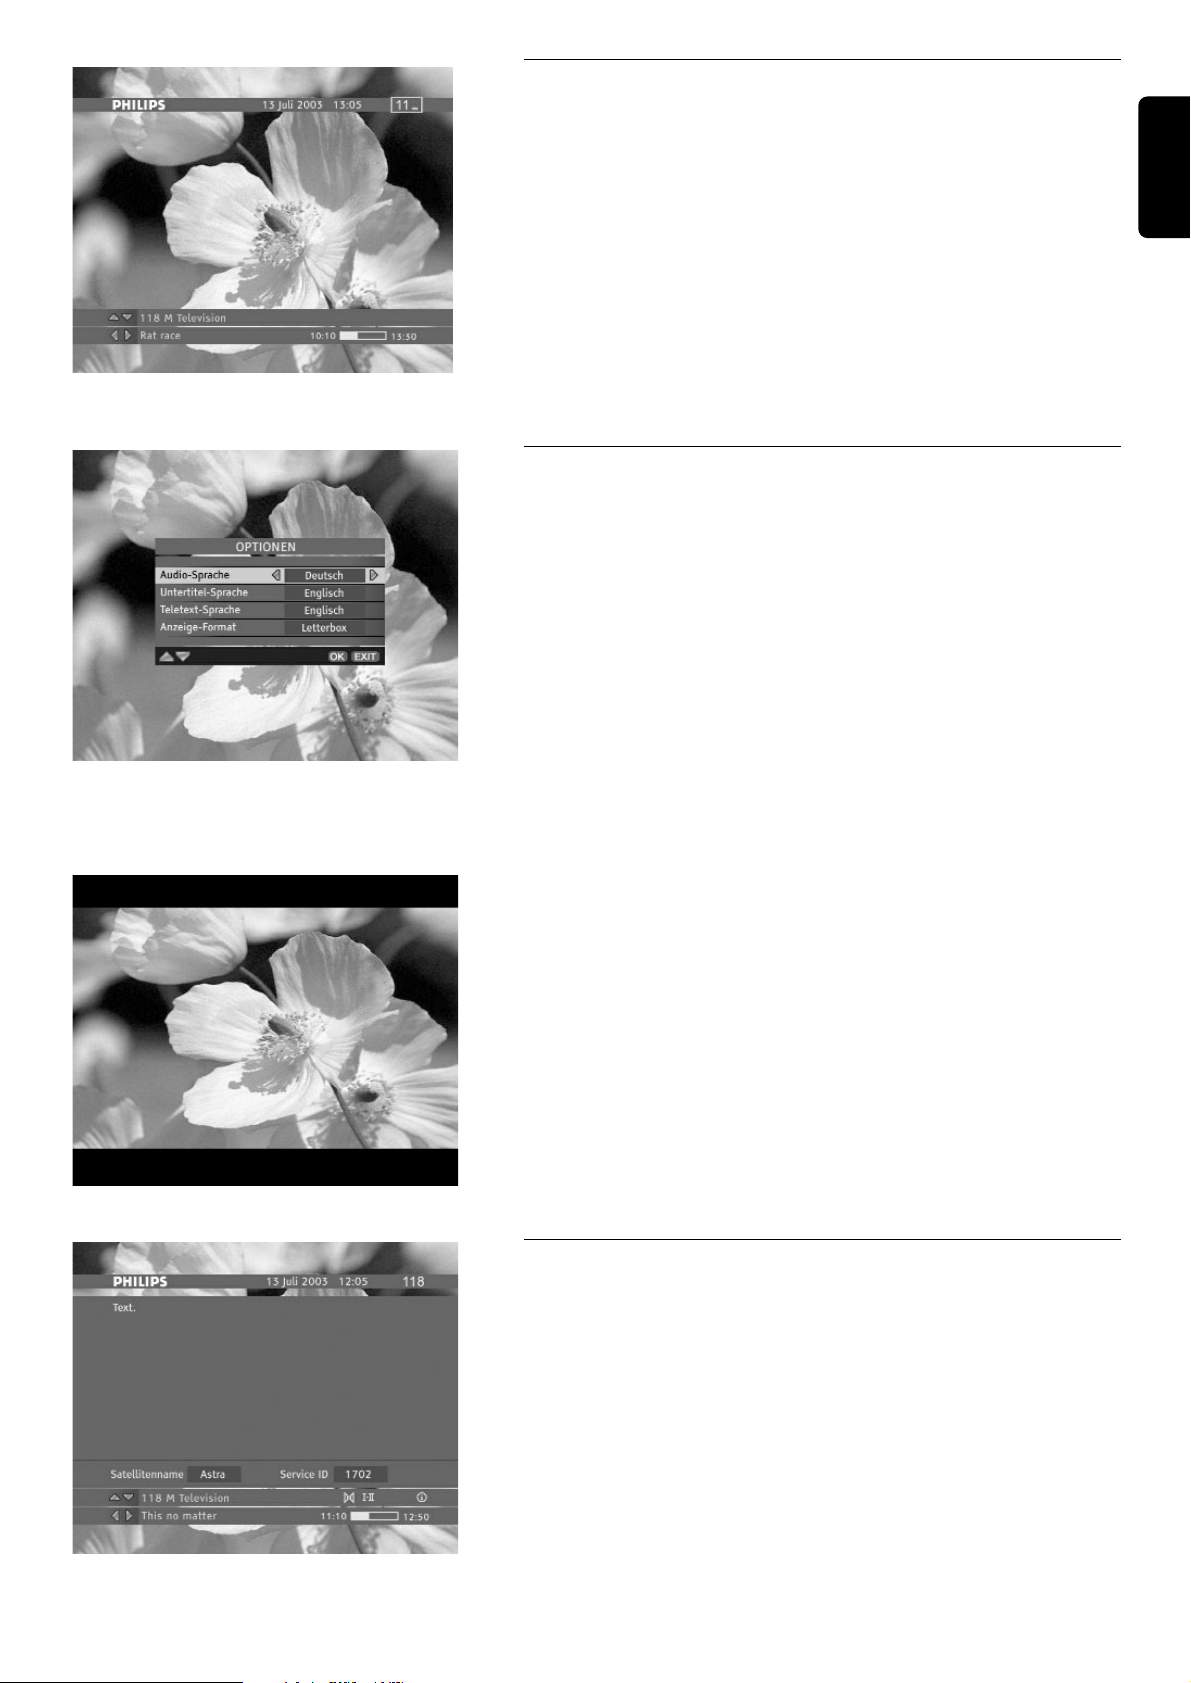
6.6 Änderung der Optionen des gerade
angesehenen Programms
Durch drücken der 44oder iiTaste, lassen Sie sich die MenüOptionen anzeigen. Dieses Menü ermöglicht Ihnen, die Audio-Sprache,
die Untertitel-Sprache und das Bildschirmformat für das gerade
gesehenes Programm und die Teletext-Sprache für den aktuellen Kanal
einzustellen.
Audio-Sprache
Sie können verschiedene Audio-Sprachen wählen, wenn sie angeboten
werden.
Untertitel-Sprache
Sie können verschiedene Untertitel-Sprachen wählen, wenn sie
angeboten werden.
Teletext-Sprache
Sie können verschiedene Teletext-Sprachen wählen, wenn sie angeboten
werden.
Bildschirmformat
Wenn Sie einen Fernseher mit dem 4:3 Format haben und die
Übertragung im 16:9 Format erfolgt, können Sie das Bildschirmformat für
das aktuelle Programm ändern. Zum Beispiel wenn Sie einen Fernseher
mit dem 4:3 Format haben und die Übertragung im 16:9 Format erfolgt,
können Sie Letter-box, Pan-Scan oder Vollbild wählen. Wenn Sie
Letter-box wählen, wird das Bild formatfüllend angepaßt (vollständiges
Bild wird mit schwarzen Flächen oben und unten geliefert.
Anzeige-Format (Letter-box)
6.7 Aufrufen weiterer Informationen zu
dem gerade angeschauten Programm
Das [ i ] Zeichen wird im Kanalbanner gezeigt und informiert, daß
mm
drücken manche zusätzlichen Programminformationen über das gerade
gewählten Programm gezeigt werden können. Wenn mehrere Seiten der
Programminformationen verfügbar sind, mmdrücken wird folgende
Seiten zeigen. Um Program-Info Bildschirm zu einzublenden, drücken
Sie EXIT, oder mmwenn die letzte Programminfoseite gezeigt wird.
Program Info Bildschirm
Deutsch
Optionen Menü
Page 16
6.8 Verwenden der Taste TV/STB
Die Taste TV/STB (oder TV/SAT) dient zum Umschalten zwischen der Wiedergabe von digitalen Satellitenprogrammen über
den digitalen Receiver und der Wiedergabe von normalen analogen Programmen auf dem Fernsehgerät. Die Funktion der
Taste hängt davon ab, ob der digitale Receiver mit dem mitgelieferten Scart-Kabel angeschlossen wurde.
Durch erneutes Drücken dieser Taste wird wieder auf die Wiedergabe eines digitalen Satellitenprogramms zurückgeschaltet.
Wenn Sie Ihren digitalen Satelliten-Receiver über ein Scart-Kabel mit dem Fernsehgerät verbunden haben, werden Sie in den
meisten Fällen das korrekte Programm nicht von Hand an Ihrem Fernsehgerät einstellen müssen, um digitale
Satellitenprogramme zu sehen. Um sicherzustellen, dass das korrekte Programm automatisch gewählt wird, sollten Sie Ihr
Fernsehgerät einschalten, bevor Sie den digitalen Satelliten-Receiver einschalten. Wird das Fernsehgerät nach dem digitalen
Satelliten-Receiver eingeschaltet, müssen Sie eventuell die Taste TV/STB (oder TV/SAT) betätigen, um das korrekte
Programm auf Ihrem Fernsehgerät zu wählen.
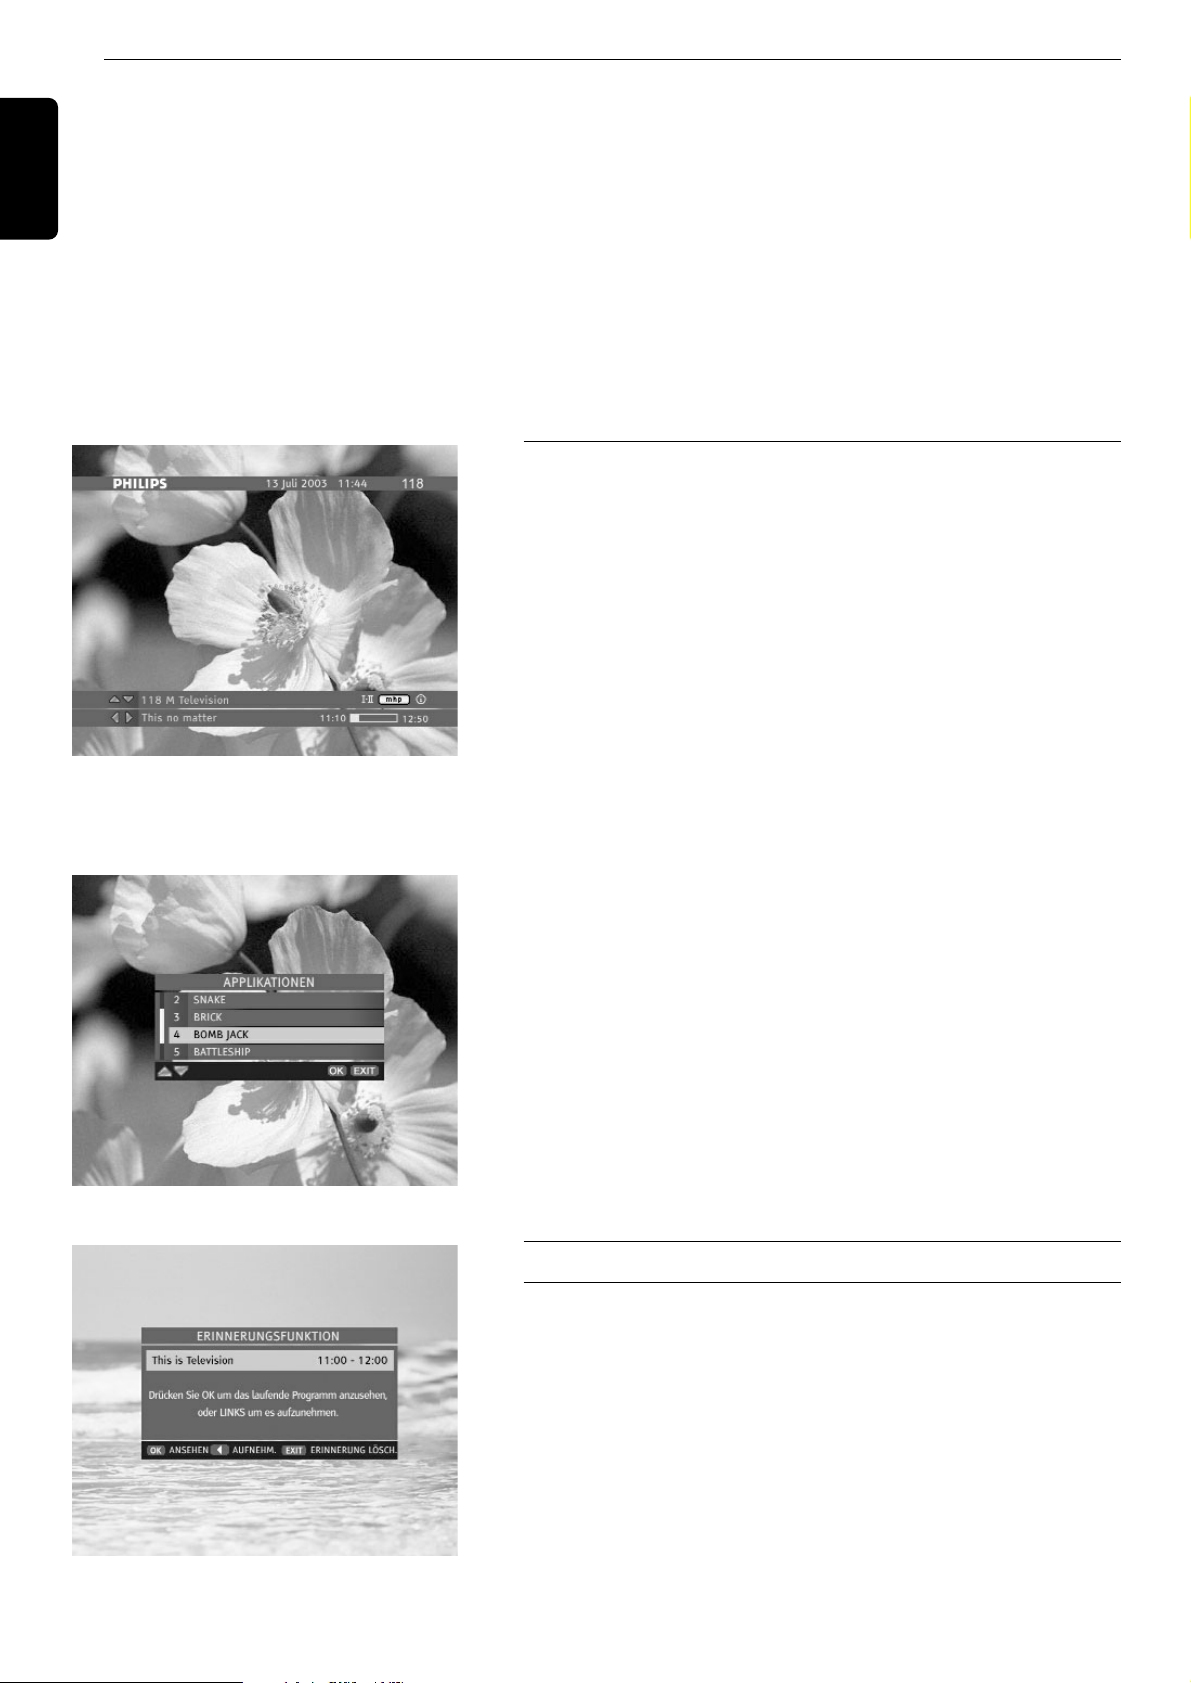
6.9 Starten/stoppen/verbergen einer
ausgestrahlten MHP-Anwendung
Ihr Receiver ermöglicht Ihnen Herunterladung und Benutzung der
interaktiven MHP-Applikationen. Manche von denen werden automatisch
während Einstellung auf jeweiligen Kanäle gesendet, die anderen müssen
manuell gestartet werden.
Wenn Sie einen Kanal einstellen wollen wo interaktive Applikationen
vermittelt werden, sehen Sie das [ mhp ] Logo im Kanalbanner. Dieses
Logo wird wechselweise mit dem [ OK ] Zeichen gezeigt, das Ihnen
anfordert, die OK Taste zu drücken. Wenn Sie OK drücken, der
Applikations-Bildschirm aufgerufen wird, wo Sie wählen können, welche
Applikation Sie starten wollen. Wenn Sie die Applikation schon wählen,
drücken Sie erneut OK. Wenn Sie an Applikationenstart nicht
interessiert sind, drücken Sie EXIT um Applikations-Anzeige aus dem
Bildschirm zu löschen.
Um interaktive Applikation aufzugeben, lesen Sie sie BildschirmInformationen, die von der Applikation erzeugt werden, oder schalten
Sie zu anderem Kanal mit Hilfe von P+ / P- drücken.
Bitte beachten Sie, daß falls Sie an keine automatisch gestarteten
interaktiven Applikationen interessiert sind, stellen Sie Applikation
AUTOSTART-Option in Display-Optionen Bildschirm auf NO ein.
Applikations Anzeige
6.10 Erinnerungsfunktion und Timers
6.10.1 Unterschied zwischen Erinnerungs- und
Timerfunktionen
Der Erinnerungs-/Timerfunktionszweck ist Ihnen davon zu erinnern, daß
das Programm, daß Sie anzusehen geplannt haben, gleich anfangen wird.
Der Hauptunterschied zwischen der Erinnerungs- und Timerfunktion
besteht darin, daß die Erinnerungsfunktionen über den Kanalbanner
eingestellt werden. Um die Erinnerungsfunktion einzustellen, wählen Sie
aus dem Kanalbanner ein der zukünftigen Programme und drücken Sie
OK. Dann werden Sie gefragt, ob Sie eine Schau- oder Aufnahme-
Funktion einstellen wollen.
Erinnerung einstellen
14 GRUNDFUNKTIONE
Deutsch
Zeichenn der nteraktiven Applikationen
Page 17
GRUNDFUNKTIONE 15
Timers sind von dem Übertragungsplan unabhängig. Timers werden über
Timer eingestellt. Um Zugang zu Timer zu haben, wählen Sie Timer
Option aus dem Hauptmenü. Timer enthält alle Timers- und
Erinnerungsfunktionen, die definiert wurden. Es ermöglicht Ihnen nicht
nur die Timers einzustellen, aber auch die eingestellten Timers und
Erinnerungsfunktionen zu ändern/löschen. Sie werden auch gebeten,
Timer zu öffnen jedesmal eine Kollision zwischen Erinnerungs/Timerfunktionen erscheinen. Mehr dazu lesen Sie im Timer Kapitel in
diesem Benutzerhandbuch.
Timer Einstellen
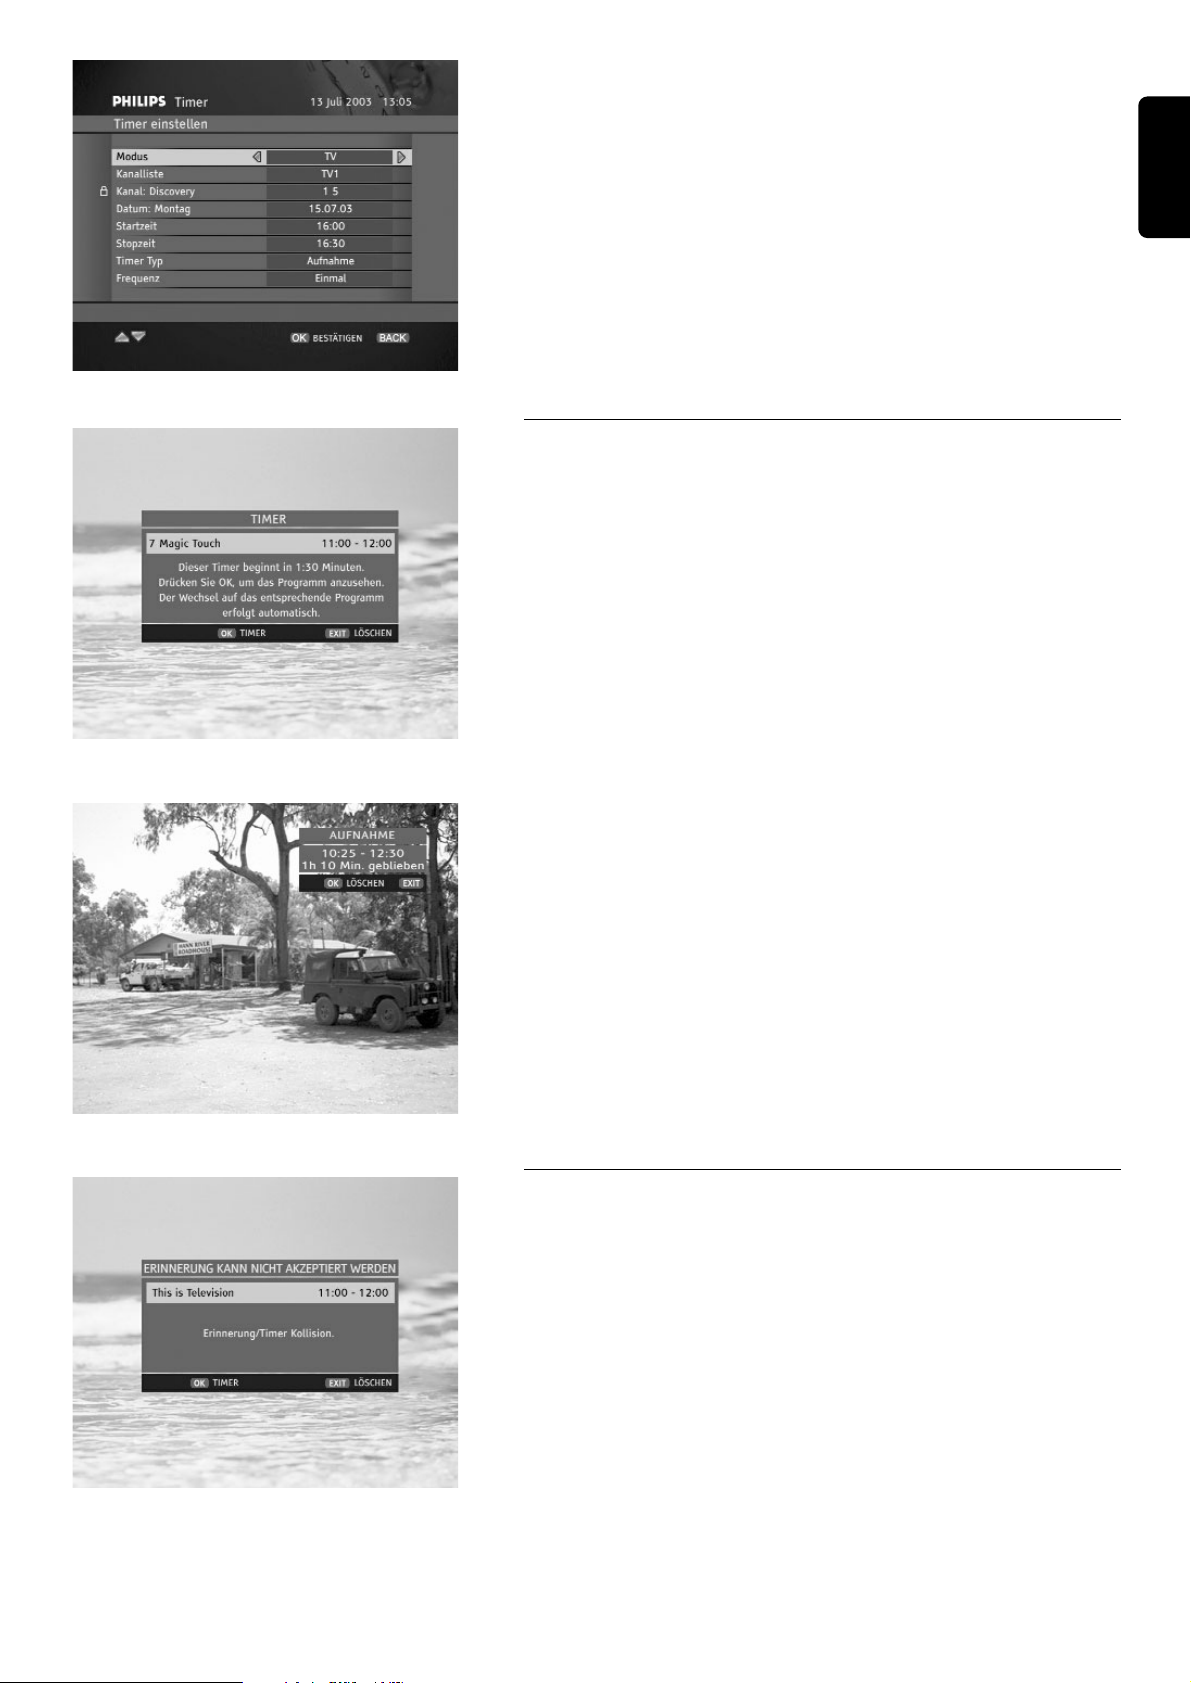
6.10.2 Aufnahme Erinnerungs-/Timerfunktionen
Es gibt 2 Sorten von Erinnerungs-/Timerfunktionen: Erinnerungs/Timerfunktion und Aufnahme Erinnerungs-/Timerfunktion. Wenn
Sie Erinnerung/Timer eingestellt haben, ihre pop-up - Anzeige
erscheint 1.5 Minuten bevor Programmstart. Wenn Sie auf die
Erinnerung/Timer pop-up nicht reagieren, Erinnerung/Timer wird
gelöscht, der Receiver stellt sich auf entsprechenden Kanal um die vorher
gegebene Startzeit.
Bitte beachten Sie, daß die Aufnahme- Erinnerung/Timer vor
Unterbrechen geschützt wird. Wenn Sie die Aufnahme unterbrechen
wollen, drücken Sie EXIT. Es wird pop-up Anzeige aufrufen, die Sie
informiert, wie lange die Aufnahme noch dauern wird. Danach werden
Sie gefragt, OK zu drücken, um die Aufnahme zu unterbrechen, oder
EXIT um pop-up Anzeige aus dem Bildschirm einzublenden.
Aufnahme Pop-up
6.10.3 Erinnerung/Timer Kollision
Ihr Receiver ermöglicht Ihnen bis 8 Erinnerungs- und Timeroptionen
einzustellen. Jede Erinnerung/Timer wird geprüft, ob es keine Kollision
mit den vorher eingestellten Erinnerungen/Timers gibt. Wenn Sie eine
Erinnerung oder Timer einstellen und solch eine Kollisn entsteht, eine
Kollision pop-up Anzeige erscheint. Sie werden gebeten EXIT zu
drücken um die aktuelle Erinnerung zu löschen, oder
OK um zu Timer
zu gelangen. Die neu eingestellte Erinnerung wird im Timer als
ausgeschaltete Erinnerung (mit ?" markiert) gezeigt. Diese Erinnerung
kann nur dann akzeptiert werden, wenn Sie welche der KollisionErinnerungen/Timers löschen oder manche ihren Angaben ändern.
Weitere Informationen finden Sie in dem unteren Timer Kapitel.
Erinnerungen Kollision Pop-up
Deutsch
Schau Timer Pop-up
Page 18
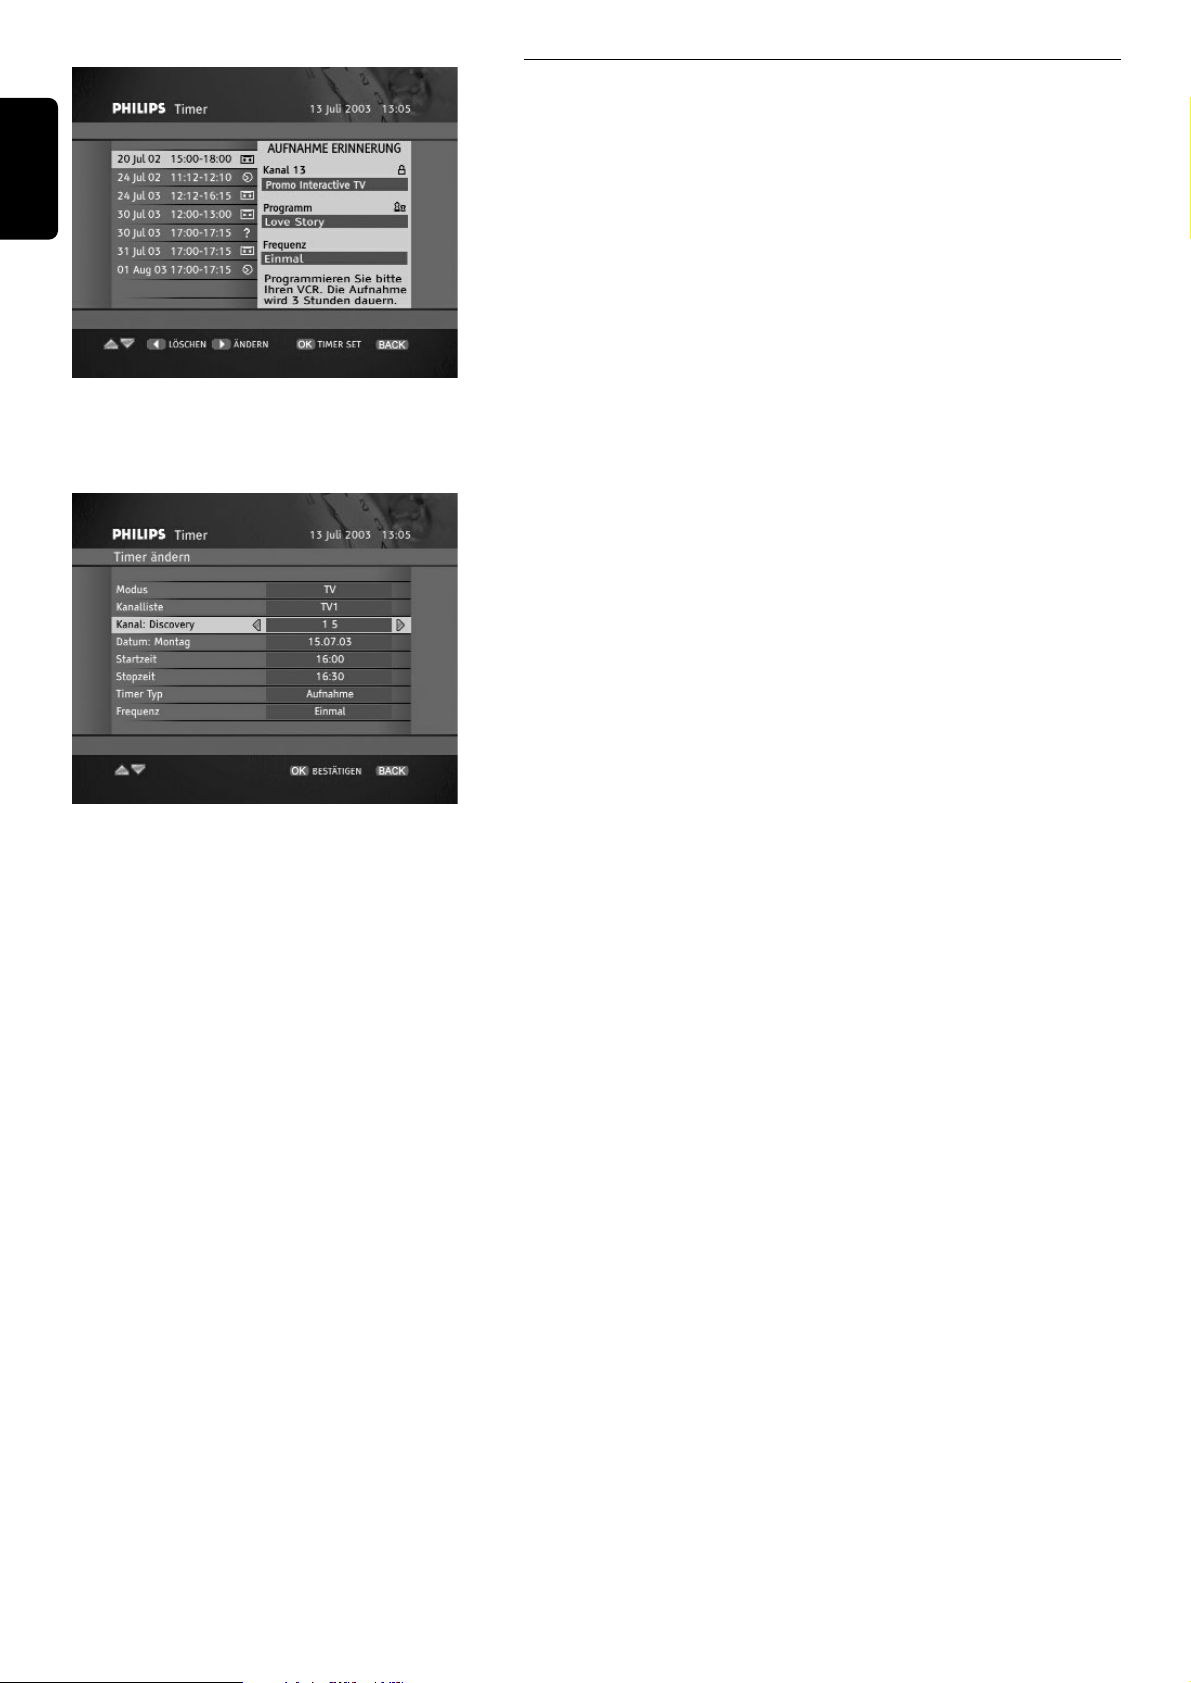
6.10.4 Timer
Timer enthält die Liste von allen Erinnerungen und Timers definiert. Im
Timer Menü können Sie folgende Funktionen einstellen.
Timer-Einstellung
Drücken Sie OK um neuen Timer einzustellen. Es wird TimerEinstellung Bildschirm aufrufen. Geben Sie alle erforderlichen Angaben
ein und drücken Sie OK für Bestätigung. Wenn die Angaben gültig sind
und es gibt keine Kollision mit den vorher eingestellten
Erinnerungen/Timers, dann können Sie zu Timer Bildschirm
zurückkehren. Der neu eingestellter Timer erscheint auf der Timer Liste.
Erinnerungen/Timers Änderung
Auf dem Timer Bildschirm markieren Sie Timer/Erinnerung die Sie
ändern wollen und drücken Sie B. Es wird entweder Timer-Änderung
oder Erinnerung-Änderung Bildschirm aufrufen. Verändern Sie die
Erinnerung/Timer Angaben und drücken Sie OK um zu bestätigen.
Timers/Erinnerungen Löschen
Markieren Sie Erinnerung/Timer die Sie löschen wollen, und drücken Sie
C Sie werden gebeten, die Löschoperation zu bestätigen.
Timer ändern
16 GRUNDFUNKTIONE
Deutsch
Timer
Page 19
HAUPTMENÜ 17
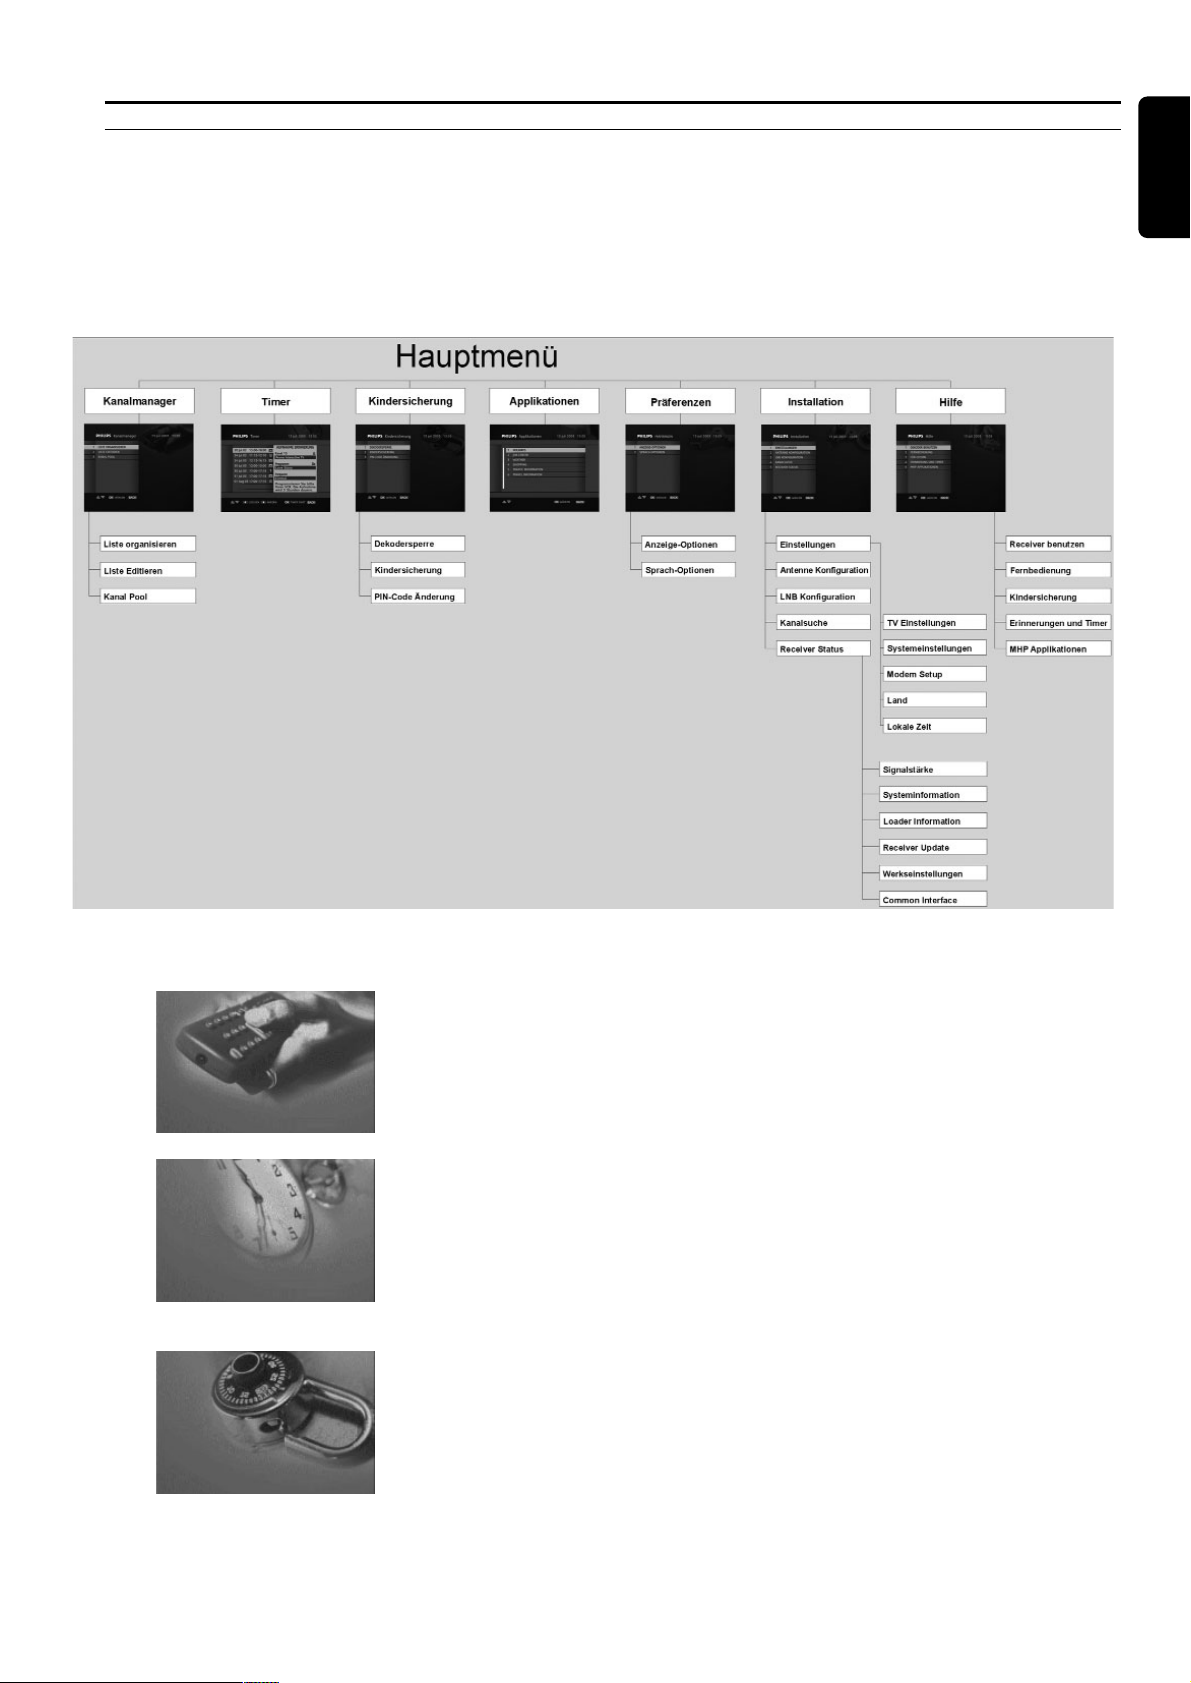
7 Hauptmenü
7.1 Menüstruktur
Ihr Receiver bietet Ihnen das Menü-System an, das Ihnen die Änderung von vielen seinen Funktionen ermöglicht. Um das
Hauptmenü zu wählen, drücken Sie die MENU Taste. Das Hauptmenü besteht aus 7 Untermenüs. Um ein der Untermenüs
aufzurufen, markieren Sie ihren Namen mit Hilfe von V oder W und drücken Sie dann OK. Sie können auch die
Zifferntasten benutzen um entsprechenden Menüpunkt zu markieren. Um zum Hauptmenü zurückzukehren, drücken Sie
BACK. Drücken Sie MENU oder EXIT wenn Sie Menü-System sofort verlassen wollen.
Hier gibt es kurze Übersicht der Grundfunktionen von individuellen Untermenüs.
Kanalmanager
Ermöglicht Ihnen die Liste der bevorzugten Kanäle ändern, bearbeiten
den Inhalt der individuellen Kanallisten und Zugang zu Kanal Pool. Mehr
dazu finden Sie in 6.4 und 8.1 Kapiteln dieses Benutzerhandbuchs.
Schalgen Sie auch in dem Kanal Manager Kapitel nach.
Timer
Hier finden Sie die Liste von allen Erinnerungen und Timers definiert. Es
ermöglicht Ihnen die Timers- und Erinnerungen einzustellen und die
schon eingestellten Timers und Erinnerungsfunktionen zu
ändern/löschen. Mehr dazu lesen Sie im Time 6.10 Kapitel dieses
Benutzerhandbuchs.
Kindersicherung
Dieses Untermenü wurde eingerichtet damit Ihre Kinder vor
ungeeigneten TV Sendungen zu schützen. Hier können Sie auch Ihr
aktuellen PIN-Code ändern. Mehr dazu finden Sie in 8.2 Kapitel dieses
Benutzerhandbuchs.
Deutsch
Page 20

Applikationen
Ermöglicht Ihnen eine der verfügbaren "Off-the-Air" Applikationen zu
starten. Gehen Sie zum Kapitel 6.9 über.
Persönliche Einstellungen
Ermöglicht Ihnen sowohl Ihre Bildschirm-Anzeige Einstellungen, als auch
die Audio- und Untertitelsprache definieren. Mehr dazu finden Sie in
Persönliche Einstellungen Kapitel 8.2 dieses Benutzerhandbuchs.
Installation
Ermöglicht Ihnen folgende Einstellungen: System-Konfiguration, ModemKonfiguration, Suche nach existierende Kanäle, Status des Receivers
prüfen, lokale Zeit einstellen, stellt Ihren Receiver zurück auf
Werkseinstellungen. Mehr dazu finden Sie in Installation Kapitel 8.4 dieses
Benutzerhandbuchs.
Hilfe
Gibt Ihnen Zugang zu "on-line Hilfe" Informationen, die Grundfunktionen
Ihres Receivers betreffen.
18 HAUPTMENÜ
Deutsch
Page 21
ANDERN DER EINSTELLUNGEN DES RECEIVERS 19
8 Ändern der Einstellungen des Receivers
8.1 Kanal-Manager
Wenn Sie Kanal-Manager aus dem Hauptmenü wählen, kriegen Sie
Zugang zu Kanal-Manager Untermenü. Dieses Untermenü ermöglicht
Ihnen die Organization der Kanallisten zu ändern (Option der Liste-
Organization) oder den Inhalt der individuellen Kanalliste zu ändern.
(Option der Liste-Edition). Mehr dazu finden Sie in 8.11 und in 8.12
Kapiteln dieses Benutzerhandbuchs.
Die dritte Option Kanal Pool gibt Ihnen Zugang zu aller verfügbaren
Kanälen. Aus Kanal Pool können Sie Kanäle zu individuellen Kanallisten
zu übertragen. Sie können Kanal Pool auf bestimmte Satelliten, Modus
und bestimmte Kanaltypen filtern. Sie können auch die Kanäle im
alphabetischen Ordnung sortieren: von A bis Z oder von Z bis A.
Über Kanal Pool können Sie auch Kanäle löschen wenn Sie OK drücken
(nur für individuelle Kanäle) oder mit B drücken (löscht alle Kanäle).
Wenn Sie alle Kanäle löschen, werden Sie gefragt, ob Sie alle löschen
wollen, oder nur diese, die Sie noch nicht zu Ihrer Kanallisten übertragen
haben.
Kanal Pool Inhalt
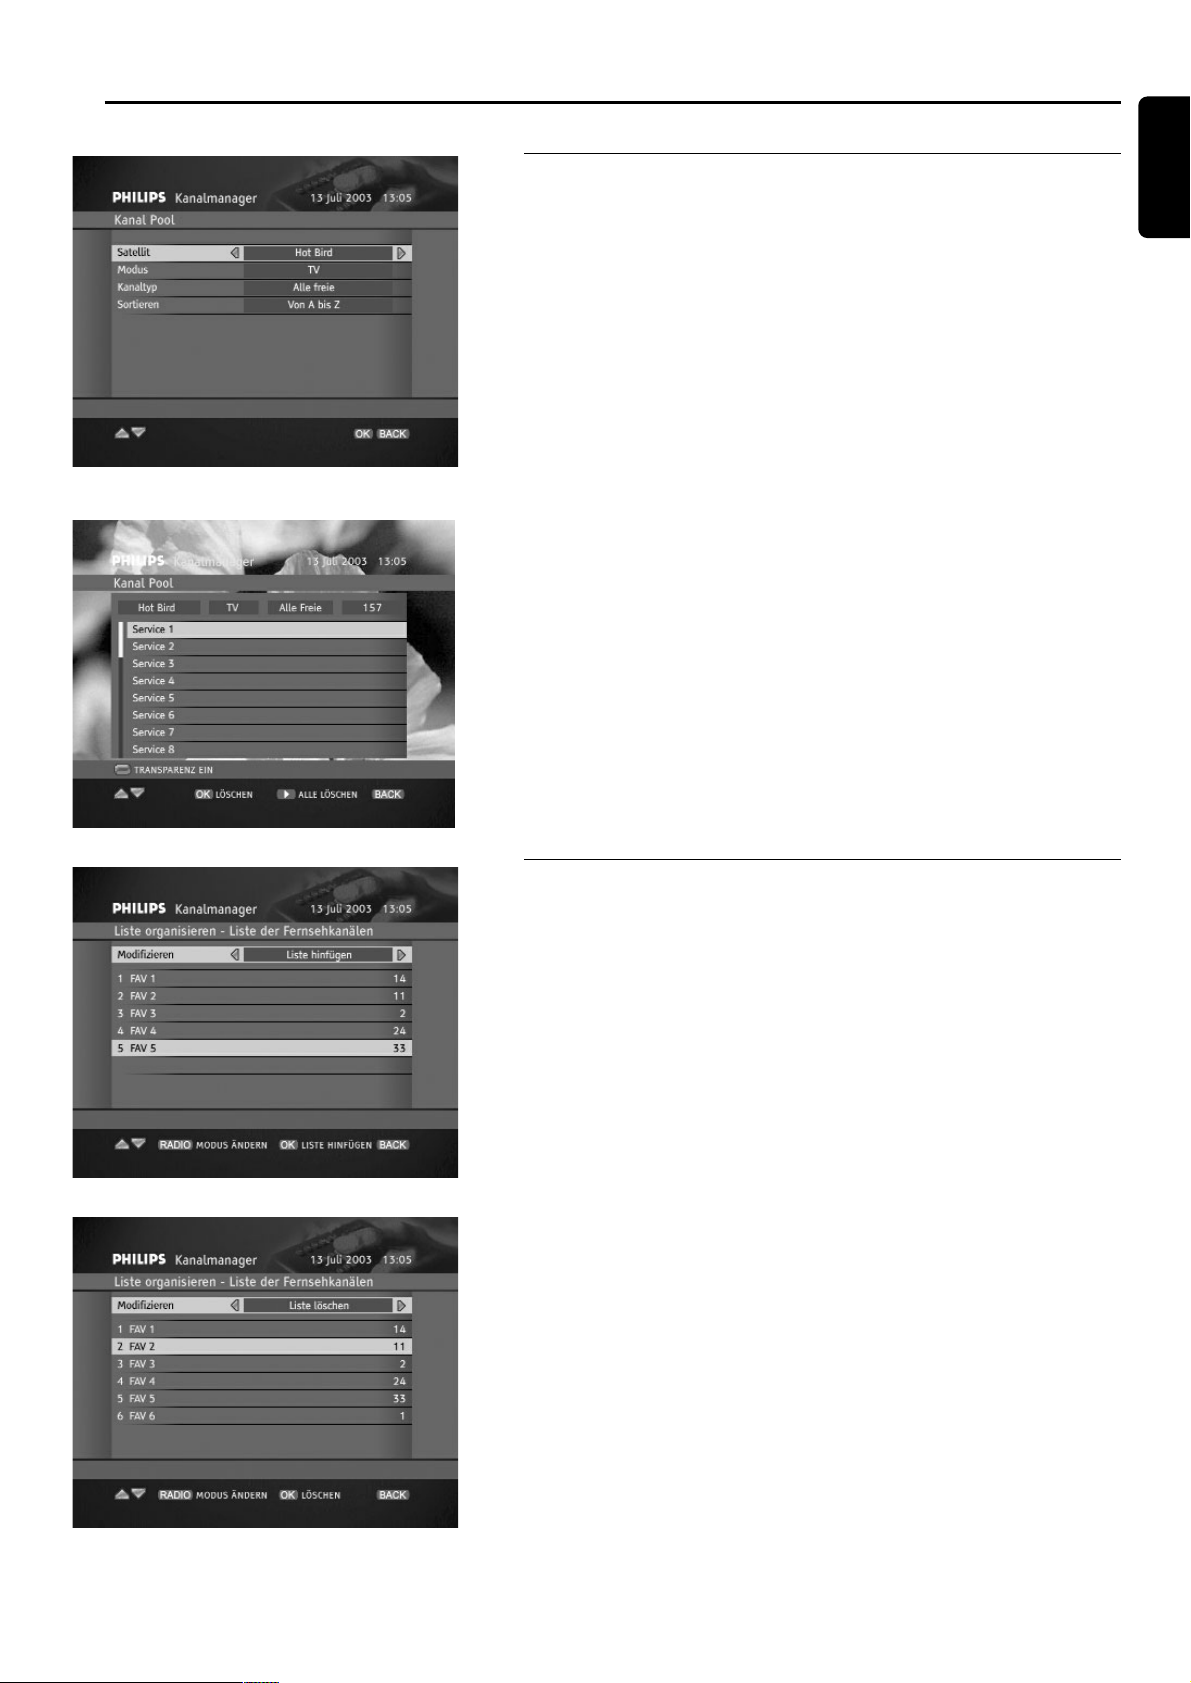
8.1.1 Kanalliste organisieren
Wenn Sie Ihr Receiver eingestellt haben, kriegen Sie Zugang zu 6 TVKanallisten und 6 Radio-Kanallisten. Diese Kanallisten haben ihre Namen
voreingestellt und erscheinen in gespeicherter Reihenfolge.
Wenn Sie die Organisation Ihrer Kanallisten ändern wollen, drücken Sie
MENU Taste und wählen Sie Liste-Organisieren Option aus dem
Kanal-Manager Untermenü.
Die Liste-Organisieren Bildschirm ermöglicht Ihnen folgendes:
- Löschen die Listen, an die Sie nicht interessiert sind (Liste löschen).
- Neue Liste einrichten (Liste einrichten).
- Ändern den Namen der Kanalliste (Liste umbenennen).
- Ändern die Reihenfolge in der zwischen der Listen umgeschaltet wird
wenn angeschaut (Listen umstellen).
Kanalliste Löschen
Deutsch
Liste-Organisieren - neue Liste hinfügen
Kanal Pool filtern
Page 22
Wenn Sie Liste-Organisieren Option das erste Mal öffnen, auf dem
Bilschirm werden Ihnen alle verfügbaren Kanallisten in dem gerade
gewählten Modus (TV oder Radio) gezeigt. Um Modus umzuschalten,
drücken Sie die RADIO Taste. Dann wählen Sie entsprechenden Befehl
indem Sie Ändern Option markieren und C / B so lange betätigen, bis
Sie den gewünschten Befehl sehen. Die Anzeigen, die in Hilfebalken
unten auf dem Bildschirm gezeigt werden, werden dann auch
entsprechend geändert. Bitte folgen Sie die Anzeigen, die auf dem
Bildschirm gezeigt werden.
Kanalliste Löschen-Bestätigen
8.1.2 Kanalliste ändern
Wenn Sie Ihren Receiver einstellen, kriegen Sie Zugang zu 6 TVKanallisten und 6 Radio-Kanallisten. Wenn Sie Ihren Receiver auf einen
anderen Satelliten als einen aus der gegebenen Liste einstellen, diese
Kanallisten bleiben leer. Um sie zu editieren, drücken Sie MENU und
wählen Sie Liste Editieren Option aus dem Kanal-Manager
Unternenü.
Es gibt Ihnen Zugang zu Liste Editieren Bildschirm. Wählen Sie Modus
erst, dann Kanalliste die Sie ändern wollen. Als nächstes wählen Sie
entsprechenden Änderung Befehl.
Wenn Sie the Liste Editieren Bildschirm benutzen, können Sie folgendes
tun:
- Zu der gewählten Kanalliste können Sie aus der Kanal Pool Kanäle
hinzufügen (Kanäle hinfügen). Mehreres dazu finden Sie unten im
Kanäle hinfügen".
- Kanäle aus der gewählten Kanalliste löschen (Kanäle löschen). Bitte
beachten Sie, daß die gelöschten Kanäle noch in dem Kanal Pool
gespeichert sind und können umgespeichert werden.
- Kanälenreihenfolge im Bereich der gewählten Kanalliste ändern.
(Kanäle schieben).
- sperren/entsperren individuelle Kanäle (Kanäle sperren).
Wahl der Kanälenquelle
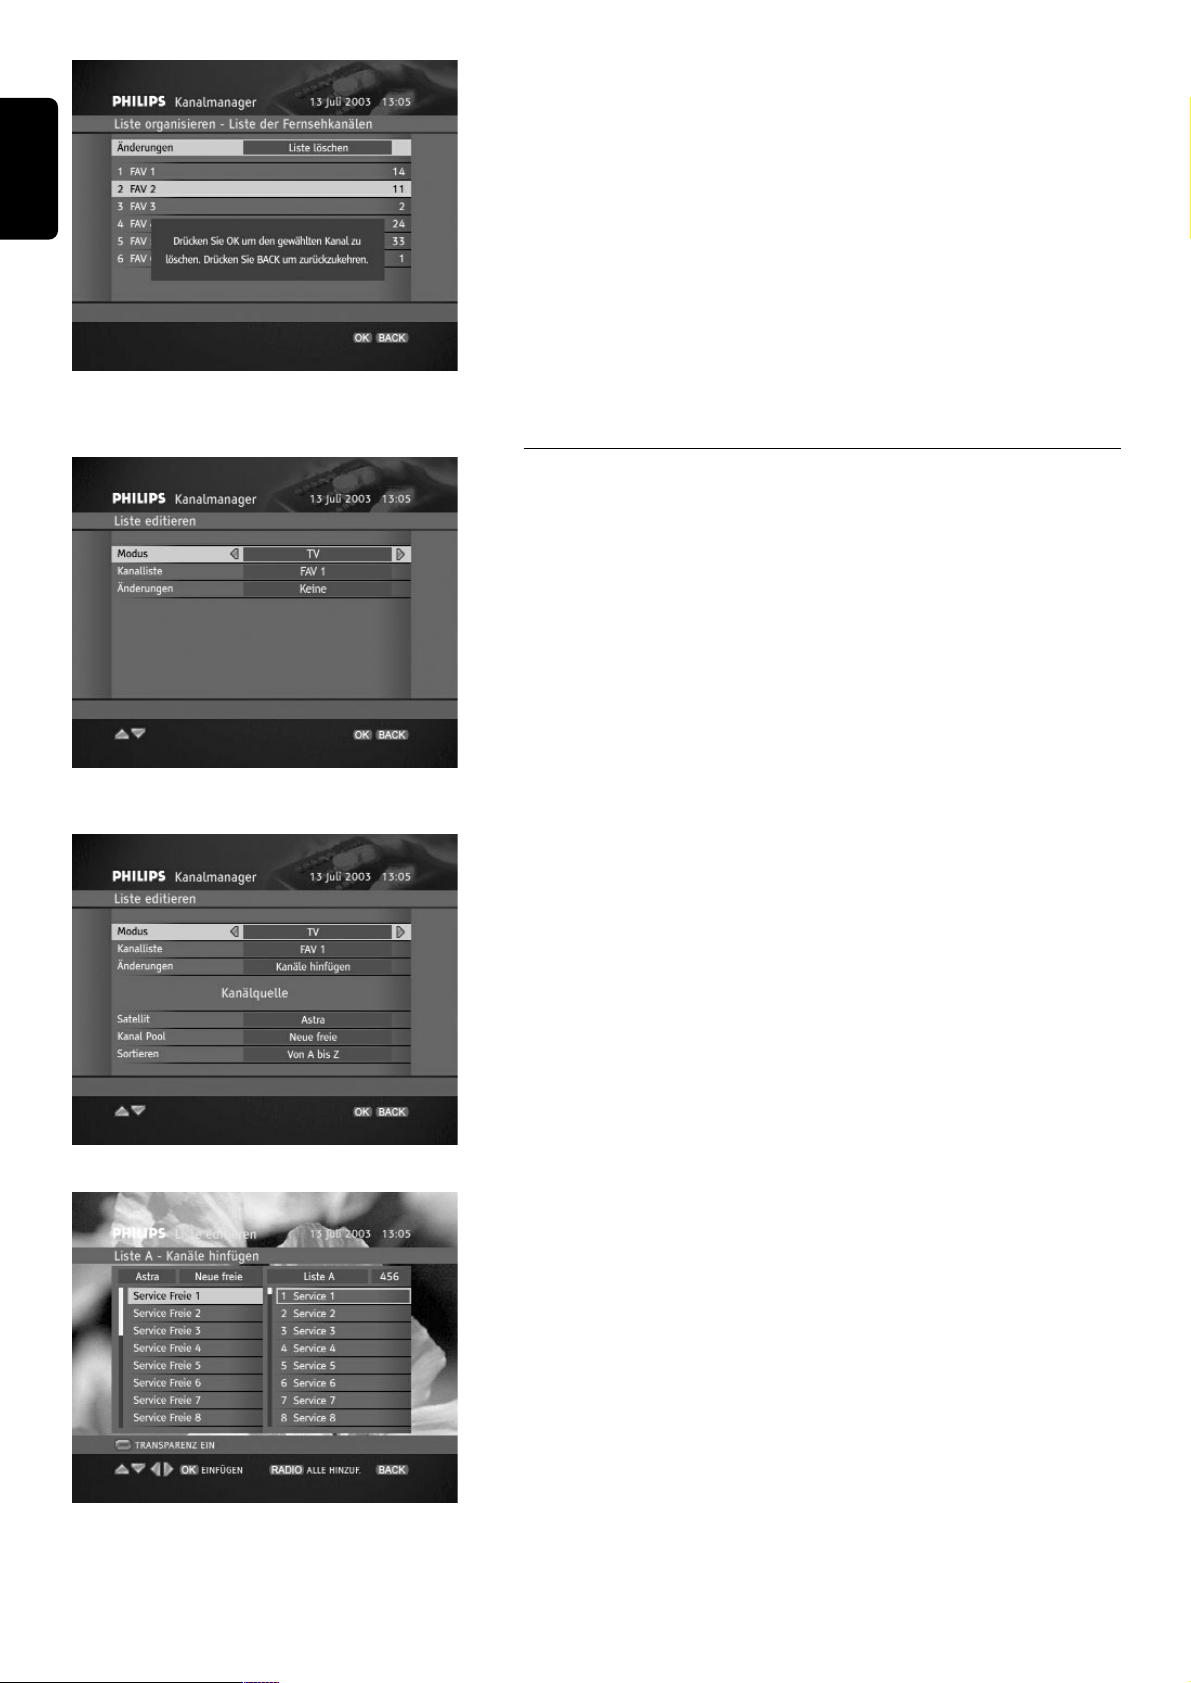
Neue Kanäle zu Kanallisten hinfügen
Wenn Sie Kanäle hinfügen Befehl wählen, werden Sie nach
Satellitennameneingabe und Kanälentypen, an den Sie interessiert sind,
gefragt. Als Bestätigung erscheinen zwei Kanalspalten. Links gibt es eine
Kanälenliste des gegebenen Typs und aus dem gewählten Satelliten.
Rechts gibt es Inhalt der gewählten Kanalliste. Markieren Sie den Kanal,
den Sie Ihrer Liste hinfügen wollen, und drücken Sie OK. Bitte beachten
Sie, daß Sie Kanäle auch hinfügen können, indem Sie RADIO drücken
und die Kanäle aus Ihrer bevorzügen Kanalliste löschen. Um zwischen
diesen zwei Kanallisten umzuschalten, drücken Sie B / C.
Kanäle zu Liste A hinfügen
20 ANDERN DER EINSTELLUNGEN DES RECEIVERS
Deutsch
Bildschirm der Liste Editieren
Page 23
ANDERN DER EINSTELLUNGEN DES RECEIVERS 21
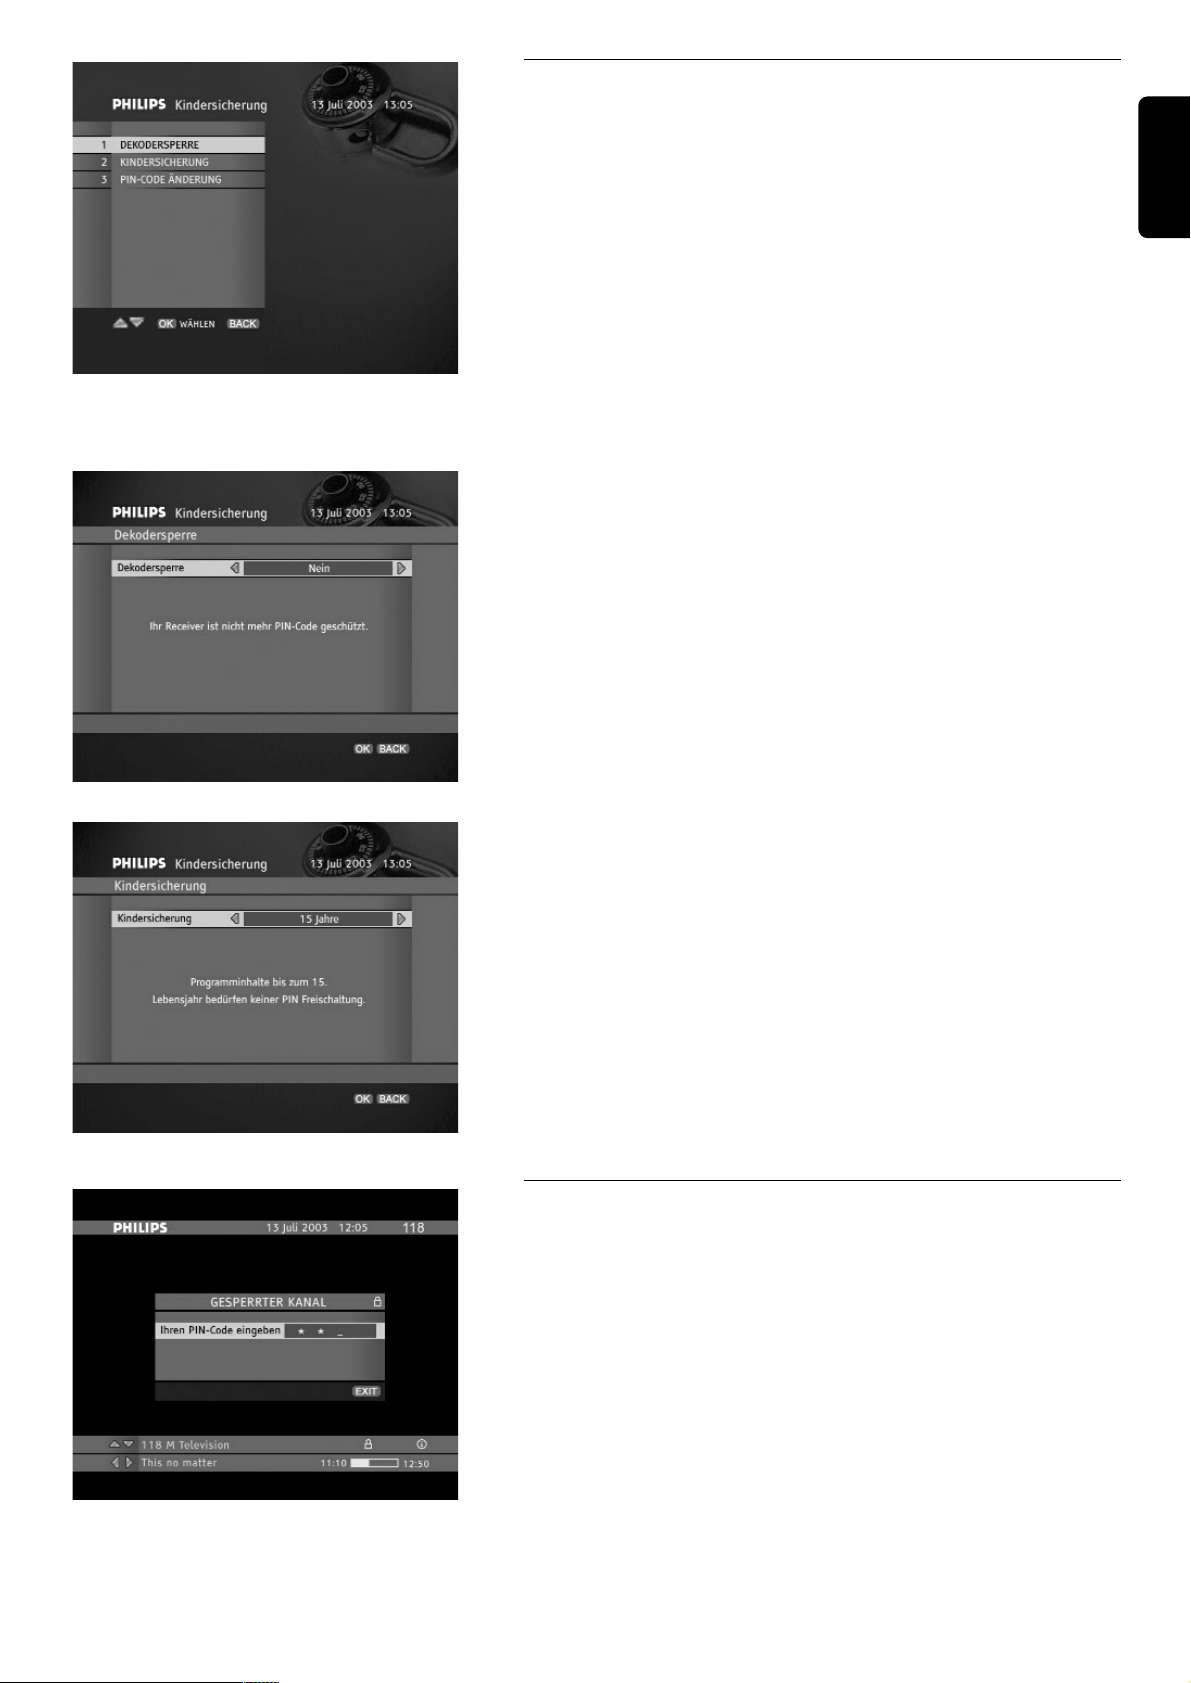
8.2 Kindersicherung
Ihr Receiver gibt Ihnen Zugang zu manche Optionen, die Ihnen erlauben,
Ihre Kinder vor ungeeigneten TV Sendungen zu schützen. Drücken Sie
MENU und wählen Sie Kindersicherung Untermenü um die Liste der
Sperrebenenen aufzurufen. Ihnen stehen folgende Sperrebenen zur
Verfügung:
- Receiver-Sperre Option ermöglicht denjenigen das Fernsehen, die
vollen Zugang zum Receiver haben. Wenn Sie die Receiver-Sperre
Option auf Nein umstellen, werden Sie nach PIN-Code Eingabe
gefragt.
- Sie können z.B 15 Jahre elterliche Ebene einstellen indem Sie
Elterliche Ebene Option benutzen. Dann werden alle Sendungen, die
für 15-jährigen ungeeignet sind, vom Fernsehen gesperrt.
- Wenn Sie sich entscheiden, Ihren PIN-Code zu ändern, wählen Sie
PIN-Code Änderung. Ändern Sie Ihren PIN-Code so, daß Sie sich an
die neuen Angaben einfach erinnern können. Wenn Sie den PIN-Code
doch vergessen, wenden Sie sich an Ihren Händler.
- Sie können zusätzlich die ganzen Kanäle einsperren. Mehreres dazu
finden Sie in Wie sperrt man die Kanäle weiter in diesem
Benutzerhandbuch (Kapitel 8.1.2). Wenn Sie diese Kanäle dann sehen
wollen, werden Sie nach PIN-Code Eingabe gefragt.
Receiver Sperre
Elterliche Ebene
8.2.1 Ihr PIN-Code
Der PIN-Code ist Ihre persönliche 4-stellige Nummer, die den Zugang zu
Ihrem Receiver beschränkt. Sie ist auf 1234 voreingestellt. Sie können
mit dem PIN-Code Kinder vor Sehen der ungeeigneten TV Sendungen
schützen, oder die Einstellungen des Receivers schützen. Immer wenn
Sie versuchen, Zugang zum mit dem PIN-Code gesperrten Programm
oder Funktion zu haben, werden Sie umgehend um die Eingabe von PINCode gebeten. Sie können Ihren PIN-Code ändern, wenn Sie das PIN-
Code ändern in dem Kindersicherung Untermenü benutzen.
PIN-Code eingeben
Deutsch
Kindersicherung Untermenü
Page 24
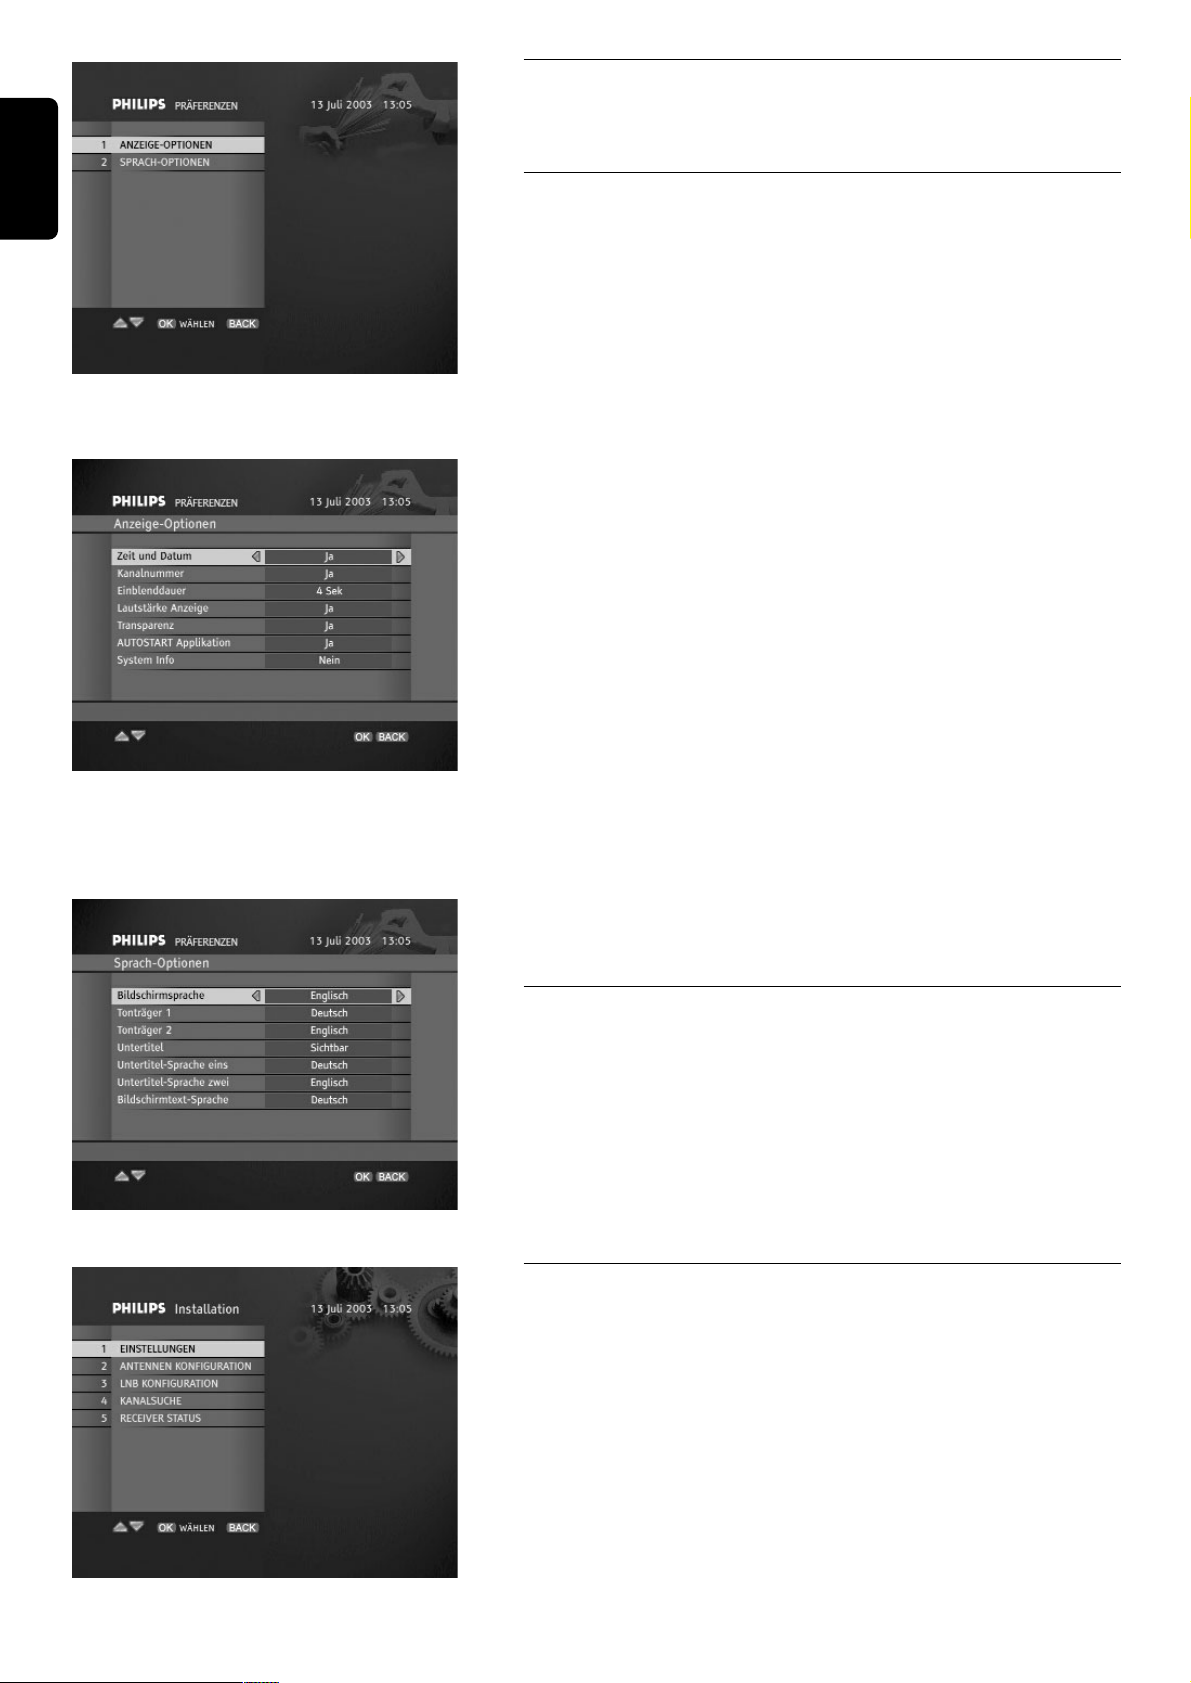
8.3 Benutzer (persönliche) -Einstellungen
Persönliche Einstellungen Untermenü enthält zwei optionen:
Anzeige- Option und Sprache-Option.
8.3.1 Anzeige-Option
Der Anzeige-Option Bildschirm ermöglicht Ihnen manche Optionen zu
definieren, die auf dem Bildschirm gezeigt werden. .
Zeit und Datum
Blockiert die aktuellen Zeit und Datum Anzeige im KanalbannerModus. .
Kanalnummer
Blockiert die Kanalnummer Anzeige oben in der rechten
Bildschirmsecke.
Kanalbanner Dauer
Gibt an, wie lange Kanalbanner angezeigt bleibt.
Lautstärkebalken
Bocks the volume bar from being displayed.
Hinweis:
1-Tdie JA Option soll eingestellt werden, wenn Lautstärke und Stummschalten
über den Receiver gesteuert sind.
2-die NEIN Option soll eingestellt werden, wenn Lautstärke und
Stummschalten über den Fernsehgerät gesteuert sind.
Transparenz
Zeigt die Transparenz der Bildschirmanzeige.
AUTOSTART Applikation
Definiert ob die MHP Applikationen automatisch gestartet werden sollen
wenn Sie einen Kanal einstellen, auf dem externe Applikationen
übertragen werden.
System Info
Entscheidet, ob einige technischen Daten wie Satellitenname oder
Service-ID im Programm-Info Fenster gezeigt werden sollen.
8.3.2 Sprachen-Optionen
Der Sprachen-Optionen Bildschirm ermöglicht Ihnen manche
Sprachen-Optionen definieren. Ändern Sie die gewünschten Sprachen
persönlichen Einstellungen nach und bestätigen Sie Ihre Wahl mit OK
Taste drücken.
Bildschirm der Sprachen-Optionen
8.4 Installation
Wenn Ihr Satelliten-Receiver richtig eingestellt und konfiguriert wurde,
werden Sie kaum Installation Untermenü benutzen. Immerhin wird es
benutzt, wenn Sie z.B. ein neues Fernsehgerät kaufen und Sie prüfen
wollen, ob Ihr Receiver die Funktionen des Fernsehgeräts am besten
nutzt, oder wenn Sie Ihre Antennenkonfiguration ändern wollen.
Unten finden Sie manche Bildschirme der Installation Untermenü.
Installation Untermenü
22 ANDERN DER EINSTELLUNGEN DES RECEIVERS
Deutsch
Persönliche Einstellungen Untermenü
Bildschirm der Anzeige-Optionen
Page 25
ANDERN DER EINSTELLUNGEN DES RECEIVERS 23
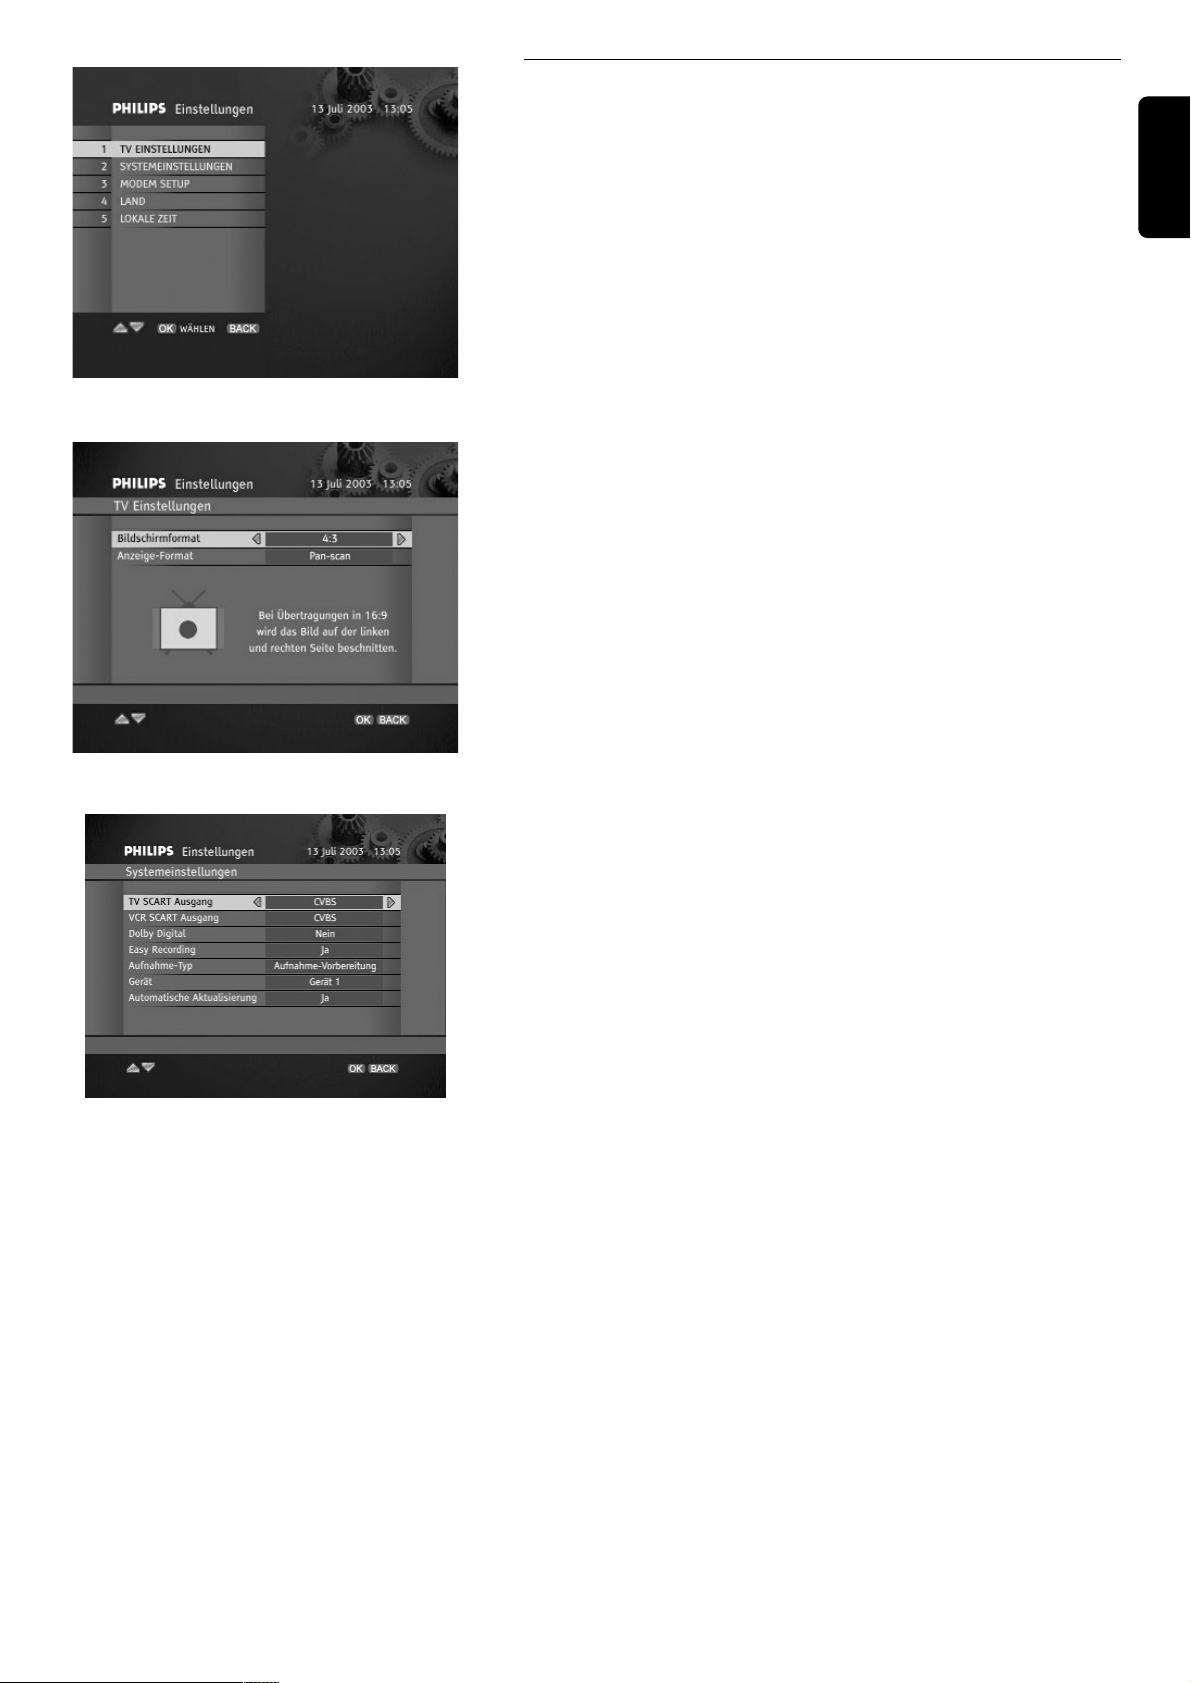
8.4.1 Einstellungen
Die Einstellungen Untermenü ermöglicht Ihnen TV-/System/Modemeinstellungen so zu ändern, daß Sie Land Einstellungen wählen
können und lokale Zeit einstellen können.
Einstellungen Untermenü
8.4.1.1 Installation / Einstellungen / TV-Einstellungen
Der TV-Einstellungen Bildschirm enthält 2 Optionen: TV-Bildschirm-
Format und Anzeige-Format. Ändern Sie die TV-Bildschirm Format
Einstellungen, wenn nötig. Sie können auch default Anzeige-Format
ändern (Letter-box), wenn Video Übertragungsbildseitenverhältnis dem
Bildseitenverhältnis Ihres Fernsehgeräts nicht gleich wird und Sie es
angepaßt haben wollen. Lesen Sie die Informationen die auf Ihrem TV-
Einstellung Bildschirm erscheinen bevor Sie sich auf Änderung
entscheiden.
Bildschirm der TV-Einstellungen
8.4.1.2 Installation / Einstellungen / System-Einstellungen
Der System-Einstellungen Bildschirm enthält manche
Konfigurationsangaben die Sie ändern können.
TV SCART Ausgang, VCR SCART Ausgang
Markieren Sie entsprechendes Format des Signalausgangs. Wir empfehlen
Ihnen RGB Format für TV SCART, weil es die beste Bildqualität
ermöglicht.
Dolby Digital
Wenn Sie einen Dolby Digital Receiver haben, ändern Sie die Dolby
Digital Option auf Ja.
Hinweis: Wenn Sie die Option auf JA während Sendung mit Dolby Digital
einstellen:
- kein Audio wird am TV & VCR SCART und L/R Audio-Ausgänge erreichbar. Nur
Dolby Digital Bit Stream (AC3 - 5.1) wird am Digital Optical Ausgang verfügbar.
- Während Timer wird sich der Receiver automatisch zu PCM (2 Kanal in digital)
umschalten. Audio- und L/R Audio-Ausgänge werden dann am TV & VCR SCART
des Receivers verfügbar um Audio-Aufnahme zu ermöglichen.
Auto Upgrade
Wenn Sie Ihren Receiver in Standby-Modus umschalten, die Applikation
prüfen wird, ob neue Software-Version verfügbar ist. Wenn neue
Software-Version entdeckt wird, werden Sie davon benachrichtigt gleich
nachdem Sie Ihren Receiver zu EIN Modus umstellen. Sie können auch
die Auto-Upgrade Option auf Ja einstellen. In diesem Fall wird die
Receiver Software automatisch heruntergeladen während Ihr Receiver im
Standby-Modus ist.
Mehr zu: Easy Recording, Aufnahme-Typ und Gerät Einstellungen
finden Sie in Kapiteln 9.1-9.2 Fortgeschrittene Einstellungen in diesem
Benutzerhandbuch.
Deutsch
Bildschirm der System-Einstellungen
Page 26
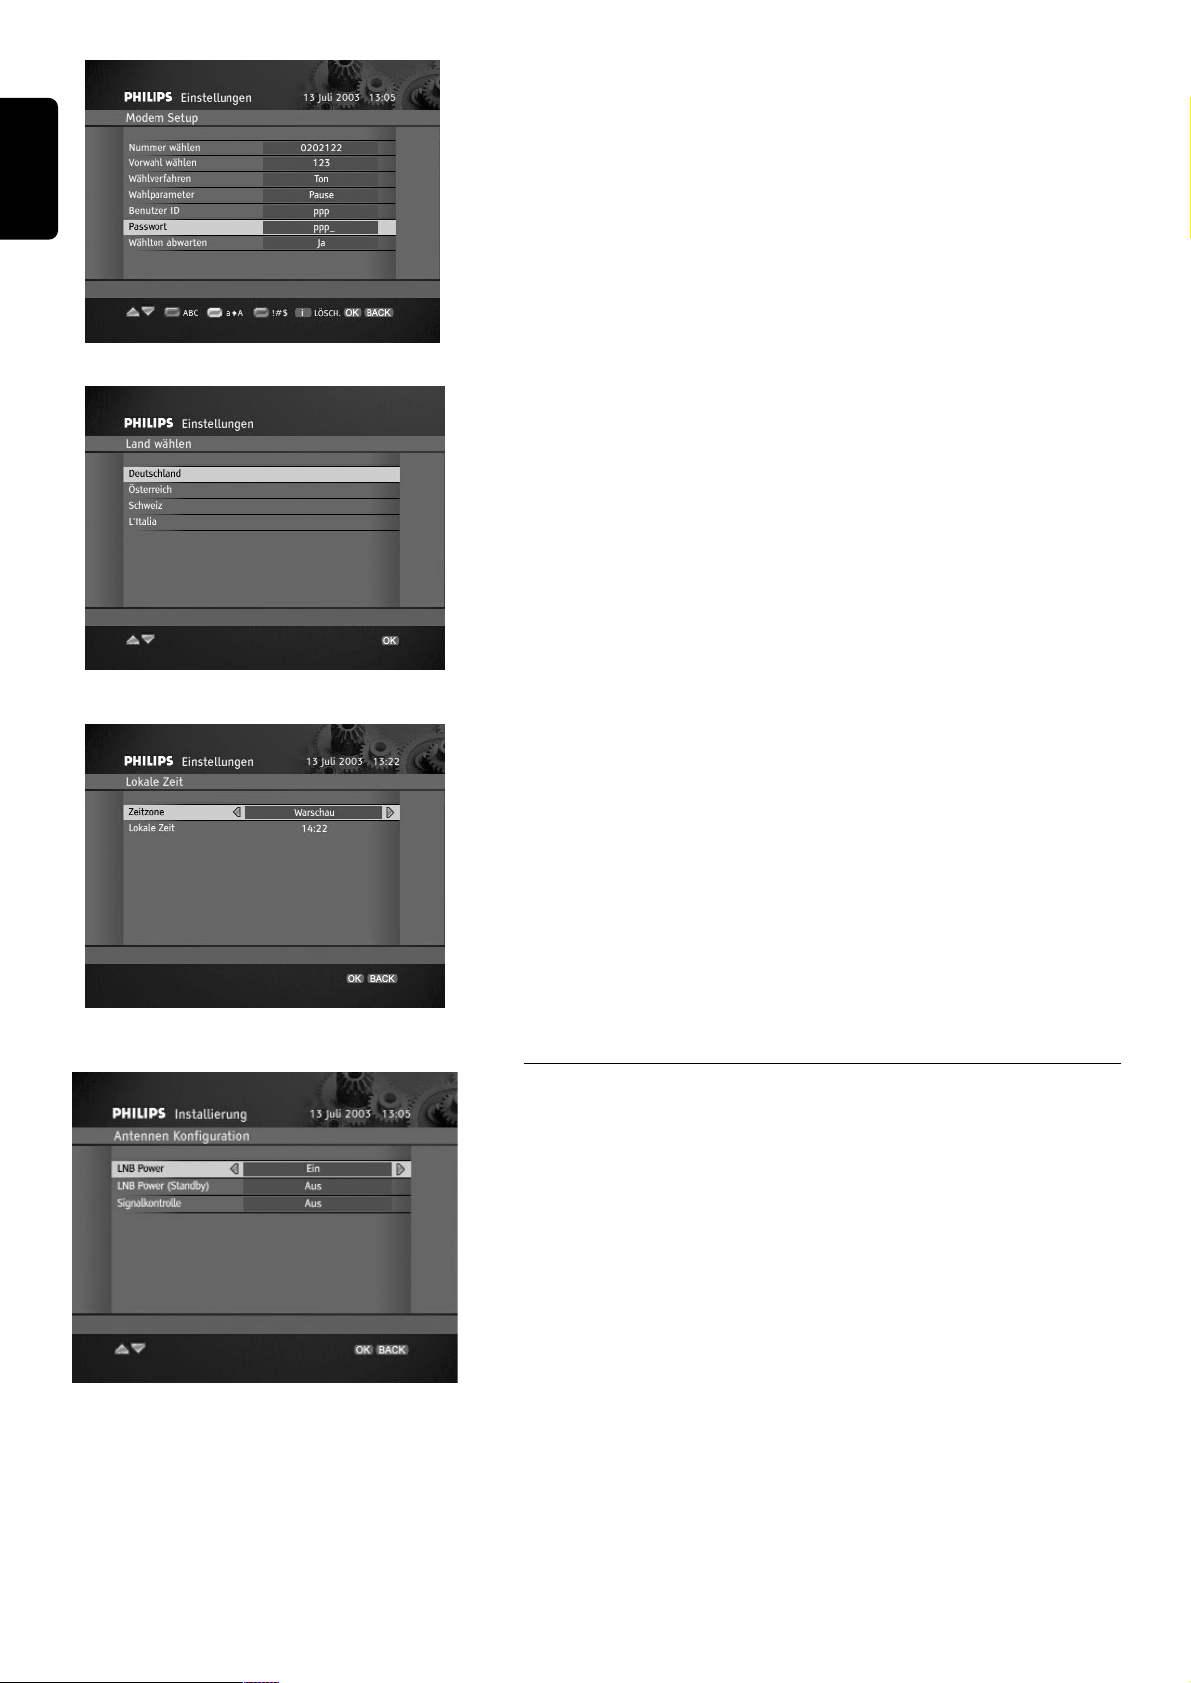
8.4.1.3 Installation / Einstellungen / Modem-Einstellungen
Ihr Receiver ist mit einem internalen Modem ausgerüstet. Wenn Sie die
Modem-Parameter konfigurieren wollen, benutzen Sie Ihre
Fernbedienung - die Kontroltasten, die auf dem Hilfebalken gezeigt
werden. Wenn Sie BLAU drücken, haben Sie Zugang zu Buchstaben,
GRÜN schaltet zwischen großen und kleinen Buchstaben um, ROT gibt
Ihnen Zugang zu einer Sonderzeichentabelle. Wenn Sie Zeichen in dem
Eintrag löschen wollen, drücken Sie mmTaste. Wenn Sie Ihr Modem
konfiguriert haben, drücken Sie
OK um die Einstellungen zu bestätigen.
Bildschirm der Modem-Einstellungen
8.4.1.4 Installation / Einstellungen / Land
Der Land wahlen Bildschirm ermöglicht Ihnen den Land, auf den Ihr
Receiver konfiguriert werden soll. Drücken Sie V oder W um Land zu
markieren und dann
OK um ihn zu wählen. Sie mögen diese Option
noch brauchen, wenn Sie Ihren Receiver mit in einen anderen Land
nehmen oder wenn Sie bei der ersten Installation Ihres Receivers falsches
Land gewählt haben.
Land wählen
8.4.1.5 Installation / Einstellungen / lokale Zeit
Sie mögen brauchen lokale Zeit einstellen. Verwenden Sie dazu C / B
Tasten um die Zeitzone zu ändern. Drücken Sie die Tasten solange, bis
Sie entsprechende lokale Zeit Angabe finden. Drücken Sie dann OK
Taste um die Änderungen zu bestätigen.
Bildschirm der lokalen Zeit
8.4.2 Installation / Antennenkonfiguration
Antennen-Konfiguration Bildschirm ermöglicht Ihnen folgende
Optionen einzustellen:
LNB Power
Dem LNB-Power können zwei Werten zugeschrieben werden: ON
(werksseitige Einstellung) oder OFF. Es kann sein, LNB-Power für
manche Antennensysteme deaktiviert werden muß.
LNB Power (Standby)
Der können zwei Werten zugeschrieben werden: OFF (werksseitige
Einstellung) oder ON. Es kann sein, LNB-Power im Standby-Modus für
manche Antennensysteme aktiviert werden muß.
Signalkontrolle
Der können drei Werten zugeschrieben werden: OFF (werksseitige
Einstellung), Tone Burst, oder DiSEqC 1.0. Wählen Sie die
Einstellungen die für Ihren Antennensystem erforderlich sind.
24 ANDERN DER EINSTELLUNGEN DES RECEIVERS
Deutsch
Antennen- Konfiguration
Page 27

ANDERN DER EINSTELLUNGEN DES RECEIVERS 25
8.4.3 Installation / LNB-Konfiguration
Hinweis: Wir empfehlen Ihnen, den Satelliten Astra 19.2° Ost stets als LNB1
LNB/Antenna in Ihrer Anlage zu behalten, weil ein Upgrade der Software Ihres
Satelliten-Receivers nur über den Satelliten Astra 19,2° Ost möglich ist. Auf diese
Weise können Sie Ihren Receiver aktualisieren.
Signalkontrolle = Tone Burst oder DiSEqC 1.0
Wenn Sie auf Antennen-Konfiguration Bildschirm entweder Tone Burst
oder DiSEqC 1.0 Schalter eingestellt haben, haben Sie Zugang zu LNBKonfiguration Bildschirm. Markieren Sie den LNB, den Sie konfigurieren
wollen und drücken Sie OK um die Liste der verfügbaren LNB
Konfigurationsparameter zu sehen. Tun Sie dasselbe für irgendeinen
aktiven LNB in Ihrer Antenneneinstellung. Bitte beachten Sie, daß jeder
LNB einem Satelliten zugeschrieben ist.
Hinweis: Mehr zu Signalkontrolle (Antenneneinstellung) inkl. DiSEqC Schalter
finden Sie im Kapitel 5.3.2.
Signalkontrolle = Off
Wenn Sie auf dem Antennen Konfiguration Bildschirm keinen Tone
Burst / DiSEqC 1.0 Schalter gewählt haben (Sie wollen Kanäle aus nur
einem Satelliten sehen), wählen Sie LNB Konfiguration, was Ihnen zu
LNB Konfiguration Bildschirm mitnimmt, wo Sie direkten Zugang zu
der Liste aller LNB-Konfigurationsparameter, die in Ihrer
Antenneneinstellung vorhanden sind, haben.
LNB Typ Option ist werksseitig auf Universell eingestellt. Ändern Sie
die Einstellung wenn nötig und geben Sie entsprechende Frequenz(-en)
ein. Prüfen Sie Ihr LNB Benutzerhandbuch.
LNB1 Konfigurationsbildschirm
Signalstärke/-qualität prüfen
Um die Signalebene/-qualität aud Ihrer Antenne zu prüfen, drücken Sie
ROT Taste auf dem LNB Konfiguration Bildschirm. Auf dem
Signalstärke-Bildschirm können Sie Transpondercharakteristik ändern,
die für Testen der Signalqualität für entsprechenden Satelliten und seinem
LNB benutzt wird. Wenn die Signalstärke/-qualität gut ist, ist Ihre
Antenne ordentlich auf entsprechenden Satelliten gezielt. Wenn die
Signalstärke/-qualität schlecht ist, ändern Sie die Antennenorientierung.
Wenn die Antenne ordentlich gezielt ist, vergessen Sie nicht, sie zu
befestigen. Jetzt sind Sie bereit, die Kanalsuche anzufangen.
Signalqualität/Stärke (Astra)
Symbolrate hinfügen/löschen
Um Symbol Rates, die während Kanalsuche gebraucht werden zu ändern,
drücken Sie mm. Die Symbolrate Werkseinstellungen enthalten die
meisten Werte, die auf bestimmten Satelliten zu treffen sind.
Symbolrate Tabelle
Deutsch
LNB-Konfiguration
Page 28
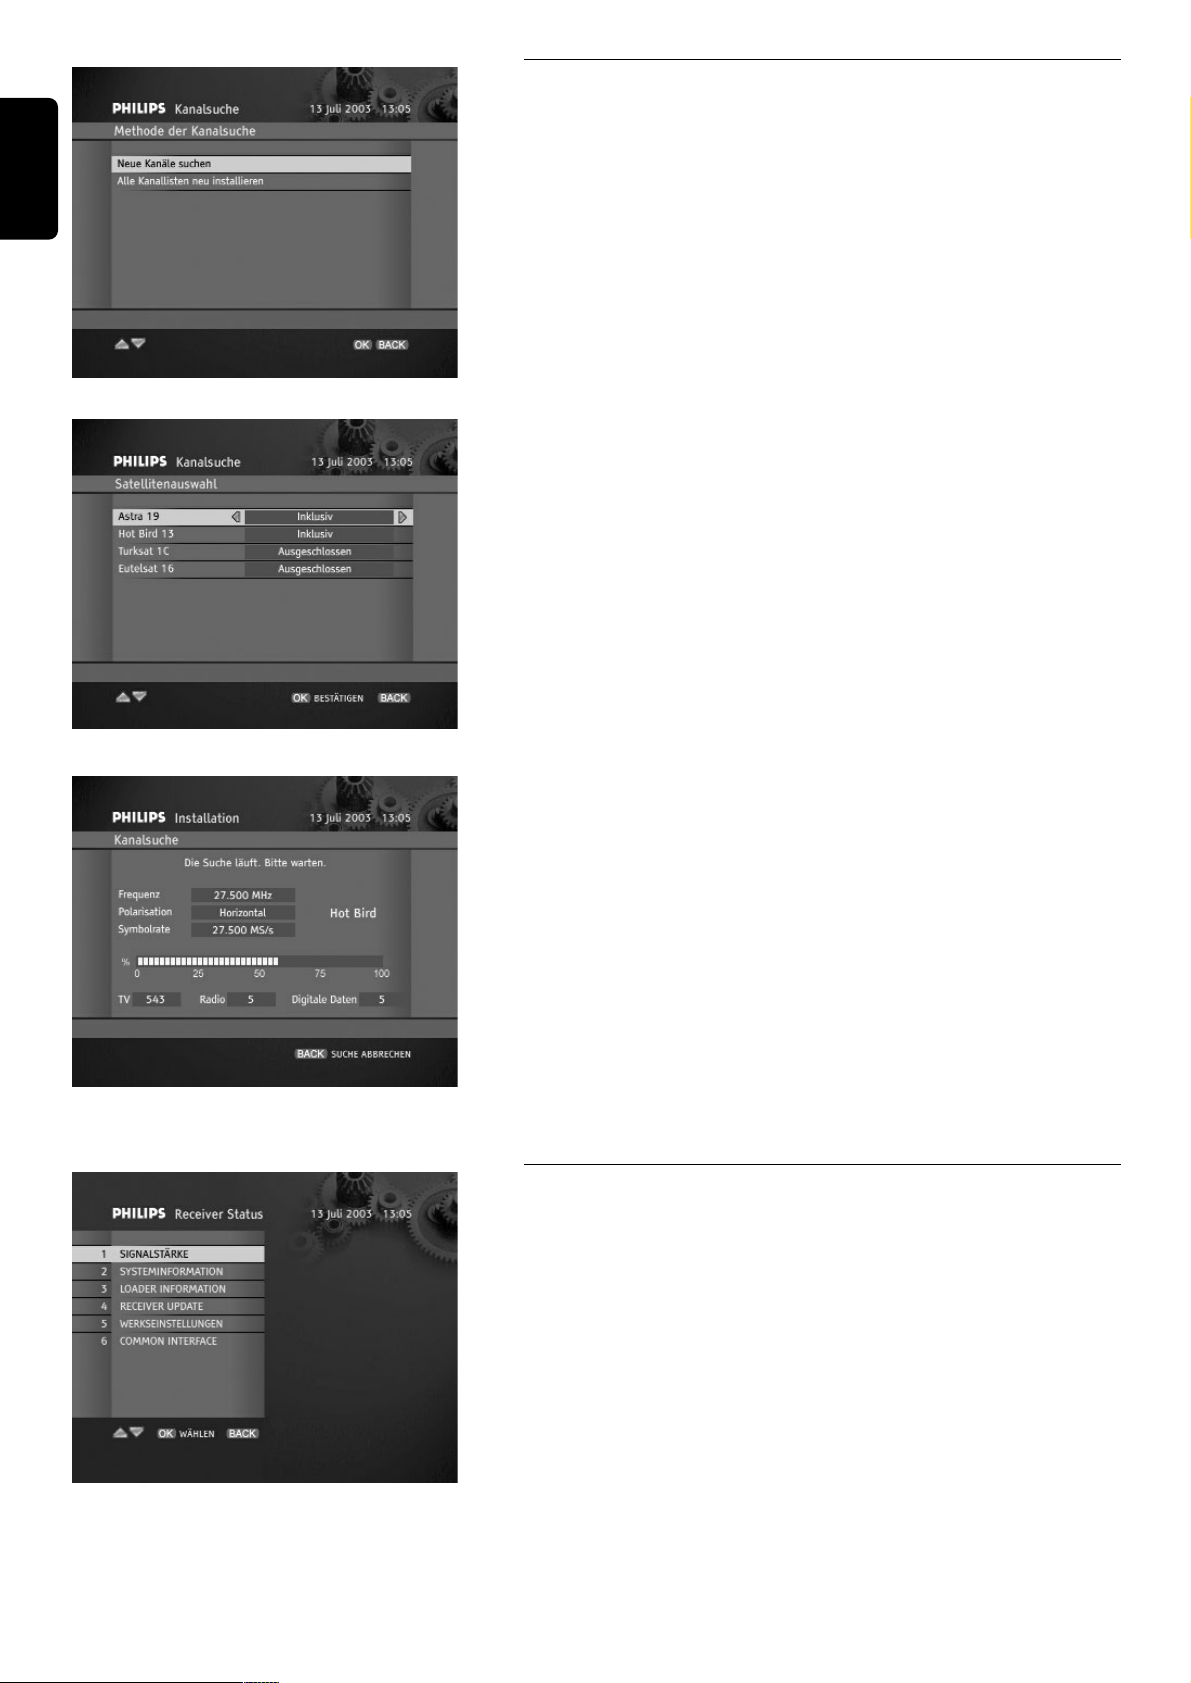
8.4.4 Installation / Kanalsuche
Wenn Sie Kanalsuche Option aus dem Installation Untermenü wählen,
werden Sie gefragt, ob Sie neue Kanäle aussuchen wollen, oder ob Sie
alle Kanallisten neu installieren wollen.
Wenn Sie Neue Kanäle Suche wählen, Ihre Kanalliste bleibt intakt. Alle
neu gefundenen Kanäle werden im Kanal Pool gespeichert. Wenn die
Kanalsuche zu Ende ist, werden Sie gebeten, die neu gefundenen Kanäle
zu Ihrer Kanallisten zu übertragen.
Methode der Kanalsuche
Wenn Sie Alle Kanälenlisten neu installieren wählen, die
gespeicherten Kanälenlisten, die für das gerade gewählten Land verfügbar
sind, wiedererstellt werden. Bitte beachten Sie dabei, daß diese
gespeicherten Kanäle aus Astra19.2° oder anderen Satelliten, die sich auf
der Liste der Satellitenwahl Menü befinden, sind. Wenn Ihre Antenne auf
anderen Satelliten gezielt ist, dann müssen Sie die Kanalliste manuell
einrichten indem Sie die Kanälen aus der Kanal Pool zu individuelle
Kanallisten übertragen.
Satellitenwahl
Wenn Ihre Antenneneinstellung Ihrem Receiver mehr als einen Satelliten
scannen erlaubt, der Satellitenwahl Bildschirm erscheinen wird, daß
Ihnen ermöglicht, einige Satelliten aus dem Kanalsucheverlauf
auszuschließen. Wenn Sie OK drücken, wird der Kanalsucheverlauf
angefangen. Sie können es unterbrechen, indem Sie BACK drücken.
Folgen Sie die Bildschirmanzeigen.
Kanalsuche Im Gange
8.4.5 Installation / Receiver Status
Receiver Status Untermenü gibt Ihnen Zugang zu manchen System-
und Loaderinformationen. Die Funktionalität der Signalstärke informiert
Sie über die Stärke des Satellitensignals, die Ihnen hilft, die
Parabolantenne am besten zu positionieren. Über Receiver Status können
Sie auch Receiver Upgrade durchführen. Bitte beachten Sie, daß Receiver
Upgrade auf Astra19.2° orbitale Position eingestellt ist. Wenn Ihre
Antenneneinstellung nicht auf Astra19.2° konfiguriert ist, ziehen Sie
keinen Vorteil von der Aktualisierung Ihres Receivers.
Receiver Status Untermenü
26 ANDERN DER EINSTELLUNGEN DES RECEIVERS
Deutsch
Page 29

ANDERN DER EINSTELLUNGEN DES RECEIVERS 27
Benutzen Sie Zurück zu Werkseinstellungen Option wenn Sie die
Werkseinstellungen zurücksetzen wollen. Wenn Sie Zugang zu Zurück
zu Werkseinstellungen Bildschirm haben, drücken Sie C/B um
Zurück zu Werkseinstellungen Option auf Ja umzustellen, und dann
drücken Sie OK um die Werkseinstellungen zurückzusetzen.
Benutzen Sie Common Interface wenn Sie den Conditional Access
Modul im Common Interface Modulsteckplatz haben. So kriegen Sie
Zugang zu alle Informationen, die auf der CA smart card gespeichert
Zurück Zu Werkseinstellungen
Deutsch
Page 30
9 Fortgeschrittene Einstellungen
9.1 Easy recording
Easy recording Funktion ermöglicht Ihnen Aufnahme ohne VCR zu programmieren. Sie brauchen nur Aufnahme Timer
oder Erinnerung im Kanalbanner oder Timer einzustellen, und Ihr VCR die Aufnahme um gegebene Zeit starten/enden
wird. Sie können auch die Easy recording Funktion noch nutzbarer machen unter der Bedingung, daß Ihr Gerät es
unterstützt.
● Vor allem, prüfen Sie das Benutzerhandbuch für Ihr Gerät ob es Easy recording Option unterstützt Die meisten VCR/DVD
Aufnahmegeräten von Philips unterstützen eine der zwei Easy recording Optionen: entweder Aufnahme-Vorbereitung
(prüfen Sie als erste Option) oder Record Link.
● Beide Ihren Geräte (TV und VCR) sollen auch mit zwei SCART Buchsen ausgestattet werden.
Wenn Ihr Gerät die beiden obigen Voraussetzungen erfüllt, verbinden Sie Ihren Receiver wie auf dem Anschlußplan unten
dargestellt.
Wählen Sie dann System-Einstellungen Option aus dem Einstellungen Untermenü, aktivieren Sie Easy recording Funktion,
und schreiben Sie dem Aufnahme-Typ entsprechende Wert zu: entweder Aufnahme-Vorbereiten oder Easy recording. Es
kann sein, Sie müßten beide Einstellungen testen, bevor Sie die Ihrem Receiver entsprechende finden.
Angenommen die Einstellungen Ihres Receivers und Ihres VCRs (prüfen Sie Ihren VCR oder DVD Benutzerhandbuch) schon
durchgeführt wurden, tun Sie folgendes um aufzunehmen:
- programmieren Sie Timer Ihres Receivers (Kapitel 6.10) ,
- stellen Sie Ihren Rekorder in entsprechenden Modus um damit es von Ihrem Receiver gesteuert wird (prüfen Sie Ihren
VCR oder DVD Benutzerhandbuch).
- um gegebene Zeit soll Ihr Rekorder automatisch gestartet/gestoppt werden.
Hinweis: Während die Aufnahme im Gange ist, wird Ihr Receiver vor unachtsamer Aktion, die zum Aufnahmeunterbrechen führen kann,
geschützt. Bitte beachten Sie, daß während des Aufnahmeprozesses die "rEc" Anzeige im Vorderansicht des Receivers leuchtet. Wenn Sie
die laufende Aufnahme unterbrechen wollen, drücken Sie EXIT. Das wird ein kleines Fenster aufrufen, wo Sie um Bestätigung gebeten
werden. Um die Aufnahme volkommen zu unterbrechen, drücken Sie OK.
Deutsch
28 FORTGESCHRITTENE EINSTELLUNGEN
Satellite recever
Page 31

9.2 Änderung der
Fernbedienungs- und
Receiverseinstellungen
Wenn Sie andere als Philips A/V Geräte zu Hause haben
und die Philips Fernbedienung Ihres Receivers mit ihnen
nicht übereinstimmt, können Sie die Fernbedienungs- und
Receiverseinstellungen ändern. Werksseitig ist Ihr
Receiver als Gerät 1 und die Fernbedienung ist auf
Gerät 1 Steuerung voreingestellt. Sie können diese
Identifizierung auf Gerät 2 umstellen indem Sie System-
Einstellungen Bildschirm aus Einstellungen Untermenü
wählen und da entsprechende Änderungen machen. Bitte
beachten Sie dabei, daß Sie Fernbedienungseinstellungen
entsprechend ändern müssen (auf Gerät 2).
Um die Einstellungen Ihrer Fernbedienung zu ändern, tun
Sie folgendes:
1 Stellen Sie sicher, daß die Fernbedienung in STB-Modus
ist (drücken Sie Modus Taste und die STB LED soll
blinken. Falls eine andere LED blinkt, drücken Sie Modus
Taste so lange, bis die STB LED blinken wird)
2 Drücken Sie gleichzeitig Zifferntasten 1 und 3 und halten
Sie sie bis LED zweimal blinkt.
3 Lassen Sie die zwei Zifferntasten frei, die STB LED soll
einige Zeit blinken um zu bestätigen, daß die
Fernbedienung jetzt in Programmierungsmodus ist..
4 Geben Sie neue Einstellung in 60 Sekunden ein: entweder
0039 für Gerät 2 oder 0038 für Gerät 1.
Als Alternative können Sie Ihre Fernbedienung zurück auf
voreingestellte Einstellung setzen (Gerät 1) indem Sie die
Batterien entfernen und erst nach 3 Minuten wieder
einlegen. .
9.3 Master PIN Code
Wenn Sie Ihren PIN-Code vergessen, immer noch haben
Sie die Möglichkeit, ihn auf die Werkeinstellung (1234)
zurückzusetzen. Auf Hauptmenüebene geben Sie den sogenannten Master PIN-Code (00799700) ein in kürzer
Aufeinanderfolge. Bevor Sie den Master PIN-Code
eingeben, drücken Sie mmTaste. Bitte aufbewahren Sie
den Code geheim um es vor Benutzen von Ihre Kinder
zu schützen.
FORTGESCHRITTENE EINSTELLUNGEN 29
Deutsch
Page 32

10 Upgrade der Receiver-Software
Ihr Receiver's software kann über Satelliten aktualisiert werden. Neue
Software Versionen für Ihren Receiver werden auf Astra19.2° orbitale
Position gesendet. Falls Ihre Antenneneinstellung über Astra19.2°
Satelliten nicht verfügt, können Sie Ihren Receiver nicht aktualisieren.
Um zu prüfen, ob neue Softwere Version verfügbar ist, wählen Sie
Receiver Status aus Installation Untermenü. Danach wählen Sie
Receiver Upgrade Option aus Receiver Status Untermenü. Jetzt wird
es geprüft, ob neue Software Version aus Astra19.2° orbitaler Position
gesendet wird. Wenn es neue Software gibt, werden Sie gebeten OK zu
drücken um Herunterladen anzufangen.
Upgrade Suche
Wenn Sie Ihren Receiver in Standby-Modus umschalten, wird es geprüft,
ob neue Software version verfügbar ist. Wenn neue Software-Version
entdeckt wird, entweder wird die Aktualisierung gleich in Standby-Modus
durchgeführt (die Auto-Upgrade Option ist auf Ja eingestellt), oder
werden Sie von Upgrademöglichkeit benachrichtigt gleich nachdem Sie
Ihren Receiver zu EIN Modus umstellen (die Auto-Upgrade Option ist
auf Nein eingestellt). .
Upgrade Kann Angefangen Werden
Um die Auto-Upgrade Option zu ändern, drücken Sie MENU Taste.
Aus Hauptmenü, wählen Sie die Installation Untermenü, dann wählen
Sie Einstellungen Umtermenü. Markieren Sie System-
Einstellungen Option um Zugang zu Auto-Upgrade Option zu
kriegen.
Upgrade Nachricht
Deutsch
30 UPGRADE DER RECEIVER
-SOFTWARE
Page 33

11 Programmieren der Fernbedienung für Ihr STB,
Fernsehgerät, Ihren Videorekorder, DVD und
Verstärker/Tuner.
11.1 Einrichten der Fernbedienung
Beim Einschalten, zum Beispiel bei der ersten Inbetriebnahme oder nach einem Batteriewechsel, ist die Fernbedienung
standardmäßig so eingestellt, dass hiermit der Satelliten-Receiver sowie die meisten Audio/Video-Geräte von Philips
gesteuert werden können.
Wenn Sie Geräte von anderen Herstellern haben oder wenn die Voreinstellung nicht zur Steuerung Ihres Philips Geräts
geeignet ist, gehen Sie bitte wie folgt vor.
Hinweis : Einige der auf den nächsten Seiten beschriebenen Funktionen stehen eventuell nicht zur Verfügung oder haben nicht bei allen
Geräten das gleiche Verhalten zur Folge.
1 Drücken Sie die MODE-Taste, um das einzurichtende Gerät zu wählen (TV, VCR (Videorecorder), DVD oder
Verstärker/Tuner).
Durch einmaliges Drücken der MODE-Taste wird durch Aufleuchten der entsprechenden grünen Leuchtanzeigen der
aktuelle Modus angezeigt: links für SAT - STB, Mitte für TV, rechts für VCR (Videorecorder), links/Mitte für DVD,
Mitte/rechts für Verstärker/Tuner.
Zum Einstellen des Modus drücken Sie mehrmals die MODE-Taste, bis der gewünschte Modus durch die Leuchtanzeigen
angezeigt wird. Die Reihenfolge ist: SAT/STB -> TV -> VCR -> DVD
-> Verstärker/Tuner. Bei jedem Tastendruck blinken die Leuchtanzeigen, um den aktuellen Modus anzugeben.
2 Drücken Sie die Zifferntasten 1 und 3 gleichzeitig und halten Sie sie 3 Sekunden lang gedrückt. Nach 3 Sekunden blinken die
Leuchtanzeigen für den gewählten Modus zweimal und leuchten dann kontinuierlich.
3 Geben Sie innerhalb von 60 Sekunden den 4-stelligen Code ein. Eine Code-Liste finden Sie hinten in diesem Handbuch.
(Wenn mehrere Codes möglich sind, durchlaufen Sie diese Prozedur mit dem ersten Code und probieren Sie Ihre
Fernbedienung aus. Wenn die Prozedur nicht erfolgreich war, wiederholen Sie sie mit dem zweiten Code, usw)
4 Wenn ein gültiger 4-stelliger Code eingegeben wurde, erlöschen die Leuchtanzeigen und blinken dann zweimal. Ist dies nicht
der Fall, kehren Sie zu Schritt 1 zurück.
Durch Drücken einer beliebigen anderen Taste außer den Zifferntasten und der Standby-Taste verlassen Sie diese Prozedur
automatisch.
Wir empfehlen Ihnen, die nachstehende Tabelle auszufüllen, um sich die Einstellung Ihrer Fernbedienung besser merken zu
können. Die Tabelle wird Ihnen von Nutzen sein, wenn Sie die Batterien der Fernbedienung wechseln müssen (siehe
nachstehenden HINWEIS 2).
Werkseitige Einstellung Marke / Typ Ihre Code
für die Marke Philips Ihres Geräts Einstellung
Fernsehgerät 0666
Videorecorder (VCR) 1608
DVD-Spieler / -Recorder 0566
Verstärker / Tuner 1316 (Philips tuner)
STB (Ihr Satelliten-Receiver) 0038 (Device 1)
Regelung der Lautstärke siehe
Kapitel 4.2.2.
Deutsch
PROGRAMMIEREN DER FERNBEDIENUNG 31
Page 34

Deutsch
32 PROGRAMMIEREN DER FERNBEDIENUNG
11.2 Verwenden der Fernbedienung für das Fernsehgerät
TV-Modus (TV)
Hinweis: Einige der nachstehend beschriebenen Funktionen stehen eventuell nicht zur Verfügung oder haben nicht bei allen Geräten das
gleiche Verhalten zur Folge.
MENU
- Zum Öffnen / Schließen eines
Menüs
bb
- Zum Ein- und Ausschalten der
Videotext-Funktion
GUIDE
- Zum Wählen zwischen dem ersten
und dem zweiten Audio-Kanal
¯¯
- Zum Umschalten zwischen
Videotext und TV/VideotextKombinationsmodi
ROT, GRÜN,GELB, BLAU, WEISS:
- Kontext-Tasten im VideotextModus
AA
+/-
- Zum Einstellen der Lautstärke des
Fernsehgeräts
44 /ii
- Blättern Sie eine Seite weiter in
der Programmliste
VWCB
- Zum Bewegen des
Auswahlbalkens nach oben und
unten und zum Ändern der
Einstellungen im Menü
OK
- Zum Bestätigen der Auswahl einer
Menü-Option
Standby
**
- Stromversorgung / Standby / Ein
mm
(Wide screen)
- Zum Wählen des TV-Bildformats
(16:9, 4:3,)
TV/STB
aa
- Zum Umschalten zwischen den
verschiedenen Modi des
Fernsehgeräts (TV, AV1,AV2,
Front,)
0-9
- Zum Wählen des entsprechenden
Fernsehprogramms
EXIT
- Zum Verlassen des Menüs
MUTE
HH
- Zum Stummschalten des
Fernsehtons.
P+ P-
- Zum Wählen des nächsten oder
vorhergehenden
Fernsehprogramms
BACK
- Zum Wählen des zuletzt
betrachteten Fernsehprogramms
Page 35

11.3 Verwenden der Fernbedienung für den Videorecorder
VCR-Modus (VCR / Videorecorder)
Hinweis: Einige der nachstehend beschriebenen Funktionen stehen eventuell nicht zur Verfügung oder haben nicht bei allen Geräten das
gleiche Verhalten zur Folge.
Deutsch
PROGRAMMIEREN DER FERNBEDIENUNG 33
MENU
- Zum Öffnen / Schließen eines
Menüs
G
- Schneller Rücklauf
K
- Pause
L
- Stopp
B
- Wiedergabe
F
- Schneller Vorlauf
mm
- Zum Anzeigen von On-ScreenMeldungen
0-9
- Zum Wählen des entsprechenden
Fernsehprogramms
EXIT
- Zum Verlassen eines Menüs
MUTE H
- Zum Stummschalten des
Fernsehtons
P+ P-
- Zum Wählen des nächsten oder
vorhergehenden Programms für
den Videorecorder
FAV
- Zum Ein- und Ausschalten von
Untertiteln
VWCB
- Zum Verschieben des
Auswahlbalkens nach oben und
unten und zum Ändern der
Einstellungen im Menü
OK
- Zum Bestätigen der Auswahl einer
Menü-Option
AA
+/-
- Zum Einstellen der Lautstärke des
Fernsehgeräts
TV/STB
aa
- Zum Umschalten zwischen den
verschiedenen VCR-Modi (VCR,
AUX1, AUX2, )
Standby
**
- Stromversorgung / Standby / Ein
RADIO
- Zum Wählen zwischen dem ersten
und dem zweiten Audio-Kanal
Page 36

11.4 Verwenden der Fernbedienung für den DVD-Spieler
DVD-Modus (DVD)
Hinweis: Einige der nachstehend beschriebenen Funktionen stehen eventuell nicht zur Verfügung oder haben nicht bei allen Geräten das
gleiche Verhalten zur Folge.
Deutsch
34 PROGRAMMIEREN DER FERNBEDIENUNG
MENU
- Zum Öffnen / Schließen eines
Menüs
G
- Suchlauf in Rückwärtsrichtung
K
- Stopp
L
- Stopp
B
- Wiedergabe
F
- Suchlauf in Vorwärtsrichtung
mm
- Zum Anzeigen von On-ScreenMeldungen
0-9
- Zum direkten Wählen von DVDStücken
EXIT
- Zum Verlassen eines Menüs
MUTE H
- Zum Stummschalten des
Fernsehtons
P+ P-
- Zum Wählen des nächsten /
vorhergehenden Kapitels oder
Titels
VWCB
- Zum Verschieben des
Auswahlbalkens nach oben und
unten und zum Ändern der
Einstellungen in einem Menü
OK
- Zum Bestätigen der Auswahl einer
Menü-Option
AA
+/-
- Zum Einstellen der Lautstärke des
Fernsehgeräts
TV/STB
aa
- Zum Umschalten zwischen DVDund TV-Wiedergabe
Standby
**
- Stromversorgung / Standby / Ein
bb
- Zum Ein- und Ausschalten der
Videotext-Funktion
GUIDE
- Zum Wählen der
Kameraperspektive, falls verfügbar
RADIO
- Zum Wählen einer anderen
Tonspur, falls verfügbar
Page 37

11.5 Verwenden der Fernbedienung für den Tuner-Verstärker
TUNER-VERSTÄRKER-Modus (AMP)
Hinweis: Einige der nachstehend beschriebenen Funktionen stehen eventuell nicht zur Verfügung oder haben nicht bei allen Geräten das
gleiche Verhalten zur Folge.
(*) Bezeichnet Befehle, die nur für Philips Tuner / Verstärker zur Verfügung stehen.
Deutsch
PROGRAMMIEREN DER FERNBEDIENUNG 35
G (*)
- Zum Wählen der Signalquelle DVD
K(*)
- Zum Wählen der Signalquelle
Satelliten-Receiver
L
- Zum Wählen der Signalquelle TV
B (*)
- Zum Wählen der Signalquelle VCR
(Videorecorder)
F (*)
- Zum Wählen der Signalquelle
Tuner.
mm
- Zum Wählen des TV-Bildformats
(16:9, 4:3,)
0-9 (*)
- Zum direkten Wählen eines
bestimmten Vorwahlsenders
MUTE H
- Zum Stummschalten des Tons vom
Verstärker / Tuner
P+ P- (*)
- Zum Wählen des nächsten /
vorhergehenden Vorwahlsenders
VW
- Zum Wählen des nächsten /
vorhergehenden Vorwahlsenders
AA
+/-
- Zum Einstellen der Lautstärke des
Verstärkers / Tuners
Standby
**
- Stromversorgung / Standby / Ein
CB
- Zum Suchen von
Radioprogrammen mit höheren /
niedrigeren Frequenzen
Page 38

12 Fehlersuche
Wenn Sie Schwierigkeiten beim Betrieb Ihres Receivers haben, kontrollieren Sie zuerst die folgenden Punkte. Die meisten
Probleme werden von Kabeln verursacht. Stellen Sie sicher, ob Ihr Receiver ordentlich angeschlossen ist.
Deutsch
36 FEHLERSUCHE
Keine Anzeige auf dem Display.
Die Fernbedienung funktioniert nicht
ordnungsgemäß.
Kein Bild, kein Ton; aber aktuelle ZeitAngabe auf dem Display ist korrekt.
Kein Bild, kein Ton; aber Anzeige auf dem
Display ist korrekt.
Nur das Hauptmenü steht zur Verfügung.
Kanalauswahl ist nicht möglich.
Hauptmenü und Kanalbanner werden
gezeigt, aber es gibt keinen Empfang
(dunkler Bildschirm).
Intermittierender Empfang, "Mosaik"Effekt oder "eingefrorenes" Bild..
Das Bild ist nicht scharf und der Text ist
kaum lesbar.
Sie haben ein CAM-Modul und eine
SmartCard in das Common Interface
eingeführt: Während des ansonsten
normalen Empfangs ergibt die Anwahl von
Kanälen einen dunklen Bildschirm.
Prüfen Sie die Verbindung des Netzkabels mit der Netzspannung. Trennen Sie den
Kabel von der Netzverbindung und verbinden Sie ihn noch mal.
Prüfen Sie ob es in der Wandsteckdose Spannung gibt.
Prüfen Sie ob die ON/OFF Taste (auf der Rückseite des Receivers) in ON-Position
ist.
Prüfen Sie, ob Ihr Receiver in Ein-Modus ist.
Prüfen Sie, ob Sie die Fernbedienung auf die Receivers Vorderseite zielen.
Überprüfen Sie die Batterien
Stellen Sie sicher, ob die Fernbedienung in STB Modus ist (Kapitel 4.2.1)
Ihr Receiver ist im Standby-Modus. Drücken Sie P+/P- auf der Fernbedienung um
ihn zu aktivieren. Oder drücken Sie hoch / runter Tasten auf der Vorderseite des
Receivers.
Sie sehen über Ihren UHF- Fernsehantennenanschluss. Drücken Sie zweimal
TV/STB Taste auf der Fernbedienung .
Prüfen Sie die SCART-Verbindungen
Verbindungen sind korrekt - aber das Fernsehgerät ist NICHT auf eine externe AVSignalquelle umgeschaltet. Drücken Sie zweimal TV/STB Taste Fernbedienungstaste,
wenn das Problem nicht gelöst wird, prüfen Sie das Benutzerhandbuch Ihres
Fernsehgeräts.
Der Receiver ist nicht korrekt auf die Antenne eingestellt. Prüfen Sie Antennen-
Konfiguration und LNB-Konfiguration. Durchführen Sie Kanalsuche Prozedur.
(Wählen Sie Installation Untermenü aus Hauptmenü). Eventuell kehren Sie zu
Werkseinstellungen zurück.
Ihre Kanallisten sind leer. Schieben Sie Kanäle aus dem Kanal Pool. (Wählen Sie
Kanal Manager aus Hauptmenü)
Die Antenne empfängt kein Satellitensignal. Prüfen Sie die Installation und die
Antennenpositionierung (prüfen Sie Signalqualität).
Die Stromversorgung zum LNB ist unterbrochen. Prüfen Sie die Kabelverbindung
zwischen LNB und Satelliten-Receiver.
Das übertragene Signal ist zu schwach. Prüfen Sie die Installation und Positionierung
der Antenne. Dieses Problem kann auch vom schlechten Wetterbedingungen
verursacht werden. (z.B. große Wolken).
Das übertragene Signal ist zu stark. Installieren Sie einen Abschwächer am
Antenneneingang.
Sie können defekte Kabelverbindungen haben. Prüfen Sie alle Verbindungen und
Kabel.
Schwaches Signal, weil die Antenne nicht korrekt positioniert oder instabil ist.
Richten Sie die Antenne neu aus. Sorgen Sie für eine sichere Befestigung der
Antenne.
Das TV SCART Ausgang Video Format ist nicht auf RGB eingestellt. Ändern Sie die
TV SCART Einstellungen auf RGB im System-Einstellungen Menü.
Der TV SCART Anschlußdraht ist mit RGB fähigen SCART Buchseneingang Ihres
Fernsehgeräts nicht verbunden (prüfen Sie Fernsehbenutzerhandbuch für korrekte
Verbindungseinstellung)
Der TV SCART Anschlußdraht für TV-Verbindung ist nicht RGB-fähig (nicht
vollverdraht). Benutzen Sie den SCART Kabel, den Sie als Receiver-Zubehör
geliefert wurde, um Ihren Fernseher zu verbinden.
Ihr Abonnement-Rechte beziehen sich nicht auf den gewählten Dienst oder das
gewählte Ereignis. Wählen Sie einen anderen Dienst.
Problem
Mögliche Ursache/Abhilfe
Page 39

Dieses Produkt wurde der 95/47/EC Norm gemäß entworfen.
Video-Decodierung
MPEG-2 DVB kompatibel bis MP@ML
Video-Bitrate: bis zu 15 Mbit/s
Bildformat: 4 :3 (letter- box wenn die
Quelle 16:9) und 16 :9
Auflösung: bis zu 720 x 576 Pixel
Audio Dekodierung
MPEG Layer I / II
Operation/Features
Automatische Programm-Installation beim Scannen
TV- & Radio-Betrieb
Empfang von kostenlosen und nicht verschlüsselten Programmen
(free-to-air)
6 favoriten (bevorzugten) TV Listen & 6 favoriten (bevorzugten)
Radiolisten
Programm-Editing zur individuellen Anpassung der Installation
(löschen, hinzufügen, verschieben)
Untertitel
Kindersicherung mit PIN-Code
Umfassende Fernsteuerung
Menügesteuerte Installation und Bedienung mit On-Screen-Display
VCR-Timer für 8 Ereignisse
Automatische Aufnahme über: Erinnerungen- und
Timersprogrammierung und Easy recording für Philips VCR und
DVD- RW
Automatische VCR-Wiedergabe: Audio L/R + CVBS oder RGB / Fast
Blanking
Receiver kompatibel mit interaktiven Diensten auf MHP-Basis
Angabe der aktuellen und nachfolgenden Sendungen (Now & Next)
im Kanalbanner
Software-Upgrade per Satelliten-Download
Video projector Anschlußmöglichkeit
System-Ressourcen für Anwendungen
Prozessor: 180 MHz
SDRAM - CPU/Video-Graphik 32 MB
Flash - Daten/Code: 8MB
Satellitenantennen-Interface
HF-Eingang: F-Typ-Konnektor
HF-Ausgang (Bypass): F-Typ-Konnektor
LNB-Versorgung (V): 0, 14, 18 Volt
LNB-Strom (mA): 350 mA
Ton-Umschaltung: 22 kHz (ein / aus)
DiSEqc 1.0
Empfangsdemodulation
Demodulationstyp: QPSK
Eingangsfrequenzbereich: 950-2150 MHz
Durchschleif- Frequenzbereich: 950-2150 MHz
Durch Applikation gesteuerte Symbolrate: 2 bis 45 Mbaud
Empfangenes Satellitenband: Ku Band 10,7 bis 12,75 GHz
Entschlüsselung
TV SCART:
Ausgang CVBS oder S-Video oder RGB/ Fast blanking gesteuert
Audio L/R, Slow blanking
VCR SCART:
Eingang: CVBS oder RGB / Fast
blanking, Slow blanking ,
Audio L/R
Ausgang: CVBS oder S-Video Audio
L/R, Slow blanking während
Timer wenn "Aufnahme
Vorbereitung"-Modus aktiv
ist
Audio CINCH:
Analog Audio Ausgang: L / R
Digital Audio Ausgang: S/PDIF
Serielles Interface: D-9 Buchse
Zubehör
- Fernbedienung: Typ RC2585108
- Scart-Kabel
- Benutzerhandbuch
- Garantieheft für weltweite Garantie
- Telefonkabel für Modem
- Batterien: 2 x 1,5 V Typ AA/R06
- Netzkabel
Verschiedenes
Temperaturbereich (°C)
im Betrieb +5 bis 45
bei Lagerung : -10 bis +70
Stromversorgung: 230 V ~ +/-10%; 50Hz
Leistungsaufnahme: max. 25 W ohne LNB
Gewicht: 1,400 kg
einschließlich Verpackung : 2.5 kg
Abmessungen: 430mm x 50mm x 255
einschließlich
(Vorderansichtsfläche)
Deutsch
TECHNISCHE DATEN 37
13 Technische Daten
Wegen ständige Produktverbesserungsarbeiten sind die
Änderungen der oben gegebenen Informationen vorbehalten.
Page 40

TV
A.R. Systems 0064 0583
Accent 0064
Accuphase 0583
Acec 0039
Adcom 0652
Admiral 0120 0445 0114 0190 0291
Adyson 0244 0243
AEA 0064
Agashi 0243 0291 0244
AGB 0543
Agef 0114
Aiko 0036 0243
Aim 0064 0099 0439
Aiwa 0728
Akai 0235 0398 0064 0460 0036 0099 0245
0741 0190 0543 0742 0629 0583 0507
0244 0658 0243 0291 0633
Akiba 0245 0309 0482 0064 0321
Alaron 0243
Allorgan 0233 0321 0244
Allstar 0064
Amplivision 0244 0427 0397
Amstrad 0036 0543 0291 0381 0398 0245 0064
0460 0439 1064 0675
Anam 0064 0036
Anam National 0064 0677
Anglo 0036 0291
Anitech 0036 0291 0064 0309 0129
Ansonic 0397 0064 0036 0695 0401 0190 0319
0129 0438 0286 0274 0039 0131
Apollo 0500
Arc en Ciel 0136 0223
Arcam 0243 0244
Ardem 0513 0741 0064 0583
Aristona 0583 0064 0039
Arthur Martin 0190 0427
ASA 0132 0373 0097 0131 0114
Asberg 0064 0129
Asora 0036
Astra 0064
Asuka 0245 0244 0243 0291 0309
Atlantic 0064 0243 0233 0286
Atori 0036
Auchan 0190 0427
Audiosonic 0036 0064 0401 0136 0741 0742 0244
0397 0291 0245 0513
Audioton 0244 0513 0397 0291
Autovox 0114 0233 0244 0274
AWA 0038 0063 0036 0401 0439 0064 0243
0633 0244 0135 0291
Axxent 0036
Bang & Olufsen 0592 0114
Barco 0407 0190
Basic Line 0401 0064 0190 0695 0583 0036 0245
0309 0244 0482
Bastide 0244
Baur 0222 0539 0064
Bazin 0244
Beko 0513 0741 0397 0064 0633 0742
Beon 0064 0445
Best 0397
Bestar 0064 0397 0401
Bestar-Daewoo 0401
Black Diamond 1064 0583
Black Panther 0129
Black Star 0274
Blacktron 0309
Blackway 0309 0245
Blaupunkt 0222 0227 0354 0482 0197
Blue Sky 0064 0741 1064 0514 0695 0742 0651
0583 0245 0309 0482
Blue Star 0309
Bondstec 0274
Boots 0244 0036
Bosch 0354
BPL 0064 0309
Brandt 0652 0136 0223 0362
Brandt Electronique 0362
Brinkmann 0064 0695 0445 0513
Brionvega 0064 0114
Brother 0291
Bruns 0114
BSR 0190 0321
BTC 0245
Canton 0245
Capsonic 0291
Carad 0637 0064
Carena 0482 0064
Carrefour 0063 0097 0064
Carver 0197
Cascade 0036 0064
Casio 0064 0190
Cathay 0064
CCE 0064 0244
Centrum 1064
Centurion 0064
Century 0114 0274 0265
CGE 0101 0445 0274 0397 0190
Cimline 0036 0245
City 0036
Clarivox 0445 0064 0097 0129
Clatronic 0064 0397 0398 0741 0245 0291 0583
0244 0274 0036 0129 0606 0675
CMS 0243
CMS hightec 0244
Concorde 0036
Condor 0064 0397 0243 0036 0309 0129 0274
0445 0438 0190 0291
Conrad 0064
Contec 0243 0036 0038 0063 0291 0064
Continental Edison 0136 0223 0514
Cosmel 0036 0064
Crosley 0114 0274 0101 0190
Crown 0036 0397 0513 0064 0514 0741 0633
0742 0445 0606 0235 0366
CS Electronics 0243 0245 0274
CTC 0274
Curtis Mathes 0120
Cybertron 0245
D-Vision 0064
Daewoo 0661 0651 0401 0064 0583 0036 0243
14 CODE LIST FÜR VERCHIEDEN MARKEN
38 CODE LIST FUR VERCHIEDEN MARKEN
Page 41

0245 0244
Dainichi 0245 0243
Dansai 0064 0291 0243 0036 0063 0244
Dansette 0439
Dantax 0397 0513 0741 0633 0742
Daytron 0036 0401 0064
de Graaf 0235 0190
Deitron 0064 0401 0245
Denko 0291
Denver 0064 0633
Desmet 0064 0036 0114
Diamant 0064
Diamond 0291
Digiline 0064
Dik 0064
Dixi 0036 0064 0274 0244 0114
Domeos 0695
Domland 0421
DTS 0036
Dual 0244 0064 0286 0421 0190
Dumont 0114 0131 0129 0244 0097 0099
Dunai 0190
Dux 0064 0039
Dynatron 0064 0039
E-Elite 0245
Edison-Minerva 0514
Elbe 0462 0265 0286 0319 0397 0190 0064
0245 0438 0637 0244 0543
Elbe-Sharp 0543
Elcit 0114 0274 0543 0129 0190
Elekta 0036 0064 0291 0309
ELG 0064
Elin 0243 0064 0132 0131 0190 0036
Elite 0245 0064
Elman 0129
Elta 0036 0291 0243
Emco 0274
Emerson 0114 0274 0064 0398 0097 0309 0651
0513 0397 0190
Emperor 0309
Erres 0064 0039
ESC 0064 0244
Estèle 0190
Etron 0064 0036 0190
Eurofeel 0291 0244
Euroman 0243 0291 0064 0244 0397
Europa 0064
Europhon 0064 0543 0129 0190 0244 0583 0274
0243
Excel 0064 0583
Expert 0233 0427 0286 0190
Exquisit 0064 0274
Family Life 0064
Fenner 0401 0036
Fidelity 0539
Filsai 0244
Finlux 0132 0131 0064 0741 0373 0244 0099
0190 0543 0742 0097 0114 0129 0438
0658 0519 0507 0500 0445 0633
Firstline 0064 0401 0695 0741 0651 0190 0036
0321 0243 0274 0129 0244 0438 0265
0099 0235
Fisher 0131 0244 0063 0235 0397 0072 0114
0190 0099
Flint 0064 0637 0099 0245 0482 0291
FNR 0129
Formenti 0190 0064 0583 0513 0243 0114
Formenti-Phoenix 0243
Fortress 0120 0114
Fraba 0064 0397
Friac 0036 0064 0129 0397 0682
Frontech 0274 0291 0244 0036 0190
Fujitsu 0233 0099 0129 0244 0190 0036 0064
0286
Fujitsu General 0036 0244 0233 0190
Funai 0695 0291 0321 0439
Future 0064 0583
Galaxi 0129 0064 0190
Galaxis 0397 0445 0064 0129 0583
Galeria 0036
GBC 0190 0036 0401 0245
GE 0309 0587 0136 0362
Geant Casino 0190 0427
GEC 0190 0064 0543 0583 0099 0244
Geloso 0274 0036 0190 0401
General 0136
General Technic 0036
Genesis 0036
Genexxa 0245 0064 0439 0190 0036
Goldfunk 0695
Goldhand 0243
GoldStar 0064 0036 0397 0317 0244 0274 0243
0583 0190 0136 0633
Gooding 0514
Gorenje 0397
GPM 0245
Gradiente 0197 0064
Graetz 0398 0190 0064 0366 0583
Gran Prix 0675
Grandin 0064 0036 0190 0637 0741 0742 0695
0401 0309 0245 0482 0427 0606
Gronic 0129 0244 0190
Grundig 0222 0514 0097 0064 0583 0614 0036
0063 0397
Halifax 0291 0243 0244
Hampton 0243 0244
Hanseatic 0064 0583 0190 0319 0309 0421 0661
0397 0036 0321 0244 0114
Hantarex 0036 0064 0129 0543
Hantor 0064
Hauppauge 0064
HCM 0036 0439 0064 0244 0245 0445 0309
0291
Hema 0244 0036
Hifivox 0136 0223
Highline 0291 0064
Hisawa 0309 0245 0427 0482 0637
Hit 0114
Hitachi 0252 1252 0063 0135 0500 0190 0605
0223 0244 0221 0543 0099 0064 0583
0136 0661 0132 0519 0539 0507
Hitachi Fujian 0135 0252
Hitsu 0036 0482 0245 0637
HMV 0114
Hornyphone 0064 0039
Hoshai 0245 0482
CODE LIST FUR VERCHIEDEN MARKEN 39
Deutsch
Page 42

40 CODE LIST FUR VERCHIEDEN MARKEN
Huanyu 0401 0243
Hygashi 0244 0243
Hyper 0036 0243 0244 0274
Hypson 0064 0741 0291 0244 0309 0482 0427
0265
Iberia 0064 0583
ICE 0291 0064 0398 0036 0583 0245 0244
0243
Ices 0245 0243
Icos 0039
Imperial 0064 0190 0397 0101 0583 0438 0445
0274 0223
Indiana 0064
Ingelen 0514 0637 0741 0190
Ingersoll 0036
Inno Hit 0036 0099 0064 0245 0317 0244 0543
0274 0129 0309
Innovation 0064 0583
Interactive 0064 0039 0114 0539 0354 0190 0397
0136
Interbuy 0036 0064 0291 0274 0539 0583
Interfunk 0064 0039 0114 0539 0354 0190 0397
0136 0274
Internal 0064 0651 0401
International 0243
Intervision 0309 0244 0482 0064 0398 0513 0397
0421 0514 0245 0129 0190 0291 0274
0036 0583
Irradio 0036 0064 0245 0274 0317 0398
Isukai 0245 0064 0309 0482
ITC 0244
ITS 0064 0398 0245 0309 0291 0243 0036
0583
ITT 0190 0507 0500 0373 0366 0235 0637
ITT Nokia 0190 0500 0507 0373 0235 0366 0633
0637 0658
ITV 0291 0064 0274 0401
Jean 0063
Jubilee 0583
JVC 0680 0063 0398 0245 0633 0445
Kaisui 0245 0309 0064 0243 0482 0244 0036
Kamp 0243
Kapsch 0190 0233 0286 0131
Karcher 0064 0397 0637 0190 0309 0129 0291
Kathrein 0583 0064
Kawa 0398
Kawasho 0243
Kendo 0637 0064 0190 0539 0397 0438 0129
0274
Kennedy 0190 0233 0462
Kenwood 0132
Kingsley 0243
Kiton 0583 0064
Kneissel 0064 0397 0637 0438 0401 0583 0462
0286 0319 0265
Kolster 0064 0129
Konka 0064 0398 0741 0445 0245
Kontakt 0514
Korpel 0064 0583
Korting 0114 0397
Kotron 0439 0291
Koyoda 0036
Kraking 0265
Kriesler 0039
KTV 0244
Kuba 0190
Kuba Electronic 0190
Kyoshu 0439 0445 0291
Kyoto 0190 0243 0244
LaSAT 0513 0397
Leader 0036
Lemair 0438
Lenco 0064 0036 0190 0401 0583 0131
Lenoir 0036
Lesa 0274
Levis Austria 0064 0583
Leyco 0291 0099 0064 0321 0606
LG 0064 0397 0036 0244 0583 0274 0243
0317 0190 0633 0741 0136
Liesenk & Tter 0354 0064 0583
Liesenkotter 0064 0354 0039 0583
Lifetec 0064 0036 0401 0695 0539 0682 1064
0583 0245 0291
Loewe 0539 0064 0682 0397 0114 0319
Logik 0038 0398
Logix 0695
Luma 0064 0233 0190 0438 0583 0401 0036
0286
Lumatron 0233 0064 0190 0286 0244 0291
Lux May 0064 0036 0583
Luxman 0606
Luxor 0221 0317 0507 0519 0235 0190 0373
0500 0244 0658
Madison 0064 0583
Magnadyne 0114 0274 0543 0129 0190
Magnafon 0543 0129 0243
Magnavox 0064 0063
Magnum 0675 0741 0064
Mandor 0291
Manesth 0064 0583 0244 0291 0321 0190
Manhattan 0064 0695 1064 0190
Marantz 0064 0583 0439
Marelli 0114
Mark 0064 0244 0243 0401 0036 0741 0742
Masuda 0245 0398 0036 0291 0064 0244 0583
Matsushita 0677
Mediator 0064 0583 0039
Medion 0064 0695 0539 0583
Megas 0637
Melectronic 0373 0064 0539 0136 0274 0132 0131
0401 0036 0244 0507 0519 0243 0438
0190 0583 0651 0661 0222
Melvox 0427
Memorex 0036
Memphis 0099 0036
Mercury 0064 0036 0583
Metz 0222 0474 0394 0415 0064 0114 0583
0614 0695
MGA 0064 0583 0245 0131
Micromaxx 0064 0695 1064
Minato 0064 0583
Minerva 0514 0222 0097 0543 0135
Minoka 0439 0064
Mitsubishi 0135 0120 0539 0064 0381 0114 0063
0583 0235
Mitsuri General 0190
Deutsch
Page 43

Mivar 0319 0317 0318 0397 0243 0636 0543
0244
Monaco 0036
Morgan's 0064 0583
Motorola 0120
MTC 0397 0539 0190 0243
Multistandard 0129
Multitec 0064 0695 0513
Multitech 0036 0513 0064 0397 0583 0244 0243
0274 0129 0291
Murphy 0131 0243 0099 0190
Musikland 0064 0245 0274 0583
Myryad 0583 0064
NAD 0190
Naiko 0064 0633 0583
Nakimura 0401 0064 0583
Naonis 0190
NAT 0253
National 0253
NEC 0197 0063 0482 0036 0401 0244 0064
0038
Neckermann 0064 0397 0227 0583 0190 0354 0445
0114 0274 0244 0438 0539
NEI 0064 0398 0190
Nesco 0274
Netsat 0064 0583
Neufunk 0064 0036 0583 0637 0245 0309
New Tech 0064 0036 0583 0244
New World 0245
Nicamagic 0243
Nobliko 0129 0097 0243
Nogamatic 0136 0223
Nokia 0190 0507 0519 0500 0366 0235 0401
0658 0633 0373 0637 0136
Nordic 0244
Nordmende 0136 0223 0587 0222 0064 0362 0190
Norfolk 0190
Normerel 0064 0583
Novak 0039
Novatronic 0064 0132 0401 0583
Nurnberg 0190
Oceanic 0190 0427 0321 0235 0500 0507
Odeon 0291
Okano 0397 0064 0291 0099 0036
Omega 0291
Onwa 0398 0629 0245 0460 0129
Opera 0064 0583
Optimus 0677
Optonica 0120
Orbit 0064 0583
Orion 0064 0583 0682 0321 0038 0036 0129
0291 0439 0543
Orline 0064 0245 0583
Ormond 0695 1064 0064 0583
Orsowe 0543
Osaki 0099 0245 0244 0291 0064 0439 0401
0583
Osio 0064 0583 0317
Oso 0245
Osume 0099 0063 0245 0064
Otto Versand 0063 0120 0539 0064 0583 0222 0136
0321 0253 0274 0244 0036 0309 0543
Pacific 0064 0583
Pael 0243
Palladium 0397 0064 0227 0445 0583 0274 0354
0114 0190 0244 0438 0682
Palsonic 0291 0439 0064 0244 0245 0583
Panama 0036 0244 0291 0243 0064 0274
Panasonic 0677 0253 0394 0543 0064 0190
Panavision 0064 0438 0583
Pathe Cinema 0190 0265 0243 0427 0319 0397
Pathe Marconi 0136 0223
Pausa 0036
Perdio 0099 0190 0064 0243 0309 0583
Perfekt 0064 0583
Pershin 0427
Philco 0114 0101 0445 0274 0190 0397 0064
Philharmonic 0244
Philips 0666 0064 0583 0039 0114 0401
Phoenix 0064 0114 0513 0397 0243 0190 0099
Phonola 0064 0583 0039 0114 0243
Pilot 0064 0583
Pioneer 0064 0397 0136 0190 0513
Pionier 0397 0513
Plantron 0064 0291 0036
Playsonic 0244
Policom 0129 0136 0223 0233 0265
Poppy 0036
Portland 0401 0651
Powerpoint 0514
Prandoni-Prince 0274 0543
Precision 0244
Prima 0036 0291
Prinz 0099 0221
Profex 0036 0190
Profi 0036
Profitronic 0064 0129
Proline 0099 0064 0039 0652
Prosonic 0064 0243 0397 0401 0606 0398 0695
Protech 0064 0244 0036 0274 0129 0291 0445
0695 0309
Provision 0064 0583 1064
Pye 0064 0401 0583 0039 0114
Pymi 0036
Quadra Vision 0427
Quasar 0274
Quelle 0064 0038 0136 0539 0063 0244 0274
0101 0354 0097 0131 0132 0222 0227
0291 0317 0695 0321 0373 0036
Questa 0063
R-Line 0064
Radialva 0136 0245 0190 0064
Radiola 0064 0583 0039 0244
Radiomarelli 0114 0543 0274 0064
RadioShack 0064
Radiotone 0036 0064 0397 0606 0445 0291 0439
0675
Rank 0097
Rank Arena 0063
RBM 0097
RCA 0652 0120 0587 0362
Recor 0064
Rectiligne 0064
Rediffusion 0063
Redstar 0064 0583
CODE LIST FUR VERCHIEDEN MARKEN 41
Deutsch
Page 44

42 CODE LIST FUR VERCHIEDEN MARKEN
Reflex 0064 0695
Revox 0064 0397
Rex 0233 0438 0274 0190 0286 0291
RFT 0114 0319 0397 0099 0291
Rhapsody 0243
Ricoh 0064 0583
Roadstar 0036 0291 0245 0445 0064 0309 1064
Robotron 0114
Rodex 0064 0583
Rowa 0291 0244
Royal Lux 0397 0439
Saba 0652 0114 0190 0136 0543 0223 0362
0587
Saccs 0265
Sagem 0482 0637 0309
Saisho 0543 0036 0038 0244 0190 0291 0381
Saivod 0064
Salora 0317 0221 0190 0543 0366 0235
Salsa 0362
Sambers 0543 0129
Samsung 0064 0583 0614 0645 0036 0244 0397
0291 0243 0317 0099 0235
Sandra 0243 0244
Sanela 0265
Sansui 0064 0398 0682
Santon 0036
Sanyo 0235 0319 0063 0038 0397 0366 0099
0243 0244 0131 0072 0036 0190 0064
0135
Save 0064
SBR 0064 0583 0039
Schaub Lorenz 0633
Schneider 0064 0583 0039 0421 0286 0244 0274
0398 0245 0190 0695 0675 1064
Scotland 0190
SEG 0244 0291 0036 0274 0063 0129 0190
0064 0243 0695 0514 0661 1064
SEI 0114 0129 0190 0543 0321 0233 0064
Sei-Sinudyne 0129 0233 0321 0543 0064 0114
Seleco 0398 0233 0286 0190 0438
Sencora 0036
Sentra 0245 0036
Serino 0482 0637 0243
Sharp 0120 1220 0063 0321 0680 0543
Shintoshi 0064
Shorai 0321
Siarem 0190 0114 0129 0543
Siemens 0227 0222 0354 0064
Siera 0064 0583 0039
Siesta 0397
Silva 0243 0064
Silver 0063 0064 0583 0742 0190
Singer 0114 0129 0274 0427 0462 0036 0064
Sinudyne 0114 0129 0321 0190 0543 0233 0064
Sky 0064
Skymaster 0132
Smaragd 0514
Solavox 0099 0190 0064
Sonawa 0245
Sonitron 0235 0397 0366 0244
Sonneclair 0064
Sonoko 0064 0036 0291 0309 0244
Sonolor 0235 0190 0427 0309
Sontec 0064 0397 0321 0036
Sony 1532 1678 1037 0038 0063 0129 0064
Sound & Vision 0129 0245 0401
Soundwave 0064 0445
Spectra 0036
Ssangyong 0036
Standard 0245 0036 0244 0064 1064 0401
Starlite 0036 0190 0064 0291
Stenway 0309 0245
Stern 0233 0286 0190 0291 0438
Strato 0064 0291 0036
Stylandia 0244
Sunkai 0321 0482 0245 0064 0514 0637
Sunstar 0398 0064 0036 0606
Sunwood 0064 0036
Superla 0543 0243
SuperTech 0036 0064 0243 0583 0245
Supra 0401 0036
Susumu 0362 0245
Sutron 0036
Swissline 0274
Sydney 0243 0244
Sysline 0064
Sytong 0243
T+A 0474
Tandberg 0394 0438 0136 0223
Tandy 0120 0245 0099 0244 0274 0190
Tashiko 0063 0244 0197 0243 0190
Tatung 0099 0543 0244 0064 0038
Teac 0244 0539 0064 0482 0291 0036 0439
0695
TEC 0244 0036 0274 0362 0286
Tech Line 0064 0695
Techica 0245
TechniSat 0682
Tedelex 0244 0633
Teiron 0036
Teleavia 0136 0223
Telecor 0064 0190 0245 0244 0286 0421
Telefunken 0136 0101 0128 0362 0289 0223 0064
0513 0652
Telefusion 0064
Telegazi 0064 0190 0286 0245 0291
Telemeister 0064
Telesonic 0064
Telestar 0064 0606
Teletech 0036 0274 0064 0695
Teleton 0244 0233 0190 0286 0063
Televideon 0190 0243
Televiso 0427
Temco 0321
Tempest 0036 0064
Tennessee 0064
Tensai 0131 0245 0064 0244 0321 0036 0132
0401 0398 0274
Tenson 0036
Tevion 0064 0675 0695
Texet 0244 0401 0036 0243 0245
Thomson 0652 0136 0362 0223 0064 0587
Thorn 0265 0101 0064 0131 0362 0539 0401
0135 0136 0252 0099
Thorn-Ferguson 0131 0135 0136 0265 0362
Deutsch
Page 45

Tokai 0099 0064 0190 0244 0401 0036
Tokyo 0243
Tomashi 0309 0245
Toshiba 0535 0063 0097 0129 0244 0136
Towada 0129 0244
Toyoda 0036
Trakton 0291
Trans Continens 0695 0244 0064
Transonic 0064 0482 0614 0539 0291
Transtec 0243
Trident 0543 0244
Tristar 0245
Triumph 0543 0373 0583 0064
Tsoschi 0309
TVTEXT 95 0583
Uher 0064 0233 0401 0445 0513 0397 0286
Ultravox 0114 0129 0401 0274 0243 0190 0064
Unic Line 0064 0500 0482
United 0064 0741 0742
Universum 0373 0132 0222 0500 0274 0519 0507
0397 0227 0445 0038 0539 0321 0063
0097 0190 0291 0131 0064 0438 0317
0101 0354 0695 0244 0136 0658 0036
Univox 0114 0064 0190 0265
Vestel 0064 0190 0244 0583 0695 1064
Vexa 0036 0064
Videologique 0243 0245 0244
Videosat 0274
VideoSystem 0064
Videotechnic 0243 0244 0401
Videoton 0190
Vidikron 0129
Vidtech 0063
Visiola 0243
Vision 0064 0244
Vistar 0233
Vortec 0064
Voxson 0114 0064 0445 0190
Waltham 0244 0695 0445 0064 0136
Watson 0064 0190 0245 0606 0421 0036 0695
1064
Watt Radio 0129 0190 0243
Wega 0063 0114 0064
Wegavox 0036
Weltblick 0064 0244
White Westinghouse0243 0064
Windstar 0309
Xrypton 0064
Yamishi 0309 0482 0245 0064 0244
Yokan 0064
Yoko 0244 0064 0245 0291 0036 0397 0366
0243 0274
Yorx 0245
Zanussi 0233 0244
Zenor 0366
VCR
Adyson 0099
Aiwa 0334 0027 0068 0375 0379 0064
Akai 0133 0342 0068 0047 0379 0267
Akiba 0099
Akura 0099 0068
Allorgan 0267
Allstar 0108
Ambassador 0047
Amstrad 0027 0305 0099
Anitech 0099
Aristona 0108
ASA 0064 0108
Asuka 0099 0064 0108 0027 0065
Audiosonic 0305
Audioton 0047
AVP 0379
AWA 0064 0305 0070
Baird 0133 0305 0131 0068 0027
Bang & Olufsen 0526
Basic Line 0305 0047 0099
Bestar 0305 0047
Black Panther 0305
Blaupunkt 0253 0108 0222 0061
Blue Sky 0064 0375 0099 0379 0305
Bondstec 0047 0099
Brandt 0068 0347 0348 0520
Brandt Electronique 0068
Brinkmann 0375
Carena 0108
Carrefour 0072
Casio 0027
Cathay 0305
Catron 0047
CGE 0068 0027
Cimline 0099
Clatronic 0047 0099
Combitech 0379
Condor 0047 0305
Crown 0305 0099 0047
Cyrus 0108
Daewoo 0305 0047 0072 0379
Dansai 0099 0305
Daytron 0305
de Graaf 0069 0108 0131 0075
Decca 0027 0068 0108 0035 0094 0375
Deitron 0305
Denko 0099
Diamant 0064
Dual 0068 0108 0305 0027
Dumont 0027 0108 0131
Elbe 0305 0065
Elcatech 0099
Elin 0267
Elsay 0099
Elta 0099 0305
Emerson 0099 0072
ESC 0305 0267 0047
Etzuko 0099
Europhon 0047
Fenner 0047
Ferguson 0068 0347 0348 0520 0027 0305
CODE LIST FUR VERCHIEDEN MARKEN 43
Deutsch
Page 46

44 CODE LIST FUR VERCHIEDEN MARKEN
Fidelity 0027 0099 0267 0379
Finlandia 0131 0108 0069 0027 0075 0411
Finlux 0027 0108 0131 0069
Firstline 0099 0375 0070 0064 0072 0069 0305
Fisher 0074 0131 0065 0047
Frontech 0047 0099
Fujitsu 0027
Funai 0027
Galaxi 0027
Galaxis 0305
GBC 0047
GEC 0108
General 0047
General Technic 0375
Genexxa 0131
Goldhand 0099
GoldStar 0064 0027
Graetz 0068 0131 0267
Granada 0131 0075 0108 0267 0064 0253 0069
0027
Grandin 0099 0064 0047 0027 0305
Grundig 0222 0108 0374 0253 0347 0375 0099
Hanimex 0379
Hanseatic 0064 0305 0108 0065
Hantor 0047
Harwood 0099
HCM 0099
Hisawa 0379
Hischito 0072
Hitachi 0069 0068 0027 0267 0108 0131 0411
Hornyphone 0108
Hypson 0099 0305 0379
Impego 0047
Imperial 0027 0267
Ingersoll 0267
Inno Hit 0047 0267 0305 0099
Interbuy 0064 0099
Interfunk 0108 0131
Internal 0305
International 0305 0064
Intervision 0027 0305 0064 0375
Irradio 0099 0064 0108
ITT 0133 0068 0411 0131 0267
ITT Nokia 0075
ITV 0305 0064 0047
JVC 0068 0094 0035 0411
Kaisui 0099
Karcher 0305
Kendo 0133 0342 0375 0099 0064
Kenwood 0068 0065
KIC 0027
Kimari 0074
Kneissel 0379 0375 0064
Korpel 0099
Kuba 0074
Kuba Electronic 0074
Kuwa 0253
Kyoto 0099
Lenco 0305
Leyco 0099
LG 0064 0027 0305
Lifetec 0375
Loewe 0108 0064 1189
Logik 0267 0099 0133
Lumatron 0305
Luxor 0133 0070 0099 0089 0131 0074 0075
Magnavox 0108
Manesth 0099 0072 0108
Marantz 0108 0065 0089
Mark 0305 0047
Matsui 0375 0064 0267 0379 0027
Mediator 0108
Medion 0375 0379
Melectronic 0027 0064 0065
Memorex 0131 0027 0064 0075 0074
Memphis 0099
Metz 0222 0374 0108 1189 0253 0064
Micormay 0375
Migros 0027
Minerva 0222
Mitsubishi 0070 0094 0108
Multitec 0064
Multitech 0027 0099 0047 0131
Murphy 0027
Myryad 0108
NAD 0131
National 0253
NEC 0068 0065 0094 0131 0064
Neckermann 0068 0108
Nesco 0099 0027 0379
Nikkai 0047 0099 0305
Nokia 0131 0133 0342 0068 0305 0267 0075
0069 0108
Nordmende 0068 0411 0347 0348 0521 0555 0094
0520
Oceanic 0027 0075 0133 0108 0131 0068
Okano 0342 0375 0099 0305
Orbit 0099
Orion 0379 0375
Orson 0027
Osaki 0027 0064 0099
Osume 0099
Otto Versand 0108
Palladium 0099 0342 0064 0068 0267
Palsonic 0099 0027
Panasonic 1189 0253
Pathe Cinema 0070
Pathe Marconi 0068
Perdio 0027
Philco 0065 0099
Philips 1608 0108 0411
Phonola 0108
Pioneer 0094 0108 0069
Portland 0047 0305
Prinz 0027
Profitronic 0108 0267
Proline 0027 0347 0348
Prosco 0305
Prosonic 0305 0027
Protech 0108
Provision 0305
Pye 0108
Quasar 0305
Quelle 0108
Radialva 0064 0099 0108 0075
Radiola 0108
Deutsch
Page 47

Rank 0068
Rex 0068 0411
RFT 0047 0099
Roadstar 0267 0099 0064 0305
Royal 0099
Saba 0068 0347 0348 0411 0521 0089 0607
0305
Saisho 0375
Salora 0070 0133 0131
Samsung 0267 0459
Samurai 0047
Sansui 0068 0094 0133 0099 0375
Sanyo 0131 0074 0075 0094
Saville 0379 0305 0267
SBR 0108
Scan Sonic 0267
Schaub Lorenz 0068 0131 0027 0133 0342
Schneider 0099 0027 0064 0108 0305 0267 0069
Seaway 0305
SEG 0099 0267 0305 0108
SEI 0108
Sei-Sinudyne 0108
Seleco 0068 0035 0411 0047 0064
Sentra 0099 0047
Setron 0099
Sharp 0075 0089 0064
Shintom 0099 0131
Shivaki 0064
Siemens 0222 0064 0131 0108 0347 0374
Siera 0108
Silva 0064
Silver 0305
Singer 0072
Sinudyne 0108
Smaragd 0375
Solavox 0047
Sonitron 0074
Sonneclair 0099
Sonoko 0305
Sonolor 0075 0089
Sontec 0064 0305
Sony 0060 0061 0059 0133 1059
Soundwave 0064
Ssangyong 0099
Standard 0305
Starlite 0064 0131
Stern 0305
Sunkai 0375 0305
Sunstar 0027
Suntronic 0027
Sunwood 0099
Supra 0064 0267
Symphonic 0027 0099
Tandberg 0305
Tashiko 0027 0075 0267 0108 0064
Tatung 0027 0068 0108 0075 0070 0375 0379
Teac 0099 0068 0027 0305 0064 0108 0334
TEC 0047 0305 0099
Tech Line 0099
TechniSat 0375
Teleavia 0068 0520
Telefunken 0068 0347 0348 0411 0520 0521 0305
0607
Teletech 0099 0305 0027
Tempest 0047
Tenosal 0099
Tensai 0027 0064 0099
Tevion 0375
Thomson 0347 0348 0068 0094 0411 0520 0521
0555 0305
Thorn 0068 0131 0064
Thorn-Ferguson 0347
Tokai 0099 0064 0068 0131
Tokiwa 0099
Topline 0375
Toshiba 0072 0068 0411 0070 0108
Towada 0099
Tracton 0047
Trakton 0047
TVA 0047
Uher 0064 0267
Ultravox 0305
Unitech 0267
United Quick Star 0305
Universum 0027 0108 0267 0064 0133 0375 0222
0131
Victor 0035 0094
Watson 0108 0379
Weltblick 0064
Yamaha 0068
Yamishi 0099 0305
Yokan 0099
Yoko 0064 0099 0047 0267
CODE LIST FUR VERCHIEDEN MARKEN 45
Deutsch
Page 48

46 CODE LIST FUR VERCHIEDEN MARKEN
SAT - STB
Philips 0038
AMP
Arcam 0668
Curtis Mathes 0327
JBL 1030 0695
Marantz 0348
Mark 1030
Optimus 0040
Philips 0668
Pioneer 0040 0327
Sansui 0348
Teac 0448
Yamaha 0170 0381
TUNER
Aiwa 0148 1432
Akai 0142
Arcam 1116 1216
Audiolab 1216
Carver 0387
Denon 1187 1131 1387
Fisher 0387
Grundig 1216 1116
Harman/Kardon 0137
Inkel 0518
JBL 0137
JVC 0101
Kenwood 1054 1340 1596
Marantz 1216 1116 1316
Micromega 1216
Myryad 1216
NAD 0347
Onkyo 0162
Panasonic 1335 1336 1790 1545
Philips 1216 1116 1316
Pioneer 1050 0316
Sansui 1116
Sanyo 0387
Schneider 0137
Sherwood 0518
Sony 1085 1185 1285
Teac 0137
Technics 1335 1336 1790 1545
Thorens 1216
Victor 0101
DVD
3DLAB 0566
A-Trend 0741
Acoustic Solutions 0757
AEG 0815
Afreey 0725
Boman 0810
Brandt 0678
Clatronic 0815
Cyber Home 0741
Cytron 0678
Daewoo 0797
Dansai 0797
Denon 0517
Denver 0815
Denzel 0692
Diamond 0678
Dual 0692 0678 0757
Elta 0717
Emerson 0618
Encore 0725
Enzer 0692
Ferguson 0678
Finlux 0768
GoldStar 0618 0768
Graetz 0692
Grundig 0566 0802
Grunkel 0797
Hanseatic 0768
Hitachi 0692 0600
JVC 0650 0585 0566 0530
Karcher 0810
Kenwood 0561 0517 0764
Kiss 0692
Lenco 0678 0797
LG 0618 0768
Lifetec 0678
Loewe 0566
Magnavox 0530
Marantz 0566
Matsui 0678
MBO 0717
Medion 0810 0678
Metz 0598 0552
Micromedia 0530 0566
Micromega 0566
Microsoft 0549
Monyka 0692
Mustek 0757
Mx Onda 0678
NAD 0768
Naiko 0797
Neufunk 0692
Onkyo 0530
Optimus 0598 0552
Oritron 0678
Palsonic 0716
Panasonic 0517
Philips 0566 0530
Pioneer 0598 0552
Proline 0678
Proscan 0549
Deutsch
Page 49

Radionette 0768
Raite 0692
RCA 0549
REC 0716 0517
Roadstar 0717 0716
Rotel 0650 0585
Saba 0678
Salora 0768
Sampo 0725
Samsung 0600
Schaub Lorenz 0815
Schneider 0678 0810
Scott 0678
SEG 0692
Sharp 0657
Sherwood 0768
Silva 0815
Singer 0717
Skymaster 0757
SM Electronic 0717 0757
Sony 0560 0600
Soundwave 0810
Standard 0678
Sunwood 0815
Teac 0768 0598 0618
Technics 0517
Technika 0797
Tensai 0717 0678
Tevion 0678
Theta Digital 0598
Thomson 0578 0549
Tokai 0692 0725
Tokaido 0725
Toshiba 0530
United 0815
Universum 0768 0618
XMS 0815 0716
Yamaha 0517 0566
Yamakawa 0692
Yukai 0757
Zenith 0530 0618 0768
CODE LIST FUR VERCHIEDEN MARKEN 47
Deutsch
Page 50

48
Page 51

1 Safety Instructions ___________________________3
2 Unpacking __________________________________3
3 Product description __________________________4
3.1 Front view _________________________________4
3.2 Rear view __________________________________5
3.3 Conditional Access Module ____________________5
4 Preparing, setting and using your
Remote Control _____________________________6
4.1 Installation of batteries ________________________6
4.2 Setting of your remote control _________________6
4.2.1 Mode setting ________________________________6
4.2.2 Volume and mute control setting _________________6
4.2.3 Changing the brand setting of your remote control
for TV, VCR, DVD or Amplifier-Tuner ______________6
4.3 Using the remote to control your digital receiver
The remote control is set to STB mode. _________7
5 Connection and Installation ___________________8
5.1 Connections ________________________________8
5.1.1 Connect the satellite receiver to your TV and VCR. ___8
5.1.2 Connect your HiFi appliance ____________________8
5.1.3 Connect your receiver to the telephone line (for future
use) _______________________________________8
5.2 Quick start up guide for quick installation _________9
5.3 Full receiver installation _______________________9
5.3.1 Perform full installation _________________________9
5.3.2 Your installation includes a DiSEqC switch _________10
6 Day to Day operation _______________________11
6.1 Switch your receiver ON/OFF ________________11
6.2 Wake up or Switch your receiver to standby _____11
6.3 Select TV or Radio mode _____________________11
6.4 How to switch between channel lists ___________11
6.5 How to use the channel Banner _______________12
6.5.1 Channel Banner Icons ________________________12
6.5.2 How to Select Programs ______________________12
6.5.3 How to Select Channels ______________________13
6.6 How to Change momentarily the current Program
Options __________________________________13
6.7 How to Display More Program Info ____________13
6.8 How to use TV/STB button ___________________14
6.9 How to Run Interactive Applications ____________14
6.10 Reminders and Timers _______________________14
6.10.1 Difference Between Reminder and Timer _________14
6.10.2 Viewing and Recording Reminders/Timers _________15
6.10.3 Reminder/Timer Conflicts _____________________15
6.10.4 Timer Manager _____________________________16
7 Main Menu _________________________________17
7.1 Menu Structure ____________________________17
8 Change the setting of your receiver ___________19
8.1 Channel Manager ___________________________19
8.1.1 How to organize a channel list __________________19
8.1.2 How to modify a channel list ___________________20
8.2 Specially for parents _________________________21
8.2.1 Your PIN code ______________________________21
8.3 Your Preferences ___________________________22
8.3.1 Display Options _____________________________22
8.3.2 Language Options ___________________________22
8.4 Installation _________________________________22
8.4.1 Settings ___________________________________23
8.4.2 Installation / Antenna Configuration ______________24
8.4.3 Installation / LNB Configuration _________________25
8.4.4 Installation / Channel Search ___________________26
8.4.5 Installation / Decoder Status ____________________26
9 Advanced Settings __________________________28
9.1 Easy Recording _____________________________28
9.2 Change the Remote Control and receiver Settings _29
9.3 Master PIN Code ___________________________29
10 Decoder Software Upgrade __________________30
CONTENTS 1
Welcome To Digital Television
Congratulations on choosing the Philips DSR 5600 digital satellite receiver. This receiver will allow you to access free-toview as well as scrambled digital satellite television, radio and interactive channels. The embedded MHP feature makes your
receiver compatible with the MHP interactive television applications that are carried on some of the channels.
Please note, however, that to view scrambled channels, you will need to buy a conditional access module and take a
subscription. The conditional access module is not supplied with your receiver. You will find more information on how to use
the conditional access module later in this manual.
Note: "Decoder" is used in all the menu screens. The term "decoder" also stands for "STB (Set Top Box)", "Receiver" or "Digital receiver". In
the user manual all descriptions refer to "receiver".
Contents
English
Page 52

2 CONTENTS
11 Programming the Remote Control for your STB,
TV, Video Recorder, DVD and
Tuner Amplifier. ___________________________31
11.1 Setting up your remote control ________________31
11.2 Using your remote control for your TV _________32
11.3 Using your remote control for your VCR ________33
11.4 Using Remote Control For Your DVD Player _____34
11.5 Using Remote Control For Your Tuner / Amplifier _35
12 Troubleshooting guide ______________________36
13 Technical Specification ______________________37
14 BRAND CODE LIST ________________________38
English
Page 53

SAFETY INSTRUCTIONS 3
1 Safety Instructions
English
All the safety and operating Instructions should be read
and understood before the receiver is operated.
For best results, position your receiver away from
radiators or other heat sources. Leave a space of at least
3 cm around the receiver for ventilation making sure that
the ventilation holes are not obstructed.
This receiver is intended for use in a domestic
environment only and should never be operated or
stored in excessively hot, humid or damp conditions.
Make sure no objects or fluids enter the housing through
the ventilation slots. Should this happen, disconnect your
receiver from the mains and consult your retailer.
For cleaning, use a damp chamois leather. Never use
any abrasive cloth, sponge or cleaner.
When connecting or disconnecting cables to the receiver
always ensure the receiver is disconnected from the
mains.
Please wait before connecting your receiver - read on.
Do not disassemble the equipment. There are no user
serviceable parts.
Mains connection
Before connecting the receiver to the mains, check that
the mains supply voltage corresponds to the voltage
printed on the rear of the receiver. If the mains voltage is
different, consult your dealer.
Please wait before connecting your receiver - read
on.
As you unpack your digital receiver, please make sure the
following accessories are included:
- Remote control with separately packed Philips alkaline
batteries
- Mains cord
- SCART cable
- Phone cord
- User Manual
- Philips guarantee card
Warning: Plastic bags can be dangerous. To avoid suffocation
keep the bag away from babies and children.
2 Unpacking
Page 54

3 Product description
3.1 Front view
1 Door Hide the CI module opening.
2 Reset This button resets your receiver (the receiver behaves as if you powered itoff and
powered it on again).
3 Standby Switch your receiver from the digital TV mode into the standby mode.
4 MENU Open / close the Menu.
5OK ● In the menu system, this button selects menu items or confirms your choices.
● In Channel Banner, this key tunes to the selected program or sets/cancels a reminder for
the next program.
6 Left/Right ● In normal viewing, changes the volume level.
● In Channel Banner, switches between now/next programs.
● In the Menu, moves the on-screen highlight left/right, or to switch between predefined
values.
6 Up/Down ● In standby mode, wakes up the receiver.
● In normal viewing or in Channel Banner, tunes program Up/Down to consecutive
channels.
● In the Menu system, moves the on-screen highlight up/down.
Front Panel Display
The front panel LED display gives you information about the current state of your receiver.
Status indicator table
Current time displayed in 24-hour format when the box is in the standby mode.
Receiver is tuned to one of the TV channels.
Receiver is tuned to one of the radio channels.
Recording is in progress.
The VCR connected to the VCR SCART of your receiver is playing back a tape. Stop VCR
play back to return to the receiver viewing mode.
Your decoder is switched into the TV mode. Press the TV / STB remote control key to
return to he STB mode.
Dot in the middle blinks when you press remote control keys.
Receiver upgrade is in progress.
On the currently tuned channel, there is an interactive application available.
4 PRODUCT DESCRIPTION
English
123546
Page 55

PRODUCT DESCRIPTION 5
3.2 Rear view
1 Power Switch Use this switch to power your receiver on/off.
2 Power Plug (HV) Connect the power cable to the power socket.
3 RS232 (SELV) Data interface used during servicing.
4 LNB IN (SELV) Satellite signal input to connect the cable of your satellite antenna.
5 Telephone Line (TNV3) Connect to the telephone line.
6 Optical Audio (SELV) If you have an external audio receiver to decode Digital signal, connect it
here.
7 TV SCART (SELV) (1) (2) Connect your TV set here using the SCART cable supplied.
8 VCR SCART (SELV) (1) Connect your VCR here.
9 L/R Audio Output (SELV) Left/Right audio outputs to connect your HIFI/ audio receiver system.
SELV: Safety Extra Low Voltage.
HV: Hazardous Voltage.
TNV 3: Telecommunication Network 3.
(1) SCART is also called Euroconnector or Peritel.
(2) The supplied SCART lead is suited for RGB format which allows the best picture quality. Consult the user manual of your TV set to
select its RGB capable SCART socket input.
3.3 Conditional Access Module
It is also possible to insert a separate Conditional Access (CA) module
into the Common Interface slot located on the left of the front panel of
your receiver (The Common Interface slot is behind the door). The CA
module together with an adequate Smart card allows viewing scrambled
channels relevant for the subscription you have taken. This module shall
be associated with a smart card and may bring up special menus not
described in this manual. To get access to information available on the
Smart card, press the MENU key, select the Installation item from the
Main Menu. From the Installation submenu that appears, select the
Receiver Status item, and finally select the Common Interface item. This
will give you access to any info stored on the Smart Card.
CA Module and Its Card
Looking After Your Smart Card
The card is fragile, so keep in mind the following precautions.
● Do not bend or twist the card.
● Do not expose the card to heat or sunlight.
● After inserting the card, leave it in the slot permanently.
● Clean only with a soft dry tissu.
Common Interface Screen
English
12 3 547896
Page 56

6 PREPARING SETTING USING REMOTE CONTROL
4.1 Installation of batteries
● Remove the remote control back cover.
● Insert the two batteries (type R06 / AA 1.5 V)
supplied.
● Position them as shown in the diagram in the battery
compartment.
● Replace the cover.
The Philips batteries supplied with your receivers
remote control do not contain heavy metals such as
Mercury or Nikel Cadmium. Nevertheless in many
countries exhausted batteries may not be disposed of
with your household waste. Please ensure you dispose of
exhausted batteries according to local regulations.
4.2 Setting of your remote
control
4.2.1 Mode setting
Your 5 in 1 Remote control allows the control of most of
your Audio / Video equipment through various modes
which are: Satellite receiver mode so called STB (Set Top
Box - This is your receiver), TV , VCR and AmplifierTuner.
Pressing the MODE button once will remind you the
mode you are in through blinking lights: left for STB,
middle for TV, right for VCR, left-middle for DVD and
middle-right for Amplifier-Tuner.
To set a given mode press the MODE button several
times until the desired mode is signalled by the light(s).
The setting sequence is STB ->TV->VCR-> DVD>Amplifier-Tuner.
4.2.2 Volume and mute control setting
When the remote control is set to STB mode the
Volume + / Volume - / Mute buttons can either control
the corresponding functions of your TV sets or the
corresponding function of your digital receiver. Refer to
chapters 4.2.2.1 or 4.2.2.2.
Note: we recommend Volume and mute control via your digital
receiver. Refer to chapter 4.2.2.2 for setting.
4.2.2.1 You want the remote to control the volume
and mute of your TV set / Set volume
control to TV.
The factory setting of your remote is set to allow the
control of the volume of a Philips TV set. If your TV set
has a different brand check in the TV brand list what
code(s) might apply then change the setting of your
remote control as according to the method described in
chapter 10.
Note: to reset the volume/mute control to TV.
1 Select the STB mode
2 Press simultaneously 1 and 9 buttons until the LED has
blinked twice then release the buttons.
3 Enter code 993, the LED is blinking once after each
entry.
4 Press the yellow button, the LED shall blink twice to
acknowledge the new setting.
4.2.2.2 You want the remote to control the volume
and mute via your digital receiver (recommended).
To set the volume/mute control to STB
1 Select the STB mode
2 Press simultaneously 1 and 9 buttons until the LED has
blinked twice then release the buttons.
3 Enter code 993, the LED is blinking once after each
entry.
4 Press the green button, the LED shall blink twice to
acknowledge the new setting.
4.2.3 Changing the brand setting of your
remote control for TV, VCR, DVD or
Amplifier-Tuner
Refer to chapter 11 for brand setting procedure.
4 Preparing, setting and using your Remote Control
English
Page 57

PREPARING SETTING USING REMOTE CONTROL 7
4.3 Using the remote to control your digital receiver The remote
control is set to STB mode.
English
MODE
Selects the remote control mode.
MENU
Opens / Closes the Menu.
FAV
Open / close the current channel list.
GUIDE
Non active button in this application
version.
RADIO
Toggles between TV and Radio
modes.
RED, GREEN, YELLOW, BLUE,
WHITE
Contextual buttons used in MHP
applications.
AA
+/-
Change the volume level.
44
Open the Options menu to change
momentarily soundtrack / subtitles
/ teletext / display format setting.
VW
- Switches the Channel Banner in
the browsing mode. - Scrolls
selection up/down in a menu or
channel list.
CB
- In Channel Banner, switch
between the current and next
program.
- In the Menu screens, selects
between predefined settings.
OK key
Confirms your choices.
ii
Open the Options menu to change
momentarily soundtrack / subtitles
/ teletext / display format setting.
Standby
**
Switches your receiver into the
standby mode.
aa
TV/STB
Toggles between watching satellite
digital programs via your receiver
and standard analogue programs.
mm
Switches between viewing mode,
Channel Banner, and Channel
Banner with Extended Info.
0-9
- In viewing mode: Selects channels
- In menu ; Selects directly menu
item or Sets new parameter value
- In standby: Wakes up the receiver.
BACK
- In viewing mode: Returns to the
previously tuned channel
- In menu mode returns to the
previous screen.
- In standby: Wakes up the receiver.
EXIT
Returns to normal viewing mode.
MUTE H
Mutes the sound on your TV or
digital receiver.
P+ P-
- In viewing mode: Tunes to the
higher/lower channel within the
same channel list.
- scrolls one page up or down in
channel list
- In standby: Wakes up the receiver.
Page 58

5 Connection and Installation
5.1 Connections
5.1.1 Connect the satellite receiver to your TV and VCR.
1 Unplug all equipment (TV set as well as VCR and / or DVD if required) from the mains before making connections.
Note: Before starting to connect, check your current wiring because you can keep the coaxial connection in between your TV and your
video recorder provided they are connected as shown below. This connection ensures you can still watch and record your current
terrestrial channels if necessary.
2 Connect your receiver in your existing installation as shown above:
- Connect the supplied mains cord to the mains (230V 50 Hz) socket of your satellite receiver.
- Connect the TV set EXT1 to the TV SCART of your satellite receiver by means of the supplied SCART lead.
- If you have a VCR, connect the VCR EXT1 to the VCR SCART of your satellite receiver by means of a SCART lead.
- Connect the plug of the cable coming from your satellite antenna to the LNB IN socket of your satellite receiver.
3 Then plug all your appliances, including your satellite receiver, into the mains.
5.1.2 Connect your HiFi appliance
Connect the L/R (Left / Right) AUDIO OUT sockets of your satellite receiver to the relevant L/R audio analogue input
sockets of your HiFi equipment by means of a double CINCH cable (not supplied).
If applicable connect the Digital OPTICAL OUT socket of your satellite receiver to one of the optical Digital input socket
of your HiFi equipment by means of an appropriate cable (not supplied).
5.1.3 Connect your receiver to the telephone line (for future use)
Connect the RJ11/TELEPHONE LINE socket of your satellite receiver to the wall outlet telephone socket by means of the
supplied telephone cord.
Note: The equipment has been approved pursuant to Commission Decision 99/303/EC for pan-European
connection to the public switched telephone network (PSTN). However, due to differences between the
individual PSTNs provided for in different countries, the approval does not, of itself, give an unconditional assurance of successful operation
on every PSTN network termination point.
In the event of problems, you should contact your equipment supplier in the first instance.
8 CONNECTION AND INSTALLATION
English
Satellite recever
Page 59

CONNECTION AND INSTALLATION 9
English
5.2 Quick start up guide for
quick installation
● You have already a satellite antenna.
● Your antenna is properly aiming at Astra 19.2° East
satellite orbital position.
● You want only programs from Astra 19.2° East satellite
orbital position.
● Your menu preferred language is German.
● You have made the connections according to chapter
5.1.1.
● Your remote control is set to SBT mode and installed
according to chapter 4.2 description.
If not, prior proceeding with the quick installation go to
chapter 4.2.
Note: Your satellite receiver can only be updated via Astra
19.2° East satellite. Therefore if you want to benefit from
further upgrades you, at least, have to install your receiver for
the reception of the Astra 19.2° East satellite.
If you satisfy above conditions, then proceed with the
quick installation of your satellite receiver, then:
Note:If you have a DiSEqC 1.0 switch in your antenna set up
you can proceed with this quick installation, provided you
connect directly the plug of the cable coming from your
antenna aiming at Astra 19.2° East to the LNB IN socket of
your satellite receiver. Otherwise refer to chapter 5.3.1
If you meet the above conditions, proceed with the quick
installation of your satellite receiver:
1 All your appliances, including your digital receiver, shall be
plugged into the mains.
2 Put the power switch, located on the rear panel of the
receiver, in the ON position. The receiver front panel
gets on, after a few seconds the Welcome screen is
shortly shown then after few tenth of seconds the First
Installation screen is shown. Select you preferred
country with the V / W buttons and press OK. Your
receiver is configured for your country including the
relevant menu language.
Note: During power up after putting the rear panel mains
switch to on, it is normal for the front display to turn off for few
seconds. It shall turn on later on by showing MHP.
3 To start watching satellite TV press one digit key or P+
or P- or BACK, your receiver shall tune one program.
4 From now on you can enjoy watching satellite television.
Refer to chapter 6 to learn more about USING YOUR
RECEIVER.
Note: To change Language Options,,see the 8.3.2 section
later in this manual.
5.3 Full receiver installation
Why do you need a full receiver installation?
➤ Your satellite antenna is properly aiming at a satellite
which is different from Astra 19.2° East satellite orbital
position.
➤ Your antenna is not installed and not properly aiming at
Astra 19.2° East satellite.
➤ Your antenna set up include a DiSEqC 1.0 switch.
➤ This chapter explains how to set your receiver
according to your installation and needs. If you do not
feel comfortable with such an installation described in
paragraphs 5.3.1 and 5.3.2 please contact your dealer.
5.3.1 Perform full installation
1 Plug the receivers power supply cord to the mains.
Switch on the TV set and select a program. Put the
power switch, located on the rear panel of the receiver,
in the ON position. The receiver front panel display gets
on.
2 Now you should see the Welcome screen on your TV
screen. After a few seconds, the Welcome screen
disappears.
3 Next, a screen appears that allows you to select your
country. Highlight your country by pressing V / W and
then press OK. Then you will be asked to confirm your
choice. Press OK to confirm, or press BACK to select
another country.
4 Press the MENU key to bring up the Main Menu.
Highlight the Installation item and press OK.
5 From the Installation submenu, select the Antenna
Configuration item. Change any values if necessary for
your antenna setup. Then press OK to store changes
and return to the Installation submenu.
6 From the Installation submenu, select the LNB
Configuration item. Then, select your satellite by
pressing C / B. If you want to check the signal strength
and quality, press the Red key. Change any LNB
Configuration parameters, if required.
7 Select the Channel Search item from the Installation
submenu. In the screen that appears, select the Search
for New Channels item. Press OK. Then select the
type of channels and press OK again. This initiates the
channel search procedure. Once it has been completed,
follow the prompts displayed on the screen.
8 All found channels are stored in the Channel Pool. You
will have to transfer channels to your favourite channel
lists. For more info, see the 8.1 section later in this
manual.
9 Now you are ready to enjoy viewing your satellite
receiver. Refer to chapter 6 Day to Day operation to
learn more about using your receiver.
Page 60

5.3.2 Your installation includes a DiSEqC switch
To watch programs from different satellites you need to install a DiSEqC switch in your antenna set up. A DiSEqC switch has
2 or 4 inputs and one output. The inputs are identified by A / B alternatively 1 / 2 for a 2 input switch. The inputs are
identified by A / B / C / D alternatively 1 / 2 / 3 / 4 for a 4 input switch.
Each LNB shall be connected to one input of the switch by means of an appropriate coaxial cable fitted with F type plugs
while the switch output is connected to the LNB Input of the satellite receiver by means of an appropriate coaxial cable
fitted with F type plugs.
As example refer to the connection diagram below to insert a DiSEqC switch in an antenna set up which includes 2 LNBs.
The popular configuration shown is made of one antenna fitted with 2 LNBs for the reception of Astra 19.2° East and Hot
Bird 13° East satellites. Pay attention to the relative position of the Astra and Hot Bird LNBs in the set up, it is necessary to
get the system up and running the first time.
Refer to the installation process described in paragraph 5.3.1
At step 5 antenna configuration set "Antenna Control" menu item:
- either to "Tone Burst" if you have a tone burst switch and two LNB to control,
- or to "DiSEqC 1.0" if you have a DiSEqC switch and up to 4 LNB to control.
At step 6 select which LNB's shall be active. Once the cursor is on an active LNB, pressing OK open the relevant "LNB
configuration" menu allowing setting change to your convenience and check of the signal quality.
Note:
- For more details on possible option settings consult the paragraphs 8.4.2 "Installation / Antenna configuration" and 8.4.3 "Installation /
LNB Configuration". The proper satellite installation requires:
Matching LNB number with satellite name (for instance Astra 19.2 allocated to LNB1)
Right physical connection in between the LNB aiming at a given satellite and the appropriate DiSEqC switch input. In the menu
"Installation / LNB Configuration" (8.4.3 section): LNB1 means "the LNB which is connected to DiSEqC switch input 1, LNB2
means "the LNB which is connected to DiSEqC switch input 2", etc
- If your installation includes an assembly incorporating 2 LNB's combined with a DiSEqC switch in one block (so called mono-block),
consult its user manual to properly allocate each satellite to the relevant DiSEqC switch inputs (Hot Bird respectively Astra 19.2 East
satellite might be allocated to input 1 respectively input 2 of the DiSEqC switch). Make sure Satellite name (Hot Bird for instance) is
allocated to the right LNB number (LNB1 for instance).
10 CONNECTION AND INSTALLATION
English
HOT BIRD
TELECOM
ASTRA
DiSEqC switch
(4 inputs)
Satellite recever
A B C D
Page 61

DAY TO DAY OPERATION 11
6 Day to Day operation
6.1 Switch your receiver ON/OFF
Your receiver is connected to mains and the power switch, located on
the rear panel of your receiver is in the OFF position.
● To switch on your receiver put the power switch in the ON position.
The receiver front panel display gets on, after a few seconds the
Welcome screen is shortly shown then after few tenth of seconds the
receiver is either in standby or in viewing mode.
● To switch off your receiver put the power switch in the OFF position.
Note: During power up after putting the rear panel mains switch to on, it is
normal for the front display to turn off for few seconds. It shall turn on later on
by showing MHP.
6.2 Wake up or Switch your receiver to
standby
● You watch TV or listen to radio, press the standby button to switch your
receiver to standby.
● Your receiver is in standby, to wake it up :
- Either press the P+ or the P- button
- Or press one digit button
6.3 Select TV or Radio mode
Your receiver may work in two modes: TV or radio. To switch between
these two modes, press the RADIO key. If you are watching one of the
TV channels, pressing RADIO tunes to the last tuned radio channel
belonging to the previously selected channel list. Pressing RADIO again
returns to the TV mode - to the last tuned TV channel.
On switching the mode, the Channel Banner appears for its timeout. In
the radio mode, the radio label appears/disappears at random positions
on the screen to avoid damaging your TV screen..
Radio Label
6.4 How to switch between channel lists
Your receiver gives you access up to 6 TV Channel Lists and up to 6
Radio Channel Lists.
To display the currently selected channel list, press the FAV key. To
switch between any available non-empty channel lists of a particular
mode (TV or radio), press C / B. The name of the selected list
appears at the top of the Channel List window. Then select the channel
by pressing V or W, or number keys. Each time you highlight a noncurrent channel, the
[OK] icon appears in the Channel Banner. To
tune to this channel, press
OK.
TV Channel List
Note: Channels lists allow you to work in so-called browsing mode. In this mode,
the box remains tuned to the same channel, while you browse through channels
and programs.
English
Page 62

6.5 How to use the channel Banner
Channel Banner appears at the bottom of the screen when you tune
your receiver to a new channel or when you press the mmkey. It offers
you basic information about individual programs and facilitates surfing
through channels and programs. When you are in the Channel Banner,
you can only browse through channels belonging to the currently
selected channel list. The Channel Banner disappears automatically
after a few seconds, or when you press EXIT.
6.5.1 Channel Banner Icons
This icon informs that some program information is available for the
program displayed in Channel Banner.
This icon informs that the current channel is locked.
This icon informs that the viewing reminder has been set for a particular
program.
This icon informs that the recording reminder has been set for a
particular program.
This icon informs that a program with more than one soundtrack is
broadcast.
This icon informs you that pressing OK tunes to the channel that the
Channel Banner refers to, or sets/cancels a reminder.
This icon informs you that the program is broadcast with the surround
sound.
This icon informs you that the particular program is parentally locked.
This symbol informs that you may launch external applications by
pressing OK.
This icon informs that teletext is broadcast on the currently tuned
channel.
This icon informs that you may select subtitles for the current program.
6.5.2 How to Select Programs
The Channel Banner allows you to display information concerning the
current program and the next program broadcast on the selected
channel. Press C / B to see what is broadcast next on the currently
selected channel.
If you select one of the future programs, pressing OK allows you to
set/cancel a reminder. For more information on setting reminders, see
the Reminders and Timers 6.10 section later in this manual.
Current Program Info
12 DAY TO DAY OPERATION
English
Page 63

DAY TO DAY OPERATION 13
6.5.3 How to Select Channels
There are three different ways of changing channels:
- Press V or W to scroll through the current channel list. Please note
that your receiver remains tuned to the current channel.
- When you press P+ / P-, your receiver tunes to the next
higher/lower channel from the currently selected channel list.
- You can also select channels by entering their numbers directly. Once
you press a number key, the channel number entry box appears in the
upper right corner of the screen.
● Please note that pressing BACK allows you to switch between two
channels: the current channel and the previously tuned channel within
the selected channel list.
Channel Number Entry Box
6.6 How to Change momentarily the
current Program Options
Press the 44or iikey, to gain access to the Options menu. This menu
allows you to change the Audio Language, Subtitle Language, or the
Display Format for the currently broadcast program, and the Teletext
Language for the currently tuned channel.
Audio Language
If available, you can select among different audio languages.
Subtitle Language
If available, you can select among different subtitle languages.
Teletext Language
If available, you can select among different teletext languages.
Display Format
If you have a TV set with 4:3 picture format, and the transmission is in
16:9 format (or the other way round), you can change display format for
the currently broadcast program.
For example, if you have a TV set with the 4:3 picture format and the
transmission is 16:9, you can select Letter-box, Pan-Scan or Full
Screen. If you select Letter-box, you will get a complete picture with
black areas at the top and bottom.
Display Format (Letter-box)
6.7 How to Display More Program Info
The [ i ] icon displayed in the Channel Banner informs that pressing
the mmkey displays some additional information about the currently
selected program. If there are more pages of program info, pressing
mm
displays consecutive pages of program info. To remove the Program
Info window from the screen, press EXIT, or mmwhen the last page of
program info is displayed.
Program Info Window
English
Options Menu
Page 64

6.8 How to use TV/STB button
The TV/STB (or TV/SAT) key is used to switch between watching satellite digital programs via your digital receiver and
standard analogue programs on your TV. The function of the button depends on whether you have connected your digital
receiver using the scart lead supplied.
Pressing this key again will switch back to watching a satellite digital program.
In most cases, having connected your satellite digital receiver and TV by a scart lead, you will not have to manually select the
correct program on your TV for watching satellite digital programs. To ensure the correct program is selected automatically,
your TV should be switched on before your satellite digital receiver. If your TV is switched on after your satellite digital
receiver, you may need to use the TV/STB (or TV/SAT) key to select the correct program on your TV.
6.9 How to Run Interactive Applications
Your receiver supports downloading and running MHP interactive
applications. Some applications are run automatically on tuning to a
respective channel. Other applications will be launched manually.
If you tune to a channel on which interactive applications are broadcast,
you will see the [ mhp ] icon on the Channel Banner. This icon is
displayed alternately with the [ OK ] icon prompting you to press the
OK key. Pressing OK brings up the Applications window allowing you
to select the application you want to run. Once you select the
application, press OK again. However, if you are not interested in
running interactive applications, press EXIT to remove the
Applications window from the screen.
To quit the interactive application, read the on-screen descriptions
brought to you by the application itself or tune to a different channel by
pressing P+ / P-.
Please note that if you do not want any interactive applications to be run
automatically, set the Application AutoSTART option in the Display
Options screen to NO.
Applications Window
6.10 Reminders and Timers
6.10.1 Difference Between Reminder and Timer
The aim of the reminder/timer is to remind you that the program you
scheduled for viewing is about to start. The main difference between a
reminder and a timer is that you set reminders from the Channel
Banner. To set a reminder, select one of the future programs in the
Channel Banner and press OK. Then you are prompted to decide
whether you want to set a viewing or a recording reminder.
Setting a Reminder
14 DAY TO DAY OPERATION
English
Interactive Applications Icon
Page 65

DAY TO DAY OPERATION 15
Timers are independent from the broadcast schedule. You will set timers
from the Timer Manager. To get access to the Timer Manager, select
the Timer Manager item from the Main Menu. Timer Manager
contains all timers and reminders defined so far. It allows you not only to
set timers but also to delete or modify selected timers/reminders. You
will be asked to enter Timer Manager each time any conflicts between
reminders/timers occur. You will find more information on Timer
Manager later in this manual.
Setting a Timer
6.10.2 Viewing and Recording Reminders/Timers
There are two types of reminders/timers: a viewing reminder/timer
and a recording reminder/timer. If you have set a reminder/timer, its
pop-up appears 1.5 minute before the program starts. If you do not
respond to the viewing reminder/timer pop-up, the reminder/timer is
canceled. If you do not respond to the recording reminder/timer pop-up,
the receiver tunes to the appropriate channel at specified start time.
Please note that when you set a recording reminder/timer, the recording
is protected from being interrupted. If you want to interrupt the
recording, press EXIT. This brings up a pop-up informing you how long
the recording will last. Then, you will be asked to press OK to interrupt
the recording or press EXIT to dismiss the pop-up from the screen.
Viewing Timer Pop-up
Recording Pop-up
6.10.3 Reminder/Timer Conflicts
Your receiver allows you to set up to 8 reminders/timers. Each
subsequent reminder/timer is checked against any conflicts with the
previously set reminders/timers. If you set a reminder or timer and such
a conflict occurs, a conflict pop-up appears. You will be prompted to
press EXIT to cancel the current reminder, or to press OK to get
access to Timer Manager. The currently set reminder will be listed in
the Timer Manager as a disabled reminder (marked with the ? sign).
This reminder can only be accepted if you delete any conflicting
timers/reminders or you change some of its data. For more info, see the
Timer Manager section below.
Reminder Conflict Pop-up
English
Page 66

6.10.4 Timer Manager
Timer Manager contains a list of all reminders and timers defined so far.
In the Timer Manager you can perform the following operations.
Setting a Timer
Press OK to set a new timer. This will bring up the Setting a Timer
screen. Fill in any required data and press OK to confirm. If the data are
valid and there are no conflicts with the previous reminders/timers, you
return to the Timer Manager screen. The newly defined timer appears
in the Timer Manager list.
Modifying Reminders/Timers
In the Timer Manager screen, highlight the timer/reminder you want to
modify and then press B. This will bring up either Modifying a Timer
or Modifying a Reminder screen. Change the reminder/timer data and
then press OK to confirm.
Deleting Timers/Reminders
Highlight the reminder/timer you are not interested in and press C.
Then you will be prompted to confirm the delete operation.
Modifying a Timer
16 DAY TO DAY OPERATION
English
Timer Manager
Page 67

MAIN MENU 17
7 Main Menu
7.1 Menu Structure
Your receiver offers Menu System that allows you to change the way many of the features of your receiver operate. To gain
access to the Menu, press the MENU key. The Main Menu consists of 7 submenus. To evoke one of the submenus,
highlight its name using V or W keys and then press OK. You may also press the number key to highlight a respective
menu item. To return to the Main Menu from one of its submenus, press BACK. To exit the Menu System immediately,
press MENU or EXIT.
Here is a short overview of basic functions performed by individual submenus.
Channel Manager
Allows you to change the organization of favorite channel lists, to edit the
content of individual channel lists, and to get access to the Channel
Pool. For more information, see the 6.4 and the 8.1 sections. Also see
the Channel Manager section below.
Timer Manager
You will find here a list of any reminders and timers defined so far. You
will mainly use Timer Manager to set timers and to delete/modify
timers/reminders. For more information, see the Timer Manager 6.10
section earlier in this manual.
For Parents
This submenu allows you to protect your children from viewing
unsuitable material. Here, you can also change your current PIN code.
You will find more info in the 8.2 section.
English
Page 68

Applications
Allows you to run one of the available Off-the-Air applications. Refer to
6.9 section.
Your Preferences
Allows you to define your preferences concerning on-screen display as
well as audio and subtitle languages. You will find more information in the
Your Preferences 8.2 section.
Installation
Allows you to configure your system, to set up your modem, to search
for existing channels, to check receivers status, to set up local time, and
to restore factory settings of your receiver. For more information, see
the Installation 8.4 section.
Help
Gives you access to the on-line help information concerning the basic
functionality of your receiver.
18 MAIN MENU
English
Page 69

CHANGE THE SETTING OF YOUR RECEIVER 19
8 Change the setting of your receiver
8.1 Channel Manager
When you select the Channel Manager item from the Main Menu, you
get access to Channel Manager submenu. This submenu allows you to
change the way all your channel lists are organized (the List
Organization item) or to change the content of individual channel lists
(the List Editing item). For more information on these two items, see
the 8.11. and the 8.12 sections.
The third option Channel Pool gives you access to the list of all available
channels. From the Channel Pool you may transfer channels to
individual channel lists. You may filter the Channel Pool for a particular
satellite, mode and a particular type of channels. You may also sort all
channels alphabetically from A to Z or from Z to A.
From the Channel Pool, you may delete channels by pressing OK
(deleting individual channels) or by pressing B (deleting all channels). If
you decide to delete all channels, you will be prompted to decide
whether you want to delete all channels or only those channels you
havent transferred to your channel lists yet.
Channel Pool Content
8.1.1 How to organize a channel list
Once you have set up your receiver, you have access to 6 TV channel
lists and 6 radio channel lists. These channels lists are assigned default
names and they appear in a predefined order.
To change the way your channels lists are organized, press the MENU
key and then select the List Organization item from the Channel
Manager submenu.
The List Organization screen allows you to perform the following
operations:
- delete the list that you are not interested in (Delete List ).
- create a new list (Add List).
- change the name of the channel list (Rename List).
- change the order in which the channels lists are switched while viewing
(Reorder Lists).
Deleting Channel List
English
List Organization Adding a New List
Channel Pool Filtering
Page 70

On first entry to the List Organization screen, you will see all available
channel lists of the currently selected mode: TV or radio. To change the
mode, press the RADIO key. Then select an appropriate command by
highlighting the Modify item and press C / B until you see the desired
command. The prompts displayed in the help bar at the bottom of the
screen are modified appropriately then. Please follow the prompts
displayed on the screen.
Confirm Deleting Channel List
8.1.2 How to modify a channel list
Once you set up your receiver, you have access to 6 TV and 6 radio
channel lists. If you have set up your receiver for other satellite than one
or several of those reported in the receiver satellite list, these channel
lists are empty. To edit channel lists, press MENU and select the List
Editing item from the Channel Manager submenu.
This will give you access to the List Editing screen. First select the
Mode and the Channel List you want to modify. Then select an
appropriate Modify command.
Using the List Editing screen, you may perform the following
operations:
- add channels to the selected channel list (Add Channels) from the
Channel Pool. You will find more info on adding channels below.
- delete channels from the selected channel list (Delete Channels).
Please note that deleted channels are still available in the Channel
Pool and can be inserted again.
- change order of channels within the selected channel list (Move
Channels)
- lock/unlock individual channels (Lock Channels).
Channels Source Selection
Adding New Channels to Channel Lists
If you select the Add Channels command, you will be prompted to
select the name of the satellite and the type of channels you are
interested in. On confirmation, two columns of channels appear. On the
left, you will see a list of all channels of a particular type from the
selected satellite. On the right, you will see the content of the selected
channel list. Highlight the channel you want to add to your list and then
press OK. Please note, that you may also add all channels by pressing
RADIO and delete channels from your favorite channel list. To move
highlight between these two channel lists, press B / C.
Adding Channels to List A
20 CHANGE THE SETTING OF YOUR RECEIVER
English
List Editing Screen
Channel Pool Filtering
Page 71

CHANGE THE SETTING OF YOUR RECEIVER 21
8.2 Specially for parents
Your digital receiver gives you access to a few options allowing you to
protect your children from viewing unsuitable material. Press the
MENU key and then select the For Parents submenu to bring up a list
of protection items. The following protection levels are available:
- The Decoder Lock item may facilitate viewing for those viewers who
have full access to the receiver. If you switch the Decoder Lock
option to No, you will not be prompted to enter the PIN code.
- You may set the current parental level, for example 15 Years using the
Parental Level option. Then any programs unsuitable for the audience
younger than 15 years will be blocked from viewing.
- If you decide to change your PIN code, select the Change PIN Code
item. Change your PIN code to a value you can easily remember. If you
happen to forget your PIN, call your customer service center.
- Additionally, you may protect whole channels. For more info on how
to lock channels, see the How to Lock Channels later in 8.1.2. section.
On tuning to such a channel, you will be prompted to type in the PIN
code.
Decoder Lock
Parental Level
8.2.1 Your PIN code
PIN code is your personal 4-digit number that is used to restrict access
to your receiver. Initially, it is assigned the 1234 value. You can use PIN
to prevent children from viewing unsuitable programs. It is also used to
protect receivers settings from being changed. Whenever an attempt to
get access to a program or feature locked by PIN is detected, you will be
prompted to type your PIN code. You can change your PIN code using
the Change PIN Code item from the For Parents submenu.
Enter PIN Code
English
For Parents Submenu
Page 72

8.3 Your Preferences
Your Preferences submenu contains two items: Display Options and
Language Options.
8.3.1 Display Options
The Display Options screen allows you to define some options related
to displaying information on the screen.
Time and Date
Blocks the current time and date from being displayed in the Channel
Banner mode.
Channel Number
Blocks the channel number from being displayed in the top right corner
of the screen.
Channel Banner Duration
Specifies how long the Channel Banner remains displayed.
Volume Bar
Bocks the volume bar from being displayed.
Note:
1- The YES option shall be set if Volume & Mute are controlled via the receiver
(so called STB).
2- The NO option shall be set if Volume & Mute are control by the TV set.
Transparency
Changes the transparency of the on-screen display.
Application AutoSTART
Defines whether MHP applications are to be launched automatically once
you tune to a channel on which external applications are broadcast.
Technical Info
Decides whether some technical info such as satellite name and the
service-id are to be displayed in the Program Info window.
8.3.2 Language Options
The Language Options screen allows you to define some options
related to language preferences. Change any languages according to your
preferences and then press OK to confirm them.
Language Options Screen
8.4 Installation
Once your satellite receiver has been properly installed and configured,
you will rarely use the Installation submenu. However, the Installation
submenu will be useful, if for example, you buy a new TV and you want
to make sure your receiver makes the best use of the new TVs features,
or you change your antenna setup.
Below, you will find description of some of the Installation submenu
screens.
Installation Submenu
22 CHANGE THE SETTING OF YOUR RECEIVER
English
Your Preferences Submenu
Display Options Screen
Page 73

CHANGE THE SETTING OF YOUR RECEIVER 23
8.4.1 Settings
The Settings submenu allows you to change TV/system/modem settings,
to adapt the Country setting as well as to adjust the local time.
Settings Submenu
8.4.1.1 Installation / Settings / TV Settings
The TV Settings screen contains two options: TV Screen Format and
Display Format. Change the TV Screen Format setting, if necessary.
You may also change the default Display Format value (Letter-box) to
change the way the video is transformed if the broadcast aspect ratio is
different than the aspect ratio of your TV. Read the descriptions that
appear in the TV Settings screen before you make a decision.
TV Settings Screen
8.4.1.2 Installation / Settings / System Settings
The System Settings screen contains some of the configuration
parameters you may change.
TV SCART Output, VCR SCART Output
Select the appropriate format of the output signals. We advise RGB
format for TV SCART because it gives the best picture quality.
Dolby Digital
If you use the Dolby Digital receiver, change the value of the Dolby
Digital option to Ye s .
Note: If you set this option to Yes, when the broadcast carries Dolby Digital:
- No audio will be available at receiver's TV & VCR SCARTs as well as L/R audio
outputs. Only Dolby Digital bit stream (AC3 - 5.1) will be available at Digital
Optical Out.
- During a timer, the receiver will automatically switch back to PCM (2 channel
in digital) and audio will be available at receiver's TV & VCR SCARTs as well as
L/R audio outputs to allow recording of audio.
Auto Upgrade
When you switch your receiver into the standby mode, the application
checks whether a new software version is available. If the new software
version is detected, you will be informed about the availability of the
receivers upgrade once you have switched your receiver into the
operate mode. However, you may switch the Auto Upgrade option to
Ye s. In this case the receivers software will be upgraded automatically
when the receiver is in the standby mode.
You will find detailed info concerning: the Easy Recording, Recording
Type and Device settings in the Advanced Settings 9.1 - 9.2 sections.
English
System Settings Screen
Page 74

8.4.1.3 Installation / Settings / Modem Settings
Your receiver is equipped with an internal modem. To configure your
modem parameters use the remote control keys presented in the help
bar. Pressing BLUE allows you to enter letters, pressing YELLOW
switches between lowercase characters and uppercase characters,
pressing RED gives you access to a table of special characters. If you
want to delete characters in the entry box, press the mmkey. Once you
have configured your modem, press
OK to confirm its configuration.
Modem Settings Screen
8.4.1.4 Installation / Settings / Country
The Select Country screen allows you to select the country for which
your receiver shall be configured. Press V or W to highlight the
country, and then press
OK to make a selection. You may need this
option if you take your receiver to another country or if you have
selected the wrong country during the first-time installation of your
receiver.
Select Country
8.4.1.5 Installation / Settings / Local Time
You may need to adjust your local time. Use the C / B keys to change
the Time Zone until the Local Time setting corresponds to your local
time. Then press the OK key to confirm any changes.
Local Time Screen
8.4.2 Installation / Antenna Configuration
The Antenna Configuration screen allows you to set the following
options.
LNB Power
It may be assigned two values: ON (default setting) or OFF. It may be
necessary to deactivate LNB supply for some antenna systems.
LNB Power (Standby)
It may be assigned two values OFF (default setting) or ON. You may
need to activate LNB supply in standby mode for some antenna systems.
Antenna Control
It may be assigned three values: OFF (default value), Tone Burst, or
DiSEqC 1.0. Select the setting applicable to your antenna system.
24 CHANGE THE SETTING OF YOUR RECEIVER
English
Antenna Configuration
Page 75

CHANGE THE SETTING OF YOUR RECEIVER 25
8.4.3 Installation / LNB Configuration
Note: We strongly advise you to keep the Astra 19.2° East satellite in your
installation as LNB1 because your satellite receiver software may only be
upgraded via the Astra 19.2° East satellite. In this way, you can enjoy new
software versions of your receiver can be updated.
Antenna Control = Tone Burst or DiSEqC 1.0
If you have selected in the Antenna Configuration screen either a
Tone Burst or a DiSEqC 1.0 switch, you will get access to the LNB
Configuration screen. Highlight the LNB that you want to configure and
then press OK to display a list of configuration parameters concerning
the selected LNB. Do the same for any active LNB in your antenna
setup. Please note that each LNB corresponds to one satellite.
LNB Configuration Note: For more details about installation of antenna set up including a DiSEqC
switch refer to 5.3.2 section.
Antenna Control = Off
If you have not selected Tone Burst / DiSEqC 1.0 switch in the
Antenna Configuration screen (you want to watch channels from one
satellite only), selecting the LNB Configuration gives you a direct
access to the LNB Configuration screen listing any configuration
parameters of the single LNB existing in your antenna setup.
By default, the LNB Type option is set to Universal. Change this setting
if necessary and type in appropriate frequency (-ies). Consult the User
Manual of your LNB.
Checking Signal Strength/Quality
To check the signal level/quality coming from your antenna, press the
RED key in the LNB Configuration screen. In the Signal Meter
screen, you can change the characteristics of the transponder that will be
used to test the signal quality from the satellite allocated to a respective
LNB. If the signal strength/quality are good, your antenna is properly
aimed at the respective satellite. If the signal strength/quality is poor,
change the antenna orientation. Once the antenna is properly aimed, do
not forget to fasten it. Now you are ready to initiate the Channel Search
procedure.
Signal Quality/Strength (Astra)
Adding/Removing Symbol Rates
To modify symbol rates that will be used during the channel search
procedure, press mm. The factory settings of symbol rates include the
most common values encountered on individual satellites.
Symbol Rates Table
English
LNB1 Configuration Screen
Page 76

8.4.4 Installation / Channel Search
Once you select the Channel Search item from the Installation submenu,
you will be prompted to decide whether you want to search for new
channels or whether you want to reinstall all channel lists.
If you select the Search for New Channels item, your channel lists
remain intact. All the newly found channels will be stored in the Channel
Pool. Once the channel search procedure has been completed, you will
be prompted to transfer any newly found channels to your channel lists.
Channel Searching Method
If you select the Reinstall All Channels Lists item, the predefined
channels lists available for the currently selected country will be
recreated. Remember, however, that these predefined channels are from
Astra19.2° or other satellites belonging to the list reported in the Satellite
Selection menu. If your antenna is aimed at a different satellite, then you
will have to create your channel lists manually transferring channels from
the Channel Pool to individual channel lists.
Sattellite Selection
If your antenna setup allows your receiver to scan more than one
satellite, the Satellite Selection screen appears that allows you to
exclude some of the satellites from the channel searching procedure. On
pressing OK the channel searching procedure gets initiated. You may
interrupt this procedure by pressing BACK. Follow the prompts
displayed on the screen.
Channel Search in Progress
8.4.5 Installation / Decoder Status
The Decoder Status submenu gives you access to some system and
loader information. The Signal Meter functionality shows the satellite
signal strength helping you to set you antenna dish in the best
position.Decoder Upgrade functionality allows you to perform the
receiver upgrade procedure. Please note that the receiver upgrade is
broadcast on Astra19.2° orbital position. Therefore, if your antenna setup
is not configured for Astra19.2°, you cannot benefit from your receiver.
Decoder Status Submenu
26 CHANGE THE SETTING OF YOUR RECEIVER
English
Page 77

CHANGE THE SETTING OF YOUR RECEIVER 27
Use the Factory Reset item if you want to restore default parameters
of your receiver. Once you get access to the Factory Reset screen, press
C/Bto change the Restore Settings item to Ye s and then press OK
to restore factory settings of your receiver.
Use the Common Interface item if you have inserted the Conditional
Access Module to the Common Interface slot at the front of your
receiver. Here you will get access to any information stored on the CA
smart card.
Factory Reset
English
Page 78

9 Advanced Settings
9.1 Easy Recording
The Easy Recording feature allows you to perform recordings without the necessity to program your VCR. You set a
recording reminder or timer from the Channel Banner or Timer Manager, and the VCR starts/ends recording at the
correct time. Please note, however, that you may utilize the Easy Recording feature provided that your equipment
supports it.
● First of all, consult User Manual of your equipment to check if it supports Easy Recording. Please note that most Philips
VCR/DVD recorders support one of the two Easy Recording options: either Prepare Record (to be checked first) or
Record Link.
● Also, both your TV and VCR shall be equipped with two SCART sockets.
If your equipment satisfies above two conditions, connect your receivers as shown in the Connection diagram below.
Then, select the System Settings item from the Settings submenu, enable the Easy Recording feature, and assign to the
Recording Type an appropriate value: either Prepare Record or Easy Recording. You might have to test both settings to
find out the one applicable for your recorder.
Assuming the settings of your receiver and recorder (refer to your VCR or DVD recorder user manual) are done , to
perform a recording you shall:
- Program a timer with your receiver (refer to 6.10 section),
- Put your recorder in the appropriate status to be controlled by your receiver (refer to the VCR or DVD recorder user
manual).
At timer occurrence your recorder shall start and stop recording automatically.
Note: While the recording is in progress, your receiver is protected from inadvertent action to disrupt the recording. Please note that
during the recording the rEc label is displayed on the front panel display. To cancel the running recording, press EXIT. This brings up a
small window prompting you for confirmation. To cancel the recording altogether, press OK.
English
28 ADVANCED SETTINGS
Satellite recever
Page 79

9.2 Change the Remote Control
and receiver Settings
If you have other equipment in your home and the Philips
remote control of your digital receiver interferes with
them, you can change the setting of your remote control
and the setting of your receiver as well. By default, your
receiver is recognized as Device 1 and the remote
control is set to control Device 1. You may change this
identifier to Device 2 using the System Settings screen
from the Settings submenu. Please note however, that
you will also have to change the remote control setting in
order to be able to control Device 2.
To change the setting of your remote control, proceed as
follows:
1 Make sure that the remote control is in the STB mode
(Press Mode button, the STB LED shall blink, if a
different LED does, Press the Mode button as many
time as necessary to get STB LED blinking).
2 Press number keys 1 and 3 simultaneously and hold them
until LED blinks twice.
3 Release these two keys. The STB LED continues blinking
to indicate that the remote control is in the programming
mode.
4 Enter the new setting within 60 seconds: Either 0039 for
Device 2 or 0038 for Device 1.
Alternatively you may reset your remote control to its
default setting (Device 1) by removing and reinserting
batteries after more than 3 minutes.
9.3 Master PIN Code
If you have forgotten your PIN code, you have the
possibility to reset it to its default PIN code (1234). To
reset the PIN code, type in the so-called Master PIN
Code (00799700). Type in the Master PIN code in quick
succession on the level of the Main Menu. Before you
enter the Master PIN code, press the
mm
key. Please
keep this code secret to prevent your children from
using it.
ADVANCED SETTINGS 29
English
Page 80

10 Decoder Software Upgrade
Your receivers software may be upgraded via the satellite transmission.
New software versions for your receiver will be broadcast on Astra19.2°
orbital position. Therefore, if your antenna setup does not include
Astra19.2° satellite, you will not be able to get your receiver updated.
To check whether a new software version is available for your receiver,
select the Decoder Status from the Installation submenu. Then, select
the Decoder Upgrade item from the Decoder Status submenu. Then
a check is made whether a new software version is broadcast from
Astra19.2° orbital position. If new software exists, you will be prompted
to press OK to initiate the upgrading process.
Checking For Upgrade
Also, when you switch your receiver into the standby mode, the check is
made whether new software version is available. If new software is
detected, either the upgrade is made in the standby mode (the Auto
Upgrade option is set to Ye s), or you are informed about upgrade
availability when you switch your receiver into the operate mode (the
Auto Upgrade option is set to No).
Upgrade Can Be Initiated
To modify the Auto Upgrade option, press the MENU key. From the
Main Menu, select the Installation submenu, then select the Settings
submenu. Next, select System Settings item to get access to the Auto
Upgrade item.
Upgrade Notification (Auto Upgrade = No)
English
30 DECODER SOFTWARE UPGRADE
Page 81

11 Programming the Remote Control for your STB,
TV, Video Recorder, DVD and Tuner Amplifier.
11.1 Setting up your remote control
By default at power up, for instance at first installation or at battery replacememt, your remote control is preset to control
your satellite receiver as well as most of the Philips audio/video appliances.
If you have other brands of appliances, or if the presets do not control your Philips appliance, please follow the procedure
here below.
Note: some of the functions described in the next pages may not be available or have the same behaviour for all brand of the same
appliances.
1 Press the MODE button to select the type of appliance you want to set up (TV, VCR, DVD or Amp/Tuner).
Pressing the MODE button once will remind you of the MODE you are in through green light indicators: left for STB, middle
for TV, right for VCR, left/middle for DVD, middle/right for Amp/Tuner.
To set the MODE, press the MODE button several times until the desired mode is signaled by the light(s). The sequence is:
STB->TV->VCR->DVD->Amp/Tuner. At every key press, lights blink to indicate in which MODE you are in.
2 Press digits 1 and 3 simultaneously untill, the lights corresponding the selected mode blinks twice and remain on.
3 Enter the 4 digit code .The lights couver ponding to the selected mode blinks once at each digit entry. You will find a list of
codes at the end of this manual. (If several codes are possible, go through this procedure with the 1st code and try your
remote control. If you are not successful, repeat the procedure with the second code, and so on).
4 If a valid 4-digit code has been entered, the lights will switch off and blink twice. If not, go back to step 1.
Pressing any key other than digit keys and standby button will automatically exit this procedure.
We advice you to fill in the table below to remind your personal remote control settings, this will be helpful the day you have
to replace the remote control batteries (see NOTE 2 below).
Philips Brand Your appliance Your code
factory setting brand / type setting
TV set 0666
Video Recorder 1608
DVD player / Recorder 0566
Amplifier / Tuner 1316 (Philips tuner)
STB (Your Satellite Receiver) 0038 (Device 1)
Volume Control refer to 4.2.2.1
or 4.2.2.2 section)
Important Notes:
1- You need to reset the STB mode to the factory mode.
If you have made a mistake changing the default setting of the STB mode resulting in the impossibility to control your satellite receiver,
then please refer to above description.
2- Battery change.
If the battery change takes more than 1 minute the remote control may return to the Philips brand factory settings. Therefore you
shall proceed with a new setting of your remote control, with the help of the table above, for your non Philips branded appliances.
3- All manufacturers are concerned about the constant improvement of their products. Although the RC2585108 is compatible with
most of the equipment of the following list, Philips cannot guarantee its operation with the complete range of products on the market.
English
PROGRAMMING THE REMOTE CONTROL 31
Page 82

English
32 PROGRAMMING THE REMOTE CONTROL
11.2 Using your remote control for your TV
TV mode (TV)
Note: Some of the functions described below may not be available or may not have the same behaviour for all appliances.
MENU
- Opens / Closes the Menu.
bb
- Teletext On/Off
GUIDE
- Selects between first and second
audio channel.
¯¯
- Toggles between Teletext and
TV/Teletext mix modes.
RED, GREEN, YELLOW, BLUE,
WHITE
- Contextual keys in teletext mode.
AA
+/-
- Adjusts TV volume.
44 /ii
- Scroll one page up / down in
program list.
VWCB
- Move the selection up, down and
change settings in menu.
OK key
- Acknowledges a menu item
selection.
Standby
**
- Power / Standby / On.
mm
(Wide screen)
- Selects the TV picture format
(16:9, 4:3,).
TV/STB
aa
- Toggles between the different TV
set mode (TV, AV1,AV2, Front,).
0-9
- Selects the relevant TV program.
EXIT
- Menu off.
MUTE
HH
- Mutes the TV sound.
P+ P-
- Selects the next or previous TV
program.
BACK
- Selects the last watched TV
program.
Page 83

11.3 Using your remote control for your VCR
VCR mode (VCR)
Note: Some of the functions described below may not be available or may not have the same behaviour for all appliances.
English
PROGRAMMING THE REMOTE CONTROL 33
MENU
- Opens / Closes the Menu.
G
- Fast rewind.
K
- Pause.
L
- Stop.
B
- Play.
F
- Fast forward.
mm
- Displays On Screen Messages.
0-9
- Selects the relevant TV program.
EXIT
- Menu off.
MUTE H
- Mutes the TV sound.
P+ P-
- Selects the next or previous
program for the VCR.
FAV
- Subtitle On/Off.
VWCB
- Move the selection up, down and
change settings in menu.
OK
- Acknowledges a menu item
selection.
AA
+/-
- Adjusts TV volume.
TV/STB
aa
- Toggles between the different VCR
mode (VCR, AUX 1,
AUX 2, ...).
Standby
**
- Power / Standby / On.
RADIO
- Selects between first and second
audio channels.
Page 84

11.4 Using Remote Control For Your DVD Player
DVD mode (DVD)
Note: Some of the functions described below may not be available or may not have the same behaviour for all appliances.
English
34 PROGRAMMING THE REMOTE CONTROL
MENU
- Opens / Closes the Menu.
G
- Search reverse.
K
- Pause.
L
- Stop.
B
- Play.
F
- Search forward.
mm
- Displays On Screen Messages.
0-9
- Selects directly DVD tracks.
EXIT
- Menu off.
MUTE H
- Mutes the TV sound.
P+ P-
- Selects next previous chapter or
title.
VWCB
- Move the selection up, down and
change settings in menu.
OK
- Acknowledges a menu item
selection.
AA
+/-
- Adjusts TV volume.
TV/STB
aa
- Toggles between DVD and TV
watching .
Standby
**
- Power / Standby / On.
bb
- Teletext On/Off.
GUIDE
- Selects, when available, the view
angle.
RADIO
- Selects when available, an
alternate audio track.
Page 85

11.5 Using Remote Control For Your Tuner / Amplifier
TUNER-AMPLIFIER mode (AMP)
Note: Some of the functions described below may not be available or may not have the same behaviour for all appliances.
(*) Indicates the commands which are only available for Philips Tuner / Amplifiers.
English
PROGRAMMING THE REMOTE CONTROL 35
G (*)
- Selects DVD source.
K(*)
- Selects STB receiver source.
L
- Select TV source.
B (*)
- Selects VCR source.
F (*)
- Selects tuner source.
mm
- Displays On Screen Messages.
0-9 (*)
- Selects the relevant TV program.
MUTE H
- Mutes the Amplifier - Tuner sound.
P+ P- (*)
- Selects the next or previous TV
program.
VW
- Selects next / previous radio
preset.
AA
+/-
- Adjusts the Amplifier - Tuner
volume.
Standby
**
- Power / Standby / On.
CB
- Searches radio programs down /
up.
Page 86

12 Troubleshooting guide
Check the guide below for a possible cause of the problem you are experiencing. The most common problems that arise
are related to cable connections. Make sure that your receiver is properly connected.
English
36 TROUBLESHOOTING GUIDE
Nothing lights up on your receivers front
panel.
Your remote control fails to operate your
receiver.
There is no sound/picture but the current
time is displayed on the receivers front
panel.
There is no sound/picture. However, front
panel display is correct.
Main Menu can be displayed but you
cannot select channels.
Main Menu and Channel Banner can be
displayed, but there is no reception (black
screen).
Intermittent reception (mosaic effect or
frozen image).
The picture is not sharp and text is difficult
to read
You have a CAM module with its card
inserted in the common interface. During
normal reception of channels, black screen
appears.
Check that the mains power cord is correctly connected. Disconnect this cord, and
then reconnect it to ensure it is in place.
Check that power is available at the wall socket.
Check that the mains switch (on the rear panel) is in the ON position.
Make sure your receiver is in the operate mode.
Make sure that you are pointing your remote control at the receiver front panel.
Make sure that the remote control is set to STB mode (see 4.2.1)
Check the batteries in your remote control.
Your receiver is in standby. Press P+ / P- button on your remote control to wake up
your receiver. Alternatively, press Up / Down button on the receivers front panel.
You are viewing TV via your UHF aerial TV connection. Press the TV / STB remote
control button once or twice.
Make sure that the SCART connections are correct.
Connections are correct but the TV set is NOT switched to external AV source.
Press twice the TV / STB remote control button, if the problem is not fixed refer
to the user manual of your TV set.
Your receiver has not been properly configured. Check Antenna Configuration
and LNB Configuration. Perform the Channel Search procedure. (Select the
Installation submenu from the Main Menu). Optionally return to factory setting.
Your channel lists are empty. Transfer channels from the Channel Pool. (Select
Channel Manager from the Main Menu).
Antenna is not receiving the satellite signal. Check the installation and the antenna
positioning (Check signal quality).
There is no power supply fed to LNB. Check the cable link between LNB and the
satellite receiver.
Transmitted signal is too weak. Check the installation and the antenna positioning.
This effect may also be produced by severe weather conditions (e.g. heavy clouds).
Transmitted signal is too strong. Install an attenuator at the dish input.
You may have defective cable links. Check all connections and cables.
Poor signal due to the incorrect positioning of the antenna. Reorient the antenna and
fasten it securely.
The TV SCART output video format is not set to RGB. Change setting of the TV
SCART item to RGB in the System Setting menu.
The TV SCART lead is not connected to the RGB capable SCART socket of your TV
set (refer to TV set user manual for proper connection).
The SCART lead for TV connection is not RGB capable (not fully wired). Use the
SCART cable supplied with your receiver for the connection to the TV set.
Your subscription rights do not include all channels/programs. Select another channel.
Symptom
Remedy
Page 87

This product is in conformity with the requirements of the 95/47/EC
directive.
Video Decoding
MPEG-2 DVB compliant up to MP@ ML
Video bit rate: up to 15 Mbit/sec
Video format: 4:3 (letter- box if source in
16:9) and 16:9
Resolution: up to 720x576 pixels
Audio Decoding
MPEG layer I / II
Operation/Features
Automatic channel installation via scanning
TV & Radio modes
Free-to-air reception
6 favorite TV lists & 6 favorite Radio lists
channel editing for personalized installation (delete, add, move)
Subtitles
Parental lock with PIN code
Full remote controlled
Menu controlled installation and operation using On Screen Display
8 VCR timers
Automatic recording via: reminders, timer programming and Easy
recording for Philips VCR and DVD- RW
Automatic VCR playback: Audio L/R + CVBS or RGB/Fast blanking
Receiver compatible with services based on MHP
Now & next event in
Channel Banner
Software upgrade via over the air download
Suited for feeding a Video projector
Application System Resources
Processor clock speed: 180 MHz
SDRAM - CPU/Video-Graphics 32 MB
Flash memor: 8MB
Satellite antenna interface
Signal input: F-type female
RF output (bypass): F-type female connector
LNB supply (V) 0, 14, 18
LNB current (mA) 350 mA
Tone switching 22 KHz ON/OFF
DiSEqc 1.0
Reception/Demodulation
Demodulation: QPSK
Input frequency range: 950-2150 MHz
Bypass freq. Range: 950-2150 MHz
Symbol Rate 2 - 45 MS/s
Satellite band coverage 10.7-12.75 GHz
Connections
TV SCART:
Output: CVBS or S-Video or RGB/
Fast blanking Volume
controlled audio L/R, Slow
blanking
VCR SCART:
Input: CVBS or RGB / Fast
blanking, Slow blanking ,
Audio L/R
Output: CVBS or S-Video Audio L/R,
Slow blanking during timer if
Prepare Record mode is
activated
Audio CINCH:
Analog audio output: L / R
Digital audio output: S/PDIF
Serial interface: D-9 female
Accessories
- Remote control: Type RC2585108
- Scart cable
- User manual
- Worldwide Guarantee booklet
- Batteries: 2 x 1.5V type AA/R06
- Telephone modem cable
- Mains cord
Miscellaneous
Temperature range (°C)
Operating +5 to 45
Storage: -10 to +70
Mains: 230 V ~ +/-10%; 50Hz
Power consumption: 15W without LNB power
Weight: 1.400 kg
Including packaging 2.5 kg
Dimensions: WxHxD 430mm x 50mm x
255 mm.
English
TECHNICAL SPECIFICATION 37
13 Technical Specification
Due to continued product improvements, this
information is subject to change without notice.
Page 88

TV
A.R. Systems 0064 0583
Accent 0064
Accuphase 0583
Acec 0039
Adcom 0652
Admiral 0120 0445 0114 0190 0291
Adyson 0244 0243
AEA 0064
Agashi 0243 0291 0244
AGB 0543
Agef 0114
Aiko 0036 0243
Aim 0064 0099 0439
Aiwa 0728
Akai 0235 0398 0064 0460 0036 0099 0245
0741 0190 0543 0742 0629 0583 0507
0244 0658 0243 0291 0633
Akiba 0245 0309 0482 0064 0321
Alaron 0243
Allorgan 0233 0321 0244
Allstar 0064
Amplivision 0244 0427 0397
Amstrad 0036 0543 0291 0381 0398 0245 0064
0460 0439 1064 0675
Anam 0064 0036
Anam National 0064 0677
Anglo 0036 0291
Anitech 0036 0291 0064 0309 0129
Ansonic 0397 0064 0036 0695 0401 0190 0319
0129 0438 0286 0274 0039 0131
Apollo 0500
Arc en Ciel 0136 0223
Arcam 0243 0244
Ardem 0513 0741 0064 0583
Aristona 0583 0064 0039
Arthur Martin 0190 0427
ASA 0132 0373 0097 0131 0114
Asberg 0064 0129
Asora 0036
Astra 0064
Asuka 0245 0244 0243 0291 0309
Atlantic 0064 0243 0233 0286
Atori 0036
Auchan 0190 0427
Audiosonic 0036 0064 0401 0136 0741 0742 0244
0397 0291 0245 0513
Audioton 0244 0513 0397 0291
Autovox 0114 0233 0244 0274
AWA 0038 0063 0036 0401 0439 0064 0243
0633 0244 0135 0291
Axxent 0036
Bang & Olufsen 0592 0114
Barco 0407 0190
Basic Line 0401 0064 0190 0695 0583 0036 0245
0309 0244 0482
Bastide 0244
Baur 0222 0539 0064
Bazin 0244
Beko 0513 0741 0397 0064 0633 0742
Beon 0064 0445
Best 0397
Bestar 0064 0397 0401
Bestar-Daewoo 0401
Black Diamond 1064 0583
Black Panther 0129
Black Star 0274
Blacktron 0309
Blackway 0309 0245
Blaupunkt 0222 0227 0354 0482 0197
Blue Sky 0064 0741 1064 0514 0695 0742 0651
0583 0245 0309 0482
Blue Star 0309
Bondstec 0274
Boots 0244 0036
Bosch 0354
BPL 0064 0309
Brandt 0652 0136 0223 0362
Brandt Electronique 0362
Brinkmann 0064 0695 0445 0513
Brionvega 0064 0114
Brother 0291
Bruns 0114
BSR 0190 0321
BTC 0245
Canton 0245
Capsonic 0291
Carad 0637 0064
Carena 0482 0064
Carrefour 0063 0097 0064
Carver 0197
Cascade 0036 0064
Casio 0064 0190
Cathay 0064
CCE 0064 0244
Centrum 1064
Centurion 0064
Century 0114 0274 0265
CGE 0101 0445 0274 0397 0190
Cimline 0036 0245
City 0036
Clarivox 0445 0064 0097 0129
Clatronic 0064 0397 0398 0741 0245 0291 0583
0244 0274 0036 0129 0606 0675
CMS 0243
CMS hightec 0244
Concorde 0036
Condor 0064 0397 0243 0036 0309 0129 0274
0445 0438 0190 0291
Conrad 0064
Contec 0243 0036 0038 0063 0291 0064
Continental Edison 0136 0223 0514
Cosmel 0036 0064
Crosley 0114 0274 0101 0190
Crown 0036 0397 0513 0064 0514 0741 0633
0742 0445 0606 0235 0366
CS Electronics 0243 0245 0274
CTC 0274
Curtis Mathes 0120
Cybertron 0245
D-Vision 0064
Daewoo 0661 0651 0401 0064 0583 0036 0243
0245 0244
14 BRAND CODE LIST
38 BRAND CODE LIST
English
Page 89

BRAND CODE LIST 39
Dainichi 0245 0243
Dansai 0064 0291 0243 0036 0063 0244
Dansette 0439
Dantax 0397 0513 0741 0633 0742
Daytron 0036 0401 0064
de Graaf 0235 0190
Deitron 0064 0401 0245
Denko 0291
Denver 0064 0633
Desmet 0064 0036 0114
Diamant 0064
Diamond 0291
Digiline 0064
Dik 0064
Dixi 0036 0064 0274 0244 0114
Domeos 0695
Domland 0421
DTS 0036
Dual 0244 0064 0286 0421 0190
Dumont 0114 0131 0129 0244 0097 0099
Dunai 0190
Dux 0064 0039
Dynatron 0064 0039
E-Elite 0245
Edison-Minerva 0514
Elbe 0462 0265 0286 0319 0397 0190 0064
0245 0438 0637 0244 0543
Elbe-Sharp 0543
Elcit 0114 0274 0543 0129 0190
Elekta 0036 0064 0291 0309
ELG 0064
Elin 0243 0064 0132 0131 0190 0036
Elite 0245 0064
Elman 0129
Elta 0036 0291 0243
Emco 0274
Emerson 0114 0274 0064 0398 0097 0309 0651
0513 0397 0190
Emperor 0309
Erres 0064 0039
ESC 0064 0244
Estèle 0190
Etron 0064 0036 0190
Eurofeel 0291 0244
Euroman 0243 0291 0064 0244 0397
Europa 0064
Europhon 0064 0543 0129 0190 0244 0583 0274
0243
Excel 0064 0583
Expert 0233 0427 0286 0190
Exquisit 0064 0274
Family Life 0064
Fenner 0401 0036
Fidelity 0539
Filsai 0244
Finlux 0132 0131 0064 0741 0373 0244 0099
0190 0543 0742 0097 0114 0129 0438
0658 0519 0507 0500 0445 0633
Firstline 0064 0401 0695 0741 0651 0190 0036
0321 0243 0274 0129 0244 0438 0265
0099 0235
Fisher 0131 0244 0063 0235 0397 0072 0114
0190 0099
Flint 0064 0637 0099 0245 0482 0291
FNR 0129
Formenti 0190 0064 0583 0513 0243 0114
Formenti-Phoenix 0243
Fortress 0120 0114
Fraba 0064 0397
Friac 0036 0064 0129 0397 0682
Frontech 0274 0291 0244 0036 0190
Fujitsu 0233 0099 0129 0244 0190 0036 0064
0286
Fujitsu General 0036 0244 0233 0190
Funai 0695 0291 0321 0439
Future 0064 0583
Galaxi 0129 0064 0190
Galaxis 0397 0445 0064 0129 0583
Galeria 0036
GBC 0190 0036 0401 0245
GE 0309 0587 0136 0362
Geant Casino 0190 0427
GEC 0190 0064 0543 0583 0099 0244
Geloso 0274 0036 0190 0401
General 0136
General Technic 0036
Genesis 0036
Genexxa 0245 0064 0439 0190 0036
Goldfunk 0695
Goldhand 0243
GoldStar 0064 0036 0397 0317 0244 0274 0243
0583 0190 0136 0633
Gooding 0514
Gorenje 0397
GPM 0245
Gradiente 0197 0064
Graetz 0398 0190 0064 0366 0583
Gran Prix 0675
Grandin 0064 0036 0190 0637 0741 0742 0695
0401 0309 0245 0482 0427 0606
Gronic 0129 0244 0190
Grundig 0222 0514 0097 0064 0583 0614 0036
0063 0397
Halifax 0291 0243 0244
Hampton 0243 0244
Hanseatic 0064 0583 0190 0319 0309 0421 0661
0397 0036 0321 0244 0114
Hantarex 0036 0064 0129 0543
Hantor 0064
Hauppauge 0064
HCM 0036 0439 0064 0244 0245 0445 0309
0291
Hema 0244 0036
Hifivox 0136 0223
Highline 0291 0064
Hisawa 0309 0245 0427 0482 0637
Hit 0114
Hitachi 0252 1252 0063 0135 0500 0190 0605
0223 0244 0221 0543 0099 0064 0583
0136 0661 0132 0519 0539 0507
Hitachi Fujian 0135 0252
Hitsu 0036 0482 0245 0637
HMV 0114
Hornyphone 0064 0039
Hoshai 0245 0482
Huanyu 0401 0243
English
Page 90

40 BRAND CODE LIST
Hygashi 0244 0243
Hyper 0036 0243 0244 0274
Hypson 0064 0741 0291 0244 0309 0482 0427
0265
Iberia 0064 0583
ICE 0291 0064 0398 0036 0583 0245 0244
0243
Ices 0245 0243
Icos 0039
Imperial 0064 0190 0397 0101 0583 0438 0445
0274 0223
Indiana 0064
Ingelen 0514 0637 0741 0190
Ingersoll 0036
Inno Hit 0036 0099 0064 0245 0317 0244 0543
0274 0129 0309
Innovation 0064 0583
Interactive 0064 0039 0114 0539 0354 0190 0397
0136
Interbuy 0036 0064 0291 0274 0539 0583
Interfunk 0064 0039 0114 0539 0354 0190 0397
0136 0274
Internal 0064 0651 0401
International 0243
Intervision 0309 0244 0482 0064 0398 0513 0397
0421 0514 0245 0129 0190 0291 0274
0036 0583
Irradio 0036 0064 0245 0274 0317 0398
Isukai 0245 0064 0309 0482
ITC 0244
ITS 0064 0398 0245 0309 0291 0243 0036
0583
ITT 0190 0507 0500 0373 0366 0235 0637
ITT Nokia 0190 0500 0507 0373 0235 0366 0633
0637 0658
ITV 0291 0064 0274 0401
Jean 0063
Jubilee 0583
JVC 0680 0063 0398 0245 0633 0445
Kaisui 0245 0309 0064 0243 0482 0244 0036
Kamp 0243
Kapsch 0190 0233 0286 0131
Karcher 0064 0397 0637 0190 0309 0129 0291
Kathrein 0583 0064
Kawa 0398
Kawasho 0243
Kendo 0637 0064 0190 0539 0397 0438 0129
0274
Kennedy 0190 0233 0462
Kenwood 0132
Kingsley 0243
Kiton 0583 0064
Kneissel 0064 0397 0637 0438 0401 0583 0462
0286 0319 0265
Kolster 0064 0129
Konka 0064 0398 0741 0445 0245
Kontakt 0514
Korpel 0064 0583
Korting 0114 0397
Kotron 0439 0291
Koyoda 0036
Kraking 0265
Kriesler 0039
KTV 0244
Kuba 0190
Kuba Electronic 0190
Kyoshu 0439 0445 0291
Kyoto 0190 0243 0244
LaSAT 0513 0397
Leader 0036
Lemair 0438
Lenco 0064 0036 0190 0401 0583 0131
Lenoir 0036
Lesa 0274
Levis Austria 0064 0583
Leyco 0291 0099 0064 0321 0606
LG 0064 0397 0036 0244 0583 0274 0243
0317 0190 0633 0741 0136
Liesenk & Tter 0354 0064 0583
Liesenkotter 0064 0354 0039 0583
Lifetec 0064 0036 0401 0695 0539 0682 1064
0583 0245 0291
Loewe 0539 0064 0682 0397 0114 0319
Logik 0038 0398
Logix 0695
Luma 0064 0233 0190 0438 0583 0401 0036
0286
Lumatron 0233 0064 0190 0286 0244 0291
Lux May 0064 0036 0583
Luxman 0606
Luxor 0221 0317 0507 0519 0235 0190 0373
0500 0244 0658
Madison 0064 0583
Magnadyne 0114 0274 0543 0129 0190
Magnafon 0543 0129 0243
Magnavox 0064 0063
Magnum 0675 0741 0064
Mandor 0291
Manesth 0064 0583 0244 0291 0321 0190
Manhattan 0064 0695 1064 0190
Marantz 0064 0583 0439
Marelli 0114
Mark 0064 0244 0243 0401 0036 0741 0742
Masuda 0245 0398 0036 0291 0064 0244 0583
Matsushita 0677
Mediator 0064 0583 0039
Medion 0064 0695 0539 0583
Megas 0637
Melectronic 0373 0064 0539 0136 0274 0132 0131
0401 0036 0244 0507 0519 0243 0438
0190 0583 0651 0661 0222
Melvox 0427
Memorex 0036
Memphis 0099 0036
Mercury 0064 0036 0583
Metz 0222 0474 0394 0415 0064 0114 0583
0614 0695
MGA 0064 0583 0245 0131
Micromaxx 0064 0695 1064
Minato 0064 0583
Minerva 0514 0222 0097 0543 0135
Minoka 0439 0064
Mitsubishi 0135 0120 0539 0064 0381 0114 0063
0583 0235
Mitsuri General 0190
English
Page 91

BRAND CODE LIST 41
Mivar 0319 0317 0318 0397 0243 0636 0543
0244
Monaco 0036
Morgan's 0064 0583
Motorola 0120
MTC 0397 0539 0190 0243
Multistandard 0129
Multitec 0064 0695 0513
Multitech 0036 0513 0064 0397 0583 0244 0243
0274 0129 0291
Murphy 0131 0243 0099 0190
Musikland 0064 0245 0274 0583
Myryad 0583 0064
NAD 0190
Naiko 0064 0633 0583
Nakimura 0401 0064 0583
Naonis 0190
NAT 0253
National 0253
NEC 0197 0063 0482 0036 0401 0244 0064
0038
Neckermann 0064 0397 0227 0583 0190 0354 0445
0114 0274 0244 0438 0539
NEI 0064 0398 0190
Nesco 0274
Netsat 0064 0583
Neufunk 0064 0036 0583 0637 0245 0309
New Tech 0064 0036 0583 0244
New World 0245
Nicamagic 0243
Nobliko 0129 0097 0243
Nogamatic 0136 0223
Nokia 0190 0507 0519 0500 0366 0235 0401
0658 0633 0373 0637 0136
Nordic 0244
Nordmende 0136 0223 0587 0222 0064 0362 0190
Norfolk 0190
Normerel 0064 0583
Novak 0039
Novatronic 0064 0132 0401 0583
Nurnberg 0190
Oceanic 0190 0427 0321 0235 0500 0507
Odeon 0291
Okano 0397 0064 0291 0099 0036
Omega 0291
Onwa 0398 0629 0245 0460 0129
Opera 0064 0583
Optimus 0677
Optonica 0120
Orbit 0064 0583
Orion 0064 0583 0682 0321 0038 0036 0129
0291 0439 0543
Orline 0064 0245 0583
Ormond 0695 1064 0064 0583
Orsowe 0543
Osaki 0099 0245 0244 0291 0064 0439 0401
0583
Osio 0064 0583 0317
Oso 0245
Osume 0099 0063 0245 0064
Otto Versand 0063 0120 0539 0064 0583 0222 0136
0321 0253 0274 0244 0036 0309 0543
Pacific 0064 0583
Pael 0243
Palladium 0397 0064 0227 0445 0583 0274 0354
0114 0190 0244 0438 0682
Palsonic 0291 0439 0064 0244 0245 0583
Panama 0036 0244 0291 0243 0064 0274
Panasonic 0677 0253 0394 0543 0064 0190
Panavision 0064 0438 0583
Pathe Cinema 0190 0265 0243 0427 0319 0397
Pathe Marconi 0136 0223
Pausa 0036
Perdio 0099 0190 0064 0243 0309 0583
Perfekt 0064 0583
Pershin 0427
Philco 0114 0101 0445 0274 0190 0397 0064
Philharmonic 0244
Philips 0666 0064 0583 0039 0114 0401
Phoenix 0064 0114 0513 0397 0243 0190 0099
Phonola 0064 0583 0039 0114 0243
Pilot 0064 0583
Pioneer 0064 0397 0136 0190 0513
Pionier 0397 0513
Plantron 0064 0291 0036
Playsonic 0244
Policom 0129 0136 0223 0233 0265
Poppy 0036
Portland 0401 0651
Powerpoint 0514
Prandoni-Prince 0274 0543
Precision 0244
Prima 0036 0291
Prinz 0099 0221
Profex 0036 0190
Profi 0036
Profitronic 0064 0129
Proline 0099 0064 0039 0652
Prosonic 0064 0243 0397 0401 0606 0398 0695
Protech 0064 0244 0036 0274 0129 0291 0445
0695 0309
Provision 0064 0583 1064
Pye 0064 0401 0583 0039 0114
Pymi 0036
Quadra Vision 0427
Quasar 0274
Quelle 0064 0038 0136 0539 0063 0244 0274
0101 0354 0097 0131 0132 0222 0227
0291 0317 0695 0321 0373 0036
Questa 0063
R-Line 0064
Radialva 0136 0245 0190 0064
Radiola 0064 0583 0039 0244
Radiomarelli 0114 0543 0274 0064
RadioShack 0064
Radiotone 0036 0064 0397 0606 0445 0291 0439
0675
Rank 0097
Rank Arena 0063
RBM 0097
RCA 0652 0120 0587 0362
Recor 0064
Rectiligne 0064
Rediffusion 0063
Redstar 0064 0583
Reflex 0064 0695
English
Page 92

42 BRAND CODE LIST
Revox 0064 0397
Rex 0233 0438 0274 0190 0286 0291
RFT 0114 0319 0397 0099 0291
Rhapsody 0243
Ricoh 0064 0583
Roadstar 0036 0291 0245 0445 0064 0309 1064
Robotron 0114
Rodex 0064 0583
Rowa 0291 0244
Royal Lux 0397 0439
Saba 0652 0114 0190 0136 0543 0223 0362
0587
Saccs 0265
Sagem 0482 0637 0309
Saisho 0543 0036 0038 0244 0190 0291 0381
Saivod 0064
Salora 0317 0221 0190 0543 0366 0235
Salsa 0362
Sambers 0543 0129
Samsung 0064 0583 0614 0645 0036 0244 0397
0291 0243 0317 0099 0235
Sandra 0243 0244
Sanela 0265
Sansui 0064 0398 0682
Santon 0036
Sanyo 0235 0319 0063 0038 0397 0366 0099
0243 0244 0131 0072 0036 0190 0064
0135
Save 0064
SBR 0064 0583 0039
Schaub Lorenz 0633
Schneider 0064 0583 0039 0421 0286 0244 0274
0398 0245 0190 0695 0675 1064
Scotland 0190
SEG 0244 0291 0036 0274 0063 0129 0190
0064 0243 0695 0514 0661 1064
SEI 0114 0129 0190 0543 0321 0233 0064
Sei-Sinudyne 0129 0233 0321 0543 0064 0114
Seleco 0398 0233 0286 0190 0438
Sencora 0036
Sentra 0245 0036
Serino 0482 0637 0243
Sharp 0120 1220 0063 0321 0680 0543
Shintoshi 0064
Shorai 0321
Siarem 0190 0114 0129 0543
Siemens 0227 0222 0354 0064
Siera 0064 0583 0039
Siesta 0397
Silva 0243 0064
Silver 0063 0064 0583 0742 0190
Singer 0114 0129 0274 0427 0462 0036 0064
Sinudyne 0114 0129 0321 0190 0543 0233 0064
Sky 0064
Skymaster 0132
Smaragd 0514
Solavox 0099 0190 0064
Sonawa 0245
Sonitron 0235 0397 0366 0244
Sonneclair 0064
Sonoko 0064 0036 0291 0309 0244
Sonolor 0235 0190 0427 0309
Sontec 0064 0397 0321 0036
Sony 1532 1678 1037 0038 0063 0129 0064
Sound & Vision 0129 0245 0401
Soundwave 0064 0445
Spectra 0036
Ssangyong 0036
Standard 0245 0036 0244 0064 1064 0401
Starlite 0036 0190 0064 0291
Stenway 0309 0245
Stern 0233 0286 0190 0291 0438
Strato 0064 0291 0036
Stylandia 0244
Sunkai 0321 0482 0245 0064 0514 0637
Sunstar 0398 0064 0036 0606
Sunwood 0064 0036
Superla 0543 0243
SuperTech 0036 0064 0243 0583 0245
Supra 0401 0036
Susumu 0362 0245
Sutron 0036
Swissline 0274
Sydney 0243 0244
Sysline 0064
Sytong 0243
T+A 0474
Tandberg 0394 0438 0136 0223
Tandy 0120 0245 0099 0244 0274 0190
Tashiko 0063 0244 0197 0243 0190
Tatung 0099 0543 0244 0064 0038
Teac 0244 0539 0064 0482 0291 0036 0439
0695
TEC 0244 0036 0274 0362 0286
Tech Line 0064 0695
Techica 0245
TechniSat 0682
Tedelex 0244 0633
Teiron 0036
Teleavia 0136 0223
Telecor 0064 0190 0245 0244 0286 0421
Telefunken 0136 0101 0128 0362 0289 0223 0064
0513 0652
Telefusion 0064
Telegazi 0064 0190 0286 0245 0291
Telemeister 0064
Telesonic 0064
Telestar 0064 0606
Teletech 0036 0274 0064 0695
Teleton 0244 0233 0190 0286 0063
Televideon 0190 0243
Televiso 0427
Temco 0321
Tempest 0036 0064
Tennessee 0064
Tensai 0131 0245 0064 0244 0321 0036 0132
0401 0398 0274
Tenson 0036
Tevion 0064 0675 0695
Texet 0244 0401 0036 0243 0245
Thomson 0652 0136 0362 0223 0064 0587
Thorn 0265 0101 0064 0131 0362 0539 0401
0135 0136 0252 0099
Thorn-Ferguson 0131 0135 0136 0265 0362
Tokai 0099 0064 0190 0244 0401 0036
English
Page 93

BRAND CODE LIST 43
Tokyo 0243
Tomashi 0309 0245
Toshiba 0535 0063 0097 0129 0244 0136
Towada 0129 0244
Toyoda 0036
Trakton 0291
Trans Continens 0695 0244 0064
Transonic 0064 0482 0614 0539 0291
Transtec 0243
Trident 0543 0244
Tristar 0245
Triumph 0543 0373 0583 0064
Tsoschi 0309
TVTEXT 95 0583
Uher 0064 0233 0401 0445 0513 0397 0286
Ultravox 0114 0129 0401 0274 0243 0190 0064
Unic Line 0064 0500 0482
United 0064 0741 0742
Universum 0373 0132 0222 0500 0274 0519 0507
0397 0227 0445 0038 0539 0321 0063
0097 0190 0291 0131 0064 0438 0317
0101 0354 0695 0244 0136 0658 0036
Univox 0114 0064 0190 0265
Vestel 0064 0190 0244 0583 0695 1064
Vexa 0036 0064
Videologique 0243 0245 0244
Videosat 0274
VideoSystem 0064
Videotechnic 0243 0244 0401
Videoton 0190
Vidikron 0129
Vidtech 0063
Visiola 0243
Vision 0064 0244
Vistar 0233
Vortec 0064
Voxson 0114 0064 0445 0190
Waltham 0244 0695 0445 0064 0136
Watson 0064 0190 0245 0606 0421 0036 0695
1064
Watt Radio 0129 0190 0243
Wega 0063 0114 0064
Wegavox 0036
Weltblick 0064 0244
White Westinghouse 0243 0064
Windstar 0309
Xrypton 0064
Yamishi 0309 0482 0245 0064 0244
Yokan 0064
Yoko 0244 0064 0245 0291 0036 0397 0366
0243 0274
Yorx 0245
Zanussi 0233 0244
Zenor 0366
VCR
Adyson 0099
Aiwa 0334 0027 0068 0375 0379 0064
Akai 0133 0342 0068 0047 0379 0267
Akiba 0099
Akura 0099 0068
Allorgan 0267
Allstar 0108
Ambassador 0047
Amstrad 0027 0305 0099
Anitech 0099
Aristona 0108
ASA 0064 0108
Asuka 0099 0064 0108 0027 0065
Audiosonic 0305
Audioton 0047
AVP 0379
AWA 0064 0305 0070
Baird 0133 0305 0131 0068 0027
Bang & Olufsen 0526
Basic Line 0305 0047 0099
Bestar 0305 0047
Black Panther 0305
Blaupunkt 0253 0108 0222 0061
Blue Sky 0064 0375 0099 0379 0305
Bondstec 0047 0099
Brandt 0068 0347 0348 0520
Brandt Electronique 0068
Brinkmann 0375
Carena 0108
Carrefour 0072
Casio 0027
Cathay 0305
Catron 0047
CGE 0068 0027
Cimline 0099
Clatronic 0047 0099
Combitech 0379
Condor 0047 0305
Crown 0305 0099 0047
Cyrus 0108
Daewoo 0305 0047 0072 0379
Dansai 0099 0305
Daytron 0305
de Graaf 0069 0108 0131 0075
Decca 0027 0068 0108 0035 0094 0375
Deitron 0305
Denko 0099
Diamant 0064
Dual 0068 0108 0305 0027
Dumont 0027 0108 0131
Elbe 0305 0065
Elcatech 0099
Elin 0267
Elsay 0099
Elta 0099 0305
Emerson 0099 0072
ESC 0305 0267 0047
Etzuko 0099
Europhon 0047
Fenner 0047
Ferguson 0068 0347 0348 0520 0027 0305
English
Page 94

44 BRAND CODE LIST
Fidelity 0027 0099 0267 0379
Finlandia 0131 0108 0069 0027 0075 0411
Finlux 0027 0108 0131 0069
Firstline 0099 0375 0070 0064 0072 0069 0305
Fisher 0074 0131 0065 0047
Frontech 0047 0099
Fujitsu 0027
Funai 0027
Galaxi 0027
Galaxis 0305
GBC 0047
GEC 0108
General 0047
General Technic 0375
Genexxa 0131
Goldhand 0099
GoldStar 0064 0027
Graetz 0068 0131 0267
Granada 0131 0075 0108 0267 0064 0253 0069
0027
Grandin 0099 0064 0047 0027 0305
Grundig 0222 0108 0374 0253 0347 0375 0099
Hanimex 0379
Hanseatic 0064 0305 0108 0065
Hantor 0047
Harwood 0099
HCM 0099
Hisawa 0379
Hischito 0072
Hitachi 0069 0068 0027 0267 0108 0131 0411
Hornyphone 0108
Hypson 0099 0305 0379
Impego 0047
Imperial 0027 0267
Ingersoll 0267
Inno Hit 0047 0267 0305 0099
Interbuy 0064 0099
Interfunk 0108 0131
Internal 0305
International 0305 0064
Intervision 0027 0305 0064 0375
Irradio 0099 0064 0108
ITT 0133 0068 0411 0131 0267
ITT Nokia 0075
ITV 0305 0064 0047
JVC 0068 0094 0035 0411
Kaisui 0099
Karcher 0305
Kendo 0133 0342 0375 0099 0064
Kenwood 0068 0065
KIC 0027
Kimari 0074
Kneissel 0379 0375 0064
Korpel 0099
Kuba 0074
Kuba Electronic 0074
Kuwa 0253
Kyoto 0099
Lenco 0305
Leyco 0099
LG 0064 0027 0305
Lifetec 0375
Loewe 0108 0064 1189
Logik 0267 0099 0133
Lumatron 0305
Luxor 0133 0070 0099 0089 0131 0074 0075
Magnavox 0108
Manesth 0099 0072 0108
Marantz 0108 0065 0089
Mark 0305 0047
Matsui 0375 0064 0267 0379 0027
Mediator 0108
Medion 0375 0379
Melectronic 0027 0064 0065
Memorex 0131 0027 0064 0075 0074
Memphis 0099
Metz 0222 0374 0108 1189 0253 0064
Micormay 0375
Migros 0027
Minerva 0222
Mitsubishi 0070 0094 0108
Multitec 0064
Multitech 0027 0099 0047 0131
Murphy 0027
Myryad 0108
NAD 0131
National 0253
NEC 0068 0065 0094 0131 0064
Neckermann 0068 0108
Nesco 0099 0027 0379
Nikkai 0047 0099 0305
Nokia 0131 0133 0342 0068 0305 0267 0075
0069 0108
Nordmende 0068 0411 0347 0348 0521 0555 0094
0520
Oceanic 0027 0075 0133 0108 0131 0068
Okano 0342 0375 0099 0305
Orbit 0099
Orion 0379 0375
Orson 0027
Osaki 0027 0064 0099
Osume 0099
Otto Versand 0108
Palladium 0099 0342 0064 0068 0267
Palsonic 0099 0027
Panasonic 1189 0253
Pathe Cinema 0070
Pathe Marconi 0068
Perdio 0027
Philco 0065 0099
Philips 1608 0108 0411
Phonola 0108
Pioneer 0094 0108 0069
Portland 0047 0305
Prinz 0027
Profitronic 0108 0267
Proline 0027 0347 0348
Prosco 0305
Prosonic 0305 0027
Protech 0108
Provision 0305
Pye 0108
Quasar 0305
Quelle 0108
Radialva 0064 0099 0108 0075
Radiola 0108
English
Page 95

BRAND CODE LIST 45
Rank 0068
Rex 0068 0411
RFT 0047 0099
Roadstar 0267 0099 0064 0305
Royal 0099
Saba 0068 0347 0348 0411 0521 0089 0607
0305
Saisho 0375
Salora 0070 0133 0131
Samsung 0267 0459
Samurai 0047
Sansui 0068 0094 0133 0099 0375
Sanyo 0131 0074 0075 0094
Saville 0379 0305 0267
SBR 0108
Scan Sonic 0267
Schaub Lorenz 0068 0131 0027 0133 0342
Schneider 0099 0027 0064 0108 0305 0267 0069
Seaway 0305
SEG 0099 0267 0305 0108
SEI 0108
Sei-Sinudyne 0108
Seleco 0068 0035 0411 0047 0064
Sentra 0099 0047
Setron 0099
Sharp 0075 0089 0064
Shintom 0099 0131
Shivaki 0064
Siemens 0222 0064 0131 0108 0347 0374
Siera 0108
Silva 0064
Silver 0305
Singer 0072
Sinudyne 0108
Smaragd 0375
Solavox 0047
Sonitron 0074
Sonneclair 0099
Sonoko 0305
Sonolor 0075 0089
Sontec 0064 0305
Sony 0060 0061 0059 0133 1059
Soundwave 0064
Ssangyong 0099
Standard 0305
Starlite 0064 0131
Stern 0305
Sunkai 0375 0305
Sunstar 0027
Suntronic 0027
Sunwood 0099
Supra 0064 0267
Symphonic 0027 0099
Tandberg 0305
Tashiko 0027 0075 0267 0108 0064
Tatung 0027 0068 0108 0075 0070 0375 0379
Teac 0099 0068 0027 0305 0064 0108 0334
TEC 0047 0305 0099
Tech Line 0099
TechniSat 0375
Teleavia 0068 0520
Telefunken 0068 0347 0348 0411 0520 0521 0305
0607
Teletech 0099 0305 0027
Tempest 0047
Tenosal 0099
Tensai 0027 0064 0099
Tevion 0375
Thomson 0347 0348 0068 0094 0411 0520 0521
0555 0305
Thorn 0068 0131 0064
Thorn-Ferguson 0347
Tokai 0099 0064 0068 0131
Tokiwa 0099
Topline 0375
Toshiba 0072 0068 0411 0070 0108
Towada 0099
Tracton 0047
Trakton 0047
TVA 0047
Uher 0064 0267
Ultravox 0305
Unitech 0267
United Quick Star 0305
Universum 0027 0108 0267 0064 0133 0375 0222
0131
Victor 0035 0094
Watson 0108 0379
Weltblick 0064
Yamaha 0068
Yamishi 0099 0305
Yokan 0099
Yoko 0064 0099 0047 0267
English
Page 96

46 BRAND CODE LIST
SAT - STB
Philips 0038
AMP
Arcam 0668
Curtis Mathes 0327
JBL 1030 0695
Marantz 0348
Mark 1030
Optimus 0040
Philips 0668
Pioneer 0040 0327
Sansui 0348
Teac 0448
Yamaha 0170 0381
TUNER
Aiwa 0148 1432
Akai 0142
Arcam 1116 1216
Audiolab 1216
Carver 0387
Denon 1187 1131 1387
Fisher 0387
Grundig 1216 1116
Harman/Kardon 0137
Inkel 0518
JBL 0137
JVC 0101
Kenwood 1054 1340 1596
Marantz 1216 1116 1316
Micromega 1216
Myryad 1216
NAD 0347
Onkyo 0162
Panasonic 1335 1336 1790 1545
Philips 1216 1116 1316
Pioneer 1050 0316
Sansui 1116
Sanyo 0387
Schneider 0137
Sherwood 0518
Sony 1085 1185 1285
Teac 0137
Technics 1335 1336 1790 1545
Thorens 1216
Victor 0101
DVD
3DLAB 0566
A-Trend 0741
Acoustic Solutions 0757
AEG 0815
Afreey 0725
Boman 0810
Brandt 0678
Clatronic 0815
Cyber Home 0741
Cytron 0678
Daewoo 0797
Dansai 0797
Denon 0517
Denver 0815
Denzel 0692
Diamond 0678
Dual 0692 0678 0757
Elta 0717
Emerson 0618
Encore 0725
Enzer 0692
Ferguson 0678
Finlux 0768
GoldStar 0618 0768
Graetz 0692
Grundig 0566 0802
Grunkel 0797
Hanseatic 0768
Hitachi 0692 0600
JVC 0650 0585 0566 0530
Karcher 0810
Kenwood 0561 0517 0764
Kiss 0692
Lenco 0678 0797
LG 0618 0768
Lifetec 0678
Loewe 0566
Magnavox 0530
Marantz 0566
Matsui 0678
MBO 0717
Medion 0810 0678
Metz 0598 0552
Micromedia 0530 0566
Micromega 0566
Microsoft 0549
Monyka 0692
Mustek 0757
Mx Onda 0678
NAD 0768
Naiko 0797
Neufunk 0692
Onkyo 0530
Optimus 0598 0552
Oritron 0678
Palsonic 0716
Panasonic 0517
Philips 0566 0530
Pioneer 0598 0552
Proline 0678
Proscan 0549
English
Page 97

BRAND CODE LIST 47
Radionette 0768
Raite 0692
RCA 0549
REC 0716 0517
Roadstar 0717 0716
Rotel 0650 0585
Saba 0678
Salora 0768
Sampo 0725
Samsung 0600
Schaub Lorenz 0815
Schneider 0678 0810
Scott 0678
SEG 0692
Sharp 0657
Sherwood 0768
Silva 0815
Singer 0717
Skymaster 0757
SM Electronic 0717 0757
Sony 0560 0600
Soundwave 0810
Standard 0678
Sunwood 0815
Teac 0768 0598 0618
Technics 0517
Technika 0797
Tensai 0717 0678
Tevion 0678
Theta Digital 0598
Thomson 0578 0549
Tokai 0692 0725
Tokaido 0725
Toshiba 0530
United 0815
Universum 0768 0618
XMS 0815 0716
Yamaha 0517 0566
Yamakawa 0692
Yukai 0757
Zenith 0530 0618 0768
English
Page 98

48
Page 99

Philips France
Digital Video Set Top Boxes
DV-STB/QP 03130/PH
(report No.)
KONFORMITÄTSERKLÄRUNG
Wir, PHILIPS FRANCE
(Name des Herstellers)
51, rue Carnot 92156 SURESNES Cedex, FRANCE
(Adresse des Herstellers)
erklären auf Grund unserer allgemeinen Verantwortung für das elektronische Produkt:
PHILIPS
DSR5600/00
(Name des Produktes) (Modell)
DIGITALER SATELLITENEMPFÄNGER
(Typ)
auf das sich diese Konformitätserklärung bezieht, den folgenden Standards entspricht:
EN 60065 : 1998,
EN 55022 class B : 1998 + A1 : 2000, EN 55024 : 1998 + A1 : 2001
EN 61000-3-2 : 2000, EN 61000-3-3 : 1995 + A1 : 2001,
EN 55013 : 2001, EN 55020 : 2002,
TBR 21 : 01/1998, TR103 000-1 v1.1.1 : 08/2001
(Titel / Datum den Normen)
gemäß den Vorschriften der R&TTE Richtlinie (1999/5/EG).
Suresnes, den 1. August 2003 P. HAMELET, Product Quality Manager
(Ort, Datum) (Unterschrift, Name und Titel)
Philips France
S.A.S. au Capital de 124 800 000
402 805 527 R.C.S. Nanterre
Siège social : 2, rue Benoît-Malon
92150 Suresnes (Hauts-de-Seine) France
Page 100

DSR 5600 -3111 176 51401 08 / 03
English
Deutsch
 Loading...