

Page 1

Page 2

Safety instructions
English
All the safety and operating instructions should be read and understood before operating the
receiver.
For best results:
- Position your receiver away from radiators or other heat sources.
- Leave a space of at least 3 cm around the receiver for ventilation, making sure that the ventilation
holes are not obstructed.
- This receiver is intended for use in a domestic environment only and should never be operated or
stored in excessively hot, humid or damp conditions.
- Make sure no objects or fluids enter the casing through the ventilation slots. Should this happen,
disconnect your receiver from the mains and consult your retailer.
- For cleaning, use a damp chamois leather. Never use any abrasive cloth, sponge or cleaner.
- Always ensure the receiver is disconnected from the mains when connecting or disconnecting
cables from the receiver.
- Do not disassemble the equipment.There are no user serviceable parts.
Mains connection
Before connecting the receiver to the mains,check that the mains supply voltage corresponds to the
voltage printed on the rear of the receiver. If the mains voltage is different, consult your dealer.
If the receiver will not be used for a long time, unplug the mains cord from the wall socket.
Please wait before connecting your receiver - read on.
2 SAFETY INSTRUCTIONS
Page 3
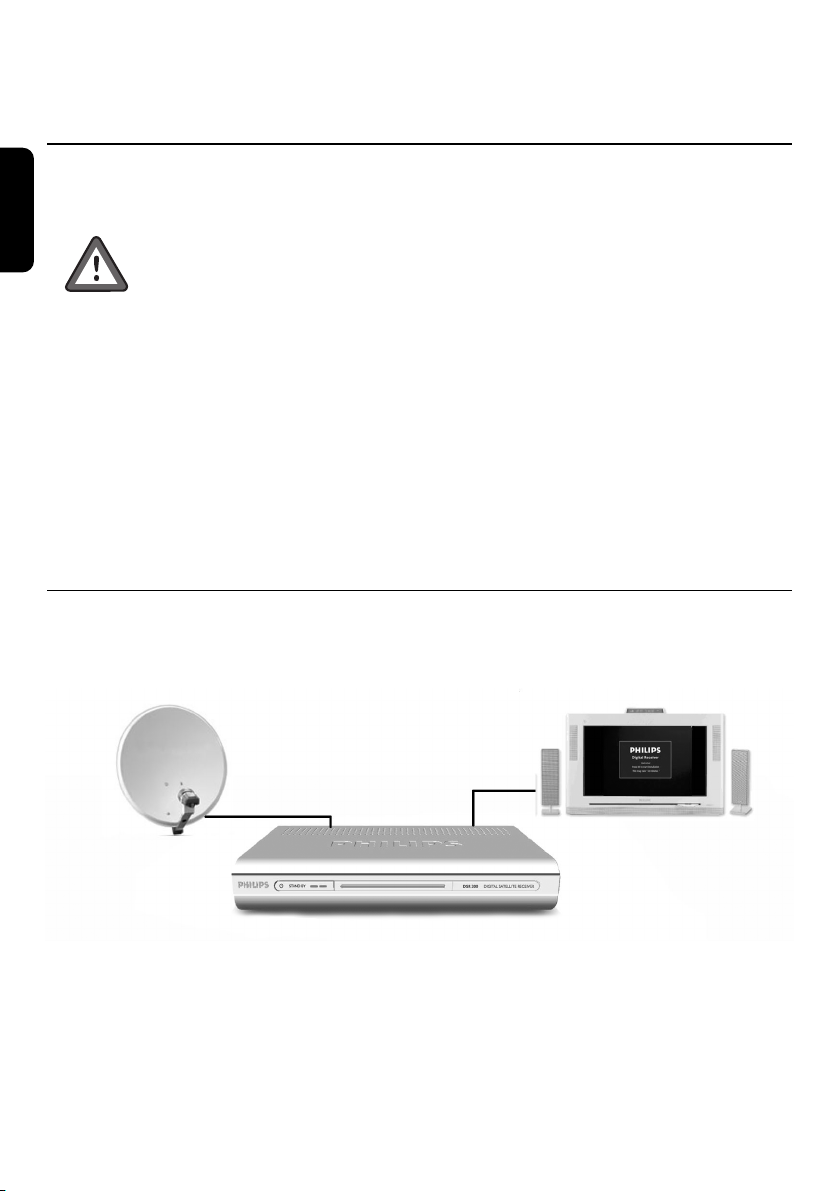
Quick installation guide
Satellite Receiver
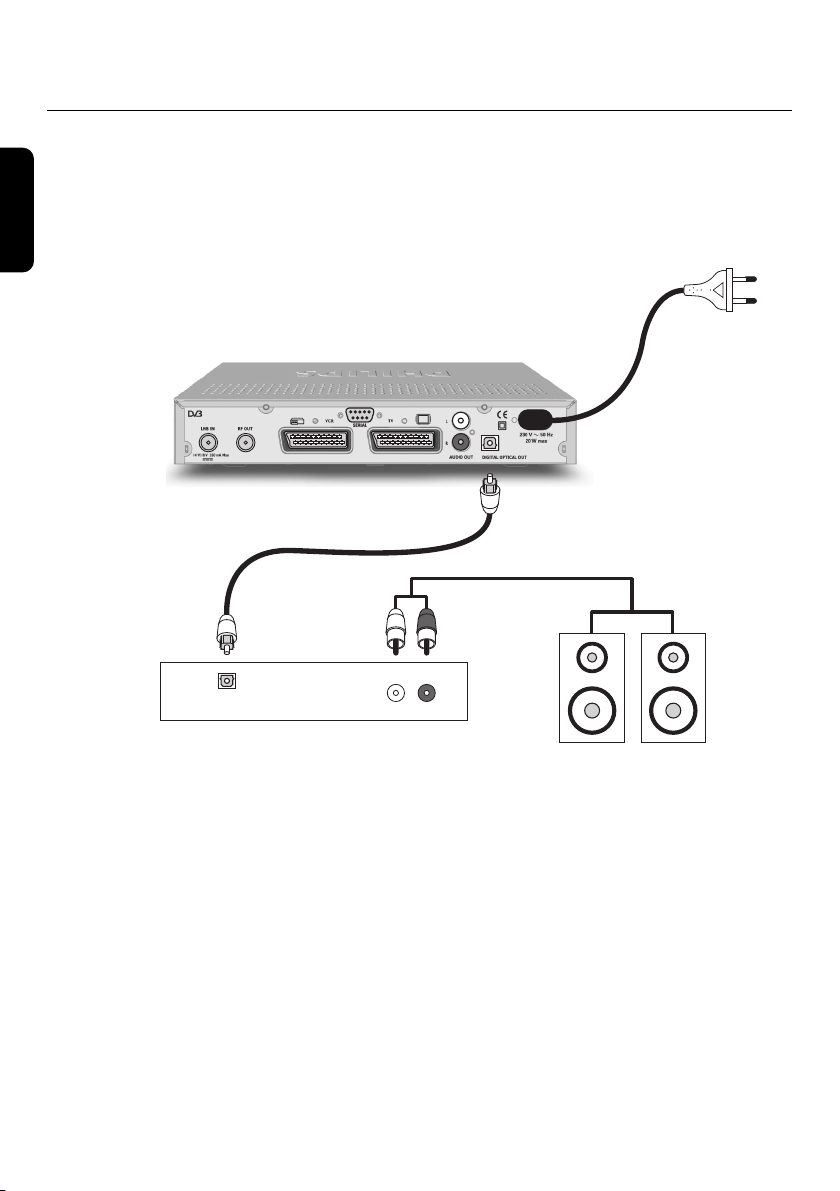
to AC outlet
Digital Audio
Convertor or
Amplifier
LR
LR
AUDIO
PHILIPSPHILIPS
TV set
V
CR/DVD
Satellite Receiver
Cable or Off-air Antenna
IN
FROM ANT
to AC outlet
O
UT TO ANT
EX
T 1
EX
T 2
S
CART
Sa
tellite
D
ish Antenna
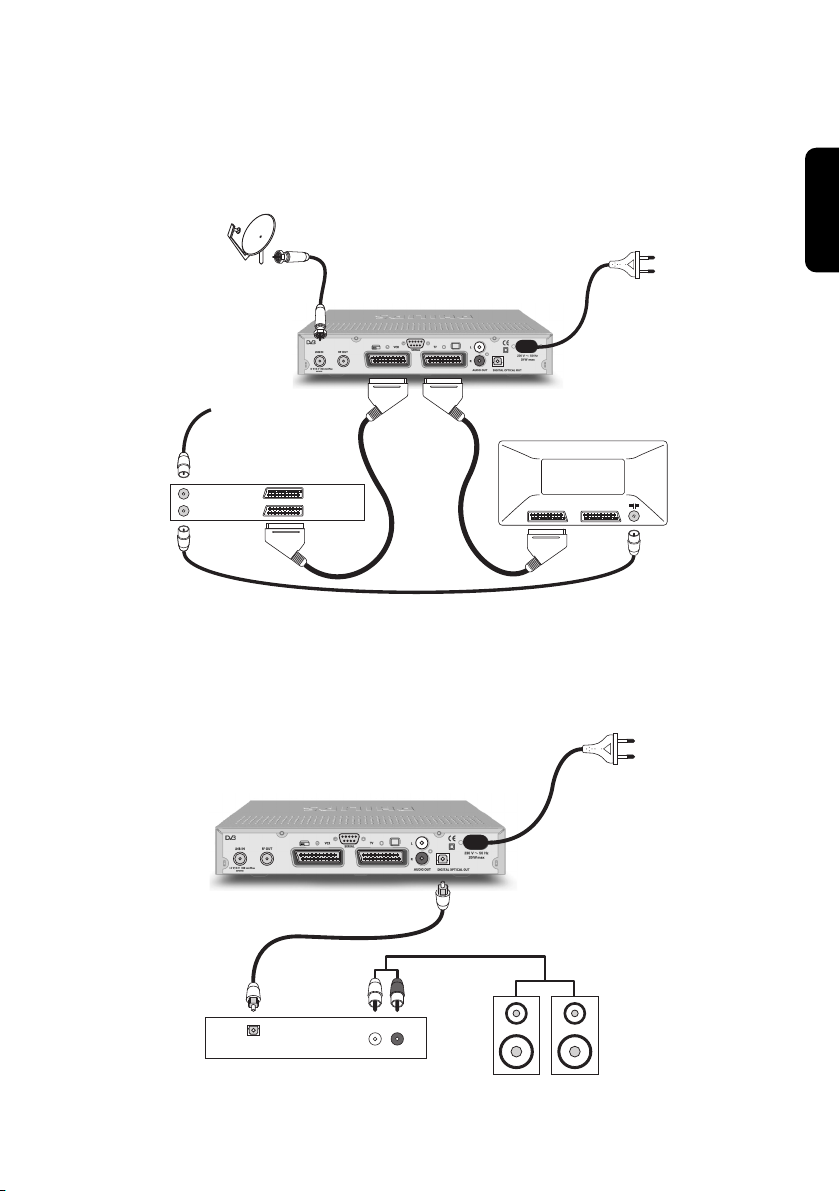
Connecting to a TV and a VCR/DVD player using SCART Support
Note: for best DVD/VCR viewing, connect the DVD/VCR SCART EXT 1 directly to a SCART
of the TV set.
English
Connecting to a Digital Amplifier/Home Theatre/HiFi set
QUICK INSTALLATION GUIDE 3
Page 4

TABLE OF CONTENTS
English
Safety instructions 2
For best results: 2
Mains connection 2
Quick installation guide 3
Connecting to a TV and a VCR/DVD
player using SCART Support 3
Connecting to a Digital Amplifier/Home
Theatre/HiFi set 3
1 Introduction 9
2 Product description 7
2.1 Unpacking the product 7
2.2 Front panel 8
2.3 Rear panel 9
3 Remote control 10
4.3 Connecting to a Digital
Amplifier/Home Theatre/HiFi
system 14
5 First installation 15
5.1 Menu language and port
selection 15
5.2 Channel scanning 16
5.3 Scanning failure 16
5.3.1 Antenna Setting 17
5.3.2 Signal test 17
6 General Viewing Function 18
6.1 Channel Information 18
6.2 Channel selection 18
6.2.1 Using <P+/P-> or
numeric keys 18
6.2.2 Using the channel list 18
4 Connecting your receiver 12
4.1 Connecting to a Satellite
Antenna and a TV 12
Connecting to a
4.2
VCR/DVD player using
the SCART Support 13
4 TABLE OF CONTENTS
TV and a
6.3 Previous Channel Recall 19
6.4 TV or Radio Mode selection 19
6.5 Volume & Audio Control 19
6.5.1 Volume control and Mute 19
6.5.2 Audio Control 19
6.5.3
6.6
Audio language 20
vourite List 20
Fa
Page 5

7 Menu 21
7.1 General information 21
7.1.1 Basics about menu navigation 21
7.1.2 Cancel/Store changes 21
7.2 Guide
(Electronic Program Guide) 22
7.7.4 Product Identifier 30
7.7.5 Factory Default 30
7.7.6 Software update 30
8 DSR 300 Menu Tree 31
English
7.3 Channel Manager 22
7.3.1 Channel Pool 23
7.3.2 Favourites 24
7.4 Parental Lock 25
7.4.1 To change your Pin Code 25
7.4.2 To use Menu Lock 25
7.5 Timer Manager 25
7.5.1 Recording timer 26
7.5.2 Reminder 26
7.5.3 Sleep timer 26
7.6 Setup menu 26
7.6.1 Time Setting 27
7.6.2 System Setting 27
Installation 28
7.7
7.7.1 Antenna Setting 28
7.7.2 Add Service 29
7.7.3 Signal Test 29
9 Troubleshooting 32
10 Technical specifications 34
TABLE OF CONTENTS 5
Page 6

1 Introduction
English
Thank you for buying this product from Philips and congratulations!
The Philips Digital Satellite Receiver DSR 300 allows you to view a wide variety of free-to-air
satellite channels with the best digital picture and sound quality.
With this product you can enjoy advanced functions and features including:
- Digital picture and sound quality
- Wide screen format
- TV SCART and VCR/DVD SCART connector
- Up to 4,000 presets for TV and Radio channels
- Easy installation and use through the well-tested Euphoria User Interface
- Fast zapp
- Personal channel list and favourite lists
- Electronic Program Guide with information about current and next programs
This User Manual covers the installation of your receiver and the necessary steps to use the various
functions, so you can obtain the best from standard as well as unique features.
Lucas Covers
Paris, February 2004
6
INTRODUCTION
Page 7
2 Product description
2.1 Unpacking the product
Unpack the DSR 300 and check to make sure that all of the following items are included in the
package:
1 x DSR 300
-
-
1 x Remote Control Unit
1 x User Manual
-
- 2 x AA batteries
1 x SCART Cable
-
1 x Power Cord.
-
1 x Warranty booklet
-
Plastic bags can be dangerous. Keep the bag away from babies and children to prevent
suffocation.
The symbol on the packaging and User Manual means that the materials are recyclable.
English
PRODUCT DESCRIPTION 7
Page 8
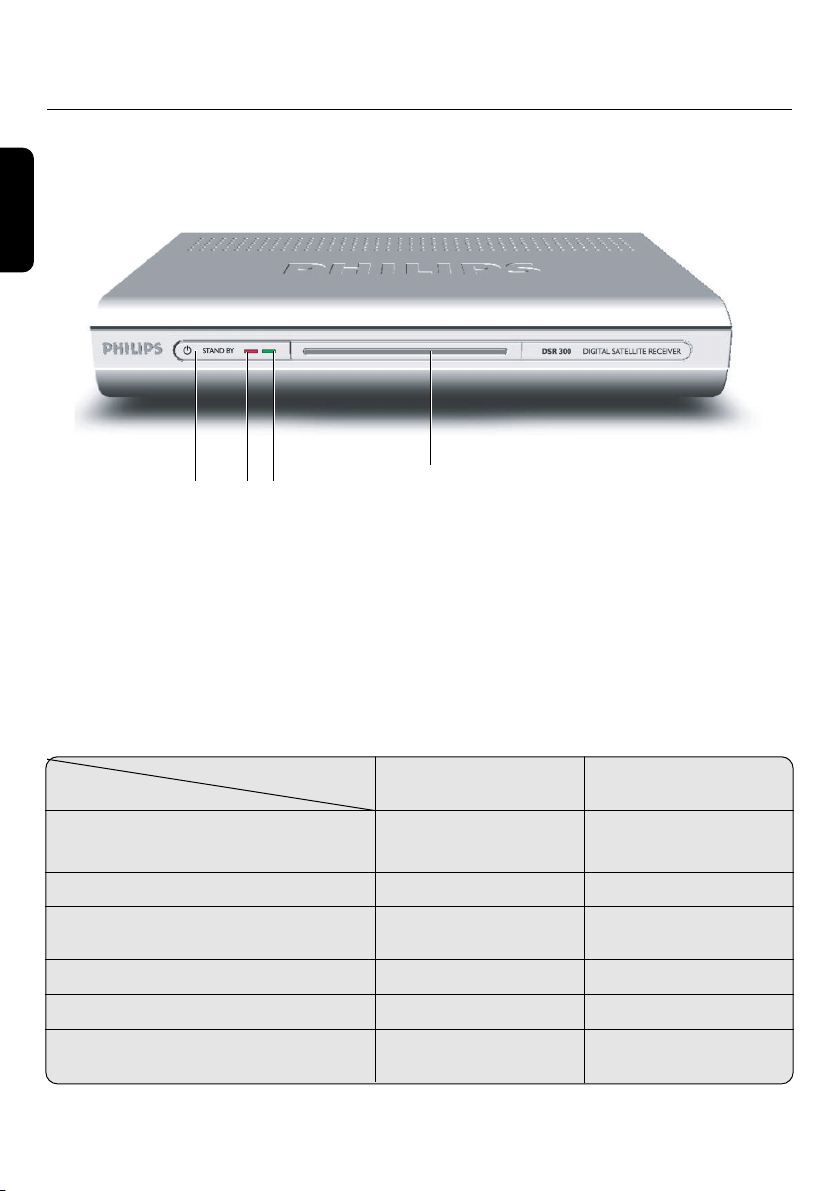
2.2 Front panel
English
Q W E
1 STANDBY button: . . . . . . . . . . . . . . . . . . . . . . . . Switch the receiver OFF.
2 Red LED indicator: . . . . . . . . . . . . . . . . . . . . . . . . Display receiver status (see status indicator table).
3 Green LED indicator: . . . . . . . . . . . . . . . . . . . . . Display receiver status (see status indicator table).
Status indicator table
Mode (Red) (Green/Orange)
Receiver connected to the mains or in
Standby mode ON OFF
Watching TV or listening to the Radio OFF ON
Pressing a remote control key Fast blinking Depending on
Timer active ON ON
Timer active in Standby Slow blinking OFF
Software download Depending on Fast blinking
Remote control
receiver window
LED Left-hand LED Right-hand LED
current mode
current mode
8 PRODUCT DESCRIPTION
Page 9
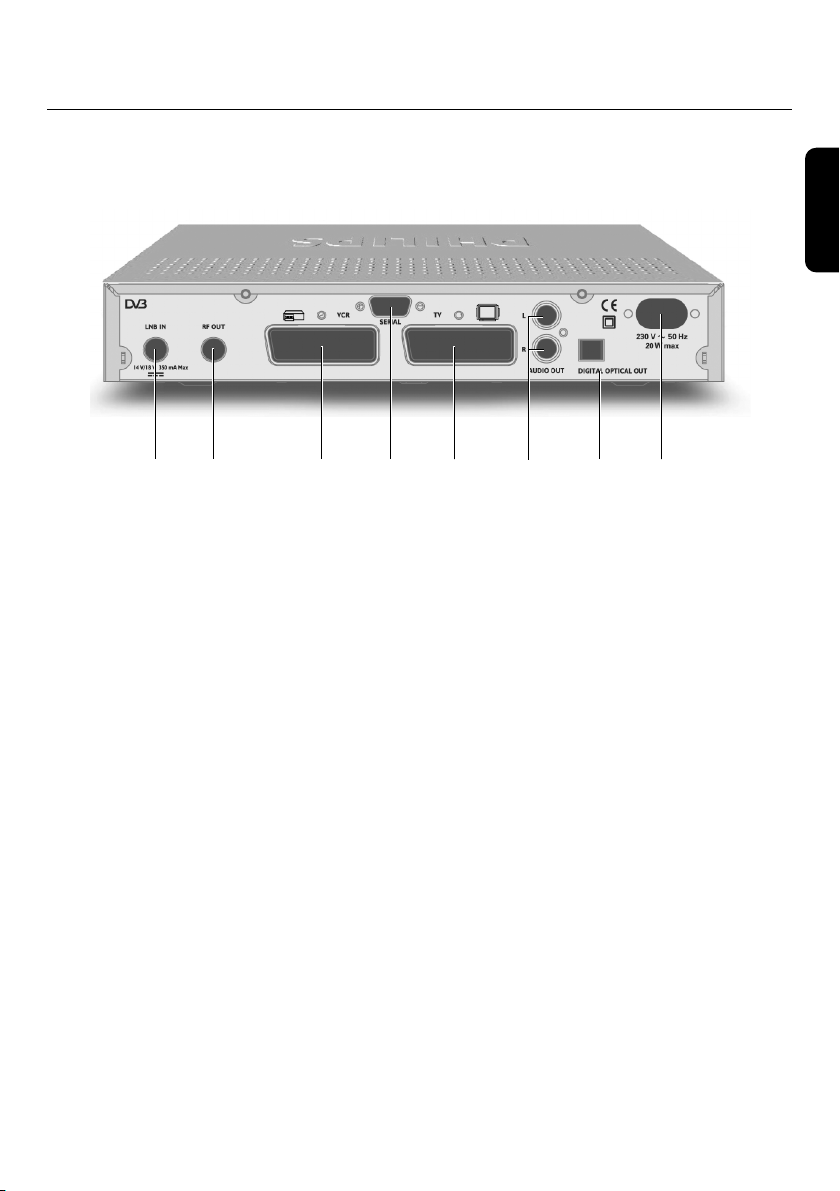
2.3 Rear panel
6
WI
Q E R U
1 LNB IN (*): . . . . . . . . . . . . . . . . . . . . . . . . . . . . . Connect the coaxial cable from the satellite dish antenna.
Refer to chapter 5 for recommended connection diagrams.
2 RF OUT (*): . . . . . . . . . . . . . . . . . . . . . . . . . . . . RF output used to connect your receiver to another
receiver.
3 VCR (*): . . . . . . . . . . . . . . . . . . . . . . . . . . . . . . . . . SCART (1) socket to connect your video recorder or DVD
player/recorder
4 SERIAL (*): . . . . . . . . . . . . . . . . . . . . . . . . . . . . . . RS232 socket for serial data transfer to a PC or another
receiver
5 TV (*): . . . . . . . . . . . . . . . . . . . . . . . . . . . . . . . . . . . SCART (1) socket to connect to your TV set or a video
projector (2)
6 L/R AUDIO OUT (*): . . . . . . . . . . . . . . . . . Left/Right outputs to connect your HIFI/Audio receiver
system
7 DIGITAL OPTICAL OUT (*): . . . . . . . Digital output to connect your HIFI/Audio receiver system
8 230V~50Hz 20W max (**): . . . . . . . . . . Socket to connect the power cord
T
T
English
Note: the label showing the type and serial number is underneath the receiver.
(1) SCART is also called Euroconnector or Peritel
(2) To connect a video projector to the TV SCART socket, refer to chapter 5.
* Safety Extra Low Voltage
** Hazardous Voltage
PRODUCT DESCRIPTION 9
Page 10

3 Remote control
English
Mute
- Audio mute
RED,GREEN,YELLOW,
BLUE
FAV
- Toggle between favourite lists
SUBTITLE
- Temporarily starts/stops or
change Audio Subtitling
I-II
- Temporary update of audio
language and selection of
audio mode
MENU
- Open/Close menu (in digital
TV mode)
CURSOR keys
- The t and y cursor keys
are used to move within the
menus and lists
u and i cursor keys
- The
are used to select a value in a
menu item
OK
- Select / call up channel
lists / zap
OLUME +/ -
V
- Volume up / down.
Standby
- Standby / ON
V
(blue) resp.V (white)
Scrolls one Page Up or one
Page Down in guide or
favourite lists
TEXT is not active
GUIDE
- Open Now & Next Guide
INFO
- Open info banner
- Show extended program
information
- Close banner
TIMER
- Set a recording timer when
watching Digital TV or from
the GUIDE feature.
“TIMER, 0” sequence
The
keystroke deletes the current
running timer
BACK
- Select the previously watched
digital TV channel
- In menu mode:
Either exit the menu or bring
selection back one level and
cancel the changes you made.
P+ / P-
- Select next / previous
channel
TV / RADIO
- Toggle between
TV / Radio mode
TV / STB
- Toggle between Digital and
Analogue TV/VCR/D
VD.
10 REMOTE CONTROL
0-9
Channel selection in digital
TV mode
Page 11

Do not dispose of the batteries with
your household waste.
The Philips batteries supplied with your receiver’s remote do not contain heavy metals such as
Mercury or Lead Cadmium. Nevertheless, in many countries, exhausted batteries cannot be disposed
of with your household waste.
Please enquire about the local regulations concerning the disposal of used batteries.
English
REMOTE CONTROL 11
Page 12
4 Connecting your receiver
English
There are several ways you can connect and incorporate your digital receiver into your existing
audio/video equipment set-up.
Warning!
Before starting to connect:
- Unplug all equipment (TV set as well as the VCR and/or DVD if required) from the mains.
- Do not connect your digital receiver to mains supply now.
- Check your current wiring: you may not need to modify your existing Audio/Video set-up
connections if they already match the connection diagrams below.
- Depending on your existing set up, choose the most suitable connection method for incorporating
your digital receiver into your existing Audio/Video set-up.Please read chapters 4.1 and 4.2
Note: for the installation of outdoor equipment such as the dish antenna, refer to the manuals supplied with
the equipment.When adding new equipment, be sure to refer to the related installation instructions of the
manual.
4.1 Connecting to a Satellite Antenna and a TV
12 CONNECTING YOUR RECEIVER
Page 13

4.2 Connecting to a TV and a VCR/DVD player using
PHILIPSPHILIPS
TV set
VCR/DVD
Satellite Receiver
Cable or Off-air Antenna
IN FROM ANT
to AC outlet
OUT TO ANT
EXT 1
EXT 2
S
CART
Satellite
Dish Antenna
the SCART Support
English
Note: for best DVD/VCR viewing, connect the DVD/VCR SCART EXT 1 directly to the TV SCART.
CONNECTING YOUR RECEIVER 13
Page 14
4.3 Connecting to a Digital Amplifier/Home Theatre/HiFi system
Satellite Receiver
to AC outlet
Digital Audio
Convertor or
Amplifier
LR
LR
AUDIO
English
14 CONNECTING YOUR RECEIVER
Page 15
5 First installation
Requirements for fast and successful start-up are as follows:
- you already have a satellite antenna installed;
- your antenna is correctly pointed at the applicable satellite
transponders (Astra, Hotbird, Eutelsat, …);
- your receiver is connected to the antenna,TV set and
other equipment according to the diagrams in chapter 4.
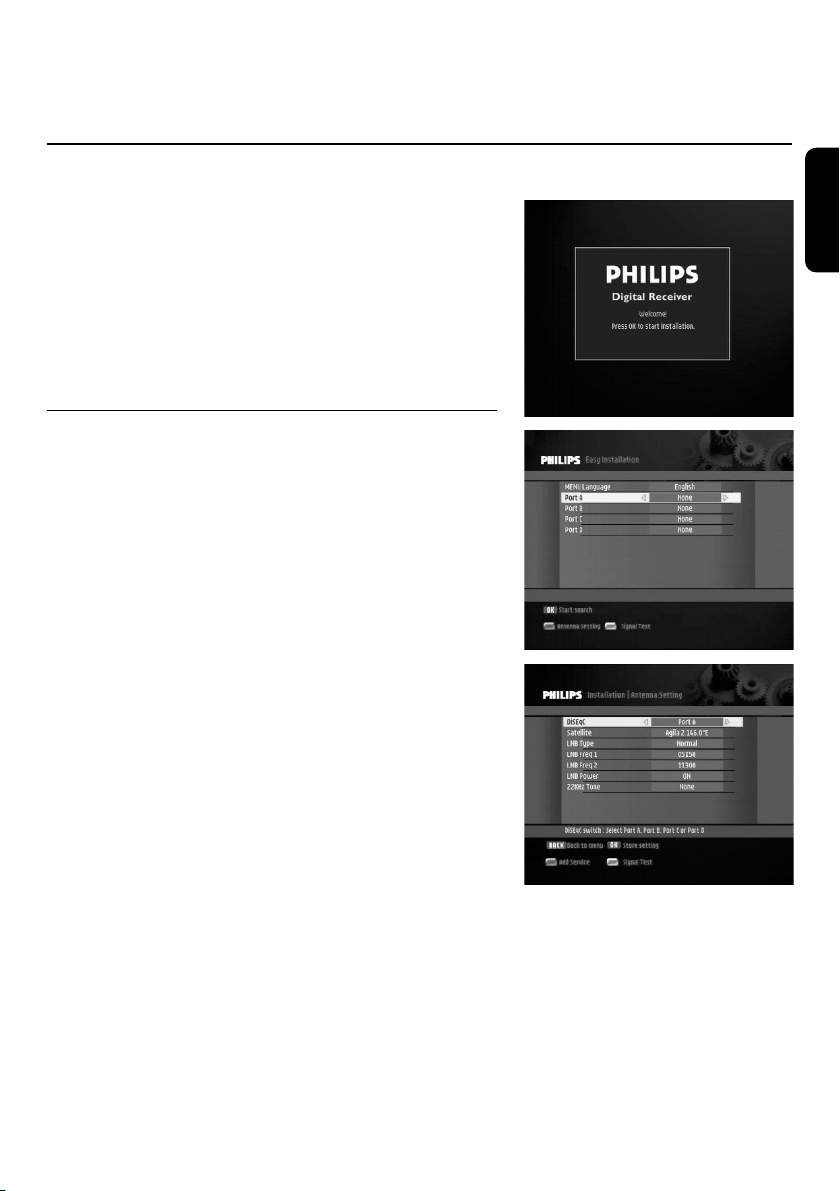
Switch ON the receiver and TV set.The welcome screen
appears.
5.1 Menu language and port selection
- When the welcome screen is displayed, press <OK> to
access the Easy installation screen.This screen prompts
you to select your favourite menu language as well as the
appropriate port configuration. Depending on your
DiSEqC set-up, you can select satellites for one or more
ports. If you do not have any DiSEqC switch, select port A
only.
- Go to the Antenna Setting screen by pressing the <Red>
key of the remote control to adjust the settings for this
port to suit your requirements. Press the <Green> key to
obtain some help on how to point the antenna in the right
direction for the best signal reception.
English
- Make the appropriate selections,and then press <OK> to
start scanning for channels.
FIRST INSTALLATION 15
Page 16
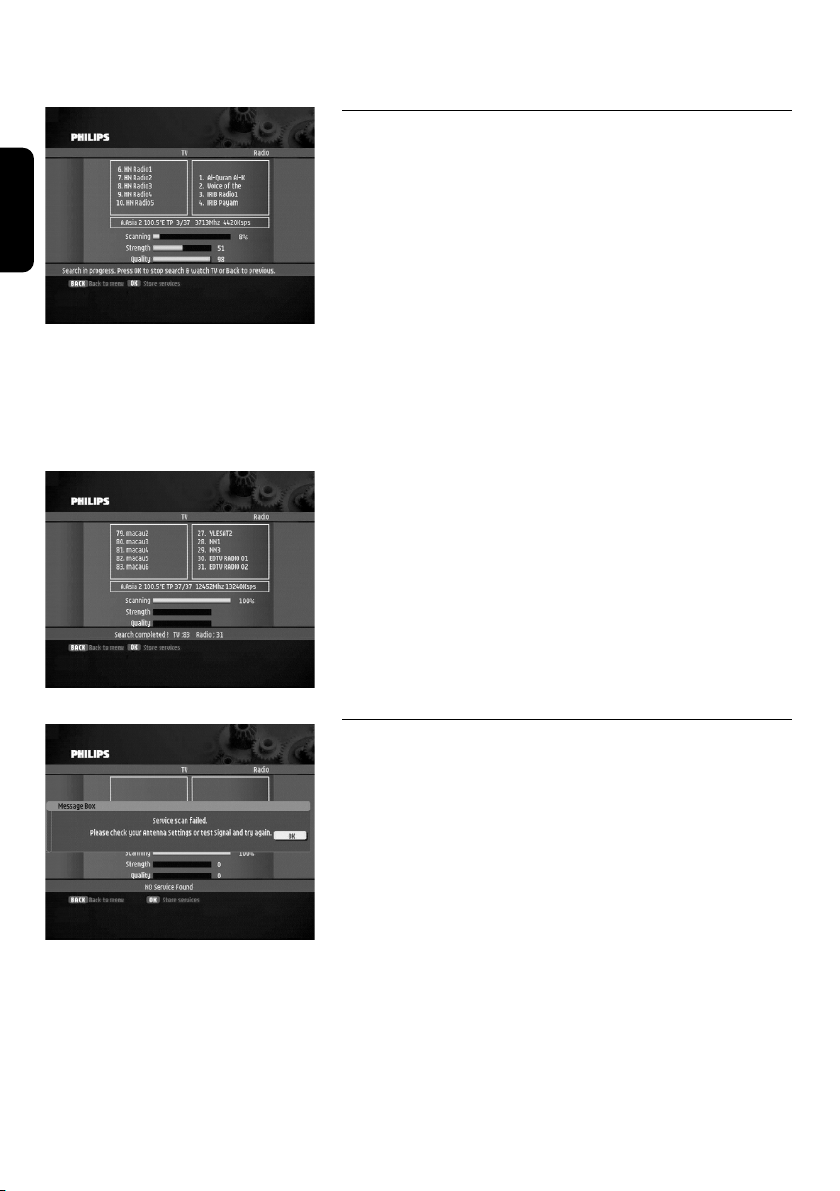
5.2 Channel scanning
English
During the scanning process, the following information is
reported on screen:
- the number of TV and Radio channels detected,
- the scanning progress, indicated as a percentage,
- the strength of the signal and the quality of reception.
Note: if you press <OK> during the scanning process, you
interrupt the scanning and return to the Easy installation screen.
Please note that it may take a few seconds before the receiver
reacts to the <OK> key press. In this case, none of the channels
found are stored.
When scanning is successfully completed, a completion
message is displayed as well as the number of channels
detected.
Press <OK> to tune the receiver to the first channel in the
list.
5.3 Scanning failure
FIRST INSTALLATION
16
In case of channel scanning failure, a failure message is
displayed.
Page 17
Before starting a new scanning
The following checks are recommended:
- antenna cable,
- antenna connection to your receiver (see chapter 5.1
and further),
- number of channels available in the region
corresponding to your area.
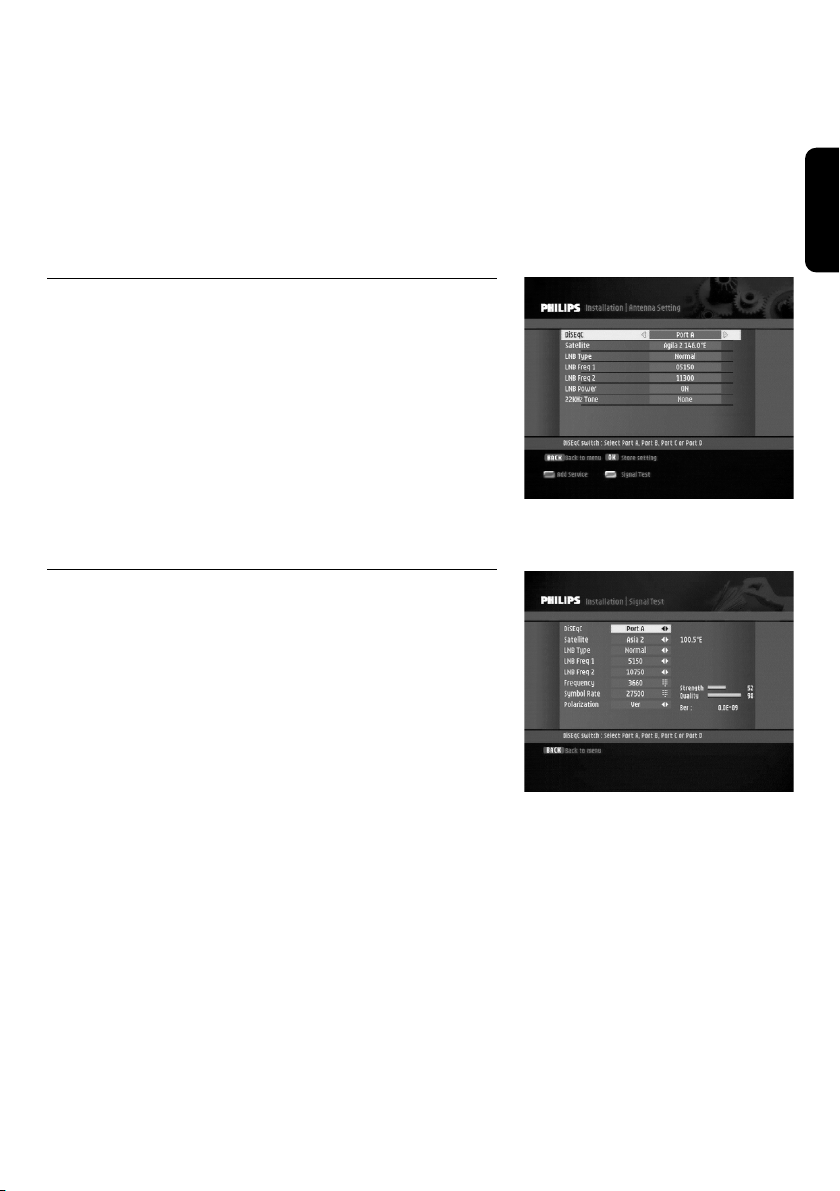
5.3.1 Antenna Setting
- To continue, press <OK>.The Antenna Setting screen
appears to help you with the installation process and to
adjust your settings if needed.
- Choose a satellite for the applicable port and enter the
LNB type (Universal by default) and LNB frequencies.You
can test the signal by pressing the <Green> key of the
remote control.
- Press <OK> to start scanning again. If the same failure
message appears after a while, refer to the
Troubleshooting chapter.
5.3.2 Signal test
You will not receive the signal from the satellite if your
antenna is not positioned correctly, even though you have
entered the correct values in the Antenna Set up menu.Your
receiver therefore provides precise Antenna Direction
information to help you direct your antenna toward a
satellite.
- Press the <Green> key of the remote control to access
the Signal Test screen. It indicates the strength of the
incoming satellite signal as well as the quality of reception.
- If both the signal strength and reception quality are
inadequate, you may need to change the direction in which
the antenna is pointing until the level becomes satisfactory.
- Press <OK> to start scanning again.
English
Note: if the same failure message appears after a while, refer to
the Troubleshooting chapter.
FIRST INSTALLATION 17
Page 18
6 General Viewing Function
English
This section describes the basic functions available while
watching satellite TV or listening to satellite Radio. For
general menu navigation information, see Basics about menu
navigation.
6.1 Channel Information
Every time you change channels, program information
appears on screen, displaying:
- the current time and date
- the current service (TV/R), channel number in the current
channel list and channel name,
- icons indicating the channel properties, e.g. channel lock
status, available audio languages, subtitling,
- the start time of the current and next programs and the
current program name.
While watching a channel, you can display the current
channel information at anytime by pressing <INFO> on the
remote control.
Note: channel information is displayed for 5 seconds as per
default.This can be adjusted from the Setup menu.
6.2 Channel selection
6.2.1 Using <P+/P-> or numeric keys
To switch channels, use <P+>/<P-> or the numeric keys of
the remote control.
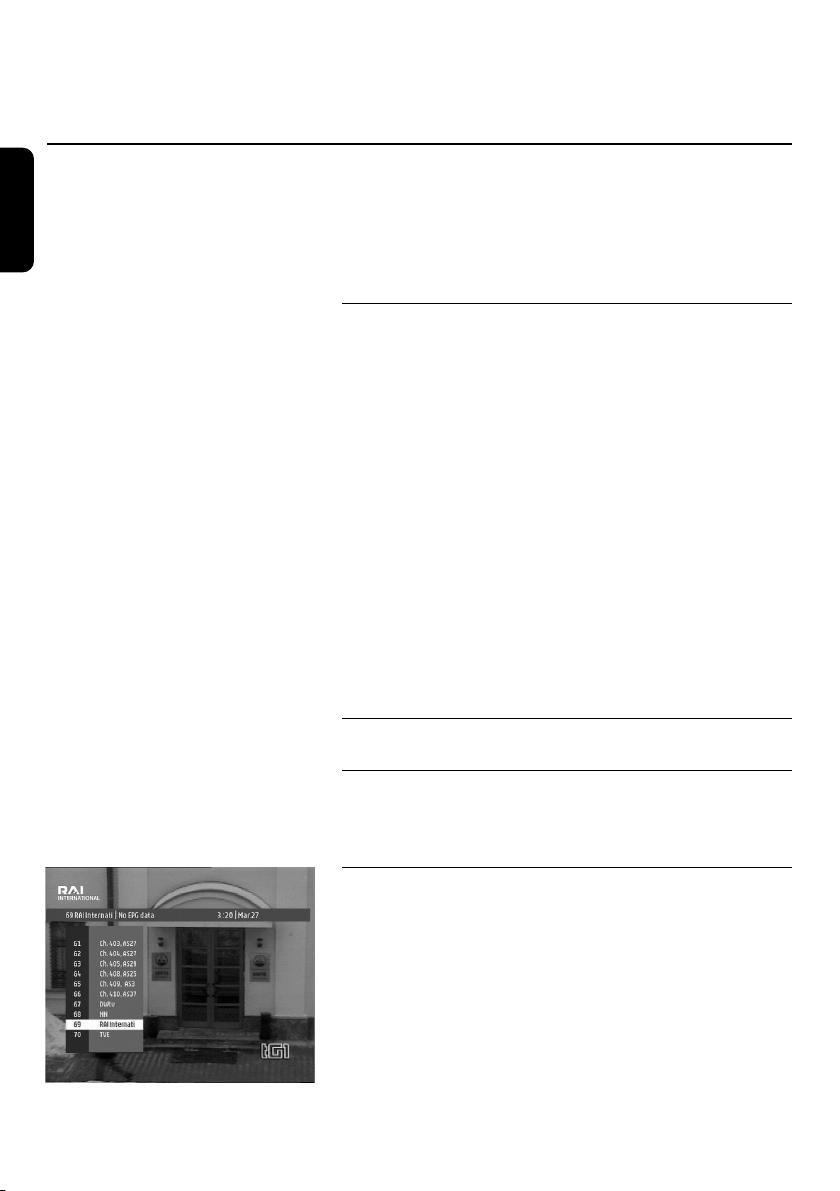
6.2.2 Using the channel list
- For a complete overview of the available channels while
Note: if you press <BACK>, the channel list disappears.
- To select a channel, scroll up or down this channel list, and
18 GENERAL VIEWING FUNCTION
watching satellite TV or listening to satellite radio, press
<OK> on the remote control.A channel list is displayed
on the left-hand side of the scr
then press <OK> to watch it.
een.
Page 19
6.3 Previous Channel Recall
Press the <BACK> key of the remote control to move to
the previous channel you watched in the current channel list.
6.4 TV or Radio Mode selection
While watching satellite TV or listening to satellite radio,
press TV/RADIO on the remote control to toggle between
TV and Radio modes.
6.5 Volume & Audio Control
English
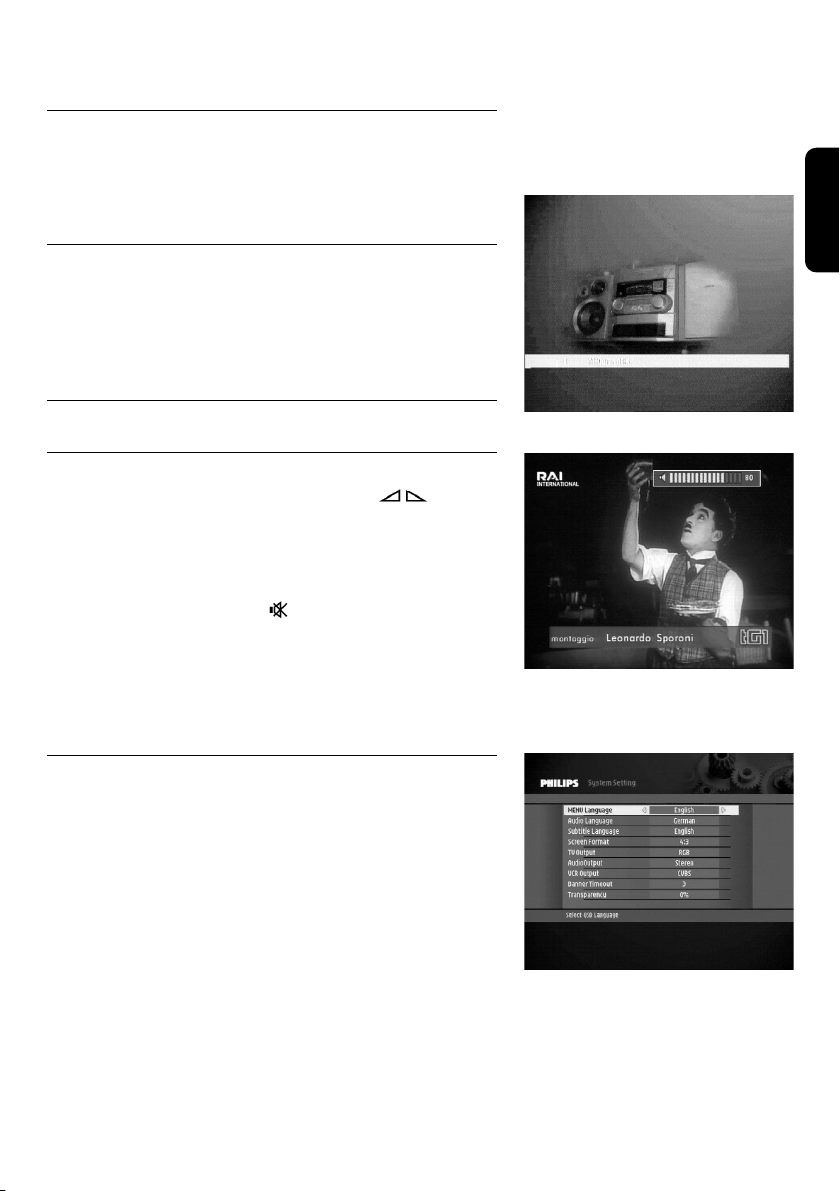
6.5.1 Volume control and Mute
-
- To increase or decrease the volume, use < > on
the remote control.
Note: the volume level can also be controlled from your TV.
- To mute the sound, press < > on the remote control
- To resume normal sound, press this key once again.
Note: change of volume is signalled on-screen using a bargraph,
while audio mute is signalled with an icon in the top right corner
of the screen.
+
6.5.2 Audio Control
- To access audio settings, select the Setup menu from the
main menu, then select System Setting.The System Setting
screen appears.
- Select Audio Output. Default Audio Output setting is
Stereo.
- Select the desired value (Left, Right, Mono, or Stereo) and
press <OK> to save your changes and exit the screen.
GENERAL VIEWING FUNCTION 19
Page 20
English
6.5.3 Audio language
- To select your preferred audio language, select the Setup
menu from the main menu, and then select System Setting.
The System Setting screen appears.
- Select Audio Language, and then select the desired
language and press <OK> to save your changes and exit
the screen.
- If you want to change the audio language for a particular
program, press <I-II> on the remote control repeatedly to
select the desired audio language.The available languages
depend on the audio signal transmission.
6.6 Favourite List
From the Channel Manager menu, select Favourites to access
the TV/R FavList screen.This feature is used to create and
manage up to 3 TV or 3 Radio Favourite Lists. Favourite lists
enable you to zap only through your favourite channels.To
create and edit your favourite lists, see Channel Manager.
While watching video, you can access your Favourite List by
pressing <FAV> on the remote control.You can access the
next favourite list by pressing <FAV> again.
GENERAL VIEWING FUNCTION
20
Page 21
7 Menu
7.1 General information
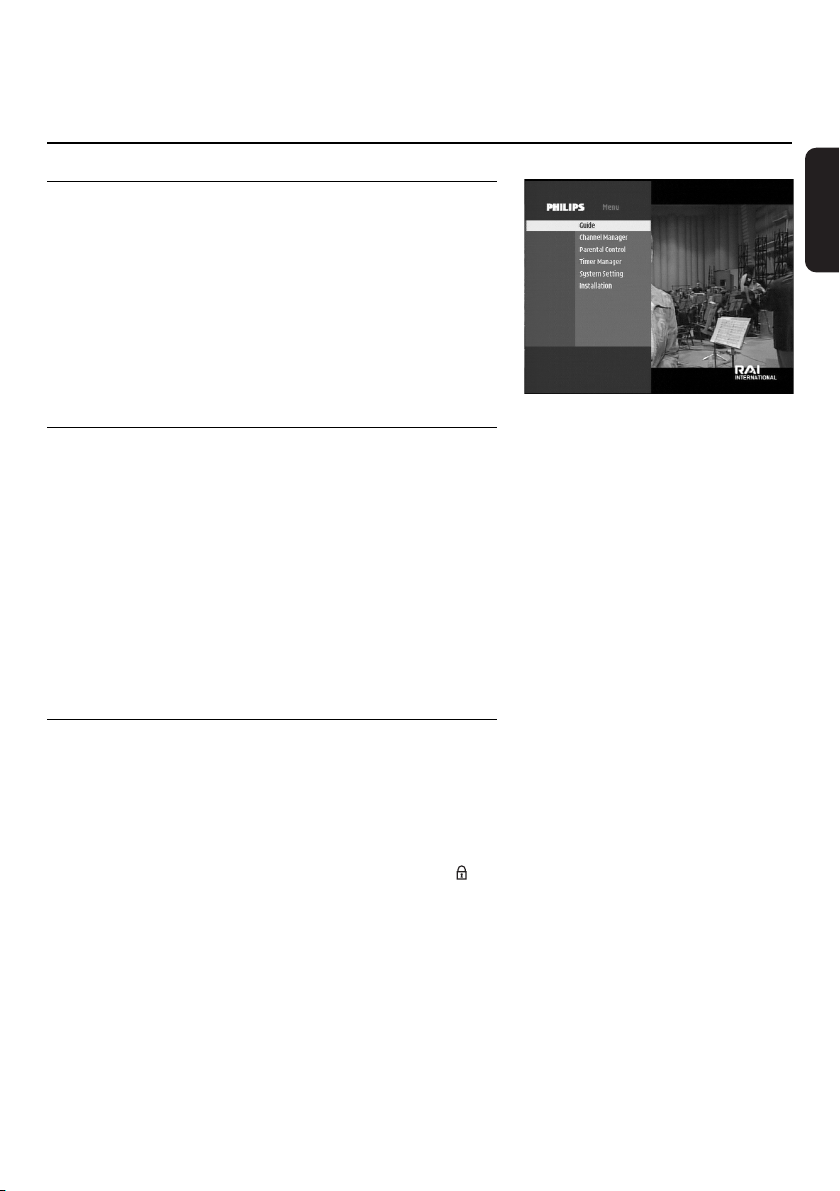
The Menu gives access to all the functions of your receiver:
o Guide
o Channel Manager
o Parental Control
o Timer Manager
o Set-up Menu
o Installation.
7.1.1 Basics about menu navigation
While watching TV or listening to the radio:
- Press <MENU> to display the Menu screen.
- Press
- Press <OK> to display the corresponding sub-items.
- Press
- Press the
Note: press <BACK> to go back one step.
t or y to scroll up or down and select the desired
menu item.
t or y to move to the desired sub-item.
u or i button to select a value in a menu item.
7.1.2 Cancel/Store changes
- Either press the <BACK> button to exit the screen
without storing changes.
- Or press the <OK> button to validate changes and exit
the screen.
English
Note: to open a locked menu item (indicated by a lock icon ),
you need to enter your Pin Code.
MENU 21
Page 22

7.2 Guide (Electronic Program Guide)
English
The TV/Radio Electronic Program Guide (EPG) provides an
overview of available TV and Radio channels, and programs
the broadcasters have scheduled for now, next and beyond,
depending on which program information they transmit.
Note: the information (program titles, start and end time) is only
available on the channel you are currently watching.
- To view EPG data, press <GUIDE> on your remote
control when watching a channel, or select the Guide item
from the Menu and press <OK>.
- Highlight the name of the program for which you want
more detailed information.
- Press <INFO> once to get more information (program
description) and <INFO> once again to close it.
- Press <OK> to view the corresponding channel.
Note: a 'No EPG information yet' message is displayed if the
selected channel has not obtained EPG data. It takes a few
seconds before data can be displayed.
If you want to check the previous or next information of the
channel, please press
u or i on the remote control.
7.3 Channel Manager
22 MENU
The Channel Manager function is used to organize your
channel list (Channel POOL) and create and edit your
favourite lists.
Note: switch from TV channel lists to Radio channel lists by
pressing <TV/RADIO>. Radio Channel Manager has the same
TV channel Manager
ation as
oper
Select Channel Manager from the Menu and press <OK> to
access the Channel sub-menu, containing the Channel POOL
ourites options.
v
and Fa
.
Page 23

7.3.1 Channel Pool
Select Channel POOL and press <OK> to access the
Channel Pool screen.
In this screen, you can:
o delete channels from the channel list,
o move channels to a different position in the list,
o lock channels,
o sort channels.
7.3.1.1 To delete channels from the Channel Pool
The Delete feature is used to permanently delete a channel.
- Press the <Red> colour key of the remote control to
enable the feature. Select the channel you want to delete
by highlighting it and pressing <OK>.A marker appears in
place of the channel number.
- Press <OK> again to cancel the selection. Deletion only
takes place when you exit the screen.You are then
prompted to confirm the changes that should be taken
into account.
Note: the deleted channel cannot be recovered unless you do a
channel scan again.
7.3.1.2 To move channels in the Channel Pool
The Move feature is used to change the position of a
channel in the list.
- Press the <Green> colour key of the remote control to
enable the feature.
- Select the channel you want to move by pressing <OK>.
Press <OK> again to cancel selection.
- Then highlight the line to which you want to move the
selected channel and press <OK>.The selected channel
moves to the desired location and the channel number
changes accordingly.You are prompted to confirm the
changes when you exit the screen.
English
MENU 23
Page 24

English
7.3.1.3 To lock channels
The Lock feature is used to lock channels.
- Press the <Yellow> colour key of the remote control to
enable the feature.
- Enter your 4-digit Pin Code.
- Select the channel you want to lock by pressing <OK>.
The selected channel is marked with this icon. Press
<OK> again to cancel selection.You are prompted to
confirm the changes when you exit the screen.
Note: you can only use this function once you have set up your Pin
Code in the Parental Control part of the Setup Menu.
7.3.1.4 To sort channels in the pool
The Sort feature is used to sort channels.
- Press the <Blue> colour key of the remote control to
enable sorting options.
- Then press the <Red> key to sort the channels in
alphabetical order (Channel Name) or the <Green>
colour key (Provider) to sort the channels according to
the service provider, or the <yellow> colour key to
restore the original order.
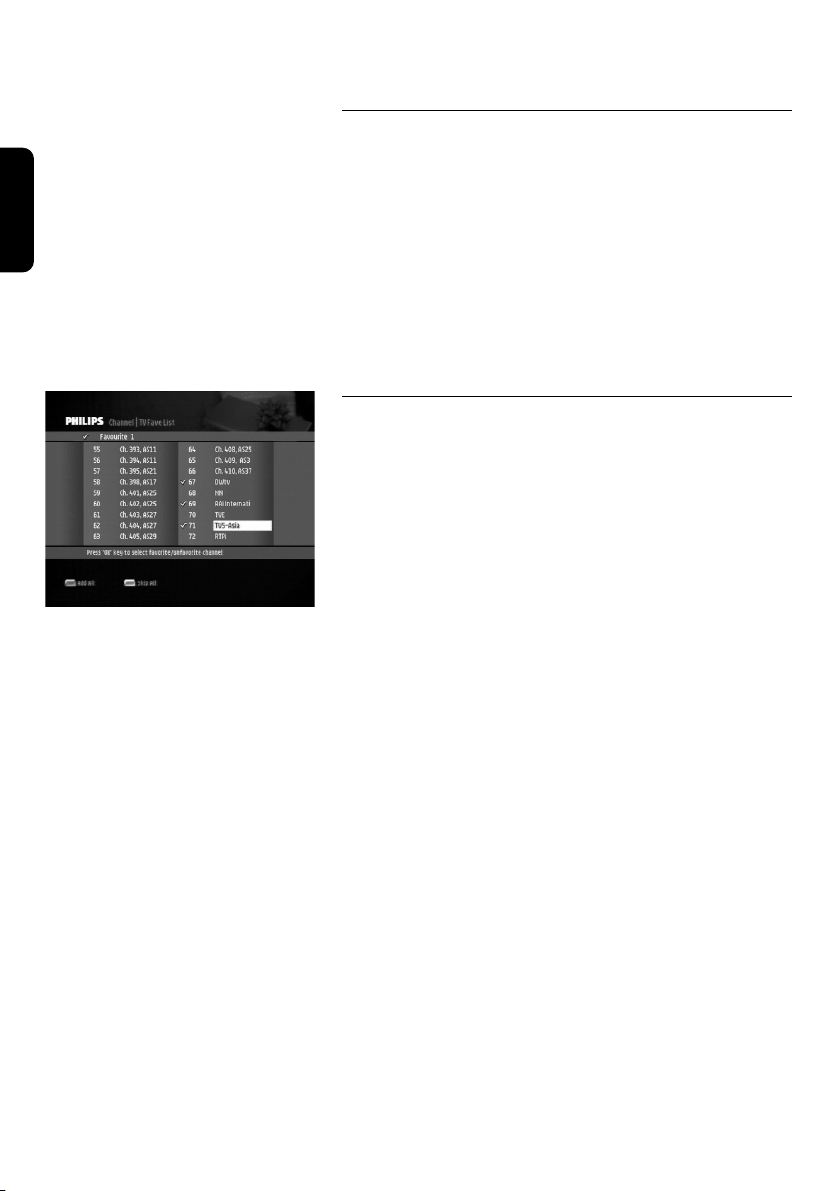
7.3.2 Favourites
Select ‘Favourites’ from the Channel sub-menu and press
<OK>.This screen is used to create and edit three TV and
three Radio favourite lists according to your personal
preferences.
24 MENU
To create a favourite list:
- Select the desired channels from the list by pressing
<OK>.The selected channels are marked with a tick.
- Press <OK> again to cancel selection.
- Select the next list by pressing <FAV>.
- Then pr
When you activate one of the favourite lists by pressing
<F
radio
Pr
the full channel list.
oceed as indicated above
V> while watching satellite
A
er only zaps through your favourite channels.
eceiv
the r
,
V> to again toggle betw
A
ess <F
.
TV or listening to satellite
ou favourite lists and
een y
Page 25
7.4 Parental Lock
Parental Lock is used to lock channels with a 4-digit code in
order to prevent children from watching these channels.
Furthermore, the maturity rating data transmitted with the
program can be used to indicate whether it is suitable for
the age of your children.
You can also block access to your receiver and its Menu
using the Menu Lock function.
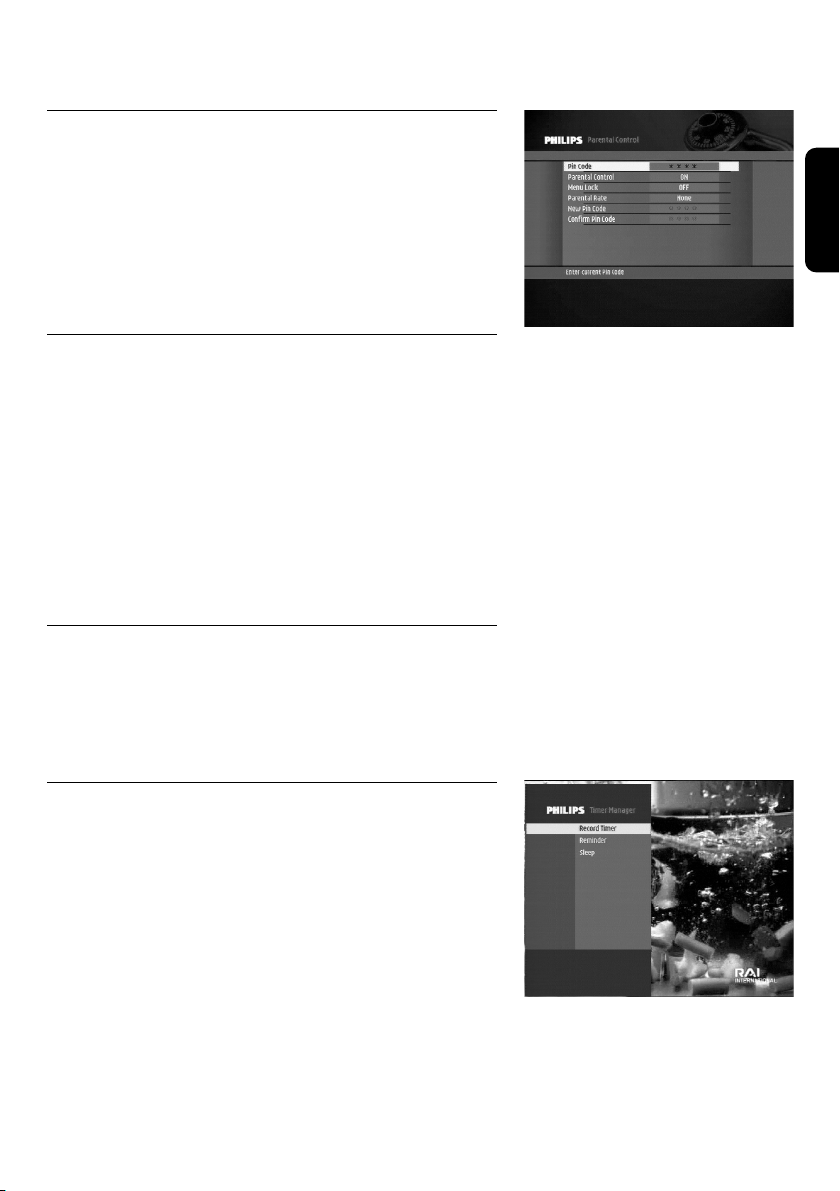
7.4.1 To change your Pin Code
The Pin Code default value is 1111.
To change your Pin Code:
- Enter the current Pin Code.
- Scroll down to New Pin Code and enter your new Pin
Code.
- Scroll down to Confirm Pin Code and your new Pin Code
again.
Note: please memorize your Pin Code carefully and keep it in a
secret place. In case you forget your Pin Code, please contact your
customer care centre.
7.4.2 To use Menu Lock
To lock access to every sub-menu of your receiver:
- Enter your Pin Code.
- Set Menu Lock to ON.
- Press <OK> to confirm and exit the screen.
English
7.5 Timer Manager
The Timer Manager is used to set:
o recording timers for the programs you want to record
using your VCR or DVD recorder,
o reminders for programs you want to see in the near
,
e
futur
o sleep timer.
MENU 25
Page 26
English
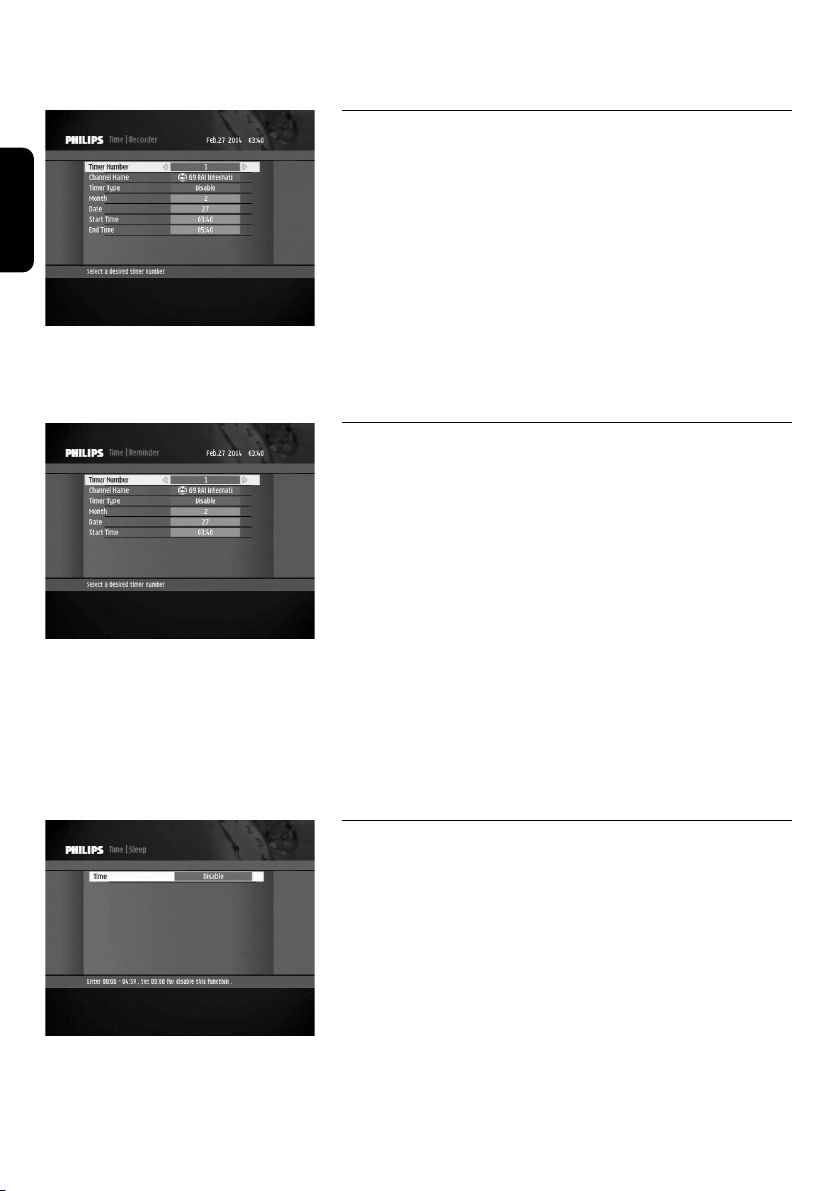
7.5.1 Recording timer
Select the Record Timer item from the Timer sub-menu or
press the <TIMER> key of the remote control to access the
Recorder screen.
To activate a recording timer:
- Set the values of the recording parameters using the
arrow keys or numerical keys as appropriate.
- Press <OK> to confirm.
Note: an existing recording timer can be disabled by selecting
Disable as Timer Type in the Recorder screen.
Note: do not forget to enable recording on your VCR.
7.5.2 Reminder
When you set a reminder for a particular program, the
receiver sends a warning at the start of that program and
switches automatically to the right channel if you accept the
reminder message.
Select the Reminder item from the Timer sub-menu to
access the Reminder screen.
To activate a reminder:
- Set the values of the reminder parameters using the arrow
keys or numerical keys as appropriate.
- Press <OK> to confirm.
26 MENU
Note: an existing reminder can be disabled by selecting Disable as
Timer Type in the Reminder screen.When a timer is already active
(recording in progress), press <TIMER> then <0> to cancel this
timer.
7.5.3 Sleep timer
You can set a sleep timer to automatically switch your
receiver to Standby mode after a given time lapse.
Select the Sleep item fr
the Sleep screen.
o activate a sleep timer:
T
Enter the time lapse after which the receiver should go to
-
Standby using the numerical keys of the remote control.
- Press <OK> to confirm.
o disable a sleep timer
T
Select Disable instead of a time lapse.
-
- Press <OK> to confirm.
om the Timer sub-menu to access
:
Page 27

7.6 Setup menu
The Setup menu is used to modify the basic settings of your
receiver, including the clock time and general settings, such
as Video and Audio output.
7.6.1 Time Setting
This feature is used to set the local time offset with respect
to actual local time normally obtained from the network.
- Select the Time Setting item from the System sub-menu to
access the Time Setting screen.
- Select the appropriate offset value (from -12 to +12).To
help you set the offset value, the names of capital cities for
which the selected value is valid are displayed at the
bottom of the screen.
- Press <OK> to store the selected value and go back to
the previous screen or <BACK> to cancel and the screen.
In case the information supplied by the satellite is not
correct, the Time Setting screen is used to set the actual
date and time using the arrow or numerical keys of the
remote control as appropriate.
7.6.2 System Setting
Note: your TV settings will be overwritten by the receiver settings.
English
This feature is used to set the system settings.
- Select the System Setting item from the Setup menu to
access the System Setting screen.
- Select appropriate values for the following:
• Menu Language: Dutch, English, French, German
(default value), Italian, Polish and Turkish
• Audio Language: Dutch, English, French, German
(default value), Italian, Polish and Turkish
• Screen Format: 4:3 or 16:9 (wide screen)
•
TV
Video Output: RGB (default value) or CVBS
Video Output:
VCR
•
• Start On Channel, which is tuned when you activate
your receiver from Standby
Note: if not enabled (None), the default value is the last
channel you watched before you put your receiver on
Standby
S-VHS or CVBS
MENU 27
Page 28
English
28 MENU
• Subtitle Language: Dutch, English,French, German
(default value), Italian, Polish and Turkish
• Audio Output: Stereo (default value), Left, Right, Mono.
Note: access to this menu can be protected by Pin Code.
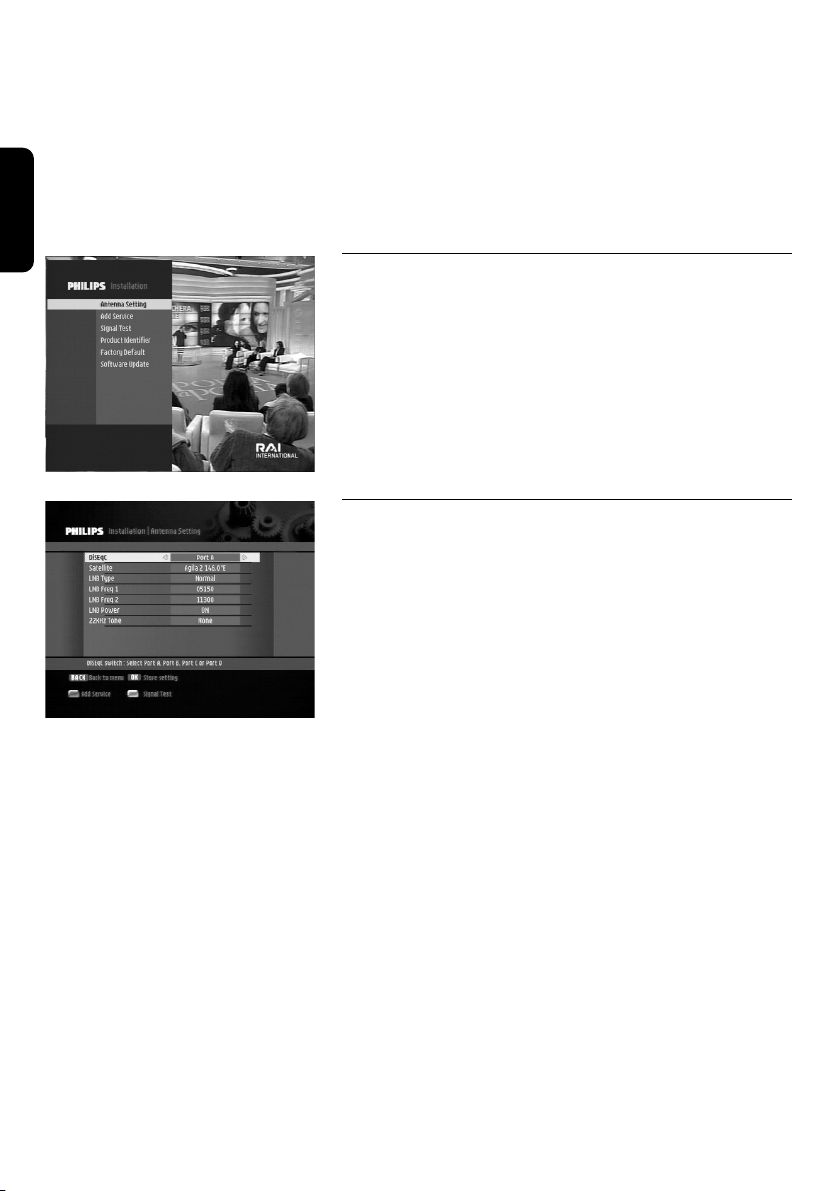
7.7 Installation
The Installation sub-menu includes the following items:
o Antenna Setting
o Add Service
o Signal Test
o Product Identifier
o Factory Default
o Software Update.
7.7.1 Antenna Setting
This feature is used to set the antenna settings.
- Select Antenna Setting from the Installation menu to
access the Antenna Setting screen.
Note: access to this menu can be protected by Pin Code.
- Select appropriate values for the following:
• Port: up to 4 ports
Note: this item is used to configure the DiSEqC option
for multiple LNBs.
• Satellite: select the appropriate satellite using arrow
keys.
• LNB Type: select your LNB type. If you use an universal
LNB, select Universal (default value).
• LNB Freq. 1: set automatically according to the satellite
and LNB Type selected. If you have a dual LNB, enter
the proper value in the value box.
• LNB Freq. 2: set automatically according to the satellite
and LNB Type selected.
• 22KHz Tone: select the switches with which you want
to configure the antenna.
- To exit the Antenna Setting screen, press the <BACK> key
emote contr
of the r
“Are you sure you want to change the configuration of
Antenna setup?” is displayed.
- Select the <OK> button on screen and then wait for the
data to be saved.
ol to finish antenna setup.The message
Page 29

7.7.2 Add Service
This feature is used to search for new channels.
- Select Add Service from the Installation menu to access
the Add Service screen.
- Select values for the following:
• Port: up to 4 ports
Note: this item is used to configure the DiSEqC option
for multiple LNBs.
• Satellite: select the appropriate satellite using arrow
keys.
• Transponder: select a transponder to perform a search
for this particular transponder.
• Frequency: frequency value corresponding to the
selected transponder or entered manually using
numerical keys.
• Symbol Rate: symbol rate value corresponding to the
selected transponder or entered manually using
numerical keys.
• Polarization: Hor (horizontal) or Ver (vertical)
• Search options: select FTA to search for Free-To-Air
channels, or FTA+Scram… for Free-To-Air and
scrambled channels.
• Search type: select TP to perform the search for a
particular transponder, Network for a group of
transponders or 1 Sat for all the transponders of a
satellite.
English
Note: information about the selected satellite is displayed on the
right side of the screen.
7.7.3 Signal Test
This feature is used to test the signal strength and quality.
- Select Signal Test from the Installation menu to access the
Signal Test screen.
- Select values f
• Antenna: select your antenna number
• Satellite: select the appropriate satellite using arrows
keys
• LNB Type: select your LNB type. If you use an universal
LNB, select Universal
• LNB Freq. 1: set automatically according to the satellite
and LNB Type selected. If you have a dual LNB, enter
the proper value in the value box.
or the following:
MENU 29
Page 30
English
• LNB Freq. 2: set automatically according to the satellite
and LNB Type selected.
• Frequency: frequency value corresponding to the
selected transponder or entered manually using
numerical keys.
• Symbol Rate: symbol rate value corresponding to the
selected transponder or entered manually using
numerical keys.
• Polarization: Hor (horizontal) or Ver (vertical)
As you enter values, you can view the signal strength and
quality on the right-hand side of the screen.
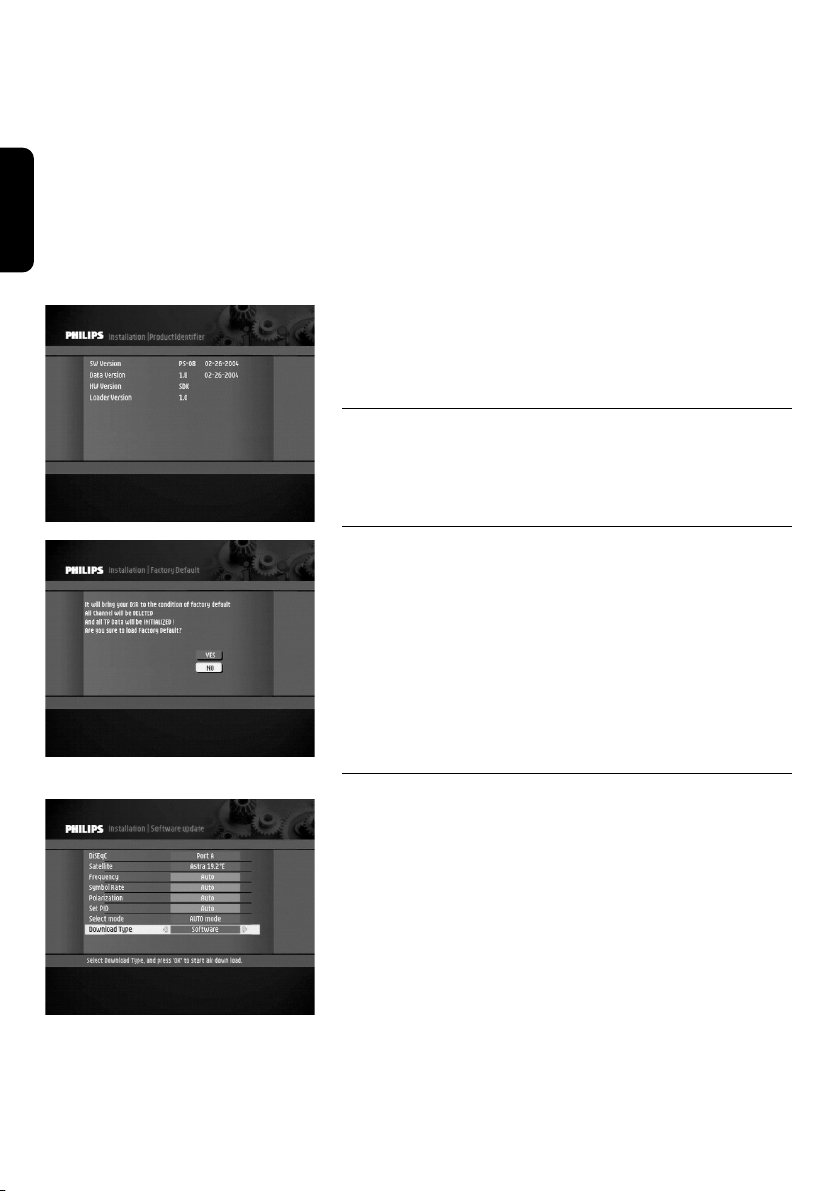
7.7.4 Product Identifier
This feature is used to provide hardware and software
information.
7.7.5 Factory Default
To reset your receiver back to the factory default condition,
select Factory Default from the Installation sub-menu.The
Factory Default screen appears, displaying a warning
message. Press <OK> to confirm (selection is highlighted in
yellow).
30 MENU
Note: if you reset your receiver to factory default settings, you lose
all the data and information that was previously stored.
7.7.6 Software update
This feature is used to set the software download mode and
type.
To manage software downloads:
- Select Software update from the Installation sub-menu.
- Select the appropriate values for the followings:
• Select mode:Auto Mode or User Mode. It is
recommended to set the update mode to Auto Mode.
• Download Type: Software, Software+Data or Data
• For instance, data is a preset list.
-
Pr
ess <OK> to launch a new software search.The
ying the search
displa
ppears,
een a
ch scr
e sear
softwar
ess and the ne
ogr
pr
w software version.
Page 31

8 Menu tree
Guide
Channel Manager
Parental control
(Pin Code required)
Timer Manager
Setup menu
Channel POOL
Favourites
Parental control ON/OFF
Menu lock ON/OFF
Parental Rate
New Pin Code
Confirm Pin Code
Record Timer
Reminder
Sleep
Time Setting
System Setting
Installation
Timer Number
Channel Name
Timer Type
Month
Date
Start Time
End Time
Timer Number
Channel Name
Timer Type
Month
Date
Start Time
Time
Set Local Time
Summer Time
Year
Month
Date
Time
Menu Language
Audio Language
Subtitle language
Screen Format
TV Output
Audio Output
VCR Output
Timeout
Banner
ransparency
T
Antenna Setting
Add Service
Signal Test
Product identifier
Factory default
Software update
English
DiSEqC
Satellite
LNB Type
LNB Freq. 1
LNB Freq. 2
LNB Power
22KHz Tone
DiSEqC
Satellite
Transponder
Frequency
Symbol Rate
Polarization
22KHz
Search Options
Search Type
DiSEqC
Satellite
LNB Type
LNB Freq. 1
LNB Freq. 2
Frequency
Symbol Rate
Polarization
DiSEqC
Satellite
Frequency
Symbol Rate
Polarization
Set PID
Select mode
Download Type
MENU TREE 31
Page 32

9 Troubleshooting
Please be aware that new software may change the functionality of your receiver.
English
Should you experience any difficulties with the operation of the receiver, please consult the relevant section of
this manual, including this Troubleshooting section. If the problem cannot be solved, call your dealer or a
customer service adviser.
Symptom Cause Remedy
The display on the front panel does
not light up.
No sound or picture but the front
panel red light is on.
No sound or picture but the front
panel green light is on.
Poor picture
The remote control does not
operate your receiver.
Faulty power supply
Receiver in Standby
Dish pointed incorrectly
Poor signal
Receiver in TV mode
Poor SCART connections
Incorrect dish pointing
Check that the power cord is
correctly connected. Disconnect
this cord and reconnect it to
ensure it is in place.
Check that the power is available
at the wall socket.
Press the Standby button.
Adjust the dish pointing. Check the
signal level from the Antenna Setup
menu.
Check the connections at the LNB
and between the LNB and the
receiver, or adjust the dish.
Press <TV/STB> on the remote
control once or twice.
Check the SCART connections
Adjust the dish pointing.
Make sure the receiver is on.
Make sure you are pointing the
remote control at the receiver
front panel.
On-screen display working but
there is no reception
.
32 TROUBLESHOOTING
Poor reception/signal
No power fed to LNB
Check the batteries in y
remote control.
Check the installation and the
antenna positioning.
Check the cable between the LNB
and the receiver.
our
Page 33

Symptom Cause Remedy
Intermittent reception.
The picture is not sharp and onscreen text is difficult to read.
You cannot find all the channels
you think should be available.
The picture on some channels
seems to have been stretched or
squashed.
Faulty connections
Incorrect dish pointing
TV SCART output format not set
to RGB
TV SCART not connected to the
RGB-capable SCART socket of
your TV set.
Inappropriate TV SCART
The signal to your aerial may be
weak.
Your aerial may need adjusting or
your local transmitter may not be
working.
The broadcast is probably in wide
screen and the receiver settings
may not be correct.
Check all connections and cable.
Adjust the dish pointing. Fasten the
antenna securely.
Change the setting of the TV
SCART item to RGB from the
System Setting menu.
Refer to your TV User Manual.
Use the SCART cable supplied
with your receiver.
Try retuning your receiver,
following the relevant steps in the
Quick installation chapter. If you
are still missing channels, your
aerial may need adjusting.
Call your local dealer.
Check the receiver “TV format”
option setting, following the
information in chapter 7.6.2. If you
have a wide screen TV, you may
also need to check the settings on
your TV.
English
Even if you use the number
buttons, you cannot access a
particular channel.
You set a timer but did not record
what you wanted.
The order of the channels has
changed.
The parental lock has been
activated on this channel and a
message asks for your parental
code.
The video was set incorrectly
They have been re-arranged as
described in chapter 7.
Enter your parental code to access
the channel or remove it as a
locked channel.
Make sure that your video is set
for the same time as your digital
receiver.
Refer to this chapter to change the
order again.
Note: if you have tried all of the actions suggested above, and cannot solve the problem; please contact your
dealer or service provider.
OUBLESHOO
TR
TING
33
Page 34

10 Technical specifications
English
This product is in conformity with European Directives 95/47/EC and 2002/21/EC.
Video decoding
MPEG-2 DVB compliant up to MP@ML
-
- Video bit rate: up to 15 Mbit/sec
- Video format: 4:3
(letter box if source is in 16:9) and 16:9
Resolution: up to 720x576 pixels
-
Audio decoding
MPEG layer I / II
Ease of Installation
- Plug and Play for Astra 19.2 E Satellite
reception
- Menu-controlled installation and
operation using On Screen Display &
sound support
- Automatic channel installation based
on pre-defined scan list
- Up to 4000 presets.
Ease of Use
- Channel editing for personalized
installation (delete, add,move)
- 3 favourite TV channel lists
- 3 favourite Radio channel lists
- Full remote controlled
- Now & Next EPG / program
monitoring
- Automatic recording via Timer
programming in EPG
Operation/Features
- Free-to-air reception
- Variable LNB frequency
- DiSEqC 1.0 antenna control
- RF input short circuit protection
- TV & Radio modes
- Automatic program list update
- Subtitles
- Parental lock with Pin Code
Child timer
-
- 10 events VCR timers
- 10 reminders
- Record Failure alarm
- Record header message
-
VCR to TV loop-through
- TV to VCR loop-through
- Highlight program coming soon in EPG
Software upgrade over the air
-
wnload
do
- Low power mode
- Audio mode: Mono / Stereo
- Dolby Digital bit - stream out
e analogue audio outputs)
(exclusiv
Application system r
Processor clock speed 81 MHz
SDRAM-CPU/Video-Graphics 8 MB
Flash memory 2 MB
Terrestrial antenna interface
- RF input: F type connector
- LNC supply (V): 0 / 14 / 18
- LNB current (mA): 350 max
- Tone switching: 22 kHz (on / off)
- DiSEqC 1.0: for 4 orbital positions
- RF output: type IEC 169-21 male
Reception-Demodulation
- Demodulation type: QPSK
- Configuration: MCPC/ SCPC
- Input frequency range (MHz): 950-2150
- Input level range (dBm): -65 to -25
- Symbol rate controlled by application
(Mbaud): 2 to 45
- Satellite band coverage:
Ku band: 10.7 to 12.75 GHz
esources
(RF loop-through)
Connections
TV SCART
Output: CVBS, Controlled audio L/R,
RGB , Slow blanking ,
Fast blanking,
S-Video (for LCD projector)
VCR SCART
Output:
Audio CINCH
Analog audio output: L/R
Digital audio output: AC3 over SPDIF
Accessories
- Remote control
Type RC19336002/01 (‘Zappa’)
- SCART cable
- User manual
- Worldwide Guarantee booklet
- Batteries: 2 x 1.5V type AA/R06
- Mains cord
Miscellaneous
- Temperature range (°C)
- Operating: +5 to +40
- Storage: -10 to +70
- Mains: 230 V ~ +/-10% - 50 Hz
- Power consumption: 20 W max
- Standby/low power: 5 W max
- Weight: 0.980 kg
- Including packaging: 1.780 kg
- Dimensions: 258 / 42 / 155
- Including packaging: 365 / 62 / 230
CVBS, Controlled audio
Serial interface:
L/R,
Y/C, RGB
RS 232
The product complies with
the following European
council Directives:
- 73/23/EEC
- 93/68/EEC
- 89/336/EEC
Due to continued product improvements, this information is subject to change without notice.
34 TECHNICAL SPECIFICATIONS
Page 35

Sicherheitsanweisungen
Sicherheitsanweisungen und Bedienungsanleitung müssen vor der Inbetriebnahme des Receivers
sorgfältig durchgelesen und verstanden werden. .
Für einen optimalen Einsatz:
- Das Gerät nicht in der Nähe von Heizkörpern oder anderen Wärmequellen aufstellen.
- Für ausreichende Belüftung einen Freiraum von mindestens 3 cm rund um das Gerät lassen und
Deutsch
darauf achten, dass die Belüftungsöffnungen nicht verstopft sind.
- Der Receiver ist ausschließlich für den Einsatz in Privathaushalten bestimmt und darf nicht in
übermäßig warmer oder feuchter Umgebung betrieben oder aufbewahrt werden.
- Darauf achten, dass keine Gegenstände oder Flüssigkeiten durch die Belüftungsschlitze in das
Gehäuse eindringen können. Falls dies dennoch passieren sollte, das Gerät vom Netz trennen und
den Händler um Rat fragen.
- Das Gerät mit einem feuchten Autotuch reinigen. Keine Kratzschwämme oder Scheuermittel
verwenden.
- Beim Anschließen oder Ausstöpseln der Kabel muss das Gerät stets vom Netz getrennt sein.
- Das Gerät nicht auseinander bauen. Die Bauteile können nicht vom Anwender gewartet werden.
Stromanschluss
Überprüfen Sie vor dem Anschluss des Gerätes ans Netz, ob die Versorgungsspannung dem auf der
Geräterückseite aufgeführten Wert entspricht.Wenn nicht, fragen Sie Ihren Händler um Rat.
Wenn das Gerät längere Zeit nicht benutzt wird, ziehen Sie den Netzstecker aus der
Wandsteckdose.
Bitte lesen Sie weiter, bevor Sie den Receiver anschließen.
36 SICHERHEITSANWEISUNGEN
Page 36

Kurzanleitung zur Installation
Satellitenreceiver
Anschluss an Netzstrom
Digitaler
Audio-Converter
oder-Verstärker
LR
LR
AUDIO
PHILIPSPHILIPS
TV-Gerät
V
CR/DVD
Satellitenreceiver
Kabel bzw. terrestrische Antenne
V
ON ANTENNE
Anschluss an Netzstrom
Z
U ANTENNE
A
USSEN 1
A
USSEN 2
SCART
S
atellitenschüssel
Anschluss an einen Fernseher oder einen VCR/DVD-Player mit Hilfe eines SCART-Steckers
Hinweis: für optimale DVD/VCR-Bildqualität schließen Sie den DVD/VCR SCART EXT 1-Stecker direkt an den
SCART-Anschluss des Fernsehers an.
Deutsch
Anschluss an eine Digitalverstärker/Heimkino/HiFi-Anlage
KURZANLEITUNG ZUR INSTALLATION 37
Page 37

INHALT
Sicherheitsanweisungen 36
Für einen optimalen Einsatz: 36
Deutsch
Stromanschluss 36
Kurzanleitung zur Installation 37
Anschluss an einen Fernseher oder
einen VCR/DVD-Player mit Hilfe eines
SCART-Steckers 37
Anschluss an eine
Digitalverstärker/Heimkino/HiFi-Anlage 37
1 Einleitung 40
2 Produktbeschreibung 41
2.1 Auspacken 41
2.2 Gerätevorderseite 42
2.3 Geräterückseite 42
3 Fernbedienung 44
4 Anschluss des Receivers 45
4.1 Anschluss an Satellitenantenne
und TV 46
4.2 Anschluss an einen Fernseher
und einen VCR/DVD-Player mit
Hilfe eines SCART-Steckers 47
4.3 Anschluss an eine
Digitalverstärker/Heimkino/HiFiAnlage 48
5 Erstinstallation 49
5.1 Wahl der Menüsprache und der
Anschlüsse 49
5.2 Sendersuchlauf 50
5.3 Sendersuchlauf fehlgeschlagen 50
5.3.1 Antenneneinstellung 51
5.3.2 Signaltest 51
6 Hauptansicht 52
6.1 Programminformationen 52
6.2 Programmwahl 52
6.2.1 Mit <P+/P-> oder
Zahlentasten 52
6.2.2 Benutzung der Programmliste 52
6.3 Vorheriges Programm erneut
aufrufen 53
6.4 TV oder Radio wählen 53
Lautstärke & Audio-Regelung 53
6.5
6.5.1 Lautstärkeregelung und
Ton aus 53
6.5.2 Audio-Regelung 53
38 INHALT
Page 38

6.5.3 Audio-Sprache 54
7.7 Installation 62
6.6 Favoritenliste 54
7 Menü 55
7.1 Allgemeine Informationen 55
7.1.1 Grundlegende Hinweise zur
Menünavigation 55
7.1.2 Abbrechen/Änderungen
speichern 55
7.2 Elektronischer Programmführer 56
7.3 Programmverwaltung 56
7.3.1 Programmliste 57
7.3.2 Favoriten 57
7.4 Kindersicherung 59
7.4.1 PIN-Code ändern 59
7.4.2 Menüsperre benutzen 59
7.5 Timerverwalung 59
7.5.1 Aufnahme-Timer 60
7.5.2 Erinnerungsfunktion 60
7.7.1 Antenneneinstellung 62
7.7.2 Dienste hinzufügen 63
7.7.3 Signaltest 63
7.7.4 Produktidentifikator 64
7.7.5 Werkseinstellungen 64
7.7.6 Software-Aktualisierung 64
8 DSR 300 Menü-Struktur 65
9 Störungsbeseitigung 67
10 Technische Daten 68
Deutsch
7.5.3 Schlaftimer 60
7.6 Systemeinstellung 61
7.6.1 Zeiteinstellung 61
7.6.2 Systemeinstellung 61
INHALT 39
Page 39

1 Einleitung
Vielen Dank und herzlichen Glückwunsch zum Kauf dieses Philips-Produkts!
Mit dem digitalen Satellitenreceiver DSR 300 können Sie eine breite Auswahl an freien
Satellitenkanälen in bester digitaler Bild- und Tonqualität empfangen.
Das Gerät bietet Ihnen folgende erweiterte Funktionen und Merkmale:
- Digitale Bild- und Tonqualität
Deutsch
- Breitwandbildschirmformat
- SCART-Anschlüsse für TV und VCR/DVD
- Maximal 4.000 voreingestellte TV- und Radioprogramme
- Bewährte Euphoria-Anwenderschnittstelle für unkomplizierte Installation und Bedienung
- Schnelles Umschalten
- Persönliche Programm- und Favoritenlisten
- Elektronische Programmführung mit Informationen über aktuelle und kommende Programme
Die vorliegende Bedienungsanleitung beschreibt die Installation des Geräts und den Zugriff auf die
einzelnen Funktionen, damit Sie sowohl das Standardangebot als auch die besonderen Merkmale des
Geräts optimal nutzen können.
Lucas Covers
Paris, Februar 2004
40 EINLEITUNG
Page 40

2 Produktbeschreibung
2.1 Auspacken
Packen Sie den DSR 300 aus und überprüfen Sie die Verpackung auf vollständigen Inhalt:
1 x DSR 300
-
-
1 x Fernbedienung
1 x Bedienungsanleitung
-
- 2 x AA Batterien
1 x SCART-Kabel
-
1 x Netzkabel.
-
1 x Garantie
-
Plastiktüten können gefährlich sein.Von Säuglingen und Kindern fernhalten, um
Erstickungen zu vermeiden.
Dieses Symbol auf der Verpackung und der Bedienungsanleitung bedeutet, dass das
Verpackungsmaterial recyclingfähig ist.
Deutsch
PRODUKTBESCHREIBUNG 41
Page 41

2.2 Gerätevorderseite
Deutsch
Q W E
STANDBY-Knopf: . . . . . . . . . . . . . . . . . . . . . . . . . . Zum AUS-Schalten des Receivers.
1
2 Rote LED-Anzeige: . . . . . . . . . . . . . . . . . . . . . . . . Zur Anzeige des Receiverstatus (siehe Übersicht unten).
3 Grüne LED-Anzeige: . . . . . . . . . . . . . . . . . . . . . . Zur Anzeige des Receiverstatus (siehe Übersicht unten).
Statusübersicht
Betriebsart (rot) (grün)
Receiver ans Netz angeschlossen und im EIN AUS
Standby-Betrieb
Auf TV- oder Radioempfang AUS EIN
Betätigung einer Fernbedienungstaste Schnelles Blinken Aktueller Status
Timer eingeschaltet EIN EIN
Timer eingeschaltet, Gerät im Langsames Blinken AUS
Standby-Betrieb
Software wird heruntergeladen Aktueller Status Schnelles Blinken
Herunterladen von Software beendet Aktueller Status Rückkehr zum
Empfängerfenster
der Fernbedienung
LED Linke LED Rechte LED
vorherigen Status
42 PRODUKTBESCHREIBUNG
Page 42

2.3 Geräterückseite
6
WI
Q E R U
1 LNC IN (*): . . . . . . . . . . . . . . . . . . . . . . . . . . . . . Für den Anschluss des Koaxialkabels der Satellitenschüssel.
Empfohlene Anschlüsse s. Schaubild in Kapitel 5.
2 RF OUT (*): . . . . . . . . . . . . . . . . . . . . . . . . . . . . RF Ausgang für den Anschluss des Receivers an einen
anderen Receiver.
3 VCR (*): . . . . . . . . . . . . . . . . . . . . . . . . . . . . . . . . . SCART-Buchse für den Anschluss eines Videorecorders oder
DVD-Players/Recorders
4 SERIAL (*): . . . . . . . . . . . . . . . . . . . . . . . . . . . . . . RS232-Buchse für serielle Datenübertragung an einen PC
oder anderen Receiver
5 TV (*): . . . . . . . . . . . . . . . . . . . . . . . . . . . . . . . . . . . SCART-Buchse für den Anschluss an den Fernseher oder
einen Videoprojektor (2)
6 L/R AUDIO OUT (*): . . . . . . . . . . . . . . . . . Linker/rechter Ausgang für den Anschluss einer HIFI-/Audio-
Empfängeranlage
7 DIGITAL OPTICAL OUT (*): . . . . . . . Digitaler Ausgang für den Anschluss einer HIFI/Audio-
Empfängeranlage
8 230V~50Hz 20W max (**): . . . . . . . . . . Buchse für den Anschluss des Netzkabels
T
T
Deutsch
Hinweis: der Aufkleber mit der Typenbezeichnung und Seriennummer befindet sich auf der Unterseite des
.
s
Receiver
(1) Der SCART-Anschluss wird auch Euroconnector oder Peritel genannt.
(2) Anschluss eines Videoprojektors an die TV SCART-Buchse siehe Kapitel 5.
* Extrem niedrige Sicherheitsspannung
** Gefährlich hohe Spannung
PRODUKTBESCHREIBUNG 43
Page 43

3 Fernbedienung
Ton aus
Deutsch
ROT, GRÜN,GELB, BLAU
FAV
Von einer zur anderen
Favoritenliste wechseln
UNTERTITEL
Vorübergehend die AudioUntertitel starten/beenden
oder ändern
I-II
Vorübergehend die AudioSprache aktualisieren und die
Audio-Betriebsart wählen
MENU
Digitales TV-/Radio-Menü
öffnen/schließen
PFEIL-Tasten
- Mit den Pfeiltasten t und y
kann man Menüs und Listen
durchlaufen.
- Mit den Pfeiltasten
kann man einen Wert in
einem Menü wählen.
OK
Programmliste
wählen/aufrufen/umschalten
UTSTÄRKE
LA
Ton lauter/leiser stellen
u und i
+/ -
Standby
- Standby/EIN
V
(blau) und V (weiß)
Im Programmführer oder der
Favoritenliste eine Seite voroder zurückscrollen
TEXT ist nicht aktiv
GUIDE
Aktuelle und kommende
Programme anzeigen
INFO
- Infobanner öffnen
- Ganzes Programm anzeigen
- Infobanner schließen
TIMER
Aufnahme-Timer während des
digitalen TV-Emfangs oder über
den PROGRAMMFÜHRER
festlegen
Mit der Tastenfolge
0” wird die aktuelle
Timereinstellung gelöscht.
ZURÜCK
- Wählt den zuletzt
empfangenen digitalen TVKanal.
- Bei Betriebsart Menü: Menü
verlassen oder Auswahl um 1
zurücksetzen und
vorgenommene Änderungen
rückgängig machen.
P+ / P-
Nächsten/vorherigen Sender
wählen
“TIMER,
TV / STB
Von TV-Betrieb auf ReceiverBetrieb und umgek
schalten
ehr
t
44 FERNBEDIENUNG
TV / RADIO
Von Fernsehen auf Radio und
umgekehrt schalten
0-9
Einen Fernsehsender im
Receiver-Betrieb wählen
Page 44

Gebrauchte Batterien nicht in den
Hausmüll werfen.
Die mit dem Receiver mitgelieferten Philips-Batterien enthalten keine Schwermetalle wie
Quecksilber oder Blei-Cadmium. Dennoch dürfen gebrauchte Batterien in vielen Ländern nicht
im Hausmüll entsorgt werden.
Informieren Sie sich diesbezüglich vor Ort über geltende Bestimmungen.
Deutsch
FERNBEDIENUNG 45
Page 45

4 Anschluss des Receivers
Es gibt mehrere Möglichkeiten,den Receiver in die vorhandene Audio-/Video-Gerätanordnung zu
integrieren.
Vorsicht!
Deutsch
Bevor Sie den Receiver anschließen:
- Trennen Sie sämtliche Geräte (Fernseher,Videorecorder und/oder DVD) vom Netz.
- Den Digital-Receiver noch nicht ans Netz anschließen.
- Überprüfen Sie die vorhandene Kabelführung:Wenn die Verkabelung der Audio/VideoGerätanordnung den Schaubildern unten entspricht, müssen Sie nichts zu ändern.
- Wählen Sie unter Berücksichtigung der vorhandenen Gerätanordnung die am besten geeignete
Anschlussart für die Integrierung des Digital-Receivers in die vorhandene Audio-/Video-Anlage.
Lesen Sie dazu bitte die Kapitel 4.1 und 4.2.
Hinweis: außenanlagen wie Satellitenschüsseln sind gemäß Anweisung in der Dokumentation des betreffenden
Geräts zu installieren. Bei Installation zusätzlicher Geräte lesen Sie bitte die Installationshinweise der
vorliegenden Anleitung durch.
4.1 Anschluss an Satellitenantenne und TV
46 ANSCHLUSS DES RECEIVERS
Page 46

4.2 Anschluss an einen Fernseher und einen VCR/DVD-Player mit
PHILIPSPHILIPS
T
V-Gerät
VCR/DVD
Satellitenreceiver
Kabel bzw. terrestrische Antenne
VON ANTENNE
Anschluss an Netzstrom
ZU ANTENNE
AUSSEN 1
AUSSEN 2
SCART
Satellitenschüssel
Hilfe eines SCART-Steckers
Hinweis: für optimale DVD/VCR-Bildqualität schließen Sie den DVD/VCR SCART EXT 1-Stecker direkt an den
SCART-Anschluss des Fernsehers an.
Deutsch
ANSCHLUSS DES RECEIVERS 47
Page 47

4.3 Anschluss an eine Digitalverstärker/Heimkino/HiFi-Anlage
Satellitenreceiver
Anschluss an Netzstrom
Digitaler
Audio-Converter
oder-Verstärker
LR
LR
AUDIO
Deutsch
48 ANSCHLUSS DES RECEIVERS
Page 48

5 Erstinstallation
Vorraussetzungen für eine schnelle und erfolgreiche
Inbetriebnahme:
- Die Satellitenantenne ist bereits installiert.
- Sie ist korrekt auf den betreffenden Satelliten ausgerichtet
(Astra, Hotbird, Eutelsat u.a.).
- Der Receiver ist gemäß Anweisung in Kapitel 4 an die
Antenne, den Fernseher und die anderen Geräte
angeschlossen.
Receiver und Fernseher einschalten. Der Empfangsbildschirm
erscheint.
5.1 Wahl der Menüsprache und der
Anschlüsse
- Sobald der Empfangsbildschirm angezeigt wird, drücken Sie
auf <OK>, um den Schnellinstallationsbildschirm
anzuzeigen. Dort erscheint die Aufforderung, die
gewünschte Menüsprache und die passende
Satellitenkonfiguration zu wählen. Je nach DiSEqCEinstellung können Sie dabei Satelliten für einen oder
mehrere Satelliten wählen.Wenn Sie keinen DiSEqCSchalter haben, bitte nur Anschluss A wählen.Wenn Sie
ausschließlich ASTRA 19,2° empfangen, brauchen Sie keine
Einstellung zu ändern.
Deutsch
- Drücken Sie die <rote> Taste auf der Fernbedienung, um
den Port Ihren Anforderungen entsprechend einzustellen.
Drücken Sie die <grüne> Taste, um Hilfestellung für die
korrekte Ausrichtung der Antenne und den bestmöglichen
Signalempfang anzufordern.
- Wählen Sie die passenden Optionen und drücken Sie
anschließend auf <OK>, um den Sendersuchlauf zu starten.
ERSTINSTALLATION 49
Page 49

Deutsch
5.2 Sendersuchlauf
Bei der Sendersuche werden folgende Informationen auf
dem Bildschirm angezeigt:
- Anzahl der gefundenen TV- und Radioprogramme
- Fortschritt des Sendersuchlaufs in Prozent
- Signalstärke und Empfangsqualität
Hinweis: wenn Sie während des Sendersuchlaufs <OK> drücken,
wird der Vorgang abgebrochen und erneut der
Schnellinstallationsbildschirm angezeigt. Es dauert ein paar
Sekunden, bis der Receiver auf den <OK>-Tastendruck anspricht.
Die gefundenen Programme werden in diesem Fall nicht
gespeichert.
Nach erfolgreichem Abschluss des Sendersuchlaufs wird eine
Beendigungsmeldung und die Anzahl der gefundenen
Programme angezeigt.
Drücken Sie auf <OK>, um den Receiver auf das erste
Programm der Liste einzustellen.
50 ERSTINSTALLATION
5.3 Sendersuchlauf fehlgeschlagen
Bei fehlgeschlagenem Sendersuchlauf erscheint eine
entsprechende Fehlermeldung.
Page 50

Vor Durchführung eines erneuten Sendersuchlaufs
sollten Sie folgende Punkte überprüfen:
- Antennenkabel
- Anschluss der Antenne an den Receiver (siehe Kapitel
5.1 u.f.)
- Anzahl der in Ihrer Region empfangbaren Programme
5.3.1 Antenneneinstellung
- Drücken Sie auf <OK>, um weiter zu gehen.Als
Hilfestellung für die Installation und möglicherweise
erforderlichen Änderungen erscheint der
Antenneneinstellungsbildschirm.
- Wählen Sie für den betreffenden Anschluss einen Satelliten
und geben Sie LNC-Typ (Standardwert ist Universal) und
LNC-Frequenzen ein. Sie können das Signal durch
Betätigen der <grünen> Taste der Fernbedienung testen.
- Drücken Sie auf <OK>, um einen erneuten Sendersuchlauf
durchzuführen.Wenn dieselbe Fehlermeldung nach einer
gewissen Zeit erneut erscheint, sehen Sie im Kapitel
Störungsbeseitigung nach.
5.3.2 Signaltest
Bei falsch ausgerichteter Antenne ist auch dann kein
Signalempfang möglich, wenn Sie im
Antenneneinstellungsmenü die richtigen Werte eingegeben
haben.Als Hilfestellung liefert der Receiver Ihnen präzise
Angaben zur Antennenausrichtung auf den gewünschten
Satelliten.
- Drücken Sie die <grüne> Taste auf der Fernbedienung, um
den Signaltestbildschirm mit der Stärke des empfangenen
Satellitensignals und der Empfangsqualität anzuzeigen.
- Wenn sowohl die Signalstärke als auch die
Empfangsqualität zu wünschen übrig lassen, muss die
Antenne möglicherweise neu ausgerichtet werden, so dass
sich bessere Werte ergeben.
- Drücken Sie auf <OK>, um den Sendersuchlauf erneut zu
starten.
Deutsch
Hinweis:Wenn dieselbe Fehlermeldung nach einer gewissen Zeit
erneut auftritt, lesen Sie bitte im Kapitel Stör
ungsbeseitigung nach.
ERSTINSTALLATION 51
Page 51

6 Hauptansicht
Deutsch
Im folgenden Abschnitt werden die beim Fernsehen oder
Radiohören zugänglichen Grundfunktionen beschrieben.
Informationen für die Navigation im Hauptmenü entnehmen
Sie dem Abschnitt Grundlegende Hinweise zur
Menünavigation.
6.1 Programminformationen
Bei jedem Programmwechsel erscheinen auf dem Bildschirm
folgende Programminformationen:
- Aktuelles Datum und aktuelle Uhrzeit
- Aktueller Service (TV/R), Programmnummer und
Programmname in der aktuellen Programmliste
- Symbole für die Programmeigenschaften wie z.B.
- Sperrstatus, angebotene Audio-Sprachen oder Untertitel
- Startzeit des aktuellen und kommenden Programms und
aktueller Programmname
Während des Fernsehempfangs können Sie die aktuellen
Programminformationen jederzeit durch Betätigen der
<INFO>-Taste auf der Fernbedienung anzeigen.
Hinweis: die Programminformationen werden jeweils 5 Sekunden
lang eingeblendet. Die Einblendedauer kann im Setup-Menü
eingestellt werden.
52 HAUPTANSICHT
6.2 Programmwahl
6.2.1 Mit <P+/P-> oder Zahlentasten
Mit den <P+>/<P-> oder Zahlentasten der Fernbedienung
können Sie auf ein anderes Programm umschalten.
utzung der Pr
6.2.2
- Um beim Fernsehen oder Radiohören alle empfangbaren
Hinweis: drücken Sie <BACK>, um die Programmliste wieder
auszublenden.
Ben
ogramme anzuzeigen,
Pr
Fernbedienung. Die Programmliste erscheint links im
Bildschirm.
ogrammliste
en Sie <OK> auf der
drück
Page 52

- Um ein Programm zu wählen, scrollen Sie in der Liste nach
oben oder unten und drücken <OK>, um das Programm
zu sehen.
6.3 Vorheriges Programm erneut
aufrufen
Drücken Sie die <BACK>-Taste der Fernbedienung, um zum
vorherigen Programm aus der aktuellen Programmliste
zurückzukehren.
6.4 TV oder Radio wählen
Drücken Sie beim Fernsehen oder Radiohören TV/RADIO
auf der Fernbedienung, um von der einen auf die andere
Betriebsart umzuschalten.
6.5 Lautstärke & Audio-Regelung
Deutsch
6.5.1 Lautstärkeregelung und Ton aus
-
- Regeln Sie die Lautstärke mit Hilfe der < >-Tasten
auf der Fernbedienung.
Hinweis: sie können die Lautstärke auch am Fernseher einstellen.
- Schalten Sie den Ton mit Hilfe der < >-Taste auf der
Fernbedienung aus.
- Drücken Sie die Taste erneut,um wieder auf normale
Lautstärke umzuschalten.
Hinweis: die Lautstärkenänderung wird am Bildschirm durch einen
Balken, die Tonausschaltung durch ein Symbol oben rechts im
Bildschirm veranschaulicht.
+
6.5.2 Audio-Regelung
- Um auf die Audio-Einstellungen zugreifen zu können,
wählen Sie im Hauptmenü das Systemeinstellung-Menü
und anschließend Systemeinstellung. Der dazugehörige
Bildschirm wird angezeigt.
- Wählen Sie Audio-Ausgang. Er ist normalerweise auf
Stereo eingestellt.
HAUPTANSICHT 53
Page 53

Deutsch
- Wählen Sie den gewünschten Wert (Links, Rechts,
Mono, Stereo oder AC3) und drücken Sie <OK>, um die
Änderungen zu speichern und den Bildschirm zu verlassen.
6.5.3 Audio-Sprache
- Zur Auswahl der gewünschten Audio-Sprache wählen Sie
im Hauptmenü das Systemeinstellung-Menü und
anschließend Systemeinstellung. Der dazugehörige
Bildschirm wird angezeigt.
- Wählen Sie zunächst Audio-Sprache, dann die gewünschte
Sprache und drücken Sie anschießend auf <OK>, um die
Änderungen zu speichern und den Bildschirm zu verlassen.
- Wenn Sie die Audio-Sprache für ein bestimmtes Programm
ändern möchten, drücken Sie mehrmals <I-II> auf der
Fernbedienung, um die gewünschte Audio-Sprache
auszuwählen. Das Sprachangebot hängt von der
Audiosignalübertragung ab.
6.6 Favoritenliste
Wählen Sie in der Programmverwaltung die Rubrik
Favoriten, um den Bildschirm TV/R Fav-Liste anzuzeigen.
Damit können bis zu 3 TV- und 3 Radio-Favoritenlisten
angelegt und verwaltet werden. Mit diesen Listen können Sie
zwischen Ihren Favoriten hin- und herschalten.Wie sie
angelegt und bearbeitet werden, erfahren Sie im Abschnitt
Programmverwaltung.
54 HAUPTANSICHT
Während des Receiver- Betriebes können Sie mit der
<FAV>- Taste auf der Fernbedienung auf die Favoritenlisten
zugreifen. Die jeweils nächste Liste können Sie durch
erneuten Tastenddruck auf <FAV> anzeigen.
Page 54

7 Menü
7.1 Allgemeine Informationen
Über das Menü haben Sie Zugriff auf sämtliche Funktionen
des Receivers:
o Programmführer
o Programmverwaltung
o Kindersicherung
o Timerverwaltung
o Systemeinstellung
o Installation
7.1.1 Grundlegende Hinweise zur Menünavigation
Beim Fernsehen oder Radiohören:
- Drücken Sie <MENU>, um den Menübildschirm
anzuzeigen.
- Scrollen Sie mit
wählen Sie die gewünschte Menürubrik.
- Drücken Sie <OK>, um die entsprechenden
Unterrubriken anzuzeigen.
- Gehen Sie mit
- Wählen Sie mit der
Menürubrik.
t oder y nach oben oder unten und
t oder y auf die gewünschte Unterrubrik.
u oder i Taste einen Wert in einer,
Deutsch
Hinweis: drücken Sie <BACK>, um jeweils einen Schritt
zurückzugehen.
7.1.2 Abbrechen/Änderungen speichern
- Drücken Sie auf die <BACK>-Taste, um den Bildschirm zu
verlassen, ohne die Änderungen zu speichern.
- Drücken Sie auf <OK>, wenn Sie die Änderungen
bestätigen und den Bildschirm verlassen möchten.
Hinweis: um auf eine gesperrte Menürubrik (mit dem
Sperrsymbol ) zugreifen zu können, müssen Sie Ihren PIN-Code
eingeben.
MENÜ 55
Page 55

7.2 Elektronischer Programmführer
Der elektronische TV-/Radioprogrammführer bietet Ihnen
einen Überblick über das Angebot an TV- und
Radioprogrammen und aktuelle sowie kommende
Programme, die die Sendeanstalten geplant und übermittelt
haben.
Deutsch
Hinweise: Die Programminformationen (Titel, Beginn, Ende) werden
jeweils nur für die aktuell empfangenen Programme angezeigt.
- Um die Programminfos anzuzeigen, drücken Sie beim
Fernsehen <GUIDE> auf der Fernbedienung bzw. wählen
Sie den Programmführer im Menü und drücken Sie <OK>.
- Markieren Sie den Namen des Programms, über das Sie
Detailinformationen haben möchten.
- Drücken Sie einmal <INFO>, um die
Programmbeschreibung anzuzeigen, und noch einmal
<INFO>, um den Bildschirm wieder zu schließen.
- Drücken Sie <OK>, um das Programm zu sehen.
Hinweis: die Meldung 'Keine Programmdaten verfügbar' ist ein
Hinweis darauf, dass für das gewählte Programm noch keine
Daten vorliegen. Es dauert manchmal mehrere Sekunden, bis diese
Daten angezeigt werden.
Wenn Sie die vorherige oder kommende
Programminformation sehen möchten, drücken Sie
u oder i auf der Fernbedienung.
7.3 Programmverwaltung
Mit der Programmverwaltung können Sie Ihre Programmliste
organisieren und Favoritenlisten anlegen und bearbeiten.
56 MENÜ
Hinweis: drücken Sie <TV/RADIO>, um von den TV- auf die RadioFavoritenlisten umzuschalten. Die Radioprogrammverwaltung
funktioniert nach dem gleichen Prinzip wie die TVProgrammverwaltung.
Wählen Sie im Menü Programmverwaltung und drücken Sie
<OK>, um das Programm-Untermenü mit der
Programmliste und den Favoritenoptionen zu öffnen.
Page 56

7.3.1 Programmliste
Wählen Sie Programmliste und drücken Sie <OK>, um den
dazugehörigen Bildschirm zu öffnen. Dort können Sie:
o Programm aus der Liste entfernen,
o Programm in der Liste verschieben,
o Programm sperren,
o Programme sortieren
7.3.1.1 Programme aus der Programmliste
entfernen
Mit der Funktion Entfernen können Programme endgültig
gelöscht werden.
- Drücken Sie die <rote> Taste auf der Fernbedienung, um
die Funktion einzuschalten. Markieren Sie das Programm,
das Sie löschen möchten, und drücken Sie <OK>.Anstelle
der Programmnummer erscheint eine Marke.
- Drücken Sie erneut <OK>, um die Auswahl rückgängig zu
machen. Gelöscht wird das Programm jedoch erst, wenn
Sie den Bildschirm verlassen.Anschließend werden Sie
aufgefordert, die gewünschten Änderungen zu bestätigen.
Hinweis: gelöschte Programme können nur durch einen erneuten
Sendersuchlauf wiederhergestellt werden.
7.3.1.2 Programme auf der Programmliste
verschieben
Mit der Funktion Verschieben können Programme an eine
andere Stelle in der Liste verschoben werden .
- Drücken Sie die <grüne> Taste auf der Fernbedienung, um
die Funktion einzuschalten.
- Drücken Sie <OK>, um das zu verschiebende Programm
auszuwählen. Drücken Sie erneut <OK>, um die Auswahl
rückgängig zu machen.
- Markieren Sie anschließend die neue Position, auf die das
ausgewählte Programm verschoben werden soll. Drücken
Sie <OK> und die Verschiebung wird durchgeführt. Beim
Verlassen des Bildschirms werden Sie aufgefordert, die
gewünschten Änderungen zu bestätigen.
Deutsch
7.3.1.3 Programme sperren
Mit der Funktion Sperren können Programme gesperrt
werden.
- Drücken Sie die <gelbe> Taste auf der Fernbedienung, um
die Funktion einzuschalten.
- Geben Sie Ihr 4-stelliges PIN-code.
MENÜ 57
Page 57

Deutsch
- Drücken Sie <OK>, um das zu sperrenden Programm
auszuwählen. Das gewählte Programm wird mit einem
Symbol markiert. Drücken Sie erneut <OK>, um die
Auswahl rückgängig zu machen. Beim Verlassen des
Bildschirms werden Sie aufgefordert, die gewünschten
Änderungen zu bestätigen.
Hinweis: die Sperrfunktion ist nur verfügbar, wenn Sie Ihren PINCode in der Rubrik Kindersicherung im Setup-Menü festgelegt
haben.
7.3.1.4 Programme in der Programmliste
sortieren
Mit der Funktion Sortieren können Programme sortiert
werden.
- Drücken Sie die <blaue> Taste auf der Fernbedienung, um
die Sortieroptionen freizugeben.
- Drücken Sie die <rote> Taste, um die Programme
alphabetisch (nach Programmnamen) bzw. die <grüne>, um
sie nach Dienstleistern zu sortieren oder die <gelbe>
Taste, um die ursprüngliche Reihenfolge
wiederherzustellen.
7.3.2 Favoriten
Wählen Sie Favoriten im Programm-Untermenü und drücken
Sie <OK>. Mit diesem Bildschirm können Sie Ihren
persönlichen Präferenzen entsprechend drei Favoritenlisten
für das Fernsehen und drei für das Radio anlegen und
bearbeiten.
58 MENÜ
Favoritenliste anlegen
- Drücken Sie <OK>, um die gewünschten Programme auf
der Liste auszuwählen. Die gewählten Programme werden
mit einem Häkchen versehen.
- Drücken Sie erneut <OK>, um die Auswahl rückgängig zu
machen.
- Wählen Sie die nächste Liste mit <FAV>.
- Gehen Sie wie oben beschrieben vor.
Wenn Sie während des Satelliten-Fernsehens oder
Radiohörens eine der Favoritenlisten mit <FAV> auswählen,
schaltet der Receiver nur zwischen den vorgewählten
ogrammen hin und her
Pr
zwischen Ihrer Favoritenliste und der kompletten
Programmliste umzuschalten.
. Drücken Sie erneut <FAV>, um
Page 58

7.4 Kindersicherung
Mit Hilfe des 4-stelligen Codes können bestimmte
Programme für Kinder gesperrt werden. Darüber hinaus
können Sie anhand der übermittelten Alterseinstufung
beurteilen, ob das betreffende Programm für Ihre Kinder
geeignet ist oder nicht.
7.4.1 PIN-Code ändern
Der PIN-Code ist werkseitig auf 1111 eingestellt.
So ändern Sie Ihren PIN-Code:
- Geben Sie den aktuellen PIN-Code ein.
- Scrollen Sie nach unten auf Neues Kennwort und geben
Sie Ihren neuen PIN-Code ein.
- Scrollen Sie nach unten auf Kennwort bestätigen und
geben Sie den neuen PIN-Code erneut ein.
Hinweis: bitte merken Sie sich Ihren PIN-Code und heben Sie ihn
an einem geheimen Ort auf. Falls Sie ihn vergessen haben,
wenden Sie sich bitte an die Kundendienstzentrale.
7.4.2 Menüsperre benutzen
So sperren Sie den Zugang zu den Untermenüs des
Receivers:
- Geben Sie Ihren PIN-Code ein.
- Stellen Sie die Menüsperre auf JA.
- Drücken Sie <OK>, um den Vorgang zu bestätigen und den
Bildschirm zu verlassen.
Deutsch
7.5 Timerverwaltung
Mit der Timerverwaltung können Sie folgende Festlegungen
machen:
- Aufnahmezeiten für Programme, die Sie mit dem
VCR- oder DVD-Recorder aufnehmen möchten
Erinnerungsfunktion für Programme, die Sie in Kürze
-
sehen möchten
- Schlaf-Timer
MENÜ 59
Page 59

Deutsch
7.5.1 Aufnahme-Timer
Wählen Sie die Rubrik Aufnahme-Timer im Untermenü
Timer bzw. drücken Sie die <TIMER>-Taste auf der
Fernbedienung, um den Bildschirm Aufnahme zu öffnen. So
schalten Sie den Aufnahme-Timer ein:
- Legen Sie mit Hilfe der Pfeil- bzw. Zahlentasten die
Aufnahmeparameter fest.
- Drücken Sie <OK>, um die Eingaben zu bestätigen.
Hinweis: ein vorhandener Aufnahme-Timer kann im dazugehörigen
Bildschirm durch Auswahl der Option Timer-Ausschalten
aufgehoben werden.
Hinweis: vergessen Sie nicht, Ihren Videorecorder auf Aufnahme
einzustellen. .
7.5.2 Erinnerungsfunktion
Wenn Sie die Erinnerungsfunktion für ein bestimmtes
Programm eingeschaltet haben, sendet der Receiver bei
Beginn des betreffenden Programms eine Warnmeldung und
schaltet bei Bestätigung der Warnmeldung automatisch das
richtige Programm ein.
Wählen Sie die Rubrik Erinnerungsfunktion im TimerUntermenü, um den dazugehörigen Bildschirm zu öffnen. So
schalten Sie die Erinnerungsfunktion ein:
- Legen Sie mit Hilfe der Pfeil- bzw. Zahlentasten die
Erinnerungsfunktionsparameter fest.
- Drücken Sie <OK>, um die Eingaben zu bestätigen.
60 MENÜ
Hinweis: Eine vorhandene Erinnerungsfunktion kann im
dazugehörigen Bildschirm durch Auswahl der Option Timer
Ausschalten aufgehoben werden.Wenn bereits ein Timer (eine
Aufnahme) läuft, drücken Sie <TIMER> und anschließend <0>,
um den betreffenden Timer aufzuheben.
7.5.3 Schlaftimer
Wenn Sie einen Schlaftimer einstellen, schaltet der Receiver
nach einer bestimmten Zeit automatisch auf Standby-Betrieb.
Wählen Sie im Timer-Untermenü die Rubrik Schlaftimer, um
den dazugehörigen Bildschirm zu öffnen.
So schalten Sie den Schlaftimer ein:
Geben Sie mit Hilfe der Zahlentasten auf der
-
Fernbedienung die Zeit ein, nach Ablauf derer der Receiver
in den Standby-Betrieb schalten soll.
en Sie <OK>,
Drück
-
um die Eingabe zu bestätigen.
Page 60

Schlaftimer ausschalten:
- Wählen Sie Ausschalten anstelle des Zeitwerts.
- Drücken Sie <OK>, um zu bestätigen.
7.6 Systemeinstellung
Im Menü Systemeinstellung können die Grundeinstellungen
des Receivers, z.B. Uhrzeit und allgemeine Einstellungen wie
Video- und Audioausgang, geändert werden.
7.6.1 Zeiteinstellung
Mit dieser Funktion wird die Zeitverschiebung zwischen
Ortszeit und der vom Netzwerk gelieferten tatsächlichen
Ortszeit festgelegt.
- Wählen Sie die Rubrik Uhrzeit einstellen im SystemUntermenü, um den dazugehörigen Bildschirm zu öffnen.
- Wählen Sie den passenden Wert für die Verschiebung
(von -12 bis +12).Als Hilfestellung werden unten am
Bildschirm die Namen der Hauptstädte, für die der
gewählte Wert gilt, eingeblendet.
- Drücken Sie <OK>, um den gewählten Wert zu speichern
und zum vorhergehenden Bildschirm zurückzugehen bzw.
auf <BACK>, um den Vorgang abzubrechen und den
Bildschirm zu verlassen.
Falls die vom Satelliten gelieferten Informationen nicht
stimmen, können die aktuellen Werte für Uhrzeit und Datum
auf dem Bildschirm Zeiteinstellung mit Hilfe der Pfeil- oder
Zahlentasten der Fernbedienung eingegeben werden.
Deutsch
7.6.2 Systemeinstellung
Hinweis: Ihre TV-Einstellungen werden durch die ReceiverEinstellungen überschrieben.
Mit dieser Funktion werden die Systemeinstellungen
festgelegt.
- Wählen Sie die Rubrik Systemeinstellung im Setup-Menü,
um den dazugehörigen Bildschirm zu öffnen.
- Geben Sie die passenden Werte für folgende Parameter:
• Menüsprache (niederländisch, englisch, französisch,
deutsch (Standard), italienisch, polnisch oder türkisch)
• Audio-Sprache (niederländisch, englisch,französisch,
deutsch (Standard), italienisch, polnisch oder türkisch)
• Bildformat 4:3 oder 16:9 (Breitwandbildschirm)
• TV-Ausgang in RGB (Standard) oder FBAS
• VCR-Ausgang in FBAS (Standard) oder Y/C
MENÜ 61
Page 61

Deutsch
• Programm, der beim Einschalten des Receivers aus
dem Standby-Betrieb automatisch eingeschaltet wird.
Hinweis: falls nichts anderes eingegeben wird (Keine), ist
das das vor dem Schalten in den Standby-Betrieb zuletzt
gesehene Programm.
• Untertitelsprache (niederländisch, englisch, französisch,
deutsch (Standard), italienisch, polnisch oder türkisch)
• Audio-Ausgang auf Stereo (Standard), Links, Rechts
oder Mono
Hinweis: der Zugang zu diesem Menü kann mit dem PIN-Code
gesperrt werden.
7.7 Installation
Das Untermenü Installation umfasst folgende Rubriken:
o Antenneneinstellung
o Dienste hinzufügen
o Signaltest
o Produktidentifikator
o Werkseinstellungen
o Software-Aktualisierung
7.7.1 Antenneneinstellung
Mit dieser Funktion können die Antenneneinstellungen
festgelegt werden.
- Wählen Sie im Installationsmenü Antenneneinstellung, um
den dazugehörigen Bildschirm zu öffnen.
62 MENÜ
Hinweis: der Zugang zu diesem Menü kann mit dem PIN-Code
gesperrt werden.
- Wählen Sie die passenden Werte für folgende Parameter:
• Antenne: bis zu 4 Antennen mit den Mehrfachschaltern
• Satellit:Wählen Sie mit den Pfeiltasten den
betreffenden Satelliten.
• LNC-Typ:Wählen Sie Ihre LNC-Typ.Wenn Sie ein
Universal-LNC haben, wählen Sie Universal (Standard).
1:Wird automatisch je nach Satellit und
eq.
LNC Fr
•
wähltem LNC-Typ eingestellt.Wenn Sie ein Dual-
ge
t in das
er
LNC haben,
er
W
LNC Freq. 2:Wird automatisch je nach Satellit und
•
gewähltem LNC-Typ eingestellt.
Schalter (22KHz
•
mit denen Sie die
geben Sie den passenden
eld ein.
tf
one
T
Antenne k
DiSEqC):
,
onfigurier
W
Wählen Sie die Schalter,
en möchten.
Page 62

- Drücken Sie <BACK> auf der Fernbedienung, um die
Antenneneinstellung zu beenden und den Bildschirm zu
verlassen. Daraufhin erscheint die Frage, ob Sie die
Antennen-einstellungen wirklich ändern möchten.
- Wählen Sie die Schaltfläche <OK> auf dem Bildschirm und
warten Sie, bis die Daten gespeichert werden.
7.7.2 Dienste hinzufügen
Mit dieser Funktion können neue Programme gesucht
werden.
- Wählen Sie Dienste hinzufügen im Installationsmenü, um
den Bildschirm zum Hinzufügen von Diensten zu öffnen.
- Wählen Sie die passenden Werte für folgende Parameter:
• Antenne:Wählen Sie die Nummer Ihrer Antenne.
• Satellit:Wählen Sie mit den Pfeiltasten den
betreffenden Satelliten.
• Transponder:Wählen Sie einen Transponder, um den
Transpondersuchlauf durchführen zu können.
• Frequenz: Die dem gewählten Transponder
entsprechende bzw. mit Hilfe der Zahlentasten
eingegebene Frequenz
• Symbolrate: Die dem gewählten Transponder
entsprechende bzw. mit Hilfe der Zahlentasten
eingegebene Symbolrate
• Polarisierung: Hor (horizontal) oder Ver (vertikal)
• Suchoptionen:Wählen Sie FTA für die Suche nach
unverschlüsselten Programmen oder FTA+Scram…
nach unverschlüsselten und verschlüsselten
Programmen.
• Suchmodus:Wählen Sie TP für die Suche nach einem
bestimmten Transponder,Netzwerk für eine
Transpondergruppe oder 1 Sat für alle Transponder
eines Satelliten.
Hinweis: die Informationen über den gewählten Satelliten werden
rechts im Bildschirm angezeigt.
Deutsch
7.7.3 Signaltest
Mit dieser Funktion kann die Signalstärk
getestet werden.
Wählen Sie Signal
-
Signaltestbildschirm zu öffnen.
- Wählen Sie die passenden Werte für folgende Parameter:
• Antenne:Wählen Sie die Nummer Ihr
• Satellit:Wählen Sie mit den Pfeiltasten den
betreffenden Satelliten.
• LNC-Typ:Wählen Sie Ihr
Universal-LNC haben,
est im Installationsmenü,
T
en LNC-T
wählen Sie Univ
e und –qualität
um den
er Antenne.
.Wenn Sie ein
yp
ersal.
MENÜ 63
Page 63

Deutsch
• LNC Freq. 1:Wird automatisch je nach Satellit und
gewähltem LNC-Typ eingestellt.Wenn Sie ein DualLNC haben, geben Sie den passenden Wert in das
Wertfeld ein.
• LNC Freq. 2:Wird automatisch je nach Satellit und
gewähltem LNC-Typ eingestellt.
• Frequenz: Die dem gewählten Transponder
entsprechende bzw. mit Hilfe der Zahlentasten
eingegebene Frequenz
• Symbolrate: Die dem gewählten Transponder
entsprechende bzw. mit Hilfe der Zahlentasten
eingegebene Symbolrate
• Polarisierung: Hor (horizontal) oder Ver (vertikal)
Bei Eingabe der Werte werden die Signalstärke und –qualität
rechts im Bildschirm angezeigt.
7.7.4 Produktidentifikator
Der Produktidentifikator liefert Informationen zum Gerät
und zur Software.
7.7.5 Werkseinstellungen
Wählen Sie Werkseinstellungen im Untermenü Installation.
Auf dem dazugehörigen Bildschirm erscheint eine
Warnmeldung. Drücken Sie <OK>, um die (gelb markierte)
Auswahl zu bestätigen.
64 MENÜ
Hinweis: wenn Sie den Receiver auf Werkseinstellungen
zurückstellen, gehen alle vorher gespeicherten Daten und
Informationen verloren.
7.7.6 Software-Aktualisierung
Mit dieser Funktion werden die Modalitäten für das
Herunterladen von Software festgelegt.
Steuern Sie das Herunterladen von Software wie folgt:
- Wählen Sie Software-Aktualisierung im Untermenü
Installation.
Wählen Sie die passenden
-
Modus wählen:
•
Anwender. Empfohlen wird der Auto-Modus.
• Format: Software, Software + Daten oder Daten
• Daten können z.B. eine Voreinstellungsliste sein.
en Sie <OK>, um eine neue Software-Suche
Drück
-
durchzuführen.Auf dem Software-Such-Bildschirm wird
der Fortschritt des Suchvorgangs und die neue
Softwar
ersion angezeigt.
v
e
Werte für folgende Parameter:
Wählen Sie zwischen Auto oder
Page 64

8 DSR 300 Menü-Struktur
Programmführer
Programmverwaltung
Kindersicherung
(PIN-Code
erforderlich)
Timerverwaltung
Setup-Menü
Programmliste
Favoriten
Kindersicherung EIN/AUS
Menüsperre EIN/AUS
ALTERSSTUFE
Neuer PIN-Code
PIN-Code bestätigen
Aufnahme-Timer
Erinnerungsfunktion
Schlaftimer
Zeiteinstellung
Systemeinstellung
Installation
Timer-Nr.
Programmname
Timer-Typ
Monat
Datum
Aufnahmestart
Aufnahmeende
Timer-Nr.
Programmname
Timer-Typ
Monat
Datum
Aufnahmestart
Zeit
Örtliche Zeit
Einstellen
Sommerzeit
Jahr
Monat
Datum
Zeit
Menüsprache
Audio-Sprache
Untertitelsprache
Bildformat
TV-Ausgang
Audio-Ausgang
VCR-Ausgang
Einblendedauer
Transparenz
Antenneneinstellung
Deutsch
DiSEqC
Satellit
LNC-Type
LNC-Oszfr. 1
LNC-Oszfr. 2
LNC-Spannung
22 kHz Ton
DiSEqC
Satellit
Transponder
Frequenz
Symbolrate
Polarisierung
22 kHz
Suchoptionen
Suchmodus
DiSEqC
Satellit
LNC-Typ
LNC-Oszfr. 1
LNC-Oszfr. 2
Frequenz
Symbolrate
Polarisierung
Dienste hinzufügen
Signaltest
Produktidentifikator
Werkseinstellungen
SoftwareAktualisierung
DiSEqC
Satellit
Frequenz
Symbolrate
Polarisierung
PID einstellen
Modus wählen
Download-Typ
MENÜ-STRUKTUR 65
Page 65

9 Störungsbeseitigung
Berücksichtigen Sie bitte, dass neue Software Auswirkungen auf die Funktionsfähigkeit des Receivers
haben kann.Wenn Sie Probleme beim Betrieb des Receivers haben, lesen Sie bitte im betreffenden
Abschnitt der vorliegenden Bedienungsanleitung und der untenstehenden Übersicht nach.Wenn das
Problem dadurch nicht gelöst wird,wenden Sie sich bitte an Ihren Händler oder einen
Kundendienstanbieter.
Deutsch
Anzeige auf der Gerätvorderseite
leuchtet nicht
Ton- und Bildausfall, rote Lampe auf
der Gerätvorderseite leuchtet
Ton- und Bildausfall, grüne Lampe
auf der Gerätvorderseite leuchtet.
Schlechte Bildqualität
Fernbedienung spricht nicht an
Bildschirmanzeige funktioniert, aber
kein Empfang
Problem Mögliche Ursache Maßnahme
Gestörte Stromversorgung
Receiver im Standby-Betrieb
Satellitenschüssel falsch
ausgerichtet
Signal schwach
Receiver im TV-Betrieb
Fehlerhafte SCART-Anschlüsse
Satellitenschüssel falsch
ausgerichtet
Schlechter Empfang/ schlechte
Signalqualität
LNC hat keinen Strom
Überprüfen Sie, ob dass Netzkabel
richtig angeschlossen ist. Stöpseln
Sie es aus und erneut ein.
Überprüfen Sie, ob die Wandsteckdose mit Strom versorgt wird.
Drücken Sie den Standby-Knopf
Richten Sie die Satellitenschüssel
richtig aus. Überprüfen Sie die
Signalstärke mit Hilfe des
Antenneneinstellungsmenüs.
Überprüfen Sie die Anschlüsse am
LNC und zwischen LNC und
Receiver bzw.richten Sie die
Satellitenschüssel richtig aus.
Drücken Sie ein- oder zweimal
<TV/STB> auf der Fernbedienung.
Überprüfen Sie die SCARTAnschlüsse
Richten Sie die Satellitenschüssel
richtig aus.
Überprüfen Sie, ob der Receiver
eingeschaltet ist.
Halten Sie die Fernbedienung in
Richtung Gerätevorderseite.
Überprüfen Sie die Batterien in der
Fernbedienung.
Überprüfen Sie die Anlage und die
Antennenausrichtung.
Überprüfen Sie das Kabel zwischen
LNC und Receiver.
66 STÖRUNGSBESEITIGUNG
Page 66

Problem Mögliche Ursache Maßnahme
Unterbrochener Empfang
Bild unscharf, Bildschirmtext
schwer lesbar
Sie können nicht alle
normalerweise verfügbaren
Programme empfangen.
Das Bild sieht auf einigen
Programmen gestreckt oder
gequetscht aus.
Ein bestimmtes Programm kann
nicht mit Hilfe der Zahlentasten
angewählt werden.
Sie haben einen Timer
programmiert, doch die
gewünschte Sendung wurde nicht
aufgenommen.
Die Reihenfolge der Programme
hat sich geänder
t.
Fehlerhafte Anschlüsse
Satellitenschüssel falsch
ausgerichtet
TV SCART-Ausgang nicht auf RGB
eingestellt
TV SCART ist nicht an die RGBfähige SCART-Buchse des
Fernsehers angeschlossen.
Falsches TV SCART-Kabel
Das von der Antenne empfangene
Signal ist zu schwach
Entweder muss die Antennen
nachgestellt werden oder das
örtliche Programm funktioniert
nicht.
Übertragung möglicher-weise im
Breitwandbild-schirmformat,
Receiver-einstellungen stimmen
nicht.
Für das betreffende Programm ist
die Kinder-sicherung eingeschaltet.
Sie werden aufgefordert, den
Kindersicherungs-code einzugeben.
Der Videorecorder ist falsch
eingestellt.
Der Videorecorder ist falsch
eingestellt.
Überprüfen Sie alle Anschlüsse und
Kabel.
Richten Sie die Satellitenschüssel
richtig aus. Befestigen Sie die
Antenne sicher.
Ändern Sie die Einstellung in der
Rubrik TV SCART des
Systemeinstellungsmenüs in RGB.
Lesen Sie in der
Bedienungsanleitung Ihres
Fernsehers nach.
Verwenden Sie das mit dem
Receiver mitgelieferte SCARTKabel.
Versuchen Sie, den Receiver gemäß
Kurzanleitung zur Installation neu
einzustellen.Wenn danach immer
noch Programme fehlen, muss die
Antenne möglicherweise
nachgestellt werden.
Wenden Sie sich an Ihren Händler.
Überprüfen Sie die Einstellungen
der TV-Formatoption gemäß
Kapitel 7.6.2.Wenn Sie einen
Breitwandbild-schirm haben,
überprüfen Sie ggf. auch die
Einstellungen Ihres Fernsehers.
Geben Sie den
Kindersicherungscode ein, um das
Programm einschalten zu können,
oder heben Sie die
Kindersicherung auf.
Überprüfen Sie, dass der
Videorecorder auf die gleiche Zeit
eingestellt ist wie der Digital-
.
er
Receiv
Lesen in Kapitel 7 nach, wie Sie die
olge erneut ändern können.
Reihenf
Deutsch
Hinweis: wenn Sie alle oben genannten Maßnahmen durchgeführt haben, das Problem aber nach wie vor
nicht gelöst ist, wenden Sie sich bitte an Ihren Händler oder Kundendienstanbieter.
UNGSBESEITIGUNG
STÖR
67
Page 67

10 Technische Daten
Das Produkt entspricht den Anforderungen der europäischen Richtlinien 95/47/EC und 2002/21/EC.
Video-Decodierung
- MPEG-2 D
- Video-Bitrate: bis zu 15 Mbit/Sek
- Bildformat: 4:3 (Letterbox bei
Quellensignal 16:9) und 16:9
Deutsch
- Auflösung: bis zu 720 x 576 Pixel
Audio-Decodierung
- MPEG Layer I / II
Leichte Installation
- Plug and Play für Satellitenempfang
über Astra 19.2 E
- Menügeführte Installation und
Bedienung mit Bild- und
Tonunterstützung
- Automatische Programminstallation
anhand einer vorab festgelegten
Suchlaufliste
- Bis zu 4.000 voreingestellte
Programme
Bedienerfreundlichkeit
- Programmbearbeitung für individuelle
Installation (löschen, hinzufügen,
verschieben)
- 3 Fernseh-Favoritenlisten
- 3 Radio-Favoritenlisten
- Multifunktions-Fernbedienung
- Elektronische Programmführung/anzeige für aktuelle und kommende
Programme
- Automatische Aufnahme durch
Timerprogrammierung
Bedienung/Funktionen
- Empfang unverschlüsselter Programme
- Variable LNC-Frequenz
- DiSEqC 1.0 Antennensteuerung
- Kurzschlusssicherung RF-Eingang
- TV & Radio-Betrieb
- Automatische Aktualisierung der
Programmlisten
- Untertitel
Kindersicherung mit PIN-Code
-
- Kinder-Timer
- VCR-Timer für 10 Sendungen
- Erinnerungsfunktion für 10 Sendungen
- Aufnahmestörungsalarm
- Aufnahmekopfmeldung
- Durchschleifung von
- Durchschleifung von TV zu VCR
- Markierung des nächsten Programms
in der elektronischen
Programmführung
VB kompatibel bis MP@ ML
VCR zu TV
- Software-Aktualisierung durch
Herunterladen über Sendesignal
Stromsparbetrieb
-
- Audio-Betrieb: Mono / Stereo
- Digitaler Dolby-Bitstrom Ausgang
ur an analogen Audio-Ausgängen)
(n
Anwendungssystemressourcen
- Prozessor-Taktgeschwindigkeit:81 MHz
- SDRAM-CPU/Video - Grafik: 8 MB
- Flash-Speicher: 2 MB
Satellitenantennenschnittstelle
- RF-Eingang: F-Stecker
- LNC-Versorgung (V): 0 / 14 / 18
- LNC-Strom (mA): max. 350
- Tonschaltung: 22 kHz (ein / aus)
- DiSEqC 1.0: für 4 Orbitalpositionen
- RF-Ausgang: IEC 169-21 Stecker
(RF-Durchschleifung)
Empfangs-Demodulation
- Demodulationsart: QPSK
- Konfiguration: MCPC/ SCPC
- Eingangsfrequenzbereich (MHz):
- Eingangspegelbereich (dBm):
- Anwendungsgesteuerte Symbolrate
(Mbaud): 2 bis 45
- Satellitenbandbreite:
Ku-Band: 10.7 bis 12.75 GHz
Anschlüsse
TV-SCART
- Ausgang: CVBS, gesteuertes
Slow Blanking, Fast Blanking, S-Video
(für LCD-Projektor)
VCR-SCART
Ausgang: CVBS, gesteuertes Audiosignal
Audiosignal L/R, RGB,
L/R,Y/C, RGB
Im Rahmen der ständigen Produktverbesserung können die
obenstehenden Angaben ohne Vorankündigung geändert werden
950-2150
-65 bis -25
Audio CINCH-Buchsen
Analoges Audio-Ausgangssignal: L/R
Audio-Ausgangssignal: AC3
Digitales
Serielle Schnittstelle
RS 232
Zubehör
- Fernbedienung
Bauart RC19336002/01 (‘Zappa’)
- SCART-Kabel
- Bedienungsanleitung
- Weltweit gültige Garantie
- Batterien: 2 x 1,5V Typ AA/R06
- Netzkabel
Sonstiges
- Temperaturbereich (°C)
- Betrieb +5 bis +40
- Lagerung: -10 bis +70
- Netzspannung: 230 V ~ +/-10% - 50 Hz
- Leistungsaufnahme: max. 20 W
- Standby-Betrieb/Sparbetrieb: max. 5 W
- Gewicht: 0,980 kg
- Einschließlich Verpackung: 1,780 kg
- Abmessungen: 258 / 42 / 155
- Einschließl. Verpackung: 365 / 62 / 230
Das Produkt entspricht den
Anforderungen folgender
europäischer Richtlinien:
- 73/23/EEC
- 93/68/EEC
- 89/336/EEC
über SPDIF
68 TECHNISCHE DATEN
Page 68

Norme di sicurezza
Prima di utilizzare il ricevitore leggere attentamente tutte le norme di sicurezza e le istruzioni per
l'uso.
Per risultati ottimali:
- Posizionare il ricevitore lontano da radiatori o altre sorgenti di calore.
- Lasciare uno spazio libero di almeno 3 cm attorno al ricevitore per consentire la corretta
ventilazione verificando che i fori di aerazione non siano ostruiti.
- Questo ricevitore è destinato esclusivamente all'utilizzo domestico e non deve essere utilizzato o
immagazzinato in ambienti particolarmente caldi o umidi (o in presenza di condensa).
- Controllare che oggetti estranei o fluidi non penetrino all'interno del contenitore attraverso i fori
di aerazione. In tal caso, scollegare il ricevitore dalla rete di alimentazione e rivolgersi al
rivenditore.
Italiano
- Per la pulizia del ricevitore, utilizzare pelle scamosciata umida. Non utilizzare panni abrasivi, spugne
o detergenti.
- Nel collegare o scollegare i cavi dal ricevitore, controllare sempre che quest'ultimo sia staccato
dalla rete di alimentazione.
- Non smontare l'apparecchio. All'interno non sono presenti componenti che l'utente può riparare
da solo.
Collegamento alla rete di alimentazione
Prima di collegare il ricevitore alla rete di alimentazione, controllare che la tensione di alimentazione
della rete corrisponda alla tensione stampata sul retro del ricevitore. Se la tensione di rete è
differente, rivolgersi al rivenditore.
Se il ricevitore non viene utilizzato per un lungo periodo,scollegare il cavo di alimentazione dalla
presa di corrente.
Prima di collegare il ricevitore, completare la lettura del manuale.
70 NORME DI SICUREZZA
Page 69

Guida rapida di installazione
Satellite Receiver
to AC outlet
Digital Audio
Convertor or
Amplifier
LR
LR
AUDIO
PHILIPSPHILIPS
TV set
V
CR/DVD
Satellite Receiver
Cable or Off-air Antenna
IN
FROM ANT
to AC outlet
O
UT TO ANT
EX
T 1
EX
T 2
S
CART
Sa
tellite
D
ish Antenna
Collegamento a un televisore, a un videoregistratore o a un lettore di DVD muniti di
presa SCART
Nota: per la visualizzazione ottimale dei DVD e delle videocassette, collegare la SCART EXT 1 del
videoregistratore e lettore di DVD direttamente alla presa SCART del televisore.
Collegamento ad un sistema di amplificazione digitale, HIFI e Home Theatre
Italiano
GUIDA RAPIDA DI INSTALLAZIONE 71
Page 70

SOMMARIO
Norme di sicurezza 70
Per risultati ottimali: 70
Collegamento alla rete di alimentazione 70
Guida rapida di installazione 71
Collegamento a un televisore, a un
videoregistratore o a un lettore di DVD
muniti di presa SCART 71
Italiano
Collegamento ad un sistema di
amplificazione digitale, HIFI e Home
Theatre 71
1 Introduzione 74
2 Descrizione del prodotto 75
2.1 Disimballaggio del prodotto 75
2.2 Pannello frontale 76
2.3 Pannello posteriore 77
3 Telecomando 78
4.3 Collegamento ad un sistema di
amplificazione digitale, HIFI e
Home Theatre. 82
5 Prima installazione 83
5.1 Selezione della porta e della
lingua dei menu. 83
5.2 Scansione dei canali 84
5.3 Scansione non riuscita 84
5.3.1 Installazione dell’antenna 85
5.3.2 Verifica del segnale 85
6 Funzione di visualizzazione
generale 86
6.1 Informazioni sui canali 86
6.2 Selezione del canale 86
6.2.1 Uso di <P+/P-> o dei tasti
numerici 86
6.2.2 Uso della lista canali 86
6.3 Richiamo del canale precedente 87
4 Collegamento del ricevitore 80
4.1 Collegamento all'antenna
parabolica e al televisore 80
4.2 Collegamento a un televisore, a un
videoregistratore o a un lettore
di DVD con la presa SCART 81
72 SOMMARIO
6.4 Selezione della modalità
TV / Radio 87
ollo del v
Contr
6.5
6.5.1 Controllo del volume e
disattivazione dell'audio
6.5.2 Modalità Audio 87
olume e dell’audio
87
87
Page 71

6.5.3 Scelta della lingua Audio 88
7.7 Installazione 96
6.6 Elenco preferiti 88
7 Menu 89
7.1 Informazioni generali 89
Informazioni fondamentali per la
navigazione all'interno dei menu
7.1.2 Annullamento e salvataggio
delle modifiche 89
7.2 Guida (Guida elettronica dei
programmi EPG) 90
7.3 Menu Canali 90
7.3.1 Organizzazione dei canali 91
7.3.2 Preferiti 92
7.4 Controllo Familiare 93
7.4.1 Modifica del codice Pin 93
7.4.2 Uso di Blocco Menu: 93
7.5 Menu Timer 93
7.5.1 Timer di registrazione 94
7.7.1 Configurazione Parabola 96
7.7.2 Aggiunta di un nuovo canale 97
7.7.3 Test Segnale 97
7.7.4 Identificatore Prodotto 98
7.7.5 Impostazioni originali 98
7.7.6 Aggiornamento software 98
Italiano
8 Mappa dei menu 99
9 Risoluzione dei problemi 100
10 Specifiche tecniche 102
7.5.2 Promemoria 94
7.5.3 Spegnimento programmato 94
7.6 Menu Installazione 95
7.6.1 Fuso Orario 95
Impostazione Sistema
7.6.2
95
SOMMARIO 73
Page 72

1 Introduzione
Congratulazioni per avere acquistato questo prodotto Philips!
Il ricevitore satellitare digitale DSR 300 vi consentirà di visualizzare una vasta scelta di programmi
satellitari free-to-air con la migliore qualità audio e video digitale.
Con questo prodotto disporrete di funzioni e opzioni avanzate, quali:
- Qualità audio e video digitale
- Formato schermo panoramico
- SCART TV e connettore SCART per il videoregistratore e il DVD
- Fino a 4.000 canali televisivi e radiofonici
- Installazione semplice e uso tramite l'interfaccia collaudata Euphoria User
- Zapping veloce
- Elenco dei canali personali e elenchi dei canali preferiti
Italiano
- Guida elettronica dei programmi (EPG) con informazioni sui programmi attuali e i programmi
successivi
Questo manuale di istruzioni descrive come installare il ricevitore e le modalità necessarie per
l'utilizzo delle varie caratteristiche che consentiranno di ottenere sempre le migliori prestazioni
grazie alle funzioni standard e alle funzioni esclusive.
Lucas Covers
Parigi, Febbraio 2004
74 INTRODUZIONE
Page 73

2 Descrizione del prodotto
2.1 Disimballaggio del prodotto
Disimballare il DSR 300 e controllare che nella confezione si trovano tutti i componenti seguenti:
1 ricevitore DSR 300
-
-
1 telecomando
1 manuale di istruzioni
-
- 2 batterie AA
1 cavo SCART
-
1 cavo di alimentazione
-
1 libretto della garanzia
-
I sacchetti di plastica possono essere pericolosi. Per evitare eventuali soffocamenti,
custodire i sacchetti lontano da neonati e bambini.
Il simbolo sull’imballaggio e nel Manuale di istruzioni indica che tale materiale è riciclabile.
Italiano
DESCRIZIONE DEL PRODOTTO 75
Page 74

2.2 Pannello frontale
Italiano
Q W E
1 Pulsante STANDBY: . . . . . . . . . . . . . . . . . . . . . . . spegne il ricevitore.
2 Indicatore LED rosso: . . . . . . . . . . . . . . . . . . . . Visualizzazione stato del ricevitore
3 Indicatore LED verde: . . . . . . . . . . . . . . . . . . . . Visualizzazione stato del ricevitore
Tabella con gli indicatori di stato
Modalità (rosso) (verde)
Recevitore collegato alla rete di
alimentazione o nella modalità Standby ON OFF
Si sta guardando un programma televisivo
o acoltando un programma radio OFF ON
Si preme un tasto del telecomando Lampeggia velocemente Stato corrente
Timer attivo ON ON
Timer attivo in stanby Lampeggia lentamente OFF
Download software Stato corrente Lempeggia velocemente
Download software completato Stato corrente Ritorno allo
Finestra di ricezione
del telecomando
(vedere la tabella seguente).
(vedere la tabella seguente).
LED LED a sinistra LED a destra
stato recedente
76 DESCRIZIONE DEL PRODOTTO
Page 75

2.3 Pannello posteriore
6
WI
Q E R U
T
T
1 LNB IN (*): . . . . . . . . . . . . . . . . . . . . . . . . . . . . . Collegare il cavo coassiale proveniente dall'antenna
parabolica.
Per gli schemi di collegamento consigliati, consultare il
capitolo 5
2 RF OUT (*): . . . . . . . . . . . . . . . . . . . . . . . . . . . . Uscita RF per il collegamento di un altro ricevitore.
3 VCR (*): . . . . . . . . . . . . . . . . . . . . . . . . . . . . . . . . . SCART (1) per il collegamento di videoregistratore o del
lettore / masterizzatore di DVD
4 SERIAL (*): . . . . . . . . . . . . . . . . . . . . . . . . . . . . . . Presa RJ 9 per il trasferimento dei dati seriali al PC o a un
altro ricevitore
5 TV (*): . . . . . . . . . . . . . . . . . . . . . . . . . . . . . . . . . . . Presa SCART (1) per il collegamento del televisore o di un
videoproiettore (2)
6 L/R AUDIO OUT (*): . . . . . . . . . . . . . . . . . Uscite audio sinistra/destra per il collegamento del sistema
HIFI/Audio
7 DIGITAL OPTICAL OUT (*): . . . . . . . Uscita digitale per il collegamento del sistema HIFI/Audio.
8 230V~50Hz 20W max (**): . . . . . . . . . . Presa per il collegamento del cavo di alimentazione
Nota: l'etichetta con il modello e il numero di serie si trova sotto al ricevitore.
(1) La presa SCART viene anche chiamata Euroconnector o Peritel.
(2) Per collegare un videoproiettore alla presa TV SCART, consultare il capitolo 5.
* Bassa tensione di sicurezza
** Tensione pericolosa
Italiano
DESCRIZIONE DEL PRODOTTO 77
Page 76

3 Telecomando
Disattivazione audio
Per disattivare l'audio.
ROSSO,VERDE, GIALLO,
BLU
Standby
Standby / ON
V
(blu) e V (bianca)
Avanzamento di una pagina
verso l'alto o di una pagina
verso il basso nella guida o
nell'elenco dei preferiti. Il tasto
TESTO non è attivo.
FAV
Premere brevemente per
selezionare gli elenchi dei
preferiti
Italiano
SUTTOTITOLI
Attiva o disattiva
temporaneamente i sottotitoli
audio.
I-II
Modifica temporanea della
lingua dell’audio e selezione
della modalità audio.
MENU
Apertura/chiusura del menu
nella modalità TV / Radio
digitale.
CURSORI
- I tasti del cursore t e y
servono per spostarsi
all'interno di menu e elenchi.
- I tasti
u e i servono per
selezionare un valore nella
voce del menu.
Tasto OK
Selezione / richiamo elenco
programmi / zapping.
olume
V
Aumento/riduzione del
volume
TV / STB
Passaggio dalla TV digitale ai
programmi analogici
TV/videoregistratore/DVD.
+/ -
GUIDA
Apre la Guida Now & Next.
INFO
- Apre il banner delle
informazioni.
- Mostra ulteriori informazioni.
- Chiude il banner.
TIMER
Imposta un timer di
registrazione quando si guarda
un programma televisivo
digitali o all’interno della
GUIDA.
Premendo “
cancella il timer in corso.
BACK
- Seleziona il canale TV digitale
visualizzato
precedentemente.
- Nella modalità menu:
esce dal menu o riporta la
selezione al livello precedente
e annulla le modifiche
apportate.
P+ / P-
Selezione del canale successivo
/ precedente.
TV / RADIO
Passa dalla modalità TV alla
modalità radio e viceversa.
0-9
Selezione canali in modalità TV
digitale.
TIMER, 0”, si
78 TELECOMANDO
Page 77

Non gettare le batterie nell’immondizia
Le batterie Philips fornite in dotazione con il telecomando del ricevitore non contengono metalli
pesanti quali mercurio, piombo o cadmio.Tuttavia, in molti paesi non è consentito gettare le batterie
nell'immondizia.
Prima di procedere allo smaltimento delle batterie usate, informarsi sulle apposite normative locali.
Italiano
TELECOMANDO 79
Page 78

4 Collegamento del ricevitore
TIl ricevitore digitale può essere collegato e integrato nella configurazione dell’impianto audio/video
esistente in molti modi.
Avvertenza!
Prima di iniziare il collegamento:
- Scollegare tutti i dispositivi dalla rete di alimentazione (il televisore e anche il videoregistratore e/o
il DVD, se presenti).
- Non collegare subito il ricevitore digitale alla rete di alimentazione.
Italiano
- Controllare il cablaggio: se lo schema collegamenti dell’impianto audio/video esistente corrisponde
già allo schema seguente, potrebbe essere inutile modificarlo.
- A seconda della configurazione esistente, selezionare il metodo di collegamento più opportuno per
integrare il ricevitore digitale nel proprio impianto audio/video. Leggere i capitoli 4.1 e 4.2.
Nota: per l'installazione di un dispositivo esterno, quale un'antenna parabolica, consultare il manuale fornito
con tale dispositivo. Se vengono aggiunti nuovi apparecchi, consultare le istruzioni relative all'installazione
dell’apparecchio contenute nel manuale.
4.1 Collegamento all'antenna parabolica e al televisore
80 COLLEGAMENTO DEL RICEVITORE
Page 79

4.2 Collegamento a un televisore, a un videoregistratore o a un
PHILIPSPHILIPS
TV set
VCR/DVD
Satellite Receiver
Cable or Off-air Antenna
IN FROM ANT
to AC outlet
OUT TO ANT
EXT 1
EXT 2
S
CART
Satellite
Dish Antenna
lettore di DVD con la presa SCART
Nota: per la visualizzazione ottimale dei DVD e delle videocassette, collegare la SCART EXT 1 del
videoregistratore/lettore di DVD direttamente alla presa SCART del televisore.
Italiano
COLLEGAMENTO DEL RICEVITORE 81
Page 80

4.3 Collegamento ad un sistema di amplificazione digitale, HIFI e
Satellite Receiver
to AC outlet
Digital Audio
Convertor or
Amplifier
LR
LR
AUDIO
Home Theatre
Italiano
82 COLLEGAMENTO DEL RICEVITORE
Page 81

5 Prima installazione
Di seguito vengono riportati i requisiti per un'installazione
veloce e riuscita:
- si è già provveduto ad installare l'antenna parabolica;
- l'antenna è puntata correttamente verso gli appositi
trasponder satellitari (Astra, Hotbird, Eutelsat, ecc.,…);
- il ricevitore è collegato all’antenna, all'apparecchio
televisivo e ad altri apparecchi come nei precedenti schemi
della sezione 4.
Accendere il ricevitore e l’apparecchio televisivo.Verrà
visualizzata la schermata Benvenuti.
5.1 Selezione della porta e della lingua
dei menu
- Una volta visualizzata la schermata Benvenuti,premere
<OK> per accedere alla schermata di installazione
semplificata. In questa schermata verrà chiesto di
selezionare la lingua preferita del menu, nonché
l’impostazione corretta della porta. A seconda
dell’impostazione DiSEqC, è possibile selezionare satelliti
per una o più porte. Se non si dispone di uno switch
DiSEqC, selezionare solo la porta A.
Italiano
- Passare alla schermata Configurazione Parabola premendo
il tasto <Rosso> del telecomando in modo da impostare i
parametri di questa porta e regolarli secondo le proprie
esigenze. Per visualizzare la guida su come puntare
l'antenna nella direzione corretta in modo da ricevere il
segnale migliore, premere il tasto <Verde>.
e il tasto <OK>
- Eseguire le selezioni a
per avviare la scansione dei canali.
pposite e pr
emer
PRIMA INSTALLAZIONE 83
Page 82

Italiano
5.2 Scansione dei canali
Durante la procedura di scansione, sullo schermo vengono
visualizzate le informazioni seguenti:
- il numero di canali televisivi o radiofonici rilevati,
- la procedura di scansione indicata sotto forma di
percentuale,
- la potenza del segnale e la qualità della ricezione.
Nota: se durante la procedura di scansione si preme il tasto
<OK>, la scansione verrà interrotta e si ritornerà alla schermata
di installazione semplificata. Il ricevitore risponderà al comando del
ricevitore solo dopo alcuni secondi. In questo caso, non verrà
memorizzato nessuno dei canali rilevati.
Al termine della scansione, verrà visualizzato un messaggio
per confermare il completamento, nonché il numero dei
canali rilevati.
Per sintonizzare il ricevitore sul primo canale nell'elenco,
premere <OK>.
5.3 Scansione non riuscita
84 PRIMA INSTALLAZIONE
Se è impossibile eseguire la scansione dei canali, viene
visualizzato un messaggio di errore.
Page 83

Prima di iniziare una nuova scansione:
Si consiglia di procedere come segue:
- controllare il cavo dell'antenna,
- controllare il collegamento dall'antenna al ricevitore (fare
ferimento al capitolo 5.1 e ai capitoli successivi),
- controllare il numero di canali disponibili nella regione
corrispondente alla propria zona.
5.3.1 Installazione dell’antenna
- Per continuare, premere <OK>.Verrà visualizzata la
schermata Configurazione Parabola che assiste nella
procedura di configurazione e nell’eseguire le eventuali
impostazioni.
- Selezionare un satellite per la porta corretta e specificare
il tipo di LNB (Universale per impostazione predefinita) e
le frequenze dell’LNB. Per controllare il segnale, premere il
tasto <Verde> del telecomando.
- Per riavviare la scansione, premere <OK>. Se un
messaggio di errore identico viene visualizzato a lungo, fare
riferimento al capitolo Risoluzione dei problemi.
5.3.2 Verifica del segnale
Se l'antenna non è posizionata correttamente, non si riceverà
alcun segnale dal satellite nonostante nel menu di
configurazione dell'antenna siano stati immessi i valori
corretti. Il ricevitore fornisce perciò informazioni precise
relative all'orientamento dell'antenna per agevolarne
l'orientamento verso il satellite.
- Per accedere alla schermata Test Segnale, premere il tasto
<Verde> del telecomando. Indica la potenza del segnale
proveniente dal satellite nonché la qualità della ricezione.
- Se la potenza del segnale e la qualità della ricezione non
sono soddisfacenti, potrebbe essere necessario modificare
l'orientamento dell'antenna fino a quando si ottiene un
livello accettabile.
- Per riavviare la scansione, premere <OK>.
Italiano
Nota: se viene visualizzato a lungo un messaggio di errore
identico, fare riferimento al capitolo Risoluzione dei problemi.
PRIMA INSTALLAZIONE 85
Page 84

6 Funzione di visualizzazione generale
Questa sezione descrive le funzioni di base disponibili
quando si guarda un programma televisivo o si ascolta un
programma radio satellitare. Per le informazioni generali
relative alla navigazione nei menu, vedere Informazioni
fondamentali per la navigazione all'interno dei menu.
6.1 Informazioni sui canali
Ogni volta che si cambia canale, sullo schermo vengono
visualizzate informazioni relative al programma,nonché:
- la data e l’orario correnti
Italiano
- il servizio corrente (TV/R), il numero di canali nell’elenco
dei canali corrente e il nome del canale
- icone che indicano le proprietà del canale, ad esempio lo
stato sul blocco del canale, le lingue audio disponibili, i
sottotitoli,
- l’ora iniziale dei programmi attuali e successivi ed il nome
del programma corrente.
Durante la visualizzazione di un canale, è possibile
visualizzare in qualsiasi momento le informazioni correnti sul
canale premendo il tasto <INFO> del telecomando.
Nota: le informazioni sul canale vengono visualizzate per 5
secondi. Questo intervallo può essere impostato nel menu
Configurazione.
6.2 Selezione del canale
6.2.1 Uso di <P+/P-> o dei tasti numerici
Per cambiare canale, usare i tasti <P+>/<P-> o i tasti
numerici del telecomando.
6.2.2 Uso dell’elenco di canali
- Per una descrizione completa dei canali disponibili mentre
si guarda un canale o si ascolta una radio satellitare,
e <OK> sul telecomando
emer
pr
rà visualizzato l’elenco dei canali.
er
v
Nota: se si preme <BACK>, l’elenco dei canali scompare.
86 FUNZIONE DI VISUALIZZAZIONE GENERALE
A sinistra dello schermo
.
Page 85

- Per selezionare un canale, scorrere l'elenco dei canali
verso l'alto o verso il basso,e quindi premere <OK> per
visualizzarlo.
6.3 Richiamo del canale precedente
Premere il tasto <BACK> del telecomando per spostarsi sul
canale visualizzato precedentemente nell'elenco dei canali
corrente.
6.4 Selezione della modalità TV / Radio
Mentre si guarda un canale o si ascolta una radio satellitare,
premere il tasto TV/RADIO sul telecomando per passare
dalla modalità TV alla modalità Radio e viceversa.
6.5 Controllo del volume e dell’audio
6.5.1 Controllo del volume e disattivazione
dell'audio
+/ -
- Premere < > sul telecomando per aumentare o
diminuire il volume.
Italiano
Nota: il livello del volume può anche essere controllato dal
televisore.
- Premere < > sul telecomando per disattivare l'audio
- Per ripristinare l'audio normale, premere questo tasto di
nuovo.
Nota: la modifica del volume viene segnalata da una barra di
avanzamento, mentre la disattivazione dell'audio viene segnalata
da un'apposita icona nell'angolo super
iore destro dello scher
FUNZIONE DI VISUALIZZAZIONE GENERALE 87
mo.
Page 86

Italiano
6.5.2 Modalità Audio
- Per accedere alle impostazioni dell’audio, selezionare il
menu Installazione a partire dal menu principale, quindi
selezionare Impostazione Sistema. Verrà visualizzata la
schermata Impostazione Sistema.
- Selezionare Uscita audio. L’impostazione predefinita
dell'uscita audio è in modalità Stereo.
- Selezionare la modalità desiderata (Sinistro, Destro, Mono
o Stereo) e quindi premere <OK> per salvare le
modifiche e uscire dalla schermata.
6.5.3 Scelta della lingua Audio
- Per scegliere la lingua preferita dell'audio, selezionare il
menu Installazione a partire dal menu principale
"Impostazione Sistema". Verrà visualizzata la schermata
Impostazione Sistema.
- Selezionare Lingua Audio, quindi selezionare la lingua
desiderata e premere <OK> per salvare le modifiche e
uscire dalla schermata.
- Per modificare la lingua dell'audio relativa a un programma
specifico, premere ripetutamente <I-II> sul telecomando
per selezionare la lingua desiderata. Le lingue disponibili
dipendono dal segnale audio trasmesso.
6.6 Elenco preferiti
Nel menu Menu Canali, selezionare Preferiti per accedere
alla schermata Lista Pref.TV. Questa funzionalità serve a
creare e gestire fino a 3 elenchi di canali televisivi e radio
preferiti. Gli elenchi preferiti consentono di eseguire solo lo
zapping dei canali preferiti. Per creare e modificare gli elenchi
dei canali preferiti, consultare il capitolo Gestore canali
(Per controllare le informazioni precedenti o successive,
premere
Durante la visualizzazione di un canale video, è possibile
acceder
<F
accedere all'elenco successivo dei canali preferiti.
88 FUNZIONE DI VISUALIZZAZIONE GENERALE
u o i sul telecomando.).
e all'elenco dei canali pr
AV> del telecomando. Premere <FAV> di nuovo per
eferiti premendo il tasto
Page 87

7 Menu
7.1 Informazioni generali
Questo menu consente di accedere a tutte le funzioni del
ricevitore:
o Guida
o Menu Canali
o Controllo Familiare
o Impostazioni Timer
o Impostazione Sistema
o Installazione
7.1.1 Informazioni fondamentali per la navigazione all'interno dei menu
Mentre si sta guardando un programma televisivo o
ascoltando un programma radio:
- Premere <MENU> per visualizzare la schermata Menu.
- Premere
la voce desiderata del menu.
- Premere “OK” per confermare e visualizzare le sottovoci
corrispondenti.
- Premere
- Premere
menu.
t o y per spostarsi verso l'alto o verso il basso
t o y per spostarsi sulla sottovoce desiderata.
t o y per selezionare un valore nella voce del
Italiano
Nota: premere <BACK> per ritornare al passaggio precedente.
7.1.2 Annullamento e salvataggio delle
modifiche
- Per uscire dalla schermata senza salvare le modifiche,
premere il tasto <BACK>.
- Altrimenti, premere il tasto “OK” per convalidare le
modifiche e uscire dalla schermata.
Nota: per aprire la voce bloccata di un menu (indicata da un’icona
a forma di lucchetto), digitare il proprio codice PIN.
MENU 89
Page 88

Italiano
7.2 Guida (Guida elettronica dei
programmi EPG)
La guida EPG (Electronic Program Guide) dei programmi
televisivi e radiofonici fornisce una rassegna dei canali
televisivi e radiofonici disponibili, nonché dei programmi
attuali e futuri che verranno inviati dall’emittente a seconda
delle informazioni trasmesse sul programma.
Nota: sono disponibili solo le informazioni (titoli, ora iniziale e finale
del programma) relative al programma che si sta visualizzando
attualmente.
- Per visualizzare le informazioni dell’EPG, premere il tasto
<GUIDE> sul telecomando durante la visualizzazione di un
canale, oppure selezionare la voce Guida nel menu e
premere <OK>.
- Evidenziare il nome del programma di cui si desidera
visualizzare informazioni più dettagliate.
- Premere <INFO> una volta per ottenere ulteriori
informazioni (descrizione del programma) e premere
<INFO> di nuovo per farle scomparire.
- Premere <OK> per visualizzare il canale corrispondente.
Nota: se le informazioni EPG sul canale selezionato non vengono
trasmesse, verrà visualizzato il messaggio 'Nessuna informazione
EPG'. Occorrono alcuni secondi prima che i dati possano essere
visualizzati.
90 MENU
Per controllare le informazioni su eventi precedenti o
successivi relativi al canale selezionato, premere
telecomando.
u o i sul
7.3 Menu Canali
Questa funzione serve a organizzare l'elenco dei canali,
nonché a creare e modificare gli elenchi dei canali preferiti.
Nota: per passare dagli elenchi dei canali televisivi agli elenchi dei
canali radiofonici, premere il tasto <TV/RADIO>. Il gestore dei canali
radiofonici funziona analogamente al gestore dei canali televisivi.
Selezionare Menu Canali nel menu e premere <OK> per
accedere al sottomenu Canale contenente le opzioni
Organizza canali e Preferiti.
Page 89

7.3.1 Organizzazione dei canali
Selezionare Organizza canali e premere <OK> per accedere
a questa schermata,
In questa schermata è possibile:
o cancellare i canali dall'apposito elenco,
o spostare i canali in una posizione diversa dell'elenco,
o bloccare i canali,
o ordinare i canali,
7.3.1.1 Per cancellare i canali dalla schermata
Organizza canali:
L’opzione Cancella serve a rimuovere permanentemente un
canale.
- Premere il tasto <ROSSO> del telecomando per attivare
questa opzione. Selezionare il canale che si desidera
rimuovere evidenziandolo e premere <OK>. In
corrispondenza del numero di canale apparirà un
indicatore. (X)
- Premere <OK> di nuovo per annullare la selezione.
L’eliminazione verrà effettuata una volta che si esce dalla
schermata. Quindi, verrà chiesto di confermare le
modifiche da eseguire.
Nota: se la scansione non viene eseguita di nuovo, il canale
cancellato non potrà essere rimosso.
7.3.1.2 Per spostare i canali nella schermata
Organizza canali:
L'opzione Sposta serve a modificare la posizione di un canale
nell'elenco.
- Premere il tasto <Verde> del telecomando per attivare
questa opzione.
- Selezionare il canale che si desidera spostare premendo
<OK>. Premere <OK> di nuovo per annullare la
selezione.
- Quindi, evidenziare la riga nella quale si desidera spostare
il canale selezionato e premere <OK>. Il canale
selezionato viene spostato nella posizione desiderata ed il
numero del canale viene modificato appositamente.Verrà
chiesto di conf
schermata.
ermare le modifiche quando si esce dalla
Italiano
MENU 91
Page 90

7.3.1.3 Blocco dei canali:
L’opzione Blocca serve a bloccare i canali.
- Premere il tasto <Giallo> del telecomando per attivare
questa opzione.
- Inserire la codice PIN a 4 cifre.
- Selezionare il canale che si desidera bloccare premendo
<OK>. Il canale selezionato viene contrassegnato con
questa icona . Premere <OK> di nuovo per annullare la
selezione.Verrà chiesto di confermare le modifiche quando
si esce dalla schermata.
Nota: questa funzione può essere impostata solo dopo avere
impostato il codice Pin nella parte Controllo Visione del menu
Installazione.
Italiano
7.3.1.4 Per ordinare i canali nella schermata
Organizza canali:
L’opzione Ordina viene usata per l'ordinamento dei canali.
- Premere il tasto <Blu> del telecomando per attivare le
opzioni di ordinamento.
- Quindi, premere il tasto <Rosso> per ordinare i canali in
ordine alfabetico (Nome canale) o il tasto <Verde>
(Fornitore) per ordinare i canali a seconda del fornitore di
servizi, o il tasto <giallo> per ripristinare l'ordine originale.
7.3.2 Preferiti
Selezionare Preferiti nel sottomenu "Menu Canali" e
premere <OK>. Questa schermata viene usata per creare e
modificare tre elenchi con i canali televisivi e radiofonici
preferiti a seconda delle preferenze personali.
Per creare un elenco di canali preferiti:
- Selezionare i canali desiderati dall'elenco con il tasto
<OK>. I canali selezionati vengono contrassegnati con un
segno di spunta.
- Premere <OK> di nuovo per annullare la selezione.
- Selezionare l'elenco successivo con il tasto <FAV>.
e come indicato in alto
oceder
pr
Quindi,
-
V>
eriti con il tasto <F
Se si attiva uno degli elenchi pr
e si guar
mentr
programma radiofonico satellitare, lo zapping potrà essere
effettuato solo tra i canali preferiti.
Premere <FAV> di nuovo per passare dall'elenco dei canali
eriti all’elenco dei canali completo
ef
pr
da un canale tele
ef
o o si ascolta un
visiv
.
A
92 MENU
Page 91

7.4 Controllo Familiare
Il controllo familiare viene utilizzato per impedire la visione
di alcuni canali ai bambini. Il blocco del canale avviene
tramite un codice a 4 cifre. Oltre al blocco è possibile
indicare il livello di maturità (età - solamente se questa
informazione viene trasmessa con il programma). In questo
caso, se il canale trasmette un programma con contenuto
non adatto al di sotto dell'età impostata, il ricevitore
chiederà di inserire il codice.
7.4.1 Modifica del codice Pin
Il valore predefinito del codice Pin è 1111.
Per cambiare il codice Pin:
- Immettere il codice Pin corrente
- Scorrere fino alla voce Nuovo Codice ed inserire il nuovo
codice Pin.
- Scorrere fino alla voce Conferma Codice ed inserire il
codice Pin di nuovo.
Nota: memorizzare il codice Pin e mantenerlo al sicuro. Se lo si
dimentica, contattare l’assistenza clienti.
7.4.2 Uso di Blocco Menu
Per bloccare l'accesso ad ogni sottomenu del ricevitore:
- Inserire il codice Pin.
- Impostare il Blocco Menu su ON.
- Premere <OK> per confermare e uscire dalla schermata.
Italiano
7.5 Menu Timer
Questa funzione serve a impostare:
- il(i) timer di registrazione per i programmi da registrare
con il videor
- i promemoria per i programmi che si desidera
visualizzare tra breve,
- lo spegnimento programmato.
egistrator
e o il masterizzatore di DVD
MENU 93
Page 92

Italiano
7.5.1 Timer di registrazione
Per accedere alla schermata Registratore, selezionare la voce
Timer Registrazione nel sottomenu "Impostazione Timer" o
premere il tasto <TIMER> del telecomando.
Per attivare un timer di registrazione:
- Impostare i valori relativi ai parametri di registrazione con
i tasti direzionali o numerici appropriati.
- Premere <OK> per confermare.
Nota: è possibile disattivare un timer di registrazione esistente
selezionando Disattiva come Tipo Timer nella schermata
Registratore.
Nota: non dimenticare di attivare la registrazione sul
videoregistratore.
7.5.2 Promemoria
Quando si imposta un promemoria per un programma
specifico, il ricevitore invia un avviso all'inizio del programma
e, se il messaggio del promemoria viene accettato, passa
automaticamente al canale corretto.
Per accedere alla schermata Promemoria,selezionare la voce
Promemoria nel sottomenu Timer.
Per attivare un promemoria:
- Impostare i valori relativi ai parametri del promemoria con
i tasti direzionali o numerici appropriati.
- Premere <OK> per confermare.
94 MENU
Nota: è possibile disattivare un promemoria esistente selezionando
Disattiva come Tipo Timer nella schermata Promemoria. Se un
timer è già attivo (registrazione in corso), premere il tasto
<TIMER>, quindi <0> per cancellare tale timer.
7.5.3 Spegnimento programmato
È possibile impostare lo spegnimento programmato per fare
passare il ricevitore sulla modalità Standby dopo un
determinato lasso di tempo.
er acceder
P
selezionare la voce Spegnimento Programmato nel
sottomenu Timer.
er attivar
P
- Con i tasti numerici del telecomando, immettere il lasso di
tempo dopo il quale il ricevitore deve passare alla modalità
Standby.
e alla schermata Spegnimento Pr
e lo spegnimento pr
ogrammato:
ogrammato,
Page 93

- Premere <OK> per confermare.
Per disattivare uno spegnimento programmato:
- Selezionare Disattiva invece del lasso di tempo.
- Premere <OK> per confermare.
7.6 Menu Installazione
Il menu Installazione serve a modificare le impostazioni di
base del ricevitore, inclusi l'orologio e le impostazioni
generali, quali l'uscita audio e video.
7.6.1 Fuso Orario
Questa opzione serve a impostare il fuso orario rispetto
all'ora locale ottenuta normalmente dalla rete.
- Accedere alla schermata Regolazione Orario, selezionando
il parametro nel sottomenu "Impostazione Sistema"
- Selezionare il valore corretto del fuso orario
(da –12 a +12)
- Premere <OK> per memorizzare il valore selezionato e
ritornare alla schermata precedente, oppure premere
<BACK> per annullare.
Se le informazioni fornite dal satellite non sono corrette, la
schermata Regolazione Orario consente di impostare la data
e l'ora attuali con i tasti numerici o direzionali appropriati
del telecomando.
Italiano
7.6.2 Impostazione Sistema
Nota: le impostazioni del televisore verranno sovrascritte dalle
impostazioni del ricevitore.
Questa opzione serve a definire le impostazioni del sistema.
- Selezionare la voce Impostazione Sistema nel menu
Installazione per accedere alla schermata Impostazione
Sistema.
- Selezionare i valori appropriati per le seguenti:
• Lingua Menu e Lingua Audio: inglese, tedesco (valore
predefinito), italiano, polacco e turco
• Lingua Sottotitoli: inglese, tedesco (valore predefinito),
italiano
F
•
Uscita Video: RGB (valore predefinito) o CVBS
- Uscita audio: Ster
Mono.
polacco
,
ormato Schermo: 4:3 o 16:9 (schermo panoramico)
turco e OFF
,
eo (valor
e pr
edefinito),
Sinistr
, Destro,
o
MENU 95
Page 94

Italiano
- Uscita VCR: CVBS,Y/C
- Timeout Banner (1,2,3,4,5 secondi): Selezionare il numero
di secondi per cui si desidera che la barra permanga sullo
schermo.
- Immagine: permette di settare la trasparenza dei banner
(30%, 50%,70%).
7.7 Installazione
Il sottomenu Installazione contiene le voci seguenti:
o Configurazione Parabola
o Aggiungi Servizio
o Test Segnale
o Identificatore Prodotto
o Impostazioni Originali
o Aggiornamento Software
7.7.1 Configurazione Parabola
Questa opzione serve a definire le impostazioni dell’antenna.
- Selezionare Configurazione Parabola nel menu
Installazione per accedere alla schermata Configurazione
Parabola
- Selezionare i valori appropriati per le seguenti voci:
• Parabola: fino a 4 antenne con gli switch di
commutazione (DiSEqC A, B,C, D).
• Satellite: selezionare il satellite adatto con i tasti
direzionali.
• Tipo LNB: selezionare il tipo di LNB. Se si usa un LNB
universale, selezionare Universale (valore predefinito).
• Freq. LNB 1:viene impostata automaticamente a
seconda del satellite e del tipo di LNB selezionati.
Se si dispone di un doppio LNB (dual feed), inserire il
valore corretto nell’apposita casella.
• Freq. LNB 2:viene impostata automaticamente a
seconda del satellite e del tipo di LNB selezionati.
• Commut. (22KHz, DiSEqC): selezionare le commutazioni
con le quali si desidera configurare l'antenna.
- Per uscire dalla schermata Configurazione Parabola
- Selezionare il pulsante <OK> sullo schermo e quindi
e il tasto <BACK> del telecomando in modo da
emer
pr
completar
visualizzato il messaggio “Confermare la modifica alla
configurazione della parabola”?
attendere che i dati vengano salvati.
e la configurazione dell'antenna.
Viene
96 MENU
Page 95

7.7.2 Aggiungi Servizio
Questa opzione serve per la ricerca di nuovi canali.
- Per accedere alla schermata Aggiungi Servizio, selezionare
Aggiungi Servizio nel menu Installazione.
- Selezionare i valori per le seguenti voci:
• DiSEqC: selezionare l'ingresso antenna (A,B,C,D)
• Satellite: selezionare il satellite adatto con i tasti direzionali.
• Trasponder: selezionare un trasponder per effettuare
una ricerca relativa a questo trasponder specifico.
• Frequenza: il valore della frequenza corrispondente al
trasponder selezionato o inserito manualmente con i
tasti numerici.
• Symbolrate: il valore della velocità di modulazione
corrispondente al trasponder selezionato o inserito
manualmente con i tasti numerici.
• Polarizzazione: Ori (Hor) (orizzontale) o Ver (verticale)
• Opzioni Ricerca: selezionare FTA per ricercare i canali
“Free-To-Air” o FTA+Codi… (FTA+Scram…) per
ricercare sia i canali Free-To-Air, sia i canali codificati.
• Tipo Ricerca: selezionare TP per effettuare la ricerca di
un trasponder specifico, Rete (Network) per un
gruppo di trasponder o 1 Sat per tutti i trasponder di
un satellite.
Nota: le informazioni sul satellite selezionato vengono visualizzate
a destra dello schermo.
7.7.3 Test Segnale
Questa opzione serve a un controllare la potenza e la qualità
del segnale.
- Selezionare Test Segnale nel menu Installazione per
accedere alla schermata Test Segnale.
- Selezionare i valori per le seguenti voci:
• DiSEqC: selezionare l'ingresso antenna (A,B,C,D)
• Satellite: selezionare il satellite adatto con i tasti
direzionali
• Tipo LNB: selezionare il tipo di LNB. Se si usa un LNB
universale, selezionare Universale (Universal).
• Freq. LNB 1:viene impostata automaticamente a
seconda del satellite e del tipo di LNB selezionati.
Se si dispone di un doppio LNB (dual feed), inserire il
valore corretto nell’apposita casella.
• Freq. LNB 2:viene impostata automaticamente a
seconda del satellite e del tipo di LNB selezionati.
• Frequenza: il valore della frequenza corrispondente al
trasponder selezionato o inserito manualmente con i
tasti numerici.
Italiano
MENU 97
Page 96

Italiano
• Symbolrate: il valore della velocità di modulazione
corrispondente al trasponder selezionato o inserito
manualmente con i tasti numerici.
• Polarizzazione: Ori (orizzontale) o Ver (verticale)
Durante l’inserimento dei valori, è possibile visualizzare la
potenza e la qualità del segnale a destra dello schermo.
7.7.4 Identificatore Prodotto
Questa opzione serve a fornire le informazioni relative alle
versioni hardware e software.
7.7.5 Impostazioni originali
Per ripristinare i valori di fabbrica del ricevitore, selezionare
Impostazioni Originali nel sottomenu Installazione.Verrà
visualizzata la schermata Impostazioni Originali che contiene
un messaggio di avviso.Premere <OK> per confermare (la
selezione viene evidenziata in giallo).
Nota: se vengono ripristinati i valori di fabbrica del ricevitore, si
perderanno tutti i dati e le informazioni salvati precedentemente.
7.7.6 Aggiornamento software
Questa opzione serve a definire la modalità e il tipo di
download del software.
Per gestire i download del software:
- Selezionare Aggiornamento Software nel sottomenu
Installazione.
- Selezionare i valori appropriati per le seguenti voci:
• DiSEqC (A,B,C,D,) e Nome Satellite
• Select mode: Modalità automatica o Modalità utente .
Si consiglia di impostare la modalità di aggiornamento
sulla Modalità automatica.
• Tipo Download: Software, Software+Dati o Dati
• Ad esempio, i dati corrispondono a un elenco
preimpostato.
- Premere <OK> per avviare le ricerca di nuovo software.
Verrà visualizzata la schermata per la ricerca del software
che visualizza l'avanzamento della ricerca e la nuova
versione del software
98 MENU
Page 97

8 Mappa dei menu
Guida
Menu Canali
Controllo Familiare
(richiesto codice
PIN)
Impostazioni Timer
Impostazione
Sistema
Organizza Canali
Preferiti
Controllo visione ON/OFF
Blocco menu ON/OFF
Categoria visione
Nuovo codice PIN
Conferma codice PIN
d'accesso
Timer registrazione
Promemoria
Spegnimento
programmato
Impostazione ora
Impostazione sistema
Installazione
N. evento timer
Nome canale
Tipo timer
Mese
Data
Orario inizio
Orario fine
N. evento timer
Nome canale
Tipo timer
Mese
Data
Orario inizio
Ora
Imp. ora loc.
Ora legale
Anno
Mese
Data
Ora
Lingua menu
Lingua audio
Lingua sottitoli
Formato schermo
Uscita TV
Uscita audio
Uscita VCR
Timeout banner
Immagine
Configurazione
parabola
Aggiungi servizio
Test segnale
Identificatore
odotto
pr
Impostazioni originali
Aggiornamento
e
softwar
DiSEqC
Satellite
Tipo LNB
Freq. LNB 1
Freq. LNB 2
Alim. LNB
22KHz
DiSEqC
Satellite
Transponder
Frequenza
Symbolrate
Polarizzazione
22KHz
Opzioni ricerca
Tipo ricerca
DiSEqC
Satellite
Tipo LNB
Freq. LNB 1
Freq. LNB 2
Frequenza
Symbolrate
Polarizzazione
DiSEqC
Satellite
Frequenza
Symbolrate
olarizzazione
P
Imposta PID
Modalità selezione
wnload
Tipo do
MENU 99
Italiano
Page 98

9 Risoluzione dei problemi
Il nuovo software potrebbe alterare le funzionalità del ricevitore.
Se si riscontrano anomalie nel funzionamento del ricevitore, consultare l'apposita sezione di questo
manuale, inclusa la sezione Risoluzione dei problemi. Se è impossibile risolvere il problema, contattare
il proprio rivenditore o un consulente del servizio clienti.
Problema Causa Intervento
Il display sul pannello frontale non
si accende.
Italiano
Immagine assente, audio assente e
nessuna indicazione sul display.
Immagine assente, audio assente
ma il LED verde sul pannello
frontale è acceso.
La qualità dell'immagine è
insufficiente
Il ricevitore non risponde al
telecomando.
Il display a video OSD funziona ma
la ricezione è assente
Ricezione intermittente
Alimentazione difettosa
Il ricevitore è in standby
La parabola non è puntata
correttamente
Il segnale è debole
Il ricevitore è nella modalità TV
I collegamenti delle prese SCART
non sono corretti
Il puntamento della parabola non è
corretto
Ricezione/segnale debole
’LNB non riceve alimentazione
L
etti
I collegamenti non sono cor
r
Controllare che il cavo di
alimentazione è collegato
correttamente. Staccare il cavo e
ricollegarlo per controllare se è a
posto.
Controllare che l'alimentazione è
presente alla presa murale.
Premere il tasto Standby.
Regolare il puntamento della
parabola. Controllare il livello del
segnale nel menu Configurazione
Parabola.
Controllare i collegamenti dell’LNB
e tra l’LNB e il ricevitore, o
regolare la parabola.
Premere <TV/STB> una o due
volte sul telecomando.
Controllare i collegamenti delle
prese SCART
Regolare il puntamento della
parabola.
Controllare che il ricevitore è
acceso.
Controllare che il telecomando
viene puntato verso il pannello
frontale del ricevitore.
Controllare le batterie del
telecomando
Reg
posizionamento dell'antenna.
Contr
ricevitore.
Contr
collegamenti.
.
e l'impianto e il
olar
ollare il cavo tra l’LNB ed il
o e tutti i
v
e il ca
ollar
100 RISOLUZIONE DEI PROBLEMI
Page 99

Problema Causa Intervento
Le immagini non sono nitide e il
testo sullo schermo non è leggibile.
Impossibile trovare tutti i canali
che potrebbero essere disponibili.
L'immagine su alcuni canali sembra
allungata o schiacciata.
Nonostante vengano utilizzati i
tasti numerici, non è possibile
accedere ad un canale specifico.
È stato impostato un timer ma non
è stata registrato nessun
programma.
dine dei canali è stato
L'or
modificato.
Il puntamento della parabola è
errato
Il formato dell'uscita SCART TV
non è impostato su RGB
La SCART TV non è collegata ad
una presa SCART del televisore
compatibile RGB.
La SCART TV non è corretta
Il segnale dell’antenna potrebbe
essere debole.
Potrebbe essere necessario
regolare l'antenna o l'emittente
locale potrebbe non trasmettere.
Il programma potrebbe essere
trasmesso in formato schermo
panoramico e le impostazioni del
ricevitore potrebbero essere
errate.
Il blocco del controllo visione è
stato attivato su questo canale ed
un messaggio chiede il codice del
controllo visione.
Il videoregistratore non è stato
impostato correttamente.
I canali sono stati rior
descritto nel capitolo 7.
dinati come
Regolare il puntamento della
parabola. Serrare il fissaggio
dell’antenna.
Modificare l'impostazione della
voce SCART TV (TV SCART) su
RGB nel menu Impostazione
Sistema.
Consultare il Manuale di istruzioni
del televisore.
Usare il cavo SCART fornito con il
ricevitore.
Ripristinare le impostazioni del
ricevitore attenendosi alle apposite
istruzioni contenute nel capitolo
Installazione rapida. Se la ricezione
dei canali risulta ancora
impossibile, potrebbe essere
necessario regolare l'antenna.
Contattare il proprio rivenditore.
Verificare l'impostazione
dell'opzione "Formato TV" del
ricevitore in base a quanto indicato
nel capitolo 8.2.1. Se si dispone di
un televisore con schermo
panoramico, è probabile che sia
necessario controllare le
impostazioni sul televisore.
Inserire il codice del controllo
visione per accedere al canale o
rimuovere il canale bloccato.
Controllare che l’ora di
programmazione del
videoregistratore corrisponde
all'ora impostata nel ricevitore
digitale.
er modificar
P
dei canali, consultare questo
capitolo.
e di nuovo l'ordine
Italiano
ate tutte le operazioni suggerite in alto ed il problema non è stato risolto, contattare
Nota: se sono state pro
v
il proprio rivenditore o il fornitore di ser vizi.
RISOLUZIONE DEI PROBLEMI 101
Page 100

10 Specifiche tecniche
Il prodotto è conforme ai requisiti previsti dalle direttive europee 95/47/EC e 2002/21/EC.
Decodifica video
- Compatibile MPEG-2 DVB fino a MP@ML
- Bit rate video: fino a 15 Mbit/sec
- Formato video: 4:3
x se la sorgente è in 16:9) e 16:9
(letter bo
- Risoluzione: fino a 720 x 576 pixel
Decodifica audio
- MPEG layer I / II
Installazione semplice
- Plug and Play per la ricezione del
Italiano
satellite Astra 19.2 E
- Installazione tramite menu, utilizzo
tramite On Screen Display e supporto
audio
- Installazione automatica dei canali
tramite un elenco di scansione
predefinito
- Fino a 4.000 canali.
Utilizzo semplice
- Installazione personalizzata con
modifica dei canali (cancellazione,
aggiunta e spostamento dei canali)
- 3 elenchi di canali televisivi preferiti
- 3 elenchi di canali radiofonici preferiti
- Controllo completo con telecomando
- Funzione EPG Now & Next /
monitoraggio programma
- Registrazione automatica tramite la
programmazione del timer nella
modalità EPG
Funzionamento/caratteristiche
- Ricezione Free-to-air
- LNB a frequenza variabile
- Controllo DiSEqC 1.0
- Protezione dell’ingresso RF contro i
cortocircuiti
Modalità tele
-
- Aggiornamento automatico dell'elenco
programmi
- Sottotitoli
- Blocco del controllo visione tramite
codice PIN
Timer per il blocco del contr
-
visione e radio
ollo
visione ai bambini
- Programmazione di 10 eventi per il
egistratore
videor
Programmazione di 10 promemoria
-
- Allarme di mancata registrazione
- Registrazione con messaggio di
intestazione
Loopthrough videoregistratore a
-
televisore
- Loopthrough televisore a
videoregistratore
- Funzione EPG (evidenziazione dei
programmi successivi)
- Aggiornamento software tramite
download via satellite
- Modalità basso consumo
- Modalità audio: Mono / Stereo
- Bit Dolby Digital - stream in uscita
(uscite audio analogiche esclusive)
Risorse del sistema applicativo
- Velocità processore: 81 MHz
- SDRAM-CPU/Video - grafica video: 8 MB
- Memoria Flash: 2 MB
Interfaccia antenna satellitare
- Ingresso RF: connettore femmina
- Alimentazione LNC (V): 0 / 14 / 18
- Tensione LNB (mA): 350 max
- Commutazione tono: 22 kHz (on / off)
- DiSEqC 1.0: per 4 posizioni orbitali
- Uscita RF: tipo IEC 169-21 maschio
Ricezione-Demodulazione
- Tipo di demodulazione: QPSK
- Configurazione: MCPC/ SCPC
- Campo frequenza d’ingresso (MHz):
- Campo livello d’ingresso (dBm):
- Velocità modulazione controllata
dall'applicazione (Mbaud): 2 a 45
- Copertura banda satellitare:
Decodifica
Tipo: DVB
Implementazione: integrata
Banda K
(loopthrough RF)
950-2150
-65 a -25
u: 10.7 a 12.75 GHz
Smart card (non fornita): 1 per
Sistema interfaccia com
è richiesto un abbonamento per la
Nota:
visualizzazione delle TV a pagamento
Collegamenti
- SCART TV
CVBS, volume controllato L/R, RGB,
- Uscita:
Slow blanking, Fast blanking, S-Video
(per i proiettori con LCD)
- SCART VCR
Uscita: CVBS, volume controllato L/R,
Y/C, RGB
- CINCH audio:
Uscita audio analogica: L/R
Uscita audio digitale:AC3 tramite SPDIF
Interfaccia seriale:
RS 232
Accessori
- Telecomando
Modello RC19336002/01 (‘Zappa’)
- Cavo SCART
- Manuale di istruzioni
- Libretto della garanzia mondiale
- Batterie: 2 x 1,5V tipo AA/R06
- Cavo di alimentazione
Varie
- Intervallo di temperatura (°C)
- Funzionamento: da +5 a +40
- Immagazzinaggio: da -10 a +70
- Alimentazione: 230 V ~ +/-10% - 50 Hz
- Consumo di corrente max: 20 W
- Consumo di corrente max in standby
e a basso consumo: 5 W max
- Peso: 0,980 kg
- Compreso l’imballaggio: 1,780 kg
- Dimensioni: 258 / 42 / 155
- Compreso l’imballaggio: 365 / 62 / 230
interfaccia comune
une: Conax
Il prodotto è conforme alle
seguenti direttive europee:
- 73/23/EEC
- 93/68/EEC
- 89/336/EEC
Il prodotto è confor
Per i continui miglior
me al D
amenti appor
102 TEKNISKA DATA
17 maggio 1999,n.191.
.
.Lgs
tati al prodotto, queste informazioni possono essere modificate senza preavviso.
 Loading...