

Page 1
Instructions for use
Philips FunCam
Page 2

ENGLISH2
Philips FunCam
DMVC 300K
The Philips FunCam DMVC 300K you have just purchased is manufactured to the highest
standards and will give you years of trouble-free use. This new digital camera is the most
advanced means of recording high quality movies or still photos quickly and easily on your PC or
laptop computer. After installation the camera can be used as a:
• PC camera for video chat and video mail;
• digital camera for taking high quality photos;
• video camera for capturing video clips.
Please read the following instructions carefully. They provide a step-by-step description of the
installation process and explain how to use the Philips FunCam.
Page 3

ENGLISH 3
Contents
Introduction......................................................................................................................2
1.Things you should know.............................................................................................................................................5-6
Safety precautions........................................................................................................................................................................5
Copyright..........................................................................................................................................................................................5
Pack contents.................................................................................................................................................................................6
2. Quick start...............................................................................................................7-10
3. Functional overview .............................................................................................11-12
4. Installation.............................................................................................................13-17
Installing the camera software....................................................................................................................................13-14
Connecting the camera to your PC..............................................................................................................................15
Selecting the required frequency.....................................................................................................................................15
Selecting low resolution mode .........................................................................................................................................16
Connecting the neck strap / belt clip............................................................................................................................16
Recharging the battery ..........................................................................................................................................................17
5. Operating the camera..........................................................................................18-23
Tu r ning the camera on and off.........................................................................................................................................18
Taking photos..............................................................................................................................................................................18
Setting the self-timer...............................................................................................................................................................19
Taking three photos in a row.....................................................................................................................................19-20
Making a video recording.....................................................................................................................................................20
Clearing photos and video recordings..................................................................................................................20-21
Tr anferring/viewing photos and video clips to your PC.............................................................................22-23
Using the camera as a PC-camera (webcam) .........................................................................................................23
6. Using the applications..........................................................................................24-28
Philips VLounge...........................................................................................................................................................................24
Video Chat............................................................................................................................................................................25-26
Microsoft
Microsoft
®
Netmeeting ..........................................................................................................................................25-26
®
MSN Messenger and Yahoo!®Messenger...................................................................................26
Image.........................................................................................................................................................................................26-27
Philips Photo Manager............................................................................................................................................26-27
Video.........................................................................................................................................................................................27-28
Philips VRecord ...........................................................................................................................................................27-28
7. Problem solving..........................................................................................................29
8.Technical specifications..............................................................................................30
Page 4

ENGLISH4
9. Important information.........................................................................................31-32
Disclaimer......................................................................................................................................................................................31
FCC compliance ........................................................................................................................................................................31
End of life directives................................................................................................................................................................32
System requirement................................................................................................................................................................32
Disclaimer of warranty...........................................................................................................................................................32
Limitation of damages............................................................................................................................................................32
10. Helpline.....................................................................................................................33
11.Warranty ...................................................................................................................34
1. Things you should know
Page 5

ENGLISH 5
1. Things you should know
• Please read the following instructions carefully, and retain them for future reference.
• It may be helpful to have the instructions for use for the PC at hand for reference.
Safety precautions
Observe the following guidelines to ensure that the camera will operate safely and to prevent
defects.
• Do not use your camera in environments outside the following range: temperature: 0°C
to 40°C, relative humidity: 45% ~ 85%.
• Do not use or store your camera in/under:
– direct sunlight exposure;
– very humid and dusty environment;
– near any kind of heat sources;
• If your camera gets wet, dry it with soft cloth as soon as possible.
• Salt seawater may cause severe camera damage.
• If the lens or viewfinder is dirty, please use the lens brush or soft cloth to clean the lens.
Do NOT touch the lens with your fingers.
• Clean the outside of the camera with a soft cloth.
• Do NOT use cleaning fluids based on alcohol,methylated spirit, ammonia, etc.
• Do NOT attempt to disassemble or repair your camera by yourself. Do not open the
camera. In the event of technical difficulties return it to your Philips retailer.
• Do NOT use your camera outdoors when it is raining or snowing.
• Do NOT use your camera in the water.
•Protect the camera from oil, vapour, steam, moisture, and dust.
•Never point the camera lens at the sun.
Copyright
Copyright© 2003 by Philips Consumer Electronics B.V. All rights reserved. No part of this
publication may be reproduced, transmitted, transcribed, stored in a retrieval system or translated
into any language or computer language, in any form or by any means, electronic, mechanical,
magnetic, optical, chemical, manual or otherwise, without prior written permission from Philips.
Brands and product names are trademarks or registered trademarks of their respective
companies.
Page 6
FunCam
FunCam
iioiioiioi oiiioi oi ioioiiio ioio
iioiiiiioi oiiioiioi ioi
iioiiiiioioo
1 iioiiiiioioo oioioi io
2 ioioiio oioioiii
3 oioiioioi ioioioioi oioiioioiioioiooi
oiiooiiii oiio iioiiioi ioioiioiioo
iioiioiioi
ENGLISH6
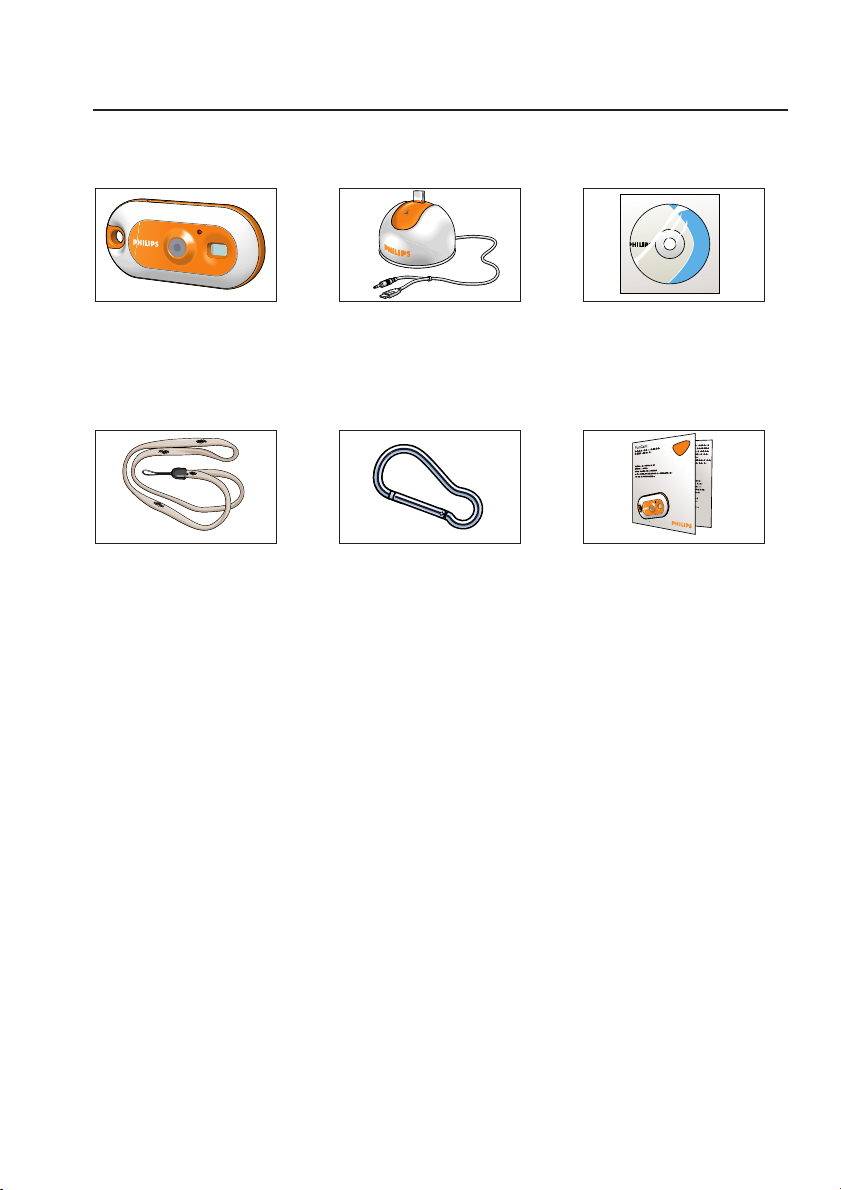
Pack contents
Please check that the following items are packed in the Philips FunCam box. They are provided
to help you set up and use your Philips FunCam.
The Philips FunCam Desktop stand with USB/ CD-ROM containing
DMVC 300K microphone cable attached the Philips installation
software, application
software and manual
Neckstrap Beltclip Quick Installation Guide
Page 7
2. Quick start
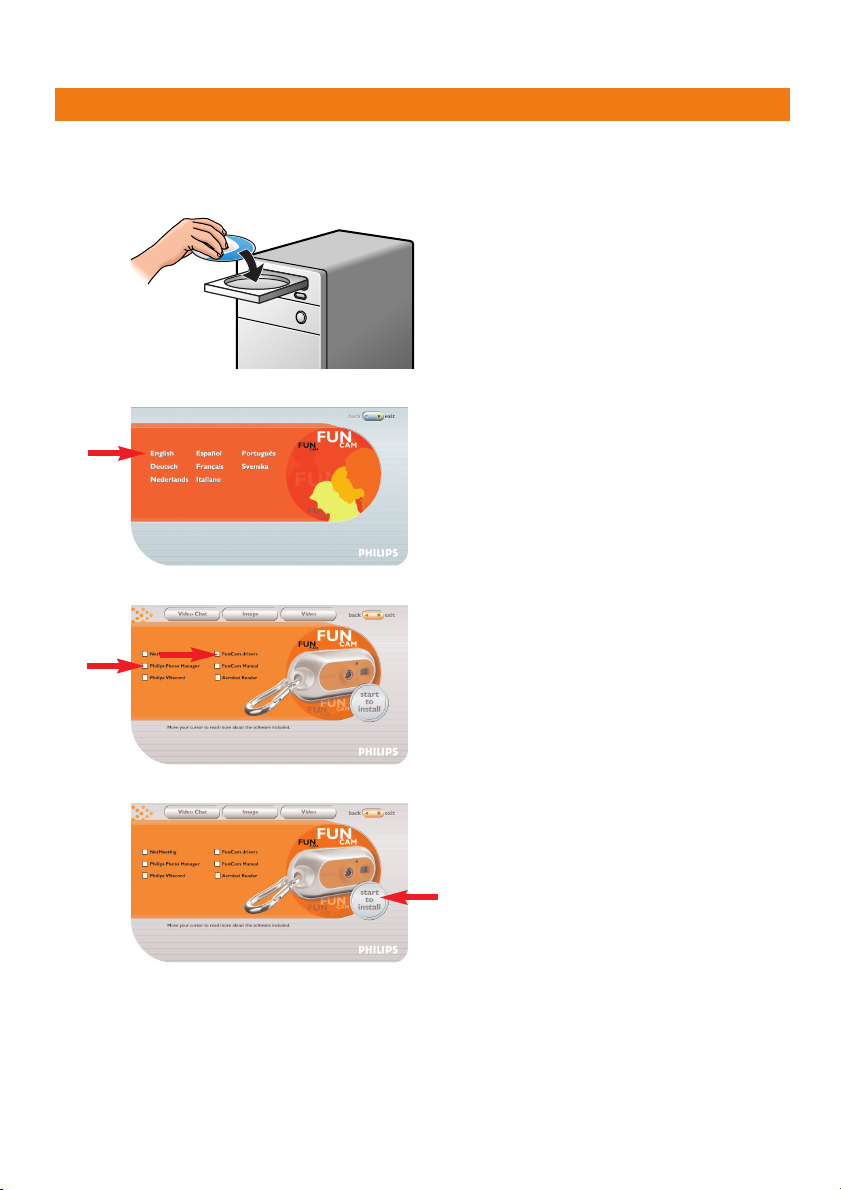
I
Installation
1 Unplug all your USB devices (except USB keyboard and USB mouse).
2 Place the installation CD-ROM in your computer’s CD-ROM-/DVD drive.
3 Select your language.
4 Select at least ‘FunCam drivers’ and ‘Philips Photo Manager’.
ENGLISH 7
5 Click ‘Start to install’ to start installation.
Note! If the the ‘Language Selection’ screen does not appear automatically, open Windows Explorer
and double-click the ‘Autorun.exe’ icon in the CD-ROM directory.
Page 8
ENGLISH8
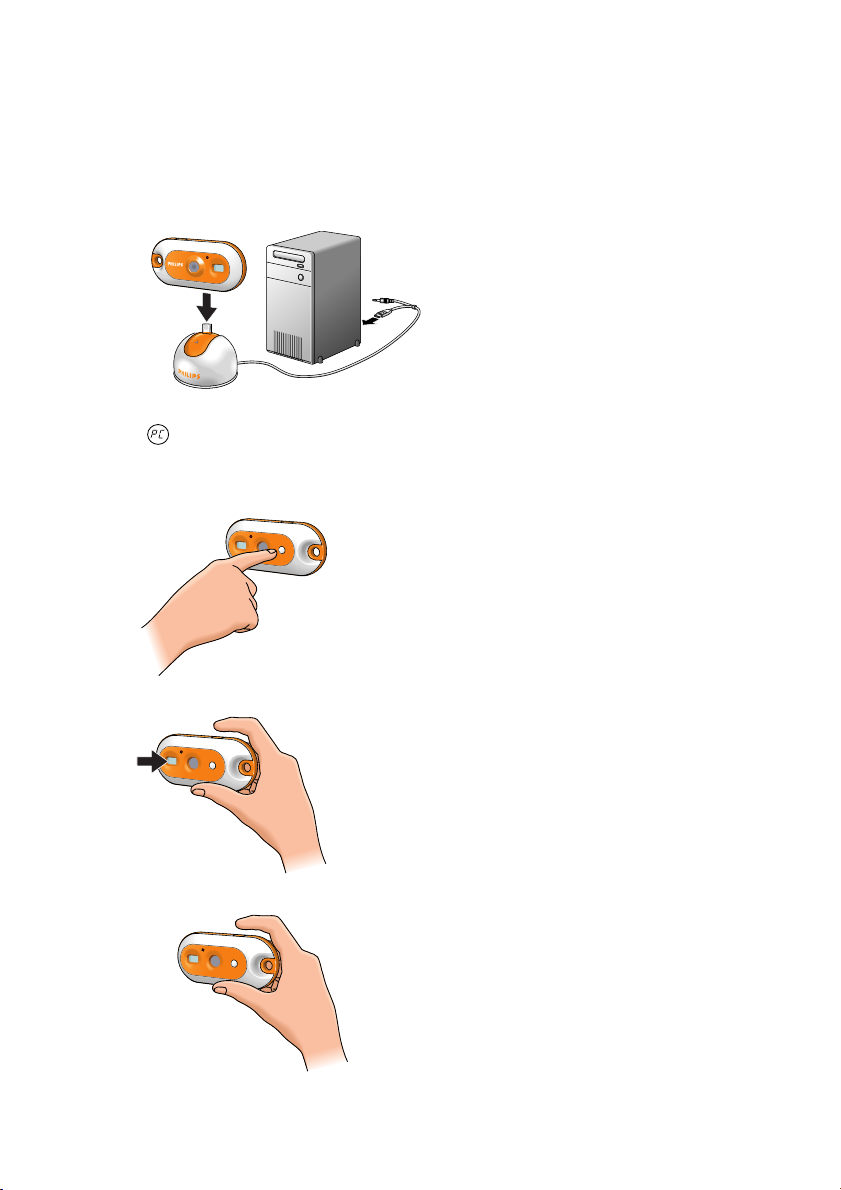
Charging
1 Turn on the PC.
2 Be sure to run the installation CD-ROM first, before connecting the camera to the PC.
3 Connect the USB plug of the USB/Microphone cable to the USB port of the PC.
4 Place the camera’s USB connector on the USB connector in the desktop stand. Push it
down gently until it clicks in position.
> You will hear a beeping sound, the display lights up blue and the Charge LED lights up red.
> appears on the display.The battery will now be charged.
Taking photos
1 Press and hold the Mode button for 2 seconds to turn on the camera.
2 Frame the subject though the viewfinder.
3 Press the Shutter button.
>You will hear a beep twice when the photo is taken.
Page 9
ENGLISH 9
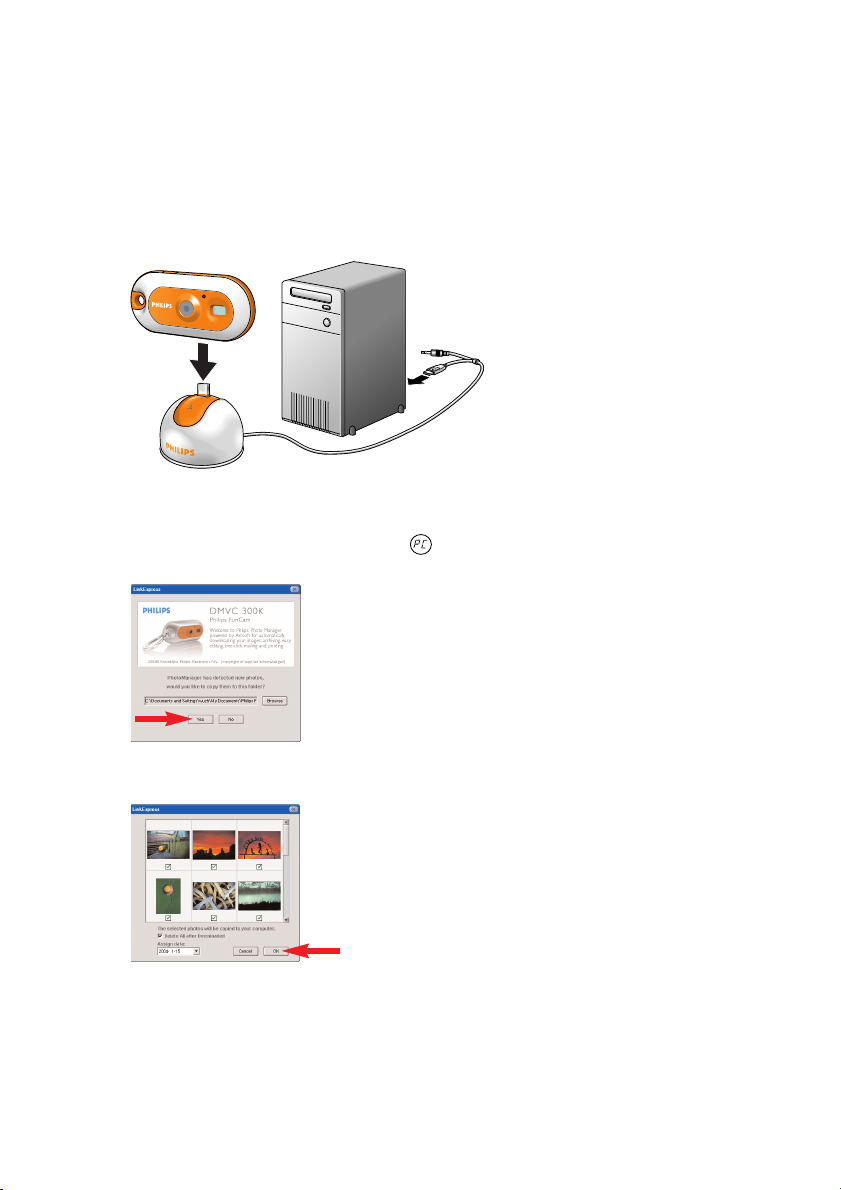
Transferring photos/video clips to your PC
1 Make sure the PC is turned on and that ‘FunCam drivers’ and ‘Philips Photo Manager’ are
installed.
2 Connect the desktop stand to the PC:
• Connect the USB plug of the USB/microphone cable to the USB port of the PC.
3 Place the camera’s USB connector on the USB connector in the desktop stand. Push it
down gently until it clicks in position.
>You will hear a beeping sound, the display lights up blue and the Charge LED lights up
red.
> The camera turns on automatically and appears on the display.
> The following screen will appear.
4 If you wish to start transferring press ‘YES’
> The following screen will appear.
5 Select the photos you wish to transfer and press ‘OK’
Page 10

ENGLISH10
> If the transfer is complete the following screen will appear.
Notes!
– If the ‘Philips FunCam’ screen does not appear, you can start ‘Philips Photo Manager’ and click on the
'Get Photo' icon. Select you camera (Philips FunCam) to start the transfer.
– For more information on transferring/viewing photos and video clips see chapter ‘Transferring
photos/video clips to your PC’ under ‘5. Operating the camera’
Page 11
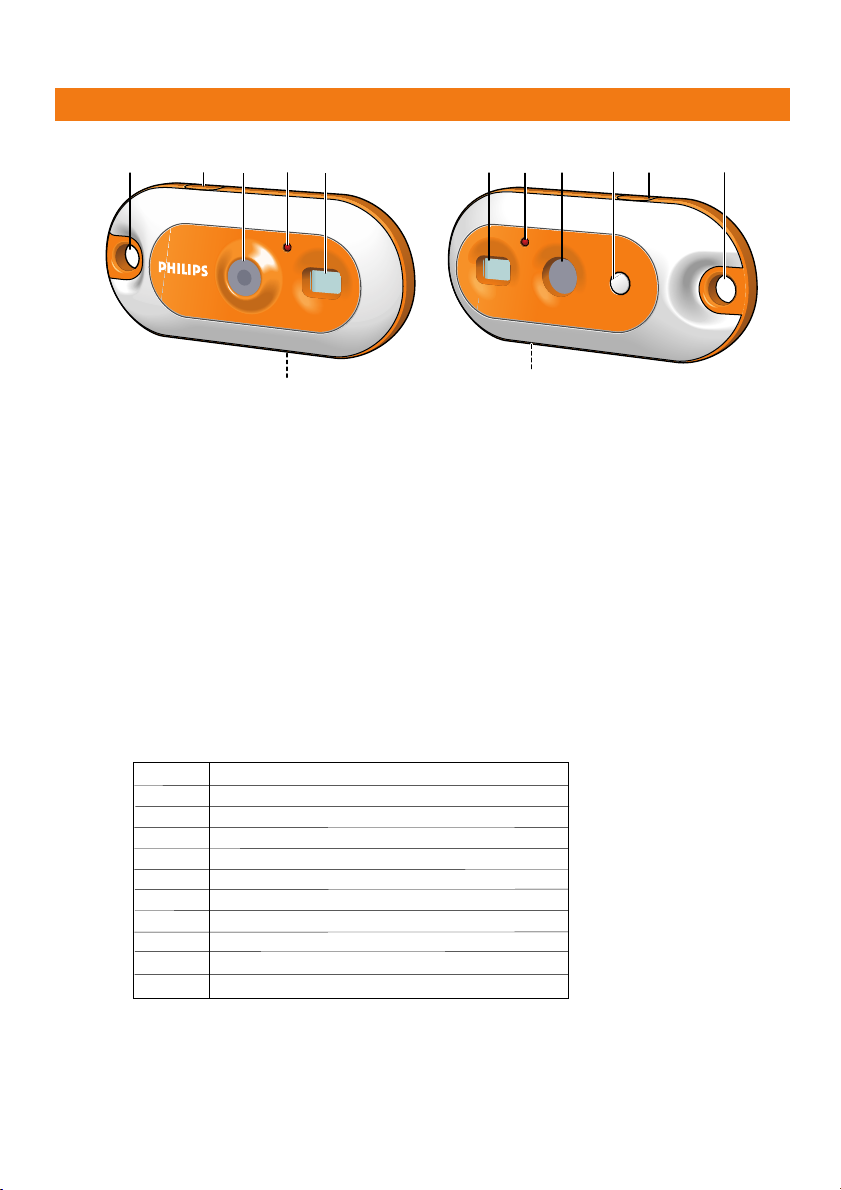
3. Functional overview
00 number of photos currently taken (capture mode)
St self-timer mode
3S three pictures continuous mode
high/low-resolution mode or battery low
CS continuous snap mode (video recording)
50/60 frequency selection mode
CL clear last picture mode
CA clear all pictures mode
PC PC camera mode
FU memory full. (No more photos can be taken.)
On power on
Hl
Lo
/
28
7
5
9
1
6
2 4
5
3
1
6
1 Strap hole
for connecting neck strap or belt clip
2 Shutter button
for taking photos and making video recordings
3 Lens
4 Timer LED
blinks red for 10 seconds when the self-timer has been set
5 Viewfinder
for framing you photo subject
6 USB port
for connecting the camera to the USB connector of the desktop stand
7 Charge LED
blinks red when the battery is being recharged
8 Display
– lights up blue when the camera is turned on
– linforms you about the present status of the camera:
ENGLISH 11
9 Mode button
– for turning the camera on and off
– for changing camera settings
Page 12

%
$
@
!
#
0
ENGLISH12
10 Desktop stand
for placing the camera in when:
– (re-)charging the battery
– using the camera as a PC-camera
– tranferring/viewing photos and video clips
11 Microphone
12 USB connector
for connecting to the camera’s USB port
13 USB/microphone cable
– for connecting to the USB port of the PC
– for connecting to the audio input of the PC
14 Belt clip
15 Neck strap
Page 13

4. Installation
ENGLISH 13
Installing the camera software
The software supplied only works on PCs with the operating systems Microsoft®Windows
98SE, ME, 2000 and XP.
Notes!
– Unplug all your USB devices (except USB keyboard and USB mouse) before you start.
– Do not plug in your USB camera yet. Run the Installation CD-ROM first.
– Have your Windows
®
CD-ROM at hand.
1 Insert the installation CD-ROM supplied into the PC’s CD-ROM-/DVD drive.
> The ‘Language Selection’ screen will appear automatically.
2 Select your language.
Note! If the the ‘Language Selection’ screen does not appear automatically, open Windows Explorer
and double-click the ‘Autorun.exe’ icon in the CD-ROM directory.
> The software installation screen will now appear.
3 Select at least ‘FunCam drivers’ and ‘Philips Photo Manager’.
®
There are three clusters of application software to install:
- software for video chat (Video Conference):
- software for image applications (Image);
- software for video applications (Video).
> If you move your cursor onto a button or application name, you will see a brief
introduction at the bottom of the menu.
• You can add the additional software by selecting the box in front of the software name:
Windows
®
NetMeeting, Philips Photo Manager, Philips VRecord, Acrobat Reader.
Page 14

ENGLISH14
4 Click ‘Start to install’ to start installation.
Note! If your Operating System is Windows XP, continue the installation process when the dialog box
below appears on the screen. (In Windows 2000/NT, the same dialog box may also appear.
You may then continue the installation process.)
5 Follow the instructions on the screen to complete the installation.
6 Restart your computer when you have finished installing all of the above software.
> The V(ideo)-Lounge desktop shortcut will be installed after installation.
> Via VLounge you have access to all camera-related software.
Also see ‘Using the applications’.
7 Double click on the icon to initiate the VLounge application.
> The VLounge application will now be initiated and the VLounge selection screen appears.
Page 15

ENGLISH 15
Connecting the camera to your PC
1 Be sure to run the installation CD first, before connecting the camera to the PC.
2 Turn on the PC.
3 Connect the desktop stand to the PC:
• Connect the USB plug of the USB/Microphone cable to the USB port of the PC.
• Connect the 3.5 mm jack plug the USB/Microphone cable to the audio input of the PC.
4 Place the camera’s USB connector on the USB connector in the desktop stand. Push it down
gently until it clicks into position.
> You will hear a beeping sound, the display lights up blue and the Charge LED lights up red.
> The camera turns on automatically and appears on the display .
> The camera will now derive its power from the PC.
Selecting the required frequency
Default frequency setting is .
1 Press the Mode button until the currently selected frequency range appears on the
display: (Europe) or (U.S.A).
2 Press the Shutter button if you wish to change the frequency.
> You will hear a beep.The frequency setting has now been changed.
Page 16

ENGLISH16
Selecting low resolution mode
Default setting is VGA (high resolution mode). In mode, the camera will take CIF
(320x240) size photos.
1 Press the Mode button until the currently selected resolution mode appears on the
display: or .
2 Press the Shutter button if you wish to change the resolution mode.
> You will hear a beep.The resolution mode has now been changed.
Connecting the neck strap / belt clip
• Thread the neck strap through the strap hole as indicated below.
• Press the beltclip open and slide it through the strap hole as indicated below.
Page 17

ENGLISH 17
Recharging the battery
1 Make sure the camera is turned off.
2 Turn on the PC.
3 Connect the USB plug of the USB/Microphone cable to the USB port of the PC.
4 Place the camera’s USB connector on the USB connector in the desktop stand. Push it down
gently until it clicks into position.
> You will hear a beeping sound, the display lights up blue and the Charge LED lights up red.
The battery will now be recharged.
> It will take four hours to fully recharge the battery. When the battery is fully recharged the
Charge LED will go out.
Notes!
– Charge the camera in time! When the battery is empty all photos in the camera memory will be lost..
– When the battery is almost empty, the camera starts beeping and appears on the display.
Page 18

ENGLISH18
5. Operating the camera
Turning the camera On and Off
• Press and hold the Mode button for two seconds to turn on the camera.
> You will hear a beeping sound, the display lights up blue and the Charge LED lights up red.
> appears briefly on the display, followed by the number of photos currently taken .
• Press and hold the Mode button again for two seconds to turn off the camera.
> When no buttons are pressed for 60 seconds, the display goes blank, you will hear a
beeping sound and the camera will turn off automatically.
Taking photos
1 Make sure the camera is turned on.
2 Look through the viewfinder to frame the object you wish to take a photo of.
3 Press the Shutter button.
> You will hear a beep twice when the photo was taken successfully.
Page 19

Setting the self-timer
1 Make sure the camera is turned on.
2 Press the Mode button until appears on the display.
3 Press the Shutter button to enter Self-timer mode.
4 Press the Shutter button again, within five seconds.
> You will hear a beep twice.
>The Timer LED starts blinking red and you will hear a beep every second.
> Ater 10 seconds the camera will automatically take a photo.
ENGLISH 19
Taking three photos in a row (Three photos continuous mode)
1 Make sure the camera is turned on.
2 Press the Mode button until appears on the display.
3Press the Shutter button to enter Three photos continuous mode mode.
Page 20

ENGLISH20
4 Press the Shutter button within five seconds.
> The camera will automatically take three photos in a row.
> You will hear a beep each time a photo is taken.
Making a video recording (Continuous Snap mode)
1 Make sure the camera is turned on.
2 Press the Mode button until appears on the display.
3 Press the Shutter button within 5 seconds to start video recording.
Keep the Shutter button pressed for as long as you wish the recording to last (maximum
recording time is 35 seconds).
> When the Shutter button is released, recording will stop and Contionuous Snap mode is
disabled.
Clearing photos and video recordings
Clearing the last stored photo/video recording
1 Make sure the camera is turned on.
2 Press the Mode button until appears on the display.
Page 21

ENGLISH 21
3 Press the Shutter button to enter Clear Last mode.
> You will hear a beep.The camera is now in Clear Last mode.
4 Press the Shutter button again within five seconds to confirm that you wish to clear the
last stored photo/video recording.
> You will hear a beep when the last stored photo/video recording has been cleared from
the memory.
Clearing all photos/video recordings
1 Press the Mode button until appears on the display.
2 Press the Shutter button to enter Clear All mode.
> You will hear an alarm sound, notifying you that the camera is in Clear All mode and that
all Photos/video recordings will be cleared.
3 Press the Shutter button again within five seconds to confirm that you wish to clear all
photos/video recordings from the memory.
> You will hear a beep when all photos/video recordings have been cleared from the
memory.
Page 22

ENGLISH22
Transferring photos/video clips to your PC
1 Make sure the PC is turned on and that ‘Philips FunCam drivers’ and ‘Philips Photo
Manager’ are installed.
2 Connect the desktop stand to the PC:
• Connect the USB plug of the USB/Microphone cable to the USB port of the PC.
3 Place the camera’s USB connector on the USB connector in the desktop stand. Push it
down gently until it clicks into position.
> You will hear a beeping sound and the Power LED lights up blue.
> The camera turns on automatically and appears on the display.
> The following screen will appear.
4 If you wish to start transferring press ‘YES’
> The following screen will appear.
5 Select the photos you wish to transfer and press ‘OK’
Page 23

ENGLISH 23
> If the transfer is complete the following screen will appear.
Note! If the ‘Philips FunCam’ screen does not appear you can start ‘Philips Photo Manager’ and click
on the 'Get Photo' icon. Select your camera (Philips FunCam) to start the transfer.
Using the camera as PC-camera (webcam)
1 Be sure to run the installation CD first, before connecting the camera to the PC.
2 Turn on the PC.
3 Connect the desktop stand to the PC:
• Connect the USB plug of the USB/Microphone cable to the USB port of the PC.
• Connect the 3.5 mm jack plug the USB/Microphone cable to the audio input of the PC.
4 Place the camera’s USB connector on the USB connector in the desktop stand. Push it
down gently until it clicks into position.
> You will hear a beeping sound and the Power LED lights up blue.
> appears on the display and the camera turns on automatically.
> The camera can now be used as a PC-camera (webcam) and photos and video clips can
be transferred to the PC.
See chapters ‘Transferring/viewing photos and video clips’,‘NetMeeting’ and ‘Philips
VRecord’.
Note! The Philips FunCam works with Microsoft
®
MSN Messenger and Yahoo!®Messenger.
Page 24

ENGLISH24
6. Using the applications
Philips VLounge
Note! Make sure your PC runs on Microsoft®Windows®98SE, ME, 2000 or XP and that you have
run the Philips FunCam Installation CD-ROM on your PC.
All applications can be accessed via the Philips V(ideo)-Lounge application. VLounge is the central
application for easy access to your Philips FunCam and all image and video applications installed
during setup. You can start VLounge through the Windows QuickLaunch menu in your taskbar,
via the program group ‘Philips FunCam’, or by clicking the VLounge icon on the desktop.
VLounge gives you access to the following Applications (if installed):
1 Image - Philips Photo Manager
2 Video - Philips VRecord
3 Video Chat - Windows
- Links to Microsoft
•Move the cursor over the buttons in the screen below to find out more about the
specific functions of VLounge.
• Click the buttons to start the applications.
> If a button is greyed out, this means that the application has not been installed. To install
the application, see ‘Installing the camera software’.
®
NetMeeting
®
MSN Messenger and Yahoo!®Messenger downloads.
Optional buttons
4 FunCam manual
Page 25

Video Chat
ENGLISH 25
Microsoft®Netmeeting
Microsoft
intranet.
To initiate a video chat:
1 Start NetMeeting by clicking the NetMeeting button in the VLounge selection screen.
2 Click on ‘Help’ -> ‘About NetMeeting’ and find out your local IP address. You can ask
3 Click the telephone icon.
®
NetMeeting enables you to communicate with others over the Internet or your local
your meeting partner to find out his/her IP address in the same way.
4 In the ‘Place A Call’ dialogue box, fill in your partner's IP address in ‘To:‘
5 Click on ‘Call’ and wait for response.
Note! If you or your partner are/is behind a firewall or is using a proxy server (common for office
users), please refer to NetMeeting Help about detail solutions.
Page 26

ENGLISH26
To respond to an incoming call:
1 You can choose ‘Automatically Accept Calls’ or you can accept manually.
2 When the ‘Incoming Call’ dialogue box appears, click on ‘Accept’.
Notes!
– Only two computers in a NetMeeting conference can use audio for communication. All other
participants must communicate through other options, like Chat or the shared Whiteboard.
–You can also initiate a video conference with more than one partner. Please read Help in
Microsoft
®
NetMeeting.
Microsoft
Philips VLounge contains web links allowing you to download Microsoft
Yahoo!
®
MSN Messenger and Yahoo!®Messenger
®
Messenger.These applications enable immediate contact with other persons online. Your
®
MSN Messenger and
messages, as well as the response from the receiving person, will be delivered instantly. Just as if
you were having a normal person-to-person conversation. With Microsoft
®
Yahoo!
Messenger you can study online with classmates, play games, work with colleagues,
®
MSN Messenger and
exchange ideas,‘hand over’ photos and files, meet new people, surf the web together and much,
much more.
• Just click on the desired link and follow the on screen instructions to download and
install the applications.
Image
Philips Photo Manager
Philips Photo Manager enables you to transfer, preview, edit, e-mail, print and organise your
photos and video recordings.
1 Click on the ‘Philips Photo Manager’ button in the VLounge selection screen.
2 If you are using ‘Philips Photo Manager’ for the first time, click the ‘Search’ icon in the
tool bar if the search for photos and video recordings does not start automatically.
> All photos and video clips, located anywhere on your system, will now be searched for.
> After the search, all folders containing photos and clips will be shown on your desktop.
Page 27

ENGLISH 27
• Double-click on a folder to show its content.
• Using the tools in the toolbar you can now edit your photos, create slide shows, add
audio, create new albums and much more.
• If you need more information on the possibilities of ‘Philips Photo Manager’, select ‘Help’
in the toolbar and then select ‘Contents...’.
> In the chapters ‘Albums/Tree structure’, ‘Menu commands’, ‘Tools’, ‘Editing tools’ and
‘Advanced features’ you will find all the information you need to create customised
multimedia collections from files located anywhere on your system.
Video
Philips VRecord
Philips VRecord enables you to record video clips onto your hard disk.
1 Click the ‘Philips VRecord’ button in the ‘VLounge selection’ screen.
> The ‘Philips VRecord’ screen appears.
2 Select a file name in the File menu using 'Set Capture File'.
3 Click 'Devices' to set the video and audio source you want to use.
4 Enable 'Preview' in the Options menu to see the live Philips USB Web Camera preview,
then adjust your audio and video settings if necessary.
For instance the ‘Frame Rate’ setting in the Options - Video Format menu which
determines the frame rate the Philips USB Web Camera hardware should deliver to
VRecord.
Page 28

ENGLISH28
5 Use the Capture menu to start or stop capturing a video. Enable 'Capture Audio' if you
want to record sound together with the camera photos.(See below for other capture
options.)
6 You can replay the recording by opening the AVI file you selected for your capture file
name in the File - Set Capture File menu. Double click this AVI file in Windows Explorer
and Windows Media Player will show you the recording.
Other capture options
The 'Master Stream' option determines the preferred synchronisation between the video stream
and the recorded sounds.
• Select 'Audio' if you want to make sure the video rate adapts to the sound recording
rate.
• Select 'Video' if you want to make sure the sound recording rate adapts to the video
recording rate. If 'None' is enabled,VRecord will adapt both streams to each other
whenever necessary.
If 'Use Frame Rate' is enabled in Capture - Set Frame Rate it determines the software frame
rate in which VRecord captures the movie independently from the hardware frame rate
delivered by the Philips USB Web Camera according to the Frame Rate setting in the Options VideoFormat menu
Page 29

7. Problem solving
If a fault occurs, first check the points listed below. If you are unable to
remedy a problem by following these hints, contact the helpline
(see ‘Helpline’) or consult your dealer.
Never try to open the camera yourself as this will void the guarantee.
First, check all cables to ensure that they are connected correctly.
Problem Possible cause / Solution
ENGLISH 29
No photo is taken
while the Shutter • Recharge battery. See ‘Recharging the battery.
button is pressed Memory full
all the way down •Transfer photos/video recordings to your PC or clear photos in order to
No reaction Battery exhausted
to controls • Recharge battery. See ‘Recharging the battery.
File transfer not USB cable not properly connected
possible • Properly connect USB cable to both desktop stand and PC and make
Not all images The RAM memory installed in your computer may not have
can be transferred sufficient storage space.
to the PC • Close all software programs and proceed to transfer your images. If the
Battery exhausted
create memory space. See ‘Transferring/viewing photos and video
recordings’ and/or ‘Clearing photos and video recordings’.
Camera is still connected to the PC’s USB port
• Disconnect the camera from the PC’s USB port or take the camera out
of its desktop stand.
Poor light conditions
•Try to improve light conditions.
Camera turned off automatically (no button pressed for 60 seconds)
•Turn the camera back on. See ‘Turning the camera on and off ’.
sure the camera is placed on the desktop stand.
USB driver not installed
• Install USB driver and ‘Philips Photo Manager’ on your PC.
problem persists, transfer images in batches and store each batch on
your hard drive before proceeding to the next batch. Make sure all the
images you want are stored before you clear the camera memory.
Camera
connected to PC
but the Philips FunCam
driver says:
‘Device not ready’.
• Check if the camera power is turned on. If not, turn it on and then
connect the camera to the PC again by placing it on the desktop stand.
Page 30

ENGLISH30
8. Technical specifications
Image resolution....................................................................................................................VGA (640 x 480)
Sensor................................................................................................................................................1/4”VGA CMOS
PC camera resolution (connected to PC)..............................VGA (640 x 480) up to 15 fps
or CIF (320 x 240) up to 25 fps
Video resolution (disconnected from PC)....................................CIF (320 x 240) up to 15 fps
Built-in battery..........................................Li-polymer battery. 150 mAh. Rechargeable via USB.
PC interface .....................................................................................................................................................USB 1.1
Internal memory capacity........................................................................................................................8 MB
Case material.......................................................................................................................................................Metal
Power up time ...........................................................................................................................................2 seconds
Auto Power off.......................................................................................................................................60 seconds
Still image format..............................................................................................................................................JPEG
Video file format....................................................................................................................................................AVI
Page 31

ENGLISH 31
9. Important information
Disclaimer
Philips makes no warranty of any kind with regard to this material, including, but not limited to,
the implied warranties of merchantability and fitness for a particular purpose. Philips assumes no
responsibility for any error that may appear in this document. Philips makes no commitment to
update nor to keep current the information contained in this document.
FCC compliance
This device complies with Part 15 of the FCC Rules. Operation is subject to the following two
conditions:
1 this device may not cause harmful interference, and
2 this device must accept any interference received, including interference that may cause
undesired operation.
Note!
This equipment has been tested and found to comply with the limits for a Class B digital device,
pursuant to Part 15 of the FCC Rules. These limits are designed to provide reasonable protection
against harmful interference in a residential installation. This equipment generates, uses and can
radiate radio frequency energy and, if not installed and used in accordance with the instructions, may
cause harmful interference to radio communications. However, there is no guarantee that interference
will not occur in a particular installation. If this equipment does cause harmful interference to radio or
television reception, which can be determined by turning the equipment off and on, the user is
encouraged to try to correct the interference by one or more of the following measures:
• Reorient or relocate the receiving antenna.
• Increase the separation between the equipment and receiver.
• Connect the equipment to an outlet on a circuit different from that to which the receiver is
connected.
• Consult the dealer or an experienced radio/TV technician for help.
Any unauthorized modification to this equipment could result in the revocation of the
authorization to operate the equipment.
Page 32

ENGLISH32
End of life directives
Philips is paying a lot of attention to producing environmentally-friendly in green focal
areas. Your new camera contains materials which can be recycled and reused. At
the end of its life specialised companies can dismantle the discarded camera to
concentrate the reusable materials and to minimise the amount of materials to be
disposed of.
Please ensure you dispose of your old camera according to local regulations.
Note! This product may contain lead and mercury. Disposal of these materials may be regulated due
to environmental considerations. For disposal or recycling information, please contact your local
authorities or the ElectronicIndustries Alliance (U.S. specific): www.eiae.org.
System requirements
• Microsoft®Windows®98SE/2000/ME or XP;
•Pentium
• 32MB RAM and 100 MB free hard disk space;
• One free USB port and CD-ROM-/DVD drive.
®
II or AMS K6-ll or above;
Disclaimer of warranty
The software on the CD-ROM supplied is sold ‘as is’ and without warranties whether expressed
or implied. Because of the various software and hardware environments into which this program
may be put, no warranty of fitness for a particular purpose is offered.
Limitations of damages
The vendor will not be liable for any indirect, special, incidental or consequential damages
(including damages for loss of business, loss of profits, or the like), whether based on breach of
contract, tort (including negligence), product liability or otherwise, even if the vendor or its
representatives have been advised of the possibility of such damages and even if a remedy set
forth herein is found to have failed its essential purpose.
Page 33

ENGLISH 33
10. Helpline
Need Help?
If you have any questions about the Philips FunCam, please contact our helpline for assistance!
You can find the number in the list below.
Before you call, please read this manual carefully. You will be able to solve most of your
problems.
The model number of the camera is DMVC 300K.
Date of purchase: _____ /_____ /______
day /month /year
België/ Belgien/ Belgique Nederland
02-275-0701 053-482-9800
Danmark Norge
35-25-8761 22-70-82-50
Deutschland Österreich
0696-698-4712 01-546-575-603
España Portugal
09-17-45-62-46 0800-831-363
France Schweiz/ Suisse/ Svizzera
03-8717-0033 02-23-10-21-16
Suomi
00800 3122 1223 09-2290-1908
Ireland Sverige
01-601-1161 08-632-0016
Italia UK (United Kingdom)
02-48-27-11-53 0207-949-0069
Luxemburg/ Luxembourg
408-433-5501
Page 34

11. Warranty
Guarantee certificate
Garantiebewijs
Certificado de garantia
Garantibevis
Certificat de garantie
Certificado de garantia
Garantibevis
year warranty
année garantie
Jahr Garantie
jaar garantie
año garantia
anno garanzia
Garantieschein
Certificato di garanzia
Garanticertifikat
Takuutodistus
år garanti
år garanti
år garanti
vuosi takuu
año garantia
22
Type: DMVC 300K
Serial no: ___________________________________________________________________
Date of purchase - Date de la vente - Verkaufsdatum - Aankoopdatum - Fecha de compra - Date d’acquisito -
Data da adquirição - G - Inköpsdatum - Anskaffelsesdato - Kjøpedato - Oatopäivä -
Dealer’s name, address and signature
Nom, adresse et signature du revendeur
Name,Anschrift und Unterschrift des Händlers
Naam, adres en handtekening v.d.handelaar
Nombre, direccion y firma del distribudor
Nome, indirizzo e firma del fornitore
6 month guarantee on rechargeable batteries
6 mois de garantie sur les piles rechargeables
6 meses de garantía para las pilas recargables
6 Monate Garantie auf wiederaufladbare Batterien
6 maanden garantie op oplaadbare batterijen
Garanzia di 6 mesi sulle batterie ricaricabili
www.philips.com
Data subject to change without notice
, .
Återförsäljarens namn, adress och signatur
Forhandlerens navn,adresse og unterskrift
Forhandlerens navn,adresse og unterskrift
Jälleenmyyjän nimi, osoite ja allekirjoitus
Nome, morada e assinature da loja
Pilhas recarregáveis com 6 meses de garantia
E 6
6 månaders garanti på laddningsbara batterier
6 måneders garanti på genopladelige batterier
6 måneders garanti på de oppladbare batteriene
Ladattavilla akuilla on 6 kuukauden takuu
0682
 Loading...