

Page 1
Page 2
Conformity, Environment and Safety
Safety information: this equipment is not designed to make emergency calls when power fails.
An alternative has to be made available to allow emergency calls.
Conformity : hereby, Philips declares that the DECT 521xx and 525xx are in compliance with
the essential requirements and other relevant provisions of Directive 1999/5/EC.
Power requirements: this product requires an electrical supply of 220-240 volts, alternating
monophased power, excluding IT installations defined in standard EN 60-950.
WARNING ! the electrical network is classified as hazardous according to criteria in the
standard EN 60-950. The only way to power down this product is to unplug the power supply
from the electrical outlet. Ensure the electrical outlet is located close to the apparatus and is
always easily accessible.
Telephone connection: the voltage on the network is classified as TNV-3 (Telecommunication
Network Voltage) as defined in the standard EN 60-950.
Safety precautions: do not allow the handset to come into contact with water. Do not open
the handset.You could be exposed to high voltages. Do not allow the charging contacts or the
batteries to come into contact with conductive materials.
Environmental care: please remember to observe the local regulations regarding the disposal
of your packaging materials, exhausted batteries and old phone and where possible promote
their recycling.
Using GAP standard compliance
The GAP standard guarantees that all DECTTMGAP handsets and base stations comply with a
minimum operating standard irrespective of their make.Your handset is GAP compliant, which
means the minimum guaranteed functions are : take the line, receive a call and dial.
Using Philips base stations
If you register the additional handset to a Philips DECT 521 or DECT 525 base station, the
handset will have all the features described in the corresponding complete set user guide.
If you register the additional handset to another Philips base station, only a limited number of
menus will be available. Please refer to the corresponding complete set user guides.
Using a non-Philips GAP base station
To register the Philips additional handset to a non-Philips base station, follow the base station
instructions described by the other manufacturer.Then follow the instructions on page 5 to
register the Philips additional handset.There will be only a few menus available.
Philips has marked the battery and packaging with standard symbols designed to promote the
recycling and appropriate disposal of your eventual waste.
The labelled packaging material is recyclable.
A financial contribution has been paid to the associated national recovery & recycling system.
DECTTMis a trade mark of ETSI registered for the benefit of the implementers of the DECT technology
Conformity, Environment & Safety
1
Page 3
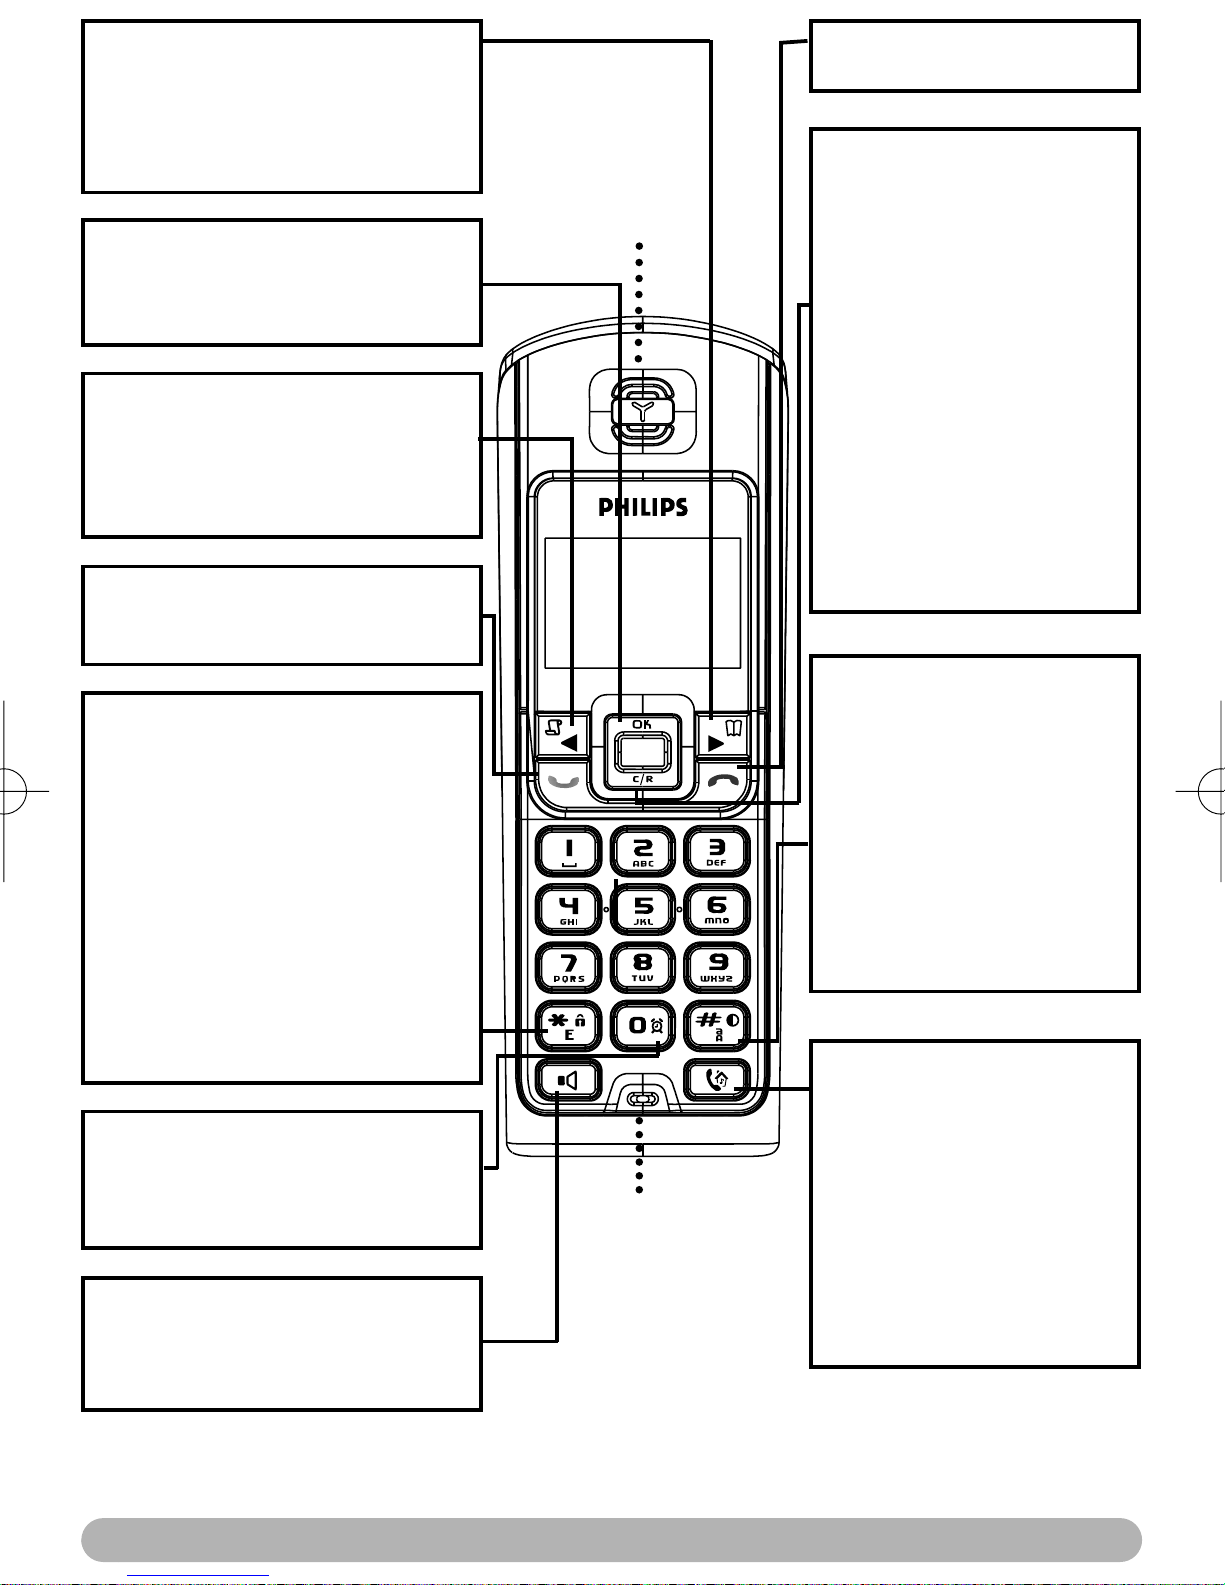
Phonebook / Right key
- Press to access the phonebook
from idle mode.
- Press to move through the menus
and options in menu screen.
OK key
- Press to enter the carousel menu
- Press to validate your choice
Call log / Left key
- Press to access the call log from
idle mode.
- Press to move through the menus
and options in menu screen.
Talk key
Earpiece
End key
- Press to end a call
Clear/Recall
- Short press to correct a
digit when predialling or a
character when editing
- Short press to go back one
menu when browsing
through the menus
- Short press to use operator services during a call
- Long press to delete several digits or a whole text in
once
- Long press to return to
idle mode when browsing
through the menus
- Press to make or answer a call
Keypad lock & Editing
- Short press to insert *
- Long press to lock/unlock the
keypad in idle mode
- Long press to insert R (in
between-digit pause) when dialling
- A short press to change the letter
when editing in Eatoni®.
- Long press to enter multitap
system or Eatoni®editor when
entering text.
Alarm clock
- A short press to dial 0
- A long press to activate/deactivate
the alarm clock
Loudspeaker*
- Short press to take the line or to
activate the handset loudspeaker
during a call
Microphone
Do not disturb & case mode
- Short press to insert #
when dialling
- Long press to activate/
deactivate the Do Not
Disturb mode
- Long press to insert a
pause (P) when dialling
- Press to switch case mode
when editing
Call transfer/Intercom
- Short press to initiate or
cancel internal call
- Short press during internal
call to transfer the call or
switch between internal call
and External call
- Short press to answer an
internal call or to release an
internal call
*Warning : Handsfree activation could suddenly increase the volume in the earpiece to a very
high level. Make sure the handset is not too close to your ear.
2
The handset
Page 4
Icons on the handset display
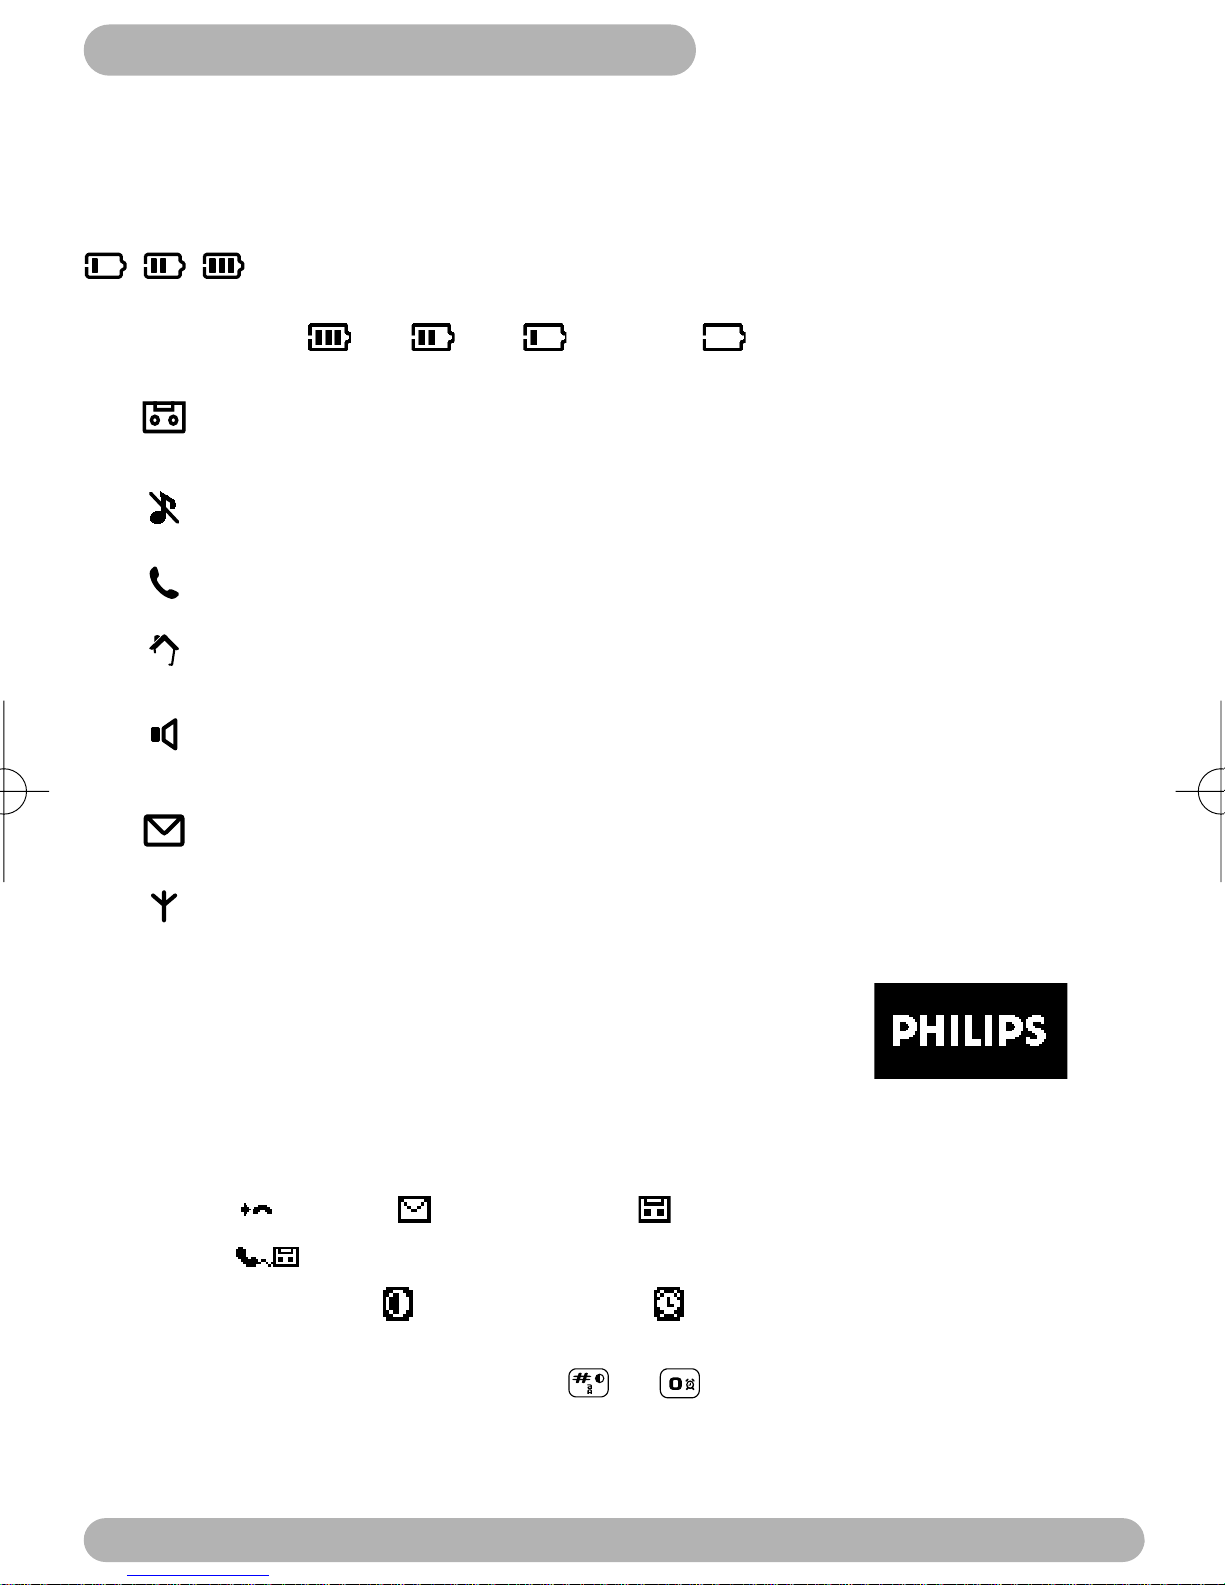
The display gives information about the operation of your telephone
On first use, it is sometimes necessary to wait for a few minutes of charge before seeing icons
on the display.
When charging, the battery bars scroll from empty to full status.
When the handset discharges, the battery shows the status :
Full , 2/3 , 1/3 and empty .
The answer machine is activated (DECT 525). When blinking, this symbol
indicates that there is a new message on the answer machine or on the operator
voice mailbox. When fast blinking it shows that the answer machine is full.
The ringtone is deactivated.
An external call is in progress. When blinking, this symbol indicates that there
is an incoming external call in progress or that the line is already busy.
An internal call is in progress. When blinking, this symbol indicates that there
is an incoming internal call.
The handset loudspeaker is activated. When blinking, this symbol shows that
the base loudspeaker is activated (only for DECT 525).
The SMS function is activated. When blinking, this symbol indicates that a new SMS
has been received. When fast blinking, it indicates that the SMS memory is full.
The handset is registered and in range of the base. When blinking, this symbol
indicates that the handset is not registered to the base.
Philips screen saver
After 2 minutes of inactivity, the screen saver is displayed:
You can deactivate it (see p. 7)
In idle mode, the DECT 521/525 display shows various information:
- the date & time, the name of the handset and the instructions to access the menu,
- missed calls , new SMS or new messages (answer machine) or network voicemail-
box message , if any,
- Do Not Disturb mode , and the alarm clock , if activated.
To activate/deactivate these functions press or .
The handset display
3
Page 5
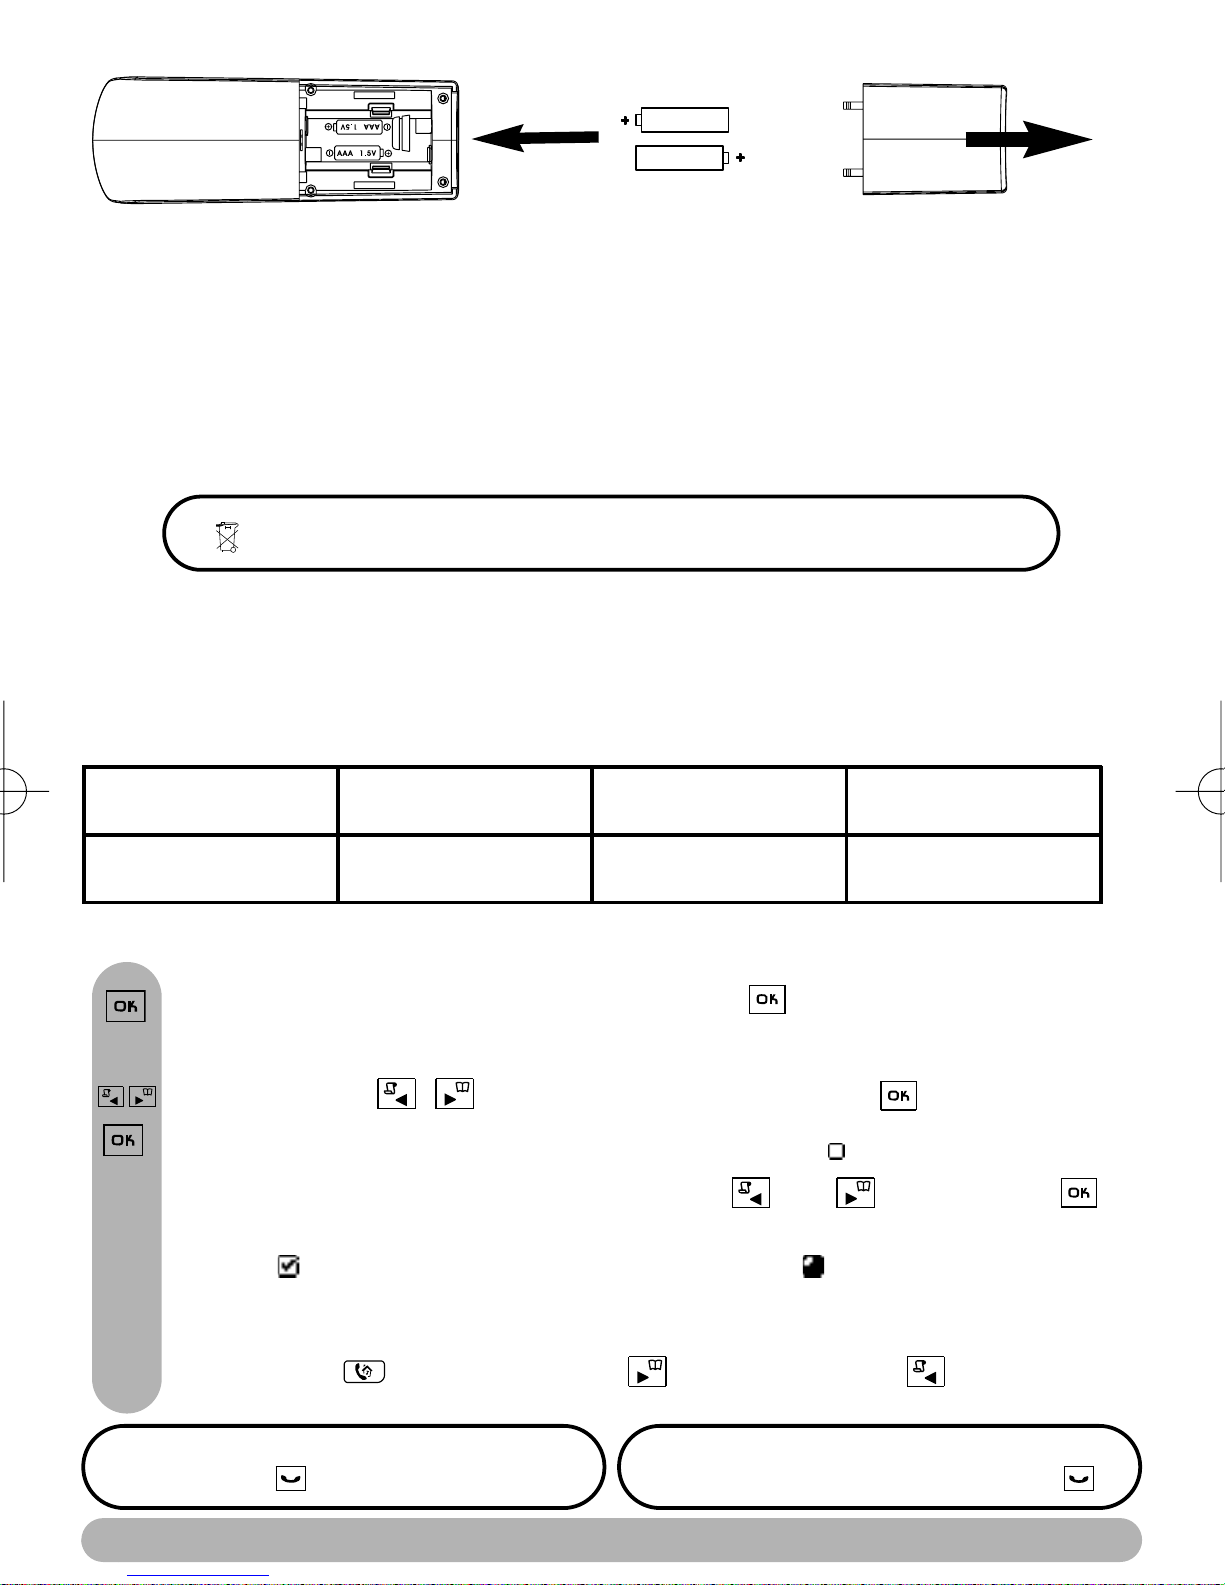
Installing and replacing the batteries in the handset
To insert the batteries, open the battery cover, place the batteries as indicated and put the
battery cover back.When the handset is placed on the base station the 3 battery bars scroll (if
charge is needed).Allow the handset to charge for 24 hours to reach full charge. On first use it
may be necessary to wait for a few minutes before seeing symbols on the display.
In case you need to change the batteries, the following type is mandatory 2HR AAA NiMh 600 mAh.
Warning: the base station must always be plugged into the mains when charging or when in use. Always
use rechargeable batteries.
The warranty shall not apply to the batteries and any other components within limited lifetime
and wear.
Batteries should not be disposed of with general household waste.
Battery life and range
Optimal battery life is reached after 3 cycles of complete charge & discharge.When reaching the
range limit and the conversation becoming crackly, move closer to the base.To reach optimal range,
place the base station away from electrical appliances.
Battery life in standby
mode
up to 300 hours up to15 hours up to 50 metres up to 300 metres
Battery life in
communication
Indoor range Outdoor range
Understanding the menu system
To access the carousel menu from idle mode, press .The carousel represents a
loop of icons that gives access to the different first level menus.
Scroll left or right to reach the desired menu and press to select.
The sub menus are listed and represented by little squares at the bottom of the
display. To reach one particular sub-menu use the and keys and press
to validate your choice.
A tick shows the selected sub-menu or option.The shows the option you are
browsing.
Note: some menus are also directly accessible via a dedicated key on the keypad like the
Intercom with , the phonebook with and the call log with .
Direct dialling
Take the line and dial on the keypad
4
Predialling
Dial on the keypad and take the line
Batteries and menu system
Page 6
Handset
Registration
The additional handset will get full capability when it is registered to the base station (see p. 1).
You can register up to 6 handsets to the DECT 521 or DECT 525 base station.
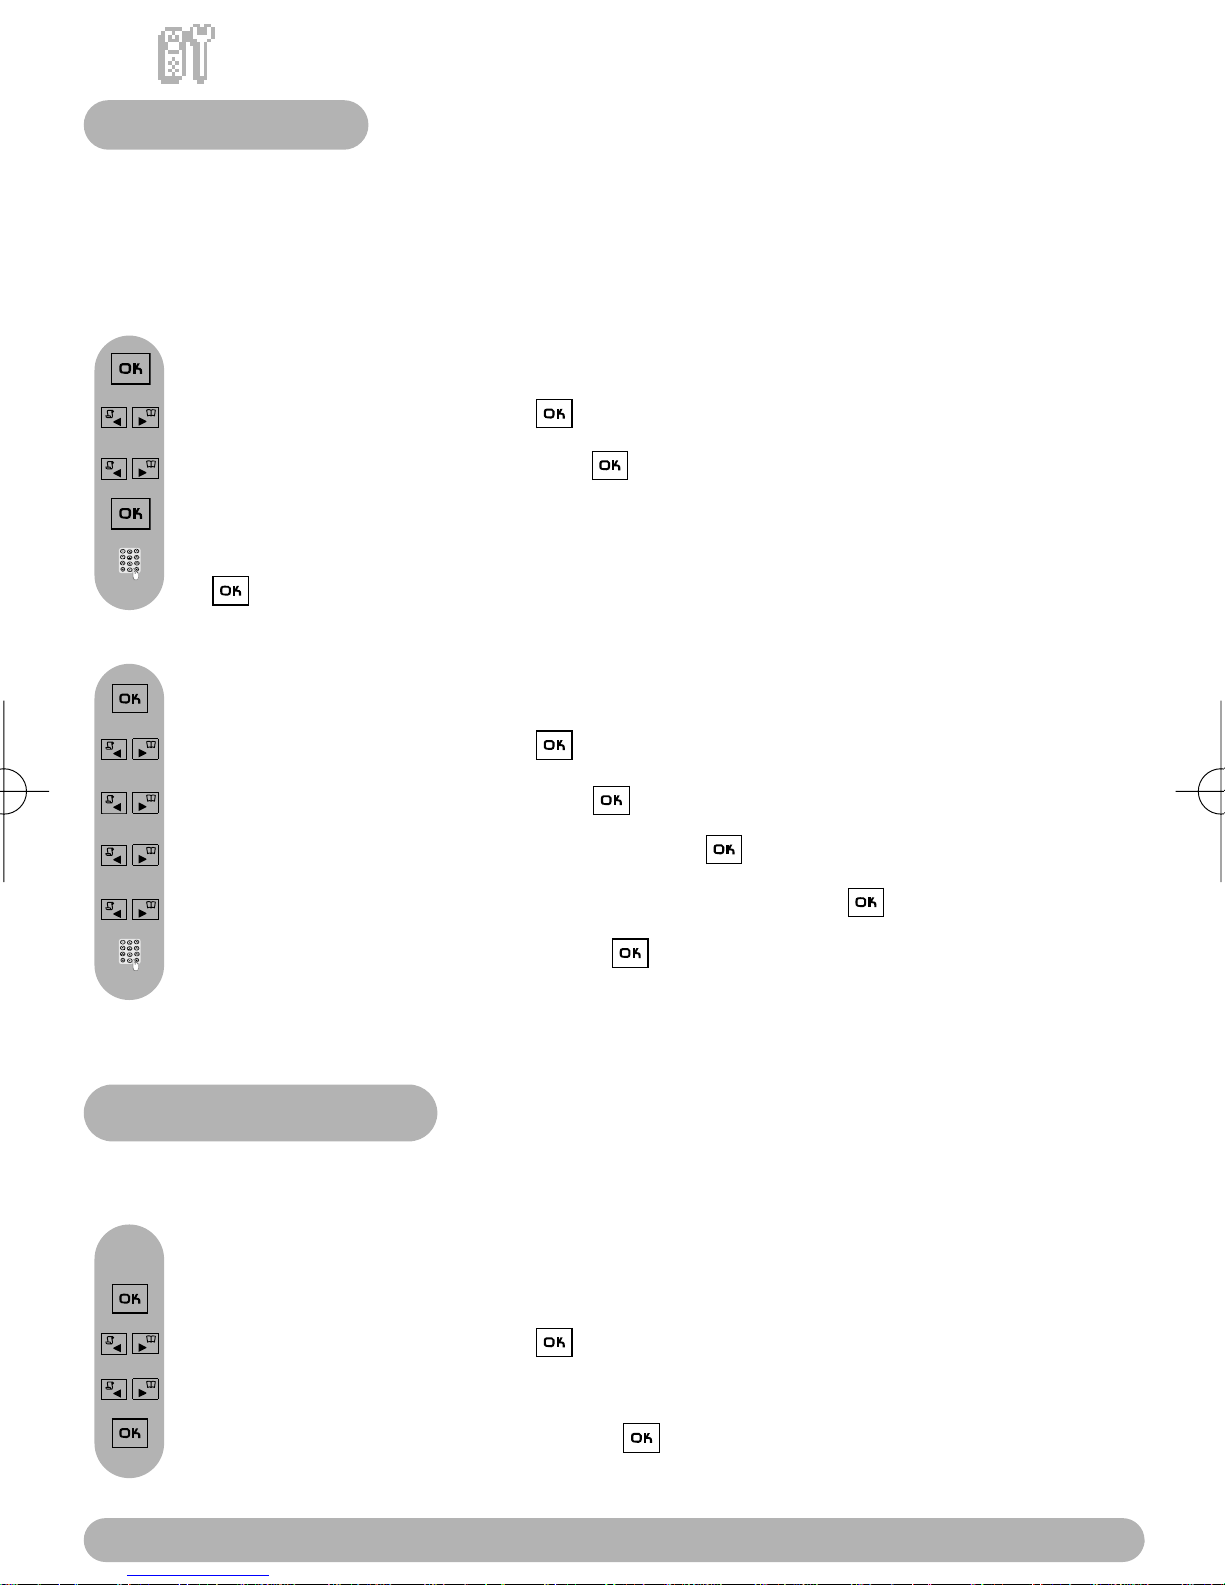
To register a handset
Unplug and plug back in the mains supply to put the base in registration mode and start the
following procedure immediately after that.
Press to enter the carousel menu.
Scroll to Handset and press to select.
Scroll to Registration and press to select.
Press to select Register handset.
Enter the 4-digit RC code written on the sticker placed under the base and press
.
To unregister a handset
Press to enter the carousel menu.
Scroll to Handset and press to select.
Scroll to Registration and press to select.
Scroll to Un-register handset and press to select.
Choose the handset to un-register from the list and press .
Enter the 4-digit RC code and press .
Note: should you have your handset serviced alone, please make sure it is unregistered from the
base station before taking it back to the repair centre.
Babysit mode
This feature allows you to monitor the babys room. Place the handset in the room to be
monitored and you will hear the noise coming from the room on the additional handset.
if there are at least 2 handsets
To activate/deactivate the babysit mode
Press to enter the carousel menu.
Scroll to Handset and press to select.
Press to select Babysit mode.
Select ON or scroll to OFF and press to confirm.
Note: an intercom is necessary to monitor the room (see page 8).
Handset
5
Page 7
Rename handset
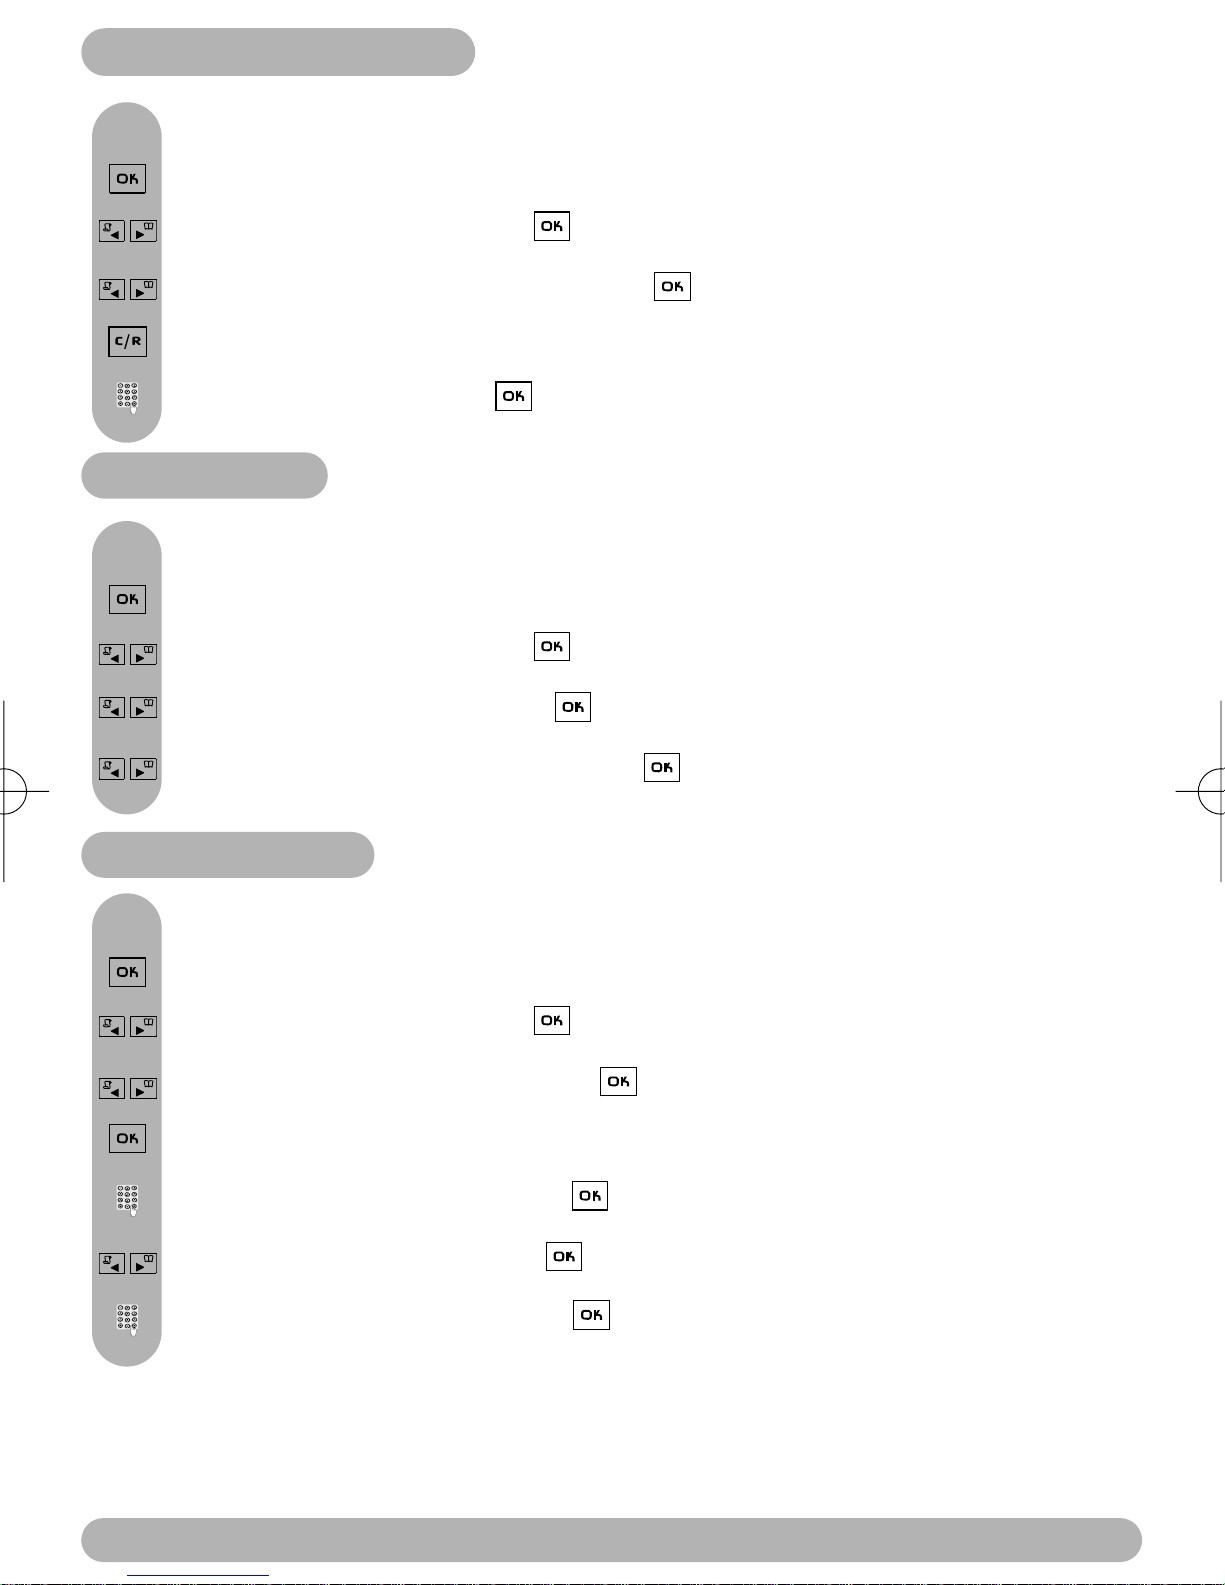
To rename a handset
Press to enter the carousel menu.
Scroll to Handset and press to select.
Scroll to Rename handset and press to select.
Long press to delete the current name.
Enter the name and press .
Language
To change the language of the display
Press to enter the carousel menu.
Scroll to Handset and press to select.
Scroll to Language and press to select.
Browse through the list and select with .
Date & time
To set the date and time
Press to enter the carousel menu.
Scroll to Handset and press to select.
Scroll to Date & time and press to select.
Select Set date.
Enter the current date and press .
Scroll to Set time and press to select.
Enter the current time and press .
6
Handset
Page 8
Display contrast
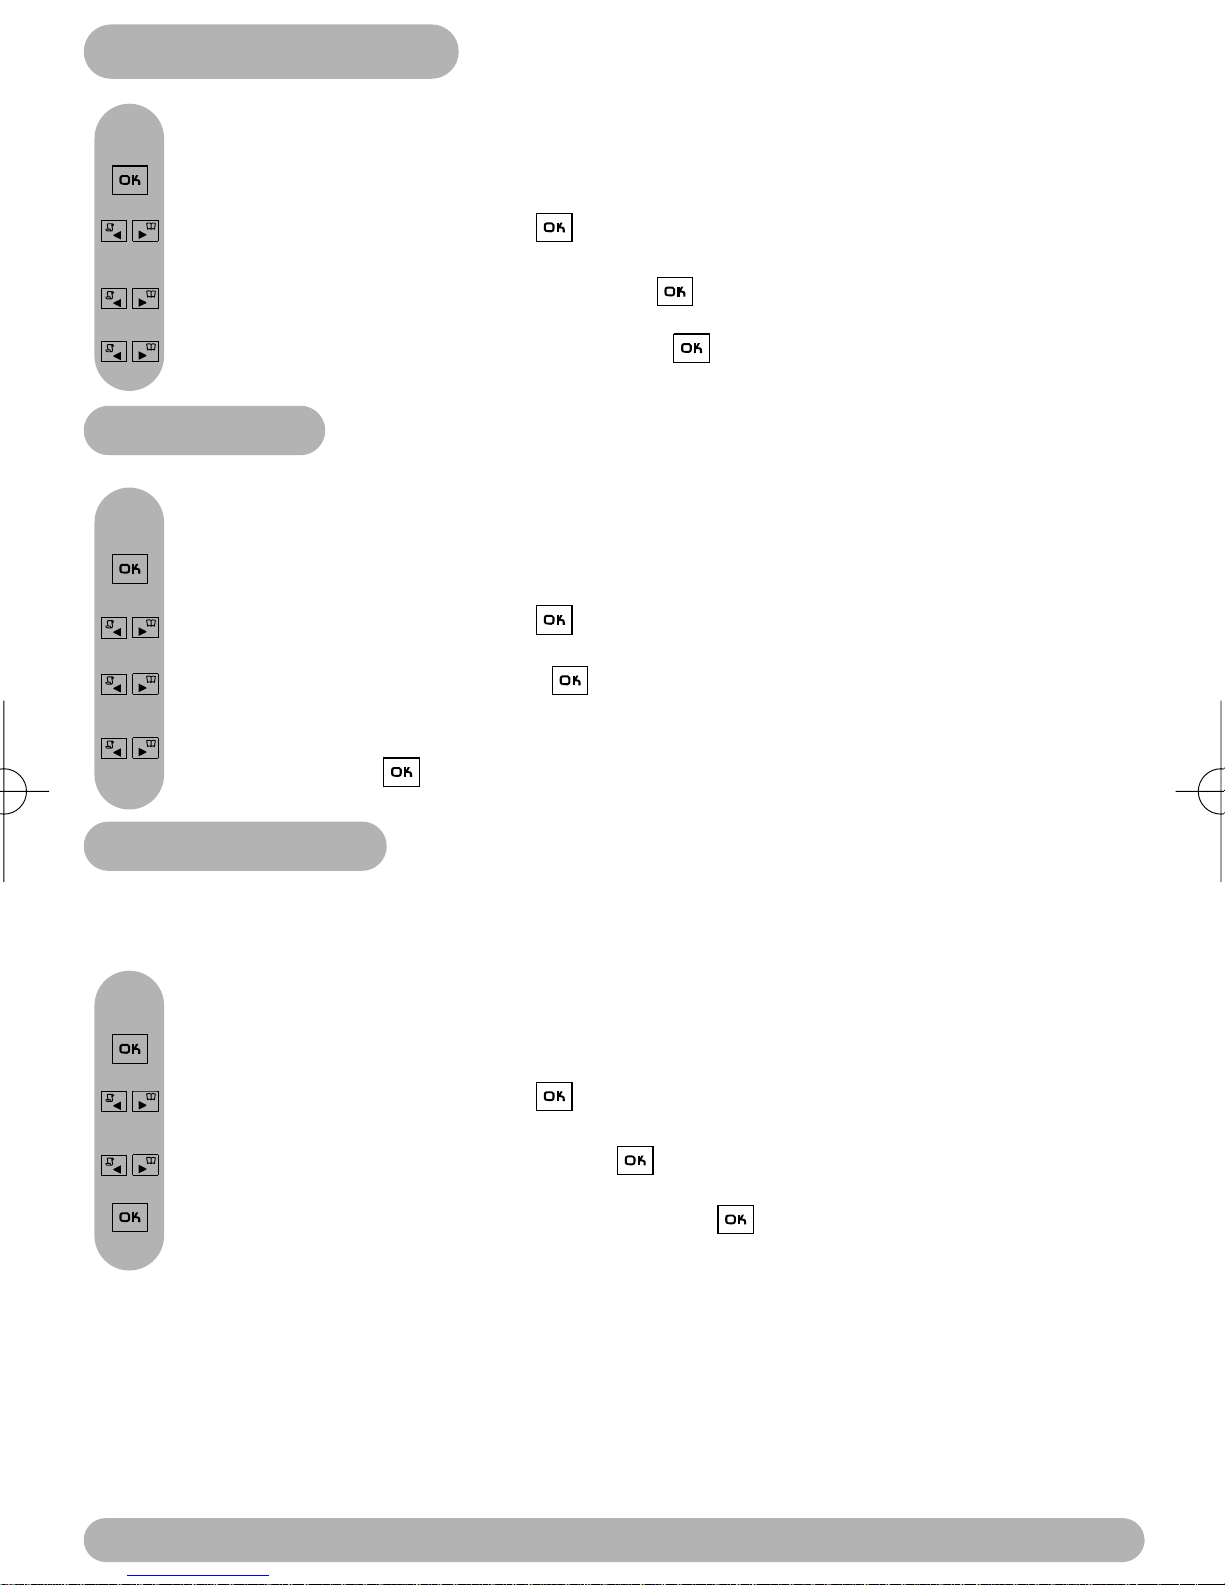
To set the display contrast
Press to enter the carousel menu.
Scroll to Handset and press to select.
Scroll to Display contrast and press to select.
Browse through the levels and select with the appropriate one.
Backlight
To set the display backlight duration or deactivate it
Press to enter the carousel menu.
Scroll to Handset and press to select.
Scroll to Backlight and press to select.
Browse through the durations OFF / 10 seconds / 20 seconds
and select with .
Screen saver
After 2 minutes of inactivity, the screen saver is displayed.
You can choose to activate or deactivate it
To activate or deactivate the screen saver
Press to enter the carousel menu.
Scroll to Handset and press to select.
Scroll to Screen saver and press to select.
Press to select ON or scroll to OFF and press .
Handset
7
Page 9
Intercom
Using the Intercom (if there are at least 2 handsets)
This feature allows you to make free internal calls, transfer external calls from one handset
to another, use the conference option and the babysit feature (room monitoring).
Internal call
Press to call the selected handset + handset number (for example ).
Hang up.
Note: if the handset does not belong to the Philips DECT 521/525 range, this function may not
be available.
Fast call transfer when on line
During a call you can transfer the call without waiting for the other handset to pick up.
All the handsets will then ring.
Press to call the other handset.
Hang up.
Note: the person on hold hears music. A press on allows you to switch between the 2 calls.
Call transfer to a specific handset when on line
During a call you can transfer the call to a specific handset.
Press to call the selected handset + handset number (for example ).
Hang up.
Note: the person on hold hears music. A press on allows you to switch between the 2 calls.
Call transfer via the in-call options
During a call you can transfer the call via the in call options.
Press to enter the options (with handset 1).
Scroll to Intercom and press to select.
If there is only one additional handset, it rings automatically. Otherwise:
Browse through the handset list and select with the one you want to transfer the
call to.
8
Intercom
Page 10
The called handset rings.The external call is put on hold. If there is no answer
from the called handset you can resume the call on the first handset.
Take the line on the called handset, both internal callers can talk.
Press to select Transfer (with handset 1).
Scroll to Switch and come back to the external caller.
Note: to answer the call on the second handset you can press .
Conference call via the in-call options
Conference call allows one external call to be shared with two handsets (in intercom).
The 3 people can share the conversation. No operator subscription is needed.
Press to enter the options (with handset 1).
Scroll to Intercom and press to select.
If there is only one additional handset, it rings automatically. Otherwise:
Browse through the handset list and select with the one you want to call.
The called handset rings.The external call is put on hold. If there is no answer from
the called handset you can resume the call on the first handset.
Take the line on the called handset, both internal callers can talk.
Scroll to the Conference call option and press to select.
The 3 people can share the conversation.
Note: to answer the call on the second handset you can press .
To initiate the babysit if there are at least two handsets (room monitoring)
To use the babysit mode feature you need to activate it (p. 5) & initiate an intercom. Place the handset in
the room to be monitored and you will hear the noise coming from the room on the additional handset.
Press to enter the options.
Scroll to Intercom and press to select.
If there is only one additional handset, it rings automatically. Otherwise:
Browse through the handset list and select with the one you want to call.
The called handset rings.
Take the line on the called handset, the room monitoring can start.
Intercom
9
Page 11
Sounds
Setting the handset sounds
The ringers can be set for:
- the external standard ringer for callers whose number is not stored in the phonebook or
stored with no group settings.
- the internal ringer for the intercom (if there are at least 2 handsets).
To set the 3 group ring tones see manual DECT 521 / DECT 525.
To set the earpiece tone, the key and feedback tones and to activate/deactivate the
notification beeps, go to the menu Sounds and to the sub-menu Settings.
Handset ring tones
To set the external ring tone (ring tone for external calls)
Press to enter the carousel.
Scroll to Sounds and press to select.
Press to select Handset ring tones.
Press to select External ring tone.
Browse through the list of ring tones and press to select.
To set the internal ring tone (ring tone for internal calls)
Press to enter the carousel.
Scroll to Sounds and press to select.
Press to select Handset ring tones.
Scroll to Internal ring tone and press to select.
Browse through the list of ring tones and press to select one.
Handset ring tone volume
Press to enter the carousel.
Scroll to Sounds and press to select.
Scroll to Handset ring tone vol. and press to select.
The current level is heard, browse through the levels to hear them.
Press to select the appropriate volume.
Warning: We strongly advise to put the handset far from your ear when it is ringing.
10
Sounds
Page 12
Troubleshooting
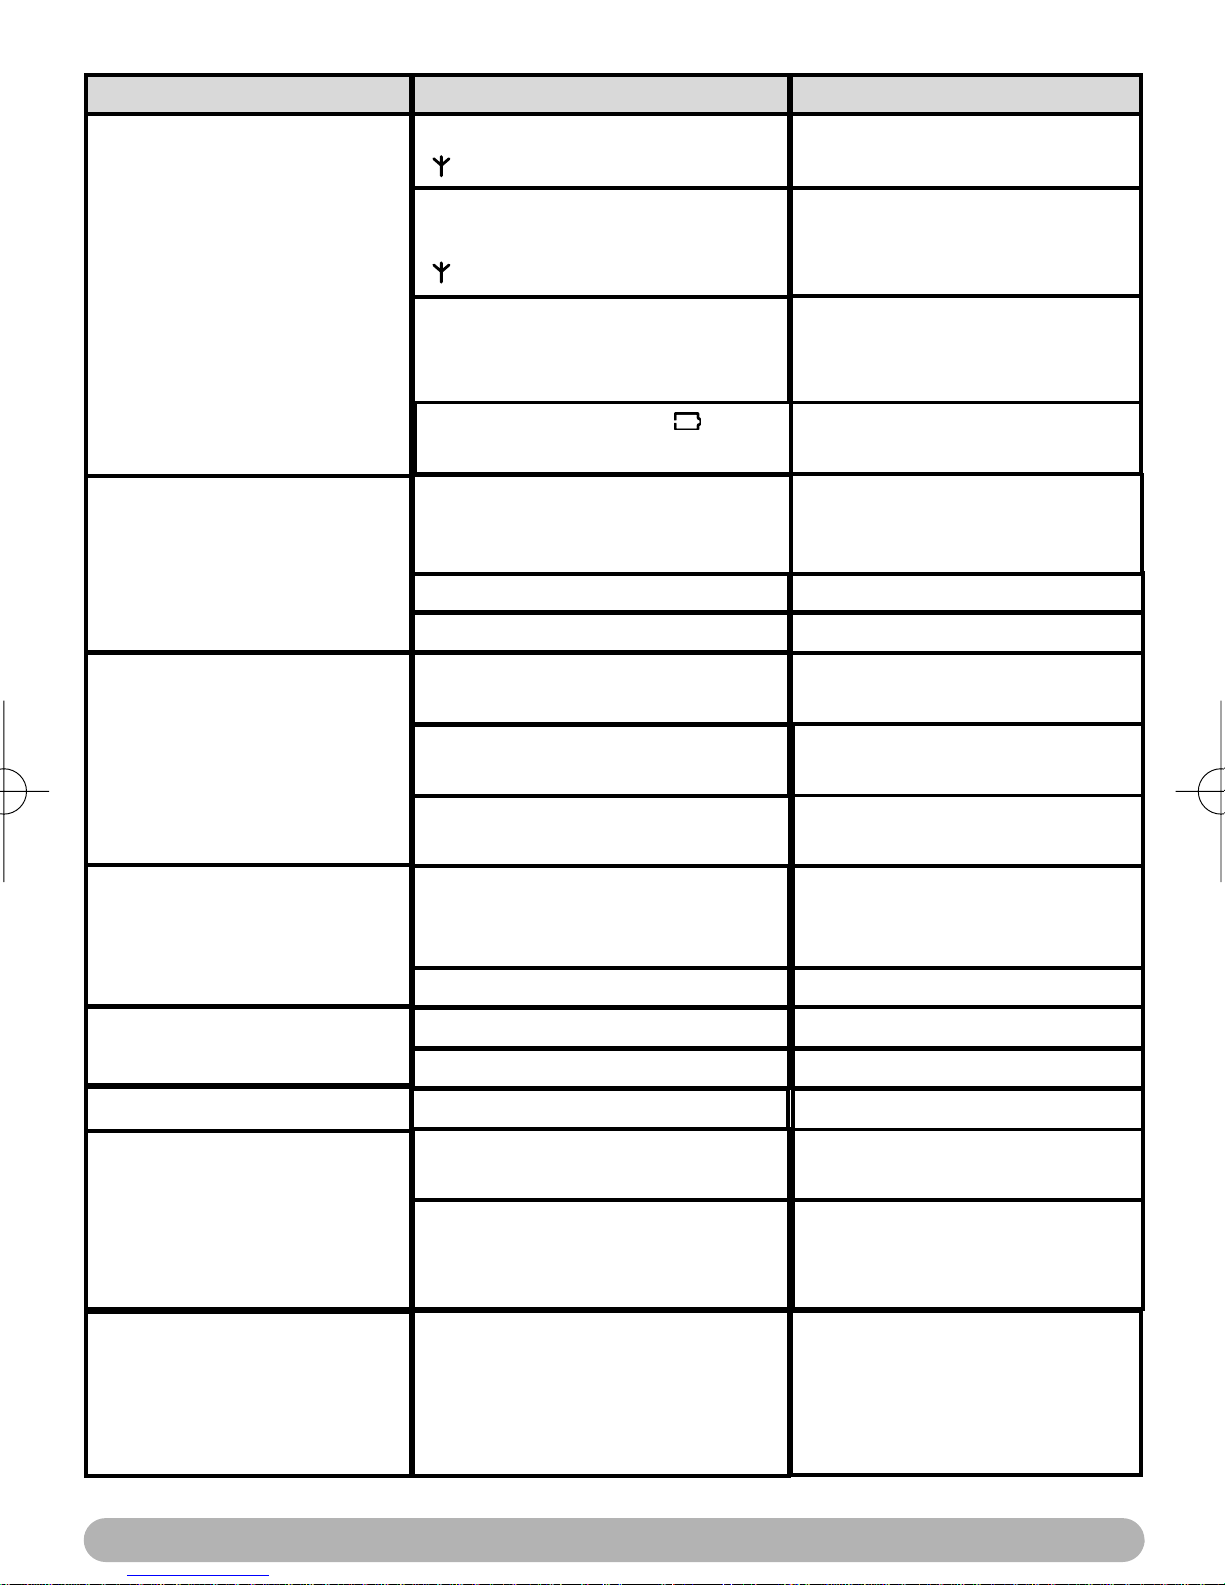
Problem
No dial tone.
When the handset is placed
on the charging unit, no
beep is heard.
The batteries remain low
although they have charged
for 12 hours.
Cause Solution
The handset is out of range,
( is not displayed).
The handset has not been
registered to the base station
Move closer to the base
station and try again.
Register the handset to the
base station (page 5).
( is not displayed).
The base station is not
Check the connections.
properly connected to the mains
or the telephone line.
The batteries are low ( is
Charge batteries (page 4).
displayed).
The charging unit is not properly
connected to the mains.
Charging contacts are dirty.
Key tones are deactivated.
The charging unit is not properly
Check the connection between
charging unit and mains.
Clean with a clean & dry cloth.
Activate them (page 10).
Check the connection.
connected to the mains.
Handset not registered to base.
Register handset to base
(page 5).
An error beep is heard from
the handset when trying to
make a call.
An error beep is heard
during a call.
There is no ringer.
When adding a handset to
the base station, a failure
message is displayed.
Interference during call.
The batteries are defective or
too old.
Another call is already in
progress from another handset
or the base station.
The base is being consulted.
The handset is out of range.
The handset batteries are low.
The ringer is deactivated.
The procedure has failed.
The maximum number of
handset has been reached.
You are too far from the base.
The base station is too close to
electrical appliances, reinforced
concrete walls or metal door
frames.
Contact your dealer.
Purchase new batteries.
Retry when the current call is
finished.
Wait until it is available.
Move closer to the base.
Charge the batteries.
Activate it (page 10).
Try the procedure again
(page 5).
Un-register a handset (page 5).
Get closer to the base station.
Move the base station to find a
better place (the higher the
better).
Troubleshooting
11
Page 13
Declaration of conformity
We,
PHILIPS Consumer Electronics
Route d'Angers
72081 Le Mans Cedex 9
France
Declare that the products DECT521xx and DECT525xx are in compliance with
ANNEX III of the R&TTE-Directive 1999/5/EC and then with the following essential
requirements:
Article 3.1 a : (protection of the health & the safety of the user)
Safety : EN 60950-1 (10/2001)
SAR : EN 50371 (2002)
Article 3.1 b : (protection requirements with respect to electromagnetic
compatibility)
EMC : ETSI EN 301 489-6 V1.2.1 (08/2002) &
ETSI EN 301 489-1 V1.4.1 (08/2002)
Article 3.2 : (effective use of the radio spectrum)
Radio : EN 301 406 V1.5.1 (2003)
The presumption of conformity with the essential requirements regarding Council
Directive 1999/5/EC is ensured.
Date : 04/03/2005 Le Mans
Product Quality Manager
Home Communication
12
Declaration of conformity
Page 14

 Loading...