

Page 1
© 2020 Koninklijke Philips N.V.
All rights reserved.
4241 210 89187
DE5205
DE5206
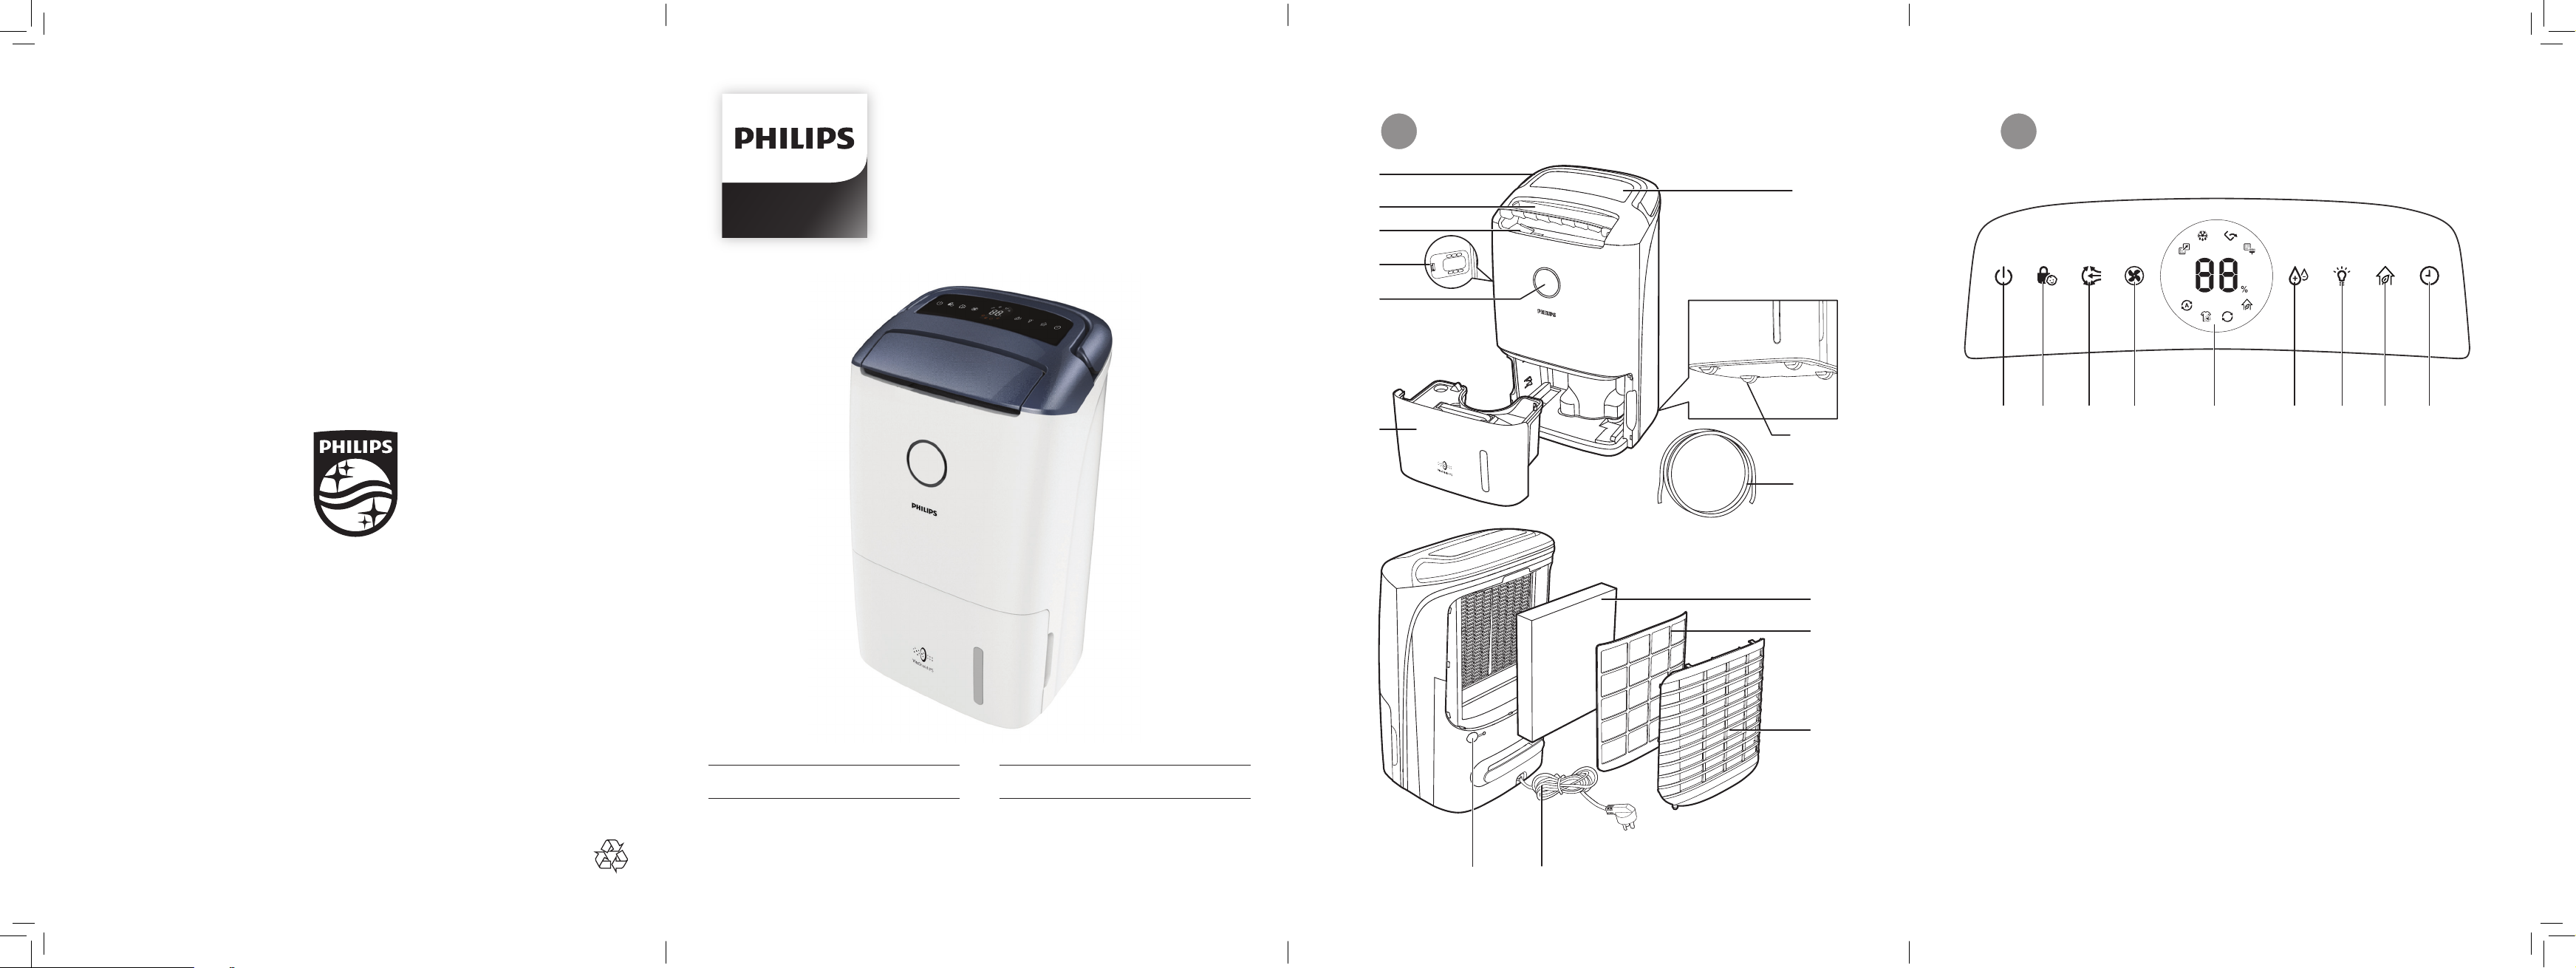
1 2
a
b
c
d
e
f
i
h
g
a b c d e f g h i
n
m
l
EN User manual 1 ZH-S 用户手册 19
j k
Page 2
3S
3s
3s
Page 3
English
Contents
1 Important 2
Safety 2
2 Your Philips 2-in-1 Air
Dehumidier and Purier 6
Product Overview (g.a) 6
Controls Overview (g.b) 6
3 Getting started 7
Installing the lter 7
Positioning the
dehumidier 7
4 Using the dehumidier 8
The air quality light 8
Turning on and o 8
Setting the humidity level 8
Changing the fan speed 9
Using the purication only
mode 9
Using the swing function 10
Setting the Timer 10
Defrosting the
dehumidier 10
Setting the child lock 11
Using the light on/o
function 11
6 Cleaning 12
Cleaning the body of the
dehumidier 12
Cleaning the water tank 13
Cleaning the pre-lter 13
Cleaning the air quality
sensor 14
7 Replacing the HEPA lter 14
HEPA lter replacement
indicator 14
Replacing the HEPA lter 14
8 Storage 15
9 Troubleshooting 16
10 Guarantee and service 18
Order parts or accessories 18
11 Notices 18
Electromagnetic elds
(EMF) 18
Recycling 18
5 Draining the dehumidier 11
Emptying the water tank 11
Using the continuous
drainage 11
1EN
Page 4

1 Important
Safety
Read this user manual carefully before
you use the dehumidier, and save it for
future reference.
Danger
• Do not spray any
ammable materials such
as insecticides or fragrance
around the dehumidier to
avoid electric shock and/or
a re hazard.
• Do not drink the
accumulated water, use
it to feed animals, nor to
water plants. Empty the
water tank, and pour the
water down the drain.
Warning
• Check if the voltage
indicated on the bottom
or indicated at the rear of
the appliance corresponds
to the local power voltage
before you connect the
appliance.
• Connect the dehumidier
to the power socket
exclusively, and do not
connect it through an
extension cord to prevent
re hazard and/ or electric
shock.
• If the power cord is
damaged, you must have
it replaced by Philips, a
service center authorized
by Philips, or similarly
qualied persons in order
to avoid a hazard.
• Do not use the appliance
if the plug, the power cord,
or the appliance itself is
damaged.
• This appliance is not
intended for use by
persons (including
children) with reduced
physical sensory or mental
capabilities, or lack of
experience and knowledge,
unless they have been
given supervision or
instruction concerning
use of the appliance by a
person responsible for their
safety.
• Children should be
supervised to ensure that
they do not play with the
appliance.
• Do not start or stop the
dehumidier by plugging
and unplugging the power
cord.
2 EN
Page 5

English
• Do not block the air inlet
and outlet, e.g. by placing
items on the air outlet or in
front of the air inlet.
• Do not insert your ngers
or objects into the air inlet
and outlet to prevent
physical injury or product
malfunction.
Caution
• Do not turn the appliance
on and o frequently.
• If the power socket used
to power the dehumidier
has poor connections, the
plug of the dehumidier
becomes hot. Make sure
you plug the dehumidier
into properly connected
power socket.
• Always place and use the
dehumidier on a dry,
stable, level, and horizontal
surface.
• Leave at least 40 cm free
space behind and on both
sides of the dehumidier
and leave at least 60 cm
free space above it.
Insucient ventilation may
cause overheating or re
hazard.
• Do not use this
dehumidier when you
have used indoor smoketype insect repellents or in
places with oily residues,
burning incense, or
chemical fumes.
• Do not operate or store the
dehumidier under direct
sunlight.
• Do not use the
dehumidier near gas
appliances, heating devices
or replaces.
• Do not use the
dehumidier in a bathroom
or other places where it is
likely to come in contact
with water, or wash it with
water.
• When you use the
dehumidier for drying
laundry, hang your clothes
from a distance where
water droplets will not drip
onto the dehumidier.
• The dehumidier is only
intended for household use
under normal operating
conditions (5°C - 35°C).
• Do not use the
dehumidier in a room
with major temperature
changes.
3EN
Page 6

• Run the power cord under
carpeting, rugs, or runners.
Arrange the cord away
from areas where it may be
tripped over.
• Make sure the lters and
the water tank are properly
installed before you switch
on the dehumidier.
• Do not touch the swing
louver.
• Avoid knocking against the
dehumidier (the air inlet
and outlet in particular)
with hard objects.
• Always unplug the
dehumidier after use and
before you move or clean it.
• Power o and unplug
the dehumidier before
draining the water from the
tank. Otherwise, this may
result in water leakage.
• Always move the
dehumidier in an upright
position with handle, and
do not carry it horizontally.
• Do not drop the
dehumidier as this may
cause personal injury, and
damage to the oor or
household items as a result
of water spillage.
• Do not place anything on
top of the dehumidier.
4 EN
• Do not stand on, sit
on, or lean against the
dehumidier. This may
cause the dehumidier to
tip over causing injury.
• Do not remove or dismantle
the oat in the tank;
otherwise, the dehumidier
cannot detect when the
tank is full and could result
in water leakage.
• Do not use detergents,
cleaning agents, abrasive
powders, chemically
treated dusters, gasoline,
benzene, thinners or other
solvents, as they can
damage the dehumidier
or the water tank. This may
result in water leakage.
• Mildew may form in the
water tank, clean it every
week with tap water. Then,
wipe with a soft, dry cloth.
• If you do not use the
dehumidier for an
extended period of time,
make sure all parts are
clean and dry.
• Do not use the dehumidier
for food preservation, art or
scientic works.
• Do not point the airow of
the dehumidier directly at
Page 7

English
the body for a prolonged
period of time, especially
where there is someone
who is unable to adjust
the humidity. For instance:
infant, child, or elderly
person. This may harm the
physical condition and
lead to dehydration.
• Use the dehumidier with
cautions where the walls,
furniture, and art works are
vulnerable to dry air.
• Do not place the
appliance directly below
an air conditioner to
prevent condensation
from dripping onto the
appliance which will cause
short circuit and leakage of
electricity.
• Only use the original
Philips lters specially
intended for this appliance.
Do not use any other lters.
• Burning the lter may
cause irreversible damage
to humans or other
creatures. Do not use the
lter as fuel or for similar
purposes.
• Always lift or move the
appliance by the handle at
the top of the appliance.
• Do not use the
dehumidier in a room
with major temperature
changes, as this may cause
condensation inside the
dehumidier.
• To prevent interference,
place the appliance at least
2m away from electrical
appliances that use
airborne radio waves such
as TVs, radios, and radiocontrolled clocks.
• The appliance does not
remove carbon monoxide
(CO) or radon (Rn). It
cannot be used a safety
device in case of accidents
with combustion processes
and hazardous chemicals.
• Never move the appliance
by pulling the power cord.
• This appliance is not
a substitute for proper
ventilation, regular vacuum
cleaning, or use of an
extractor hood or fan while
cooking.
• If the appliance is not used
for a long period of time,
remove the HEPA lter from
the dehumidier and store
it separately in a cool, dry
place.
• Do not sit or stand on the
appliance. The appliance
is equipped with unilateral
rotating wheels. Sitting or
standing on the appliance
may lead to potential injury.
Fuse Specication:
2010 T2.0A 250V
2010 T3.15A 250V
5EN
Page 8
2 Your Philips 2-in-1 Air Dehumidifier
and Purifier
Congratulations on your purchase, and welcome to Philips!
To fully benet from the support that Philips oers, register your product at
www.Philips.com/welcome.
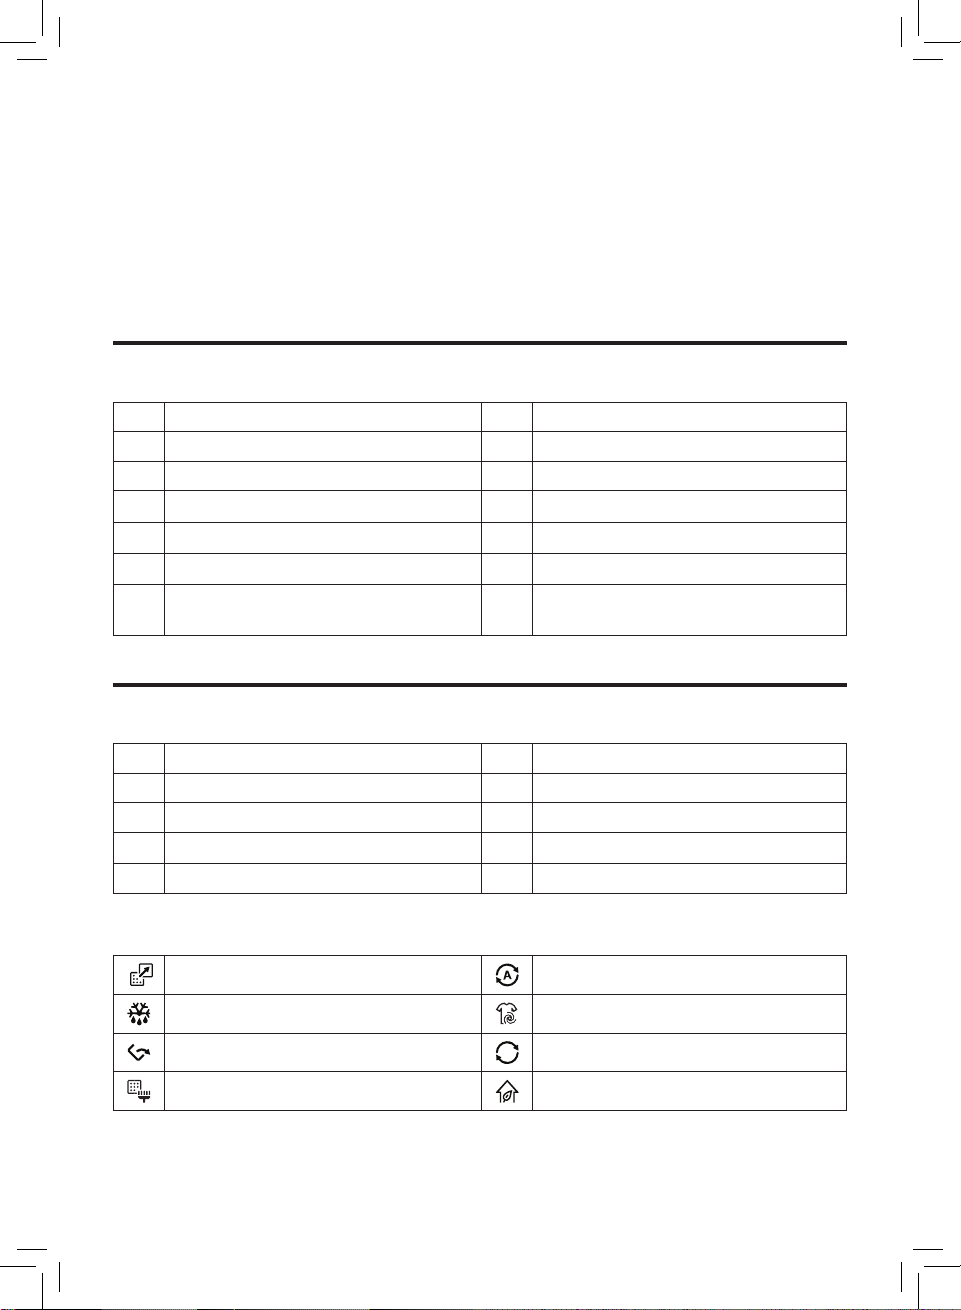
Product Overview (g.a)
a Handle h Unilateral rotating wheels
b Louver i Display panel
c Air outlet j Continuous drainage outlet
d Air quality sensor k Power cord
e Air quality light l Rear cover with air inlet
f Water tank m Pre-lter
g Hose n NanoProtect lter HEPA Series 1
(FY1119)
Controls Overview (g.b)
a On/o button f Humidity level setting button
b Child lock button g Light on/o button
c Auto swing button h Purication ONLY button
d Fan speed button i Timer button
e Display screen
Display panel
HEPA lter replacement alert Auto mode icon
Auto defrosting indicator Laundry drying mode icon
Water tank full alert Continuous mode icon
Pre-lter cleaning alert Purication ONLY mode icon
6 EN
Page 9
English
3 Getting started
Positioning the
dehumidier
Installing the lter
Note
• Make sure that the appliance is
unplugged before installing the
lter.
Before using the appliance, remove all
packaging materials from the lter and
place the lter into the appliance as
described as follows.
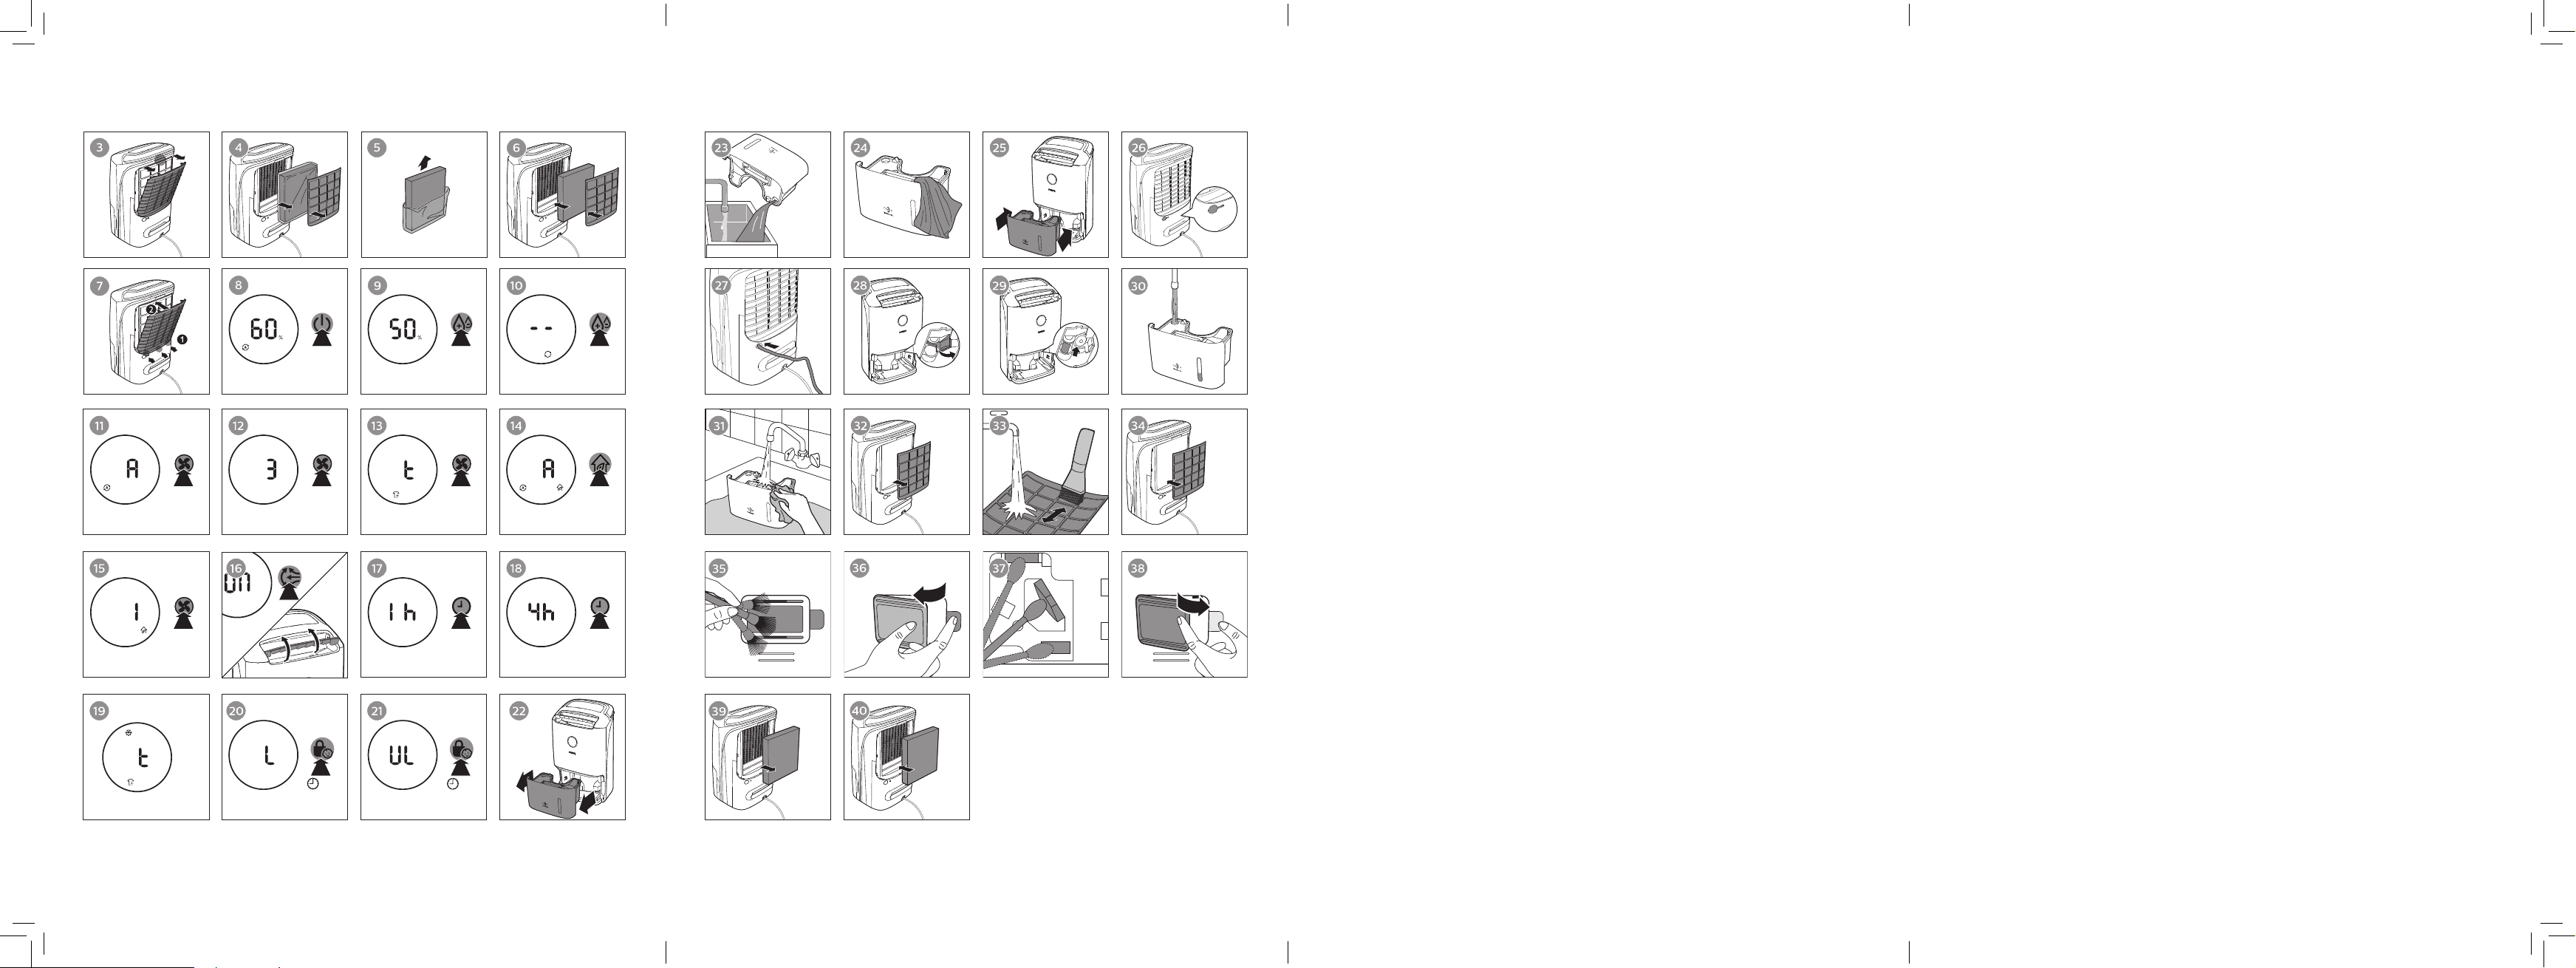
1 Pull the top part of the rear panel to
remove it from the appliance
(g.c).
2 Take out the HEPA lter and the
pre-lter (g.d).
3 Remove all packaging materials
from the HEPA lter (g.e).
4 Place the HEPA lter into the
dehumidier and then the pre-lter
(g.f).
Note
To increase the dehumidifying
eectiveness, position the dehumidier
in a location that can draw the most air.
Note
• When the dehumidier is operating,
do not open exterior doors or
windows.
• Make sure that the HEPA lter and
the pre-lter are properly attached
to the dehumidier.
5 Reattach the rear cover by pressing
the bottom part of the rear cover
onto the appliance rst (1). Then,
gently push the rear cover against
the body of the appliance (2)
(g.g).
6 Wash your hands thoroughly after
installing lters.
7EN
Page 10
4 Using the
dehumidifier
The air quality light
Color of the air
quality light
Blue Good
Blue-violet Fair
Red-purple Unhealthy
Red Very unhealthy
The air quality light automatically goes
on when the appliance is switched on,
and lights up all colors in sequence.
In a short time the air quality sensors
select the color that corresponds to
the surrounding air quality of airborne
particles.
Turning on and o
Air quality
level
2 Touch the button once to turn on
the appliance (g.h).
» The current humidity level is
displayed on the screen.
» After measuring the air quality
for a short time, the air quality
sensor automatically selects the
color of the air quality light.
» The dehumidier goes to combi
AUTO mode.
3 Touch and hold for 3 seconds to
turn o the appliance.
Setting the humidity
level
You can set the desired humidity level
to 40, 50, 60, 70, or 80 percent.
1 Touch the button one or more
times to set the desired humidity
level, and the humidity indicator
lights up (g.i).
Note
• For optimum performance, close
doors and windows.
• Keep curtains away from the air
inlet or air outlet.
• For optimum dehumidication
eciency, place the dehumidier in
a at, stable surface.
• Before turning on the dehumidier,
check if the power voltage
corresponds to the voltage printed
on the dehumidier.
1 Put the plug of the dehumidier in
the wall outlet.
» The dehumidier beeps.
8 EN
Note
• When the humidity is decreased to
the selected level, the dehumidier
automatically stops dehumidifying
the air, but the fan will continue
working.
• If you do not set the humidity level,
the default humidier is 60%.
• You can touch the button for
5 seconds to display the current
ambient temperature.
Tip
• A comfortable humidity level is from
40RH% to 60RH%.
Page 11
English
Continuous mode
In continuous mode, the appliance
constantly works with the optimal
dehumidifying settings.
1 Touch the button repeatedly to
select the continuous mode (g.j).
» The and display on the
screen.
Changing the fan speed
You can select the desired fan speed
(Auto,1, 2 ,3 and 4), or clothes dry
mode.
Auto
• Touch the fan speed button
repeatedly to select the auto mode
(g.k).
Note
• You can adjust the humidity settings
manually by touching the button.
Manual
• Touch the fan speed button
repeatedly to select the fan speed
you need (g.l).
Laundry drying mode
• Touch the button until is
displayed to select the laundry
drying mode (g.m).
» The dehumidier goes to
laundry drying mode.
» The dehumidier operates under
the highest fan speed.
and display on the screen.
»
Note
• Do not point the airow of the
dehumidier directly at the body
for a prolonged period of time,
especially where there is someone
who is unable to adjust the
humidity.
• When you use the dehumidier
for laundry drying, hang your
clothes from a distance where
water droplets will not drip onto the
dehumidier.
• Make sure the air inlet and outlet
are not blocked by the clothes.
• Make sure that you dry the clothes
on a safe and secure place from
dropping to block the air inlet and
outlet.
Tip
• Direct the louvre until air ows
directly onto the clothes to dry your
clothes more eciently.
Using the purication
only mode
The appliance can be used in
purication only mode.
1 Press the button to access
purication only mode (g.n).
» The appliance operates under
auto mode by default.
» The dehumidifier will stop
dehumidifying the air.
» The and the display on
the screen.
9EN
Page 12
2 Touch the fan speed button to
select the desired fan speed (g.o).
» The fan speed and display
on the screen.
3 Touch the button again to exit
the purication only mode.
» The dehumidier goes to combi
AUTO mode.
Note
• Whenever the current mode of
appliance works, it goes to
purication only mode when
touching the button.
• Humidity setting and laundry drying
mode are o in the purication only
mode.
Using the swing function
The louver is able to swing up to 90
degrees. Use the swing function to
direct the air ow.
1 Touch the button to activate the
swing function (g.p).
2 Touch the button again to
deactivate the swing function.
Setting the Timer
With the timer function, you can let
the dehumidier operate for a set
number of hours. When the set time has
elapsed, the dehumidier automatically
stops dehumidifying the air, but remains
on. The timer is available from 1 to
9 hours.
1 Touch the button to activate the
timer (g.q).
2 Touch the button repeatedly to
choose the number of hours you
want the dehumidier to operate
(g.r).
• To deactivate the timer function,
touch the button repeatedly
until is displayed on the
screen.
Defrosting the
dehumidier
Note
• The defrosting function is enabled
only when the dehumidier
operates under dehumidifying
mode.
Tip
• After the appliance is turned on,
turn the louver upward to increase
the dehumidifying eciency.
10 EN
The dehumidier is equipped with a
defrosting sensor to make sure it is in
optimal condition when being used
in cold weather. The dehumidier
automatically detects if defrosting is
required.
When defrosting is required:
» The indicator is on (g.s).
» Defrosting will begin defrosting
and continue until the
dehumidier is completely
defrosted.
Page 13
English
Note
• During defrosting, the dehumidier
operates in clothes dry mode.
• The dehumidier will resume
working and operate the previous
settings after defrosting is
completed.
Setting the child lock
1 Touch and hold the child lock
button for 3 seconds to activate
child lock (g.t).
» "L" displays on the screen for
3 seconds.
» When the child lock is on,
all the other buttons are not
responsive.
2 Touch and hold the child lock
button for 3 seconds again to
deactivate child lock (g.u).
» "UL" displays on the screen for
3 seconds.
5 Draining the
dehumidifier
Emptying the water tank
When the water tank is full:
» The appliance beeps, and the
indicator is on.
» The appliance goes to purication
only mode automatically.
1 Place your ngers in the side recess
of the dehumidier, and gently pull
the water tank out. Hold the sides of
the water tank, and remove it from
the dehumidier (g.v).
2 Empty the water into a sink (g.w).
3 Wipe the outside of the water tank
dry with a clean cloth (g.x).
4 Put the water tank back into the
dehumidier (g.y).
Using the light on/o
function
With the light on/o button, you can
switch on or o the air quality light,
the display screen and the function
indicators if desired.
1 Touch the light on/o button
once, the air quality light will go o.
2 Touch the light on/of button
again, the display screen will
dimmed.
3 Touch the light on/o button for
the third time, all lights will be on
again.
Note
• The dehumidier will resume
working after the water tank is
emptied.
Using the continuous
drainage
The dehumidier can also drain excess
water by attaching a hose. This allows
you to operate the dehumidier without
emptying the water tank.
1 Turn o the dehumidier and
unplug from the wall outlet.
2 Open protective cover of the
drainage hole (g.z).
11EN
Page 14
3 Remove the water tank from the
dehumidier (g.v).
4 Insert the Philips provided hose into
the drainage hole (g.{).
5 Push the protective cover of
drainage outlet rightwards to open
it (g.|).
6 Connect the hose to the drainage
outlet (g.}).
7 Put the water tank back into the
dehumidier (g.y).
Note
• Put the water tank back in to
the dehumidier even using
the continuous drainage, or the
dehumidier can not operate
normally.
• Make sure the hose ts tightly
so that no water leaks from the
dehumidier.
• When using the continuous
drainage, make sure the hose is laid
at and not knotted.
• Make sure the hose is not immersed
in water, nor raised higher than the
continuous drainage hole.
• Place the outlet of the hose in
somewhere it can easily drain.
• Check the dehumidier once a week
when draining water continuously
or left unattended for an extended
period of time.
6 Cleaning
Note
• Always turn the appliance o and
unplug the appliance from the
electrical outlet before cleaning.
• Never immerse the appliance in
water or any other liquid.
• Never use abrasive or aggressive
cleaning agents such as bleach
or alcohol to clean any part of the
appliance.
• Only the pre-lter is washable. The
air purication lter is not washable.
• Do not attempt to clean the lter or
air quality sensor with a vacuum.
Cleaning the body of the
dehumidier
Regularly clean the inside and outside
of the dehumidier to prevent dust from
collecting.
1 Use a soft, dry cloth to clean both
the interior and exterior of the
appliance.
2 The air outlet can also be cleaned
with a dry, soft cloth.
12 EN
Page 15
English
Cleaning the water tank
Clean the water tank every day to keep
it clean.
1 Switch o the dehumidier and
unplug from the electrical outlet.
2 Remove the water tank from the
dehumidier (g.v).
3 Fill the water tank for 1/3 with water
(g.~).
4 Add some mild washing-up liquid
to the water in the water tank.
5 Wash the water tank under a
running tap water, and clean the
insides of it with a soft clean cloth
(g.).
6 Wipe the outside of the water tank
dry with a clean cloth (g.x).
7 Put the water tank back into the
dehumidier (g.y).
Cleaning the pre-lter
Clean the pre-lter when F0 and are
displayed on the screen.
5 Allow the pre-lter to air dry
thoroughly before placing back in
the dehumidier.
Note
• To optimize the lifetime of the
pre-lter, make sure it dries
completely after cleaning.
• Wash your hands after handling the
lter.
6 Put the pre-lter back into the
appliance (g.‚).
7 Reattach the rear panel by pressing
the bottom part of the rear panel
onto the appliance rst (1). Then,
gently push the panel against the
body of the appliance (2) (g.g).
8 Put the plug of the dehumidier in
the wall outlet.
9 Touch and hold the timer button
for 3 seconds to reset the pre-lter.
10 Wash your hands thoroughly after
cleaning the lter.
Note
• The pre-lter is washable and
vacuum cleanable.
1 Switch o the dehumidier and
unplug from the electrical outlet.
2 Hold the dehumidier and pull the
top part of the rear cover towards
you (g.c).
3 Detach the pre-lter from the
appliance (g.€).
4 If the pre-lter is very dirty, use a
soft brush to brush away the dust.
Wash the pre-lter under a running
tap water (g.).
13EN
Page 16
Cleaning the air quality
sensor
Clean the air quality sensor every
2 months for optimal functioning of the
dehumidier.
Note
7 Replacing the
HEPA filter
HEPA lter replacement
indicator
• If the humidity level in the room
is very high, condensation may
develop on the air quality sensor
and the air quality light may indicate
a more poor air quality even though
the air quality is actually good. If this
occurs, clean the air quality sensor
or use the dehumidier on a manual
speed setting.
• If the dehumidier is used in a dusty
environment, it may need to be
cleaned more often.
1 Switch o the dehumidier and
unplug from the wall outlet.
2 Clean the air quality sensor inlet and
outlet with a soft brush (g.ƒ).
3 Remove the air quality sensor cover
(g.„).
4 Clean the air quality sensor, the
dust inlet and the dust outlet with a
damp cotton swab (g.…).
5 Dry all parts thoroughly with a dry
cotton swab.
6 Reattach the air quality sensor cover
(g.†).
This dehumidier is equipped with a
lter replacement indicator to make sure
that the air lter is in optimal condition
when the dehumidier is operating.
When the HEPA lter needs to be
replaced, the HEPA lter replacement
alert displays on the screen.
If the HEPA lter is not replaced in
14 days, the dehumidier will stop
operating and automatically lock.
You need to replace the HEPA lter
immediately.
Replacing the HEPA lter
Note
• The HEPA lter is not washable nor
reusable.
• Always turn o the dehumidier and
unplug from the electrical outlet
before replacing the HEPA lter.
• Do not clean the HEPA lter with a
vacuum.
Replace the HEPA lter when A3 and
display on the screen.
1 Switch o the dehumidier and
unplug from the wall outlet.
2 Take out the used HEPA lter
according to the lter alert light
status displayed on the screen.
Discard used lters (g.‡).
14 EN
Page 17
English
Note
• Do not touch the pleated HEPA lter
surface, or smell the lters as they
have collected pollutants from the
ai r.
3 Remove all packaging material from
the new HEPA lter (g.e).
4 Place the new HEPA lter into the
appliance (g.ˆ).
5 Put the plug of the dehumidier in
to wall outlet.
6 Touch and hold the timer button
for 3 seconds to reset the lter
lifetime counter.
7 Wash your hands thoroughly after
changing the HEPA lter.
8 Storage
1 Turn o the dehumidier and
unplug from the wall outlet.
2 Clean the dehumidier, air quality
sensor, empty the water tank and
wash the pre-lter (see chapter
‘Cleaning’).
3 Let all parts dry thoroughly before
storing.
4 Wrap the lter and pre-lter
separately in air tight plastic bags.
5 Store the dehumidier, lters and
pre-lter in a cool, dry location.
6 Always thoroughly wash hands after
handling lters.
15EN
Page 18
9 Troubleshooting
This chapter summarizes the most common problems you could encounter with the
dehumidier. If you are unable to solve the problem with the information below, visit
www.philips.com/support or contact the Consumer Care Center in your country
for assistance.
Problem Possible solution
• The timer is set to a specic time interval. Reset or turn o
The appliance
does not work even
though it is plugged
in to the wall outlet
and switched on.
the timer.
• Try a dierent electrical outlet or check the wall switch.
• Make sure that the water tank is empty and placed in the
dehumidier properly.
• The lter alert status is displaying the lter code. Replace
the corresponding lter and reset the lter lifetime counter
(see chapter "Replacing the lter").
The dehumidier
does not work
even though it is
switched on.
The water tank is
empty but the
indictor is still on.
There is no air
dehumidication
in the room or the
dehumidifying
eectiveness is low.
Water leaks from
the dehumidier.
The dehumidier
does not collect
water.
• The lter replacement indicator has been on continuously
but you have not replaced the corresponding lter, and the
appliance is now locked. In this case, replace the lter and
reset the lter lifetime counter.
• Remove the water tank from the dehumidier and place it
back to the dehumidier again.
• Make sure that the lters are clean and in good condition.
• Make sure the air inlet and outlet are not blocked.
• The room humidity is below what the dehumidier is set to.
Select a lower humidity level.
• Make sure that no exterixor doors or windows are open.
• The current temperature is low in the room. Try again until
the temperature rises up.
• Make sure that the dehumidier is in good condition and
the water tank is not cracked.
• The humidity is low. The dehumidier automatically
resumes working when the humidity level is increased.
• The temperature is low. Wait until the temperature rises up.
16 EN
Page 19
English
Problem Possible solution
The airow that
comes out of
the air outlet is
signicantly weaker
than before.
• The pre-lter is dirty. Clean the pre-lter (see chapter
"Cleaning").
The air quality
does not improve,
even though the
appliance has been
operating for a long
time.
The color of the air
quality light always
stays the same.
The dehumidier
produces a
unpleasant smell.
The dehumidier is
loud.
The dehumidier
still indicates that I
need to replace a
lter, but I already
did.
• One of the lters has not been placed in the appliance.
Make sure that all lters are properly installed in the
following order, starting with the innermost lter:
1) NanoProtect lter HEPA Series 1 (FY1119); 2) pre-lter.
• The air quality sensor is wet. Make sure that the air quality
sensor is clean and dry (see chapter "Cleaning").
• The air quality sensor is dirty. Clean the air quality sensor
(see chapter "Cleaning").
• The rst few times you use the dehumidier, it may
produce a plastic smell. This is normal. The dehumidier
may also produce an unpleasant smell when the lter is
dirty. In this case, clean or replace the appropriate lter.
• If the dehumidier produces a burnt odor, switch OFF and
unplug from the electrical outlet. Contact the Consumer
Care Center in your country for assistance.
• If the dehumidier is too loud, change the fan speed to
a lower fan speed level. When using the product in a
bedroom at night, choose a lower fan speed.
• Make sure that the dehumidier is placed on a at and
stable surface.
• Perhaps you did not reset the lter lifetime counter. Plug
in the dehumidier, touch to switch on the dehumidier,
and touch and hold the timer button for 3 seconds.
Error codes "E1",
"E2", "E3" “E4” or
"E5" displays on
the screen.
• The dehumidier has malfunctions. Contact the Consumer
Care Center in your country.
17EN
Page 20

10 Guarantee and
service
If you need information or if you have a
problem, please visit the Philips website
at www.philips.com or contact the
Philips Consumer Care Center in your
country (you can nd its phone number
in the worldwide guarantee leaet). If
there is no Consumer Care Center in
your country, go to your local Philips
dealer.
Order parts or
accessories
If you have to replace a part or want to
purchase an additional part, go to your
Philips dealer or visit www.philips.com/
support.
If you have problems obtaining the
parts, please contact the Philips
Consumer Care Center in your country
(you can nd its phone number in the
worldwide guarantee leaet).
11 Notices
Electromagnetic elds
(EMF)
This Philips appliance complies with all
applicable standards and regulations
regarding exposure to electromagnetic
elds.
Compliance with EMF
Koninklijke Philips N.V. manufactures
and sells many products targeted at
consumers, which, like any electronic
apparatus, in general have the ability to
emit and receive electromagnetic signals.
One of Philips’ leading Business
Principles is to take all necessary health
and safety measures for our products,
to comply with all applicable legal
requirements and to stay well within the
EMF standards applicable at the time of
producing the products.
Philips is committed to develop,
produce and market products that
cause no adverse health eects. Philips
conrms that if its products are handled
properly for their intended use, they
are safe to use according to scientic
evidence available today.
Philips plays an active role in the
development of international EMF
and safety standards, enabling Philips
to anticipate further developments in
standardization for early integration in
its products.
18 EN
Recycling
Do not throw away the product with
the normal household waste at the
end of its life, but hand it in at an
ocial collection point for recycling.
By doing this, you help to preserve the
environment.
Follow your country's rules for the
separate collection of electrical and
electronic products. Correct disposal
helps prevent negative consequences
for the environment and human health.
Page 21
ZH-S
简体中文
目录
1
重要事项
安全
2
您的飞利浦空气除湿净化一
体机
产品概述(图 a)
控件概述(图 b)
3
使用入门
安装滤网
放置除湿机
4
使用除湿机
空气质量指示灯
打开和关闭
设置湿度级别
更改风扇速度
使用纯净化模式
使用摆风功能
设置定时器
除湿机除霜
设置儿童锁
使用灯光开/关功能
20
20
23
23
23
24
24
24
24
24
24
25
25
26
26
26
26
27
27
7
8
9
10
HEPA
更换
HEPA
更换
存放
滤网
滤网更换指示灯
HEPA
滤网
31
故障种类和处理方法
保修与服务
34
订购部件或附件
11
34
声明
电磁场
回收
(EMF) 34
34
30
30
30
32
34
5
排空除湿机
倒空水箱
27
27
使用连续排水口
6
28
清洁
清洁除湿机的机身
清洁水箱
28
清洁预过滤网
清洁空气质量传感器
27
28
29
29
19
Page 22

ZH-S
1
重要事项
安全
使用除湿机之前,请仔细阅读
本用户手册,并妥善保管以备
日后参考。
危险
• 切勿将任何可燃材料(例如
杀虫剂或香水)喷到除湿机
周围,以免发生触电和/或
火灾。
• 请勿饮用积水,也不要用其
喂养动物或浇灌植物。清空
水箱,将水倒入水槽。
警告
• 在将产品接通电源以前,首
先确认产品背面或底部所标
示的电压是否与当地的电压
相符。
• 将除湿机连接至专用电源插
座,切勿通过延长线连接,
以防止发生火灾危险和/或
触电。
• 如果电源软线损坏,为避免
危险,必须由制造厂或其维
修部或类似的专职人员来
更换。
• 如果插头、电源线或产品
本身受损,请勿再使用
本产品。
20
• 本产品不可由肢体残障、精
神障碍或缺乏相关经验和技
能的人(包括儿童)使用,
除非有负责安全的人员对他
们进行产品使用的相关指导
或说明,方可使用本产品。
• 应照看好儿童,避免他们玩
耍本产品。
• 请勿通过插上或拔下电源线
来启动或停止除湿机。
• 请勿堵塞进风和出风口,例
如不要将物体放置在出风口
上或进风口前方。
• 请勿将手指或其他物体插入
进风口和出风口,以防发生
人身伤害或出现产品故障。
警告
• 请勿频繁开关本产品。
• 如果连接除湿机的电源插座
接触不良,则除湿机的插头
可能会变得很热。确保除湿
机所连接的电源插座接触
良好。
• 一定要在干燥、稳固、平整
且水平的表面上放置和使用
除湿机。
• 除湿机的后侧及两侧均要留
出至少
至少要留出
通风不足可能导致过热或发
生火灾危险。
• 当您使用室内烟雾式驱虫剂
或在充满油污、燃烧的香或
化学烟雾的地方时,请勿使
用本除湿机。
40
厘米的空间,上方
60
厘米的空间。
Page 23

ZH-S
简体中文
• 请勿在阳光直射处操作或存
放除湿机。
• 请勿在气体用具、加热装置
或火炉附近使用除湿机。
• 请勿在浴室或可能会接触水
的其他地方使用或用水清洗
除湿机。
• 用除湿机吹干衣物时,请将
衣服挂在远处,使水滴不会
滴到除湿机上。
• 本除湿机仅限于家用并在
正常运行条件下使用
(5°C-35°C)
。
• 请勿在温度变化较大的房间
内使用除湿机。
• 将电源线置于地毯、小地毯
或滑槽下。将电线远离可能
会造成绊倒的区域。
• 确保已正确安装滤网和水
箱,然后再打开除湿机。
• 切勿触摸摇摆式气窗。
• 请勿用硬物敲击除湿机(尤
其是进风口和出风口)。
• 使用之后和在您移动或清洁
产品之前,务必先将除湿机
的电源插头拔掉。
• 排出水箱中的水之前,
先关闭电源并拔下除湿机的
电源插头。否则,可能导致
漏水。
• 始终用手柄竖直移动除湿
机,切勿水平搬运。
• 切勿让除湿机跌落,否则可
能会造成人身伤害,因水溢
出损坏地板或家居用品。
• 请勿在除湿机上放置任何
物品。
• 请勿站、坐或靠在除湿机
上。否则会导致除湿机翻
倒,对人体造成伤害。
• 请勿移除或拆下水箱中的
浮子;否则,除湿机无法
检测水箱是否已满,可能
导致漏水。
• 请勿使用去污剂、清洁剂、
磨蚀性粉末、经过化学处理
的抹布、汽油、苯、稀释剂
或其他溶剂,否则可能会损
坏除湿机或水箱。否则,可
能导致漏水。
• 水箱中可能会生长霉菌,
每周用自来水清洗一次。
然后,用柔软的干布擦净。
• 如果打算较长时间不使用
除湿机,确保所有部件清洁
且干燥。
• 请勿将除湿机用于食品保
鲜、艺术品或科研工作。
• 请勿让除湿机的气流长时间
正对着身体,尤其是无法调
节湿度的人。例如:婴儿、
儿童或老人。否则可能会损
坏身体状况并导致脱水。
• 在易受干燥空气影响的墙
壁、家具和艺术品处要小心
使用除湿机。
21
Page 24

ZH-S
• 切勿将产品直接放在空调
下方,以防冷凝水滴到
产品中造成短路或者漏电。
• 只能使用飞利浦专门为本产
品设计的原装过滤网。切勿
使用任何其它过滤网。
• 燃烧滤网可能对人体或其他
生物造成不可逆转的损害。
请勿将滤网用作燃料或类似
用途。
• 请始终用产品顶端的手柄提
拉或移动产品。
• 请勿在温度变化较大的房间
内使用除湿机,因为这可能
导致除湿机内部的冷凝。
• 为防止产生干扰,产品与使
用无线电波的电器(例如电
视机、收音机和无线电控制
时钟)之间至少应保持
2
米
距离。
• 本产品不能去除一氧化碳
(CO)
或氡
(Rn),
因此在发生
燃烧和危险化学品事故时,
不能作为安全设备使用。
• 切勿通过拖拽电源线来移动
产品。
• 本产品不能替代正常通风、
日常吸尘或者在烹饪时使用
的抽油烟机。
• 如果长期不使用本产品,请
从除湿机上取下
HEPA
滤
网,并将其存放在阴凉干燥
的地方。
• 请勿坐在或站在产品上面。
产品配有单边旋转轮。坐在
或站在产品上方可能引发人
身伤害。
保险丝规格:
2010 T2.0A 250V
2010 T3.15A 250V
22
Page 25
ZH-S
简体中文
2
您的飞利浦空气除湿净化一体机
感谢您的惠顾,欢迎光临飞利浦!
为充分享受飞利浦提供的支持,请在
www.philips.com/welcome
产品概述(图 a)
注册您的产品。
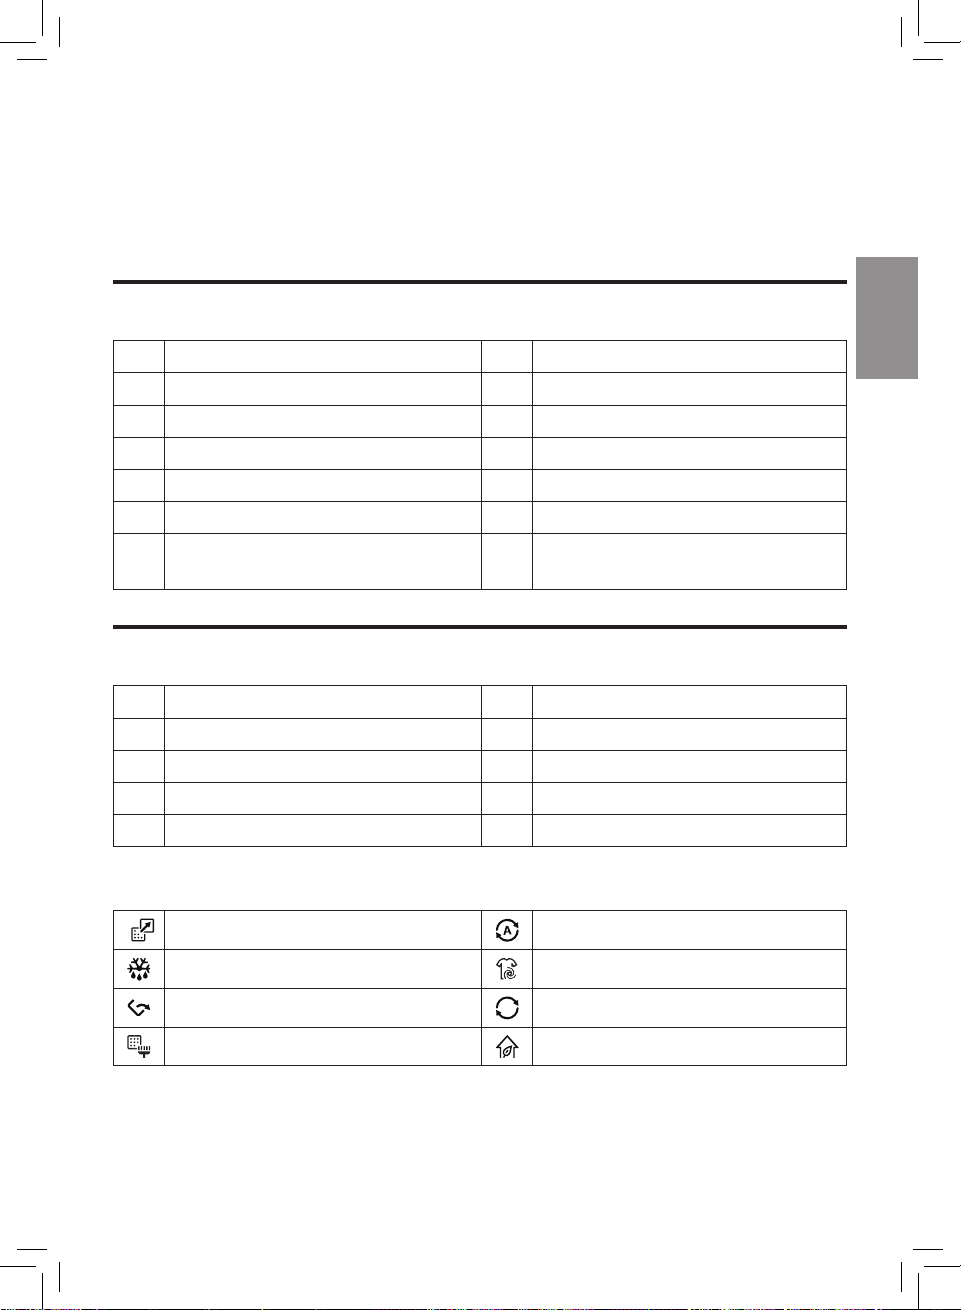
a
手柄
b
摆叶
c
出风口
d
空气质量感应器
e
空气质量指示灯
f
水箱
g
软管
控件概述(图 b)
a
开/关钮
b
儿童锁按钮
c
自动摆风按钮
d
风速设定按钮
e
显示屏
显示面板
HEPA
滤网更换提醒 自动模式图标
h
单边旋转轮
i
显示面板
j
连续排水口
k
电源线
l
带进风口的后盖
m
预过滤网
n
纳米级劲护滤网
FY1119
(
f
湿度设定按钮
g
灯光开/关按钮
h
纯净化模式按钮
i
预约按钮
)
-HEPA S1
型
自动除霜指示灯
水箱满水提醒 持续除湿模式图标
清洁预滤网提醒
干衣模式图标
纯净化模式图标
23
Page 26
ZH-S
3
使用入门
4
使用除湿机
安装滤网
注意
• 安装滤网前,确保先拔出产品
插头。
使用产品前,先拆掉滤网的所有包装材
料,然后按如下所述将滤网装入产品。
1
拉出后面板的上半部分将其从产品
上卸下(图
2
3
4
• 确保
5
6
HEPA
取出
(图
HEPA
拆除
(图
HEPA
将
行预过滤(图
注意
HEPA
除湿机。
重新安装后盖,先将后盖的下半部
分按入产品
方向轻推后盖
安装滤网后,彻底洗净双手。
c)。
滤网和预滤网
d)。
滤网的所有包装材料
e)。
滤网放入除湿机,然后进
f)。
滤网和预滤网正确装入
(1)
。然后,朝产品机身
(2)
(图
g)。
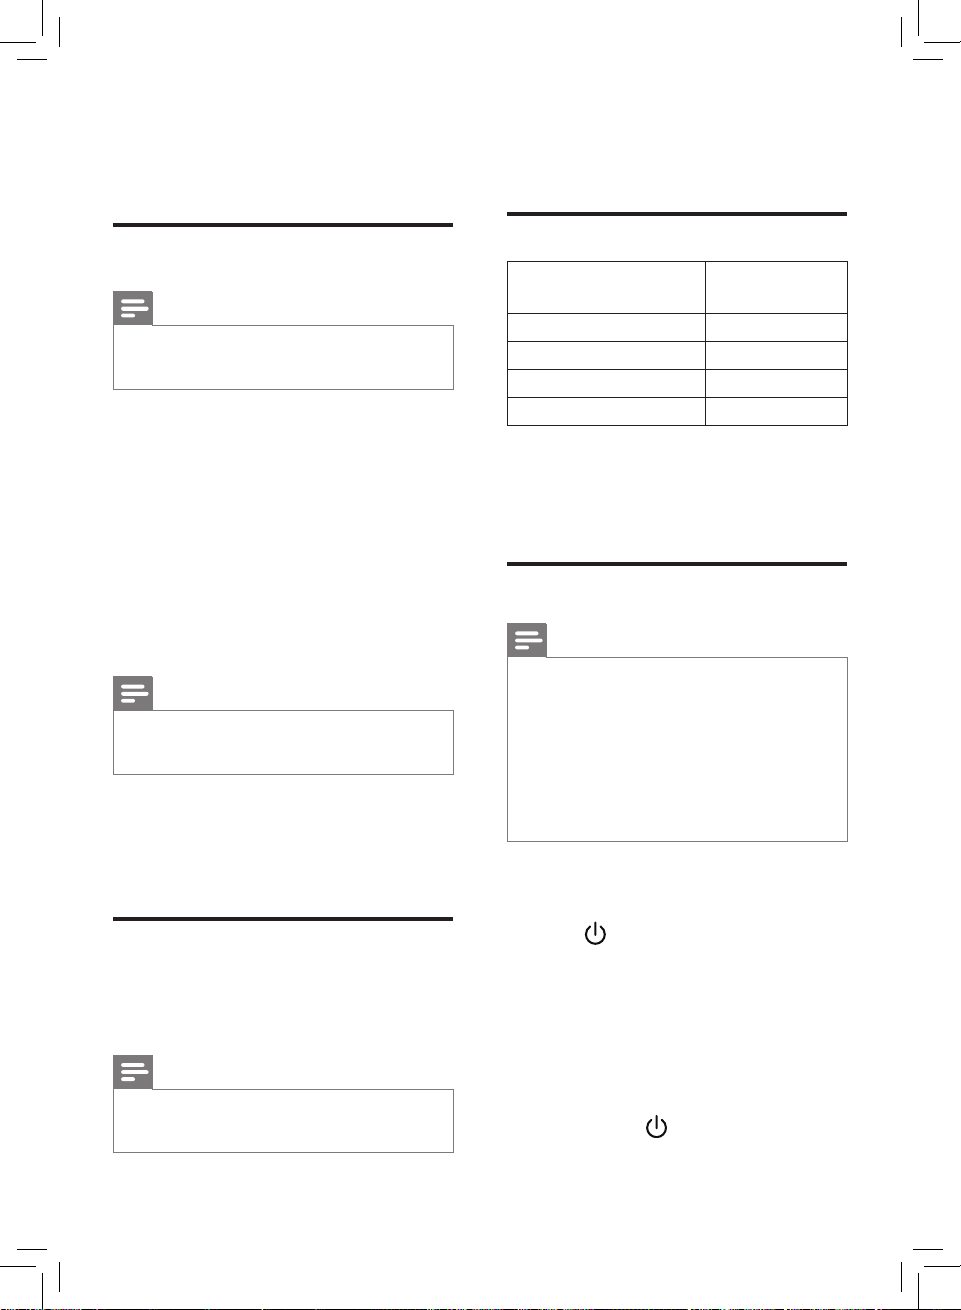
空气质量指示灯
空气质量指示灯的
颜色
蓝色 良好
蓝紫色 一般
紫红色 不健康
红色 非常不健康
产品打开后,空气质量指示灯会自动亮
起,并按顺序亮起所有颜色。片刻后,
空气质量传感器将选择与环境空气悬浮
颗粒质量相对应的颜色。
空气质量级别
打开和关闭
注意
• 为了达到较好除湿效果,请关闭
门窗。
• 使窗帘远离进风口或出风口。
• 为了达到较好除湿效果,请将除湿
机放在平稳的表面。
• 开启除湿机之前,请检查电源电压
是否与印在除湿机上的电压匹配。
1
将除湿机的插头插入墙面插座。
» 除湿机会发出蜂鸣音。
放置除湿机
为了提高除湿效率,请将除湿机放在可
抽取大部分空气的位置。
注意
• 除湿机运行时,请勿打开外面的
门窗。
24
2
3
轻触
(图
» 屏幕将显示当前湿度级别。
» 测量空气质量片刻后,空气质
轻触并按住
按钮一次打开设备
h)。
量传感器会自动选择空气质量
指示灯的颜色。
» 除湿机进入组合自动模式。
3
秒将产品关闭。
Page 27
ZH-S
简体中文
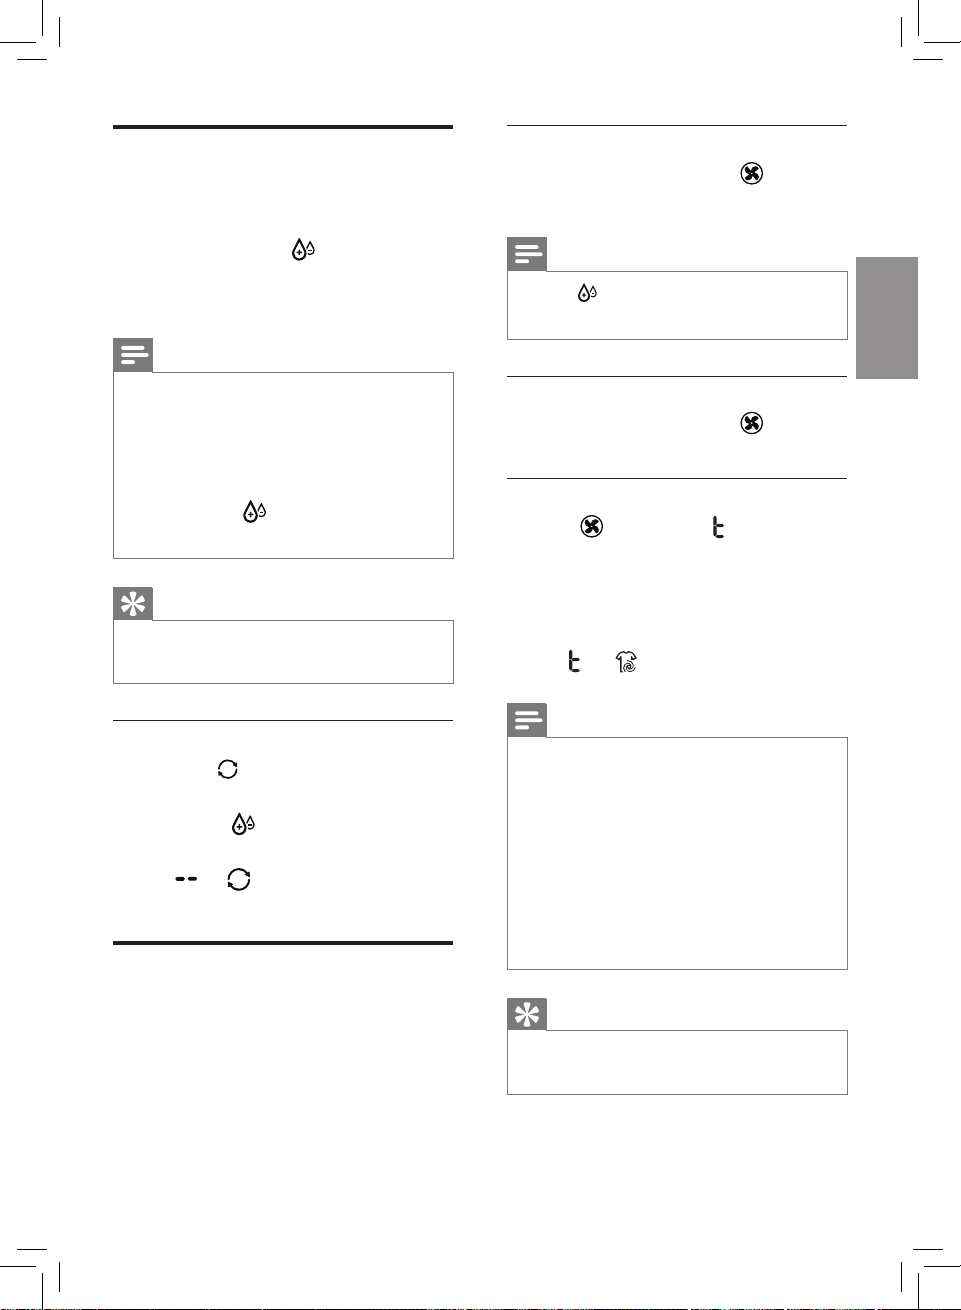
设置湿度级别
本产品可将所要的湿度级别设置为
40
1
50
%
、
一次或多次轻触
要的湿度级别,湿度指示灯将亮起
(图
注意
• 当湿度降低至所需级别,除湿机会
自动停止对空气除湿,但风扇会继
续工作。
• 如果不设置湿度级别,默认湿度计
60%
为
• 您可以轻触
显示当前环境温度。
提示
• 舒适湿度介于
之间。
%
、
i)。
。
60
70
%
% 或 80%
、
按钮来设置所
按钮并保持5 秒来
40RH%到 60RH%
。
自动
选择自
选择所
• 反复轻触风速设定按钮
动模式(图
注意
• 按下
设置。
k)。
按钮可手动调整湿度
手动
• 反复轻触风速设定按钮
需的风速(图
l)。
干衣模式
• 轻触
按钮,直至
可选择干衣模式(图
» 除湿机进入干衣模式。
» 除湿机将以最高风扇速度
运转。
和
»
将在屏幕上显示。
显示,这样
m)。
持续除湿模式
在持续除湿
除湿设置连续工作。
1
反复轻触
模式。
» 和
(图
模式下,产品将以较好
按钮选择持续除湿
将在屏幕上显示
j)。
更改风扇速度
本产品可以选择您所要的风扇速度
(自动、
模式。
1、2、3 和 4
),或干衣
注意
• 请勿让除湿机的气流长时间正对着
身体,尤其是无法调节湿度的人。
• 使用除湿机吹干衣物时,请将衣服
挂在远处,使水滴不会滴到除湿机
上。
• 确保衣物不会挡住进风口和
出风口。
• 确保在安全的地方吹干衣物,防止
水滴阻塞进风口和出风口。
提示
• 调整放气窗,直至气流直接对准衣
物,以便更有效地吹干衣物。
25
Page 28
ZH-S
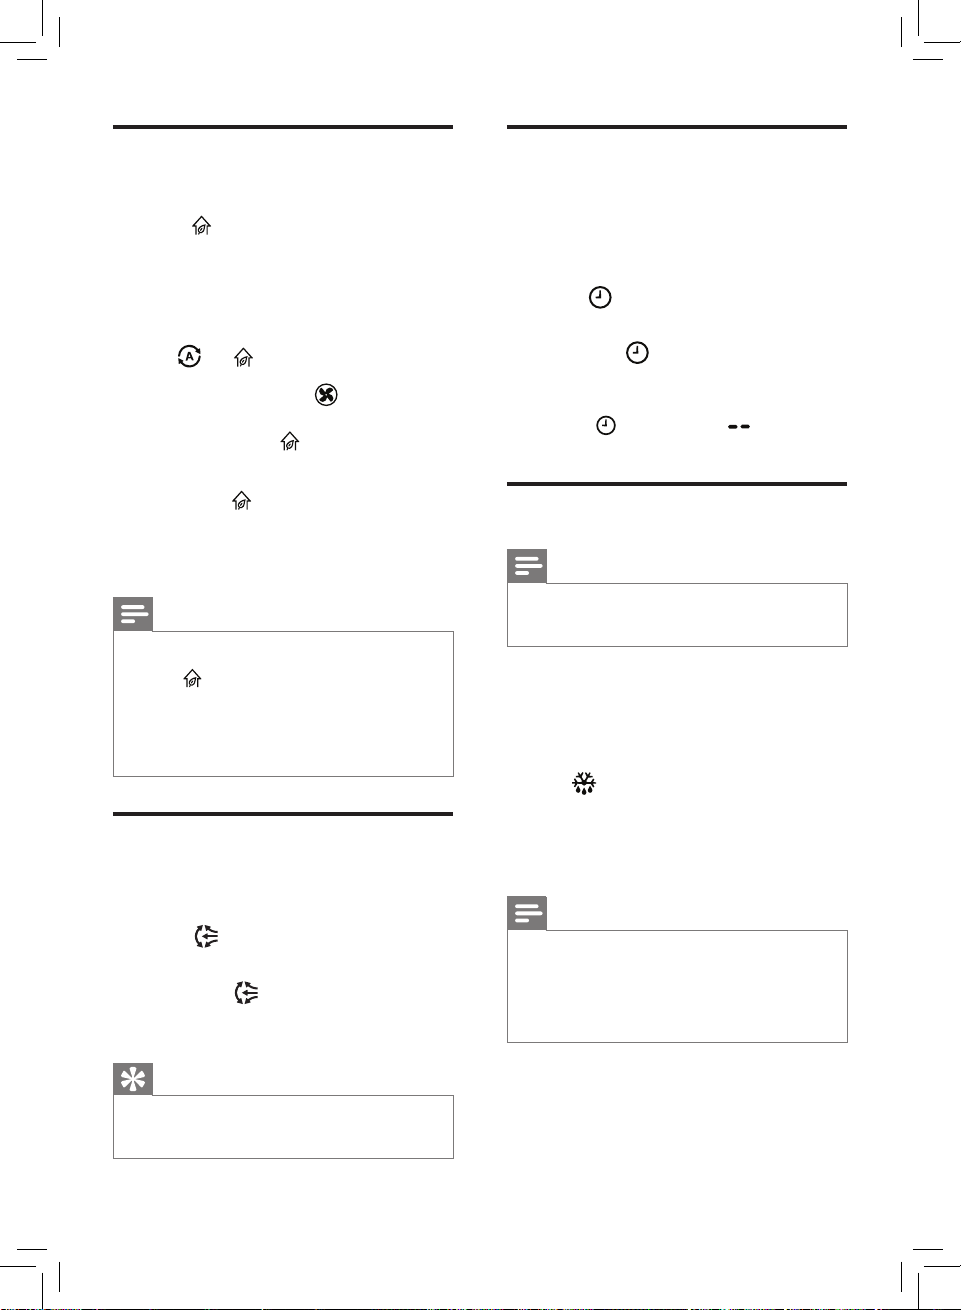
使用纯净化模式
设置定时器
本产品可在纯净化模式下使用。
1
轻触
(图
» 除湿机停止对空气除湿。
2
轻触风速设定按钮
风扇速度(图
3
再次轻触
模式。
• 当产品在任何非净化模式工作时,
轻触
模式。
• 湿度设置和干衣模式将在纯净化模
式下关闭。
按钮进入纯净化模式
n)。
» 默认情况下,产品将在自动模
式下运行。
和
»
» 风扇速度和
显示。
» 除湿机进入组合自动模式。
注意
将在屏幕上显示。
o)。
将在屏幕上
按钮退出纯净化
按钮即可使其进入纯净化
选择所要的
使用摆风功能
出风口摆风可以最高
摆风功能调整气流方向。
1
2
轻触
(图
p)。
再次轻触
功能。
按钮可启动摆风功能
90
度摇摆。使用
按钮可停用摆风
使用定时器功能,您可设定除湿机运行
的小时数。到达设置的时间后,除湿机
会自动停止对空气除湿,但保持开机状
态。定时器的设置范围为
1
2
轻触
(图
反复轻触
运行的小时数(图
• 要停用定时器功能,请反复轻
按钮启用定时器功能
q)。
按钮可选择要除湿机
触
按钮,直至
显示。
1 至 9
r)。
小时。
在屏幕上
除湿机除霜
注意
• 只有在除湿机在除湿模式下运行
时,除霜功能才会启用。
除湿机配有除霜传感器,可确保其在寒
冷天气中使用时处于较好状态。除湿机
可自动检测是否需要除霜。
需要除霜时:
»
指示灯亮起(图
» 除霜功能将开始启动,并一直
持续,直至除湿机彻底除霜完
成。
注意
• 除霜期间,除湿机将以干衣模式
运行。
• 除霜完成后,除湿机将恢复运行,
并以先前的设置运行。
s)。
提示
• 产品开启后,将摆叶向上可提高除
湿效率。
26
Page 29
ZH-S
简体中文
设置儿童锁
5
排空除湿机
1
轻触并按住儿童锁按钮
激活儿童锁(图 t)。
» “L”将在屏幕上显示
3
秒钟。
» 打开儿童锁时,其他所有按钮
均将没有反应。
2
再次轻触并按住儿童锁按钮
3
秒可停用儿童锁(图
» “UL”将在屏幕上显示
3
秒钟。
3
u)。
秒可
使用灯光开/关功能
借助灯光开/关按钮,您可以打开或关
闭空气质量指示灯、显示屏和功能指示
灯(如果需要)。
1
轻触灯光开/关按钮
质量指示灯将熄灭。
2
再次轻触灯光开/关按钮
屏将变暗。
3
第三次轻触灯光开/关按钮 ,所
有指示灯都将重新亮起。
一次,空气
,显示
倒空水箱
水箱已满时:
» 产品发出蜂鸣声,
点亮。
» 产品自动进入纯净化模式。
1
将手指放在除湿机侧面的凹陷处,
轻轻拉出水箱。握住水箱两侧,将
其从除湿机上取下(图
2
将水倒入水槽(图
3
用干净的布将水箱外侧擦干
(图
x)。
4
将水箱放回除湿机(图
注意
• 倒空水箱后,除湿机会继续工作。
w)。
指示灯
v)。
y)。
使用连续排水口
除湿机也可以通过安装软管排出过多的
水。这样您无需倒空水箱,就能操作
除湿机。
1
关闭空气除湿机,从墙面插座上拔
下插头。
2
打开排水孔的保护盖(图
3
从除湿机中取出水箱(图
4
将飞利浦提供的软管插入排水孔
(图
{)。
5
向右按下排水口的保护盖将其打开
(图
|)。
6
将软管连接至排水口(图
7
将水箱放回除湿机(图
y)。
z)。
v)。
})。
27
Page 30
ZH-S
注意
• 即使使用连续排水,也请将水箱放
回除湿机,否则除湿机可能无法正
常运行。
• 确保软管安装牢固,以使除湿机不
会漏水。
• 使用连续排水时,要确保将软管放
平,不打结。
• 确保软管未浸入水中,也不要高于
连续排水口。
• 将软管的出口放在可方便排水的
地方。
• 连续排水或长时间无人看管时,请
每周检查一次除湿机。
6
清洁
注意
• 清洁前,请务必关闭产品,并从电
源插座上拔下产品的插头。
• 切勿将本产品浸入水中或任何其它
液体中。
• 切勿使用研磨性或腐蚀性的清洁剂
(例如漂白剂或酒精)清洁本产品
的任何部件。
• 只有预过滤网可以用水清洗。空气
净化滤网不可水洗。
• 请勿尝试用吸尘器清洁滤网或空气
质量传感器。
清洁除湿机的机身
定期清洁空气除湿机的内侧和外侧,以
防止灰尘积聚。
1
使用柔软的干布清洁产品的内部和
外部。
2
出风口也可用柔软的干布进行
清洁。
28
清洁水箱
每天清洁水箱,使其保持洁净。
1
关闭除湿机,从电源插座上拔下
插头。
2
从除湿机中取出水箱(图
3
向水箱中注入三分之一的水
(图
~)。
4
向水箱里的水中添加一些温和的
洗涤剂。
5
使用自来水清洗水箱,并用干净的
软布对其内部进行清洁(图
v)。
)。
Page 31
ZH-S
简体中文
6
用干净的布将水箱外侧擦干
(图
x)。
7
将水箱放回除湿机(图
y)。
清洁预过滤网
)。
F0 和
c)。
时,清洁
当屏幕上显示
预滤网。
注意
• 预滤网可水洗,也可用吸尘器
清洁。
1
关闭除湿机,从电源插座上拔下
插头。
2
按住除湿机,将后盖的顶部朝自己
的方向拉(图
3
从产品中卸下预滤网(图
4
如果很脏,请使用软刷清除上面的
灰尘。使用自来水冲洗预滤网
(图
5
待预滤网完全晾干后,再将其装回
除湿机。
注意
• 要优化预滤网的使用寿命,请确保
清洁后将其完全晾干。
• 拆装滤网后,请清洗双手。
€)。
清洁空气质量传感器
2
每
个月清洁一次空气质量传感器,
确保除湿机处于较好的功能状态。
注意
• 如果室内的湿度非常高,则空气质
量传感器上可能会形成冷凝水,即
使空气质量确实很好,空气质量指
示灯也可能会指示空气质量较差。
如出现此情况,请清洁空气质量传
感器,或以手动速度设置使用除湿
机。
• 如果在多尘环境中使用除湿机,则
可能需要更频繁地进行清洁。
1
关闭除湿机,从墙面插座上拔下
插头。
2
使用软毛刷清洁空气质量传感器进
风口和出风口(图
3
卸下空气质量感应器的保护盖
(图
„)。
4
使用湿棉签清洁空气质量传感器、
进风口和出风口(图
5
使用干棉签彻底擦干所有部件。
6
重新装上空气质量感应器的保护盖
(图
†)。
ƒ)。
…)。
6
将预过滤网放回产品内部
(图
‚)。
7
重新安装前面板,先将后面板的下
半部分按入产品
机身方向轻推面板
8
将除湿机的插头插入墙面插座。
9
轻触并按住重置按钮
置预滤网。
10
清洁滤网后,彻底清洗双手。
(1)
。然后,朝产品
(2)
(图
3
g)。
秒,重
29
Page 32
ZH-S
7
更换
HEPA
这款除湿机配有滤网更换指示灯,用于
确保在除湿机运行时,空气滤网处于较
好工作状态。当
时,屏幕上会显示
醒 。
14
如果
机将停止运行并自动锁定。您需要立即
更换滤网。
更换
天内未更换
HEPA
注意
HEPA
滤网
滤网更换指示灯
HEPA
滤网需要更换
HEPA
HEPA
滤网更换提
滤网,除湿
滤网
4
将新的
(图
5
将除湿机的插头插入墙面插座。
6
轻触并按住重置按钮
置过滤网使用寿命计数器。
7
更换
手。
HEPA
ˆ)。
HEPA
滤网放入产品中
滤网后,彻底清洗双
3
秒可重
HEPA
•
• 在更换
• 请勿使用吸尘器清洁
当屏幕上显示
HEPA
1
2
• 请勿接触
3
滤网不可水洗,也不可重复
使用。
HEPA
闭除湿机并从电源插座上拔下
插头。
滤网。
关闭除湿机,从墙面插座上拔下
插头。
根据屏幕上显示的滤网提示灯状
态,取出用过的
用过的滤网(图
注意
闻嗅滤网,因为它们收集了空气中
的污染物。
拆除新
料(图
滤网之前,请务必关
A3 和
HEPA
‡)。
HEPA
HEPA
e)。
滤网的褶皱面,或
滤网上的所有包装材
HEPA
时,请更换
滤网。丢弃
滤网。
30
Page 33

ZH-S
简体中文
8
存放
1
关闭空气除湿机,从墙面插座上拔
下插头。
2
清洁除湿机、空气质量传感器,倒
空水箱,并清洗预滤网(请见“清
洁”一章)。
3
待所有部件完全晾干后再进行存
放。
4
将滤网和预过滤网分别装入密封的
塑料袋中。
5
将除湿机、滤网和预滤网放在阴凉
干燥的地方。
6
拆装滤网后,务必彻底洗净双手。
31
Page 34
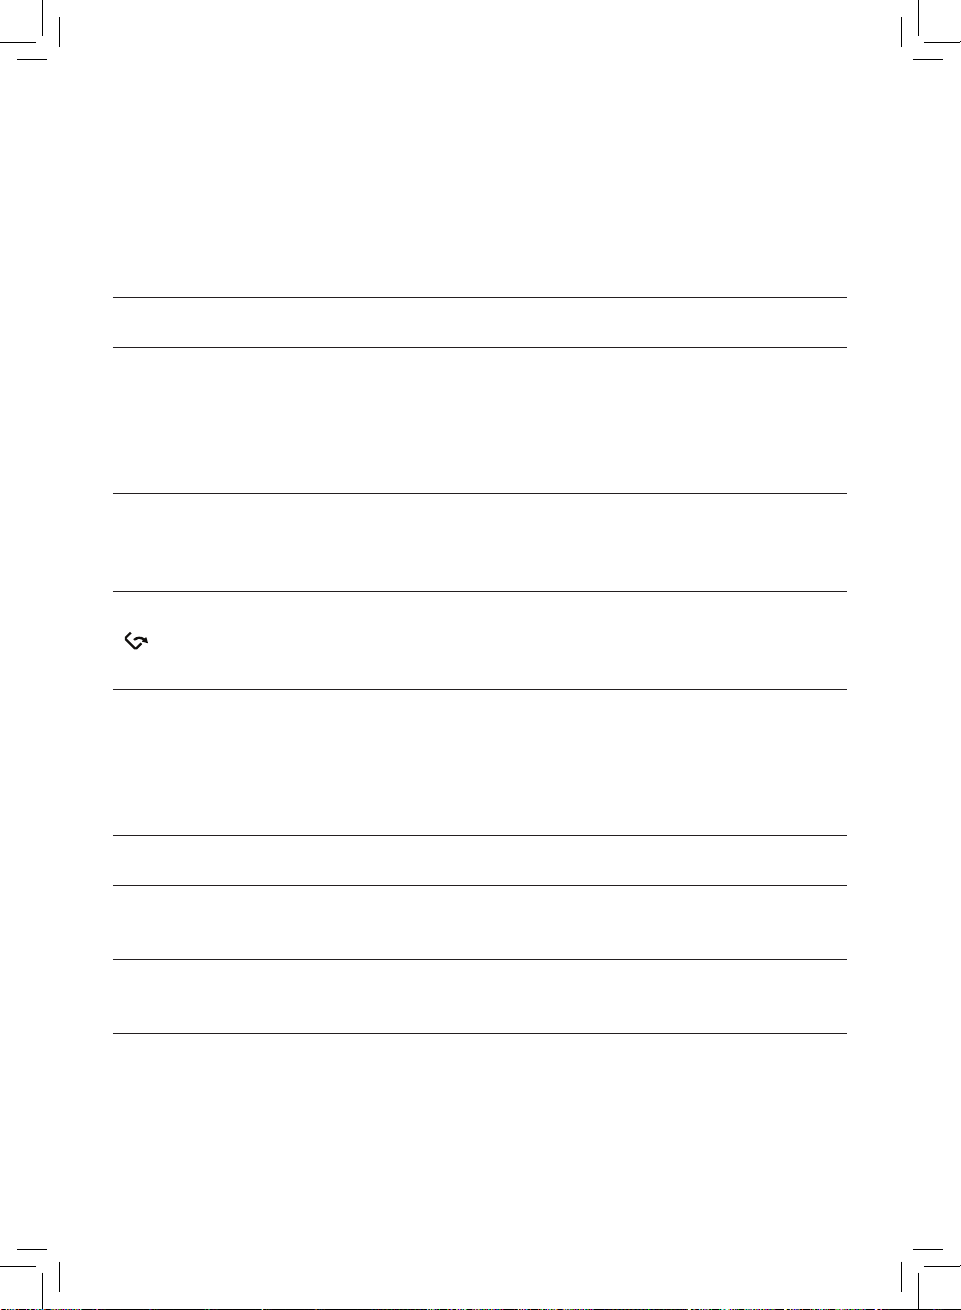
ZH-S
9
故障种类和处理方法
本章归纳了您在使用除湿机时最常遇到的问题。如果根据以下信息无法解决问题,
www.philips.com/support
请访问
帮助。
问题 可能的解决方法
或联系您所在国家/地区的客户服务中心寻求
即使将本产品的插
头插入墙面插座并
开机,产品仍然不
运行。
除湿机即使已开启
也无法运行。
水箱已空,但是
指示灯仍然
亮起。
房间内无空气除湿
机,或者除湿效果
很差。
除湿机漏水。 • 确保除湿机状态良好,水箱未破裂。
除湿机无法采集
水分。
• 定时器已设置为特定时间间隔。重置或关闭定时器。
• 尝试使用其他电源插座或检查墙壁开关。
• 确保水箱已倒空并正确放置于除湿机中。
• 滤网警报状态显示滤网代码。更换相应的滤网并重置滤
网使用寿命计数器(请参阅“更换滤网”一章)。
• 滤网更换指示灯持续亮起,而您还没有更换相应的滤
网,产品现在已锁定。在此情况下,更换过滤网并重置
过滤网使用寿命计数器。
• 将水箱从除湿机中取出,然后重新放回除湿机。
• 确保滤网洁净且状态良好。
• 确保进风口和出风口未被堵塞。
• 室内湿度低于除湿机所设置的湿度。选择更低的湿度。
• 确保未打开外面的门窗。
• 房间里当前温度较低。请重试,直至温度上升。
• 湿度过低。湿度增加后,除湿机将自动恢复工作。
• 温度过低。等到温度上升。
出风口排出的气流
比之前明显减弱。
32
• 预过滤网变脏。
清洁预过滤网(请参阅“清洁”一章)。
Page 35
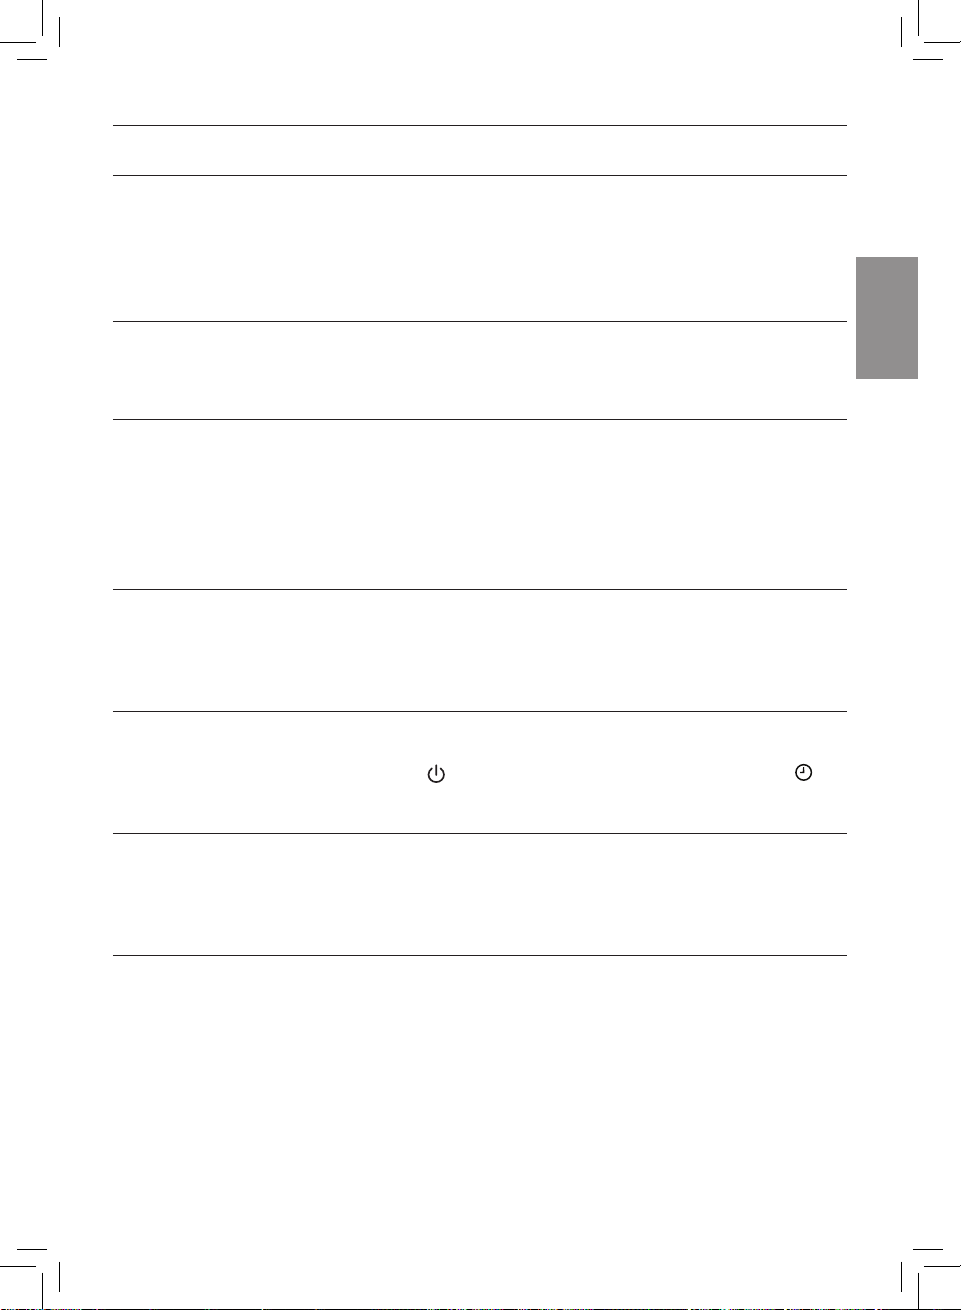
ZH-S
简体中文
问题 可能的解决方法
即使在产品已经运
行很长时间以后,
空气质量也未见显
著改善。
空气质量指示灯的
颜色始终保持
不变。
除湿机产生难闻的
气味。
除湿机声音很响。
我已经更换了滤
网,但是除湿机
还是指出需要更换
滤网。
• 某一过滤网可能没有放在产品内部。确保按以下顺序正
);
2)
预滤网。
确安装所有滤网,先从最里面的滤网开始:
1)
纳米级劲护滤网
-HEPA S1
型(
FY1119
• 空气质量感应器湿了。确保空气质量传感器清洁干燥
(请参阅“清洁”一章)。
• 空气质量感应器变脏。清洁空气质量传感器
(请参阅“清洁”一章)。
• 前几次使用除湿机时,它可能会产生塑料味。这是正常
的。当滤网很脏时,除湿机也可能会发出难闻的气味。
在此情况下,请清洁或更换相应的滤网。
• 如果除湿机发出烧焦的气味,请关机并从电源插座上拔
下插头。请与您所在国家/地区的客户服务中心联系,
以取得帮助。
• 如果除湿机声音过大,请将风扇速度更改为较低的风扇
速度级别。夜间在卧室里使用本产品时,请选择较低的
风扇速度。
• 确保将除湿机置于水平、稳固的表面上。
• 可能是您未重置滤网使用寿命计数器。插入除湿机插
头,轻触
3
秒钟。
打开除湿机,然后轻触并按住重置按钮
屏幕上显示错误代
码 “E1”、“E2”、
“E3”、“E4” 或
“E5”。
• 除湿机出现故障。请与您所在国家/地区的客户服务中心
联系。
33
Page 36
ZH-S
10
保修与服务
如果您需要了解信息或有任何疑问,请
访问飞利浦网站
联系您所在国家/地区的飞利浦客户服
务中心(可在全球保修卡中找到飞利浦
客户服务中心的电话号码)。如果您所
在的国家/地区没有飞利浦客户服务中
心,请向当地的飞利浦经销商求助。
www.philips.com
或
11
声明
电磁场
本飞利浦产品符合所有有关暴露于电磁
场的适用标准和法规。
符合
(EMF)
EMF
标准
订购部件或附件
如果您必须更换部件或需要购买额外的
部件,请转到您的飞利浦经销商或访问
www.philips.com/support
如果获取部件有问题,请与您所在国
家/地区的飞利浦客户服务中心联系
(可在全球保修卡中找到其电话号码)
。
Koninklijke Philips N.V.
消费者制造和销售各类产品,包括通
常能发射和接收电磁信号的各种电子
设备。
飞利浦的主要经营原则之一就是要对我
们的产品采取各种必要的健康和安全措
施,符合所有相应的法律要求,并在生
产产品时严格遵照
飞利浦致力于开发、生产和销售对人体
健康无任何危害的产品。飞利浦确认,
据目前的科学证明,如果其产品使用得
当,则对人体毫无危害。
长期以来,
和安全标准的制定工作中扮演着积极的
角色,这就使
发展趋势,并率先应用到其产品中去。
Philips
Philips
主要面向广大
EMF
标准。
始终在国际
总能预知标准的
回收
弃置产品时,请不要将它与一般生活垃
圾一同丢弃,应将其交给官方指定的回
收中心。这样做有利于环保。
请遵循您所在国家/地区的电器及电子
产品分类回收规定。 正确弃置产品有
助于避免对环境和人类健康造成负面
影响。
EMF
34
Page 37
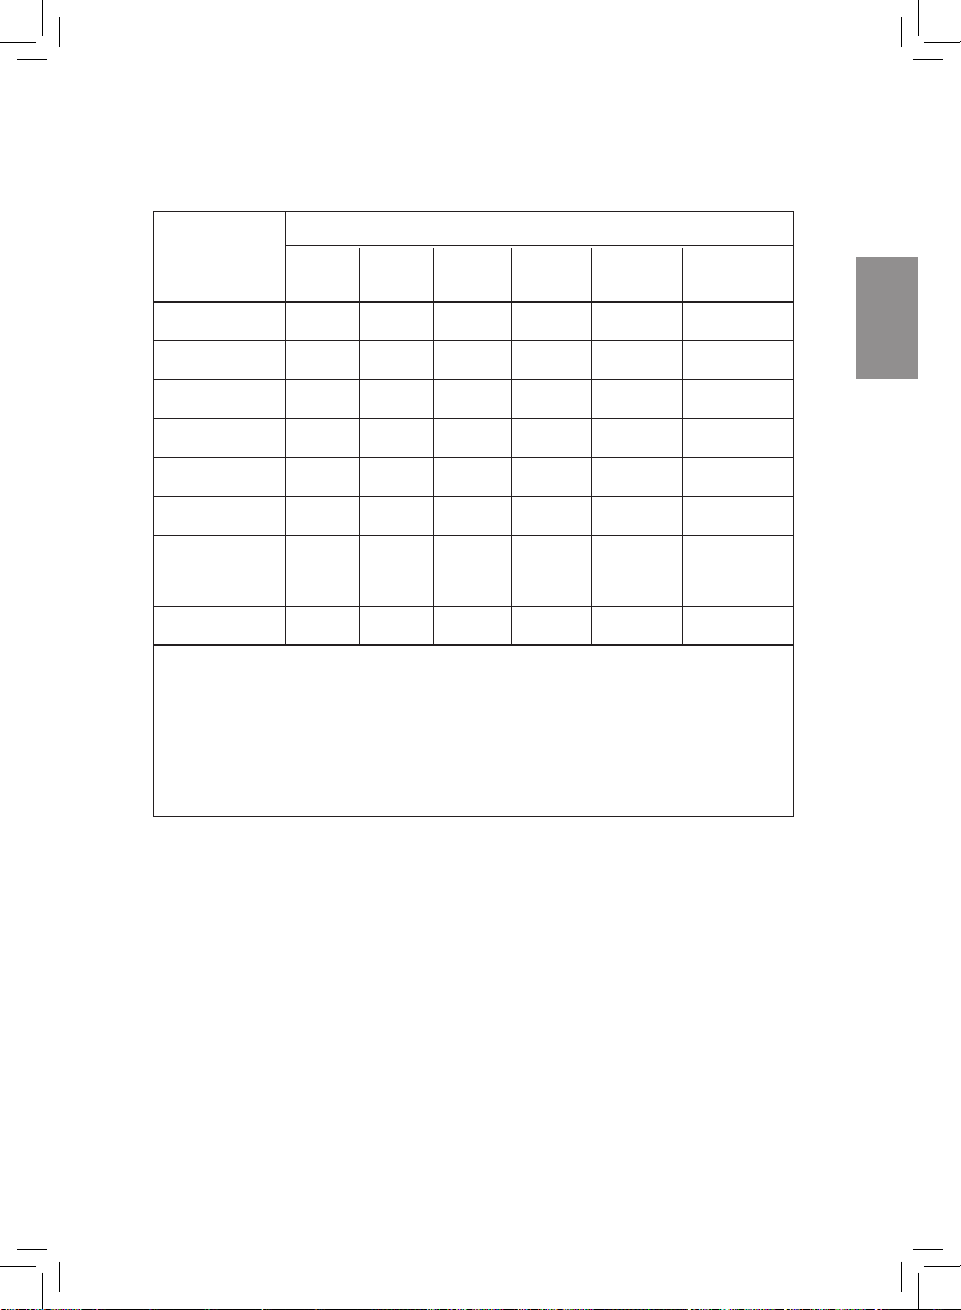
ZH-S
简体中文
部件名称
产品中有害物质的名称及含量
有害物质
铅(Pb) 汞(Hg) 镉(Cd)
六价铬
(Cr(VI))
多溴联苯
(PBB)
多溴二苯醚
(PBDE)
风扇马达
摆风马达
压缩机
电源线
电源PCBA板
控制PCBA板
× ○
×
×
○
○ ○
○
○
× ○ ○ ○ ○ ○
× ○ ○ ○ ○ ○
× ○ ○ ○ ○ ○
○
○
○
○
○
○
○
○
○
温湿度感应
PCBA板
温度传感器
× ○ ○ ○ ○ ○
× ○ ○ ○ ○ ○
本表格依据SJ/T 11364的规定编制。
○
表示该有害物质在该部件所有均质材料中的含量均在
GB/T 26572规定的限量要求以下。
×
表示该有害物质至少在该部件的某一均质材料中的含量超出
GB/T 26572规定的限量要求。
*
该表格中所显示的“有害物质”在产品正常使用情况下不会对人身和环境产生
任何伤害。
*
该表格中所显示的“有害物质”及其存在的部件向消费者和回收处理从业者提
供相关物质的存在信息,有助于产品废弃时的妥善处理。
35
Page 38

产品保用卡
- 此证须联同发票正本使用方
为有效。
- 以下情况将不能获得免费
服务。
1 使用不当引起的人为损坏,
例如接入不适当电源、使用
不适当配件、不适当之安
装、不依说明书使用、错误
使用或疏忽而造成损坏等。
因运输及其他意外而造成之
损坏。非经本公司认可之维
修和改装。其他因不可抗力
(如自然灾害、电压异常
等)造成的损坏。
2 一般家庭以外使用(如工业、
商业用)而造成的损坏。
3 正常使用引起的产品老化、
磨损等,但不影响产品的正
常使用。
- 保修证作为在规定期限及条
件之内进行免费维修的保
证,并不限制消费者的法定
权利。
- 飞利浦提供2年全球联保服
务,在产品由飞利浦正式销
售的所有国家中,都提供保
修和保修期满的维修服务。
要求保修时,您需提供发票
正本,且请求保修的日期还
在保修期限之内。
服务须知
需要此产品的售后服务,拨打
服务热线:4008 800 008
在维修服务过程中有任何意
见,欢迎致函飞利浦(中国)
投资有限公司解决疑难。
飞利浦(中国)投资有限公
司上海市静安区灵石路718
号A1幢
保修及服务:
此产品是一件设计精良,
用高品质元件制造之家用电
器,在正常使用及保养下应能
发挥其优越性能。在购买日期
后二年内,若发生任何因制造
工艺或元器件造成之损坏,
飞利浦中国维修服务中心将为
持证用户提供免费门市维修服
务,视情况更换零件或整个产
品。无论在保期中或保期后,
只要飞利浦正式行销该产品的
任何国家皆可获得维修服务。
若飞利浦在当地无行销该项产
品,飞利浦同样提供维修服务,
但可能因未储备所需零件,维修
时间可能较长,敬请见谅。请联
络当地飞利浦经销商,或飞利浦
服务部门。若您需洽询相关资
讯,或遇困难事项时,请联络
当地飞利浦维修服务中心,
或向飞利浦服务热线咨询。
中国顾客服务热线:
4008 800 008 (用户需承
担本地通话费)。
网址:www.philips.com.cn
网上会员注册与产品注册:
1
登陆 www.philips.com.cn/
welcome
2 点击“创建新账户”,
创建您的飞利浦账号
3 点击“注册产品”,
通过产品名称或产品型号查
找产品,完成产品注册
保修条例:
- 在购买日期后二年内,凡经
本公司特约维修站人员确认
为正常使用情况下,因制造
工艺或元器件造成之损坏,
您都将获得免费保修服务。
- 此免费服务不包括需时常更
换的易耗零配件(吸尘机纸
袋,布袋,空气清新机滤
网,滤芯,活性碳,咖啡壶
过滤网)及附件(如须刀网
膜、刀头,咖啡杯,食品加
工机杯/刀具等),辅助装
置,运输费及维修人员上门
服务费。
- 用户请保留此联。
- 此证若经涂改即作废。
Page 39

- 此证须联同发票正本使用方
为有效。
- 以下情况将不能获得免费
服务。
1 使用不当引起的人为损坏,
例如接入不适当电源、使用
不适当配件、不适当之安
装、不依说明书使用、错误
使用或疏忽而造成损坏等。
因运输及其他意外而造成之
损坏。非经本公司认可之维
修和改装。其他因不可抗力
(如自然灾害、电压异常
等)造成的损坏。
2 一般家庭以外使用(如工业、
商业用)而造成的损坏。
3 正常使用引起的产品老化、
磨损等,但不影响产品的正
常使用。
- 保修证作为在规定期限及条
件之内进行免费维修的保
证,并不限制消费者的法定
权利。
- 飞利浦提供2年全球联保服
务,在产品由飞利浦正式销
售的所有国家中,都提供保
修和保修期满的维修服务。
要求保修时,您需提供发票
正本,且请求保修的日期还
在保修期限之内。
服务须知
需要此产品的售后服务,拨打
服务热线:4008 800 008
在维修服务过程中有任何意
见,欢迎致函飞利浦(中国)
投资有限公司解决疑难。
飞利浦(中国)投资有限公
司上海市静安区灵石路718
号A1幢
Page 40
产品 :飞利浦空气除湿净化一体机
型号 :DE5205
额定电压 :220V~
额定频率 :50Hz
额定消耗功率:260 W (27℃ RH60%)
最大输入功率:355 W (35℃ RH90%)
生产日期 :请见产品本体
产地 :中国广东深圳
技能种类 :B
额定除湿能力:12.5L/日(27℃ RH60%)
最大除湿能力:25L/日(35℃ RH90%)
冷媒填充量 :R134a/155g
工作压力(制冷回路) :吸气0.33/排气1.26MPa
最大工作压力(热交换器):
高压侧最大允许工作压力:1.6MPa
低压侧最大允许工作压力:0.4MPa
吸排气侧允许工作过压 :0.5MPa/1.8MPa
额定电流 :1.23A(27℃ RH60%)
机体外观尺寸:宽343*高617*深318(mm)
制品净重 :14kg
适用室温 :5℃~35℃
水箱容量 :4L
飞利浦(中国)投资有限公司
上海市静安区灵石路 718 号 A1 幢
全国顾客服务热线:4008 800 008
本产品根据国标 GB4706.1-2005,
GB4706.32-2012,GB4706.45-2008,
GB4343.1-2009 及 GB17625.1-2012 制造
产品空气净化性能指标
目标污染物 洁净空气量 (CADR) 累计净化量(CCM) 净化能效等级
颗粒物 高效级
甲 醛
甲 苯
噪声( 声功率级) 适用面积*
*适用面积是按照国标GB/T18801-2015根据颗粒物洁净空气量计算得出
以上性能指标数据是在第三方试验室按照国标GB/T18801-2015,以特定
的烟尘颗粒物或气态污染物为目标污染物测试得出
220 m3/h P1
59 dB (A)
----
--
--
----
15 - 26 m
2
保留备用
出版日期:
2020-06-01
Page 41
产品 :飞利浦空气除湿净化一体机
型号 :DE5206
额定电压 :220V~
额定频率 :50Hz
额定消耗功率:260 W (27℃ RH60%)
最大输入功率:355 W (35℃ RH90%)
生产日期 :请见产品本体
产地 :中国广东深圳
技能种类 :B
额定除湿能力:12.5L/日(27℃ RH60%)
最大除湿能力:25L/日(35℃ RH90%)
冷媒填充量 :R134a/155g
工作压力(制冷回路) :吸气0.33/排气1.26MPa
最大工作压力(热交换器):
高压侧最大允许工作压力:1.6MPa
低压侧最大允许工作压力:0.4MPa
吸排气侧允许工作过压 :0.5MPa/1.8MPa
额定电流 :1.23A(27℃ RH60%)
机体外观尺寸:宽343*高617*深318(mm)
制品净重 :14kg
适用室温 :5℃~35℃
水箱容量 :4L
飞利浦(中国)投资有限公司
上海市静安区灵石路 718 号 A1 幢
全国顾客服务热线:4008 800 008
本产品根据国标 GB4706.1-2005,
GB4706.32-2012,GB4706.45-2008,
GB4343.1-2009 及 GB17625.1-2012 制造
产品空气净化性能指标
目标污染物 洁净空气量 (CADR) 累计净化量(CCM) 净化能效等级
颗粒物 高效级
甲 醛
甲 苯
噪声( 声功率级) 适用面积*
*适用面积是按照国标GB/T18801-2015根据颗粒物洁净空气量计算得出
以上性能指标数据是在第三方试验室按照国标GB/T18801-2015,以特定
的烟尘颗粒物或气态污染物为目标污染物测试得出
220 m3/h P1
59 dB (A)
----
--
--
----
15 - 26 m
2
能源效率标识见机身能效标识。
Page 42

 Loading...