


EasyKey
7000 series
Smart
Video Door Lock
DDL702
User
manual
To register your produc t(s)
and get suppor t from below
site
www. philip s.com/support


Contents
1. Important information 02
Security
Caution
Disposal of used products
and batteries
2. EasyKey installation 03
Packaging list
Exploded views
Pre-installation instructions
Installation steps
3. Get to know your
08
EasyKey
Outside escutcheon
Inside escutcheon
4. How to set up your
09
Easykey
Pre-setup instructions
Enter master mode
Change master PIN code
Add a new user
Delete a user record
System settings
Extended functions
System query
Shortcut keys
App pairing guide
6. Other functions 18
Indoor infrared sensor unlock
Outside forced lock
Mute mode
Restore to default settings
Doorbell
Two-way video intercom
7. Indicators meaning
21
and usage
Door lock status indicator
Low battery voltage indicator
Outside forced lock indicator
Mute indicator
Inside deadlock indicator
System freezing indicator
[OPEN/CLOSE] indicator
Indoor infrared sensor unlock
indicator
8. Troubleshooting 23
Alert types and methods
How to charge EasyKey in an
emergency
How to replace batteries
How to charge lithium battery
5. How to use EasyKey 16
Unlock from outside or inside
Lock from outside or inside
Inside deadlock
Unlock with mechanical key
1

1. Important information
Safety
Before using Philips EasyKey, please read
◆
and understand all instructions. Damage
caused by non-compliance with the
instructions will not be covered by warranty.
Use only the manufacturer-specied
◆
accessories/components.
Use only the alkaline batteries the
◆
product is equipped with, or use the same
specication type of alkaline batteries.
Do not forcibly disassemble this product
◆
to avoid triggering an alarm or damaging the
product.
Do not scrape the ngerprint sensor
◆
with sharp objects, otherwise it may cause
permanent damage.
Do not expose products to environments
◆
where there is water leakage or splashing.
Do not expose the product to corrosive
◆
substances to prevent damaging the
protective cover.
Do not hang objects on the handle, in
◆
case it might aect the normal use of the
lock.
Please clean the product with a soft cloth.
◆
Do not remove the battery during
◆
setting up and operating.
Please let a professional technician
◆
to install the door lock and follow the
installation guidelines provided. Do not
disassemble the lock by yourself. Keep the
relevant sealed stickers properly.
Please modify the default master PIN
◆
code immediately after nishing installing
and debugging, and do not easily disclose
the password information and also keep the
mechanical key properly.
Please replace all the batteries
◆
immediately if there is a low battery alarm.
Please make sure to correctly match the
poles (+/-) when installing the batteries.
Caution
Do not place the battery near re sources
◆
to avoid the explosion.
Do not use any emergency power supply
◆
that does not meet the safety requirements
to power up the product.
Do not connect the 2 poles of the
◆
batteries with metals to avoid short circuit
which may lead to an explosion.
Please make sure any component
◆
replacement is executed by Philips, Philips
authorized service center or professional
technicians.
Do not use accessories or parts that have
◆
been produced by other manufacturers or
have not been specically recommended
by Philips. The use of such accessories and
parts may void your warranty.
Disposal of used
products and batteries
You can have your locks reclaimed at
◆
Philips authorized service centers. You will
receive corresponding compensation if your
products meet our conditions.
Please familiarize yourself with the local
◆
electronic product collection system.
Please follow local regulations and do
◆
not discard used products into ordinary
household waste.
Proper disposal of used products can
◆
help to avoid potential negative impacts on
the environment and human health.
Batteries must not be disposed of with
◆
ordinary household waste.
Please familiarize yourself with the
◆
local regulations on batteries classication
recycling. Disposing of batteries properly
can help avoid a negative impact on the
environment and human health.
2

2. EasyKey installation
Packaging list
The pictures are for reference only, please refer to the actual packaging
items.
Drilling
Outside
①
escutcheon with
silicone pad
Inside
②
escutcheon with
silicone pad
③
template
Mortise
④
Mounting plate
⑤
Installation kit
⑨
Cleaning pad
⑬
Easy
Key
User
Manual
User manual
⑥
Mechanical key
⑩
USB cable
⑭
Easy
Key
Warranty
Card
Warranty card
⑦
Lithium battery
⑪
EasyKey
Certicate of
⑧
conformity
Strike
⑫
3

Exploded views
2
1
5
7
6
10
11
9
8
12 14
3
13
4
1.
Deco cover *1
2.
M6 connecting screw*1
3.
M6 connecting screw tube*1
4.
Outside escutcheon*1
5.
Battery cover*1
6.
M6 mounting screw*1
7.
Inside escutcheon*1
4
8.
Compressed spring *2
9.
Square shaft*2
10.
M5 connecting screw*4
11.
Mounting plate*1
12.
Mortise*1
Mortise anchor screw* 4
13.
14.
M5 connecting screw tube*4
Pre-setup instructions
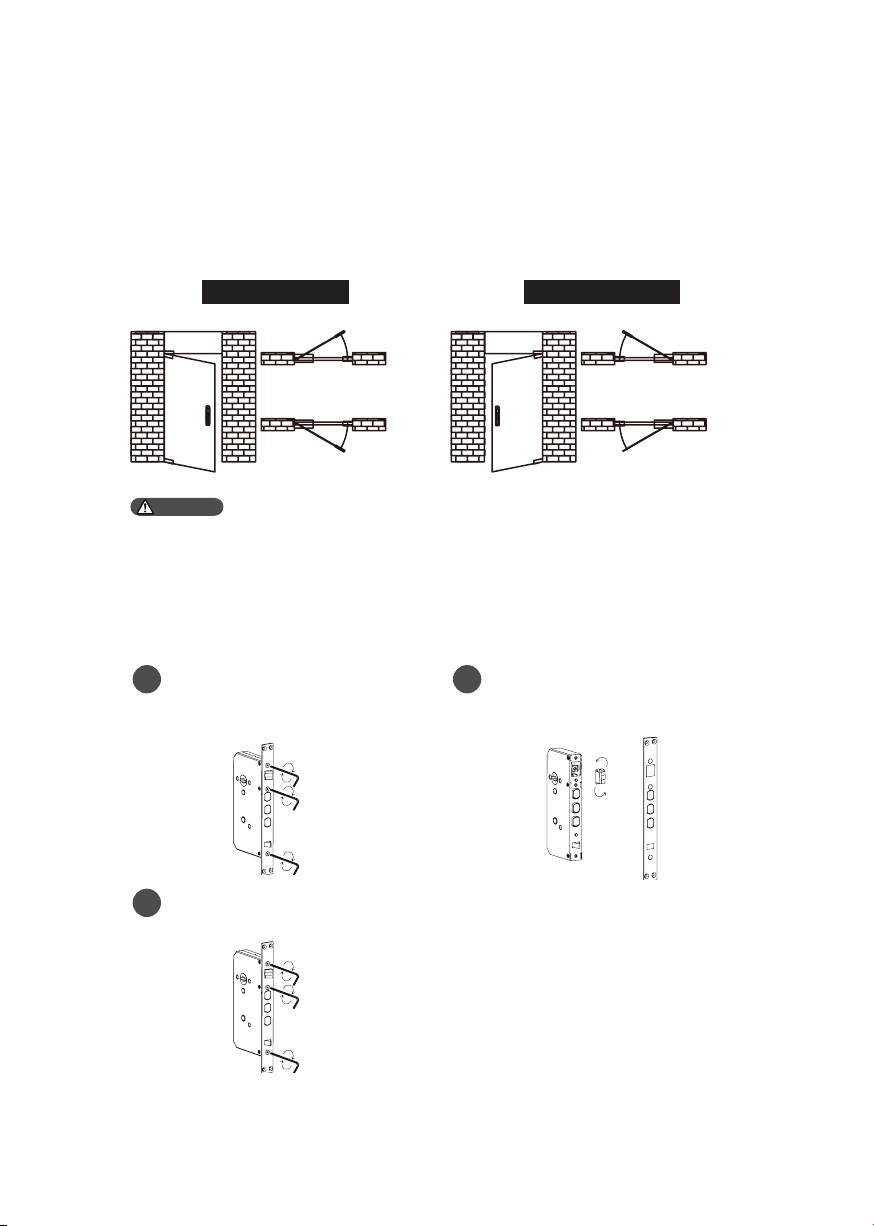
Step 1 | Determine door swing direction
This product allows you to have your door installed to go in four directions:
left outward, right outward, left inward and r ight inward.
Left-handed door Right-handed door
Left inwar d
Left outward
Attention
1. Plea se choose the proper inst allation k it to suit your door thickness.
2. The default install ation kit is applicable for a door thickness of 60-90mm. If your
door thickness does not w ithin this range, please feel free to contact us.
Right inward
Right outward
Step 2 | Change the orientation of the latch bolt
Loosen the screws by turning them
1
counterclockwise w ith an Allen
wrench and remove the mortise
plate.
Mortise plate
Allen wrench
Mount the mort ise plate and
3
fasten it with screws .
Mortise plate
Take out the latch bolt and rotate
2
it to 180°, then put it back.
Latch
bolt
Allen wrench
5

Installation steps
The following installation steps only apply to right-handed doors. For
left-handed doors, please read [Pre-installation instructions] carefully
and make necessary adjustments.
Mark the hole for dr illing with
1 2
drilling template and drill the hole
marked, then mount the mortise
into the hole and fasten it with
four mortise anchor screws.
Attention
Make sure the latch bolt stays inside
the door during installat ion.
Pass the cable through the hole
3
and then inser t the square shaf t
of the outside escutcheon to the
rotary hole on the mortise until
the out side escutcheon is close to
the sur face of the door.
Install the connect ing screw tubes
on the outside escutcheon, and
put the compressed spring and
square shaft accordingly into the
square shaft holes.
M6 connecting
screw tube
Wi-Fi
antennas
Attention
Escutcheon
cable
M5 connecting
screw tube
Please choose the proper square shaft
and connecting screw tube to suit your
door thickness.
Place the mount ing plate against
4
the inner surface of the door and
fasten it with four M5 connect ing
screws.
Mortise cable
Escutcheon cable
Wi-Fi antennas
6

Put the compressed spring and
5 6
square shaft into the square shaft
hole of the inside escutcheon
accordingly.
Inser t the cable of both outside
escutcheon and mortise into the
corresponding sockets on the
inside escutcheon. Then insert
the square shaf t of the inside
escutcheon to the rotar y hole
on the mortise until the inside
escutcheon is close to the surface
of the door.
Front escutcheon cable
Remove the deco
7 8
cover at the top and
press the button at
the bot tom of rear
escutcheon to remove
the battery cover,
then fasten the rear
escutcheon with two
M6 mounting screws.
Mortise cable
Wi-Fi antennas
Attention
Please hide the extra cables in the
door hole or the inside escutcheon.
Put the deco cover
back, install the
lithium battery, and
install the batter y
cover along with the
strike.
Check whether
9
the rotary knob,
mechanical key, and
all other components
work properly.
Mort ise ca ble
connector
Escutcheon
cable connector
Attention
After nishing the str ike installation, please check whether the smart
door lock can be used normally.
7

3. Get to know your EasyKey
The pictures are for reference only, please refer to the actual packaging
items.
Outside escutcheon
Door lock status
①
indicator
7
1
2
3
4
9
5
6
8
Inside escutcheon
11
10
Keypad
②
Mute button
③
Doorbell button/Low
④
battery voltage indicator
Push-pull handle
⑤
Outside forced lock
⑥
button
Camera
⑦
PIR sensor
⑧
Fingerprint sensor
⑨
Reboot and emergency
⑩
power supply interface
Mechanical key hole
⑪
7
5
3
2
8
4
6
1
Battery cover
①
Battery compartment
②
Restore to a default
③
setting
Push-pull handle
④
[OPEN/CLOSE] button
⑤
Rotary knob
⑥
Infrared sensor
⑦

4. How to set up your EasyKey
Pre-setup instructions
◆Philips EasyKey comes with two modes: General mode and Dual verication mode.
General mode Unlock w ith any registered identit y information
Dual verication mode
Unlock w ith the two seperate forms of identication: PIN
code + Fingerpr int.
◆User code
If you want to delete a specic user's information, you could delete the related user
code in the system.
You can use the below template to write down all user information for review.
User
code
00
01
02
03
04
05
06
Name Fingerprint Password
◆Icon annotation
Master
PIN
time PIN
code
1.Press [*] key to return to the previous menu.
2.The default master PIN code is 12345678.
code
Attention
User
PIN
code
Fingerprint [#]One-
User
code
00-99
[*]
9

How to enter master
mode
Add a new user
Add a user PIN code
Enter [#] and enter ma ster PIN code,
then conrm with [#].
Wake up the keypad and enter [#]
before you enter any other numbers,
then enter master PIN code and enter
[#] to enter the master mode.
Attention
You can only wake up the keypad by
pressing keys in the keypad
Change master PIN code
Enter [#] and enter ma ster PIN code,
then conrm with [#].
1
Enter [1] to change master PIN code.
2
Enter [2] to enter user registrat ion and
enter [1] to add a new user PIN code,
then the system will automat ically
number it and generate a voice prompt.
Enter a new user PIN code of 6 to
12 digits and conrm with [#]. Then
re-enter the new user PIN code and
comrm w ith [#]. Af ter hea ring a voice
prompt of "Succeeded", press [*] until
you nally exit master mode.
Add one-time PIN code
Enter [#] and enter ma ster PIN code,
then conrm with [#].
1
2 2
Enter [2] to enter user settings, then
enter [2] again to add a one-time PIN code.
Enter the new master PIN code and
conrm w ith [#]. Re-enter the new
master PIN code master PIN code
and conrm with [#]. After hearing a
voice prompt of “Succeeded", press [*]
to return to previous menu until you
nally exit master mode.
10
Enter a new one-time PIN code of 6 to
12 digits and conrm with [#]. Then reenter the new one-time PIN code and
comrm w ith [#]. Af ter hea ring a voice
prompt of "Succeeded", press [*] until
you nally exit master mode.

Add a ngerprint
Enter [#] and enter ma ster PIN code,
then conrm with [#].
2
Enter [2] to enter user registrat ion and
enter [3] to add a user ngerprint, then
the system will automatically number it
and generate a voice prompt.
3
Enter a 2-digit code (user code:00-19)
to be deleted and conrm with[#]. After
hear ing a voice prompt of “Succeeded",
press [*] until you nally exit the master
mode.
Delete all user PIN codes
Enter [#] and enter ma ster PIN code,
then conrm with [#].
Place your nger on the ngerprint
sensor until you hear a voice prompt
of “Move your nger and put on
again". Lift your nger and repeat
the process unt il you hear a voice
prompt of “Succeeded". After you have
successfully registered your ngerprint,
press [*] until you nally exit the
master mode.
Delete a user record
Delete a single user PIN code
Enter [#] and enter ma ster PIN code,
then conrm with [#].
Enter [3] to enter user record deletion
and enter [1] to enter user PIN code
delet ion, then enter [ 1] to delete a
single user PIN code.
Enter [3] to enter user record deletion
and enter [1] to enter user PIN code
delet ion, then enter [ 2] to delete all
user PIN code. After hearing a voice
prompt of "Succeeded", press [*] until
you nally exit the master mode.
Delete one-time PIN code
Enter [#] and enter ma ster PIN code,
then conrm with [#].
Enter [3] to enter user record deletion
and enter [2] to delete one-time PIN
code. Af ter hearing a voice prompt of
"Succeeded", press [*] unt il you nally
exit the master mode.
Delete a single ngerprint
Enter [#] and enter ma ster PIN code,
then conrm with [#].
11

Enter [3] to enter user record deletion
and enter [3] to enter user ngerprint
delet ion, then enter [ 1] to delete a
single ngerprint.
Enter a 2-digit code (user code:00-99)
to be deleted and conrm with[#]. After
hear ing a voice prompt of “Succeeded',
press [*] until you nally exit the master
mode.
Delete all ngerprints
Enter [#] and enter ma ster PIN code,
then conrm with [#].
System initialization
Remove the battery cover, then double
press the [RES] hole with a sharp
object. When you hear a voice prompt
of “Restoring to default sett ings", it
means all user record are deleted.
System settings
Enter [3] to enter user record deletion
and enter [3] to enter user ngerprint
delet ion, then enter [ 2] to delete all
ngerprint s. After hear ing a voice
prompt of “Succeeded", press [*] until
you nally exit the master mode.
12
Language settings
Enter [#] and enter ma ster PIN code,
then conrm with [#].
Enter [4] to go to system settings and
enter [1] to go to language sett ings.
or
Choose the language a s needed: For
Chinese, press [1]; for English, press
[2]. After hearing a voice prompt of
“Succeeded", press [*] unt il you nally
exit the master mode.
Attention
The default language is English.

Volume settings
Locking mode
Enter [#] and enter ma ster PIN code
and conrm with [#].
Enter [4] to go to system settings and
then enter [2] to enter volume settings.
or or
Choose the volume as needed: For
high volume, press [1]; for low volume,
press [ 2]; for mute mode, press [3].
After hearing a voice prompt of
“Succeeded", press [*] unt il you nally
exit the master mode.
Attention
The default volume is "high volume".
Switch to dual vericat ion mode
Enter [#] and enter ma ster PIN code,
then conrm with [#].
Enter [#] and enter the master PIN
code, then conrm with [#].
Enter [4] to go to system settings and
enter [4] again to enter the locking
mode.
or
Press [1] to enable auto mode and
press [ 2] to enable manua l mode. After
hear ing a voice prompt of "Succeeded",
press [*] to exit the master mode.
Extended functions
Enter [#] and enter ma ster PIN code,
then conrm with [#].
Enter [4] to go into system sett ings, then
enter [3] to go into dual verication
mode.
or
For single verication mode, please
press [1]; For dual verication mode,
press [ 2]; After hear ing a voice prompt
of “Succeeded", press [*] unt il nally
you exit master mode.
Enter [5] to go into extended functions.
or
To join a network, press [1]. To exit
a network, press [2]. Before setting
up the ex tended functions , please
download and open the oc ial app on
your mobile phone.
13

System query
Shortcut keys*
Secur ity code query
Enter [#] and enter ma ster PIN code,
then conrm with [#].
Enter [6] to go into system query, then
enter [1] to check the security code
and the system w ill automatically
broadcast the product ser ies number.
Attention
Directly enter 400# to go into system
que ry.
Local query
Enter [#] and enter ma ster PIN code,
then conrm with [#].
Enter [6] to go into system query, and
enter [2] to check the soft ware version,
then the system will broadca st it
automatically.
Attention
Directly enter 114# to go into the local
que ry.
Functions Shortcut keys
Check serial number 400#
Check rmware version 114#
Enable video 407#
Disable video 408#
Attention
The above function of shortcut keys
are prov ided for reference only and
might be updated l ater for usability
reasons.
App binding instruction
Attention
Due to the funct ions vary in dierent
model s, please consult the oc ial
authorized seller to conrm whether
the product(s) you purchased
support(s) networking.
Download the App
Please scan the QR code above to
download the App and install it.
Lock pairing
1. For Bluetooth smart door lock(s)
Make sure the door lock terminal
①
has been installed w ith batter ies or
connected to the power supply.
14

Sign in to the App, click to “Add
②
a device” on the Homepage,
choose [Bluetooth Smart Door
Lock] to enter the pairing page,
then complete the pairing process
according to the App prompt s.
2. For Wi-Fi smart door lock(s), facial
recognition smart door lock(s) and
video smart door lock(s)
Make sure the door lock terminal
①
has been installed w ith batter ies or
connected to the power supply.
Click the [#] on the smart door
②
lock terminal and enter the
master PIN code, re-click the
[#] to enter master mode, press
[5], then press[1] to enter the
Networking Distribution Mode,
then you will hear a voice prompt
of “Connecting, please wait a
moment”.
Sign in to the App, click to “Add a
③
device” on the Homepage, choose
[Wi-Fi lock/Facial recognition lock/
Video lock] to enter the pairing
page, then complete the pairing
process according to the App
prompts.
Attention
The door locks only support connecting
to the 2.4Ghz Wi-Fi router (5Ghz W i-Fi
is not supported). Plea se make sure
that the visua l distance bet ween the
router and the door lock terminal is less
than 10 meters, otherwise, the signal
might be poor.
15

5. How to use EasyKey
Unlock from inside or outside
Unlock from outside
With PIN code With ngerprint
1
Keypad
2
Push or
pull to
unlock
1
Fingerprint
sensor
2
Push or
pull to
unlock
①Touch the digit input area
to light up the keypad and
enter the registered PIN
code and conrm w ith [#].
②After hear ing a voice
prompt of “Door opened",
push or pull the door to
unlock.
Unlock from inside
With a rotary knob With a funct ional
Philips EasyKey adopts
indoor fast opening
mort ise. You can unlock
the door from ins ide by
rotat ing the rotary knob.
16
①Place the registered
nger on the ngerprint
sensor.
②When you hear a voice
prompt of "Door opened",
push or pull the handle to
unlock.
button
Double press the [OPEN]
functional button within
one second, then push or
pull to unlock the door.
With an infrared
sensor
Philips Easykey has an
infrared sensor on the
handle. When the sensor is
triggered, you can press the
sensor module on both the
front and rear sides of the
handle simultaneously to
unlock the door.

Lock from outside or inside
The latch bolt will pop up automat ically as soon as the door is close and there will
be a voice prompt of “Door Close”.
Inside deadlock
When the EasyKey is locked, long press the
[CLOSE] button until the indicator ashes
once in red, then there will be a voice
prompt of “Inside deadlock enabled".
Attention
When the door is under inside deadlock
mode, the outs ide escutcheon will lock up. If
you try to wake up the system manually, the
keypad area will displ ay the combination of
“15937(X)” and there w ill be a voice prompt of
“Inside deadlock enabled" to remind you that
the door has been deadlocked from inside.
Under deadlock mode, all operations of the
outside escutcheon are disabled. Master PIN
code ver ication or mechanical key opening
is required to release the door from deadlock
mode.
Unlock with mechanical key
Push button
① Cut the mechanical
box and take out the
key. Push the cover
aside and reveal the key.
Attention
It is recommended not to use mechanical keys daily unless there is a n emergency,
such as the battery is dead, forgett ing the password, or the system is not work ing
pro perly.
② Inser t the key into
the keyhole and the key
should be vert ical to the
key shell. Then turn the
key shell by 90° in the
direc tion of the handle
until it is close to the
lock.
③ Make a 180 degrees
twist clock wise and
make sure the key
shell is parallel to the
horizontal plane. Then
rotate the key cover
horizontally in the
direc tion of the handle
to unlock.
17

6. Other functions
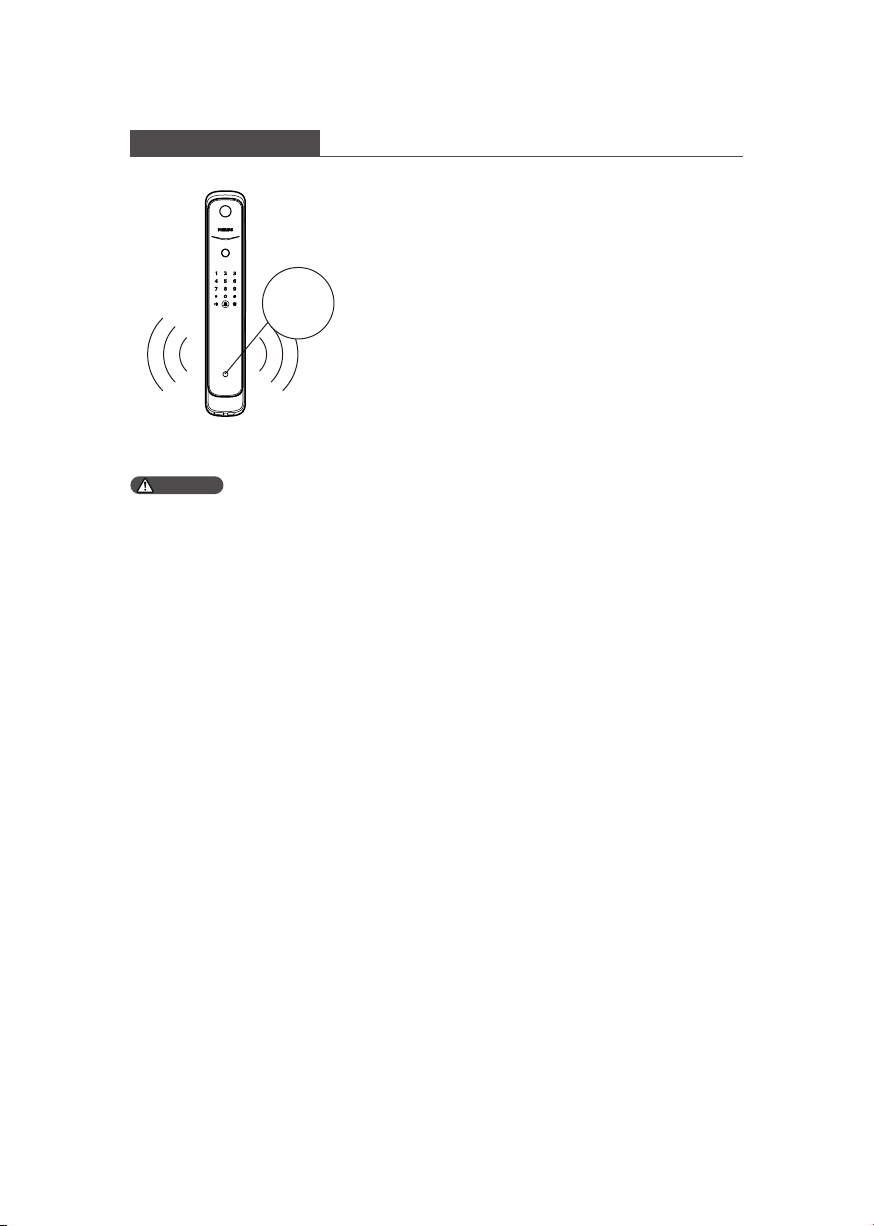
Indoor infrared sensor unlock
Function:
Once the indoor infrared sensor
unlocking is enabled, you could easily
Infrared sensor
Rear sensing area
Front sensing area
Attention
When the infrared sensor unlocking
is disabled, the indoor inductive
unlock ing would be inactive. When
you touch both the front and rear
side of the sensing area on the
handle, the red light will light up
to remind you that the indoor
inductive unlocking is o.
unlock the door from inside.
How to use:
Philips Easykey has an infrared sensor
on the handle. When the sensor is
triggered, you can press the sensor
module on both sides of the handle
simultaneously to unlock the door.
Enable/Disable:
When the infrared sensor unlocking is
disabled, long press the [OPEN/CLOSE]
button at the same time to turn on the
function, and the green light will glow
quickly;
When the infrared sensor unlocking is
enabled, long press the [OPEN/ CLOSE]
button at the same time to turn o the
function and the red light will glow
quickly.
Outside forced lock
Outside forced lock button
18
Function:
Unlocking from inside will trigger an
alert.
How to use:
After the door is successfully locked,
long press the button for 2 seconds to
enter the outside forced lock mode.
Attention
Enabling the outside forced lock funct ion
will not aect the normal way to unlock the
door from outside.

Mute mode
Mute button
Restore to default settings
Function:
Use only one button to mute the
lock and the voice guide will be
turned o. This feature applies to
the scenes where you don't want to
disturb your family.
How to use:
1. Mute: When the system is awake,
long press the [Mute] button for 2
seconds until it glows green.
2. Unmute: When the system is
awake, long press the [Mute] button
for 2 seconds until it glows white
and the lock will produce sound
again.
Function:
Empty all user information and
restore the EasyKey to default
settings.
How to use:
Use a sharp object to double press
the [RES] button, and all the user
information will be emptied, then
the lock will be restored to default
settings.
19

Doorbell
Function:
When the doorbell make sound, it
indicates that someone comes in
the door.
How to use:
When the visitor press the doorbell
on the keypad, the indoor chime
will produce a dingdong bell
sound. Meanwhile, the camera of
smart lock will capture a video clip
of the visitors and send it straight
to the paired app. When you get
a notication on your phone, you
can check the situation outside
your front door remotely via app.
Attention
When you press the doorbell key, the
light will ash twice in blue.
Two-way video intercom
20
Function:
View the situation outside the
front door and talk to the visitors
via mobile app.
How to use:
When paired the smart door lock
with mobile app, you can view the
situation outside the front door
and talk to the visitors in real-t ime
with app.

7. Indicators meaning and usage
Door lock status indicator
Blue: When the system wakes up
and the light glows blue, it means
you can use the lock.
Door lock
status indicator
Low battery voltage indicator
Low battery
voltage indicator
Green: When the door is unlocked
and the light glows green, it means
the door is open.
Red: When the door is locked and
the light glows red, it means the
door is closed.
Red: When the system wakes up,
it will automat ically check the
battery voltage. If the voltage is
too low, then the light will ash
in red and there will be a voice
prompt of “Low battery voltage,
please replace all batteries".
Outside forced lock indicator
White:
1. When the door is locked and
the outside forced lock indicator
is glowing, it means that you can
enable the outside forced locking.
2. When outside forced lock mode
Outside forced
lock indicator
is enabled, the light will glow as
soon as the system wakes up.
21

Mute mode indicator
Mute mode
indicator
Inside deadlock indicator
1. White: indicates the mute mode
is o.
2. Green: indicates the mute mode
is on.
When the door is under inside
deadlock mode, the keypad will
lock. If you wake up the system
manually, the keypad w ill show the
combinat ion of “15937 (X)” with a
voice prompt of "inside deadlock
enabled".
System freezing indicator
Flash three times Flash twice Flash once
3 minutes
22
2 minutes 1 minute
If there are consecutive
incorrect inputs of any
of the ngerprint, PIN
code,5 t imes w ithin 5
minutes, the system will
lock up for 3 minutes.
Attention
Only when waking up
the outside escutcheon
or verifying the identity
of the user would the
numbers appear.

[OPEN/CLOSE] indicator
1. Red light ashing twice: indicates that
the door is locked successfully.
2. Green light ashing twice: indicates that
the door is unlocked successfully.
3. Red light ashing once: indicates that
the door is under the deadlock mode.
Infrared sensor unlocking indicator
1.Fast ashing in green: infrared sensor
unlocking is on.
2.Fast ashing in red: infrared sensor
unlocking is o.
8. Troubleshooting
Alert types and methods
Alert to unlock from inside under outside forced lock mode
Way to trigger: Under outside forced lock
mode, an alert w ill be triggered when the
door is unlocked from inside.
Way to be alerted: Repeat alerts
Way to turn o: The alert will be turned o
once the identit y verication is successful.
23

Low battery voltage alert reminds you to replace the batter ies
Way to trigger: When the system wakes
up, it will automatically check the battery
voltage. If the voltage is too low, then an
alert will be triggered to remind you to
replace the batteries.
Way to be alerted: A voice prompt of
“Low battery voltage, please replace all
batteries" will be given when unlocking the
door.
Way to turn o: The alert will be
automatically turned o.
Anti-dismantling alert
1. Way to trigger: The door is pried apart
and the latch bolt is popped up.
Way to be alerted: Repeat alerts.
Way to turn o: Automatically turning o or
successful identity verication.
2. Way to trigger: The outside escutcheon
is pried open and there is a gap of space
between the door and the outside
escutcheon.
Way to be alerted: Repeat alerts.
Way to turn o: Automatically turning o or
successful identity verication or a normal
way to unlock the door from inside.
24
Anomalous deadbolt alert
Way to trigger: The deadbolt works
abnormally and causes a failure in locking
or unlock ing the door.
Way to be alerted: Repeat alerts
Way to turn o: The alert will be
automatically turned o.
Motion sensor alert
Way to trigger: When an unexpected
person shows up and stays outside your
home for more than 30 seconds within a
certain distance, an alert w ill be triggered.
PIR
sensor
Way to be alerted: The camera can record
10 seconds of video and send instant
notications to the mobile app.
Way to turn o: The motion sensor alert is
turned o by default. In order to use this
function, you can turn it on or o on the
mobile app.
Attention
1. Once the smar t door lock is restored to default set tings, the PIR motion sensor is
turned o by default. In order to turn it on, please install the ocial app rst and
choose "Add a device" on the rst screen.Af ter pairing successfully, plea se open
the set ting page, go to "motion sensor alert " and turn it on.
2. When paired the smart video door lock with the mobile app, you can set the
sensitiv ity level of the mot ion sensor on the sett ing screen. The default detect ion
distance for the motion sensor is 3 meters and the default length of stay outside
the front door is 10 seconds . If an inv ited person is wander ing within this certain
distance and time, a n alert will be triggered.
3. The increas ing operating frequency of functions on smart video door lock
can increase the power consumpt ion, so it is recommended to set the minimum
sensitiv ity level of the mot ion sensor. If there are many passersby travel the road
in front of your door, it is advised to limit the detection dista nce to 3 meters and
also set the length of stay to 30 seconds. By doing so, it can lower the sensitivity
level and reducing the power consumption of the device.
25
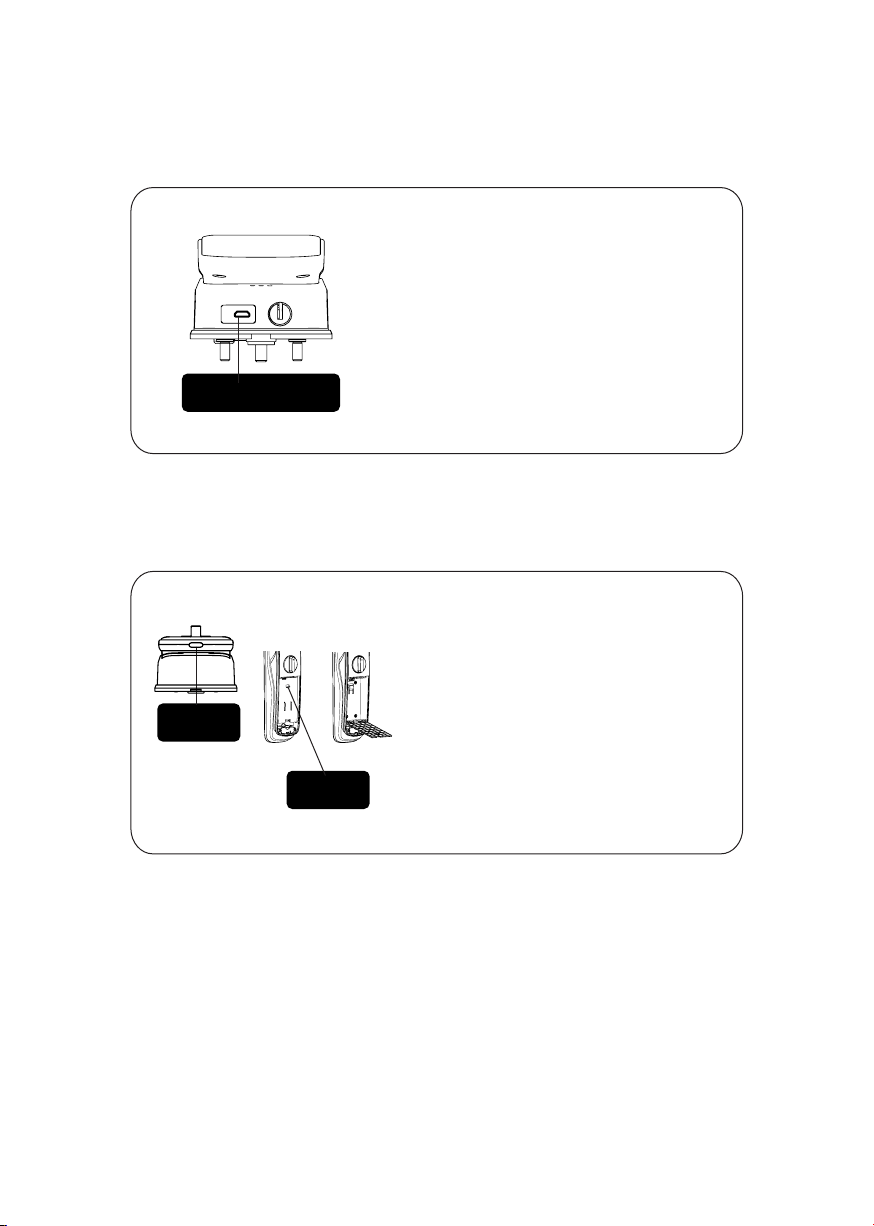
How to charge EasyKey in an emergency
When th e battery voltage is low, and the
door cannot be opened from
outs ide, you c an power up the lock by
plugg ing 5V power bank into the micro
USB. Af ter the door is unlocked, please
replace the batter ies instantly.
If the sy stem crash occu rs and the smar t
Reboot and emergency
power supply interface
door lock can not b e unlocked from the
outs ide, you c an rebo ot the system using
micro USB port.
How to replace batteries
The sma rt door lock is powered by a
5000mA/h lithium battery.
The batter y compartment is in the lower
Battery
cover button
Battery
cover buckle
part of the ins ide escutcheon. Press the
button near the bottom of the inside
escutcheon, then remove the battery
cover to replace lithium batter y.
26

How to charge the lithium battery
Press the button near t he bottom of the
insid e escutcheon, remove the b attery
cover and take out the lithium battery.
You can cha rge the li thium batter y using
USB port.
Attention
1. Lithium battery is guaranteed for
one year and the lithium batter y life
is 300 times of complete charge and
discharge.
2. For a lithium bat tery, the charge
cut-o volt age is 5V.
3, A bad network connection w ill
increa se power consumpt ion at a
faster rate.
27

Philips and the Philips Shield Emblem are registered trademarks of Koninklijke Philips
N.V. and are used under license. This product has been manufactured by and is sold
under the responsibility of Shenzhen Conex Intelligent Technology Co., Ltd, and
Shenzhen Conex Intelligent Technology Co., Ltd is the warrantor in relation to this
product.
 Loading...