

Page 1
www.philips.com/support
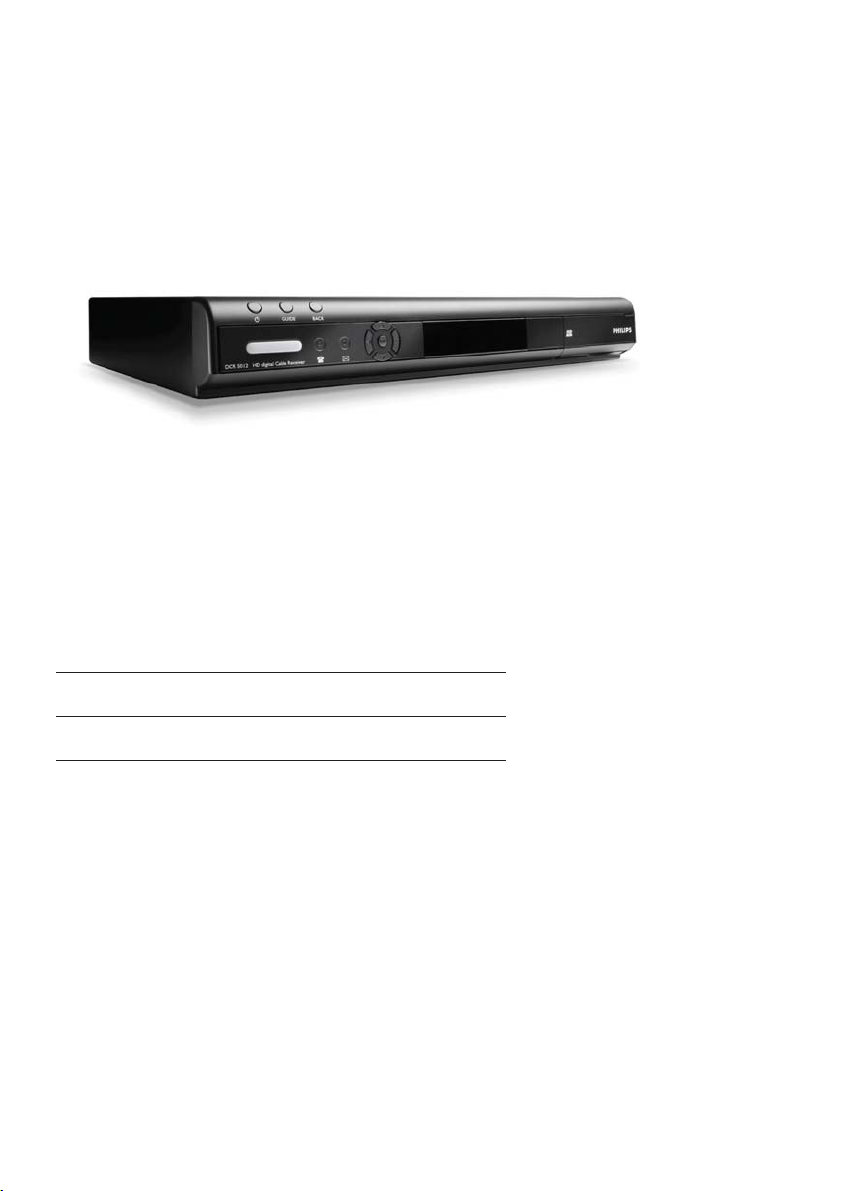
DCR 5012
NL Digitale Kabelontvanger 2
EN Digital Cable Receiver 61
Page 2

Table of contents1
1 Important 62
2 Your Digital Cable Receiver 64
2.1 What’s in the box? 65
2.2 What you also need 65
2.3 Overview 66
2.4 Main menu overview 67
2.5 How to read this manual 67
8 Guarantee and service 96
9 Technical data 97
10 Additional information 98
11 Frequently asked questions 105
12 Glossary of terms 110
ENGLISH
13 Index 112
3 Getting started 67
3.1 Prepare 67
3.2 Connect 68
3.3 Install 68
4 Using your Digital Cable Receiver 70
4.1 Switching the Digital Cable Receiver on
and off 70
4.2 Changing channels 70
4.3 The Programme Information Bar 71
4.4 Zapping with the Programme Information
Bar 71
4.5 Additional programme information 72
4.6 Favourite channels 72
5 Use more of your Digital Cable
Receiver 73
5.1 Digital Cable Receiver full overview 73
5.2 Remote control full overview 74
5.3 Main menu full overview 75
5.4 TV guide full overview 75
5.5 Settings full overview 79
5.6 UPC services 84
6 Maintenance 91
6.1 Cleaning 91
6.2 Replacement 91
6.3 Disposal 91
Contact information 113
Trademarks and partner logos 114
7 Accessories and connections 92
7.1 Setting up the remote control 92
7.2 Connections 93
7.3 In-home cabling check 95
62Table of contents
Page 3
Important2
Take time to read this User Manual before using the Digital Cable Receiver.
It contains important information and notes regarding how to operate it.
Disposal of your old product
Your product is designed and manufactured with high quality materials
and components, which can be recycled and reused.
When this crossed-out wheeled bin symbol is attached to a product or
its packaging, it means the product is covered by European Directive
2002/96/EC.
Please inform yourself about the local separate collection process for
electrical and electronic products.
Please act according to your local rules and do not dispose of your old
products with your normal household waste. The correct disposal of
your old product will help prevent potential negative consequences for
the environment and human health.
The “Material recyclability symbol” affi xed on package cardboard and
user manual means these parts are recyclable.
So do not dispose of them with your normal household waste.
The “Material recyclability symbol” affi xed on plastic packaging parts
means these parts are recyclable.
So do not dispose of them with your normal household waste.
The “Green Dot” affi xed on cardboard means PHILIPS pays a fi nancial
duty to the “Avoidance and Recovery of Packaging Waste” organization.
Danger
Describes situations of injury or loss of life.
Warning
Describes actions that may cause damage to the product.
Caution
Describes the actions required to avoid dangerous or illegal situations.
Note
Additional information.
Tip
Information that is useful to know but not essential to the task. For example, information about
alternative use.
Important63
Page 4

The Digital Cable Receiver has been manufactured to meet the appropriate safety standards, but the
instructions below must be followed to operate it safely. These instructions must be kept for future
reference.
Danger
The Digital Cable Receiver does not contain any user-serviceable parts. Do not attempt to open •
it. All maintenance work must be carried out by qualifi ed services centres.
Make sure that children do not place any foreign objects in any of the openings.•
Warnings
Before connecting the Digital Cable Receiver to the mains, check that the mains supply voltage •
corresponds to the voltage printed on the rear of the Digital Cable Receiver. If the mains voltage
is different, consult your dealer.
If you disconnect the Digital Cable Receiver from the mains, make sure to unplug it from the wall •
socket and not just from the AC socket at the back of the unit. Children could seriously injure
themselves, as the free end of the cable is still live.
It is recommended to unplug the Digital Cable Receiver from the mains during lightning storms.•
If the power cord is damaged, it must be replaced. Always refer to qualifi ed centres.•
To prevent fi re or shock hazard, do not expose the Digital Cable Receiver to rain or moisture.•
The Digital Cable Receiver should be placed on a fi rm surface, and the ventilation openings must •
not be covered with items, such as newspapers, table clothes, curtains, etc.
Do not install the Digital Cable Receiver near heat sources such as radiators, stoves or other •
apparatus that produce heat. Protect it from direct sunlight.
When installing the Digital Cable Receiver, ensure there is a gap of approximately 5 cm around the •
Digital Cable Receiver to enable air to circulate freely and prevent overheating.
Leave accessible the mains connector at the back of the unit in case emergency shutdown is •
required.
Do not place any combustible objects on the Digital Cable Receiver (candles, etc.).•
No objects fi lled with liquids, such as vases, shall be placed on the unit. The Digital Cable Receiver •
shall not be exposed to dripping or splashing. Should this happen, disconnect the Digital Cable
Receiver from the mains and consult your dealer.
ENGLISH
Refer also to the cautions throughout this manual.
64Important
Page 5

Your Digital Cable 3
Receiver
Bring the future into your home with UPC
Digital TV. You can enjoy enhanced picture and
sound quality, a wider selection of channels and
special setup options.
UPC Digital TV HD will continuously be
extended to include even more features and HD
channels. UPC Digital TV HD is received via the
Digital Cable Receiver.
What are the benefi ts of UPC Digital TV
and the Digital Cable Receiver?
Razor-sharp picture and perfect sound •
quality.
More TV channels. Apart from the current •
channels on offer, you can choose from
additional UPC Digital TV channels.
More radio channels. Apart from the •
current radio channels available via the
cable, dozens more digital radio channels
can be received.
You can use UPC On Demand to watch •
top fi lms whenever you want.
A TV guide always on hand. The UPC TV •
Guide is an easy-to-use programme guide
you can view on screen. All programme
details are on hand at all times.
Special settings such as blocking channels •
using a PIN code and language settings.
Interactive Services. Games can be played •
via the television.
You are equipped for the future. New •
features are regularly added to the Digital
Cable Receiver. We will keep you informed
of new features and interactive services via
www.upc.nl
Additional benefi ts of the Digital Cable
Receiver - HDTV
I ntense colours, more details, razor sharp •
picture and multichannel surround sound
(Dolby 5.1).
Your Digital Cable Receiver65
Page 6
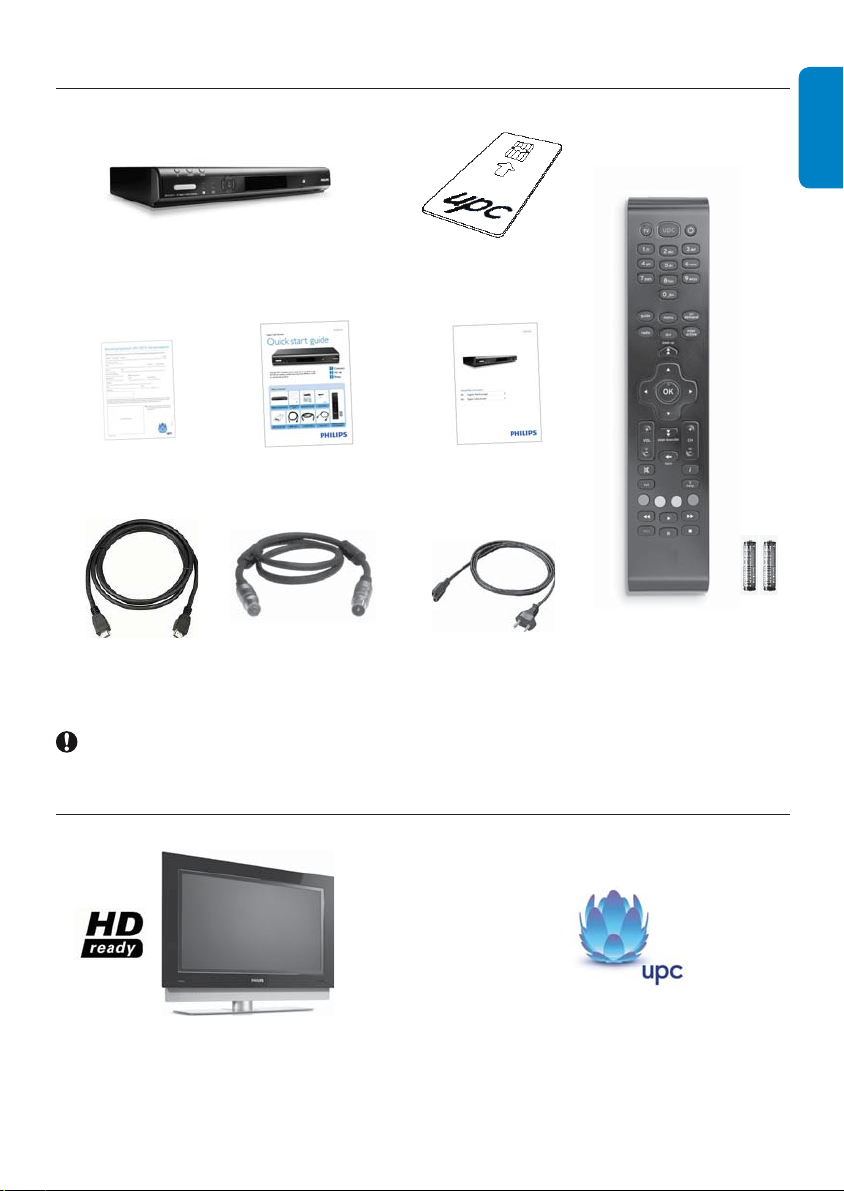
What’s in the box?3.1
ENGLISH
Digital Cable Receiver
Confi rmation card Quick Start Guide User manual
HDMI cable Coaxial cable Power cord
Caution
Plastic bags can be dangerous.
To avoid suffocation keep the bag away from babies and children.
What you also need3.2
UPC smart card (already
inserted)
Remote control and
2 batteries
HD Television
+
Subscription to UPC Digital
TV HD
66Your Digital Cable Receiver
Page 7
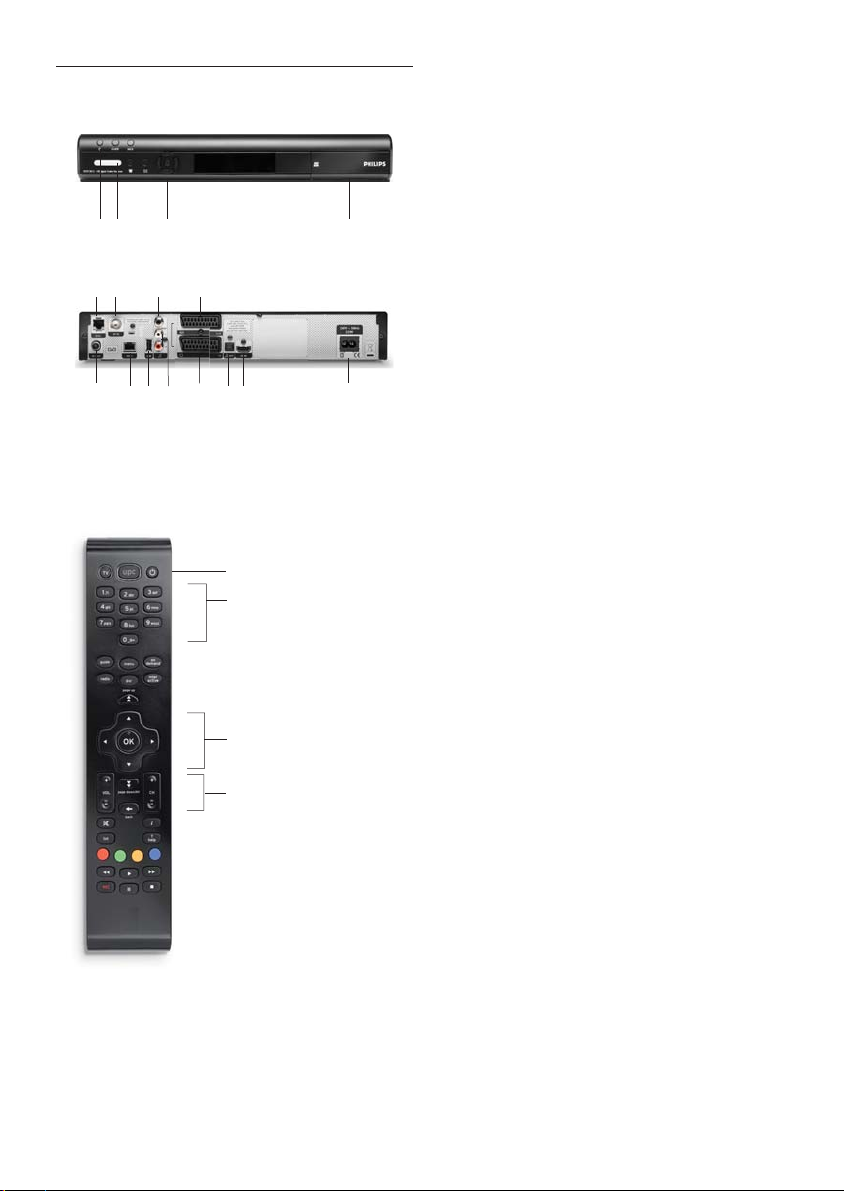
Overview3.3
AB C D
Main unit
L
AD G HE
BC F
IJK
Main unit backside
A
B
C
Main unit
A Standby
B Status led
C Navigation buttons
D Smart card door
Main unit backside
A RF OUT
B ETHERNET2
C USB
*
*
*
D L/R audio* (analogue)
E TV scart
F Optical Digital audio
G HDMI
H Power
I AUX scart
*
*
*
**
*
J SPDIF* (digital)
K RF IN
L ETHERNET1
*
Safety extra low voltage
**
Hazardous voltage
*
*
Remote control unit
A Standby
B Alphanumeric keypad
C Navigation keys
D Volume/channel control and Back key
Remote control unit
D
Your Digital Cable Receiver67
Page 8
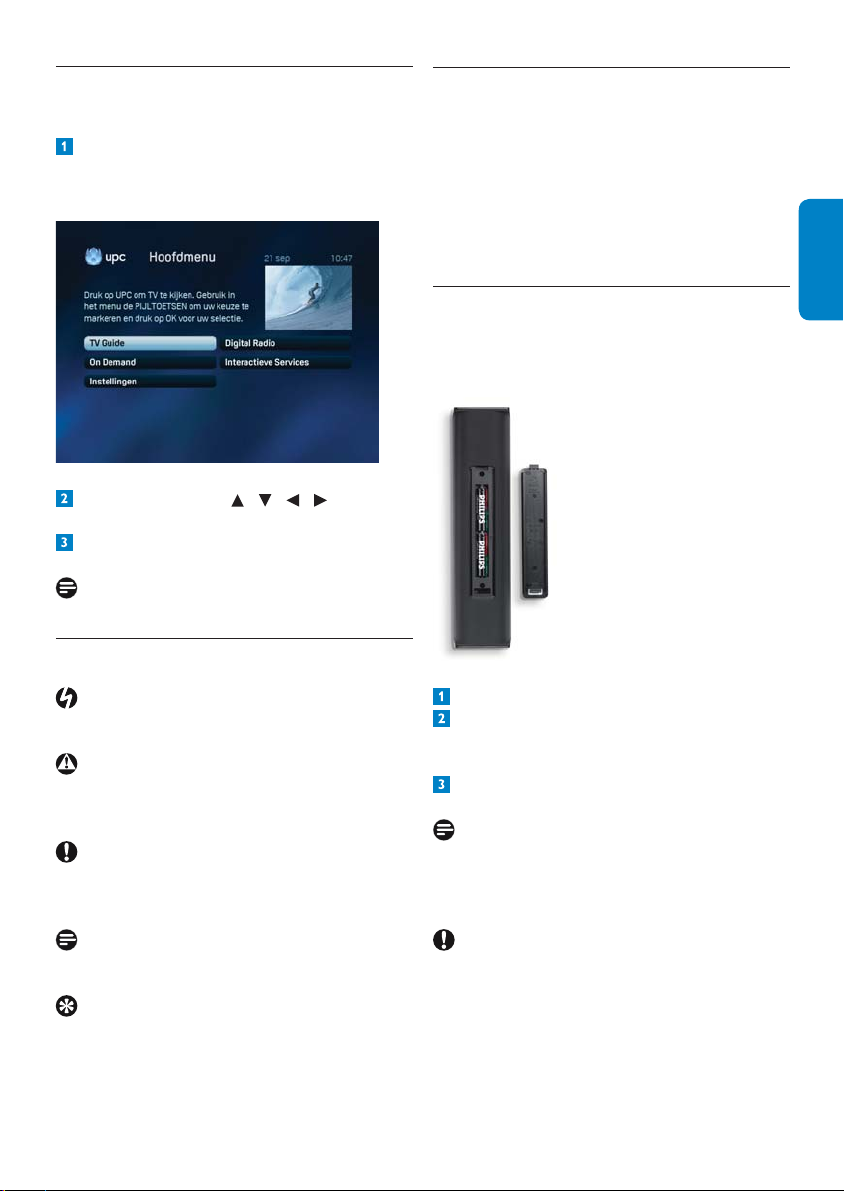
Main menu overview 3.4
Getting started4
Press menu on the remote control to
access the main menu.
Use the arrow keys / / / to navigate
through the different options.
Press OK to validate your choice.
Note
For menu full overview, see Chapter 5.
How to read this manual3.5
Danger
Describes situations of injury or loss of life.
Warning
Describes actions that may cause damage to the
product.
Caution
Describes the actions required to avoid
dangerous or illegal situations.
In this chapter, the basic steps to get you started
are described.
Call the UPC Customer Service department
at 0900-5008080 (€ 0.10 per minute) available
Monday to Friday 8AM to 9PM and Saturday
from 8AM to 6PM to activate the product.
ENGLISH
Prepare4.1
Prepare the remote control
Open the battery compartment.
Insert the two batteries supplied according
to the indications (+/-) inside the
compartment.
Close the battery compartment.
Note
Point the remote control directly at the remote
sensor on the front panel and select the desired
function.
Note
Additional information.
Tip
Information that is useful to know but not
essential to the task. For example, information
about alternative use.
Caution
Do not mix batteries or keep them in the remote
control for long periods of time without use.
Batteries must not be disposed of with your
household waste but to a local separate battery
collection system.
Do not dispose of batteries in a fi re.
68Getting started
Page 9

Check the smart card
Check whether the UPC smart card is inside the
front slot of the Digital Cable Receiver.
If this is not the case, slide it in the slot:
Open the smart card door on the right •
side of the box.
Insert the smart card into the smart card slot •
as far as it will go. The end of the card will be
visible from outside the slot.
Warning
Insert the smart card with the chip facing down.
4.2 Connect
Danger
Risk of electric shock!
Make sure all the devices are disconnected from
the mains before making any connections.
HDMI connection
Cable Wall
Socket
TV set
Digital Cable Receiver
Connect the coaxial cable from the cable
wall socket to the RF IN socket at the rear
of the Digital Cable Receiver.
Connect the HDMI cable to the HDMI input
of the TV set and to the HDMI socket at
the rear of the Digital Cable Receiver.
Plug your Digital Cable Receiver to the
mains using the supplied power cord. The
front display panel indicates Init, then UPC.
Note
For scart connection, refer to chapter 7.2.
4.3 Install
Before you start installation, make sure you have
made all the required connections.
Switch on your TV set. The country selection
screen appears. In that case, the Digital
Cable Receiver has automatically started up
at connecting.
Note
If you can’t you see the country selection screen,
switch on the Digital Cable Receiver by pressing
at the front of the Digital Cable Receiver or
press the remote control. In case you still can’t
see this screen, check whether your TV is set to
the right A/V (Audio/Video) channel.
Read the manual of your TV set if you do not
know how to set the A/V channel. In case you
still can’t see the screen, check all connections
and start installation again. If everything is
properly connected and you still can’t see the
country selection screen, after multiple efforts,
please contact UPC Customer service.
Warning
Do not switch off the Digital Cable Receiver
during activation.
Also pay special attention to children, so that
they cannot interrupt activation, for example by
pulling the plug from the socket of by pressing
on it.
Getting started69
Page 10
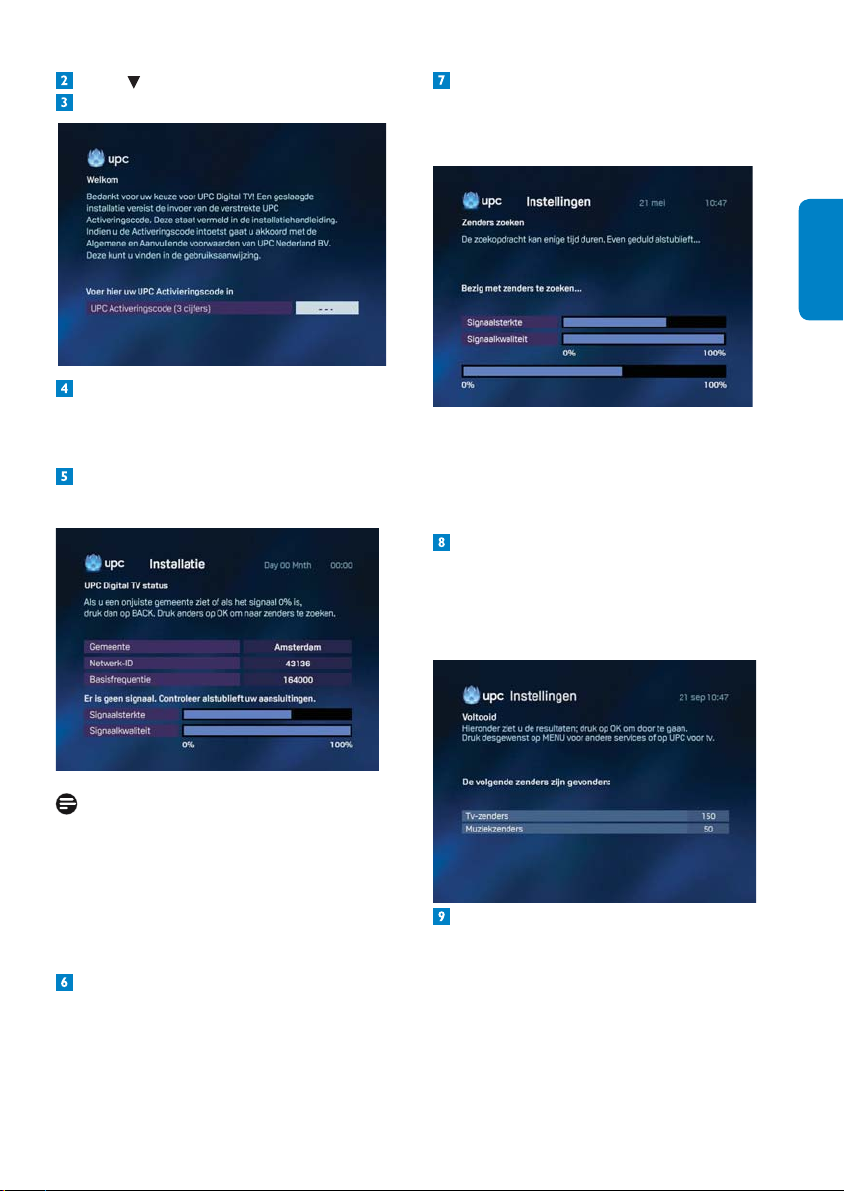
Press to select Nederland.
Press OK. The welcome screen appears.
Using the numerical keys of the remote
control, enter the 3-digit activation code
found in chapter Additional Information.
Press OK. The UPC Digital TV status
screen appears.
Press OK when the signal quality is at 100%.
After some time, the Search channels
screen indicating the signal strength and
quality appears.
ENGLISH
The Search channels screen is a controlscreen where you can see the progress of
automatic tuning of the stations available in your
city.
Check the bargraphs for adequate signal
strength and quality, and then press OK to
search for channels. The search progress is
reported on-screen by the bottom bargraph.
The screen complete is displayed.
Note
If an error screen appears during the activation
procedure, you can return in the previous
screens using the back key of your remote
control and start the procedure again. If after
multiple efforts, you still can’t get a picture,
please contact UPC Customer service.
Check if the home town displayed is correct.
When the search has been successfully
completed, the number of TV and Music
channels found is displayed.
70Getting started
Page 11
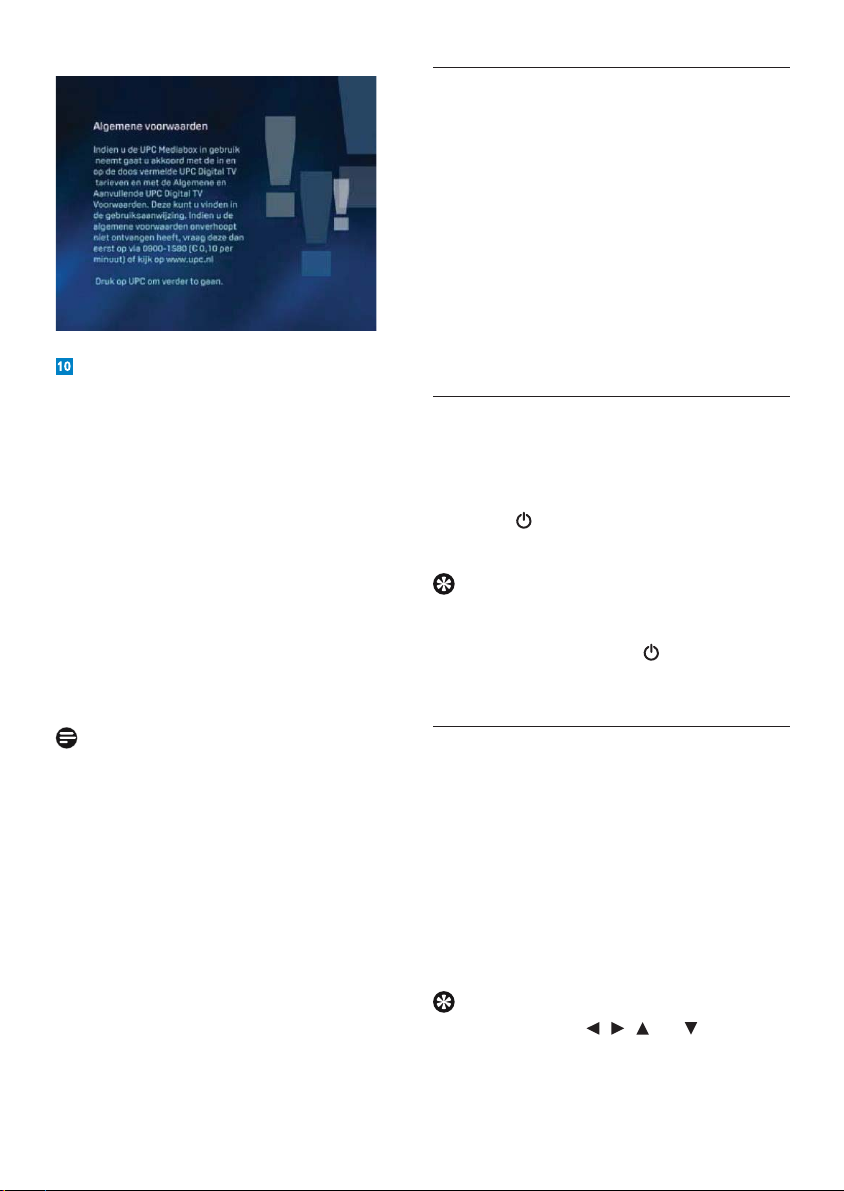
Press the UPC key to accept the terms and
conditions. A short description of all the
features in the Digital Cable Receiver with
a UPC subscription will be displayed, and a
test will start to check that setup is done
correctly.
Search failure
In case of channel search failure, before starting
a new search, check the following points:
RF cable condition and connection to your •
Digital Cable Receiver as described in
chapter Connect
Signal quality•
Correct activation code is entered•
Using your Digital 5
Cable Receiver
Once you have connected the Digital Cable
Receiver, use the remote control to operate
the basic, frequently-used functions, such as
switching on and off and changing channels.
You will also become familiar with the handy
Programme Information Bar. This is used to
display information on the programme you are
watching, search for another programme, or
change channels.
Switching the Digital Cable 5.1
Receiver on and off
Press the • UPC key on the remote control
to switch on the Digital Cable Receiver.
Press •
to switch off the Digital Cable
Receiver.
Tip
You can also switch on the Digital Cable
Receiver by pressing the CH+/- keys, and set
it to standby by pressing the
front of the Digital Cable Receiver.
button on the
Note
If the same failure message appears after a while,
refer to chapter Frequently asked questions.
If the problem remains, contact your dealer.
Changing channels5.2
There are various ways of using the remote
control to quickly change channels.
Zapping
Press CH+/- to quickly switch between adjacent
channels.
Press • CH+ once to change from channel 1
to channel 2.
Press • CH- once to change from channel 2
to channel 1.
Tip
You can also use the
the front panel of the Digital Cable Receiver to
quickly switch between adjacent channels.
Using your Digital Cable Receiver71
, , and buttons on
Page 12
Selecting the channel number
You can use the numerical keys of the remote
control to go to a specifi c channel directly.
Press • 5 to switch to channel 5.
To switch to a channel higher than 10, •
press both digits in quick succession, for
example, 1 and then 5 to switch to channel
15.
The 5.3 Programme Information Bar
Each time you change channels, a bar containing
programme information is displayed on your
television screen.
Refer to the chapter Preference
settings.
The Programme Information Bar will not •
automatically disappear when you press
OK to display it.
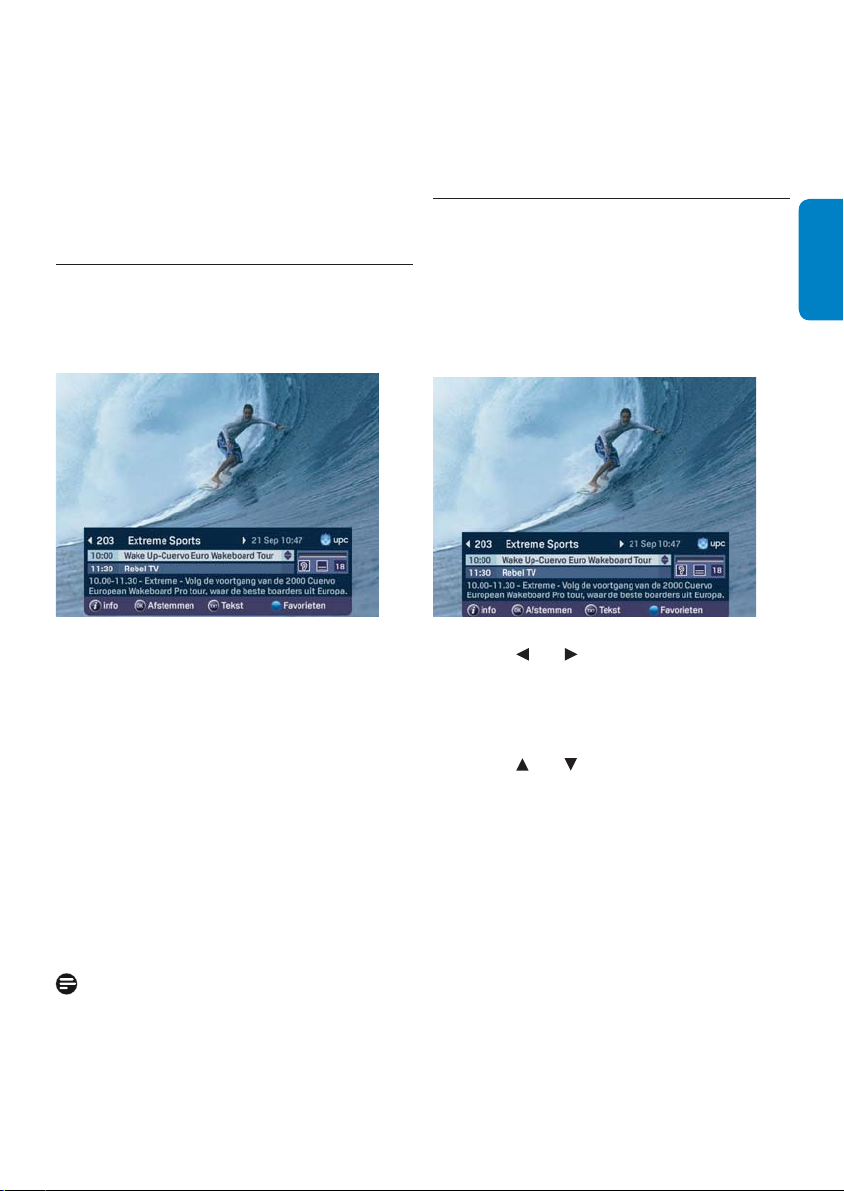
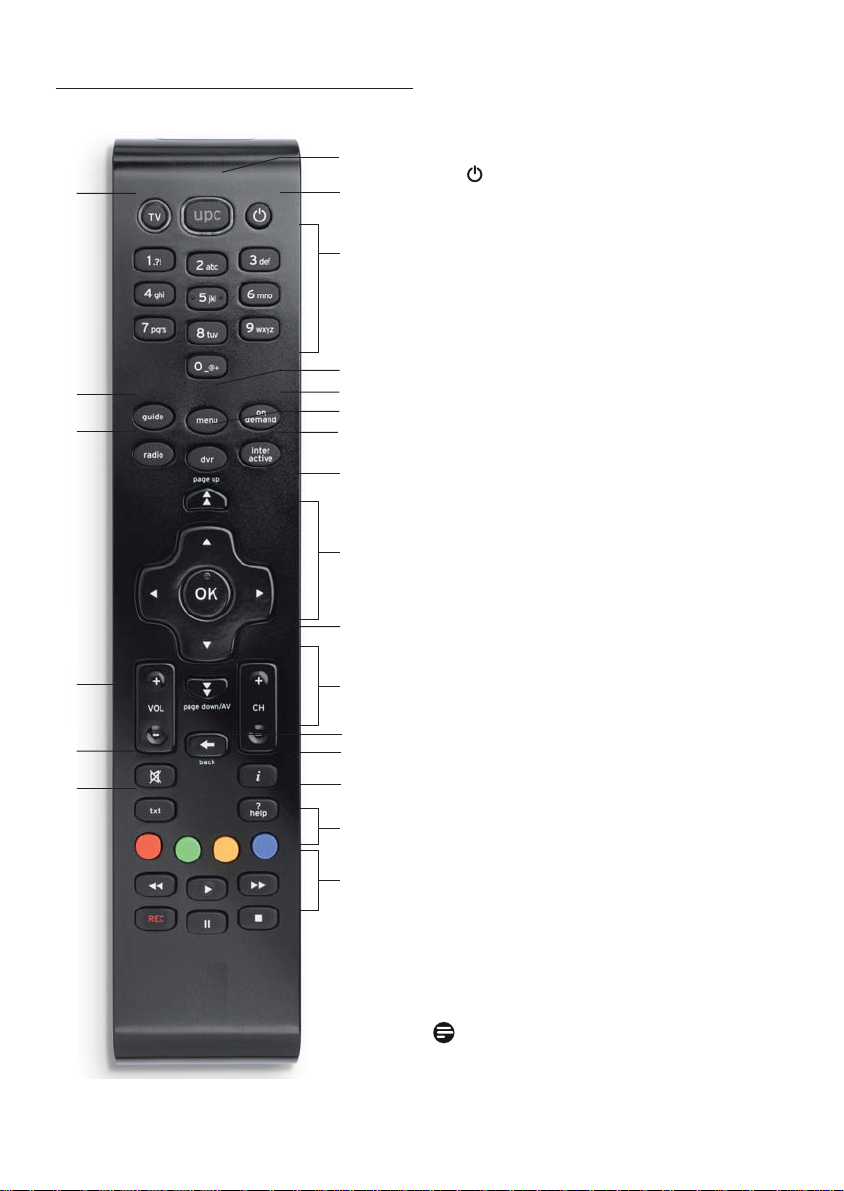
Zapping with the Programme 5.4
Information Bar
Press OK to display the Programme Information
Bar.
You can now see the channel and programme
you are watching as well as the next
programmes to be shown on this channel.
ENGLISH
The Programme Information Bar displays the
following information:
the programme and channel you are •
currently watching;
the next programmes on the channel you •
are currently watching;
the suitability of the programme for •
particular age groups (6+, 9+, 12+, 16+ and
18+; this information is not available for all
programmes);
the elapsed time of the programme;•
whether the programme is available in •
several languages;
whether subtitling in several languages is •
available for the programme.
Notes
After a while, the Programme Information •
Bar will disappear from your screen.
You can set how long the Programme •
Information Bar should be displayed.
You now have the following options:
Press •
and to view programme
information about another channel.
The information in the•
bar changes,
whilst the programme in the background
continues.
Press •
and to switch between the two
programmes displayed. Your active selection
is highlighted. A brief description of the
highlighted programme is given at the
bottom of the Programme Information Bar.
Press the • i key for a more detailed
description of the highlighted programme
(also see later in this chapter).
Press • OK to select the channel shown at
the top of the Programme Information Bar.
Press the • UPC key to hide the Programme
Information Bar without changing channels.
72Using your Digital Cable Receiver
Page 13
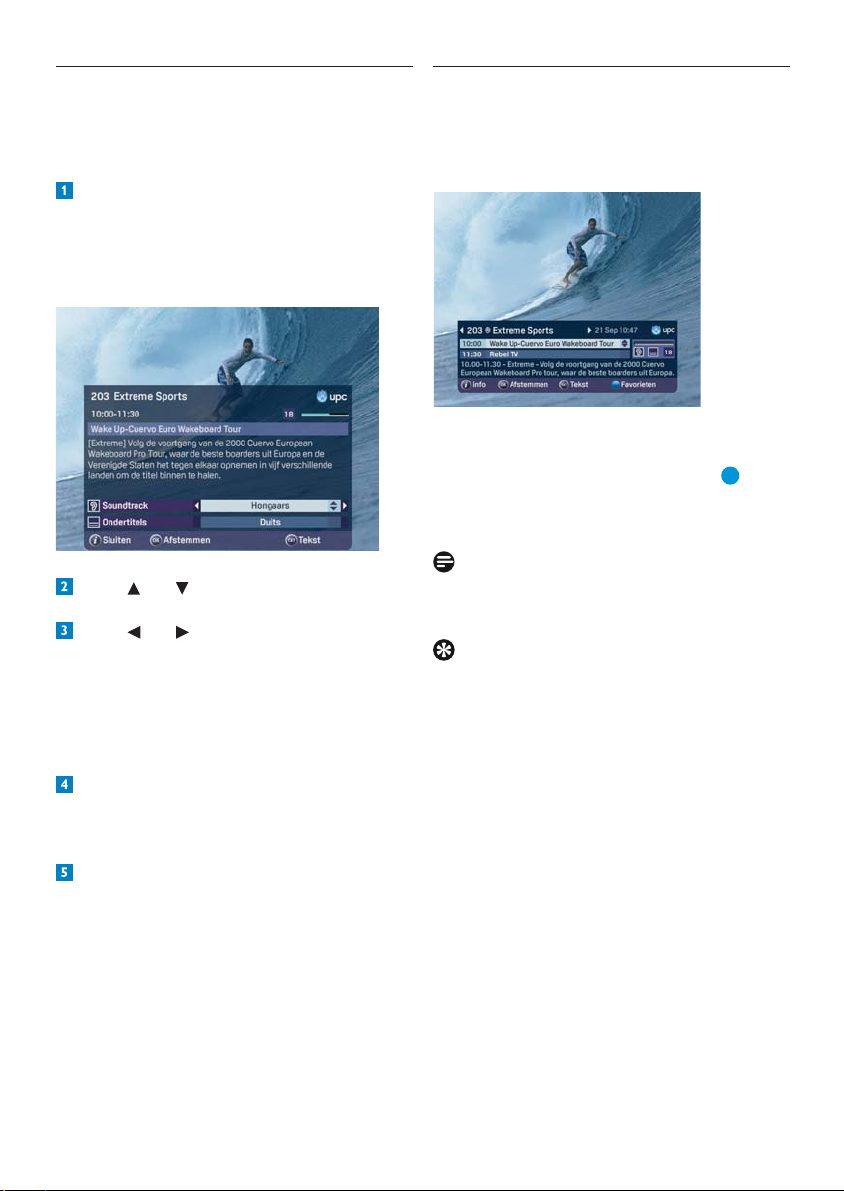
Additional programme 5.5
information
Additional information can be displayed for
the programme highlighted in the Programme
Information Bar.
Press the i key to display the additional
Programme Information Bar. You will now
see a detailed summary of the highlighted
programme. Below this are the available
soundtrack language and subtitling settings.
Press and to select Soundtrack or
Subtitles.
Press and to change the language. This
option is only available when the programme
is being broadcast in several languages and/
or with subtitles. By default, the soundtrack
and subtitle settings correspond to the
language confi gured in Preference settings
menu, providing this is available.
Press the i key to close the screen. You will
return to the Programme Information Bar
or the programme you were previously
watching.
Press OK to change to the channel displayed
in the Programme Information Bar.
Favourite channels5.6
When zapping, you can choose to zap only
through the channels included in your favourite
list. Favourite channels are indicated by a smiley
in the information bar.
Zapping with favourites
This function is indicated by the text All
channels in the Information Bar. Press
switch between zapping with favourites and
zapping all channels.
Note
Refer to chapter UPC TV Guide to set
favourites.
Tip
You can also set reminders on the Digital Cable
Receiver. More information about reminders can
be found in chapter UPC TV Guide.
to
Using your Digital Cable Receiver73
Page 14

Use more of your 6
Digital Cable Receiver
This chapter gives a complete description of the
functionalities of your Digital Cable Receiver.
Digital Cable Receiver full 6.1
overview
AICB DE F G H
Main unit
KL
J
A BC D E FG H
Main unit backside
I
ENGLISH
Main unit
A
- Switch to standby mode
B Status led
Green: the receiver is on
Red: standby mode
Blinking: software update in progress
C Guide - For future use
D Back - Not active
E Led - Not active
F Led - For future use
G Navigation buttons - Move up/down, left/right
OK: confi rm the selection
H Display panel
I Smart card door
Main unit backside
A RF OUT
*
- Input to connect the cable from
your wall cable socket
B ETHERNET2
*
C USB
*
D L/R audio* - Left/Right analogue audio outputs
E TV scart
F Optical digital audio output
*
- Output to connect your TV set
*
G HDMI* - Output to connect your TV set
HDMI input
H Power
I AUX scart
**
- Output to connect the mains cord
*
- Output to connect your video
recorder or DVD player
J SPDIF
*
- Digital audio output
K RF IN*
L ETHERNET1*
*
Safety extra low voltage
**
Hazardous voltage
74Use more of your Digital Cable Receiver
Page 15
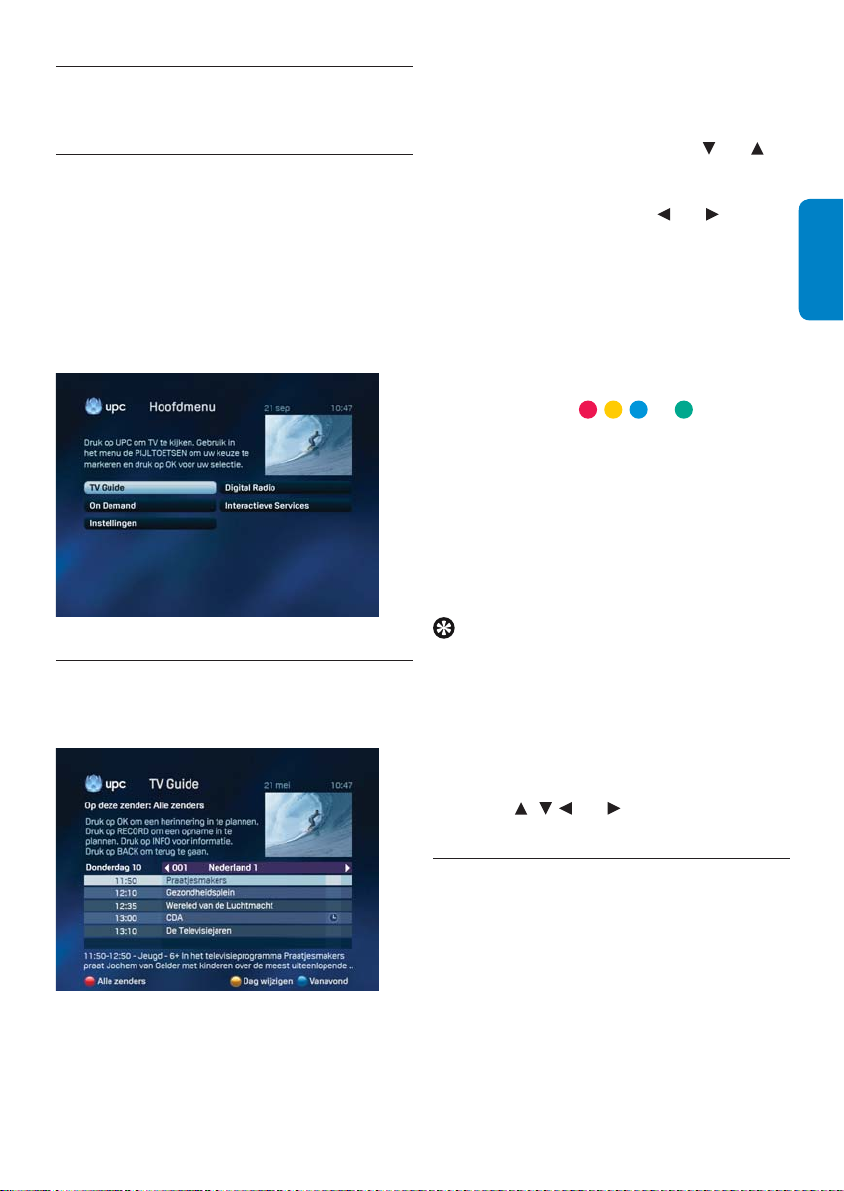
6.2 Remote control full overview
P
Q
R
S
T
U
A UPC - Turn the Digital Cable Receiver
on. Back to the full screen display of the
A
B
channel you were previously watching
- Switch your Digital Cable Receiver to
B
standby mode
C Alphanumeric keypad - Select a channel on
C
the Digital Cable Receiver, enter a PIN code
or select an option
D Menu - Display the Main menu
E On Demand - Display the UPC On Demand
D
E
F
G
H
menu
F DVR - Digital Video Recorder
G Interactive - Display the Interactive menu
H Page down/page up - Scroll down/up one
page
I Arrow keys - Navigate through the menu
OK - Confi rm the selection
I
J CH +/- Next / previous channel
K Back - Back to the previous channel or
previous section
L
H
J
K
L
M
N
i - Display / hide programme information
M
? help - Display help information on screen,
regarding the most frequently used keys on
your remote control
N Coloured keys - Select coloured text on
screen
O Keys to operate a video recorder or DVD
player/recorder
P TV - Set the remote control to operate
your television
O
Q Guide - Display the UPC TV Guide menu
R Radio
S VOL +/- Turn the sound level up / down
T c - Mute or restore the sound
U txt - Display / hide teletext
Note
First set up the remote control for use with
your television
Use more of your Digital Cable Receiver75
Page 16
Main menu full overview6.3
Menus are used for the extra features offered by
UPC Digital TV.
Displaying the Main menu6.3.1
Press menu to display the Main menu:
TV Guide• : the user-friendly television
guide.
On Demand• : easy access to movies, etc.
Settings• : to set your preferences.
Digital Radio• : a wide range of digital
music channels.
Interactive Services• : for playing games.
Using the menus6.3.2
Some basic actions will now be explained using
an example screen.
Selecting an option from a list
Most menus contain lists. The highlighted line in
the list is the active selection.
To select a different line, press •
and .
In cases where the line contains several •
options (as is the case with the top bar in
the example screen), use
and to set
the appropriate option. When you select a
different option, the yellow marking jumps.
To confi rm an active selection in a list or •
menu summary, press OK. You will see
another screen or change to the selected
channel.
To select an option using coloured keys:•
some text in the menus is preceded by a
coloured dot (
, , or ). To perform
the action described in the text, press the
key of the same colour on the remote
control.
To go back to the previous screen, press •
the back key.
For more information, press the • i key.
To return to the TV programme, press the •
UPC key.
Tips
You are probably already familiar with •
coloured keys from teletext, where
coloured texts are displayed at the bottom
of the screen so that you can quickly
access the relevant page.
Brief information is often provided at the •
top of the menu screens to indicate which
keys (
, , and ) must be pressed to
select another option.
ENGLISH
TV guide full overview6.4
The UPC TV Guide gives you fast access to a
summary of the programmes you can watch
on the channels available from UPC Digital TV.
You can display a channel list of all programmes
currently being broadcast. For each channel, you
can also request a summary of the programmes
to be broadcast later or over the next few days,
up to eight days in advance.
76Use more of your Digital Cable Receiver
Page 17
Use the Programme Information to obtain
more information on the programmes in the
summaries.
UPC TV Guide6.4.1
Press guide to directly view the UPC TV
Guide or press menu, followed by TV Guide
in the Main menu, and then OK. You will now
see a menu containing channel categories.
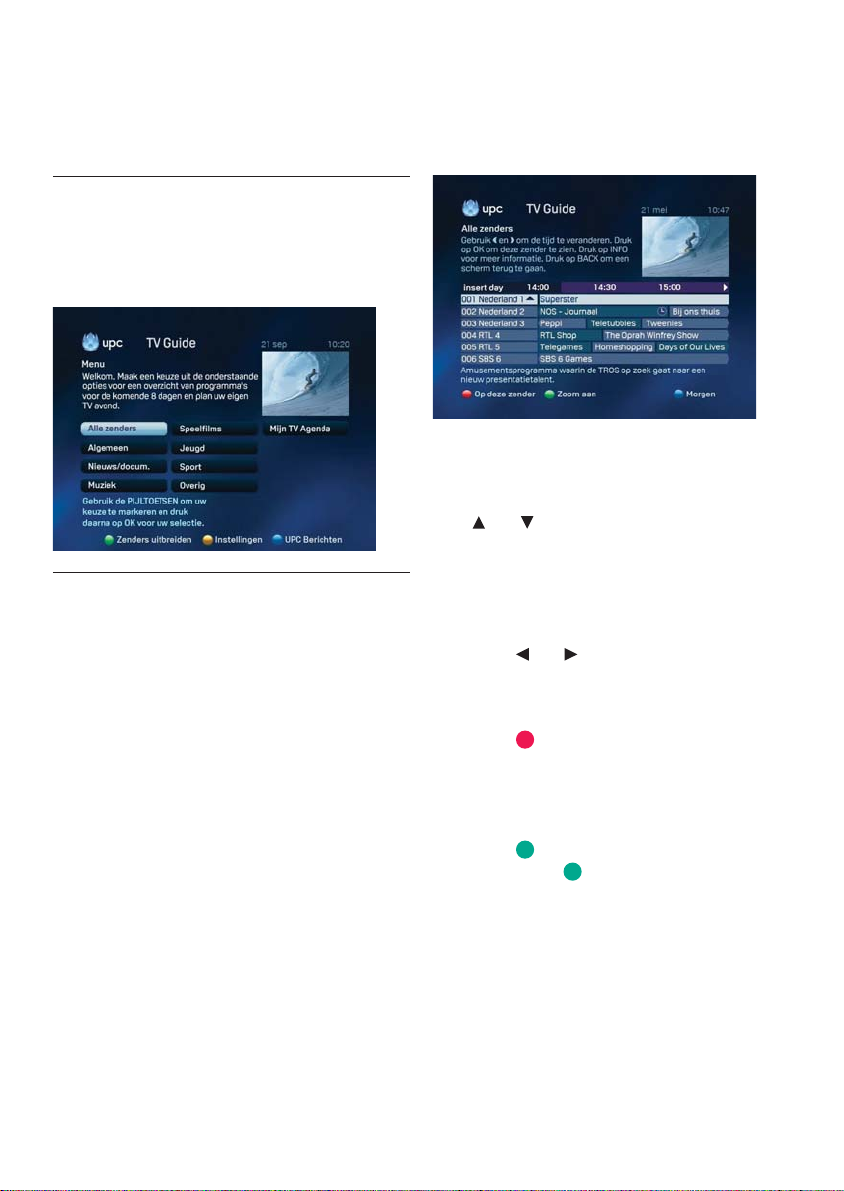
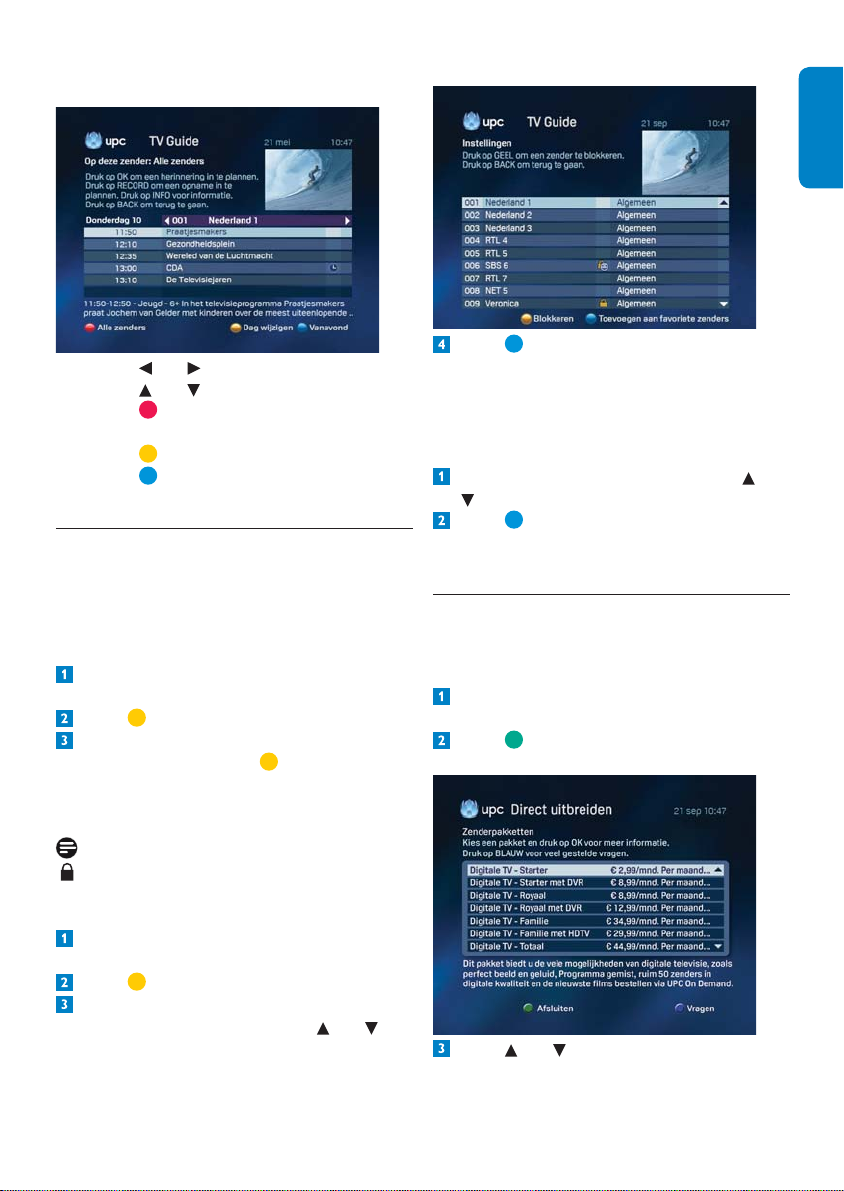
All channels6.4.2
The All channels screen of the TV Guide
provides a complete summary of the
programmes that can now be watched on the
UPC Digital TV channels. Use the All channels
screen to select a programme of your choice,
block access to certain channels, set favourite
channels, order additional subscription, or check
which programmes are being broadcast now or
in the future on a specifi c channel.
Displaying the All channels screen
Select All channels in the UPC TV Guide. You
will see a summary of channels and programmes
currently being broadcast.
The All channels screen provides you with the
following options:
Scroll through the channels by pressing •
and (also see the information on
the screen). The highlight moves up and
down accordingly. At the bottom of the
screen, you will see a brief description of
the programme being broadcast on the
highlighted channel.
Press •
and to view the programmes
broadcast on the channel. Additional
programme information will appear on
your screen.
Press •
shown on the channel during the rest of
the day and over the next few days.
Press the • i key for a detailed description of
the highlighted programme.
Press •
larger. Press
Press • OK to select the channel.
to view the programmes to be
to zoom in. The text will become
again to zoom out.
Use more of your Digital Cable Receiver77
Page 18
On the selected channel
Press • and to view other channels.
Press •
and to select a programme.
Press •
to return to the summary of
channels and programmes.
Press •
Press •
to navigate to the previous day.
to navigate to the next day.
Settings6.4.3
Blocking channels
You can block certain channels as required, if
you do not want your children to watch them
for instance.
Display the UPC TV Guide by pressing
guide.
Press to display the Settings screen.
In this screen, select the channel to be
blocked, and then press
. The channel can
now only be viewed by entering a PIN code.
The default PIN code is 0000.
ENGLISH
Press to add the selected channel to your
favourites (providing the channel has not
already been set as a favourite).
Deleting favourites
To delete favourites from your personal list:
Select the desired channel by pressing and
on your remote control.
Press to delete the selected channel from
the list of favourites (providing the channel
has been set as a favourite).
Adding channels6.4.4
You can order channels for which you do not
have a subscription directly via the Digital Cable
Receiver:
Display the UPC TV Guide by pressing
guide.
Press to directly order your
subscriptions.
Note
indicates that the channel is blocked.
Setting favourites
Display the UPC TV Guide by pressing
guide.
Press to display the Settings screen.
To add favourites to your personal list, select
the desired channel by pressing
and on
the remote control.
Press and to select the subscription of
your choice.
78Use more of your Digital Cable Receiver
Page 19

Press OK to display additional information
on the selected subscription.
Press OK once more to order the
subscription.
Enter the PIN code to process the order.
Note
Channels you have ordered will not directly be
visible once the order has been placed.
It will take a maximum of 48 hours before you
can view this channel.
Setting reminders6.4.5
There are different ways to set reminders: using
the UPC TV Guide or using the Programme
Information Bar.
Setting a reminder using the UPC TV
Guide
Display the UPC TV Guide by pressing
guide on the remote control.
Press OK to access to the channel
categories.
Press to view the programmes to be
shown on the channel during the rest of the
day and over the next few days.
Setting a reminder using the Programme
Information Bar
While the Programme Information Bar is
displayed:
Press to select the next programme.
Press OK to set the reminder.
Summary of reminders
Display the UPC TV Guide by pressing
guide on the remote control.
Select My TV Agenda and press OK.
Navigate to the desired day and channel:
Press •
and to view other channels
Press •
Press •
Choose a programme by pressing and .
Press OK to set a reminder on the selected
programme.
to navigate to the previous day.
to navigate to the next day.
This summary displays at a glance the reminders
you have set.
You can also delete reminders in this screen:
Select the reminder with and .
Press to delete the reminder.
Use more of your Digital Cable Receiver79
Page 20

Settings full overview6.5
In the Settings menu you can confi gure various
preferences for using your UPC Digital TV.
For example, you can set PIN codes to block
channels with an age rating and services, set
preferences for menu and subtitle language and
specify the type of television you have.
Displaying the Settings menu6.5.1
Press menu on the remote control. The
Main menu now appears on your screen.
Select Settings using , , and . The
Settings bar is highlighted.
Press OK. The Settings menu now appears
on your screen.
Displaying the PIN settings menu
PIN settings can be changed using the PIN
settings option of the Settings menu.
Display the Settings menu on your screen
(see chapter Displaying the Settings
menu). By default, the PIN settings bar is
highlighted.
Press OK.
Now enter your Customer PIN code. The
default Customer PIN code is 0000. The OK
button is highlighted.
Press OK. The PIN settings menu now
appears on your screen.
The Parental control option is already
highlighted.
ENGLISH
PIN settings6.5.2
A 4-digit PIN code can be set to block certain
channels and services against use by others (for
example your children).
PIN code protection can be set for:
Restricting access to certain channels;•
Ordering fi lms from UPC On Demand;•
Ordering games via your television;•
Programmes with an age restriction (6+, •
9+, 12+, 16+ and 18+). This enables you to
stop your children watching programmes
for which they are too young.
You now have the following options:
You can use your Parental PIN code to limit
access to programmes with an age restriction.
To access a programme above the set age
restriction, you will be prompted to enter your
Parental PIN code.
This feature enables you to prevent your
children from choosing a programme for which
they are too young:
Select Parental control from the PIN
settings menu, and then press OK.
The Programme Age Lock option is
highlighted.
Select a suitable age restriction (6+, 9+, 12+,
16+ and 18+) using
and .
Press OK.
80Use more of your Digital Cable Receiver
Page 21

You can also set the parental control for
purchases (UPC On Demand / Interactive
Services).
Select Parental control from the PIN
settings menu, and then press OK.
Select the Prompt for PIN when
purchasing ON/OFF option using
option is highlighted.
Select ON using and .
Press OK. Your children will not be able to
make any purchases (unless you have given
them an extra PIN code).
Note
Programmes are only protected by a PIN code if
age restriction information is available for them.
Tips
Games in Interactive Services can be
protected with your Customer PIN code.
Customer PIN and extra PIN
You can set two PIN codes. The most important
PIN code is the Customer PIN code. You can
also give your children an extra PIN so that he
can order On Demand fi lms up to a specifi ed
age restriction or games via the television.
. The
Note
Always choose different digit combinations for
the Customer PIN and extra PIN!
Changing the PIN code
The default PIN code is 0000. It can be changed
in the PIN settings menu
Use , , and to select Customer
PIN or Extra PIN depending on the code
you want to change.
Press OK. A screen for changing your PIN
code is now displayed.
Enter a new PIN code.
Confi rm your new PIN code by entering it
again.
Press OK to save the new PIN code.
Press OK to confi rm or the back key to
cancel the change.
Both PIN codes are set to 0000 by default.
If you want to set PIN code protection, it is
important you change the default code of 0000
for the Customer PIN and extra PIN to four
digits of your choice.
Protecting access to UPC On Demand
Adult fi lms
You can use your Customer PIN code to
protect access to the channel summaries and
the UPC Adult Preview channel. This feature
enables you, for instance, to prevent your
children from viewing the previews and channel
summaries.
Display the UPC On Demand menu with
the on demand key.
Highlight Erotiek using , and then press
OK.
Enter your PIN Code (The default
Customer PIN is 0000) and then press OK.
Use more of your Digital Cable Receiver81
Page 22

Press of your remote control.
Enter your PIN Code again (The default
Customer PIN is 0000) and then press OK.
The Settings screen now appears.
Use and to select Ye s for the Block
the Adult fi lms section? option. Access to
the channel summaries and the UPC Adult
Preview channel is now protected by the
Customer PIN.
Press the UPC key to return to the
television screen.
ENGLISH
82Use more of your Digital Cable Receiver
Page 23

List of PIN settings
The table below lists the most important PIN
settings.
Your requirement:
No protection
To protect all purchases (UPC On Demand,
Interactive Services) with a PIN code (also
from your children)
You do not want your children to watch
programmes unsuitable for their age.
You want your children to be able to order
UPC On Demand fi lms that fall below a
certain age limit and order games.
You want to prevent access to adult channels
and the UPC Adult Preview channel.
Settings required:
- Programme Age Lock OFF
- PIN code for purchases set to OFF
- PIN code for purchases set to ON
- Change Customer PIN and extra PIN
- Do not give your children the extra PIN code
- Set age restriction (6+, 9+, 12+, 16+, 18+)
- Change Customer PIN and extra PIN
- PIN code for purchases set to ON
- Set programme blocking to the desired age
restriction (6+, 9+, 12+, 16+, 18+)
- Set Customer PIN and extra PIN
- Give your children the extra PIN
- PIN code for purchases set to ON
- Change Customer PIN and extra PIN
- Protect access to Adult fi lms
with PIN code set to YES
Incorrect PIN code entered
If you enter an incorrect PIN code three times,
the PIN code will be blocked. You can try again
after 15 minutes.
Use more of your Digital Cable Receiver83
Page 24

Preference settings6.5.3
Preference settings is used to specify your
preferred settings, such as preferred languages
for menus or programmes broadcast in
several languages, or how long the Programme
Information Bar should remain visible when you
change channels.
Displaying the Preference settings menu
Display the Settings menu on your screen
(see chapter Displaying the Settings
menu).
Select Preference settings using , ,
and . The Preference settings bar is
highlighted.
Press OK. The Preference settings menu
now appears on your screen.
Choose your language preferences (only
possible if the channel is broadcast in several
languages) from the following options:
Menu language • is the active option. Press
and to change the language in which
the on-screen menus are displayed.
Press •
to select the Soundtrack
language option, and then press
and
to set the preferred language for
programmes broadcast in several languages.
Note
You can choose from Original (the
programme is shown in the language in
which it was recorded) or a large number
of other languages (a dubbed version of
the programme is broadcast providing the
soundtrack for your specifi ed language is
available).
Press •
to select the Subtitle language
option, and then press
and to set the
preferred subtitle language for programmes
broadcast with subtitles in several
languages.
Note
You can choose Off (the programme is
shown without subtitles) or from a large
number of languages (the programme is
shown with subtitles in your preferred
language providing these subtitles are
available). Your choice of language has no
affect on programmes from the Dutch
public and commercial broadcasting
companies (for example) as the option of
choosing a language is not available.
Use •
to select the Mini TV Guide
display (sec.) option, and then press
and
to specify how long the Programme
Information Bar remains on the screen
when changing channels (2, 4, or 8
seconds).
Use •
to select the Memo countdown
period (min.) option, and then press
and
to specify how many minutes prior
to the start of a programme the reminder
should appear (1, 2, or 5 minutes).
TV settings6.5.4
UPC Digital TV is suitable for conventional and
widescreen televisions. The type of television
only has to be set once. This enables you to
take optimum advantage of the possibilities of
your television, regardless of whether it is a
conventional or widescreen model.
Changing the TV settings
Display the Settings menu on your screen
(see Displaying the Settings menu).
ENGLISH
84Use more of your Digital Cable Receiver
Page 25

Select TV settings using , , and .
The TV settings bar is highlighted.
Press OK. The TV settings screen now
appears.
Choose appropriate TV settings from the
following options:
• TV format is the active option. Use
and
to choose according to your type
of television: Widescreen, Full-screen or
Letterbox.
Select • Picture quality using
and then use
High and Standard, depending on which
setting gives the best result on your
television.
Select • RGB picture alignment using
and
. If necessary, use and to adjust
picture alignment. This value is set correctly
by default.
Select • Volume using
use
and to increase or decrease the
volume of your television when switching
it on. Only use this setting if you think the
default volume is always too loud or too
quiet after switching on the Digital Cable
Receiver.
Select • HDTV audio synchronisation
using
to increase or decrease the audio
synchronisation.
and to choose between
and , and then use and
and ,
and , and then
UPC services6.6
UPC On Demand6.6.1
UPC On Demand offers you access to UPC On
Demand fi lms.
If you feel like watching a fi lm, you can choose
from a wide selection at any time of the day.
Through the UPC On Demand-menu you
can watch fi lms, documentaries, concerts and
TV-shows, among others. UPC On Demand
also offers you the possibility to rewind / fast
forward and pause all programmes as you were
watching a DVD.
Displaying the UPC On Demand menu
Press the on demand key on the remote
control or select On Demand in the Main
menu. The On Demand menu is now
displayed on your screen. The item Films
is highlighted by default. On the right of
your screen you can see UPC fi lm previews
with passages from the UPC On Demand
selection.
Press the UPC key to return to the
programme you were watching.
Use more of your Digital Cable Receiver85
Page 26

You can now choose from the following
options:
Films• , for a selection of fi lms.
Kinderprogramma’s• , for a list of all
programmes for children.
TV-Series,• for a list of all TV series you
can order immediately.
Documentaires • for the most fascinating
documentaries that are available at UPC
On Demand.
Muziek• , for a large selection of concerts
from different performers.
Erotiek• , for adult fi lms.
Paused items• , for a list of all programmes
and fi lms you have ordered in the last 24
hours.
Catch-up TV• , provides access to different
programmes that were broadcasted on
television 1 to 10 days ago.
Films
The Films item summarizes all the fi lms
available. All the fi lms can be ordered directly.
Under Nieuwe Films, there is an overview of
fi lms that were in cinemas only a few months
ago. You can also immediately see a selection of
the latest fi lms under Overige Films.
Displaying Films
Press the on demand key on the remote
control or select On Demand in the Main
menu. The item Films is highlighted by
default.
Press OK.
Choose from the different fi lms or fi lm
categories using
and , and then press
OK. An information screen is displayed.
Press OK again to start ordering the
selected fi lm.
More Information
In the fi lm list, you can fi nd additional
information about a selected fi lm, by pressing the
i key on the remote control.
There is a short description of each fi lm and
information about genre, playback time, director
and actors. By pressing this key again, you return
to the list with fi lms.
Kinderprogramma’s
The Kinderprogramma’s item provides the
fi lms for children between 0 and 6 years old or
between 6 and 12 years old.
Displaying Kinderprogramma’s.
Press the on demand key on the remote
control or select On Demand in the Main
menu.
Press and to select
Kinderprogramma’s. The
Kinderprogramma’s bar is now
highlighted.
ENGLISH
86Use more of your Digital Cable Receiver
Page 27

Press OK. The Kinderprogramma’s
screen is now displayed. You see a list of fi lms
and programmes that can be ordered.
Muziek
In the Music item, there is an overview of
interviews and concerts of different performers,
categorized under All programmes, New
programmes, Concerts and Artists.
Displaying Muziek
Press the on demand key on the remote
control or select On Demand in the Main
menu.
Select Muziek using and .
The Muziek bar is now highlighted.
Press OK. The Muziek screen now appears.
You see a list with music and programmes
you can order.
TV-Series
The TV-Series item provides a list of TV-shows,
divided under features All programmes, New
programmes, Drama and Comedy.
Displaying TV-Series
Press the on demand key on the remote
control or select On Demand in the Main
menu.
Select TV-Series using and .
The TV-Series bar is now highlighted.
Press OK. The TV-Series screen now
appears. You see a list with the fi lms and
programmes you can order.
Documentaires
The Documentaires item provides access to a
collection of interesting documentaires divided
under All programmes, New programmes,
Nature, History or General.
Displaying Documentaires
Press the on demand key on the remote
control or select On Demand in the Main
menu.
Select Documentaires using and .
The Documentaires bar is now highlighted.
Press OK. The Documentaires screen
now appears. You see a list with the
documentaires and programmes you can
order.
Erotiek
The Erotiek item summarizes all the adult fi lms
and programmes. You can immediately order all
fi lms and programmes in Erotiek. If you want an
overview of all titles, press OK.
Note
Access to Erotiek is protected by a PIN code.
The default PIN code is 0000. See Chapter
Settings for more information on setting PIN
code protection.
Displaying Erotiek.
Press the on demand key on the remote
control or select On Demand in the Main
menu.
Select Erotiek using and .
The Erotiek bar is now highlighted.
Use more of your Digital Cable Receiver87
Page 28

Press OK. The Erotiek screen is now
displayed. You see a list of fi lms and
programmes that can be ordered.
Paused items
The Paused items bar provides an overview
of all programmes and fi lms you have ordered
in the last 24 hours at UPC On Demand. You
are able to watch the fi lm you ordered as many
times as you like within 24 hours. These fi lms are
in this section.
Displaying Paused items
Press the on demand key on the remote
control or select On Demand in the Main
menu.
Select Paused items using and .
The Paused items bar is now highlighted.
Press OK. The Paused items screen now
appears. You see a list with the fi lms and
programmes you can order.
Catch-up TV
The Catch-up TV item provides access to
programmes that were broadcast on television
the last couple of days. Depending on your
subscription, you can watch yesterday’s and
today’s programmes or programmes of the last
10 days. For instance, UPC Digital TV – Starter
provides access to today’s and yesterday’s
programmes and UPC Digital TV - Royal,
Family and Total provides access to all available
programmes within Catch-up TV.
Within Catch-up TV, you can choose between
programmes of different broadcasting stations.
For example, you can watch public service
programmes in Catch-up TV Show.
Here, you can search for programmes in
different categories. For example, you can
search for programmes broadcast recently
on Nederland 1 or search for programmes in
different genres.
Using the
and keys, you can change between
the various channels.
ENGLISH
Displaying Catch-up TV
Press the on demand key on the remote
control or select On Demand in the Main
menu.
Select Catch-up TV using and .
The Catch-up TV bar is now highlighted.
Press OK. The Catch-up TV is now
displayed. You see a list with the fi lms and
programmes you can order.
Ordering fi lms
Ordering a fi lm is simple.
Select the fi lm of your choice in the list.
Press OK. A screen displays with additional
information about the selected fi lm.
To order the fi lm, press OK again. You are
now asked to confi rm the purchase.
88Use more of your Digital Cable Receiver
Page 29

Note
On installation of the Digital Cable Receiver, all
UPC On Demand programmes are protected
by the default PIN code 0000. Enter this code to
order a fi lm. See chapter Settings for additional
information on PIN code security.
Confi rm the purchase
There are two options when ordering a fi lm:
If you have set a PIN code, you will need to •
enter the PIN code fi rst (the default PIN
code is 0000). Then select OK using
press OK to confi rm the order.
and
UPC Digital Radio6.6.2
Note
UPC Digital Radio will be available soon.
UPC Digital Radio gives you access to a wide
selection of digital radio channels that you can
listen to on your television or through an audio
system (as long as you have connected your
audio system to the Digital Cable Receiver). The
menu allows quick access to a list of all the radio
channels you can listen to. You can store your
favourite radio channels in a special list.
Viewing all radio channels:
Press Digital Radio to display the Main
menu.
Select Digital Radio using , , and .
The Digital Radio bar is now highlighted.
Press OK. The Digital Radio menu now
appears on your screen.
If you have not set a PIN code, you will •
be asked to confi rm the purchase by
highlighting Ye s and pressing OK. You
can stop the order by selecting Cancel
and pressing OK. After confi rmation, the
text Film ordered will appear at the
bottom of your screen. The fi lm you have
ordered starts immediately after you have
confi rmed your purchase.
Note
Your payments may not be processed. You will
then see notifi cation of this error on your
screen. If this problem persists, please contact
the UPC Customer Service department at
0900-5008080 (€ 0.10 per minute) available
Monday to Friday 8AM to 9PM and Saturday
from 8AM to 6PM.
Select the All radio channels option.
Press OK. You now see a list of all radio
channels you can receive via the Digital
Cable Receiver. The All radio channels
option is directly selected (the bar is
highlighted).
Use more of your Digital Cable Receiver89
Page 30

All radio channels
In the All radio channels screen you can
select a radio channel of your choice, block
access to radio channels or compile a list of
favourites.
Select a channel using and . The bar with
the channel is now highlighted.
You now have the following options:
Press • OK to listen to the selected channel.
Information on the selected channel is
now displayed to the right of the channel
list.
Press •
to block the selected channel. A
will appear to indicate that the channel
is blocked. The channel can only be listened
to once the PIN code has been entered.
The default PIN code is 0000. Chapter
Settings explains how to change the PIN
code.
Press •
to add the selected channel to
My Favourites.
Channels you add to My Favourites will
be placed in a separate list that can be
requested from the Digital Radio menu. To
go to Favourites straight from the current
screen, press
(see also Listening to
favourites further on).
Press the • back key to return to the Digital
Radio menu.
Press the • UPC key to return to the
television channel tuned before you
accessed the Digital Radio menu.
Favourites
By compiling a list with favourite channels, you
always have the channels you like to listen to
at your fi ngertips. You can compile a list with
favourite channels on the All radio channels
screen (see All radio channels).
Compile a list with favourite channels
Select the channel you would like to add
to your favourite list from the All radio
channels screen, using
and .
Press to add the channel to your list of
favourites.
Access Favourites
You can display your list of favourite radio
channels from the Digital Radio menu (see also
Displaying Digital Radio chapter).
You can block radio channels in the Favourites
screen as well as delete favourites from the list.
Select Favourites in the Digital Radio menu.
You see the list of favourite channels you
have selected.
Select a channel using and . The bar with
the channel is now highlighted.
ENGLISH
90Use more of your Digital Cable Receiver
Page 31

You now have the following options:
Press • OK to listen to the selected channel.
You can now read information about the
selected channel at the right side of the
channel list.
Press •
is blocked. The channel can only be listened
to once the PIN code has been entered.
The default PIN code is 0000. Chapter
Settings explains how to change the PIN
code.
Press •
from the list.
Press •
screen and add a favourite channel.
Press the back key to return to the Digital
Radio menu.
Press the • UPC key to return to the
television channel tuned before you
accessed the Digital Radio menu.
to block the selected channel. A
will appear to indicate that the channel
to delete the selected channel
to go to the All radio channels
Select the required service using , ,
and
.
Press OK to confi rm your choice.
News
The news section contains various articles on
domestic and foreign news, and on the economy
and culture.
Note
A screensaver will appear after a certain time
(5 minutes) to prevent the image of the tuner
screen from being burnt into the television
screen. The screensaver will disappear as soon as
you press a key on the remote control.
Interactive Services6.6.3
Interactive Services gives you access to
an interactive page on your television. In the
future, this page will display a broad range of
information. You can already fi nd information
here on the news, weather and traffi c and you
can also play games.
Displaying Interactive menu
Press interactive on your remote control.
A screen containing several options will be
displayed.
Weather
The weather section provides you with the
latest weather forecasts throughout Europe.
Traffi c
The Traffi c section provides you with the latest
rundown of all traffi c jams and road works.
Games
Follow the information on your screen to play
the game of your choice.
If you have to pay for the game, you will be asked
to confi rm the purchase after a short period of
free playing time.
Confi rm the purchase:
If you have set a PIN code, you will need to •
enter the PIN code fi rst (the default PIN
code is 0000). Then select OK with
press OK to confi rm the order.
Use more of your Digital Cable Receiver91
and
Page 32

If you have not set a PIN code, you will •
be asked to confi rm the purchase by
highlighting Ye s and pressing OK. You
can stop the order by selecting No and
pressing OK. After confi rmation, the text
Game ordered will appear at the bottom
of your screen. The game you have ordered
will appear on your screen. You can
continue playing as soon as the purchase is
confi rmed.
Maintenance7
Cleaning7.1
For cleaning, use a soft, damp (not wet) cloth.
Never use any abrasive cloth and aerosol
cleaners.
ENGLISH
Replacement7.2
The Digital Cable Receiver does not contain any
user-serviceable parts. Do not attempt to open
it. All maintenance work must be carried out by
qualifi ed service centres.
Disposal7.3
Your product is designed and manufactured with
high quality materials and components, which
can be recycled and reused.
Please inform yourself about the local separate
collection process for electrical and electronic
products.
Please act according to your local rules and
do not dispose of your old products with your
normal household waste. The correct disposal
of your old product will help prevent potential
negative consequences for the environment and
human health.
Note
A confi rmed purchase can no longer be
cancelled. Your payments may not be processed.
You will then see notifi cation of this error on
your screen. If this problem should be repeated,
please contact the UPC Customer Service
department at 0900-5008080 (€ 0.10 per
minute) available Monday to Friday 8AM to 9PM
and Saturday from 8AM to 6PM
92Maintenance
Page 33

Accessories and 8
connections
8.1 Setting up the remote control
The remote control can be set up so that you
can operate all your devices with one remote
control. However, the remote control needs to
be set up once to operate your television and
video recorder or DVD player/recorder. A list
of the most common brands is given in chapter
Additional Information.
Tip
A complete list of setup codes can be found on
teletext on the UPC Info Channel or at
www.upc.nl/upcdigitaletv/instelcodes
Find the setup code for your device. There is
a separate list of 4-digit setup codes for each
type of device (TV, video recorder or DVD
player/recorder). Most brands have several
setup codes. Try the different setup codes in
succession. Start by setting up the remote
control for your television.
Note
There may be more than one setup code in the
list for your type of television, video recorder or
DVD player/recorder. If this is the case, try the
different setup codes in succession until you fi nd
one that works. If your brand of television, video
recorder or DVD player/recorder is not listed,
use the information under Automatically
search for setup code hereafter.
Press the TV key to set the remote control
to TV mode (to set up the video recorder or
DVD player/recorder use the dvr key).
Press and hold OK and at the same time.
Wait until the light on your remote control
lights up twice before releasing the keys.
Enter the 4-digit setup code using the
numerical keys 1 to 9 on the remote
control. You have 20 seconds to enter the
numbers. The UPC key on the remote
control will light up twice after the fourth
number has been entered to indicate that
the code has been accepted. Perform the
above steps once more.
Press to check whether the device being
set up switches off. If this is not the case,
perform the above steps again.
If the device you have set up switches off
when you press
functions are working.
Automatically search for setup code
If your brand of television, video recorder or
DVD player/recorder is not in the list of setup
codes or the specifi ed setup codes do not work,
proceed as follows.
Tip
A complete list of setup codes can be found on
teletext on the UPC Info Channel or at
www.upc.nl/upcdigitaletv/instelcodes
• Switch on the device for which you want to set
up the remote control.
• Press the TV key and then release it (use the
dvr key to search for the setup code for your
video recorder or DVD player/recorder).
• Press and hold OK and
Wait until the UPC key lights up twice on the
remote control and release the keys.
• Then press 9, 9 and 1 in succession. The UPC
key lights up twice on the remote control.
• Point the remote control at your television and
press
• Continue to point the remote control at
.
your television. Repeatedly press CH+ on the
remote control, until your television switches
off (every time you press CH+ the remote
control sends an “off” signal to your television
that corresponds to a specifi c setup code).
When the setup code corresponding to your
television has been found, your television will
switch off. When the setup code corresponding
to your video recorder or DVD player/
recorder has been found, your video recorder
or DVD player/recorder will stop playing.
, check whether the other
at the same time.
Accessories and connections93
Page 34

• Press the UPC key immediately after your
television switches off to store the setup code.
Note
You may have to press CH+ several times
before the correct setup code is found and your
television switches off. It may take around 15
minutes to fi nd the code using the Search for
setup code function. When searching for the
setup code, make sure you keep the remote
control pointed at the television.
Replacing the batteries
The remote control is supplied with two new
alkaline batteries (type AAA/LR03). If the remote
control is not working, or no longer works
properly, you probably need to replace the
batteries:
• Open the cover on the back of the remote
control.
• Insert two new batteries and close the cover
to the battery compartment
Please note:
Never mix old and new batteries or different
types of batteries (standard and alkaline).
Connections8.2
Scart connection
Cable Wall
Socket
Digital Cable Receiver
TV set
Connect the supplied coaxial cable from the
cable wall socket to the RF IN socket at the
rear of the Digital Cable Receiver.
Connect a scart cable to the scart input of
the TV set and to the TV scart socket at the
rear of the Digital Cable Receiver.
Connect a coaxial cable to the RF input at
the rear of the TV set and to the RF OUT
socket at the rear of the Digital Cable
Receiver.
Plug your Digital Cable Receiver to the
mains using the supplied power cord.
ENGLISH
Tip
You can also switch the Digital Cable Receiver
on and to standby and change the channels
without the remote control.
Switch on the Digital Cable Receiver by pressing
CH+ on the front of the media box.
Once the Digital Cable Receiver is switched on,
you can change channels by pressing CH+/- on
the front of the media box. Press
to switch
the Digital Cable Receiver to standby.
Warning
The image quality will not be in High Defi nition
with the scart connection.
94Accessories and connections
Page 35

Recorder connection
Cable Wall
Socket
Audio connection
Digital Cable Receiver
TV set
Recorder
Connect the supplied coaxial cable from the
cable wall socket to the RF IN socket at the
rear of the Digital Cable Receiver.
Connect a scart cable to the AUX scart
socket at the rear of the Digital Cable
Receiver and to the scart input EXT1 of the
recorder.
Connect a scart cable to the scart input of
the TV set and to the TV scart socket at the
rear of the Digital Cable Receiver.
Connect the ANT IN socket at the rear of
your recorder to the RF OUT socket at
the rear of the Digital Cable Receiver using a
coaxial cable.
Connect the ANT OUT socket at the rear
of your recorder to the RF input of your TV
set using a coaxial cable.
Plug your Digital Cable Receiver to the
mains using the supplied power cord.
Warning
To be able to record digital television, you must
make sure the Digital Cable Receiver is switched
on.
Option A – Optical digital connection
Your audio equipment is fi tted with an optical
digital audio input:
Connect the ♫ OPT audio output of the Digital
Cable Receiver to the relevant audio input of
your audio equipment using an optical cable (not
supplied).
Consult the user manual of your audio
equipment to choose the proper digital audio
input.
Option B – Electrical digital connection
Connect the SPDIF output of the Digital Cable
Receiver to the relevant input of your audio
equipment using a single CINCH cable (not
supplied).
Consult the user manual of your audio
equipment to choose the proper digital audio
input.
Accessories and connections95
Page 36

In-home cabling check8.3
The UPC cable network is modern and reliable.
The digital TV signal runs through the radio/
TV socket in your house and the Digital Cable
Receiver to your TV.
UPC Digital TV is a quality product. Through our
experience we know that bad in-home cabling
and for example the use of unsuitable plugs
often leads to unnecessary failures.
For UPC Digital TV demands suitable quality
material for an optimized picture- and sound
quality. It could be necessary for you to replace
wiring and/or plugs you currently have in
your home, as they possibly do not meet the
necessary requirements.
(Coaxial) Cables
Coaxial Cables (“antenna cables”) transmit the
radio and TV signal, among others.
Take the following items into account:
- Only use coaxial cable type C12. You can have
the coaxial cables you currently use checked
for the right quality at your UPC Centre or a
specialized electronics shop.
- Never connect more than 15 meter coaxial
cable to the end of a splitter.
We advise you never to use more than 28 meter
coaxial cable on a distribution amplifi er. Always
work with cables of one single piece. We advise
against lengthening cables, as this often leads to
loss of signal and failures.
Plugs
A proper plug is made of metal or a metallized
IEC-plug. Plugs with a plastic cap are always
sensitive to interference.
Splitters
A splitter is used to distribute the signal to
multiple sets (for example TV sets). A suitable
splitter has a metal housing,
There are three kinds of splitters:
- T-splitter.
- The push-on splitter that can be pressed onto
the radio/TV socket.
- The socket splitter that is placed in the meter
box, for example. It is usually equipped with socalled F-connectors, recognizable by the thread.
Never place multiple splitters after each other.
The more splitters, the stronger the signal loss.
You should use an amplifi er when you have more
than two sets.
Do you already have UPC Broadband Internet
and/or Telephony? Then it is possible that a pushon splitter or amplifi er has already been placed
over the radio/TV socket.
In that case, check the type. Do you have a UPC
push-on splitter with type indication “CF-01/60
Cable modem optimizer”? Replace it with the
UPC push-on splitter of type “MCPO3”, which
can be purchased at the UPC Centres (see
chapter 10).
ENGLISH
96Accessories and connections
Page 37

Amplifi ers
It is possible that you are dividing the analogue
TV signal to a second and maybe even a third TV
with your own splitter and/or amplifi er.
This connectivity method can have an adverse
effect on the picture-and sound quality of UPC
Digital TV and the transmission of interactive
services. In that case, you need a UPC pushon splitter of type “FDU44”, which can be
purchased at the UPC Centres.
For more advice on cabling in your home
and purchasing items, you can go to the UPC
Centres and the specialized electronics shops.
This ensures that you have good quality material.
In chapter 8 of this manual you can also read
instructions on cabling and the use of materials.
Pay attention!
On purchasing an amplifi er, ensure that it
is bi-directional/ 2-way. For this is required
for using UPC Digital TV and the interactive
services.
Guarantee and service9
For the Philips warranty applicable to this
product, we refer you to the Philips website
www.philips.com/guarantee
In the event you do not have an Internet
connection, please contact your local Philips
Consumer Care Centre. Contact details are
given in the Contact information section of this
manual.
Guarantee and service97
Page 38

Copy/content protection: HDCP on HDMI, •
Technical data10
Macrovision on EXT1 / EXT 2
This product is in conformity with European
95/47/EC and 2002/21/EC directives.
The product complies with the following
European council Directives: 2006/95/EEC and
89/336/EEC.
Tuner/Reception/Transmission
DVB: Cable•
Demodulation type: MPEG-4 DVB compliant, •
MPEG-2 DVB compliant, QAM
Input frequency range: 51 - 858 MHz•
Loop through frequency range: 47-862MHz•
Symbol rate: 3 - 6.9•
Noise fi gure: < 9.5 dB•
Return loss: > 10 dB•
Broadband Interface: Ethernet 100Mb/s, •
Ethernet 10Mb/s
Connectivity
Cable antenna interface: RF in - IEC 169-2, •
RF out - IEC 169-2
Video Output - Digital: HDMI•
TV scart out: Audio L/R, CVBS, RGB•
VCR scart out: Audio L/R, CVBS•
Audio Output - Analog: Audio L/R (cinch)•
Audio Output - Digital: Coaxial (cinch), •
Optical (TOSLINK)
USB: USB 2.0•
Network connections: RJ45•
Audio Decoding
Compression format: Dolby Digital, Multi-•
channel down-mixing, MPEG layer I/II,
MPEG4 HE-AAC, MPEG4 LC-AAC
Sound system: Dolby Digital, Stereo, Mono•
Power
Power supply: 198-276 V•
Power consumption: 22 W•
Dimensions
Product dimensions (WxHxD): •
360 x 55 x 220 mm
Carton dimensions (WxDxH): 480 x 290 x •
120mm
Weight: 1.87 kg•
Weight incl. Packaging: 3 kg•
Accessories
Included Accessories: HDMI cable, coaxial •
cable, Mains cord, Remote Control, User
Manual, Quick start guide, Confi rmation
card, UPC smart card.
Batteries: 2x AAA•
Note
Mechanical design and specifi cations are subject
to change without prior notice
ENGLISH
Video Decoding
Compression Format: MPEG-4 (HD), •
MPEG-4 HP@I4, MPEG-4 HP@I3, MPEG-4
(SD), MPEG-2 MP@HL (high defi nition),
MPEG-2 MP@ML (std defi nition)
Conditional access system: Subscription •
needed for pay-TV, Nagravision (card is
supplied)
De-scrambling: Pay TV ready, Smart Card •
reader
Resolution: up to 1920 x 1080 interlaced•
Aspect Ratio: 16:9, 4:3 Letterbox, 4:3 Pan •
Scan
98Technical data
Page 39

Additional information11
List of activation codes
101 Abcoude
102 Achtkarspelen
103 Alkmaar
104 Almere
105 Amsterdam
107 Apeldoorn
108 Arnhem
109 Asten
110 Barendrecht
111 Barneveld
112 Bergeijk
115 Berkel en Rodenrijs
141 Berkelland
116 Bernisse
117 Beuningen
118 Binnenmaas
119 Bladel
120 Boarnsterhim
121 Boekel
123 Brielle
167 Bronckhorst
233 Bronckhorst
124 Brummen
125 Buren
126 Cranendonck
127 Cromstrijen
128 Deurne
130 Diemen
132 Dirksland
133 Doesburg
134 Doetinchem
135 Dordrecht
136 Dronten
137 Druten
138 Duiven
139 Ede
140 Eersel
142 Eindhoven
143 Elburg
144 Epe
145 Ermelo
146 Ferwerderadeel
147 Geldermalsen
148 Geldrop
149 Gemert-Bakel
151 Goedereede
153 Graafstroom
154 Groenlo-Lichtenvoorde
155 Groesbeek
156 Haarlem
157 Hardinxveld-Giessendam
158 Hattem
159 Heerde
160 Heerenveen
161 Heerjansdam
162 Heeze-Leende
163 Hellevoetsluis
164 Helmond
166 Hilversum
168 Korendijk
169 Krimpen aan den IJssel
170 Laarbeek
171 Landsmeer
172 Leerdam
173 Leeuwarden
174 Leeuwarderadeel
175 Lelystad
177 Lienden en Maurik
178 Liesveld
179 Lingewaal
180 Lingewaard
(Bemmel, Angeren)
181 Lingewaard (Gendt)
152 Lochem
184 Maasdriel
185 Menaldumadeel
186 Middelharnis
187 Mierlo
188 Millingen aan de Rijn
129 Montferland
190 Mook en Middelaar
191 Nederbetuwe (Dodewaard)
192 Nederbetuwe (Echteld)
194 Nederlek
195 Nederweert
197 Neerijnen
198 Nieuw-Lekkerland
199 Nigtevecht
Additional information99
Page 40

200 Nijkerk
201 Nijmegen
202 Nuenen
203 Nunspeet
204 Oirschot
205 Oldebroek
206 Oostfl akkee
207 Oostzaan
208 Oud-Beijerland
150 Oude IJsselstreek
209 Ouder-Amstel
210 Overbetuwe (Elst)
211 Overbetuwe
(Heteren, Valburg)
213 Papendrecht
214 Purmerend
215 Putten
216 Renkum
217 Reusel-De Mierden
218 Rheden
219 Ridderkerk
220 Rijnwaarden
221 Rotterdam
222 Rozenburg
223 Rozendaal
226 ‘s-Gravendeel
227 Sint-Oedenrode
228 Sliedrecht
229 Smallingerland
230 Someren
231 Son en Breugel
232 Spijkenisse
234 Strijen
235 Tiel
236 Tytsjerksteradiel
237 Ubbergen
238 Valkenswaard
239 Veldhoven
240 Vlaardingen
241 Voorst
244 Wageningen
241 Warnsveld
246 Weesp
248 West Maas en Waal
249 Westervoort
250 Westvoorne
251 Wijchen
252 Winterswijk
254 Zaanstad
255 Zaltbommel
256 Zederik
257 Zeewolde
259 Zevenaar
241 Zutphen
261 Zwijndrecht
ENGLISH
List of setup codes for the remote control
This chapter contains a list of setup codes for
setting up the remote control to operate your
television and video recorder or DVD player/
recorder. This list includes the most common
brands. A complete list of setup codes can be
found on teletext on the UPC Info Channel or
at www.upc.nl/upcdigitaletv/instelcodes
Chapter Accessories and connections
describes the procedure for setting up the
remote control to operate your television and
video recorder or DVD player/recorder.
TV setup codes
Aiko 0039, 0067, 0586, 0246, 0401, 0065, 0463,
0102, 0391, 0221, 0294, 0247
Aiwa 0735, 0731, 1946, 1938
Akai 0391, 0238, 0401, 1567, 0067, 0463, 0775,
0221, 0065, 0039, 0102, 0248, 0744, 0193, 0546,
0745, 0632, 0586, 0611, 0510, 0247, 0661, 0246,
0294, 0478, 0208, 0407, 0636, 1067, 1938, 0503,
0678, 0842
Alba 0039, 0448, 0400, 0265, 0401, 0698, 0067,
0586, 1067, 0385, 0248, 0246, 0277, 0193, 0517,
0611, 0066, 1698, 0609, 1938, 0744, 0473
Amstrad 0207, 0039, 0546, 0294, 0401, 0248,
0067, 0586, 0463, 0442, 0392, 1067, 0678, 0611
Anasonic 0400, 0067, 0586, 0039, 0698, 0404,
0193, 0322, 0132, 0441, 0289, 0277, 1467, 0042,
0458, 0134, 1698
Aristona 0586, 0067, 0042
Audiosonic 0039, 0067, 0404, 0586, 0139, 0744,
0745, 0247, 0400, 0367, 0294, 0248, 0516, 0458
Bang & Olufsen 0595, 0117, 0305
Beko 0516, 0065, 0458, 0744, 0400, 0448, 0067,
100Additional information
Page 41

1067, 0586, 0636, 0745
Bestar Daewoo 0404
Blaupunkt 0221, 0565, 0225, 0478, 0485, 0200,
0066
Bush 0698, 0248, 0193, 0039, 0066, 0067, 0401,
0265, 0312, 0385, 0393, 0404, 0294, 0391, 1067,
0517, 0238, 0247, 0644, 0647, 0728, 0611, 0586,
0744, 1930, 1938, 1698
Clatronic 0067, 0400, 0401, 0744, 0248, 0294,
0586, 0247, 0277, 0039, 0132, 0350, 0609, 0678,
0636
Condor 0350, 0067, 0586, 0400, 0246, 0039,
0312, 0132, 0277, 0448, 0441, 0193
Crown 0039, 0400, 0516, 0067, 0586, 0517, 0744,
0636, 0745, 0451, 0448, 0609, 0238, 0369
Daewoo 0664, 0404, 1939, 0529, 0691, 0067,
0586, 0039, 0246, 0248, 0247, 0481, 1167, 1932,
1938, 0910
Dansai 0067, 0586, 0294, 0062, 0065, 0246, 0039,
0066, 0247, 0238
Decca 0102, 0546, 0067, 0586, 0247, 1167, 0651,
1938
Dual 0574, 0247, 0067, 0586, 0289, 0382, 0424,
0193, 0561, 1167, 0661
Elbe 0465, 0268, 0289, 0392, 0322, 0400, 0193,
0067, 0586, 0248, 0221, 0441, 0640, 0247, 0546,
0391, 0660
Emerson 0207, 0744, 0208, 0117, 0277, 0067,
0586, 0401, 0100, 0312, 0350, 0391, 1939, 0516,
0400, 0193, 0351
Ferguson 0655, 0317, 0365, 0268, 0139, 0590,
0067, 0586, 0065, 0134, 0138, 0391, 0578
Fidelity 0193, 0542, 0393, 0067, 0586, 0401, 0442,
0561, 0246, 0294, 0574, 1938, 0391
Finlux 0135, 0134, 0067, 0586, 0744, 0376, 0247,
0102, 0193, 0546, 0745, 0100, 0117, 0132, 0441,
0661, 0522, 0510, 0659, 0503, 0448, 0636, 0651
Firstline 0067, 0586, 0404, 0698, 0744, 0193,
0039, 0351, 0246, 0277, 1939, 0132, 0247, 0441,
0574, 0561, 0268, 0102, 0265, 0238, 0391, 1067,
1698, 0838
Fisher 0134, 0247, 0066, 0238, 0400, 0585, 0075,
0117, 0187, 0391, 0193, 0574, 0102
Fujitsu 0236, 0102, 0132, 0247, 0193, 0039, 0382,
0713, 0067, 0586, 0391, 0289, 0883
Fujitsu General 0039, 0247, 0236, 0193
Goldstar 0067, 0039, 0400, 0320, 0062, 0407,
0247, 0208, 0277, 0246, 0586, 0193, 0391, 0139,
0393, 0636, 0074, 0744, 0745
Goodmans 0664, 0404, 0067, 0529, 0586, 1067,
0698, 1939, 0066, 0294, 0102, 0546, 0039, 0320,
0517, 0401, 0265, 0065, 0510, 0590, 0062, 0247,
0365, 0248, 0481, 1938, 0609, 0660, 0691, 1930,
1698
Granada 0067, 0586, 0256, 0386, 0042, 0075,
0102, 0138, 0238, 0247, 0066, 0369, 0546, 0503,
0365, 0590, 0193, 0393, 0578
Grandin 0067, 0586, 0039, 0193, 0640, 0744,
0745, 0698, 0404, 0350, 0312, 0248, 0485, 0609,
1067, 1698, 0895
Grundig 0538, 0565, 0225, 0221, 0517, 0100,
0736, 0067, 0586, 0617, 0039, 0066, 0473, 0400,
1938, 0660
Hanseatic 0067, 0586, 0529, 0193, 0391, 0322,
0574, 0312, 0424, 0350, 0664, 0458, 0400, 0691,
0039, 0247, 0117, 0407, 0744, 0838
Hauppauge 0067, 0586
Hitachi 1255, 0066, 0386, 0074, 0138, 0503, 0193,
0608, 0226, 0247, 0062, 0224, 0546, 0102, 0511,
0529,
0067, 0586, 0139, 0393, 0578, 0749, 0664, 0774,
0208, 1167, 0135, 0522, 1511, 0391, 0542, 0510,
0827, 1075, 0659, 1067, 0914, 1606, 1179
Hitachi Fujian 0138
Hypson 0067, 0586, 0744, 0745, 0294, 0247,
0312, 0485, 0268, 1938, 0698, 1698
Hyundai 0067, 0895, 0586, 0736, 1182
Interfunk 0067, 0586, 0042, 0117, 0542, 0305,
0193, 0391, 0400, 0139, 0277
Intervision 0312, 0247, 0485, 0067, 0401, 0407,
0478, 0516, 0400, 0424, 0517, 0248, 0132, 0193,
0294, 0277, 0039, 0586
ITT Nokia 0391, 0578, 0193, 0503, 0510, 0376,
0238, 0369, 0636, 0640, 0661, 0393
JVC 0683, 0066, 0713, 0401, 0248, 0636, 0448,
0761, 0123
Karcher 0067, 0586, 0451, 0400, 0640, 0193,
0312, 0132, 0294, 0744, 0636
Kendo 0640, 0067, 0586, 0193, 0542, 0400, 0407,
0393, 0458, 0441, 0132, 0265, 0277, 0392
Kenwood 0135
Kneissel 0067, 0400, 0640, 0441, 0404, 0529,
Additional information101
Page 42

0586, 0465, 0289, 0322, 0268, 0392, 1938
Lenco 0067, 0039, 0193, 0404, 0586, 0134
LG 0067, 0400, 0039, 0407, 0062, 0247, 0586,
0744, 0246, 0320, 0193, 0208, 0636, 0139, 0728,
0745, 0859, 1667, 1176, 1178
Lifetec 0067, 0039, 0404, 0698, 0542, 0685, 1067,
1167, 0586, 0248, 0294, 1698, 0713
Loewe 0542, 0663, 0067, 0586, 0685, 0400, 0117,
0322, 0392, 0820, 0546
Luxor 0224, 1193, 0320, 0393, 0510, 0522, 0391,
0238, 0386, 0578, 0193, 0376, 0503, 1067, 0247,
0661
Matsui 0067, 0586, 0517, 0039, 0265, 0207, 0041,
0385, 0102, 0066, 0247, 0401, 0463, 0473, 0393,
0609, 0485, 0193, 0546, 0065, 0238, 0075, 0225,
0221, 0365, 0744, 0574, 1938, 1067, 0659
Medion 0067, 0698, 0542, 0586, 1167, 0728, 0838,
1938, 1067, 1467, 1930, 1698, 0275
Melectronic 0376, 0067, 0542, 0139, 0277, 0135,
0134, 0404, 0039, 0247, 0510, 0522, 0246, 0441,
0193, 0317, 0586, 0664, 0391, 0221, 0225, 0691
Metz 0225, 0565, 0477, 0221, 0397, 0418, 0776,
0067, 0117, 0586, 0305, 0617, 0698, 1067, 1698
Mitsibishi 0138, 0123, 0542, 0067, 0208, 0117,
0066, 0565, 0586, 0721, 0238, 1067
Multitech 0039, 0393, 0516, 0067, 0400, 0586,
0247, 0246, 0277, 0132, 0294
NEC 0200, 0617, 1200, 1300, 0066, 0350, 0485,
0039, 0404, 0247, 0067, 0586, 0041, 0734, 0275,
0529, 1734, 0801, 0691
Neckerman 0067, 0221, 0400, 1535, 0586, 0193,
0448, 0117, 0277, 0247, 0441, 0350, 0393, 0542
Neufunk 0067, 0039, 0586, 0640, 0248, 0312,
0744
Nikkai 0102, 0248, 0067, 0586, 0247, 0294, 0062,
0065, 0367, 0246, 0039, 0066
Nokia 0391, 0193, 0510, 0578, 0522, 0503, 0369,
0238, 0404, 0661, 0636, 0376, 0350, 0640, 0139
Orion 0067, 0385, 0586, 0685, 0744, 0265, 0473,
0207, 0350, 0041, 0039, 0351, 0132, 0294, 0442,
0546, 0561, 0574, 1946, 1938, 0910
Otto Versand 1535, 0066, 0123, 0542, 0067, 0586,
0565, 0225, 0574, 0221, 0391, 0265, 0139, 0256,
0277, 0350, 0247, 0039, 0312, 0458, 0546
Palladium 0400, 0067, 0221, 1535, 0448, 0586,
0277, 0117, 0193, 0247, 0441, 0685, 0393, 0660,
0744, 1167
Panasonic 0680, 1680, 0138, 0256, 0391, 0397,
0546, 0067, 0586, 0193, 0578, 1340, 0883
Philips 0586, 0067, 0268, 0042, 0221, 0117, 0453,
0404, 0802, 0039, 1786
Pioneer 0196, 0041, 0067, 0200, 0586, 0453,
0458, 0400, 0391, 0139, 0193, 0317, 0516, 0542,
0790
Pionier 0400, 0516
Proline 0067, 0586, 0655, 0664, 0660, 0441, 0042,
0351, 0102, 0651
Protech 0067, 0586, 0247, 0039, 0277, 0132,
0294, 0448, 0367, 0698, 0312, 0193, 0516, 1067,
1698
Quelle 0067, 1535, 0041, 0139, 0542, 0565, 0574,
0221, 0391, 0062, 0066, 0247, 0277, 0100, 0134,
0135, 0698, 0586, 0187, 0225, 0294, 0320, 0376,
0451, 0039, 1698
Radiotone 0039, 0067, 0586, 0458, 0400, 0609,
0448, 0442, 0678, 0698, 0294, 1067, 1698
Samsung 0648, 0617, 0067, 0208, 0586, 0039,
0123, 0247, 0478, 0512, 0400, 0294, 0246, 0320,
0674, 0090, 0062, 0102, 0238, 0712, 0193, 0655,
0842
Sanyo 0238, 0187, 0322, 0066, 0041, 0400, 0369,
0102, 0246, 0247, 0134, 0075, 0585, 0039, 0574,
0193, 0067, 0138, 0586, 0516
Schneider 1167, 0067, 0586, 0042, 0574, 0424,
0382, 0289, 0247, 0277, 0401, 0391, 0248, 0698,
1067, 0193, 0678, 0744, 1939, 1938, 1698
SEG 0067, 0586, 1067, 1467, 0698, 0247, 0517,
0039, 0193, 0294, 0664, 0066, 0132, 0277, 0392,
0246, 0248, 1939, 1698, 1193
Seleco 0236, 0393, 0289, 0392, 0193, 0441, 0703,
0401, 0066, 0294, 0376, 0465
Sharp 0123, 1223, 0187, 0066, 0521, 0683, 0286,
0546, 0790, 0848
Siemens 0221, 0565, 0225, 0187, 0062, 0067,
0586, 0391
Sony 1535, 1681, 0041, 0066, 0132, 0383, 0067,
0586, 0187, 0864
Tandberg 0397, 0441, 0139, 0367, 0226, 0392,
0391, 0193
Teac 0728, 0542, 0067, 1467, 1067, 0586, 0698,
0485, 0247, 0736, 0294, 0574, 1939, 0208, 0039,
0442, 0312, 0448, 0785, 0200, 0744, 1698, 1754,
ENGLISH
102Additional information
Page 43

1179, 1785
Telefunken 0655, 0590, 0139, 0617, 0728, 0528,
0317, 0365, 0226, 0067, 0586, 0516, 0744
Teletech 0067, 0586, 0698, 0039, 0277, 0367,
1067, 1698
Thomson 0655, 0590, 0317, 0139, 0365, 0226,
0067, 0586
Toshiba 0065, 0090, 0538, 0066, 0100, 0132, 1538,
0247, 0139, 0748, 0225, 0221, 0648, 1946, 1938,
0039, 0728, 0067
Triumph 0207, 0546, 0376, 0586, 0067
Universum 0376, 0135, 0565, 0225, 0503, 0391,
0277, 0522, 0510, 0400, 0448, 0041, 0542, 0066,
0187, 0062, 0100, 0193, 0294, 0134, 0067, 0586,
0451, 0441, 0320, 1535, 0698, 0574, 0247, 0139,
0392, 0367, 0207, 0661, 0039, 1067, 1467, 0200,
1698
Vestel 0067, 0193, 0247, 0586, 0698, 1067, 1698,
1193
Waltham 0247, 0386, 0448, 0317, 0067, 0586,
0698, 0139, 1067, 1698
Yamaha 0680, 0827
Video setup codes
Aiwa 0337, 0030, 0378, 0382, 0067, 0772, 0764,
0071, 1167, 0062
Akai 0067, 0136, 0345, 0672, 0071, 0050, 0382,
0270, 0378
Alba 0308, 0102, 0382, 0050, 0030, 0345, 0378,
0111
Amstrad 0030, 0308, 0102
Anasonic 0030
Aristona 0111, 0176
Audiosonic 0308
Bang & Olufsen 0529
Beko 0134
Bestar 0308, 0050
Blaupunkt 1592, 0256, 0111, 0064
Bush 0102, 0308, 0345, 0382, 0030, 0378, 0111,
0672, 0772
Clatronic 0050, 0102, 0030
Condor 0050, 0308
Crown 0067, 0308, 0102, 0510, 0050
Daewoo 0308, 0672, 0667, 0874, 0378, 0382,
0075, 0050
Dansai 0102, 0308
Decca 0030, 0071, 0111, 0097, 0378, 0382
Dual 0071, 0111, 0308, 0030, 0378
Elbe 0308, 0068
Emerson 0102, 0075, 0030
Ferguson 0071, 0350, 0351, 0030, 0308
Fidelity 0030, 0102, 0270, 0462, 0382
Finlux 0030, 0111, 0134, 0072
Firstline 0102, 0378, 0073, 0067, 0075, 0072,
0308, 1167
Fisher 0077, 0134, 0068, 0050
Fujitsu 0030
Fujitsu General 0067
Goldstar 0067, 0510, 0030
Goodmans 0030, 0102, 0270, 0308, 0067, 0050,
0111, 0378, 0667, 0382, 0672
Granada 0134, 0078, 0111, 0270, 0067, 0256,
0072, 0030
Grandin 0102, 0067, 0050, 0030, 0308
Grundig 0111, 0377, 0379, 0256, 0350, 0378,
0102, 0382, 0772, 0064
Hanseatic 0067, 0308, 0111, 0068
Hitachi 0072, 0196, 0071, 0030, 0270, 0111, 0134,
0414, 0623
Hypson 0102, 0308, 0382, 0030, 0067, 0510
Interfunk 0111, 0134
Intervision 0030, 0308, 0067, 0378
ITT Nokia 0078, 0582
JVC 0071 0097, 0414, 0516
Karcher 0308
Kendo 0136, 0345, 0378, 0102, 0067, 0308
Kenwood 0071, 0068
Kneissel 0382, 0378, 0067, 0308
Lenco 0308
LG 0067, 0510, 0030, 0308, 1167
Lifetec 0378
Loewe 0111, 1592, 0256, 0067
Luxor 0136, 0073, 0102, 0134, 0077, 0078, 0345
Matsui 0378, 0067, 0270, 0382, 0030, 0772
Medion 0378, 0382
Melectronic 0030, 0067, 0068
Metz 1592, 0256, 0377, 0111, 0067, 0866, 0867
Mitsubishi 0073, 0097, 0111, 0510, 0030, 0672
Multitech 0067
NEC 0071, 0068, 0097, 0134, 0067, 0308, 1167
Neckerman 0071, 0111
Neufunk 0067
Additional information103
Page 44

Nikkai 0050, 0102, 0308
Nokia 0134, 0136, 0345, 0071, 0308, 0270, 0078,
0072, 0111, 0582
Orion 0382, 0378, 0379, 0772
Otto Versand 0111
Palladium 0102, 0345, 0067, 0071, 0270, 0378,
0462
Panasonic 1592, 0256, 0866, 0867
Philips 0111, 0176, 1311, 0414, 0623, 1299
Pioneer 0097, 0111, 0072, 1833
Proline 0030, 0308, 0350, 0672, 0351
Protech 0111, 0308
Quelle 0111
Samsung 0270, 0462, 0650
Sanyo 0134, 0077, 0078, 0097
Schneider 0102, 0030, 0067, 0111, 0308, 0270,
0176, 0072, 0382, 0672
SEG 0102, 0270, 0308, 0672, 0111, 0667
Seleco 0071, 0414, 0050, 0067
Sharp 0078, 0067, 0599
Siemens 0067, 0134, 0111, 0176, 0350, 0377
Sony 0064, 0062, 0136, 1062
Tandberg 0308
Teac 0102, 0071, 0030, 0308, 0672, 0067, 0111,
0337, 0623, 0667, 0874
Telefunken 0672, 0071, 0350, 0351, 0414, 0524,
0308
Teletech 0102, 0308, 0030
Thomson 0350, 0752, 0351, 0071, 0097, 0414,
0524, 0308
Toshiba 0075, 0071, 0414, 0073, 0111, 0772, 0382,
1038
Universum 0030, 0111, 0270, 0067, 0136, 0378,
0134
Yamaha 0071
DVD player/recorder setup codes
Aiwa 0671, 0725, 1942, 0899, 1166, 0563
Akai 0820, 0809, 0818, 0796, 0720, 0746, 0914,
0743, 0882, 0735, 1113, 1145, 1229, 1725, 1166
Alba 0747, 0729, 0743, 0753, 0763, 0725, 0760,
0813, 0569, 0702, 1170, 1081
Amstrad 0743
Anasonic 0861
Audiosonic 0720, 1953
Bang & Olufsen 1055
Blaupunkt 0747
Bush 0743, 0725, 0863, 1725, 0760, 0861, 0729,
0720, 0719, 0747, 0546, 0848, 0909, 0914, 0753
Clatronic 0818, 0809, 0848, 0702
Crown 0800, 0681, 0720
Daewoo 0735, 0862, 0863, 0800, 0744, 1948,
0900, 0902, 1171, 1199
Dansai 0800, 0777, 0813, 1145
Decca 0800
Dual 0695, 0681, 0743, 0760, 0861, 0813, 0809,
0820
Emerson 0621, 0735
Ferguson 0681
Finlux 0771, 0800, 0813, 0621, 0702, 0781, 1177
Firstline 0829, 0899, 0681
Fisher 1949
Goldstar 0621, 0771
Goodmans 0681, 1034, 0820, 0720, 0813, 0753,
0848, 0909, 0863, 2037, 0743, 0760, 1251
Grandin 0746, 1284, 0702
Grundig 0725, 0805, 0569, 0681, 0735, 0820,
0743, 0700, 0753, 1725, 2076, 1034, 1760, 1950
Hanseatic 0771, 0813, 1183
Hitachi 0694, 0695, 0603, 0809, 1950, 0887, 2024,
0743
Hyundai 0813, 1048, 0880, 0796, 1258, 2076
JVC 0653, 0588, 1931, 1970, 1194, 0569, 0533,
0897
Karcher 0813
Kendo 0729, 0743, 0861
Kenwood 0564, 0520, 0767
Lenco 0729, 0681, 0800, 0848, 0743, 1059, 0861
LG 0621, 0771, 1936, 0899, 2013, 2032
Lifetec 0681, 0861
Loewe 0569, 0771
Luxor 1034, 0743, 1760, 0760, 1275
Matsui 0681, 0743, 0702, 0725, 0914, 1760
Medion 0861, 0813, 0681, 0746, 0909, 0660, 2042,
2037
Metz 0601, 0555, 0743
Mitsubishi 0743
NEC 0899, 0722, 0621, 1948
Neufunk 0695
Nikkai 1953
Palladium 0725, 0809
Panasonic 0520, 1938, 1935, 1040, 1041
ENGLISH
104Additional information
Page 45

Philips 0569, 0676, 0915, 0533, 1941, 0705, 1842,
1188
Pioneer 0601, 1995, 0661, 0555, 1841
Proline 0681, 0702, 0820, 1034, 0863, 1945
Samsung 0603, 0774, 1962, 1958, 0850, 1105,
0520
Sanyo 0700, 0725, 0820, 1949, 0903
Schneider 0813, 0861, 0809, 0735, 0818, 0743,
0681, 0820, 1183, 1131
SEG 0695, 0743, 0798, 0914, 0902, 0793
Sharp 0660, 0782, 0725
Sony 0563, 1663, 1563, 2011, 1100, 1933, 0802,
1964, 1163, 1063, 0603, 1099
Tandberg 0743
Teac 0747, 0771, 0546, 0601, 0722, 0798, 0621,
0820, 1227, 1960, 1965, 0863
Telefunken 0820, 1113, 0819, 0818
Teletech 0743
Thomson 0581, 0552
Toshiba 0533, 1075, 2018, 2036
Universum 0771, 0743, 0621, 0809, 1948, 1943,
1257, 0820
Vestel 0743, 2024
Yamaha 0569, 0676, 0520
Additional information105
Page 46

Frequently asked 12
questions
If you encounter any problem concerning
the service, please contact the UPC
Customer Service department at
0900-5008080 (€ 0.10 per minute)
available Monday to Friday 8AM to 9PM
and Saturday from 8AM to 6PM
Testing the complete installation1.
If the quality of the signal is poor, do a test by
going to channel 999.
Step 1
Press the UPC key on the remote control and
then press 9 9 9.
The test channel is now displayed. A message
appears after a few seconds, telling you to press
on your remote control.
Step 2
Press
execute fi ve tests.
on the remote control to automatically
other on screen. If one of the tests comes back
with an error as result, we recommend that you
check the connections of all plugs and cables
and execute the test on channel 999 again. If
the test still comes back with an error, please
contact the UPC Customer Service department
at 0900-5008080 (€ 0.10 per minute) available
Monday to Friday 8AM to 9PM and Saturday
from 8AM to 6PM
The following message appears: “de 2.
installatie wordt nu voltooid. Dit kan 15
minuten duren ...”. What now?
This screen indicates that the installation will
now be completed. Wait at least 15 minutes.
If the Digital Cable Receiver still displays the
same message after 15 minutes, please contact
the UPC Customer Service department at
0900-5008080 (€ 0.10 per minute) available
Monday to Friday 8AM to 9PM and Saturday
from 8AM to 6PM to ask for the status of your
subscription.
I want to select a channel listed in the 3.
UPC TV Guide channel summary but see
the message “Zender niet toegankelijk”.
The channel summary of the UPC TV Guide
displays all the channels available from UPC
Digital TV, even those you are not subscribed
to. You can only select channels to which you
have subscribed. To watch a channel you must
subscribe to it. If you would like to subscribe
to additional channels, you can purchase a
subscription directly using the remote control.
Go to the UPC TV Guide and press
remote control. Select the subscription you
would like to purchase and follow the steps on
the screen. Please contact the UPC Customer
Service department at 0900-5008080 (€ 0.10
per minute) available Monday to Friday 8AM to
9PM and Saturday from 8AM to 6PM
on your
ENGLISH
The results of those tests appear under each
I want to select a channel to which I’ve 4.
subscribed, but the television picture stays
black.
Unfortunately, fault situations can arise (for
a number of different reasons) which can
106Frequently asked questions
Page 47

adversely affect the reception of channels. Please
contact the UPC Customer Service department
at 0900-5008080 (€ 0.10 per minute) available
Monday to Friday 8AM to 9PM and Saturday
from 8AM to 6PM
Have you lost or forgotten your PIN 5.
code?
The default PIN code is “0000” but you have
the option of changing it. It is possible to lose
or forget your PIN code after it has been
changed. To reset your PIN code please contact
Call the UPC Customer Service department
at 0900-5008080 (€ 0.10 per minute) available
Monday to Friday 8AM to 9PM and Saturday
from 8AM to 6PM
I can no longer order any fi lms via the 6.
Digital Cable Receiver.
Your Digital Cable Receiver may not be
connected properly to the wall socket. If you
have directly connected the device to the wall
socket, there may be other causes. If you want
to be certain of the cause you can perform a
diagnosis. Go to channel 999, wait for a few
seconds and then press
will be carried out. If one of the fi ve tests
should result in ERROR, please contact the UPC
Customer Service department at 0900-5008080
(€ 0.10 per minute) available Monday to Friday
8AM to 9PM and Saturday from 8AM to 6PM
I have completed the installation 7.
procedure and noticed that “150”
channels were found, but am unable to
view them all. What should I do?
The number of channels you can view depends
on your subscription.
Some channels require an additional
subscription. If you are interested, please contact
the UPC Customer Service department at
0900-5008080 (€ 0.10 per minute) available
Monday to Friday 8AM to 9PM and Saturday
from 8AM to 6PM.
. Five different tests
If you encounter any problem concerning
the product, please contact the Philips
Consumer Care Centre at 0900 84 07
(€ 0.10 per minute).
Can I use UPC Digital TV as soon as 8.
the Digital Cable Receiver is installed?
You can watch television and enjoy the benefi ts
of UPC Digital TV once the Digital Cable
Receiver has been installed and the subscription
of UPC HD TV has been activated. You will
experience enhanced (digital) picture and sound
quality, and have access to a wider selection of
television and radio channels. You can order fi lms
and have instant access to the UPC TV Guide,
an electronic programme guide, at all times.
The Digital Cable Receiver supports special TV
settings, such as parental locking for programmes
which should not be watched by your children.
How does the remote control work?9.
The remote control supplied has been specially
designed to take optimum advantage of the
possibilities offered by UPC Digital TV. It can
also be used to operate your television, video
recorder or DVD player/recorder. More
information on using the remote control and a
detailed explanation of the keys can be found in
the Remote control full overview chapter.
Can I also use the remote control for 10.
my television and other devices?
The remote control can be used to operate
your TV and DVD player/recorder or video
recorder. The remote control is set up by default
to operate the Digital Cable Receiver. To use the
remote control with your TV and DVD player/
recorder or video recorder, the remote control
must fi rst be set up for these devices. After the
remote control has been set up for use with
your TV, it can be used to increase or decrease
the volume of digital TV and radio programmes.
If you do not set up the remote control, you will
only be able to increase or decrease the volume
with the remote control for your television. The
user manual describes how to set up the remote
control for use with other devices.
Frequently asked questions107
Page 48

My remote control no longer works.11.
If the remote control no longer works properly,
this probably means the batteries need replacing.
In order to function correctly, the remote
control requires direct contact with the Digital
Cable Receiver, without any obstacles between
them. If it still doesn’t work, contact the Philips
Consumer Care Centre at 0900 84 07 (€ 0.10
per minute).
The UPC Digital TV sound is quieter 12.
than the sound of the analog channels
from the standard Radio/TV package. How
can I increase the volume?
You can increase or decrease the volume of
UPC Digital TV by selecting the TV settings
option from the Settings menu.
The volume keys on the remote 13.
control do not work. I cannot change the
volume for any programmes. What must
I do?
To increase or decrease the volume for UPC
Digital TV programmes with the remote control,
the remote control must fi rst be set up for use
with your television. If you do not set up the
remote control, you will only be able to increase
or decrease the volume with the remote
control for your television. The Setting up the
remote control chapter describes how to
set up the remote control for use with other
devices.
The television picture is pixelated or 14.
the “Signaalverlies” screen appears.
Symptoms of interference or signal loss on the
cable network (which can be due to a number
of reasons) include pixelation (visible blocks) of
the picture from the Digital Cable Receiver. The
signal received by the Digital Cable Receiver is
too weak. If the pixelated effect continues or the
message “Signaal verlies: Er schijnt geen signaal
te zijn” appears, it is important that you fi rst
check the coaxial cable between the wall socket
and the Digital Cable Receiver. It is imperative
for the quality of the digital TV signal that the
supplied cables or other cables compliant with
the C12 standard are used (C12 is short for
Coax12 - this cable meets the attenuation
(loss) and irradiation requirements). If you
are using your own distributors or amplifi ers,
disconnect them fi rst and connect the Digital
Cable Receiver directly to the wall socket. Use
the RF Out output on the Digital Cable Receiver
if you want to feed the analog television signal
to several televisions in your home. If the
picture remains pixelated after the cables have
been checked or the “Signaal verlies: Er schijnt
geen signaal te zijn” does not disappear, please
contact the Philips Consumer Care Centre at
0900 84 07 (€ 0.10 per minute).
The Digital Cable Receiver has crashed 15.
and I cannot do anything anymore.
Unfortunately, the Digital Cable Receiver
sometimes crashes and can no longer be
operated by the remote control or the
buttons on the front panel of the Digital Cable
Receiver. One possible reason for the Digital
Cable Receiver crashing is that the device is
currently receiving new information. In this
case, the message Software Download in
Progress will appear on screen. The message
will disappear from your screen as soon as the
Digital Cable Receiver has fi nished receiving the
information. You can now resume using the UPC
Digital TV services. If the Digital Cable Receiver
does not respond and/or the Software
Download in Progress message does not
appear, it may help to briefl y disconnect the
mains power to the Digital Cable Receiver.
If the Digital Cable Receiver still does not work
after this, please contact the Philips Consumer
Care Centre at 0900 84 07 (€ 0.10 per minute).
I have connected the Digital Cable 16.
Receiver and a screen now prompts me to
enter a location code. What should I do?
You must enter the location code for the town/
city in which you live.
The location code can be found in the
Additional information chapter.
ENGLISH
108Frequently asked questions
Page 49

The following message appears: 17.
“‘signaal verlies, er schijnt geen signaal te
zijn...”. What should I do?
This message indicates that the signal received
by your Digital Cable Receiver is too weak or
there is no signal.
Check that your Digital Cable Receiver is
directly connected to the wall socket - without
any intermediate non-UPC devices, distributors
or amplifi ers. If the problem cannot be resolved,
please contact the Philips Consumer Care
Centre at 0900 84 07 (€ 0.10 per minute).
I have completed the installation 18.
procedure, however the picture is very
poor. What must I do?
There can be several reasons for poor picture
quality - how would you describe the visible
symptoms of the fault?
Wrong TV format19.
The wrong picture format may also be set in the
TV settings option of the Settings menu.
Stripes, interference, black & white, 20.
specks, blurry or discoloured picture:
These faults are caused by the cable between
the Digital Cable Receiver and your television
or other external devices. Check whether these
cables are faulty or the connectors are loose
and replace the cables.
Black, frozen, pixelated picture:
This fault is caused by a problem in the signal
received by the device. Possible causes include
poor or loose cables or malfunctions in our
network. Check that the Digital Cable Receiver
is directly connected to the wall socket without any intermediate non-UPC devices,
distributors or amplifi ers. If the problem cannot
be resolved, please contact the Philips Consumer
Care Centre at 0900 84 07 (€ 0.10 per minute).
The device seems slow when I’m 21.
zapping.
Changing channels with digital television takes
approximately half a second longer than with
analog television and switching between HD and
SD channels might also take longer.
Should I leave the Digital Cable 22.
Receiver in standby mode when I’m not
watching television?
The Digital Cable Receiver regularly receives
software updates via the cable network. New
services (such as new games) are also received
via these “software downloads”. In order to
receive the new software (and new services),
it is important that you leave the Digital Cable
Receiver in standby mode if you are not using it.
What do I have to check when 23.
connecting the Digital Cable Receiver?
It is important that you directly connect your
Digital Cable Receiver to the wall socket,
without any intermediate non-UPC devices,
distributors or amplifi ers. There must also
be suffi cient space around the Digital Cable
Receiver to ensure proper ventilation.
I have several televisions at home. Can 24.
I watch UPC Digital TV on all of them?
This is not possible, unfortunately. The “digital”
signal can only be used with one television.
By connecting a distributor to the aerial (RF)
output, your “normal” analog TV signal can be
distributed to the other televisions in your
home.
I have just connected the Digital Cable 25.
Receiver but don’t see a picture. What
should I do?
Check whether the Digital Cable Receiver is
connected to the 230V mains voltage. Also check
whether the Digital Cable Receiver has been
correctly connected to the television and that
the right channel has been selected.
Frequently asked questions109
Page 50

How do I connect the Digital Cable 26.
Receiver?
Instructions can be found in the Connect
chapter. If you are purchasing several UPC
products, you can fi nd the instructions in the
installation manual Connecting all UPC
services. If you are unable or do not wish to
carry out the installation yourself, an installer
can perform the installation for you. Please
contact the Philips Consumer Care Centre at
0900 84 07 (€ 0.10 per minute).
ENGLISH
110Frequently asked questions
Page 51

Glossary of terms13
Analogue audio
Sound that has not been turned into numbers.
Analogue sound is available from the LEFT/
RIGHT AUDIO outputs. The red and white
sockets send audio through two channels, the
left and right.
Aspect ratio
Aspect ratio refers to the length to height ratio
of TV screens. The ratio of a standard TV is 4:3,
while the ratio of a high-defi nition or wide TV is
16:9. The letterbox format allows you to enjoy a
picture with a wider perspective on a standard
4:3 screen.
Delay
The time difference between a sonic event and
its perception at the listening position. Use the
Lip Synchronization feature to cancel the delay.
De-scrambling/scrambled
Many TV channels are scrambled. To de-scramble
them you need specifi c smart cards provided by
different pay-TV providers.
Digital audio
Sound signal that has been converted into
numerical values. Digital sound is available
when you use the DIGITAL AUDIO OUT
COAXIAL. These sockets send audio through
multiple channels, instead of just two channels as
analogue does.
HDMI
HDMI is a standard for video interfacing; it can
convey a massive amount of digital data. It means
it can easily support all HDTV standards.
HDTV
High-Defi nition Television.
Interactive
Gives you access to an interactive page offering
various information and services.
JPEG-EXIF
JPEG-Exchangeable Image File. A fi le format
developed by Fuji Photo Film for digital
still cameras. Digital cameras from various
manufacturers use this compressed fi le format,
which carries date, time and thumbnails
information, as well as picture data.
JPEG
A very common digital still picture format. A
still-picture data compression system proposed
by the Joint Photographic Expert Group, which
features small decrease in image quality in
spite of its high compression ratio. Files are
recognized by their fi le extension “JPG” or
“JPEG”.
Lip Synchronization
Setting used to synchronize sound and pictures
in case a delay is experienced, in particular if the
sound of speech does not match lip movements.
Dolby Digital
A surround sound system developed by Dolby
Laboratories containing up to six channels of
digital audio (front left and right, surround left
and right, centre and subwoofer).
DVB
Digital Video Broadcasting.
MPEG
Motion Picture Experts Group. A collection of
compression systems for digital audio and video.
Glossary of terms111
Page 52

PIN Code: 4-digit code used to prevent access
to inappropriate programmes (parental control).
scart Loop-through
Function allowing automatic signal by-pass for
playback from a VCR or DVD player/recorder
connected to scart EXT2.
SDTV
Standard Defi nition Television.
Smart card
Card to be inserted into the smart card slot. It
is provided by the pay-TV provider whom you
took out a subscription.
Surround
A system for creating three dimension sound
fi elds full of realism by arranging multiple
speakers around the listener.
UPC On Demand
Gives you on-demand access to fi lms from UPC
On Demand.
ENGLISH
112Glossary of terms
Page 53

Index14
Connect
basic connection, 10
Favourite lists
Add channels to a favourite list, 19
Remove channels from a favourite list, 19
Install
First installation, 10
Search failure, 12
Programme Information Bar, 13
Remote control
Prepare the remote control, 9
Setting up the remote control, 34
Use the remote control, 16
Select a channel, 13
Smart card
Check the smart card, 10
Index113
Page 54

Contact information
DCR 5012
Serial number:
UPC Centre Arnhem
Koningstraat 73
Monday 13:00 - 18:00
Tuesday to Friday 9:30 - 18:00
New: Thursday open to 21:00
Saturday 9:30 - 17:00
Closed on Sunday
UPC Centre Nijmegen
Takenhofplein 1
Monday 10:00 - 17:30
Tuesday to Friday 9:00 - 17:30
Closed on Saturdays and Sundays
ENGLISH
PHILIPS Nederland / The Netherlands
Philips Consumentenlijn
Postbus 102
5600 AC Eindhoven
Tel: 0900 8407 (€ 0,10/min)
UPC Centre Almere Stad
Traverse 5 (opposite the Utopolis movie
theater)
Monday 13:00 - 18:00
Tuesday to Friday 9:30 - 18:00
New: Thursday open to 21:00
Saturday 9:30 - 17:00
Every last Sunday of the month between 12:00
and 17:00
UPC Centre Amsterdam
Kabelweg 51
Monday 10:00 - 17:30
Tuesday to Friday 9:00 - 17:30
Closed on Saturdays and Sundays
UPC Centre Amsterdam
Ceintuurbaan 117
Monday 10:00 - 17:30
Tuesday to Friday 9:30 - 17:30
New: Thursday open to 21:00
Saturday 9:30 - 17:00
Closed on Sunday
UPC Centre Haarlem
Grote Houtstraat 133
Monday 13:00 - 18:00
Tuesday to Friday 9:30 - 18:00
New: Thursday open to 21:00
Saturday 9:30 - 17:00
Closed on Sunday
UPC Centre Leeuwarden
Ruiterskwartier 127 (on Zaailand Square)
Monday 13:00 - 18:00
Tuesday to Friday 9:30 - 18:00
New: Thursday open to 21:00
Saturday 9:30 - 17:00
Closed on Sunday
UPC Centre Rotterdam
Lijnbaan 117
Monday 12:00 - 18:00
Tuesday to Thursday 9:30 - 18:00
Friday 9:30 - 21:00
Saturday 9:30 - 18:00
Sunday 12:00 - 17:00
UPC Centre Rotterdam
Zuidplein Hoog 441
Monday 12:00 - 18:00
Tuesday to Thursday 9:30 - 18:00
Friday 9:30 - 21:00
Saturday 9:30 - 17:00
Sunday - only when shops are open
114Contact information
Page 55

UPC Customer Service
If you have any questions after reading this
manual or if you come across any unexpected
situations during or after installation of the
device, please contact the UPC Customer
Service department at 0900 15 80 for technical
support (€ 0.10 per minute), available seven days
a week from 08:00 to 21:00.
Websites
For more information about Philips products,
please visit www.philips.com
Trademarks and partner logos
Trademarks are the property of Koninklijke
Philips Electronics N.V. or their respective
owners.
Visit our website for more information on the
possibilities offered by UPC Digital TV, as well
as by UPC Broadband Internet, UPC Telephony
and UPC Mobile. For more information and
questions about UPC Digital TV, visit:
www.upc.nl
Manufactured under license from Dolby
Laboratories.
“Dolby”, “Pro Logic”, and the double-D
symbol are trademarks of Dolby Laboratories.
HDMI, and HDMI logo and High-Defi nition
Multimedia Interface are trademarks or
registered trademarks of HDMI licensing LLC.
Trademark of the DVB Digital Video
Broadcasting Project (1991 to 1996).
The “HD ready” Logo is a trademark of
EICTA.
100% recycled paper
100% papier recyclé
Trademarks and partner logos115
Page 56

Page 57

© 2008 Koninklijke Philips Electronics N.V.
All rights reserved.
Document order number: 3111 176 54541
 Loading...