

Page 1
Question?
Contact
Philips
Always there to help you
Register your product and get support at
www.philips.com/welcome
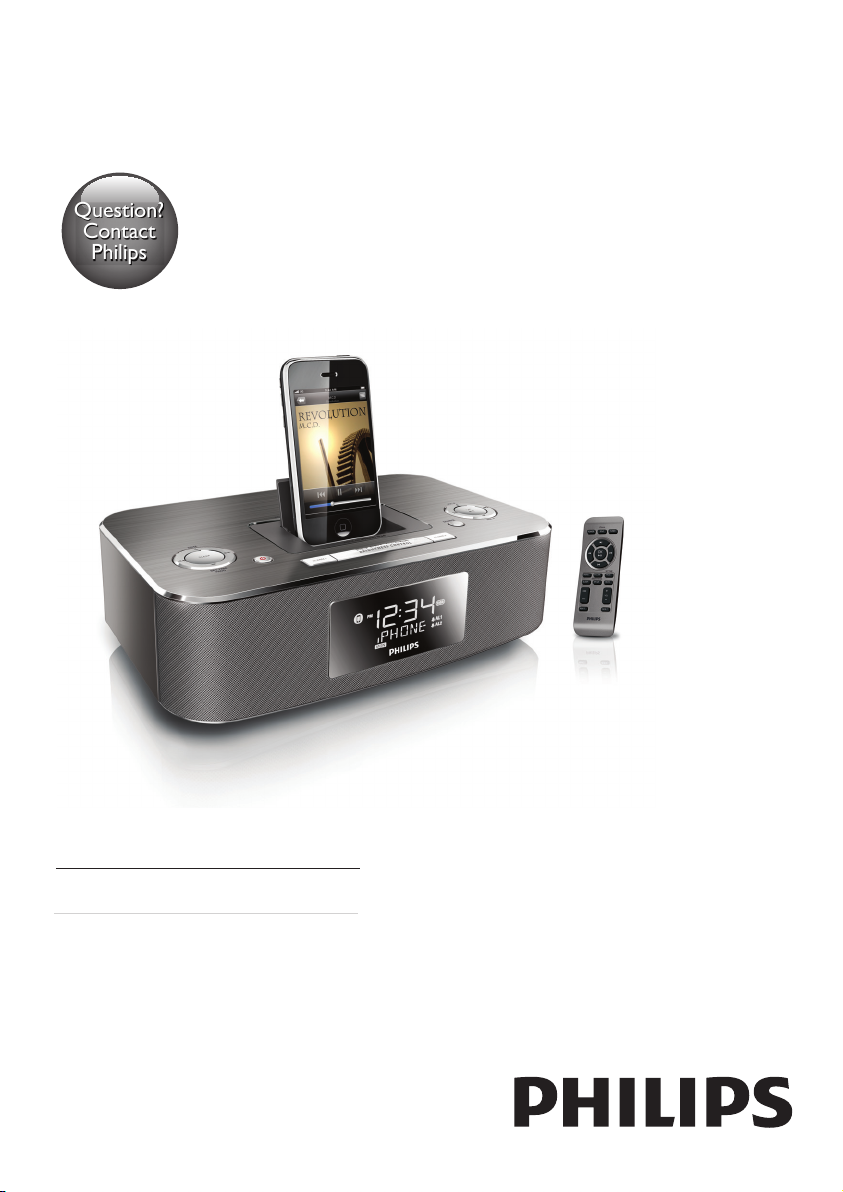
DC290B
EN User manual 3
Page 2

Canada
English:
This digital apparatus does not exceed the Class B limits for radio noise emissions from digital apparatus
as set out in the Radio Interference Regulations of the Canadian Department of Communications. This
Class B digital apparatus complies with Canadian ICES-003.
Français:
Cet appareil numérique n’émet pas de bruits radioélectriques dépassant les limites applicables aux
appareils numériques de Classe B prescrites dans le Règlement sur le Brouillage Radioélectrique édicté
par le Ministère des Communications du Canada. Cet appareil numérique de la classe B est conforme à
la norme NMB-003 du Canada.
The set complies with the FCC-Rules, Part 15 and with 21 CFR 1040.10. Operation is subject to the
following two conditions:
1. This device may not cause harmful interference, and
2. This device must accept any interference received, including interference that may cause undesired
operation.
L’appareil est conforme à la réglementation FCC, section 15, et à la norme 21 CFR 1040.10. Son
utilisation est soumise à deux conditions :
1. L’appareil ne doit pas provoquer d’interférences nuisibles, et
2. L’appareil doit suppor ter les interférences reçues, y compris les interférences empêchant son
fonctionnement correct.
Page 3

Contents
1 Important 6
Safety 6
Notice 7
2 Your Docking Entertainment System 8
Introduction 8
What’s in the box 8
Overview of the main unit 9
Overview of the remote control 10
3 Get started 11
Install batteries 11
Connect power 12
Set time and date 12
Turn on 12
4 Play 13
Play from iPod/iPhone 13
Play from an external device 14
5 Listen to radio 14
Tune to a radio station 14
Program radio stations automatically 14
Program radio stations manually 15
Select a preset radio station 15
8 Product information 17
Specications 17
9 Troubleshooting 18
English
6 Other features 15
Set the alarm timer 15
Set the sleep timer 16
Adjust display brightness 16
7 Adjust sound 16
Adjust volume level 16
Mute sound 16
Select a preset sound effect 16
Enhance bass 16
EN
3
Page 4
Register online at www.philips.com/welcome today to
*Additional Benefits
Registering your product guarantees that
you'll receive all of the privileges to
which you're entitled, including special
money-saving offers.
get the very most from your purchase.
Registering your model with PHILIPS makes you eligible for all of the valuable benets listed below,so don't miss out.
Register online at www.philips.com/welcome to ensure:
*Product Safety Notication *Additional Benefits
By registering your product, you'll receive notication - directly
from the manufacturer.
Registering your product guarantees that you'll receive all of
the privileges to which you’re entitled, including special moneysaving offers.
Know these
safetysymbols
Congratulations on your purchase,
and welcome to the “family!”
Dear PHILIPS product owner:
Thank you for your condence in PHILIPS.You’ve selected one of
the best-built, best-backed products available today.We’ll do everything in our power to keep you happy with your purchase for many
years to come.
As a member of the PHILIPS “family,” you’re entitled to protection
by one of the most comprehensive warranties in the industry.
What’s more, your purchase guar antees you’ll receive all the
information and special offers for which you qualify, plus easy access
to accessories from our convenient home shopping network.
Most importantly, you can count on our uncompromising commitment to your total satisfaction.
All of this is our way of saying welcome - and thanks for investing
in a PHILIPS product.
cause an electrical shock. For the safety of
everyone in your household, please do not
remove product covering.
read the enclosed literature closely to prevent operating and maintenance problems.
WARNING:To reduce the risk of fire or
electric shock, this apparatus should not be
exposed to rain or moisture and objects
filled with liquids, such as vases, should not
be placed on this apparatus.
CAUTION: To prevent electric shock,
match wide blade of plug to wide slot, fully
insert.
ATTENTION:Pour éviter les choc électriques, introduire la lame la plus large de la
fiche dans la borne correspondante de la
prise et pousser jusqu’au fond.
CAUTION
RISK OF ELECTRIC SHOCK
CAUTION: TO REDUCE THE RISK OF ELECTRIC SHOCK, DO NOT
REMOVE COVER (OR BACK). NO USER-SERVICEABLE PARTS
INSIDE. REFER SERVICING TO QUALIFIED SERVICE PERSONNEL.
This “bolt of lightning” indicates uninsulated material within your unit may
The “exclamation point” calls attention to features for which you should
DO NOT OPEN
P.S. To get the most from your PHILIPS purchase, be
sure to register online at:
www.philips.com/welcome
Visit our World Wide Web Site at http://www.philips.com/welcome
4 EN
For Customer Use
Enter below the Serial No.which is located on the rear of the cabinet. Retain this
information for future reference.
Model No.__________________________
Serial No. ________________________
Page 5

PHILIPS LIMITED WARRANTY
ONE (1) YEAR
WARRANTY COVERAGE:
PHILIPS warranty obligation is limited to the terms set forth
below.
WHO IS COVERED:
Philips warrants the product to the original purchaser or the person receiving the product as a gift against defects in materials and
workmanship as based on the date of original purchase
(“Warranty Period”) from an Authorized Dealer. The original
sales receipt showing the product name and the purchase date
from an authorized retailer is considered such proof.
WHAT IS COVERED:
The Philips warranty covers new products if a defect in material
or workmanship occurs and a valid claim is received by Philips
within the Warranty Period. At its option, Philips will either (1)
repair the product at no charge, using new or refurbished
replacement parts, or (2) exchange the product with a product
that is new or which has been manufactured from new, or serviceable used parts and is at least functionally equivalent or most
comparable to the original product in Philips current inventory,
or (3) refund the original purchase price of the product.
Philips warrants replacement products or parts provided under
this warranty against defects in materials and workmanship from
the date of the replacement or repair for ninety (90) days or for
the remaining portion of the
whichever provides longer coverage for you. When a product or
part is exchanged, any replacement item becomes your property
and the replaced item becomes Philips’ property. When a refund
is given, your product becomes Philips’ property.
Note: Any product sold and identified as refurbished or
renewed carries a ninety (90) day limited warranty.
Replacement product can only be sent if all warranty
requirements are met. Failure to follow all requirements
can result in delay.
WHAT IS NOT COVERED - EXCLUSIONS AND
LIMITATIONS:
This Limited Warranty applies only to the new products manufactured by or for Philips that can be identified by the trademark,
trade name, or logo affixed to it. This Limited Warranty does not
apply to any non-Philips hardware product or any software, even
if packaged or sold with the product. Non-Philips manufacturers,
suppliers, or publishers may provide a separate warranty for their
own products packaged with the bundled product.
Philips is not liable for any damage to or loss of any programs,
data, or other information stored on any media contained within
the product, or any non-Philips product or part not covered by
this warranty. Recovery or reinstallation of programs, data or
other information is not covered under this Limited Warranty.
This warranty does not apply (a) to damage caused by accident,
abuse, misuse,
to damage caused by service performed by anyone other than
Philips or Philips Authorized Service Location, (c) to a product
a part that has been modified without the written permission of
neglect, misapplication, or non-Philips product, (b)
original product’s warranty,
Philips, or (d) if any Philips serial number has been removed or
defaced, or (e) product, accessories or consumables sold “AS IS”
without warranty of any kind by including refurbished Philips
product sold “AS IS” by some retailers.
This Limited Warranty does not cover:
• Shipping charges to return defective product to Philips.
• Labor charges for installation or setup of the product, adjust-
ment of customer controls on the product, and installation or
repair of antenna/signal source systems outside of the product.
• Product repair and/or part replacement because of improper
installation or maintenance, connections to improper voltage
supply, power line surge, lightning damage, retained images or
screen markings resulting from viewing fixed stationary content for extended periods, product cosmetic appearance items
due to normal wear and tear, unauthorized repair or other
cause not within the control of Philips.
• Damage or claims for products not being available for use, or
for lost data or lost software.
• Damage from mishandled shipments or transit accidents when
returning product to Philips.
• A product that requires modification or adaptation to enable
it to operate in any country other than the country for which
it was designed, manufactured, approved and/or authorized, or
repair of
• A product used for commercial or institutional purposes
• Product lost in shipment and no signature verification receipt
• Failure to operate per Owner’s Manual.
TO OBTAIN ASSISTANCE IN THE U.S.A., CANADA,
PUERTO RICO, OR U.S. VIRGIN ISLANDS…
Contact Philips Customer Care Center at:
REPAIR OR REPLACEMENT AS PROVIDED UNDER THIS
WARRANTY IS THE EXCLUSIVE REMEDY FOR THE CONSUMER. PHILIPS SHALL NOT BE LIABLE FOR ANY INCIDENTAL OR CONSEQUENTIAL DAMAGES FOR BREACH OF
ANY EXPRESS OR IMPLIED WARRANTY ON THIS PRODUCT. EXCEPT TO THE EXTENT PROHIBITED BY APPLICABLE
LAW, ANY IMPLIED WARRANTY OF MERCHANTABILITY OR
FITNESS FOR A PARTICULAR PURPOSE ON THIS PRODUCT
IS LIMITED IN DURATION TO THE DURATION OF THIS
WARRANTY.
Some states do not allow the exclusions or limitation of incidental or consequential damages, or allow limitations on how long an
implied warranty lasts, so
not apply to you.
or
products damaged by these modifications.
(including but not limited to rental purposes).
can be provided.
1-866-309-0845
the above limitations or exclusions may
English
This warranty gives you specific legal rights. You may have other rights which vary from state/province to state/province.
P&F USA, Inc. PO Box 2248, Alpharetta, GA 30023-2248
3140 035 51091
EN
5
Page 6
1 Important
Safety
Important Safety Instructions
a Read these instructions.
b Keep these instructions.
c Heed all warnings.
d Follow all instructions.
e Do not use this apparatus near water.
f Clean only with dry cloth.
g Do not block any ventilation openings.
Install in accordance with the
manufacturer’s instructions.
h Do not install near any heat sources
such as radiators, heat registers, stoves,
or other apparatus (including ampliers)
that produce heat.
i Do not defeat the safety purpose of
the polarized or grounding-type plug.
A polarized plug has two blades with
one wider than the other. A grounding
type plug has two blades and a third
grounding prong. The wide blade or the
third prong are provided for your safety.
If the provided plug does not t into
your outlet, consult an electrician for
replacement of the obsolete outlet.
j Protect the power cord from being
walked on or pinched, particularly at
plugs, convenience receptacles, and
the point where they exit from the
apparatus.
k Only use attachments/accessories
specied by the manufacturer.
l Use only with the cart, stand, tripod,
bracket, or table specied by the
manufacturer or sold with the apparatus.
When a cart is used, use caution when
moving the cart/apparatus combination
to avoid injury from tip-over.
m Unplug this apparatus during lightning
storms or when unused for long periods
of time.
n Refer all servicing to qualied service
personnel. Servicing is required when
the apparatus has been damaged in any
way, such as power-supply cord or plug
is damaged, liquid has been spilled or
objects have fallen into the apparatus,
the apparatus has been exposed to rain
or moisture, does not operate normally,
or has been dropped.
o Battery usage CAUTION – To prevent
battery leakage which may result in
bodily injury, property damage, or
damage to the unit:
• Install all batteries correctly, + and as marked on the unit.
• Do not mix batteries (old and new
or carbon and alkaline, etc.).
• Remove batteries when the unit is
not used for a long time.
p Apparatus shall not be exposed to
dripping or splashing.
6
EN
Page 7
q Do not place any sources of danger on
the apparatus (e.g. liquid lled objects,
lighted candles).
• Where the MAINS plug or an appliance
coupler is used as the disconnect device,
the disconnect device shall remain readily
operable.
Warning
• Never remove the casing of this apparatus.
• Never lubricate any part of this apparatus.
• Never place this apparatus on other electrical
equipment.
• Keep this apparatus away from direct sunlight,
nakedamesorheat.
• Ensure that you always have easy access to the
power cord, plug or adaptor to disconnec t the
appar atus from the power.
Notice
Anychangesormodicationsmadetothis
device that are not expressly approved by
Philips Consumer Lifestyle may void the user’s
authority to operate the equipment.
Disposal of your old product and
batteries
Your product is designed and manufactured
with high quality materials and components,
which can be recycled and reused.
Never dispose of your product with other
household waste. Please inform yourself about
the local rules on the separate collection
of electrical and electronic products and
batteries. The correct disposal of these
products helps prevent potentially negative
consequences on the environment and human
health.
Your product contains batteries, which cannot
be disposed of with normal household waste.
Please inform yourself about the local rules on
separate collection of batteries. The correct
disposal of batteries helps prevent potentially
negative consequences on the environment
and human health.
Please visit www.recycle.philips.com for
additional information on a recycling center in
your area.
Environmental information
All unnecessary packaging has been omitted.
We have tried to make the packaging easy to
separate into three materials: cardboard (box),
polystyrene foam (buffer) and polyethylene
(bags, protective foam sheet.)
Your system consists of materials which can
be recycled and reused if disassembled by
a specialized company. Please observe the
local regulations regarding the disposal of
packaging materials, exhausted batteries and
old equipment.
“Made for iPod®” and “Made for iPhone®”
mean that an electronic accessory
hasbeendesignedtoconnectspecicallyto
iPod or iPhone, respectively, and has
beencertiedbythedevelopertomeet
Apple performance standards. Apple is not
responsible for the operation of this device
or its compliance with safety and regulatory
standards. Please note that the use of this
accessor y with iPod or iPhone may affect
wireless performance.
iPhone, iPod, iPod touch and iPod nano are
trademarks of Apple Inc., registered in the
U.S. and other countries.
English
EN
7
Page 8

2 Your Docking
Entertainment
System
Congratulations on your purchase, and
welcometoPhilips!Tofullybenetfromthe
support that Philips offers, register your product
at www.philips.com/welcome.
Introduction
With this unit, you can enjoy audio from the
iPod, iPhone, other audio devices, or the radio.
The radio, iPod, or iPhone can be set as the
alarm timer. You can set two alarm timers to
go off at different time.
What’s in the box
Check and identify the contents of your
package:
• Main unit
• Remote control
• 1 x MP3 link cable
• User manual
• Quick start guide
8
EN
Page 9
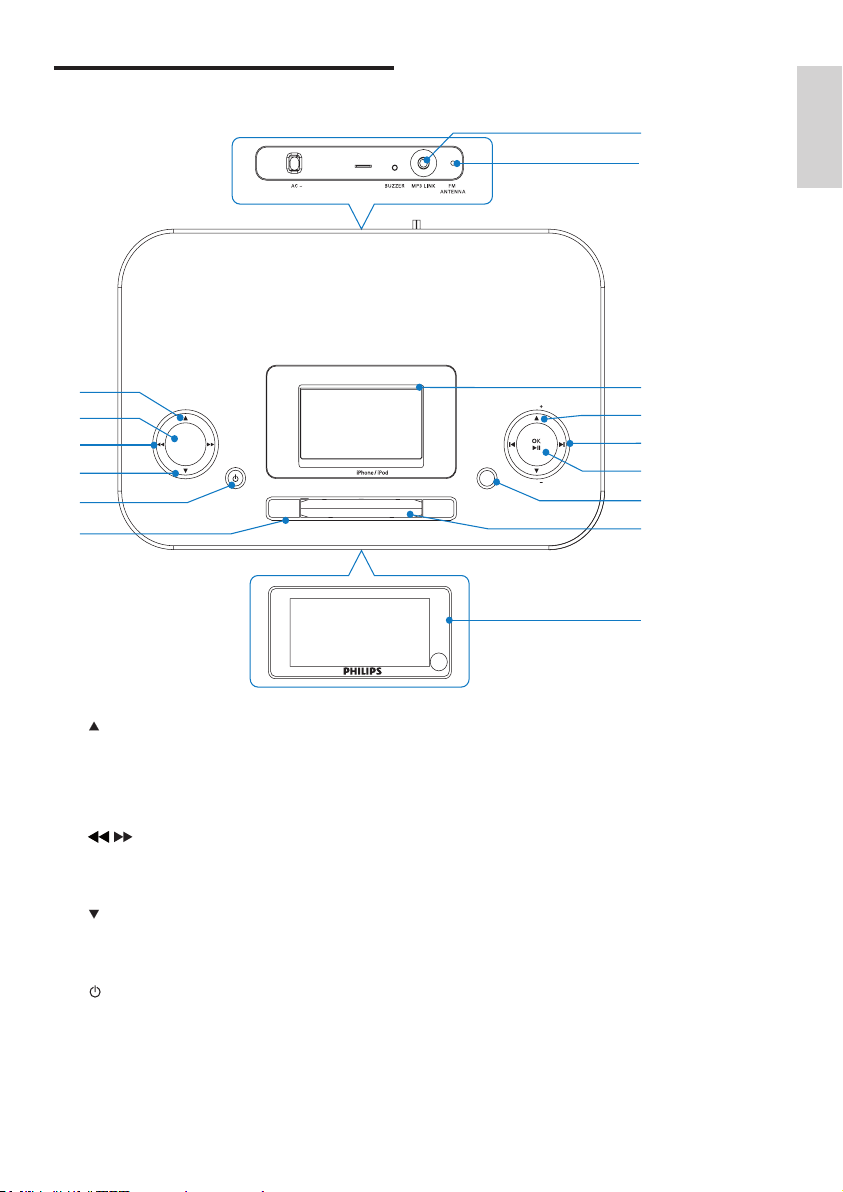
Overview of the main unit
VOL
VOL
DOCK for
SOURCE
DOCKING ENTERTAINMENT SYSTEM DC290B
ALARM 1 ALARM 2
REPEAT ALARM
BRIGHTNESS CONTROL
SLEEP
SET TIME
PROG
DATE
g
k
i
h
j
m
l
c
e
d
f
a
b
n
o
English
a / DATE
• View the clock time and date.
b SLEEP
• Set the sleep timer.
c /
• Searchwithinanaudiole.
• Tune to a radio station.
d /SET TIME/PROG
• Set the clock and date.
• Program radio stations.
e
• Turn on the unit or switch to
• Deactivate the sleep timer.
• Stop alarm.
standby mode.
f ALARM1/ALARM2
• Set the alarm timer.
• Turn off the alarm tone.
• View alarm settings.
g Display panel
• Show the current status.
h REPEAT ALARM/BRIGHTNESS
CONTROL
• Repeat the alarm.
• Adjust the display brightness.
i SOURCE
• Select a source: iPod/iPhone, FM
tuner or MP3 link.
EN
9
Page 10
REP ALM
SLEEP
SET TIME
MENU
VOL
DSC
DBB
POWER
OK
TUNER
MP3 LINK
MUTE
BRIGHTNESS
PROG
ALM 1
ALM 2
d
c
e
a
b
g
f
h
j
i
k
l
p
o
n
m
j OK/
• Star t or pause iPod/iPhone play.
• Conrmselection.
k /
• Skiptotheprevious/nextaudiole.
• Select a preset radio station.
• Adjust time.
l VOL +/-
• Adjust volume.
m Dock for iPod/iPhone
• Load an iPod/iPhone.
n FM antenna
• Improve FM reception.
o MP3-LINK
• Jack for an external audio device.
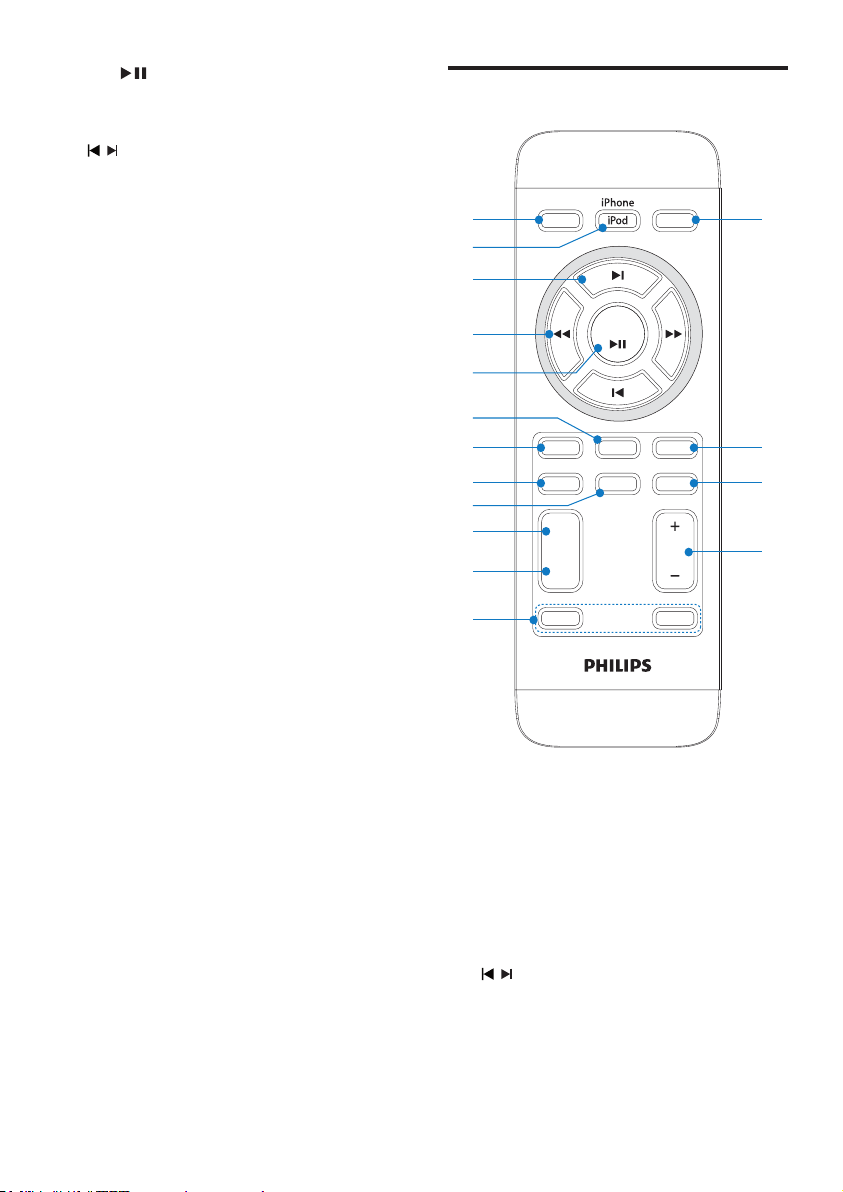
Overview of the remote control
a POWER
• Turn on the unit or switch to
standby mode.
• Stop alarm.
• Deactivate the sleep timer.
b iPhone/iPod
• Select iPhone or iPod source.
c /
• Skiptotheprevious/nextaudiole.
• Select a preset radio station.
• Navigate through the iPod/iPhone
menu.
• Adjust time.
10
EN
Page 11
d /
• Searchwithinanaudiole.
• Tune to a radio station.
e OK/
• Star t or pause iPod/iPhone play.
• Conrmselection.
f MP3 LINK
• Select external audio device source.
g MENU
• Select the iPhone/iPod menu.
h SLEEP
• Set the sleep timer.
i BRIGHTNESS/REP ALM
• Adjust the display brightness.
• Repeat the alarm.
j DBB
• Turn on or off dynamic bass
enhancement.
k DSC
• Select a preset sound setting.
l ALM 1/ALM 2
• Set the alarm timer.
• Turn off the alarm tone.
• View alarm settings.
m VOL +/-
• Adjust volume.
n MUTE
• Mute volume.
o SET TIME/PROG
• Set the clock and date.
• Program radio stations.
p TUNER
• Select the tuner source.
3 Get started
English
Caution
• Use of controls or adjustments or
performance of procedures other than herein
may result in ha zardous radiation exposure or
other unsafe operation.
Always follow the instructions in this chapter in
sequence.
If you contact Philips, you will be asked for the
model and serial number of this apparatus. The
model number and serial number are on the
rear of the apparatus. Write the numbers here:
Model No. __________________________
Serial No. ___________________________
Install batteries
Note
• You can only use AC power as power supply.
Batteries (not supplied) are for backup
purpose.
• Perchlorate Material - special handling may
apply. See www.dtsc.ca.gov/hazardouswaste/
perchlorate.
2 x AA
EN
11
Page 12
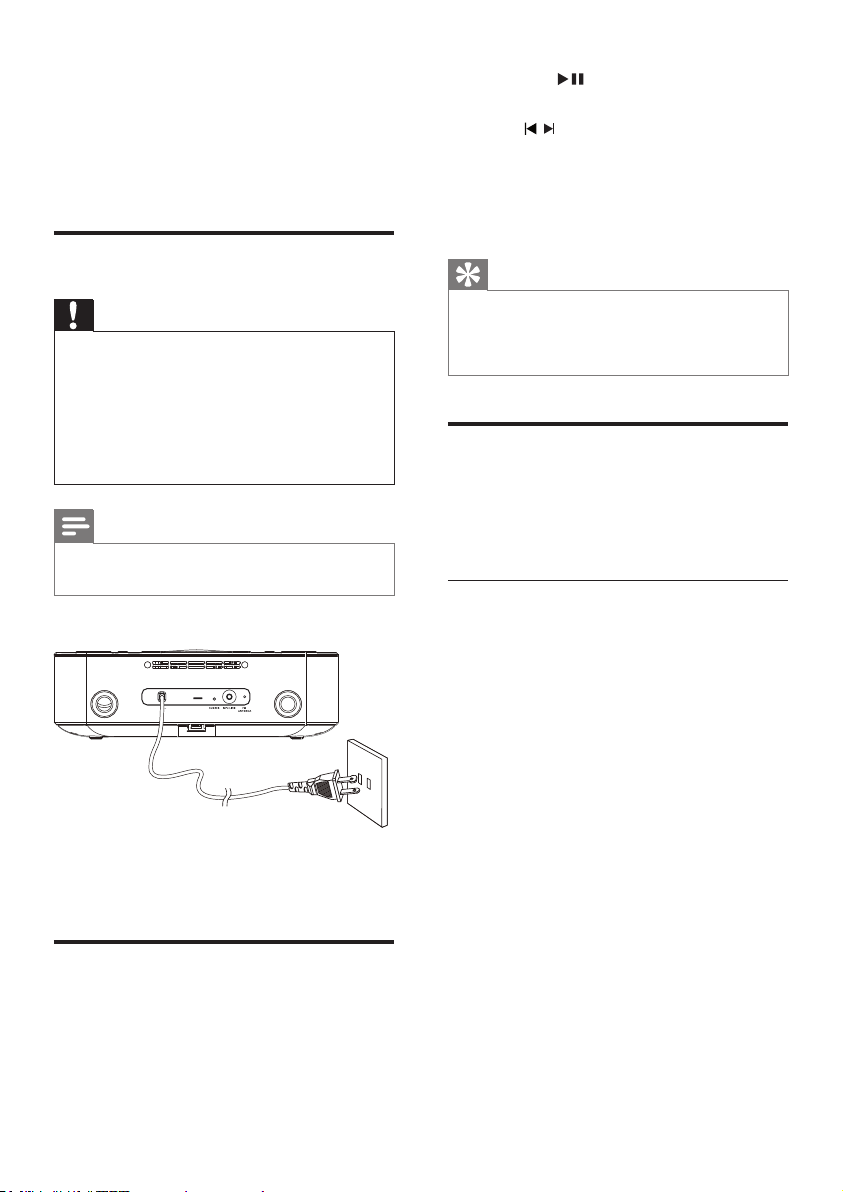
1 Open the battery compartment.
2 Inser t 2 x R6/UM-3/AA size batteries
with correct polarity (+/-) as indicated.
3 Close the battery compar tment.
Connect power
Caution
• Risk of product damage! Ensure that the power
voltage corresponds to the voltage printed on
the back or underside of the apparatus.
• Risk of electric shock! When you unplug the
AC power cord, always pull the plug from the
socket . Never pull the cord.
• Before connec ting the AC power cord, ensure
you have completed all other connections.
Note
• The type plate is located on the bottom of the
main unit.
2 Press OK/ to select the 12/24 hour
format.
3 Press / to set the hour.
4 Press SET TIME/PROGtoconrm.
» The minute digits begin to blink.
5 Repeat steps 3-4 to set the minute, year,
month, and day.
Tip
• In 12 hour format, [MONTH--DAY] is
displayed.
• in 24 hour format, [DAY--MONTH] is
displayed.
Turn on
1 Press POWER.
» The unit switches to the last selected
source.
Switch to standby
1 Press POWER again to switch the unit to
standby mode.
» The time and date (if set) appear on
the display panel.
1 Connect the AC power cord to the wall
outlet.
Set time and date
1 In standby mode, press and hold SET
TIME/PROG for 2 seconds.
» Hour digits start to blink.
12
EN
Page 13
4 Play
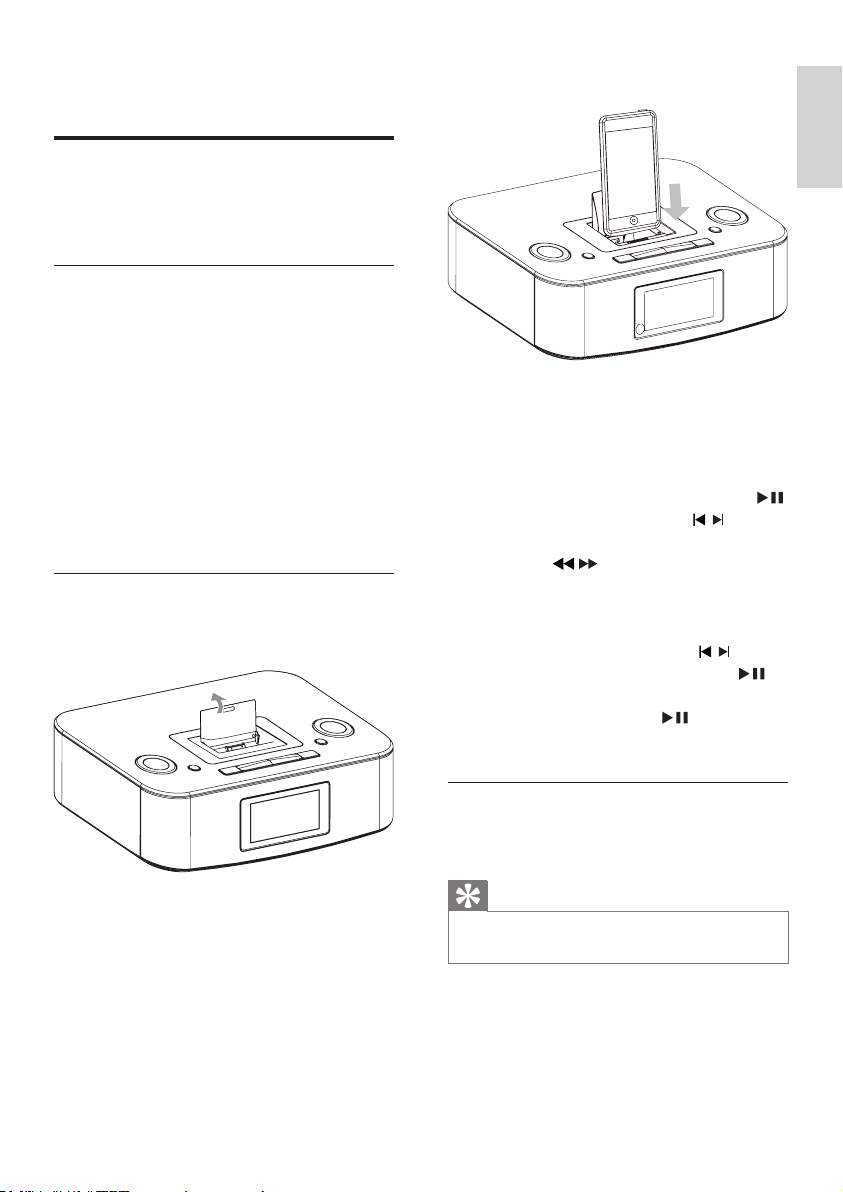
2 Place the iPhone/iPod into the dock.
Play from iPod/iPhone
You can enjoy audio from iPod/iPhone through
this unit.
Compatible iPod/iPhone
Apple iPod and iPhone models with a 30-pin
dock connector:
• iPod classic
• iPod touch
• iPod nano
• iPod 5th generation (video)
• iPod with color display
• iPod mini
• iPhone
• iPhone 3G
• iPhone 3GS
Listen to the iPod/iPhone
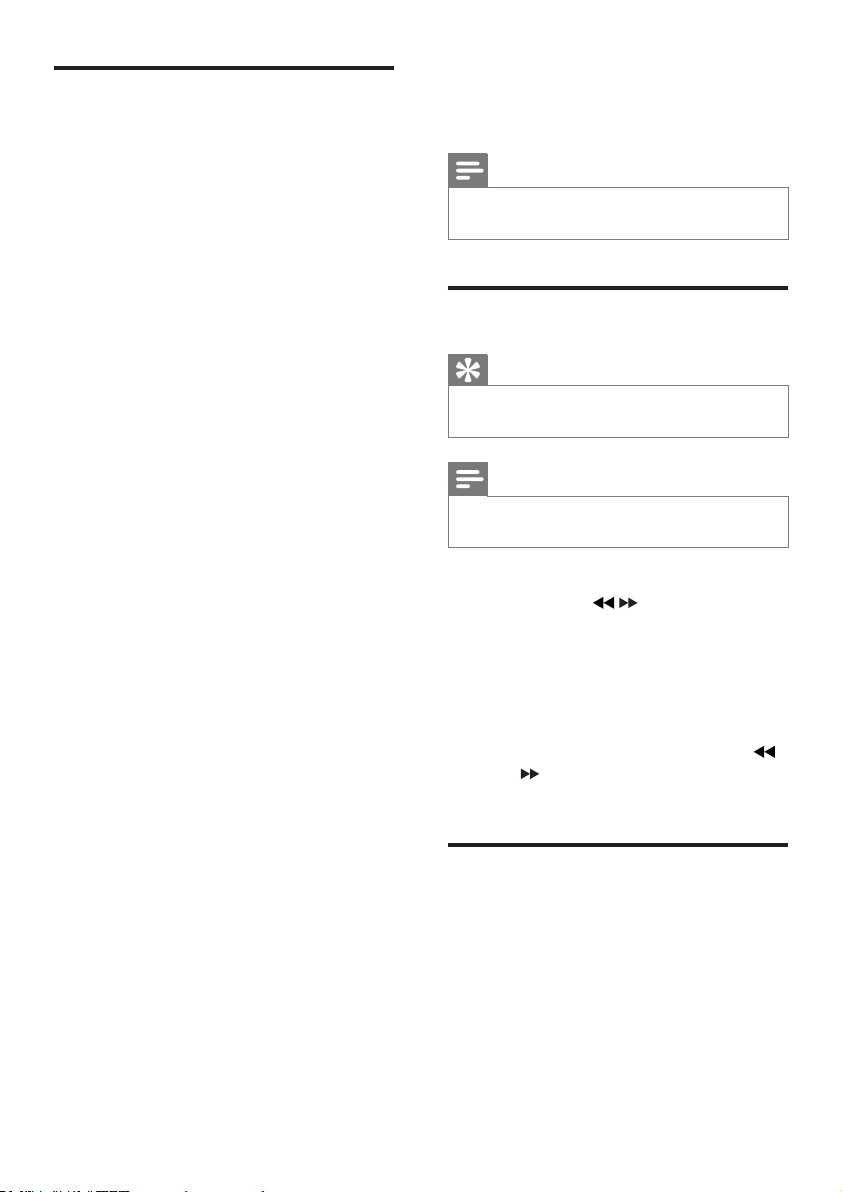
1 Lift up the iPhone/iPod dock on the top
panel.
English
3 Press iPhone/iPod to select iPod/iPhone
source.
» The connected iPod/iPhone plays
automatically.
• To pause/resume play, press OK/ .
• To skip to a track, press / .
• To search during play, press and
hold / , then release to resume
normal play.
• To go back to the previous iPod/
iPhone menu, press MENU. To scroll
through the menu, press / . To
conrmaselection,pressOK/ .
» If no key is pressed for more than
10 seconds, OK/ acts back as
the play/pause key.
Charge the iPod/iPhone
When the unit is connected to power,
the docked iPod/iPhone begins to charge.
Tip
• For cer tain iPod models, it may take up to a
minute before the charging indication appears.
EN
13
Page 14
Play from an external device
You can also listen to an external audio device
through this unit.
1 Press MP3 LINK to select the MP3 link
source.
2 Connect the supplied MP3 link cable to:
• the MP3 LINK jack (3.5mm) on the
back of the unit.
• the headphone jack on an external
device.
3 Star t to play the device (see the device
user manual).
5 Listen to radio
Note
• Only FM r adio reception is available on this
unit.
Tune to a radio station
Tip
• Position the antenna as far as possible from
TV, VCR or other radiation source.
Note
• For optimal reception, fully extend and adjust
the position of the antenna.
1 Press TUNER to select FM tuner.
2 Press and hold / for more than 2
seconds.
» [Srch] (search) is displayed.
» The radio tunes to a station with
strong reception automatically.
3 Repeat step 2 to tune to more stations.
• To tune to a weak station, press
/ repeatedlyuntilyoundoptimal
reception.
Program radio stations automatically
You can program a maximum of 20 preset
radio stations.
1 In the tuner mode, press and hold SET
TIME/PROG for more than 2 seconds to
activate automatic program mode.
» [AUTO] (auto) is displayed.
14
EN
Page 15
» All available stations are programmed
in the order of waveband reception
strength.
» Therstprogrammedradiostationis
broadcast automatically.
Program radio stations manually
You can program a maximum of 20 preset
radio stations.
1 Tune to a radio station.
2 Press SET TIME/PROG to activate the
program mode.
3 Press / to select a number.
4 Press SET TIME/PROGtoconrm.
5 Repeat the above steps to program other
stations.
Tip
• To overwrite a programmed station, store
another station in its place.
Select a preset radio station
1 Press / to select a preset number.
6 Other features
English
Set the alarm timer
You can set two alarms which go off at different
time.
1 Ensure that you have set the clock correctly.
(See “Get started - Set time and date”.)
2 Press and hold ALM 1 or ALM 2 for 2
seconds.
» [AL 1] or [AL 2] begin to blink.
3 Press SOURCE on the top panel to select
an alarm sound source: iPod/iPhone, FM
tu ner, or buz zer.
4 Press ALM 1 or ALM 2.
» The hour digits begin to blink.
5 Press / repeatedly to set the hour.
6 Press ALM 1 or ALM 2toconrm.
» The minute digits begin to blink.
7 Repeat steps 5-6 to set the minute.
8 Repeat steps 5-6 to select whether to
ring alarm the whole week, on weekdays,
or at weekend.
9 Repeat steps 5-6 to set the alarm volume.
Tip
• If you set iPhone/iPod playlist as the sound
source, you must create a playlist in iTunes
called “PHILIPS” and impor t it to your iPhone/
iPod.
• If no playlist is created in the iPod/iPhone or
there is no song in the playlist, the unit will
wake to songs in the iPod/iPhone.
Activate and deactivate the alarm timer
1 Press ALM 1 or ALM 2 repeatedly to
activate or deactivate the timer.
» If the timer is activated, [ AL 1] or
[ AL2] is displayed.
» If the timer is deactivated, [ AL1] or
[ AL2] disappears.
EN
15
Page 16
Repeat alarm
1 When the alarm rings, press
BRIGHTNESS/REP ALM.
» The alarm repeats ringing minutes later.
7 Adjust sound
Adjust volume level
Tip
• You can press / to adjust the interval to
repeat alarm.
Stop alarm ring
1 When the alarm rings, press the
corresponding ALM 1 or ALM 2.
» The alarm stops but the alarm settings
remain.
View the alarm settings
1 Press ALM 1 or ALM 2.
Set the sleep timer
This unit can switch to standby automatically
after a set period of time.
1 Press SLEEP repeatedly to select a set
period of time (in minutes).
» When the sleep timer is activated, the
display shows , and the volume will
gradually decrease in the last 5 minutes.
To deactivate sleep timer
1 Press SLEEP repeatedly until [OFF] (off )
is displayed.
» When the sleep timer is deactivated,
disappears on the display.
1 During play, press VOL +/- to increase/
decrease the volume level.
Mute sound
1 During play, press MUTE to mute/unmute
sound.
Select a preset sound effect
1 During play, press DSC repeatedly to
select:
• [POP] (pop)
• [JAZZ] (jazz)
• [CLAS ] (classic)
• [ROCK] (rock)
• [FLAT](at)
Enhance bass
1 During play, press DBB to turn on or off
dynamic bass enhancement.
» If DBB is activated, [DBB] is displayed.
Adjust display brightness
1 Press BRIGHTNESS/REP ALM
repeatedly to select different levels of
display brightness.
16
EN
Page 17
8 Product
information
Note
• Product information is subject to change
without prior notice.
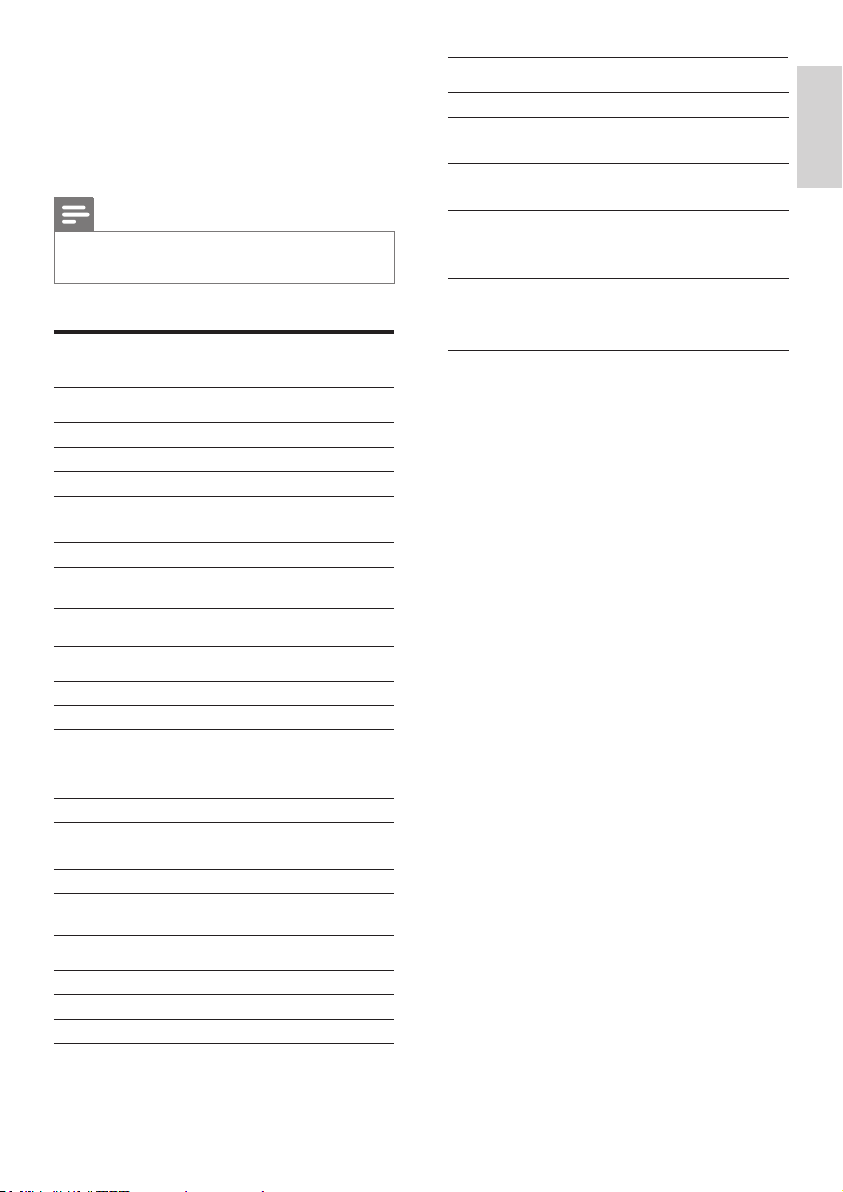
Specications
Amplier
Rated Output Power 2 x 5 W RMS
Frequency Response 20 -20000 Hz, -3dB
Signal to Noise Ratio >67 dB
Total Harmonic
Distortion <1%
Aux Input (MP3 link) 0.5 V RMS 20kohm
Tuner
General information
AC power 120V ~ 60Hz
Operation Power
Consumption 7.5 W
Standby Power
Consumption <1 W
Dimensions
- Main Unit
(W x H x D)
Weight
- With Packing
- Main Unit
263 x78 x 165 mm
2.1 kg
1.36 kg
English
FM
Tuning Range 87.5 - 108 MHz
Tuning grid 10 0 KHz
Sensitivity
- Mono, 26dB S/N Ratio
- Stereo, 46dB S/N Ratio
Search Selectivity >28 dBf
Total Harmonic
Distortion <2%
Signal to Noise Ratio >55 dB
<22 dBu
<43 dBu
Speakers
Speaker Impedance 4 ohm
Speaker Driver 2.25”
Sensitivity >84dB/m/W
EN
17
Page 18

9 Troubleshooting
Warning
• Never remove the casing of this apparatus.
To keep the warranty valid, never try to repair
the system yourself.
If you encounter problems when using this
apparatus, check the following points before
requesting service. If the problem remains
unsolved, go to the Philips web site (www.
philips.com/welcome). When you contact
Philips, ensure that the apparatus is nearby
and the model number and serial number
are available.
No power
• Ensure that the AC power plug of the
unit is connected properly.
• Ensure that there is power at the AC
outlet.
• Ensure that the batteries are inserted
correctly.
No sound
• Adjust the volume.
No response from the unit
• Disconnect and reconnect the AC power
plug, then turn on the unit again.
Poor radio reception
• Increase the distance between the unit
and your T V or VCR .
• Fully extend the FM antenna.
Timer does not work
• Set the clock correctly.
• Switch on the timer.
Clock/timer setting erased
• Power has been interrupted or the power
plug has been disconnected.
• Reset the clock/timer.
18
EN
Page 19

P&F USA Inc.
PO Box 2248
Alpharetta, GA 30023-2248
Phone 1 866 309 0845
Meet Philips at the Internet
http://www.philips.com/welcome
© 2012 Koninklijke Philips Electronics N.V.
All rights reserved.
DC290B_37_UM_V3.0
 Loading...