

Page 1
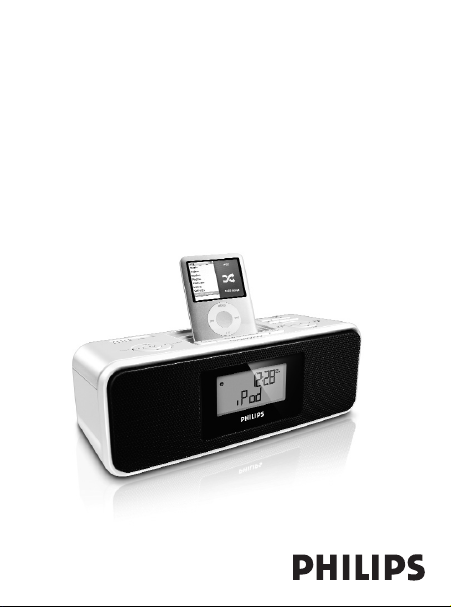
DC200Docking Entertainment System
Register your product and get support at
www.philips.com/welcome
User Manual
Page 2
1
7
8
9
0
!
1
2
3
4
5
6
@
#
$
%
Page 3
2
3
4
P-01
AL1
AL1
840
840
T001
Page 4

English
Congratulations on your purchase and welcome to Philips! To fully
benefit from the support that Philips offers, register your product at
www.philips.com/welcome.
SUPPLIED ACCESSORIES
– 1X certified AC/DC 9V adaptor
(Brand name: PHILIPS, Model No.: AS140-090-Dw,
Input: 100-240V ~ 50/60Hz 0.7A, Output: 9.0V 1.56A)
– 4X dock adaptors (for different iPod types)
– 1X AUX-IN cable
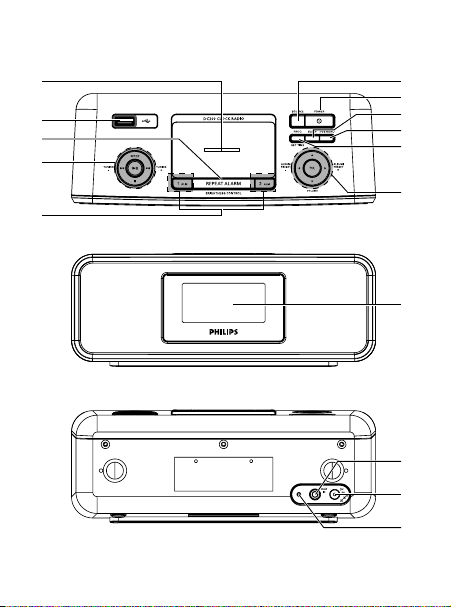
CONTROLS
(See 1)
1
SOURCE
– selects TUNER/iPod/USB/NATURE/AUX mode
2
POWER
– switches the system on or to standby mode
– stops active alarm for 24 hours
– deactivates the sleep function
3
SLEEP
– activates/
deactivates
the sleep function
4
iPod MENU
–
enters the iPod menu
5
PROG / SET TIME
– activates/confirms clock time setting
6
3 / 4 /1 / 2
for iPod . . . . . . . . . . . . . navigates in iPod menu
ALBUM/PRESET -/+
1 / 2
–
selects a preset radio station
–
selects albums in USB mode
–
selects time zone in clock mode
VOLUME
3 / 4
–
adjusts the sound level
Page 5

OK
for iPod
. . . . . . . . . . . . . .
confirms menu selection.
7
Dock connector
–
connects iPod player
8
USB jack
–
connects an external USB mass storage device
9
REPEAT
ALARM /
BRIGHTNESS CONTROL
– switches off the alarm for a 9 minute period
– changes the brightness of the display illumination
0
TUNING
¡1 / 2™
– adjusts clock/alarm time
– tunes to radio stations
– selects previous/next tracks in the iPod/USB mode
– fast searches forward/backward in the iPod/USB mode
MODE
–
selects different play modes: e.g. REPEAT or SHUFFLE (random order).
2;
– starts/pauses playback in the iPod/USB mode
9
– stops playback in the iPod/USB mode
!
1
ALM/ 2 ALM
–
activates/confirm alarm 1/alarm 2 time setting
– displays alarm 1/
alarm
2 time
– switches off alarm 1/
alarm
2 time
@
DISPLAY
–
shows clock/alarm times and status of the set
#
AUX IN jack (3.5 mm)
–
connects to external audio source
$
POWER jack
–
socket for AC/DC 9V adaptor
%
Pigtail
– improves FM reception
Page 6

POWER SUPPLY
Mains adaptor
1
Connect the mains adaptor to the set's DC 9V socket and to the power socket.
Helpful hints: To avoid damage to the set, use only the adaptor supplied!
The power rating is located on the bottom of the set.
SELF-POWERED BACK-UP
The self-powered back-up conveniently allows your alarm and clock time settings to be
stored for up to 10 minutes when there is a power interruption e.g. AC power failure.
The complete clock radio and backlight illumination will be switched off.
If power supply returns after 10 minutes and the display shows:
• clock time blinking - indicates you need to re-adjust the clock time.
BASIC OPERATION.
Switching on the system
•Press POWER.
™
The system will switch to the last selected source.
Switching the system to standby mode
• In any source mode, press POWER.
Illumination brightness
Press REPEAT
ALARM /
BRIGHTNESS CONTROL once or more.
•
The brightness of the display can be adjusted:
Bright
➟ Low ➟ Off ➟ Bright
.
SETTING THE CLOCK
1 In standby mode, press and hold PROG/SET TIME until clock digits flashes.
2
Hold down or press ¡1 / 2™ repeatedly to set and adjust the hours.
3 Press PROG/SET TIME
to confirm.
™
The clock digits for the minutes flash.
4
Hold down or press ¡1 / 2™ repeatedly to set and adjust the minutes.
Page 7

5 Press PROG/SET TIME
to confirm.
6
In clock mode, press
ALBUM/PRESET -/+
1 /2 to set your time zone.
7
To zoom in/out the clock display, press
MODE
in clock mode.
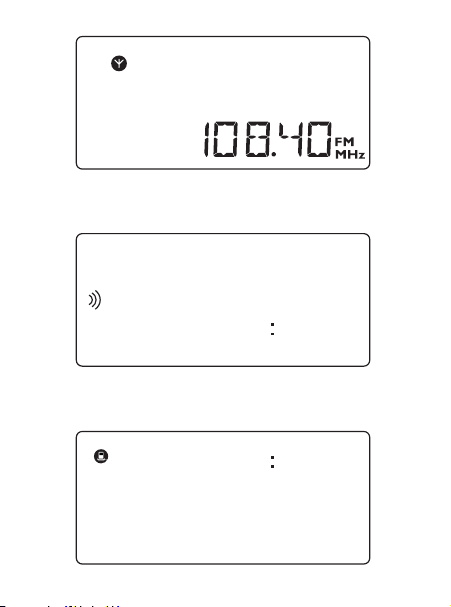
TUNER
1
Press
SOURCE
repeatedly to switch on the radio (FM only).
™
Display shows the radio frequency of the last selected waveband. Your preset station is also shown if you are listening to a preset.
(
See 2
)
2
Adjust the sound using VOLUME 3 /4
.
3 To select preset stations, press ALBUM/PRESET -/+
1 /2
once or repeatedly.
TUNING TO RADIO STATIONS
1 Press and hold
¡1 / 2™
until the frequency in the display starts changing.
™ After the system tunes to a station of sufficient reception, display shows its
frequency.
•To tune to a weak station, press
¡1 / 2™
briefly and repeatedly until an
optimal reception is found.
To improve reception (FM):
Extend and position the pigtail fully to obtain optimum reception.
STORING AND USING PRESET STATIONS
You can store up to 20 FM radio stations in the memory.
1 Tune to your desired station (see TUNING TO RADIO STATIONS).
2
Press
PROG to activate the programming, and then press ALBUM/PRESET -/+
1
/ 2
to select a desired preset number
.
3
Press
PROG again to confirm.
4
Press
ALBUM/PRESET -/+
1 / 2
to listen to a preset station.
AUTOSTORE: Automatic programming
1
Press and hold
PROG for more than two seconds.
™Available radio stations will be automatically stored.
Page 8

USING THE ALARM
GENERAL
Two different alarm times can be set. This can be useful when you need to be
woken up at a different time e.g. during the week and at the weekend, and you
can set different wake-up modes:
•Tuner mode.
• iPod/USB mode.
• Nature sound mode.
•Buzzer mode. The gentle wake buzzer alarm increases its beep tone frequency
within seconds.
SETTING THE ALARM TIME AND MODE
(See 3)
1 In any mode, press and hold 1 ALM or 2 ALM for two seconds.
™
AL1 / AL2
icon and the hour digits flash.
2
Hold down or press ¡1 / 2™ repeatedly to set and adjust the hours.
3 Press 1 ALM or 2 ALM
to confirm.
™
AL1 / AL2
icon and the minutes digits flash.
4
Hold down or press ¡1 / 2™ repeatedly to set and adjust the mintues.
5 Press 1 ALM or 2 ALM
to confirm.
™
The icon for the current alarm mode flashes.
6 Press
¡1 2™/ SOURCE repeatedly to select your desired alarm mode.
• For Nature sound mode, press ALBUM/PRESET -/+
1 / 2
to select your desired
nature sound track.
™
At the set alarm time, the selected sound source or buzzer will switch on
automatically.
Helpful hints:
–
If you have selected TUNER alarm mode, make sure you have properly tuned to a
station before turning off the set.
–
If you have selected iPod/USB alarm mode, make sure you have connected the compatible iPod player or USB device, or the buzzer mode will be selected automatically.
–
To check the alarm time setting for AL1 or AL2, press 1 ALM or 2 ALM.
Page 9

SWITCHING OFF THE ALARM
There are three ways of switching off the alarm. Unless you cancel the alarm
completely, the 24-hour ALARM RESET will be automatically selected after 59
minutes from the time your alarm first goes off.
24 HOUR ALARM RESET
If you want the alarm mode to be stopped immediately but also wish to retain
the same alarm setting for the following day:
•
Press
POWER
or 1
ALM / 2 ALM
.
REPEAT ALARM
This repeats your alarm call at 9 minute intervals.
•
During the alarm call, press REPEAT
ALARM /
BRIGHTNESS CONTROL.
™
Display shows
AL1
or
AL2
flashing during a repeat alarm.
•
Repeat if desired (up to a maximum of 6 times).
CANCELING THE ALARM COMPLETELY
•
Press 1
ALM
or 2
ALM
button once or more until
AL1
or
AL2
disappears.
DOCK (See 4)
By connecting the iPod to your DC200, you can listen to the music stored in iPod
player through the powerful speakers of the set.
COMPATIBLE PORTABLE PLAYERS
•
Most Apple iPod models with 30-pin dock connector as follows:
iPod Touch 4GB/8GB, 20GB, 40GB, iPod Photo 20GB/30GB/40GB/60GB, iPod
Video 30GB/60GB/80GB, iPod Classic 80GB/160GB, Mini and Nano.
DOCK ADAPTORS
Before plugging your player in the dock, snap the suitable dock adaptor into the
dock to provide a snug fit for the player to be docked.
Selecting the correct dock adaptor
• For the iPod dock, 4 dock adaptors of different type, as indicated at the back
of the adaptor, are included to fit the following iPod:
iPod Touch 4GB/8GB, 20GB, 40GB, iPod Photo 20GB/30GB/40GB/60GB, iPod
Video 30GB/60GB/80GB, iPod Classic 80GB/160GB, Mini and Nano.
Page 10

PLAYING iPod USING DC200
1
Remove the top cover of dock.
2
Snap the compatible iPod into the dock connector.
3
Press SOURCE repeatedly to switch on the iPod mode.
•
Make sure that you have powered on Apple iPod before selecting iPod source.
™
On the DC200’s display, “iPod” is displayed when iPod is connected.
4 T
he connected iPod player will play automatically.
Notes:
–
By using the buttons ( 2;, ¡1, 2™ and VOLUME ) on the DC200, the following
playback features are available: Play/Pause, selecting next/previous track, fast forwarding/rewinding and changing volume.
–
The buttons ( 2;, ¡1, 2™ and VOLUME ) on the DC200 can work only with
playback of the audio contents stored on the docked player.
– To navigate the iPod menu, you may use iPod MENU, 34 and OK buttons on
the set.
– When you press iPod MENU in iPod mode, 1234 and OK buttons first per-
form the navigation function, and then restore the original functions.
– For iPod operations and features, refer to the user manual of your iPod player.
– This set does not support iPod video output.
Using USB connectivity
• DC200 is fitted with a USB port on the top panel, offering a plug and play feature
which allows you to play, from your DC200, digital music and audio contents stored
on a USB mass storage device.
• Using a USB mass storage device, you can also enjoy all the features offered by
DC200.
Compatible USB mass storage devices:
With the DC200, you can use
– USB flash memory (USB 2.0 or USB 1.1)
– USB flash player (USB 2.0 or USB 1.1)
• USB device which requires driver installation under Windows XP is not
supported.
Page 11

Notes:
In some USB flash players (or memory devices), the stored contents are recorded using
copyright protection technology. Such protected contents will be unplayable on any
other devices (such as DC200 device).
Supported formats:
– USB or memory file format FAT12, FAT16, FAT32 (sector size: 512 - 65,536 bytes)
– MP3 bit rate (data rate): 32-320 kbps and variable bit rate
– WMA v9 or earlier
– Directory nesting up to a maximum of 8 levels
– Number of albums: maximum 99
– Number of tracks: maximum 999
– ID3 tag v2.0 or later
– File name in Uicode UTF8 (maximum length: 128 bytes
The system will not play or support the following:
• Empty albums: an empty album is an album that does not contain MP3/WMA files,
and will not be shown in the display.
• Non-supported file formats are skipped. This means that e.g.: Word documents
.doc or MP3 files with extension. dlf are ignored and will not be played.
• AAC, WAV, PCM. NTFS audio files
• DRM protected WMA files
• WMA files in Lossless format
PLAYING A USB MASS STORAGE DEVICE
1
Make sure your DC200 is being powered on by AC mains.
2
Press SOURCE repeatedly to select the USB mode.
3
Plug a compatible USB mass storage device to DC200’s USB port marked .
If needed, use a suitable USB cable to connect between the device and
DC200’s USB port.
™
The device will automatically power on.
• If the device is not powered on, turn on the power manually, then re-connect it.
Page 12

PROGRAMING TRACK NUMBERS
1
Press 9to stop the playback.
2
Press PROG to enter the programming mode.
™
The current album number flashes.
3
Press ¡1 / 2™
to select a desired album number
.
4
Press PROG to confirm.
™
The current track number flashes.
5
Press ¡1 / 2™
to select a desired track number
.
6
Press PROG to confirm.
7
Repeat steps 3-6 to select and store all desired tracks.
8
To start playback of your programme, press 2;.
Helpful hints:
– Up to 999 playable audio files stored on a USB mass storage device can be
played on DC200.
– Up to 99 playable albums stored on a USB mass storage device can be select-
ed and displayed on DC200.
–Make sure that file names of MP3 files end with .mp3. and the file names of
WMA files end with .wma.
– For DRM protected WMA files, use Windows Media Player 10 (or later) for
conversion. Visit www.microsoft.com for details about Windows Media
Player and WM DRM (Windows Media Digital Rights Management).
– For USB device playing, if the display shows "OL", it means that the USB
device is electrically overloading DC200. You need to change a USB device.
SLEEP
This set has a built-in sleep timer, which enables the radio to be automatically
switched off after a preset period of time.
Setting and switching off SLEEP
1
Set your timer by pressing
SLEEP
repeatedly until the desired timer option appears.
™
Selections are follows (time in minute):
120=90=60=30=15=OFF=120
2
The set will turn off automatically at the selected time.
3
To cancel sleep, press either:
–
POWER
–
SLEEP
once or more until
OFF
appears on the display.
Page 13

Helpful hints: In standby mode, you can press SLEEP to switch on the set and
directly set the sleep function.
CONNECTING AN EXTERNAL DEVICE
You can listen to the sound of the connected external device through your
DC200’s speakers.
1
Press
SOURCE
repeatedly to select AUX mode.
2
Use the supplied AUX-IN cable to connect DC200’s AUX IN jack to an AUDIO
OUT or headphone jack on an external equipment (such as CD player, or VCR).
MAINTENANCE & SAFETY
•
Install the unit near the AC outlet and where the AC power plug can be easily
reached.
•
Where the MAINS plug or an appliance coupler is used as the disconnect
device, the disconnect device shall remain readily operable.
•
The apparatus shall not be exposed to dripping or splashing.
•
Do not expose the set to humidity, rain, sand or excessive heat caused by
heating equipment or direct sunlight.
•
To clean your set, use a soft damp cloth or chamois leather. Do not use cleaning products, which contain benzene, thinner, etc. as these may harm the
housing.
Page 14

Specifications
Power consumption
Active....................................................................≤ 15W
Standby...................................................................≤ 1W
Dimensions.........216 mm x 80 mm x 80 mm
Weight.........................................................................0,96 kg
Environmental information
All unnecessary packaging material has been omitted. The packaging can be
easily separated into three materials: cardboard, polystyrene and plastic.
Your set consists of materials which can be recycled if disassembled by a specialized company. Please observe the local regulations regarding the disposal
of packaging, dead batteries and old equipment.
Page 15

TROUBLESHOOTING
If a fault occurs, first check the points listed below before taking the set for repair.
If you are unable to remedy a problem by following these hints, consult your dealer or
service centre.
WARNING: Under no circumstances should you try to repair the set yourself, as this
will invalidate the guarantee. Do not open the set as there is a risk of
electric shock!
No sound
– Volume not adjusted
• Adjust the volume
Intermittent crackling sound during FM reception
– Weak signal
•
Extend and position the pigtail aerial
The alarm does not function
–
Alarm time/ mode not set
• See SETTING THE ALARM TIME AND MODE
– Volume too low for radio
• Increase the volume
Dock operation
–
The menu navigation or photo playback of the docked player cannot be carried out through the buttons on DC200.
• The buttons on DC200 can control playback of audio contents only. To navigate the
menu, use the controls on the docked player.
–
Some buttons on DC200 have no function.
• The buttons ( 2;, 9, ¡1, 2™ and VOLUME ) function only.
Page 16

AUSTRALIA - Philips Manufacturers Warranty for Australia only
y
These warranty conditions are valid for the
following consumer electronics products:
Colour Televisions, Projection TV, Plasma &
LCD TV, Video Cassette Recorders, CD
Recorders & Players, DVD Players, DVD
Recorders, DVD Recorders with HDD, Audio
Systems, Home Theatre systems, Digital Set
Top Box & Portable Audio products.
The benefits given to the purchaser by this
warranty are in addition to all other rights
and remedies which the purchaser has in
respect of the product under the Trade
Practices Act or other Commonwealth or
State Law.
Philips Consumer Electronics warrants its products to
the purchaser as follows and subject to the stated
conditions.
1 Year Free Repair Service - at Philips ASC
Colour Television, Plasma Television, LCD Television,
Projection Televsion, DVDR/VCR Combo, DVD
Recorders with Hard Drive, LCD Projectors, Wireless
Audio Systems, Audio Systems, Home Theatre
Systems & Digital Set-Top-Box.
1 Year free Replacement – at your Retailer
Por table Audio, MP3 Infotainment products, Video
Cassette recorders, DVD Player, DVD/VCR Combo
Player, DVD Recorder without HDD & Portable
DVD/LCD players.
Conditions of Repair Warranty
1. All claims for warranty service should be made to
your nearest Philips Authorised Service Centre or the
Philips Technology Care Centre. Reasonable evidence
of date of purchase must be provided.
2. This warranty extends only to defects in material or
workmanship occurring under normal use of the product
when operated in accordance with the instructions.
3. If a replacement product is supplied under the repair
policy it is warranted, under this warranty, for the
remainder of the warranty of the original purchased
product only.
4. Home service is provided only within the normal
service area of one of our recommended Authorised
Service Centres (ASC). It will be provided for
television receivers only with a screen side of 67cms
or above (product includes CRT, LCD TV, PTV, and
Plasma TV). Televisions with screen side less than
67cms and all other products types are to be taken or
sent by the consumer to the workshop of your
nearest Authorised Service Centre, at the Consumer’s
expense.
5. This Manufacturers Warranty is limited to 3 months
for the above listed Consumer Electronics products if
used in commercial applications.
6. Philips may, at its discretion choose to replace rather
than repair any product covered by this warranty.
7. Product accessories are covered by the same
warranty period. Please contact the Philips Technology
valid for all new products purchased after 1st January 2007
Warrant
Care Centre for free replacement of faulty accessories.
8. This Manufacturers Warranty is neither transferable
nor valid in countries other than Australia.
This warranty does not cover:
a) Mileage or tr avel outside the normal service area
covered by selected Authorised Service Centre.
b) Service costs ar ising from failure to correctly
adjust the controls of the product or to observe the
instructions, or inspections that reveal that the
product is in normal working order.
c) Product failures caused by misuse, neglect,
accidental breakage, transit damage, inexpert repairs
or modification by un-authorised persons, external
fires, lightning strikes, floods, vermin infestation or
liquid spillage.
d) Cleaning of video or audio heads.
e) Inadequate receiving antennae.
f) Replacement of worn or used batter ies or other
consumables.
g) Consumer products used in commercial applications
(This warranty is limited to 3 months only).
h) Second hand products.
The conditions contained in this warranty
card replace and override the provision of
the Philips World-Wide Guarantee for
products purchased in Australia and used in
Australia.
Service is provided through more than 100
accredited Authorised Service Centres throughout
Australia. For direct contact with the nearest
recommended Authorised Service Centre in capital
& regional cities/towns
Authorised Service Centre Network
1300 361 392
Customer support is provided in Australia by our
trained call centre staff. For assistance with product
features and specifications, please call
Technology Care Centre
1300 363 391
Please record the following information for
your records and keep in a safe place.
We recommend retaining your purchase
receipt to assist with any warranty claim.
Model number:....................................................
Serial number:....................................................
Date of purchase:....................................................
Retailer:....................................................
Philips Consumer Electronics
a division of Philips Electronics Australia Limited
ABN 24 008 445 743,
Level 1, 65 Epping Road NORTH RYDE NSW 2113.
Page 17

NEW ZEALAND -
Thank-you for purchasing this quality Philips product.
Philips New Zealand Ltd guarantees this product against defective components and faulty
workmanship for a period of 12 months. Any defect in materials or workmanship occurring
within 12 months from the date of purchase subject to the following conditions will be rectified
free of charge by the retailer from whom this product was purchased.
Conditions
1. The product must have been purchased in New Zealand.As proof of purchase, retain the
original sales docket indicating the date of purchase.
2. The guarantee applies only to faults caused by defective components, or faulty workmanship
on the part of the manufacturer.
3. The guarantee does not cover failures caused by misuse, neglect, normal wear and tear,
accidental breakage, use onthe incorrect voltage, use contrary to operating instructions,
or unauthorised modification to the product or repair by an unauthorised technician.
4. Reasonable evidence (in the form of a sales docket) must be supplied to indicate that the
product was purchased no more than 12 months prior to the date of your claim.
5. In the event of a failure, Philips shall be under no liability for any injury, or any loss or
damage caused to property or products other than the product under guarantee.
This guarantee does not prejudice your rights under common law and statute,
and is in addition to the normal responsibilities of the retailer and Philips.
How to claim
Should your Philips product fail within the guarantee period, please return it to the
retailer from whom it was purchased. In most cases the retailer will be able to
satisfactorily repair or replace the product.
However, should the retailer not be able to conclude the matter satisfactorily, or if you
have other difficulties claiming under this guarantee, please contact
The Guarantee Controller
Philips New Zealand Ltd.
4 P.O. Box 41.021
Auckland
3 (09) 84 94 160
fax 3
Guarantee and Service for New Zealand
(09) 84 97 858
Page 18

Printed in China PDCC-LL/ZC-0808
W
Meet Philips at the Internet
http://www.philips.com
DC200
 Loading...