

Page 1
DA1000
Dual Band DAB Pocket Radio
User manual
Manuel d'utilisation
Manual del usuario
Benutzerhandbuch
Gebruikershandleiding
Page 2

2
Page 3
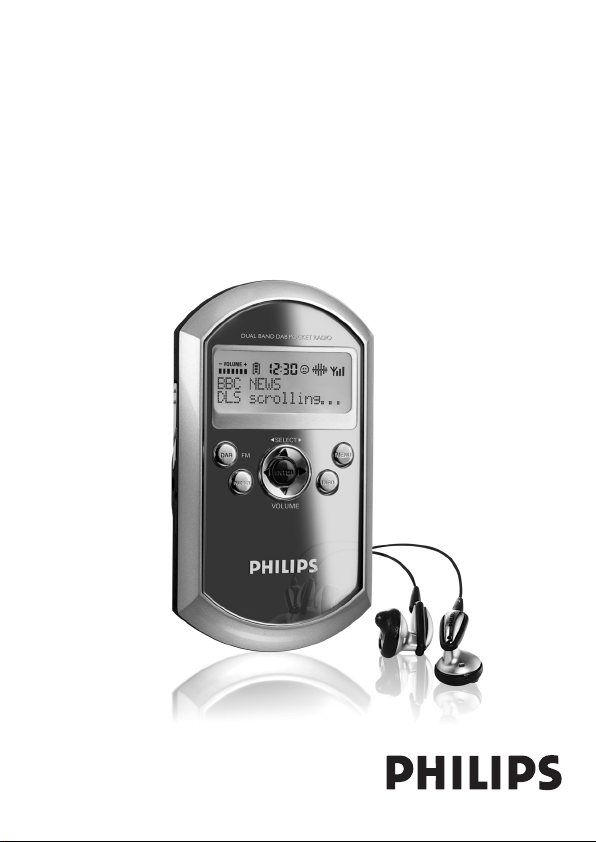
DUAL BAND DAB POCKET RADIO
ENTER
MENU
INFO
PRESET
DAB
FM
VOLUME
SELECT
VOLUME
1
2
3
4
5
6
7
1
3
Page 4

EQ
LOCK • UNLOCK
RECHARGE
POWER ON/OFF
6V DC
8
9
0
!
#
@
Left hand panel
Right hand panel
2
2 X AA
3
4
4
Page 5

English ––––––––––––––––––––––––––––––––––––––––––– 6
Français ––––––––––––––––––––––––––––––––––––––––– 21
Español ––––––––––––––––––––––––––––––––––––––––– XX
Deutsch –––––––––––––––––––––––––––––––––––––––– XX
Nederlands –––––––––––––––––––––––––––––––––––––– XX
English
FrançaisEspañolDeutsch
Nederlands
5
Page 6

Contents
English
Controls –––––––––––––––––––––––––––––––––––––––––––––––– 7
General Information
Display screen guide –––––––––––––––––––––––––––––––––––– 8
Maintenance ––––––––––––––––––––––––––––––––––––––––– 8
Environmental information –––––––––––––––––––––––––––––––– 8
About Digital Audio Broadcasting (DAB) –––––––––––––––––––––––9
Power supply
Batteries ––––––––––––––––––––––––––––––––––––––––––– 10
ECO-PLUS NiMH batteries ––––––––––––––––––––––––––––––– 10
Mains adapter ––––––––––––––––––––––––––––––––––––––– 11
Basic functions
Headphones ––––––––––––––––––––––––––––––––––––––––– 12
Adjusting the volume –––––––––––––––––––––––––––––––––– 12
Adjusting the EQ settings (DAB only) ––––––––––––––––––––––– 12
Features
Radio reception –––––––––––––––––––––––––––––––––––––– 13
DAB/FM, POWER OFF –––––––––––––––––––––––––––––––––– 13
Tuning/retuning –––––––––––––––––––––––––––––––––––––– 14
Selecting a station –––––––––––––––––––––––––––––––––––– 15
Saving & recalling presets ––––––––––––––––––––––––––––––– 16
Recalling a preset ––––––––––––––––––––––––––––––––––––– 17
Viewing the service info (DAB only) ––––––––––––––––––––––– 17
Sorting stations (DAB only) –––––––––––––––––––––––––––––– 18
Resetting ––––––––––––––––––––––––––––––––––––––––––– 18
•
UNLOCK : Locking all buttons––––––––––––––––––––––––19
LOCK
Technical Specifications ––––––––––––––––––––––––––––––––– 19
Troubleshooting –––––––––––––––––––––––––––––––––––––––– 20
6
Page 7

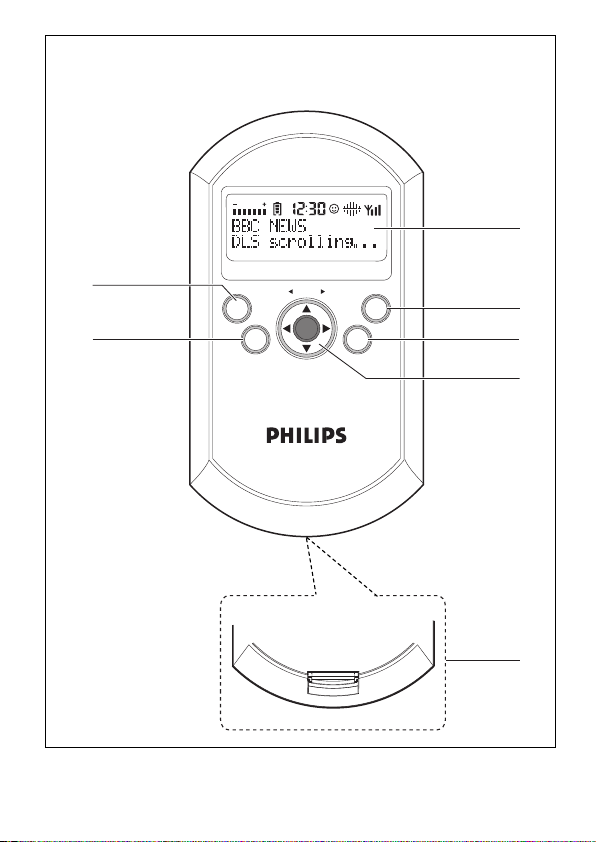
Controls (see figure 1)
1 Display
shows station details and operation
status
2 MENU
enables access to advanced setup
options (for DAB only)
3 INFO
provides service information in 7 modes
(for DAB only)
4 Navigator control
– push left/right SELECT 1/2 to
scroll radio stations.
– press ENTER to select an option.
– push up/down VOLUME 3/4 to
increase / decrease the volume.
5 push here to lift and open the door to
battery compartment. Insert 2 x
rechargeable batteries as indicated.
6 PRESET
saves 10 stations for quick access.
7 DAB/FM
selects DAB Band III, Band L and FM.
8 LOCK•UNLOCK
adjust slider to select lock function
on/ off. LOCK activated locks all
buttons to prevent accidental
operation.
9 EQ
selects from 6 different equalization
settings (for DAB only)
0 6V DC
connection for the AC/DC
adapter/charger.
! RECHARGE
lights up during charging of
rechargeable batteries.
@ p
3.5mm headphone socket.
# POWER ON/OFF switches the radio
on/off.
Supplied accessories
1 x AC/DC adapter/charger
2 x rechargeable batteries, AY3362
1 x in-ear headphones, HE570
1 x pouch, AY4206
English
This set complies with the radio interference requirements of the
European Union.
PHILIPS reserves the right to make design and specification changes for
product improvement without prior notice.
7
Page 8

General information
Display screen guide
English
Icon
VOLUME
volume (up/ down).
battery level status.
selected radio station clock time (DAB only).
when the station order is set to your
most listened to stations.
current equalizer setting (DAB only).
signal reception strength when weak.
signal reception strength when strong.
Safety instructions (see figure 4)
• To enjoy this product, please read all instructions before operating the set.
• Do not expose the unit or batteries to humidity, rain, sand or excessive heat (caused
by heating equipment or direct sunlight).
• You can clean the radio with a soft, slightly dampened, lint-free cloth. Do not use any
cleaning agents as they may have a corrosive effect.
• Active mobile phones in the vicinity of the radio may cause malfunctions.
• Avoid dropping the radio as this may cause damage.
• Do not position the set on top of other equipment that might heat it up.
• Apparatus shall not be exposed to dripping or splashing.
• Do not place any sources of danger on the apparatus (e.g. liquid filled objects, lighted
candles).
VOLUME
Environmental information
• All redundant packing material has been omitted. We have done our utmost to make
the packaging easily separable into two mono materials: cardboard and polyethylene.
• Your set consists of materials which can be recycled if disassembled by a specialized
company. Please observe the local regulations regarding the disposal of packing
materials, exhausted batteries and old equipment.
8
Page 9

General information
About Digital Audio Broadcasting (DAB)
DAB digital radio is a new way of broadcasting radio via a network of terrestrial
transmitters. It provides listeners with more choice and information delivered in crystal
clear, crackle-free sound quality.
– The technology allows the receiver to lock on to the strongest signal it can find.
– With DAB digital stations there are no frequencies to remember, and sets are tuned
by station name, so there's no retuning on the move.
What is a multiplex?
Digital radio operation is made up of a single block of frequencies called a multiplex.
Each multiplex works within a frequency spectrum, such as Band III for DAB broadcasts.
Helpful Hints:
– If you buy a receiver in the UK it will be designed to pick up DAB signals on Band III
only. You will receive only those stations within your transmission area.
DAB BROADCASTERS AND DLS
Each DAB broadcaster (or multiplex operator) also provides text and audio data services.
Some programmes are supported by Dynamic Label Segments (DLS). This is data which
you can read as scrolling text on your DAB radio display. Some stations transmit the
latest news, travel, and weather, what's on now and next, website addresses and
phone numbers.
For more information on digital radio coverage and services, please visit: ww.drdb.org
English
9
Page 10

Power Supply
English
BATTERIES (supplied or optionally available)
You can use the following batteries with Philips' DAB pocket radio.
• rechargeable batteries type AY3362
• alkaline batteries type AA (LR6, UM3) preferably Philips.
Inserting batteries ( see figure 3)
• Open the battery door and insert 2 x AY3362 rechargeable batteries or 2 x AA
batteries with the correct polarity as indicated.
Battery power level indication
Battery full
Battery two-thirds full
Battery one-third full
Battery drained. When the batteries are drained, flashes.
Batteries contain chemical substances, so they should be disposed of
properly.
Please ensure that used batteries are disposed of in accordance with
local/national legislation. Do not short circuit. Do not dispose of in a fire.
ECO-PLUS NiMH battery information (for versions supplied
with the rechargeable ECO-PLUS NiMH battery AY 3362)
Recharging works only on players supplied with the rechargeable
ECO-PLUS NiMH battery AY 3362.
Recharging the ECO-PLUS NiMH battery on board
1
Insert the rechargeable ECO-PLUS NiMH battery AY 3362.
2
Connect the mains adapter to the 6V DC socket of
the radio and then to the wall socket.
™
The RECHARGE indicator lights up during charging
• Recharging stops after a maximum of 7 hours, or when you switch on the radio.
3
When the batteries are fully recharged, the RECHARGE indicator goes out.
10
Page 11

Power Supply
Helpful Hints :
– It is normal for the batteries to become warm during recharging.
– If the batteries become too warm, recharging will be interrupted for approximately 30
minutes .
– To ensure proper recharging on board, take care that contacts are clean.
– Use only the ECO-PLUS NiMH battery AY 3362.
AC ADAPTER/CHARGER (SUPPLIED)
Please use only the adapter/charger supplied with your product. Any other
adapter/charger may damage the radio.
You can use the supplied adapter/charger to either:
• operate the radio on AC/DC power
(6V direct current, positive pole to the
current pin)
• charge the supplied rechargeable batteries on board the
radio.
1
Make sure the local voltage corresponds to the adapter's voltage.
2
Connect the adapter to the 6V DC socket of the radio and to the wall socket.
3
If you have inserted rechargeable batteries for recharging, the RECHARGE indicator
lights up during charging. When charging is full, the RECHARGE indicator goes out.
Helpful Hints :
–
Always disconnect the adapter/charger when you are not using it.
–
When charging batteries, do not operate the radio as this will
interrupt charging time and the performance of your rechargeable
batteries.
The serial and production numbers are located inside the battery compartment.
English
CAUTION
Use of controls or adjustments or performance of procedures other than
herein may result in hazardous radiation exposure or other unsafe operation.
11
Page 12

Basic functions
M
P
C
English
HEADPHONES
• Connect the supplied headphones to the
p socket of the radio.
• The headphone cable also serves as an aerial. To get
optimal signal reception, avoid coiling the headphone cord.
Take care when using headphones
Hearing safety: Listen at a moderate volume. Using headphones at high volume can
impair your hearing.
Traffic safety: do not use headphones while driving or cycling as you may cause an
accident.
ADJUSTING THE VOLUME
•
Adjust the volume by pushing VOLUME 3/4 on the
navigator control.
ADJUSTING THE EQ SETTINGS (DAB ONLY)
By pressing EQ, you can select one of 6 preset equalizer sound options.
Flat - no eq applied
FM
RESET
SELECT
ENTER
VOLUME
POW
ER ON/OFF
INFO
Bass - boosts bass and mid frequencies
Monitor - boosts treble and mid frequencies
EQ
RE
6V DC
Studio - boosts mid frequencies
Club - boosts bass frequencies with some treble
Arena - boosts bass and treble frequencies
12
Page 13

Features
RADIO RECEPTION
With this Dual Band DAB pocket radio, you can tune to both
DAB and FM modes. The headphone cable also serves as an
aerial.
1
Connect the supplied headphones to the
p socket of the radio.
2
Press and hold POWER ON/OFF briefly to switch on
the radio.
3
The set automatically starts tuning in DAB mode.
™
Display shows Welcome followed by DAB tuning.
™
The name of the last station detected/selected is
VOLUME
shown in the 1st display line;
The broadcasting text, if available, scrolls in the 2nddisplay line (DLS in the default
setting).
At the top are shown the volume, battery level, clock, preset EQ and signal strength
of the current station.
™
The last detected station plays and the list of available
stations is stored.
VOLUME
Helpful Hints :
The first time you tune this radio...
– If the tuning fails, the display shows Station not available for 5 seconds and
or SELECT appears to prompt you to enter Manual Tune, Local Scan or
Full Scan (see chapter Tuning/retuning).
POWER ON/OFF
English
DAB/FM, POWER OFF
Next time you tune the radio...
– If the tuning fails, the display shows No stations
available for 5 seconds and a list of stored stations
appears for your selection (see chapter Selecting a
Station).
DAB
PRESET
SELECT
FM
ENTER
VOLUME
13
Page 14

Features
E
R
English
SELECTING DAB/FM
• Press DAB/FM once or more to toggle.
™
Display shows FM tuning.
™
FM and station frequency appear in the 1stdisplay
line for the detected/selected station.
™
The current radio station plays.
TO SWITCH OFF THE RADIO
• Press and hold POWER ON/OFF for
3 seconds.
™ Display shows Powering off ....
™ The display backlight goes out.
Helpful Hints :
–
Activate the LOCK function to save battery power and to
prevent switching on the set accidentally.
•
After you have switched off the radio, adjust the
LOCK•UNLOCK slider to LOCK to activate.
TUNING/RETUNING
In the DAB mode
1
Press MENU to enter the advanced setup menu.
2
Push left/right
ENTER to select the tuning options.
Autoscan
Local scan – scans all the local frequencies.
Full scan – scans the full range of DAB frequencies.
™ Display shows Scanning ... ... and the scanning
progress bar
™ The number of detected radio stations appears.
SELECT 1/ 2 once or more and then,
.
VOLUME
VOLUME
LOCK • UNLOCK
FM
ESET
VOLUME
SELECT
ENTER
VOLUME
MENU
INFO
14
Page 15

Features
O
Helpful Hints :
– If no station is found during autoscan, the display will
VOLUME
return to or SELECT, Manual tune. Select
Manual tune to tune to a specific frequency.
indicates maximum reception during tuning.
indicates minimum reception during tuning.
Manual tune
1
Push left/right
in the desired frequency.
2 Press ENTER to confirm.
In FM mode
SELECT 1/2 once or more until you stop
B
PRESET
SELECT
FM
ENTER
Manual tune
1
Push left/right
SELECT 1/2 once or more until you stop
VOLUME
in the desired frequency.
2 Press ENTER to confirm.
SELECTING A STATION
In DAB mode
After your radio has been tuned, you can select a station using the navigator control.
1
Push left/right
2 When your desired station appears, press ENTER to select the station.
™
After successful tuning, the display shows the selected station name, scrolling text,
volume, battery level, clock, preset EQ and signal reception strength.
Helpful Hints :
– If tuning fails, the display shows No stations available
and goes to the screen or SELECT, Manual tune.
–
Select Manual tune by pressing ENTER.
™
A list of stored stations appears.
– Push left/right
™
Display shows the signal reception strength:
SELECT 1/ 2 once or more to scroll the list of stored stations.
VOLUME
SELECT 1/ 2 to go to a new station, and press ENTER.
indicates maximum reception during tuning.
indicates minimum reception during tuning.
English
INF
15
Page 16

Features
English
In FM mode
To select a station after you have tuned the radio :
• Press ENTER.
™
Display shows Searching ... . To select another station,
press ENTER repeatedly.
Helpful Hints :
–
If no station is selected or no action is executed for more than 5
seconds, the last selected station will continue to play.
SAVING & RECALLING PRESETS
With stations saved as presets, you can quickly access your
desired station after the radio is switched on.
Saving a preset
1
During playing a station, press PRESET.
™
Display shows: current station name at the top display
line and free locations at the bottom.
2
Push left/right
store your new station. E.g. Preset 1 free.
3 Press and hold PRESET.
™
Display: Preset X saved when a station is successfully
saved (where X denotes a preset station number).
Helpful Hints :
–
In the DAB mode, you must save a preset after the stations are
sorted by favourites. You can save your favourite stations as presets.
SELECT 1/ 2
to find a free location to
DAB
VOLUME
VOLUME
VOLUME
PRESET
SELECT
FM
ENTER
VOLUME
16
Page 17

Features
RECALLING A PRESET
1 Press PRESET.
™
Display shows: current station name at the top display
line and available presets at the bottom.
2
Push left/right
SELECT 1/ 2 once or more to find your
desired preset.
3 Press ENTER to confirm.
™
Your desired preset radio station plays.
™
appears.
VIEWING THE SERVICE INFO (DAB ONLY)
You can view the DAB service info in the following 7 information modes.
•
To scroll through the information options, press INFO repeatedly until your desired
option appears.
1 DLS Dynamic Label Segments.
Displays the scrolling broadcasting
text (default setting).
2 Signal error Displays signal errors.
3 Bitrate mode Displays the transmission rate of broadcasting
4 Channel & frequency Displays the channel and frequency of your current service.
5 Clock Shows the time of the current multiplex.
6 Multiplex name Specifies the multiplex of the current service.
7 Program type Describes content type.
data in bits per second.
(A multiplex is a group of stations broadcast by a multiplex
operator.)
VOLUME
VOLUME
English
17
Page 18

Features
English
SORTING STATIONS (DAB ONLY)
You can use MENU and the navigator control to sort and view DAB stations in
various list options.
1 Press MENU.
2
Push left/right
SELECT 1/ 2 and press ENTER to select
Station order.
™
Display shows: FAV station, Alphanumeric station,
Active station or Prune station.
Alphunumeric (default) Displays all the stations in
alphanumeric order.
Fav station Depending on the length of listening time, the radio automatically
lists 10 stations you most frequently listen to in alphanumeric
order in the 1stdisplay line. is displayed.
Active station Displays active/inactive
stations (active ones at the top and inactive ones bottom).
Prune station Removes inactive stations from the list.
3
Push left/right
™
Display shows the stations in the new specified order.
SELECT 1/ 2 and press ENTER to select your desired option.
RESETTING
If desired, you can restore your radio to its default setting by using MENU and the
navigator control.
1 Press down MENU for more than 2 seconds.
™
Display shows: Press SELECT to confirm reset.
2 Press ENTER to confirm resetting.
Helpful Hints :
–
If you wish to cancel the resetting, press any control for 7 seconds.
SELECT
VOLUME
VOLUME
ENTER
MENU
INFO
18
Page 19

Technical specifications
Q
LOCK•UNLOCK : Locking all buttons
You can lock the buttons of the set by switching the slider to
VOLUME
LOCK. With Lock activated, you can avoid accidental action
of other functions, and help save battery power (accidental
switching on).
1 Adjust the slider to LOCK to activate.
™ All buttons are locked. Key lock ON is shown when
you press any button. If the set is powered off, Key
lock ON will only be shown when the set has been
LOCK • UNLOCK
powered on.
2 To deactivate, switch the slider to UNLOCK.
TECHNICAL SPECIFICATIONS
General Stereo digital radio (stereo output possible with auxiliary speaker) with full
Band III and Band L reception capability. Fully compliant with ETS300 401
and capable of decoding all DAB transmission modes 1-4. Analogue stereo
output and headphone socket.
Power Supply 230V AC to 6V DC external power adapter.
Approvals CE marked. Compliant with the EMC and Low Voltage Directives
(89/336/EEC and 73/23/EEC)
Dimensions 60mm x 111.2mm x 21mm
Weight 92.4gram
Battery playtime up to 10 hours (FM)
English
E
19
Page 20

Troubleshooting
English
Warning: Under no circumstance should you try to repair the set yourself as
this will invalidate the guarantee. If a fault occurs, first check the points listed before
taking the unit to repair. If you are unable to solve a problem by following these hints,
consult your dealer or service centre.
The radio has no power
• Check that your batteries are not drained, that they are inserted
correctly, that the contact pins are clean.
• Your adapter connection may be loose. Connect it securely.
The indication "No station available" is displayed
• You may have moved to a new area which is blocking the range of the transmitter.
Autoscan your radio and refresh the list of stations in service (see chapter
Tuning/retuning, local scan/full scan).
• The station is out of service. In the DAB mode, search for a new station in the
station list (see chapter Selecting a station). In FM mode, press ENTER to select a
new station.
The indication "Station off air " is displayed
• The station is out of service. The radio will wait until the service resumes. You can
also tune to a new station.
No sound is heard
• Check that the headphones is connected and you allow the headphone cord to
hang freely.
• Check that the volume level is not too low.
• Adjust the position of the radio to obtain better signal reception.
• The station is currently out of service. Wait until the service resumes, or tune to a
new station.
No response to buttons or the set ‘hangs’
• Electrostatic discharge. Remove batteries for 1 minute, replace batteries then
switch on again.
• LOCK activated. Adjust lock slider to UNLOCK.
20
Page 21

Meet Philips at the Internet
http://www.philips.com
DA1000
LC/bk-0411 Issue 1
Printed in China
 Loading...