

Page 1
55S1 CXDNSUMffl ELECTRONICS
PHILIPS
□ '□aooao aoi399
Space Saving Radio Clock
Page 2
Page 3

English
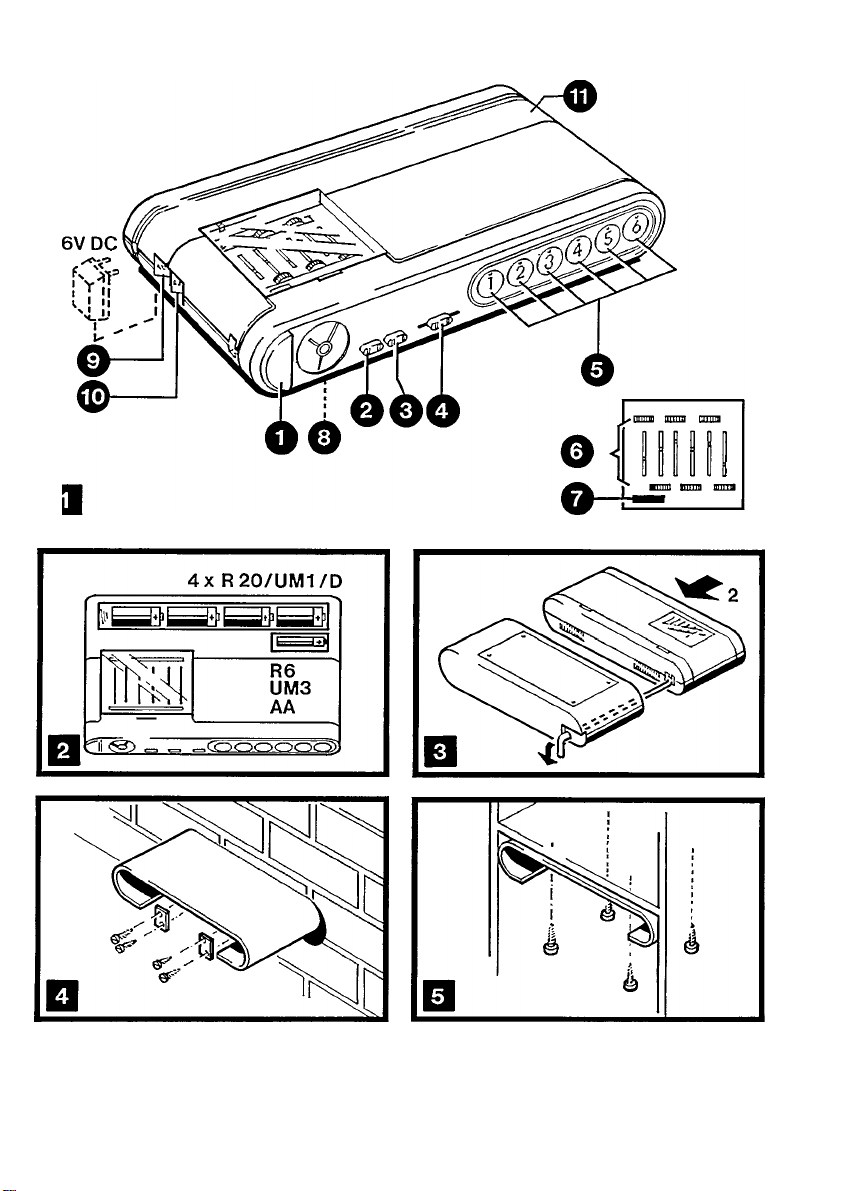
POWER SUPPLY
CONTROLS
POWER - radio on/off
©
ALARM - alarm on/off
©
TONE - sound
©
VOLUME - sound level
©
PRESET buttons - to select pre-selected sta
tions
© TUNING buttons with tuning dials - to set
pre-selected stations
MODE switch - to set correct time and alarm
©
time
CLOCK setting knob - to set hands of clock
connection for 6 V mains adapter
®
connection for loudspeaker
battery compartment
®
This product complies with the radio interference
requirements of the European Community.
The type plate is in the battery compartment.
MOUNTING
_________________________________
The tray of the appliance can be mounted on a wall
or underneath a shelf. The mounting material
required for this is supplied. Once the tray is
secured, slide the radio clock into it.
On a wall (see fig. 4)
• Make holes with a screwdriver through the
mounting holes located on the back of the tray.
• Screw the tray to the wall.
Under a shelf (see fig. 5)
• Make holes with a screwdriver through the
mounting holes on the top of the tray.
• Screw the tray to the shelf.
To attach aerial (see fig. 3}
• Clamp the excess wire from the aerial under the
screw on the back of the appliance.
• After you have mounted the tray, take the wire
through the hole on the back of the tray. A space
has been left here, so that the wire cannot be
pressed against the wall.
MAINS ADAPTER
The radio can be connected to the mains via the
enclosed 6VDC mains adapter. This adapter
supplies 6V direct current with the negative
terminal' — ’ to the central pin.
• Check that the operating voltage of the adapter
is the same as the local mains voltage.
• Insert the plug of the mains adapter into the
6 V DC connection socket ®.
• Connect the adapter to the wall socket.
• In changing over from mains supply to battery
supply, the plug must be withdrawn from 6 V DC
socket ®, otherwise the battery supply will remain
disconnected.
Important note for users In U.K:
When fitting a mains plug to the mains lead proceed as follows:
The wires in the mains lead are coloured in accordance with the
follovnng code: Blue=Neutral. Brown=Live.
These colours may not correspond wnth the colour markings
identifying the terminals in your plug, so proceed as follows:
Connect the Brmvn wire to the terminal marked Lor coloured Red.
Connect the Blue wire to the terminal marked Nor coloured Black.
No connection is necessary to the earth terminal.
Note: This apparatus must be protected by a 3 Amp Fuse if a
13 Amp plug is used or, if any other type of plug is used, by a 5 Amp
Fuse either in the plug or adapter or at the distribufion board. If in
doubt consult a qualified electrician.
Warning: When this unit is not in use and also before attempting
internal examination, remove the mains plug from the wall sockeL
BATTERIES
__________________________________
One battery of type R6, UM3 or AA is required for
the clock. The radio can operate on 4 batteries of
type R20, UM1 or D.
• Insert the batteries in compartment ® (see
fig. 2).
Recommendation
Replace the batteries at least once a year. If you will
not be using the appliance for any length of time, it
is also advisable to remove the batteries from the
appliance, to avoid the possibility of leakage and
consequently damage to the appliance.
Page 4

OPERATION
RADIO
• Press POWER button 0 and the radio comes on.
• Adjust the sound level using VOLUME control 0.
An external loudspeaker with an impedance of
4-8 ohms and with a 03,5 mm plug can be con
nected to input 0.
Pre-selected stations
You can tune to 6 stations with the radio. These are
the pre-selected stations which are programmed
as follows:
• Take the appliance out of the tray and remove the
flap on top of the radio.
• Press one of the PRESET buttons 0 on the front
of the appliance. You may, for example, press
button 1. The lamp In this button then lights up.
• Turn the TUNING button 0 which relates to the
PRESET button, in this case button 1, and search
for the required station.
You have now programmed PRESET button 1.
• Program the other pre-selected stations in the
same way.
• Replace the flap on the compartment and slide
the appliance back into the tray.
If you now wish to listen to one of your pre-selected
stations, you only have to press the appropriate
PRESET button.
Aerial
This appliance has a separate wire aerial. For
attachment of this aerial, see section on Mounting.
It may be necessary to adjust the aerial slightly in
order to obtain optimum reception.
CLOCK
To set the time
• Keep MODE switch 0 depressed in the TIME
position.
• Set the exact time using CLOCK setting knob0.
• Release MODE switch 0 and the clock starts.
MODE switch 0 springs back automatically to
ALARM.
ALARM_____________________________________
Alarm on
• Turn CLOCK setting knob0 in anticlockwise
direction and set the red hand to the alarm time
required.
• Set ALARM switch 0 to ON. The buzzer sounds
and the radio comes on at the alarm time set.
Note: The buzzer sounds like a beep.
Alarm off
• Set ALARM switch 0 to OFF.
If you forget to switch the alarm off, then the alarm
call will always stop automatically after one hour.
MAINTENANCE
- Fingerprints, dust and dirt on the appliance
should be removed with a clean, damp cloth or
chamois leather. Do not use products containing
abrasives or solvents for cleaning (spirit, thinner,
alcohol etc.), as these may damage the casing.
- Rain, damp and excessive heat are bad for the
appliance. The radio should therefore never be
left for long periods in direct sunlight or near
heating equipment.
- Do not mount the appliance above a tap, cooking
ring, stove or near an extractor hood.
Page 5

19
Page 6

20
0587/1
 Loading...