

Page 1
I
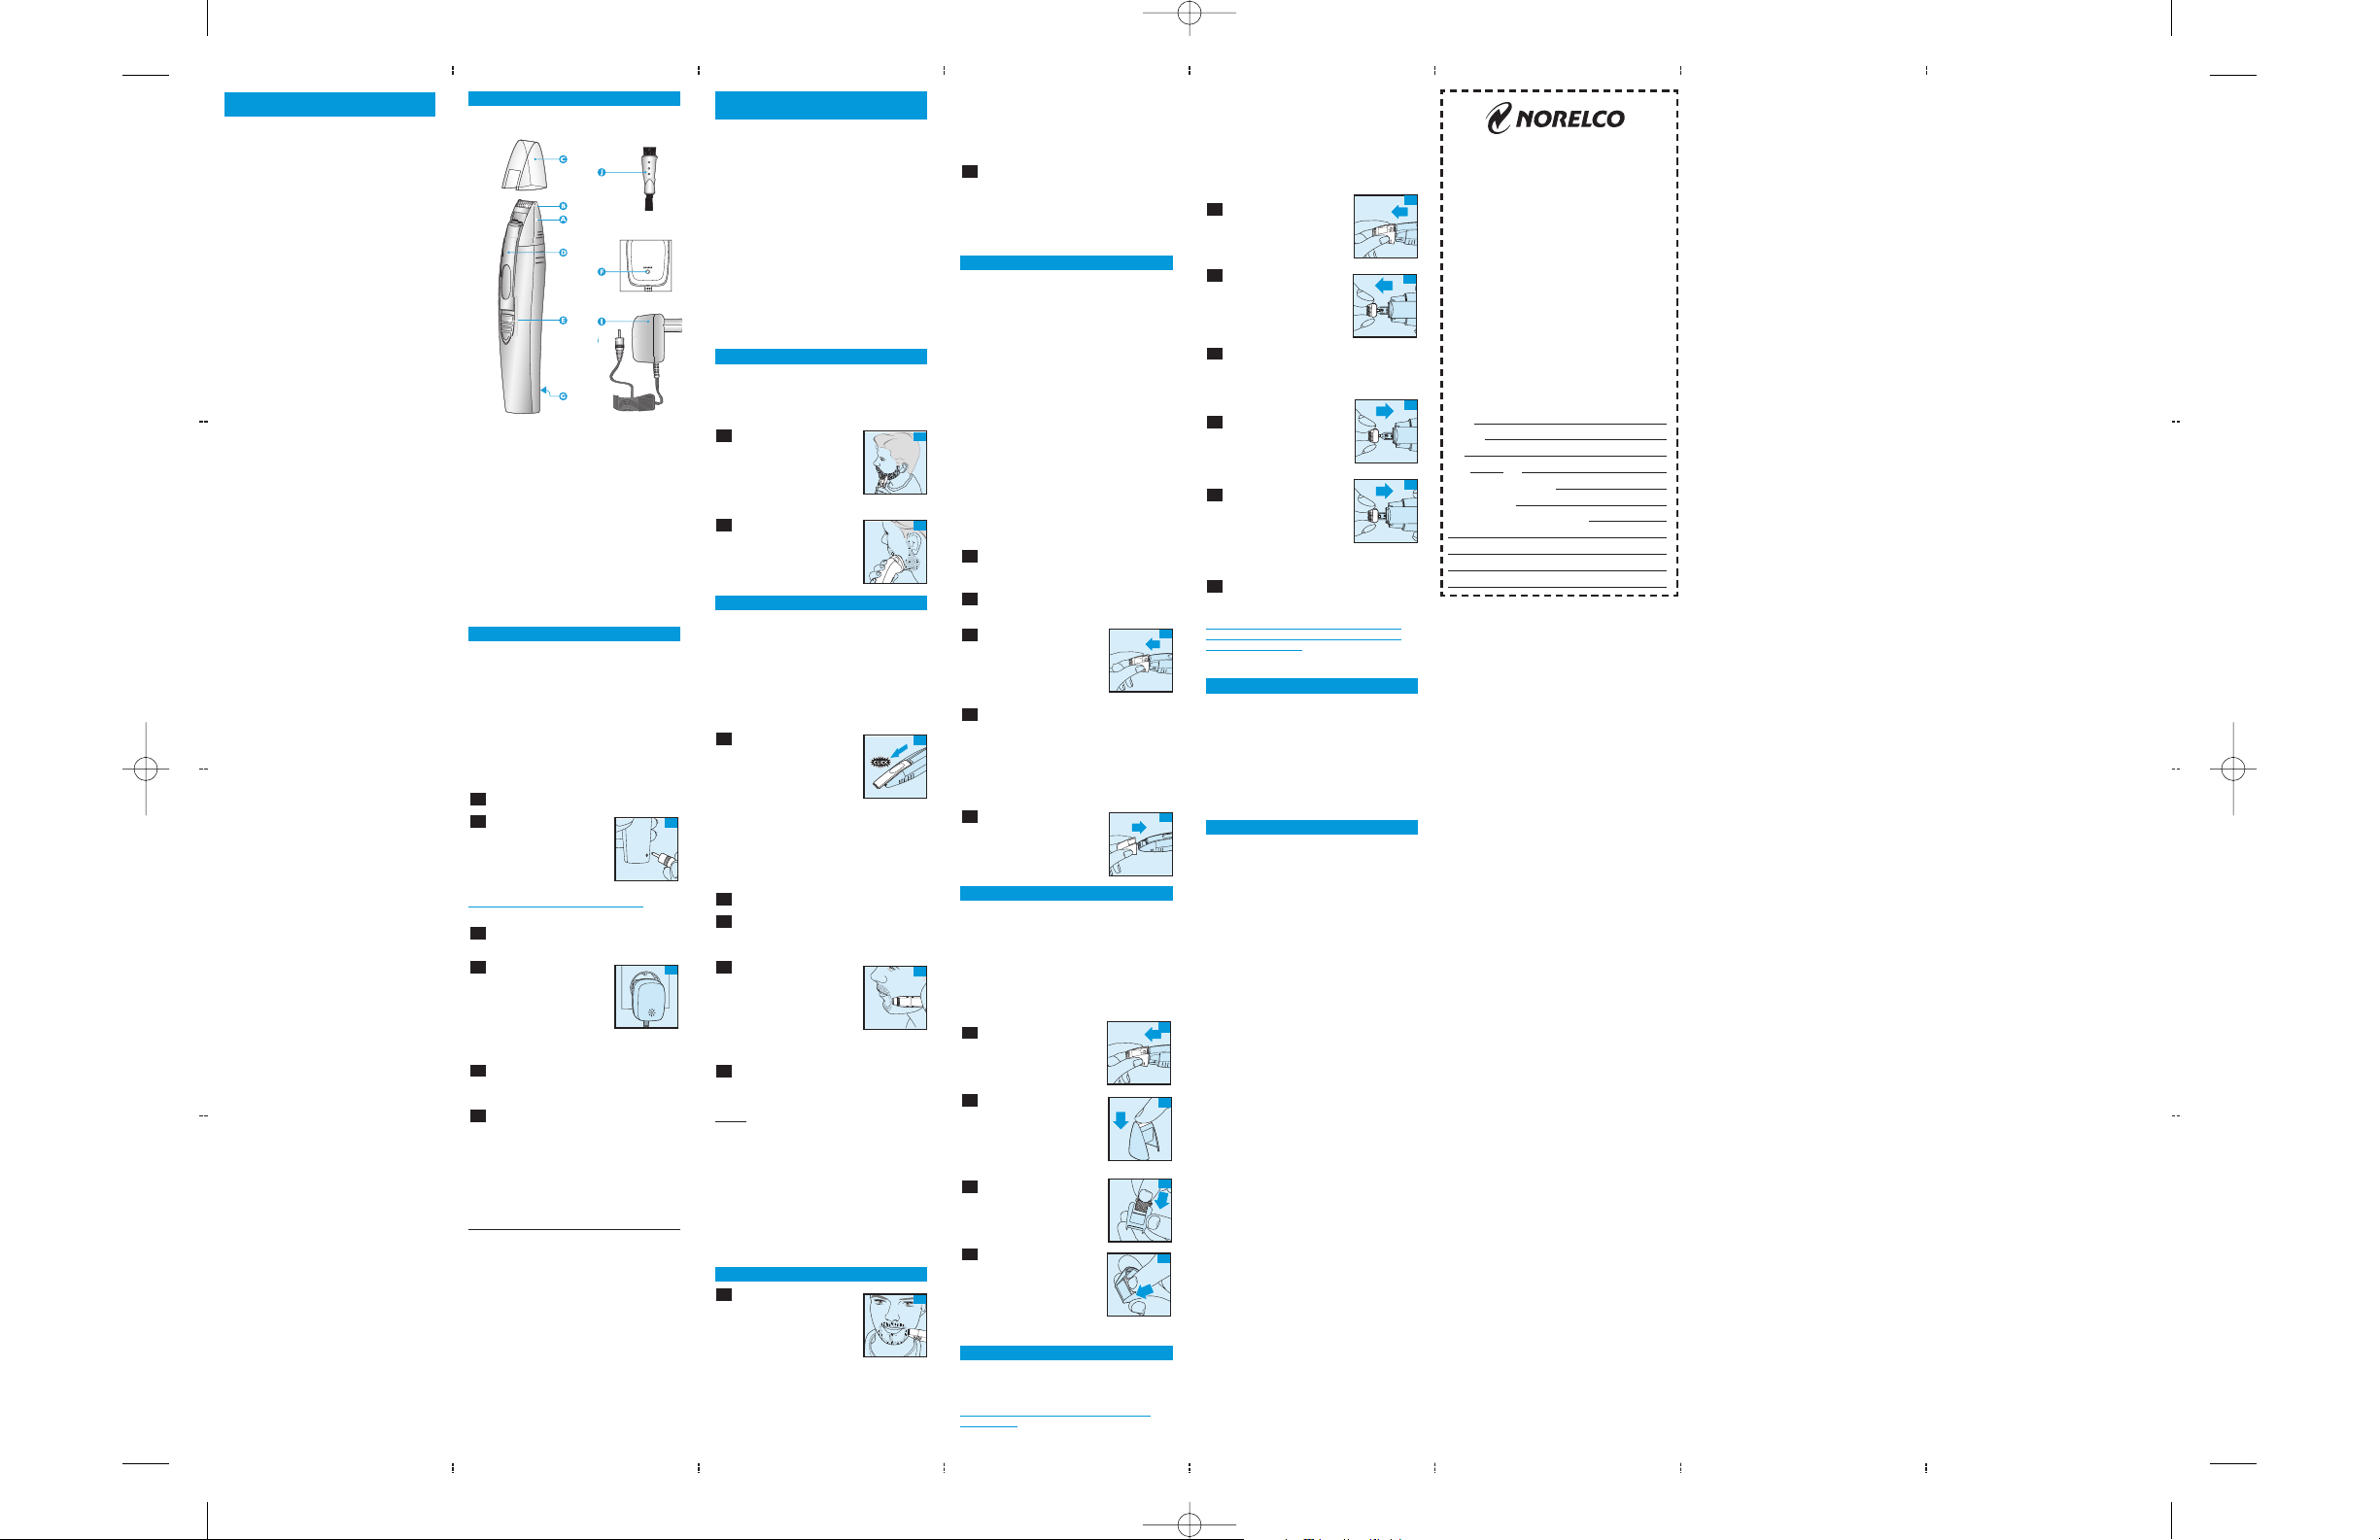
FEATURES
A. Removable Shaving Head
B. Shaving mini-foil
C. Protective Cap
D. Specialty Hi-Definition Trimmer
E. On/Off Switch
F. Charging Indicator Light
G. Power Cord Socket
H. Power Cord
I. Adaptor
J. Cleaning Brush
K. Full Two-Year Warranty
L. 60-Day Money-Back Guarantee
To Charge/Recharge
◗ (Re)charging requires 10 full hours.
◗ Use only the cord provided.
◗ Battery performance is best if you recharge
only when the battery is (almost) completely
empty.
◗ Charging or recharging at temperatures below
40˚F or higher than 95˚F adversely affects
lifetime of the battery.
◗ Continuously recharging Shaper will reduce
life of battery.
Be certain Shaper is OFF.
Connect the power cord
plug to Shaper (Fig. 1).
Do not charge Shaper for more than 24 hours.
Plug adaptor into any 120V AC outlet.
Use only the cord provided.
Green Charging Indicator
Light on the adaptor will
go on to indicate the
Shaper is charging (Fig. 2).
A full charge takes
approximately 10 hours
for up to 40 minutes of
cordless operation.
Remove the adaptor from the electrical
outlet and disconnect the power cord
plug from the Shaper.
When the battery is empty, recharge the
appliance for 10 hours. The Shaper does
not operate directly from the electrical
outlet. If you want to style your facial
hair when the battery is empty, charge
the appliance at least 90 minutes to
ensure enough power for the one styling
session.
Optimize the working life of the battery
After the Shaper has been charged for the
first time, do not recharge it between styling
sessions. Continue using it until the battery is
almost completely empty.
◗ Discharge the battery completely twice a year
by letting the motor run until it stops. Then
recharge the battery for at least 10 hour s.
◗ Do not charge the appliance for more than
24 hours.
◗ Do not keep cord permanently plugged into
the electrical outlet.
◗ If Shaper hasn’t been used for a long period
of time, it must be recharged for a full 10
hours.
6
5
4
3
2
1
Name
Address
City
State Zip
Daytime Telephone No.( )
Email Address:
REASON FOR RETURNING:
60-DAY MONEY-
BACK GUARANTEE
If you are not fully satisfied with your Norelco D-Finer
Precise Shaper,send the product back and we’ll refund
you the full purchase price.
The D-Finer Precise Shaper must be shipped prepaid by insured mail, insurance prepaid, and have
the sales receipt, indicating purchase price and the
date of purchase, enclosed.The D-Finer Precise
Shaper must be postmarked no later than 60 days
after the date of purchase. Norelco reserves the
right to verify the purchase price of the D-Finer
Precise Shaper and limit refunds not to exceed suggested retail price.
Send dated sales receipt, your complete name and
address as indicated below,and the D-Finer Precise
Shaper,prepaid to:
Norelco Consumer Products Company
A Division of Philips Electronics
North America Corporation
450 North Medinah Road, Dock 16
Roselle, IL 60172-2329
Please allow 4-6 weeks for delivery of check.
AREA CODE
ENGLISH
IMPORTANT SAFETY
INSTRUCTIONS
When using an electrical appliance, basic safety
precautions should always be followed,including
the following:
Read all instructions before using this
appliance.
DANGER
To reduce the risk of electric shock:
1. Do not reach for a Shaper that has fallen
into water.Unplug immediately.
2. Do not use while bathing or in a shower.
3. Do not place or store Shaper where it can
fall or be pulled into a tub or sink. Do not
place in or drop into water or other liquid.
4. Always unplug this Shaper from the electrical
outlet immediately after using, except when
Shaper is (re)charging.
5. Unplug Shaper before cleaning.
6. When discarding Shaper,unplug Shaper and
remove rechargeable battery. See Battery
Removal instruction sheet.
WARNING
To reduce the risk of burns, fire, electric
shock or injury to persons:
1. Close supervision is necessary when
this appliance is used by,on, or near children
or invalids.
2. Use this Shaper for its intended household
use as described in this manual. Do not use
attachments not recommended by Philips
Electronics North America Corporation.
3. Never operate this Shaper if it has a
damaged cord or plug, if it is not working
properly,if it has been dropped, damaged, or
dropped into water. Return the Shaper to an
Authorized Norelco Service Location for
examination and repair.
4. Keep the Shaper and cord away from heated
surfaces.
5. Never drop or insert any object into any
opening.
6. Do not operate, charge or plug in Shaper
outdoors or where aerosol (spray) products
are being used or where oxygen is being
administered.
7. Do not use this Shaper with a damaged or
broken specialty Hi-Definition Trimmer or
mini-foil, as facial injury may occur.
8. Always attach plug to Shaper first, then to
outlet.To disconnect,turn on/off switch to
“OFF” position (switch is down), then
remove plug from outlet.
9. To prevent possible damage to the cord,do
not wrap cord around the Shaper.
10.Never put Shaper in direct sunlight or store
at a temperature above 140°F.
11.This Shaper is for use on human facial hair
only.Do not use this Shaper for any other
purpose.
12.Always store your Shaper and adaptor in a
moisture-free area. Make sure the cord is
disconnected from the Shaper.
SAVE THESE
INSTRUCTIONS
IMPORTANT:YOUR SHAPER
CONTAINS A NICKEL-CADMIUM
RECHARGEABLE BATTERY. See Battery
Removal instruction sheet.
D-Finer Precise Shaper with
Dual Defining Technology
Put it to the test. Like many new products,
your Norelco D-Finer Precise Shaper may take
a little getting used to. So take the time to get
acquainted with the two-step shaping and
finishing process. Use the narrow specialty HiDefinition Trimmer to shape your beard, even
in the smallest areas. Then follow-up with the
narrow shaving mini-foil to shave along the
edges and eliminate any stubble to create a
smooth and clean contoured beard line.
Use the D-Finer Precise Shaper in addition to
your beard trimmer and razor to create and
maintain the beard shape that defines your
personal style.The unique ergonomic design
makes it easy to see exactly what you’re doing
so you get precisely the look you want.
Before You Begin
Preparing your beard for shaping
Follow these steps to prepare your beard.
Use a Norelco beard and
moustache trimmer to
trim your beard (Fig.3).
Use a Norelco razor to
shave larger areas of the
skin (Fig.4).
Shaping
Now you can shape and define your facial hair
style.
Use the D-Finer Precise Shaper on a clean, dry
face. Do not use any type of lotion or cream
before using.
Use the Precise Shaper only for its intended
household use as described in this manual.
Slide the specialty HiDefinition Trimmer out
until you hear a “click”
and the Hi-Definition
Trimmer snaps into
position.You will see the
slide-out mark (Fig. 5).
The slide-out mark is hidden underneath the
specialty Hi-Definition Trimmer and only
becomes visible when the specialty HiDefinition Trimmer has been slid out correctly
and “clicks” into position.
Switch the D-Finer Precise Shaper ON.
Shape the contours of your beard and
sideburns with the specialty Hi-Definition
Trimmer.
To contour most
effectively, place the flat
surface of the specialty HiDefinition Trimmer in
contact with the skin and
move it against the
direction of hair growth
(Fig. 6).
Make well-controlled movements. Touch
the hair lightly with the specialty HiDefinition Trimmer.
NO
TE: Since all hairs do not grow in the same
direction, you may want to try different
contouring positions (i.e., upwards,
downwards, or across). Practice is best for
optimum results.
For additional styles and defining tips, visit our
website: www.norelco.com/d-finer.
When you have created your desired beard
contour,slide the specialty Hi-Definition
Trimmer back down to its original position.
Finishing
Finally,use the narrow
shaving mini-foil to shave
along the contour edges to
remove any stubble while
creating a smooth clean
beard line (Fig. 7).
Before using mini-foil, always check mini-foil
for wear or damage. If mini-foil shows signs of
wear or damage, do not use shaver as injury
may occur. Do not use until mini-foil has been
replaced.
1
5
4
3
2
1
2
1
Gently press the shaving mini-foil to the skin.
Do not press too hard.
To maintain a shape, use the shaving mini-foil
to shave along the edges to provide a smooth
and clean beard line.
Switch the D-Finer Shaper OFF. Put on
the protective shaving head cap to
protect the specialty Hi-Definition
Trimmer and the shaving mini-foil.
CLEANING
◗ Always switch D-Finer Precise Shaper off
before cleaning.
◗ Do not use abrasives, scourers or liquids such
as alcohol, benzene, bleach or acetone to
clean the D-Finer Shaper.
◗ Never clean the specialty Hi-Definition
Trimmer or shaving mini-foil with the motor
ON.
◗ Do not apply pressure to specialty Hi-
Definition Trimmer or shaving mini-foil. Do
not touch specialty Hi-Definition Trimmer or
shaving mini-foil with hard objects as this may
damage them.
◗ Do not use while bathing, showering or
immerse the D-Finer in water or other liquids
as damage to D-Finer Shaper may occur.
◗ Clean cut hairs from D-Finer Shaper as they
accumulate during use.
◗ Always clean D-Finer Shaper after each use
and before storing.
Make sure D-Finer Shaper is switched
OFF and disconnected from the electrical
outlet.
Make sure the specialty Hi-Definition
Trimmer is down in its original position.
Remove the removable
shaving head by pulling it
off the D-Finer body
(Fig. 8).
Shake or blow cut hairs from the shaving
head. Carefully clean the cutting unit and
the shaving head and body of the D-Finer
Shaper with the brush supplied.
Important: Do not clean the shaving minifoil with the brush. The brush may damage the
shaving mini-foil.
Put on the protective
shaving head cap to
protect the specialty HiDefinition Trimmer and the
shaving mini-foil (Fig. 9).
Replacing Th e Shaving Mini-foil
If the shaving mini-foil is worn or damaged, do
not continue using the appliance. Replace the
shaving mini-foil immediately.
A worn or damaged shaving mini-foil should
only be replaced with an original Philips
shaving mini-foil, which is available at an
authorized Norelco Service Location.
Remove the detachable
shaving head by pulling it
from the appliance (fig. 10).
Remove the shaving minifoil by pushing it out of the
shaving head (fig. 11).
Place the new shaving minifoil carefully in the shaving
head (fig. 12).
When the shaving mini-foil
is properly positioned,
push it into its end
position with your finger
(fig. 13).
Replacing Th e Mini-foil Cutter
The mini-foil cutter is located under the
detachable shaving head.
Do not switch the appliance on when replacing the
mini-foil cutter.
4
3
2
1
5
4
3
2
1
2
3
4
5
6
7
8
9
2
1
If the mini-foil cutter is worn or damaged, do
not continue using the appliance. Replace the
mini-foil cutter and the shaving mini-foil
immediately.
A worn or damaged mini-foil cutter should
only be replaced with an original Philips cutter,
which is available at an authorized Norelco
Service Location.
Remove the detachable
shaving head by pulling it
from the Shaper (fig. 14)
Remove the old mini-foil
cutter by pulling it from the
appliance (fig. 15).
Make sure that the spring within the
driving unit does not get lost.
Insert the new mini-foil
cutter carefully into the
driving unit (fig. 16).
When the mini-foil cutter
is properly positioned,
push it into its end
position with your finger
(fig. 17).
Replace the detachable shaving head on
the Shaper.
This shaper has no other user-serviceable parts. Any
other service should be performed by an Authorized
Norelco Service Location.
Assistance
For assistance or the Authorized Norelco
Service Location nearest you, call toll free:
1-800-243-3050
or for live help online visit our website:
www.norelco.com
Authorized Norelco Service Location
information is available 24 hours a day, 7 days a
week.
Battery Removal
◗ This Norelco D-Finer Shaper contains a
rechargeable Nickel-Cadmium battery, which
must be disposed of properly.
◗ Battery should only be removed when D-
Finer Shaper is to be discarded.
◗ Refer to Battery Removal instruction sheet for
directions on removing the rechargeable
battery.
6
5
4
3
2
1
14
15
16
11
12
13
17
10
4203.000.5253.2.qxd 5/2/03 4:44 PM Page 1
Page 2
ESPAÑOL
INSTRUCCIONES
DE SEGURIDAD
IMPORTANTES
Cuando utilice un aparato eléctrico, siempre
debe tomar una serie de precauciones básicas,
entre las que se incluyen las siguientes:
Lea todas las instrucciones antes de
utilizar el aparato.
PELIGRO
Para reducir el riesgo de una descarga
eléctrica:
1. Si el aparato para el contorno se cae al
agua, no intente sacarlo. Desenchúfelo
inmediatamente.
2. No lo utilice mientras se baña o en la
ducha.
3. No coloque el aparato donde se pueda
caer o lo puedan tirar a la bañera o al
lavabo. No lo sumerja en agua u otro
líquido.
4. Desenchufe siempre el aparato de la toma
de corriente inmediatamente después de
utilizarlo, excepto si el aparato se está
(re)cargando.
5. Desenchufe el aparato antes de limpiarlo.
6. Cuando deseche el aparato, desenchúfelo y
quite la batería recargable. Consulte las
instrucciones sobre Cómo quitar batería.
AVISO
Para reducir el riesgo de quemaduras,
fuego, descarga eléctrica o heridas
personales:
1. Tenga especial cuidado cuando niños o
personas discapacitadas utilicen el aparato,
estén cerca de él o se utilice éste con
ellos.
2. Utilice el aparato para la finalidad que se
describe en este manual. No utilice
accesorios no recomendados por Philips
Electronics North America Corporation.
3. Nunca conecte el aparato si tiene el cable
o el enchufe dañado, si no funciona
correctamente, si ha caído, está
deteriorado o si se ha caído al agua.
Devuelva el aparato al Centro de Servicio
autorizado Norelco para que lo revisen y
lo reparen.
4. Mantenga el aparato y el cable alejados de
superficies calientes.
5. No inserte nunca un objeto por ninguna
abertura.
6. Nunca conecte, cargue o enchufe el
aparato al aire libre o en lugares donde se
hayan utilizado sprays o liberado oxígeno.
7. No utilice este aparato para el contorno
con Cortapatillas de alta definición o miniláminas deteriorados o rotos, ya que se
puede hacer heridas en la cara.
8. Primero conecte el cable al aparato, y
después enchúfelo a la toma de corriente.
Para desconectarlo, gire el interruptor
on/off a la posición OFF (interruptor hacia
abajo), y desenchufe el cable de la toma de
corriente.
9. Para evitar que se dañe el cable, no enrolle
el cable alrededor del aparato.
10. Nunca deje que la luz solar incida
directamente en el aparato o lo guarde a
temperatura superior a los 140ºF.
11. Este aparato sólo se puede utilizar sobre el
contorno de la barba. No lo utilice para
cualquier otra cosa.
12. Guarde siempre el aparato y el adaptador
en un lugar sin humedad.Asegúrese de que
el cable está desenchufado del aparato.
GUARDE ESTAS
INSTRUCCIONES
IMPORTANTE: SU APARATO PARA
EL CONTORNO CONTIENE UNA
BATERÍA RECARGABLE DE
NIQUEL-CADMIO. Consulte las
instrucciones sobre “Cómo quitar la
batería”.
Para acabar
Finalmente, utilice la minilámina afeitadora estrecha
para llegar a los extremos
y eliminar la barba de
unos días y conseguir una
línea de contorno suave y
limpia (Fig. 7).
Antes de utilizar la mini-lámina afeitadora,
compruebe siempre que no está dañada o
rota. Si la mini-lámina afeitadora estuviera
dañada, no utilice la afeitadora ya que puede
provocar heridas. No la utilice hasta que
sustituya la mini-lámina.
Presione ligeramente la mini-lámina contra la
piel. No presione con demasiada fuerza.
Para mantener la forma, utilice una minilámina afeitadora para llegar a los extremos y
conseguir una línea de contorno suave y
limpia.
Desconecte el aparato para el contorno
D-Finer (OFF). Ponga la funda protectora
en los cabezales para proteger el
cortapatillas de alta definición y la minilámina afeitadora.
LIMPIEZA
◗ Desconecte siempre el aparato para el
contorno D-Finer Precise antes de
limpiarlo.
◗ No utilice elementos abrasivos, estropajos
o líquidos como alcohol, benceno, lejía o
acetona para limpiar el aparato para el
contorno D-Finer.
◗ Nunca limpie el cortapatillas de alta
definición o la mini-lámina afeitadora con el
motor encendido.
◗ No ejerza presión al utilizar el cortapatillas
de alta definición o la mini-lámina afeitadora.
Ni los manipule con objetos duros, ya que
podrían dañarse.
◗ No utilice el D-Finer mientras se baña o se
ducha, ni lo sumerja en agua u otros
líquidos, ya que podría dañarse.
◗ Retire el pelo cortado del aparato para el
contorno D-Finer,ya que se va acumulando
durante el uso.
◗ Limpie siempre el aparato para el contorno
D-Finer después de cada uso y antes de
guardarlo.
Asegúrese de que el aparato para el
contorno D-Finer está apagado (OFF)
y desconectado de la toma de corriente.
Asegúrese de que el cortapatillas de alta
definición está colocado en su posición
original.
Quite el cabezal
desmontable tirando de él
para sacarlo del cuerpo
del D-Finer (Fig. 8).
Sacuda o sople el pelo cortado del
cabezal. Limpie con cuidado la unidad de
corte, los cabezales y el cuerpo del
cortapatillas de alta definición con el
cepillo que se incluye.
Importante: no limpie la mini-lámina
afeitadora con el cepillo. El cepillo puede
dañar la mini-lámina afeitadora.
Ponga la funda protectora
en los cabezales para
proteger el cortapatillas
de alta definición y la minilámina afeitadora (Fig. 9).
Cómo sustituir la mini-lámina
afeitadora
Si la mini-lámina afeitadora está rota o
deteriorada, no siga utilizando el aparato.
Sustituya la mini-lámina afeitadora
inmediatamente.
Una mini-lámina afeitadora rota o deteriorada
debe sustituirse por otra original de Philips,
disponible en un centro de servicio Norelco
autorizado.
Quite el cabezal
desmontable tirando de él
para sacarlo del aparato
(fig. 10).
1
5
4
3
2
1
2
1
Saque del cabezal la minilámina afeitadora tirando
de ella (fig.11).
Coloque con cuidado la
mini-lámina afeitadora
nueva en el cabezal (fig.12).
Cuando la mini-lámina
afeitadora esté colocada
adecuadamente, empújela
con los dedos hasta
encajarla en su posición
final (fig. 13).
Cómo sustituir la cuchilla de
mini-lámina
La cuchilla de mini-lámina se encuentra debajo
del cabezal desmontable.
No conecte el aparato cuando sustituya la cuchilla
de mini-lámina.
Si la cuchilla de mini-lámina está rota o
deteriorada, deje de utilizar el aparato.
Sustituya la cuchilla de mini-lámina y la minilámina afeitadora inmediatamente.
Una cuchilla de mini-lámina debe sustituirse
únicamente por otra original de Philips,
disponible en un centro de servicio Norelco
autorizado.
Quite el cabezal
desmontable tirando de él
para sacarlo del aparato
(fig. 14).
Quite la cuchilla de minilámina vieja tirando de ella
para sacarla del aparato
(fig. 15).
Asegúrese de no perder el muelle de la
unidad motora.
Inserte con cuidado la
cuchilla de mini-lámina en
la unidad motora (fig. 16).
Cuando la cuchilla minilámina esté colocada
correctamente, encájela
hasta el tope con los
dedos (fig. 17).
Sustituya el cabezal
desmontable del aparato para el
contorno.
El usuario no debe manipular ninguna otra pieza de esta
aparato. Cualquier otro servicio deberá ser realizado
en un centro de servicio Norelco autorizado.
Servicio de asistencia
Para contactar con el servicio de asistencia o
el centro de servicio Norelco autorizado más
cercano, llame gratuitamente al:
1-800-243-3050
o para conseguir ayuda online, visite nuestro
sitio web:
www.norelco.com
El servicio de información sobre centros de
servicio Norelco autorizados está disponible
las 24 horas del día, 7 días a la semana.
Extracción de la batería
◗ El aparato para el contorno D-Finer de
Norelco contiene una batería recargable de
Níquel-Cadmio, que debe desecharse de
forma correcta.
◗ La batería sólo debe extraerse cuando el
aparato para el contorno D-Finer Shaper va
a desecharse.
◗ Consulte las instrucciones de Extracción de
la batería para ver los pasos que debe seguir
cuando quiera extraer la batería recargable.
6
5
4
3
2
1
4
3
2
FULL TWO-YEAR WARRANTY
Philips Electronics North America Corporation warrants each new Norelco
product, Model D350 or D359 (except cutters and mini-foil), against defects
in materials or workmanship for a period of two years from the date of purchase, and agrees to repair or replace any defective product without charge.
IMPORTANT: This warranty does not cover damage resulting from accident,
misuse or abuse, lack of reasonable care, the affixing of any attachment not
provided with the product or loss of parts or subjecting the product to any
but the specificied voltage.* Use of unauthorized replacement parts will void
this warranty.
PHILIPS ELECTRONICS NORTH AMERICA CORPORATION WILL NOT PAY
FOR WARRANTY SERVICE PERFORMED BY A NON-AUTHORIZED REPAIR
SERVICE AND WILL NOT REIMBURSE THE CONSUMER FOR DAMAGE
RESULTING FROM WARRANTY SERVICE PERFORMED BY A NONAUTHORIZED REPAIR SERVICE. NO RESPONSIBILITY IS ASSUMED FOR
ANY SPECIAL, INCIDENTAL OR CONSEQUENTIAL DAMAGES.
In order to obtain warranty service, simply take or ship the product postage
prepaid to the nearest Authorized Norelco Service Location. It is suggested
that for your protection you return shipments of product by insured mail,
insurance prepaid. Damage occurring during shipment is not covered by this
warranty.
NOTE: No other warranty, written or oral, is authorized by Philips Electronics
North America Corporation. This warranty gives you specific legal rights, and
you may also have other rights which vary from state to state. Some states
do not allow the exclusion or limitation of incidental or consequential damages, so the above exclusion and limitations may not apply to you.
*Read enclosed instructions carefully.
Manufactured for: Norelco Consumer Products Company
A Division of Philips Electronics North America Corporation
1010 Washington Blvd., Stamford, CT 06912-0015
MADE IN AUSTRIA.
This symbol on the product’s nameplate means it is
listed by Underwriters’ Laboratories, Inc.
Norelco is a Registered Trademark of Philips Electronics North America
Corporation.
D-Finer and Dual Defining Technology are Trademarks of Philips Electronics
North America Corporation.
PHILIPS is a Registered Trademark of Koninklijke Philips Electronics N.V.
© 2003 Philips Electronics North America Corporation. All Rights Reserved.
Rev. 1 - 4/03
Garantía Completa De Dos Años
Philips Electronics North America Corporation garantiza todo producto Norelco
modelo D350 or D359 (expcepto las chchillas y mini-láminas), nuevo contra defectos de materiales o mano de obra por un período de dos años (cuchillas hasta
cinco años) desde la fecha de compra y está de acuerdoen reparar o reemplazar
todo producto defectuoso sin cargo alguno.
IMPORTANTE: Esta garantía no cubre daños causados por accidente, maltrato
o abuso, falta de cuidado razonable, conexiones a cualquier accesorio que
no venga suministrado con el producto, pérdida de piezas ni por someter
el producto a un voltaje que no sea el especificado.* El uso de piezas
de repuesto no autorizadas anulará esta garantía.
PHILIPS ELECTRONICS NORTH AMERICA CORPORATION NO PAGARÁ UN
SERVICIO DE GARANTÍA QUE HAYA SIDO REALIZADO POR UN SERVICIO
DE REPARACIÓN NO AUTORIZADO Y NO REEMBOLSARÁ AL CONSUMIDOR
LOS GASTOS DE LOS DAÑOS QUE RESULTEN DE UN SERVICIO DE
GARANTÍA QUE HAYA REALIZAD ICIO DE REPARACIÓN NO AUTORIZADO.
NO SE ASUME NINGUNA RESPONSABILIDAD POR DAÑOS ESPECIALES,
ACCIDENTALES O DERIVADOS.
Para obtener el servicio de garantía, sólo tiene que llevar o enviar el producto
con franqueo pagado al Centro de servicio Norelco autorizado. Se aconseja
que para la protección del producto certifique el envío, con franqueo pagado.
Los daños que puedan acontecer durante el envío no están cubiertos por
esta garantía.
NOTA: Ninguna otra garantía, escrita u oral, está autorizada por Philips
Electronics North America Corporation. Esta garantía le proporciona derechos legales específicos, y también puede tener otros derechos que varían
de un estado a otro. Algunos estados no admiten la exclusión o limitación
de daños accidentales o derivados, en tal caso, no se aplicaría la exclusión
o limitación.
*Lea las instrucciones anexas con atención.
Fabricado por: Norelco Consumer Products Company
A Division of Philips Electronics North America Corporation
1010 Washington Blvd., Stamford, CT 06912-0015
FABRICADO EN AUSTRIA
Este símbolo en la placa del producto significa que está reconocido
por Underwriters’ Laboratories, Inc.
Norelco es una marca registrada de Philips Electronics North America
Corporation.
D-Finer y Dual Defining Technology son marcas de Philips Electronics
North America Corporation.
PHILIPS es una marca registrada de Koninklijke Philips Electronics N.V.
” 2003 Philips Electronics North America Corporation. Todos los derechos
reservados.
4203 000 5259 2
I
◗ No deje el cable permanentemente
enchufado en la toma de corriente.
◗ Si no ha utilizado el aparato durante mucho
tiempo, debe recargarlo durante 10 horas.
Aparato para el contorno D-Finer
Precise con Tecnología de
definición dual
Pruébelo. Como ocurre con muchos otros
productos nuevos,tardará en acostumbrarse al
aparato para el contorno D-Finer Precise de
Norelco. Por lo tanto, tómese tiempo para
acostumbrarse al proceso de definición de
contorno y acabado en dos pasos. Utilice el
estrecho cortapatillas de alta definición para
afeitarse la barba, incluso las zonas más
pequeñas. Después continúe el afeitado con la
mini-lámina afeitadora estrecha para llegar a
los extremos y eliminar la barba de unos días
y conseguir una línea de contorno suave y
limpia.
Utilice el aparato para el contorno D-Finer
Precise además de su barberp y su afeitadora
para conseguir y mantener un contorno de
barba que defina su estilo personal. Su
exclusivo diseño ergonómico le permite ver lo
que está haciendo, por lo que puede conseguir
exactamente el look que prefiera.
Antes de empezar
Prepare su barba para darle forma.
Siga los siguientes pasos para preparar su
barba.
Utilice un barbero
Norelco para recortar su
barba (fig. 3).
Utilice una afeitadora
Norelco para afeitar las
zonas amplias de la piel
(fig. 4).
Cómo dar forma a la barba
Ahora ya puede dar forma y definir el estilo
de su barba.
Utilice el aparato para el contorno D-Finer
Precise sobre la cara limpia y seca. No use
ningún tipo de loción o crema antes de
utilizarlo.
Utilice el aparato para el contorno Precise
únicamente para el uso que se define en este
manual.
Deslice hacia fuera el
cortapatillas de alta
definición hasta que oiga
un clic y encaje en su
posición.Ahora podrá ver
la marca de tope (Fig.5).
La marca de tope se esconde debajo del
cortapatillas de alta definición y sólo se verá si
éste se ha deslizado correctamente y ha
encajado con un clic en su posición.
Conecte el aparato para el contorno
D-Finer Precise.
Dé forma al contorno de la barba y
patillas con el aparato para el contorno
con el cortapatillas de alta definición.
Para definir el contorno
de una forma más precisa,
coloque la superficie plana
del cortapatillas de alta
definición sobre la piel y
muévalo en dirección
opuesta al crecimiento
del bello (Fig.6).
Haga movimientos precisos.Toque la
barba con cuidado con el cortapatillas de
alta definición.
NOTA: Como no todo el bello crece en la
misma dirección, puede probar con distintas
posiciones (es decir,hacia arriba, hacia abajo, o
cruzado). Con la práctica se consiguen
mejores resultados.
Para crear otros estilos y leer más consejos
de definición, visite nuestro sitio
web:www.norelco.com/d-finer.
Cuando haya conseguido el contorno de barba
que desee, deslice el cortapatillas de alta
definición hasta su posición inicial.
5
4
3
2
1
2
1
3
4
5
6
7
8
9
11
12
13
14
15
16
17
60 DÍAS DE
GARANTÍA DE
DEVOLUCIÓN DEL
DINERO
Si usted no está plenamente satisfecho con el aparato
para el contorno D-Finer Precise de Norelco, devuelva el
producto y le reembolsaremos el precio total de compra.
El D-Finer debe enviarse por correo franqueado y asegurado, con el seguro pagado, el recibo de compra
incluido, con indicación del precio y la fecha de compra. El Precise no debe ser posterior a 60 días de la
fecha de compra. Norelco se reserva el derecho de
verificar el precio de compra del producto y limitar
los reembolsos de manera que no excedan el precio
de venta sugerido.
Envíe el recibo de compra fechado, su nombre completo y
dirección como se indica más abajo, y el producto franqueado a:
Norelco Consumer Products Company
A Division of Philips Electronics
North America Corporation
450 North Medinah Road, Dock 16
Roselle, IL 60172-2329
Nombre
Dirección
Ciudad
Estado Código postal
Número de teléfono de día
. ( )
Dirección de email:
MOTIVO DE LA DEVOLUCIÓN:
CÓDIGO DEL ÁREA
®
LISTED
10
®
LISTED
D359
D350
Precise Shaper
Guaranteed Precision and Definition
Guaranteed Precision and Definition
CARACTERÍSTICAS
A. Cabezal desmontable
B. Mini-lámina afeitadora
C. Funda protectora
D. Cortapatillas de alta definición
E. Interruptor encendido/apagado (On/Off)
F. Luz indicadora de carga
G. Enchufe
H. Cable
I. Adaptador
J. Cepillo limpiador
K. Garantía total de dos años
L. Garantía de reembolso de 60 días
Para cargar/descargar
◗ El aparato tarda en (re)cargarse 10 horas.
◗ Utilice sólo el cable que se incluye.
◗ Se consigue un mejor rendimiento de la
batería si se carga únicamente cuando esté
(casi) completamente descargada.
◗ Si carga o descarga la batería a una
temperatura inferior a 40ºF o a superior a
95ºF podrán producirse efectos adversos en
cuanto a la vida útil de la batería.
◗ Si está cargando continuamente el aparato,
se reducirá la vida útil del aparato.
Asegúrese de que el
aparato está en posición
OFF (apagado).
Conecte el cable al aparato
(fig. 1).
No cargue el aparato durante más de 24 horas
Enchufe el adaptador a una
toma de corriente de
120V AC. Utilice sólo el
cable que se incluye.
La luz indicadora de carga
verde del adaptador se encenderá para
indicar que el aparato está cargado (Fig.2)
Tarda en cargarse completamente unas 10
horas aproximadamente con
un tiempo de autonomía
de hasta 40 minutos.
Desenchufe el adaptador de la toma de
corriente y desconecte el cable del
aparato.
Cuando la batería esté vacía, recargue el
aparato durante 10 horas. El aparato no
funciona si está enchufa directamente a la
toma de corriente. Si desea arreglarse el
contorno de la barba cuando la batería
esté vacía, cargue el aparato durante al
menos 90 minutos para conseguir la carga
suficiente para una sesión.
Cómo mejorar la vida útil de la batería
Después de cargar el aparato por primera vez,
no lo recargue entre sesión y sesión. Siga
utilizándolo hasta que la batería se descargue
por completo.
◗ Descargue la batería completamente dos
veces al año dejando el motor en marcha
hasta que se pare. Después recargue la
batería durante al menos 10 horas.
◗ No cargue el aparato durante más de 24
horas.
6
5
4
3
2
1
1
2
4203.000.5253.2.qxd 5/2/03 4:44 PM Page 2
 Loading...