

Page 1
HD2615, HD2613, HD2611
Page 2
2
Page 3
3
1
Page 4

4
Page 5

ENGLISH 6
FRANÇAIS 10
NEDERLANDS 14
HD2615, HD2613, HD2611
Page 6

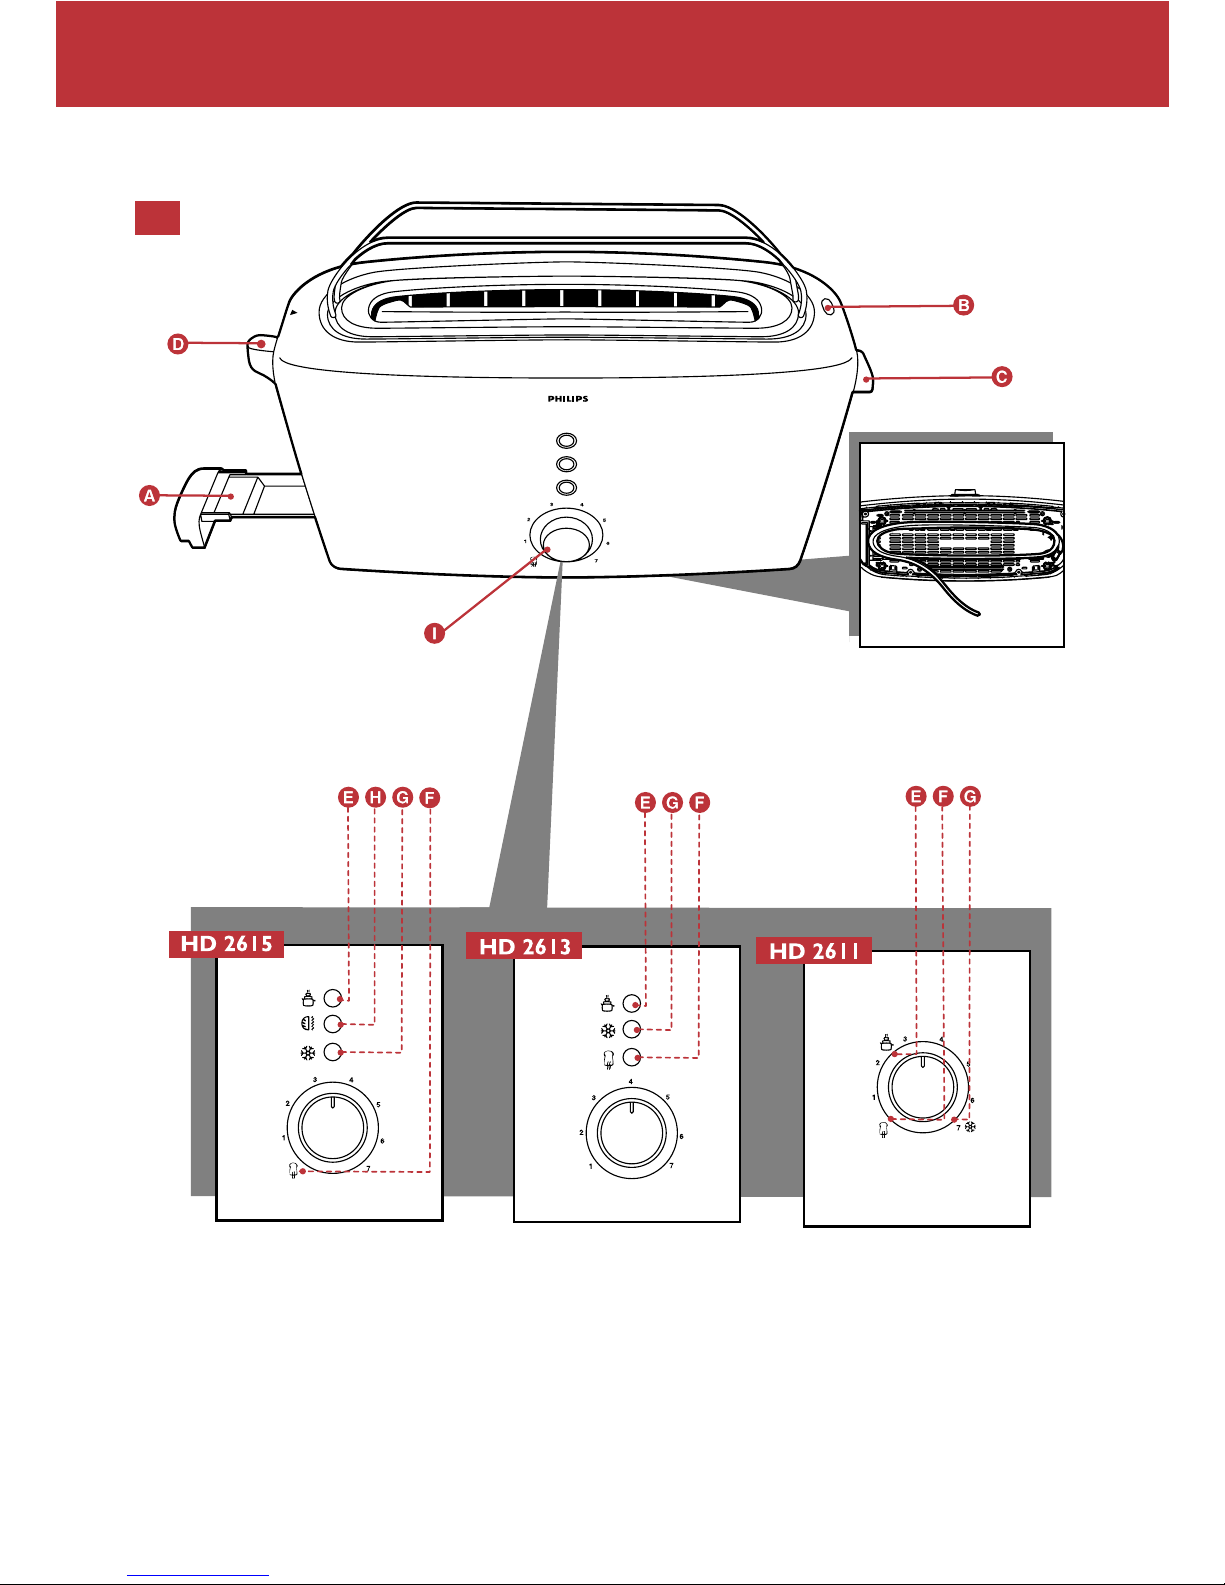
General description (fig.1)
A Crumb tray
B Stop button
C Toasting lever
D Warming rack lever
E Warming button (HD2613, HD2615)
Warming setting (HD2611)
F Reheat button (HD2613)
Reheat setting (HD2611, HD2615)
G Defrost button (HD2613, HD2615)
Defrost setting (HD2611)
H One-side toasting button (HD2615)
I Browning control
Important
Read these instructions for use carefully before using the appliance and save them for future
reference.
◗ Check if the voltage indicated on the bottom of the appliance corresponds to the local mains
voltage before you connect the appliance.
◗ Only connect the appliance to an earthed wall socket.
◗ If the mains cord is damaged, it must be replaced by Philips, a service centre authorised by
Philips or similarly qualified persons in order to avoid a hazard.
◗ Do not immerse the appliance or the mains cord in water or other liquids.
◗ Always unplug the appliance after use.
◗ Keep the appliance out of the reach of children.
◗ Do not let the mains cord hang over the edge of the table or worktop and keep the cord
away from hot surfaces.
◗ Do not let the appliance operate unattended. Do not operate it under or near curtains or
other flammable materials or under wall cabinets, as bread may burn.
◗ Avoid touching the metal parts of the toaster as they become very hot during toasting. Only
touch the controls and lift the appliance by its plastic body.
◗ The toaster is intended for household use only and may only be used indoors.
◗ To avoid the risk of fire, frequently remove crumbs from the crumb tray. Make sure the
crumb tray is correctly placed.
◗ Immediately unplug the toaster if fire or smoke is observed.
◗ If a slice of bread gets stuck inside the toaster, unplug the appliance and allow it to cool down
before trying to remove the bread. Do not use a knife or a sharp tool, as these may cause
damage to the heating elements.
◗ The appliance is only meant for toasting bread. Do not put any other ingredients in the
appliance, as this may lead to a hazardous situation.
◗ Oversized foods and metal foil packages must not be inserted into the toaster, as this may
cause fire or electric shock.
◗ Do not place the dust cover (some types only) on top of the toaster when the appliance is
switched on or when it is still hot, as this could lead to damage.
◗ Do not place the toaster on a hot surface.
◗ The warming rack is only meant for warming up rolls or croissants. Do not put any other
ingredients on the warming rack, as this may lead to a hazardous situation.
ENGLISH6
Page 7
Before first use
Remove any stickers and wipe the body of the toaster with a damp cloth.
Before using the appliance for the first time, we advise you to let the appliance complete a few
toasting cycles without slices of bread on the highest browning setting in a properly ventilated room.
This will burn off any dust that may have accumulated on the heating elements and will prevent
unpleasant smells when toasting bread.
Using the appliance
1 Put the appliance on a stable and flat surface, away from curtains and other combustible
materials. Put the plug in the wall socket.
◗ You can adjust the length of the cord by winding part of it round the brackets in the base of
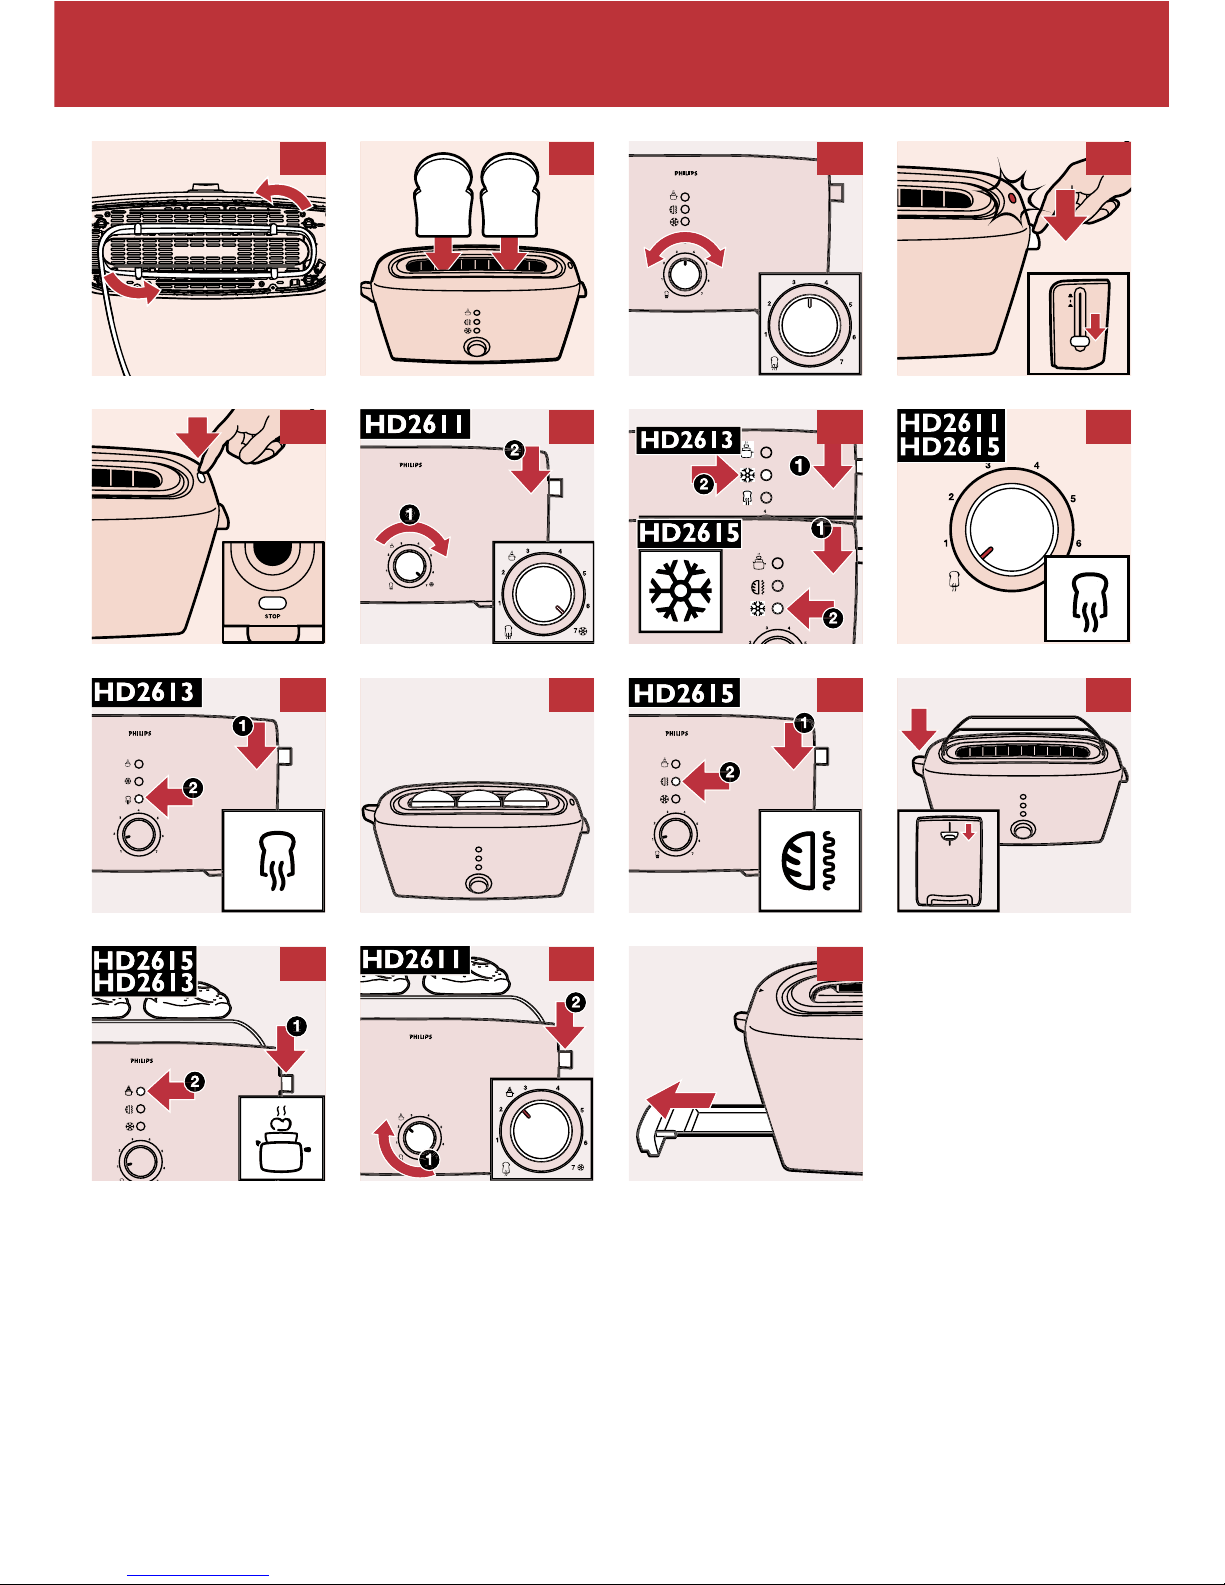
the appliance (fig. 2).
Toasting bread
Never let the toaster operate unattended.
1 Put one or two slices of bread in the toaster (fig. 3).
2 Select the desired browning setting (fig. 4).
Select a low setting (1-2) for lightly toasted bread and a high setting for a dark browning result
(5-7).
3 Push the toasting lever down to switch the appliance on (fig. 5).
- The stop button lights up.
- The toasting lever will only stay down if the appliance has been connected to the mains.
The metal parts of the toaster will get hot during toasting. Be careful not to touch them.
4 When the toast is ready, it pops up and the toaster switches off.
◗ The toaster will switch off automatically.You can stop the toasting process and pop the bread
up at any time by pressing the STOP button on top of the toaster (fig. 6).
◗ To remove smaller items, you can move the toasting lever upwards a little further.
◗ If bread gets stuck inside the toaster, remove the plug from the wall socket, let the appliance
cool down completely and carefully remove the bread from the toaster. Do not use a knife
or another sharp metal tool to do this and do not touch the metal internal parts of the
toaster.
Toasting frozen bread
Type HD2611:
1 Follow the instructions in the 'Toasting bread' section, but turn the browning control to
setting — and then push the toasting lever down (fig. 7).
Types HD2613 and HD2615:
2 Follow the instructions in the 'Toasting bread' section, but push the toasting lever down and
then press the defrost button — (fig. 8).
The button lights up.
Note: toasting frozen bread will take longer to toast than defrosted bread.
ENGLISH 7
Page 8

Reheating toasted bread
Types HD2611 and HD2615:
1 Follow the instructions in the 'Toasting bread' section, but turn the browning control to
setting ç and then push the toasting lever down (fig. 9).
Type HD2613:
2 Follow the instructions in the 'Toasting bread' section, but push the toasting lever down and
then press the reheat button ç (fig. 10).
The button lights up
Toasting one side only (type HD2615 only)
Ideal for toasting bagels and baguettes.
1 Half the bagel or baguette lengthwise and shorten the baguette to a length of max. 13 cm.
2 Put the bread in the toaster with the side to be toasted facing the front of the toaster
(fig. 11).
3 Follow the instructions in the 'Toasting bread' section, but push the toasting lever down and
then press the one-side toasting button Ù (fig. 12).
The button lights up.
Before every new one-side toasting cycle, you have to push the toasting lever down and press the
one-side toasting button Ù again.
You can also use this function in combination with the setting for toasting frozen bread.
Heating up rolls and croissants
1 Push the warming rack lever down to unfold the warming rack (fig. 13).
Never put the rolls to be heated up directly on top of the toaster without having unfolded the
warming rack to avoid damaging the toaster.
2 Put the rolls or croissants on top of the warming rack.
Do not heat up more than 2 items at a time.
Types HD2613 and HD2615:
3 Push the toasting lever down and press the warming button Û.The button lights up (fig. 14).
If you want to heat the rolls or croissants on both sides, turn them after the toaster has shut itself
off and switch the toaster on again by pushing the toasting lever down and then pressing the
warming button Û.
Before every new warming cycle, you have to push the toasting lever down and press the warming
button again.
Type HD2611:
4 Turn the browning control to setting Û and push the toasting lever down (fig. 15).
If you want to heat the rolls or croissants on both sides, turn them after the toaster has shut itself
off. Leave the browning control set to the warming setting Û and switch the toaster on again by
pushing the toasting lever down.
ENGLISH8
Page 9

Cleaning
1 Unplug the appliance.
2 Let the appliance cool down.
3 Clean the appliance with a damp cloth. Do not use abrasive cleaning agents.
Never immerse the appliance in water.
4 Remove crumbs from the appliance by sliding the crumb tray out of the appliance (fig. 16).
Do not hold the appliance upside down and do not shake it to remove the crumbs.
Guarantee & service
If you need information or if you have a problem, please visit the Philips website at www.philips.com
or contact the Philips Customer Care Centre in your country (you will find its phone number in the
worldwide guarantee leaflet). If there is no Customer Care Centre in your country, turn to your
local Philips dealer or contact the Service Department of Philips Domestic Appliances and Personal
Care BV.
Troubleshooting
If you are unable to solve the problem by means of this troubleshooting guide, contact the
Customer Care Centre in your country (see chapter 'Guarantee & service').
ENGLISH 9
Solution
Check if the plug has been properly inserted into the wall socket.
If the toaster still does not work, take it to a ser vice centre authorised by Philips
for examination.
Unplug the appliance and let it cool down. Carefully remove the slice or slices from
the toaster.Take care not to damage the heating elements while removing the slice
or slices of bread. Never use a metal object for this purpose.
Check the browning setting selected for toasting. Select a lower setting next time if
your toast is too dark and a higher setting if your toast is too light.
You have chosen a too high setting for the type of bread inserted. Push the stop
button to stop the toasting process.
If the mains cord of this appliance is damaged, it must always be replaced by Philips,
a service centre authorised by Philips or similarly qualified persons in order to
avoid a hazard.
You have pressed the one-side toasting button Ù (type HD2615 only).That is why
only one side of the bread has been toasted.To toast the other side as well, put the
bread in the slot with the untoasted side facing the front of the toaster and press
the one-side toasting button again.
This is normal, for the toaster has a fixed temperature setting for warming up rolls
and croissants, which guarantees a perfect end result.
Turn your roll or croissant over and warm it up again. Follow the instructions in
'Heating up rolls or croissants'.
Problem
1.The toaster does not
work.
2. Bread gets stuck in the
appliance.
3.The toast is too
dark/too light.
4. Smoke comes out of
the toaster.
5.The mains cord is
damaged.
6. One side of the bread
has not been toasted.
7. I cannot change the
browning level when I
use the warming
function.
8. Only one side of my roll
or croissant is warm.
Page 10

Description générale (fig. 1)
A Ramasse-miettes
B Bouton stop
C Manette pour grillage
D Manette pour l'accessoire de réchauffage
E Bouton chauffage (HD2613, HD2615)
Réglage chauffage (HD2611)
F Bouton réchauffage (HD2613)
Réglage réchauffage (HD2611, HD2615)
G Bouton décongélation (HD2613, HD2615)
Réglage décongélation (HD2611)
H Bouton grillage partiel (HD2615)
I Commande de brunissage
Important
Avant de commencer à utiliser l'appareil, lisez attentivement ce mode d'emploi et conservez-le pour
une consultation ultérieure.
◗ Avant de brancher l'appareil, vérifiez que la tension indiquée à la base de l'appareil
correspond à la tension de votre réseau.
◗ Branchez l'appareil uniquement sur une prise murale équipée d'une mise à la terre.
◗ Si le cordon d'alimentation est endommagé, il ne doit être remplacé que par un Centre
Service Agréé Philips ou par une personne autorisée pour éviter tout accident.
◗ Ne plongez jamais l'appareil ou le cordon d'alimentation dans l'eau ou dans tout autre
liquide.
◗ Débranchez tourjours l'appareil après utilisation.
◗ Tenez l'appareil hors de portée des enfants.
◗ Ne laissez pas le cordon d'alimentation pendre de la table et tenez-le à l'écart des surfaces
très chaudes.
◗ Ne laissez jamais le grille-pain en marche sans surveillance. N'utilisez pas le grille-pain s'il
touche ou est recouvert par des matériaux inflammables tels que les rideaux. Ne faites pas
fonctionner l'appareil sous des placards suspendus, car le pain peut brûler.
◗ Ne touchez pas les parties métalliques du grille-pain car elles chauffent pendant le grillage.
Utilisez uniquement les boutons et soulevez l'appareil en touchant les parties en plastique.
◗ Ce grille-pain est destiné à un usage domestique uniquement.
◗ Pour éviter tout risque d'incendie, retirez fréquemment les miettes du ramasse-miettes.
Replacez correctement le ramasse-miettes.
◗ Débranchez immédiatement le grille-pain si vous observez de la fumée ou des flammes.
◗ Si une tranche de pain reste coincée, débranchez le grille-pain et laissez-le refroidir
complètement avant de retirer le pain. N'insérez jamais un couteau ou des objets pointus car
il y a risque d'endommager les éléments chauffants.
◗ Dans cet appareil introduisez uniquement des tranches de pain afin d'éviter tout accident.
◗ N'introduisez pas des tranches de pain trop grandes ou de la nourriture avec du papier en
aluminium dans le grille-pain car il y a risque d'incendie ou d'électrocution.
◗ Ne placez pas le capot de protection (certains modèles uniquement) sur le grille-pain
lorsque celui-ci est en marche ou encore chaud, car vous pouvez le détériorer.
◗ Ne placez jamais le grille-pain sur une surface chaude.
◗ Utilisez l'accessoire de réchauffage uniquement pour réchauffer des petits pains ou des
croissants. Si vous placez d'autres ingrédients sur l'accessoire il y a un risque de danger réel.
10
FRANÇAIS
Page 11
11
Avant la première utilisation
Retirez tout autocollant et essuyez le grille-pain à l'aide d'un chiffon humide.
Lors de la première utilisation, faites fonctionner l'appareil plusieurs fois sans introduire de tranches
de pain, au réglage maximum, pour chauffer les éléments chauffants et brûler les par ticules de
poussière qui se sont accumulées.
Utilisation de l'appareil
1 Placez l'appareil dans un endroit sûr loin de toute matière inflammable comme des rideaux,
et branchez-le sur une prise de courant.
◗ Il est possible de régler la longueur du cordon d'alimentation en enroulant l'excédent autour
des pattes de fixation situées en dessous de l'appareil (fig. 2).
Faire griller du pain
Ne laissez jamais le grille-pain en marche sans surveillance.
1 Mettez une ou deux tranches de pain dans le grille-pain (fig. 3).
2 Sélectionnez le degré de brunissage désiré (fig. 4).
Sélectionnez un réglage plus faible (1-2) pour obtenir du pain légèrement grillé ou un réglage plus
fort (5-7) pour obtenir du pain bien grillé.
3 Abaissez la manette pour mettre l'appareil en marche (fig. 5).
- Le bouton stop s'allume.
- La manette ne restera en position que si l'appareil est branché sur le secteur.
Les parties métalliques chauffent pendant l'utilisation. Ne les touchez pas.
4 Lorsque le pain est prêt, la manette remonte et l'appareil s'éteint automatiquement.
◗ L'appareil s'éteint automatiquement.Vous pouvez suspendre le brunissage et éjecter le pain à
tout moment en appuyant sur le bouton Stop au-dessus du grille-pain (fig. 6).
◗ Pour retirer de petits morceaux de pain, il suffit de relever légèrement la manette.
◗ Si une tranche reste coincée, débranchez la fiche d'alimentation de la prise murale, laissez le
grille-pain refroidir et retirez soigneusement le toast du grille-pain. N'introduisez jamais
d'objet métallique dans le grille-pain et évitez de toucher les parties métalliques de l'appareil.
Faire griller du pain congelé
Type HD2611:
1 Suivez les instructions de la section "Faire griller du pain", mais tournez la commande de
brunissage sur le réglage — et puis abaissez la manette (fig. 7).
Types HD2613 et HD2615:
2 Suivez les instructions de la section "Faire griller du pain", mais abaissez la manette et
appuyez sur le bouton décongélation — (fig. 8).
Le bouton s'allume.
Note: Lorsque vous faites griller du pain congelé cela durera plus longtemps que lors du grillage du
pain décongelé.
FRANÇAIS
Page 12
12
Faire réchauffer du pain grillé
Types HD2611 et HD2615:
1 Suivez les instructions de la section "Faire griller du pain", mais tournez la commande de
brunissage sur le réglage ç et puis abaissez la manette (fig. 9).
Type HD2613:
2 Suivez les instructions de la section "Faire griller du pain", mais abaissez la manette et
appuyez sur le bouton réchauffage ç (fig. 10).
Le bouton s'allume.
Grillage partiel (type HD2615 uniquement)
Idéal pour les bagels et les baguettes.
1 Coupez les bagels ou les baguettes en deux et puis recoupez-les à une longueur de 13 cm au
maximum.
2 Mettez les morceaux de pain dans le grille-pain, la face à griller orientée vers le devant de
l'appareil (fig. 11).
3 Suivez les instructions de la section "Faire griller du pain", mais abaissez la manette et
appuyez sur le bouton pour grillage partiel Ù (fig. 12).
Le bouton s'allume.
Vous devez abaisser la manette et appuyer sur le bouton pour grillage partiel Ù avant chaque
nouveau cycle de grillage partiel.
Vous pouvez utiliser cette fonction avec le réglage pour griller du pain congelé.
Faire réchauffer des petits pains ou croissants
1 Abaissez la manette pour l'accessoire de réchauffage pour le déplier (fig. 13).
Ne mettez jamais les petits pains à réchauffer directement sur le grille-pain afin de ne pas
endommager l'appareil.
2 Mettez les petits pains ou les croissants sur l'accessoire de réchauffage.
Ne faites pas chauffer plus de 2 pains à la fois.
Types HD2613 et HD2615:
3 Abaissez la manette et appuyez sur le bouton de réchauffage Û. Le bouton s'allume (fig. 14).
Si vous voulez faire réchauffer les petits pains ou croissants sur les deux faces, tournez-les après
l'arrêt du grille-pain et mettez l'appareil en marche à nouveau en abaissant la manette et en
appuyant sur le bouton Û.
Avant chaque nouveau cycle de chauffage, vous devez abaisser la manette et appuyez sur le bouton
de chauffage à nouveau.
Type HD2611:
4 Tournez la commande de brunissage sur le réglage Û et abaissez la manette (fig. 15).
Si vous voulez faire réchauffer les petits pains ou croissants sur les deux faces, tournez-les après
l'arrêt du grille-pain. Laissez le commutateur sur la position de chauffage Û et mettez l'appareil en
marche à nouveau en abaissant la manette.
FRANÇAIS
Page 13

13
Solution
Vérifiez si vous avez branché l'appareil correctement.
Si le grille-pain ne fonctionne toujours pas, portez-le dans un Centre Ser vice
Agréé Philips pour vérification.
Débranchez le grille-pain et laissez-le refroidir complètement. Retirez le pain avec
précaution. Faites attention de ne pas endommager les éléments chauffants.
N'utilisez jamais un objet métallique.
Vérifiez le réglage de brunissage choisi. Sélectionnez un grillage inférieur si le pain
est trop grillé et un réglage supérieur si le pain n'est pas assez grillé.
Vous avez choisi un réglage trop élevé pour le type de pain inséré. Appuyez sur le
bouton Stop.
Si le cordon d'alimentation est endommagé, il doit être remplacé uniquement par
Philips ou un Centre Service Agréé pour éviter tout accident.
Vous avez activé la fonction pour le grillage partiel en appuyant sur Ù (type
HD2615 uniquement). Pour faire griller l'autre face de la tranche de pain, placez le
pain dans la fente avec la face non grillée orientée vers le devant du grille-pain et
appuyez à nouveau sur le bouton pour grillage partiel.
C'est normal, puisque le grille-pain a un réglage prédéterminé pour réchauffer les
petits pains ou les croissants afin d'assurer un résultat optimal.
Tournez le petit pain ou le croissant et réchauffer-le à nouveau. Suivez les
instructions du chapitre "Faire réchauffer des petits pains ou croissants".
Problème
1. Le grille-pain ne
fonctionne pas.
2. Une tranche de pain
reste coincée.
3. Le pain est trop
grillé/n'est pas assez
grillé.
4. De la fumée sort de
l'appareil.
5. Le cordon
d'alimentation est
endommagé.
6. Une face de la tranche
de pain n'a pas été
grillée.
7. Je ne peux pas changer
le niveau de brunissage
lors de l'utilisation de la
fonction réchauffage.
8. Une face du petit pain
ou du croissant n'a pas
été chauffée.
Nettoyage
1 Débranchez l'appareil.
2 Laissez l'appareil refroidir.
3 Nettoyez le grille-pain à l'aide d'un chiffon humide. N'utilisez pas de nettoyants abrasifs.
Ne plongez jamais l'appareil dans l'eau.
4 Pour enlever les miettes de l'appareil, retirez le ramasse-miettes de l'appareil (fig. 16).
Ne tenez pas l'appareil à l'envers, ne le secouez pas non plus pour enlever les miettes.
Garantie et service
Pour plus d'informations, visitez notre Philips Web site : www.philips.com ou veuillez contacter le
Service Consommateurs Philips de votre pays (vous trouverez le numéro de téléphone dans le
dépliant sur la garantie internationale). S'il n'y a aucun Service Consommateurs Philips dans votre
pays, contactez votre distributeur ou le Service Department of Philips Domestic Appliances and
Personal Care BV.
Dépannage
Si vous ne réussissez pas à résoudre le problème à l'aide du guide ci-dessous, veuillez contacter le
Service Consommateurs Philips de votre pays (voir chapitre "Garantie et service").
FRANÇAIS
Page 14

14
Algemene beschrijving (fig. 1)
A Kruimellade
B Stopknop
C Liftknop
D Hendel voor opwarmrek
E Opwarmknop voor broodjes (HD2613, HD2615)
Opwarmstand voor broodjes (HD2611)
F Opwarmknop (HD2613)
Opwarmstand (HD2611, HD2615)
G Ontdooiknop (HD2613, HD2615)
Ontdooistand (HD2611)
H Knop voor enkelzijdig roosteren (HD2615)
I Bruiningsregelaar
Belangrijk
Lees deze gebruiksaanwijzing zorgvuldig door voordat u het apparaat gaat gebruiken en bewaar de
gebruiksaanwijzing om deze indien nodig te kunnen raadplegen.
◗ Controleer of het voltage aangegeven op het apparaat overeenkomt met de plaatselijke
netspanning voordat u het apparaat aansluit.
◗ Sluit het apparaat alleen aan op een geaard stopcontact.
◗ Indien het netsnoer beschadigd is, moet het vervangen worden door Philips, een door Philips
geautoriseerd servicecentrum of personen met vergelijkbare kwalificaties om gevaar te
voorkomen.
◗ Dompel het apparaat en het snoer niet in water of andere vloeistoffen.
◗ Haal na gebruik altijd de stekker uit het stopcontact.
◗ Houd het apparaat buiten het bereik van kinderen.
◗ Laat het snoer niet over de rand van de tafel of het aanrecht hangen en houd het snoer uit
de buurt van hete oppervlakken.
◗ Laat het apparaat nooit zonder toezicht werken. Gebruik het apparaat niet onder of in de
nabijheid van gordijnen of andere brandbare materialen en ook niet onder hangende
keukenkastjes, omdat brood vlam kan vatten.
◗ Raak de metalen delen van het apparaat niet aan wanneer het ingeschakeld is, omdat deze
zeer heet worden.Til het apparaat alleen op aan de kunststof behuizing.
◗ De broodsrooster is uitsluitend bedoeld voor huishoudelijk gebruik en mag alleen
binnenshuis gebruikt worden.
◗ Om brandgevaar te voorkomen moet de kruimellade regelmatig geleegd worden. Zorg
ervoor dat de kruimellade goed in het apparaat zit.
◗ Haal direct de stekker uit het stopcontact indien u brand of rook waarneemt.
◗ Als een stuk brood vast blijft zitten in het apparaat, haal dan de stekker uit het stopcontact
en laat het apparaat afkoelen voordat u het brood verwijdert. Gebruik geen mes of ander
scherp voorwerp om het brood te verwijderen, omdat de verwarmingselementen hierdoor
beschadigd kunnen raken.
◗ De broodrooster is uitsluitend bedoeld voor het roosteren van brood. Doe geen andere
ingrediënten in het apparaat, aangezien dit tot gevaarlijke situaties kan leiden.
◗ Grote stukken brood en verpakkingen van aluminiumfolie mogen niet in de broodrooster
gestoken worden, omdat dit brand of een elektrische schok kan veroorzaken.
◗ Plaats het stofdeksel (alleen bepaalde types) niet op het apparaat wanneer het ingeschakeld is
of wanneer het nog heet is, omdat dit schade kan veroorzaken.
◗ Plaats het apparaat niet op een hete ondergrond.
◗ Het opwarmrek is uitsluitend bedoeld voor het opwarmen van broodjes en croissants. Plaats
geen andere ingrediënten op het opwarmrek, aangezien dit een gevaarlijke situatie kan
opleveren.
NEDERLANDS
Page 15
15
Voordat u het apparaat voor de eerste keer gebruikt
Verwijder stickers die eventueel op het apparaat aanwezig zijn en reinig de behuizing van het
apparaat met een vochtige doek.
Voordat u het apparaat voor de eerste keer gebruikt, raden we u aan het apparaat in een goed
geventileerde kamer enkele keren op de hoogste bruiningsstand te laten werken zonder dat er brood in
zit. Hierdoor zal het stof dat zich eventueel op de verwarmingselementen verzameld heeft, weggebrand
worden en wordt het ontstaan van onaangename geurtjes tijdens het roosteren voorkomen.
Gebruik
1 Plaats het apparaat op een stabiele en vlakke ondergrond, uit de buurt van gordijnen en
andere brandbare materialen. Steek de stekker in het stopcontact.
◗ U kunt de lengte van het snoer aanpassen door een deel van het snoer rond de haken in de
onderzijde van het apparaat te wikkelen (fig. 2).
Brood roosteren
Laat de broodrooster nooit zonder toezicht werken.
1 Plaats een of twee sneetjes brood in de broodrooster (fig. 3).
2 Stel de gewenste bruiningsstand in (fig. 4).
Kies een lage stand (1-2) voor licht geroosterd brood en een hoge stand (5-7) voor een donker
bruiningsresultaat.
3 Duw de liftknop naar beneden om het apparaat in te schakelen (fig. 5).
- De stopknop gaat branden.
- De liftknop blijft alleen omlaag indien het apparaat op netspanning aangesloten is.
De metalen delen van het apparaat worden heet tijdens het roosteren. Raak deze delen niet aan.
4 Wanneer het geroosterde brood klaar is, komt de broodlift omhoog en schakelt het apparaat
uit.
◗ De broodrooster schakelt automatisch uit. U kunt het roosterproces echter ook op ieder
gewenst moment onderbreken en de broodlift omhoog laten komen door op de stopknop
bovenop de broodrooster te drukken (fig. 6).
◗ Om kleinere stukken brood te verwijderen, kunt u de liftknop iets verder omhoog duwen.
◗ Als er brood in de broodrooster blijft vastzitten, haal dan de stekker uit het stopcontact, laat
het apparaat volledig afkoelen en verwijder het brood voorzichting uit de broodrooster.
Gebruik geen mes of ander scherp metalen voorwerp om het brood te verwijderen, omdat
de metalen onderdelen in de openingen hierdoor beschadigd kunnen raken.
Bevroren brood roosteren
Type HD2611:
1 Volg de instructies in 'Brood roosteren', maar draai de bruiningsregelaar naar stand — en
duw daarna de liftknop naar beneden (fig. 7).
Types HD2613 en HD2615:
2 Volg de instructies in 'Brood roosteren', maar duw de liftknop naar beneden en druk daarna
op de ontdooiknop — (fig. 8).
De knop gaat branden.
Let op: het roosteren van bevroren brood duurt langer dan het roosteren van ontdooid brood.
NEDERLANDS
Page 16

16
Geroosterd brood opwarmen
Types HD2611 en HD2615:
1 Volg de instructies in 'Brood roosteren', maar draai de bruiningsregelaar naar stand ç en duw
daarna de liftknop naar beneden (fig. 9).
Type HD2613:
2 Volg de instructies in 'Brood roosteren', maar duw de liftknop naar beneden en druk daarna
op de opwarmknop ç (fig. 10).
De knop gaat branden.
Enkelzijdig roosteren (alleen type HD2615)
Perfect voor bagels en stokbrood.
1 Halveer de bagel of het stokbrood in de lengte. Snijd het stokbrood in stukken van max.
13 cm.
2 Doe het brood in de broodrooster op zo'n manier dat de te roosteren zijden naar de
voorkant van de broodrooster wijzen (fig. 11).
3 Volg de instructies in 'Brood roosteren', maar duw de liftknop naar beneden en druk daarna
op de Ù knop voor enkelzijdig roosteren (fig. 12).
De knop gaat branden.
Telkens wanneer u de functie voor enkelzijdig roosteren wilt gebruiken, moet u de Ù knop opnieuw
indrukken.
U kunt deze functie ook gebruiken in combinatie met de functie voor het roosteren van bevroren
brood.
Broodjes en croissants opwarmen
1 Duw de hendel voor het opwarmrek naar beneden om het opwarmrek uit te klappen
(fig. 13).
Plaats de op te warmen broodjes nooit rechtstreeks bovenop de broodrooster zonder het
opwarmrek te hebben uitgeklapt om schade aan de broodrooster te voorkomen.
2 Plaats de broodjes of croissants bovenop het opwarmrek.
Warm niet meer dan 2 broodjes of croissants tegelijk op.
Types HD2613 en HD2615:
3 Duw de liftknop naar beneden en druk op de opwarmknop Û. De knop gaat branden (fig. 14).
Als u broodjes of croissants aan beide zijden wilt opwarmen, draai ze dan om nadat de liftknop
omhoog is gekomen en rooster dan de andere zijde door de liftknop omlaag te duwen en op de
opwarmknop Û te drukken.
Telkens wanneer u de opwarmfunctie wilt gebruiken, moet u de liftknop naar beneden duwen en
opnieuw op de opwarmknop drukken.
Type HD2611:
4 Draai de bruiningsregelaar naar stand Û en duw de liftknop naar beneden (fig. 15).
Als u broodjes of croissants aan beide zijden wilt opwarmen, draai ze dan om nadat de liftknop
omhoog is gekomen en rooster dan de andere zijde door de bruiningsregelaar op de opwarmstand
Û te laten staan en de liftknop omlaag te duwen.
NEDERLANDS
Page 17

17
Schoonmaken
1 Haal de stekker uit het stopcontact.
2 Laat het apparaat afkoelen.
3 Reinig het apparaat met een vochtige doek. Gebruik geen schurende schoonmaakmiddelen.
Dompel het apparaat nooit in water.
4 Verwijder kruimels door de kruimellade uit het apparaat te trekken en boven een vuilnisbak
te legen (fig. 16).
Houd het apparaat niet op de kop en schud het niet om kruimels te verwijderen.
Garantie & service
Als u informatie nodig heeft of als u een probleem heeft, bezoek dan de Philips website
(www.philips.com), of neem contact op met het Philips Customer Care Centre in uw land (u vindt
het telefoonnummer in het 'worldwide guarantee' vouwblad). Als er geen Customer Care Centre in
uw land is, ga dan naar uw Philips dealer of neem contact op met de afdeling Service van Philips
Domestic Appliances and Personal Care BV.
Problemen oplossen
Als u niet in staat bent het probleem op te lossen met behulp van deze tabel, neem dan contact op
met het Customer Care Centre in uw land (zie hoofdstuk 'Garantie & service').
NEDERLANDS
Oplossing
Controleer of de stekker goed in het stopcontact zit.
Als de broodrooster nu nog steeds niet werkt, breng het apparaat dan naar een
door Philips geautoriseerd servicecentrum om het te laten onderzoeken.
Haal de stekker uit het stopcontact en laat het apparaat afkoelen.Verwijder het
brood voorzichting uit de broodrooster. Pas op dat u hierbij de
verwarmingselementen niet beschadigd. Gebruik nooit een metalen voorwerp om
brood uit de broodrooster te verwijderen.
Controleer de ingestelde bruiningsstand. Stel een lagere stand in als het
geroosterde brood te donker is of een hogere stand als het te licht is.
U heeft een bruiningsstand ingesteld die te hoog is voor het type brood dat u aan
het roosteren bent. Druk op de stopknop om het roosterproces te beeïndigen.
Indien het netsnoer beschadigd is, moet het vervangen worden door Philips, een
door Philips geautoriseerd servicecentrum of personen met vergelijkbare
kwalificaties om gevaar te voorkomen.
U heeft op knop Ù voor enkelzijdig roosteren gedrukt (alleen type HD2615).
Daarom is slechts één kant van het brood geroosterd. Om ook de andere kant te
roosteren, doet u het brood nogmaals in de broodrooster met de ongeroosterde
zijde wijzend naar de voorkant van de broodrooster en drukt u nogmaals op knop
Ù voor enkelzijdig roosteren.
Dit is normaal. De broodrooster is uitgerust met een vaste temperatuurstand voor
het opwarmen van broodjes en croissants, die garandeert dat het eindresultaat
altijd perfect is.
Draai het broodje of de croissant om en warm ook de andere kant op.Volg de
instructies in 'Broodjes en croissants opwarmen'.
Probleem
1. De broodrooster werkt
niet.
2. Het brood zit vast in de
broodrooster.
3. Het geroosterde brood
is te donker/te licht.
4. Er komt rook uit de
broodrooster.
5. Het netsnoer is
beschadigd.
6. Eén kant van het brood
is niet geroosterd.
7. Ik kan de bruiningsgraad
niet aanpassen wanneer
ik de opwarmfunctie
voor broodjes en
croissants gebruik.
8. Slechts één kant van het
broodje of de croissant
is warm.
Page 18
18
2 3 4 5
6 7 8 9
10 11 12 13
14 15 16
Page 19

19
Page 20

u
4222 001 96772
www.philips.com
 Loading...