

Philips CTX800 User Manual

Discover your phone
y
Back of the
phone: speaker
& camera lens
Lock key
Pick up key
Microphone
Stylus
USB Port/
charger &
headset
Philips continuously strives to improve its
products. Therefore, Philips reserves the rights
to revise this user guide or withdraw it at any
time without prior notice. Philips provides this
user guide "as is" and does not accept, except
262K TFT
LCD
+/- Volume
& zoom key
On-screen
keypad icon
Camera key
Hang up and
on/off ke
as required by the applicable law, liability for
any error, omission or discrepancy between this
user guide and the product described. The
device is meant to be connected to GSM/GPRS
networks.
How to...
Switch the phone
On/Off
Enter your PIN
code
Make a call Enter the phone number via
Answer a call When the phone rings,
Activate/
Deactivate
handsfree mode
End a call Press
Long press .
Enter your PIN code via the
on-screen keypad and tap
on
OK to confirm.
the on-screen keypad and
press to dial.
press .
When the phone rings,
press , then tap Options
> Handsfree/Handheld.
.

Reject a call Press when your
Access Call list Press
Quickly return
to idle when
browsing menus
Active the
camera function
phone rings.
Call list display your recent
Missed calls, Dialed calls and
Received calls.
Short press
In idle mode, short press
the camera key.
in idle mode.
.
Hard keys
Hang up
Key
Answer
key
• In menu or edit mode, short
press to return to idle mode.
• During an incoming call or call in
progress, press to end the call or
reject the call.
• When the phone is switched off,
long press to switch on the
phone.
• When the phone is switched on,
long press to switch off the
phone anytime.
• When the music/FM radio is
playing in background, press to
stop the music/FM radio.
• Answer a call or dial a phone
number.
• In idle mode, press to view the
Call list.
1

+/- Volume
side keys
Side
camera
key
• Adjust the speaker and ringtone
volume.
• Zoom in/out the image for phone
shooting.
• Zoom in/out your documents
under Documents reader.
• In idle mode, short press to
enter the camera mode.
Softkeys
The soft keys located right below the main screen
allow you to select the corresponding options that
appear on the screen immediately above them,
including options during a call. These keys are
contextual: they vary according to the current
context.
Soft icons
There are 4 soft icons at the bottom of the touch
screen, namely (from left to right): Messages,
Contacts, On screen keypad and Home.
The 4 soft icons are displayed in idle mode.
2
Tap on the Messages icon to enter the
Messaging menu.
Tap on the Contacts icon to enter the contact
list searching.
Tap on the on-screen keypad icon to open the
on-screen keypad, whereby you can tap to enter
numbers.
Tap on the Home icon to enter the Main menu.
Touch screen
Warning! The stylus pen supplied with your
product is the only tool that you can use when
tapping the touch screen. Do NOT use any
other tool on the touch screen.
Your mobile phone features a touch screen which
provides a faster and more intuitive way for you to
navigate through lists and menus. The touch screen
is operated with a stylus pen located at the side of
the phone. It becomes available as soon as you
enter any of the available menus. Use the stylus pen
to tap once or twice on any available screen zone
to carry out the corresponding operations (such as
menu page header, menu items, lists, softkeys,
options menu, function keys, text input area,

selection area, pull-down menu box, selection box,
etc.).
The scroll bar will disappear after a few
seconds if the user does not touch the screen.
You will not be able to use the touch screen in
some cases, as they are not able to replace the
keys to carry out certain operations.
The screen will display lists and menus that can be
selected with the stylus pen. You can select an item,
move up and down or select a few items
simultaneously.
Pen calibration
You must carry out screen calibration in order to
obtain better accuracy when using it with the stylus
pen. Tap the center of the symbol with the stylus
until “Done” appears on screen.
Main menu
The main menu gives you access to all the different
features of your mobile phone presented in the
form of a grid. The table below summarizes the
arrangement of the Main Menu, the meanings of the
various icons found there, and the pages in this
manual where more detailed information
concerning the subjects can be found.
Fun Browser Music
page 16 page 18 page 20
Camera Messaging My files
page 23 page 25 page 35
Business Contacts Profiles
page 38
Bluetooth Calls Settings
page 48 page 49 page 53
Tap to access the main menu when in idle
mode, then tap the main menu icons to browse the
sub-menus. Tap on OK to access the options
related to the selected item, or tap on Back to go
back one level.
page 44
page 47
3

Table of contents
1. Getting Started ................................. 6
Inserting the SIM card ..................................... 6
Switching on the phone .................................. 7
Charging the battery ....................................... 8
Inserting the micro-SD Card ......................... 8
2. Calling ............................................... 10
Make a call ....................................................... 10
Answer and end a call ................................... 10
IP call (China only) ......................................... 10
Options during a call ..................................... 10
Adjust the earpiece volume ......................... 11
Speed Dial ........................................................ 11
Make an emergency call ................................ 11
Handling multiple calls .................................. 11
3. Text Entry ........................................ 13
Handwriting recognition .............................. 13
On-screen keyboard input ........................... 15
4. Fun ...................................................... 16
STK .................................................................... 16
Java ..................................................................... 16
5. Browser ............................................ 18
WAP................................................................... 18
4
6. Music ................................................. 20
Music player .................................................... 20
FM radio ........................................................... 21
7. Camera ............................................. 23
Camera ............................................................. 23
Video recorder ............................................... 24
8. Messaging .........................................25
Create message .............................................. 25
Inbox ................................................................. 27
Sent ................................................................... 27
Outbox ............................................................. 28
Drafts ................................................................ 28
SIM archive ...................................................... 29
Templates ........................................................ 29
E-mail ................................................................ 29
Broadcast messages ....................................... 31
Settings ............................................................. 32
9. My files .............................................. 35
Picture .............................................................. 35
Video ................................................................. 36
Audio ................................................................ 36
Others .............................................................. 37

10. Business ..........................................38
Calendar ........................................................... 38
Alarm ................................................................ 38
Quick note ...................................................... 38
Calculator ........................................................ 39
Sound recorder .............................................. 39
Stopwatch ........................................................ 39
Currency converter ...................................... 39
Firewall ............................................................. 40
World clock .................................................... 40
Eng-Chi dictionary (if available)
............................................................................. 41
Text reader ...................................................... 41
Documents reader.......................................... 41
Business card reader ...................................... 42
11. Contacts .........................................44
View contacts ................................................. 44
View groups .................................................... 45
Special numbers .............................................. 45
Advanced ......................................................... 46
12. Profiles ............................................47
13. Bluetooth.........................................48
Bluetooth ......................................................... 48
14. Calls .................................................49
View calls ......................................................... 49
Call options ..................................................... 49
Clear history .................................................... 51
15. Settings ...........................................53
Pen calibration ................................................. 53
General ............................................................ 53
Display .............................................................. 54
Sounds .............................................................. 55
Connectivity .................................................... 56
Icons & Symbols ..................................57
Precautions ...........................................59
Troubleshooting ..................................64
Philips Authentic Accessories ..........67
Trademark Declaration .....................69
Specific Absorption Rate Information ... 70
Limited Warranty ............................... 71
Declaration of conformity ................74
5

1. Getting Started
Please read the safety instructions in the
"Precautions" section before use.
To use your phone, you must insert a valid SIM card
supplied by your GSM operator or retailer. The
SIM card contains your subscription information,
your mobile telephone number, and a memory in
which you can store phone numbers and messages.
Inserting the SIM card
Follow the steps below to insert your new SIM
card. Remember to switch off your mobile phone
before removing the back cover.
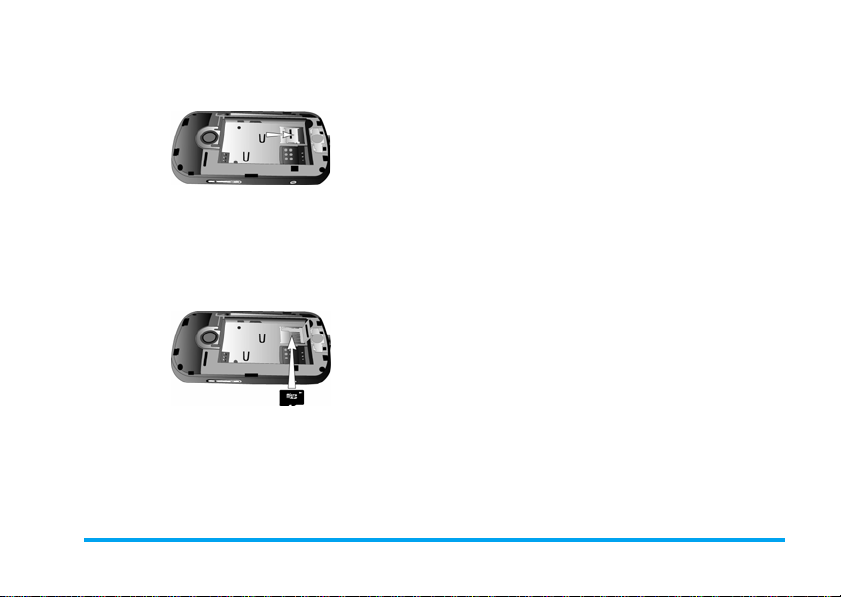
Remove the back cover
To insert the SIM card, you must first remove the
back cover. Press on the button on the back cover
and then slide the cover downwards as shown in
the diagram.
6 Getting Started
Remove the battery
To remove the battery, pull up the battery from the
bottom right corner.
You may lose all your personal settings if you
remove the battery when the phone is switched
on.
Insert the SIM card
Insert your SIM card under the metal clip holder,
until it stops. Make sure that the clipped corner of
the SIM card is aligned with the clipped corner of

the SIM card slot and that the gold contacts of SIM
card are facing downwards.
Replace the back cover
Align and hook the back cover to the left side of the
phone and press down the back cover until it locks
into place with the right side of the phone.
Replace the battery
Slide the battery into its slot, metallic connectors
facing downwards, until it stops. Then lock it by
pushing it down.
Remove the protective film covering the screen
and the camera lens before using the phone.
Switching on the phone
To switch on the phone, long-press key. Enter
the PIN code if required. A PIN code is a 4- to 8digit secret code of your SIM card. It is
preconfigured and communicated to you by your
network operator or retailer.
If you enter an incorrect PIN code three times
in succession, your SIM card will be blocked. To
unblock it, you must request the PUK code from
your operator.
Getting Started 7

Charging the battery
Your phone is powered by a rechargeable battery.
A new battery is partially charged and a sound alert
will be emitted when the battery level reaches low
(if the battery alert is set to On).
Once the battery and battery cover are back in
place, you can charge the phone. Plug in the
connector as shown below. Then plug the other end
into a power socket.
The battery symbol indicates the state of charge.
During charging, the charge indicators will scroll if
your phone is switched on; it takes about 2.5 hours
to fully recharge the battery. When all the scroll
bars are steady, the battery is fully charged. You can
then disconnect the charger.
Depending on the network and condition of use,
talk time goes up to 10 hours and stand-by time up
to 1 month.
*Depending on the network conditions, user
settings, method of use, etc the actual results
may differ.
Keeping the charger plugged to the mobile
phone when the battery is fully charged will not
damage the battery. The only way to turn off
the charger is to unplug it, so it is advisable to
use an easily accessible power socket.
If you do not intend to use your phone for
several days, we recommend that you remove
the battery.
You can use the phone while it is charging. If
the battery is completely flat, the battery icon
will only reappear after a few minutes of
charging.
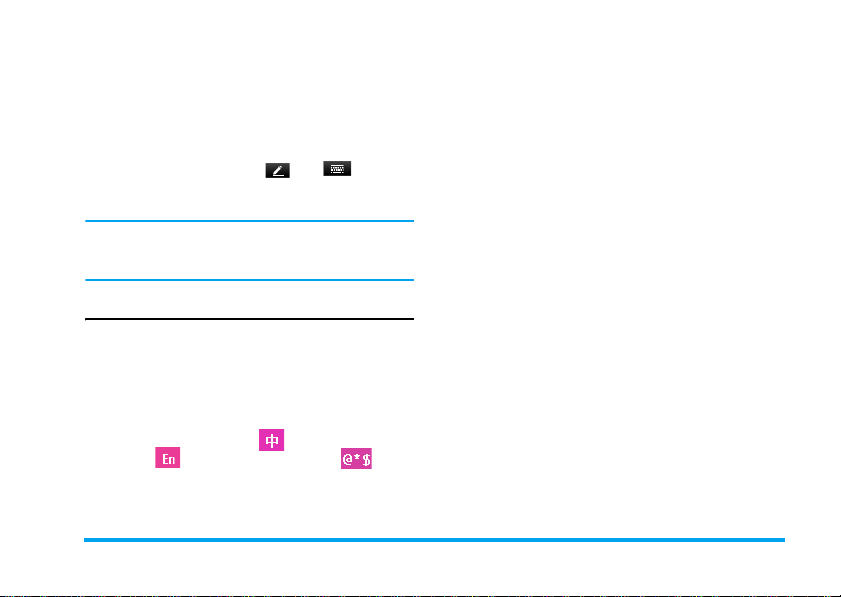
Inserting the micro-SD card
The maximum capacity of micro-SD that X800
can support is up to 8GB.
8 Getting Started
Remove the back cover
The micro-SD card slot is visible only when the
battery of the phone is removed.
Insert the micro-SD card
After the battery is removed, you can unlock the
micro-SD card slot by sliding it backward and lift it
up on its hinge. Insert the micro-SD card as
indicated below. Then close the card slot and slide
it into the locked position.
Getting Started 9

2. Calling
Make a call
From the idle screen
1.
In idle mode, tap the icon at the bottom
of the touch screen to open the phone
number input screen. Tap the on-screen
numbers to enter the phone number. To
correct an error, tap on Clear.
2.
Press to dial or tap on Dial.
3.
Press to hang up.
For international calls, long press the on-screen "0"
key to enter the "+" sign for the international
prefix.
Using the phonebook
1.
In idle mode, tap on the icon at the
bottom of the touch screen and select View
contacts to open the contact list..
2.
Select a contact from the list and press
to dial the selected number.
3.
Press to hang up.
party has chosen to display his or her ID. If the
number is stored in the phonebook, then the
corresponding name is displayed.
• Answer the call: press or tap on Options
and select Answer.
• Reject the call: press
and select Reject. If you have activated Call
forward, then the call will be diverted to another
number or your voice mail.
• Hang up: press .
The phone will not ring if it is in Silent mode (see
“Profiles” on page 47 ).
or tap on Options
IP call (China only)
You may select IP call when you press in idle
mode to access the Call list. When you tap on IP call,
the mobile phone will automatically add the IP
service number preset by you in front of the phone
number and then make the IP call. You can preset
your IP service number under Calls > Call options >
IP number.
Answer and end a call
When receiving a call, the number of the caller may be
displayed, depending on whether or not the calling
10 Calling

Options during a call
During a call, you can switch to Handsfree/Handheld
mode, display the Keypad or Options to access the
following options:
- Contacts
-Put the call on Hold
-Sound recorder
- Mute/Unmute the call
- Send and receive Messages
- Access Calendar
- Access Calculator
- Enabling DTMF (the touch tone dialing
system)
- Make a New call
Sound recorder
In most countries, recording of telephone
conversation is subject to legislation. We advise
you to notify the caller if you intend to record
the conversation and only do so if they agree.
You should also ensure confidentiality of the
recordings.
To record a conversation during a call, select
Options and select Sound recorder. Recorded sound is
saved in *.amr format and stored in Audio of My files
menu. (see “Music” on page 20).
Mute or unmute a call
During a call, select
Mute
function On/
microphone will be deactivated.
Options
and select to set the
Off
. If you select
Mute
, the
Adjust the earpiece volume
During a call, press + or - side keys to increase or
decrease the volume.
Speed dial
Speed dial via call list
In idle mode, press to access
number you wish to call and press to dial the
number.
Call list
. Select a
Make an emergency call
Without a SIM card in phone, you can tap on SOS
to make the emergency call.
With a SIM card in phone, you can enter the
emergency number in idle mode, then press .
Note that an emergency call will not be stored
in the call record.
Calling 11

In Europe, the standard emergency number is
112, in the UK, it is 999.
Handle multiple calls (Network dependent)
You can handle two or more calls at the same time,
as well as make conference calls with your phone.
The availability of this feature is dependent on your
network operator and/or your subscription.
Make a second call
You can make a second call when there is an active
call or with a call on hold. While on the phone, dial
the number (or select a contact from the
phonebook) and press . The first call is put on
hold and the second number is dialed. You can then
select Options to access the following options:
• Handsfree/Handheld
• Swap to toggle between 2 calls.
• Conference to introduce the caller into a
conference call.
• Transfer to connect the two calls. You are
disconnected when the transfer is completed.
• End single to disconnect one party from the call.
• End all to disconnect all party from the call.
• Sound recorder to record the phone conversation.
• Mute to deactivate the microphone.
• Send and receive Messages
• Access Calendar
• Access Calculator
• DTMF to activate the touch tone dialing system.
Answer a second call
When you receive a second call while already in
communication, the phone will emit a beep tone
and the screen displays information about the
incoming call. You can then:
Press To answer the call (the first one
is put on hold).
Press To reject the call.
Options To access the options list. You
can select End active to end the
current call and answer the
incoming call.
To receive a second call, Call Divert for voice
calls (see page 50) must be deactivated and Call
waiting (see page 50) must be activated.
12 Calling
2.
3. Text Entry
Your mobile phone supports a number of text
editing modes, including Handwriting input, Pinyin
input, English input, Numeric input and Symbol
input.
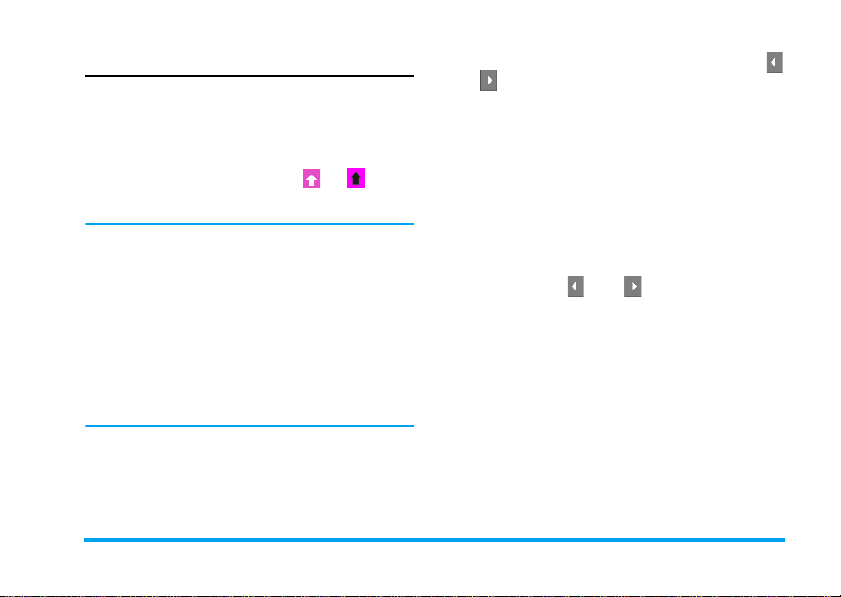
During text editing, tap on and to toggle
between the handwriting recognition mode and on screen keyboard input mode.
You can use the handwriting recognition mode
and on-screen keyboard input mode at the
same time .
Handwriting recognition
In handwriting recognition mode, you can enter
Chinese characters, English letters, numbers,
symbols (including punctuations) by means of
handwriting recognition.
1.
Tap the corresponding icon on the touch
screen to toggle between the Chinese
character input mode , English letter input
mode and symbol input mode .
Write the text with your stylus pen. The
system will recognize your handwriting
automatically and show the recognized result in
the input area, with the proposed candidate
characters displayed.
3.
Ta p Select to confirm the character. If the
recognized result is not the character you
desire, choose one from the candidate
characters and tap it to replace the one in the
input area. You can tap on Clear to delete the
character or symbol on the left of the cursor
in the text area. Long press Clear will clear all
contents on the left of the cursor in the text
area.
4.
After you have finished writing, tap on Send to
go to the next step and choose a recipient for
your message .
5.
Ta p o n Options and select Save as, Insert contact
and Use template. For detailed information, see
“Messaging” on page 25,
The following examples describe the handwriting
recognition process for Chinese characters, English
letters, symbols and numbers.
Text Entry 13

Input Chinese characters
1.
Tap to enter the Chinese character input
mode.
2.
Write the Chinese character with your stylus
pen on the touch screen.
3.
You will see the recognized result on the input
area, with the proposed candidate characters
displayed.
4.
Ta p Select to confirm the character or choose
one of the candidates from the input line and tap
it to replace the one in the input area.
Input English letters
1.
Tap to enter the English letter input
mode.
2.
Write an English letter with your stylus pen
on the touch screen. The system can
differentiate between upper and lower case.
You do not need to shift case before you
write.
3.
You will see the recognized result on the input
area, with the proposed candidate characters
displayed. .
4.
Ta p Select to confirm the character or choose
one of the candidates from the input line and tap
it to replace the one in the input area.
Input symbols
1.
Tap to enter the symbol input mode.
2.
Tap a symbol on the touch screen with your
stylus pen.
Input numbers
1.
Tap to enter the number input mode.
2.
Write a number with your stylus pen on the
touch screen.
3.
You will see the recognized result on the input
area with the proposed candidate characters
displayed. .
4.
Ta p Select to confirm the character or choose
one of the candidates from the input line and tap
it to replace the one in the input area.
Space input
Tap to insert a space after the cursor.
Line break operation
Tap on the on-screen line break symbol to start
a new line.
Move the cursor
To move the cursor left/right, you can press +/volume side keys
14 Text Entry
On-screen keyboard input
On-screen English keyboard
You can input 26 English letters, 10 numbers and
other symbols under this mode. Tap the letter or
number on the screen and the editor will display
the letter or number you have tapped. Under the
English input mode, you can tap or on the
screen to switch between the upper case and lower
case letter.
The on-screen keyboard input mode has 3 tabs,
allowing you to input Chinese characters,
English characters, and symbols. It does not
have a tab for entering numbers, because
numeric keys are part of the keyboard. The
method for entering English characters,
Chinese characters, symbols, space inputs, and
line breaks are exactly the same as those under
Handwriting recognition mode. Please refer to
the section “Handwriting recognition” on
page 13 for more information.
screen. You can view the candidate letters using
and on-screen icons. They are needed when the
candidate characters cannot be displayed on one
li ne of spa ce. If the ch aracter that you wish to input
is displayed in the candidate list, you can tap the
character directly with your stylus pen to display it
in the editor.
Predictive text input
The predictive text input is an intelligent editing
mode for entering text on a mobile phone. It allows
you to enter the text more quickly by anticipating
the word you want to enter based on the key
presses. Press and on-screen icons to
browse the list and tap the character directly with
your stylus pen to display it in the editor.
On-screen symbol/number keyboard
See “Input symbols” on page 14 and “Input
numbers” on page 14.
On-screen Pinyin keyboard (for Simplified Chinese)
Tap the Chinese characters on the screen to
compose a pinyin combination, the corresponding
list of candidate characters will be displayed on the
Text Entry 15

4. Fun
STK
The availability of the features in this menu depends
on whether or not your SIM card supports STK. If
your SIM card supports STK function, the STK
menu will be displayed on the screen.
Java
Your mobile phone features a Java run-time
environment, which allows you to run Java
applications, such as games downloaded from the
network.
The first time when you launch Java, a message
appears to alert you that the installation and
configuration of Java will take several moments.
This is a one-time occurrence.
Java settings
Once Java has been installed, you may then select
Options > Settings to set the following:
Network
Access
Auto Invocation Allows you to set the preference
Messaging Allows you to set the preference
Multimedia Allows you to set the preference
Allows you to set the automatic
connection preference. You can
select Prompt always, Prompt at
first, or Never.
of starting a Midlet automatically.
You can select Prompt always,
Prompt at first, or Never.
Your mobile phone may display
messages about "MIDlets".
MIDlets are JAVA applications
or games.
of receiving messages. You can
select Prompt always or Never.
of multimedia messages. You can
select Prompt always, Prompt at
first, or Never.
16 Fun

Read user data Allows you to set the preference
Write user data Allows you to set the preference
Local
connectivity
of Read user data. You can select
Prompt always, Prompt at first, Allow,
or Never.
of Write user data. You can select
Prompt always, Prompt at first, Allow,
or Never.
Allows you to set the preference
of Local connectivity. You can
select Prompt always, Prompt at
first, Allow, or Never.
Fun 17

5. Browser
Delete all Delete all bookmarks
Add bookmark Enter the title and URL to create a
new bookmark.
Enter address
WAP
This option allows you to access the internet. Your
phone has been pre-configured with a number of
internet access modes. You can start browsing the
internet once you have activated an access mode.
Home
You can store a homepage for each access mode.
When you access the internet with the WAP
browser, the homepage of the access mode which
you have selected will be displayed first.
Bookmarks
You can save the URL as a bookmark in your
phone. Select a bookmark and tap on Goto to
access the web page of the selected bookmark, or
tap on Options to access the following options:
Edit Edit the selected bookmark.
Send Send the selected bookmark.
Delete Delete the selected bookmark.
Enter a web address and confirm connection to the
website.
History
This menu allows you to view the websites which
you have visited recently.
Settings
This menu allows you to configure web settings for
web browsing. Your phone may be preconfigured
with the settings parameter of a particular network
operator. If you are a subscriber of the network
operator, you may start using your browser.
Otherwise, you need to reconfigure the settings.
Philips is not liable to give prior notification nor
shall it bear any consequences for any failures
arising from changes of configuration made by
you or by the network operator. Please check
with your network operator for the most
updated information.
18 Browser

The following options for Web settings are
available:
WAP profile
Browser
options
Push message
settings
Clear cache
Clear cookies
Make changes on the configuration
of the currently selected profile.
Allows you to configure the
browser parameters, such as set
Timeout
and enable or disable
images
function.
Allows you to configure the service
message settings.
You can enable, disable or clear
cache.
You can enable or disable Cookie,
and clear cookie. Cookie is an
information sent to your browser
when you visit a website.
Show
Browser 19
6. Music
This feature allows you to play sound files. Your
mobile phone supports MP3 format.
Music player
Tracks
This feature allows you to play downloaded music
from either the Phone or Memory card. For
example, to play tracks from an inserted micro-SD
card, make sure you have selected Memory card
under Music player > Settings > Music source. Then
select the Tracks option. From the listed tracks,
select the music file you want to play and then tap
Play or access the following options:
Set as
ringtone
Details Display the detailed information of
When playing songs, a track will appear on the
screen to indicate the playback progress. The
Set the track as ringtone and add
it to the ringer list.
the track .
screen will also display the total duration of the
song, the time lapse and the play volume.
The keypad operations during music playback are
as follows:
Key
key Press to Start/Pause/resume
or Short press to select the
Repeat When on, the icon will light up.
Shuffle When on, the icon will light up.
Equalizer When on, the icon will light up.
+/-
side keys
Options
Back
Operation
music playback.
previous song/next song. Long
press to forward/rewind the
song.
Adjust the volume.
Open the options menu.
Return to the previous menu.
Settings
This feature allows you to access the following
settings:
Music
source
You can select Phone or Memory
card.
20 Music

Track
selection
Music in
background
Equalizer
Repeat
Shuffle
You can select Show all or My
selection.
You can select Ask First, Always or
Never.
When you have an incoming
phone call while listening to the
music, the music will stop
playing until you have picked up
or rejected the call. When you
have an incoming message while
listening to the music, the music
will continue to play and you will
hear a beep sound for the event.
You can select Normal, Bass, Dance,
Classical, Tremble, Party, Pop or Rock.
You can set the Repeat mode One,
Off or All.
You can set the Shuffle mode On or
Off.
Music playback options menu
Options Description
Set as
Ringtone
Equalizer
Repeat
Shuffle
Details Display the detailed information of
Set the track as ringtone.
You can select Normal, Bass,
Dance, Classical, Tremble, Party, Pop
or Rock.
You can set the Repeat mode One,
Off or All.
You can set the Shuffle mode On
or Off.
the track .
Now playing
This feature displays the song that is currently
playing.
Only those music tracks saved in the root
directory folder of My files > Audio can be
displayed on Tracks. Your mobile phone
cannot read the tracks saved under a subfolder.
FM radio
This menu allows you to listen to the radio on your
phone. Connect the headset connector to your
Music 21

phone. When listening the radio, the radio
frequency and volume will appear on the screen.
The keypad operations when listening to the radio
are as follows:
Key
or Manual tune to the previous/
Stop Tap to stop the radio.
Tap to enable the auto search
+/-
side keys
Options
Back
Operation
next frequency.
mode. Then press or
to start scanning the radio
frequency automatically.
Adjust the volume.
Open the options menu.
Return to the previous menu.
FM radio options menu
Channel list Displays the list of radio frequency
presets. You can save up to 9
preset stations.
Manual
input
Auto presets Scan the radio frequency
Settings Background play: Listen to radio
Allows you to enter the radio
frequency. Tap the number with
your stylus pen on the touch screen
to enter the radio frequency. Press
OK to confirm or Clear to remove
the number.
automatically and save it to the
preset channel list.
station without quiting the radio
application.
When you have an incoming
phone call while listening to the
radio, the radio will stop playing
until you have picked up or
rejected the call. When you
have an incoming message while
listening to the radio, the radio
will continue to play and you will
hear a beep sound for the event.
Loud speaker: Allows you to listen
to the radio with (When set to On)
or without (When set to Off) the
loud speaker .
22 Music
 Loading...