

Philips 362, CT3622-ASUSA0P2, CT3622/000APMEA, CT3622/AKUSA0P2 User Manual
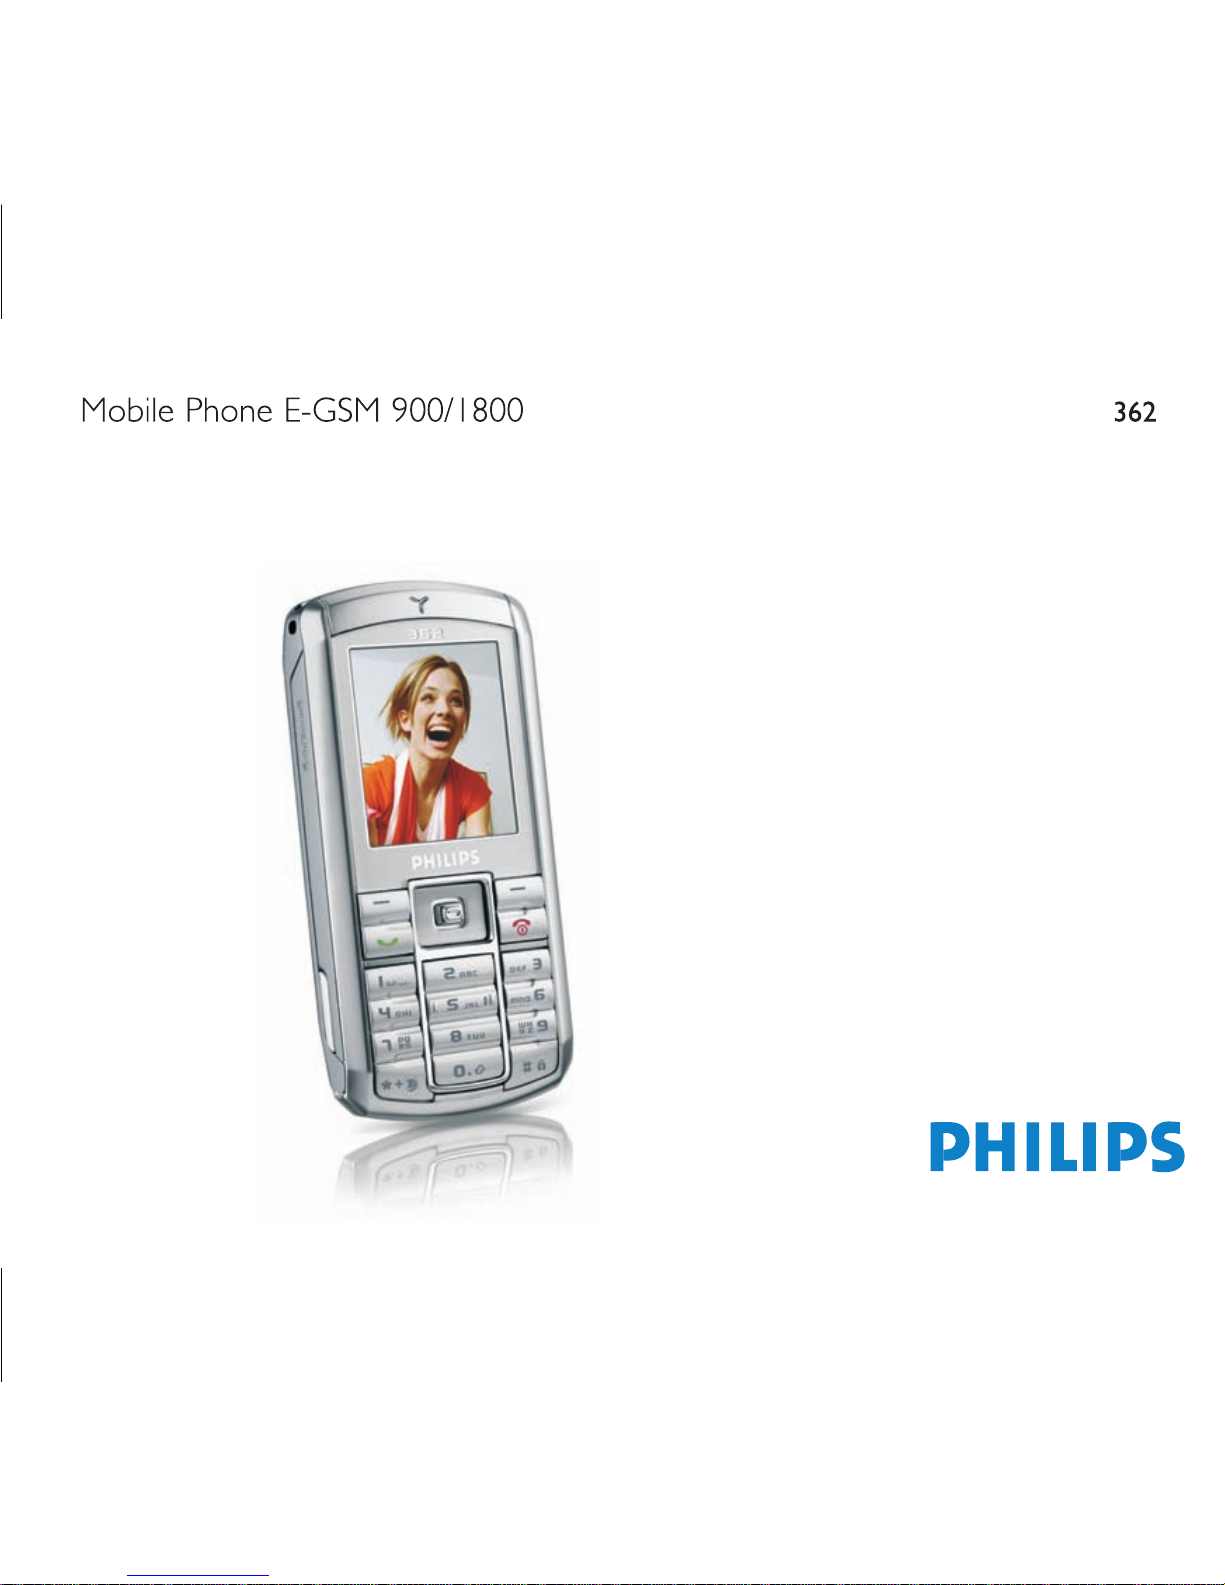

Discover Your Phone
How to...
65,000 colour
main screen
Pick up key
Hang up, cancel
Back of the
phone:
camera lens
Left softkey
Right softkey
Navigation
and
,
keys
Switch the phone
On/Off
Long press ).
Enter your PIN
code
Enter your PIN code using
the keypad and press OK or
L to confirm.
Make a call Enter the phone number on
the keypad and press
(
to dial.
Philips362-V2_GB_4311 255 63391.book Page 1 Mardi, 5. juillet 2005 2:42 14

Access
QuickCall Press + in idle mode.
Access the
Names list Press - in idle mode.
Access the
Sound
Album
Press > in idle mode.
Access the
Picture
album
Press < in idle mode.
Access the
Call list Press ( in idle mode.
The Call list displays alls calls
missed, dialled and received.
Business Multimedia Entertainment
page 10 page 16 page 20
Operator Messages Settings
page 22
page 25
page 38
Camera Contacts Call Info
Philips362-V2_GB_4311 255 63391.book Page 2 Mardi, 5. juillet 2005 2:42 14

the +, -, < or >signs - to browse the
icons and lists. When navigating in a list, a scroll bar
located on the right hand side of the screen shows
your current position in the list. Within lists, press
, to access the options related to the selected
item, press select
R Back to go back one level.
How to use this manual
The current manual is structured as follows:
Discover
The current section. Presents an
Chapter 2:
Calling
Information on how to make and
receive calls.
Chapter 3:
Text entry
Information on how to enter text
using the numeric keypad.
Chapters 4
to 12
These chapters treat each element of
the Main Menu one at a time.
Other
sections
After Chapter 12 appear the sections
for Icons & Symbols, Precautions,
Philips authentic accessories, SAR
Philips362-V2_GB_4311 255 63391.book Page 3 Mardi, 5. juillet 2005 2:42 14

Table of contents
1. Getting Started ............................................1
Inserting the SIM card ......................................1
Switching on the phone ...................................2
Charging the battery ........................................3
Setting Hotkeys .................................................3
2. Calling ................................................................4
Make a call ..........................................................4
Alarm clock ..................................................... 14
Infrared ............................................................. 14
Auto Switch On / Off ................................... 16
Services + ........................................................ 16
5. Multimedia ................................................... 17
Memory status ................................................ 17
Links .................................................................. 17
Sound album ................................................... 17
Philips362-V2_GB_4311 255 63391.book Page i Mardi, 5. juillet 2005 2:42 14

9. Settings .......................................................... 39
Time and date ................................................. 39
Autonomy ........................................................ 39
Security ............................................................. 39
Profiles .............................................................. 41
Sounds .............................................................. 41
Display .............................................................. 42
Network .......................................................... 43
QuickCall ......................................................... 52
Names list ........................................................ 52
Add a contact ................................................. 55
Service numbers ............................................. 55
Status ................................................................ 55
12. Call Info ...................................................... 56
Counters .......................................................... 56
Settings ............................................................. 57
Philips362-V2_GB_4311 255 63391.book Page ii Mardi, 5. juillet 2005 2:42 14

1. Getting Started
Please read the safety instructions in the "Precautions"
section before use.
To use your phone, you must insert a valid SIM card
supplied by a GSM operator or retailer. The SIM card
contains your subscription information, your mobile
telephone number, and a memory in which you can
store phone numbers and messages (for more
information, see “Address book” on page 52).
Remove the battery
To remove the battery, press the inner clips outwards,
then remove the battery by pulling it up from the
bottom.
Philips362-V2_GB_4311 255 63391.book Page 1 Mardi, 5. juillet 2005 2:42 14
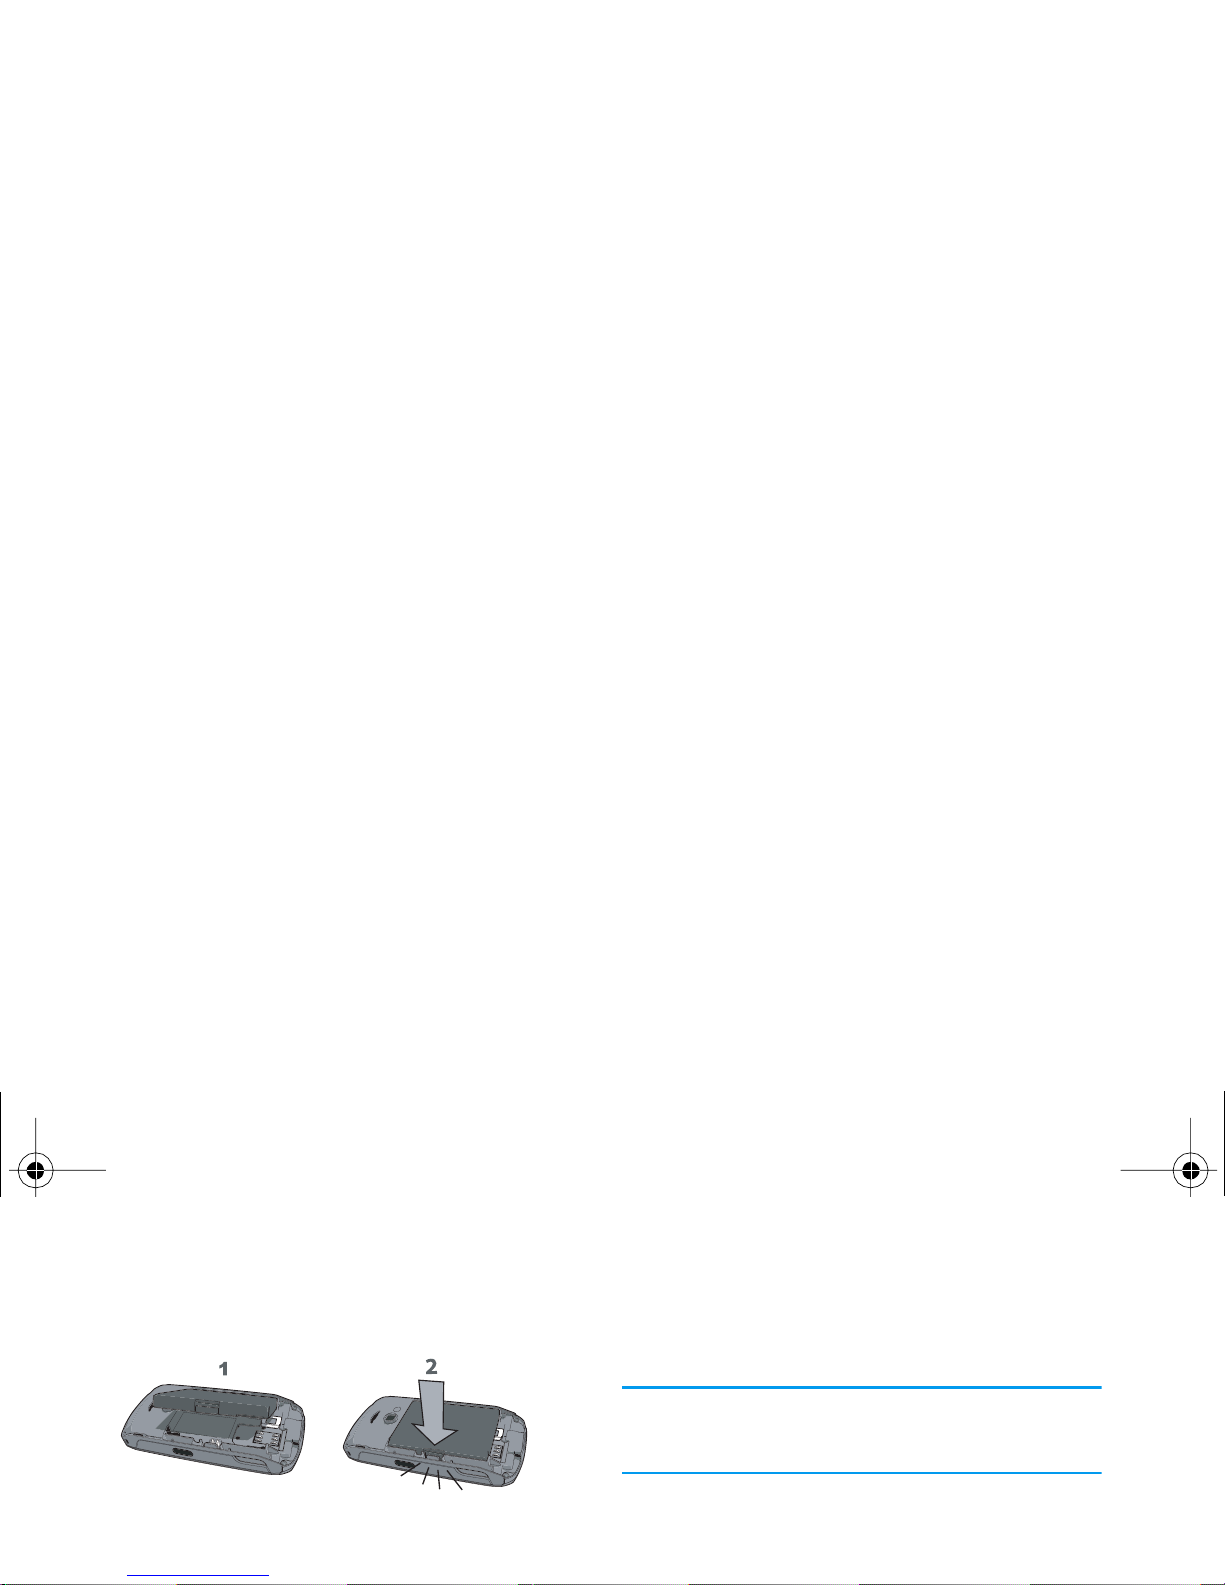
Replace the battery as shown below, connectors
downwards.
Replace the back cover as shown below: hook the
housing into the hindge on the top of the phone, then
press the bottom down until the latch catches.
preconfigured and communicated to you by your
operator or retailer. For more information on PIN
codes, see “Display” on page 42.
If you enter an incorrect PIN code three times, your
SIM card will be blocked. To unblock it, you must
request the PUK code from your operator.
When you switch on your mobile phone with your
new SIM for the first time, you will be asked for the
following:
Philips362-V2_GB_4311 255 63391.book Page 2 Mardi, 5. juillet 2005 2:42 14

Charging the battery
Your phone is powered by a rechargeable battery. A
new battery is partially charged and a sound alert will
warn you when the battery reaches low, if the battery
alert in On (see “Sounds alerts” on page 42).
Once the battery and battery cover are back in place
you can charge the phone. Pull away the protective
rubber cap covering the charger connector (it is
attached to the phone so that you cannot lose it). Plug
in the connector as shown below. Then plug the other
The battery symbol indicates the state of charge.
During charging, the charge indicators will scroll; it
takes around 2.5 hours to fully recharge your mobile
phone. When all the scroll bars are steady the battery
is fully charged. You can then disconnect the charger.
Depending on the network and condition of use, talk
time goes up to 6 hours and stand-by time up to 400
hours.
Keeping the charger plugged to the mobile when the
battery is fully charged will not damage the battery.
The only way to turn off the charger is to unplug it,
Philips362-V2_GB_4311 255 63391.book Page 3 Mardi, 5. juillet 2005 2:42 14

2. Calling
Make a call
From the idle screen
1.
In idle mode, enter the phone number using the
keypad. To correct an error, press R <C.
2.
Press ( to dial.
3.
Press ) or R End call to hang up.
For an international call, long press * to enter the
"+" sign for the international prefix.
Answer and end a call
When receiving a call, the number of the caller may be
displayed, depending on whether or not the person
calling has chosen to display his or her ID. If the
number is stored in the selected phonebook, then the
corresponding name is displayed instead of the
number.
• Answer the call: press (.
• Reject the call: press ). If you have activated Call
forward (see page 57), the call is diverted to a
Philips362-V2_GB_4311 255 63391.book Page 4 Mardi, 5. juillet 2005 2:42 14

Call handsfree
For your own comfort and safety, ensure you move the
phone away from your ear when calling handsfree,
especially when increasing the volume.
1.
In idle mode, enter the phone number using the
keypad or select a contact in the phonebook.
2.
Press , or L Options then select Call
handsfree and press,or L Select.
If you are already on the phone, long press ( to
Record dialogue
In most countries, recording telephone conversations is
subject to legislation. We advise you to notify the caller
if you intend to record your conversation and only do
so if they agree.
To record a conversation during a call, select Record
dialogue and press OK. Press OK again or L Save to
end the recording: an edit window allows you to
assign a name to the recording, which is then available
in Multimedia > Sound album > Recordings, and also in
Philips362-V2_GB_4311 255 63391.book Page 5 Mardi, 5. juillet 2005 2:42 14

The Notepad allows you to note down a number. You
can then store it in the phonebook, call it, or send a
message to this number.
Quickcall
To access the Quickcall feature, press + when in idle
mode. It allows you to set your four most frequently
dialled numbers. You can then quickly call one of
them by selecting the corresponding icon or picture
on the screen.
To reconfigure a thumbnail, select it and press , to
Replace the name and/or picture.
If a picture is already associated with a contact, it is
displayed in the Quickcall screen. Changing the
picture in one of the menus will also update it in the
other.
Handling multiple calls
The ability to handle two or more calls at one time
and to make conference calls is dependent on your
Philips362-V2_GB_4311 255 63391.book Page 6 Mardi, 5. juillet 2005 2:42 14

Answering a second call
When you receive a second call while being already in
communication, the phone emits a beep alert and the
screen displays Call waiting. You can then:
one of the calls or introduce the new caller to a
conference.
This service is limited to two current communications
Press( To answer the call (the first one is
put on hold).
Press) To reject the call.
Press,or
LOptions
To open the options list. You can
select End call to end the current
Press ) To reject the call.
Press,or
LOptions
To open the options list. You can
select Accept to answer the
incoming call, or End call to end the
current call, then answer the
incoming call.
Philips362-V2_GB_4311 255 63391.book Page 7 Mardi, 5. juillet 2005 2:42 14

private call with this member only (other
members are put on hold).
4.
Press ) to disconnect all calls at once.
If there is an incoming call during the conference call
and there are less than five members, you can accept
this new call and add this member to the Conference
call (if five members are already connected, you can
answer the call, but not add it to the conference).
Philips362-V2_GB_4311 255 63391.book Page 8 Mardi, 5. juillet 2005 2:42 14

3. Text Entry
Text can be entered in editing screens in two different
ways: by using T9
®
Predictive Text Input or basic text
input. The techniques for using these two methods
are discussed below.
T9® text input
T9® Predictive Text Input is an
intelligent editing mode for entering text
>
1
,
Press any of the three keys to insert the
selected word followed by a space.
R
Short press to backspace, long press to
clear all text.
0 To shift letter case: Standard, lower or
UPPERCASE letters.
#
To view the table of symbols and
punctuation. Then press
L >> or <
and > to browse the 3 available tables.
Philips362-V2_GB_4311 255 63391.book Page 9 Mardi, 5. juillet 2005 2:42 14

Press R Spell to open a basic text editing screen.
Enter the new word without spaces using the methods
described below and press L OK when done. You
are then returned to the message you were composing
and the new word is inserted.
Language
You can switch input language while writing a
message by long-pressing the # key. The available
languages will depend on where you purchased your
mobile phone.
Short press Long press
1
space 1. , @ / : ; " ’ ! ¡ ? ¿ # + - * =
% < > ( ) & £ $ ¥ €
1
2
a b c 2 à ä å æ ç 2
3 d e f 3 é è D F 3
4 g h i 4 G ì4
5
j k l 5 L 5
Philips362-V2_GB_4311 255 63391.book Page 10 Mardi, 5. juillet 2005 2:42 14

4. Business
This menu contains features and options designed to
help you keep you organised and informed while on
the move.
Calculator
Your phone has a built-in calculator that you
Press and hold 0 to get the decimal point.
Calculator accuracy is to 2 decimal places and is
rounded up to the higher decimal figure.
Money converter
This menu allows you to convert a sum from
one currency into another using the exchange
rate of your choice. You can convert from
Local to Foreign or vice versa. Enter a rate in the
Exchange rate field and an amount in either the Local
Philips362-V2_GB_4311 255 63391.book Page 11 Mardi, 5. juillet 2005 2:42 14

2.
Enter the starting and ending date and time of
the event and name it (e.g. "Meeting with
Smith").
3.
Set a reminder and a frequency: alerts will be
triggered at the chosen time.
The reminder only applies to Meeting and To Do
events. It will be updated when changing time zones
(see “World clock” below).
Deleting old events
Changing a repeating event modifies all instances of
this event.
Events views
Change To change the selected event.
Send by
infrared
To transmit the selected event to
another infrared-compatible device.
Change
sound
To change the sound associated with
the alarm type of the selected event.
Philips362-V2_GB_4311 255 63391.book Page 12 Mardi, 5. juillet 2005 2:42 14

Local settings
Foreign settings
Alarms, reminders, programmed events are time zone
independent! If you set an alarm or an event at
9:00 AM in time zone A, it will still ring or be due at
Set time Allows you to set the time by
pressing the appropriate keys.
Own time zone Move+or-to select the
time zone corresponding to your
area.
Daylight saving Allows you to set the daylight
saving option On or Off for the
local time zone.
Foreign time
zone
Move+or-to select the time
zone of your choice.
Daylight
saving
Allows you to set the daylight saving
option On or Off for a foreign time
zone.
Philips362-V2_GB_4311 255 63391.book Page 13 Mardi, 5. juillet 2005 2:42 14

Press R Back to access the list of all recordings.
When you select a sound file, it is played
automatically in a loop. Press OK to access the
options. You can Play recording, Rename or Delete it,
Set as ringer, As SMS/MMS ringer or As reminder. You
can also send it by Email, IrDA or MMS.
A flashing warning sign indicates that your recording
will soon reach the maximum authorized length. If
you do not stop recording, a red envelope icon informs
you tha t yo ur re cording is too lo ng t o be sen t via MMS.
The alarm clock will ring even if your mobile phone is
switched off and/or the ringer volume is set to Silent.
When the alarm rings, press any key to stop it (except
if the snooze mode is on, see below).
Snooze mode
This menu allows you to set the snooze mode On or
Off. When the alarm rings and the snooze mode is On:
• press any key (except R Stop) to stop the ring-
ing temporarily. The alarm will ring again
Philips362-V2_GB_4311 255 63391.book Page 14 Mardi, 5. juillet 2005 2:42 14

Files that are copyright protected cannot be sent.
When connecting with a PC, make sure you have
activated its infrared option.
Position of devices
Before transmitting data between two devices, they
must be correctly positioned in relation to one
another. Make sure that:
• the infrared ports are facing each other,
• they are at a less than 50 cm away from each other.
• nothing obstructs the infrared beam.
Receiving data
When you select Receive your phone is ready to
receive an item via infrared and waits for the another
infrared device to send it. As with sending data,
messages are displayed on the screen and allow you to
follow the process.
Receiving is cancelled if your phone isn’t contacted by
another device before the time out is reached, if the
infrared link is broken, if the size of the file sent is too
large or if you cancel the process.
Philips362-V2_GB_4311 255 63391.book Page 15 Mardi, 5. juillet 2005 2:42 14

Auto Switch On / Off
These two separate menus allow you to set your
mobile phone to switch itself on or off at pre-set times.
This lets you extend your phone’s battery life (e.g.
during the night), not be disturbed at given times and
have your phone switch back on automatically.
To set Auto switch on, select the option and press OK.
Select On and press OK. Enter the time at which you
want your mobile phone to switch itself on and press
OK. Select the desired frequency from Once, Every
day, or On weekdays and press OK. A message appears
to confirm activation.
Services +
This menu option is reserved for operatorspecific services. Please contact your operator
for more information about these options.
Philips362-V2_GB_4311 255 63391.book Page 16 Mardi, 5. juillet 2005 2:42 14

5. Multimedia
Memory status
This menu allows you to display the
percentage of memory available in your
phone. Various features share the memory
capacity: pictures, sounds, recorded memos and voice
tags for voice commands, stored messages, phonebook
Links
This menu gives you access to preconfigured WAP
links. Select a link and press L Select to launch the
connection.
Sound album
This menu allows you to manage the sound
files stored in your mobile phone. The
options are:
Philips362-V2_GB_4311 255 63391.book Page 17 Mardi, 5. juillet 2005 2:42 14

Once in a list, you can then select a sound file and
press OK to access the menu options listed below.
Pictures must be of the correct size and in the format
for your mobile phone to store and display them
correctly. See “Settings” on page 51 for details.
Send by... To send the selected sound file via
E-mail (see page 31), via Infrared (see
page 14) or MMS (see page 33).
Note that sound files from
Recordings folder cannot be sent via
MMS.
Set as ringer To set the selected sound as ringer.
<Get
more...>
To launch the WAP application and
download new image files. For more
information, see page 26.
View all To access all your image files in a
single list.
My photos To access the photos taken with the
Philips362-V2_GB_4311 255 63391.book Page 18 Mardi, 5. juillet 2005 2:42 14
 Loading...