

Page 1
Page 2
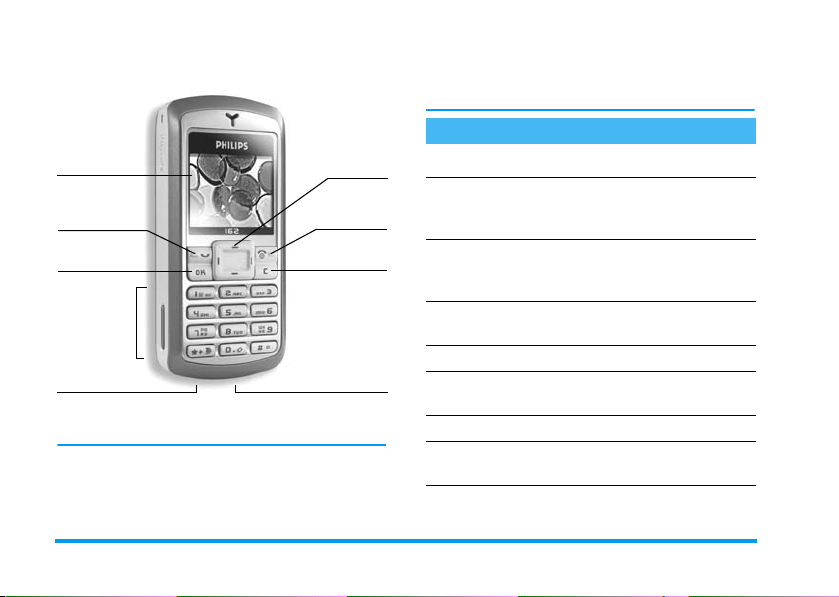
Discover your phone
s
p
Screen
Call and
ick up key
,
key
Keypad
Battery
connector
(1) Navigation keys will b e represented in the manual b y the following
igns: le ft < / > right, up + / - down.
Philips continuously strives to improve its products.
Therefore, Philips reserves the rights to revise this user
guide or withdraw it at any time without prior notice.
Philips provides this user guide "as is" and does not
accept, except as required by applicable law, liability
Navigation
(1)
keys
Hang up and
on/off key
Cancel and
lock key
Headset
connect or
for any error, omission or discrepancy between this
user guide and the product described. The device is
meant to be connected to GSM network.
How to...
Switch phone On/Off
Enter PIN code
Make a ca ll
Answer a call
End a call
Set conversation
volume
Access the main menu
Change the ringer
volume
Access the
Contacts
Press and hold ).
Enter your PIN code
using the keypad and press
,
or # to confirm.
Enter the phone number
on the keypad and press
(
to dial.
Press
(
when your
phone rings.
Press ) .
Press + or - during the
call.
Press , in idle mode.
Press + in idle mode.
Press-in idle mode.
Page 3

Use the
Contac ts
Access the
Go to previous menu
Quickly return to idle
when browsing menus
Launch
Open the
Open the
Lock/Unlock the keypad
Call list
WA P
SMS
menu
Sound Album
Browse the list by moving
+or-
and press ( to
call the selected name.
Press ( in idle mode.
Press c.
Press ) or press and
hold
c
.
Press and hold 0.
Press > in idle mode.
Press < in idle mode.
Press and hold c.
The carousel
You access the carousel menu by pressing , when
in idle mode. Each icon represents a feature or
operation of your phone. Use
menu and press
to cancel). Another sub-menu or list will then appear.
Pressing +or -will alternate between two options,
such as Activate/Deactivate, On/Off, Increase/Decrease a value, etc.
,
<or>
to select a menu (or press
to browse the
c
Events
Some events may modify the idle screen (missed call,
new message, etc.). Press
corresponding menu or press
idle screen.
,
to access the
c
to go back to the
Page 4

Table of contents
1. Getting started ............................................1
Insert the SIM card ...........................................1
Set date and time ..............................................2
Copy the SIM phonebook ...............................2
Switch on the phone ........................................2
Charge the battery ...........................................2
2. Main features ................................................4
Access and view the phonebook ...................4
Make a call ..........................................................4
Answer and end a call ......................................4
Adjust the earpiece volume ............................4
Mute/Unmute the microphone ......................4
Change the ringer .............................................5
Activate the vibra alert ....................................5
Quickly scroll a list ...........................................5
3. Text or number entry ............................6
T9 ® Text input .................................................6
Basic text input ..................................................7
4. Contacts ..........................................................8
Settings ................................................................8
Add contacts to a phonebook .......................8
Fotocall: See & hear who’s calling .................9
Edit and manage contacts ............................ 10
5. Settings .......................................................... 12
Sounds .............................................................. 12
Display .............................................................. 12
Hotkeys ............................................................ 13
Time and date ................................................. 13
Language .......................................................... 14
Security ............................................................ 14
Network .......................................................... 15
6. Messages ....................................................... 17
SMS ................................................................... 17
Broadcast SMS ................................................ 19
SMS chat .......................................................... 19
7. Multimedia ................................................... 20
Sound album ................................................... 20
Picture album .................................................. 20
Memory status ................................................ 21
8. Games & Applications ......................... 22
Calculator ........................................................ 22
Alarm clock ..................................................... 22
Euro converter ............................................... 22
Games .............................................................. 23
i
Page 5

9. Call information ....................................... 24
Call settings ..................................................... 24
Call list .............................................................. 25
Counters .......................................................... 25
10. Operator ................................................... 26
WAP ................................................................. 26
ii
Handling several calls .................................... 28
Icons & symbols ............................................ 30
Precautions ....................................................... 31
Troubleshooting ........................................... 34
Philips authentic accessories ................. 37
Page 6

2.
1 • Getting started
Read the safety instructions in the “Precautions” section
before use.
To use your phone, you must insert a valid SIM card
supplied by your operator or retailer. The SIM card
contains your subscription and a memory in which
you can store phone numbers and messages.
Place the SIM card in its slot (with the
connectors facing the phone) then replace the
metallic holder.
3.
Insert the battery (with the connectors facing the
connectors of the phone) and press until it clips.
Insert the SIM card
1.
Press on the two clips on each side of the phone
and pull the back cover to remove it.
4.
Replace the back cover as shown below. Remove
the protective film covering the screen before
using the phone.
Getting started 1
Page 7

Switch on the phone
To switch on the phone, long press ) . Enter the
PIN code if required (i.e. the 4- to 8-digit secret code
of your SIM card). It is preconfigured and
com municated t o you by your operator or retailer. To
personalise the PIN code, see “Change codes”
page 14. Press
If you enter a incorrect PIN code 3 times, your SIM
card is blocked. To unblock it, you must request the
PUK code from your operator.
,
to confirm.
Set date and time
As prompted by the phone at first switch on, set the
date by pressing the appropriate numeric keys (press
c
to erase a number), then set the time.
For complete date and time options, see page 13.
Copy the SIM phonebook
The mobile phone detects a SIM card that already
contains names and a message asks you if you want to
copy your SIM phonebook onto the built-in
phonebook. Press
If at first switch you do not copy the SIM phonebook,
you can do it manually (see page 8).
c
to cancel or , to accept.
Charge the battery
Your phone is powered by a rechargeable battery. A
new battery is partially charged and an alarm will warn
you when the battery reaches low. If the battery is
completely flat, it will take 2 or 3 minutes of charging
for its icon to reappear.
You may lose all your personal settings if you remove
the battery when the phone is switched on.
1.
Once the battery and battery cover are clipped
on the phone, plug the connector of the charger
(supplied with the phone, in the box) into the
socket at the base of the phone on one end, then
2Getting started
Page 8

plug it into a main AC power socket with easy
access to the other end.
2.
The battery symbol indicates the state of charge:
- During charging the 4 charge indicators scroll;
it takes around 2.30 hours to fully recharge
your mobile phone.
-
When all 4 bars are steady the battery is fully
charged and you can disconnect the charger
Depending on the network and condition of
use, talk time goes from 2 to 4 hours and
standby time from 200 to 300 hours.
Keeping the charger plugged into the mobile when the
battery is fully charged doesn’t damage the battery.
The only way to turn off the charger is to unplug it, so
use an easily accessible AC power socket. You can
connect the charger to an IT supply (Belgium only).
Getting started 3
.
Page 9

2 • Main features
Access and view the phonebook
In idle mode, press -. Depending on the selected
phonebook (in SIM or in phone, see page 8), the
content that appears on the screen may vary.
To view the phonebook during a call, press
select Names List. Press
in-call screen.
In the phonebook, select <Search>, enter the first
letters of the name you are searching, and press
to go directly to that name.
To read your own mobile phone number, select Own
number > Show.
c
twice to return to the
Make a call
1.
In idle mode, enter the phone number using the
keypad. To correct an error, press
2.
Press ( to dial the number and press ) to
hang up.
For an international call, press and hold * to
enter the "+" sign instead of the usual international
c
,
.
and
,
prefix. For details on how to handle several calls
(operator-dependent), see page 28.
Answer and end a call
When receiving a call, the number of the caller may be
displayed. If the number is stored in the phonebook,
the corresponding name is displayed instead of the
number.
1.
To answer the call, press (.
2.
To reject the call, press ). If you have
activated Call forward (see page 24), the call is
diverted to a number or voice mail.
3.
To hang up, press ).
If you have selected Any Key Answer (see page 25),
you can accept a call by pressing any key (except )).
Adjust the earpiece volume
+
During a call, press
the volume.
or - to increase or decrease
Mute/Unmute the microphone
You can mute the microphone so that your caller
cannot hear you. During a call, press
Mute and press
,
again. To unmute the
,
, select
4 Main features
Page 10

microphone, press , , select Unmute and confirm
by pressing
,
.
Change the ringer
Select Settings > Sounds > Ringtone, press
move
+or-
to select a ringer. Press , to confirm.
,
and
Activate the vibra alert
If you want your phone to vibrate when you receive a
call, activate the vibra alert by selecting Settings
> Sounds > Vibra alert, then On or Off.
The vibra alert is automatically set to Off when you
plug the charger.
Quickly scroll a list
When browsing a list (of ringers, events, etc.), long
press
+
or - to quickly scroll.
Main features 5
Page 11

3 • Text or number entry
Text can be entered in editing screens in two different
ways: by using T9
input. Two other modes for numbers and
punctuation marks are also available. Icons appearing
on the screen indicate the active text mode.
T9® Text input
Tegic Euro. Pat.
App. 0842463
keystrokes input are analysed and the word suggested
®
by T9
is displayed in the edit screen. If several words
are available according to the keys used, the word you
entered is highlighted: press
list and to choose from those proposed by the T9
built-in dictionary (see example below).
®
predictive text input, or basic text
®
predictive Text Input is an
T9
intelligent editing mode for messages
including a comprehensive dictionary.
It allows you to quickly enter text. Press
only once on the key corresponding to
each letter needed to spell a word:
<
or > to browse the
How to use it
Alphabets and symbols represented by each key are as
follows:
2
to 9To key in letters.
<
or
,
c
0
*
#
®
To browse the list of candidate words.
>
or
1
To confirm entry.
Short press to clear one entry, long
press to clear all text.
Shift from Standard, to lower, to
UPPER case.
Shift from T9® to basic mode, to
numeric mode.
Shift to symbols and punctuation
mode. Press
>
to display other pages.
Example: how to enter the word "home":
1.
Press 4 6 6
The screen displays the first word of a list:
2.
Press>to scroll and select
3.
Press , or 1 to confirm selection of the
word
Home
.
3
Home
Good
.
6 Text or number entry
.
Page 12

Basic text input
If you wish to access the basic text input, press *.
This method requires multiple key presses to reach the
desired character: the letter "h" is the second letter on
the
4
key, so you must press it twice to enter "h".
Example: how to enter the word "home":
Press 4, 4 (GHI) 6, 6, 6 (MNO),
6
(MNO), 3, 3 (DEF). Press , when
the message is completed.
Letters, numbers and symbols are located on each key
as follows:
Shor t press Long press
space ’ . , ! ? " @ 1
1
a b c 2 à ä å æ ç 2
2
3
d e f 3 é è ∆ Φ 3
g h i 4 Γ ì4
4
j k l 5 Λ 5
5
6
m n o 6 ñ ò ö 6
p q r s 7 β Π Θ Σ 7
7
t u v 8 ü ù 8
8
9
w x y z 9 ø Ω Ξ Ψ 9
Shift letter case 0
0
Text or number entry 7
Page 13

4 • Contacts
Contacts are stored in one of the two available
phonebooks: in your SIM card (number of entries
depending on capacity) or in your phone (up to 99
names). When entering new names, they will only be
added to the selected phonebook.
99 is the maximum number of name cards, provided
that other features (sounds, pictures, etc.) are not using
a significant amount of the phone’s memory.
Settings
Contacts select
Press + or - to select a phonebook, In SIM card or
In phone. Contacts added to the selected phonebook
can then be copied into the other, via Copy to SIM or
Copy to phone options.
Your phone only manages one phonebook at a time
and will ignore the information relative to the other
one e.g. if "Smith" is present in both phonebooks and
if you delete it in the phone, it remains unchanged in
the SIM.
Delete all
To delete all contacts at once. This option only
applies to the phonebook in phone, NOT to the SIM
phonebook.
Copy to phone
If you cancelled or aborted the automatic copy of your
SIM phonebook at first switch, you can do it
manually with this option.
Copy to phone will copy the content of your SIM
card into your phone. Selecting this option twice will
duplicate all the names.
Groups settings
Allows you to manage groups, rename them and link
a specific melody and picture to each group. See
“Fotocall: See & hear who’s calling” page 9.
Add contacts to a phonebook
Contacts will be added to the selected phonebook.
In the SIM phonebook
1.
Press-when in idle mode and select <
2.
Enter the name and the number of your choice,
then the type of number (
Phone, Fax
New>
or
.
Data
)
8Contacts
Page 14

and press , to store this name in your
phonebook.
A number is limited to 40 digits, depending on your
SIM card. Entering international prefix, country &
area codes allows you to dial a number from any
location.
In the phone phonebook
1.
Press-when in idle mode and select <
Enter the first, then last name (up to 20 latin
characters); one of the two fields can be empty,
but not both.
2.
Then select the
hold up to 40 digits and one "+" sign and
alphanumeric fields feature up to 50 latin
characters. Each contact can feature a maximum
of 5 numeric fields (e.g. 2 mobile numbers, 3
work numbers, an e-mail address and a text
note).
3.
If needed, choose the group you want this
contact to belong to.
Numbe r type
. Numeric fields can
New>
Own numbers
The
Own numbers
should contain your own phone number. If not, we
item that appears in the names list
advise that you enter your mobile number as well as
any other relevant information.
Although all its fields can be empty, the
item cannot be deleted.
Emergency number
The emergency number will call the emergency
services number in your country. In most cases, you
can call this number even if you haven’t yet entered
.
your PIN.
In Europe the standard emergency number is 112, in
the UK it is 999.
Fotocall: See & hear who’s calling
This feature is available ONLY when you select the
phonebook in phone.
This feature allows you to personalize the groups
available with a name ("Friends", "Office", etc.), a
given picture and a given melody. One or several
names can be linked to a group. When a name in that
group calls, it will appear along with the
corresponding picture, and the melody defined for
that group will ring.
Own numbers
Contacts 9
Page 15

1.
In Contacts > Settings > Groups setting, select
a group to be identified.
2.
Rename the group and select the
Picture
3.
to be associated to this group.
Back to idle mode, press - to access the
phonebook. Select a contact you wish to link to
this group, then choose
the group of your choice.
Melo dy
Select group
Edit and manage contacts
-
when in idle mode to access the
Press
have stored. To search for a given name:
2
to
9
Press the key for the letter that you
want to go to in the list (e.g. press
8
twice to access the letter
"U"). The first record starting
with this letter is selected.
#
Or press #, enter the first
letters of the name you are
searching, and press
directly to that name.
Contacts
,
and the
and select
you
to access
In the SIM card phonebook
Choose a contact in the SIM card phonebook and
press
,
to access the following options:
•Call
•Send SMS
•Flash dial
•Copy to phone
• Delete
•Change
In the phone phonebook
Choose a contact in the phone phonebook and press
,
to access the following options:
•Call
•Send SMS
Select Show to access the list of all numbers or fields
saved for this contact then <New> to create a new
field for this contact. Select one of the fields and press
,
to access a second set of options, which are:
Make
default
Copy to
SIM card
• Change name
• Select group
The first number you enter becomes
the default number. This option allows
you to make another number default.
To copy a contact from your phone
phonebook into the SIM card.
• Delete
•Show
10 Contacts
Page 16

Show To display the details of the selected
Change
type
Alphanumeric fields can only be changed or deleted.
field.
To change or to define the field type of
the selected number.
Contacts 11
Page 17

5 • Settings
The vibra alert is always
charger or the Cigarette Lighter Adapter.
Off
when you connect the
Battery alert
This menu allows you to customise your phone and
change the settings related to each available option
(sounds, time and date, security, etc.).
Sounds
Ringer volume
Press +or -to select the volume of your ringer from
Silent
to
Increasing
.
This setting also applies to the messages ringer.
Ringtone
Allows you to select a ringer. The list also includes
melodies you saved. Scroll through the list and wait to
hear the selected melody being played.
You will not hear the melody if the volume ringer is set
to
Silence
.
Vibra alert
Allows you to set the vibra alert On or
receiving a call, when you receive a message or when
the alarm rings.
Off
when
Allows you to switch On or Off the alert that indicates
when the battery is running low.
Minute alert
Allows you to switch On or Off a beep alert that
sounds every minute during a call to help you manage
the duration of your call.
For alerts, the menu only allows you to set the alert
sounds On or Off, NOT the alert themselves.
Key tones
Allows you to switch the key tones On or
Off
.
Messages ringer
Allows you to switch On or
you receive a new message. When On, this option
allows you to select the alert from the ringers list.
Off
an alert for each time
Display
Screen saver
When On, it will run a slide show in idle mode, by
using the JPEG file(s) you have stored in your phone
12 Settings
Page 18

and selected. Use >to select the pictures of your
choice, then press
,
to activate the screen saver.
Economic mode
When On, this mode displays the current time on a
background when the phone is in idle. It increases
battery life.
Backlight
Backlight is activated when receiving incoming calls
or messages, browsing menus, etc. Select one of the
available values.
Deactivating this function increases battery life.
Wallpaper
Allows you to set the wallpaper display on the main
screen
On
or
Off
in idle mode.
Only JPEG type pictures can be used as wallpapers.
Contrast
Allows you to choose from several levels of contrast.
Hotkeys
Allows you to set up a direct access to a specific
function or a contact (Flash dial) by linking it to a key.
Hotkeys are configured by default, e.g. 6 for
Silence, but you can reprogram them (keys from
to 9 only). The following hotkeys are locked:
(call voice mailbox) and * (dial international
call). Depending on your service provider, other
hotkeys may be predefined and locked.
2
Select a key from
Browse the list to select the function you wish to
associate with this key and press
hotkeys, press and hold the programmed key while in
idle mode.
If the selected key is already set, you can reprogram it
by pressing
bring you to the list of available functions. If you select
Flash dial, you will be asked to select a contact in the
name list.
,
to 9 and press ,.
twice and selecting
,
Change
2
1
. To use the
. This will
Time and date
Clock display
Allows you to select
clock
time formats when shown in idle mode.
Analogue, Digital, Tiny digital or No
Settings 13
Page 19

Set time
Allows you to set the time by pressing the appropriate
numeric keys. You can also use
decrease the time minute by minute.
+/-
to increase or
Set date
Allows you to set the date by pressing the appropriate
numeric keys. You can also use
+/ -
to set the date.
Language
Allows you to select a language for all menu texts.
+/-
Press
to select a language then , to confirm.
Security
PIN protection
The PIN protection can be set On or
you will be asked to enter your PIN code when
switching your phone on. Depending on your SIM
card, some features or options may require a PIN2
secret code, given to you by your operator.
You cannot change your PIN code if this option is
Change codes
Allows you to change your
PIN
and
Off
PIN 2
. When On,
Off
codes.
If you enter an incorrect PIN2 code 3 times, your SIM
card is blocked. To unblock it, request the PUK2 code
from your operator or retailer. If you enter an
incorrect PUK code 10 times in a row, the SIM card
will be blocked and unusable. If this happens, contact
your operator or retailer.
Public names
Allows you to manage a specific names list, called
Public Names
Call restriction
This function is subscription dependent and requires
a PIN2 code. This option might also apply to WAP.
Public names Allows you to create, edit and
Call
restriction
.
list, and restrict calls to this list via the
option.
modify your
PIN2 code.
Allows you to restrict the calls to the
Public Names
can only access the names of the
Public names
Contacts
Public Names
list. In this case, you
list, as opposed to the
of the main menu.
list. via a
14 Settings
Page 20

Call barring
Network dependent. This requires a specific call
barring password supplied by your service provider.
Allows you to limit the use of your phone to specific
calls by letting you bar both Outgoing and Incoming
calls. In all cases, the Cancel option of these menus
applies to all calls at once. The Status menu allows
you to know whether a type of call is barred or not.
Keypad lock
Allows you to set a delayed automatic keypad lock in
idle. The keypad unlocks when receiving a call or
when placing an emergency call. Long press
unlock the keypad.
In idle, long press c to lock/unlock the keypad
manually.
c
Network
Register again
Provides you with a list of the networks available in
the area when the
network you want to register with and press
Manual
mode is selected. Select the
,
.
Preferred list
Allows you to build a network list in order of
preference. Once defined, the phone will try to
register on a network, according to your preferences.
Access settings
This menu allows you to create several data profiles:
when using WAP, the selected profile will be used to
connect to the network.
Options described below are operator and/or
subscription dependent. Error messages during
connections are mainly due to incorrect parameters:
contact your operator before first use, in order to have
to
the appropriate settings, which you may receive by
SMS in some cases. Some pre-configured profiles
might be locked, preventing re-programming and
renaming.
Select an item in the list and press
following options:
Change name To rename the selected profile.
Show To visualise all parameters of the
selected profile.
,
to access the
Settings 15
Page 21

GSM Settings To change the GSM settings:
Login, Password, Phone
number needed to establish the
connection and provided by your
operator, Inactivity time (a value
of over 30 seconds after which
the phone disconnects
automatically if a connection was
in progress).
16 Settings
Page 22

2.
6 • Messages
SMS
This menu allows you to send short messages (SMS)
with sounds, animations or pictures, as well as manage
the ones you receive.
Send SMS
This menu allows you to send an SMS to one or
several contacts.
1.
Choose from three different types of messages:
<New>
Last message
Template
To write a new message.
To edit, modify and re-send the last
message.
To select a pre-configured message,
such as
Can you ring me back at this
numbe r.
including your number, if
it is the first one of the
option (see page 9).
Own num.
Enter your text then press , to access the
next options:
Save
Send
Add sound
Add graphic
You can send up to 2 attachments of 2 different types
together with your SMS. Animations and pictures are
exclusive: if you first select an animation, then a
picture, only the picture will be taken into account
and vice-versa.
Some pre-defined items are supplied as standard with
your mobile phone. Personal pictures and sounds
cannot be sent when they are copyright protected.
3.
Choose a recipient in the names list. Select
<Add contacts> to add other recipient(s).
When selecting a recipient in the mailing list,
you can remove it from the list or edit the
number.
4.
Select Send now to send the message.
To store the current message in the
Archive
menu.
To validate the message and select
the recipient(s) of the message.
To attach a melody.
To attach a bitmap image or an
animation.
Messages 17
Page 23

Outbox
When the Auto Save SMS option is On (see page 18),
messages you sent are stored in this menu.
Inbox
Thi s menu all ows you to rea d your SMS. T he number
indicates the number of unread message(s). When a
message is displayed, press
following options:
Delete all
Delete
Move to
archive
Reply
Forward to
Store
number
To delete all the messages at once.
To delete the selected message.
To store messages in the phone
memory. You can then consult them in
SMS
>
Archive
Moving a message to the archive list
deletes it from the read SMS list.
To reply to the sender.
To edit and forward the selected
message.
Attachments cannot be forwarded.
To save the number of the sender if it
is attached to the message.
,
.
to access the
Call back
No.
extracted
To call the sender of the message
(operator- dependent).
To extract a number included in the
message itself, if this number is
included in double quotes (several
numbers can be included and
extracted).
SMS settings
This menu allows you to customise your SMS via the
following options:
SMS
centre
Signature
Val id it y
period
To select your default SMS centre.
not available on your SIM card, you must
enter your SMS centre number
To add a signature at the end of your
message. You can
the signature.
To select the length of time your
message is to be stored in your SMS
centre.
This feature is subscription dependent.
Edit, Change
.
or
Save
If
18 Messages
Page 24

Delivery
report
Auto save
SMS
Archive
This menu allows you to consult all stored messages in
the phone’s memory. Select a message, then press
,
selected message
Forward, Call back, Store number, Extract number
When On, this option will inform you
via SMS whether your own SMS was
received or not.
This feature is subscription dependent.
When On, this option will
automatically save messages sent in the
Outbox
menu.
to access to the following options:
, Delete all
messages at once
Delete
, Reply,
.
the
Broadcast SMS
This feature is network dependent.
This menu allows you to manage the reception of
SMS broadcasts regularly transmitted to all
subscribers on the network. Please contact your
operator for details.
SMS chat
SMS chat
feature
This menu allows you to set the
or
Off
. When On, any SMS you receive is
automatically displayed in idle mode.
Scroll down to read it, and quickly reply by pressing
,
twice: first to enter the editing screen, then to
send your message. The phone will automatically go
back to the idle screen.
If you receive a second SMS while you are reading one,
reply to the first one or press
phone will then display the second message.
c
to exit. The mobile
On
Messages 19
Page 25

7 • Multimedia
Sound album
This menu allows you to manage and listen to the
sounds stored in your mobile phone. Select a sound
and press
The Download new option gives you access to a
WAP page where you can download sounds (operator
dependent).
,
to access the following options:
Delete all To delete all sounds at once.
Copyright protected melodies cannot
be deleted.
Delete To delete the selected sound.
Set as ringer To set the selected sound as Ringer.
Set as SMS
ringer
Rename To rename the selected sound.
To set the selected sound as
Messages ringer (this option must
be set On, see page 12).
Picture album
JPEG pictures must have the correct size and format
for your mobile phone to store and display them
correctly (max 640 x 640 pixels).
This menu allows you to manage and display the
pictures stored in your mobile phone. To access the
graphical display, select a picture in the list and
press
>
. Press ,to access the following options:
Delete all To delete all pictures at once.
Copyright protected pictures cannot
be deleted.
Delete To Delete the selected picture.
Rename To Rename the selected picture.
Set as
wallpaper
The Download new option gives you access to a
WAP page where you can download pictures
(operator dependent).
If there isn’t enough space to store a new picture, you
must delete some other pictures to release memory.
To set the selected picture as wallpaper (this option must be set On, see
page 13).
20 Multimedia
Page 26

Press
,
Memory status
This menu allows you to display the percentage of
memory available in your phone. Several features
share the mobile capacity: pictures and sound albums,
archive messages, phonebook entries, etc.
Kilobytes, KB). Press
list of memory used by each feature.
If "List full" appears when saving a new item or to free
memory space, you must delete an item to be able to
create or add a new one.
to check the general memory status (in
,
again to access the detailed
Multimedia 21
Page 27

8 • Games & Applications
Calculator
This menu provides the following functions:
Addition
Substraction
Multiplication
Division
Equals
Enter the figures using the keypad. Calculator
accuracy is to 2 decimal places and is rounded up to
the higher decimal figure. Press and hold
the decimal point.
Alarm clock
This menu allows you to set the alarm clock (up to 3
alarms). Select an alarm clock and press
set it On or Off. When set to On, enter the time and
press
,
weekdays) and press
the list.
Press
*
Press
*
Press
*
Press
*
Press
#
, select the frequency (
,
. Then select a melody in
once or press >.
twice or press <.
3 times or press +.
4 times or press -.
or ,.
0
to get
+
or - to
Once, Every day
, On
The alarm clock will ring even if you turned off your
phone, and even if the Ringer volume is set to
Press any key to stop the alarm ringing.
Silence
Snooze mode
This menu allows you to set the snooze mode On or
Off. The setting applies to all the alarms.
When the alarm rings and the snooze mode is On,
press any key (except
temporarily or wait till the ringing time is out. The
alarm will ring again around 7 minutes later. To stop
the alarm repetition, long press
The snooze mode is automatically deactivated after 9
alarm repetitions.
,
) to stop the ringing
,
.
Euro converter
These menus allow you to convert a sum from or into
Euros by entering the amount and pressing
The currency used for the conversion is determined by
the country where you have subscribed. The Euro
converter is available upon subscription and only in
countries using the Euro.
,
.
22 Games & Applications
.
Page 28

Games
Your phone is supplied with 3 games: Brick, Snake
and Master mind.
Brick
Goal: destroy the bricks by hitting them with a ball.
4
/ 6 To move the racket left or right.
#
0
Snake
Goal: feed the snake without it touching the wall.
1
/
7
To throw the ball.
To pause/resume the game.
To move the snake up, down or
left.
3
/
9
0
Master mind
Goal: find the correct combination.
1- 8
,
#
0
To move the snake up, down or
right.
To pause/resume the game.
To enter symbols.
To validate the combination.
To change the difficulty level or
to start a new game.
To pause/resume the game.
Games & Applications 23
Page 29

9 • Call information
Call settings
This menu allows you to set all the call options (call
forward, waiting, etc.).
Call forward
To divert incoming calls to your mailbox or to a
number (whether in your
to
Data calls, Voice cal l s
Before activating this option, you must enter your
voice mailbox numbers (see below). This feature is
subscription dependent, and different from the call
transfer, which takes place when one/several calls are
in progress.
Unconditional
Contacts
and
Will divert all the incoming calls.
Warning! When selecting this
option, you will not receive any
calls at all until you deactivate it.
or not) and applies
Fax calls
.
If busy
If no reply
If unreachable
Conditional
Status
Mailboxes
To enter your voice mailbox numbers (if not available
on your SIM card).
In some cases, you might have to enter two numbers:
one to listen to your mailbox, the other one to forward
calls. Contact your operator for more information on
this subject.
Auto redial
To set the auto redial On or
person you are calling is busy, your phone
automatically redials this number until a successful
connection is made or until the maximum number of
attempts is reached (10).
The time between redials increases with each attempt.
Allows you to choose in which
circumstance you want to divert
incoming calls.
Will divert the incoming calls in
all above circumstances.
Will display the status of all call
forwarding.
Off
. When On if the
24 Call information
Page 30

,
Any key answer
When this option is active, you can accept a call by
pressing any key, except
a call).
)
(which is used to reject
Call waiting
Wh en th is o pt ion is act iv e, yo u h ear a b ee p if so meo ne
tries to call you while already on a call. Select the
Status
option to check whether the call waiting is
active or not.
This function is subscription dependent. Contact your
operator.
Caller ID
To
Show
or
Hide
The
Status
activated or not.
your identity to your correspondent.
option will inform you if this function is
Call list
This menu provides you with the list of outgoing and
incoming calls and call details.
Select an item and press
time, number and call status. If the number is stored
in the selected phonebook, the corresponding name is
displayed.
Press
,
reset the list,
Delete
already in your phonebook).
again to access the options: Delete all to
Call
the selected call or
back this correspondent,
Counters
This menu allows you to handle the duration of your
incoming and outgoing calls.
Most options mentioned below are subscription
dependent.
Total
duration
Reset
To display the duration of calls
since last reset.
To reset the outgoing and incoming
call counters.
to consult the date,
Store
the number (if not
Send a SMS
Call information 25
,
Page 31

10 • Operator
Most items of this menu are subscription dependent
and specific to operators. Consequently, the menus
shown following may or may not be available.
Contact your network operator for details.
The services provided may involve making a phone
call or sending a SMS for which you may be charged.
WAP
This menu allows you to access services supplied with
your network, such as news, sports, weather, etc.
Your mobile phone may have been pre-configured. If
not, settings can be configured "over the air", via the
club Philips website. Connect to
www.club.philips.com then select your country. Note
that this service isn’t available if your country and/or
mobile doesn’t appear in the list. In this case, contact
your operator for information.
,
To launch a WAP session, press
>
Homepage
Move + or
.
-
To browse the on-line pages.
and select
WAP
,
c
Press
Press and hold
c
Your mobile phone connects to the network according
to the
Access settings
Settings
>
connection error, the screen displays "Go to menu":
press(to go to the WAP options.
Homepage
This is the link to the first WAP site you access when
launching a WAP session. In most cases, this menu
item is preconfigured and will connect to your
operator’s WAP homepage. To change this default
homepage see “Settings” page 27.
Bookmarks
This menu allows you to store your favourite WAP
site addresses, rename them and access them quickly
from the list.
To select a highlighted item.
To return to the previous page.
To end the WAP session.
You can also select
Exit
and press ,.
you have defined in the menu
Network
(see page 15). In case of a
Options
>
Press
26 Operator
Page 32

Press (while browsing, then select
Name and URL fields will be automatically filled in
with the information of the page you are browsing.
Add bookmark
Select
for the edit screen to appear. Press
the same way to enter the URL address.
The Manage bookmarks menu allows you to
or
Edit
the selected bookmark.
and start entering the new name
Bookmarks
,
, then proceed
: the
Dele te
Go to URL
This menu allows you to enter a WAP site address, to
which you connect directly when selecting it (a quick
way to access WAP addresses without saving them as
bookmarks).
All the addresses you enter in this menu and connect
to at least once will appear in a list. Select one of the
items and press
page, without having to re-enter its complete address.
,
to reconnect to the corresponding
Settings
Select
profile
Connection Homepage allows you to change the
To select one of the available
profiles, then define the connection
settings for each of them (press
>
to select / deselect).
All connection settings described
below apply to the selected profile.
name and address (start entering the
new name for the edit screen to
appear).
Select connection allows you to
select one of the data profiles you
have defined in
settings
(see page 15).
Proxy address and Proxy port
allow you to define a gateway
address and port number to be used
when launching a WAP connection
using the selected profile.
Settings
>
Access
<
Push inbox
This menu allows you to read and manage messages
automatically sent to you by the network and / or by
your operator. Push messages may include URL for
Operator 27
/
Page 33

quick access to WAP services: press , to connect
to the WAP site.
If your push inbox is full, a message will ask you to
delete some messages in WAP > Push Inbox.
Options
While browsing, press the ( key to access:
Homepage To access th e homepage of the WAP
Back To go back to the previous page.
Forward To go to the next page.
Refresh To reload the currently browsed
Set as
homepage
Save as... To save images embedded in the
Exit To end a WAP session.
site you are browsing.
page from its original server.
To save the currently browsed WAP
page as the default homepage.
pages that are displayed in the
Picture album.
Handling several calls
Subscription dependent.
Making a second call
When you are in an active call, you can dial a number
(or select a contact in the phonebook) and press
The first call is put on hold and the second number is
dialled. Then press
options:
• Switch calls to toggle between calls.
• Tra n s fe r to connect the two calls. You are dis-
connected when the transfer is completed.
• Conference to introduce the caller into a con-
ference call.
• End call to hang up the active line.
You can also use < and >to toggle between calls.
,
to access the following
(
28 Operator
.
Page 34

Answering a second call
When you receive a second call while already in
communication, the phone emits a beep alert and the
screen displays Call waiting. You can then:
Press
(
To answer the call (the first one is put
on hold). Then press
•
Switch calls
•
Conference
caller into a conference call.
)
Press
Press
To receive a second call, you must have deactivated the
Call forward
the
Call waiting
To reject the call.
,
To s e l e c t End call to end the current
call, then answer the incoming call.
for voice calls (see page 24) and activated
(see page 25).
,
to toggle between calls,
to introduce the new
and select:
Conference call
A conference call allows you to speak with up to 5
callers at the same time.
1.
Make a first call, then a second one .
2.
Press ,and select
3.
Repeat the process until 5 callers are connected.
4.
Select Remove party to disconnect a caller of
the conference, or select
private call with this caller only (other callers are
put on hold).
5.
Press ) to disconnect all calls at once.
If there is an incoming call during the conference call
and there are less than 5 callers, you can accept this
new call and add this member to the conference call
(if 5 callers are already connected, you can answer the
call, but cannot add it to the conference).
Conference
Private call
.
to have a
Operator 29
Page 35

Roaming
Icons & symbols
In idle mode, several symbols can be displayed
simultaneously on the screen.
If the network symbol isn’t displayed, the network is
not currently available. You may be in a bad reception
area, moving to a different location may help.
Silence - Your phone will not ring when
receiving a call.
Vibra
- Your phone will vibrate when receiving
a call.
SMS message - You have received a new
message.
Vo ice ma i l
mail.
Battery
bars = full, 1 bar = low).
Alarm clock
Keypad lock activated.
- You have received a new voice
- The bars indicate the battery level (4
activated.
- Displayed when your phone is registered to a network other than your own (especially when you’re abroad).
SMS full
- Memory for messages is full. Delete
old messages to receive new ones.
Call Forward Unconditional to number
your incoming voice calls are being forwarded
to a number other than voice mail.
Call Forward to voice mailbox
are being forwarded to voice mail.
Home zone
work operator. Subscription dependent, contact your service provider for details.
GSM Network: your phone is connected to a
GSM network
Reception quality: the more bars are shown
the better the reception is.
SMS Chat
Memory full
lete items to store new ones.
WAP message - You have received a mes-
sage in the WAP push inbox.
- A zone designated by your net-
- option is set to On.
- The pho ne’s memory is ful l. De-
- All
- All your calls
30 Icons & symbols
Page 36

Precautions
Radio waves
Your cellular mobile phone is a low power radio
transmitter and receiver. When it is operating, it
sends and receives radio waves. The radio waves
carry your voice or data signal to a base station that
is connected to the telephone network. The
network controls the power at which the phone transmits.
• Your phone transmits/receives radio waves in the GSM
frequen cy (900 / 1800MHz).
• The GSM network controls transmission power (0.01
to 2 watts).
• Your phone complies with all relevant safety standards.
• The CE mark on your phone shows compliancy with
European electromagnetic compatibility (Ref. 89/336/
EEC) and low voltage directives (Ref. 73/23/EEC).
Your cellular mobile phone is your responsibility. To avoid
damage to yourself, to others or to the phone itself, read and
follow all the safety instructions and make them known to
anyone borrowing your phone. Furthermore to prevent
unauthorised use of your phone:
Keep your phone in a safe place and keep it out of
small children's reach.
Avoid writing down your PIN code. Try to remember it instead.
Switch off the phone and remove the battery if you
are going to leave it unused for a long time.
Security
Use the
purchasing the phone and to activate call restriction options.
menu to change the PIN code after
The design of your phone complies with all
applicable laws and regulations. However your
phone may cause i nterference with other electronic
devices. Consequently you should follow all local
recommendations and regulations when using
your cellular phone both at home and when away.
Regulations on the use of cellular phones in vehicles and
aircraft are par ticularly stringent.
Public concern has been focused for some time on the possible
health risks for users of cellular phones. The current research
on radio wave technology, including the GSM technology,
has been reviewed and safety standard s have been dr awn up to
ensure protection from exposure to radio wave energy. Your
cellular telephone complies with all applicable safety
standards and the Radio Equipment and
Telecommunications Terminal Equipment Directive 1999/
5/EC.
Always switch off your phone
Inadequately protected or sensitive electronic equipment
may be affected by radio energy. This interference can lead to
accidents.
Before boarding an aircraft and/or when packing
the phone in your luggage: the use of mobile
phones in an aircraft may be dangerous for the
operation of the aircraf t, disrupt th e mobile phones
network and may be illegal.
In hospitals, clinics, other health care centres and
anywhere else where you may be in the close
vicini ty of medic
al equ
ipment.
Precautions 31
Page 37

In areas with a potentially explosive atmosphere
(e.g. petrol stations and also areas where the air
contains dust particles, such as metal powders) .
In a vehicle transporting flammable products (even
if the vehicle is parked) or a vehicle powered by
liquefied petroleum gas (LPG), check first that the vehicle
complies with the applicable safety rules.
In areas where you are requested to turn off radio transmitting
devices, such as quarries or other areas where blasting
operations are in progress.
Check with the vehicle manufacturer that
electronic equipment used in your vehicle will not
be affected by radio energy.
Users of pacemakers
If you are a user of a pacemaker:
• Always keep the phone more than 15 cm from your
pacemaker when the phone is switched on, in order to
avoid potential interference.
• Do not carry the phone in a breastpocket.
• Use the ear opposite to the pacemaker to minimise the
potential interference.
• Switch off your phone if you suspect that interference is
taking place.
Users of hearing aids
If you are a user of a hearing aid, consult your physician and
hearing aid manufacturer to learn whether your particular
device is susceptible to cell ular phone interferen ce.
Performance improvement
In order to improve the performance of your phone, reduce
radio energy emission, reduce battery consumption and
ensure safe operation adhere to the following guidelines:
For the optimal and satisfactory operation of the
phone you are recommended to use the phone in
the normal operating position (when not using in
hands-free mode or with a hands-free accessory).
• Do not expose your phone to extreme temperatures.
• Treat the phone with care. Any misuse will void the
International Guarantee.
• Do not immerse the pho ne in any liquid; if your phone
is damp, switch it off, remove the battery and let them
dry for 24hrs before usin g them again.
• To clean the phone, wipe it with a soft cloth.
• Placing and receivin g calls consumes the same amount
of batter y energy. However, the mobile consumes less
energy in idle screen when kept in the same place.
When in idle screen and while you are moving, your
phone consumes energy to transmit updated location
information to the network. Setting the backlight for a
shorter period of time as well as avoiding unnecessary
navigating in the menus will also help to save the battery’s energy for longer phoning and stand-by performances.
Information displayed on the battery
• Your phone is powered by a rechargeable battery.
•Use specified charger only.
• Do not incinerate.
32 Precautions
Page 38

• Do not deform or open the battery.
• Do not allow metal objects (such as keys in your
pocket) to short circuit the battery contacts.
• Avoid exposure to excessive heat (>60°C or 140°F),
moisture or caustic environments.
You should only use Philips Authentic Accesso ries,
as the use of any other accessories may damage your
phone and will make all guarantees for your Philips
phone null and void.
Make sure damaged parts are replaced immediately by a
qualified technician and that they are replaced with genuine
Philips replacement parts.
Do not use your phone while driving
It lowers concentration, which can be dangerous.
Adhere to the following guidelines: Give your full
attention to driving. Pull off the road and park
before using the phone. Respect the local
regulations in countries where you drive and use
your GSM phone. If you want to use your phone in a vehicle,
install the hands-free car kit which is designed for that
purpose, still ensuring you give full attention to driving.
Ensure that your phone and car kit do not block any air bags
or other security devices fitted in your car. The use of an alarm
system to operate a vehicle's light or horn to indicate
incoming phone calls i s prohibited on public roads in some
countries. Check local regulations.
EN 60950 Norm
In case of hot weather or after a prolonged exposure to the sun
(e.g. behind a window or a windscreen), the temperature of
your phone's casing might increase, especially when featuring
a metallic finish. Be very careful in this case when picking up
your phone and also avoid using it with an ambient
temperature over 40°C.
Environmental care
Remember to observe the local regulations
regarding the disposal of your packaging materials,
exhausted batteries and old phone and please
promote their recycling.
Philips has marked the battery and packaging with standard
symbols designed to promote the recycling and appropriate
disposal of your eventual waste.
The battery should not be disposed of with
general household waste.
The labelled packaging material is recyclable.
A financial contribution has been made to the
associated national packaging recovery and
recycling system (e.g. EcoEmballage in France).
The materials are recyclable (also identifies the
plastic material).
Precautions 33
Page 39

Troubleshooting
The phone does
not switch on
The display shows
BLOCKED when
you switch on
The display shows
IMSI failure
Remove and reinstall the
battery (see page 1). Make sure
you plugged the jack of the
charger into the correct
connector (see page 2). Then
charge the phone until the
battery icon has stopped
scrolling. Finally, unplug from
the charger and try to switch
the mobile on.
Somebody tried to use your
phone but didn’t know the
PIN code nor the unblocking
code (PUK). Contact your
service provider.
This problem is related to your
subscription. Contact your
operator.
The symbol is
not displayed
The display doesn’t
respond (or the
display responds
slowly) to key
presses
The network connection is
lost. Either you are in a radio
shadow (in a t unnel or between
tall buildings) or you are
outside the network coverage
area. Try from another place,
try to reconnect to the network
(especially when abroad),
check that the antenna is in
place if your mobile has an
external antenna, or contact
your network operator for
assistance/information about
the network.
The display responds more
slowly at very low
temperatures. This is normal
and does not affect the
operation of the phone. Take
the phone to a warmer place
and try again.
In other cases ple ase contact
your phone supplier.
34 Troubleshooting
Page 40

Your phone
doesn’t return to
the idle screen
Your phone
doesn’t display the
phone numbers of
incoming calls
You can’t send text
messages
Press and hold c or switch
off the phone, check that the
SIM card and the battery are
installed correctly and switch it
on again.
This feature is network and
subscription dependent. If the
network doesn’t send the
caller’s number, the phone will
display
Call 1
instead. Contact your operator
for detailed information on
this subject.
Some networks don’t allow
message exchanges with other
networks. First check that you
entered the number of your
SMS centre, or contact your
operator for detailed
information on this subject.
or Withheld
You can’t receive
and/or store JPEG
pictures
During battery
charge, the battery
icon shows no bar
and the outline is
flashing
The display shows
SIM failure
You have the
feeling that you
miss some calls
A picture may not be accepted
by your mobile phone if it is
too large, if its name is too
long, or if it doesn’t have the
correct file format.
Only charge the battery in an
environment where the
temperature does not go below
0°C (32°F) or above 50°C
(113°F). In other cases please
contact your phone supplier.
Check that the SIM card has
been inserted in the right
position (see page 1). If the
problem remains, your SIM
card may be damaged. Contact
your operator.
To receive all calls, make sure
that none of the features
"Conditional call forward" or
"unconditional call forward" is
activated (see page 24).
Troubleshooting 35
Page 41

When attempting
to use a feature in
the menu, the
mobil e displays
NOT ALLOWED
The display shows
I NSERT YO U R
SIM CARD
The autonomy of
your phone seems
lower that
indicated in the
user guide
Some features are network
dependent. They are only
available, therefore, if the
network or your subscription
supports them. Contact your
operator for detailed
information on this subject.
Check that the SIM card has
been inserted in the right
position (see page 1). If the
problem remains, your SIM
card might be damaged.
Contact your operator.
The autonomy is linked to
your settings (e.g. ringer
volume, backlight duration)
and the features you use. To
increase the autonomy, and
whenever possible, you must
deactivate features you do not
use.
Your phone
does n’t work well
in your car
Your phone is not
charging
A car contains many metallic
parts that absorb electormagnetic waves which can
affect the phone’s
performances. A car kit is
available to provide you with
an external antenna and
enables you to make and
receive phone calls without
handling the handset.
Check with local authorities if
you are allowed to use the
phone whilst driving.
Make sure you plugged the
jack of the charger into the
correct connector (see “Charge
the battery” page 2). If your
battery is completely flat, it
might take several minutes of
pre-charge (up to 5 in some
cases) before the charging icon
is displayed on the screen.
36 Troubleshooting
Page 42

Philips authentic
accessories
Some accessories, such as a standard battery and a
charger are included as standard in the package of
your mobile phone. Other accessories might be sold
in the commercial package (according to the operator
or the retailer), or sold separately. As a consequence,
the package content may vary.
To maximise the performance of your Philips phone
and not to void the warranty, always purchase Philips
Authentic Accessories that are specially designed for
use with your phone. Philips Consumer Electronics
cannot be held liable for any damage due to use with
non authorised accessories.
Charger
Charges your battery in any AC outlet. Small enough
to carry in a briefcase/handbag.
Cigarette light adapter
Charges the battery and plugs into any vehicle power
outlet.
Universal car kit
Designed to operate your Philips mobile phone
hands-free and easy to use, this compact hands-free
solution offers a high audio quality.
Simply plug the kit into the vehicle auxiliary outlet.
In certain countries, telephoning whilst driving is
prohibited. For safe and trouble free installation, we
recommend that specialized technicians install handsfree car kits.
Deluxe headset
In-line answer button offers you a simplified
alternative to searching for the phone. Simply answer
an incoming call by pressing the button.
Philips authentic accessories 37
Page 43

SAR Information - EU (RTTE)
THIS MODEL PHONE MEETS THE EU REQUIREMENTS
Your mobile phone is a radio transmitter and receiver. It is designed and manufactured not to exceed the limits for
exposure to radio frequency (RF) energy recommended by the Council of the European Union. These limits are
part of comprehensive guidelines and establish permitted levels of RF energy for the general population. The
guidelines were developed by independent scientific organisations through periodic and thorough evaluation of
scientific studies. The limits include a substantial safety margin designed to assure the safety of all persons,
regardless of age and health.
The exposure standard for mobile phones employs a unit of measurement known as the Specific Absorption Rate,
or SAR. The SAR limit recommended by the Council of the European Union is 2.0 W/kg. Tests for SAR have
been conducted using standard operating positions with the phone transmitting at its highest certified power level
in all tested frequency bands. Although the SAR is determined at the highest certified power level, the actual SAR
level of the phone while operating can be well below the maximum value. This is because the phone is designed to
operate at multiple power levels so as to use only the power required to reach the network. In general, the closer
you are to a base station antenna, the lower the power output.
Before a phone model is available for sale to the public, compliance with the European RTTE directive must be
shown. This directive includes as one essential requirement the protection of the health and the safety for the user
and any other person.
The highest SAR value for this Philips 162 / CT 1628 model phone when tested for compliance against the
standard was 0.506 W/kg. While there may be differences between the SAR levels of various phones and at various
positions, they all meet the EU requirements for RF exposure.
38 SAR Information - EU (RTTE)
FOR EXPOSURE TO RADIO WAVES
Page 44

SAR Information - International (ICNIRP)
THIS MOBILE PHONE MEETS INTERNATIONAL REQUIREMENTS
Your mobile phone is a radio transmitter and receiver. It is designed and manufactured not to exceed the limits for
exposure to radio frequency (RF) recommended by international guidelines (ICNIRP). These limits are part of
comprehensive guidelines and establish permitted levels of RF energy for the general population. The guidelines
were developed by independent scientific organisations through periodic and thorough evaluation of scientific
studies. The guidelines include a substantial safety margin designed to assure the safety of all persons, regardless of
age and health.
The exposure standard for mobile phones employs a unit of measurement known as the Specific Absorption Rate,
or SAR. The SAR limit stated in the international guidelines is 2.0 W/kg. Tests for SAR are conducted using
standard operating positions with the phone transmitting at its highest certified power level in all tested frequency
bands. Although the SAR is determined at the highest certified power level, the actual SAR of the phone while
operating can be well below the maximum value. This is because the phone is designed to operate at multiple power
levels so as to use only the power required to reach the network. In general, the closer you are to a base station, the
lower the power output of the phone.
The highest SAR value for this Philips 162 / CT 1628 model phone when tested for use at the ear is 0.506 W/kg.
While there may be differences between the SAR levels of various phones and at various positions, they all meet
the relevant international guidelines for RF exposure.
SAR Information - International (ICNIRP) 39
FOR EXPOSURE TO RADIO WAVES
Page 45

Declaration of
conformity
We,
Philips France - Mobile Telephony
4 rue du Port aux Vins - Les patios
92156 Suresnes Cedex
FRANCE
declare under our sole responsibility that the product
Philips 162
CT 1628
Cellular Mobile Radio GSM 900/GSM 1800
TAC: 353885 00
to which this declaration relates, is in conformity with
the following Standards:
EN 60950, EN 50360 and EN 301 489-07
EN 301 511 v 7.0.1
We hereby declare that all essential radio test suites
have been carried out and that the above named
product is in conformity to all the essential
requirements of Directive 1999/5/EC.
The conformity assessment procedure referred to in
Article 10 and detailed in Annex V of Directive 1999/
5/EC has been followed related to articles 3.1 and 3.2
with the involvement of the following Notified Body:
BABT, Claremont House, 34 Molesey Road, Wa ltonon-Thames, KT12 4RQ, UK
Identification mark: 0168
Le Mans, December 23
In case your Philips product is not working correctly or
is defective, please return your phone to the place of
purchase or to the Philips National Service Center.
Refer to the International Guarantee shipped in the
box for information on Service centers and technical
documentation relevant to your equipment.
rd
, 2004
Jean-Omer Kifouani
Quality Manager
 Loading...