

Page 1
Register your product and get support at
www.philips.com/welcome
CSP550
CSP652
CSP650
EN User manual
Page 2
b edac
f
ghjki
A
B
a
b c
Page 3

d
e f
C
Page 4

Option 1:
Flush mounting
Option 2:
Flush mounting
Option 3:
Surface mounting
Option 4:
Surface mounting
Option 5:
Angle mounting
D
Page 5

White lined
White lined
White lined
Amplifier
Network
Woofer
Tweeter
Black
Black
Black
E
F
Page 6

English
1. Important
Safety
Read and understand all instructions before you use the apparatus. •
If damage is caused by failure to follow instructions, the warranty does
not apply.
Use only the supplied mounting hardware for a safe and secure •
installation.
Do not continuously use the speaker system beyond the peak power •
handling capacity.
Keep credit cards, watches, recorded tapes etc. with magnetic coding •
away from the speaker system to prevent damage caused by the
magnets in the speakers.
Clean the apparatus with sof t, damp cloth. Never use substances such •
as alcohol, chemicals or household cleaners on the apparatus.
Notice
Environmental information
All unnecessary packaging has been omitted. We have tried to make
the packaging easy to separate into three materials: cardboard (box),
polystyrene foam (buffer) and polyethylene (bags, protective foam sheet.)
Your system consists of materials which can be recycled and reused if
disassembled by a specialized company. Please observe the local regulations
regarding the disposal of packaging materials, exhausted batteries and old
equipment.
Any changes or modications made to this device that are not expressly
approved by Philips Consumer Lifestyle may void the user’s authority to
operate the equipment.
2009 © Koninklijke Phili ps Elec tro nics N .V. All righ ts reserved.
Specicat ions are subject to change w ithout notice. Trad emar ks are the propert y of Koninklijke Phil ips
Elec tronics N.V. or their respec tive owner s. Philips r eser ves the right to change product s at any time
with out be ing obl iged to adjust earlier supplies accordingly.
Page 7

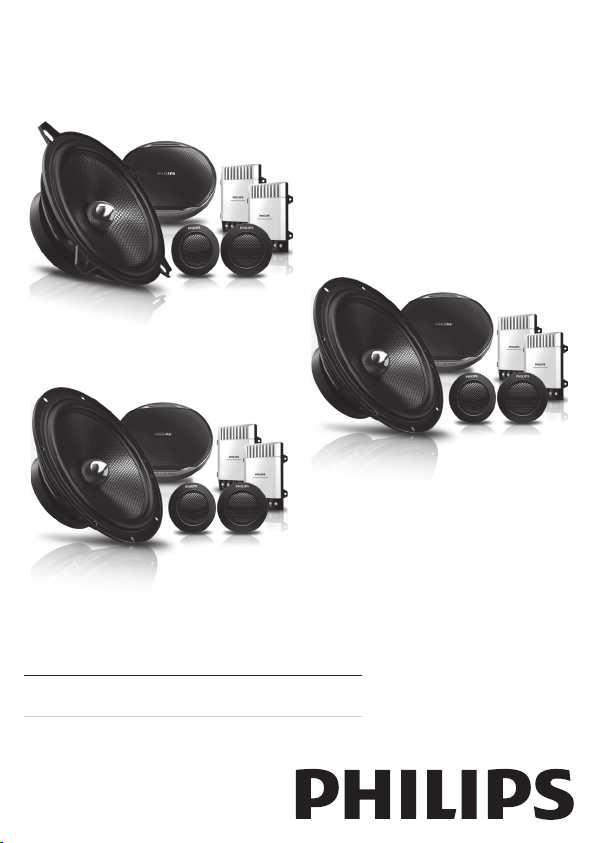
2. Your car stereo speakers
Congratulations on your purchase, and welcome to Philips! To fully
benet from the support that Philips offers, register your product at
www.philips.com/welcome.
Introduction
With the woofers and tweeters, you can enjoy high power music with
vivid sound.
What’s in the box
Check and identify the contents of your package:
a Woofer (x2)
b Grille assembly (x2)
c Tweeter (with wire) (x2)
d Network (x2)
e Speaker wire (x4)
f Angle adapter (x2)
g Fix frame (x2)
h Mounting bracket (x4)
i Screw
j Screw nut
k Shrapnel
A
Page 8

3. Installation
A depth of at least 52mm is required to mount the woofer and a depth
of at least 19mm is required to mount the tweeter. Measure the depth
of the area where you are to mount the woofer/tweeter, and ensure that
the woofer/tweeter does not obstruct any other components of the car.
Note
Make sure that nothing obstructs around the mounting location of the door.
•
A hole for mounting may already be cut out of the inner panel of the door
•
(front or rear). In this case, you need to modify the board only.
Ensure that the speaker ter minals, fr ame or magnet do not interfere with any
•
inner parts, such as the window mechanism in the door (when you open or
close the window), etc. Also ensure that the speaker grille does not touch any
inner ttings, such as the window cranks, door handles, arm rests etc.
Mount the woofer
Option 1: Mount on door (front or rear)
You can mount the wooferss on the front/rear door of your car.
Turn off the car ignition key.
1
•
If the power is on, the click noise generated by the connection
may damage the speakers.
Cut out the mounting template from the packing box and paste
2
B
a
it on the location selected for mounting the woofer.
b
Mark the cut-off hole and the 4 bolt holes.
3
Cut out the marked area and drill the bolt holes.
4
Remove the grille net.
5
Connect the woofers to the network or car audio (see ‘Connect
6
d
the woofer/tweeter to the network’).
Mount on the speaker as shown below.
7
c
e
Page 9

Press and inser t the edges of the grille net.
8
Tip
The speaker grille can be mounted without the grille net, if you like.
•
f
Option 2: Mount on rear tray
You can also mount the woofers into the surface of the rear tray.
Follow the steps in section “Option 1: Mount in door” to mount the
speakers into the rear tray.
Mount the Tweeter
Follow steps mentioned in “Mount the woofer” section to mount the
tweeters.
Mount the network
Find a proper location to mount the networks.
1
Mount the networks onto the car with the supplied screws.
2
D
E
Connect the woofer/tweeter to the network
Note
Match the “lef t”, “right”, “+” and “-” terminals correctly. Revised polarity may
•
degrade sound quality.
Two 4-ohm speakers, wired in stereo, present a 8 ohm load to each channel
•
of the amplier. Most two channel ampliers work well in this conguration.
However, if two 4-ohm speakers, wired in parallel to a br idged two -channel
amplier, present a 2-ohm mono load to the amplier. Most 2-channel ampliers
do not suppor t 2-ohm mono operation! Amplier damage may result!
C
F
Page 10

Connect the woofers and the tweeters to the 2-way crossover
1
network rst, then connect the network to your amplier or car
audio directly.
4. Product information
Model CSP550 CSP650 CSP652
Speaker type 13cm, 2-way
RMS power (Watts) 40W 50W 60W
Peak music power (Watts) 210W 240W 300W
Sensitivity (dB/W/m) 90dB 90dB 91dB
Frequency response (Hz) 4 0-35kHz 36-35kH z 34-35k Hz
Impedance (ohms) 4 ohms 4 ohms 4 ohms
Magnet mass (Oz) 11Oz 12.6O z 18.8Oz
Woofer mounting depth (mm) 52mm 61mm 63mm
Tweeter mounting depth (mm) 19mm 19mm 19mm
Note
Product information is subjec t to change without prior notice.
•
component
speaker
16.5cm, 2-way
component
speaker
16.5cm, 2-way
component
speaker
5. Troubleshooting
To keep the warranty valid, never try to repair the system yourself.
If you encounter problems when using this apparatus, go to the
Philips web site (www.philips.com/welcome). When you contact
Philips, ensure that the apparatus is nearby and the model number
and serial number are available.
© 2009 Koninklijke Philips Electronics N .V.
All rig hts reserved.
CSP550_51_UM_V2.0
 Loading...